
Lost files on your Mac? The options you have depend on how the data disappeared, what happened right before it, and what you did afterward. Each of those details affects what can still be recovered. We tested every realistic method and laid them out for you in order of usefulness. Get comfortable, spend a few minutes with this guide, and you’ll know exactly how to recover deleted files on your Mac.
We’re looking at the full picture here – everything from how to find deleted files on your Mac to using the tools macOS already gives you, even if you didn’t know they were there. But we’re starting with the heavy stuff: permanent deletion. Over the years, we’ve seen this issue come up more than anything else. Someone empties the Trash (or the file never even made it there) and they realize there’s no backup to fall back on – a common tight spot. Our own survey backs this up. Even among people who say they back up, only 33% actually do it regularly. That means for most folks, there’s no Time Machine snapshot waiting to save the day. So yeah, built-in backups are helpful, but we’ll get to that part later.
How to Recover Permanently Deleted Files on Mac
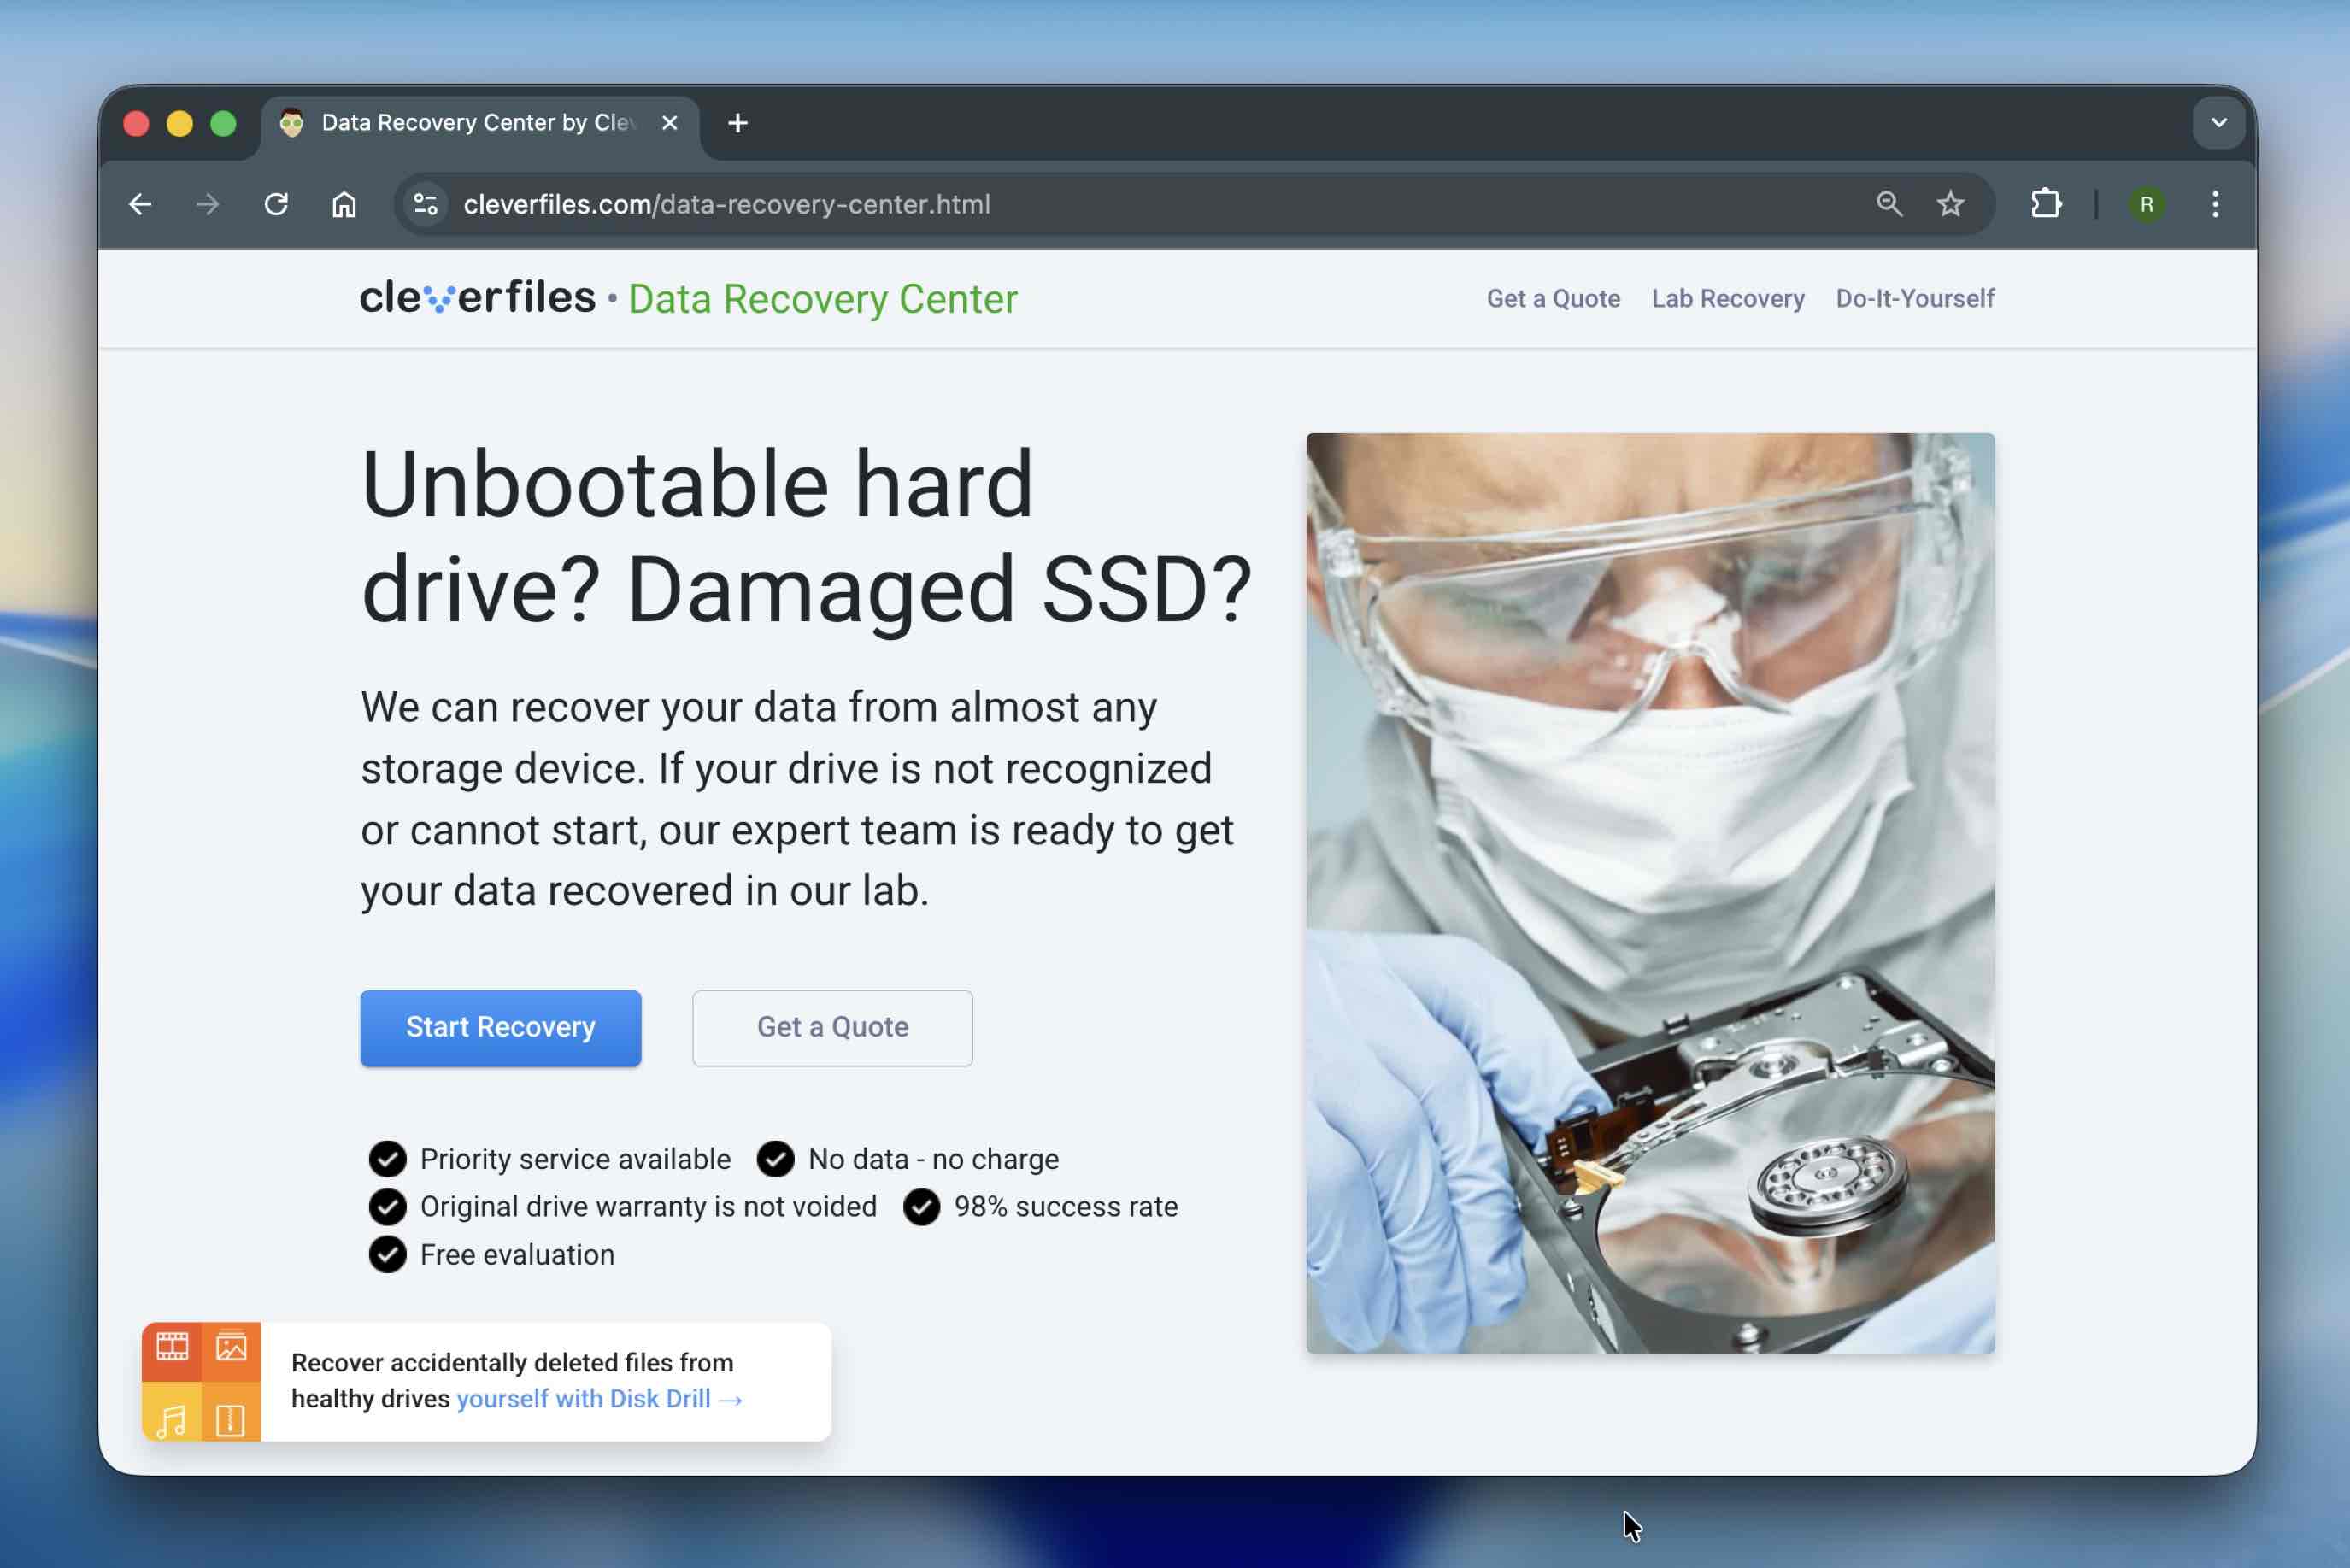
To recover permanently deleted files, you’ll need specialized data recovery software for Mac. This software can help you restore lost data from various scenarios such as accidental deletion, formatting, or system crashes.
For this demo, we’re going to show you how to use Disk Drill for Mac, a tool we rely on in almost every recovery guide we publish. Over the years, we’ve received a steady stream of positive feedback from readers, especially from those on macOS. All you need to do is install the software, scan your Mac or the external device where the files were deleted, and see what can be recovered.
To recover deleted files on your Mac computer using Disk Drill, you’ll need to do the following:
- Head over to CleverFiles’ official site and download Disk Drill. ⚠️
When performing data recovery, you want to use the storage device where the deleted files were stored as little as possible. This means that you want to download/install it on a different drive or partition than the one where your files were located. A USB flash drive is a good choice for this purpose. And if there’s no other option, install it on your Mac’s main drive, but don’t do anything else until recovery’s done.
- Once downloaded, install it like any other app – drag it into your Applications folder and open it.👀
You’ll need to enable Disk Drill’s Kernel Extension (KEXT) the first time you scan your system disk. This step is required so the app can access low-level parts of macOS. The process might look a little different depending on your Mac model, but it usually only takes a few minutes. If you’re planning to recover data from your main internal drive, this step is a must. You can follow the official setup instructions here.
- When you launch Disk Drill, you’ll see a list of all available storage devices.
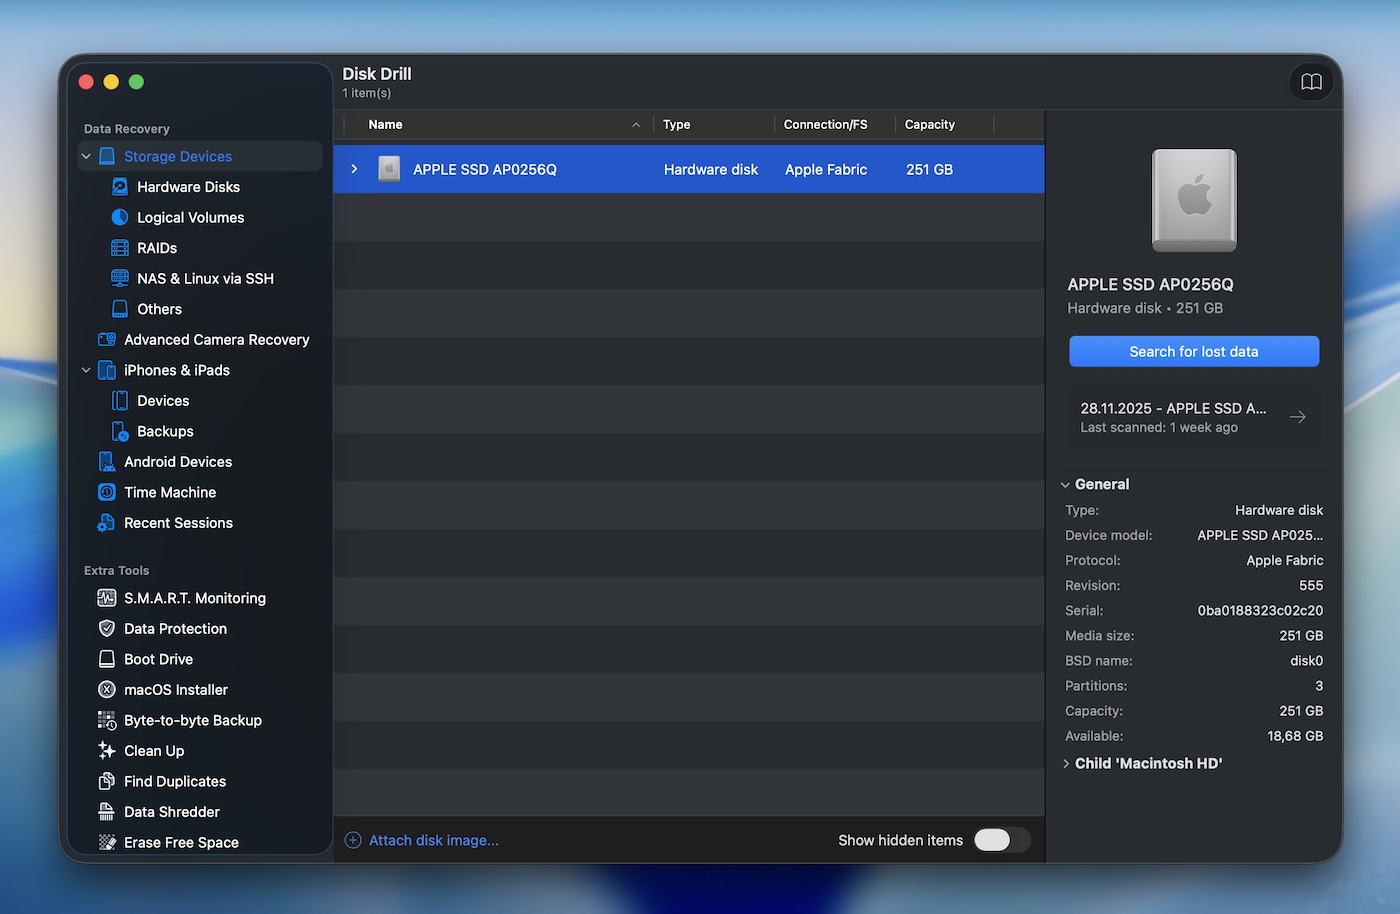 That includes your Mac’s internal drive, any connected external drives, USB sticks, SD cards (basically anything your system can “see”).
 - Look for the drive where the deleted files used to be. If you’re not sure which one it is, check the name, capacity, or connection type (Disk Drill shows those clearly).
- Once you spot it, click to select it, then click on Search for lost data. If you’re scanning an external device, Disk Drill will ask you to choose a scan mode. Universal Scan is usually the right pick, unless you’re working with raw camera or drone footage on a memory card.
- Once the scan kicks off, you’ll see files start to show up under categories like Pictures, Video, Audio, Documents, Archives, and Other.
 You don’t have to wait for the whole scan to finish; you can click into it right away – Click Review Found Items or jump into a category like Videos or Documents.At the top of the interface, you can switch how things look – Tree View helps if you’re trying to find something based on original folder structure, and Icons View is useful when you’re browsing for images or videos visually. You’ll also find quick filters under Show – helpful if you want to hide duplicates, view only deleted files, or dig into hidden system data.
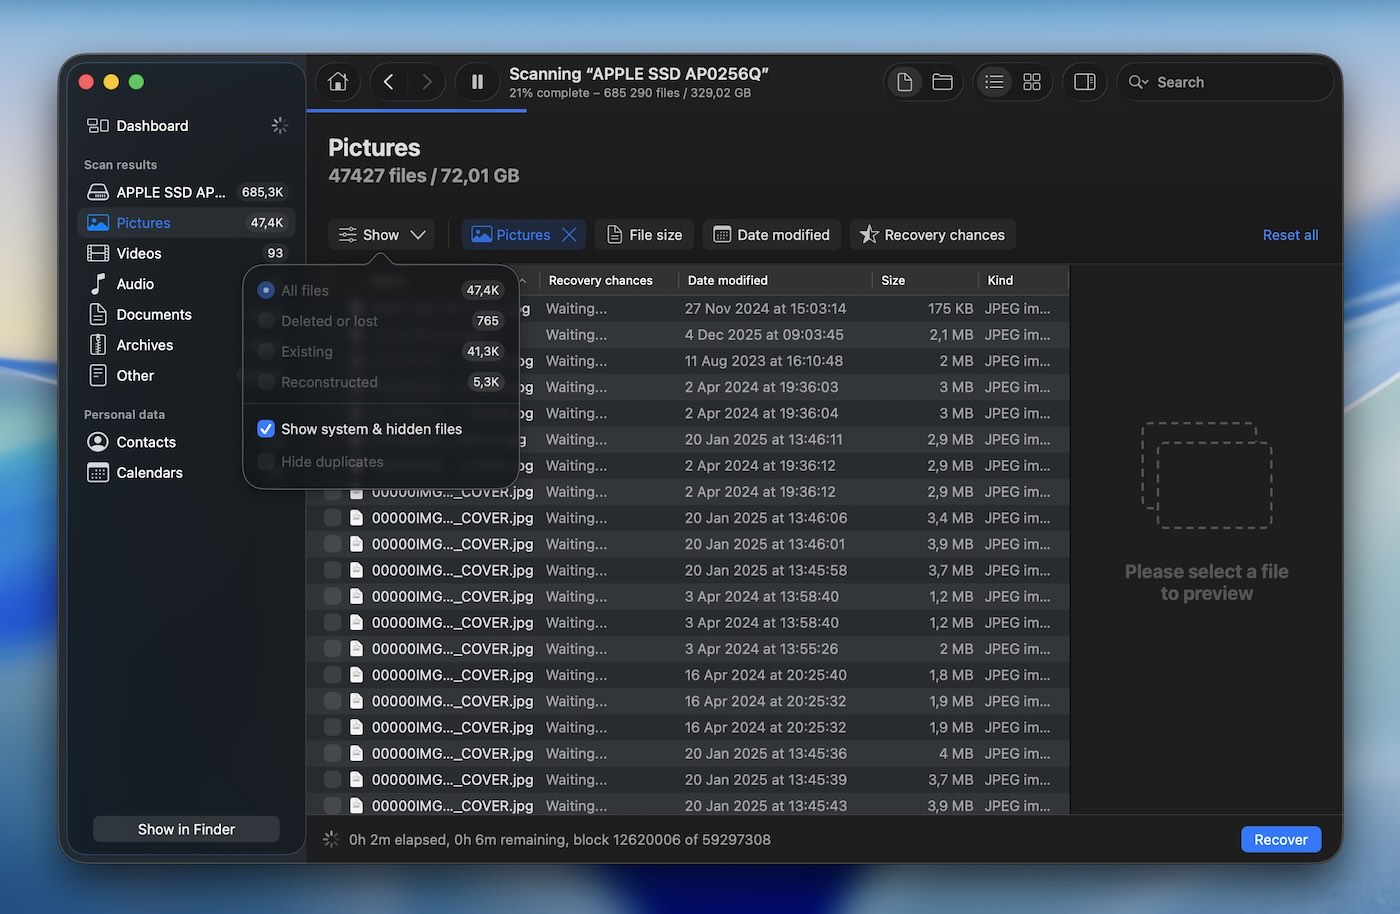
- The search bar is also your friend. Type in a filename, even part of one, or a file extension like “.jpg” or “.pdf” to pull up matches. It works like Finder.
- When you click on any file in Disk Drill, you’ll get a thumbnail preview or some file details (name, format, size, maybe the original path if it’s still available).
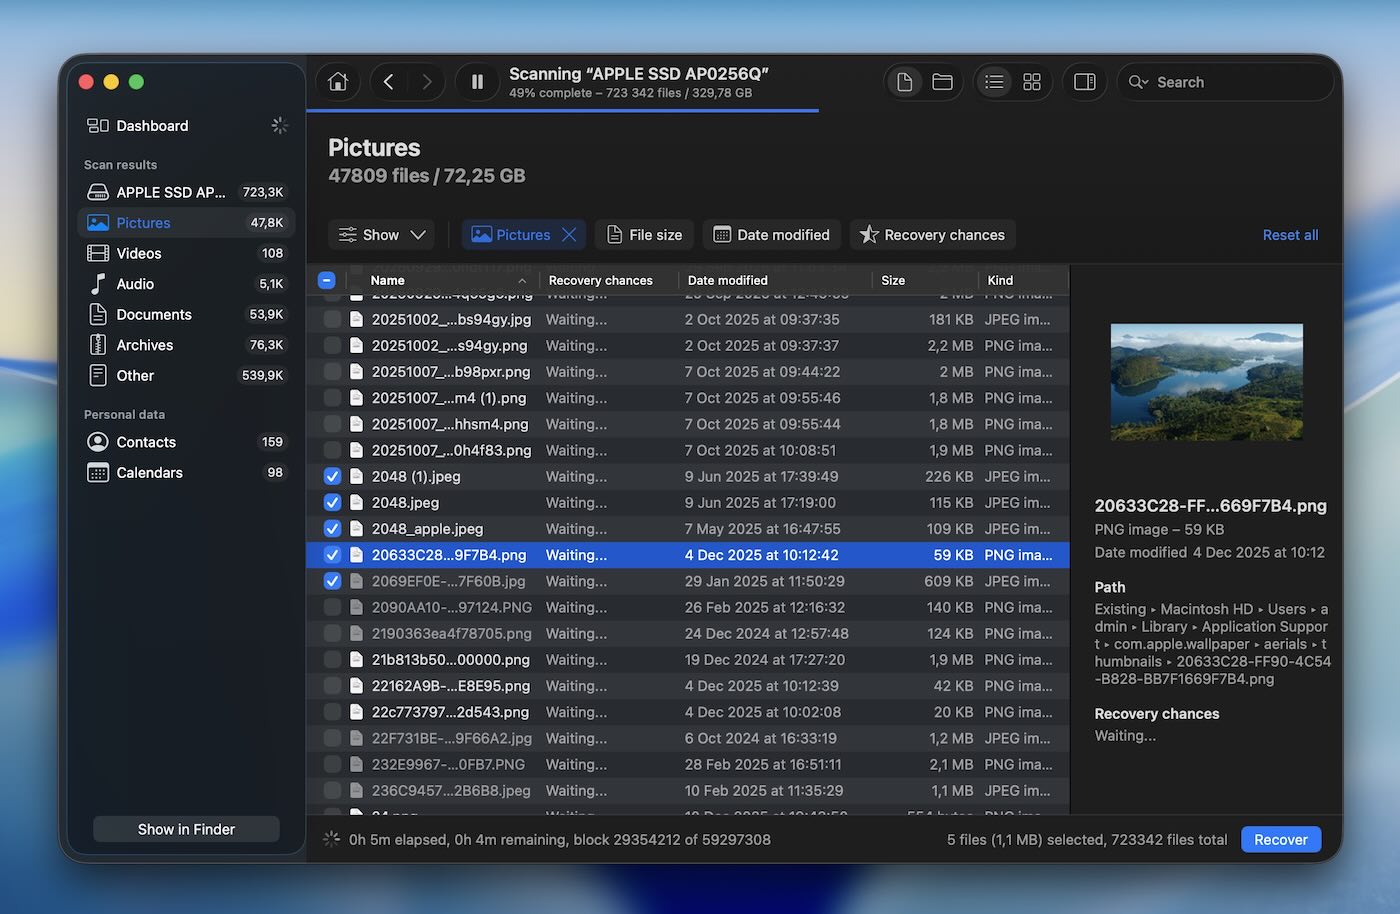 But the preview does more than help you recognize the file. It’s the most reliable way to confirm if that file can be recovered successfully. (Rule of thumb: if you can see it, you can recover it).👀
Disk Drill also gives each file a recovery chance rating (High, Average, or Low) based on how intact it is. High means you’re almost guaranteed a clean recovery.
- When you find the files you want to get back, all you need to do is check the box next to each one.
- Once you’ve made your selection, click the Recover button at the bottom right.
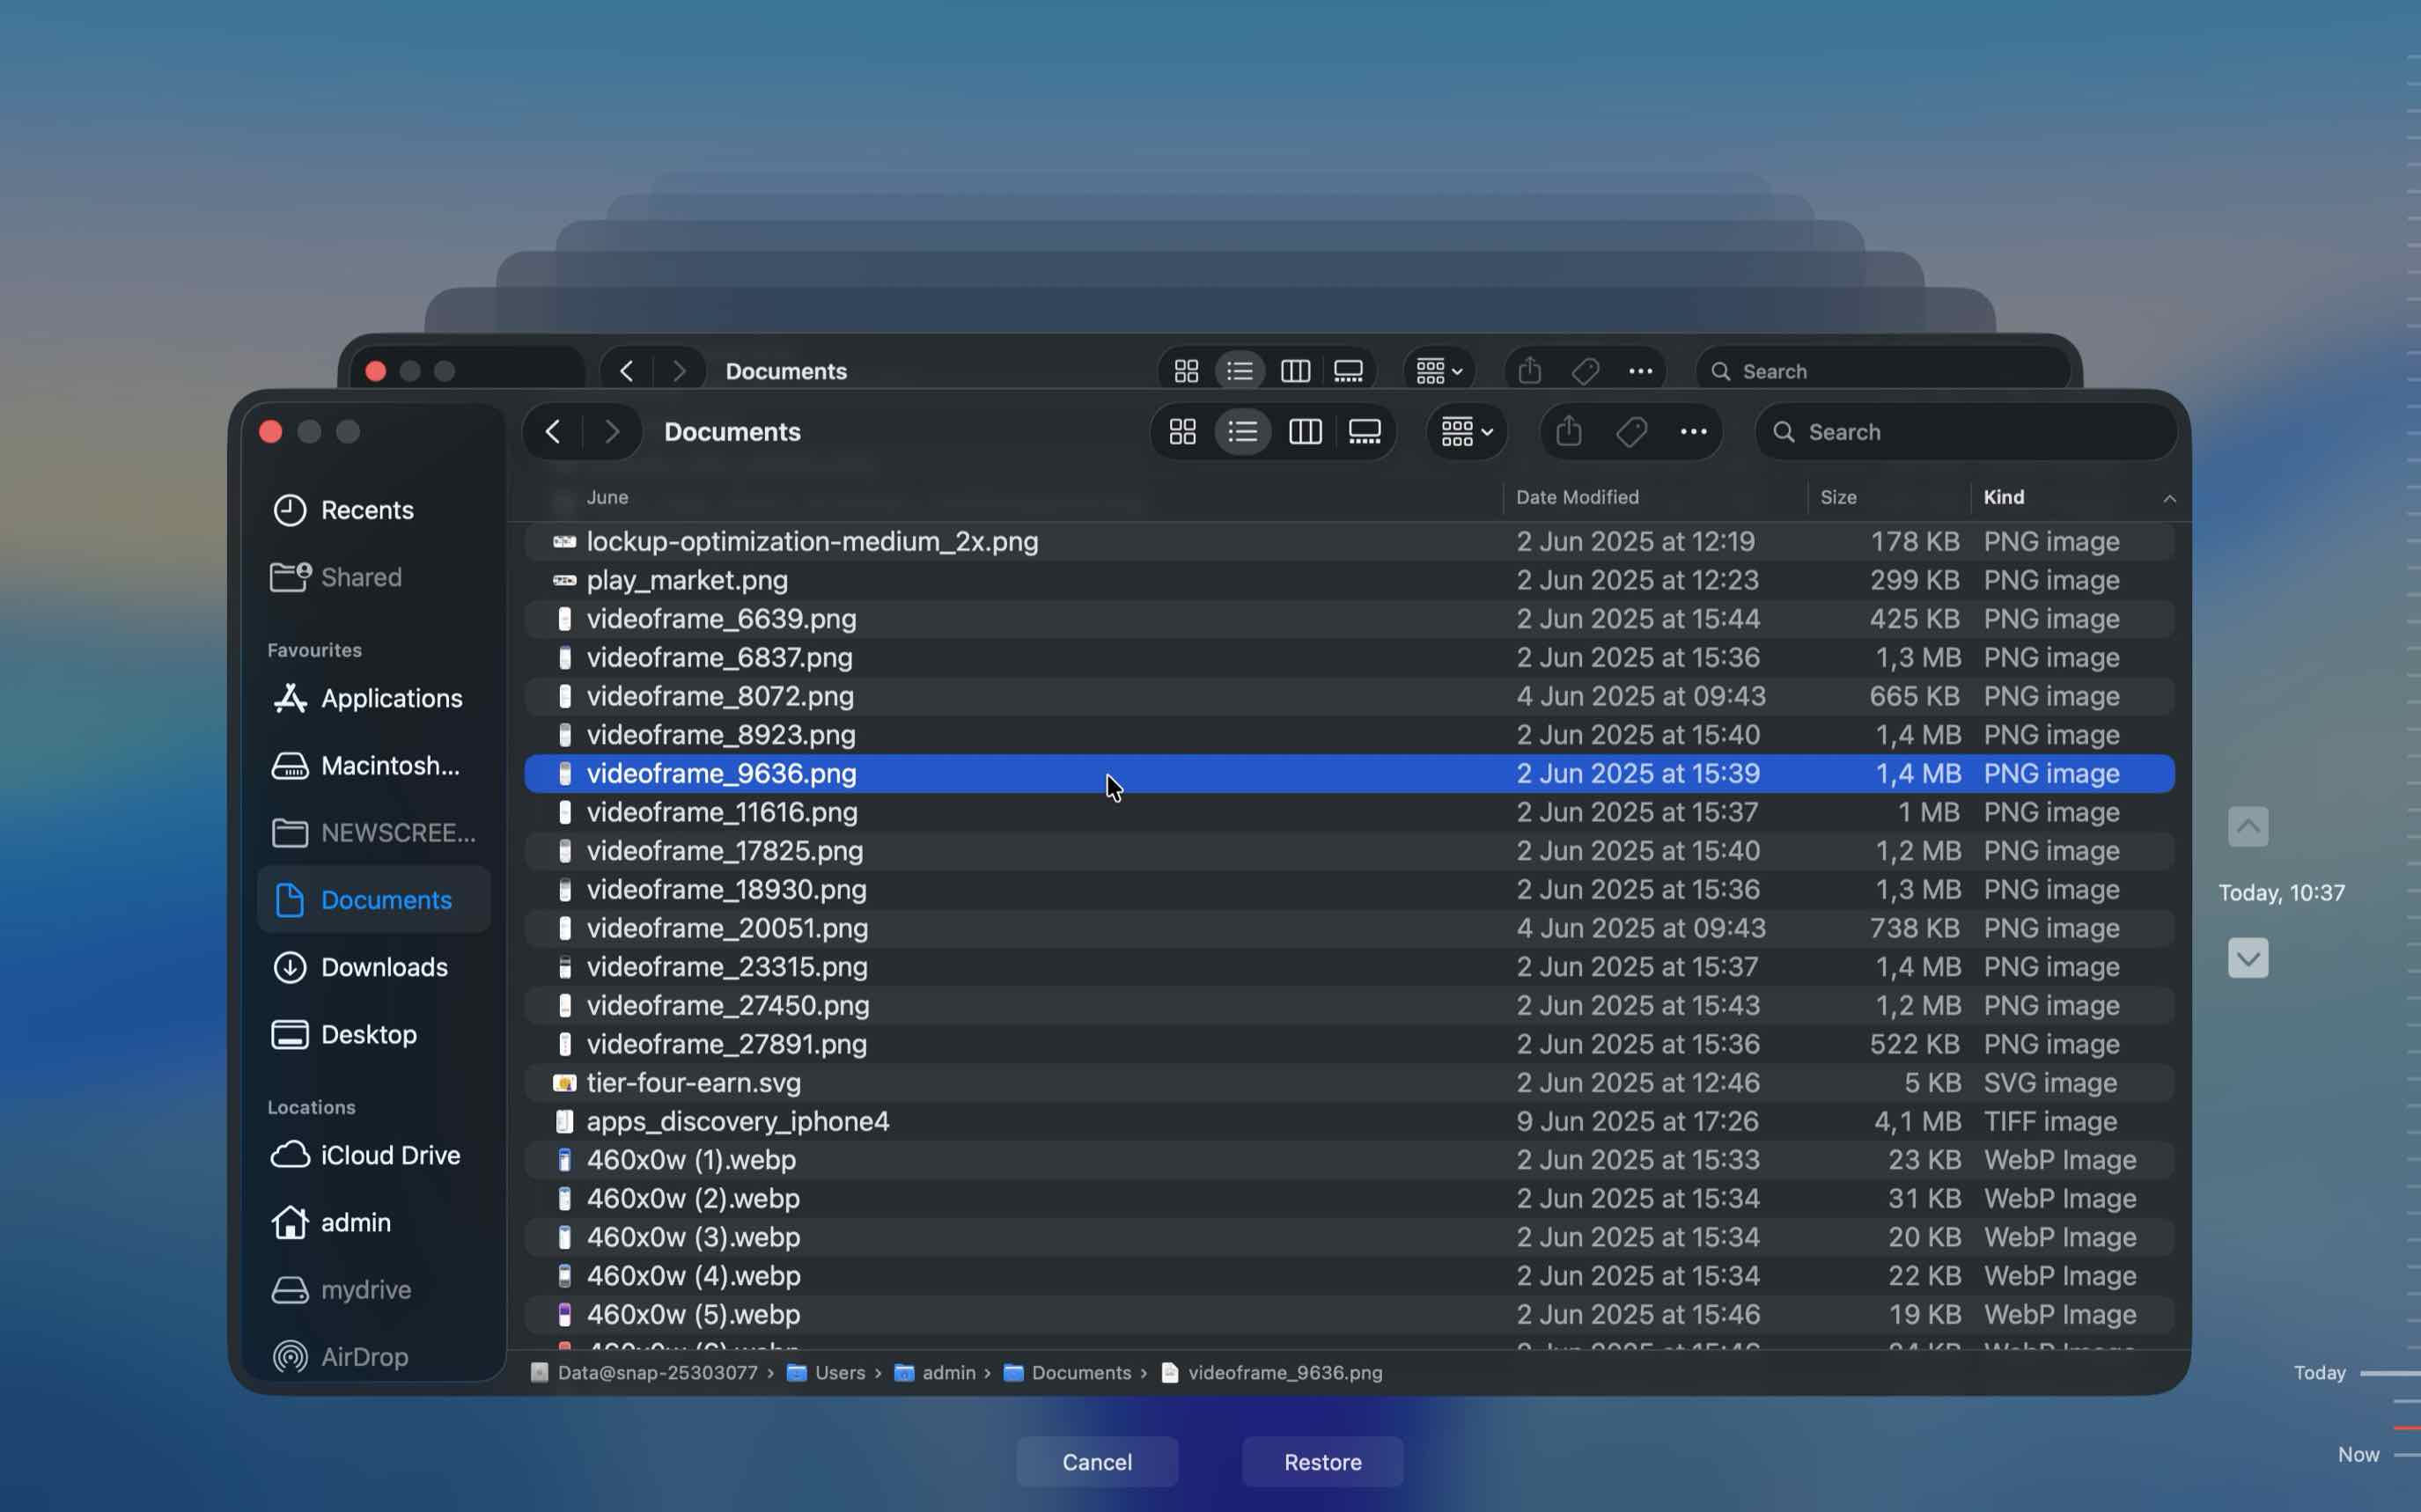
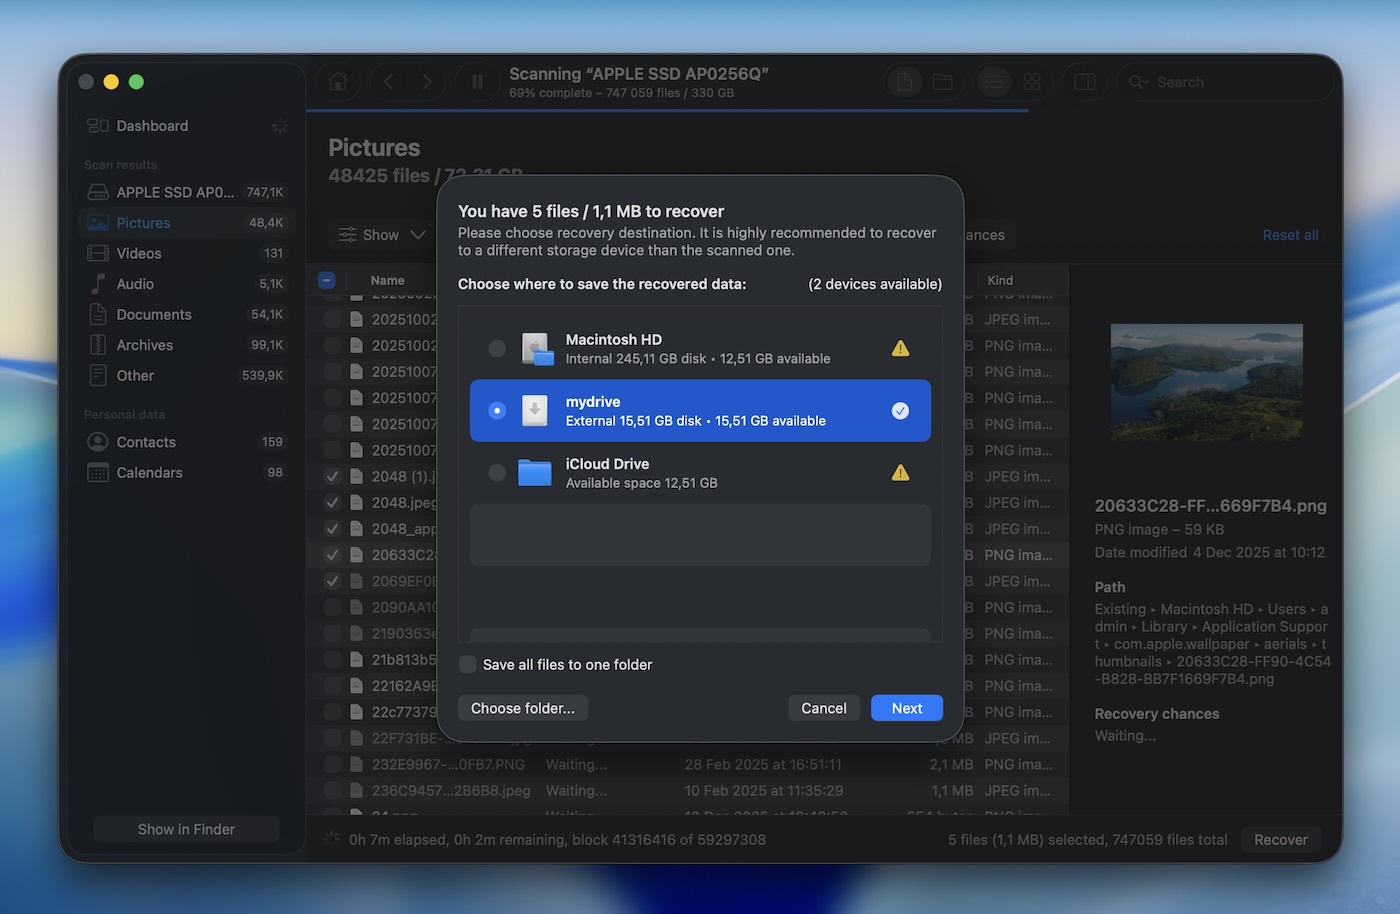 Disk Drill will prompt you to choose a recovery location. ⚠️
We emphasize again that you need to recover the files to a different storage device in order to avoid overwriting them during the recovery process.
If you want more info, we’ve got a complete Disk Drill review here that goes into features and what it can (and can’t) do. But when we’re talking specifically about Mac file recovery, this is where Disk Drill shines the most:
- It supports APFS, HFS+, exFAT, and FAT32 – it works across pretty much all Mac volumes, including Time Machine drives.
- Supports both Intel-based Macs and Apple Silicon machines (M1-M5) natively.
- If your drive is unstable, you can make a byte-to-byte backup image and scan that instead.
- It can recover from deleted partitions, emptied Trash, or even after formatting a disk.
- You get a preview of recoverable files, so you’re not going in blind.
- You can recover from internal SSDs, external hard drives, USB sticks, and SD cards.
A quick note on recovery chances. Modern Macs come with fast SSDs – and that speed comes at a trade-off when it comes to data recovery. These drives use something called the TRIM command. As we explain in our SSD recovery article, TRIM lets macOS tell the SSD which blocks of data are no longer needed so they can be wiped in the background. This helps keep your system fast and smooth during normal use. But from a recovery standpoint, that’s a problem (because once TRIM does its job, those deleted files are truly gone).
So if you’re trying to recover data from your Mac’s internal SSD, whether it’s a MacBook or desktop – your chances aren’t as good as they would be on an older Mac with a traditional spinning hard drive. That’s just the reality of how modern storage works. With SSDs, once the TRIM command clears deleted blocks, the data’s gone for good.
It’s important to be realistic about that. But don’t let it stop you from trying. There are scenarios where TRIM might not have kicked in (we recommend checking out the TRIM discussion in our community forum – there’s a lot of useful detail there).
Until you scan the drive and actually see what’s recoverable, you won’t know for sure.
7 More Ways to Recover Deleted Files on Mac
Now let’s go over the other ways to recover deleted files on a Mac – one by one. Most of these use tools and features that are already built into any modern macOS, so you won’t need to install anything or mess with extra software. But we’re also including a few lesser-known methods that can help in the right scenario.
Before each one, we’ll give you a quick rundown of what to expect in terms of: Difficulty, Chance of success (based on what we’ve seen in real-world use) and Requirements (what you’ll need to have set up beforehand – if anything).
That way, you can tell at a glance whether it’s worth trying based on your setup.
Method 1: Select the Undo Option
- Difficulty: Easy
- Chance of success: Low
- Requirements: Your files were deleted very recently
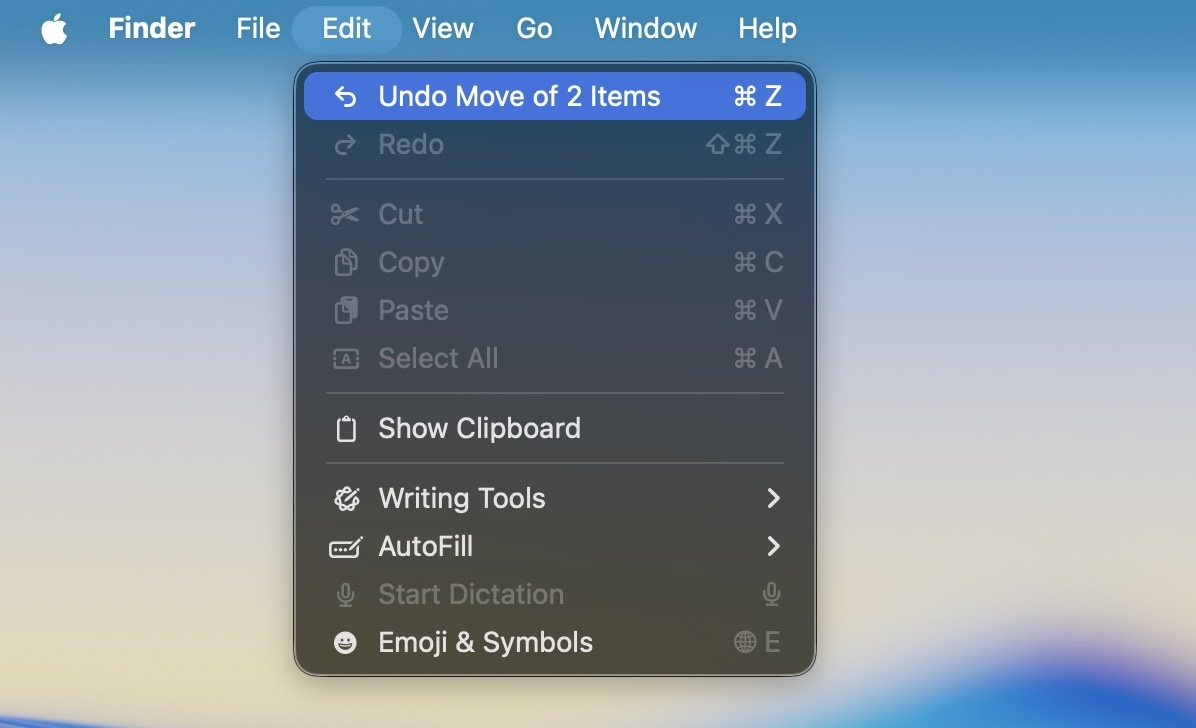
The macOS operating system lets you erase the last performed action with a single click on the Undo button (or by pressing the Command – Z keyboard shortcut).
The Undo option can be useful when you make a mistake and accidentally delete important files that you certainly don’t want to lose. As long as you notice your mistake soon enough (before closing the app that was used to perform the deletion or restarting your Mac), you can make your files reappear with minimal effort.
To undelete files on Mac:
- Make sure the application that was used to delete the files (such as Finder) is selected.
- Open the Edit menu in the menu bar.
- Click the “Undo Move of [filename]” option.
It really doesn’t get any simpler than this. The only problem is that most users notice the loss of important files only when it’s already too late for the Undo option to be effective. Fortunately, other methods described in this article are not nearly as time sensitive, although you should still hurry up because deleted data can be recovered only until it is overwritten or replaced.
Method 2: Make Sure the File Was Actually Deleted
- Difficulty: Easy
- Chance of success: Moderate
- Requirements: The deleted files are present in Trash
Now, this might seem too obvious to include, but trust us, it belongs here. We’ve helped enough people over the years to know that “obvious” is completely relative. Our contact form gets questions like this all the time. At some point, we stopped assuming anything. So we’re including this for anyone who might’ve overlooked it.
Perhaps you were working on a file and accidentally deleted it. You look in the Finder app, and it is not in the folder where it should be located.
Here’s how to find deleted files on Mac:
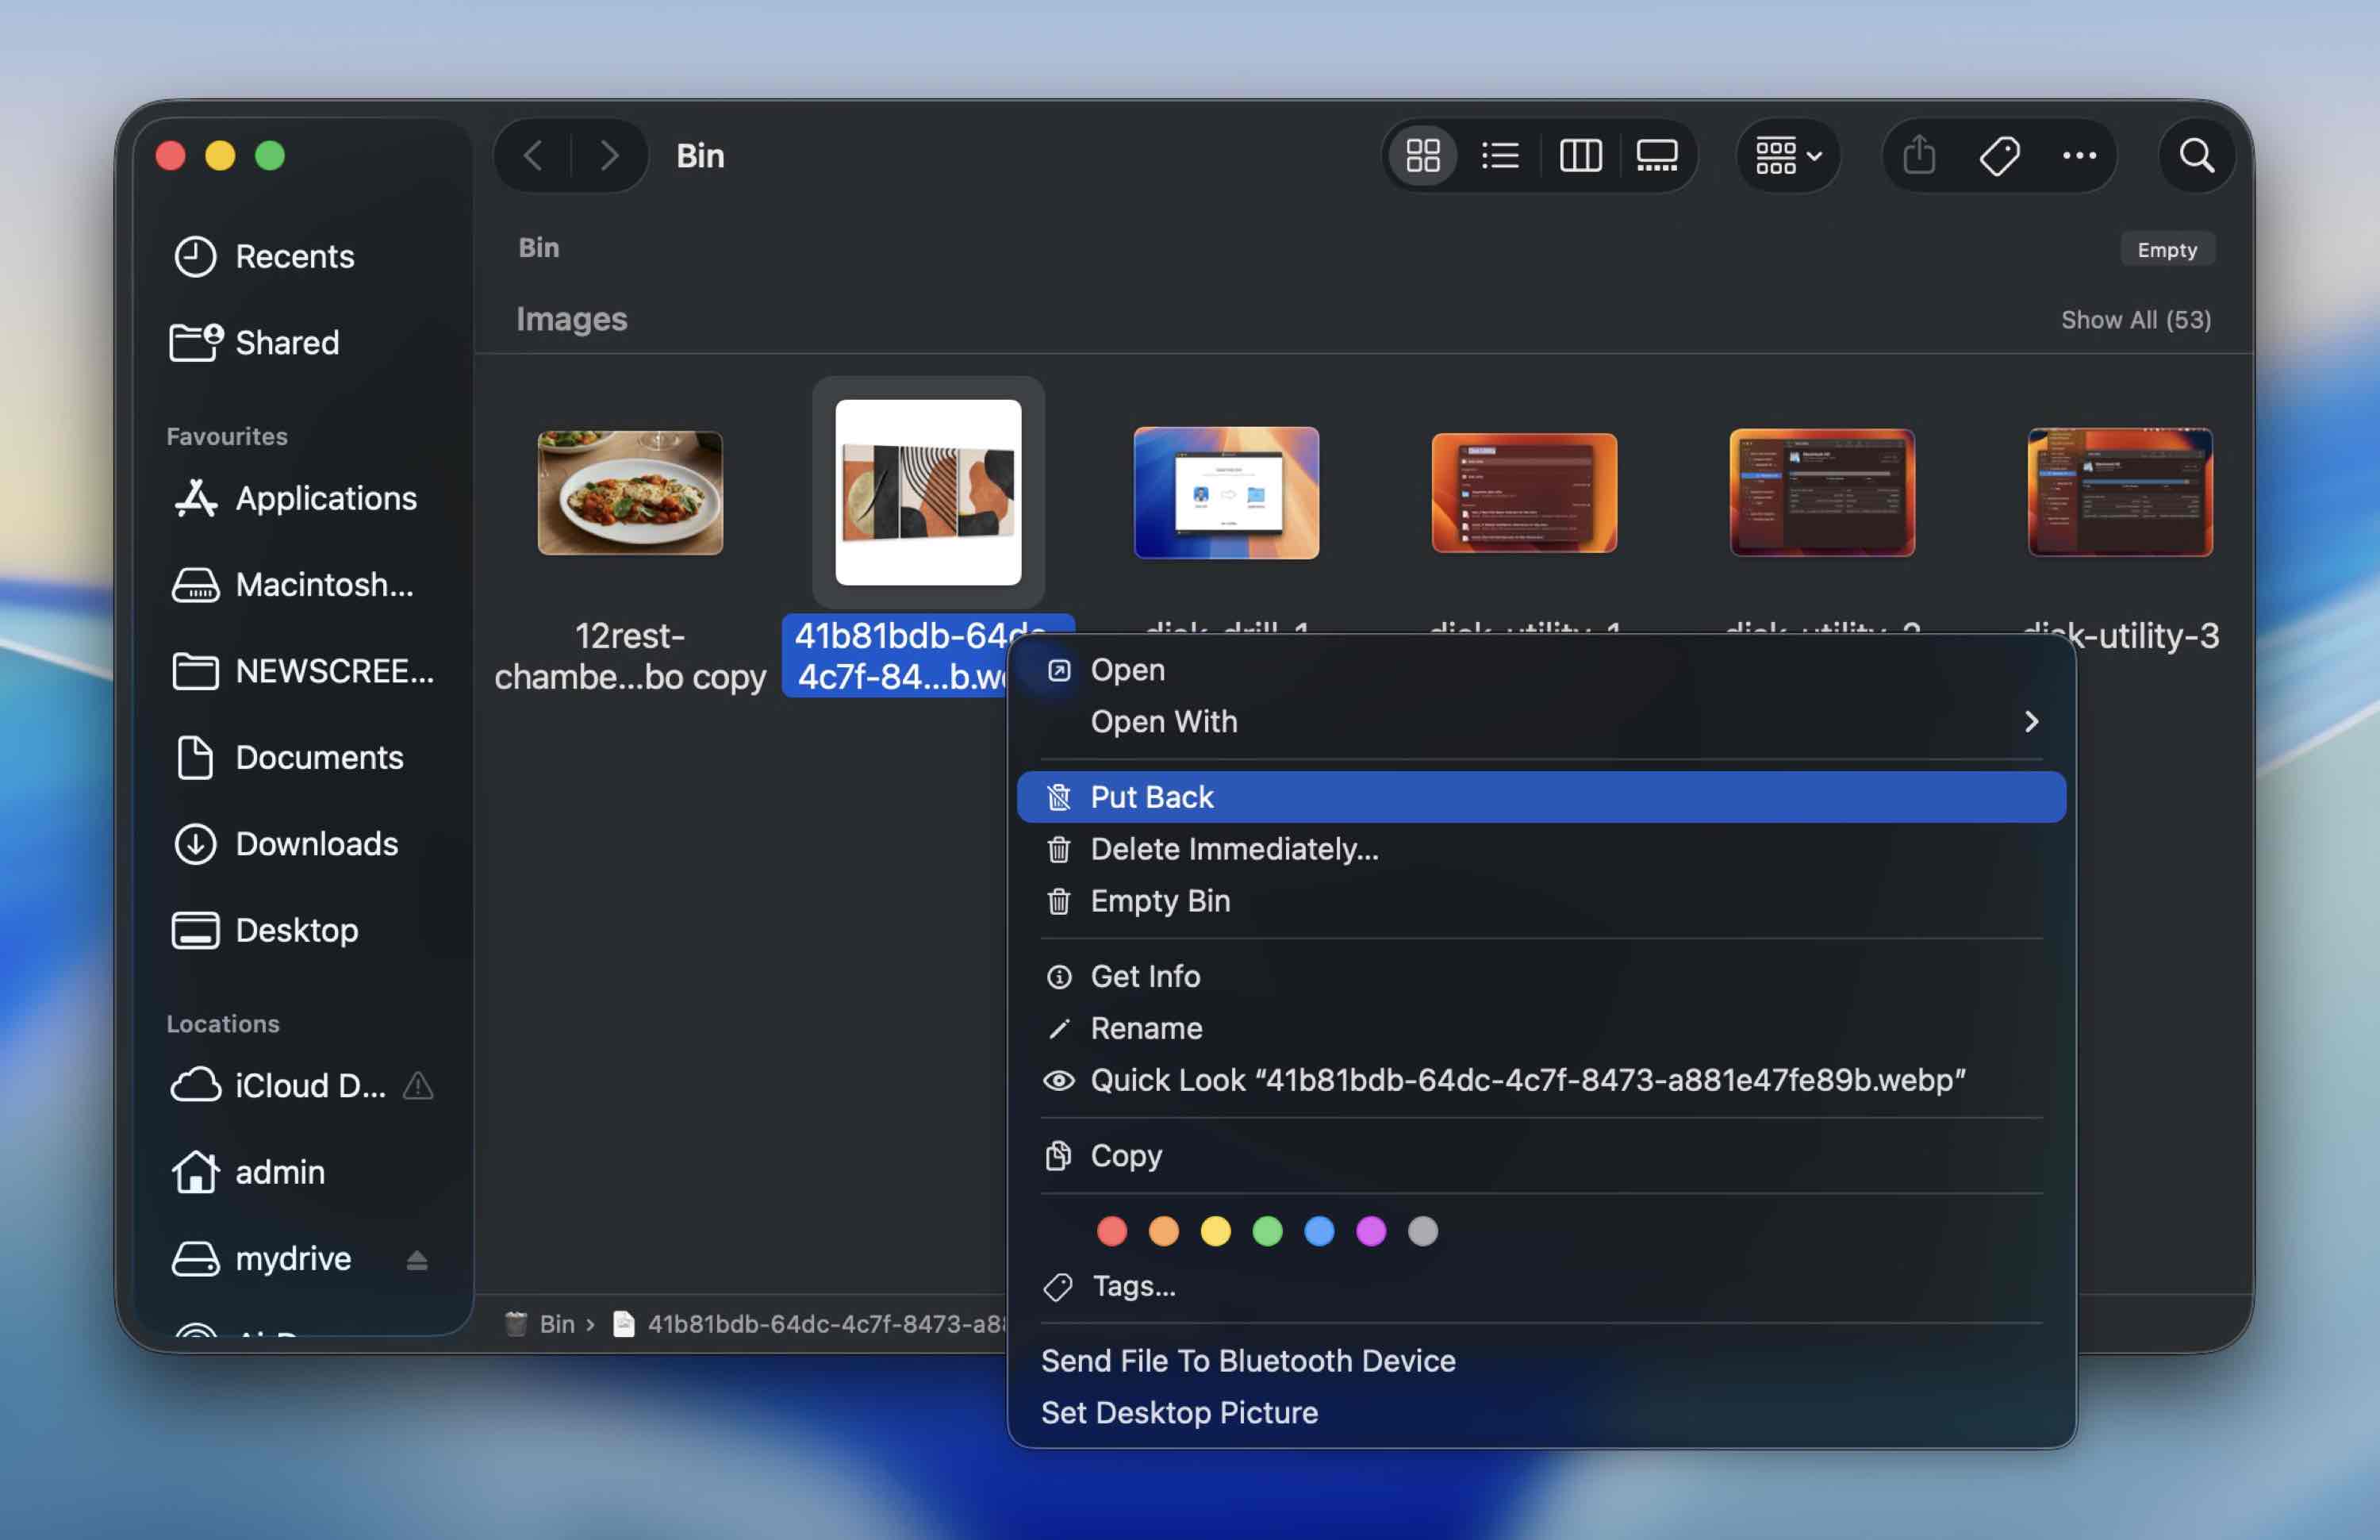
- Open the Trash Bin by clicking on its icon.
- Search for the file you suspect was deleted.
- If the file is found, right-click on the file and select the “Put Back” option.
Other ways to search your computer may turn up a missing file. You may have inadvertently moved it to a different location, perhaps even to the cloud.
- First, try using Spotlight (press Command + Space, then type part of the filename). Sometimes files renamed, moved, or stuck in a random folder you haven’t checked in weeks.
- Also check iCloud Drive, especially if you use Desktop & Documents syncing. Files might’ve moved between devices or into the Recently Deleted folder on iCloud. You can log in at icloud.com and check Recently Deleted (Apple keeps files there for 30 days by default).
If the file was saved inside a third-party app folder, like Google Drive, Dropbox, or OneDrive, open their respective apps or websites and look for their own trash/recycle bin.
We’ve seen countless cases where the “lost” file turned out to be exactly where the user left it. It’s worth the 30 seconds to double-check.
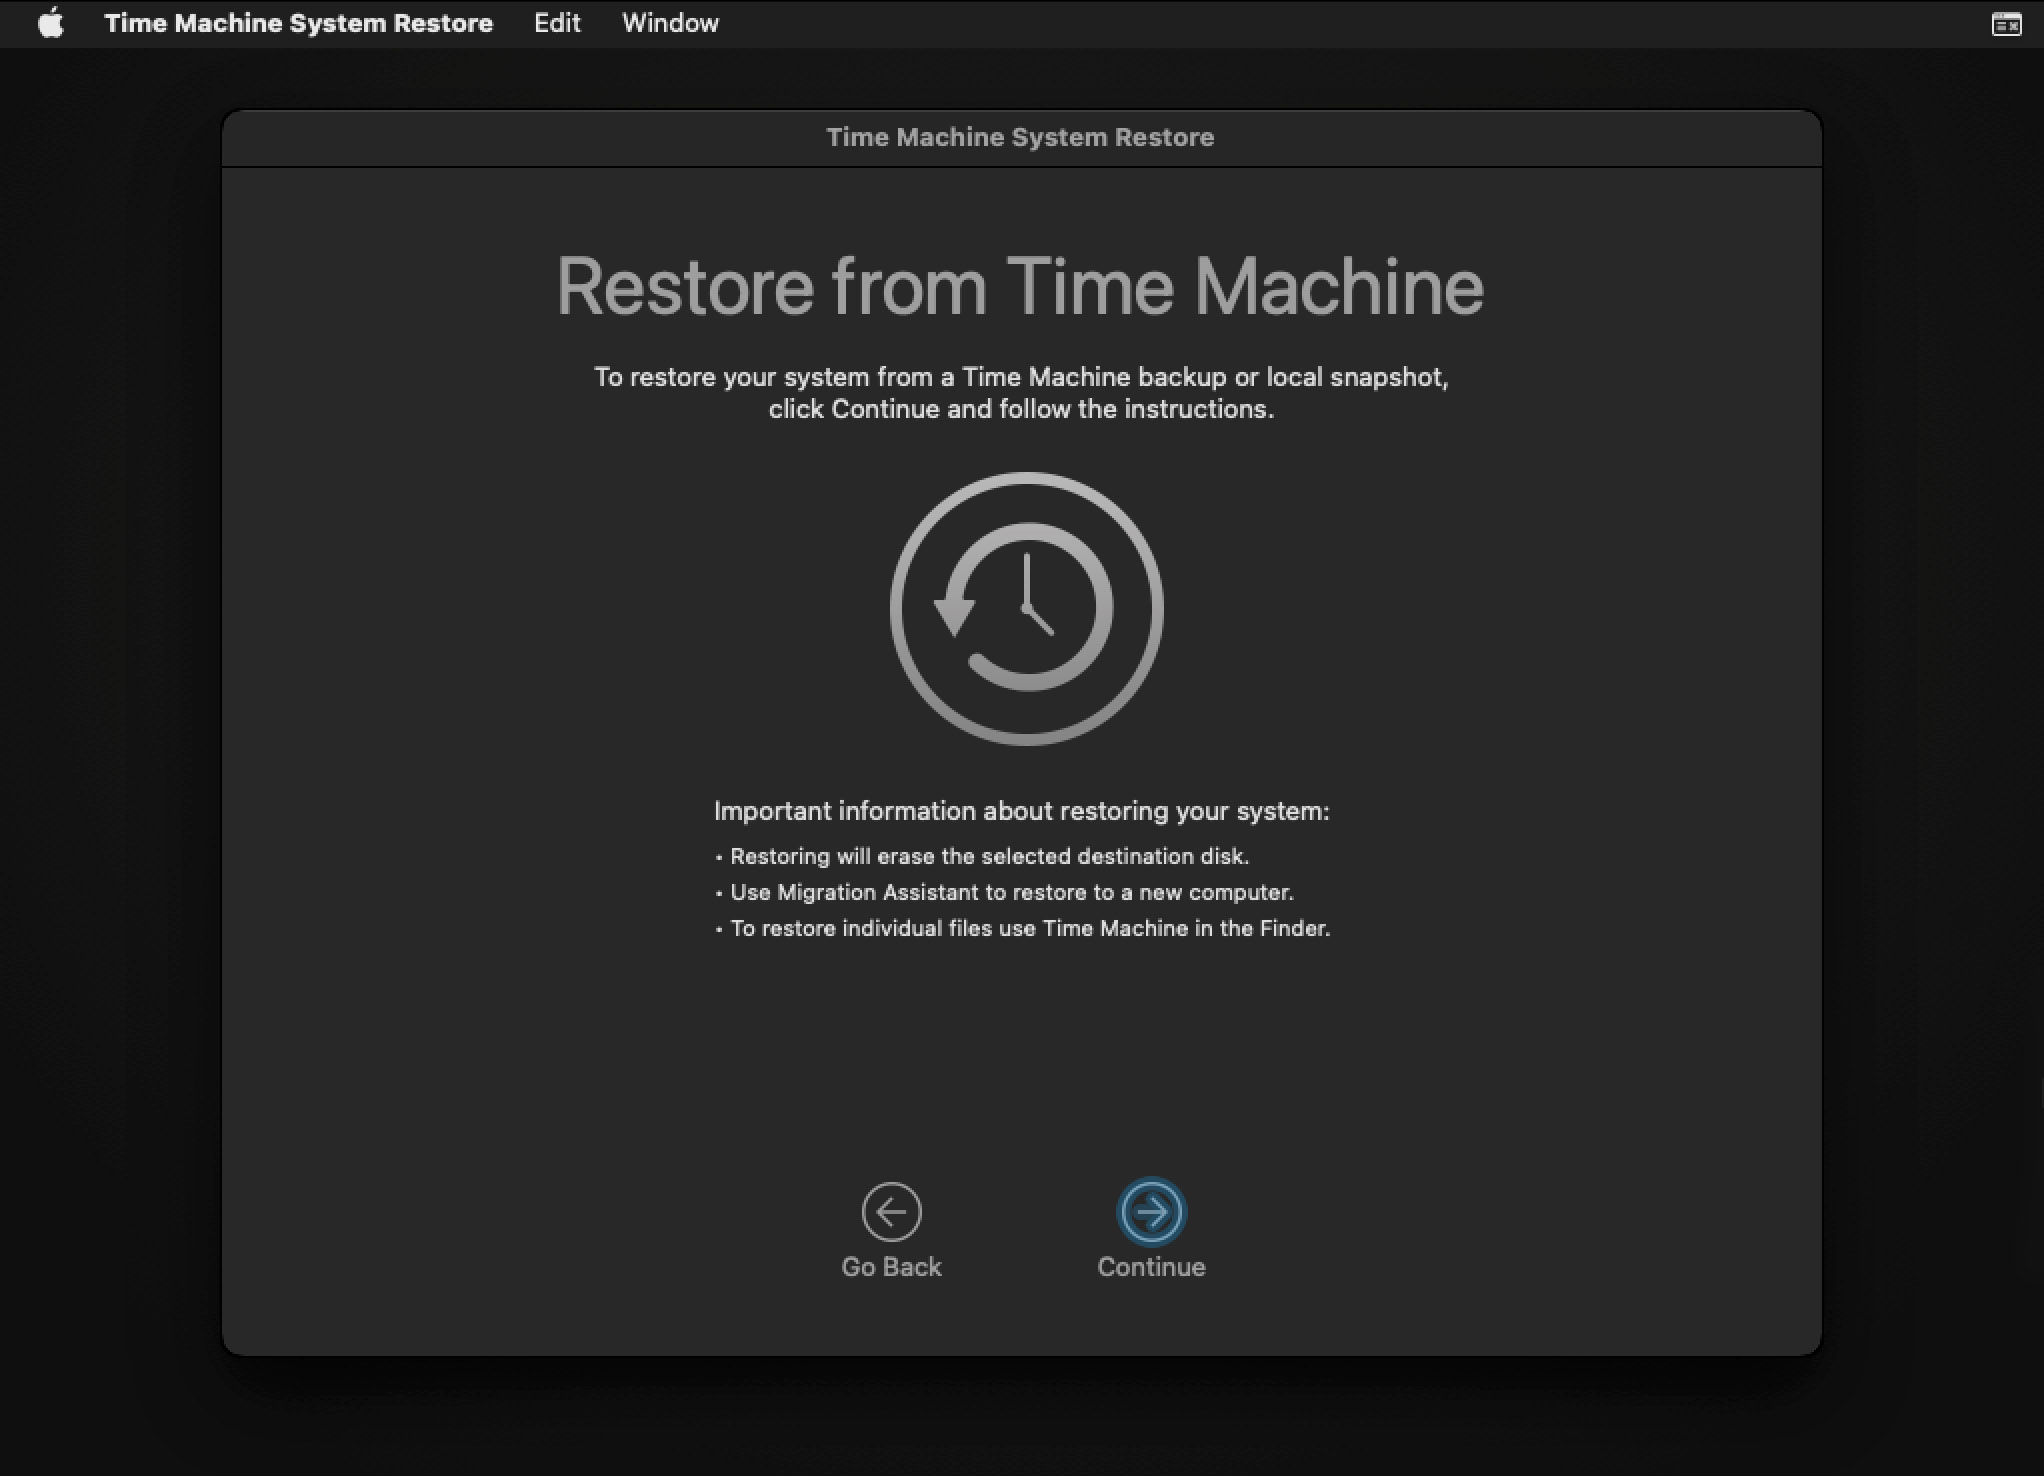
Method 3: Restore Deleted Mac Files from a Time Machine Backup
- Difficulty: Easy
- Chance of success: High (if backups exist)
- Requirements: Time Machine must’ve been set up before file was lost
Time Machine is Apple’s backup and recovery tool, and it comes installed on your Mac. You should use it as part of your regular computer maintenance schedule to create backups of your valuable data. Backup can come in handy if you discover you have deleted some files and emptied the Trash bin (what the Recycle Bin is called on Mac computers) because Time Machine can recover even permanently deleted files.
To restore files on Mac using a Time Machine backup, follow these steps:
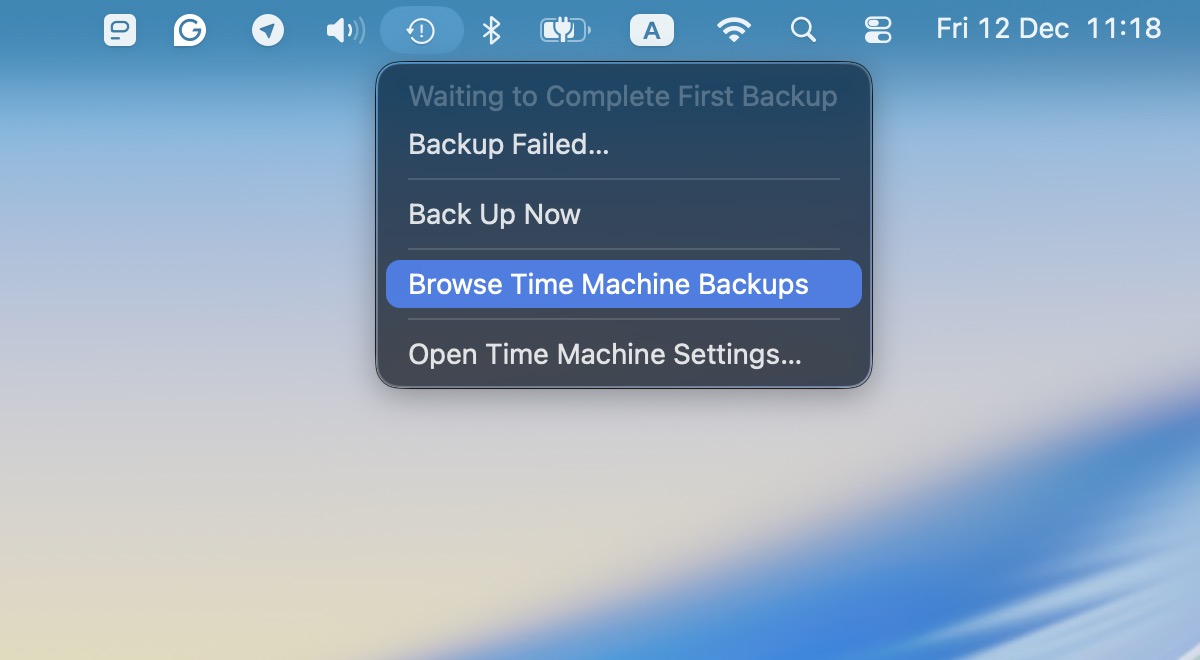
- Connect the device that contains the Time Machine backup. 👀
If you don’t have it ready right now, you can still go ahead and launch Time Machine; your Mac may still have local snapshots saved on your internal drive. These are typically saved about once per hour and kept for about 24 hours (plus one snapshot from your last successful backup until space is needed), so they can help if the file was deleted recently.
- Launch Time Machine.
- Open a Finder window in the location you last remember seeing the file.
- Scroll back through Time Machine until the file appears in the Finder window.
- Select the file and click Restore to recover it.
Time Machine also works with APFS snapshots on modern Macs, so even if your external backup drive hasn’t been connected in a while, your Mac might still have local snapshots that are accessible. More on that in the next method.
Method 4: Restore Files on Mac from APFS Snapshots
- Difficulty: Moderate
- Chance of success: Decent (if snapshots exist)
- Requirements: Time Machine must’ve been active before file was lost
If you’ve ever had Time Machine turned on (even briefly) your Mac might’ve saved local APFS snapshots without you realizing it. These are read-only restore points that live right on your internal drive. They’re meant to give you a fallback if you delete something and your external Time Machine drive isn’t connected.
Here’s how to restore recently deleted files on Mac using APFS Snapshots:
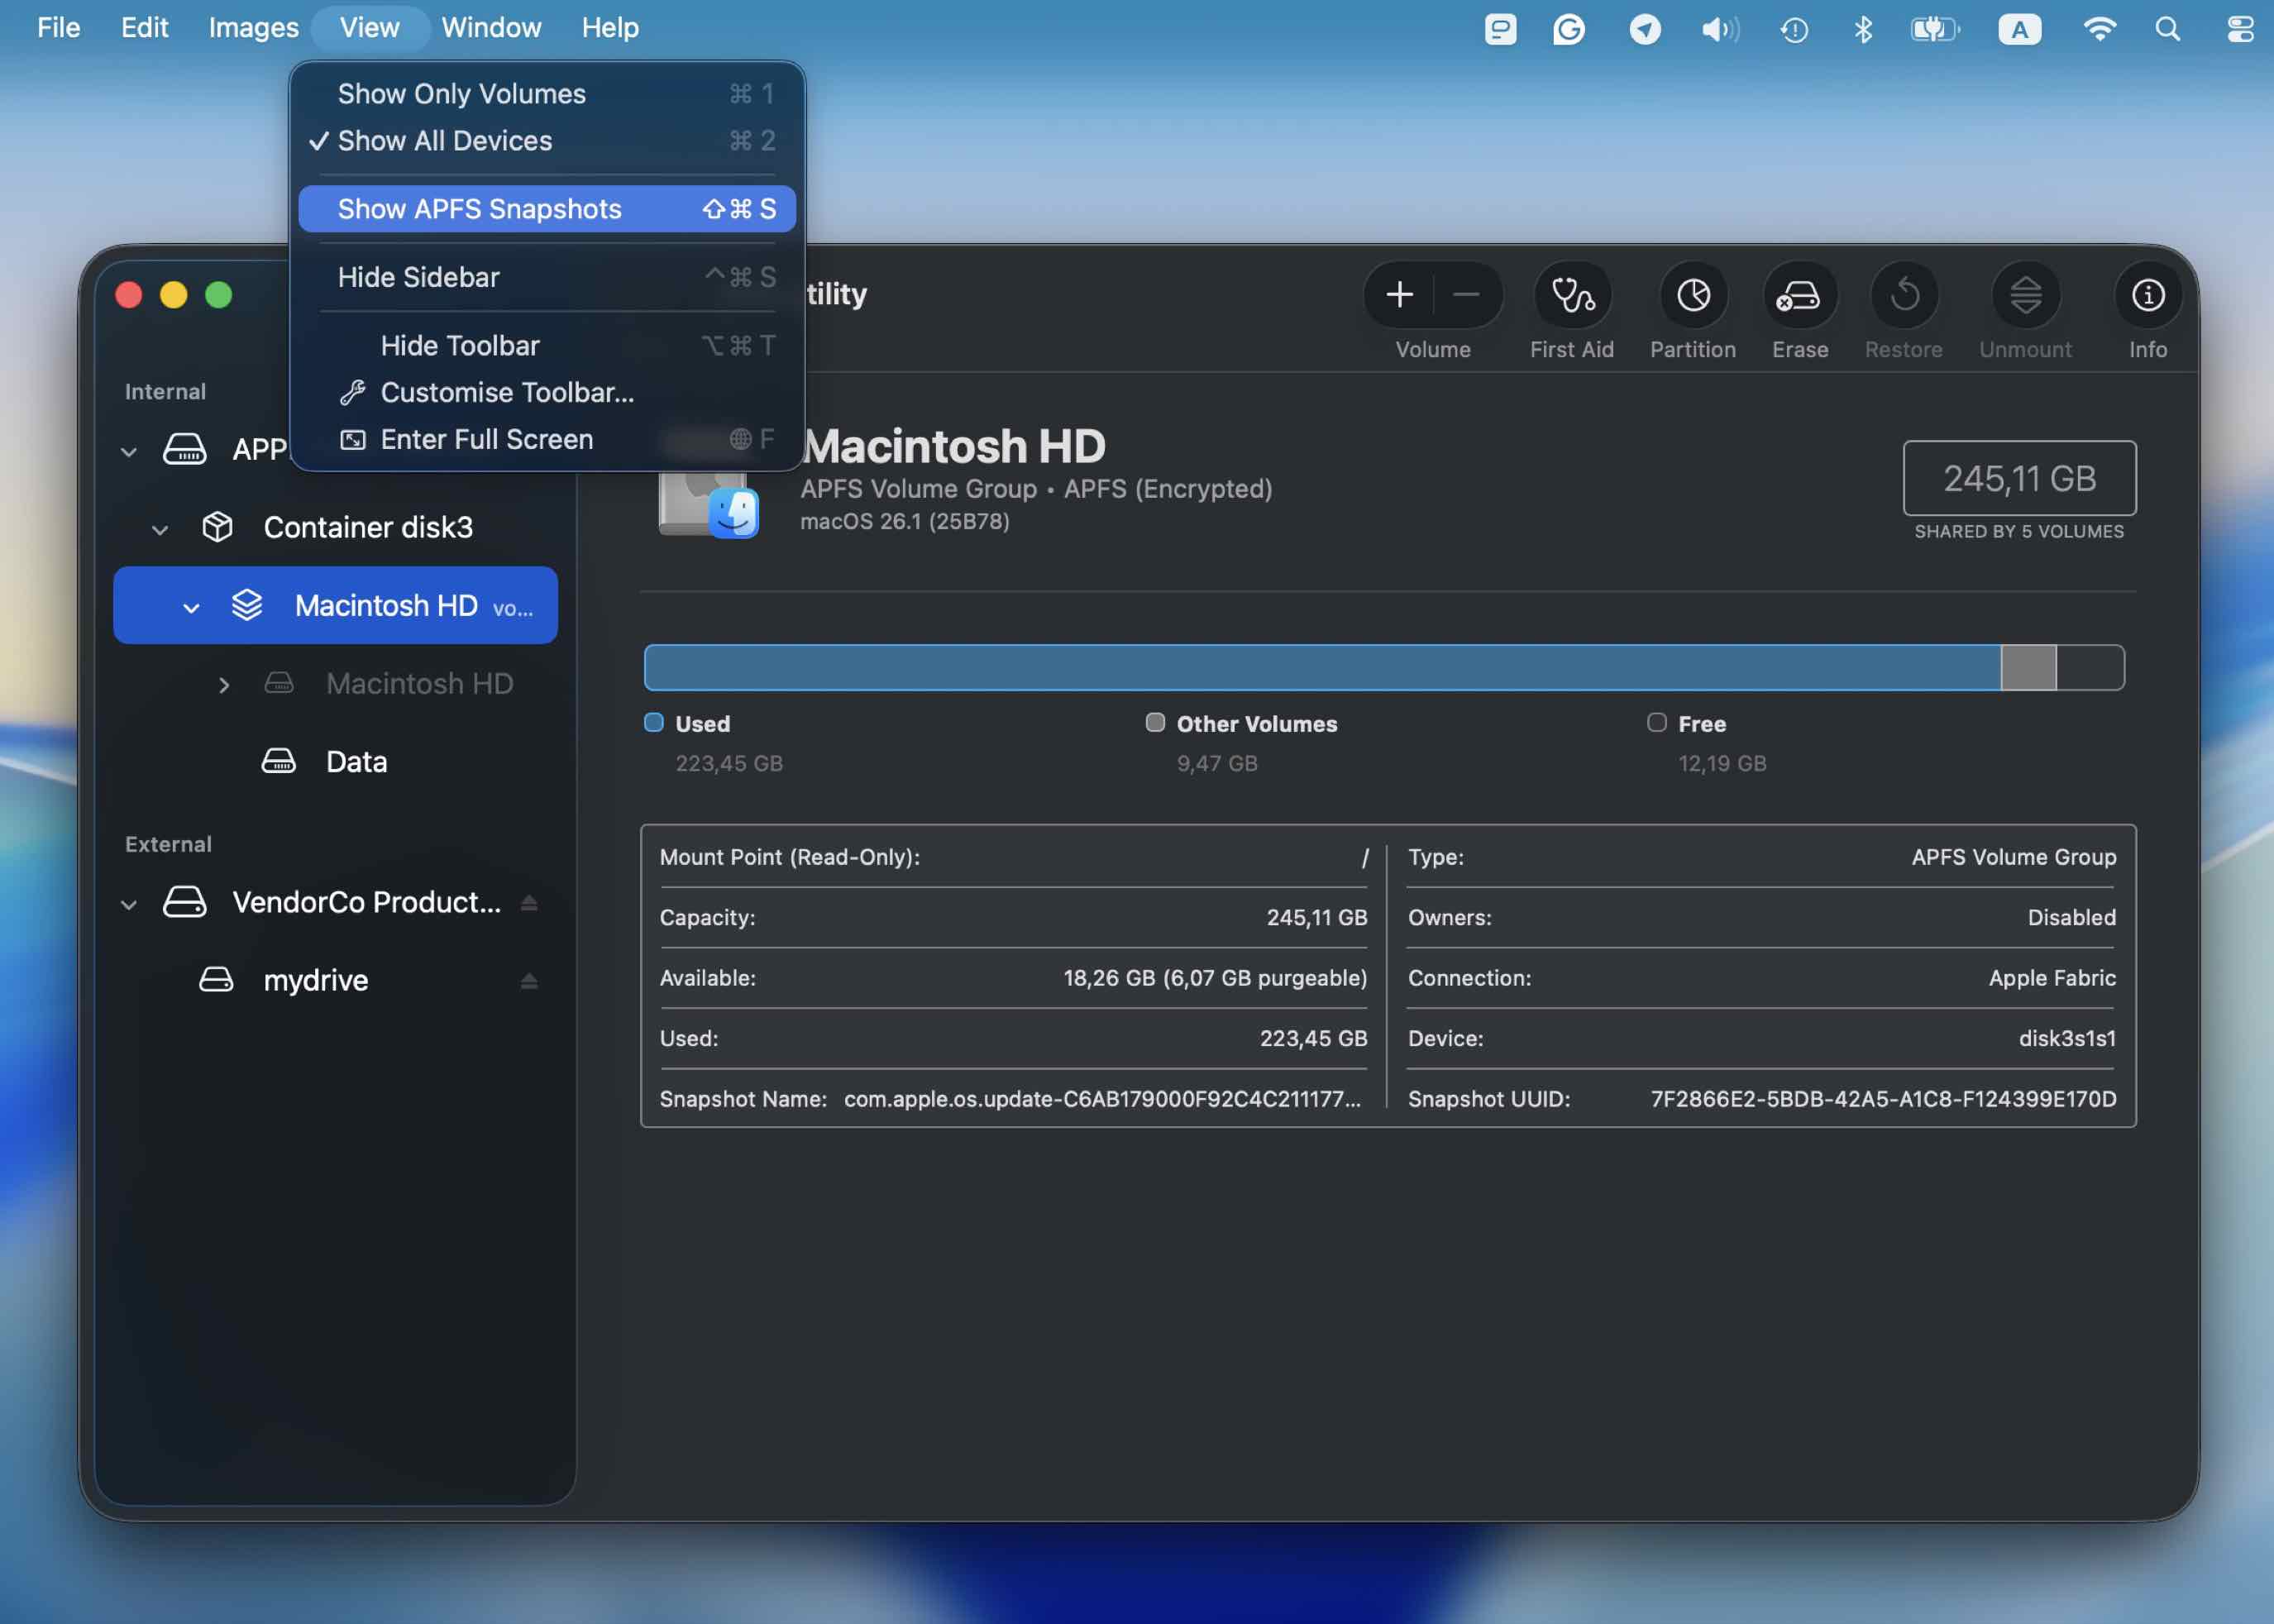
- To check for snapshots, open Disk Utility (find it via Spotlight or in Applications).
- Select Macintosh HD, or whatever your main volume is called.
- Then go to the top menu and click View > Show APFS Snapshots.
 If snapshots are available, they’ll appear in a list with timestamps.
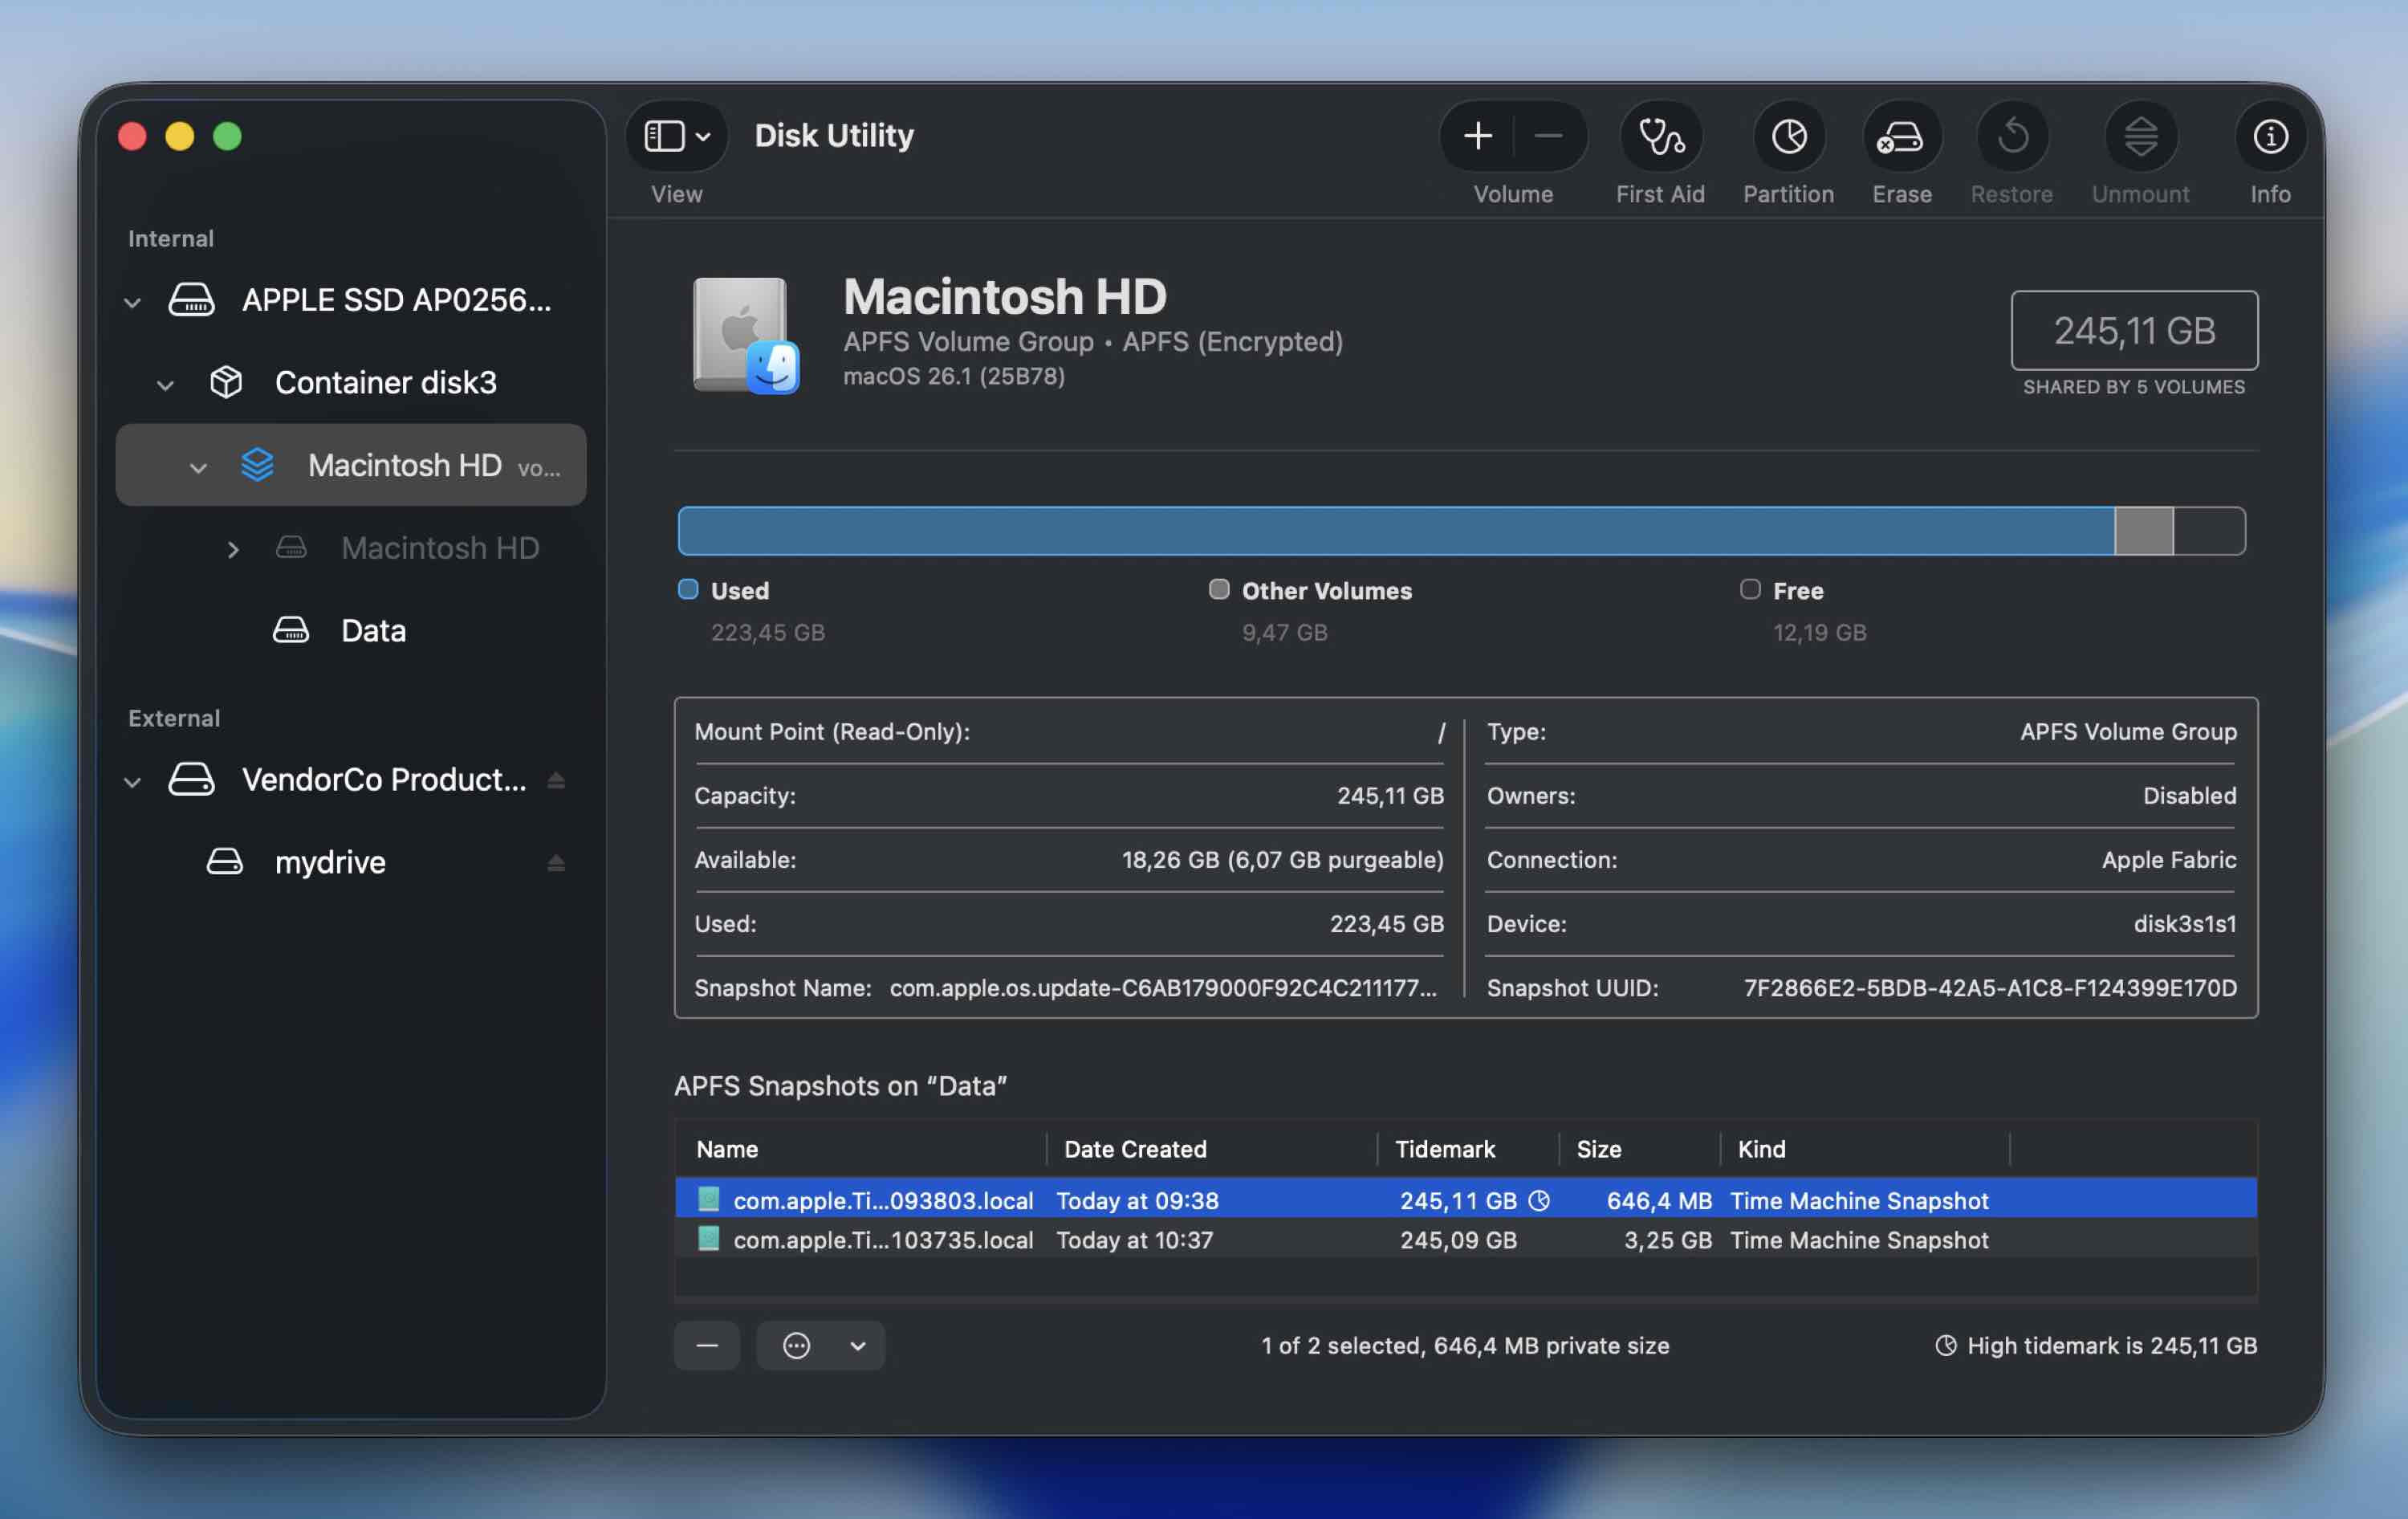
You can double-click one to mount it (it’ll open in Finder like a separate, read-only drive). From there, you can browse to your old Desktop, Documents, Downloads, or any other folder, and copy files out manually.
If you’re more comfortable using Terminal, you can also run:
tmutil listlocalsnapshots /
That will list any available snapshots on your system volume.
These local snapshots don’t stick around forever – they get deleted automatically when disk space runs low, but if you act quickly after losing a file, they’re often still there. Definitely worth checking.
Method 5: Recover Deleted Files from a Backup
- Difficulty: Easy
- Chance of success: High
- Requirements: Previous backup
There are other methods besides Time Machine to back up your Mac. You can simply copy files and folders to an external drive or cloud storage. Many third-party backup products are also available to protect your data assets. All of these methods require that you save the backups to some type of external storage. The process of recovering files or folders from a backup is similar no matter which type of system you use.
The following steps can be used for recovering deleted files on Mac from backup media:
- Connect the backup media to your computer.
- Launch the data protection tool that was used to create the backup.
- Search for the desired files and folders using the restoration tool’s interface.
- Select the items to be restored and use the interface to begin the process.
Method 6: Explore App-Specific File Recovery Options
- Difficulty: Easy
- Chance of success: Moderate
- Requirements: The app that was used to create the lost files has a built-in recovery feature
Another useful method that often gets overlooked.
Check whether the app you were using has its own recovery system. A lot of modern apps save backup copies, temporary versions to help users recover their work in case of a crash or accidental deletion.
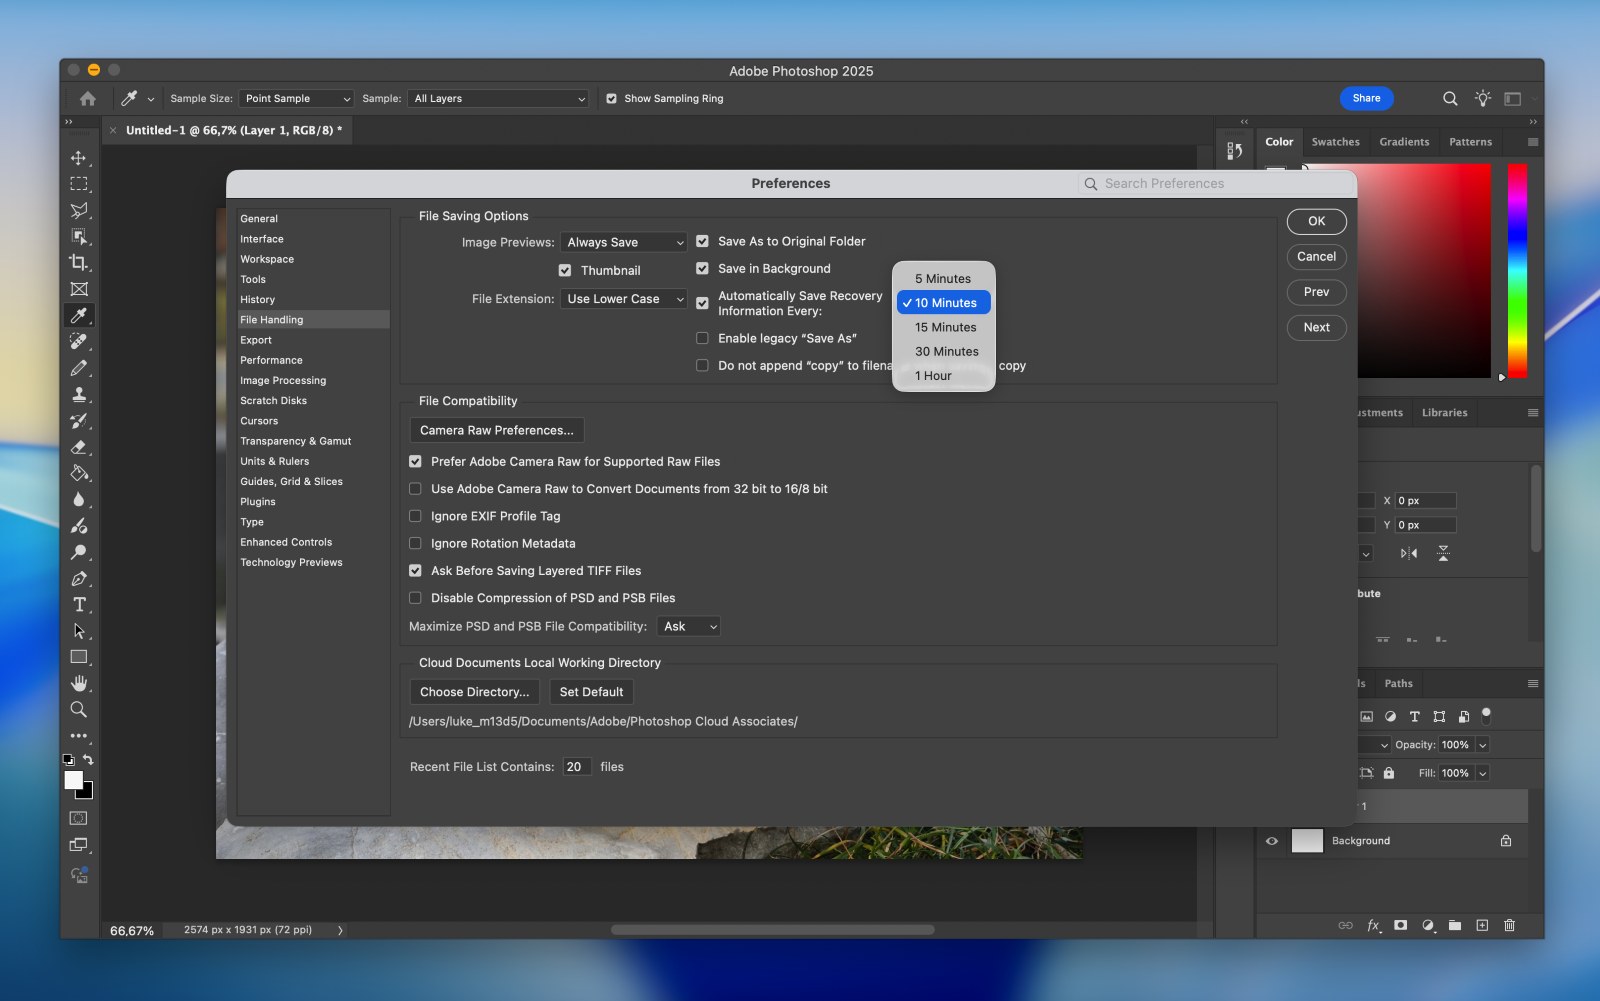
Apps like Adobe Photoshop with its Autosave feature. Or Apple’s built-in apps like Pages, Numbers, and Keynote.
If you’re using Microsoft Office apps like Word or Excel, they also have similar autosave and cloud saving capabilities.
Since each app that has a built-in recovery feature works slightly differently, it would be beyond the scope of this article to provide you with detailed instructions for all major apps.
However, the process is usually quite similar, and it looks something like this:
- Open the app that was used to create the file you want to recover.
- Look for the app’s recovery feature.
- Choose the files you want to recover and move them to a safe location.
Apps that back up files to the cloud are especially convenient because they let you perform deleted file recovery from any device that’s connected to the internet. So, even if your Mac gets lost, stolen, or critically damaged, you should still be able to get your files back.
Method 7: Use a Certified Recovery Lab
- Difficulty: Low (they handle it for you)
- Chance of success: Depends on damage
- Requirements: You’ll need to send or drop off your drive and approve the quote
And finally, there’s always the option to hand things off to the pros. If your drive is physically damaged, acting strange, or you simply don’t want to deal with DIY methods, professional data recovery services might be your best move.
Professional data recovery services have the equipment and know-how to perform complicated repairs of physically damaged storage devices that are no longer recognized or simply don’t work. Thanks to their immense experience, they achieve a very high recovery success rate.
As you can probably guess, the biggest downside of professional data recovery services is their price. The cost isn’t small, and in many cases, it’s several times higher than using recovery software at home.
If you’re curious about how high that number can go, we break it down in this investigation. But to give you a rough idea: pricing usually starts in the hundreds of dollars and can climb past a thousand depending on how complex the job is.
We also have a guide on how to find an affordable offline data recovery service if you want to check whether there’s one near you.
That’s why we always recommend trying the DIY route first. If you simply deleted a file (no hardware failure) recovery tools might solve the problem without sending your device anywhere (or spending that kind of money). A quick scan at home could save you time and a lot of cash.
One quick but important reality check: some people (including folks in our own community) think that professional recovery labs can recover anything. Like they’ve got magic tools that go deeper than software. But that’s not always true.
We want to be clear: even the best data recovery labs in the world can’t recover files that have been overwritten.
If your drive has already marked a deleted file’s space as reusable and that space was overwritten, the original data is gone – completely. No lab process can bring it back. The same goes for modern SSDs, where TRIM has already cleared the blocks.
So if a good recovery tool didn’t find the file (and the reason is that it’s already been replaced with new data) a professional lab won’t be able to recover it either.
Is it Possible to Recover Permanently Deleted Files Using Mac Terminal?
No, not really – If your files have been permanently deleted from your Mac (as in, removed from Trash and no longer residing on your disk), Terminal can’t bring them back. It doesn’t have native commands that recover data from a deleted state the way recovery software does.
However, if the file is still in the Trash, you can use Terminal to restore it. Here’s how:
- Launch the Terminal application.
- Enter the cd .Trash command.
- Type this command: mv xxx.xxx where xxx.xxx is the full filename and extension. Hit Return.
- Type Quit to exit the Terminal app.
- Open a Finder window and you should find the recovered file in its original location.
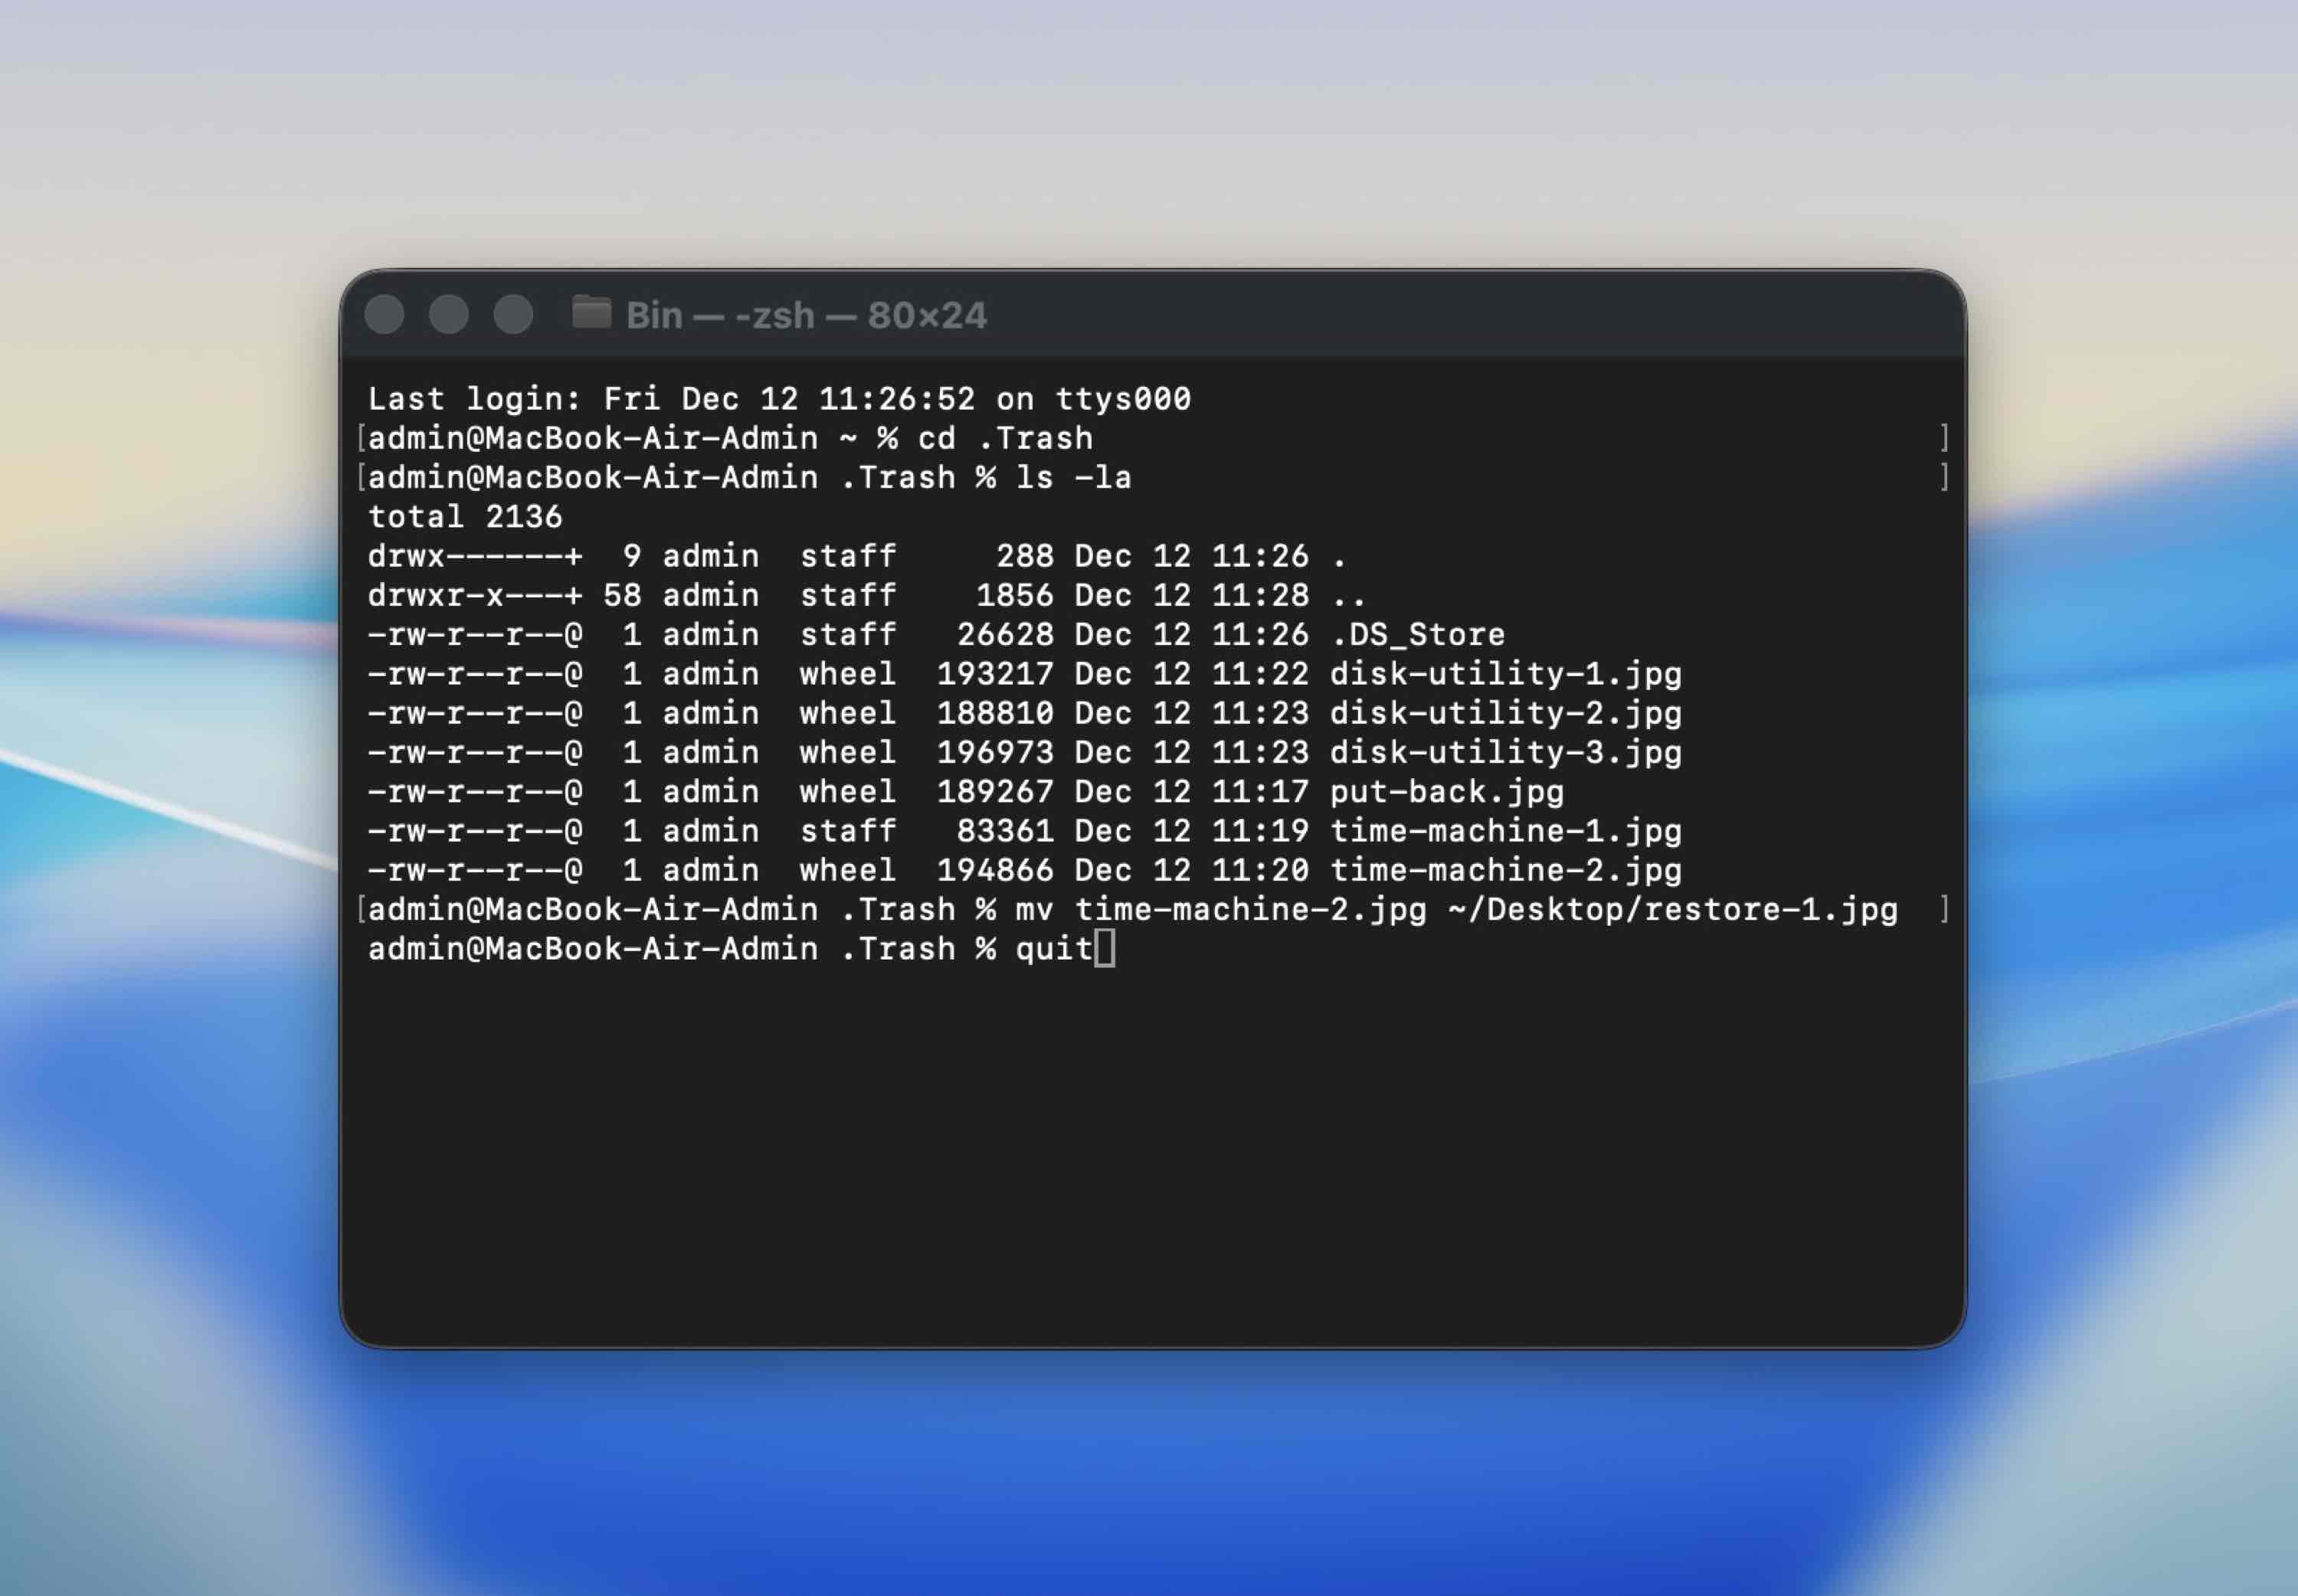
Terminal is case-sensitive. That means typing Filename.pdf is not the same as filename.pdf. If you get the name even slightly wrong, the command won’t work. So when you use the mv command to recover something from the Trash, double-check the spelling, capitalization, and extension.
Also, Terminal can be useful in some other cases. You can use command-line tools to access Time Machine backups or even work with Terminal-based recovery tools like PhotoRec or TestDisk. These methods aren’t beginner-friendly, and they don’t guarantee success, but they can be helpful in some specific scenarios. We won’t go into the details here, but if you want to learn how to use Terminal for recovery tasks on macOS, we’ve broken it all down in this guide: How to Recover Deleted Files Using Mac Terminal.
What Is Mac’s Recovery Mode and Can It Help Recover Lost Files?
macOS Recovery, commonly referred to as Mac Recovery Mode, is a relatively old feature that’s been available to Mac users since Mac OS X Lion (version 10.7). It’s essentially a useful collection of troubleshooting tools that you can use to fix startup issues, repair your operating system, and, yes, even recover lost files.
To start a Mac in Recovery Mode, do the following:
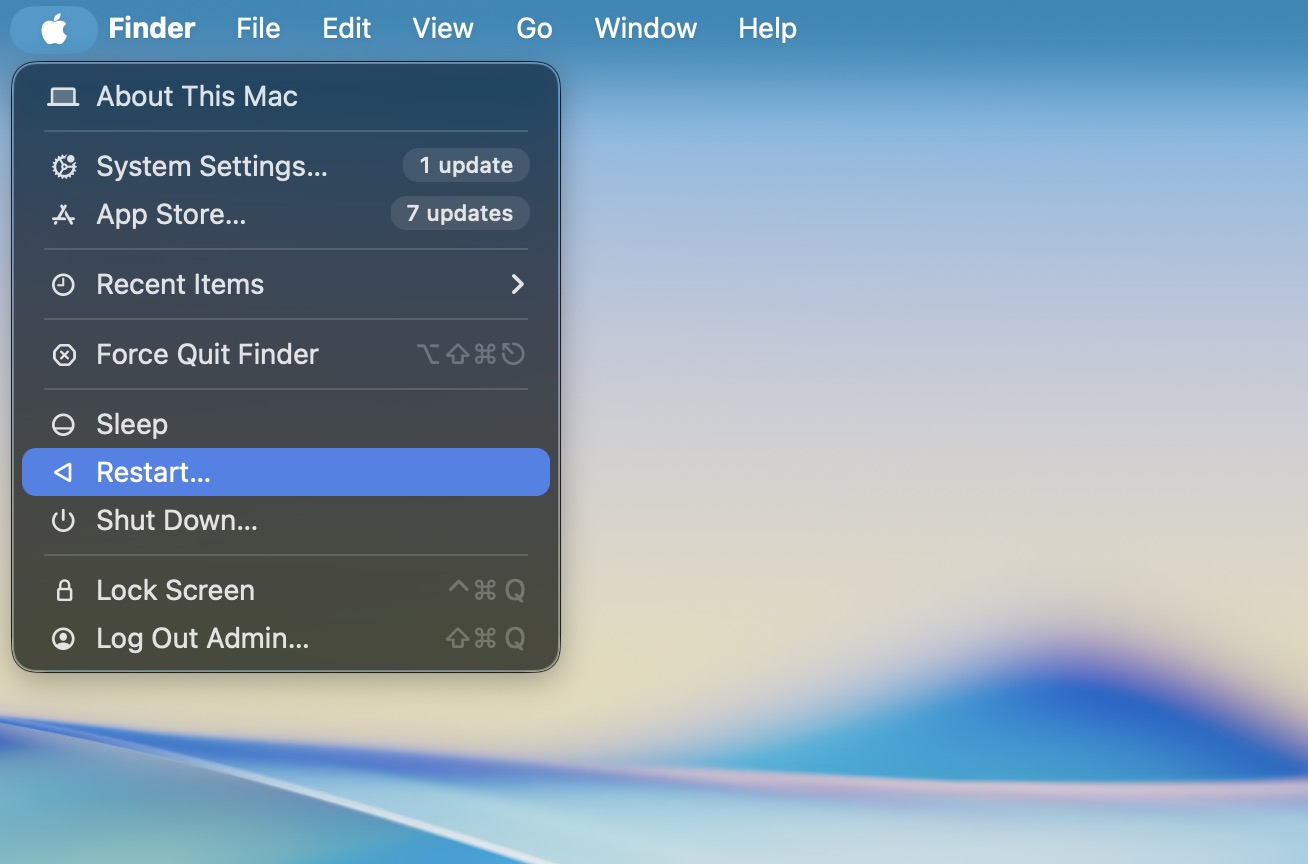
- Click the Apple logo at the top left.
- Select Restart.
- For Intel-based Macs press and hold Command (⌘) + R until you see the Apple logo or a spinning globe.
- For Apple Silicon Macs (M1–M5), press and hold the power button until you see the message “Loading startup options.” Once the options appear, click Options, then Continue to enter Recovery Mode.

- After your Mac finishes booting into Recovery Mode, you will see a window titled macOS Utilities with several options:
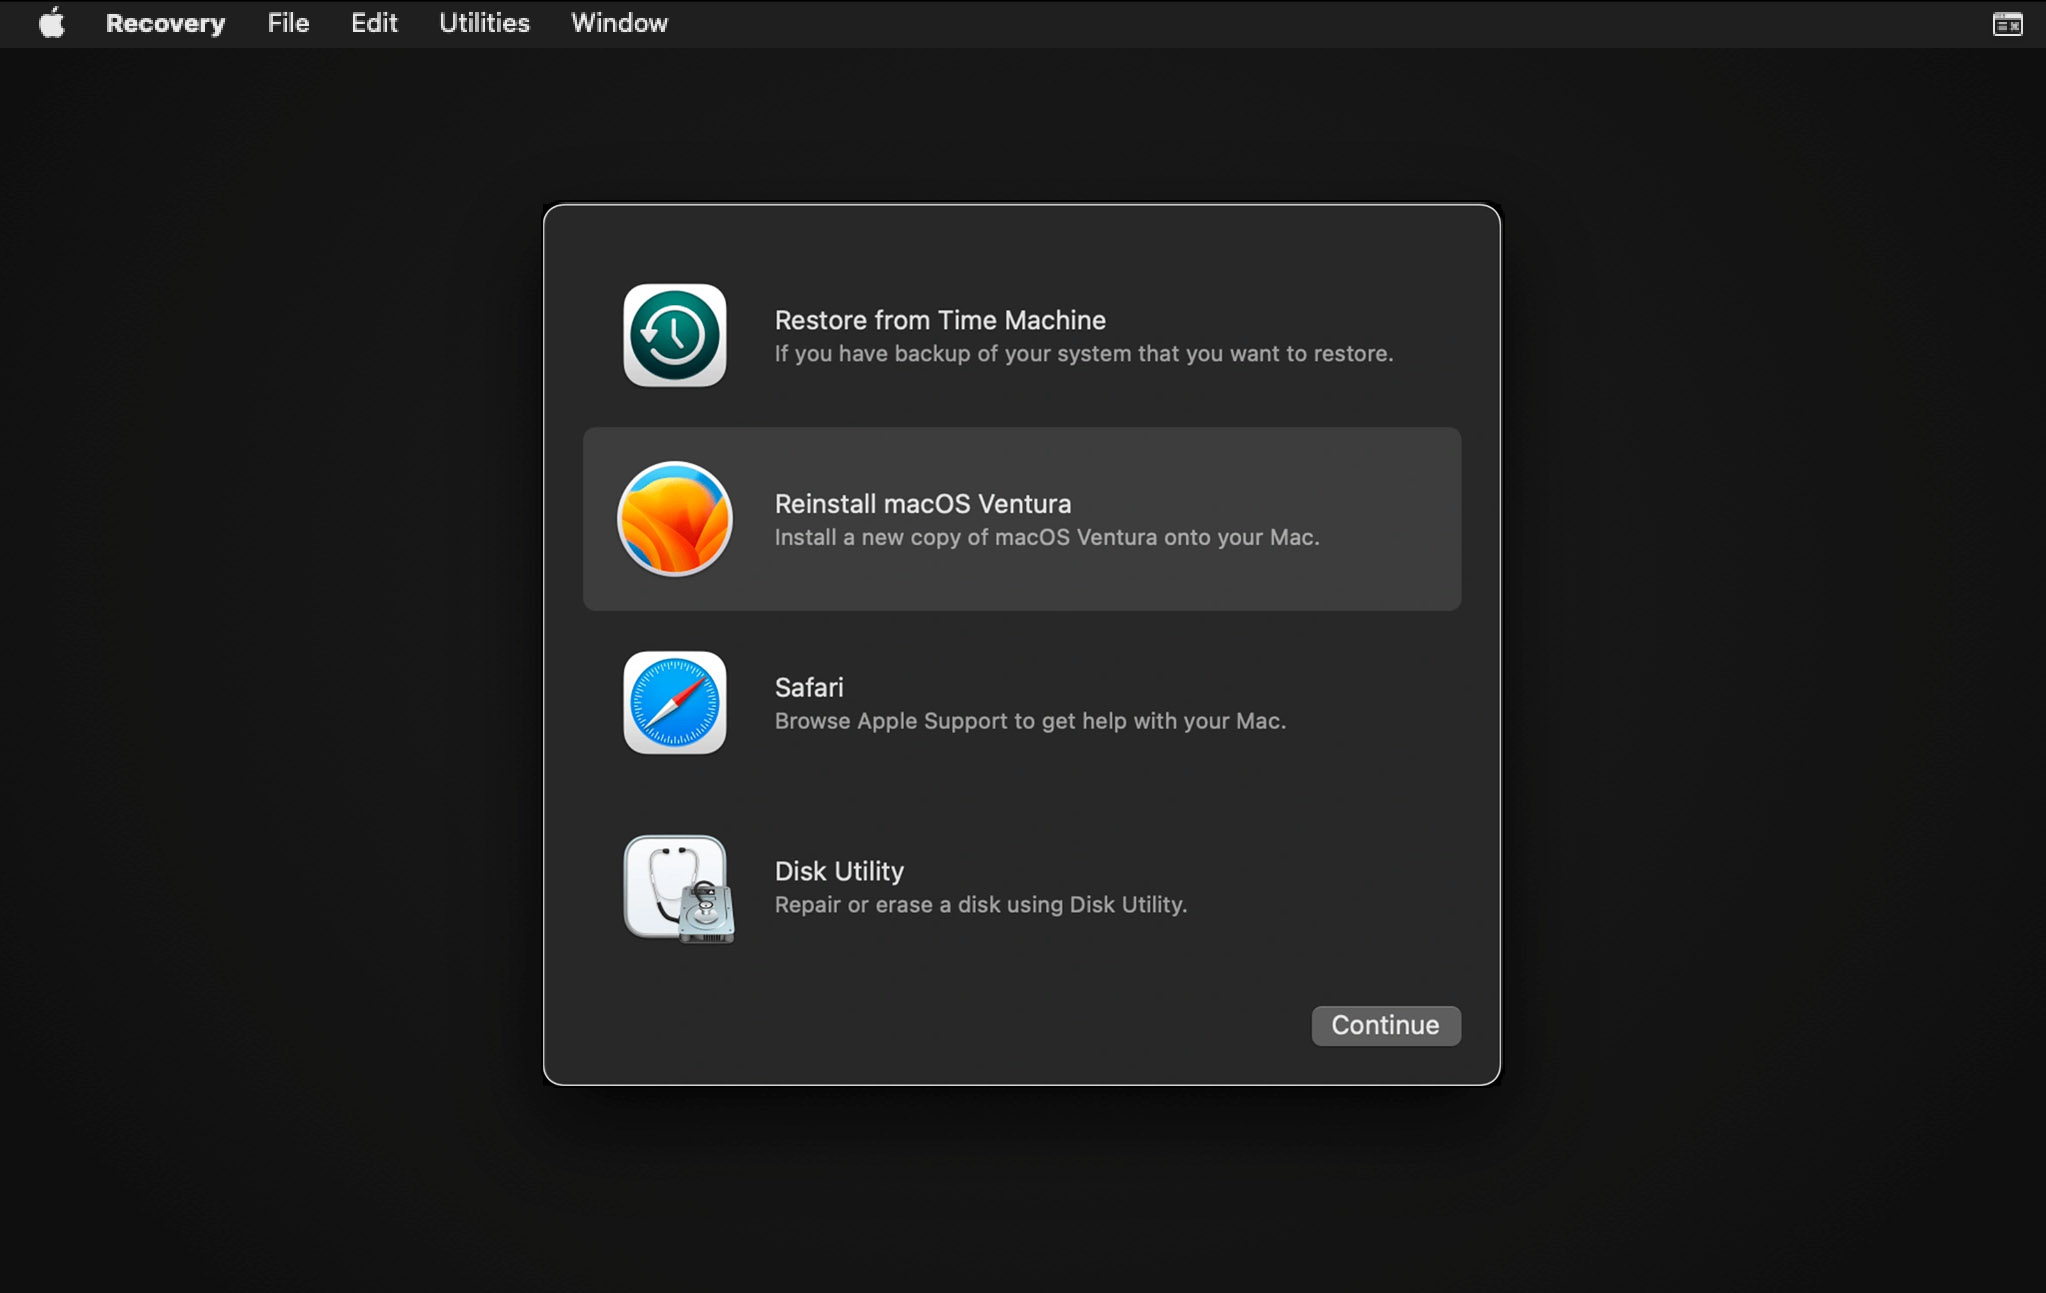
- Restore From Time Machine – You have a backup of your system that you want to restore.
- Reinstall macOS – Reinstall a new copy of macOS.
- Disk Utility – Repair or erase a disk using Disk Utility.
- If your goal is to recover lost files and you have a Time Machine backup, select the first option and follow the on-screen instructions.
Some data recovery tools can actually be launched right from macOS Recovery Mode, without booting into your regular system. For example, Disk Drill, the app we used at the beginning of this guide, supports this kind of setup.
To launch it in Recovery Mode:
- Open Terminal from the macOS Utilities window.
- Enter this command and press Return: sh <(curl http://www.cleverfiles.com/bootmode/boot.xml)
This script fetches a lightweight version of Disk Drill directly from developer’s servers and allows you to run the app in memory.
However, keep in mind that scanning the system drive from Recovery Mode like this only works on Macs that don’t have an Apple T2 Security Chip or Apple Silicon (M1-M5). Why? Because those newer Macs encrypt the system disk by default, and without access to the full macOS environment, there’s no way to read the contents of the drive, even with recovery tools.
Conclusion
If you skimmed everything above and just want the best path, here’s what we’d do:
If the file is gone for real (Trash emptied or it never made it there) and you don’t have a backup, a data recovery app is your best shot. In our experience, tools like Disk Drill are often the best way to recover files on a Mac; it’s fast to get started with, it supports the file systems most Mac users run into, and it gives you previews.
Just remember the two rules that save recoveries: stop writing new data to that drive, and recover to a different drive.
After that, your next “best method” depends on what actually happened:
- Undo works only if you deleted something literally seconds ago and you haven’t closed the app or restarted.
- Trash is the quickest win. If the file is there, “Put Back” fixes it in one click.
- Spotlight + cloud trash bins (iCloud Drive, Dropbox, OneDrive, Google Drive) help when the file wasn’t deleted (if it got moved or renamed).
- Time Machine is the cleanest recovery method if it was set up before the loss. Even without the external drive, local snapshots might still cover the last day or so.
- APFS snapshots can save you when Time Machine was enabled at some point and your Mac kept local restore points.
- Other backups (manual copies, NAS, third-party backup apps) work great (if they exist).
- App-specific recovery can help for documents created inside apps that keep versions or autosaves (Pages/Numbers/Keynote, Adobe apps, Microsoft 365 with cloud saving, etc.).
- A recovery lab makes sense when the drive is failing, not detected, or physically damaged. But even pros can’t recover what’s already overwritten, and they can’t undo TRIM on internal SSDs once it clears deleted blocks.
And finally, no matter which method ends up working for you, please set up Time Machine. It takes a bit of time to get going, but once it’s in place, you’ll thank yourself the next time something disappears.
FAQ
How to recover deleted files from Mac with official Apple software?
If you’re trying to recover deleted files from Mac using official Apple tools, your main (and really only) option is Time Machine, Apple’s built-in backup feature.
But, as we already covered, this only works if Time Machine was active before the file was lost. If it wasn’t set up in advance, it won’t help with recovering that specific file, no matter how quickly you turn it on afterward. (That said, activating it now is still a good idea going forward).
Without a Time Machine backup, Apple doesn’t offer any official tool for file recovery. There’s no built-in “undelete” feature. At that point, your only real option is to use a third-party data recovery tool like Disk Drill, PhotoRec, Stellar, or others.
What is the most effective way to restore data on Mac without software?
Backups are the most effective way to restore data on Mac without software. That’s because only backups can be used to restore permanently deleted files that have already been overwritten, which is a major issue with modern SSD drives that enable the TRIM command, which automatically wipes the storage space occupied by deleted files to improve write performance.
Can files deleted with rm -rf be recovered?
The rm -rf command is used to force the recursive deletion of everything inside a specified folder. Because this command is processed by the command line in macOS, all files deleted with it skip the Trash folder and, instead, immediately become permanently deleted. To recover them, you need to use a third-party data recovery application.
Can Mac recover deleted files using completely free software?
Yes, but with important caveats. There are free data recovery tools for macOS, yet each comes with significant limitations.
- Lazesoft Mac Data Recovery. Once a popular choice, but it hasn’t been updated in years, which raises compatibility and safety concerns.
- PhotoRec / TestDisk. Open-source and powerful, but command-line only, which makes it less user-friendly for many mac users. It also lacks the polish, previews, and guided workflows of paid tools.
- Exif Untrasher. Once useful for recovering files, but now discontinued and no longer updated.
In short: If you’re looking for a fully free tool, you will find one, but expect trade-offs: outdated software, limited file types, lack of GUI, or missing support. Most serious recovery tools are either paid or have a free version (freemium) with restrictions.
Is it possible to recover deleted files from a guest account on Mac?
Yes, but only under very specific conditions. If the guest session is still active and hasn’t been logged out yet, you can recover deleted files, those in the Trash, because the data still exists in the guest account’s temporary environment.
However, once the guest user logs out, macOS automatically deletes all files associated with that session (including the entire home folder and Trash). At that point, the only possible way to recover anything is with a data recovery tool from an administrator account, since the guest account doesn’t have permission to install software or scan the disk at a low level.
This article was written by Robert Agar, a Staff Writer at Handy Recovery Advisor. It was recently updated by Roman Demian. It was also verified for technical accuracy by Andrey Vasilyev, our editorial advisor.
Curious about our content creation process? Take a look at our Editor Guidelines.