Some files on your USB flash drive appear mangled or refuse to "open". Maybe you can't even access your pen drive anymore through a typical file manager, like Windows File Explorer. Or, even worse, your computer might fail to "recognize it".
Thankfully, dozens of USB flash repair tools can help you address most issues that could appear when using thumb drives. This "dozens", though, also means that it's not easy to locate among them the proper tool for dealing with the specific problem you're facing. Perhaps you've tried one or two apps, but neither has improved the situation, and the problems persist.
No worries, for that's precisely what this guide is about: 10 of the very best apps you can use for dealing with most significant issues that could strike your little portable storage wonder! They’re all hand-picked selections that we’ve personally tested as data recovery specialists, and used to recover our own files and successfully revitalize our thumbdrives.
Read on to find more about all of those tools that you should always keep handy in your toolkit!
- We tested and ranked the 10 best USB flash drive repair tools for Windows, macOS, and Linux.
- Covers data recovery, partition repair, bad sector fixes, and drive diagnostics.
- Includes both free and paid solutions, from beginner-friendly tools to advanced firmware repair utilities.
- Learn which tool to use depending on whether you need to recover data, fix corrupted drives, test storage health, or reflash controllers.
But before moving on to the main content of our article, including our complete ranking, here’s a quick recap of the best USB stick repair tools.

How to Tell If Your USB Drive Needs Repairing
For most people, the sign that they'll have to try to fix their USB flash drive is when their computer stops "recognizing it" at all, rendering it useless. The more alert among us will spring into action as soon as they realize some of their files aren't accessible anymore, and start seeking a USB drive repair utility immediately, to deal with potential file system corruption.
Problematic USB drives may behave erratically, and their issues can worsen with time and use. It's a given that, in time, like all devices, they, too, will fail.
What's worse, they don't come with technologies like S.M.A.R.T. (found on all modern SSDs, HDDs, and M2 drives) for checking out their health status.
That's why you should stop actively accessing them and adding more data to them as soon as you realize something's wrong, until you identify the root of the issue and address it with the correct tool.
You can deduce if you can perform flash disk repair/recovery by yourself based on the following list of progressively worse scenarios:
- 🟩 Easy: Your pen drive is still fully usable and only a handful of files are inaccessible. It's possible for Windows not to realize there are issues with your USB flash drive, and keep acting as if everything is normal. You shouldn't ignore any sign of problems, no matter how minor. Take proactive action by first copying all your precious files off your USB flash drive to a second device and then attempting to repair it.
- 🟨 Possible: The USB flash drive does not appear in File Explorer (or other file managers), but is still visible "as a device" through the Windows Disk Management applet. Even if you cannot access your USB stick normally, an advanced tool like Disk Drill will still be able to analyze it, locate your files, and enable you to recover them to another storage device. Afterward, you should check your USB pen drive's health, with tools like CrystalDiskMark and H2TestW. If it seems usable, "reboot it" by turning it into a blank slate with HDD Low Level Format Tool.
- 🟧 Hard: Doesn't your USB stick show up in Windows (or it insists on remaining inaccessible, no matter what you've tried), but your computer's BIOS/UEFI still occasionally detects it? Download ChipGenius, and keep it handy until your USB flash drive "decides" to pop up in Windows. When that happens, spring into action and use ChipGenius to check your USB stick. The information it provides is necessary for finding and downloading the appropriate MPtool for your USB flash drive's controller, to attempt to reflash it.
- 🟥 Impossible: Does your pendrive show up in Disk Management, or is generally detected by your PC, but shows the wrong size or even zero space? Or is your USB flash drive not detected at all by your computer or any other devices where you tried it, or is it physically damaged? All the tools we will see can only help with logical damage, provided your USB stick remains detectable by your computer. If that's not the case or there's physical damage, your optimal course of action would be to contact data recovery professionals for assistance.
If your USB stick becomes inaccessible, and your PC prompts you to format it to keep using it, don't! Doing so may negatively impact your chances of successfully recovering the files on it by overwriting the existing data.
Instead, use a data recovery tool to get your files off your USB flash drive. After that, with your files safe, you can try to fix it with pen drive repair software and format it to make it usable again.
What Are the Capabilities of the USB Repair Tools?
Multiple solutions fall under the somewhat vague term "USB repair tools". Although they can achieve the same result, repair a USB Flash Drive or other storage device connected through USB (like an external HDD, a portable enclosure for NVMe drives, etc.), they can also be radically different in various ways.
- Error checking and correction: Some of the best USB repair tools specialize in checking storage devices for errors and attempting to correct them if they are found. For example, the CHKDSK tool that accompanies all versions of Windows and the third-party Victoria utility belong to that group.
- Backup and cloning: Acting on a failing USB drive may drive it closer to the point of no return. In such cases, it's best to first use a backup or cloning tool before attempting anything else. This way, you can be sure your precious files will be safe even if an old and battered USB Flash Drive becomes completely unusable.Although there are specialized tools for such tasks, like the open-source and free Clonezilla, or the also free but closed-source Veeam Agent, we considered them redundant for this article. Their core functionality is replicated within two of the other tools we’ll see, like Disk Drill and AOMEI Partition Assistant. Thus, you can rely on those for your basic backup and cloning needs, unless you require specific functionality that’s explicitly available in other options (like restoring backups “outside of Windows” using custom boot media).
- Data Recovery: Some apps, like Disk Drill or PhotoRec, can be considered "USB repair tools" even if they don't come with any actual repair features, and that's because they're still relevant and helpful when dealing with such issues. We're talking about data recovery solutions that might leave a USB Flash Drive "unfixed" after using them, but which are crucial for saving your precious files out of it.
- Formatting and partitioning: Just like Alexander the Great "solved" the legendary Gordian Knot not by finding a way to untie it but by slicing through it with his sword, sometimes the easiest way of "repairing" a USB drive isn't by trying to find and "fix" every single error on it, but by "nuking" it. That's where formatting and partitioning solutions, like HDD Low Level Format Tool or AOMEI Partition Assistant, can help you perform the equivalent of "rebooting" the USB drive by erasing everything on it and recreating the data structures required for using it from scratch.
Some of those tools, like CHKDSK, might come bundled with the operating system or, like CrystalDiskMark, be available as third-party downloadable software. Depending on the solution, they might require installation, work as standalone portable apps, or expect you to create bootable media and use them from there.
It's also worth noting that often you'll find you have to use more than one USB stick repair tool for a truly successful outcome. For instance, start by recovering your files from a corrupted USB drive using an app like Disk Drill. With your files safely copied "outside" the USB flash drive, you should first check its actual condition with a tool like Victoria, and then also perform a thorough format with an app like HDD Low Level Format Tool.
10 Best Tools to Repair Your USB Drive
The USB stick repair solutions we will see here are the best for dealing with multiple problems. If you know what you're dealing with, feel free to pick the best USB flash drive repair tool for the issue at hand.
Although all tools on this list are useful, and optimally you should get all of them, we're presenting them in a somewhat loose "order of importance". We'll start with the most crucial action: retrieving most of your data that is "locked inside it". Then, we'll move to solutions that aim to fix your USB flash drive. Finally, we'll see tools that enable flash disk repair and analysis.
1. Disk Drill
What it helps with? Data recovery, plus byte-to-byte imaging so you can work from a safer copy.
- Developer: CleverFiles
- Price: $89
- Free/Trial Version: Free trial limits total recovery size to 100MBs.
Disk Drill has a modern-looking and thoughtfully-designed interface, that also grants access to helpful features for easily locating and prioritizing the files you wish to recover. That's of paramount importance when you can't access the contents of your USB flash drive "normally", with a file manager like Windows File Explorer, while dealing with a corrupted or generally "misbehaving" storage device. But it's also handy when you've absent-mindedly formatted your USB stick, or accidentally deleted (or forgotten where you moved) a bunch of files.
Behind that "front" lies a powerful scan and recovery engine, that can work with almost all USB flash drives (or any other type of storage device).
And if your USB drive's rapidly deteriorating, you can take advantage of Disk Drill's byte-by-byte backup tool, which received a significant upgrade in the app's latest version, to create an image of your pen drive's contents.
It would be best to create a byte-by-byte backup image of your USB pen drive, even if it isn't failing, before you try any of the other apps in this article, since their actions could lead to further corruption (or even total elimination) of any data stored even on a "healthy" USB flash drive.
Key Features
- Modern, sleek interface.
- Easy to use, well-organized wizard-based process setup.
- Can work with almost all USB sticks (and any other storage device, as long as the computer detects it).
- Helpful Categories, Filters, Preview, and Recovery Chance Estimation features.
- Life-saving byte-by-byte backup image support.
Interface & User Experience
With a modern and aesthetically pleasing, but more importantly, immaculately organized interface, Disk Drill makes recovering your files unbelievably easy.
Its robust and speedy scan and recovery engine is complemented by well-thought-out Categories and Filters, and handy preview functionality for many major filetypes. Those features empower you to locate precisely the files you need quickly, without having to manually seek them among (often tens of) thousands of results.
USB Repair Functionality
Disk Drill's intelligent algorithms can analyze the recovery potential of all files it detects, enabling you to prioritize what to recover first in "ticking time bomb" scenarios, where time is of the essence - like a quickly failing USB stick.
However, in such cases, it's best to take advantage of the app's built-in backup tool. This way, you can "clone" the whole USB pen drive into a virtual disk image, and then use that as the source for recovering your data, to avoid causing more damage to your USB flash drive by merely trying to access it.
When dealing with corrupted file systems and inaccessible storage devices, the details of the files that remain on them may be lost. That's why it's also essential for a data recovery solution to "know about" and "be able to recognize" as many types of files as possible, to "detect them" among the mess of a continuous stream of data that's still on the storage device, identify them, and recover them successfully.
Disk Drill "is intimately familiar" with close to 400 file types, including all major audio, video, image, document, and archive formats. From the more common JPG, MP3, MP4, TXT, DocX, XLSX, PDF, and 7Z formats, to the not-as-popular IIQ, RFL, P65, RPH, and RDB file types, it's almost a given that Disk Drill will be able to find and recover all crucial files from your USB stick.
Disk Drill is not a USB stick repair tool in the literal sense of the term, since your pen drive will remain unaltered after using the app. You'll have to use other tools afterward to perform an actual flash disk repair. And yet, it's also the most critical part of the "fixing your flash drive" equation, for it can pull your precious data out of your USB stick before it gets corrupted further, permanently altered or erased by the other apps we'll see in this article, or it reaches its end-of-life point and becomes entirely inaccessible.
Pros:
- Supports about 400 file types.
- Can preview the contents of many image and document files before recovery.
- Accurately estimates every file's recovery chances.
- Works with almost all storage devices.
- Can "clone" any storage device into a backup image.
- The free version can recover up to 100 MB of data. In the worst case, this will be enough to test the software; in the best case, it could cover the entire data loss incident.
Cons:
- Health monitoring relies on S.M.A.R.T., which isn't supported by USB flash drives.
We only saw a few basic details about Disk Drill, one of the friendliest and safest data recovery apps which, especially in its latest 6th iteration, manages to pull farther ahead from most of its peers. To learn more about it - and how it achieves this, make sure to check our full review of Disk Drill's latest version. And if you’d prefer to trade some usability to keep costs down, advanced recovery functionality for experts, or anything in-between, check out our guide on some of the best alternatives to Disk Drill.
2. AOMEI Partition Assistant
What it helps with? Partition and volume fixes and “make it usable again” tasks (format, delete/recreate partitions, drive letter, MBR/GPT work, cloning).
- Developer: AOMEI
- Price: Freeware
- Free/Trial Version: Free version available, with restricted functionality (cannot create bootable media, split partitions, lacks partition recovery wizard functionality, etc.) compared to higher-tier versions.
Partitioning tools can be handy for segmenting large storage devices, like multi-terabyte HDDs, into logical (or more manageable) sections. However, they're not the first that come to mind when seeking a USB stick repair tool for your portable storage. And yet, AOMEI Partition Assistant comes packed with numerous additional features, some of which can prove essential for fixing a USB thumb drive.
On the most basic level, a tool like AOMEI Partition Assistant serves as a more comprehensive alternative to the Disk Management applet built into Windows. It can perform the same actions that may also be helpful when troubleshooting or fixing USB thumb drives, like changing drive letters, formatting, or deleting partitions. But it can do those (and more) either more effortlessly than the Disk Management applet, offering more control, or "just better".
Still, what makes it an essential addition to everyone's pen drive repair software collection are its abilities to modify partitions while preserving all data on them, clone partitions or whole disks, perform speed and surface tests, and rebuild a storage device's Master Boot Record (MBR), all from the same convenient interface.
Key Features
- All-in-one solution for most partition & disk management needs.
- Can resize, move, and merge partitions while preserving their data.
- Can repair, clone, and test the speed and condition of storage devices and their partitions.
- Comes with data-preserving functionality (in the actions where that's possible).
Interface & User Experience
AOMEI Partition Assistant's interface is a mixed bag, primarily due to the ton of features included in the app. The more technical among us will appreciate how AOMEI Partition Assistant offers instant access to almost all its major features from its main page. This way, many of the supported actions that can work for flash disk repair are only a single click away.
Still, the app's usability would take a significant boost if it also used sub-groups for better categorization of its actions. As it is, you have to hunt down a particular option in operation lists with up to twenty entries. And that's not considering how some of those operations also show up as icons or right-click menu entries.
USB Repair Functionality
Many of AOMEI Partition Assistant's operations are the equivalents of what dedicated usb fix tools offer, practically turning this app into a multi-tool for all USB flash drive repair adventures.
- It can clone a rapidly failing USB stick to keep all data on it available even after it fails.
- The app can perform a typical format to "re-initialize" a misbehaving USB flash drive, and if that doesn't work, entirely wipe everything on it.
- AOMEI Partition Assistant can convert USB sticks formatted with the older MBR approach to the newer GPT format, and vice-versa.
- Similarly, it can convert USB sticks formatted with the modern NTFS file system to the older but more compatible FAT32 file system.
- It can resize, move, and merge partitions, enabling the "re-unification" of a USB flash drive's segmented storage.
- It comes with extra tools for checking a storage device's health, testing its surface condition, and even defragmenting it (although that's not useful with memory-based media).
We should emphasize that many of AOMEI Partition Assistant's features are "destructive", so using them to fix a USB flash drive also eradicates all data stored on it. Therefore, you should first transfer as many of your files as possible from your flash drive to another storage device using a tool like Disk Drill before attempting to repair it with AOMEI Partition Assistant.
Pros:
- Most of the functions that make AOMEI Partition Assistant a valid USB flash repair tool are available without restrictions in its free version.
- Some of the app's features are rare to find elsewhere (like MBR/GPT and NTFS/FAT32 conversion).
- All of the app's operations are instantly accessible from the same interface.
Cons:
- Some of AOMEI Partition Assistant's functionality is duplicated in multiple entries in operations lists, icons, and right-click menus.
- No hand-holding, as the tool takes it for granted that the user knows which operation to choose, when, and how to configure any related options properly.
- Some of the most useful operations, like its Partition Recovery Wizard or its support for splitting partitions, are locked behind a paid tier.
If you're planning to fix your USB flash drive by rebuilding its MBR with AOMEI Partition Assistant, check the appropriate section in our article on how to recover deleted partitions on Windows 10/11 for detailed instructions on the process.
3. CHKDSK
What it helps with? File system repair (FAT/NTFS mainly, limited exFAT) and bad sector marking.
- Developer: Microsoft
- Price: Included in all of Microsoft's OSes for no additional cost.
- Free/Trial Version: Freely accessible through the terminal in all of Microsoft's OSes.
The CheckDisk utility has been accompanying Microsoft's OSes since the DOS era as their official solution for dealing with disk-related issues. Better known as CHKDSK (its filename abbreviated to fewer-than-eight-letters because of original DOS file naming restrictions), it's a command-line tool that can be used for flash disk repair, checking Microsoft's FAT, NTFS, and (partially) exFAT file systems for logical and physical errors.
CHKDSK can often successfully fix USB flash drives that Windows detected, but the files on them are corrupted, fail to open, or their whole file system is inaccessible. Still, that also means that CHKDSK is a very specialized and limited in scope (and usefulness) tool.
Knowing that the average user prefers to avoid typing commands, Microsoft has also integrated into Windows a more limited but also easier-to-use version of CHKDSK with a rudimentary graphic user interface.
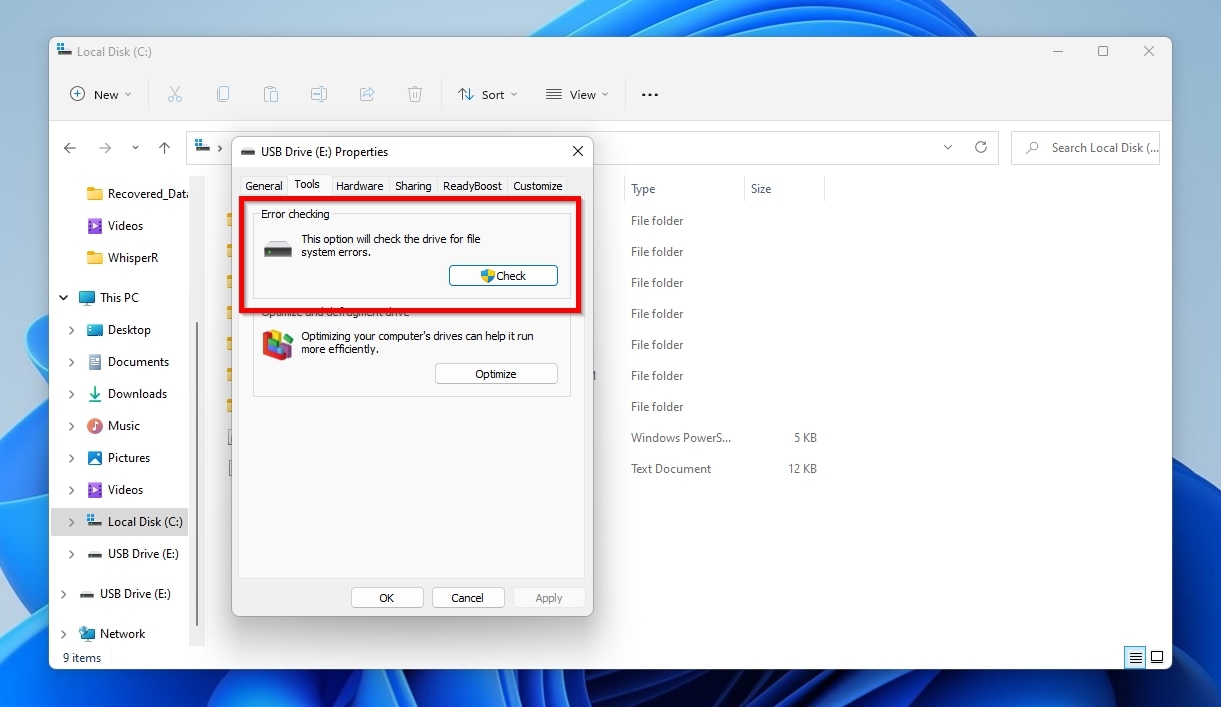
To find it, right-click on your problematic USB flash drive (or any other storage device), and click Properties. It's the "Error checking" section on the "Tools" tab.
Note that this is possible only when the drive you want to check is visible in File Explorer.
Key Features
- Comes bundled with all Microsoft's OSes.
- Has a more limited but also more user-friendly GUI-based version.
- Can scan and (attempt to) repair all versions of Microsoft's FAT and NTFS file systems, with more restricted support for exFAT.
Interface & User Experience
As a command-line tool, CHKDSK lacks a proper interface. In many ways, it feels like a relic from the past. Still, thanks to its specialization and specificity, it also proves easy to use, since most people only need to remember fewer than a handful of its parameters to use it.
USB Repair Functionality
CHKDSK may be far from the best USB stick repair tool, since more versatile alternatives include its functionality, and it can perform only two actions:
- It can scan a disk for errors when used only with the disk's drive letter, like:
chkdsk e:. - It can scan for and attempt to repair any errors it finds. When used as
chkdsk /f e:, thefflag instructs it to seek logical (file-system) errors. Instead,chkdsk /r e:also checks for bad sectors, and marks them as unusable while trying to recover any information stored on them.
More parameters allow further customization of how CHKDSK operates - read more about them on our guide on how to run CHKDSK to diagnose and fix disk problems on Windows.
Keep in mind that, like other tools that deal with storage devices, CHKDSK can also lead to further data loss. So, either start by trying to recover as many of your files as you can off a misbehaving USB stick with an app like Disk Drill, or clone it with a solution like AOMEI Partition Assistant before unleashing CHKDSK on it.
And if CHKDSK gets stuck for hours with nothing happening, or you meet other issues with it, the members of our community would be happy to help!
Pros:
- Free and ready-to-use for users of Microsoft's OSes.
- Can successfully deal with most cases of FAT or NTFS corruption.
- Can work with any storage devices detected by Windows.
Cons:
- Minimal functionality - only helpful in dealing with corrupted file systems.
- Only supports Microsoft's file systems, with limited support for their exFAT file system (for example, may produce errors on large HDDs formatted with exFAT).
- May lead to further data loss.
4. Victoria
What it helps with? Surface scanning and bad block handling (scan ranges, remap/erase options), plus deep device info.
- Developer: Sergei Kazanskij
- Price: Free — accepts donations to support development.
- Free/Trial Version: Freeware app with no restrictions.
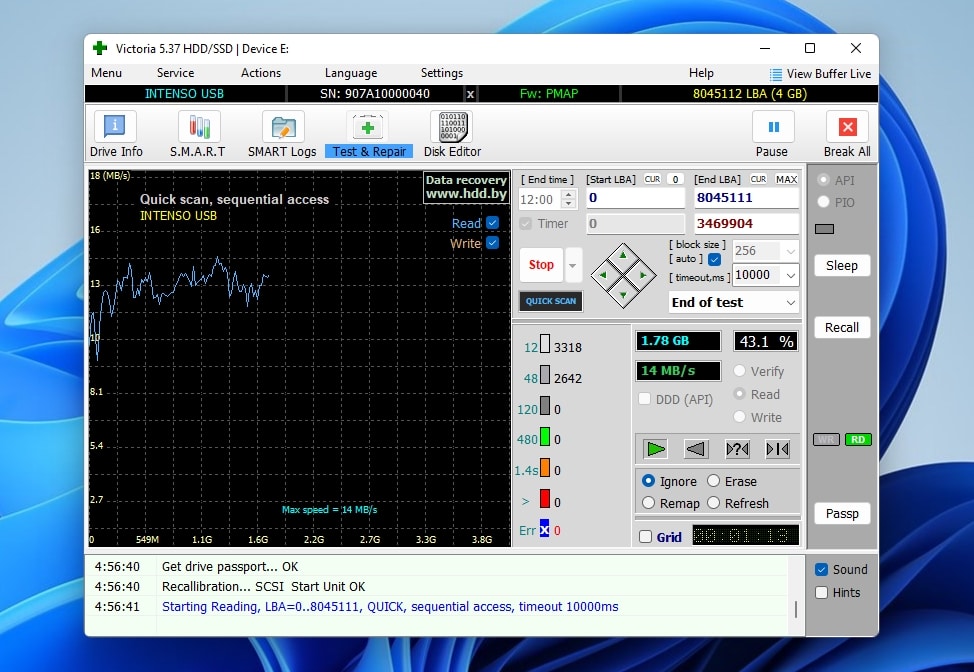
When directly compared with Victoria, CHKDSK proves more limited in both functionality and the amount of information it provides about its processes. Despite its complete name being Victoria HDD/SSD, this tool can also be used to scan and fix USB flash drives, memory cards, and almost any other storage device that's detected by the OS.
Victoria can perform quick and "lite" or more thorough and destructive tests, on a whole or only part of a pen drive, and seek, locate, and remap any bad sectors on it.
Even if Victoria manages to remap all bad sectors on a misbehaving thumbstick, that doesn't mean that it's permanently fixed and you can trust it with more data.
The appearance of bad sectors is usually the signal that a storage device's actual "storage surface" (memory chips in USB sticks, memory cards, and SSDs, magnetic platters in HDDs, etc.) has started failing, and that can only get progressively worse. The problem will likely appear again in the future.
So, consider any repairs temporary, get as many of your files as you can off such a device as quickly as possible, and then replace it with a new one.
The more demanding users among us will also appreciate the detailed information it provides on a selected device, and its Disk Editor that allows manually modifying the data on a storage device. Those seeking a simple USB stick repair utility, though, may feel lost with Victoria's convoluted interface and reliance on technical jargon.
Although Victoria also supports S.M.A.R.T. monitoring and logging, this feature is not usable with USB flash drives and memory cards, which don't support such functionality.
Key Features
- Can analyze a whole storage device or only a user-defined part of it.
- Can find and erase or remap bad sectors.
- Presents detailed information about any selected storage device.
Interface & User Experience
Victoria supports only a handful of actual operations, yet its interface ends up being overwhelming. Its aesthetics are pulled straight out of Windows 95, and all its elements look almost randomly thrown on its window.
Still, after you use it for a while, and maybe read a tutorial or two, you begin to understand how to navigate its chaotic GUI, and start using the app to analyze and repair your storage devices (relatively) effortlessly.
USB Repair Functionality
You may encounter claims that CHKDSK is only suitable for scanning file systems and fixing logical errors, whereas Victoria can also scan a disk's surface and remap bad sectors. However, the truth is that both apps can perform both tasks. So, why use Victoria, created by a single Belarusian developer, instead of CHKDSK, a tried-and-tested solution by an established mega-corporation, for your flash disk repairs? Especially when considering how CHKDSK also has a GUI version baked into Windows?
- Unlike CHKDSK, with Victoria you can not only perform scan and repair operations separately, but you can also explicitly define what to scan and repair, by restricting those operations on specific sector ranges.
- It's possible to only erase any bad sectors, in an attempt to "soft-fix them" without having to remap them.
- The app's Disk Editor makes it possible to check those - or any other - sectors' contents with your own eyes, which advanced users may find helpful when trying to carve manually an ultra-important but currently unreadable file.
- The drive information it presents is much more thorough, surfacing many more details about the selected storage device, which can assist when trying to identify a USB flash drive's actual specs.
Pros:
- USB repair tool free to use with no restrictions.
- Can perform quick scans or thorough bad sector analysis and remapping.
- Built-in Disk Editor can help advanced users manually check a device's contents sector-by-sector.
Cons:
- Chaotic, archaic, and unfriendly interface.
- Casual users don't have a reason to use it over the already-available and built-into-Windows CHKDSK.
To find out more about Victoria, check its mini-review that we've included in our guide on the best hard disk repair software.
5. TestDisk
What it helps with? Partition table and boot sector repair and “bring the partition back” scenarios.
- Developer: Christophe Grenier / CGSecurity
- Price: Free — open to donations for supporting development.
- Free/Trial Version: Unrestricted freeware solution.
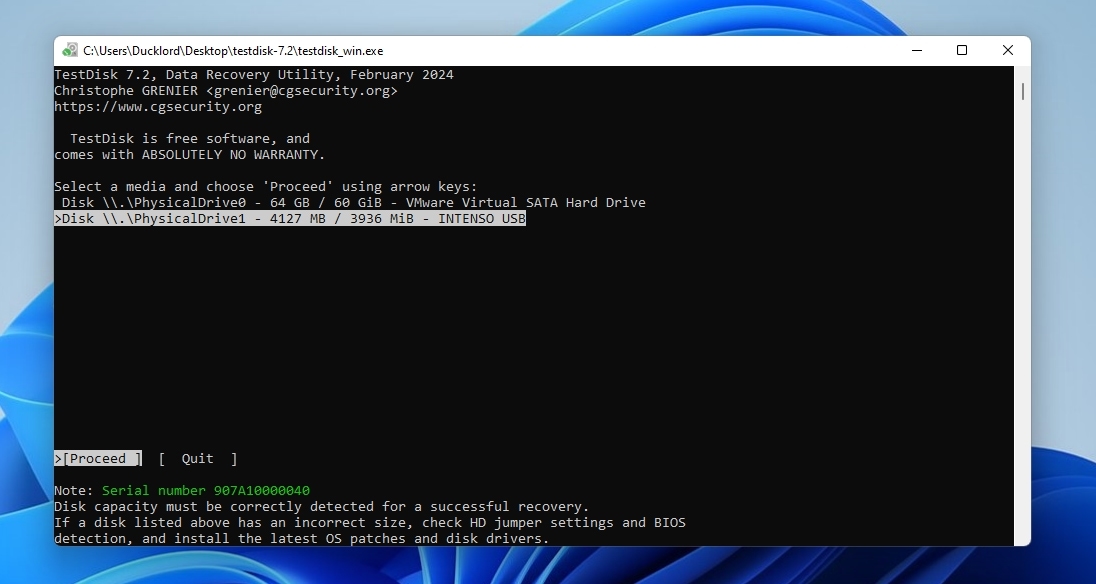
Do you prefer your USB repair tools portable, free, open-source, and don't mind some rough edges? One of the most popular solutions in the world of data recovery, TestDisk is an open-source app that can help when dealing with damaged data structures on a storage device. It's a closer sibling to solutions like CHKDSK than Disk Drill, for instead of dealing with files and prioritizing data recovery, it's more of a "repair tool" that attempts to fix issues with partitions and boot sectors on quickly-formatted, corrupted, or non-recognizable disks.
However, it's also not a full-blown partition management solution, like AOMEI Partition Assistant, lacking most of the functionality you'd expect to find in such an app (like moving or resizing partitions). It's also far from the most user-friendly solution, since it runs in the terminal, presenting a rudimentary text-based interface.
Still, it might be the best software to repair a USB drive when it reports having more storage capacity than Dr. Who's Tardis, it shows up as RAW, or its former partitions are now appearing as unallocated or free space.
TestDisk doesn't come with an installer; instead, it's bundled in a compressed archive, together with its sister-app, PhotoRec. After downloading, you have to manually extract the archive's contents to a folder, and locate and run the app from there, or manually create shortcuts for more convenient access.
PhotoRec is TestDisk's data recovery sibling, and closer to Disk Drill than CHKDSK, for instead of scanning and repairing storage devices, it specializes in locating and recovering files from them. Still, sharing a common point with TestDisk, it's similarly unfriendly to casual users, lacking even basic features one would take for granted in similar apps, like the ability to select specific files for recovery or preview their contents.
Key Features
- It specializes in locating "lost" partitions and making them accessible again.
- Allows fixing, recovering, or reconstructing partition tables and boot sectors.
- Comes bundled with the powerful (but far from straightforward) PhotoRec for actual file recovery.
Interface & User Experience
Despite being the better-known of the two solutions, TestDisk still relies on a text-based interface. In contrast, PhotoRec also comes in an alternative QPhotoRec variant, which recreates its functionality in an actual GUI. Thus, the default method to "navigate" and use TestDisk is using the keyboard, highlighting options and actions with the cursor keys, and selecting them by hitting Enter.
Regarding the offered User Experience (UX), there are no wizards, no result-based step-by-step processes, and you have to be familiar with core storage concepts and terms to use the app correctly. And this "correctly" is gravely important, for choosing an incorrect partition table type or remnants of an older "overlapping" partition may have the opposite of the intended result, and actually worsen data loss beyond any chance of recovery on the pen drive you're trying to repair.
USB Repair Functionality
TestDisk proves its usefulness after you've accidentally quick-formatted the wrong USB pen drive, or you see its space appear as RAW or unallocated after you forgot to "remove it safely" the last time you used it. In such scenarios, you can fix your USB flash drive by repairing or recreating the data structures that reflect its previous state, when you could still access all your files on it.
Depending on what you choose, TestDisk can repair the partition table to render existing partitions visible again, and seek and recover lost ones. You can also use the app to deal with problematic file tables, which can make a device appear empty or its file structure corrupted.
TestDisk also knows how to repair a damaged or rebuild a missing boot sector, required for USB flash drives that are used for booting a PC (like OS installers, "Live" Linux distributions, troubleshooting and backing-up tools, etc.).
You can use TestDisk on the three most popular OSes for computers, Windows, macOS, and Linux, since it offers native versions for them, and supports their primary file systems (FAT12/16/32, exFAT, and NTFS for Windows, HFS, HFS+, and HFSX on Macs, and the EXT family of file systems on Linux). Note, though, that some of its operations are only possible (or useful) for specific file systems (like fixing file tables on NTFS-formatted drives).
It also has basic support for undeleting files, but it's limited to the point of being almost entirely useless when compared to what freely available alternatives offer.
TestDisk (and similar solutions) can recover lost partitions after a quick format (which only marks the storage space as empty), but not after a full format or secure erase (that actively overwrite all existing data).
It's also crucial to act quickly to recover any data on a quickly-formatted USB flash drive and repair it. Although most typical USB sticks don't support (or need) a process called TRIM, that juggles how data is stored to maximize a device's performance and extend its lifespan, their controllers come with their own form of "garbage collection", which could modify the existing data and hinder future attempts at recovery.
Pros:
- Its open-source code renders it both robust and trustworthy.
- One of the few entirely free apps for repairing structural issues on storage devices.
- Offers "native" versions for all major OSes, and supports their primary file systems.
- Can make thumb drives bootable again without affecting the rest of the data on them.
Cons:
- Vintage text-based interface can alienate modern casual users.
- Expects familiarity with relatively advanced storage terminology (like partitions, partition tables, specific file systems, etc.).
- Zero extra features.
TestDisk admittedly sits high on the difficulty scale. Why try to wrap your head around it on your own, though, when you can dive into our extended TestDisk review and guide? Check that to learn more about the app and how to use it (with step-by-step instructions).
If you're more interested in its sister-app or recovering your files, we've got you covered, too, thanks to our detailed PhotoRec review.
6.CrystalDiskMark
What it helps with? Speed benchmarks that can hint at problems (unexpectedly slow reads/writes).
- Developer: Crystal Dew World
- Price: Free
- Free/Trial Version: Freeware, supported by donations, or by purchasing the Microsoft Store version for $9.99. Note that the Microsoft Store version is marked as a "free trial," while the fully free version is available from the official site.
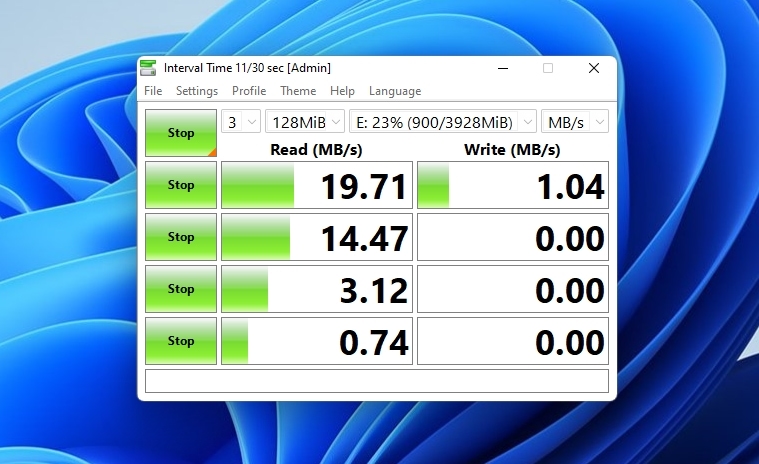
They might not specialize in repairing issues or recovering files, but benchmarking tools like CrystalDiskMark are helpful in their own way when troubleshooting a misbehaving USB stick. By analyzing your thumb drive with CrystalDiskMark, you can get a good idea of its condition based on the two most meaningful real-world metrics: its speed, and its available capacity.
Compared to similar apps, CrystalDiskMark is, strangely, both more customizable and more streamlined. The app allows you to define the amount of storage space it will use for its tests, and even change its visual theme. But it's also possible to ignore all options, accept the (good enough for most needs) defaults as they are, select your USB thumb drive from the app's drop-down menu, and have CrystalDiskMark start testing it.
If you know that your pen drive is on the brink of failure, instead of trying to benchmark it to assess its actual condition, you should prioritize getting your data off it. Any additional access (and especially processes that write data) can bring your thumbstick closer to the point of no return - and there's even a warning about that, in bold red type, on the app's official site.
Thus, in such scenarios, you should avoid CrystalDiskMark's most thorough scans, which also write a significant amount of data, since that can significantly worsen your USB flash drive's condition. Plus, writing data on any storage device may overwrite the very files you'd want to recover from it.
Key Features
- Can perform selective read and/or write tests.
- User-customizable test length (amount of data) and iterations (repeated tests).
- Can check random and/or sequential access.
- Supports themes.
Interface & User Experience
CrystalDiskMark offers a highly streamlined interface, even when compared with similar apps. The app doesn't stray away from its purpose with extreme (but, ultimately, not too helpful) or additional features.
As a result, you can immediately start using it to test your USB stick's speed and capacity with two or three clicks, without having to get familiar with menus and submenus, or advanced terminology.
USB Repair Functionality
CrystalDiskMark is only useful for testing the condition of your USB flash drive - or any other storage device. Knowing its real-world performance when reading and writing data, as well as its actual storage capacity, are helpful pieces of information when troubleshooting.
However, it's not really pen drive repair software that can help you regain access to your data or "fix" a problematic USB stick. So, you should check the other apps we see here for actual repairs and data recovery, and consider CrystalDiskMark more of a "complementary tool".
Pros:
- Intuitive and straight-to-the-point interface.
- Covers all basic benchmarks usually required for checking USB sticks.
- Allows selecting (and basic configuration of) the types of tests you want to perform.
Cons:
- Extensive tests (especially those including writes) can stress any storage device and push problematic USB sticks over the point of failure.
- Minimal secondary options, and zero extra features.
- Test result information lacks depth.
- Experts may deem it too limited, and its interface basic.
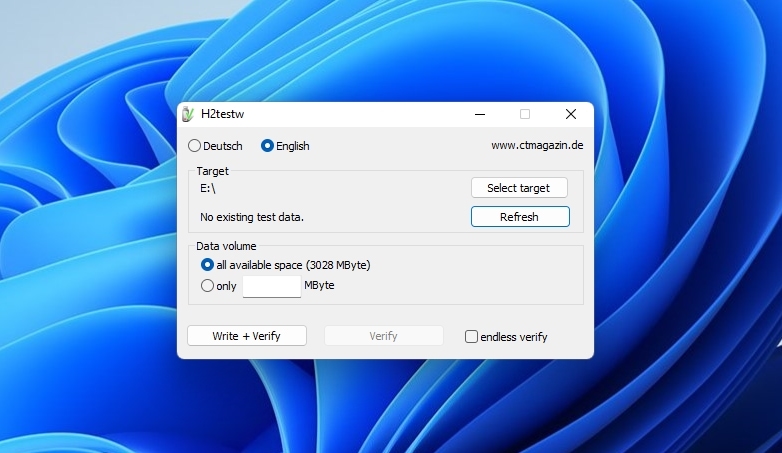
7. H2testw
What it helps with? Capacity verification and basic integrity checks (great for fake/counterfeit USB sticks).
- Developer: h2testw / Harald Boegeholz
- Price: Free
- Free/Trial Version: Fully free app with no restrictions.
Many purchase USB flash drives at unbelievably low prices, ignoring their questionable sources. Then, in actual use, many of those thumb drives prove to be much smaller when trying to utilize their whole advertised capacity. Or, they might abruptly disconnect when you least expect it. Although it can't do much about the second issue, h2testw was explicitly designed for dealing with the first, since it specializes in checking any storage device's actual storage capacity.
H2testw manages to be even simpler to use than CrystalDiskMark, thanks to skipping all but the most basic of customization. For some, that simplicity is a feature, since it renders h2testw accessible by everyone. If you're already using CrystalDiskMark, by seemingly offering only a subset of its functionality, h2testw appears redundant. Appearances, though, can be deceiving.
Although h2testw is more straightforward to use than CrystalDiskMark and offers fewer customization options, it isn't a lesser tool; rather, it is a valid alternative option, depending on your requirements. That's because h2testw's tests also include checks for the existence of bad sectors, together with the actual read and write speeds achieved during testing.
Key Features
- Trustworthy capacity testing for most storage devices.
- Two-click solution for checking if a USB thumb drive works as advertised.
Interface & User Experience
H2testw's interface is "uncomplicated" to the point it might feel lacking in features - and make expert users wonder if something is missing. It only offers a basic set of buttons and toggles for selecting the device to check, and the volume of the data that the app will check (all space VS a specific number of MBs).
USB Repair Functionality
Similar to CrystalDiskMark, h2testw cannot help recover files from an inaccessible USB flash drive, nor perform any repairs to help you regain access to its contents. It can come in handy when you want to make sure your pen drive offers the capacity it was supposed to, its speed, and the existence of bad sectors, quickly and without overthinking about it.
Pros:
- Extremely simple to use.
- Checks not only for capacity, but also speed and bad sectors.
- Provides detailed information about the analyzed device's performance.
Cons:
- Almost non-existent customization.
- No additional features.
8. HDD Low Level Format Tool
What it helps with? Full wipe reset so the stick can be repartitioned and used again.
- Developer: HDDGURU.COM
- Price: Free
- Free/Trial Version: Free for all uses (including commercial use) with no limitations.
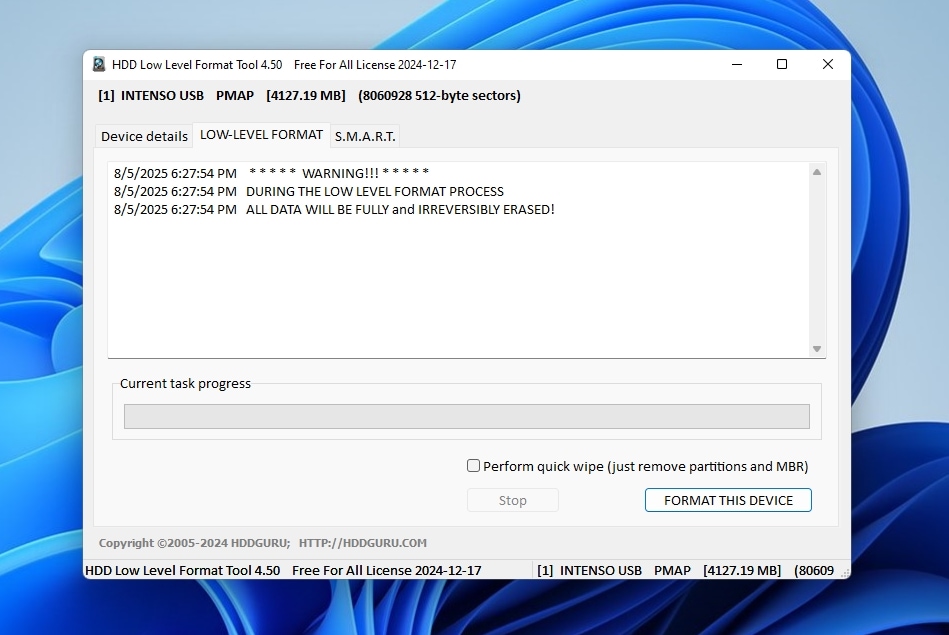
Did a typical format process fail to complete on your USB stick, or didn't it produce the intended results, and your thumb drive remains inaccessible? Or, maybe you've recovered all your crucial files from it, performed other repairs, and now want to erase everything on it, to start fresh, as if it were brand new. That's where HDD Guru's Low Level Format Tool enters the picture.
HDD Guru's HDD Low Level Format Tool, as is the app's complete name, can fully erase everything on a USB flash drive, performing the equivalent of what we nowadays call "a factory reset". In that regard, it's practically the closest to "making a USB pen drive feel like new again".
It's worth noting that HDD Guru's HDD Low Level Format Tool's name is somewhat misleading, since it doesn't perform the very function after which it's named. However, instead of boring you with details on the "hows" and "whys", we'd suggest you dive into our guide on low-level format recovery: is it possible to recover data after low-level format? to learn more about the topic.
Long story short, HDD Guru's HDD Low Level Format Tool is more of a "full data erasure" tool, instead of (and as its name implies) a solution for re-configuring how a storage device's space "works".
Key Features
- Can "renew" a USB flash drive, performing the equivalent of a "factory reset", erasing everything on it.
- Can be used to erase sensitive data beyond any chance of recovery.
- May successfully format devices on which typical formatting processes have failed.
Interface & User Experience
Thanks to its wizard-based design, anyone can use HDD Guru's HDD LLF Low Level Format Tool to fix their USB flash drive by "nuking" everything on it and turning it into a "blank slate".
The app works as a sequence of simple steps:
- Select the USB flash drive (or other storage device) you want to low-level format.
- Check the selected device's details, its S.M.A.R.T. status (for other devices - not supported on USB sticks), or start the actual low-level format process.
For better and for worse, that's all this ultra-specialized tool can do for you.
USB Repair Functionality
HDD Low Level Format Tool can entirely erase anything on a storage device, and often, that's all that's needed for a stumbling USB stick to get back up to shape.
Rge app also offers a secondary option, as a toggle, that we suggest you avoid using: it gives you the choice to "quick-wipe" the data on a storage device. This, as explained in that option, "just removes partition and MBR".
In other words, this "quick wipe" process is pretty much identical to a typical quick format that you can perform from within Windows. Your pen drive will appear empty afterwards, but the process will have left all data on it in a recoverable state. The only reason to try that option is if any attempts at quick-formatting your USB stick from within Windows have failed, and you are seeking more resilient alternatives that may be able to pull off the task.
As with other tools in this article, we must emphasize that using the app means removing all existing data on a USB stick beyond any chance of recovery. Make sure to only use such solutions after you've copied all your files out of the storage device you're going to low-level format.
Pros:
- Effortless wizard-based interface.
- Can entirely erase a USB flash drive in three clicks.
- Fully "nukes" all data on a storage device, including system-related storage structures (like the partition tables and Master Boot Record).
Cons:
- Zero customizability.
- Cannot "shred" individual files - only works on whole devices.
- Quick mode feels redundant.
- Its name doesn't reflect its actual functionality.
9. ChipGenius
What it helps with? Identify the controller and flash details (VID/PID, controller model, memory type).
- Developer: hit00
- Price: Free
- Free/Trial Version: Unrestricted freeware tool.
When everything else has failed, there's one last thing left to try before calling it a day and replacing a problematic USB stick: dropping to the hardware level, and reflashing your pen drive's controller!
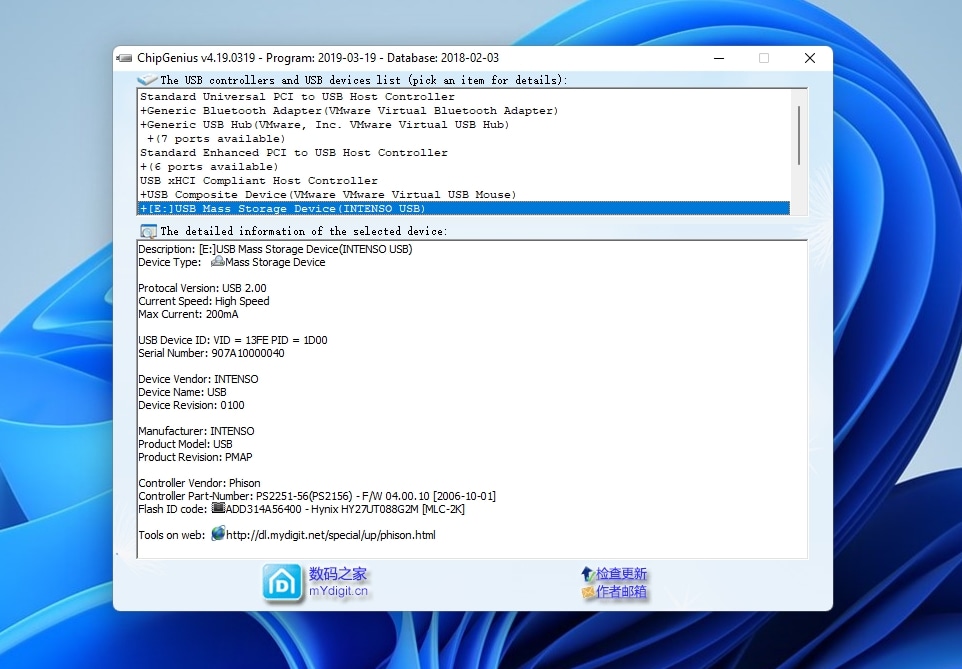
We'll see how that's possible with the next tool in this article, but this entry is all about the exact previous step: digging out all necessary information about your USB flash drive's hardware. And that's precisely what ChipGenius does.
One of the most obscure and hard-to-find apps on the Internet, ChipGenius is, according to USBDev.Ru, the creation of a Chinese developer known only by the alias hit00 and the forum about digital devices mYdigit. The tool can poll the controllers of USB flash drives, card readers, and MP3 players, and return detailed information about them, like their Vendor and Product IDs, Serial Numbers, flash memory type, and their controller model.
Key Features
- Works with flash drives, card readers, and MP3 players.
- Returns detailed information about the selected device's actual hardware.
- Single-click interface (select a device to see all of its details on a secondary window pane).
Interface & User Experience
Although ChipGenius is intended for advanced users and specialists, it is also the easiest-to-use app in this article. Its interface doesn't show menus, user-customizable fields, or even a single button to click. It only presents a list of the controllers and related devices it detected after running.
Click on any of those entries, and the bottom half of its window gets populated with detailed information about the selected device. There you'll find helpful tidbits for identifying your USB stick's specifics, ranging from the manufacturer, product model, and product revision, to its controller vendor and part number.
USB Repair Functionality
On its own, ChipGenius is useless as a USB stick repair tool, since the only action it performs is "reading" and presenting information about any of the supported devices it detects. And yet, it's essential for using (the correct) MPTool, as we'll see in the next section.
Pros:
- Single-click reporting solution.
- Presents extremely detailed information about detected devices.
Cons:
- Hard to find a trustworthy download link, shoddy origins, impossible-to-locate original site.
- Zero extra features.
- Practically useless for "casual" users.
When we mentioned that ChipGenius "is hard to find", we meant it. Let's say that the top result when using the most popular search engine is far from "official", and you should avoid visiting it or, worse, downloading and running any file from there.
10. MPTool
What it helps with? Controller reflashing (last-ditch attempt to revive a stick at the firmware level).
- Developer: Changes among vendor-specific variants
- Price: Free
- Free/Trial Version: Unofficial "leaked" versions at zero cost.
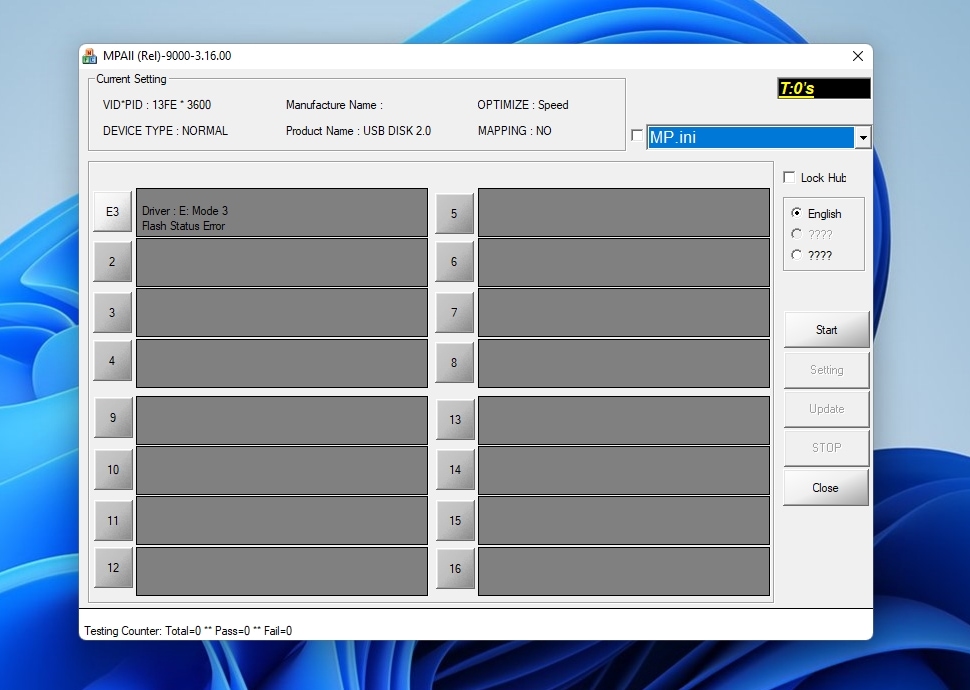
When every other attempt with USB stick repair tools has hit a wall, and with nothing to lose, the ChipGenius (that we saw in the previous section) and MPTool combination might be the only remaining way to try to fix your USB flash drive. It's last on our list since it's the most complicated and advanced process, and also the most potentially dangerous for the well-being of your pen drive.
That's because MPTool isn't a single utility for dealing with specific storage-related issues, but the whole group of official tools used by manufacturers to "flash" the controller chips within their USB sticks with the correct "microcode", the "programming" that makes them work as they usually do.
With "MPTool" being a shorter version of "Mass Production Tool", those single-purpose utilities come in different variants that support specific families of microcontrollers. You may find them with names like "AlcorMP", "SMI MPTool", "Phison MPTool", etc.
In other words, if you have two USB sticks, each might require a different MPTool (or an alternative version of the same MPTool), depending on the microcontroller and its version within it. Unfortunately, this also means that it's hard to locate the correct one for your particular USB flash drive - and that's why we saw ChipGenius in the previous section.
Key Features
- Depends on the variant.
Interface & User Experience
With many "MPTools" available for various microcontrollers and their versions, each has a different interface and may require different steps to perform its task.
Still, what they all have in common is that they're advanced pieces of software for specialists, and that's apparent by both how they look and function. To use them, you're supposed to know what you're doing, and one wrong click or selecting an incompatible file can render your USB stick useless.
USB Repair Functionality
Although the various MPTools also differ in the options they offer, most people only use them for their core functionality: as usb fix tools with which they're "flashing" a USB stick's controller with either the same or an updated firmware.
Such a flashing process is the microcontroller's equivalent to formatting a disk to start anew, or performing a "factory reset" on a device or OS to revert it to its default (and hopefully working without issues) state.
Pros:
- The same tool used by manufacturers for flashing their USB sticks.
- The pen drive repair software to use when everything else has failed.
Cons:
- Cryptic interface and terminology, extremely unfriendly to casual users.
- May worsen a USB flash drive's condition when improperly used.
Wrapping Up
The tools we covered in this article are distinct solutions with unalike goals. Yet, there's a common thread connecting all of them: they can all work as USB stick repair utilities. They can help you, each in its way, to deal with various issues that may plague your pen drive, get your essential files out of its clutches, and "refresh it" to keep using it.
Their usefulness depends on the problem you want to tackle, and it's rare to need all of them. However, the opposite is also true: you'll usually have to juggle a combination of two, three, or even more of those tools in most scenarios involving misbehaving USB flash drives.
For example...
When your filled-with-files USB flash drive shows up empty, you can:
- Analyze it to find and recover your most important files to another storage device using Disk Drill.
- Scan and fix your pen drive with CHKDSK.
- If that fails, use TestDisk to try to locate and restore the necessary data structures for accessing the USB stick's storage as before.
If your USB became corrupted while filling it with data:
- Use Disk Drill's byte-to-byte backup functionality to clone your USB stick to an image on a secondary storage device.
- Check the thumb drive's condition using Victoria.
- Test its actual storage capacity with H2testw.
- If it looks OK, re-format with HDD Low Level Format Tool back to its full capacity.
- After formatting, also test its speed using CrystalDiskMark.
We're sure you'll find a combination that works for you among all the tools we saw.
FAQ
What are the best free USB flash drive repair tools?
Various tools can be used to "repair" a USB flash drive, and many are free. The choice of "the best" depends on the problem at hand. Does the USB flash drive show up empty or RAW? TestDisk can help with such issues. Do some files appear garbled? CHKDSK can attempt to "fix" its (probably) corrupted file system.
Still, out of all the types of USB flash drive repair tools, we consider one the most important: true data recovery solutions, like Disk Drill or PhotoRec, that can save your files from one storage device to another to ensure you won't lose them.
How do I know if my USB is corrupted?
Your USB flash drive is corrupted when it looks empty, appears as RAW, or the files stored on it are inaccessible.
In "light" cases of corruption, you might overlook a handful of random files becoming inaccessible. In contrast, you'll be able to tell more severe corruption right away, with your USB stick not showing up as an accessible storage device in Windows File Explorer (or any other file manager you might be using).
A check of your pen drive with Victoria or TestDisk can help you verify those suspicions - and potentially address the cause of the corruption.
Can a corrupted USB stick be repaired online?
The short version is "no, you won't find any good tools for repairing corrupted USB sticks online". As for the "why"...
All the best software to repair USB flash drives, or any other storage device, requires a direct connection to it. The fewer "abstraction layers" between an app and a device, the fewer the "barriers" that can prevent the app from performing a correct analysis, assessment, and applying any required tweaks and fixes.
And that's why you won't find any online solutions for fixing any issue with USB pen drives: the whole required networking infrastructure, from any network tools and firewalls running locally on a PC, to the specialized software running on remote servers, would all become "barriers" between such an online tool and a physical USB stick.
Are there any USB Repair Tools working on Android?
Using USB sticks on Android devices never really caught on. With an almost non-existent target audience, app developers seem not to see a point in creating flash drive repair solutions on Android.
You can use the same programs, like AOMEI Partition Assistant and Disk Drill, to fix flash drives made by Silicon Power, SanDisk, Lexar, Kingston, or any other brand.
Are USB repair kits and USB repair tools the same?
Many people use the terms USB repair kit and USB repair tool interchangeably. Still, the term "kit" is mainly used for hardware.
For example, a broken USB connector doesn't mean the USB stick itself is useless. If you have soldering equipment (and know-how), you can also purchase a USB socket connector (or ten) and replace the broken one on your USB flash drive. Then, keep using it as if brand new.
How can I repair a physically damaged USB drive?
Repairing a physically damaged USB drive ranges from relatively easy to impossible. It depends on the combination of the extent and type of damage, as well as your knowledge of electronics, your hardware tweaking or modification skills, and the available gear.
For example:
- If an old USB flash drive has fallen apart, but its main board is intact, you can "fix it" by simply "putting it back together" with some sticky tape.
- If you forgot your pen drive in your car during a hot day, and it started melting, or you accidentally stepped on it, or your dog chewed it, and a part of the casing broke, if its main board and chips are in working order, you can consider that damage purely aesthetic and keep using the device.
- If your USB stick, including its logic board, broke in half after driving over it, but you've got soldering skills and an eye for detail, you could glue the logic board back together. Then, using a fine-tip soldering iron (or maybe even a pencil), retrace the board's "lines" to reconnect any broken circuits.
- If your USB thumb drive went diving in a lake, and you found it two weeks later, or was caught in a fire, and now looks like a piece of charcoal, it's highly improbable you could do anything to save it. Maybe data recovery specialists could help, but there's a limit to what they can pull off, too.
My PC doesn't recognize my USB drive. Is it possible to repair it?
Does a PC permanently fail to recognize a connected USB drive when checking its UEFI/BIOS? With the drive practically invisible, the only way to check for any issues is to connect it to a secondary PC, and hope the reason your main PC couldn't "see it" was because of an incompatibility with its storage controller, or another similarly rare problem.
If the PC can physically "see" a connected USB drive, but Windows fails to recognize it correctly and present it as a usable storage device, some of the tools we saw in this article might help. Apps like AOMEI Partition Assistant, Victoria, and TestDisk, can analyze even storage devices that Windows doesn't recognize and "mount" automatically (to grant access to their contents).
When a USB flash drive remains invisible, unrecognized on multiple PCs, "through" both Windows and their initial BIOS/UEFI menus, there's not much one can do to revive it. In such cases, the damage is often physical, or so severe (like a fried controller chip) that only data recovery professionals can deal with it.
This article was written by Odysseas Kourafalos, a Editor-in-Chief at Handy Recovery Advisor. It was also verified for technical accuracy by Andrey Vasilyev, our editorial advisor.
Curious about our content creation process? Take a look at our Editor Guidelines.