
Losing or accidentally deleting a file is bad enough, but when a whole folder disappears it can be overwhelming. You may have accumulated a substantial number of files in that folder that cannot easily be replaced. While your first impulse may be to panic, don’t. We may be able to help.
Fortunately, several methods can recover a deleted folder on Mac. Using these techniques, there’s a very good chance you can recover the lost folder and retrieve your valuable files. So take a deep breath and read on for information on recovering your lost folders.
3 Best Options To Recover Deleted Folders on Mac
Whether you deleted your folder recently or not, there are many ways to recover a lost folder. In this article, we’ll show you three easy ways to restore deleted folders on Mac – saving you time and a headache.
Method 1: Recover the Deleted Folder from Mac Trash Bin
Although you won’t see deleted files and folders on your computer, your Mac does not immediately erase deleted folders. Instead, deleted folders are automatically stored inside the Trash Bin application for 30 days.
If the folder you are looking to recover was deleted within that period and you haven’t emptied your Trash Bin, you will likely find your folder hidden in the Trash Bin folder.
Here’s how you can recover it:
- Locate the Trash Bin and find your folder. Navigate to the Dock on the bottom of your screen, and click the ‘Trash Bin’ icon. It is usually located on the far right side of the dock.
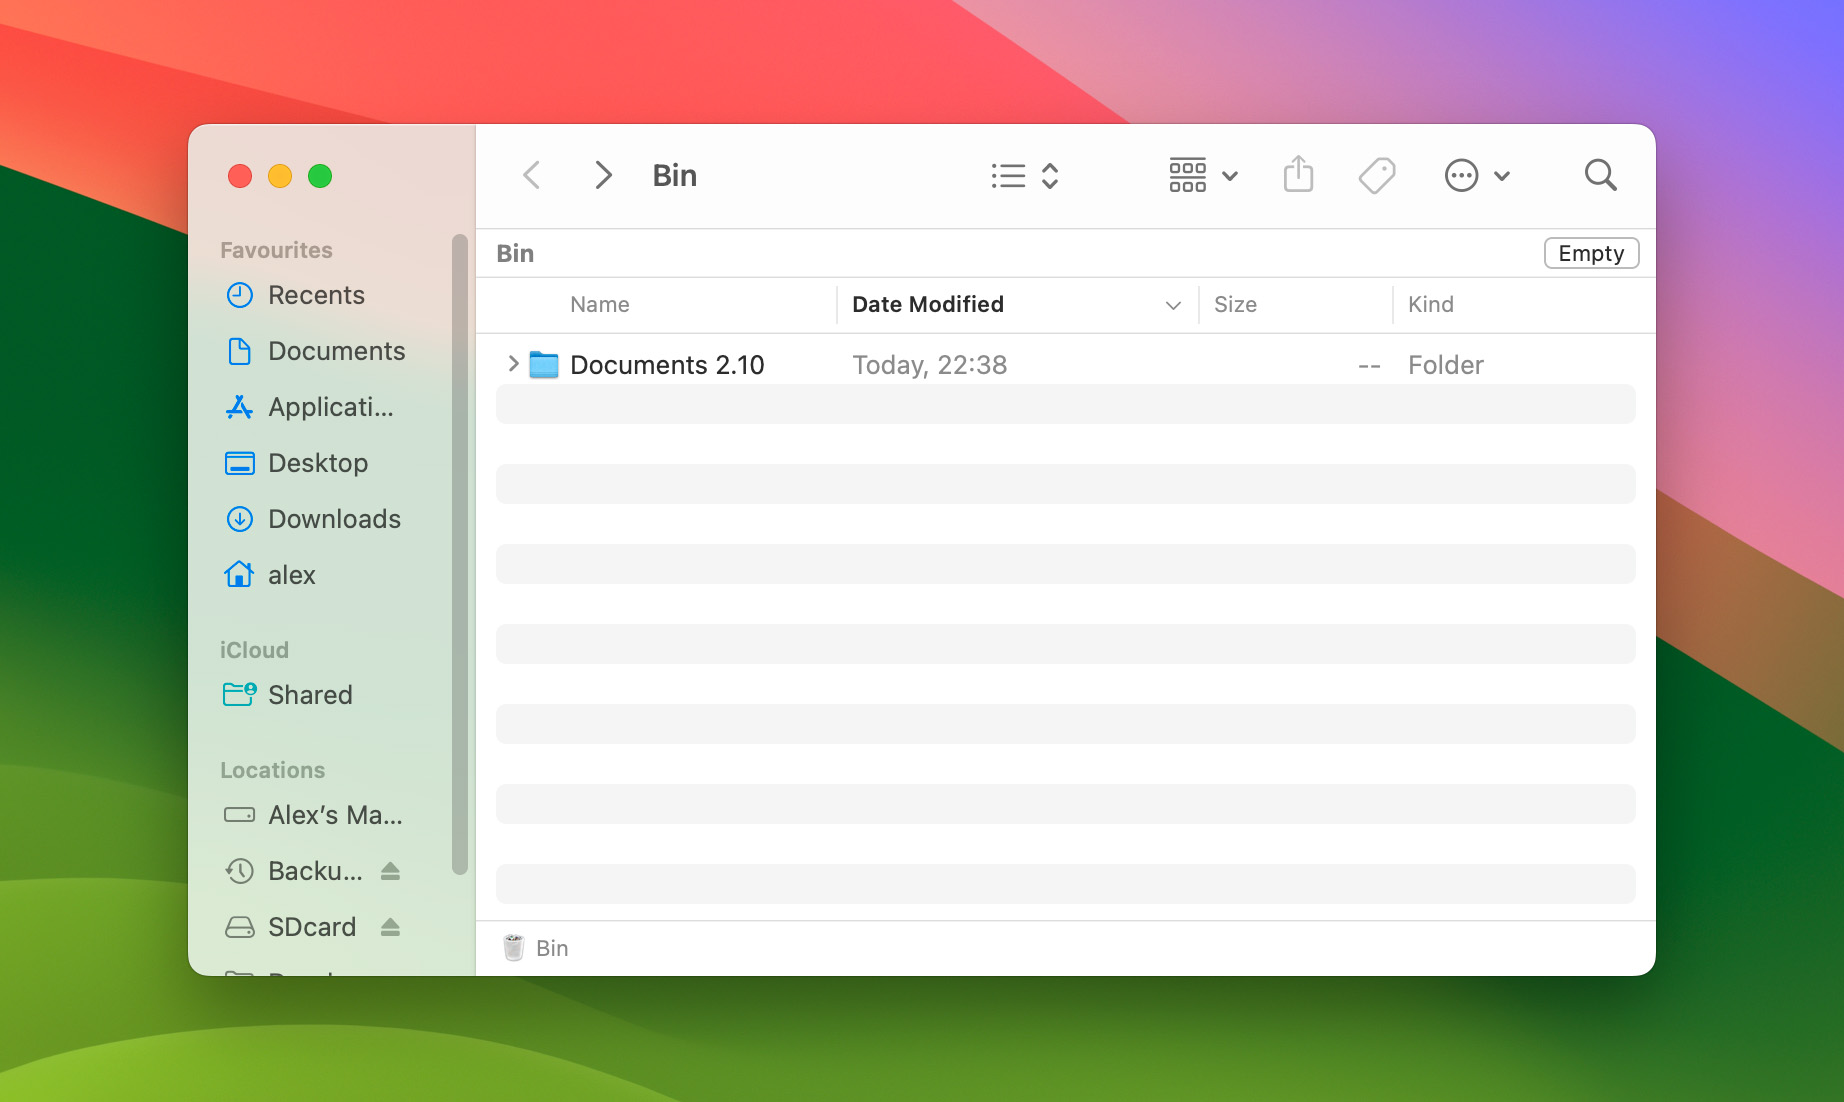
- Restore your deleted folder. Hover over the folder you want to restore and right-click. From the menu, select either ‘Put Back’ or ‘Restore’. The folder and its contents will then disappear from your Trash Bin and will be restored to their original location.
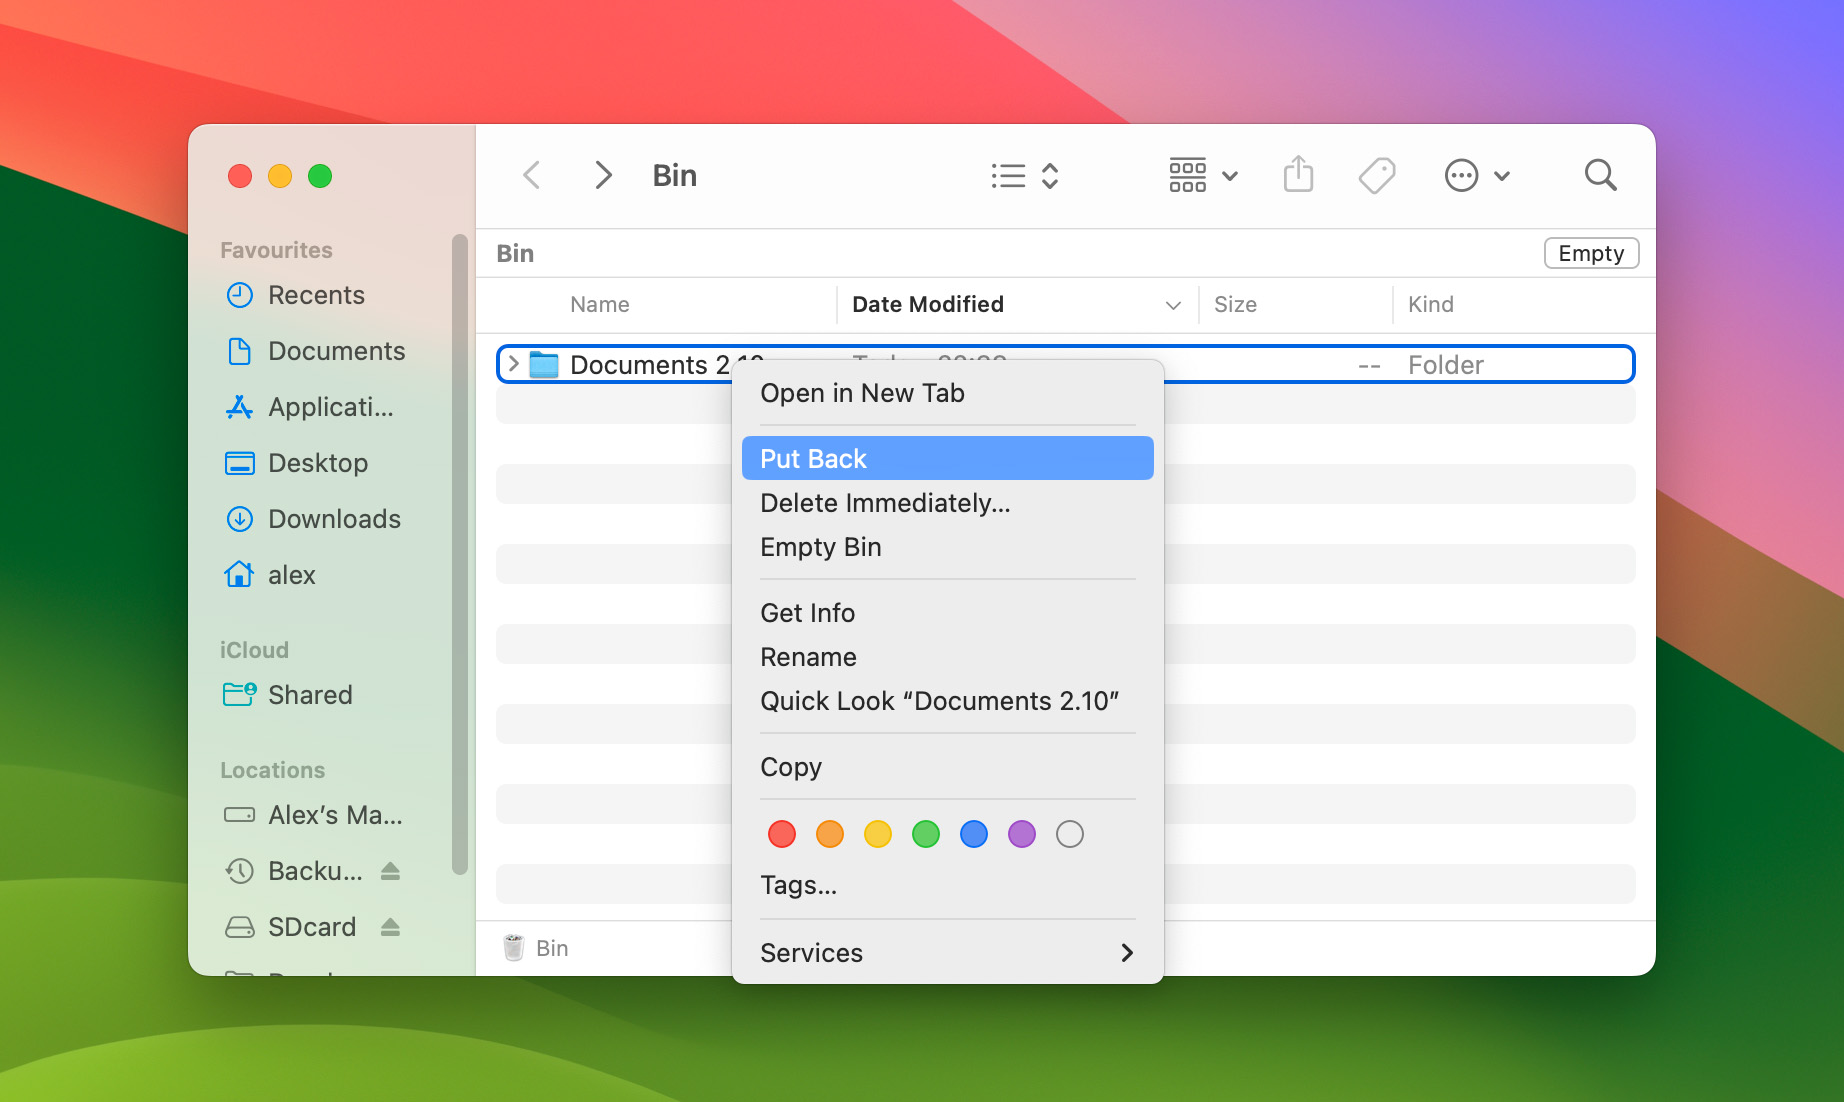
If you only want to recover a single file from the folder, you can double-click on the folder in Trash Bin, right-click on the file, and select ‘Put Back’ or ‘Restore’ to recover the file individually.
Method 1.1: Press Undo
If you find yourself needing to recover deleted folders on Mac frequently, it might be useful to learn how to use your computer’s ‘undo’ button. The ‘undo’ button will erase the last action you took on your computer, making it a great tool for deleted folder recovery.
There are two ways to use the ‘undo’ button:
- First, you can simply press the Command + Z keys.
- Alternatively, you can navigate to the top of your screen, mouse over ‘Edit’, and select ‘Undo Move of XXXX’.

Method 1.2: Recover from Your Trash Bin Using Terminal
You can also recover items from your Trash Bin using the app ‘Terminal’. Terminal lets you use a command-line interface to interact with your operating system directly. This is particularly useful if you are having trouble sorting through your Trash Bin manually, and know the name of your deleted folder.
To recover a deleted folder through Terminal, follow these steps:
- Launch Terminal by clicking on ‘Applications’, then ‘Utilities’.
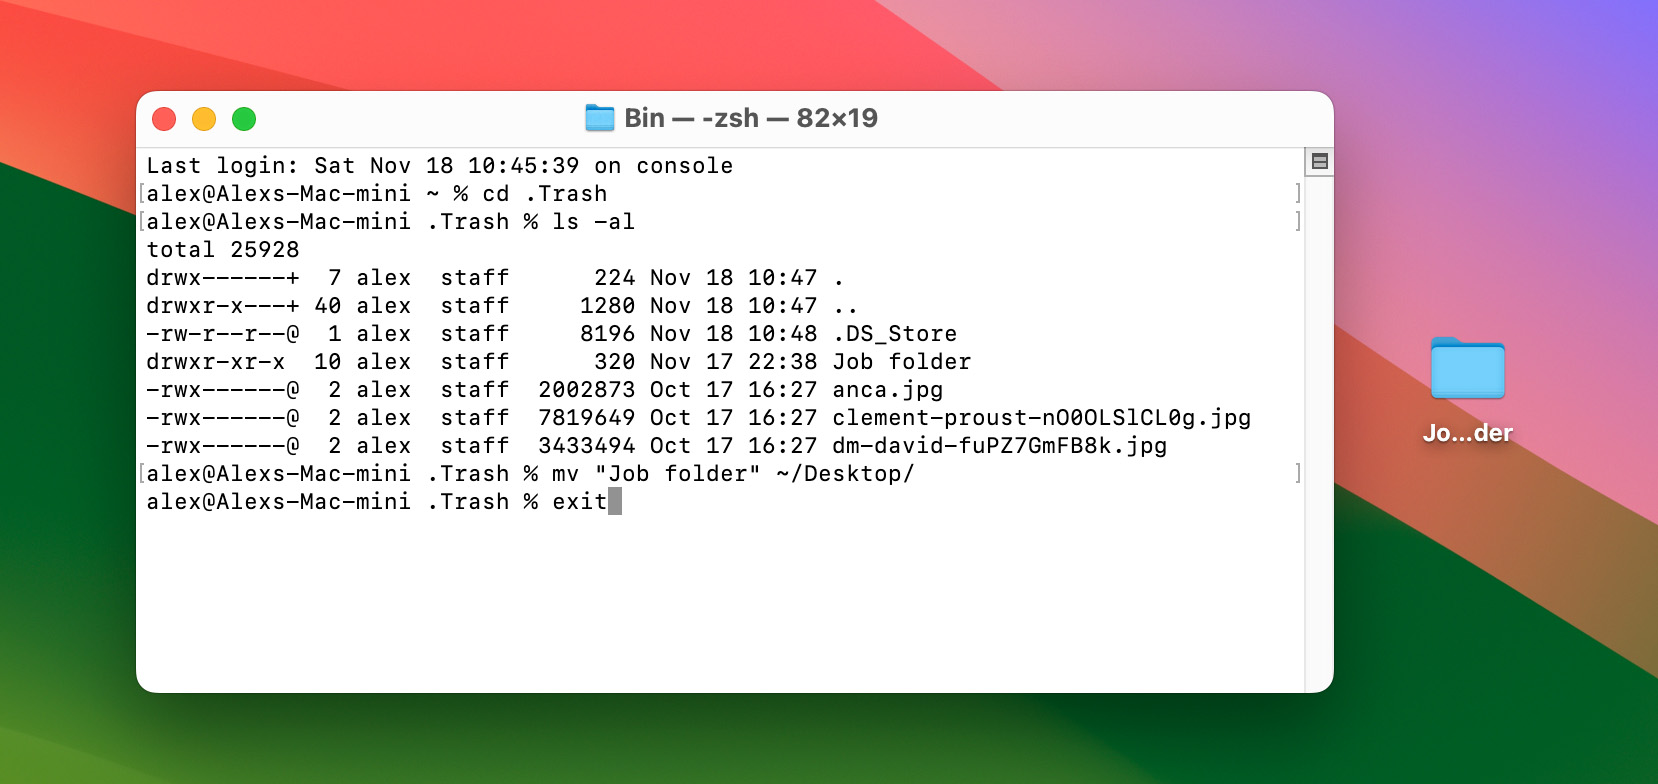
- Type in cd .Trash to locate the Trash Bin folder.
- Enter ls -al ~/.Trash to view the contents of your Trash Bin.
- Once you have located the folder you want to restore, enter the command mv folder ~/Desktop/.⚠️
NOTE: Change ‘folder’ for the name of your deleted folder.If your folder name contains multiple words, make sure to enclose them in quotation marks.
- After you have restored the folder, type exit to exit Terminal.
This will allow you to recover deleted folders on Mac’s instantly.
Method 2: Recover Deleted Mac Folders Using Data Recovery Software
If you are unable to recover your folder from the Trash Bin, you may be able to recover the folder directly from your hard drive. After your Trash Bin is emptied, files and folders are stored on your hard drive until they are overwritten.
Deleted folders that have not been overwritten can often be retrieved with the right data recovery software for Mac. While there are many deleted folder recovery programs online, our editorial team prefers to use Disk Drill as our primary recovery tool for articles as it is incredibly effective at recovering deleting folders.
Note: Every new Mac that comes with an Apple SSD has TRIM enabled by default. This tells the SSD which data blocks are no longer in use and can be safely erased. While this can be great to keep your SSD healthy, it makes data recovery almost impossible, even with Disk Drill.
Disk Drill works by scanning your computer and displaying all folders that can be recovered. The program is affordable and can be tested for free on macOS. This means you can install it, scan your drive, and see what files and folders are recoverable before making a decision about upgrading to the PRO version.
Here’s how you can recover deleted folders as a first-time Disk Drill user:
- Check your computer is compatible. Ensure that your Mac is compatible with Disk Drill 5 by verifying your computer is updated to macOS 10.15 “Catalina” or later. For older versions of macOS, you should use the previous versions of Disk Drill.👀
Hint: You can check for software updates by navigating to ‘System Preferences’ and selecting ‘Software Update’.
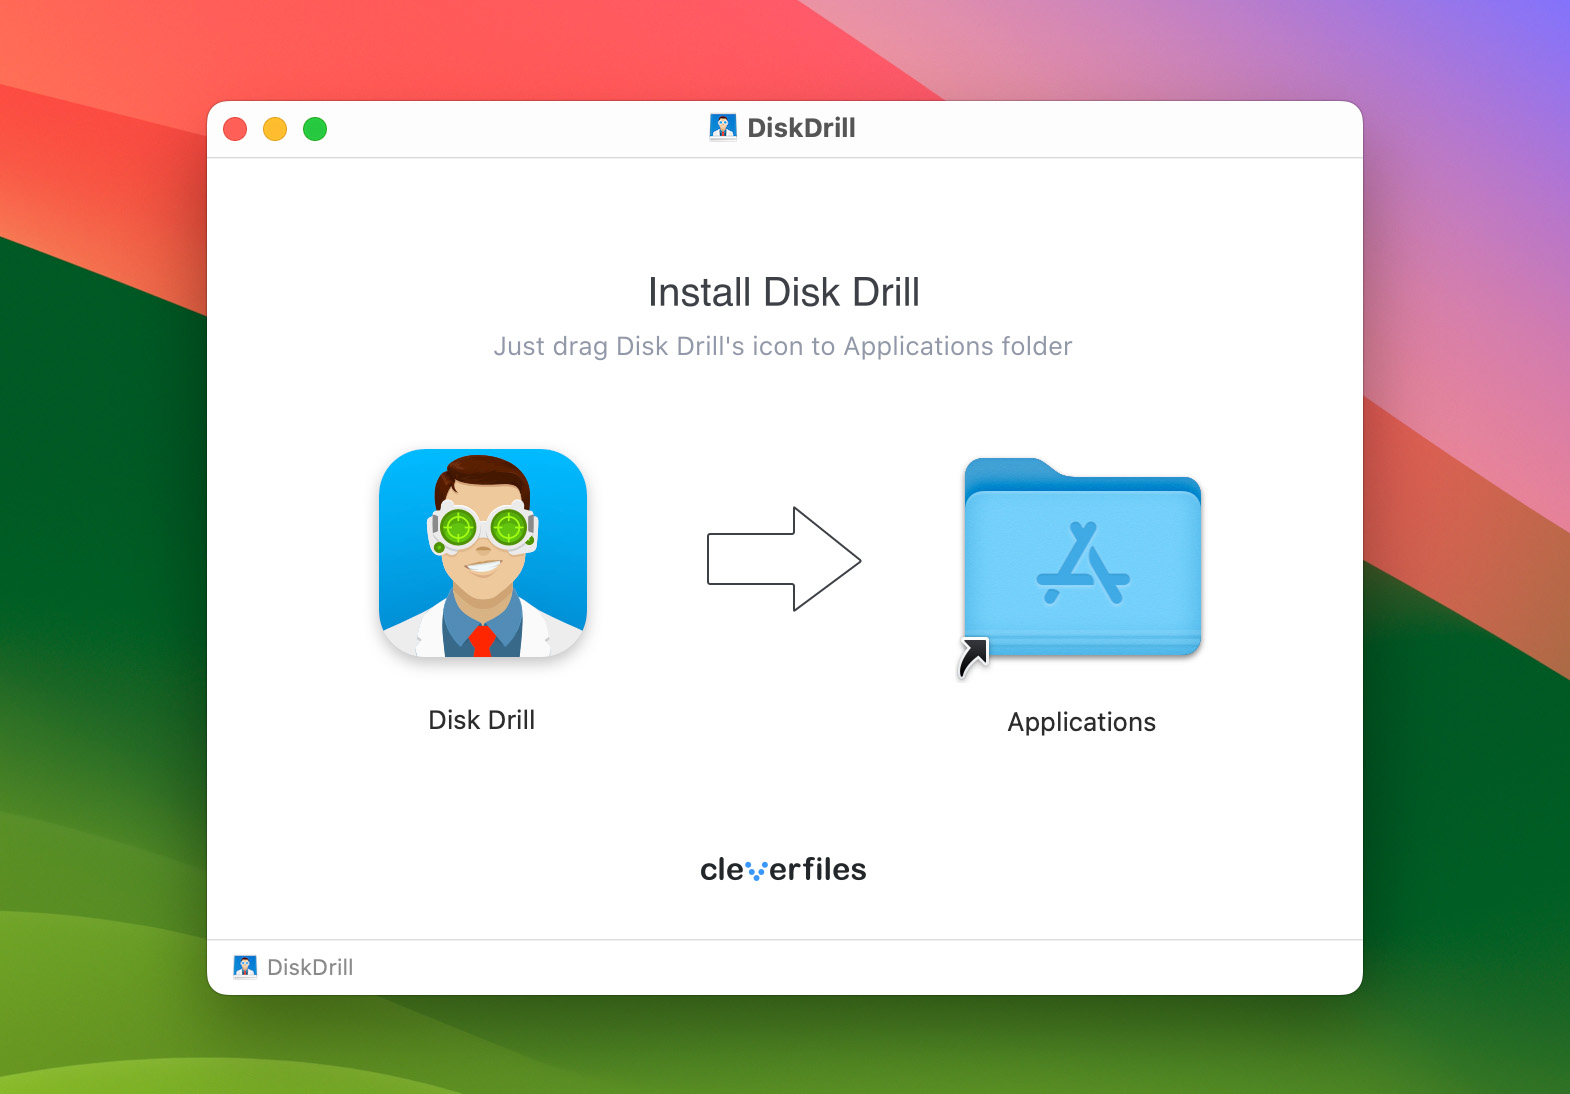
- Download Disk Drill for Mac. Then, navigate to your Downloads Folder, and double-click the file named ‘diskdrill.dmg’. When prompted, drag the Disk Drill icon into your Applications folder to install it.
- Launch Disk Drill. Launch the Disk Drill application by double-clicking the program’s icon. You will need to give Disk Drill permission to scan your hard drive by entering your administrator password.
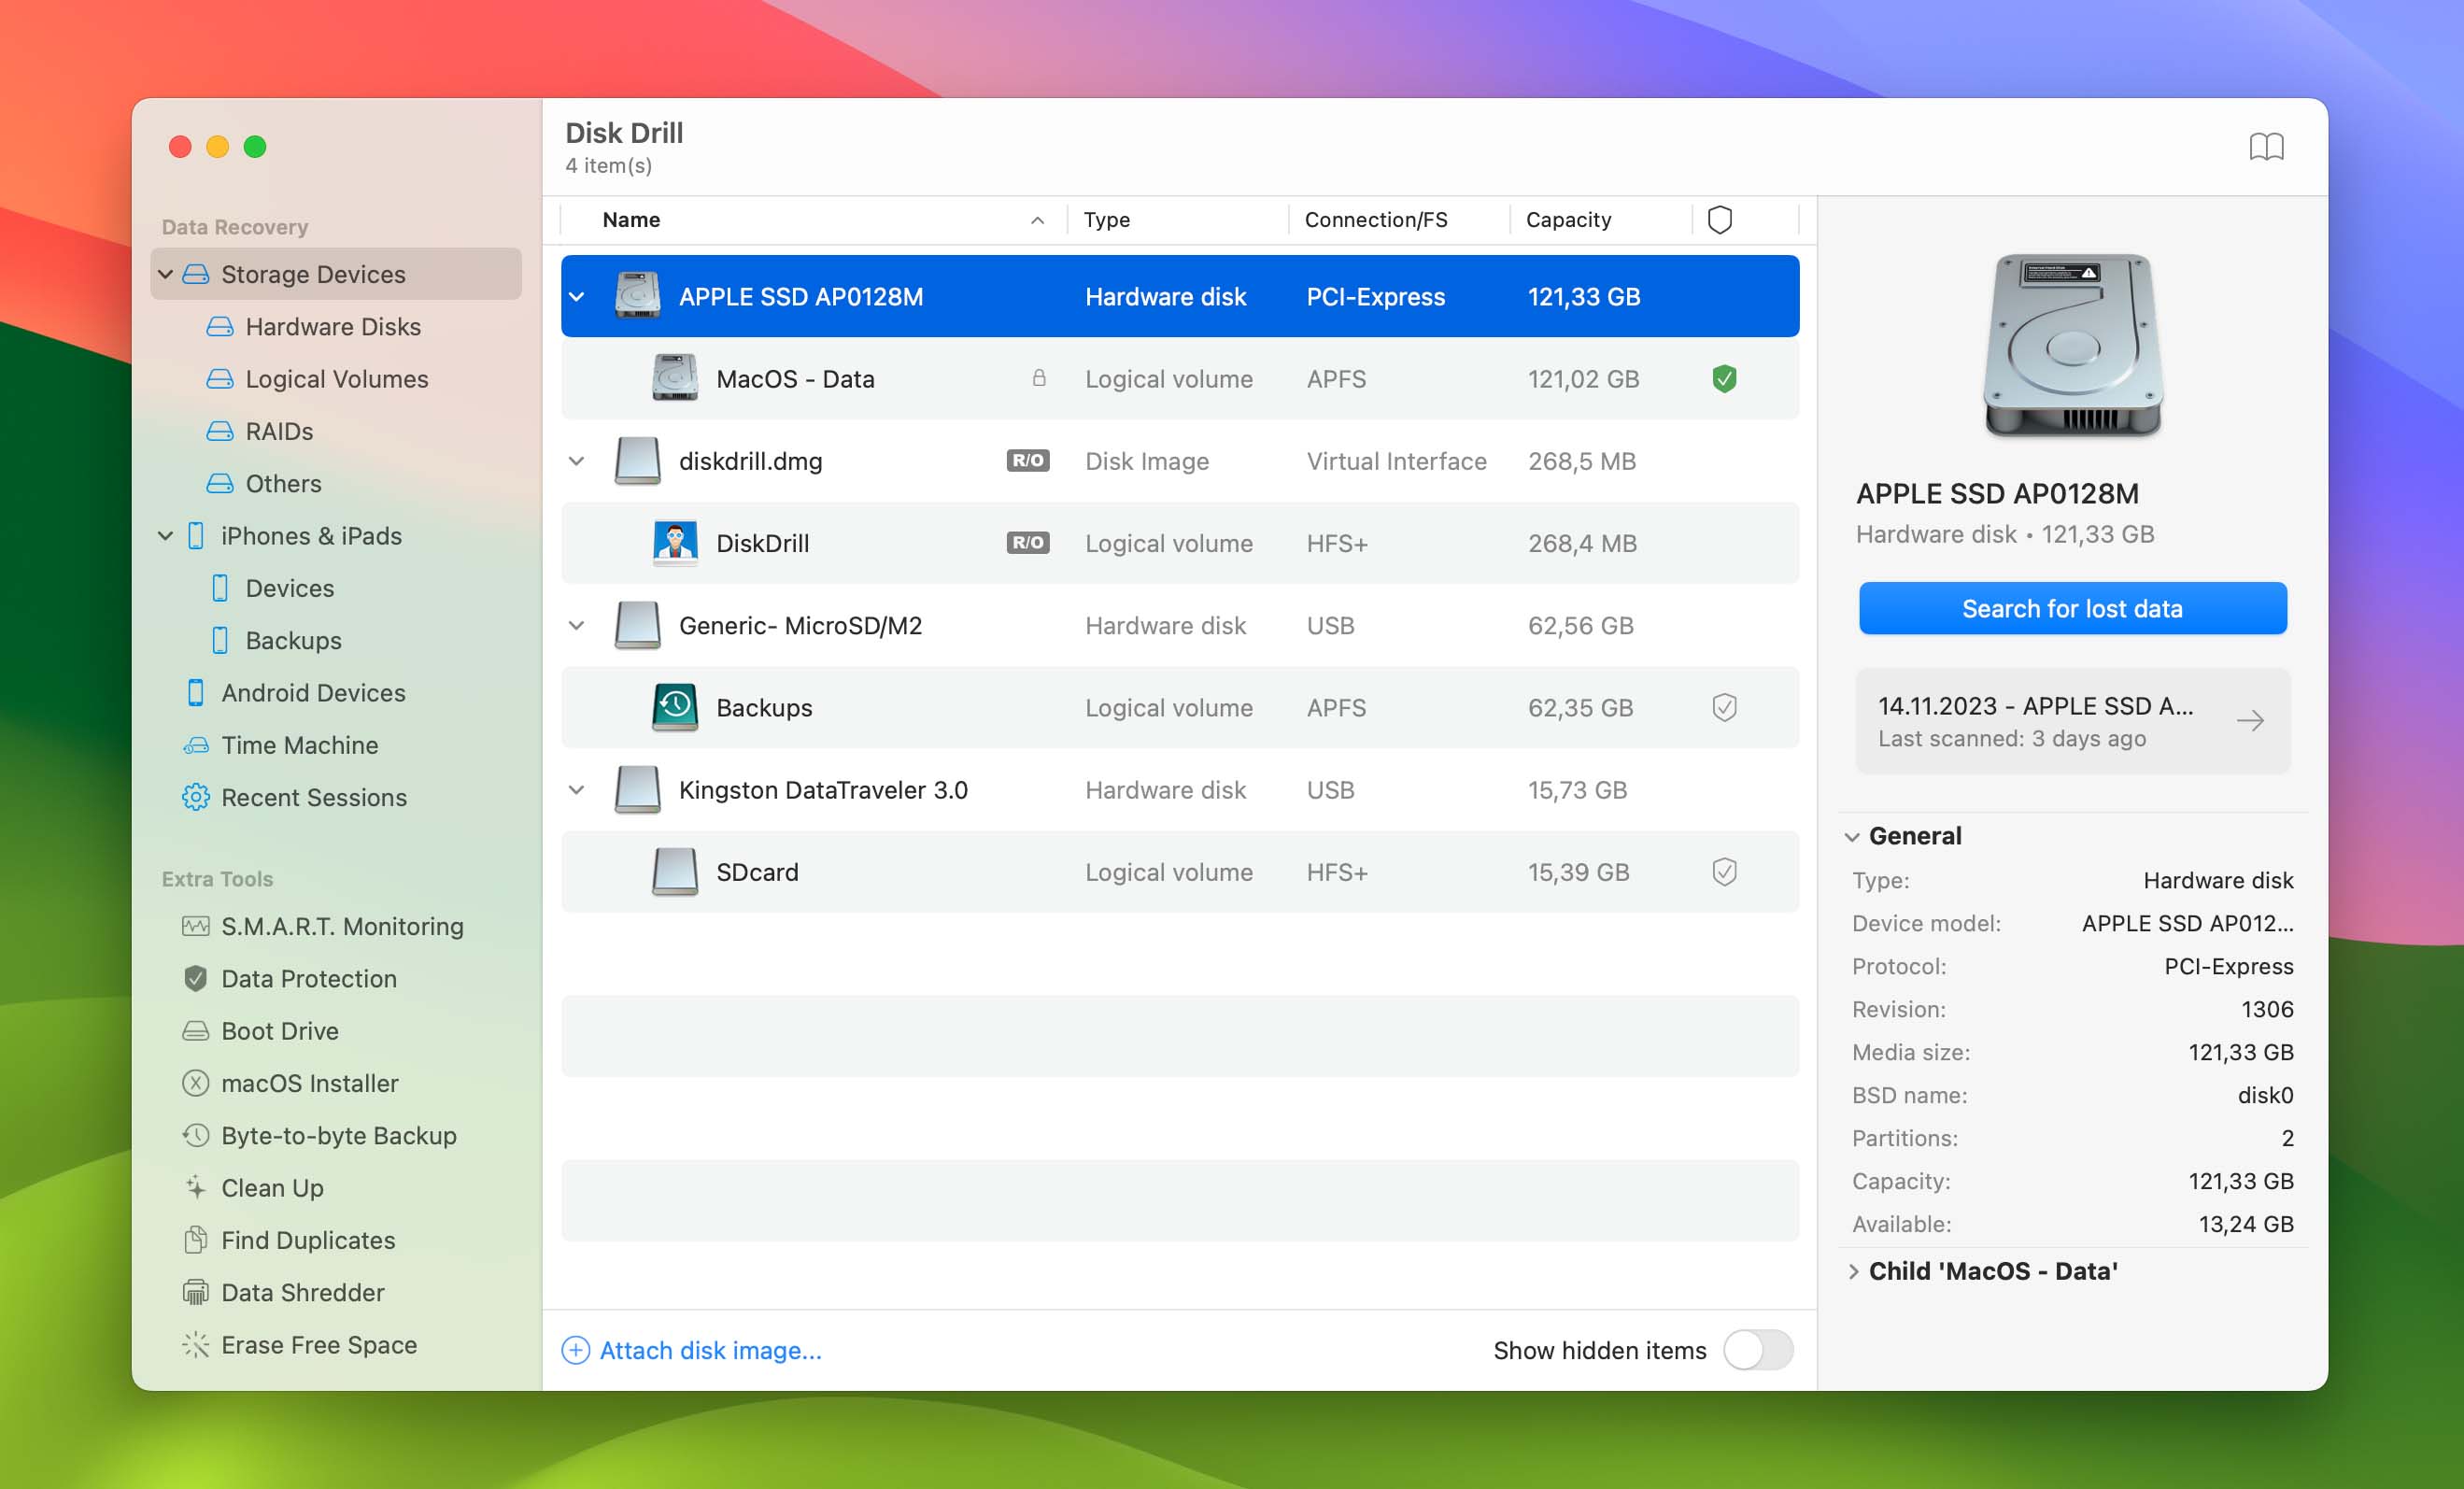
- Scan your hard drive. Select the drive or partition that contained the deleted folder(s) and press the ‘Search for lost data’ button. Disk Drill will perform different scanning methods in the best sequence possible to detect lost data thoroughly. Aside from Quick and Deep scans, it may also search for lost partitions and file signatures. After scanning, you can also click the ‘Scan entire disk’ option to scan the remaining partitions on the same storage device.
- Find your lost and deleted folders. Finally, go through the scan results and locate the folder you want to restore. Add all files contained inside the folder to your recovery queue and click the ‘Recover’ button. If you’ve already upgraded to Disk Drill PRO, you will be asked to specify the recovery location. Make sure your recovery location isn’t on the same hard drive as the folder you want to recover and click ‘OK’ to proceed.
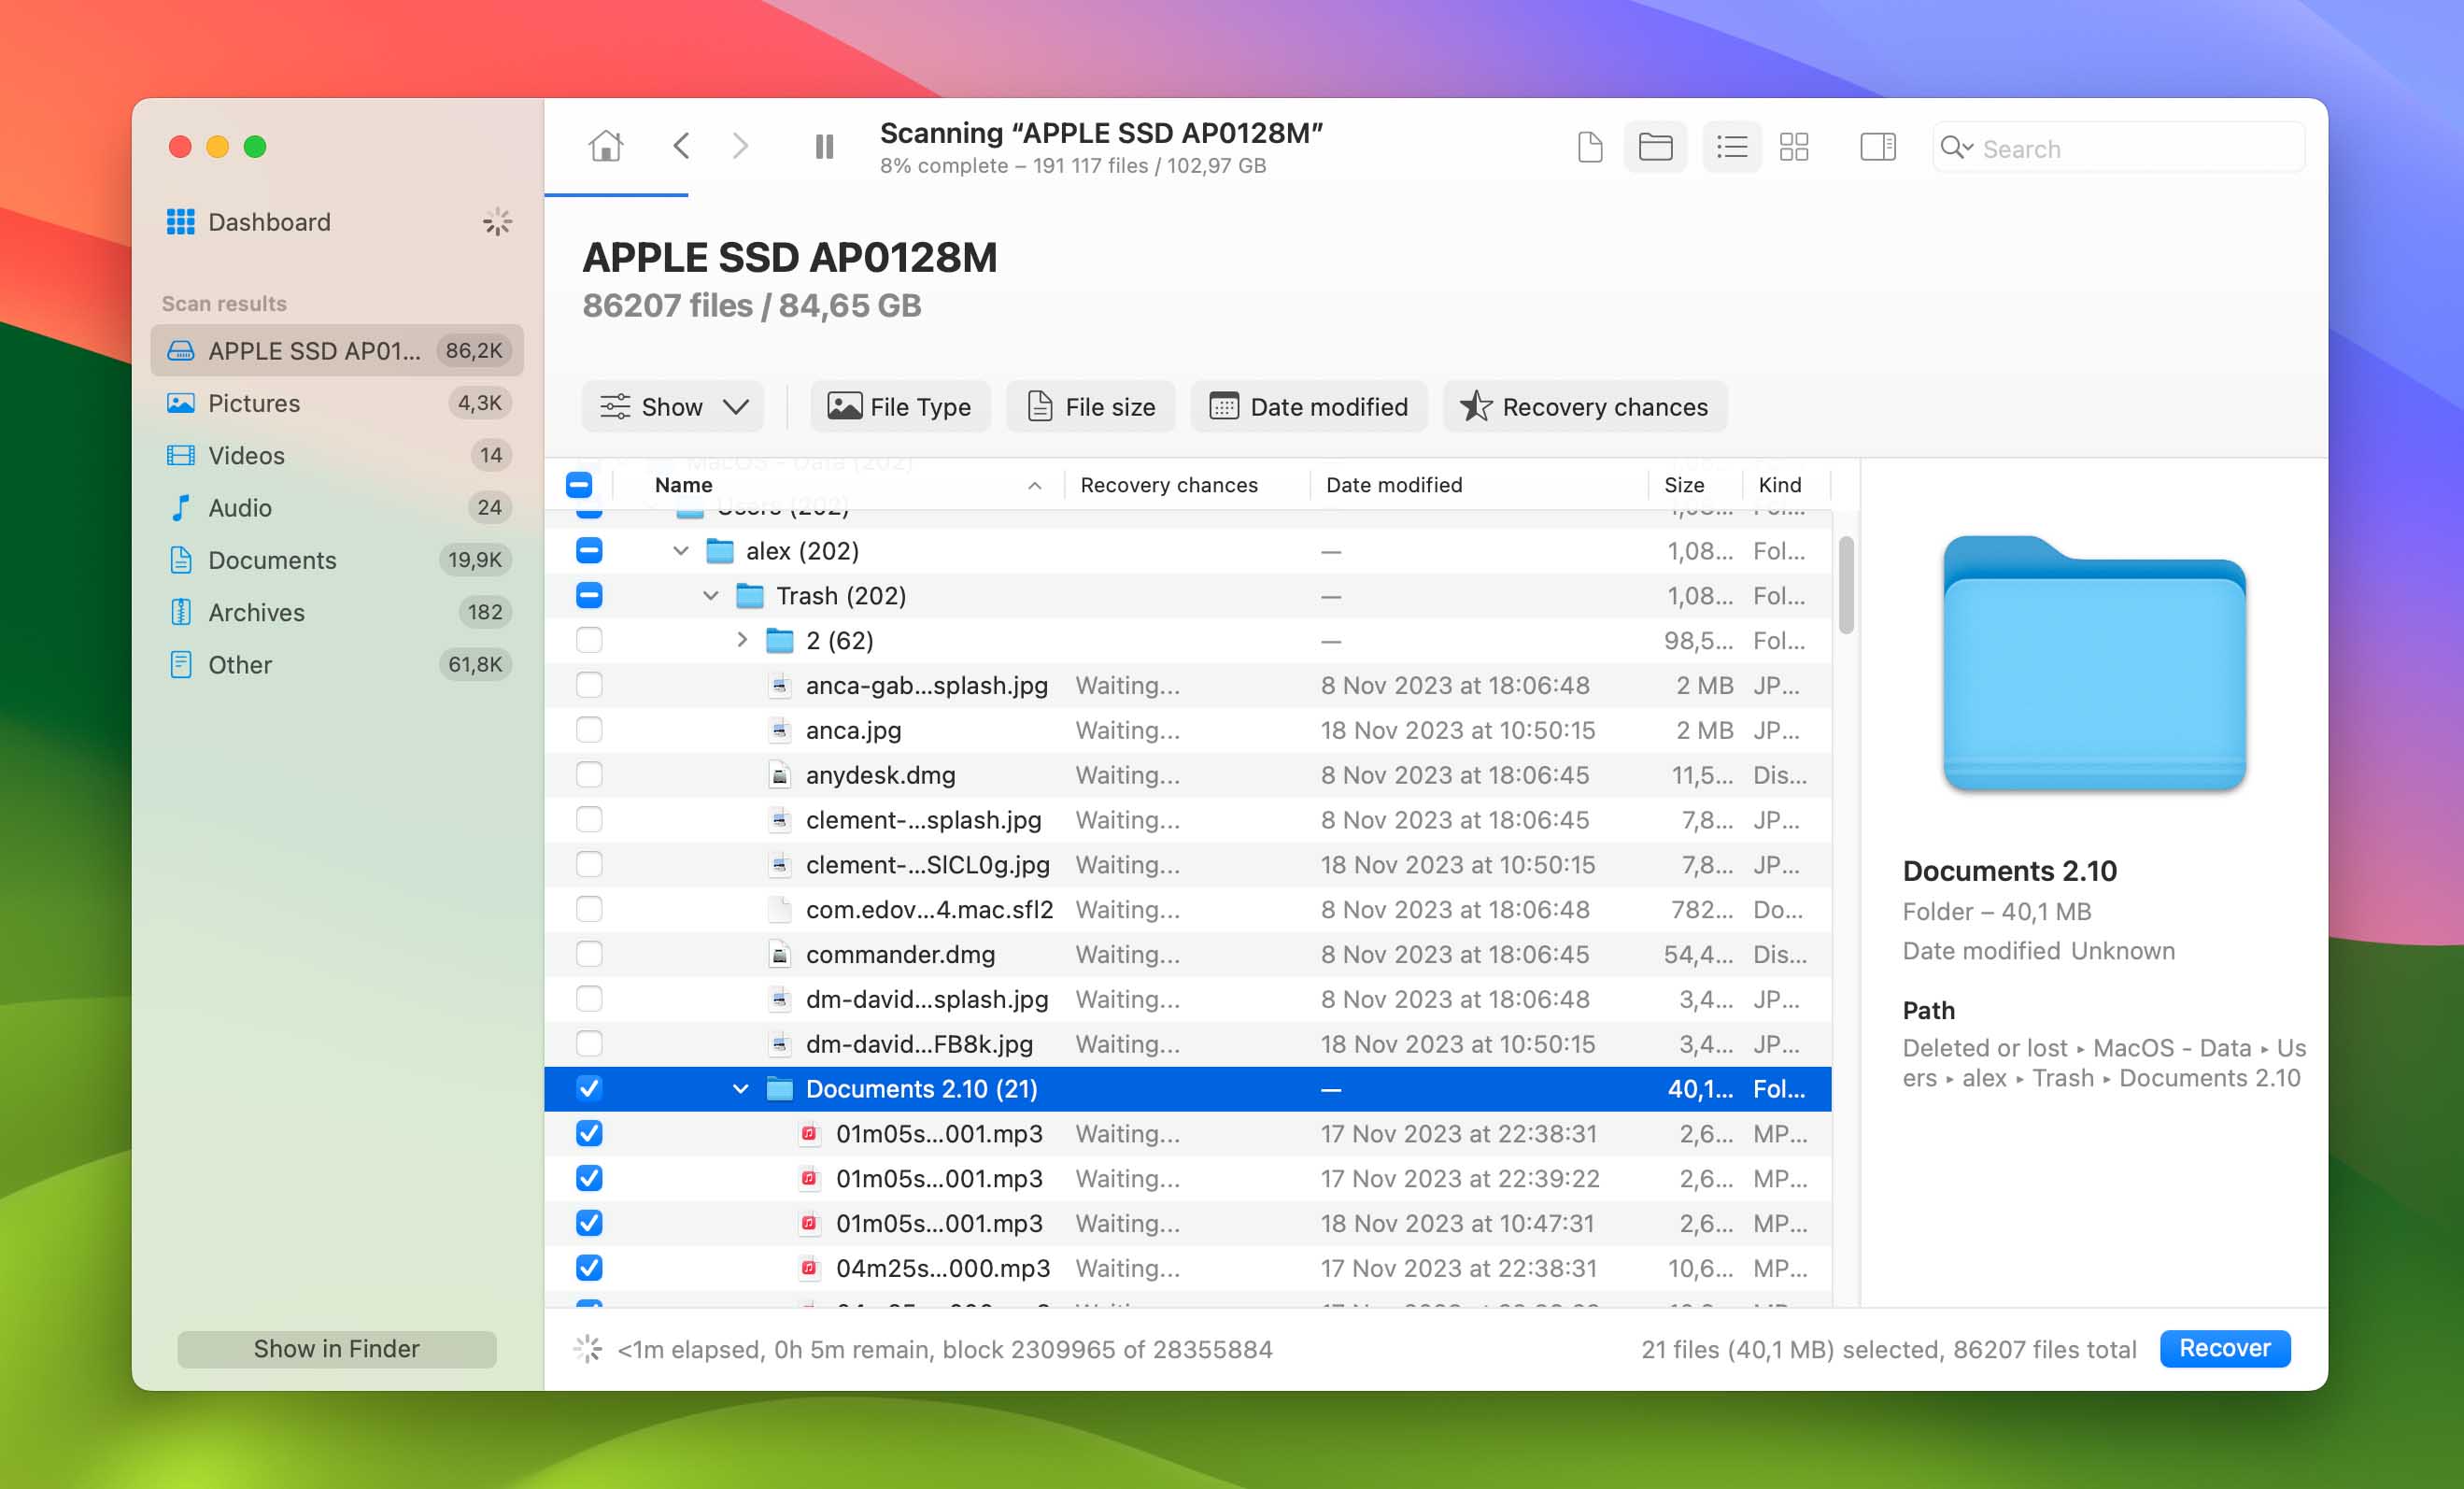
- Recover deleted folders. Once you have located your deleted folder, select the file, choose a location to restore it to, and press the ‘Recover’ button. You will then be prompted to upgrade to PRO. Disk Drive will then restore your deleted folder to the location you choose.
If you were using Disk Drill before your folder was deleted, follow steps 3 – 6, as your folder can likely be recovered using Disk Drill’s data protection tools. This includes Recovery Vault, which saves file metadata (location, name, etc.) for easier identification. You can also use Disk Drill’s Mac-exclusive Guaranteed Recovery feature, which creates a complete copy of files sent to Trash.
Method 3: Recover Deleted Folder on a Mac Using Time Machine
If you are unable to locate your folder in the Trash Bin and have previously enabled and configured Time Machine (before data loss occurred), you can use the program to restore deleted folders in a few clicks.
Time Machine is an in-built system that automatically backs up data from your apps, books, photos, music, emails, and documents. Time Machine backs up the contents of your Mac to an external hard drive, storing new data locally as it is created. This gives you easy access to deleted folders, even when they have been erased from the Trash Bin.
When an external disk isn’t available, Time Machine stores these backups directly on your Mac. These are called local snapshots, which also help restore lost data on your computer.
Here’s how to recover a folder using Time Machine:
- Open Time Machine from the menu bar. When it’s enabled, you cannot remove Time Machine from the menu bar for macOS Monterey and later. But if you’re using an older version of the OS, navigate to ‘System Preferences’ by selecting the apple menu. Double-click the Time Machine icon. Select the checkbox next to ‘Show Time Machine in menu bar’.
- Enter Time Machine and find your deleted folder. Select the Time Machine icon on your menu bar, and click ‘Browse Time Machine Backups’.
 Inside the Time Machine, you can find your folder manually, or use the search bar. Select your deleted folder, and click the ‘Restore’ button at the bottom of the Time Machine window.
Once Time Machine has finished the deleted folder recovery process, your folder will be returned to its original location.
The Different Types of Folders in macOS
Not all macOS folders are the same. They can be broadly categorized as either System or User folders. The type of folder determines the best recovery technique to use in a data loss scenario.
📁 System Folders
Your Mac’s system folders are comprised of three main categories.
- The System folder contains the macOS operating system. Alterations to this folder or its contents are restricted to ensure the proper functioning of the OS.
- The Application folder holds all apps, including those like Mail and Safari. When you remove an app from the Application folder, you effectively uninstall and delete the program. However, note that programs can still save associated files in other directories, too.
- The Library folder stores fonts and other items essential for apps available to all users. It’s not recommended to use this folder for personal file storage.
These folders are critical for the functioning of macOS and generally cannot be deleted. If a system folder is lost or corrupted, restoration is possible through a Time Machine backup or by reinstalling the operating system.
💁♂️ User Folders
macOS organizes user-specific data in the Users folder. This includes individual home folders for each user, with subfolders for desktop files, documents, downloads, and more. The Users folder also contains a Shared folder, accessible to all users on the Mac. In case of deletion, user folders can often be recovered from the Trash, via a backup, or with data recovery software.
How to Ensure You Never Lose Another Folder
Recovering a folder you thought was permanently lost can give you feelings of immense relief. Thankfully, there are steps you can take to ensure you never lose another folder.
⌚ Set Up Time Machine on Your Mac
As mentioned above, Time Machine automatically backs up the data on your Mac. This ensures folders that are deleted can be recovered quickly, saving you stress and time.
To set up Time Machine, simply connect an external hard drive to your Mac and select ‘Use as Backup Disk’ when prompted.
Time Machine will then backup your data hourly unless you choose otherwise.
🔐 Lock Your Folders
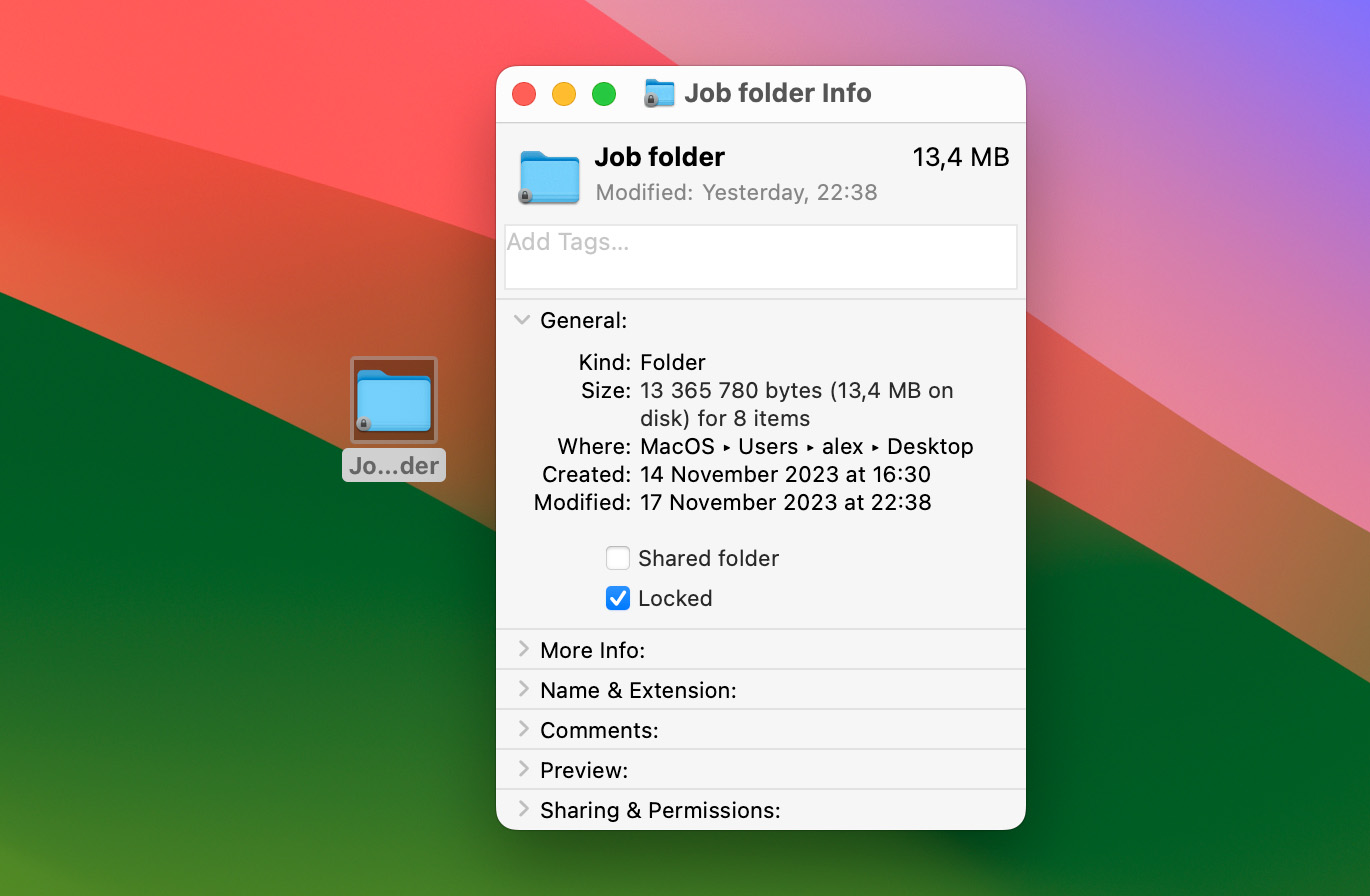
If you need to keep an important folder from being deleted, you can always lock the folder. Locking a folder prevents it from being deleted accidentally by giving you a warning when the folder is added to the trash.
You can lock a folder by right-clicking the folder, navigating to ‘Get Info’, and pressing ‘Locked’ under the general settings.
Once you lock a folder, you will need to unlock it before you can make any changes to the contents of the folder. Unlock the folder by right-clicking the folder, pressing ‘Get Info’, and de-selecting ‘locked’.
☁️ Store Your Folders with iCloud
If you need to recover deleted folders on Mac often, it may be worth storing backups of your data with iCloud. You can set up iCloud by navigating to ‘System Preferences’ and selecting ‘iCloud’. From there, you can enable ‘iCloud Drive’, which will backup your folders and files.
Note: You can only backup the files and folders inside Desktop and Documents to your iCloud account.
🛡️ Ensure Your Device is Virus-Free
Computer viruses are nasty at the best of times, but many computer viruses are known to delete folders and files. To stop this from happening to your Mac, monitor your internet downloads with an antivirus program.
FAQ
How do I recover a lost folder on my Mac?
The most efficient way to recover a lost folder on a Mac is with data recovery software. Most recovery apps use a similar process to restore lost data.
- Install the recovery software.
- Select the device that stored the deleted folder.
- Scan the device for recoverable data.
- Choose the recoverable items that you want to restore or recover them in bulk.
- Complete the recovery.
Is there a recently deleted folder on Mac?
There are several recently deleted folders on a Mac. The main one is the Trash Bin which is a special folder that temporarily holds recently deleted items. There are also application-specific recently deleted folders in apps like Photos and Notes.
Is it possible to recover deleted folders on a Mac without software?
Yes, it is possible. If the folders were deleted recently they may be able to be restored from your Mac’s Trash. The Trash should always be the first place you look for deleted items on your Mac. You can also use Time Machine to restore individual files and folders from a recent backup.
Summary
While it may seem like a deleted folder is gone forever, this is seldom the case. In just a few clicks, lost folders can be retrieved from your Trash Bin and hard drive with a little time and the help of Time Machine and data recovery software.
This article was written by Karie Cornell, a Author at Handy Recovery Advisor. It was recently updated by Princess Lescan. It was also verified for technical accuracy by Andrey Vasilyev, our editorial advisor.
Curious about our content creation process? Take a look at our Editor Guidelines.