Time Machine is the native macOS backup and recovery tool. Using it regularly helps protect your information from accidental deletion. Time Machine is designed to create local backups to an external storage device. It offers a simple method by which you can protect the valuable information on your Mac. Apple also offers the ability to create backups through its iCloud cloud service.
In this article, we are going to discuss how to restore your Mac from Time Machine backups. We will also investigate how to use data recovery software to restore lost data when no backup is available.
IMPORTANT: The importance of backing up your data cannot be overstated. If the information stored on your Mac holds any value for you, it needs to be backed up regularly. Apple knows this, and it’s why they include a tool like Time Machine as part of the default macOS installation. You should take advantage of this free tool to protect your data. Get yourself an external hard drive and start regularly backing up your Mac with Time Machine as soon as possible.
Quick Navigation:
Problem |
Solution |
I need to recover specific files from Time Machine. |
Selectively restore the files from a Time Machine backup using the first procedure presented after this chart. |
I need to fully restore macOS from a Time Machine backup. |
Restore a complete drive from a Time Machine backup using the second procedure presented after this chart. |
I have accidentally deleted an important file but I didn’t have Time Machine active. |
You may be able to recover your file quickly from your Mac’s Trash. Just open the Trash folder and drag the items to your desktop or right-click on them and select Put Back to restore them to their original location. |
I have accidentally deleted an important file but I didn’t have Time Machine active and have emptied the Trash. |
Data recovery software offers the best method of recovering files for which there are no backups and that are not in the Trash. We discuss recovering with software in the third section of the article after the chart. |
I need to restore from Time Machine after a clean install. |
Use Migration Assistant and Time Machine backups to restore user data. |
I need to recover specific data from my old Mac’s Time Machine to my new one. |
Connect the old backup and manually move files to your new computer. |
I have accidentally deleted an important file but I didn’t have Time Machine active. |
First, check your Trash folder. If it’s there, right-click it and click Put Back. If you deleted it from your Trash folder, follow this guide. |
I never set up Time Machine. |
If you never set up Time Machine and need to recover data, follow this procedure. If you want to learn how to set up Time Machine, follow this guide. |
What happens to my Time Machine backups when I enable iCloud? |
If iCloud offloaded old files before setting up Time Machine, they won’t get backed up. More info in this section of the article. |
I don’t have my Time Machine backup with me. |
You can still try browsing your Time Machine backups because some of them are stored locally. Otherwise, use this solution. |
Recovering Individual Files from a Time Machine Backup
There are 3 ways to recover files from a Time Machine backup. (1) Simply open the backup using Finder and copy the files to your Mac. (2) Use Time Machine to restore your backups normally.
And (3) Use 3rd party software if you think your Time Machine drive is compromised (for ex. your drive is corrupted or has connection issues). The first method is self-explanatory – we’ll guide you through 2 and 3 in the sections below.
Using Time Machine
The following procedure should be used to restore files from a Time Machine backup:
- Before you can perform the restore, you need to connect the device that contains the Time Machine backups to your Mac. This makes the data in the backups available to the recovery application.
- Open a Finder window that displays the storage location where the lost data was last stored. For example, if the missing files were last in the Downloads folder, open a Finder window that displays that folder. There is no need to open a Finder window if the missing item was from the Desktop.
- Open Time Machine by clicking the Time Machine icon on the menu bar. You can also start Time Machine from Launchpad. If the icon is not on your menu bar, you can have it displayed by choosing Time Machine in System Preferences and selecting “Show Time Machine in menu bar.”
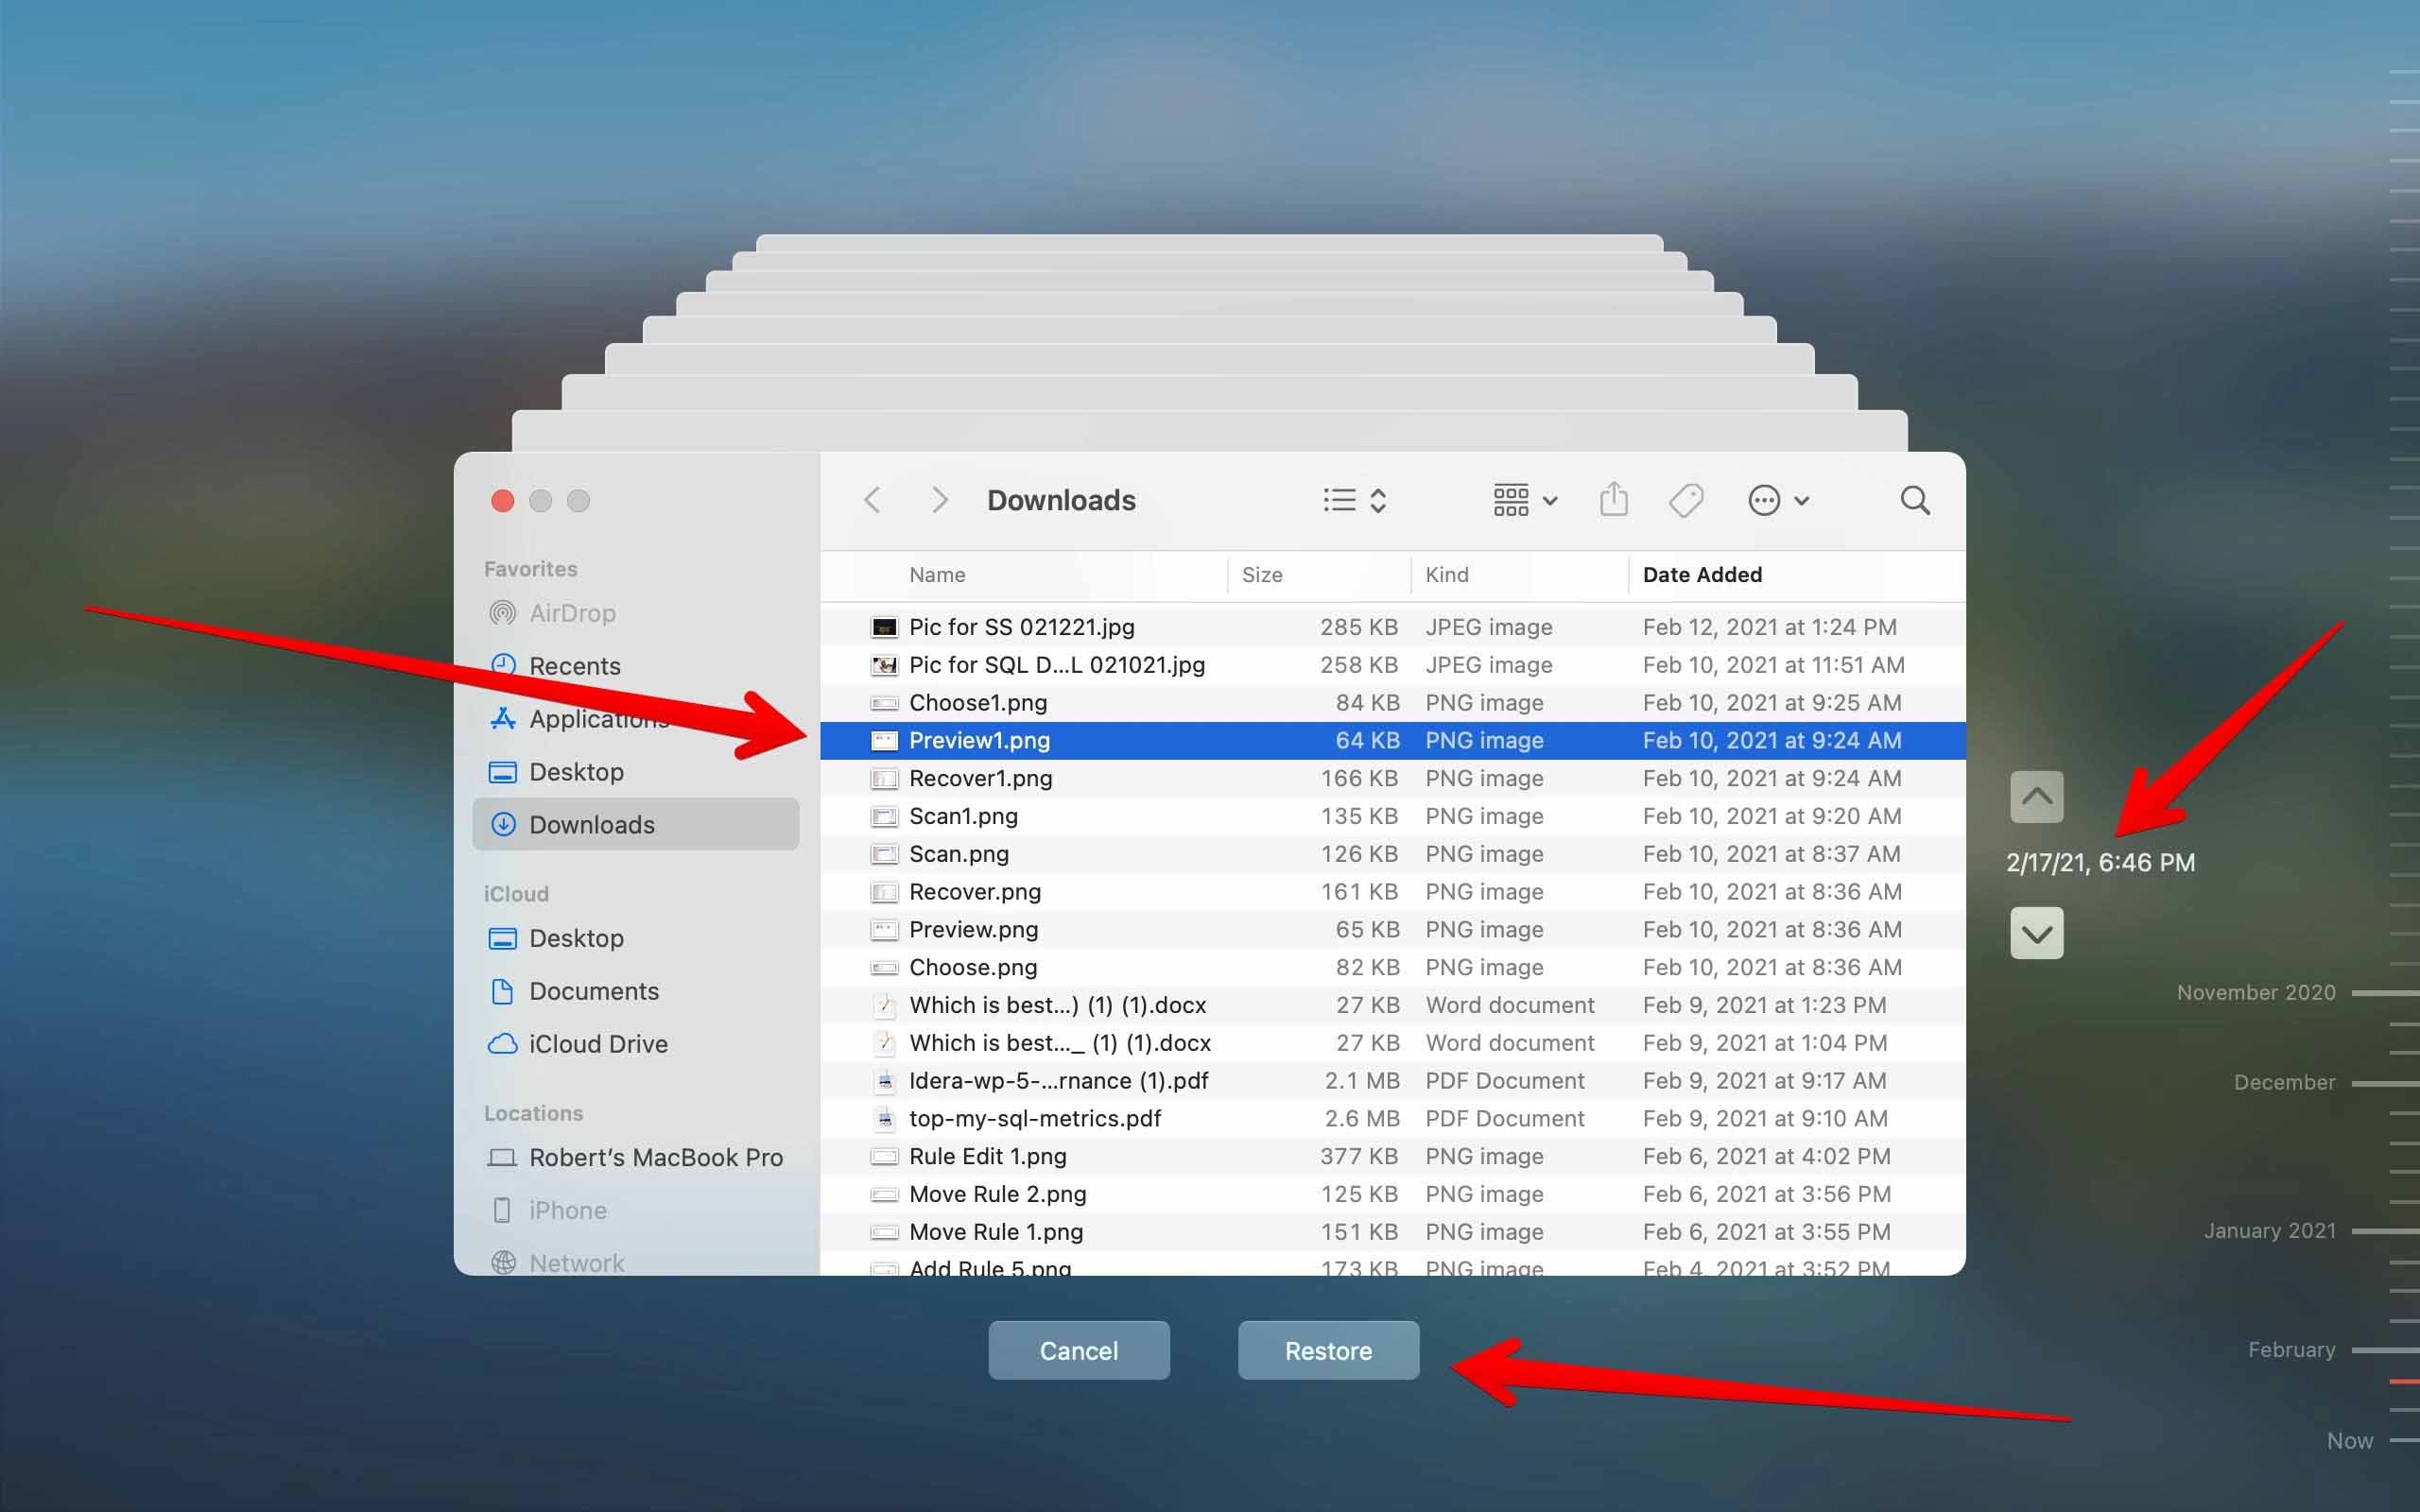
- Use Time Machine’s arrows and timeline to browse the local snapshots and backups. Scroll through to find the items you wish to recover. You can restore individual files or a complete disk at this point.
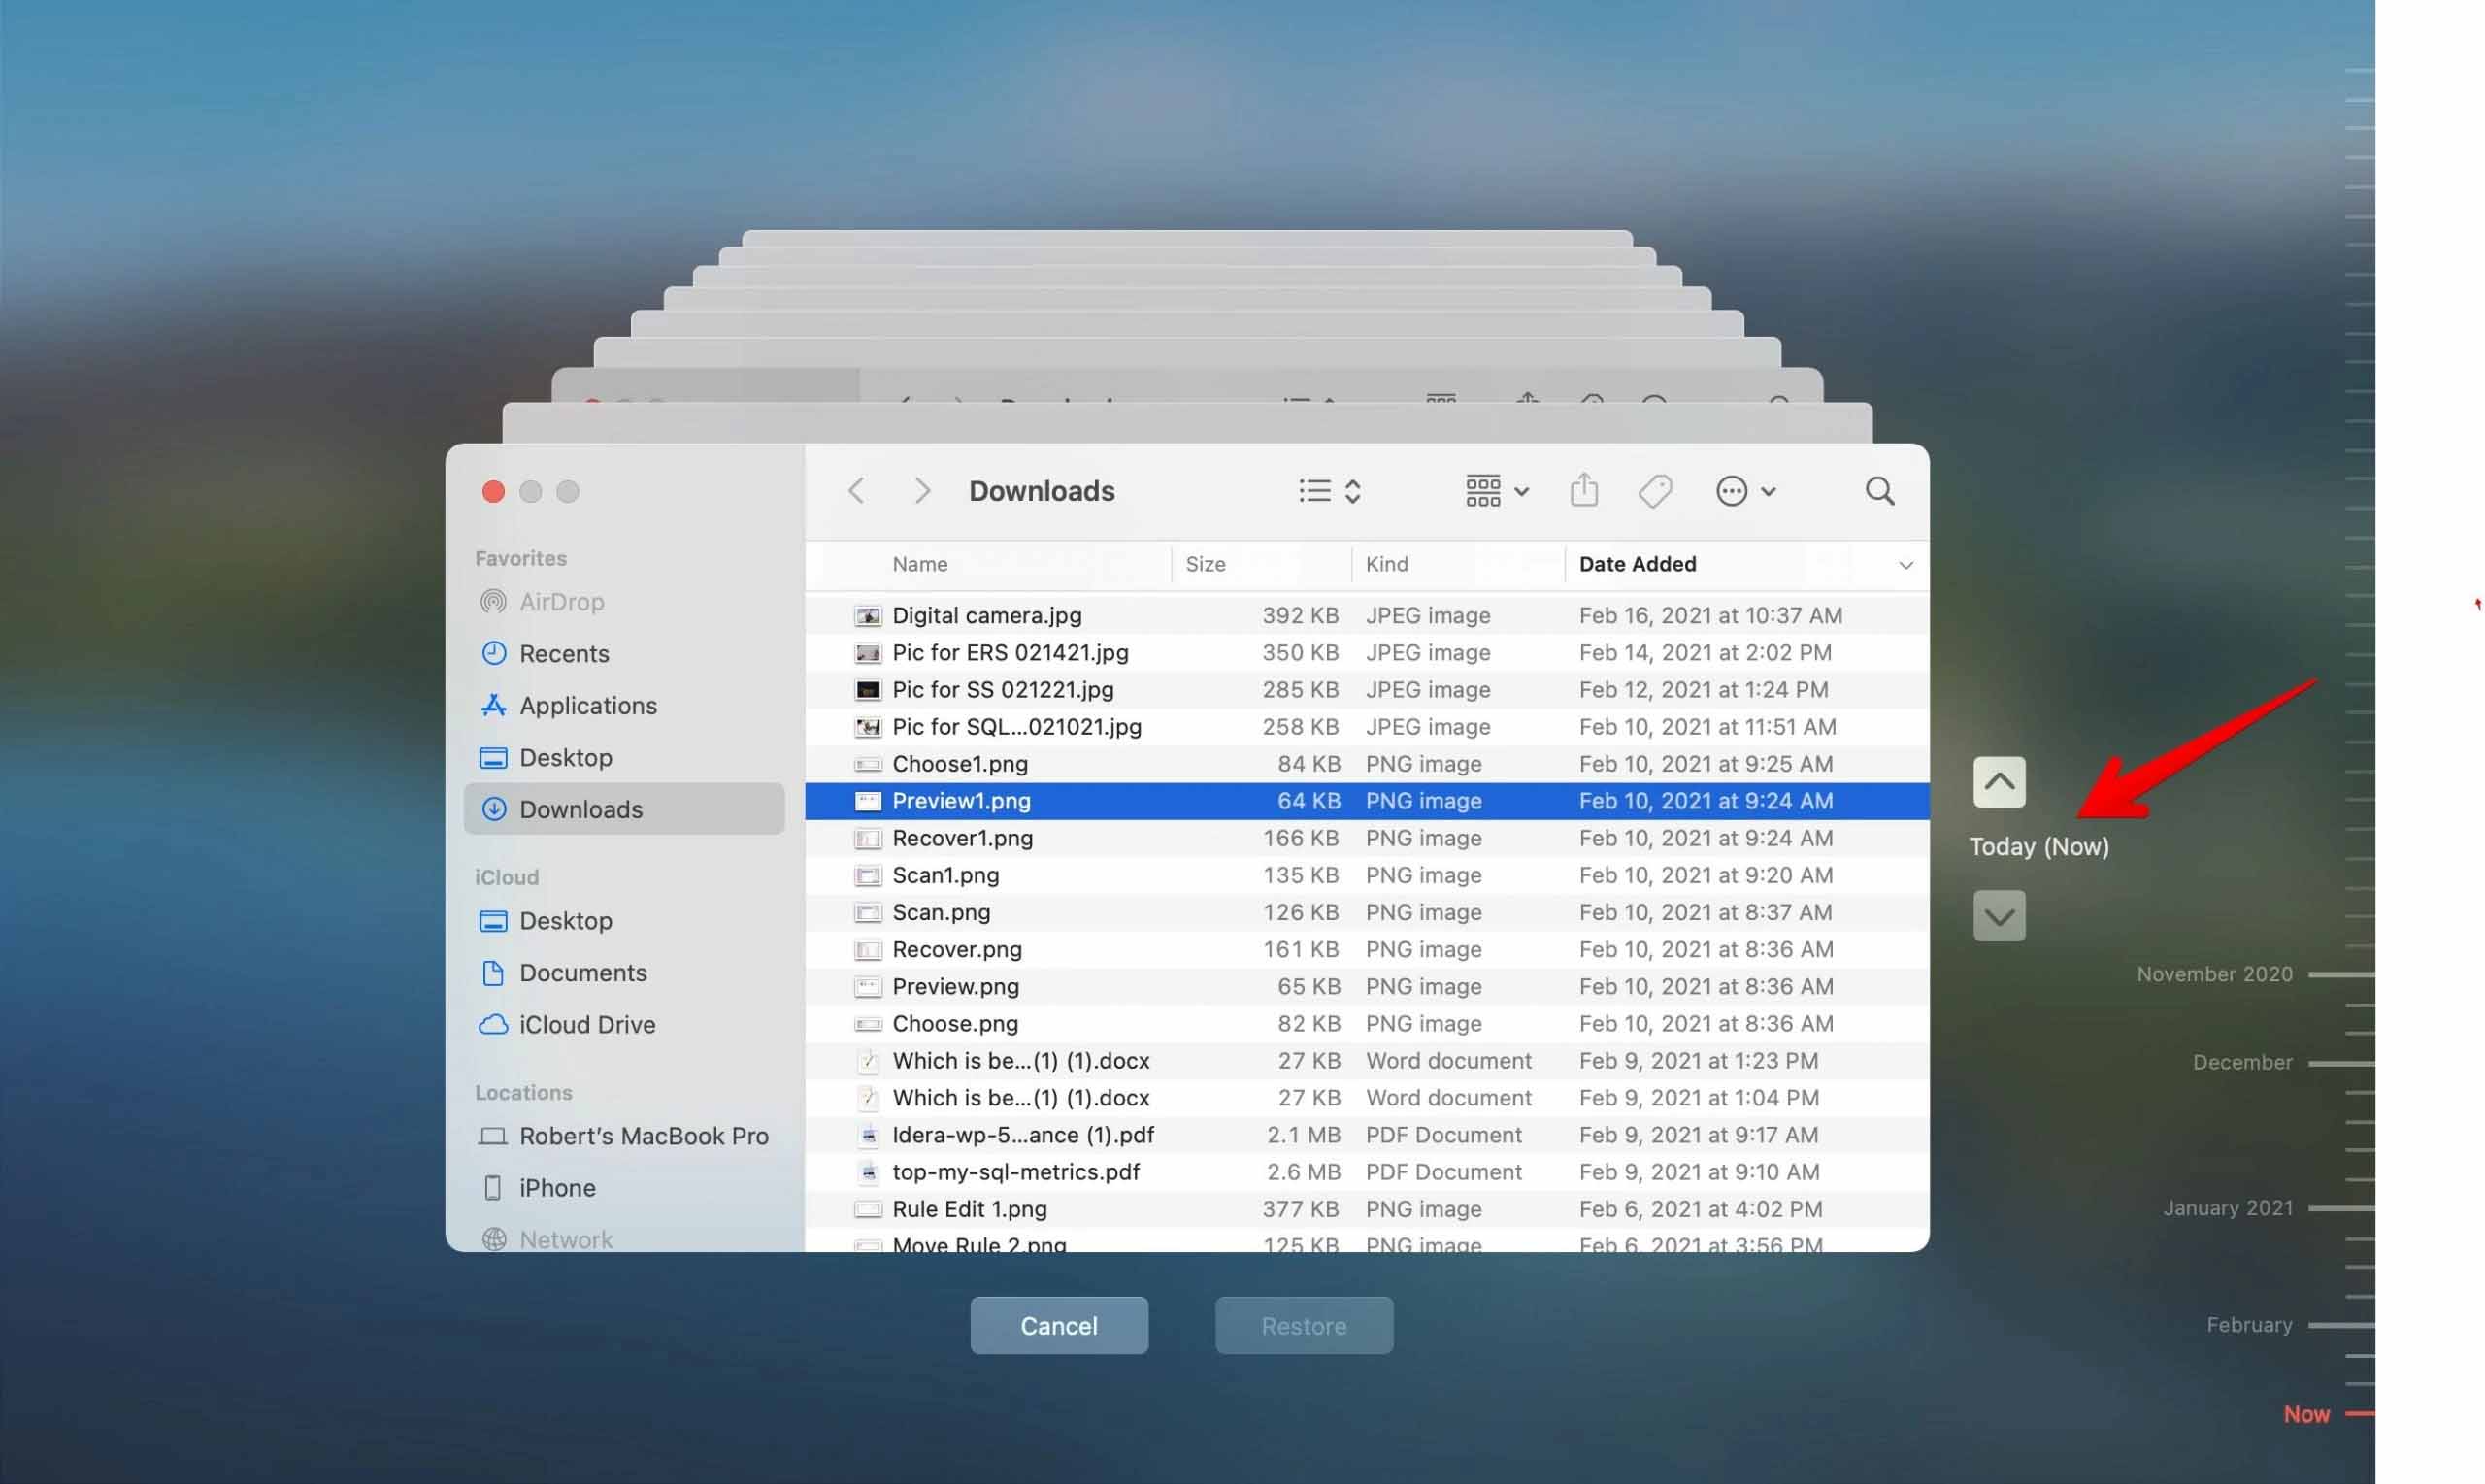
- Select the items you wish to recover and click the Restore button. The restored items will be recovered to their original storage locations. Those files lost from your Downloads folder will be put back there after the recovery is complete. It may take some time for the process to finish based on the number of files and their sizes. Be patient and your files will soon be back where they belong.
Using 3rd Party Software
Another way to restore data from a Time Machine backup is by scanning it with data recovery software. This is helpful for bypassing any issues or corruption you may encounter with your Time Machine drive. It also provides more advanced recovery tools than those included in Time Machine and can even recover deleted or formatted Time Machine backups.
For this article, we’ll be using an app called Disk Drill. It’s user-friendly and easy to demonstrate but it’s also super powerful. It supports Time Machine recovery and it’s optimized for all macOS file systems (HFS+, APFS) and common Mac file types. Disk Drill is also Apple Silicon-ready and supports all M1 and M2 computers (as well as older models).
Many data recovery applications are on the market, and we have tested quite a few of them with varying results. We like Disk Drill for Mac as our favorite recovery software tool for macOS. It’s easy to use, has an intuitive interface, and recovers all types of files and formats. You can see other macOS solutions if Disk Drill is not right for you by checking our list of data recovery software for macOS.
To use restore files from a Time Machine backup using Disk Drill:
- Download and install Disk Drill.
- Connect your Time Machine backup to your Mac, then launch Disk Drill (Finder > Applications).

- Select the drive that contains your Time Machine backup disk. Enable Show hidden items (at the bottom of the window) to make sure you’re choosing the correct one. Then, click Search for lost data. Note that if your Time Machine drive is working properly, its partition will be hidden by default as Disk Drill has another tool for scanning Time Machine backups. You can use it by clicking Time Machine in the left sidebar.

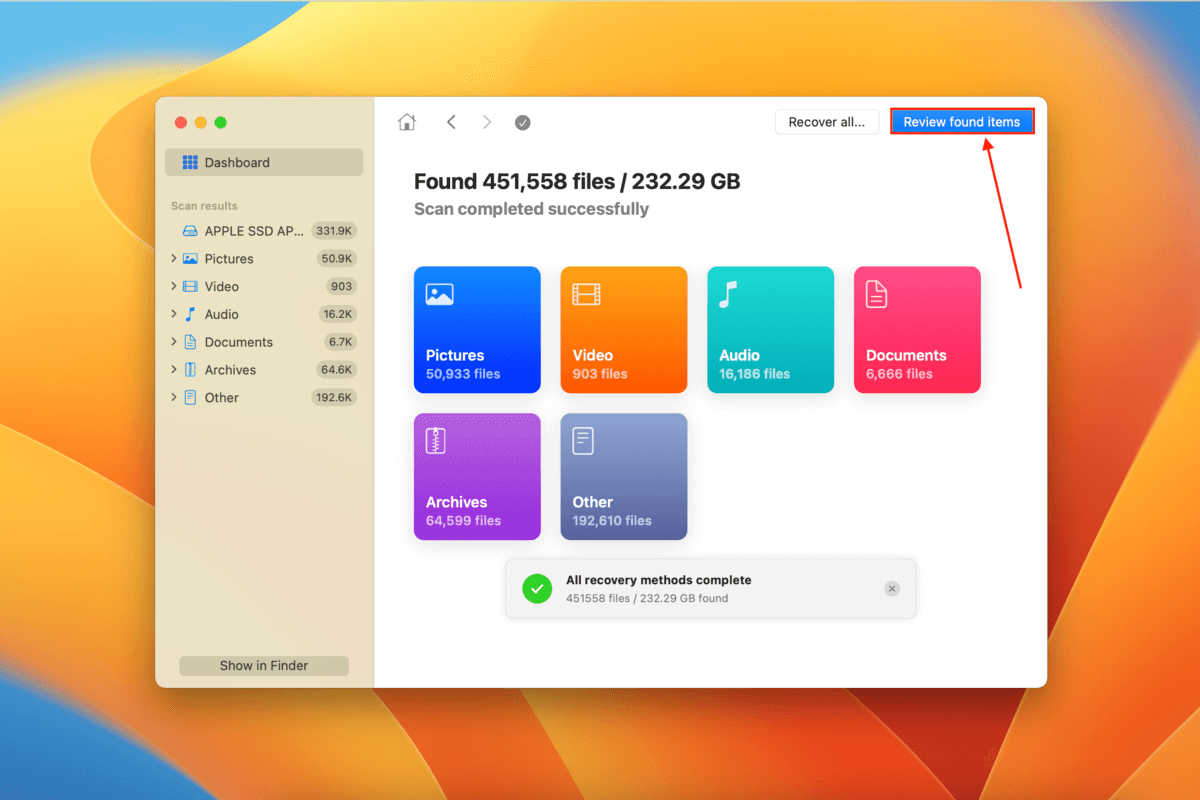
- Wait for Disk Drill to finish scanning your Time Machine drive. When it’s done, click Review found items.
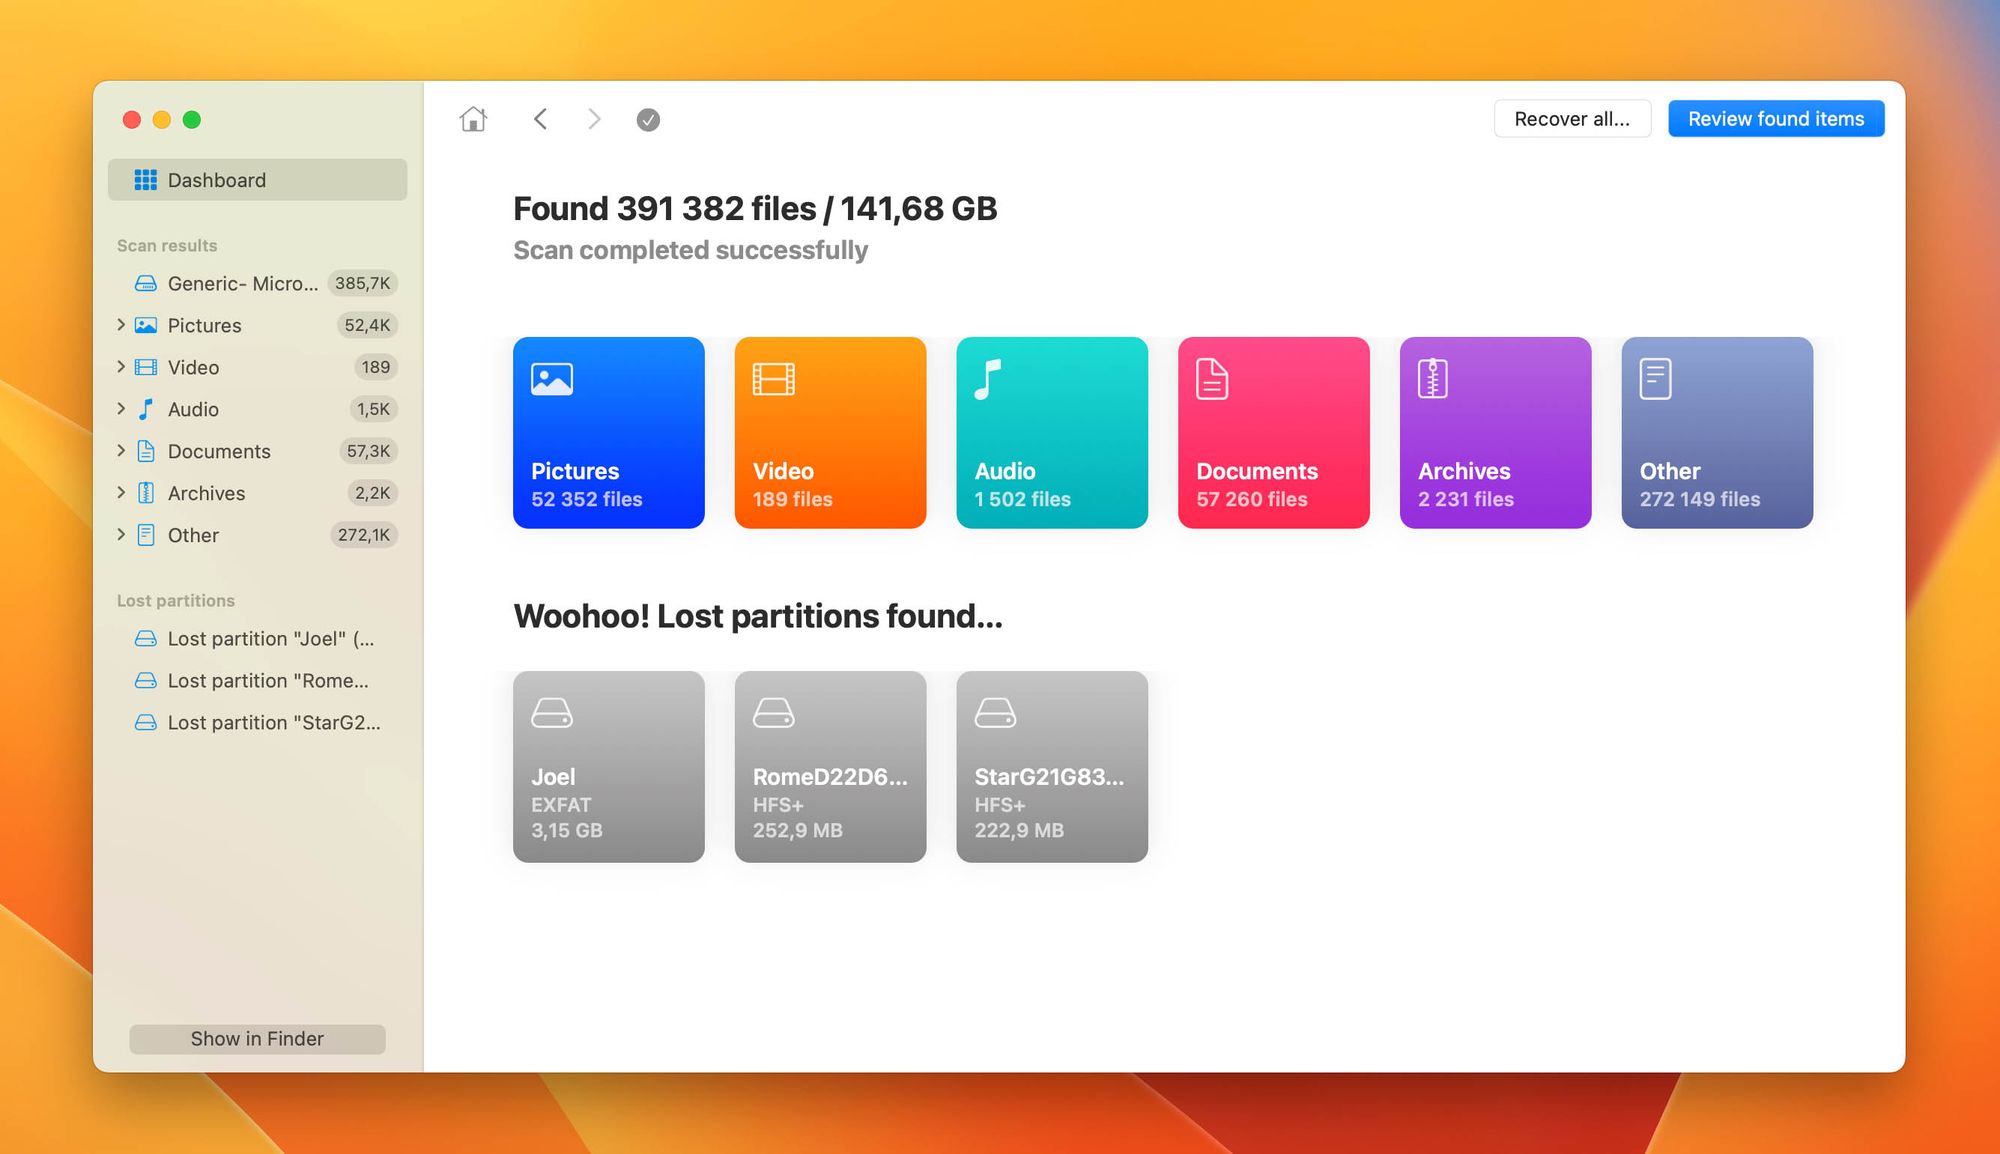
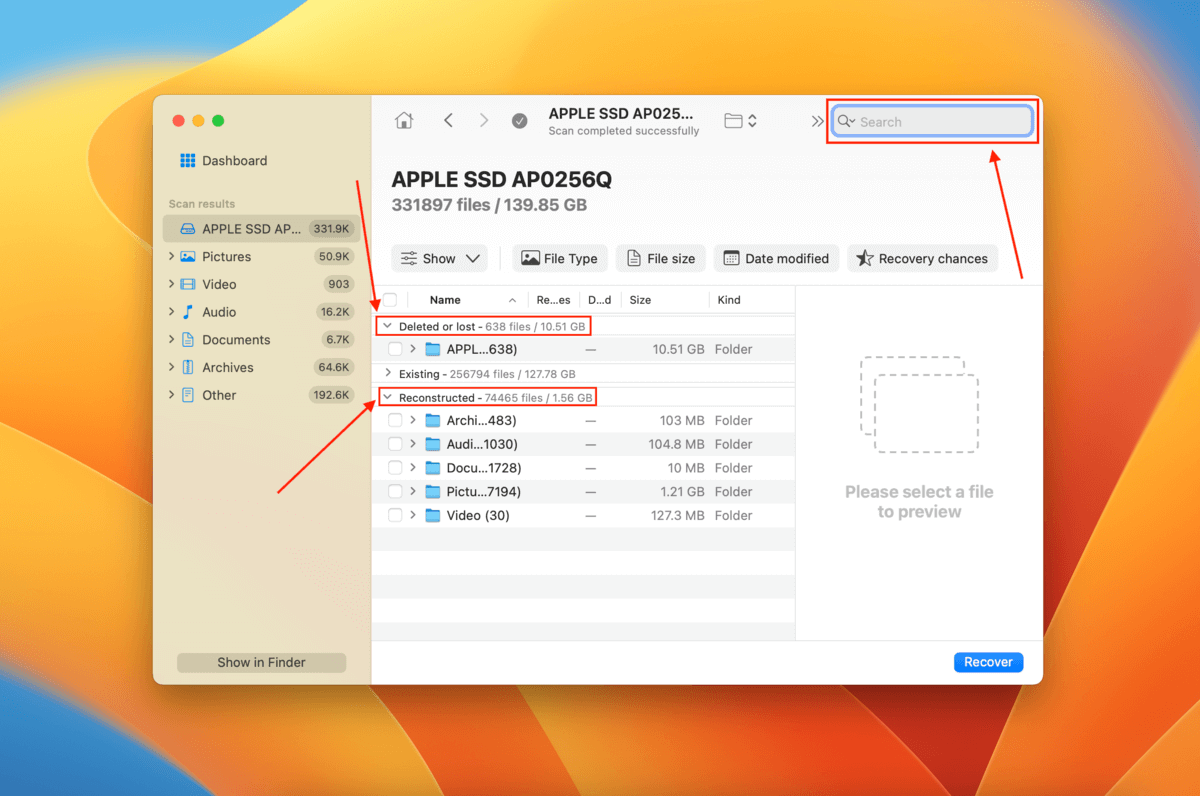
- Click the Show button and select Deleted or lost or Reconstructed to view the recovered Time Machine backups. These includes existing, deleted, and corrupted backups.
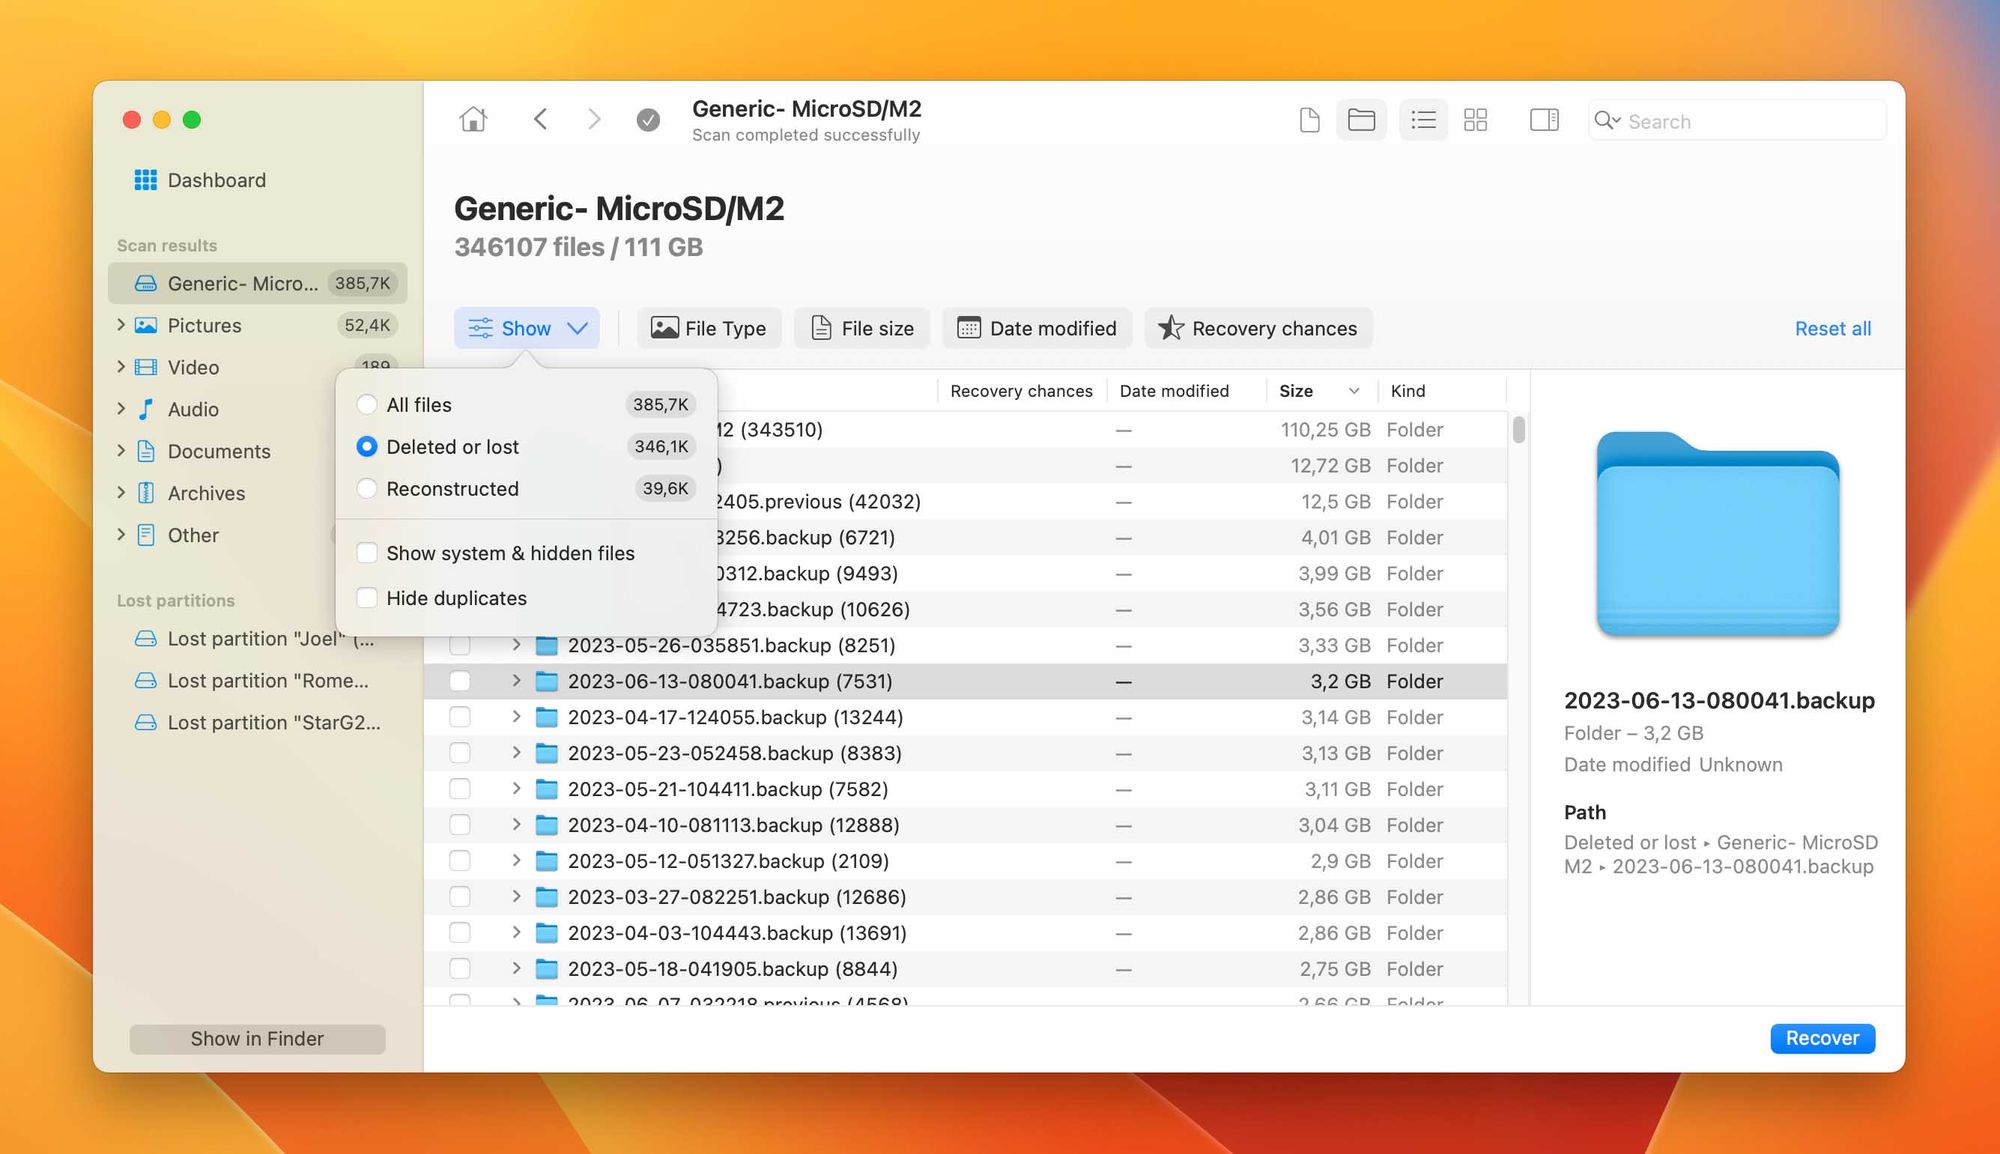
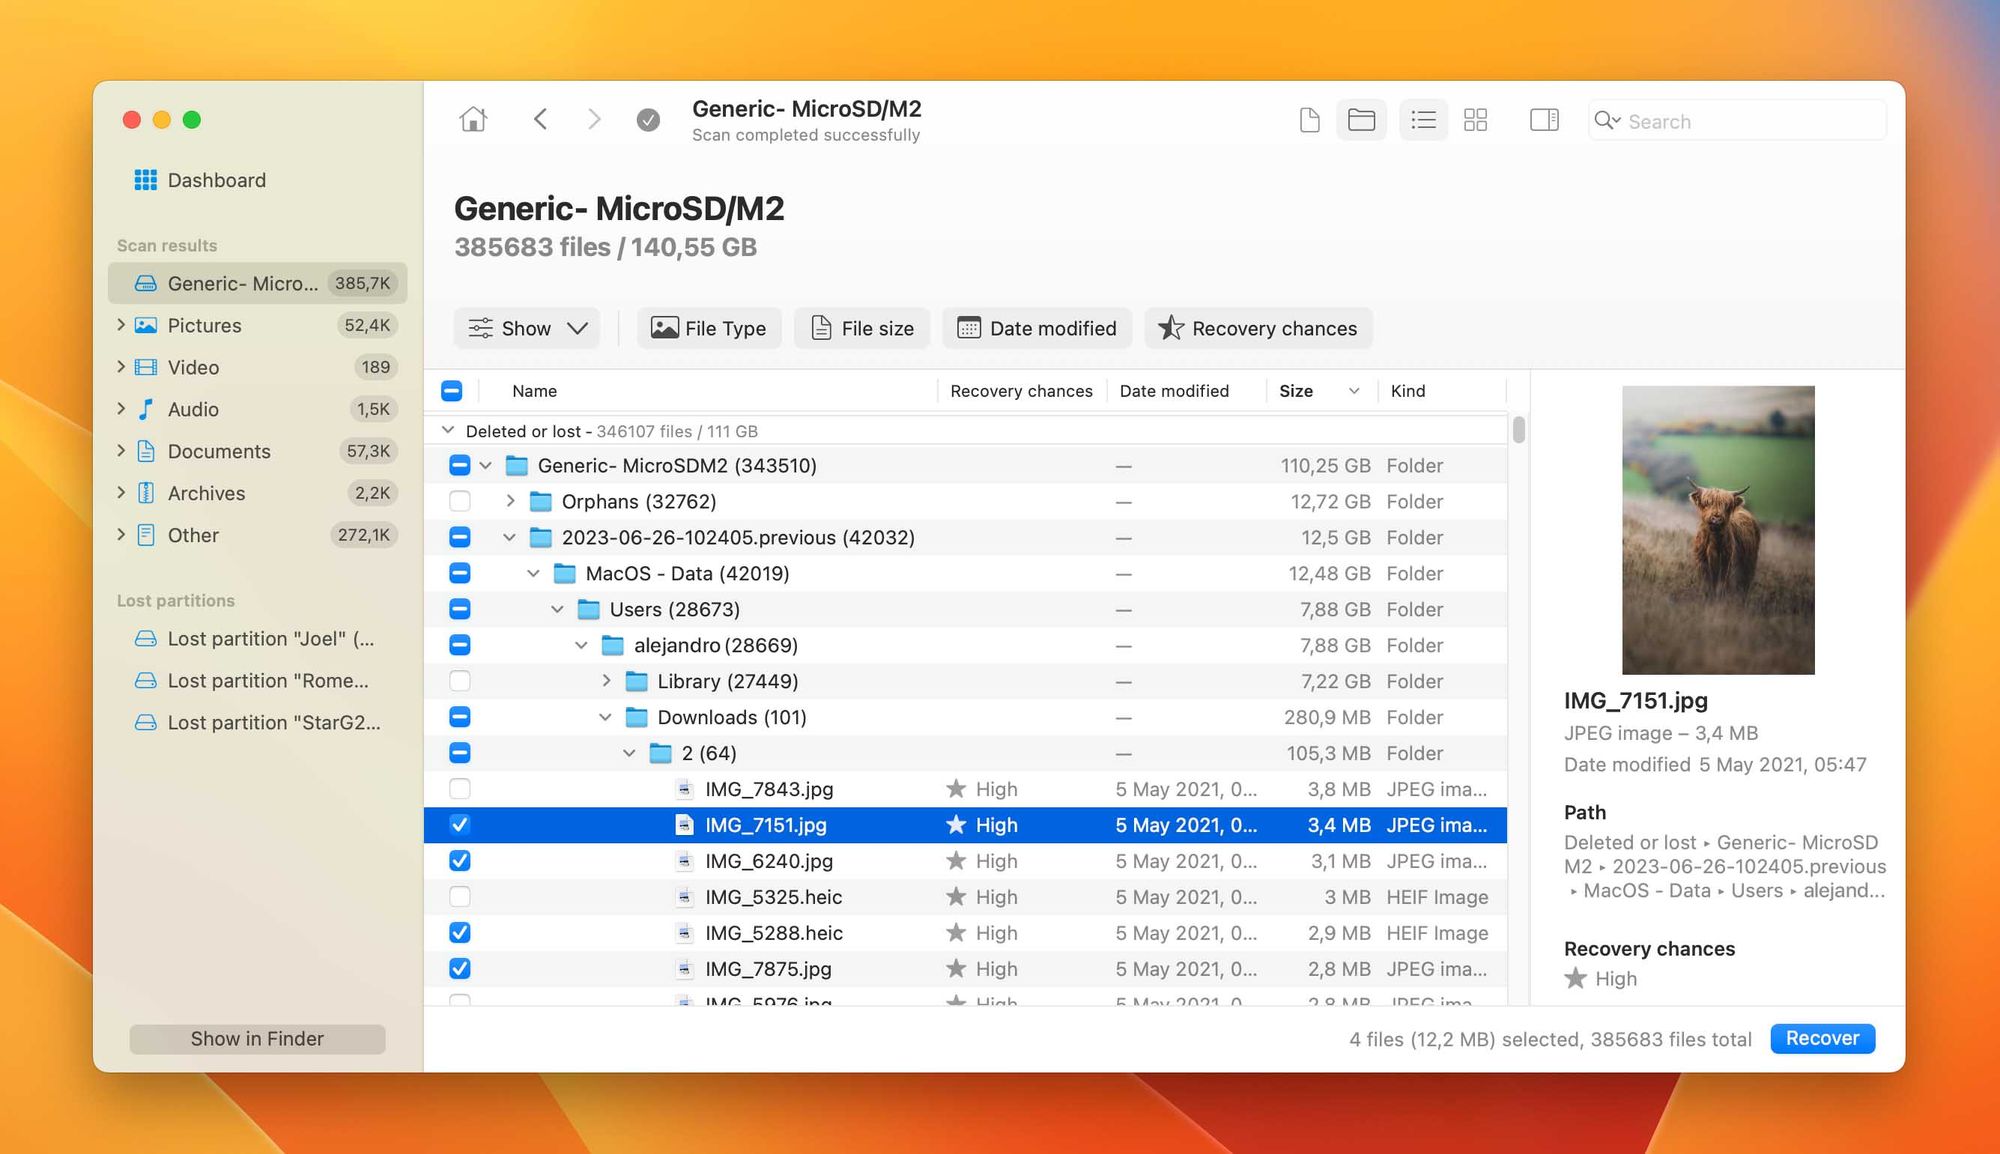
- Make sure to preview your files by clicking each one once. Then, select the files you want to restore by marking the boxes beside them. Then, click Recover.
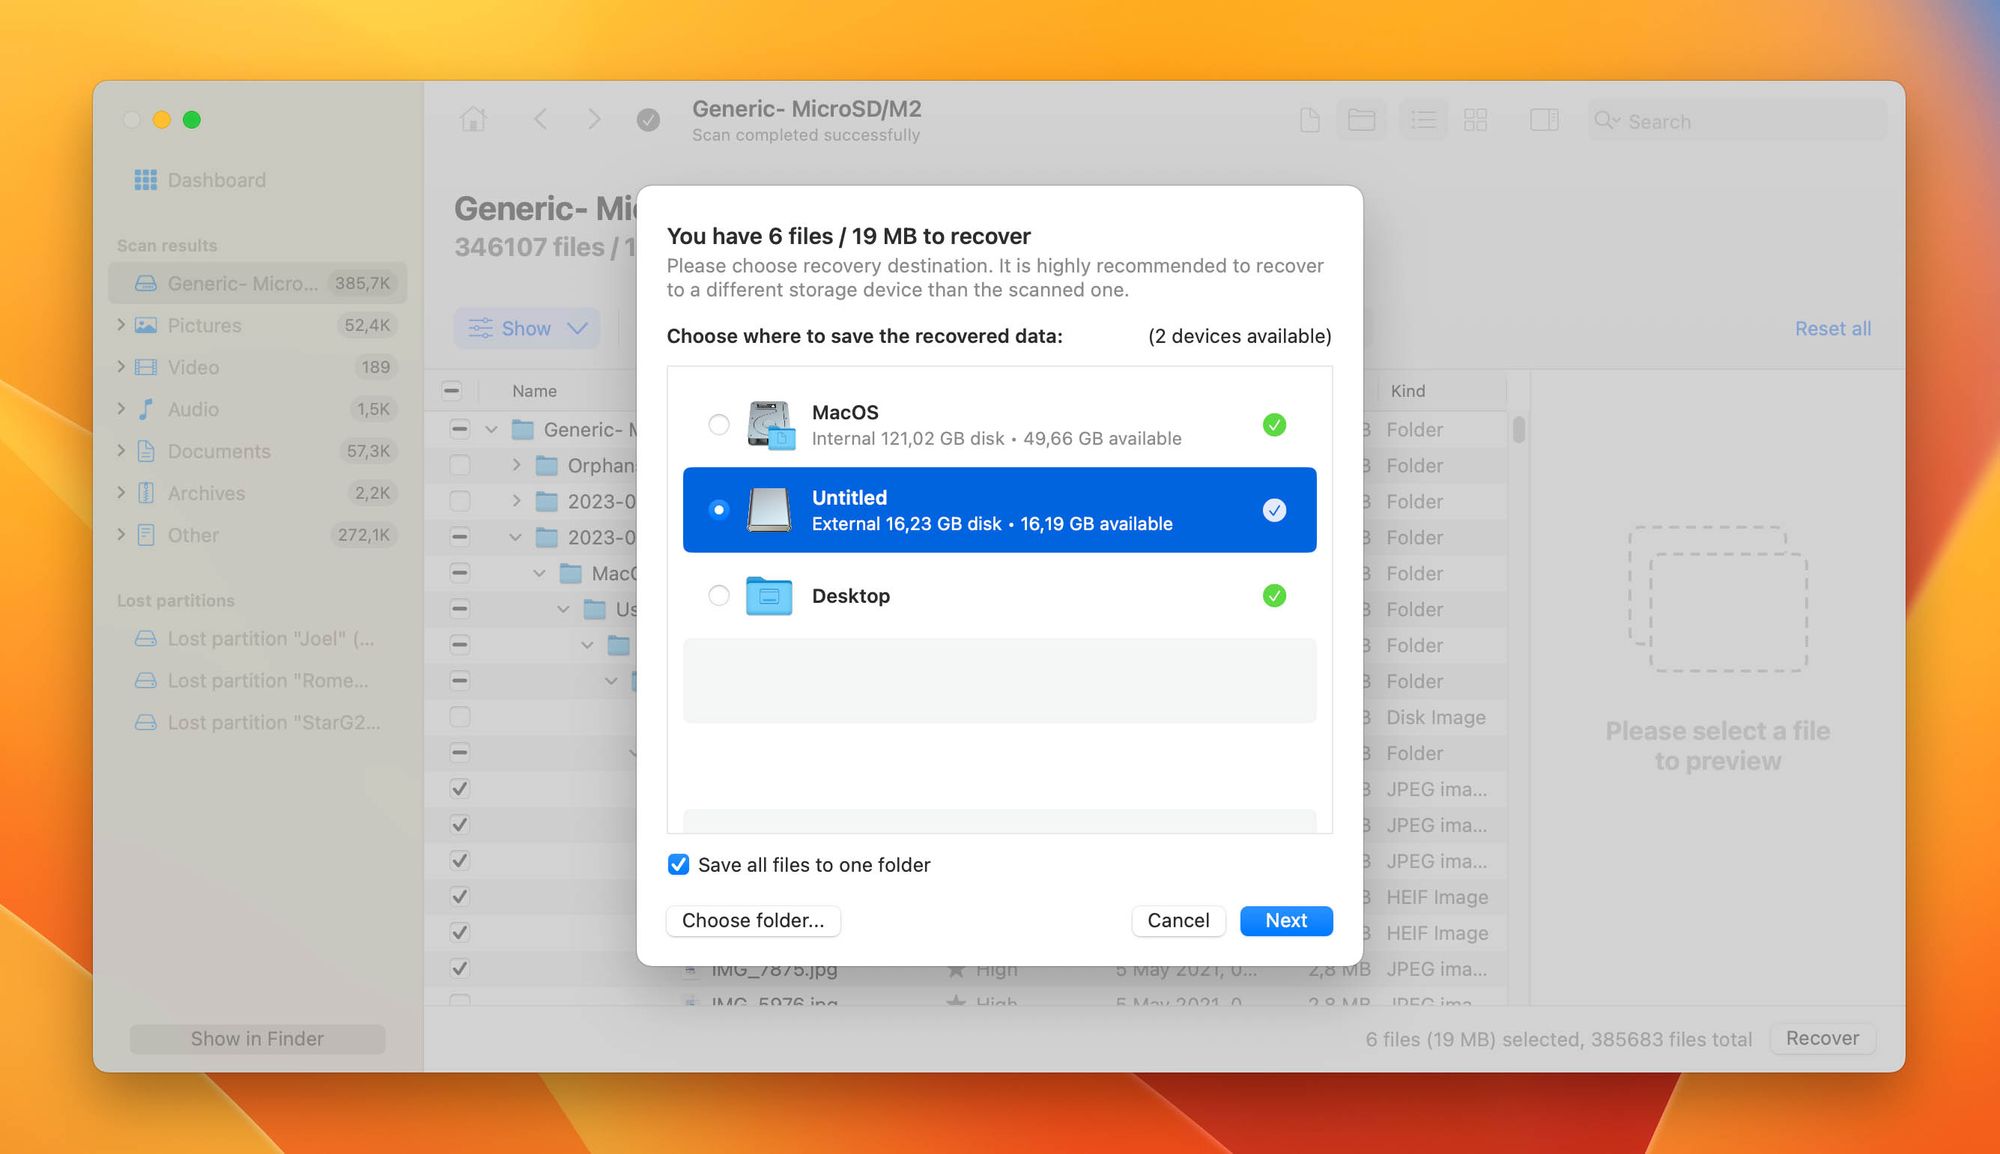
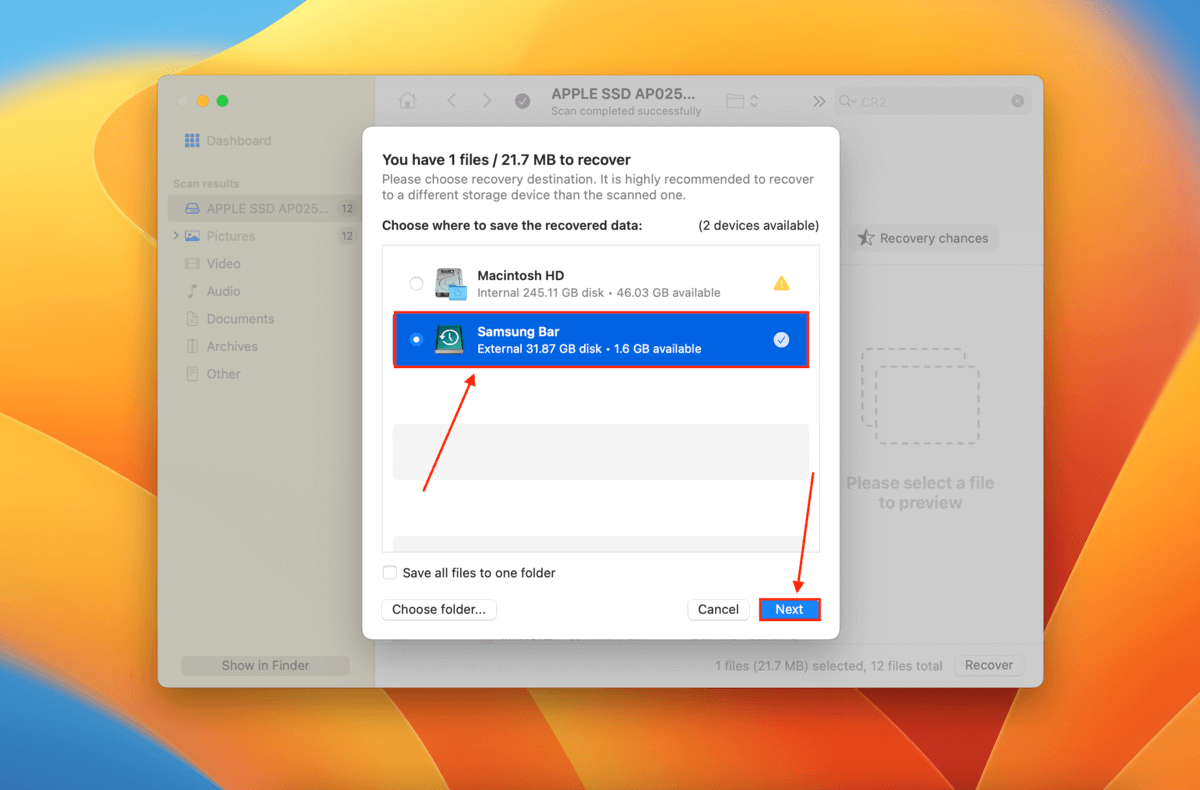
- Choose a location on your computer (not on your Time Machine drive) where Disk Drill will store the recovered files. Then, click Next.
Disk Drill Basic for Mac doesn’t offer free data recovery. However, you can scan and preview as much data as you want – this should help you identify which files are recoverable.
Restore your Mac from a Time Machine Backup
Depending on your needs, you can use 1 of 2 methods you can use to restore your Mac from a Time Machine backup.
The first method, macOS Recovery, is the more comprehensive solution. It allows you to return your Mac to the exact state it was in when the backup was created. Nothing more, nothing less.
The second method, Migration Assistant, allows you to be more selective about what data gets copied and what gets overwritten. It’s the method usually recommended for setting up new Macs.
Using macOS Recovery
This method will completely restore your Mac to its previous state, exactly how it was when the backup was created. That means all of the existing files, apps, and other data currently on your Mac will be replaced by the backup data.
This drastic measure is suitable for scenarios where you can’t boot into macOS or you’ve encountered unresolvable conflicts as a result of deleting critical data.
To restore your Mac from a Time Machine backup through macOS Recovery:
- Shut down your Mac completely. Turn it back on and immediately do one of the following: (1) For Apple Silicon Macs, hold the power button until the Options button appears. Then, click Options. (2) For Intel-based Macs, hit the following keys: Command + Option + R
- In the macOS Utilities window, select Time Machine System Restore (Apple Silicon) or Restore From Time Machine Backup (Intel). Then, click Continue.
- Follow the wizard until you’re prompted to select a Restore Source. Select your Time Machine backup and click Continue.
- Select the backup you want to restore your Mac from and click Continue.
Confirm any actions prompted by your Mac and wait for the restore process to finish.
Using Migration Assistant
Time Machine is not only useful for recovering groups of lost or deleted files. You can also use it to perform a complete restore of your Mac’s user accounts and data. Time Machine will not recover your operating system.
Before proceeding, you need to have macOS installed on the machine. If you are performing a bare-metal restore, you’ll need to reinstall macOS before recovering data with Time Machine.
Once you have the OS installed, you will be using the Migration Assistant application which will extract data from your Time Machine backups.
Use the following steps to restore your Mac from Time Machine:
- Connect the disk that contains the Time Machine backup to your computer.
- Open Migration Assistant which can be found in the Utilities folder inside the Applications folder.
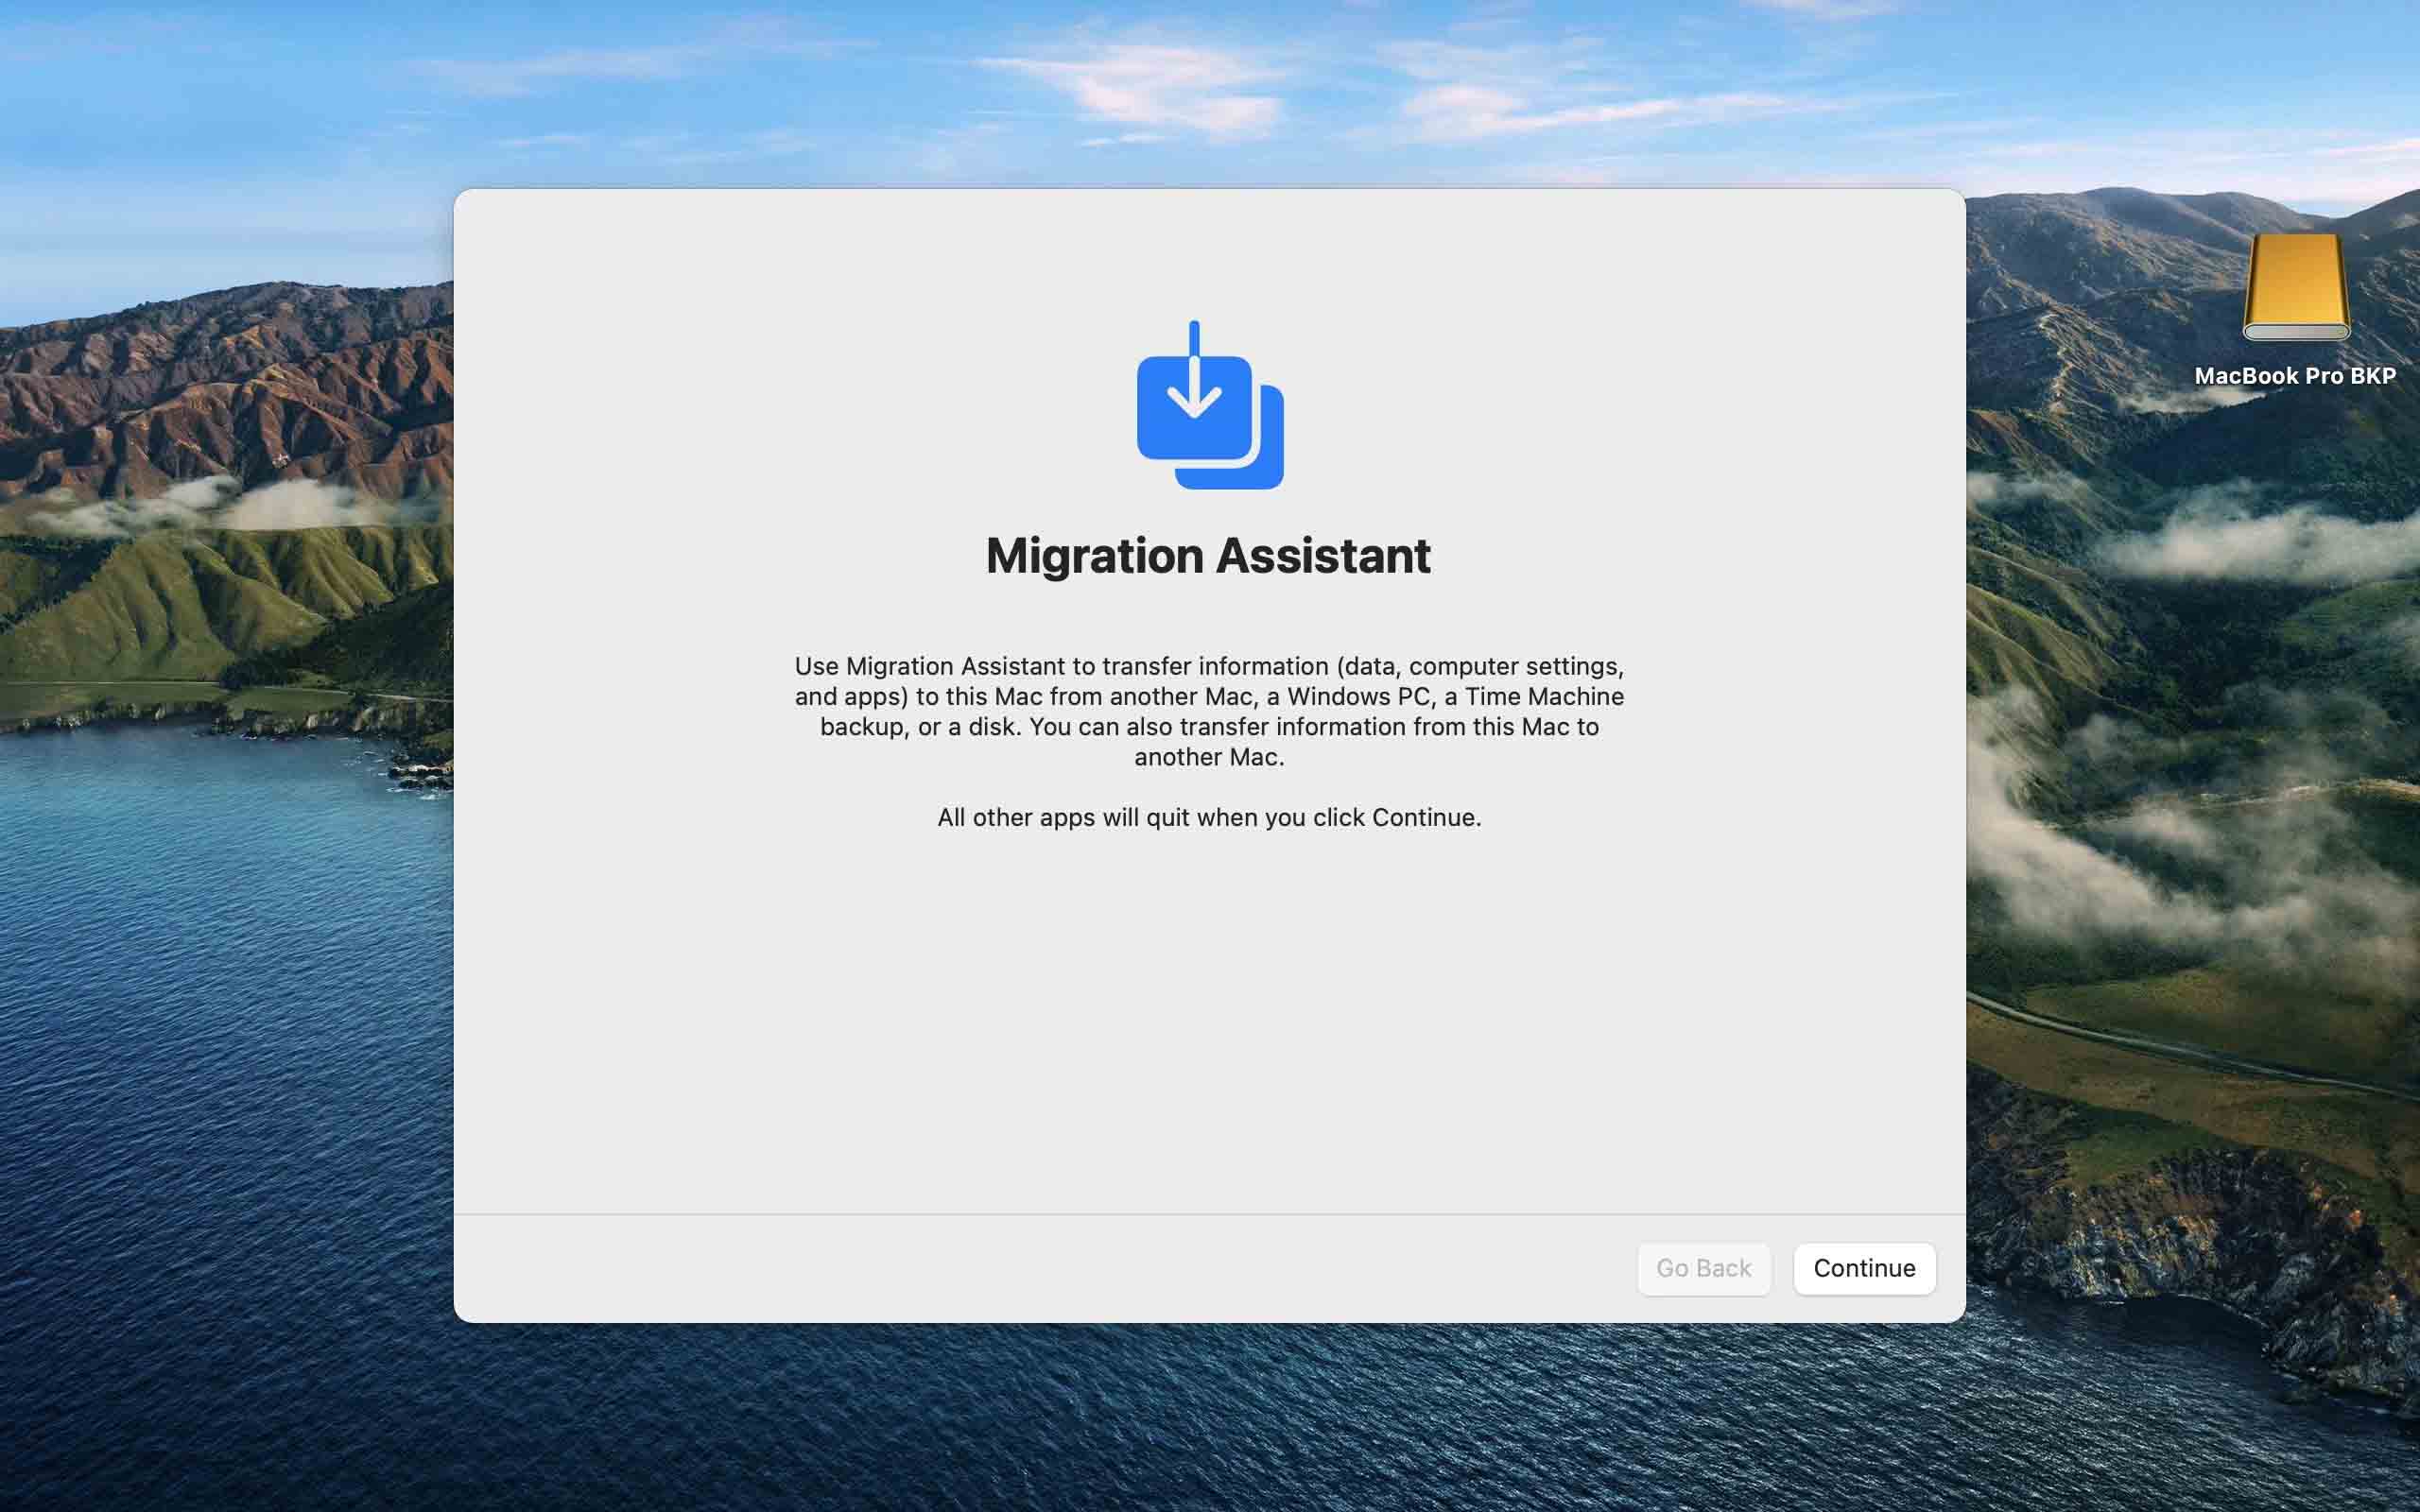
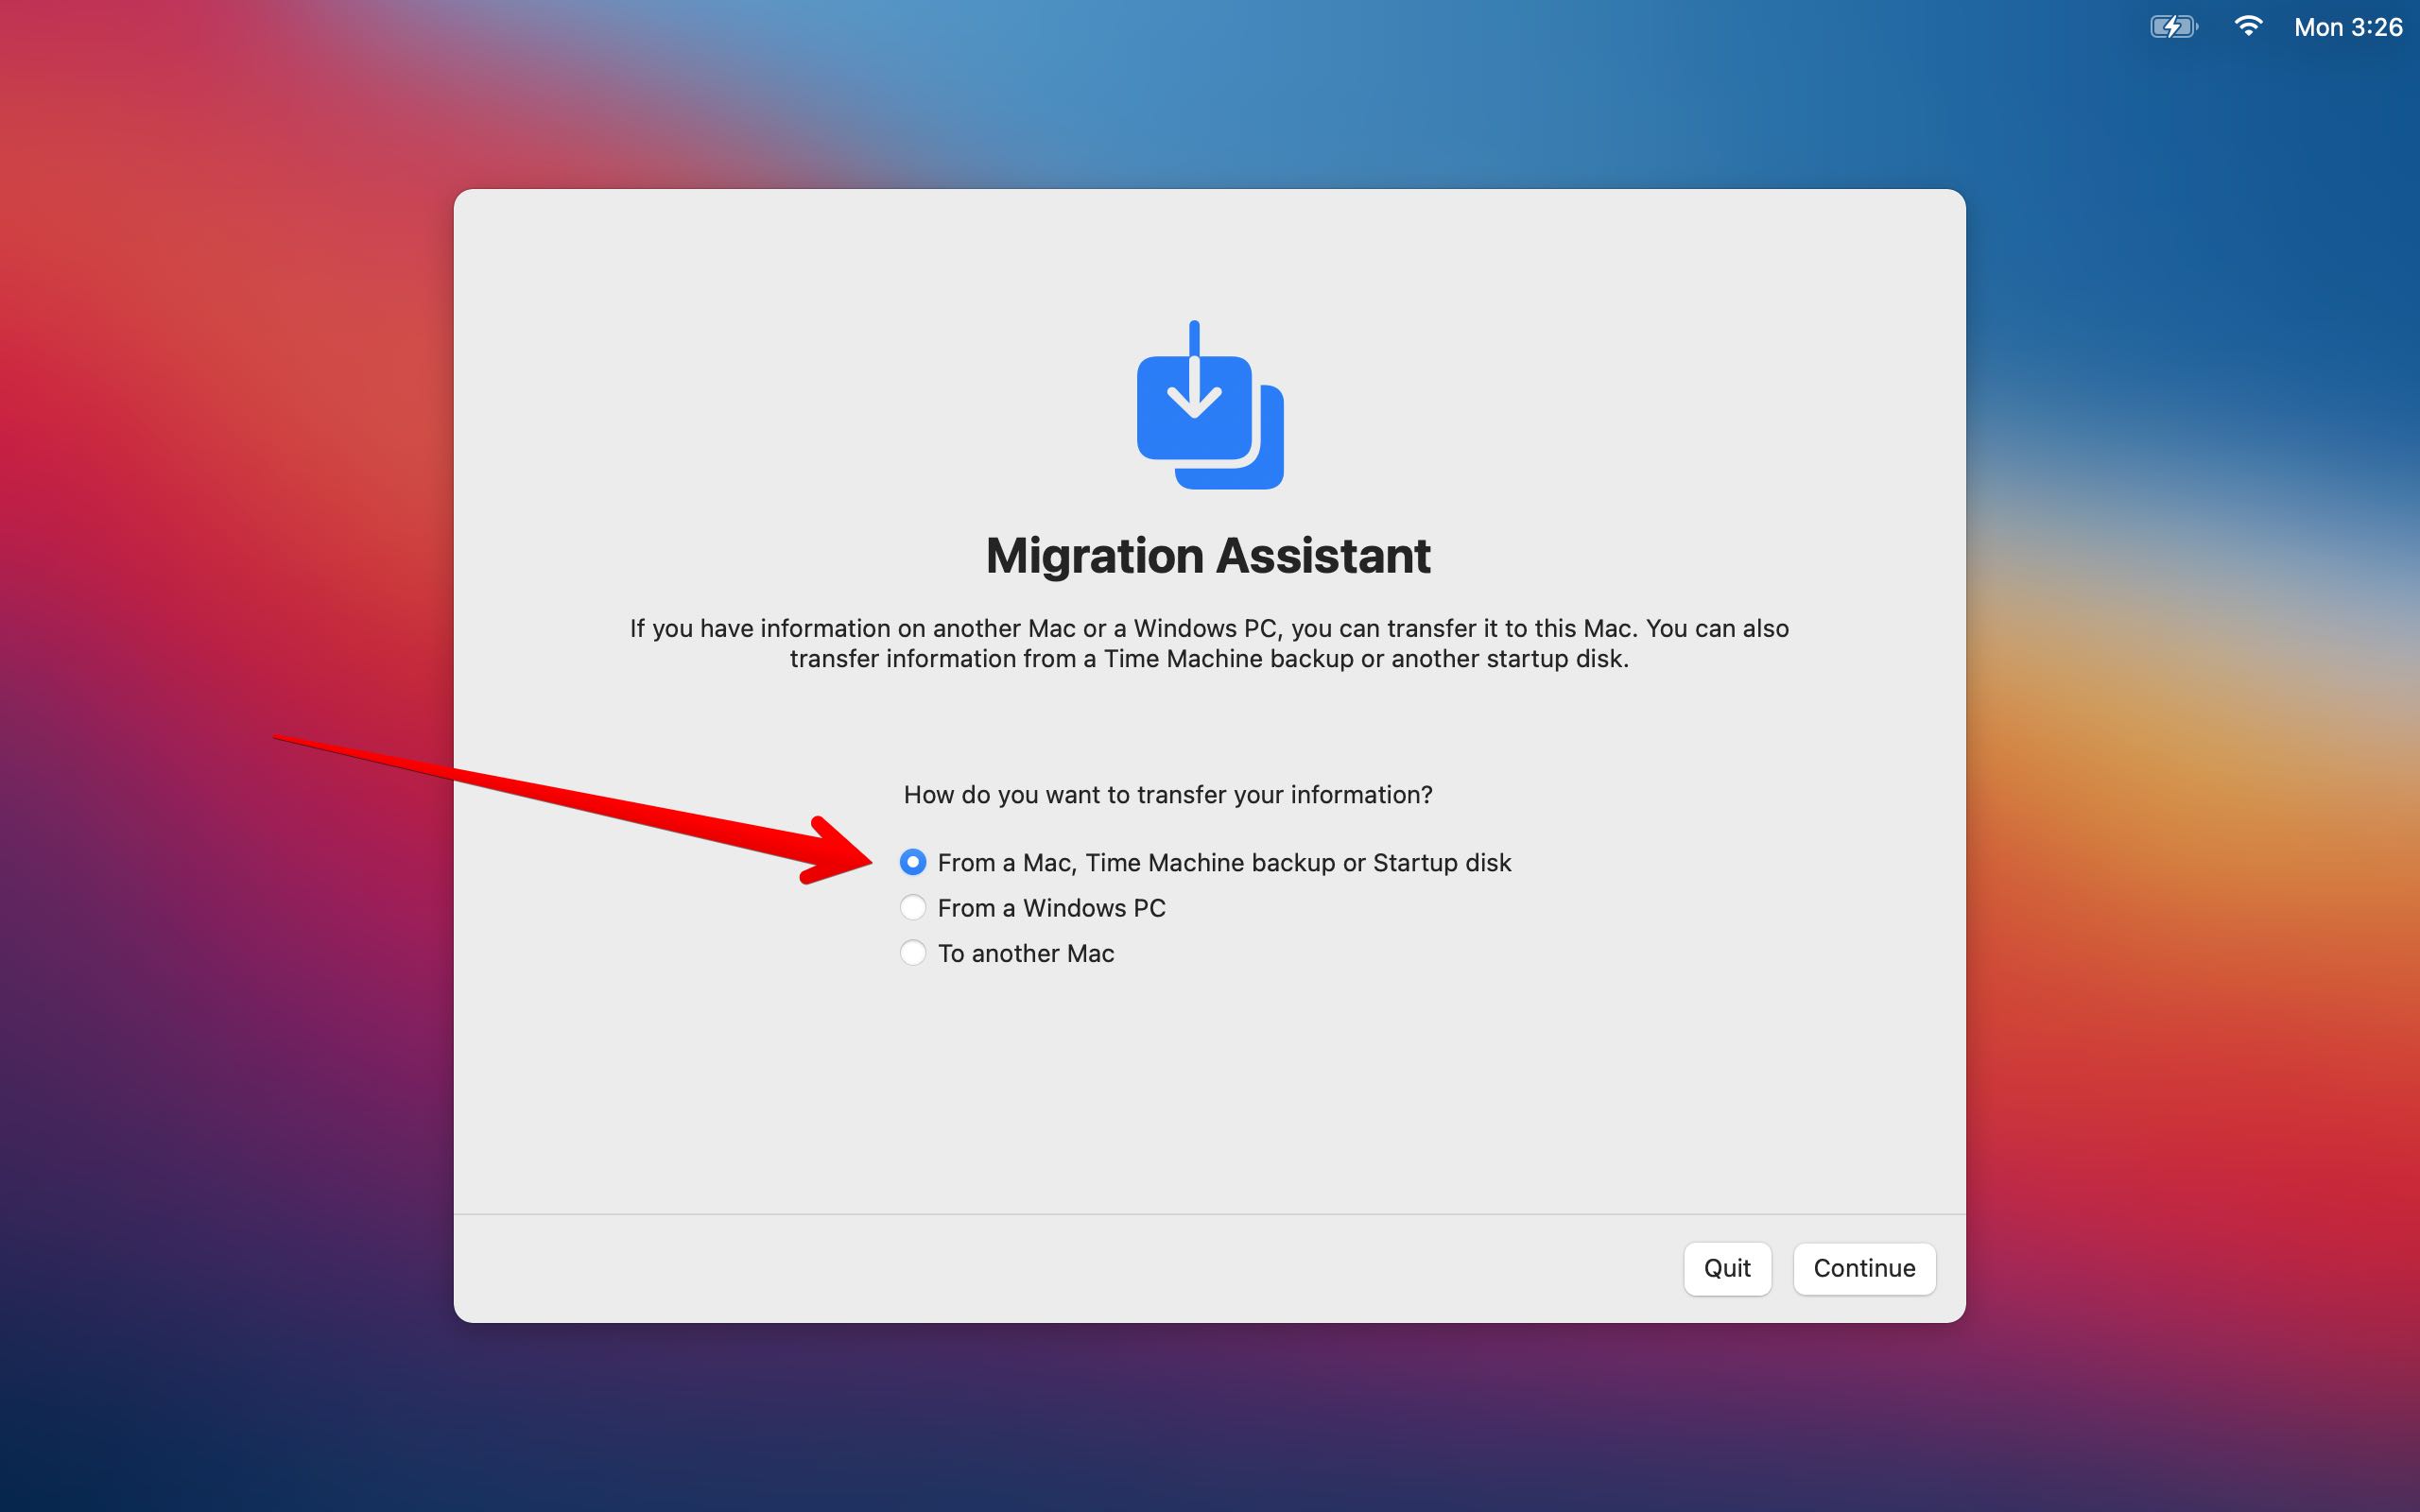
- You will be prompted to select the data transfer method to be used for the migration. Choose the option to transfer From a Mac, Time Machine backup, or startup disk. Click the Continue button.
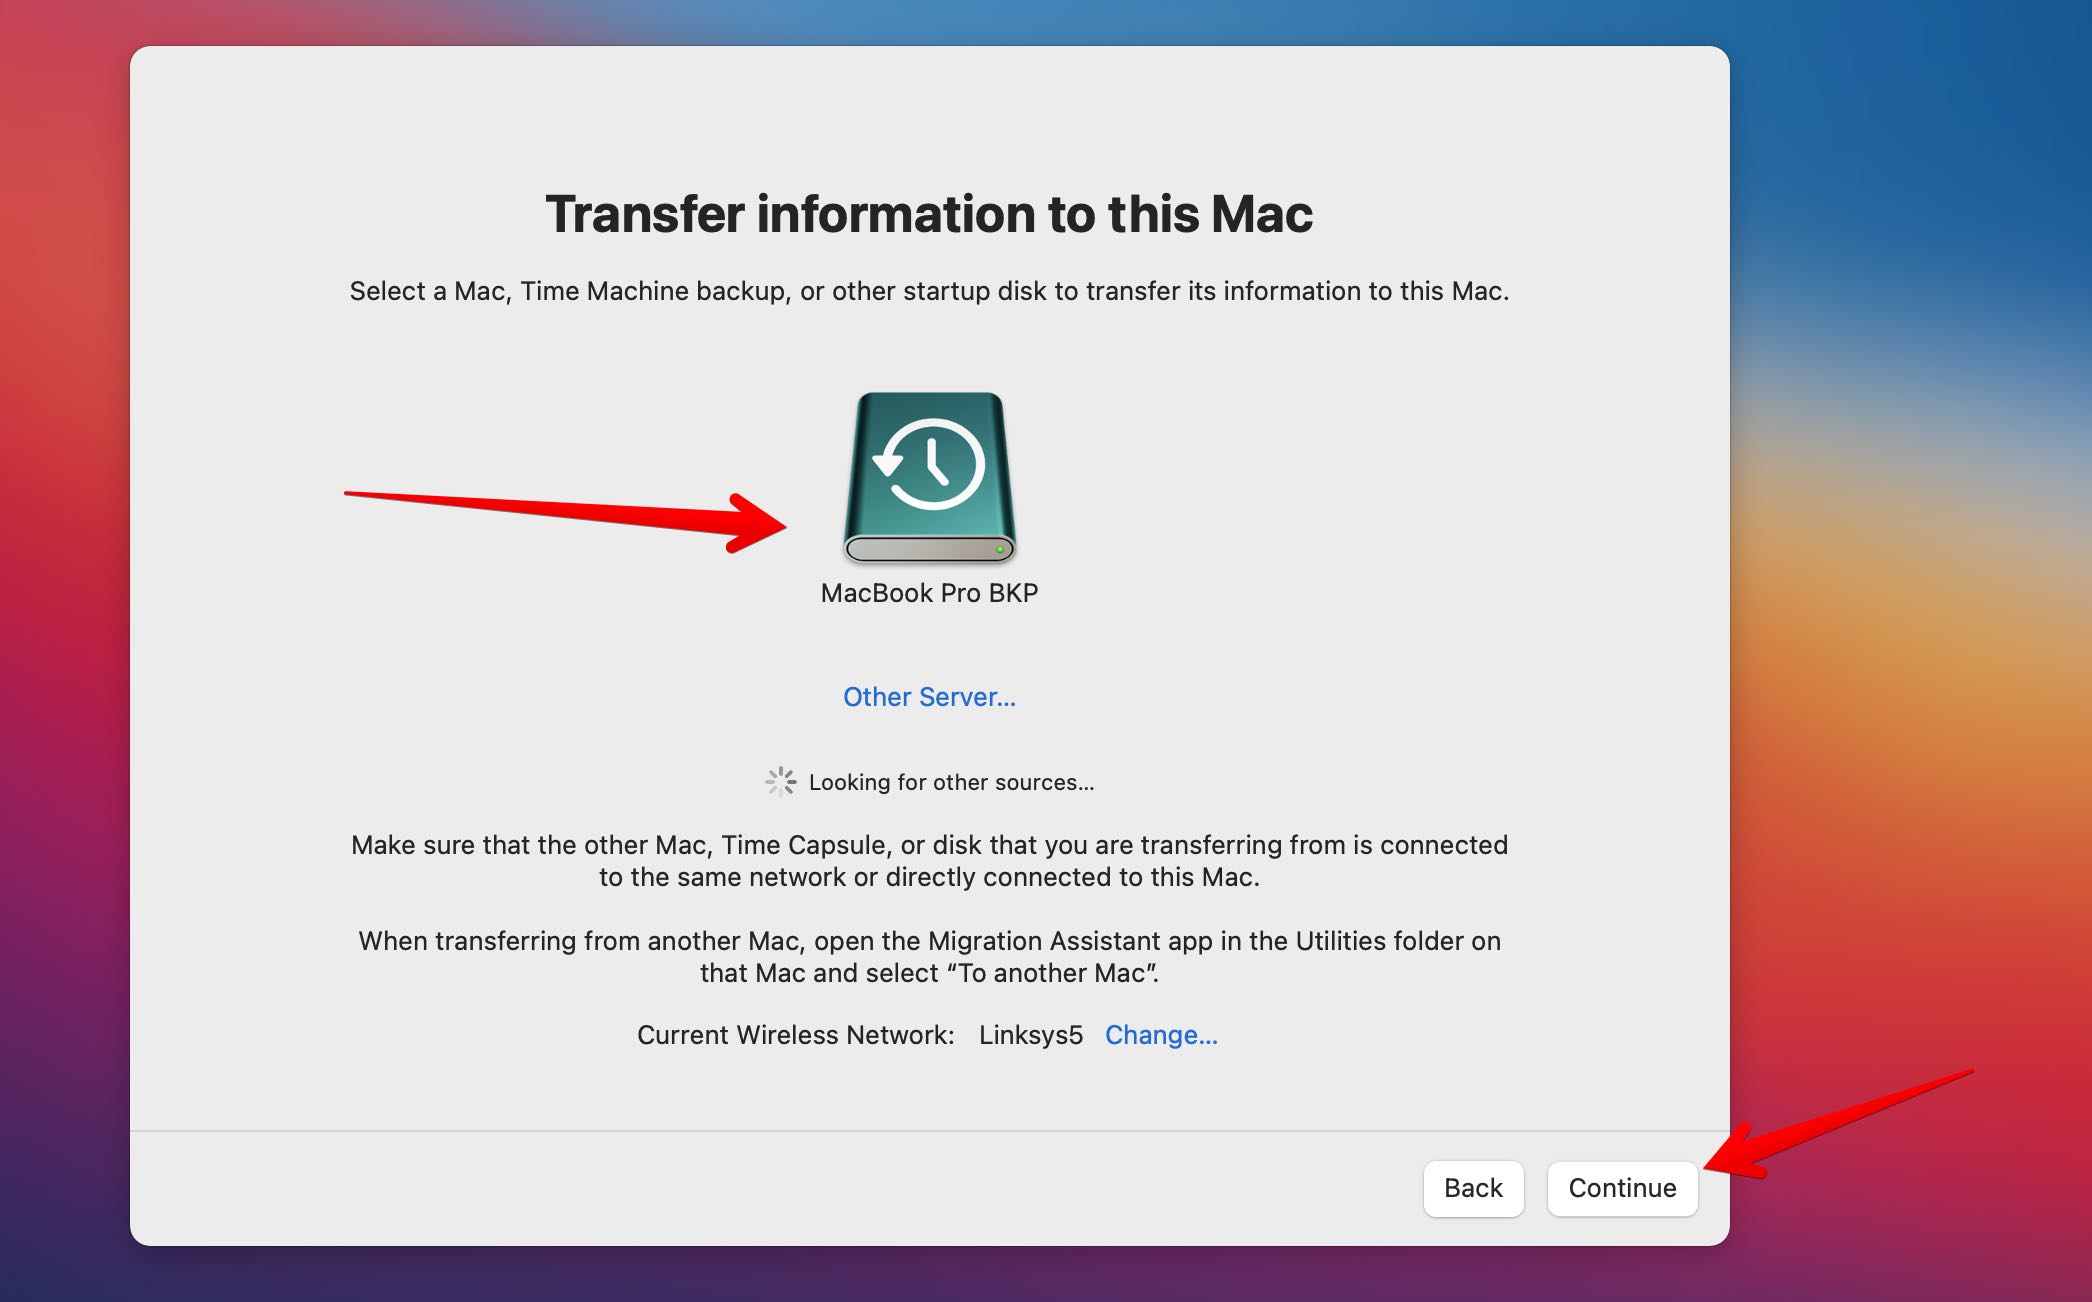
- Select the Time Machine backup you will use for recovery and click Continue.
- Choose which backup you wish to use for data recovery and click Continue.
- Select the information you want to transfer. You can transfer user accounts, applications, files, folders, and system settings.
- Click Continue to begin the transfer. It may take multiple hours for large restores to complete.
Recover Data Without Time Machine
Time Machine is a great tool for recovering deleted files and folders. The catch is that you need to have backed up your data using Time Machine for it to be useful.
Unfortunately, you might not always have made a backup of the files that need to be recovered. They may have only been on your computer for a short time before being deleted.
When deleted files are not available in a backup or your Trash bin, data recovery software may be able to get them back for you. The macOS does not immediately physically remove data from a storage device when it is deleted. The operating system removes the logical links that make the data accessible and marks the storage space as being available for use.
Until the deleted items are overwritten by new information, data recovery software can repair the logical links and restore access. It essentially undeletes the deleted data, making it accessible to the OS and other applications.
IMPORTANT: If you plan on using data recovery software, stop using the affected disk as soon as you suspect data loss. Continued use of the device risks overwriting or corrupting the data you want to restore.
To recover data from your Mac (without Time Machine) using Disk Drill:
- Connect a drive to your Mac, ensuring that it has enough storage space for the recovered files.
- Download and install Disk Drill. If possible, do so in a separate partition to avoid overwriting your data.
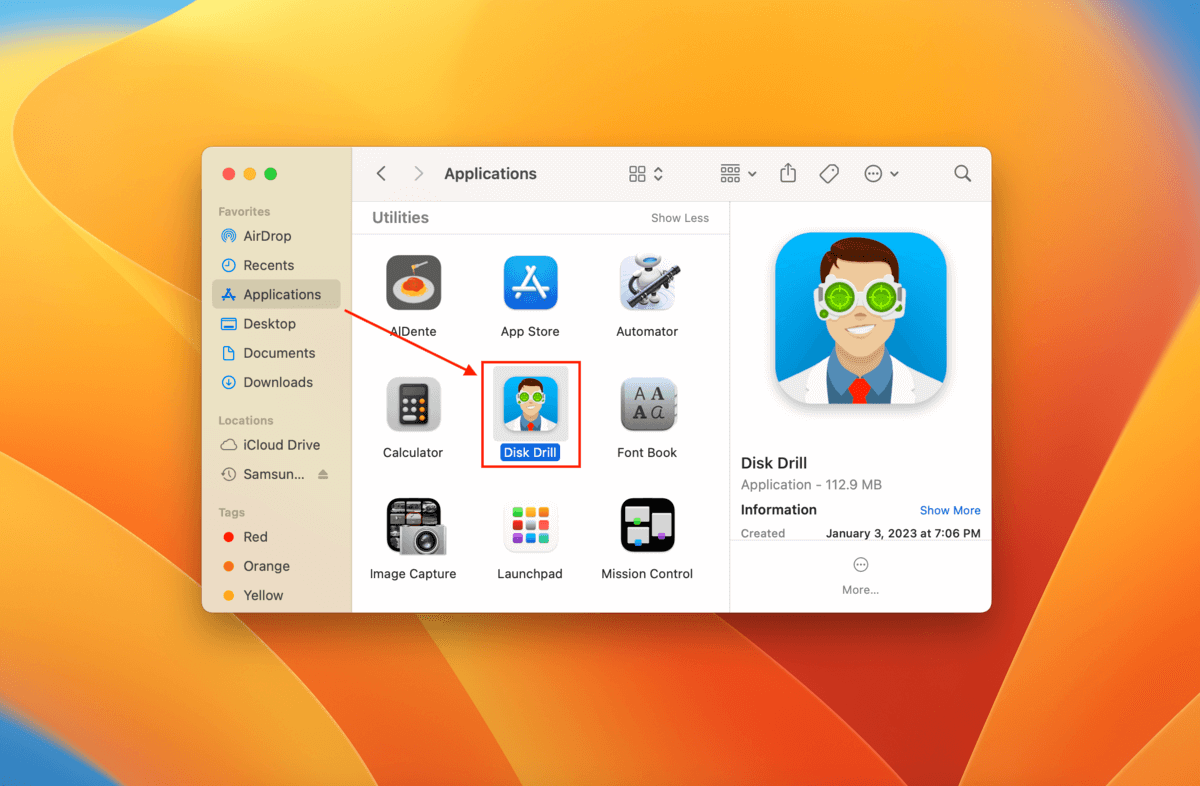
- Launch Disk Drill (Finder > Applications).
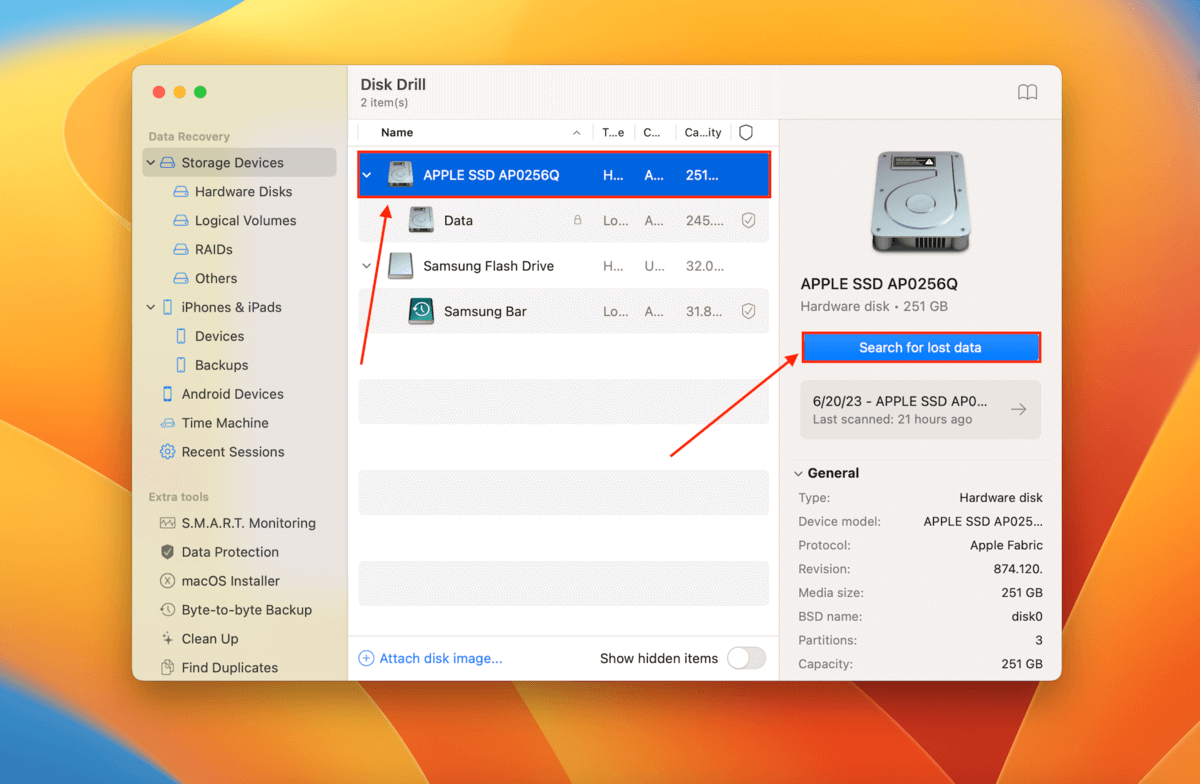
- Select your Mac drive from the drive list. It’s usually labeled APPLE SSD or something similar. Then, click Search for lost data.
- Wait for Disk Drill to finish scanning your Mac and click Review found items.
- Expand the Deleted or lost and Reconstructed tabs and browse the found data. Use the search and filter tools to organize the scan results.
- Click on your files at least once to trigger the preview tool. Mark the boxes beside the files and folders you want to restore. Then, click Recover.

- Select a folder on the drive we connected in Step 1 as the save location. Then, click Next.
How to back up your Mac with Time Machine in macOS
If you’ve never set up Time Machine before, we highly recommend that you do. It works quietly in the background while securing as much data as it can hold. It even stores some backups locally, in case you don’t have access to your Time Machine drive.
All you need is an external storage device (used solely for backups), like an external HDD. The setup is a bit different for older macOS versions, so we’ve prepared mini-guides for Ventura and Monterey or earlier.
While setting up Time Machine, you may be prompted to encrypt your backup. We suggest that you do so with a secure password to protect your data.
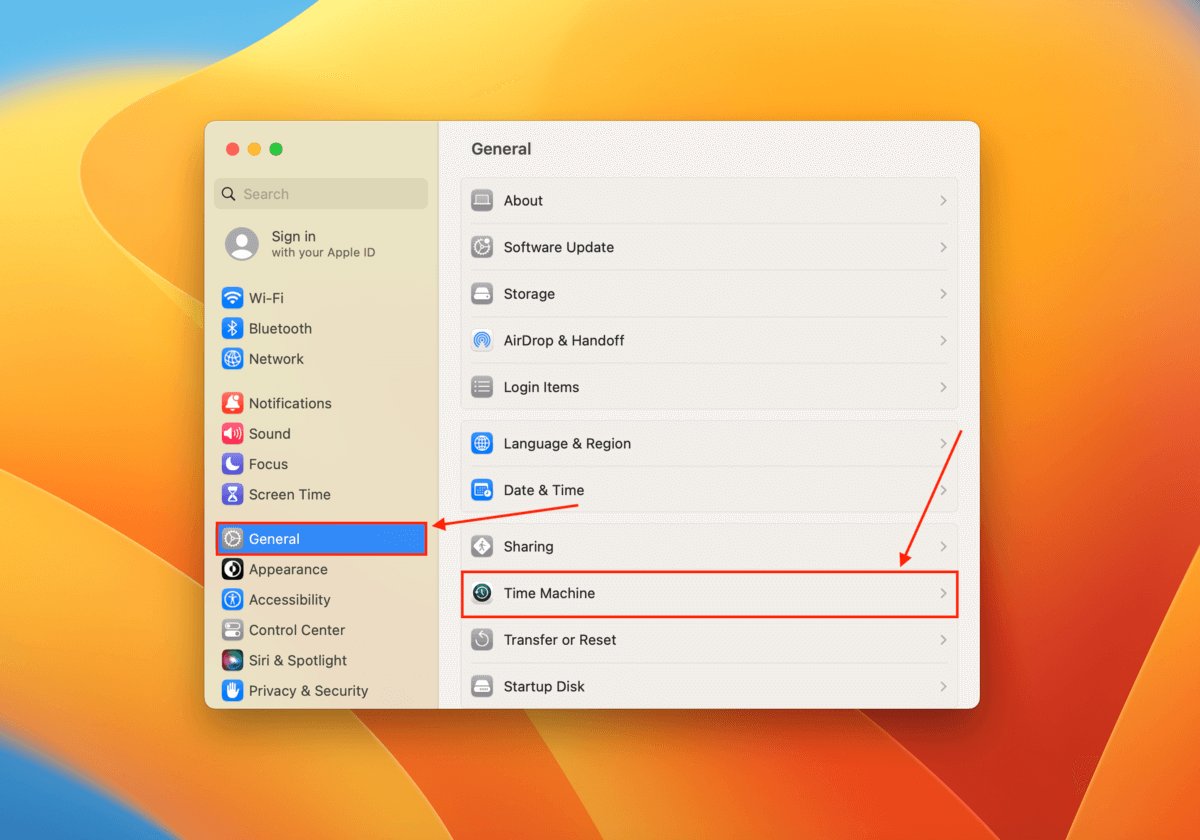
To back up your Mac using Time Machine on Ventura:
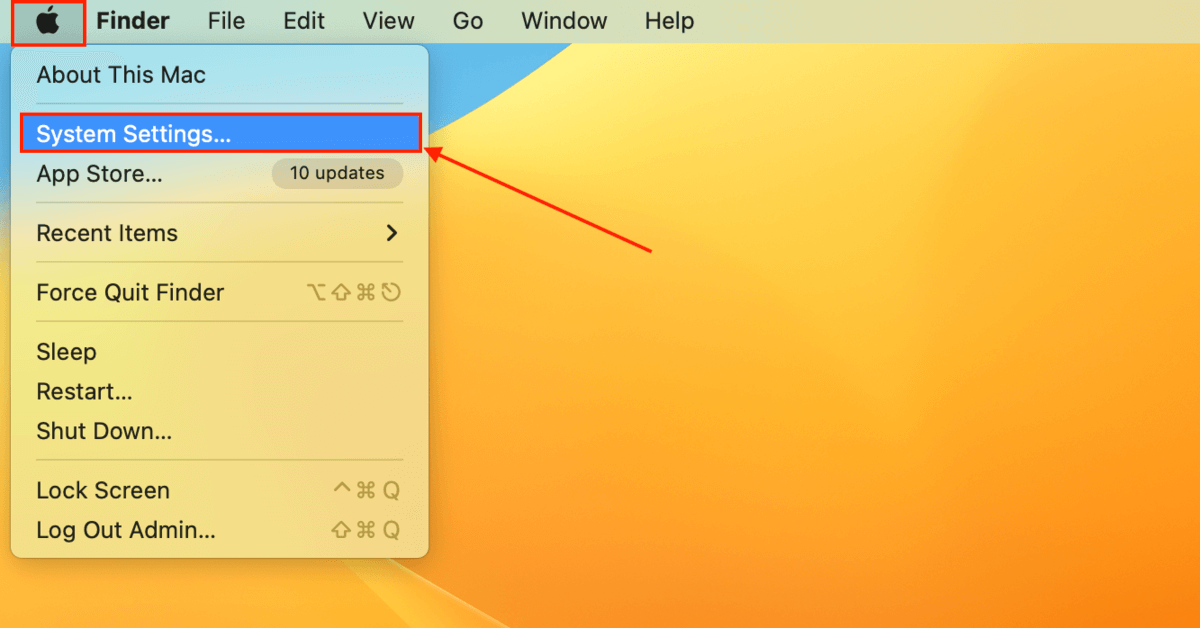
- Connect a storage device to your Mac, ensuring it has enough space for your data. Then, click the Apple menu > System Settings.
- Click General > Time Machine.
- Click the + button.
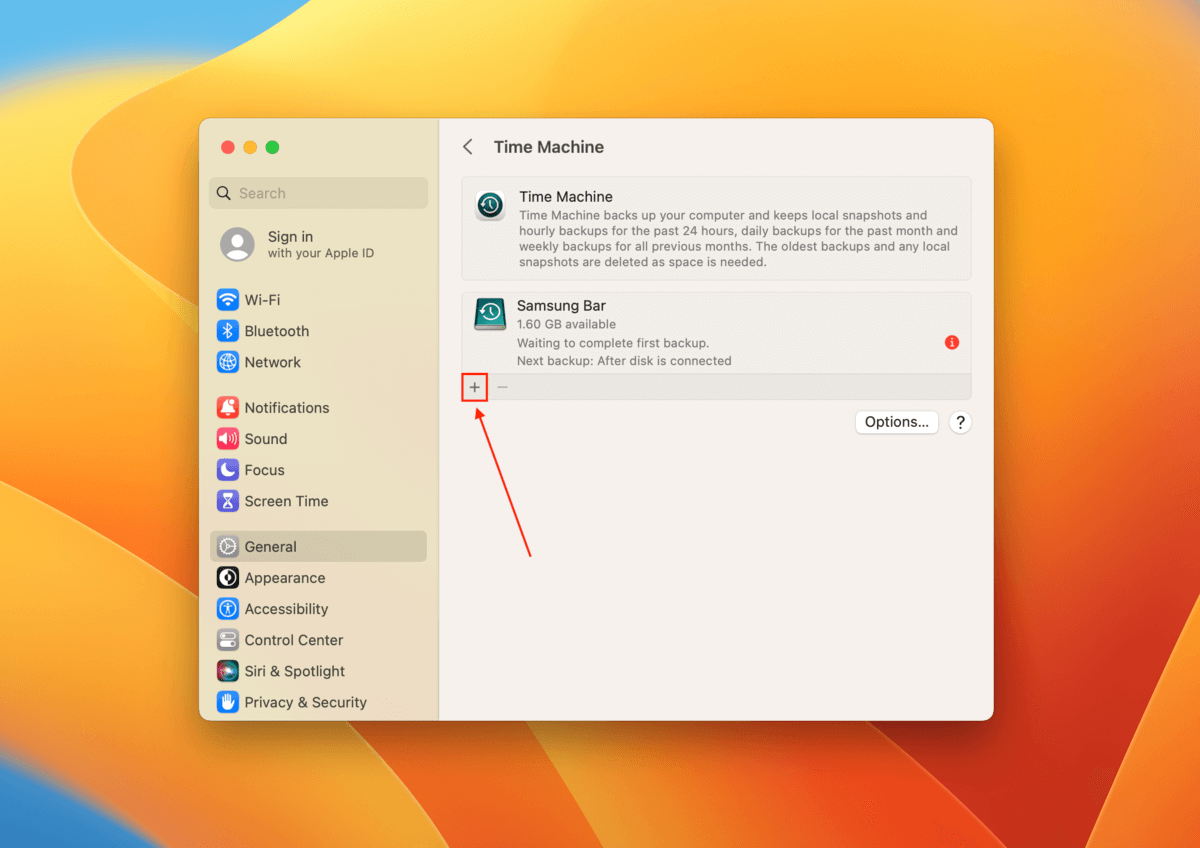
- Select the disk you connected in Step 1 and click Set up Disk… and follow the onscreen instructions. Once the process is complete, Time Machine will begin backing up your Mac.
To back up your Mac using Time Machine on Monterey or earlier:
- Connect a storage device to your Mac, ensuring it has enough space for your data. Then, click the Apple menu > System Preferences.
- Click on the Time Machine icon.
- Click Select Disk…
- Select the drive you connected in Step 1 and click Use Disk. Time Machine will not start backing up your data.
Time Machine will automatically delete the oldest backups in your drive when it hits full capacity to make space for new backups.
How Time Machine Backups Work When using iCloud
iCloud is an Apple feature that automatically keeps your Mac files backed up and synced to a cloud server. That means if you have File A on your Mac with iCloud enabled, you’ll also have a mirror copy of File A in the cloud. If you delete File A from your Mac, it also gets deleted from the cloud.
iCloud is important to understand because it can affect what data Time Machine backs up. This is directly related to the Optimize Mac Storage setting, which we’ll discuss below.
Optimize Mac Storage ON
When Optimize Mac Storage is turned ON, files that you haven’t accessed for a long time get offloaded or removed from your local storage, but they will be accessible in iCloud. The purpose of this setting is to free up space on your local drive.
In Finder, offloaded files will look like “blank” files with a cloud icon beside them. You can click this icon to re-download a file from iCloud.
If you enabled Time Machine after a file gets offloaded, that file won’t be included in the backup. However, you should still be able to access it on iCloud.com.
In this situation, you should be safe in case your MacBook gets stolen or destroyed. You can also revert to an old version of a file easily. But if you delete a file that Time Machine was unable to back up (because it was offloaded at the time), you won’t be able to recover it – assuming that you also deleted it from the Trash folder.
Optimize Mac Storage OFF
When Optimize Mac Storage is turned OFF, all of your files are stored locally. That means that Time Machine will back up 100% of your data. However, that means you’ll need enough storage for all of your files, even the ones you never use.
In this situation, your files will always be completely backed up, but at the cost of having a large local storage disk.
Our suggestion? Use Time Machine and turn Optimize Mac Storage ON. Just make sure to download old files (by clicking the cloud icon beside them) every once in a while and they won’t be offloaded again for some time. Just remember to run the backup again
FAQ
How can I restore individual files from Time Machine to a new Mac?
Follow these steps to recover individual files from a Time Machine to a new Mac.
- Connect the disk with the Time Machine backup to your computer.
- Open Migration Assistant which can be found in the Utilities folder inside the Applications folder.
- Choose the option to transfer From a Mac, Time Machine backup, or startup disk. Click the Continue button.
- Select the Time Machine backup you will use for recovery and click Continue.
- Choose the backup to use for recovery and click Continue.
- Select the information you want to transfer. You can transfer user accounts, applications, files, folders, and system settings.
- Click Continue to begin the transfer.
How do I access Time Machine files from another Mac?
Use the following steps to access Time Machine files made on one Mac from another Mac.
- Connect the Time Machine backup drive to your computer.
- Open Finder and select the external storage device.
- Select the folder named Backups.backupdb.
- Double-click on the folder with the name of the Mac.
- Folders containing backed-up files are identified by the date of the backup. You can drill down into the folders to locate specific documents.
Can I restore my Mac to an earlier date without a Time Machine backup?
Without a Time Machine backup, you will not be able to restore your Mac to an earlier date.
Why is my Time Machine Restore button is greyed out?
Your Time Machine Restore button will be greyed out if you have not selected a valid file or folder for recovery.
How to selectively recover files from your old Mac?
To selectively recover files from your old Mac, you can use Time Machine with the Migration Assistant app. Using the data from your Time Machine drive, Migration Assistant will help you choose what data you want to carry over.
Which drive should I choose for Time Machine?
The drive you choose for Time Machine depends on your budget, but here are some tips to steer you in the right direction:
- External SSD – This is the biggest budget breaker. SSDs are faster and more reliable than traditional hard drives but are much more expensive. Alternatively, keep multiple traditional HDDs.
- Capacity – 2x of your Mac’s hard drive for multiple backups and file versions. Note that Time Machine deletes old backups to make space for new ones.
- Speed – Use a drive with a fast transfer rate; ideally USB 3.0 or Thunderbird.
- Reliability – Choose a drive from a reliable manufacturer that offers a good warranty policy. Make sure to scope out real user reviews.
Conclusion
Losing data on your Mac is never pleasant, but the problem can often be minimized if you have Time Machine backups available. You should use the tool regularly to backup your valuable information. Your backups might be the only way to recover from a serious data loss scenario. The procedures outlined above will help you restore files from Time Machine backups.
When you can’t restore files from Time Machine, data recovery software may be able to get your data back. For the best results, stop using the device with the lost files until recovery is complete. Good luck restoring your data!
This article was written by Robert Agar, a Staff Writer at Handy Recovery Advisor. It was recently updated by Alejandro Santos. It was also verified for technical accuracy by Andrey Vasilyev, our editorial advisor.
Curious about our content creation process? Take a look at our Editor Guidelines.