
A lot of factors can influence an HFS formatted drive or partition that can lead to such complex issues as data loss. Whether it’s aging, malware, or your own mistake, it’s always overwhelming to lose important files or even a whole partition. Luckily, there is a solution even for the most difficult situations.
In this article, we’ll cover the most effective methods that should help you with HFS data recovery on a troublesome disk/partition.
What is HFS+ & Where Is It Used?
HFS and HFS+ (also known as Mac OS Standard and Mac OS Extended) are file systems developed by Apple. HFS+ remained the primary file system for Mac computers up until it was replaced by APFS in 2017.
But despite the fact that it isn’t the main macOS file system anymore, it’s still being widely used in various devices, such as internal and external drives, solid-state drives, etc.
In general, the main reason why some people still prefer to use the HFS file system over APFS is that it’s compatible with older Macs (those that are powered by macOS 10.12 Sierra and earlier). Besides, HFS has proven to be a better option for mechanical drives, and it also gives support to the Fusion drives while APFS doesn’t.
Can a Deleted HFS Data be Recovered?
Depending on the situation, you can potentially recover data from any type of hard drive on a Mac. So, the answer is — yes, it’s possible to complete an HFS file recovery from most devices. Even if you’ve deleted the whole partition from your storage device or formatted the hard drive, there is a way to get back the missing data.
Whether you want to restore the deleted files from an HFS+ internal hard drive, external storage device, or a solid-state drive, there are a few factors that can influence the data recovery results:
- ⌛ Time: Well, it’s quite simple; the longer you wait, the fewer chances you’ll have to recover the deleted files. So it’s essential to start the recovery process as soon as you’ve noticed that your files are missing.
- ❓ Reason: If some physical damage has been done to the troublesome storage device, you won’t be able to recover your data just with the help of software. In such a case, your best option is to get help from a professional data recovery lab.
- 🖱️ Usage after data loss: It’s important to stop using the damaged drive once you’ve noticed an issue. If you continue to use it even after you’ve realized that files are missing, there is a possibility that the deleted file will get overwritten with new data, which will crash your chances of successful data recovery.
How to Recover Lost or Deleted HFS+ Data
Whether you’ve lost specific files from an HFS/HFS+ drive or the whole partition due to corruption, disk failure, or basic human error, one of these data recovery methods should help you with restoring the missing data.
Option A: Recover Specific Files from an HFS+ Formatted Drive
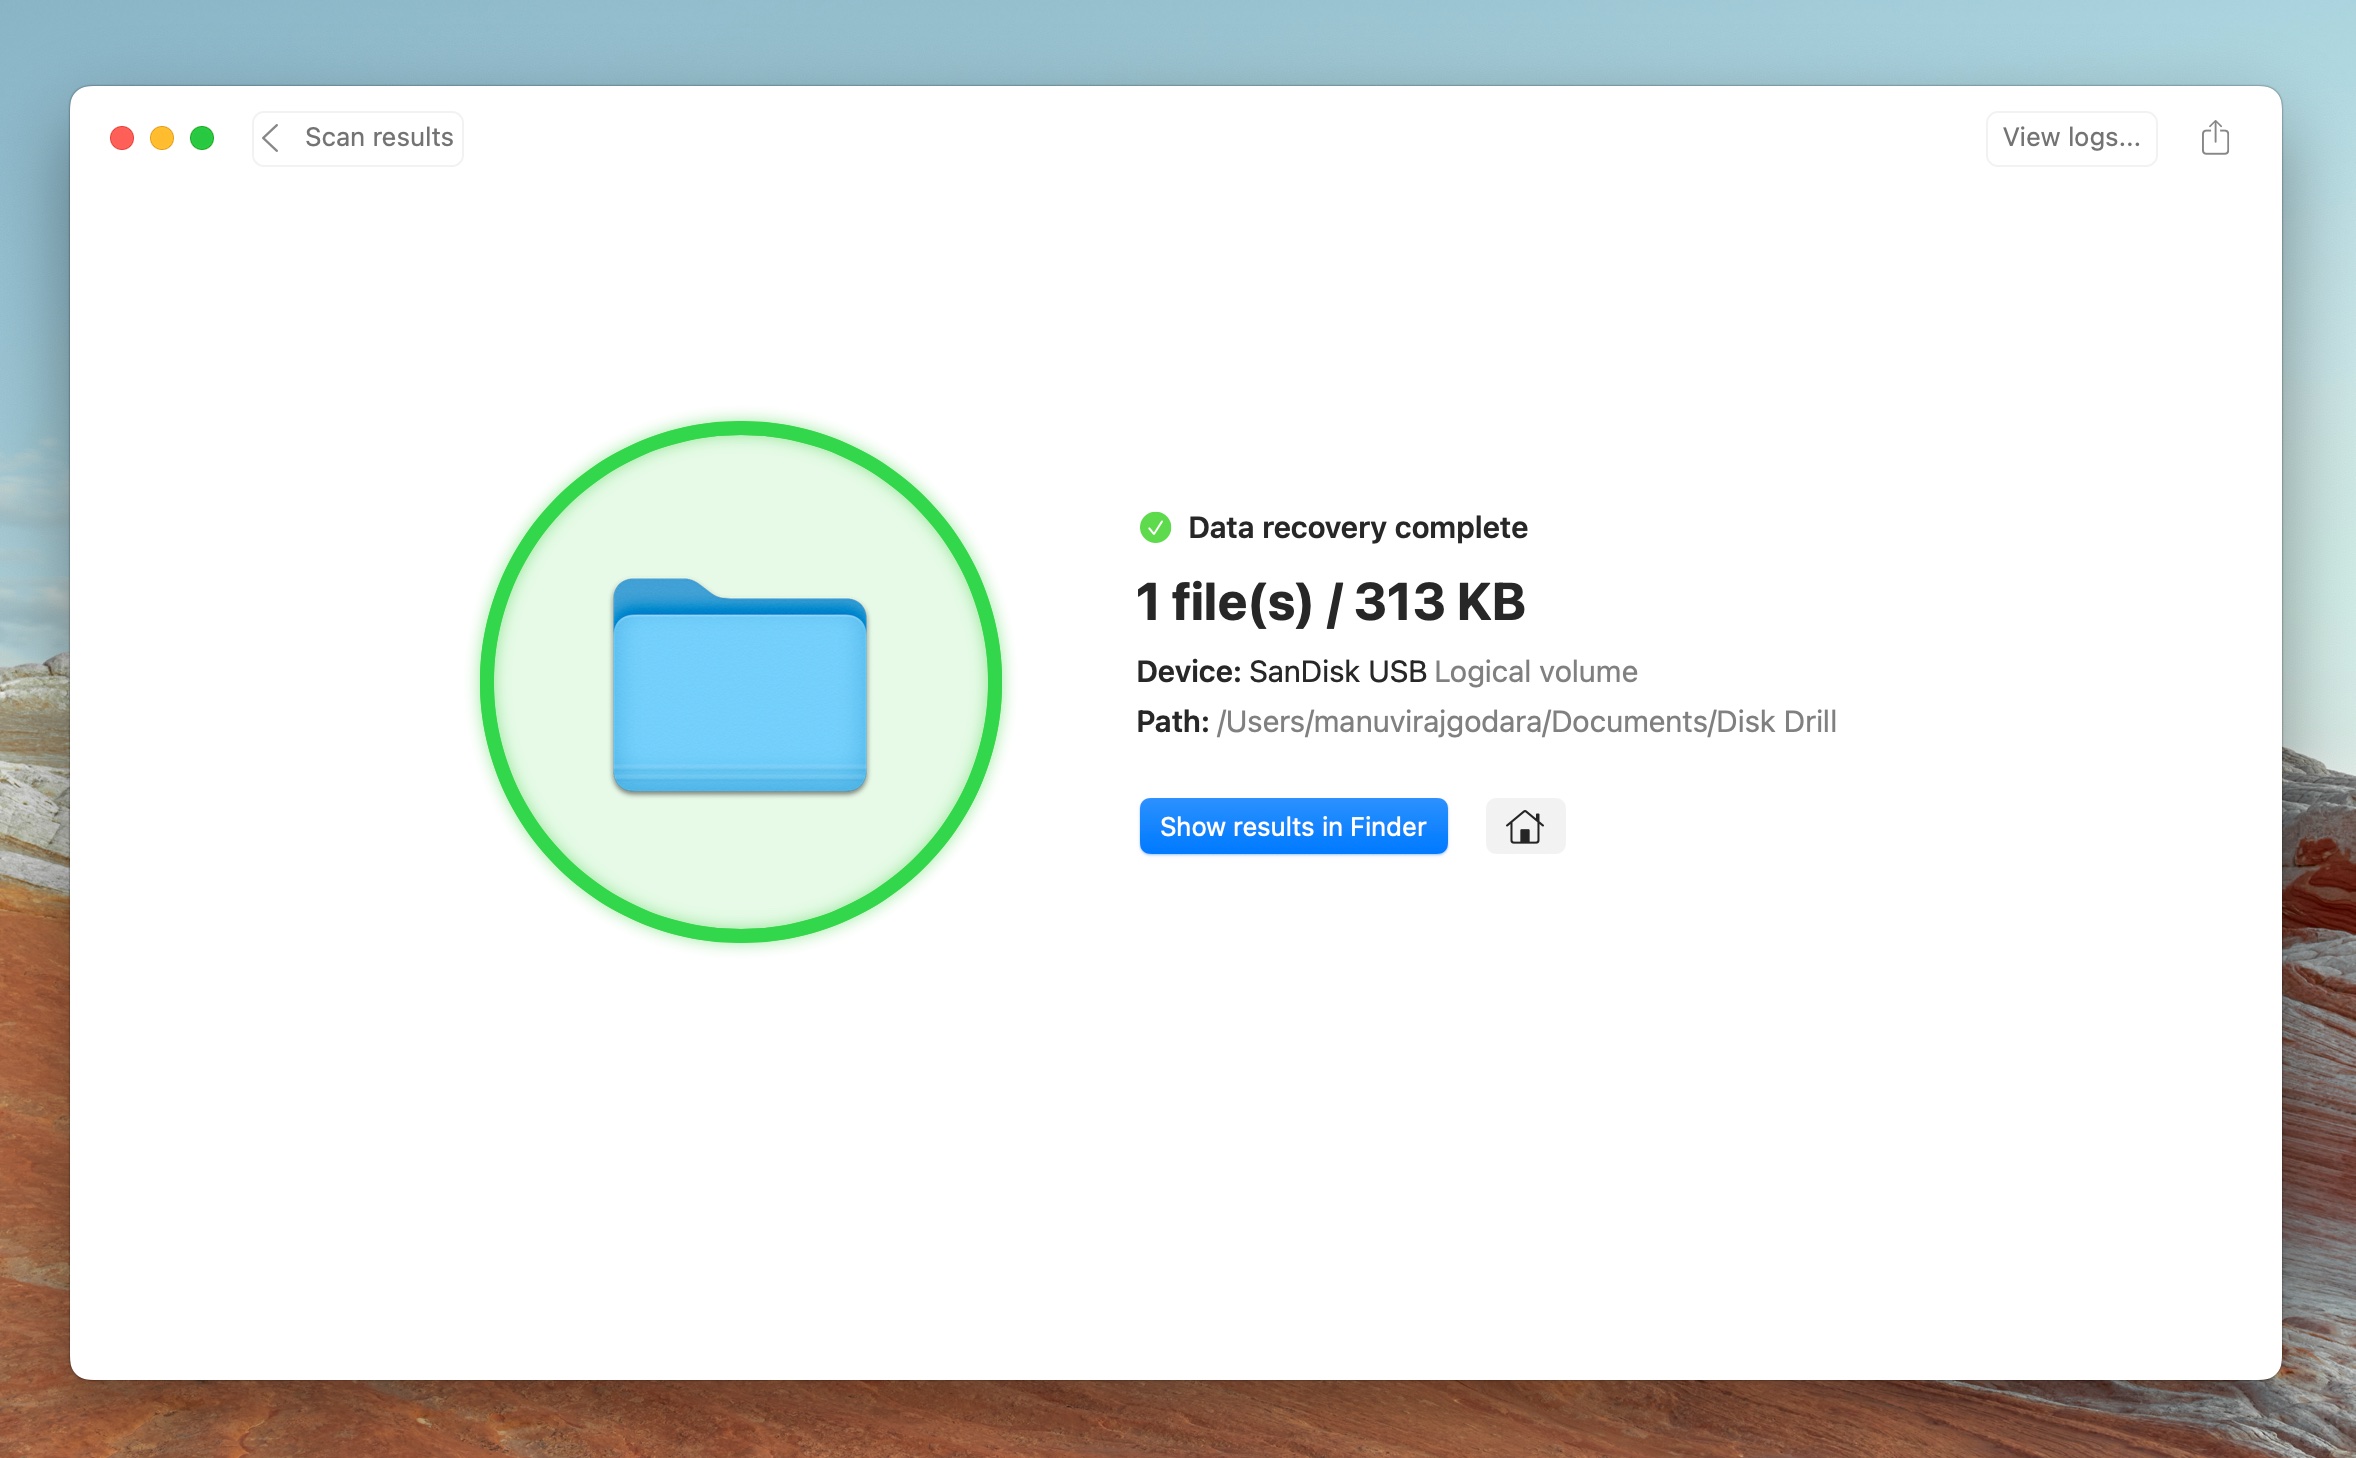
![]() If you’ve mistakenly erased valuable data from an HFS/HFS+ drive or partition, you might still have a good chance of recovering it. Once you delete a file, it doesn’t permanently disappear right away. The key is to act as fast as possible to make an attempt to recover the deleted files while the data sectors with the file still exist on the drive.
If you’ve mistakenly erased valuable data from an HFS/HFS+ drive or partition, you might still have a good chance of recovering it. Once you delete a file, it doesn’t permanently disappear right away. The key is to act as fast as possible to make an attempt to recover the deleted files while the data sectors with the file still exist on the drive.
When it comes to recovering specific files from an HFS disk, the best option that you have is to use specialized data recovery software. For this article, we’ll show you how to recover data from an HFS+ drive or partition with a tool called Disk Drill. We chose this application because it’s suitable for users with various tech knowledge levels, it has a proven record of successful data recovery results, and most importantly, it has a great support of HFS.
If your HFS+ drive refuses to show up in Finder, it’s usually because of a corrupt, or missing file system. Fortunately, Disk Drill can bypass this, and still scan and recover your files, as long as your drive is visible in Disk Utility with its correct storage capacity.
Disk Drill is a tool trusted by many Mac and Windows users. It’s pretty versatile and works with all major file systems: APFS, HFS/HFS+, EXT3/EXT4, NTFS, FAT32, and others. Also, it’s compatible with all kinds of internal and external drives and devices (USB flash drives, hard drives, SD cards, etc.).
Here’s how to recover data from HFS+ drives using Disk Drill:
- Download Disk Drill and install it on your Mac.
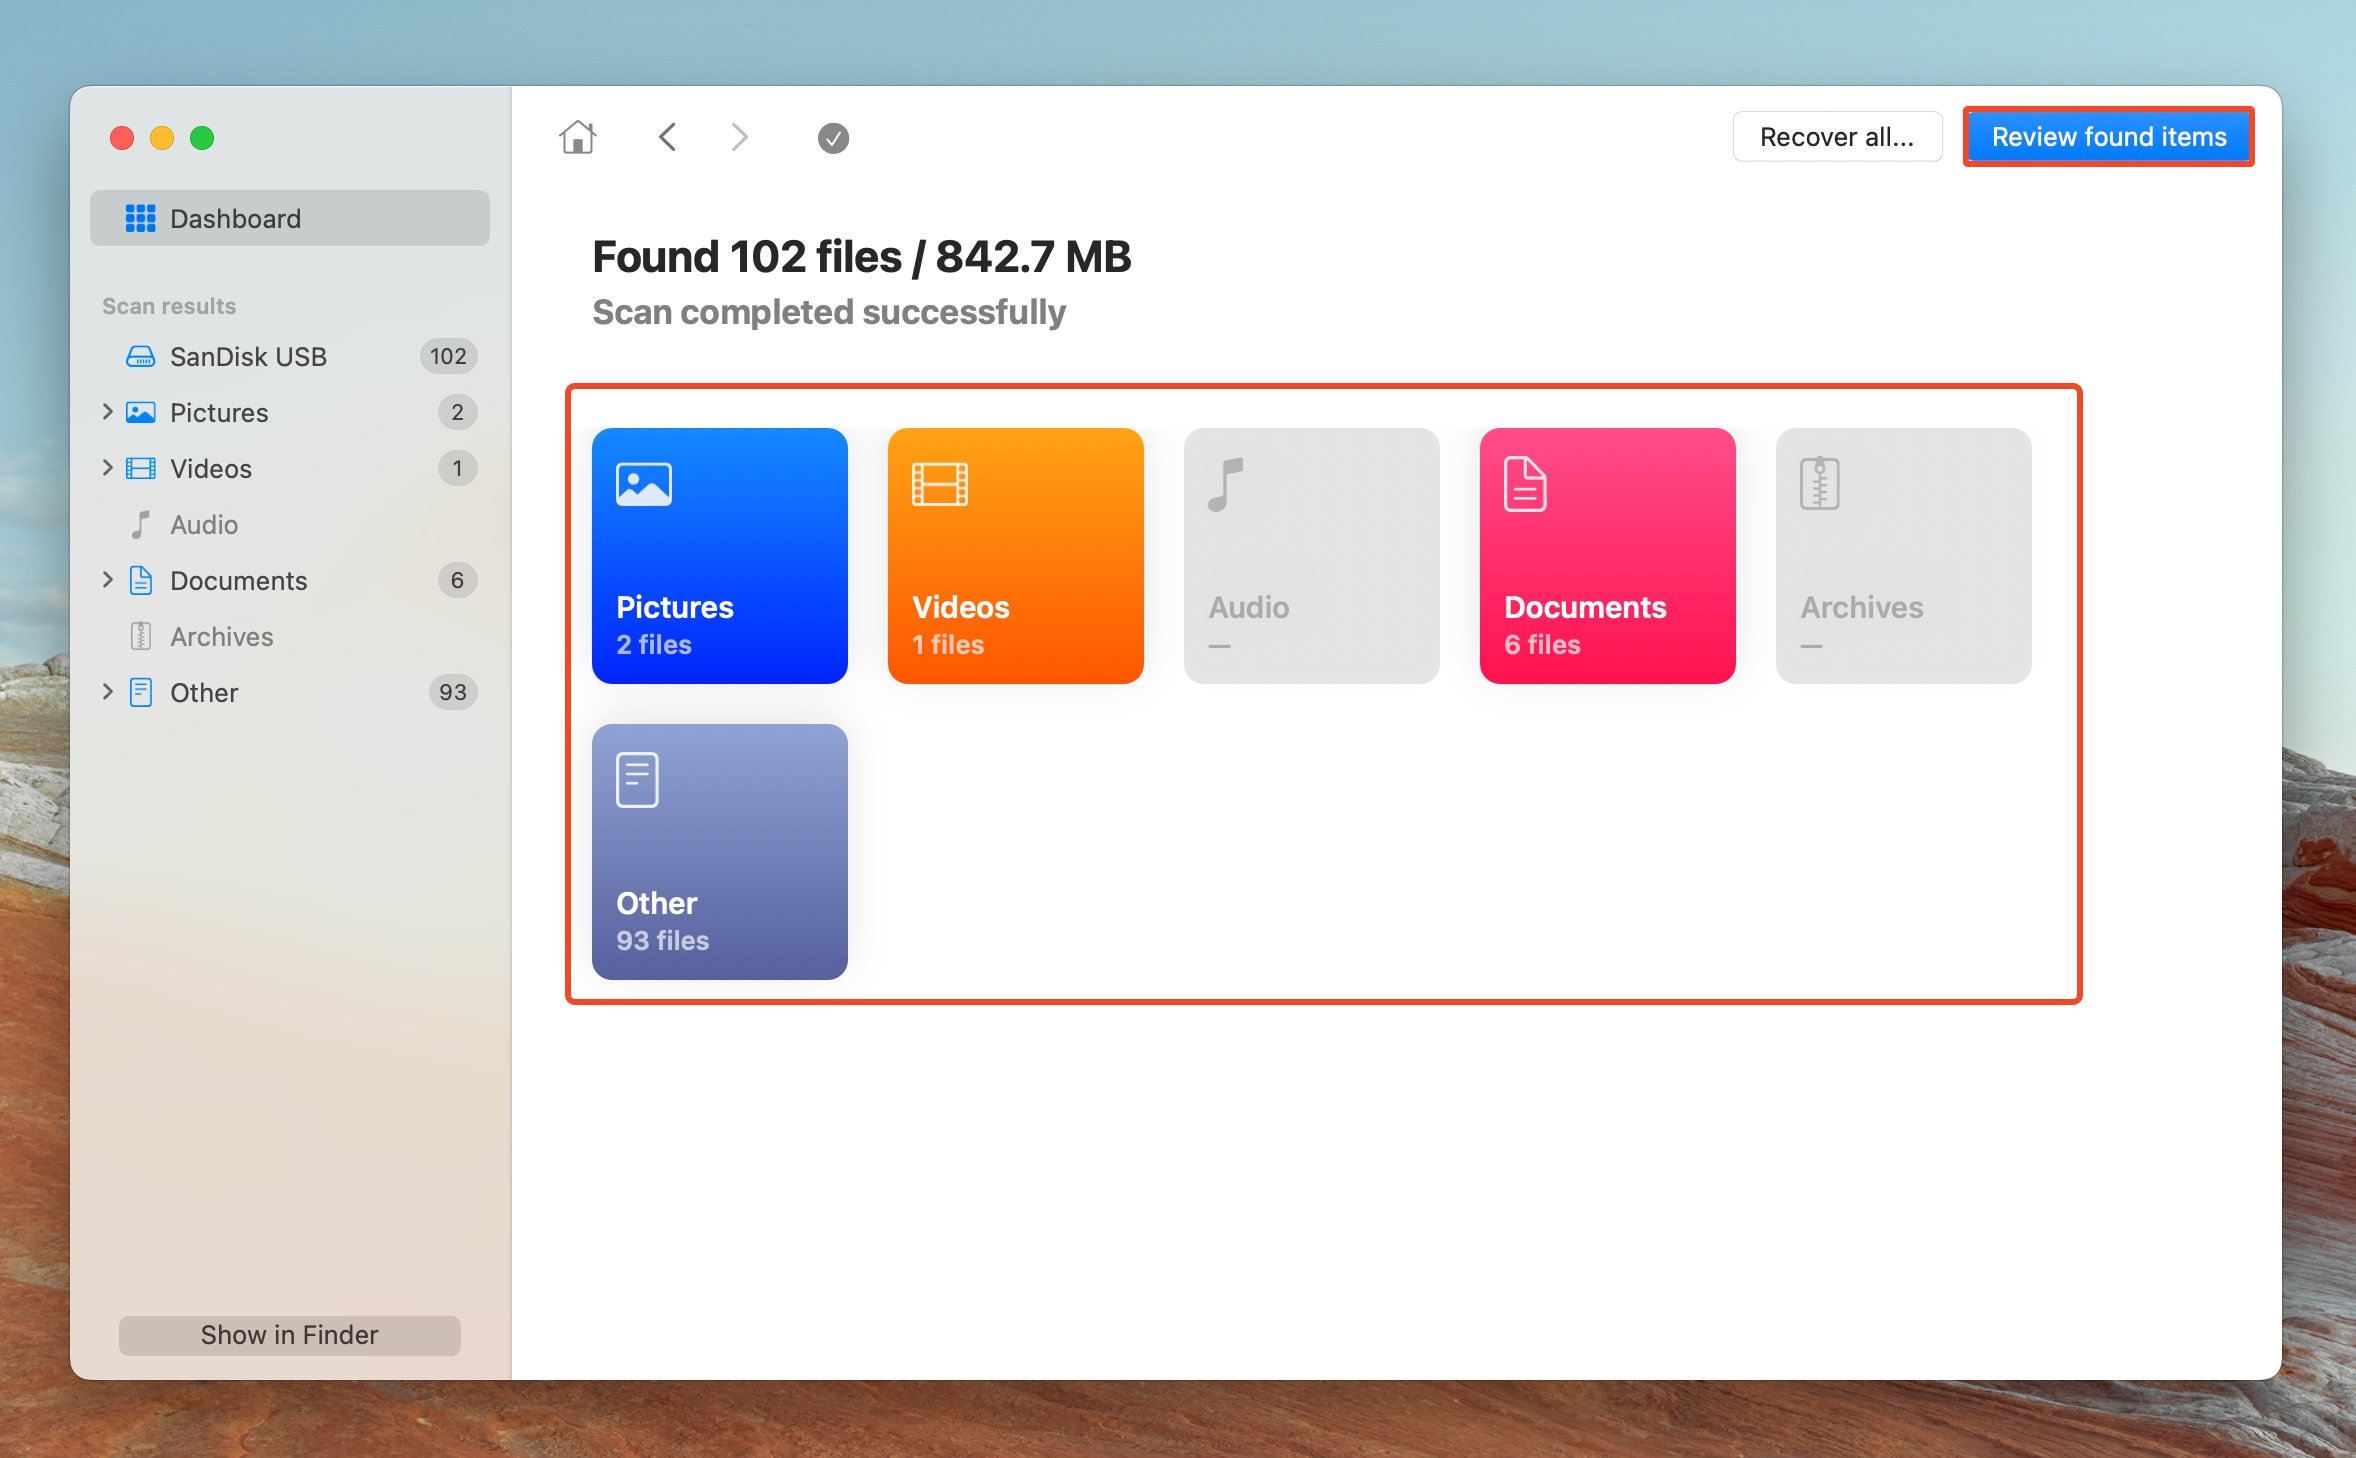
- Open Disk Drill, select the HFS drive, and click on Search for lost data.

- Click on Review found items to view recoverable files. If you wish to only view certain file types, click on the required file type tile (Pictures, Videos, Audio, Documents, Archives, and Other) instead.
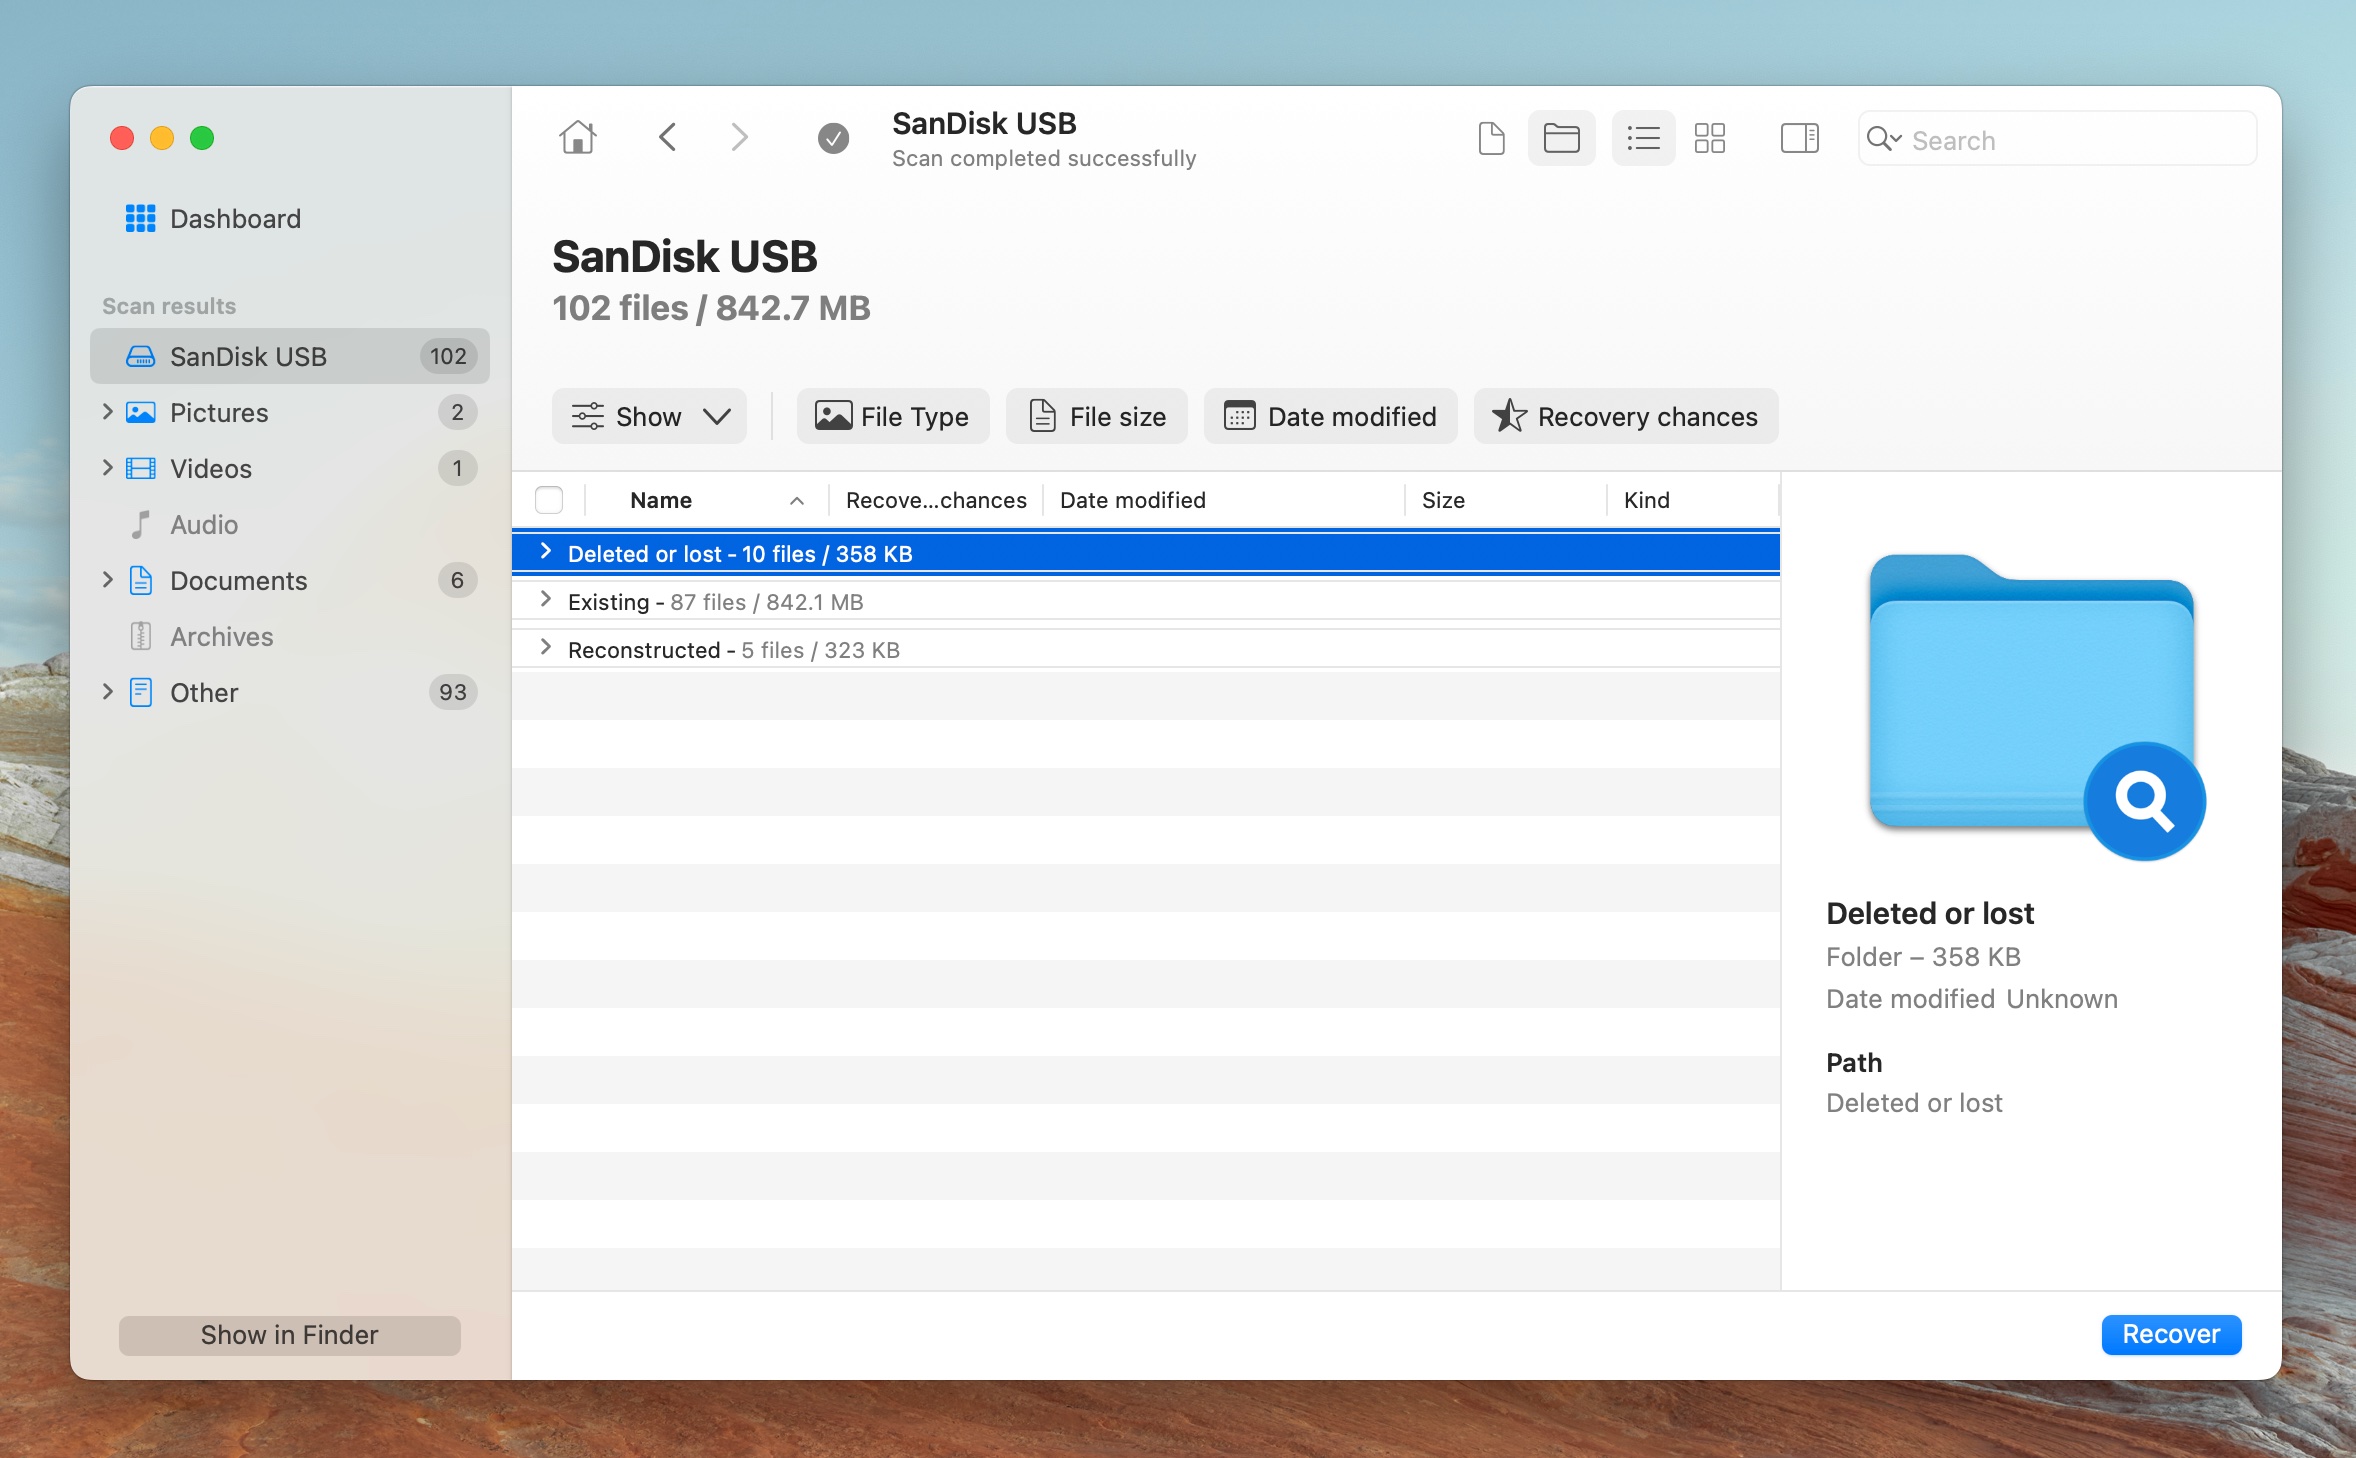
- Expand the Deleted or lost and Reconstructed sections to view deleted files that can be recovered. To view existing files on the drive, expand the Existing section.
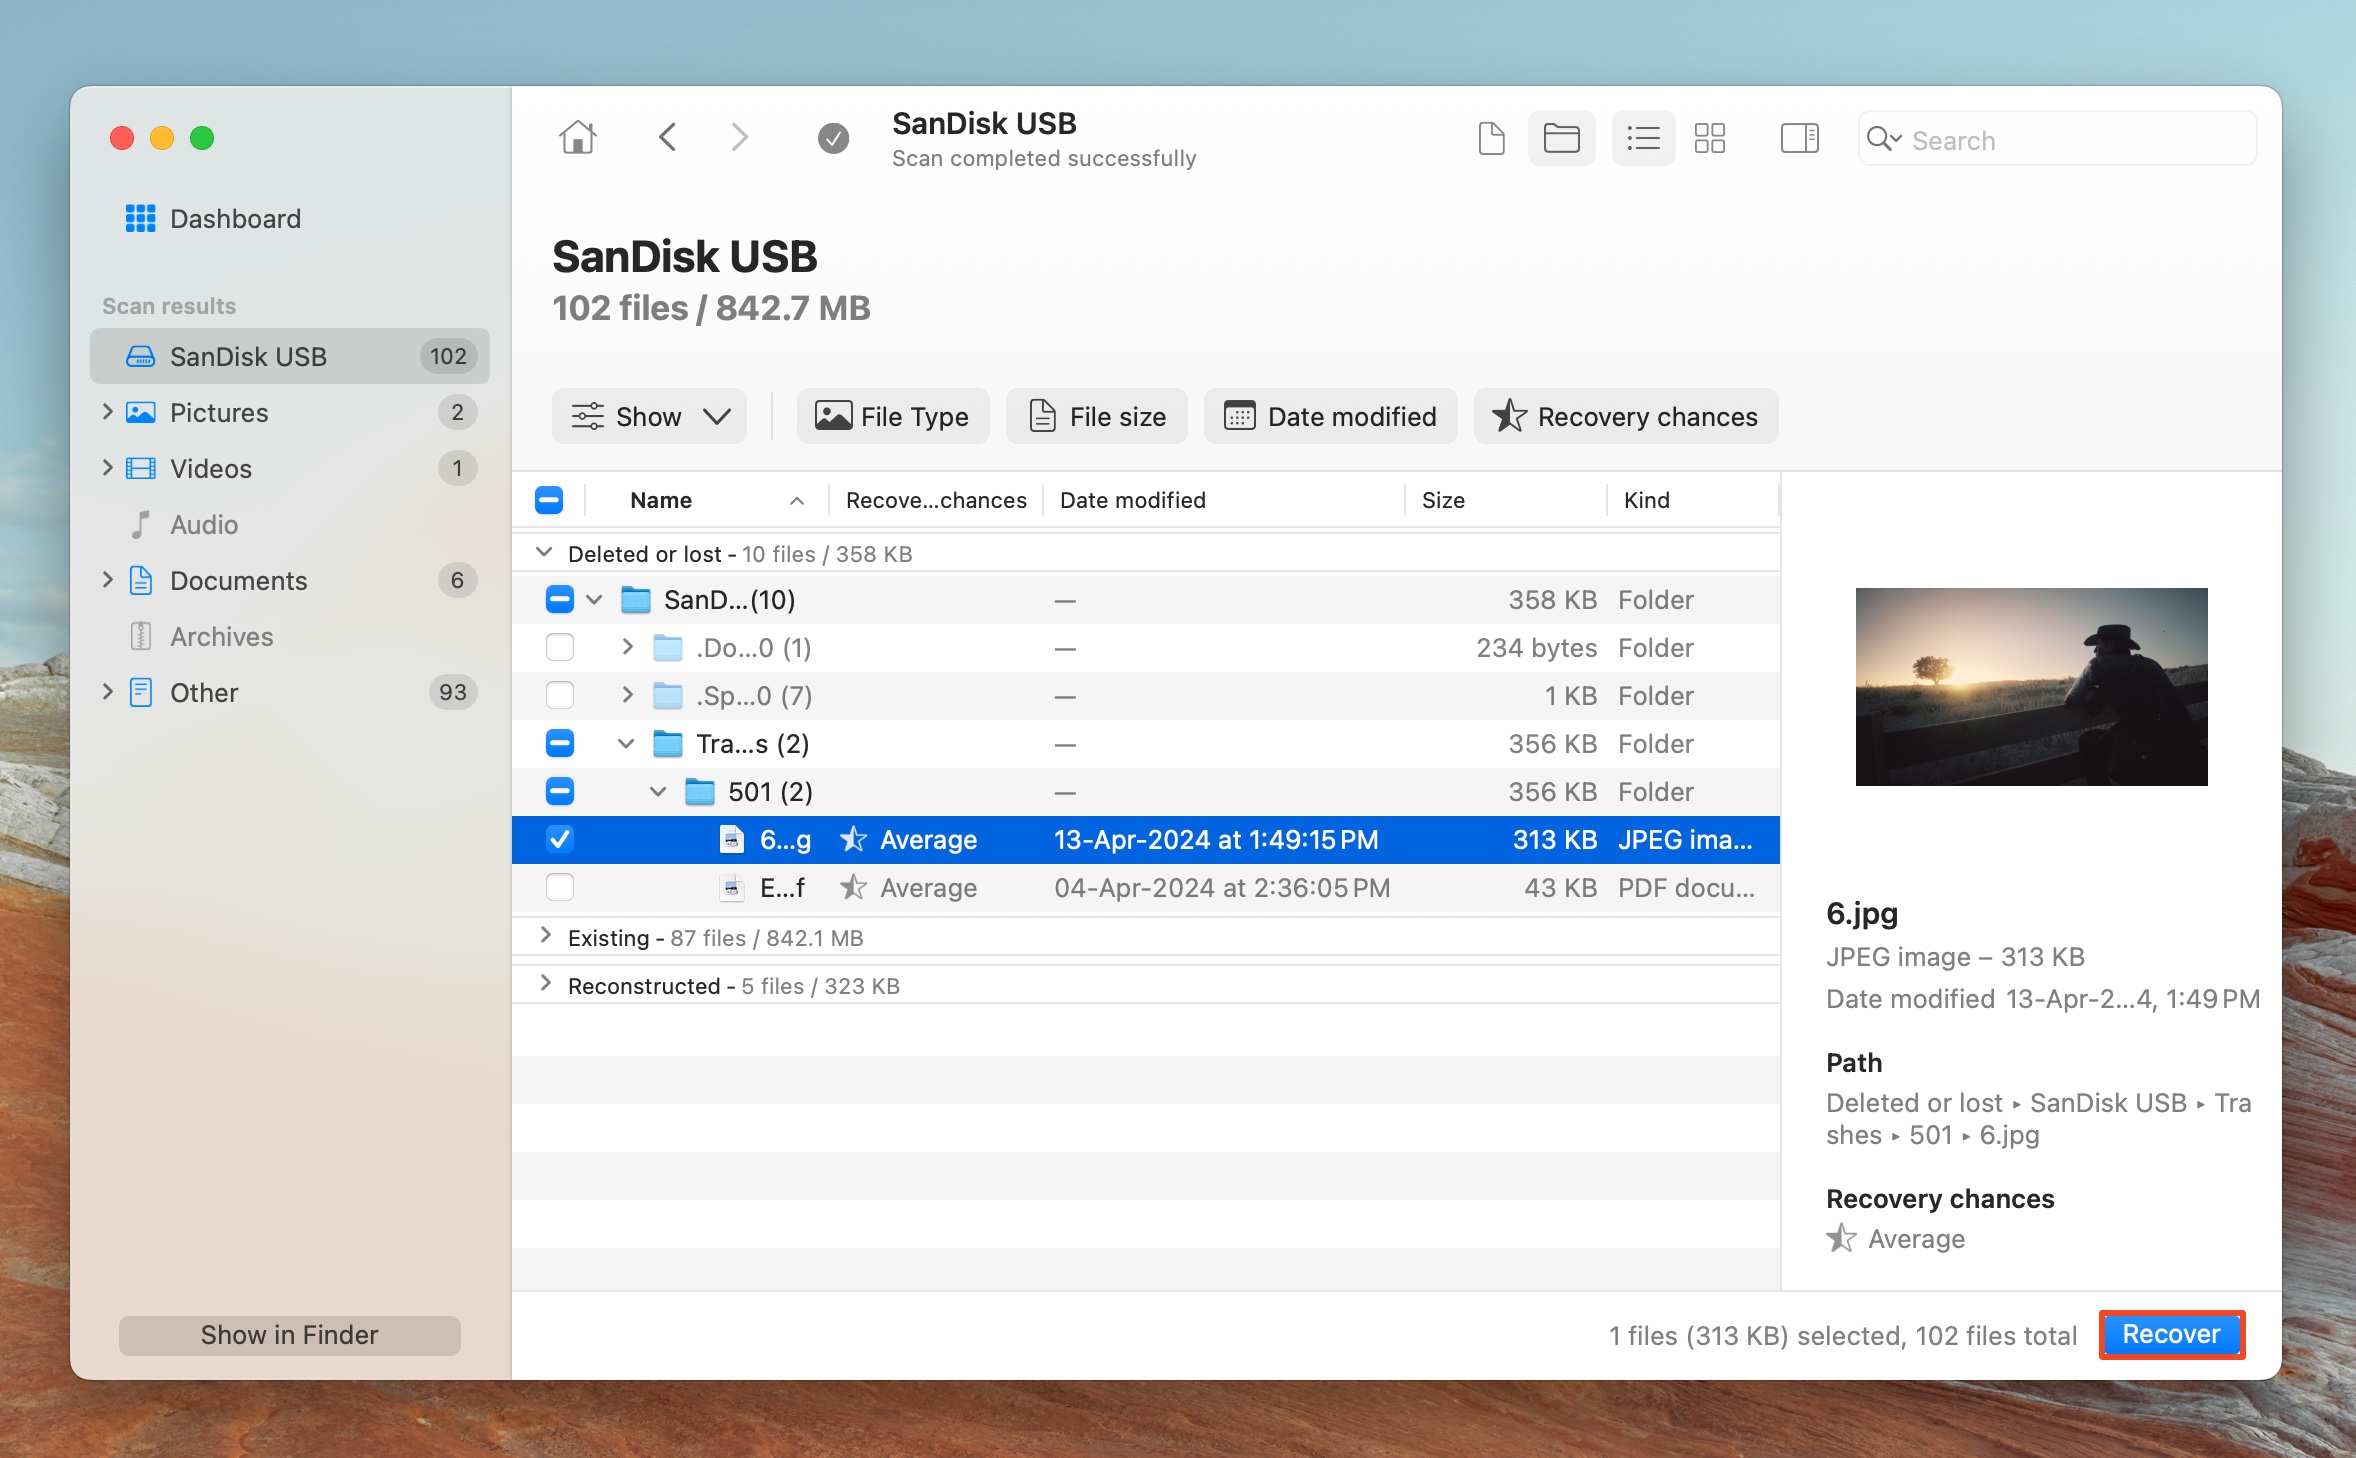
- Select the files you wish to recover, and click on Recover. Disk Drill displays a preview of the selected file, but you can manually preview any file by clicking the eye icon next to its filename.
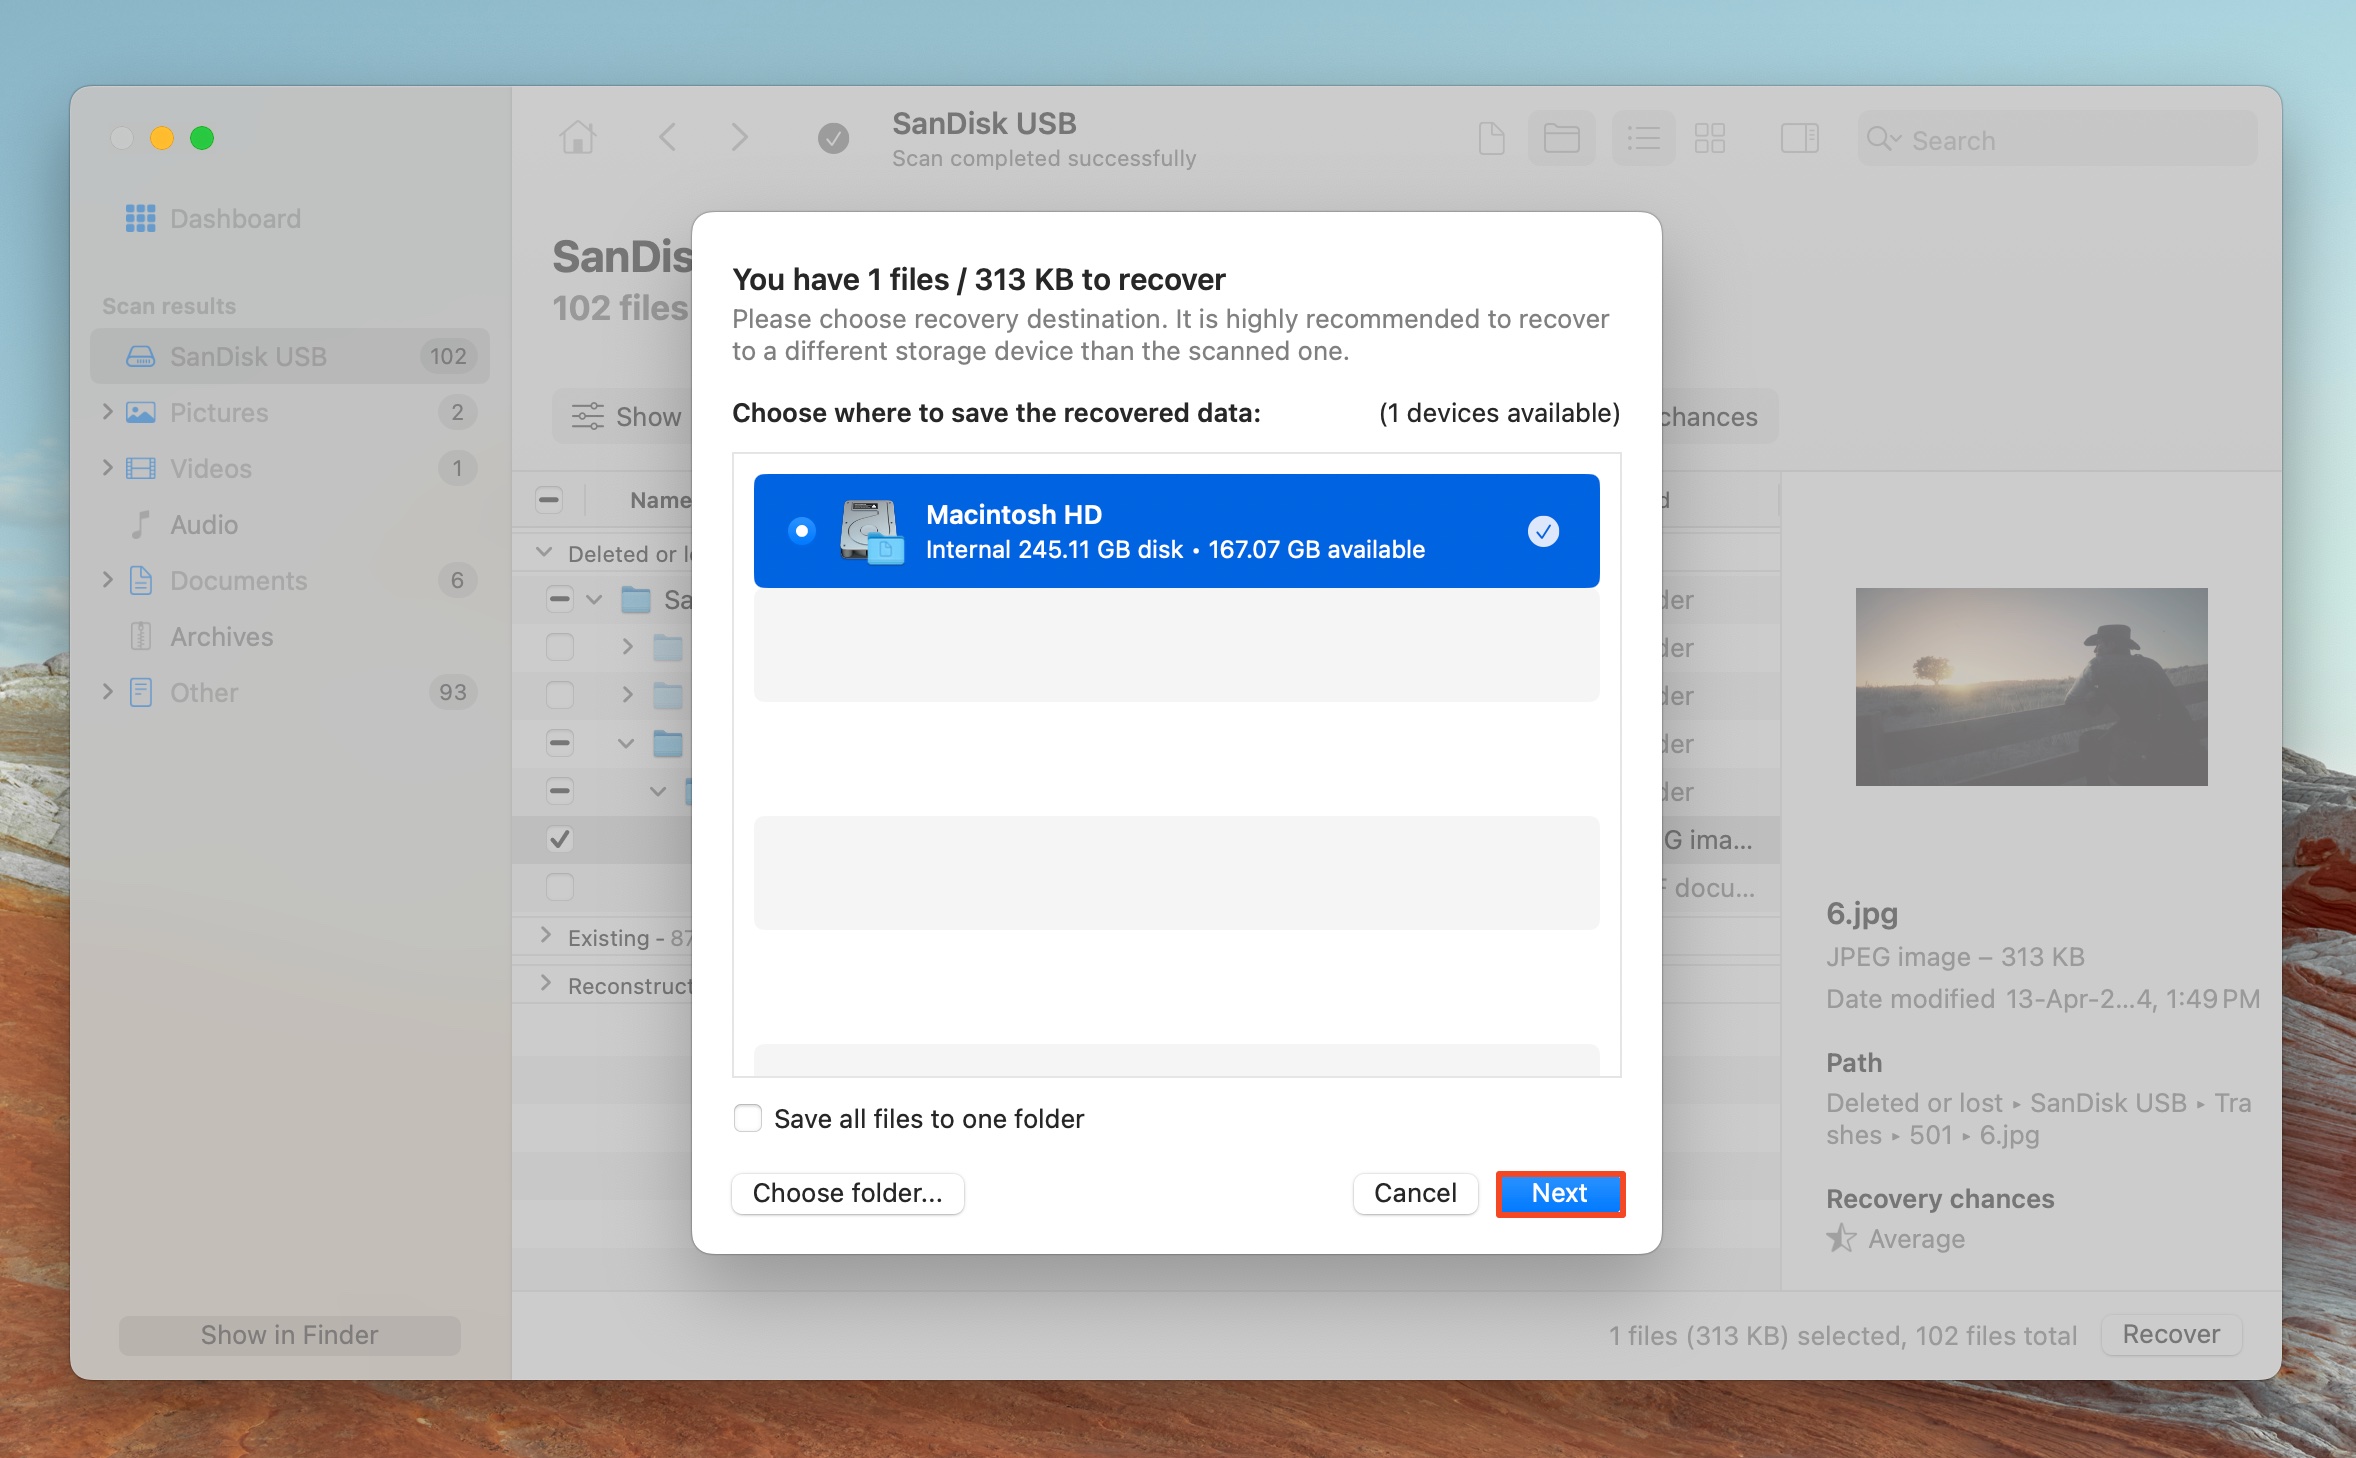
- Choose a recovery destination for the files. We recommend saving these files to a separate drive, instead of the scanned one. Click on Next.
- Disk Drill will recover the selected files.
Option B: Recover a Complete HFS+ Volume/Partition
![]() If you’ve mistakenly deleted or formatted a whole HFS/HFS+ partition and want to recover it, a tool called TestDisk should help you. Whether you were the one who deleted the whole partition, or the data loss happened because of a virus or disk failure, this powerful data recovery software can restore the lost, deleted, or damaged HFS formatted partition/volume.
If you’ve mistakenly deleted or formatted a whole HFS/HFS+ partition and want to recover it, a tool called TestDisk should help you. Whether you were the one who deleted the whole partition, or the data loss happened because of a virus or disk failure, this powerful data recovery software can restore the lost, deleted, or damaged HFS formatted partition/volume.
Note: Unfortunately, there is no way to recover a missing partition with software if the data loss happened because of some kind of physical damage to the drive. If that’s the case, the only option that you have is to get help from professionals (for example, resort to a specialized data recovery service like the CleverFiles Data Recovery Center).
Test Disk is an open-source data recovery utility, meaning it’s completely free to use. Overall, it’s quite an effective tool when it comes to recovering whole HFS partitions. But there is one thing about this software that many users don’t like— it has a text-based user interface. So if you’re not comfortable with using such applications, it might be slightly complicated for you to navigate this tool.
Follow these steps to recover a complete HFS partition/volume on a Mac using TestDisk:
- Open Terminal on your Mac (go to Launchpad and type Terminal in the search field).
- Copy-paste the following command in the Terminal window and hit the Return key:
/bin/bash -c “$(curl -fsSL https://raw.githubusercontent.com/Homebrew/install/master/install.sh)”
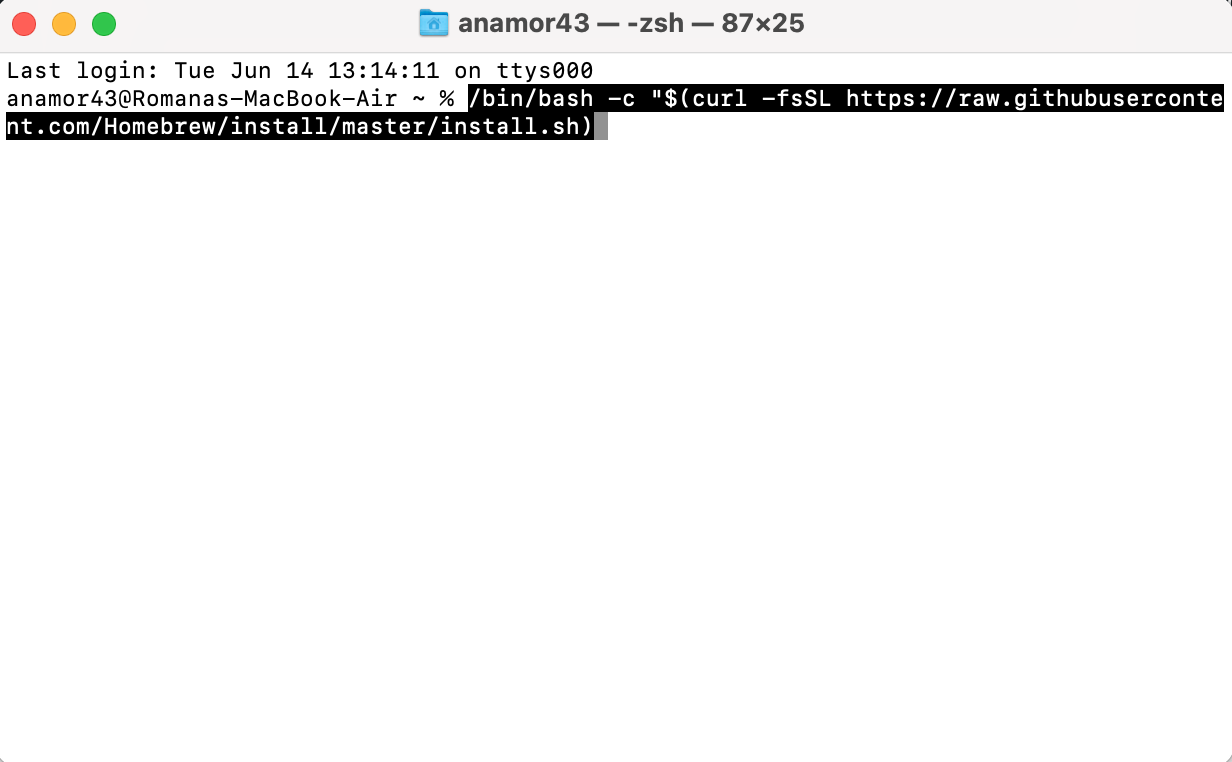
- Type in brew install testdisk in the Terminal window and hit Return to install the tool.
- To launch TestDisk, type sudo testdisk in the Terminal window and hit Return.
- Use the arrow keys on your keyboard to select Create a new log file and hit Return.
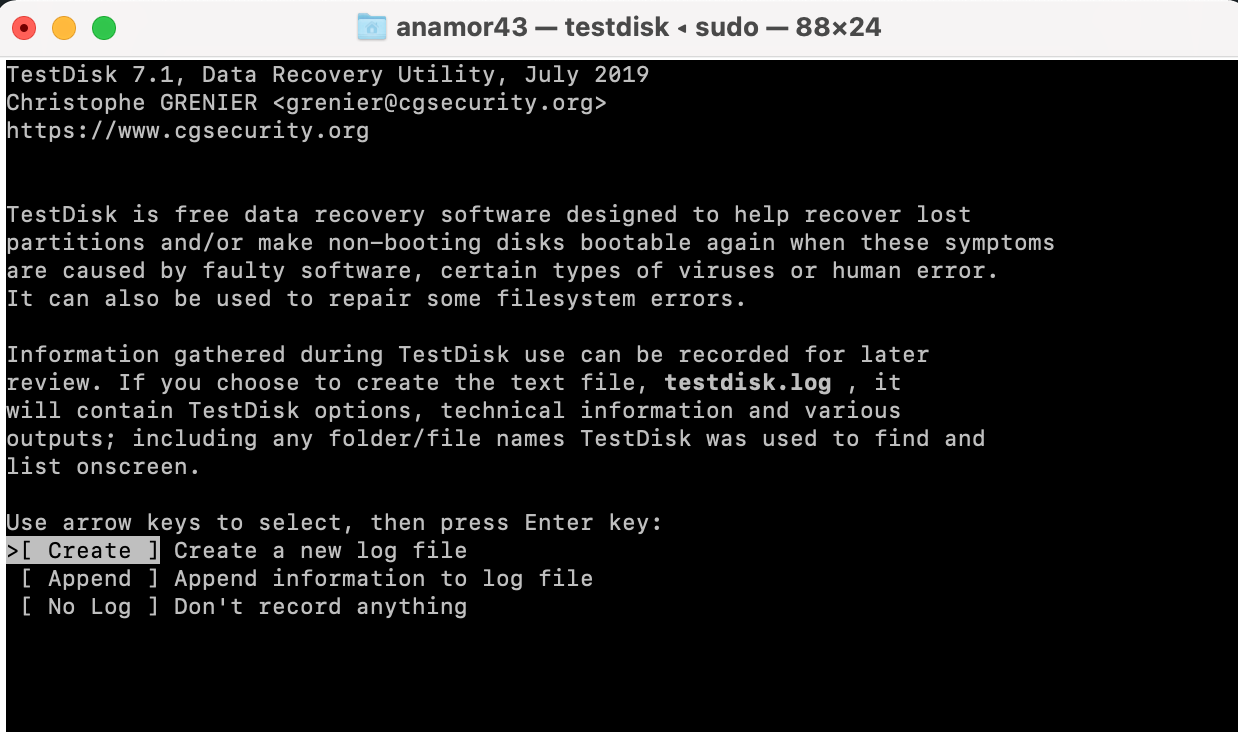
- Choose the drive containing the missing partition and hit Return.
- Choose the suitable partition table type and hit Return.
- Choose Analyse current partition structure and search for lost partitions, and hit Return.
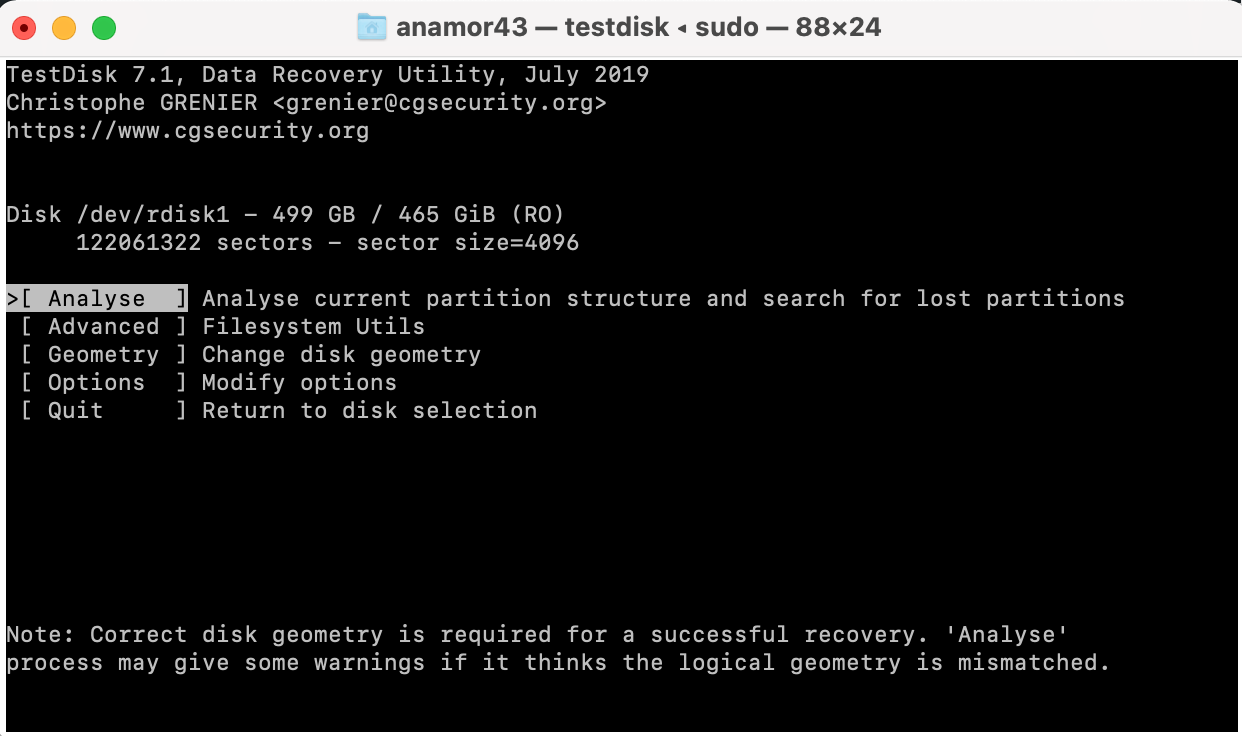
- Once the scan is finished, look for the needed partition.
- To recover a partition, select it, and choose the Write option.
- If the scan hasn’t revealed the partition that you were looking for, select Deeper Search and hit Return.
Can I Recover HFS+ Formatted Disks on Windows?
Yes. However, Windows doesn’t recognize the HFS+ file system, prompting HFS drives to show up as RAW. While Disk Drill for Windows can still scan these drives and recover data from them, it won’t recover the files’ original folder structure.
Important: Once you connect the HFS formatted drive to your Windows computer, make sure you don’t mistakenly format it. If you see a popup window asking you to format the drive, click Cancel right away to avoid making the data loss situation even more complicated.
Also, keep in mind that if the HFS drive which you’re trying to recover data from is encrypted with a FileVault password, you’ll need to decrypt it before moving on with the recovery process.
FAQ
How to perform HFS data recovery?
A convenient way to recover data from HFS drives is to use third-party data recovery tools. Once you’ve downloaded the required data recovery tool, simply:
- Install the data recovery tool, and ensure the HFS drive is connected to your PC.
- Launch the data recovery program, select the HFS drive, and scan it for deleted data.
- Select the files you wish to recover.
- Choose a recovery destination for the files. It’s best to save these files to some other drive, instead of the HFS one.
How to recover a deleted HFS partition?
The most effective way to recover a deleted or lost HFS partition is with the help of a specialized utility like TestDisk:
- Download, install, and launch TestDisk.
- Choose Create and choose the drive containing the HFS partition.
- Select the partition table type.
- Select Analyse and wait for the scan to finish.
- Choose the lost partition and select the Write option.
What is the best HFS recovery software?
Depending on what exactly you expect from the HFS recovery software, there are two effective solutions that you can try:
- Use data recovery software like Disk Drill if you wish to restore specific files
- Use a utility like TestDisk to recover the whole HFS/HFS partition
Can Recuva recover an HFS?
No, Recuva can’t recover files from HFS/HFS+ formatted drives.
Conclusion
Even though the HFS or HFS+ file system is a great option for external hard drives, it’s not as resistant to data loss as APFS.
Therefore, it’s always a good idea to prevent something like that from happening rather than having to deal with the consequences. The best way to do it is by regularly checking your drive for errors (for example, with Disk Utility) and if possible, fixing the hard drive right away. And if you notice that your drive has been physically damaged, get help from professionals as soon as you have the chance to retrieve the data from it while it’s still an option.
This article was written by Romana Levko, a Staff Writer at Handy Recovery Advisor. It was recently updated by Manuviraj Godara. It was also verified for technical accuracy by Andrey Vasilyev, our editorial advisor.
Curious about our content creation process? Take a look at our Editor Guidelines.