Trying to fix a corrupted hard drive on your Mac?
A corrupted hard drive on a Mac can feel like a blaring alarm. Unlike Windows computers, Macs aren’t built by default to fix and repair corrupted hard drives. So, what can you do?
There are more than several ways to fix a Mac hard drive. Whether you’re having trouble with an external device or with the storage inside your Mac, we have all the steps you need to know to fix this issue.
Signs of a Corrupted Hard Drive
The symptoms of a corrupted hard drive are frequently the same, whether it is an internal drive inside your device or an external drive connected to your computer. Recognizing these signs will enable you to address the problem and help you recover your data. Check out below the signs that your hard drive may be corrupted:
Mac hard drive failure symptoms |
Description |
⚠️ Your hard drive is not recognized by your Mac. |
Your Mac cannot recognize your hard drive as a connected storage device if it cannot detect it. Faulty connections, frayed cables, or a failing hard drive are just a few possible causes. You won’t be able to access any of the data on your hard drive if your Mac does not recognize it. |
📄 Your files and folder disappear or get corrupted. |
You risk losing data if your files and folders get corrupted or vanish out of nowhere. This might happen because of hard drive failure, file system errors, or corrupted sectors. Accessing or recovering files is difficult or impossible when they vanish or get corrupted. |
📛 You get various error messages. |
These alerts can be general disk-related errors or more targeted warnings about issues with file access, read/write errors, or input/output errors. Error messages are signs of a problem with the hard drive’s functionality. |
🐌 The performance of your Mac is slowed down. |
It can be a sign of hard drive trouble if you observe a significant decline in your Mac’s overall performance, such as extended boot times, sluggish application launches, or increased system lag. Hard drives that are failing or corrupted might find it difficult to read and write data efficiently, slowing operations and making them less responsive. |
💢 Your hard drive makes unusual noises. |
Clicking, grinding, or buzzing sounds from your hard drive are typical signs of mechanical problems such as broken motors or other physical issues. It’s important to address the issue as soon as your hard drive starts making these noises to avoid further damage or possible data loss, |
Back up all your data on your hard drive as soon as you notice these symptoms manifesting in your Mac. Immediately seek help from an expert to fix the underlying problems with your Mac’s hard drive.
Fixing Corrupted External Hard Drives on a Mac
With all that said, thankfully there are as many ways to fix these problems as there are symptoms for it!
Step 1: Using Disk Drill to Backup Corrupted Hard Drive Data
Before we start tinkering with settings and trying to fix the hard drive on your Mac, let’s make sure we save and backup all the data inside it first. If worse comes to worst, we might have to reformat your hard drive.
Now, there are a lot of data recovery programs out there. Some are more powerful than others as they are capable to create a backup of your data before performing a recovery. We recommend trying out Disk Drill. It’s our favorite data backup and recovery software and free to use!
If you’re backing up an external hard drive, you can use your Mac for the backup files if you have any space. However, if you’re backing up your Mac’s files, then you’ll need a functional external hard drive for the backup files. The capacity of the hard disk must be larger than the size of the disk from which the copy is created. This ensures that the destination drive has enough space to store all the data being backed up.
Backing up your files can take more or less 30 minutes, depending on the size of the files you’re saving.
- You can start by downloading Disk Drill from their official website. While that’s downloading, go ahead and connect your external drive to your Mac.
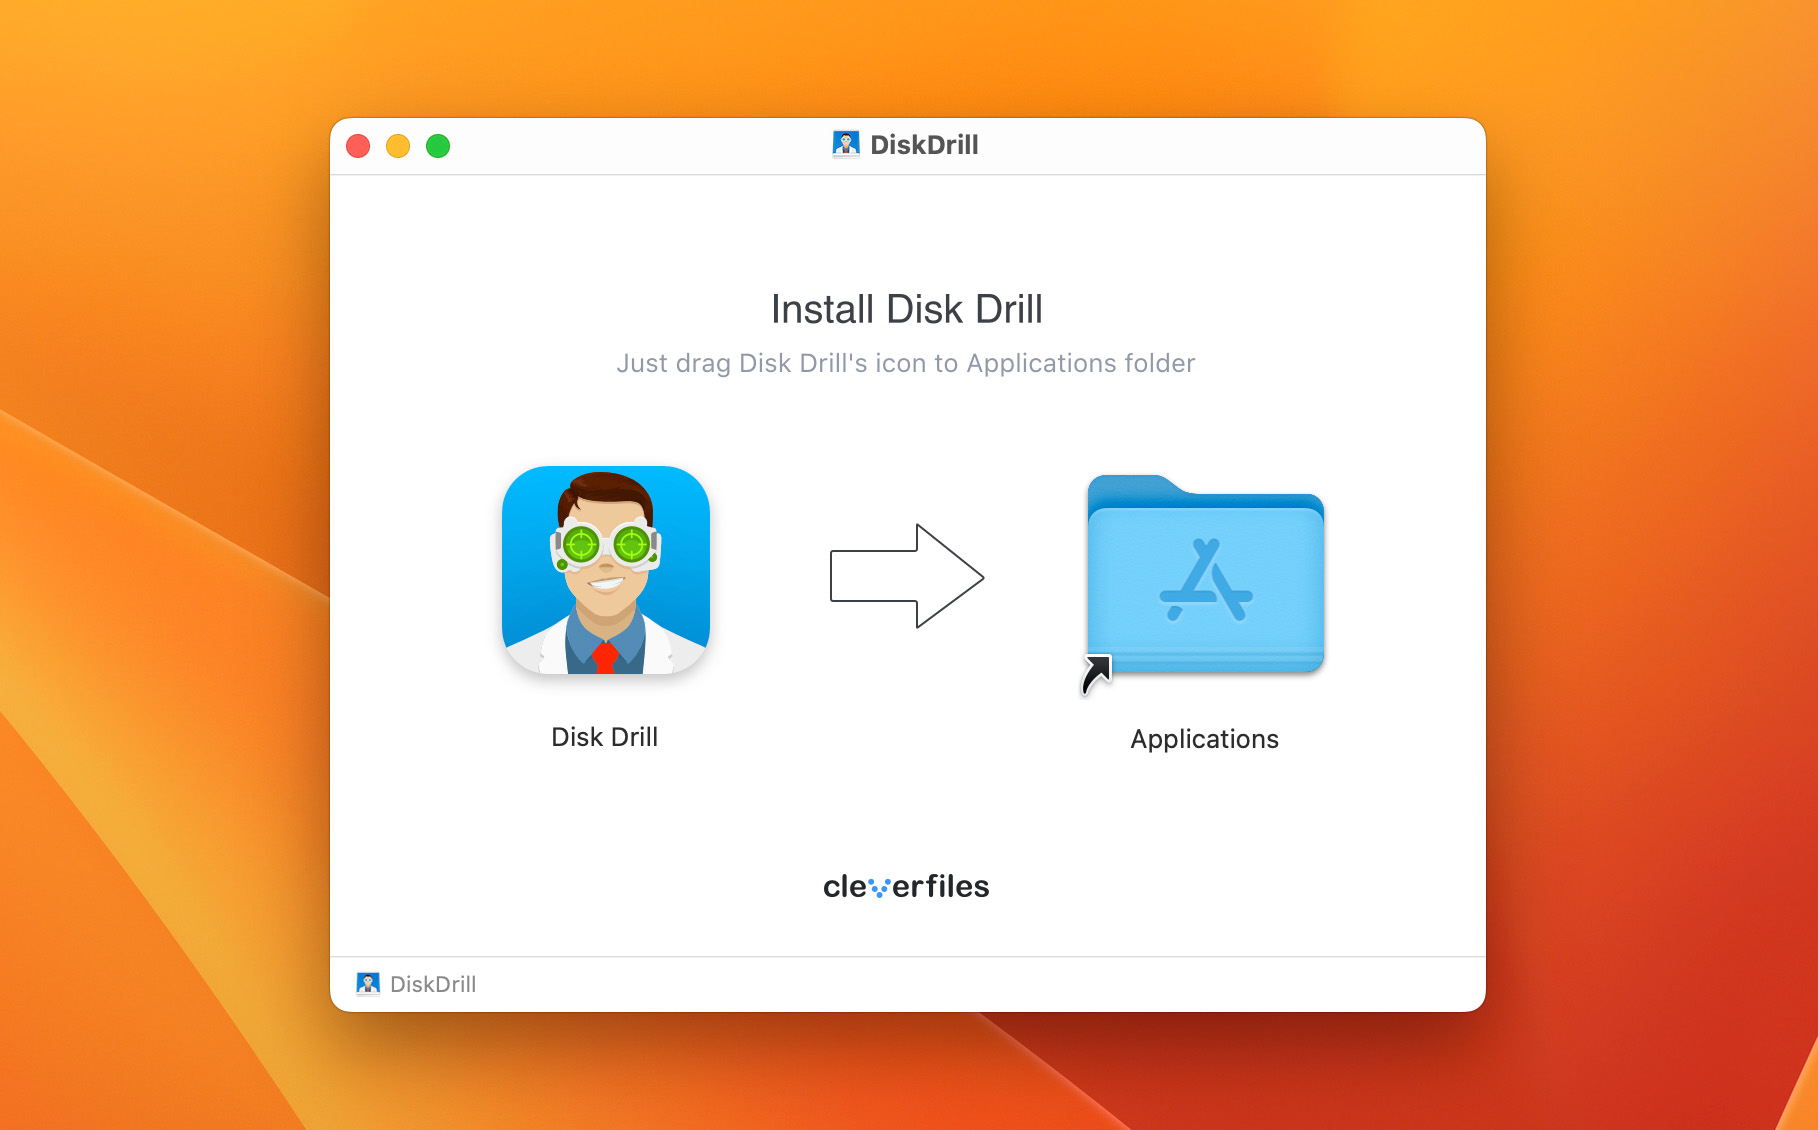
- When that’s done, just install the program by dragging it to your Applications folder and then launching it. In case there’s a problem with the accessibility of the internal hard drive, it is recommended to install Disk Drill on external data storage or to boot Disk Drill in recovery mode. Installing Disk Drill on external storage allows you to connect the external drive and perform data recovery operations on it. Alternatively, booting Disk Drill in recovery mode enables you to run the software directly from a recovery environment, bypassing any issues with the internal hard drive accessibility.
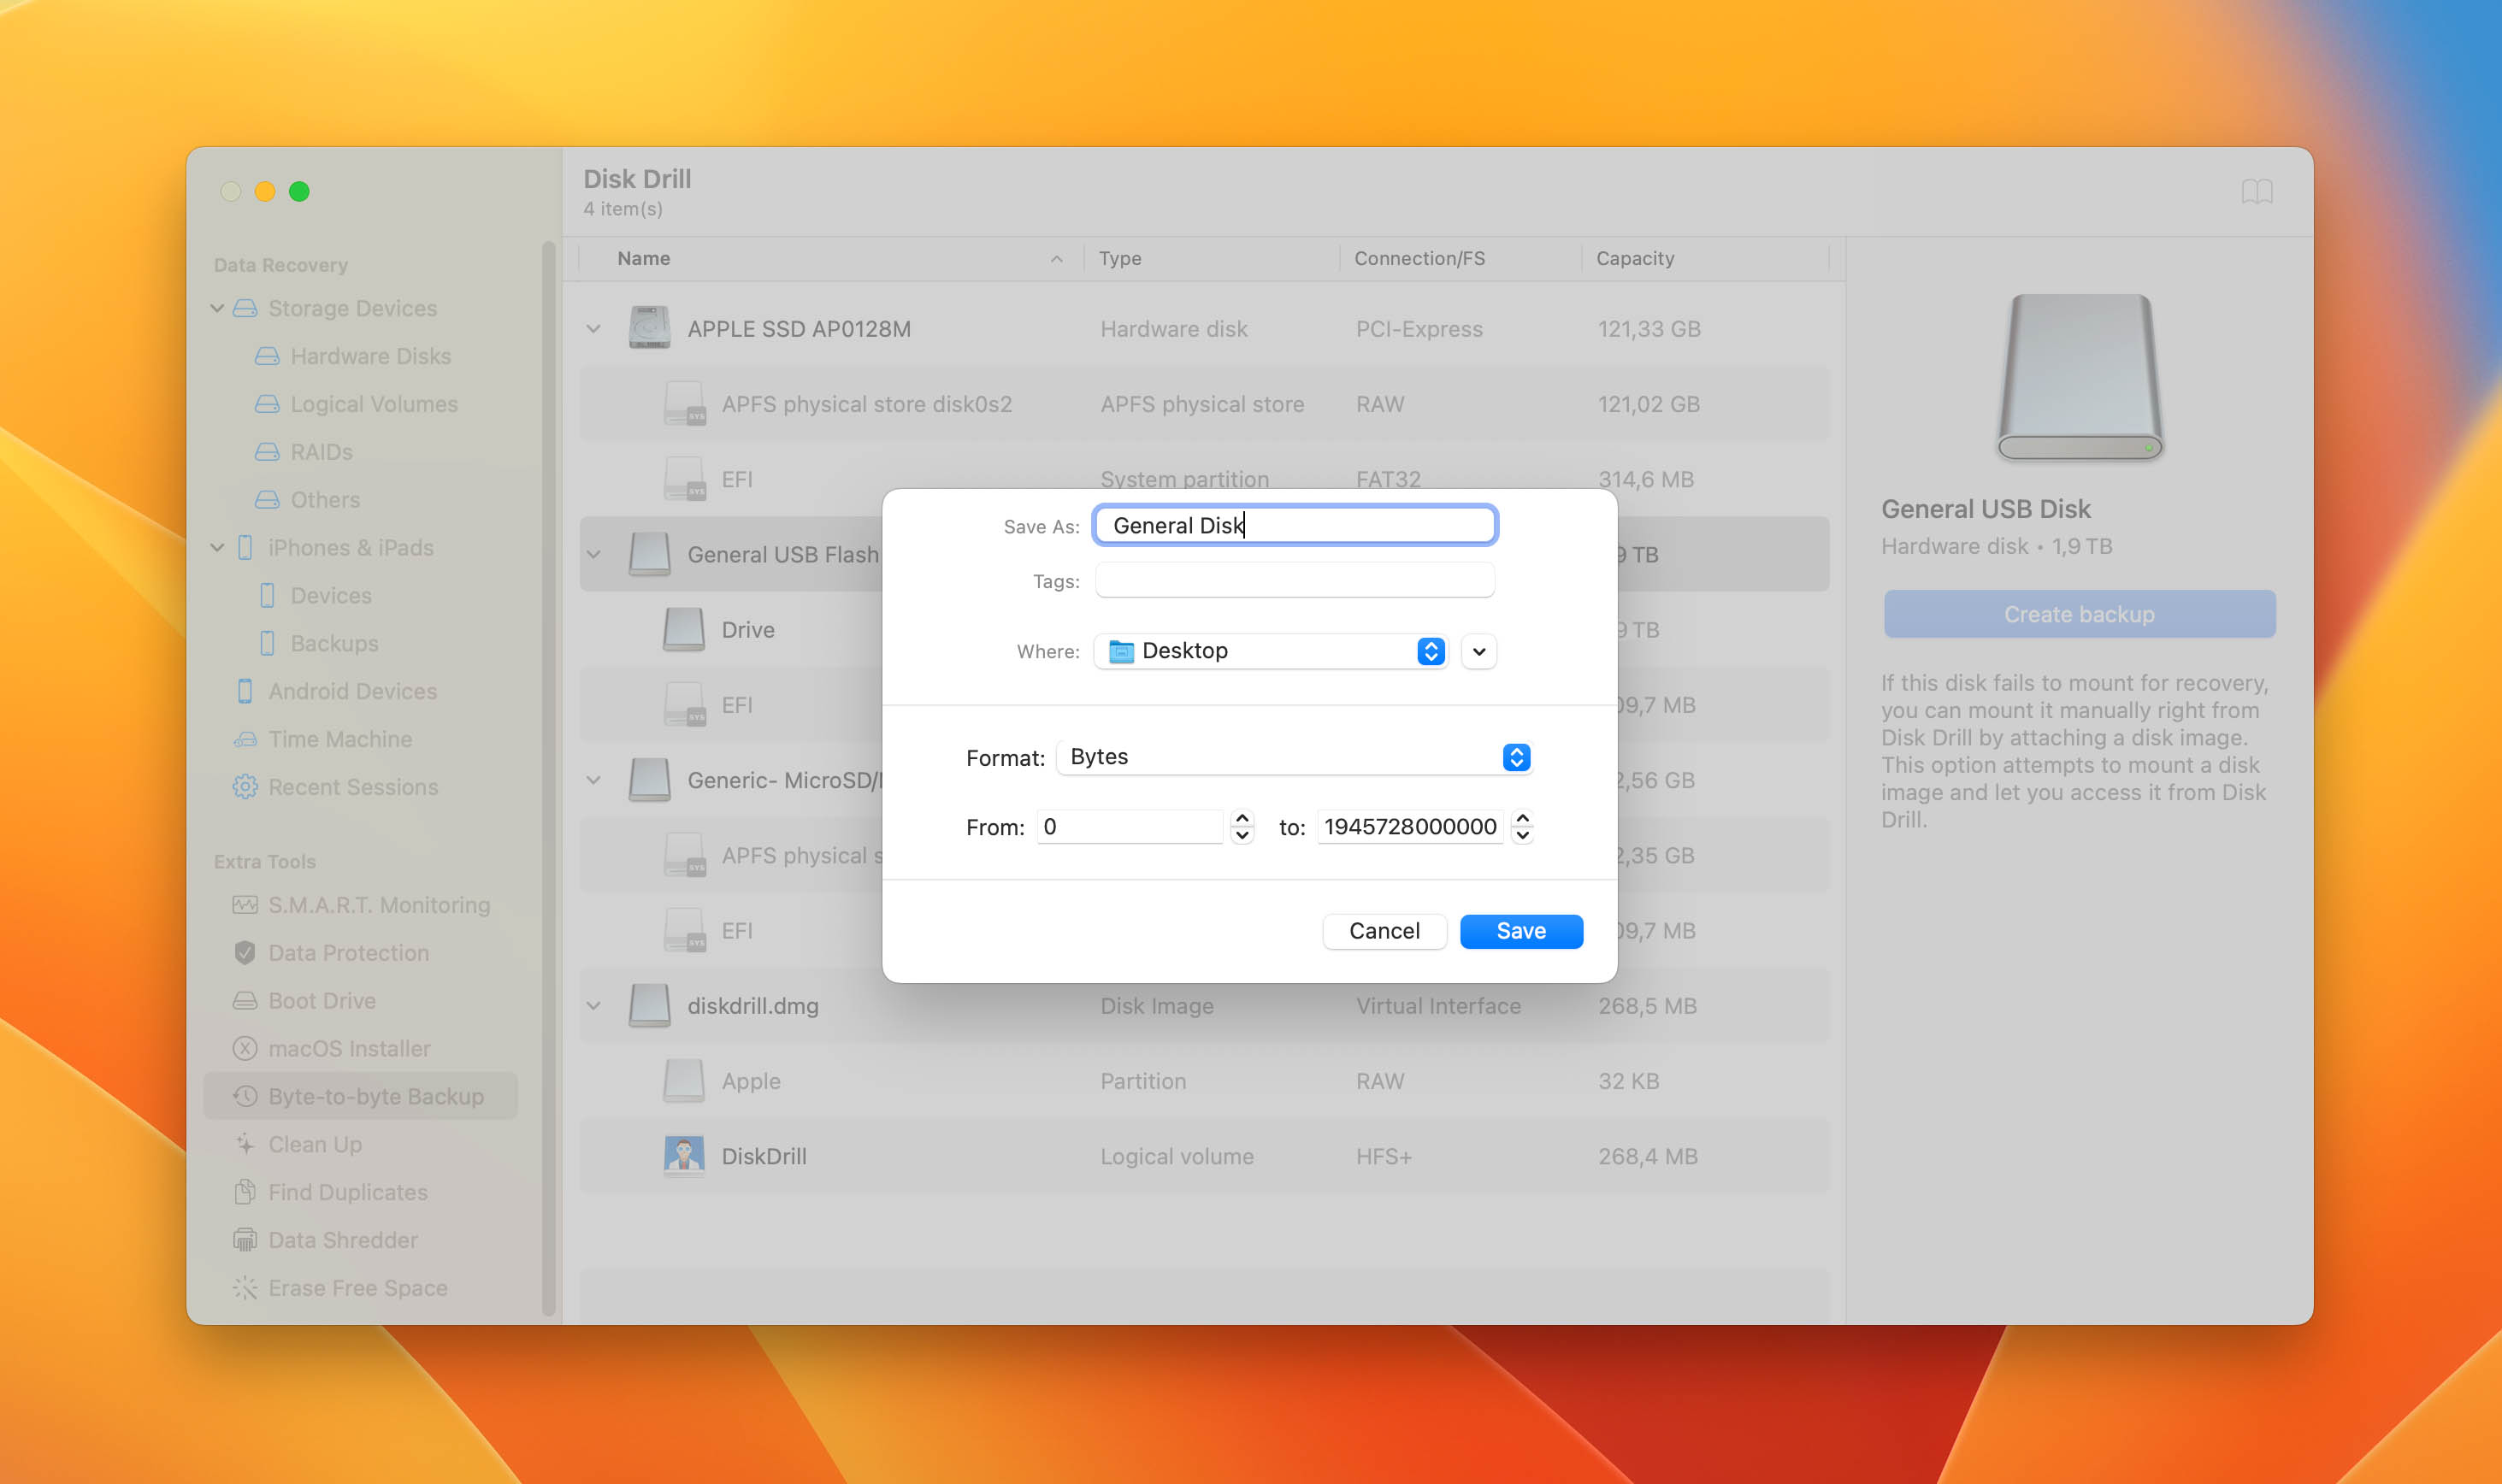
- After launching the program, select byte-to-byte backup in the left panel.
- When you’re there, click on the disk you want to backup.
- After, look for and click on the Create backup button.
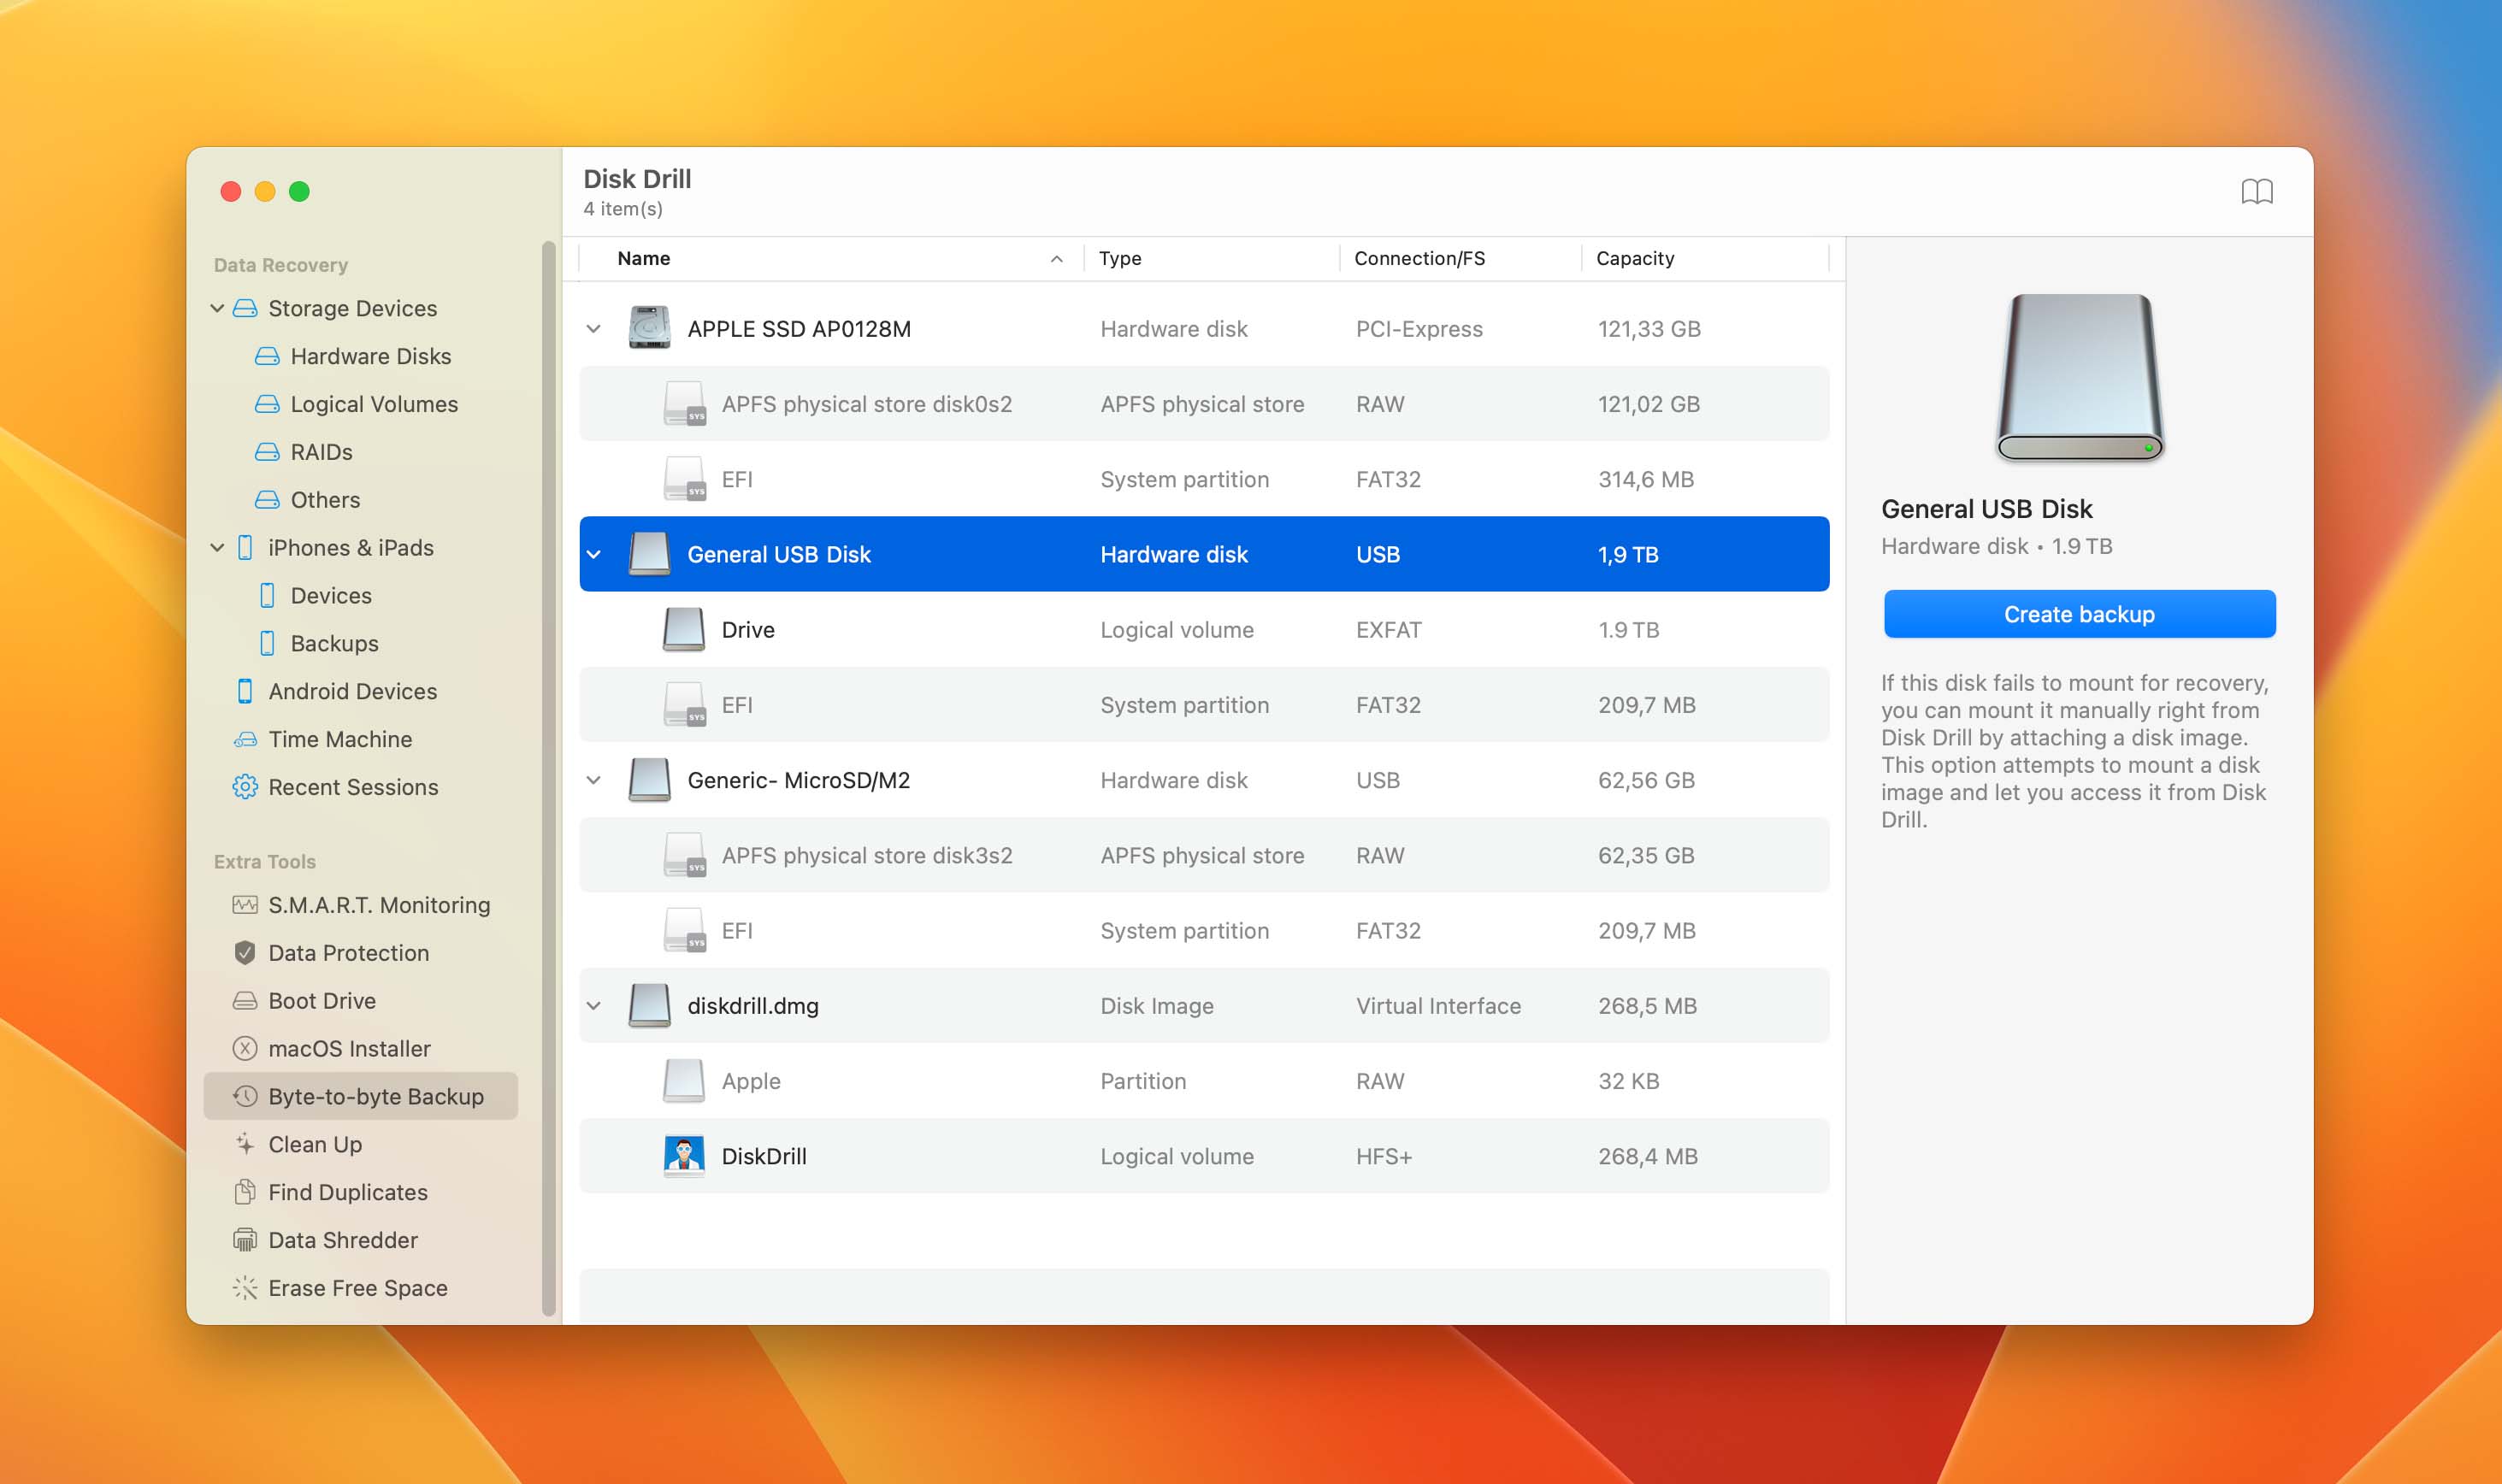
- Choose a location and click on Save when you’re done.
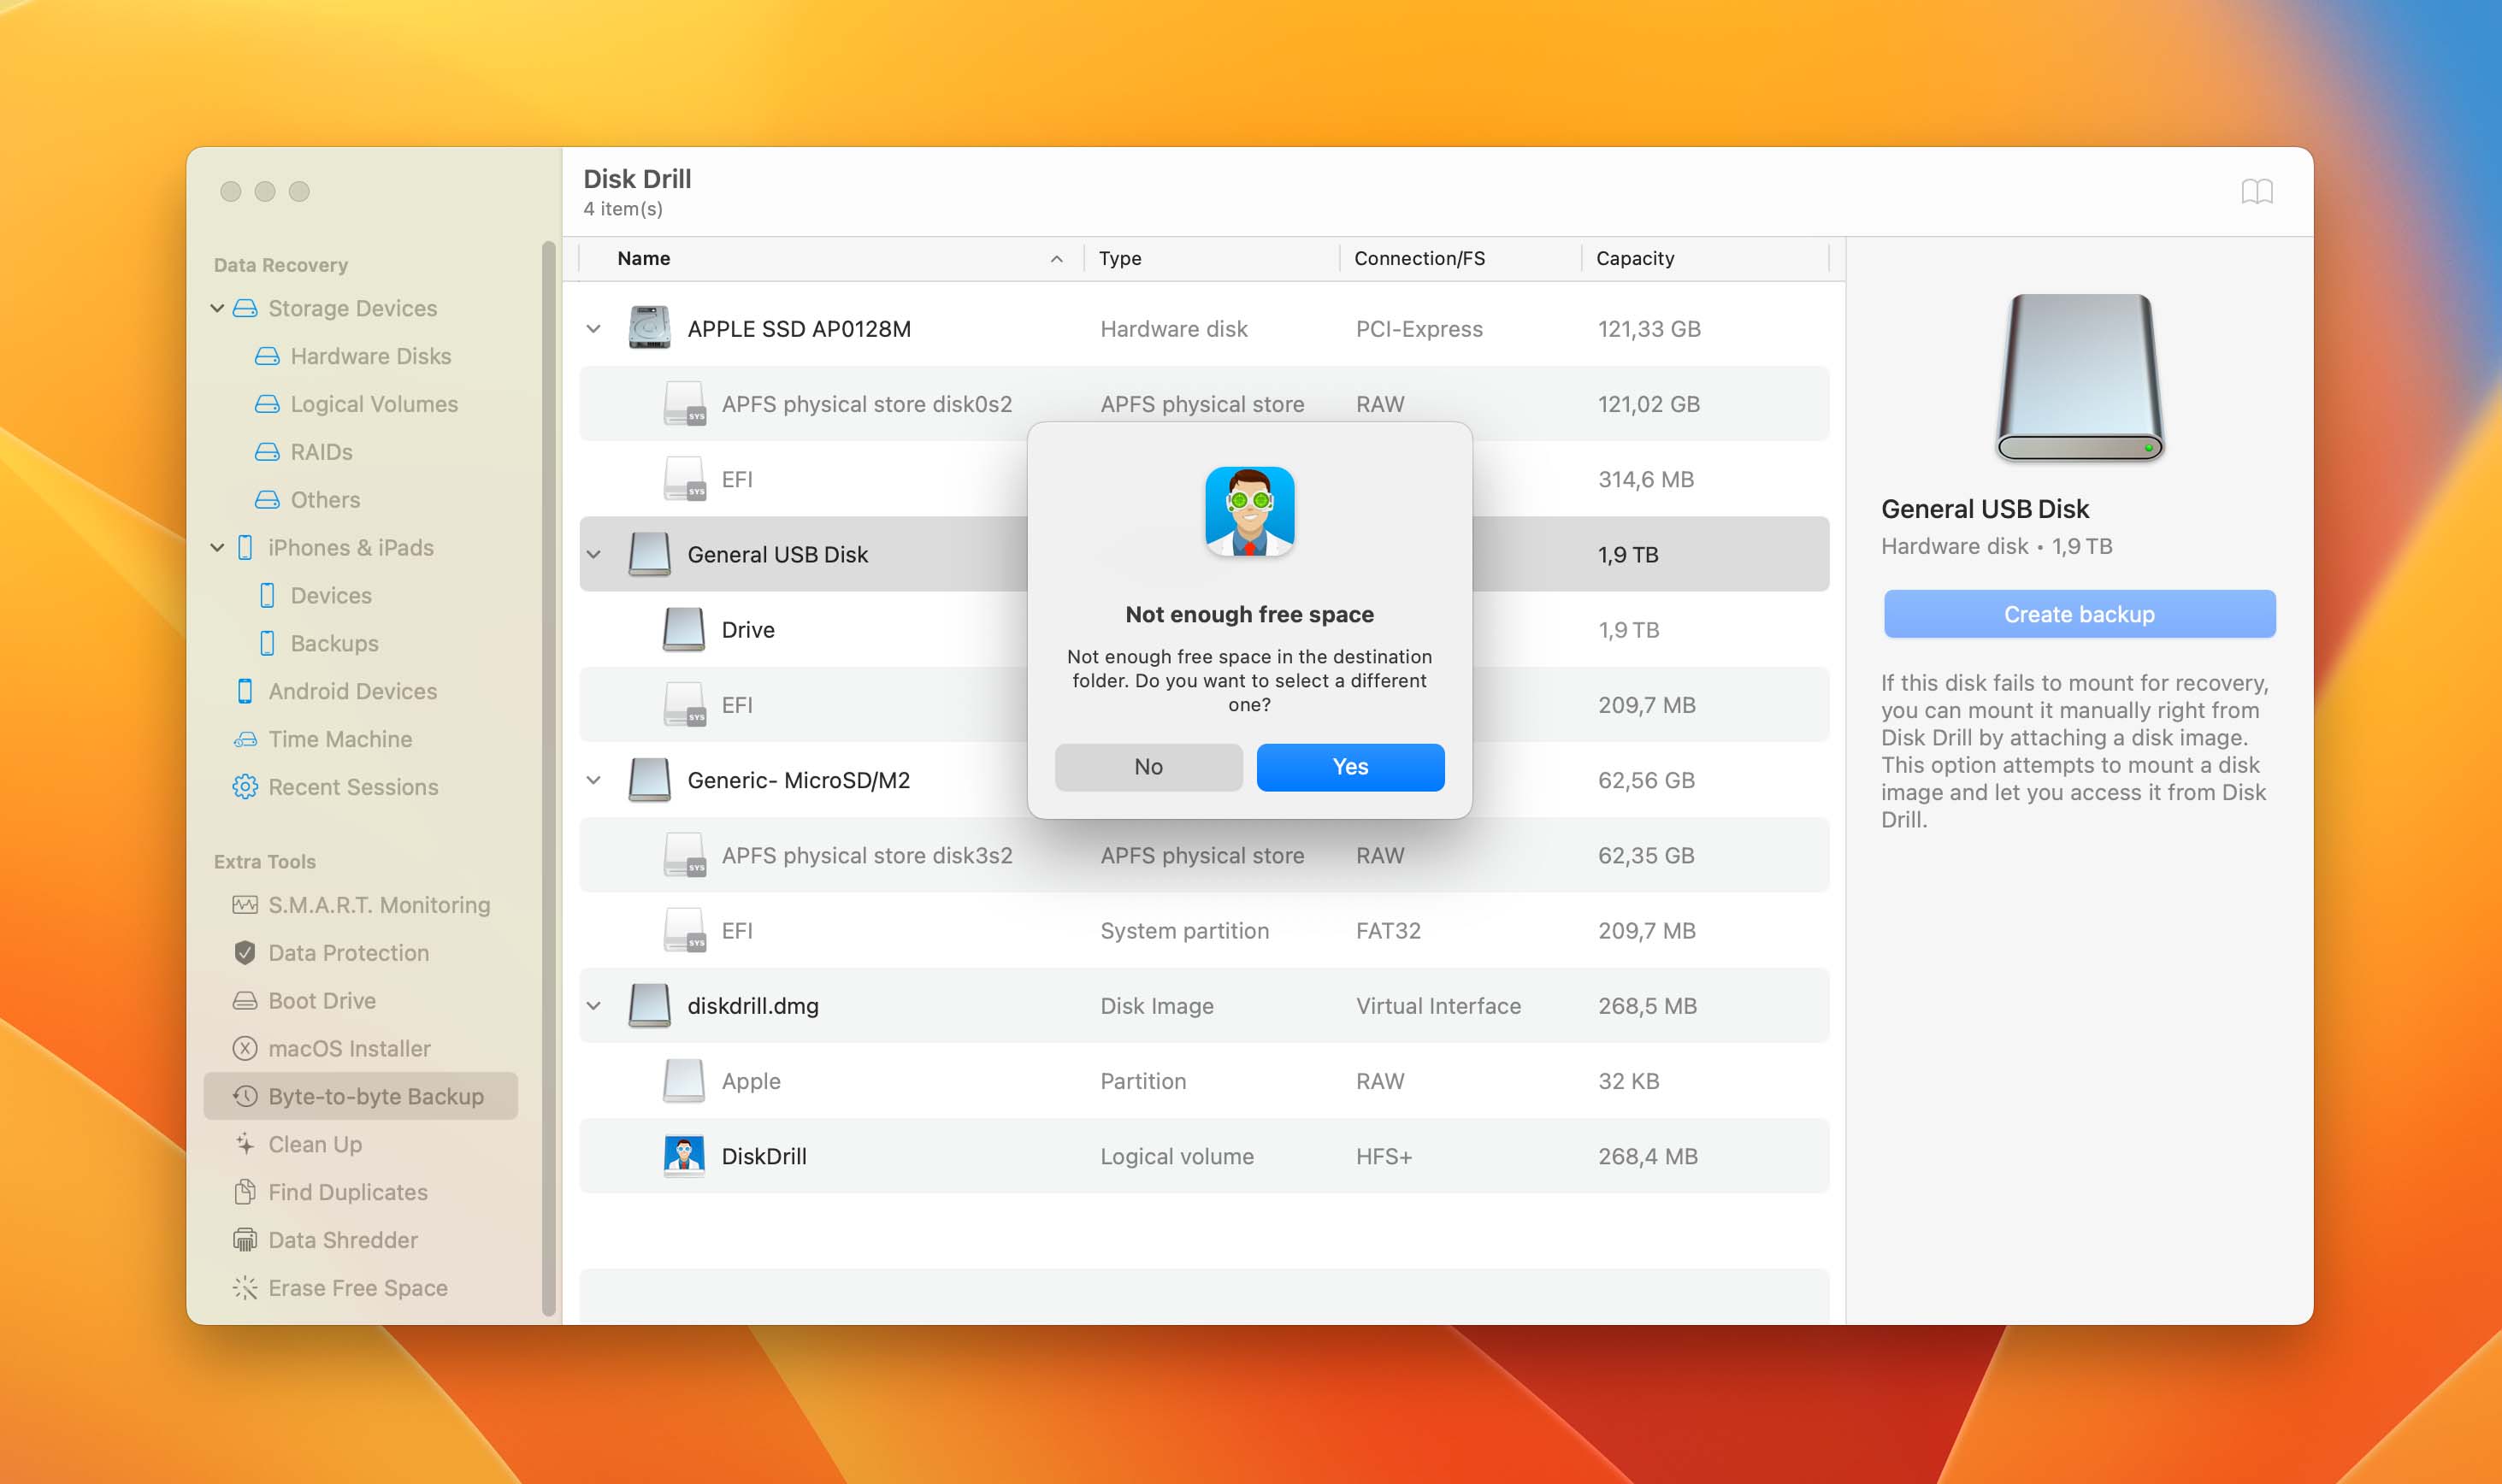
Disk Drill will send you a warning if the backup hard drive doesn’t have enough space. You can either try to free up space from that hard drive or find another with more space. If your hard drive has enough space, Disk Drill will immediately start backing up your files.
Now that you’re done backing up your files, we can troubleshoot the issue with your hard drive. The steps for troubleshooting your hard drive issues will be listed below in the article.
In the meantime, we recommend learning how Disk Drill allows you to scan your newly created byte-to-byte in the next step.
Step 2: Scanning and Recovering Files From Your Byte-By-Byte Backup
Every time you use a third-party tool to scan and recover files, you risk overwriting your drive or even making the corruption worse. Whenever you’re recovering data, the main thing to avoid is overwriting the data on the drive you’re recovering from.
So, creating a byte-by-byte backup and then scanning that instead is a surefire way to preserve your original files and scan the new backup without fear of losing your data.
The benefits to backing up your files and then scanning your backup include:
- ✅ Keeping the integrity of your original files.
- ✅ Having a backup with all your data.
- ✅ Having a backup you can scan repeatedly without fear of something bad happening to your data.
This way, even if your original disk is corrupted, you don’t have to worry about having only one chance to recover your files.
We recommend using Disk Drill to do these steps because it allows users to view and scan files that otherwise cannot be accessed through standard macOS features.
Here’s how you can do that:
- If you haven’t done it yet for the previous step, go ahead and download Disk Drill into your Mac and install the program.
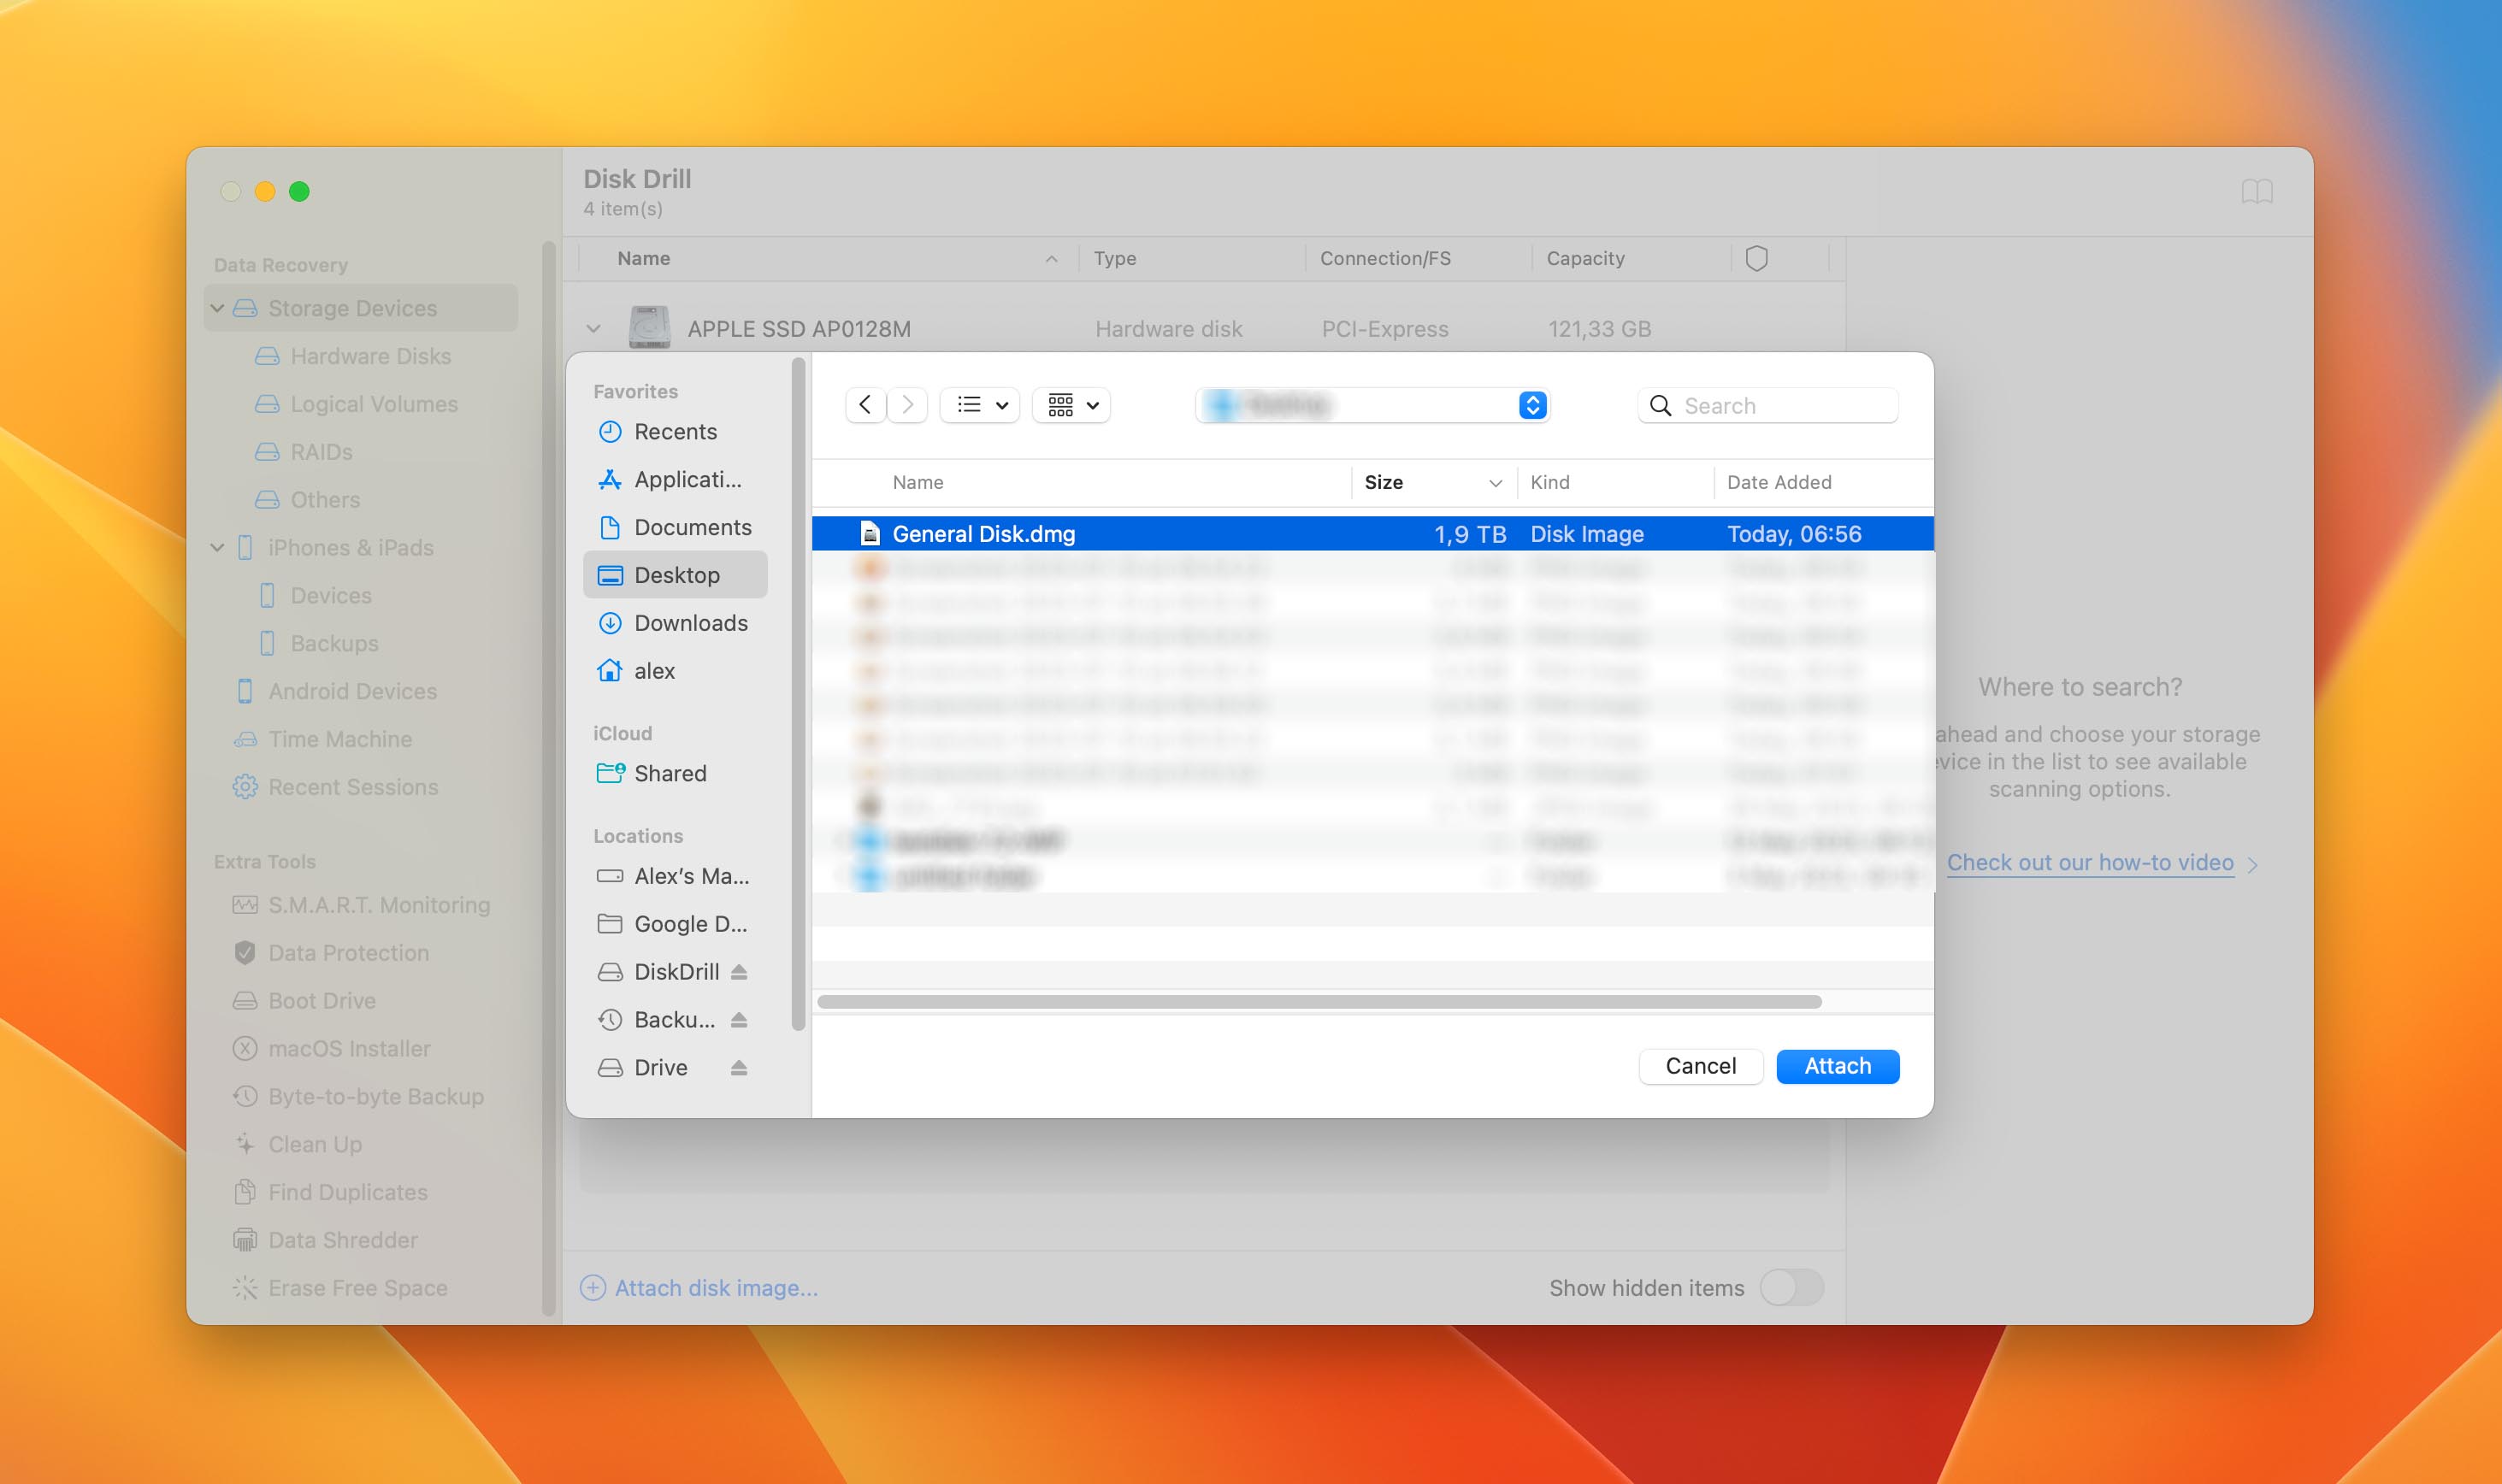
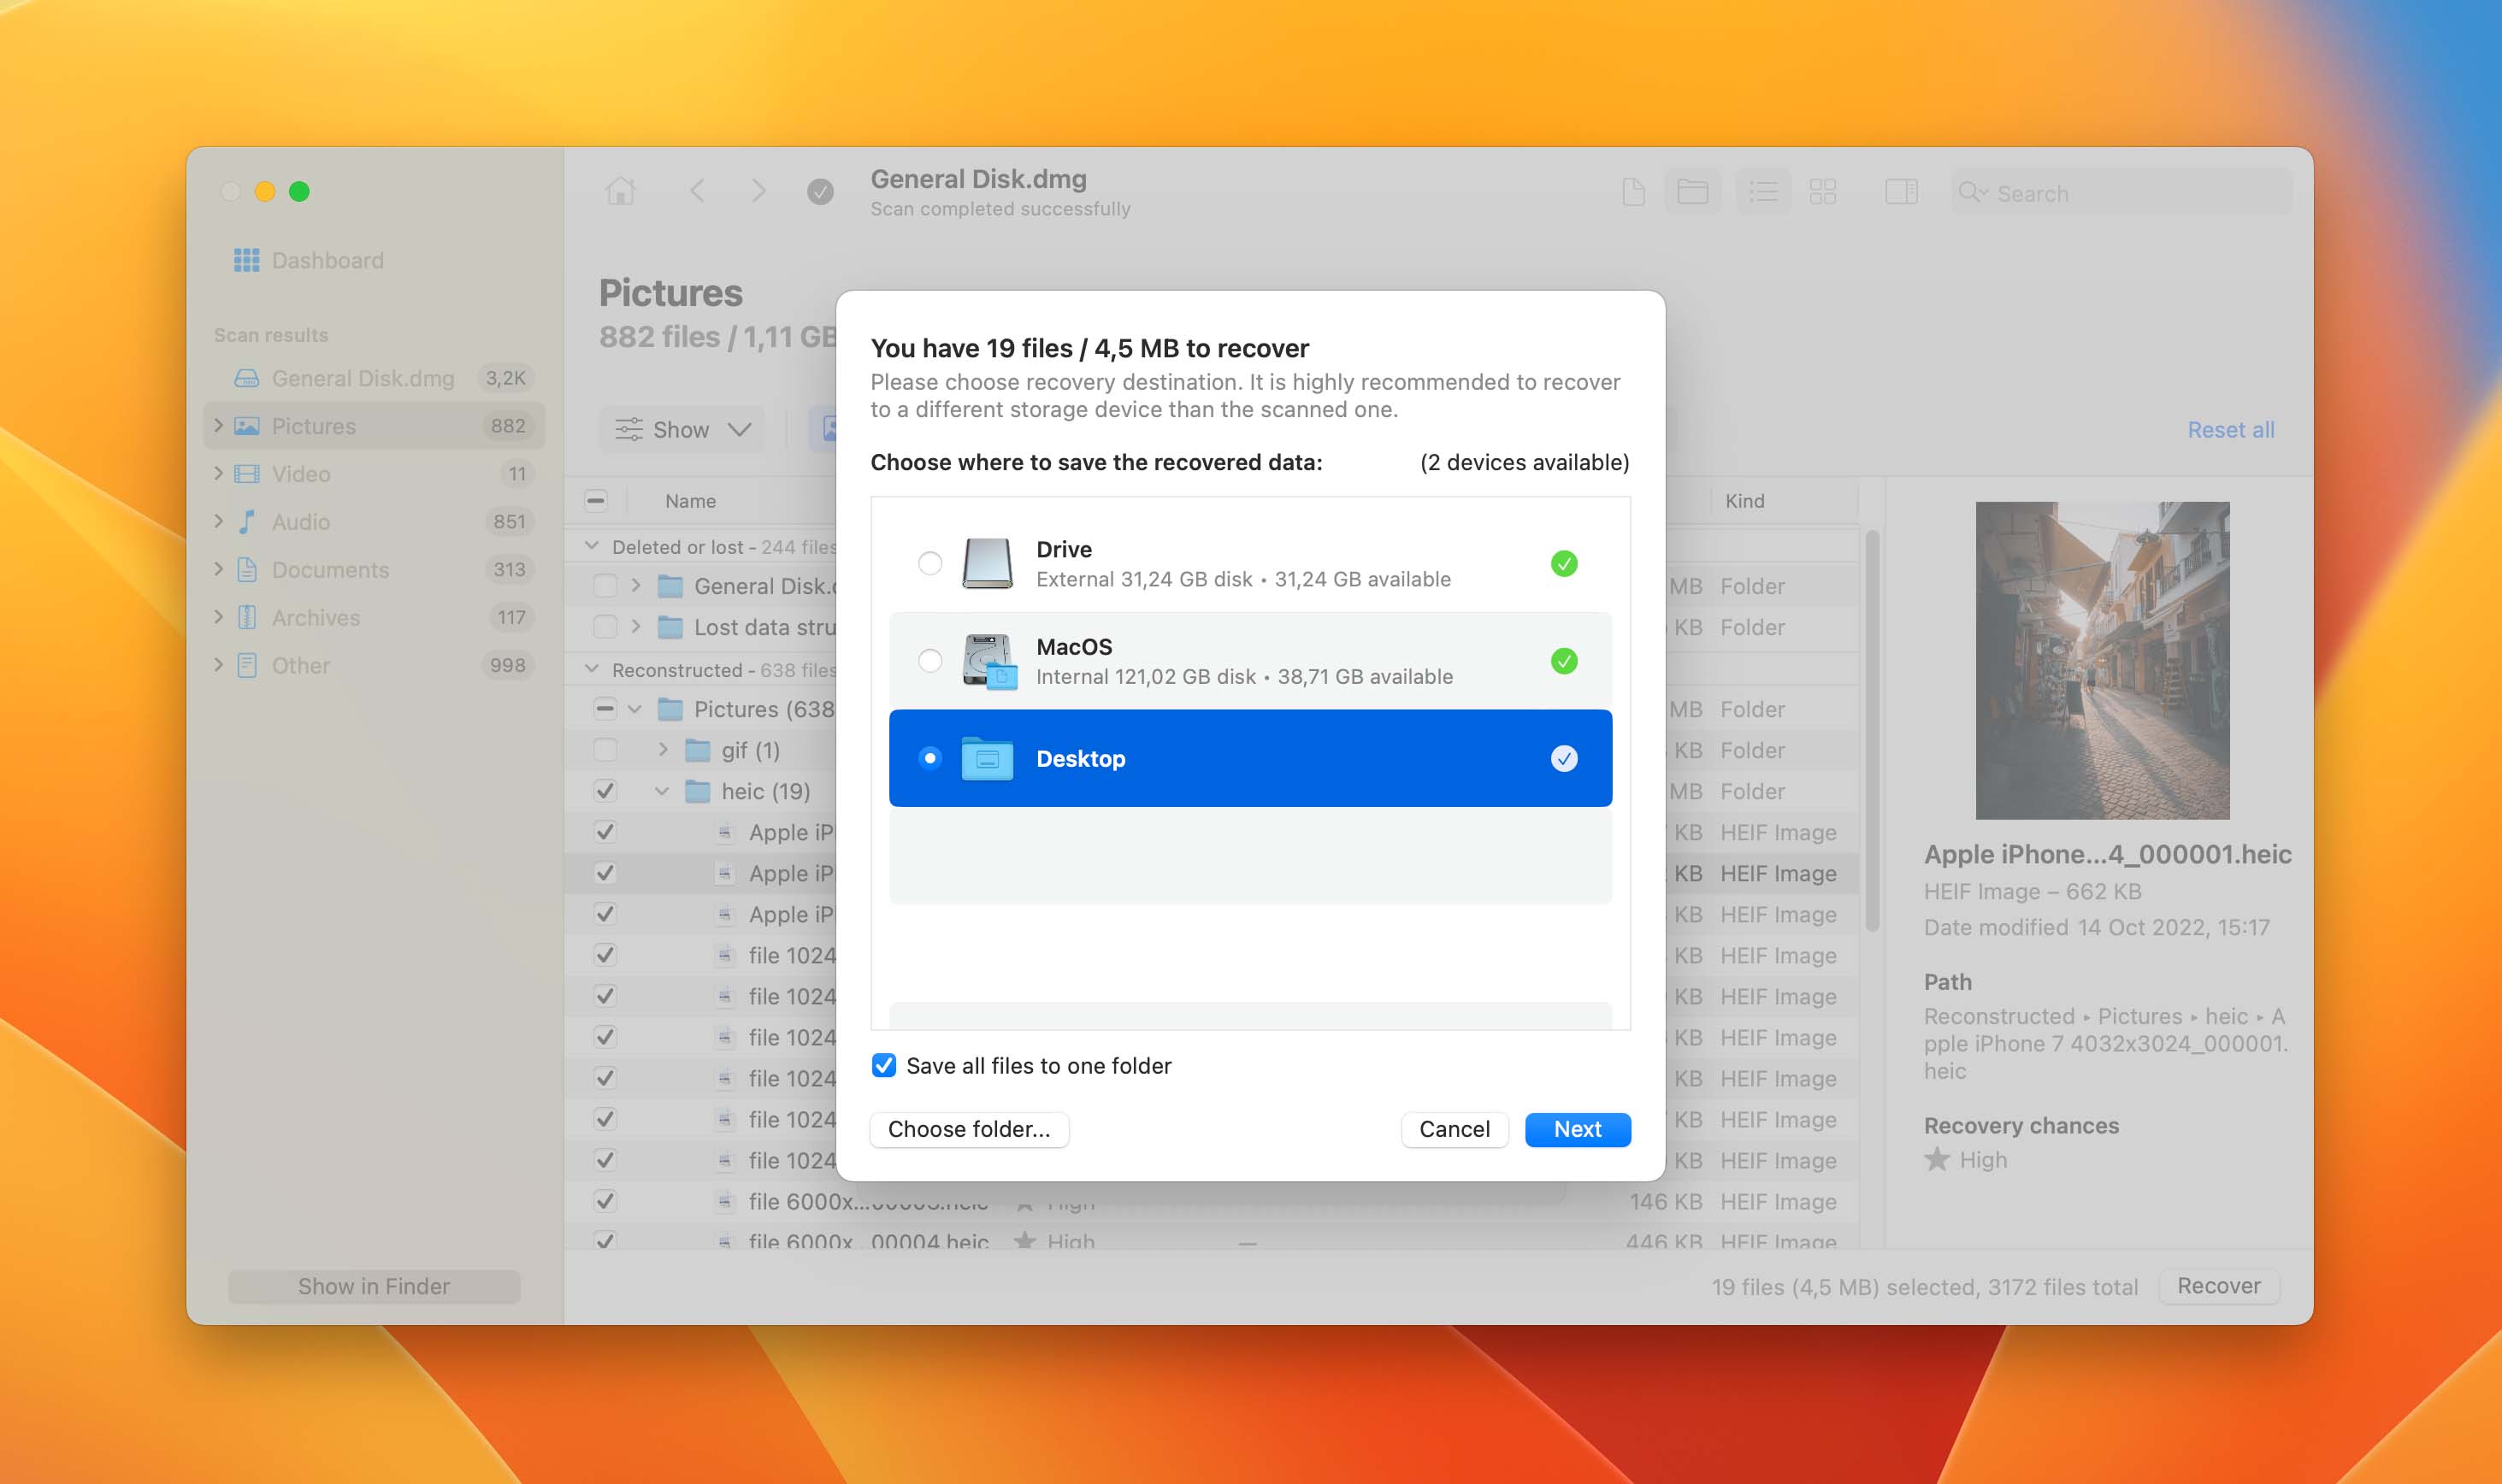
- When it’s installed, open up the program and select the storage device you want to scan. This should be the byte-by-byte backup that you just made or simply your drive if you skipped the first step. Go and click on the Search for lost data button on the right side bar. This process will take several minutes to half an hour, depending on the size and speed of your storage device.
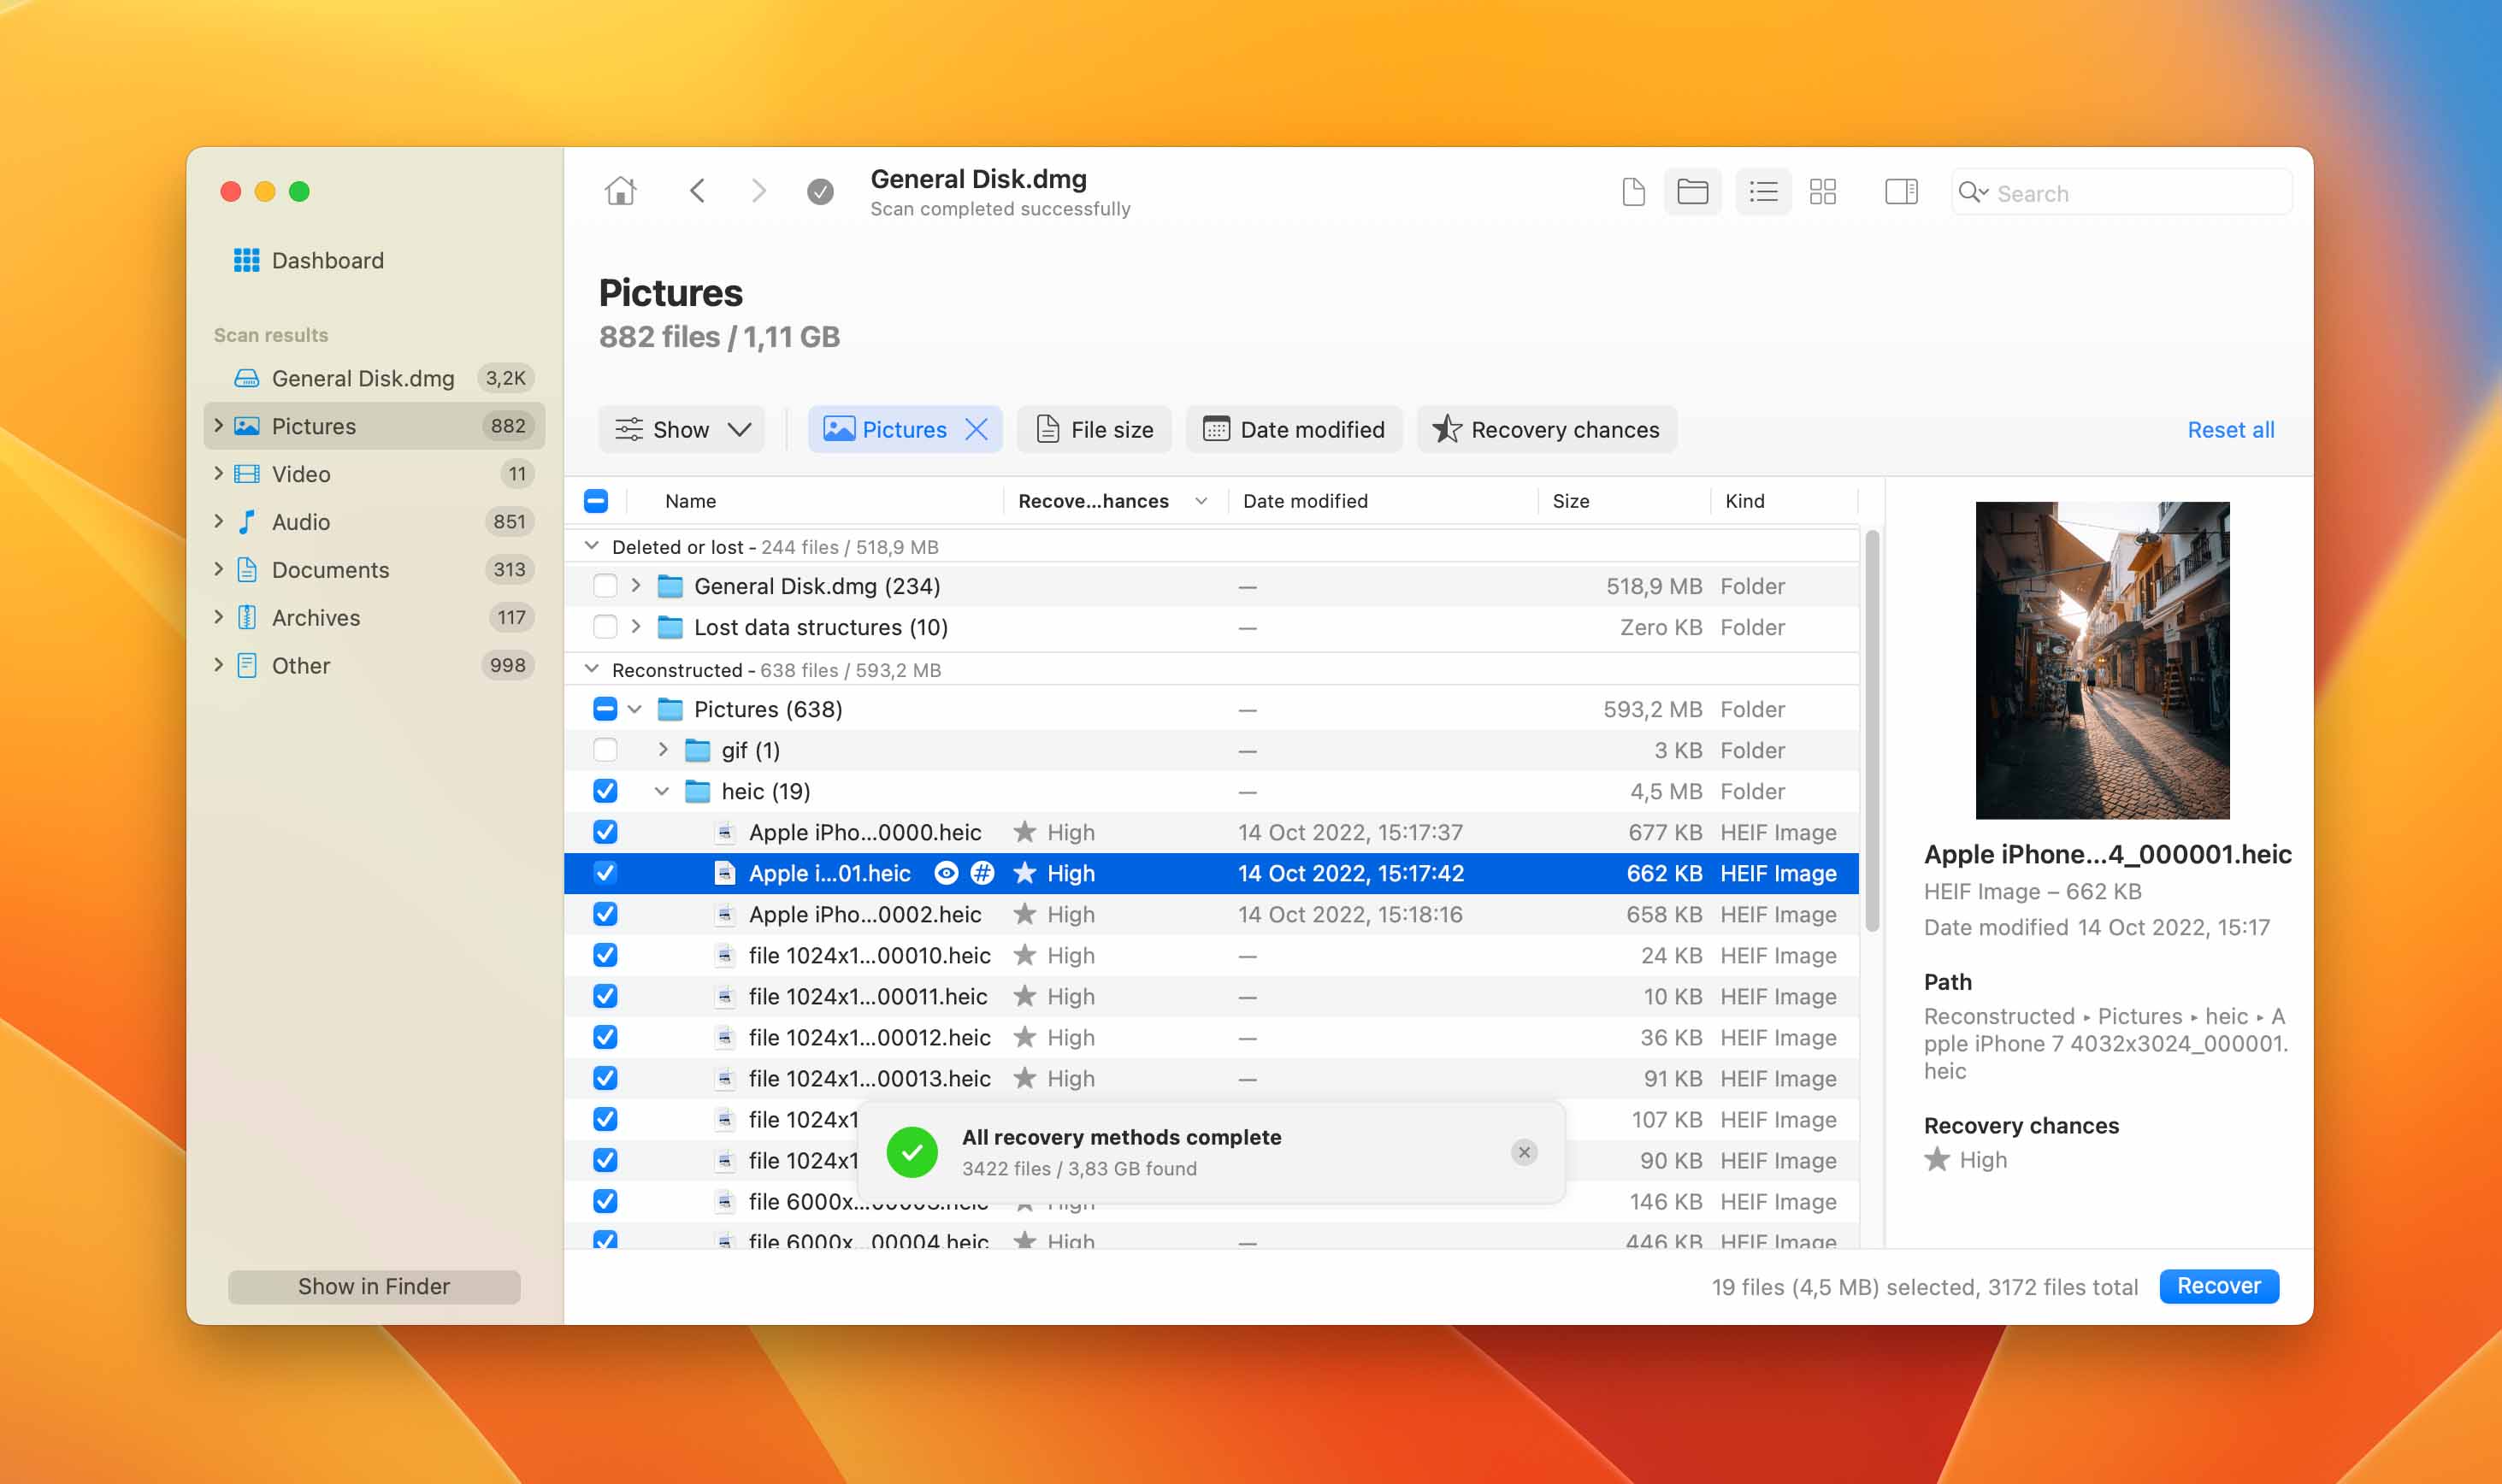
- While the scan is ongoing, you can already preview the files by clicking on Review found items found at the upper right corner of your screen. There, you can preview all the Pictures, Videos, Audio, Documents, and Archives that Disk Drill managed to find.

- It is possible to sort the files to help you look for your lost data. You can use the options on the left-side of your screen to filter the results per file type. On the center screen, Disk Drill also sorts out the files into three categories: deleted or lost, existing, and reconstructed. You can click on the arrow to expand the list of files under each category.
- Click on the files you want to recover and select Recover at the bottom-right corner of your screen. If you want to recover all files, just click on the checkbox in the header of the results.
- Finally, choose a location where you want to save your recovered data. Just click the Choose Folder button at the lower left part of your screen. It is important to note that you should not save your recovered files from the same disk where the deleted files are located, the newly recovered files may overwrite other recoverable data. Recovery to another drive is recommended.
You can repeat this process again and again with a byte-by-byte backup without the fear of losing your data.
Step 3: Ensuring Your External Disks are Visible
There’s a macOS setting that’s responsible for showing hard disks, CDs, DVDs, and more on your desktop. If you can’t find your hard drive, it might be hidden and not corrupted. Hopefully, this is the case, so you won’t have to repair your hard drive later on.
Here’s how you can make your external disks visible through Finder:
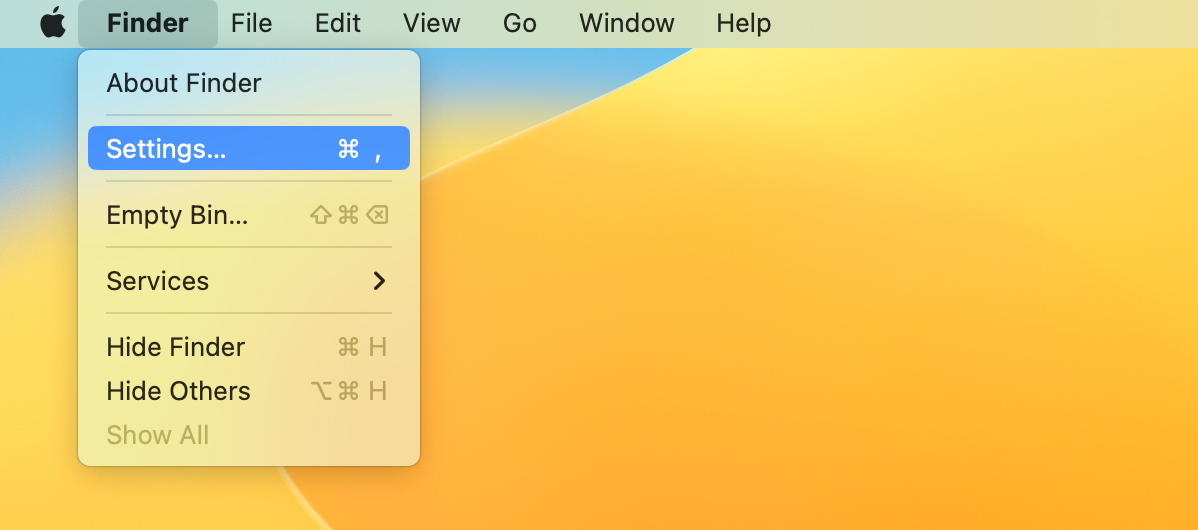
- Open up Finder and click on the Finder tab at the top-left corner of your screen.
- From there, click on Settings… and look for the General tab.
- You’ll see a whole list of checkboxes. Click on External disks and make sure it’s enabled.
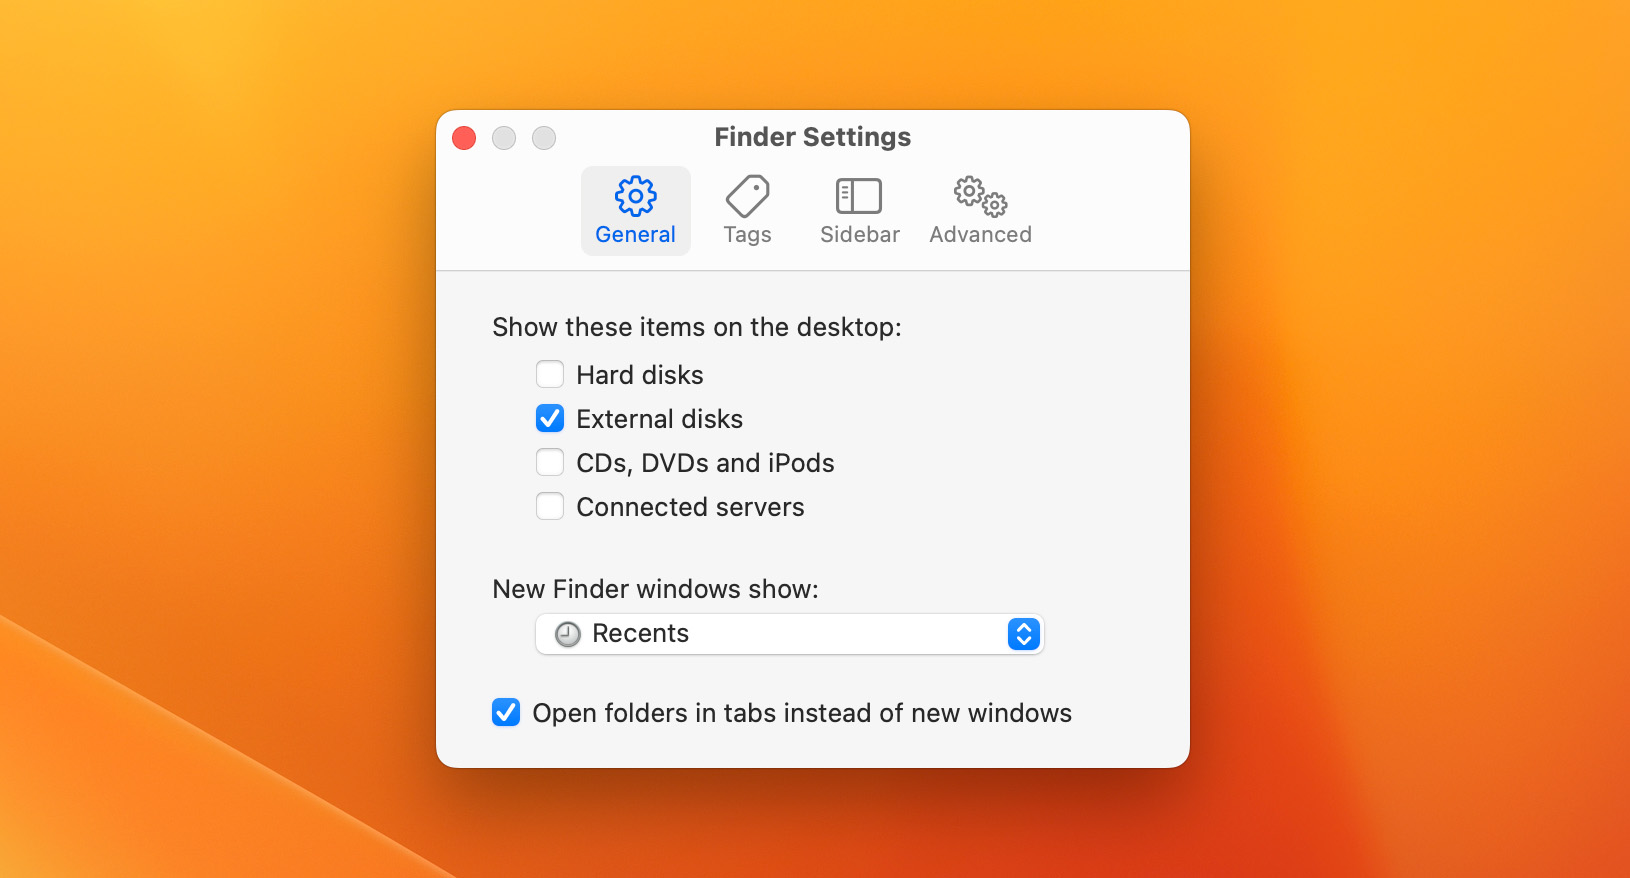
If this option was disabled when you opened Finder Preferences, then this should fix your problem. Go and look for your hard drive on your desktop.
Step 4: Force Mount Your Hard Drive in Disk Utility
Even though your hard drive is connected, a simple tug from the wire can disconnect it. At the same time, a faulty hard drive may also have a hard time connecting to your Mac.
You can try to forcefully mount your hard drive using Disk Utility. This lets your Mac actively try to read and mount any hard drive that’s plugged into it.
Here’s how you can force mount your hard drive:
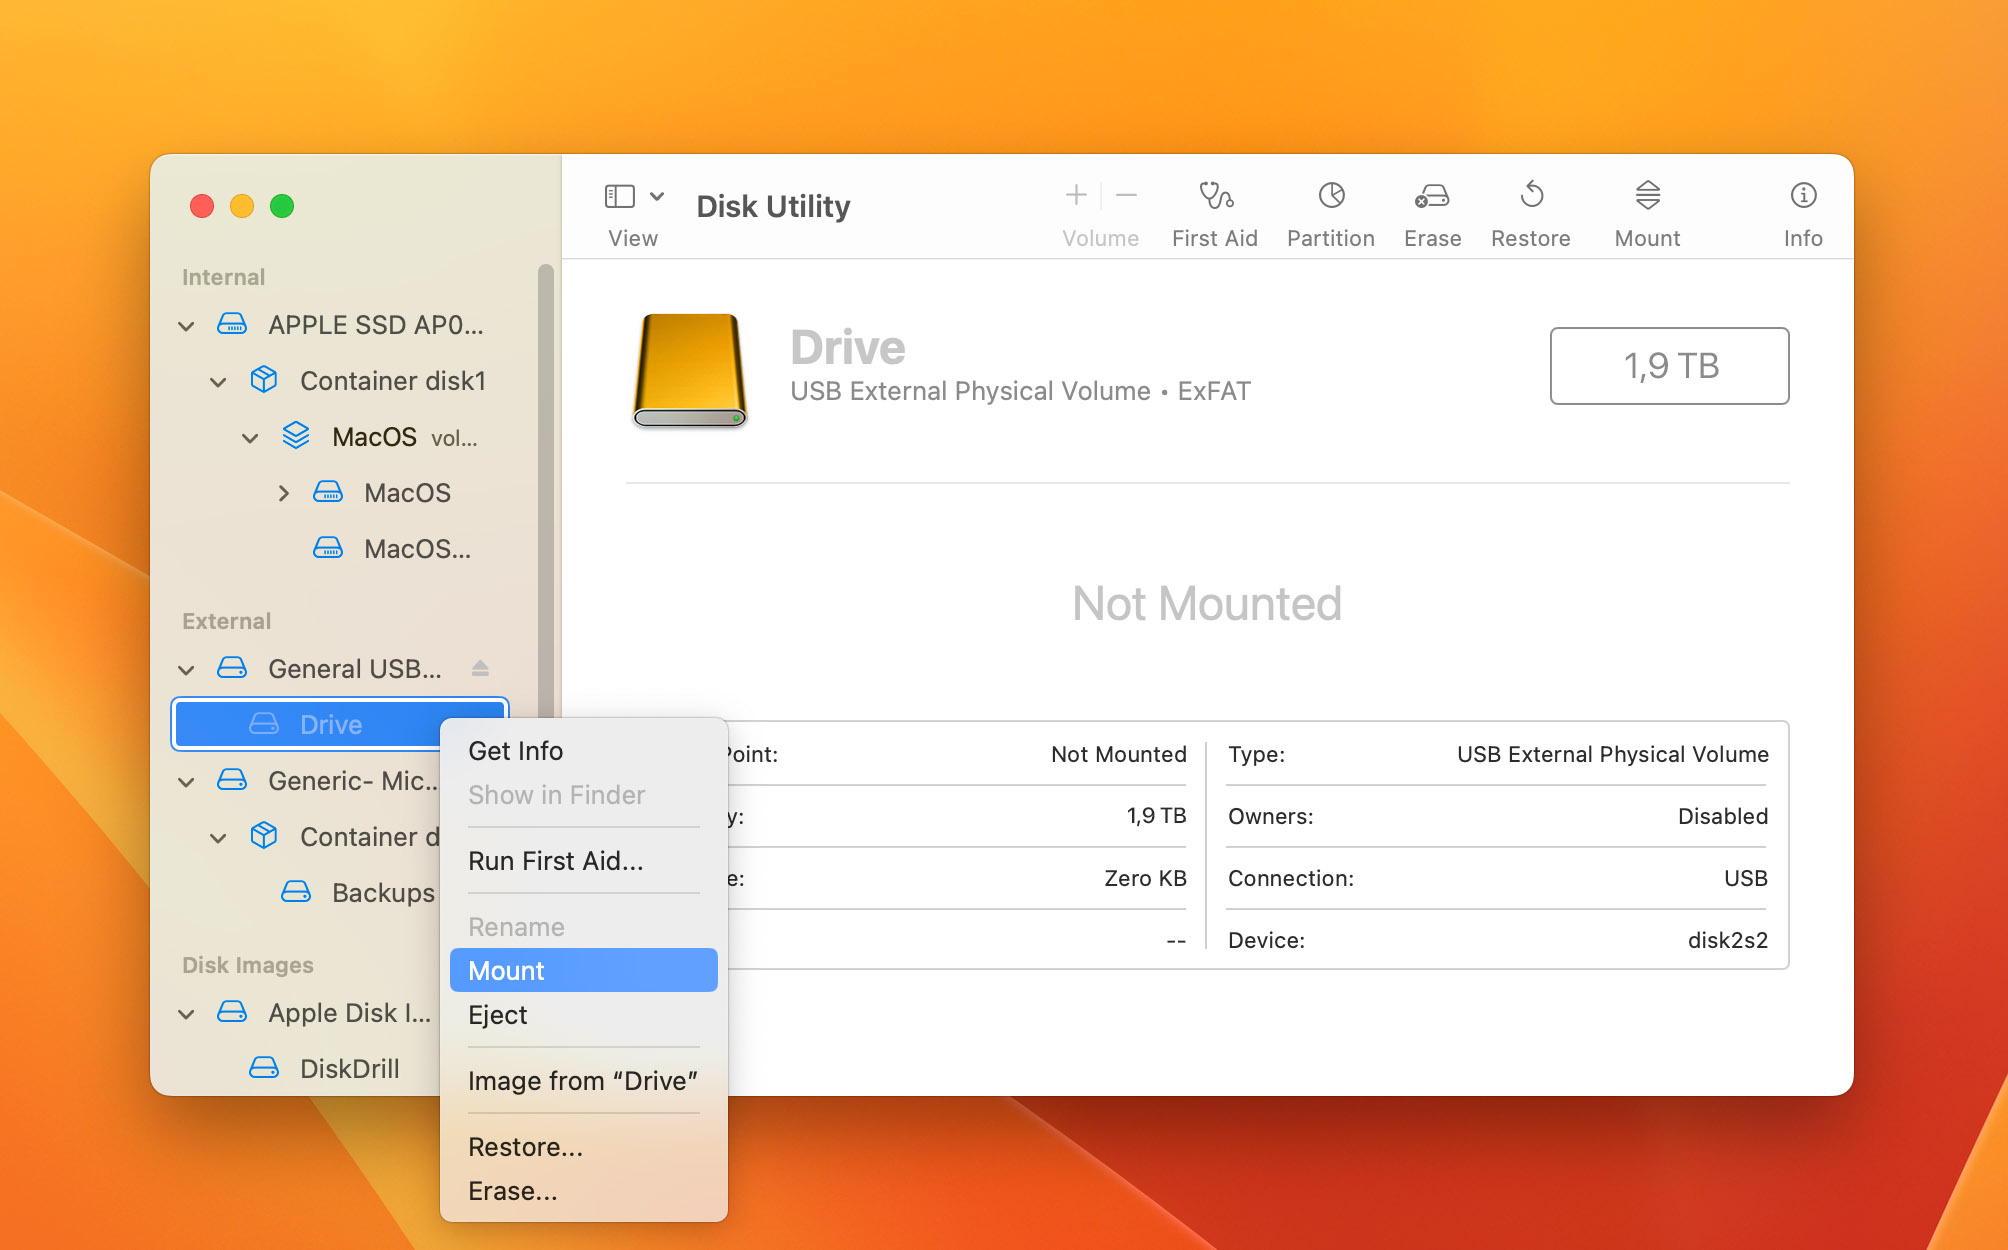
- Start by opening up the Disk Utility app.
- At the left-hand side of your screen, look for and right-click the external hard drive partition or partition container you’re having a problem with.
- In the quick-access menu, select Mount to force your Mac to read the drive.
Hopefully, this will let your Mac recognize your hard drive and help you recover data from it.
Step 5: Trying General Suggestions
These are quick and easy fixes that might help fix and connect your hard drive.
🐌 Do a Super Slow Jam
I don’t know how this was named, but a super slow jam is when you insert your hard drive super slowly into your Mac’s USB port. It’s one of those fixes that doesn’t really have a solid explanation behind it but has been a tried and tested method that works time and again.
🔌 Connect to a Different Port
Try plugging in your hard drive to a different USB port. Chances are there might be an issue with the USB port that you’re connecting your hard drive into. Or, maybe changing up the USB ports will reposition the hard drive enough to get it to read and work.
📏 Straighten Hard Drive Wire
A coiled up USB wire is a bad USB wire. Try putting your hard drive flat on the floor, away from sudden movements, and keep the wire connecting to your Mac straight. More often than not, old hard drives will likely have sensitive wires and will need to be in a certain position for them to read and work.
❌ Avoid Using a USB Hub
For those of you using a USB hub, try to remove it and connect your external hard drive directly to your Mac. If that works and fixes your problem, there might be an issue with your USB hub.
💡Provide Sufficient Power for the Drive
Ensure that the external power supply is connected if your external hard drive needs more power and if your hard drive’s manufacturer requires you to do so. When you connect a hard drive rated with a higher power or with a large capacity on a Mac, it might not get enough power just from the USB connection alone. That is why it is recommended to connect it to an external power supply.
Step 6: View Console Reports from Your Mac About the Hard Drive
Console reports are a great way to know what’s happening behind the scenes. Even if you don’t see the hard drive on your desktop, the activity should still be reported to the Console along with other reported problems.
- Open the Console app on your Mac through Spotlight or Finder.
- Click on View a report and select a report category in the sidebar. Look for any issues regarding your hard drive and see which errors are popping out. Here’s a basic guide.
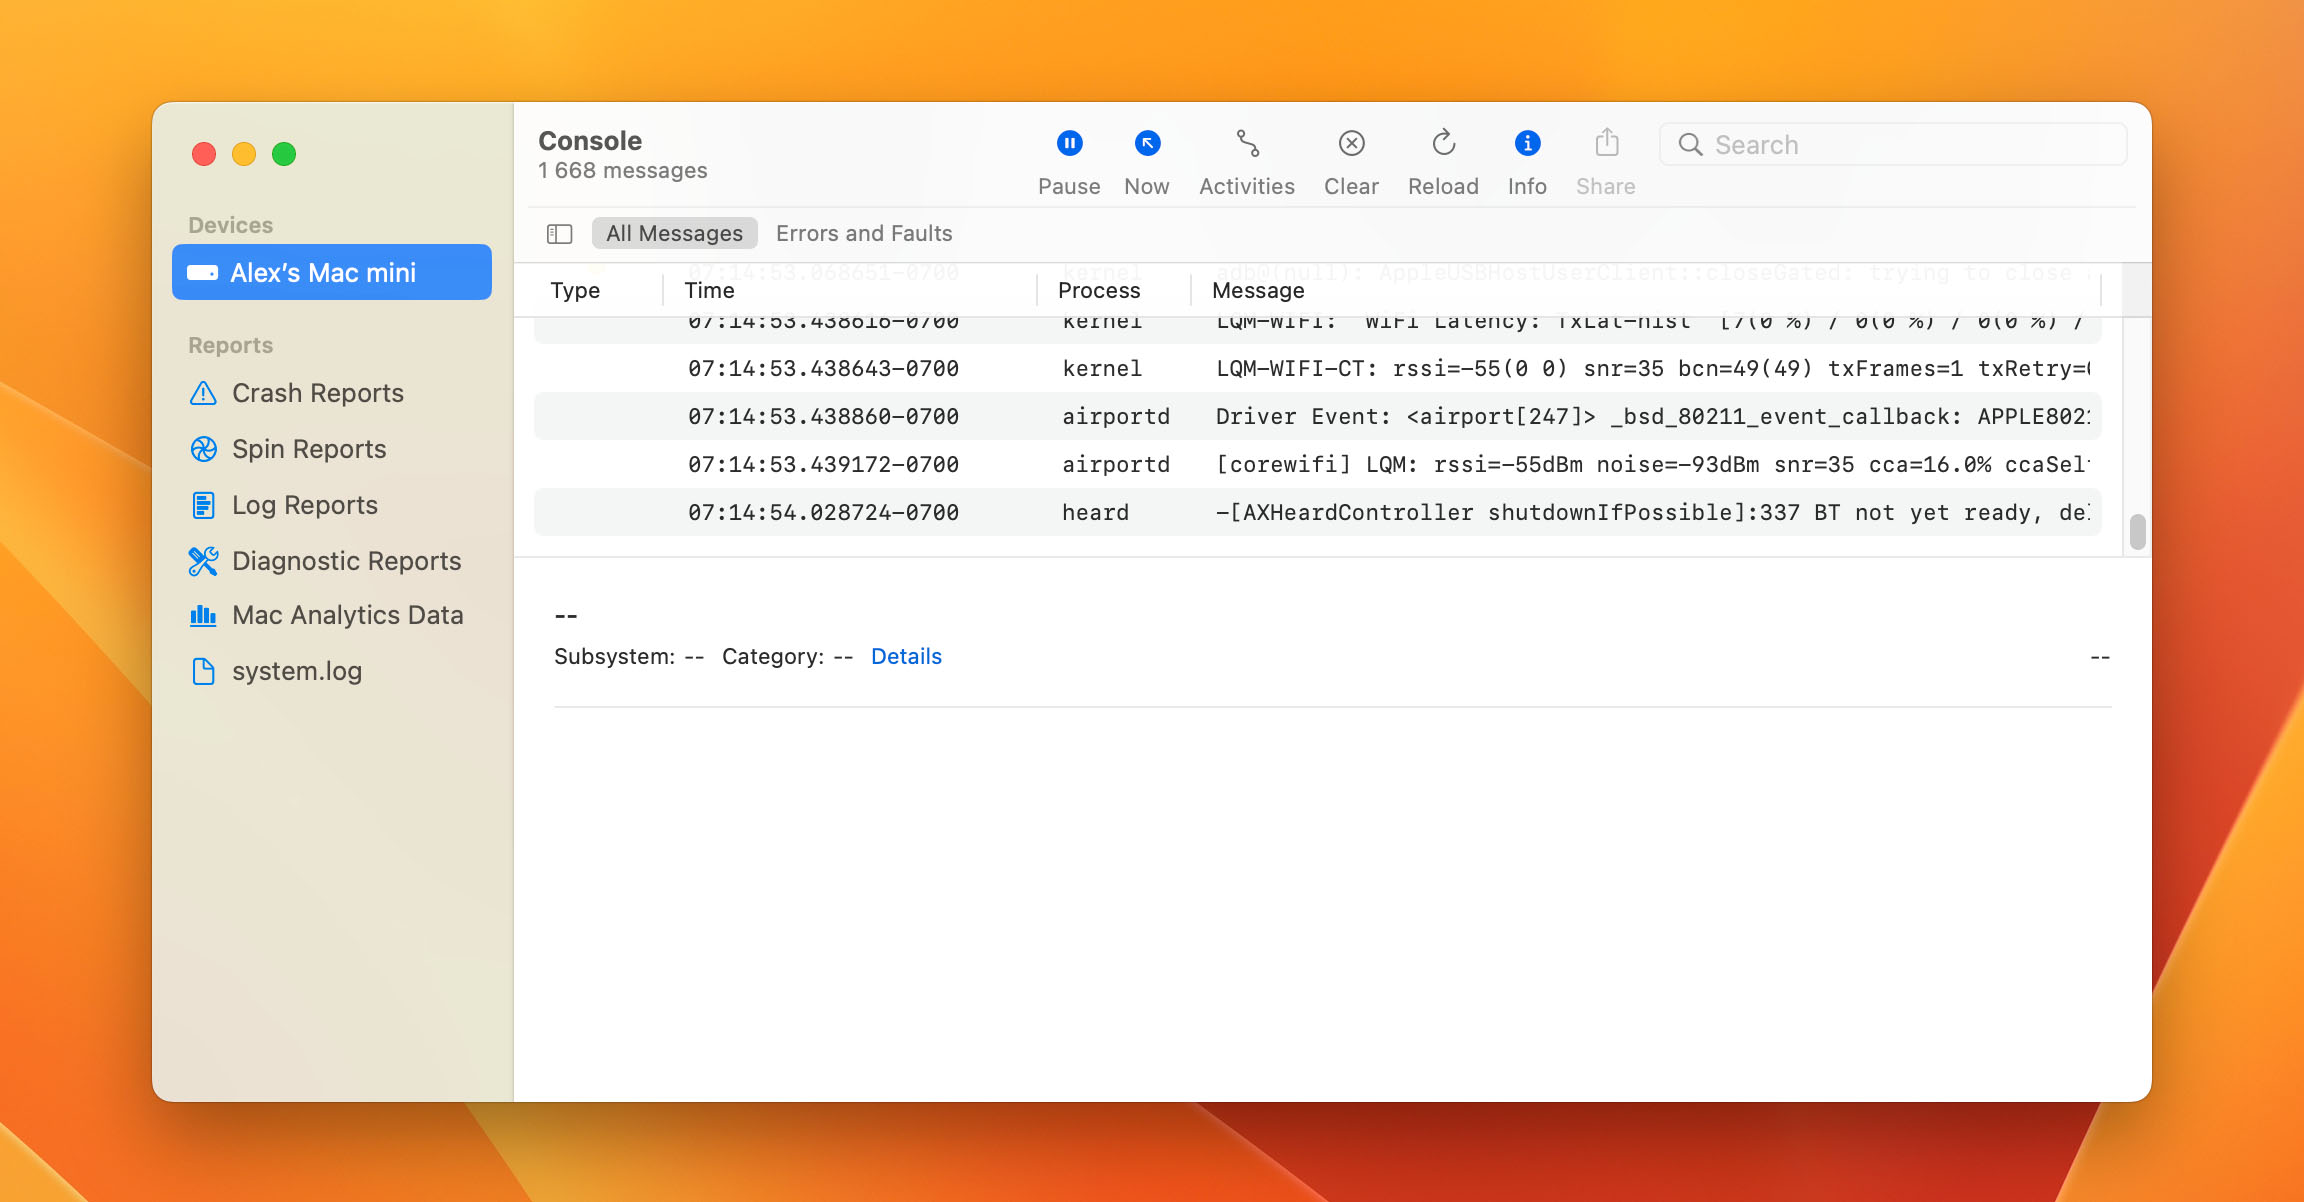
- Crash Reports – details on apps or processes that have recently crashed.
- Spin Reports – details on app or process issues.
- Log Reports – system and use reports on specific apps and their respective events.
- Diagnostic Reports – details on how your hardware resources are performing.
You won’t need to look at Mac Analytics Data and system.log reports for this issue. Look for the reason why your drive isn’t mounting. It should state if the problem is due to a crash, corrupted file, or simply being unable to read and connect the hard drive to your Mac.
Step 7: Use First Aid from Disk Utility
Disk Utility has a ton of features that are designed for hard drives and First Aid is one of them. It is designed to fix and repair errors on storage devices.
If the storage device you’re checking is your startup disk or startup volume, you’ll have to restart your Mac in macOS recovery first.
- Open up the Disk Utility app on your Mac. You can do this through Spotlight or Finder.
- Click on View and select Show All Devices.
- You should find the volume that needs fixing in the sidebar. Click on the First Aid button to fix that device.
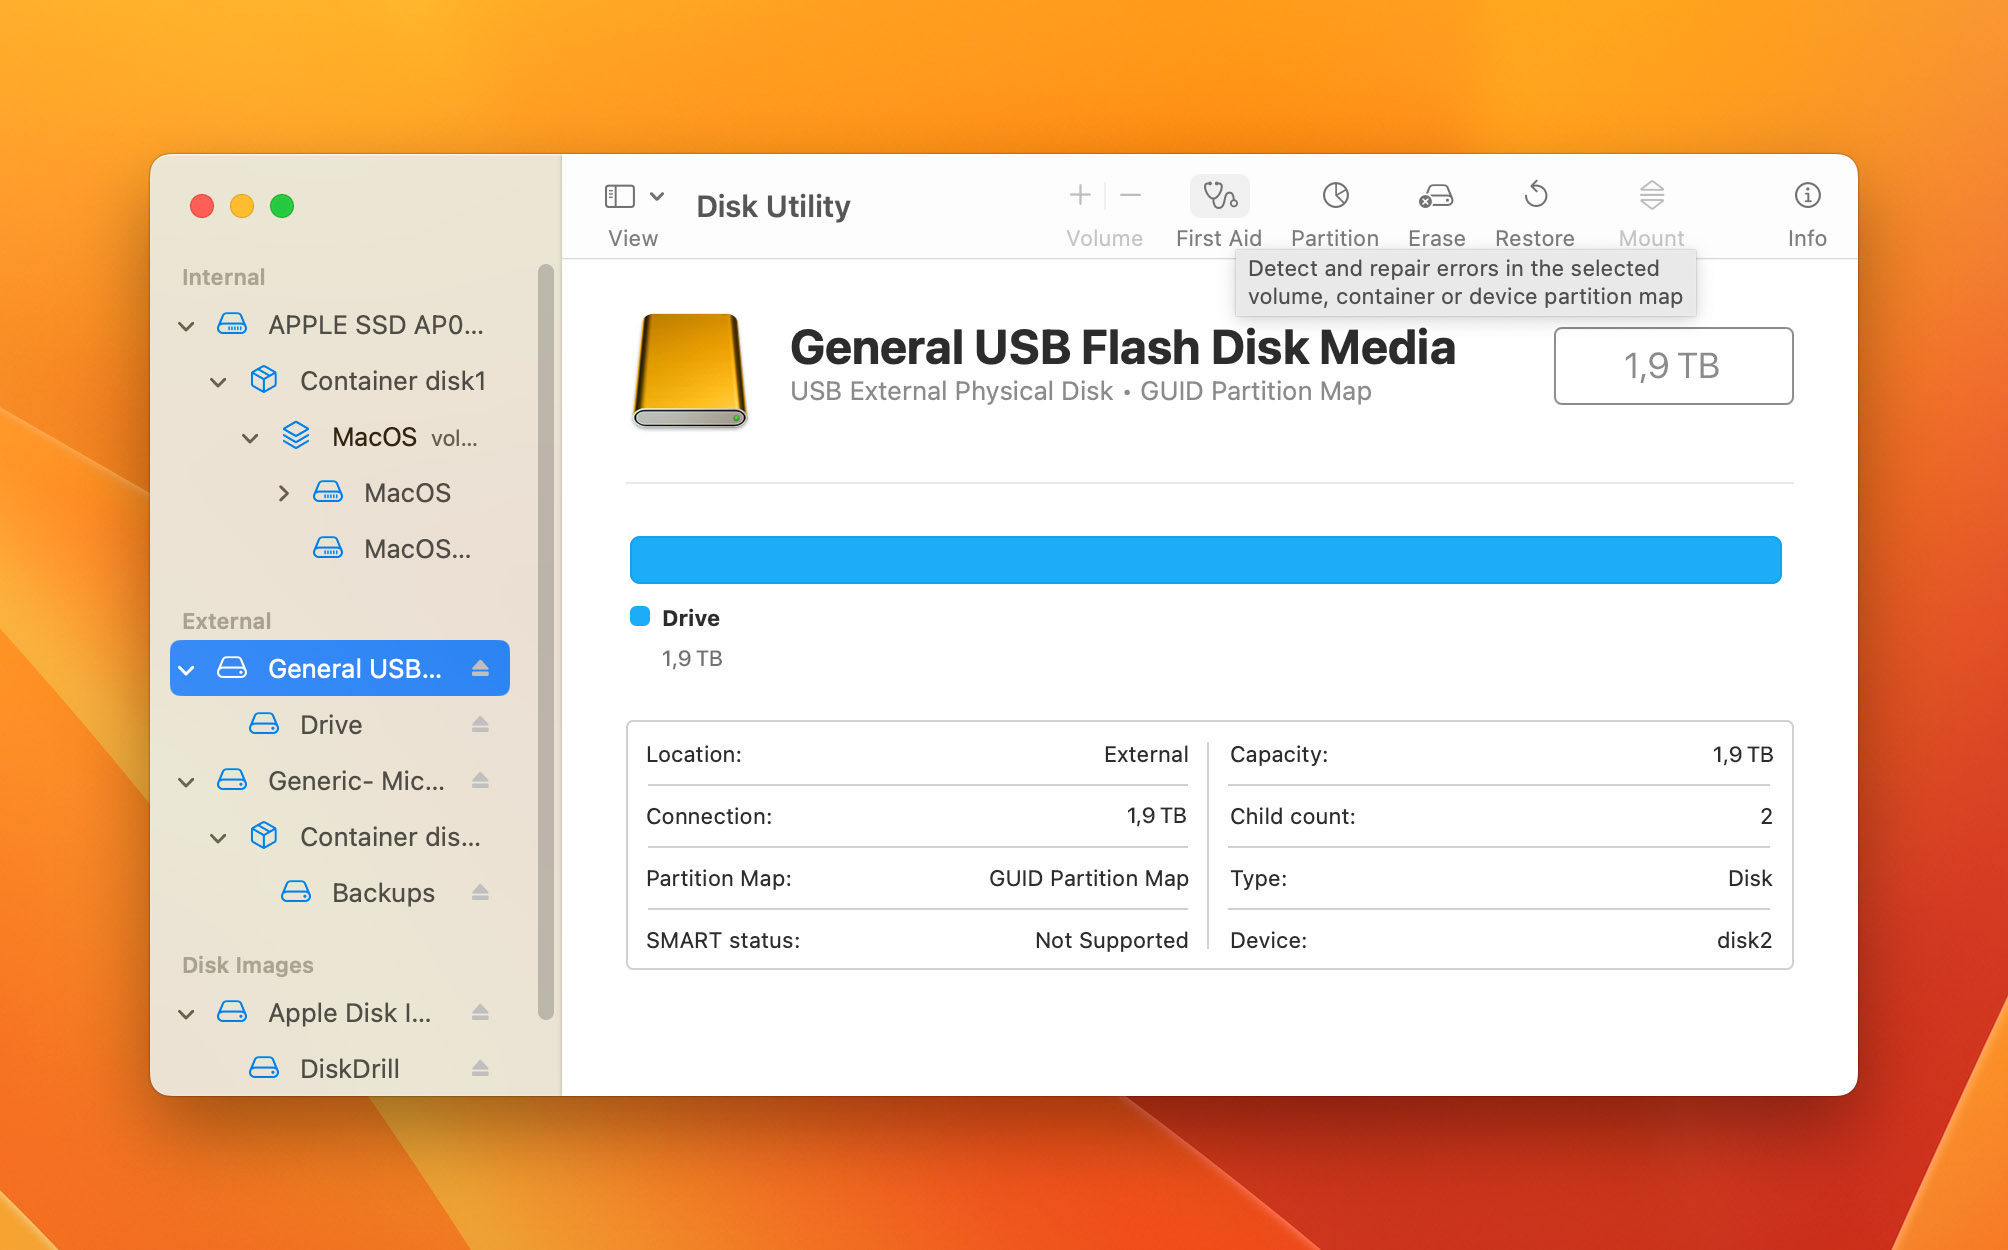
- In the First Aid pop-up that opens, click on Run and follow the instructions.
- Repeat steps 3 and 4 for all the volumes on the storage device.
- When that’s done, select the container and click on the First Aid button.
- Again, click on Run from the dialog box and follow the instructions.
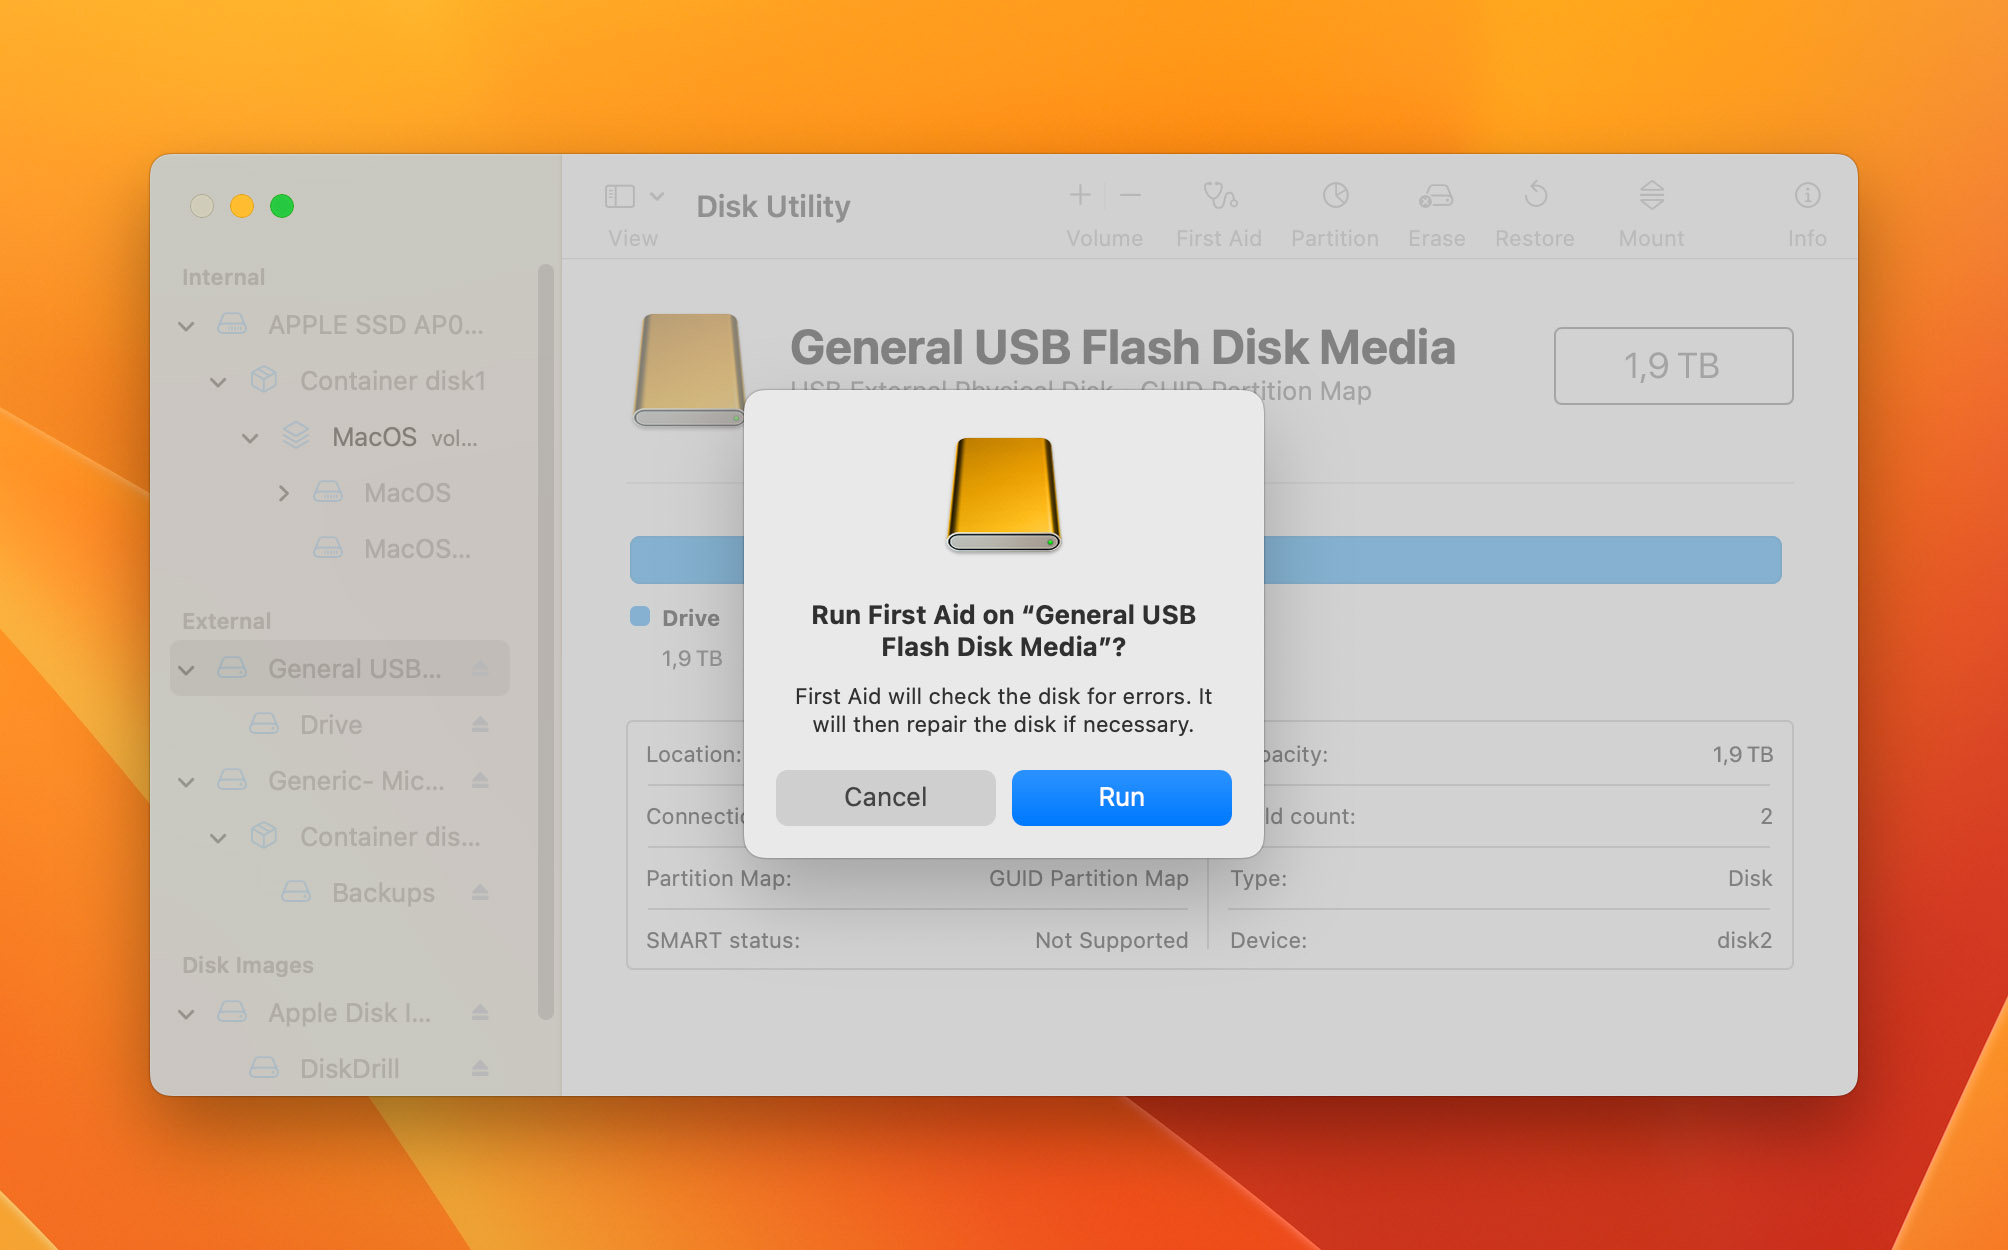
- Repeat steps 6 and 7 for each container on that storage device.
- Now, from the sidebar, select the storage device and press the First Aid button again.
- Go through the First Aid dialog box, click Run, and breeze through the instructions.
Just click on Done when you’re through with everything and that should give Disk Utility enough information to either fix your storage device or tell you if something is wrong with it.
- If the report says that you have “overlapped extent allocation” errors, then two or more files are occupying the same space on your disk and one of them is corrupted. You’ll need to check every file in the list of affected files and possibly delete them. If the files contain sensitive and important pieces of information, open them and try to recover the files by saving it into a different folder.
- If Disk Utility fails to repair the hard disk on your Mac, try going through the steps again just to make sure. In the case that it fails again, back up your data as much as possible (Disk Drill is a good way to do this) and then reformat your disk. After that, reinstall the latest version of macOS, and restore your data.
Finally, if Disk Drill tells you that your disk is about to fail, back up your data as much as and as quickly as possible. You will have to replace the disk through a certified Apple repair shop.
You can also use the Terminal to access the First Aid feature and fix the corrupted hard drive you’re dealing with. This step is pretty simple, but we don’t recommend this alternative to users who aren’t familiar with the Terminal.
- Open up the Terminal through the Dock or Spotlight.
- Copy-paste this code into the Terminal command line: diskutil repairVolume /Volumes/[Drive Name]. Replace “[Drive Name]” with the appropriate name of the hard drive on your Mac.
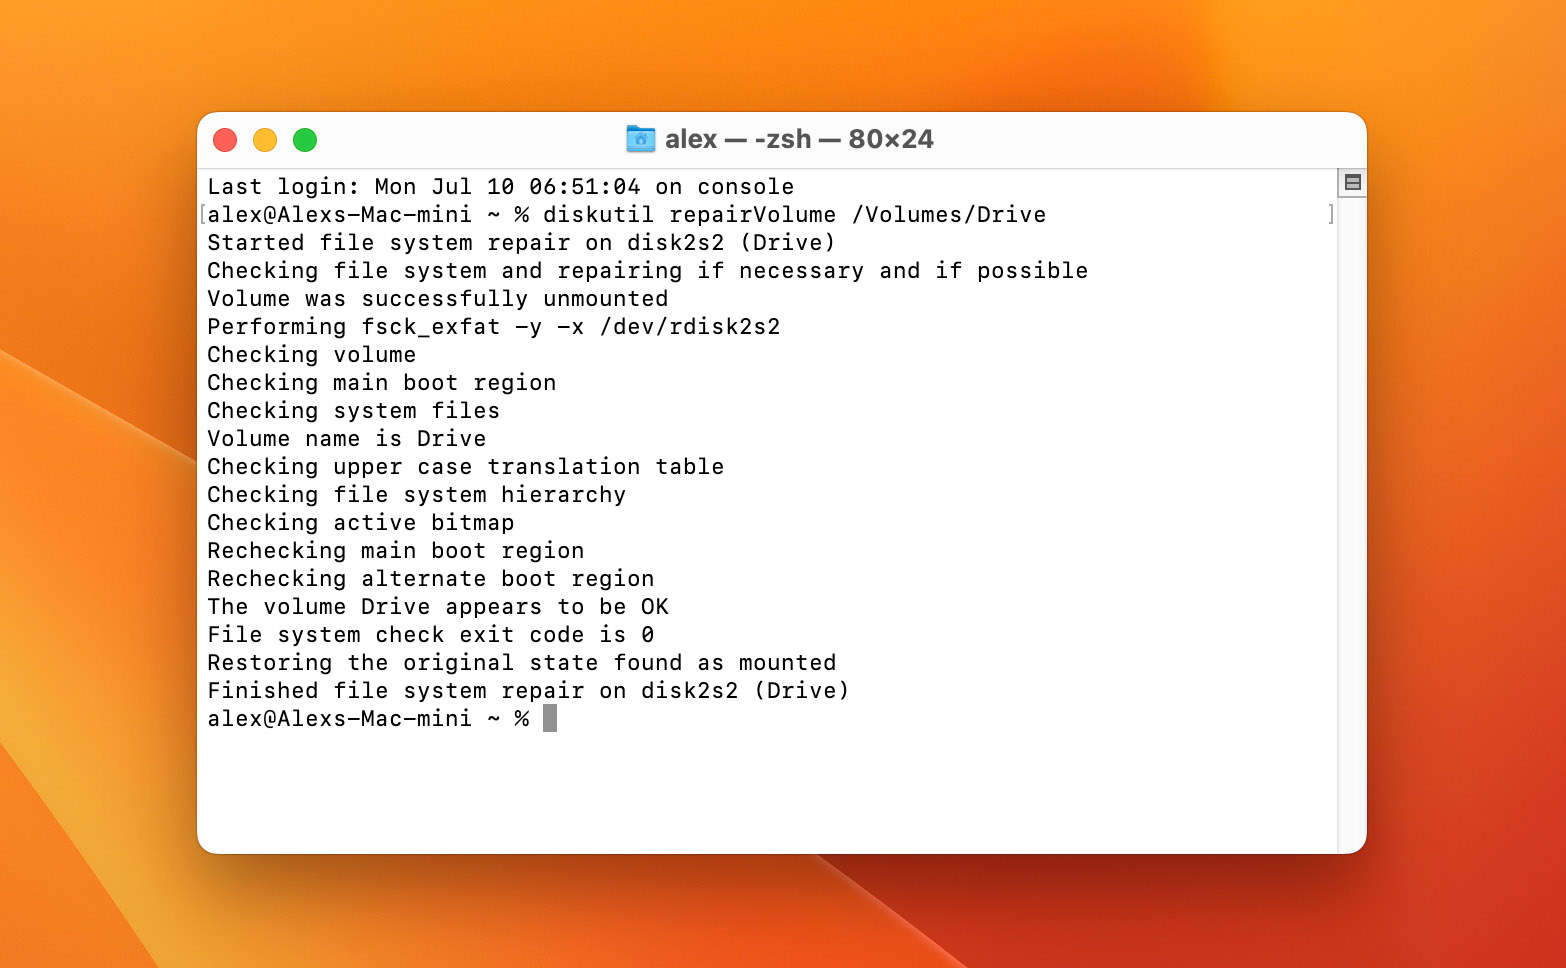
This can take around a couple of minutes, so now would be the perfect time to brew yourself a cup of coffee or take a stretch.
Step 8: Reset Your SMC
A built-in chip on the logic board of your Mac called the SMC is responsible for multiple functions, primarily with power and settings configurations of your macOS. The parameters of the chip often change, sometimes causing a malfunction that a good reset can fix.
Resetting the SMC will revert settings on your computer which might fix the corrupted hard drive issue where it’s either not connecting or not being read. It’s a bit of a long shot, but everything helps when you’re troubleshooting hardware problems like this.
The steps will be different for varying Mac models, so look for your Mac model and read the instructions from there.
💻 For MacBooks with the M1 Chip:
M1 Macs don’t have an SMC chip. All the functions are already incorporated into the M1 processor, so just reset your computer.
🔌 For MacBooks with Non-Removable Batteries:
- Start by powering off your Mac.
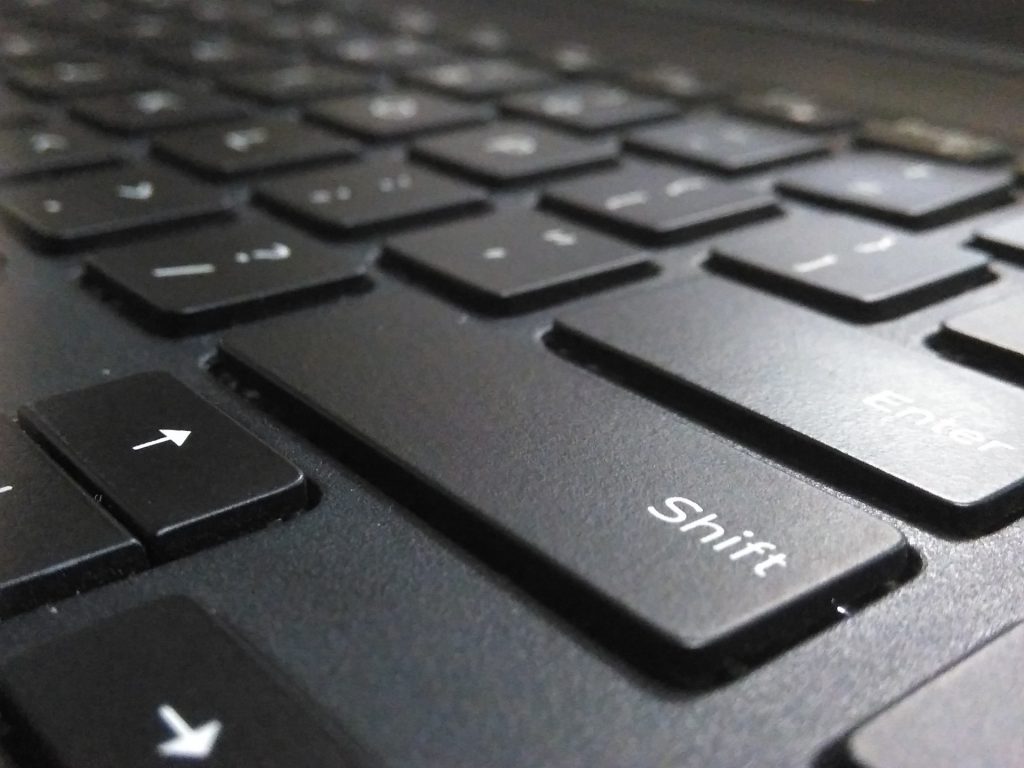
- After several seconds, press the Shift + Control + Option with your left hand. Use your right hand to hold down the power button at the top-left corner of your keyboard.

- Press these four buttons together at the same time and hold them for more than 10 seconds.
- Release all the keys and then turn on your Mac by pressing the power button.
🔋 For MacBooks with Removable Batteries:
- Shut down your Mac and remove the battery.
- Press and hold the power button for around five seconds.
- Reinstall the battery and press the power button again to turn your Mac back on.
🛡️ For MacBooks that Have the T2 Chip:
- Shut down your Mac, just like the previous steps.
- Press and hold Control + Option at the left side and Shift at the right side of your keyboard for about 7 seconds.
- After 7 seconds, press and hold the power button as well. Hold all four keys down for another 7 seconds before releasing them.
- Wait for a couple of seconds and then turn on your Mac.
🔩 For Desktop Computers that Have the T2 Chip and Intel-Based Macs:
- Like all the steps above, shut down your Mac and unplug the power cord.
- After a good 15 seconds, plug the power cord back in.
- Wait for exactly 5 seconds before turning on your Mac by pressing the power button.
Although the SMC primarily handles the battery, fans, and LED indicators among other things, resetting it should help fix any hardware issues with your hard drive:
Step 9: Resetting Your NVRAM
Here’s another method that involves resetting something. Your NVRAM is responsible for storing your preferences and settings. Although the data stored isn’t personal data, resetting it does revert the personal preferences that you’ve previously set on your Mac’s settings.
Here’s how you can quickly do that:
- Shut down your Mac.
- Power it back on.
- When you press the power button, immediately press the Option + Command + P + R keys for a good 20 seconds. Your Mac might seemingly restart during the process, but that’s normal.

On Mac computers that play a startup sound, you can release the keys right after the second startup sound.
For Macs with the T2 Security Chip, you can take your fingers off the keys when the Apple logo appears and disappears on your screen after a second time.
You can see if you did this correctly by opening up your System Preferences window and checking if the settings were reverted to their default states.
For M1 Macs, you can simply shut down your computer and then power it back on. After a complete shutdown, your Mac tests the NVRAM for defaults and will reset automatically if something is wrong.
Step 10: Uninstall SMART Utilities
SMART programs are a great way to keep track of the health of your hard drive, but they can also block certain storage types from connecting to your Mac. For example, a known issue with SAT SMART drivers is that it doesn’t allow LaCie or Drobo drives to mount.
If you have a SMART driver installed in your system, removing it might fix the corrupted hard drives issues you’re having.
There are a few ways you can uninstall these programs:
- Open up the Finder app and look for the SMART utility installed in your computer. Drag it to the Trash and then right-click the Trash icon. Select Empty Trash to begin uninstalling.
- Use the built-in uninstaller that comes with the SMART drive program you installed. It should be in the folder together with the SMART drive. If it isn’t there, try opening the SMART utility and looking for an uninstall option.
For example, SAT SMART uninstallations happen this way:
- Open up the Terminal.
- Copy-paste the command sudo rm-r /Library/Extensions/SATSMARTDriver.kext.
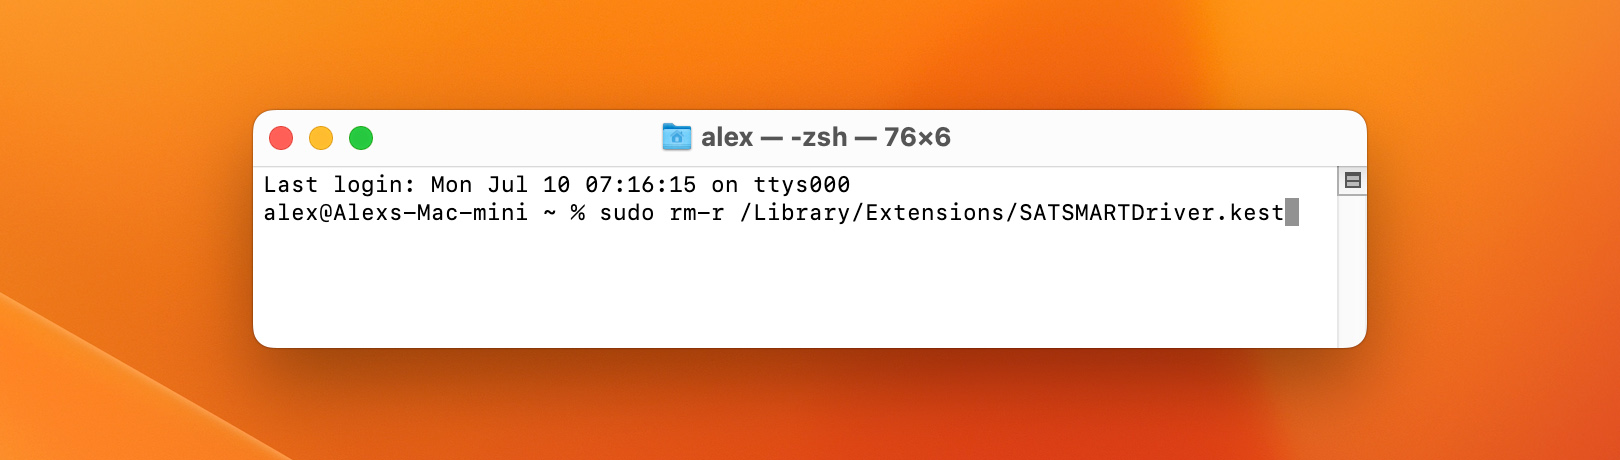
- After that, copy-paste the second command sudo rm -r /Library/Extensions/SATSMARTLib.plugin.
Step 11: Boot Your Mac in Safe Mode
Macs are one of the safest laptops or desktops you can use, and for good reason. It’s strict when it comes to any signs of malicious behavior, even if it is from your trust hard drive. There’s a huge chance that your Mac considers your hard drive malicious and therefore doesn’t open it.
Similarly, you may also have other apps open that are preventing you from accessing your hard drive.
Booting up your Mac in Safe Mode will run only the necessary apps to operate your Mac. This means that the third-party apps that are possibly blocking your hard drive won’t open.
🛡️ Here’s how you can boot in Safe Mode for Macs with Intel CPUs and T2 security chips:
- Shut down your Mac.
- Wait for about 10 seconds, then power on your Mac by pressing the power button.
- Immediately press and hold the Shift key all the way until you see the login window.
💻 For Macs with Apple silicon, follow these steps:
- Shut down your Mac just like the previous step.
- After 10 seconds, press and hold the power button to turn your Mac on, all the way until the startup option window appears. That will show all the available startup disks and Options on your Mac.
- Select the startup disk you want to open.
- Press and hold Shift, click Continue in safe mode, and then release the Shift key.
✅ Here’s how to check if you did it correctly and booted up in Safe Mode:
- Click on the Apple menu.
- Look for and select About This Mac.
- Navigate to the Overview tab and select the System Report button.
- Click on Software at the left-side menu. In the System Software Overview section, look for the Boot Mode and see if it says either “Safe” or “Normal”.
You can exit out of Safe Mode by doing a simple restart. Don’t press any keys during the startup and your Mac will power on like normal.
Step 12: Rebuild HFS Tree with FSCK Command
An HFS tree (Hierarchical File System) is a system developed by Apple to specify how data is arranged or allowed to exist on a drive. Your HFS tree might have issues, which is what’s causing the data-reading problem.
To run this command, you’ll have to restart your Mac and login as an Administrator. If you’ve done that, go ahead and proceed to the steps below.
- Open up the Terminal on your Mac.
- When that’s done, type out sudo diskutil unmount /dev/disk1s2 and press Enter. Replace the disk1s2 numbers with the correct ones in your drive. You can look for the number of your drive by opening Disk Utility, selecting your hard drive, and clicking on info at the top-right corner of your screen. This will open your hard drive details, but just look for your BSD device node information.
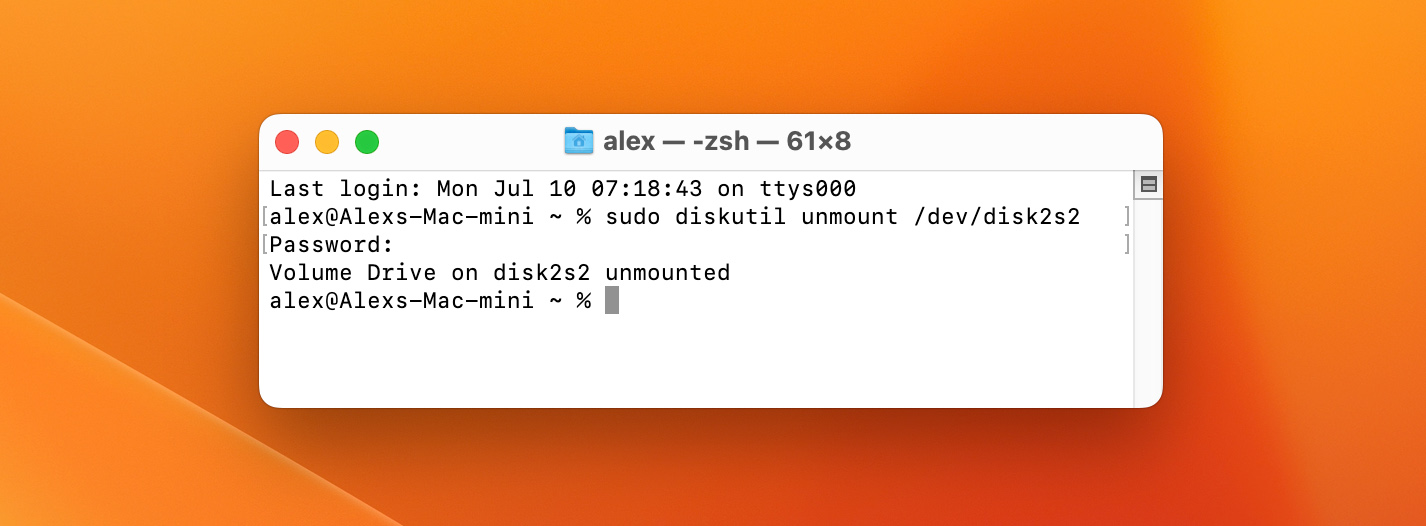
- After that, enter the command sudo fsck_hfs -f /dev/disk1s2.
Here are a couple of useful options that you can add to this command:
- -f — forces a filesystem check even if the OS X says the filesystem doesn’t need it.
- -n — reports the errors it finds. Doesn’t fix the errors.
- -y — fixes errors automatically. Only use this if you know what you’re doing. Any mishaps can seriously mess up a filesystem.
This entire process can take a couple of minutes depending on the speed of your Mac. Reconnect the drive after the operation.
Step 13: Format Your Hard Drive
For the last step on this article, we’re going to be formatting your hard drive. This will erase all the files on your hard drive.
Formatting your hard drive is essential when your drive is badly corrupted. If the repair tools couldn’t help with the errors, backup your files as best as you can and then reformat the drive.
Back up the files using the steps we highlighted above with Disk Drill. Once that’s done, here’s how you can format your hard drive.
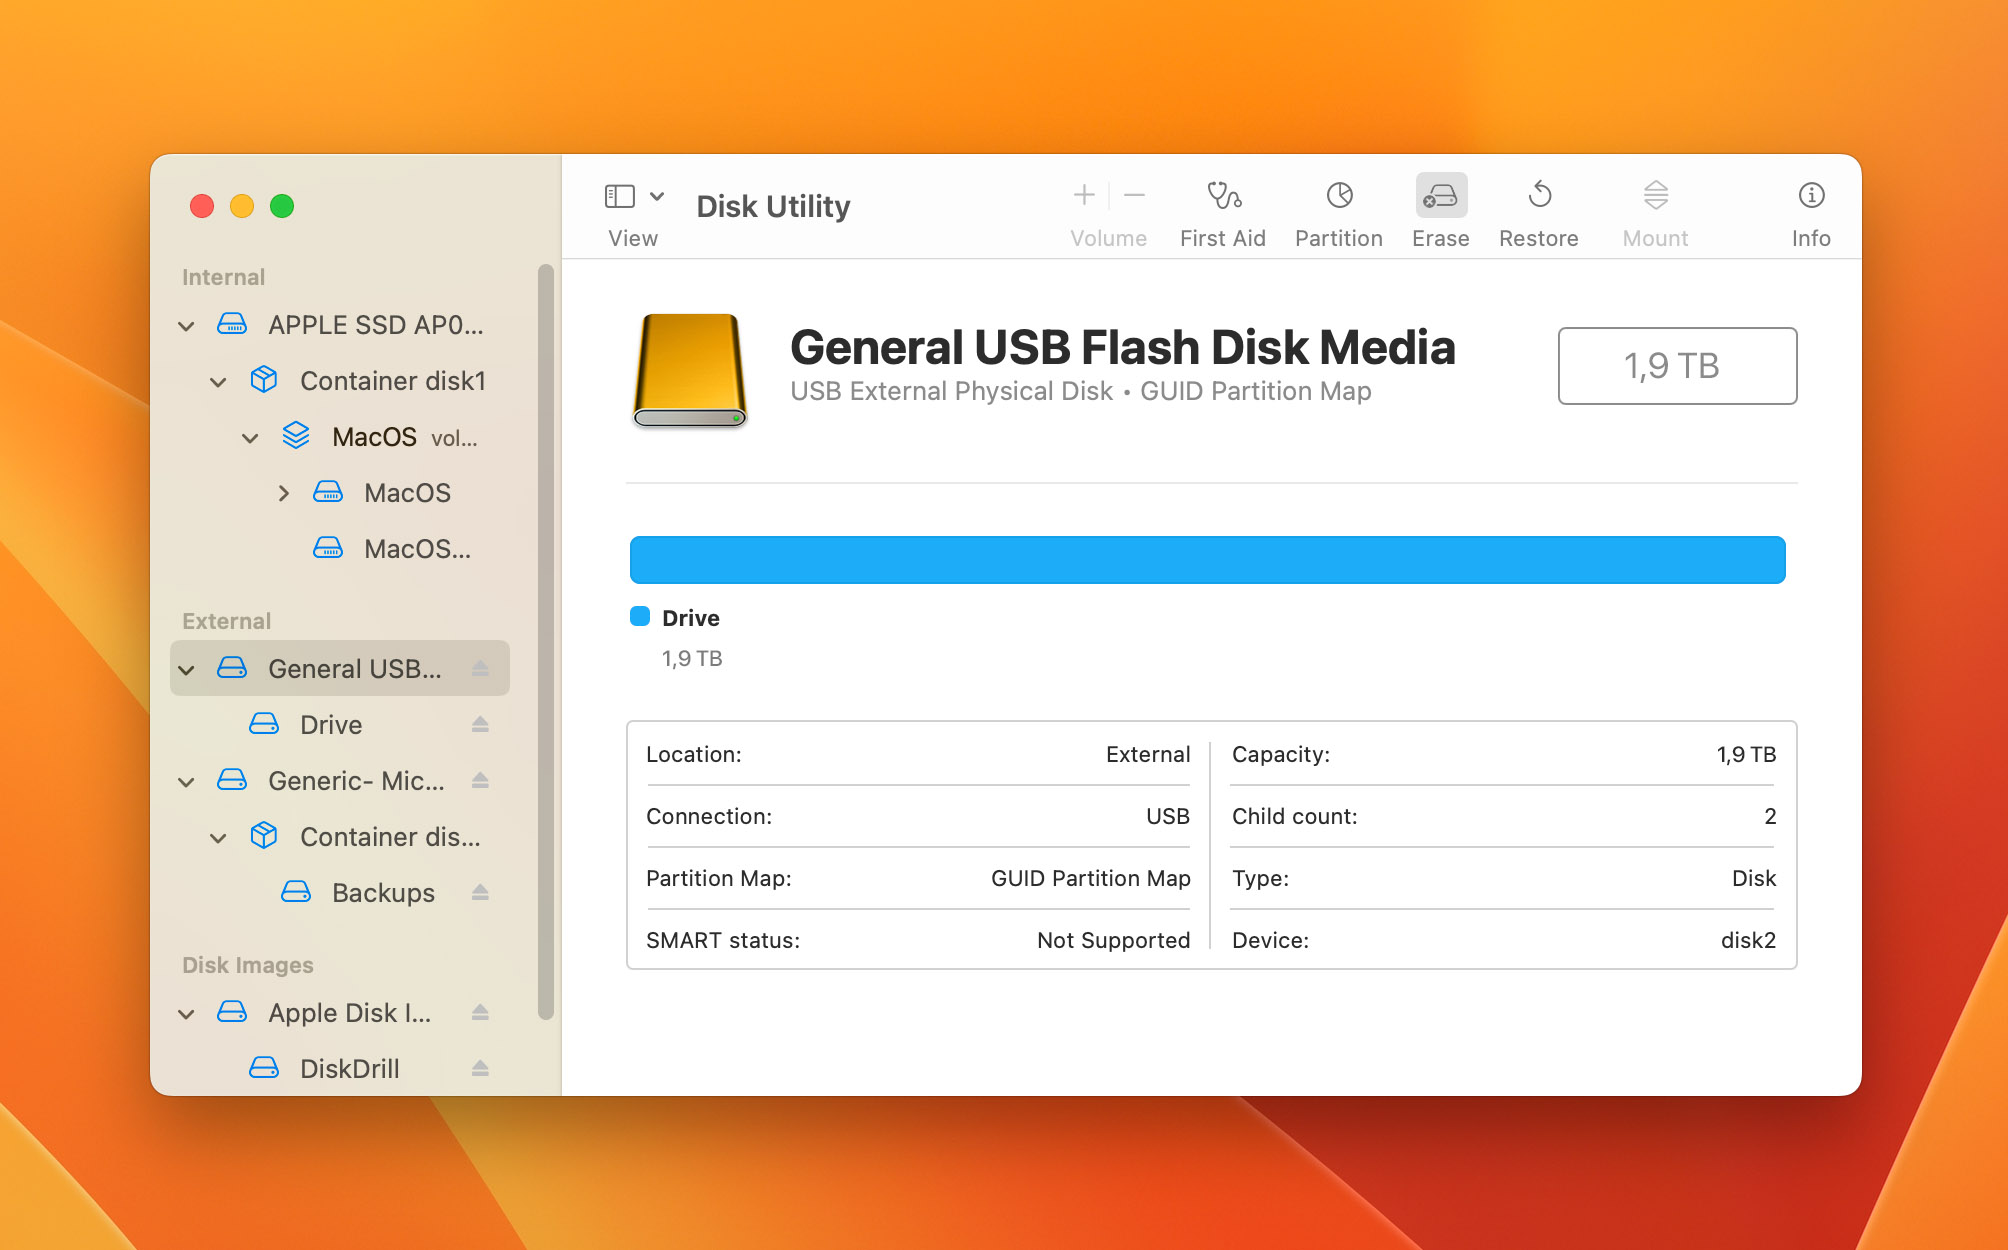
- Open Disk Utility on your Mac.
- Click on the External Hard Drive you want to format at the left-hand side of your screen.
- Look for and press the Erase button. You can also right-click the hard drive and just click Erase from there.
- Give the soon-to-be-formatted hard drive a new name.
- We recommend choosing APFS, but you can choose whichever you want as the storage and file format. Select GUID as the Scheme.
- When that’s all configured, click on Erase to start the process.
After your hard drive has been reformatted, safely eject it with the steps below and then plug it back to your Mac. Your computer should read the external hard drive successfully and consistently from now on.
Bonus Tip: Disconnect Your Device Properly
If you somehow managed to repair the external hard drive on your Mac, let’s make sure that this problem doesn’t come up again.
There’s a step-by-step process to disconnecting your external hard drives properly. Unplugging it without going through those steps can cause errors, corrupted files, and even damage to your hard drive.
You can properly remove external drives by dragging the hard drive icon from the desktop to the Eject icon on the Dock. The Trash icon changes to the Eject icon during this process.
Alternatively, you can also Ctrl + Click the drive and click on Eject from the quick access menu.
Now, if you happen to run into multiple errors while trying to safely eject your hard drive, I understand where you’re coming from. Sometimes your Mac thinks that the hard drive is still being used, even when nothing is open on your computer anymore. Despite that, don’t give up and unplug the hard drive. Shut down your computer and wait for around 5 seconds before unplugging the drive. This is the best way to deal with a problematic hard drive that can’t be ejected safely.
FAQ
Can you fix hard drive corruption?
Yes, you can absolutely fix most hard drives from corruption. Unless there’s any physical damage to a hard drive, you can always reformat it and use it again like new. Just remember to recover your data before formatting your hard drive.
How did my hard drive get corrupted?
Your hard drive can get corrupted for multiple reasons such as mechanical component issues, software or storage errors, and even electrical surges. Among these three, the mechanical components that will eventually break is your biggest concern. Once your hard drive starts to deteriorate and will be beyond repair, you’ll reach a certain point where you need to replace it and can no longer fix it.
Can a laptop hard drive be repaired?
In most cases, a laptop hard drive can be repaired by a software repair tool or by reformatting that drive. If your main drive is compromised, you’ll have to backup all your files into an external hard drive for safekeeping before you reformat your drive.
Conclusion
Losing a hard drive can be such a huge problem, especially for the creatives who need it for files or for sentimental people keeping memories. While it’s inevitable for a hard drive to eventually break down and become obsolete, there are a ton of ways to recover and restore the health of a hard drive for another year.
Let me know on Twitter or LinkedIn if you need any help with fixing your hard drives! You can find the links in my author profile below.
This article was written by Mako Young, a Contributing Writer at Handy Recovery Advisor. It was also verified for technical accuracy by Andrey Vasilyev, our editorial advisor.
Curious about our content creation process? Take a look at our Editor Guidelines.