If you’re wondering how to recover deleted files from an SD card on Mac, then make sure to read this article from start to finish.
Why? Because we describe three SD card recovery methods that all Mac users can try for free to get back lost photos, videos, audio files, documents, and other data from corrupted, formatted, erased, or damaged memory cards. In addition to tried and tested recovery methods, we also provide helpful tips to ensure that you avoid making beginner mistakes that could cost you your data.
3 Best Methods to Recover Deleted Files from an SD Card on a Mac
Below you will find what we believe to be the three most effective methods for recovering data from a memory card on macOS devices.
Method 1: Use Data Recovery Software
Mac computers don’t come with any data recovery software that would allow its users to recover permanently deleted files that are still physically present on the storage devices from which they were deleted. That’s why Mac users have to rely on third-party SD card recovery solutions, which are available at a variety of price points to appeal to different classes of users.
Let’s take a closer look at one free and one freemium data recovery application to explain how they work and what the main differences between them are.
Option A: Disk Drill
Disk Drill is an intuitive data recovery software application that makes it effortless for beginners and pros alike to get back all missing data. The free version can preview an unlimited number of files, which will help you make sure they are recoverable, but their recovery is possible only with a valid Disk Drill PRO or Enterprise license, which also gives you access to Disk Drill for Windows, allowing you to recover deleted files from SD card on any PC.
![]()
To recover files from an SD card using Disk Drill:
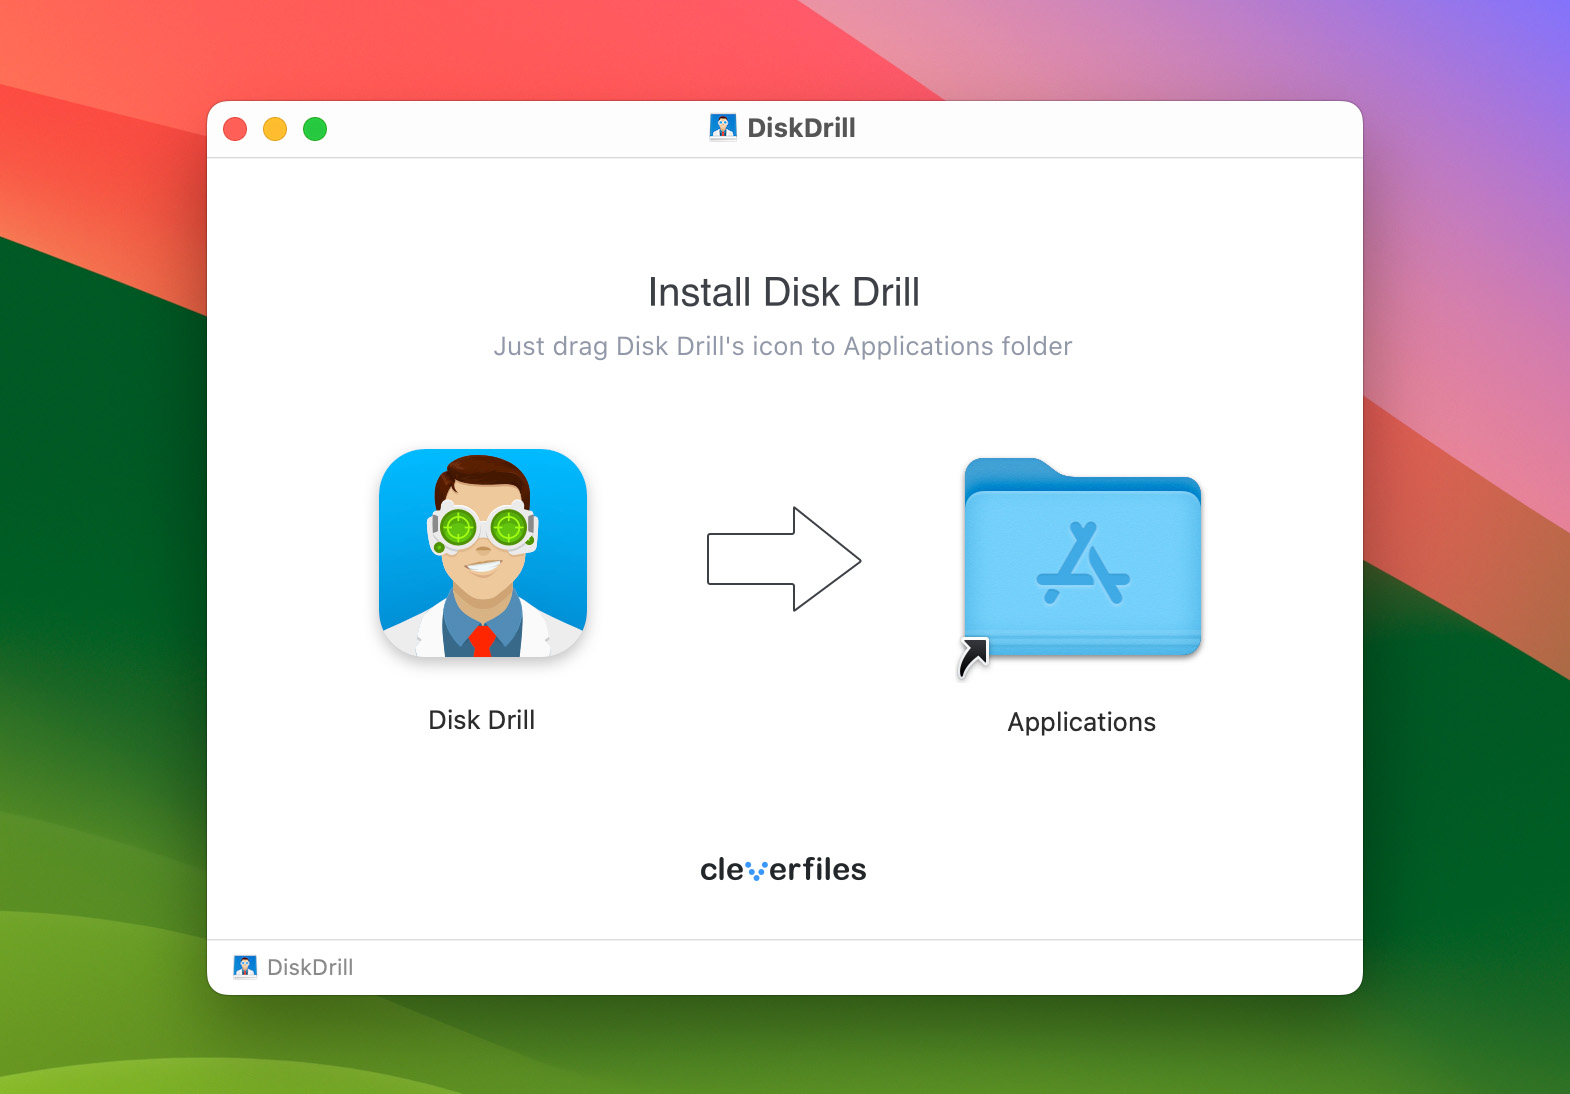
- Download and Install Disk Drill: Visit the official Disk Drill website to download the software. Follow the step-by-step instructions provided on the website to install Disk Drill on your Mac. The process is accompanied by illustrations for better understanding.
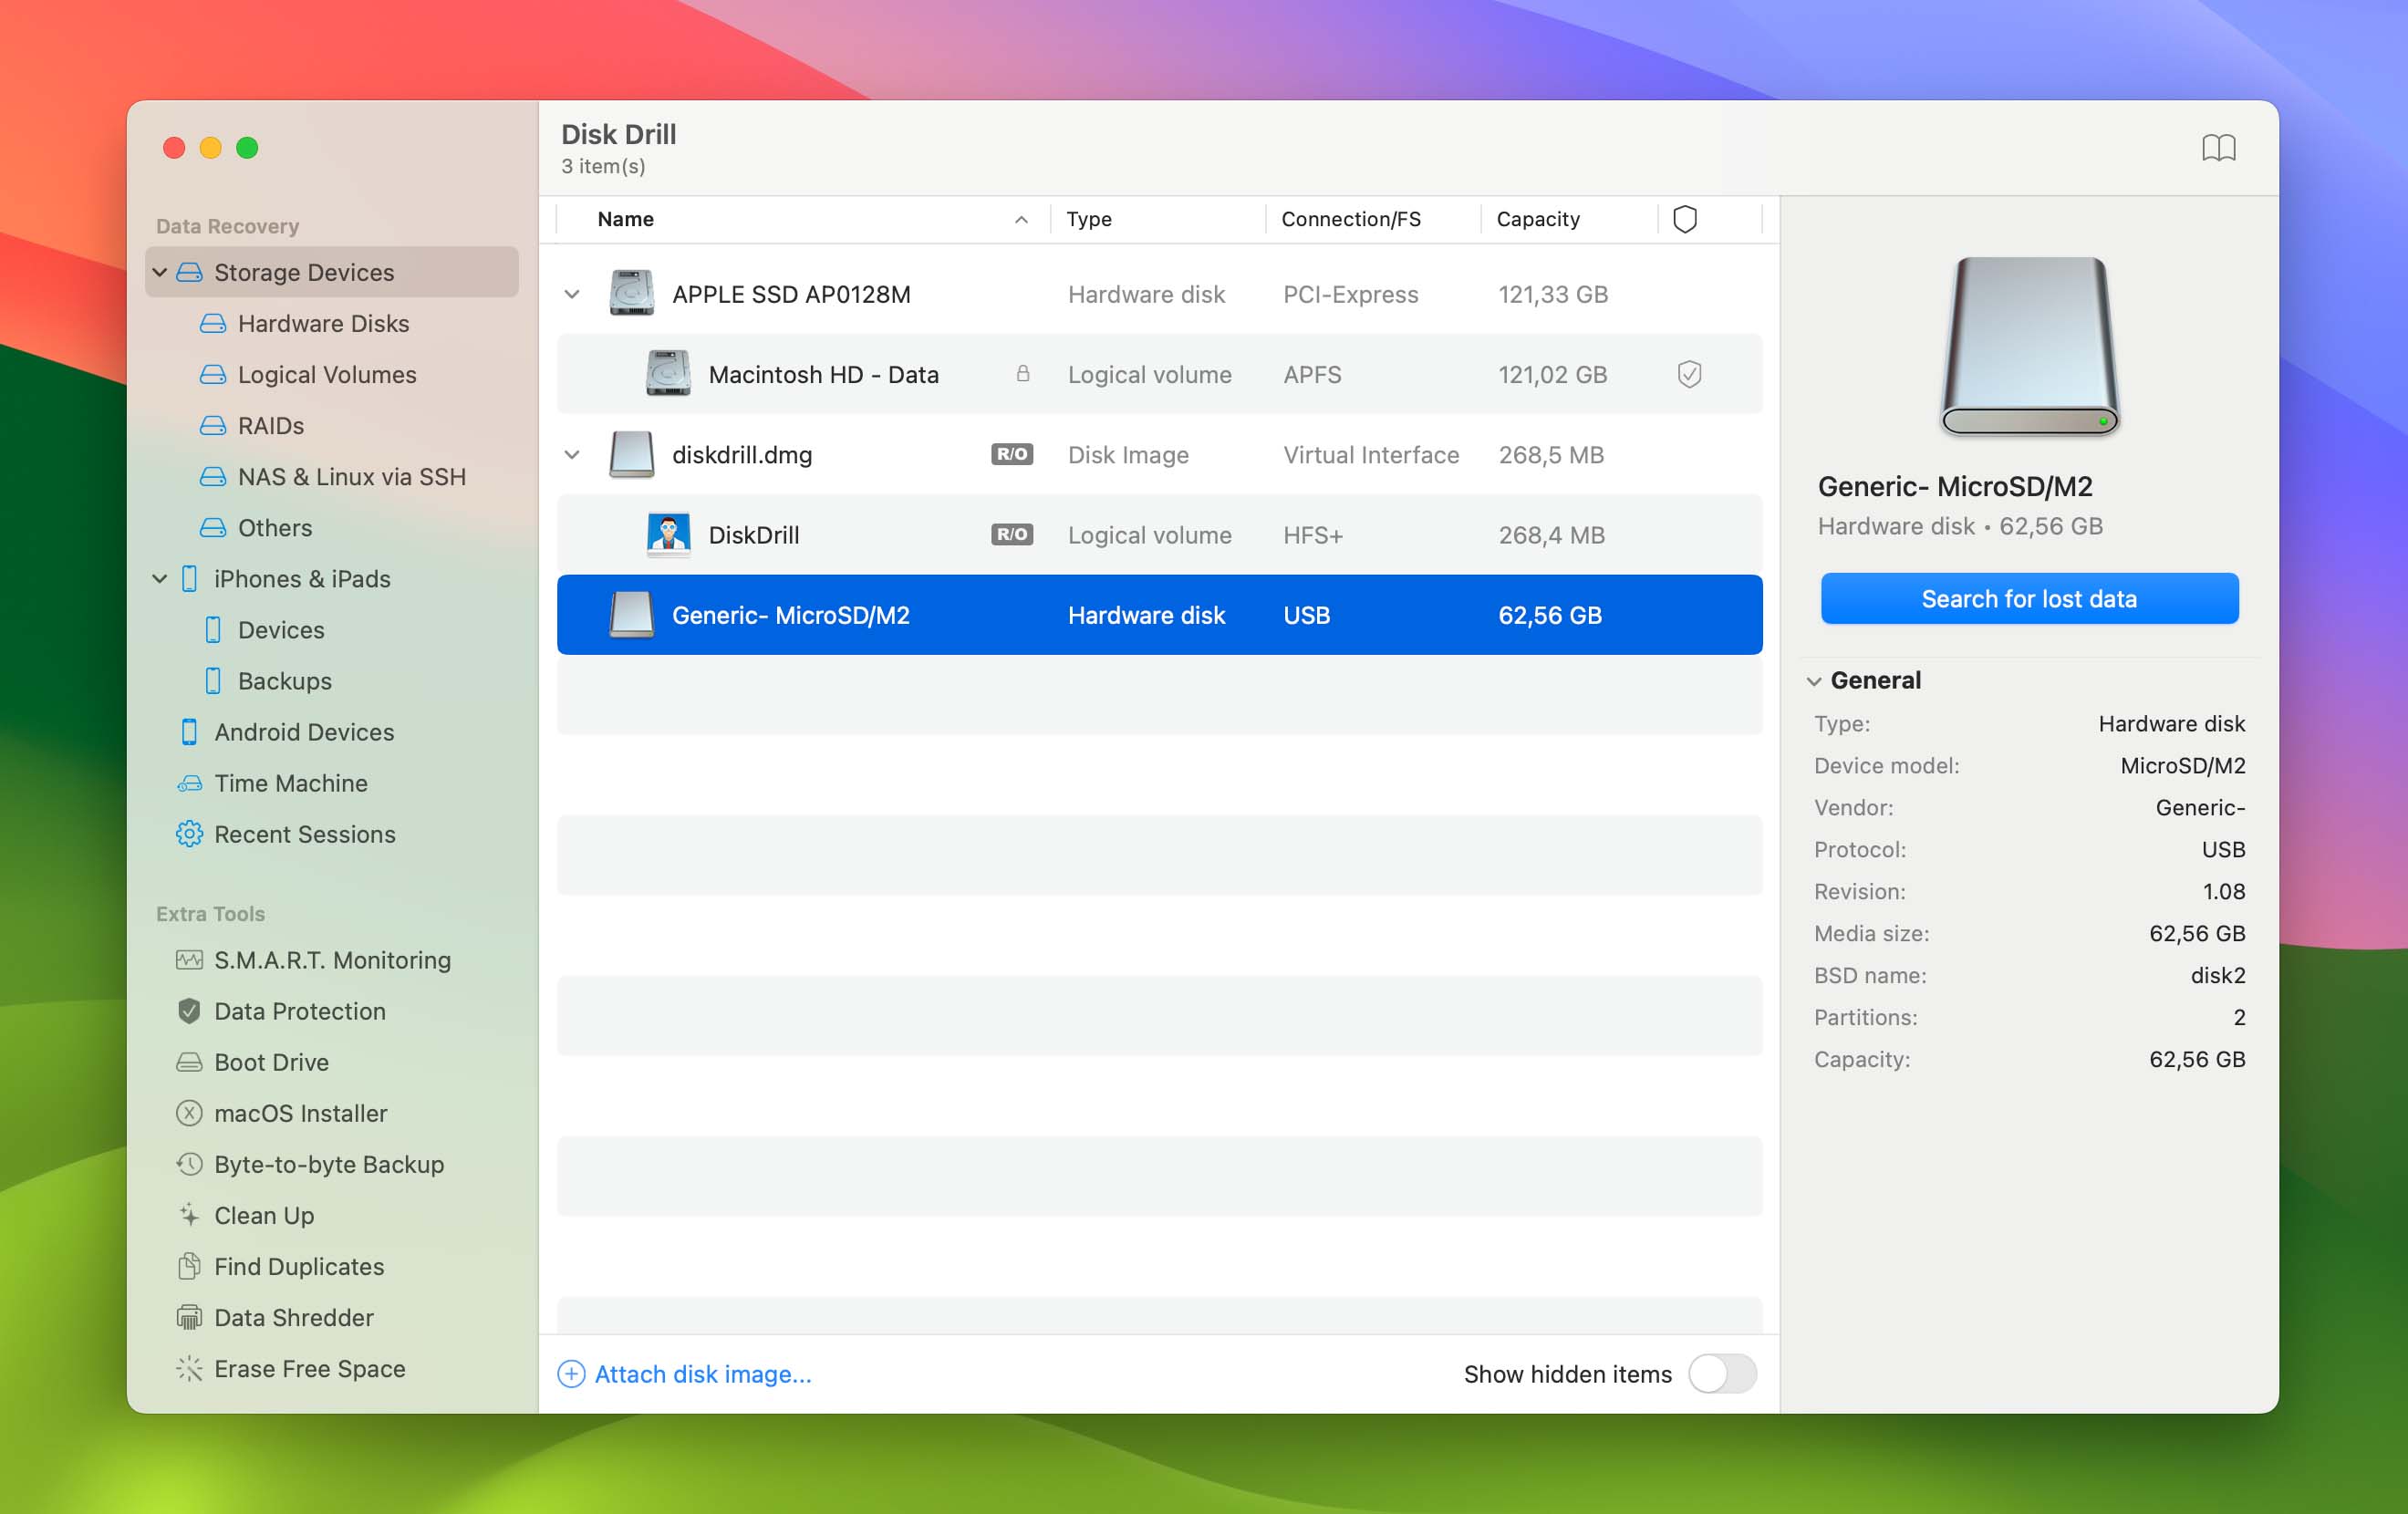
- Launch Disk Drill and Select the Drive: Once Disk Drill is installed, launch the application. Insert your SD card into a card reader or your Mac’s memory card slot. In Disk Drill’s user-friendly interface, select the SD card from the list of drives.
- Scan the SD Card: Click on the “Search for lost data” button to initiate the scan. Disk Drill employs advanced scanning methods to detect as many lost files as possible.
- Wait for the Scan to Finish: You will receive real-time updates as Disk Drill scans your SD card, categorizing the files into photos, video, audio, documents, archives, and others. The tool also indicates the number of files detected in each category.
- Review and Select Files: Once the scan is completed, click on “Review found items” to see a preview of all recoverable files. Disk Drill organizes files into three main categories:
- Deleted or lost: recovered deleted data.
- Existing: data currently present on the disk.
- Reconstructed: data recovered using file signatures.
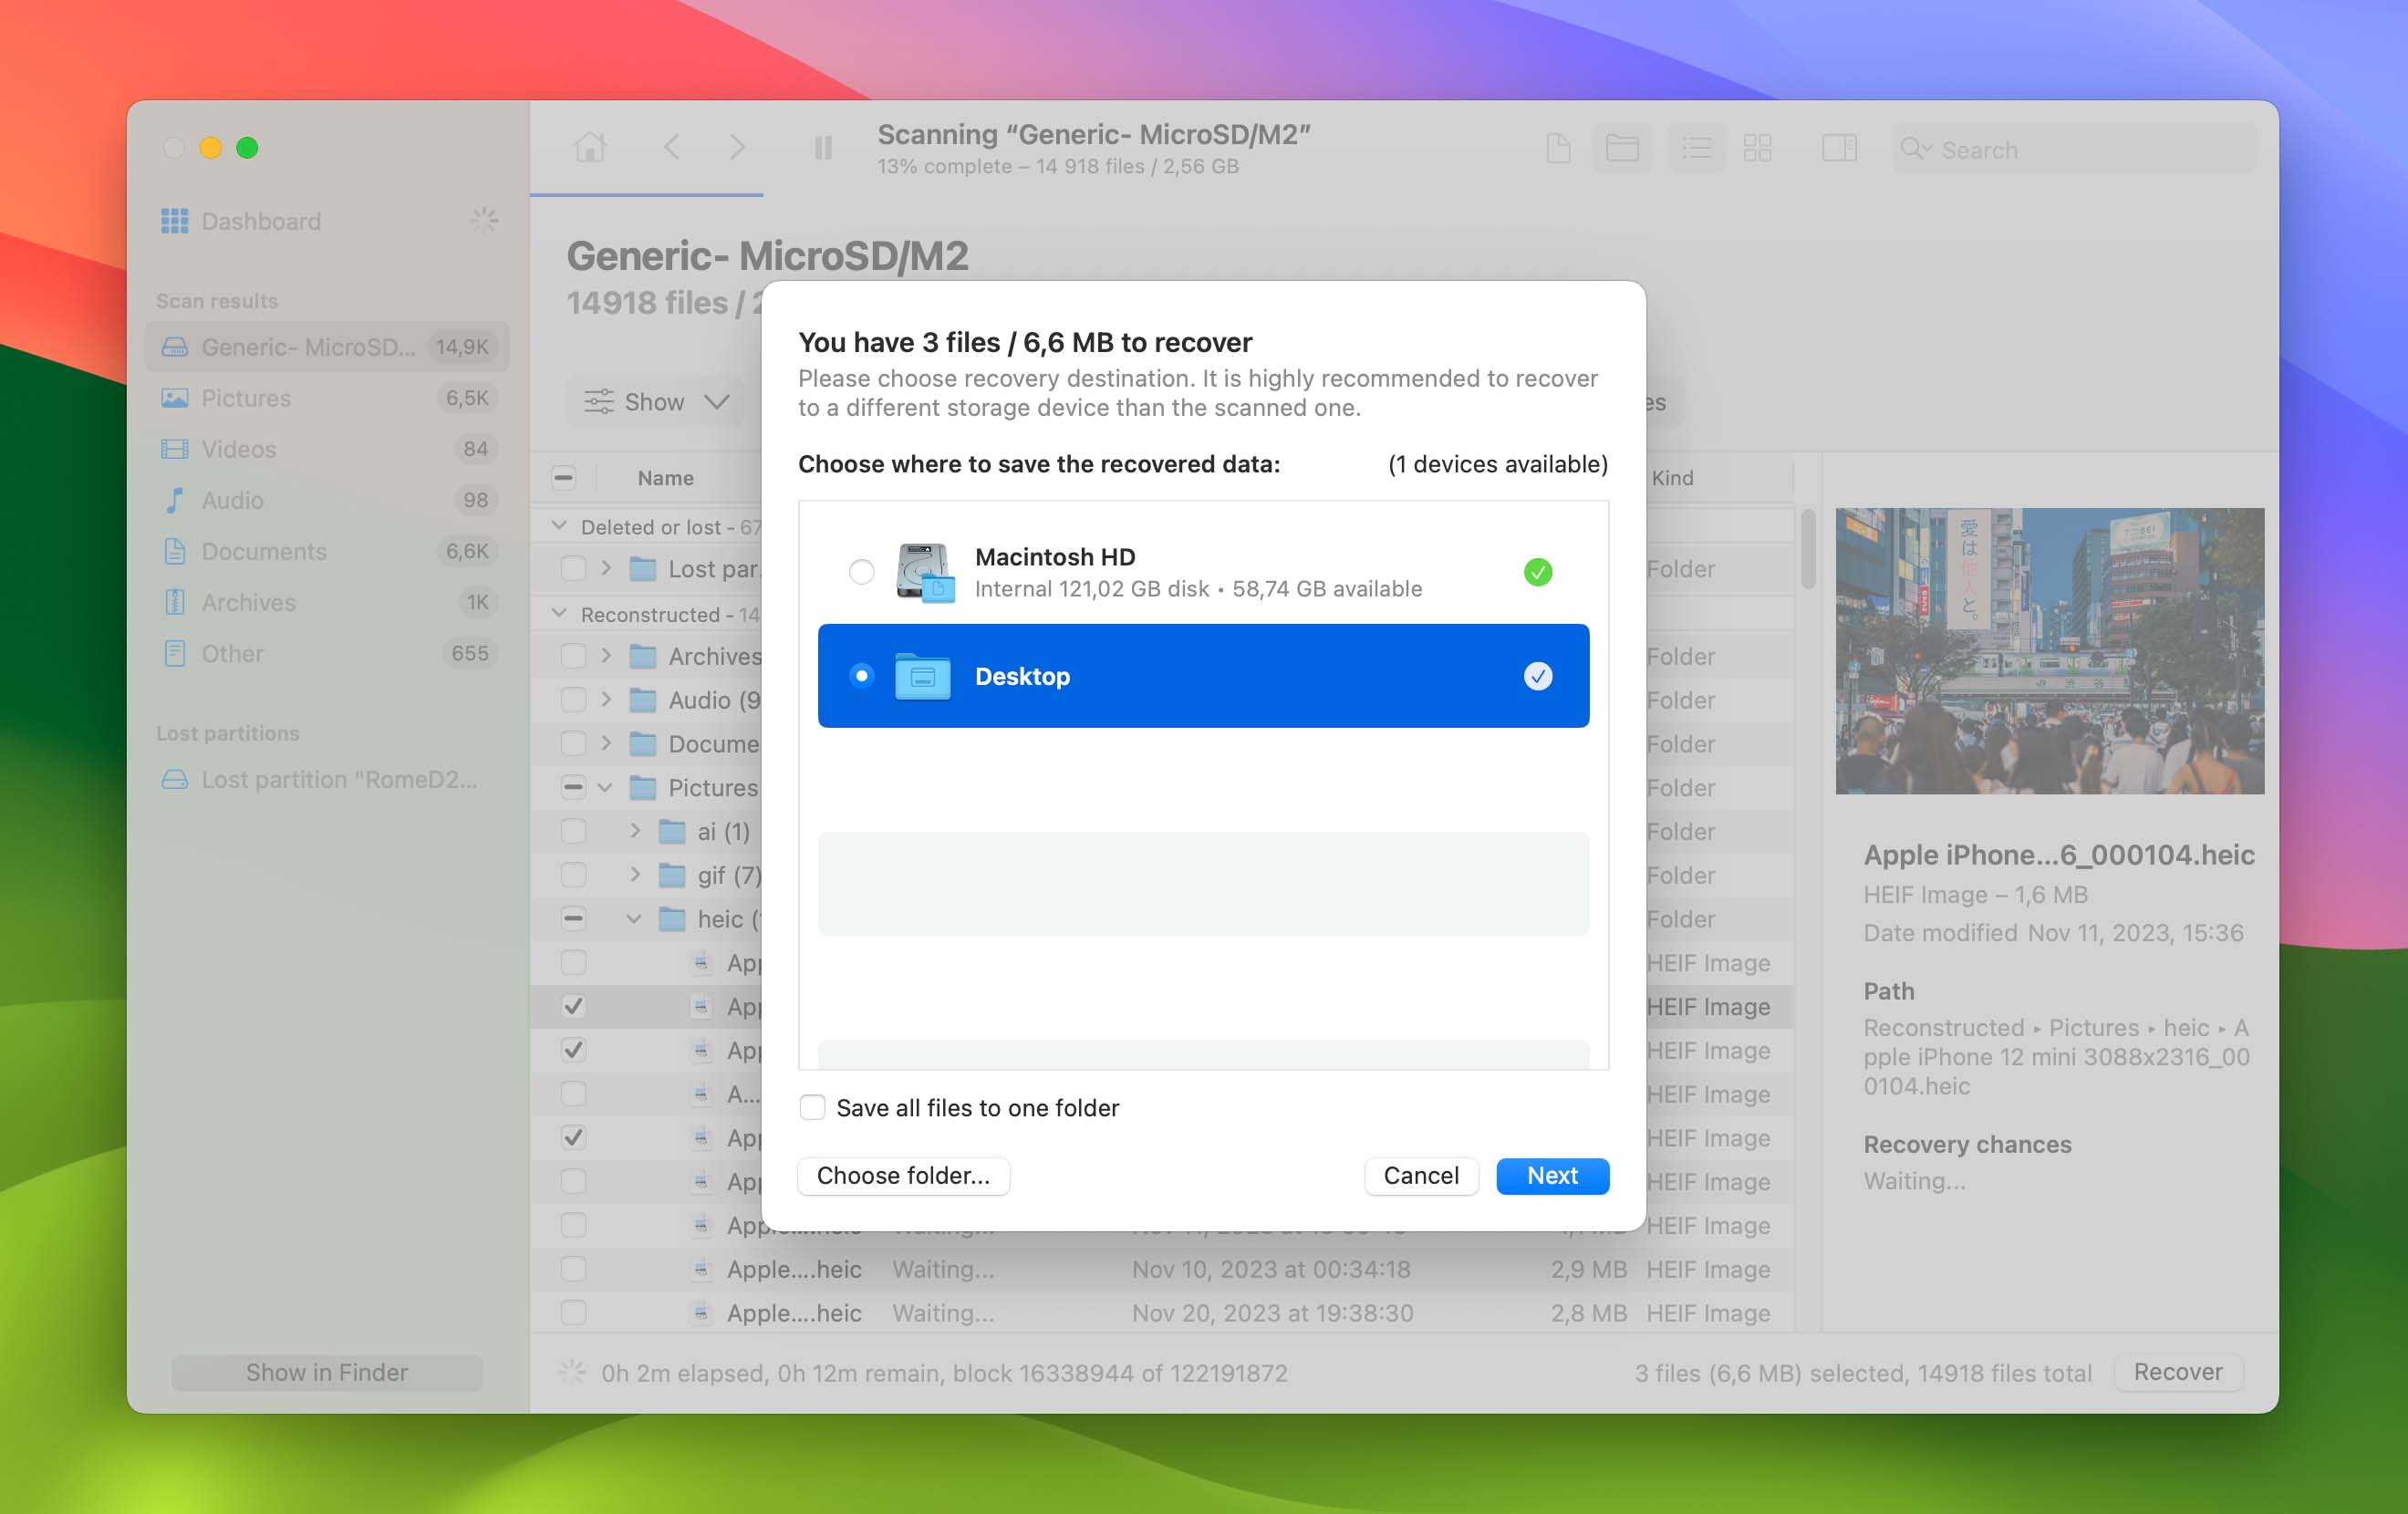
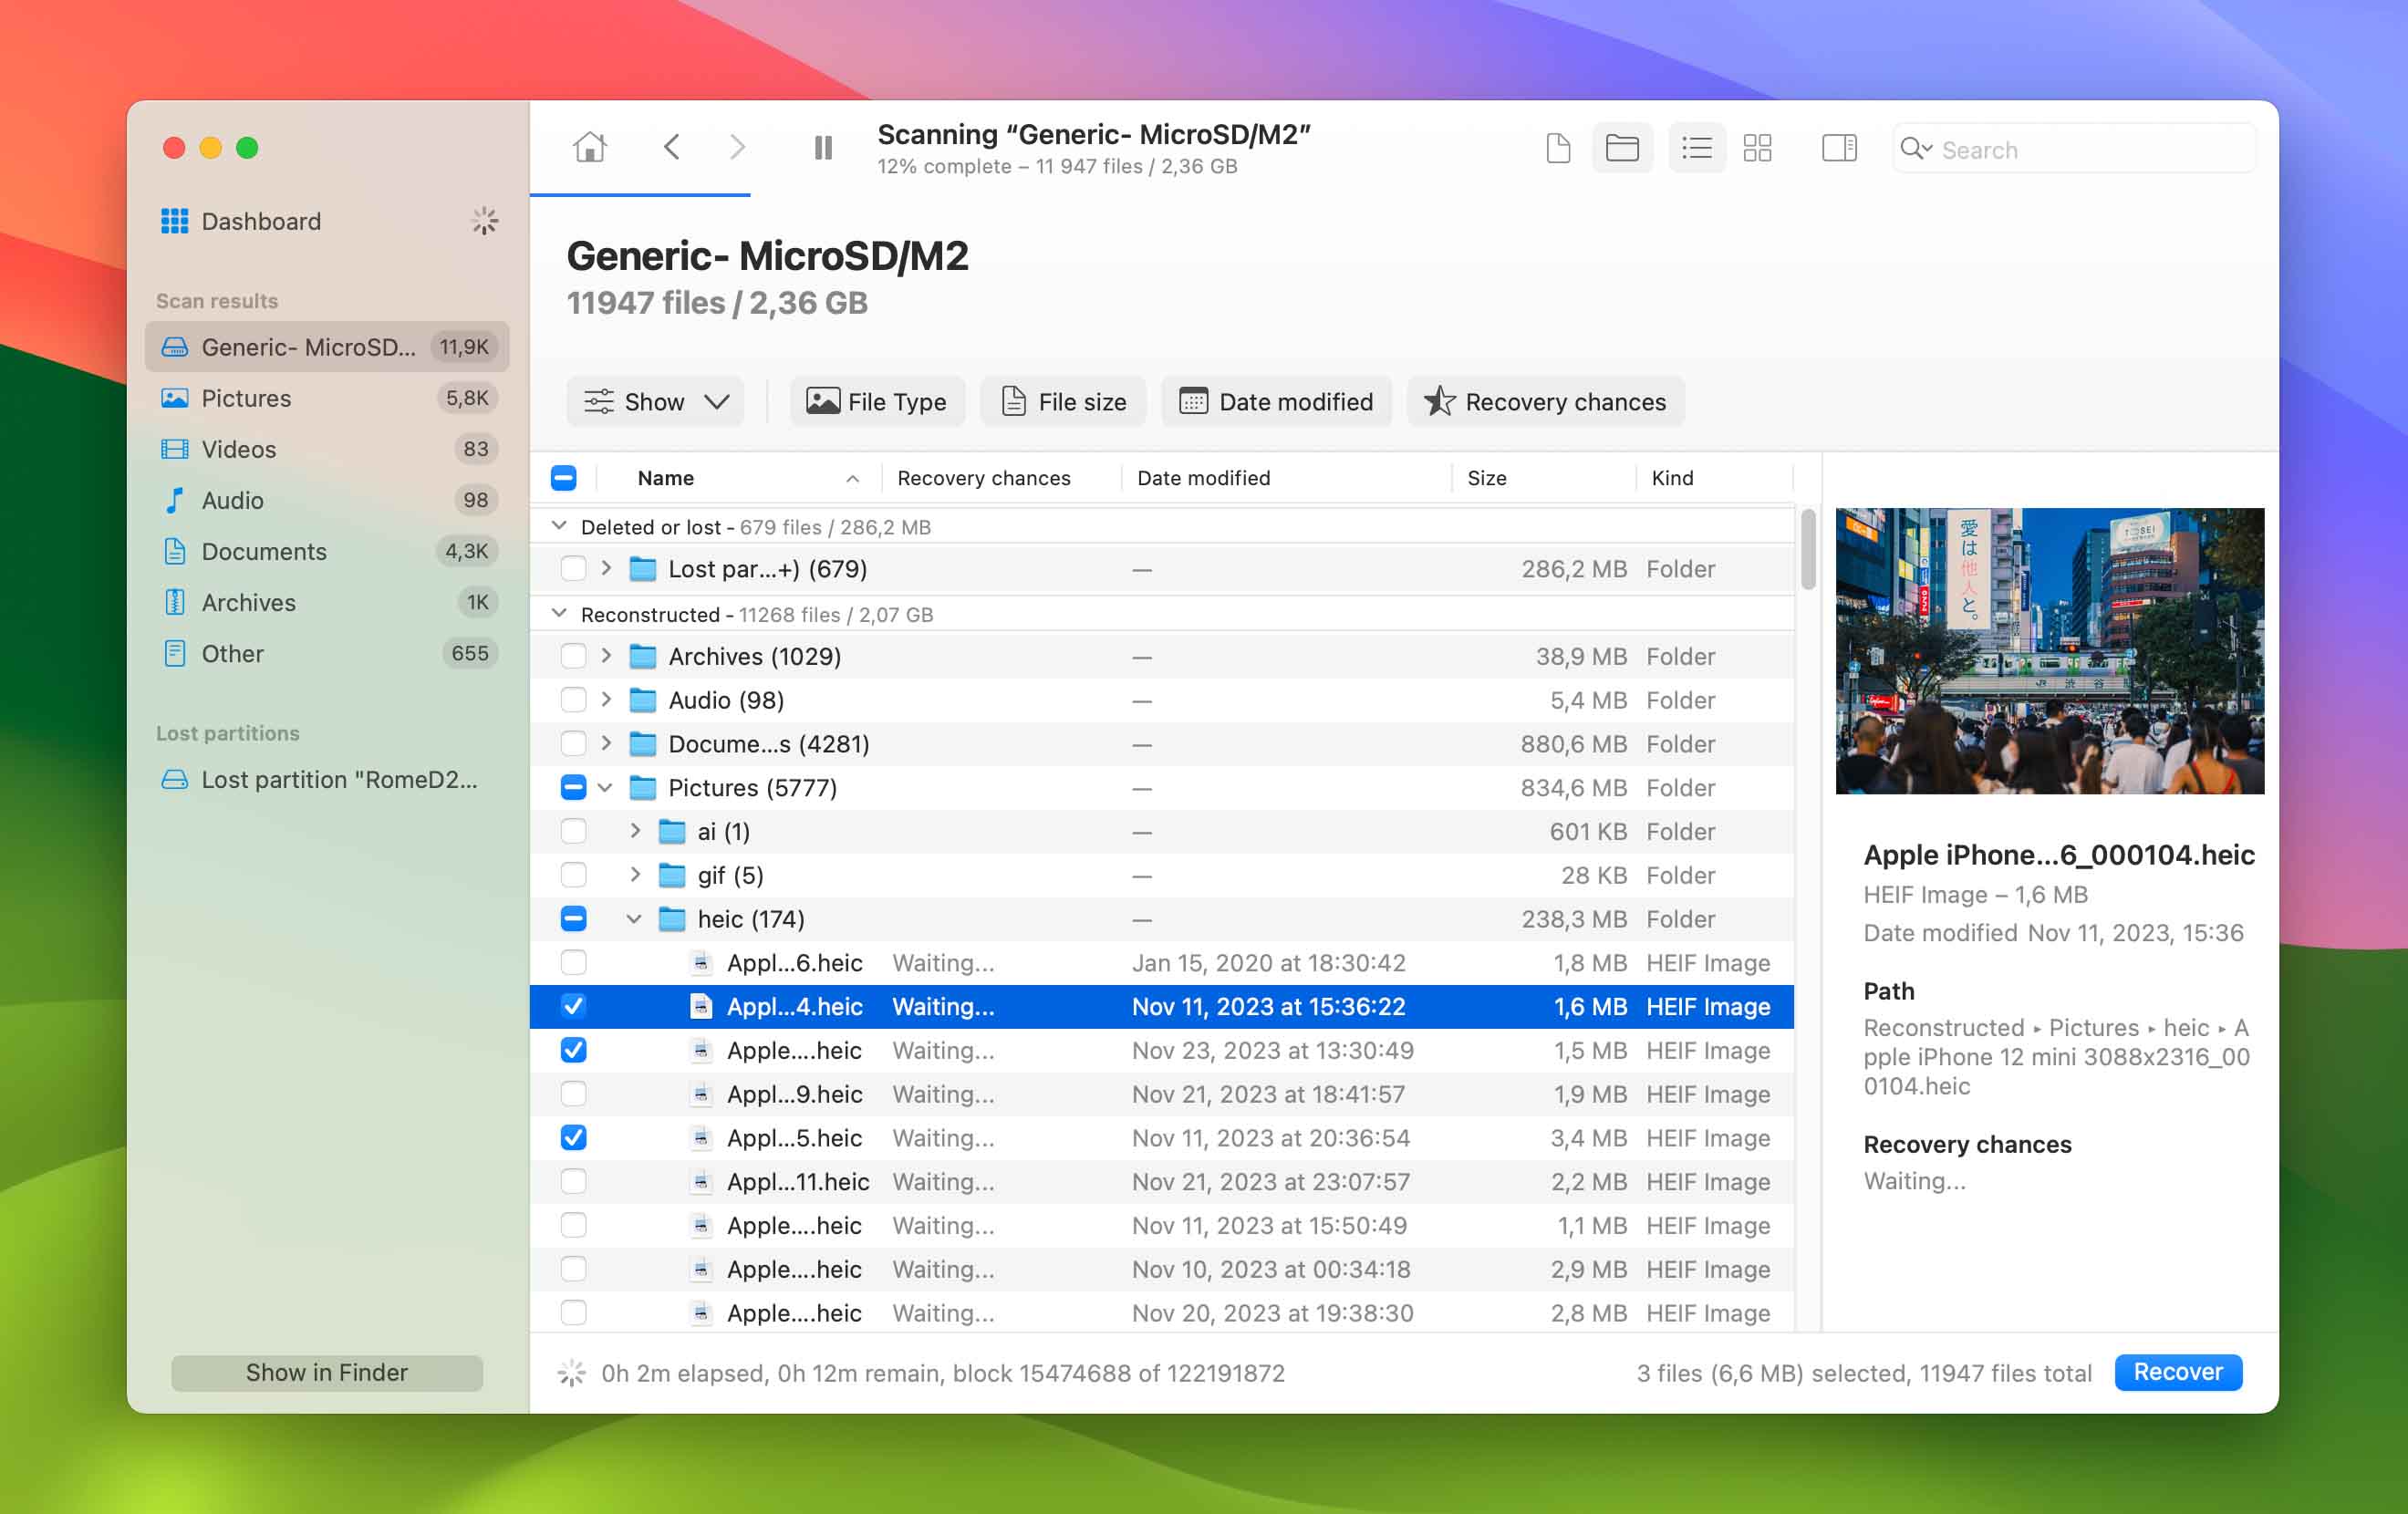 You can navigate between these categories using advanced filters. Select the files you wish to recover. Use the preview feature (represented by an eye icon) to view files before making your final selections.
 - Recover Selected Files: After making your selections, click on the “Recover” button. Disk Drill will prompt you to choose a directory for storing the recovered files. Select your preferred destination and initiate the recovery process.
 Once the recovery process concludes, Disk Drill offers the option to view the recovered files in Finder. Ensure the files are present in the directory you specified earlier.
With just a few simple clicks, Disk Drill ensures a safe recovery process for all lost files from any SD card, regardless of its size, manufacturer, or file system. If you’re curious about its performance, check out this review based on the Windows version. Concerned about its safety? Read more on how safe Disk Drill is, also reviewed for its Windows edition. For insights on the macOS version of Disk Drill, don’t miss this comprehensive review.
Option B: PhotoRec
PhotoRec is an open-source data recovery software application that runs in the Mac terminal and can be used to undelete an unlimited number of files from any storage device. Despite not being user-friendly, it enjoys great popularity among advanced Mac users who are not intimidated by the lack of a graphical user interface.

To recover files from a memory card using PhotoRec on Mac:
- Install Homebrew: Homebrew is a free and open-source software package management system. You can install it by pasting the following command in the Terminal:
/bin/bash -c "$(curl -fsSL https://raw.githubusercontent.com/Homebrew/install/master/install.sh)"
- Install TestDisk/PhotoRec: Type brew install testdisk and hit Enter to install TestDisk (PhotoRec is included in the TestDisk package).
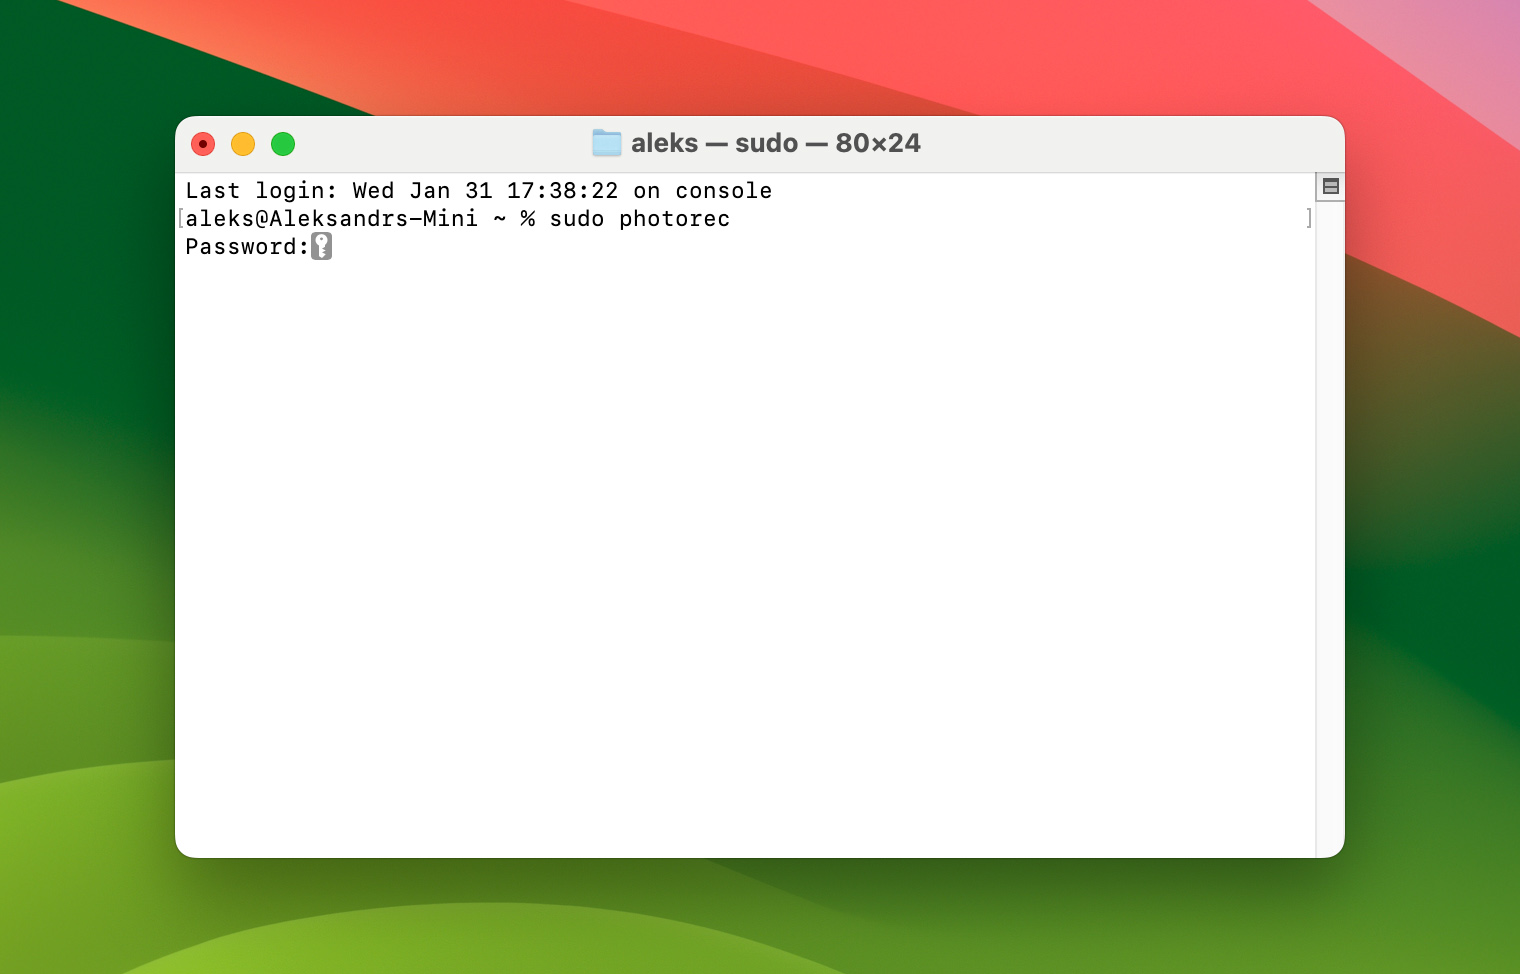
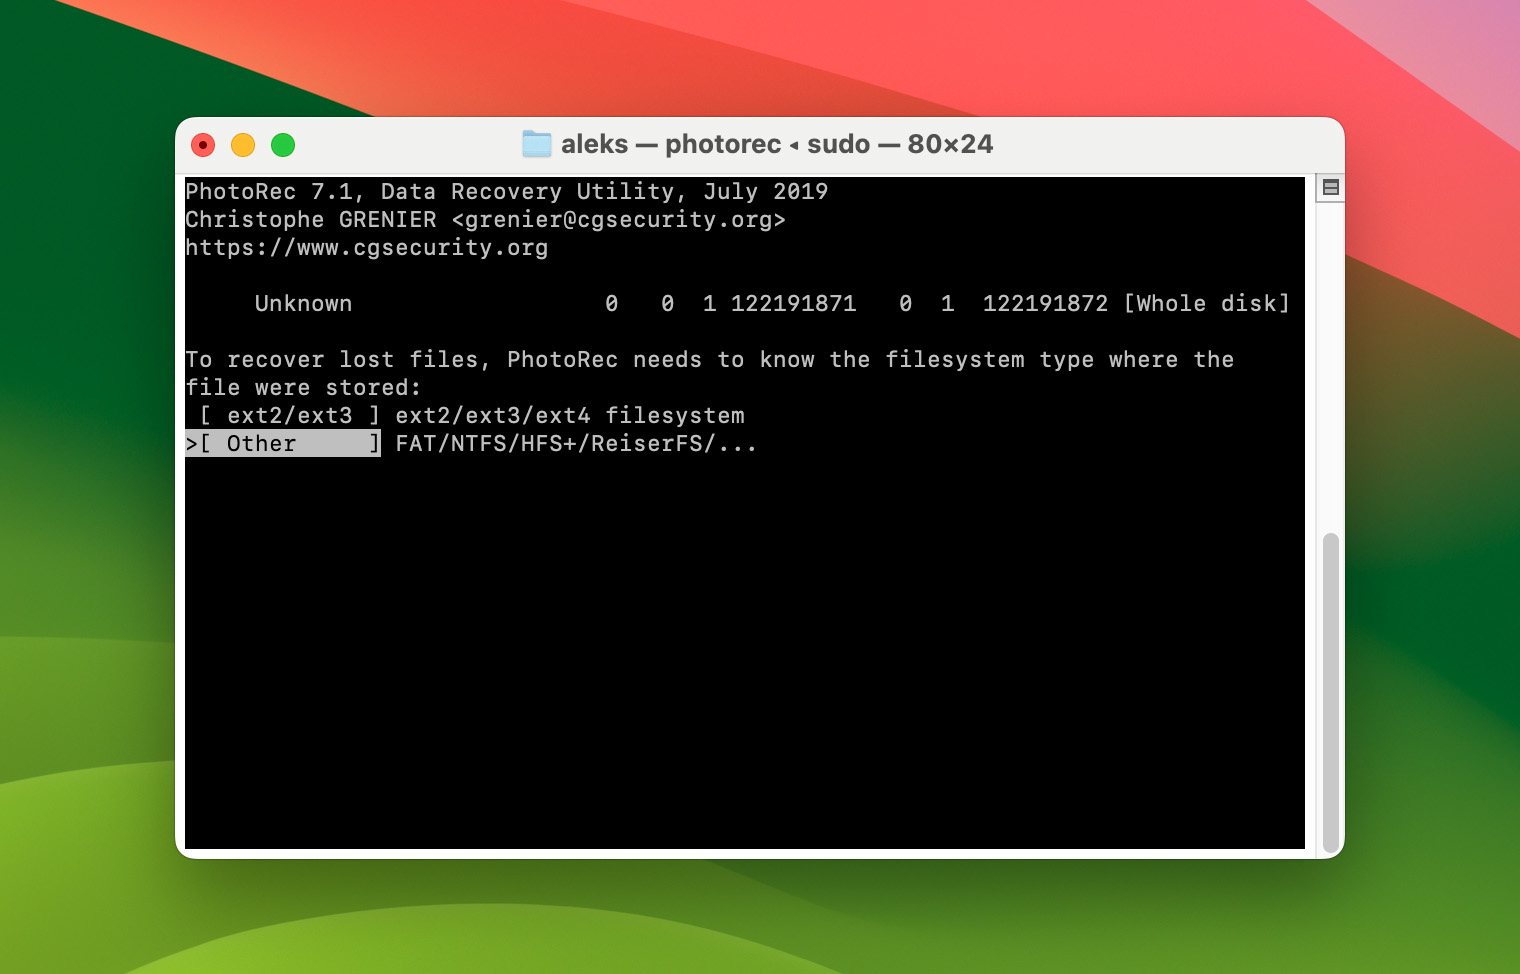
- Launch PhotoRec: Type sudo photorec and hit Enter to run PhotoRec.
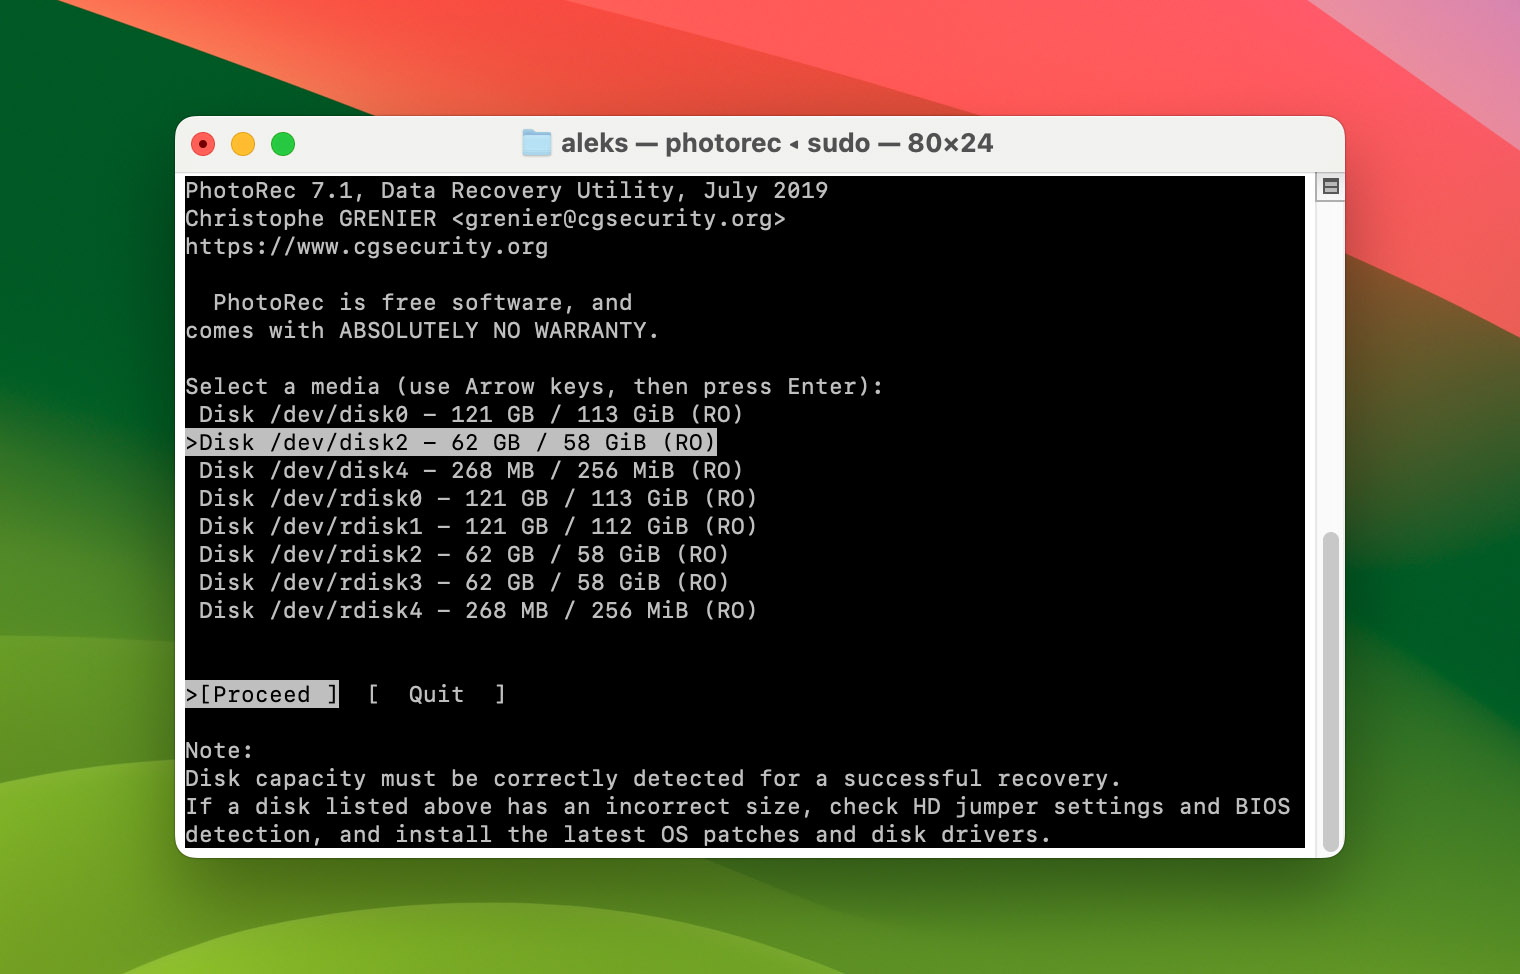
- Select the Memory Card: Use your arrow keys to select a media source (in your case, your SD card) from which you want to recover files.
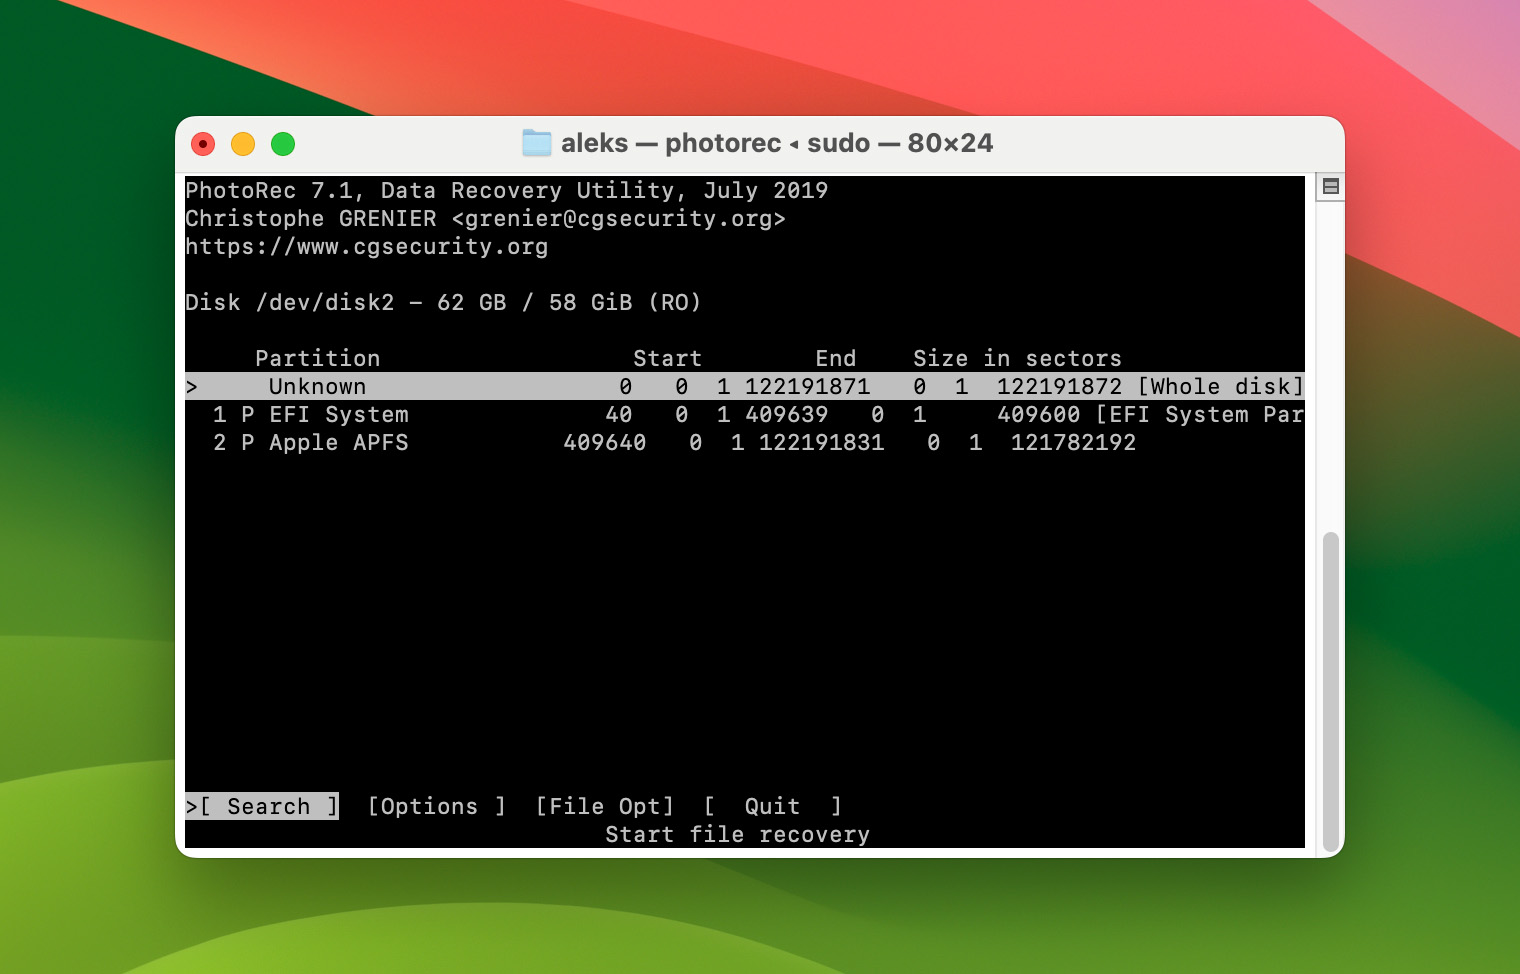
- Select the Partition: Choose the No partition option to scan the whole SD card.
- Specify the File Sytem: Select the right file system and press Enter. PhotoRec will automatically suggest what it believes to be the right option (most likely FAT or FAT32).
- Choose a Recovery Path: Select a destination to save the recovered files to and press C on your keyboard when done.
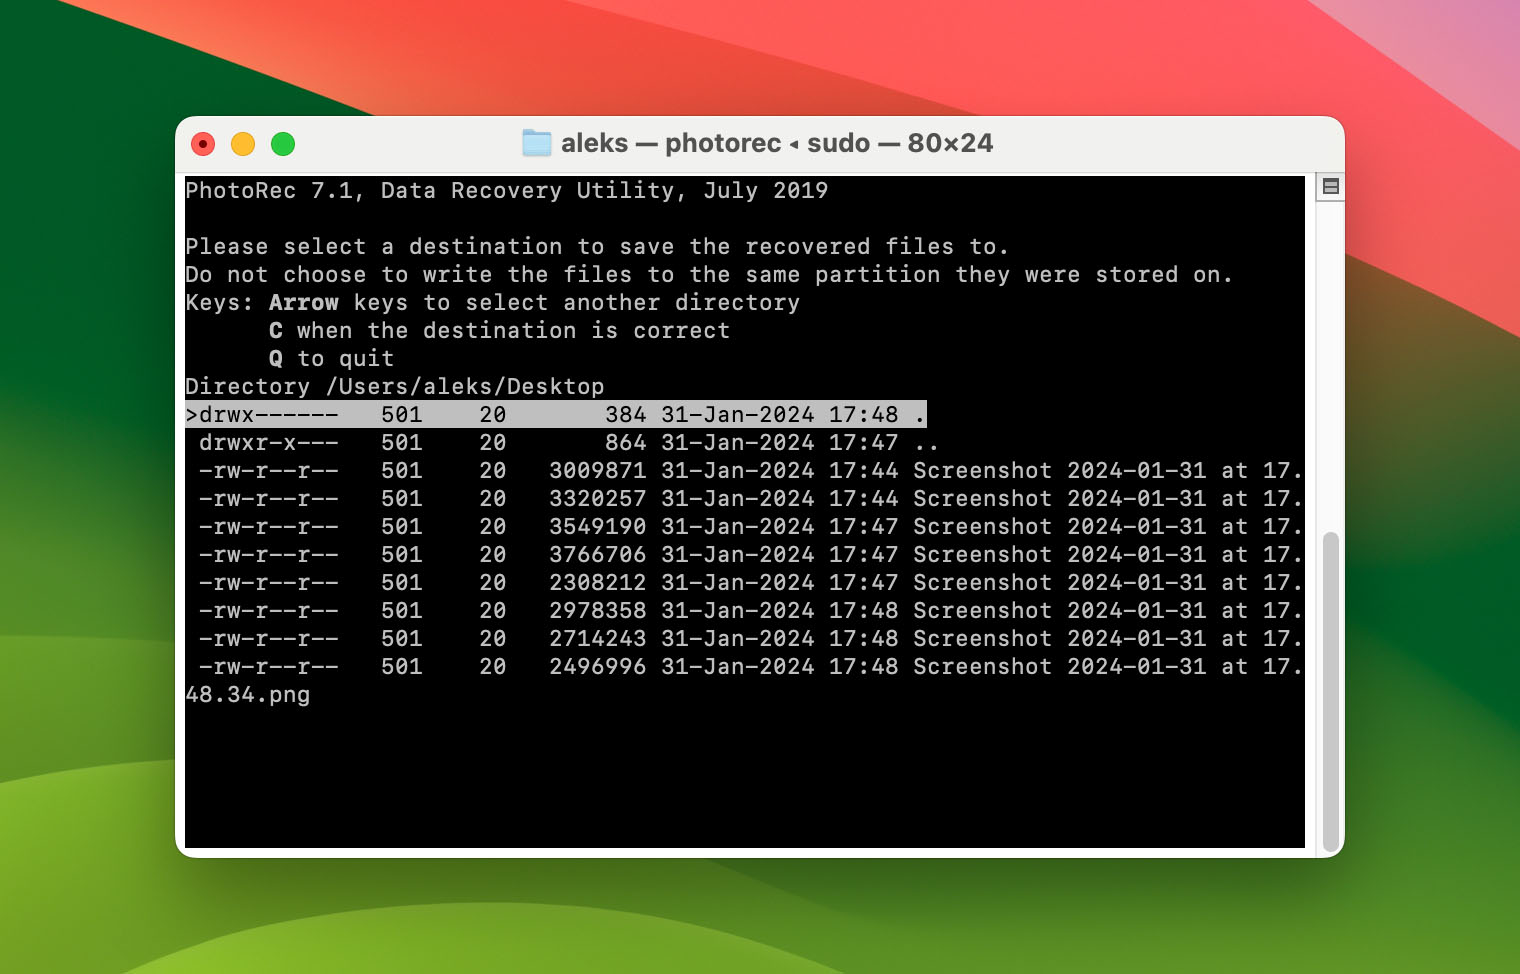
- Wait for the scan to complete: After completing the previous step, the program will start scanning, and the number of files found will be displayed as the scan progresses. Once the scan is complete, you will be able find all the recovered files in the folder you specified earlier.
You should be aware that PhotoRec recovers files in bulk, meaning you will not be able to choose specific files for recovery. The program will recover anything it finds. Additionally, PhotoRec uses a so-called signature scanner, which implies that file system information is never restored. As a result, file names and paths (folder structure) are always lost.
As you can see, performing a memory card data recovery using PhotoRec on Mac is far from simple, but at least the application is completely free. But if you’re willing to spend some money to enjoy a much more streamlined data recovery process (not to mention a superior data recovery performance), then paid solutions are definitely worth checking out. For a comprehensive insight into PhotoRec, check out this review.
Method 2: Find Deleted SD Card Files on Your Mac
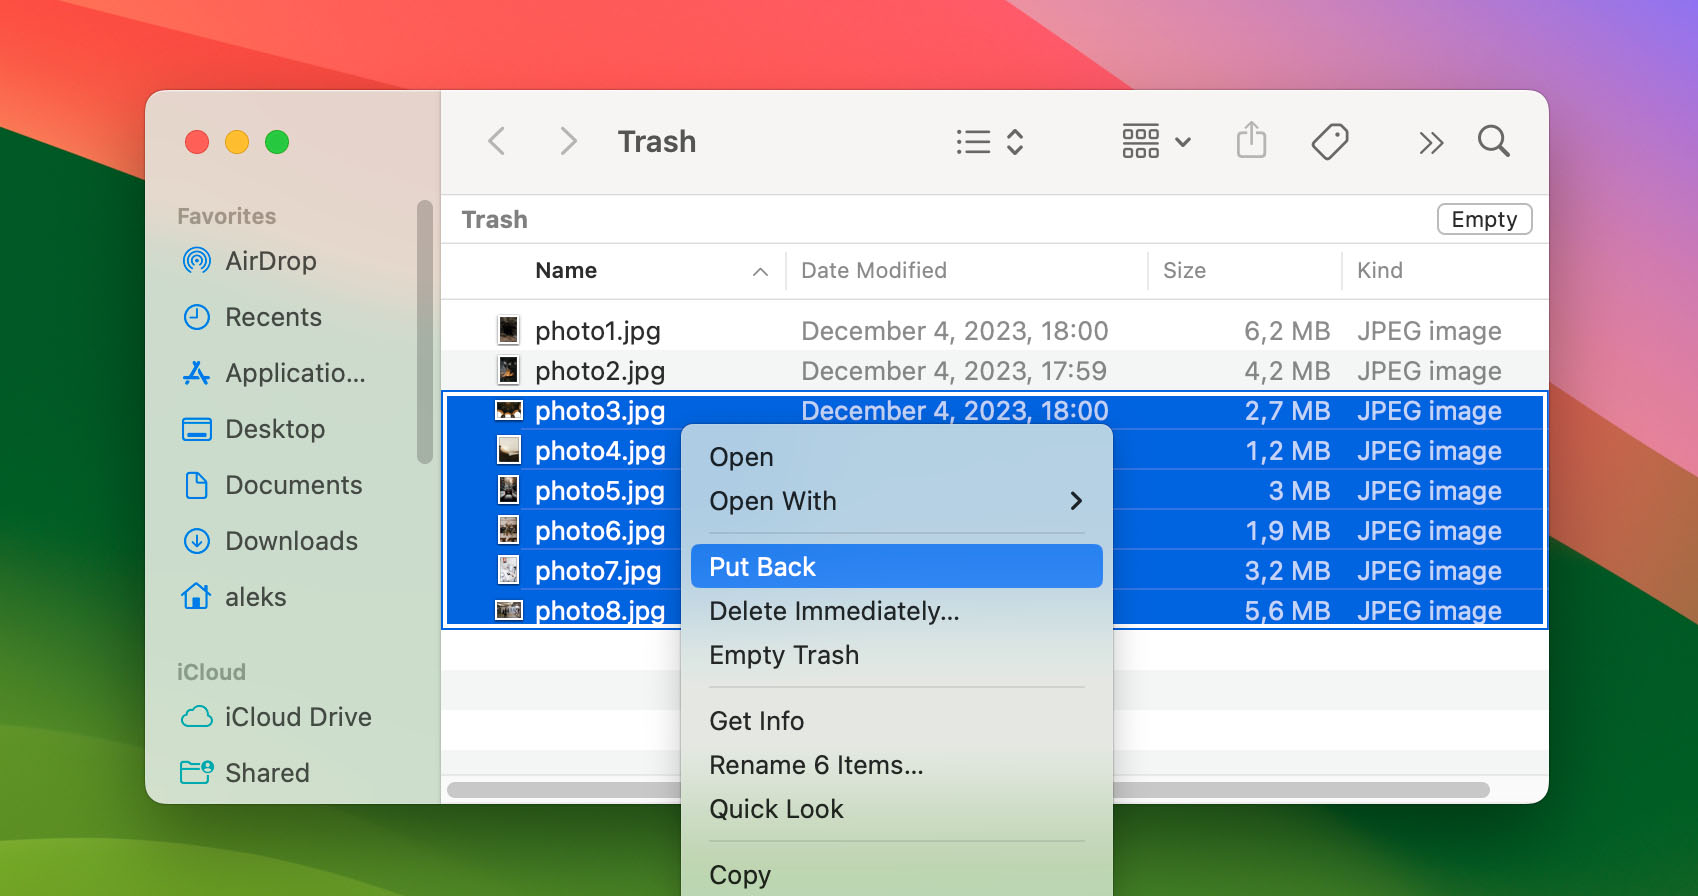
One thing that’s great about macOS is that clicking the Delete option doesn’t immediately delete the selected files. Instead, they are first sent to the Trash folder, where they wait until the folder is emptied, giving you a chance to change your mind.
![]()
To check the Trash folder:
- Locate the Trash icon at the right end of your Dock.
- Click on it.

- Go through the Trash folder or use the Search bar in the top-right corner to find your files.
- Select any files you want to recover.
- Right-click on a selected file and choose the Put Back option.
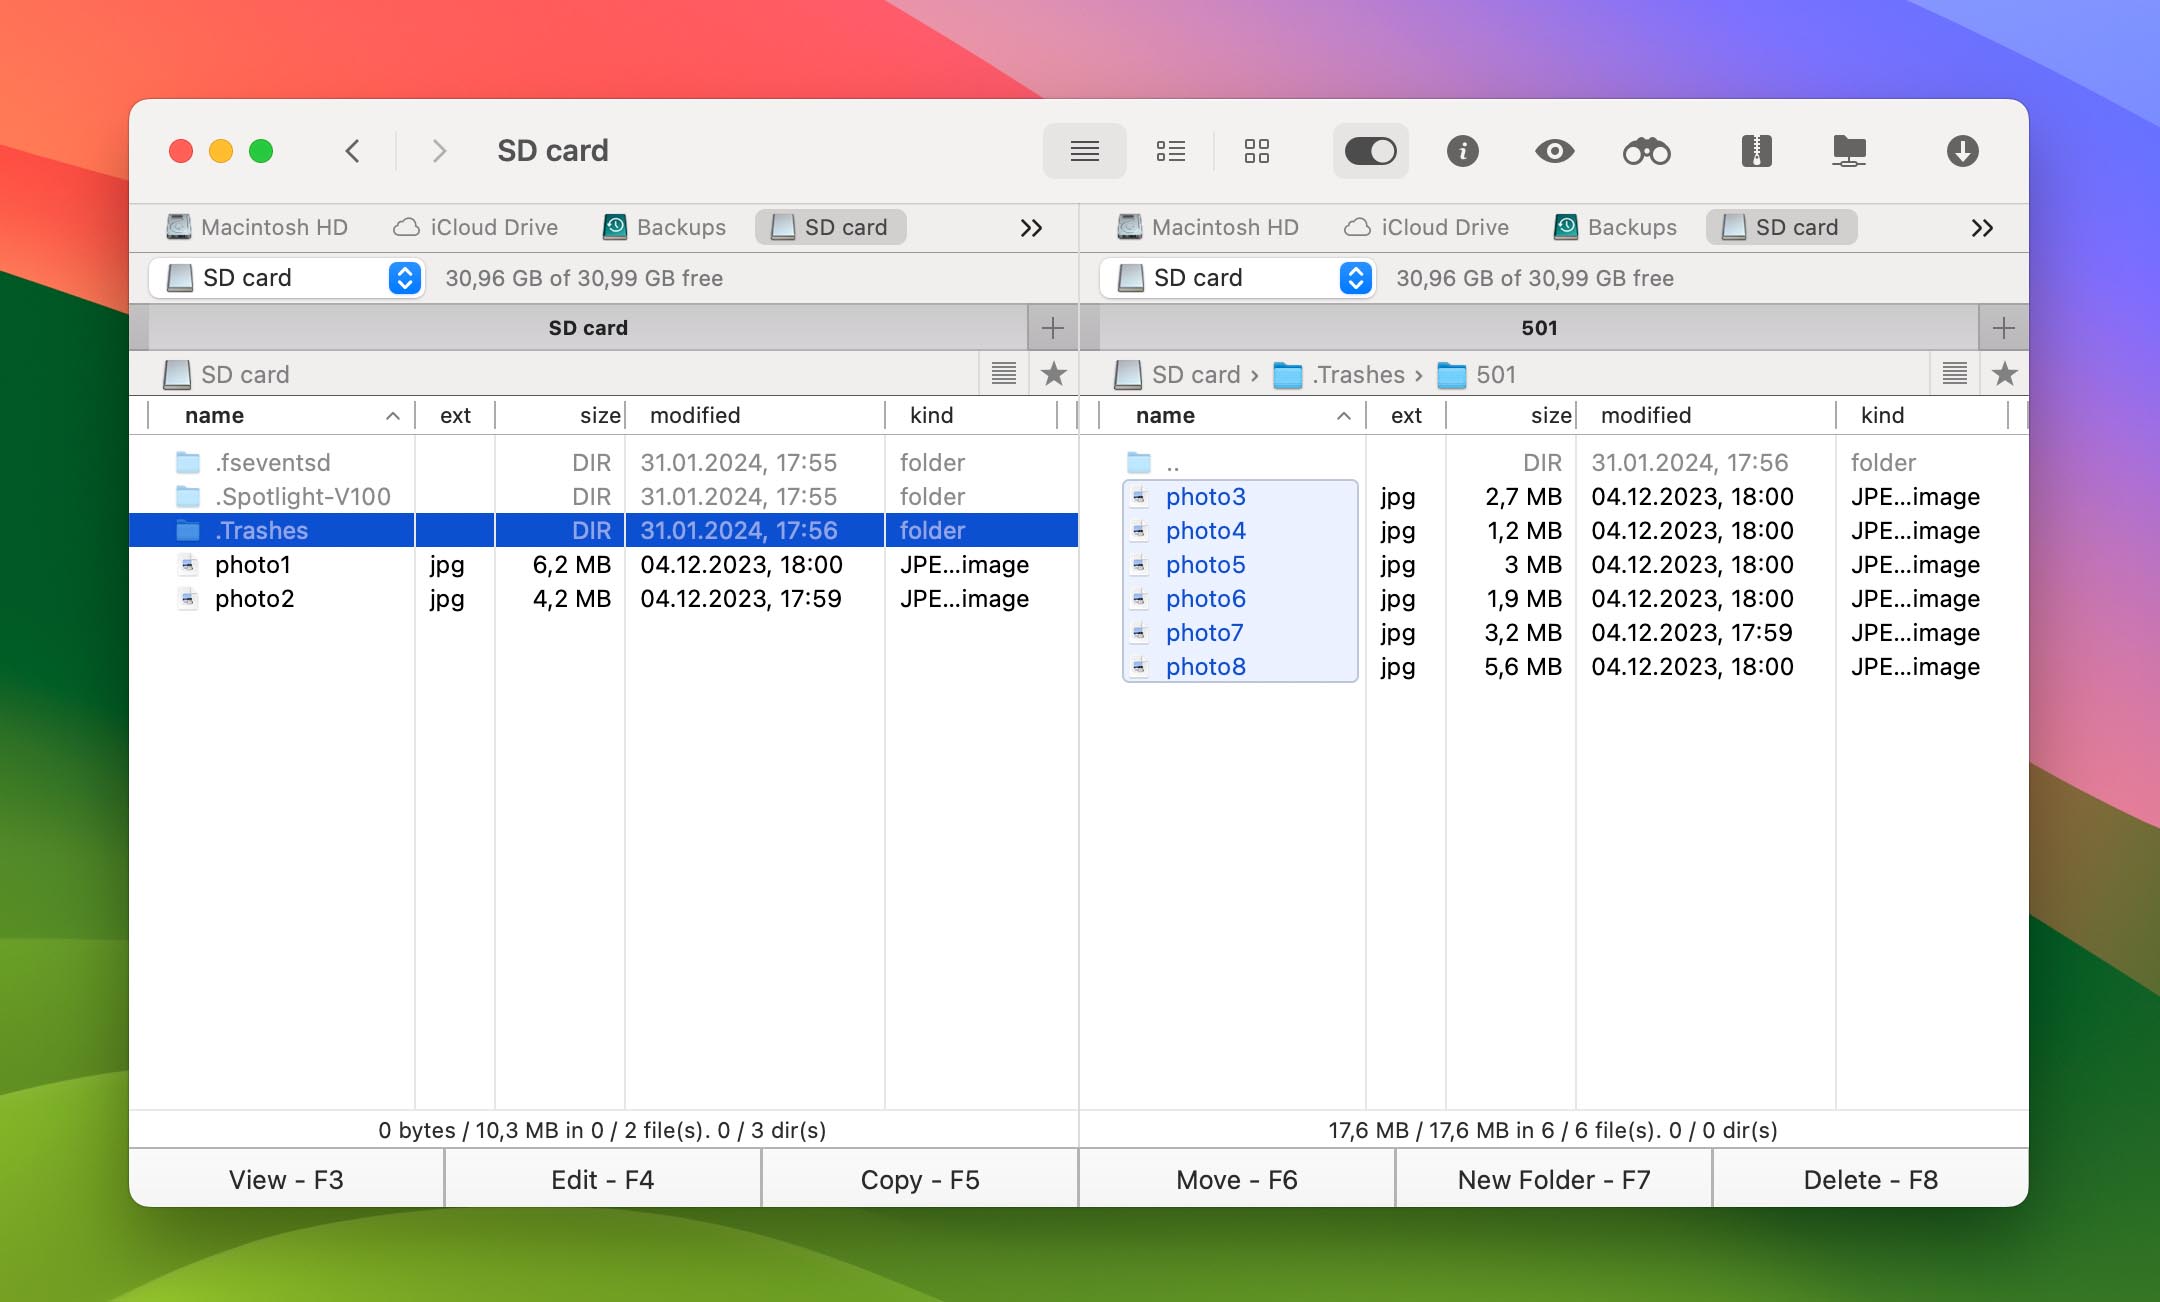
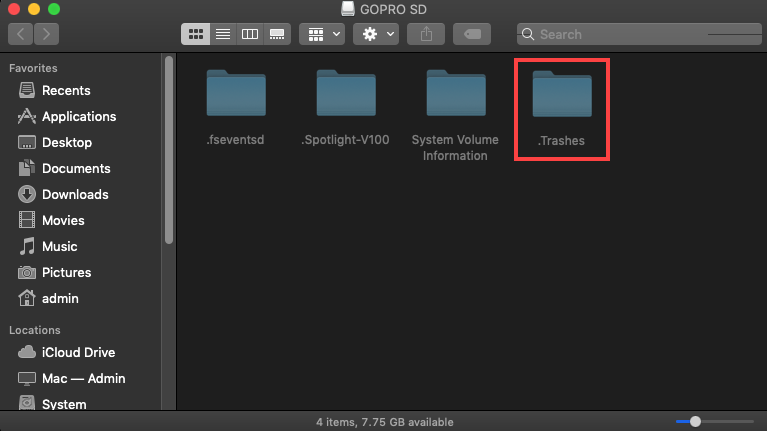
When you delete a file from an external storage device like an SD card, the file doesn’t go to your Mac’s main Trash. Instead, it’s moved to a hidden “.Trashes” folder on that device. This means that while your main Trash folder contains deleted files from your Mac’s internal storage, the “.Trashes” folder on your SD card (or any other external storage) contains files deleted from that specific device.
To view the content of the .Trashes folder on your memory card, you need to first display hidden files:
To display hidden files on macOS Ventura or newer:
For macOS Ventura and subsequent releases, viewing the .Trashes folder in Finder by revealing hidden files is not possible. To access this folder, it’s necessary to use a third-party file manager. An example is Commander One, which is capable of showing such hidden folders.
To display hidden files on macOS Sierra – macOS Monterey:
- Open Finder.
- Press SHIFT + CMD + . (period).
To display hidden files on older versions of Mac OS X:
-
- Open Finder and go to Applications > Utilities.
- Launch the Mac Terminal app and enter the following two commands:
defaults write com.apple.finder AppleShowAllFiles TRUE
killall Finder
You can now open Finder again, view the content of your SD card, and go through the .Trashes folder to see if it contains the deleted files. If it does, simply copy them to a safe location.
If you can’t find the deleted files anywhere on your Mac, it doesn’t mean that they’re completely lost. There’s still a chance that you’ll be able to recover them from an existing backup or using special data recovery software for Mac.
Method 3: Recover Files from a Time Machine Backup
Your Mac computer is equipped with a built-in data backup application called Time Machine. This tool can be invaluable for recovering files from a memory card, even if they’ve been overwritten. However, it’s essential to understand that Time Machine can only recover overwritten files if they were included in a previous backup snapshot. If a file was created and then overwritten between two backup intervals, Time Machine wouldn’t have a record of it. Despite this limitation, Time Machine stands out as a method that can recover overwritten files from an SD card, especially if third-party recovery software for Mac proved unsuccessful.
![]()
This method is highly reliable, provided you have an appropriate backup from which you can recover. However, a crucial thing to note is that, by default, Time Machine backs up only your Mac’s internal drive. If you wish to back up external storage devices, such as external hard drives, USB flash drives, or memory cards, as long as they are formatted in HFS or APFS, you need to specifically include them in the Time Machine backup settings. Unfortunately, many Mac users either aren’t aware of this or choose not to back up external storage.
To recover deleted SD card files from a Time Machine backup:
- Connect your Time Machine backup drive to your Mac.
- Launch Finder and open your SD card.
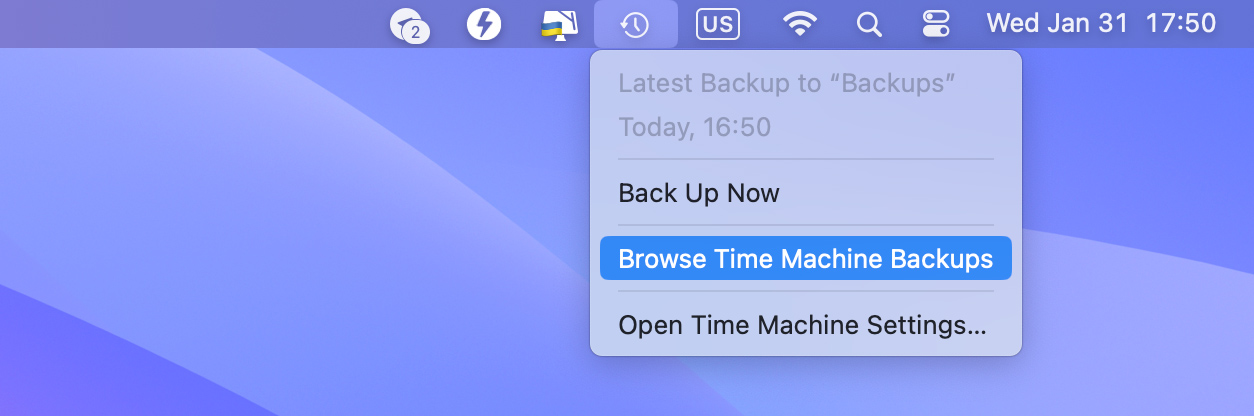
- Click the Time Machine icon located in the Menu Bar and choose Browse Time Machine Backups.
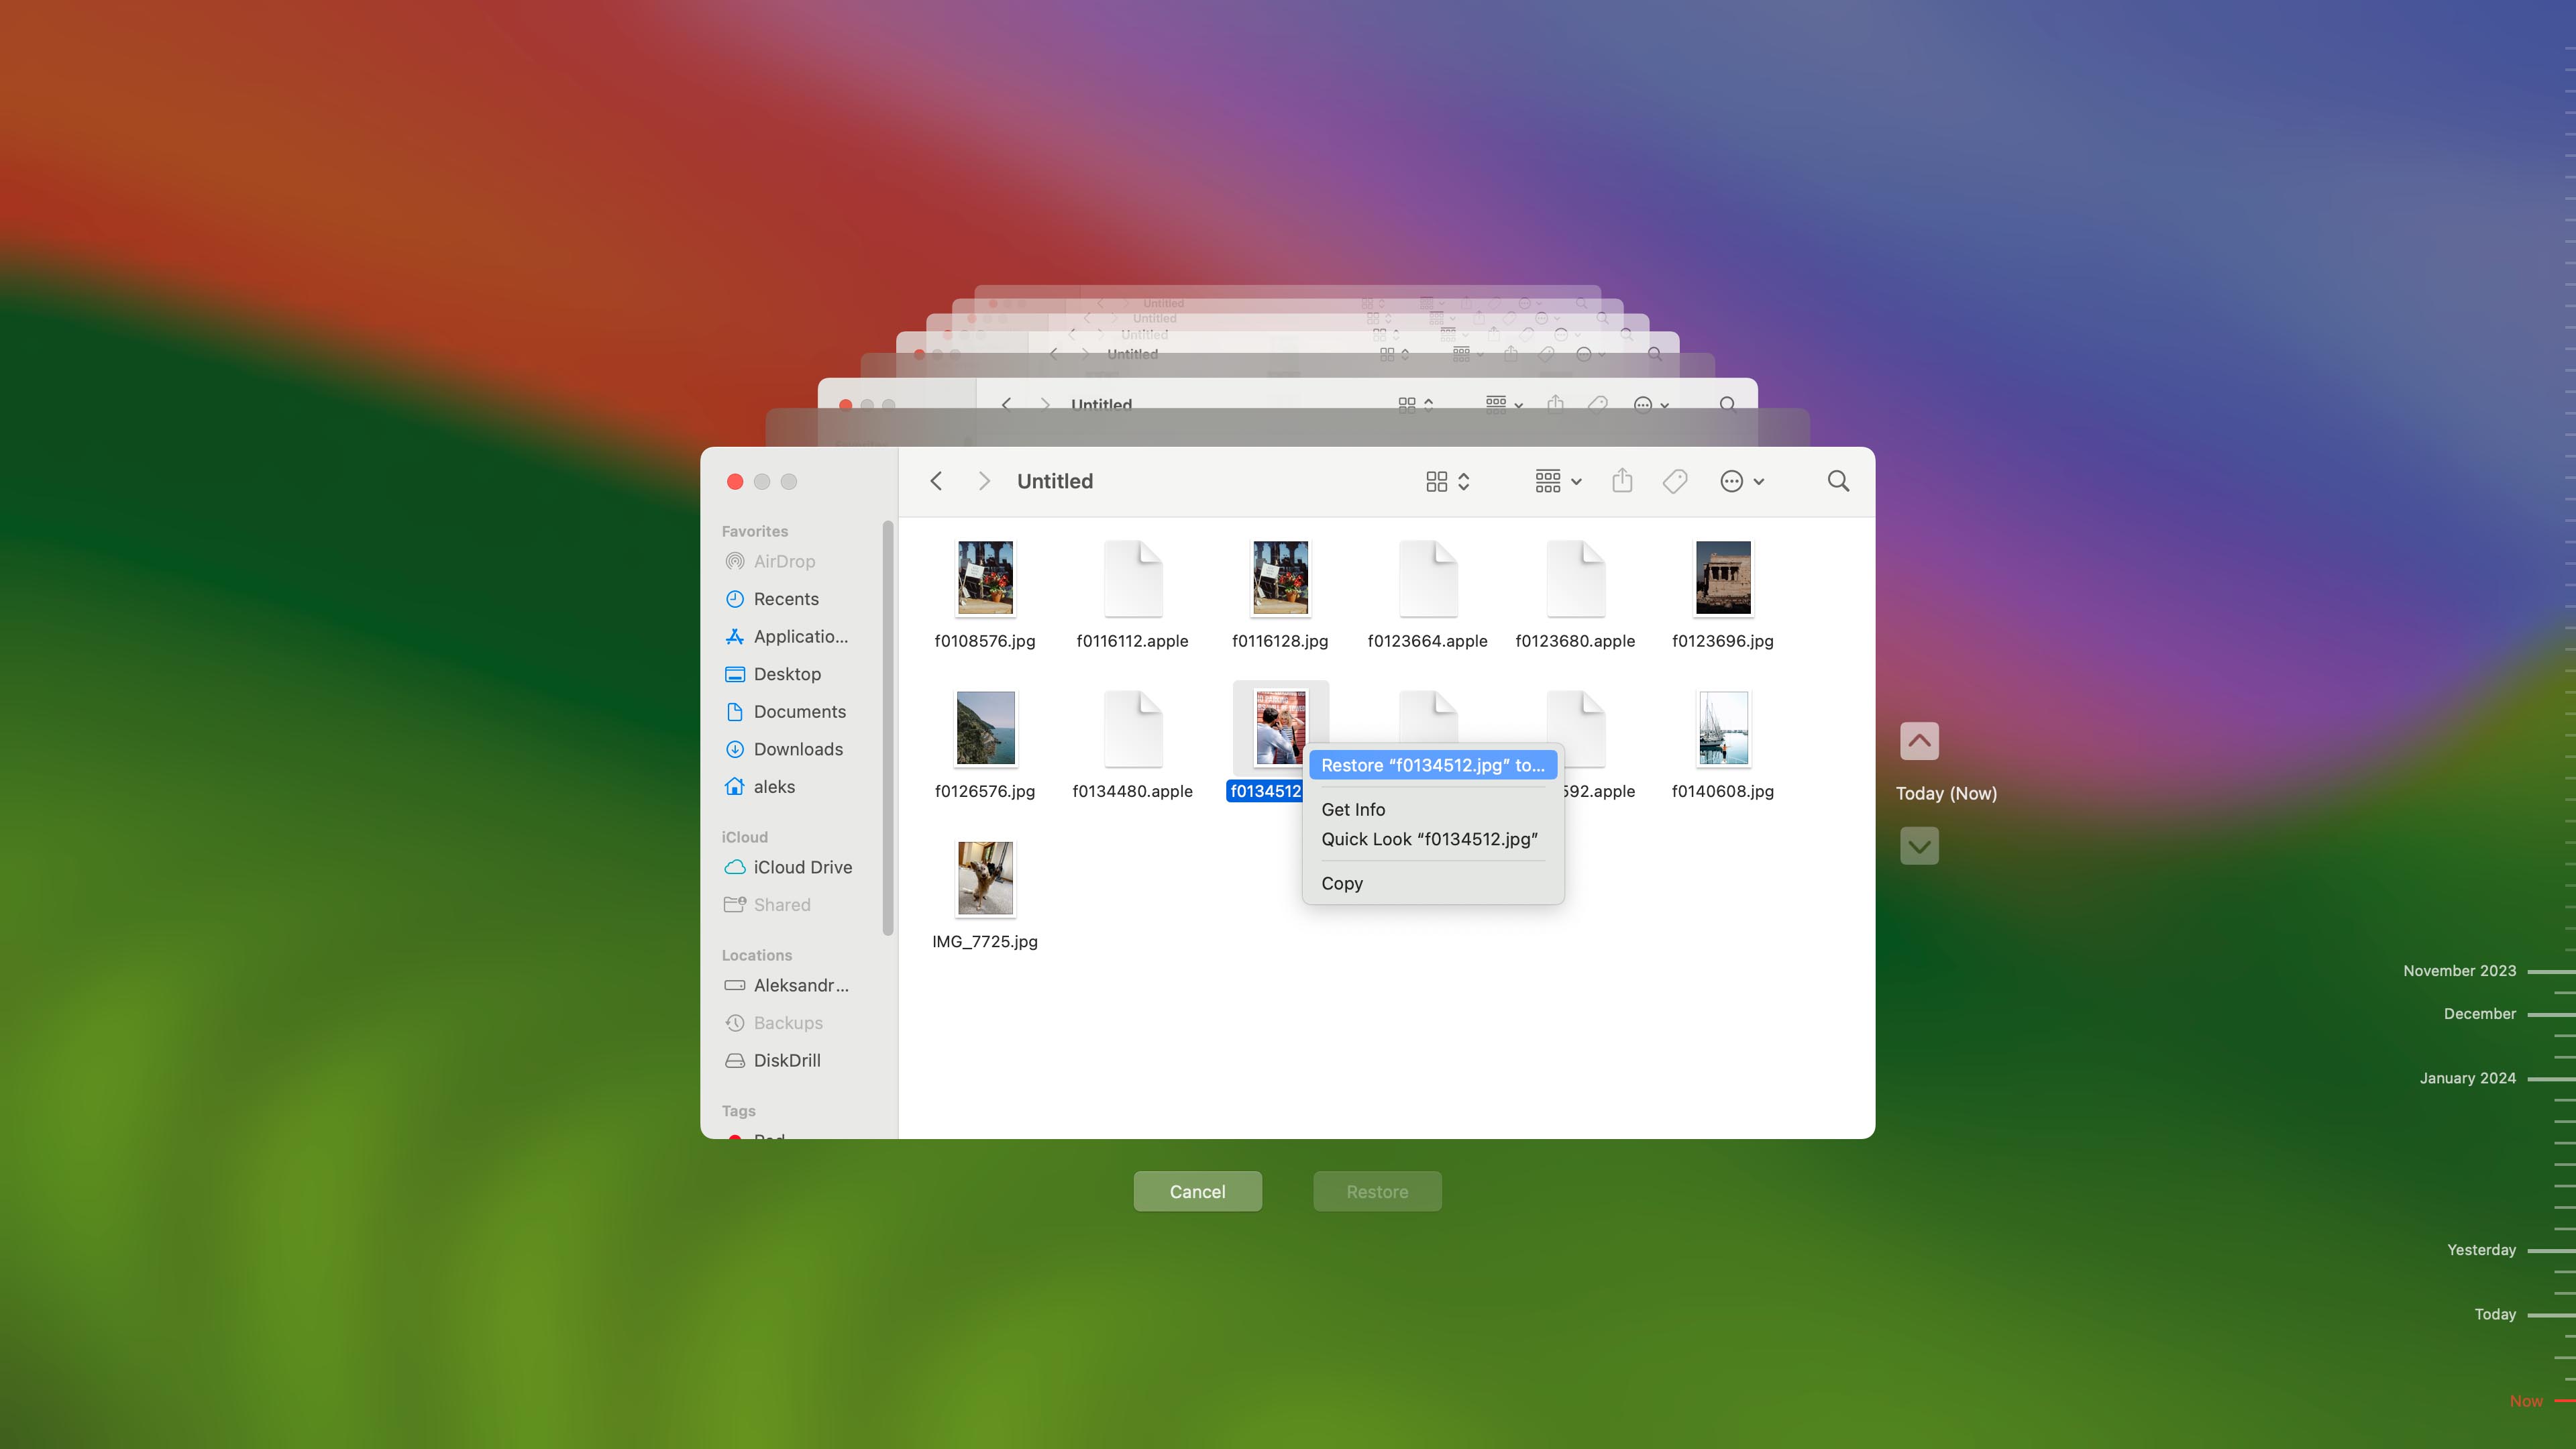
- Locate the files you want to recover using the timeline on the right edge of the screen.
- Click Restore to restore the selected file.
If you’re among those who haven’t backed up their external storage devices, you might need to revert to the previous method described in this article. That approach can potentially allow for memory card data recovery on Mac, even in the absence of a backup.
Mac SD Card Recovery Tips
🛑 Stop using the SD card as soon as possible |
Deleted files are recoverable because they are still physically present on your SD card, ready to become overwritten by new files. Once that happens, there’s no way at all to recover them. That’s why you need to stop using the SD card as soon as you find out that you’re missing important files. |
🧰 Do not (re)format the SD card |
Formatting can quickly solve many issues with corrupt partitions and damaged sectors, but it won’t help you restore erased files from your SD card. In fact, it can only make their recovery more difficult, so avoid it at all costs and use the methods described in this article instead. |
📱 Do not seek professional help |
Professional data recovery services can deliver excellent results, but they are undeniably expensive. As such, they should be seen as a last resort to be used only after trying the SD card recovery methods for Mac described in this article. |
📁 Backup your data |
Optionally, you can create a byte-to-byte backup of your memory card. That way, you will always have an exact image (copy) of your device if something goes wrong during the recovery process. |
By keeping these four SD card recovery tips in mind, you’re guaranteed to successfully retrieve as many deleted files as possible.
FAQ
How to recover deleted photos from SD card on Mac?
Here’s how you can recover deleted photos from your SD card on Mac:
- Download and install data recovery software on your Mac.
- Connect the SD card containing deleted photos to your machine.
- Select your SD card from the device list and run the scan.
- Pick the photos you need to recover.
- Choose a recovery destination to finish the process.
How to fix a corrupted SD card on Mac?
You can fix a corrupted SD card on Mac using the First Aid feature of Disk Utility:
- Open Finder and go to Applications > Utilities.
- Launch Disk Utility.
- Choose your SD card from the list of available storage devices on the left.
- Click First Aid and begin checking the selected volume for errors.
Please be aware that using First Aid may impact the integrity of the data on the disk (or memory card, in our case). If your primary goal is to preserve data on this card, you should use data recovery software or consult a specialist.
In addition to the First Aid feature, you can also try other methods to fix a corrupted SD card, including CHKDSK in Windows and free software applications like TestDisk.
Is it possible to recover data from a formatted SD card?
Yes, it’s possible to recover data from a formatted SD card, but you must begin the recovery process before the files become overwritten and use the best data recovery software available.
How to recover overwritten files from an SD card on Mac?
Unfortunately, it’s not possible to recover overwritten files from an SD card on Mac unless you have a backup. When deleted files become overwritten, they physically disappear from the SD card, and even the best SD card data recovery software won’t help you get them back.
This article was written by David Morelo, a Staff Writer at Handy Recovery Advisor. It was also verified for technical accuracy by Andrey Vasilyev, our editorial advisor.
Curious about our content creation process? Take a look at our Editor Guidelines.