Did you accidentally delete photos or videos from your Sony SD card? Maybe the card got corrupted, or your device won’t recognize it. Or worse, did formatting the card erase all your files?
Whatever the issue, if you need to recover data from a Sony SD card (or any SD card really), this guide has you covered. We’ve helped countless people get their data back, and now we’ll show you how to do it yourself, step by step.
Is it Possible to Recover Deleted Data From a Sony SD Card?
Yes, you can recover deleted data from a Sony SD card. But—here’s the catch—whether you actually succeed depends on a few important factors. Let’s break it down so you don’t waste your time.
- First things first: stop using the SD card. Seriously, don’t even think about taking one more photo. Every time you write new data to the card, you risk overwriting the old stuff you’re trying to recover. Pop that card out, and put it somewhere safe, until you are ready to start recovery.
- The integrity of your data is key. If your files have been partially overwritten or corrupted, recovery gets a whole lot trickier. Think of it like a puzzle missing a few pieces—it’s harder to complete, and sometimes you’re left with gaps. That said, it’s important to say that data damage is not the same as file system damage. File system damage, like when your card gets reformatted or the directory structure breaks down, is something recovery tools can usually handle with ease. Data damage, on the other hand, refers to the actual contents of the files being altered or overwritten, which is much harder (usually impossible) to fix.
- Your computer needs to actually recognize the SD card. If it shows up in Disk Management on Windows, you’re in luck—you can use data recovery tools to try to recover your data, even if your SD card doesn’t show up in File Explorer.
- Let’s talk about physical damage. If your SD card looks like it’s been through a war—cracks, bent connectors, or worse—your DIY days are over. No, tape won’t fix this. It’s time to call in the pros. They have the tools to deal with the kind of damage you shouldn’t touch.
- The right recovery software can save your day (and your files). Tools like Disk Drill or Sony’s very own Memory Card File Rescue do a pretty solid job. Pick one, follow the steps, and let the software work its magic.
So, yes, you can recover deleted files, but you’ve got to play it smart. The sooner you act, the better your chances.
SD cards can support commands CMD32, CMD33, and CMD38. When formatted in a camera that supports the SD_ERASE command, files become unrecoverable, similar to how TRIM works on SSDs. While we couldn’t find specific information confirming that Sony cards support these commands, we believe it’s possible they do.
How to Recover Data from a Sony SD Card
As we stated earlier, recovering data from a Sony SD card will require SD recovery software installed on your computer and your Sony card connected to it.
We’ve tested and reviewed many SD card recovery tools, from completely free options to “free-ish” trials and fully paid software. No matter your budget or the type of files you need to restore, you’ll find something that works.
When it comes to recovery tools, some of the most popular choices include Disk Drill, Recuva, PhotoRec, EaseUS Data Recovery Wizard, and Recoverit. All of them are capable of handling Sony memory card recovery. But, out of the tools we tested, Disk Drill offered the best results for SD card recovery. It is a highly rated data recovery tool that we love to recommend on Handy Recovery Advisor because it’s so easy to use. Even beginners won’t have any problems figuring it out. It can also recover files from corrupted SD cards or even formatted SD cards. To learn more about Disk Drill’s many useful data management features (most included in the free version), read our full Disk Drill review.
If you suspect your Sony SD card is badly corrupted—like when it’s not recognized by your device, shows error messages like “The disk needs to be formatted,” files are missing, or it’s performing unusually slow—check out the Byte-for-Byte Backup (If Your Sony SD Card Is in Bad Shape) section before you attempt to scan the card.
Here’s how to use it to recover deleted files from a Sony SD card:
- Plug your Sony SD card into your computer using a card reader.
- Download and install Disk Drill.
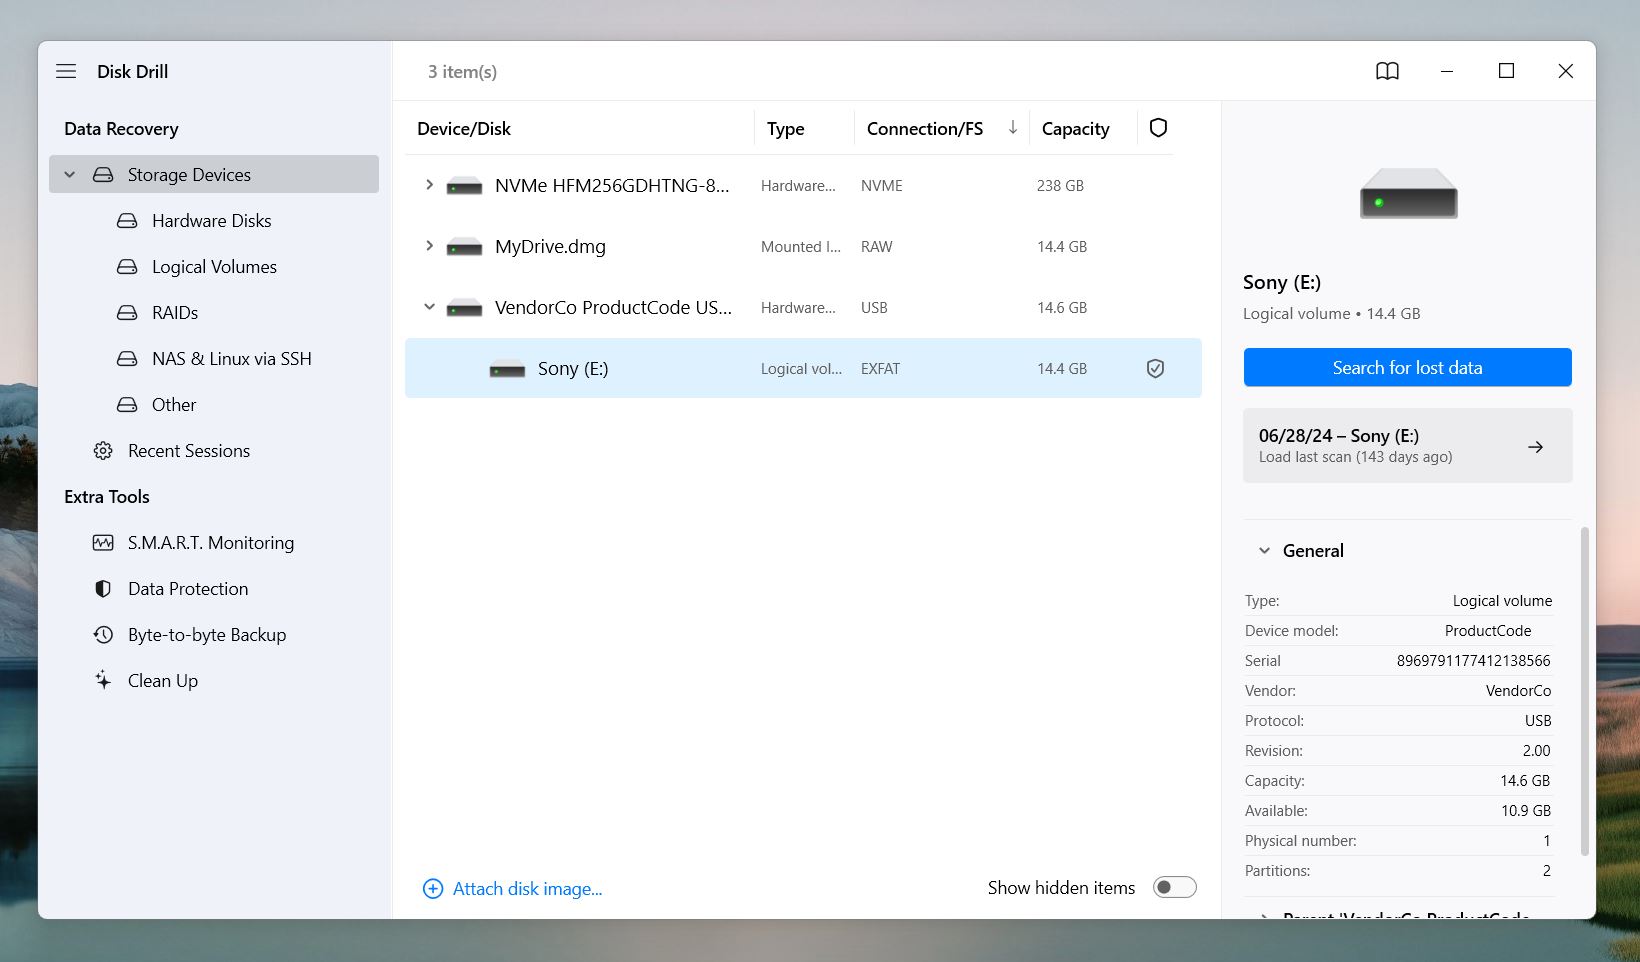
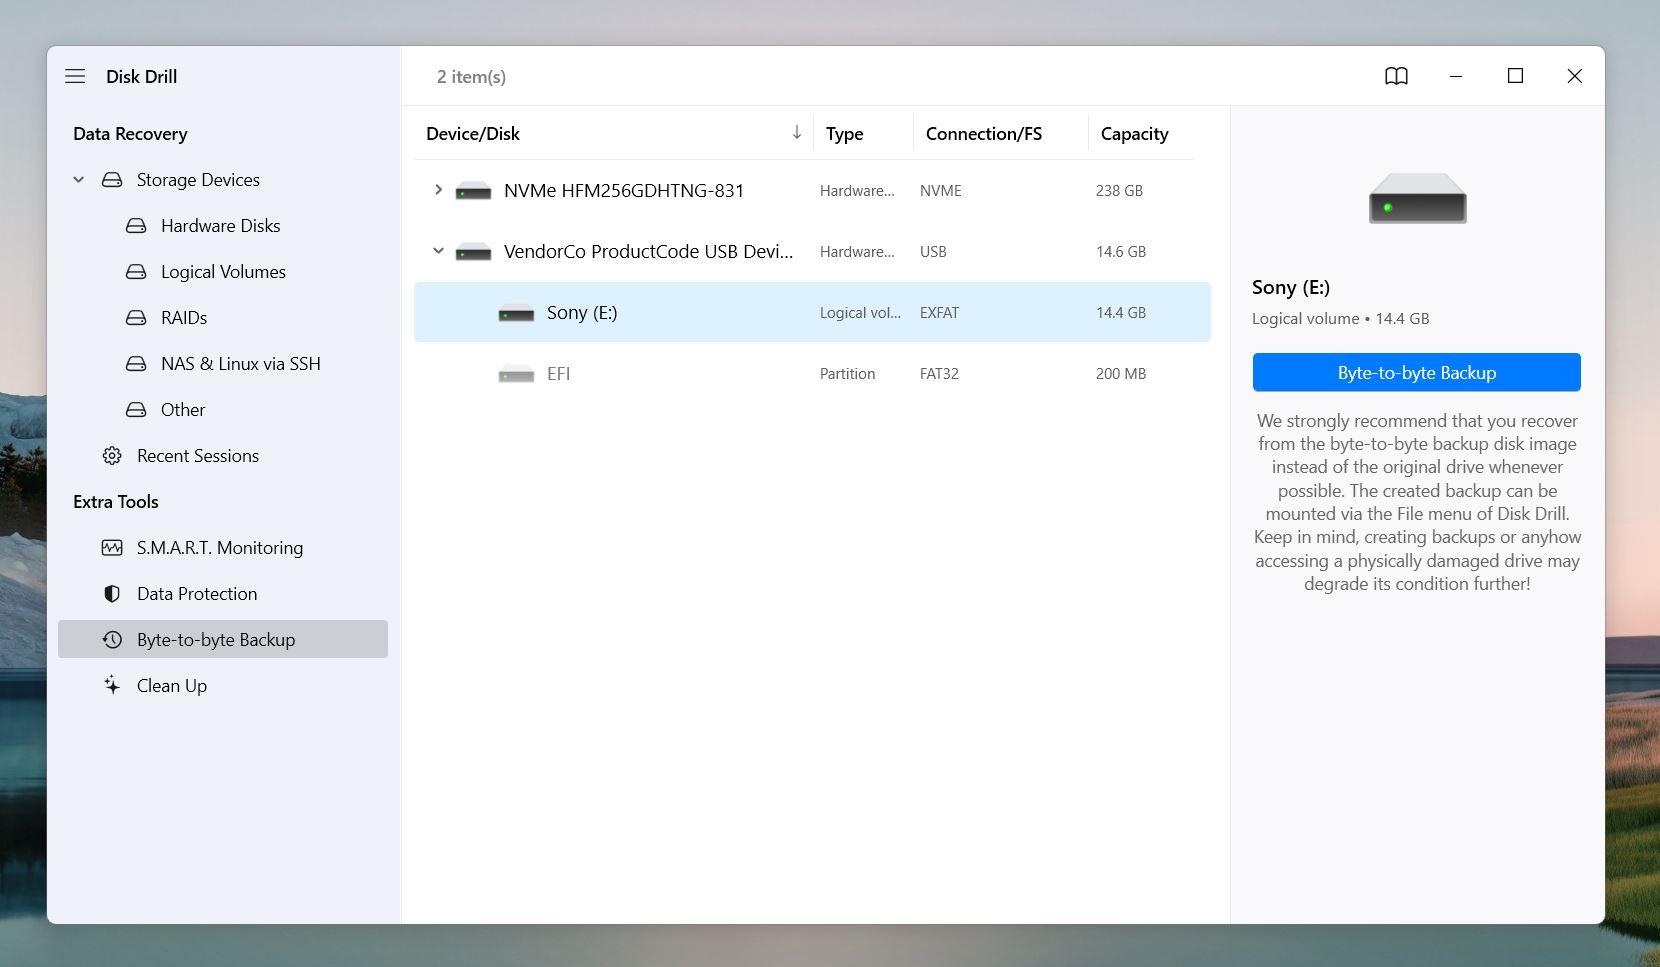
- Launch Disk Drill and select your SD card from the list of drives. Then, click “Search for lost data.”
- Wait for Disk Drill to complete its scan, or don’t—it’s flexible. Disk Drill allows you to click “Review found items” at any time. As the scan progresses, the list of recoverable files will keep growing, so you can already start to browse through what it has found.
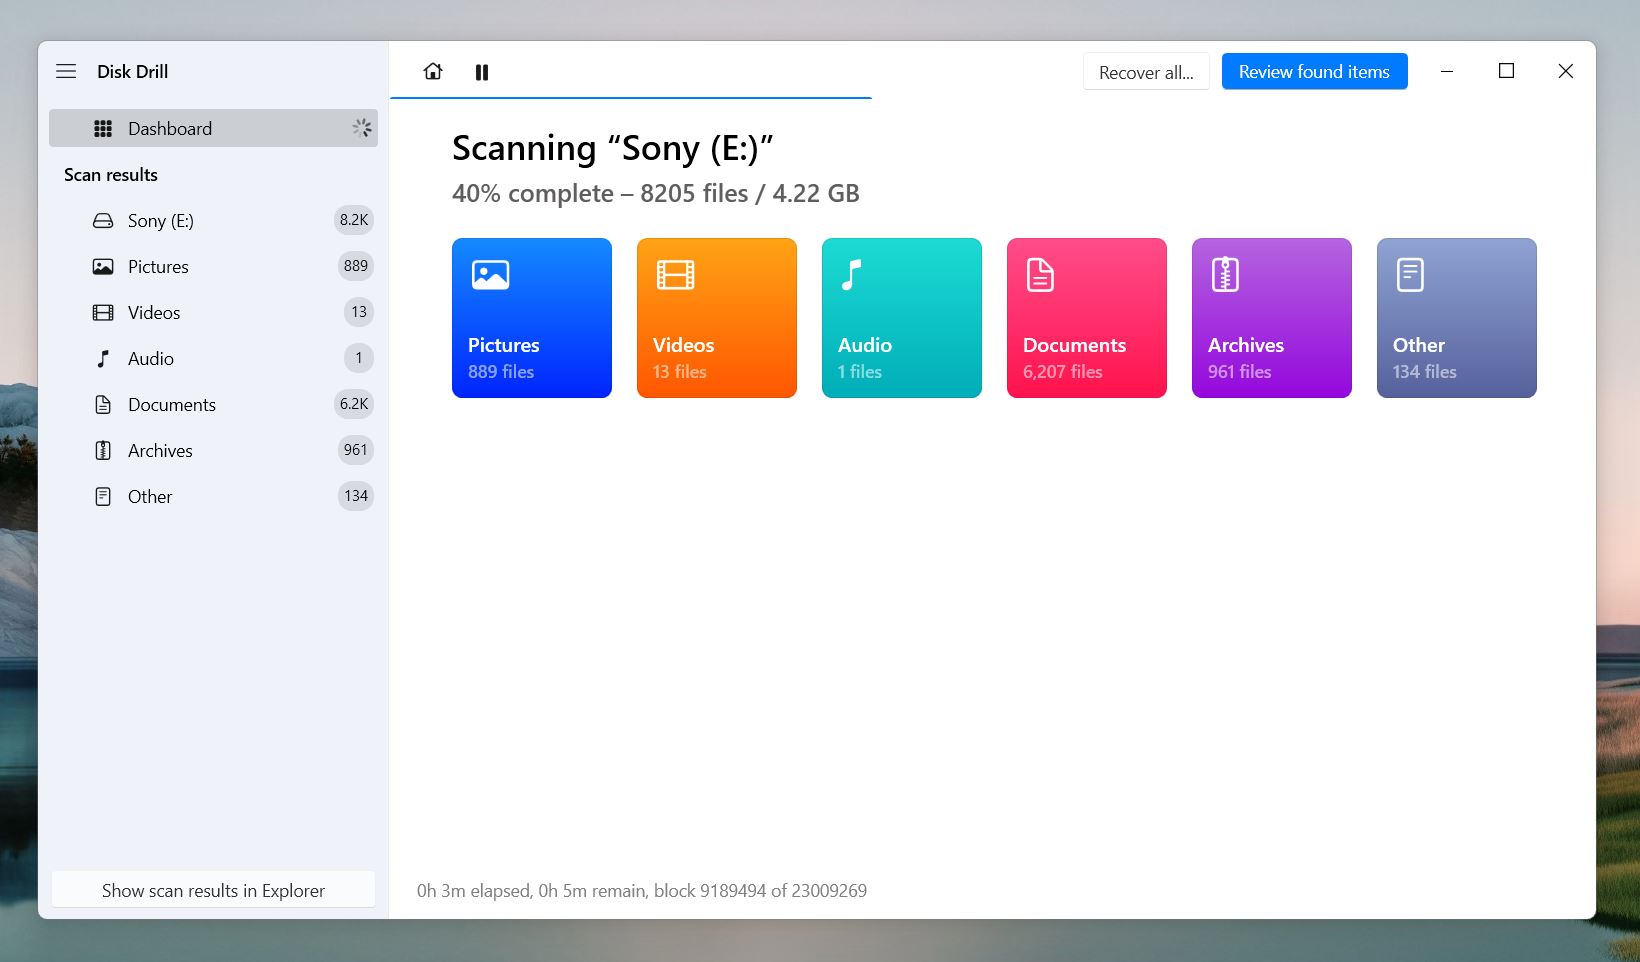
- If you spot the files you need before the scan is done, you don’t have to wait. You can recover them right away. There’s no need to wait for the full scan to finish—Disk Drill makes it quick and easy to get your files back.
- You can search for specific files or file types using the search bar on the top-right corner of the window and the navigational sidebar on the left. For example, you can type “.png” or “.jpg” in the search bar if you only want to recover deleted photos from your SD card.

- Preview your files by hovering your mouse pointer on the right side of their filenames. Click the eye button that appears. Disk Drill’s preview viewer/player works super well even when recovering deleted videos from your SD card.
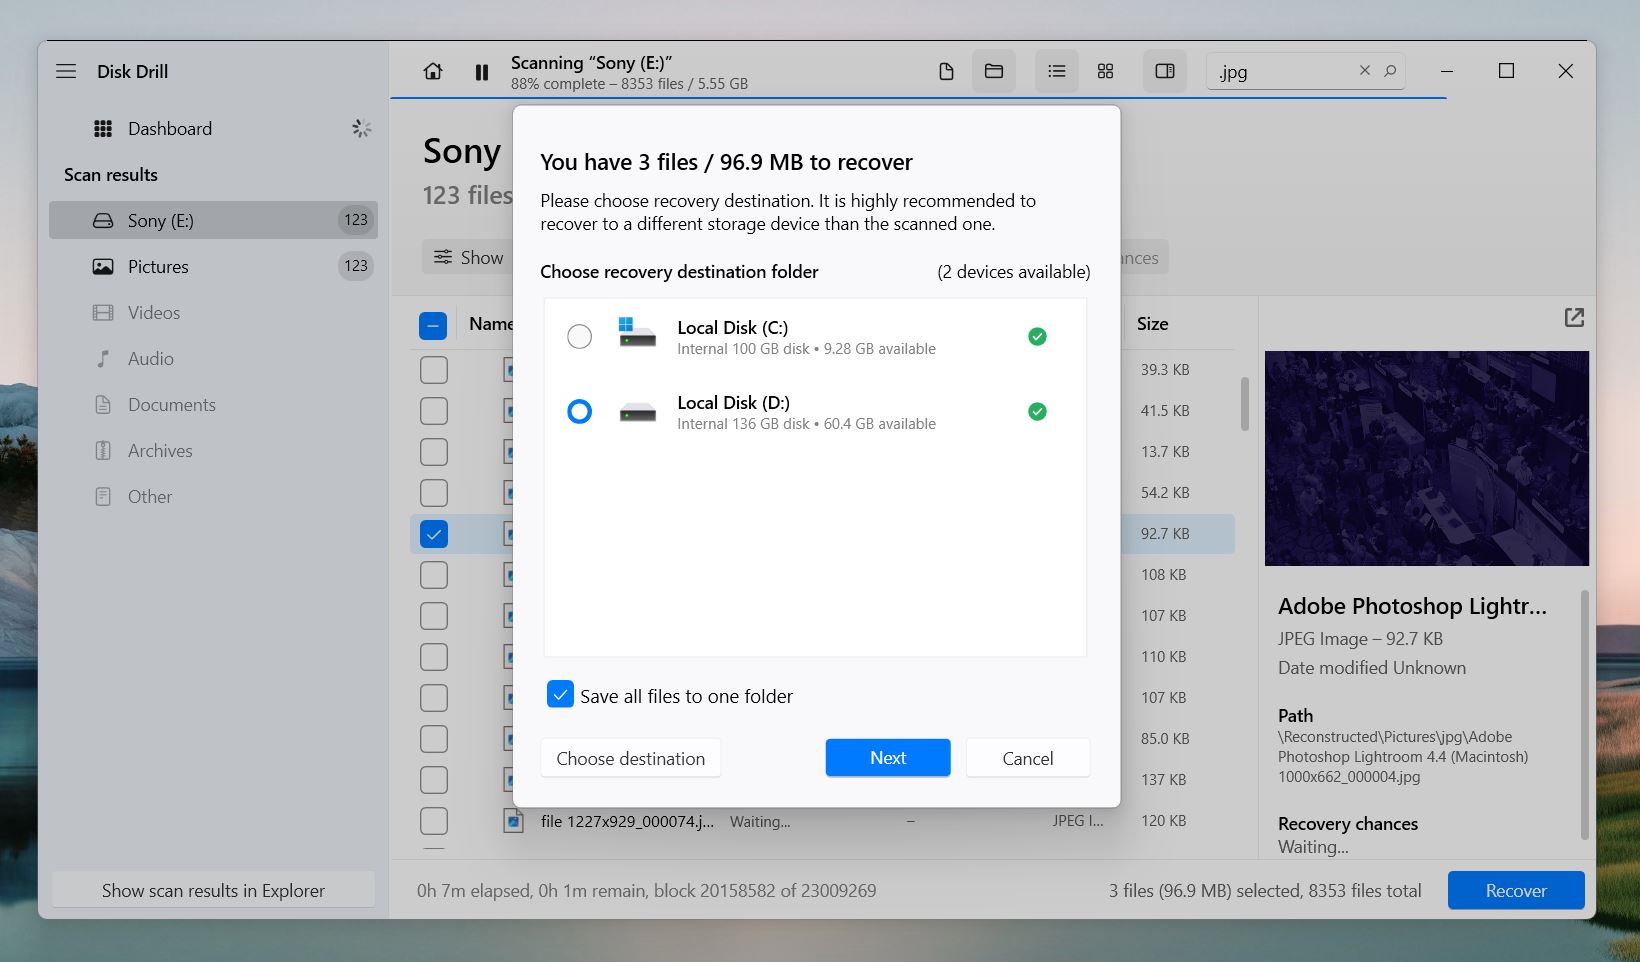
- Select the files you want to recover by using the checkbox column. Then, click “Recover.” You can also leave all checkboxes blank and click “Recover all…”
- On the dialogue box that appears, select a location on your computer where Disk Drill will save your recovered files. Don’t save them back to the SD card—that may overwrite files in the queue. Choose a different drive to keep everything safe.
Disk Drill is excellent software for Sony SD card recovery. It’s reliable, easy to use, and packed with features that simplify the recovery process. However, like anything made by humans, it’s not without its downsides. Let’s take a look at the pros and cons:
Pros:
- Easy for beginners to navigate and use effectively.
- Byte-to-Byte Backup Feature is ideal for recovering data from damaged or corrupted SD cards.
- Recovers photos (JPEG, RAW formats like ARW and CR2), videos (MP4, MOV, XAVC S, AVCHD), audio files (MP3, WAV), documents (PDF, DOCX, XLSX) and more.
- Lets you see recoverable files before recovery and allows file recovery as soon as they’re found.
- Additional free tools: duplicate file finder, cleanup tools, disk health monitoring, and data protection features.
Cons:
- Unlimited recovery requires a paid upgrade.
- Files on fully formatted or severely damaged media may not be recoverable.
Disk Drill Basic for Windows offers 500MB of free data recovery, as well as unlimited preview. Previewable files have a higher recovery success rate than non-previewable files. If you can’t preview ANY of your files, you may need to send your card to a professional data recovery center. See the section What if my Sony SD Card is Broken/Unreadable? for details.
Byte-for-Byte Backup (If Your Sony SD Card Is in Bad Shape)
In cases where we suspect an SD card is in bad shape and extensive scans might cause further data loss, we always use Disk Drill’s Byte-for-Byte Backup feature. This creates a complete copy of the card—literally a “byte-for-byte” image— that captures all the data, hidden files, corrupted files, deleted files, everything. Then you can scan this image as if the Sony SD card itself, thus you can avoid the risk of further damage to the original card.
To make this backup takes just a couple of clicks:
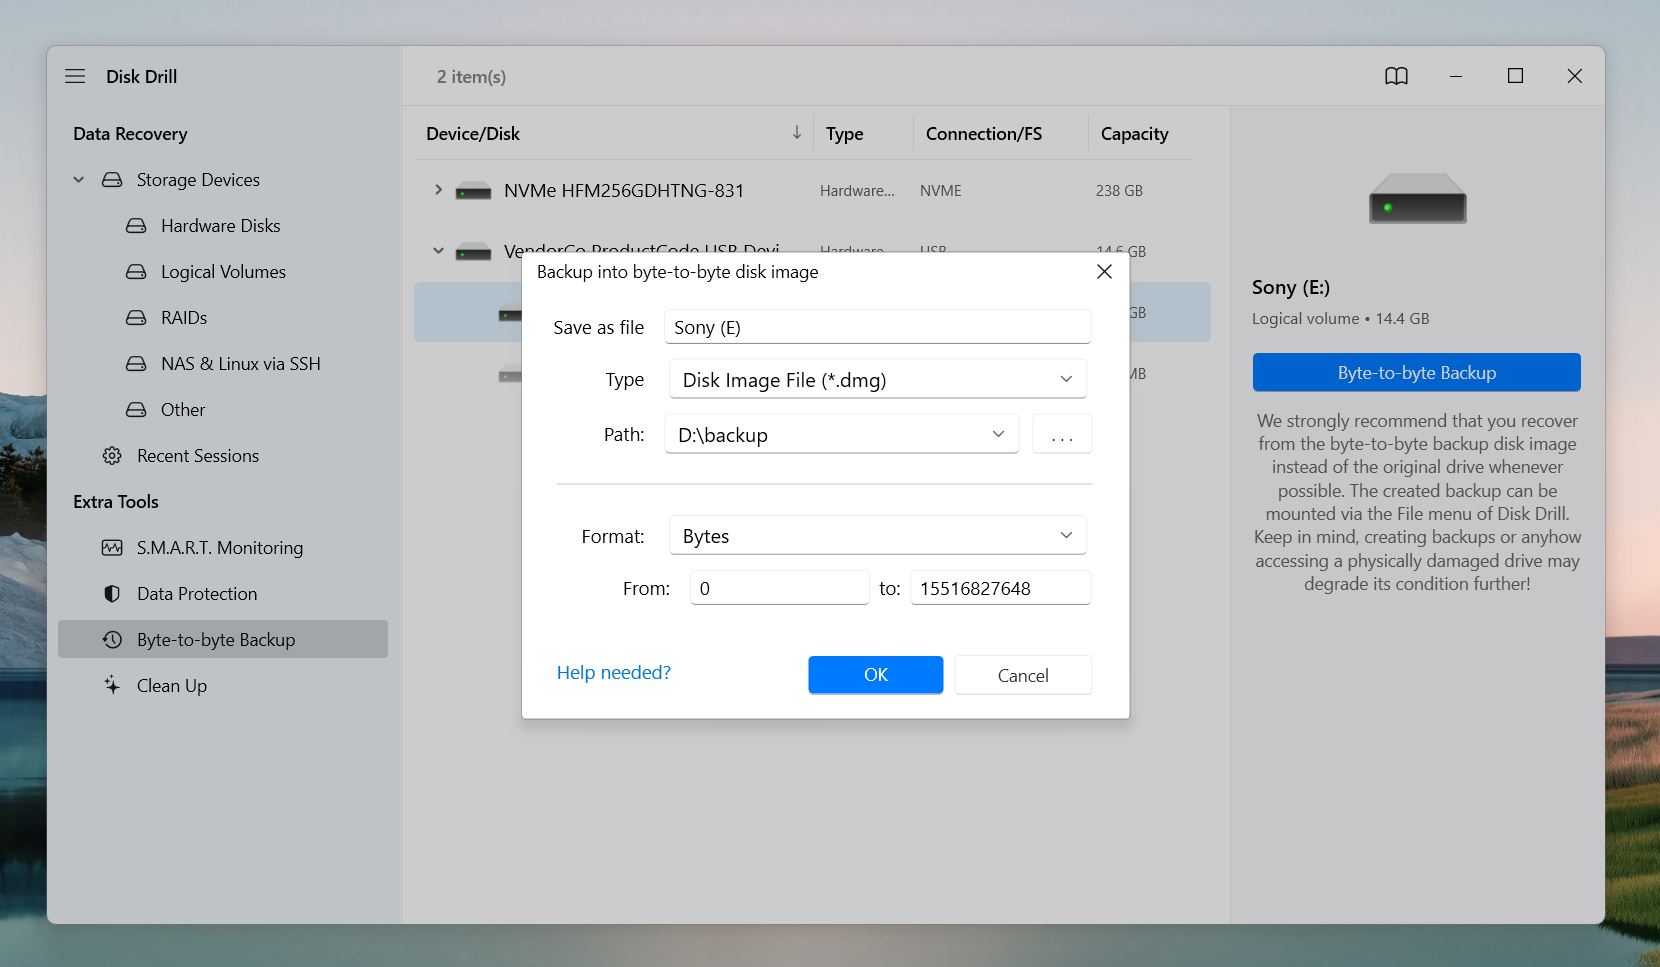
- On Disk Drill’s main screen, click the “Byte-to-Byte Backup” option in the menu bar.
- From the list of connected drives, choose your Sony SD Card.
- Disk Drill will prompt you to pick a location to save the backup file. Choose a storage device with enough free space to hold the entire card image. For instance, if your card is 32GB, make sure the destination has at least 32GB available.
- Once the backup is complete, go to the Data Recovery section, click “Attach Disk Image”, and select the image file you just created.
- After the image loads, use the “Search for Lost Data” button to scan it just like you would with a regular SD card.
Does Sony Offer Any Tools for Memory Card Recovery?
Yes, Sony provides an SD card recovery software called Memory Card File Rescue to help retrieve data from their memory cards. This software supports a variety of file formats, including JPEG, RAW, and video files. It’s specifically designed to work with Sony memory media products, such as:
- Sony SD Memory Card
- Sony CFexpress Type A/B Memory Card
- Sony XQD Memory Card
- Sony External SSD SL-M Series
- Sony USB Flash Drive
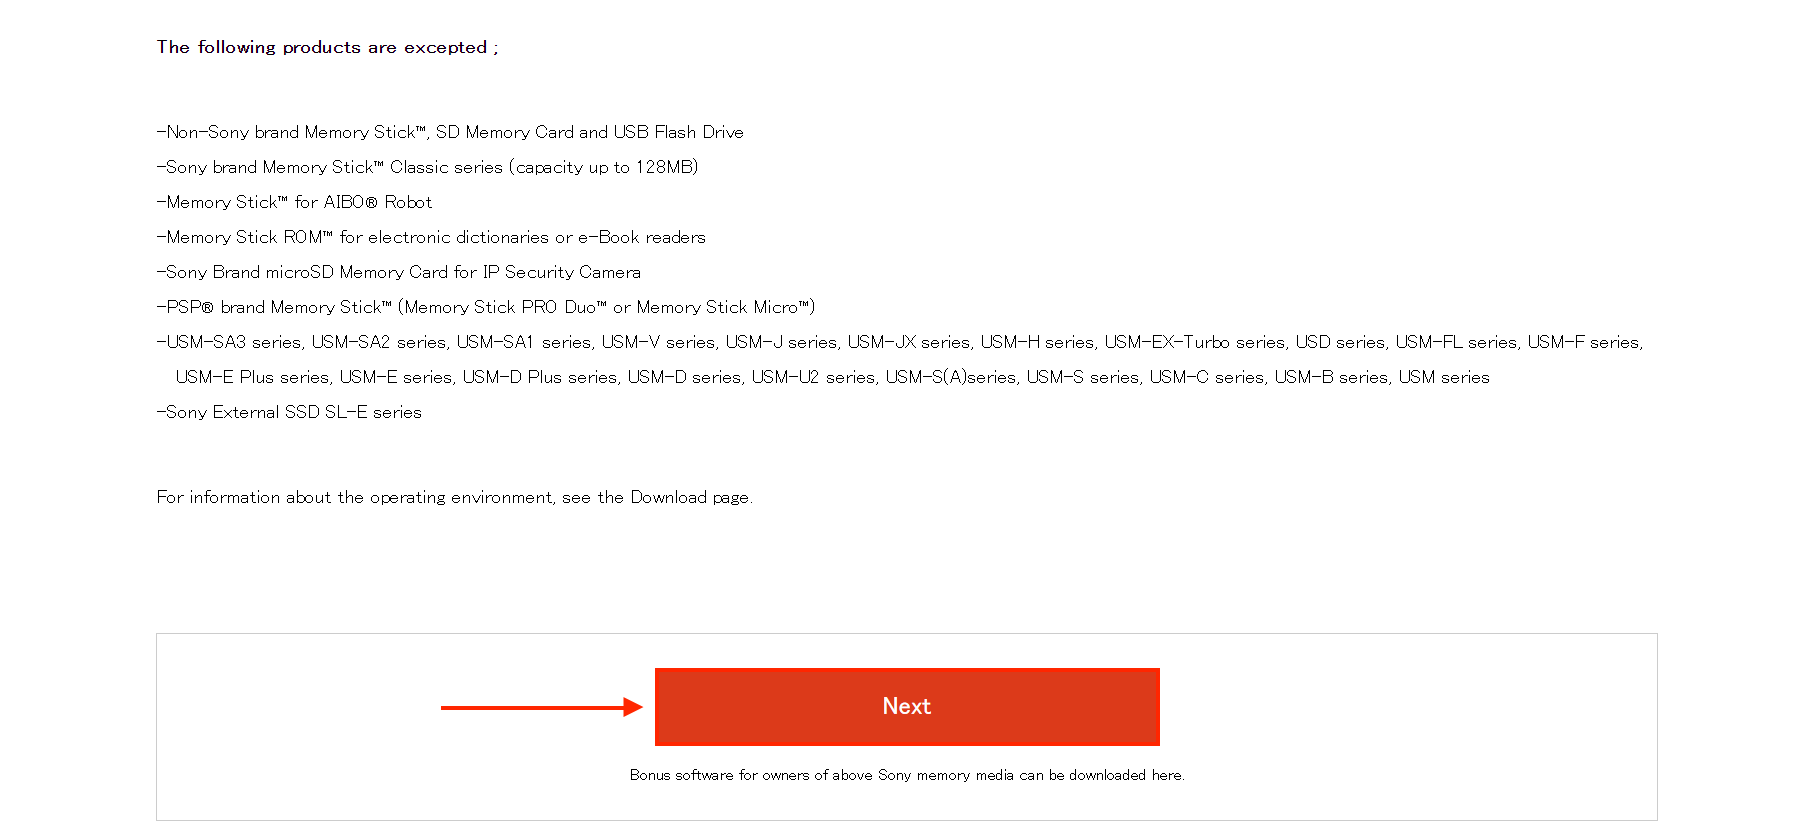
The following products are not supported by Sony’s Memory Card File Rescue:
- Non-Sony brand Memory Stick™, SD Memory Cards, and USB Flash Drives.
- Sony brand microSD Memory Cards designed for IP Security Cameras.
Memory Card File Rescue is free for those who purchased original Sony SD cards (you’ll need the official manual to download the software), so we’d say Disk Drill is better purely because it works for all SD cards, as well as mobile devices.
However, if you’re a Sony SD card owner, this is a great free tool that’s optimized just for you. The latest version supports the Memory Stick and MagicGate Memory Stick series, SD cards, and the Microvault USB Flash Drive.
Here’s how to use it:
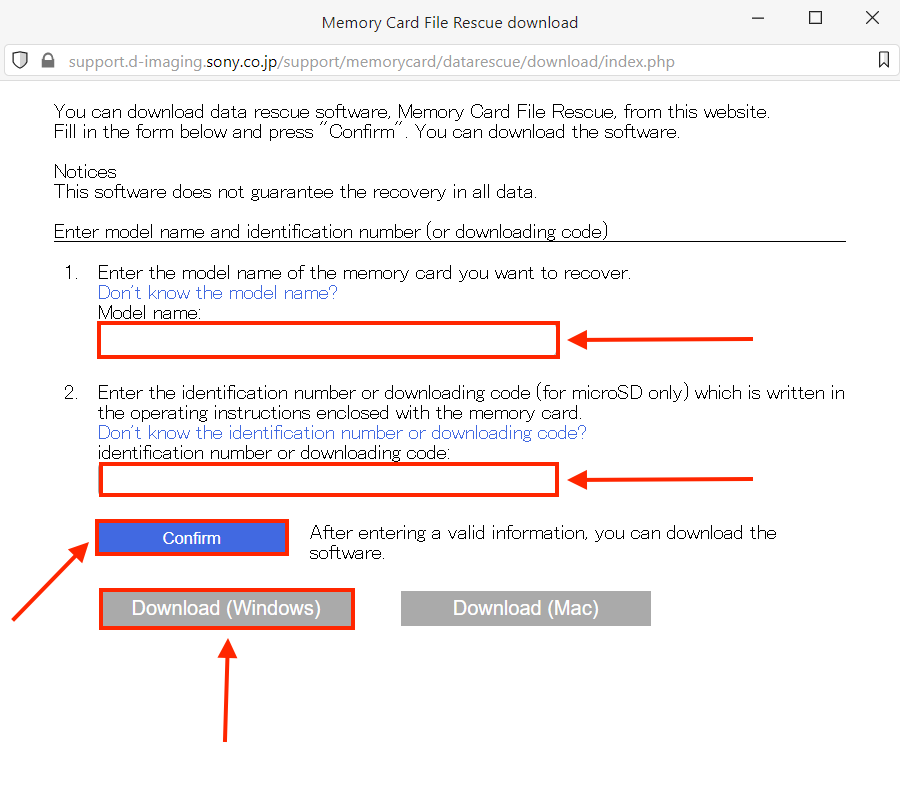
- Download MCFileRescue.exe from the official Sony website.
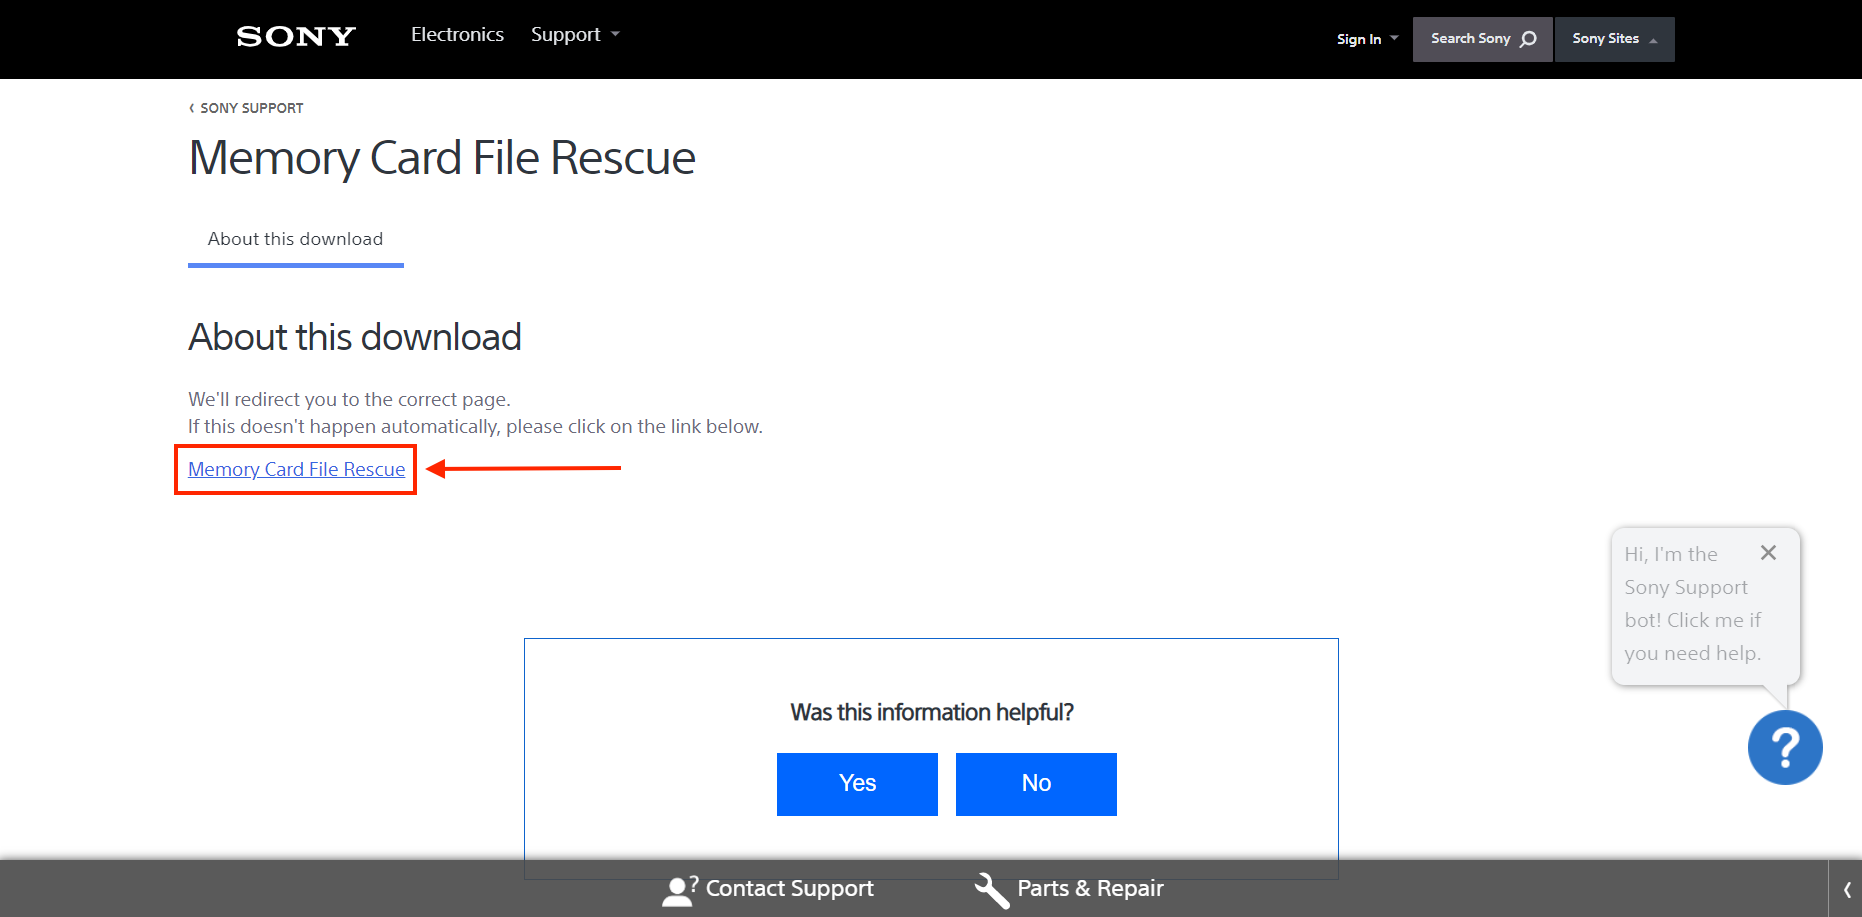
- Scroll down to the bottom of the page, then click “Next”, and “Next” again on the following page.
- A new window will appear. Enter your Sony SD card’s Model name and identification number in the indicated fields. You can find the Model name at the back of the SD card, and the identification number in your user manual. Then, click “Confirm”, and click “Download (Windows).”
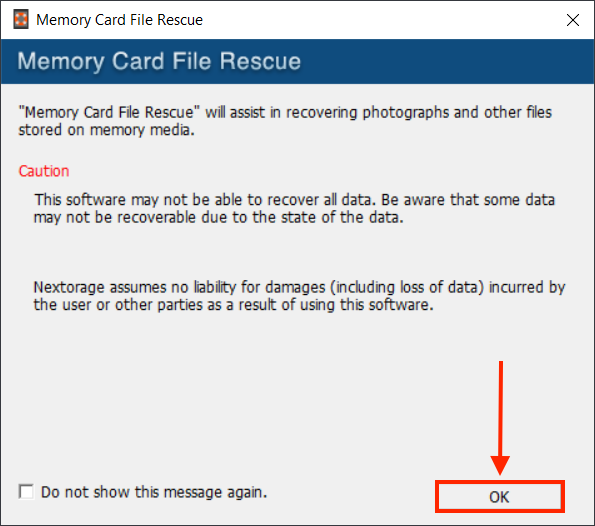
- Double-click the file we just downloaded, then proceed with the installation process (it’s pretty straightforward).
- Launch Memory Card File Rescue by double-clicking its icon.
- Read the disclaimer, then click “OK.”
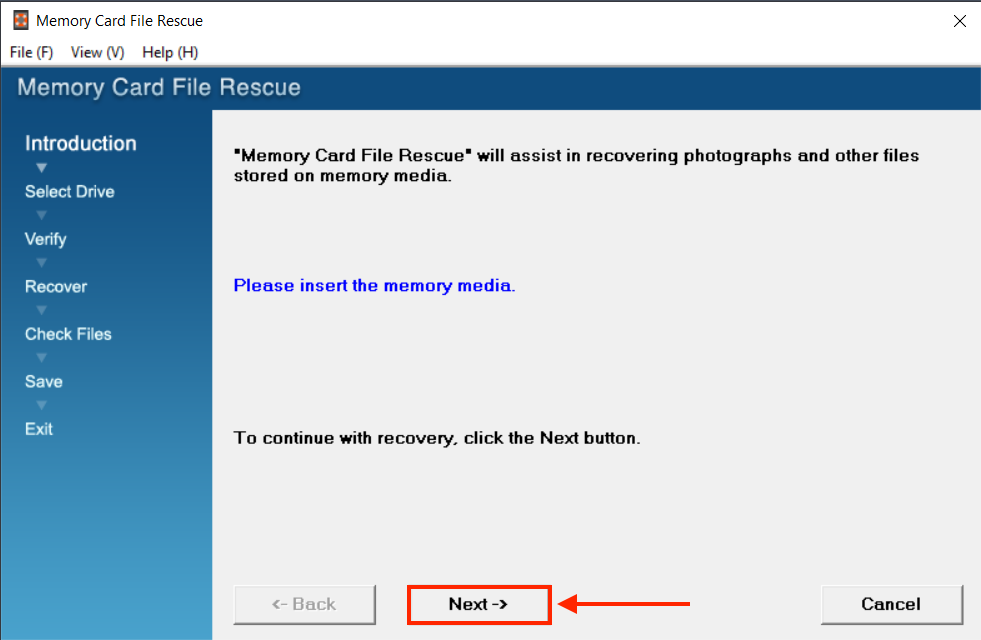
- Insert your Sony SD card into your computer using your USB-type card reader or built-in laptop card reader. Then, click “Next.”
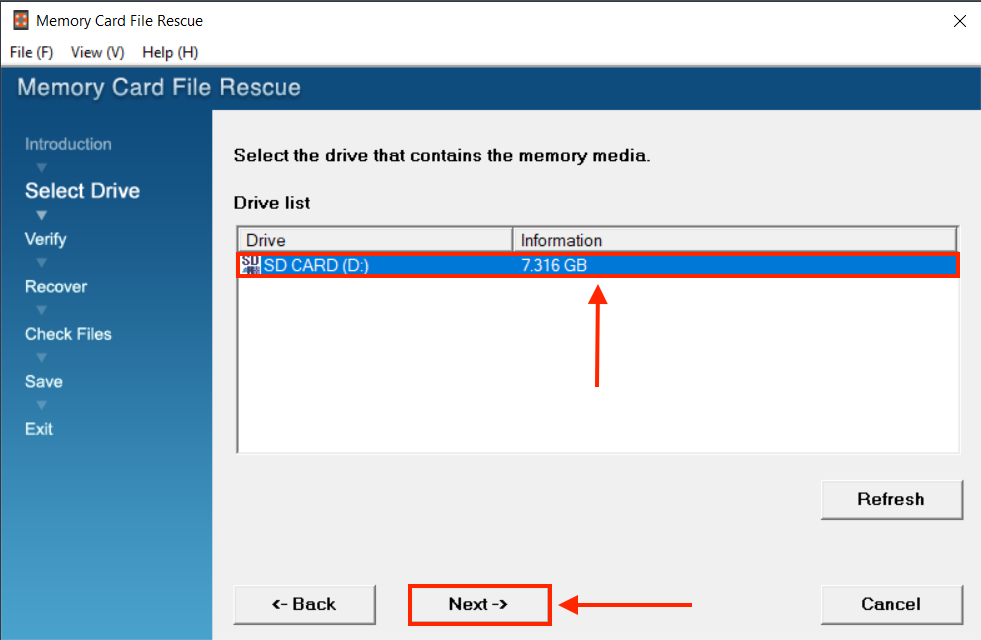
- Select your SD card from the Drive List, then click “Next.”
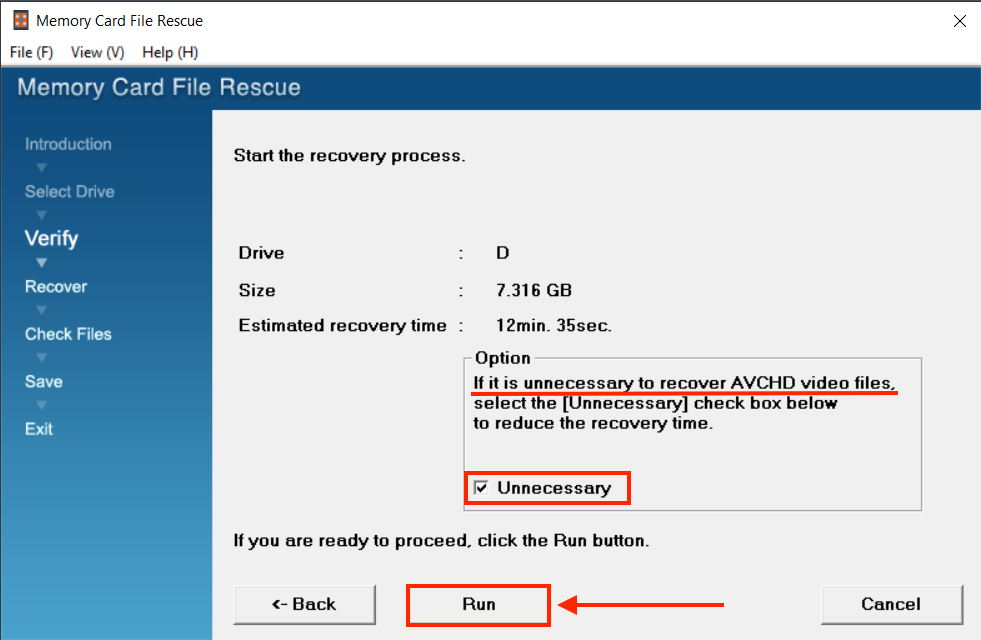
- If you want to restore AVCHD files (a video format typically used by Sony and Panasonic camcorders), leave the checkbox beside “Unnecessary” unticked. Then, click “Run.”
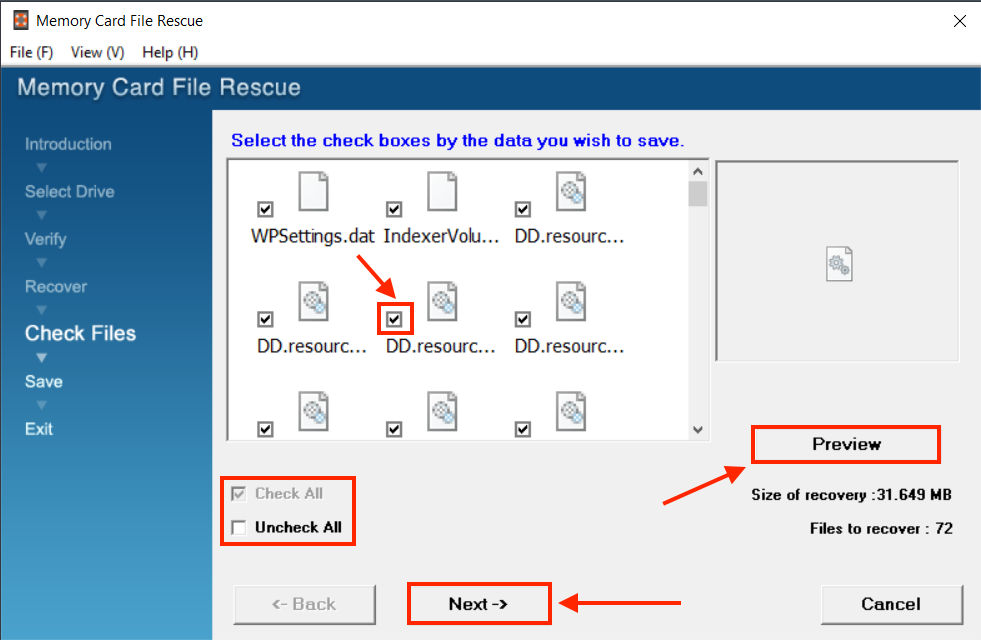
- Use the checkboxes to select the files you want to recover. You can also use the Preview button to display the files MCFR found. Once you’ve made your selection, click “Next.”
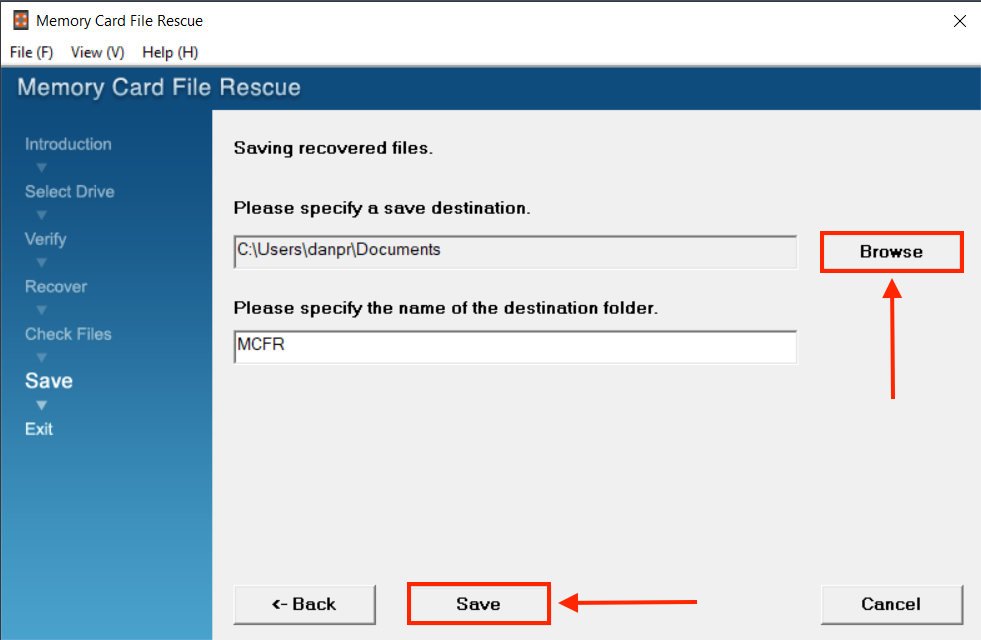
- Use the “Browse” button to select a location on your computer where MCFR will save your recovered files. Then, click “Save.”
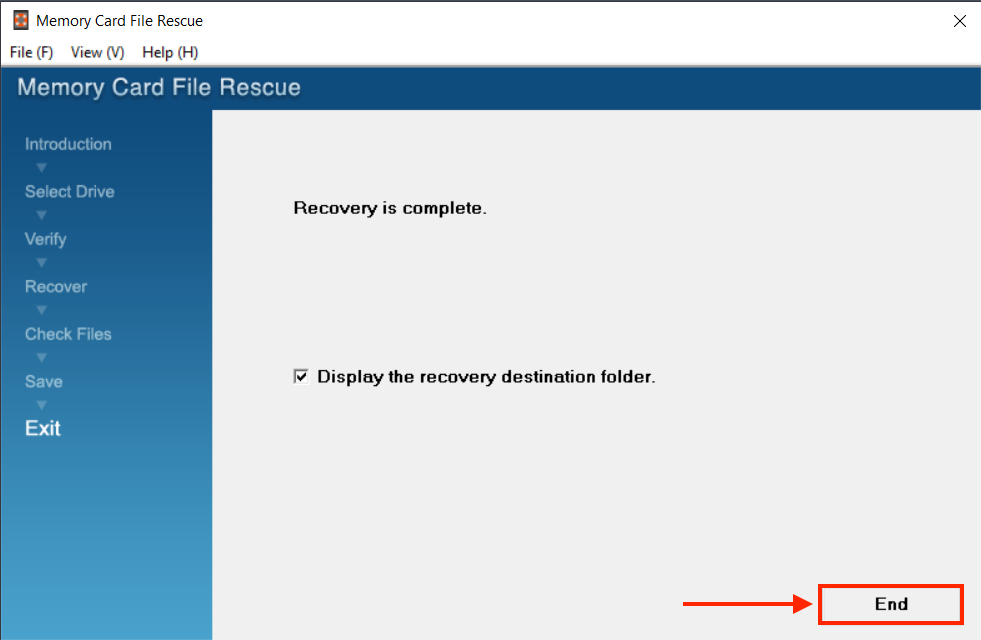
- Finally, click “End.”
Sony’s Memory Card File Rescue is capable free recovery option but it it also has notable limitations.
Pros:
- No cost for users of supported Sony memory devices.
- Wide file format support.
- Support for professional-grade media.
- Beginner-friendly interface.
Cons:
- Only supports Sony memory media.
- Does not support certain Sony microSD cards.
- Cannot recover content-protected files.
- Files on formatted or severely damaged media may not be recoverable.
- You need a code from the SD card’s operating instructions to download it.
What if my Sony SD Card is Broken/Unreadable?
In most cases with Sony SD cards, the methods we’ve covered above work like a charm. However, for more situational cases we want to mention additional tools and methods that might come in handy. Here, we’ll cover three options: TestDisk, CHKDSK, and professional SD recovery services.
TestDisk
TestDisk is incredibly helpful when your Sony SD card becomes unreadable due to partition issues or file system corruption. This free, open-source tool can recover lost partitions and fix damaged file systems. We’ve used it many times with great success. However, it doesn’t have a graphical interface and runs only in the command line, so be careful and follow our instructions closely.
How to use TestDisk for Sony SD card recovery:
- Go to the official TestDisk website and download the latest version for your OS.
- Extract the files.
- Press the Windows key or click the Start menu.
- Type cmd into the search bar.
- Click on Command Prompt from the search results.

- Right-click Command Prompt and choose Run as administrator.
- Navigate to the folder containing TestDisk by typing cd [folder path]. For example: cd C:\Users\YourUsername\Downloads\TestDisk
- Run the program by typing testdisk_win.exe.
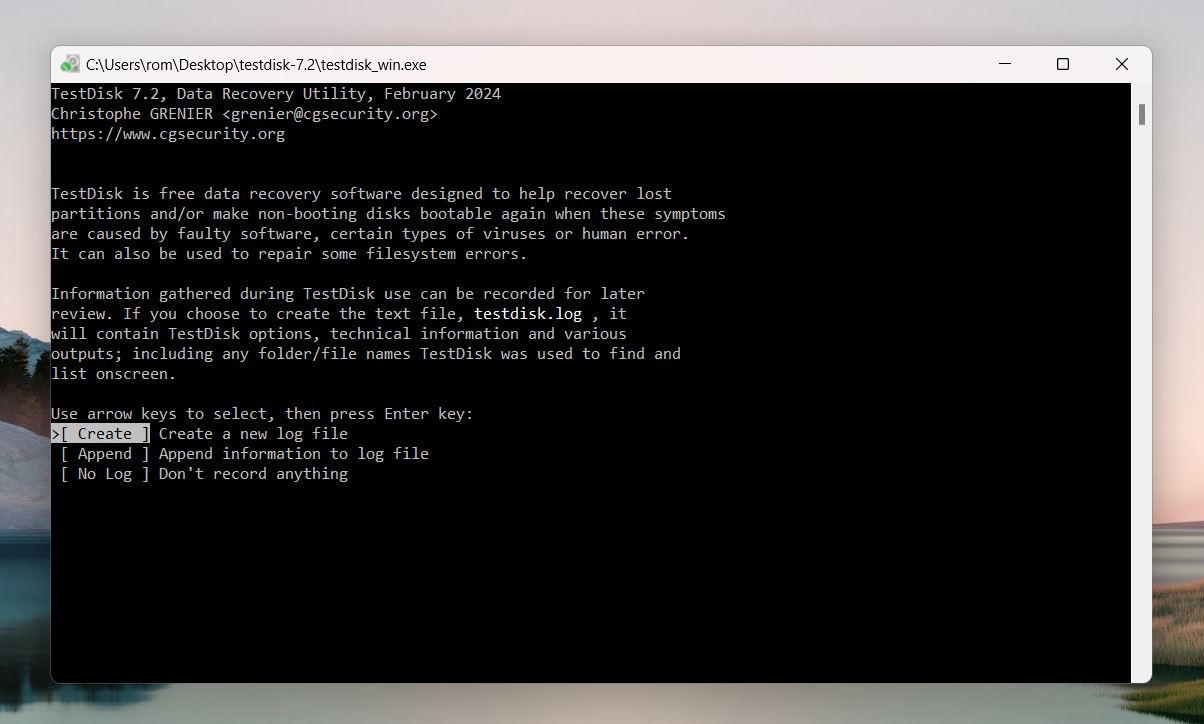
- When prompted, choose to create a new log file, use an existing log file, or skip the log. Select your option using the arrow keys and press Enter.
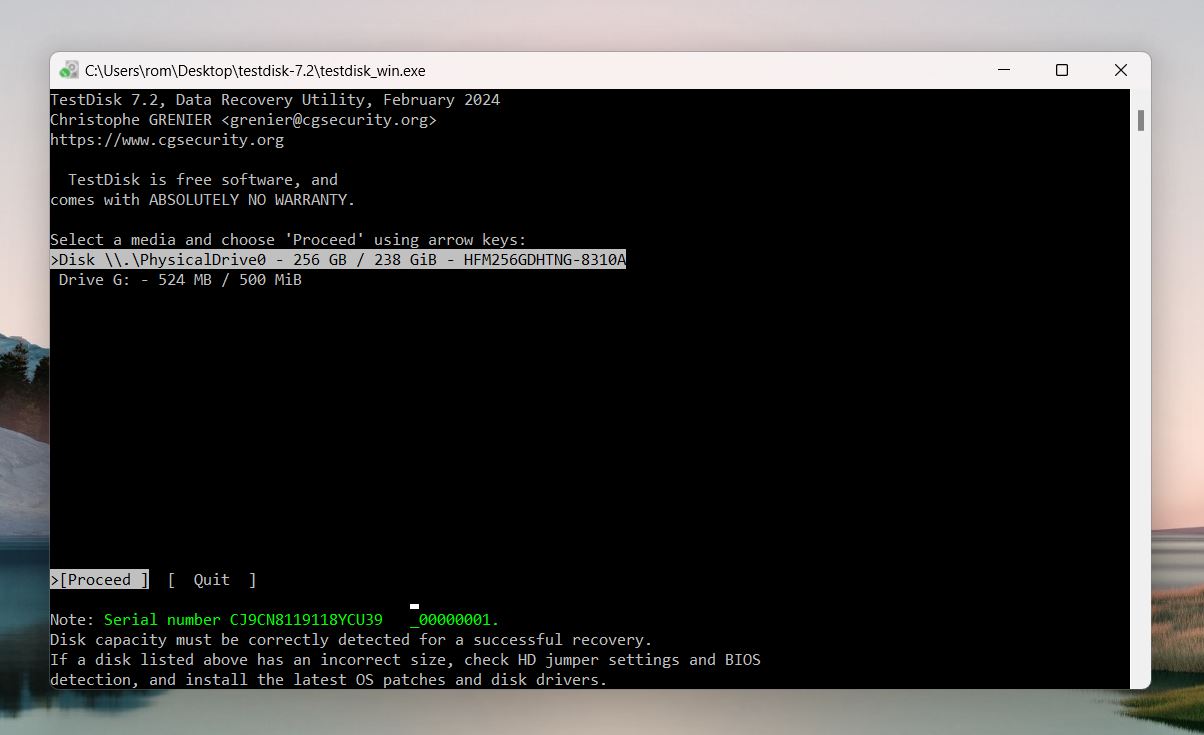
- TestDisk will list all connected drives. Highlight your Sony SD card using the arrow keys. Double-check its size and label to make sure you select the right one. Press Enter to move forward.
- TestDisk will try to detect the partition table type for your SD card (e.g., FAT32 or exFAT). If it looks right, press Enter to confirm. If you’re not sure, let TestDisk choose automatically.
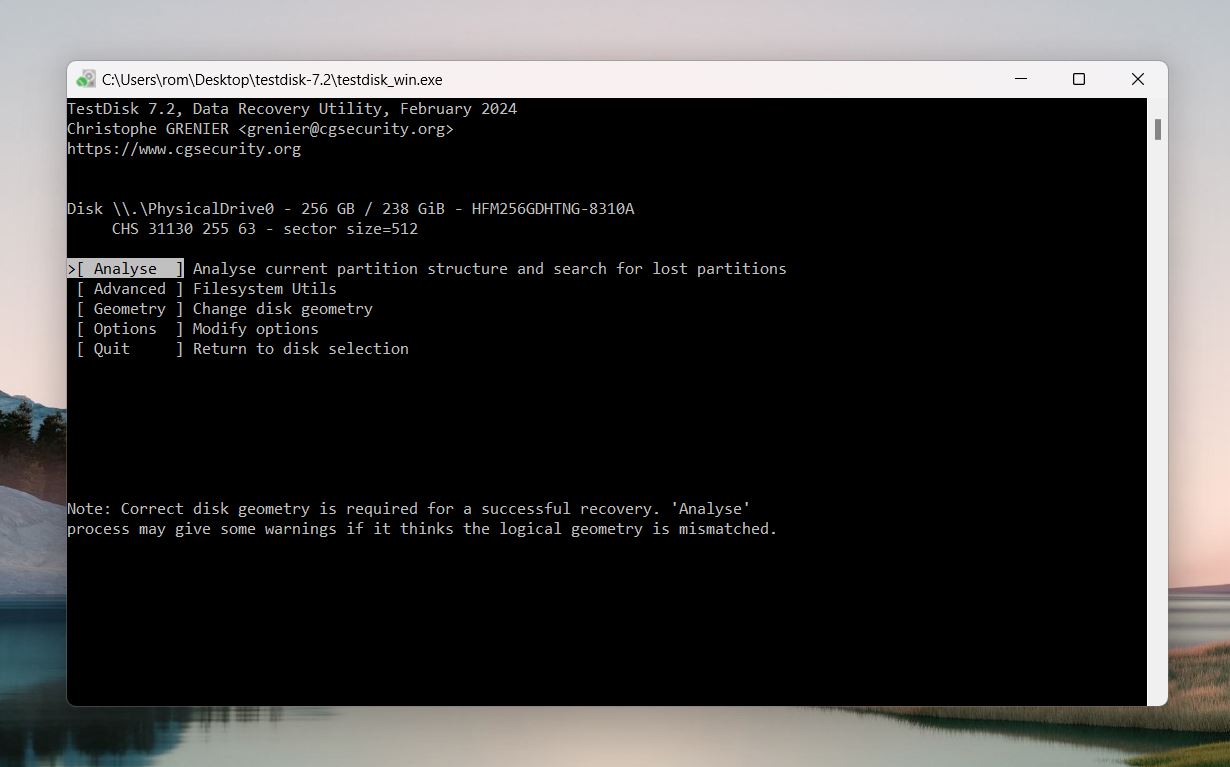
- Use the “Analyze” option to scan for lost partitions and file system errors.
- Look at the results of the scan to find the partitions. If TestDisk shows the correct partition, highlight it and select Write to restore it.
- Once the card is accessible, transfer your files to a safe location right away.
If you’re curious about TestDisk, check out our detailed TestDisk review. It explains its strengths and weaknesses, and why it’s a powerful recovery option (if used properly).
Checkdisk
Another tool we want to mention is a built-in Windows utility designed to scan and repair file system errors and bad sectors—CHKDSK (short for “Check Disk”). It’s a simple and effective option for minor issues with your Sony SD card and can help make the card usable/accessible again.
In rare cases, CHKDSK can cause data loss. It might mark damaged areas of the file system as inaccessible or overwrite recoverable data. To avoid this risk, we recommend using a recovery tool like Disk Drill to recover your files first. There are also instances where it gets stuck at a certain stage, as one user described on our forum.
How to use CHKDSK for Sony SD card recovery:
- Insert your Sony SD card into your computer using a card reader. Make note of the drive letter assigned to it (e.g., D: or E:).
- Run Command Prompt.
- Type the following command and hit Enter:
chkdsk E: /r
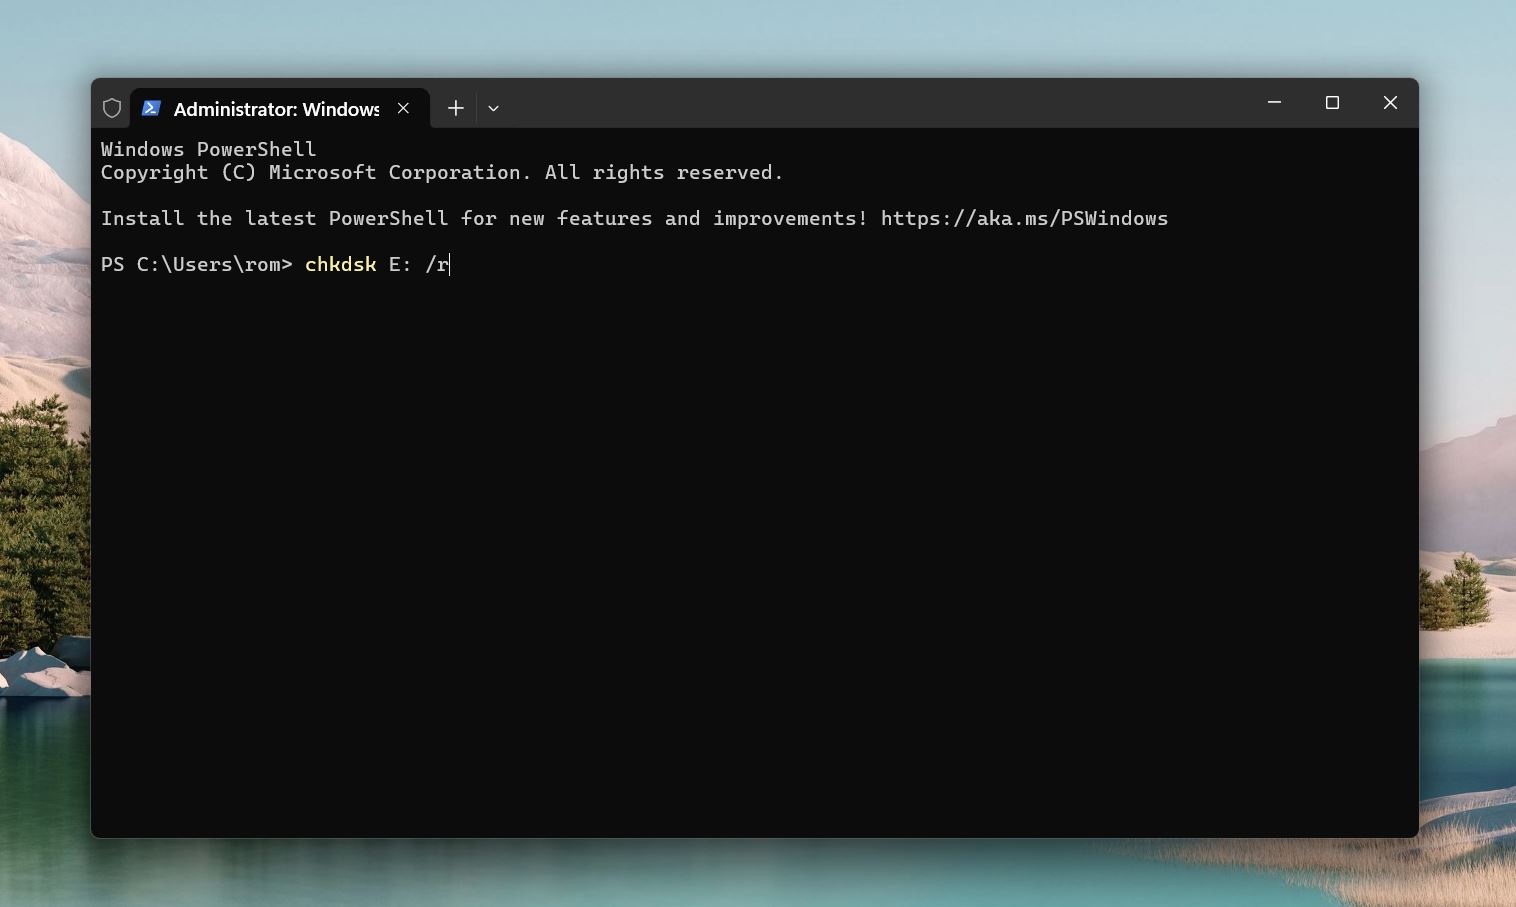 Replace E: with the SD card’s drive letter.
 - CHKDSK will scan the card for errors and attempt to fix them. Once done, check if the SD card is accessible in File Explorer.
SD Repair Service
If your Sony SD card is too damaged for you to recover it on your own you can send it to a professional data recovery service.
Not only do they have the right equipment and facilities, but their recovery specialists are highly trained to physically take apart and repair damaged storage devices. For the first-timers, here’s what to expect:
- The first step is to look for a reputable data recovery center near you and call them. Tell them the problems you’re facing with your SD card, as well as what data you need to have recovered. Competent centers will give you a free estimate, and the best SD card data recovery services offer a no data – no-charge guarantee. Make sure that it has a Class 100 Clean Room and good reviews.
- After the initial call, you’ll be asked to send your SD card to the center. Their recovery specialists will closely evaluate your SD card and let you know what to expect after the process. After their evaluation, they will give you a more accurate quote for how much data recovery costs.
- Get ready to sign some waivers (such as whether you’re authorized to recover a company-owned storage device) and pay the fee. All that is left at this point is to wait until the recovery process is complete and the center sends back your SD card.
FAQ
Why did all my files disappear from my Sony SD card?
There are a few common reasons why your files might go missing from your Sony SD card:
- You may have deleted the files by mistake, especially when managing storage on your camera, phone, or computer.
- Corruption in the file system can make your files invisible/inaccessible. This can happen due to improper ejection, power interruptions, or even malware.
- If the SD card was formatted, either by accident or on purpose, all files become invisible. However, they may still be recoverable in some cases (as long as they haven’t been overwritten).
- Malware can hide files or corrupt the card, which might make it look empty. You’ll need to run a virus scan.
- If the SD card is damaged, it might not read correctly, making files inaccessible.
Is it possible to recover formatted Sony SD card?
It depends on the type of formatting. There are two main types: Quick Format and Full Format.
- Quick format doesn’t erase the actual data on the card. It only clears the file system and marks the storage as empty. The files are still there until they’re overwritten, so recovery is usually possible.
- Full format goes deeper. It overwrites data and scans for bad sectors, which makes recovery much harder and, in most cases, impossible.
How to fix a corrupted Sony SD card?
The more you use a corrupted SD card, the worse it becomes. So recover and backup your data first! Disk Drill has both features (data recovery & byte-to-byte image backup), so we recommend using that.
Then, try the following methods:
- Format the SD card by right-clicking your SD card > Format.
- Use Windows “Error Checking” feature by right-clicking your SD card > Properties > Tools Tab > “Check…” button under “Error checking.”
- Assign a new drive letter to the SD card using Disk Management.
- Use the “diskpart” command in Command Prompt.
- Reinstall drivers from Sony’s official website.
- Use the “chkdsk” command in Command Prompt.
- Use Windows Troubleshooter.
This article was written by Alejandro Santos, a Staff Writer at Handy Recovery Advisor. It was recently updated by Roman Demian. It was also verified for technical accuracy by Andrey Vasilyev, our editorial advisor.
Curious about our content creation process? Take a look at our Editor Guidelines.