Don’t fret; you’re not the first or the last person who had to search online for advice on recovering a quick-formatted drive. We, too, have been in the same position.
That’s precisely why we’ve written this article, to share the best ways to undo a quick format’s damage. For yes, that’s possible, even at no cost with free software, as we’ll see next.
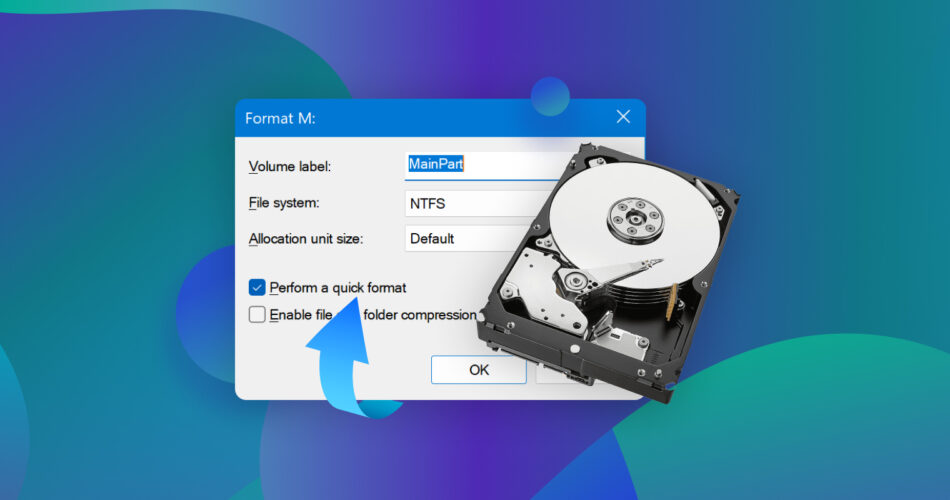
What Is the Difference Between Quick Format and Full Format?
A full format wipes a whole storage device by filling it with zeroes.
Thankfully, as it’s a much simpler process, it’s easy to undo a quick format. That’s because instead of erasing everything on a device, a quick format merely marks the storage space as “available for use”. With no data erased, it’s still possible to recover files after a quick format. If you’re interested on the topic, check out Wikipedia’s entry on data recovery, which covers how data can get lost and how (and when) its recovery is possible.
Are you dealing with the related-but-not-identical scenario of a formatted partition? Check our guide on how to recover a formatted partition. And if it’s the whole drive that was formatted, don’t worry. We also have a guide on how to recover files from a formatted hard drive.
Quick format data recovery is possible precisely because your files haven’t been overwritten – by a format’s “zeroes”. It’s for the same reason you should avoid writing on the device from which you want to recover data. Newly written files could overwrite the ones you want to get back, eliminating any chance of their successful recovery.
Is It Possible to Recover Files After Quick Format?
Although it’s possible to recover quick-formatted drive data, that’s not possible with the tools that come with Windows. Note that this applies to all versions of Windows, from the still-popular Windows 10 and the new Windows 11, even back to Windows XP, as well as other operating systems, like Mac OS X and Linux.
Thankfully, there are plenty of data recovery solutions, some even available as fully free software, allowing you to restore lost data at zero cost. We’ve already covered those we believe you should check before all others in our article on the best data recovery apps.
It may be possible to recover documents, pictures, and other lost files from an accidentally quick-formatted hard drive. Still, you shouldn’t bet your data on that. Even the best data recovery solution might not be able to bring back all your lost files after a quick format. For that reason, we recommend taking frequent backups of your important data.
How to Recover Data After Quick Format
You might have missed our guide on how to fix a corrupted hard drive and quick-formatted a malfunctioning hard drive while trying to “fix” it. Or you might have absent-mindedly quick-formatted the wrong partition on your main Windows 10 backup drive.
Despite the reason for a quick format, the primary solution for restoring your lost data is to use a data recovery solution.
Thankfully, it’s still possible to recover data after a quick format. You can read more about the “hows” and “whys” in our article where we see what is data recovery and how data recovery software works. Thanks to that, data recovery software can analyze a storage device to detect the files that still linger hidden on it after a quick format. Then, offer the option to restore them.
So, let’s see how you can bring back your lost files from a quick-formatted hard drive using three of the most popular data recovery solutions on Windows 10 and 11.
Option A: Using Disk Drill
![]() Restoring data with Disk Drill after quick-formatting a storage device is straightforward. In this article, we’ll dive straight into the action. If you want to learn more about the app, check out our comprehensive review of Disk Drill.
Restoring data with Disk Drill after quick-formatting a storage device is straightforward. In this article, we’ll dive straight into the action. If you want to learn more about the app, check out our comprehensive review of Disk Drill.
Also note that although we’re using Windows 11, everything we see also applies to the still popular Windows 10.
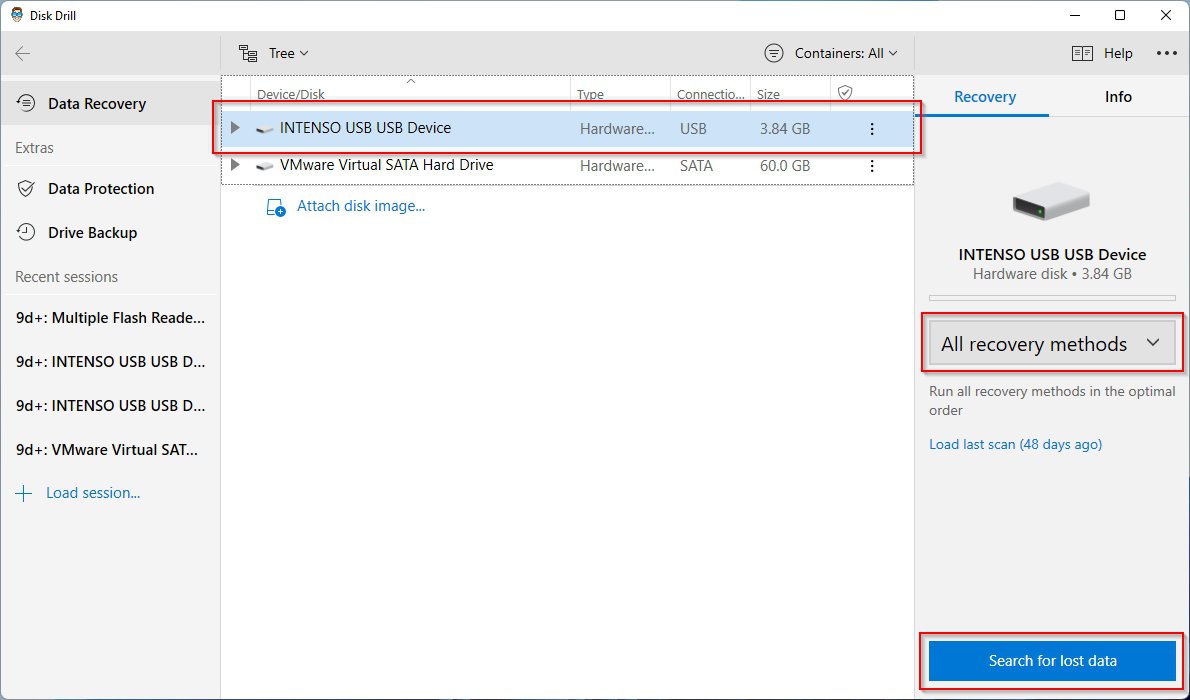
- Download Disk Drill from its official site, install it, and run it. Then, select the quick formatted device that you want to scan from the list dominating the center of its window. Make sure All recovery methods is selected from the drop-down menu on the right and then click on Search for lost data on the bottom right of the window.
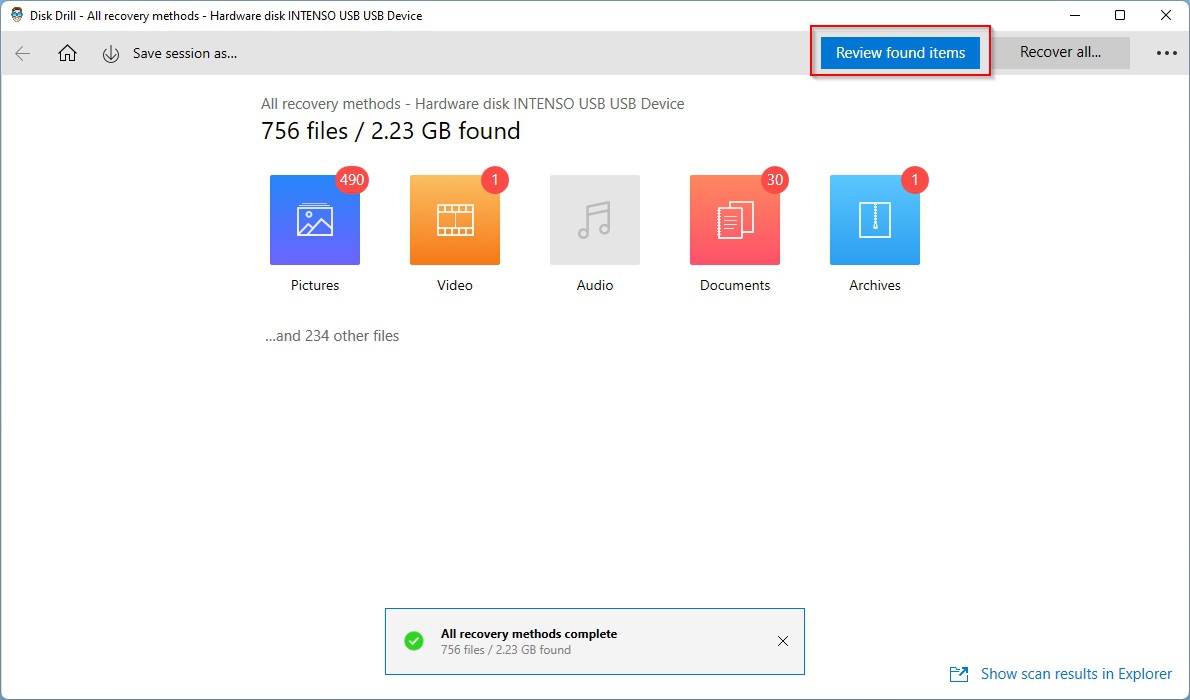
- Disk Drill will update you in real-time about the progress of the scanning process. When it finishes analyzing your quick formatted device for lost data, Disk Drill will show a pop-up message stating, “All recovery methods complete”. You can then click on Review found items on the top right of its window to check out the files the app located.
- Look inside the categorized folders to find the files you want to recover. If you can’t decide solely based on their file name, you can right-click on them and choose Preview or click on the little button with the eye icon
that shows up when you select one of them to check out the content of files like documents and images.
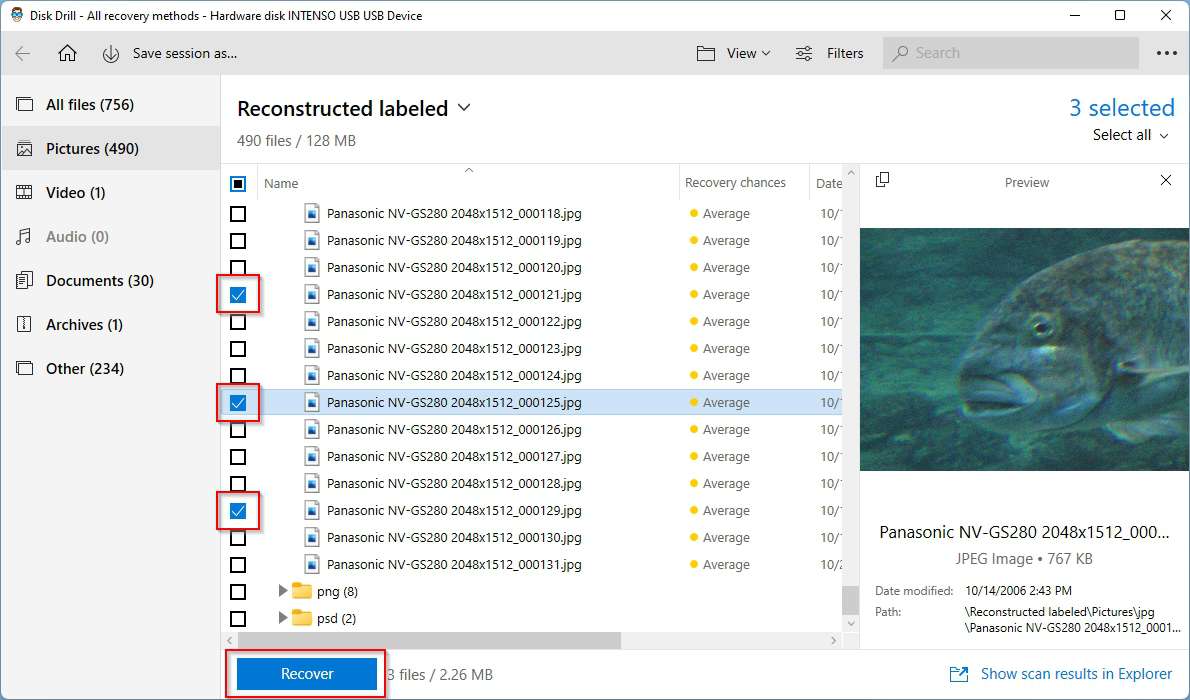
- Are there too many files to go through? Use the categories on the left or the filtering functionality accessible on the top right of Disk Drill’s window. This will allow you to check them in more manageable sub-groups according to their type and content. Mark for recovery the files you want to get back by placing a checkmark on the left of their file name. Finally, click on the blue Recover button on the bottom left of Disk Drill’s window to begin the actual recovery process.
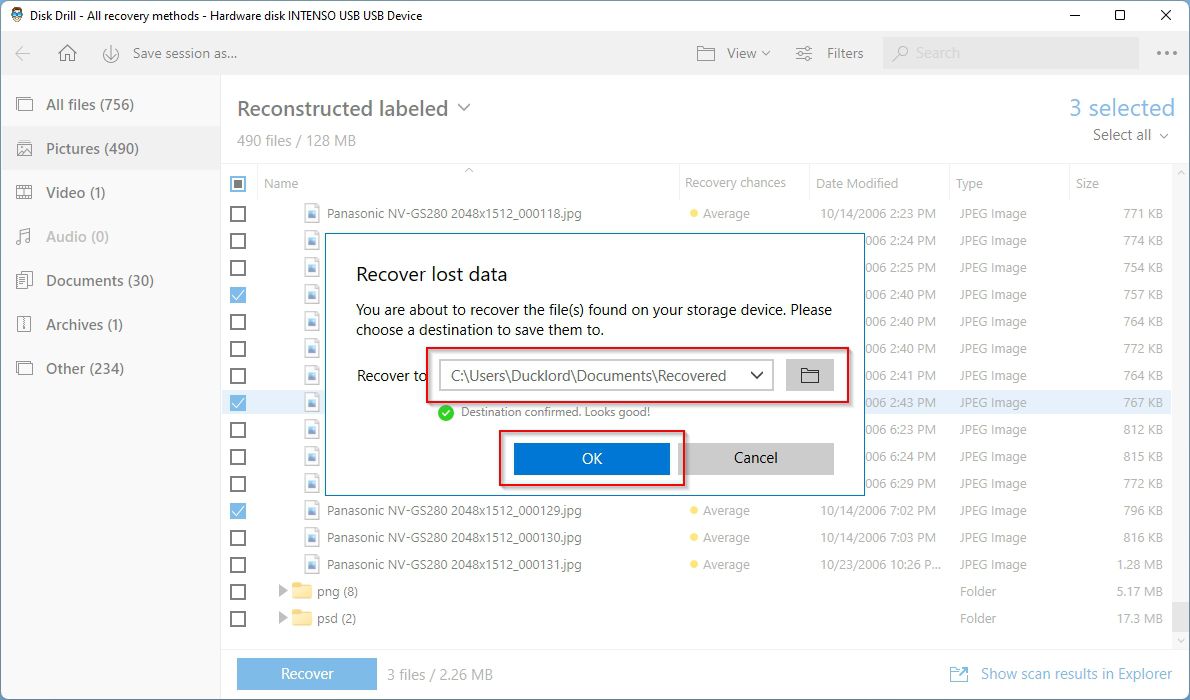
- Disk Drill will ask where you want to store the recovered data.
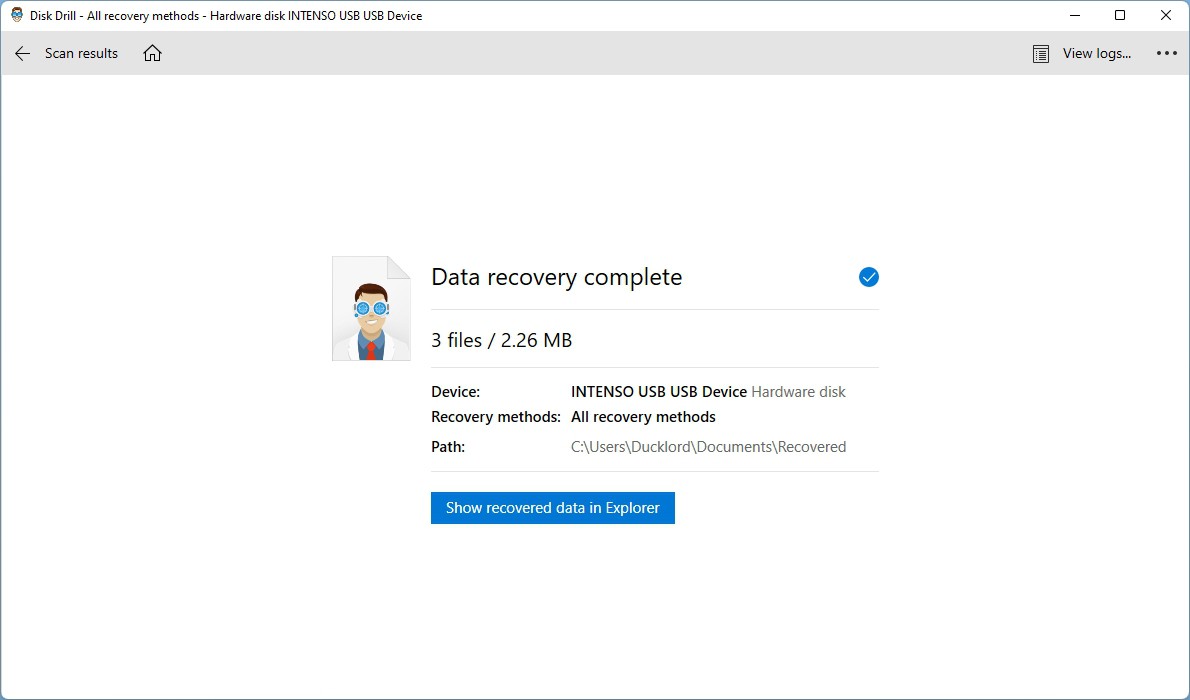
Click on the little button with the folder icon and choose a folder where you want Disk Drill to store your recovered files. Then click on OK. Soon after, Disk Drill will present a brief report with the recovery process results. You can click on Show recovered data in Explorer to instantly visit the folder where Disk Drill stored the recovered files.
Option B: Using Recuva
![]() Recuva is one of the most popular (and few) fully free software solutions for data recovery. Bringing back your lost files after a quick format with Recuva is just as easy as Disk Drill, although the results may vary. To learn more about the app, dive into our extended review of Recuva.
Recuva is one of the most popular (and few) fully free software solutions for data recovery. Bringing back your lost files after a quick format with Recuva is just as easy as Disk Drill, although the results may vary. To learn more about the app, dive into our extended review of Recuva.
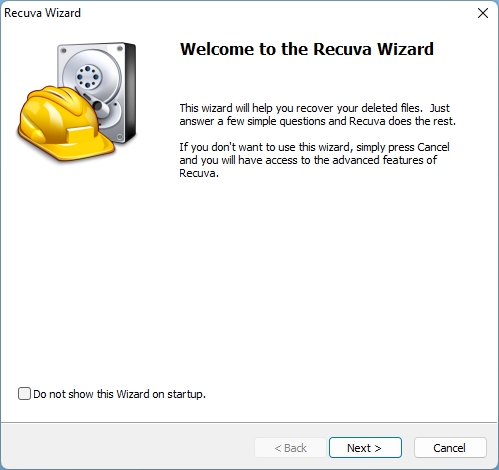
- Start by downloading the app from its official site, then installing and running it. Click the Next button to move past its wizard’s introduction.
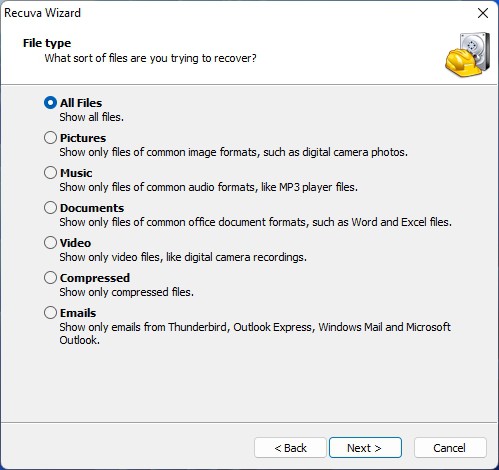
- Recuva will ask you to choose the type of files you want to recover.
If you don’t know what you’re seeking or want to recover more than one type, leave All files selected. Then click on the Next button.
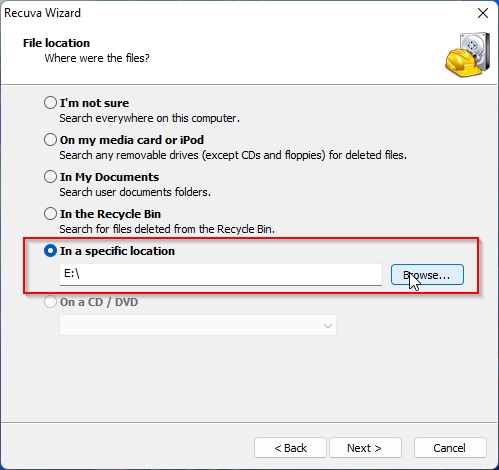
- In the next step, Recuva will ask you to define where your lost files were stored. Choose In a specific location, and then click on the Browse button to choose the quickly formatted device where your files were stored. Then click Next.
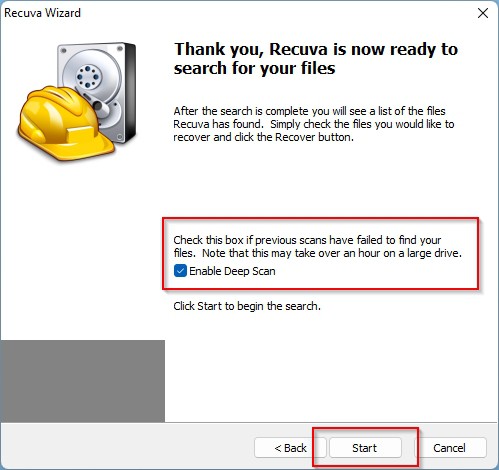
- For better results, choose to Enable Deep Scan when asked. With a click on the Start button, Recuva will begin scanning your device for lost data.
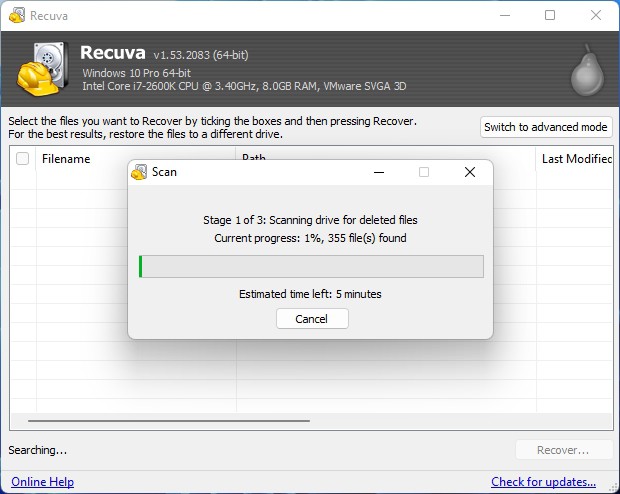
- Recuva will update you in real-time about the scanning process.
The only options available here are to wait for the scan process to finish or cut it short by clicking on the Cancel button.
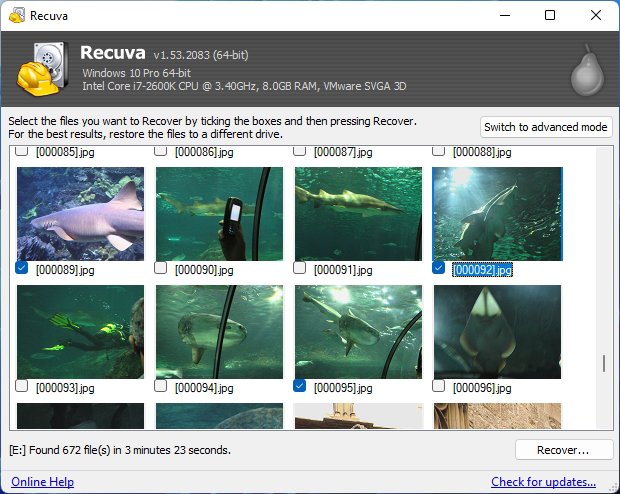
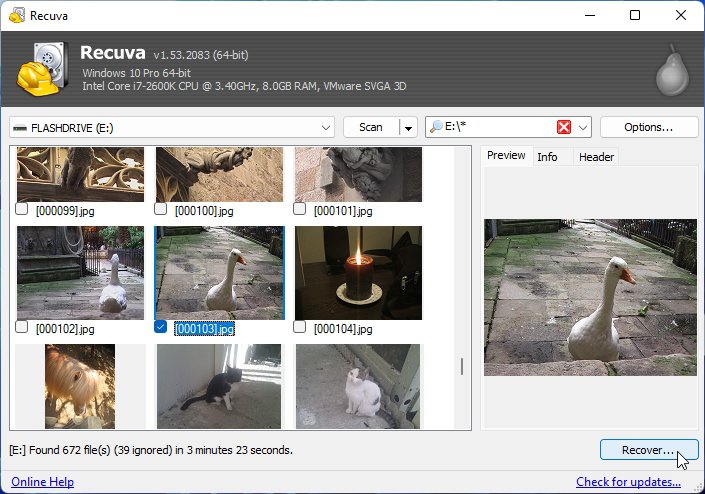
- When the scan process completes, Recuva will present all the files it discovered. Are you seeking lost images? To make finding the ones you want to recover easier, right-click on a file and change Recuva’s view mode to Thumbnails view.

- Mark the files you want to recover by placing a checkmark next to their file name, under their thumbnail.
- After you select all files you want to recover, click on the Recover button on the bottom right of Recuva’s window to begin the recovery process.
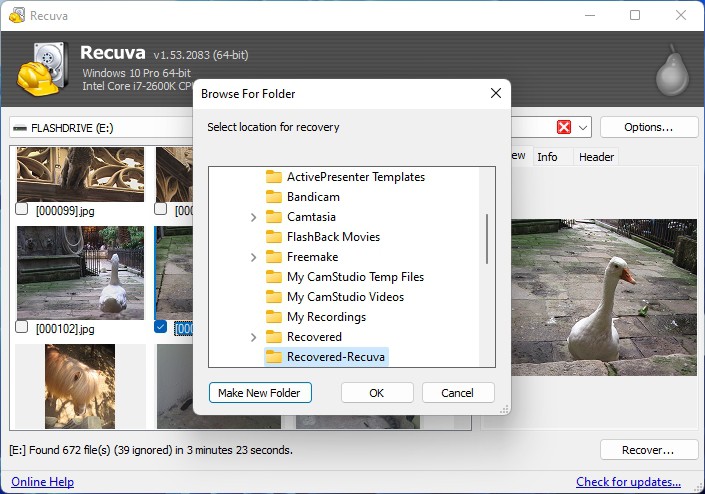
- Recuva will ask you where to store the recovered files. So, choose a folder and click on OK.
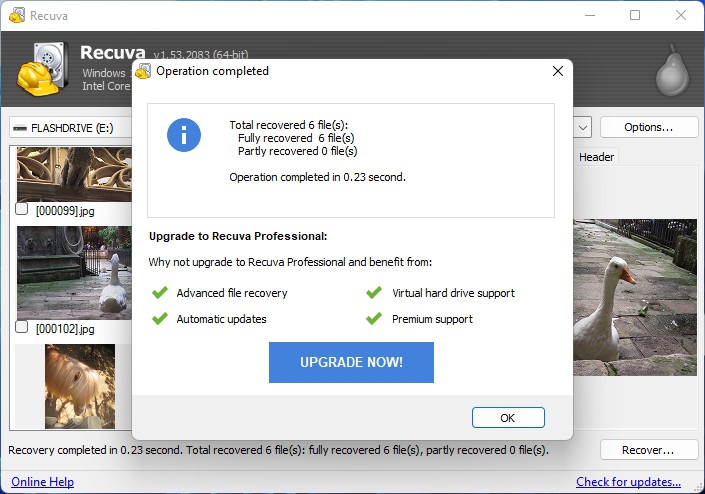
- After restoring the selected files, Recuva will present a brief report about the recovery process. You can click on the OK button to close this window. You will find your recovered files in the folder you chose in the previous step.
Option C: Using R-Studio
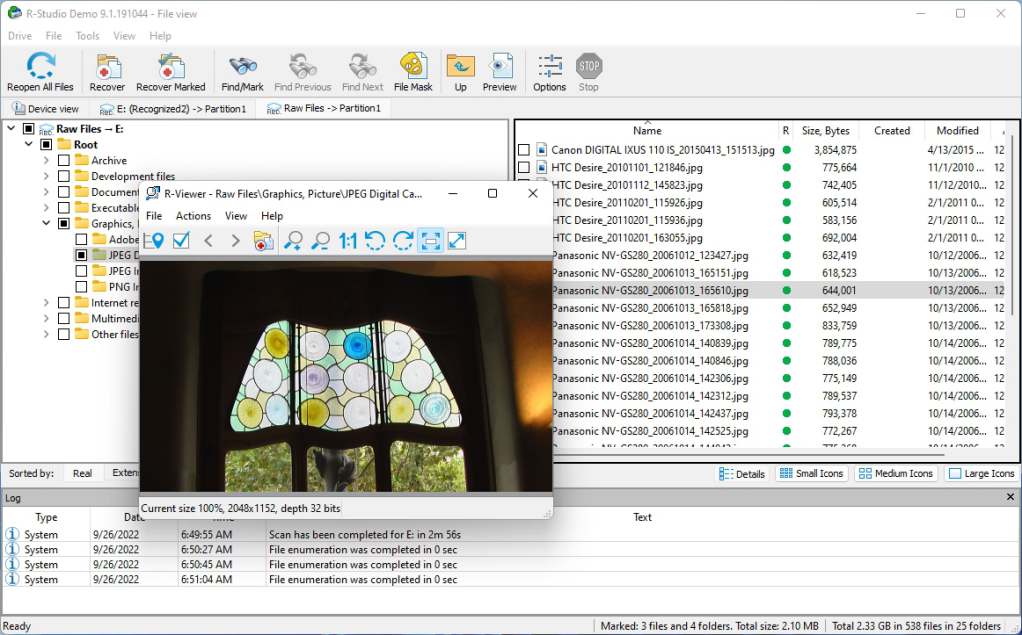
![]() R-Studio was originally geared more towards recovery professionals. Its creators “rebooted” the app to render it easier to use. You can find out more about it in our R-Studio review.
R-Studio was originally geared more towards recovery professionals. Its creators “rebooted” the app to render it easier to use. You can find out more about it in our R-Studio review.
Still, recovering your files with R-Studio after a quick format remains more complicated than with alternatives.
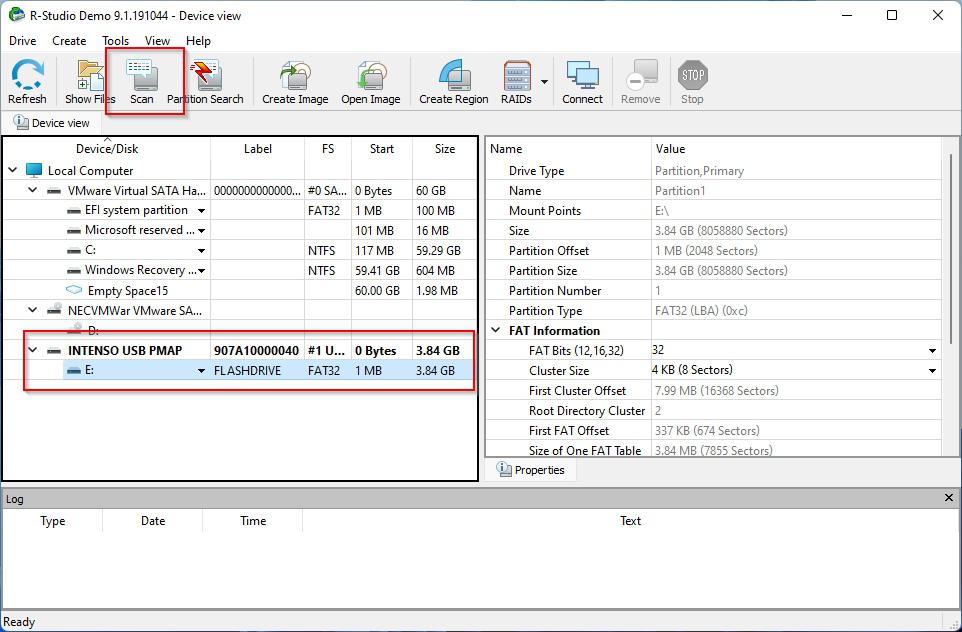
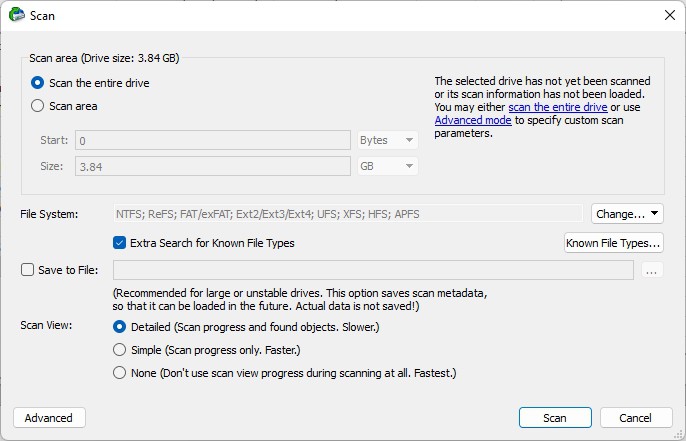
- Download R-Studio from its official site, install and run it. Choose the quick format device you want to scan for lost data from the list on the left of R-Studio’s window and click on the third button on its toolbar, labeled Scan.
- R-Studio allows you to customize the scanning process. For the best results in the scenario we are dealing with, leave Scan the entire drive, Extra Search for Known File Types, and Detailed enabled. Then, click on Scan.
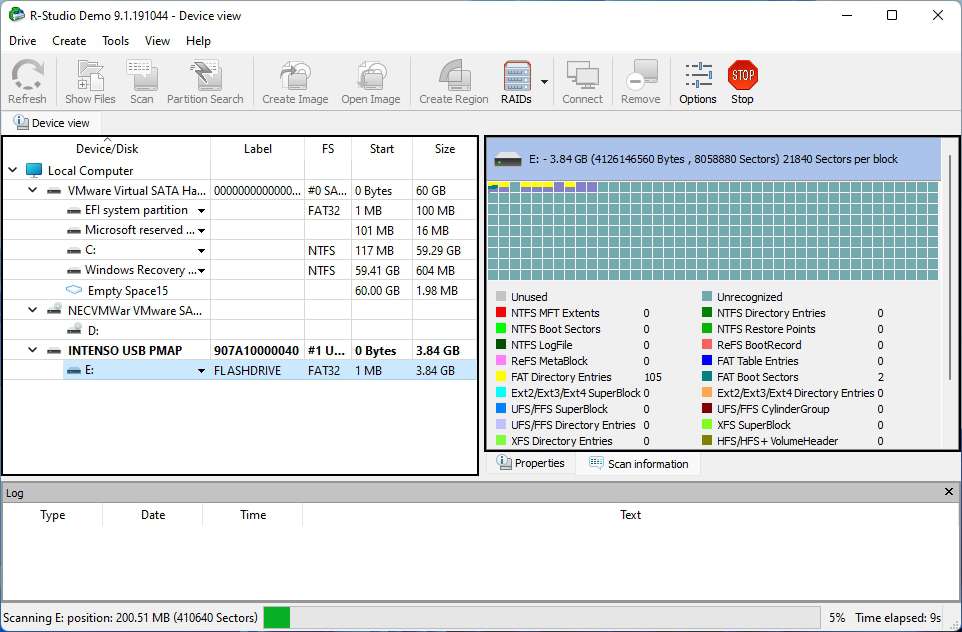
- R-Studio will begin scanning the quick-formatted device you selected. On the right, you will see a representation of the whole storage area. Blocks will be color-coded depending on what R-Studio locates. You’ll also see an easier-to-read progress bar at the bottom of the window.
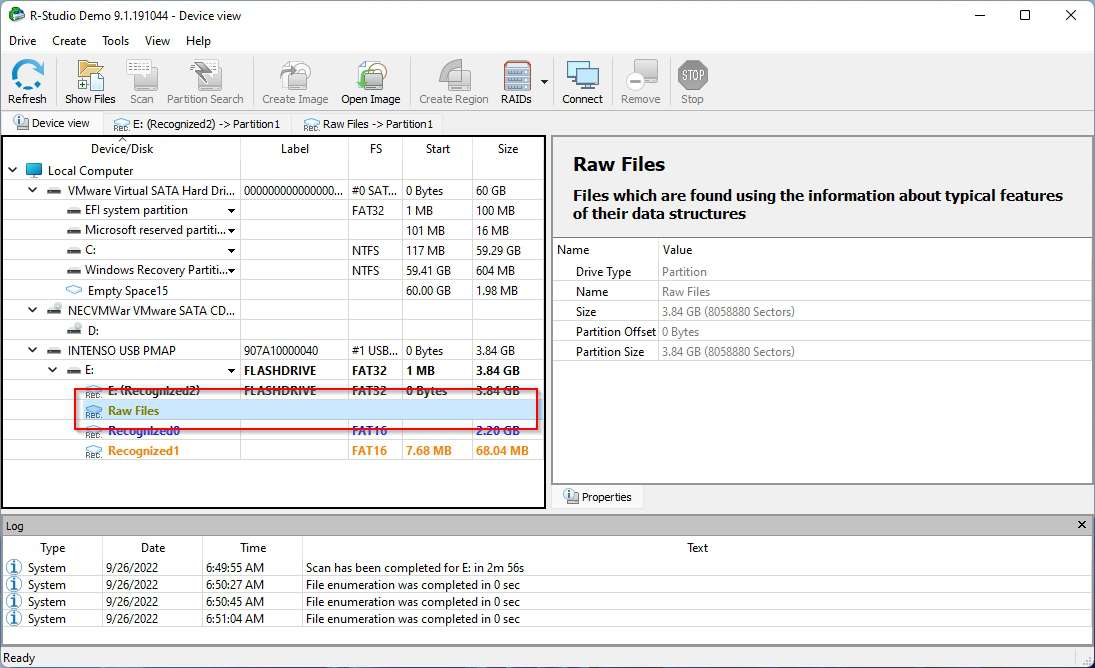
- When the scan completes, you will have to choose the type of results you want to check out, presented as subentries under the device you selected, on the left of R-Studio’s window.
- Go through the categorized folders that R-Studio will show you, and place a checkmark on the left of the files you want to recover.
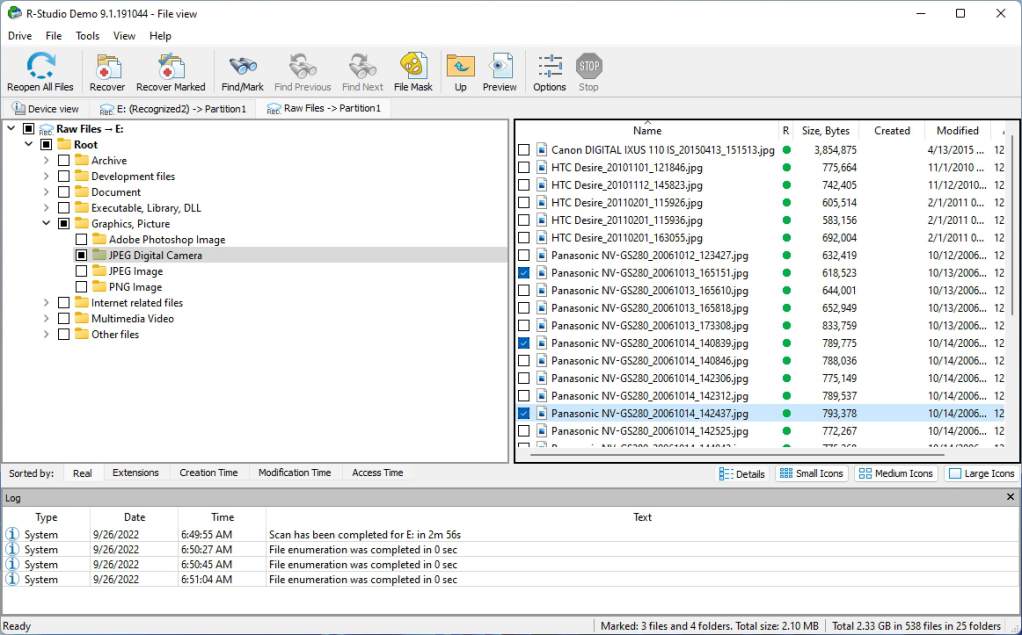
- Like many other modern data recovery solutions, R-Studio also allows you to preview files like images. Double-click on them, and a preview window will pop up, showing a mini version of their contents.
- When you have selected all the files you want to recover, click on the third button of our studio’s toolbar, labeled Recover Marked.

- When asked, choose the output folder where you want R-Studio to store the files it recovers, then click on the OK button.
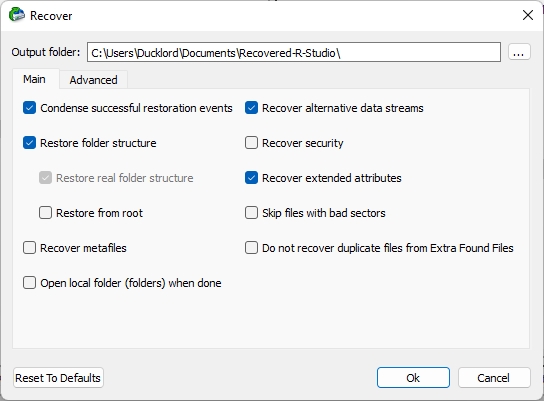
- Unfortunately, the success of the process depends on the size of the files you are trying to recover since the free version of R-Studio comes with a relatively strict limit of 256kb per file.

FAQ
Can you recover files from a quick format?
Here’s a super-quick guide on recovering data from a quick-formatted drive:
- Download, install, and run Disk Drill.
- Choose your quick-formatted device and scan it.
- Check the results and mark the files you want to restore.
- Start the recovery process.
- Choose where to save the recovered files.
What is the best method for data recovery?
The best way to recover files from a storage device after a quick format is by using a data recovery solution:
- Choose and download a data recovery solution.
- Have it analyze your quick-formatted device.
- Recover the lost files you want back.
What is the best undo quick format freeware?
There’s no single best free software solution for undoing quick format catastrophes – the app’s choice depends on personal preference.
That said, two of the most popular free data recovery solutions are Recuva, which we also used in this article, and PhotoRec. We’ve covered both before, so, to learn more about them, find our extensive review of Recuva here, and read more about Photorec here.
Does a quick format erase data?
A quick format process does the equivalent of “resetting” a storage device’s “indexes”, marking its space as available for use. The actual files on it remain intact until overwritten.
Does full format erase all data?
A full format erases all data on a storage device by meticulously filling all available storage space with zeroes. Since existing data is overwritten (by zeroes), its recovery is impossible afterward.
Conclusion
Even if the result of a quick format is a seemingly empty storage device, as we saw, the process is quite different from a full format.
Thankfully, that also means that although you can’t really “undo a quick format”, you can still bring back the files that were stored on a quick-formatted device. You only need a readily available specialized data recovery solution, like R-Studio or Disk Drill.
This article was written by Odysseas Kourafalos, a Editor-in-Chief at Handy Recovery Advisor. It was also verified for technical accuracy by Andrey Vasilyev, our editorial advisor.
Curious about our content creation process? Take a look at our Editor Guidelines.