Samsung Portable SSD not showing up on your Mac? You’re not alone. This is a common issue among Mac users that can be resolved in different ways.
Based on our research on this topic, when you connect an external SSD to your Mac, the disk might fail to appear in the following directories:
- Disk Utility
- Desktop
- In the Finder sidebar
We’ll address each one and more through step-by-step instructions below. Let’s begin.
Samsung Portable SSD Not Detected by Mac? Here Are the Possible Reasons
Many users have reported experiencing Samsung Portable SSD T5 not showing up Mac problems, as well as “No Samsung Portable SSD is connected T7 Mac” issues. This may arise from common reasons such as connection problems and software issues, among others.
Your SSD may not appear on Disk Utility, Finder, your desktop, or in any combination of these locations. The location also plays a role, not just in the case of the Samsung Portable SSD but also in fixing unrecognized external disks in general.
Here are the possible reasons why your SSD is not detected, depending on where your disk is not showing up:
Disk Utility:
- Connection problems (ports, wires, etc.).
- Problems with the SSD itself
Finder:
- Unmounted disk volume
- Unsupported file system / missing file system / uninitialized disk
- Damaged file system
Desktop:
- Unmounted disk volume
- Unsupported file system / missing file system / uninitialized disk
- Corrupted file system
- External drives not displayed on the Desktop
Sidebar in the Finder:
- Unmounted volume
- Unsupported file system / missing file system / uninitialized disk
- Corrupted file system
- Display of external drives in the Sidebar is disabled
Note that if Disk Utility does not display your Samsung Portable SSD, it will most likely not be displayed in the Finder or the Desktop.
Primary Methods of Fixing a Samsung Portable SSD Not Detected by Your Mac
We have put together the main fixes you can try to repair your unrecognized drive. These methods have worked on different Samsung Portable SSDs, including the T9, T7, and Samsung T5 not showing up Mac issues.
Also, remember that some of these methods may result in data loss. If you have essential files on your SSD, check out “How to Recover Data from a Samsung Portable SSD Not Showing Up/Not Detected on a Mac” below.
Method 1: Restart Your Mac
If you haven’t tried it yet, a simple possible solution to an unrecognized external drive is restarting your Mac. Rebooting your system allows it to refresh, which can repair small glitches.
Do this by unplugging your Samsung Portable SSD and then restarting your system. Here’s how to do it:
- Click on the Apple logo in the menu bar (top left).
- Next, click Restart.

After rebooting, connect your external drive again to see if your Mac recognizes it now. If the problem persists, proceed to the next option.
Method 2: Ensure the Connection is Correct (In Case of ‘Physical’ Problems)
In other cases, your Mac cannot recognize your Samsung Portable SSD because of physical connectivity issues. Confirm that your drive is connected to your Mac to narrow down the possible cause of your error.
Also, ensure that its cable is not malfunctioning by switching it to another one and connecting it to your Mac. If you have another Mac or PC, also attempt to connect your drive and see if it gets recognized.
Method 3: Configure the Disks to Display in the Appropriate Locations
Sometimes, the “Samsung Portable SSD not detected” issue is simply because of your current system settings. To remedy this, you can verify if your Mac displays the external disk on your desktop in the Finder settings.
Here’s how to do it:
- Open Finder.
- Click on Preferences.
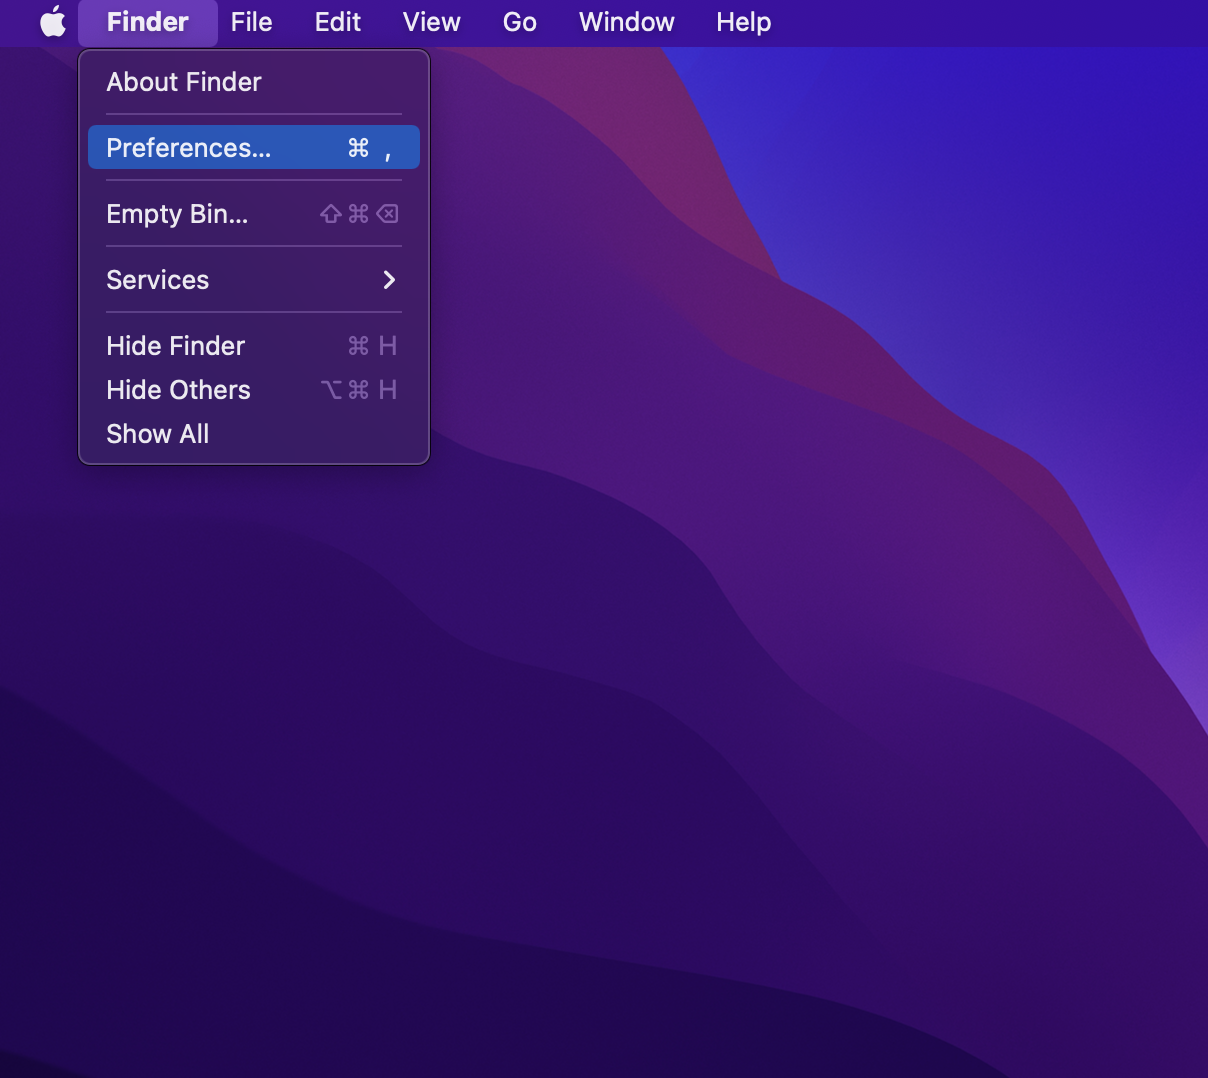
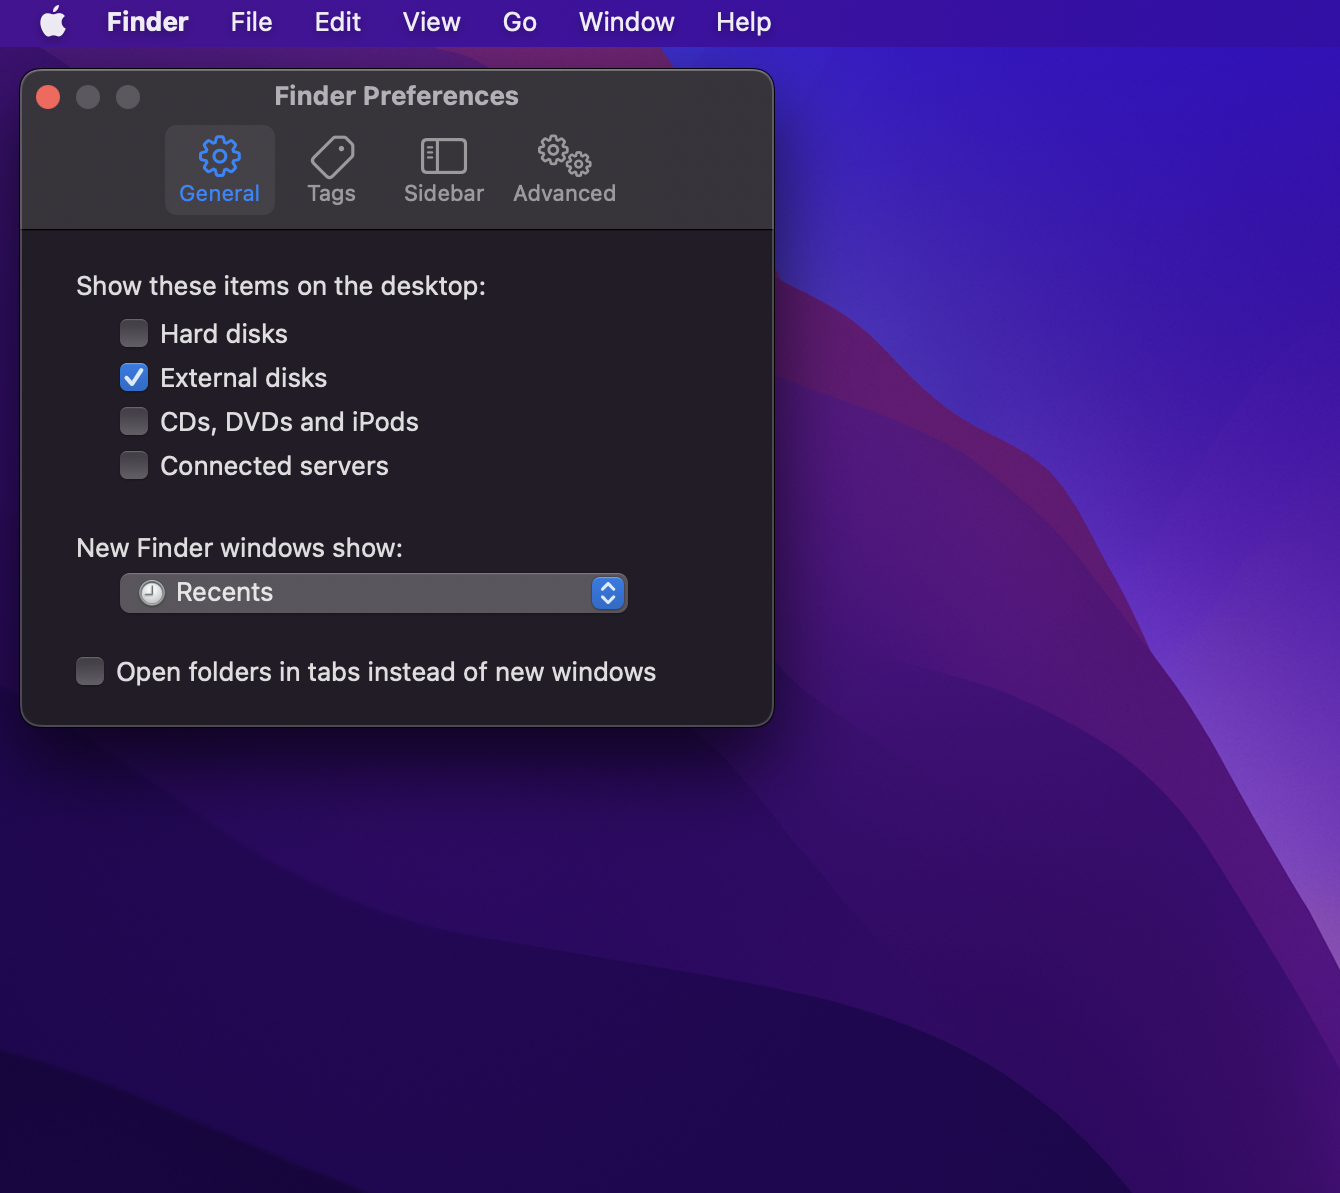
- Select General.
- Under “Show these items on the desktop,” make sure the “External disks” check box is enabled.
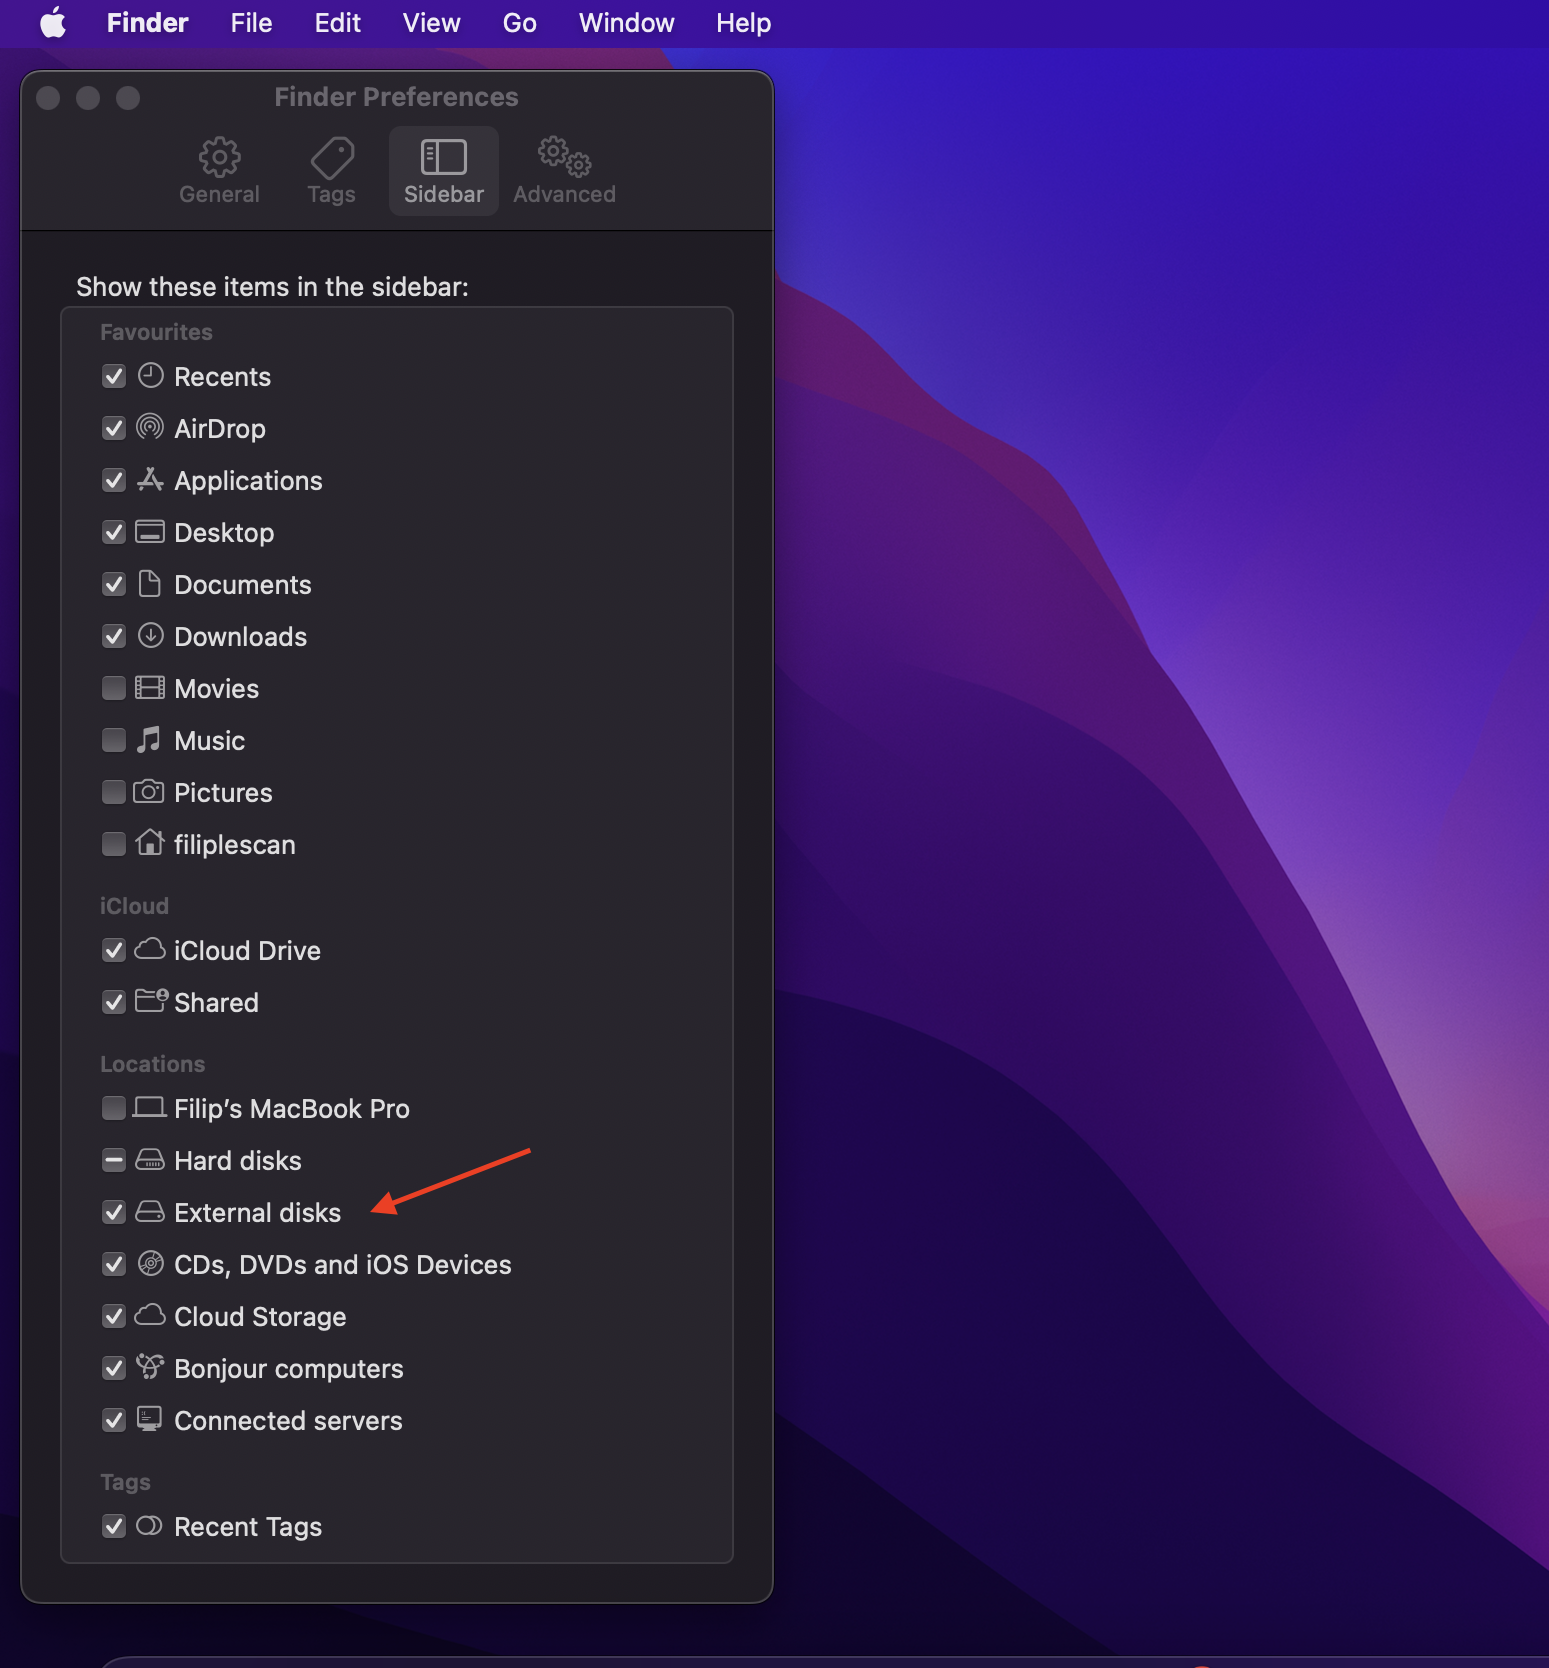
- You can also go to the Sidebar tab and make sure that the “External Disks” option is enabled to display an external SSD in the Finder window.
Method 4: Mount the Disk Volume
In other cases, your Samsung Portable SSD not detected Mac issue persists even if the system recognizes your drive because of improper mounting. You can check if this is the case by using Disk Utility and manually mounting the disk volume.
Follow these steps to proceed:
- Open Disk Utility by typing “Disk utility” in the spotlight search and clicking on it from the search results.
- On the left sidebar, you should see your Samsung Portable SSD among the list of drives. Click on your drive.
- Next, click the Mount option on the top right side of the Disk Utility menu bar.
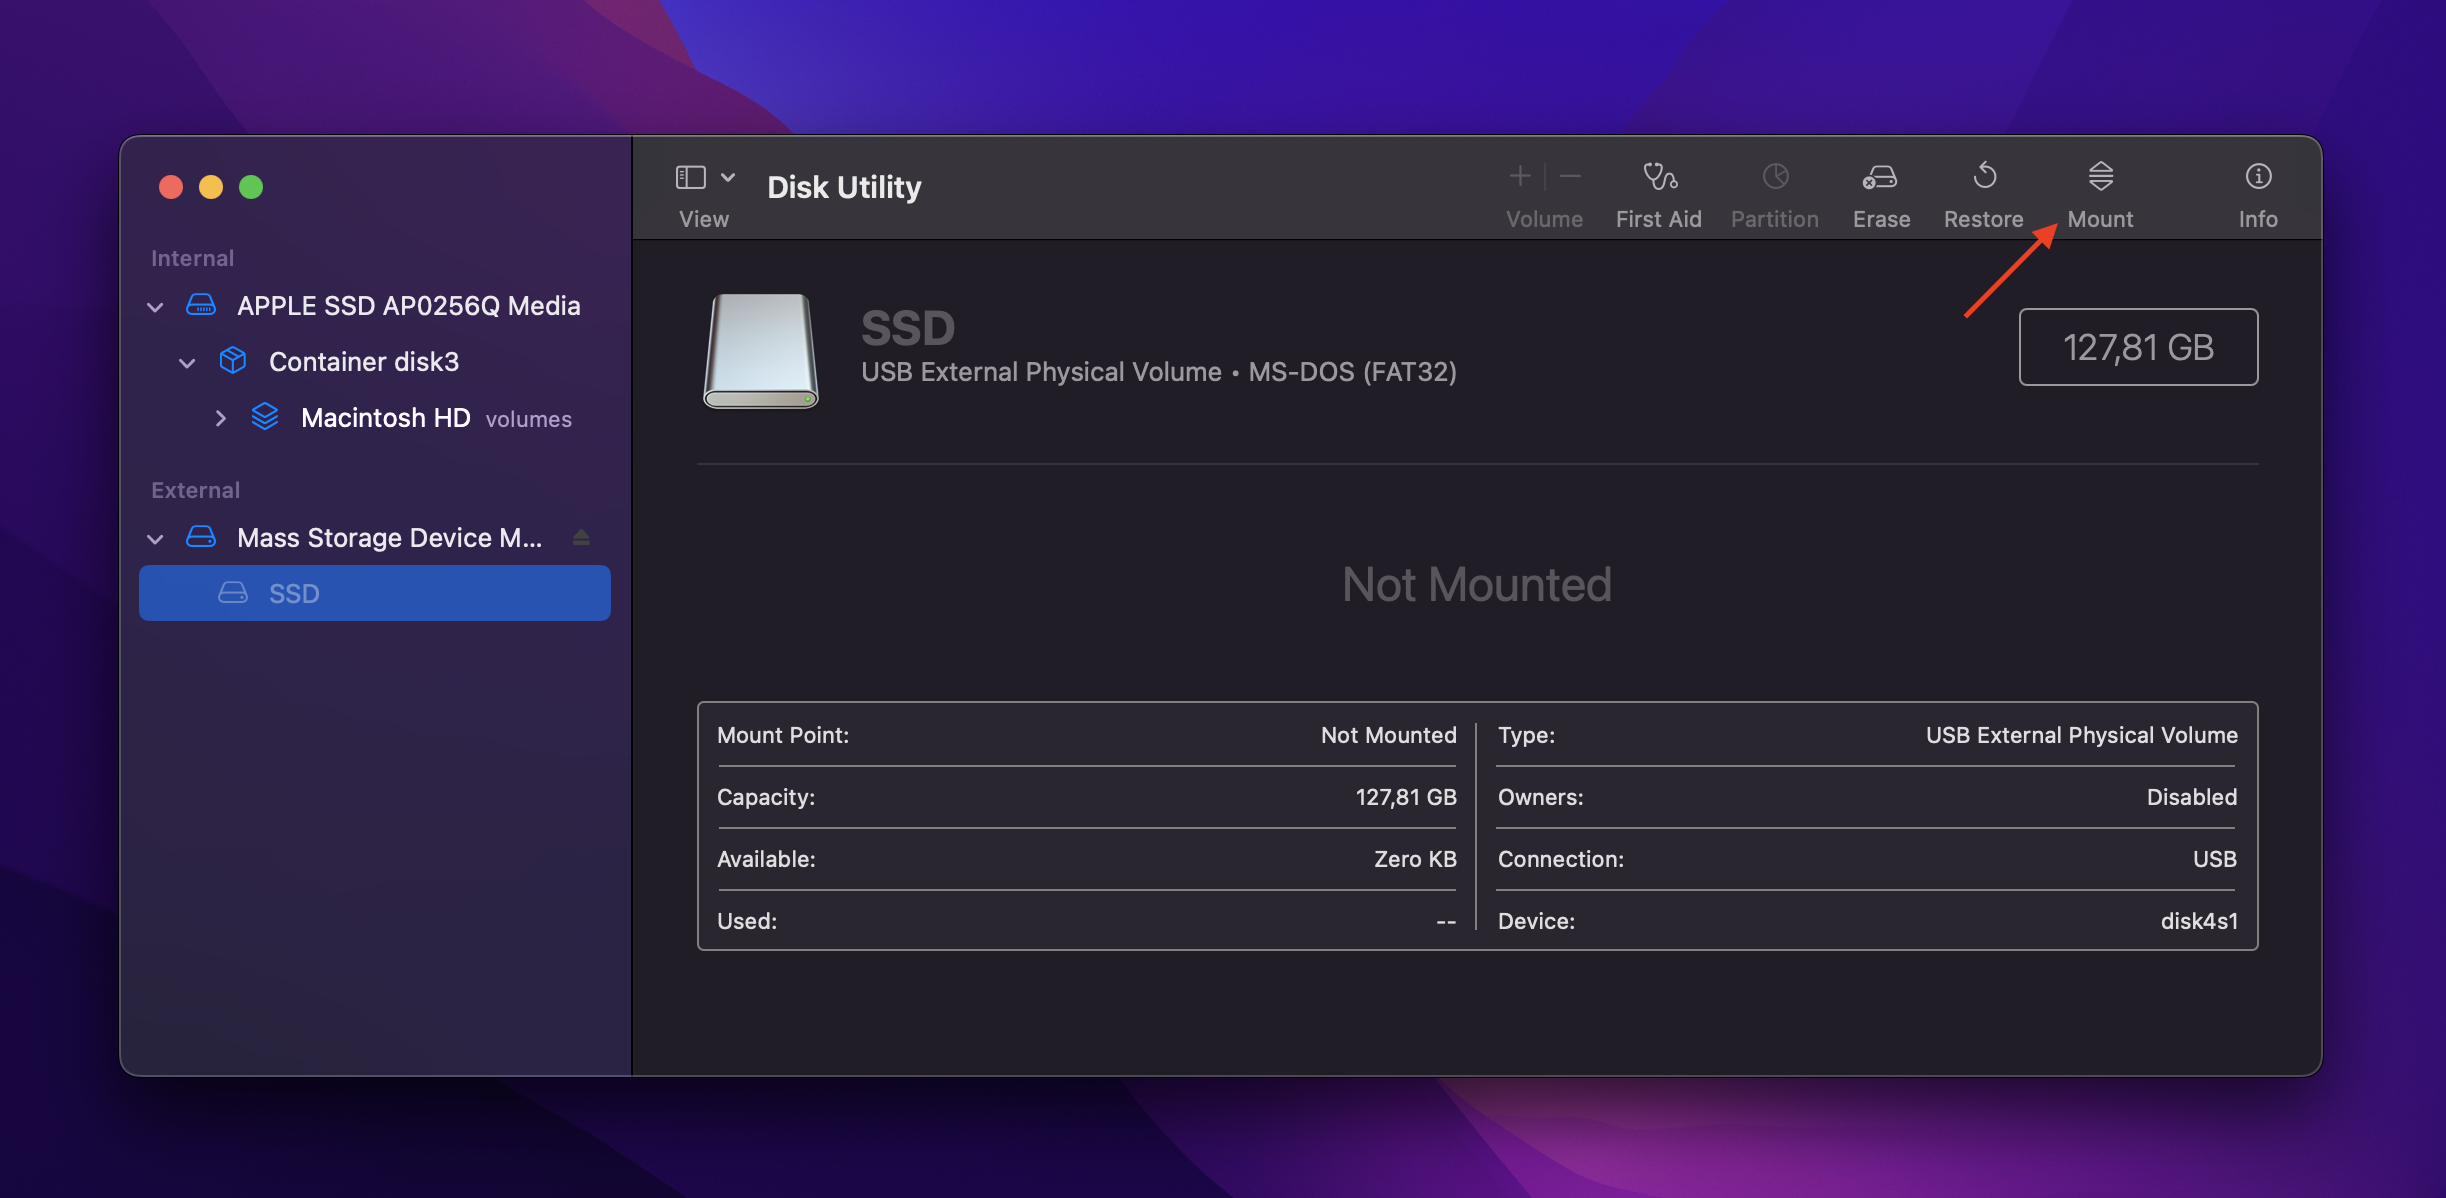
- Follow steps 1-2 for each volume on the external SSD and your drive should appear in Finder.
If you encounter the error “com.apple.DiskManagement.disenter”, you may have to refer to another solution below. You can also refer to our other solutions to fix hard drive not mounting issues.
Method 5: Repair the Damaged File System with TestDisk
If you’re still experiencing Samsung SSD not showing up Mac problems, then your file system may be corrupted. You can repair the damaged file system using tools like TestDisk.
TestDisk is a free Terminal application specializing in recovering lost partitions and repairing system errors to make drives bootable again. Using TestDisk is more technical than other methods but it’s not something you can’t do by following our guide.
To repair your Samsung Portable SSD using TestDisk, simply follow these steps:
- Start by downloading the TestDisk and PhotoRec bundle on the CGSecurity website.
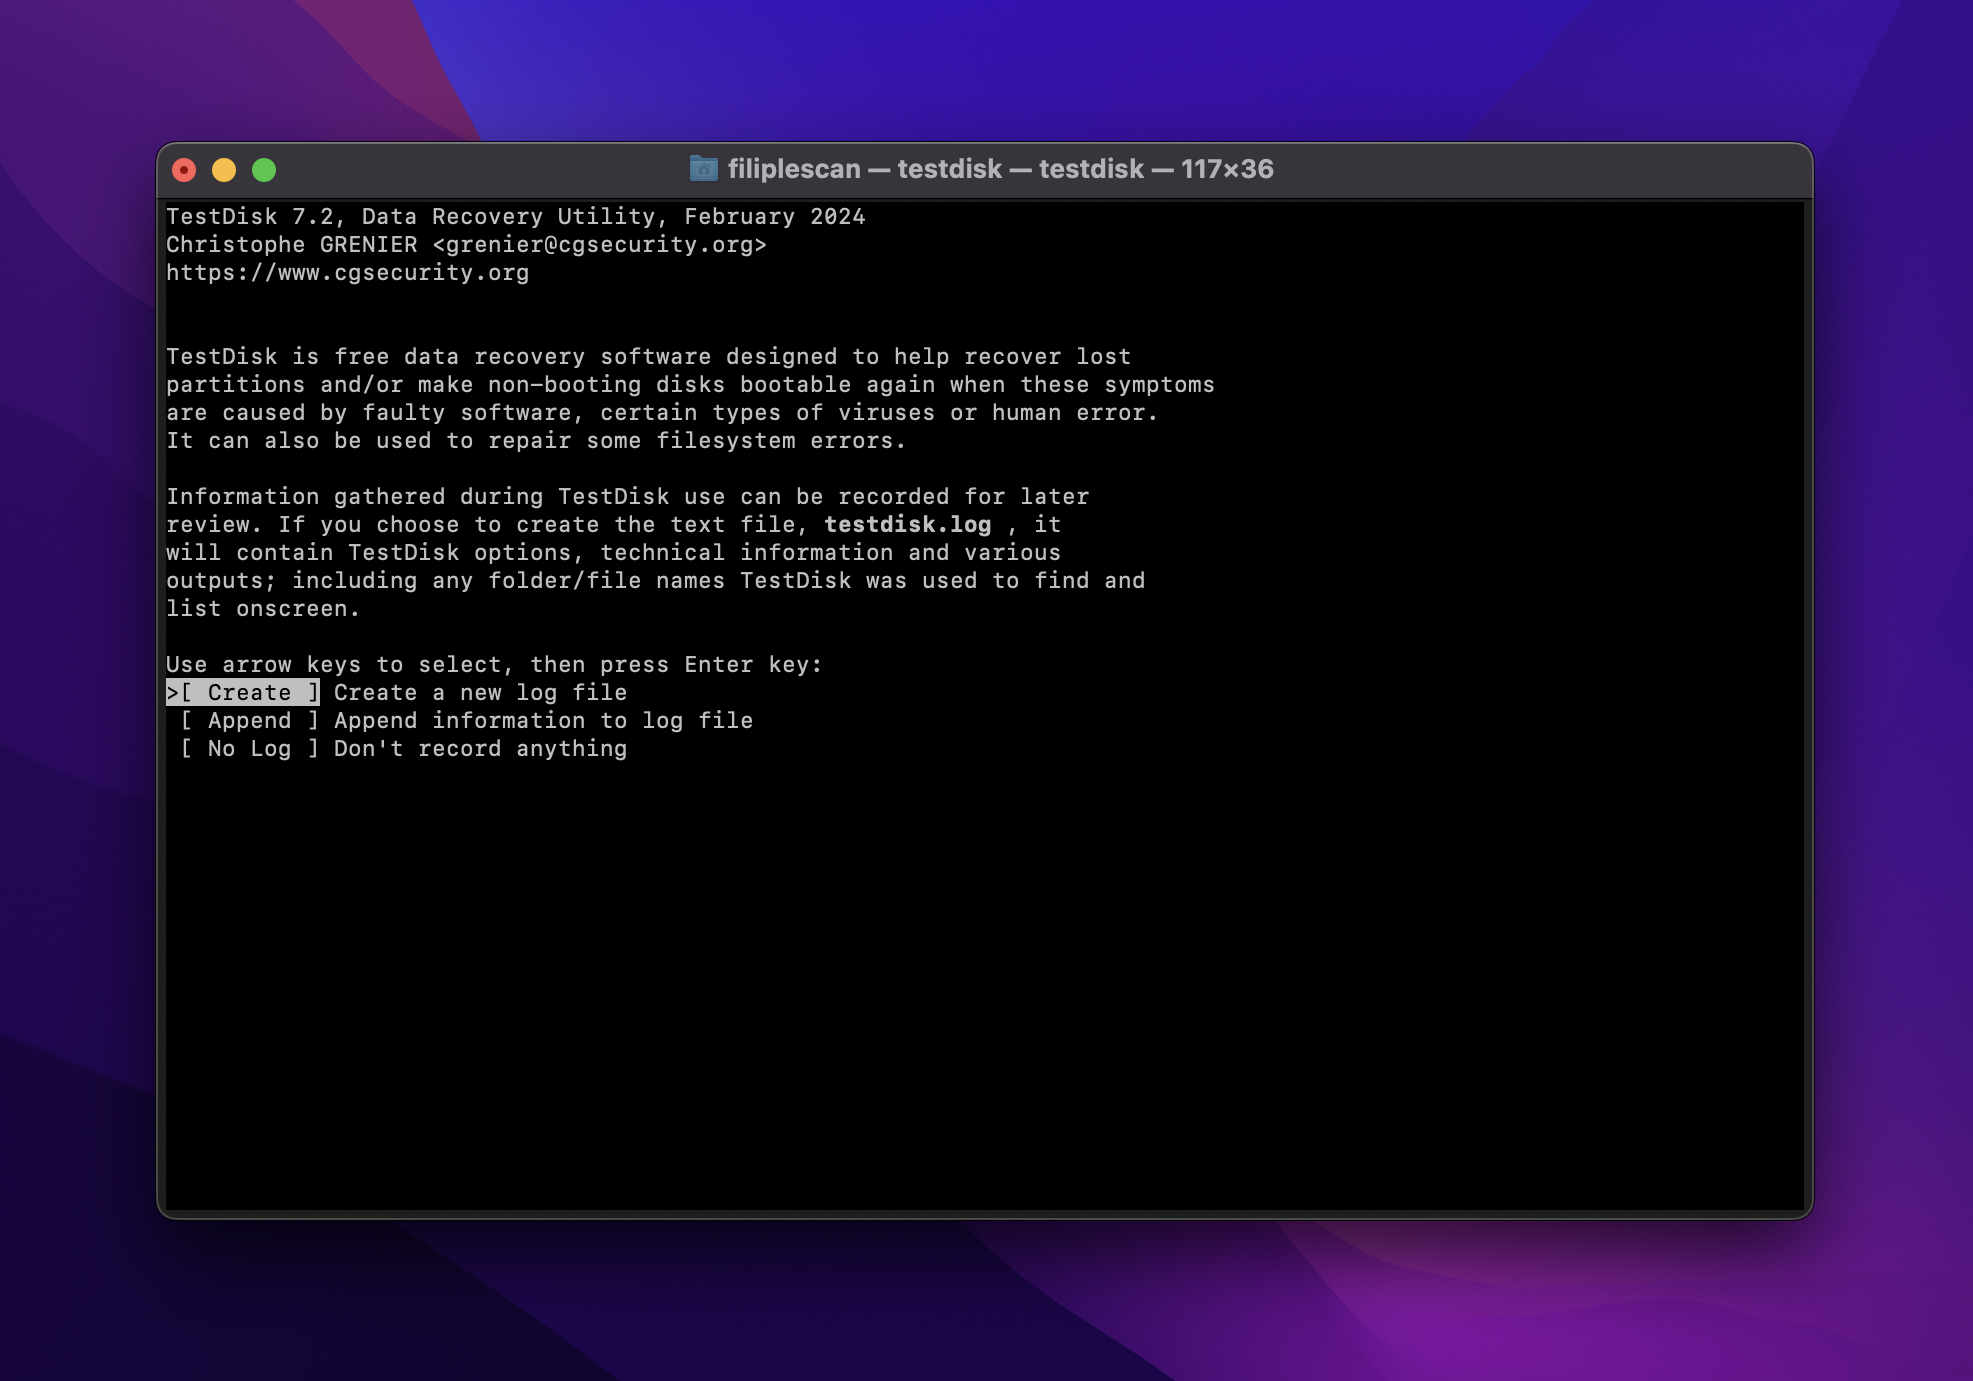
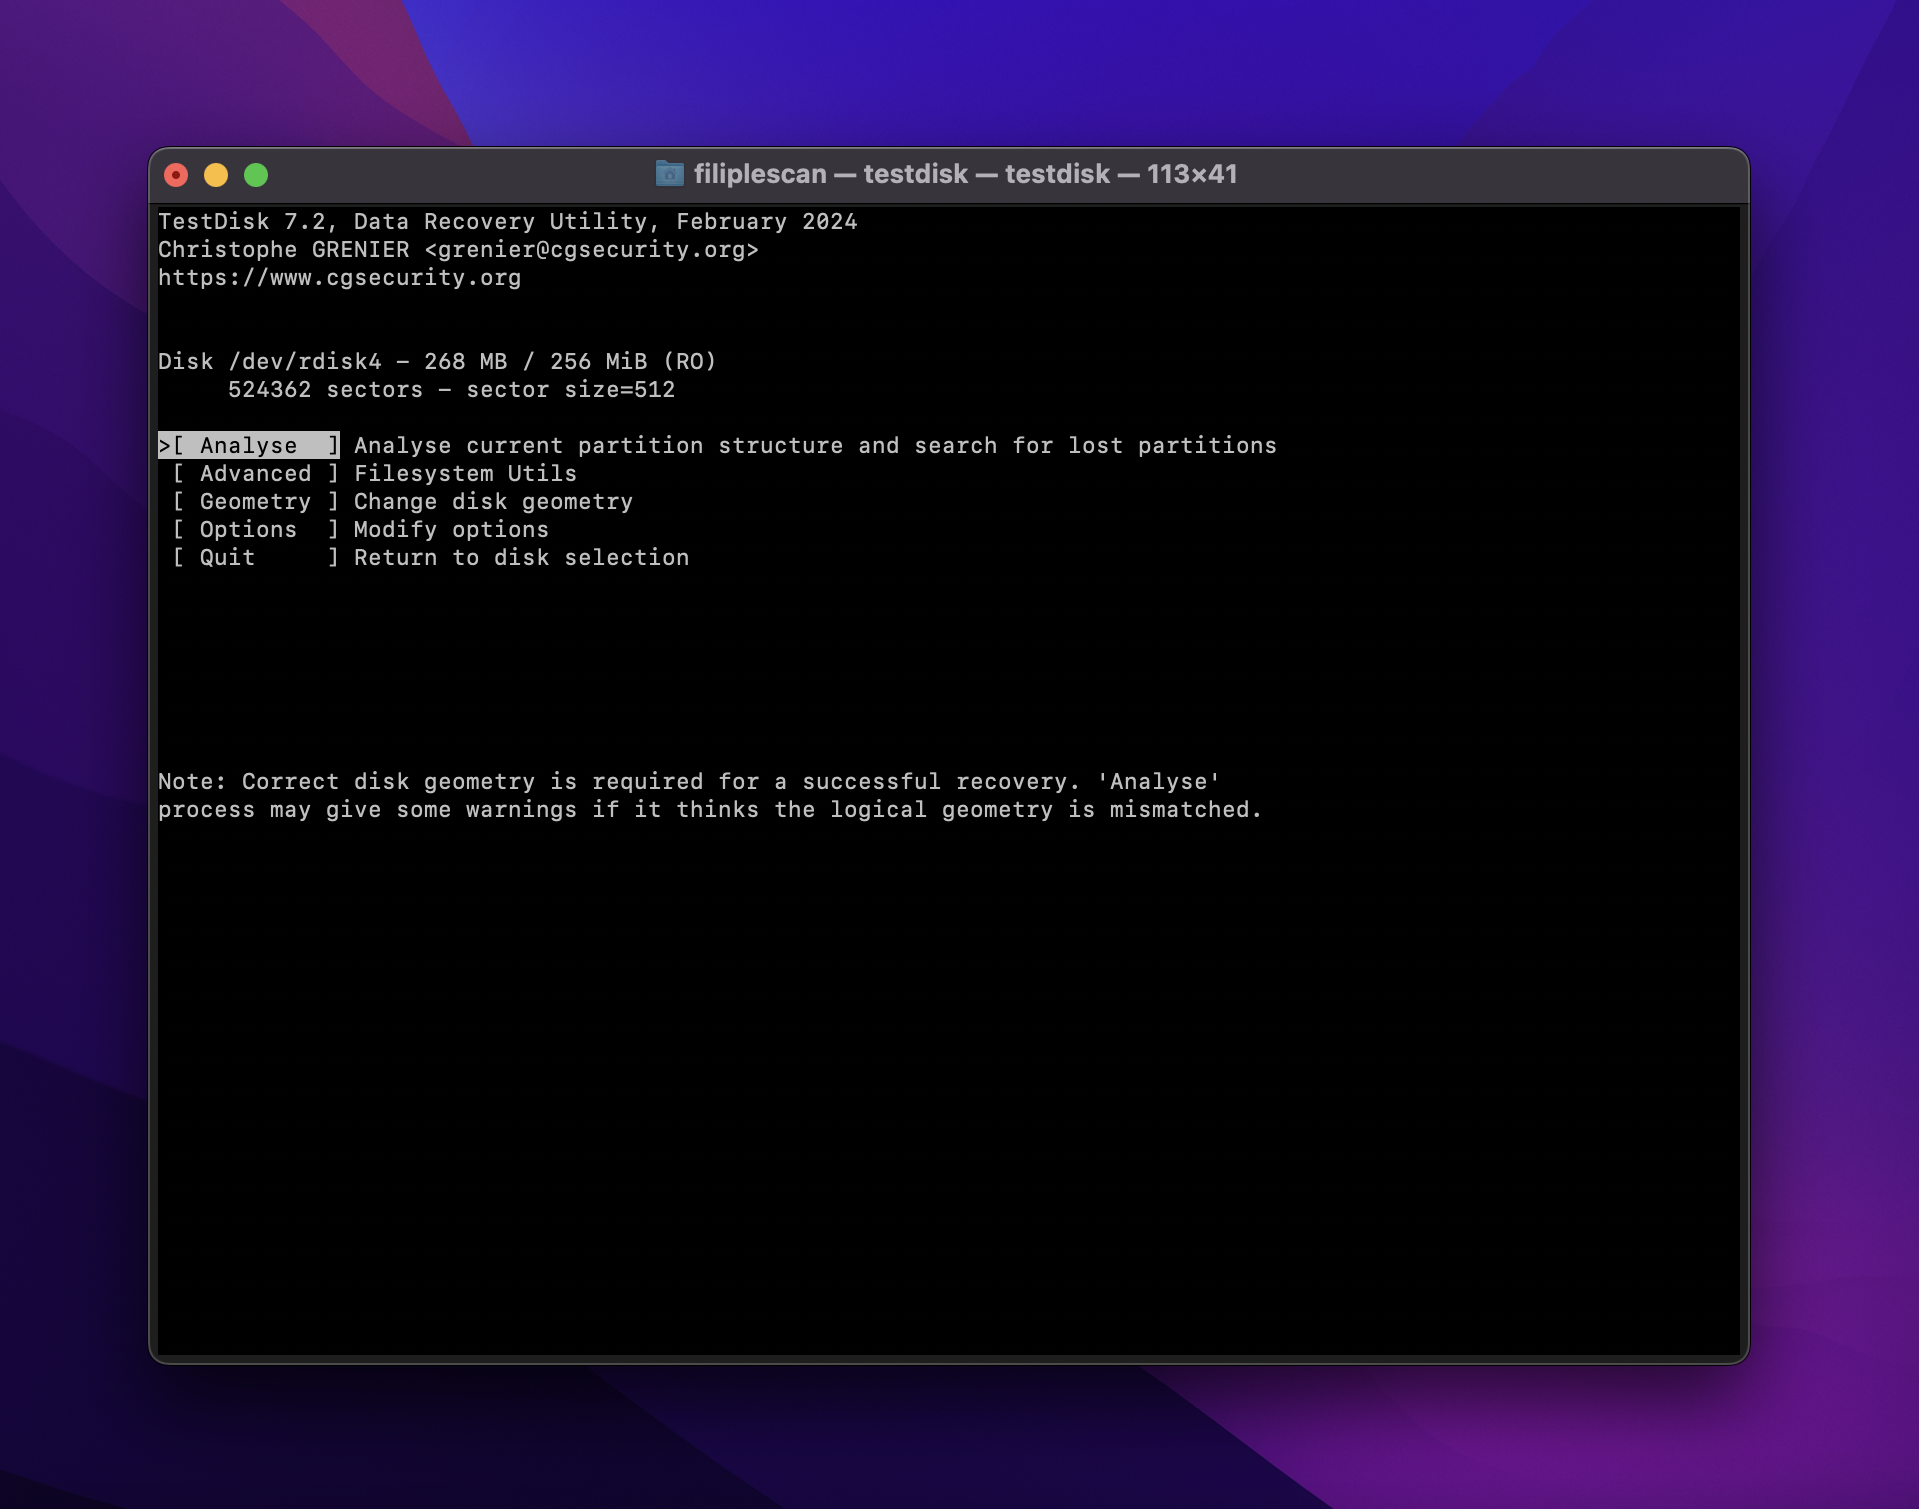
- Run the TestDisk application.
- The first window redirects you to the log creation section. Select Create and press Enter to save a new log file for your session, if you wish to do so.
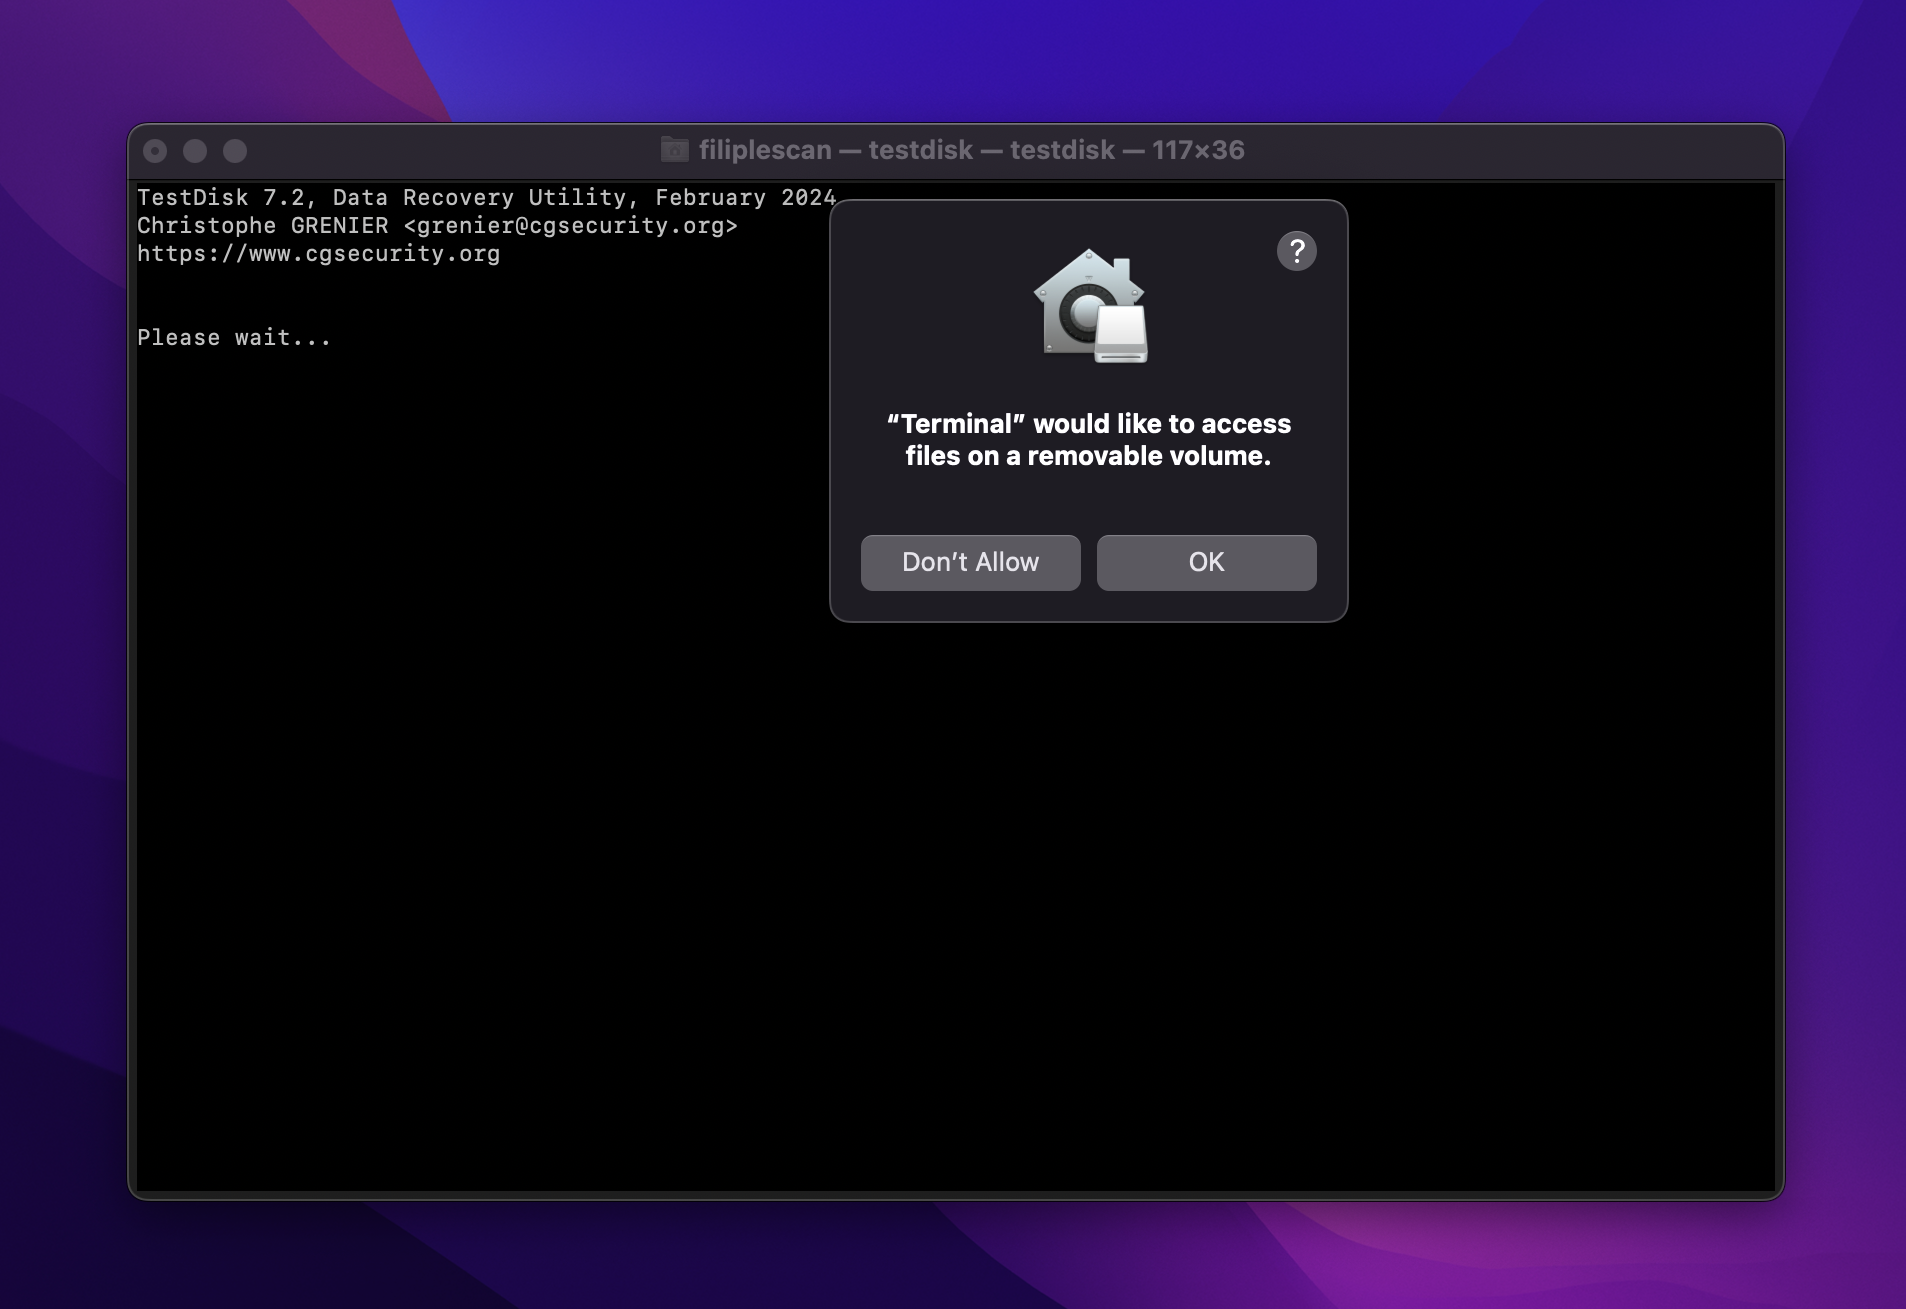
- A prompt will appear asking if you’d like Terminal to access files on a removable volume. Select OK.
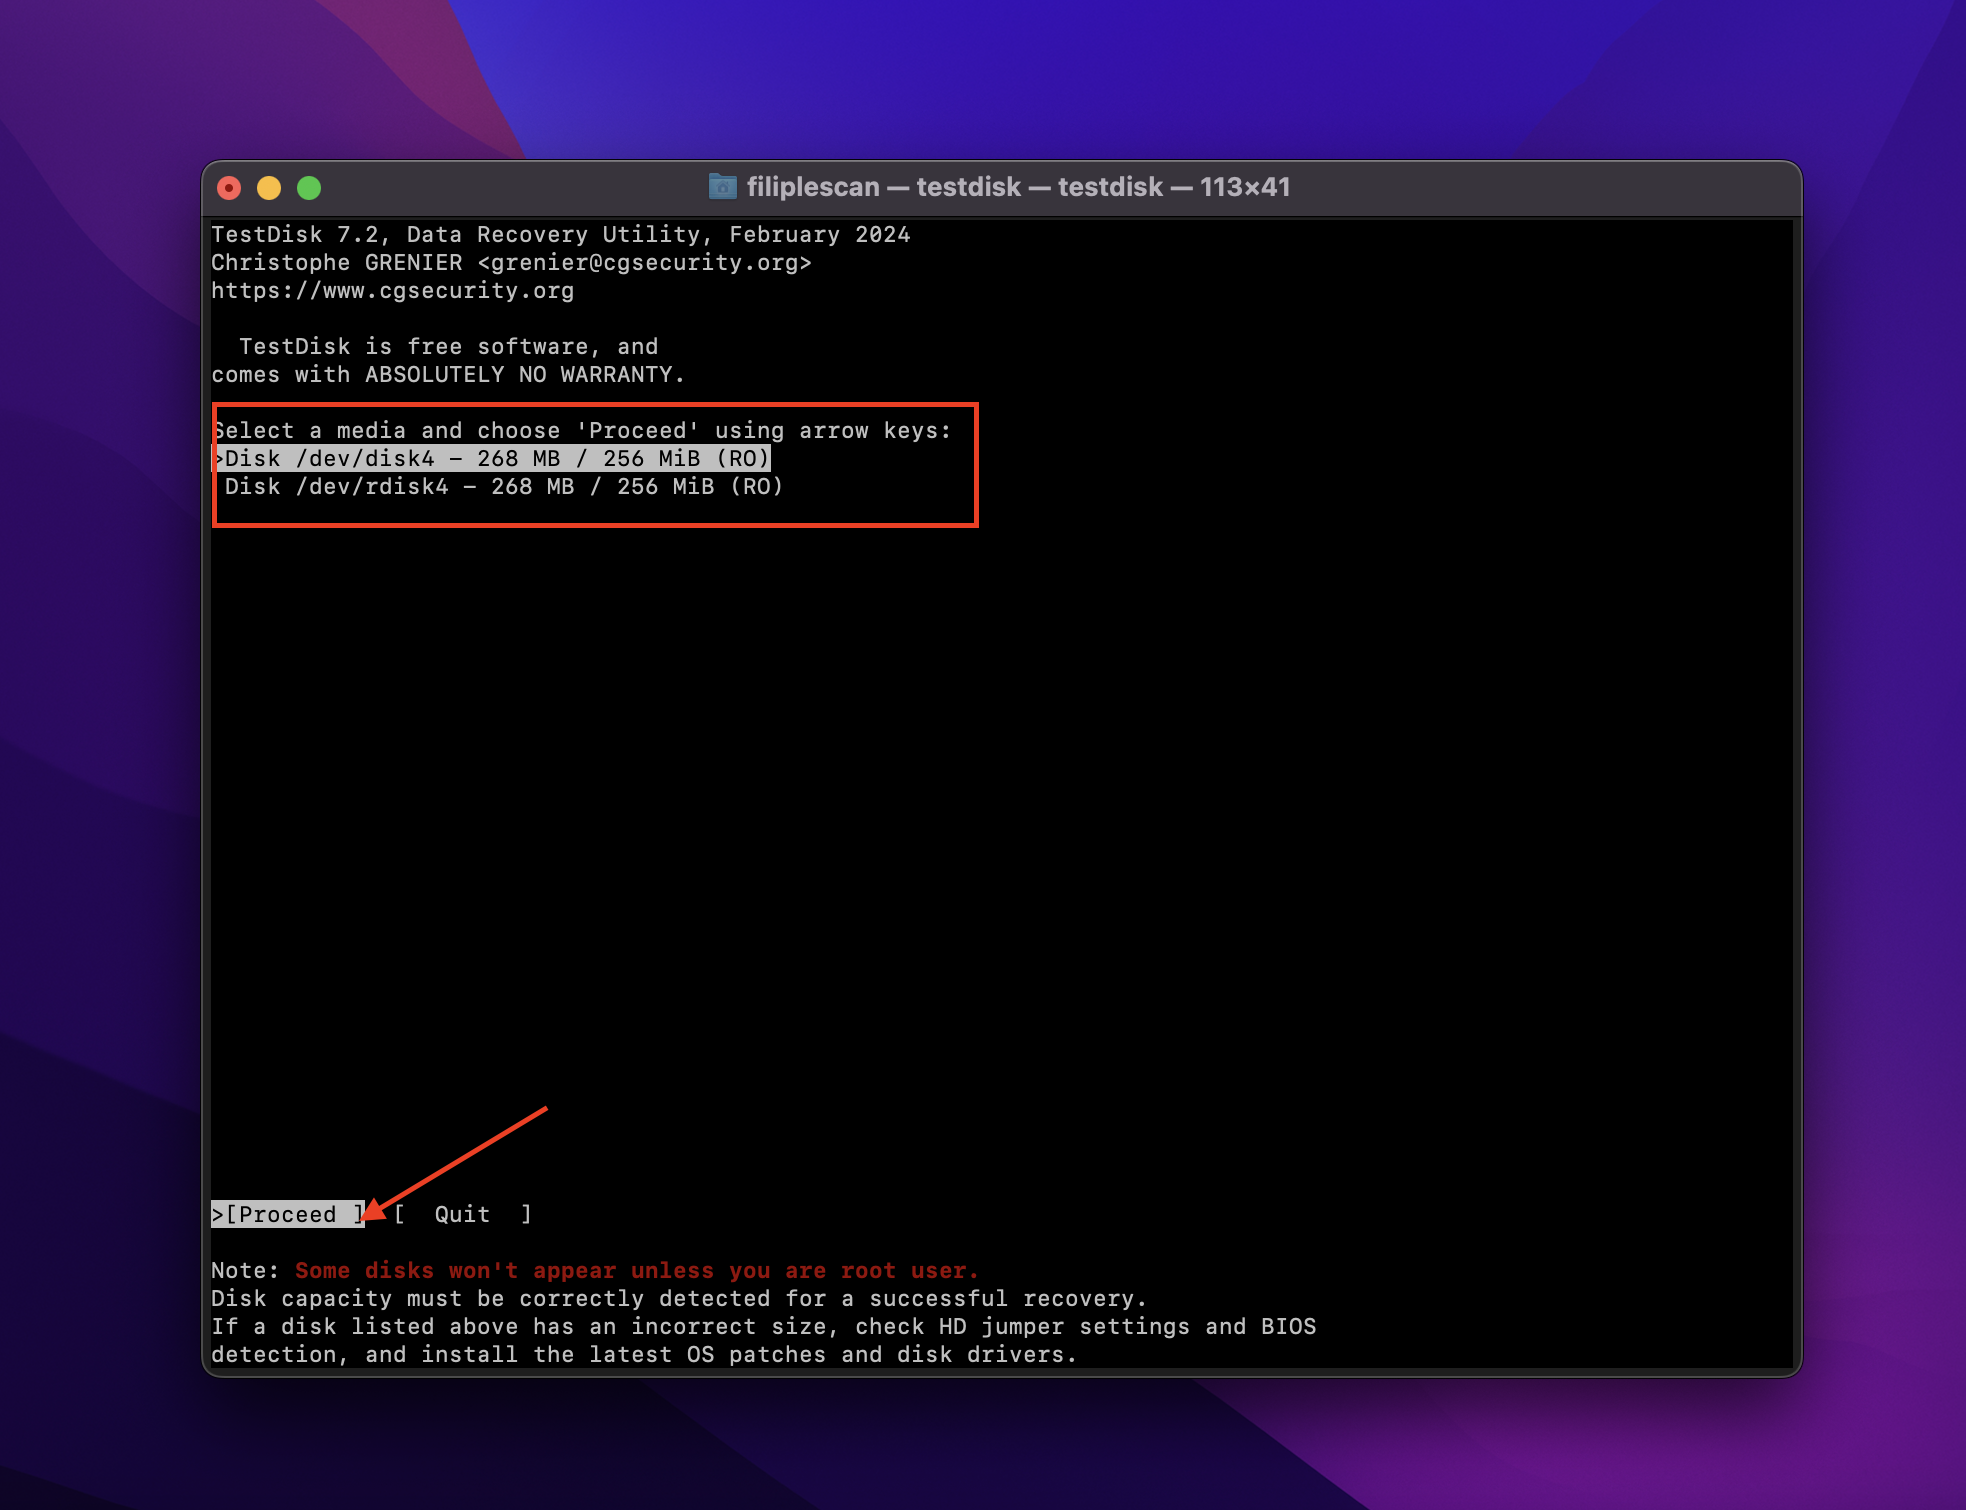
- Select your Samsung portable SSD from the list of available drives and press Enter.
- Select the partition type and press Enter. If you do not know which one to choose, follow TestDisk’s suggested option.

- Choose Analyse to search for lost partitions and press Enter.
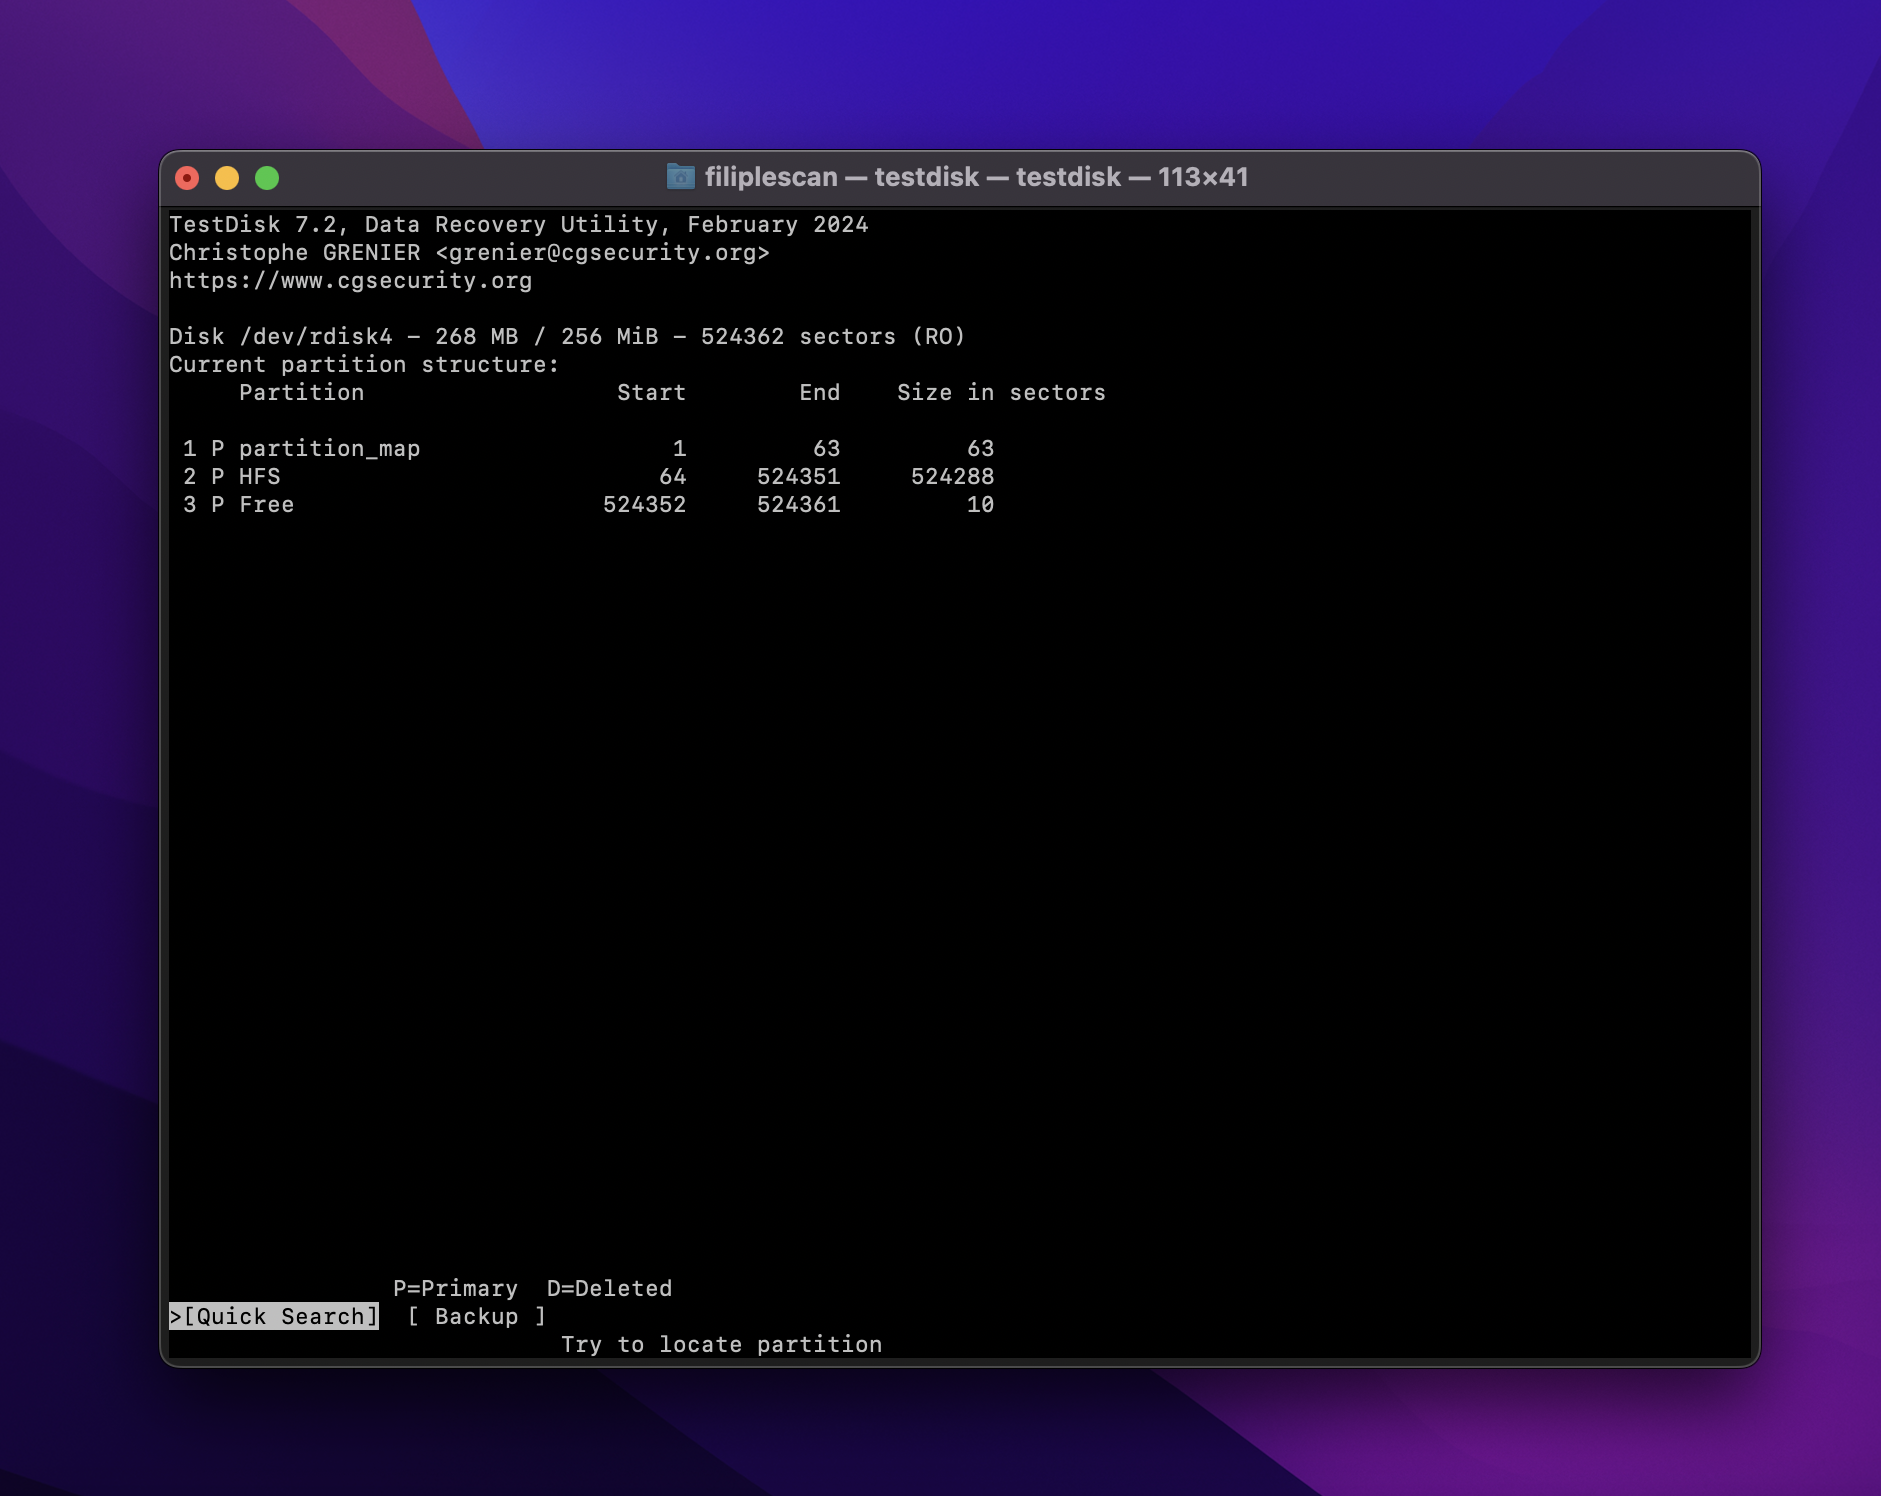
- Now, examine the current partition structure detected by TestDisk. Select Quick Search to scan for lost partitions indicated by the partition list and press Enter.
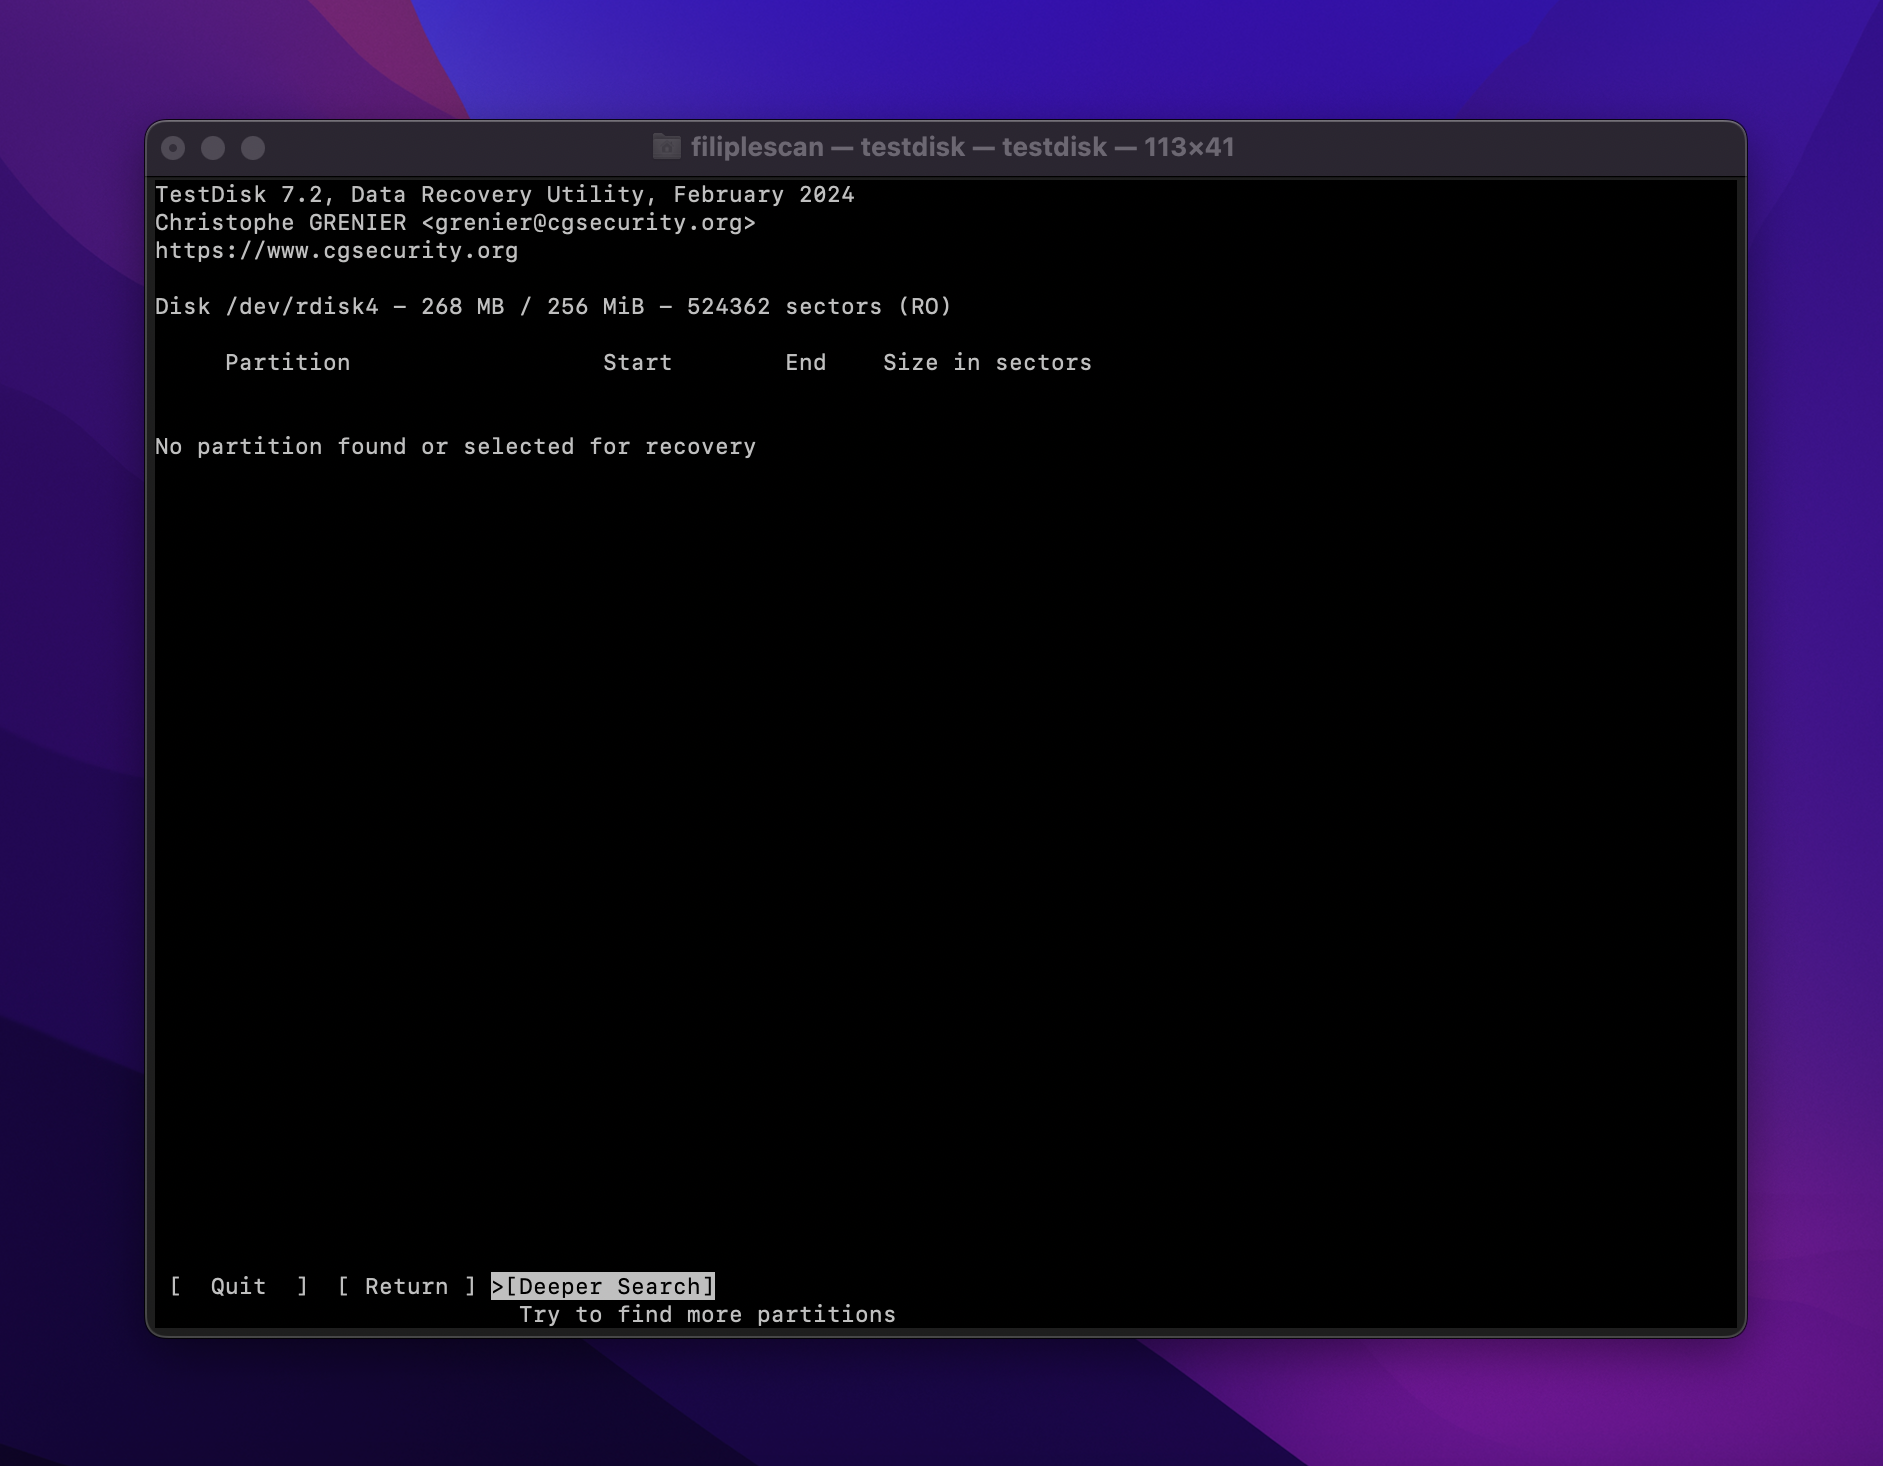
- After the search, TestDisk will display the partitions found. If the app does not display all your partitions, you can choose Deeper Search and press Enter to continue searching. Otherwise, skip to the next step.
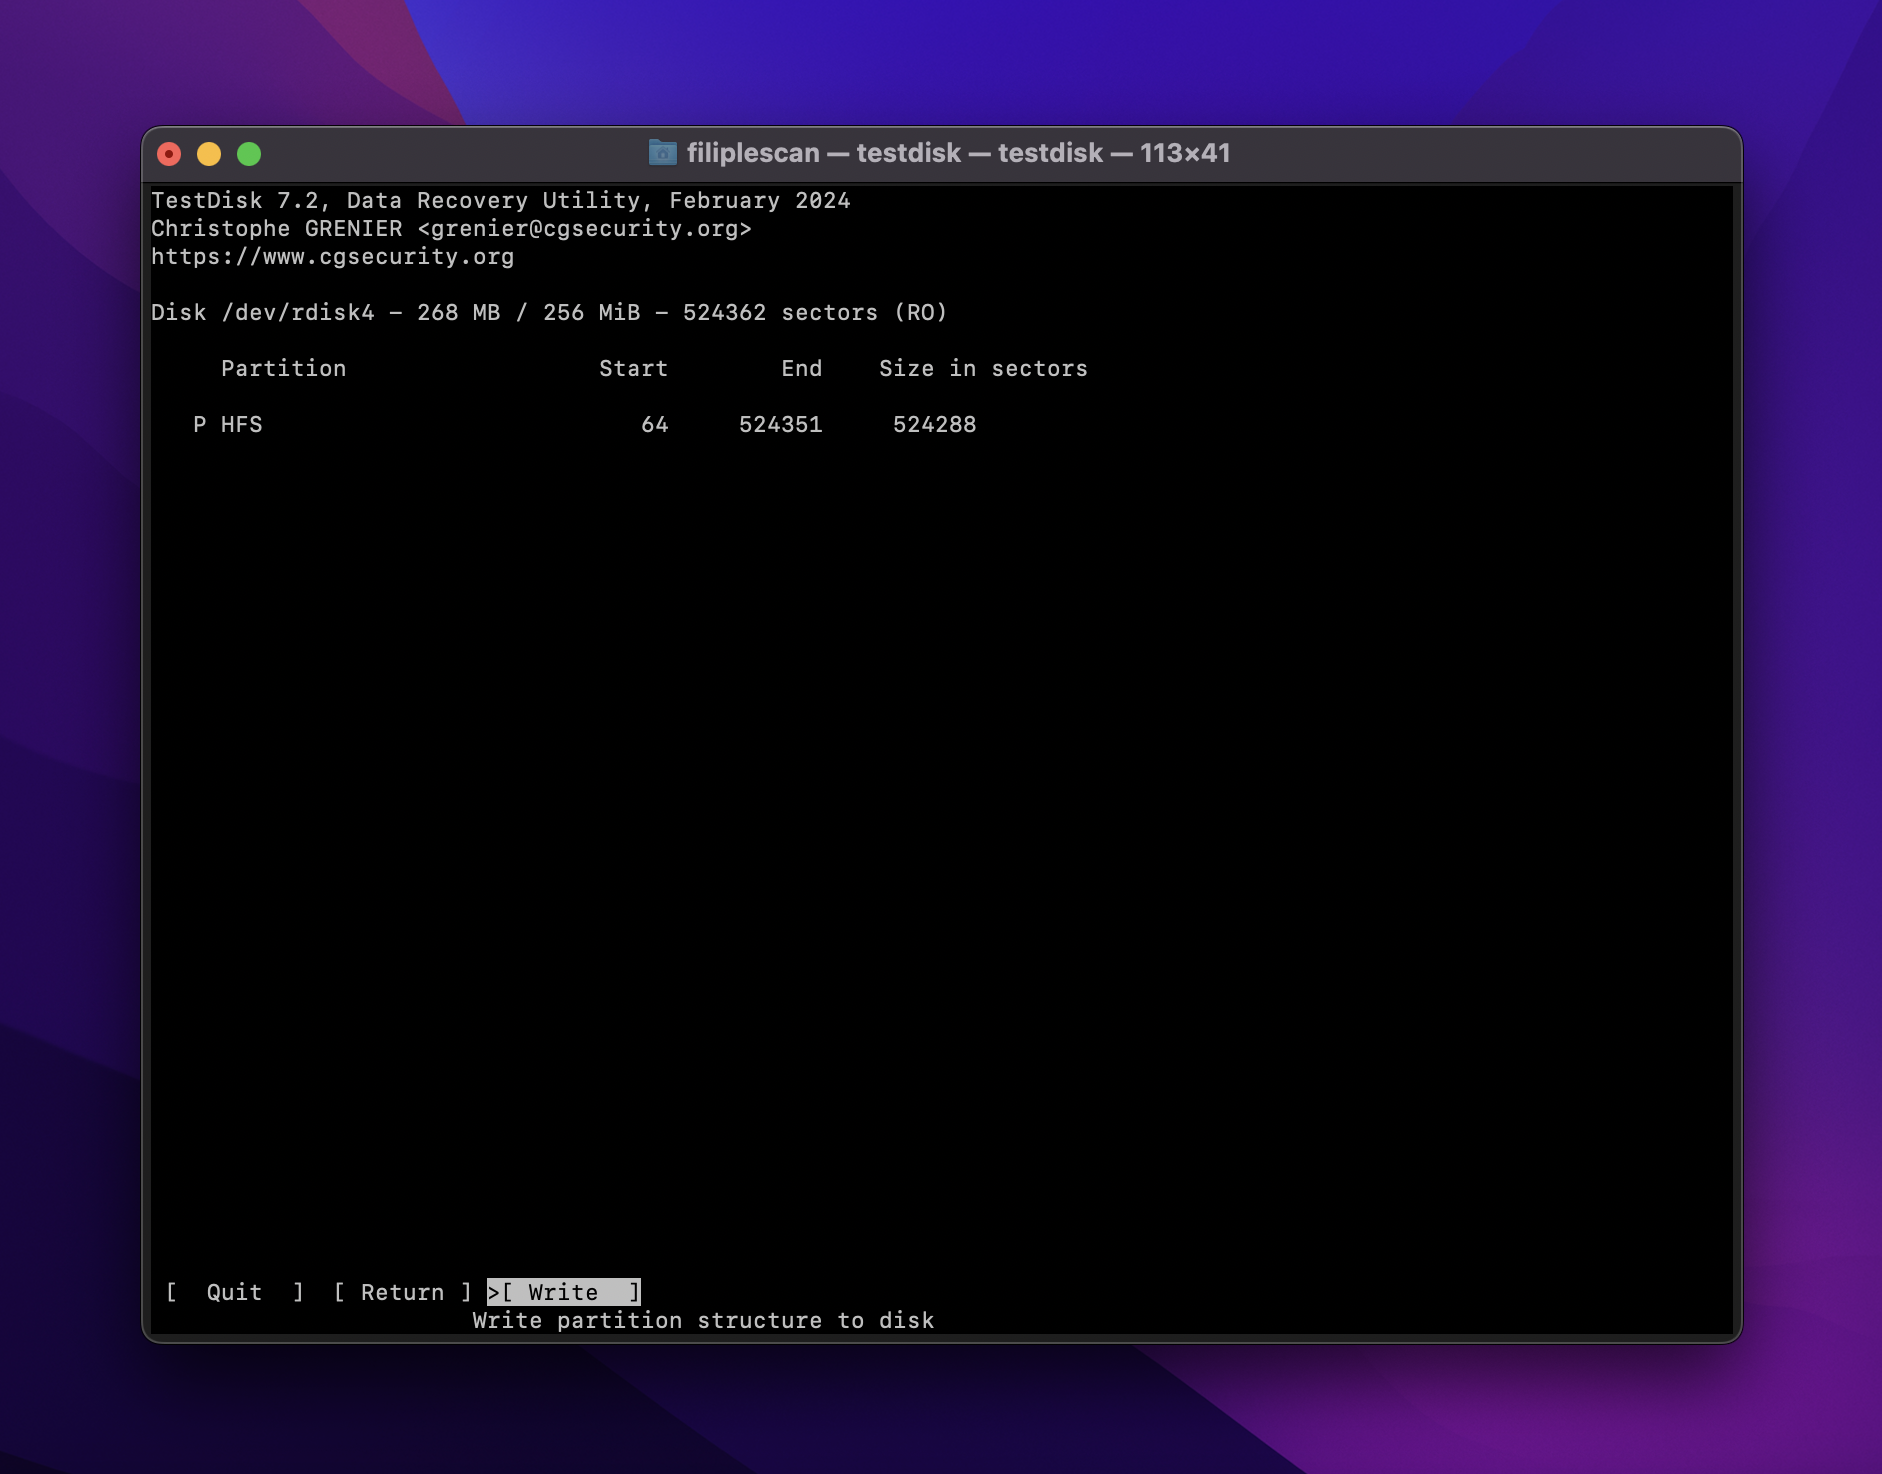
- If TestDisk finds a deleted partition marked as D, change the status to L (logical) to recover the said partition.
- Once all partitions are correctly listed, you can select Write and press Enter. Finally, press Y in the confirmation prompt.
- Restart your Mac and replug your Samsung Portable SSD to see if it gets recognized now.
To use this method correctly, you have to be able to determine if there are any missing or corrupted partitions on your SSD. You can also try to follow TestDisk’s instructions on repairing the file system. Otherwise, proceed to the next method.
Method 6: Format (Initialize) the SSD to the Required/Supported File System
One of the most common reasons your Samsung Portable SSD does not show up on Mac is because your OS does not recognize your file system. In this case, you can try formatting your drive to the Mac-supported file system.
Remember that this process will erase all the files on your drive, so ensure you have backed up your files beforehand. If Disk Utility can recognize your SSD properly, you can use third-party software like Disk Drill to secure a copy of your drive before proceeding.
Follow these steps to format your Samsung Portable SSD:
- Connect your Samsung Portable SSD to your Mac.
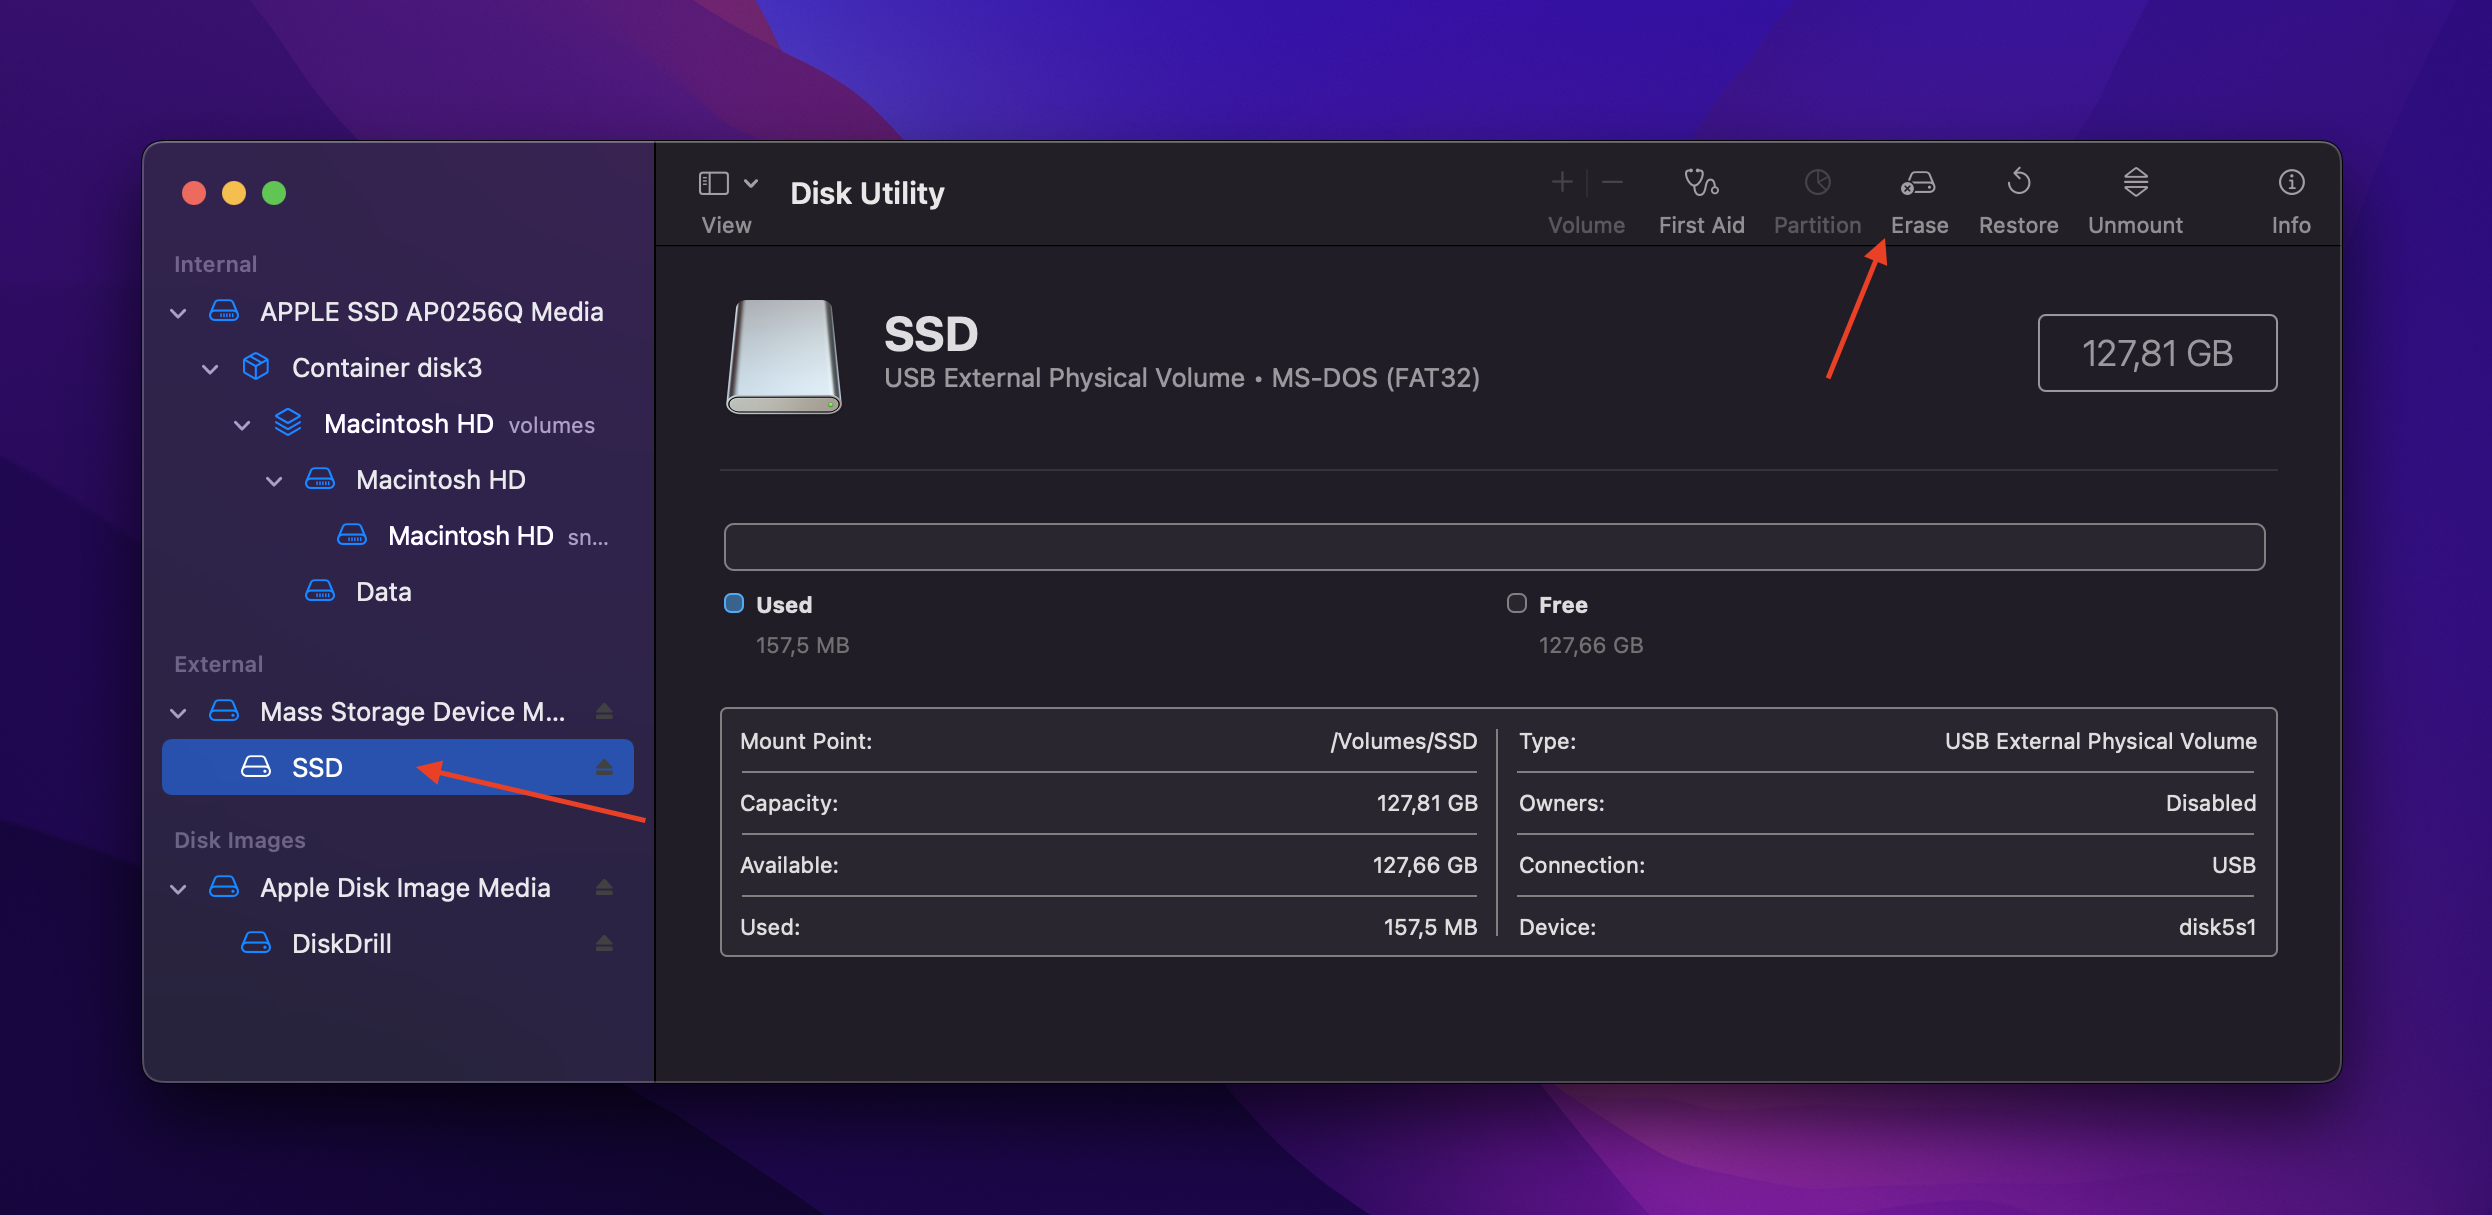
- Open Disk Utility.
- Select your external SSD in the list of drives on the left sidebar.
- Then, click Erase on the top right side of the Disk Utility menu bar. A pop-up window should appear.
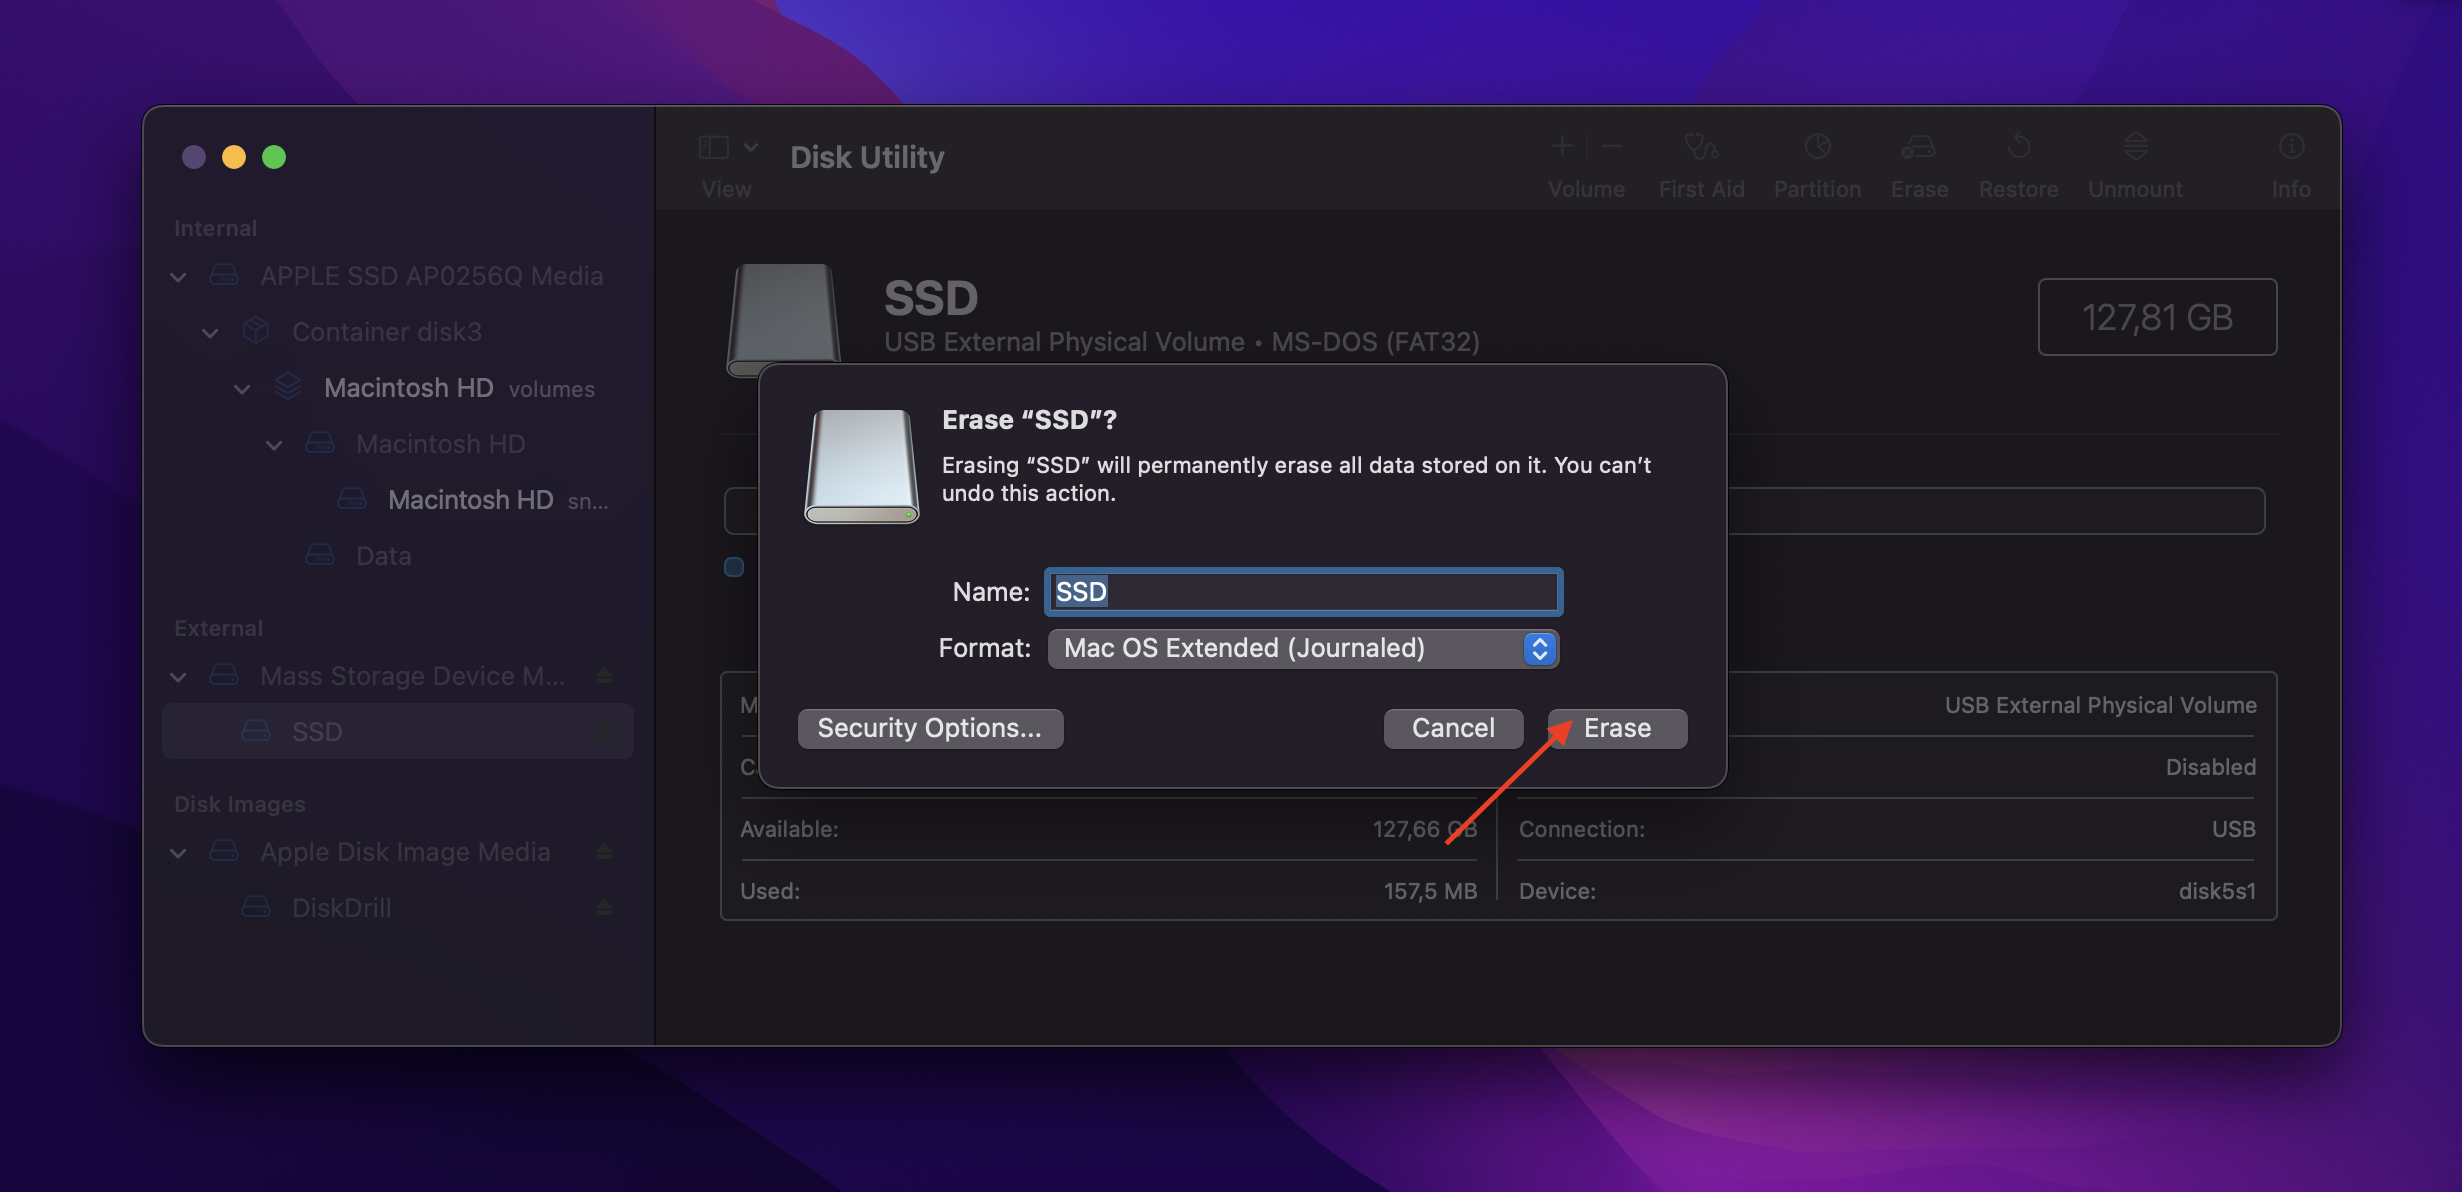
- To ensure your Mac will recognize the SSD, choose the APFS (Apple File System) format. However, your drive will only run on macOS High Sierra or later with this option. Choose ExFAT if you still want it to get recognized by the Windows system. For older macOS versions, use the Mac OS Extended (Journaled) format. You can also rename the drive if needed.
- Once you have changed the options to your preference, click Erase to format your drive.
If none of these methods work, you can refer to other options to fix your Samsung SSD not showing up on your Mac.
More Options for Fixing Your Samsung SSD Not Showing Up on Mac
Aside from the main methods above, the following options are available if your Mac still cannot recognize your external drive.
Option A: Use First Aid in Disk Utility
First Aid in Disk Utility is an Apple-native feature designed to fix Mac storage devices’ formatting and directory structure errors. Although it’s not a hundred percent guarantee, it promises to repair external drives that are not properly working.
Take note, though, that this process may lead to data loss. We recommend proceeding only if you do not have important files on your drive.
Here’s how you can use First Aid to attempt repairs on your Samsung Portable SSD:
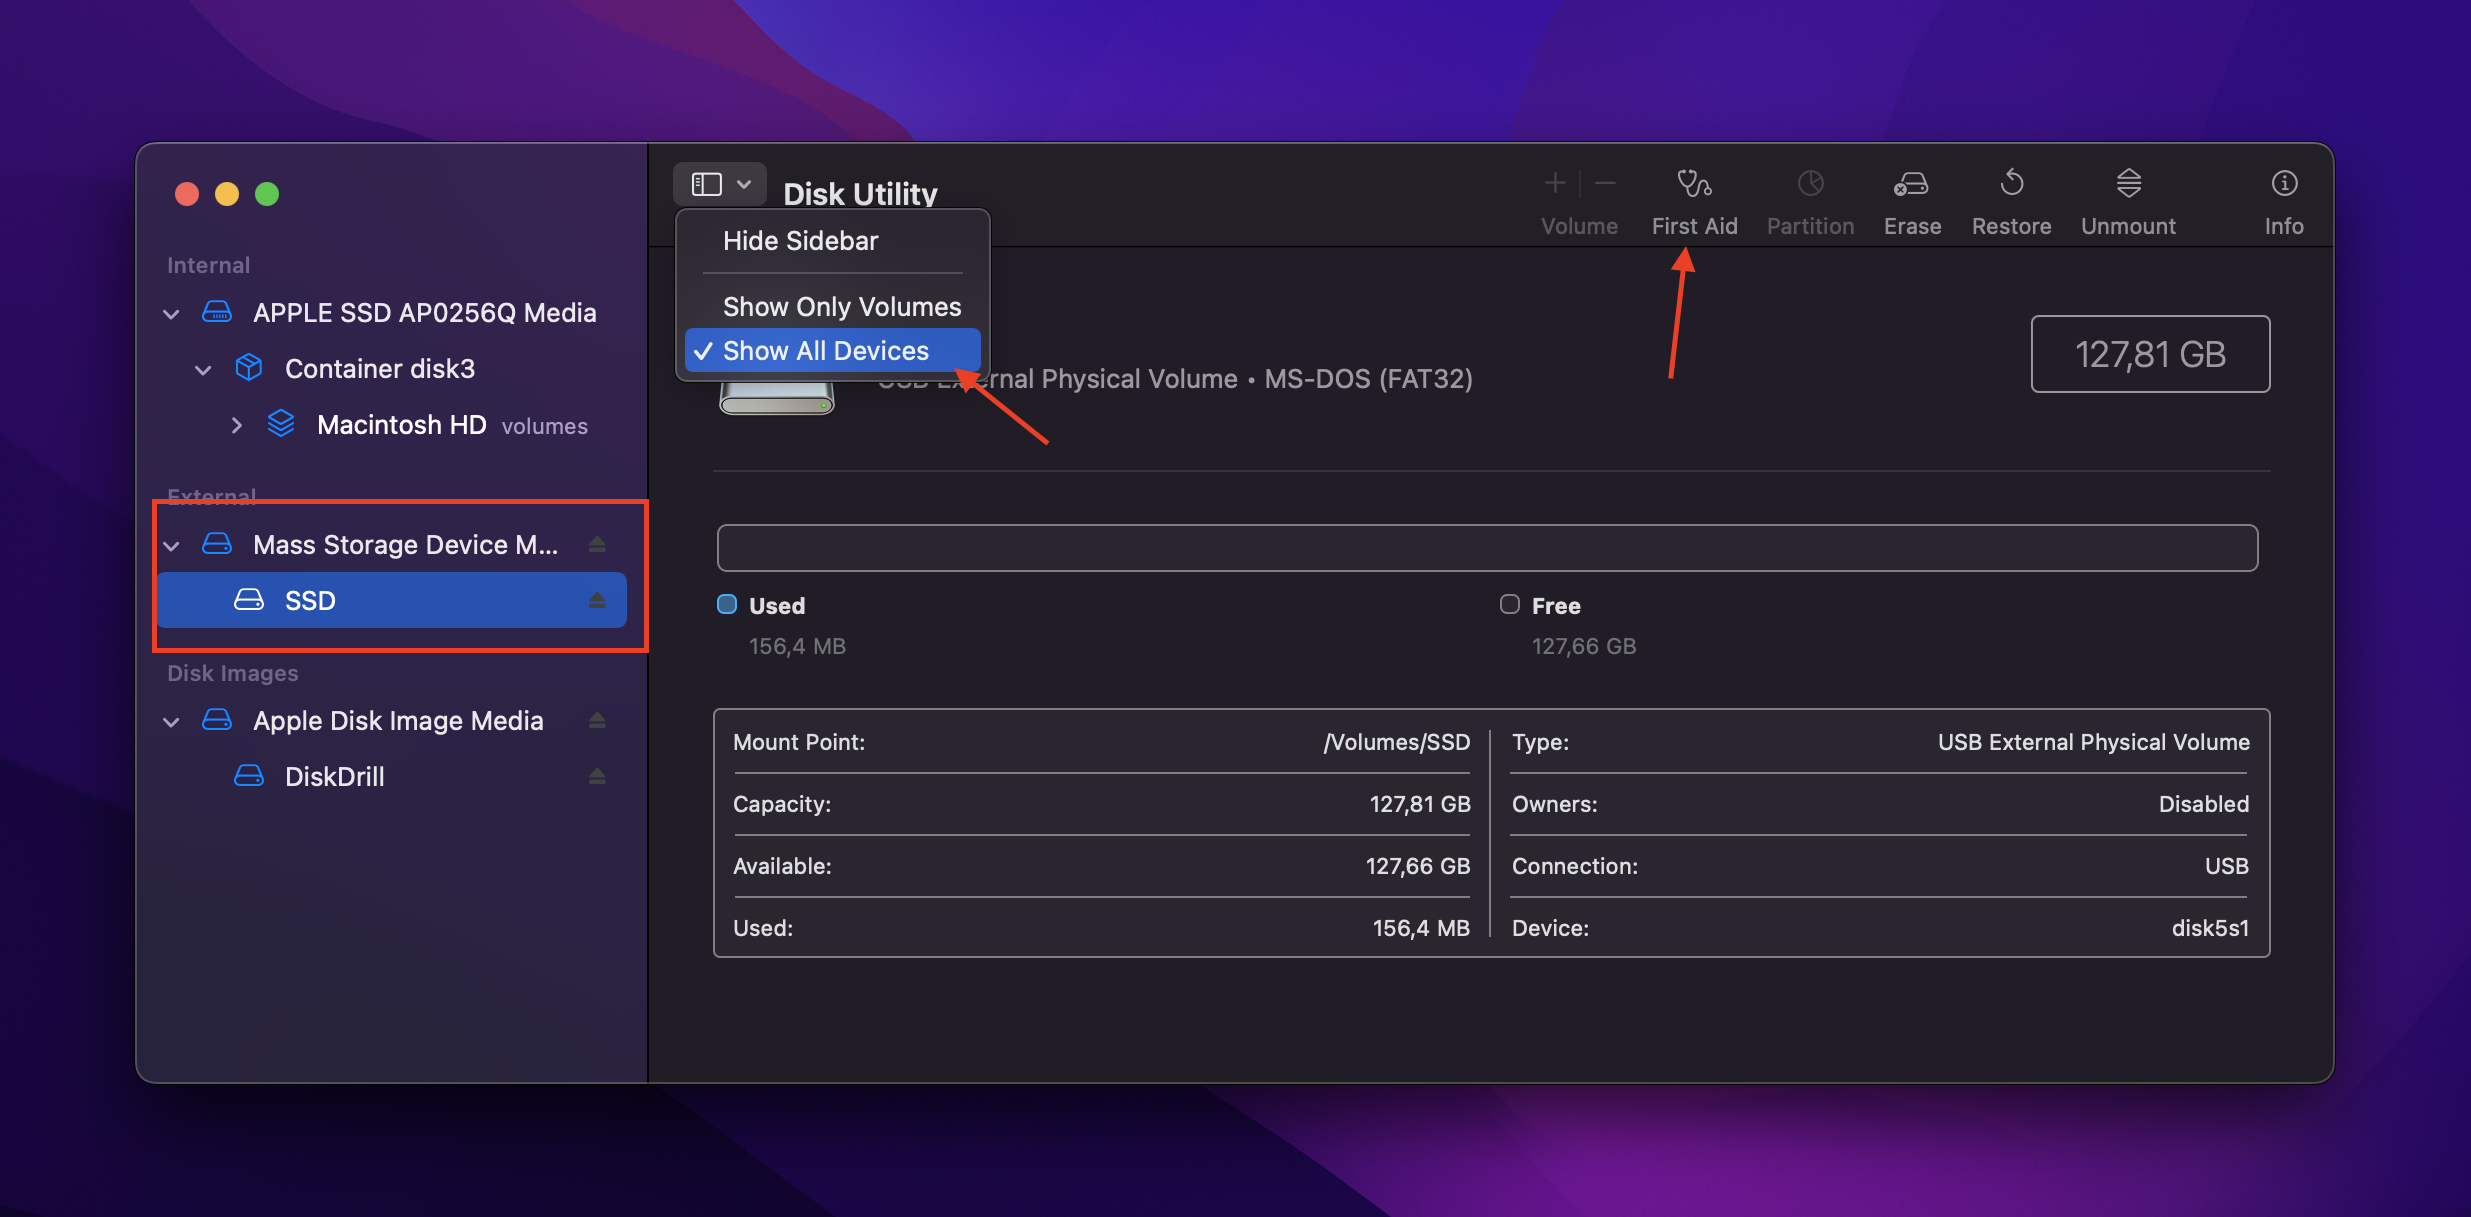
- Open Disk Utility on your Mac.
- In the Disk Utility, select View > Show All Devices.
- Next, choose and expand your external drive in the sidebar to see its hierarchy (storage device, container, and volume).
- If you have multiple volumes on your hard drive, select one and click the First Aid button on the top right menu.
- Follow the onscreen instructions in the First Aid dialog box. Once it’s finished, click Done.
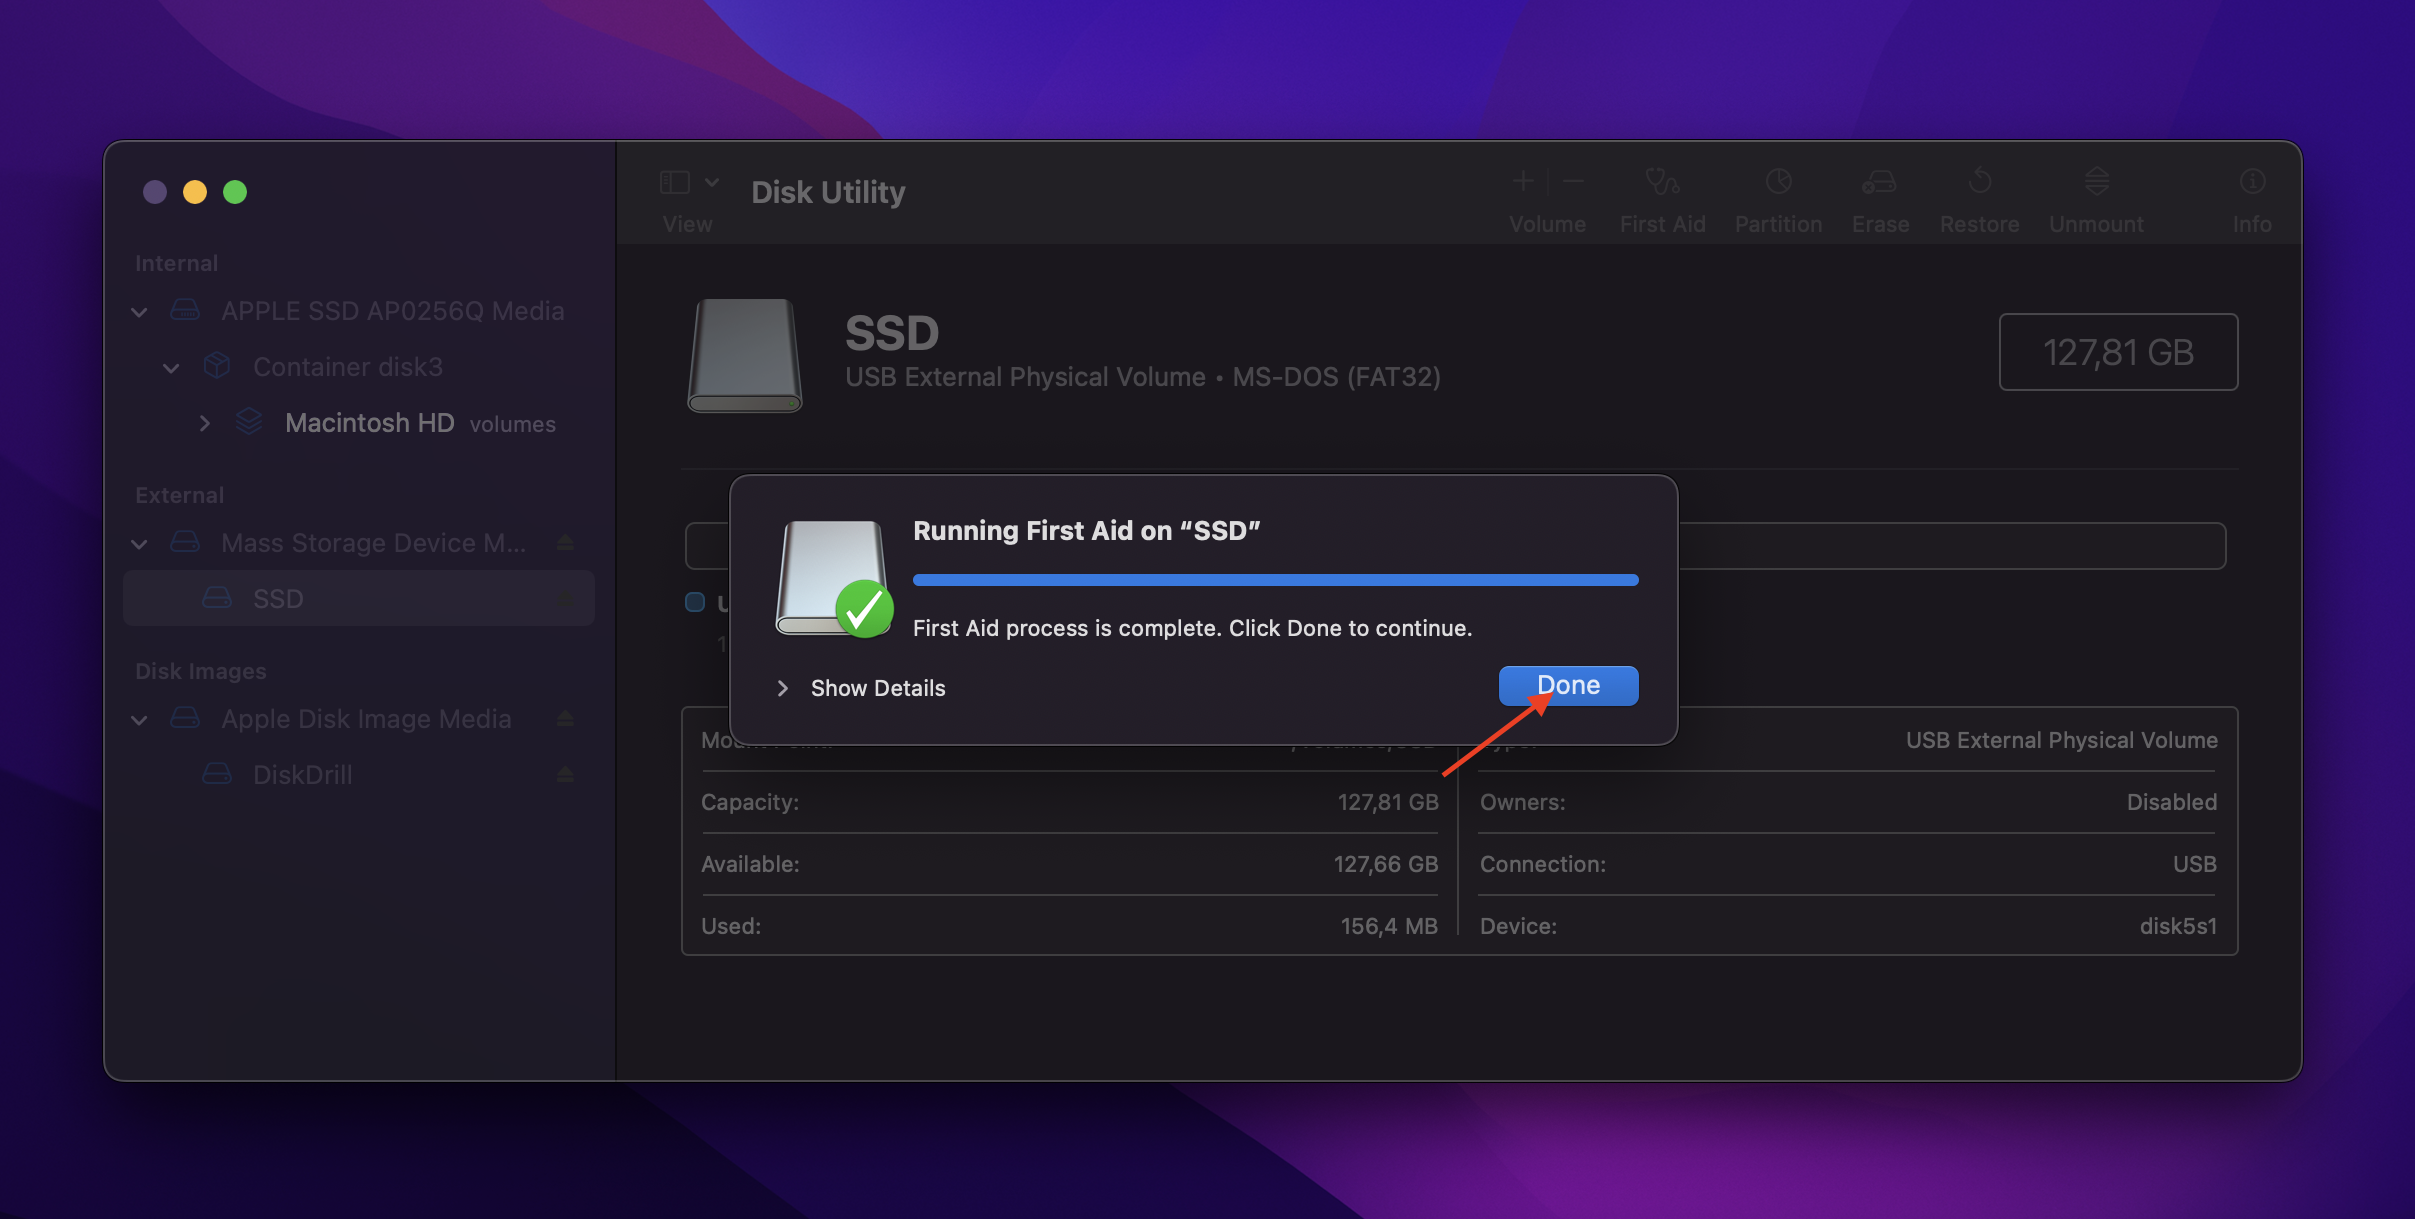
- If your drive has multiple containers, run First Aid for the rest of them.
- Finally, select your storage device and run First Aid as well. After the process finishes, click Done. Now, plug your Samsung Portable SSD back into your Mac.
If your Mac still can’t recognize your disk, go to the next option.
Option B: Connect the SSD to Windows to See if It Can Find and Fix the Error
If you have a Windows PC, connecting your Samsung SSD to it is an option, as some users in the Apple community forum have discussed.
The catch? Windows can’t interact with your disk if it is in HFS/APFS format. Thus, this method is only suitable for exFAT and FAT32 drives.
To access your drive via a Windows PC, simply do the following:
- Plug your Samsung portable SSD into a working Windows PC.
- Upon plugging in, a disk error message should pop out, along with an option to repair the drive. Click Repair and wait for it to finish.
- After repairing, safely eject your SSD, and then try to plug it into your Mac again to see if this solves the problem.
If your drive is recognized properly on Windows, you can try to go to This PC > right-click on your external drive > Properties. Then, go to the Tools tab and click the Check option under Error checking. Follow the onscreen instructions to let Windows scan and attempt to repair detected errors on your Samsung SSD. Once the process is complete, safely eject your drive and connect it to your Mac.
Option C: Try Resetting the SMC and NVRAM
The System Management Controller (SMC) manages the physical components of your Mac, such as the connection to external devices connected via USB-C. On the other hand, Non-Volatile Random-Access Memory (NVRAM) stores certain settings for quick access. Resetting these units may resolve connectivity issues on your Mac.
Follow these steps to reset the SMC and NVRAM on your Mac:
Reset the SMC:
- Shut down your Mac.
- Prepare your Mac by doing the following: a. For Macs with removable batteries, remove the battery. b. For Macs with non-removable batteries, proceed to the next step.
- Press and hold down Shift + Control + Option + your power button at the same time. Hold these keys for 10 seconds.
- Release all keys and press the power button again to turn on your Mac.
Reset NVRAM:
- Restart your Mac, immediately pressing and holding Option + Command + P + R as it boots up.
- Hold the keys for around 20 seconds. Your Mac might appear to restart during this process. Allow it to proceed and try connecting your drive afterward.
Remember that while these methods have worked for some users, they are not guaranteed to work all the time.
How to Recover Data from a Samsung Portable SSD Not Showing Up/Not Detected on a Mac
If you have important files on your Samsung Portable SSD, consider SSD data recovery on Mac first. It is essential to safeguard your files before proceeding with fixes that might put your files at risk of being deleted.
Disk Drill is one of our top choices for the best SSD data recovery software on Mac. You can try out Disk Drill to scan your files for free. However, you’d have to upgrade to the PRO version application to recover your files. Aside from reliable data recovery, Disk Drill is guaranteed safe to use without risk of malware injection or other viruses.
Note: Disk Drill will only help if your SSD appears in Disk Utility and shows the correct size.
Here’s how you can use Disk Drill to recover data from a Samsung portable SSD not showing up on your Mac:
- Download Disk Drill for Mac from the Cleverfiles website. Then, install the app on your device.
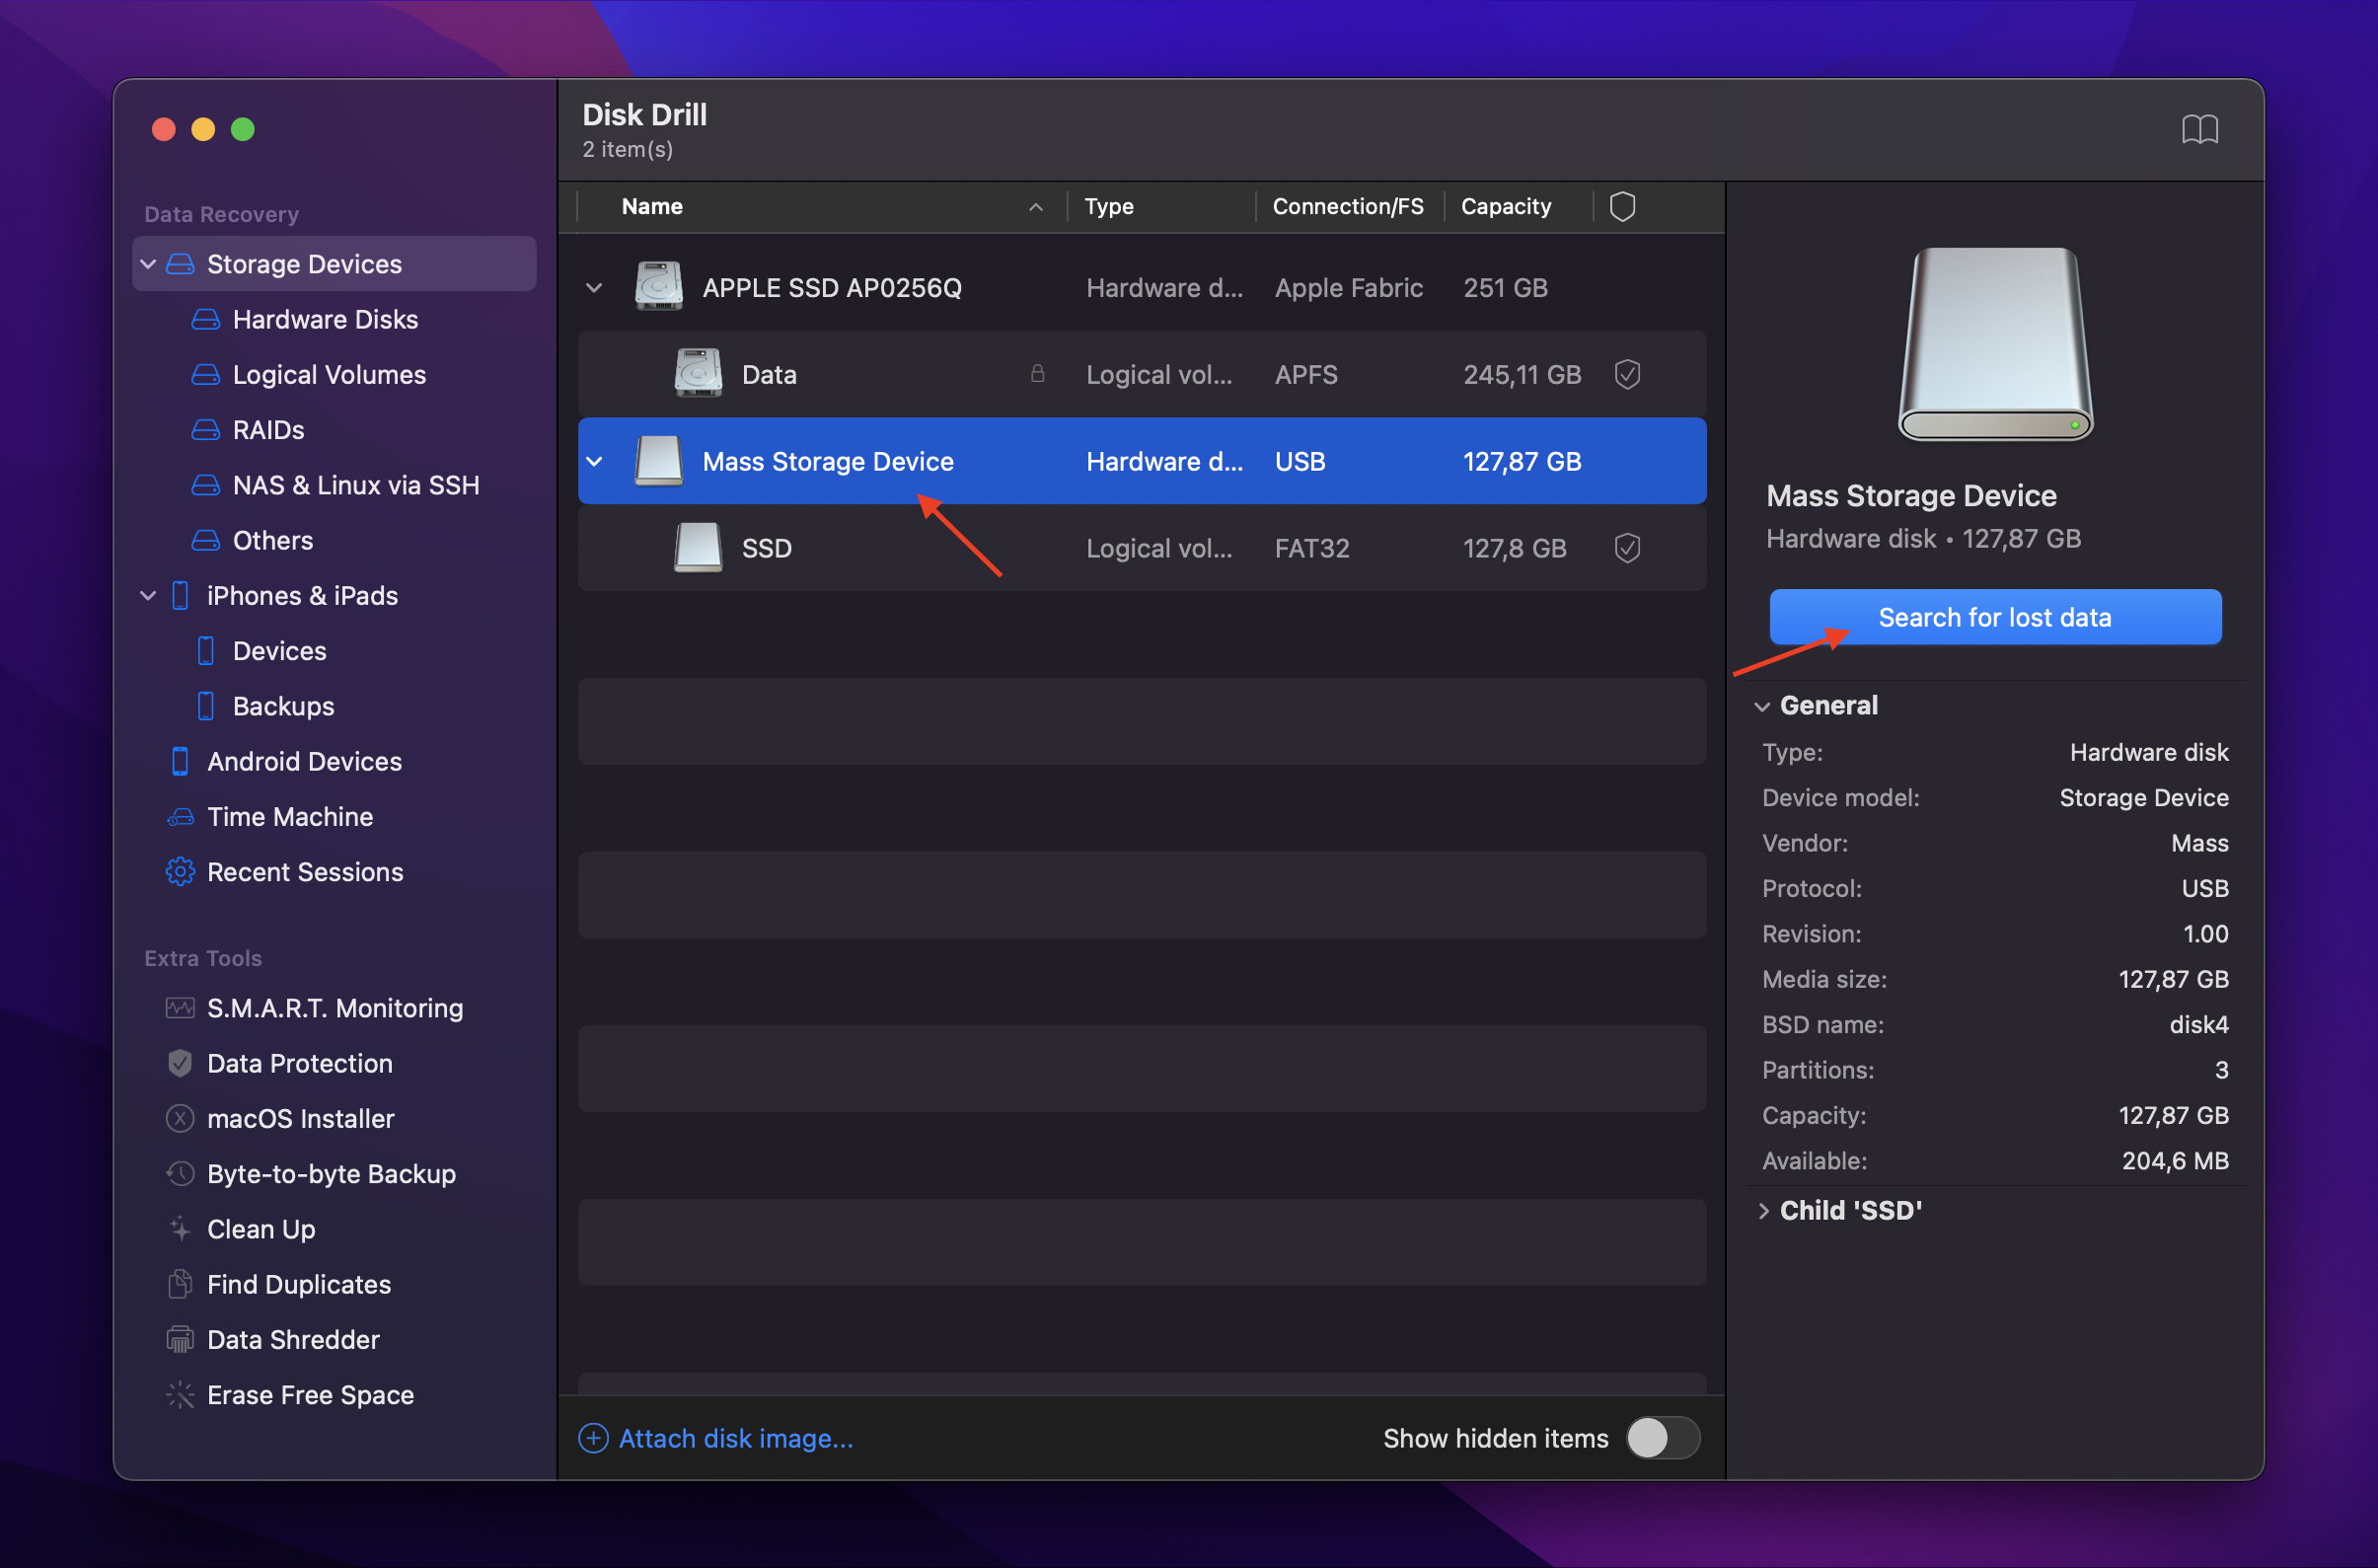
- Once installed, open the app and select your Samsung Portable SSD from the list of drives available. Then, click Search for Lost Data to begin scanning your drive.
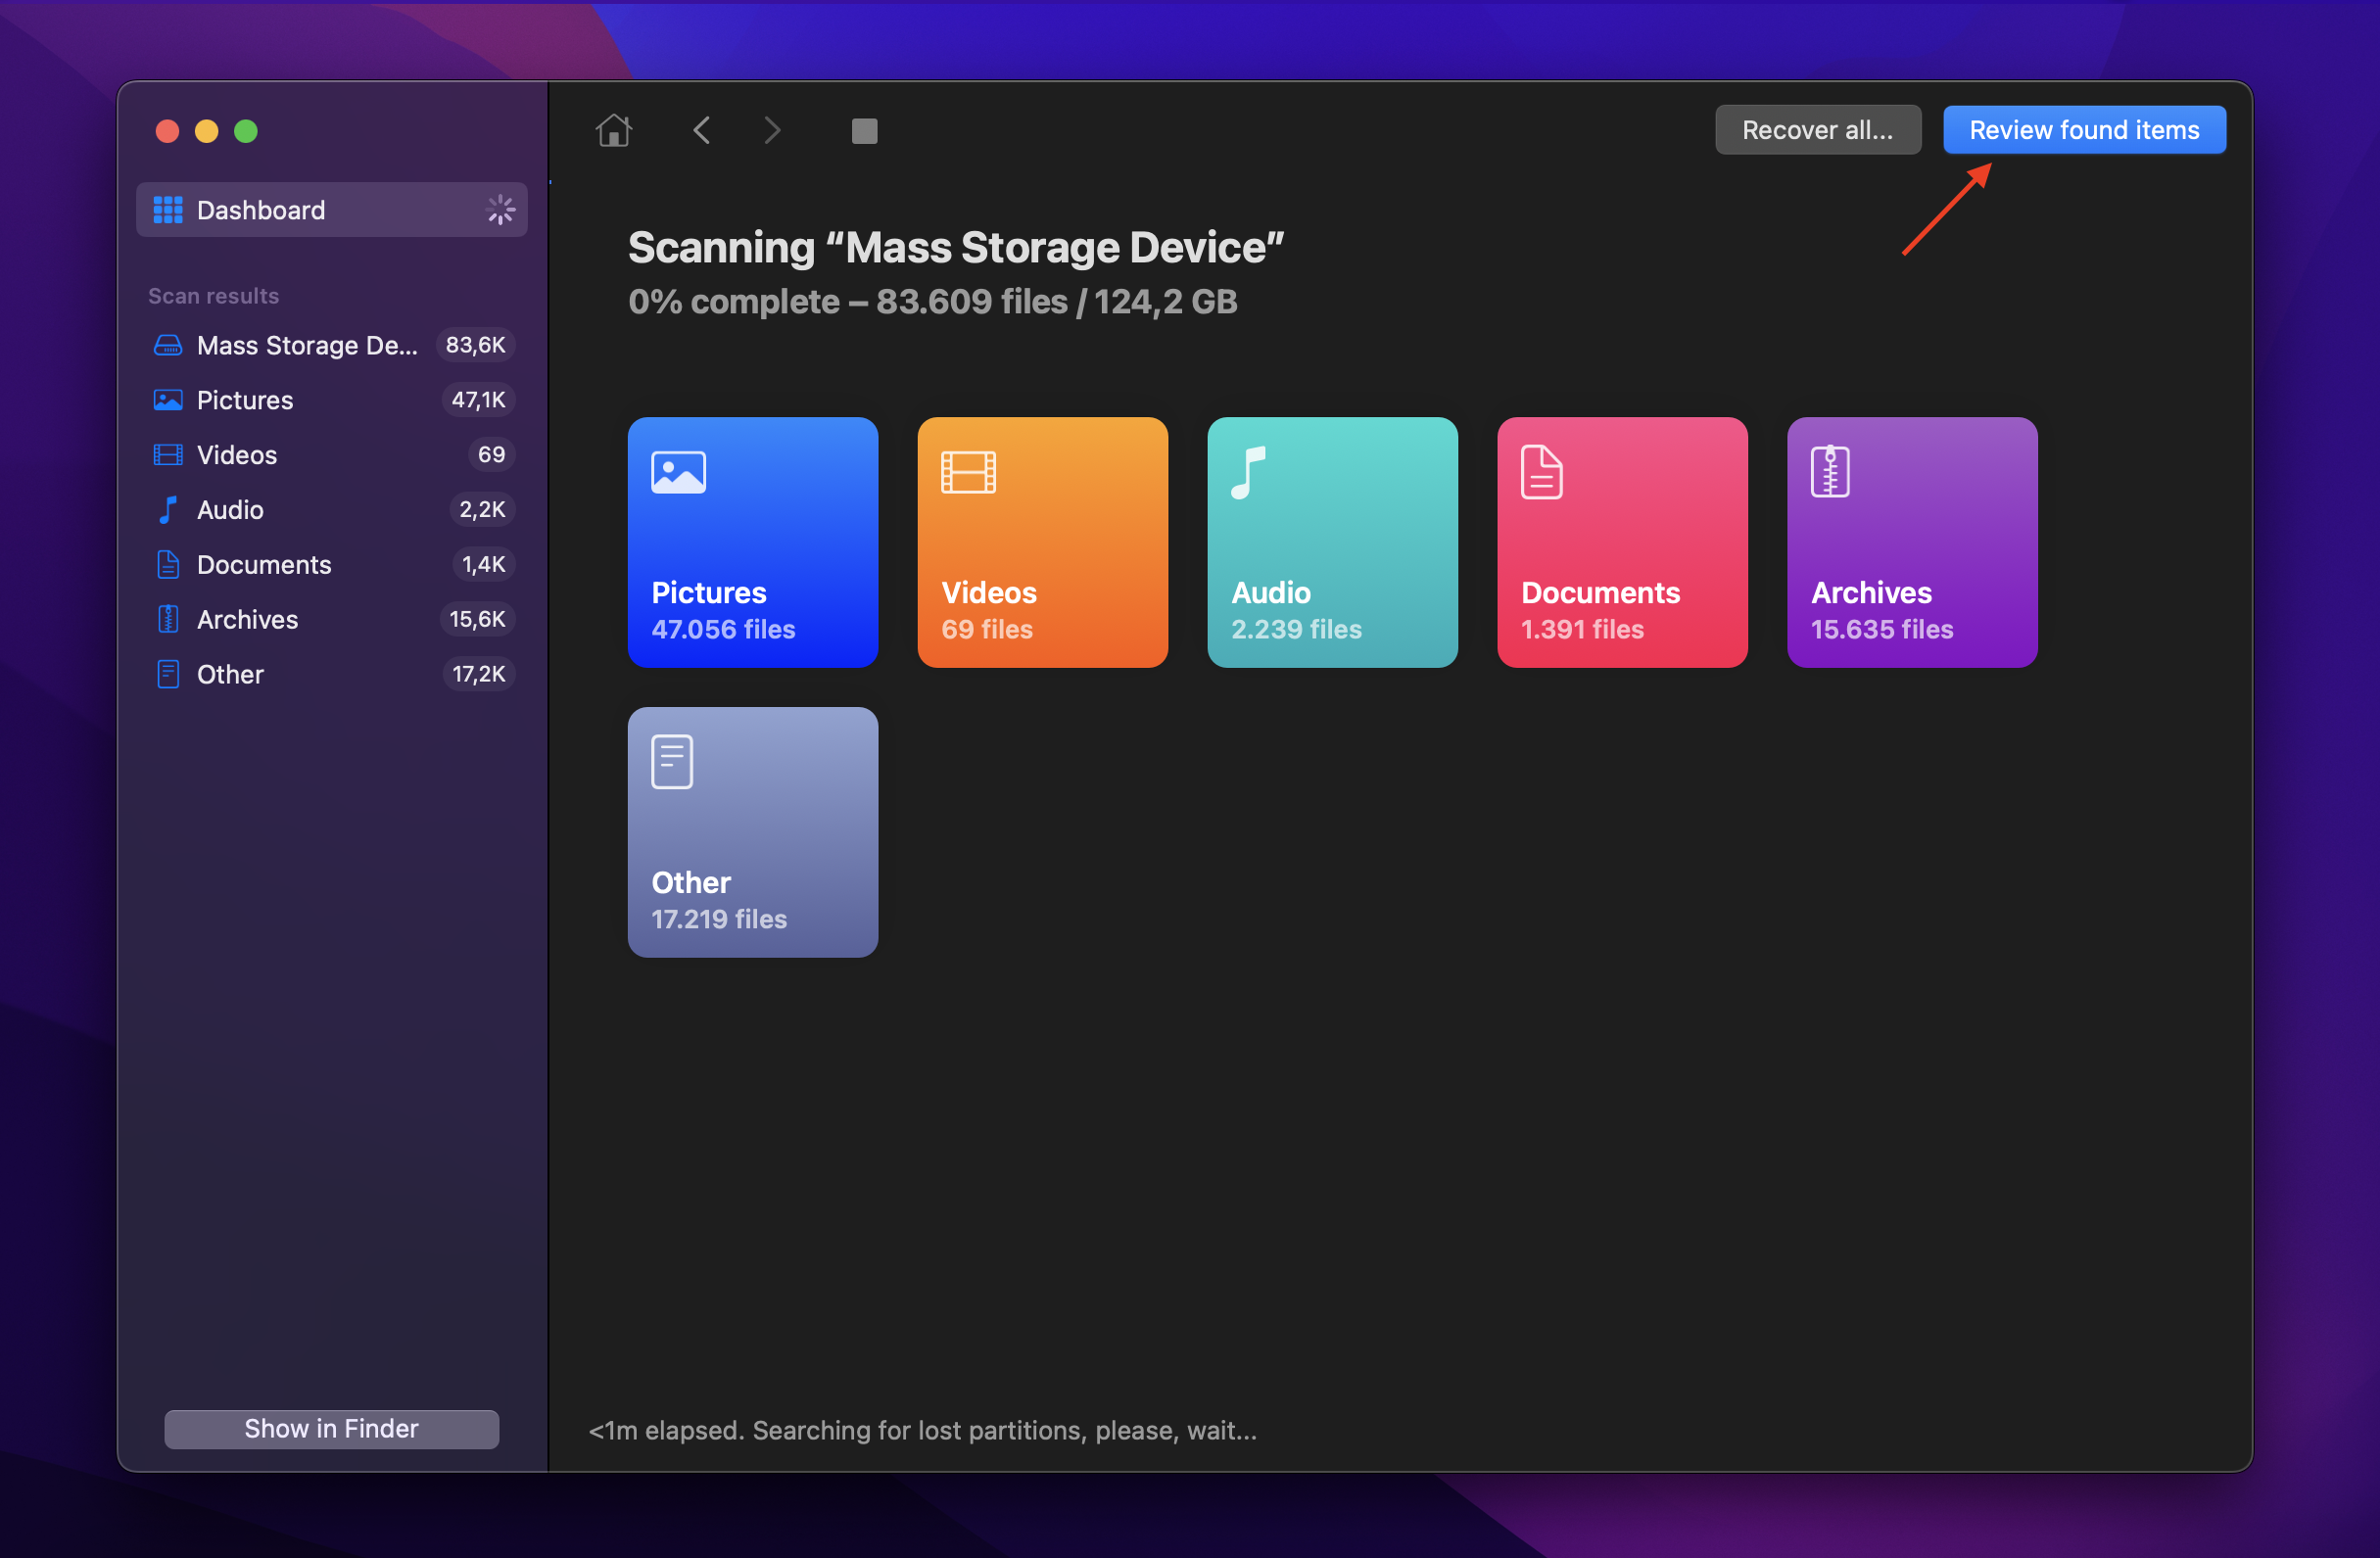
- While the scan is being processed, you can select Review found items to see all the files Disk Drill has found. You can click the file type selections on the left sidebar to filter your view by file types (photos, videos, audios, documents, etc.).
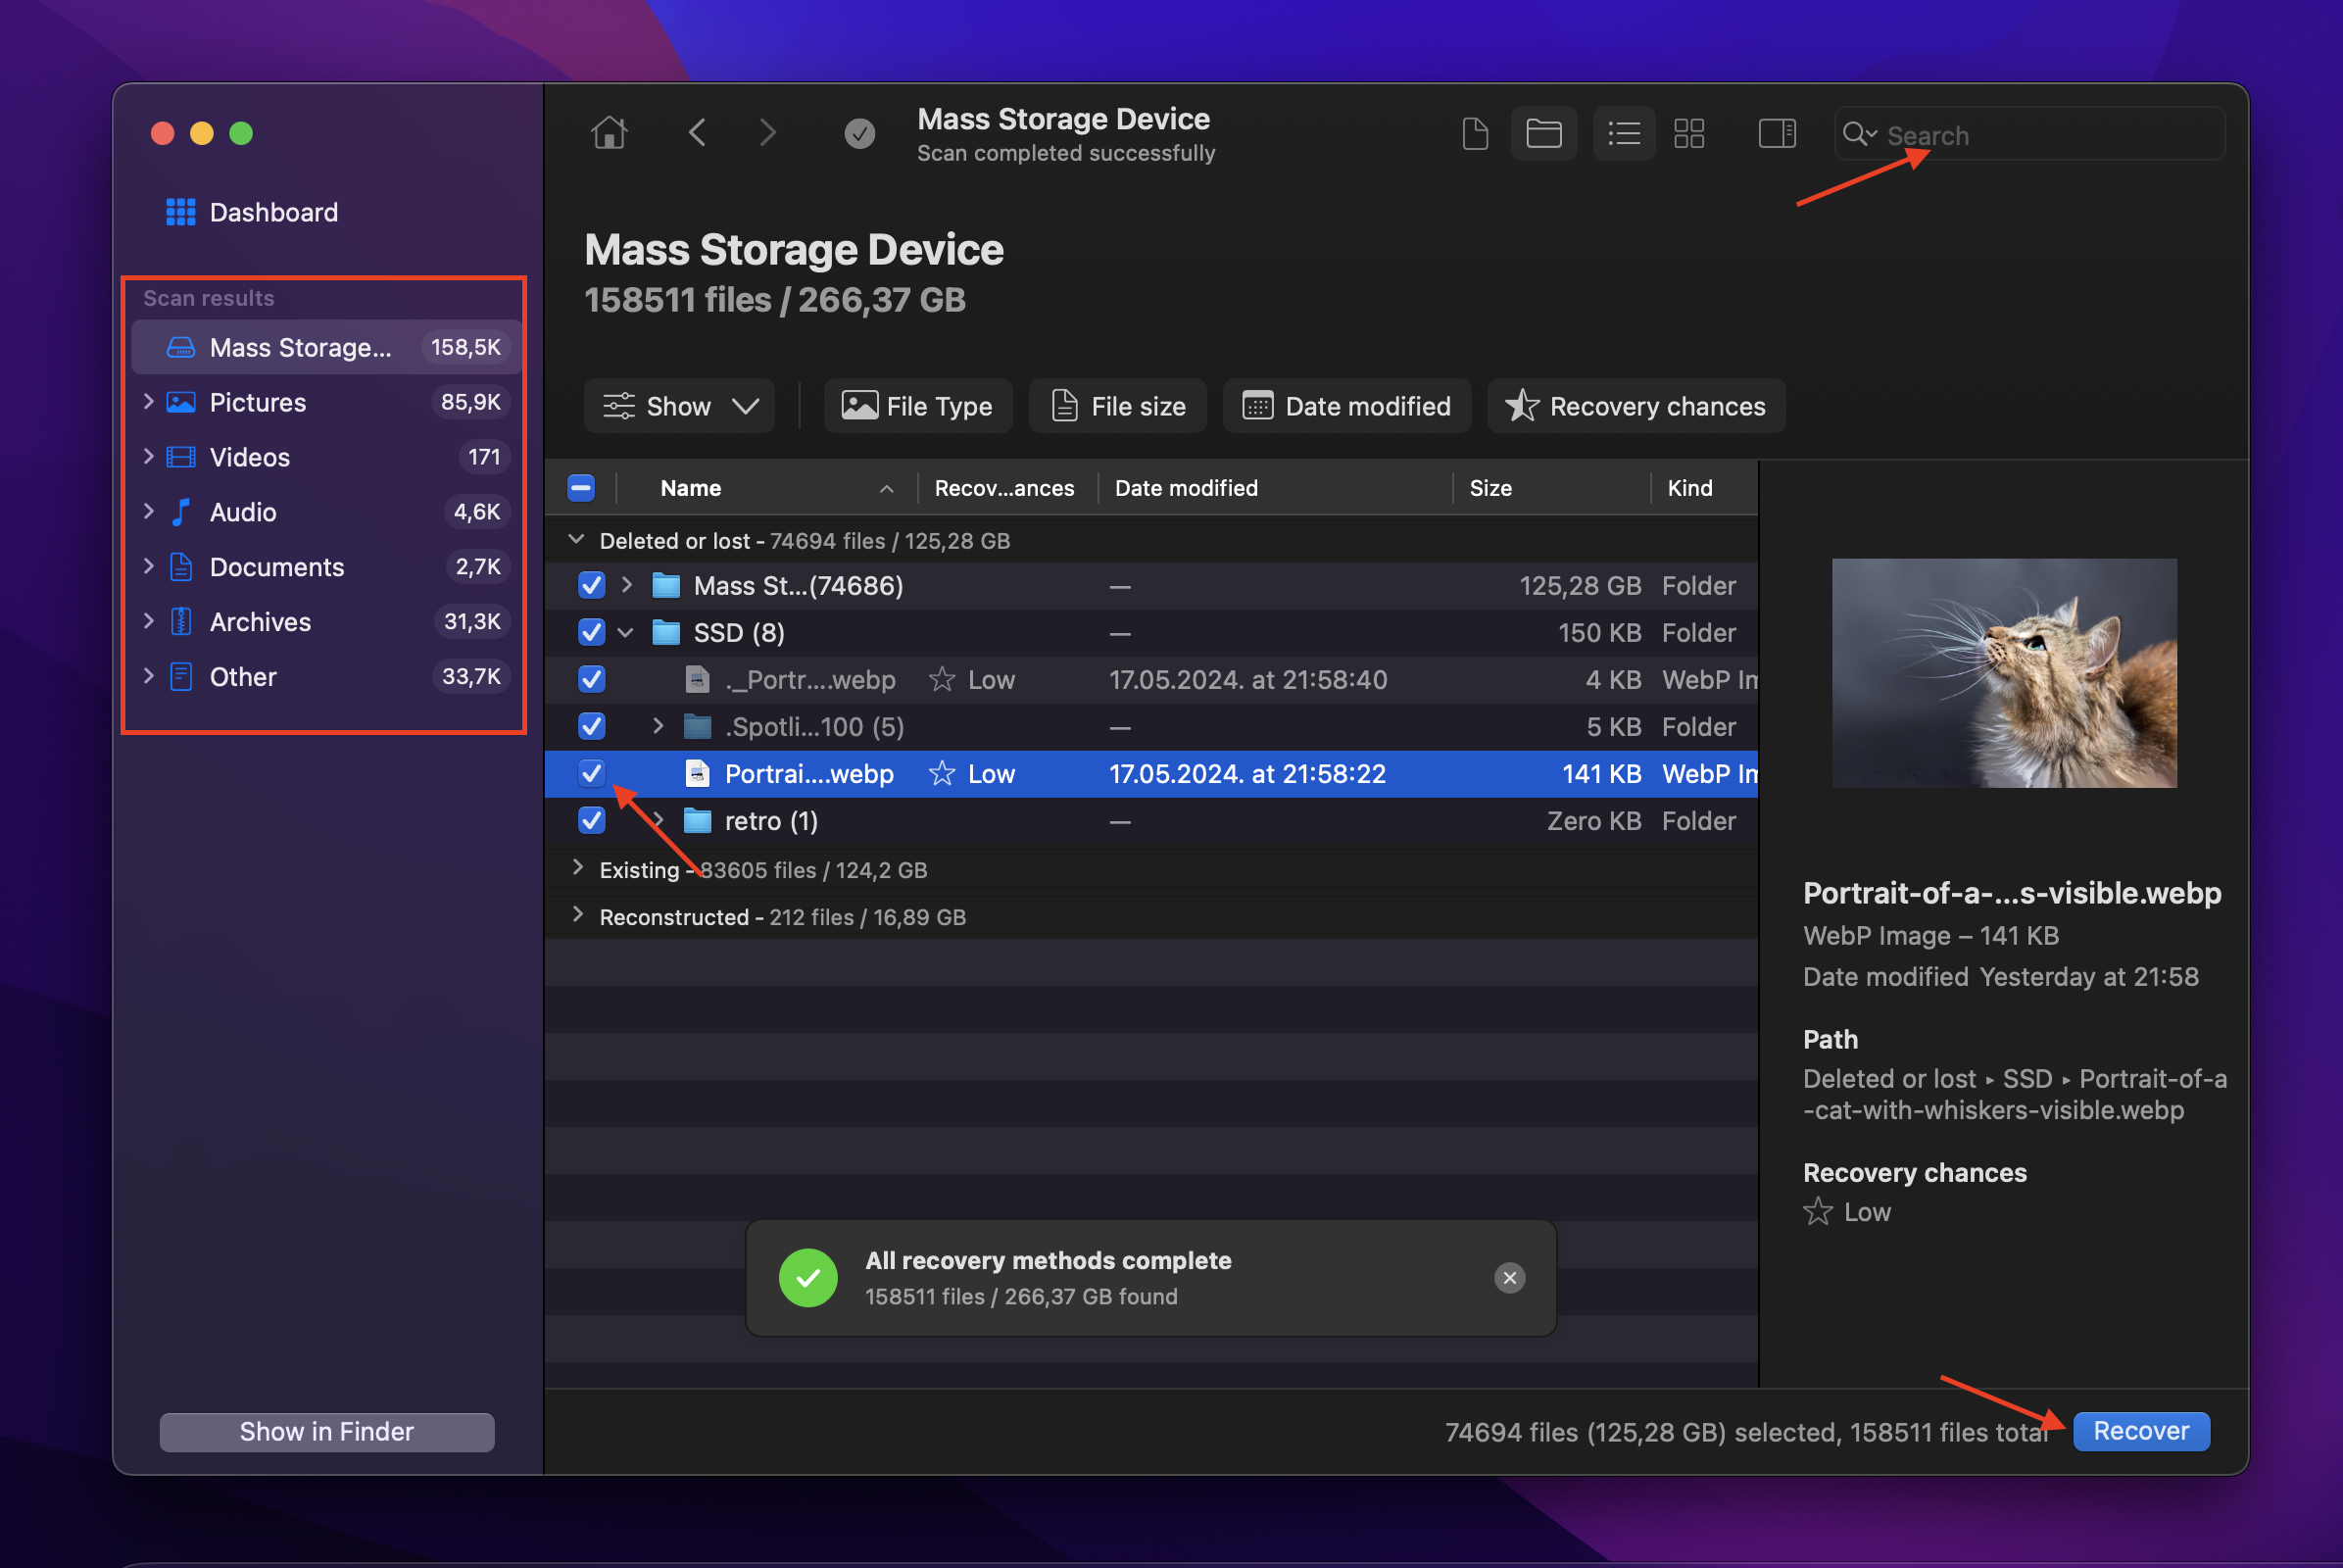
- Once the scan is finished, select all the files you want to retrieve. You can use the search bar and the preview feature to help find your files easily. Once you’re done confirming your selection, hit Recover.
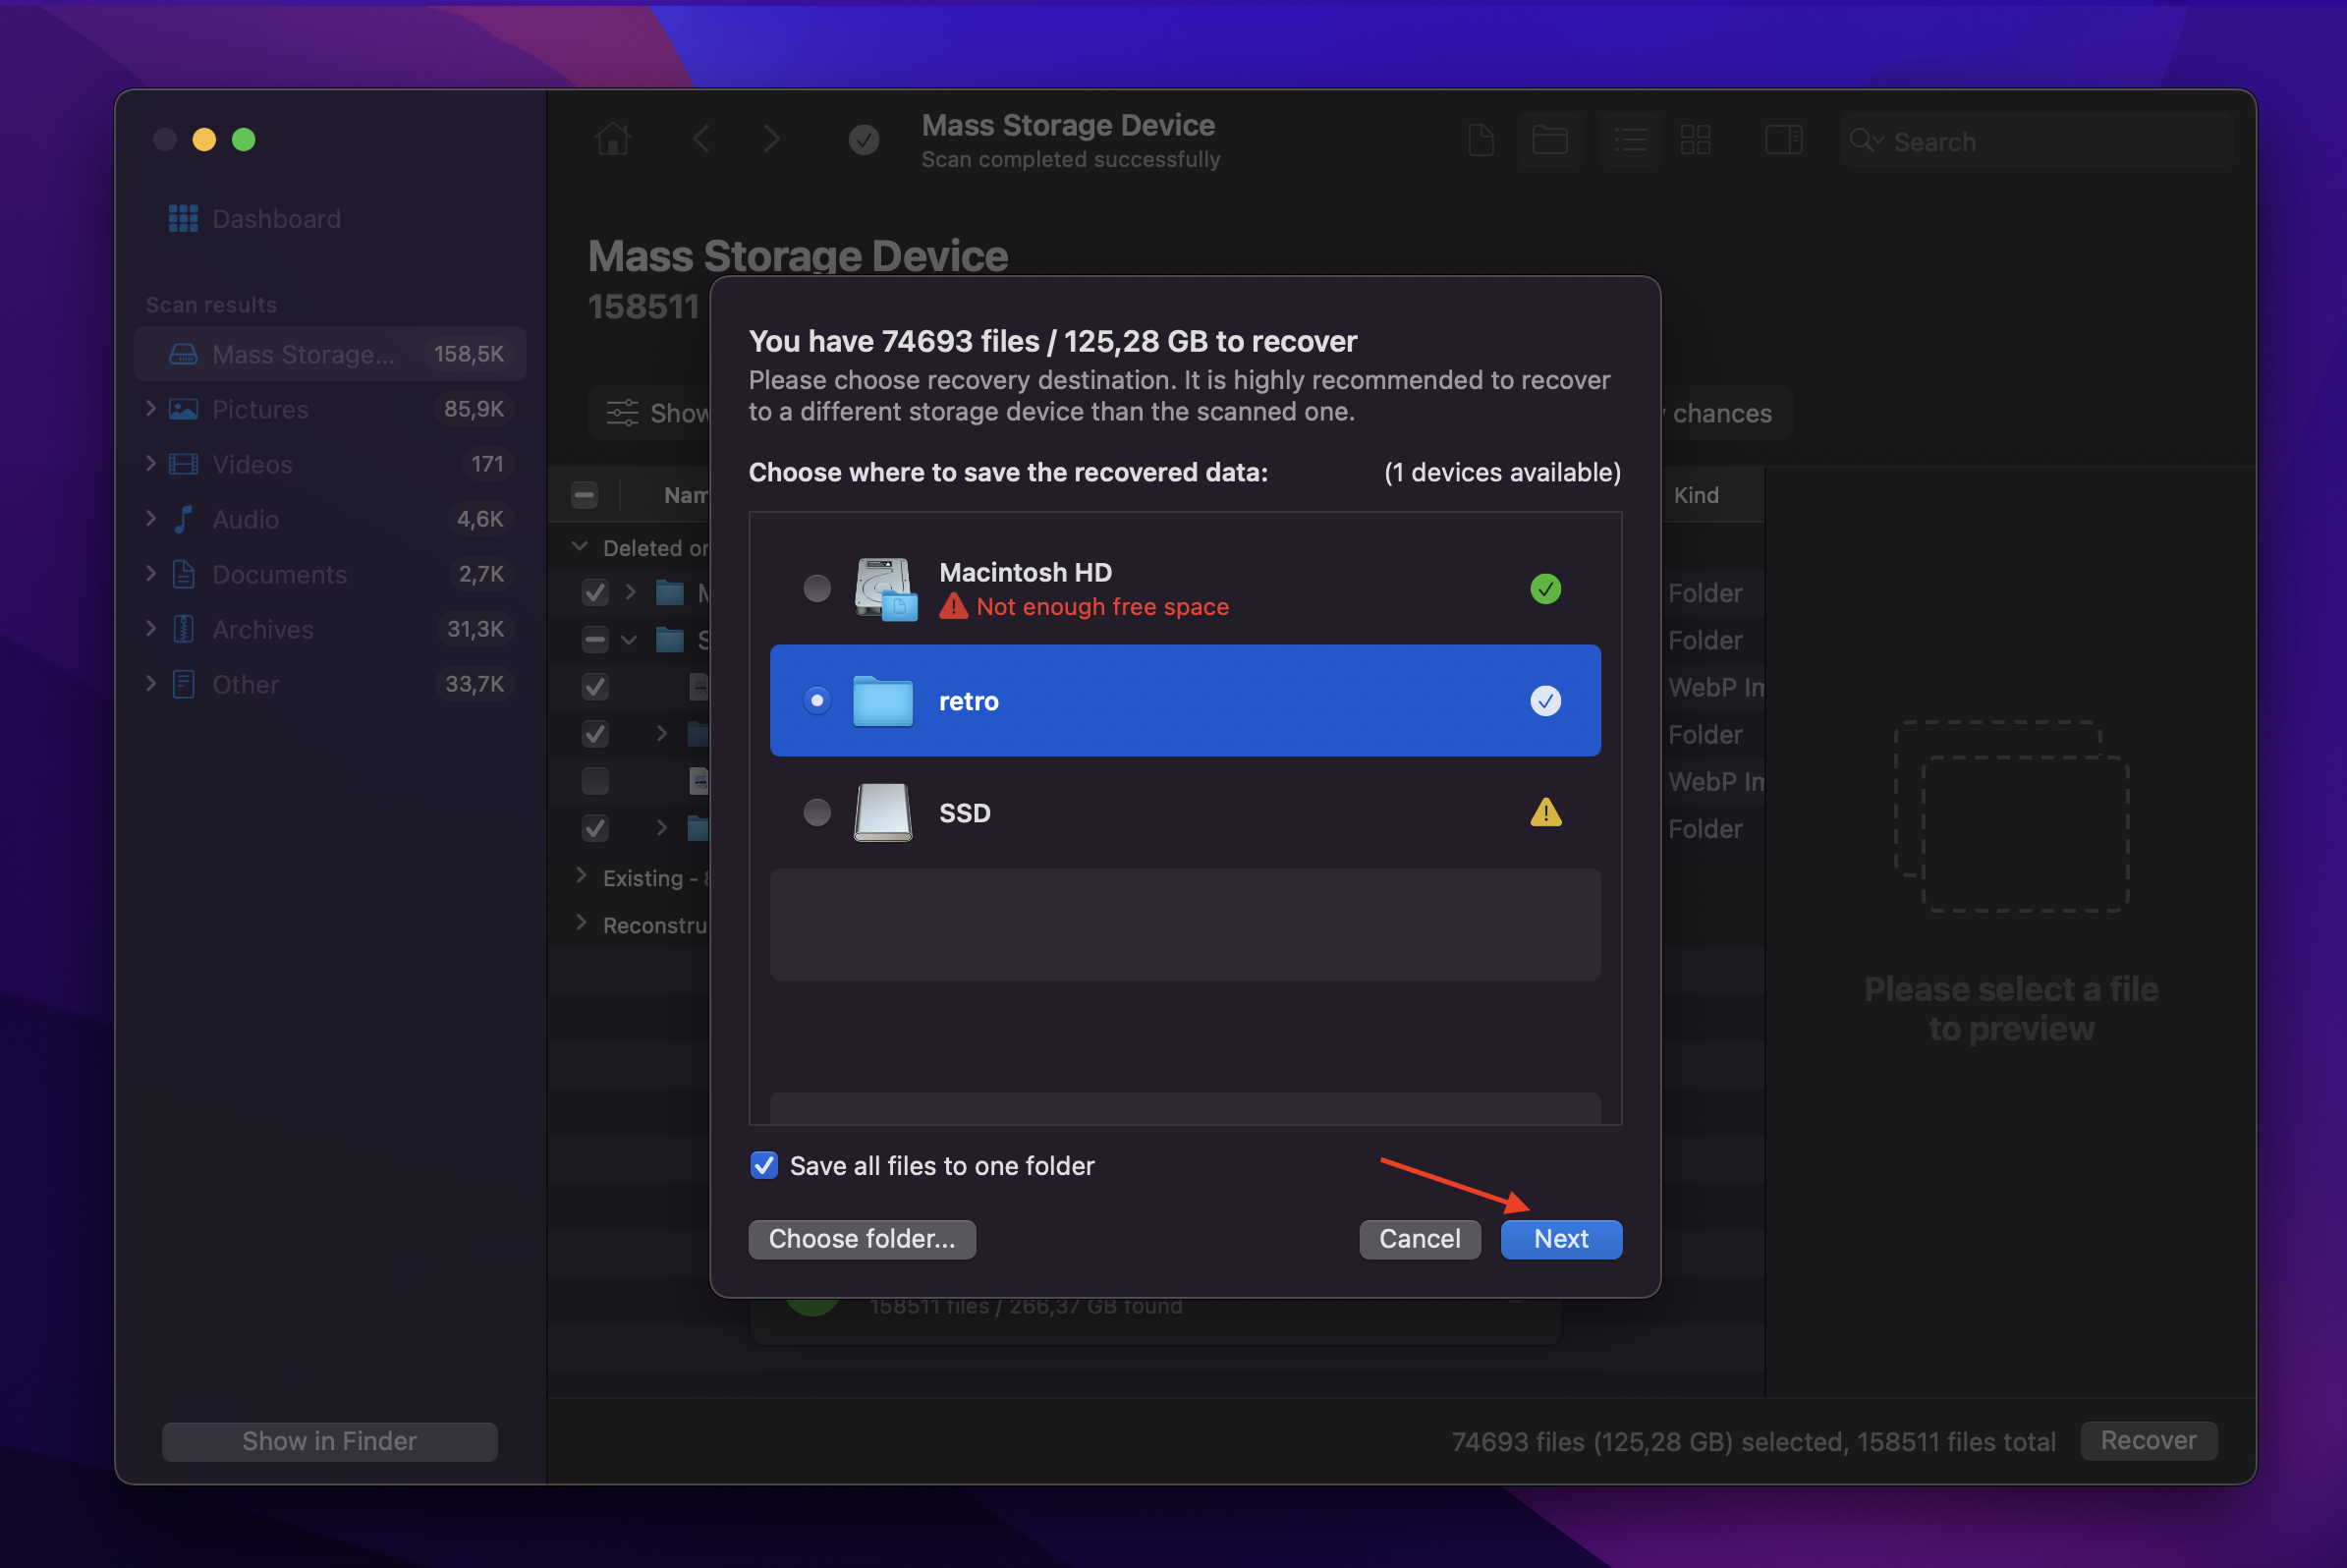
- Now, select the location where you want to save your recovered files. We recommend you choose a different drive than your Samsung Portable SSD to avoid overwriting data. You can also choose a particular folder where you want your files to be saved. After that, click Next.
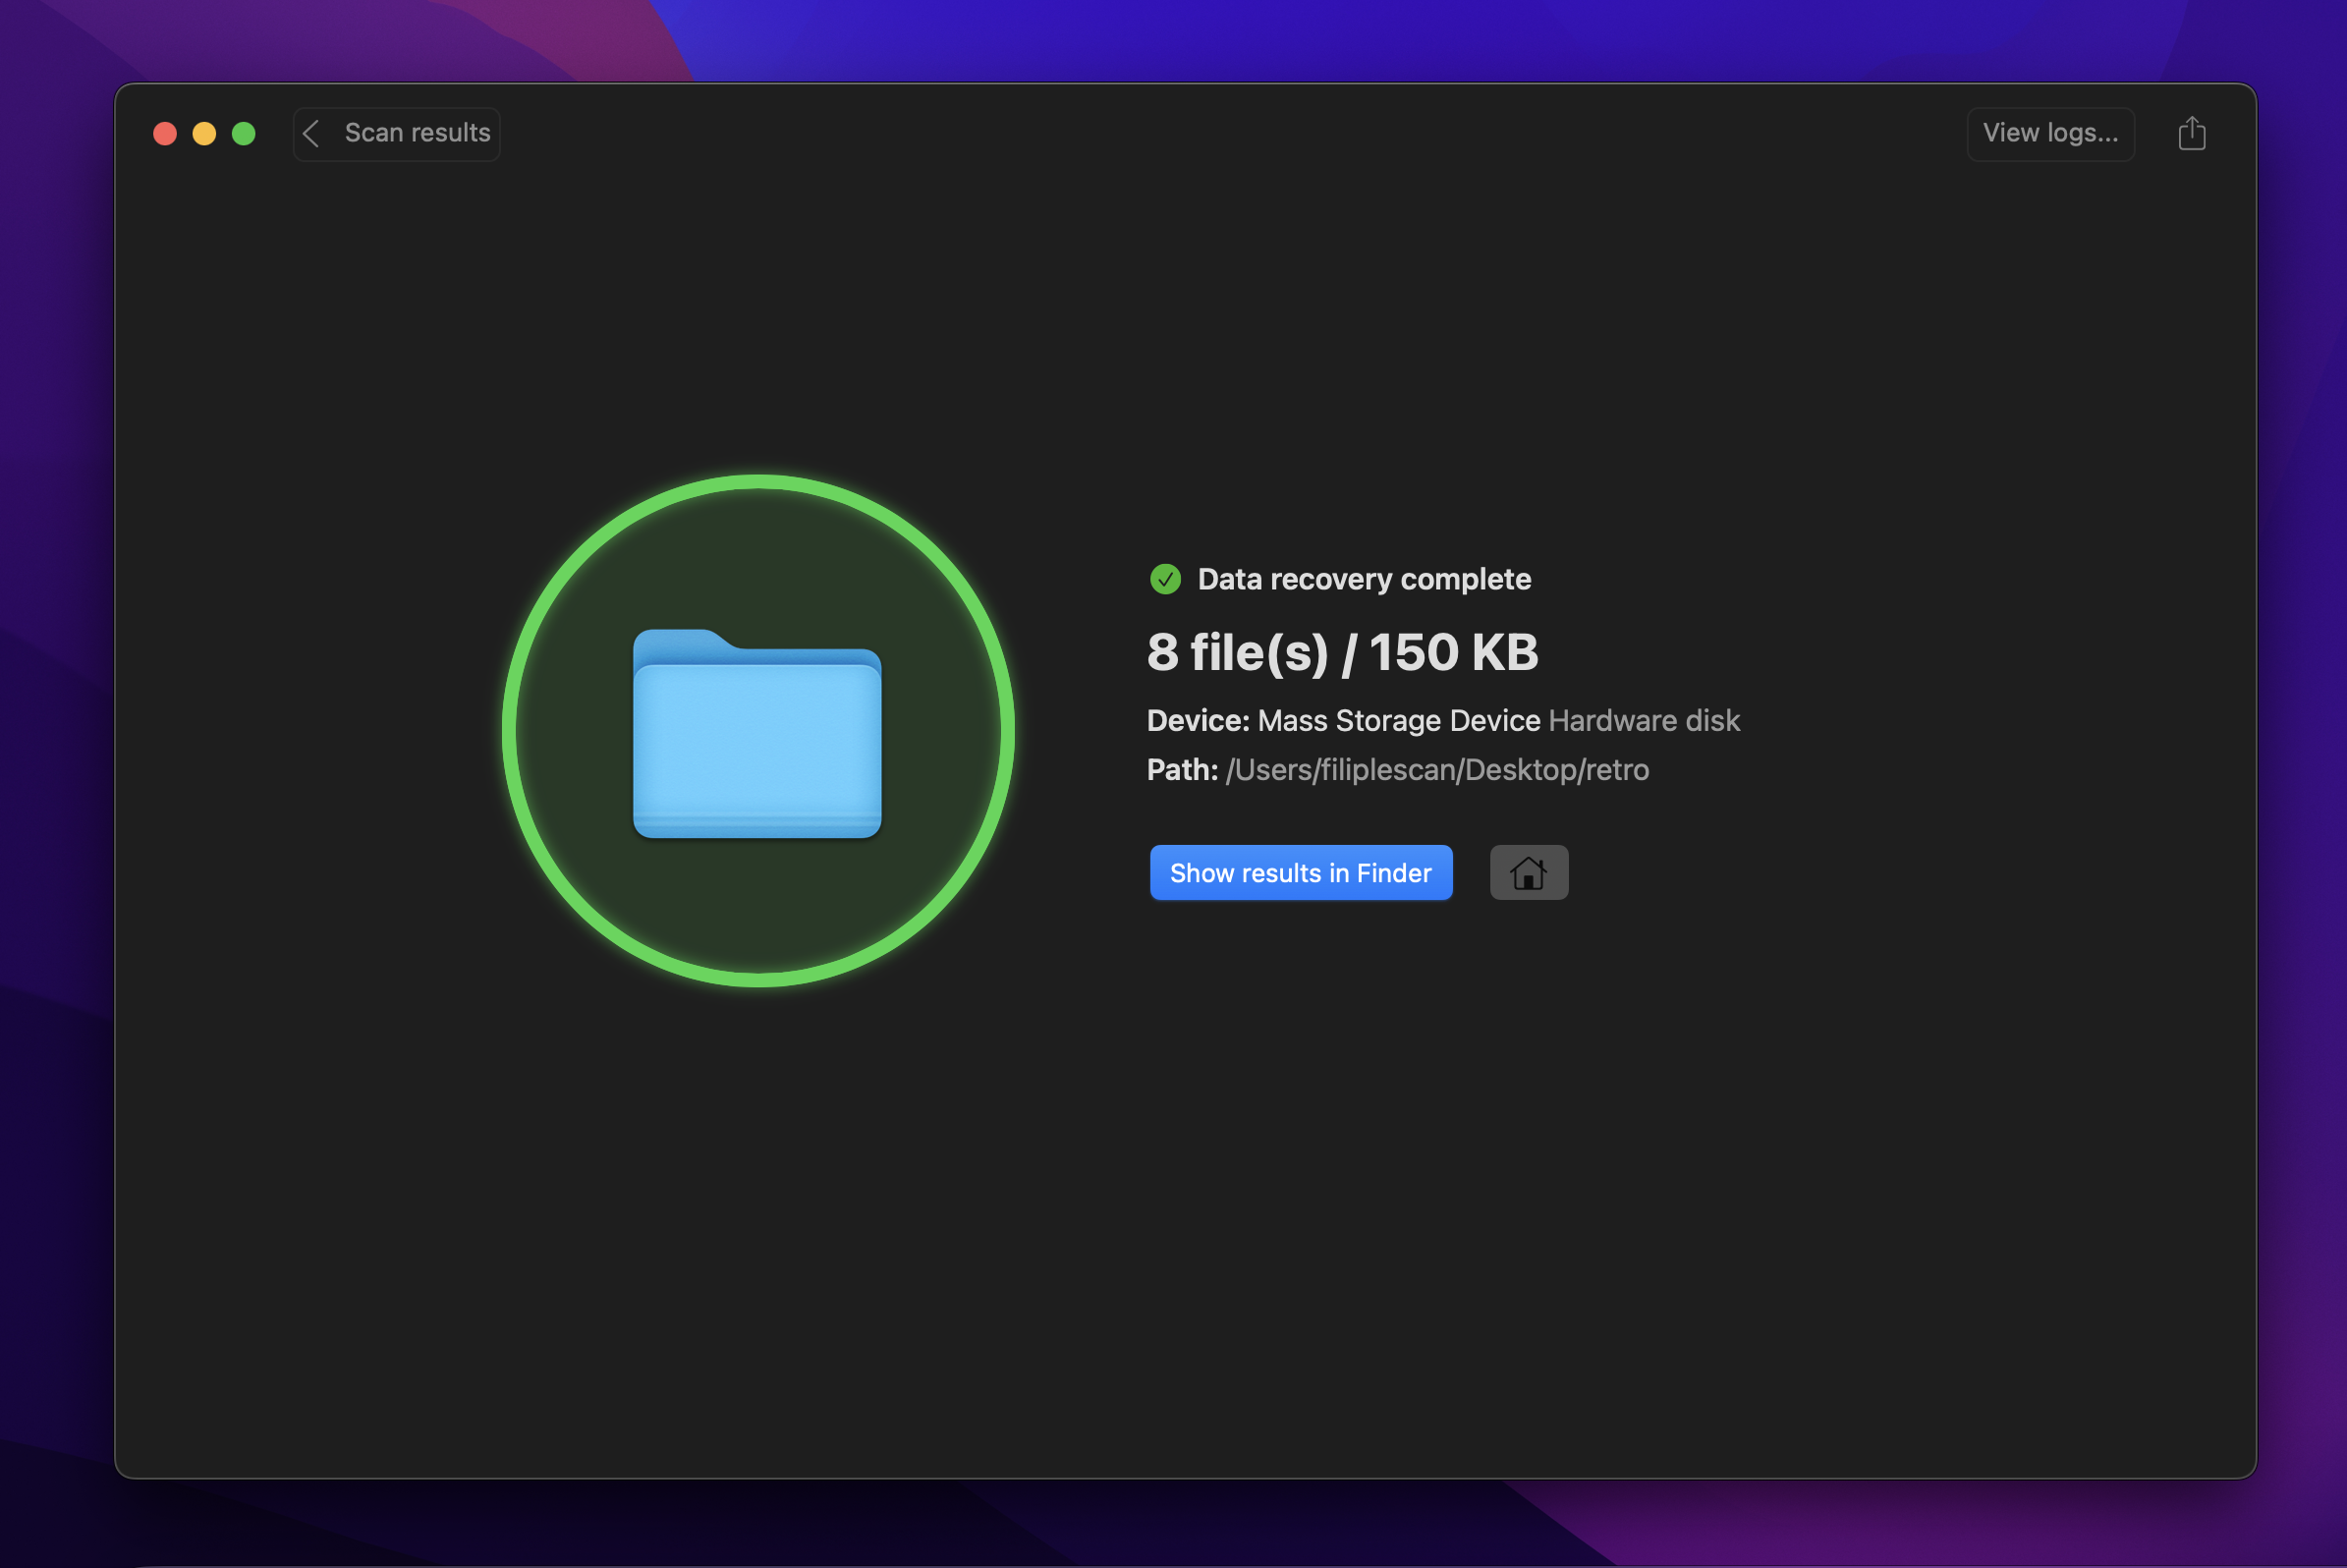
- Finally, Disk Drill will complete the recovery of your files. Once done, click Show results in finder.
Note that as long as the disk is selected in Disk Utility with the correct size, Disk Drill can scan it and retrieve existing or lost files. You can find out more about Disk Drill’s capabilities in our complete Disk Drill review.
Conclusion
Samsung Portable SSDs are not immune to connectivity issues on Mac, and they are more of a common occurrence than you think. There are different reasons why your SSD is not showing up on Mac, including connectivity issues, file system errors, and more. The good thing is that there are many ways to fix this problem.
But before trying our fixes, make sure to back up your files or recover them through data recovery software like Disk Drill. After that, you can safely try to repair your Samsung Portable SSD now showing up on Mac.
This article was written by Princess Lescan, a Staff Writer at Handy Recovery Advisor. It was also verified for technical accuracy by Andrey Vasilyev, our editorial advisor.
Curious about our content creation process? Take a look at our Editor Guidelines.