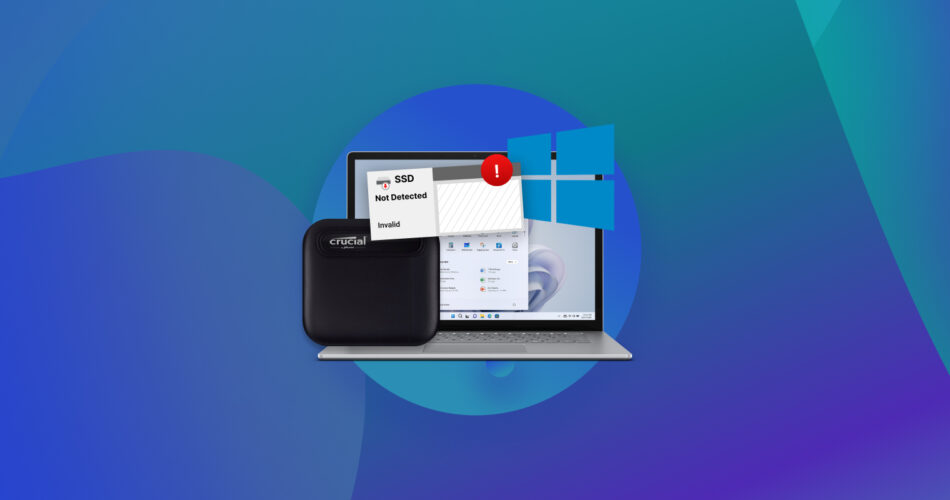
Windows is supposed to be plug-and-play, but sometimes your Crucial SSD is not detected at all. From potential BIOS configuration issues to simpler logical errors, this guide will provide a solution to each scenario.
We have used many of these fixes to repair corrupted SSD drives before, as that’s the usual reason for an SSD not showing up. Very rarely is the drive not detected at the BIOS level (especially for a brand-new Crucial SSD), but we will cover both scenarios. Of course, this is only a consideration for an internal SSD – external SSDs simply use USB ports to connect.
Common Reasons Why Your Computer May Not Recognize a Crucial SSD
- The disk is not initialized. A new Crucial SSD is often not initialized, ie. its storage space is “Unallocated”. Before Windows can write any files to it (or even open it as a drive), it needs to initialize the storage space with a proper file system. Old drives can sometimes end up this way as well due to a corrupted or damaged Master Boot Record (MBR).
- Volume letter is not assigned. Sometimes even when the disk is initialized, it does not show up since it has not been assigned a drive letter yet. The process is supposed to be automatic for a new drive, but sometimes it does not go smoothly. It is also possible for an old SSD to de-initialize due to corruption or system failure. In both cases, a volume letter can be manually assigned to the Crucial SSD
- The disk is not connected correctly. Just like with any peripheral device, not connecting the Crucial SSD properly with your PC can be the reason why it does not show up. For an internal SSD, this means confirming that it is mounted into the correct slot, while for an external drive, you need to firmly insert the USB cable.
- The device is disabled at the BIOS level. If you are installing a new Crucial internal SSD as a secondary drive on your computer, it is possible that this second slot is disabled in the BIOS, or configured incorrectly. For this, you need to navigate to the BIOS options and enable the drive to be used for storage, setting the correct SATA controller mode.
- Legacy BIOS mode and the disk is in GPT. There are two types of partition systems for bootable SSDs – GPT and MBR, with some old computers only capable of booting from MBR drives. This means even if you plug in a perfectly fine Crucial SSD with GPT partitions as your primary hard drive, the system might fail to boot up. To fix this you either need to change the boot mode to UEFI (which might require updating the BIOS) or reformat the drive with the legacy MBR system.
- Problems with the disk. Lastly, your Crucial SSD may not be detected because of actual hardware issues with the disk itself. The likelihood of this being the case depends on the age of the drive – SSDs do get worn out after a certain amount of usage, so it is possible for a very old Crucial SSD to stop working and not be detected. But for a new purchase, this is almost impossible unless it gets physically damaged.
How to Fix a Crucial SSD Not Detected in File Explorer
As we mentioned earlier, usually your Crucial SSD does not appear in File Explorer due to file system issues rather than any hardware or BIOS problem. So we will first deal with all the ways of fixing these logical issues with your SSD, and discuss the hardware solutions in the next section.
Note: As these methods involve reformatting or reinitializing your SSD, any data already present on it will be lost. If you are looking to recover data from a Crucial SSD that cannot be detected, refer to our dedicated section at the end of this guide.
Method 1: Initialize Your SSD
When your Crucial SSD does not show up in the File Explorer, the first thing to try is to initialize it. Especially if this is a newly bought SSD you are yet to use on another machine.
- To initialize (or reinitialize) your Crucial SSD, open Disk Management by searching for it from the Start menu. In Windows 11, it appears as “Create and format hard disk partitions”.

- The initialized disks and partitions are shown on the top section of the window. All disks are listed in the bottom section, with any that are not initialized but detected by the BIOS showing up as “Unknown”. Right-clicking on it gives you the option to Initialize Disk.
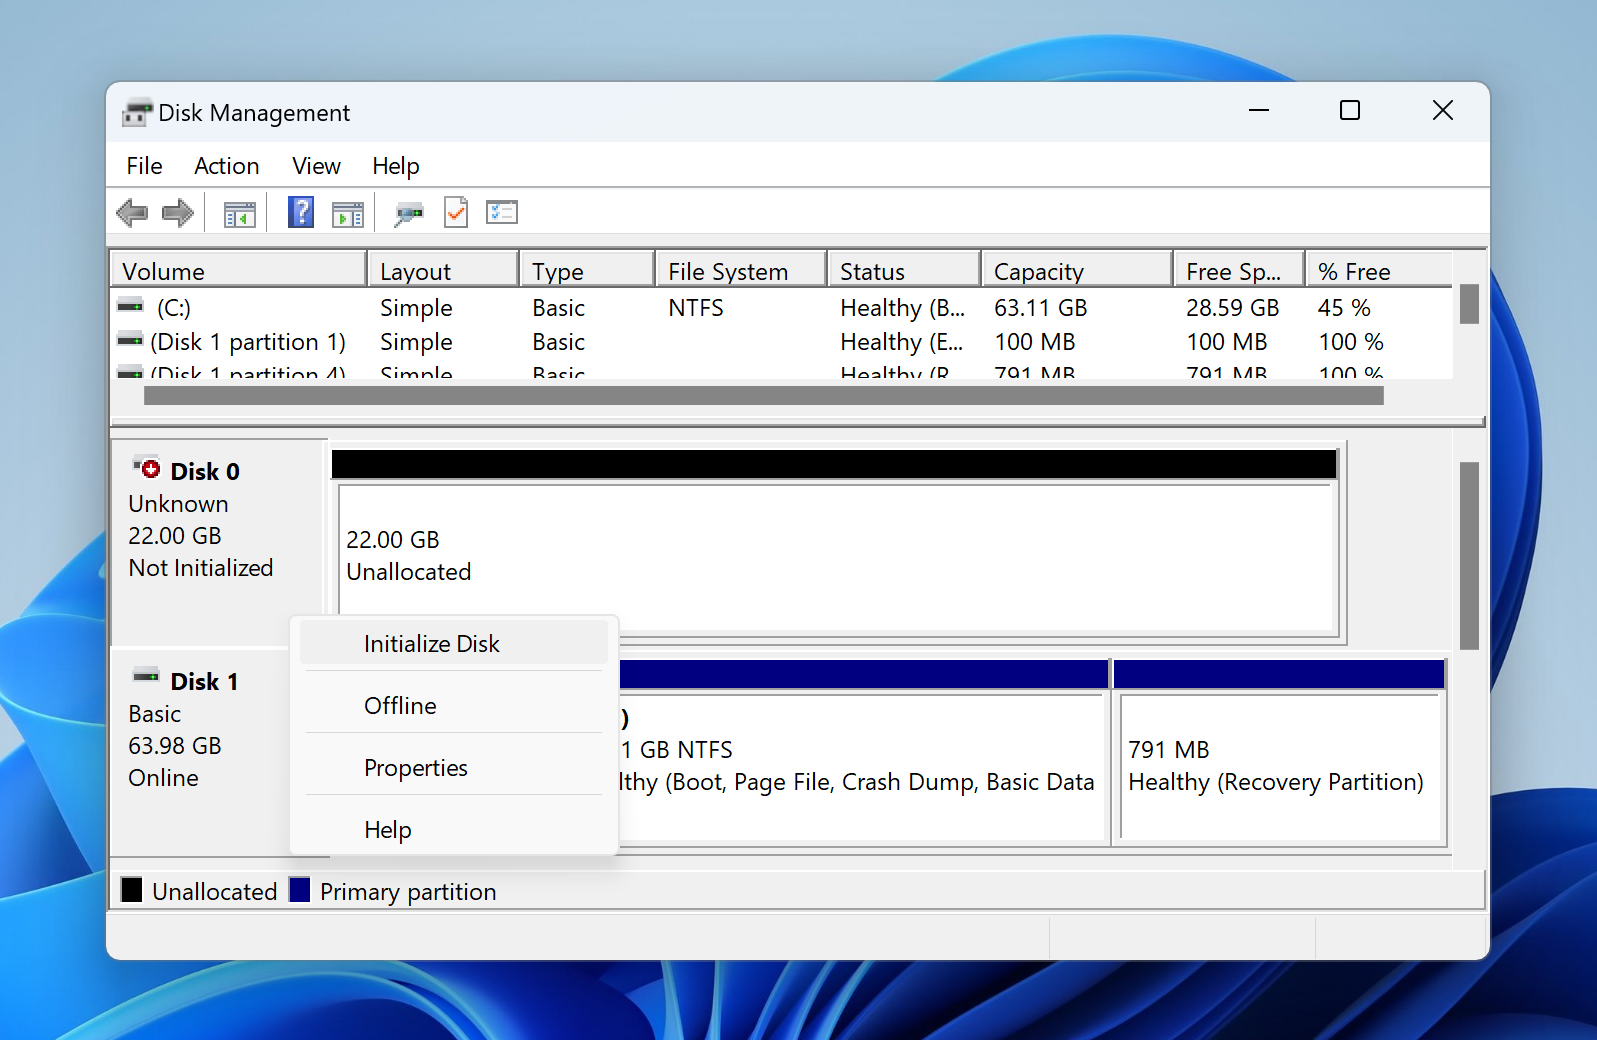
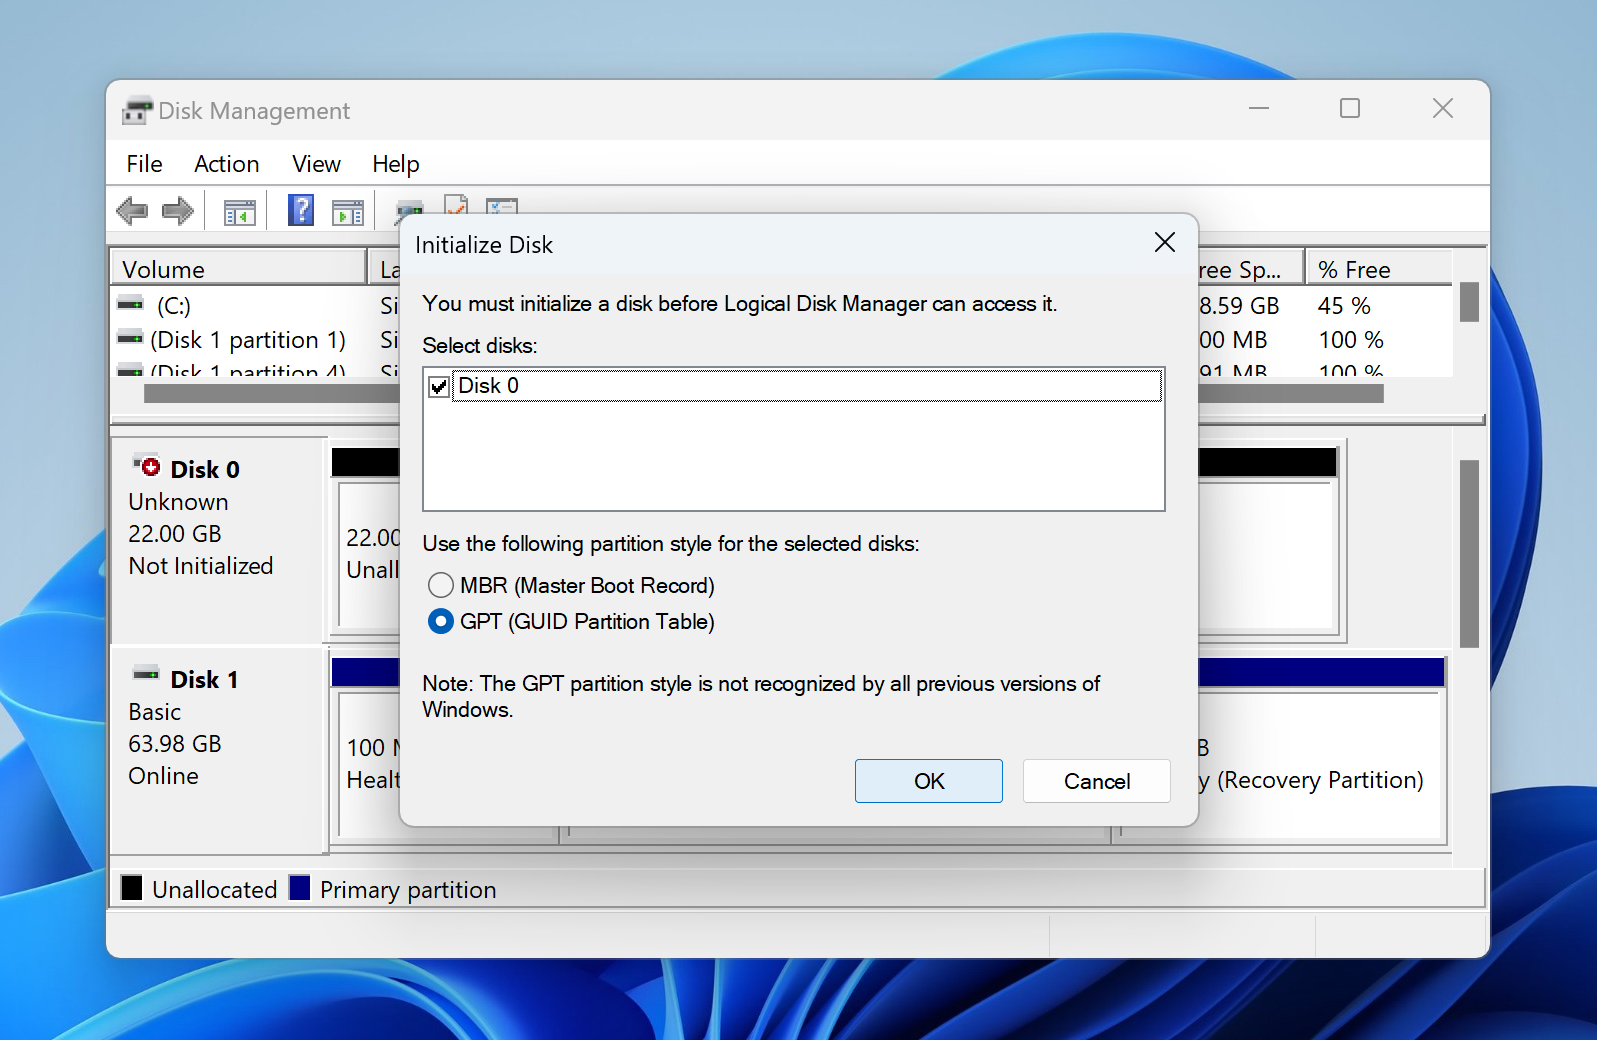
- The Initialize Disk window will simply ask you to choose the type of boot system to initialize it with. Master Boot Record (MBR) is the most widely supported legacy solution, while GUID Partition Table (GPT) is more flexible, but only supported by UEFI-compatible computers.
Method 2: Assign a Drive Letter to Your SSD Volume
If your Crucial SSD shows up initialized in Disk Management but simply lacks a drive letter, you have to manually assign one to it. It might be worth it to change the drive letter even if it has one, in case a conflict with another storage device is causing it to not show up.
- To change the drive letter of your Crucial SSD (or assign it one), open Disk Management. You can search for it in the Start Menu.

- Right-click on the drive that represents the SSD and select the Change Drive Letter and Paths option.
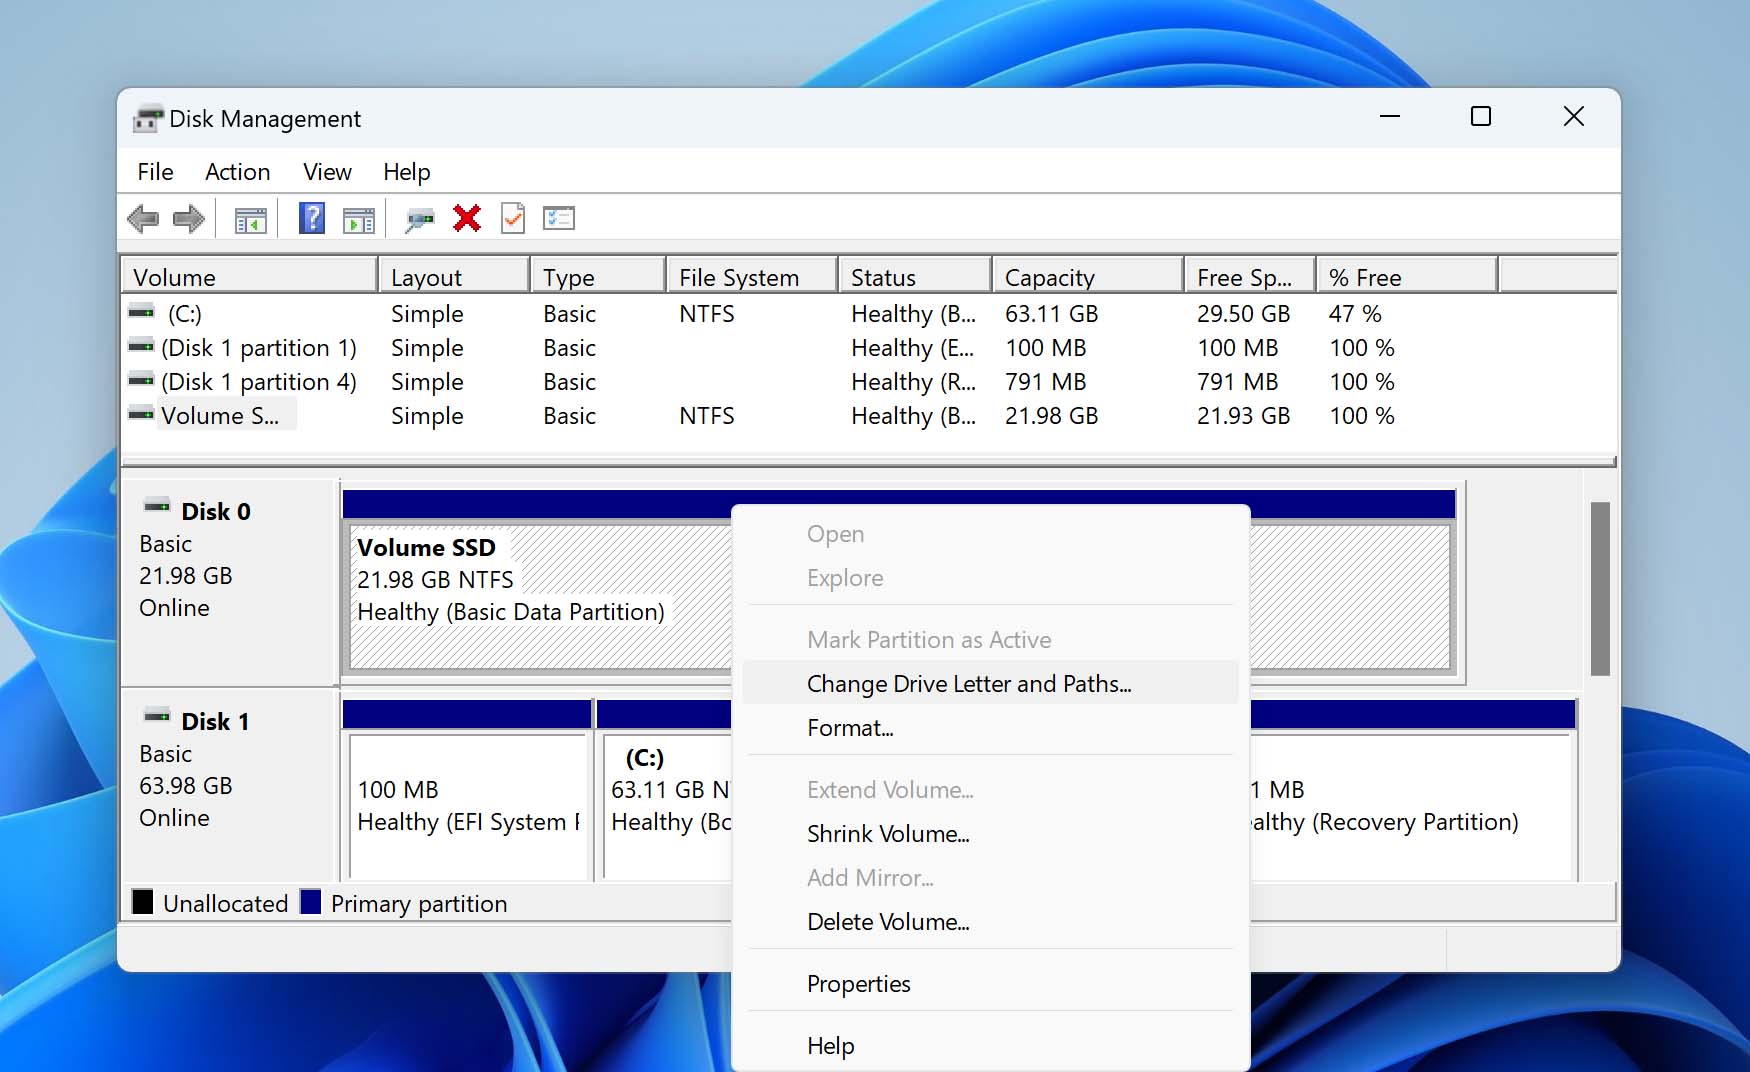
- A smaller window will open, giving you the option to add a drive letter, change it, or remove it. Select Add for now.
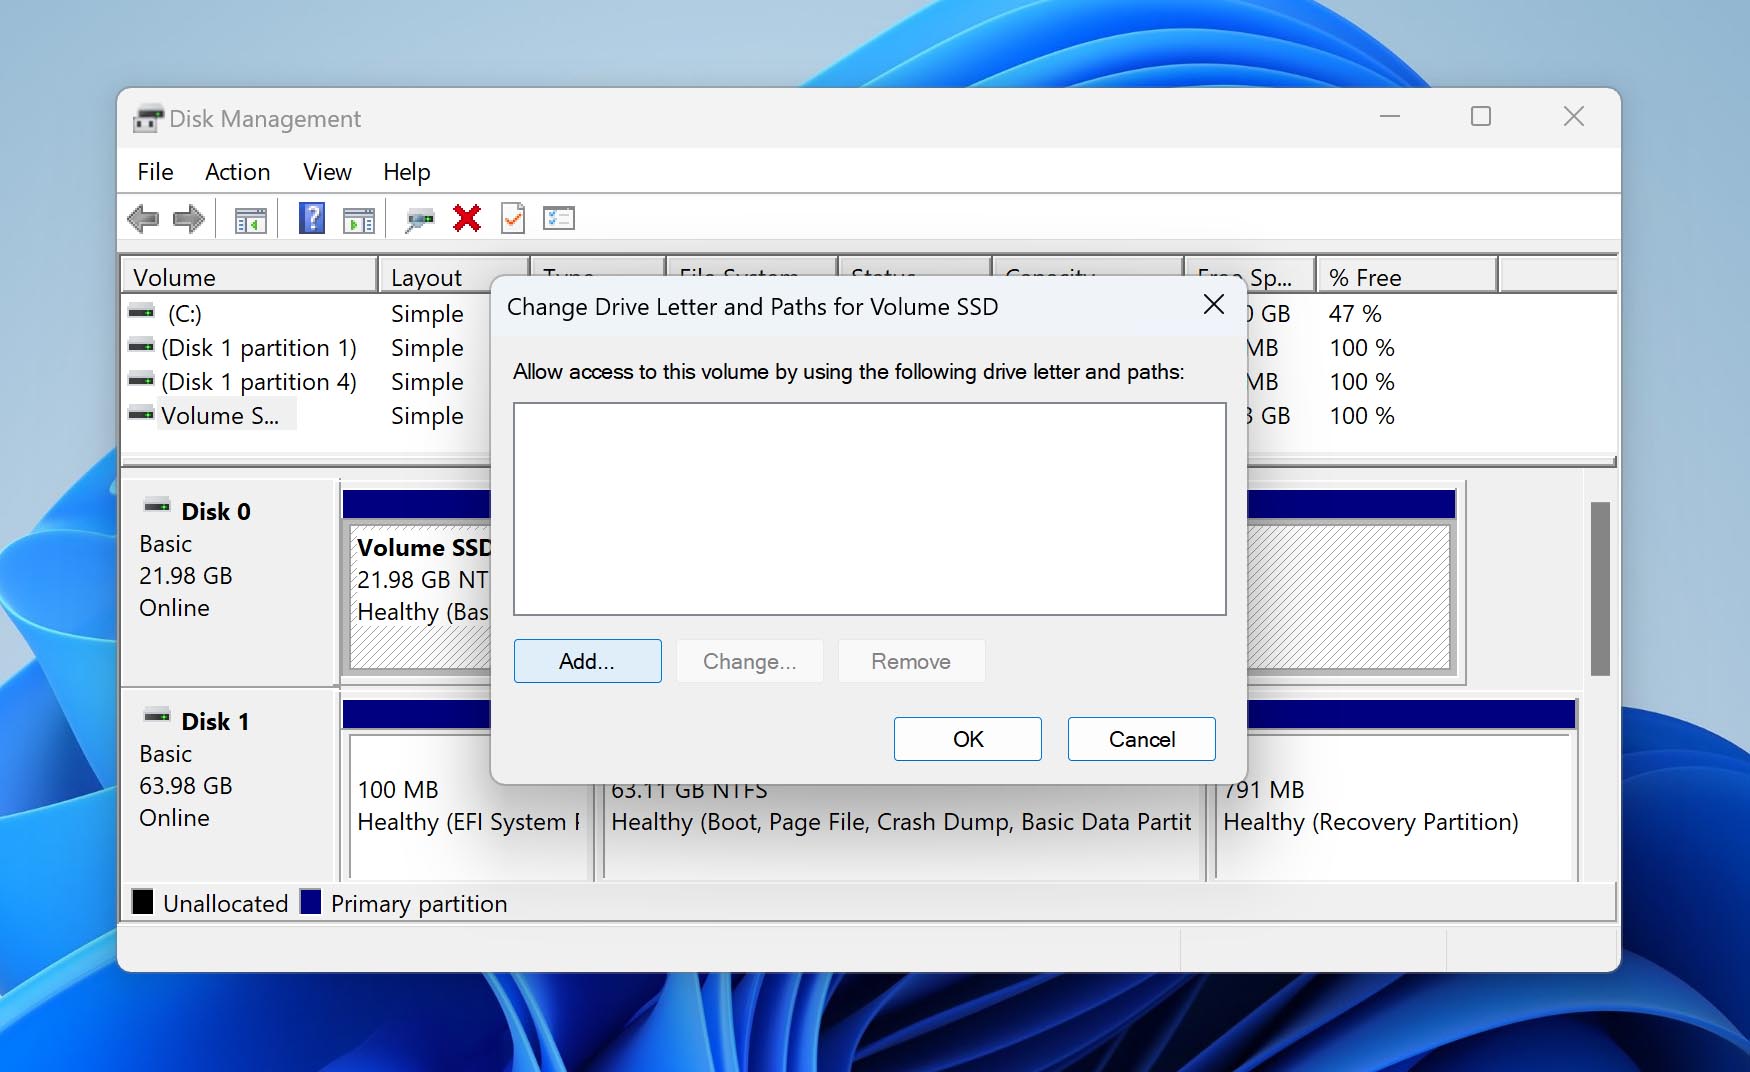
- Now you can set the new drive letter from the drop-down menu. Hit OK and the drive letter will be immediately added.

Method 3: Format Your SSD
Sometimes, your Crucial SSD is initialized, but due to a broken file system, it shows up as “RAW”. Alternatively, SSD can have an unsupported file system. For both scenarios, the solution is to format the drive.
Formatting makes the drive usable for storage on your Windows computer by giving it a compatible file system. Even older drives that fail to be detected can be fixed by formatting them to replace their damaged or corrupted file systems. However, formatting also leads to the loss of any data already on the drive, so be sure to recover it first (we’ll cover this later in the article) or create an image (backup) of your drive before proceeding.
You can format a drive from the File Explorer itself, but as this guide deals with disks not being detected, we will show you how to format it when it’s not showing there.
- Open Disk Management from the Control Panel or the Start menu.
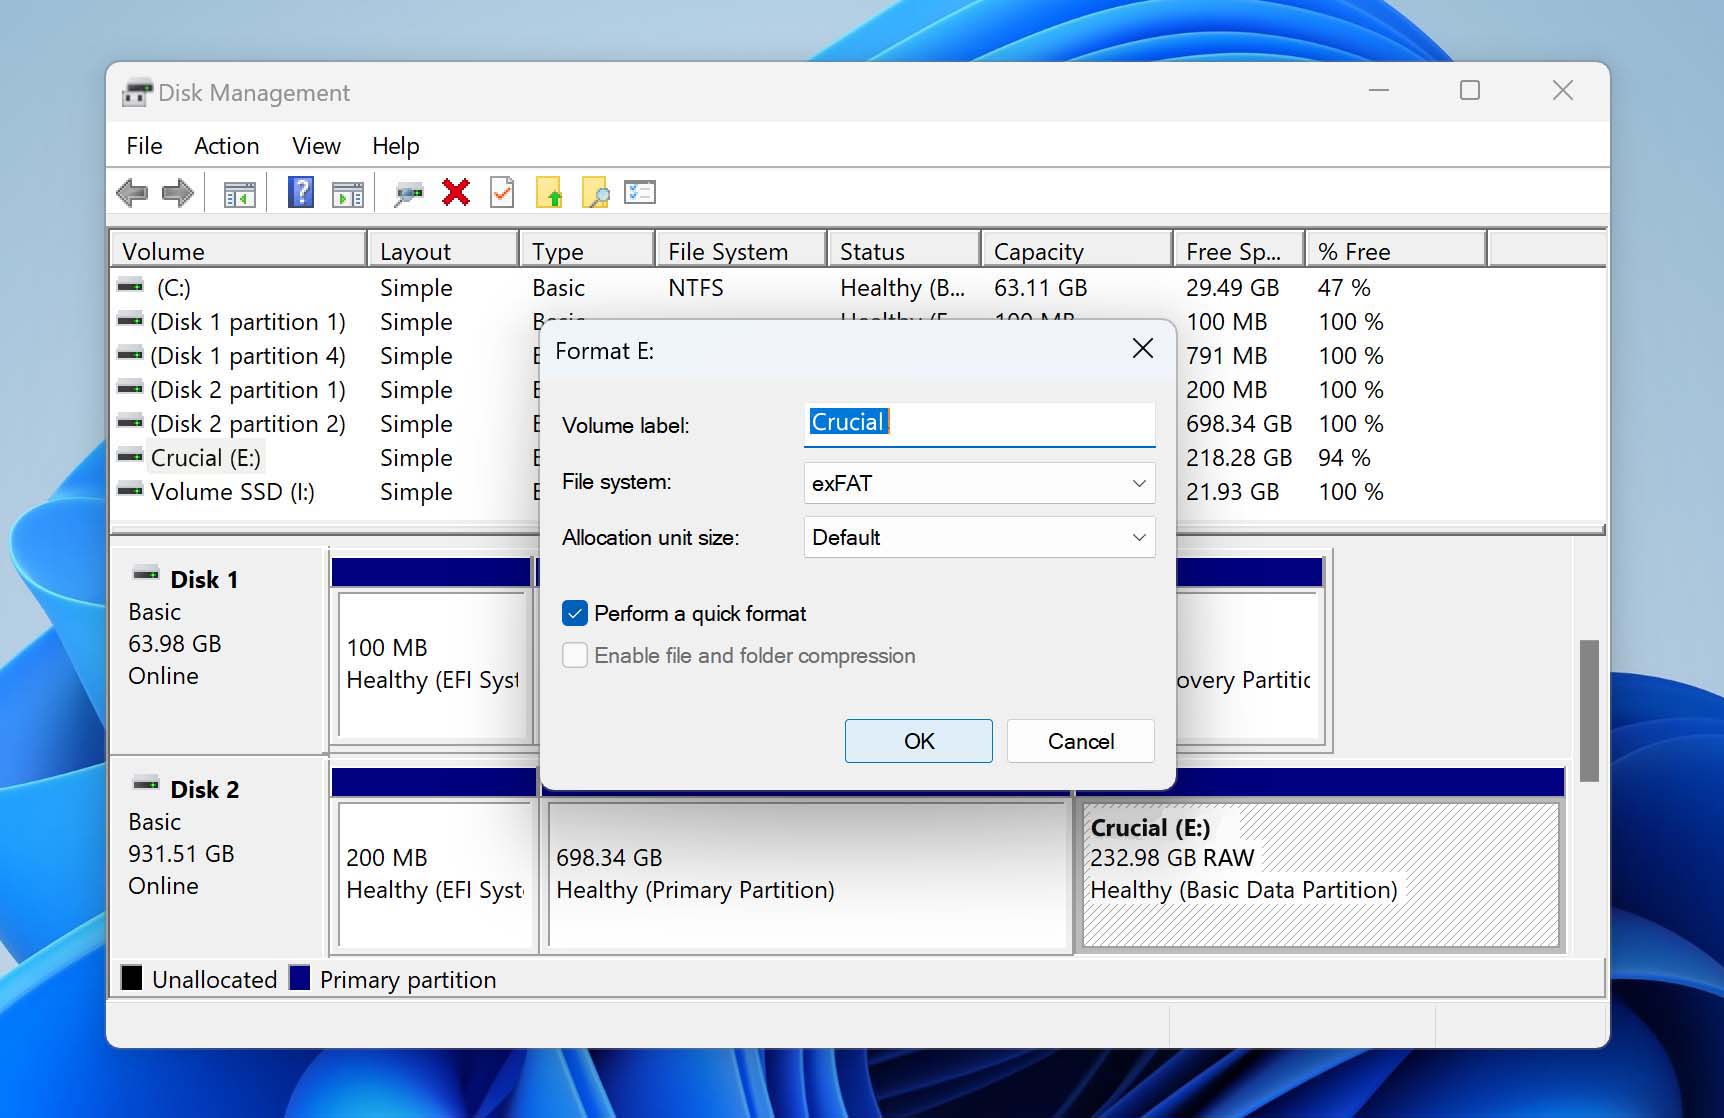
- From the disks listed below, locate the one representing your Crucial SSD. Right-click on that disk’s volume (the area on the right representing its storage space) and select Format.
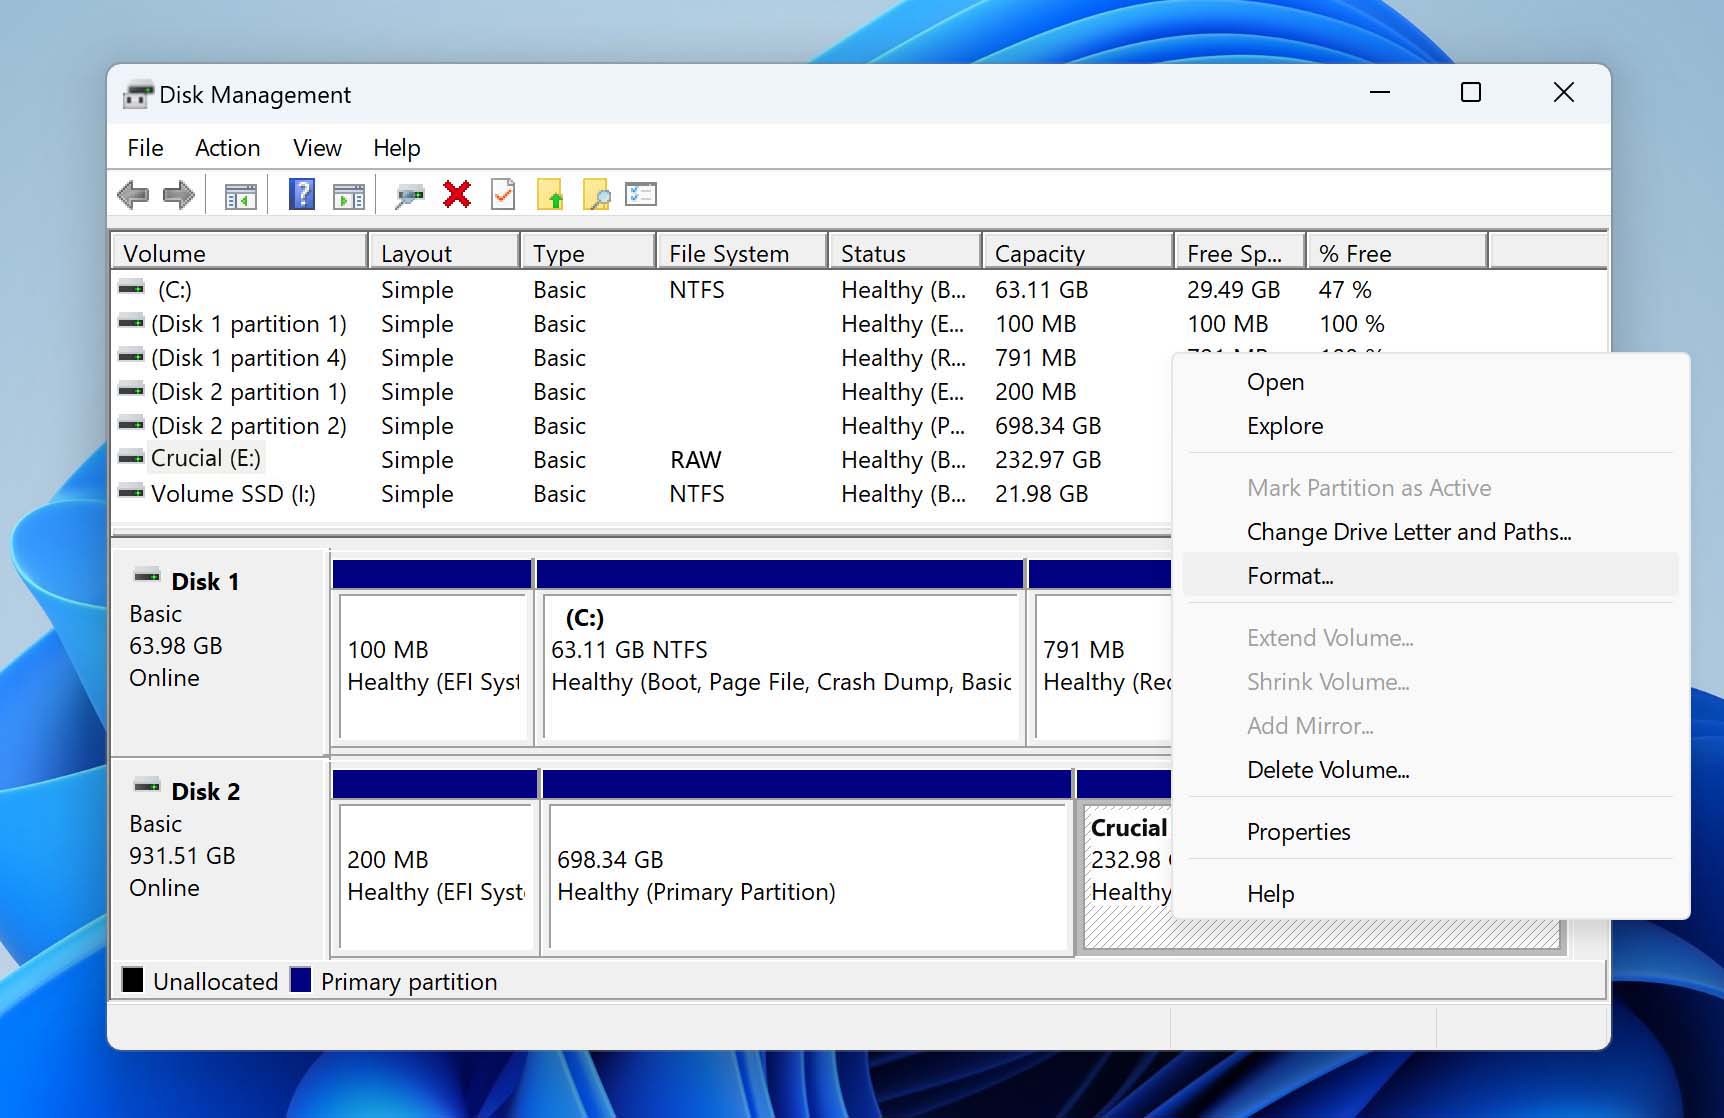
- In the new window that opens you can specify the File System and other formatting options. Once you are satisfied, click on OK. The drive will be formatted.
How to Fix a PC Not Recognizing a Crucial SSD in BIOS/UEFI or Disk Management
If you tried using the methods of the last section and noticed that your Crucial SSD did not show up in Disk Management either, you are dealing with a more fundamental issue. This can mean two things – either the disk is physically not being detected (poor connection, dead drive) or there is a mismatch in the BIOS settings.
Let’s take a look at both issues.
Option A: Ensure Proper Connection
For the Crucial SSD to be detected by the system, it needs to be interfaced properly. For an external SSD this is easy – just make sure the USB cable is firmly plugged in. Verify the port itself is functioning by inserting a different device as well.
For an internal Crucial SSD, this boils down to proper installation. Whether your SSD is M.2 or SATA, the drive needs to be properly attached to its dedicated slot. For newer M.2 drives, you need to insert your SSD so that the gold contacts and the notch line up with the slot perfectly. For SATA drives, the connection involves cables instead of contacts.
A properly installed SSD will not shake or budge once it is firmly secured, so if your drive is still hanging loose, you are not doing it right. If you are finding it tricky, get a professional to install the Crucial SSD for you.
Option B: Configure BIOS Settings
Once you are sure that your Crucial SSD is perfectly connected, it is time to check out the BIOS settings. Keep in mind that this only applies to an internal SSD – an external SSD connected through the USB slot is just treated as removable storage and does not require any BIOS configuration.
For an internal SSD, however, the drive should show up in the BIOS boot menu. In case it is missing from the options there, the SATA controller mode might be incorrectly configured.
The exact options for doing this can vary from one manufacturer to another, so you will need to scroll through the BIOS settings to find a SATA controller mode option and select IDE or AHCI. Often there is also an option to disable the HDD entirely, so make sure that is not the case as well.
If the problem is that Windows fails to boot from the Crucial SSD, it is also worth looking at the boot mode itself. For newer GPT drives, you need to enable UEFI booting. In case your BIOS is too old to support this option, your only recourse is to update the BIOS or reformat the SSD with legacy MBR partitions.
How to Recover Data from a Crucial SSD Not Showing Up in Windows File Explorer
When your Crucial SSD shows up in Disk Management but cannot be accessed through the File Explorer, this points toward a file system issue. While you can fix this problem by reinitializing and reformatting the drive, that will also erase any data already on it. It is also possible for the disk to show up in the File Explorer but with no storage space.
So is there any way to recover data from an SSD like this?
Yes, there is. Many data recovery tools can scan such drives even when they are not visible in the File Explorer, and recover any lost data. Disk Drill, for example, can recover files from any drive that is detected in Disk Management with the correct size.
And don’t worry; we have tested this app extensively, and Disk Drill is safe to use for recovering any kind of data from your Crucial SSD. It is also free to use for the first 500MB of data recovery, which is more than enough to restore your important files (simply scanning the drive to check which files can be recovered is totally free).
- To recover data from an undetected Crucial SSD in Windows, install Disk Drill from the official website.
- After installing Disk Drill, run the program and proceed through the startup instructions to arrive at the main screen. This lists all the drives connected to your computer, even when they are not showing up in the File Explorer.
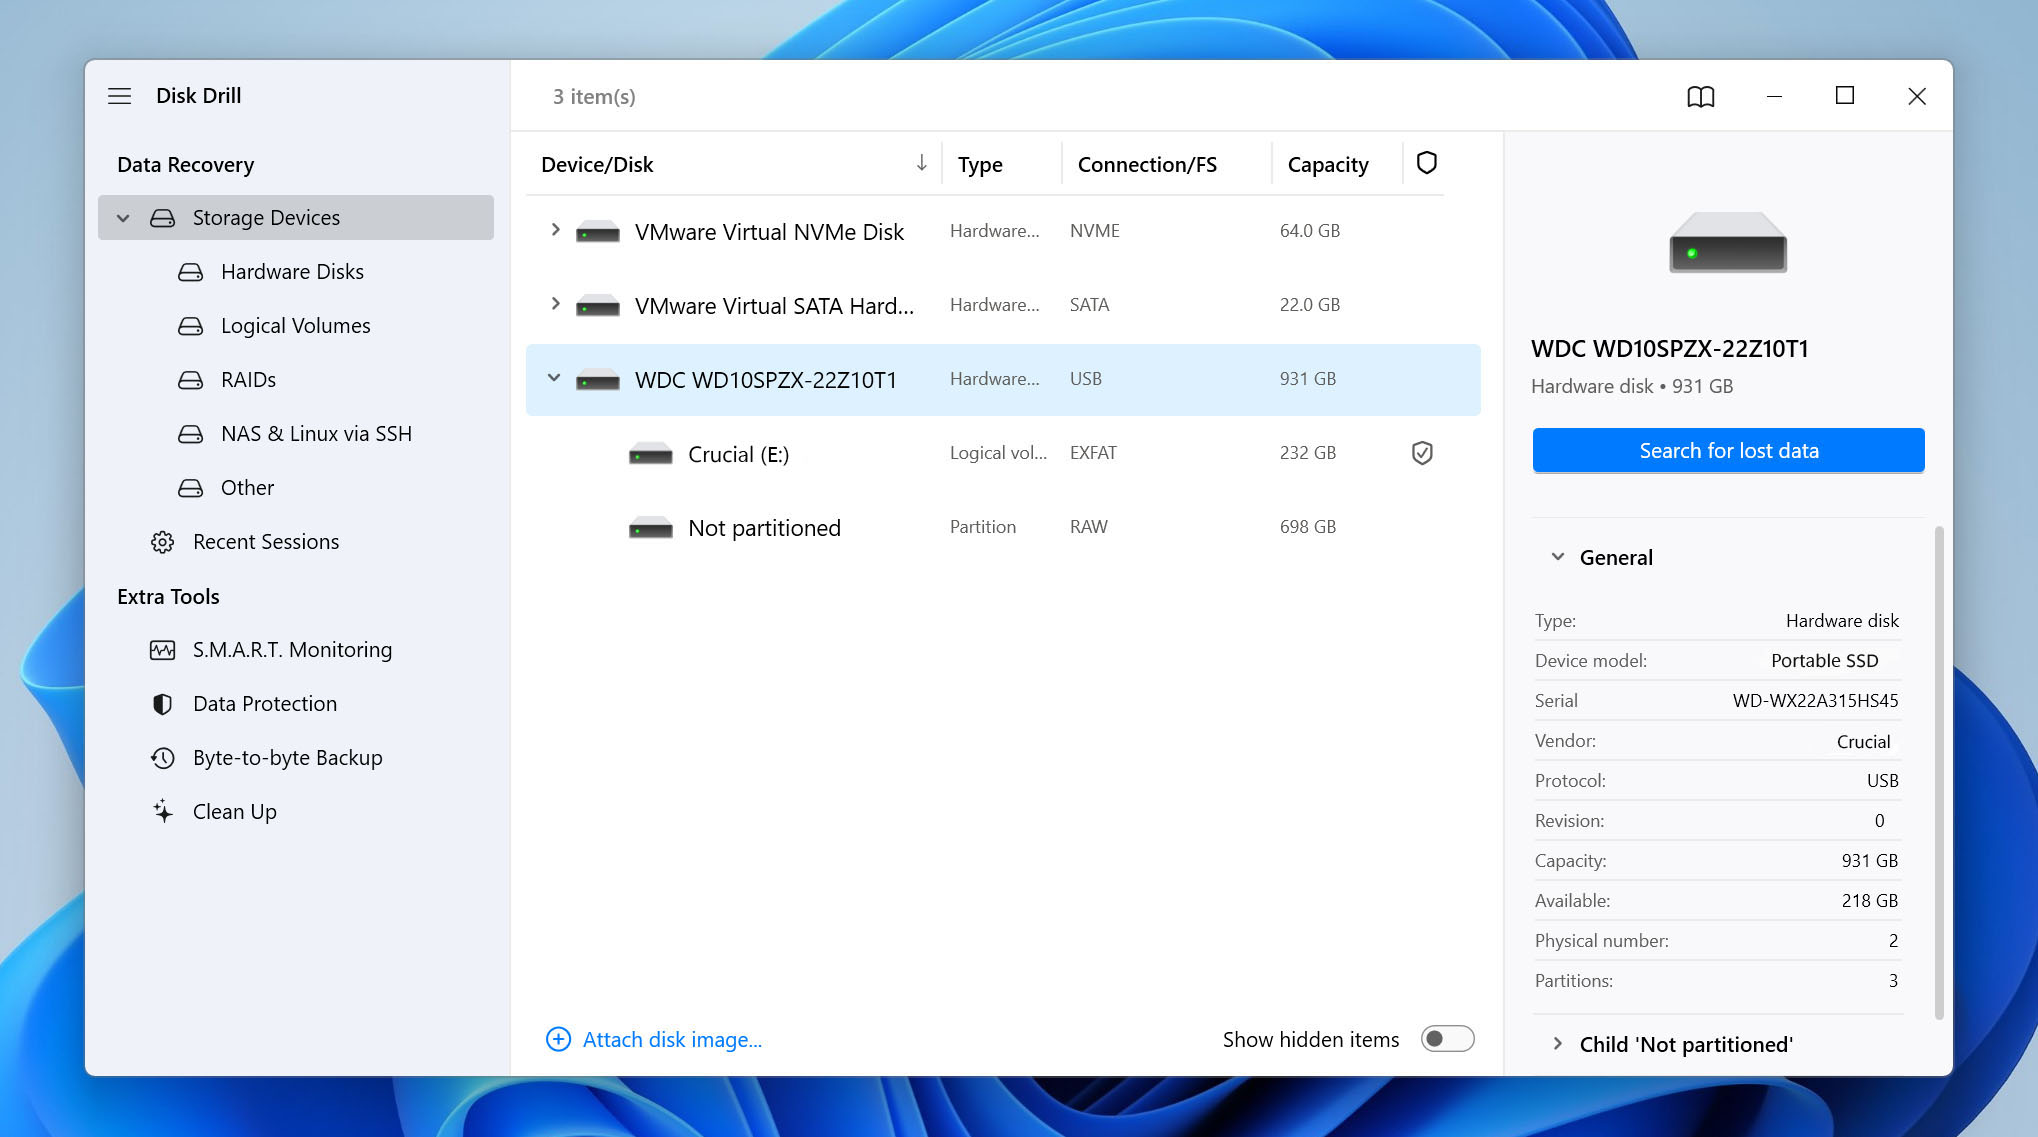
- Select your Crucial SSD to scan and click on the Search for lost data option.
- As Disk Drill scans the drive, it will sort the findings into categories. For drives that are not detected, it will often find entire partitions.
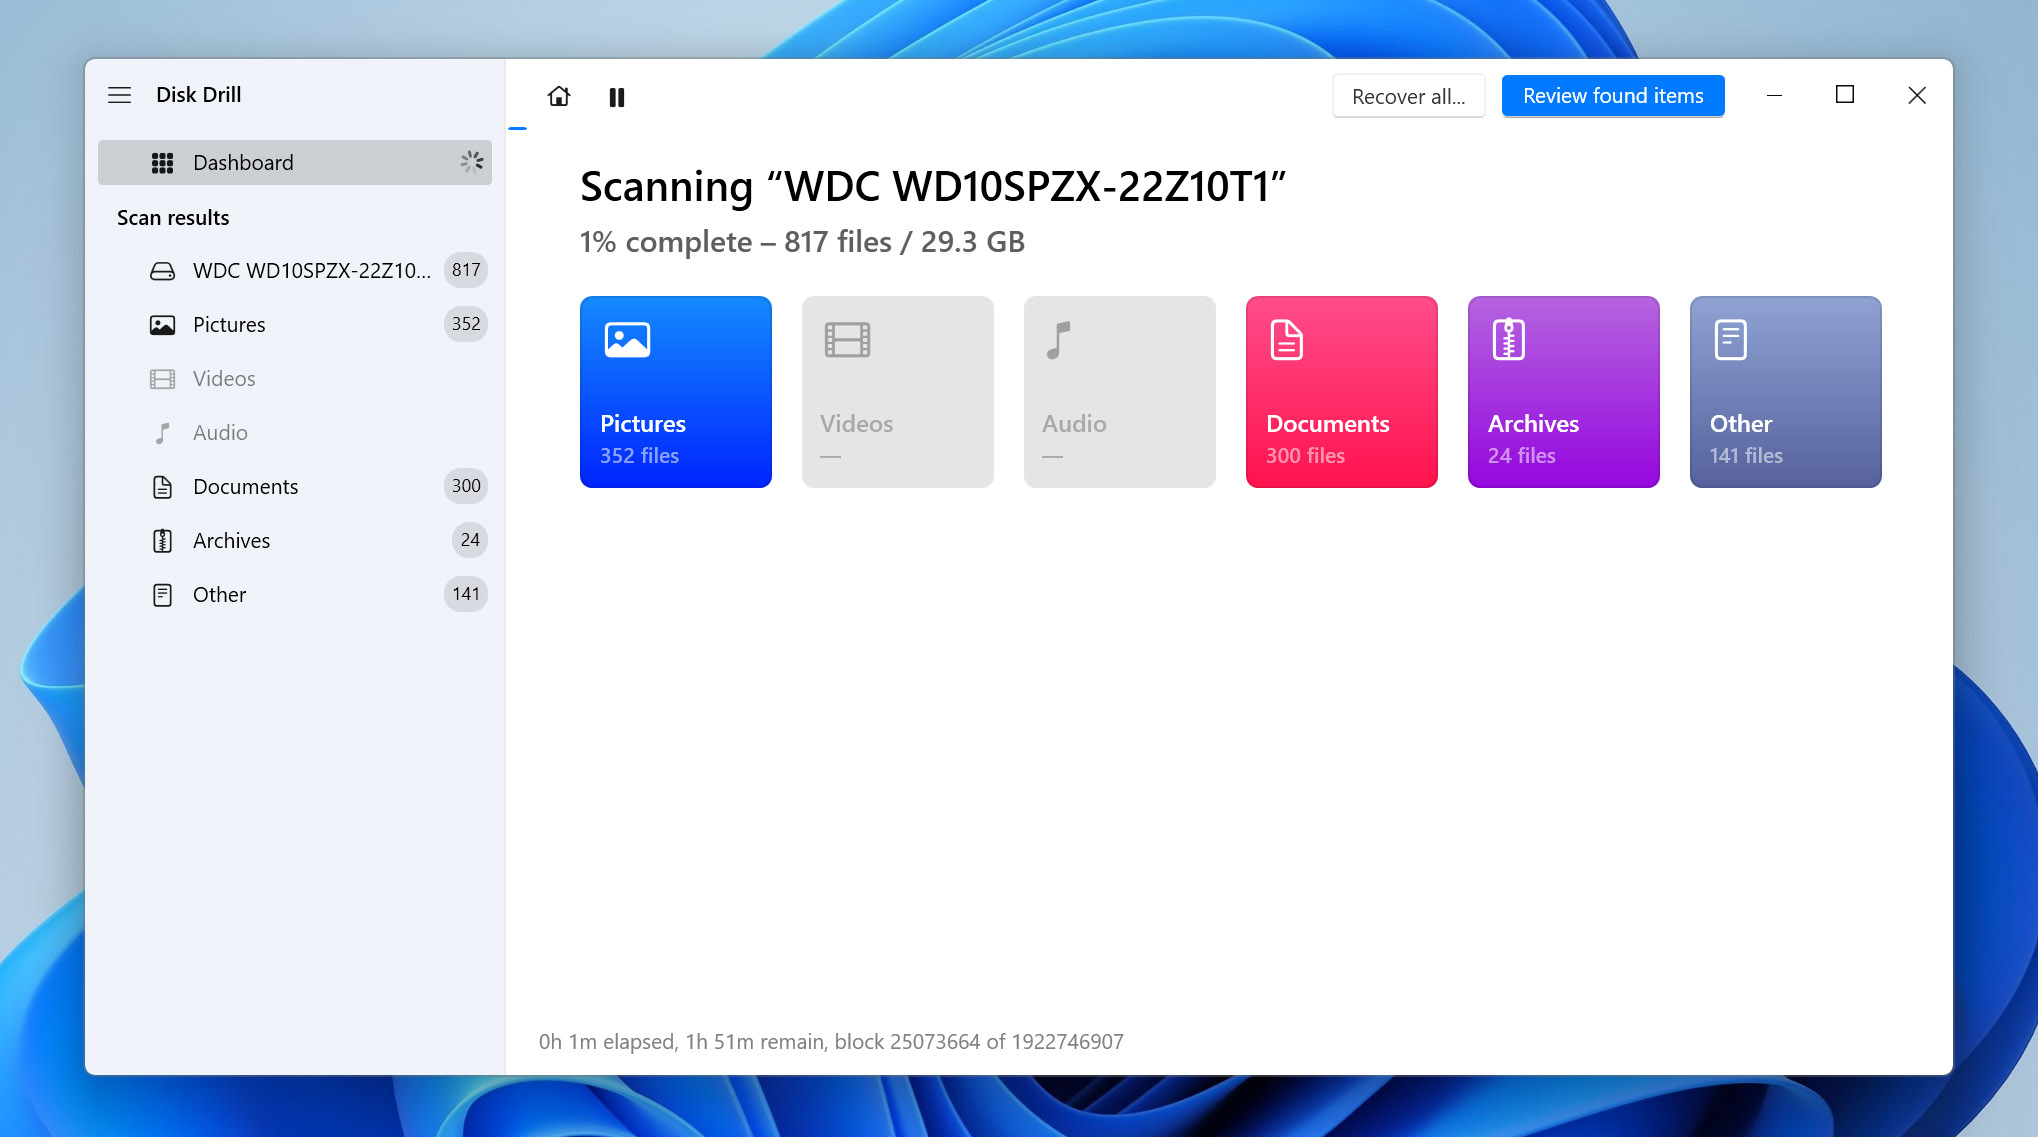
- At any point during the scan, you can use the Review found items button to check out the files that were found. Still, it is recommended to wait for the scan to complete, as this gives you a complete idea of what can be recovered.
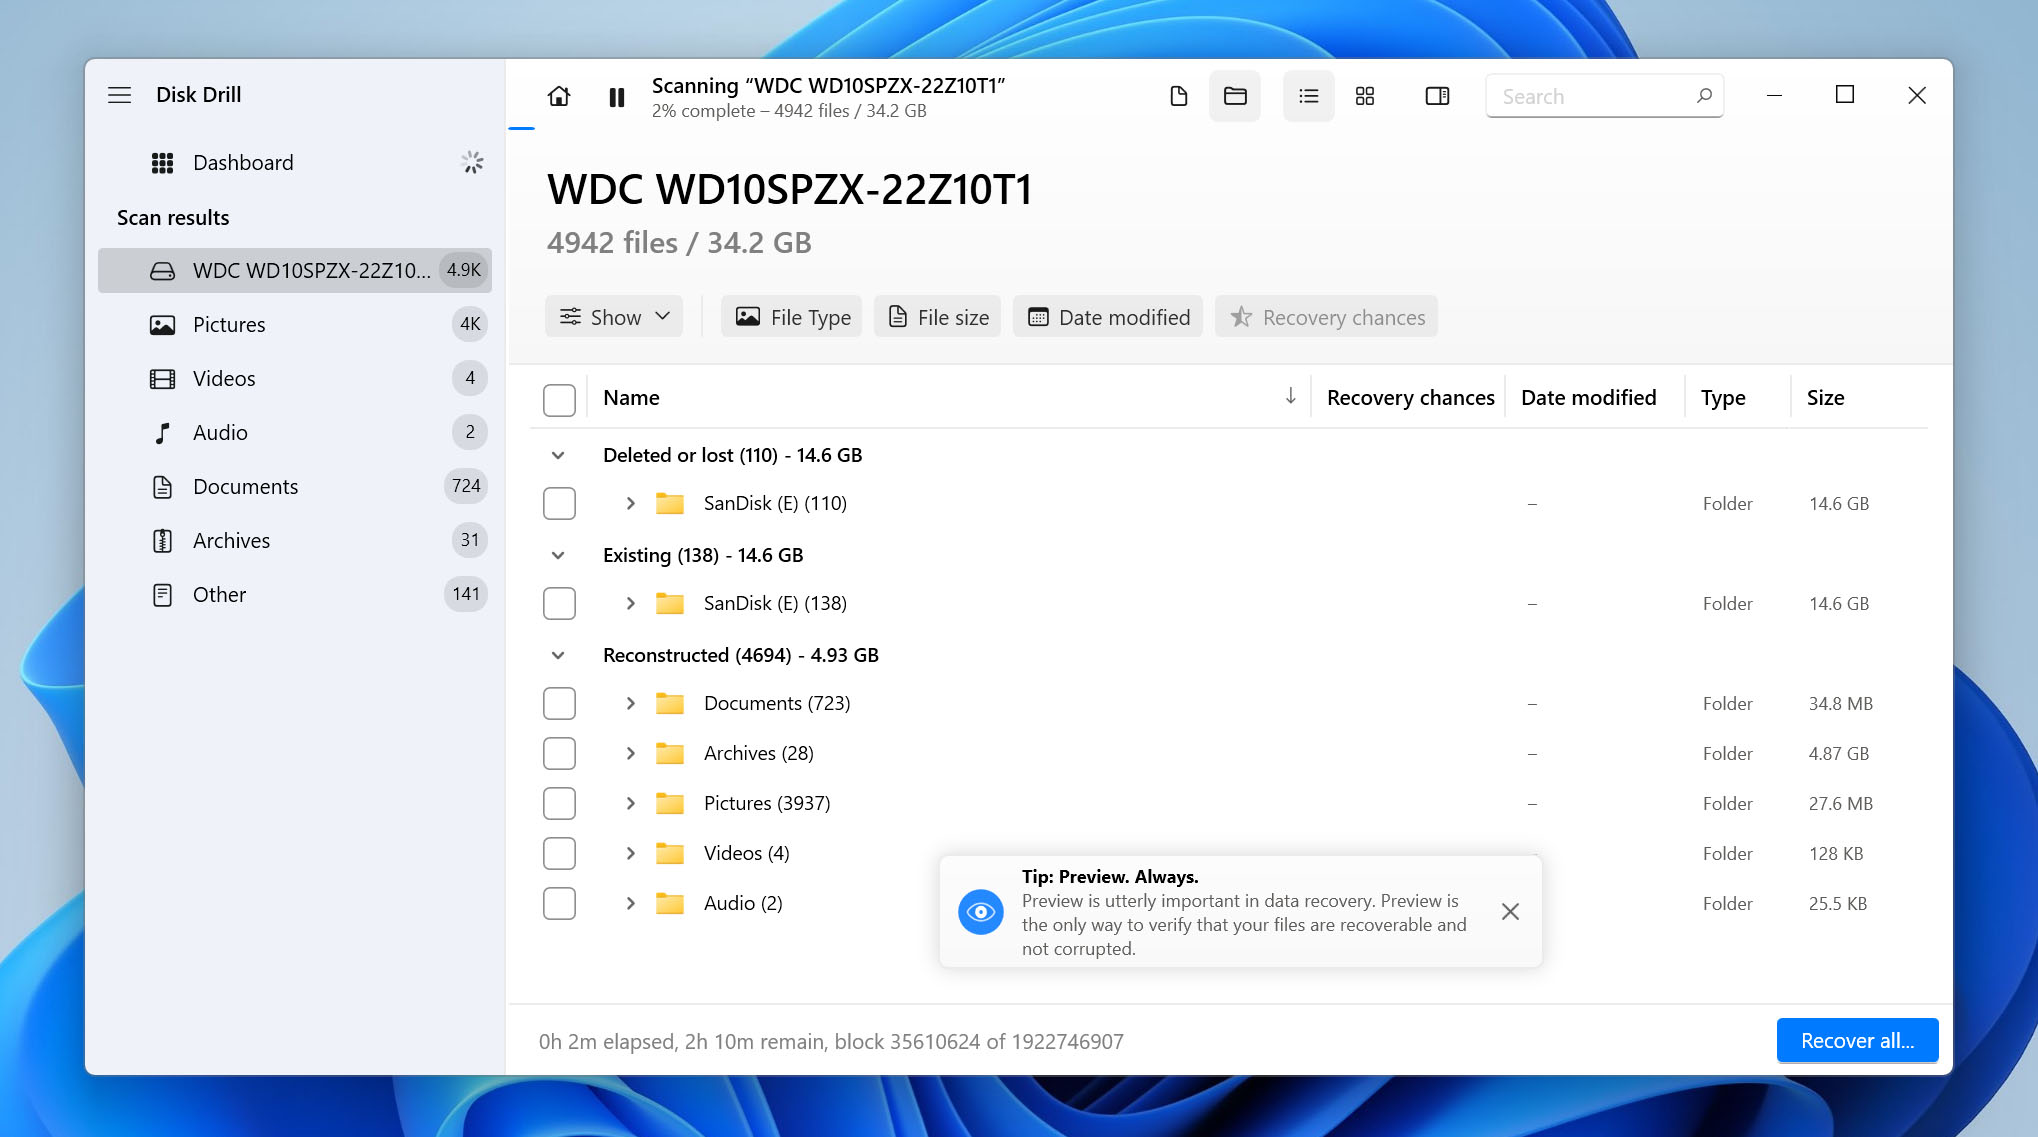
- The categories seen during scanning are now listed on the left, where you can quickly select any one type. In the middle of the screen, the recovered files are sorted by a folder structure, under different headers depending on whether the files were simply deleted (or formatted) or had to be reconstructed. You can also search files by their names from the search bar at the top.
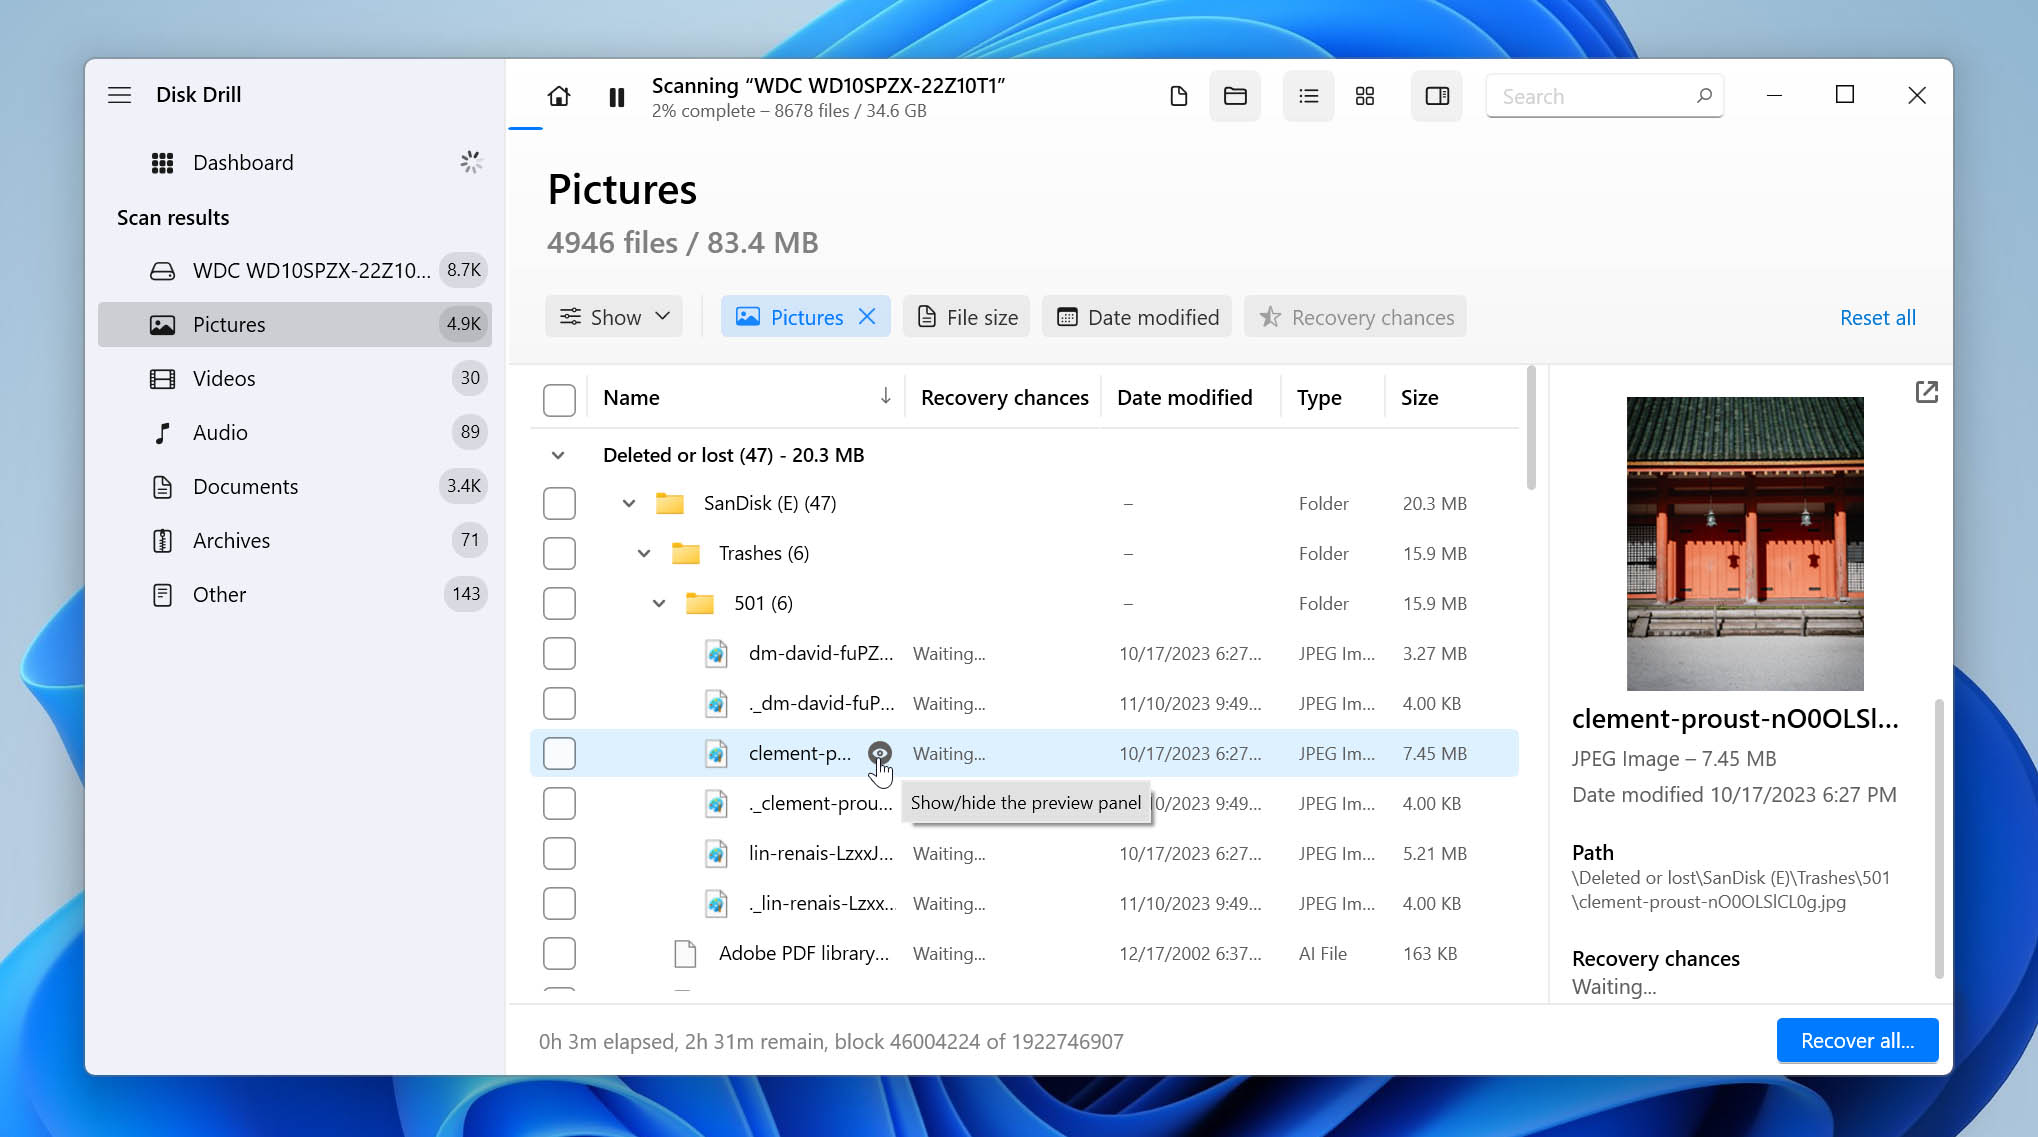
- Selecting any files of a supported file type (usually images and videos) will display a preview on the right. This is very useful in selecting the files to be recovered – because while you have a Recover all button, that will use up your free data recovery limit if you are not careful. Use the preview to decide which files you want to keep.
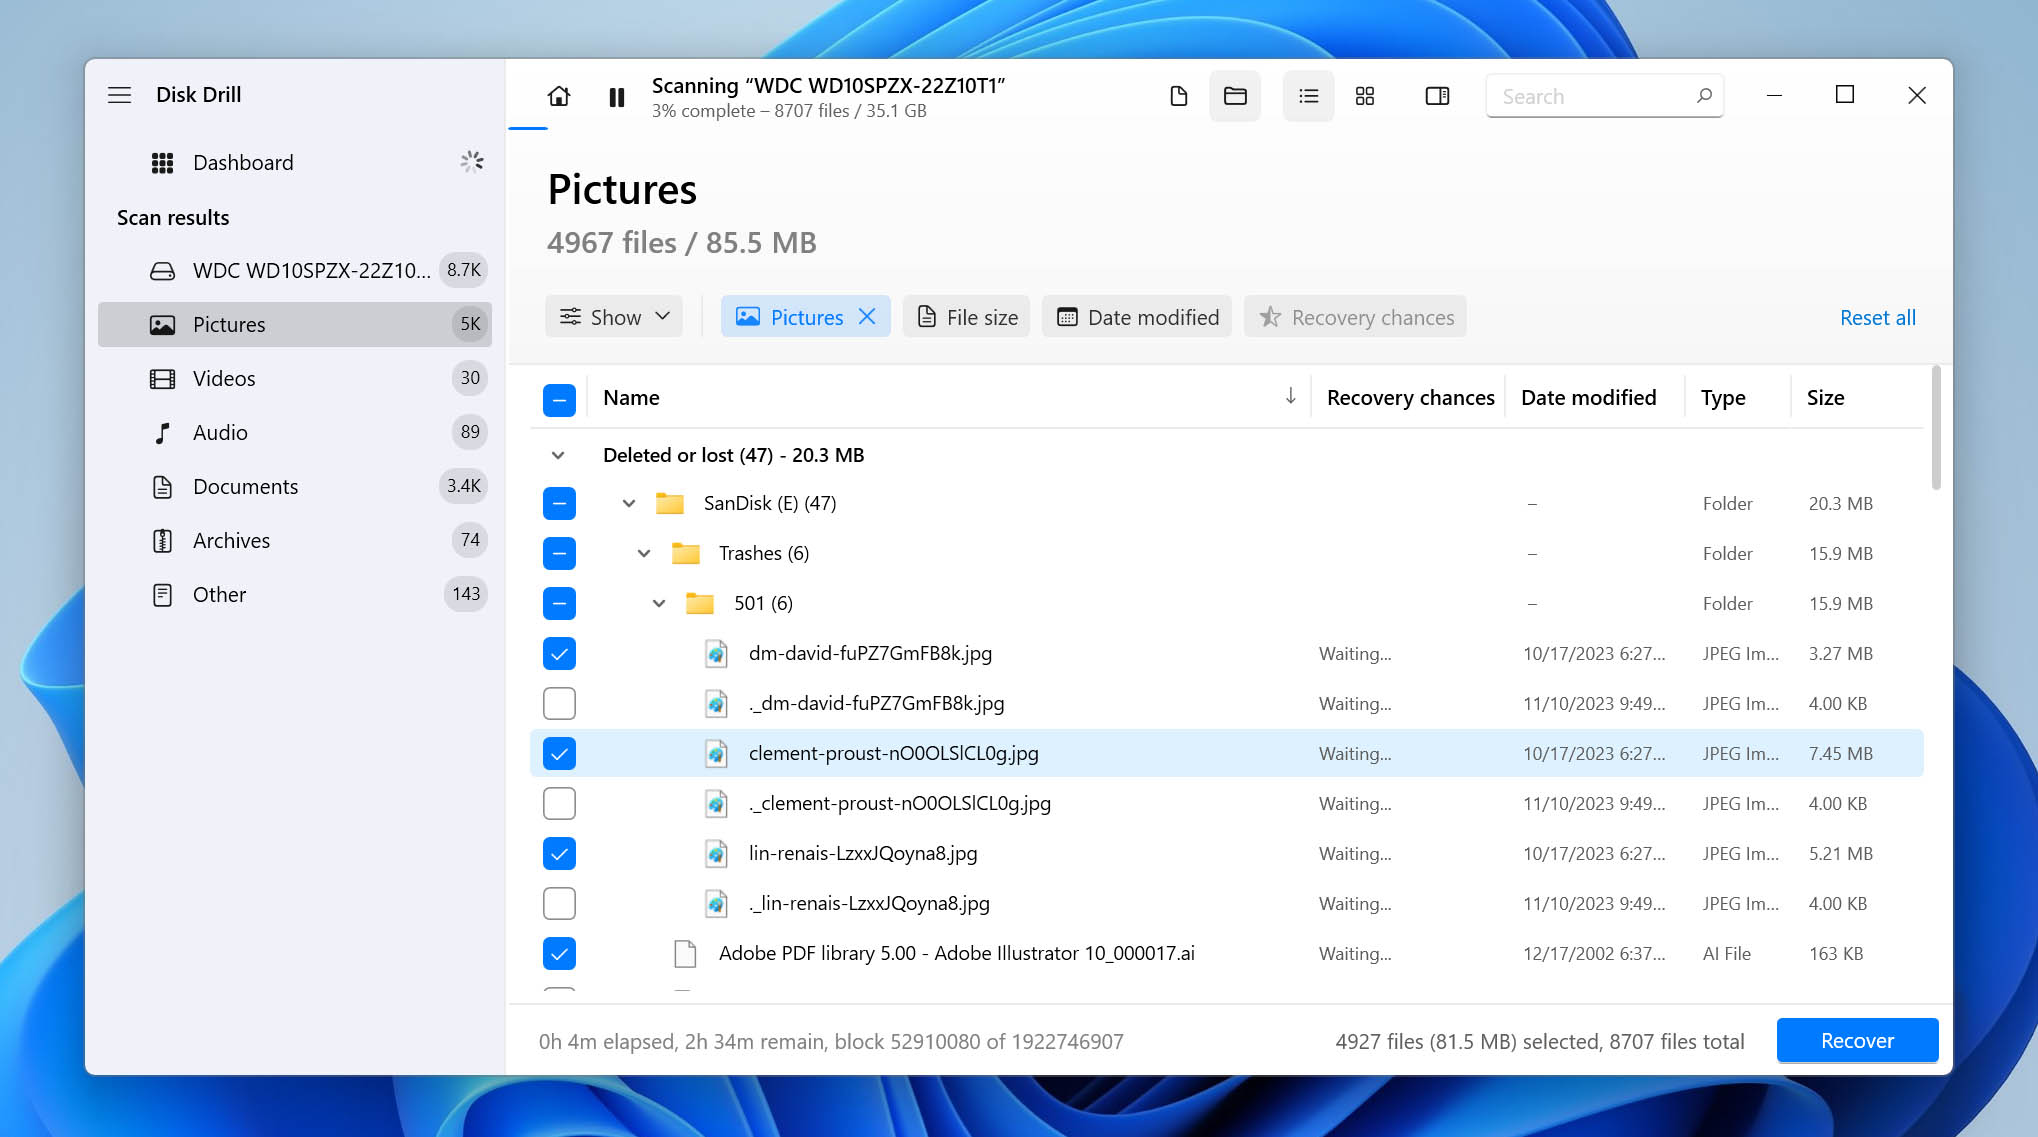
- After you have made your selections (simply enable the checkbox of every file you want to restore), hit the Recover button.
- Finally, you need to specify a recovery destination. As the app itself suggests, make sure to pick a folder not on the very drive you are recovering from (though for an undetected Crucial SSD, that wouldn’t even be an option shown).

- If everything goes well, your file will be recovered and saved in the specified folder.
Conclusion
Your Crucial SSD not showing up in the File Explorer is not necessarily the end – there are many reasons why this might be the case even when the drive is functioning normally. And for most of them, your data might still be recoverable as well.
If you have a new Crucial SSD that you just want to get working normally, try out the methods we listed in this section. In some rare cases, the problem might also lie with the BIOS configuration or improper installation of the SSD, which is easily fixed as well.
For an old Crucial SSD that suddenly disappears from File Explorer, scanning with a data recovery tool is the first priority, as this can recover your missing data even if the drive cannot be opened directly.
This article was written by Levin Roy, a Contributing Writer at Handy Recovery Advisor. It was also verified for technical accuracy by Andrey Vasilyev, our editorial advisor.
Curious about our content creation process? Take a look at our Editor Guidelines.