
Flash drives are pretty reliable. Thanks to their solid-state storage, they generally don’t fail as regularly as spinning-disk hard drives. But they’re not invincible — and sometimes you’ll lose files from a flash drive. When that happens, there are a few things you can do to try and recover your files if they’re lost. Follow the steps below to try to recover lost data from a flash drive on Mac.
Before getting started with data recovery methods, it’s important to stress one point — as soon as you find out that you have lost files, stop using your flash drive. Deleted files can still exist on your flash drive, as long as the space they were taking up isn’t written over by your computer. Don’t copy any more files to your flash drive, and in fact, keep it disconnected from your computer except follow the instructions below.
How to Recover Deleted Files From USB Drive on Mac
Below you will find what we believe to be the three most effective methods for recovering data from a USB drive on macOS devices.
Method 1: Check the Mac’s Trash Can
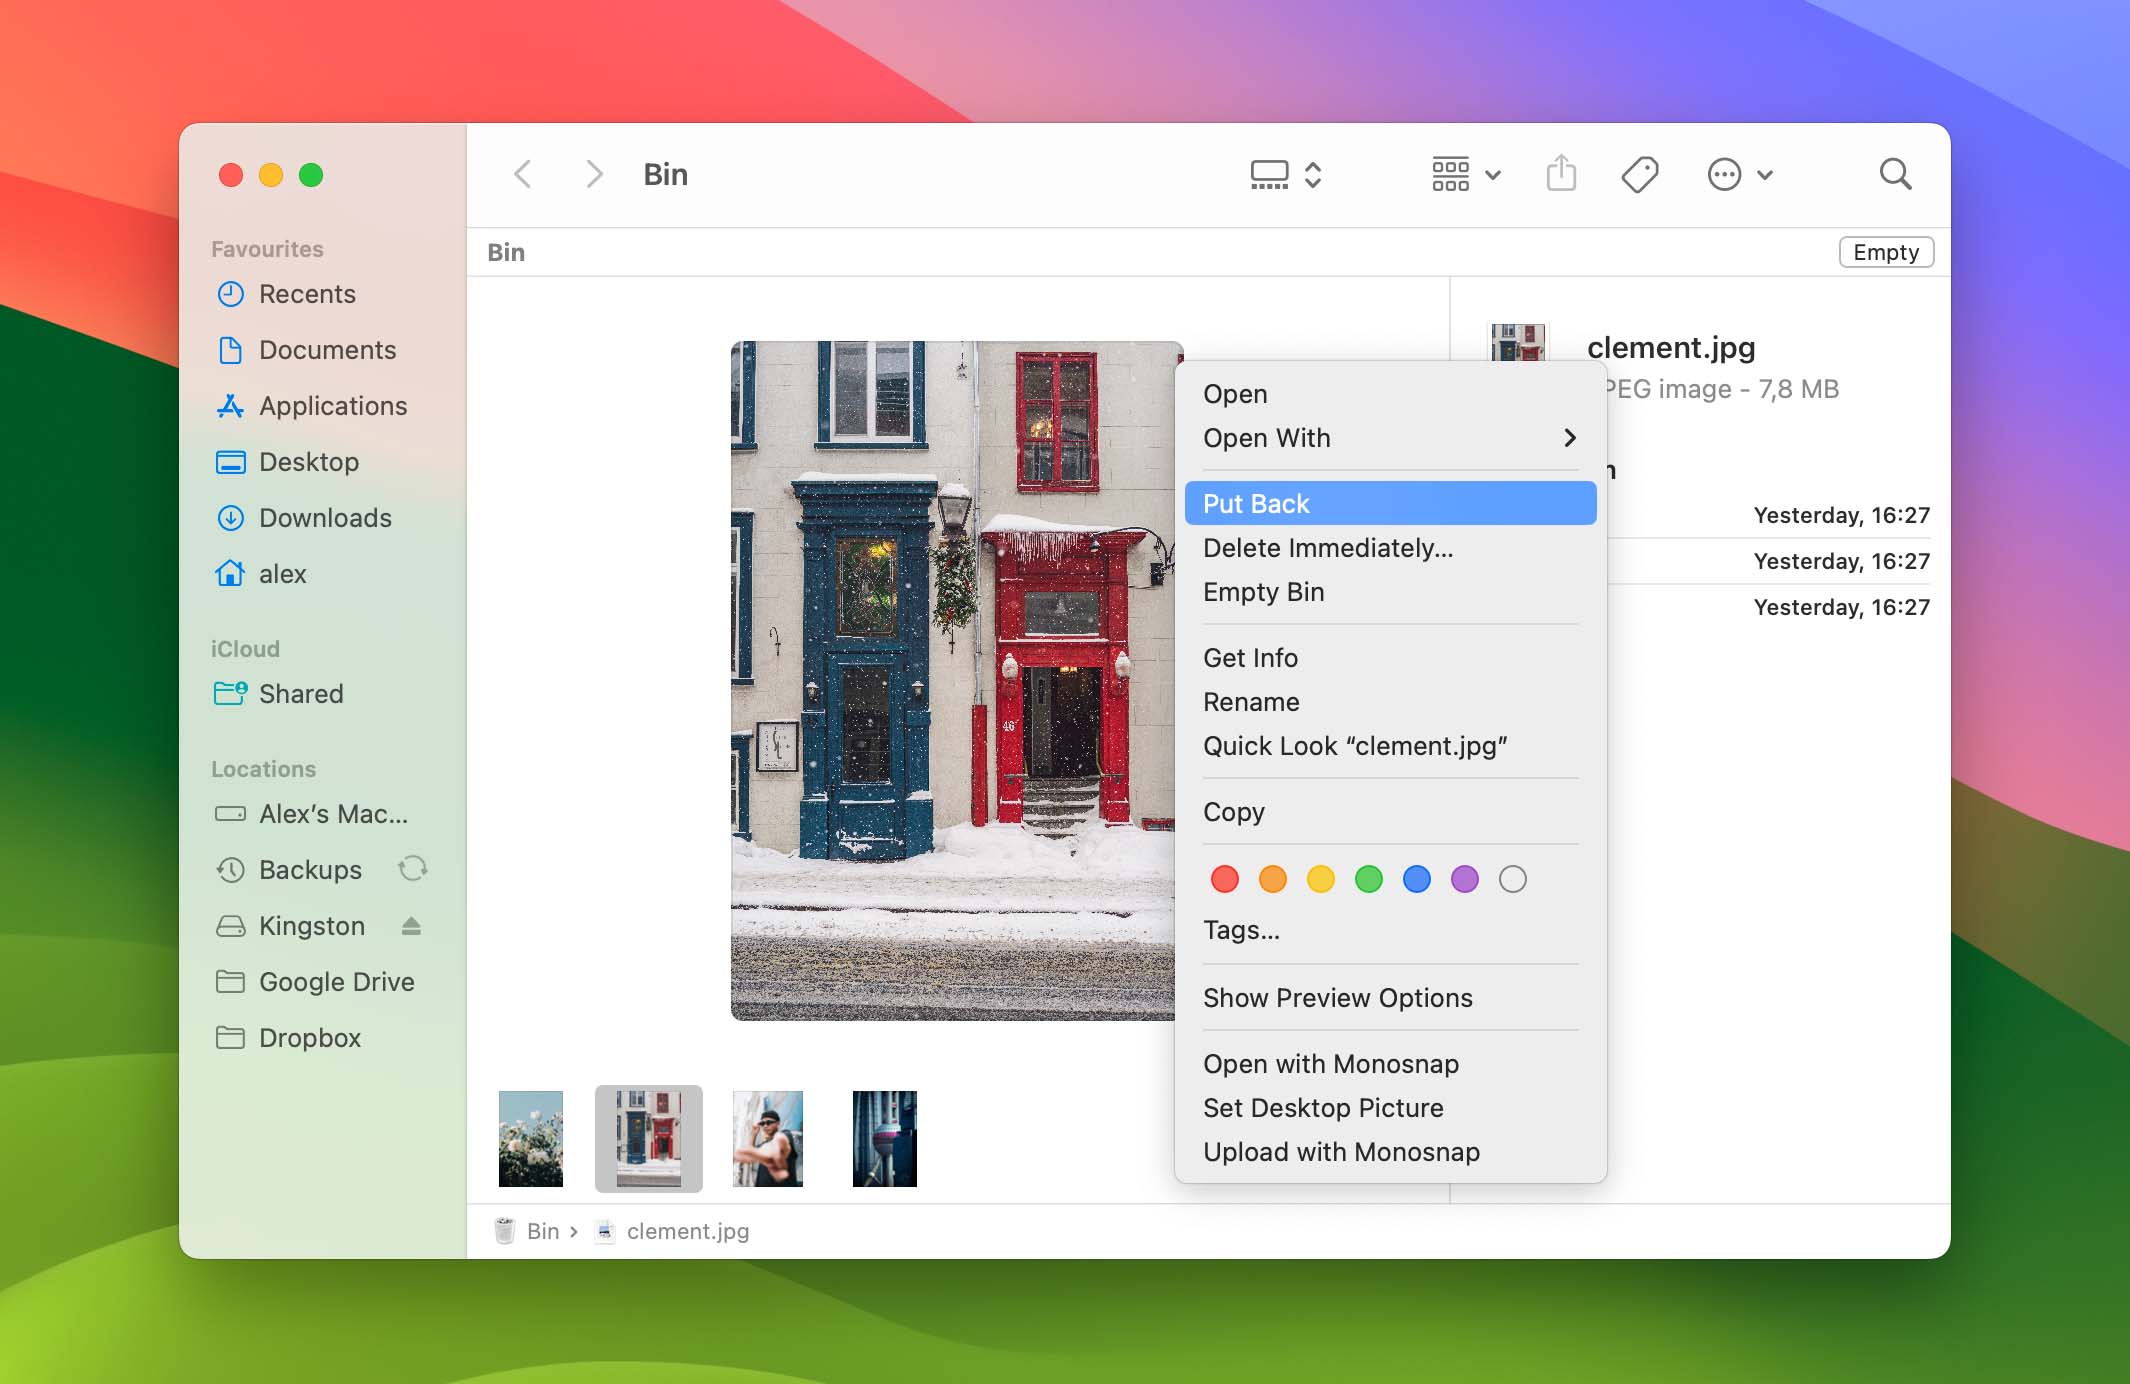
Perhaps the easiest thing you can do to try to recover files from a USB flash drive on Mac is to simply check the Mac Trash. It seems obvious, but you would be surprised how many files I personally have recovered by simply checking the Trash.
If you do find the lost files in your Trash, you can recover them by right-clicking on them and pressing the “Put Back” button. The files will then be put back to where they were before they were deleted.
Method 2: Check Other Trash Cans to Recover Files from USB Drives on Mac
Your Mac stores deleted files in a separate location for each drive you use — and not in one single Trash “folder.” In other words, the files you can see in the Trash might change depending on whether or not you have a particular drive connected to your computer.
Technically, your Mac should aggregate all those files into your Trash when drives are connected to your Mac. So as long as your drive is connected to your Mac, it should show up in your Mac’s Trash.
If you want to dig around in a drive’s own trash though, you can do so, but to do so you’ll need to enable hidden files.
- If you’re utilizing a Mac equipped with a supported version of macOS (e.g., Ventura, Sonoma), you need to either use a third-party file explorer, such as Commander One, or use the Terminal app as described below.
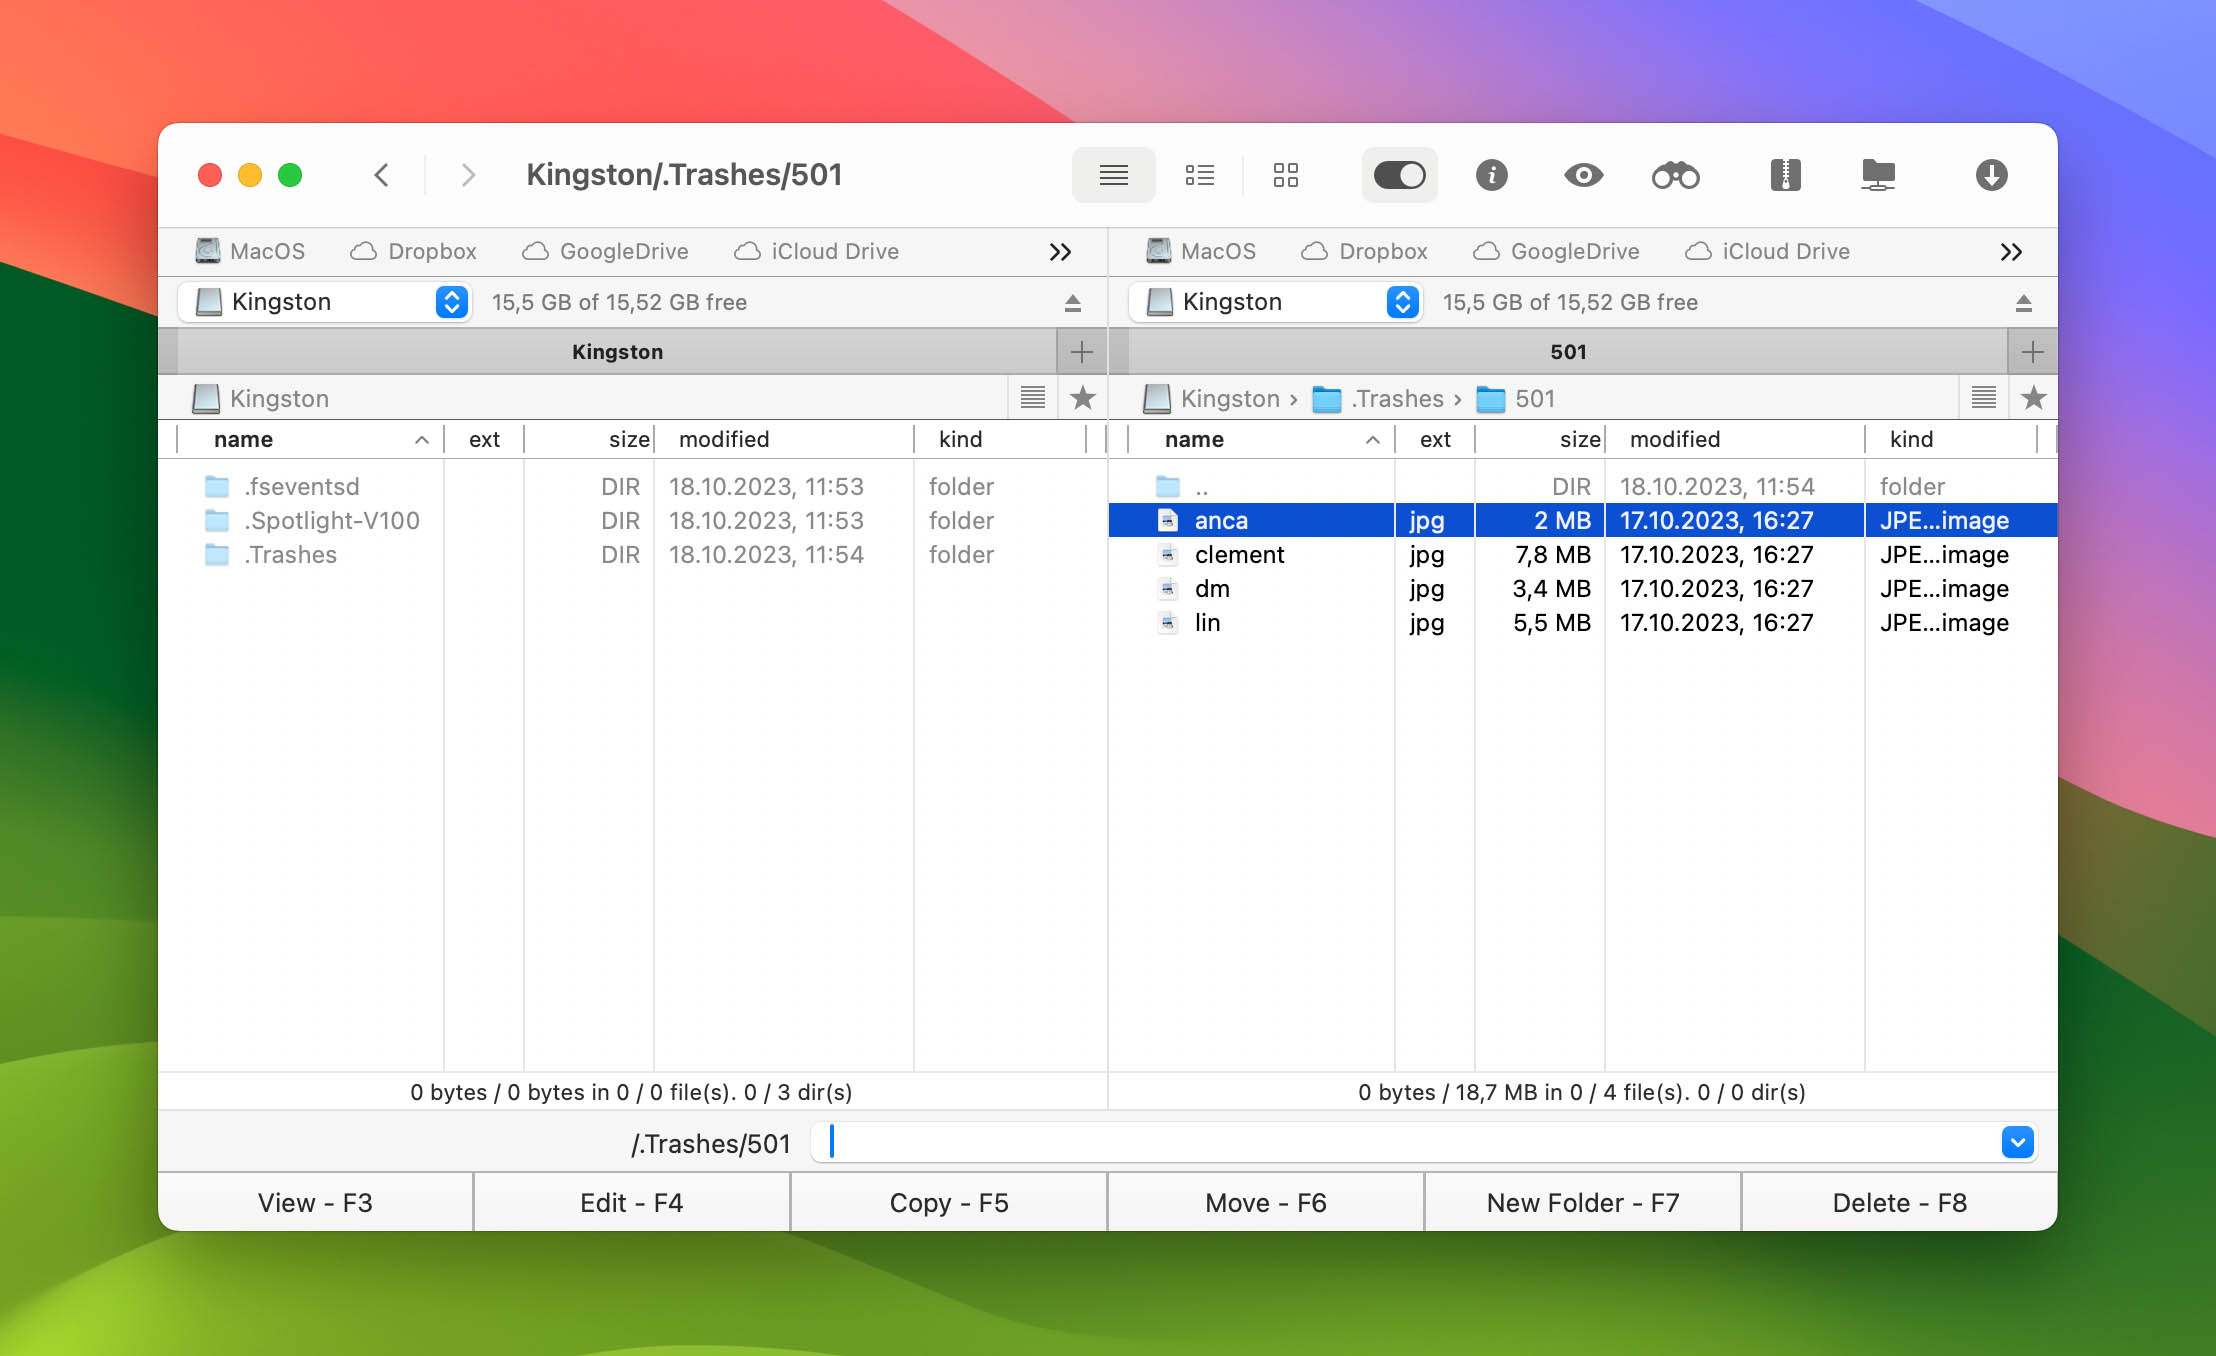
- If you’re using a Mac with Sierra or a version that came shortly after it (e.g., Mojave, Catalina), then you can enable hidden files in Finder by simply pressing Shift + Command + . (period). You should then see hidden files, and one of those will be a folder called “.Trashes”. You can open that folder and explore deleted files for your drive.
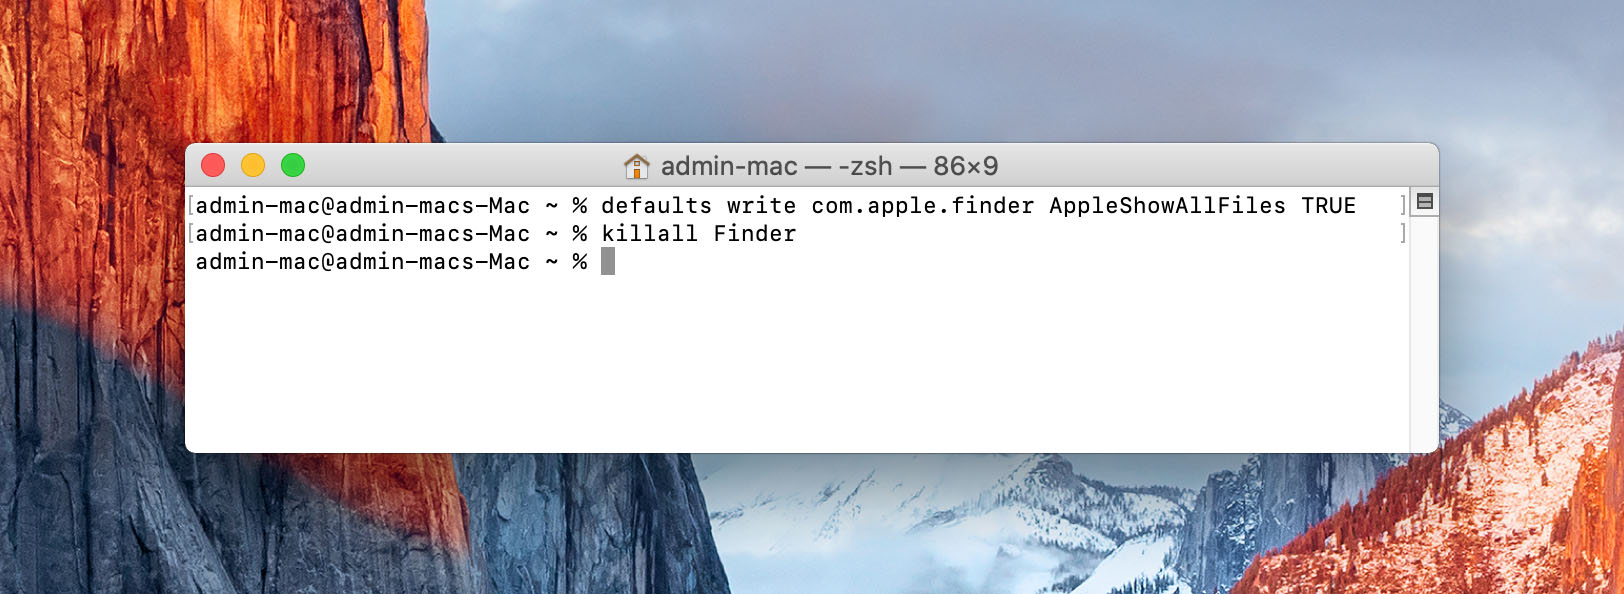
- If your Mac is running a recent version of macOS, or a version that’s older than Sierra, you’ll need to open the Terminal app (you can quickly open it by searching Terminal in Spotlight, by pressing Command + Space). Once Terminal is open, copy and paste the two commands below, pressing Enter after each line.
defaults write com.apple.finder AppleShowAllFiles TRUE
killall Finder
 👀
👀If you want to then hide hidden files again, do the same, but change TRUE to FALSE. It’s recommended that you hide hidden files again after you search for your lost files, as hidden files are hidden for a reason — and accidentally deleting them could have unintended consequences.
Method 3: Use USB Data Recovery Software
If you can’t locate your files by checking your Mac’s Trash, the drive’s own Trash, or you remember that you emptied the Trash, you might need to use a data recovery tool for Mac. There are a few different kinds of data recovery tools, and some are free while others require a purchase. Generally, it’s advisable to start with a free tool or software that offers a free trial. If you still can’t retrieve your files, consider switching to a paid tool. It’s important to note that paid tools are often better than free ones because of the fact developers of paid tools can devote more resources and time to those tools.
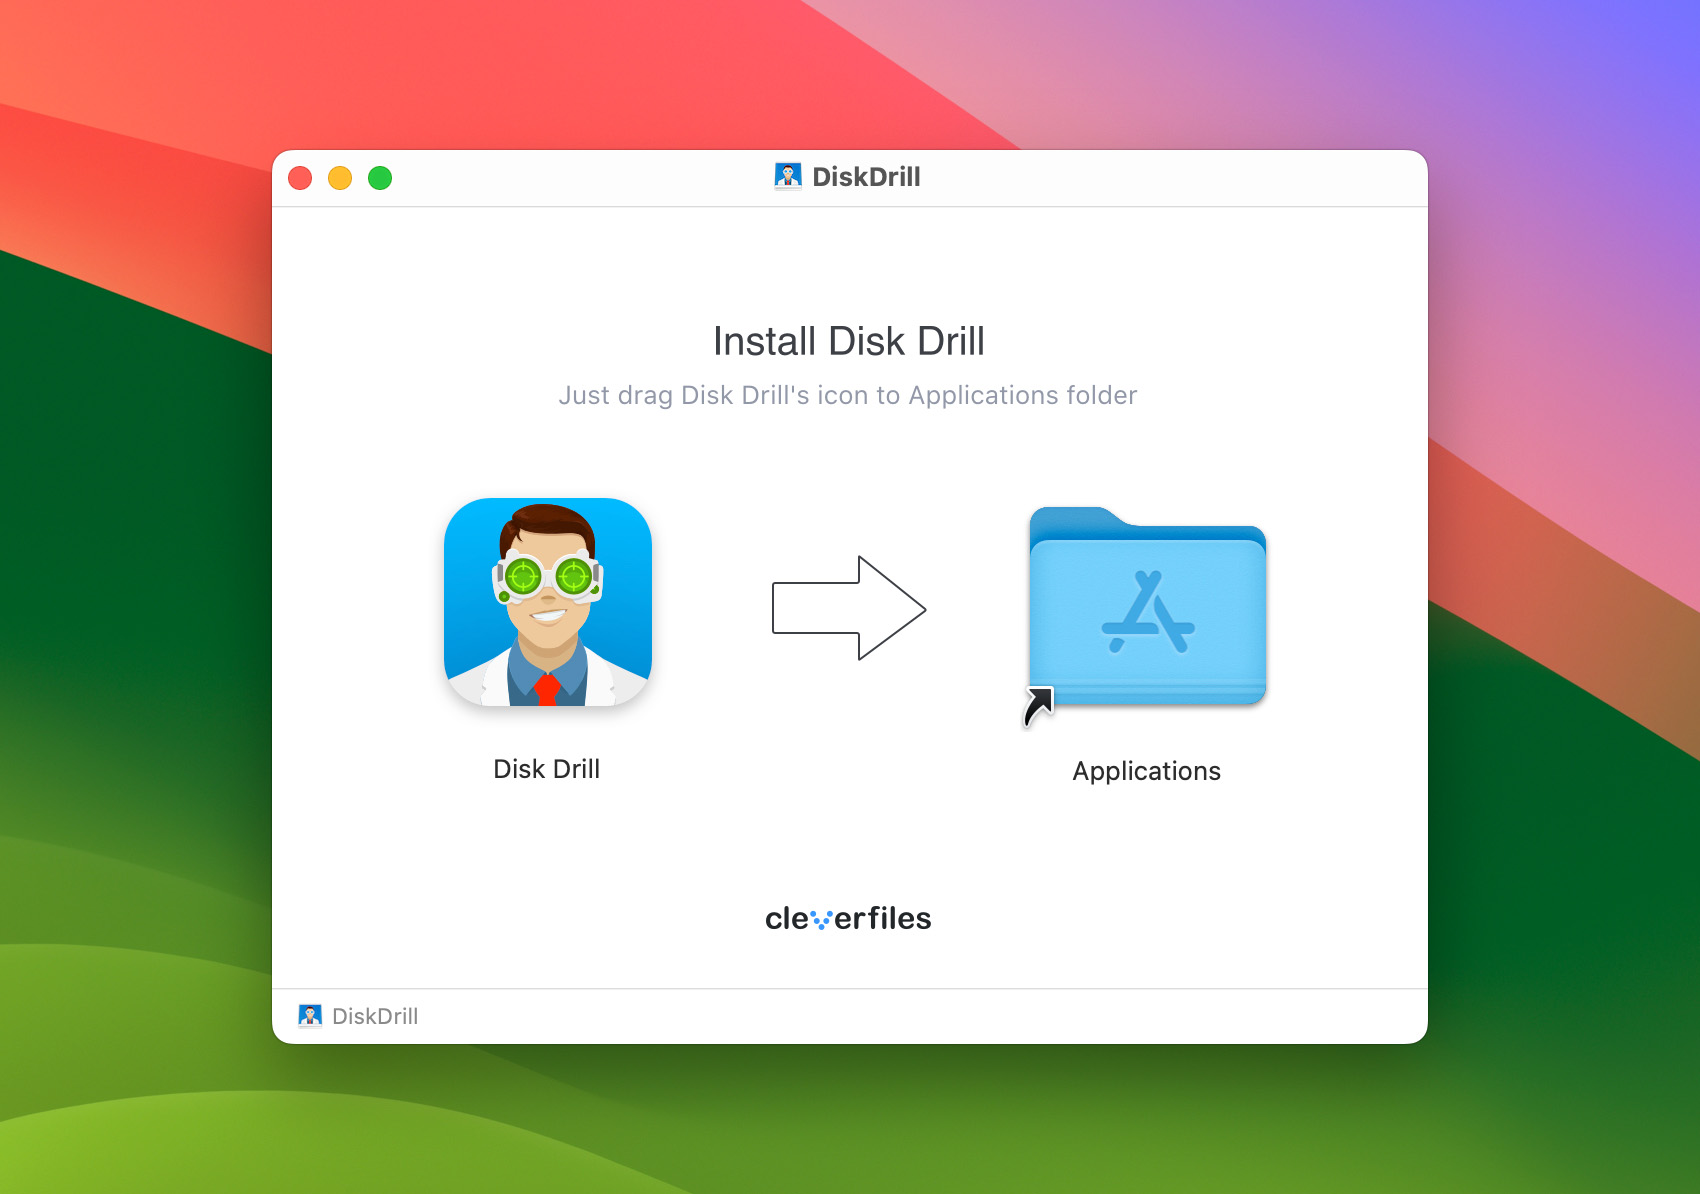
The tool that we tend to use most is Disk Drill. Disk Drill for Mac actually has a free preview feature, which you can use to preview files before recovery to make sure they are recoverable.
To use Disk Drill to recover lost files from a flash drive, follow the instructions below.
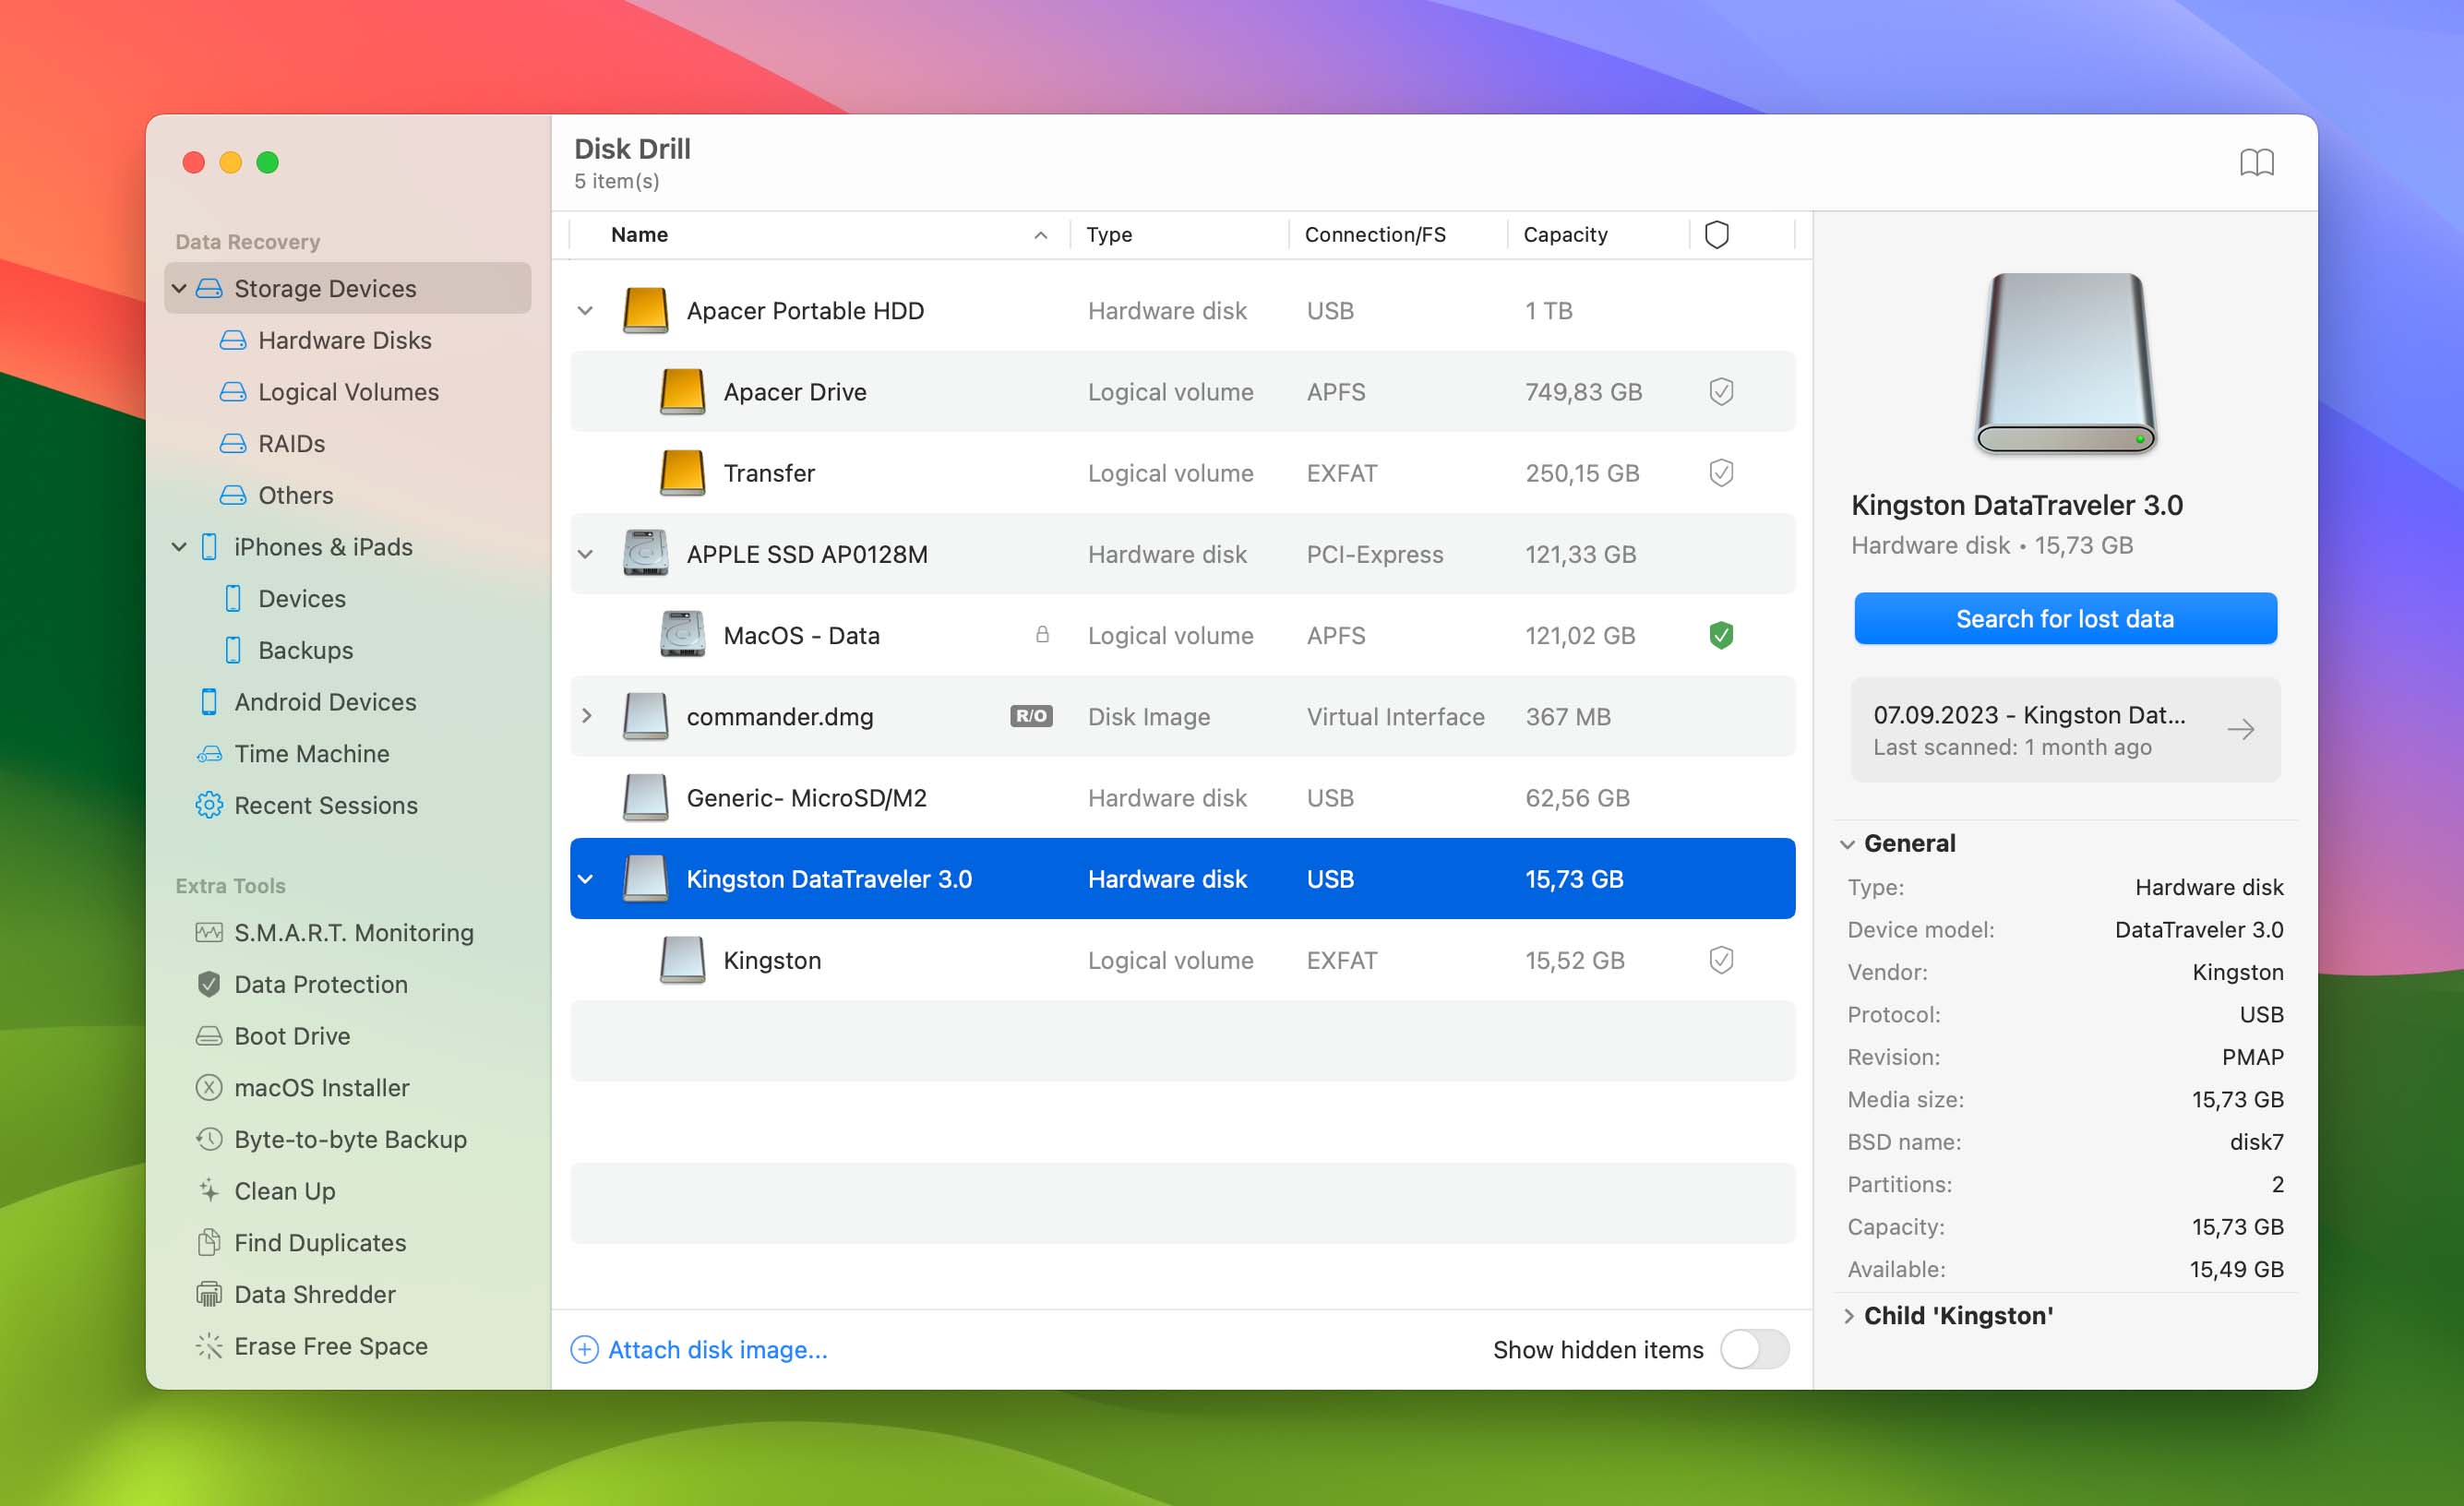
- Download and install Disk Drill for Mac, then connect your flash drive to your computer.
- Open Disk Drill and find your flash drive from the list of drives that show up. Select it, then press the “Search for last data” button at the right side of the window.
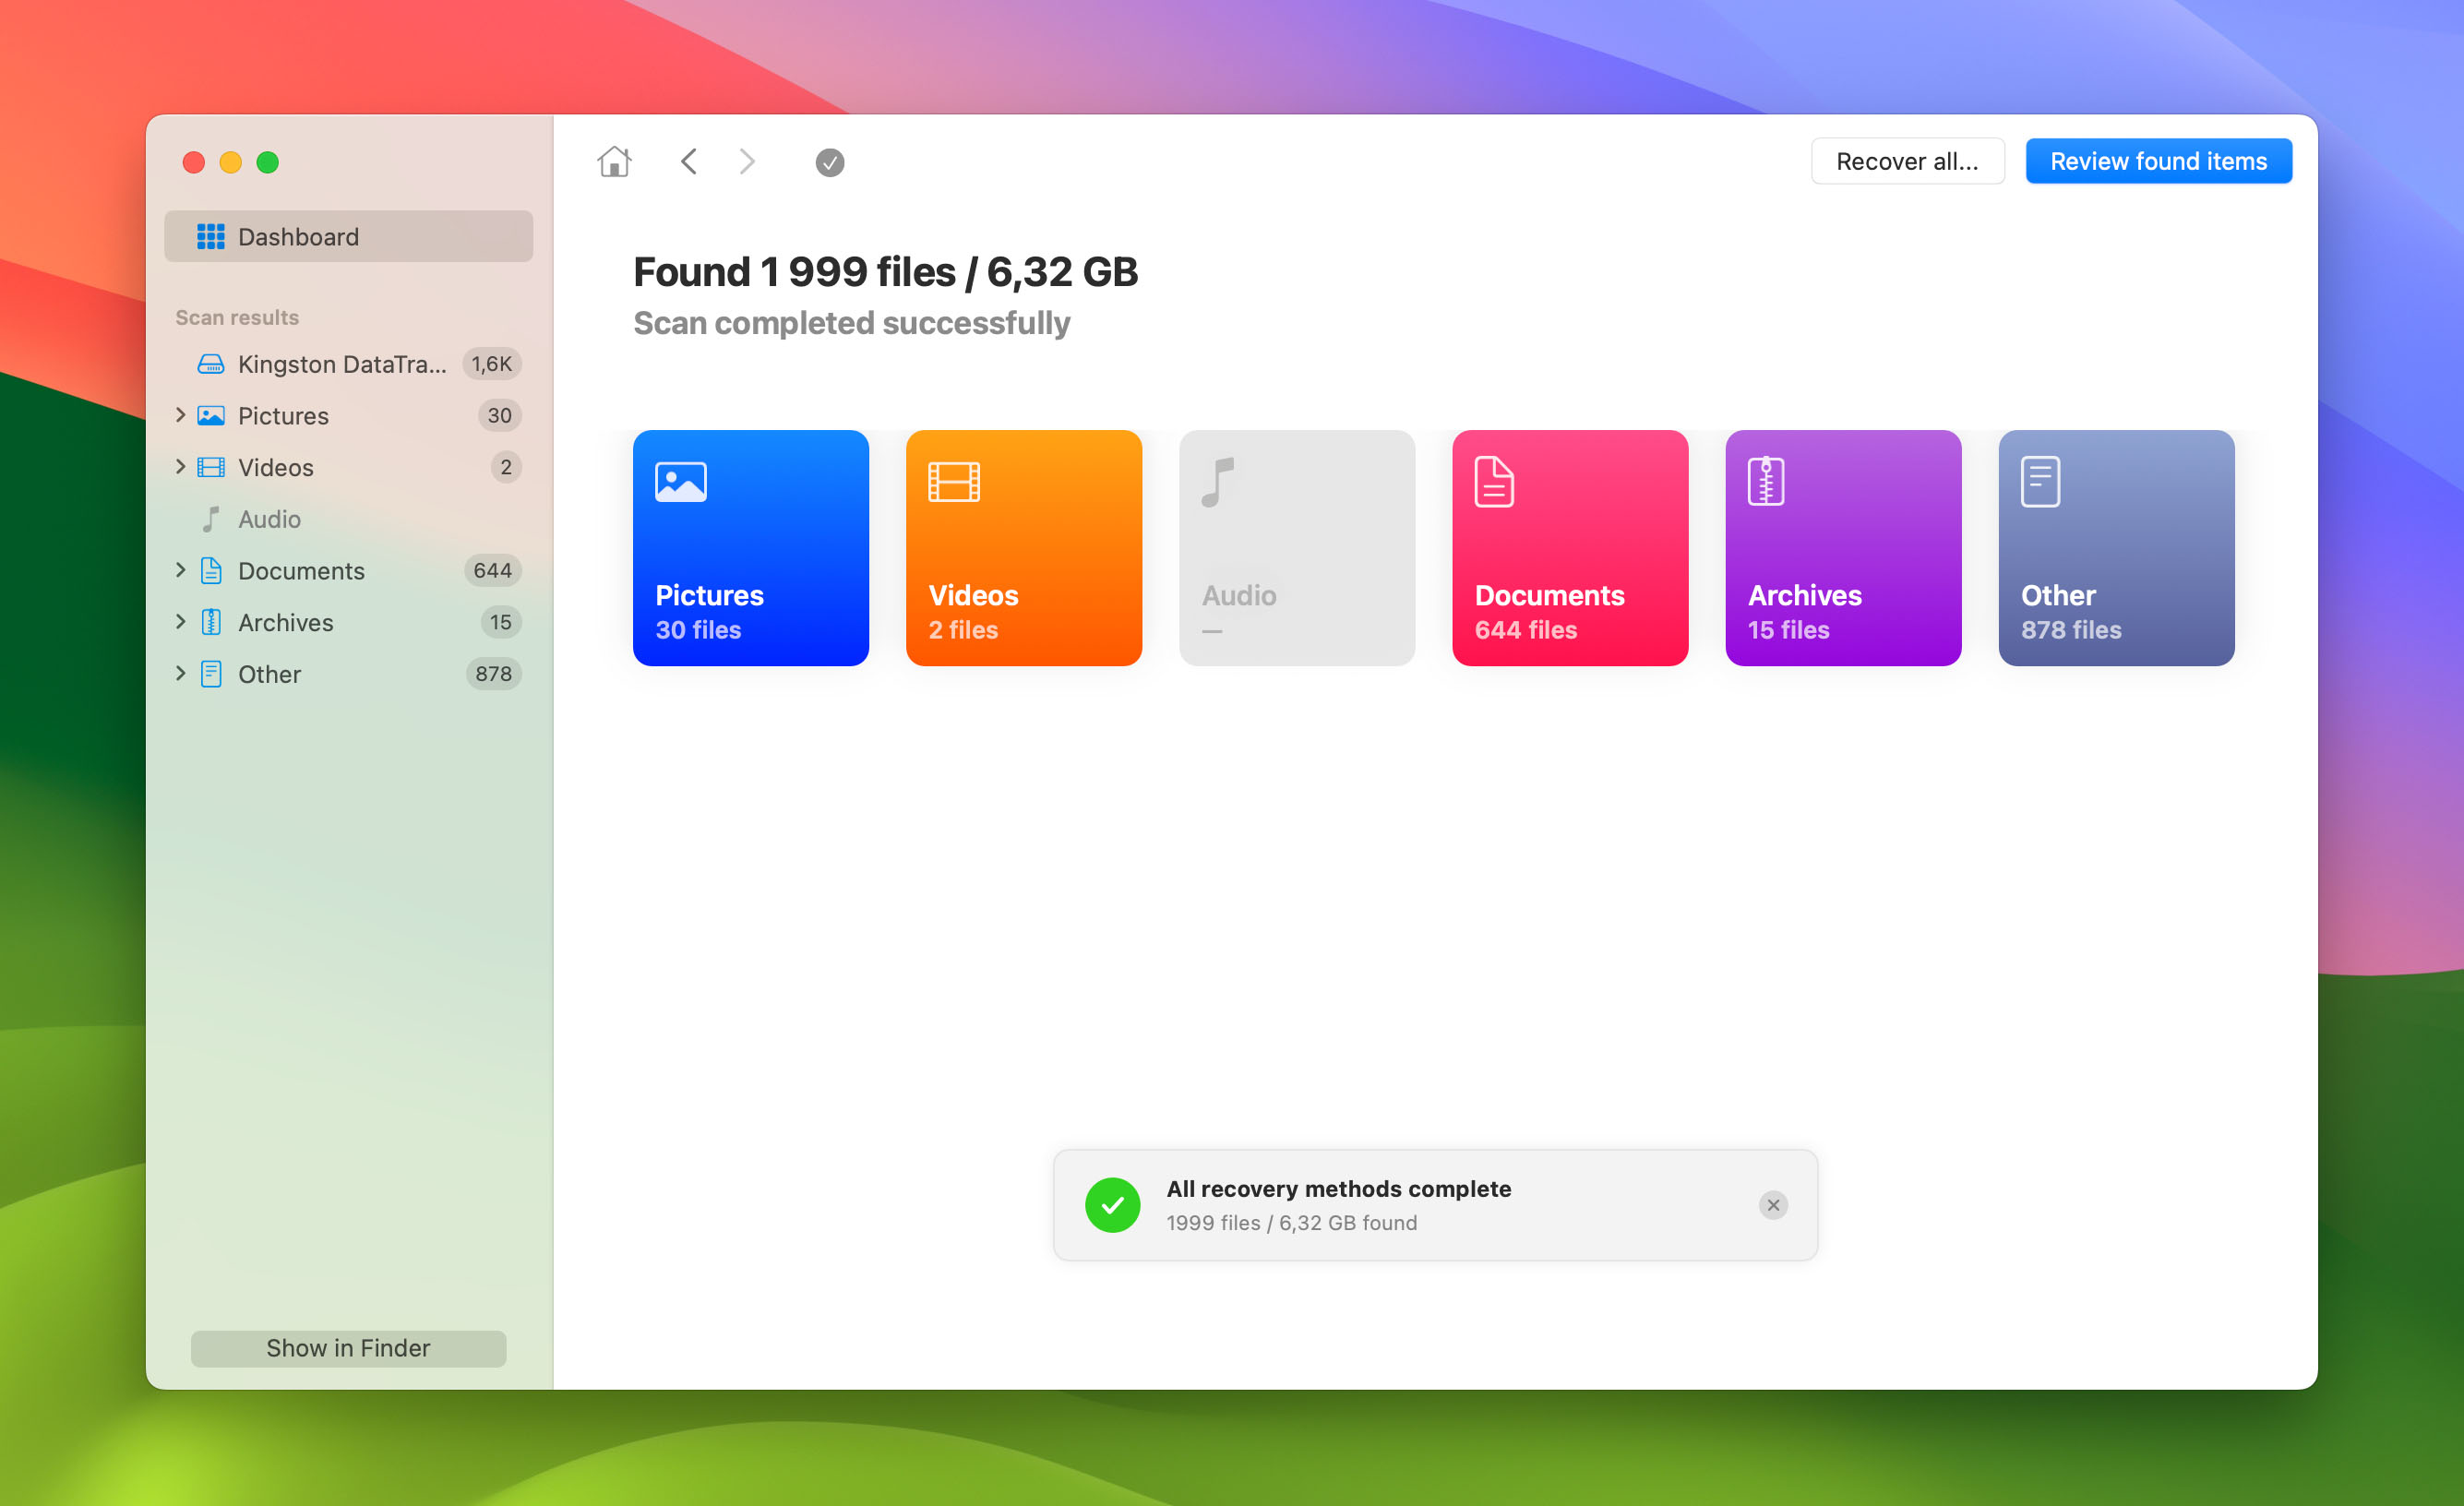
- Wait for Disk Drill to scan for files. Once it has finished scanning, you’ll be able to “Review found items,” or “Recover all.” Tap the button that best applies to your needs.
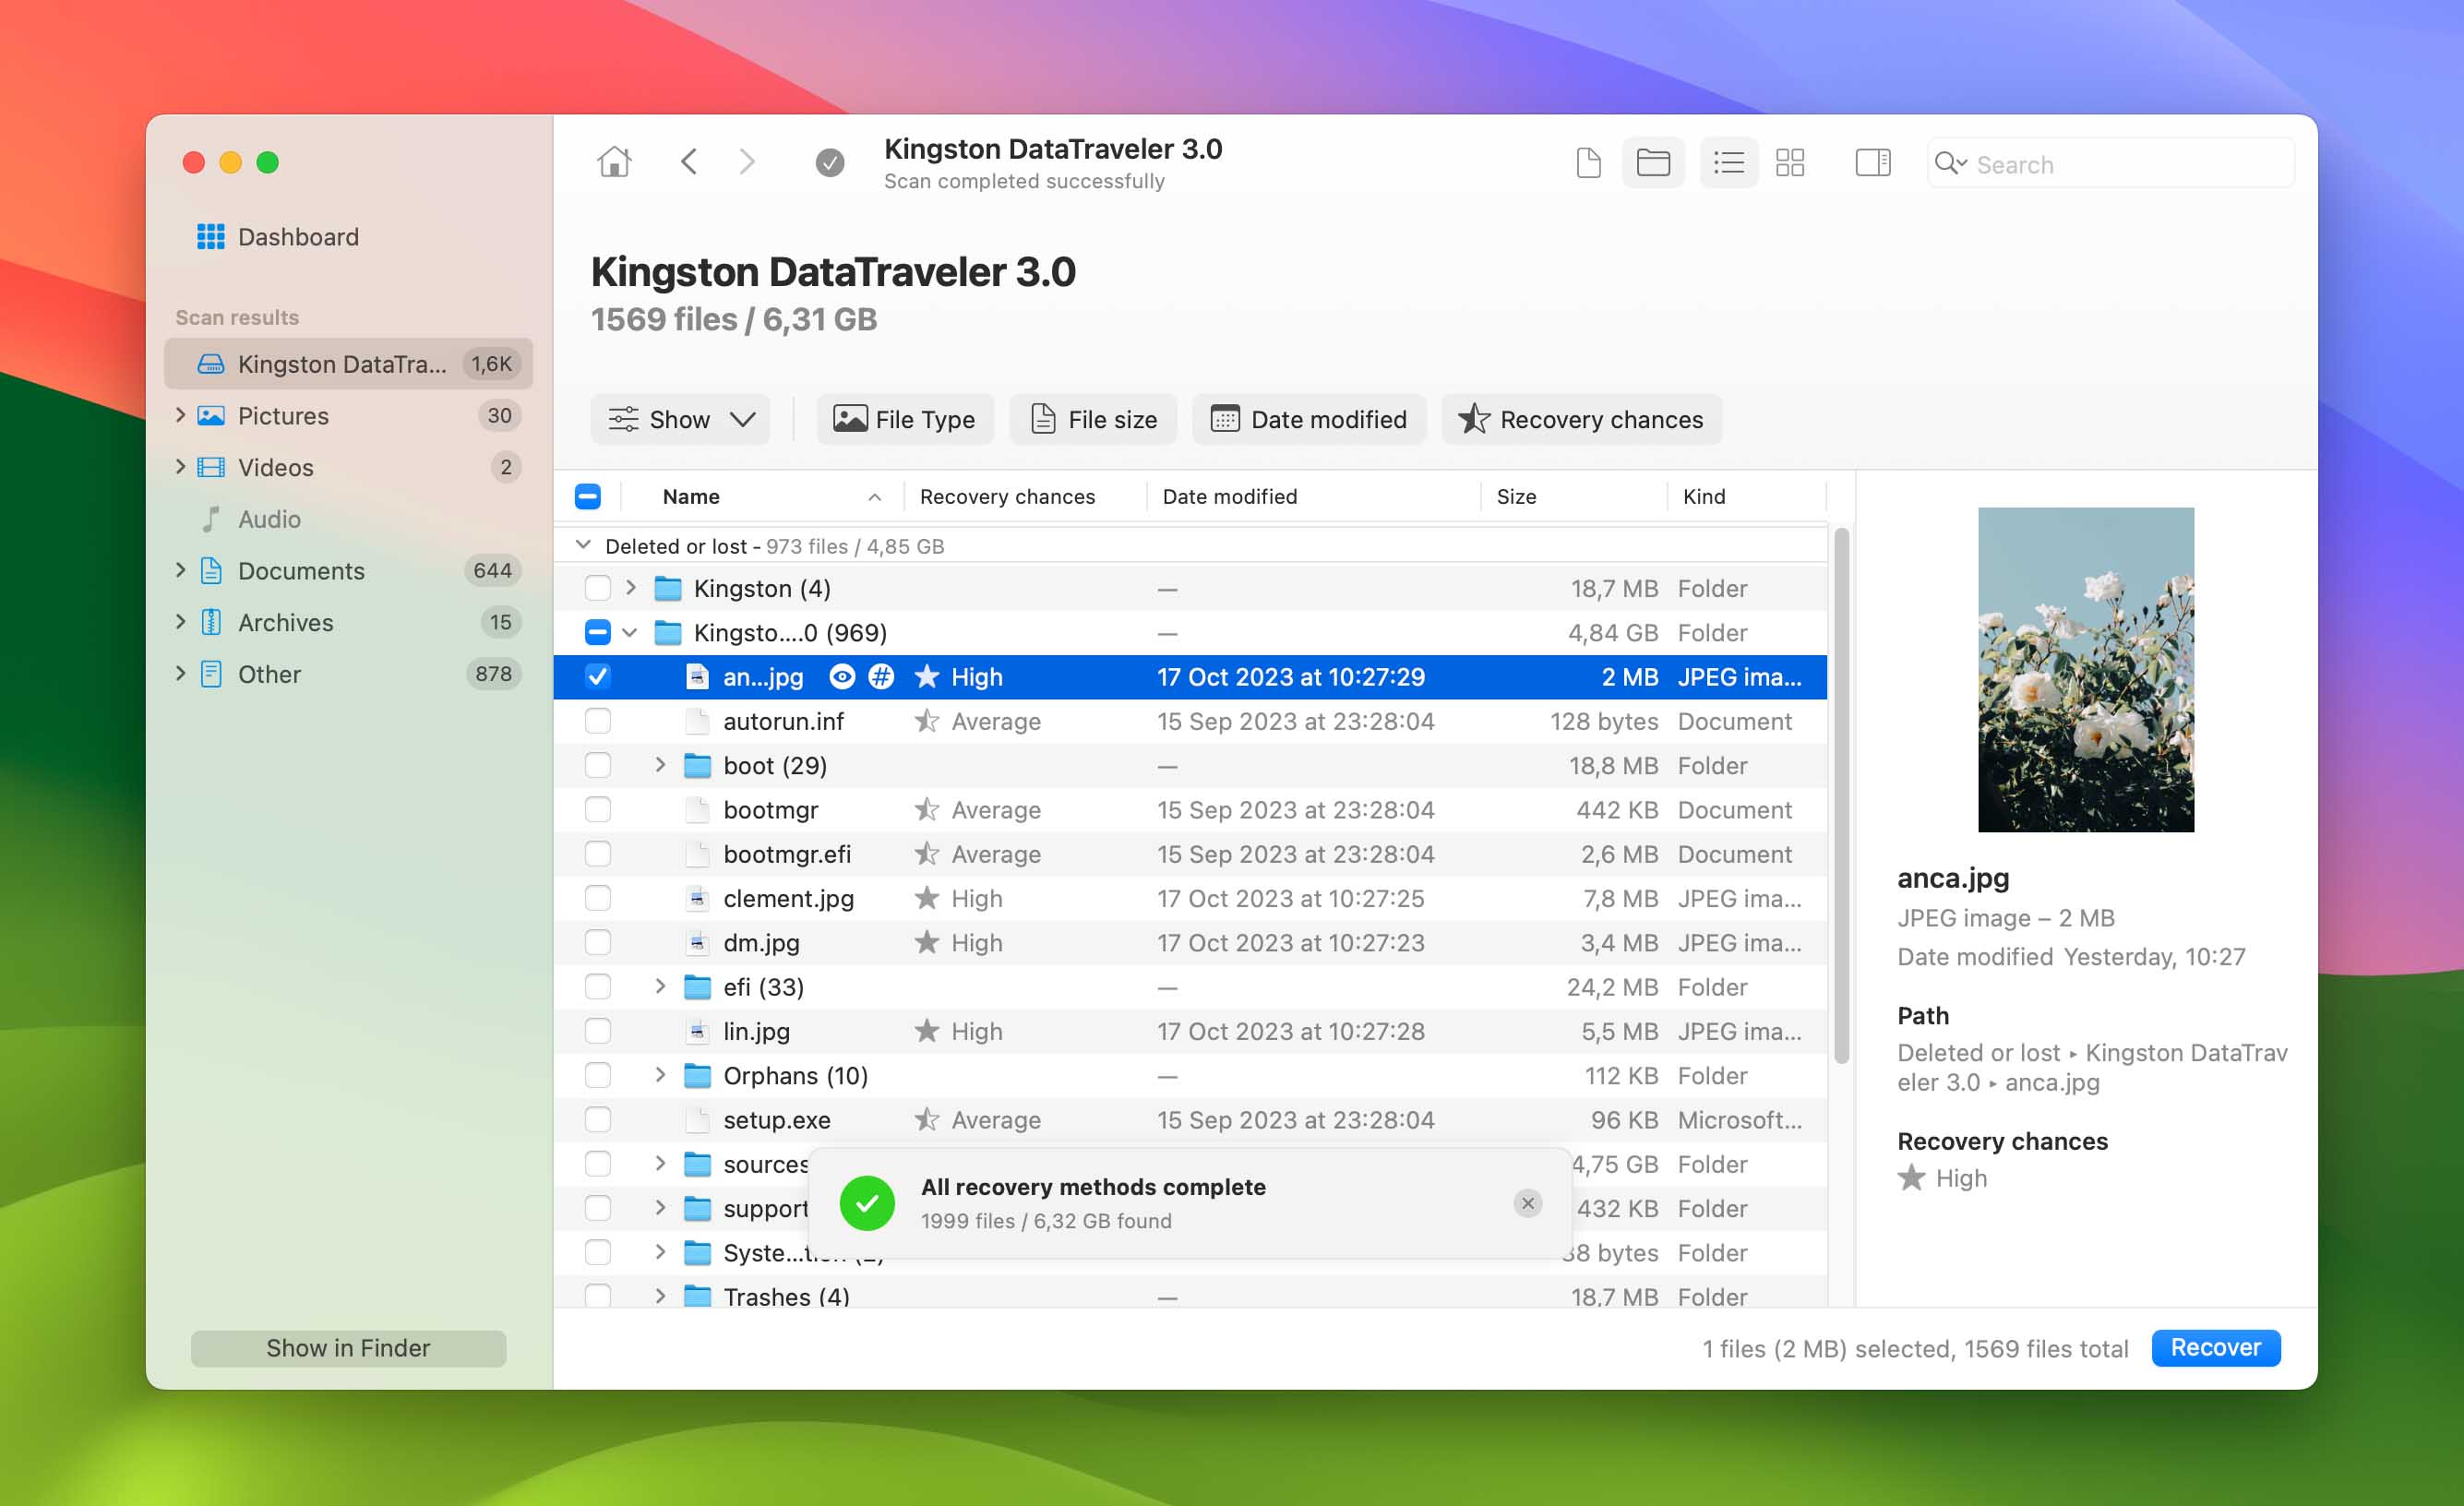
- Browse through the list of recoverable files and select the files or folders you want to restore if you selected the first option in the previous step. Disk Drill previews the currently highlighted file, but you can also manually preview any previewable file by clicking the eye icon next to its filename.
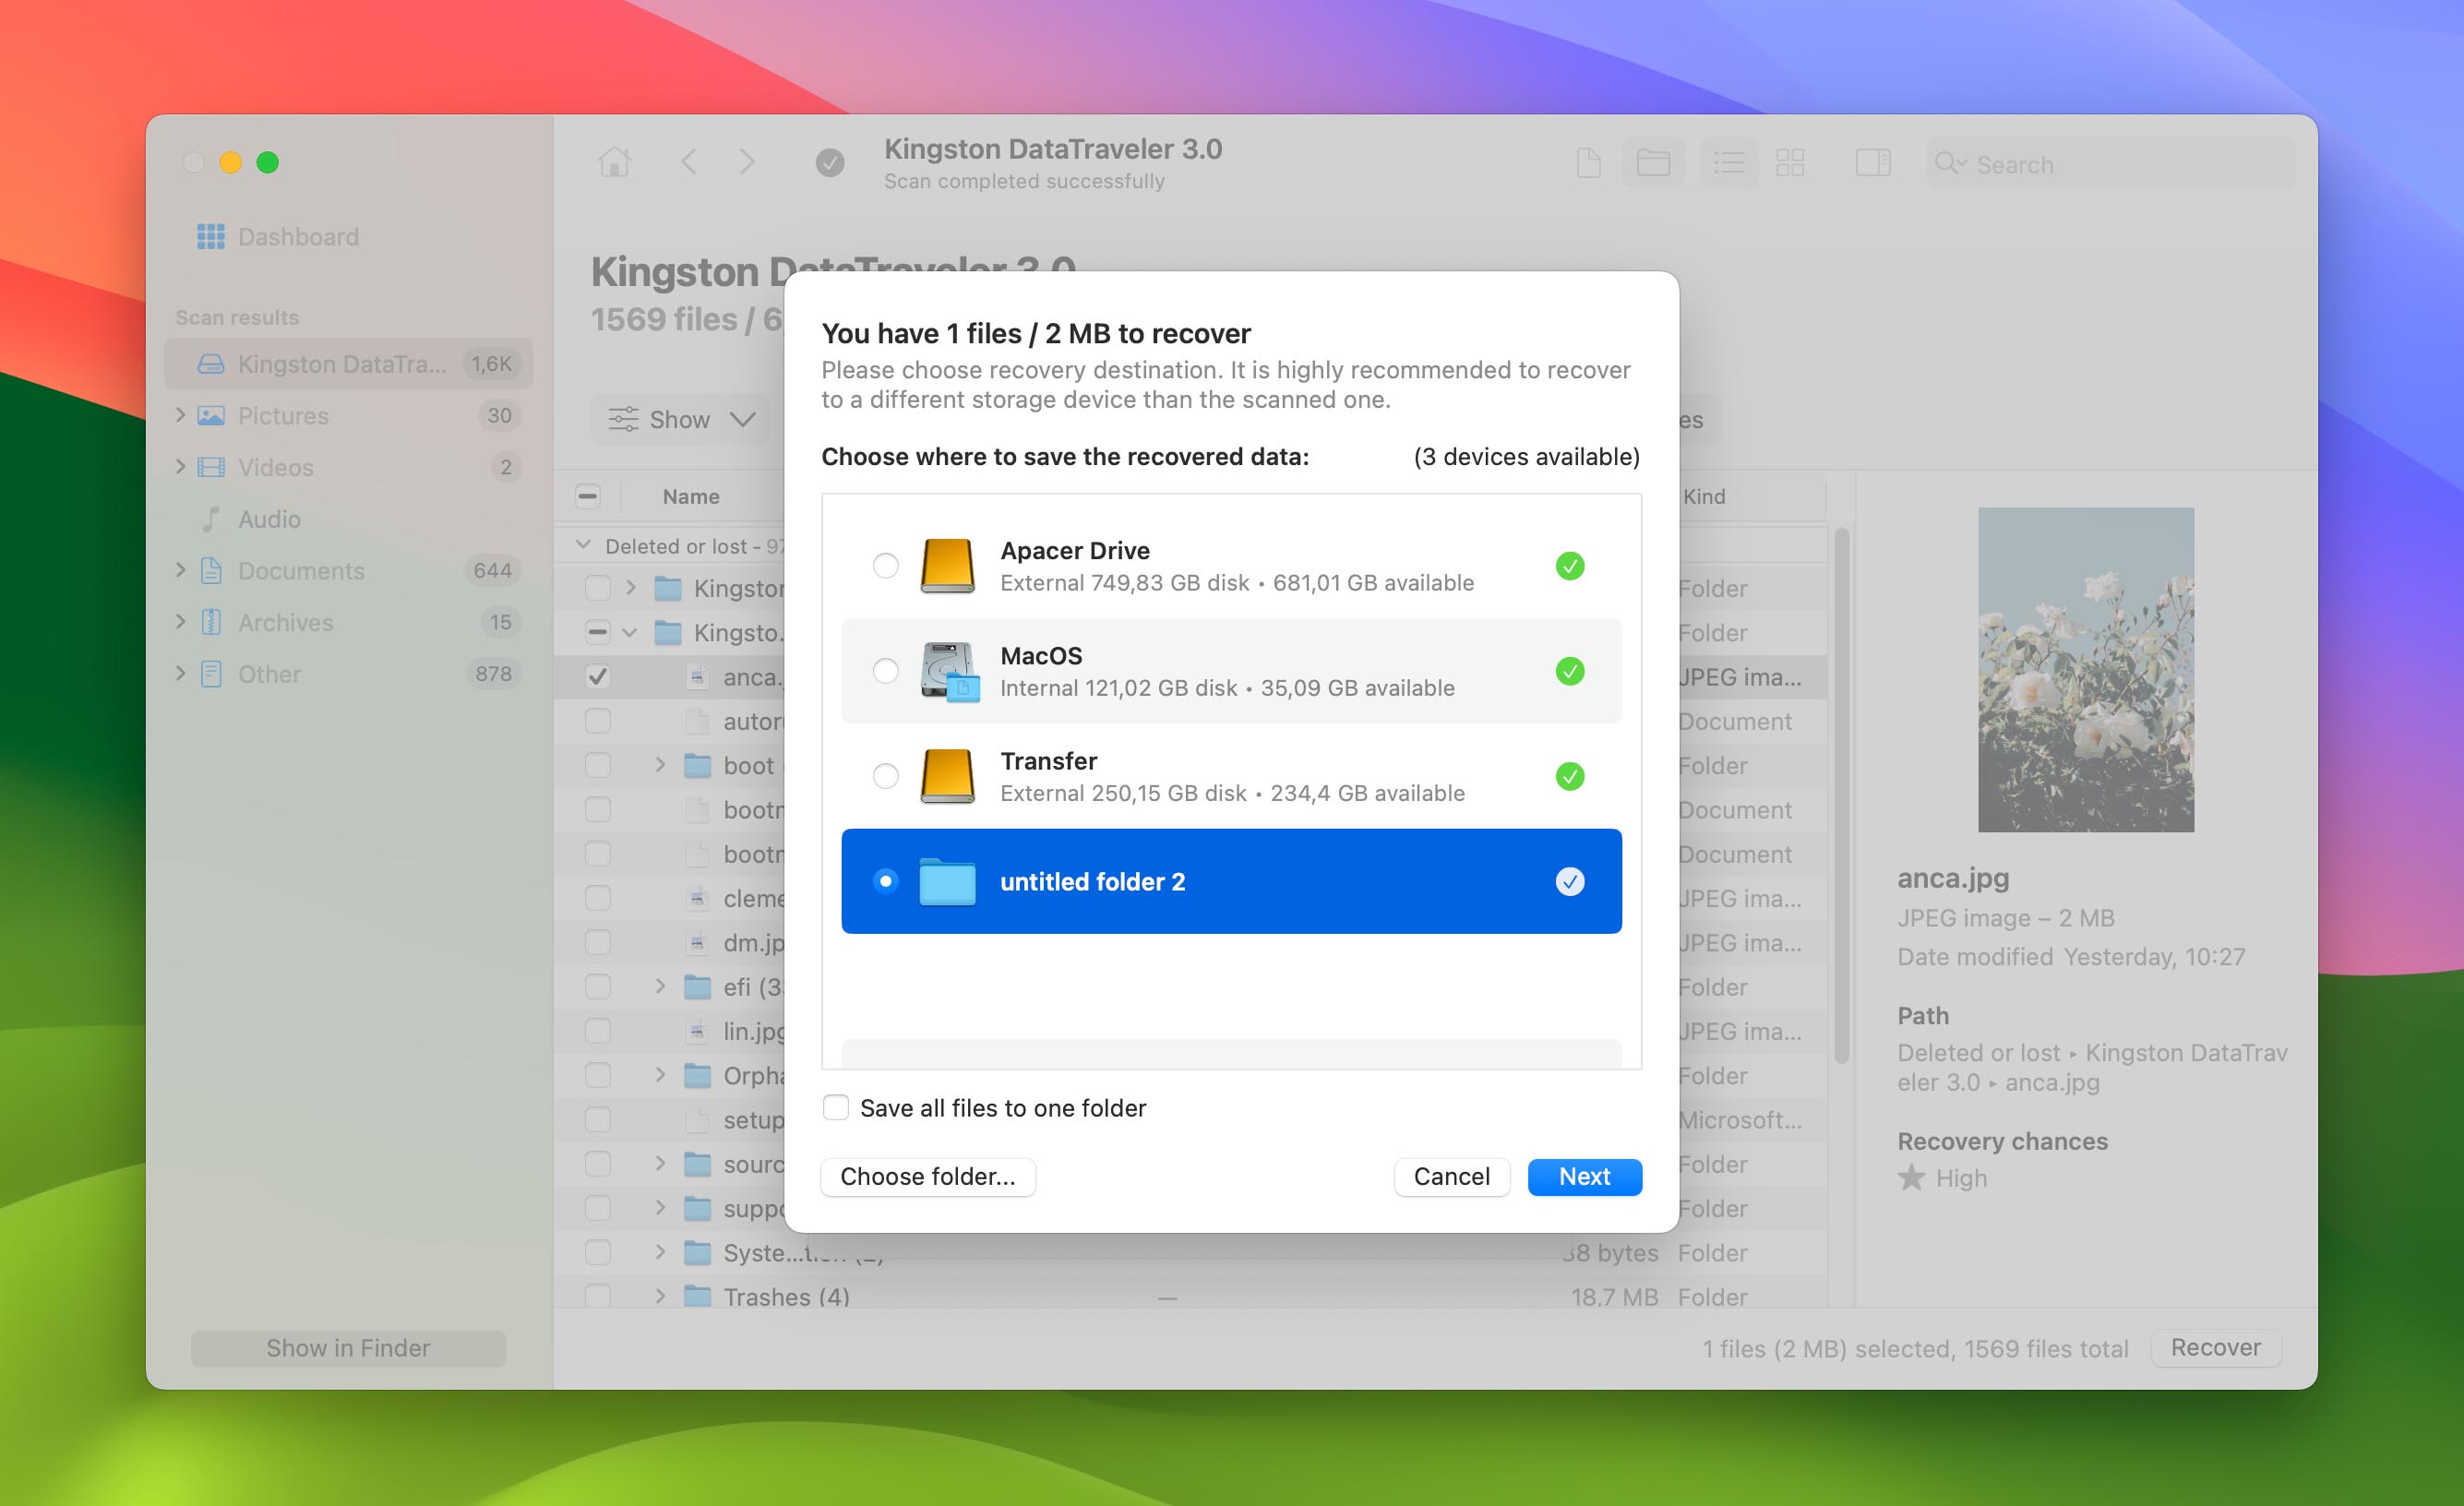
- Click the “Recover” button when you’re happy with your selection. A dialog box will appear, asking you to choose a destination for the recovered files. Disk Drill provides a list of recommended drives/folders, but you can choose the destination manually by clicking the “Choose folder…” button. When you’re finished, click “Next” to complete the recovery.
Our editorial team and I highly recommend Disk Drill, but there are other options available. For instance, you can learn how to use PhotoRec to recover lost files here.
In certain situations, you might need to take additional steps to retrieve your files. For instance, if your hard drive is malfunctioning, whether it’s corrupted or unrecognized, you can potentially use USB recovery software for recovery, especially if your computer still detects the drive. If not, consider seeking professional assistance to recover files from the flash drive.
Conclusion
Between checking your Trash, checking your flash drive’s own trash, and using a professional data recovery tool, you’ll hopefully be able to recover any files that you have lost. If you still can’t recover your lost files, unfortunately, those files may be lost forever. That said, solutions like Disk Drill and PhotoRec are pretty good at finding files that were previously deleted so hopefully, you will have been able to find your file.
FAQ
Can files deleted from a USB be recovered?
Yes. Files that were deleted from USB or lost by formatting a flash drive can still, in some cases, be recovered. That’s because when files are “deleted,” they’re not really gone — it’s just that the space they were taking up is marked as being open for use. That means that as long as they weren’t written over, those files can still be found.
How can I perform a USB data recovery on a Mac?
Here’s how you can utilize a data recovery tool to perform USB data recovery on a Mac:
- Download and install your preferred data recovery software.
- Connect the USB flash drive to your computer.
- Scan the flash drive for lost data.
- Preview and select the recoverable items.
- Proceed with the recovery of the selected files.
Is there any completely free data recovery software for Mac?
Yes. There is free data recovery software for Mac, however as mentioned, completely free software isn’t usually as reliable as paid software, because developers are able to spend more time and resources on making sure that their software is great. A good example of free data recovery software for Mac is PhotoRec, which is free and open-source.
What is the best option to recover deleted files from a flash drive without software on a Mac?
The best method to attempt recovery of deleted files from a flash drive on a Mac, without downloading additional software, is to check both your Mac’s Trash and the drive’s Trash. If you lost data due to USB drive corruption, you could also attempt fixing it with First Aid in hopes of restoring access to your drive.
Can Mac Terminal help recover data from a USB stick?
No. Mac Terminal can’t really help you recover data from a USB stick, except by enabling access to hidden files. To enable access to hidden files using Terminal, follow the instructions above.
This article was written by Christian de Looper, a Contributing Writer at Handy Recovery Advisor. It was also verified for technical accuracy by Andrey Vasilyev, our editorial advisor.
Curious about our content creation process? Take a look at our Editor Guidelines.