If you can’t access the files stored on your USB flash drive or external hard drive because of the USB Access Denied errors, then we have several fixes for you. Don’t worry: you don’t need to be a tech wizard to solve this problem. This article will guide you through the top methods in a step-by-step manner, and I will also be throwing in some extra tips and tricks to help you recover your lost data after you’ve resolved the problem.
Why Is Access Denied to My USB Drive?
Access to your USB drive can be denied for several different reasons:
- One potential reason for encountering USB Access Denied errors is insufficient access permissions in Windows 11, Windows 10, Windows 8, and older. This can manifest as USB access denied by administrator, and it often happens when the drive was previously used on another computer with different user accounts or if the drive’s ownership has changed.
- Another cause could be corrupted USB drivers. Drivers allow your operating system to communicate with your USB device. If these drivers are outdated, corrupted, or improperly installed, your system may fail to recognize the USB drive, leading to an access denied for USB drive message.
- Similarly, faulty USB ports can also be a culprit. A malfunctioning or damaged USB port may not establish a proper connection with your device, resulting in USB is not accessible errors.
- Sometimes, antivirus or firewall settings might mistakenly identify a USB drive as a security threat, thereby blocking access and leading to USB drive access denied messages.
- Finally, there are file system errors. Every storage device, including USB drives, uses a file system to organize and store data. If the file system on your USB drive becomes corrupted or damaged, it can cause the access denied for USB drive error. This issue can be resolved by repairing the file system or reformatting the drive.
Now that you’re aware of the possible causes behind USB access denial, we can proceed to preliminary checks to diagnose the issue.
Preliminary Checks Before Troubleshooting Removable Disk Access Denied

Photo by Kindel Media
These simple steps can help you identify if the problem is with the USB device itself, your computer’s USB ports, or something else entirely. Here’s what you need to do:
- Check the USB connection: First, you need to double-check if the USB drive is connected properly to your computer. Try unplugging it and plugging it back in carefully. A loose connection might cause the access denied for USB drive error.
- Clean the USB connector: Sometimes, dust or debris in the USB connector can prevent a good connection. Carefully clean the USB plug and the port on your computer to eliminate any potential physical blockages.
- Try Different USB Ports: If the issue persists, try connecting your USB drive to a different USB port on your computer. This helps rule out a faulty port.
- Try a Different Cable: If you’re using a USB cable to connect an external hard drive, try swapping it out for another one. A faulty cable can be the cause of the removable disk access denied error.
- Test the USB Drive on Another Computer: Finally, try connecting the USB drive to another computer. This step will help you figure out if the problem lies with the USB device itself or if it’s specific to your computer.
Completing these checks can often resolve simple connectivity issues that may appear as USB access denied errors. If your USB drive still isn’t recognized or if you continue to receive access denied messages, then it’s time to move on to more in-depth troubleshooting methods.
9 Methods to Fix USB Access Denied
Now that you’ve completed the preliminary checks and the issue persists, it’s time to explore more advanced troubleshooting methods. This section will guide you through 9 effective methods to fix USB access denied errors in Windows.
Basic Troubleshooting Methods
Let’s start with some basic troubleshooting methods that can often resolve the issue. These methods are extremely easy to implement, and there’s no risk of you making a mistake that could make your system unusable.
Method 1: Restart Your Computer
Sometimes, a simple restart can fix various issues, including USB access denied errors. This solution can resolve a myriad of issues, including USB access denied errors, by allowing the software responsible for managing external devices to load correctly upon system startup.
To restart your Windows computer:
- Click the Start button or press the Windows key on your keyboard.
- Click the Power icon and select Restart.
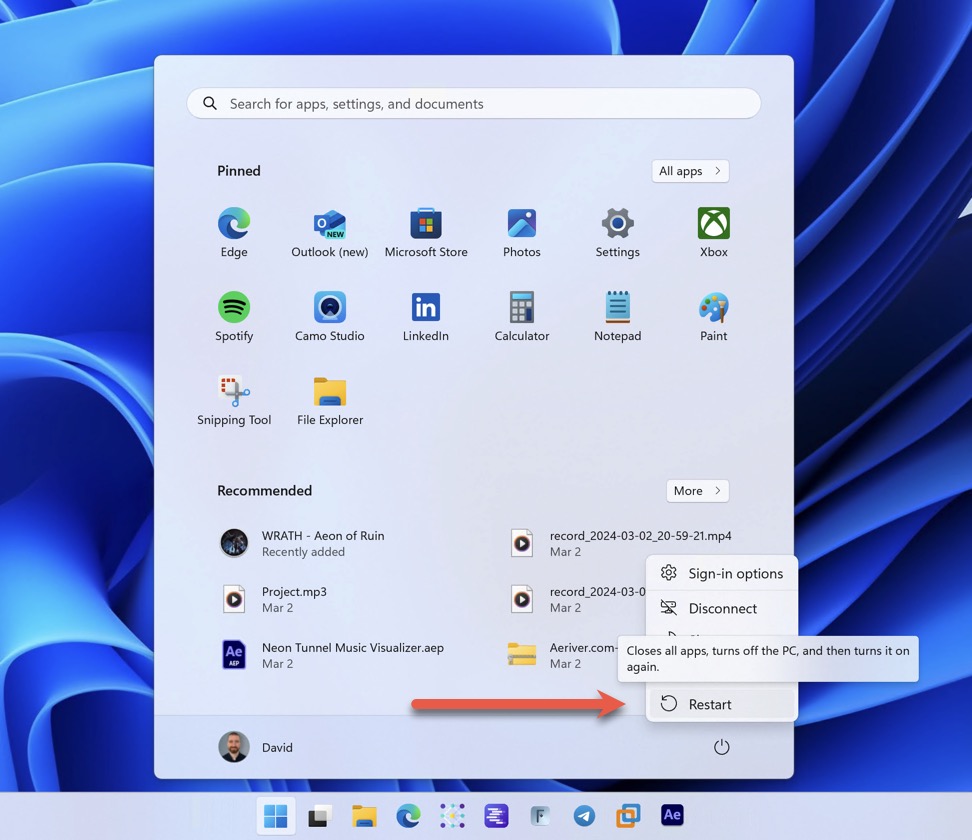
- Reconnect your USB drive and check if the issue is resolved.
Method 2: Check the USB Drive for Viruses
In some cases, viruses and malware might contribute to USB access denied errors, though such instances have become increasingly rare with advancements in security technologies.
Windows Defender, the built-in anti-malware software on all Windows computers, offers a robust tool for scanning and removing potential threats. If your PC exhibits other signs of a virus or malware infection, taking steps to inspect your USB drive for malicious software can be a wise measure.
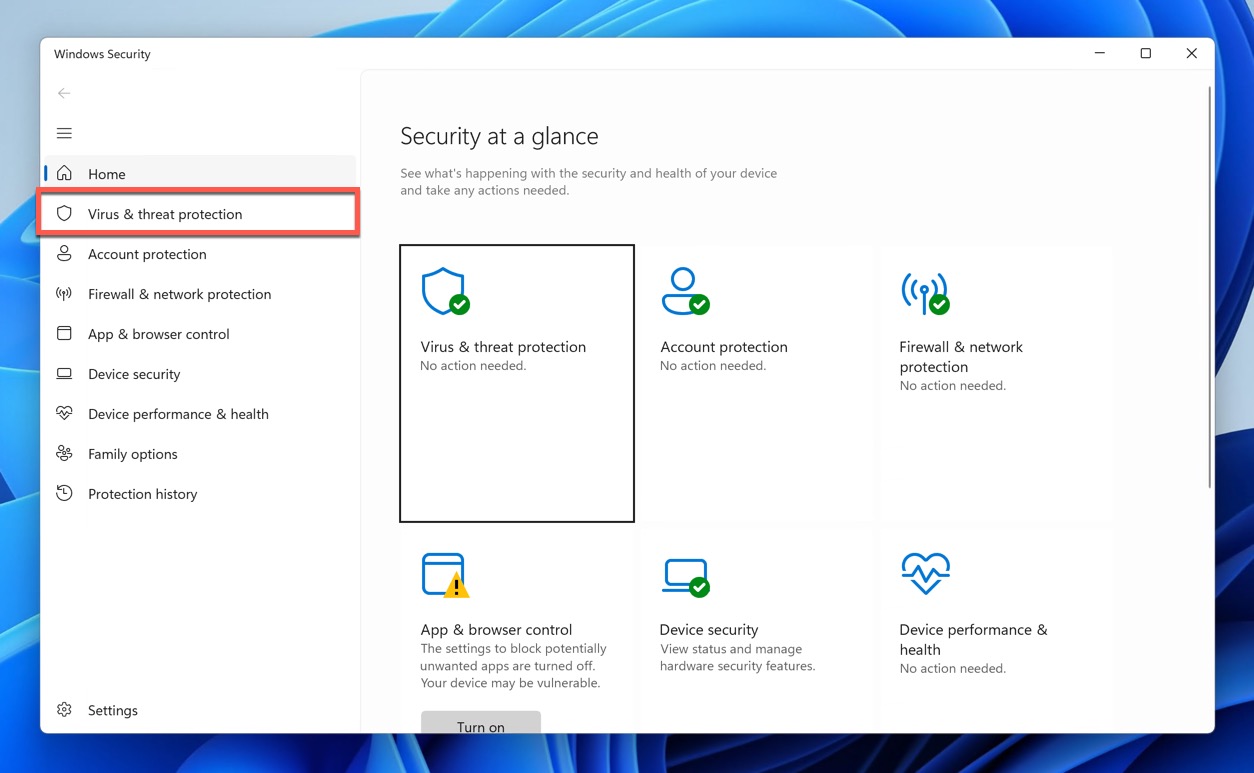
Here’s how to perform a virus scan on your USB drive using Windows Defender:
- Plug the drive into your computer.
- Open Windows Security (you can find it by searching for it in the Start menu).
- Go to Virus & threat protection.
- Click the Scan options link.
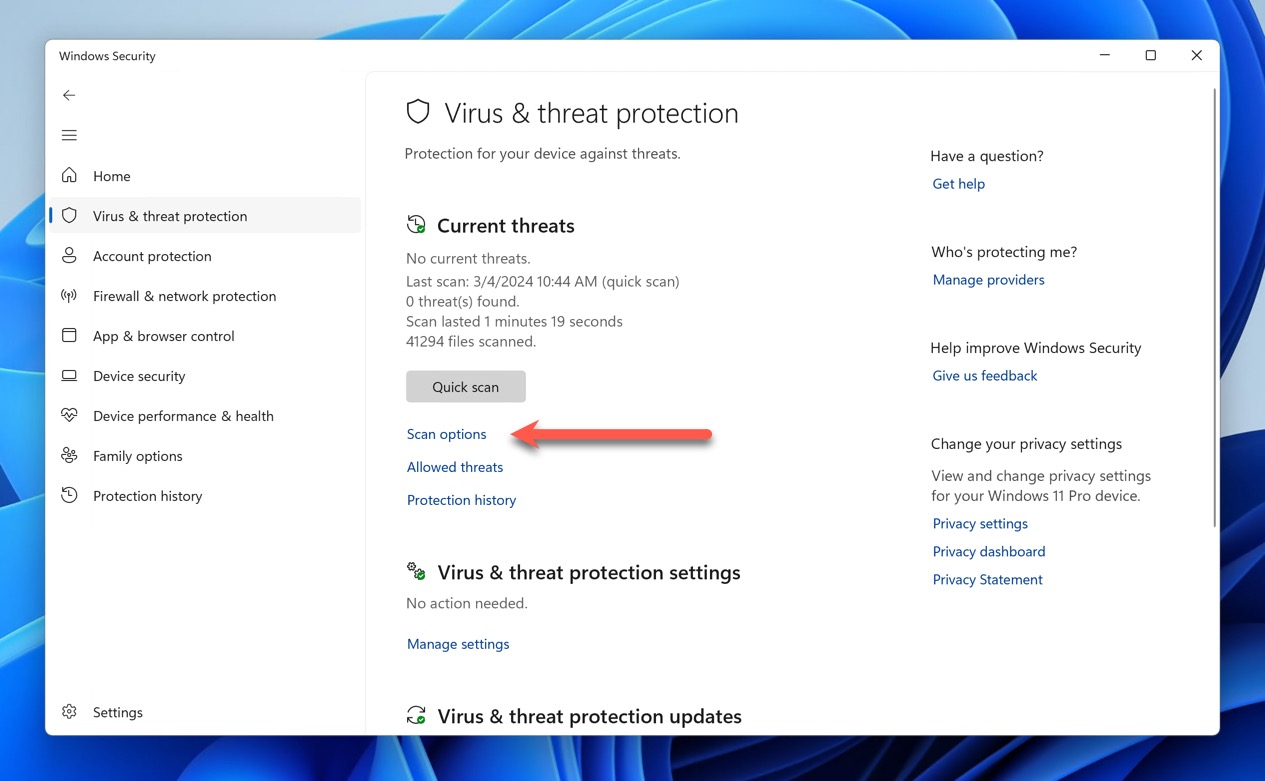
- Select Custom scan and click Scan now.

- Choose your USB drive and wait for the scan to finish.
Method 3: Run Applications as Administrator for Elevated Privileges
If you’re trying to access the USB drive using a specific third-party application and encountering the USB access denied error, the issue might lie with the application itself. To confirm this, we recommend first trying to access the USB drive using the standard File Explorer.
If you can access the drive without any issues in File Explorer, the problem likely resides within the third-party application. In such cases, running the problematic application as an administrator might resolve the USB access denied error.
Here’s how to do it:
- Right-click on the application’s shortcut.
- Select Properties.
- Go to the Compatibility tab.
- Check the box next to Run this program as an administrator.
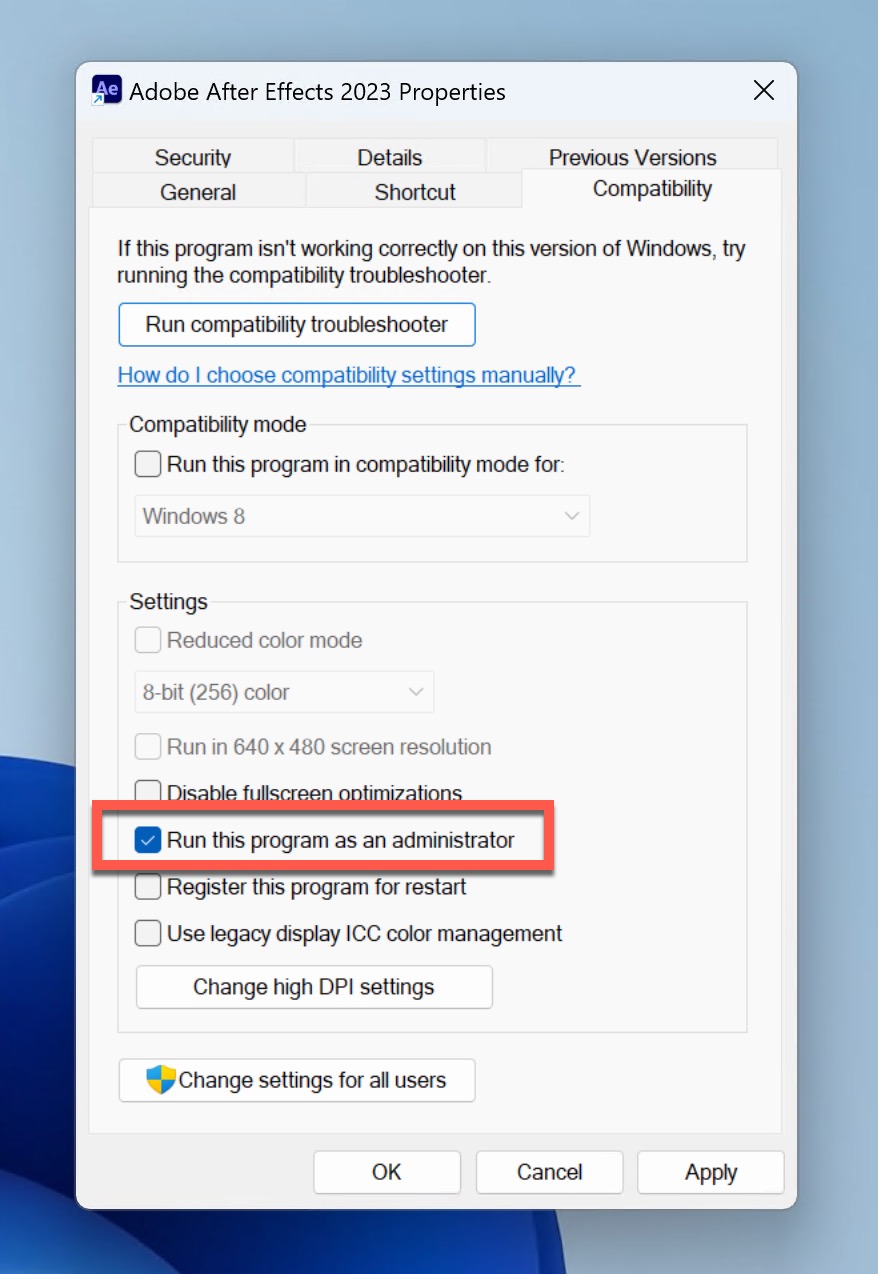
- Click Apply and OK.
- Launch the application and try accessing the USB drive again.
Advanced Troubleshooting Techniques
When basic troubleshooting doesn’t resolve your USB access denied errors, it’s time for advanced techniques that can be highly effective but (in some cases) also carry a higher risk of negative consequences in case you make a mistake. If you’re unsure about any step, it’s better to stop and seek professional help otherwise you might end up in a situation where your only option is to recover deleted files from a USB flash drive.
Method 4: Change Drive Letter via Disk Management
Sometimes, USB access denied errors can occur due to a conflict with the drive letter assigned to your USB drive or due to software glitches.
You can change the drive letter using Disk Management, which will also prompt the system to reindex the device:
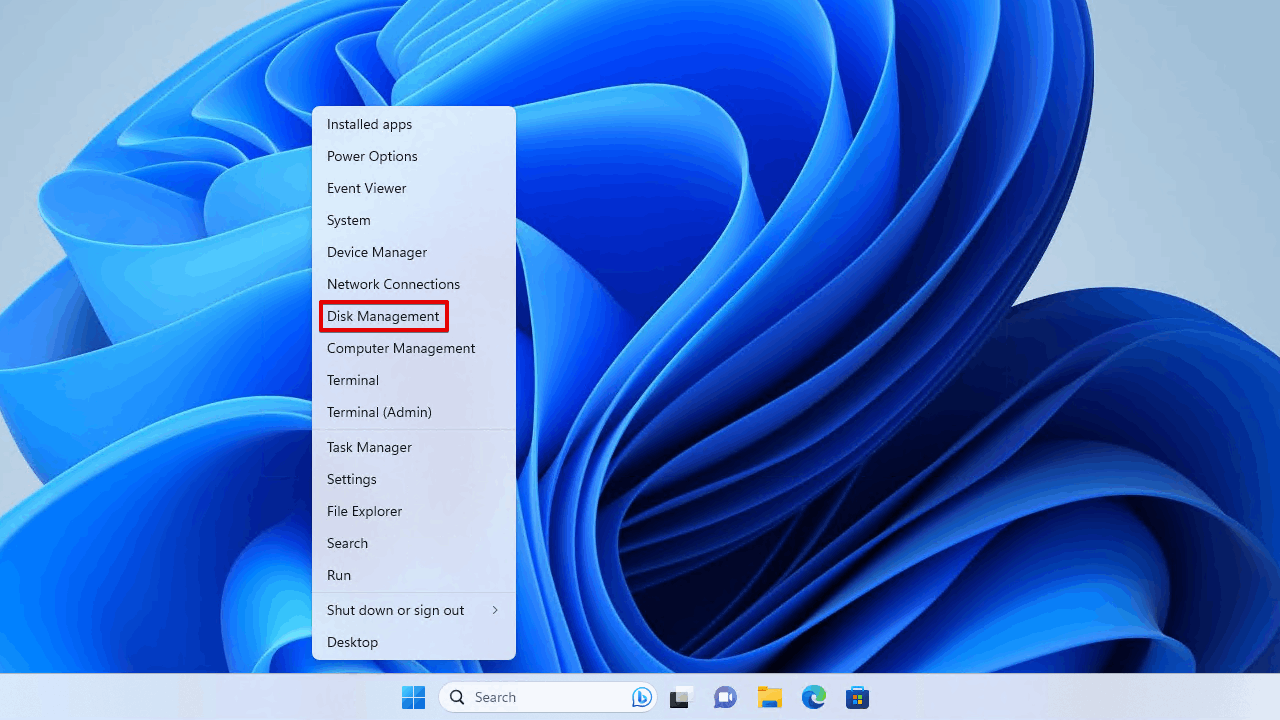
- Press Windows key + X and select Disk Management.
- Locate your USB drive in the list of drives and right-click on it.
- Select Change Drive Letter and Paths.
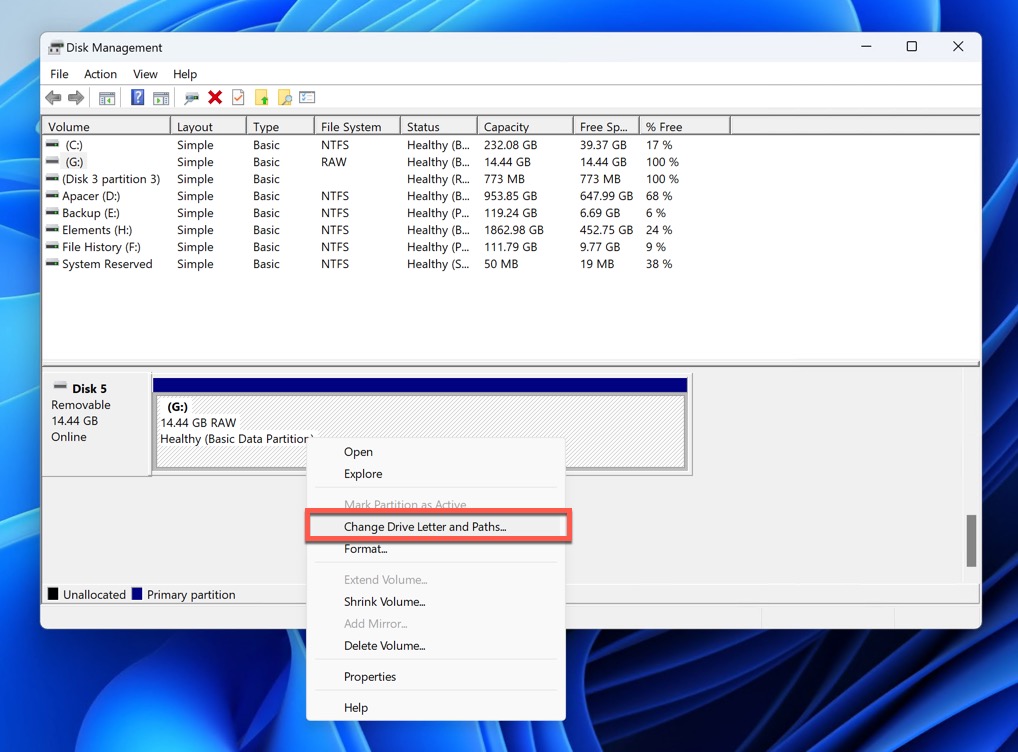
- Click Change and assign a new drive letter.
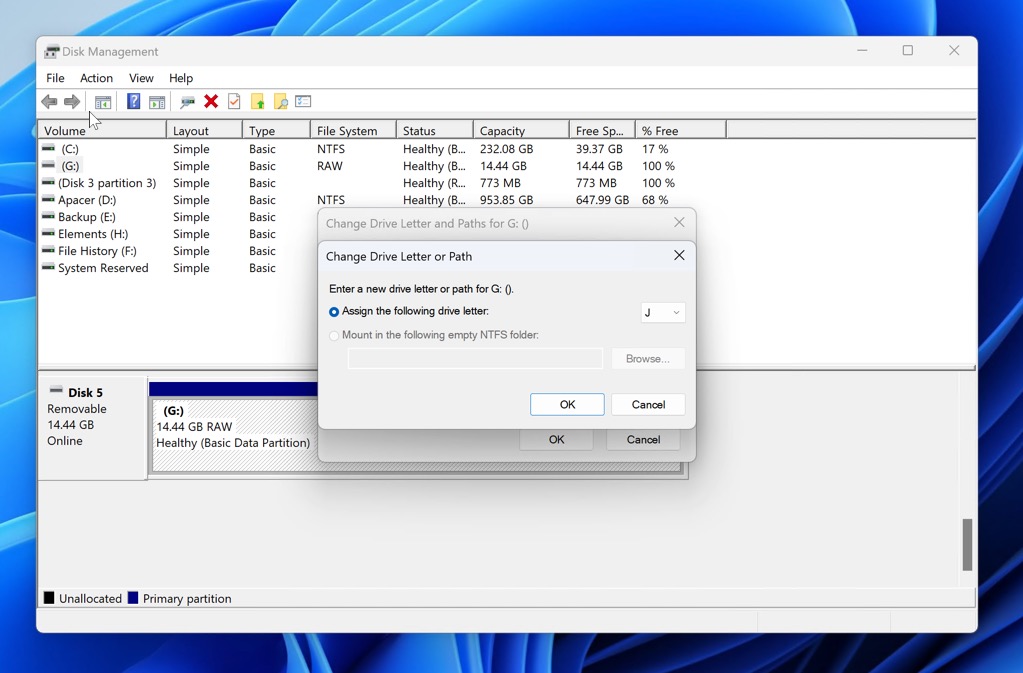
- Click OK to save the changes.
Method 5: Update or Reinstall USB Drivers
Outdated or corrupted USB drivers can cause access denied errors. You can update or reinstall the drivers using two methods:
Through Device Manager
- Press Windows key + X and select Device Manager.
- Expand the Disk drives or Universal Serial Bus controllers category.
- Right-click on your USB drive and select Update driver or Uninstall device.
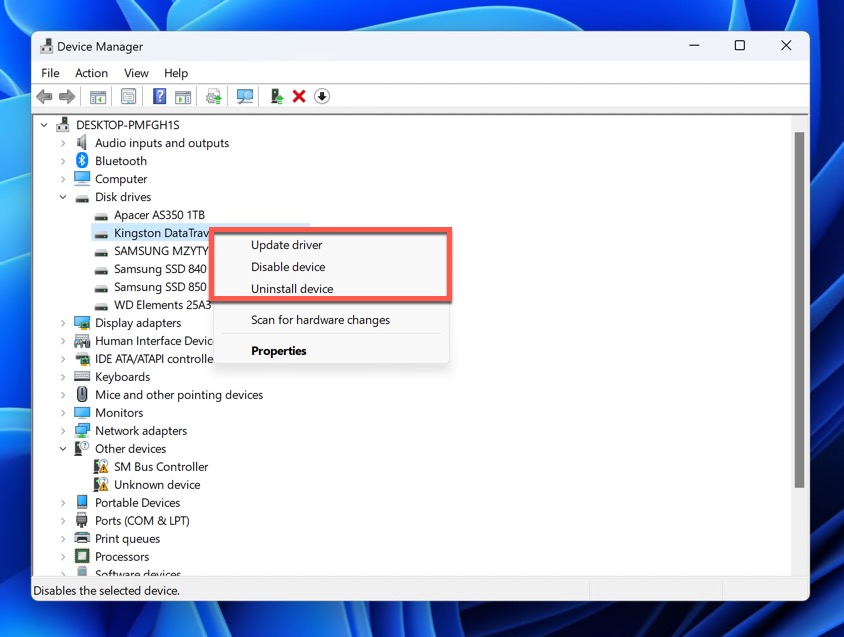
- If you choose Update driver, select Search automatically for updated driver software.
- If you choose Uninstall device, confirm the action and restart your computer. Windows will automatically reinstall the driver upon restart.
By downloading the manufacturer’s drivers
Visit the manufacturer’s website to download and install the latest drivers for your USB drive. Be sure to choose the correct drivers for your Windows version. Keep in mind that administrator privileges are necessary to install Windows drivers.
Method 6: Fix Corrupted File System on USB
To function as intended, all storage devices, including USB drives, must have a file system. A file system is responsible for organizing and managing data on the drive, enabling the operating system to read, write, and access files efficiently. When the file system on a USB drive becomes corrupted, it can lead to various issues such as data loss, access denied errors, and an inability to read or write files.
To fix a corrupted file system on your USB drive, you can use built-in Windows tools like the CHKDSK command, or you can format the drive. However, it’s important to note that both CHKDSK and formatting can potentially lead to data loss. Before proceeding with either method, it is highly recommended to recover your data using reliable data recovery software first and/or create a backup image of your drive. Both options will keep your data secure.
Even if you don’t think you need to recover files now, data recovery software can still be helpful should you change your mind afterward. CHKDSK carries a higher risk, as it can potentially corrupt data during the process. Even if you recover files after using CHKDSK, there’s a chance they might be corrupted. Formatting, on the other hand, is usually recoverable, especially if you use a quick format instead of a full format.
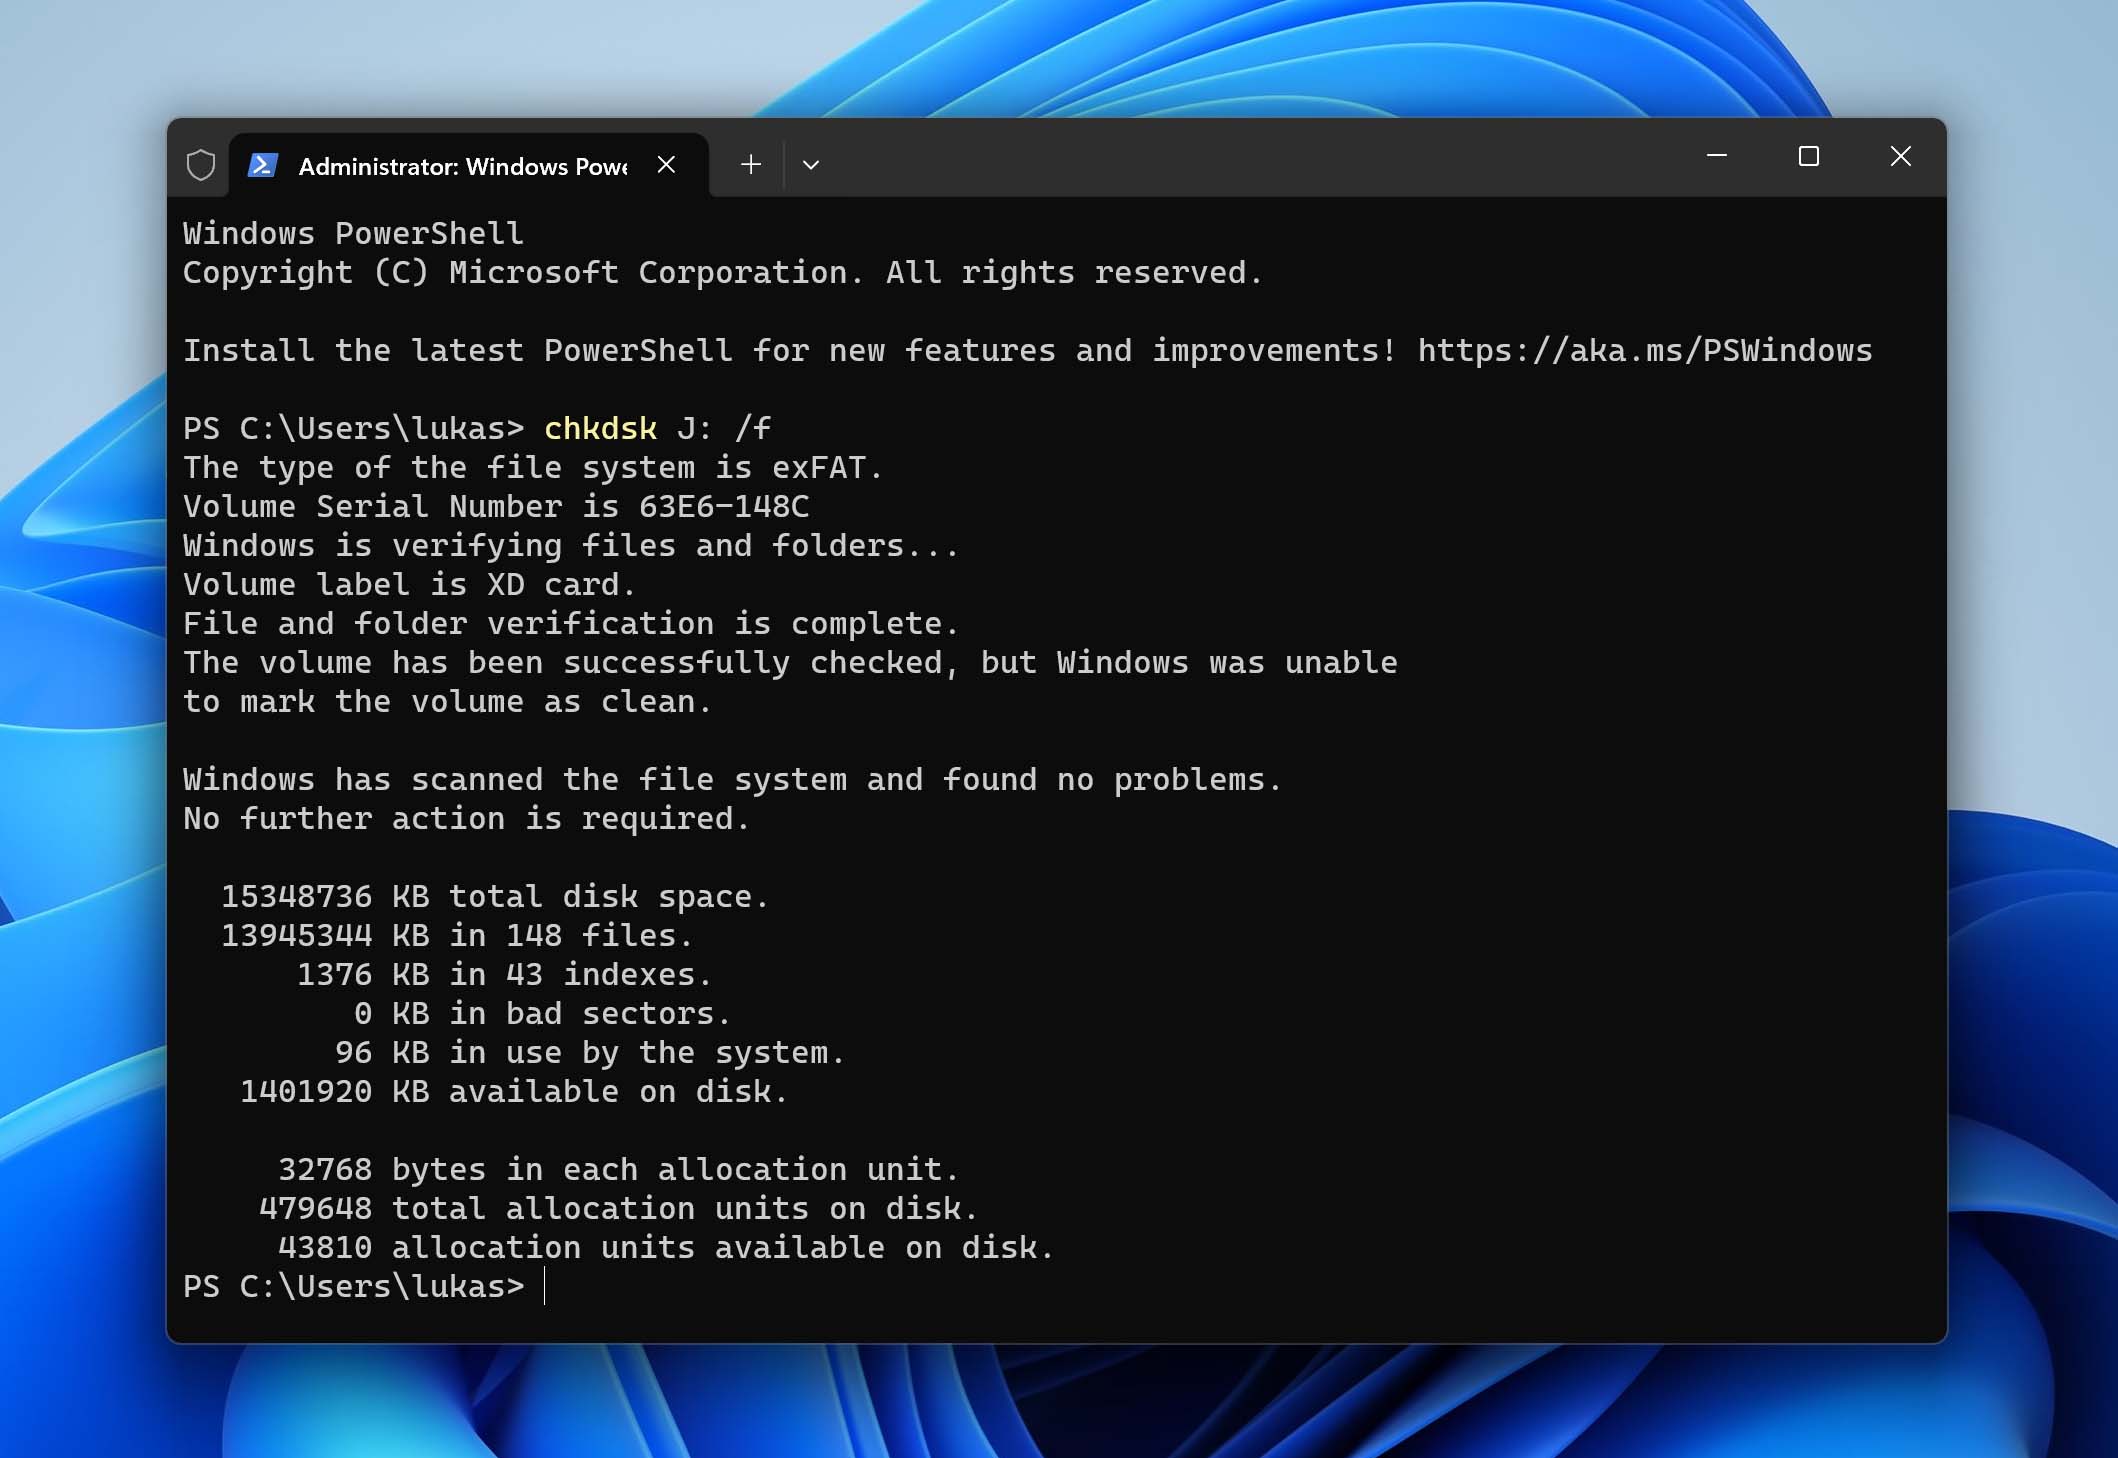
Run Chkdsk
- Search for the Terminal app in the Start menu.
- Open the Terminal app as administrator (right-click it and select the Run as Administrator option).
- Type chkdsk X: /r (replace ‘X’ with your USB drive letter) and press Enter.
Format the USB drive
- Locate your USB drive in File Explorer, right-click it, and choose Format.
- Choose a file system (NTFS is common for external USB drives, while FAT32 or exFAT is best for drives that are sometimes connected to non-Windows machines).
- Make sure the Quick Format option is checked. The difference between Full and Quick format is that the Quick Format option only deletes the file allocation table, while the Full Format option overwrites each sector, making it impossible to recover data later.
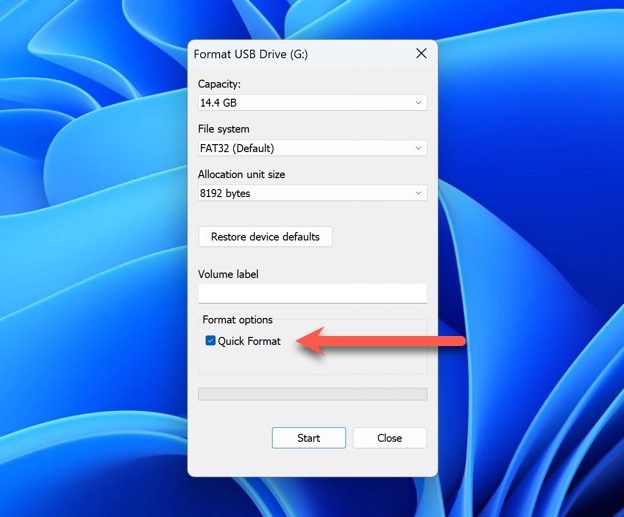
- Click Start to format.
For more information about USB drive formatting, check out our article on how to format a flash drive without losing data. And if you’ve already formatted your drive, you might be interested in how to recover data from a formatted USB drive guide.
Method 7: Disable Security Software Temporarily
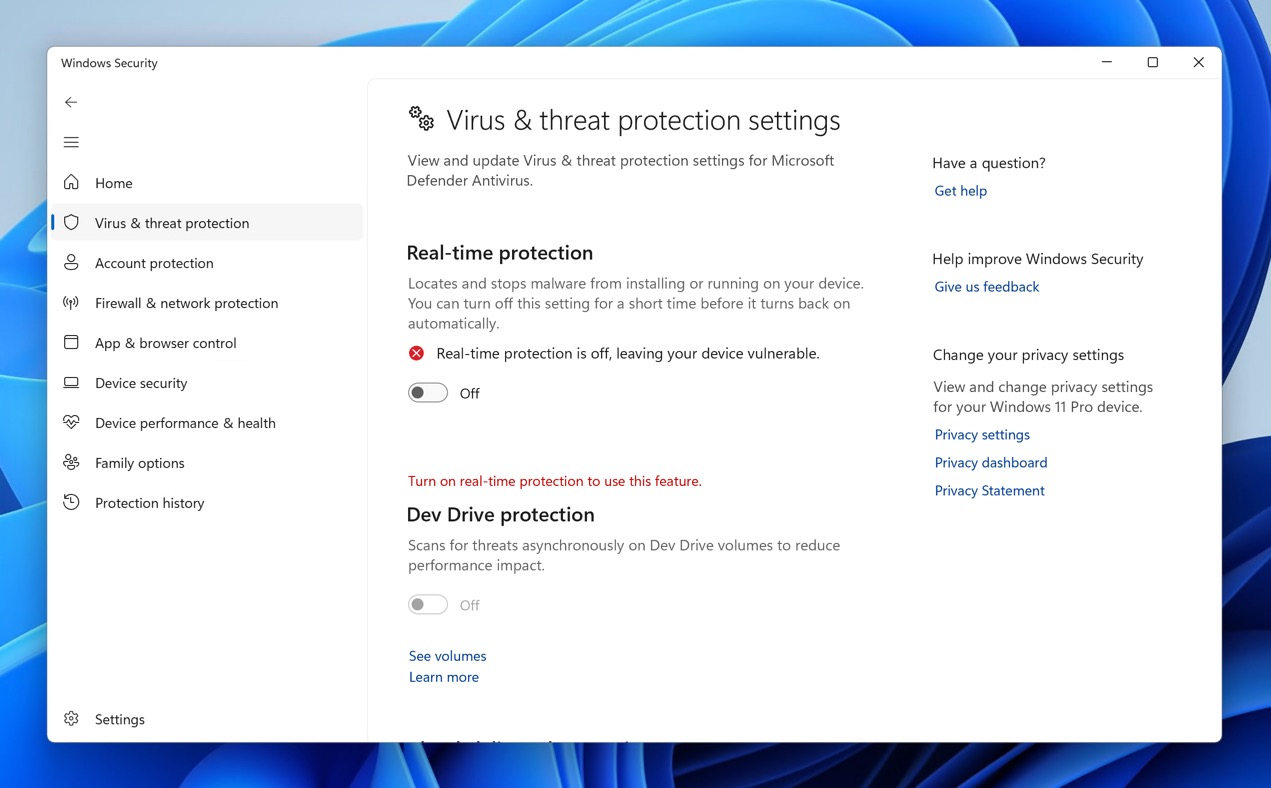
Sometimes, security software such as anti-malware programs can falsely flag USB drives as malicious or be configured to prevent them from mounting. To rule out this possibility, you can temporarily disable your security software and check if the issue persists.
If you’re using Windows Defender (native Windows security software), then you can follow Microsoft’s instructions on how to disable it. If you’re using a third-party security solution, visit the developer’s website for specific instructions on how to temporarily disable the software. Most security software can be disabled by right-clicking the system tray icon and selecting the appropriate option, such as “Disable,” “Pause Protection,” or “Exit.”
Method 8: Change Registry Permissions (Caution)
Changing registry permissions can help resolve USB access denied errors in some cases. However, editing the registry can have serious consequences if done incorrectly. Make sure to create a backup of your registry before proceeding and only follow these steps if you’re comfortable with the risks.
To change registry permissions:
- Press Windows key + R to open the Run dialog box.
- Type regedit and press Enter to open the Registry Editor.
- Navigate to the following key: HKEY_LOCAL_MACHINE\SYSTEM\CurrentControlSet\Control\usbstor
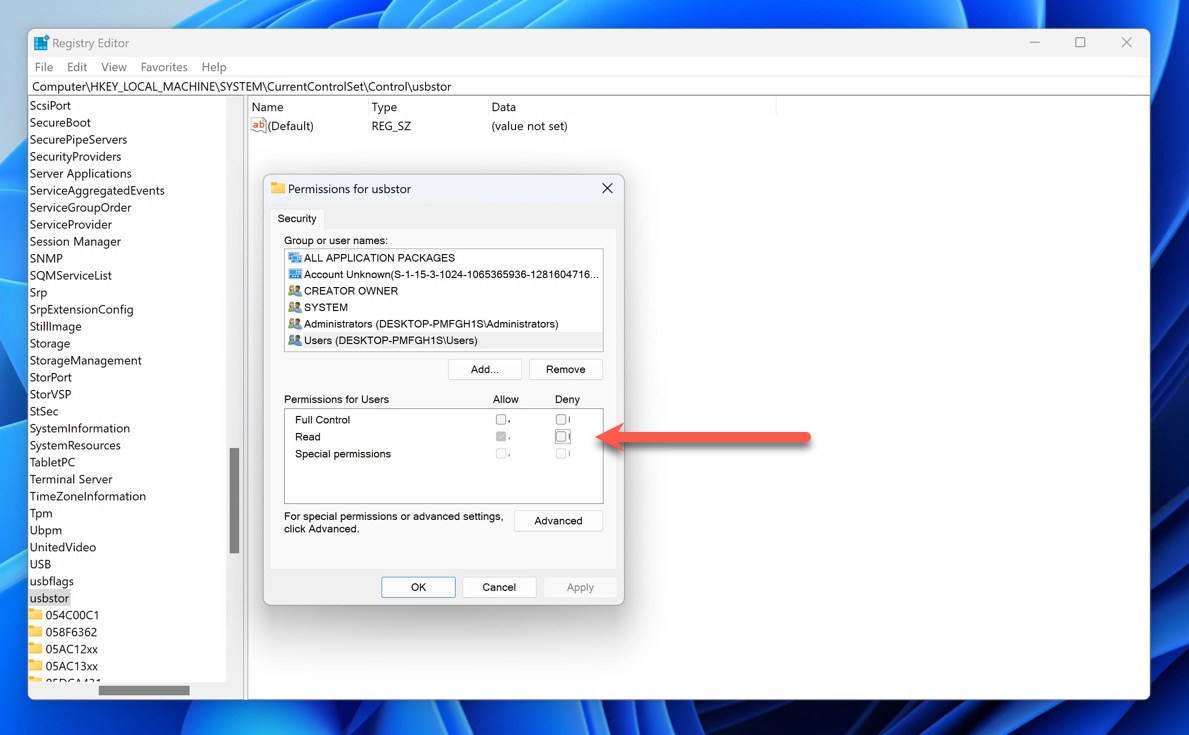
- Right-click the “usbstor” key and select Permissions.
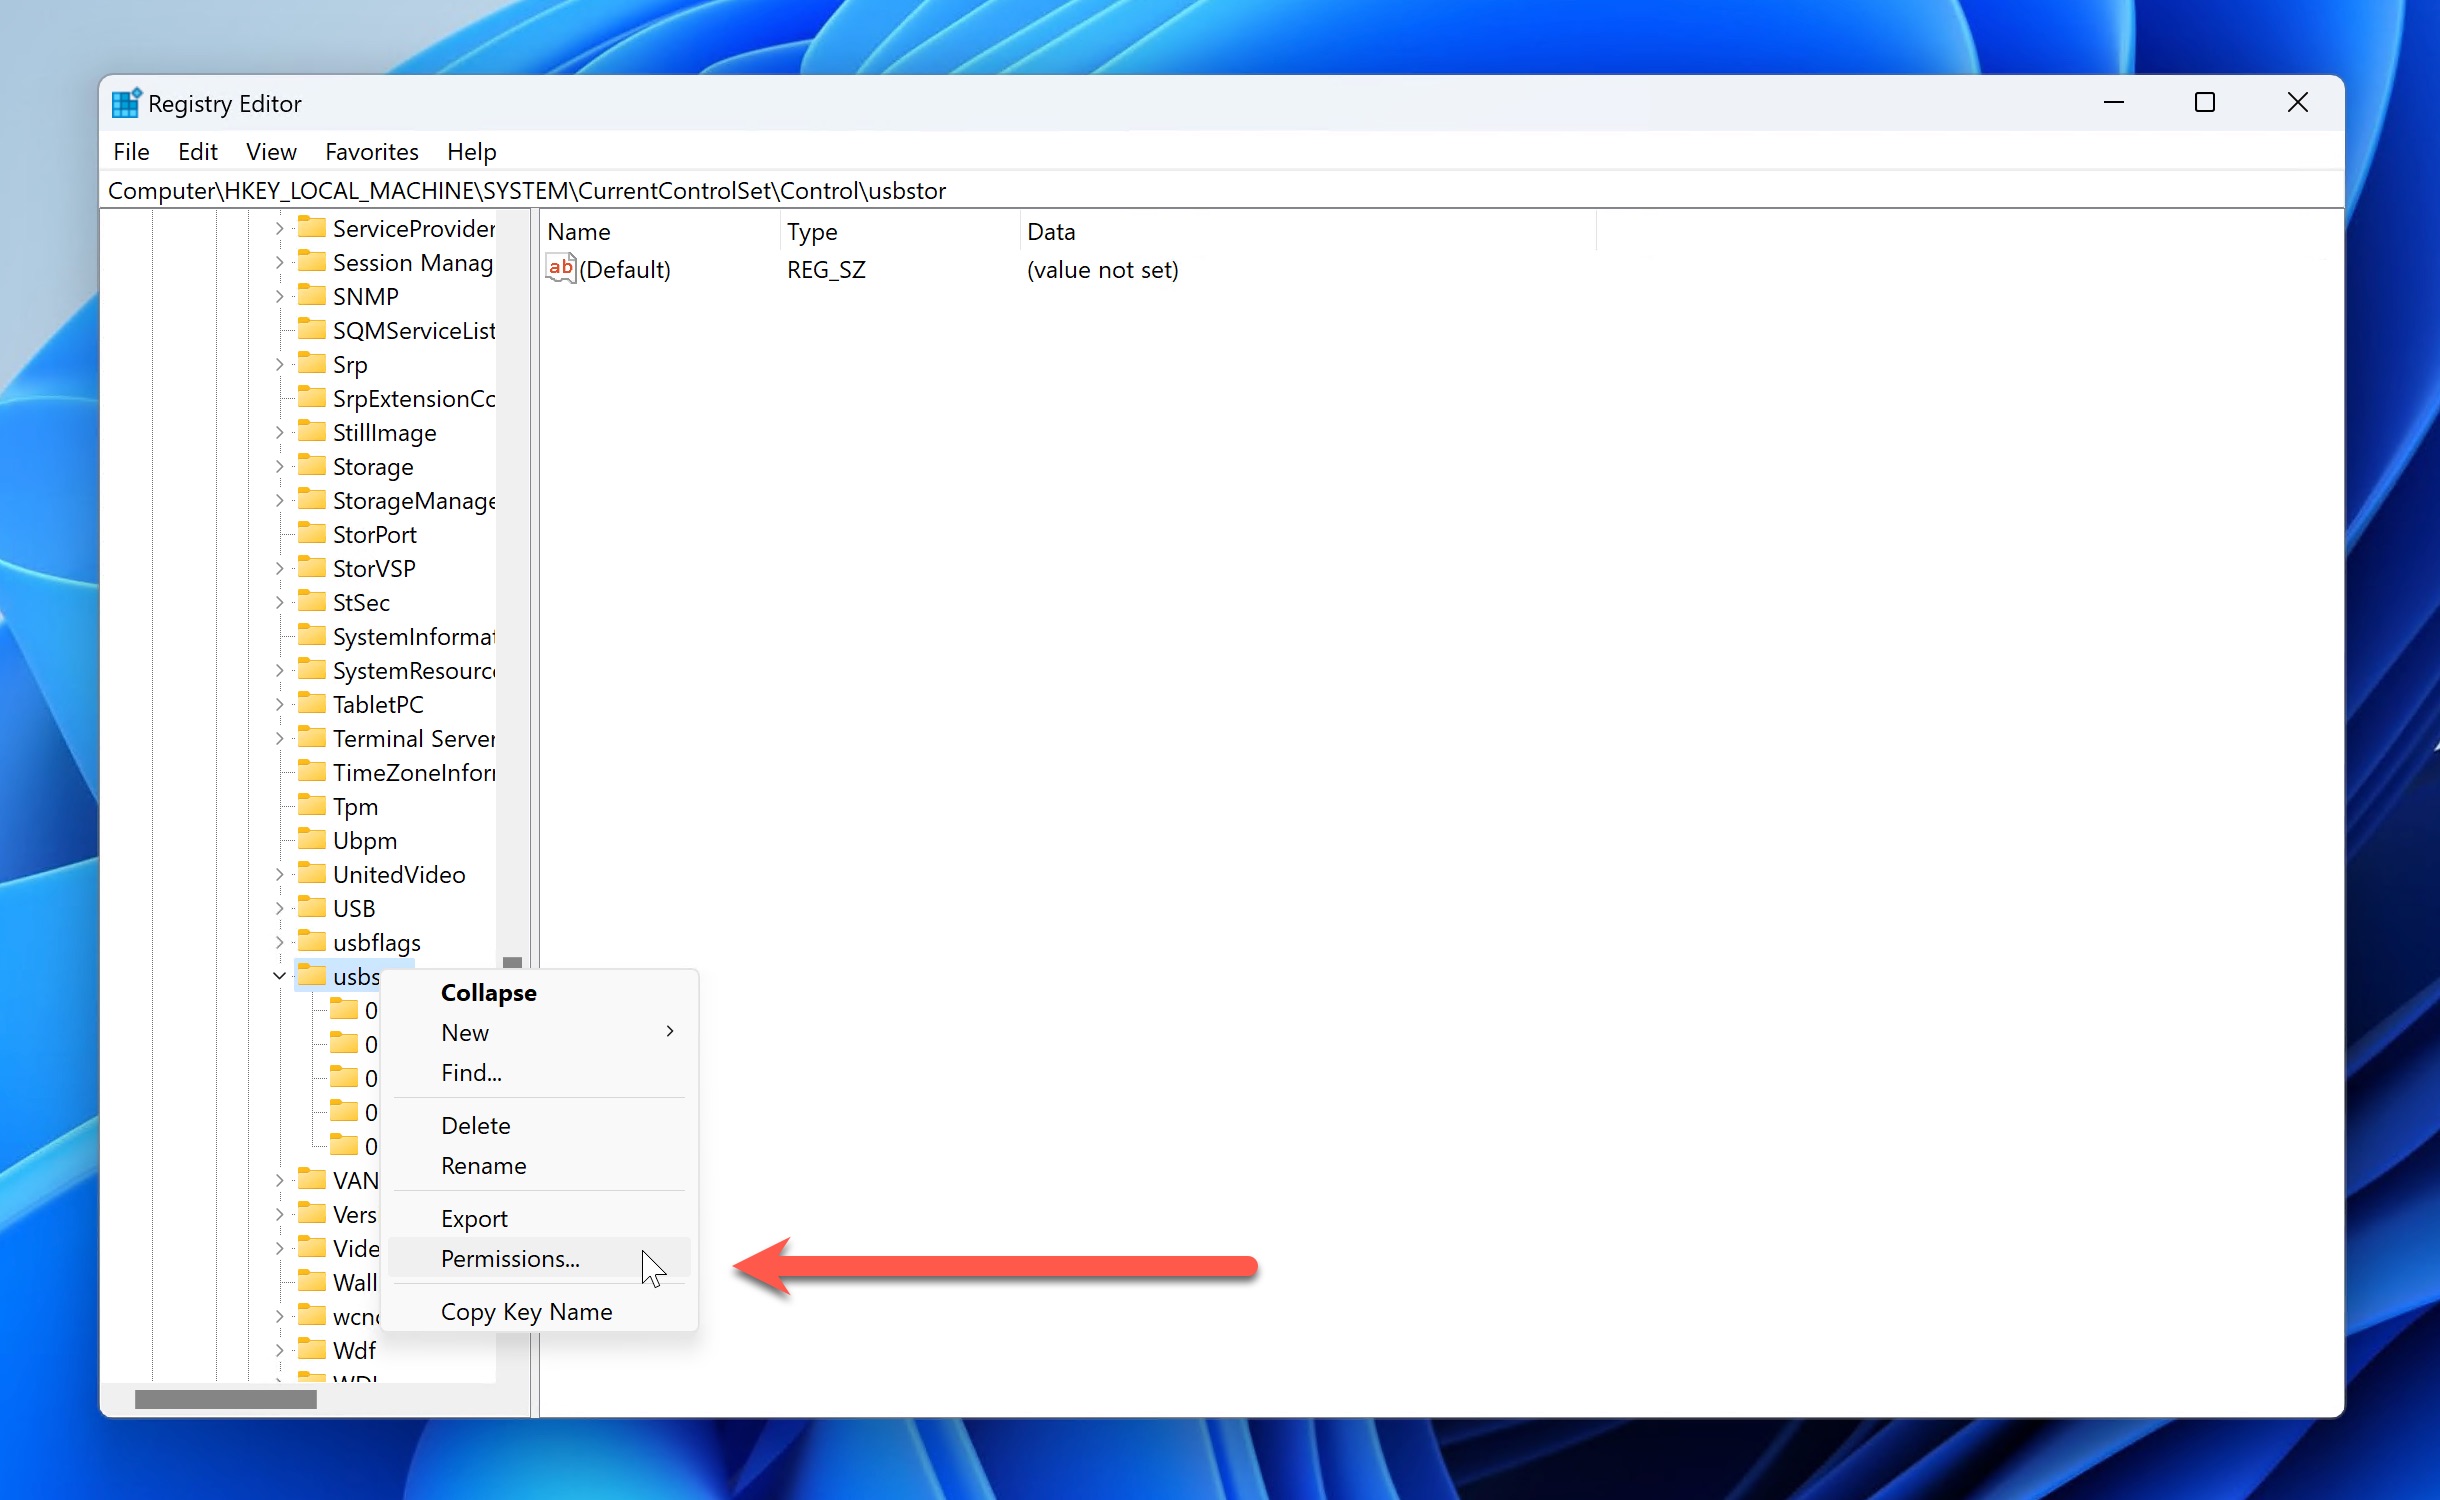
- Make sure Users aren’t denied the Read permission.
Method 9: Modify Group Policy Settings for USB Access
Group Policy settings can be used to control access to USB storage devices on your computer. If USB access has been restricted via Group Policy, you may encounter USB access denied errors.
Enable USB drive access via group Policy Editor
- Press Windows key + R to open the Run dialog box.
- Type gpedit.msc and press Enter to open the Local Group Policy Editor.
- Navigate to: Computer Configuration\Administrative Templates\System\Removable Storage Access
- Double-click the “Removable Disks: Deny execute access” policy.
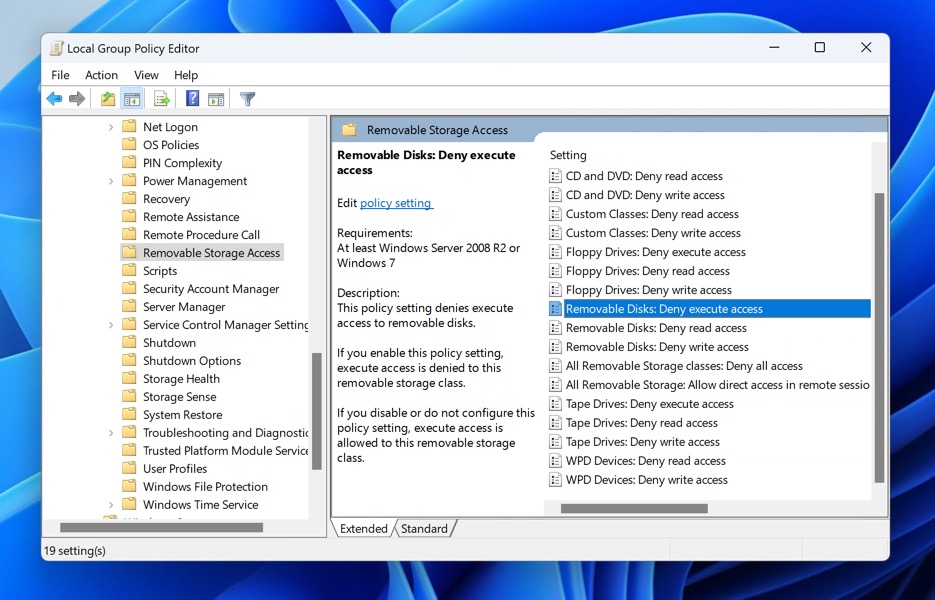
- Set the policy to Disabled and click OK.
Reverse USB access denial policies
- In the Local Group Policy Editor, navigate to the Removable Disks: Deny execute access policy as shown above.
- Double-click the policy and set it to Not Configured or Disabled.
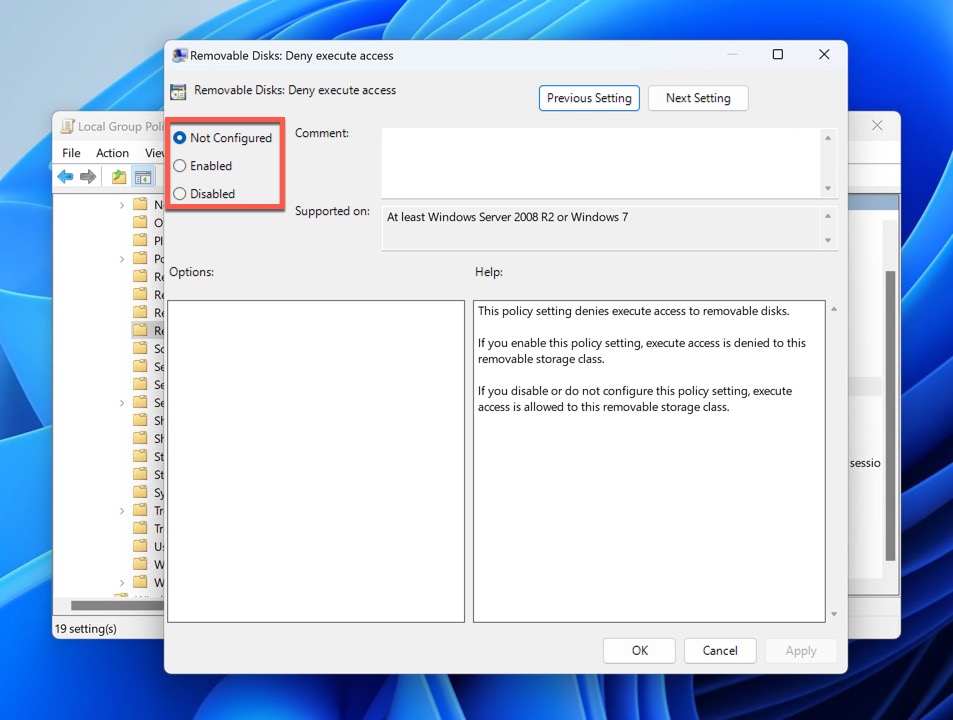
- Click OK to save the changes.
Not-So-Honorable Mentions
Many online articles on this topic list some additional methods to fix USB access denied errors. We intended to include them as well. However, our testing revealed their ineffectiveness. Here are the methods that didn’t make the cut:
Change Permissions Through Properties
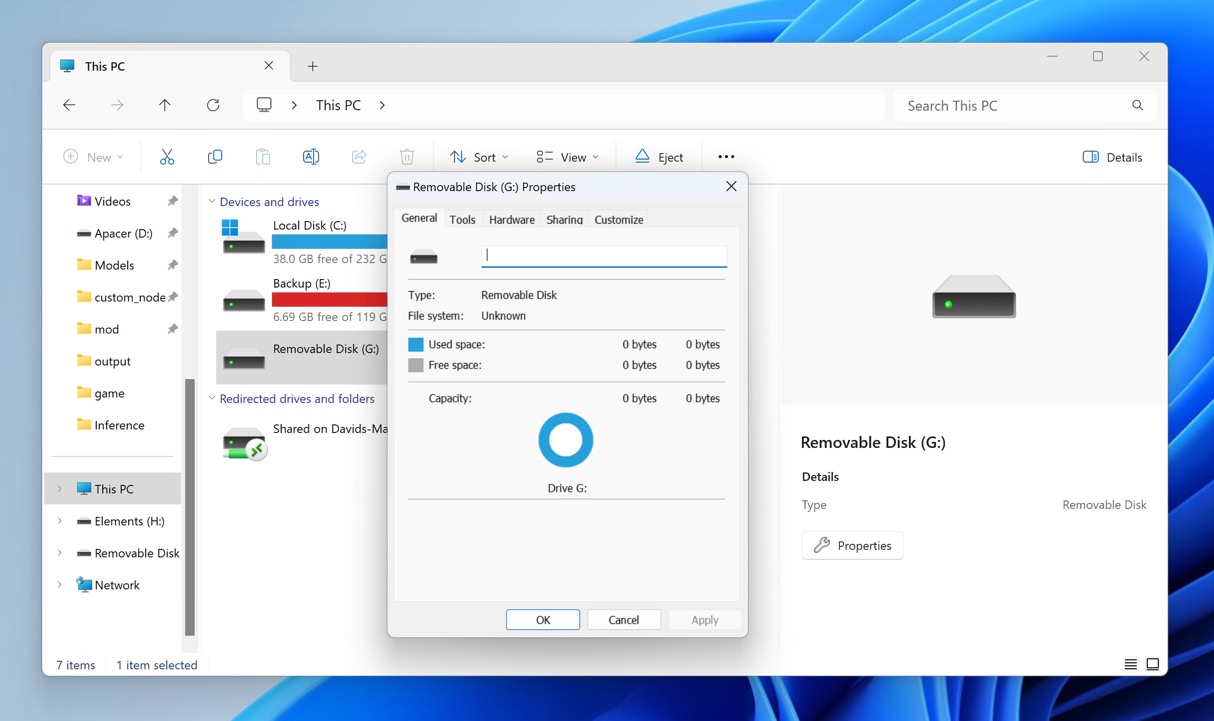
Some articles claim that you can resolve USB access denied errors by adjusting the permission settings for your user account through the Security tab in the USB drive’s Properties.
However, this is misleading. The Security tab is only available for internal devices, not external ones like USB flash drives or external hard drives. Unsurprisingly then, many users have reported the absence of this tab when trying to change permissions for their USB devices.
Add “Full Control” for Future Access
Another suggestion often mentioned is to grant your authenticated users “Full Control” permission in addition to the other permissions like modify, read & execute, list folder contents, read, and write.
The idea is that this will give you complete access to the USB drive and prevent the pen drive access denied error from occurring. However, as mentioned in the previous point, these permission settings are not applicable to external USB devices. Therefore, attempting to add “Full Control” permission won’t help resolve the issue.
Use Disk Management to Scan for New Drives
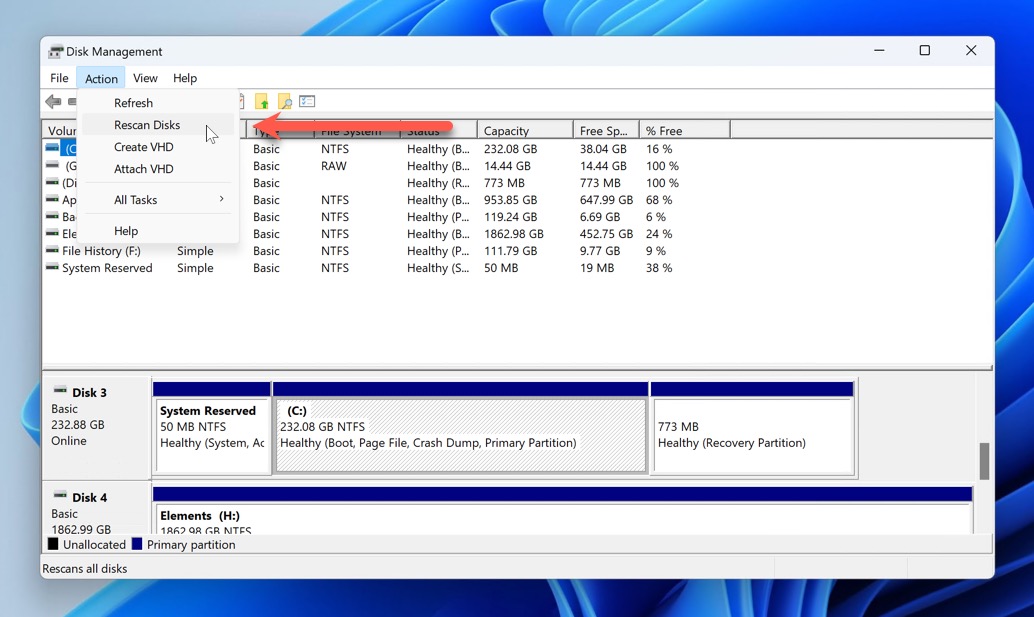
Unfortunately, the “Rescan Disks” option in the Disk Management utility won’t help you detect a newly connected USB drive. That’s because it only refreshes the list of disks in the Disk Management window. It doesn’t actually help detect a new device in the system. If the device is connected, it will appear in the system even without using this option.
How to Recover Lost Data After Resolving USB Access Denied Issues
The loss of USB access often goes hand in hand with other issues, such as corruption or partitioning problems. In such cases, certain files may not be accessible even once the access to the storage device itself has been restored.
Additionally, sometimes the fixes themselves can lead to data loss since every operation (even read-only operations, not to mention CHKDSK) on a problematic device can potentially cause data loss. If you have repaired your device and noticed some of your files are missing, the best USB recovery software tools like Disk Drill can help.
Disk Drill allows you to recover files that are still physically present on the storage device regardless of how accessible they are. This data recovery software supports multiple file systems and offers an intuitive user interface that makes it an ideal choice for both beginners and advanced users.
Important: Keep in mind that the chances of successful data recovery are higher if you act quickly and avoid using the affected storage device until you’ve recovered your files.
To recover lost data using Disk Drill:
- Download and install Disk Drill from its official website.
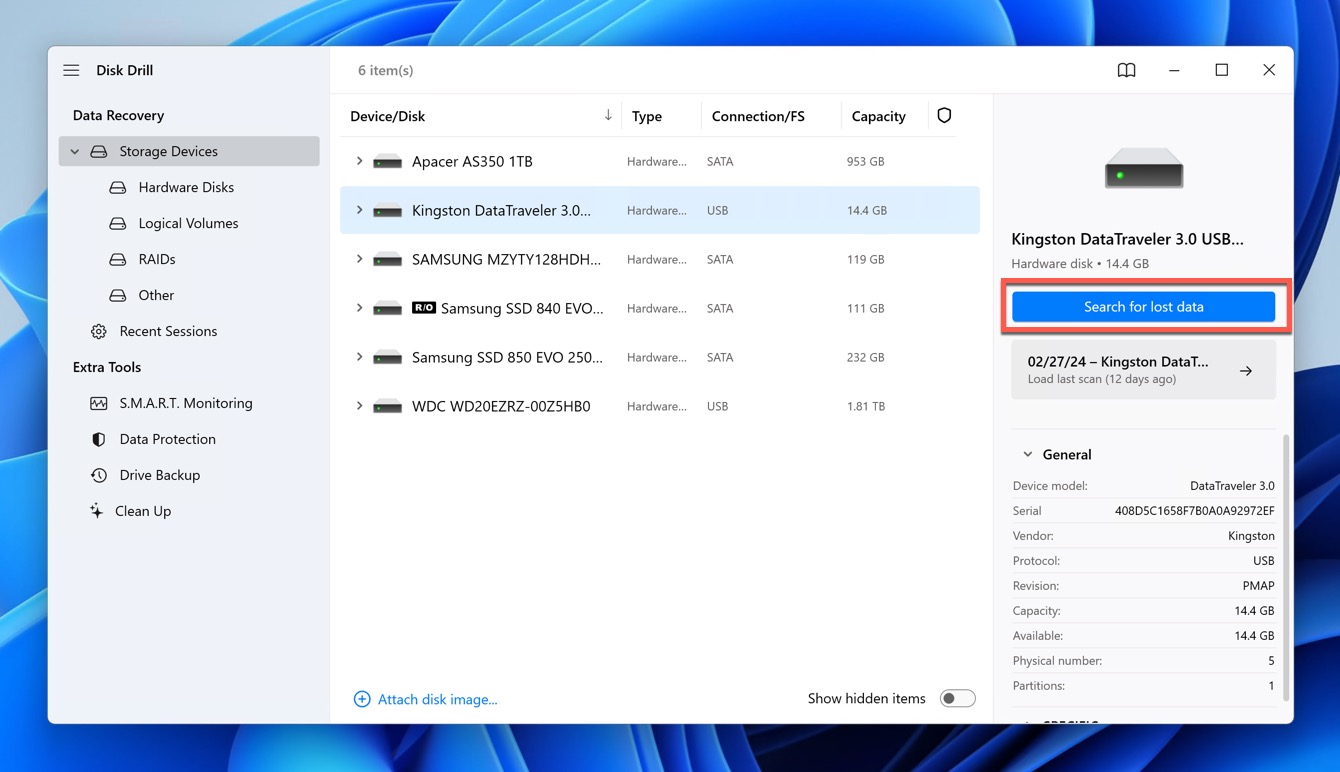
- Launch the application and connect your USB drive to your computer.
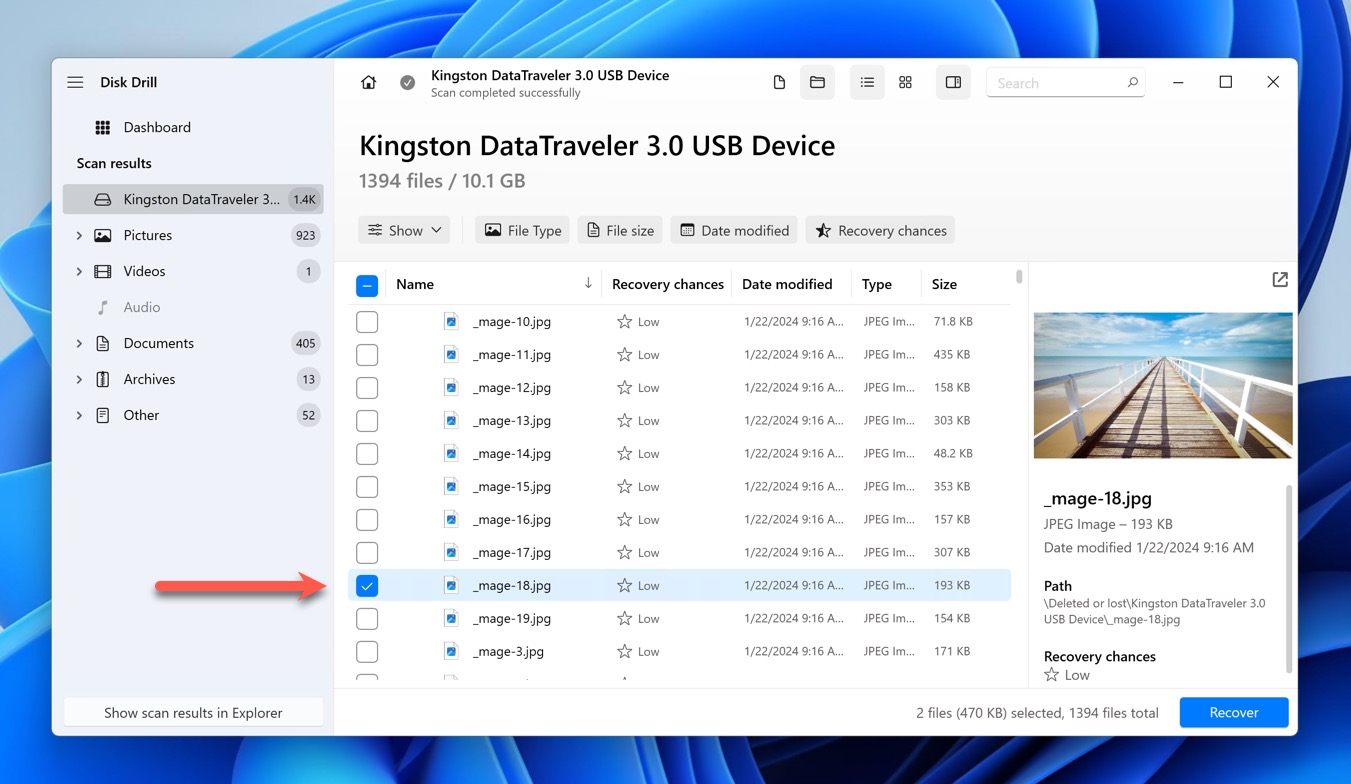
- Select the USB drive from the list of available drives in Disk Drill and click the Search for lost data button to initiate the scanning process.
- Preview the recoverable files and select the ones you want to restore.
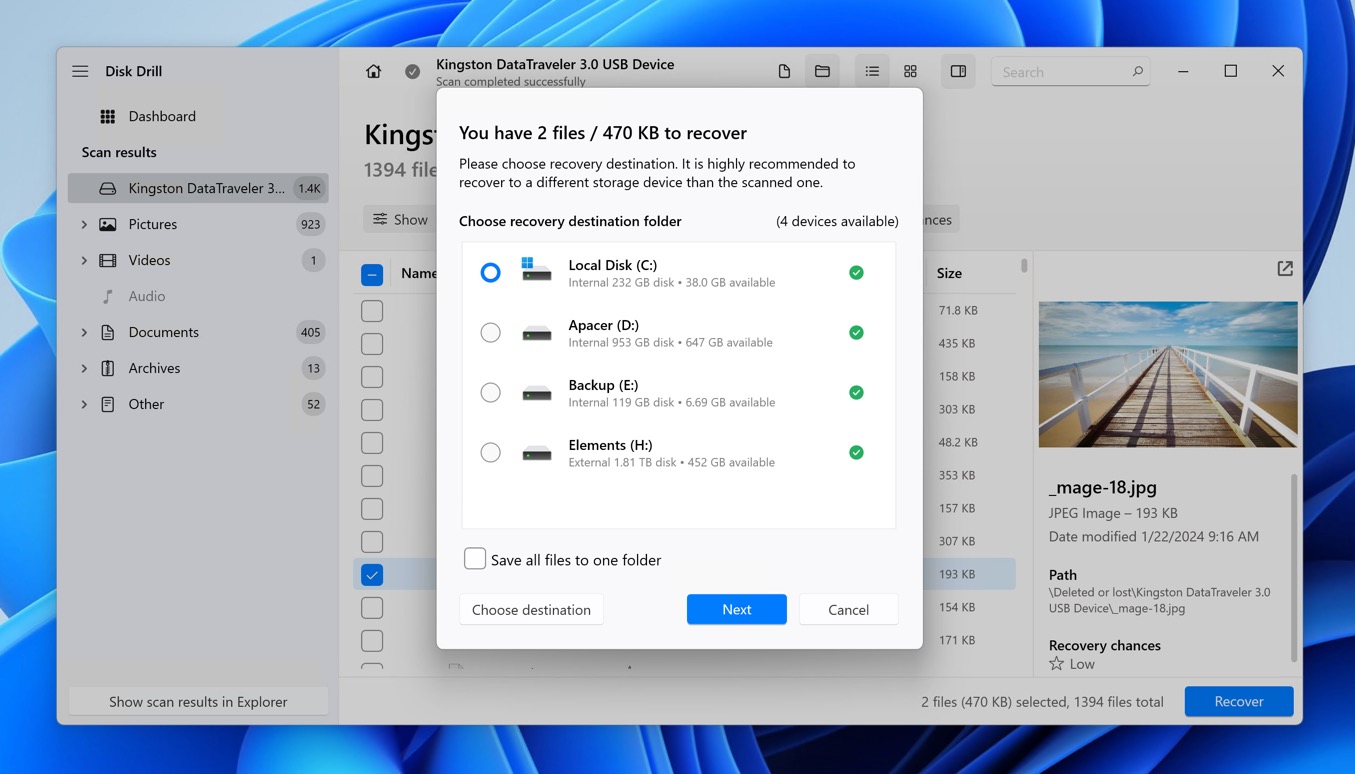
- Click the Recover button to save the selected files to a safe location on your computer or another storage device.
That’s how easy it is to recover lost data after resolving issues with USB drive access denied on Windows 11, 10, 8, and so on. In fact, Disk Drill can recover data even from drives with unresolved access issues because it can scan them directly and bypass the need for Windows to grant access. For more information about this tool, read our full Disk Drill review.
While Disk Drill is our top recommendation, there are other software solutions available for data recovery. Recuva is a simple and free option that can be effective for basic data recovery needs. On the other hand, R-Studio is a more complex tool that offers advanced capabilities for demanding data recovery scenarios. For even more options, check out our list of Disk Drill alternatives.
Conclusion
Resolving USB access denied errors in Windows requires a systematic approach to troubleshooting. By following the step-by-step instructions and taking advantage of tools like Disk Drill, you can regain access to your USB drive and recover any lost data. Remember to act quickly and avoid using the affected storage device until you’ve recovered your files to maximize the chances of successful data recovery.
FAQ
Why does my computer say USB access is denied?
USB access denied errors can occur due to various reasons, such as insufficient permissions, corrupted USB drivers, faulty USB ports, antivirus or firewall settings, and file system errors.
Can data be recovered from a USB drive with access issues?
Yes, data recovery software can recover data even from drives with unresolved access issues because it can scan the USB drive directly and bypass the need for Windows to grant access.
How can I prevent USB access denied errors in the future?
To prevent USB access denied errors in the future:
- Always safely eject USB drives before unplugging them.
- Use USB ports and cables in good condition.
- Avoid using multiple antivirus or firewall programs simultaneously.
This article was written by David Morelo, a Staff Writer at Handy Recovery Advisor. It was also verified for technical accuracy by Andrey Vasilyev, our editorial advisor.
Curious about our content creation process? Take a look at our Editor Guidelines.