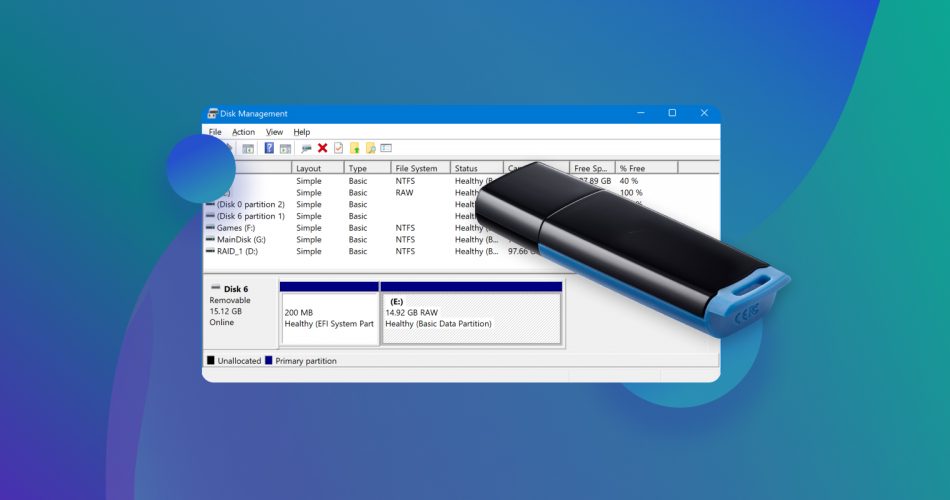
When a USB flash drive suddenly becomes RAW, it indicates that the drive’s file system is either unsupported, missing, or corrupted. This status renders all stored data inaccessible and requires immediate attention to prevent data loss and restore the drive’s functionality.
In this article, we will explain what a RAW USB drive is, the reasons behind this problem, and provide step-by-step solutions to recover your data and fix the drive efficiently.
Why Do USB Drives Become RAW?
When a USB flash drive becomes RAW, it typically signifies that the file system has been corrupted, making the drive inaccessible to your operating system. This corruption can result from either logical or physical damage to the USB drive, and the chances of successful data recovery may vary depending on the cause. Corruption, however, while most common, is not the only reason.
Here is the list of primary reasons why something could go wrong and your USB drive showing as RAW:
- ⚠️ Improper flash drive removal: Often when we’re done using the USB drive, we directly pull it out of the port and go about our business without giving it a second thought. However, it is considered a bad practice, and rightfully so. You might pull out the USB drive while it is in the middle of a writing process, leaving the data to become corrupted. Instead, it is advised to “eject” the drive first.
- 🔨 Direct physical Damage: USB drives are vulnerable to physical impacts, such as drops or crushing, which can damage the internal components. Exposure to extreme temperatures, moisture, or dust can also harm the drive. Physical degradation or damage can lead to bad sectors and corrupt the file system, rendering the drive RAW.
- ⛔ Development of bad sectors: is an another factor that can significantly contribute to such problem. Any damage to these sectors will render them unreadable, and your operating system will skip them while going through your storage device. There are two types of bad sectors: hard and soft. While it is impossible to repair some bad sectors of a hard drive, some soft bad sectors can usually be fixed. Bad sectors prevent the operating system from reading data from those parts of the drive, contributing to file system corruption and causing the drive to become RAW.
- ⚡ File system incompatibility: If you use the USB drive across different operating systems without proper formatting, you can cause file system conflicts. When the operating system does not recognize the file system, the drive will appear as RAW. However it doesn’t mean it is corrupted. Data can still be accessible using PC with another OS or with the help of proper software.
- 💾 Software conflicts or improper formatting: Certain software-level issues and improper formatting attempts can damage the logical structure of the USB drive’s file system. For example, if a formatting process does not complete due to using the wrong tools or abrupt interruption of the operation, the drive may end up without a proper file system.
- 👾 Virus or malware infections: Virus attacks are another common reason behind the “USB drives is RAW” error, as they can compromise the integrity of your storage and corrupt all your data. Not much can be said about it, except that it is recommended not to plug your USB drive into unauthorized computers without proper anti-virus software.
As you may have already guessed, this problem can have serious consequences for the data safety on your flash drive. Therefore, the data recovery process requires a consistent and competent approach.
How to Recover Data From a RAW USB Drive
In light of all the above, it would be a good practice to create a sector-by-sector copy of the device first and then scan the copy instead of the drive. This makes sure your data remains safe during the recovery process and allows for multiple recovery attempts without worrying about changes to the memory blocks of the physical device. There are many software applications that can create sector-by-sector copies of devices as well as data recovery software. In our case, we decided to use Disk Drill.
This USB recovery software is perfect for us because it allows us to create a copy of the flash drive and recover data from it using the same app. It can recover data from formatted, corrupted flash drives and those that prompt you to format them even if you don’t want to create a clone of the USB drive (nevertheless recommended). Additionally, it is straightforward and easy to use.
Here is step-by-step instruction on how to recover data from the RAW flash drive using Disk Drill:
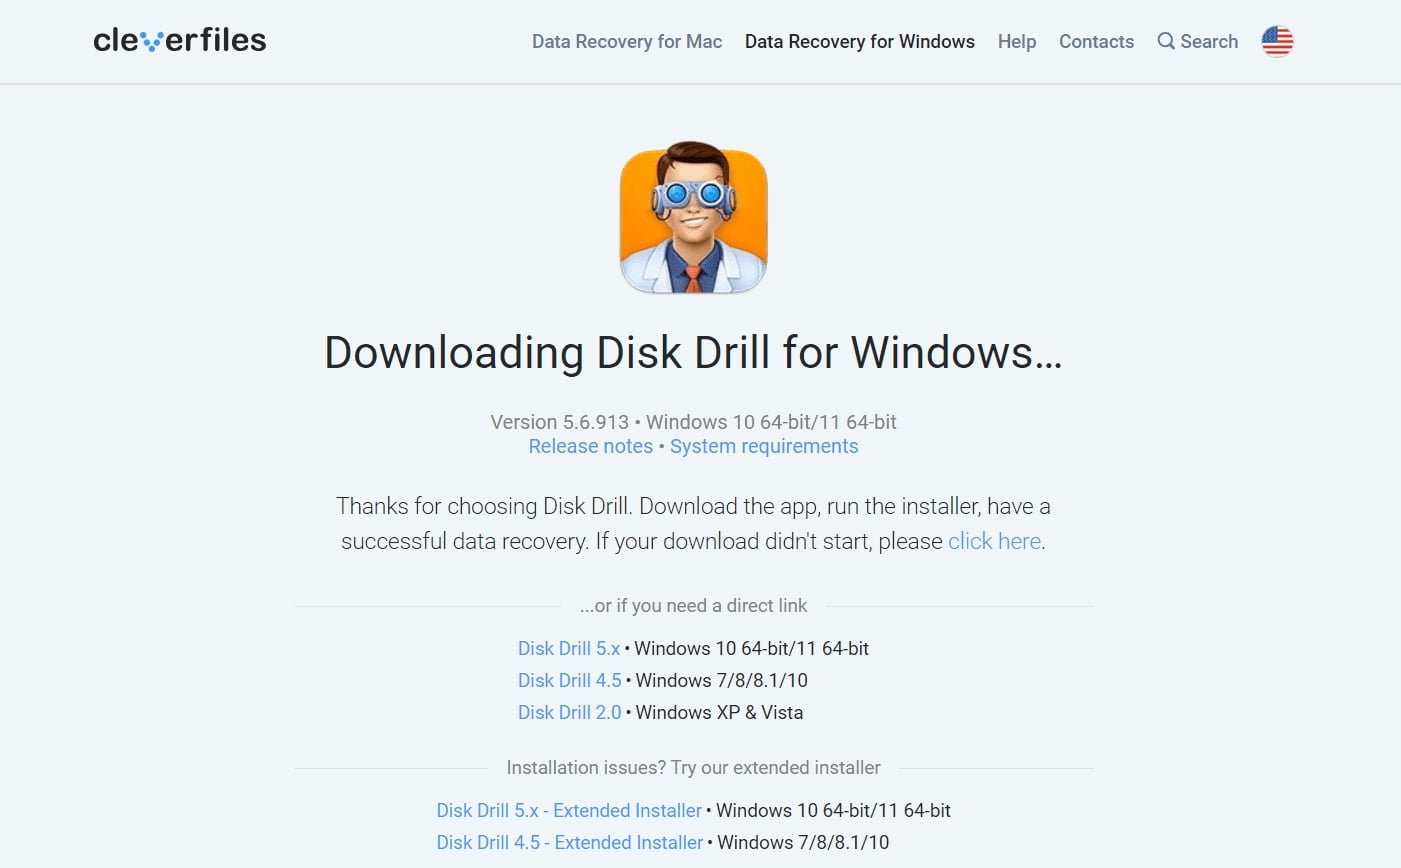
- Download Disk Drill from the official website.
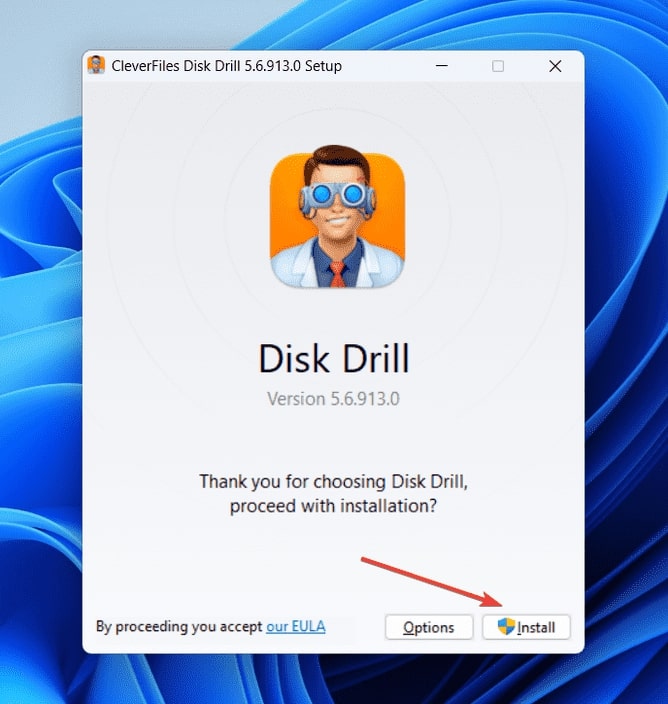
- Once the download is finished, head over to the download location to find disk-drill-win. Launch the setup application. A dialogue box will appear. Click on Install to continue.
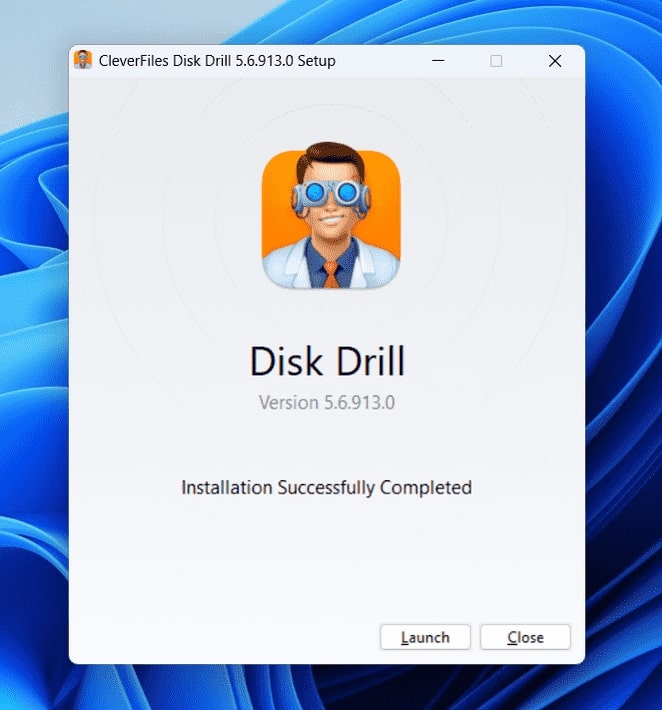
- Once the installation is complete, click on Launch.
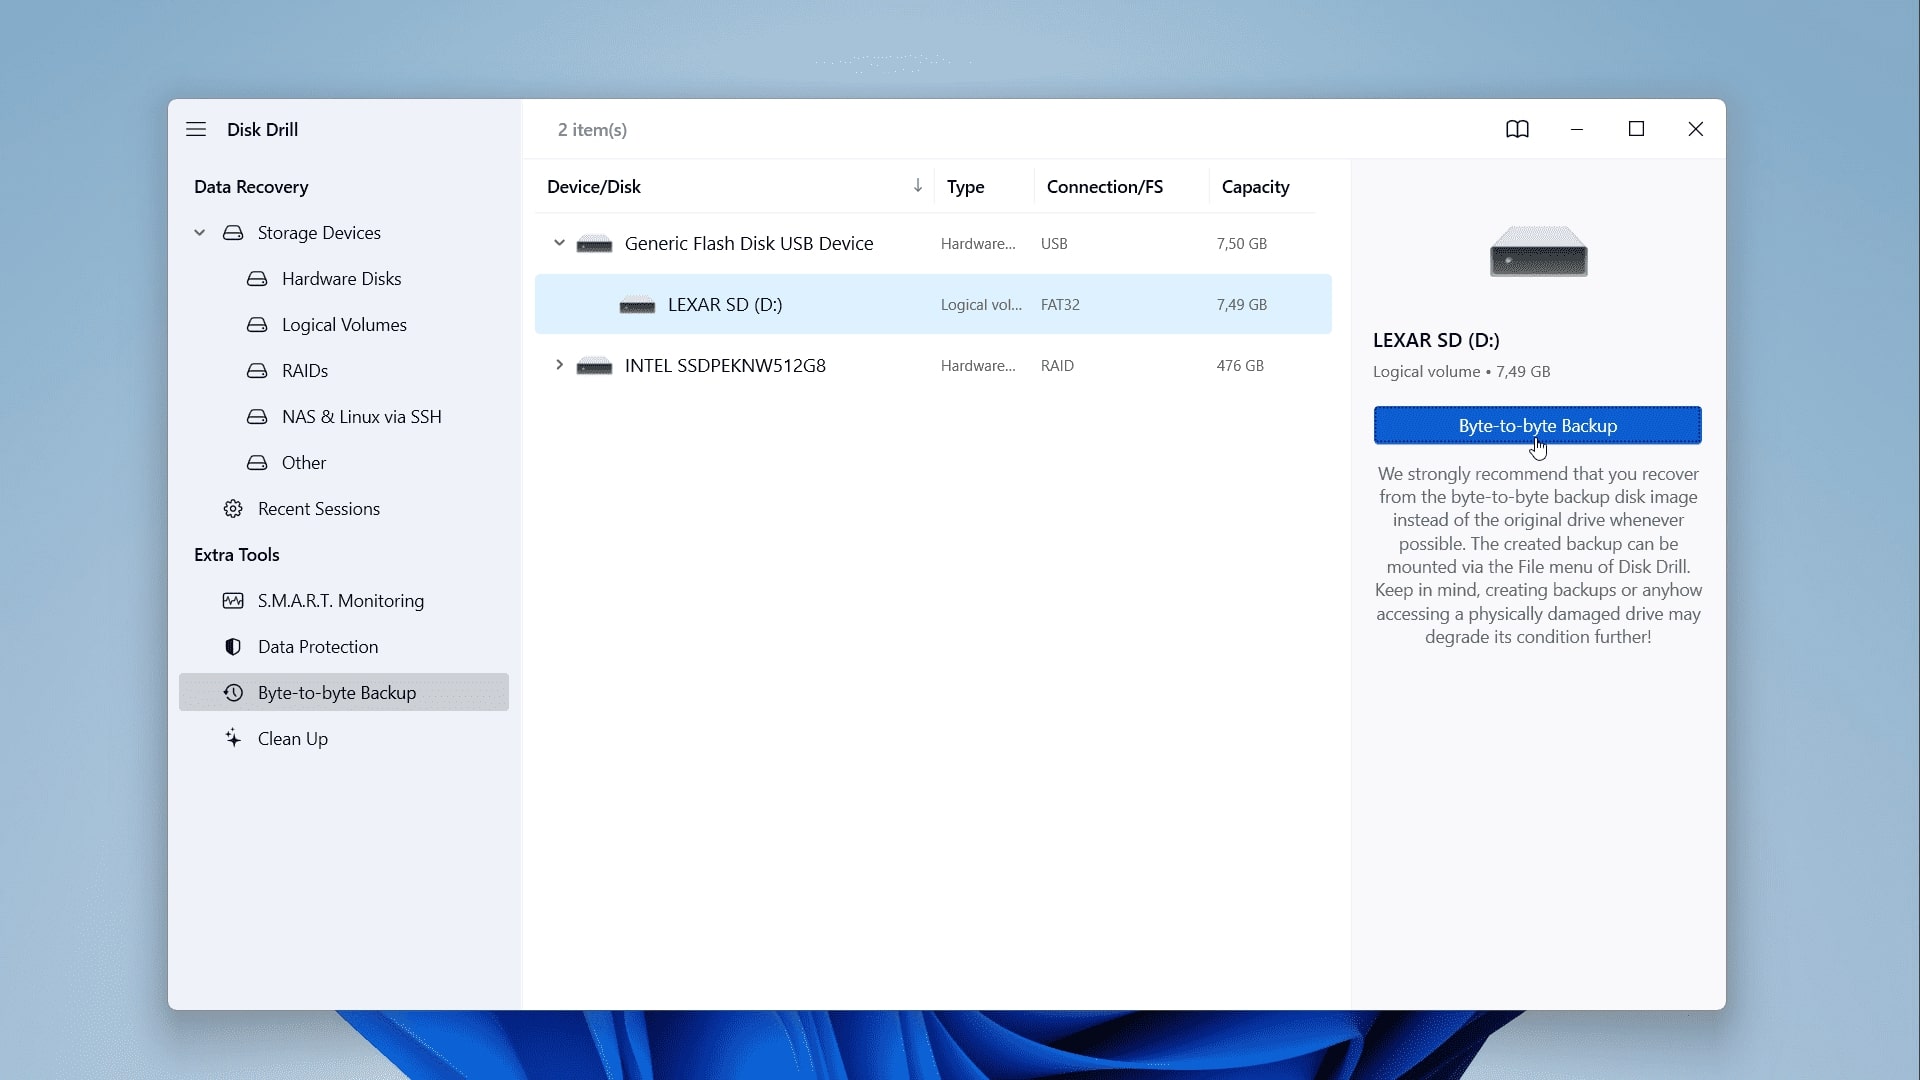
- You will be able to see all the storage drives connected to your PC on the Disk Drill app homepage. Click on Byte-to-byte Backup to continue.
- Now, select your RAW USB drive and click on Byte-to-byte backup.
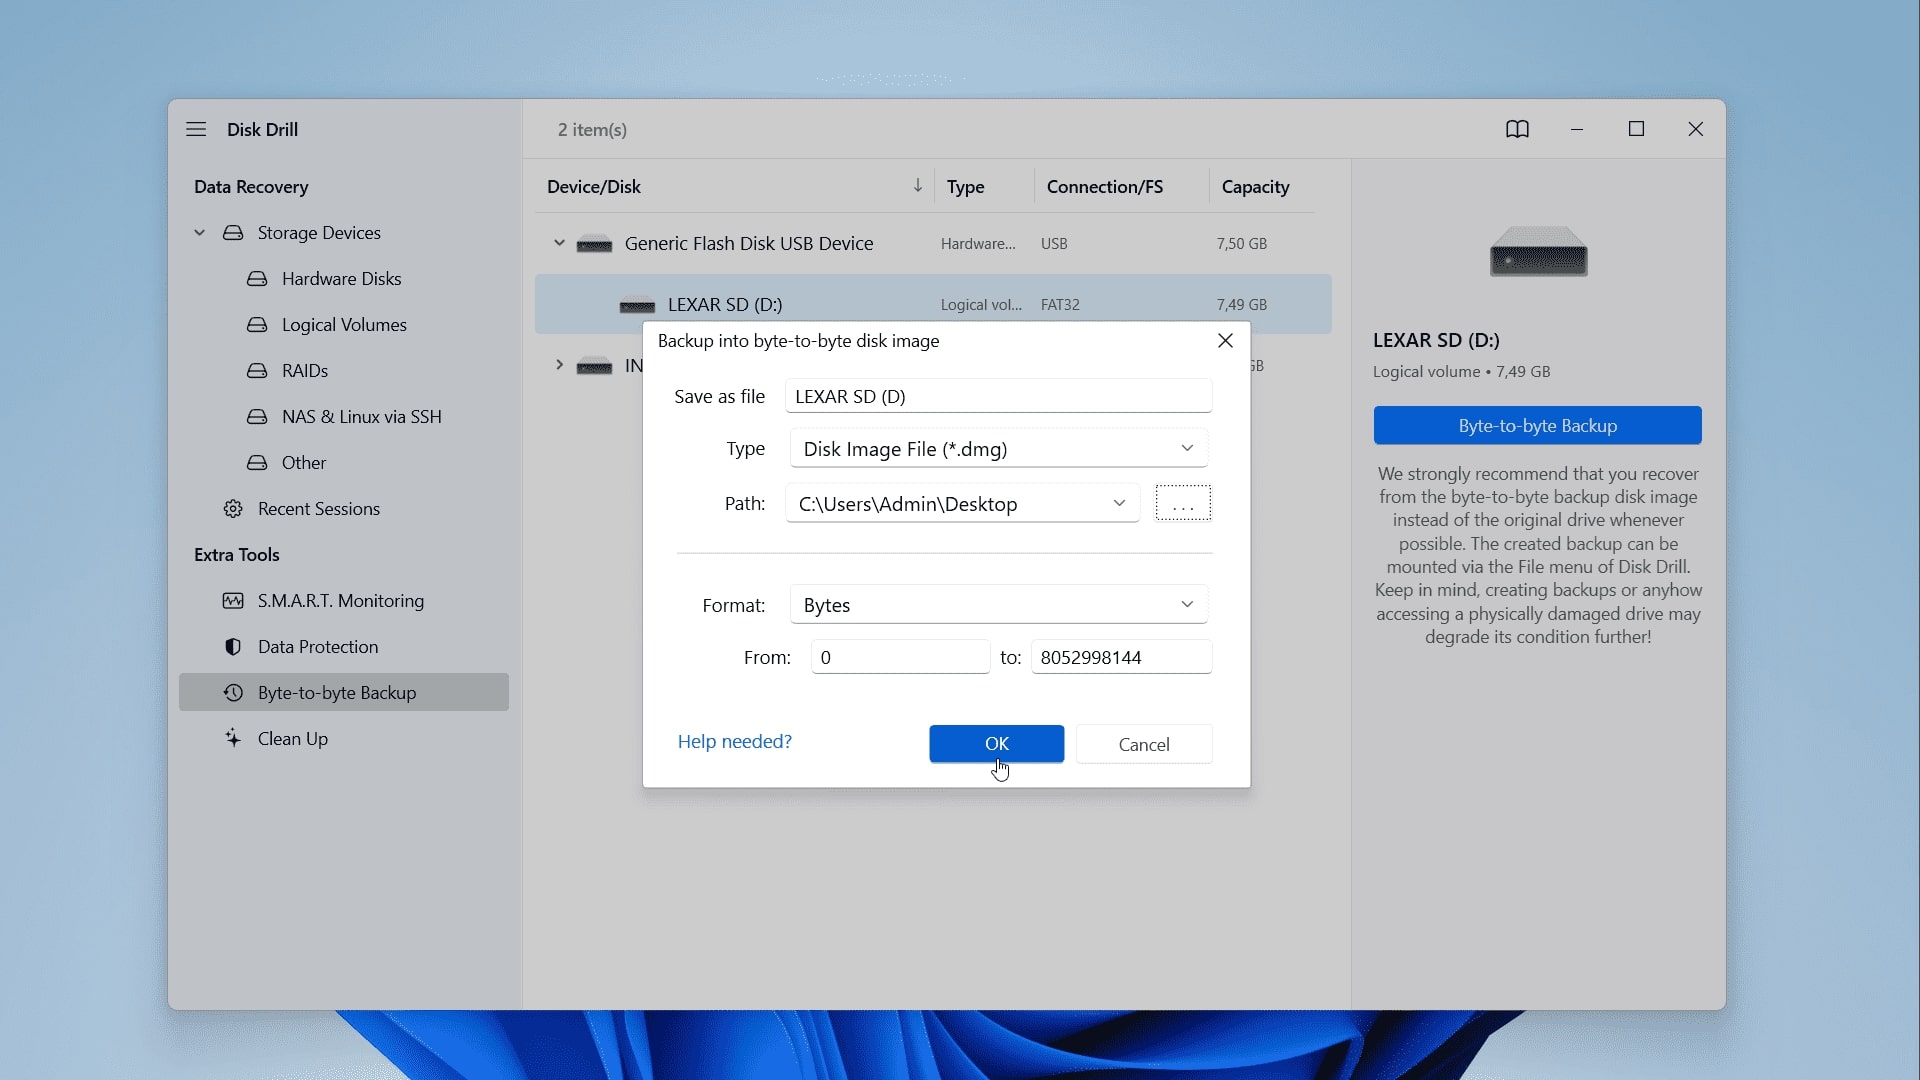
- Next, choose a landing destination and select the file type as .dmg. When you’re done, click on OK.
- Disk Drill will now create an exact byte-to-byte replica of your USB drive. Wait patiently for the process to complete. Once the backup is complete, click on Show in Explorer to continue.

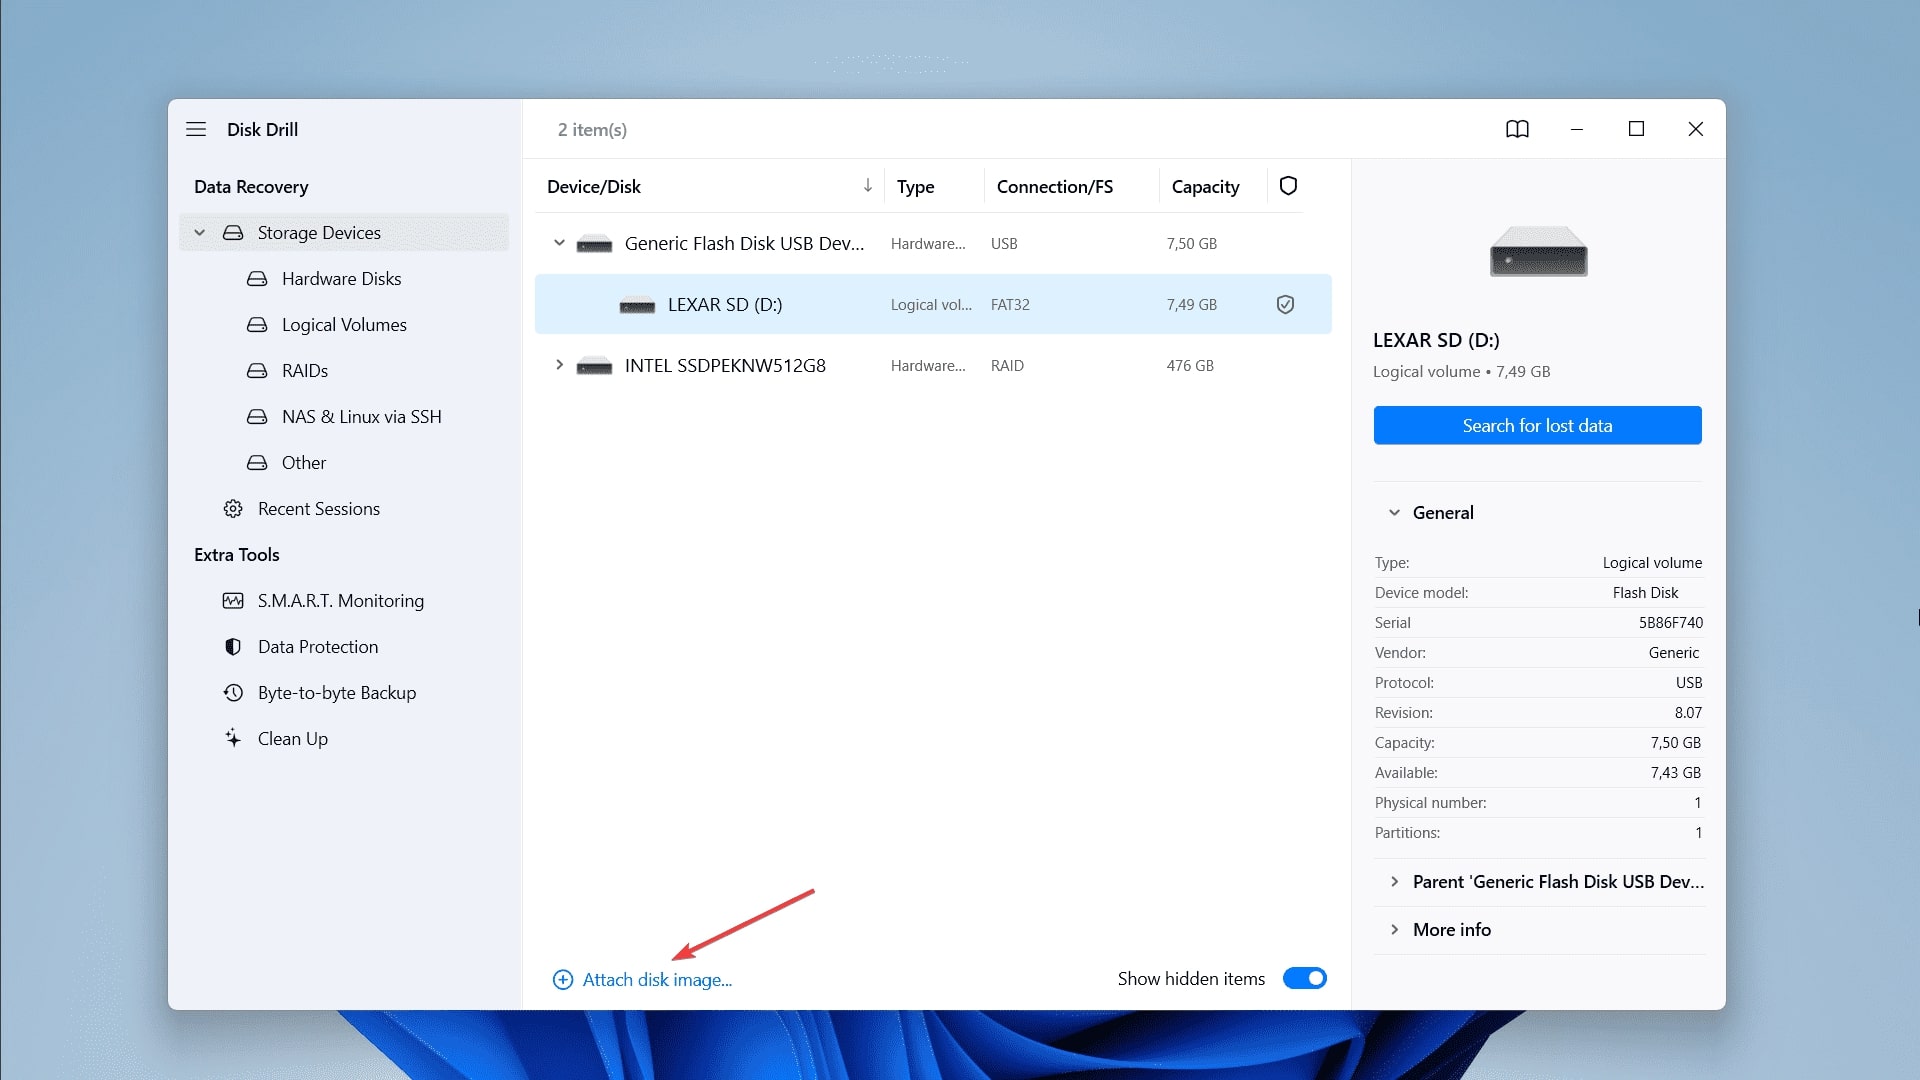
- Now that you have a replica of your flash drive, you can use it to safely recover data from the flash drive. To do that, go back to the the Disk Drill app homepage. In the center on the bottom you will see the Attach disk image… button. Click on it.
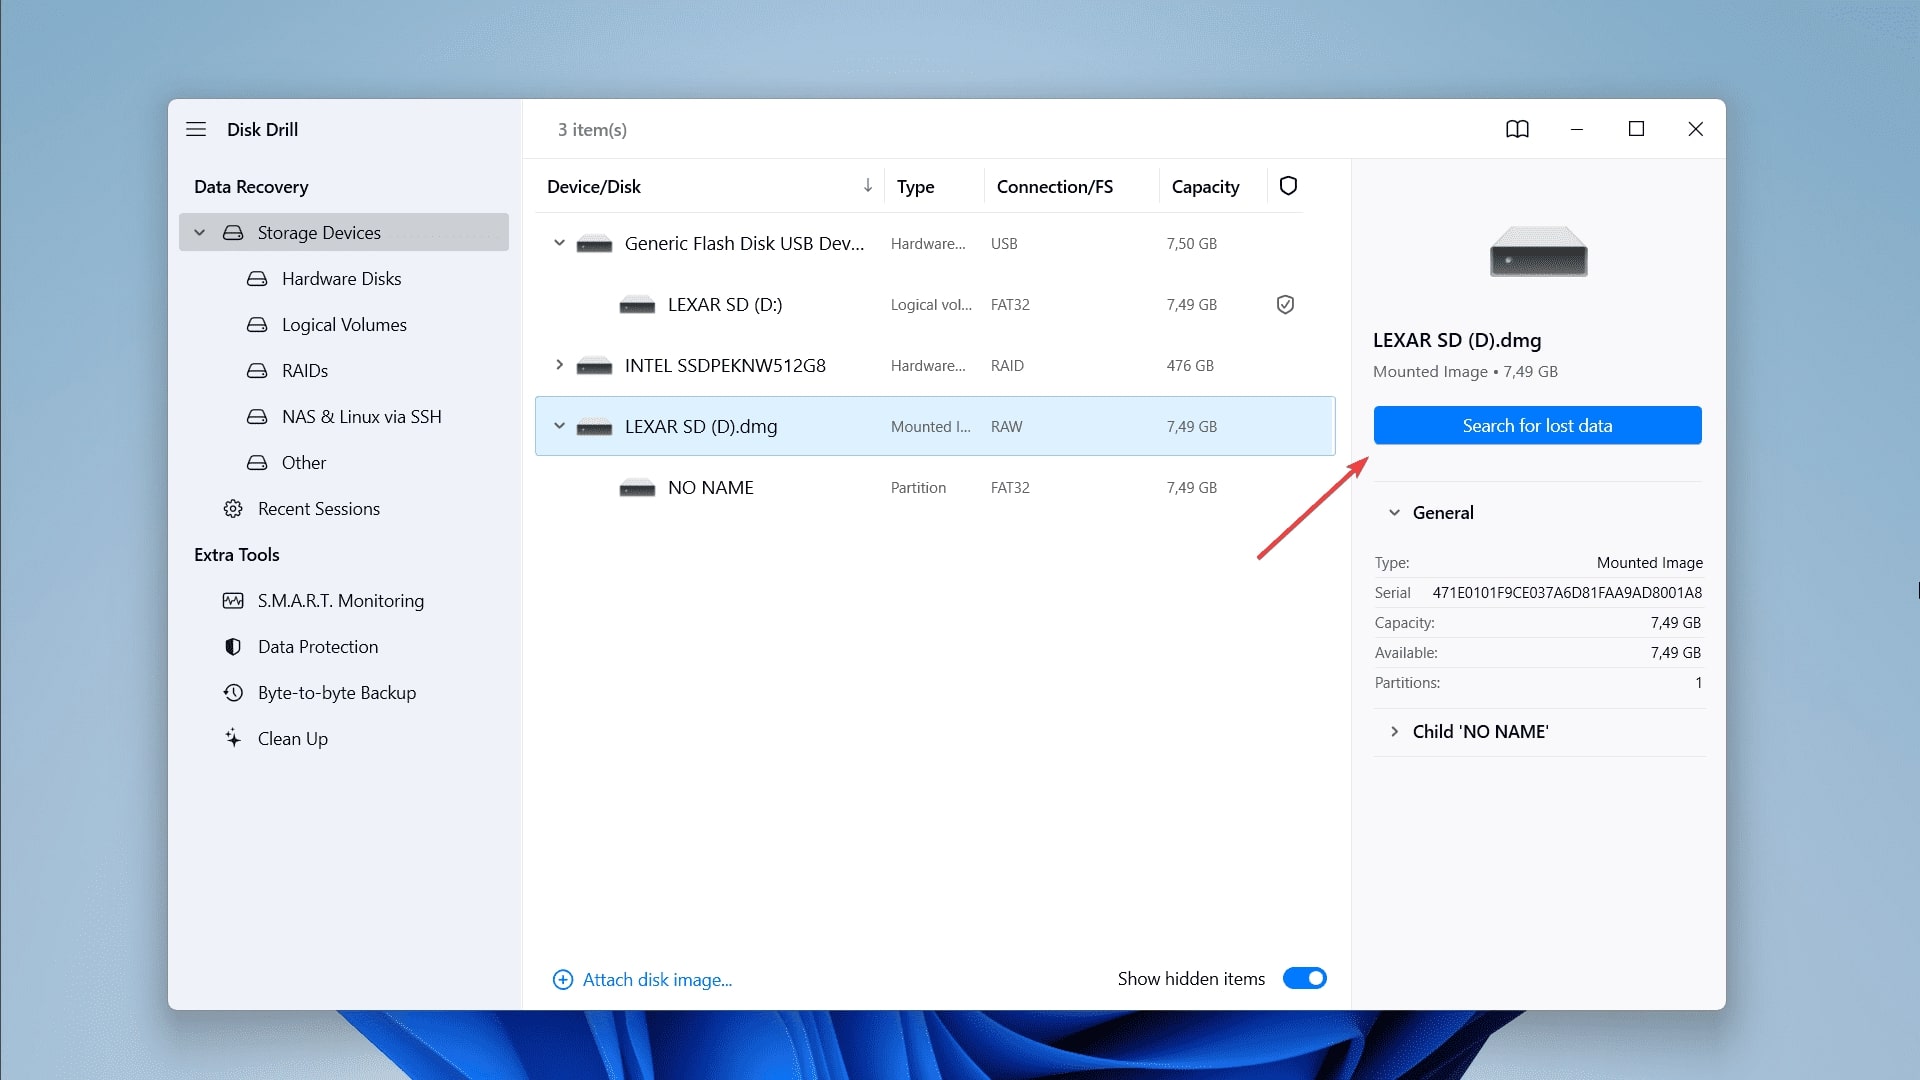
- A pop-up will appear. Select the backup image you just created and click on OK to continue.
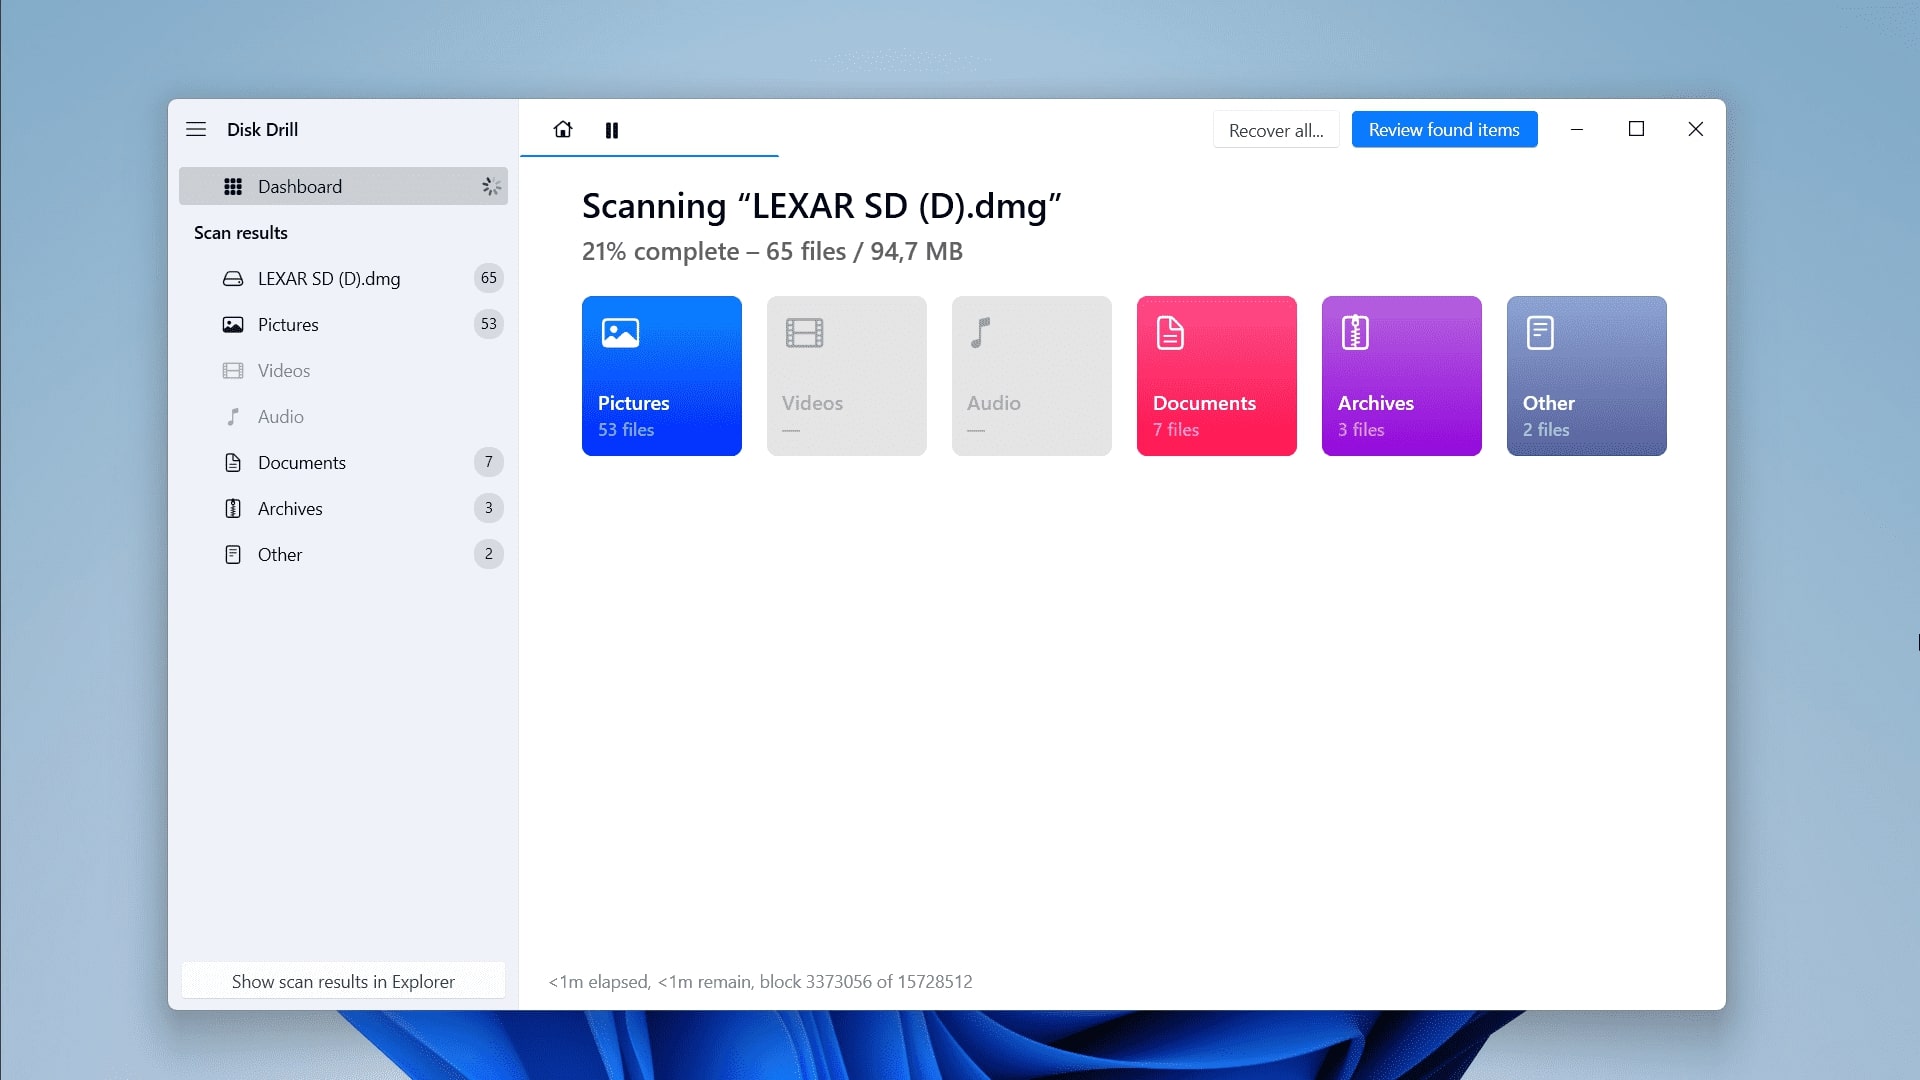
- The attached disk image will show up in the list of available devices. Select it. Than click on Search for lost data.
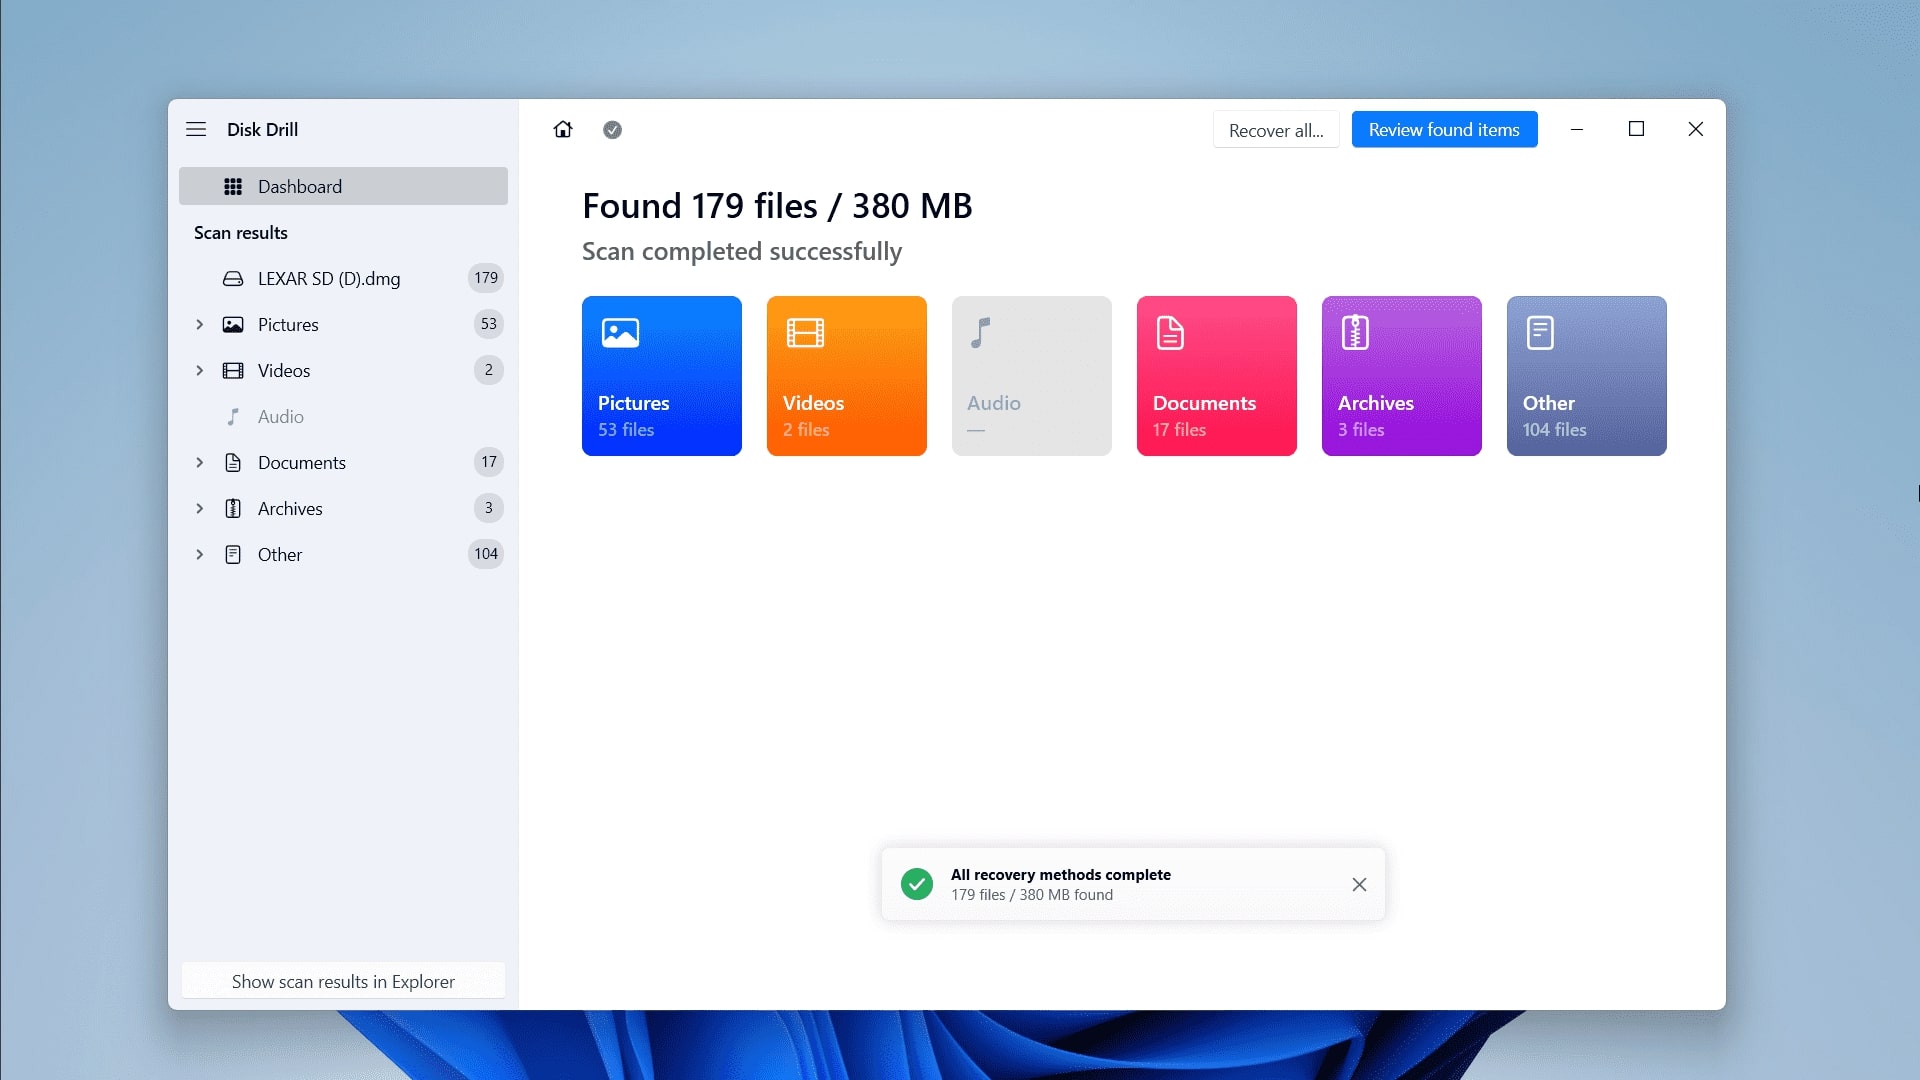
- Disk Drill will scan your flash drive for data.
- Once the scan is complete, click on Review found items.
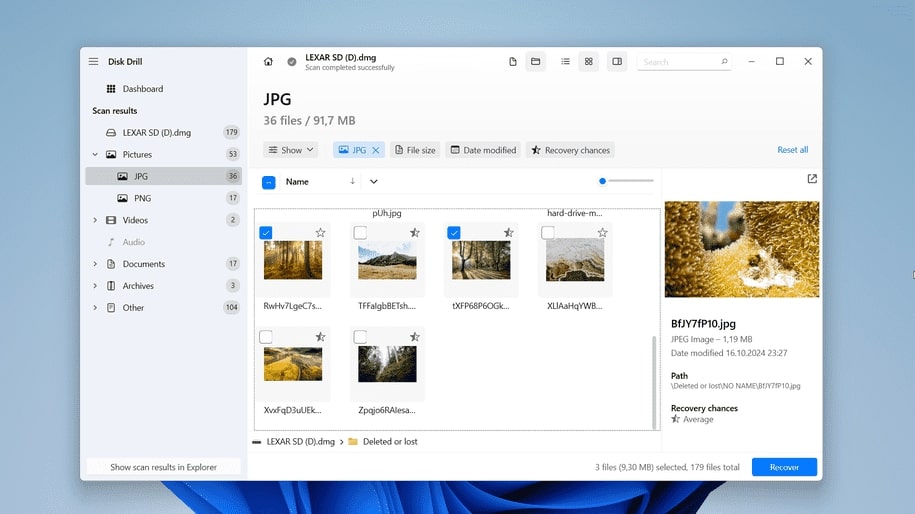
- On the next screen, you can select all the files you want to recover. If you want to recover specific files from your USB, you can use different filtering options and sort files by type, size, or date. You can use search if you remember the file name (assuming the recovery program was able to restore the original file names, which is not always possible with RAW drives) or the file extension (e.g., “.docx”). However, usually, when you deal with the RAW USB drive, your files are inaccessible and you need to recover them all. In usch a case, you don’t have to select individual files, just click on Recover all to retrieve all the files stored on your drive.
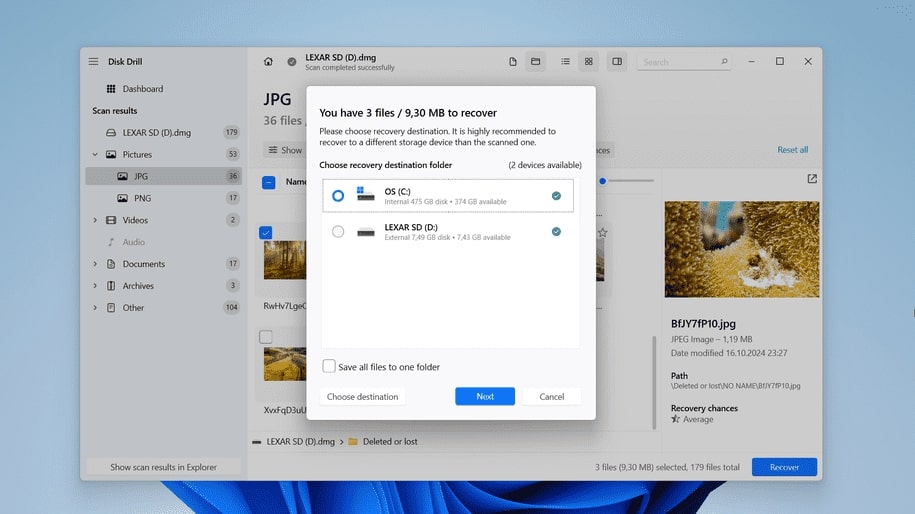
- Now select a save location for all the recovered files, which should not be on your flash drive and click Next.
- Congratulations, you have successfully performed data recovery on your RAW flash drive.
Disk Drill is one of our recommended programs, and we have verified its reliability on multiple occasions. You can familiarize yourself with all its features in our full review.
If it does not meet your requirements, we recommend that you review other worthy Disk Drill alternatives.
How to Fix a RAW USB
This section is mainly devoted to methods to return the flash drive to a working state after successful data recovery. However, we will also discuss an alternative approach that may help you regain access to the files on the flash drive. Please continue to read.
Method 1: Repair a RAW USB Partition Using TestDisk
TestDisk is a free, open-source data recovery utility that helps recover lost partitions and fixes corrupted file systems. It can restore access to a USB drive that has become RAW, so you can retrieve your important data. We advice you to create a backup of the drive before you attempt any repair procedures using Disk Drill or similar sector cloning tool, such as HDD Raw copy tool. This will give you the ability to recover data in case of unforeseen circumstances or wrong actions.
Here is how to use TestDisk to recover data from RAW USB flash drive:
- Visit the official TestDisk website to download the software. Since TestDisk is portable, no installation is required. Once you have the ZIP file, extract it to a convenient location on your computer.
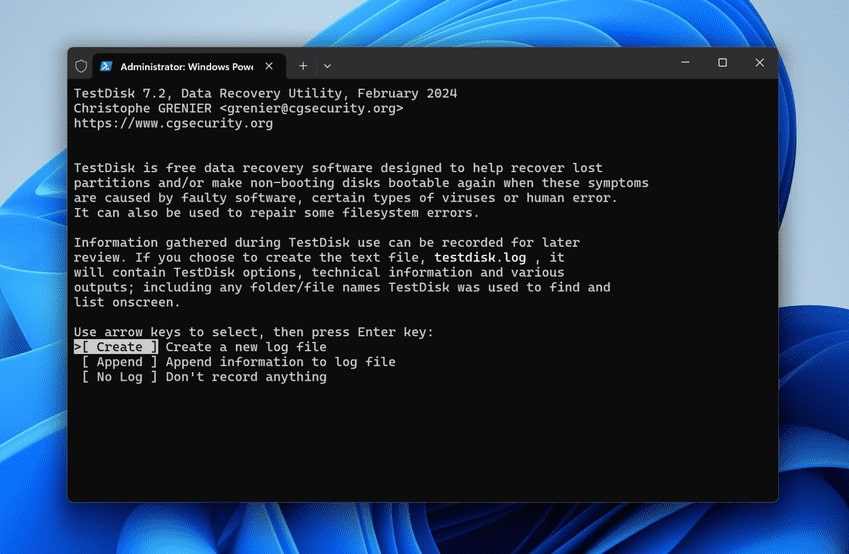
- Navigate to the extracted folder and run the TestDisk executable as an administrator. A command-line window will open. When prompted to create a log file, select “Create” and press Enter.
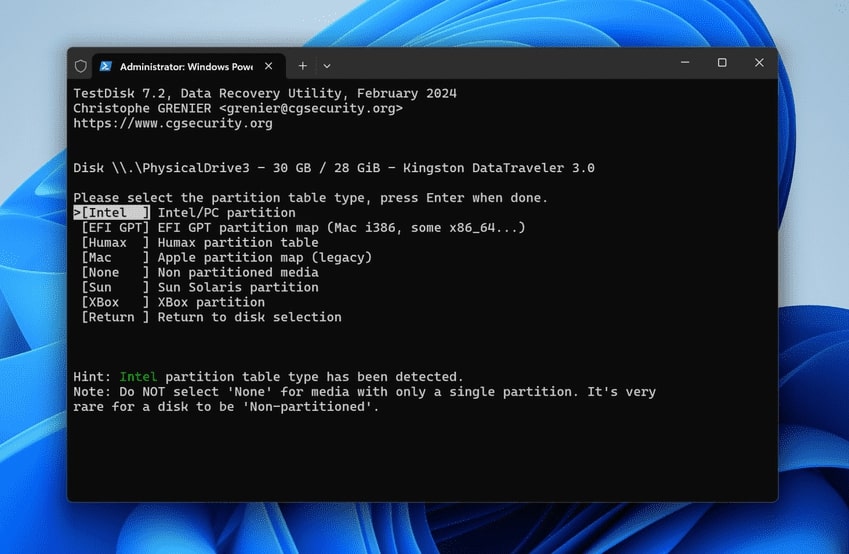
- TestDisk displays all connected drives. Use the arrow keys to select your RAW USB drive and press Enter. If prompted to select the partition table type, accept the default option; press Enter to continue.
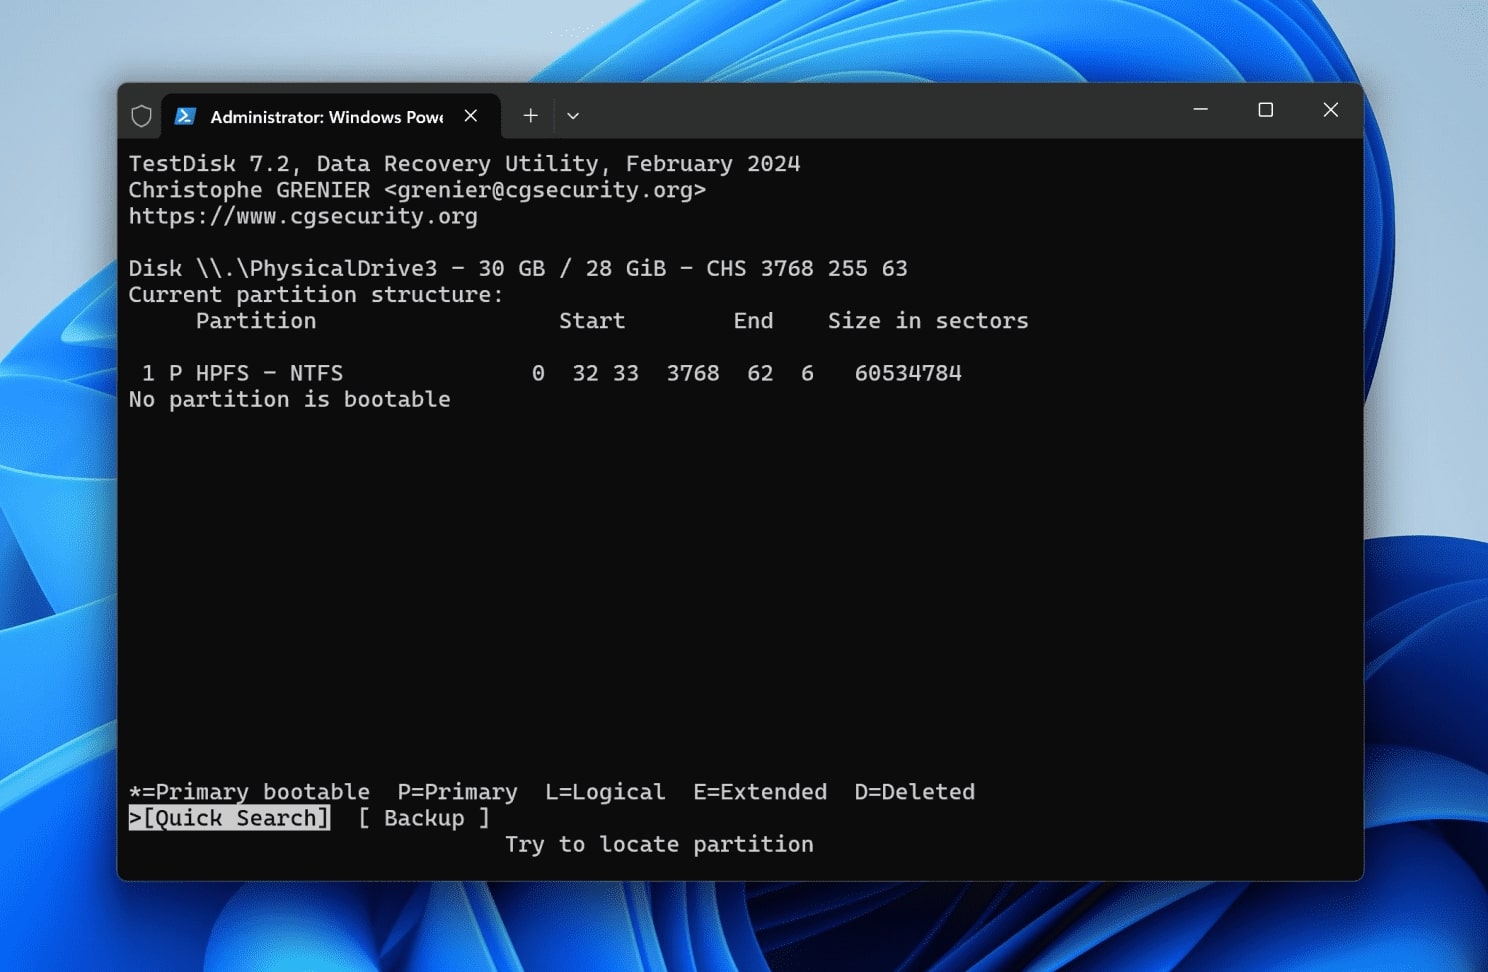
- Choose “Analyse” and press Enter to examine the current partition structure. Select “Quick Search” and press Enter to scan for lost partitions. If the lost partition appears, proceed to the next step. If not, select “Deeper Search” for a more thorough scan.
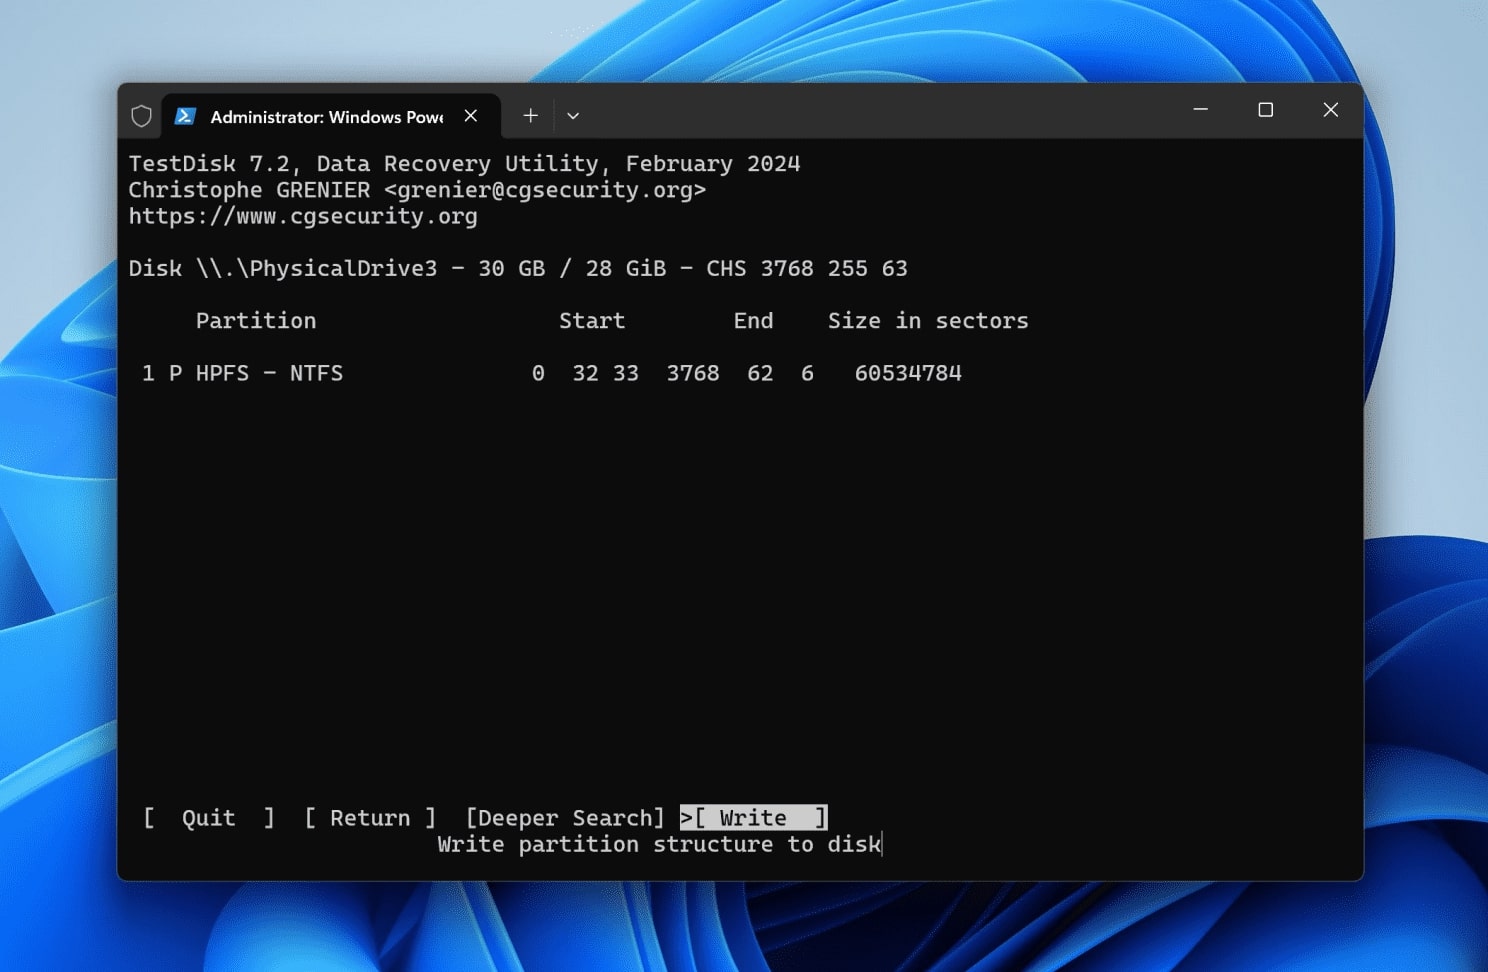
- After you find the lost partition, select it and choose “Write” to restore the partition table. Confirm the operation; type “Y” and press Enter. Restart your computer to apply the changes. Check if the USB drive is now accessible.
If TestDisk seems intimidating to you because of its lack of GUI, you can use similar tools to recover RAW partition on your USB drive.
Method 2: Format a RAW USB Drive in File Explorer
Even though it is easy to recover data from a formatted USB drive, we only recommend this method if your drive doesn’t contain valuable information or if you’ve already successfully recovered your files and now simply need to restore the drive’s functionality, as formatting will erase all data on the drive.
Here’s how to properly format your USB:
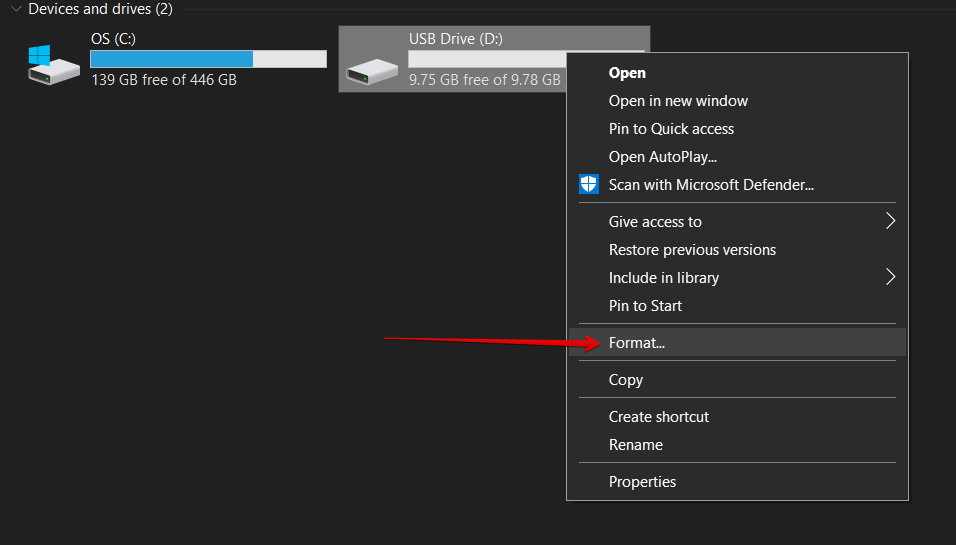
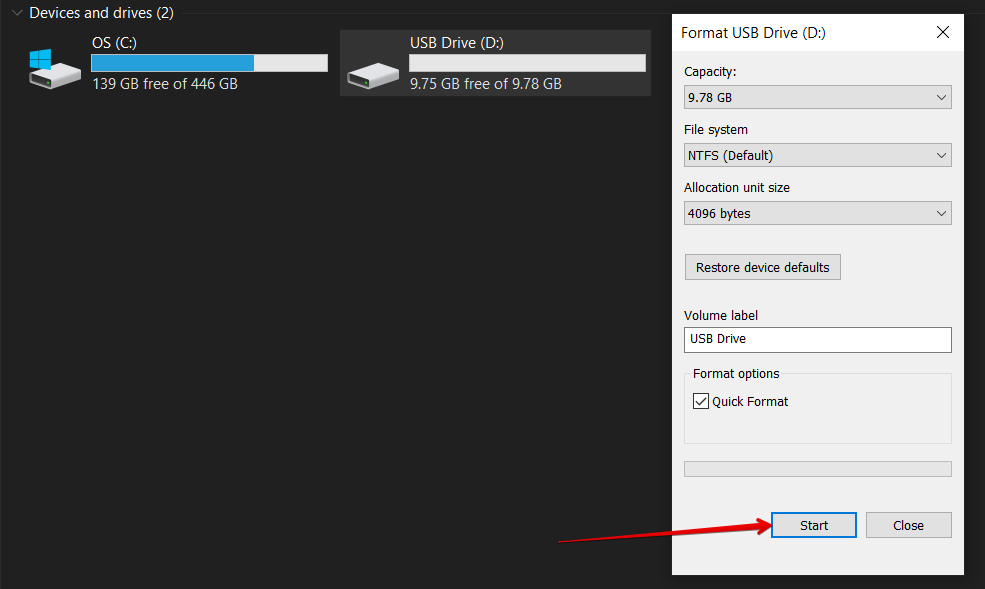
- Go to the Windows file explorer and navigate to your drive.
- Right-click on your drive and select Format.
- A pop-up will appear on your screen. Here, select a new file system type for your drive. We recommend choosing either NTFS or FAT32.
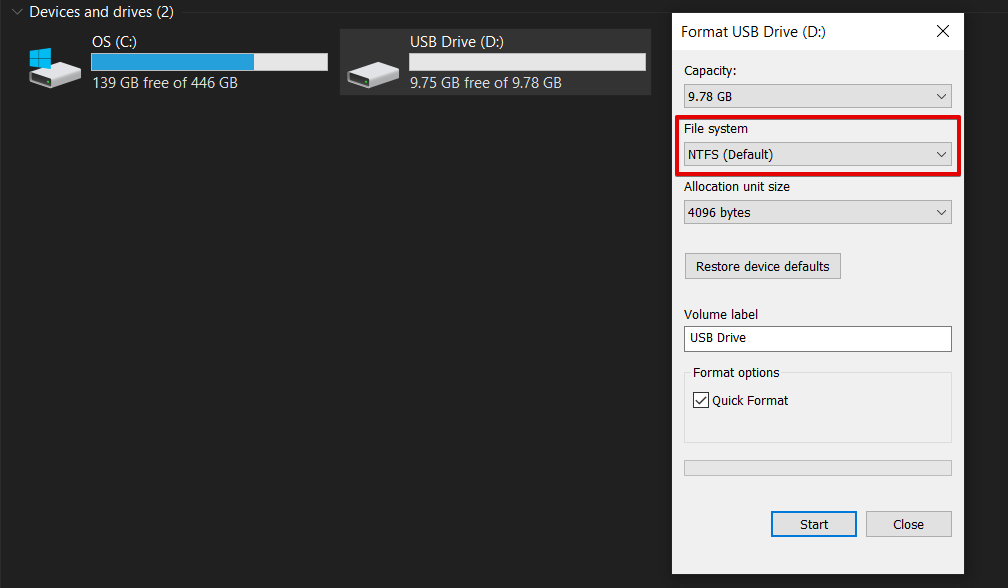
- You can also rename your drive in this step.

- Make sure Quick Format is ticked under Format options.
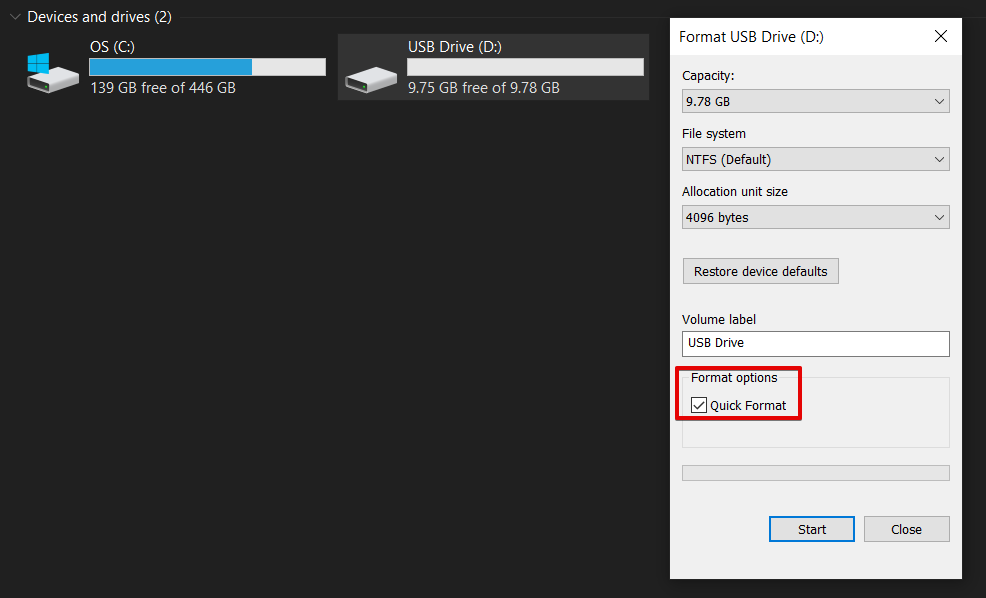
- Once everything is in order, click on Start to begin formatting the RAW USB drive.
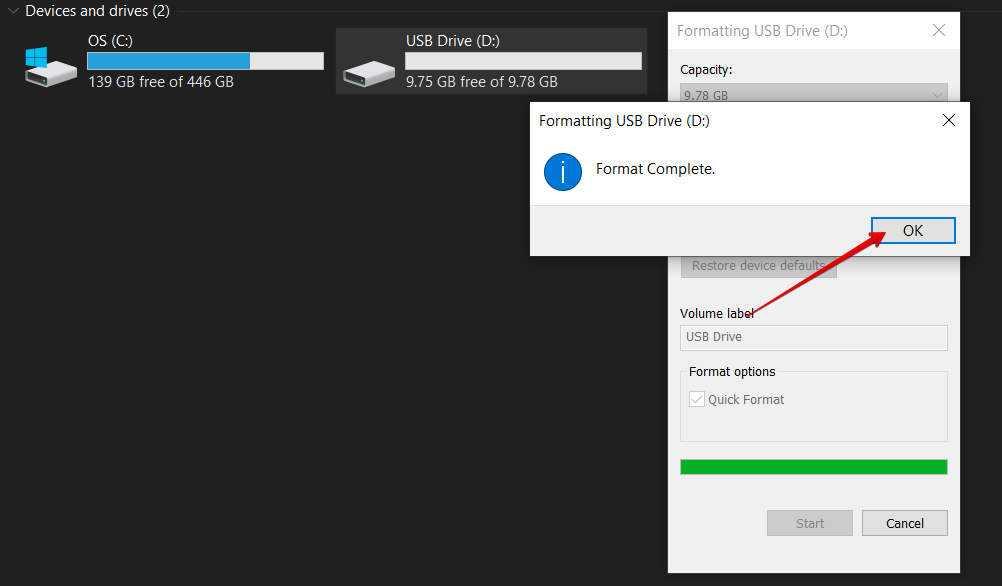
- A warning dialogue box will pop up. Click on OK to continue.
- Once it is done, you will receive a message that says Format Complete. Click on OK.
Method 3: Fix a RAW USB Drive Using Command Prompt
Alternatively, you can use CMD and the diskpart command to format a RAW drive. It’s not as easy to use as the previous GUI-based method but can be very useful in scenarios where, for some reason, you need to use the command line specifically.
Here’s how to use diskpart:
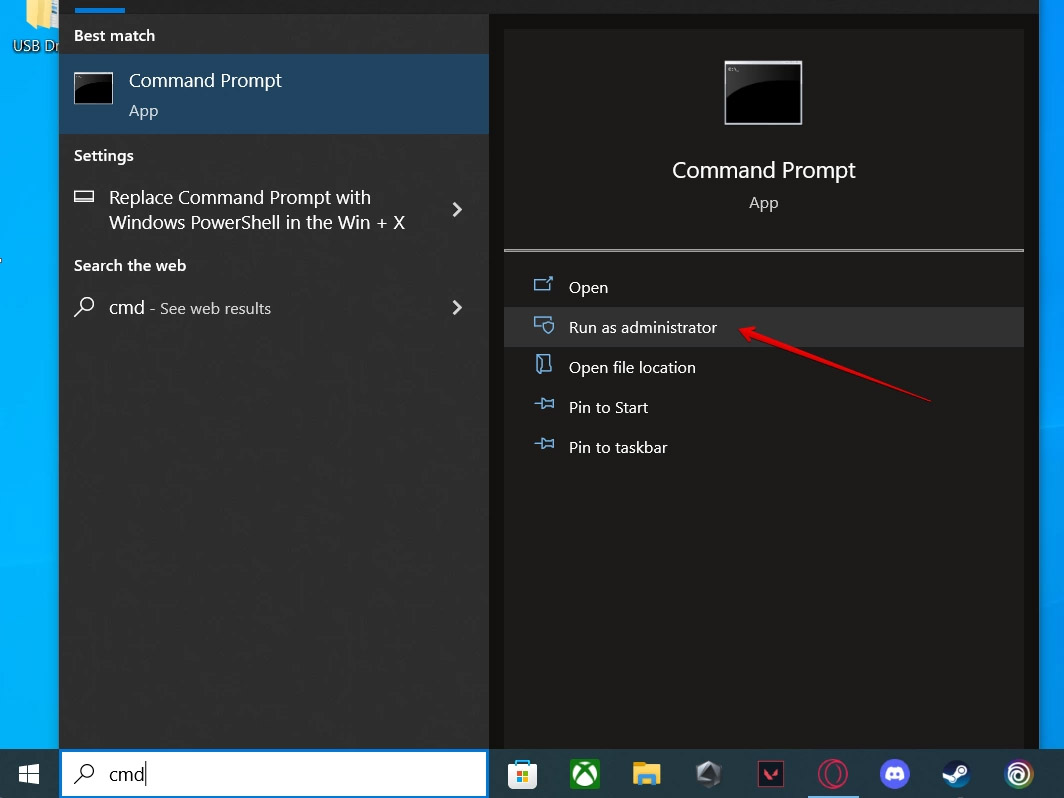
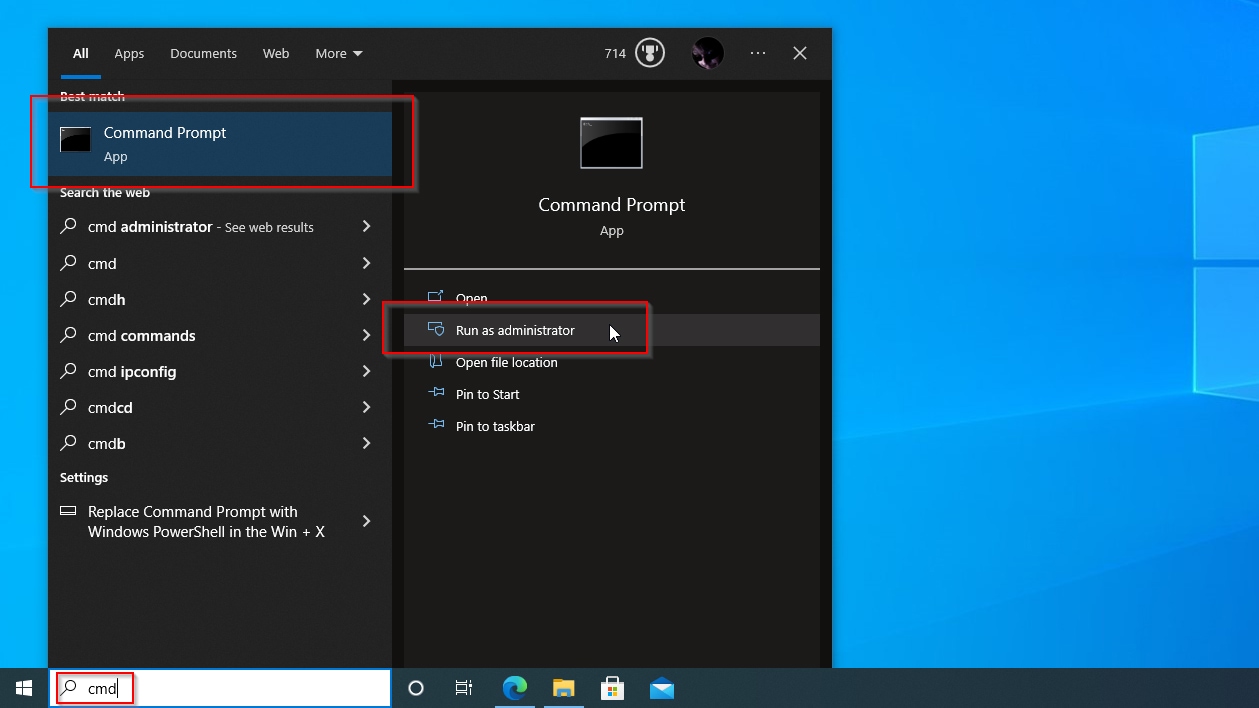
- In the Windows search bar, type cmd to search for the command prompt. Now, click on Run as administrator to continue.
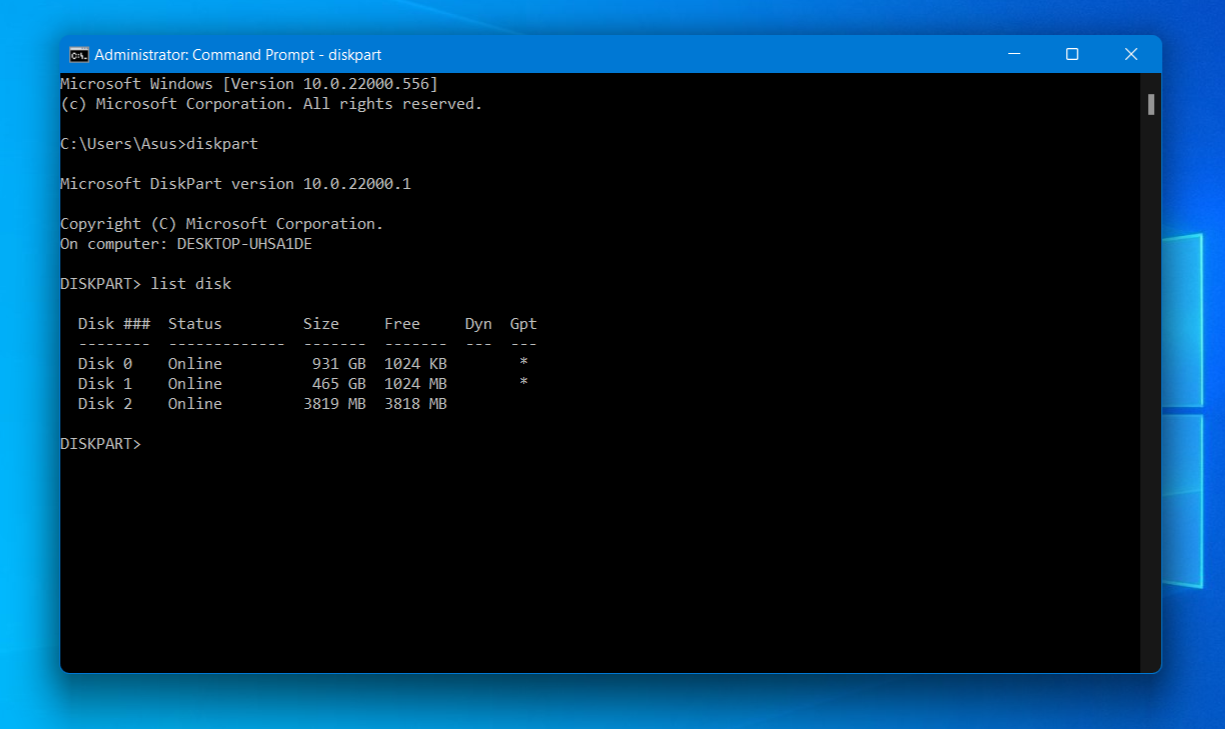
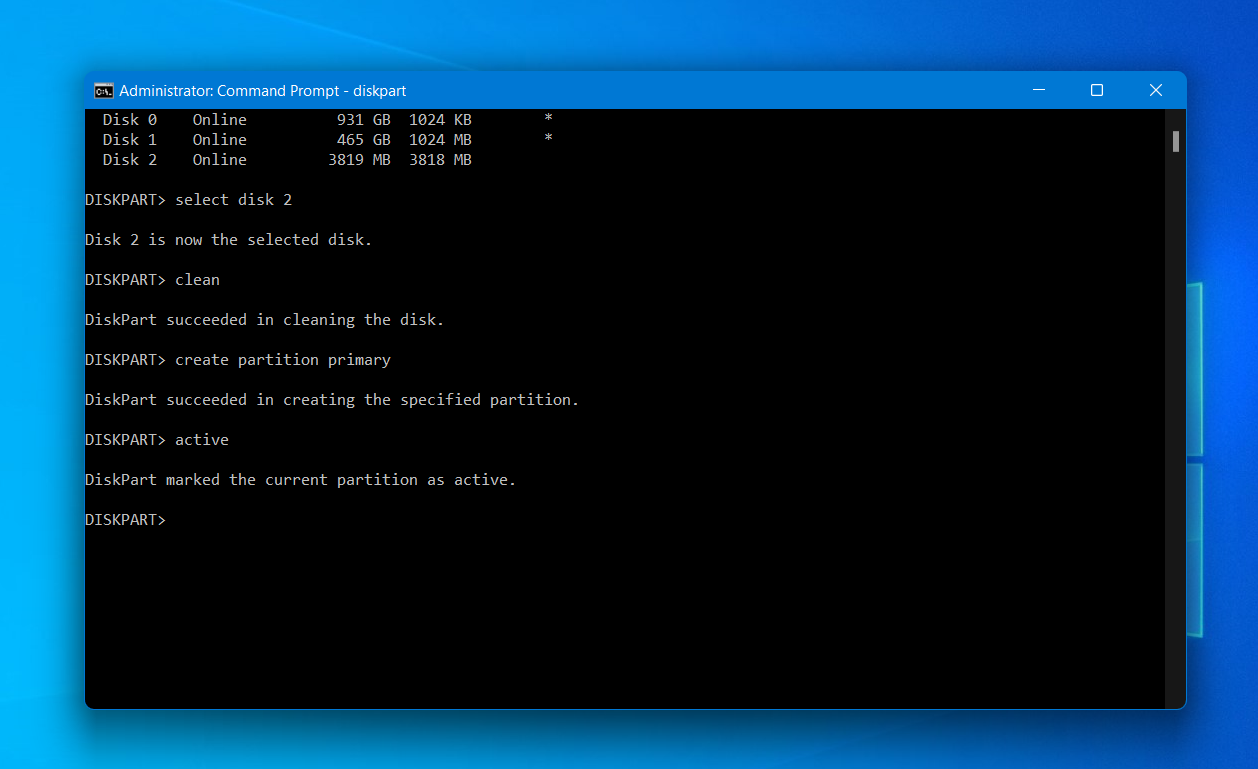
- In the command prompt window, type “diskpart” and hit Enter.
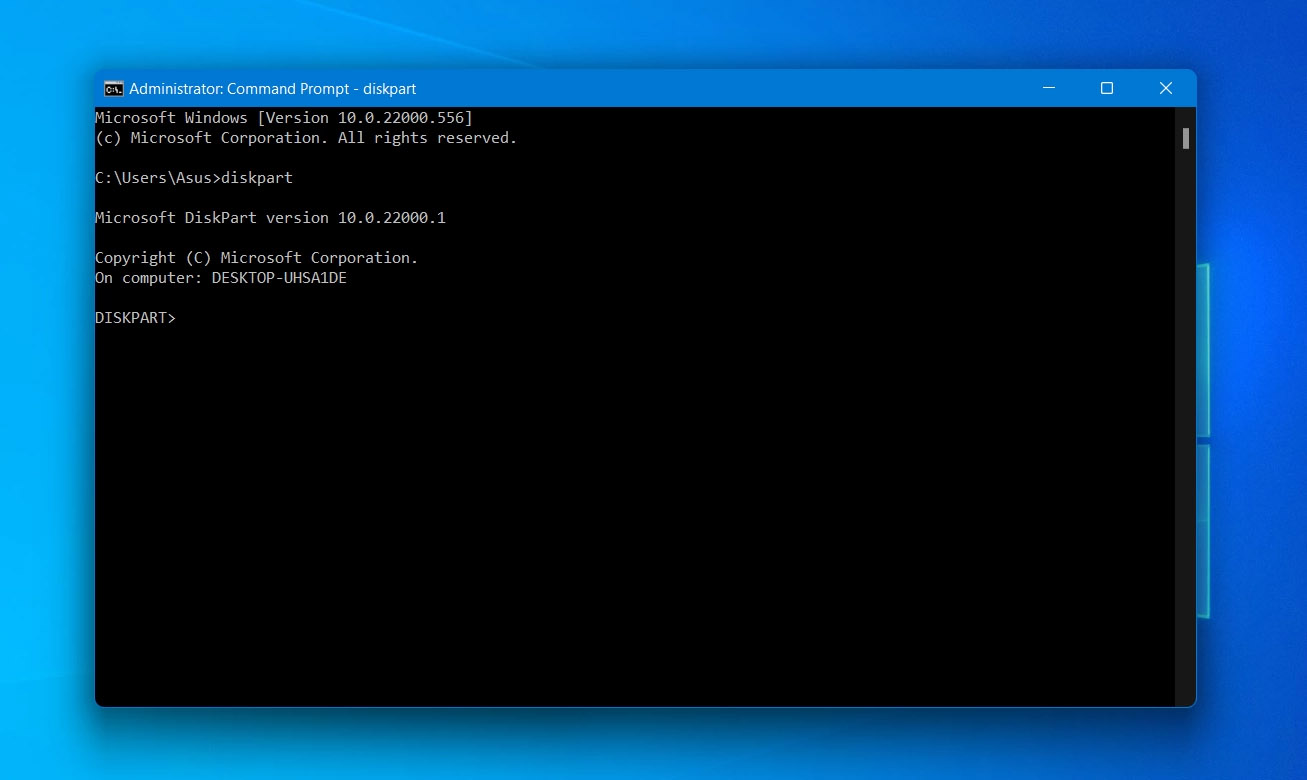
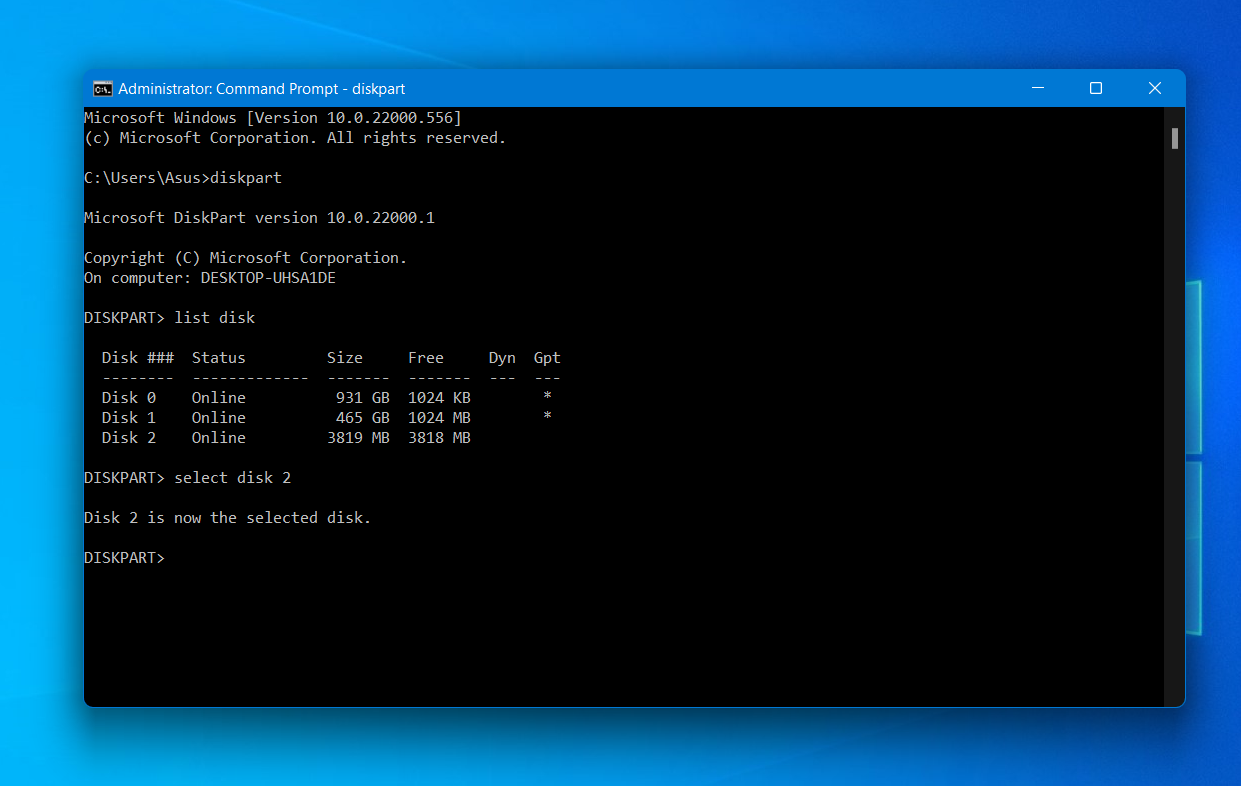
- Next, type in list disk and hit Enter. This command displays all the active drives connected to your PC.
- Type select disk x and hit Enter. This command is used to select a particular drive to work with. 👀
Replace x with the number of your faulty drive.
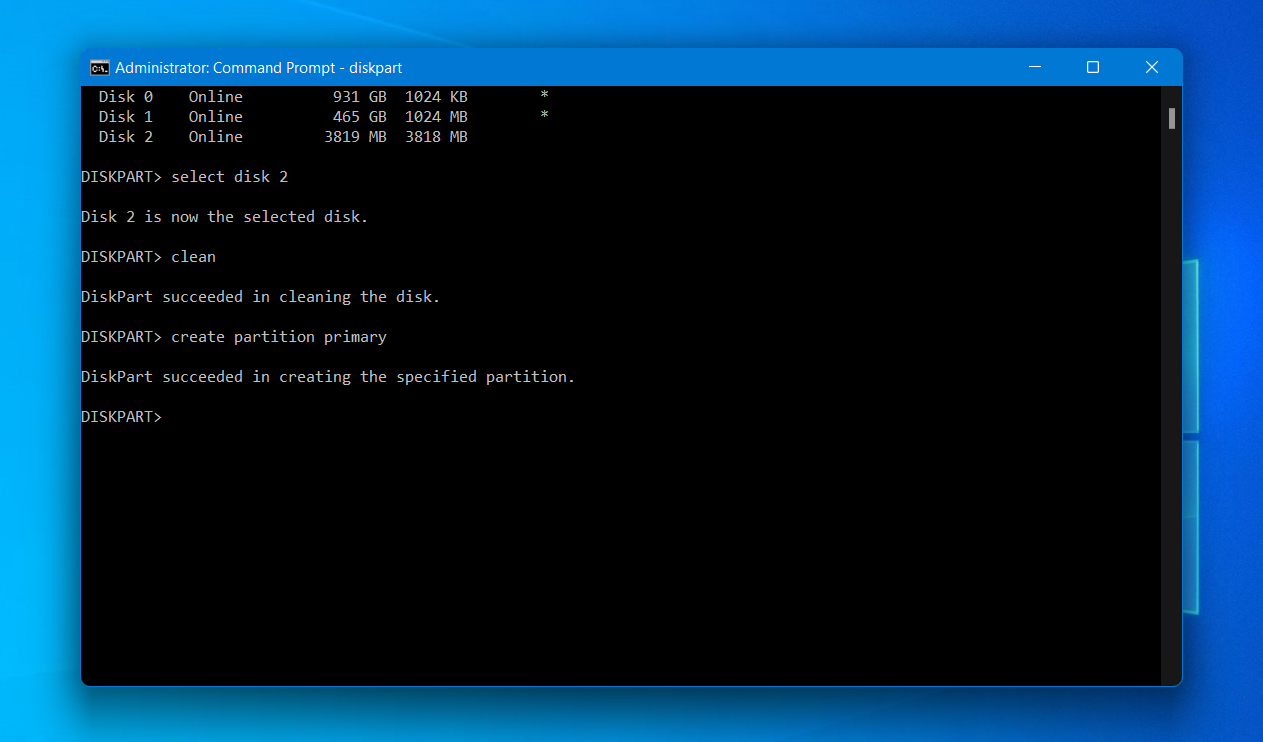
- Now, type clean and hit Enter. Doing this will erase all data and filesystem of the selected drive.
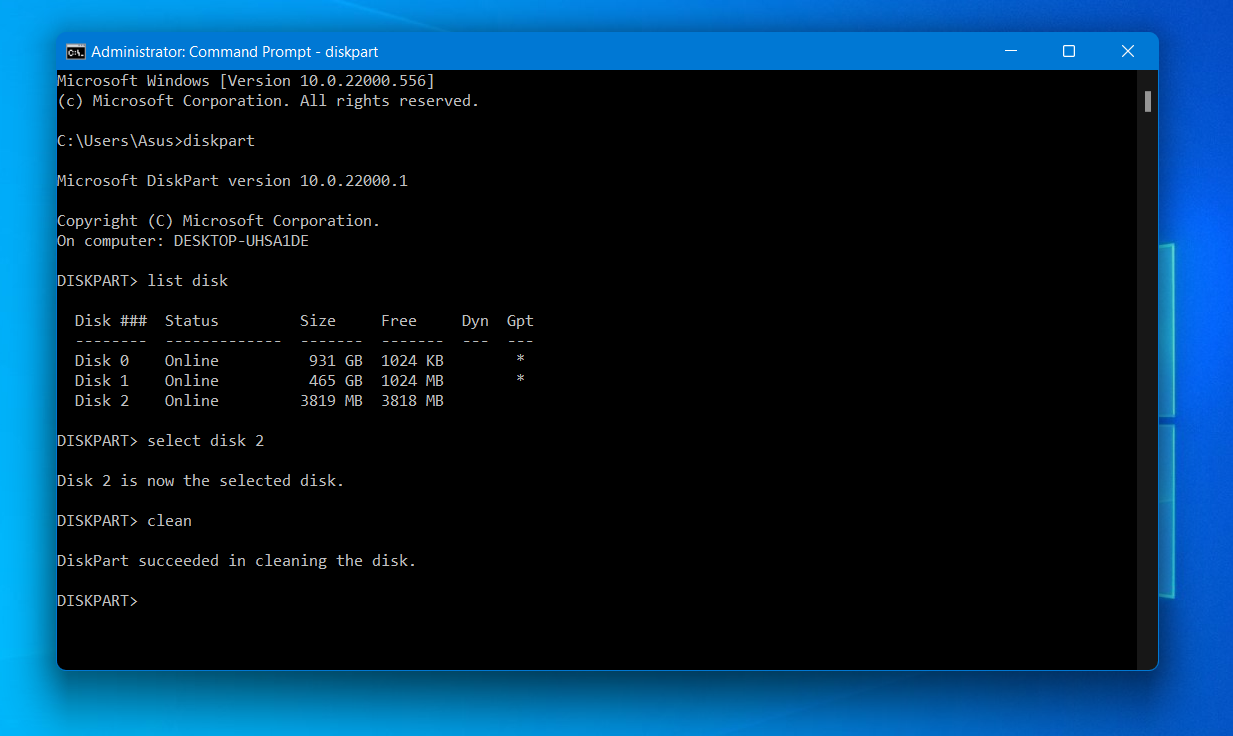
- It’s time to create a new partition on your drive. Type create primary partition and hit Enter.
- Then, input active to activate the newly created partition.
- Next, type list partition to display a list of all the partitions on your flash drive.
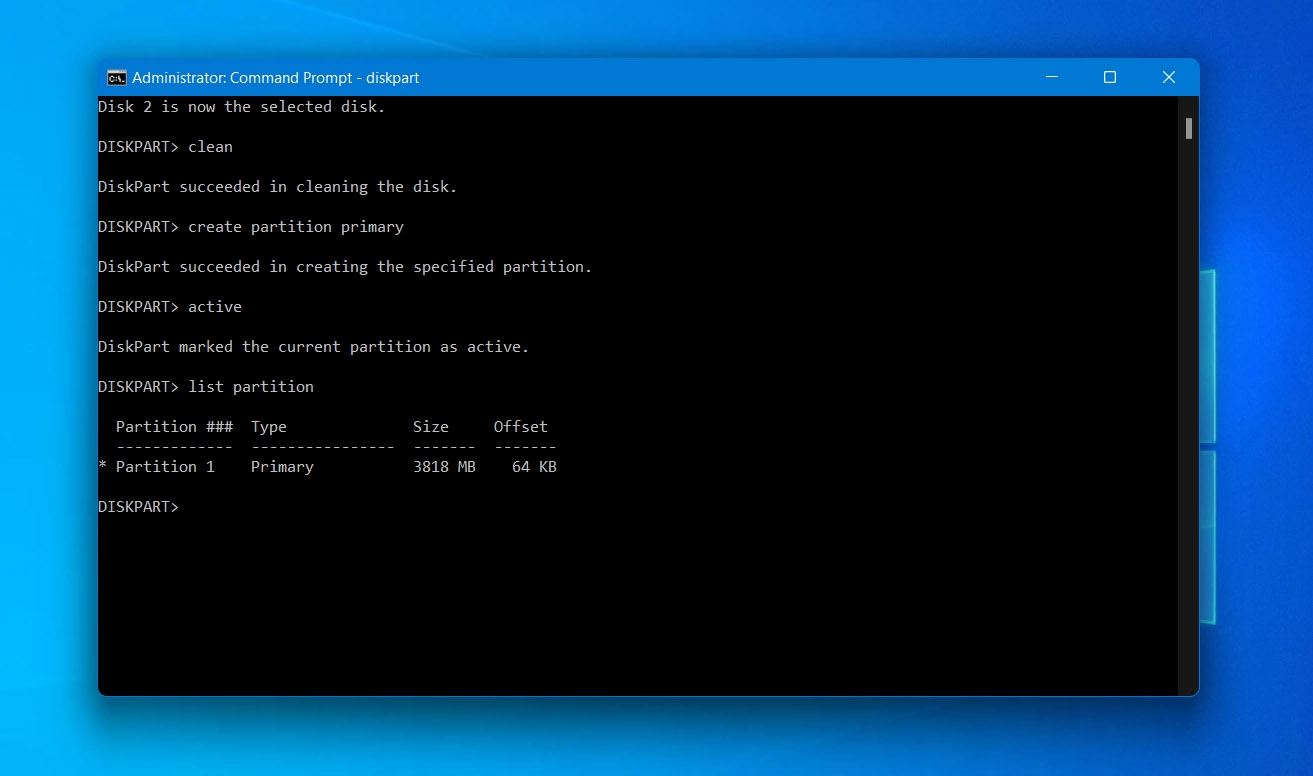
- Type select partition 1 and press Enter. This command is used to select the partition you’ve just created.
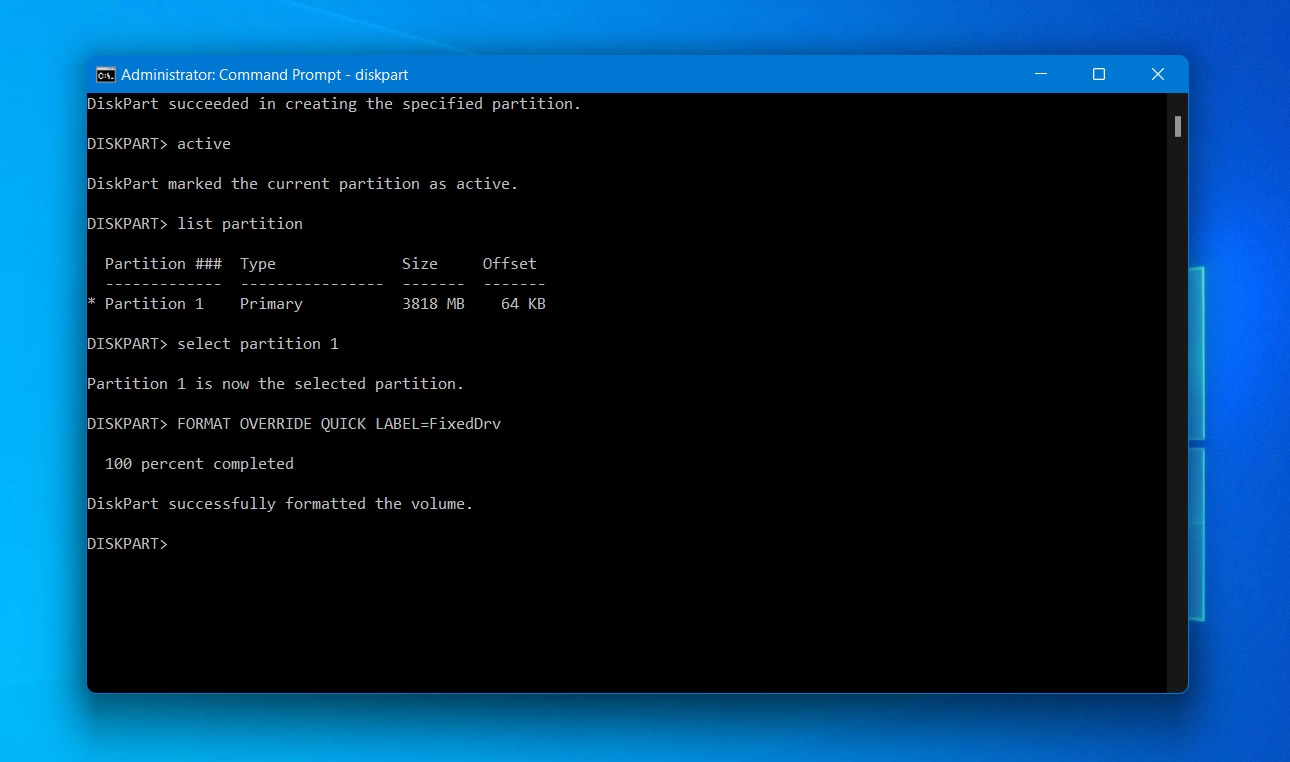
- Now, enter the following command– FORMAT OVERRIDE QUICK LABEL=FixedDrv. This command will format your partition to NTFS. Here, FixedDrv is the name of the recovered flash drive, and it can be anything you prefer.
- Now type exit to leave DiskPart.
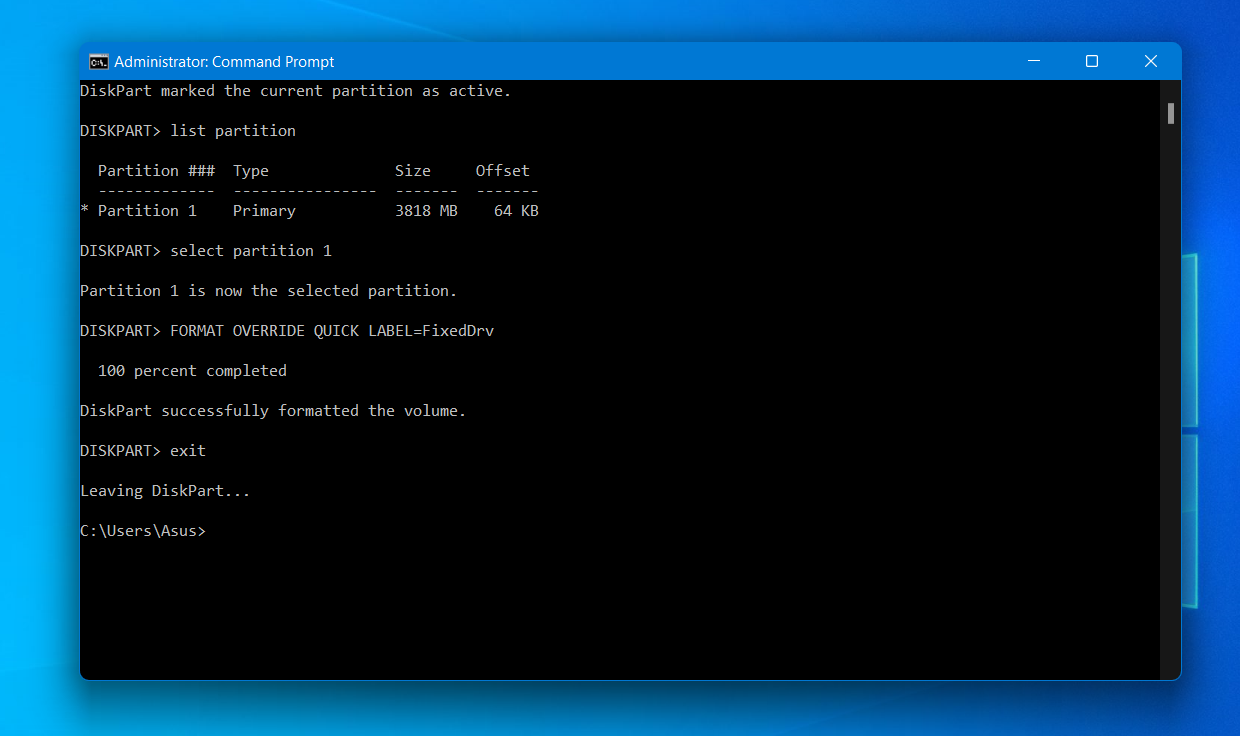
- Your flash drive is now recovered and will be displayed under the name you chose during the diskpart process.
Method 4: Use CHKDSK
You can try running the CHKDSK command, a utility designed to identify and fix file system errors and bad sectors on drives. If your USB drive was originally formatted with NTFS and became RAW due to damage to the boot sector, CHKDSK might be able to restore it using the backup. However, be prepared to encounter a message that states that CHKDSK is not available for RAW drives. This indicates that either your drive’s issue doesn’t match this scenario, or CHKDSK was unable to use the backup to restore the boot sector.
An alternative to the command-line CHKDSK command is the Error Checking tool with a graphical user interface (GUI). However, we won’t cover it here, since in our scenario, this tool will only prompt you to format your USB drive.
Here’s how to use CHKDSK:
- Press Windows + S, type cmd, right-click on “Command Prompt,” and select Run as administrator.
- Type “chkdsk /f [Drive Letter]:” in the Command Prompt and press Enter.
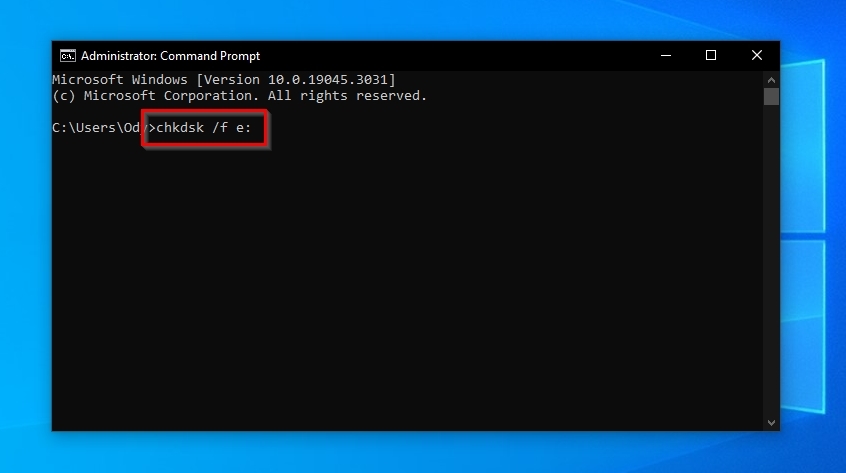 Replace [Drive Letter] with the actual letter of your USB drive (e.g., E:).
 - CHKDSK will scan the drive for errors and attempt to fix any issues it finds.
- If CHKDSK completes successfully, your drive should become accessible again.
Let’s take a look at some commonly asked questions related to recovering data from a USB flash drive that has turned RAW:
FAQ
How to Avoid Your USB Drive From Turning RAW Again?
There are a few do’s and don’ts when it comes to maintaining a storage drive such as a USB properly. And if you want to avoid your USB drive from turning RAW again, you should keep a few key points in mind.
- Eject your USB flash drive before physically pulling it out of the port.
- Do not insert your pen drive into compromised computers or it will become prone to virus attacks.
- Do not store your flash drive directly under the sun or anywhere near a heat source.
- Make sure that the USB drive is well protected from physical shocks and drops.
- Lastly, make sure that you are using the appropriate file system USB on your computer. Otherwise, it will show up as RAW.
How Do I Fix a RAW USB Without Formatting?
In order to fix the “USB device not recognized” error without formatting the drive, you’ll need to use data recovery software like Disk Drill to help you out. First, you’ll need to create a byte-to-byte backup of your USB. Once it’s done, mount the backup image on Disk Drill and it will show up in the list of available devices. Now, you can recover files from the corrupted USB using the Disk Drill data recovery tool.
How to Fix RAW Flash Drive Using CMD?
In order to fix a RAW USB using cmd, first type diskpart and hit Enter. Now, enter the following commands one by one and execute them to fix your faulty pen drive:
- list disk
- select disk x (Here, x is the number of your drive)
- clean
- create partition primary
- active
- list partition
- select partition 1
- FORMAT OVERRIDE QUICK LABEL=FixedDrv (Here, FixedDrv is the name of the recovered drive)
Once you’re done, type exit and hit Enter.
Is There Any RAW USB Formatting Tool?
When it comes to formatting a USB flash drive that has gone RAW, you can either use the Windows in-built formatting tool or utilize third-party tools such as HP USB Disk Storage Format Tool or AOMEI Partition Assistant to format your flash drive. Both methods are equally easy and fix the problem without requiring a lot of effort.
Conclusion
It might be panic-inducing to see your flash drive has become RAW, and suddenly you’ve lost all access to your important data. But, as we’ve discussed in this article, it’s extremely easy to recover all your data and fix your USB drive as well along the way. However, if the problem persists for you even after going through all the methods we’ve mentioned in this article, it’s best to seek professional help before you end up losing all your data forever.
This article was written by Ojash Yadav, a Contributing Writer at Handy Recovery Advisor. It was also verified for technical accuracy by Andrey Vasilyev, our editorial advisor.
Curious about our content creation process? Take a look at our Editor Guidelines.