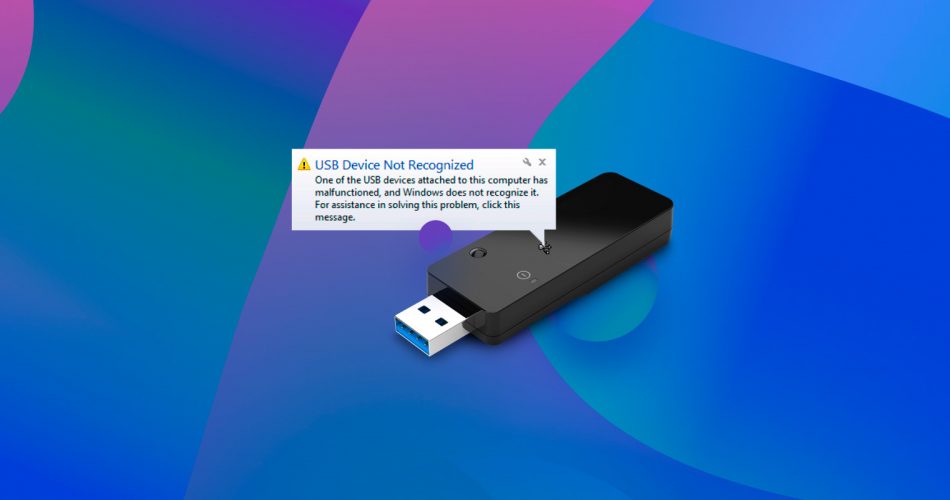
After plugging your USB into your Windows 10/11 computer, instead of seeing your files, you’re met with an error message saying “USB Device not recognized”. Don’t worry, it’s happened to most of us at least once.
Just like how there are several reasons why this could happen, there are several solutions designed to fix it. Read on to learn about the various ways you can go about fixing the “USB Device not recognized” error message.
Causes Behind The “USB Device Not Recognized” Issue
It’s often hard to determine the cause behind the message based on the fact that it can be caused by many things. However, there are a handful of common symptoms that you can use to determine the reason your USB isn’t being recognized by your Windows 10/11 computer. We’ve provided a table below that will point you toward the best solutions based on your situation:
Typical Symptoms |
Solutions |
USB device is not detected at all |
|
USB device intermittently disconnects |
|
USB device recognized but not functioning properly |
|
USB device works in some ports but not others |
|
USB device used to work but now doesn’t |
|
Error message appears whenever USB device is connected |
|
USB device is not recognized after system update or change |
Let’s move on to some of the solutions you can use to fix this message for good.
How to Fix a USB Flash Drive That’s Not Recognized
Most solutions are easy to implement. Simply follow the numbered steps through each solution until you find one that has fixed the problem.
Method 1: Restart Your Computer
The solution that’s most often mentioned as the first troubleshooting step. While it may seem unhelpful, restarting your computer actually helps detect devices that it previously didn’t. Before trying any of the other solutions, make sure you’ve completely powered down your computer and turned it back on.
You can perform a full shutdown by right-clicking the Start button, hovering over Shut down or sign out and clicking Shut down while holding the SHIFT key.
To ensure your computer is powered down completely, unplug the power cable after the computer has shut down, then plug it back in. If you have a laptop, simply holding the SHIFT key while clicking Shut down will suffice.
Method 2: Eliminate Physical Connection Issues from the Checklist
Making sure all your hardware is in ideal working order is an important step that could save you a lot of time. We recommend you perform the following preliminary troubleshooting steps before jumping into more in-depth solutions:
- Inspect both the device and USB ports for signs of physical damage that may be preventing a consistent connection.
- Try switching the cable out for one that you know is working.
- Test the USB on a different computer to see if it’s a device-related issue.
- Clean the USB ports to remove foreign substances like dust or debris.
Method 3: Plug the USB Directly Into Your Computer
Using a USB hub is a great way to expand the number of USB ports available on your computer. However, they can be counterproductive if they don’t produce enough power to support the connected devices.
Try removing the USB from the hub and plugging it directly into your computer. If this has fixed your problem, try swapping your regular USB hub out for a powered USB hub, as they are designed to send enough power to each connected device.
Additionally, if you’re plugging the USB into a USB 3.0 port, try testing it in a USB 2.0 port to see if is detected.
Method 4: Force Your USB Drivers to Reinstall
Your existing USB drivers may be corrupted or damaged. Uninstalling the drivers and re-inserting the device can force a refresh of the drivers that were once working.
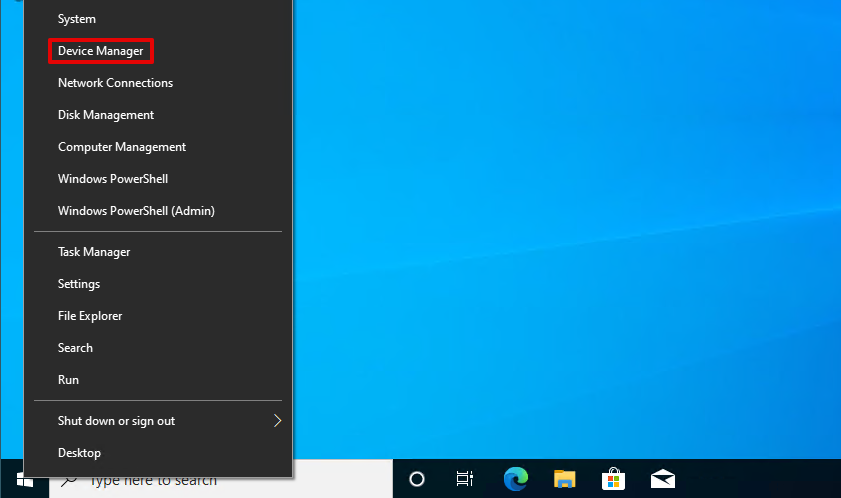
- Right-click the Start button and click Device Manager.
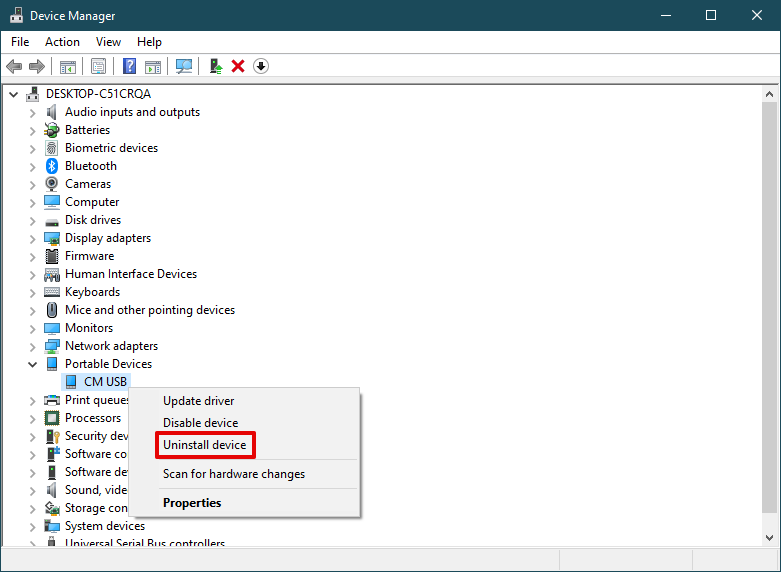
- Expand Portable Devices. Right-click your USB device, then select Uninstall device.
- Reconnect your device to your computer so the drivers can reinstall.
Once your device is connected again, Windows will force the drivers to reinstall.
Method 5: Update Your Drivers
Your devices use drivers to communicate with each other. Outdated drivers can cause hardware-related problems, like this error. Not only do you need to check if your USB drivers are updated, but also your motherboard’s.
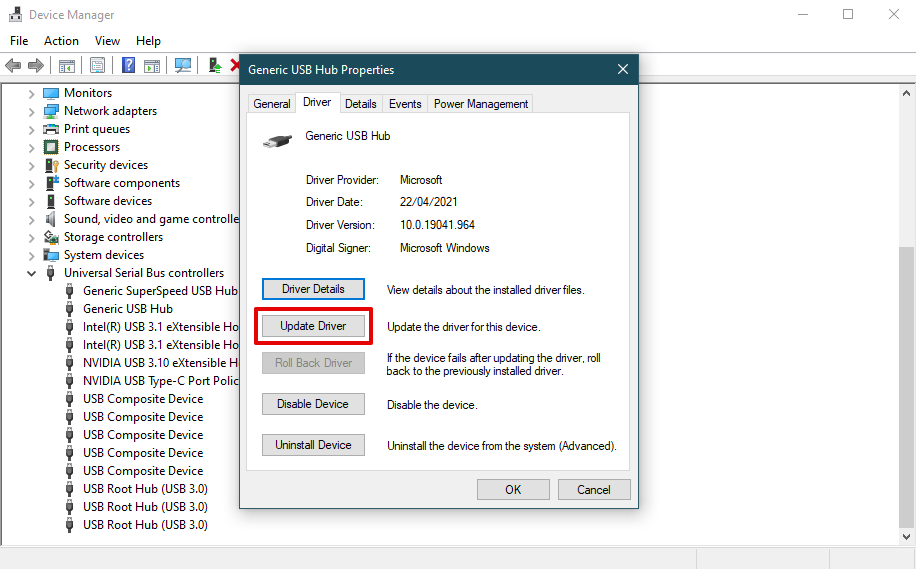
- Right-click the Start button and click Device Manager.

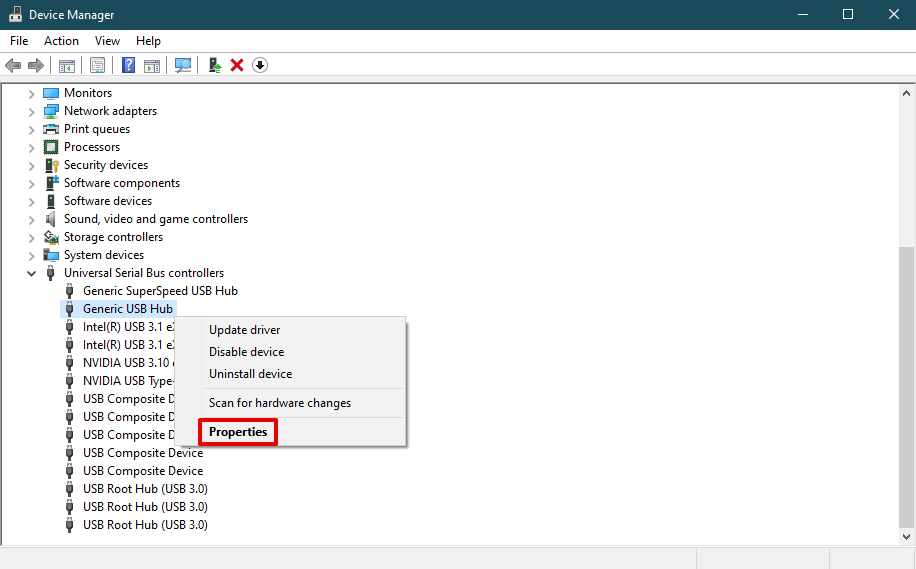
- Expand Universal Serial Bus Controllers. Right-click Generic USB Hub and click Properties.
- Go to the Driver tab and click Update Driver.
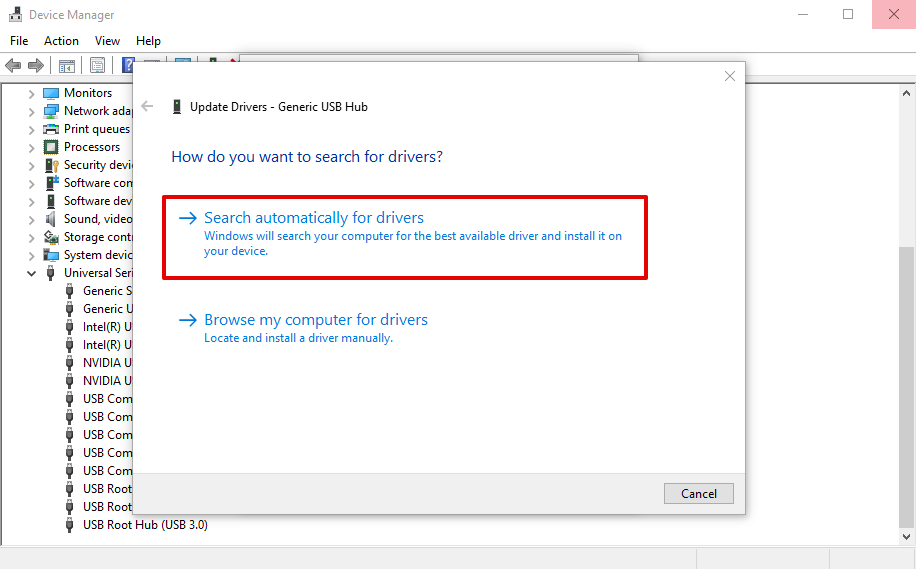
- Click Search automatically for drivers. Alternatively, you can download the necessary chipset driver manually from the motherboard manufacturer’s website and then install it using the Browse my computer for drivers option.
Once finished, Windows will search for any driver updates and automatically install them. If your drivers are already up-to-date, or if updating the drivers hasn’t worked for you, move on to the next step.
If updating your drivers actually caused the issue, you can instead roll back to a previous driver. On step three, instead of clicking Update Driver, choose Roll Back Driver to revert to the previous version.
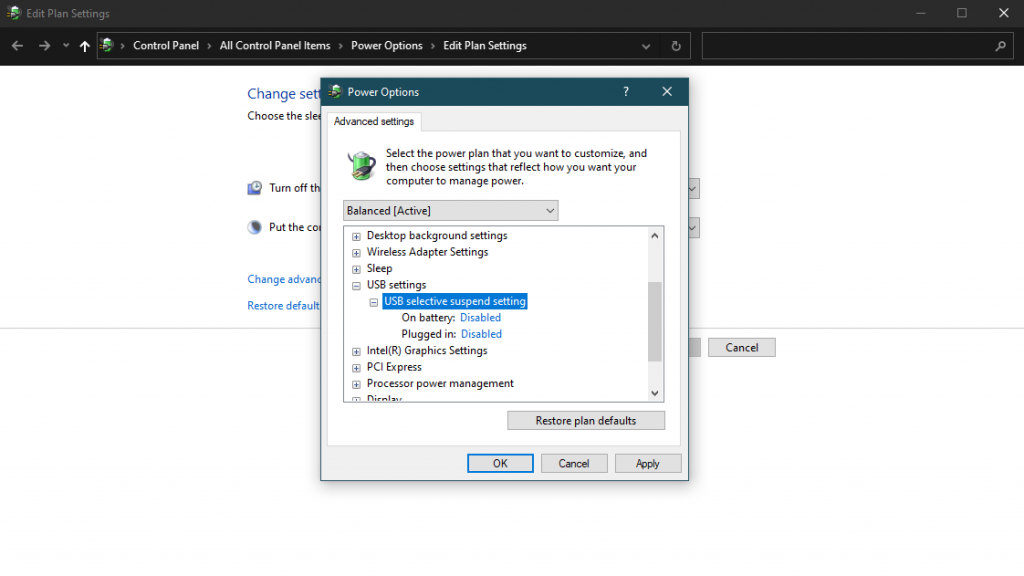
Method 6: Disable the ‘USB Selective Suspend’ Settings
Laptops often come packed with features. These features can consume a lot of power if left active. Windows combats this by implementing power-saving features. One of these features is called USB Selective Suspend. This disables USB ports that aren’t being used to help conserve power.
The problem with this is that it can cause erratic performance if it disables USB ports that it’s not supposed to. We can fix this by disabling the setting.
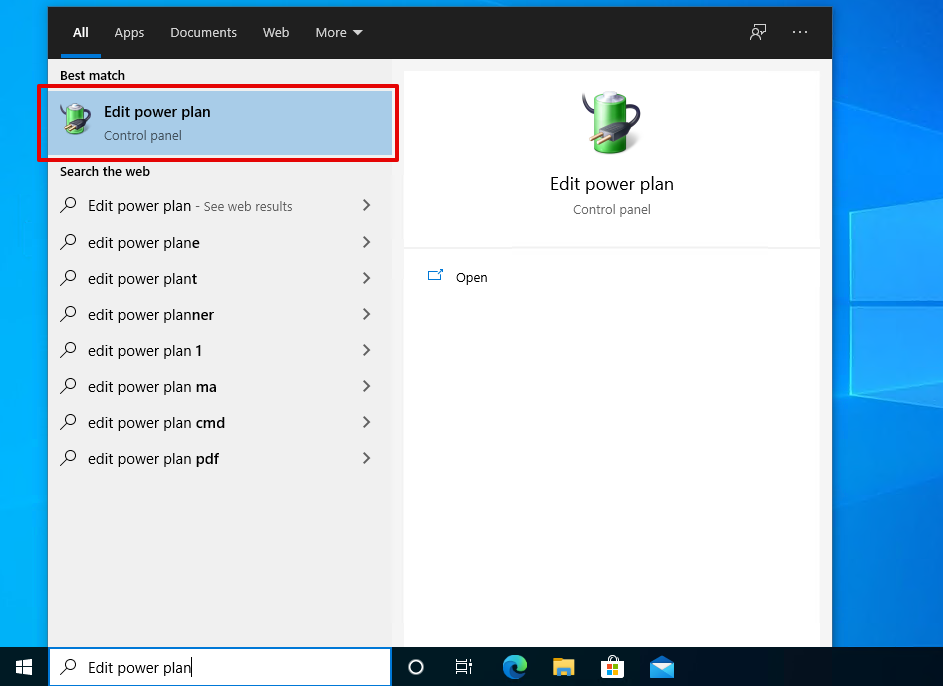
- Click the Start button and search Edit power plan. Select the first result.
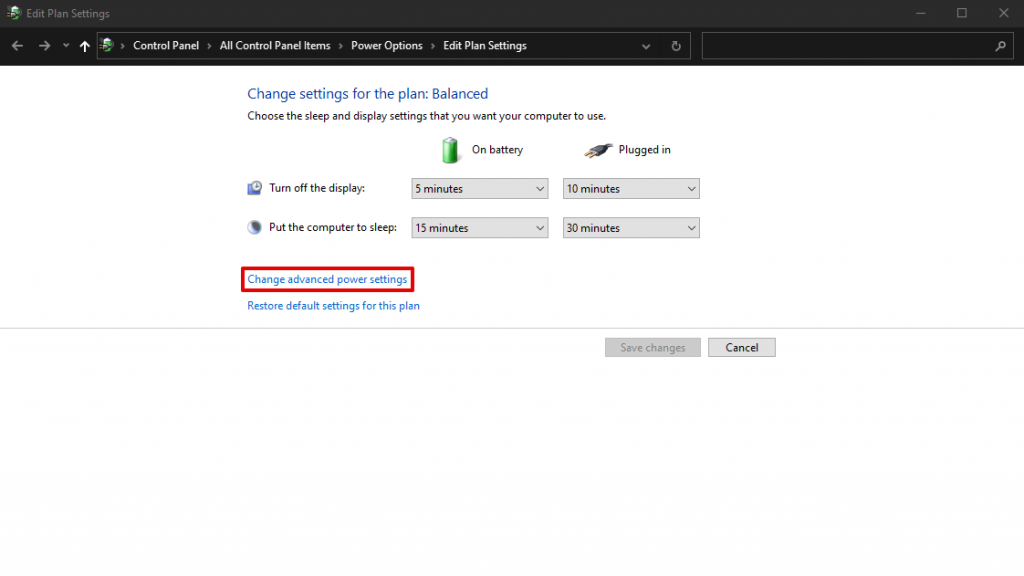
- Click Change advanced power settings.
- Expand USB settings, then USB selective suspend setting. Change these settings to Disabled and click Apply.
Method 7: Fix the Power Management of the USB Root Hub
As we mentioned in the last step, Windows includes a few features that help conserve power that’s being wasted. The USB Root Hub helps support the USB ports that are included with your computer. We can tell Windows to ignore the USB Root Hub so that it’s not disabled by accident.
- Right-click Start and click Device Manager.

- Expand Universal Serial Bus controllers. Right-click USB Root Hub and select Properties. It may also appear as USB Root Hub (USB 3.0).
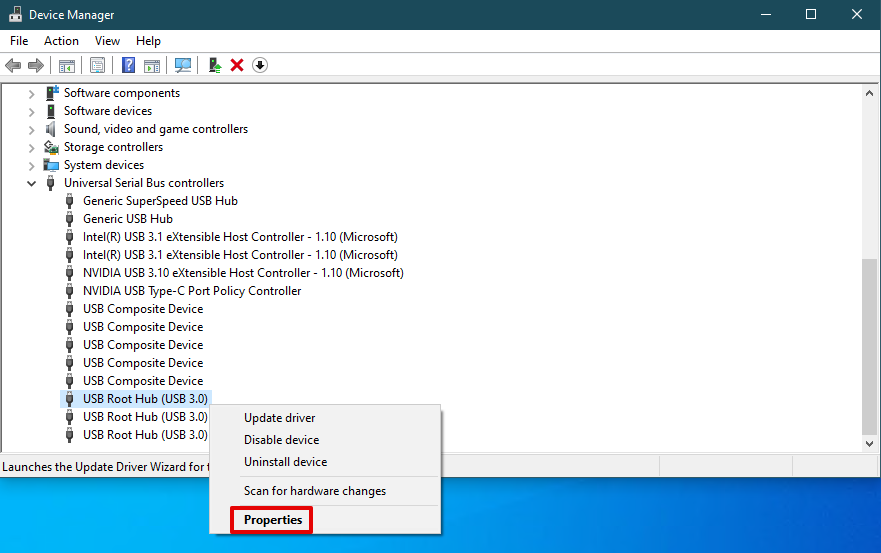
- Go to the Power Management tab and uncheck Allow the computer to turn off this device to save power. Click OK.
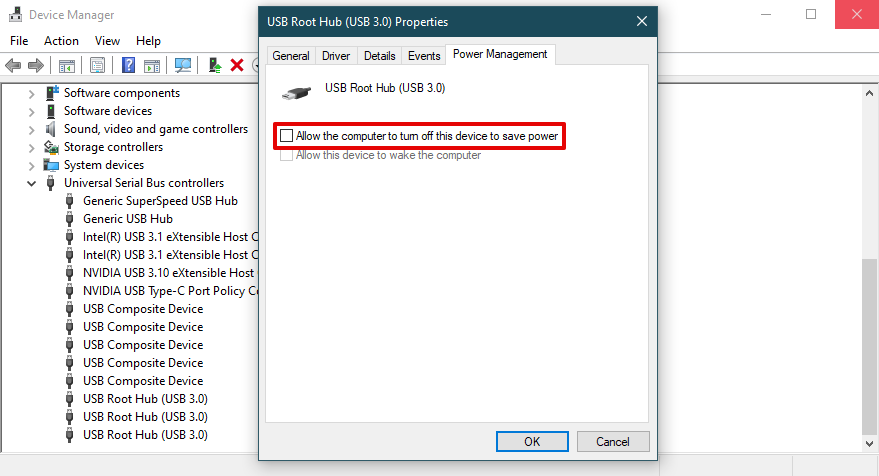
Repeat this for any other USB Root Hub list items you have in the Device Manager.
Method 8: Troubleshoot Hardware and Devices
Windows includes a variety of troubleshooters that can detect and automatically solve problems, one of which focuses on the hardware of your computer and any devices you may connect. Before starting, make sure your USB device is connected to the computer.
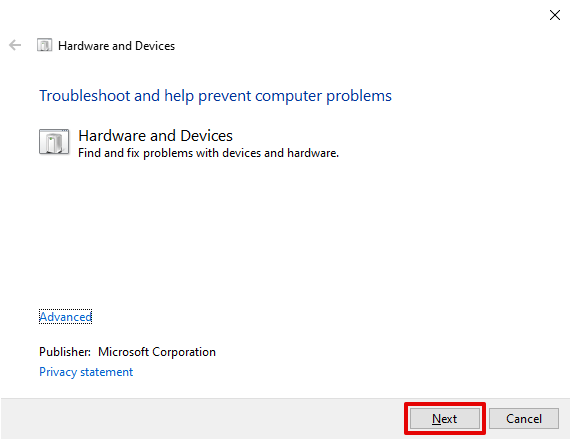
- Press Windows Key + S and search Command Prompt. Open it.
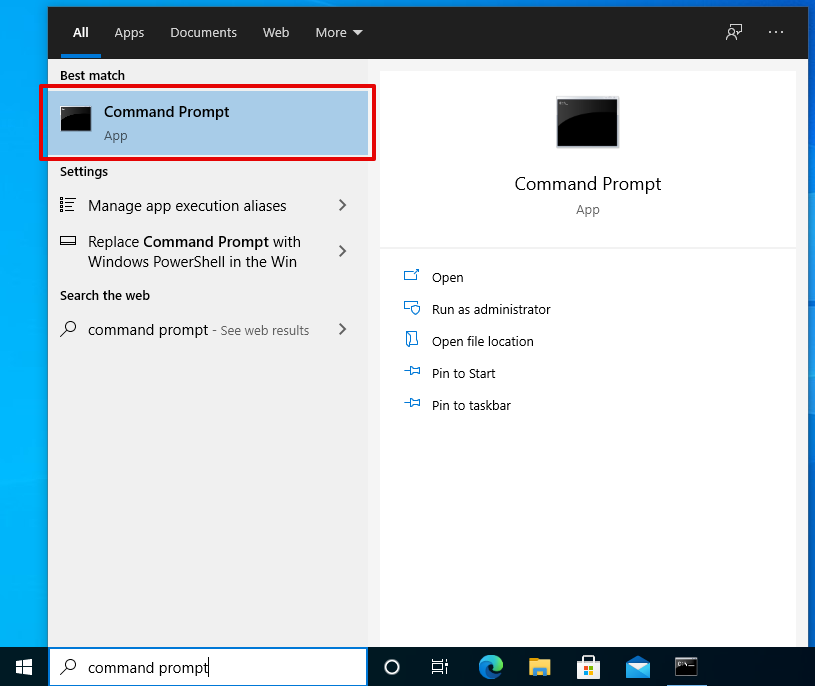
- Type msdt.exe -id DeviceDiagnostic and press Enter.

- When the troubleshooter opens, press Next. It will begin to scan for problems.
- When a problem is detected, click Apply this fix. The troubleshooter can be run multiple times to detect various issues.
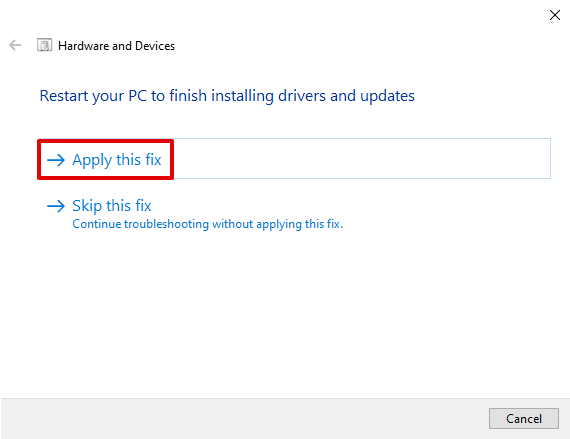
- Once the troubleshooter has finished, you’ll have the option of clicking View detailed information for clarity on what problems were detected.

Method 9: Update Your BIOS Version
The Basic Input and Output System (BIOS) is a small chip that signals all hardware components to power on the moment you push the power button. Nowadays, it’s more common to find computers with a Unified Extensible Firmware Interface (UEFI), however they both serve the same purpose, leading both terms to be commonly used interchangeably.
An outdated BIOS can cause problems with your hardware, especially in terms of compatibility. You can check your BIOS version and compare it against the latest version available to see if you’re up-to-date.
Updating your BIOS can be an intimidating process due to its technical nature. Any interruption to the update process can cause catastrophic problems. You can follow this guide as a supplemental resource to your manufacturers instructions, but if you’re not confident, have a professional perform the update for you.
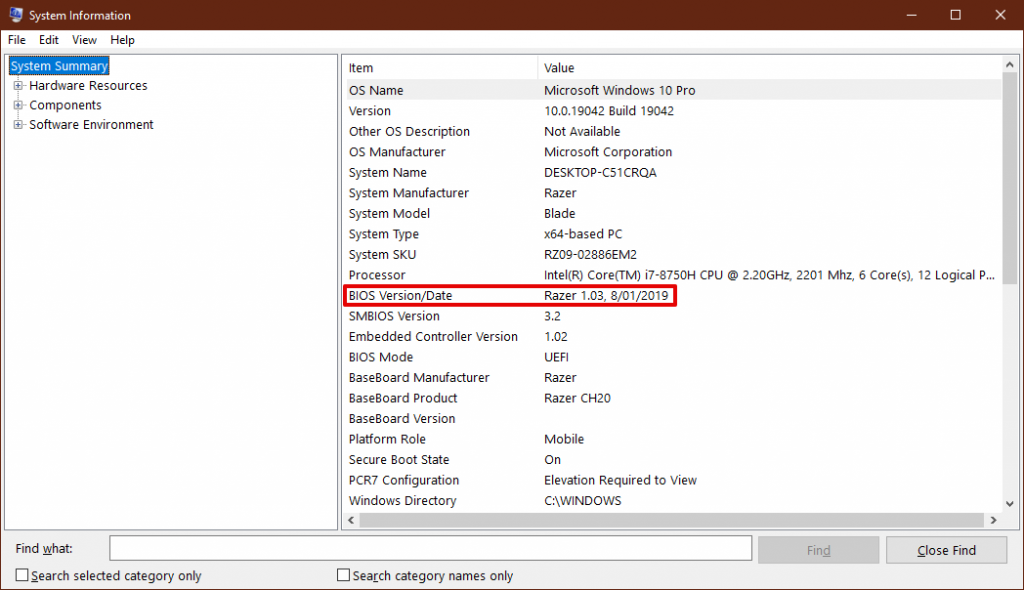
- Press Windows Key + S and search msinfo. Open System Information and take note of the BIOS version.
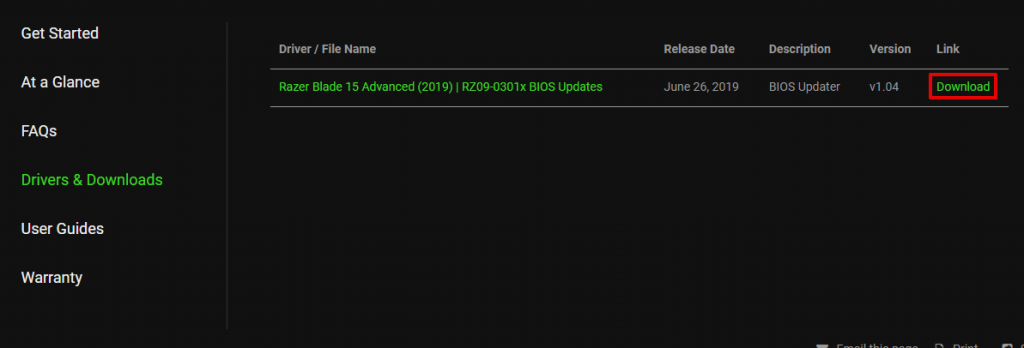
- Go to the website of your computer’s manufacturer and check the latest BIOS version available for your machine. Every manufacturer will have a different update process. Some will provide an automatic updater, others will require a manual update which can be more difficult.
Method 10: Restore System to a Previous Point Using System Restore
If the USB was once recognizable but something in your system has caused it to no longer work as it should, you can restore your system to a previous point using System Restore. In doing so, you will restore your system back to a point where it was working as intended.
Restoring your system will not affect your personal files, but it will remove any apps, drivers, system settings, and updates you installed or changed after the restore point was made.
Follow these steps to restore your system to a previous point in time:
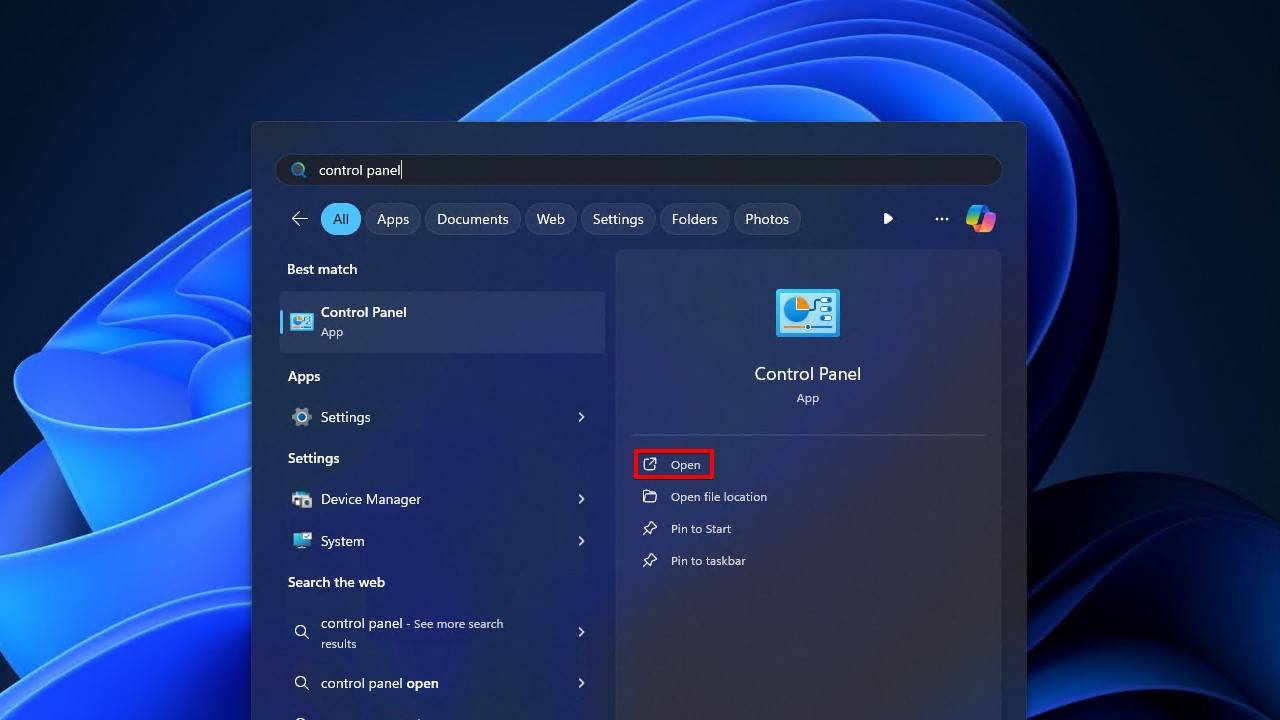
- Click Start and search “Control Panel”. Open it.
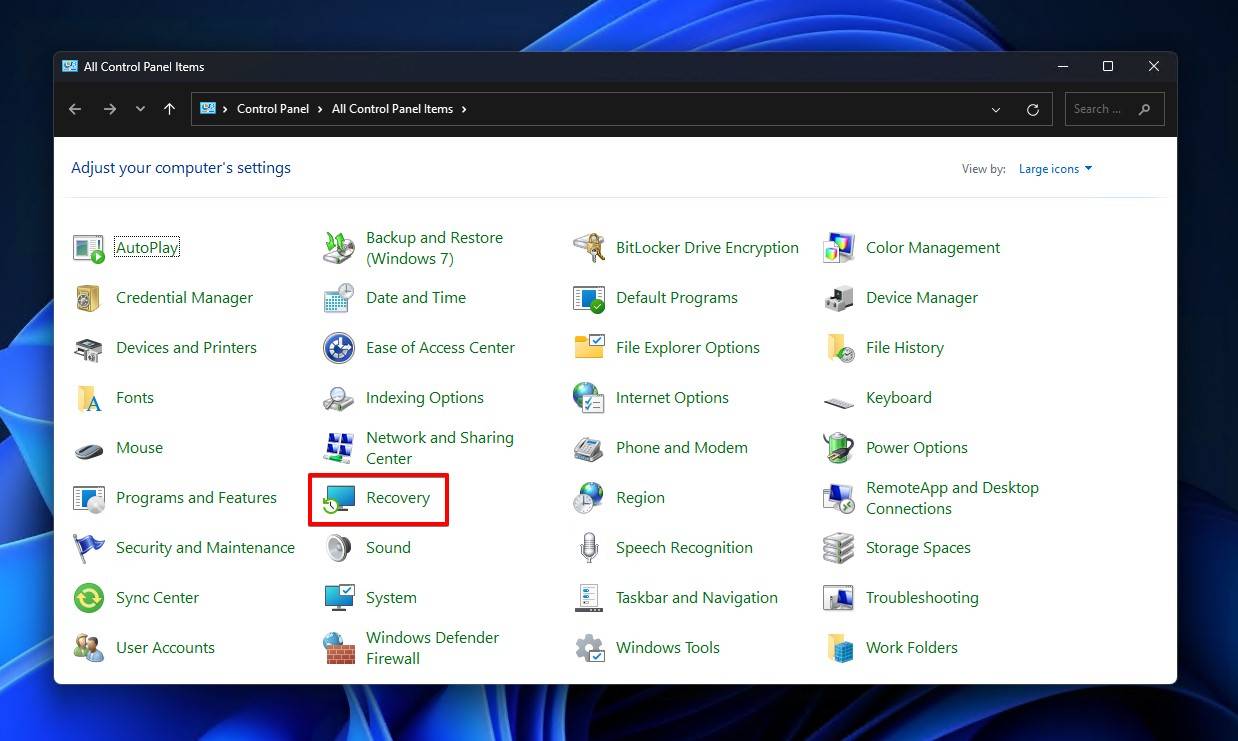
- Click Recovery. If it’s not visible, make sure you’ve set View by: to Small icons or Large icons in the top-right corner of the window.
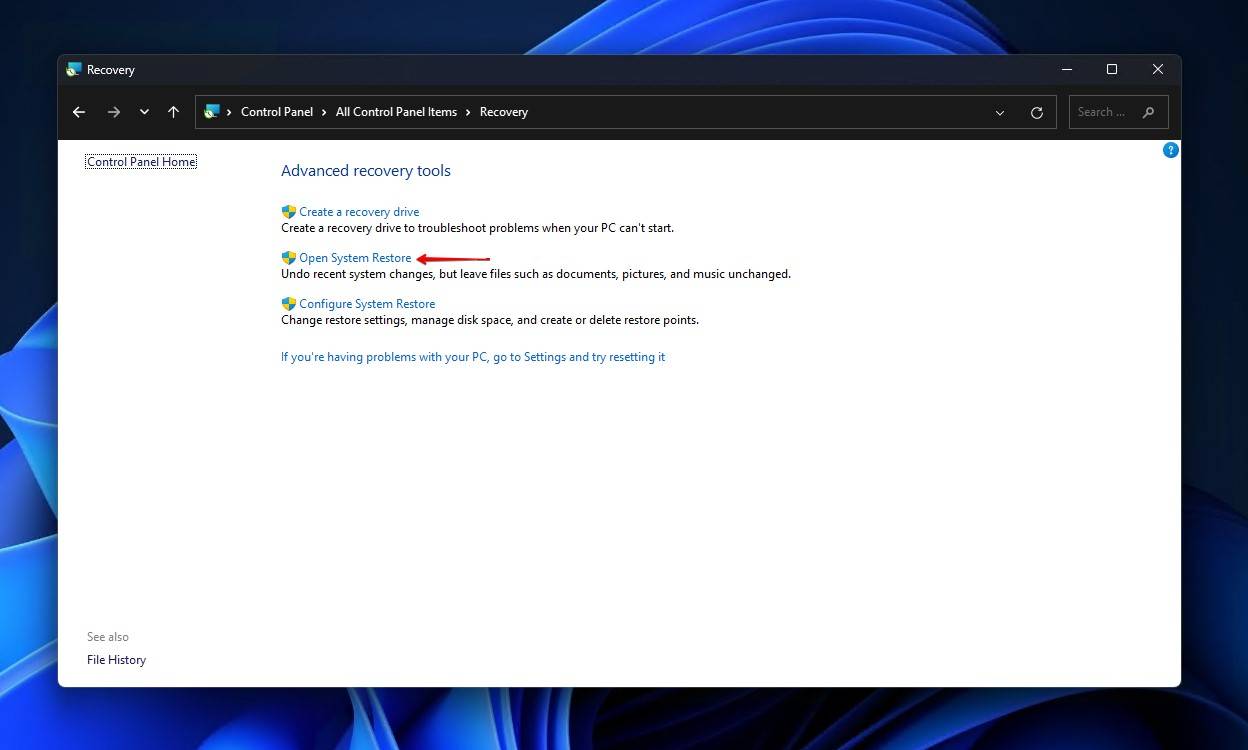
- Click Open System Restore.
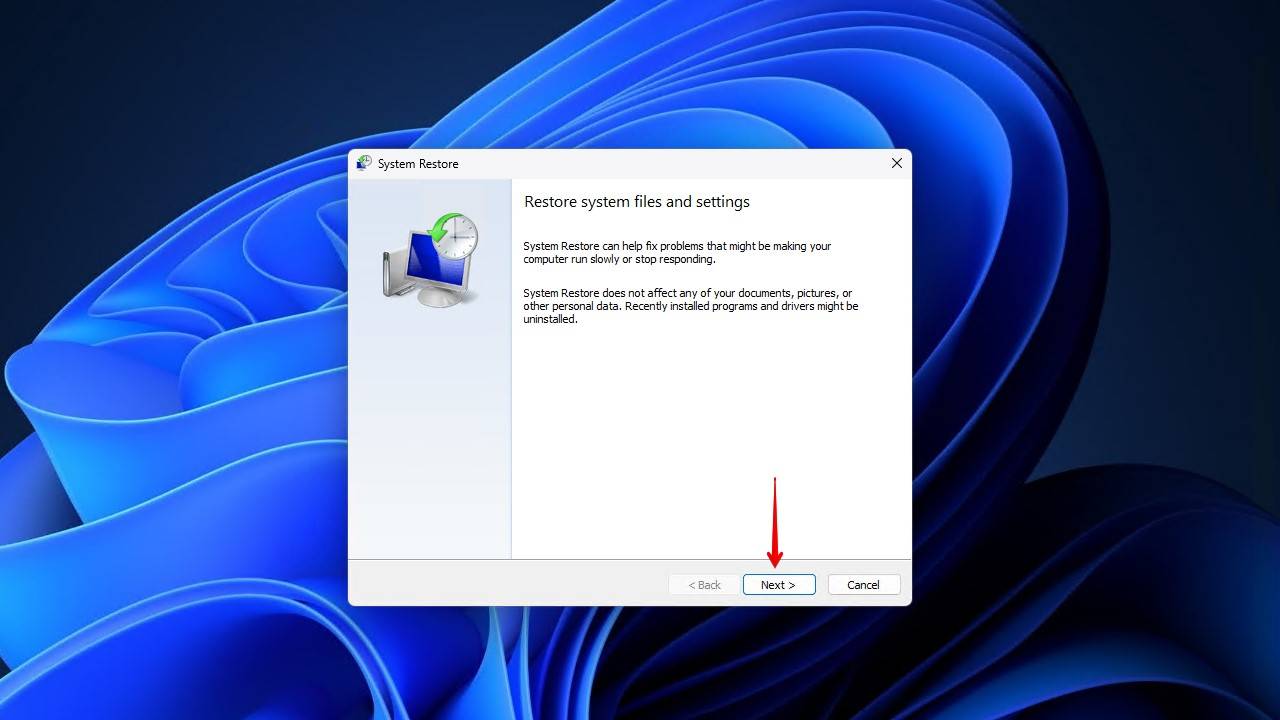
- Click Next.
- Select the restore point you wish to restore, then click Next.
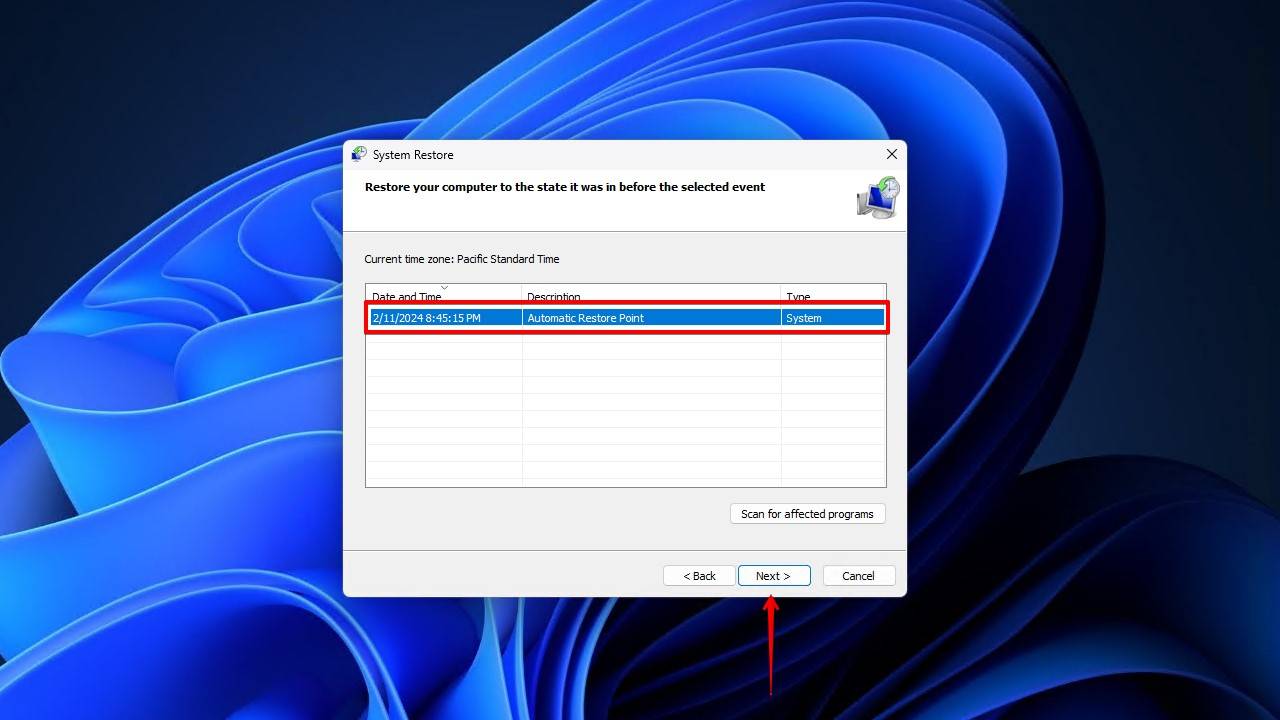
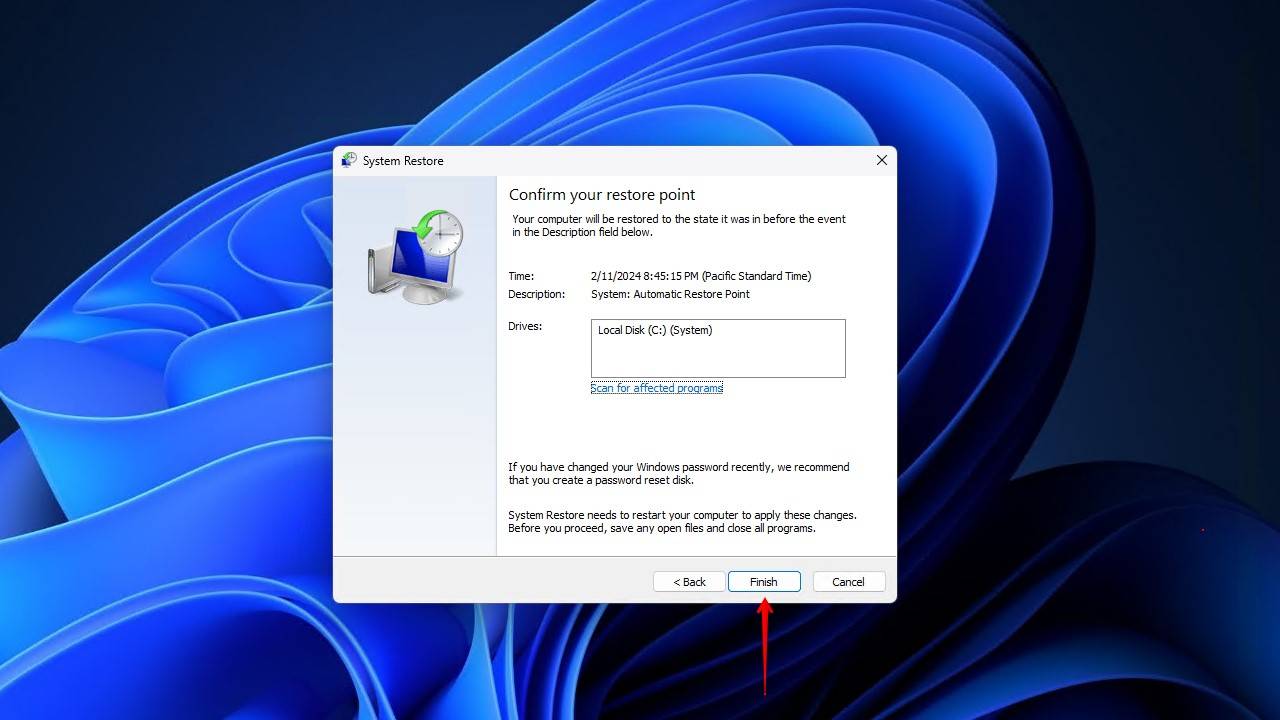
- Click Finish.
How to Recover Data From a USB That Reads “USB Device Not Recognized”
There’s only so much you can do to fix a USB that’s not being recognized by Windows. If you’ve tried everything above, then your next step is to recover the data that was on the USB.
Method 1: Recovery Using Data Recovery Software
Data recovery software isn’t new. In fact, data recovery has been around for years, with the first instance of successful data recovery occurring in 1987. Obviously, since then, we’ve made numerous technological advancements in how we use our data and how we recover it.
Nowadays, you can download recovery software at the click of a button and recover your data in any situation in a matter of minutes. Through the use of advanced recovery algorithms, these applications can deep scan your storage media and recover data after deletion. Most can even recover data from a recently formatted USB. Why is this important? Because even if you’ve regained full or partial access to your USB drive, you don’t know how long it will last. Perhaps the problem will return, or maybe some of your data was actually lost in the process.
Therefore, we’re going to show you how to use Disk Drill, a professional data recovery tool, to recover your data. Once your data is recovered, you can copy it to another storage device that’s safe and working.
Disk Drill allows you to recover up to 500 MB for free on Windows. Anything more will require a Disk Drill PRO license or higher.
Follow these steps to recover your data using Disk Drill:
- Download and install Disk Drill.
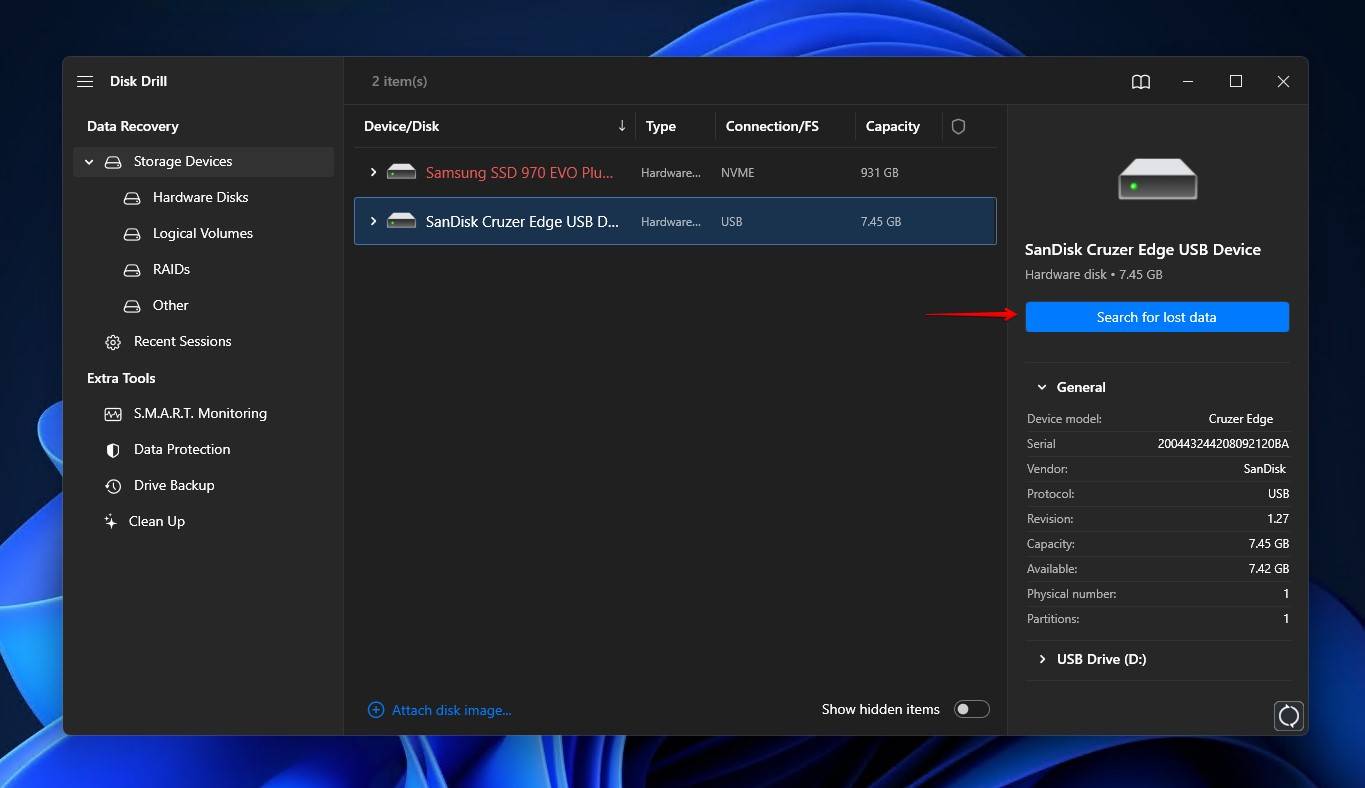
- Connect your USB to the computer. Select it from the list of devices, then click Search for lost data.
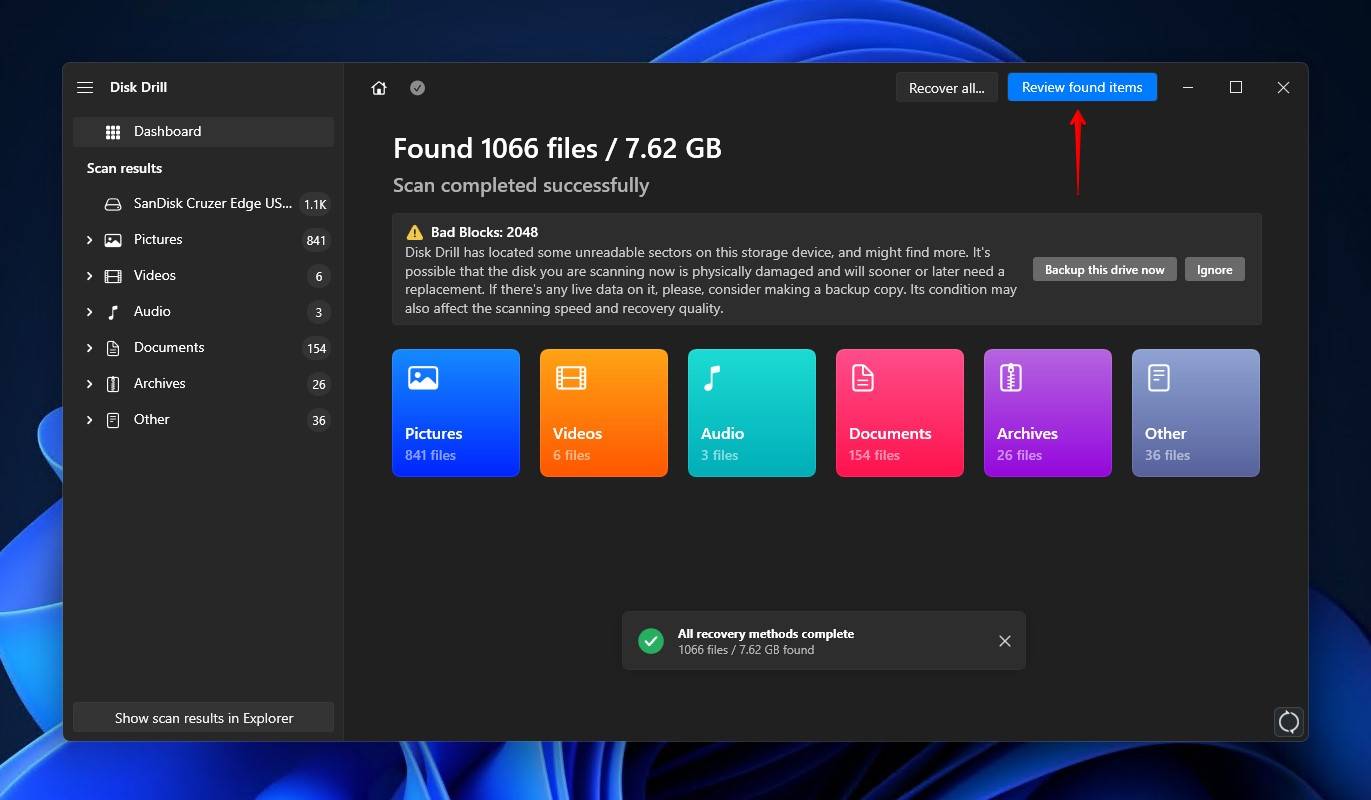
- Click Review found items once the scan is complete. Alternatively, you can recover everything straight away by clicking Recover all.
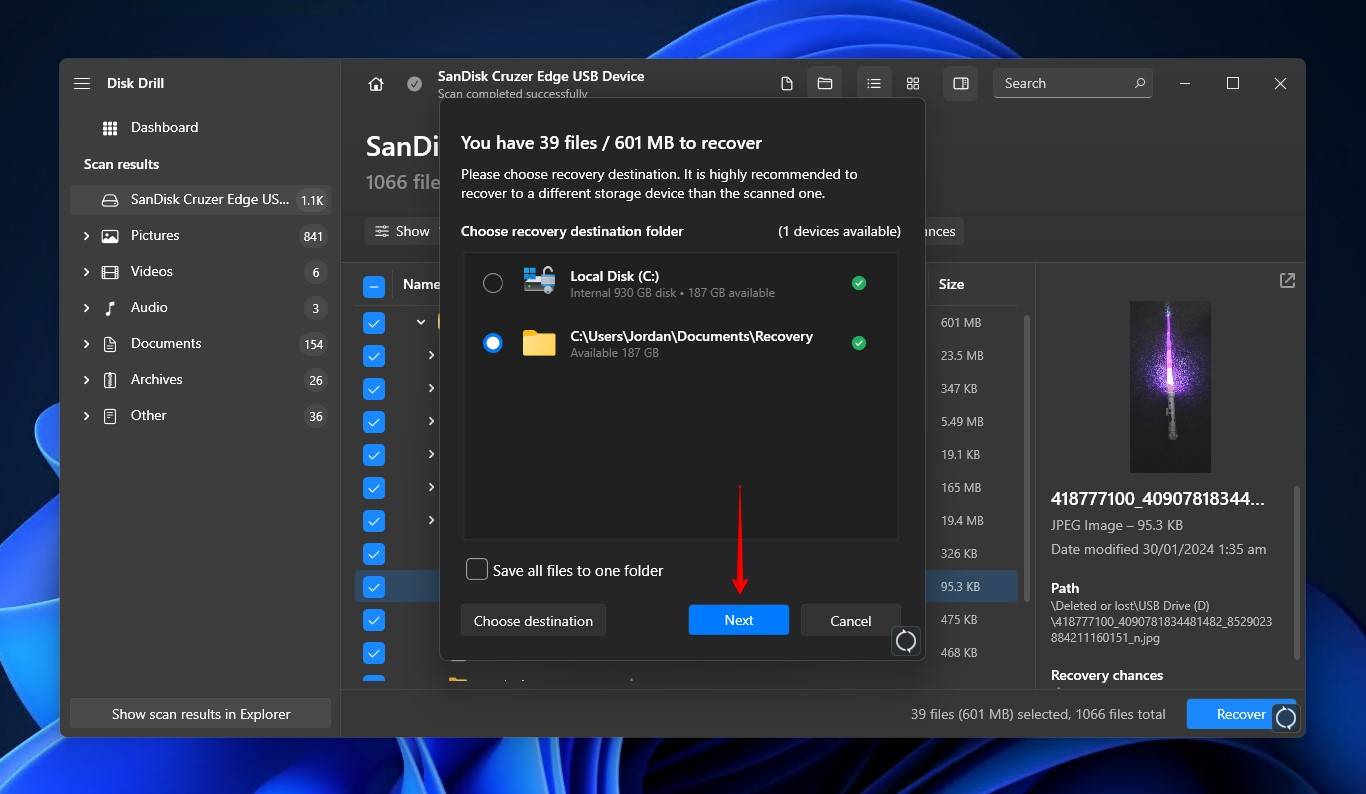
- Select the files you want to recover from the problematic USB drive. The recovery chances column and preview functions are good for determining which data is still usable. When you’re ready, click Recover.
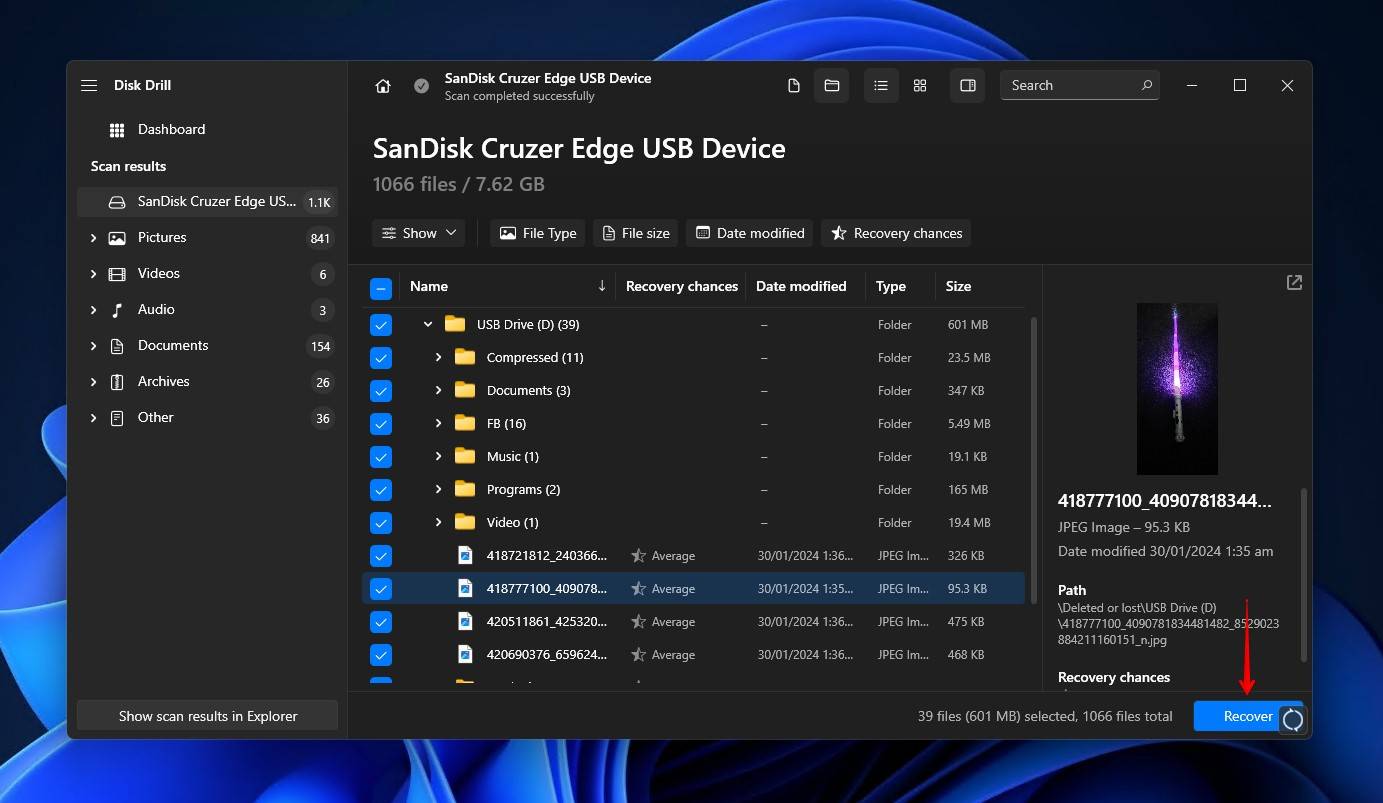
- Choose a safe recovery location. Don’t choose somewhere on the same USB drive you’re recovering from. To finish recovery, click Next.
We’ve taken our time to compile a list of the best USB recovery software available on the market. If you’re stuck in a pinch because your USB isn’t showing up, try data recovery software to recover your files. If your USB device isn’t appearing in the data recovery application, then it’s time to consider a data recovery center.
Method 2: Recovery Using a Professional Recovery Service
In more advanced data loss situations, sometimes not even data recovery software works. Or, if you’re not confident in your technical abilities, you may prefer someone else to take care of it for you. Introducing data recovery professionals.
By using a data recovery service, you’re putting your data in the hands of a trusted professional. Using commercial-grade equipment and tools, they can carefully recover the data from your damaged drive, as well as recover deleted files from the USB if you choose.
Enlisting the help of a data recovery expert is usually the last resort. Where you can, try and recover the data yourself. It could save you time and money.
Prevent USB Errors Going Forward
There’s no way to guarantee your USB will be error-free for the remainder of its life, but there are steps you can take to proactively care for your USB’s health:
- 👍 Keep software and drivers updated – If you’re actively keeping your USB drivers and operating system up-to-date, you’re less likely to encounter issues relating to outdated firmware or software.
- 💻 Eject storage media safely – Before removing any storage device, be sure to eject it safely. This will reduce the chances of the drive becoming corrupted or damaged.
- 📦 Store the USB safely – Rather than keeping your USB at the bottom of your backpack, consider picking up a shock-proof case for all of your portable storage media to protect it against physical damage.
- 💾 Create backups – Of course, accidents always happen. To make sure you’re prepared, make regular backups of your data. In the event of catastrophic failure, at least you’ll have a copy of the data to continue working on.
FAQ
How do I force Windows to recognize a USB?
If Windows isn’t recognizing your USB, try inserting it into a different USB port. If that still doesn’t work, make sure all of your drivers are up-to-date. Follow these steps:
- Right-click Start and click Device Manager.
- Expand Universal Serial Bus controllers and look for any that have a yellow exclamation mark.
- For those that do, right-click them and select Update driver.
If Windows is still not recognizing the USB, it could be an issue with the USB itself. Try connecting the USB to another device and see if it’s accessible.
Can USB ports go bad?
In a sense, yes. But, it’s not guaranteed that your USB will become faulty over time. A USB may stop working due to a build-up of foreign objects like dirt, grime, or dust. Or, the USB may have sustained some form of damage that has led to a gradual decline in performance. Either way, a USB can go bad over time if it’s not kept clean and maintained.
How do you reset a USB port?
To reset a USB port, you simply need to restart your computer or reconnecting the USB device. If neither of these has worked, you can give the USB Root Hub device a reset by disabling it, then re-enabling it:
- Right-click Start and select Device Manager.
- Expand Universal Serial Bus controllers.
- Right-click USB Root Hub (this might also include “USB 3.0”) and click Disable device. Do this for all other list items of the same name.
- Then, right-click all list items called USB Root Hub and click Enable device.
Doing this will cycle all the connected USB devices, causing them to reinitialize themselves.
How do I enable USB ports?
USB ports are enabled by default. If they’ve been manually disabled, you can enable them again through the Device Manager:
- Right-click Start and select Device Manager.
- Expand Universal Serial Bus controllers.
- Right-click each USB Root Hub device you see and click Enable device.
You can easily tell which ones are disabled by the small down-facing arrow icon on each of the devices.
How do I fix my MTP USB device driver?
If your MTP USB device isn’t connecting correctly, make sure you’ve enabled USB debugging first. If that hasn’t fixed it, try updating your MTP USB driver:
- Right-click Start and select Device Manager.
- Expand Portable Devices. Right-click on MTP USB Device and click Update Driver Software.
- Choose to scan the internet for updates. Alternatively, if you have the necessary drivers, you can choose to manually select them for installation.
When finished, try reconnecting your mobile device to the computer.
Why is USB debugging not working?
USB allows you to transfer files between your mobile device and your computer. Here are a few reasons why USB debugging might not be working:
- USB debugging isn’t enabled – Most mobile devices have USB debugging disabled by default for security reasons. Make sure USB debugging is enabled on the device you want to transfer files from/to.
- Wrong USB connection mode – Smartphones often come with more than one setting when connecting to a computer. When you connect to your computer, make sure you’re choosing the correct connection type.
- The device is locked or off – USB debugging won’t work if the device is locked or powered down. Make sure your phone is on with the screen unlocked.
- Cable is faulty – If the above conditions have been met, make sure your USB cable is working properly. If in doubt, try using a different cable for the connection.
Conclusion
Errors occur on most of our personal devices and present themselves at the most inopportune times. The “USB Device not recognized” error that appears when you connect your USB can be a head-scratcher. Luckily, with the solutions presented in this article, you’re equipped with the necessary fixes to get it sorted in no time.
This article was written by Jordan Jamieson-Mane, a Staff Writer at Handy Recovery Advisor. It was also verified for technical accuracy by Andrey Vasilyev, our editorial advisor.
Curious about our content creation process? Take a look at our Editor Guidelines.