Accidentally deleted your Sony photos, or maybe hit delete on purpose, and now regret it? First off, you’re definitely not the only one. There are countless threads on Sony forums from people in the exact same boat.
The good news here is that in many cases, deleted photos from Sony cameras can be recovered. We’ve helped a lot of users get their files back, and today, we’re laying it all out in one clear, step-by-step guide. Whether you’re using a Sony Alpha, RX100, or ZV model, this guide will walk you through everything you need to know for the best shot at recovery.
When Can You Retrieve Deleted Photos from a Sony Camera?
As you probably know, Sony cameras store photos and videos on removable memory cards, usually SD cards or CFexpress Type A cards, depending on the model. These cards use file systems like FAT32 or exFAT, which are the same systems used by most computers and are well-supported by recovery tools.
The reason why it’s often possible to recover deleted photos from these cards is simple: when you delete a file, the camera doesn’t actually erase the data on the card. It just removes the file’s entry from the system’s index and marks that space as “free.” The actual photo stays on the card until something else (like a new photo or video) takes its place.
Heads up. If you want to recover deleted photos on a Sony camera, the first thing you need to do is remove the memory card from the device.
You can’t run recovery software directly on the camera, so you’ll need to plug the card into your computer and scan it using the right tool.
Now, your chances of a successful photo recovery depend on several factors. Here’s what really matters:
- Have you continued using the card? Activity on the card can seriously hurt your chances. Every new photo or video you save might overwrite parts of the deleted files. Even just reviewing images or letting the camera buffer can write small amounts of data. If you’ve kept using the card after the photos were deleted, recovery becomes less certain.
- Was the file simply deleted, or was the card formatted? If the photos were just deleted from the SD card, the data is often still intact. Even a quick format done in the camera doesn’t fully erase the card; it just resets the file system index. In most cases, those photos are still recoverable. But if the card was fully formatted (some cameras offer this under settings like “Format with Full Erase”), the chances drop sharply. Sony’s implementation of formatting varies, but in certain cases, it may issue SD_ERASE or CMD38 commands, which tell the card to actively wipe data blocks. That’s basically the memory card equivalent of TRIM on an SSD (and recovery is impossible afterward).
- What type of memory card are you using? This part is often overlooked. Standard SD cards (used in most Sony Alpha and RX models) can still be recovered in many cases, unless the camera uses those special wipe commands during formatting. CFexpress Type A cards, found in higher-end models like the α7 IV, α1, and α7S III, support Data Set Management (DSM) commands, including TRIM-like behavior. That means when files are deleted or the card is formatted, the controller may immediately erase those blocks. If TRIM has already been executed, the data is gone permanently.
But don’t let that discourage you. In our experience, cases where someone simply deleted a few photos usually have a happy ending. When there’s been no overwriting (or even if there was, but you got lucky), memory card recovery software can do a surprisingly good job.
The key thing: don’t make assumptions. No matter what happened, the smartest move is to scan the card and see what’s actually recoverable; you might be surprised by what turns up.
And it’s not just us saying that, either; we actually ran a survey, and the numbers back it up. Nearly 79% of people who tried a DIY recovery tool were able to get their files back. So, if you have a Sony Alpha, a6000, Cybershot, or any DSLR camera, read the next section to see exactly what steps to take.
How to Recover Deleted Photos From an SD Card or a Sony Camera
Before we walk you through the recovery process, a quick heads-up: Sony actually offers their own SD card recovery tool called Memory Card File Rescue. It’s designed to help recover lost data from official Sony memory products (Sony SD memory cards, Sony CFexpress Type A/B cards, Sony XQD cards).
While it’s nice that Sony provides a tool, it’s pretty basic. It only works with Sony-branded media, and even then, it doesn’t support all Sony memory cards (some microSD cards, for example, aren’t recognized). Plus, the interface is dated, and it lacks key features like preview, file filtering, and support for other brands of storage.
So for this guide, we’ll show you how to use a much more flexible tool: Disk Drill. It’s one we’ve used many times, and it’s especially good at handling RAW, JPEG, and even video formats.
What Disk Drill offers:
- Supports ARW (Sony RAW), JPEG, HEIF, and MP4/XAVC video formats
- Works with SD, microSD, CFexpress Type A, and even Sony USB or SSD drives
- Can recover from formatted or corrupted cards, not just deleted files
- The Advanced Camera Recovery (ACR) module is built to reconstruct both photos and videos, even when they’re fragmented
- Intuitive UI (you can recover deleted pictures from Sony cameras in just a few clicks)
- Cross-platform: available for both macOS and Windows
- Preview before recovery (even while the scan is still running)
- Displays thumbnails for media that Sony cameras produce (even high-bitrate 4K video)
- Search, sort, and filter results for easier navigation
- On Windows, you get 500 MB of free recovery (and scanning + previewing is unlimited)
Let’s walk through the steps. Here’s how to retrieve deleted pictures from a Sony camera:
Step 1: Download and Install Disk Drill
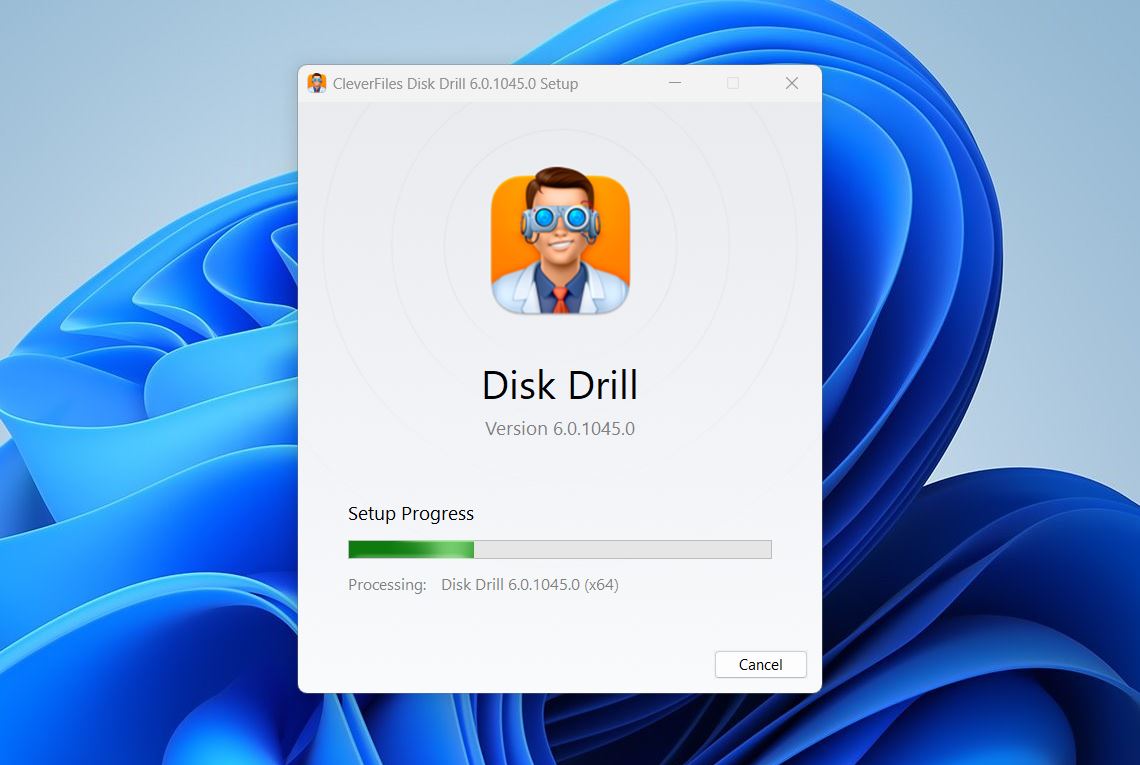
Download Disk Drill from the official website. When you click the download button, the latest version (Disk Drill 6) should download automatically. This version is fully compatible with Windows 10 and Windows 11 and includes all the latest features, including Advanced Camera Recovery.
If you’re using an older version of Windows, CleverFiles also provides previous releases:
- Disk Drill 4.5 for Windows 7, 8, and 8.1 users.
- Disk Drill 2.0, a legacy version for Windows XP and Vista. It lacks some of the modern features but still works well on older machines.
Once downloaded, install Disk Drill with the standard setup prompts. Just launch the installer and follow the instructions.
Step 2: Connect Your SD Card (or Other Sony Media)
Now it’s time to connect the memory card from your Sony camera to your computer.
Always use a good-quality card reader; cheap ones can cause connection issues. If it’s an SD card, a USB 3.0 UHS-II reader is your best bet. Whether you’re using an SD, microSD, CFexpress Type A, or even a Sony USB or SSD, make sure it shows up as a regular storage device in File Explorer. Once it does, you’re ready for the next step.
Actually, the card doesn’t even have to show up in File Explorer. As long as you can see it in Disk Management (and it shows the correct size), recovery tools can still scan it.
Step 3: Start a Scan
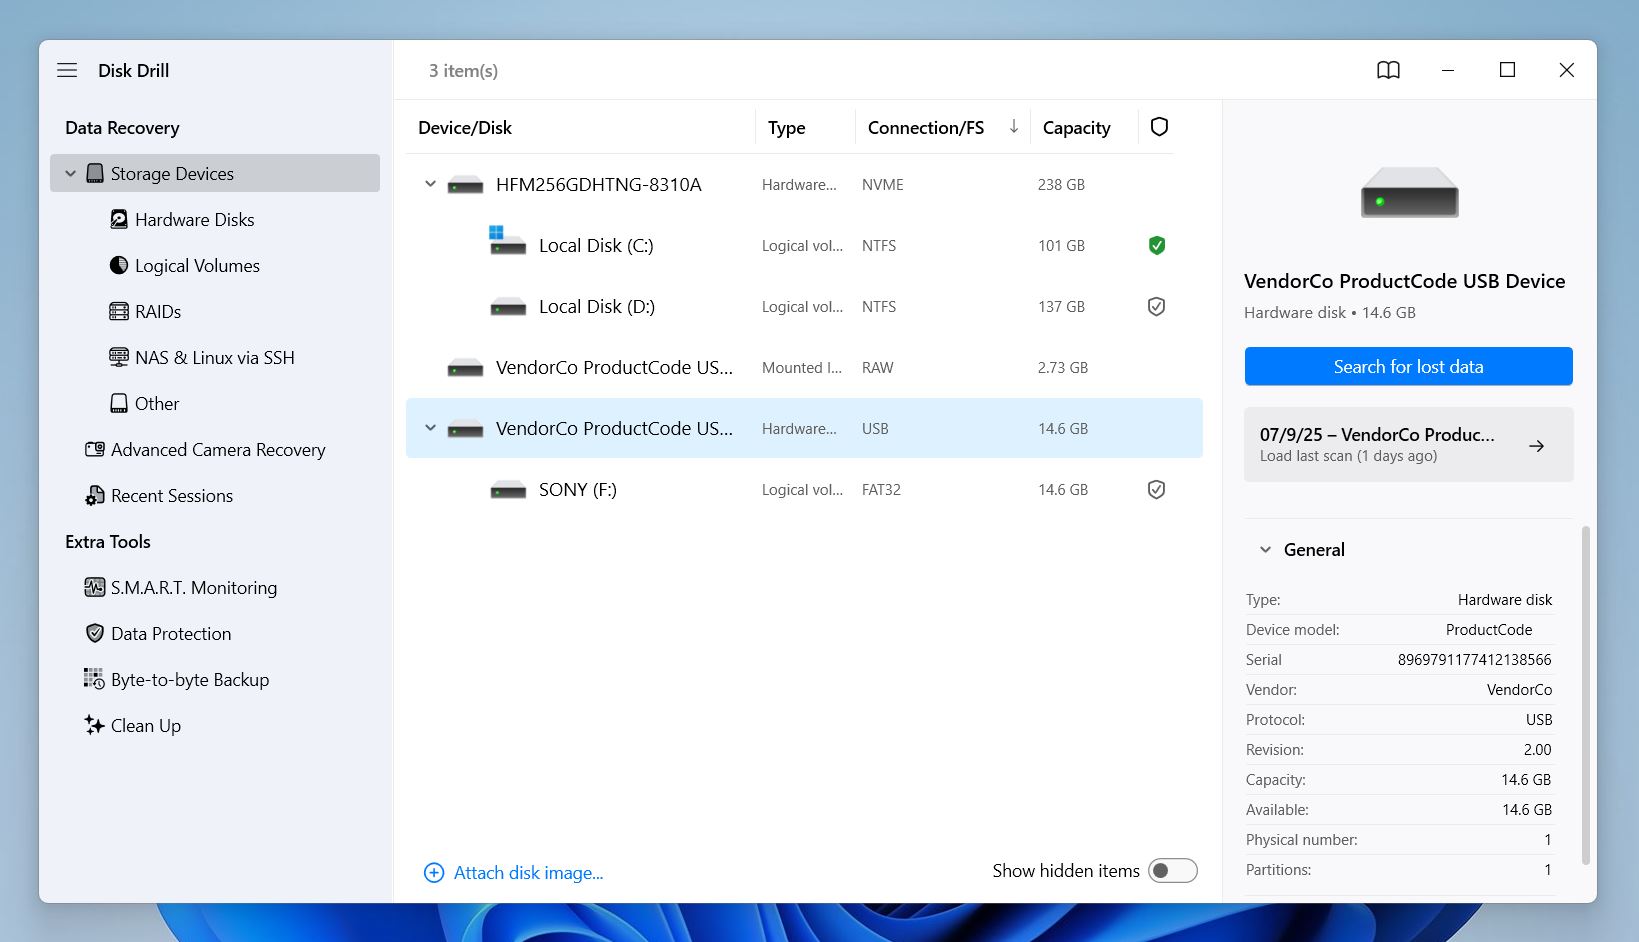
Once Disk Drill is open, you’ll see a list of all storage devices connected to your system. Look for your Sony memory card and select it, then click “Search for lost data.” When you do, Disk Drill will ask you to choose the type of scan you want to run.
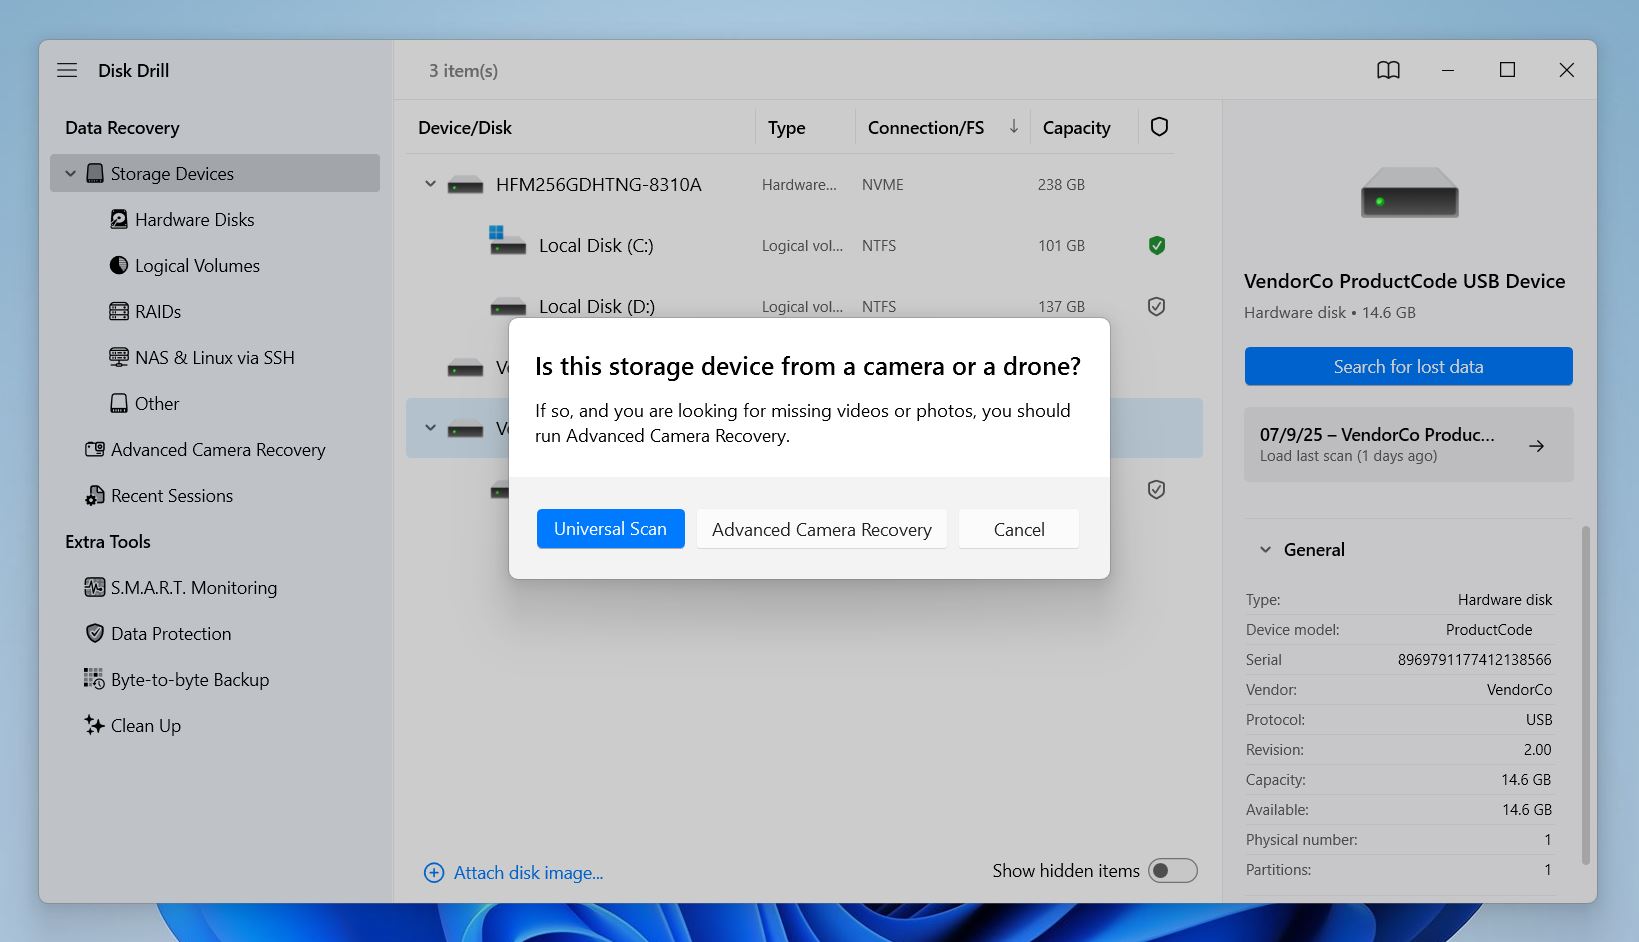
Here’s what to pick:
- If the files were deleted on the camera itself, or just disappeared without formatting, start with Advanced Camera Recovery. It’s built for exactly this kind of situation.
- If your card throws errors or isn’t accessible through File Explorer, go with Universal Scan first.
You can always try a different scan later. Disk Drill won’t write anything to the card while scanning.
Step 4: Browse the Files
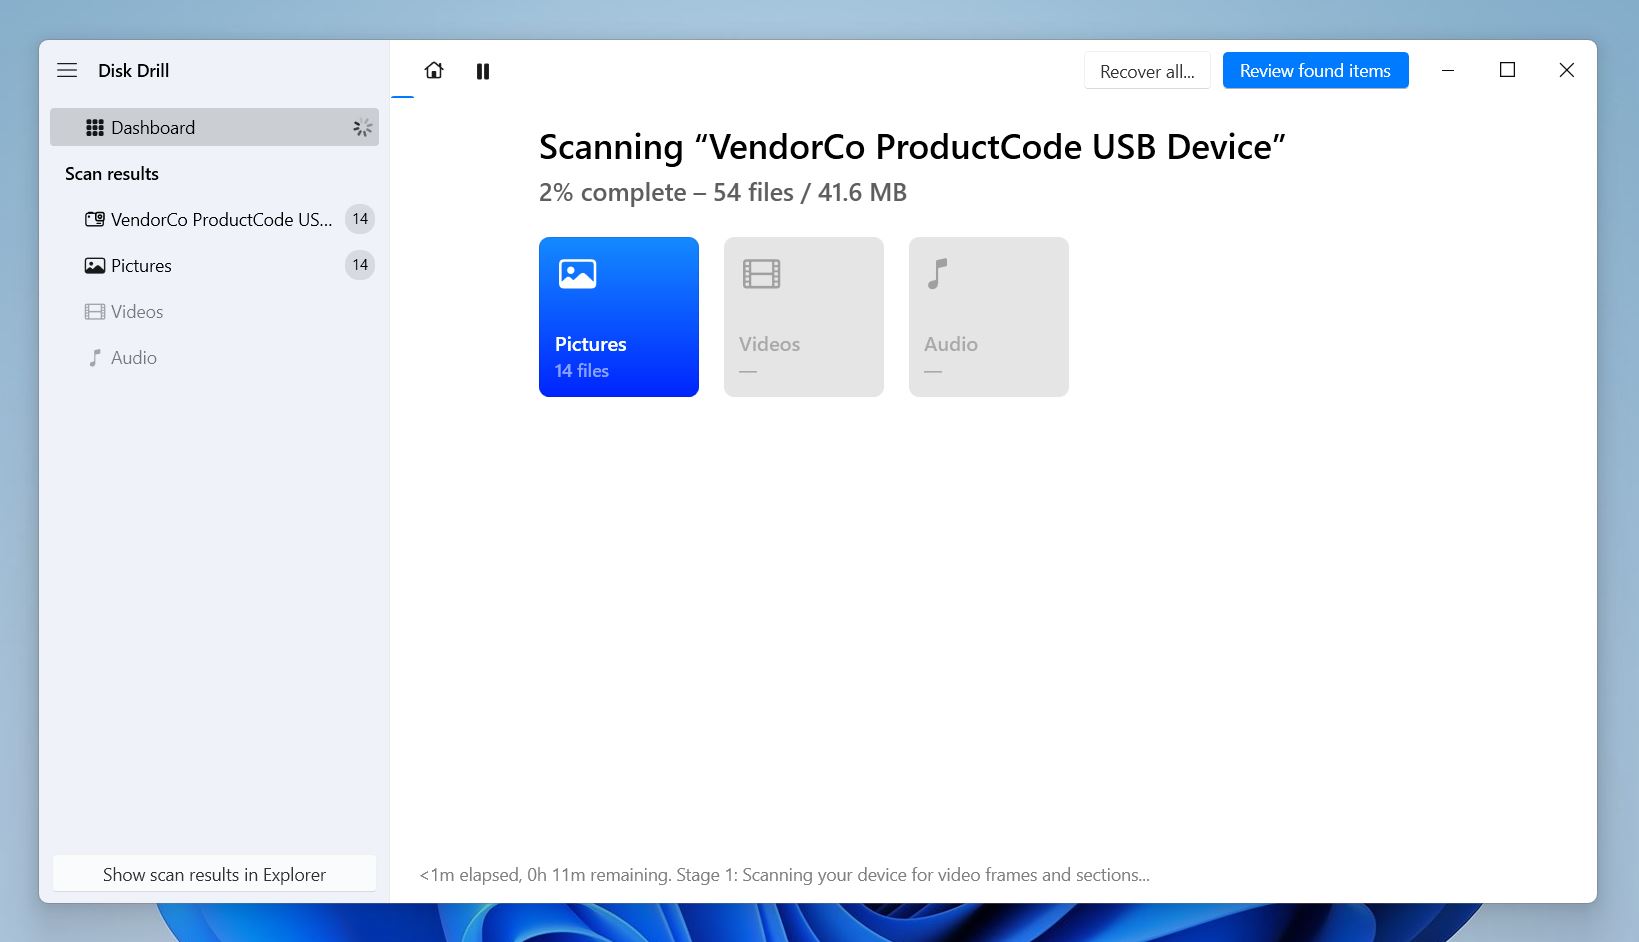
As the scan runs, Disk Drill automatically sorts recoverable files into categories like Pictures, Video, Audio, Documents, Archives, and Other. You don’t have to wait for the scan to finish – you can start browsing files right away.
If you just want everything back, the easiest option is to wait for the scan to complete and click Recover All. Then, pick a safe location (somewhere other than the card) to save the files.
But if you’re looking for specific photos, you can jump in early. Click Review Found Items or just click directly on Pictures to see what’s already been found.
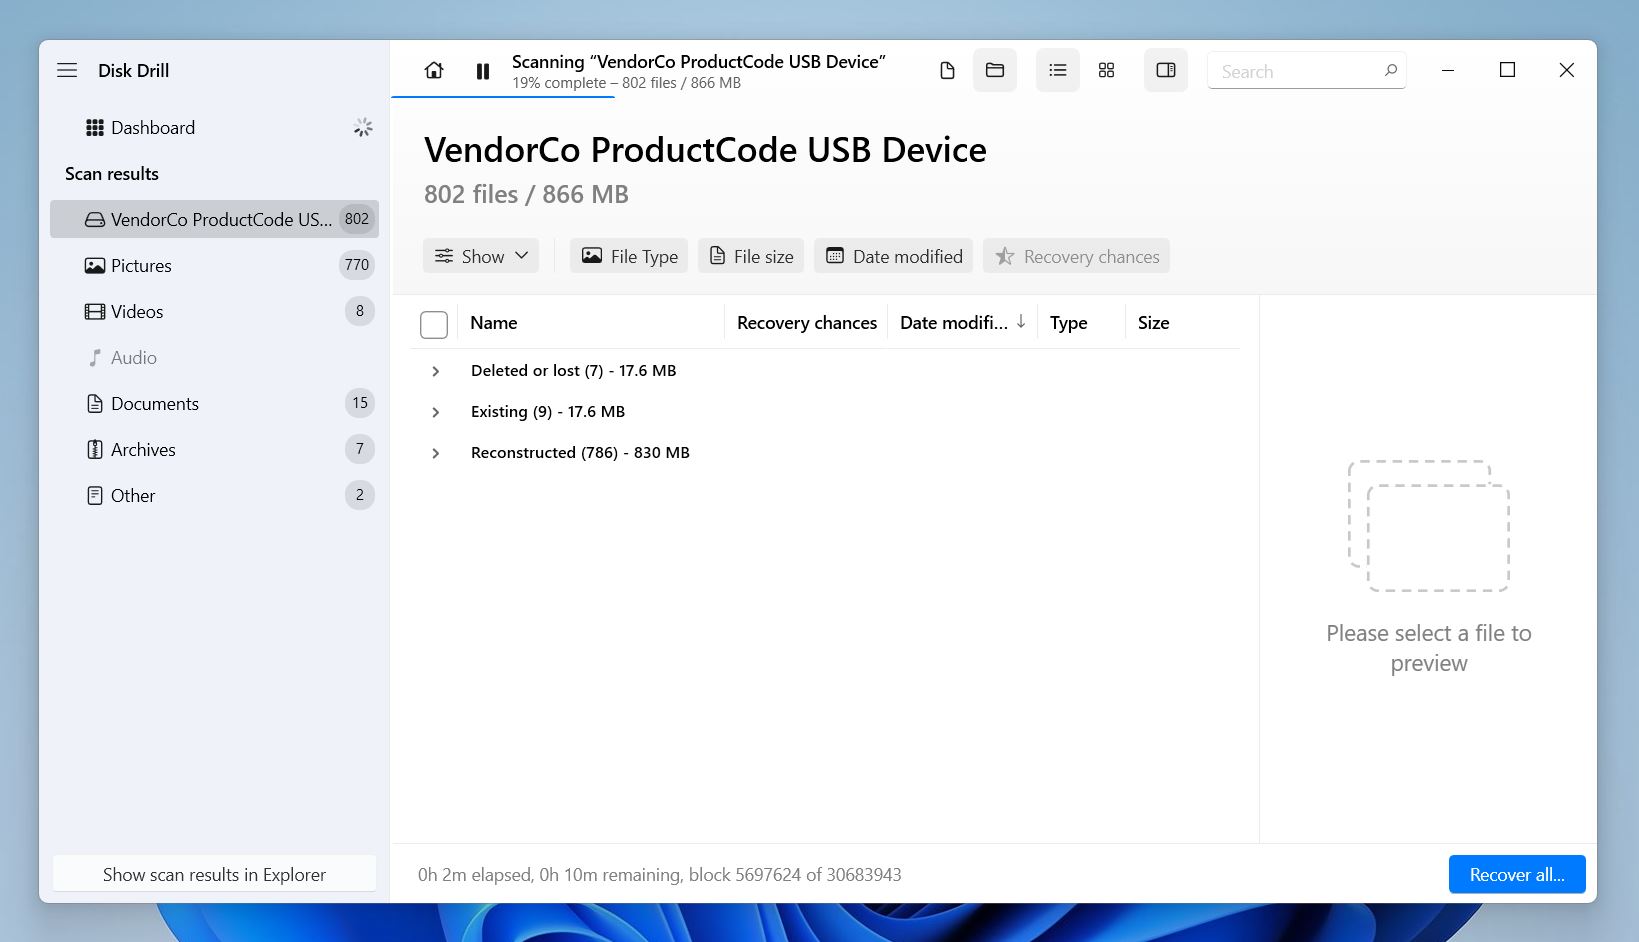
Inside you’ll see files grouped into three categories:
- 📁 Deleted or Lost. These are the files you’re most likely after: the deleted ones.
- ⚒️ Reconstructed. These are found by file signature. The names might be gone, but the data’s there.
- 💾 Existing. The ones the system could access before.
At the top, you can adjust how the files are displayed.
- Tree View organizes everything by folder structure.
- Icons View shows thumbnails, which makes it easier to visually spot photos and videos.
You can also filter results by file type, date modified, file size, or even recovery chances. Every file has a recovery rating: High, Average, or Low. This tells you how intact the file appears to be.
Step 5: Preview Your Deleted Photos
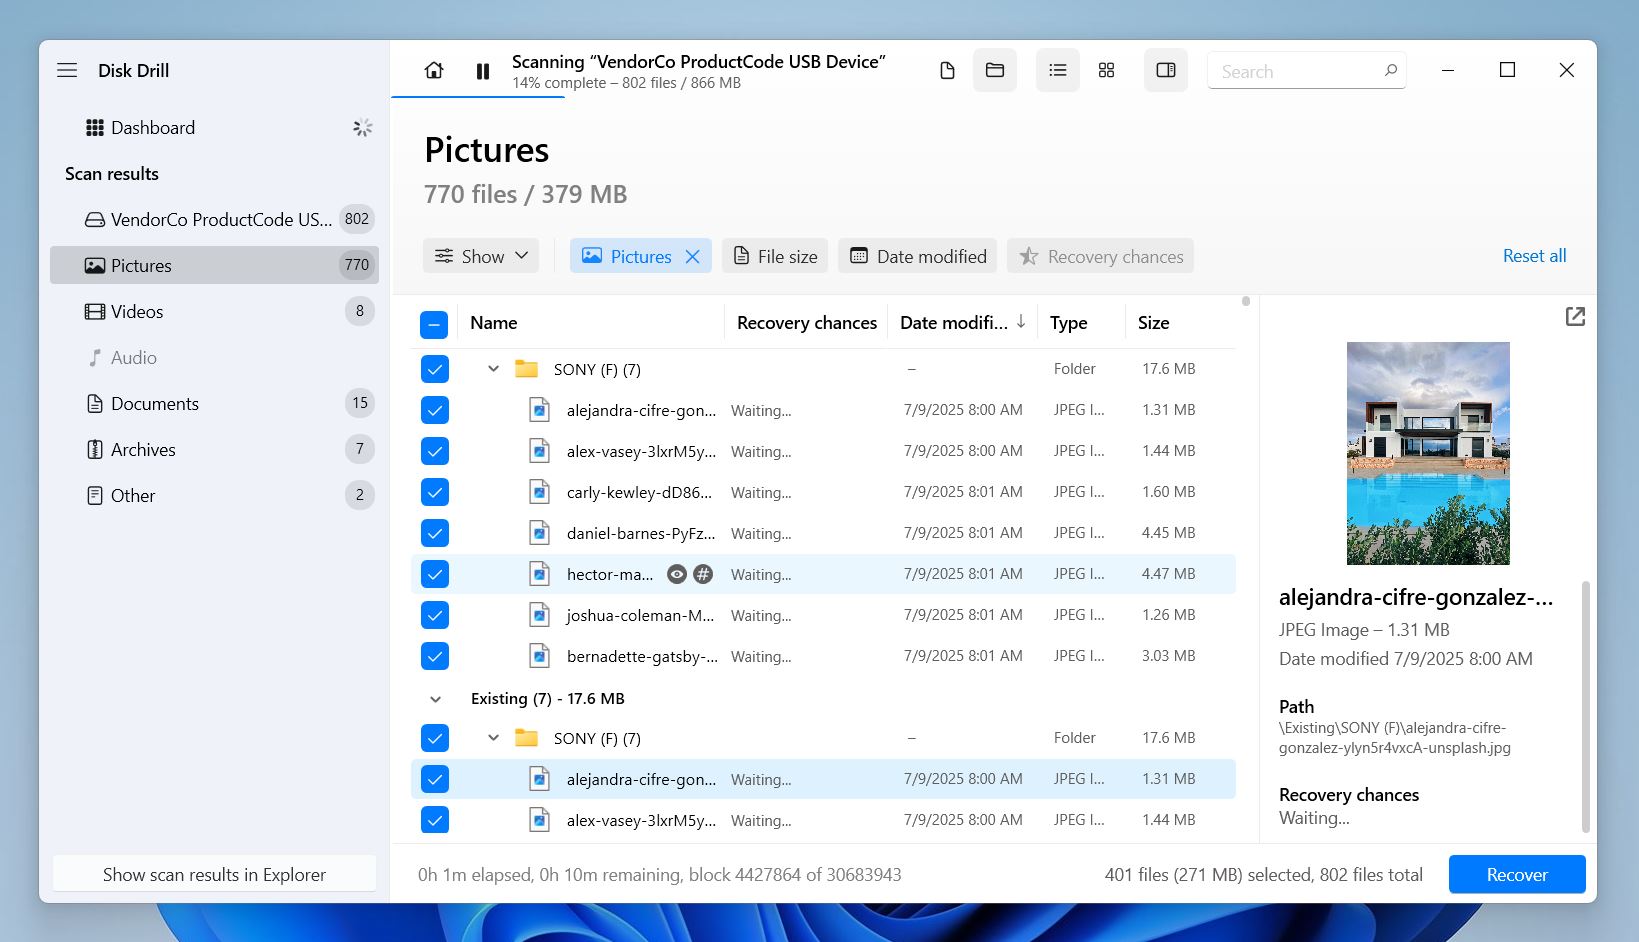
You’ll see a thumbnail preview on the right side of the screen. If it doesn’t show up automatically, click the eye icon 👁️🗨️ next to the file name to enable it.
You can open a full-size preview for most formats your system supports (either natively or with an installed viewer). This includes ARW, JPG, HIF, and even MP4 video files.
If the preview opens cleanly and plays or displays without glitches, great. It means your file is definitely recoverable.
Step 6: Checkmark Files and Start Recovery
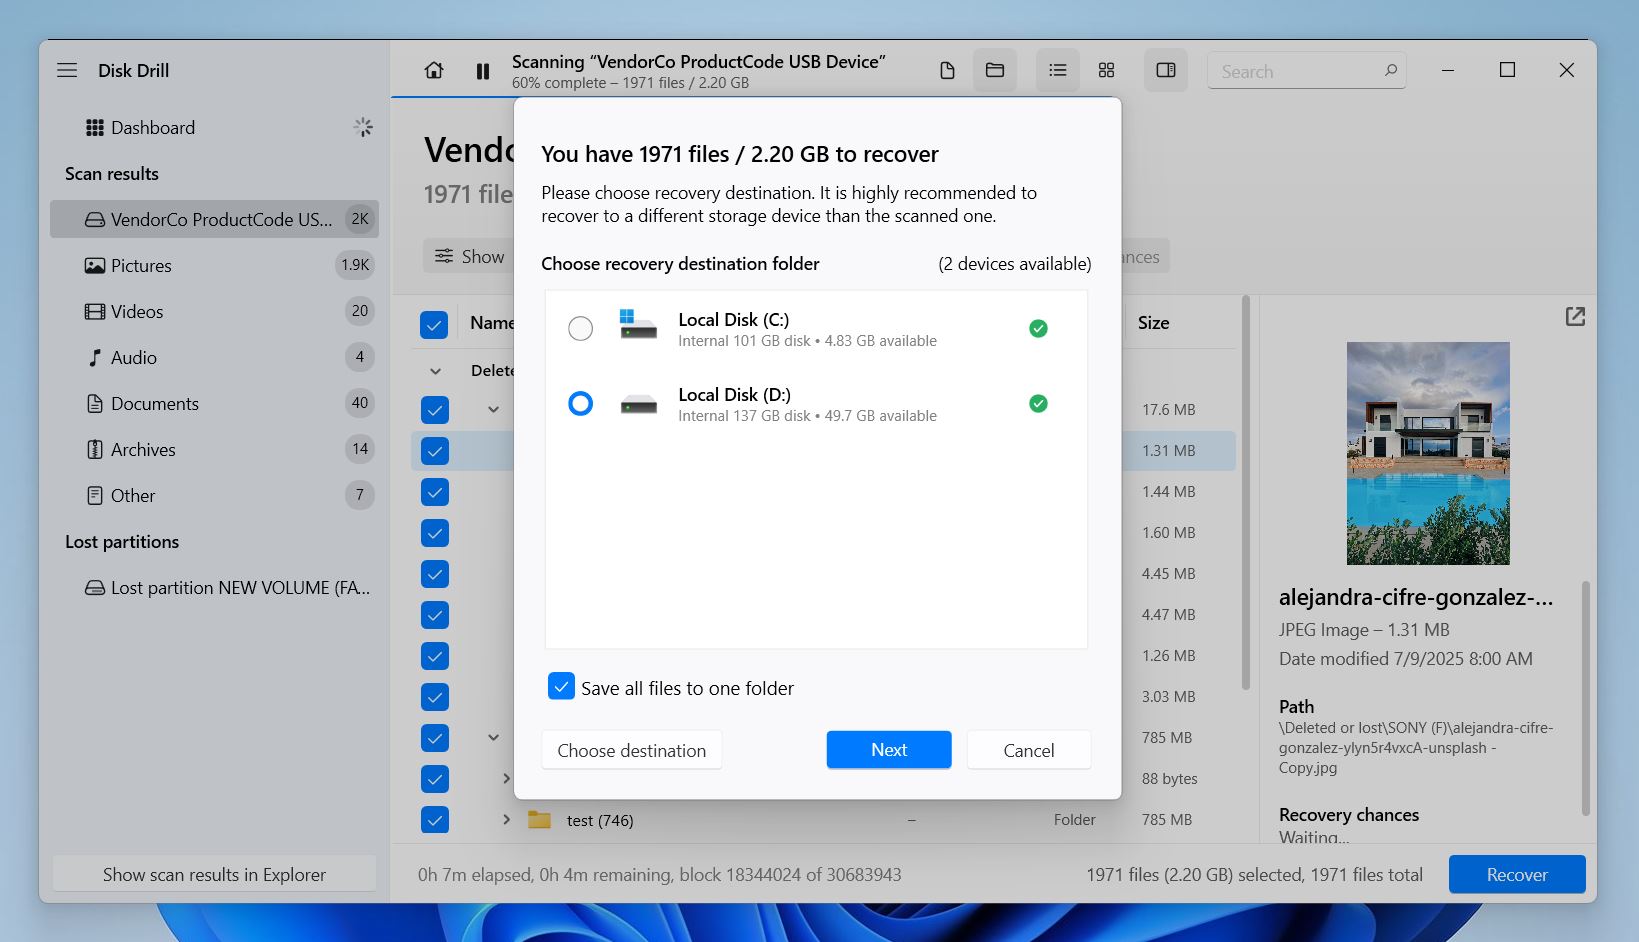
Once you’ve found the photos or videos you want, just check the boxes next to each file (or select the entire folder). Then click the Recover button.
Disk Drill will ask you to choose a destination folder before it begins recovering. Important: don’t save the files back to the same memory card or drive you’re recovering from. If you try, Disk Drill will warn you.
Why? Because writing new data to the same drive could overwrite the very same files you’re trying to recover. Always choose a different internal drive or external storage device for recovery.
After a bit of time (usually not long), Disk Drill will finish the recovery process and offer to open the folder where your files were saved.
And that’s it.
All you need to do now is grab your recovered photos and videos from the destination folder, and you’re done.
Can I Restore Data From a Sony Camera Connected Directly To My PC?
A short answer to this question would be “no”. You can’t restore deleted Sony photos by connecting the camera directly to your computer. That’s because data recovery software will be unable to read the files from an SD card while it’s plugged into the camera. It is due to the Media Transfer Protocol (MTP) as it does not allow files to be transferred automatically from a portable device to your PC in this case.
Therefore, you’ll have to eject the SD card from your camera, plug it in an SD card reader and connect it to your computer. Only then will the data recovery software on your PC be able to access the photos and videos stored on your memory card.
As for deleted video files from Sony cameras (including Sony Handycam), you can refer to our guide on recovering deleted videos from SD cards.
Let’s take a look at a few commonly asked questions related to recovering deleted photos from a Sony camera.
Wrap Up
In our experience, 7 or 8 times out of 10, people are able to recover their deleted Sony camera photos on their own, no special equipment, no tech background. DIY recovery in these cases is actually pretty simple, and as long as you act fast and don’t keep using the card, there’s a good shot you’ll get your files back.
Now, if the card is physically damaged or the data just isn’t showing up, no matter what you try, it might be time to look into a professional data recovery lab. These services aren’t cheap, but the good news is, many reputable labs offer a no data, no fee guarantee, so you only pay if they succeed.
Want to know which ones are worth it? We recently updated our ranking of the best professional SD card data recovery services. You can check it out here and see which lab might be the right fit for you.
But to save you some time, if your deleted Sony pictures have already been overwritten, even a professional lab won’t be able to bring them back. And if they haven’t, it’s quicker (and way cheaper) to just do it yourself with a recovery app, like we showed above.
If you still have questions, check out the FAQs below, or feel free to contact us directly. We’d love to help.
FAQ
How do I retrieve deleted photos from my Sony Camera?
A simple way to recover photos deleted or lost from a Sony camera is by using data recovery software. The process usually looks like this:
- Remove the SD card from your Sony camera and connect it to your computer using a card reader.
- Install and launch a data recovery program.
- Scan the memory card for lost or deleted files.
- Review the scan results and select the files you want to recover.
- Choose a safe location on your computer (not your memory card) to save the recovered files.
And that’s it. All your files will be recovered and copied to the location you’ve provided.
What is the best Sony camera data recovery software?
There are plenty of great options out there. Tools like Disk Drill, R-Studio, and PhotoRec are all widely used and effective, depending on your needs and experience level. We recently updated our full ranking of the best data recovery software, where you’ll find a variety of choices: some beginner-friendly, some more advanced. All of them can be used to recover deleted photos or videos from a Sony camera, whether you’re dealing with a simple accidental deletion or need to perform a more complex RAW SD card recovery.
Is it possible to recover deleted photos from a Sony Cybershot camera for free?
If you want to retrieve deleted photos from a Sony Cybershot camera, there are a few solid free or freemium tools worth checking out.
Disk Drill and DMDE both let you recover data on Windows for free (though they come with certain data limits). Or you can look at unlimited free options like PhotoRec (part of the TestDisk bundle) or Recuva. These tools are often used in Sony Cyber-shot recover deleted photos scenarios and don’t limit how much you can recover (but they do come with trade-offs, like fewer features, basic interfaces, or no file previews).
Is it possible to recover deleted photos from a Sony A6000?
Yes, it is possible and a rather easy task to recover photos you’ve accidentally deleted on your Sony A6000. The Sony A6000 uses standard SD cards with common file systems like FAT32 or exFAT, which are fully supported by most data recovery software.
If you deleted photos by accident, just remove the SD card, connect it to your computer using a card reader, and scan it using a reliable recovery tool. As long as you haven’t taken too many new photos since the deletion, there’s a good chance you’ll be able to get them back. This method is applicable to any Sony camera photo recovery scenario.
What if I used my Sony camera after deleting the photos, are they definitely gone?
Not necessarily. While using your camera after deletion does lower the chances of recovery, it doesn’t automatically mean the files are gone for good.
There’s no way to know exactly which part of the memory card is being used when new photos or videos are saved. The camera might overwrite your deleted files, or it might miss them entirely. You won’t know until you scan the card with recovery software.
So even if you’ve used the camera a bit, it’s still worth trying. Just stop using the card immediately and run a scan.
This article was written by Ojash Yadav, a Contributing Writer at Handy Recovery Advisor. It was recently updated by Roman Demian. It was also verified for technical accuracy by Andrey Vasilyev, our editorial advisor.
Curious about our content creation process? Take a look at our Editor Guidelines.