USB drives are a durable and convenient way to store data. However, things can go wrong at any moment. You may accidentally drop one in the water, damage its pins, or snap it in half. Sometimes, a flash drive may fail without any obvious reason, leaving you wondering what went wrong.
If you find yourself with a broken USB flash drive, know that there are steps you can take to fix the problem. This article addresses various types of flash drive issues, from severe physical damage to unexplained failures, and guides you through the processes to repair the drive and recover your data.
Want to skip the introduction part and jump right to the recovery guide? Click here.
Can You Retrieve Data From a Broken USB Stick?
Let’s answer the most obvious question right away. Yes, you can often retrieve data from a broken USB stick, but the method depends on the type of damage it has sustained.
Certain physical damages to a flash drive make professional intervention necessary. If your USB stick shows any of the following signs, it’s best to consult a data recovery service:
- A flash drive that is bent or broken into two pieces likely has internal component damage.
- Broken, bent, or missing pins prevent the drive from establishing a connection with your computer.
- Water damage or exposure to high temperatures can compromise the internal circuitry, even if the damage isn’t visible.
- Dropping the drive or subjecting it to heavy pressure can harm the delicate internal components without obvious external signs.
Attempts on DIY fixes in these situations might lead to further damage and potential data loss. Professional technicians have specialized tools and expertise to safely recover data from physically damaged drives if possible.
Sometimes, a flash drive stops working without any visible harm. You might notice issues like:
- Your computer doesn’t recognize the drive, and it doesn’t show up alongside other storage devices in File Explorer.
- The drive reports an incorrect size, such as zero bytes or a drastically reduced capacity.
- Messages like “You need to format the disk in drive” or “Please insert a disk into removable drive” appear when you plug in the flash drive.
These symptoms often point to logical damage, such as file system corruption or software conflicts. Common causes include improper ejection, virus infections, or interrupted data transfers.
The good news is that you can often address logical issues using do-it-yourself methods. Before you proceed, make sure that your computer detects the flash drive at a hardware level:
- Type Device Manager in Windows Search and open the application.
- Now, look for the Disk Drives section and expand it.
- You should see a device by the name of Generic USB Flash Drive or something similar. If it’s visible, it USUALLY means that your USB drive is readable, and you can use third-party data recovery programs to recover data.
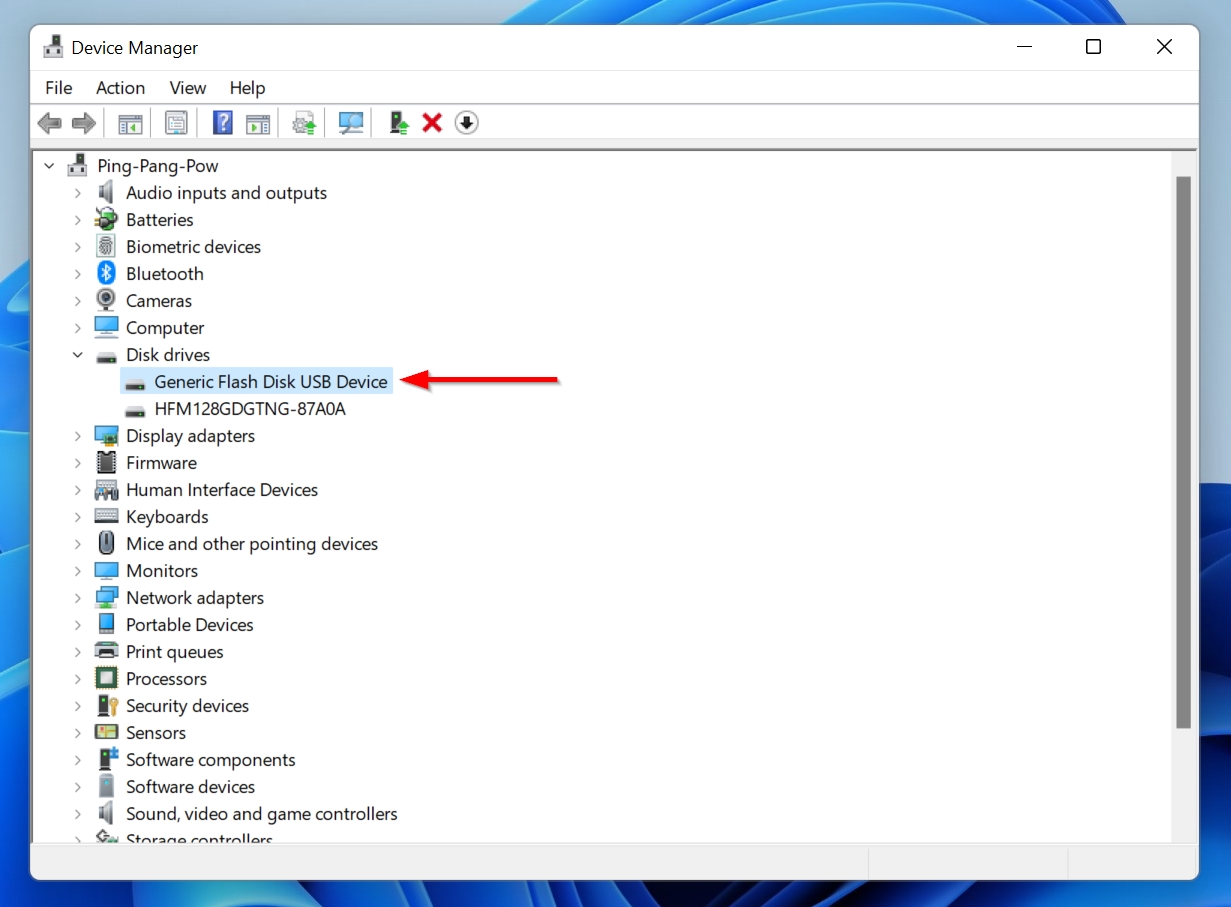
However, even if the USB appears in Device Manager, it might not show up in Disk Management or could display as ‘No Media.’ This would still prevent scanning and fixing it using DIY methods.
Therefore, it’s best to double-check using Disk Management. Go to Disk Management by typing “Disk Management” in Windows Search and opening it. Your drive should appear in Disk Management and have a correct size, even without a drive letter or with an “Unallocated” status.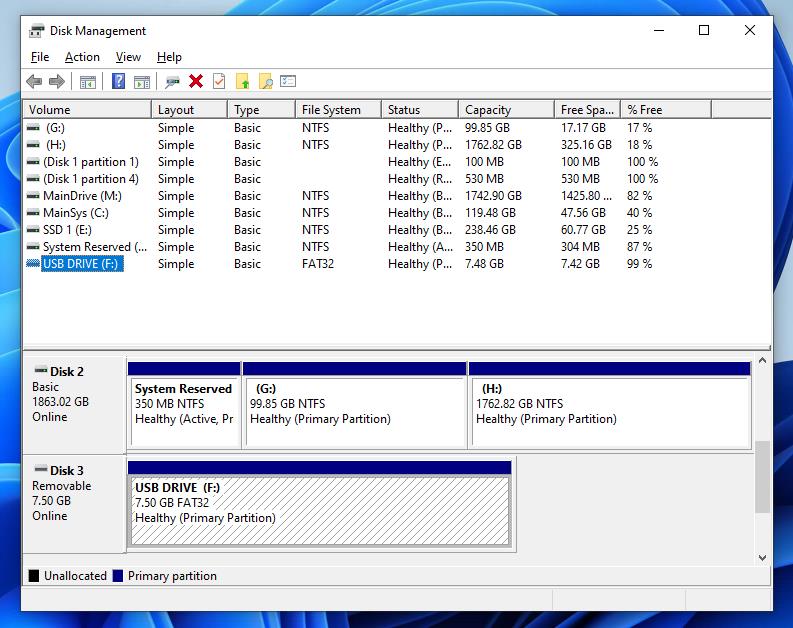
How to Recover Data from a Broken USB Drive
Before you attempt any repair procedures on your USB flash drive, it is imperative to recover your data first.
Repair efforts can sometimes lead to further data loss, especially if the drive is already unstable. In some cases, the repair process might make data recovery impossible. Because of the fragile state of a damaged flash drive, you should minimize its use to increase the chances of successful data retrieval.
Disk Drill is a powerful USB recovery software that can access data on your flash drive even when error messages appear or the file system is damaged. Disk Drill can read data from flash drives that display errors or fail to appear correctly in File Explorer. It supports various file systems, such as FAT32, exFAT, NTFS, and those are damaged and appear as RAW. Its intuitive design makes it suitable for both beginners and advanced users.
To minimize the use of your damaged USB drive, Disk Drill provides an option to create a byte-to-byte backup (clone) of the drive. By performing the recovery process on the clone instead, you reduce the risk of further damage to the original drive.
Here’s how to retrieve data from broken flash drive using Disk Drill:
- Download Disk Drill from the official website.
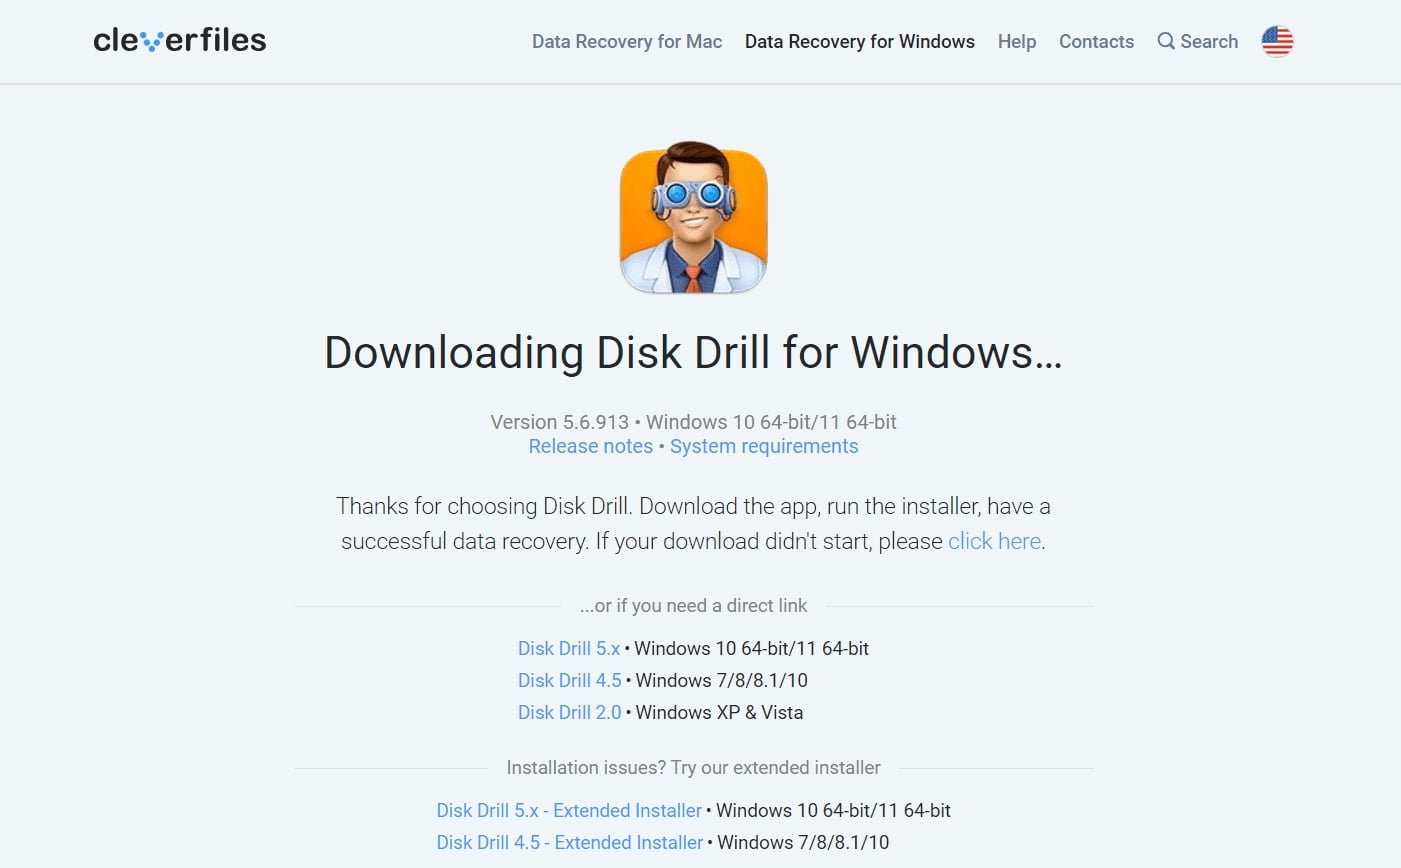
- Then go to the download location and open disk-drill-win. Click on Install to continue.
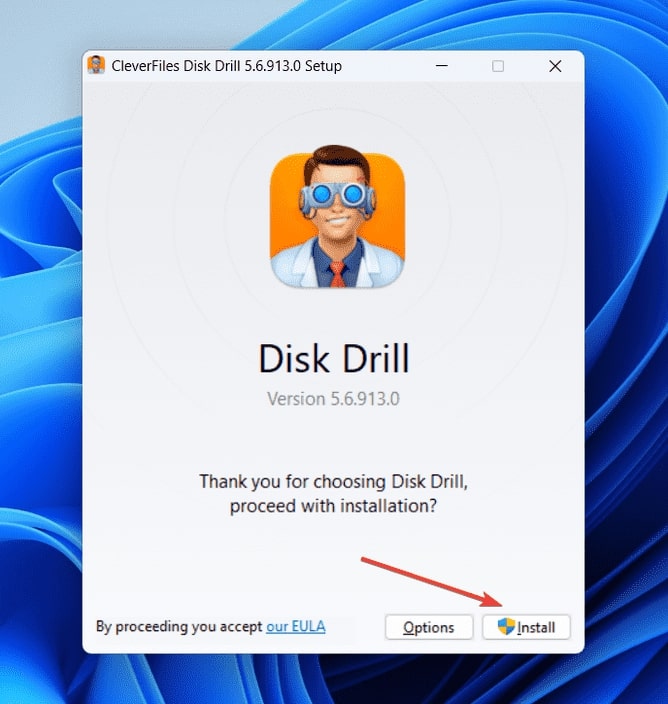
- Wait till the installation is complete, and click on Launch.
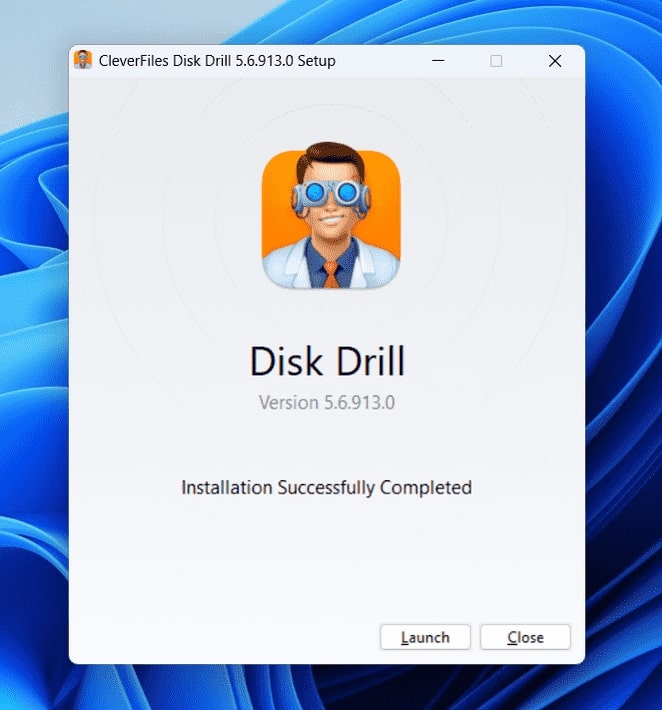
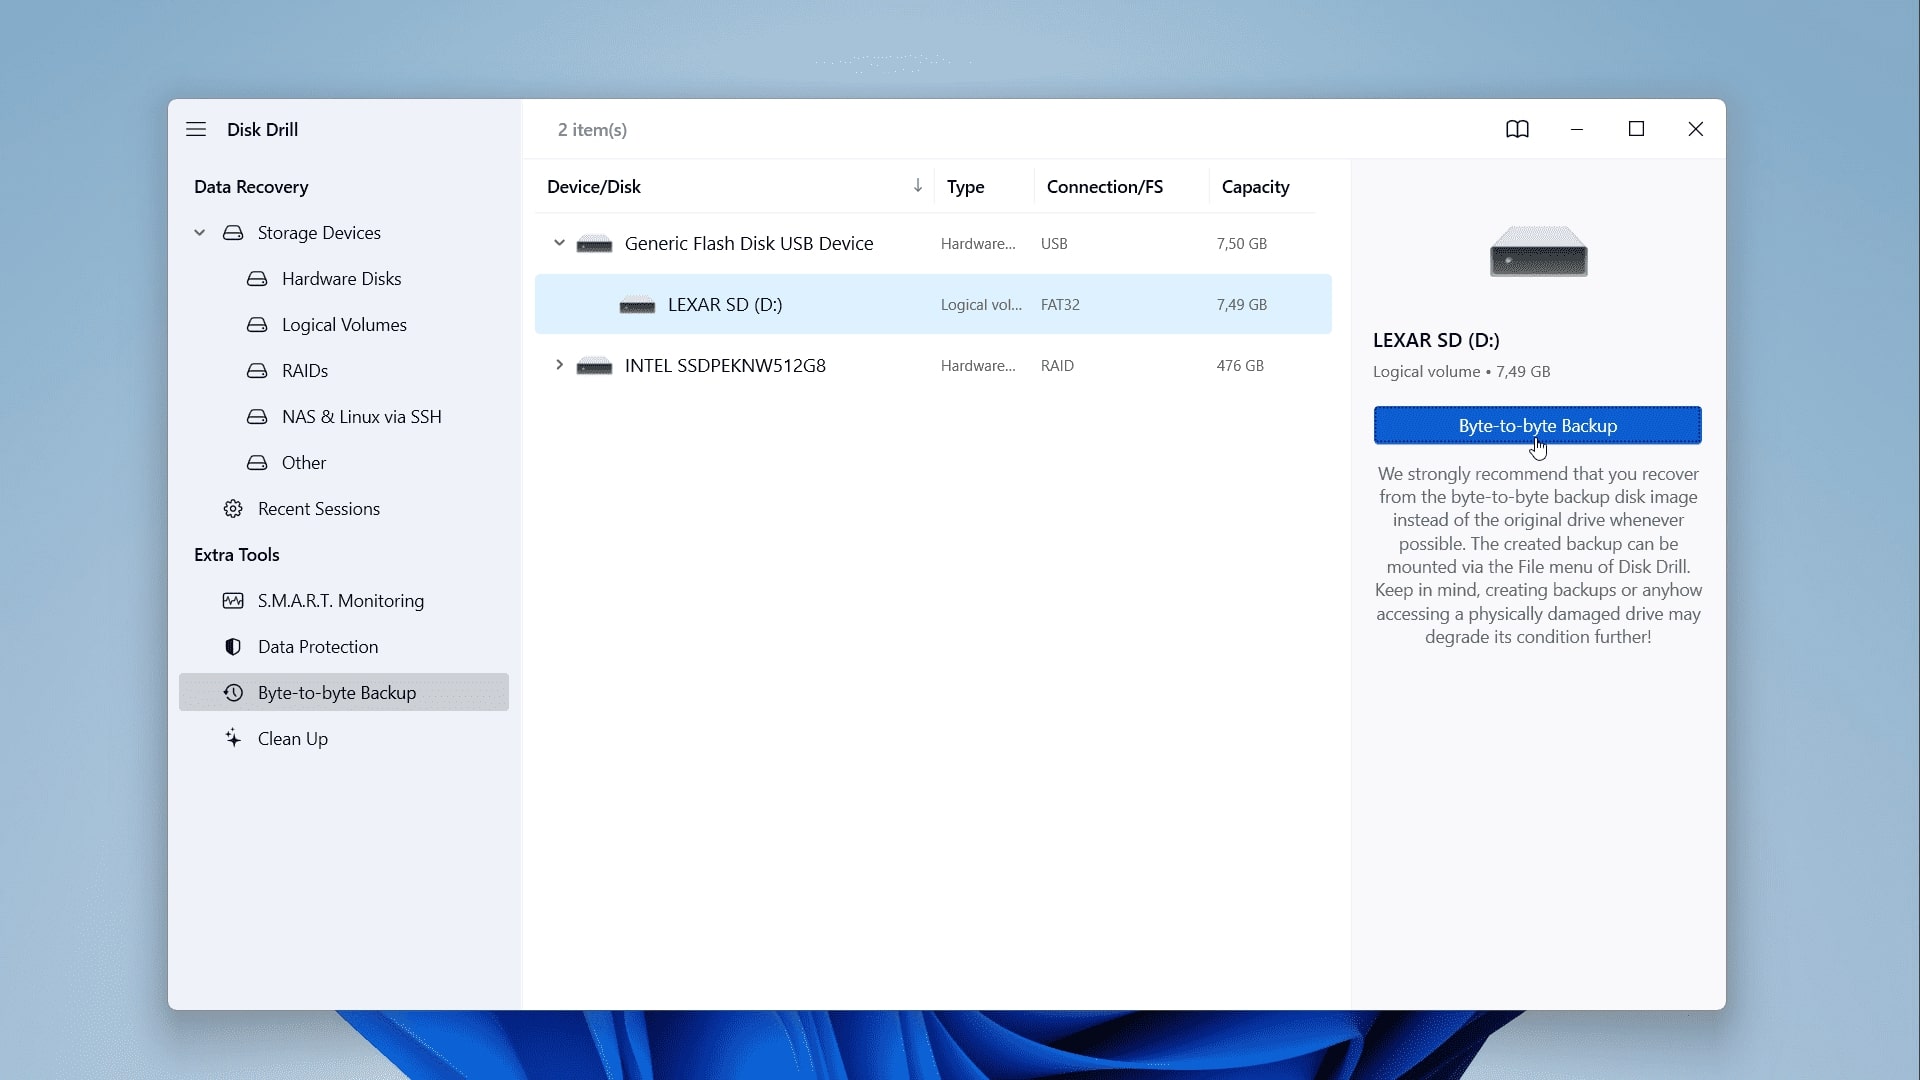
- On the home screen, you will see all the storage devices connected to your PC. We need to select Byte-to-byte Backup on the left side of the panel located under Extra Tools.
- Now, select your broken USB drive from the list in the middle and click on Byte-to-byte backup on the right.
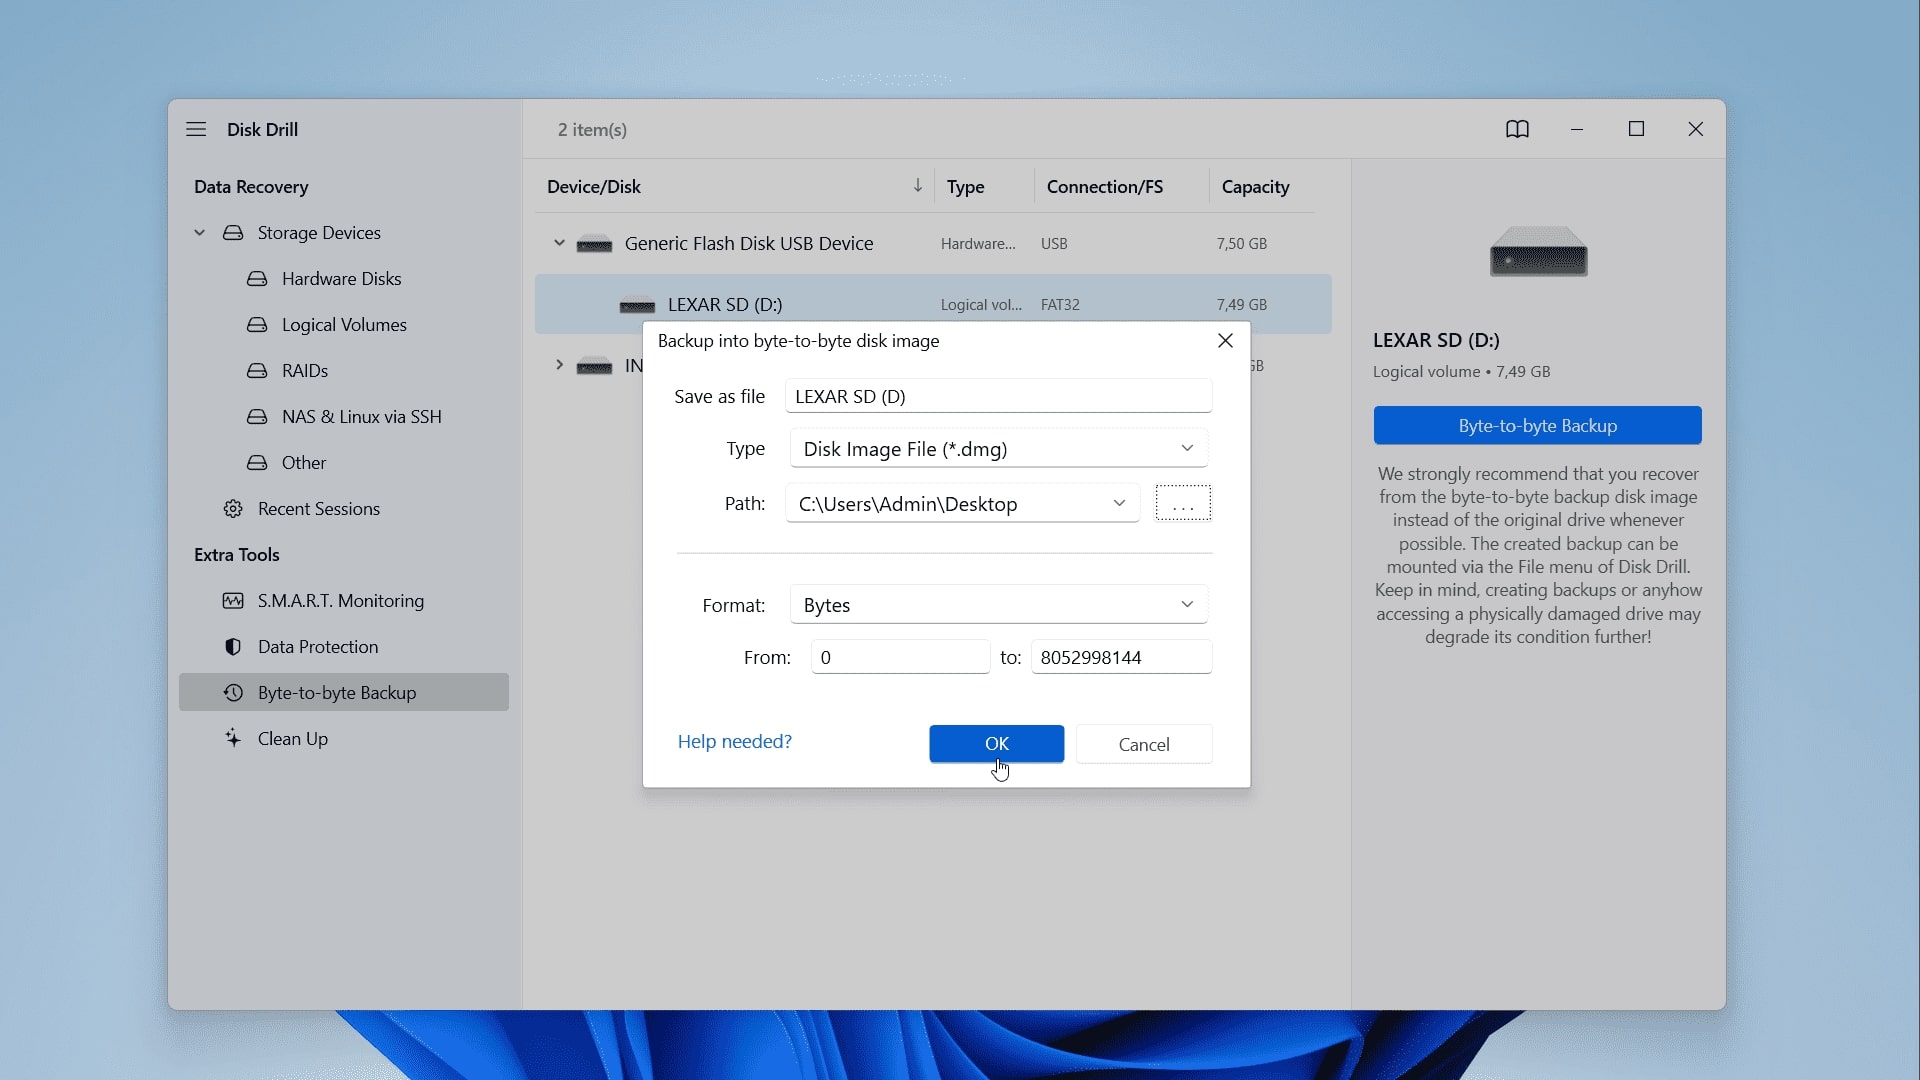
- Next, you need to choose a location where your backup will be saved. Keep in mind, that you need to have enough space on it to handle the copy of your flash drive data. Select the file type as .dmg. When you’re done, click on OK.
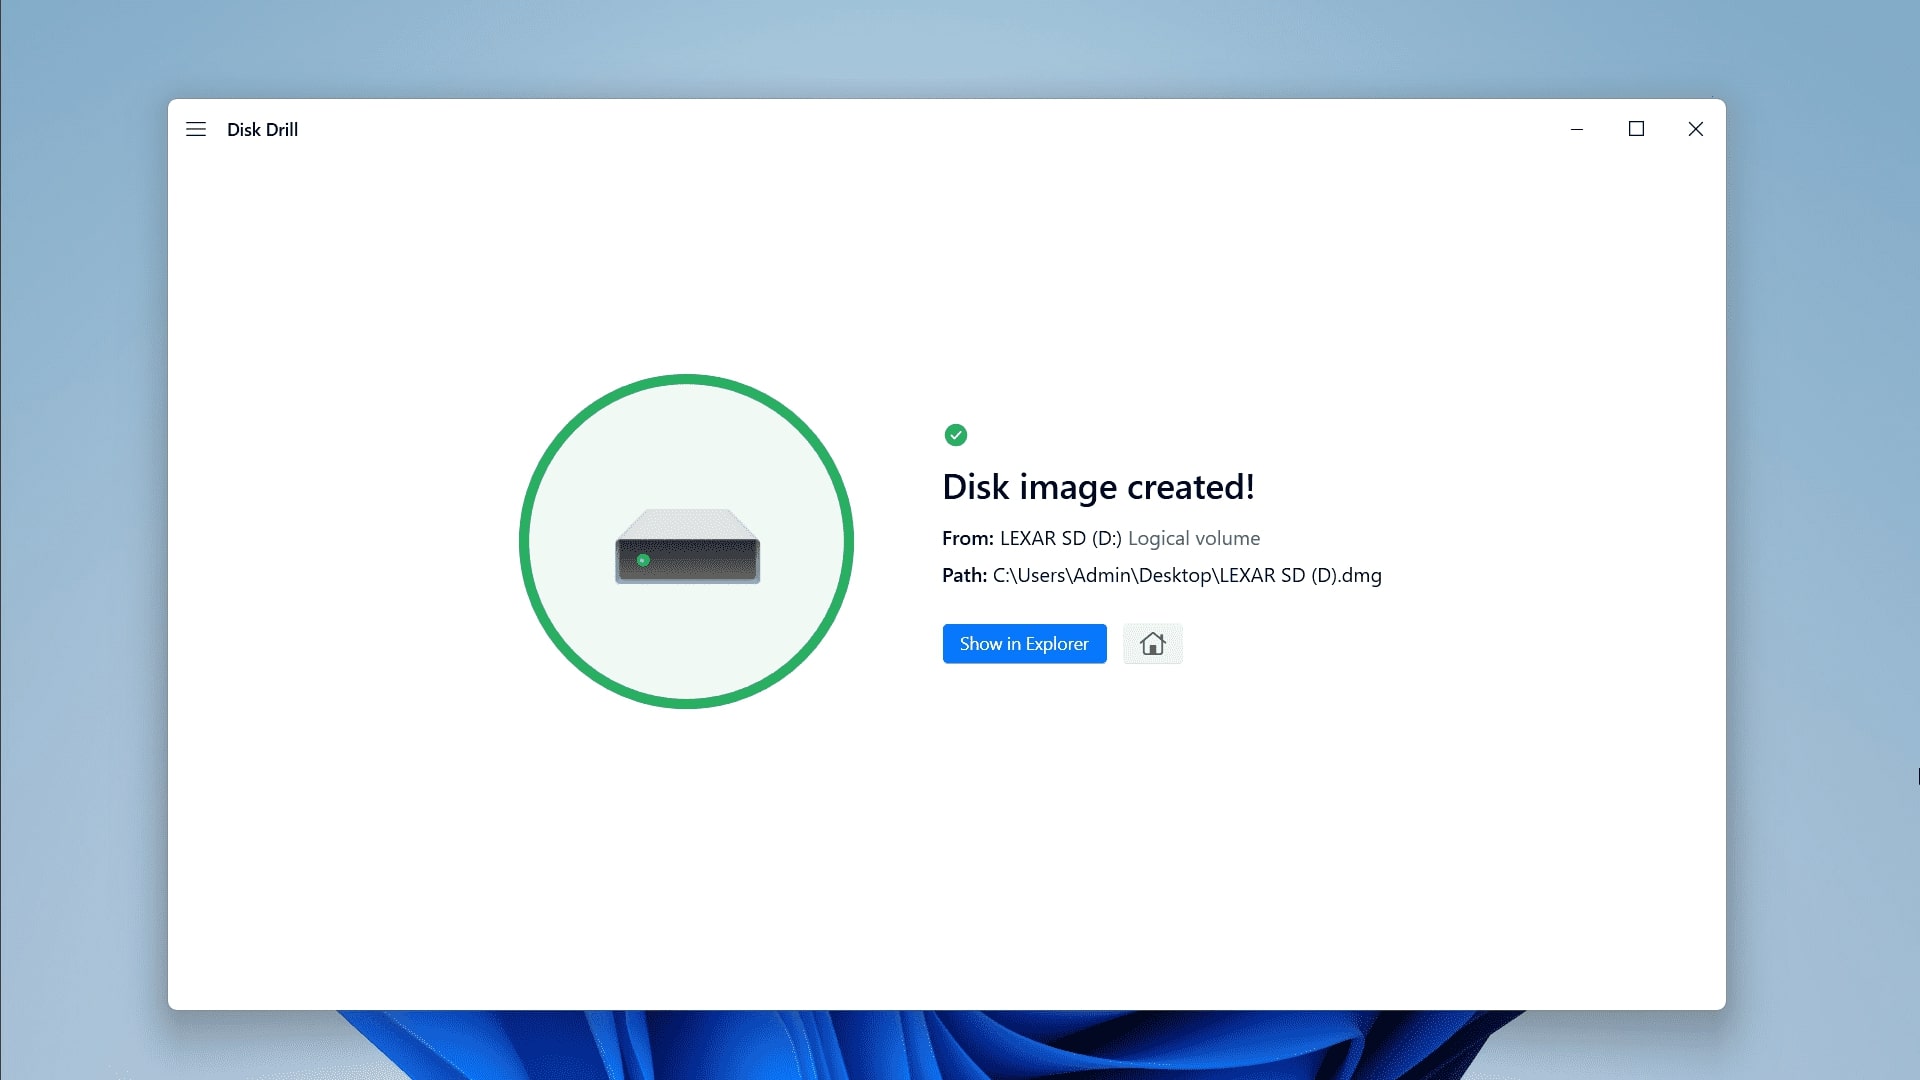
- Disk Drill will now create an exact byte-to-byte copy of your USB drive. Wait for the process to complete. Once done, click on Home button to continue.
- Now that you have a byte-to-byte copy of your flash drive, you can scan it to safely recover data that was on the flash drive. In the center on the bottom, you will see the Attach disk image… button. Click on it.
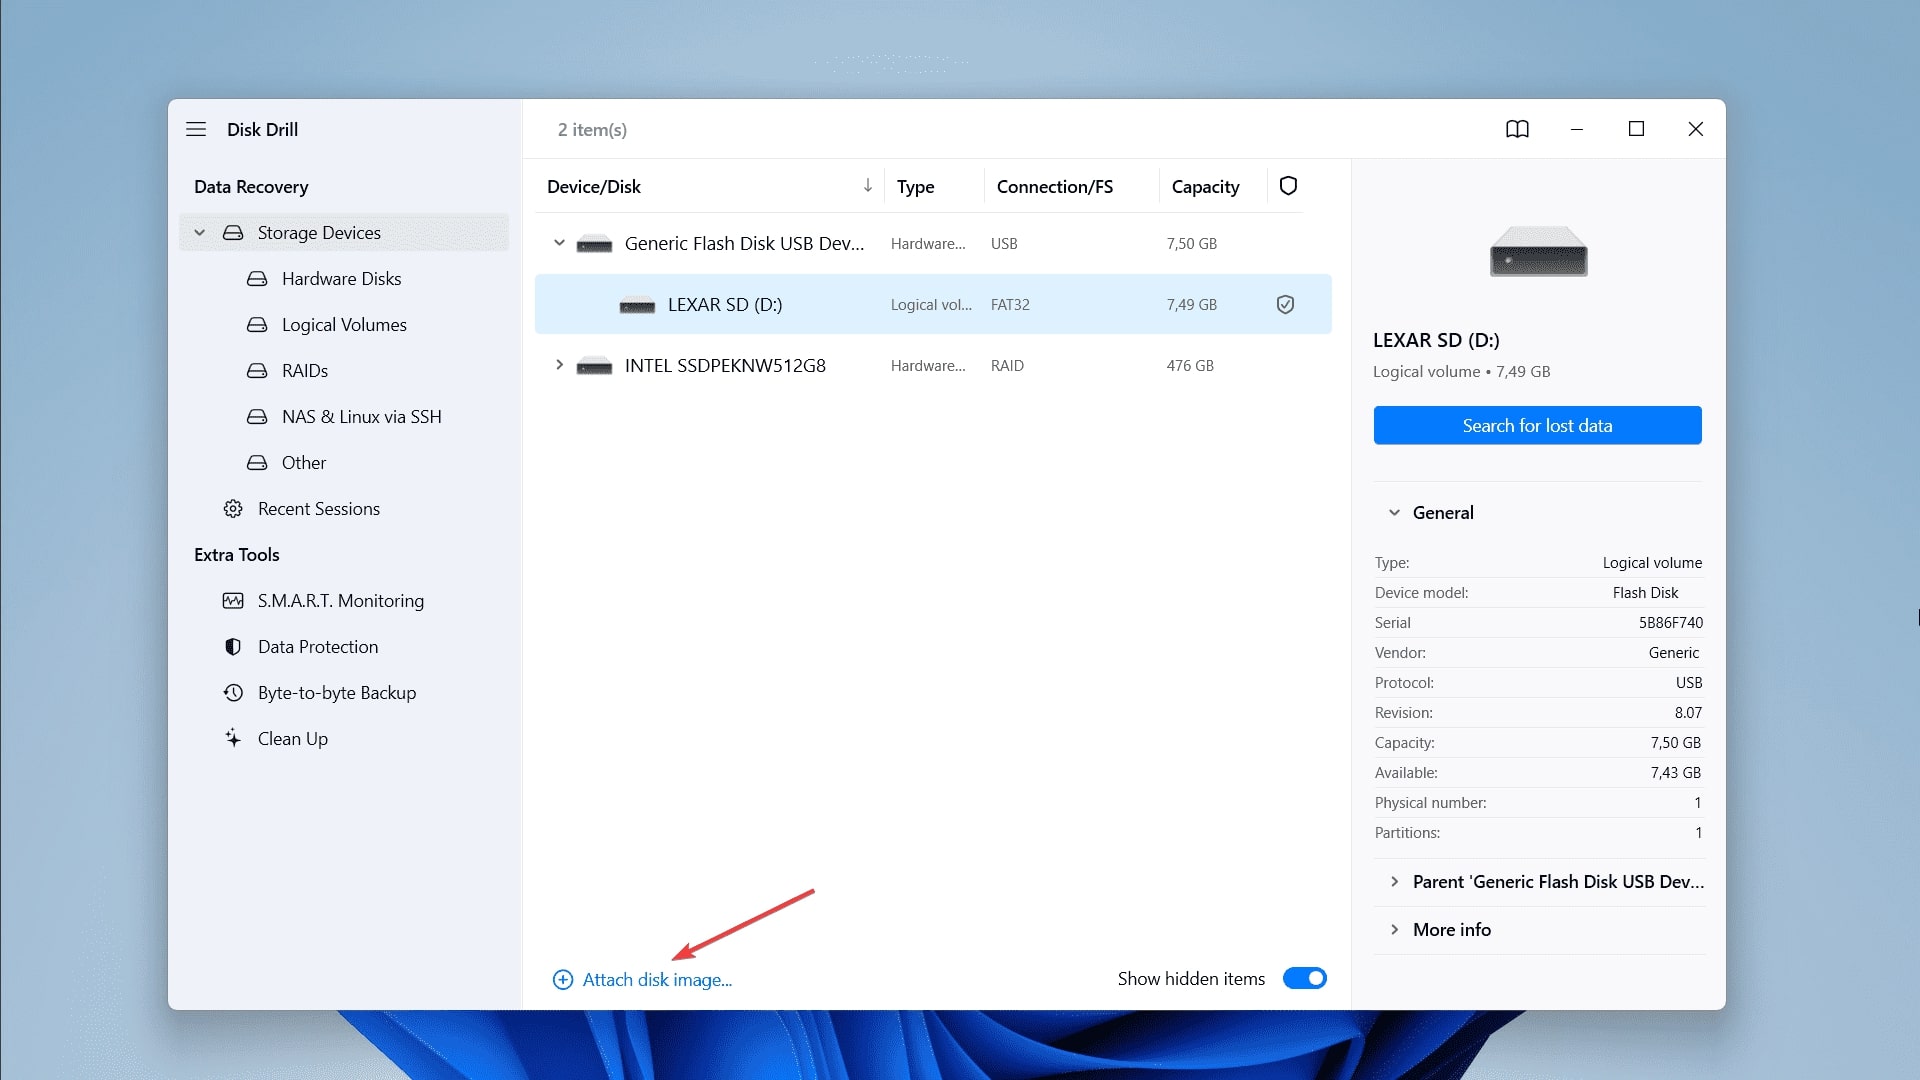
- Select the backup image you just created in a pop-up window and click on OK to continue.
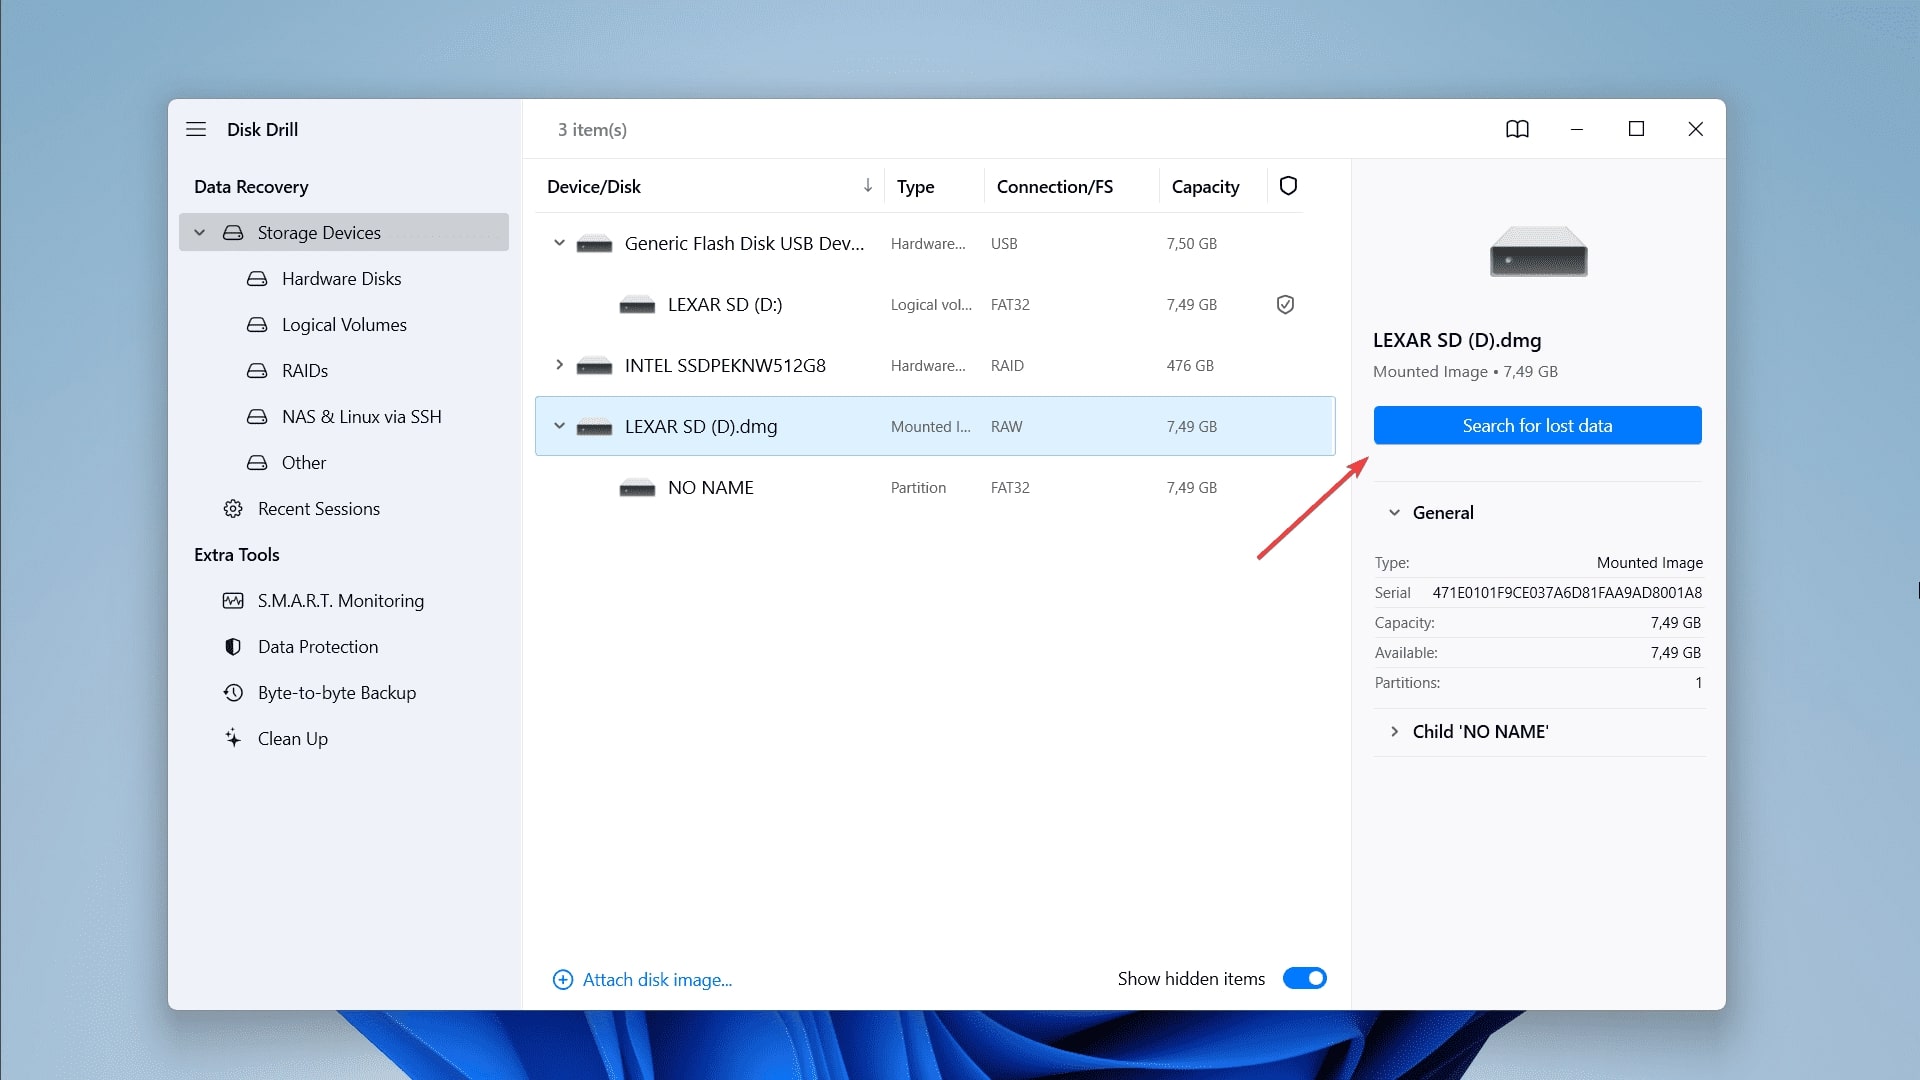
- Now disk image with the .dmg in the end you just created will appear in the list of available devices. Select it and click on Search for lost data.
- Disk Drill will scan your flash drive for data. You can click on the ‘Review found items’ button in the process, but we advise you to wait for the scan to finish.
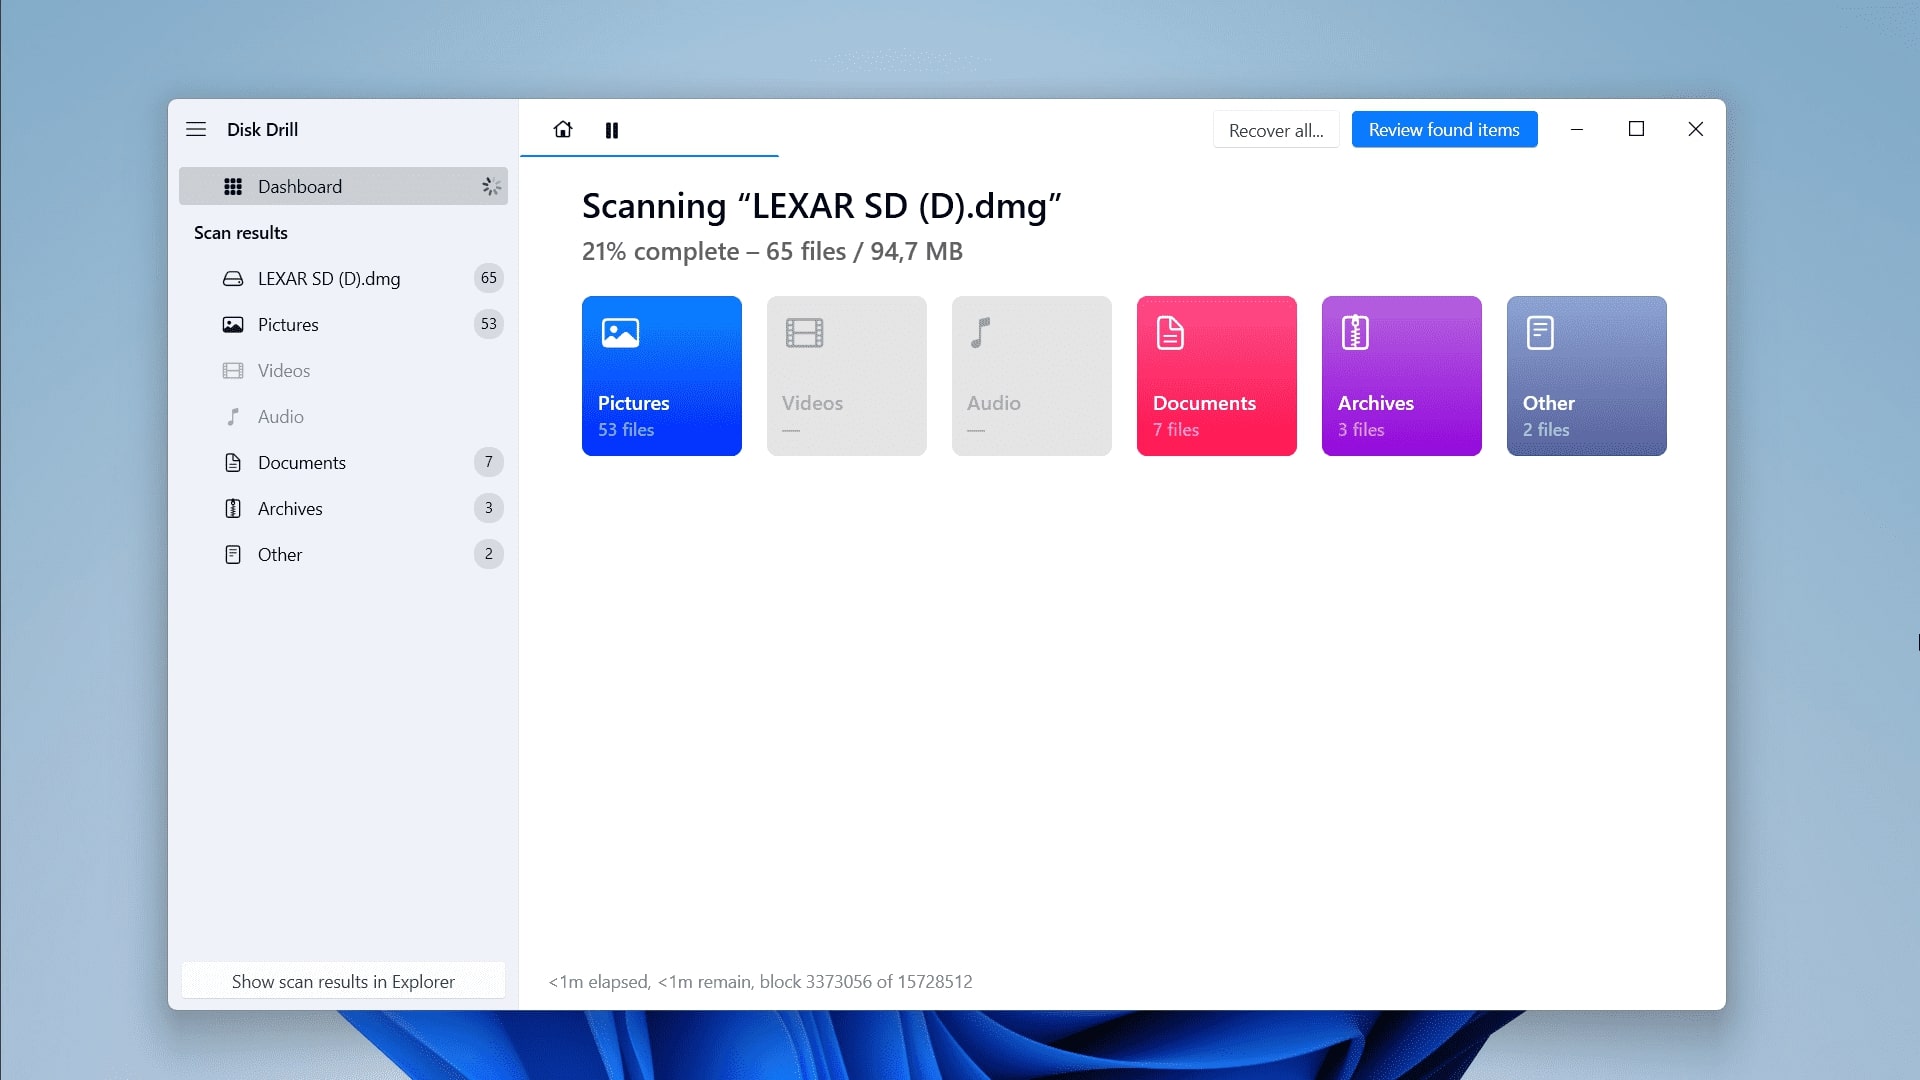
- Once the scan is complete, click on Review found items.
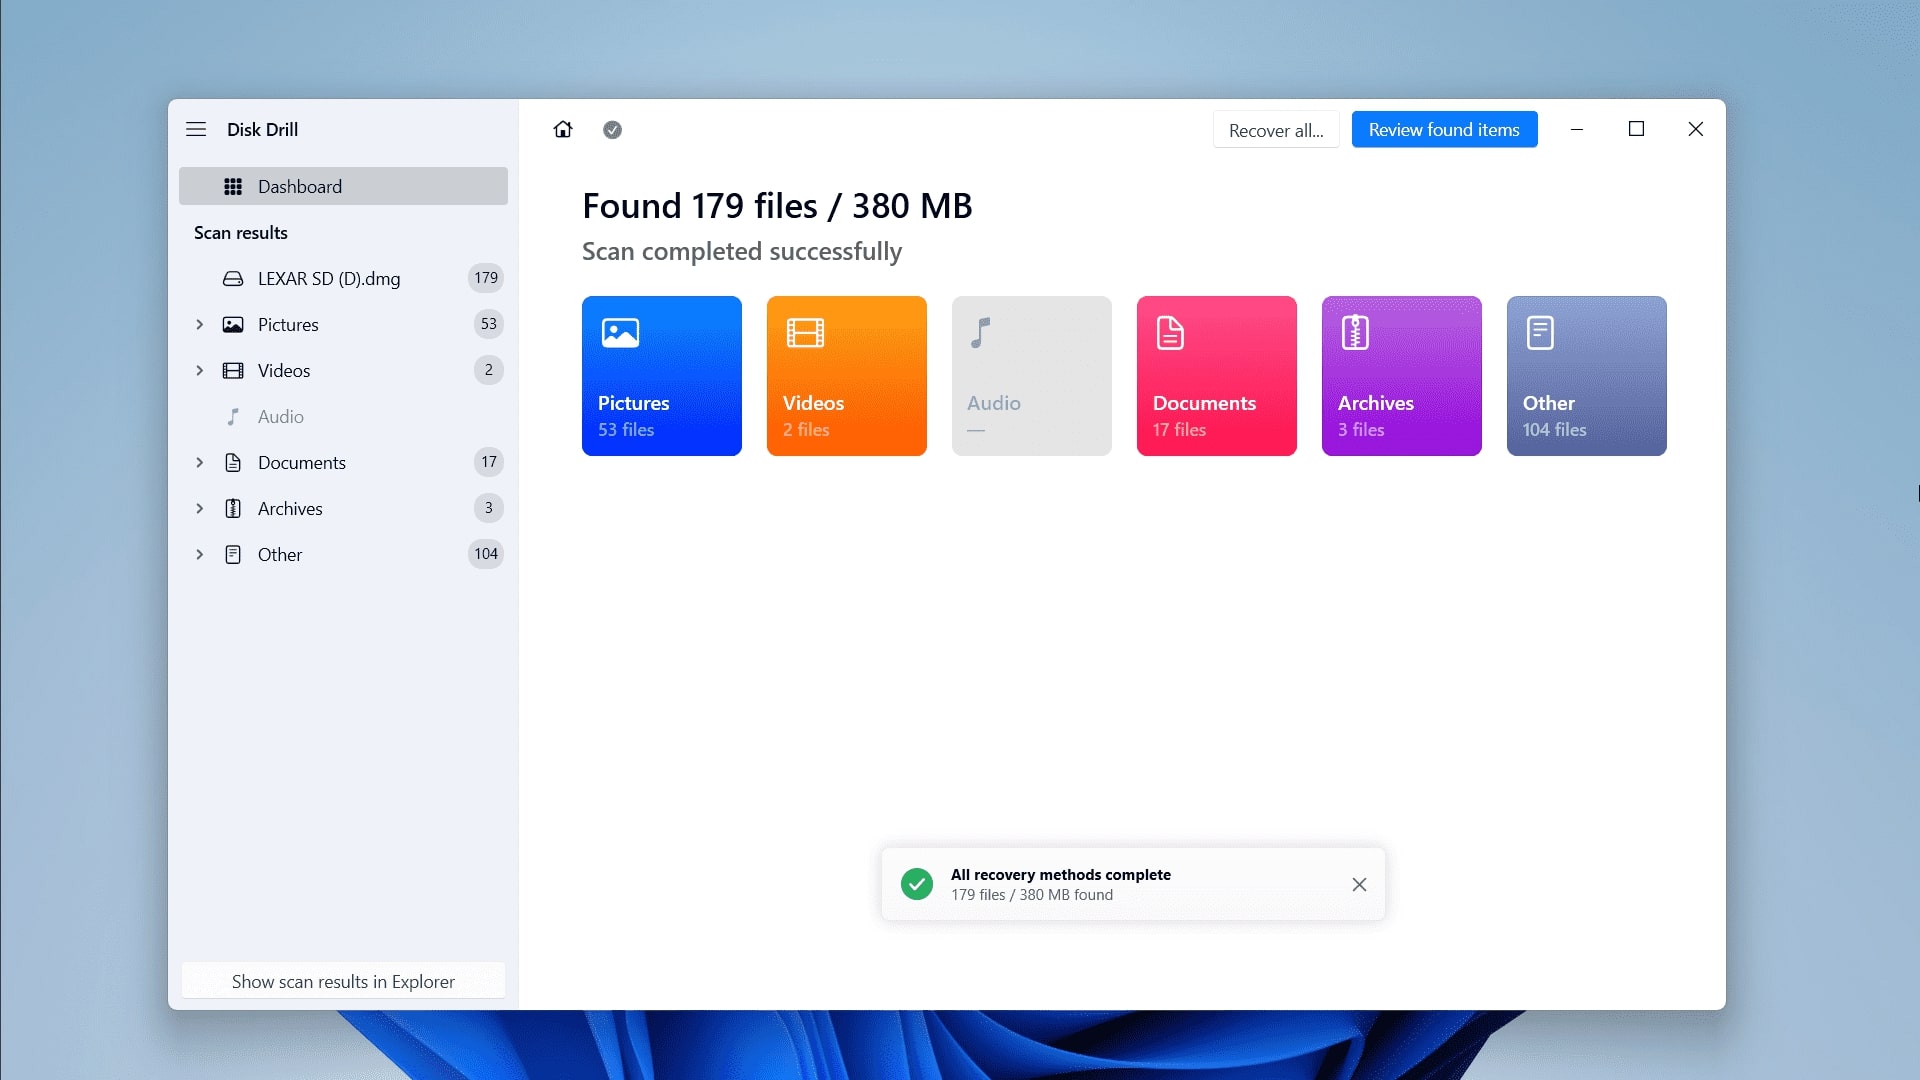
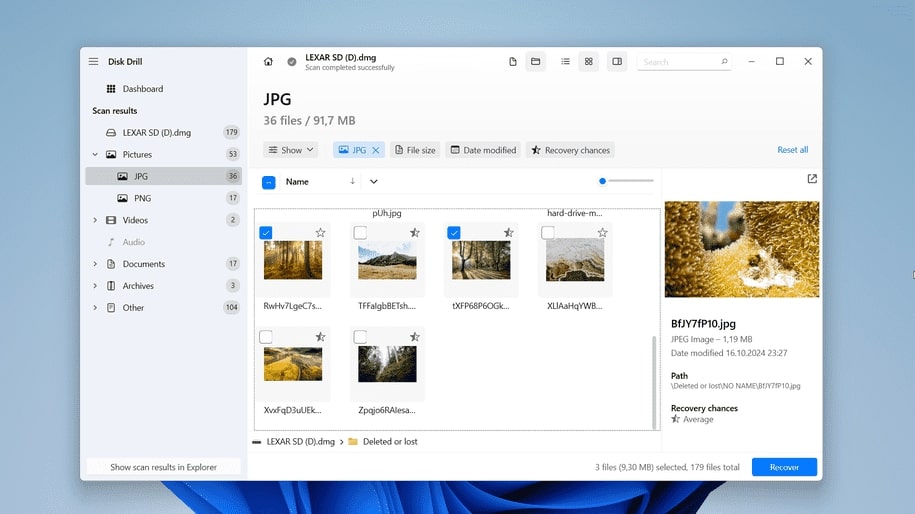
- On the next screen, you can select all the files you want to recover. Now you can simply click on the Recover All button to restore everything Disk Drill was able to find. If you want to recover specific files from your USB, you can use different filtering options and sort files by type, size, or date. You can use search if you remember the file name. Put the checkmark next to the files you need. If you select some specific files, once you are done, click on Recover.
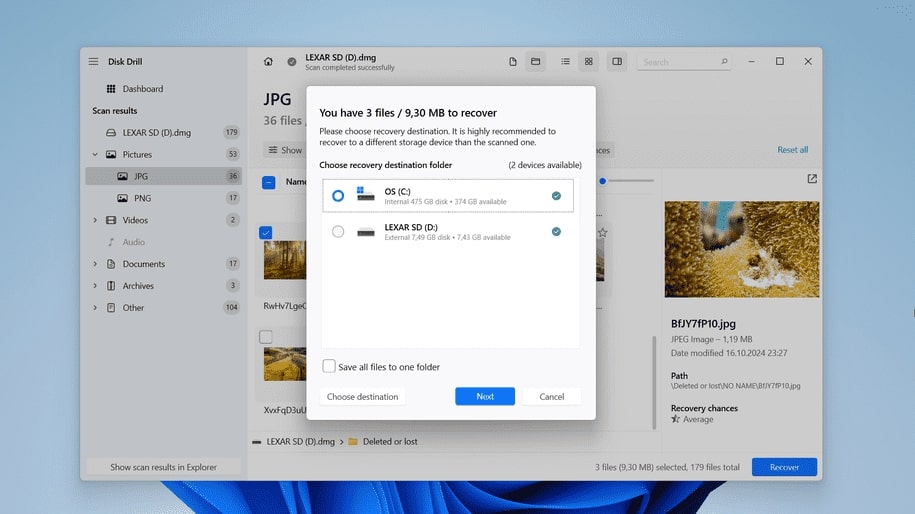
- Then you need to select a save location for all the recovered files. Make sure it’s not the flash drive you recover data from, and click Next.
- And you are done! Proceed to recovery location where you will see recovered files.
If you want to know more about Disk Drill, check out our comprehensive review of this data recovery tool.
How to Fix a Broken or Damaged USB Drive
With our data secured, we can now explore different tools and methods available in Windows to fix issues with the flash drive.
Method 1: Scan the Drive With Windows Troubleshooter
Windows Troubleshooter is a built-in tool designed to detect and, if possible, resolve errors on a USB drive. It’s one of the easiest methods to address unexpected issues, offering a quick and user-friendly solution for common problems.
- Open Windows Explorer and right-click on the USB Drive.
- Click on Properties.
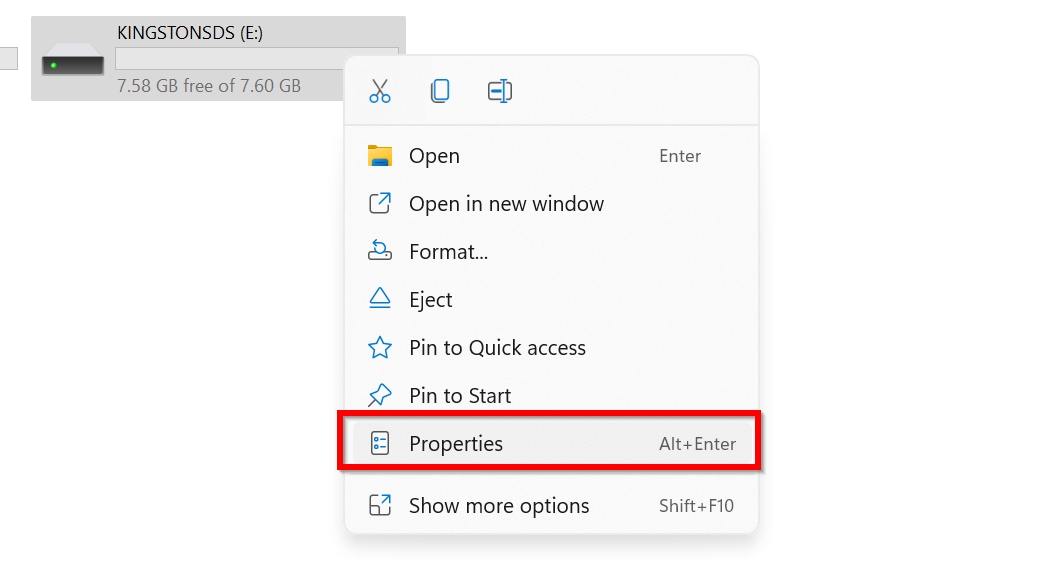
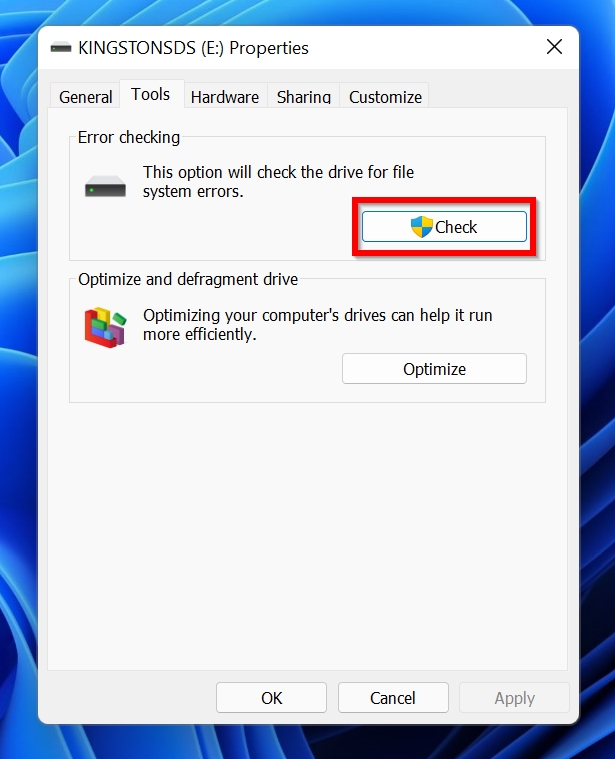
- Navigate to the Tools tab, and under Error Checking, click on Check.
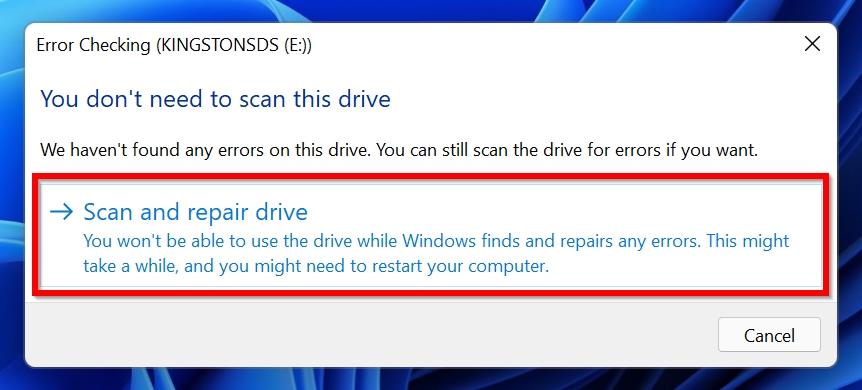
- On the next window, click on Scan and repair drive.
- Windows will automatically detect and fix any errors on the USB drive.
Method 2: Scan the USB Drive Using CHKDSK
CHKDSK is a somewhat alternative to Windows troubleshooter as it offers a similar repair process but with greater control. Unlike the automated approach of the Troubleshooter, CHKDSK allows you to use the Command Prompt to customize the repair procedure. You can apply additional options, such as identification and repair of bad sectors, or manually speed up the scanning process by adjusting parameters.
- Type “cmd” in Windows Search.
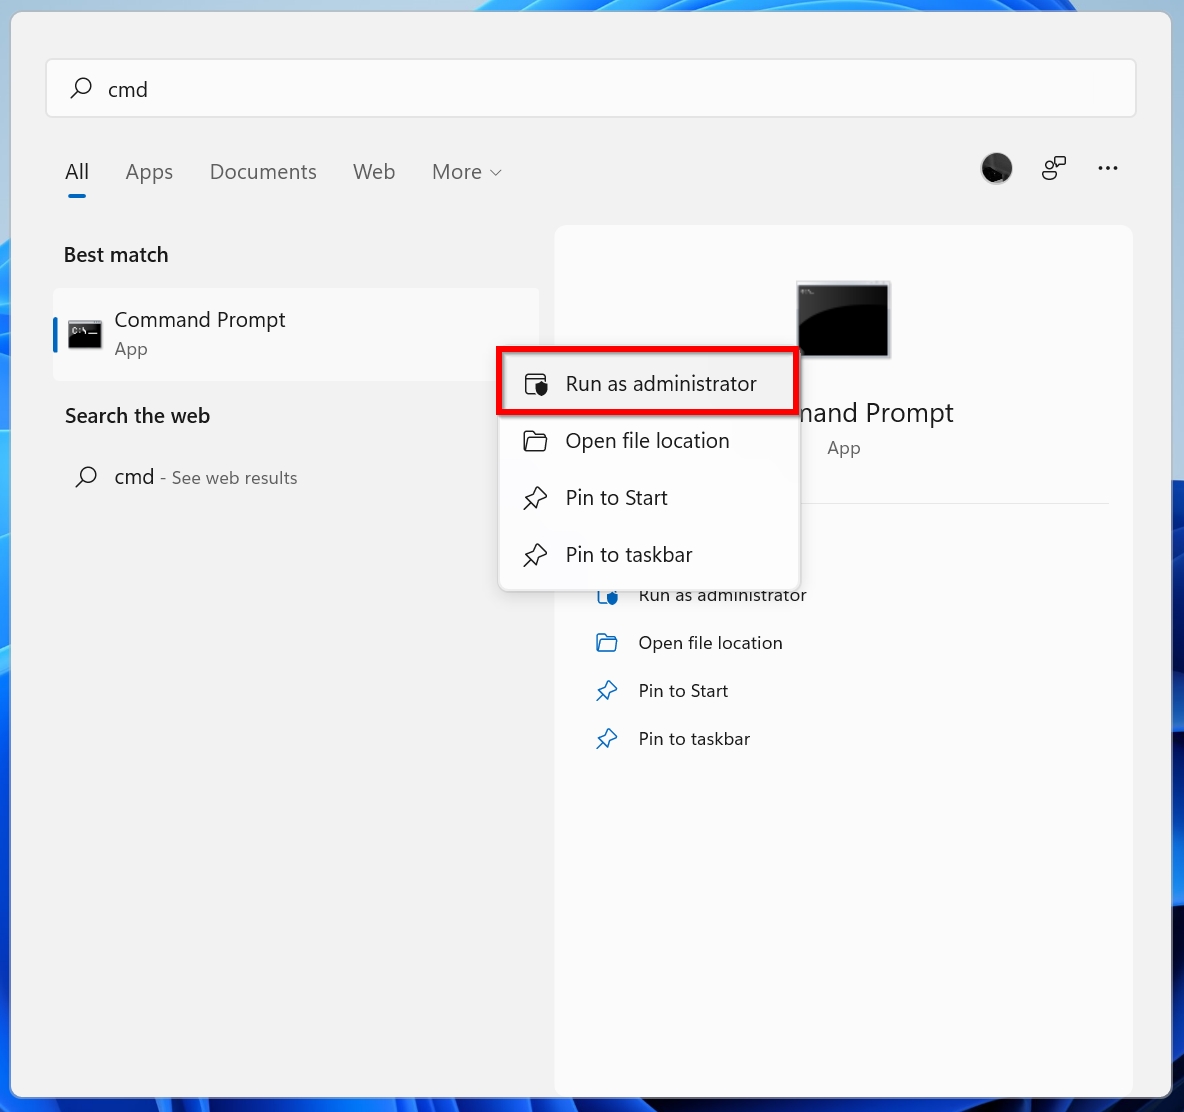
- Right-click on Command Prompt > Run as Administrator.
- In the console, type chkdsk X: /f (replace X with the drive letter of the USB, visible in the Windows Explorer.) and press Enter.
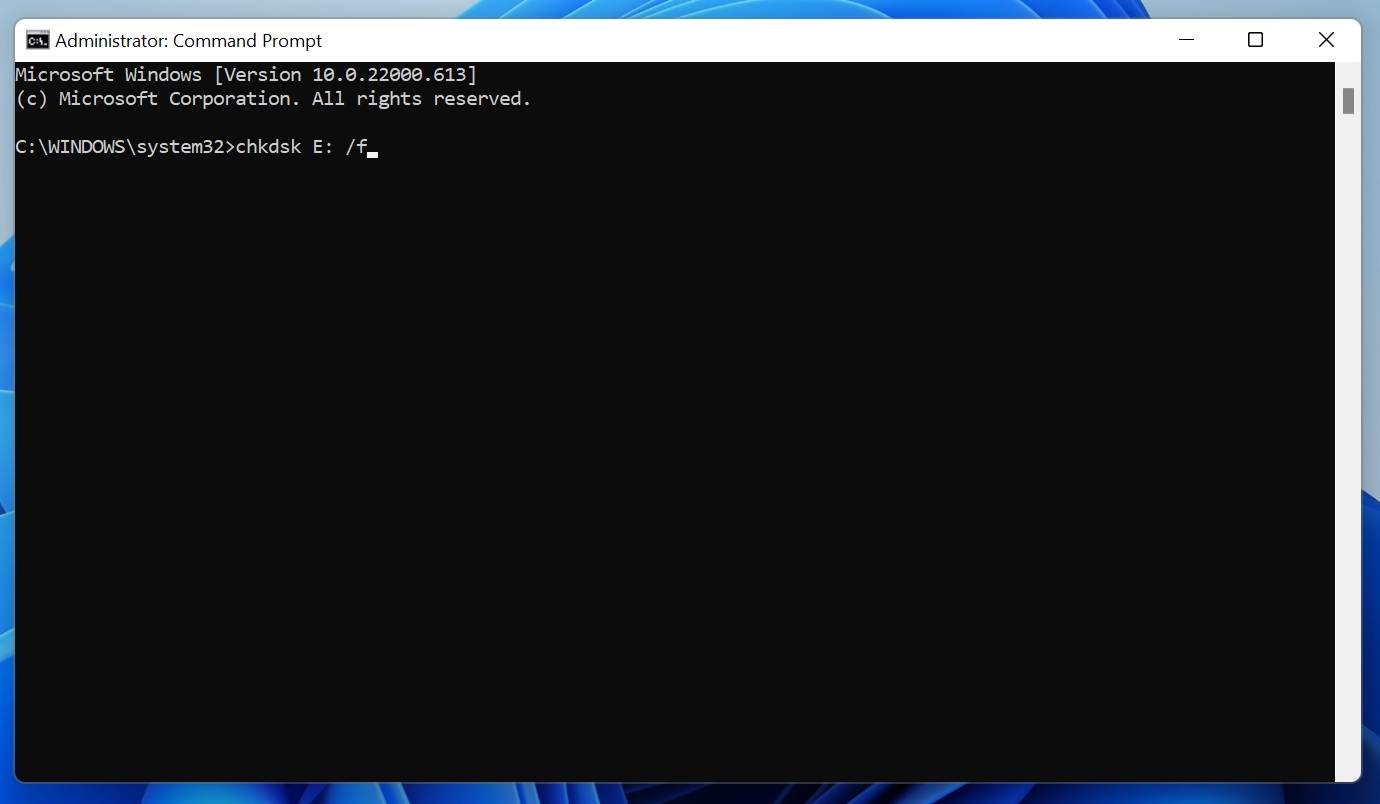 👀
👀Pro Tip: You can also use the /r parameter to instruct CHKDSK to find and fix bad sectors.
- Windows will scan and fix the USB drive.
We have a dedicated article about CHKDSK and how to use it. However, as we mentioned earlier, repair methods like CHKDSK can lead to data loss. Read more in this article.
Method 3: Change the Drive Letter Using Disk Management
If you suspect your flash drive is broken because it doesn’t show up in File Explorer, but you found it in Disk Management, then it’s probably just a drive letter conflict that prevents you from seeing it. And that can be easily fixed.
- Press Windows Key + R to open the Run application.
- Type diskmgmt.msc in the text box and press Enter.
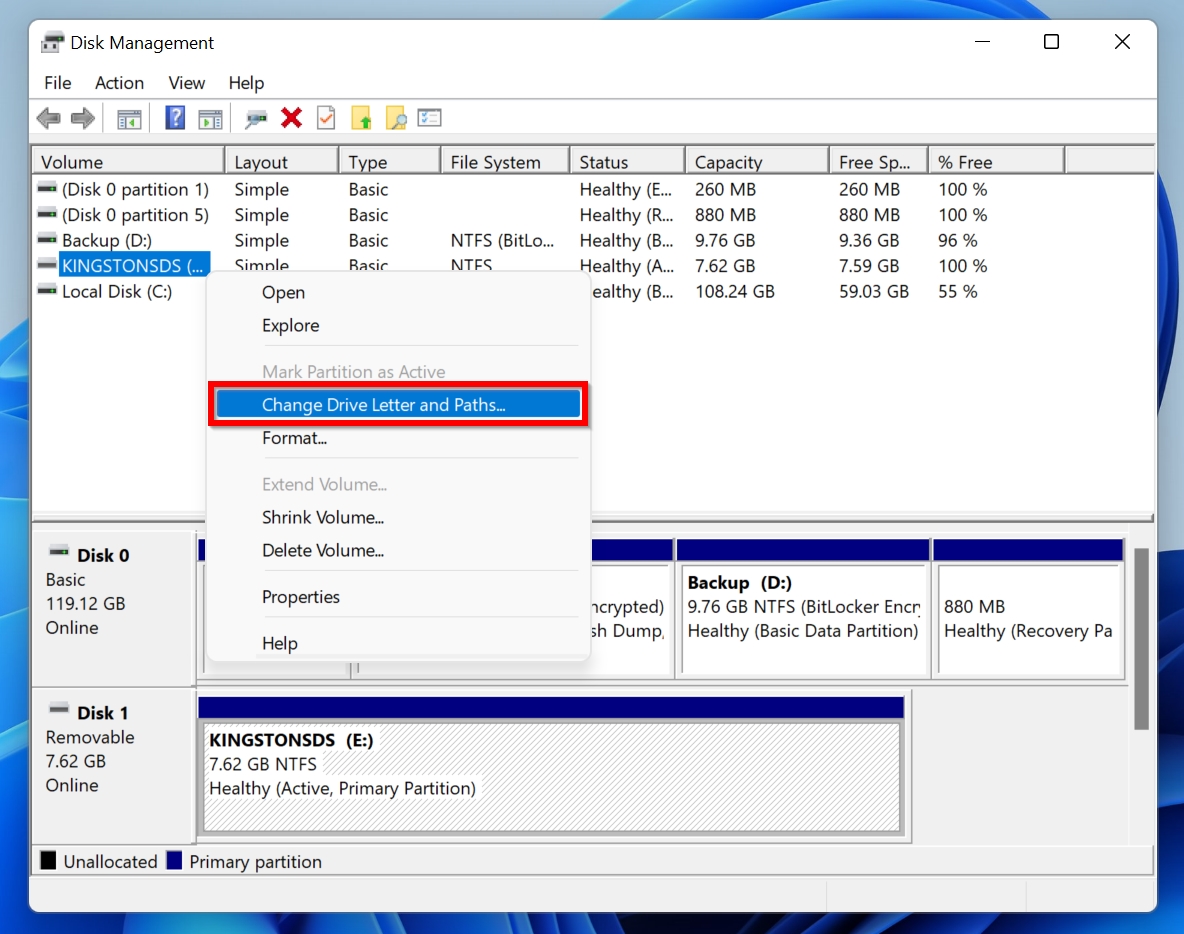
- Look for the USB drive in Disk Management and right-click on it. Select Change Drive Letter and Paths.
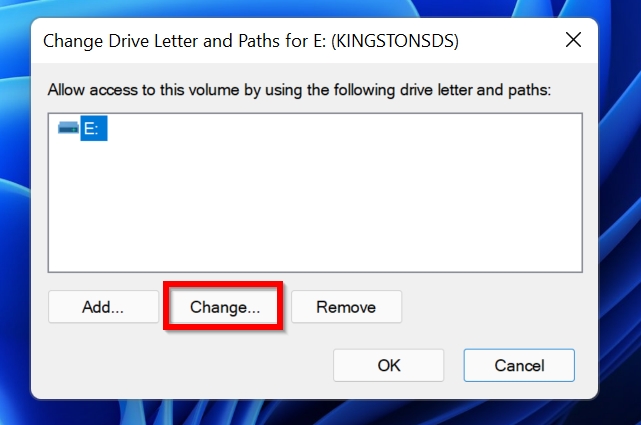
- On the next window, click on Change.
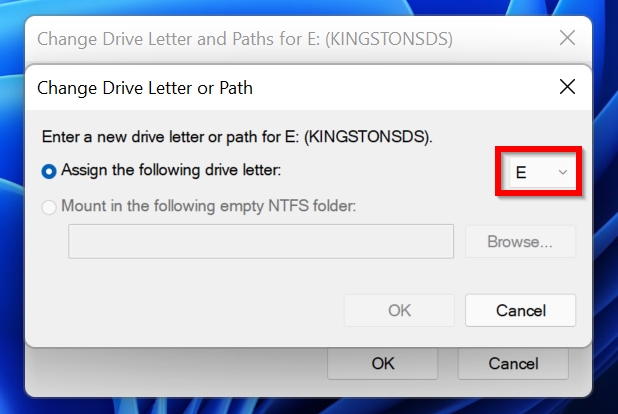
- Select a letter from the drop-down menu and click OK.
- Click OK again and close Disk Management.
Method 4: Unmount the USB Drive in Device Manager
Another method to fix a flash drive that the system cannot read is to uninstall the device through Device Manager and then reconnect it. This approach forces the system to detect and reinstall the necessary drivers, which can resolve issues caused by driver or configuration errors. Although this method does not guarantee success, it often proves effective if you need to address common problems with unresponsive flash drives.
- Open Windows Search and search for “device manager”.
- Click on Device Manager.
- Expand the Disk Drives section.
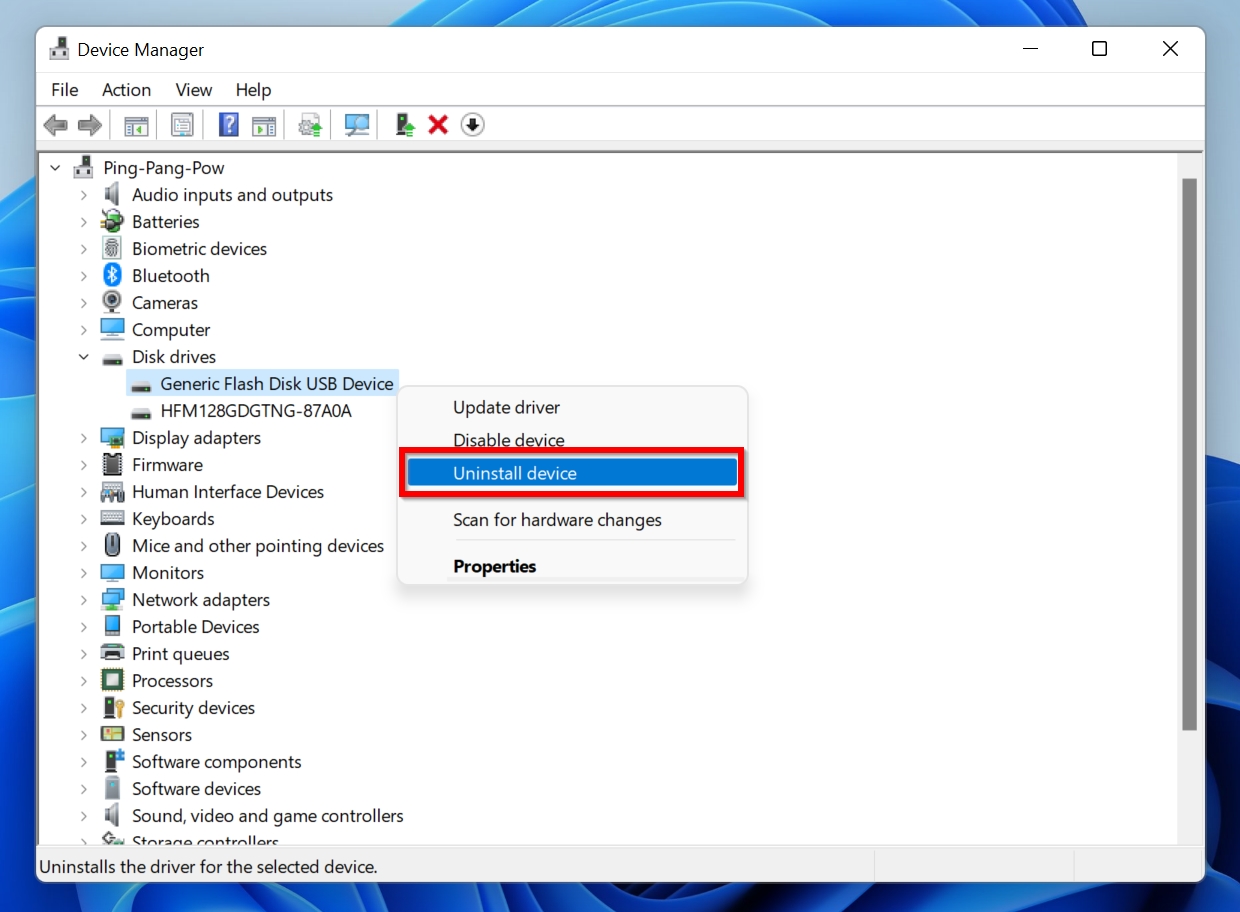
- Right-click on your USB drive and click on Uninstall device.
- In the prompt, click on Uninstall.
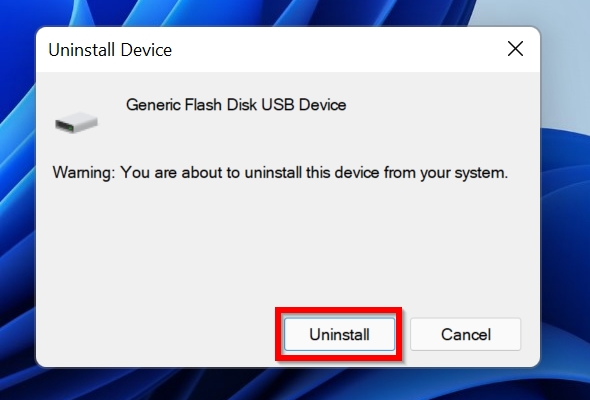
- After the uninstallation, remove the flash drive and reboot your PC.
- Reconnect the drive and Windows should automatically install the drivers again.
Method 5: Format the USB Flash Drive
If previous methods have not resolved the issues with your USB flash drive, you may restore its functionality by formatting the drive. Because the format process erases all data on the drive, make sure you have recovered your important files before you proceed. It’s important to mention that full format can eliminate bad sectors and potentially improve the performance of the flash drive if it was the reason. However, unlike a quick format, it’s irreversible.
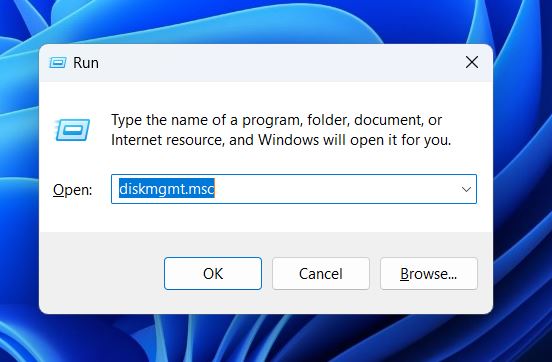
- Press Windows Key + R to open the Run dialog box. Type diskmgmt.msc and press Enter. The Disk Management window opens.
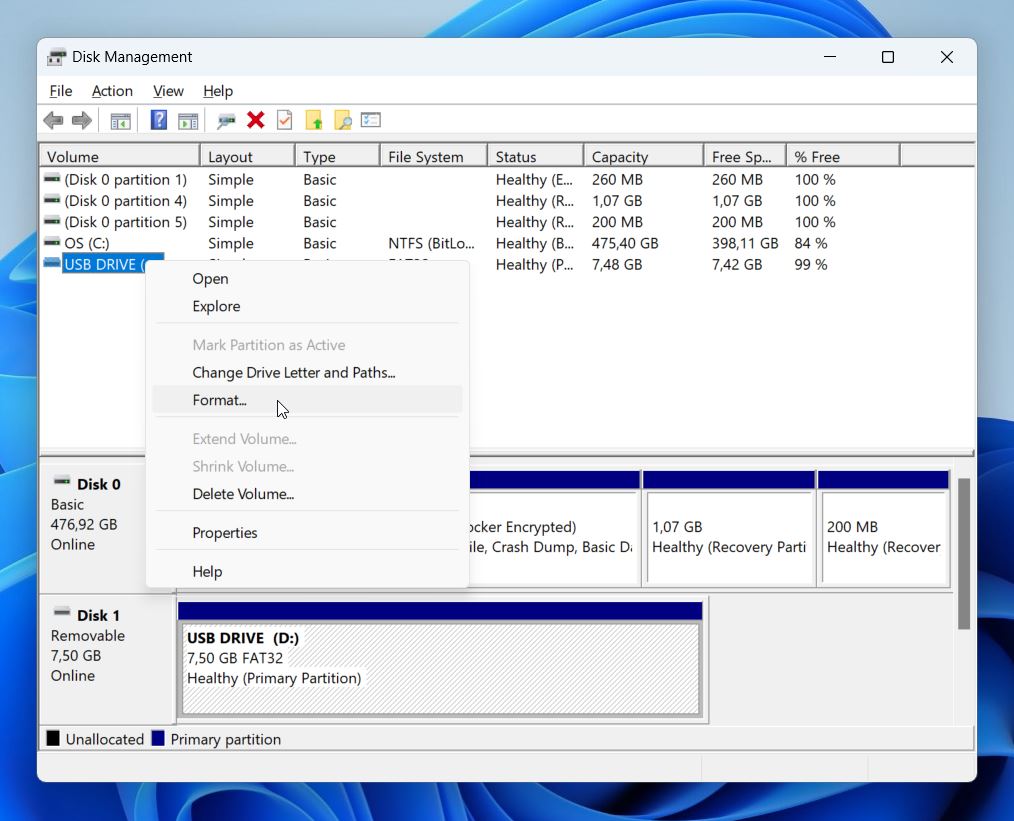
- In the Disk Management window, find your USB flash drive in the list of available drives. It may be labeled as Removable and display the size of your flash drive.
- Right-click on the partition of your USB flash drive and select Format from the context menu.
- In the Format dialog box, choose a File System (e.g., NTFS, FAT32, or exFAT). Set the Allocation Unit Size to Default. Enter a Volume Label to name your drive (optional). Uncheck the Perform a quick format option to ensure a full format.
- Click OK to confirm the format options. A warning message appears: all data on the drive will be erased. Click OK to proceed.
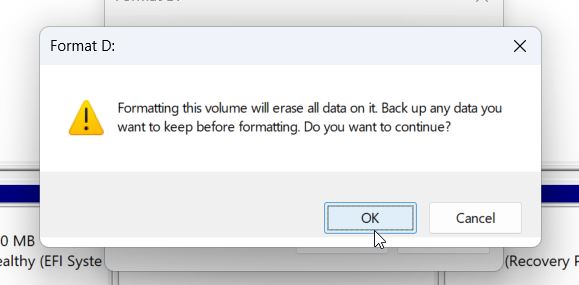
- Wait while Disk Management formats the USB flash drive. The time required depends on the size of the drive and whether you selected a quick format or full format. When the process completes, the drive is formatted and ready for use.
What Are the Signs of a Failing USB Flash Drive?
Typically, a pen drive will not instantly fail. There are a few telltale signs that can indicate if the thumb drive is about to fail. Ideally, you should get information off of the USB drive as soon as you notice any of these symptoms:
- Randomly disappearing files: One of the main signs of a damaged USB storage device is disappearing files. If you notice a file or two goes missing randomly, take it seriously, as the drive may be about to fail.
- Slow read and write speeds: While this could be an issue with your computer or USB port, sudden sluggishness in the read and write speeds of the USB drive could indicate imminent failure. Just to be safe, back up your data as soon as you notice this.
- Unrecognized device or intermittent connectivity: If your computer intermittently fails to recognize the USB drive, or if it disconnects randomly, the drive might be failing. Consistent recognition issues are a strong indicator of potential failure.
- Corrupted Files: Files that become corrupted or fail to open correctly point to problems with the storage medium. If you notice that documents, images, or videos do not function properly, the drive may be at fault.
- Incorrect capacity displayed: When the drive shows incorrect storage capacity, such as zero bytes available or an unusually low amount, it signals a possible failure in the memory chips.
- Frequent crashes or freezes: If the drive causes your computer to crash or freeze when connected, it may be due to hardware issues within the flash drive.
Why Do USB Flash Drives Stop Working Properly?
There are a few reasons why your USB drive may stop working properly. Knowing the exact cause of why pen drives malfunction is important because it helps narrow down the ideal way to fix damaged USB drives.
Here are a few common causes behind USB drive failure:
- Incorrectly removing the USB drive: All of us are guilty of this. Suddenly removing a pen drive from your computer can cause logical or physical damage to the USB drive. Always use the Eject Media option on Windows and then gently remove the pen drive from your PC. Additionally, disconnecting the drive while it’s reading or writing data can result in data corruption.
- Component failure: Naturally, a USB drive consists of various electronic components such as microcontrollers, resistors, and capacitors. An unexpected power surge, short circuit or water can irreversibly damage them.
- Excessive use: All USB drives have a limited read-write expectancy. In typical usage scenarios, a USB drive will last many years and possibly a decade before it maxes out its read and write rating. However, with excessive use, it can fail earlier than anticipated.
- Corrupted file system: Incorrect formatting, malware, improper usage (such as disconnecting the drive abruptly) can cause file system corruption, making your data inaccessible. Such a problem comes under logical damage. In most cases, you can easily recover data from a corrupted USB drive.
- Manufacturing defects: Cheap USBs use low-quality components and will fail earlier than better quality ones. It’s always best to invest in a good quality USB drive (such as SanDisk or Lexar) from the beginning and save yourself the cost of data recovery when a cheap one fails.
- Permanently connected USB drives: While it’s important to remove your USB drive correctly, it’s also important not to keep the drive connected to your PC permanently. The voltage fluctuations and other factors can result in overheating as well as significantly faster wear and tear of the components.
FAQ
How to fix a USB flash drive that is not recognized?
Some common fixes include–rebooting your PC, updating the USB drivers, reinstalling the drivers, and disabling the USB Selective Suspend setting. Our article on how to fix USB drive not recognized error delves into this issue in more detail.
What is the best USB repair tool?
Disk Drill is a good choice if you want to recover data from a logically damaged USB drive. Tools like TestDisk can help fix deleted or corrupted USB drive partitions. However, you’re not lost for options, since there are plenty of other USB repair tools that do the same.
How much does it cost to repair a flash drive?
Repairing a USB drive and the cost of data recovery can range anywhere from $20 all the way up to $3000. However, companies will only be able to provide you with a quote after they analyze your drive.
Conclusion
The main takeaways from this article are that broken USB drives can be recovered right at home if they’re still readable and there’s only minor physical damage. But, it’s important you closely follow the steps above to retrieve the data without any hiccups.
This article was written by Manuviraj Godara, a Staff Writer at Handy Recovery Advisor. It was also verified for technical accuracy by Andrey Vasilyev, our editorial advisor.
Curious about our content creation process? Take a look at our Editor Guidelines.
