Is your external hard drive not showing up on Mac? It could be harmless, but there’s a good chance that something is wrong with your drive (or your Mac). If there is, data loss will happen soon if it hasn’t already. While the situation isn’t hopeless, you need to act quickly.
This article will teach you how to recover data from an external drive not showing up on Mac. Once your data is secure, we’ll show you how to fix your drive and restore its normal functionality. Read on!
Why Is My External Hard Drive Not Showing Up on Mac?
To safely fix (and recover) a hard drive not showing up on Mac, we need to properly diagnose the problem. Each issue requires a different solution and using the wrong method might make things worse.
In this article, we provide 5 fixes you can try. To make it easier for you to choose the appropriate fix, we created a menu with links to the correct sections.
Data loss is a strong possibility when attempting to fix a faulty external hard drive. If you have important files on your drive, we strongly encourage you to recover data from your external hard drive first. We’ll show you how to do this in the next section.
Reasons |
Description and Solutions |
Improper connection |
Mac is not detecting the external hard drive because something is mechanically blocking your drive’s connection to your computer (such as a broken cable or USB port). Solution: Method 1 |
Corrupted file system |
Viruses, software-related issues, and improper ejection can corrupt your drive’s file system, preventing your computer from establishing a functional connection. A corrupted file system may also make your data inaccessible. Solution: Method 5 |
The hard drive is physically damaged |
When a hard drive is physically damaged, it’s not going to function as intended. It’s highly likely that your Mac won’t recognize the external hard drive at all. Solution: Data Recovery Center |
The external drives in the checkbox in Finder is unchecked |
Mac allows its users to choose which folders appear in the Finder sidebar. Solution: To modify these settings, open Finder > Finder (on the toolbar) > Settings > Sidebar tab. |
Software errors |
There may be an issue with your system settings and configuration, as well as conflicts or glitches in your Mac’s software-hardware management. Solution: Method 3, Method 4 |
Lack of resources |
When you physically connect your drive to your Mac, a process called “Mounting” ensures they function properly together. It’s possible that your Mac doesn’t have enough disk resources to Mount your drive. Solution: Method 2 |
How to Recover Data From a Hard Drive Not Showing Up on Mac
Even if Mac can’t see your external hard drive, recovery is still possible as long as it shows up in Disk Utility with the correct size. However, you need a third-party tool called data recovery software. It bypasses the normal way we access files and can extract files directly from the drive’s file system.
For this article, we’ll demonstrate this process using Disk Drill. It’s easy to use for beginners and is updated for macOS Monterey and Ventura, as well as Macs with M1 and M2 chips. Disk Drill also supports most (if not all) mainstream drive brands, including Seagate, Western Digital (WD), and Toshiba, as well as common file systems like FAT32, ExFAT, and HFS+.
To recover data from a hard drive not showing up on Mac:
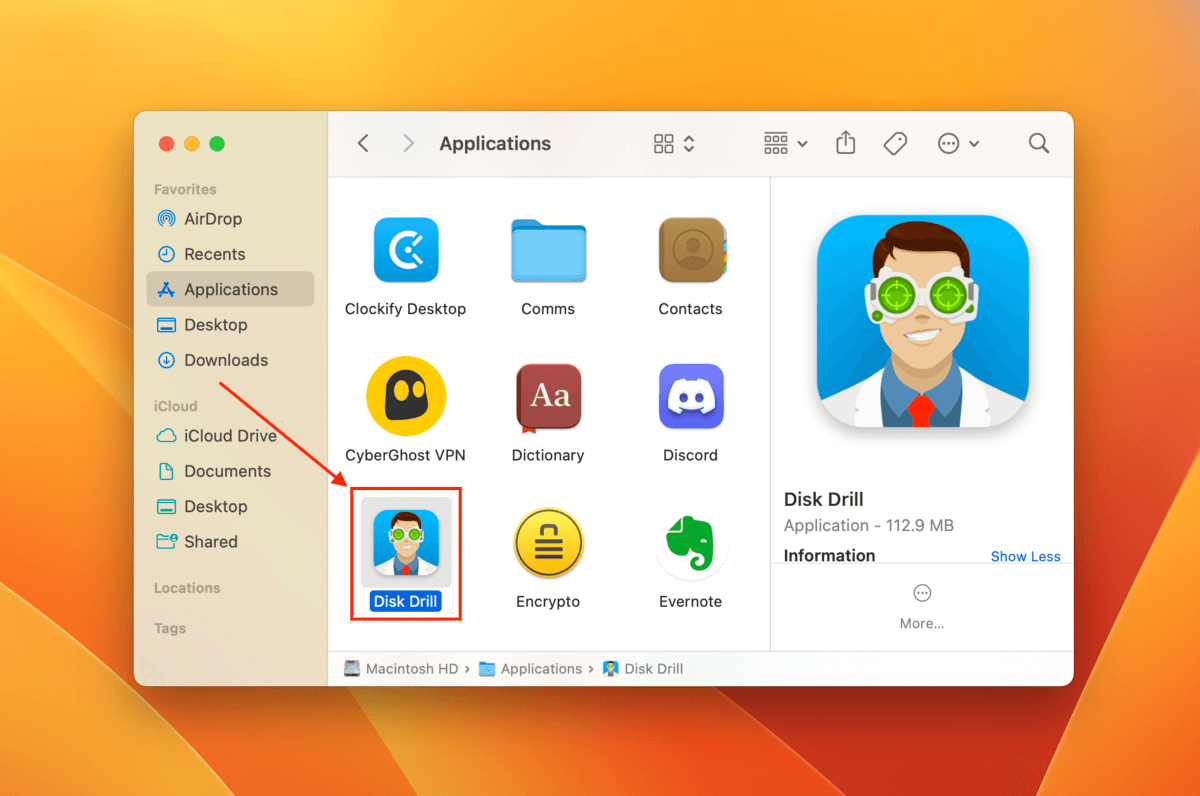
- With your hard drive disconnected, download and install Disk Drill on your Mac.
- Connect your drive to your Mac and launch Disk Drill (Finder > Applications).
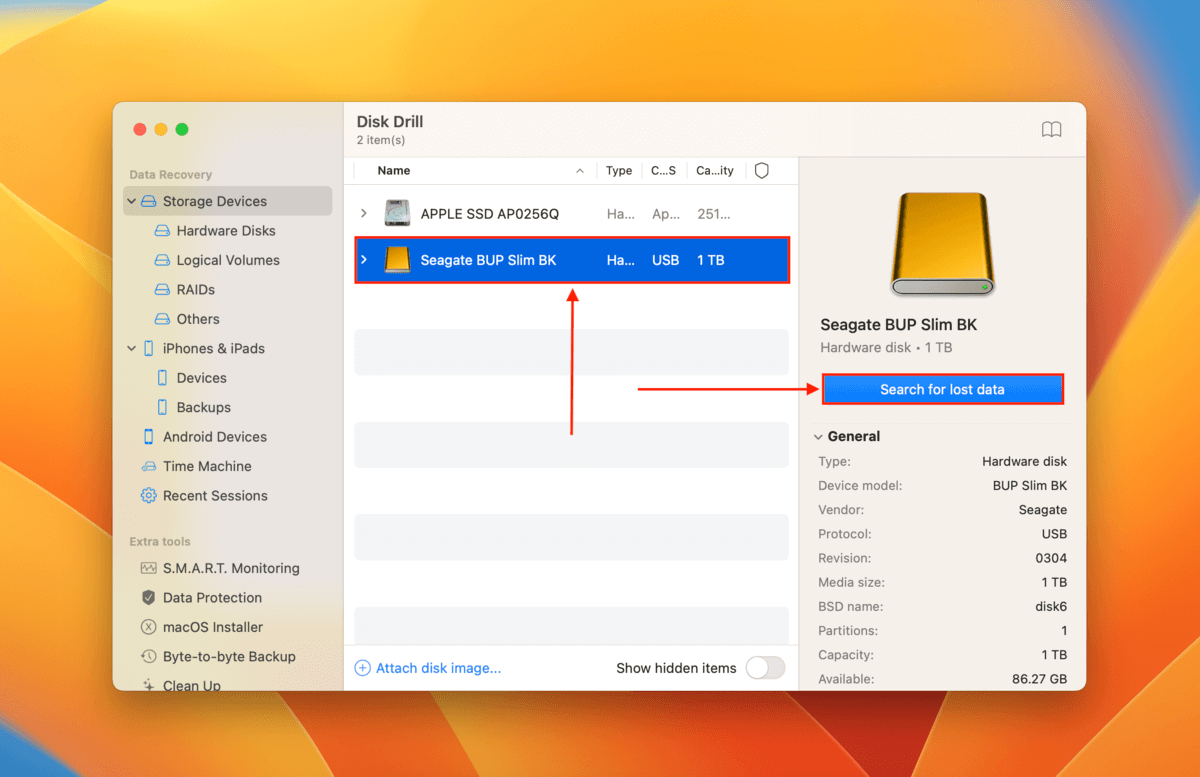
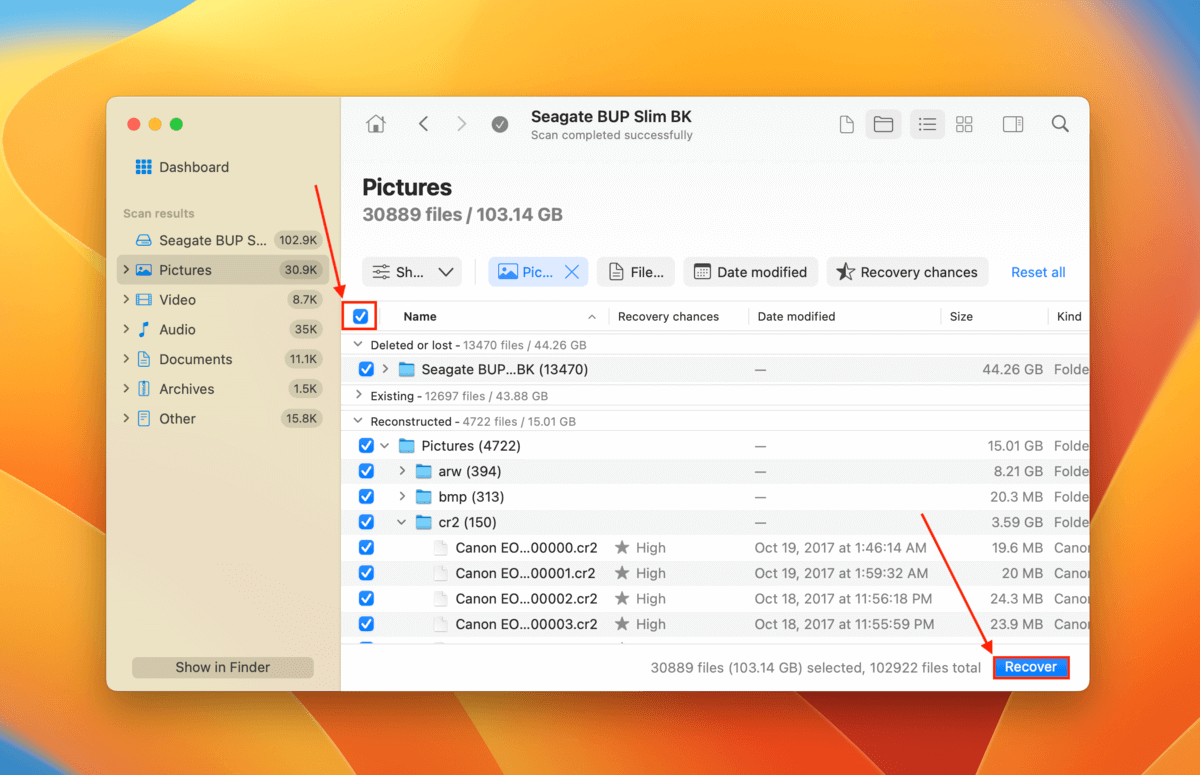
- Even if your drive doesn’t show up on your Mac, it should appear in the drives list. Click on it and click Search for lost data.
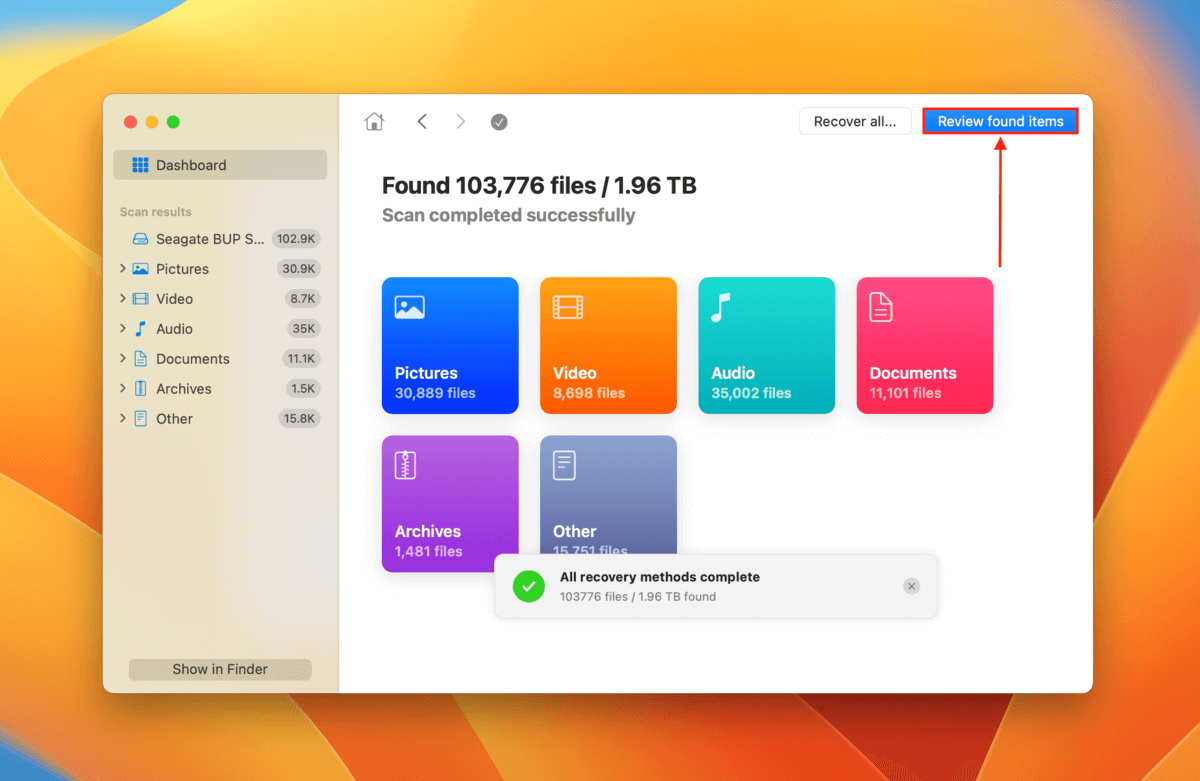
- Once Disk Drill is done scanning your hard drive, click Review found items.
- Expand the Existing tab to view the files that are currently on the drive. It’s possible that they haven’t been deleted and are just inaccessible. In case of corruption, you can expand the Deleted or lost and Reconstructed tabs as well. Filter the list using the sidebar or the search tool. It’s also a good idea to preview your files by hovering your mouse next to them and clicking the eye button.

- Select the files and folders you want to restore using the boxes in the leftmost column. You can also tick the box in the header row (beside Name) to select all data. Then, click Recover.
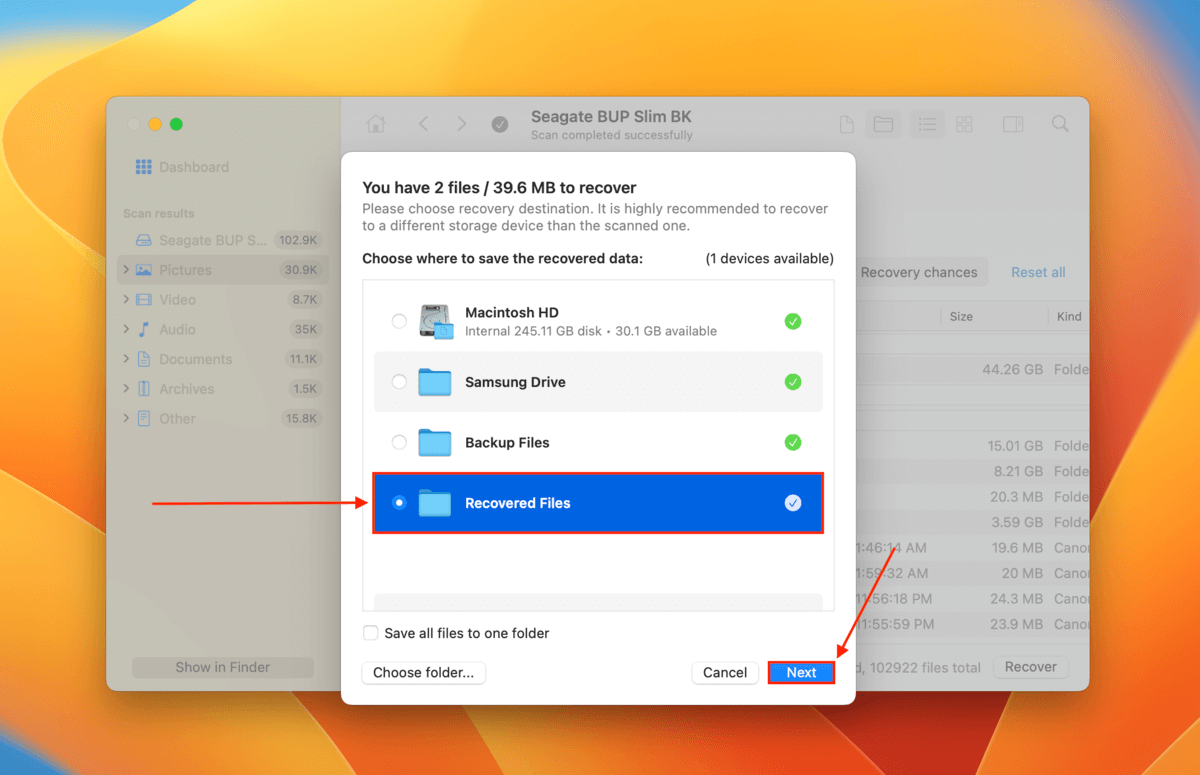
- Choose a location on your computer (not on your drive) where Disk Drill will save the restored data. Then, click Next to begin the recovery process.
Disk Drill Basic for Mac doesn’t offer free data recovery. But you can scan your drive and preview your files for free, which is important for finding out whether your data is recoverable (if you can preview it, you can usually recover it).
How to Fix an External Drive That’s Not Showing Up on Mac
In the sections below, we provide 5 methods to fix an external hard drive that’s not showing up on Mac. These methods directly address the root cause of your disappearing drive, so it’s a good idea to make sure that you are using the correct solution.
Remember that these fixes will likely cause data loss, so recover your data before proceeding!
Method 1: Try Our Quick Troubleshooting Tips
These methods are quick and easy ones that only take a couple of minutes to attempt and then you can move on to ones that are more in-depth if these don’t solve the issue.
💨 Clean Out the Ports on Your Mac
Sometimes we can get things such as debris caught in our ports which can cause issues with us not being able to get a stable connection on our Mac when we plug something into it.
I would recommend that you get some compressed air and spray it into the ports on your Mac. If you don’t have any you can bring your computer to a local computer shop and ask them to clean it out for you and you also might be able to purchase some from there as well.
I would advise that you don’t want to put anything abrasive into the port and compressed air would be your best bet for cleaning out the port and freeing it of any debris.
🖥️ Try Using the External Hard Drive on Another Mac
If the hard drive won’t work on your Mac, try plugging it into another Mac that you own, a work one, or a friend’s Mac, and see if the external hard drive will show up on their machine.
You could also try plugging in another device that you own into your Mac and see if that one will show up. This could be something such as charging your iPhone or plugging in another storage device.
🔌 Replace the Cable That You’re Using
The cable that you’re using could have a short in it or maybe it’s just not getting a solid enough connection. Grabbing a new cable and trying it with the external hard drive may resolve the issue of it not being recognized.
💾 Look in Finder for the Hard Drive
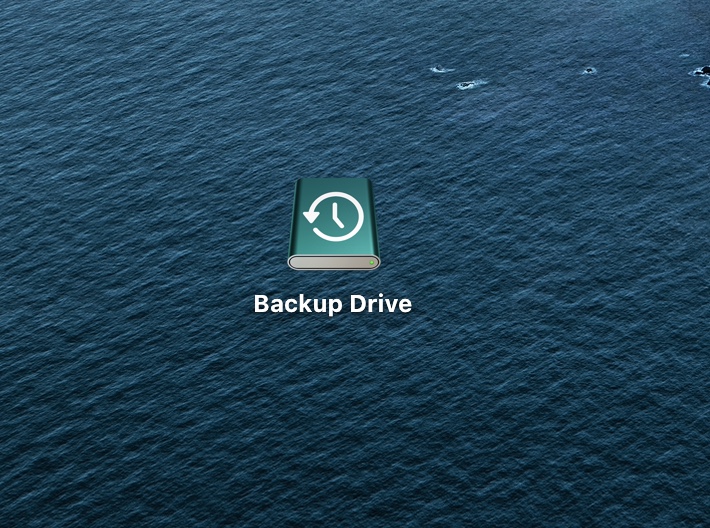
When you plug your external hard drive into your Mac you will have both a Desktop icon and one in Finder that will allow you to access the hard drive.
The one on your Desktop will look like the image below.
You can also go into Finder and find the external hard drive located within there as well and select it if you can’t find the Desktop icon.
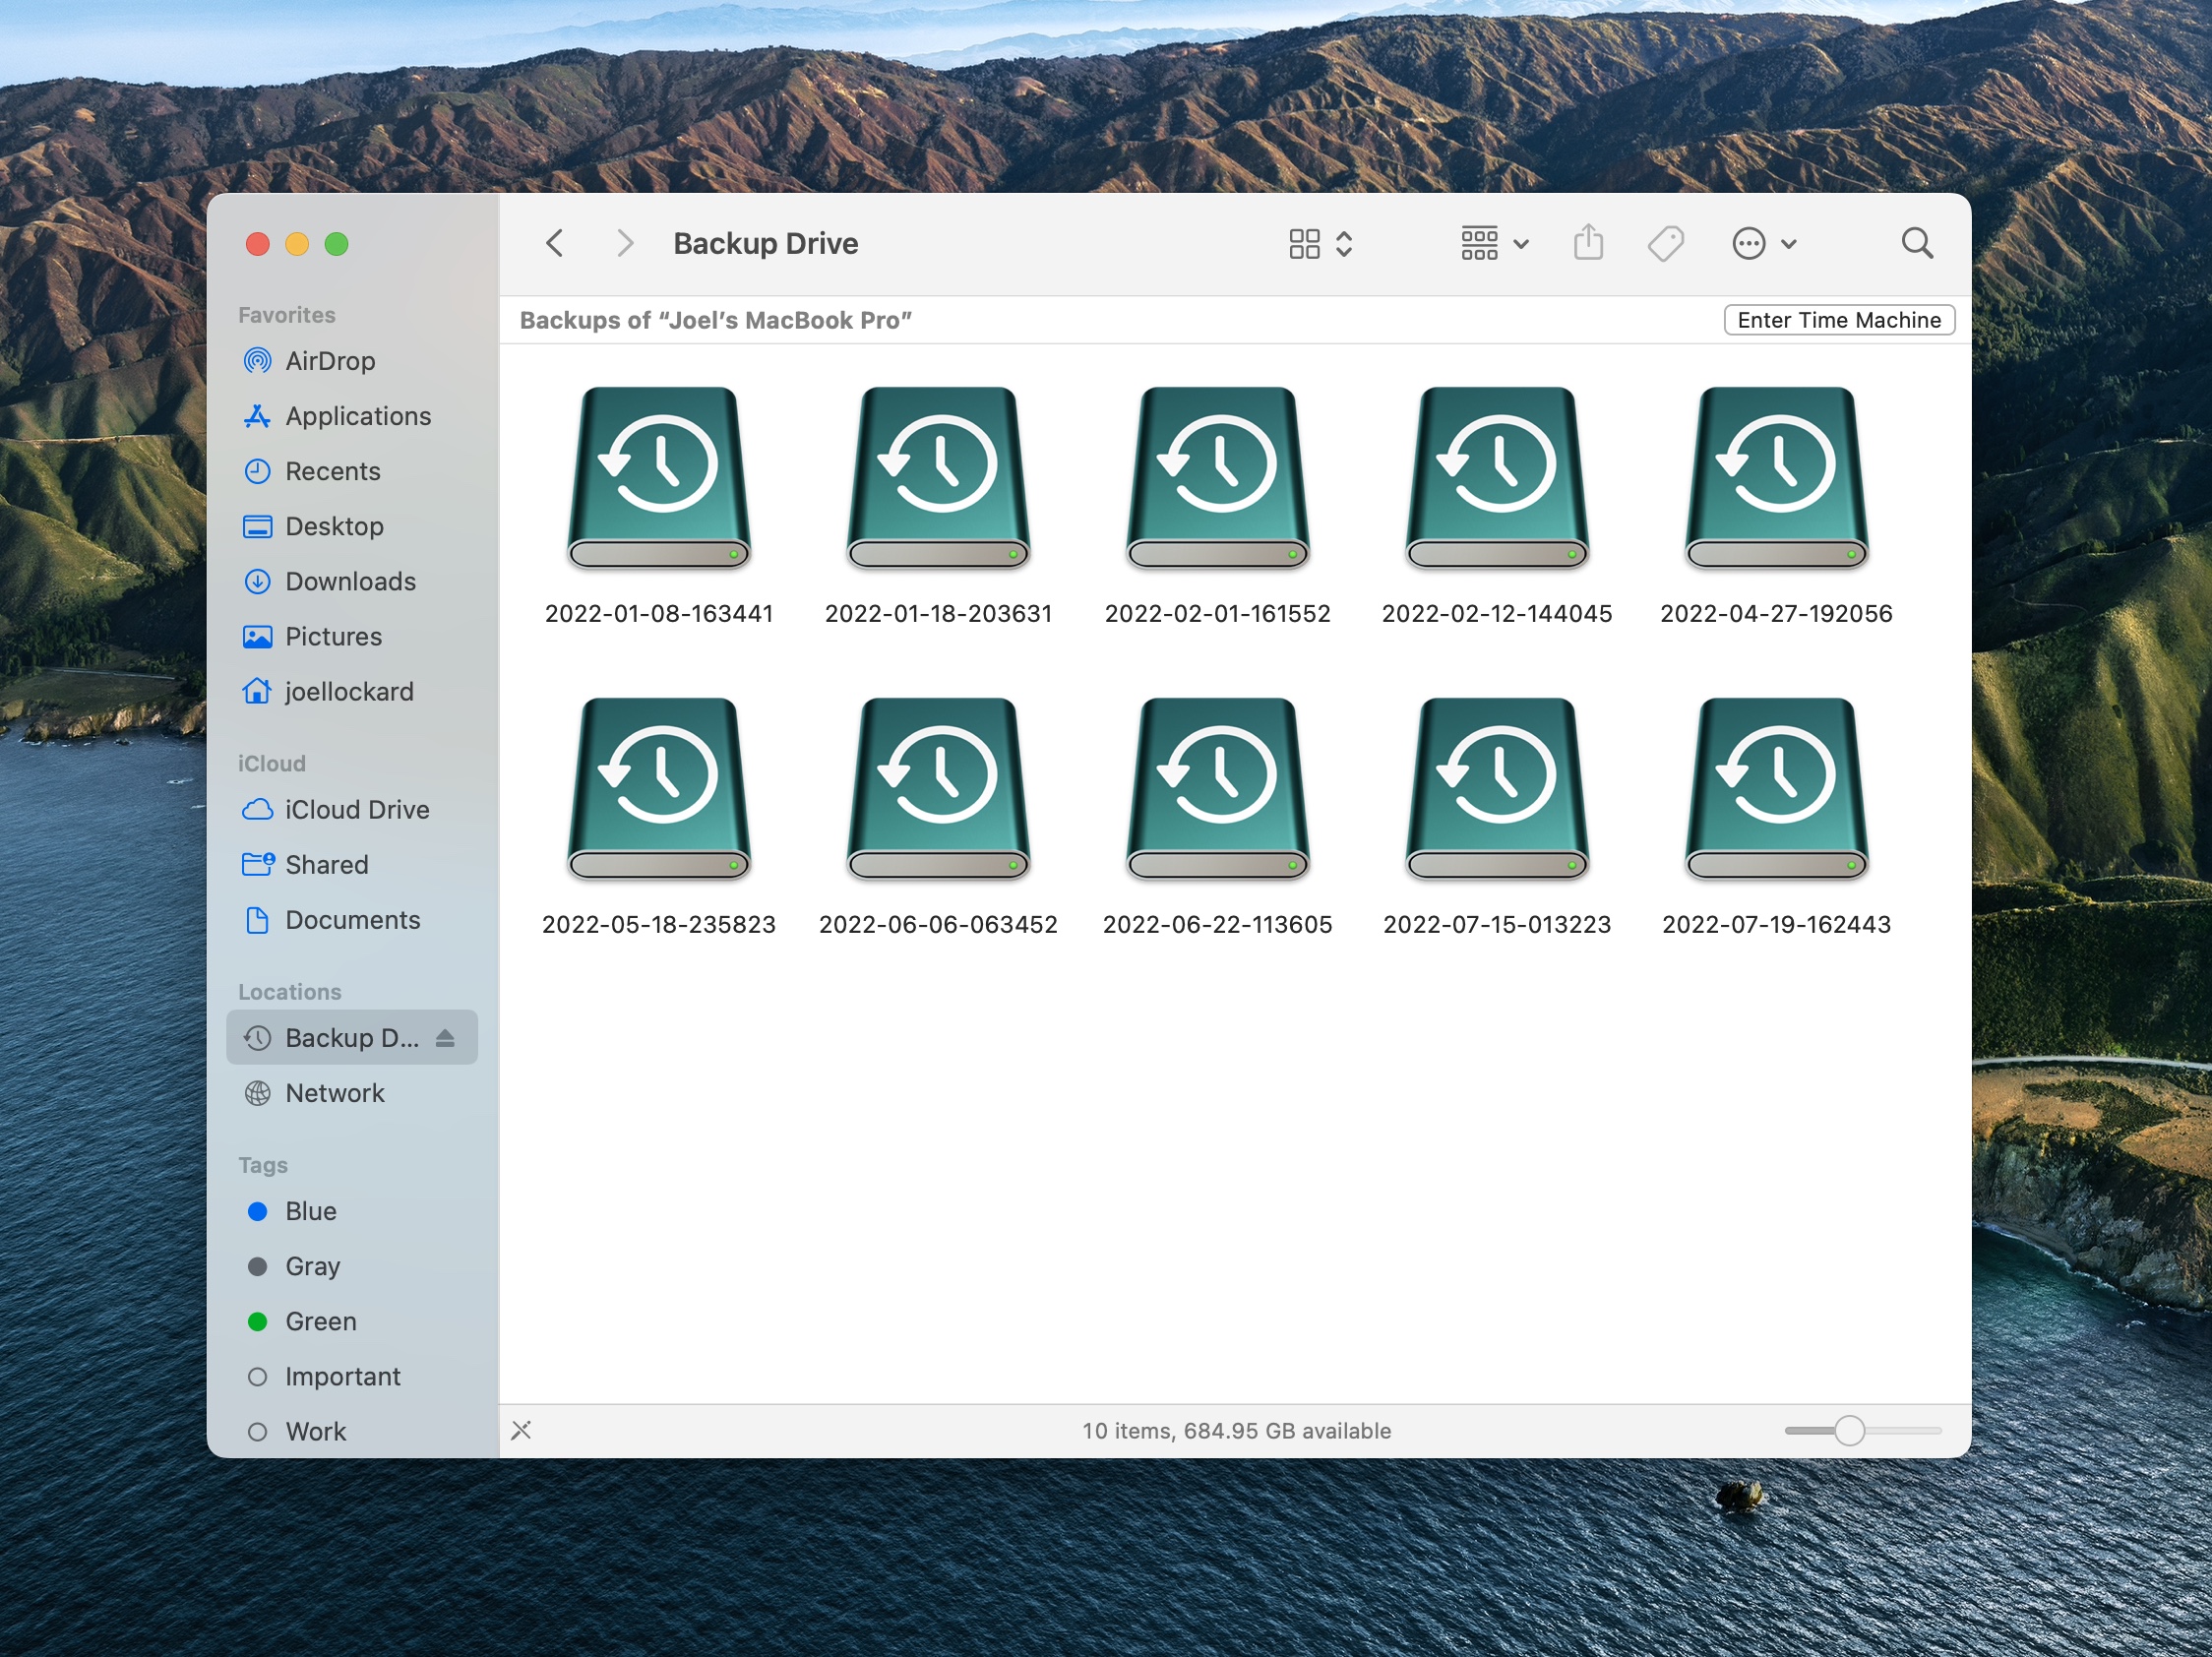
If you’re not seeing either of these icons or options, then we might need to make some changes to our Finder settings to allow them to show up correctly.
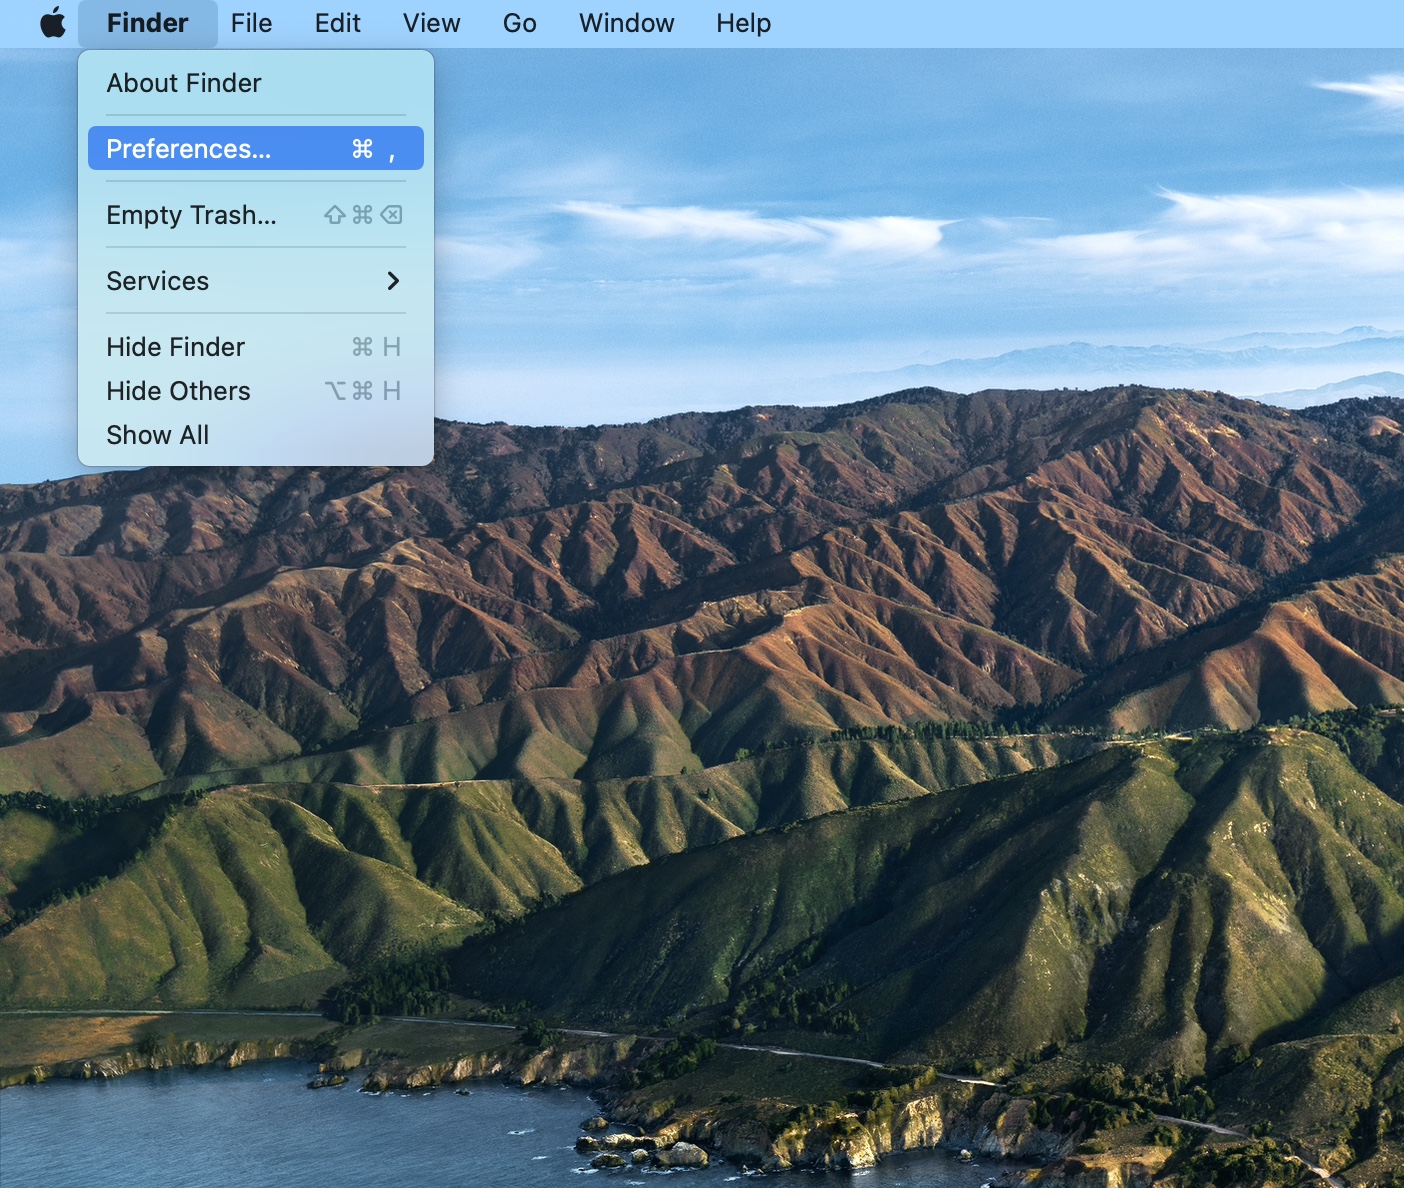
- Launch Finder and have it as the active window.
- Go up to the menu bar and then select Finder > Preferences.
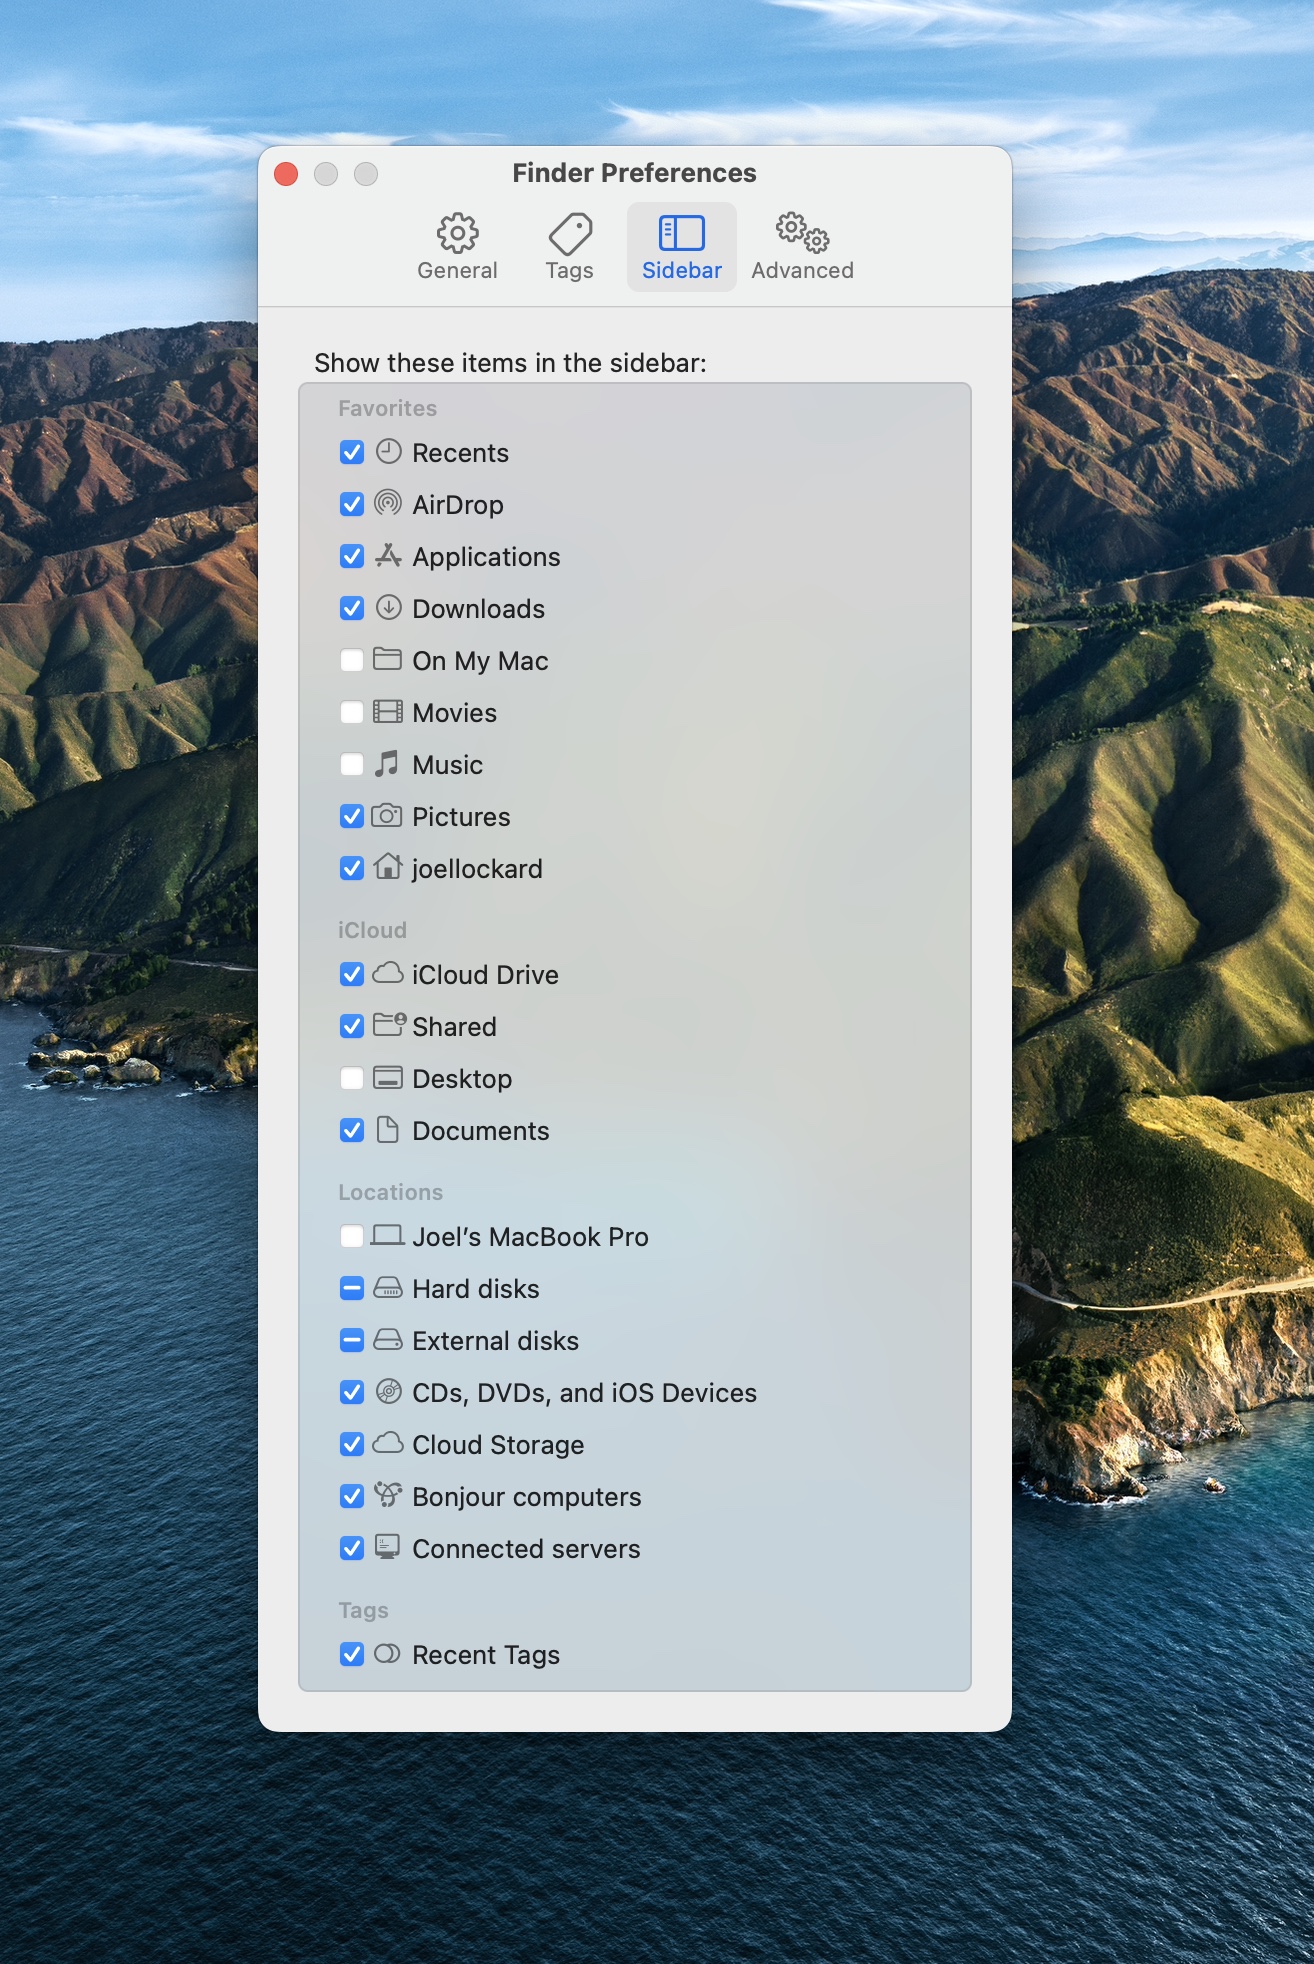
- Make sure that you have Hard Disks and External Devices checked under the locations menu.
Let’s take a look at how to mount the external hard drive if the above method didn’t work.
⚙️ Mount the External Hard Drive Using Disk Utility
The external hard drive may be plugged into your Mac but it may not be mounted. If this is the case we can go into Disk Utility and mount the disk.
- Launch Disk Utility.
- Select your external hard drive from the side and then click on the Mount option.
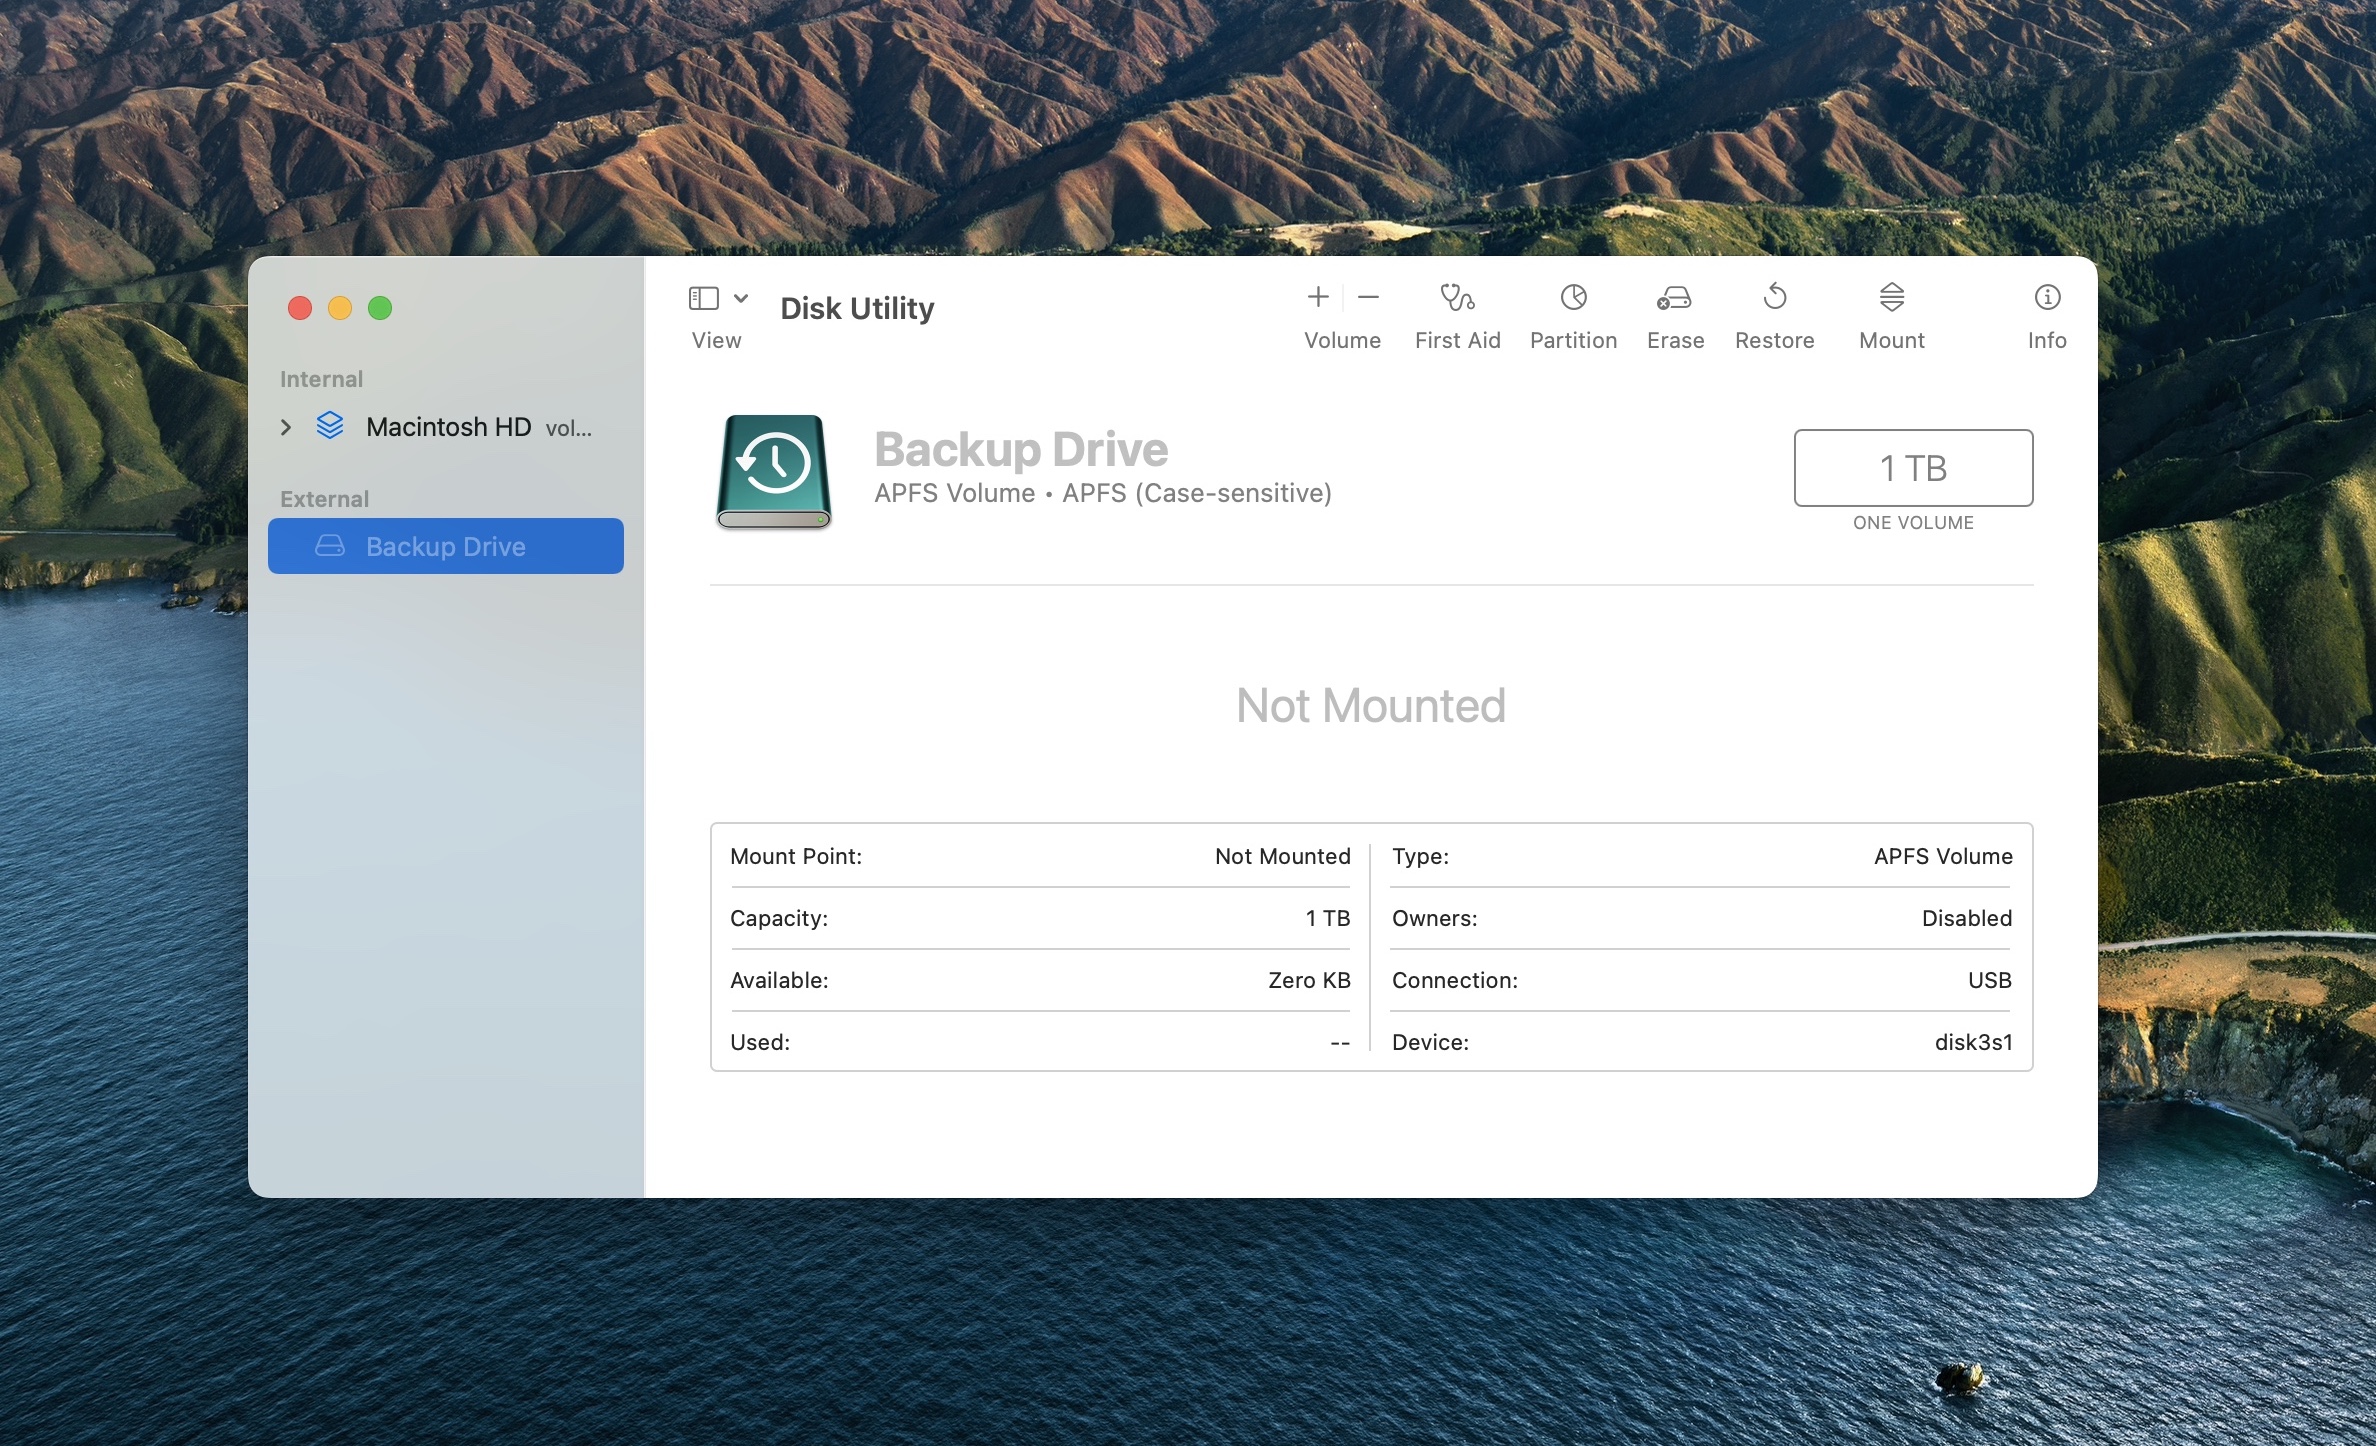
- Check your external hard drive and see if it’s working correctly now. This would include seeing if you can access files and or add and take things off of it.
After completing all of these if the external hard drive is still not showing up then it would be time to make our way onto the methods below. Don’t worry, these methods only have a couple of steps in them and are super easy to understand and walk through.
Method 2: Turn Your Mac OFF and Back ON Again
This may sound super simple, but turning your Mac off and then back on again can fix a lot of issues when it comes to things not working correctly.
Sometimes all your Mac need is to have the power cycled on it and be completely shut down and then turned back on again.
If you use a desktop Mac, after shutting it down unplug the power cable and then plug it back in to make sure that it’s completely disconnected from power for a moment.
- Unplug your external hard drive from your Mac.
- Go to the Apple logo in the upper left-hand side of the screen and then from the dropdown select Shut Down….
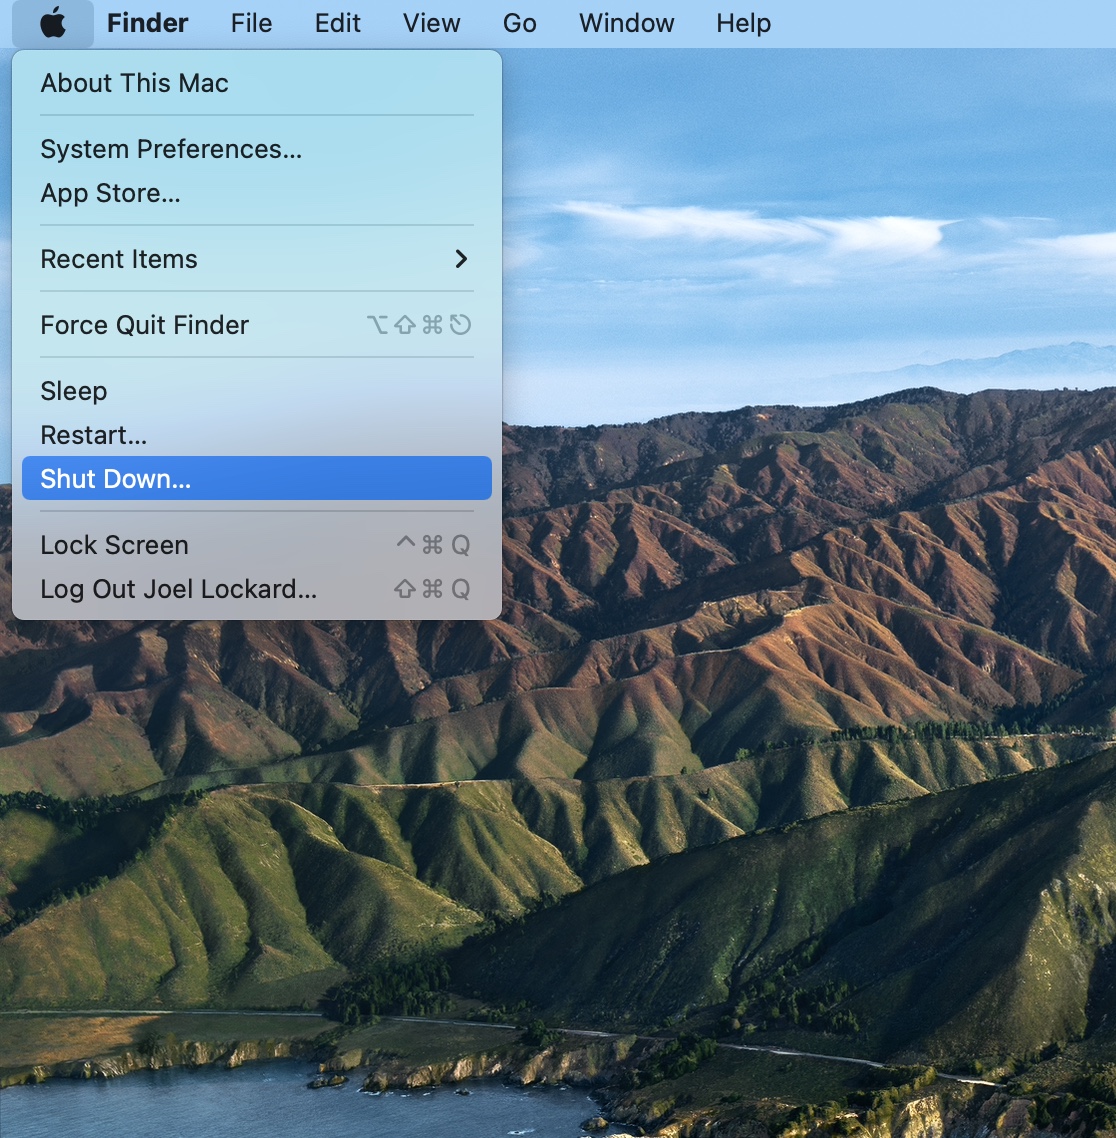
- Wait for your Mac to shut down. Then turn it back on and log back in.
- Try plugging your external hard drive into your Mac and see if it shows up properly. Make sure to give it a moment to power up and connect to your Mac.
If this didn’t work, you might want to try and do a NVRAM or PRAM reset on your Mac.
Method 3: Reset NVRAM or PRAM on Your Mac
NVRAM (nonvolatile random-access memory) is a small amount of memory that your Mac uses to store certain settings and access them quickly. PRAM (Parameter RAM) stores similar information, and the steps for resetting NVRAM and PRAM are the same.
NVRAM stores things such as your sound volume, display resolution, startup disk selection, time zone, and recent kernel panic information.
Resetting your NVRAM and PRAM might help if you’re having issues with your external hard drive not being recognized on your Mac. The steps are simple and there are only a couple that you will need to do.
- Shut down your Mac, then turn it on and immediately press and hold OPTION + COMMAND + P + R and hold these keys for about 20 seconds.
- Your Mac will then appear to restart. Let it boot up to the home screen and then log in.
- Plug in the external hard drive and see if now it’s recognizable.
If you’re using a newer Mac that has a T2 security chip, you can release the keys right after you see the Apple logo.
If this didn’t fix your issue, let’s move on to resetting your SMC on your Mac as this would be the next step in the troubleshooting process.
Method 4: Reset the SMC on Your Mac
Resetting your SMC (system management controller reset) can resolve issues related to power, battery, fans, and other features of your Mac.
This step will only apply to Macs that have an Intel processor so if you’re using a newer Apple silicon Mac then you don’t need to do this step.
This can fix the issue of your Mac not being able to see the external device you’re plugging in and hopefully, it will make it recognizable after trying these steps.
- Shut down your Mac.
- On your keyboard, press and hold the Control + Option + Shift keys.
- Keep holding down all three keys for 7 seconds, then press and hold the power button as well.

Try plugging in your external hard drive and see if it’s being recognized now.
If the hard drive isn’t showing up, we might be able to see it in Disk Utility. Within Disk Utility we might be able to run First Aid on the hard drive and get it working 100% correctly again.
Method 5: Use First Aid to Repair Your External Device
File system errors are a common reason why your Mac is not recognizing the external hard drive. Fortunately, Disk Utility’s First Aid tool is pretty good at diagnosing and fixing such errors. And since First Aid is located in Disk Utility, it’s going to recognize your drive even if the Mac itself doesn’t.
First Aid is a repair utility that comes installed on your Mac as part of macOS. We can use it to repair things such as storage devices.
Disk Utility can find and repair errors related to the formatting and directory structure of a Mac disk. Errors can lead to unexpected behavior when using your Mac, and significant errors might even prevent your Mac from starting up completely.
This method will only work if after troubleshooting using the methods above the hard drive is now showing up and we’re able to interact with it but maybe it’s still acting weird or is only connecting some of the time.
- Launch Disk Utility by going to the Applications folder and then the Utilities folder. After you’re within the Utilities folder, launch Disk Utility.
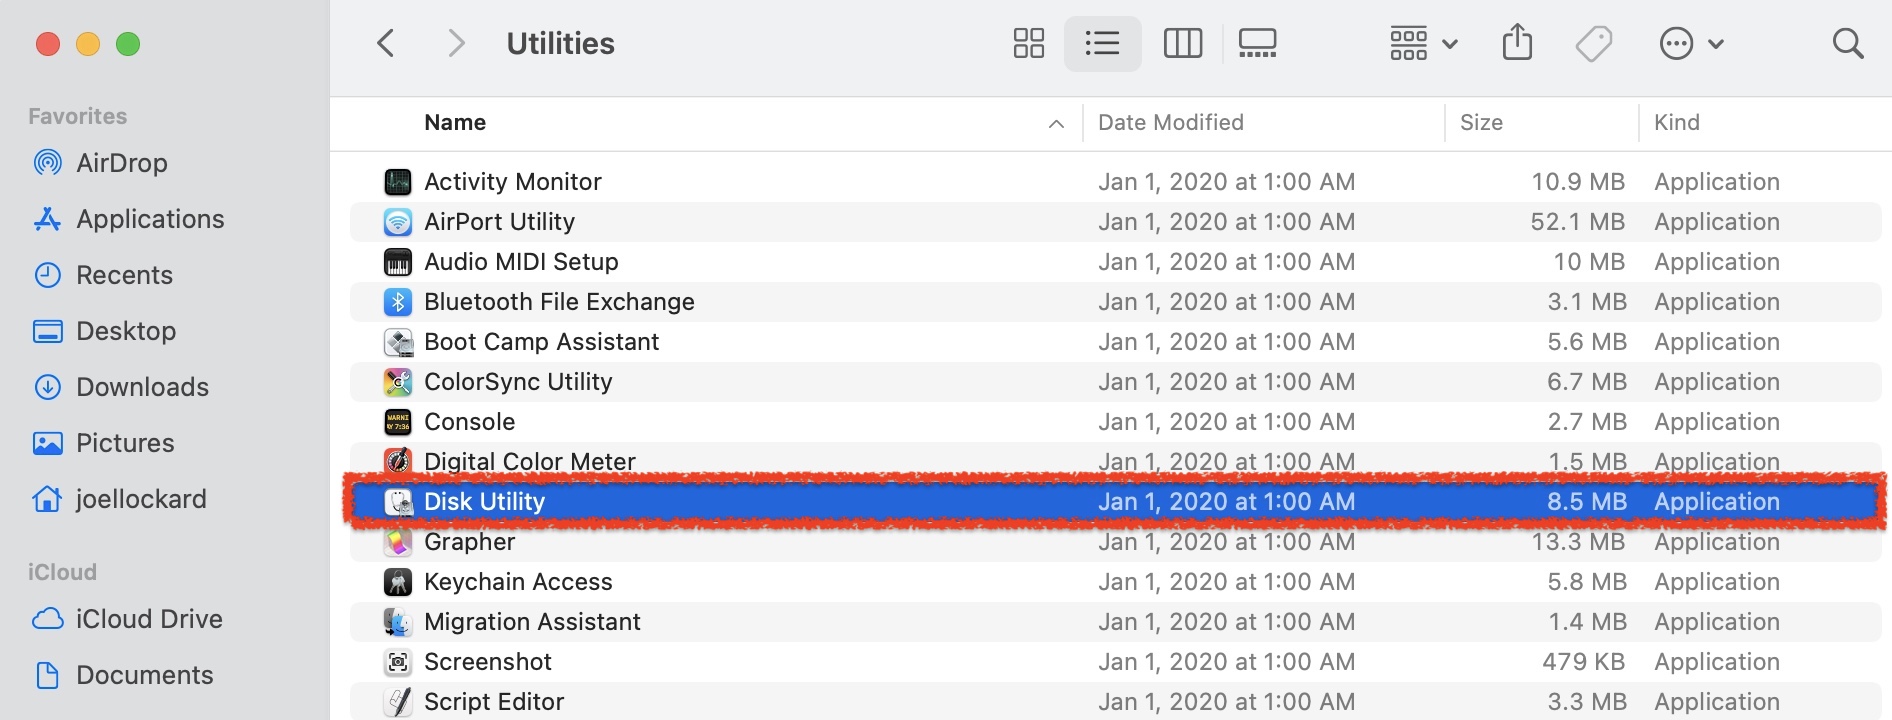
- Once you have launched Disk Utility, select your external device and then click on First Aid.

- Run First Aid on the external device. Running First Aid on the external hard drive will not cause it to lose any data so you do not need to worry about that.
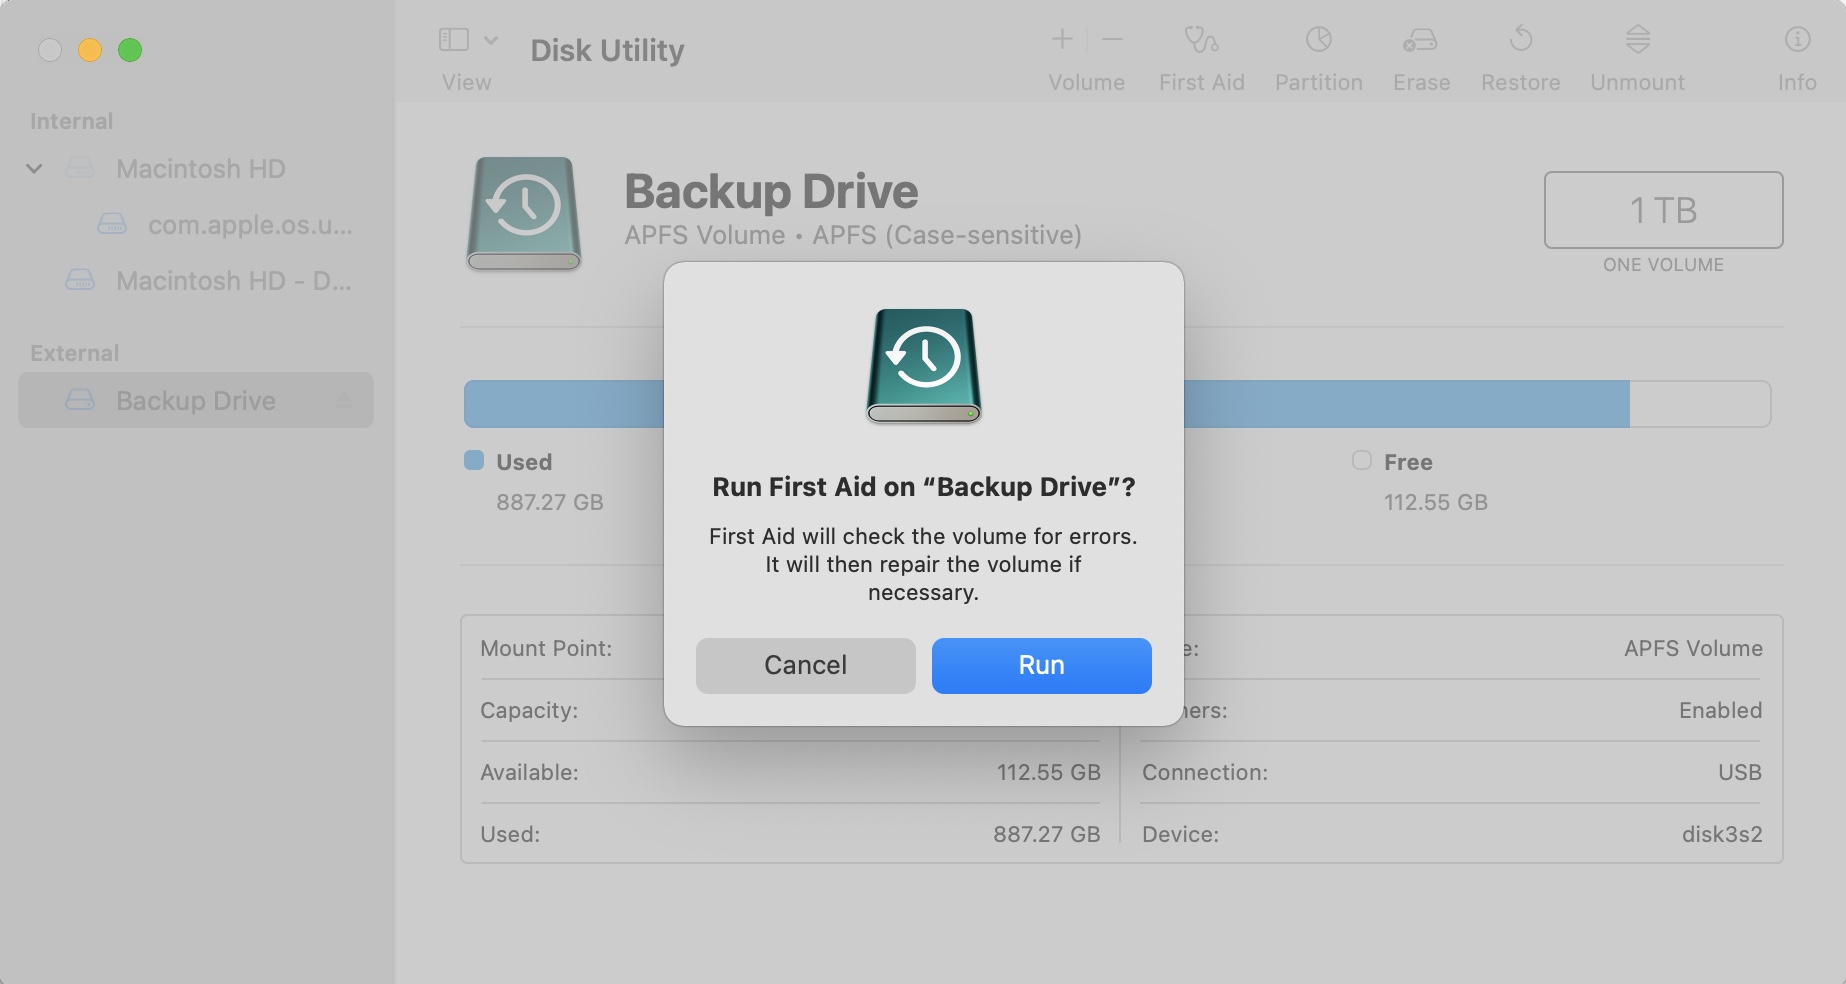
- Check and see if the device is working correctly.
If you still can’t get it to work correctly, then it may be time to send the hard drive to a professional if the data on it means a lot to you.
Sending Your Hard Drive Into a Data Recovery Center
Sometimes external hard drives break and no matter what you try to do, you might not be able to get the data off of it and that’s okay.
I would recommend that you take a look at the best hard drive data recovery services and see which option would be the best for you and your circumstance. You can’t put a price on your data if it’s important enough to you!
Conclusion
Once you notice that your external hard drive is not showing up on your drive, you have a good chance of recovering your data as long as you act fast (and you use a reliable data recovery software).
After that, it should be pretty simple to fix your drive and return it to normal function. Just make sure you secure your data before attempting to fix your drive – even just running First Aid may cause data loss!
FAQ
How to access data on the external hard drive that is not showing up on Mac?
To access data on an external hard drive that isn’t showing up on Mac, you need to use data recovery software. Let’s use Disk Drill as an example:
- Download, install, and launch Disk Drill.
- Scan the external hard drive that you can’t access or is not showing up.
- Click Review found items.
- Select the files you want to restore and click Recover.
- Choose a location on your Mac and click Next.
What to do if Mac not detecting the external hard drive?
If your Mac doesn’t recognize your drive, the first thing you should do is recover your data and save it to a secure location (like your Mac or another drive). Otherwise, prepare to lose it. Once your data is secure, try the following fixes:
- Try other ports, cables, or Macs to make sure it’s not a mechanical issue.
- Mount your external hard drive manually using Disk Utility.
- Reboot your Mac.
- Use the First Aid tool in Disk Utility.
- Reset your Mac’s NVRAM or PRAM.
- Reset your Mac’s SMC.
Why external hard drive causes my computer to shut down?
There are a few possible reasons why your external hard drive causes your computer to shut down (and what to do about it):
- Mechanical damage – There may be something wrong with your cable, ports, or USB hub (especially if it’s powered). Try switching up your equipment and see if you can reproduce the issue. You should especially try testing your external hard drive on another Mac.
- Compatibility issues – Western Digital (WD) external hard drives typically have compatibility issues with Mac. If you’re using this brand, try using a different enclosure.
- Software errors – There may be a problem with the software-hardware communication on your Mac (for ex. your external hard drive is drawing too much power, causing the shutdown). Try resetting your Mac’s NVRAM, PRAM, or SMC.
- Lack of resources – You may have a lot of devices connected to your Mac and it can’t provide enough power.
This article was written by Joel Lockard, a Contributing Writer at Handy Recovery Advisor. It was recently updated by Alejandro Santos. It was also verified for technical accuracy by Andrey Vasilyev, our editorial advisor.
Curious about our content creation process? Take a look at our Editor Guidelines.