M.2 NVMe SSDs are a relatively new storage technology when compared to regular 2.5” SSDs, and HDDs. However, they are still susceptible to data loss, like any other storage drive. But users need not panic, because NVMe data recovery is possible, and we’ve made it even more approachable in our guide below.
If files go missing from your NVMe SSD, there are recovery methods like using Disk Drill software. Additionally, you can unhide files, verify file system integrity, or even format the SSD post-backup. For those looking to understand NVMe SSDs in depth or seeking comprehensive recovery methods, our article below has you covered. Dive in!
Can Data Be Recovered from an NVMe SSD?
Yes, data recovery is possible on NVMe SSDs, but it depends on a multitude of factors:
- 💽 Reason for Data Loss: You may have accidentally emptied the Recycle Bin or the data was wiped out because of other common reasons like an accidentally formatted partition or logical errors. M.2 SSD data recovery is possible in almost all cases, provided the drive can be detected by the BIOS and the data recovery program. It’s recommended that users contact a data recovery service in case of data loss due to physical damage.
- ✂️ The TRIM Command: When you delete files from an SSD, the sectors they were stored in are marked ready for overwriting. The pointers to those files are deleted, so the OS no longer knows the files are there. The old files are technically still there until they’re overwritten by new files. But, SSDs have a TRIM feature, that cleans up these old files at regular intervals, making them almost impossible to recover. Even though it negatively impacts data recovery chances, the TRIM feature is important for the performance and longevity of your SSD. However, the TRIM command is not executed immediately. If data recovery is attempted soon enough, you can still recover data from M.2 SSDs even if they have TRIM enabled.
- ⌛ Elapsed Time Since Data Loss: Time is of the essence in NVMe data recovery. To stand the highest chance of data recovery, don’t wait more than 20–30 minutes before attempting it—the sooner, the better. The previous data can be overwritten by system functions because most people use NVMe SSDs as their primary drive. Users may unwittingly overwrite the data as well by creating new files on the NVMe SSD. Combine this with the TRIM feature in SSDs and one can see why letting too much time pass between data loss and attempting data recovery can seriously reduce the chances of successful data recovery.
How to Recover Data from an NVMe SSD
The most convenient way to recover data from an SSD is to use data recovery software. But, it’s essential to select the best SSD data recovery program, because data recovery chances decrease with subsequent data recovery attempts.
In our experience, Disk Drill is an excellent choice for beginner and seasoned PC users alike. It has a market-leading data recovery algorithm hidden behind a neat, easy-to-use interface. It allows you to create and scan disk images, which can be especially useful in the case of NVMe data recovery. Not only that, but it’s equally capable of recovering data from other storage device types (such as HDDs) as well–with support for all major file systems across different operating systems.
![]()
Before you proceed with the actual data recovery, it’s highly recommended you first disable the TRIM command on your computer, and also create a disk image of the drive using Disk Drill.
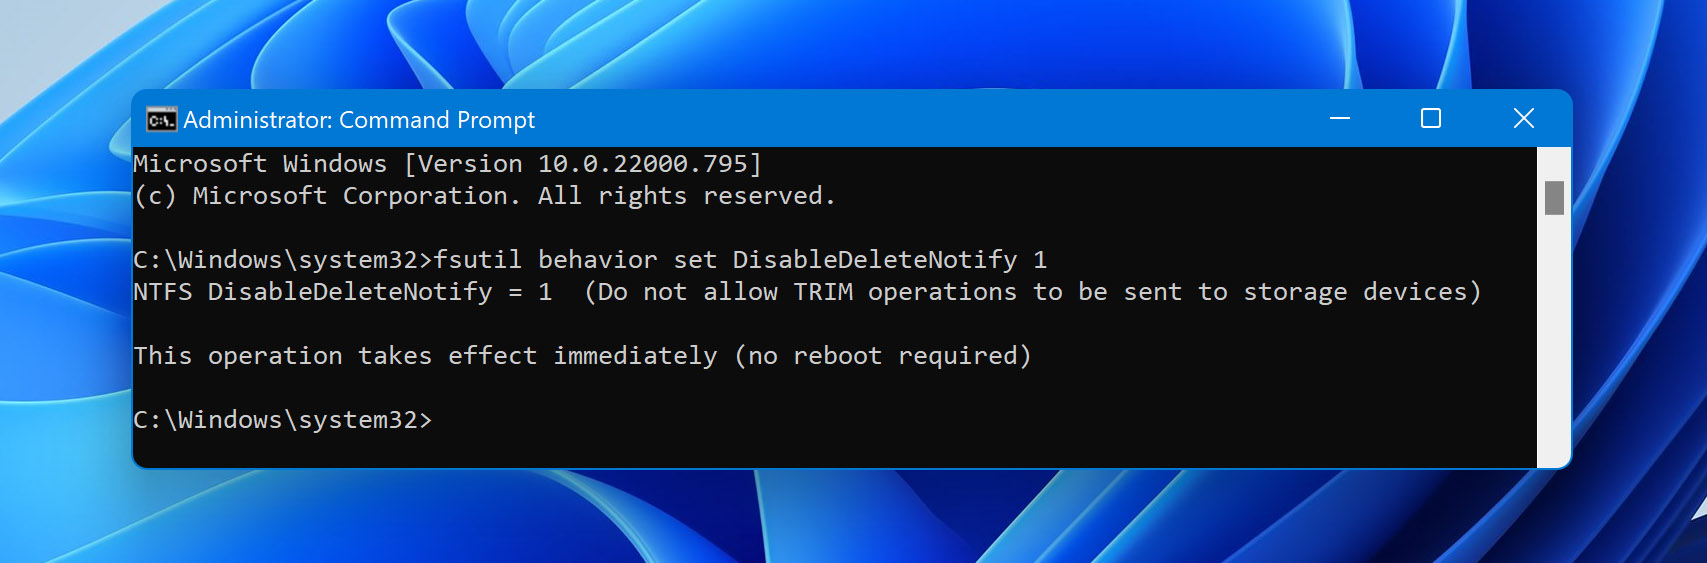
Disabling TRIM on Windows
- In the Windows search bar, type cmd.
- Right-click on Command Prompt, and select Run as administrator.
- In the CMD terminal, type fsutil behavior set DisableDeleteNotify 1 and press Enter.
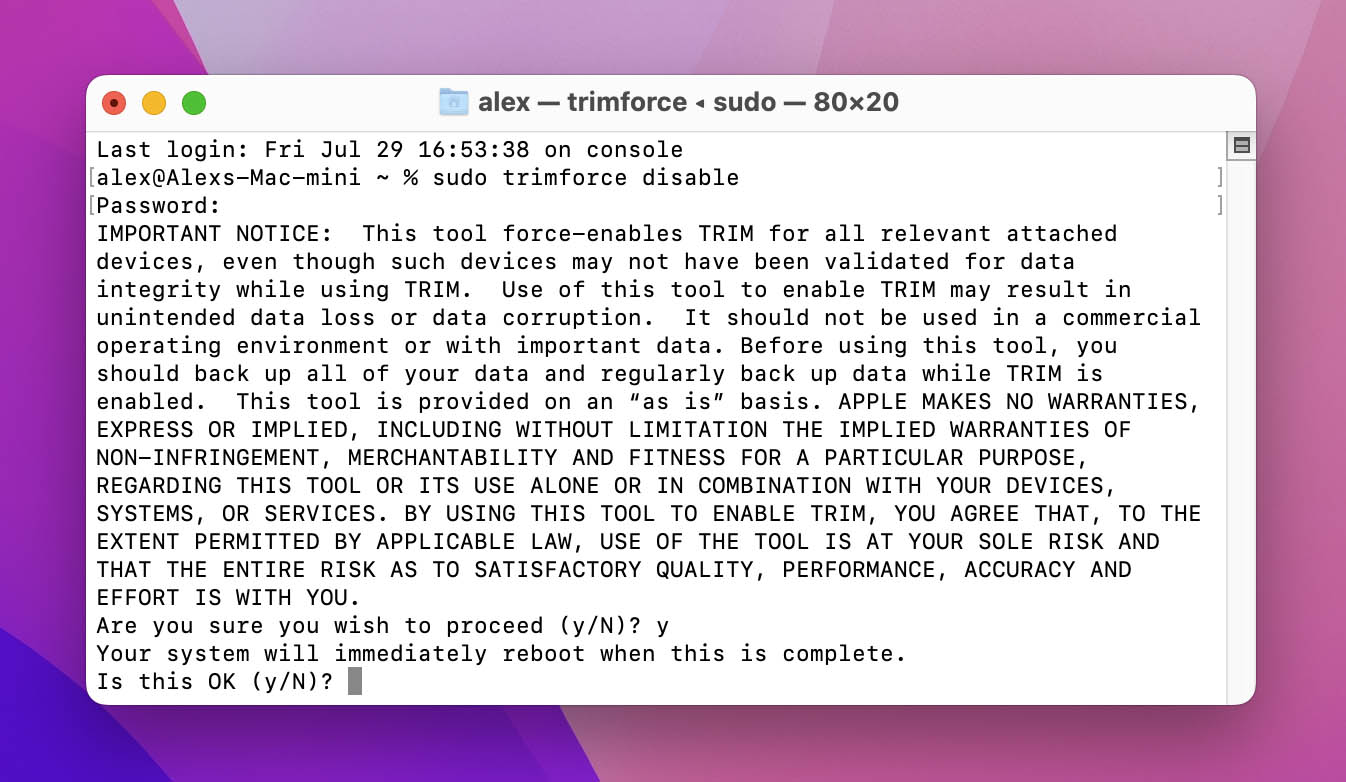
Disabling TRIM on Mac
- Open the Terminal.
- Type sudo trimforce disable and press Enter.
- When prompted, press Y.
Important: Don’t forget to enable TRIM again after you’re done recovering the data. This is essential because the TRIM feature ensures the longevity of your SSD and also makes data management more efficient. Windows users can use the fsutil behavior set DisableDeleteNotify 0 command, and for Mac users, the sudo trimforce enable command to enable the TRIM feature. But, be wary of the fact that re-enabling TRIM will adversely affect the chances of data recovery in the future if data loss occurs again.
Note for MacOS 11 & Above Users: Unfortunately, starting from macOS 11 (Big Sur), Apple no longer lets you disable the TRIM command. Even though the OS will display a message stating TRIM will be disabled after a restart, it’ll still be active. However, on older macOS versions, and all Windows versions, you should enable the TRIM command after recovering your files.
Lastly, even if TRIM was enabled and some time has passed since the data loss event, it’s still worth scanning the NVMe SSD using Disk Drill. The program lets you preview each recoverable file and also comes with a free trial with up to 500 MB of data recovery on Windows.
Creating a Disk Image Using Disk Drill
A disk image is essentially a soft copy of an entire storage drive. Regardless of your drive’s state—functional, or faulty—we recommend creating a disk image of your drive, and then scanning the disk image for any recoverable data.
The reasons for this are twofold:
- It protects you against further data loss by capturing the state of your SSD as it is.
- Data recovery scans place a lot of stress on a physical drive, as each sector is examined for recoverable data. On faulty drives, this added load can aggravate data loss. A disk image prevents this by eliminating the need to scan the physical drive.
The only downside of creating a disk image is that you need another physical disk with enough free storage space to store the SSD’s disk image.
- Download Disk Drill and install it. Do so on a separate drive to prevent the potential overwriting of any deleted data on the SSD.
- Open Disk Drill and on the left navigation bar, click on Drive Backup.
- Connect an external storage device that has more storage space than the SSD or partition you want to create a disk image of.
- Select the NVMe SSD or the partition you want to create a disk image of, then click on the Byte-to-byte backup option.
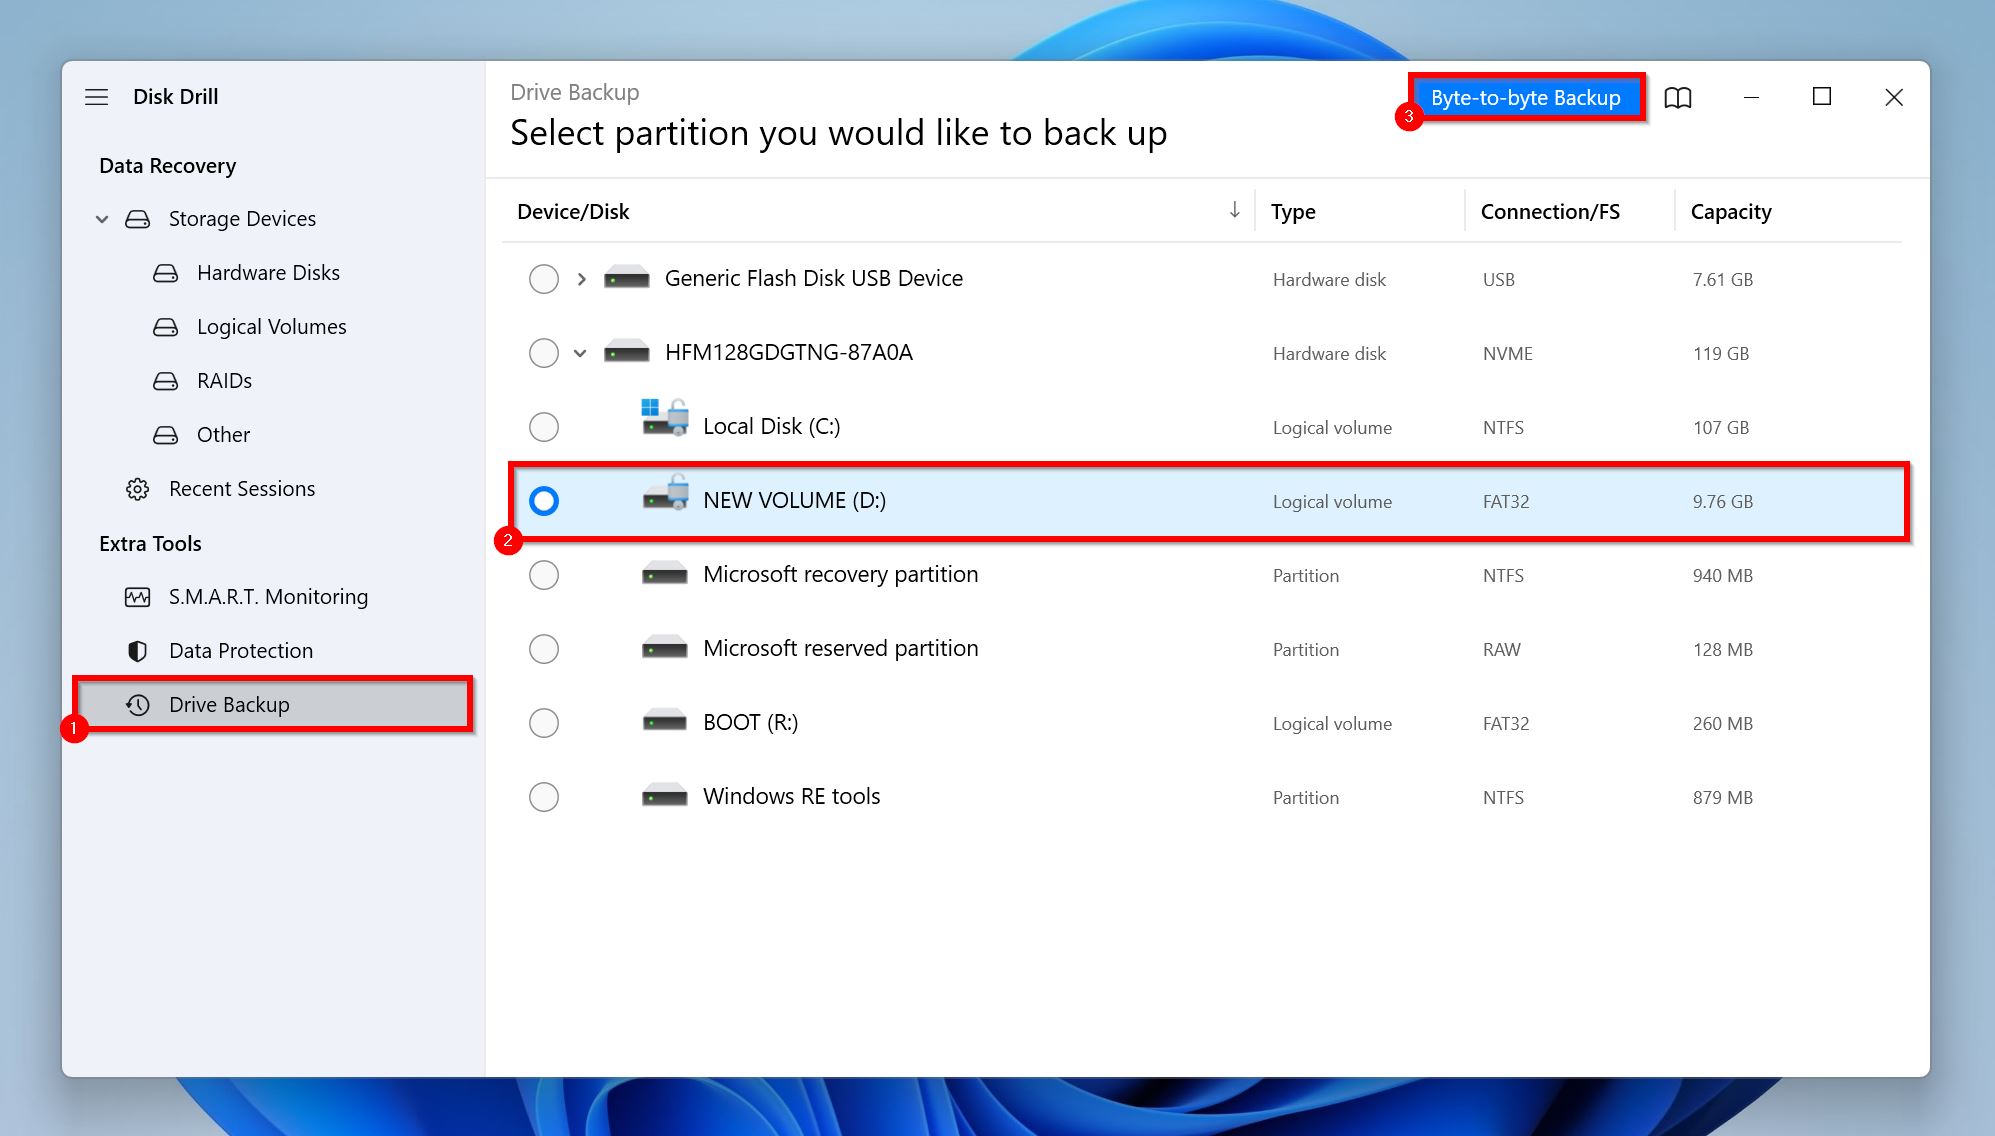
- On the next window, select the external storage device you connected as the Path. Click on OK.
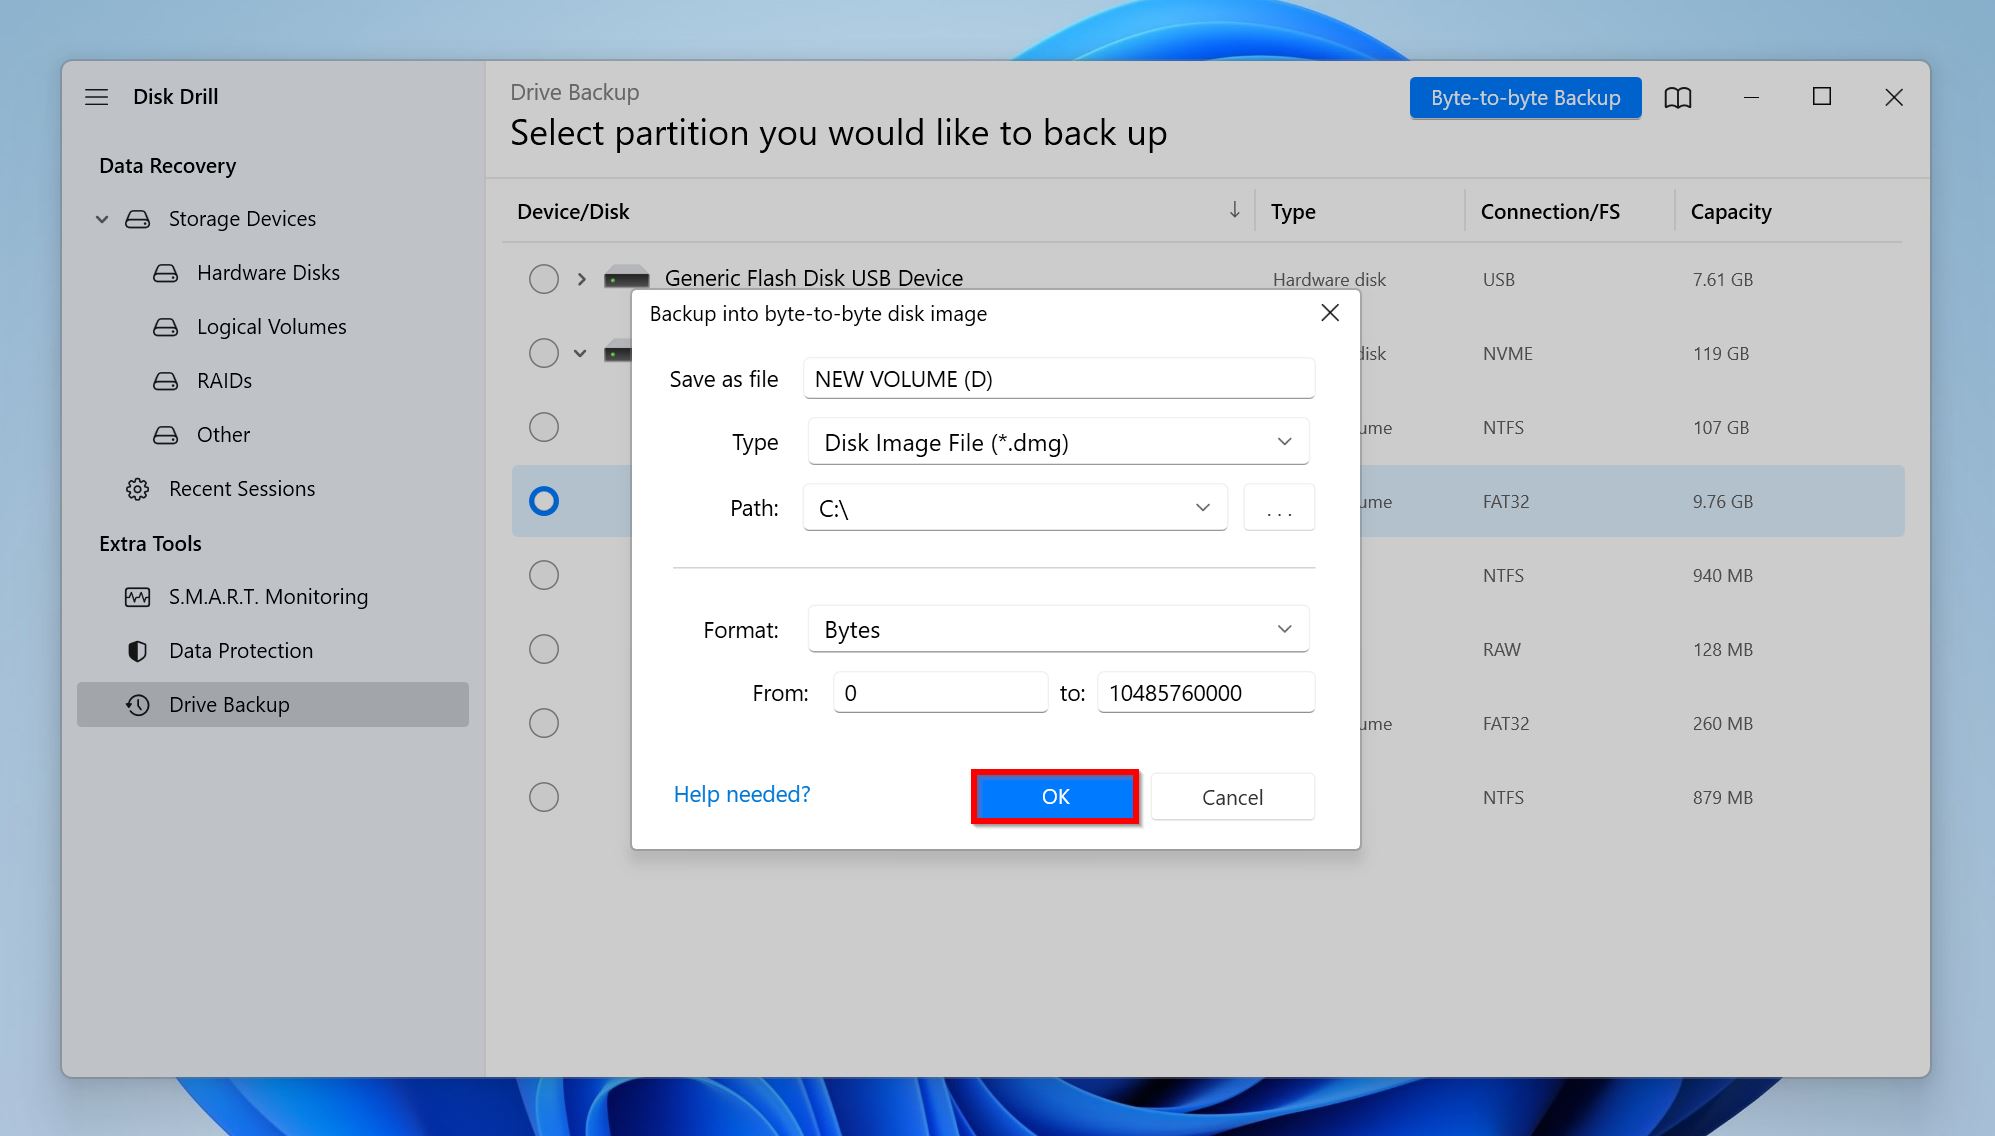
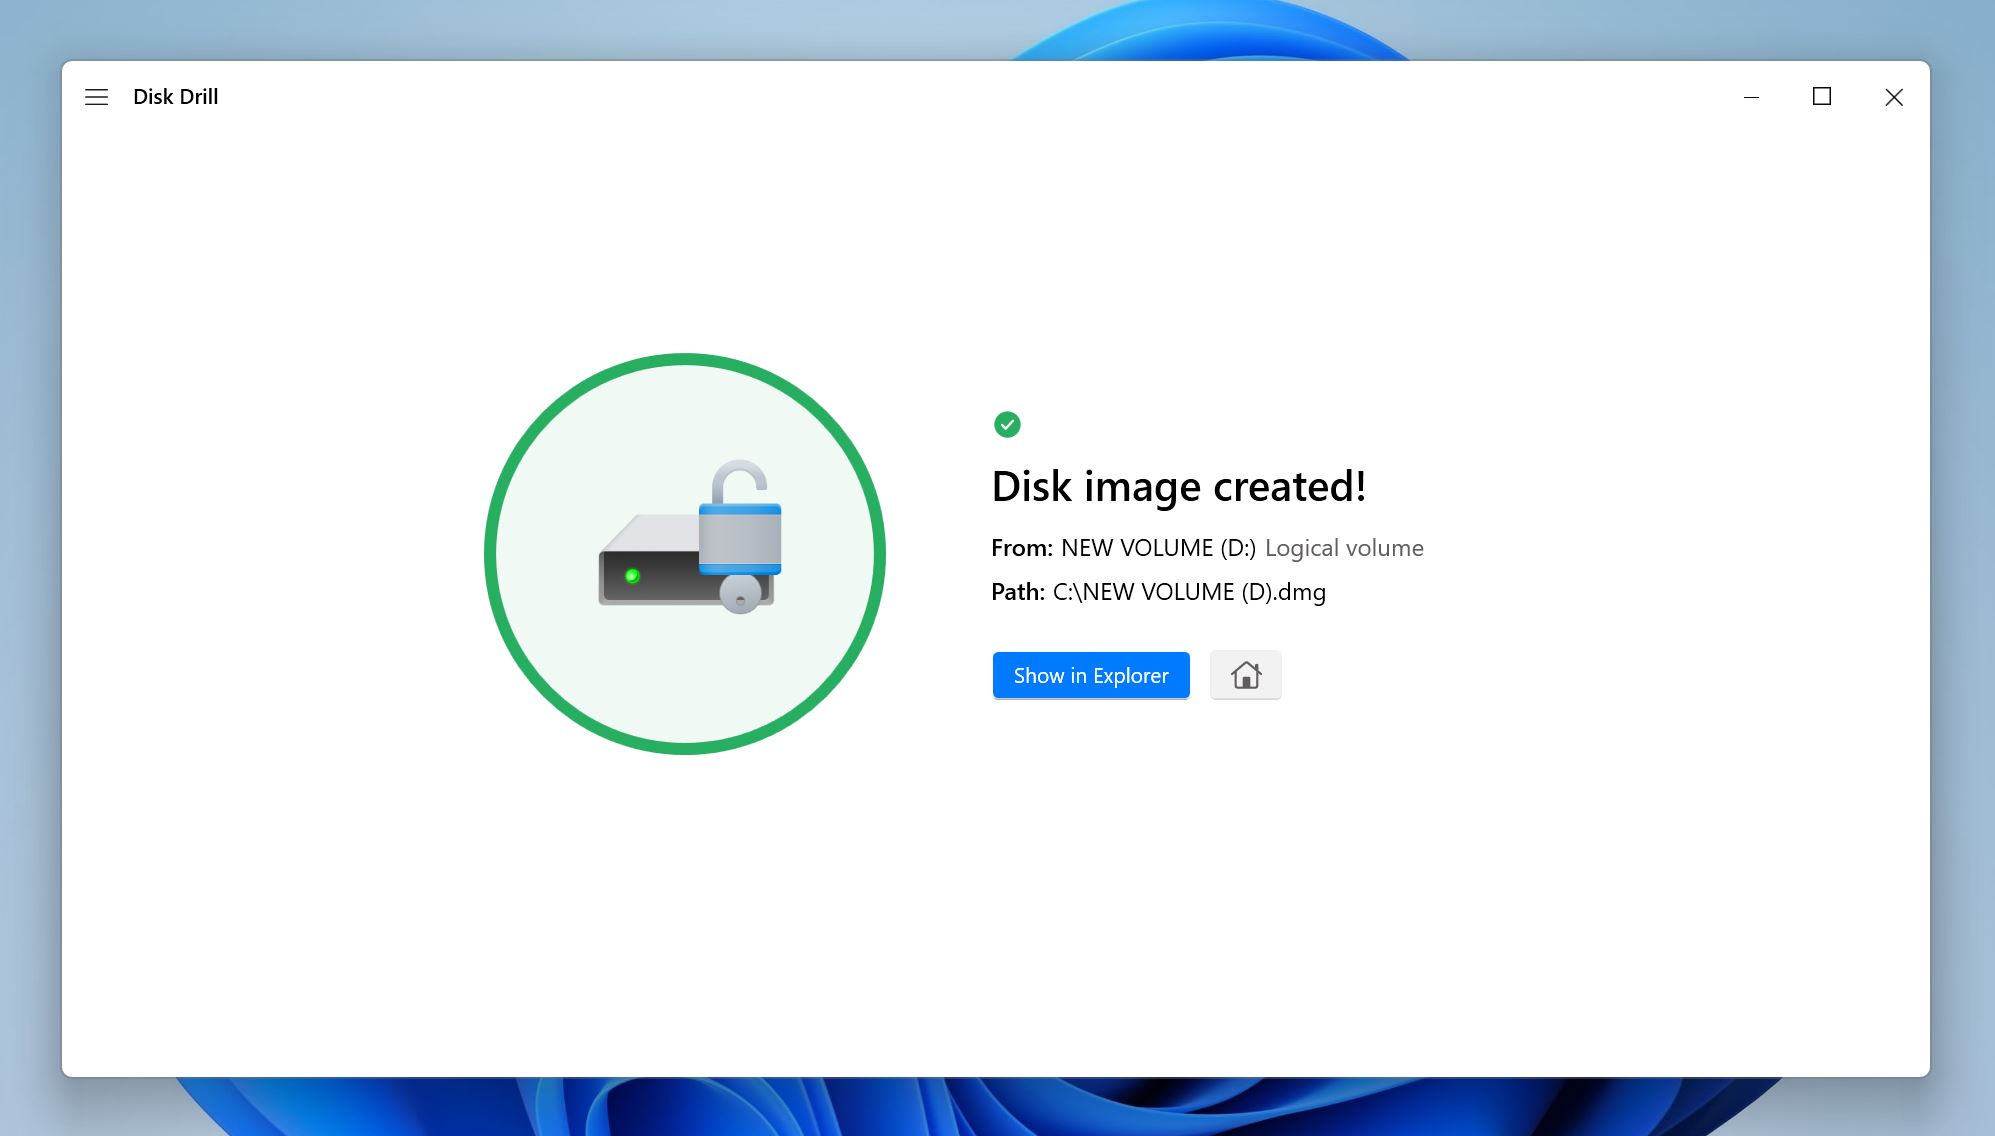
- Wait for Disk Drill to create a disk image, then click on Done.
Recovering Data from an M.2 NVMe SSD with Disk Drill
- Download Disk Drill and install the program. Again, do this on a drive other than the SSD to prevent the potential overwriting of deleted data.
- Open Disk Drill.
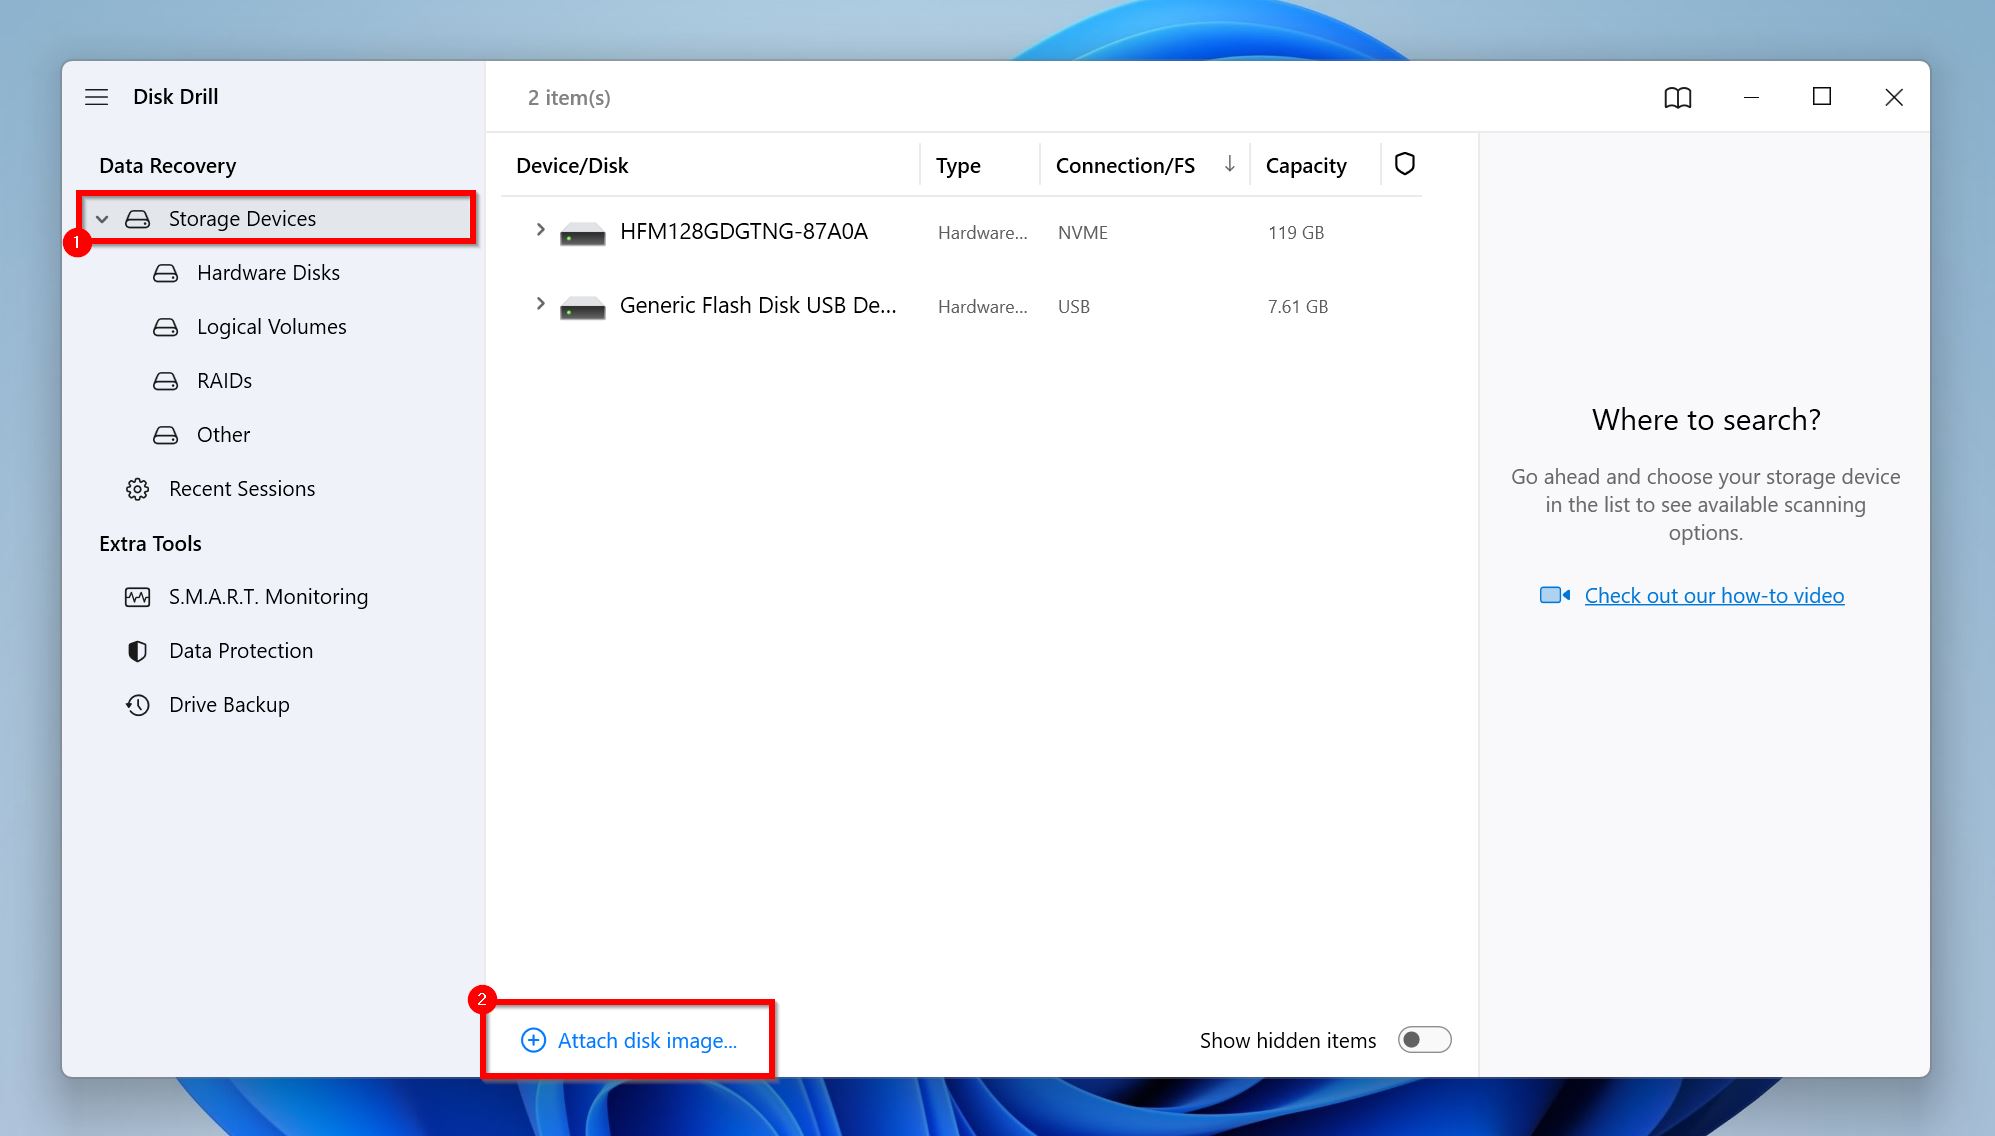
- If you created a disk image, click on the Attach a disk image and then browse for the disk image you created earlier. It will show up as a storage drive on Disk Drill.
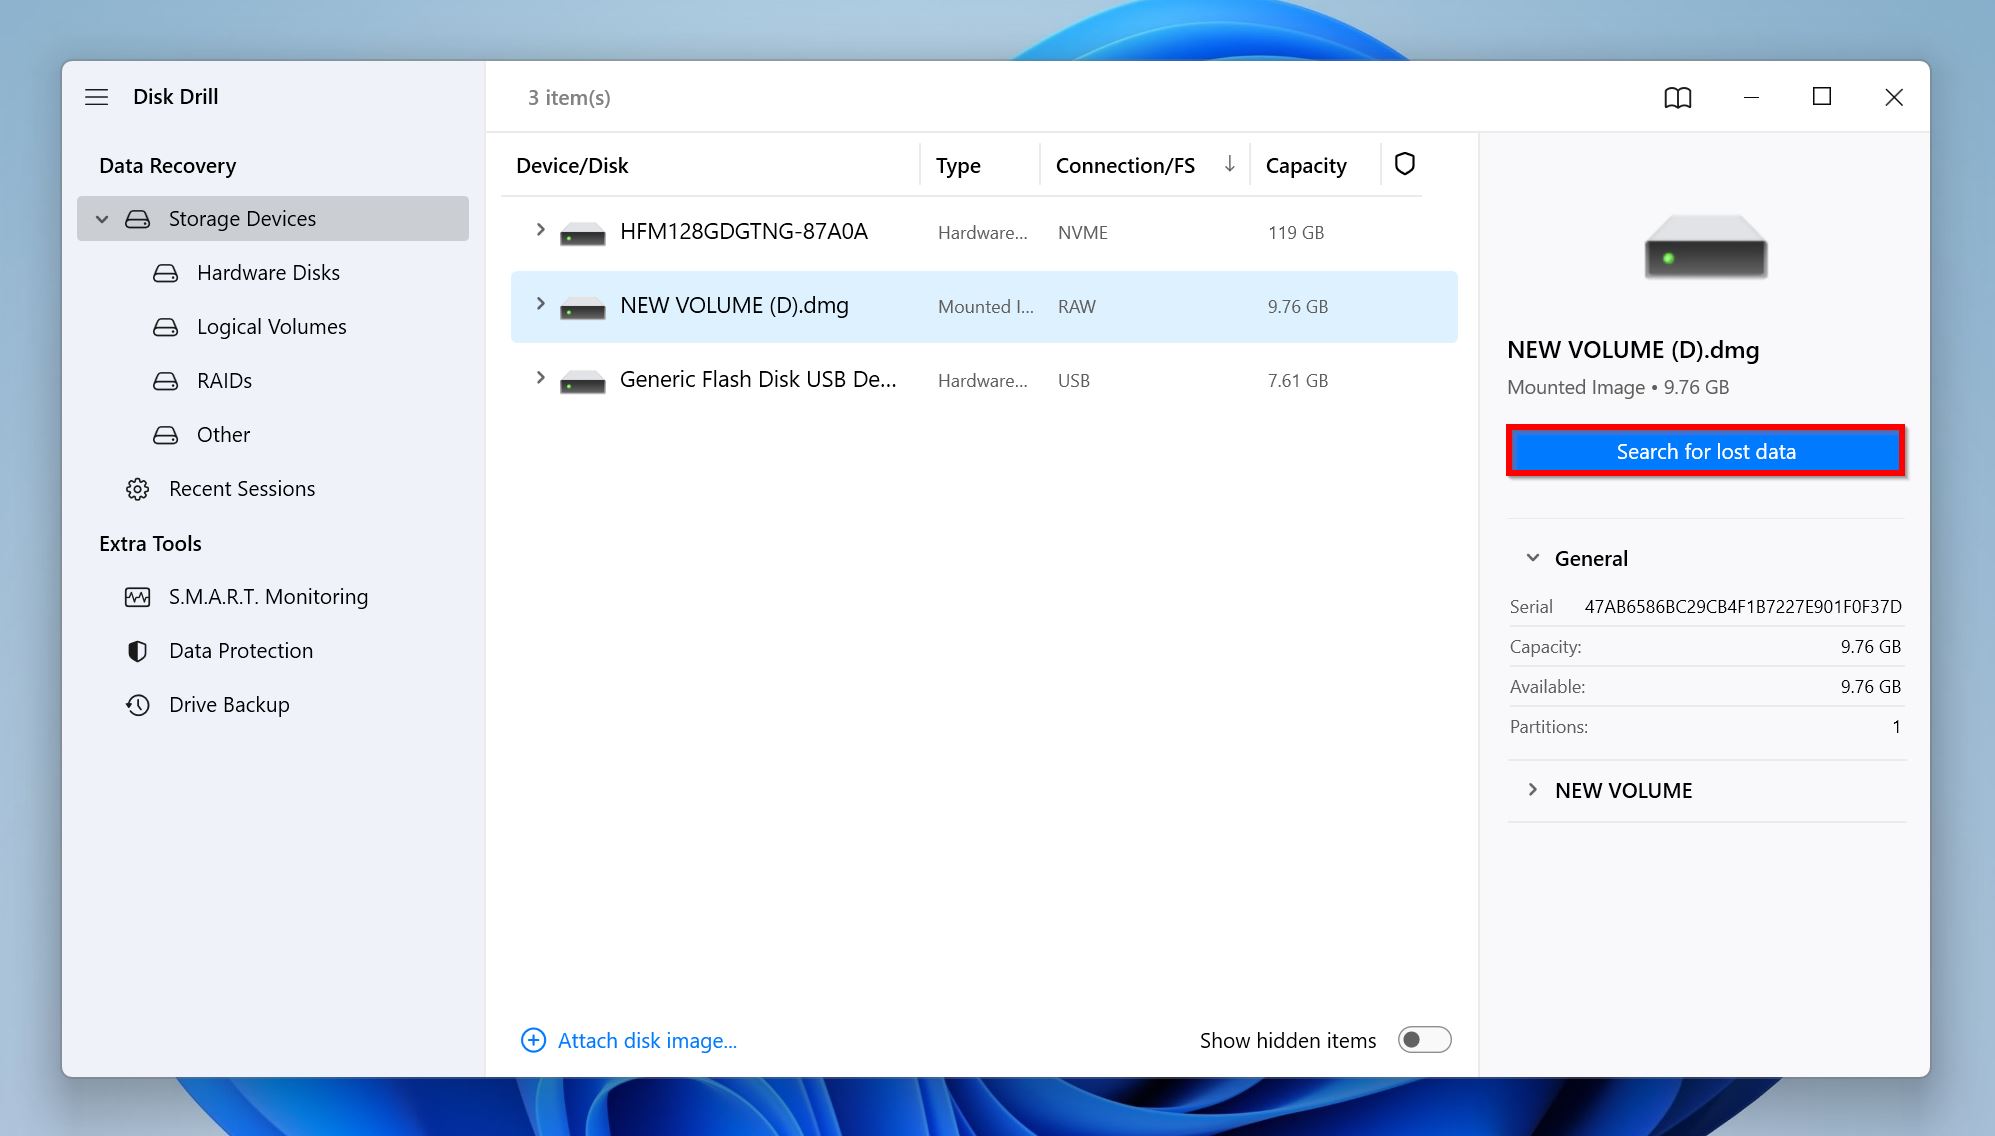
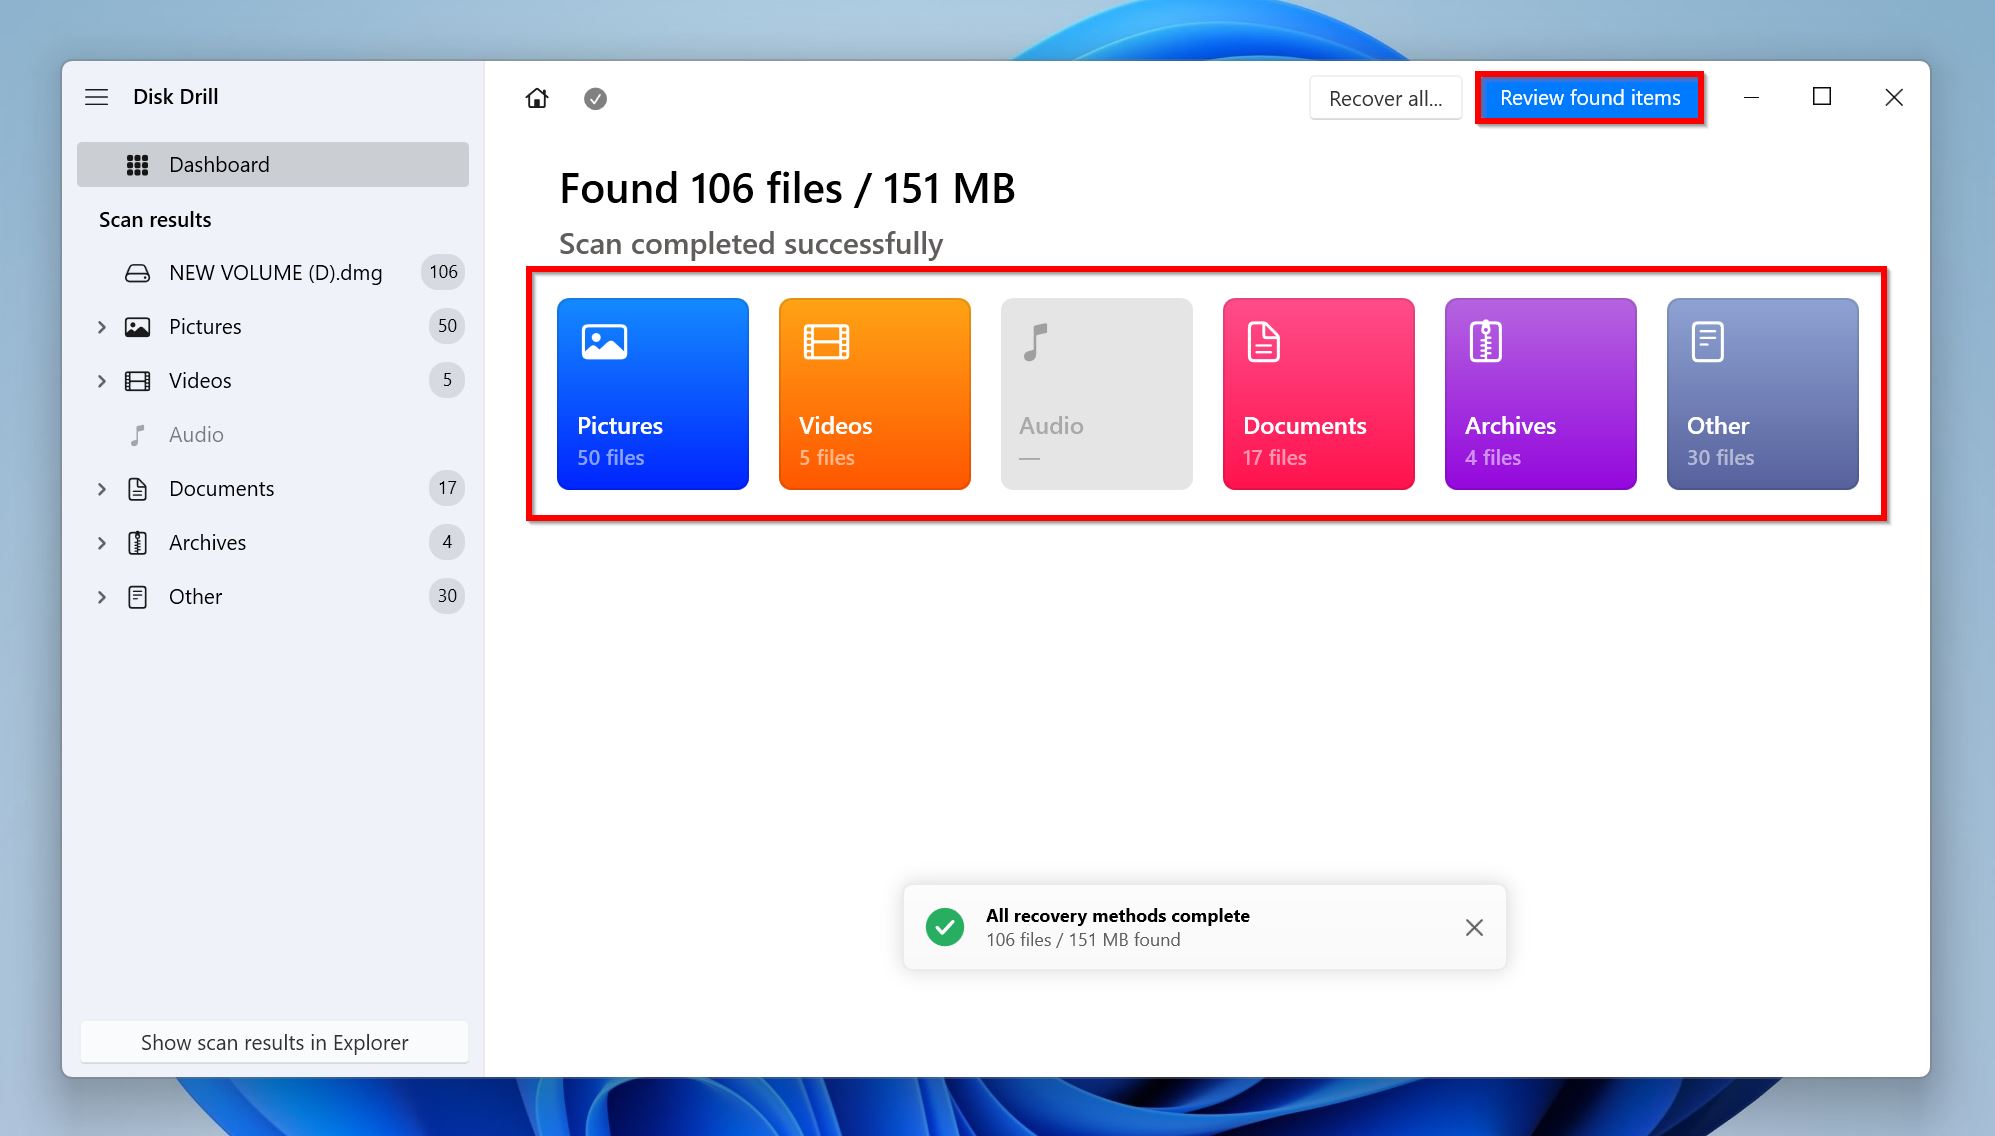
- Select the disk image, or the drive, and click on Search for lost data.
- Wait for Disk Drill to finish scanning. Click on Review found items, or simply click on the types of files you want to recover, such as Videos or Pictures.
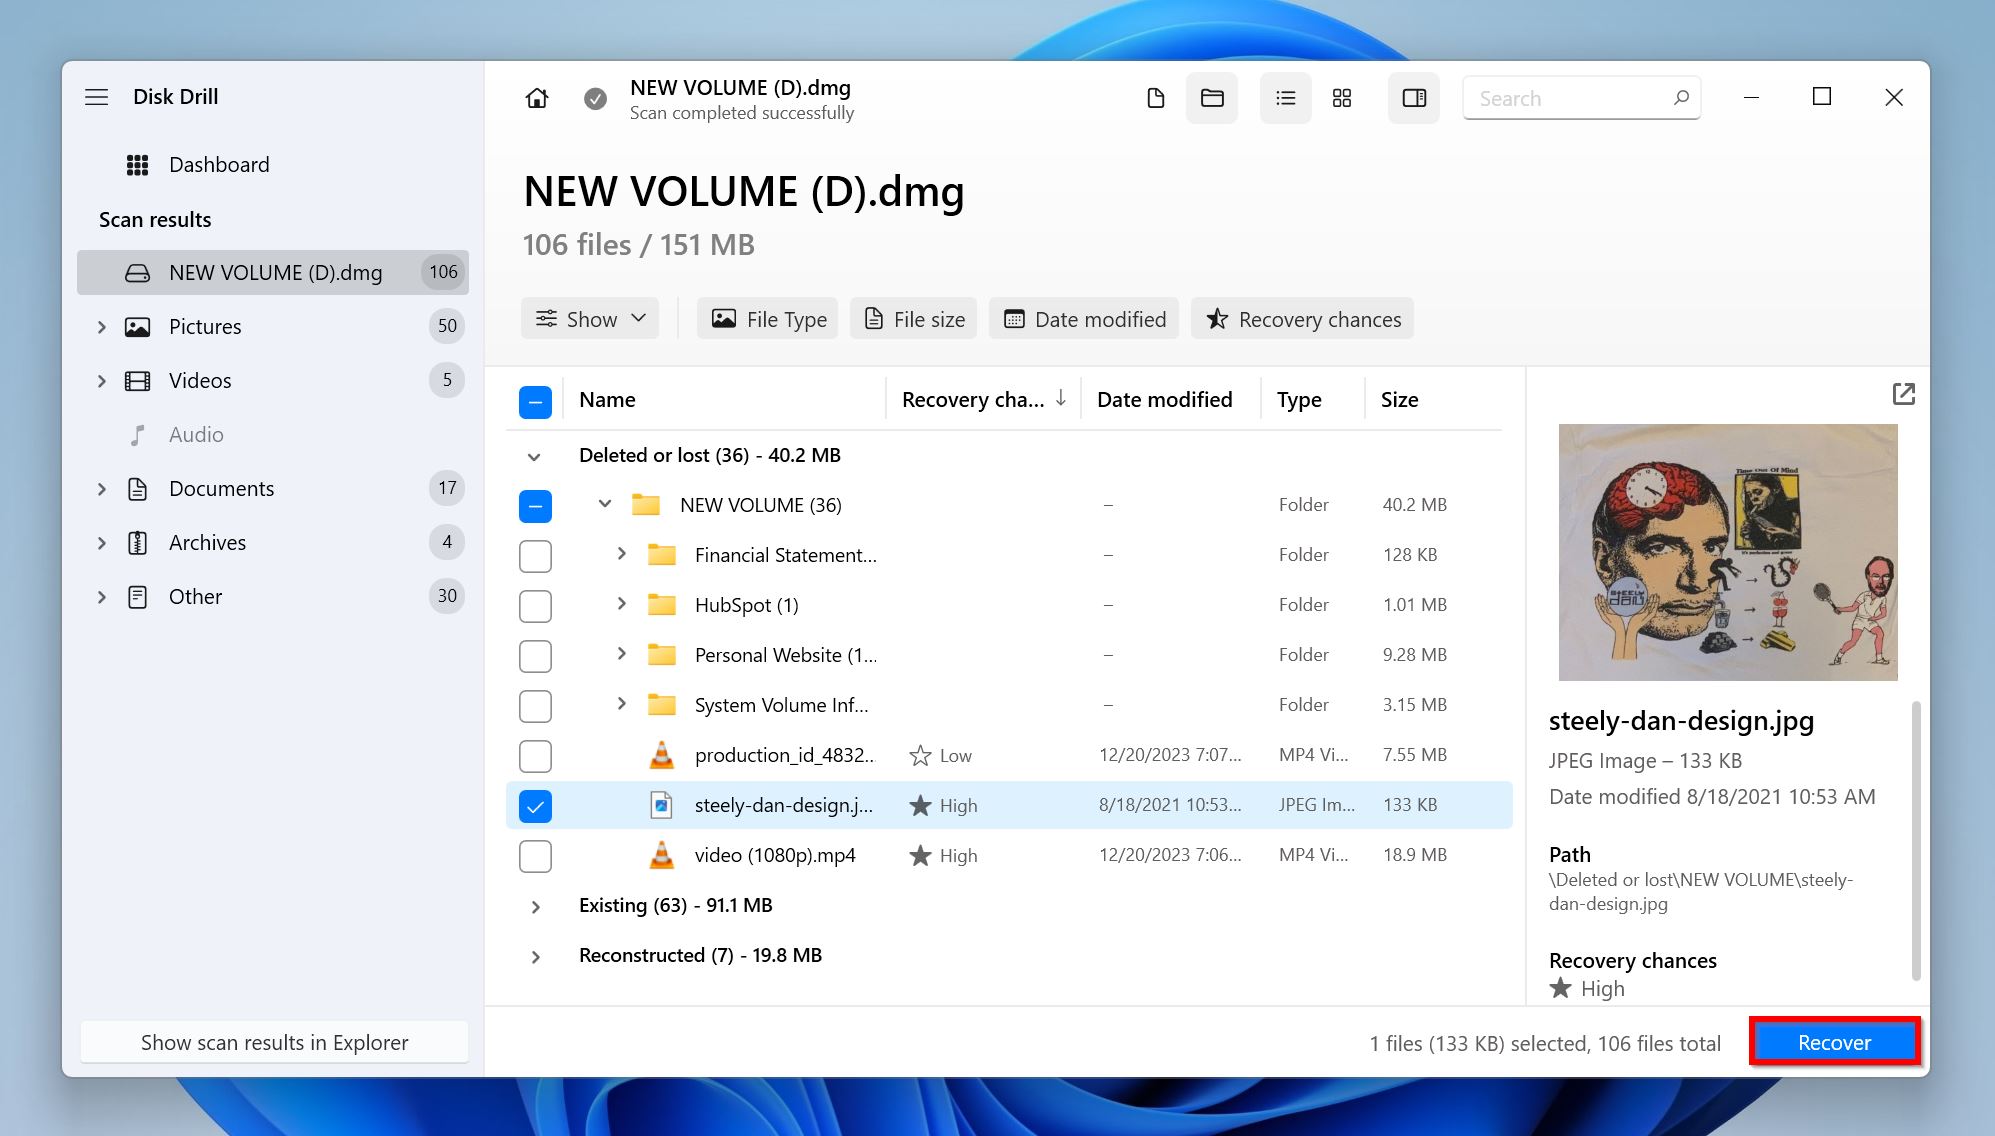
- Select the files you want to restore from your NVMe SSD. You can double-click to preview a file and also see its recovery chances right next to it. Click on Recover.
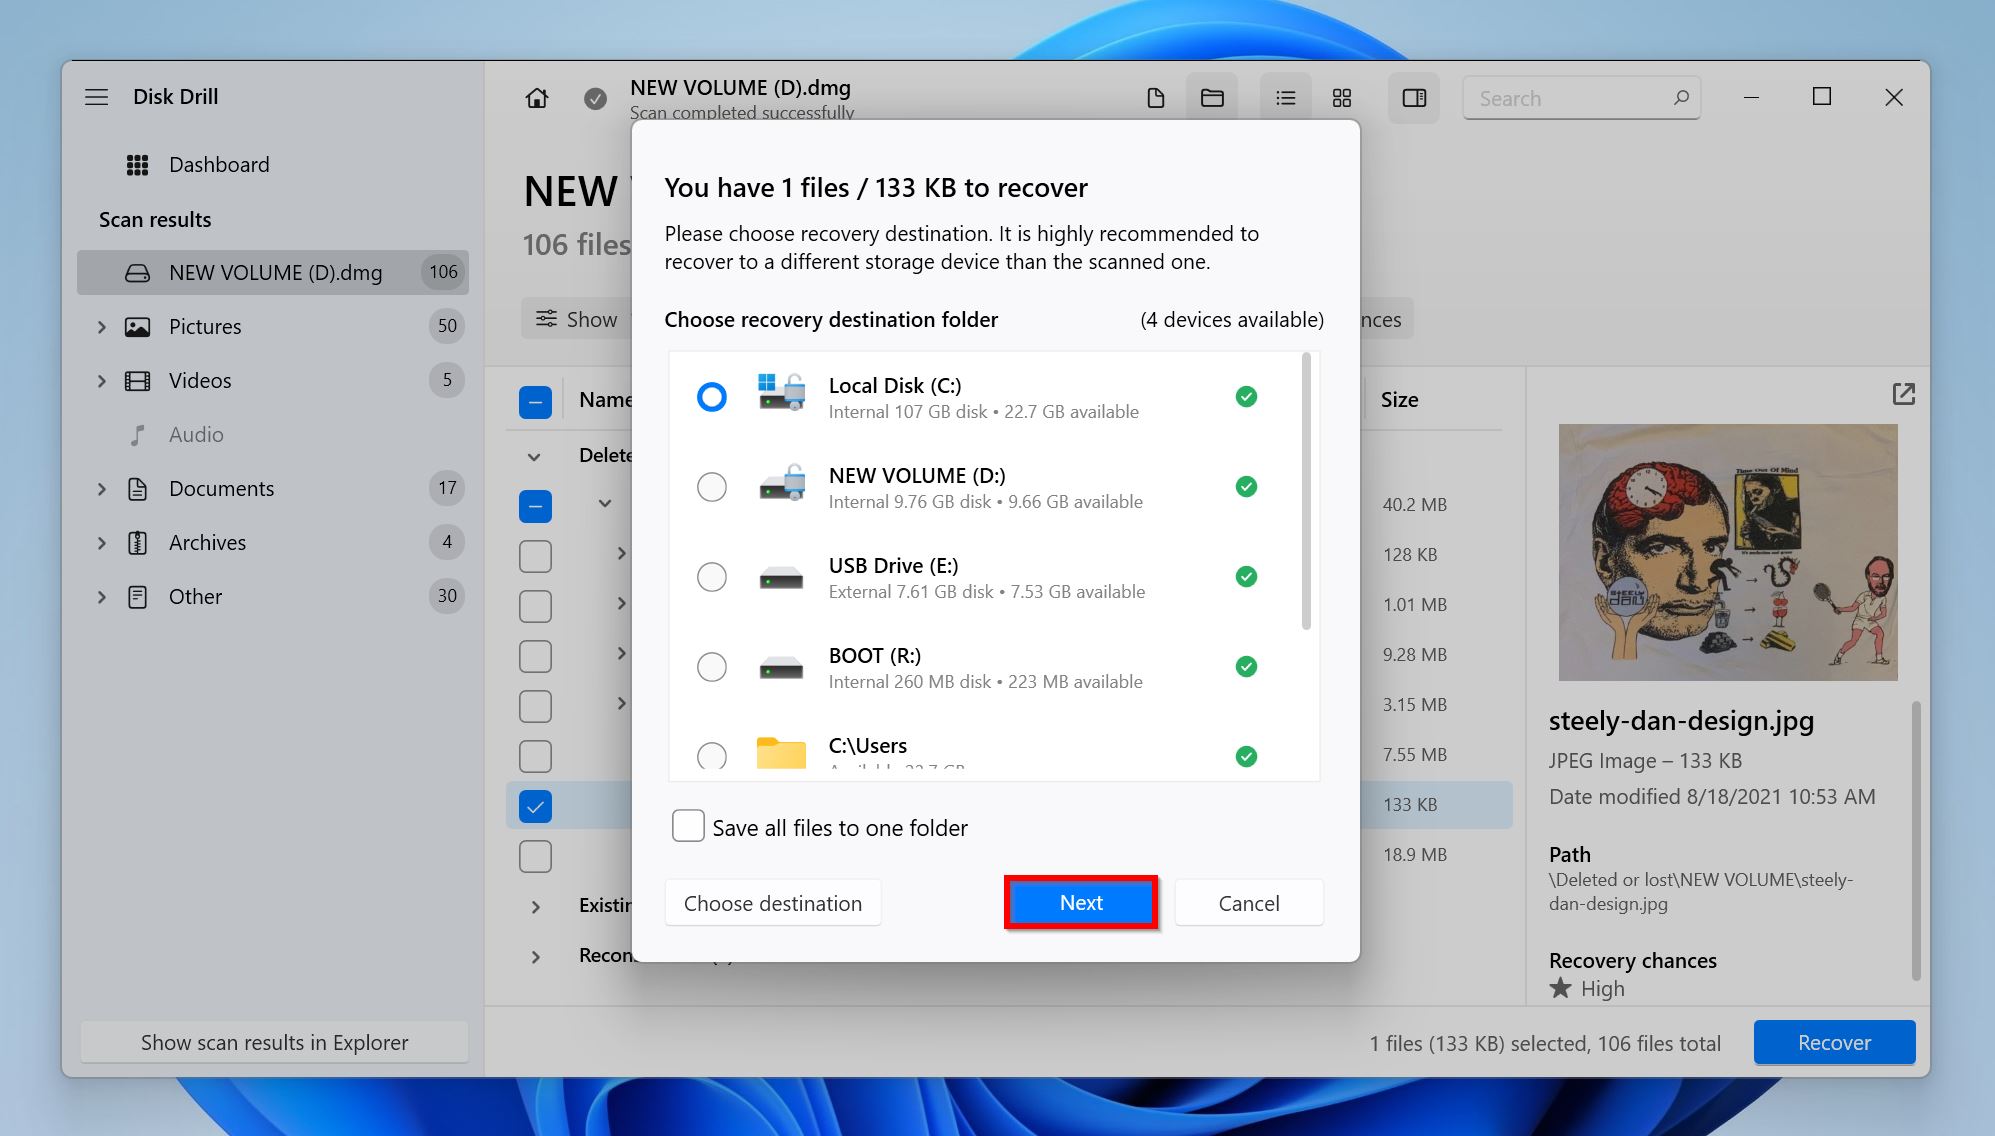
- Choose a recovery destination and click Next.
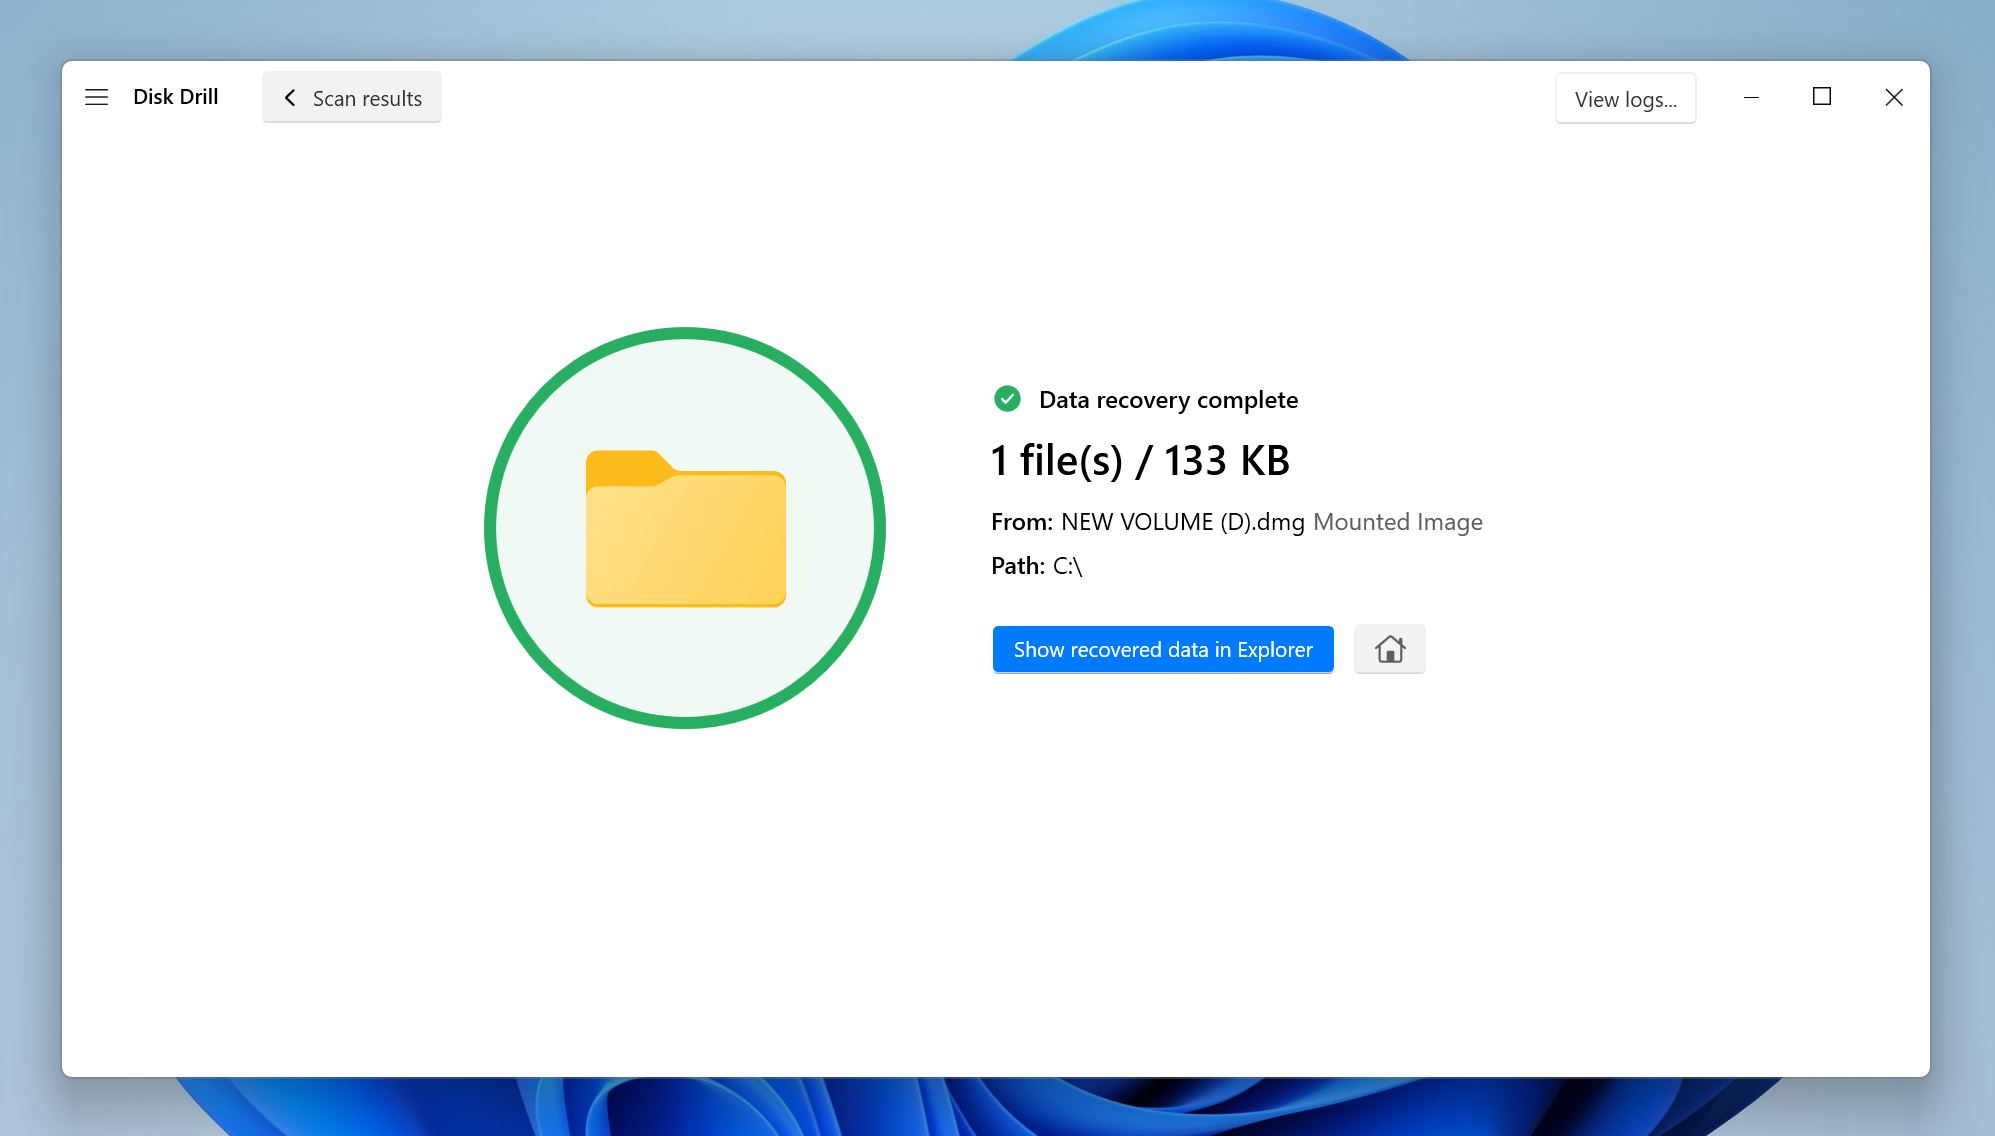
- After the recovery is complete, you can click on the Show recovered data in Explorer to view the recovered files in Windows Explorer.
Interested in Disk Drill? Dive into our comprehensive review. If you’re curious about its safety for your system, explore our technical safety analysis. Not sold on Disk Drill? Browse our top data recovery software ranking for more options.
Is It Possible to Repair NVMe SSD?
Like any other storage device, SSDs can go through limited write cycles before physical degradation starts to show, This can lead to data loss. But, beyond normal wear and tear that happens as NVMe SSDs approach the end of their lifespan—it’s rare for them to suffer physical damage, all thanks to their compact form factor and the lack of moving parts. However, if your SSD is physically damaged, you should get it repaired by an expert, instead of doing it yourself.
To repair logically corrupted SSDs, there are a few things you can do:
- 🛡️ Ensure that your drive is malware free, by running a full antivirus scan.
- 🔠 Assign a new drive letter or modify the previous one using Disk Management.
- ⚙️ Update or reinstall the SSD drivers.
- 🔎 Try running CHKDSK to repair the corrupted SSD.
A detailed explanation of all the fixes listed above is available in our guide to fixing corrupted storage drives.
What is an NVMe SSD?
When discussing SSDs, the terms M.2 and NVMe are frequently used together, especially in recent years. However, they are not interchangeable–the former is a form factor and the latter a protocol or specification on how the system CPU and the SSD communicate.
M.2 is a form factor, and M.2 SSDs are smaller when compared to standard 2.5” SSDs. Typically, they connect to your motherboard using a modified PCIe (Peripheral Component Interconnect Express) slot. Some M.2 SSDs may also use a SATA connector. But in all cases, they slot directly into the motherboard; i.e. there are no cables involved.
The NVMe (Non-Volatile Memory Interface Express) protocol specifies how your computer accesses and uses the flash memory in SSDs. It is a communications interface containing a set of instructions and a driver. It has many advantages over older communications interfaces like SATA with AHCI (Advanced Host Controller Interface) drivers–most notably faster speed and lower latency.
NVMe SSDs using the PCIe Gen 4 slot, independent of form factor, can reach read-write speeds of up to 7500 MB/s. SATA SSDs on the other hand have speeds of up to 550 MB/s. Naturally, these numbers can slightly vary, depending on the manufacturer and across different SSDs.
Due to the lack of connector cables, users typically recover data from M.2 SSDs on the same computer it is attached to. This is because, the second computer may not have an M.2 slot, and the SSD may simply be hardwired to the device, requiring above-average electronic expertise to remove and re-slot the drive.
How Do NVMe, M.2, and SATA SSDs Differ?
Here is a handy table that tells you all you need to know to differentiate between the most common SSD types:
NVMe SSD |
M.2 SSD |
SATA SSD |
|
Speed: |
Up to 3500 MB/s and 7500 MB/s using a PCIe Gen 3 and PCIe Gen 4 connector respectively. |
Up to 550 MB/s using a SATA connector. An NVMe M.2 SSD using PCIe Gen 3 and Gen 4 connectors will reach speeds of 3500 MB/s and 7500 MB/s respectively. |
Up to 550 MB/s. |
Connector: |
PCIe |
SATA and PCIe |
SATA |
Form factors: |
Commonly comes in M.2 and U.2 form factors. |
This is a form factor. |
Comes in M.2 and regular 2.5-inch form factors. |
Advantages: |
Significantly faster speeds than SATA SSDs. |
A smaller form factor allows for a cleaner build and comes in both SATA and PCIe connector types. |
Much cheaper than M.2 and NVMe SSDs while performing noticeably better than regular HDDs. |
FAQ
How to retrieve data from an NVMe SSD?
Here is a simple, quick tutorial on how to retrieve data from an NVMe SSD:
- Download & install Disk Drill using the setup.
- Open Disk Drill, select the NVMe drive and click Search for lost data.
- Click on Review found items. You can directly click on the file type as well.
- Select the files you want to restore, then click on Recover.
What is the best NVMe data recovery software?
Currently, Disk Drill leads among its competition when it comes to NVMe SSD data recovery software, or data recovery from other storage devices as well. Our Disk Drill review takes a detailed look at the various features of the program.
Some other leading data recovery programs include:
- EaseUS Data Recovery Wizard (Windows, Mac)
- Remo Recover (Windows, Mac)
- TestDisk (Windows)
- Recuva (Windows)
Do NVMe SSDs fail?
Like any other storage device, NVMe SSDs can fail. However, it’s rare for them to fail suddenly. Usually, the SSD will give out a few warning signs, such as slow performance and random disappearance of data, before it completely gives out. The quality of an NVMe SSD will vary across manufacturers, so it’s recommended you only buy them from reputed companies such as Samsung, SK Hynix, WD, Kingston, etc.
How do I recover files from a corrupted M.2 SSD?
If the M.2 SSD is still readable by your computer, you can scan the drive using a good data recovery program like Disk Drill, and recover your data. If the M.2 SSD is not readable, you can try and fix the logical corruption using the fixes in the section above or make use of a professional data recovery service.
Can I recover data from NVMe SSD backup?
Yes. Backup tools like Windows File History, and macOS Time Machine back up your data to a separate drive. You can use these drives to restore your files to the NVMe SSD.
Conclusion
NVMe SSD recovery is a more delicate affair than recovering data from your HDD, due to factors like TRIM. So, it’s essential you follow the steps in the article carefully for a successful and hassle-free data recovery experience.
This article was written by Manuviraj Godara, a Staff Writer at Handy Recovery Advisor. It was also verified for technical accuracy by Andrey Vasilyev, our editorial advisor.
Curious about our content creation process? Take a look at our Editor Guidelines.