You connect an external SSD to your Mac, but it doesn’t show up in Finder, Disk Utility, or the Desktop—preventing you from accessing or modifying existing files, or adding new ones to the drive.
There’s no one-size-fits-all solution for an external SSD that’s not showing up on your Mac, unless you know precisely what caused the problem. Fortunately, we’ve covered all bases when testing the solutions—one of them will work for you.
Note: An SSD typically fails to show up in one or more of these locations on your Mac—Disk Utility, Finder (or Finder sidebar), or Desktop. Keep in mind, if the external SSD doesn’t show up in Disk Utility, it won’t show up in Finder, and Desktop either.
Common Reasons Why Your Mac Doesn’t Recognize an External SSD
The reasons why your Mac doesn’t recognize an external SSD differ depending on the location where your SSD isn’t visible. For example, a perfectly fine SSD will not show up on the Desktop if Finder’s visibility settings aren’t configured properly.
Let’s take a look at some possible reasons why your external SSD is not showing up in different locations on your Mac:
Disk Utility:
- Physical connection issues like a damaged wire, or broken port/connector.
- Outdated SSD firmware.
- Faulty SSD.
- The SSD requires more power than the USB port can provide. This is rare.
Finder:
- The disk volume is unmounted.
- Missing, damaged, or incompatible file system.
- Uninitialized disk. This is usually applicable to brand new external SSDs.
Desktop:
- Unmounted disk volume.
- The disk is uninitialized.
- Corrupt, missing, or unsupported file system.
- Finder visibility settings are configured to not show external drives on the desktop.
Finder Sidebar:
- Unmounted disk volume.
- Unsupported or missing file system.
- Corrupt file system.
- Finder visibility settings are configured to not show external drives in the sidebar.
Primary Methods to Fix an External SSD Not Showing Up on Your Mac
The methods below directly address the root cause of why your external SSD doesn’t show up on your Mac. One of these methods will fix the issue for good, and ensure you don’t face it again. If none of these methods work, then attempt the additional methods in the next section of this article.
Note: Method 4 involves formatting the external SSD. Formatting deletes all existing data from the external SSD, so only attempt it if—you have a backup of your data, you don’t care about the data, or you’ve recovered data beforehand (you can do this using the method below). You can recover data after formatting your drive, but there’s no guarantee you’ll get back all your files. Additionally, the TRIM feature on SSDs may further complicate data recovery.
Here’s how you fix an external SSD that’s not showing up on a Mac:
Method 1: Ensure the SSD Is Connected Properly
Loose, or physically damaged connectors, and ports prevent your external SSD from showing up on your Mac.
To ensure the SSD is connected properly, keep these pointers in mind:
- Check the cable for any cracks, or unnatural bends.
- Ensure the USB A, or USB C port on your Mac is not damaged.
- If you’re using a USB C to USB A converter, make sure it’s of good quality. It’s also possible the converter can’t supply enough power to the SSD. Connect the external SSD directly to another PC with a USB A port to diagnose this.
- Try switching the cables to better-quality ones.
Method 2: Configure Finder Visibility Settings to Display External Drives
Often, there’s no real issue with the SSD or your Mac, but Finder’s visibility settings are configured to not display external drives in the Finder sidebar, or the Desktop.
Fixing this is easy, simply follow these steps:
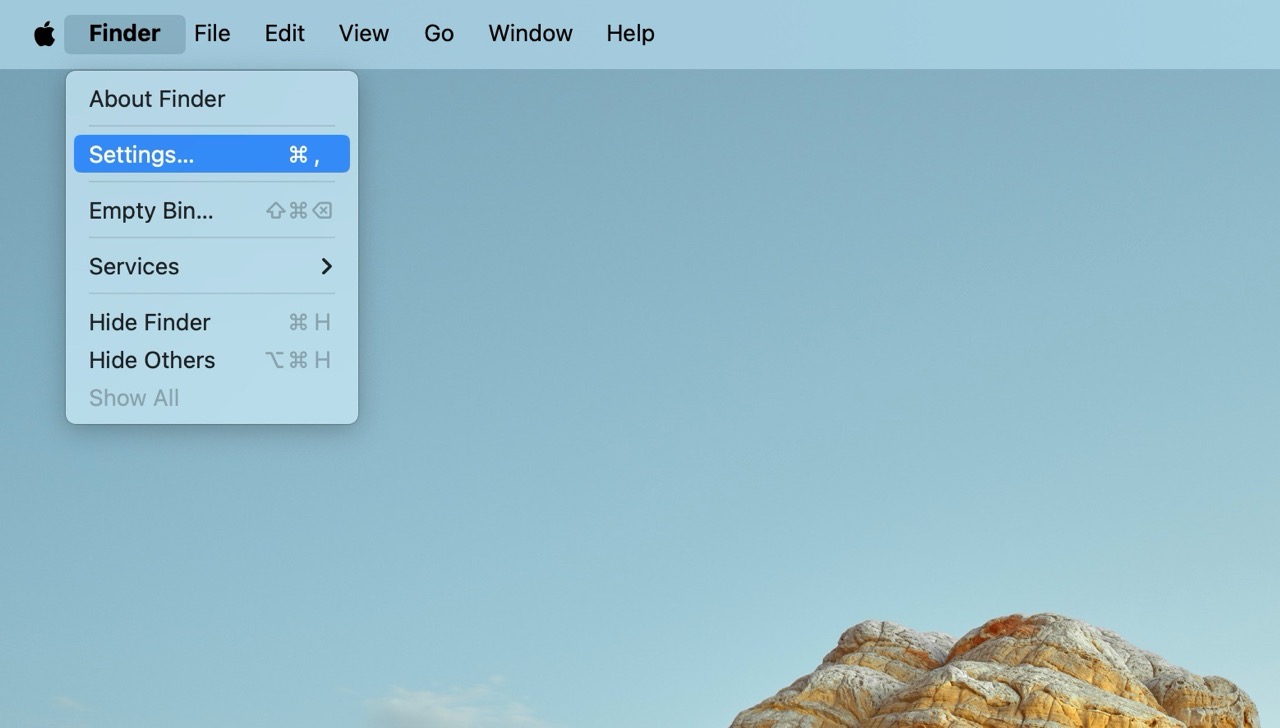
- Open Finder.
- Click on Finder in the menu bar, and click Settings.
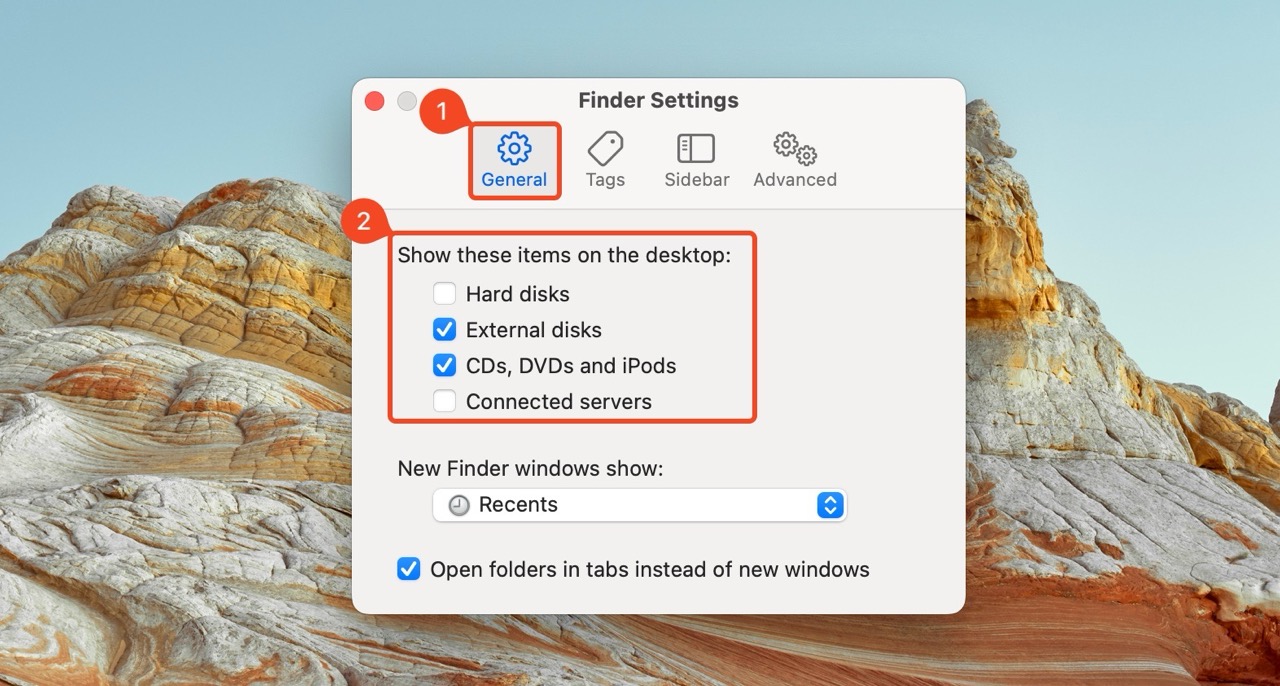
- Click on the General tab.
- Ensure the External disks option is checked under Show these items on the desktop.
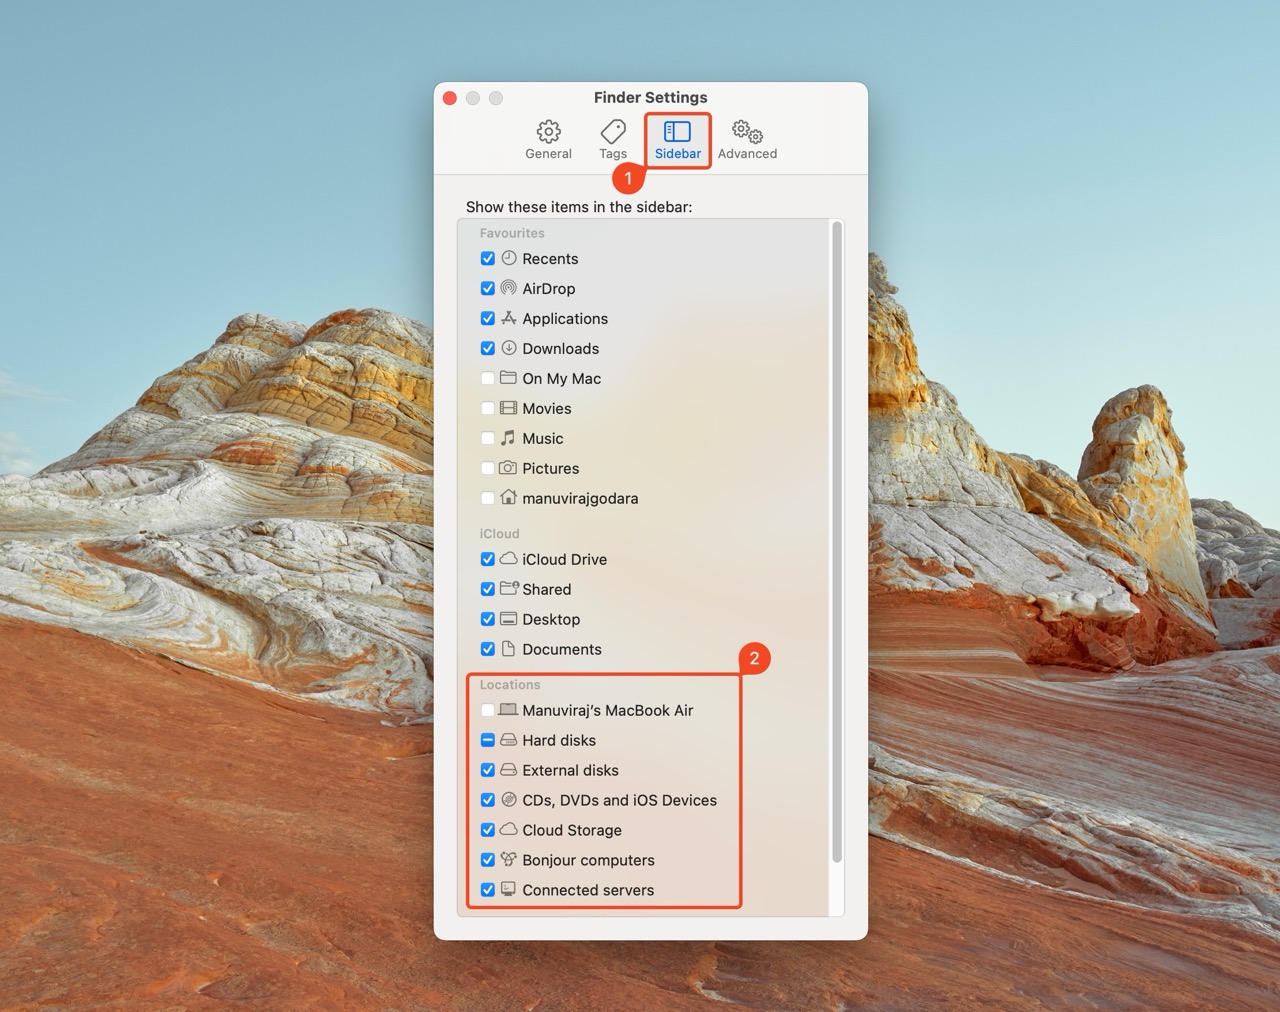
- Click on the Sidebar tab.
- Ensure the External disks option, under Locations, is ticked.
- Reconnect your external SSD.
Method 3: Mount the Disk Volume
Often, an external drive fails to show up because its disk volumes are not mounting on the Mac. If the SSD’s disk volume is ejected, the drive won’t show up in Finder, or the Desktop, but it will be visible in Disk Utility. You can use Disk Utility to mount the disk volume and fix this problem.
Here’s how to fix an external SSD that’s not mounting on your Mac:
- Type “disk utility” in Spotlight Search (Command + Space). Click on Disk Utility from the search results.
- Click on the external SSD volume, below the main SSD drive. Click on Mount in the Disk Utility menu bar.
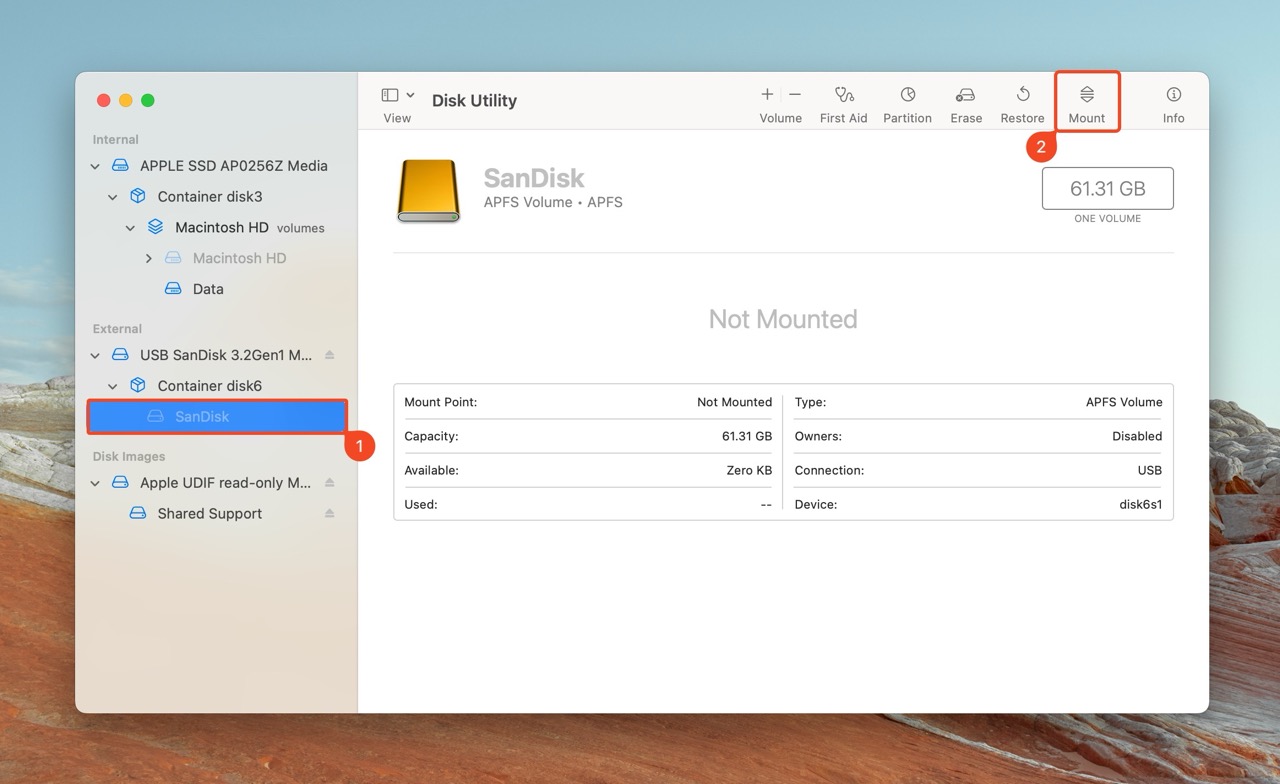
- Do this for each volume on the external SSD.
- Your drive should appear in Finder.
Method 4: Repair the Damaged File System Using TestDisk
A damaged, or corrupt file system is a common culprit why external SSDs, and external hard drives don’t show up on a Mac. You could fix this by formatting the drive, but why do that when you can keep your files, and repair the file system.
TestDisk is an excellent third-party data recovery and disk repair tool. You can use it to repair your external SSD’s file system and save any existing files in the process. TestDisk is open-source and completely free to use. However, the tool may be intimidating for new users as it lacks a graphical user interface (GUI)—you need to use the Arrow keys and the Enter key to use the app.
Here’s how to use TestDisk to repair an external SSD not showing up on a Mac:
- Download TestDisk and extract the downloaded package.
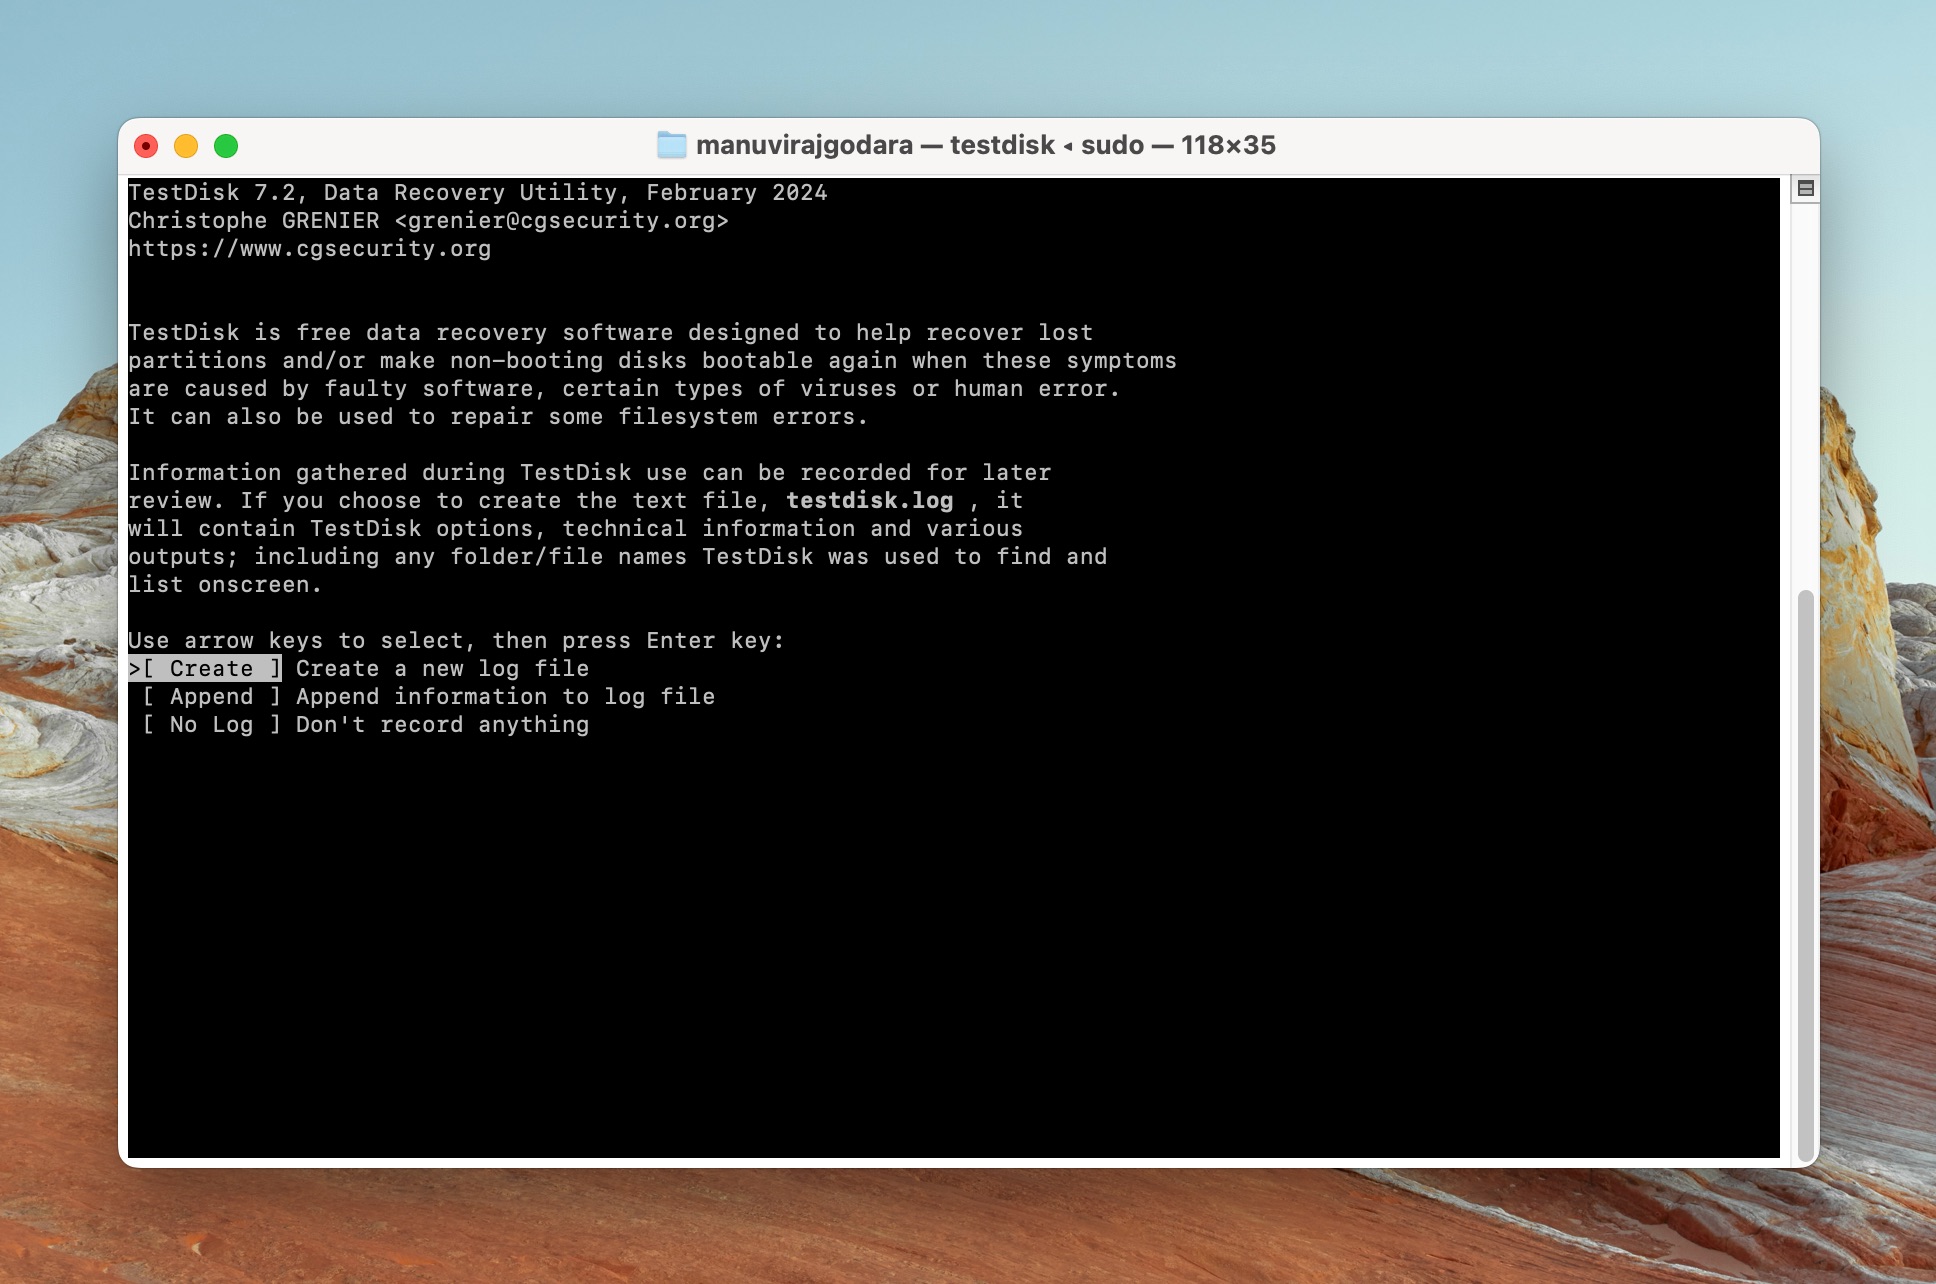
- Run the testdisk application.
- Choose whether you wish to create a log file or not, and press Enter. This option doesn’t affect the file system repair process in any way.
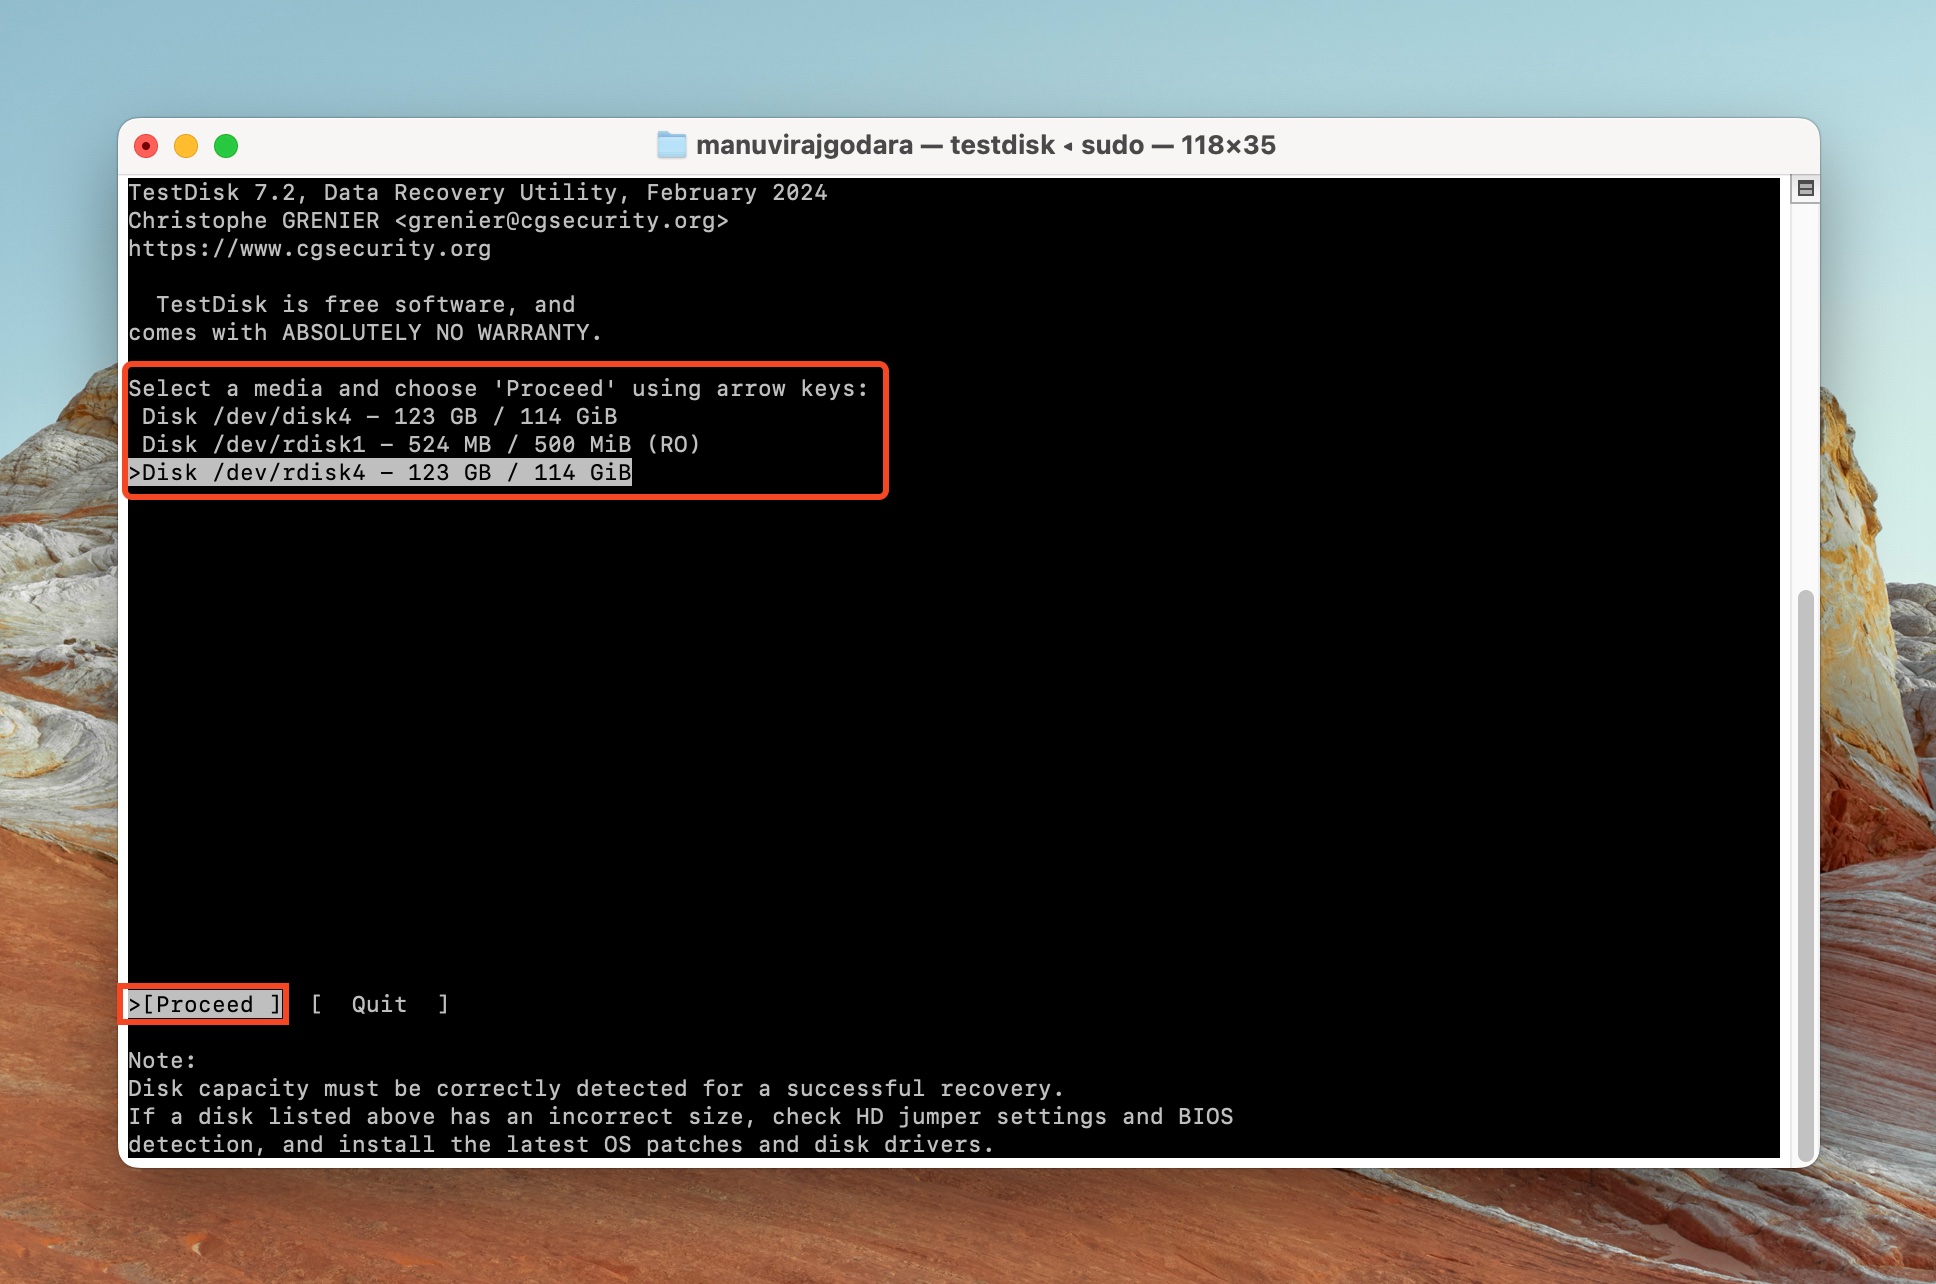
- Select the SSD external SSD from the device list and press Enter.
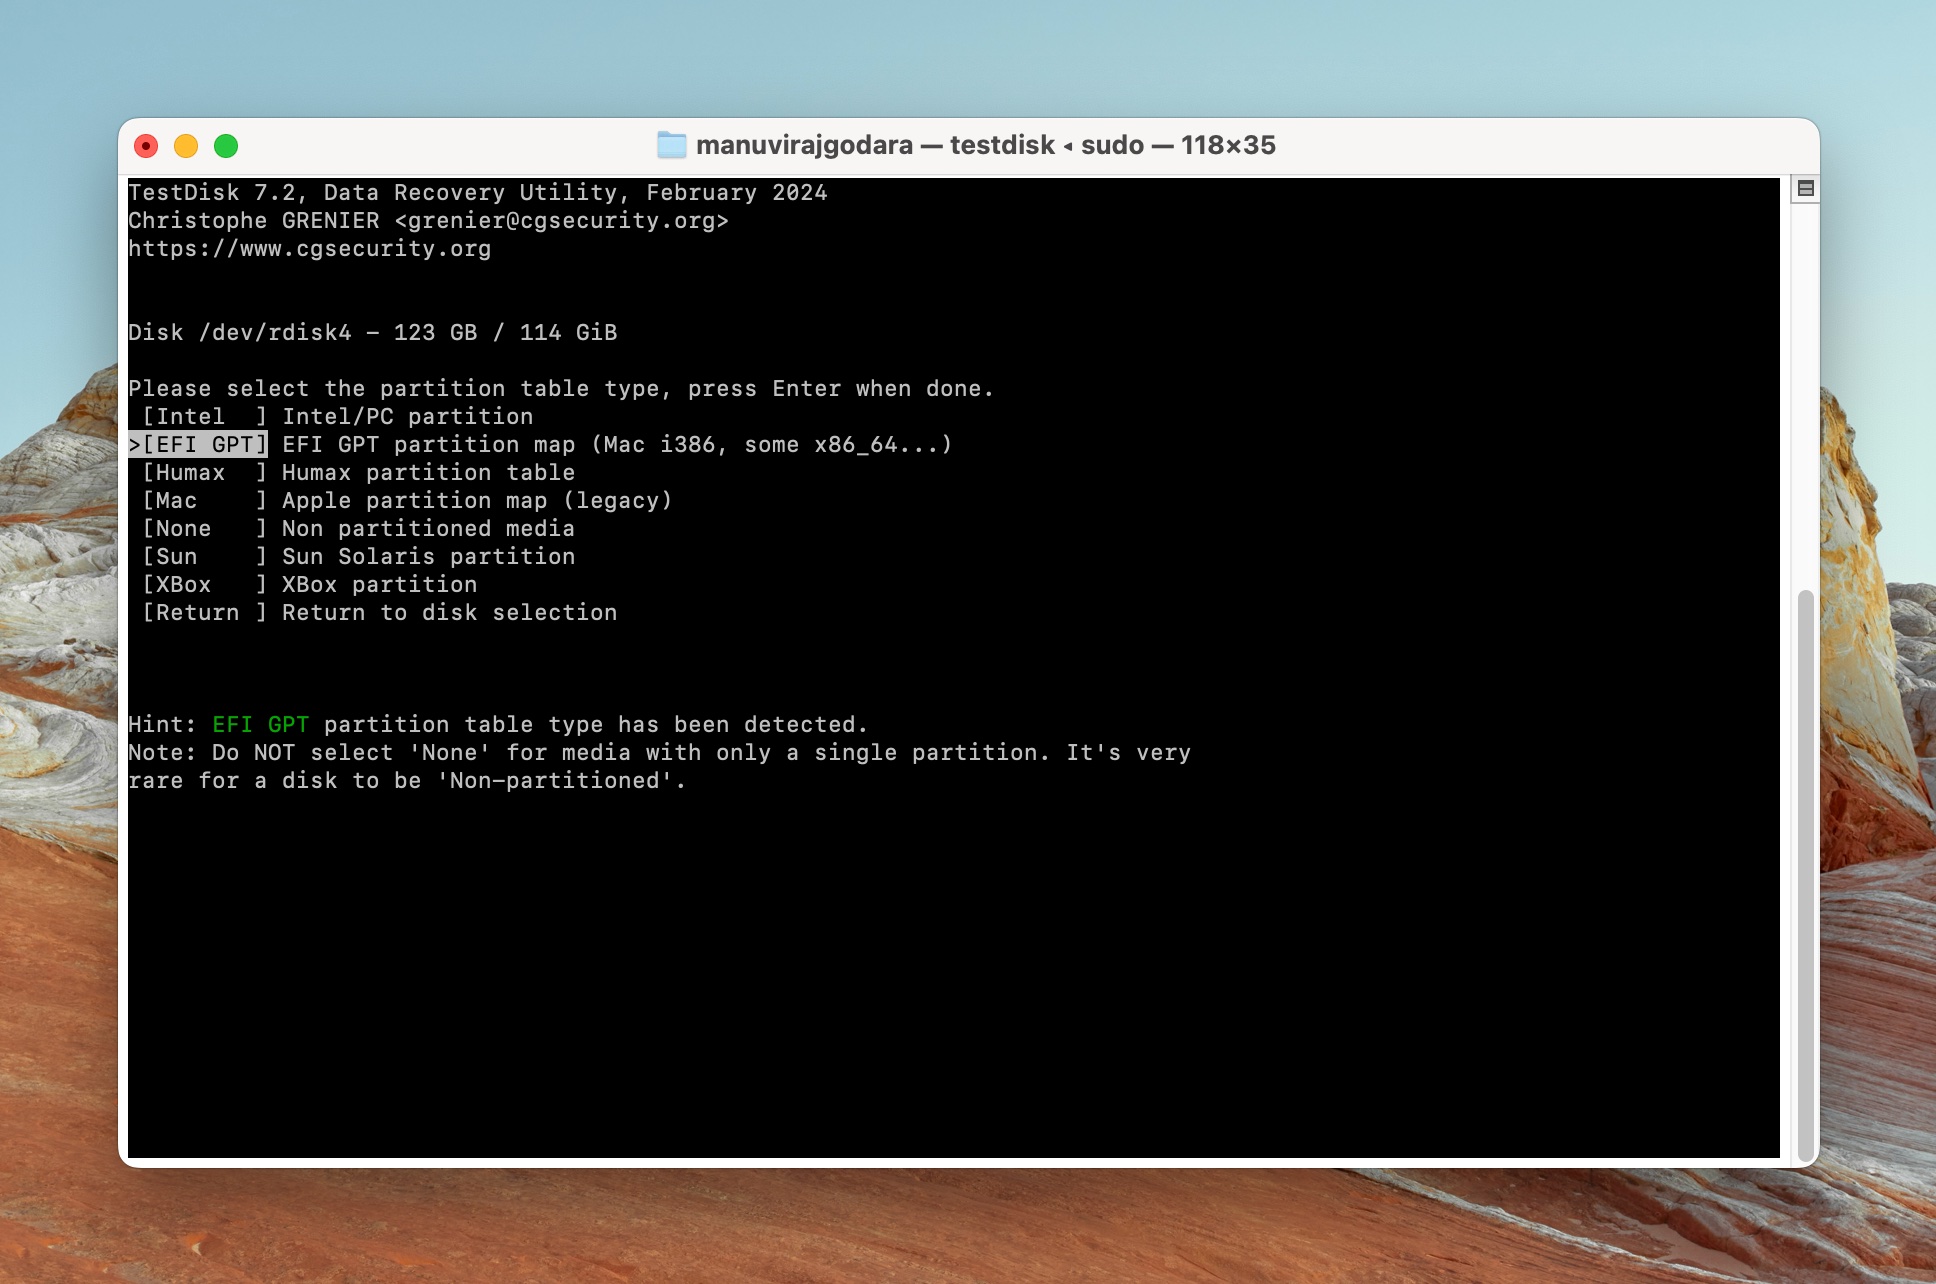
- Select the partition table type, and press Enter. TestDisk auto-detects this, so it’s best to just press Enter on this screen, unless you’re sure the external SSD is using some other partition table.
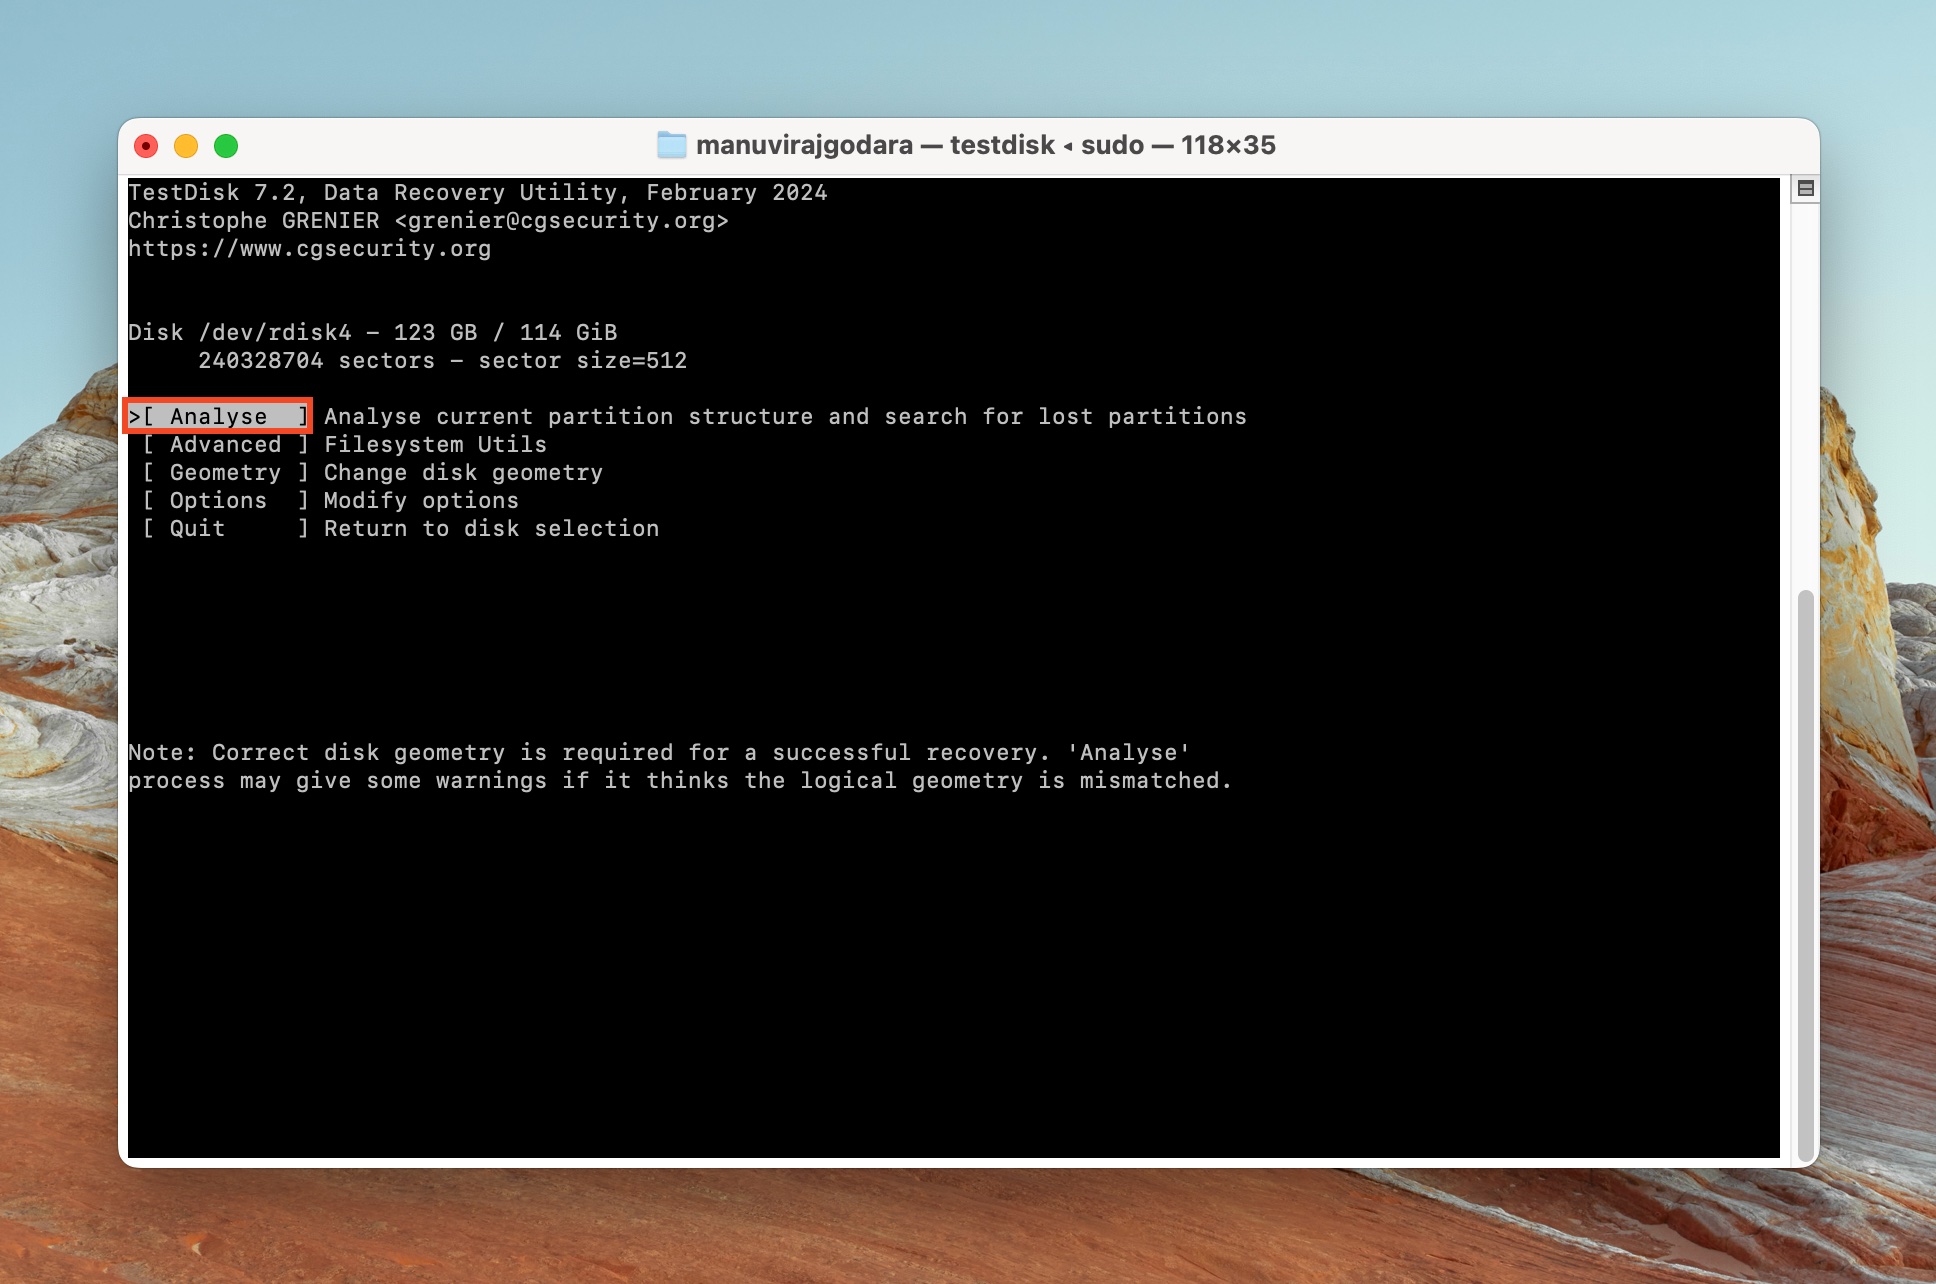
- Ensure Analyze is selected, and press Enter.
- Select Quick Search and press Enter.

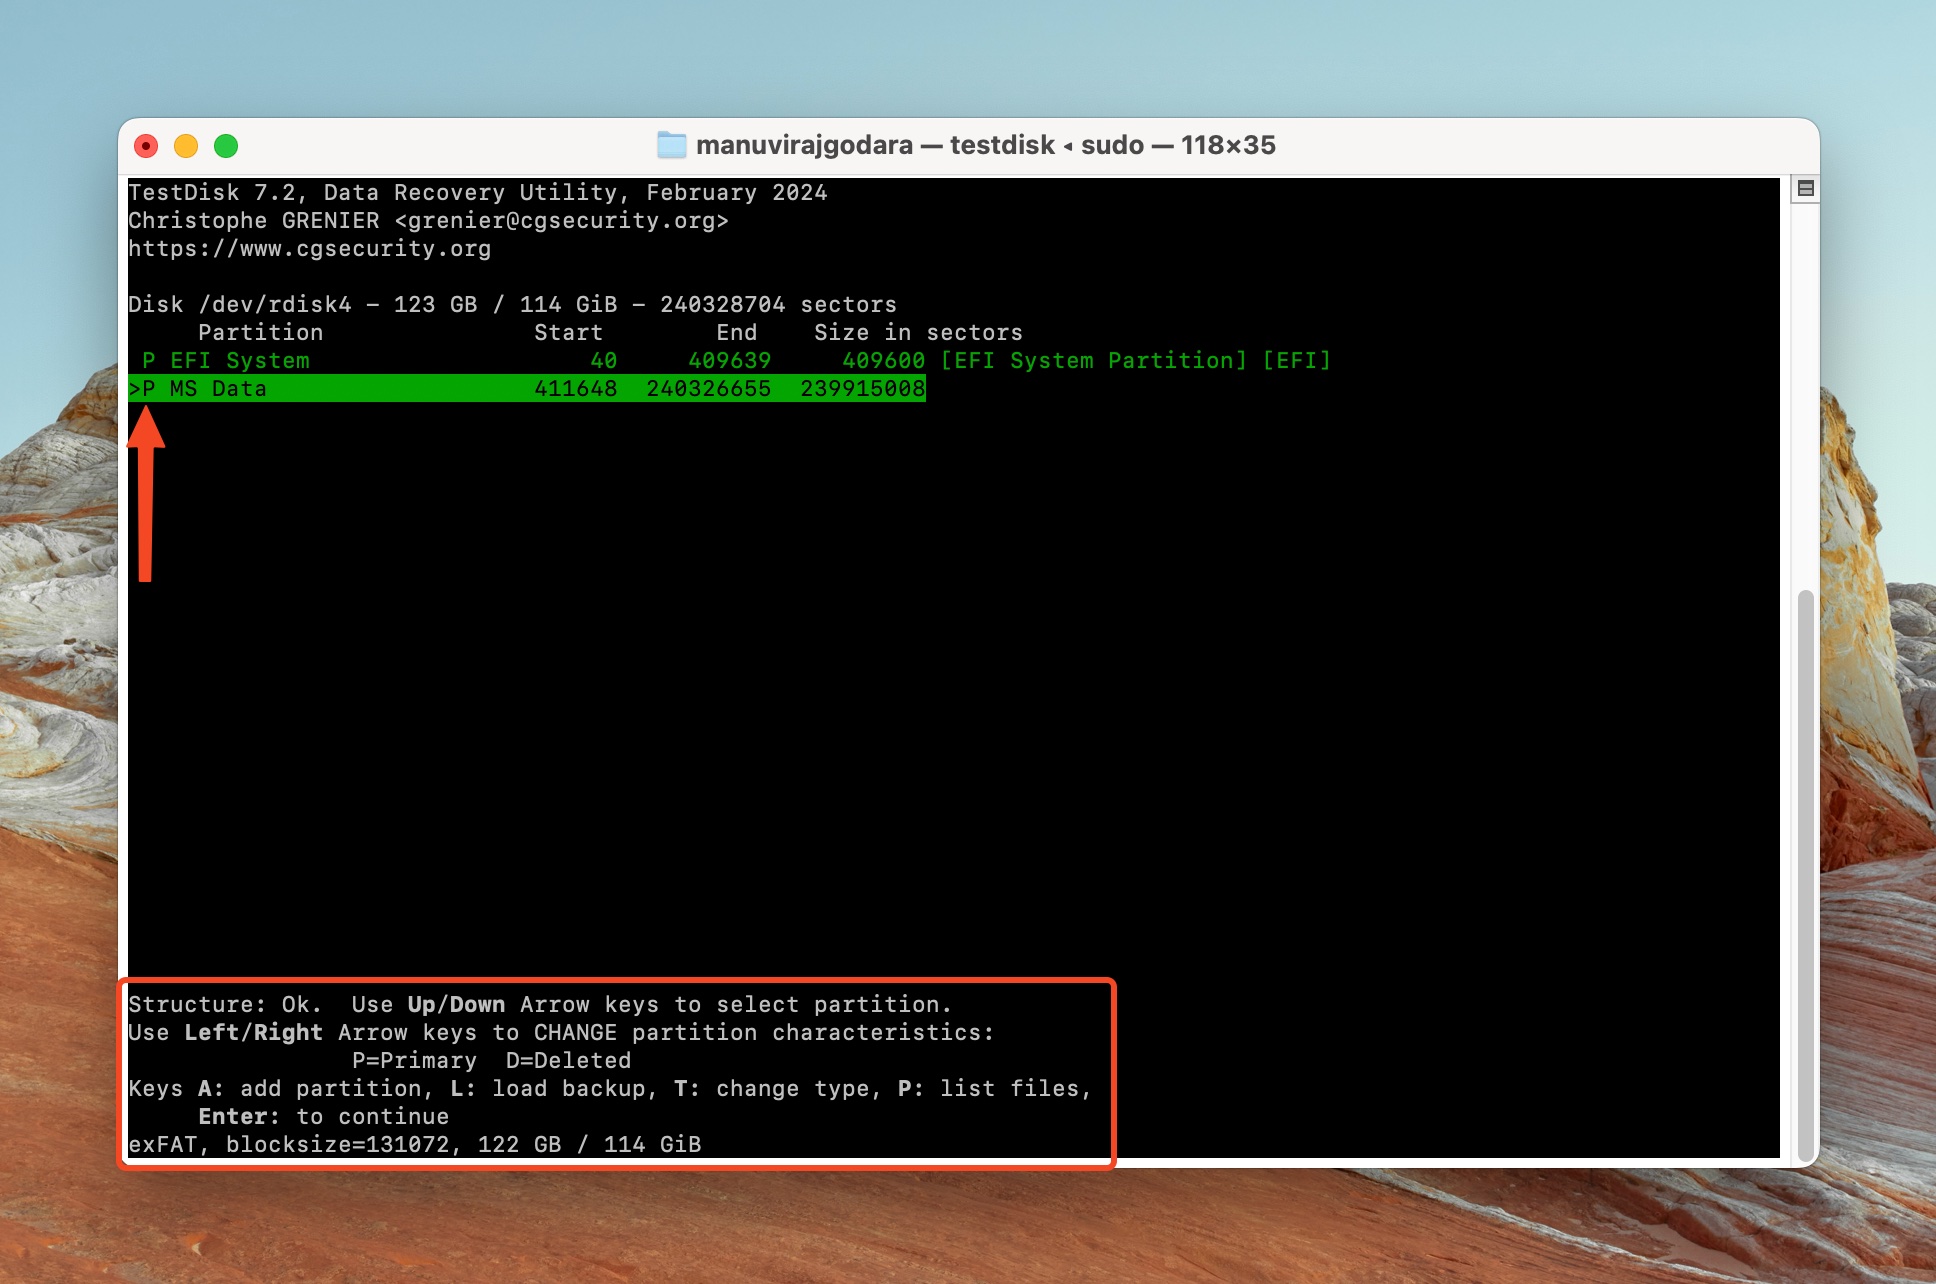
- TestDisk will list recoverable partitions. Press the P key to list files, and ensure all files on the SSD are visible, and press Q to go back. Ensure there is a P prefix before the partition you wish to recover—see the screenshot for reference. You can use the Left and Right Arrow keys to cycle through prefixes. Press Enter after doing the aforementioned things.
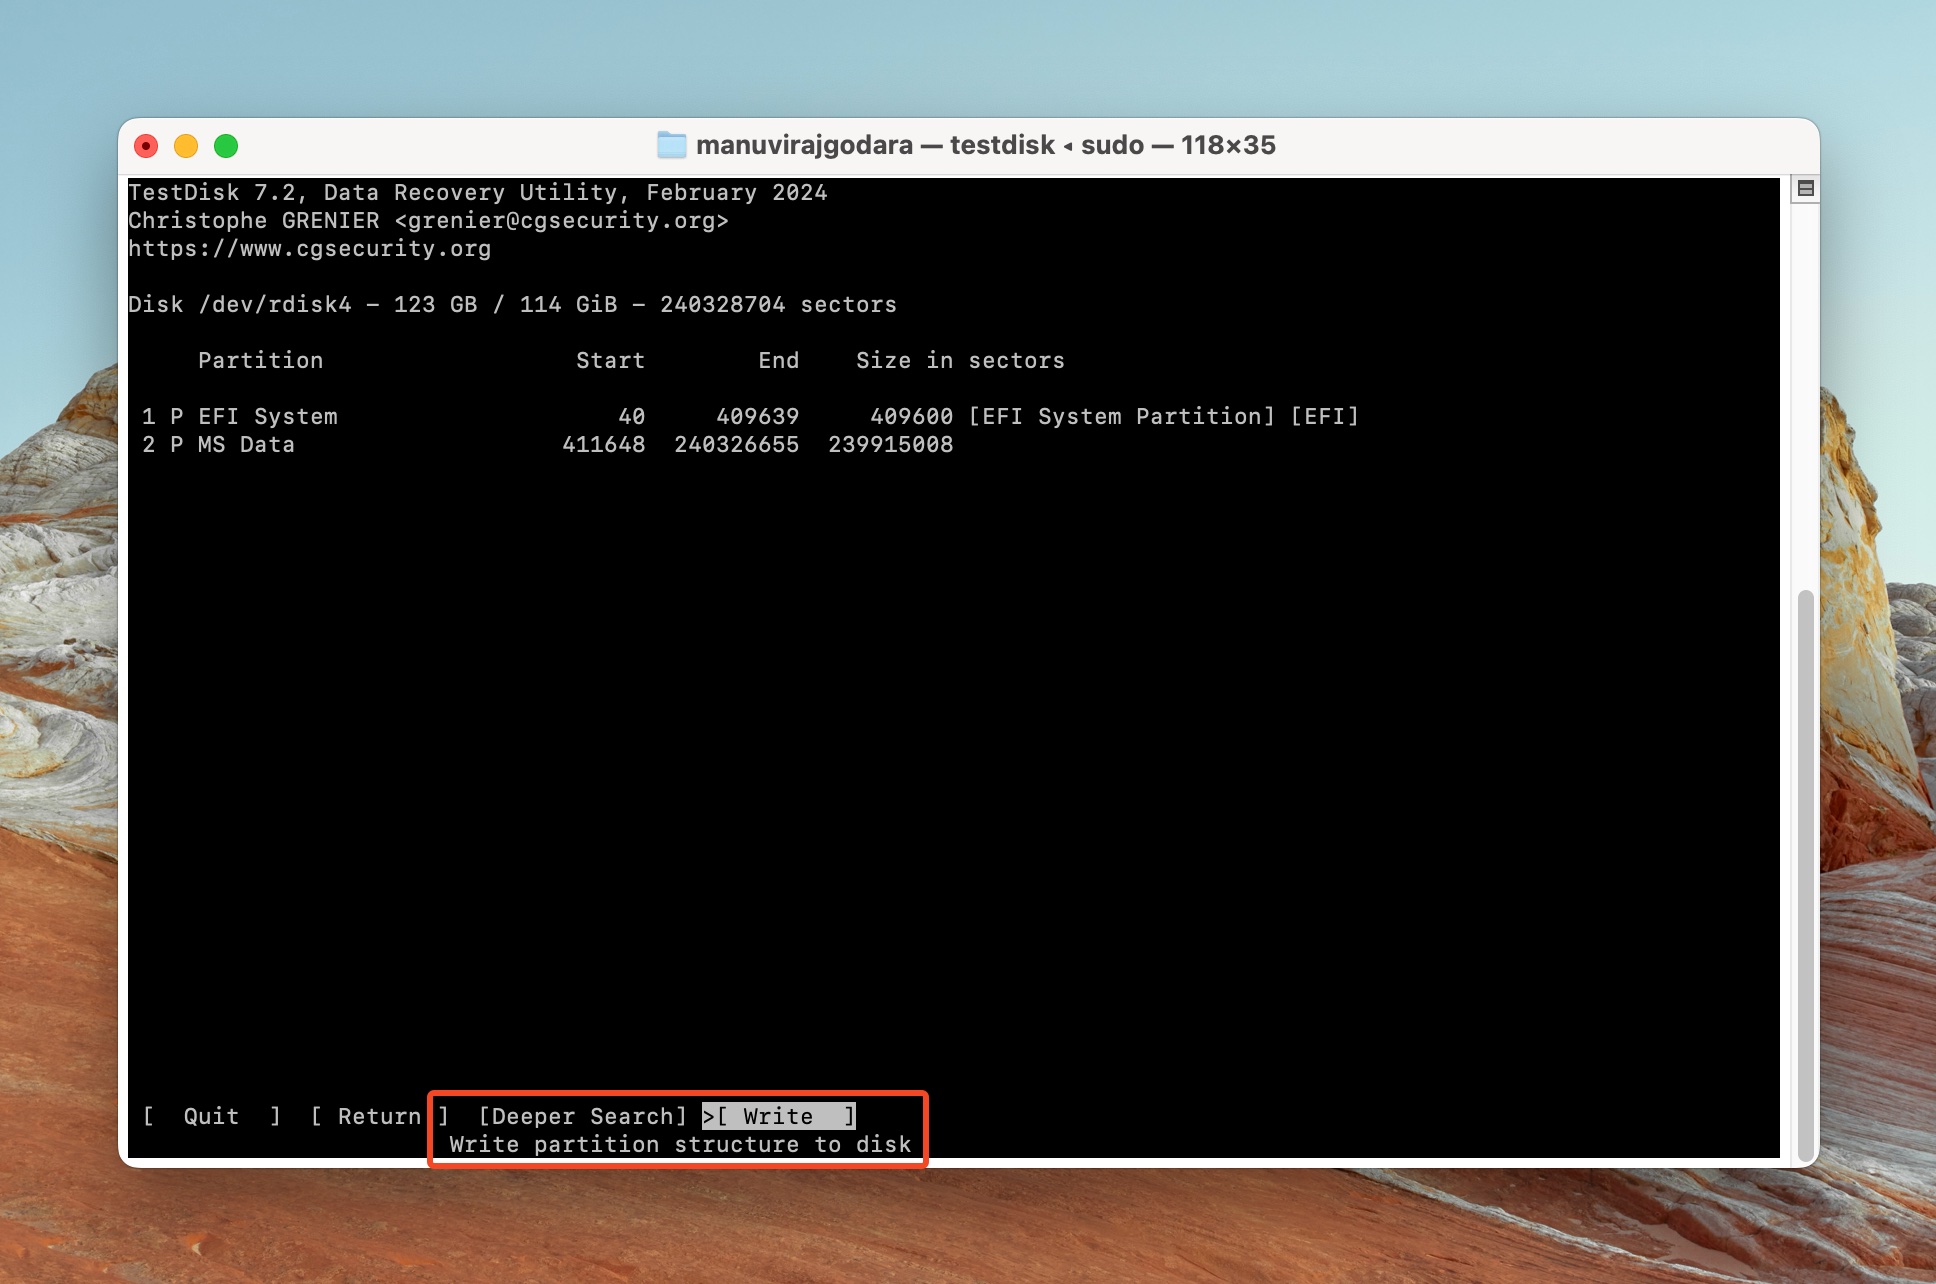
- Select Write, and press Enter. If you didn’t see the required files in the previous screen, select Deeper Search and press Enter, then follow Step 8 again.
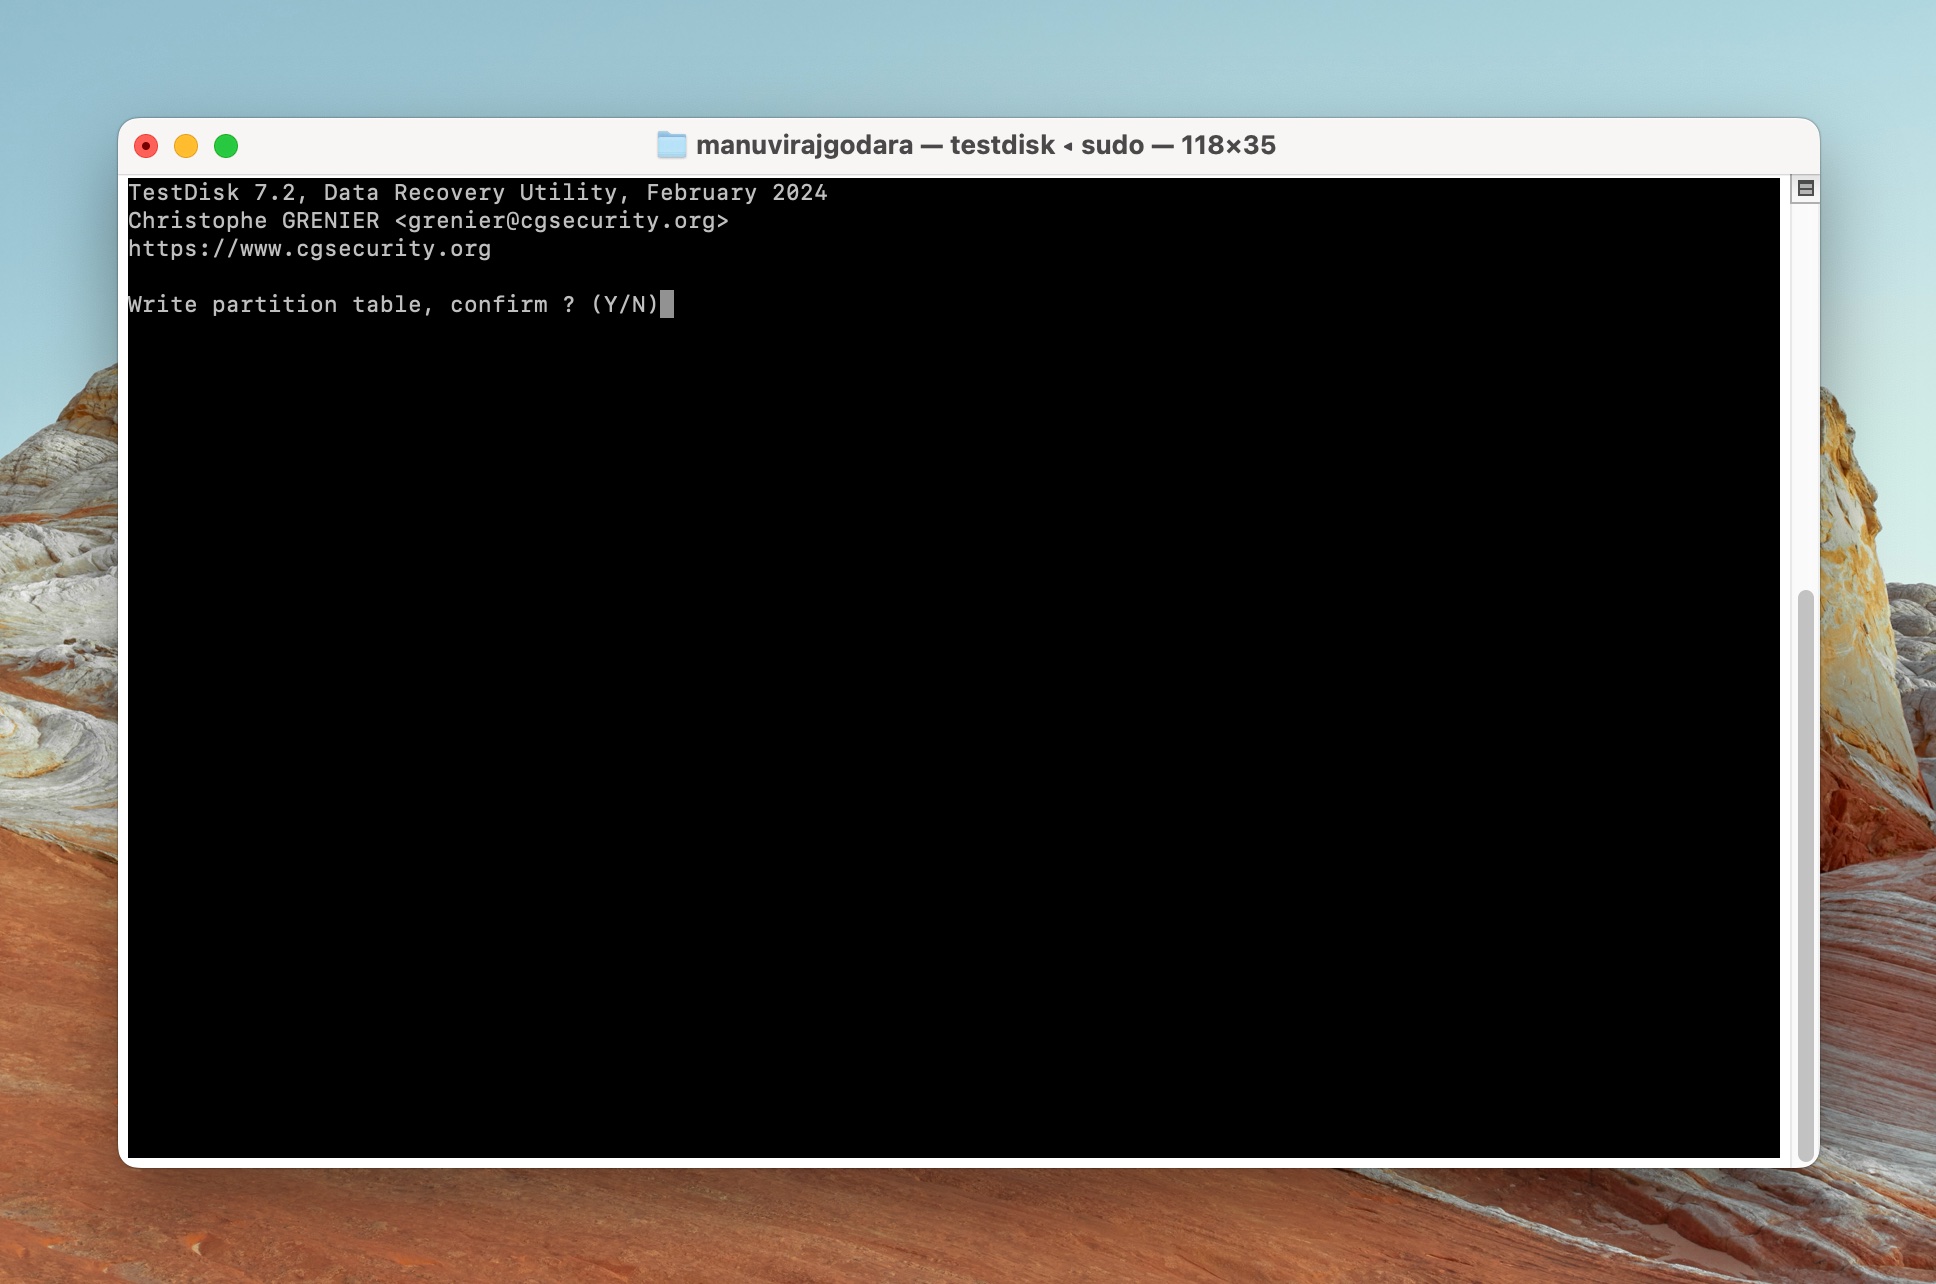
- Press Y in the confirmation prompt.
Rarely, you may run into issues when fixing the external SSD’s file system using the steps above. Here, we recommend repairing the HFS/HFS+ volume header using TestDisk.
Note: If TestDisk refuses to display any connected storage drives, citing a “root access” error, launch it using Terminal. Here’s how—type Terminal in Spotlight Search (Commmand + Space), and open Terminal. Now, open Finder, navigate to where you extracted the TestDisk archive, right-click on testdisk, hold down the Option key, and click Copy “testdisk” as pathname. Switch to Terminal, type sudo followed by the pathname (simply press Command + V to paste it), and press Enter. In my case, the command was: sudo /Users/manuvirajgodara/Downloads/testdisk-7.2/testdisk.
Method 5: Format (Initialize) the SSD to a Supported File System
An external SSD not showing up on Mac’s Finder may be formatted in an unsupported file system, or uninitialized. However, it will still be visible in Disk Utility. On macOS, initialization, and formatting involve the same steps—you need to use the Erase feature in Disk Utility.
Here’s how to format, or initialize your external SSD to a supported file system:
- Connect your external SSD to the Mac.
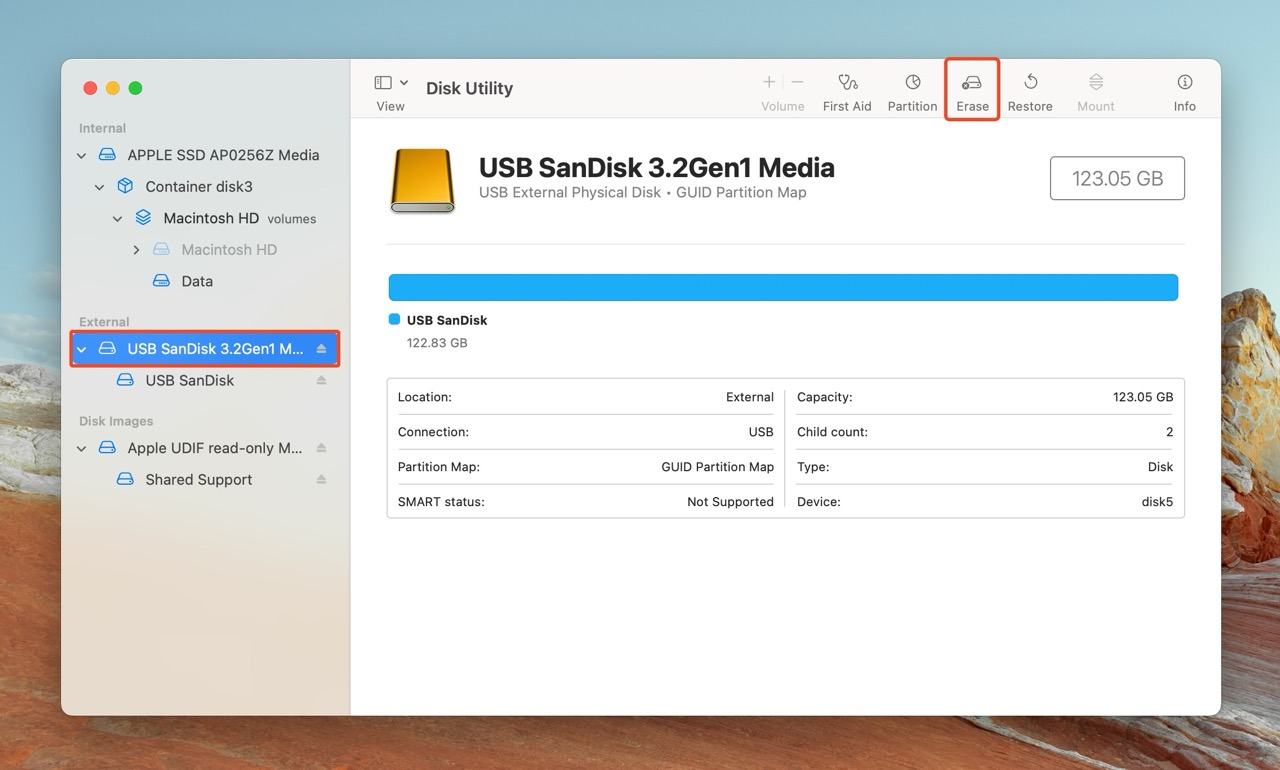
- Press Command + Space to open Spotlight Search, type disk utility, click on the Disk Utility app from the search results.
- Click on your external SSD in the Disk Utility sidebar.
- Click on the Erase button.
- Choose Mac OS Extended (Journaled), and GUID Partition Map from the Format, and Scheme drop-down menus respectively. You can name the drive according to your needs. Click on Erase.
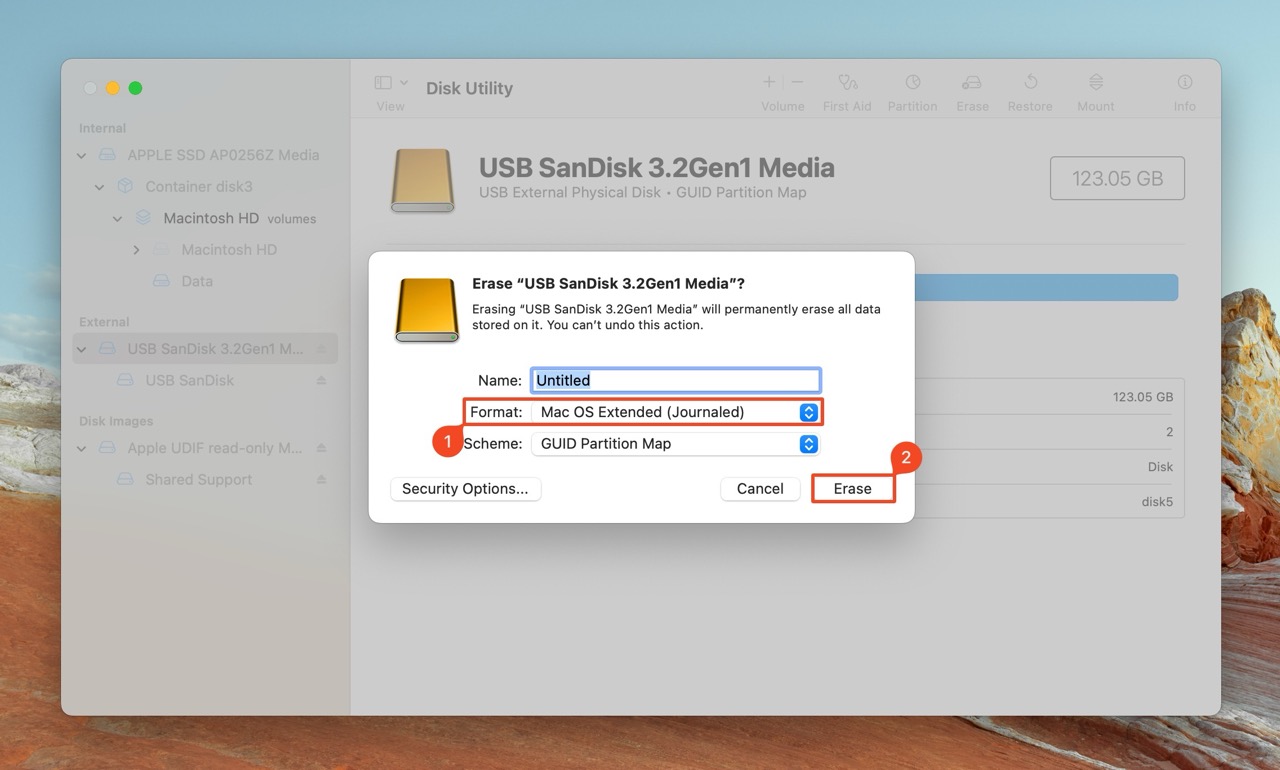
- Disk Utility will format the drive.
Additional Methods for ‘Finding’ Your SSD on a Mac
If none of the methods in the previous section worked, here are some other fixes you can try. These methods aren’t as specific, but they can help you if you’re unsure what’s causing your external SSD to not show up on your Mac. Additionally, unlike the methods outlined before, none of these will result in data loss.
Let’s look at some additional ways on how to find an SSD that’s not showing up, or mounting on your Mac:
Option A: Restart Your Mac
Restarting your Mac may not strictly qualify as a method to try if the main methods fail, but we felt it didn’t warrant inclusion in the main section, so we’ve included it here instead.
A simple restart can fix a range of problems on your Mac. It forces macOS to reload all drivers, configuration files, and other relevant programs. Additionally, some primary fixes like repairing a file system work best after rebooting your Mac.
Restart your Mac, and check if your SSD appears in Finder, and Disk Utility after that. Here’s how:
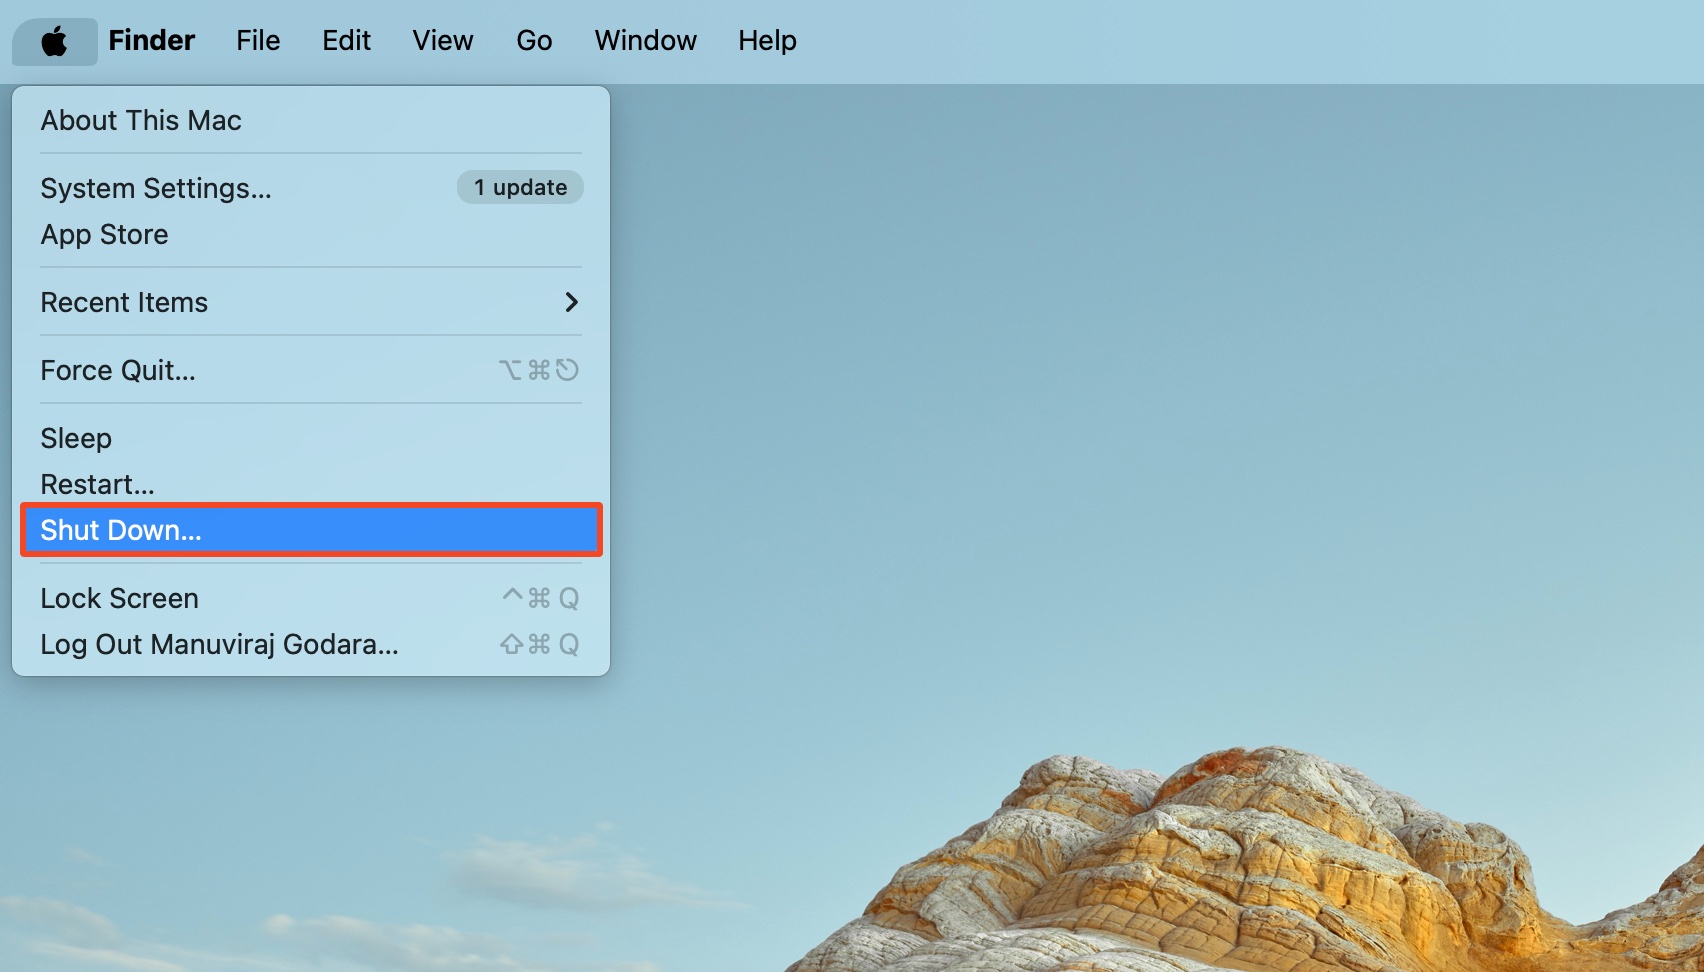
- Click on the Apple logo in the macOS menu bar.
- Click on Restart.
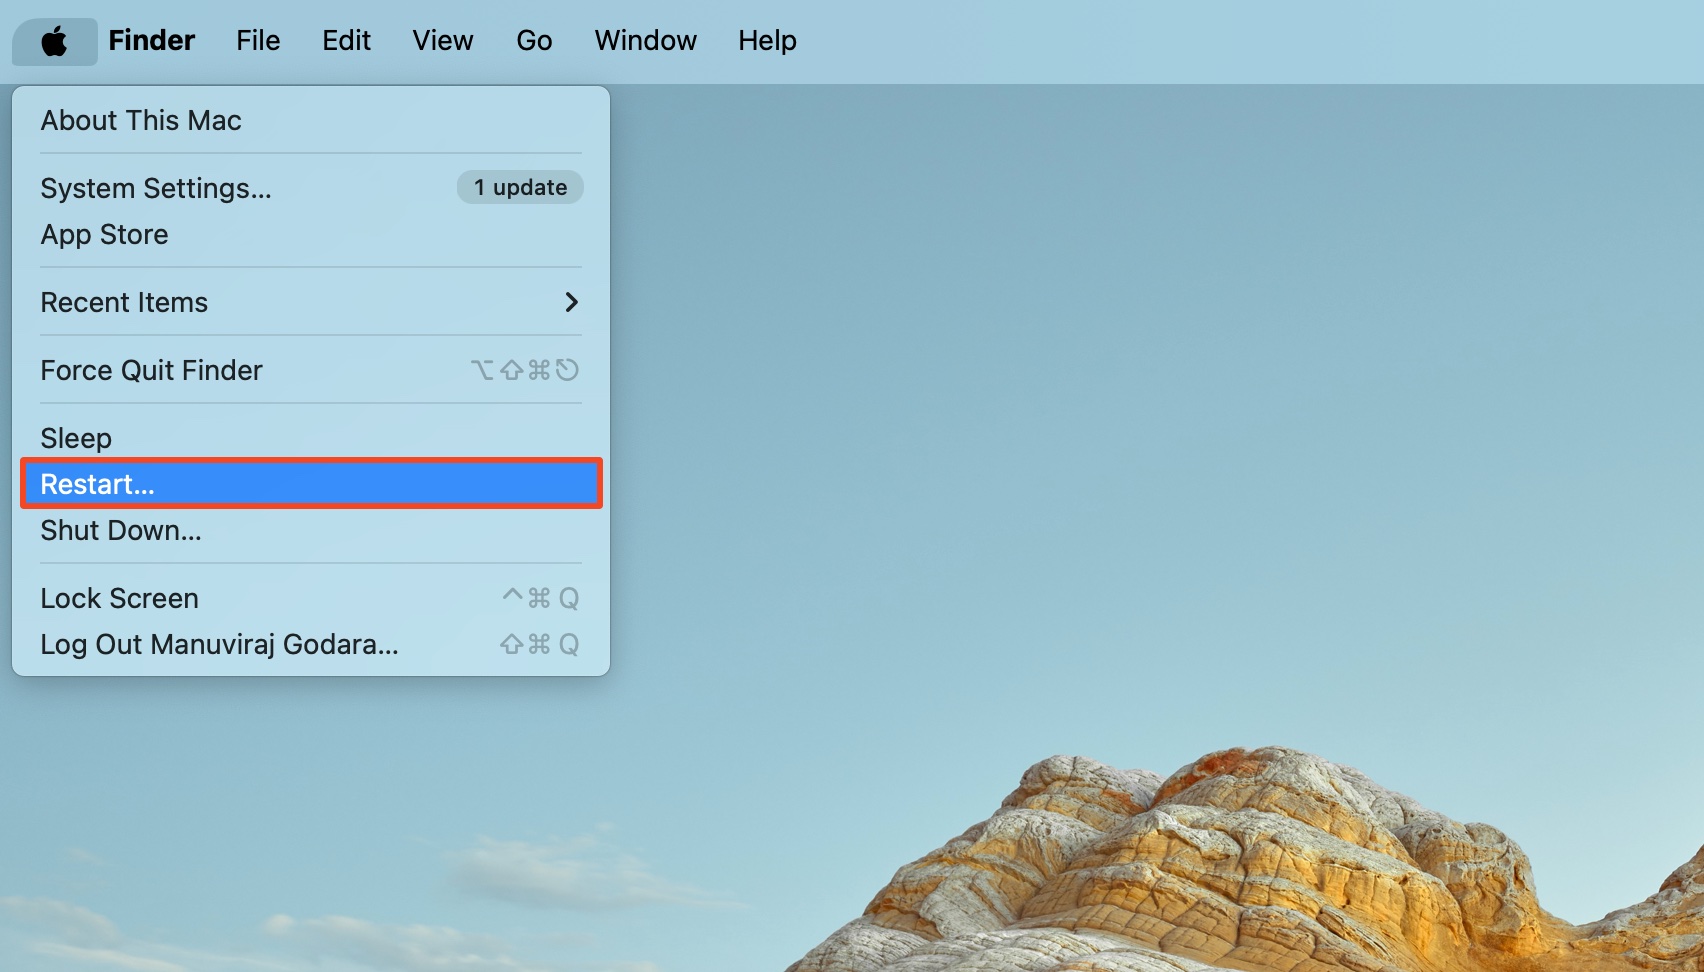
- Once macOS reboots, log in, and see if your external SSD is visible. Ensure that Finder’s visibility settings are configured properly.
Option B: Use First Aid in Disk Utility
First Aid is macOS’ disk checking feature that automatically detects and fixes disk errors. It’s highly recommended you run this feature if your external SSD is showing up in Disk Utility, but not in Finder.
Albeit rare, First Aid scans may lead to minor data loss.
Here’s how to use First Aid to fix an external SSD that’s not showing up on your Mac:
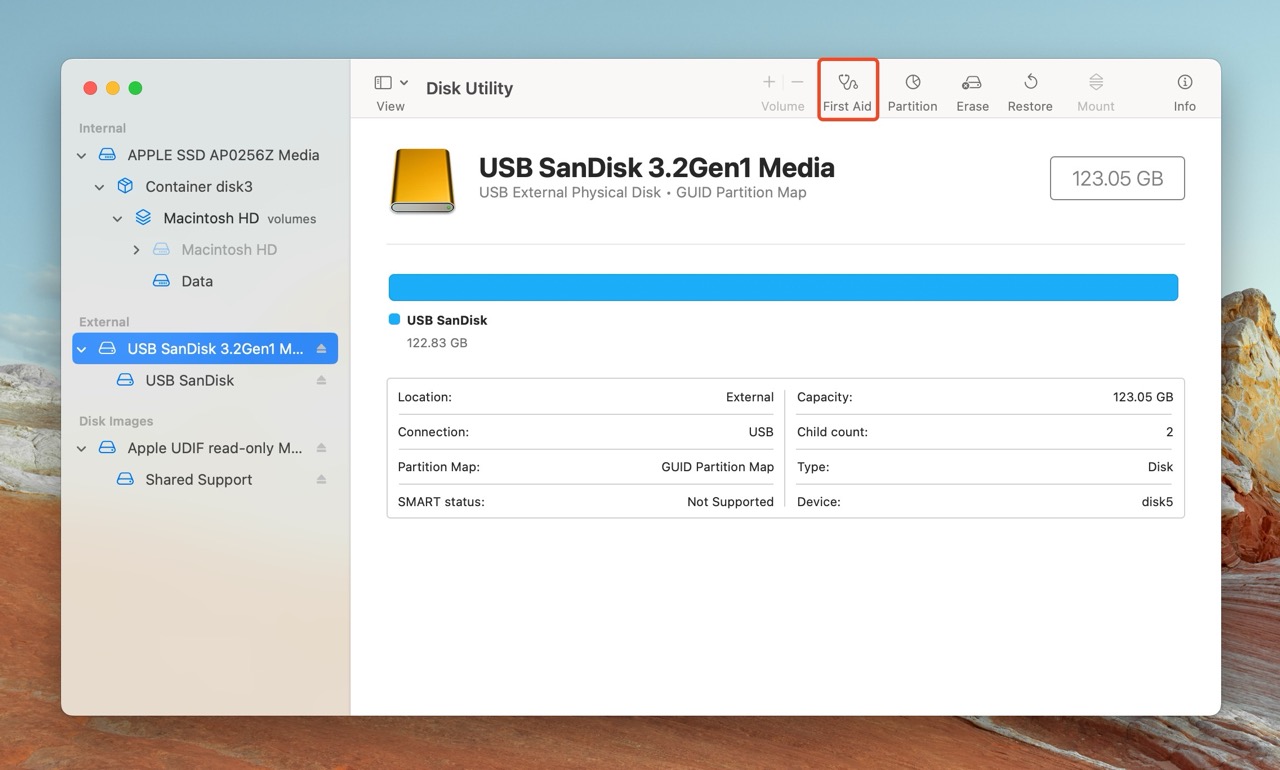
- Search for “disk utility” in Spotlight Search (Command + Space). Click on Disk Utility in the search results.
- Click on your external SSD in the Disk Utility sidebar.
- Click on the First Aid button in the top-right corner of Disk Utility.
- Click on Run in the First Aid confirmation prompt.
- First Aid will detect and attempt to repair any disk errors on the SSD.
Once the First Aid scan completes, reboot your Mac, and check if the external SSD is showing up.
Option C: Connect the SSD to Windows and See If It Can Fix the Error
In case your SSD is formatted to a Windows recognized file system (like exFAT, or FAT32), connecting a problematic external SSD to a Windows PC may prompt it to display the, “There’s a problem this drive. Scan now and fix it,” message. Users on Apple Community, and Reddit claim that scanning their drive using this prompt fixed the problem of an external drive not showing up on a Mac.
Here’s how to use scan and fix an external SSD not showing up on Mac, by connecting it to Windows:
- Connect your external SSD to a working Windows PC.
- Upon detecting an issue with the drive, Windows will display the, “Do you want to scan and fix the drive,” prompt.
- Click on the first option—Scan and fix (recommended).
- Once Windows completes the scan, safely eject the external SSD from the PC, and connect it to your Mac.
Option D: Reset the SMC and NVRAM
While they’re not bulletproof solutions, resetting the SMC (System Management Controller), and NVRAM (Non-Volatile Random Access Memory) can often fix hardware-related issues on your Mac. The NVRAM stores settings like sound volume, display resolution, and startup disk preferences. On Intel-based Macs, the SMC is a separate physical chip, responsible for managing several physical aspects of the computer.
Know that resetting the NVRAM and SMC will revert most of your settings to their default values.
Here’s how to reset the SMC and NVRAM, to potentially fix an SSD that’s not showing up on your Mac:
Part 1: Reset the SMC
The steps to reset the SMC differ, depending on the kind of Mac you have:
For Macs With Apple Silicon
- Click on the Apple menu in the top-left corner of the screen.
- Click on Restart.
- No other steps are necessary.
For Macs With the Apple T2 Security Chip
These steps will vary depending on whether you have a laptop computer, or a desktop computer, with the T2 security chip.
For laptops with the T2 security chip:
- Click on the Apple menu in the top-left corner of the screen and click Shut Down.
- Press and hold the Control, and Option keys on the left side of your keyboard, and hold down the Shift key on the right side of your keyboard.
- Hold down these keys for 7 seconds, then hold down the Power button on your Mac along with them.
- Keep holding these keys for another 7 seconds.
- Wait for a few more seconds and then power on your Mac.
For desktop computers with the T2 security chip:
- Click on the Apple menu button and choose Shut Down.
- Unplug the power cord.
- Wait for 15 seconds, then plug in the power cord.
- Wait for 5 seconds, then power on your Mac.
Part 2: Reset the NVRAM (Applicable for Intel-based Macs Only)
- Click on the Apple Menu and click Shut Down.
- Power on your Mac, and immediately hold down the Option + Command + P + R keys together.
- Release the keys after 20—25 seconds. Your Mac may restart several times—it’s completely normal.
- Once your Mac boots in, the NVRAM will be reset.
How to Recover Data from an External SSD That’s Not Showing Up, Or Mounting on a Mac
Sometimes, no matter what you do, the external SSD won’t show up on your Mac, preventing direct access to your files. Luckily, you can still recover existing, and in some cases, deleted data from it using a data recovery program. The only requirement—the disk should be visible in Disk Utility, with its correct size.
It’s crucial to choose a good data recovery program—we recommend picking one from our list of the best data recovery programs for Mac.
For this SSD data recovery tutorial, we decided to use Disk Drill—thanks to its sophisticated data recovery algorithm, ease of use, proven safety, and abundance of additional features. The program supports almost all file systems, and can even recover data from RAW drives (drives with a missing, or damaged file system) as long they show up in Disk Utility.
Note: The TRIM feature in SSDs—enabled when an external SSD is connected using USB type C, Thunderbolt, or Thunderbolt 3 ports—reduces the chances of recovering deleted files. So, it’s best to keep expectations in check. However, the TRIM feature won’t impact your chances of recovering existing, inaccessible data from your external SSD.
Here’s how to use Disk Drill to recover data from an external SSD that’s not showing up on a Mac:
- Download Disk Drill and install it on your Mac.
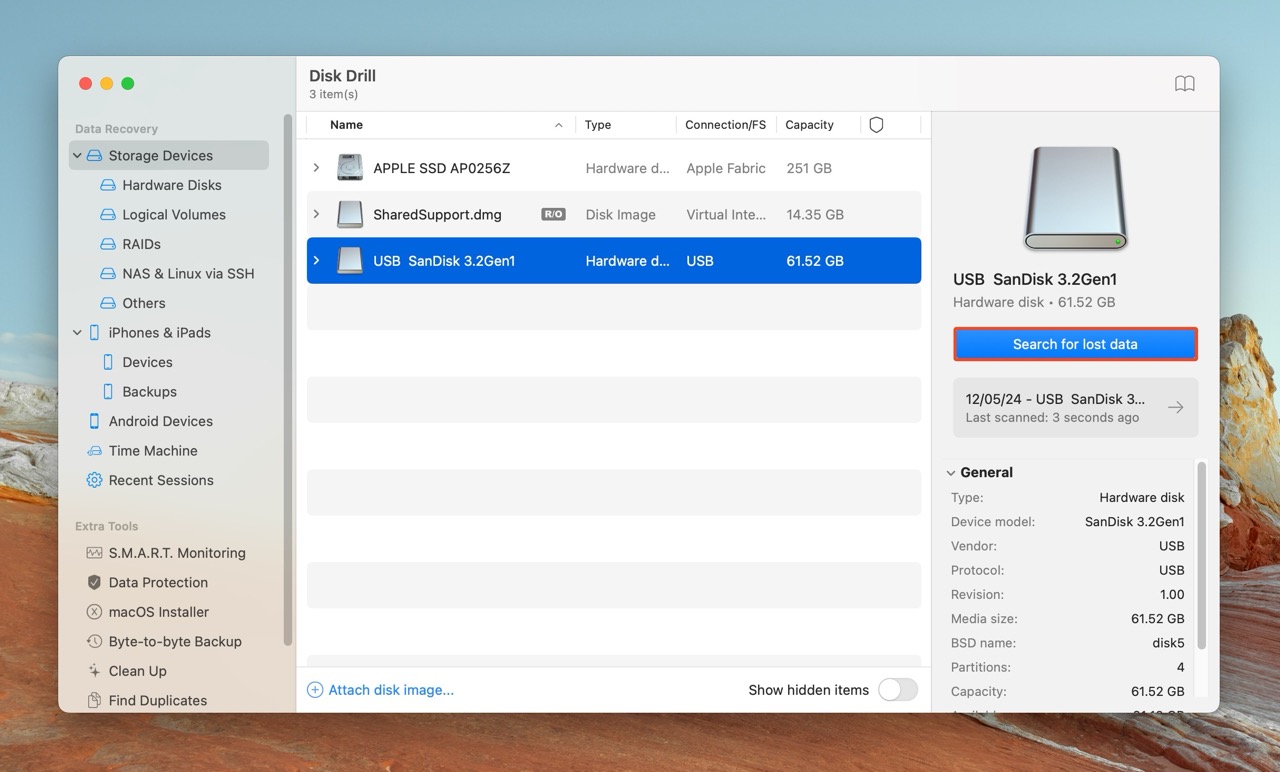
- Open Disk Drill, select your external SSD, and click on Search for lost data.
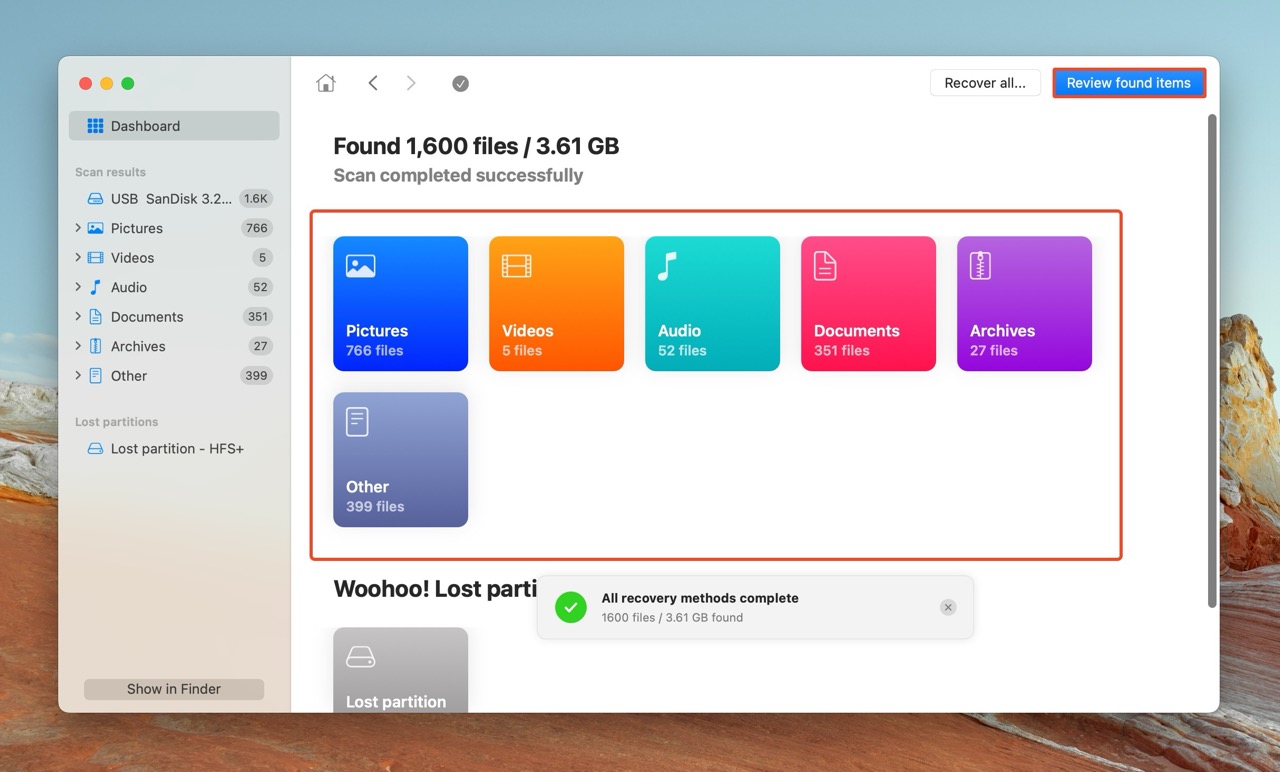
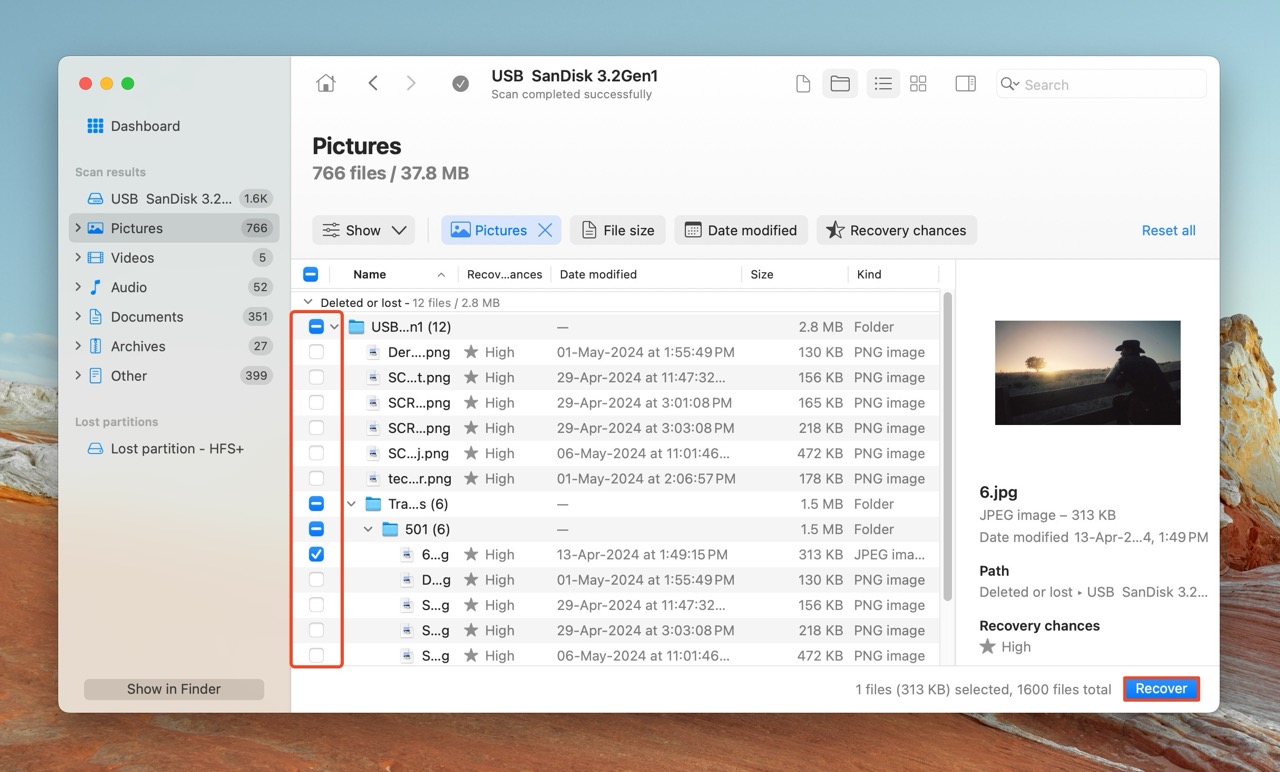
- Click on Review found items to view all recoverable files. To only view specific file types, click on the relevant file type tile instead—Pictures, Videos, Audio, Documents, Archives, and Other.
- Expand the Existing section to view existing files on the SSD. To view deleted files that may be recoverable, expand the Deleted or lost, and Reconstructed sections.
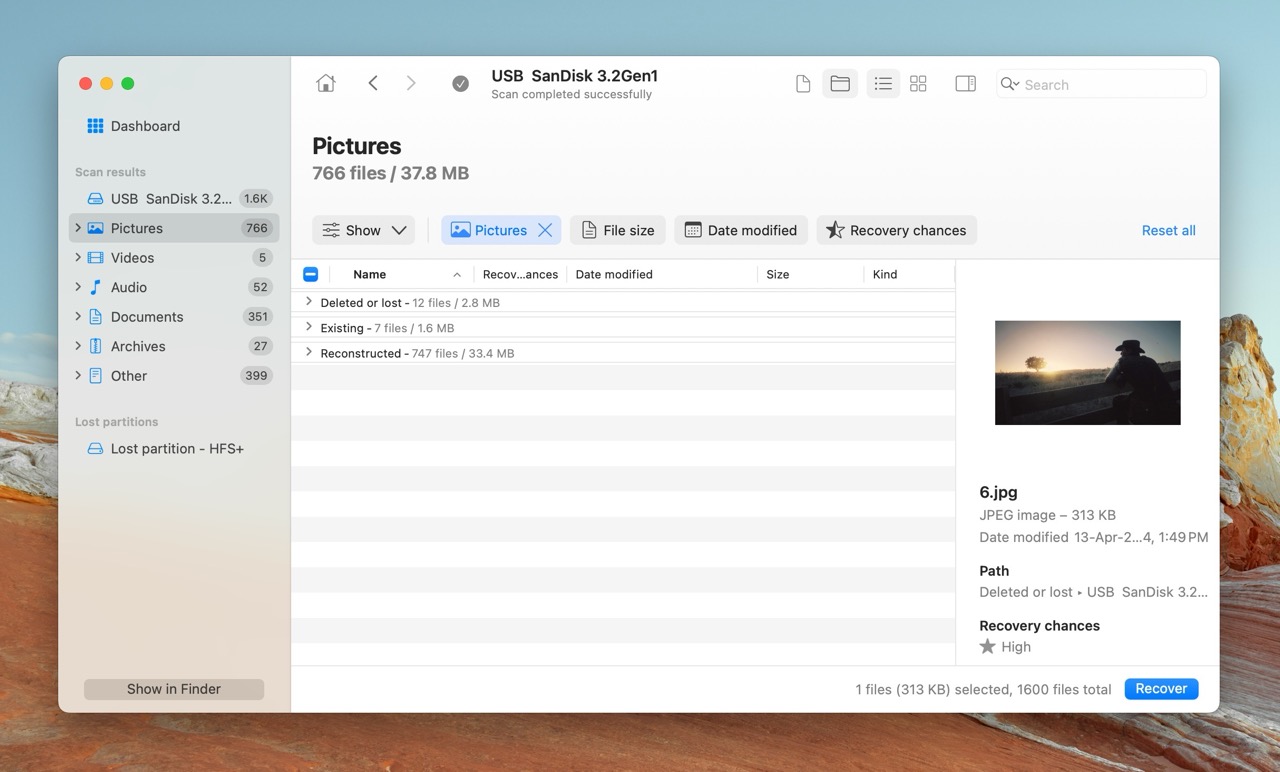
- Select the files you wish to recover. Use Disk Drill’s preview feature to help you select the correct files. Disk Drill automatically displays a preview of the currently selected file, but you can manually preview any file by clicking the eye icon next to its filename. Click on Recover after confirming your selection.
- Choose a recovery destination for the files. It’s best to recover these files to a separate drive. Click Next.
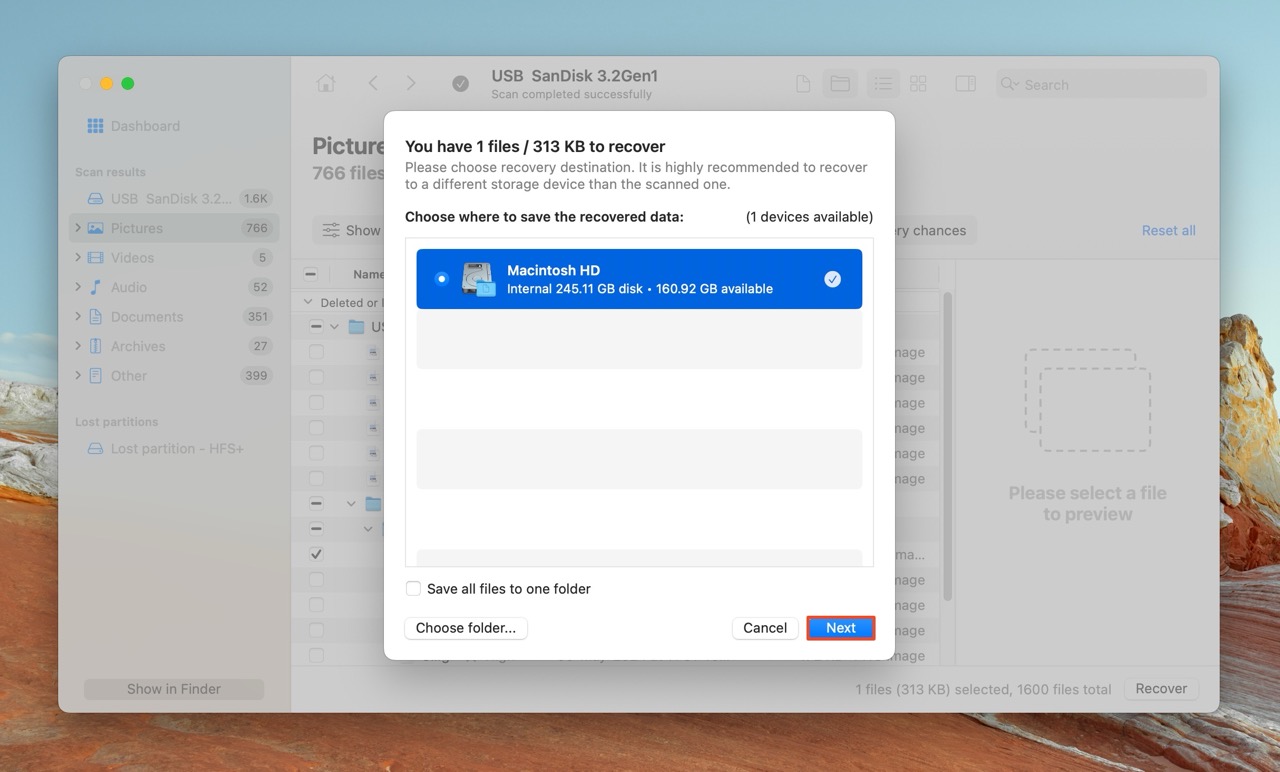
- Disk Drill will recover the selected files.
For more information about Disk Drill, it’s features, shortcomings, and alternatives—check out our detailed review of the program.
Conclusion
An external SSD that’s not showing up on a Mac is usually not inherently faulty. It may be connected improperly, or formatted with the wrong file system, or your Mac’s settings are configured to not show it. Luckily, these problems can be fixed by double-checking the drive’s connections, reformatting it, and changing macOS’ Finder visibility settings. In case the drive is logically corrupt, you can use TestDisk to fix it.
If nothing works, you can still salvage any existing (and often, deleted data) from the drive by using a competent data recovery tool.
This article was written by Manuviraj Godara, a Staff Writer at Handy Recovery Advisor. It was also verified for technical accuracy by Andrey Vasilyev, our editorial advisor.
Curious about our content creation process? Take a look at our Editor Guidelines.