No matter how reliable they get, Seagate hard drives are just as prone to data loss as any other brand. You can lose the data stored on your drive by accidental file deletion, improper formatting, and corruption.
But don’t panic, as there are numerous solutions for this issue. In this article, we will go over a few fool-proof methods that you can follow to recover a Seagate drive.
Want to skip the introduction part and jump right to the recovery guide? Click here.
Is It Possible To Recover Data From a Seagate Hard Drive?
Yes, it is possible to recover deleted files from a Seagate hard drive. However, the process is not the same for both internal and external storage. Moreover, it also differs depending on the type of drive you’re using. Let’s take a look at the different types of Seagate storage drives and their scope of recovery.
- 🟢 Seagate external hard drive recovery: Seagate external hard drive recovery: External storage drives are usually easy to recover data from. This is basically because they usually have only one partition which makes recovering data from external hard drives fairly simple. In a majority of cases, the external drive gets accidentally formatted, or you might accidentally end up deleting some important data from it. In such scenarios, using good data recovery software can easily help you out.
- 🟡 Seagate internal hard drive recovery: Even though it’s possible to recover data from internal storage drives, the chances of recovery entirely depend on how long it’s been since the data was deleted and how much data you’ve stored on your drive since then. This is because even though the deleted data is still present on your drive, it can be overwritten by the new data you store on your drive which makes the recovery process complicated. Additionally, if you have a hard drive for your internal storage, it is more prone to errors related to disk formatting, disk corruption, and physical damage to the disk as it is being used more often and for longer time periods.
- 🟠 Seagate SSD data recovery: Even though it can be difficult, it is possible to recover data from an internal SSD. However, your win rates and the amount of data you can recover completely depend on whether your drive has an active TRIM command or not. The TRIM command is exclusive to SSDs, and it basically wipes out unused or deleted data internally to speed up the drive’s overall performance. However, if you quickly begin the recovery process before the TRIM command kicks in, you can easily recover your deleted data using data recovery software.
Seagate drive model |
Solution |
I need to recover data from the internal Seagate BarraCuda/FireCuda HDD or SSD |
|
I need to recover data from the external Seagate Ultra Touch / One Touch / Expansion / Basic drive |
|
Things to Know Before We Start Seagate Data Recovery
Now that we know the challenges you’ll face while recovering data from different types of drives, it’s best to go over the actual steps you can follow to perform data recovery. However, there are a few minor things you should keep in mind before you start. Let’s go over them briefly:
Stop Using Your Drive
The first order of business while recovering data from any form of storage is to stop using it. This is because drives have storage limitations and any new data can overwrite the space where your deleted data was initially present. If that happens, it becomes difficult to retrieve your files using data recovery software.
Do Not Format/Reformat Your Hard Drive
If you have accidentally formatted your Seagate hard drive, you can still recover it using data recovery software like Disk Drill, PhotoRec and TestDisk. However, you should not format the drive as it can make the recovery process complicated and you might lose some of your data forever.
For optimum Seagate external hard drive data recovery, you should stop using it until you retrieve your files.
Create a Byte-To-Byte Backup
The most efficient way of recovering data from a Seagate hard drive is to first create a complete backup of your drive. This is important because in any case of a failed data recovery attempt, you can restore your drive and start the recovery process again. This process is called ‘creating a byte-to-byte backup’ and you can do it easily with the help of Disk Drill.
How To Recover Data From a Seagate Hard Drive
As mentioned earlier, data recovery software like Disk Drill, PhotoRec and TestDisk are excellent tools to guarantee the safety of your data. Both the software have a fairly straightforward operation and offer something to both casual users and experts alike. Let’s briefly go through them:
In this article, we will be reviewing three (but actually two) best-in-class data recovery software applications that you can use to retrieve your lost data — Disk Drill, PhotoRec and TestDisk.
Method 1: Using Disk Drill
![]() Disk Drill is an excellent data recovery software that can recover deleted files from the Seagate drive. It is critically acclaimed for its easy-to-use interface, data protection tools, powerful data recovery capabilities, and extra features such as byte-to-byte backups that support various SSD interfaces such as NVMe, SATA, etc.
Disk Drill is an excellent data recovery software that can recover deleted files from the Seagate drive. It is critically acclaimed for its easy-to-use interface, data protection tools, powerful data recovery capabilities, and extra features such as byte-to-byte backups that support various SSD interfaces such as NVMe, SATA, etc.
Disk Drill caters to every kind of user struggling with data loss and need to recover files from the Seagate external hard drive or internal drive. The program has a user-friendly interface and can scan just about any common file format, including photos, videos, audio, and documents, among others.
Here’s an easy guide on how to use Disk Drill as a Seagate data recovery software:
- Download Disk Drill from the Cleverfiles website. ⚠️
Note: Do not download and install Disk Drill on the same drive from which the files were lost.
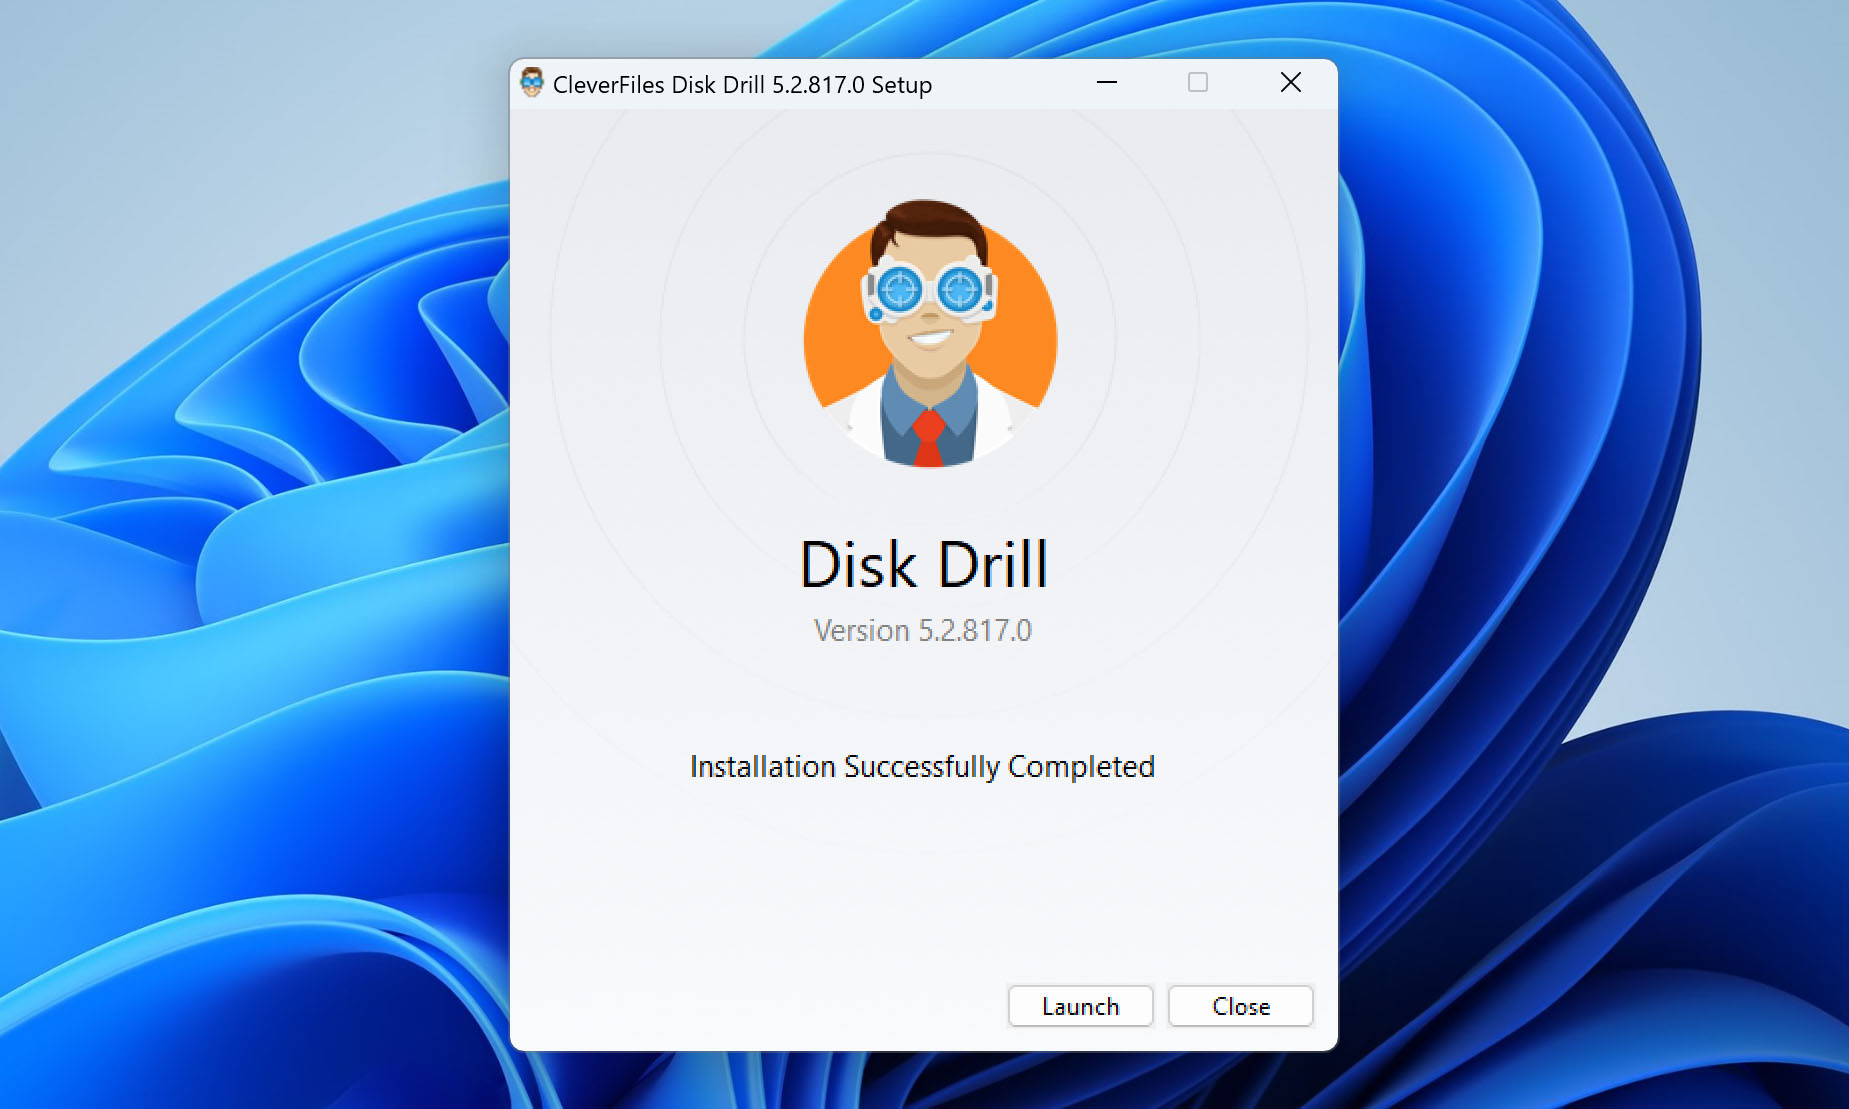
- Run the Disk Drill installer and follow instructions until successfully installed.
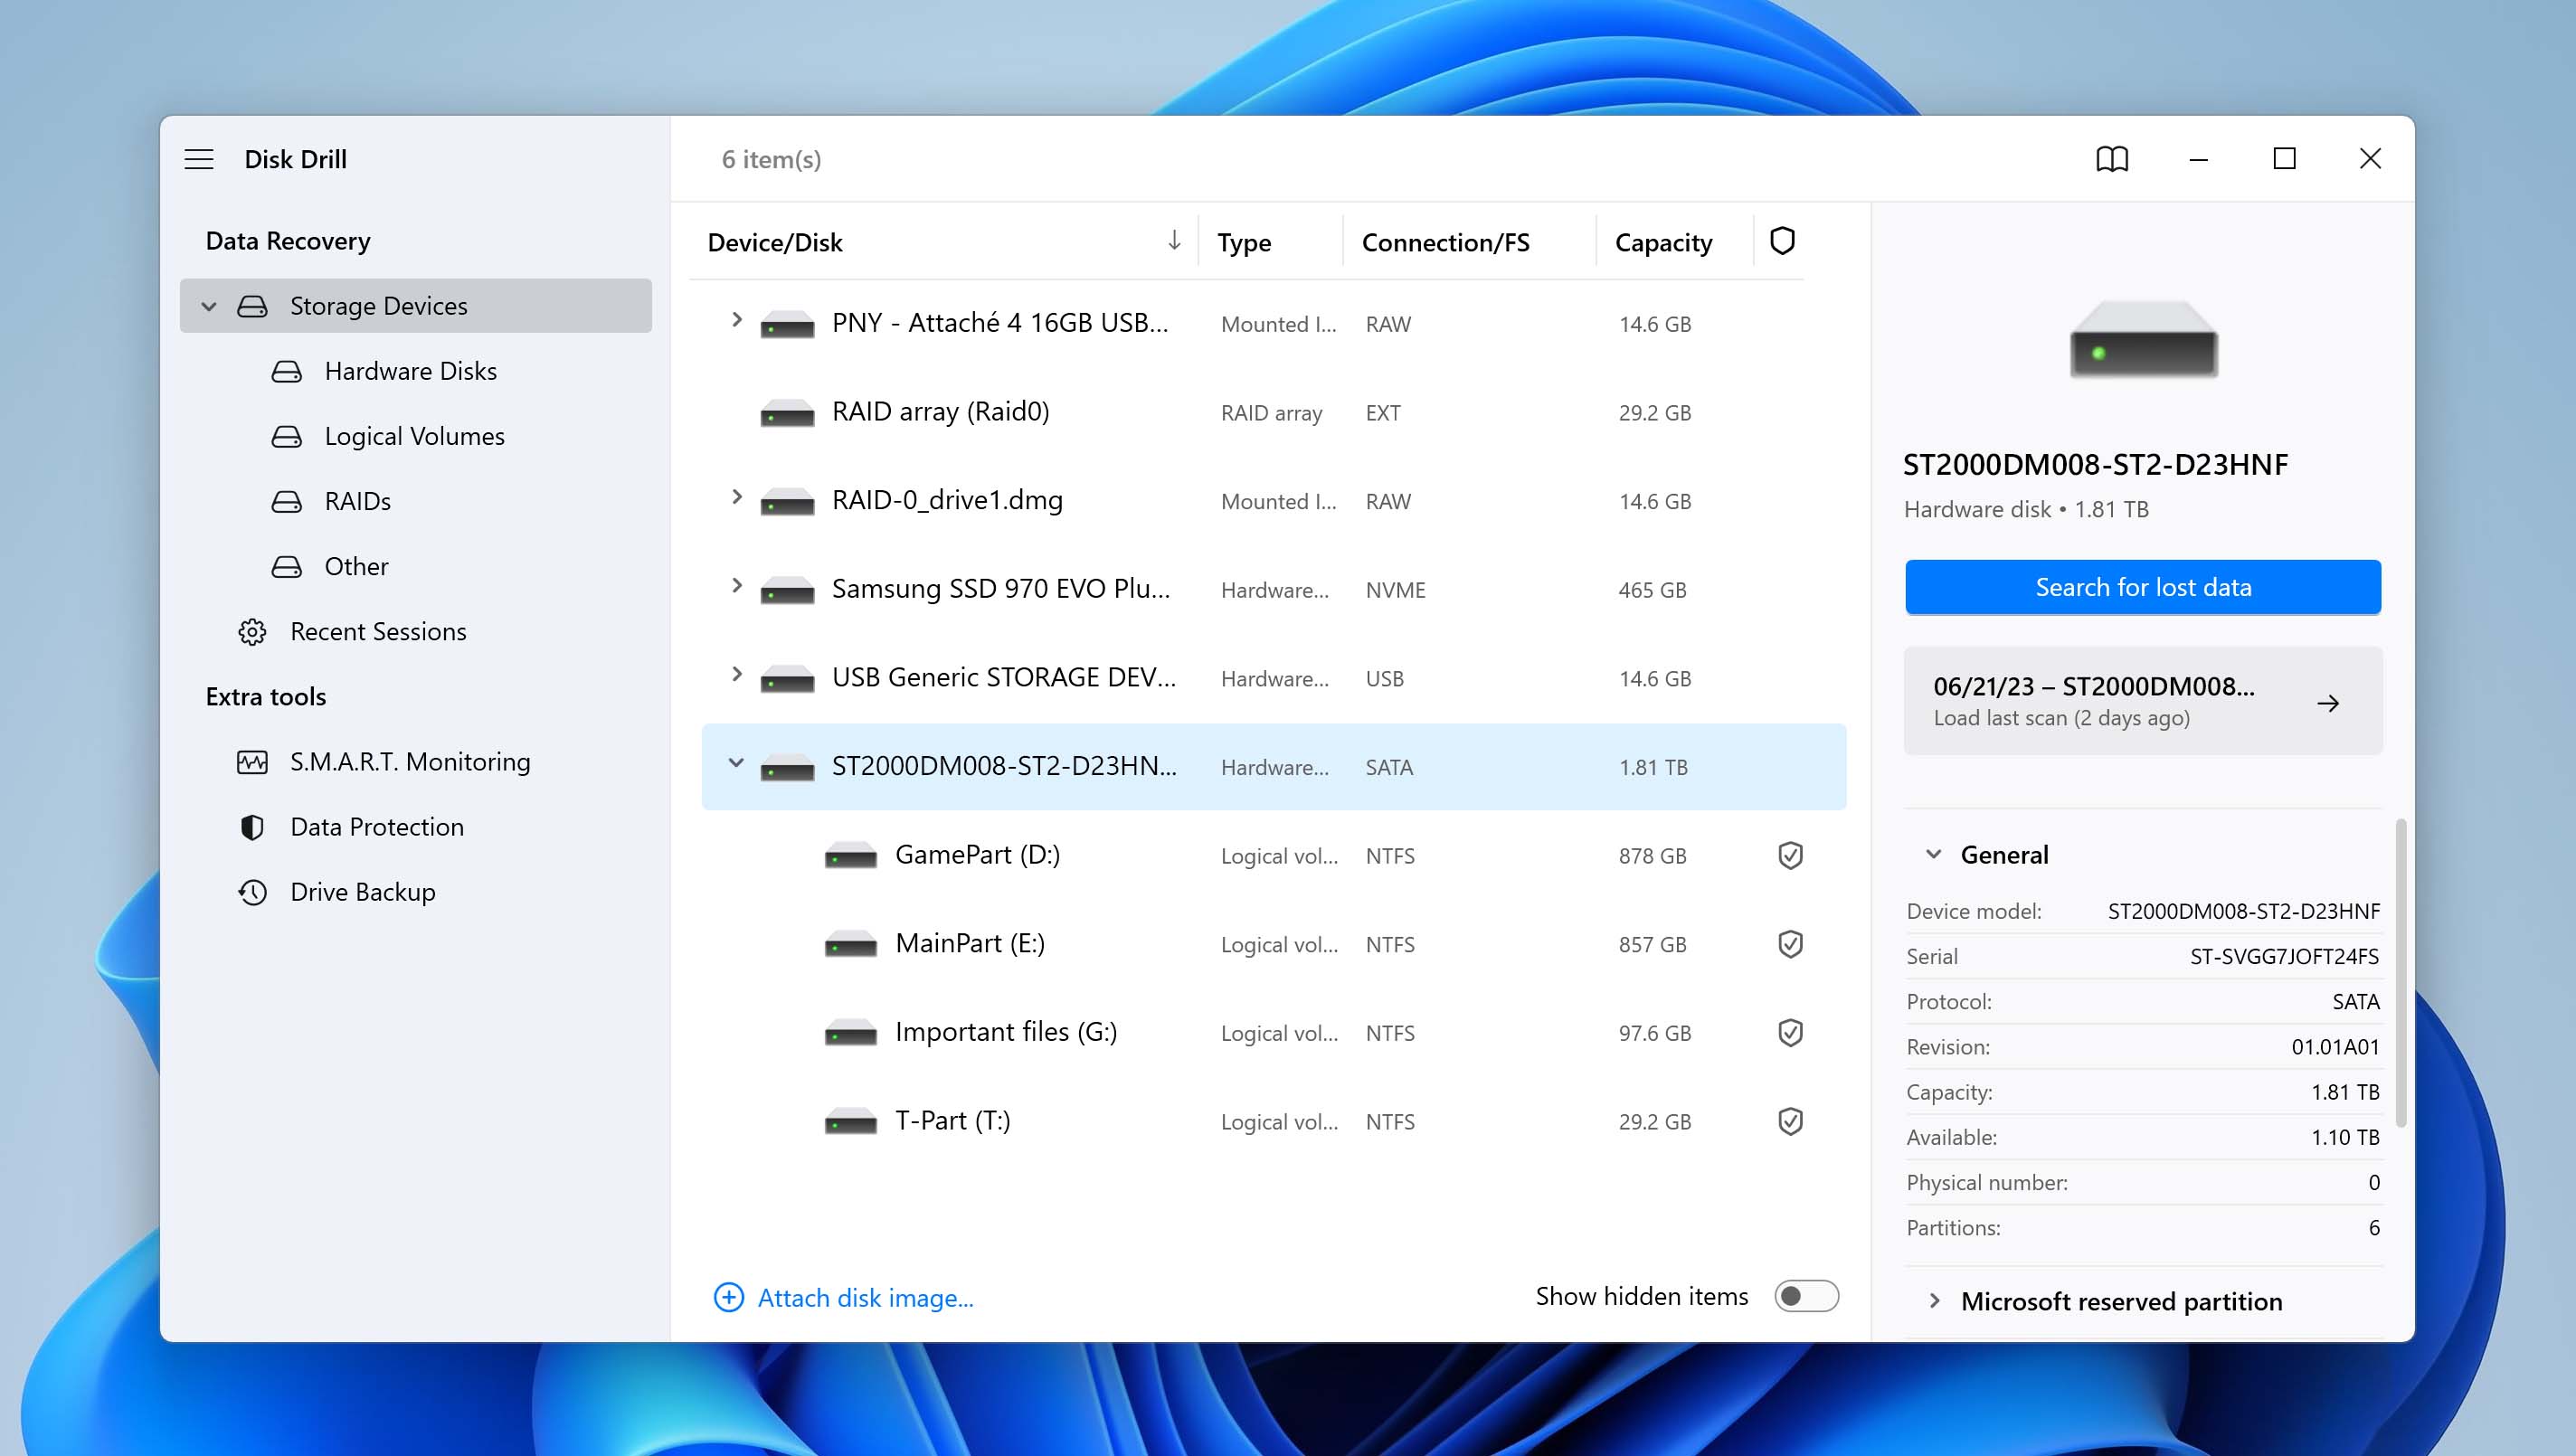
- Launch Disk Drill. In the main window, you will see a list of all the drives and partitions in your system. Select your drive and click Search for lost data.
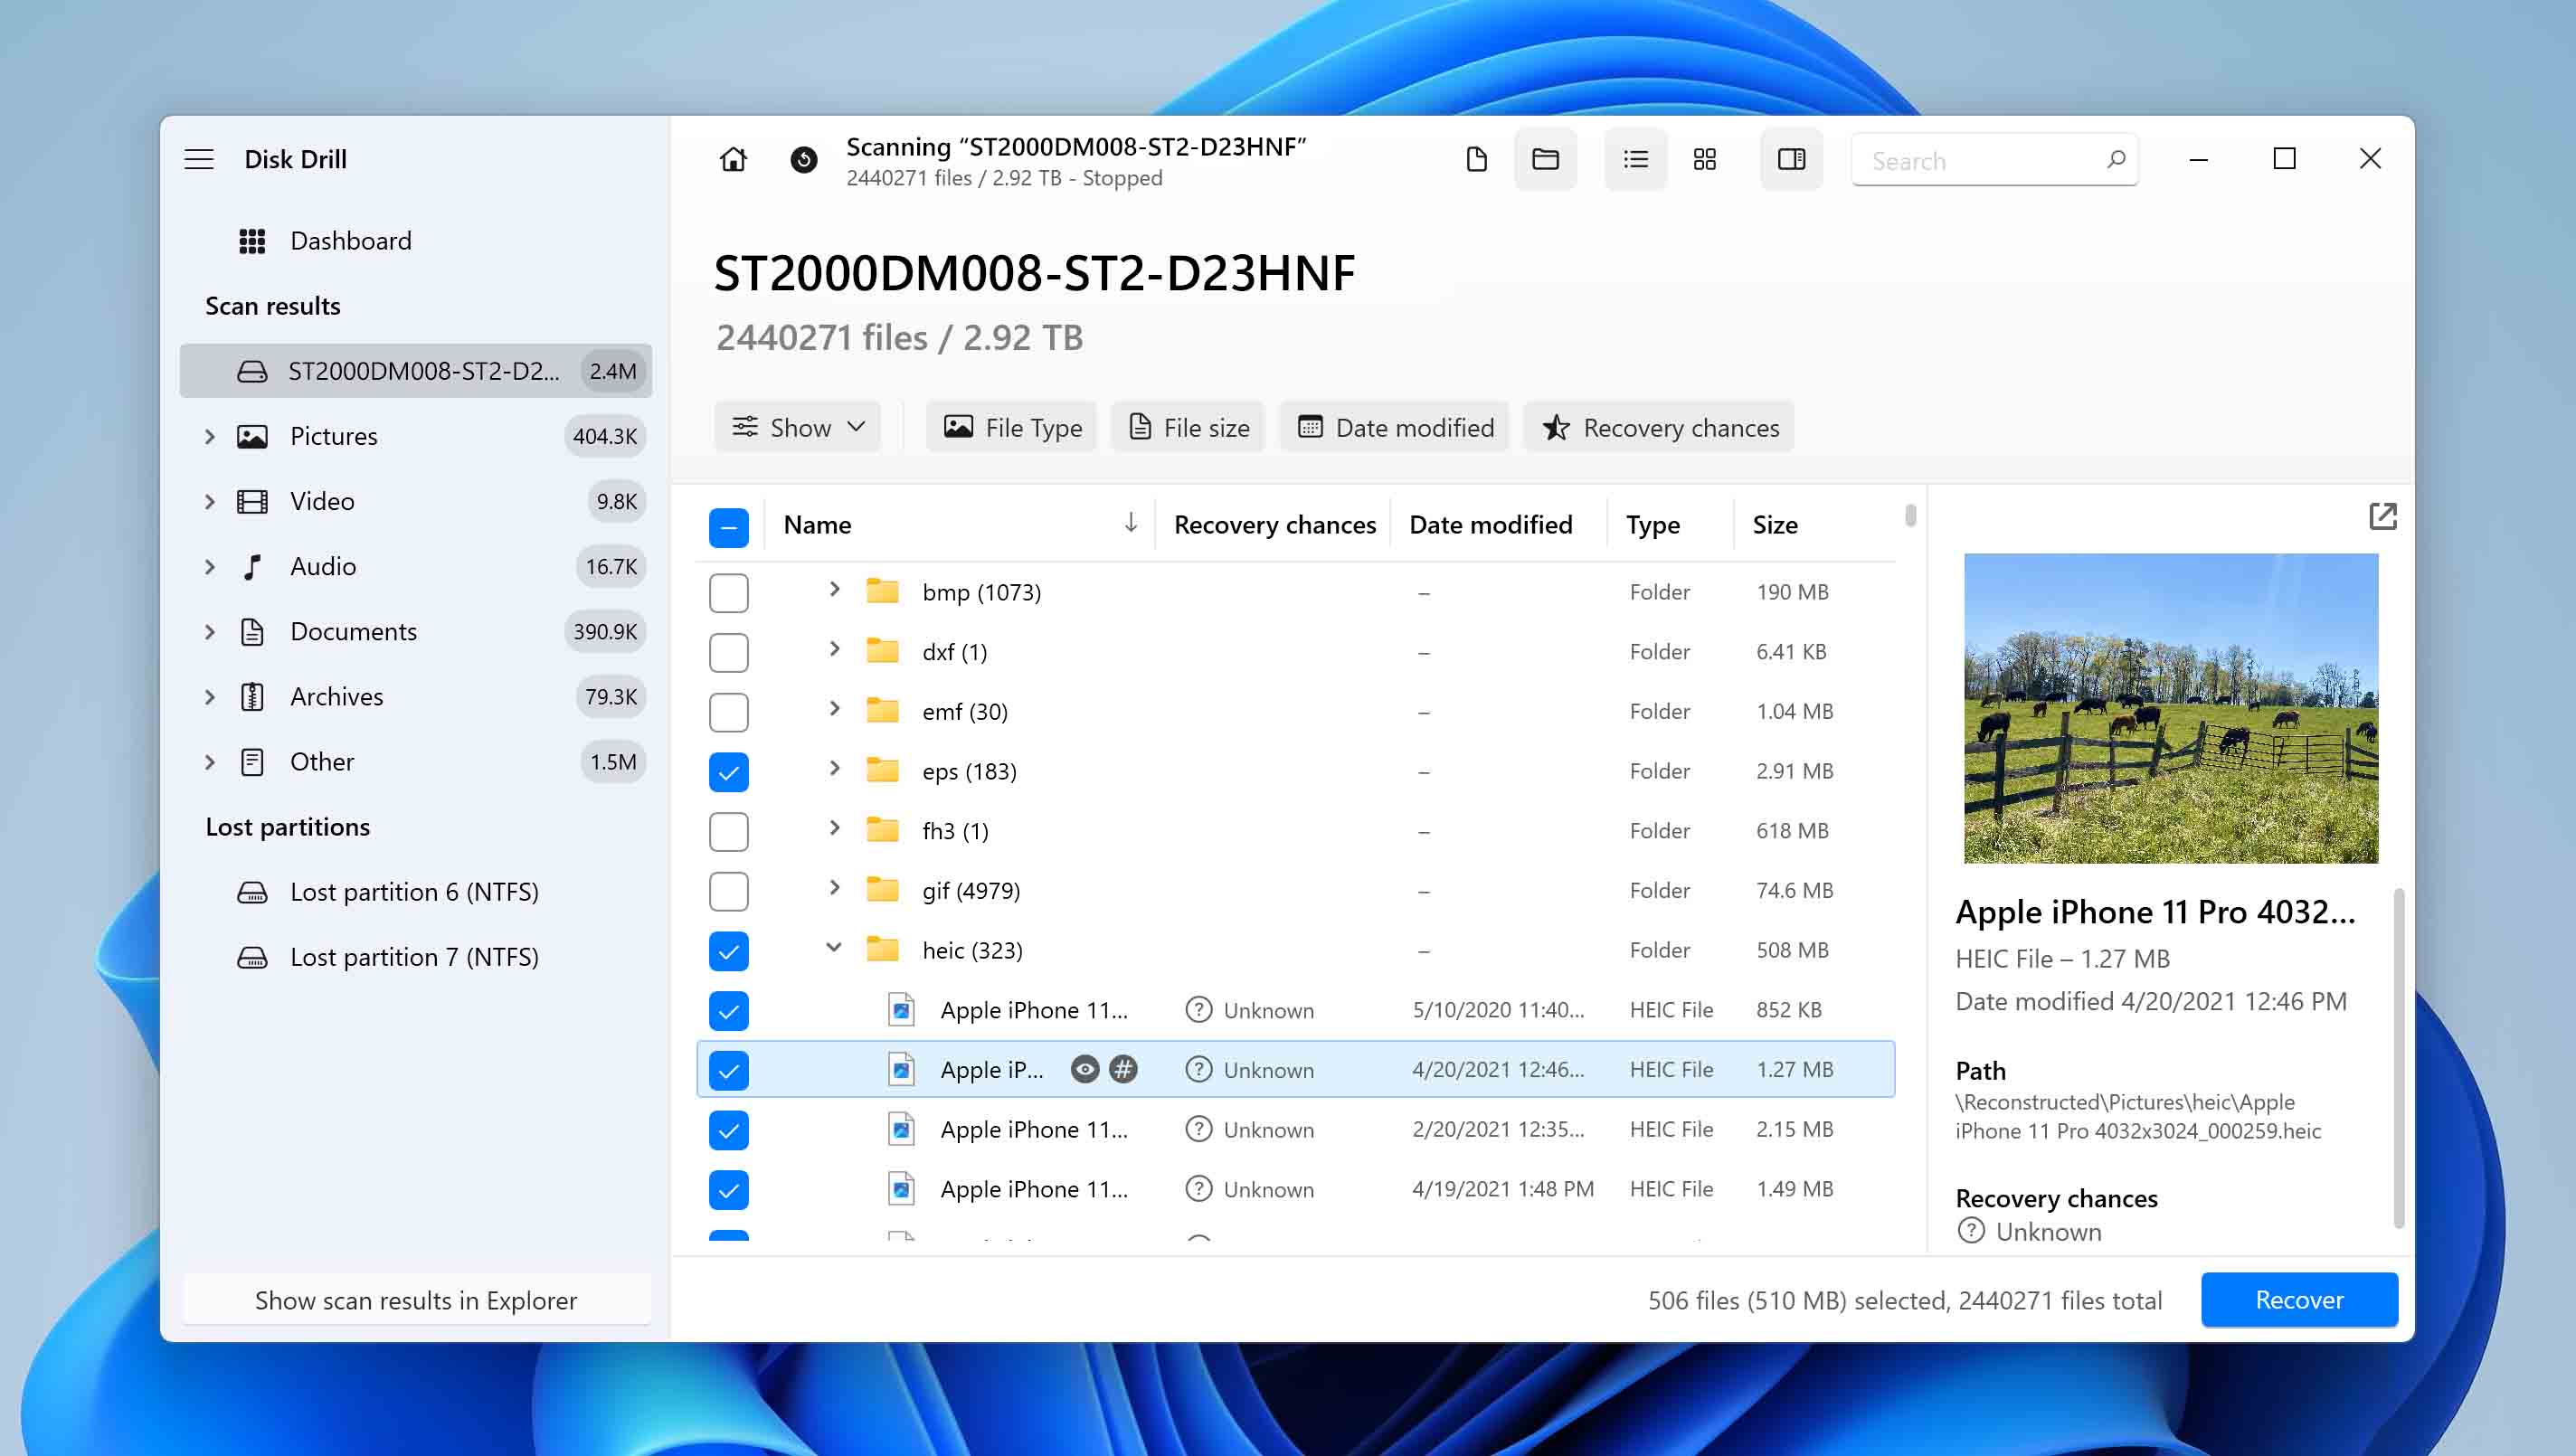
- Once the scan is complete, view the results by clicking Review found items.
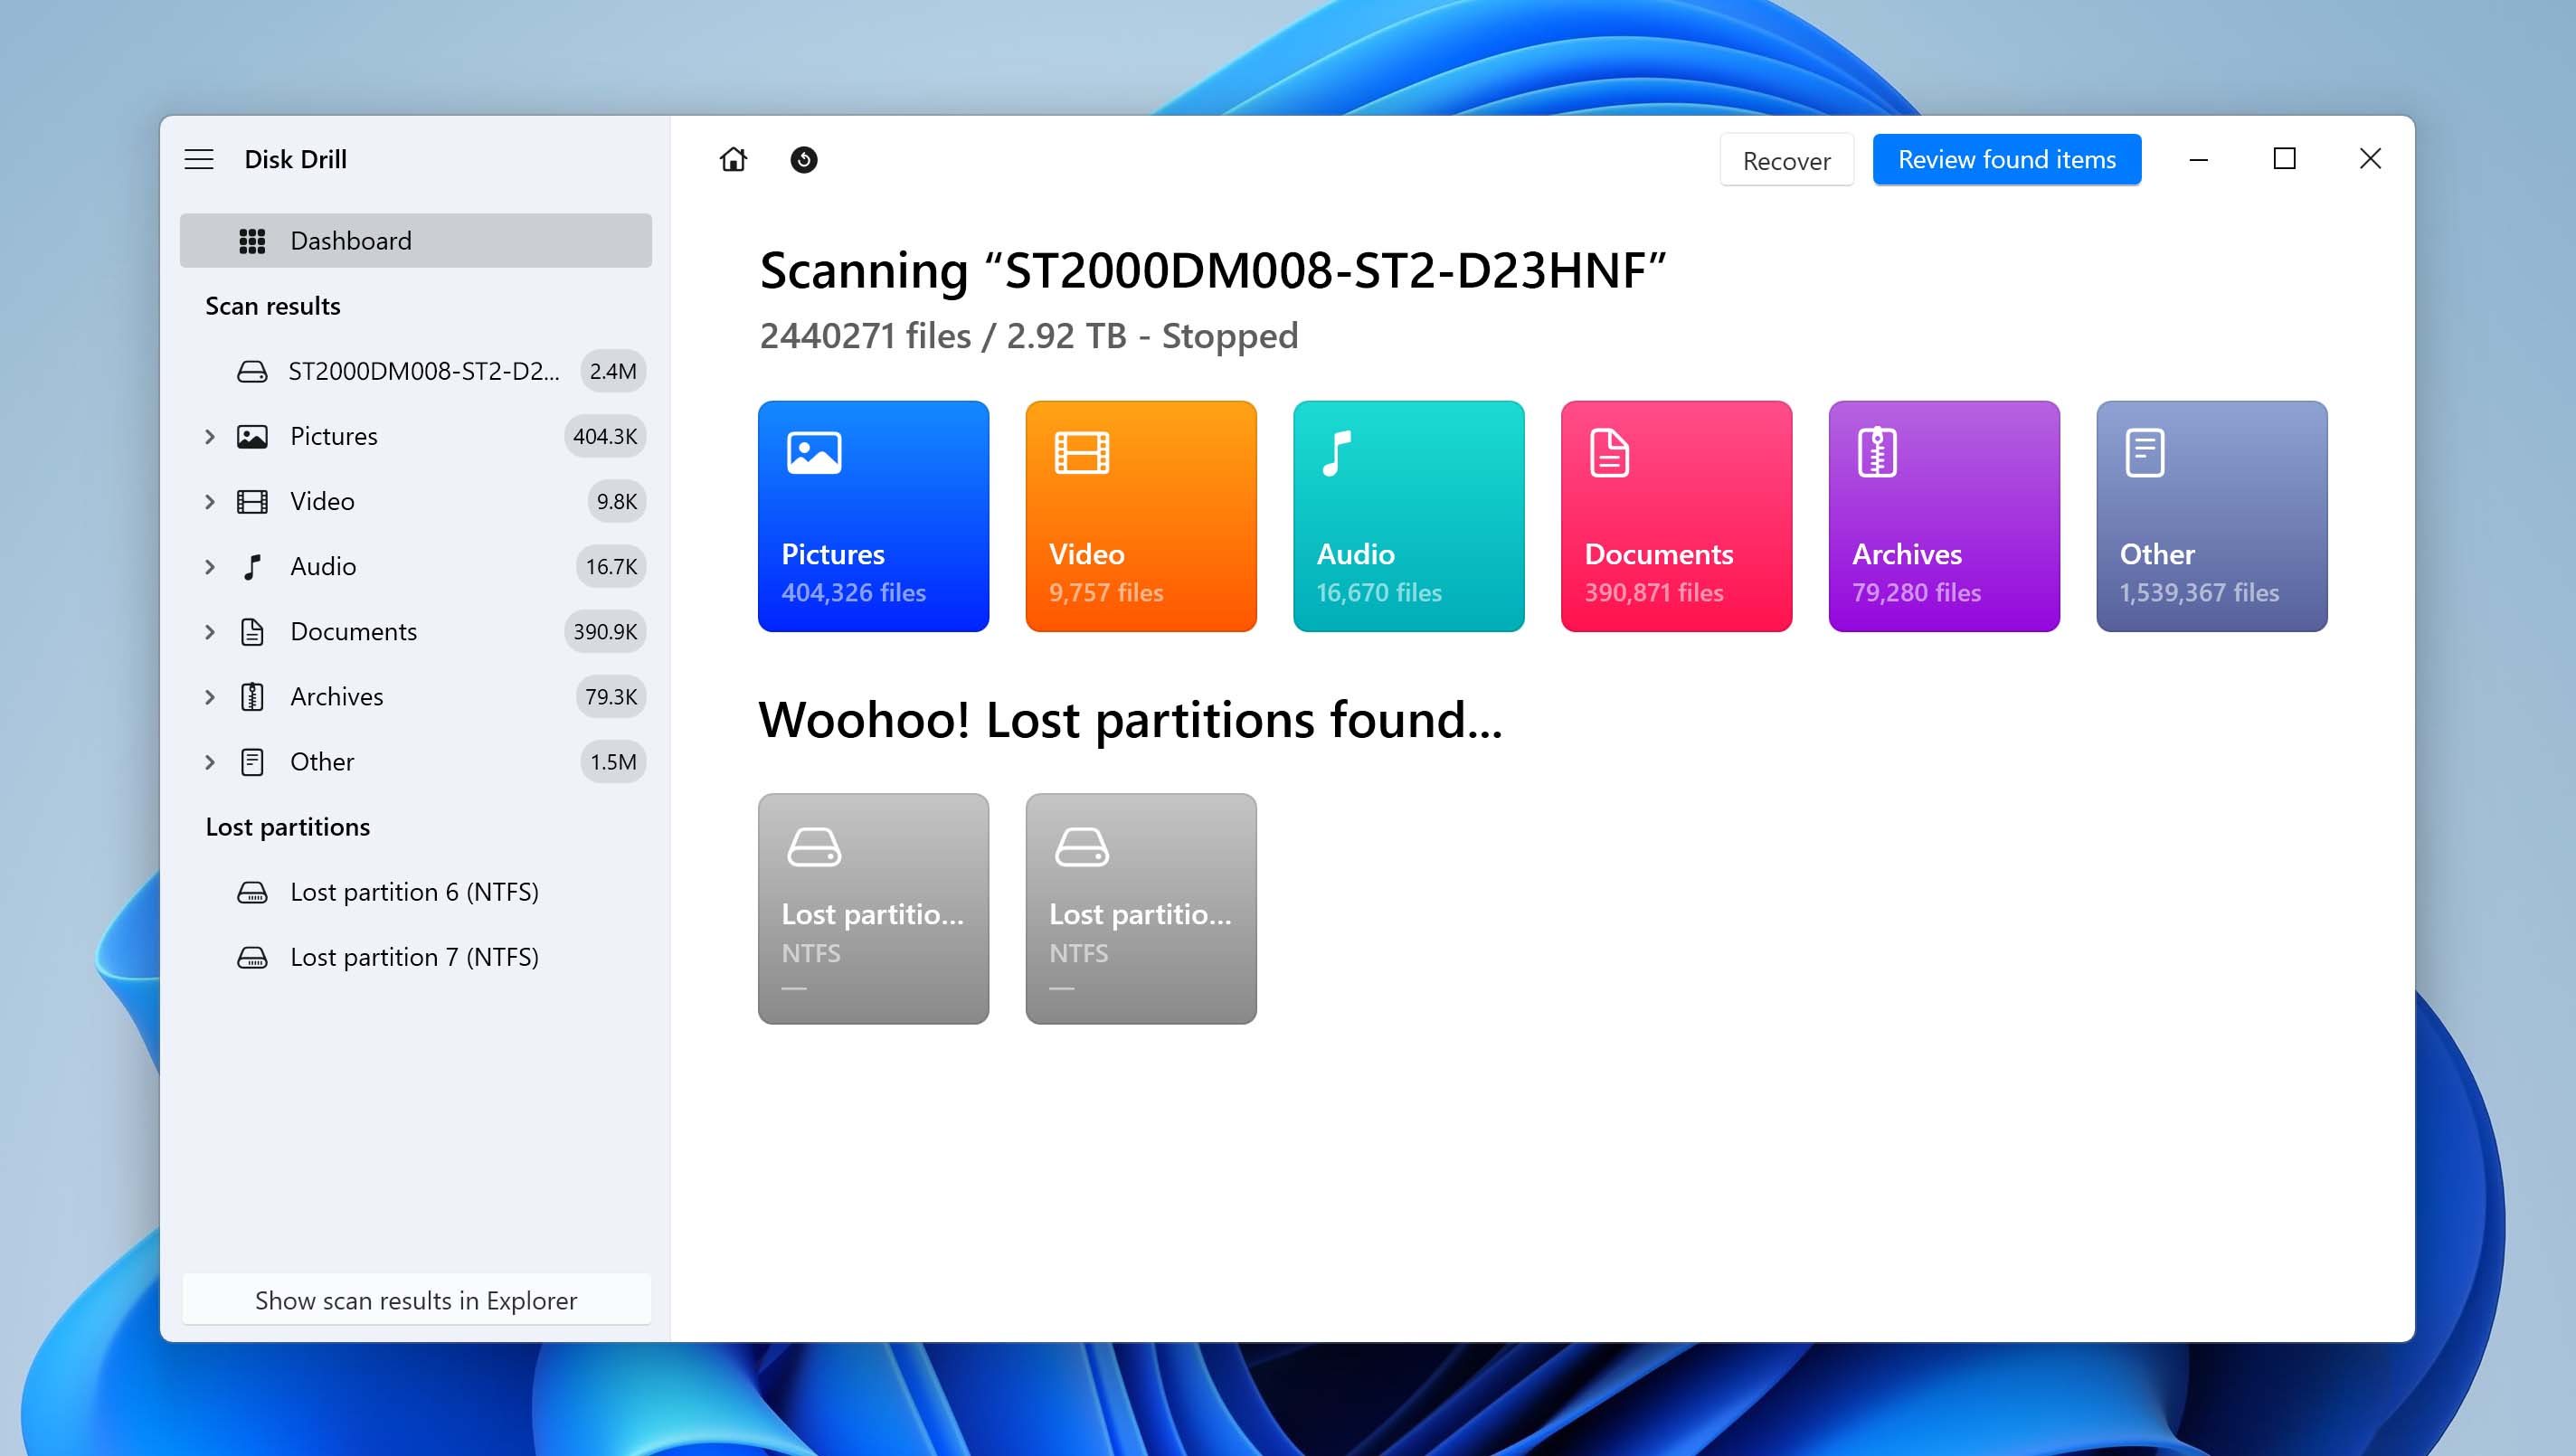
- In the Found files menu, you will find all the files recovered from your Seagate hard drive. You can also access the files by file format on the menu on the left side of the window. Select all the files you want to recover by ticking the checkboxes beside their file names. You can also search for your files using the search bar. Then, click Recover.
- Choose where your recovered files will be placed. Then, click Next.

- Disk Drill will recover the selected files and put them in your destination folder. In the next window, you can click Show recovered data in Explorer to open File Explorer and view your files.
Disk Drill will take a few moments before restoring your files to the selected destination folder. Once the process is complete, you will have access to all your lost data.
Make sure to select a different partition or another hard drive instead of the Seagate hard drive to save your recovered files.
ProTip: Disk Drill has the impressive capability to retrieve data from both uninitialized disks and seemingly inaccessible external hard drives that fail to appear when connected.
Method 2: TestDisk/PhotoRec
![]() TestDisk and its satellite software PhotoRec are freeware data recovery software bundles that can easily recover data from both internal Seagate hard drives and external Seagate hard drives.
TestDisk and its satellite software PhotoRec are freeware data recovery software bundles that can easily recover data from both internal Seagate hard drives and external Seagate hard drives.
However, unlike Disk Drill, both TestDisk and PhotoRec feature a command-line user interface that might not be accessible to everybody.
Using TestDisk for Seagate Data Recovery
TestDisk specializes in repairing disk partitions and making unbootable disks bootable, among other functions. It uses a different approach to recover lost data by providing the ability to get back access to data on your hard drive.
To recover deleted files from the Seagate drive using TestDisk, simply follow the steps below:
- Download TestDisk data recovery software from its official website.
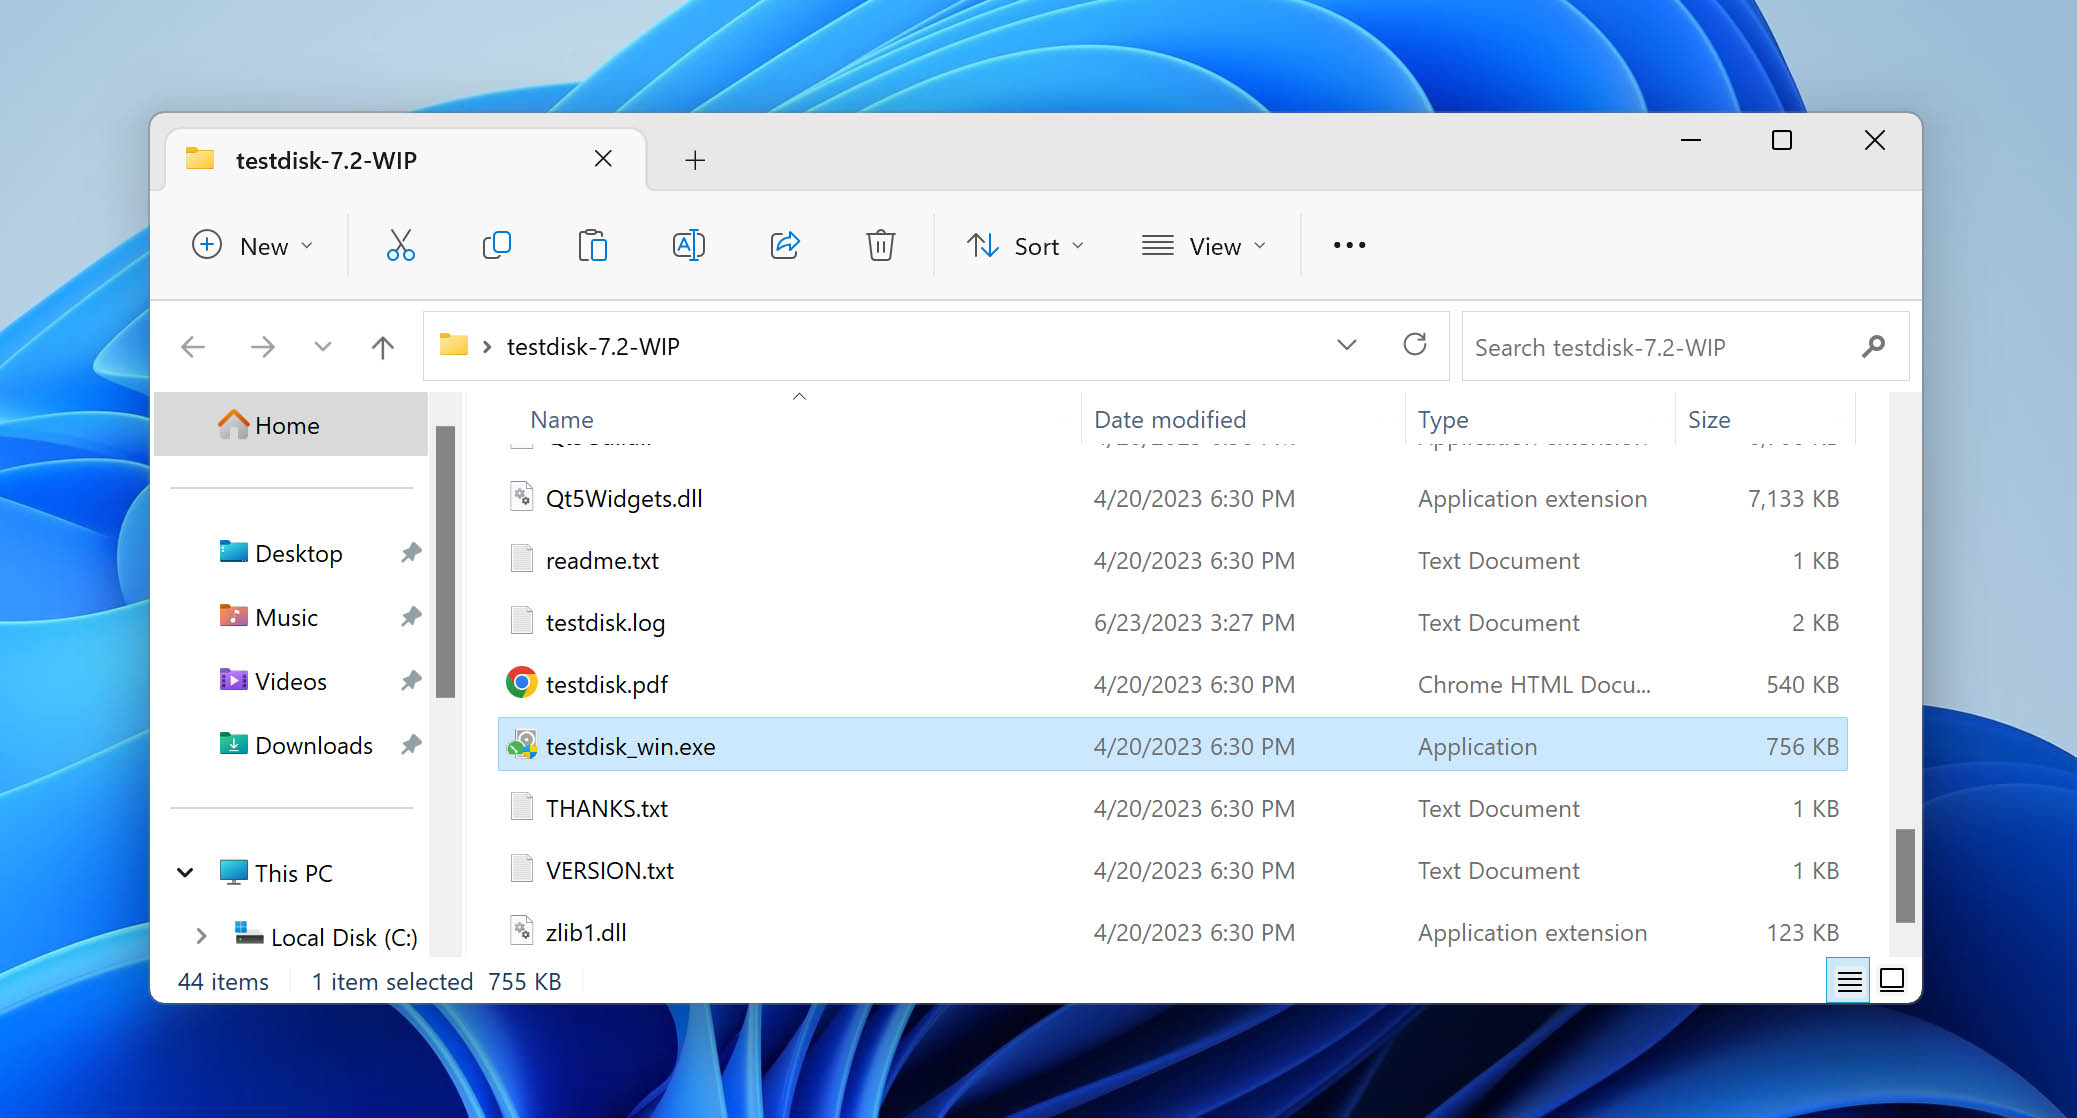
- When the download has finished, extract the contents at your desired landing location. (The extracted folder will be named after the TestDisk version you download)
- Open the folder and navigate to the application called testdisk_win. Launch it.
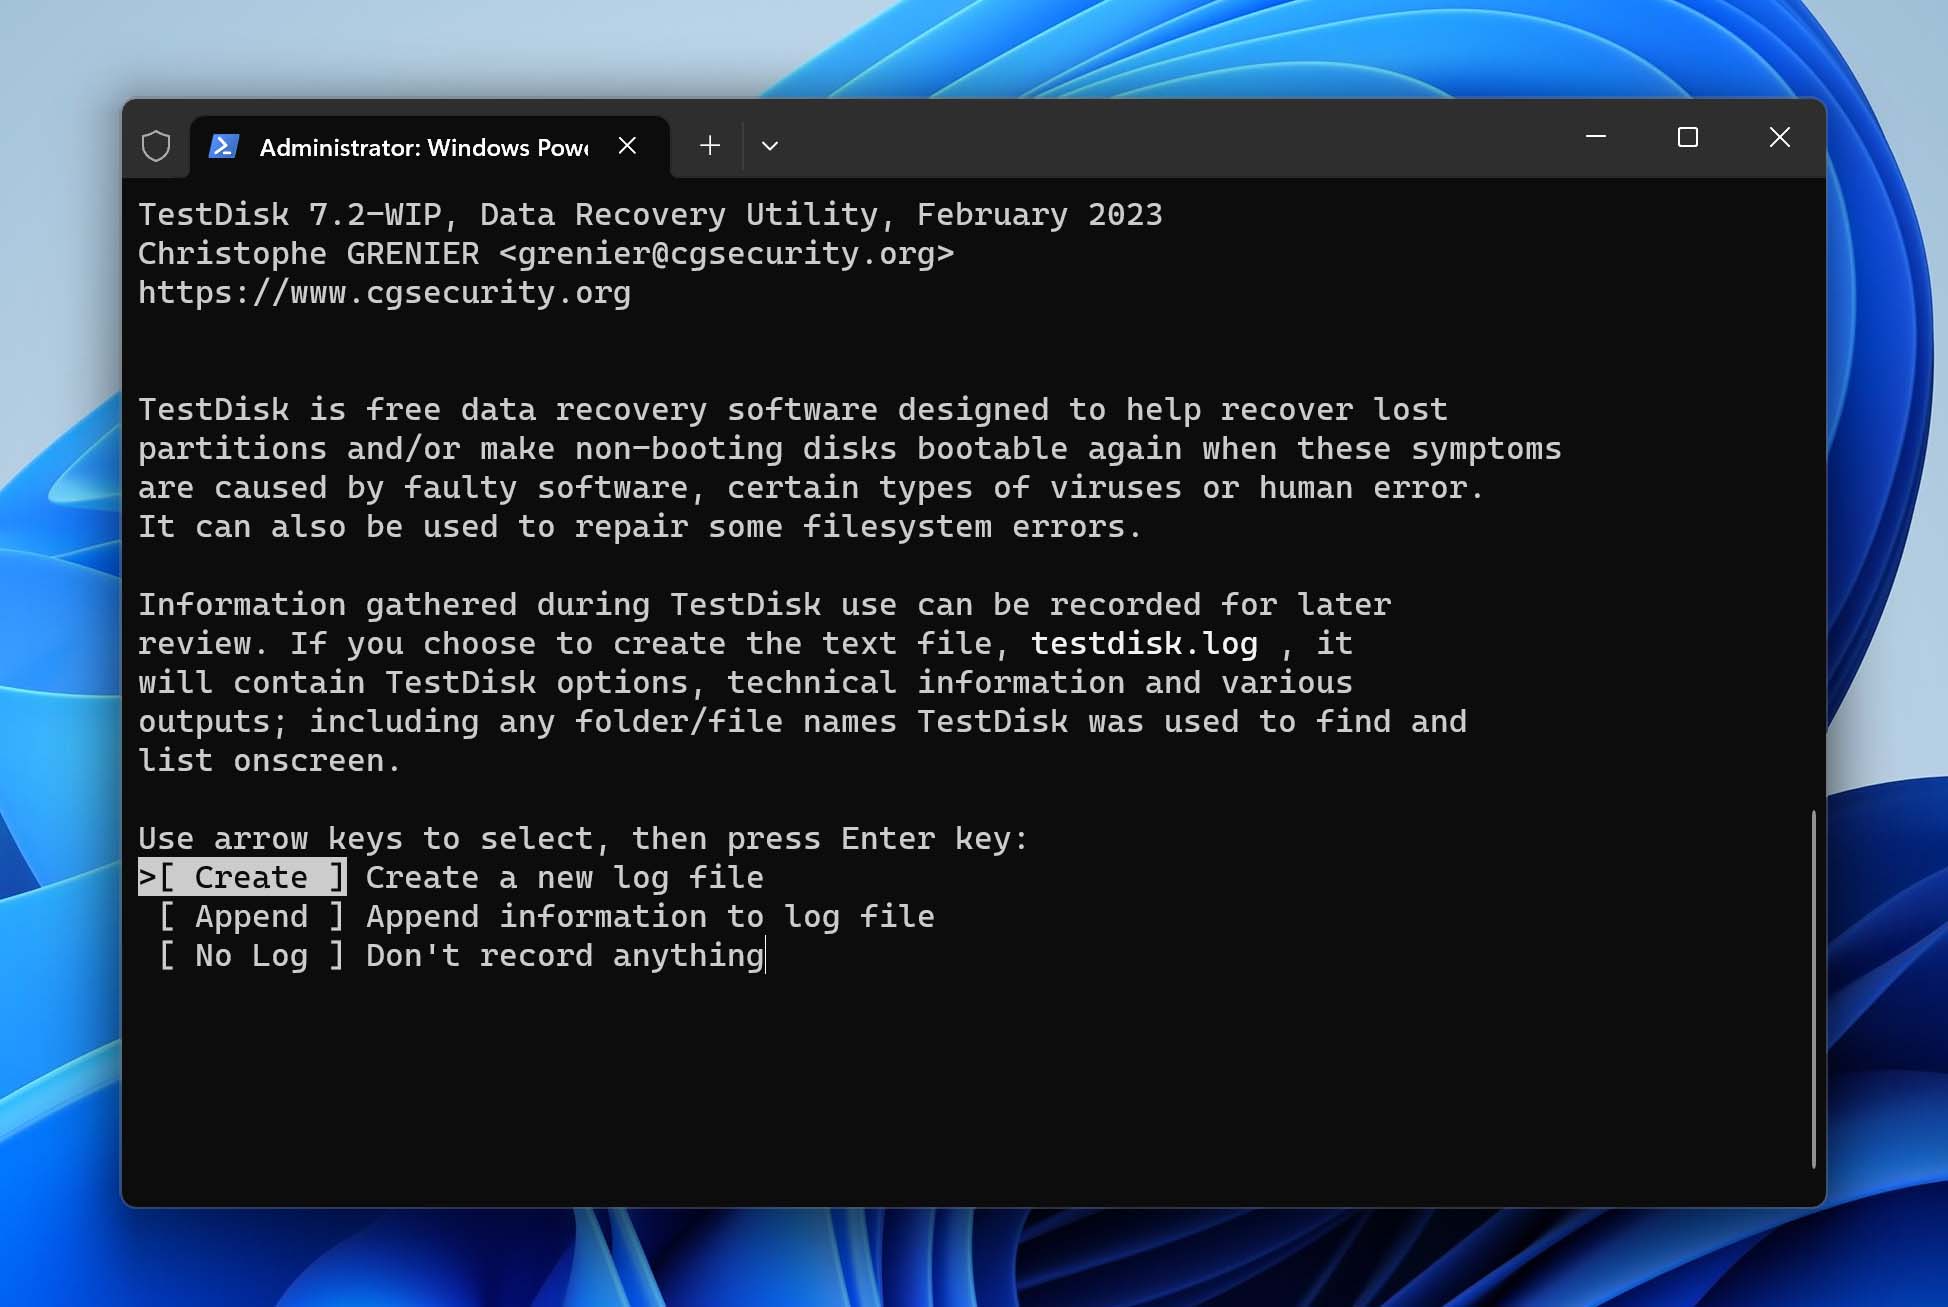
- Once you launch the app, you will be directed to a terminal screen, which is the TestDisk home. Here, select the Create option and hit Enter. TestDisk will now scan your PC for available storage devices.
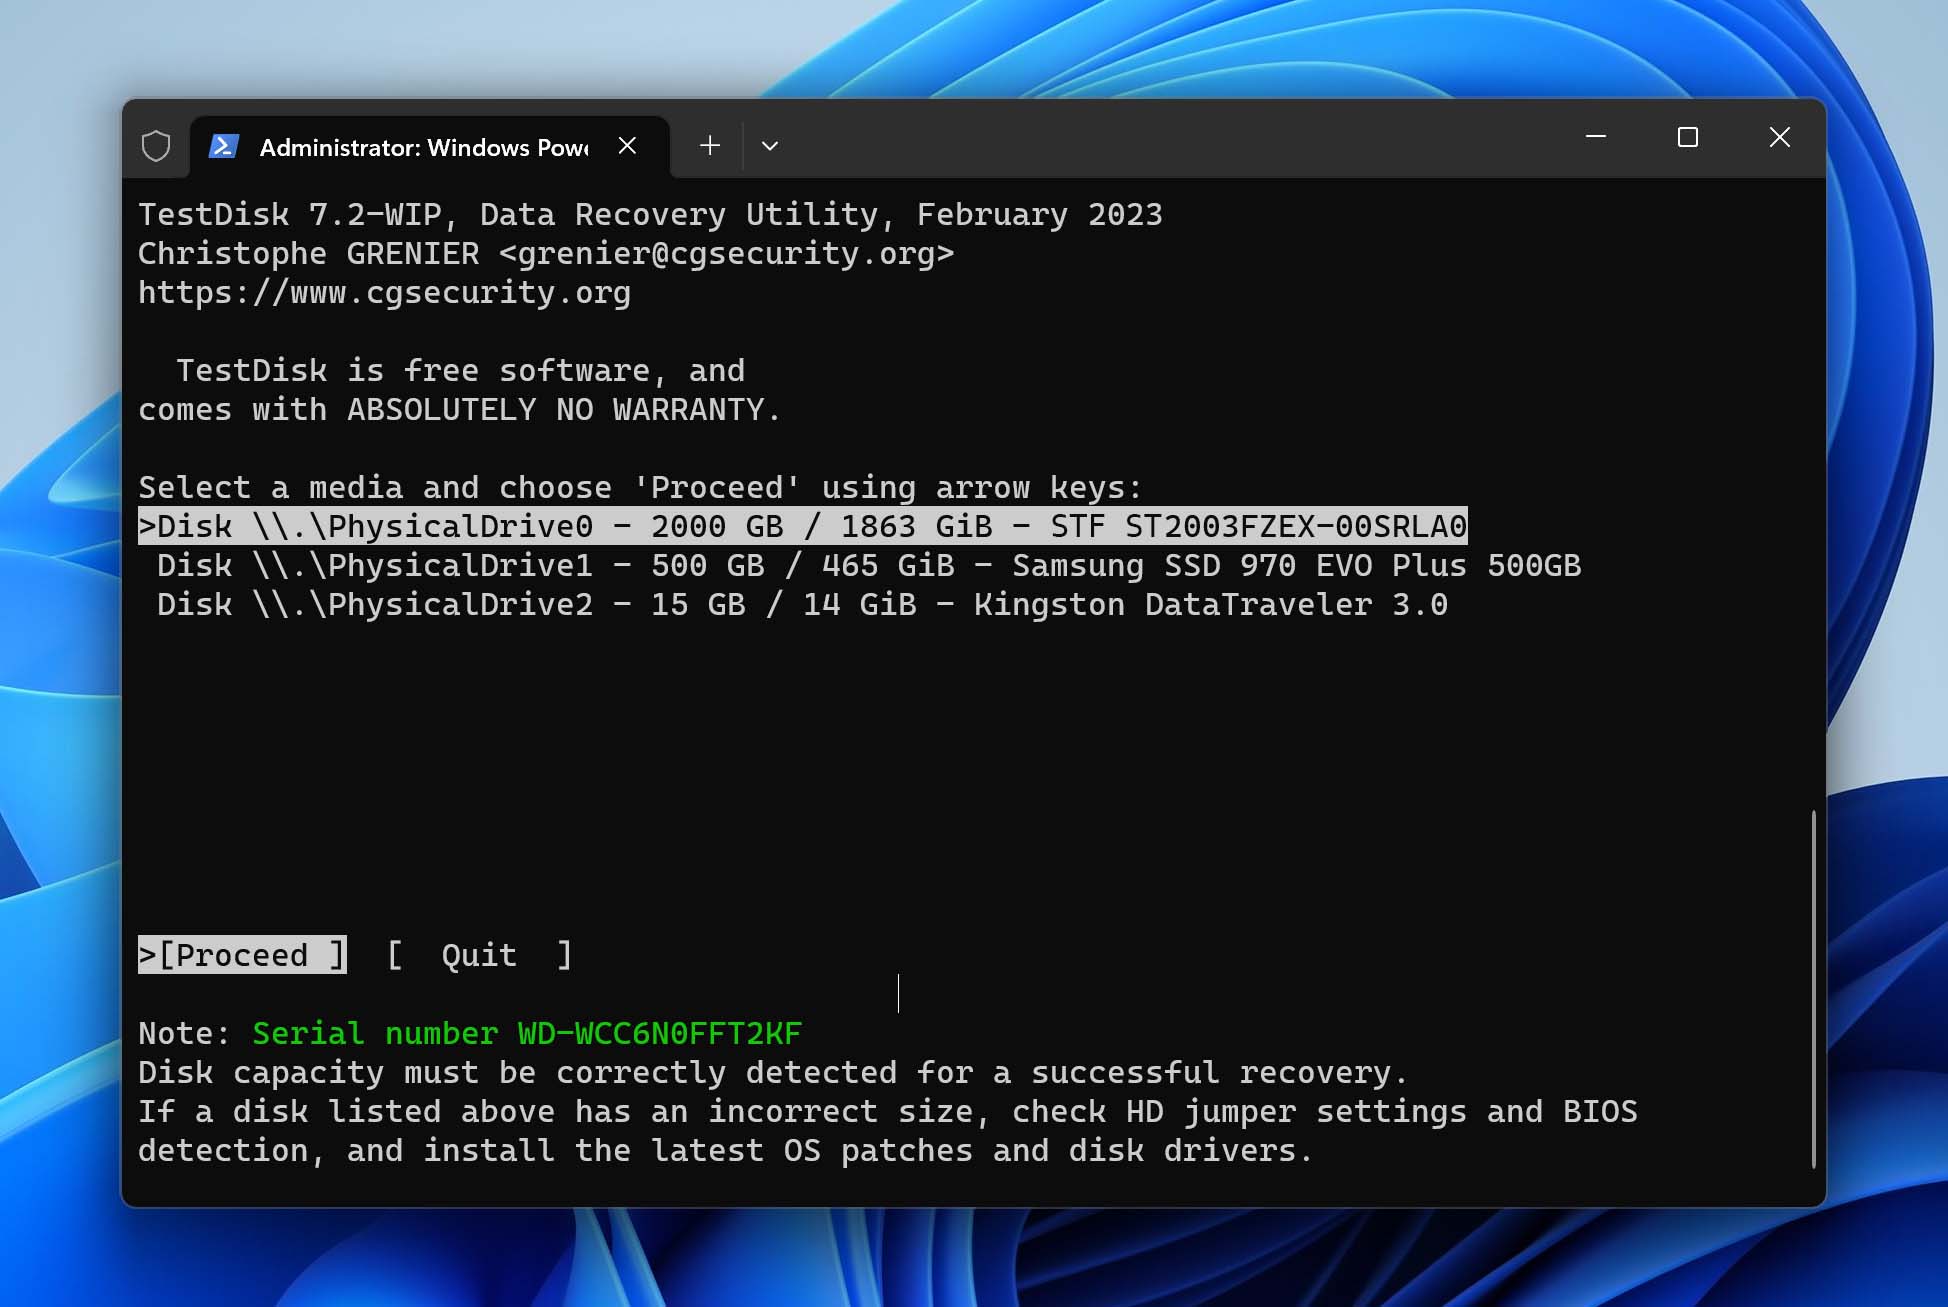
- Once the scan is complete, you will get a list of available storage devices on your screen. Select the drive you want to further scan by using the arrow keys and press Enter.
- Now, select a partition table type. To do that, navigate to Intel and press Enter.
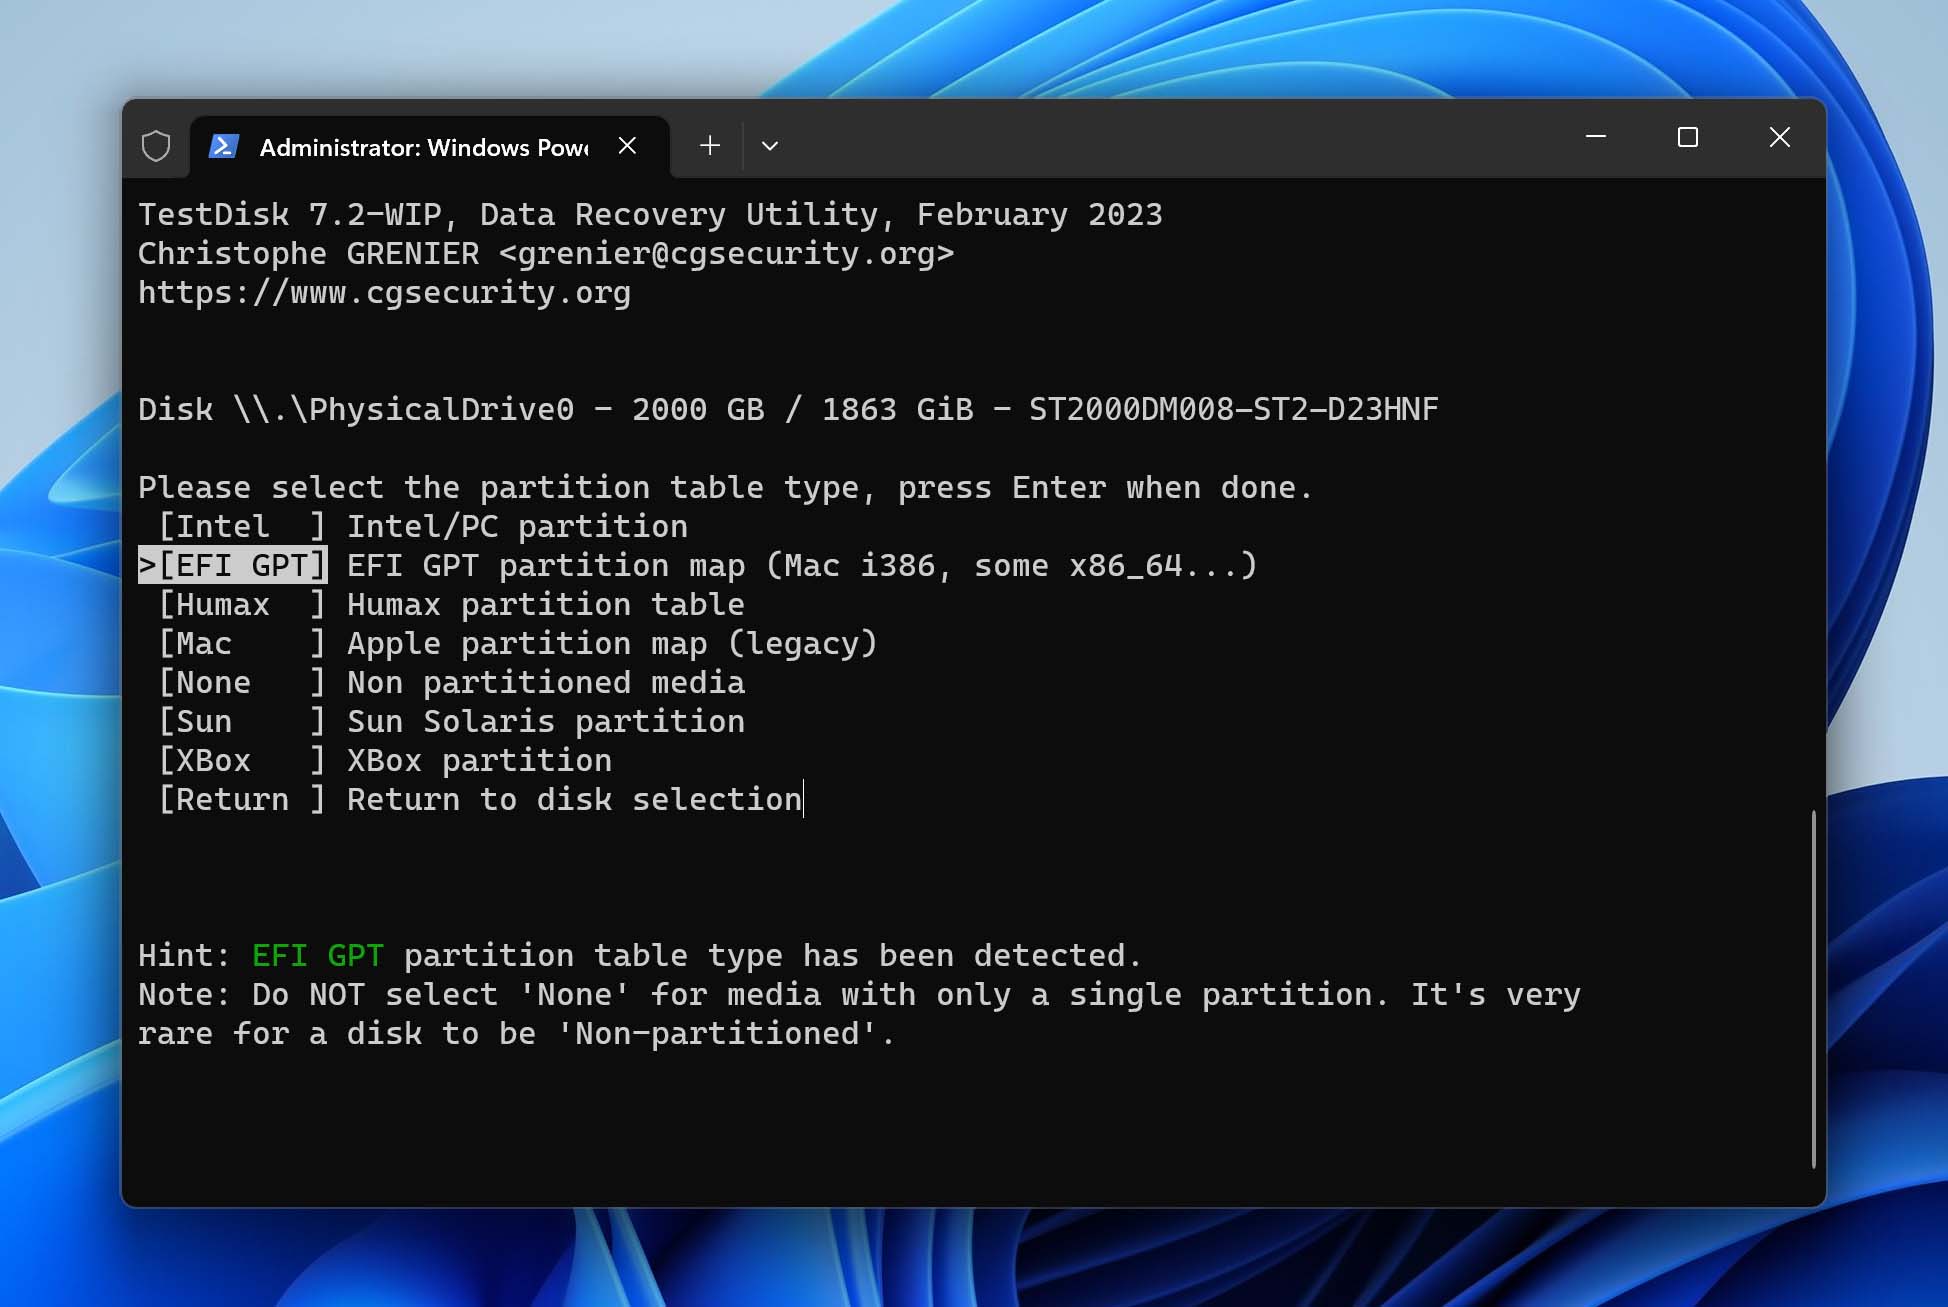 👀
👀Intel here represents your Windows PC, and the partition table type will be different for mac users.
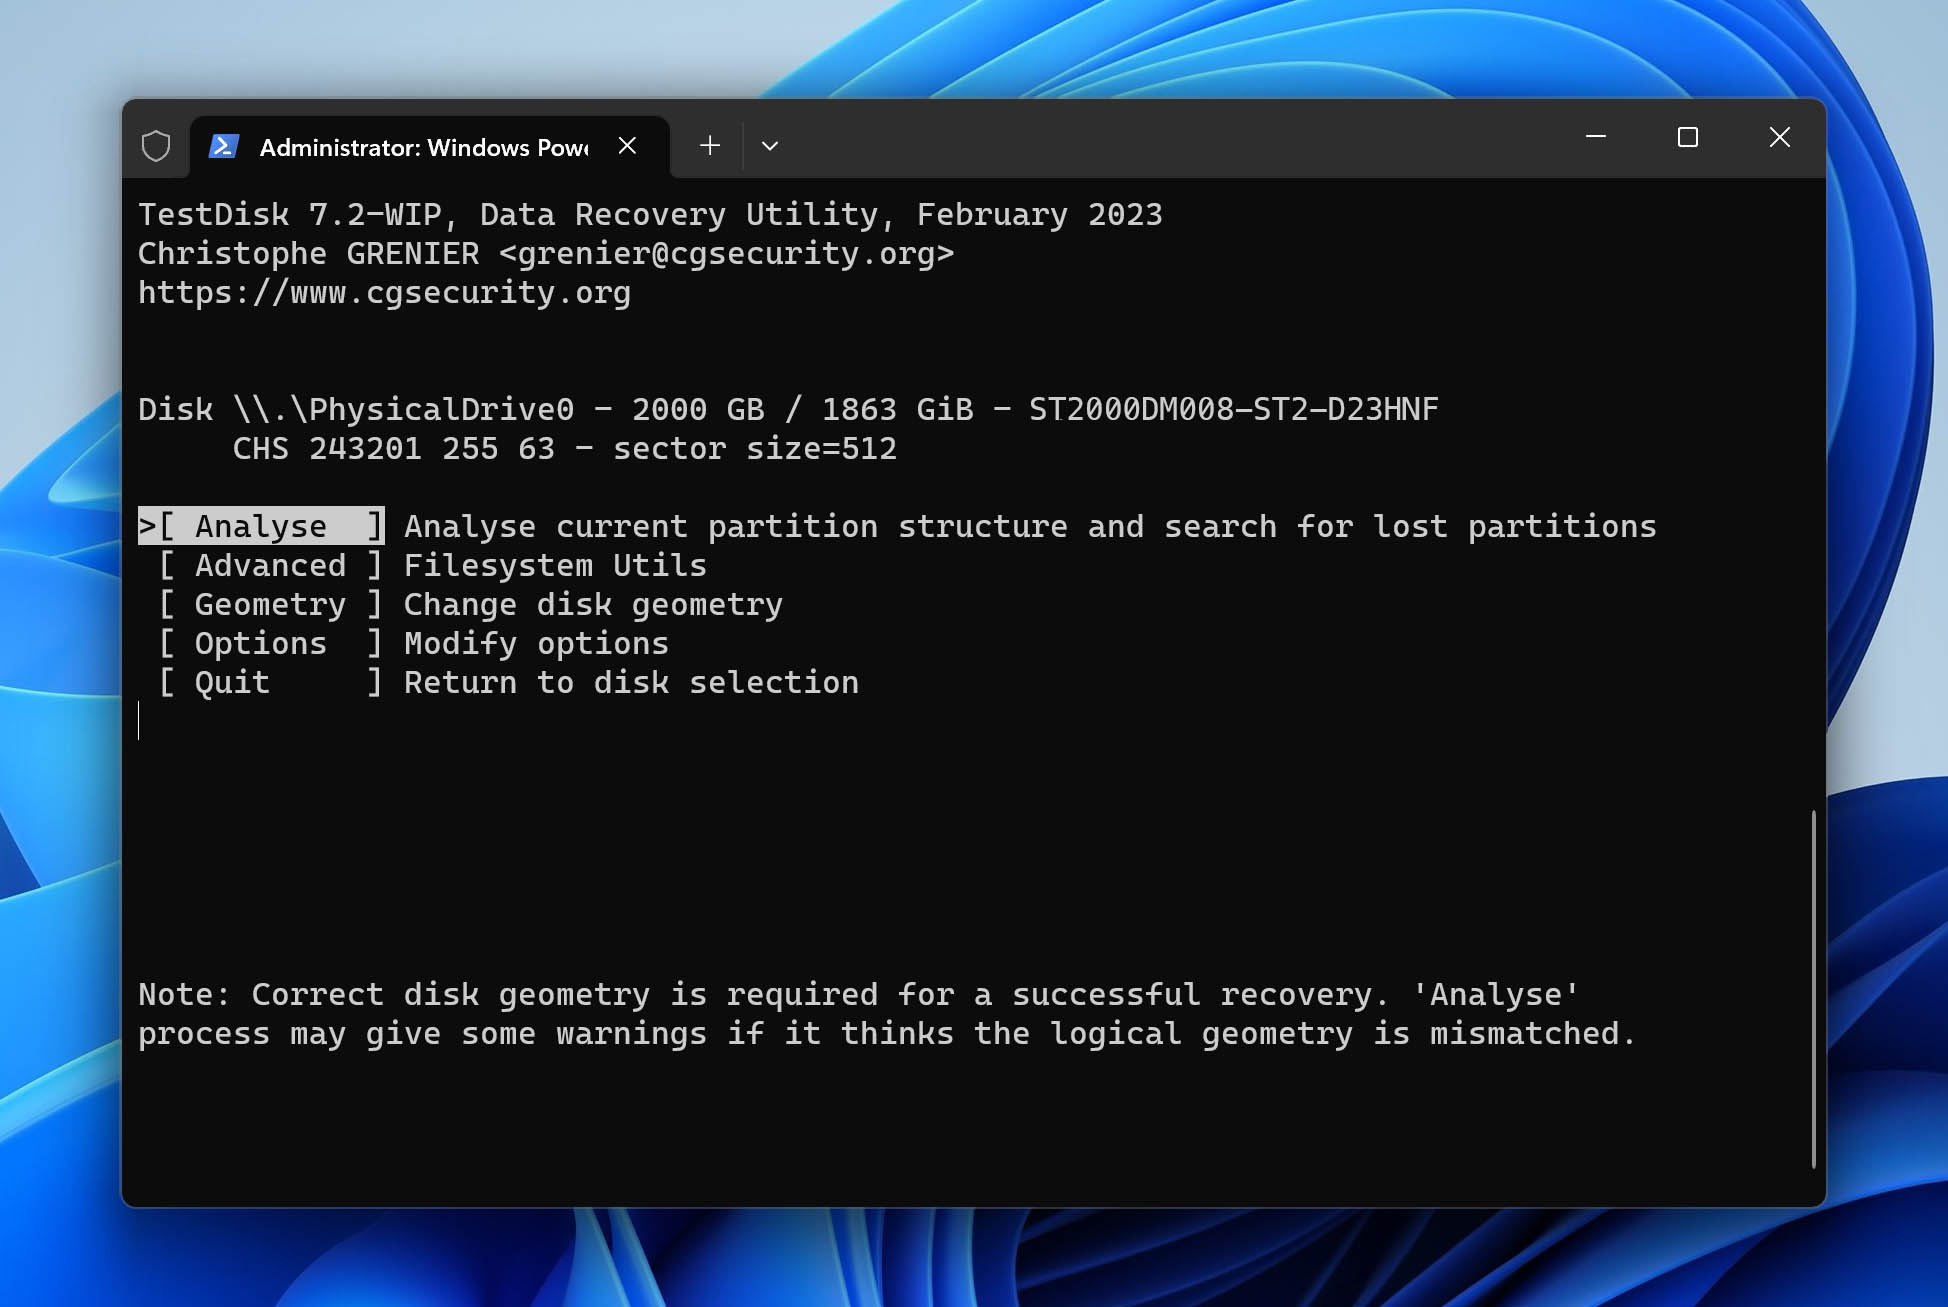
- The next screen contains a lot of options you can explore. For our purposes, we will go with the Analyze option to scan your Seagate hard drive for lost data.
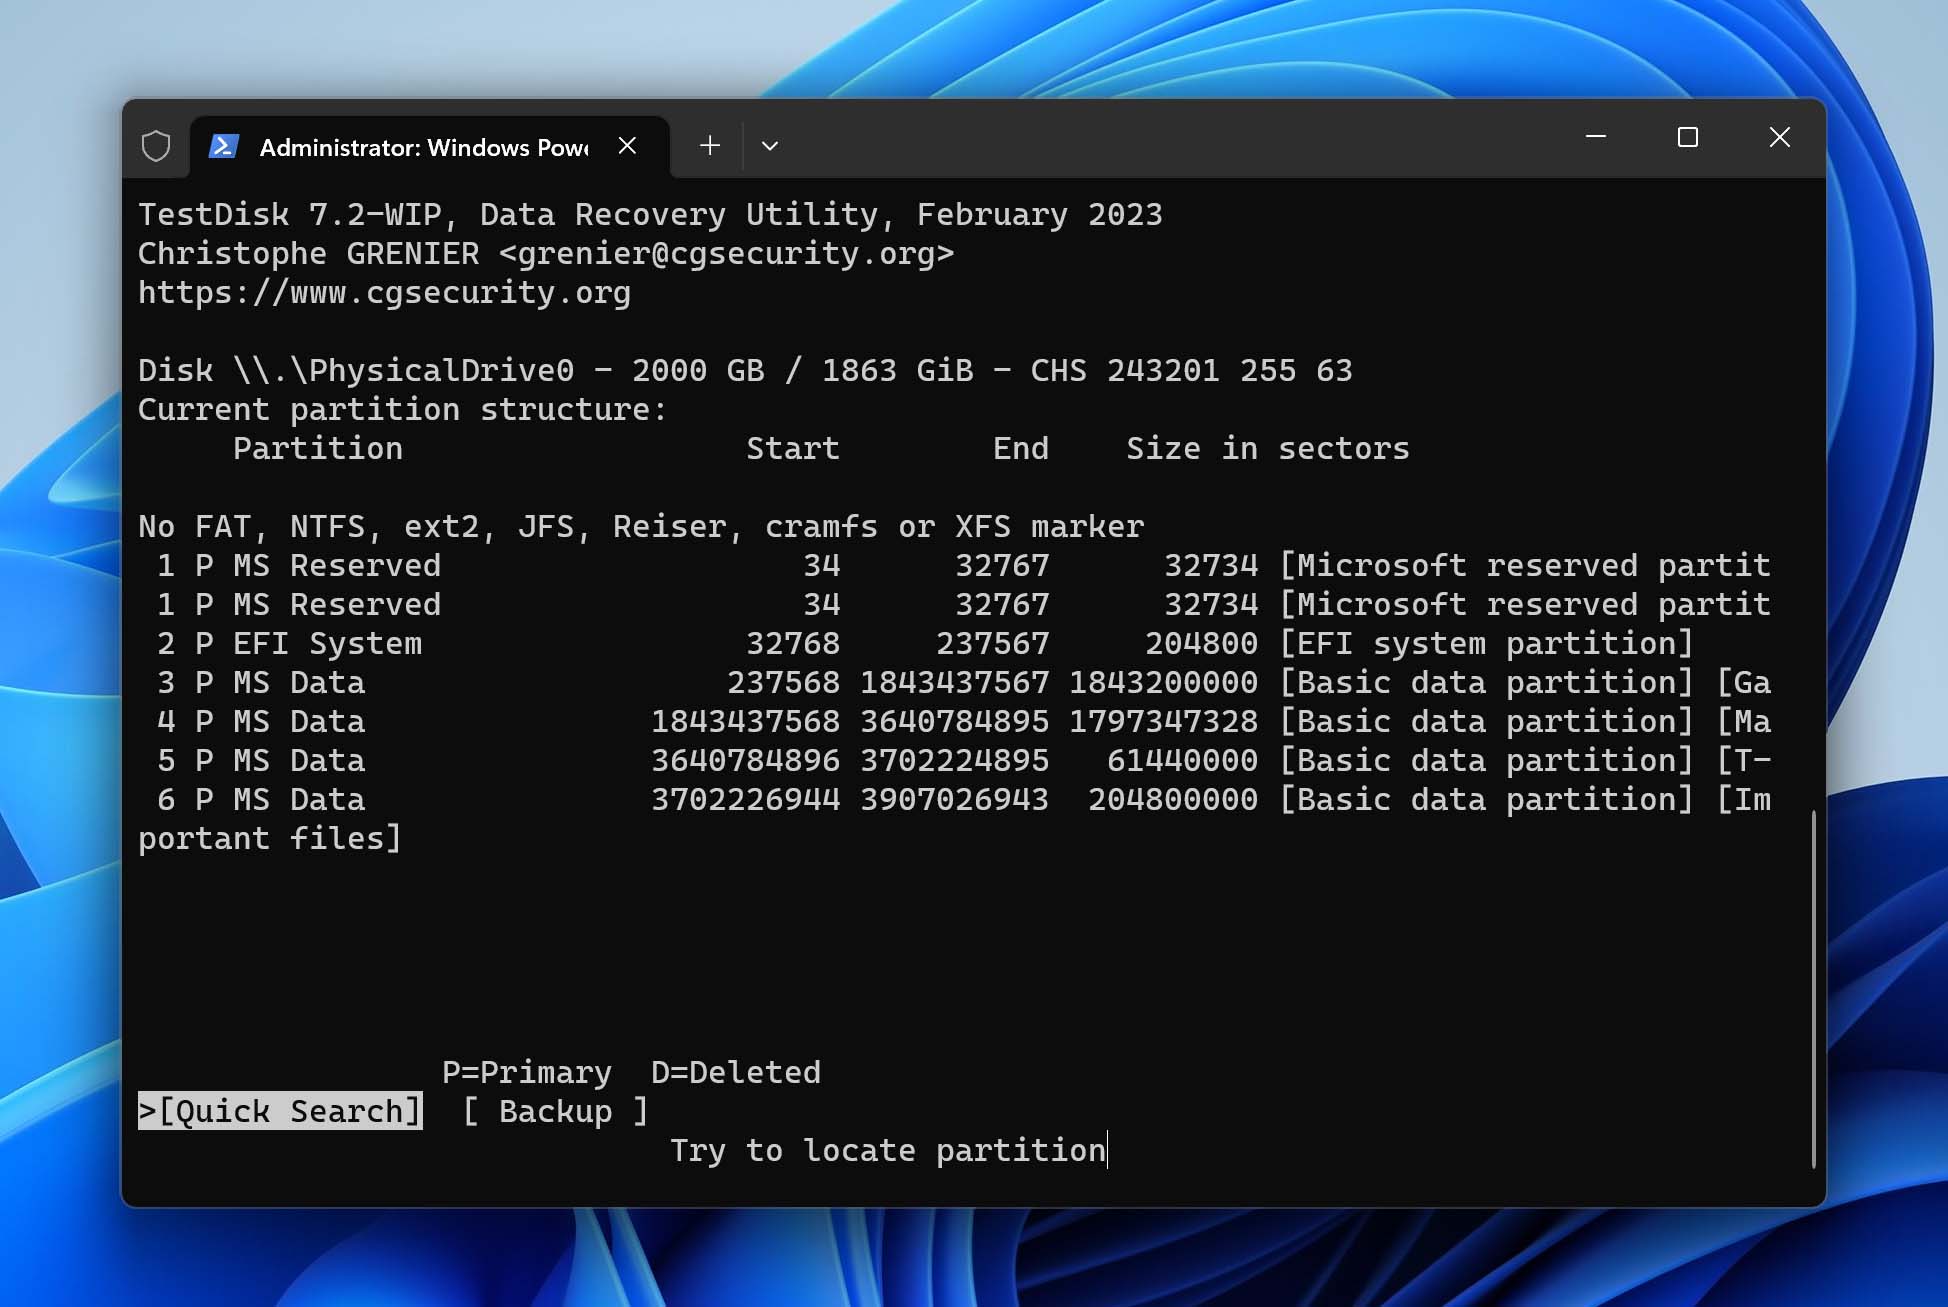
- You will be prompted with a few options on the next screen. Here, select the Quick Search option and hit Enter.
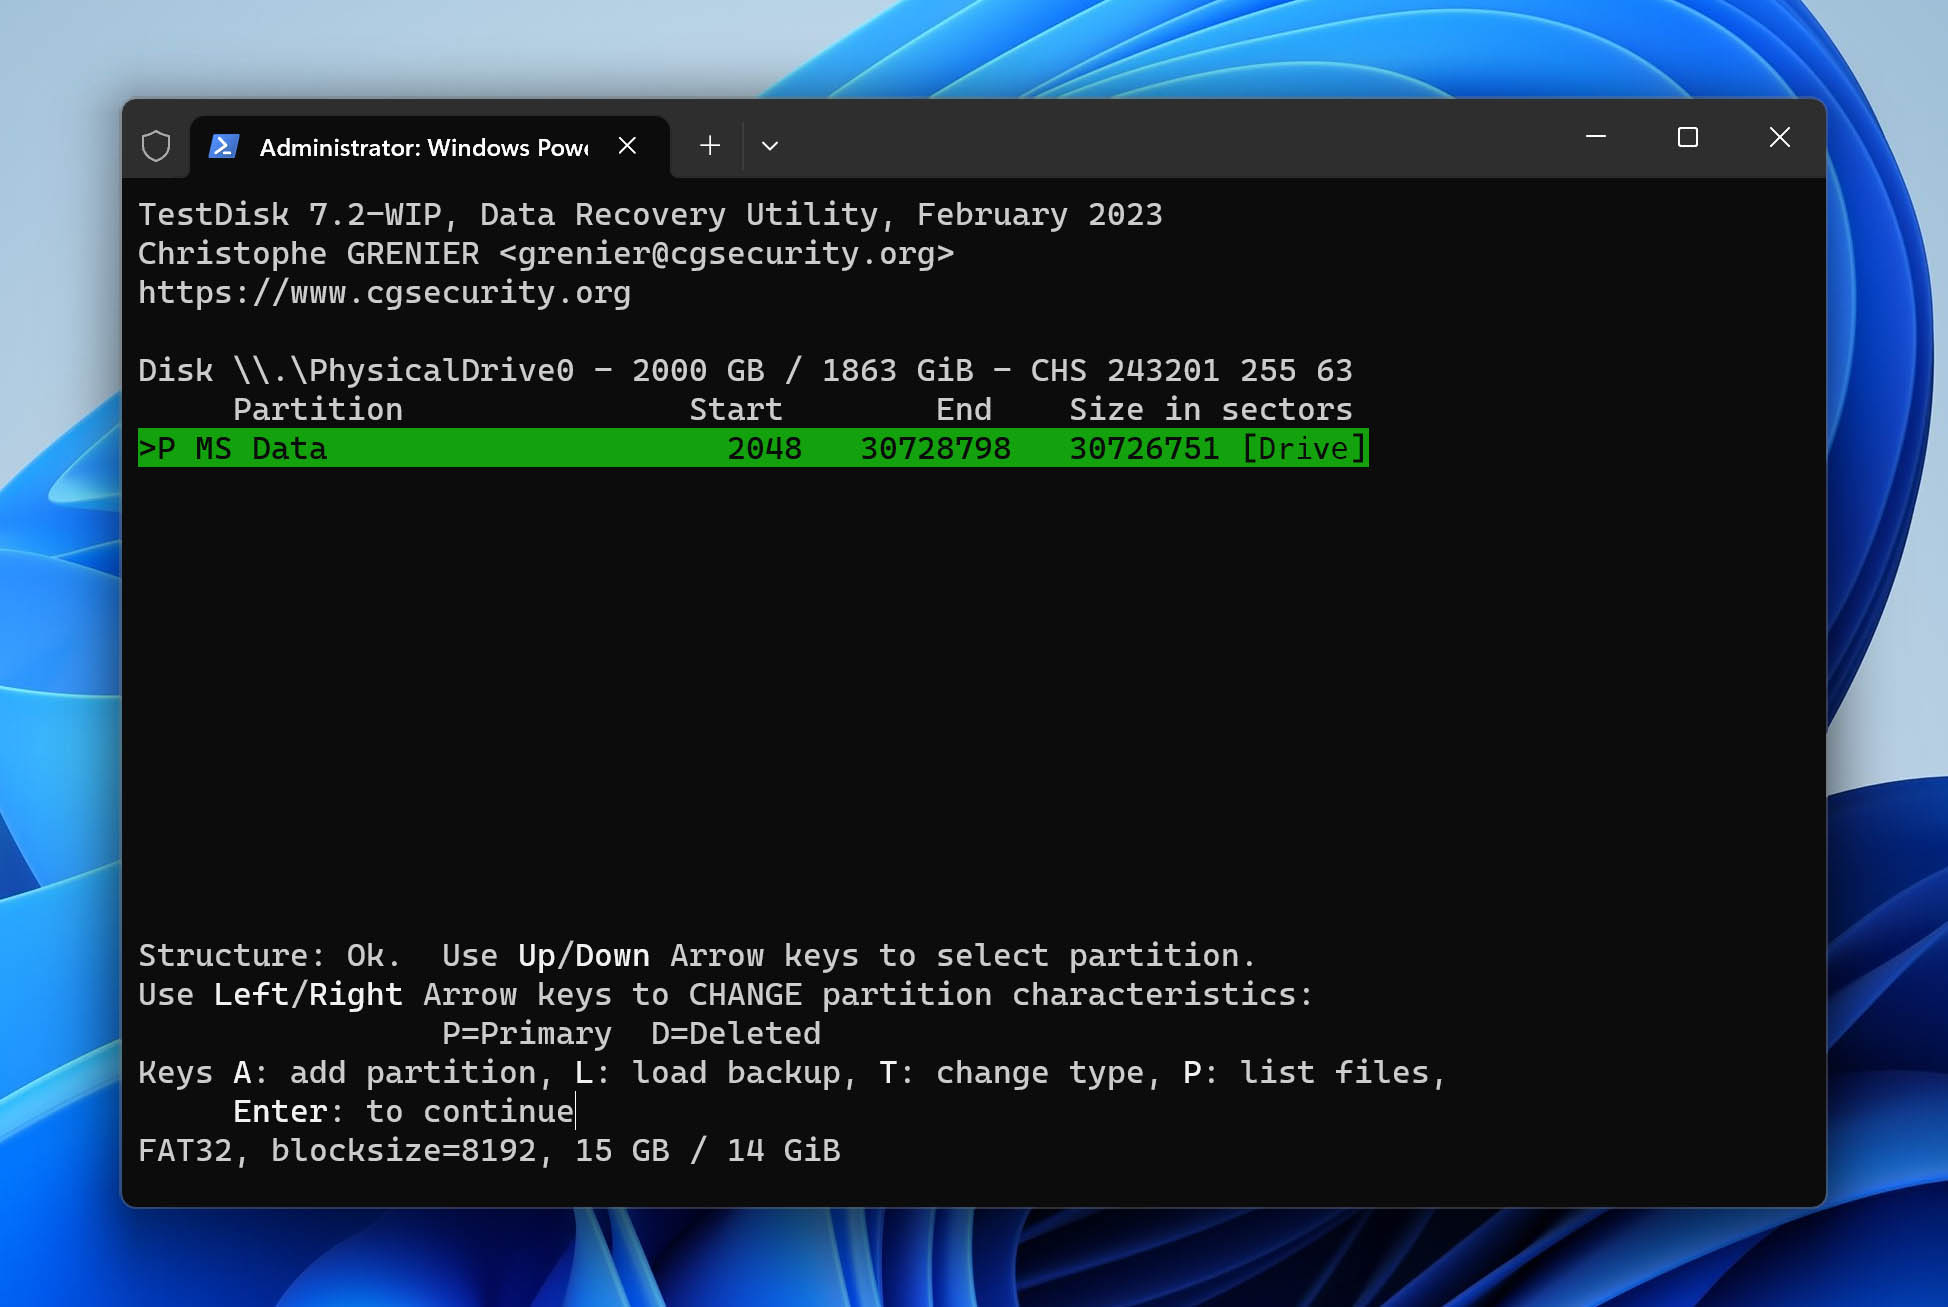
- If your files are not visible in the Quick Search, you can follow the prompts on your screen and perform a deeper search of your Seagate hard drive. (This process will take a significantly longer time to finish, but you will receive a list of all the partitions of your Seagate hard drive you can fix.)
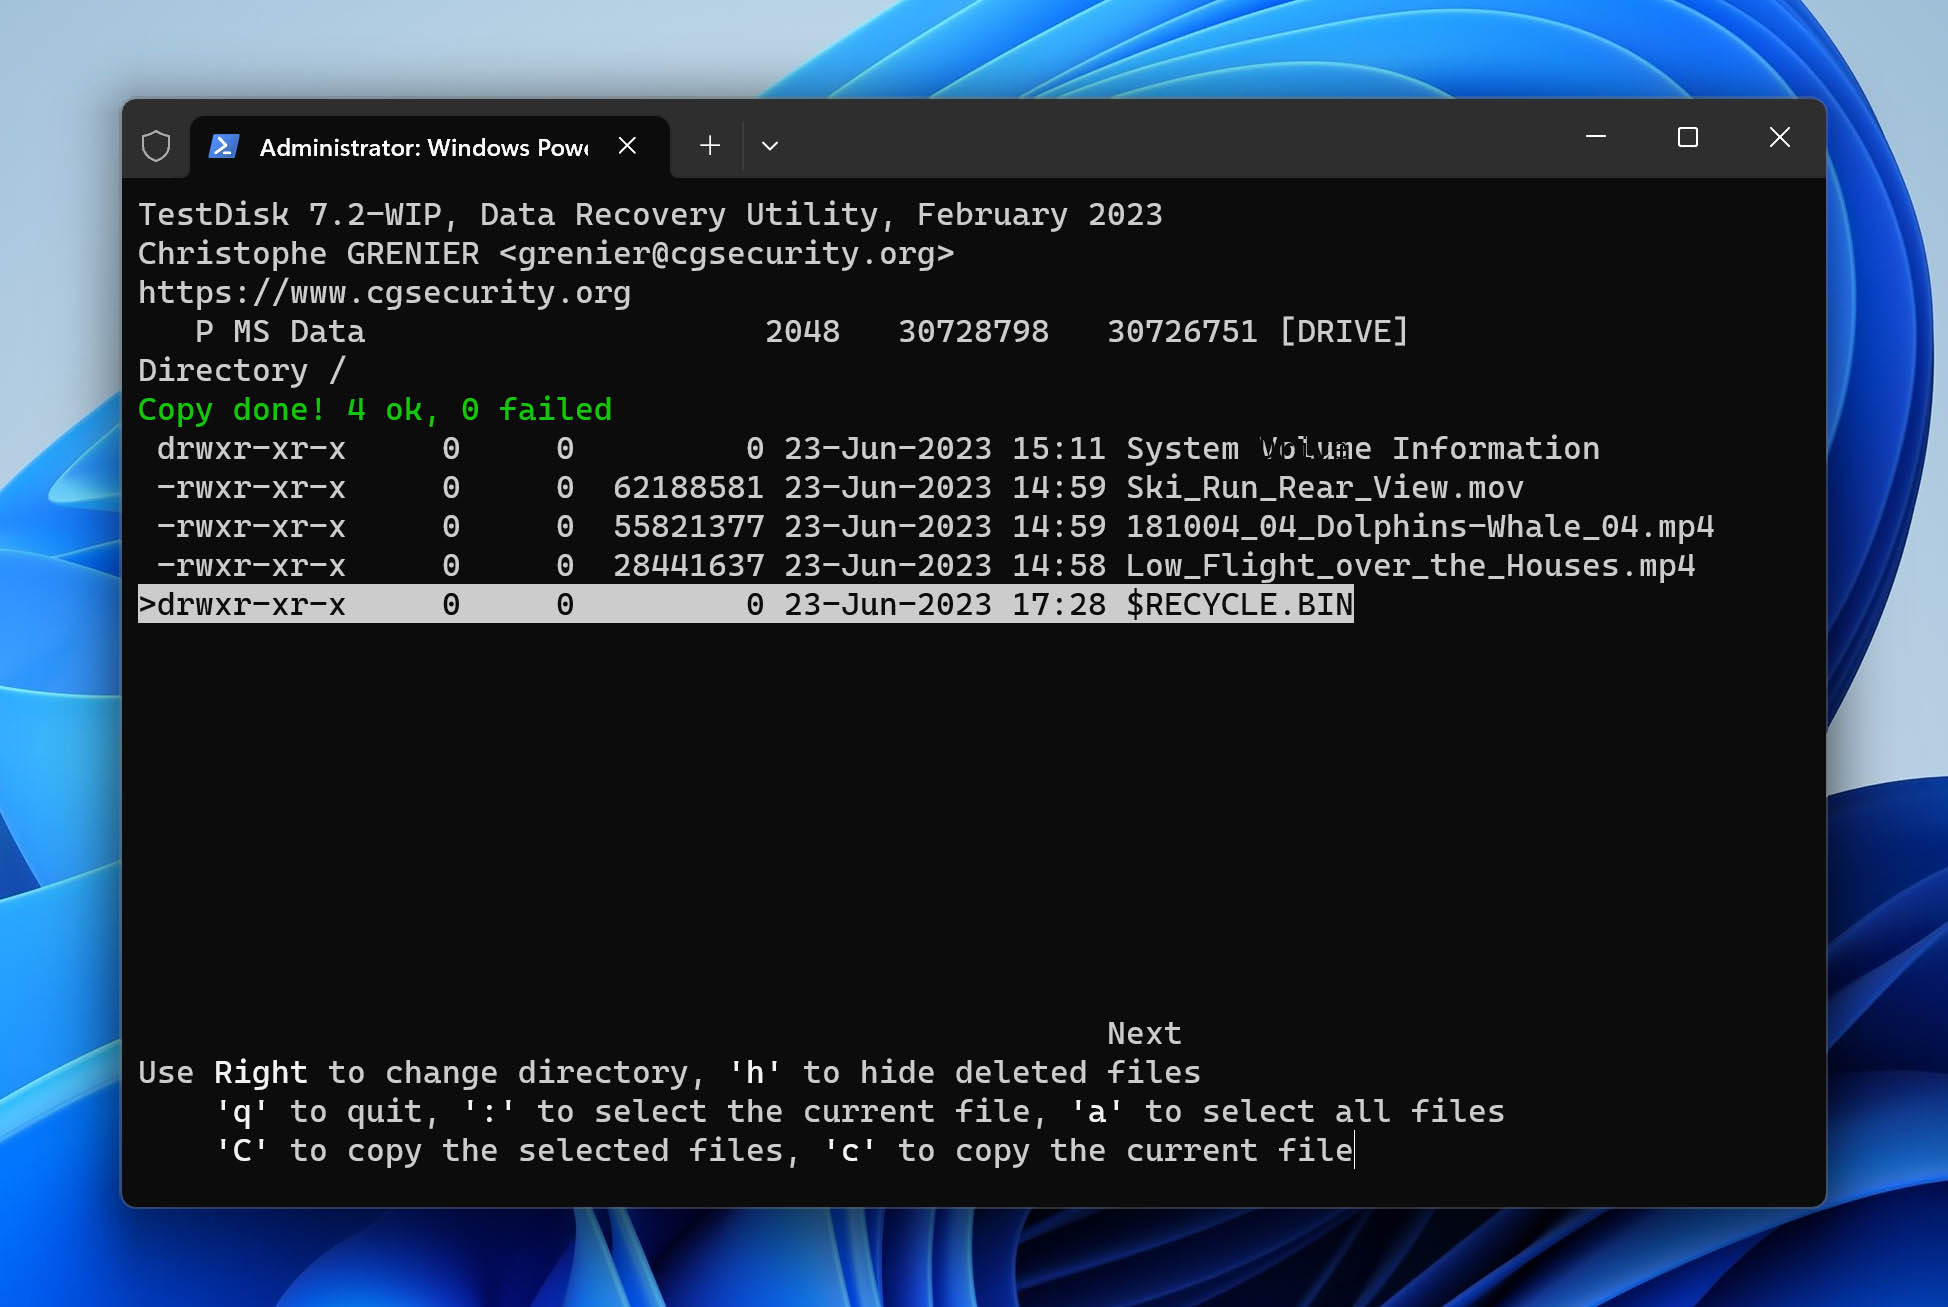
- Follow the prompts on your screen and at last, select a landing destination to store the files recovered from your Seagate hard drive. Once the restoration is complete, you will receive a text that says “Copy Done!”.
Using PhotoRec for Seagate Data Recovery
Unlike TestDisk, PhotoRec is a data recovery solution that works in a similar way to Disk Drill and is an alternative method to recover Seagate external hard drive and internal drive.
PhotoRec is completely free and doesn’t need to be installed. It also gives you plenty of scanning options, including only scanning certain partitions or only unused space on your drive to speed up the scan.
Here’s a quick step-by-step guide on how to perform Seagate data recovery with PhotoRec:
- Download the TestDisk and Photorec bundle zip from CGSecurity.
- Extract the zip file and open the photorec_win file inside the extracted folder.
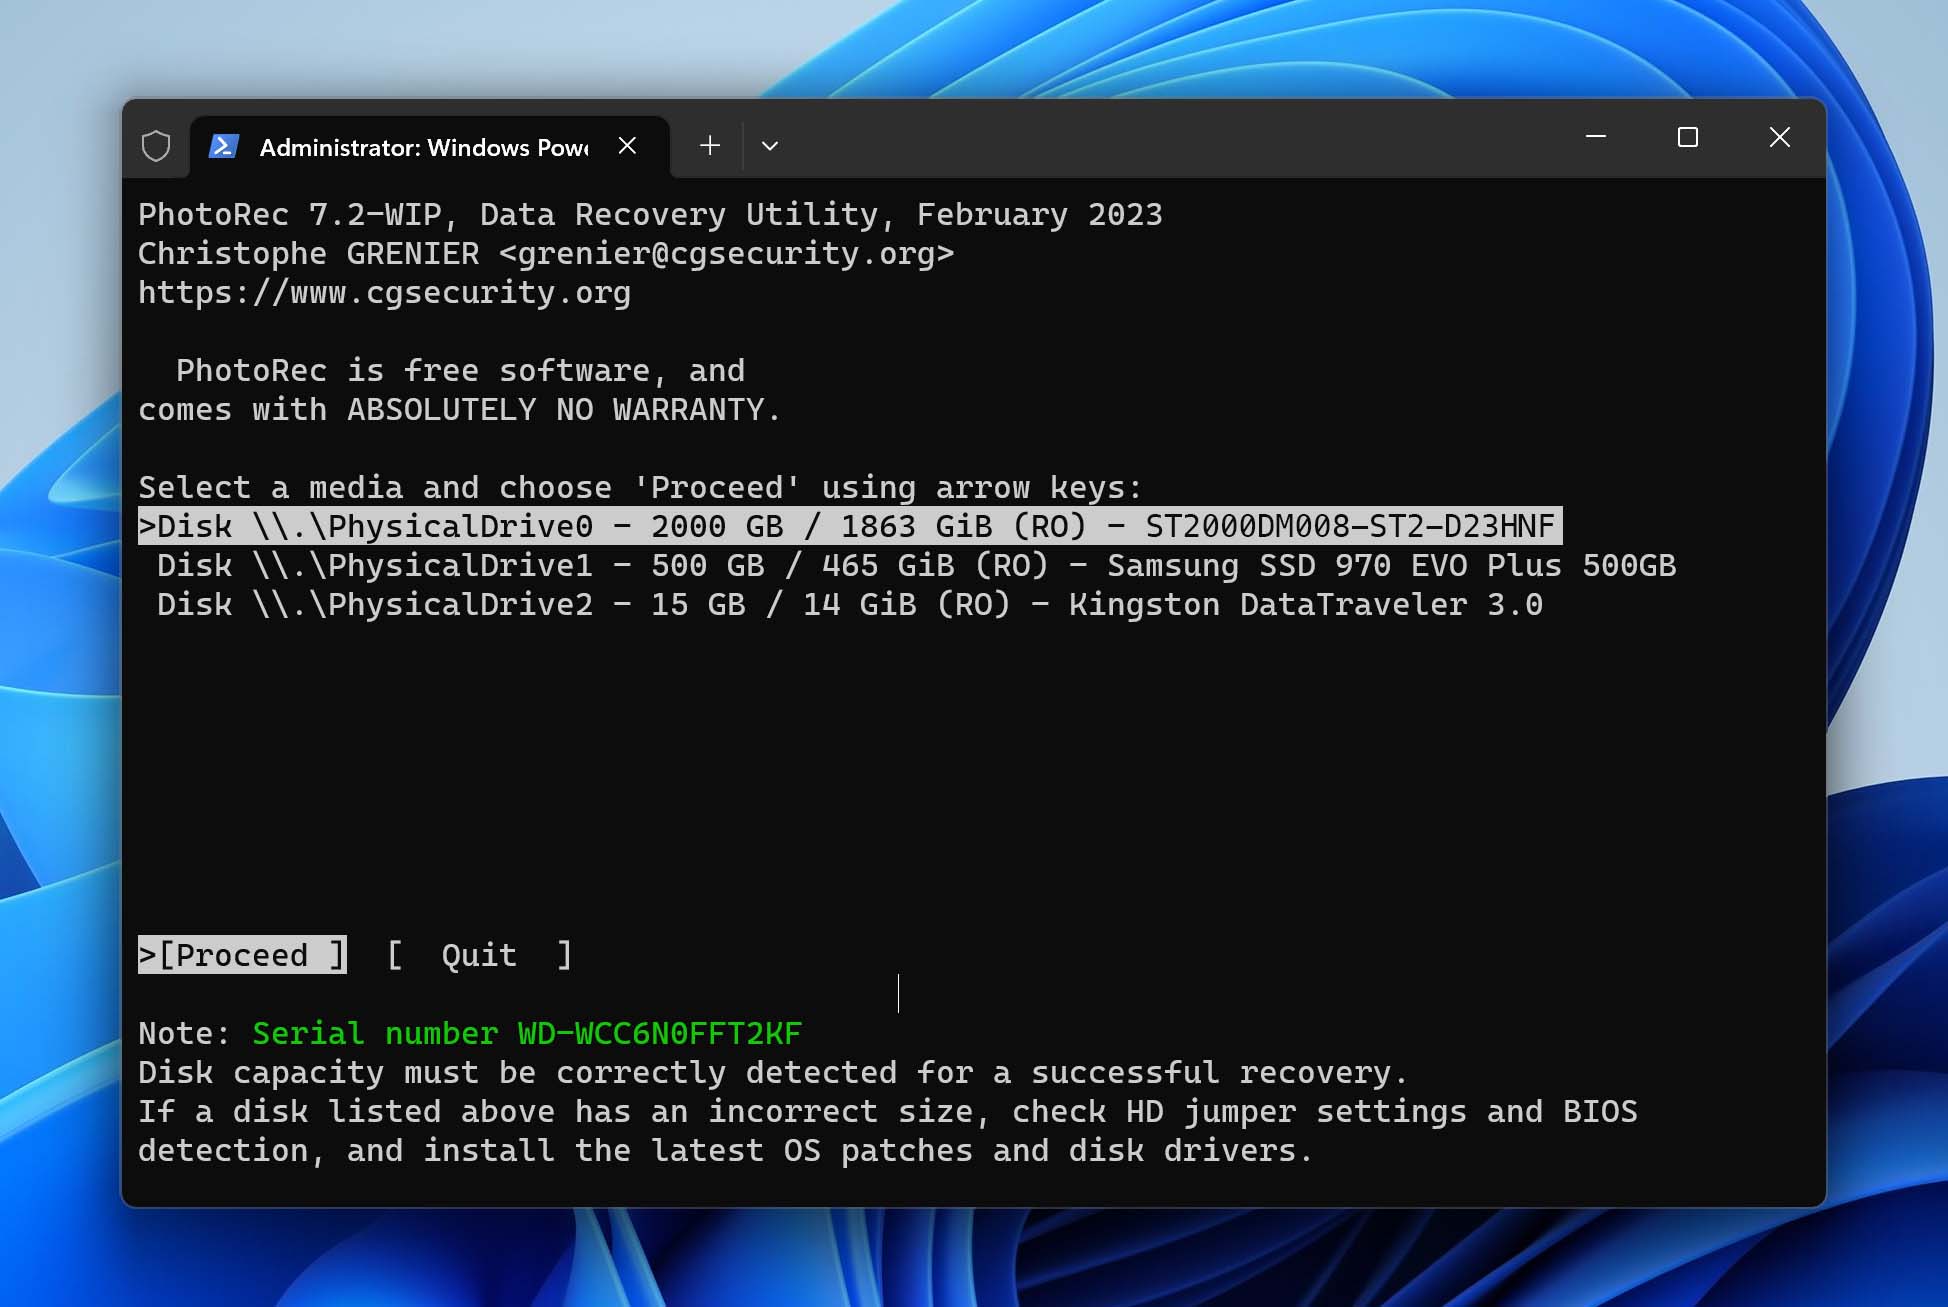
- Choose your Seagate drive from the list of disks/partitions available. Since PhotoRec does not display disk names, you have to match your disk/partition to the description provided by the software. Once selected, press Enter.
- Select the partition to scan.
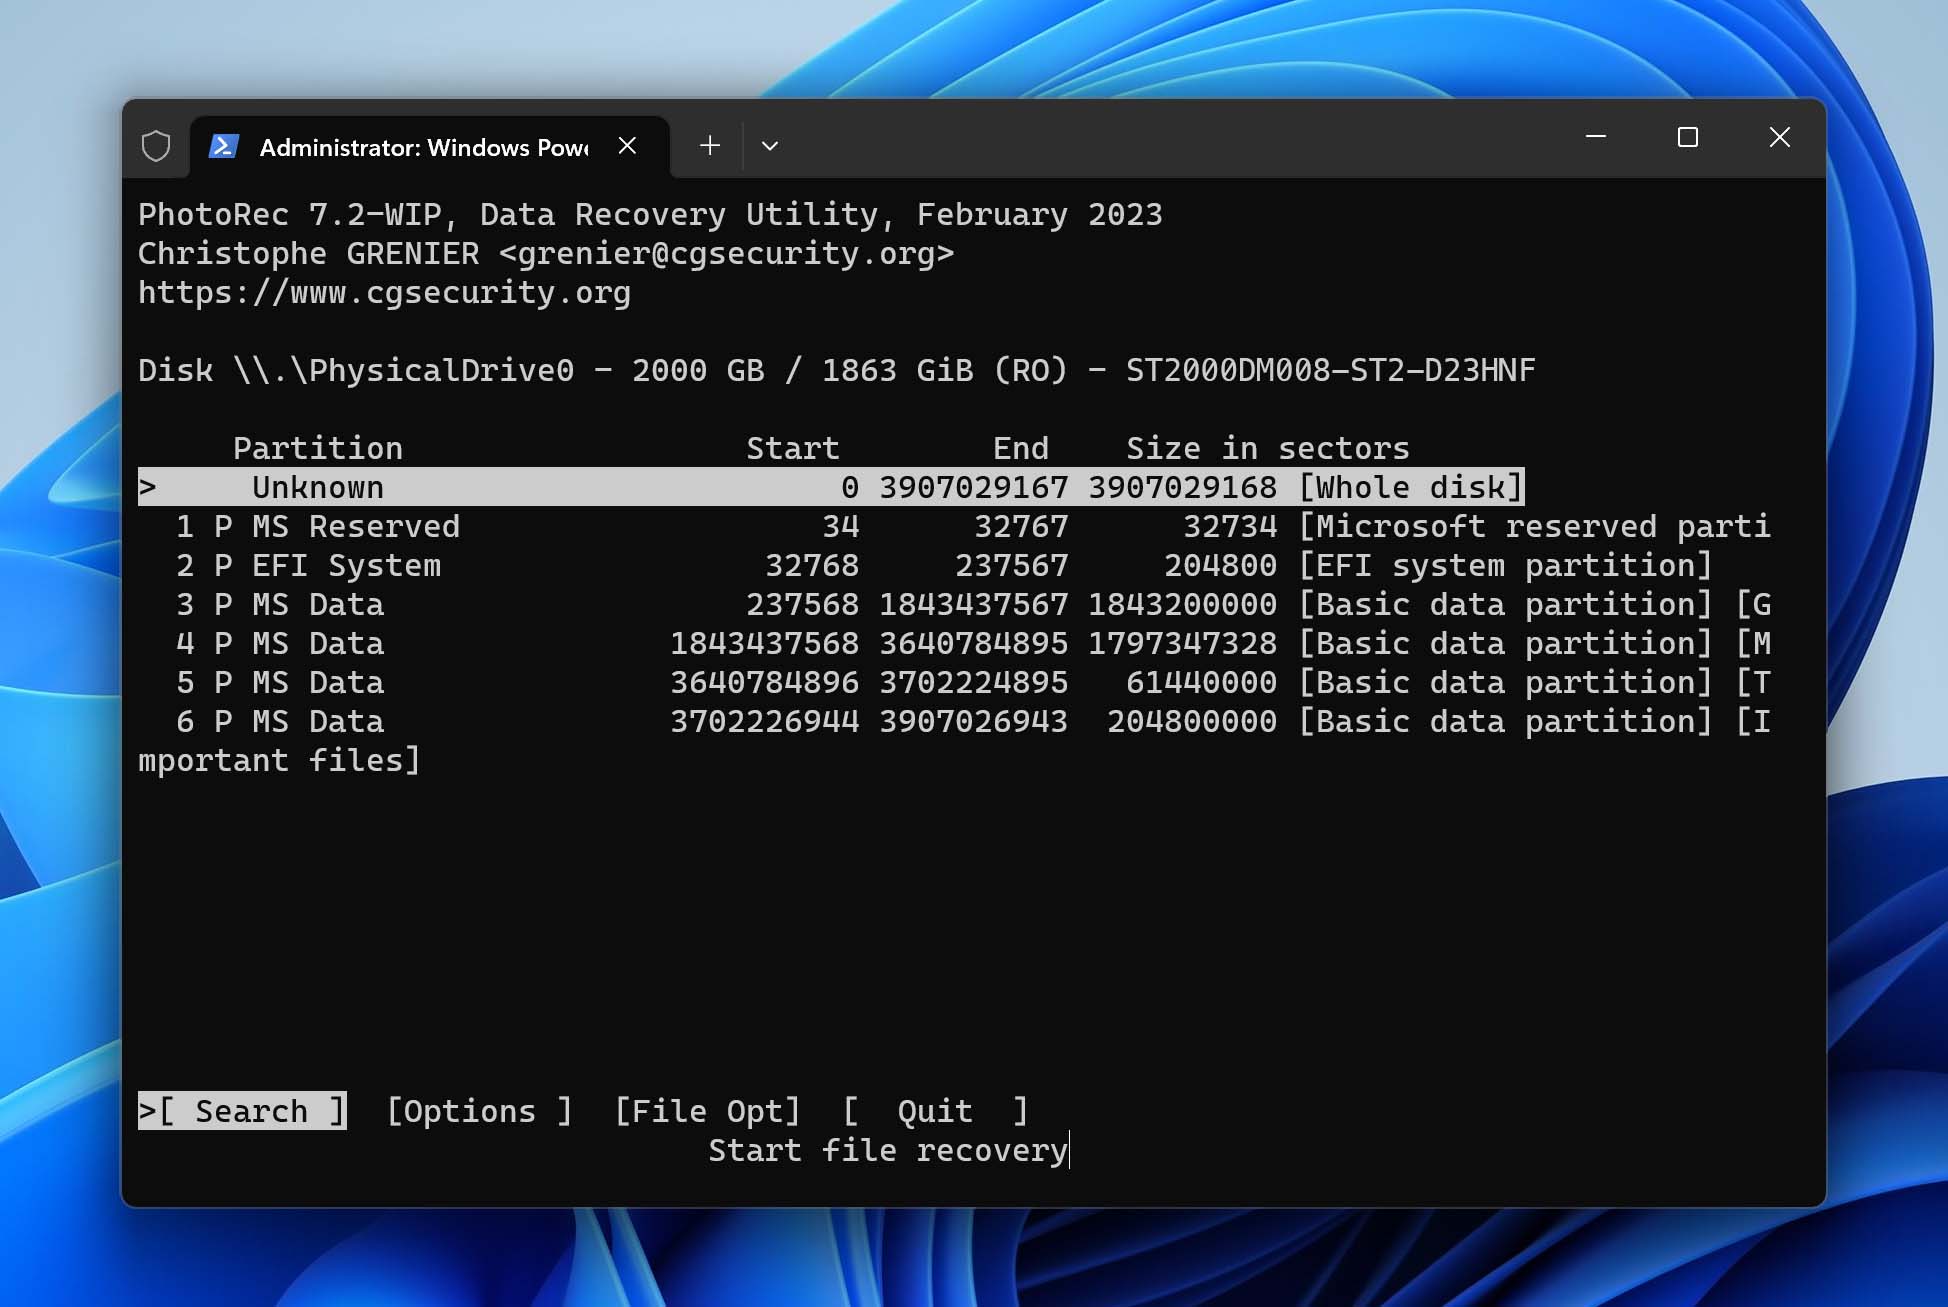
- Select the appropriate file system for your drive.
- Choose where Photorec will store your recovered files and press C once the destination is correct. The file recovery process should now begin.
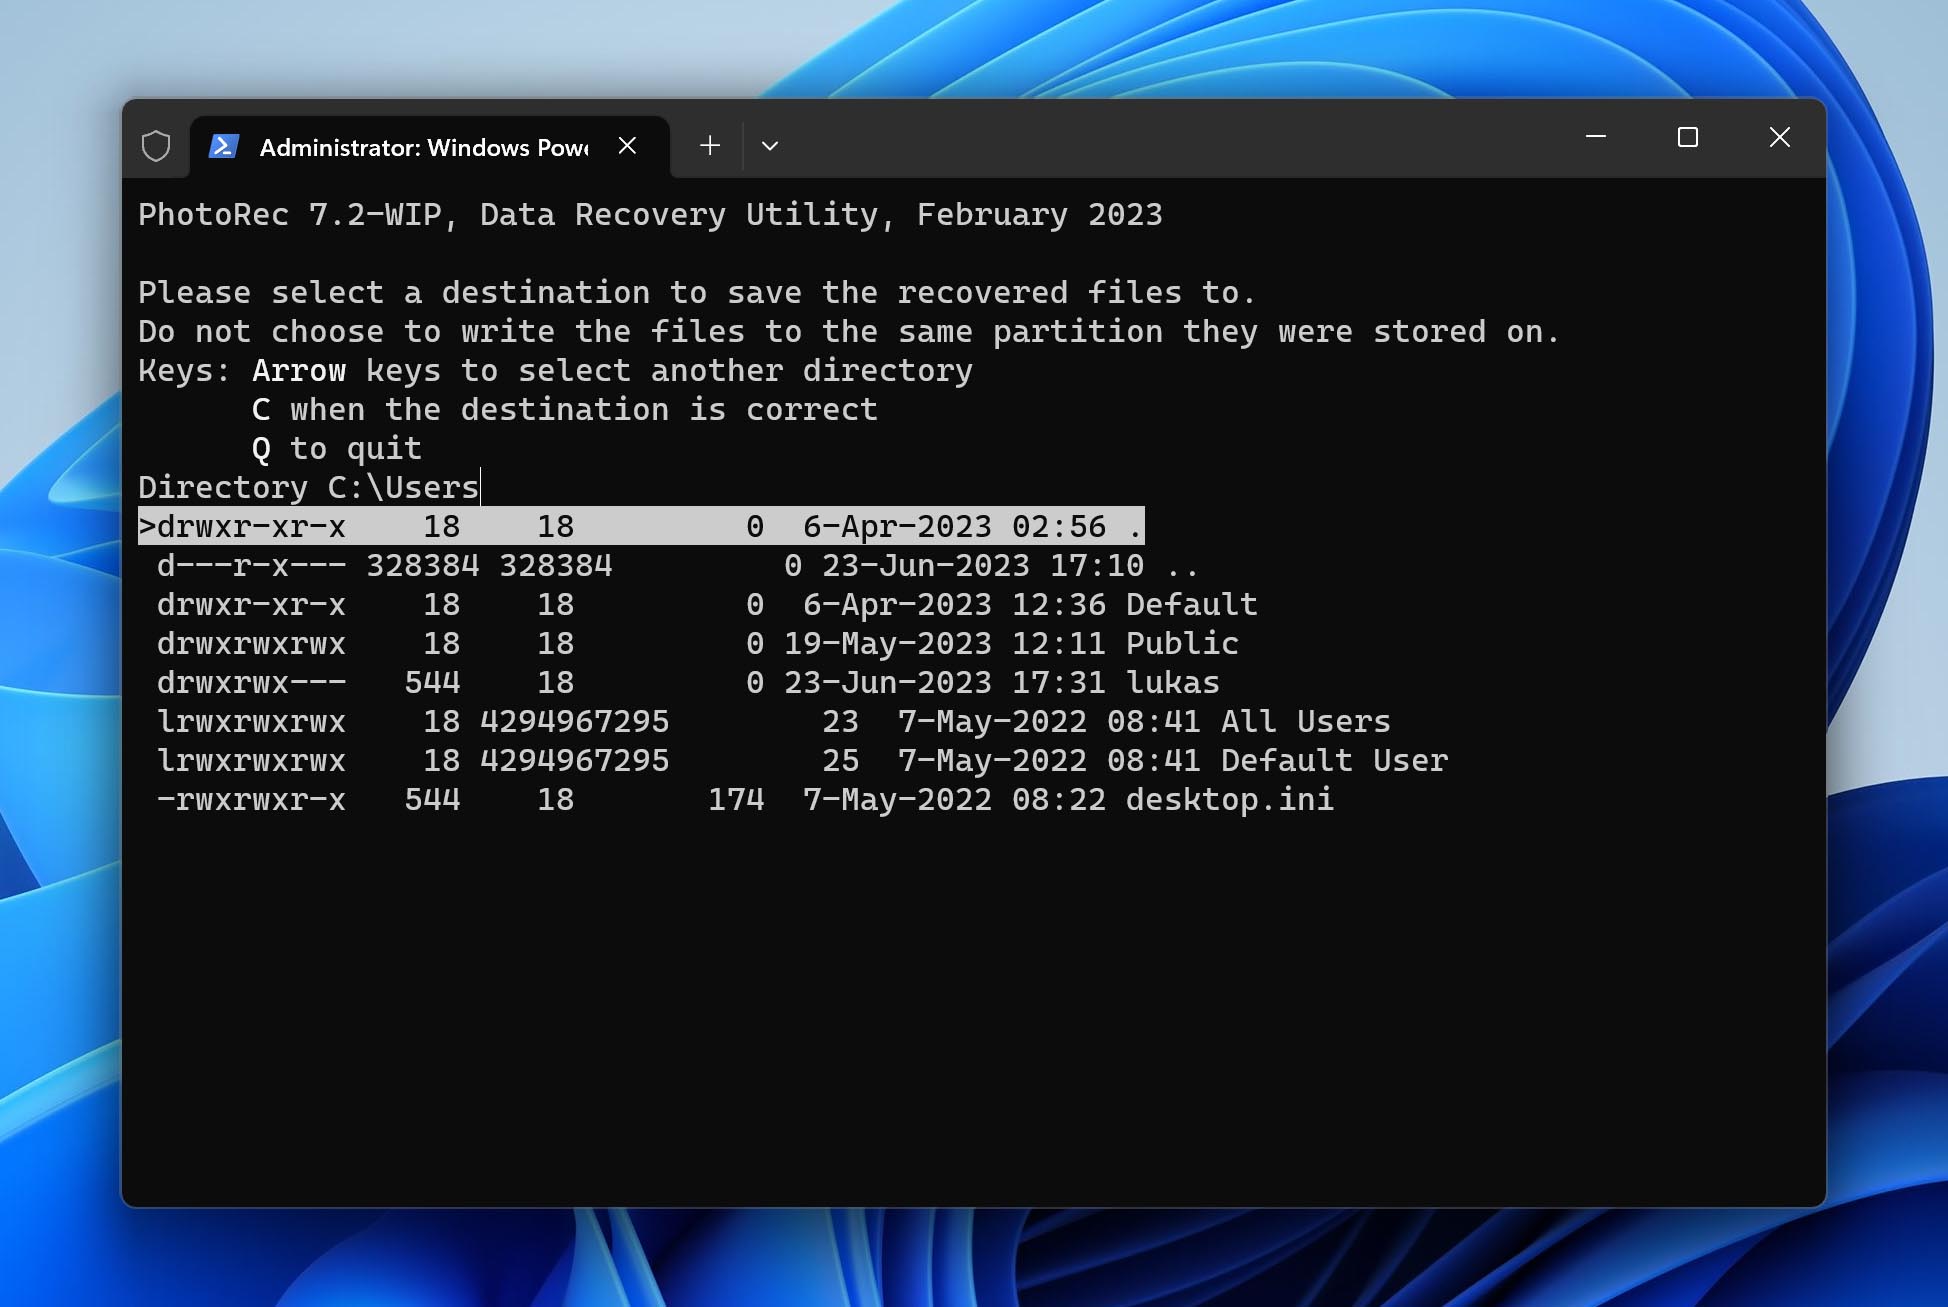
- After recovery, you should see a confirmation saying “Recovery completed”, with details about how many files were saved and the location where they are stored.
How to Fix Seagate Hard Drive Malfunction
If your Seagate hard drive is malfunctioning, has corrupted, is unrecognizable, or even unreadable in the File Explorer, you can still recover data from it using a good data recovery software like Disk Drill. However, to normally use it again, you must recover it so that windows can read it properly. To do that, follow the methods below.
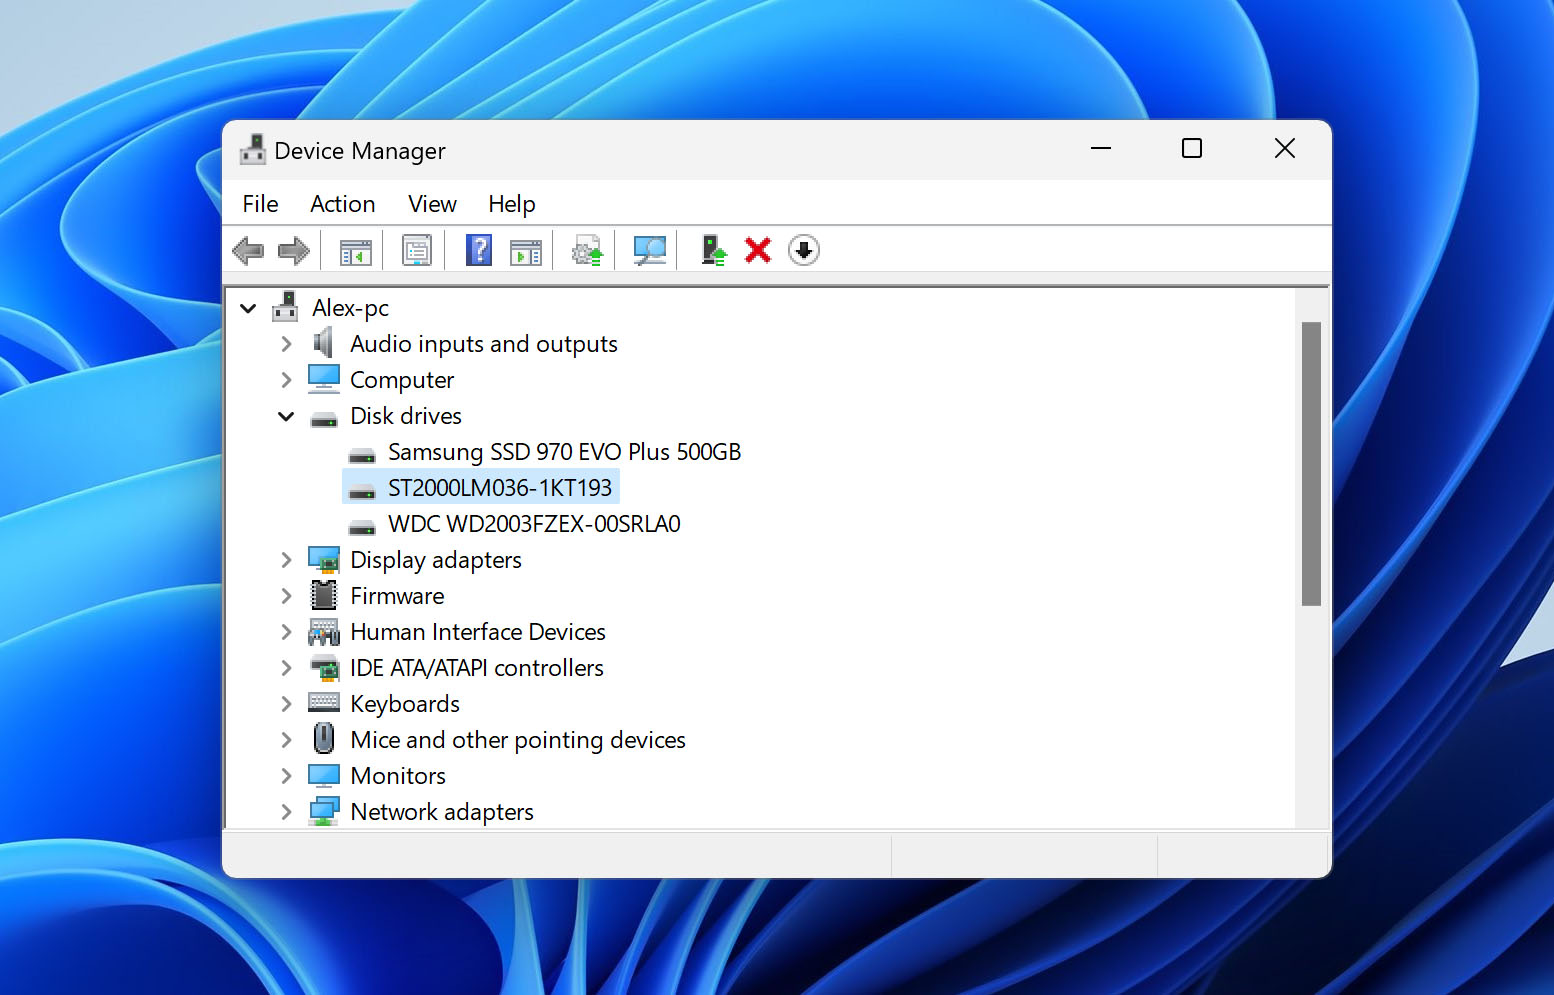
However, before we proceed, you need to make sure that the drive you want to recover is showing up in Windows Device Manager under the “Disk drives” tab.
Method 1: Uninstall And Reinstall Drives
If your Seagate hard drive is not being detected by Disk Management, you will have to uninstall and reinstall the drivers for it to work again.
Follow these steps:
- Connect your external Seagate hard drive to your PC.
👀
Skip this step if you are performing troubleshooting on your internal hard drive.
- Go to the search box and type “Device Manager”. Or you can run the device manager directly from the Control Panel.
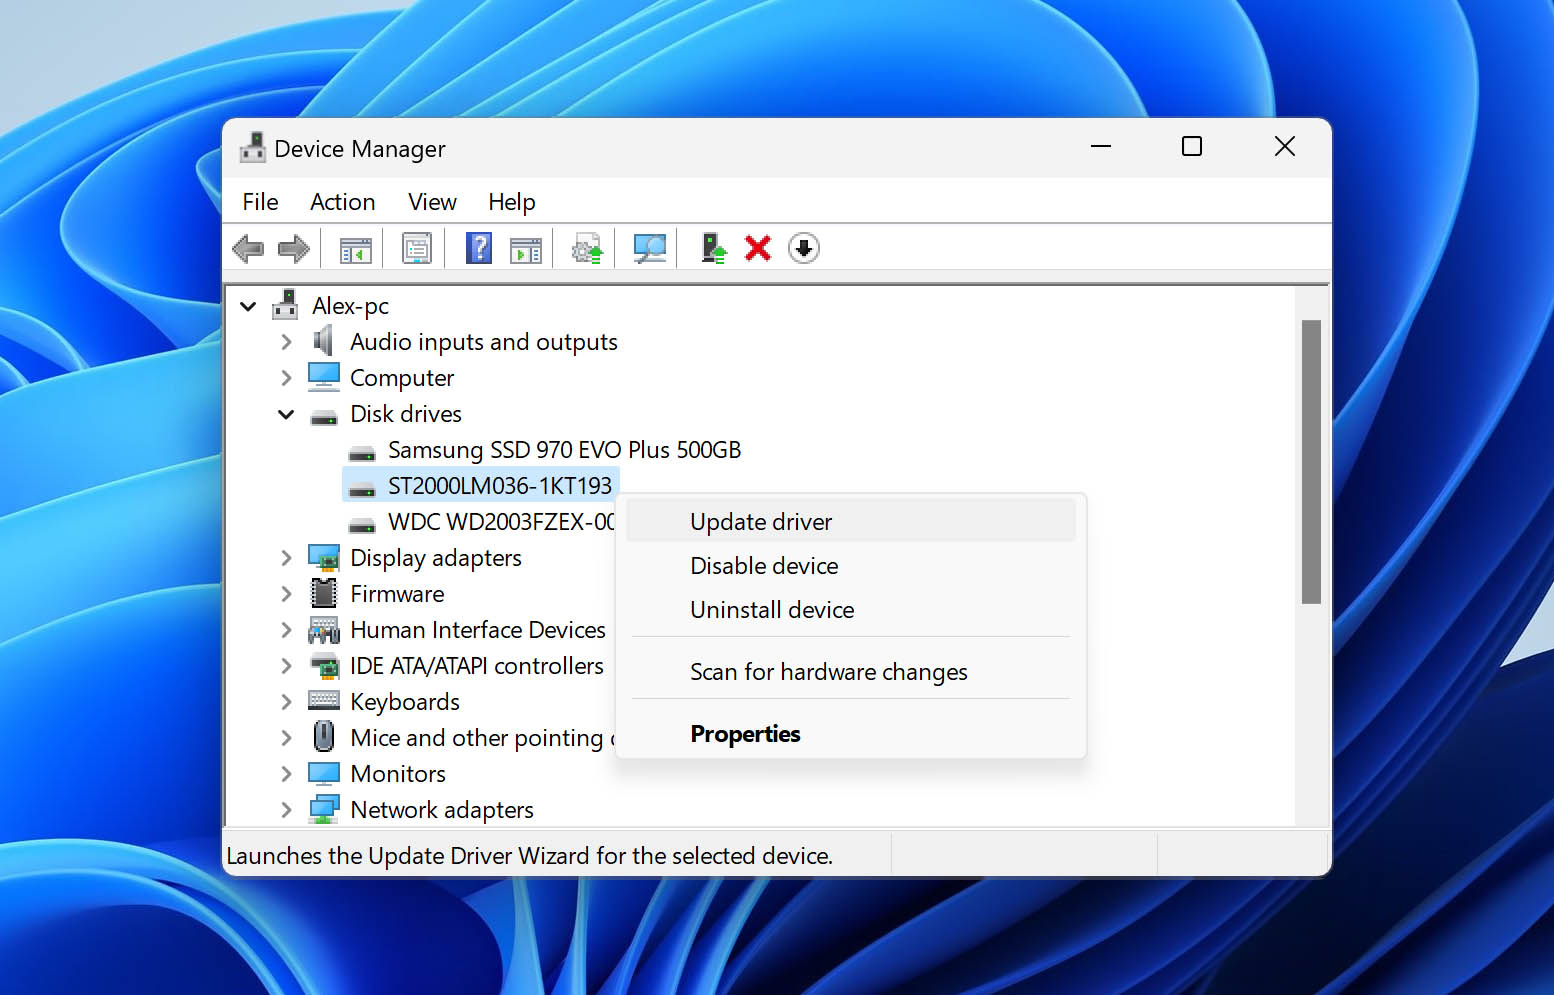
- Click on Disk drivers and right-click on your hard drive. Select “Update Driver”.
- Select “Search automatically for updated driver software”. Once the process is complete, restart your PC and your hard drive should work fine.

Method 2: Diagnose Hard Drive Using SeaTools
SeaTools provides different diagnostic tests and repairs to determine the health of both a Seagate internal or portable drive. Before performing any of these tests, you need to do the following:
- Close all other open apps before running the hard disk diagnostic tool.
- Make sure that your computer is fully powered on and avoid any power interruptions during the process.
- Make sure that your hard drive isn’t set to turn off by going to Control Panel > Power Options > Edit Plan Settings > Change advanced power settings. Then, under the Hard Disk menu, set
- Turn off hard disk after to Never.
- Remove the hard drives from your system except the one you want to test.
You can also check out Seagate’s SeaTools user guide for Windows to learn more about their diagnostic tools and its processes.
After making sure that your settings are correct, you can open SeaTools and begin diagnostics with these steps:
- Select the drive you want to test.

- Select the tests to run. You can choose among these diagnostic options:
- Fix all – Identify suspicious sectors which may or may not be bad and attempt to repair them.
- S.M.A.R.T. check – This is done to detect signs of a failing drive.
- Short Drive Self Test – This is a test conducted to evaluate the physical integrity of a PC hard drive.
- Short Generic – This test consists of an outer scan, inner scan, and random read to diagnose hard drive problems.
- Long Generic – This is a more thorough version of the Short Generic test which may take several hours to complete.
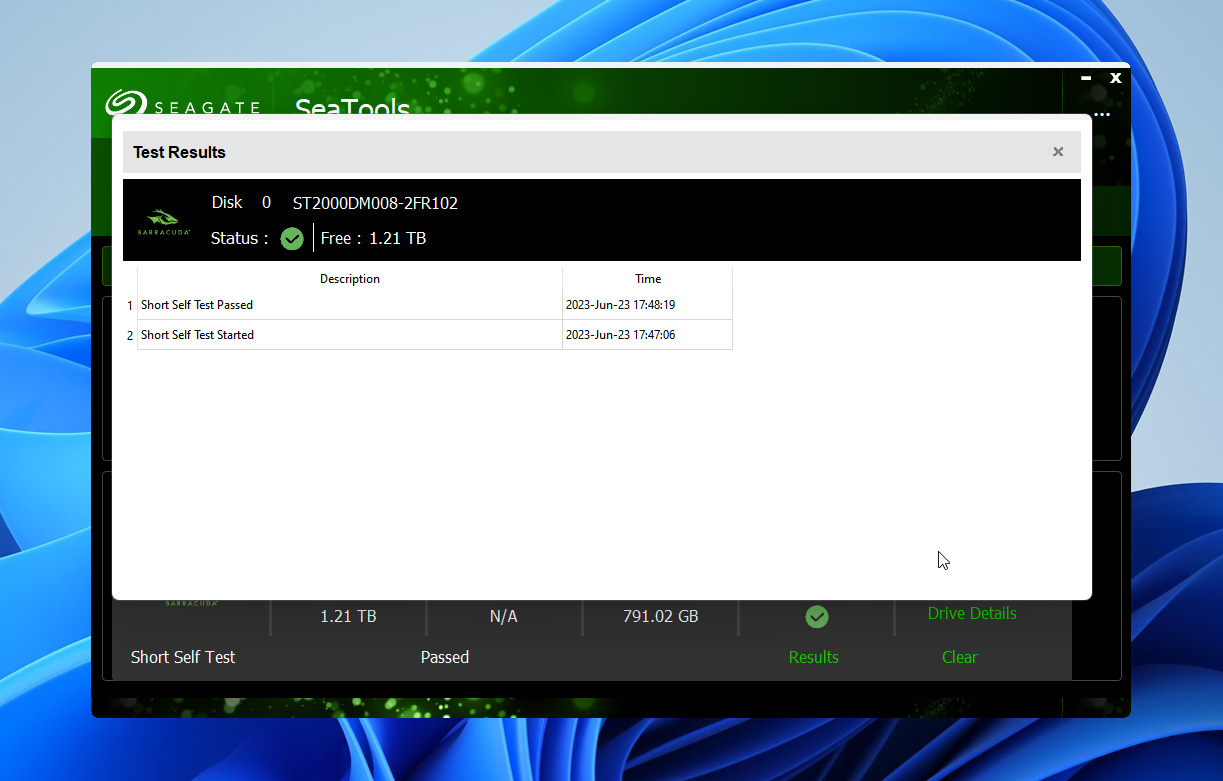
- After completing the tests, you can check the log file of your session by clicking on Help > View Log File.
Method 3: Format RAW Seagate External Hard Drive to NTFS
If your Seagate hard drive is malfunctioning and you don’t have anything valuable stored on it, you can try a simple remedy to fix it by formatting it. Formatting the drive can also fix errors if your hard drive is appearing as RAW or unallocated.
Please only follow this step if you don’t have any important data stored on your drive as formatting your drive will wipe it clean and recovering data from an erased hard drive can be challenging.
Sometimes formatting can also fix a corrupted hard drive.
- Connect the Seagate external hard drive to your PC. (Skip this step if you are performing troubleshooting on your internal hard drive)
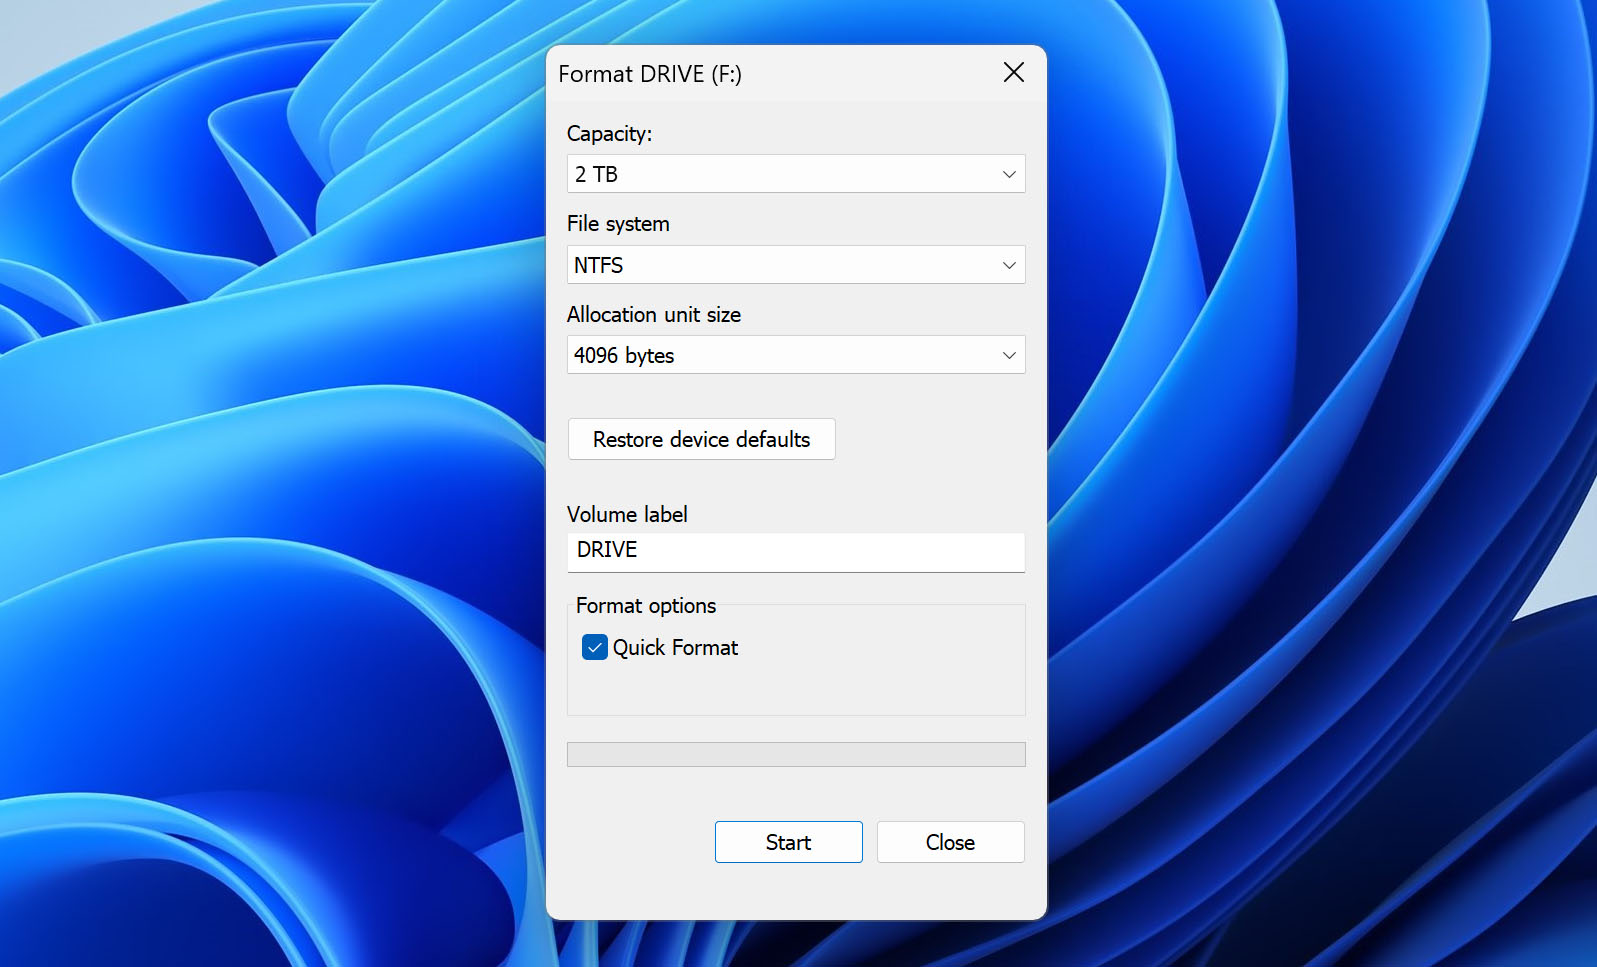
- Select your RAW hard drive that is not working and select “Format”.
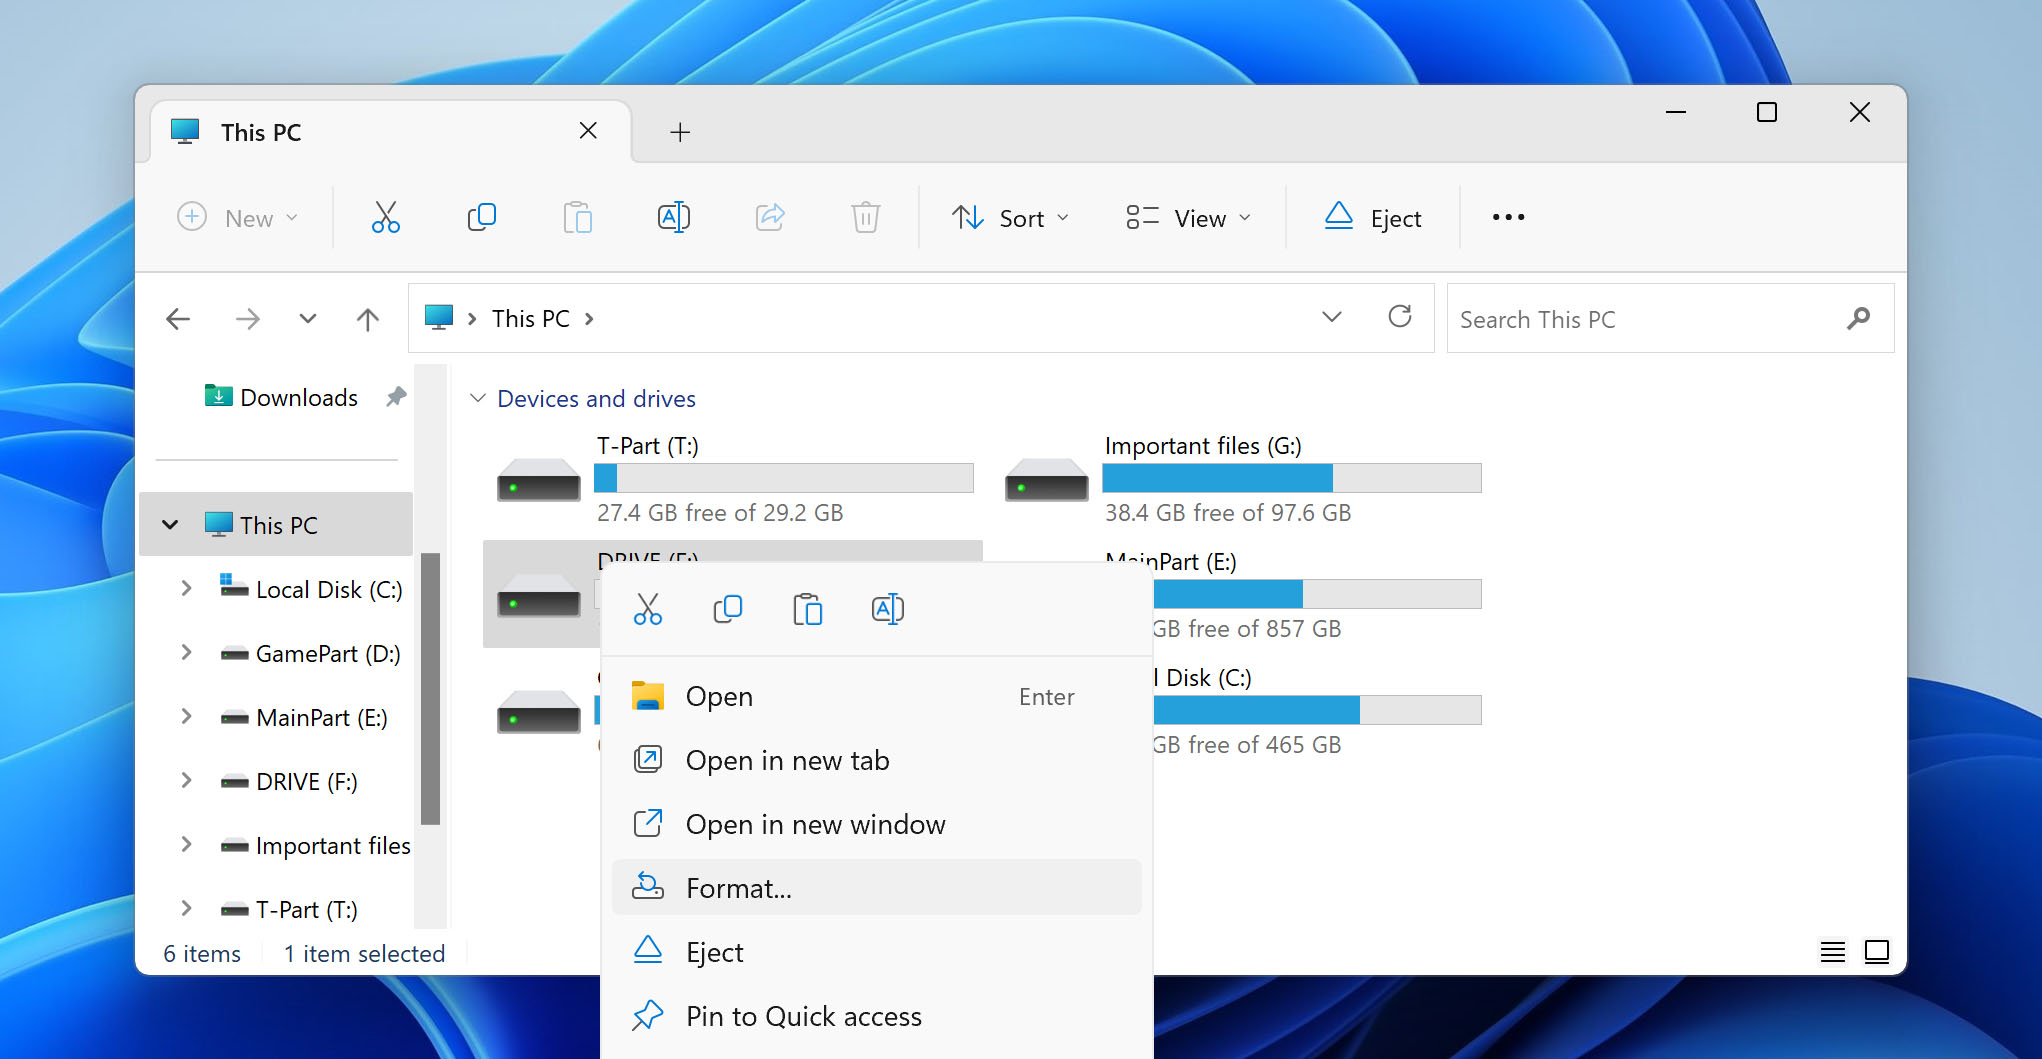
- Set NTFS as a file system and tick “Quick Format”. Click Start to format the drive.
Fortunately, it’s possible to recover data from disks that have been quick-formatted, at least to some extent. Additionally, we provide resources on topics such as whether it’s possible to recover a hard drive without formatting, and how to format a drive without losing data.
Method 4: Change Seagate Drive Letter
Sometimes the OS gets confused with drive letters and ends up not showing storage drives in the file explorer at all. You can simply bypass this conflict by assigning a new drive letter to your external Seagate hard drive.
- Connect your external Seagate hard drive to your computer.
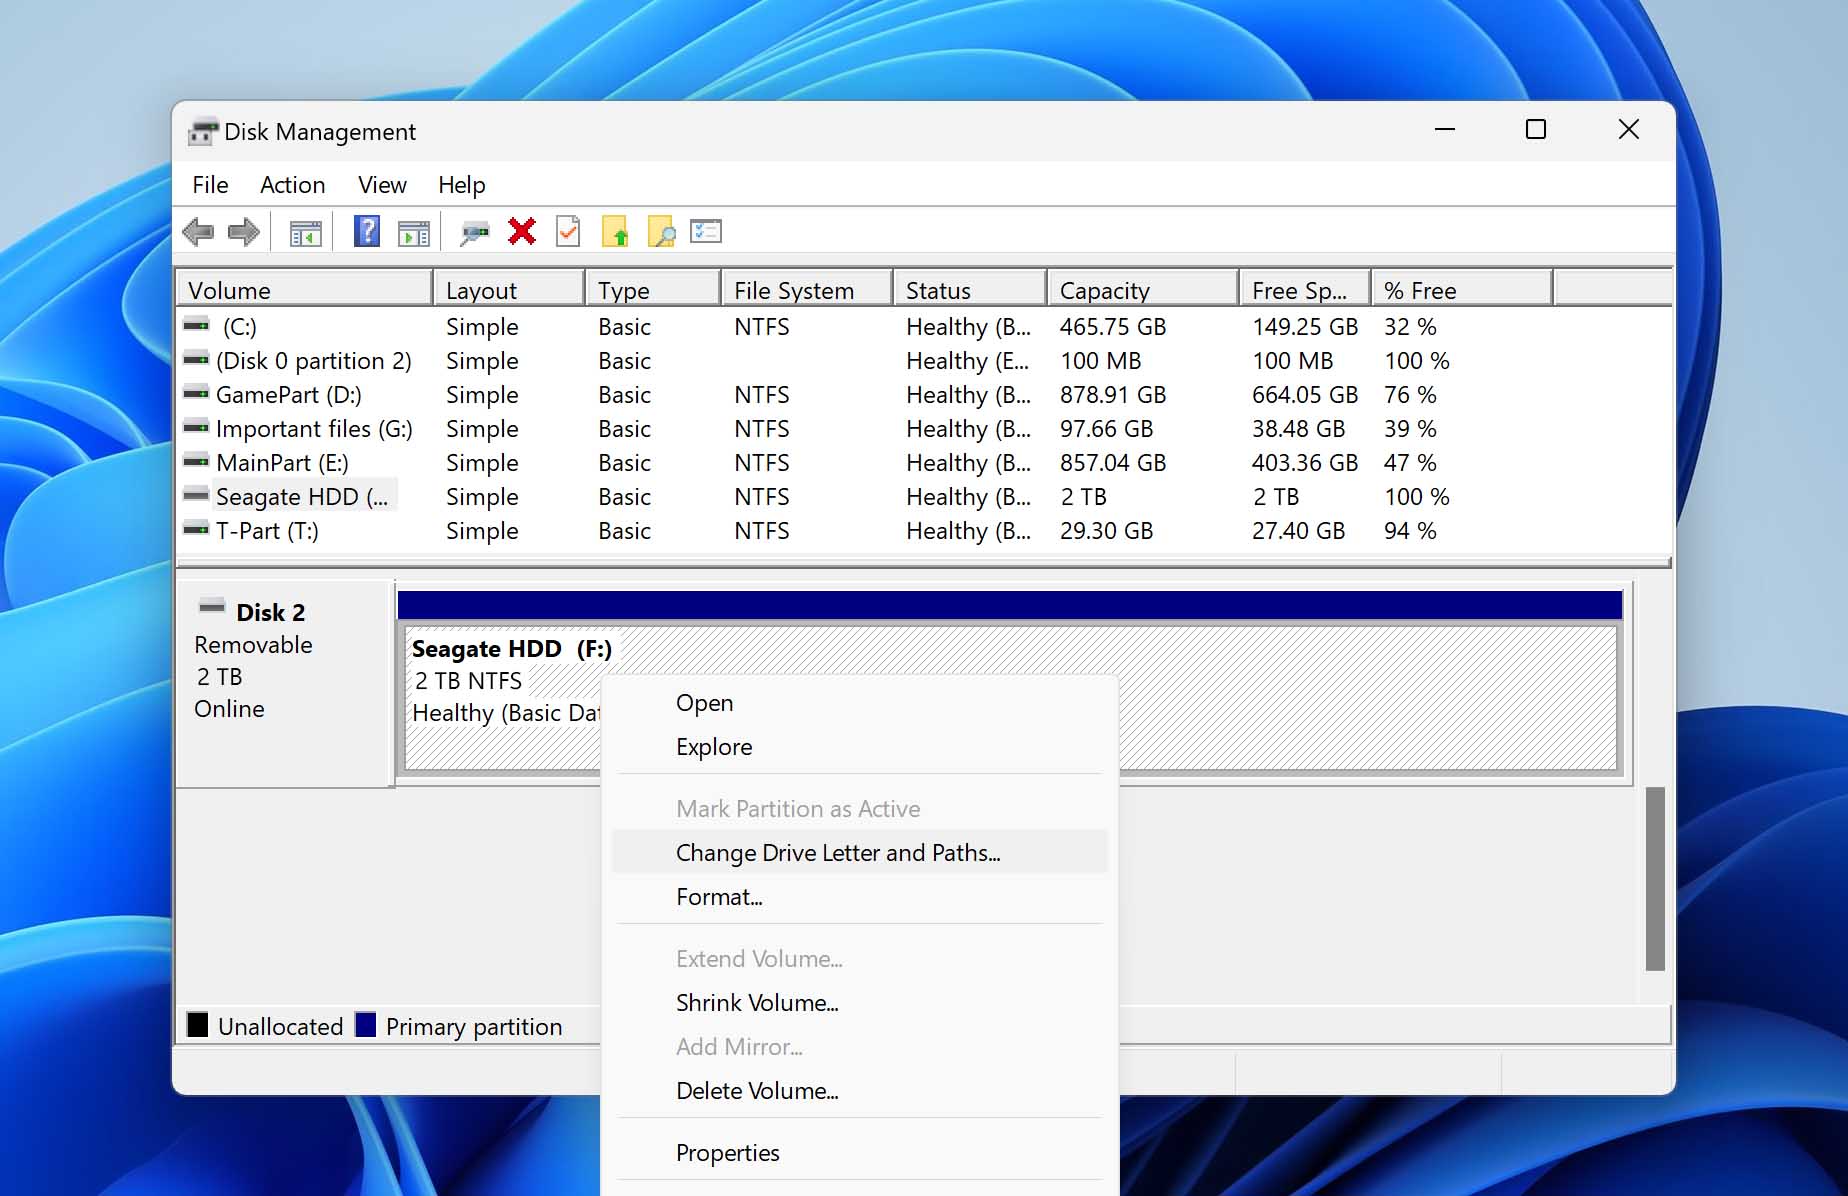
- Open Disk Management and navigate to your malfunctioning drive.
- Right-click your drive and select “Change Drive Letters and Paths”.
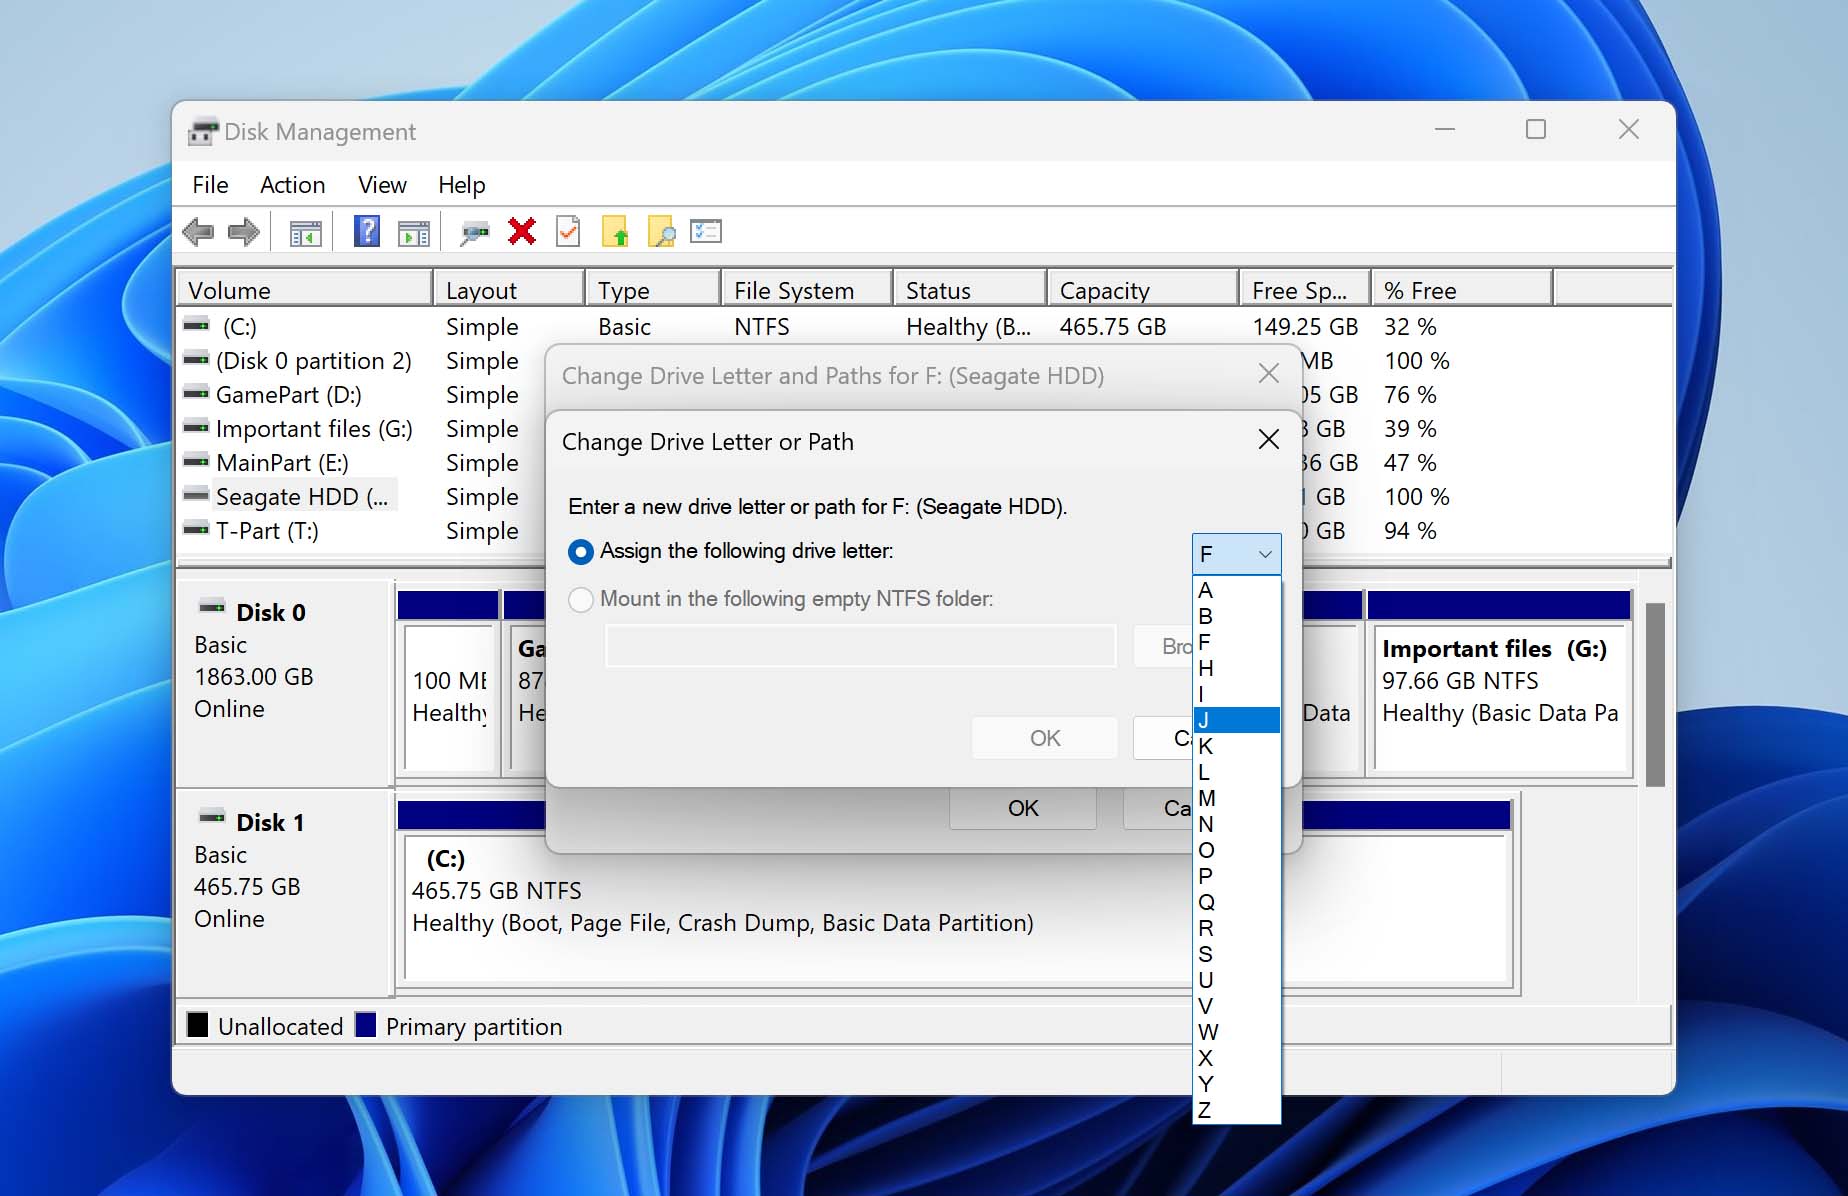
- A pop-up window will appear. Here, click on the current drive letter and then click on the Change button.
- Select a new drive letter from the drop-down menu that opens up to assign to your drive and click OK to confirm.
Method 5: Fix Seagate Drive Errors Using CMD
The Command Prompt utilities for Windows, especially CHKDSK, can be incredibly useful. They are capable of checking for logical errors in your Seagate internal or portable drive and repairing them, enabling data recovery.
Run CMD to fix Seagate drive errors by doing the following:
- Run Terminal as Administrator by searching “Terminal” through the Start menu.
- Type
chkdsk S: /fand press Enter – where S is the letter of your drive.
CHKDSK /f is a command that scans and repairs disk errors. The scan duration depends on the size of your drive.
Is It Possible To Recover Data From A Dead/Physically Damaged Seagate Hard Drive?
It’s common for external hard drives to take a beating. It can be due to a fall from the table or it might just slip off your hands while you try to put it in your pocket. However, such incidents can cause mechanical damage to the components of the hard drive which may result in a dead or damaged hard drive. Here are the most common clues that might indicate a physically damaged hard drive:
- 🔊 Strange Sounds: A hard drive includes a spinning disk that contains all your data. Naturally, the spinning motion creates some noise. However, if you hear strange sounds like clicking, whirring, or popping coming out of your hard drive, you might be dealing with a physically damaged hard drive.
- 🐌 Slow Performance: If you notice longer than usual load and boot times while using your PC, it could be due to a physically damaged disk.
- 💻 Partial Data Loss: Even though your data can be compromised by a virus, it can also be the fault of a damaged disk. If you notice that the data you often access is no longer visible, it could be a sign of a damaged hard drive.
- 🔇 No Sound: As mentioned earlier, a spinning hard disk is bound to create some noise. However, if you hear no sound at all, it means that you might be dealing with a dead drive.
Even though it is possible to recover data from a physically damaged hard drive, you will need to take your damaged Seagate hard drive to a professional data recovery service.
So, is it possible to recover data from a physically damaged hard drive? Yes, it is possible. But the best solution to this issue is to take your Seagate storage to the nearest service center and have the professionals deal with the problem. If the damage isn’t too bad, they might be able to fully recover all your data from your damaged Seagate hard drive.
Let’s take a look at a few commonly asked questions related to recovering Seagate hard drives:
FAQ
How do I recover files from my Seagate hard drive?
It’s a fairly easy process to recover your files from Seagate hard drives. All you have to do is use data recovery software such as Disk Drill or TestDisk etc. These software solutions are reliable tools that can recover your lost data even from a corrupt or malfunctioning hard drive.
How do I fix a corrupted Seagate hard drive?
There are many ways to fix a corrupted external Seagate hard drive. The most prominent one is to use the chkdsk command on your Windows PC to identify and resolve any issues with your storage. You can also use the diskpart command to fix your hard drive without having to format it.
How to recover data from a Seagate hard drive which is not being detected?
If your Seagate external hard drive is not visible in your operating system, you can use data recovery software to fix any issues with your storage. However, before you do that, make sure to troubleshoot the problem yourself by checking if the USB port is clean and working.
If not, then try reinstalling your USB drivers. At last, go to the Show Hidden Devices in Device Management option to see if your external Seagate HDD is visible or not.
How much does Seagate hard drive recovery cost?
Seagate hard drive recovery can be priced differently depending on the professional you contact. The typical price ranges from a hundred to thousands of dollars for one device.
Is Seagate Rescue Data Recovery Service any good?
If you own a Seagate storage device, you will find quality service with their data recovery membership plans. However, Seagate lacks customer care consistency and has a long turnaround time, which can be a drawback for many users.
Is Seagate SeaTools a reliable repair tool?
SeaTools, a dedicated repair tool, can serve as a starting point or an initial method to repair your drive and, hopefully, regain access to your data. However, it may not always yield promising results. In such instances, you might need to rely on other data recovery applications that primarily focus on deep scanning and proficient file retrieval.
Wrap Up
It can be upsetting to see your hard disk storage rendered useless due to corruption, virus, or improper formatting. Luckily, you can rely on data recovery software like Disk Drill and TestDisk to carry out your Seagate hard drive recovery and retrieve your important files.
If you prefer using a GUI instead of a command-line interface, you should check out Disk Drill. However, if your drive has sustained physical damage, it might be best as your last resort to head to the nearest data recovery center.
This article was written by Ojash Yadav, a Contributing Writer at Handy Recovery Advisor. It was recently updated by Princess Lescan. It was also verified for technical accuracy by Andrey Vasilyev, our editorial advisor.
Curious about our content creation process? Take a look at our Editor Guidelines.