If a drive was a pie, partitions are the slices. They store not only your data, but also your filesystem, your operating system, and an organization system called “partition tables” – the blueprint your OS uses to figure out how to store your files. When one or more of these get corrupted, it eventually leads to disaster.
This article goes through all the methods to fix corrupted drives and partitions, recover data from damaged drives, and some tips to get ahead of your partitions getting corrupted and losing data as a result.
What is a Corrupted Partition and What Causes It?
A corrupted partition is a partition that can’t be read, written on, or sometimes even detected by your operating system. Unfortunately, it can be caused by a lot of things – some of which aren’t even the user’s fault. Here are some examples:
- ❌ Corrupt Partition Table – Partition tables tell the operating system how your drive is divided into partitions, as well as other important filesystem details. When it gets corrupted, you won’t be able to access your data within that partition.
- 💻 Bad Software – Many software engage with your filesystem, so a wrong installation or even unoptimized software by themselves can cause corrupt partitions.
- ⚡️ Power Outages – If your power suddenly shuts off while your computer is writing data to a partition, this could cause corruption.
- 💻👨 Improper Formatting – The formatting process allows you to partition your drive to decide where you want to store your files and install your operating system.
- 🧩 Bad Sectors – Bad sectors are the most common reasons for corrupt file systems. It’s a flawed and unusable section of a drive. There are two types of bad sectors:
- Hard Bad Sector – Hard bad sectors are caused by physical damage – such as the drive being exposed to extreme heat, getting bumped while it’s actively writing data, dust (which is why class 100 Clean Rooms exist), etc.
⚠️
Drives with physical damage cannot be DIY repaired.
- Soft Bad Sector – Soft bad sectors are caused by software issues, shutdowns while writing data to the drive, and error correcting codes that don’t match.
- Hard Bad Sector – Hard bad sectors are caused by physical damage – such as the drive being exposed to extreme heat, getting bumped while it’s actively writing data, dust (which is why class 100 Clean Rooms exist), etc.
- 🦠 Virus Attacks – Viruses often attack the filesystem, which results in corrupt partitions.
Let’s now review the symptoms that will help you identify a damaged partition.
Symptoms of Damaged or Corrupted Partitions
The Windows operating system should theoretically warn you before anything goes too wrong, but you often encounter issues before any warnings. Here are the telltale signs of a damaged or corrupted partition:
Symptoms |
Description |
Bad Performance |
Slowdowns or freezing while engaging with files |
Corrupt Data |
File names and other details are all messed up |
Partition Loss |
Missing volume in Windows Explorer – a result of a partition table with missing information |
Non Accessible Partition |
Getting an “Access Denied” popup when you try to engage with your hard drive |
S.M.A.R.T. Error |
S.M.A.R.T. stands for Self-Monitoring, Analysis, and Reporting technology – it’s a built-in self-monitoring system in modern drives. I’ve personally never experienced getting a warning from the S.M.A.R.T. function, but its purpose is to warn you of potential drive failures. |
Missing Drive on Windows Explorer |
With a corrupt partition, the entire drive will sometimes go missing from Windows explorer |
“BSOD” (Blue Screen of Death) |
You’ll know your drive is on its last leg when you encounter the infamous Blue Screen of Death |
How to Recover Files from a Corrupted Partition
Fortunately, partition recovery software make it easy to recover data from corrupted and damaged partitions. There are a lot of tools on the internet that offer to do this, but they’re not created equal. Here are some of our favorites:
Option A: Disk Drill
Disk Drill is a freemium data recovery tool with a sleek user interface that makes it easy-to-use for those who don’t know anything about recovering partitions. It offers up to 500MB of data recovery for free, as well as unlimited free previews (which is extremely useful for knowing whether your files are recoverable using DIY methods).
It also has a S.M.A.R.T. monitoring feature that lets you access S.M.A.R.T. and review the status of your drives, which we’ll explore below. For a more detailed examination of this popular software, you can read our comprehensive Disk Drill review, along with an additional safety analysis of the software.
- Download and install Disk Drill to a drive or partition that is not affected by corruption or data loss in order to avoid overwriting existing data.
- Launch Disk Drill by double-clicking its icon on your desktop.
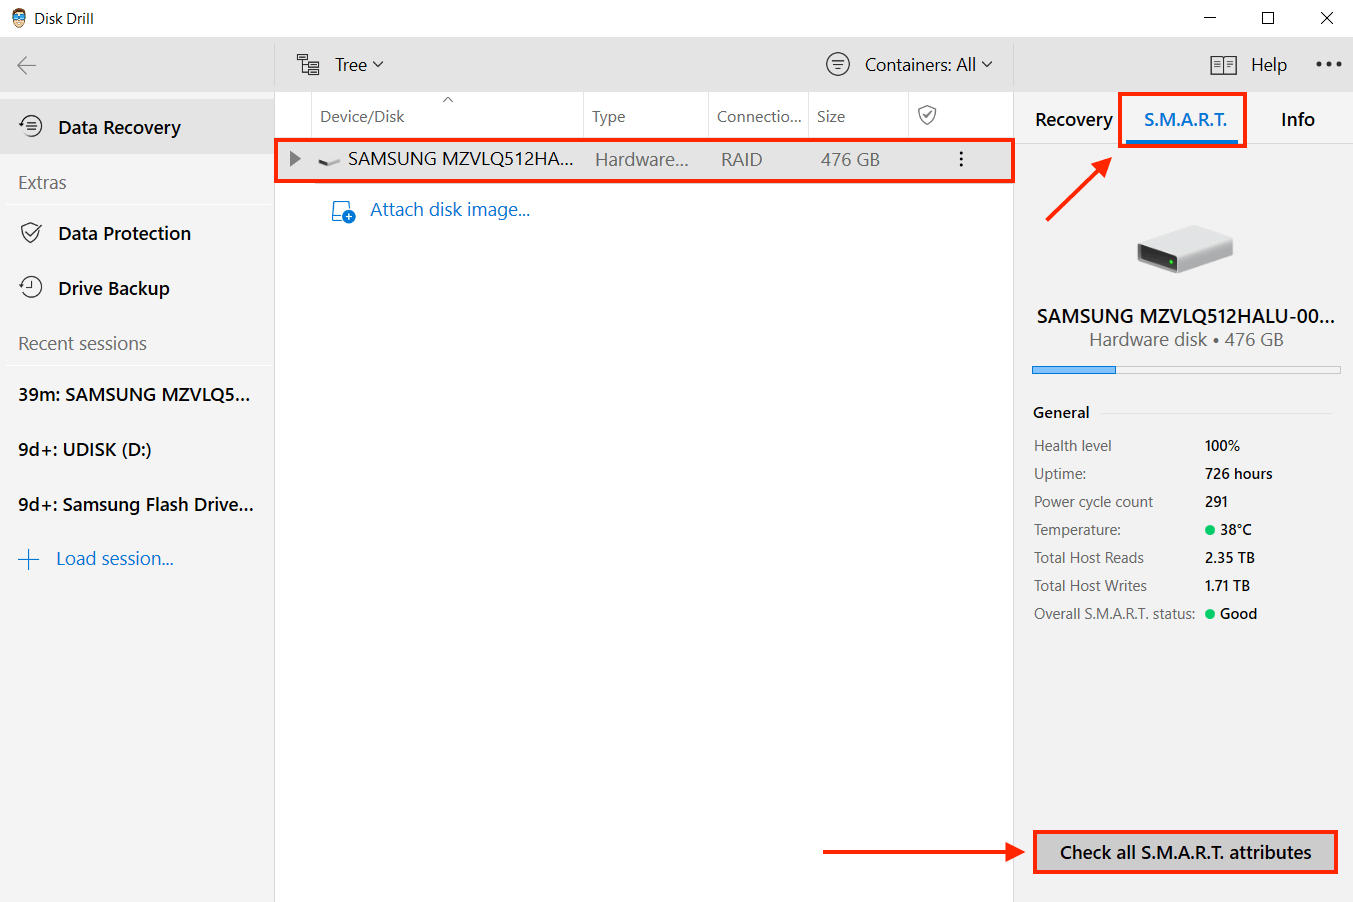
- Select the drive that contains the data you want to recover, and navigate to the S.M.A.R.T. tab on the right sidebar. Click “Check all S.M.A.R.T. attributes” to review the status of your drive.
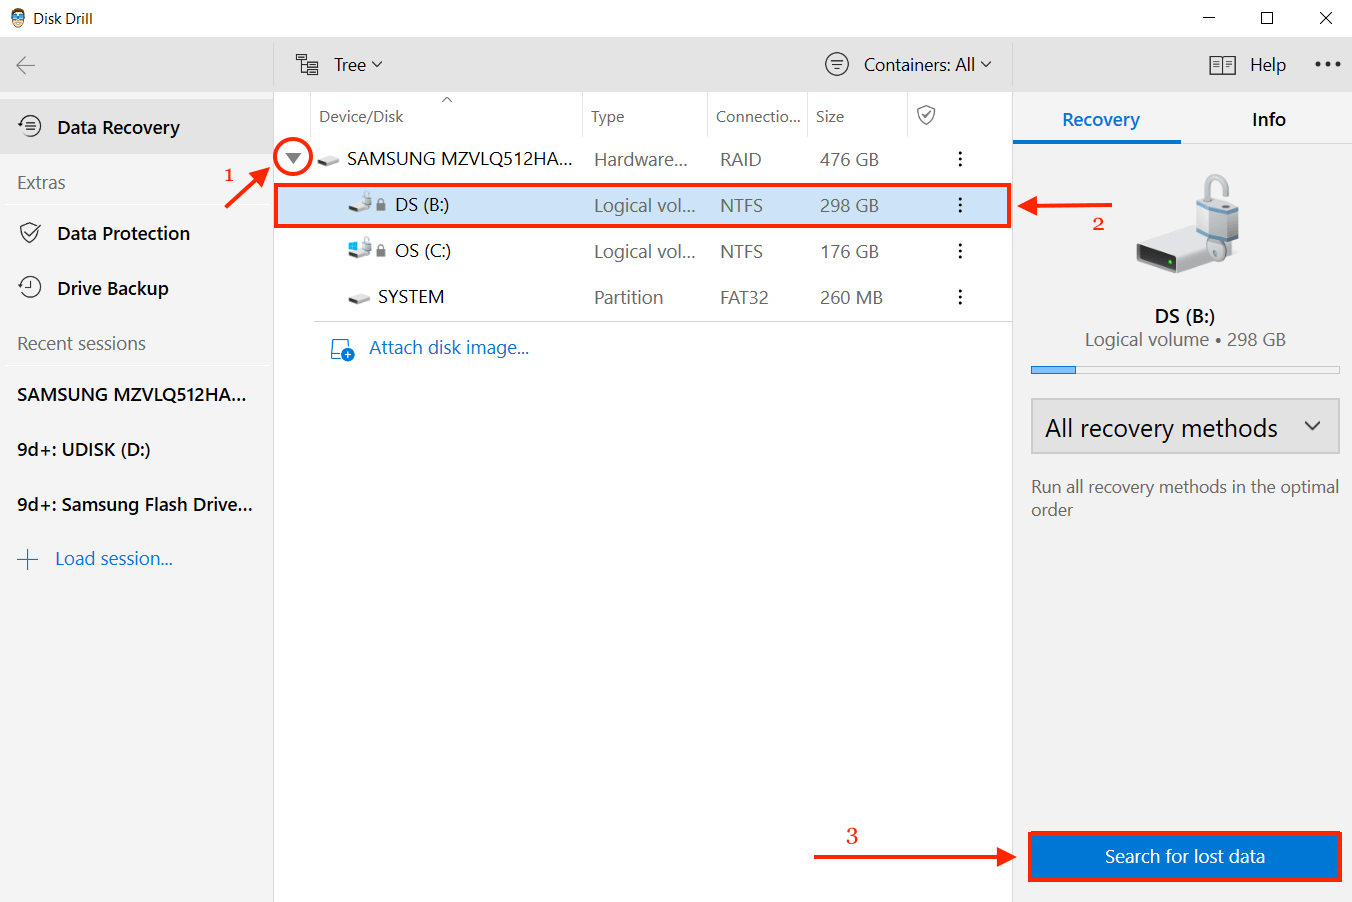
- Close the S.M.A.R.T. attributes window, and navigate back to the “Recovery” tab on the right sidebar of the Disk Drill Window. Expand the drive to specify the partition you want to scan and click “Search for lost data.”
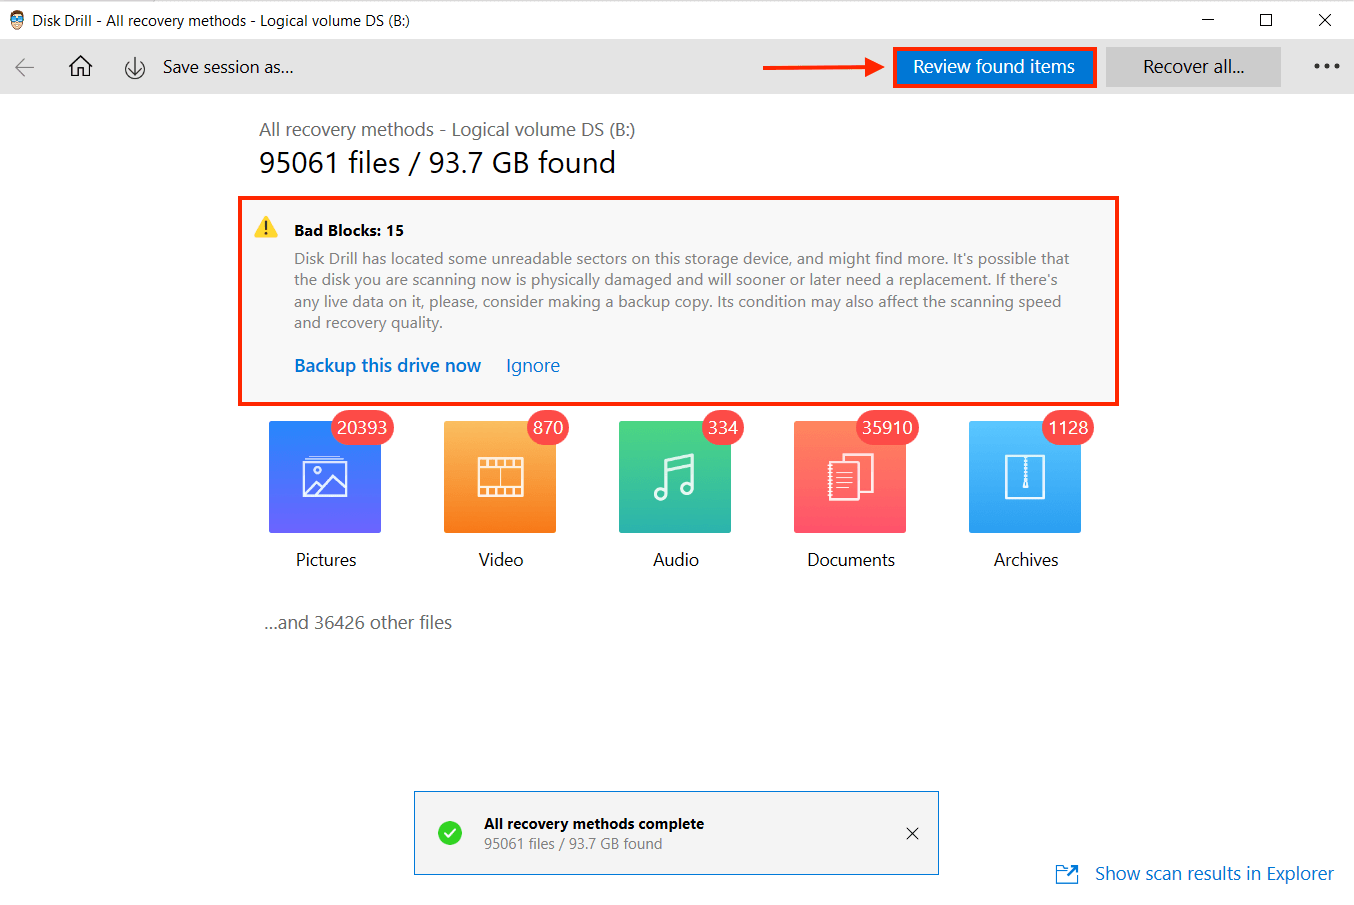
- Wait for the scanning process to complete. At this point, Disk Drill can also warn you if your drive is beginning to fail and will prompt you to backup your data. To continue with recovery, click “Review found items” at the top of the window.
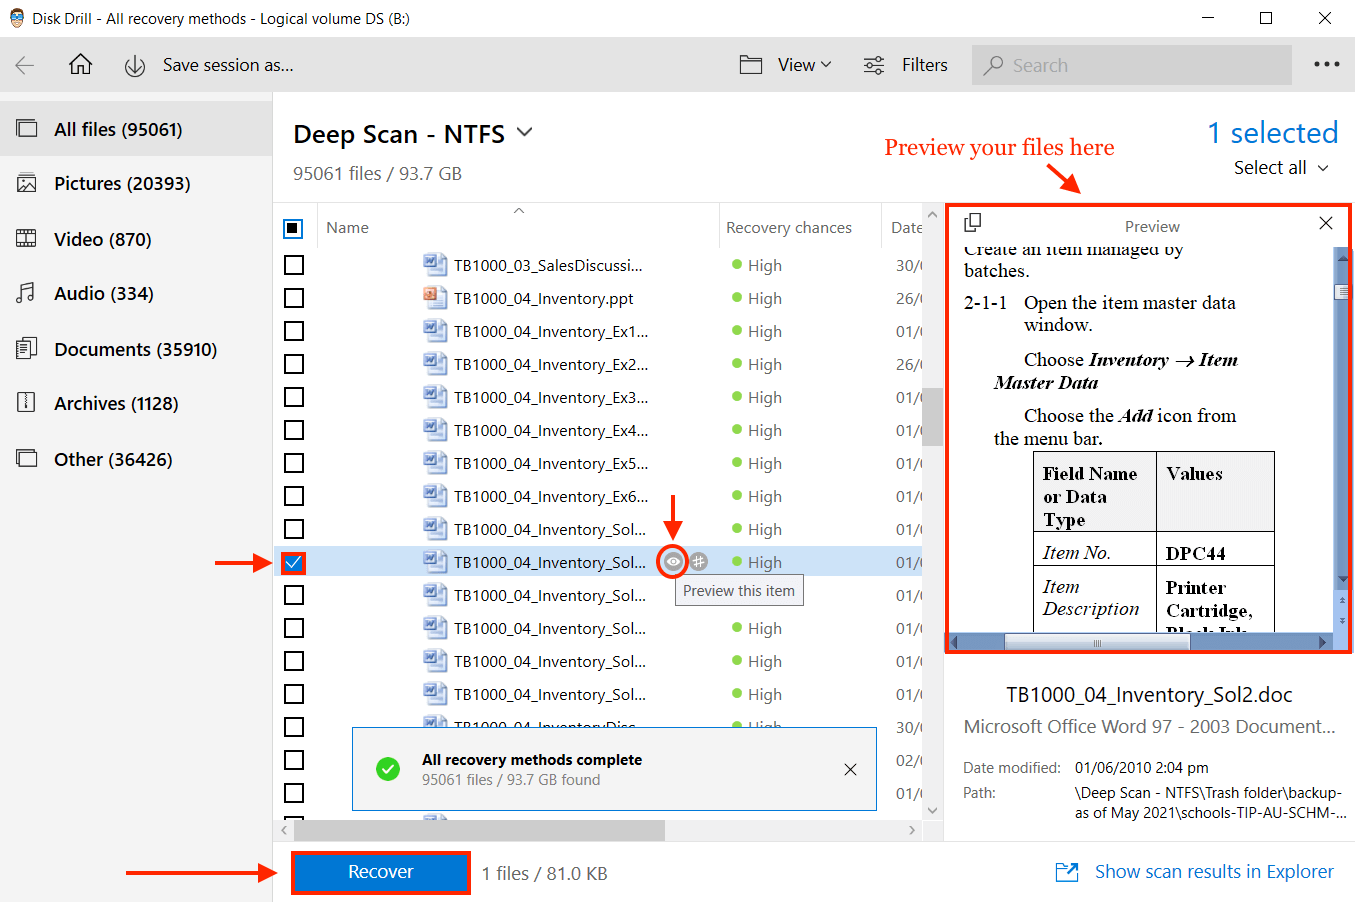
- Browse the scan results and tick the boxes beside the files you want to recover. You can also preview the files you want to recover by hovering your pointer beside the file name and clicking the eye button that appears. Once you’re satisfied with your selection, click the “Recover” button at the bottom left corner of the window.
- On the popup that appears, choose where you want to save your recovered files. It’s best practice to save recovered files in another storage device to avoid overwriting other recoverable files on the scanned partition.
Option B: EaseUS Data Recovery Wizard
EaseUS is a well-known subscription-based data recovery tool with a suite of utilities available for download on their website. EaseUS Data Recovery Wizard enables you to recover up to 2 GB of data for free, with the condition of sharing this software on your social networks.
For a more in-depth look into this software, read our full EaseUS review.
- Download and install EaseUS Data Recovery Wizard.
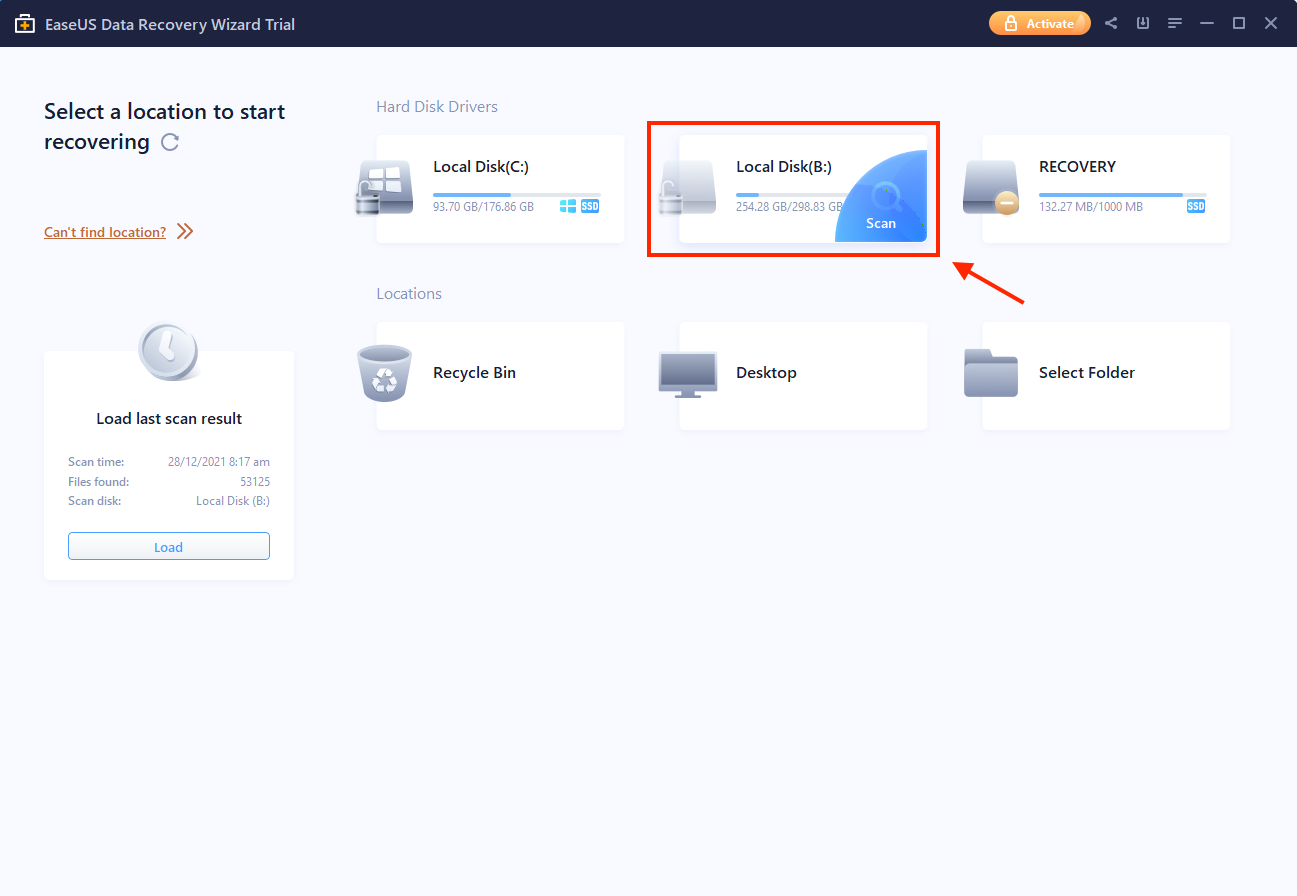
- Launch EaseUS Data Recovery Wizard and select the drive that you want to recover to proceed with the scan.
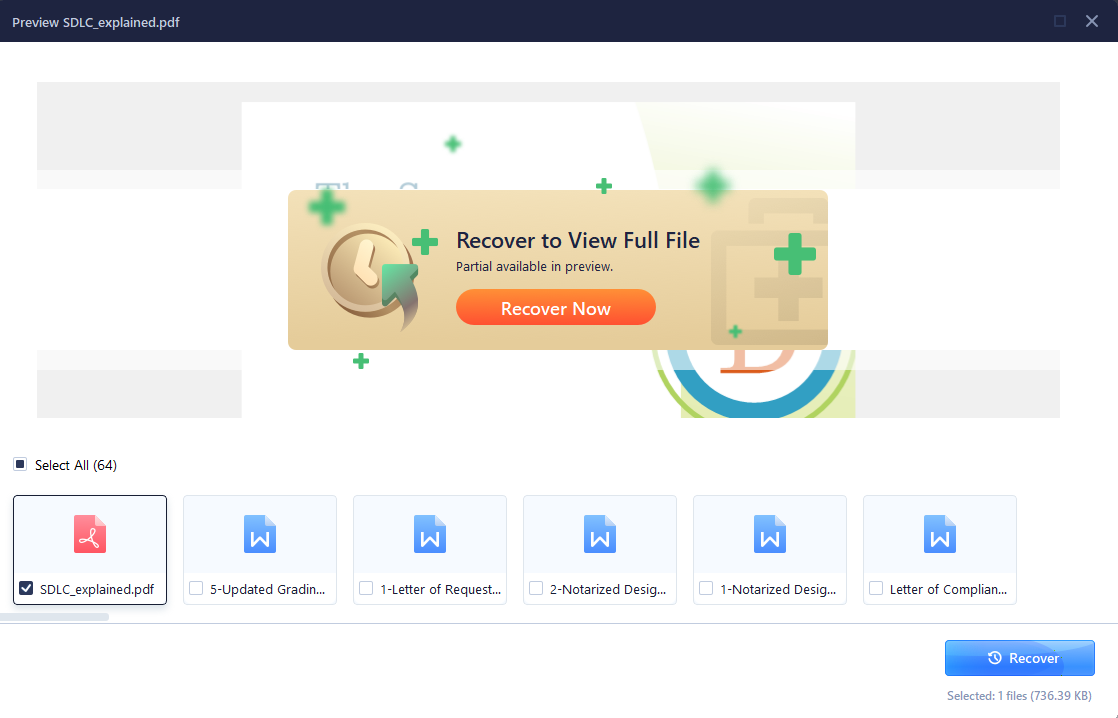
- Once the scan is complete, you’ll be presented with a list of recoverable files. You can view “partial previews” by selecting a file and clicking the “Preview” button on the right sidebar. However, as implied, you won’t be able to see the full preview of your files until you buy a license.
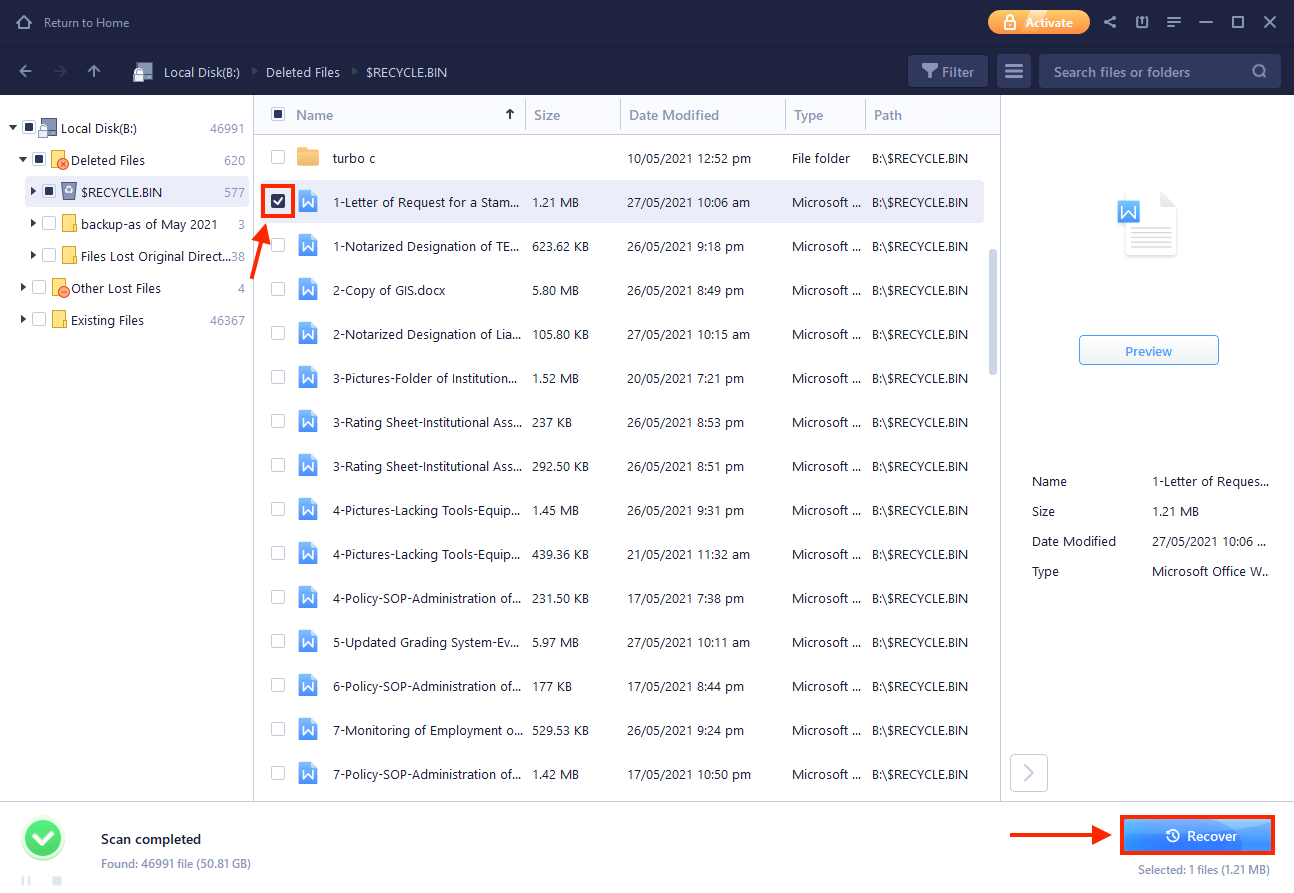
- Select the files you want to recover by ticking the boxes beside the filenames, then click the “Recover” button.
- Choose the destination for your files.
Option C: Wondershare Recoverit
Wondershare Recoverit is another subscription-based data recovery tool, this time from creative software company Wondershare. It lets you recover up to 100MB of data for free, and it has some awesome features for creative professionals who regularly work with photo and video files – however it’s not always the first choice for general data recovery.
For a deep dive into its unique features, as well as its pros and cons, read our Wondershare Recoverit review.
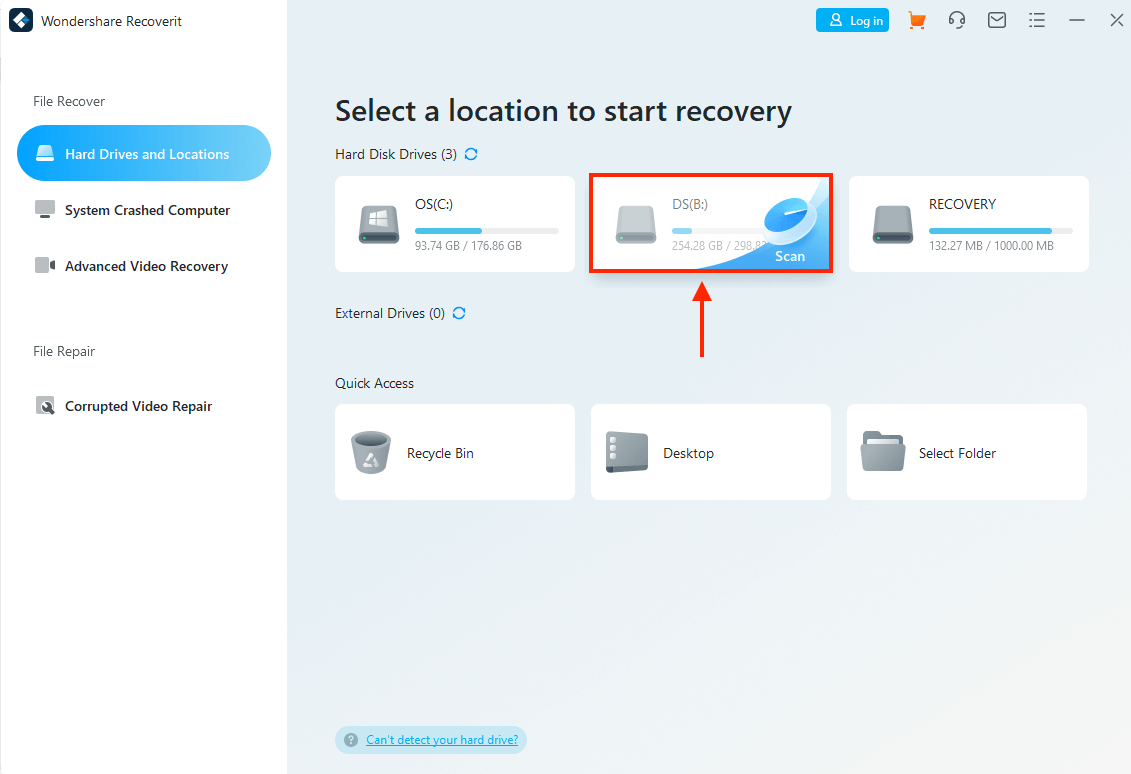
- Download and install Wondershare Recoverit.
- Launch the Wondershare Recoverit, then click the problematic drive to proceed with the scanning process.
- Wait for the scan to finish, allowing the list of recoverable files to populate. Click “OK” when the completion popup appears.

- Tick the boxes beside the files you want to recover, then click the “Recover” button.
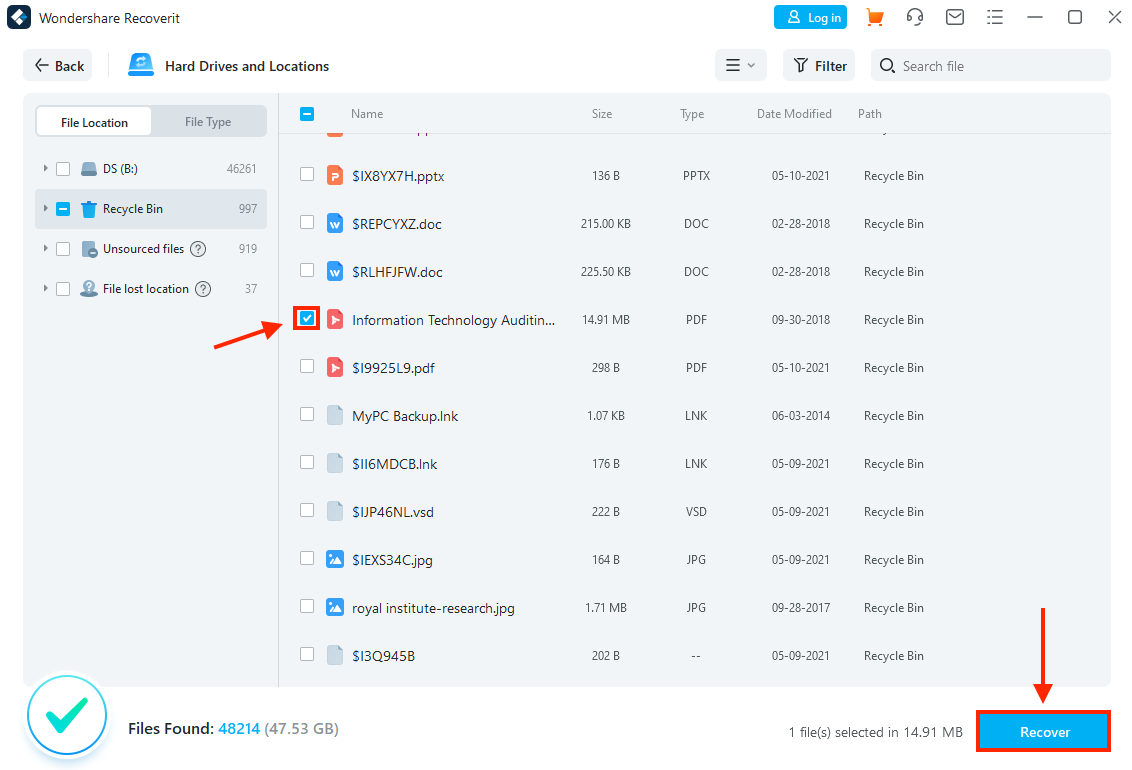
- Choose the destination for your files.
Is It Possible to Recover Damaged or Corrupted Partitions Without Losing Data?
Yes, there are a few methods of corrupted partition recovery that can preserve your data. We’ve prepared short, easy-to-follow guides for each of these methods below.
Even if these are “data-safe” damaged partition recovery methods, it’s always best practice to back up your data before engaging with your drives and file system.
Method 1: Perform an Antivirus Scan
Virus attacks can sometimes be responsible for corrupted partitions. The first thing you should try (since it’s the easiest) is to conduct a Deep Scan of your drive for any viruses.
Method 2: Use the CHKDSK Command Using Command Prompt
Method number two involves using the Command Prompt application. CHKDSK (check disk) scans your drive’s file system and automatically fixes errors. Here’s how to do it:
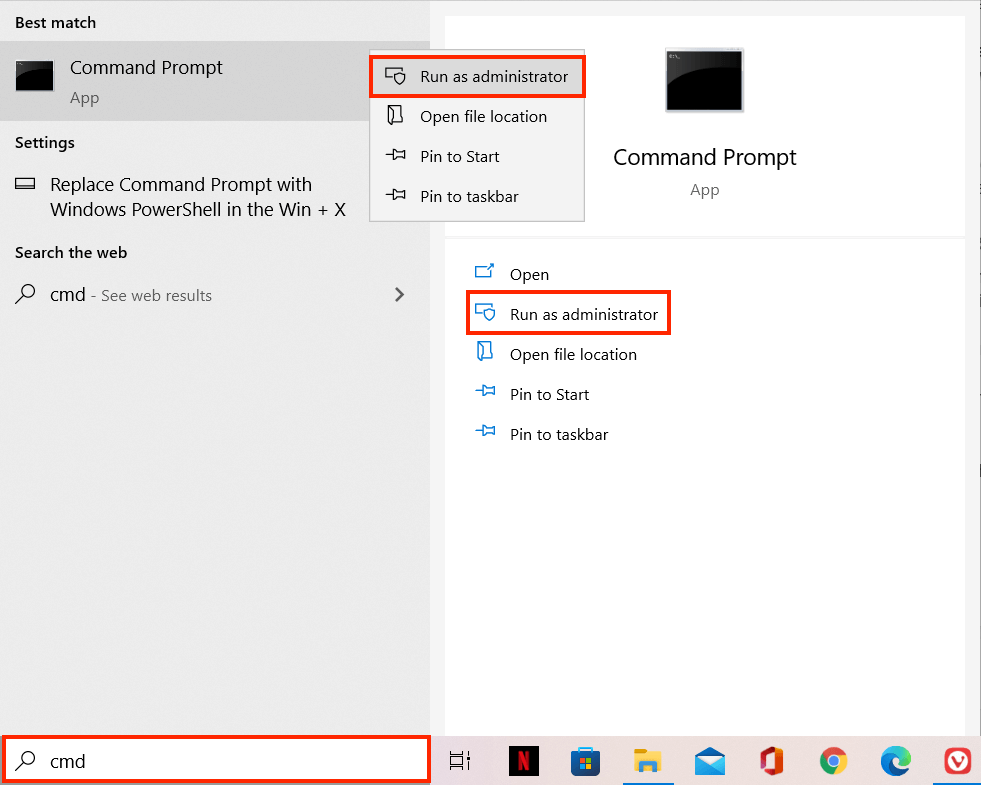
- Click the Start button > type “cmd” in the search bar > right click Command Prompt > Run as administrator.
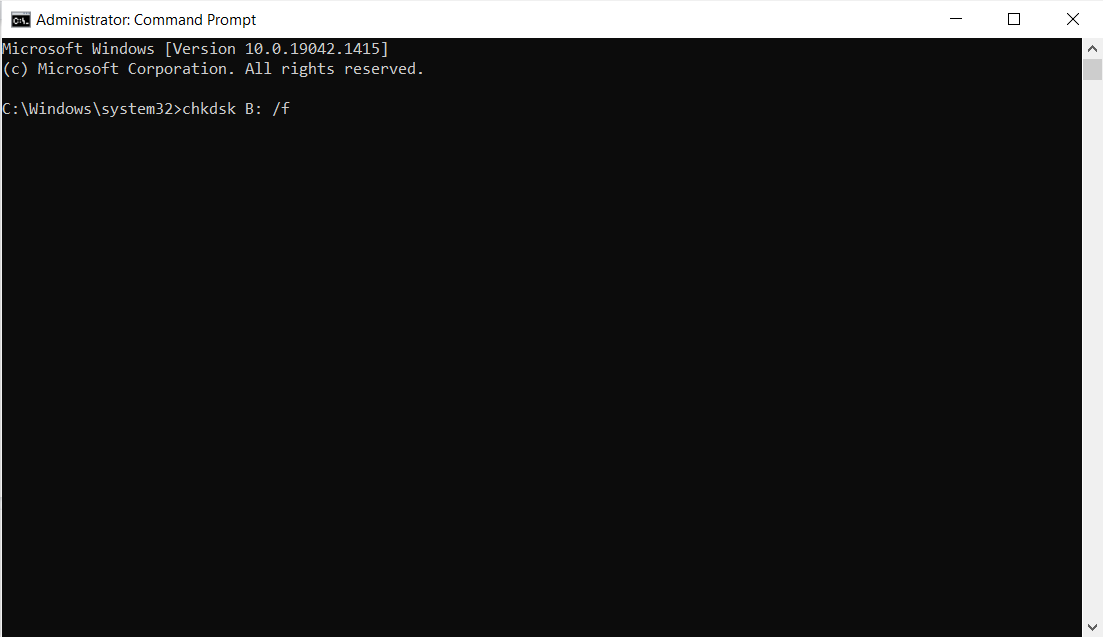
- Type the following command and press enter:
chkdsk /f

If you want to scan another drive other than where you installed windows, include the drive letter before the /f command:
chkdsk D: /f
- Let Windows restart when prompted.
Method 3: Run the SFC /SCANNOW Command Using Command Prompt
SFC /SCANNOW is another command prompt entry that scans and replaces corrupted files within the filesystem with cached copies. Here’s how to use it:
- Click the Start button > type “cmd” in the search bar > right click Command Prompt > Run as administrator.
- Type the following command and press enter:
sfc /scannow

Method 4: Change the Drive Letter
You can change drive letters using the command prompt, but Window’s Disk Management app makes it a lot simpler. Here’s how:
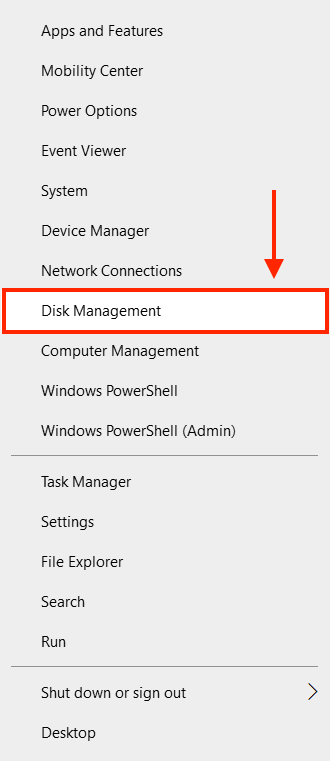
- Right-click the Windows Start button and click “Disk Management.”
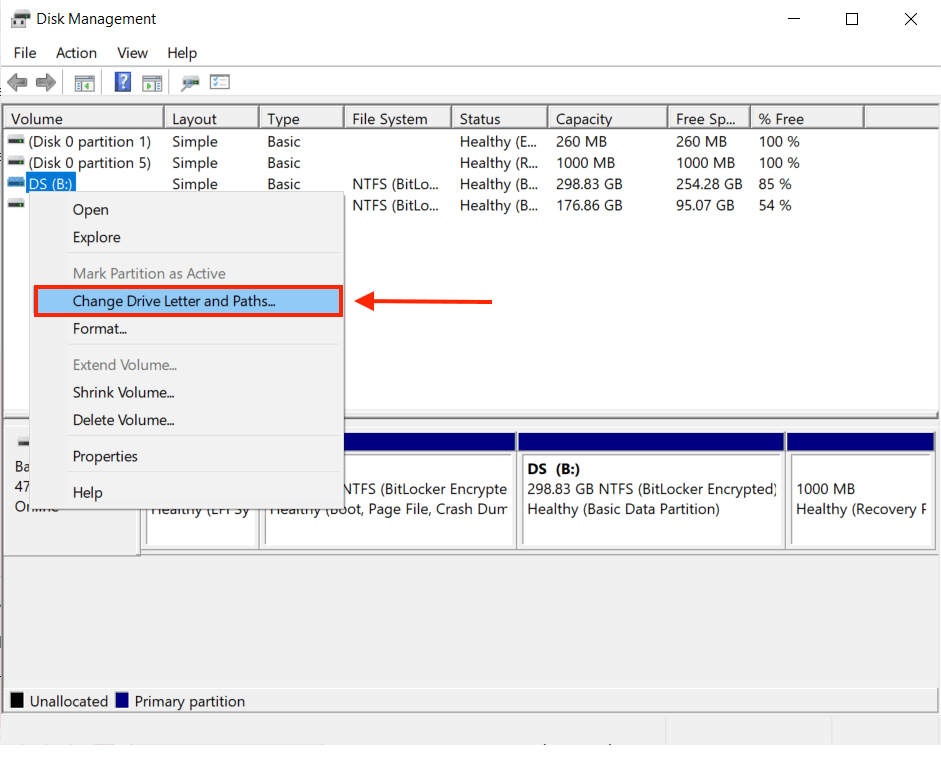
- Identify the problematic drive and right-click it. Then, click “Change Drive Letter and Paths…”
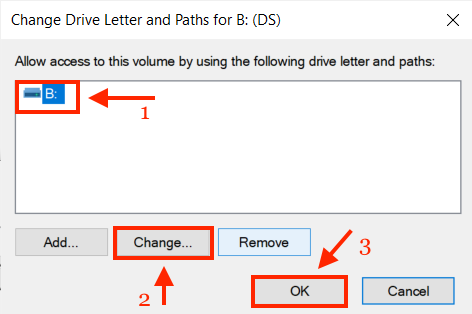
- On the popup that appears, click the current drive letter and click “Change…”
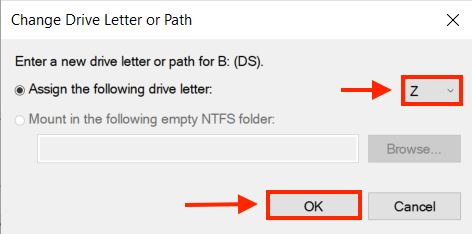
- Select “Assign the following drive letter” and choose a letter from the dropdown menu on the right, and click “OK.”
How to Fix and Recover a Corrupted Partition If You Do Not Need to Keep the Data
It’s much easier to fix a corrupted partition or drive if you don’t need to worry about keeping your data intact. All the methods listed below use native Windows tools that don’t need any additional downloading or setup.
Method 1: Rebuild the MBR
The Master Boot Record (MBR) is the very first sector of a disk and it contains the partition table, which determines how partitions and file systems are organized on the disk. It’s also responsible for loading the installed operating system. Rebuilding your MBR can sometimes help with corrupt partitions. Here’s how to do it:
- Hold the Shift button and restart your computer to enter the Advanced Setup menu.
- Click “Troubleshoot.”
- Click “Advanced Options” > Command Prompt.
- Type the following command and press enter:
bootrec /fixmbr
- Then, type the following command and press enter:
bootrec /fixboot
- Finally, exit command prompt by typing the following command and pressing enter:
exit
- Return to the first window and continue to boot normally.
Method 2: Format the Drive Using Disk Management
It’s much easier to recover a corrupted partition if you don’t need to worry about keeping your data intact. All the methods listed below use native Windows tools that don’t need any additional downloading or setup.
- Right-click the Windows Start button and click “Disk Management.”
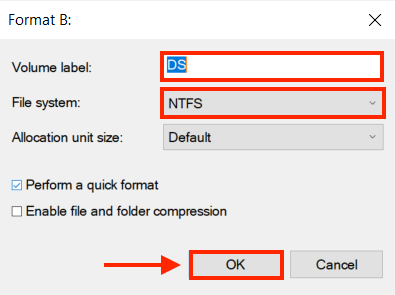
- Identify the problematic volume at the bottom of the screen, right-click it, then click “Format…”

- Type what you want to label your volume, and choose a file system (NTFS is usually your best bet). Then, click “OK.”
Method 3: Use DiskPart Clean and Clean All
DiskPart is a Microsoft tool built into command prompt. “Clean” is one of DiskPart’s commands that marks the entire disk as deleted, which means that all existing data will be overwritten while you use the drive. A few passes of DiskPart clean will get rid of all but the most stubborn viruses that could re-corrupt your partition.
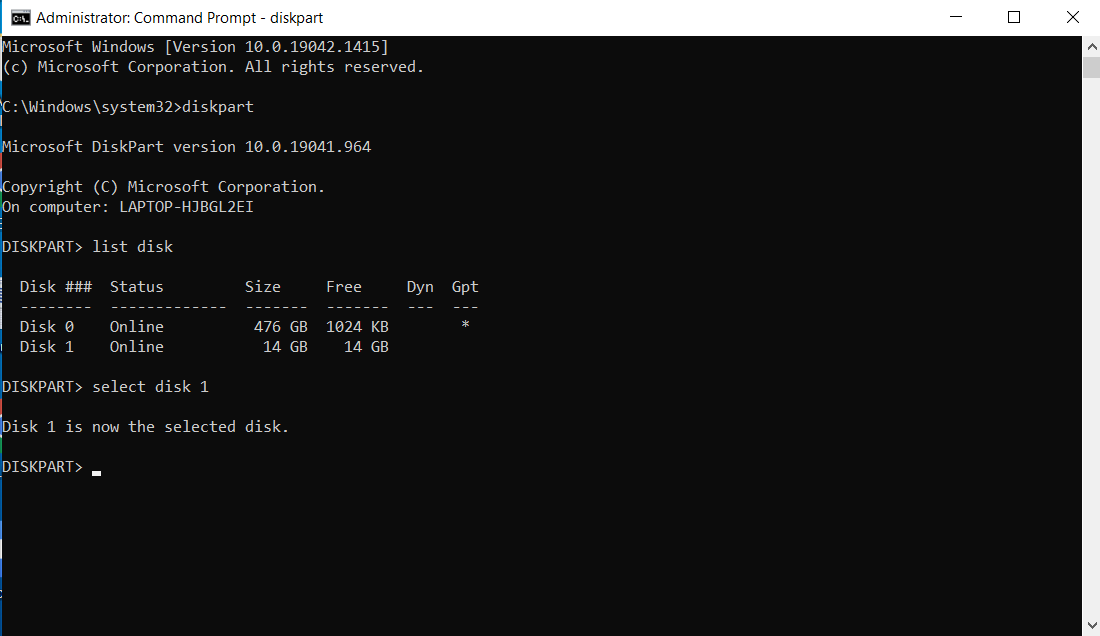
- Click the Start button > type “cmd” in the search bar > right click Command Prompt > Run as administrator.
- Type the following command and press enter:
diskpart

- Then, type the following command and press enter:
list disk

- Identify the problematic drive’s disk number, then type the following command and press enter:
select disk “disk number”
- Finally, enter the following command and hit enter:
clean
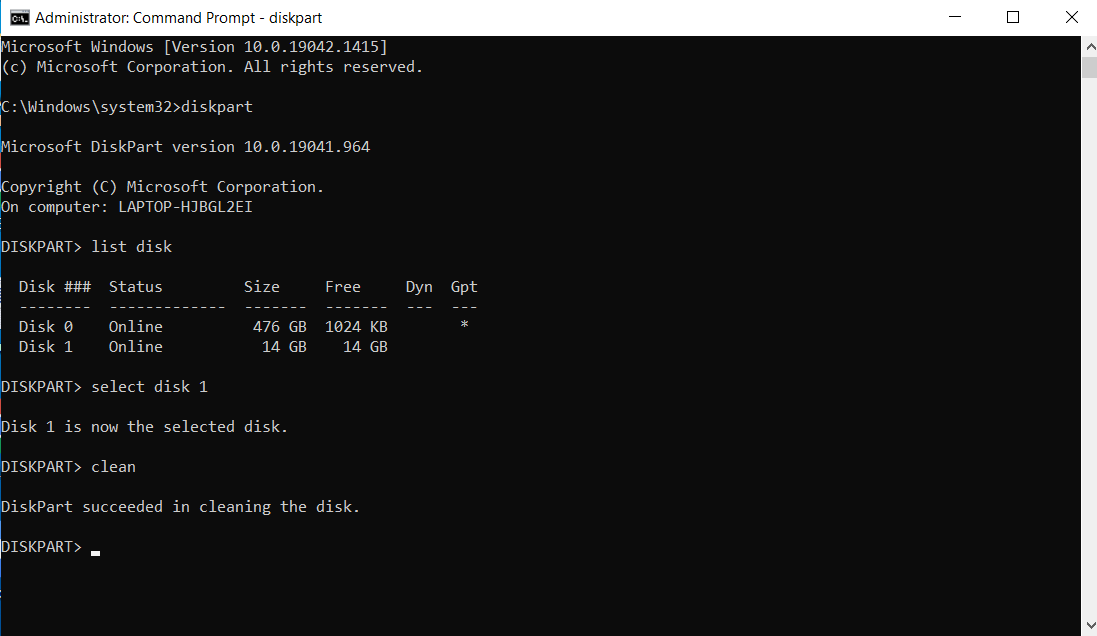 👀
👀Make absolutely sure that you selected the correct disk, as your data will be totally wiped once the command is executed.
- Once you’re done cleaning the disk, you’ll need to format it to make it usable. Refer back to Method #2 of this section to do so.
- If Clean doesn’t work, you can repeat steps 1-4, then use the command “clean all” instead of “clean.”
FAQ
Can a corrupted hard drive be recovered?
A corrupted hard drive can be recovered if the problem wasn’t caused by physical damage, such as in the case of virus attacks, software errors, etc. If the drive is physically damaged – such as from exposure to extreme heat – your next step should be to send it to a professional data recovery center to quickly get your files recovered (and then set aside a budget for a new drive).
How do I fix a corrupted hard drive without formatting?
Here are a few methods for fixing a corrupted hard drive without formatting:
- Scan your drive with an antivirus.
- Use the chkdsk /f command with the command prompt with administrator privileges.
- Use the sfc /scannow command with the command prompt with administrator privileges.
- Change the drive letter using Disk Management.
Is it possible to recover a formatted partition?
Yes, with data recovery tools like Disk Drill, it is possible to recover a formatted partition IF new data hasn’t overwritten it yet.
Here’s a good rule of thumb: stop using a corrupt partition until you have recovered and backed up your data.
How do I recover an unallocated partition?
Use a data recovery tool. We’ll use Disk Drill for this example because it has 500MB of free data recovery and it has unlimited previews.
- Download and install Disk Drill Basic.
- Launch Disk Drill and select the disk containing the unallocated partition.
- Click “Search for lost files” and wait until the scan is complete. Then, click the “Review all files” button.
- Tick the boxes beside the files you want to recover, then click the “Recover files” button.
- On the popup window that appears, select the destination folder for your files and confirm recovery.
Conclusion
Fortunately, Windows has a lot of built-in tools that let you fix corrupted partitions and missing or RAW hard drives – and even if the worst happens, data recovery tools like Disk Drill can manage to recover lost files in most cases. However, drive death is inevitable – and Windows could do a better job of warning you beforehand. Make sure to regularly back up your files.
A quick reminder: the methods in this article work only if the corrupt partition wasn’t a result of physical damage. If your drive was physically damaged, you’ll have to send it in to a professional data recovery center. Otherwise, you risk permanent data loss and even more damage to your storage device.
This article was written by Alejandro Santos, a Staff Writer at Handy Recovery Advisor. It was also verified for technical accuracy by Andrey Vasilyev, our editorial advisor.
Curious about our content creation process? Take a look at our Editor Guidelines.