After booting up your computer, did you notice that one of your partitions is missing? There are several reasons why this could have happened. Perhaps the partition is still intact but not showing correctly for one reason or another. Or, perhaps you accidentally deleted the partition from your Windows PC. Either way, there are ways to get that partition back.
Deleting a partition prompts the system to unassign that location on the hard drive. As a result, new data can be written to the same physical location, overwriting what was there. To avoid this, you need to recover the partition before it’s too late.
This article highlights tried and tested methods for recovering deleted or lost partitions. If you prefer content in video format, here is a nice piece on today’s topic:
Scenario 1: Recovering Disappeared Windows Partition
Windows assigns drive letters to the partitions of your connected storage devices. Without a drive letter, your partition will not appear as it should, even if all of your data is intact. It’s possible that the previously assigned drive letter has been removed. The best way to remedy this is by simply assigning a new drive letter.
We’re going to show you how to assign a drive letter using Disk Management:
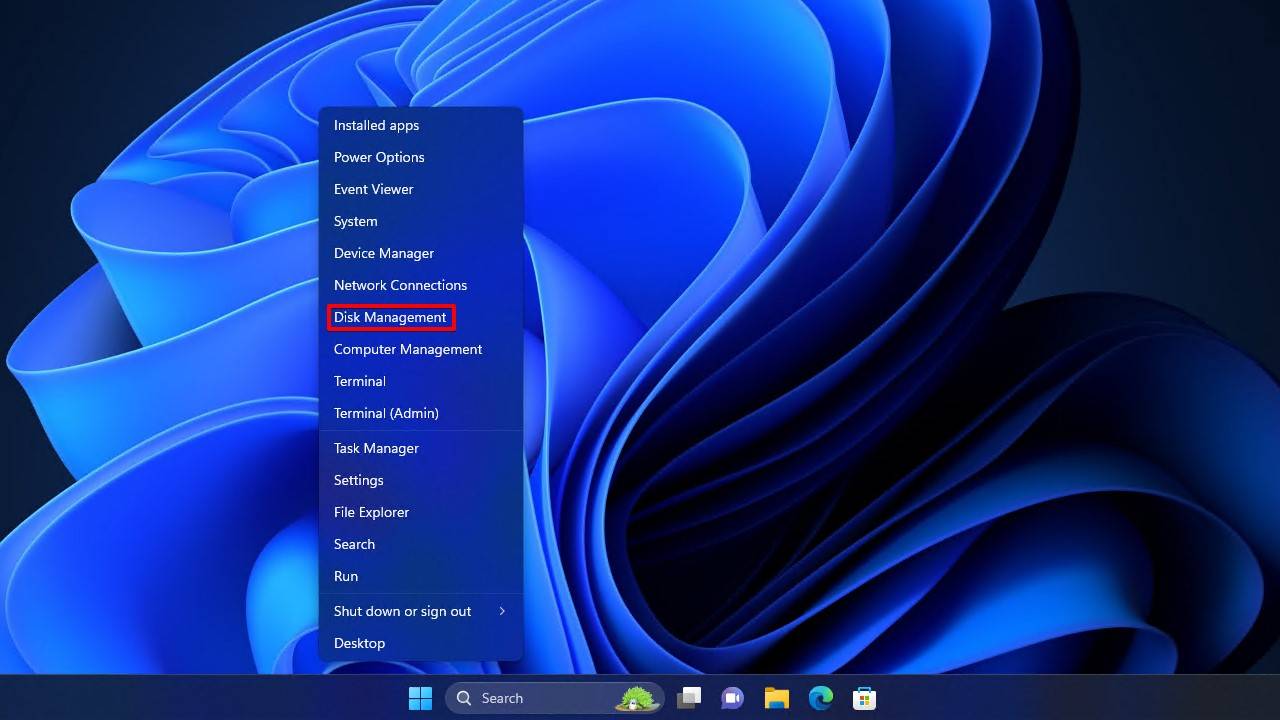
- Right-click Start and click Disk Management.
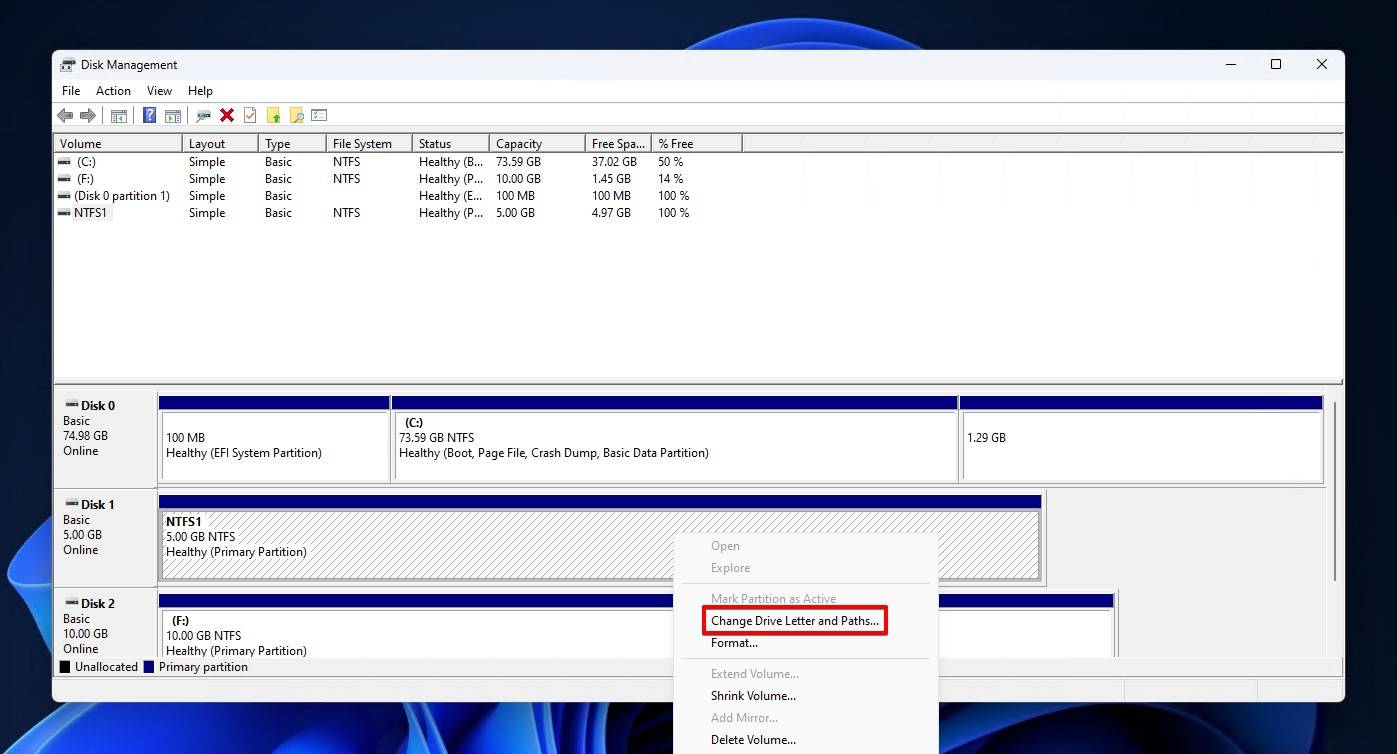
- Right-click the partition that is missing a drive letter, then click Change Drive Letter and Paths.
- Click Add.
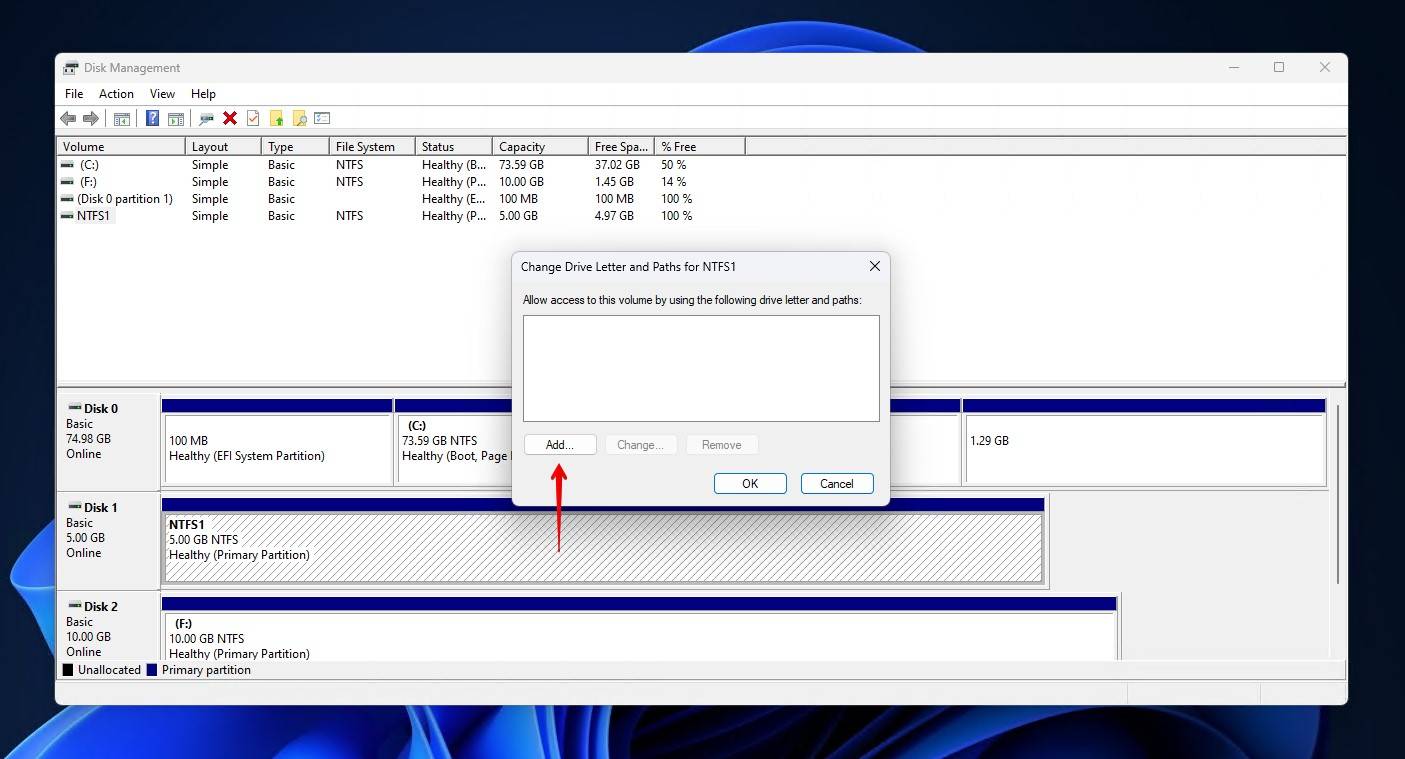
- Select a drive letter, then click OK.
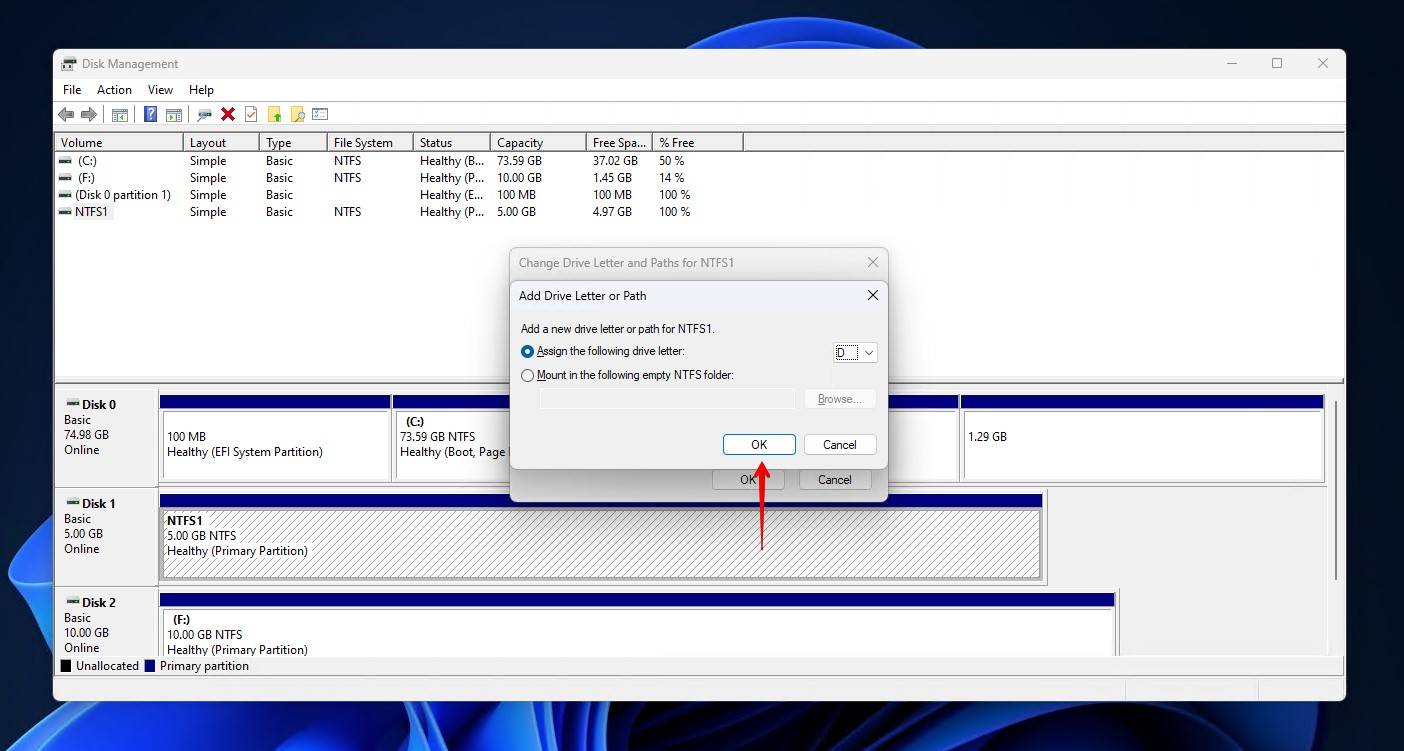
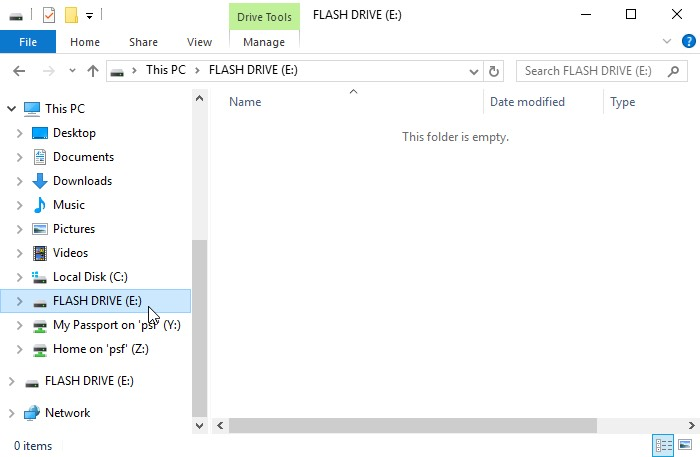
Once you have assigned a drive letter, you should be able to access the partition once again using File Explorer.
Scenario 2: Recovering Specific Files from a Deleted Windows Partition
If you were unable to assign a drive letter to your partition, then it is most likely deleted. In this case, you will need to use a partition recovery software tool to recover the files.
Our tool of choice is Disk Drill, a data recovery solution that excels in recovering lost or deleted data in a multitude of data loss scenarios, including if your partition is corrupted, deleted, or formatted. The fast scan times, user-intuitive interface, and combination of scanning methods make it ideal for recovering data from deleted Windows partitions.
Here’s a demonstration of how to recover data from a deleted partition using Disk Drill:
- Download and install Disk Drill on your PC or laptop.
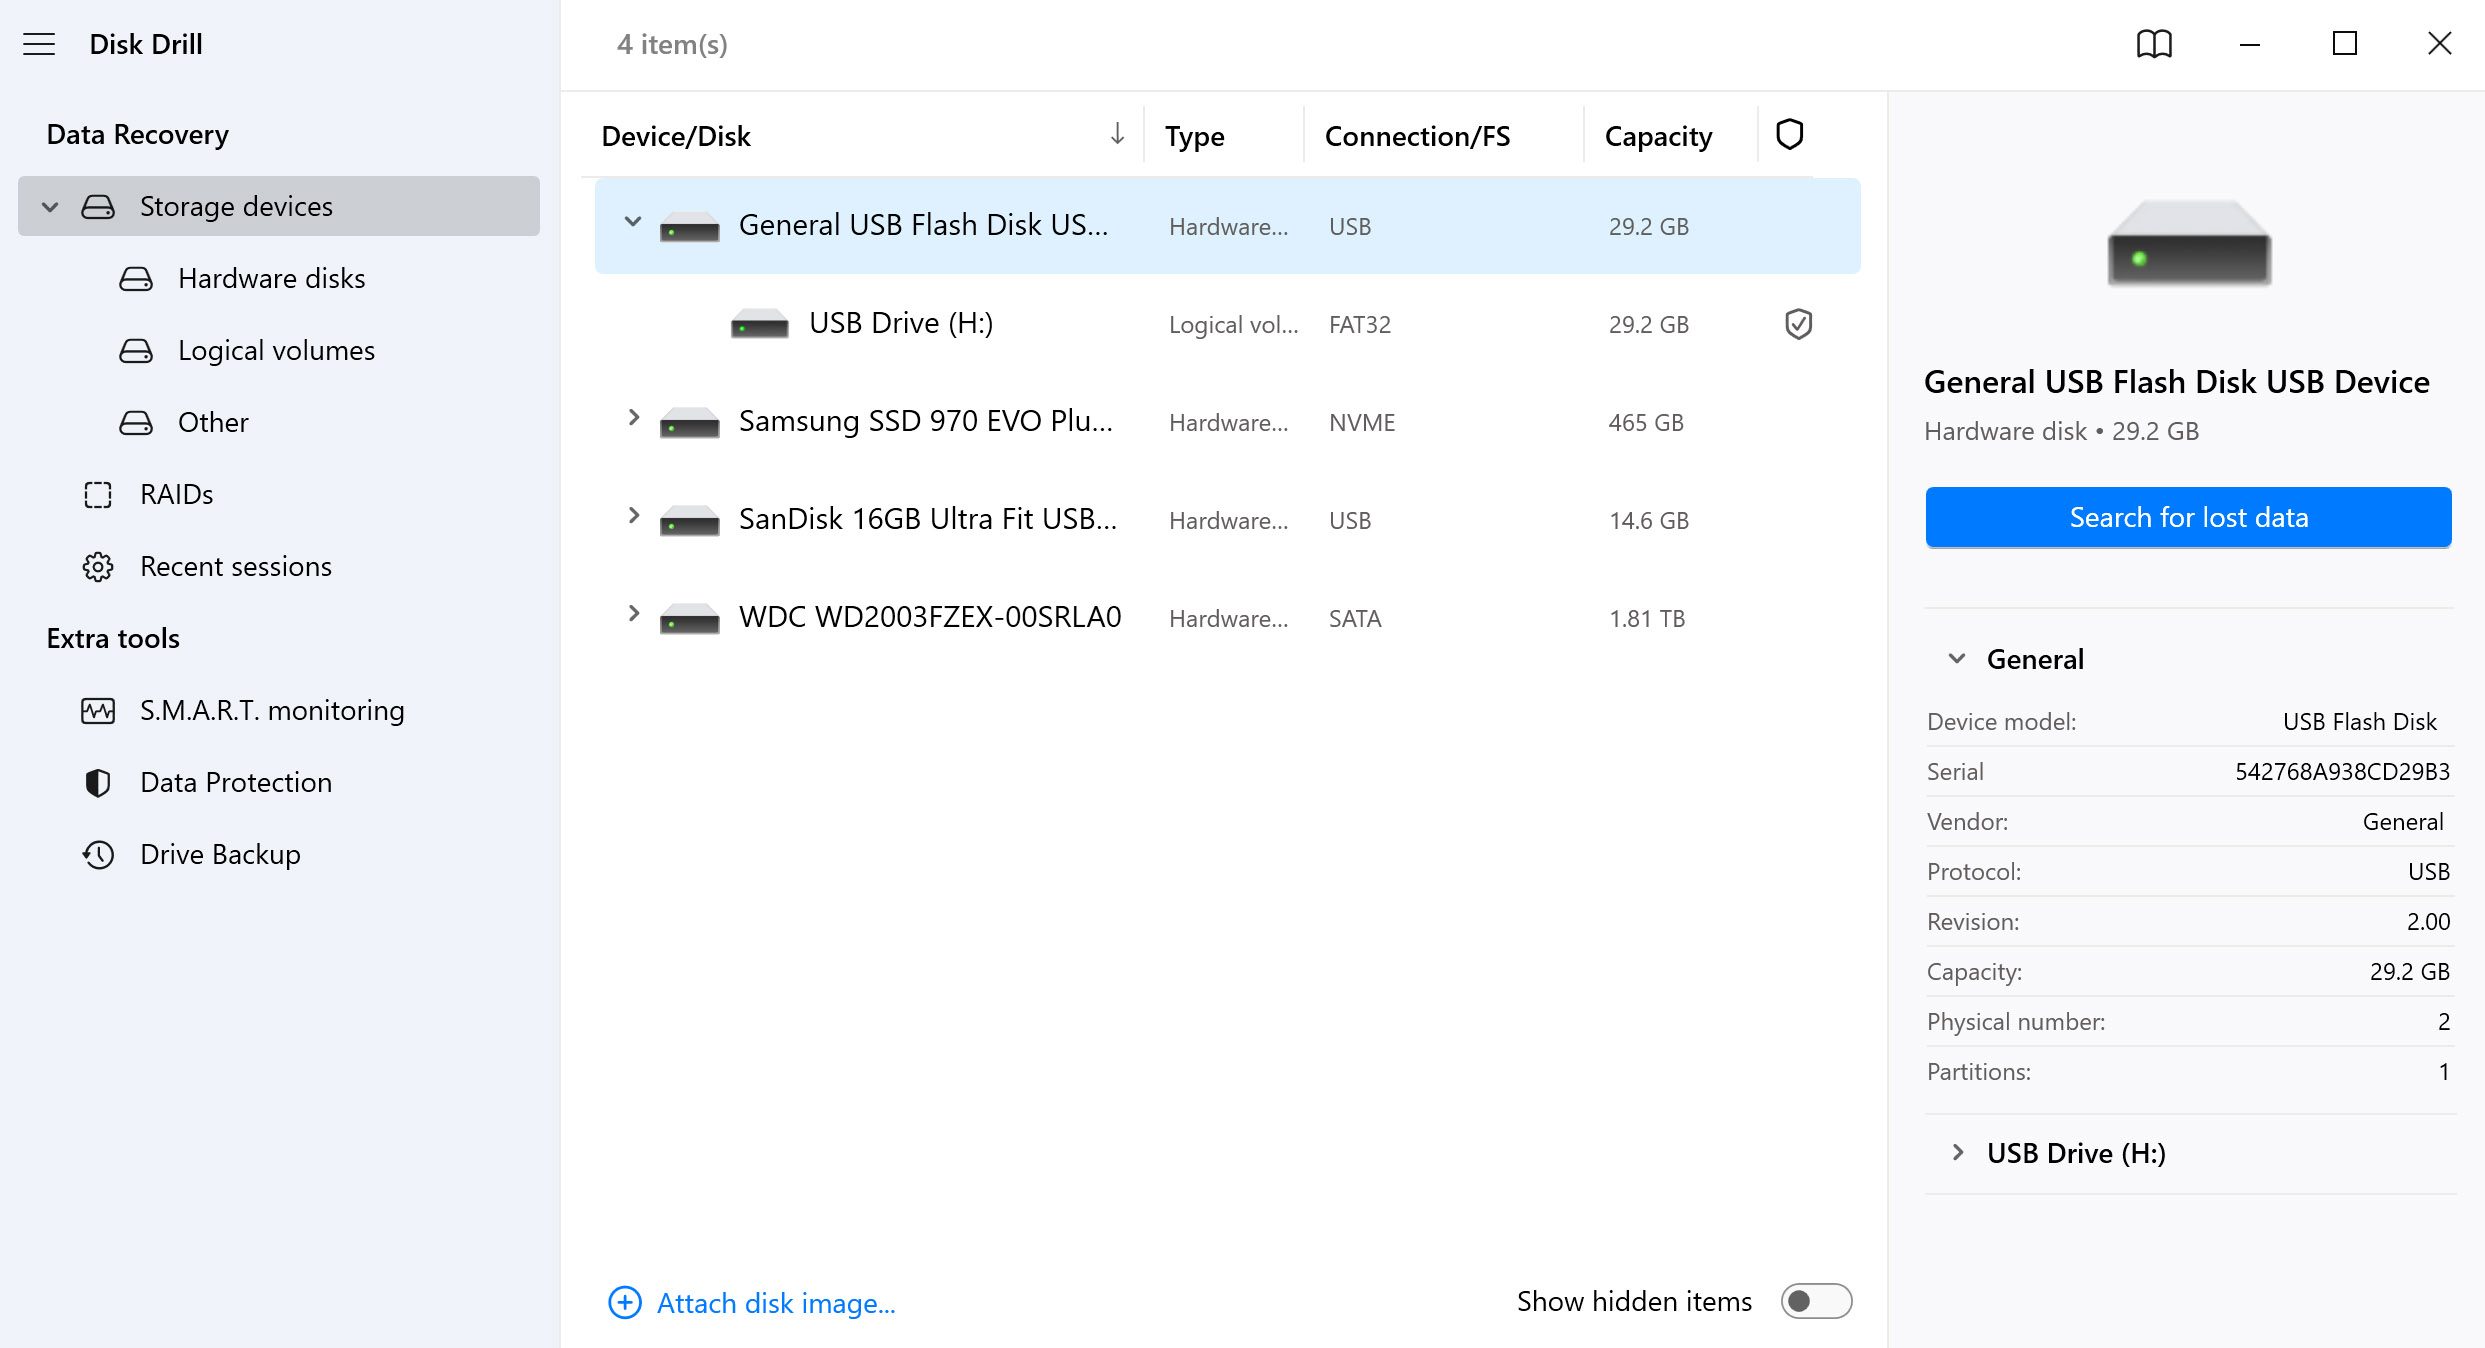
- Connect the hard drive to your computer and launch Disk Drill. If the deleted partition is located on the internal drive, you can skip this step.
- Select the hard drive that contains the deleted partition you want to recover. Alternatively, you can select the exact partition instead of the whole drive.
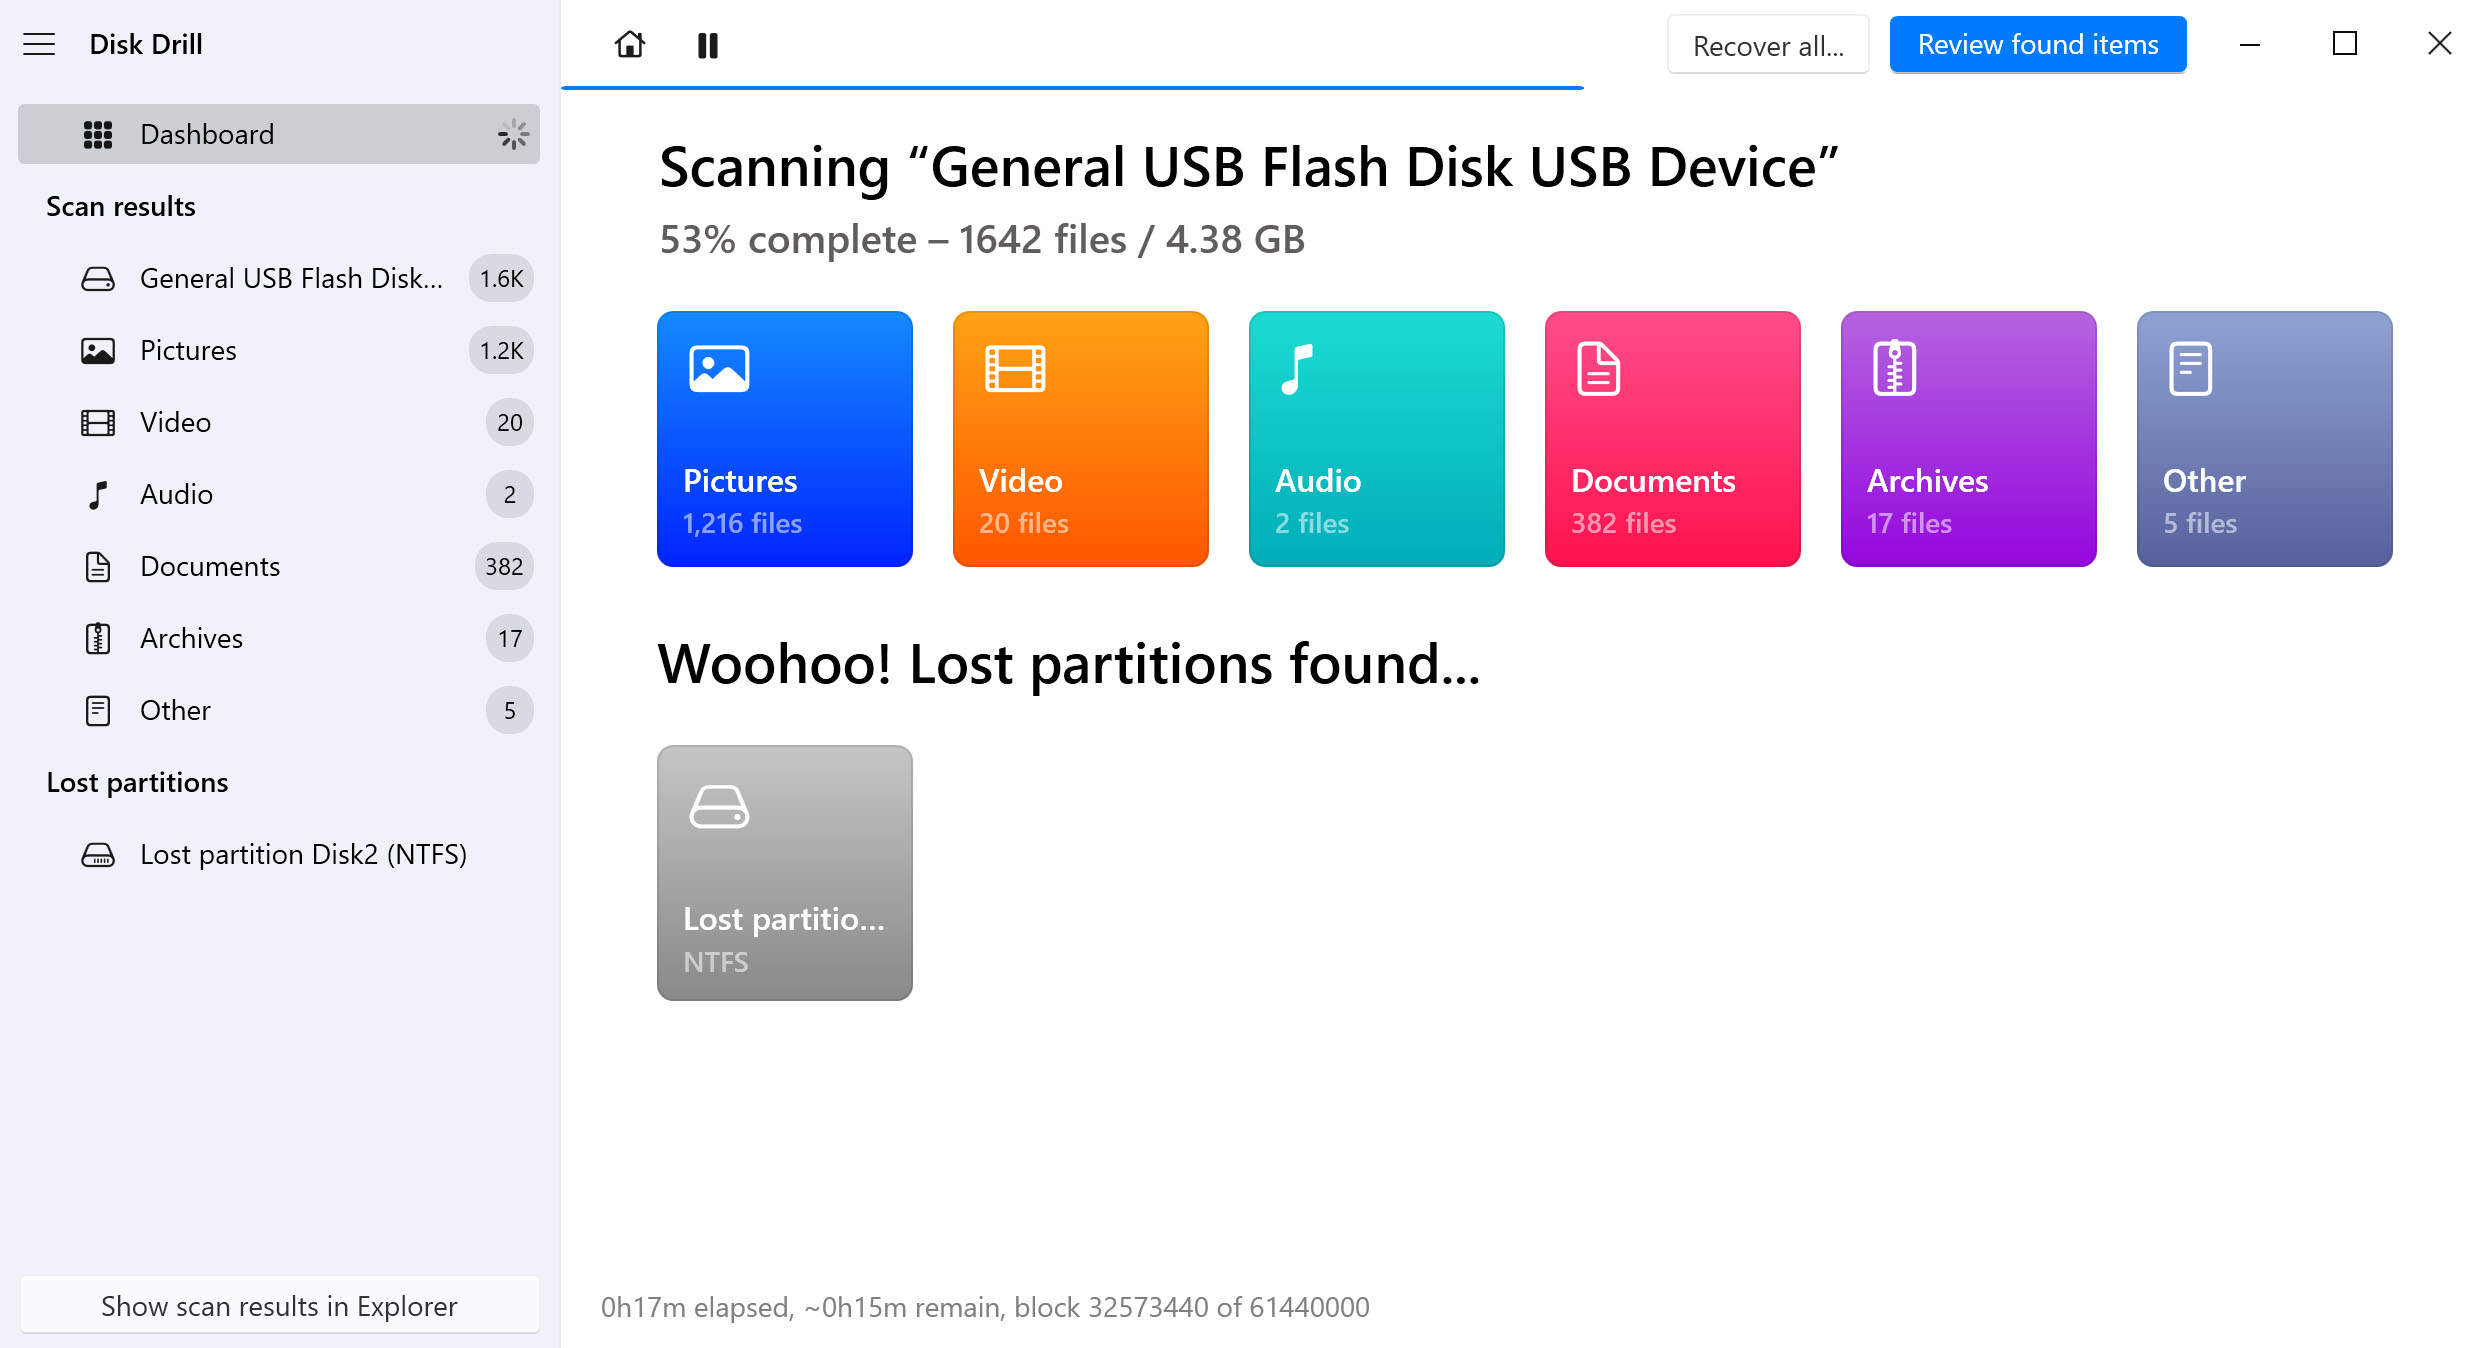
- Click the “Search for Lost Data” button to initiate a scan of the hard drive or partition.
- Wait for the scan process to finish.
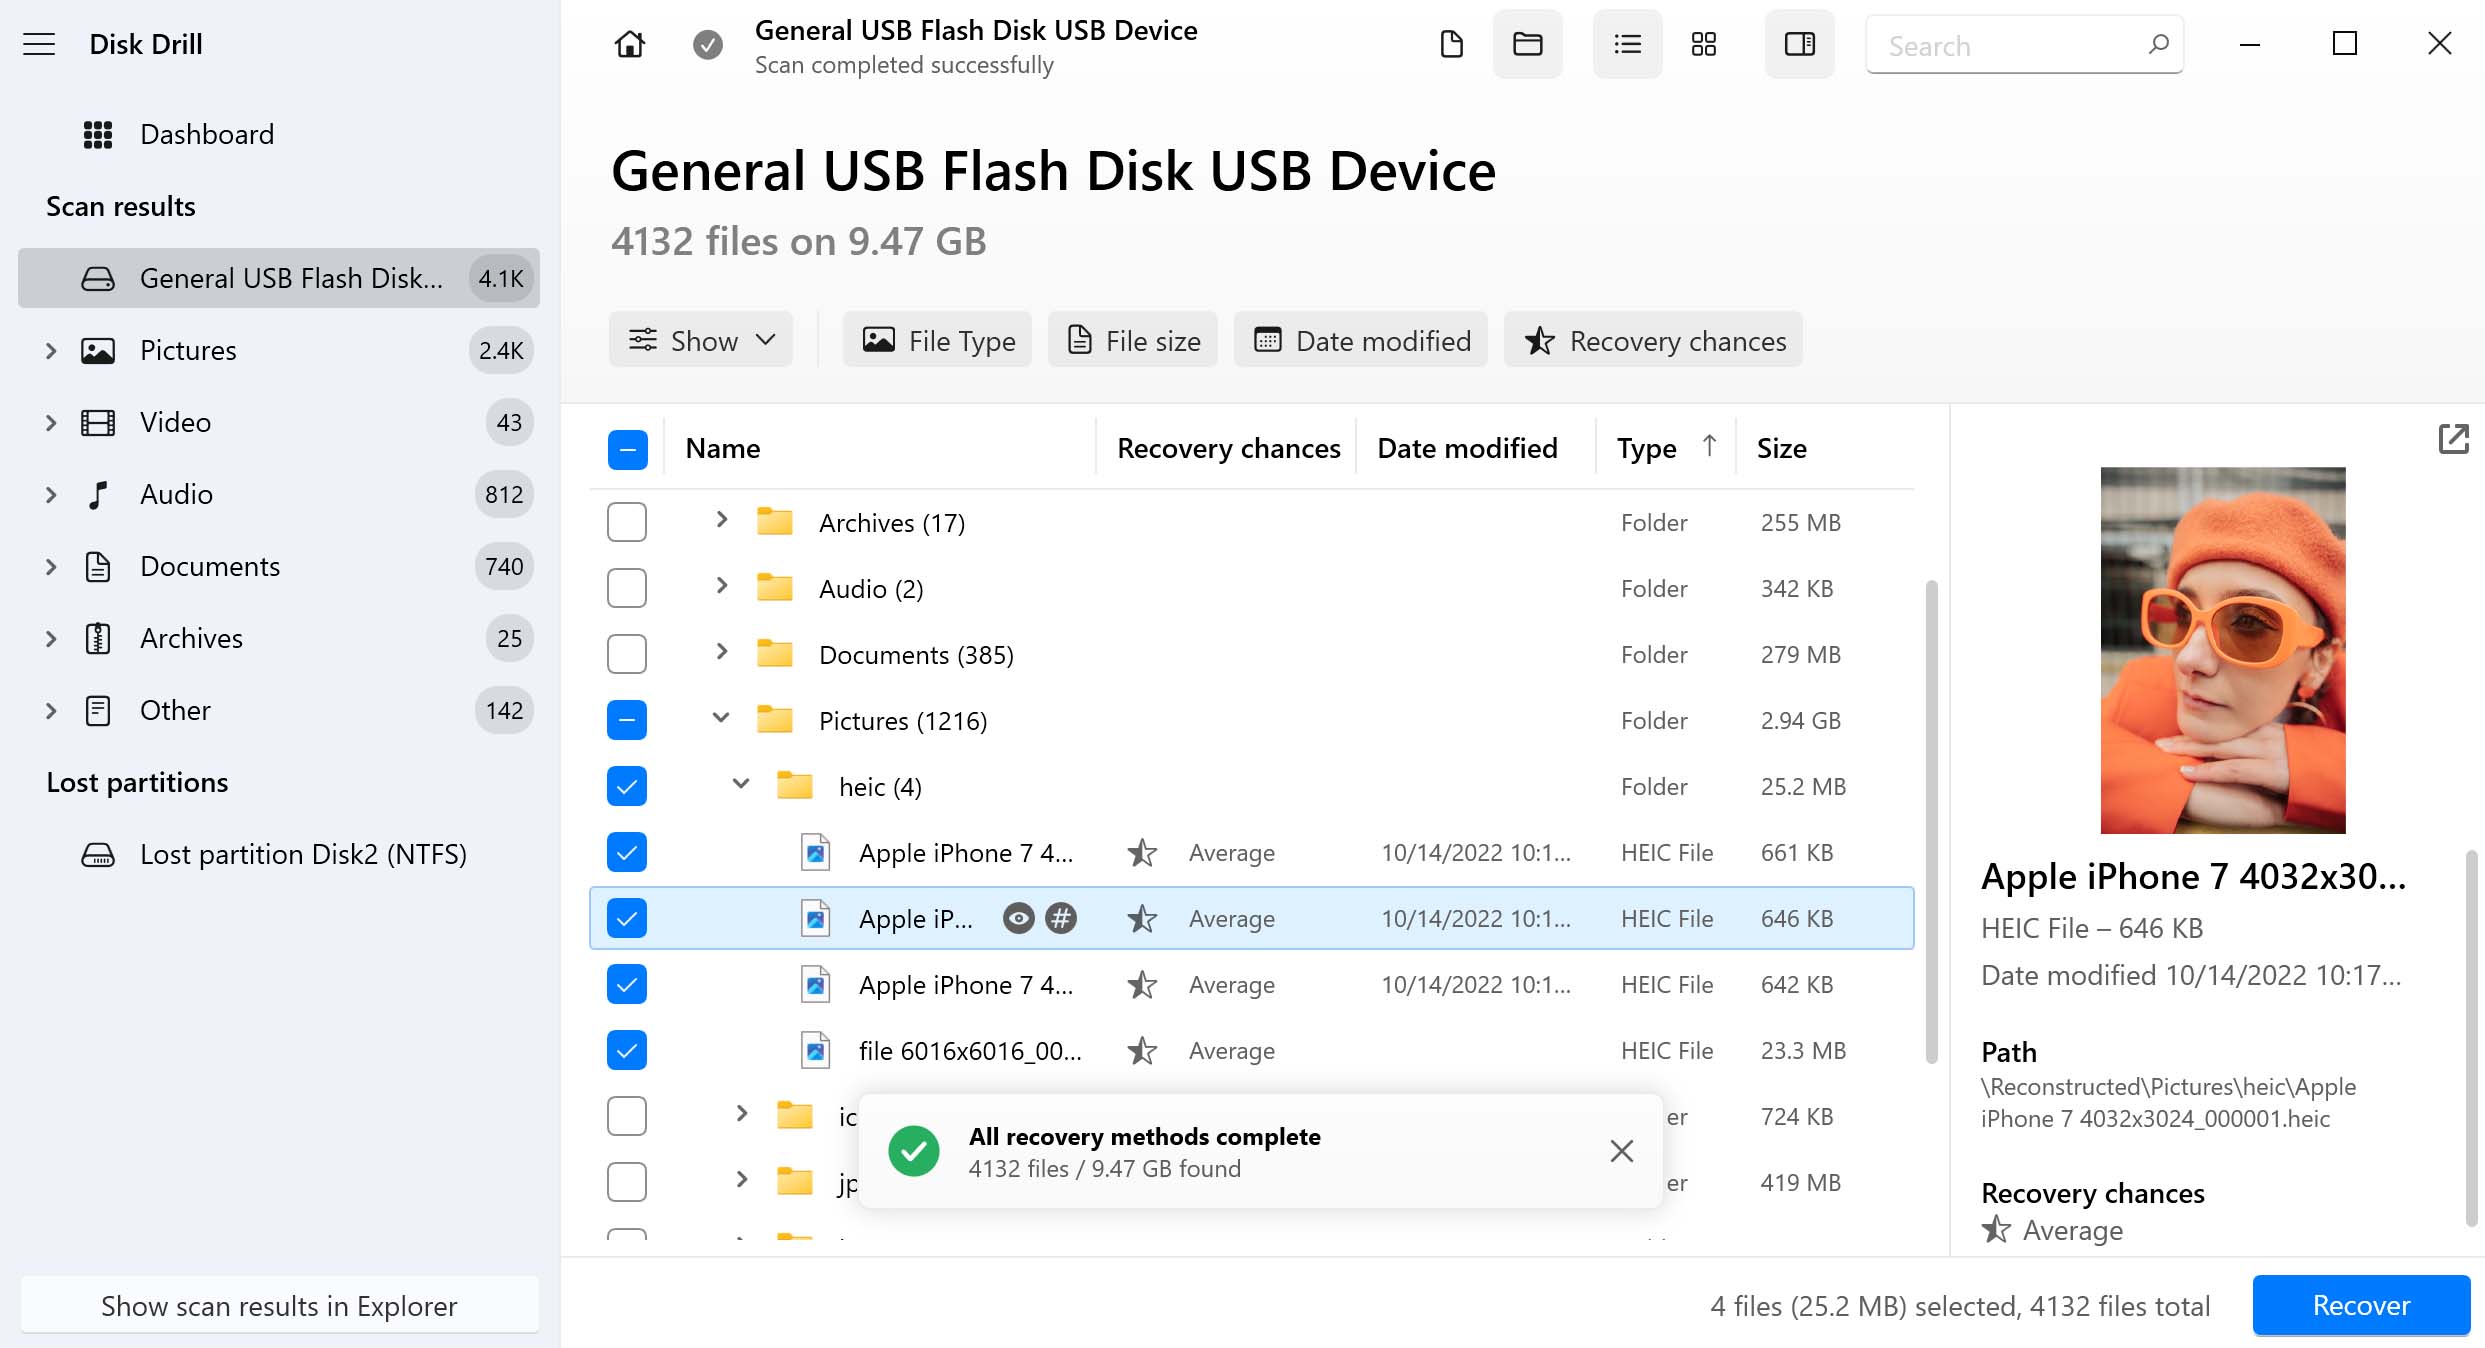
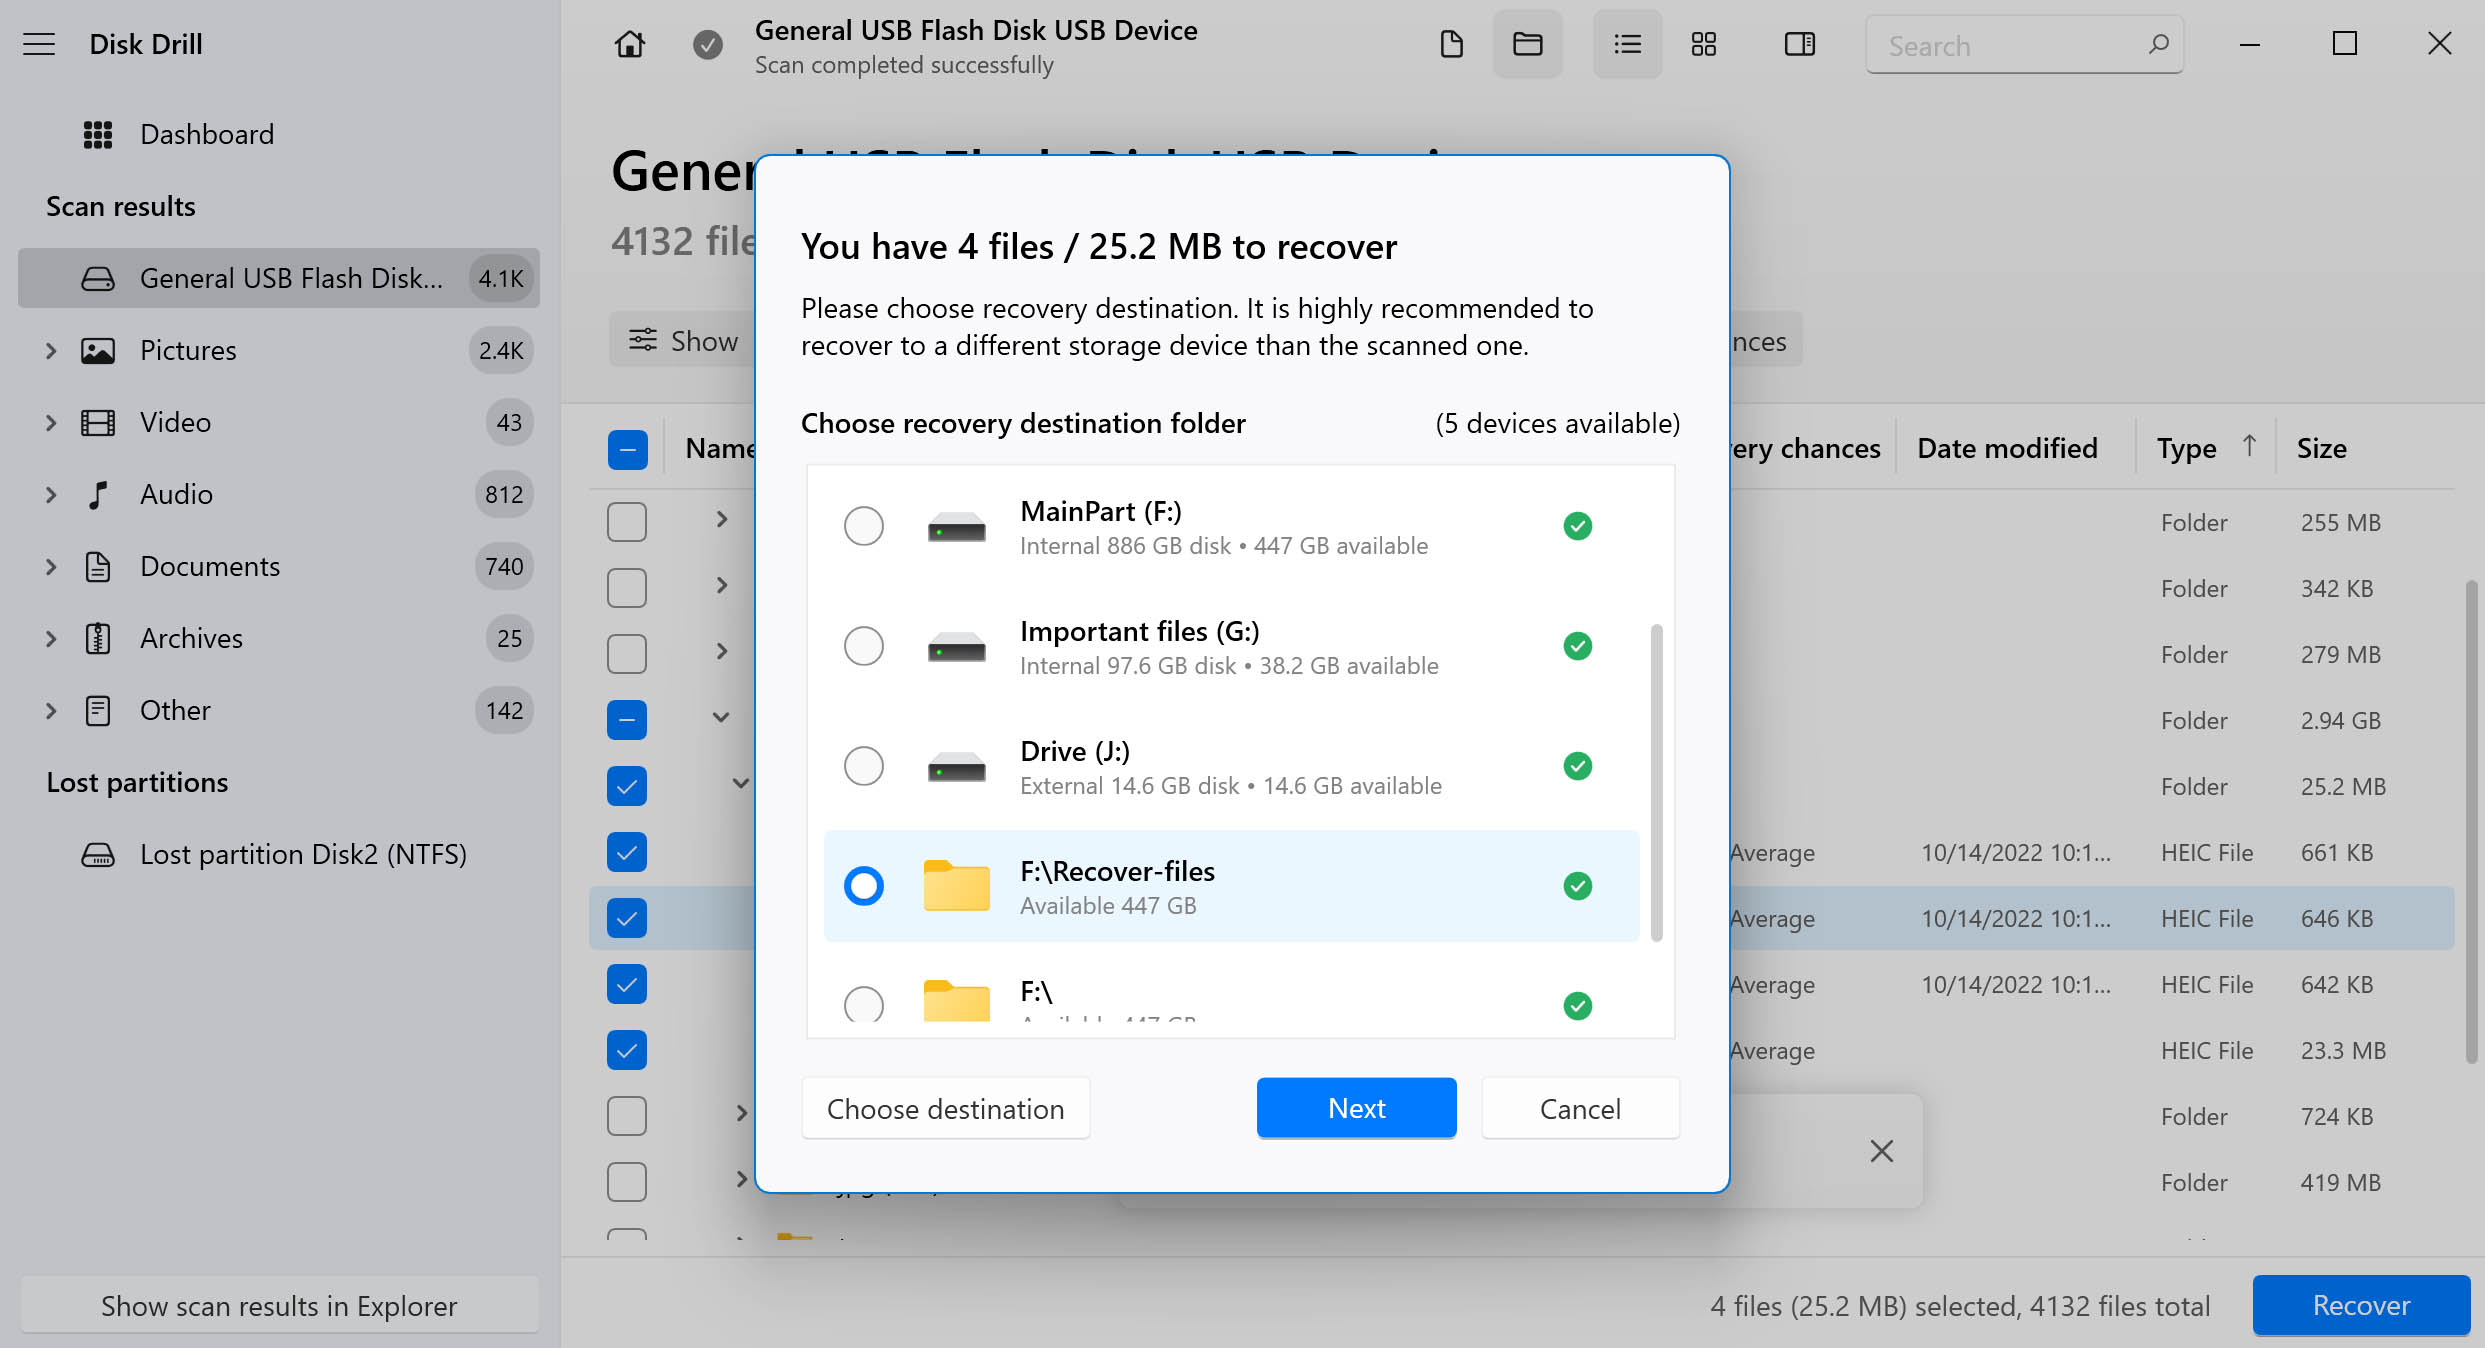
- Preview recoverable files and mark the ones you want to recover.
- Click the “Recover” button to begin the recovery process.
- Select a location for your recovered files and wait for the recovery process to complete.
In case you are wondering what the top recovery tools are, here’s a comprehensive list covering the pros and cons of all the major players out there. Interested in learning more about Disk Drill? Our team has conducted two reviews on Disk Drill. The first provides a general overview of its data recovery capabilities, while the second evaluates its safety features.
Scenario 3: Restoring Deleted Partition Itself
As an alternative to recovering the individual files from the deleted partition, you can also try restoring the entire deleted partition. To do this, we’ll be using TestDisk, a free and open-source partition recovery tool that can recover your partition by repairing the logical issue that has caused it to become deleted.
TestDisk uses a CLI (Command Line Interface), so it can be intimidating for non-technical users. However, it’s fairly straightforward and a full guide on how to use it is available online. Additionally, we’ll provide a brief walkthrough on how to use it.
Follow these steps to restore a deleted partition using TestDisk:
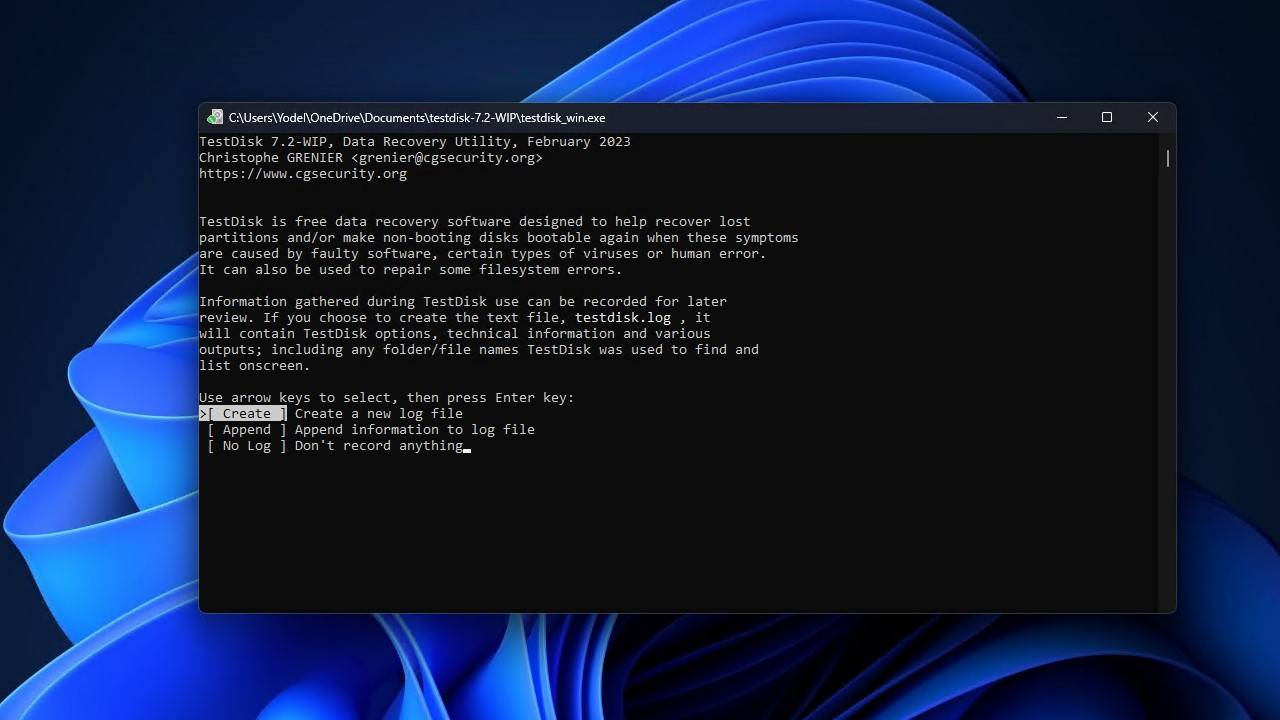
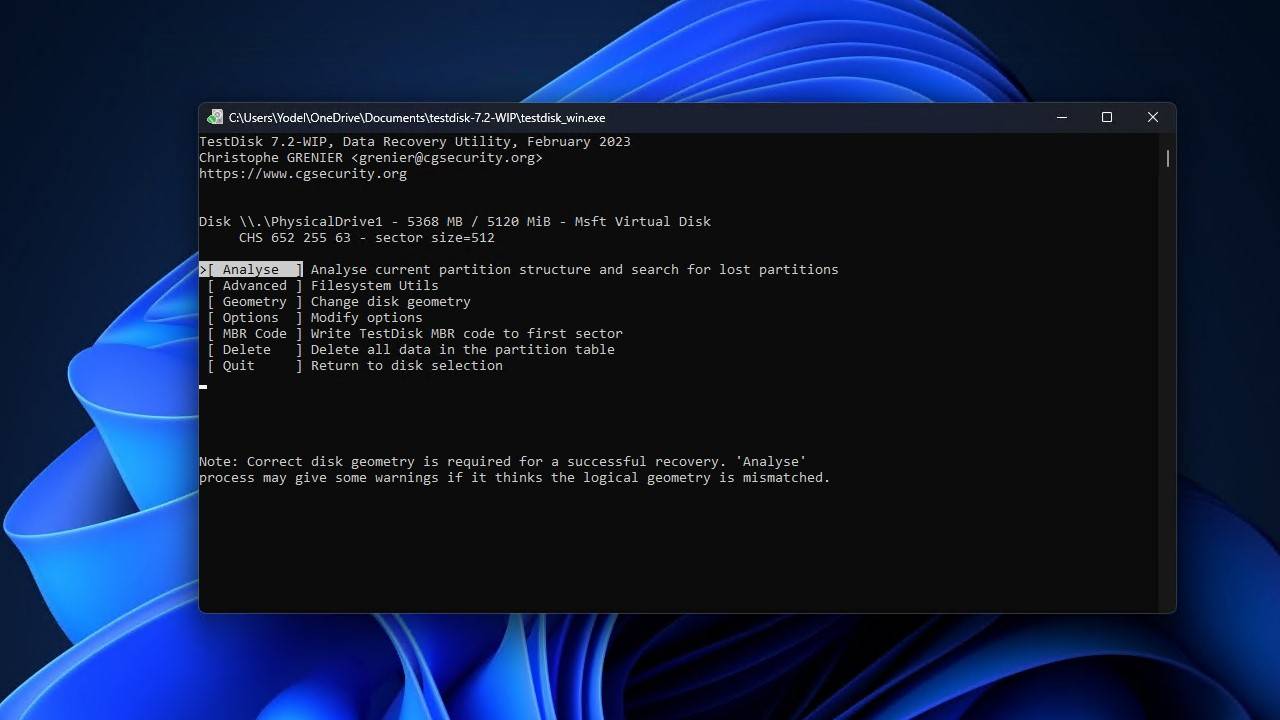
- Download and extract the contents of TestDisk. Open testdisk_win.
- Press Enter to create a new log file.
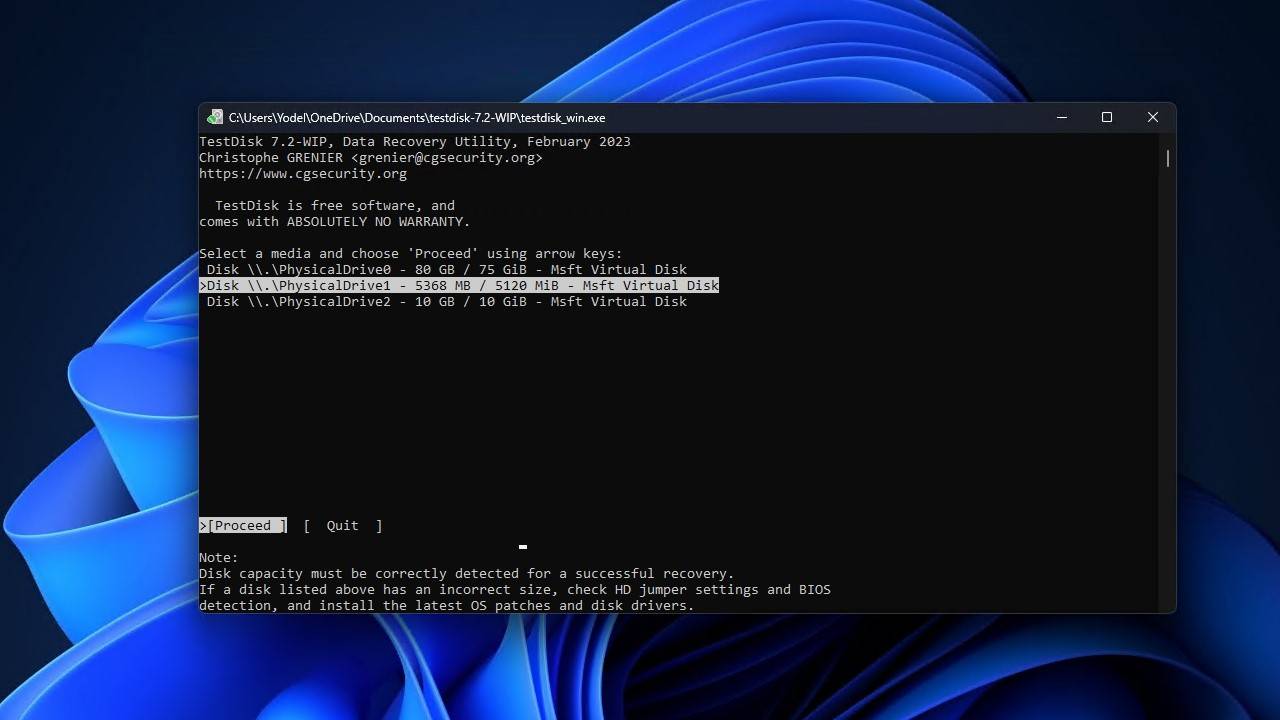
- Highlight your drive using the up and down arrow keys, then press Enter.
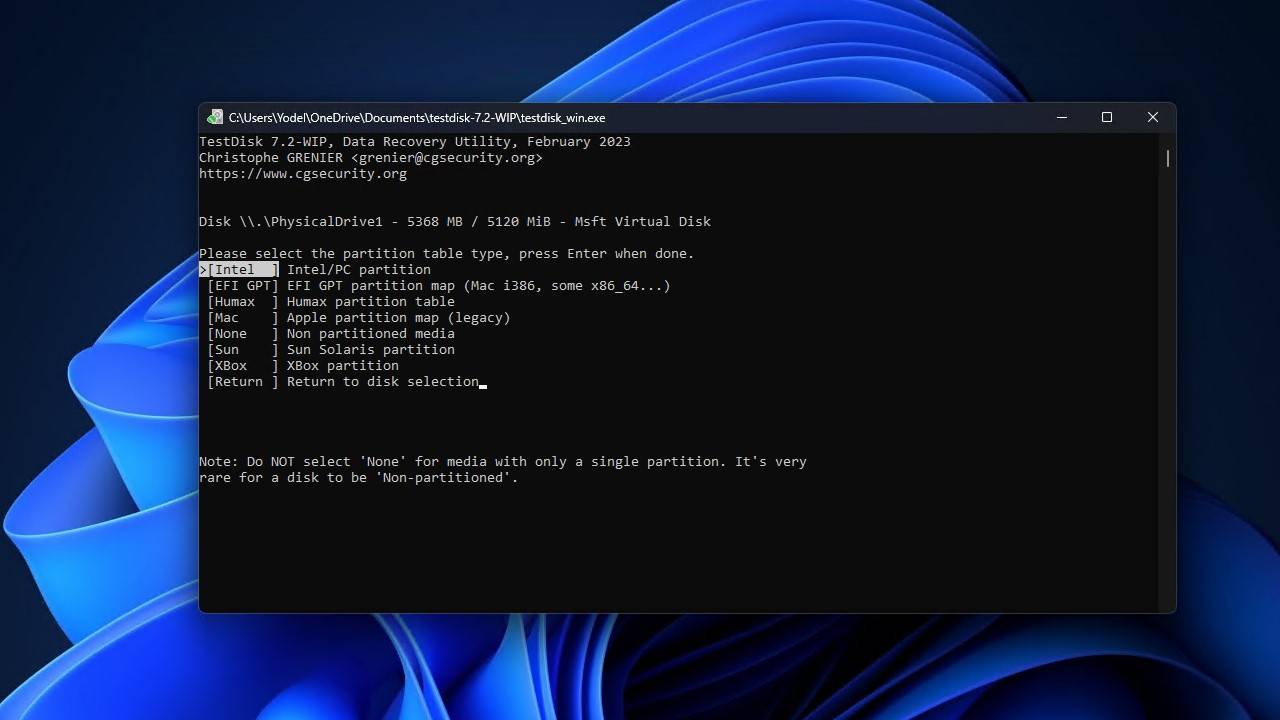
- Highlight the partition table type, then press Enter.
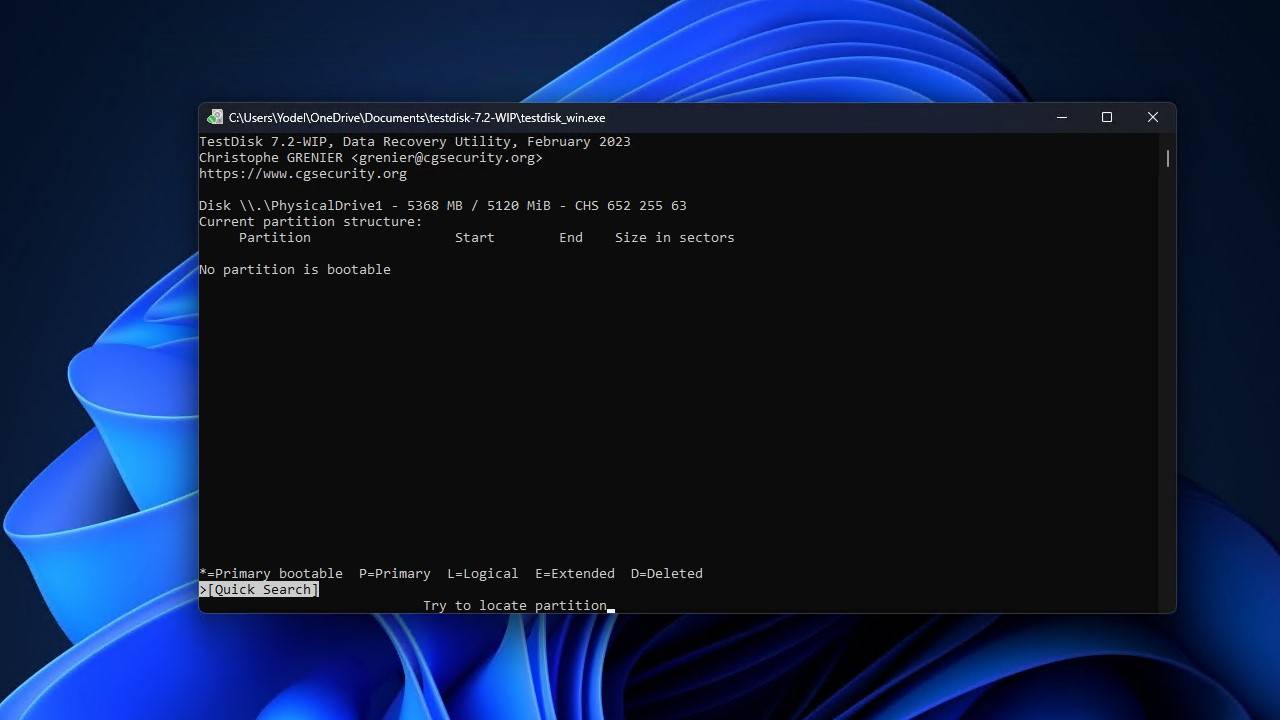
- Press Enter to begin analyzing the current partition structure.
- Press Enter to start the quick search.
- Press Enter.
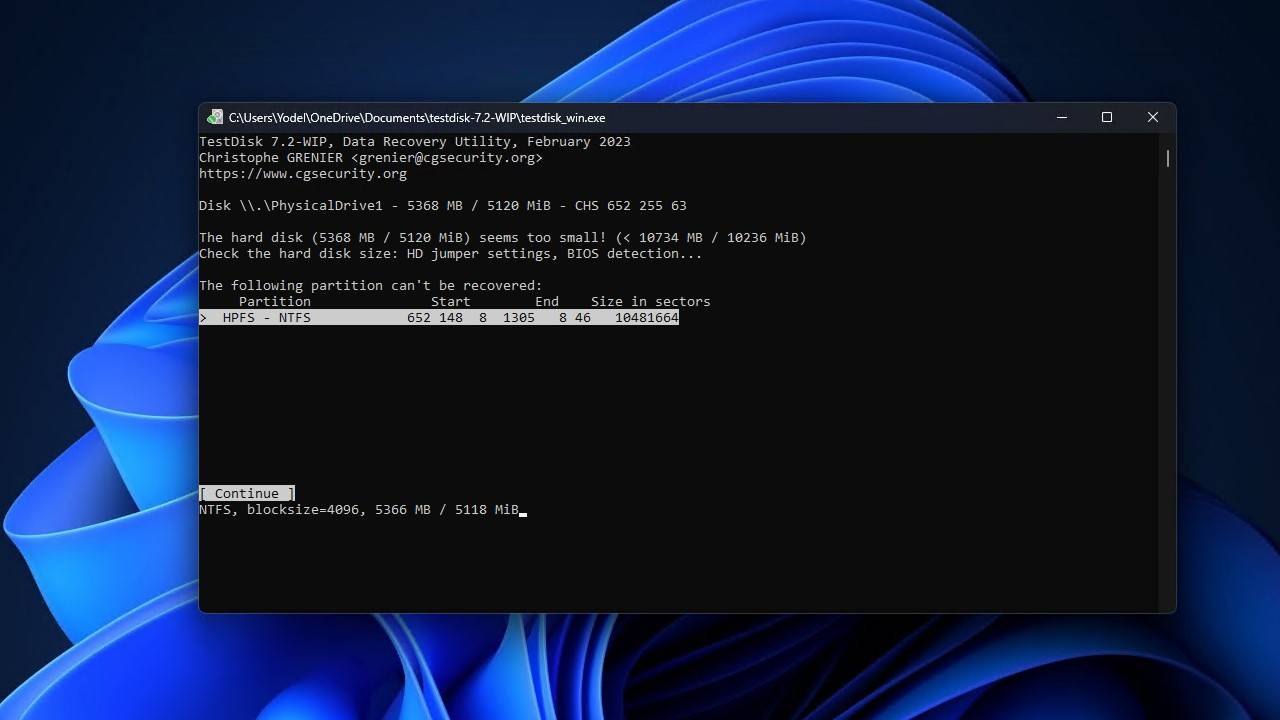
- Highlight the lost partition, then press Enter. If no partition is writable, you may need to perform a deeper search or use the left and right arrows to change the partition characteristics.
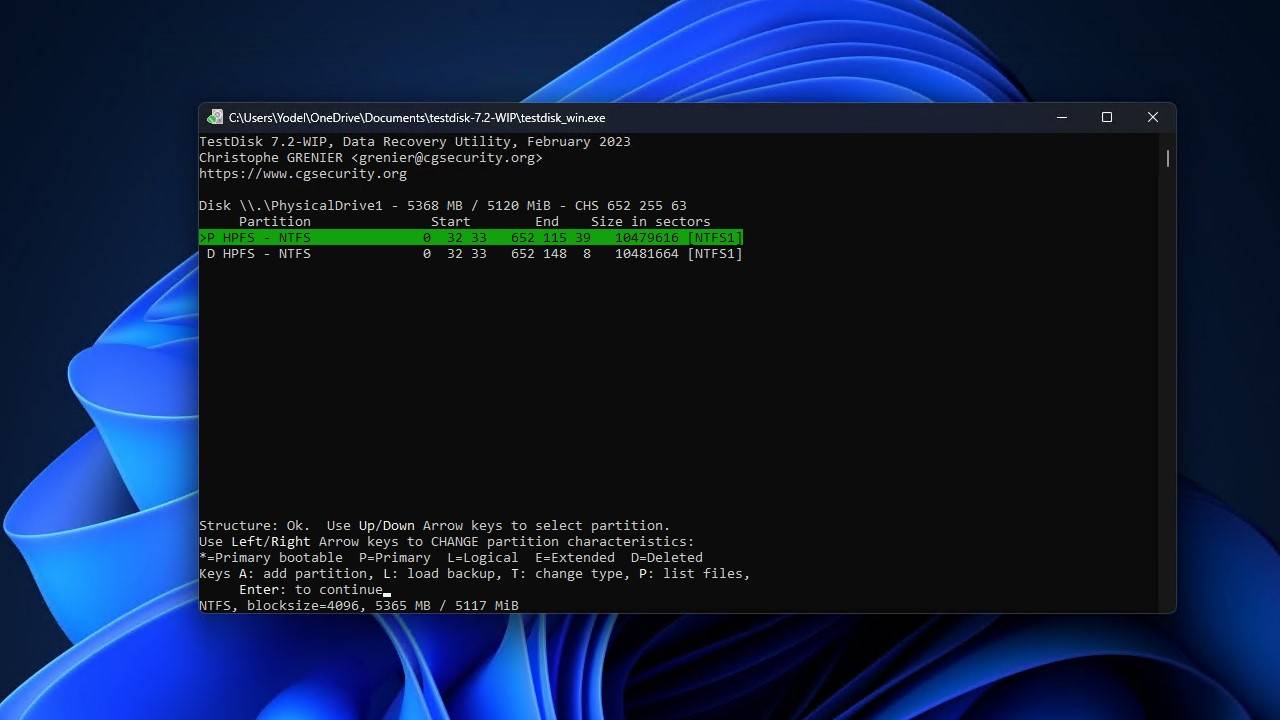
- Highlight the Write option, then press Enter.
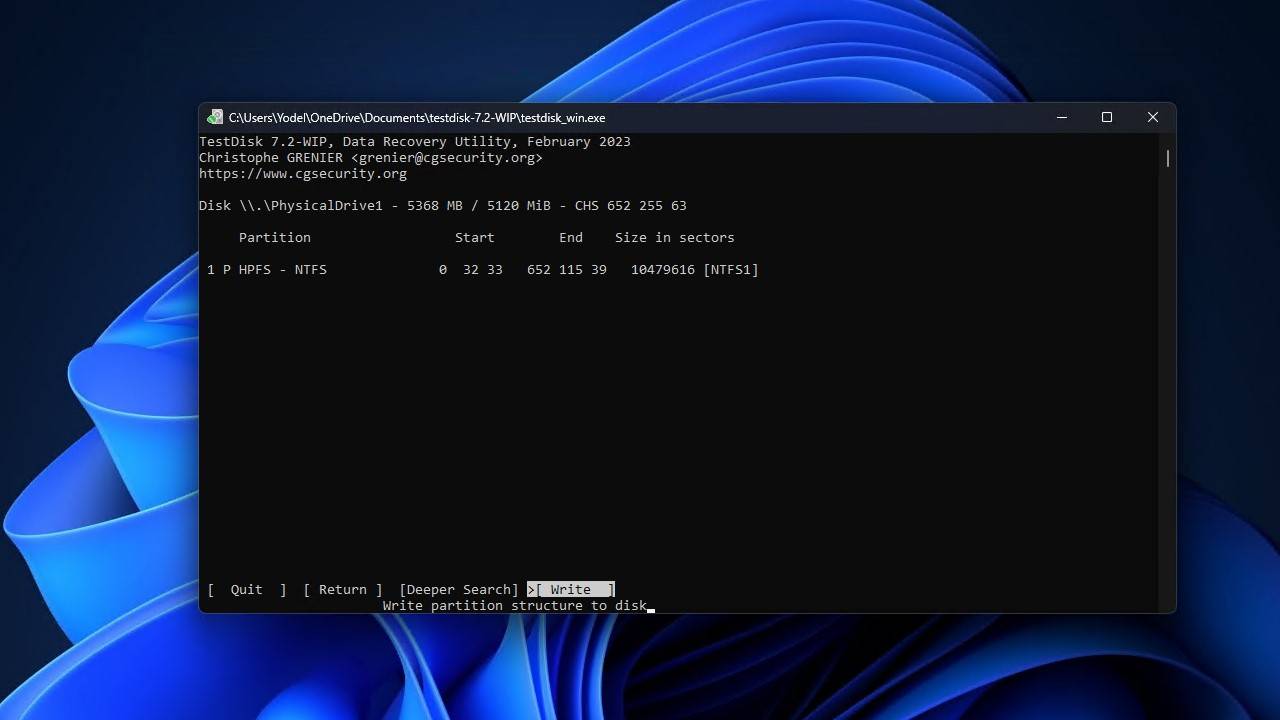
- Press Y to confirm the action, then restart your computer.
Scenario 4: Repairing the Master Boot Record for Proper System Boot-Up
If you’re faced with boot-up issues on your computer, it’s often linked to problems with the partition table or the Master Boot Record (MBR). While this might not be about recovering an entire deleted partition, it’s crucial for ensuring your system starts up correctly.
Data recovery tools can come to the rescue in such situations, helping repair these critical components. For instance, if you’ve ever encountered the alert “Invalid Partition Table” during boot-up, it’s a clear sign of a corrupted partition table preventing the system from booting. We understand that such situations can be highly stressful. To assist you, we recommend a tool that effectively addresses these issues without any cost.
AOMEI Partition Assistant Standard is capable of fixing damaged partition tables using the “Rebuild MBR” feature. It’s compatible with Windows 10, 11, 8/8.1, 7, XP, and Vista. Here’s a drill-down on how to get started:
- Download and install the tool on another working computer as your current system won’t boot because of the corrupted Master partition table.
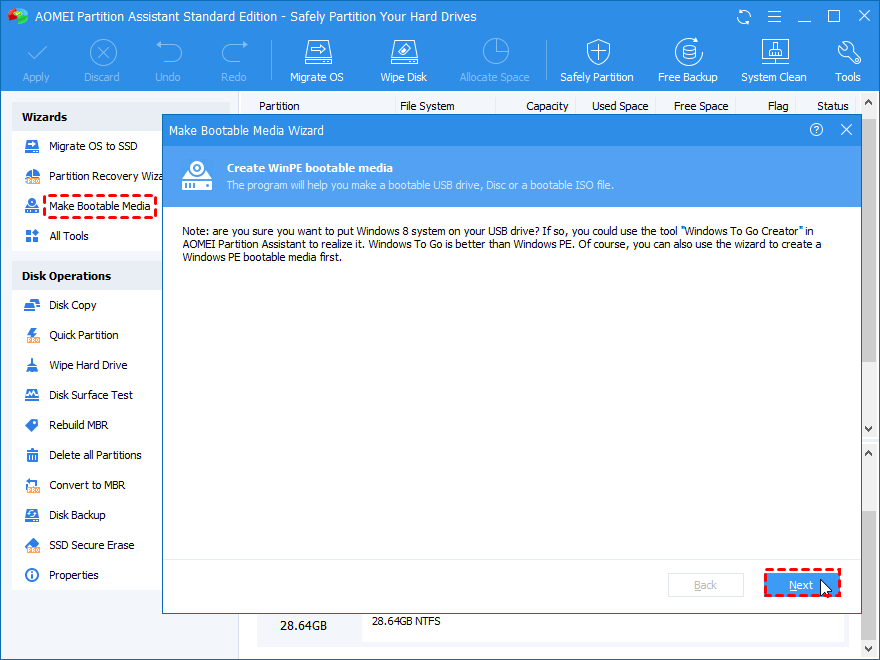
- Run the application, and Connect an empty USB drive to the computer. Now, click on “Make Bootable Media.” This function essentially loads Windows (along with the recovery tool) onto the USB drive and makes it “bootable.”
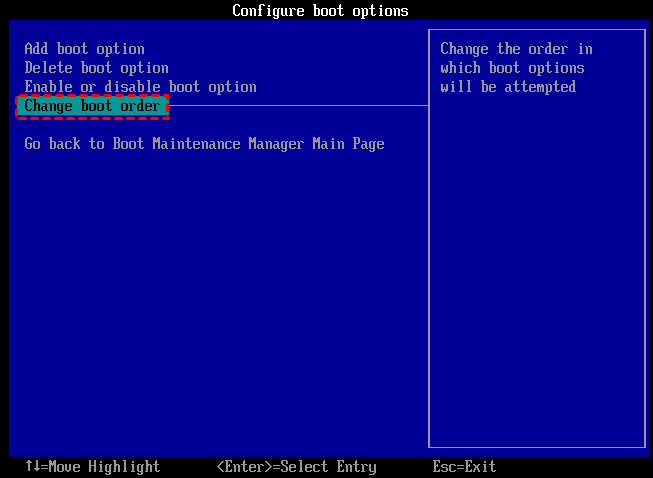
- Connect the bootable USB to the affected computer. In BIOS, change the boot order and choose to boot your computer from the USB drive. Upon logging in, AOMEI Partition Assistant runs automatically.
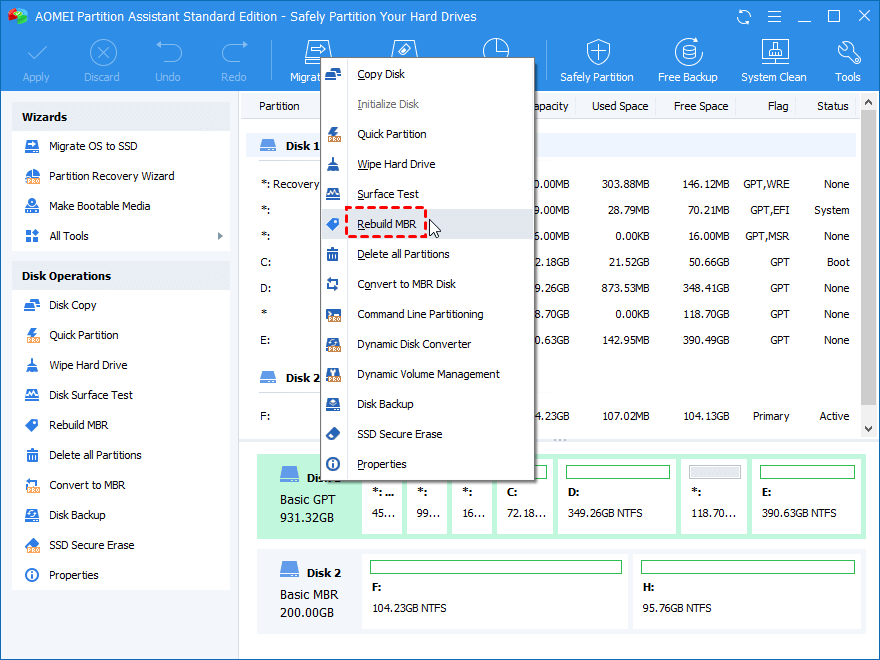
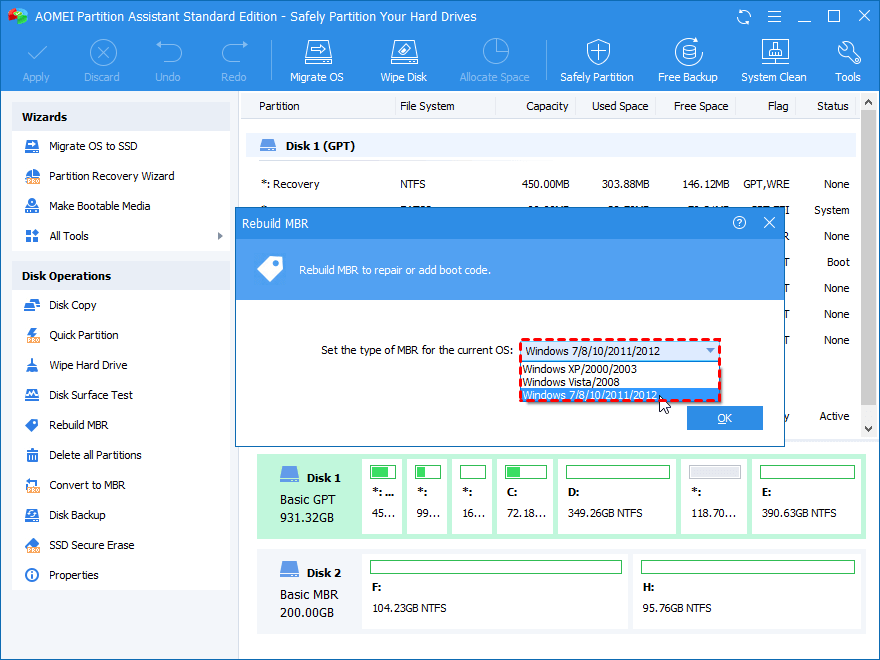
- On the home screen, right-click on the system disk and choose “Rebuild MBR.”
- Now, choose the appropriate MBR based on your Windows OS version, and hit “Okay.”
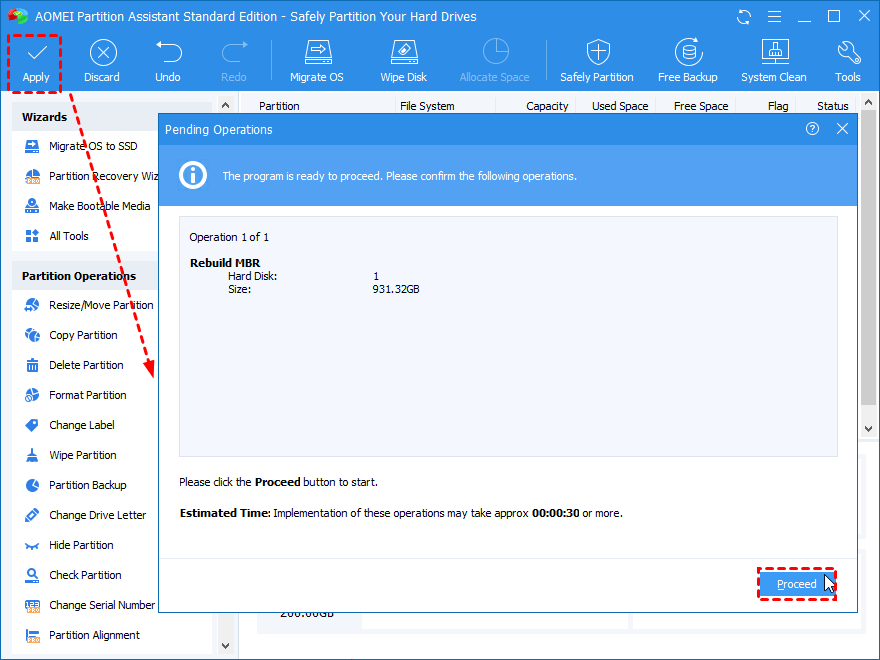
- Now “Apply” and “Proceed” as illustrated in the image below:
The AOMEI Partition tool can also repair a corrupted MBR in external hard drives.
Disk Partition & Volume Types: 101
Here’s an ultra-stripped-down and raw definition of a disk partition: It’s simply a chunk of a disk.
A partition is merely a disk segment bearing a specific size set during its creation. You can increase the size of a partition if you have extra disk space available, or shrink the partition if you want to free up some space. However, to prevent data loss, you can’t shrink the partition any more than what’s necessary to store the existing data on it. To shrink it further, you need to format it first.
Regarding the screenshot above, disk partitions are discreet sections of storage that exist independently. As a result, you can even run multiple operating systems on the same device.
The All-Important Partition Table
Windows maintains a partition table that describes all the partitions on a disk. Your computer loads and reads the partition table to identify which partition has an active operating system.
A storage medium gets subdivided by the partition table, which uses units of sectors, heads, and cylinders. Partitions usually have a file system that gets created on formatting a partition. Some standard file systems of Windows are:
The Master Boot Record (MBR) or the GUID Partition Table (GPT) is a particular location on the storage device that houses the partition table.
When there isn’t sufficient contiguous space on a hard disk for storing a huge file (all chunks of that single file), disk fragmentation occurs—the OS stores different parts of the file at various scattered locations.
No, Volumes and Disk Partitions Aren’t The Same
A volume is a storage device like a CD-ROM, USB drive, or a floppy disk formatted to store files and directories. Upon mounting a storage device, you are greeted with that sweet Windows notification sound and an alert saying, “USB Drive connected” – this is a volume.
To understand better, disk partitions (C: drive or D: drive) are subsets of a volume (HDD or SDD).
Common Causes of Partition Loss
Here’s a list of common culprits behind deleted partitions:
❌ Accidental Deletion |
Unintentionally, deleting or formatting the wrong partition is among the most common partition deletion causes. As a thumb rule, always double-check before you confirm the deletion of any file. |
💽 Partition Table Damage |
The partition table plays a vital role in describing the partitions to the OS. Therefore, a corrupted partition table would lead to partition loss. Pro tip: In the command prompt, type “bootrec.exe/fixmbr” and hit Enter. This command attempts to perform a rapid fix on the damaged partition table. |
📏 Improper Partition Resizing |
So that you know, you can tweak the size of created partitions. However, this process is extremely risky, and unforeseen events like sudden interruptions can throw the partition into limbo. If you haven’t done this before, it’s best you don’t. |
🔌 Unexpected System Shutdowns |
Frequent unexpected shutdowns lead to computer malfunctioning and affect a hard drive’s partitions. Some culprits of system shutdowns include power outages, infected applications, or irregular BIOS upgrades. |
🦠 Virus attacks |
Malware and virus often infect computers despite having antivirus solutions. Consequently, there’s a high probability that the hard drive gets infected, leading to partition deletion. |
Time is of the essence here. The quicker you act, the higher are your chances of partition recovery. When a partition gets erased, the system marks that space as available for newer partitions. As a result, you mustn’t use the drive at all. Moreover, avoid creating new partitions or adding new data – as overwritten partitions are impossible to recover.
Now that you’ve gone through the steps in the recovery section above, you should have a better understanding of how to recover a deleted partition on Windows 10 or 11. If you still have questions or need further insights, continue reading for more details on partition recovery and the technical aspects involved.
The Purpose of a Recovery Partition and Its Connection to Deleted Partitions
A recovery partition is designed to help restore systems to an OS’s factory settings in case of abrupt system failure. Moreover, this partition has no assigned drive letter.
While the recovery partition provides tools and resources to restore the system to a previous state or factory settings, it doesn’t specifically contain tools to recover other deleted partitions. For that purpose, you’d typically need third-party partition recovery software. So, while they both deal with recovery, they serve different specific purposes.
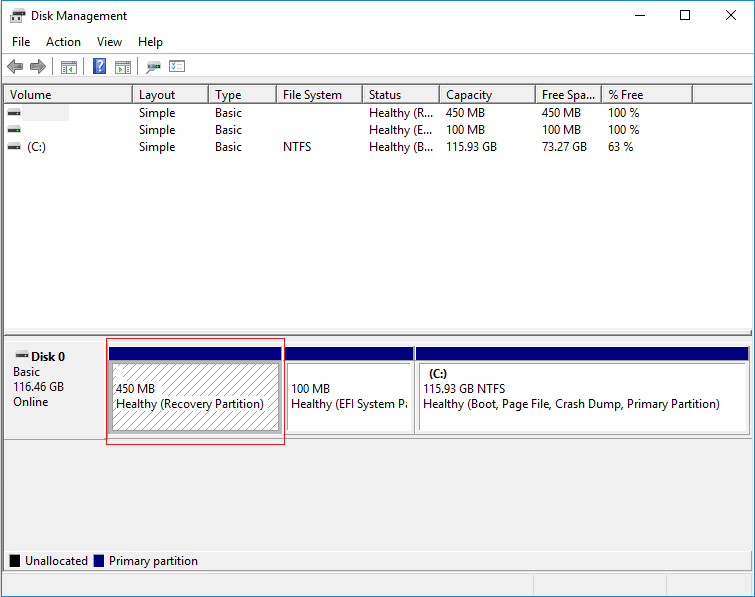
There are two significant types of Recovery Partitions:
- The default Windows Recovery Partition – This occupies a negligible volume of disk space.
- The OEM Recovery Partition – created by computer manufacturers (HP, Dell, or Lenovo). This amounts to a significant disk space volume as it contains various manufacturer settings and driver configurations for restoration to default settings.
Now, we are going to throw some light on a much-debated topic: Recovery Partition Deletion.
Just a note of caution: We do not recommend deleting the recovery partition as you are essentially deleting the necessary files to create a recovery drive (on a USB drive, for instance). Additionally, another consequence of deleting the recovery partition is losing access to the Windows Recovery Environment. However, if you so desperately need the extra disk space, first create a USB recovery drive, and then follow the upcoming guide.
How and When to Delete a Recovery Partition
There are two methods to do so:
- First method: Diskpart
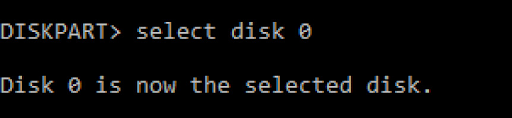
- Windows has an in-built utility called Diskpart. In Command Prompt, type “diskpart” and then type “list disk.”
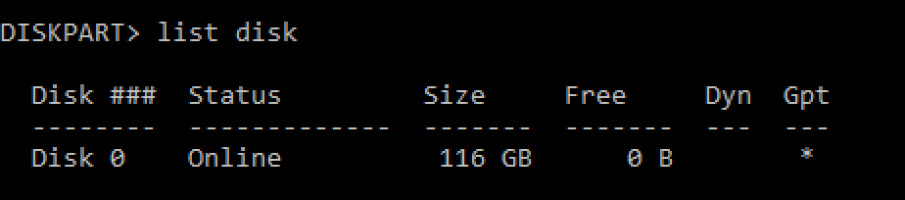
- Select the disk.
- Now type “list volume.”

- Look for the “recovery” label, and select that volume. It’s volume 1 in this case. To select a volume, type “select volume n,” where n is the partition number you want to delete.

- Now, type “delete volume override”.

- Now, the partition gets deleted. Restart your computer once the deletion process is completed.
- Windows has an in-built utility called Diskpart. In Command Prompt, type “diskpart” and then type “list disk.”
- Here’s the second method: Using a USB Drive
- Apparently, while creating a USB recovery drive, there’s an option in the wizard for deleting the recovery partition.
- Select the “Delete the recovery partition.” Then, click on “Delete:” This removes the recovery image and frees up space on your computer.
Not all PCs offer the recovery partition removal feature. Consequently, if you can’t find the option to delete, chances are your system doesn’t have a recovery partition utilizing extra disk space.
FAQ
How to recover data from deleted partition in Windows 10?
Here’s how you can recover data from a deleted partition on a Windows PC:
- Download and install the data recovery software of your choice.
- Launch the software and select the storage device with the deleted partition, then initiate the scan.
- If your software allows, select the specific files you wish to recover. Some tools might recover files in bulk.
- Specify the destination for the recovered data, unless prompted to do so in earlier steps.
- Proceed with the data recovery process.
Can I use CMD to recover a deleted partition?
As discussed earlier, CMD does offer a unique feature in the form of Diskpart – which helps to delete partitions. Additionally, you can use it to recover a deleted partition as well.
This CMD technique doesn’t work in all cases. It’s only useful when partitions are lost due to a letter volume incompatibility.
The process is relatively straightforward:
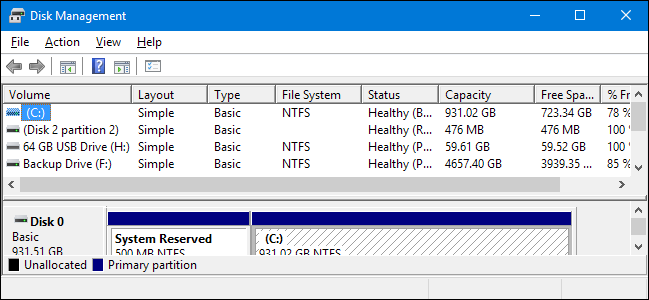
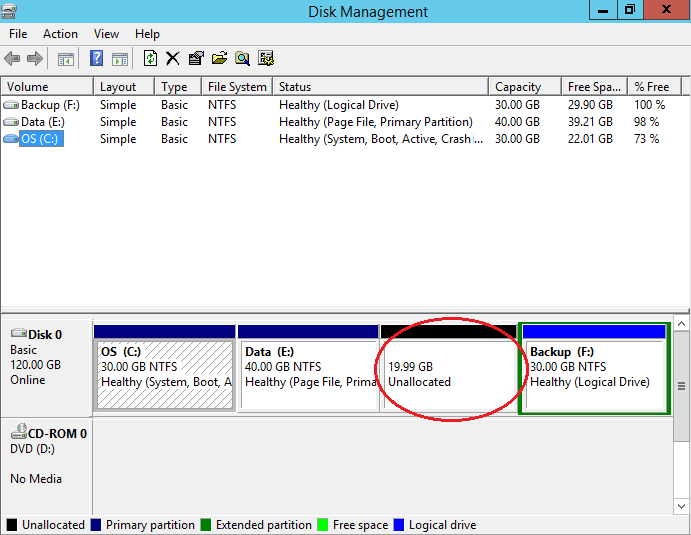
- Open Disk Management and locate the deleted partition. ⚠️
A deleted partition manifests itself as “unallocated” disk space.
- Run Command Prompt as administrator and type in “Diskpart,” and then hit Enter.
- Key in the command “list disk” and hit Enter to pull up a list of all storage devices on your computer.

- Enter command “select volume n” where n is the disk number that needs a lost partition recovery. In this case, we have chosen volume 1.

- Enter “assign letter=H” and hit Enter (H is a randomly chosen letter).
- Close Command Prompt when you encounter the following message:

Can I recover a volume accidentally deleted in disk management?
When you delete a partition or volume from disk management, this disk space turns into unallocated space on your disk. As a result, you will have to use data recovery tools to recover this deleted partition.
Some free partition recovery tools include:
Can I restore a partition that got deleted from an external hard drive?
Yes, partition recovery tools support partition recovery from external hard drives as well. However, you must stop all hard disk usage to prevent any overwriting of the deleted files.
Key Takeaways
A deleted partition isn’t necessarily a data catastrophe.
In most cases, the partition probably never got deleted. You can reassign this “vanished” partition back into existence. On the other hand, if you encounter deletion, there are techniques to either pick and restore selected files or entire partitions.
Windows offers a native “Diskpart” feature that helps recover partitions. Additionally, some commendable third-party data recovery tools offer unique partition recovery functionalities.
This article was written by Joshua Solomon, a Contributing Writer at Handy Recovery Advisor. It was recently updated by Jordan Jamieson-Mane. It was also verified for technical accuracy by Andrey Vasilyev, our editorial advisor.
Curious about our content creation process? Take a look at our Editor Guidelines.