There was a time when FAT32 was the golden standard for computer storage devices like hard disks, USB flash drives, and SD cards, but that era has long since passed as current devices opt to use more modern file systems like NTFS or exFAT.
But while there are more optimized file system formats nowadays, FAT32 is still being utilized by quite a few people and the demand for data recovery solutions for the format remains.
With that said, there are several tried-and-tested methods for rescuing deleted data from a FAT32 hard drive, and we’re here to walk you through them step by step.
Introduction to FAT32 Recovery
💻 What is FAT32?
File Allocation Table or FAT is the oldest file system in existence. Developed in the early days of computer technology, FAT ensures the compatibility of data between different operating systems and storage devices.
With increasing disk capacities, FAT transitioned into FAT12, FAT16, and finally FAT32. This formatting system then became the standard across the computing world.
Be it Windows or Macintosh, all computers used FAT32 to format their hard disk drives and other storage media, like USB drives. Even SD cards used this file system which allowed for a maximum file size of 4GB and a partition ceiling of 32 GB.
Nowadays, however, FAT32 has been replaced by better, more secure alternatives. For Windows, NTFS has become the default, while Apple uses its own proprietary file systems. Meanwhile, SD cards implement the exFAT system, which is basically a modified version of FAT32 that can handle larger volumes.
📓 How Does FAT32 Recovery Work?
When you copy a new file to a FAT32 drive, it does two things. First, it writes the file itself to some of the unused space on the disk. Second, it marks the address of the file on the File Allocation Table, allowing for it to be found again by the operating system.
But when you delete a file, things play out differently. While the file record is scrubbed from the table, the data itself is left untouched. It is only when you write a new file to the disk that the old data gets overwritten.
This means that if a program was to scan through the whole drive, checking each sector, it can ferret out files that do not “officially” exist and save them. That’s how data recovery software works for all file formats, including FAT32.
🛠️ What Are the Specifics of FAT32 Data Recovery?
Now that we know a bit more about how a FAT32 file system functions, it’s also worth going through the potential complications you may face when attempting to recover data from one. This includes:
- File Fragmentation: Part of what makes FAT32 inferior to newer file systems is its higher susceptibility to file fragmentation. This can negatively impact the recovery process since breaking up file data into several pieces and spreading it throughout the drive can make it much more difficult to restore.
- Recovery Tool Capability: Despite being the oldest file system, FAT32 is one of the most popular. The file system itself is no longer evolving, but the scanners of data recovery software are constantly updated to better search for data. The biggest difficulty for scanners is that, due to the system’s limit of 4 GB per file, files are split into parts and data fragmentation is created. This is the main difficulty that data recovery software is still struggling with.
- Vulnerability to Corruption: A glaring drawback of FAT32 file systems is their lack of certain security features like file permissions and journaling, both of which can help minimize the risk of corruption on your device.
How to Recover Deleted Files From FAT32 on Windows & Mac
Just like with any other file system, the best way to retrieve lost data from a FAT32 storage device is to use a capable and compatible data recovery program. This will allow you to do a thorough sweep of the device and potentially restore any files that have yet to be overwritten.
Disk Drill is a particularly effective option that works on both Windows and Mac machines and offers high recovery rates, quick scans, and exceptional file-type support.
Keep in mind that while both the Mac and Windows versions offer free trials to test out all of the program’s features, only the Windows one gives you a 500 MB recovery allocation to actually retrieve data.
Here are the steps on how you can use Disk Drill to recover deleted files from a FAT32 hard drive:
- To get started, go to the official Cleverfiles website, then download the latest version of Disk Drill and install it on your computer.
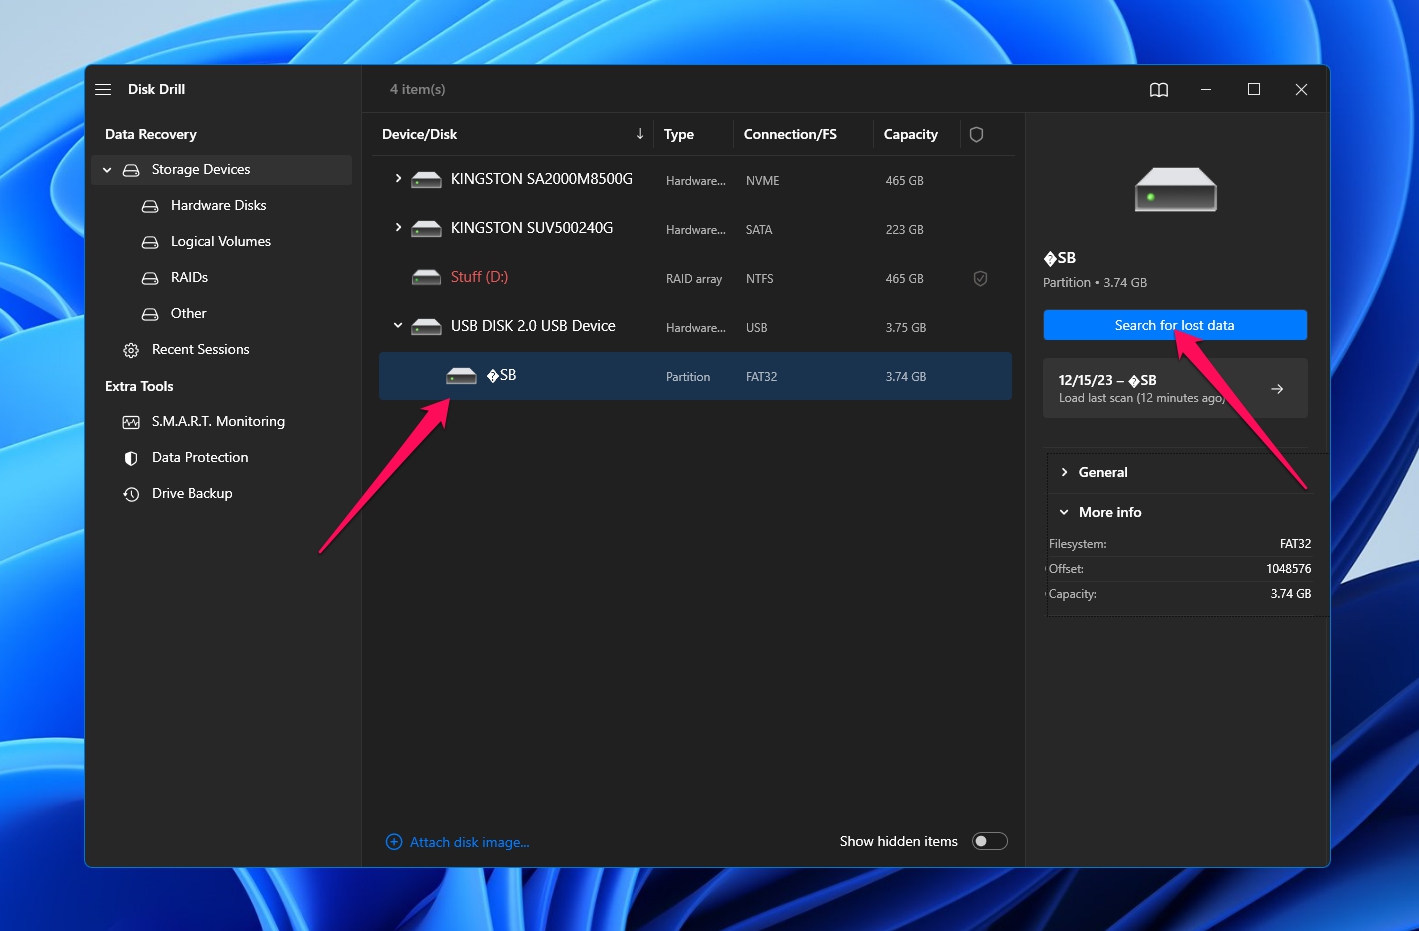
- Run the app and select the FAT32 hard drive you want to recover files from. From there, click the “Search for lost data” button in the panel to the right.
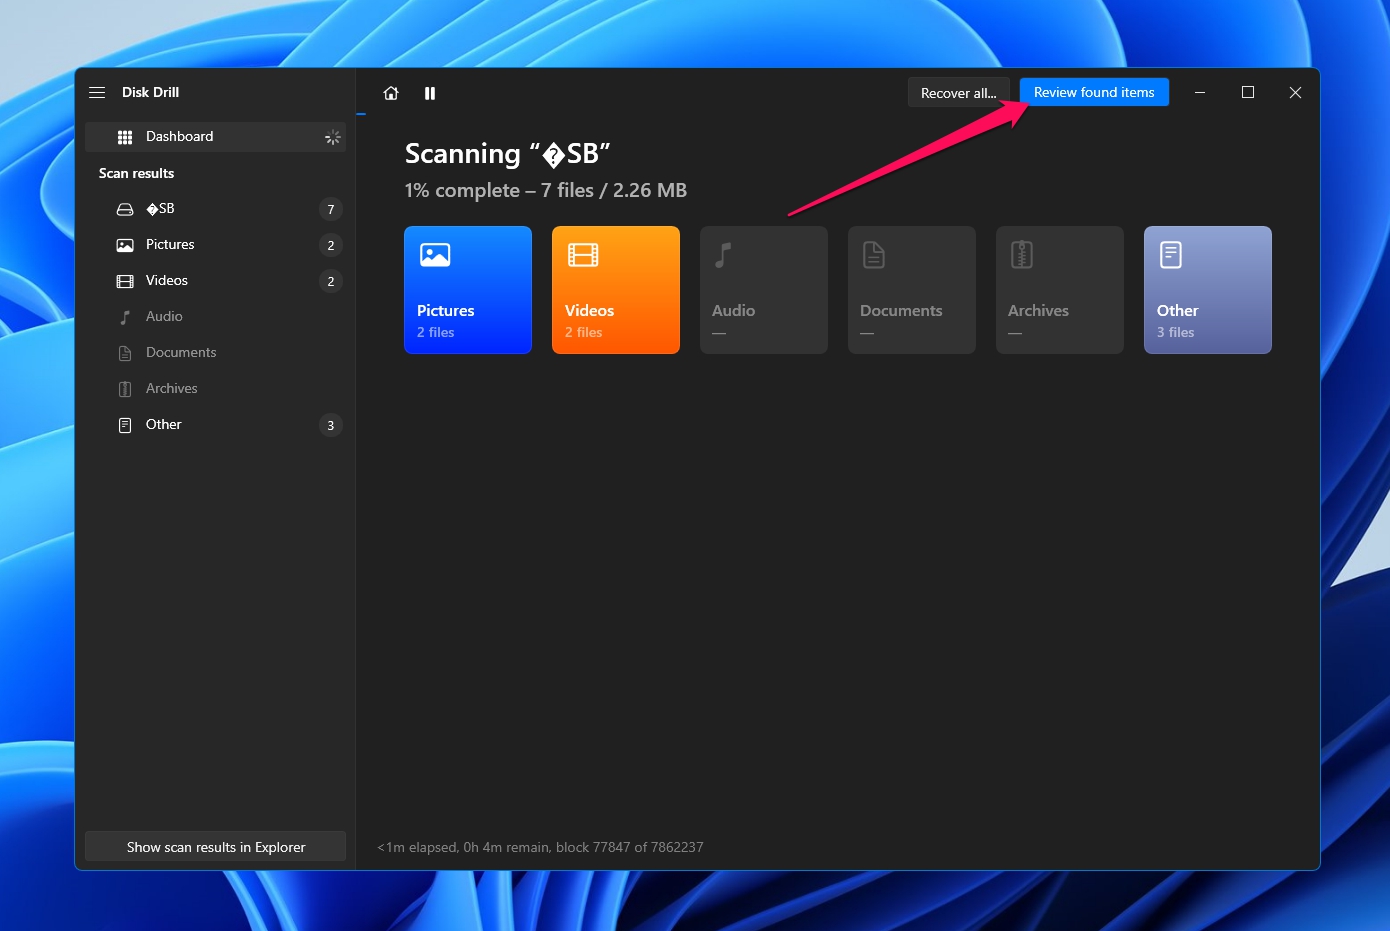
- After that, Disk Drill will start scanning the drive for any potentially retrievable files. How long this takes depends on various factors, like hard disk size, level of fragmentation, device read/write speed, etc. Once you’re ready to head to the next section, click the “Review found items” button in the top-right corner.
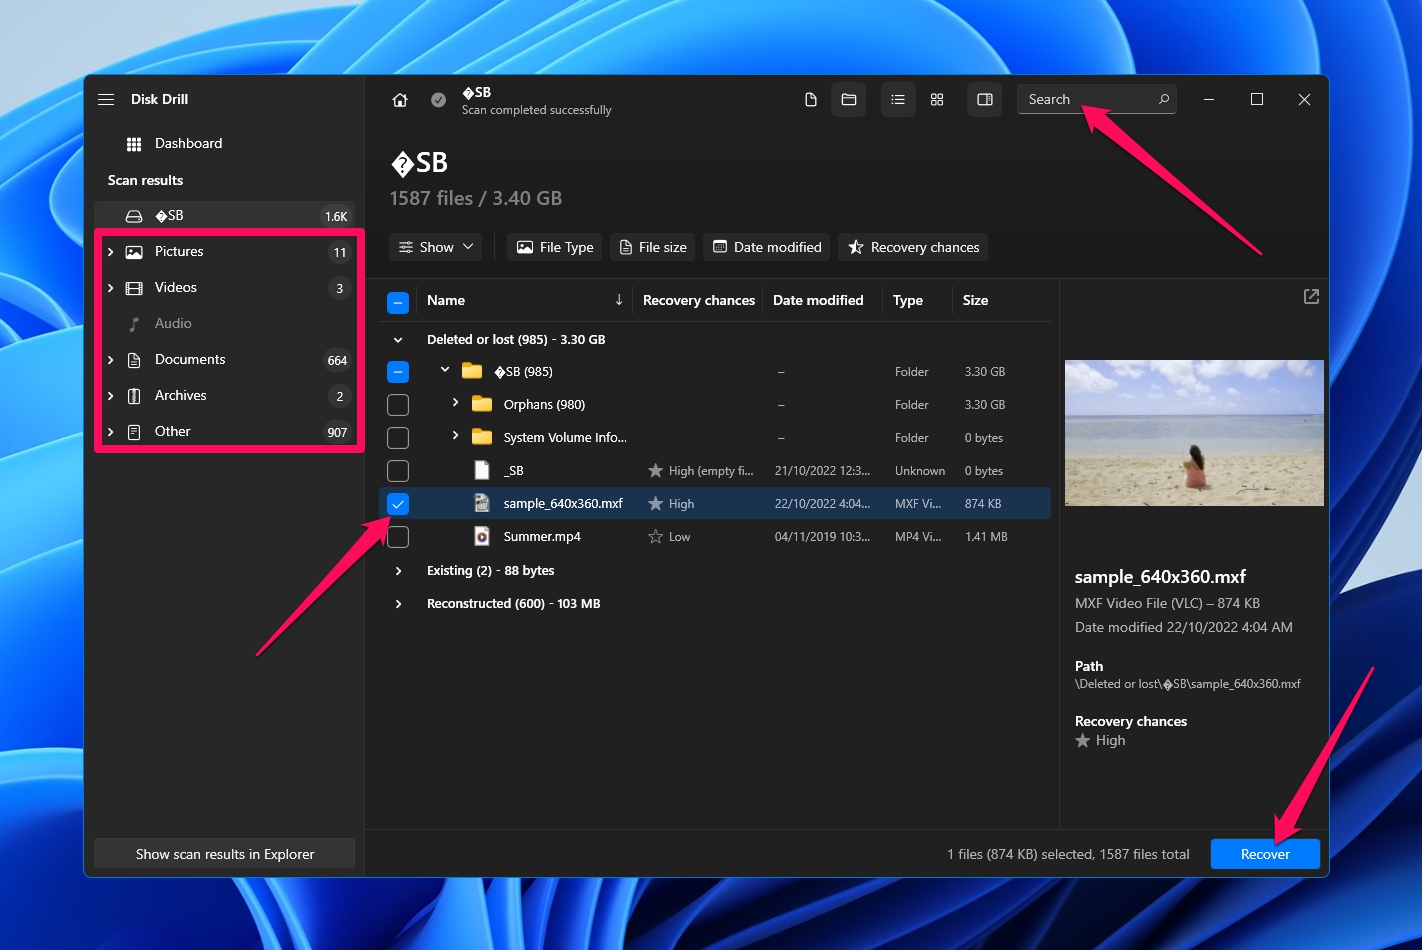
- In the results section, you’ll see a list of all the files that Disk Drill managed to uncover. The number of files may be overwhelming if the drive is used frequently, but you can narrow down the list using the categories on the left-side panel and the search bar towards the top-right. The search feature is capable of browsing not only file names but file extensions as well. Once you find the files you’re looking for, select them by marking the checkboxes next to the file names, then hit the “Recover” button in the lower-left corner.
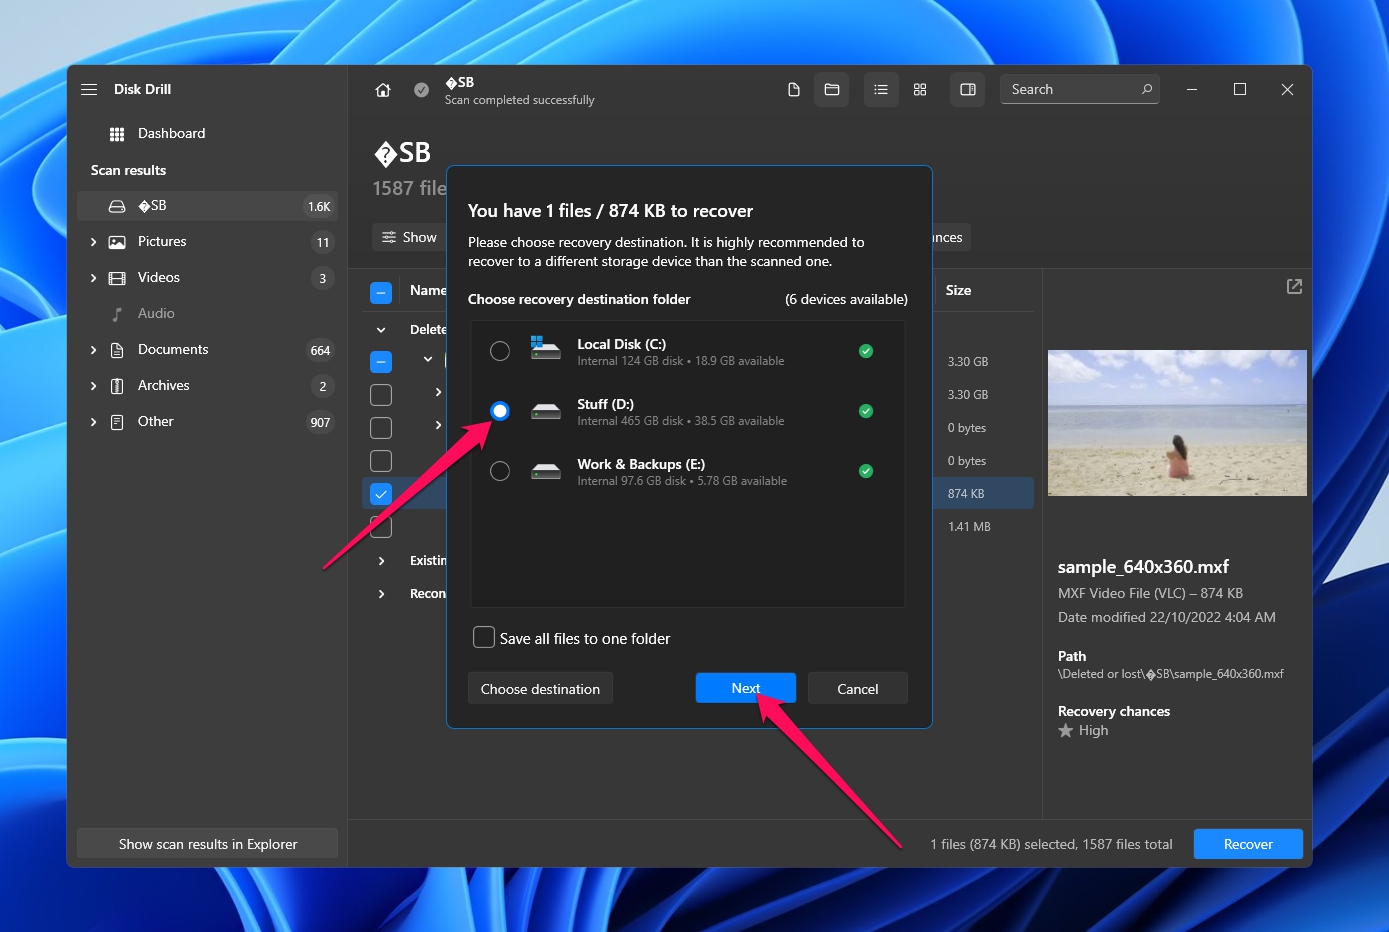
- Upon clicking, you’ll see a small pop-up asking you to pick a destination folder for the rescued files. It’s important that you choose a storage device different from the one you just scanned in order to avoid accidentally overwriting files. Click the “Next” button to continue.
- If the recovery was successful, you’ll be greeted with a completion message and a button you can press that takes you straight to your rescued files.

Interested in learning more about Disk Drill and seeing how it performs under several real-life data loss scenarios? Read our Disk Drill review. You should also take a look at our separate test dedicated to Disk Drill’s safety.
How to Recover Data From FAT32 Hard Drive on Linux
Like with any other type of application, it is hard to find a good alternative for Linux. Most apps don’t support Linux distros like Ubuntu, making it difficult to recover data from a FAT32 drive.
PhotoRec is probably your best option. It is one of the rare few data recovery tools that work on Linux (along with Windows and Mac). It supports pretty much any file format and employs a signature-based search process which allows it to scan a drive regardless of file system – even significantly compromised ones.
The only drawback is its purely text-based interface. On Linux though, it fits right in.
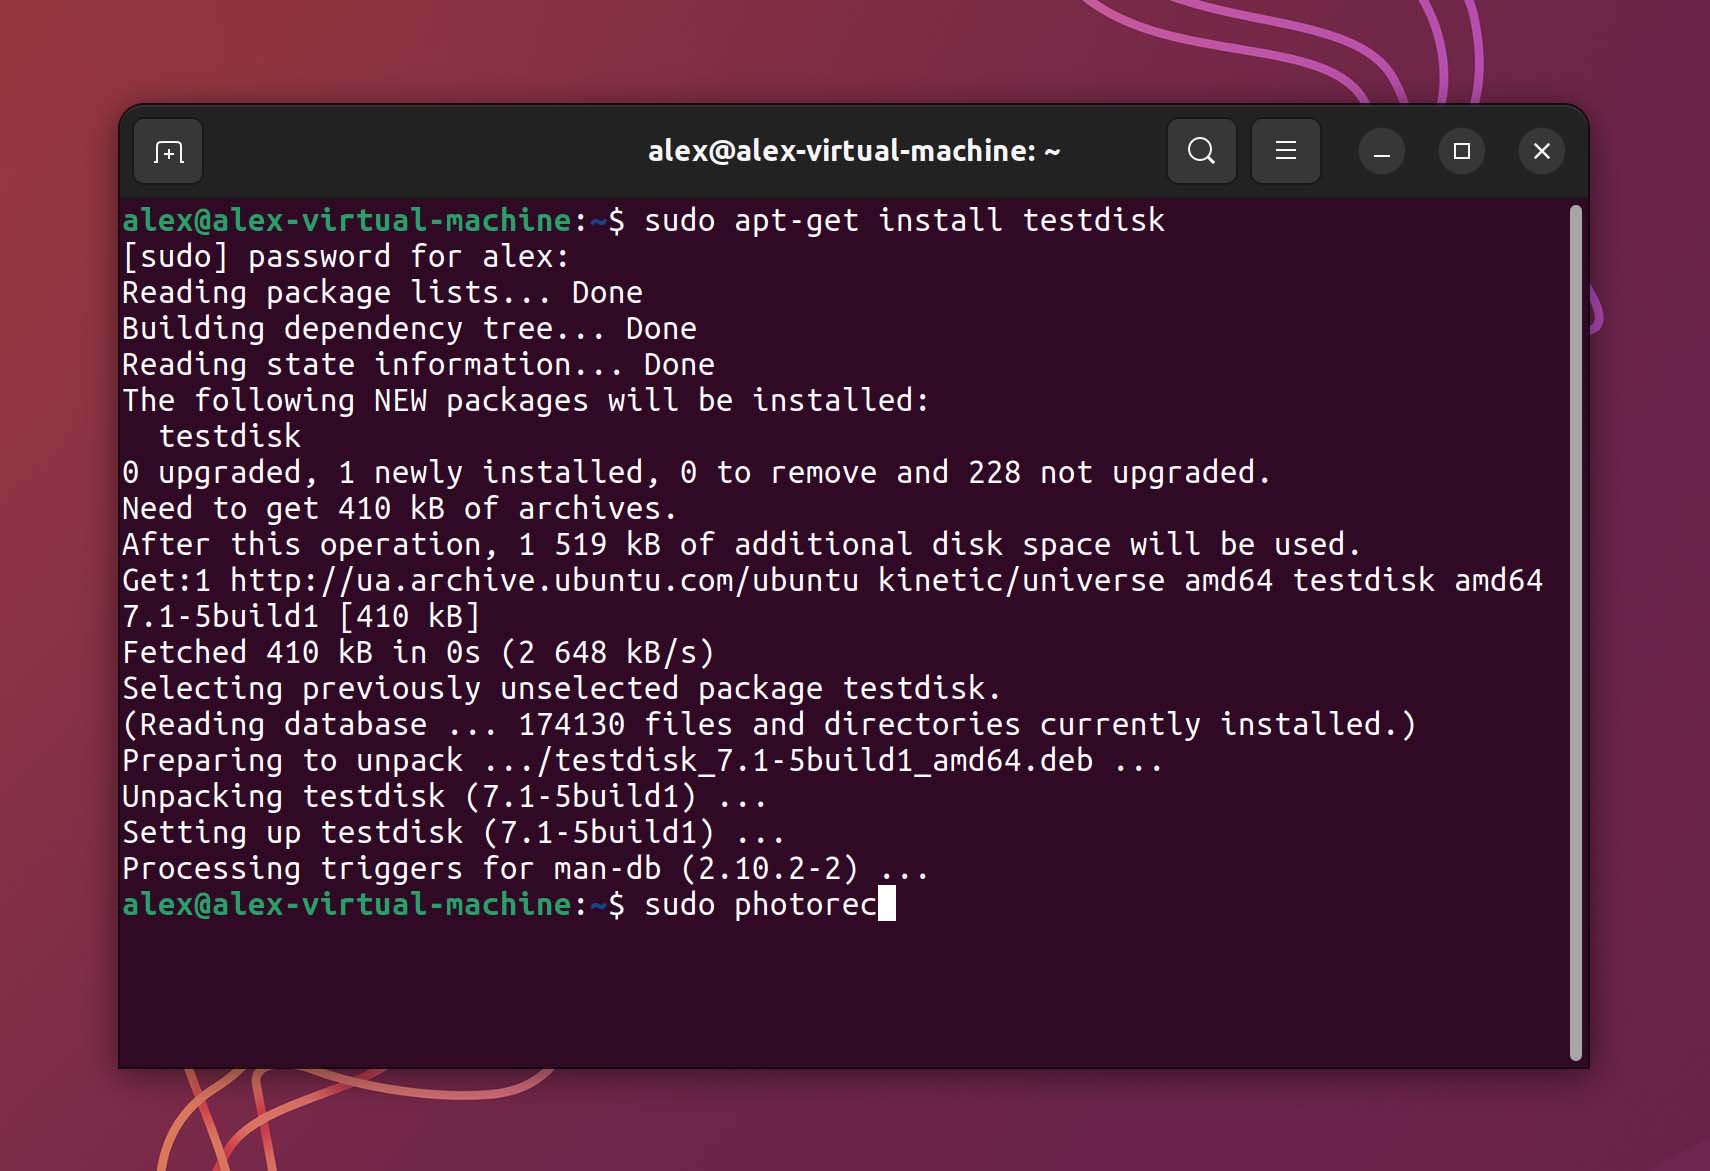
- To install PhotoRec, use the apt-get install command. It works on all Debian-based distributions such as Ubuntu. sudo apt-get install testdisk
- PhotoRec is a part of the testdisk package. You can run it directly with the sudo command.
sudo photorec
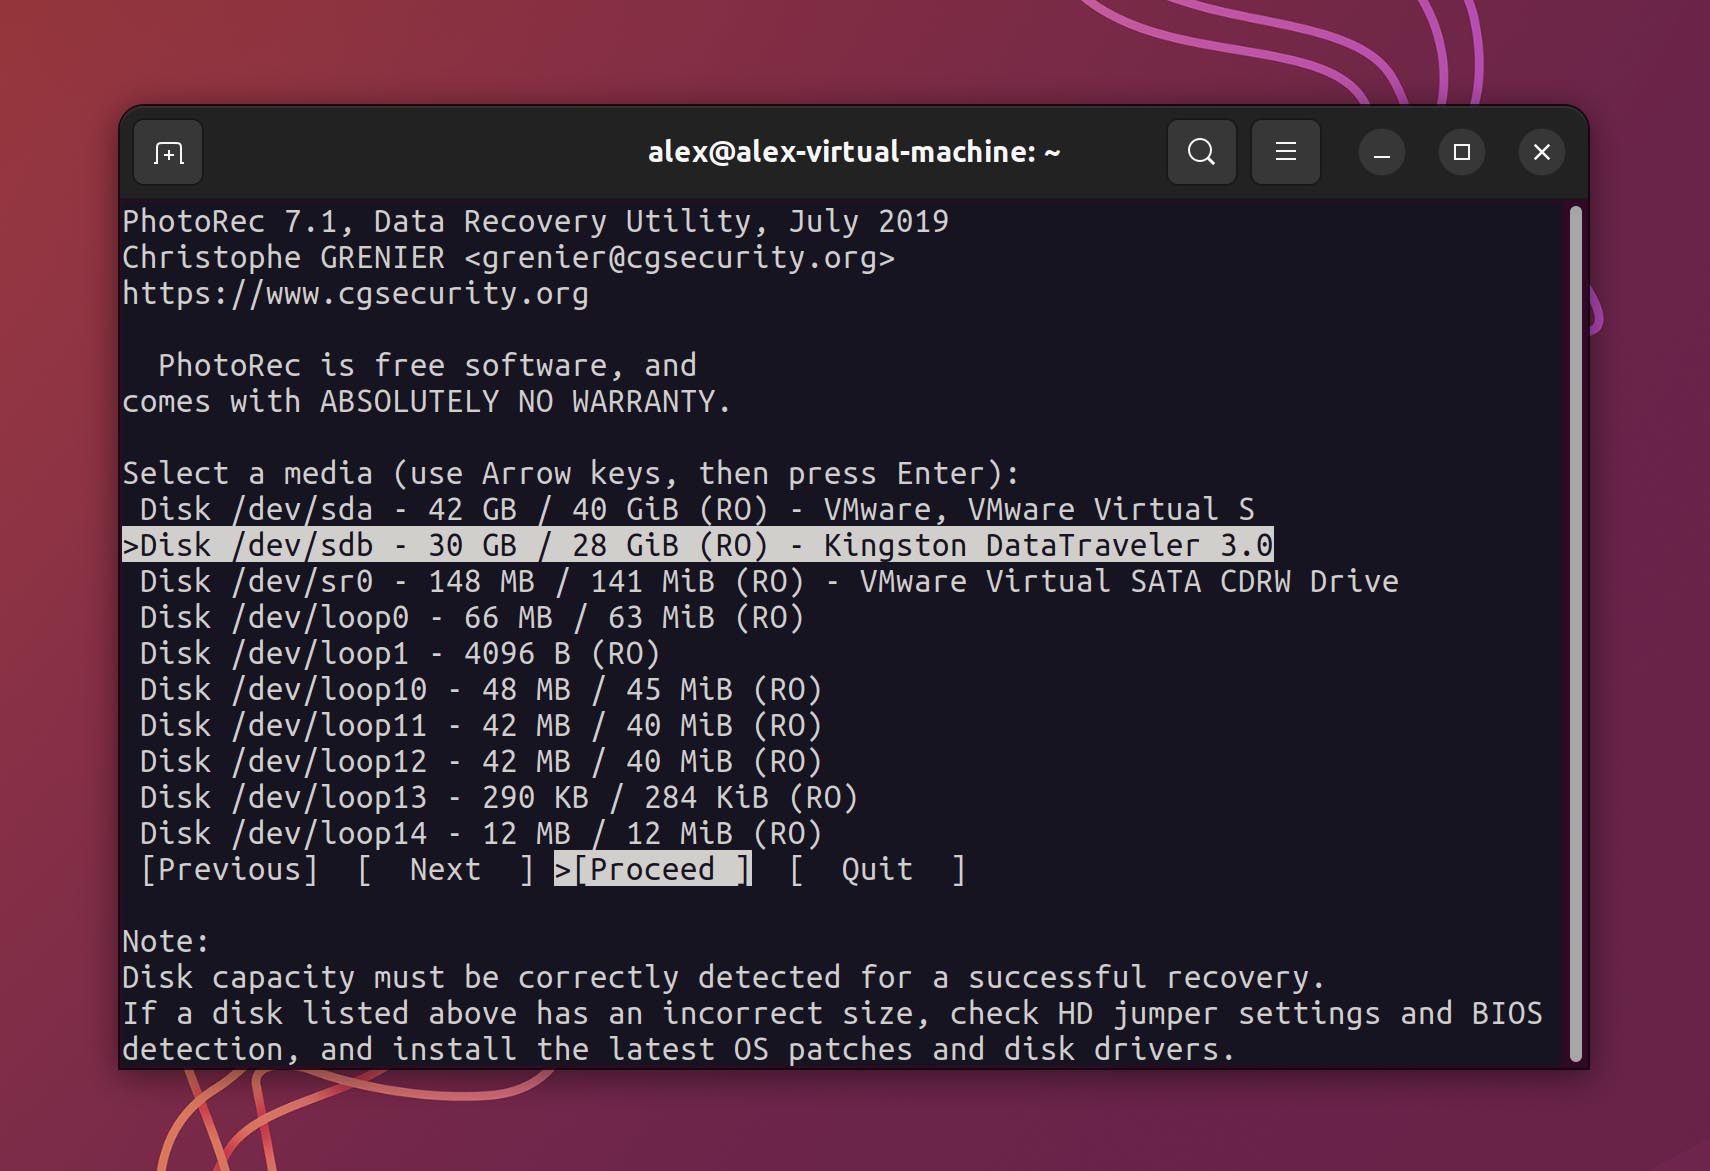
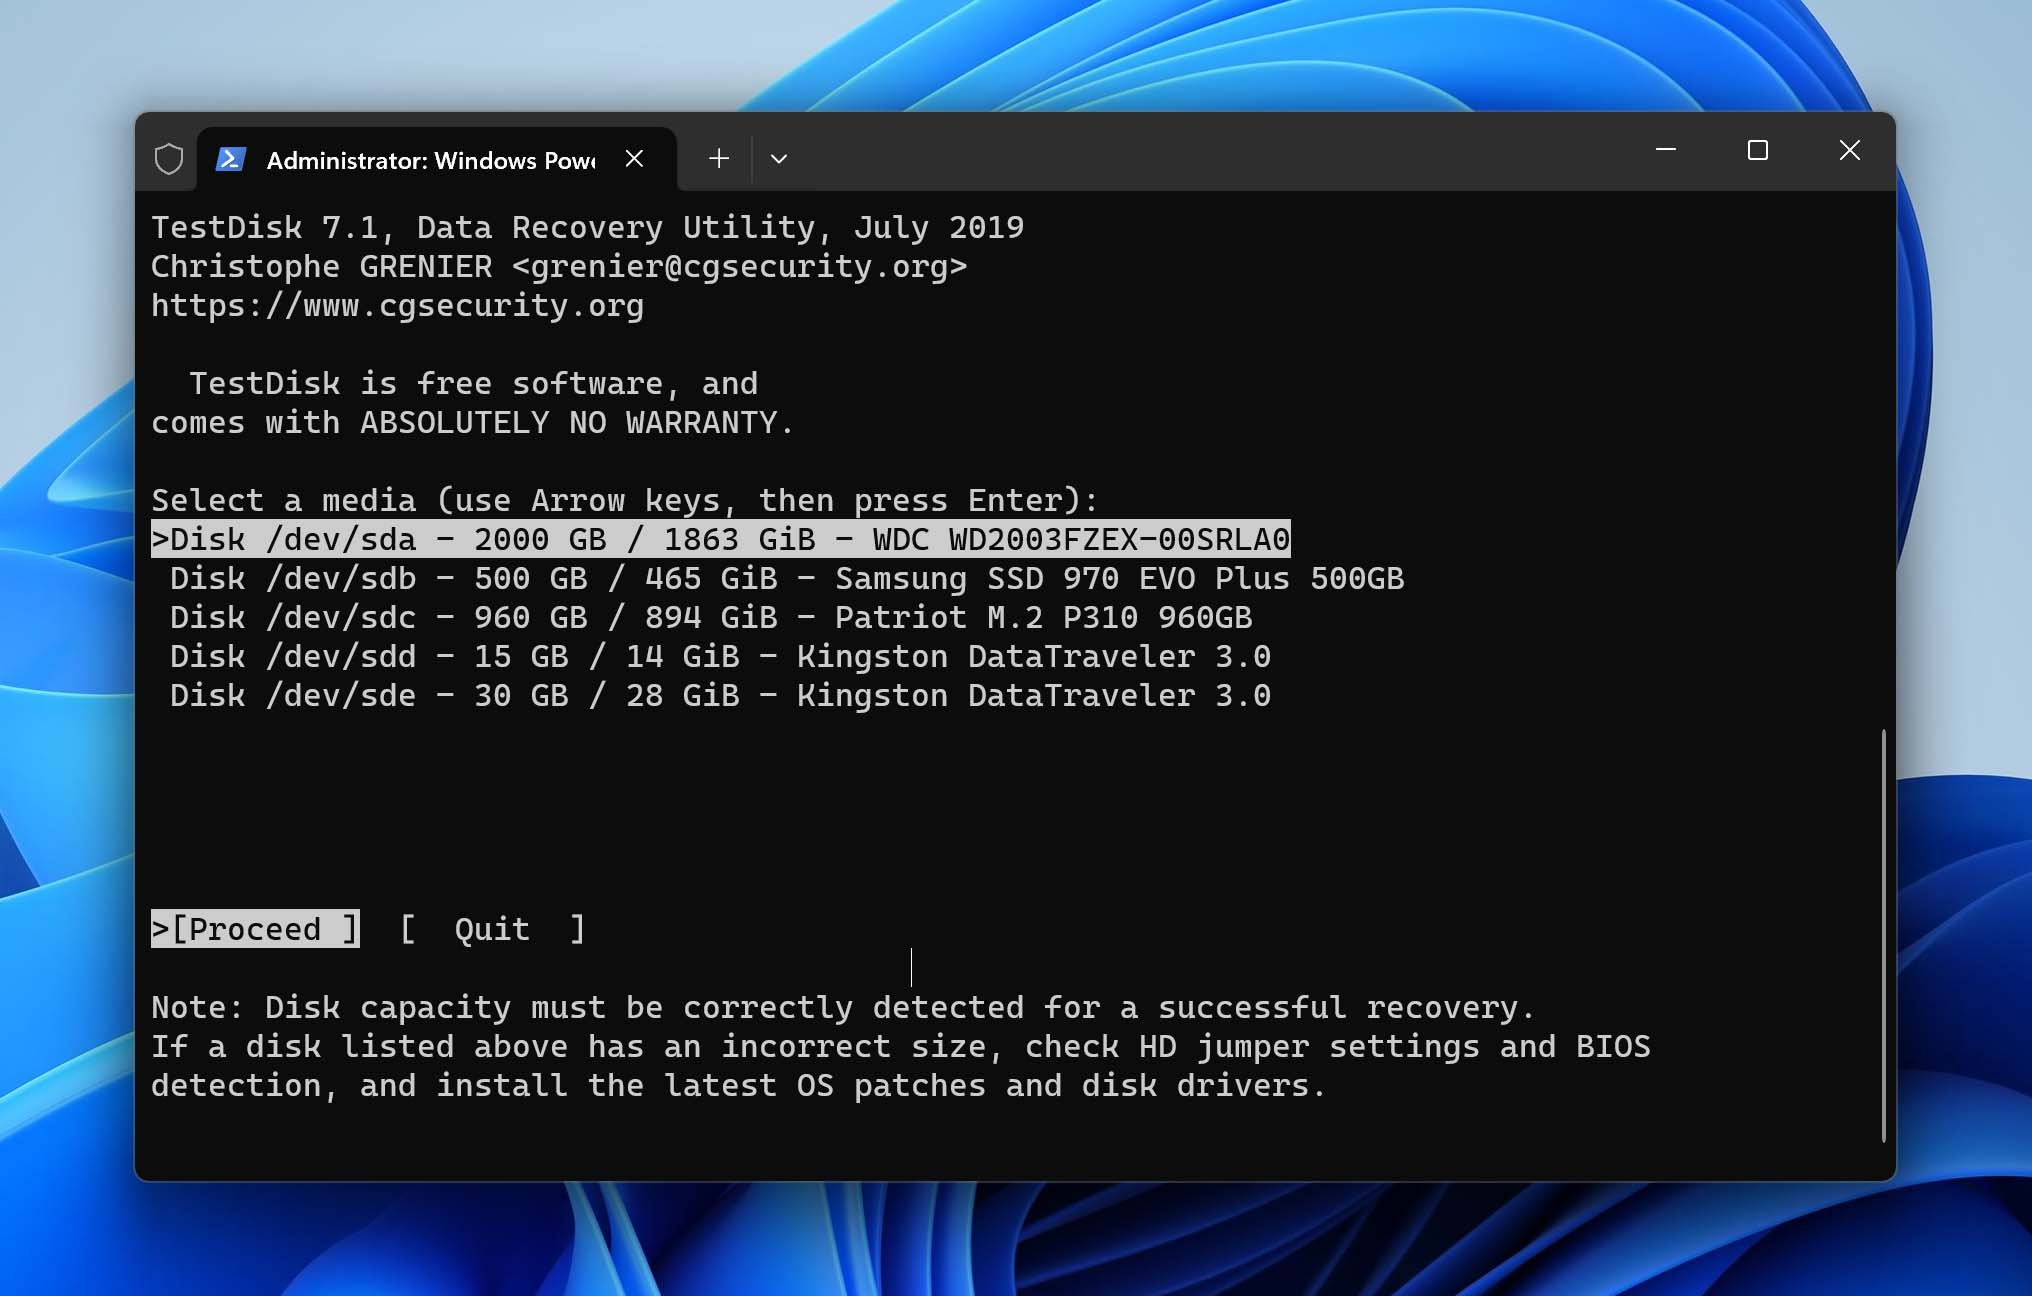
- PhotoRec will display a list of all the drives connected with your computer. You can use the arrow keys to move up and down the list. Hit Enter after selecting the FAT32 drive you want to scan.
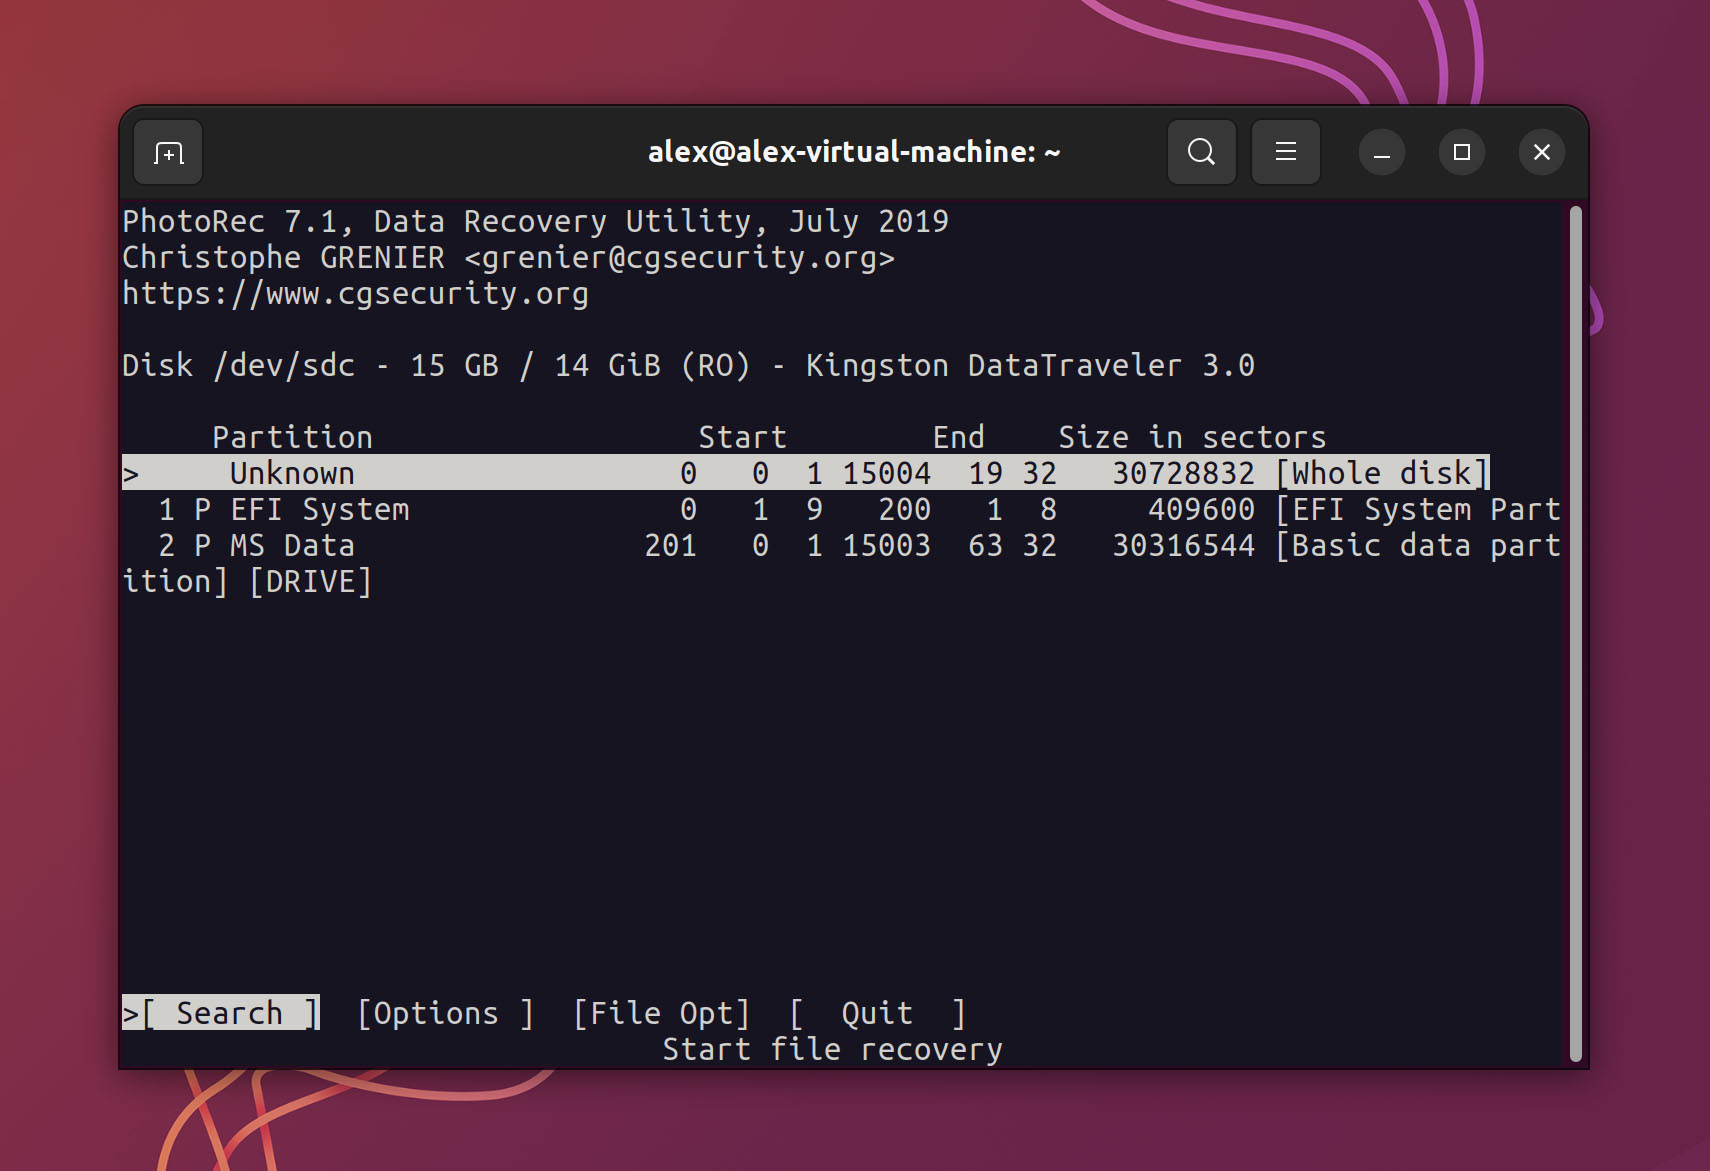
- This will bring up all the partitions on the disk. Choose a partition and hit Enter once again.
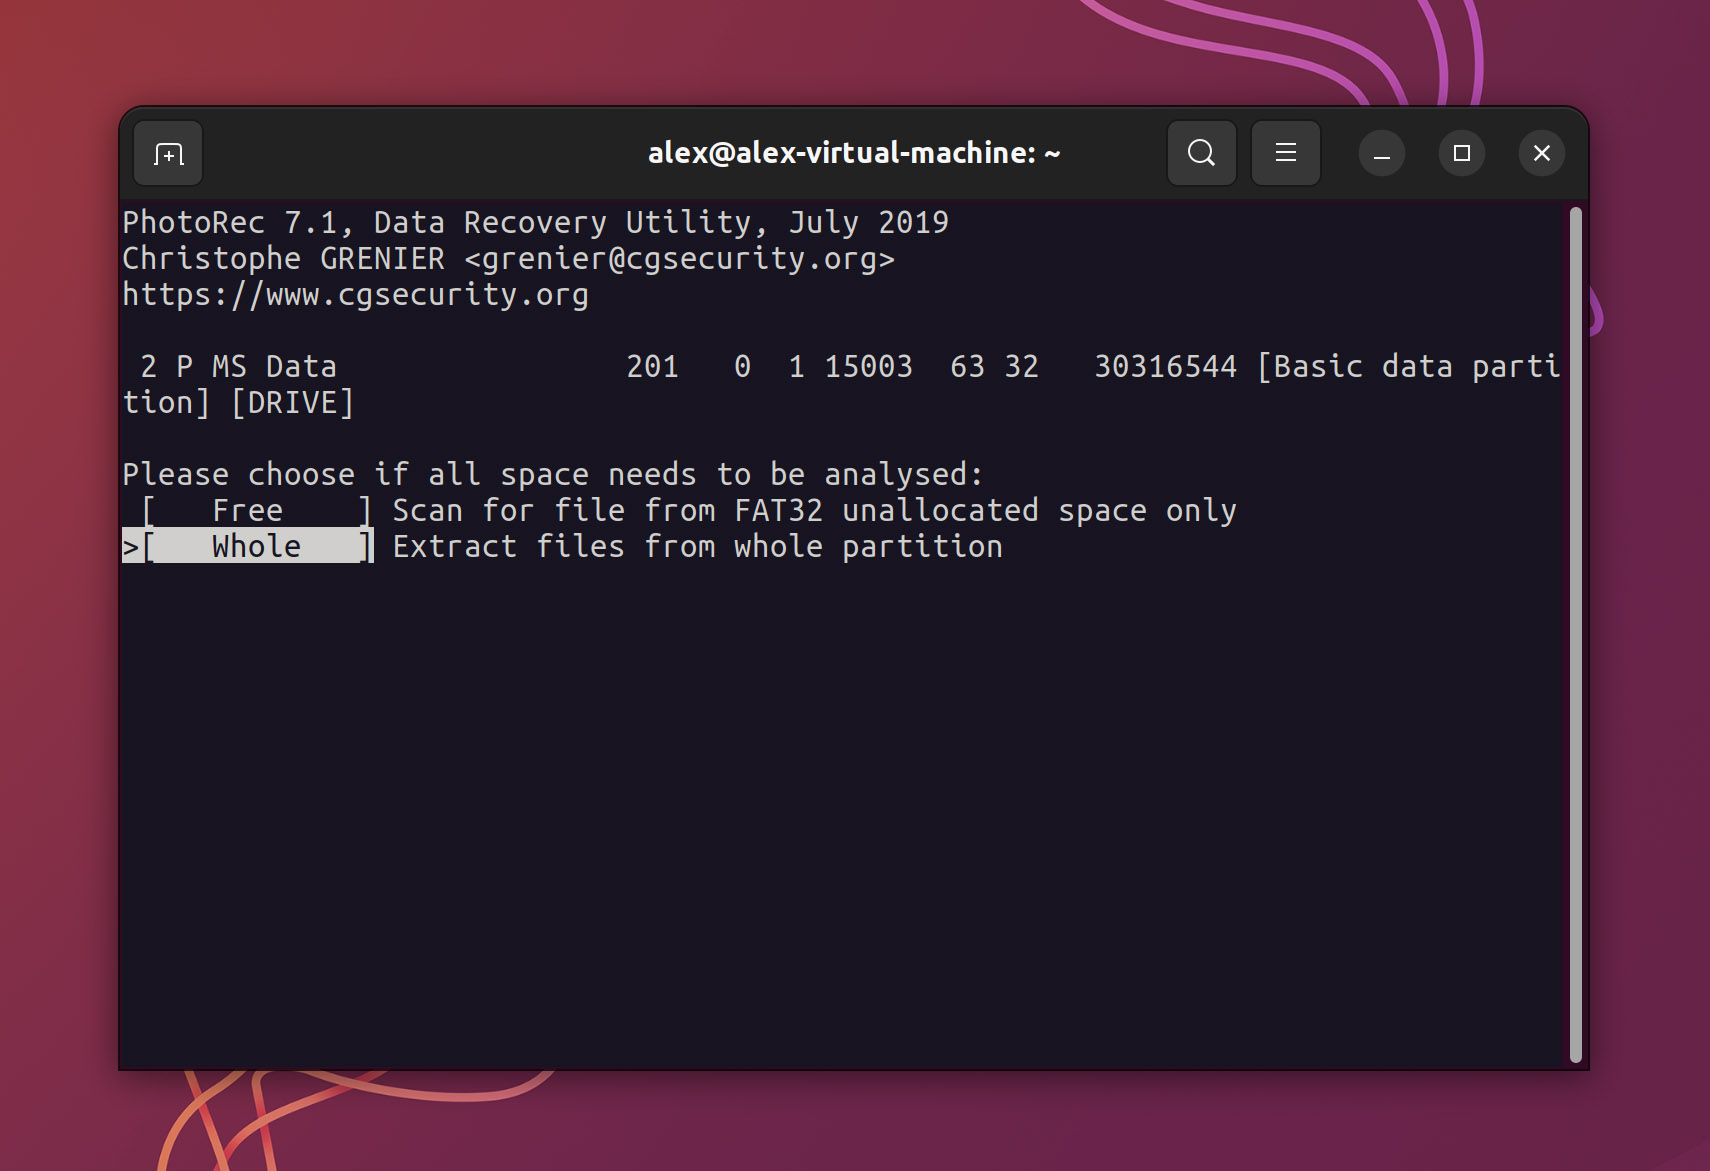
- You can choose to scan only the empty space in the drive or go over the whole drive. Scanning the free space is usually enough to find most deleted files.
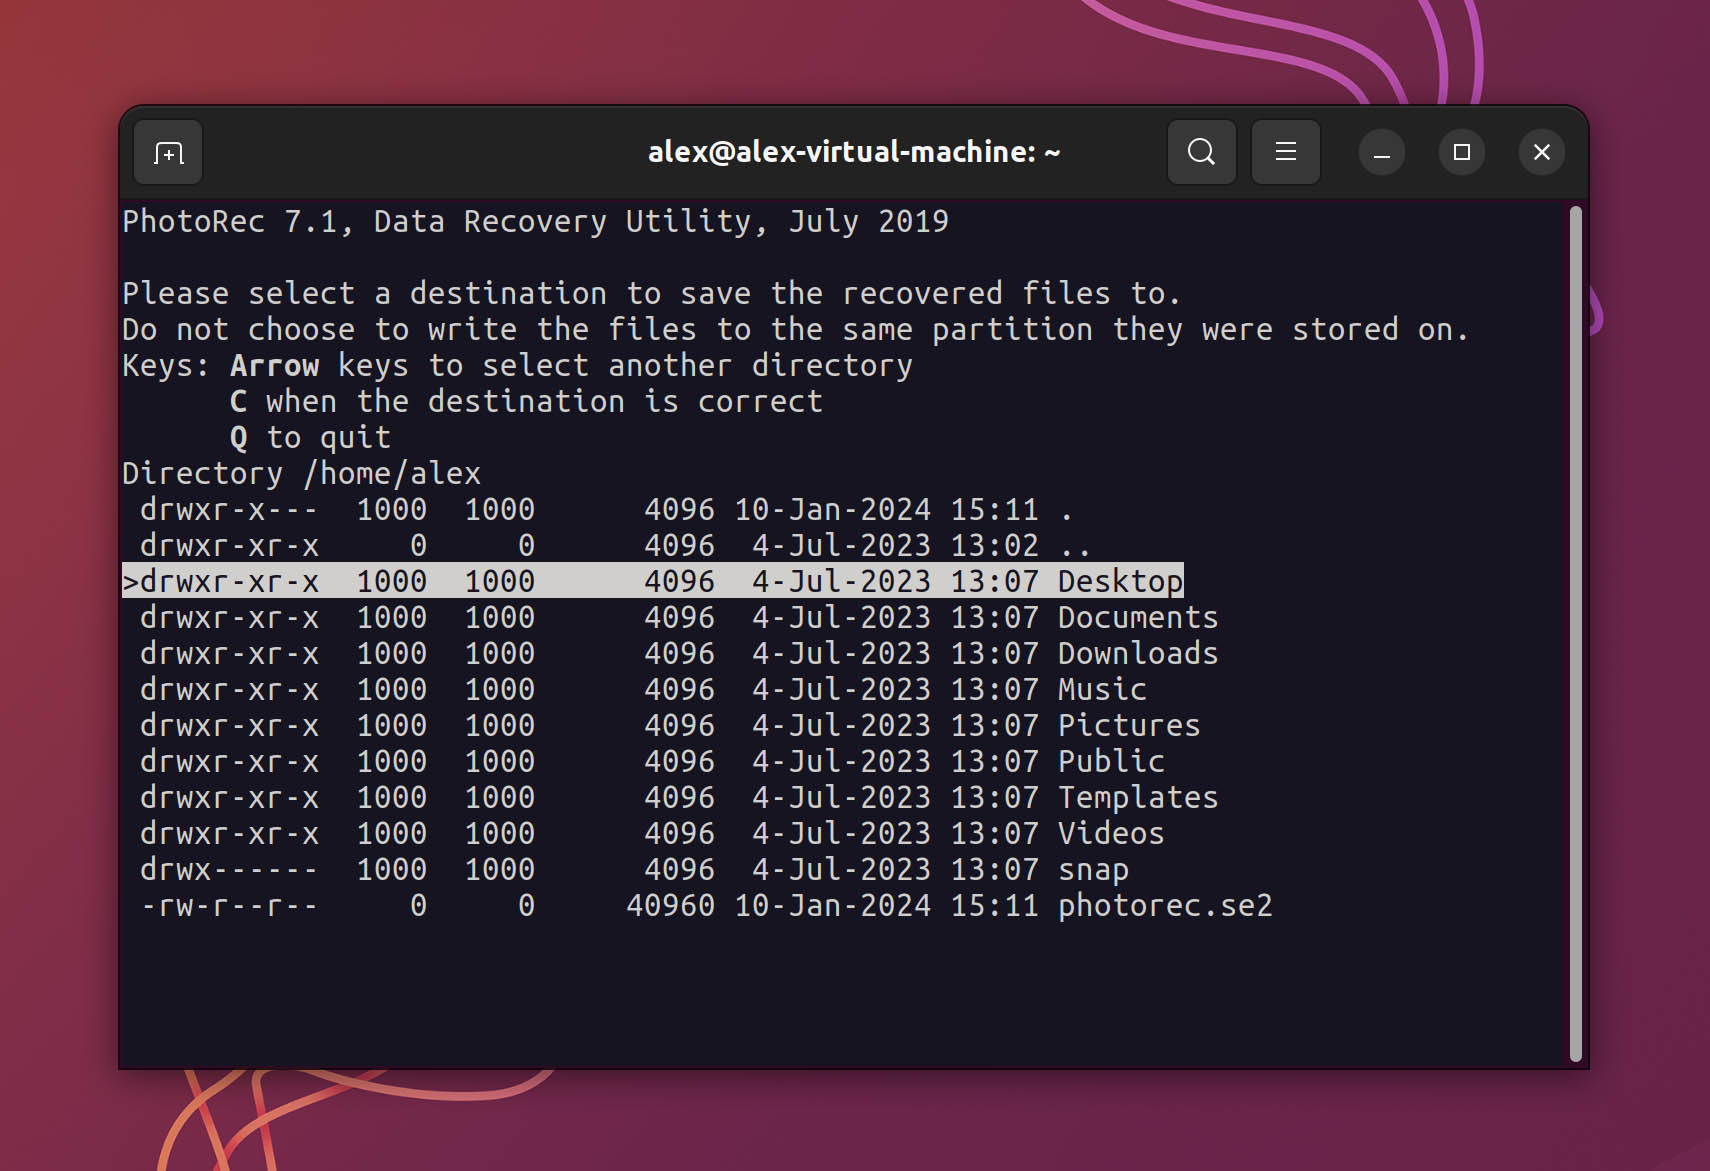
- One final thing: pick a destination folder to save the recovered files in. Unlike other tools, PhotoRec recovers all deleted files discovered in the drive, so make sure to choose a location with enough space to hold all that data.
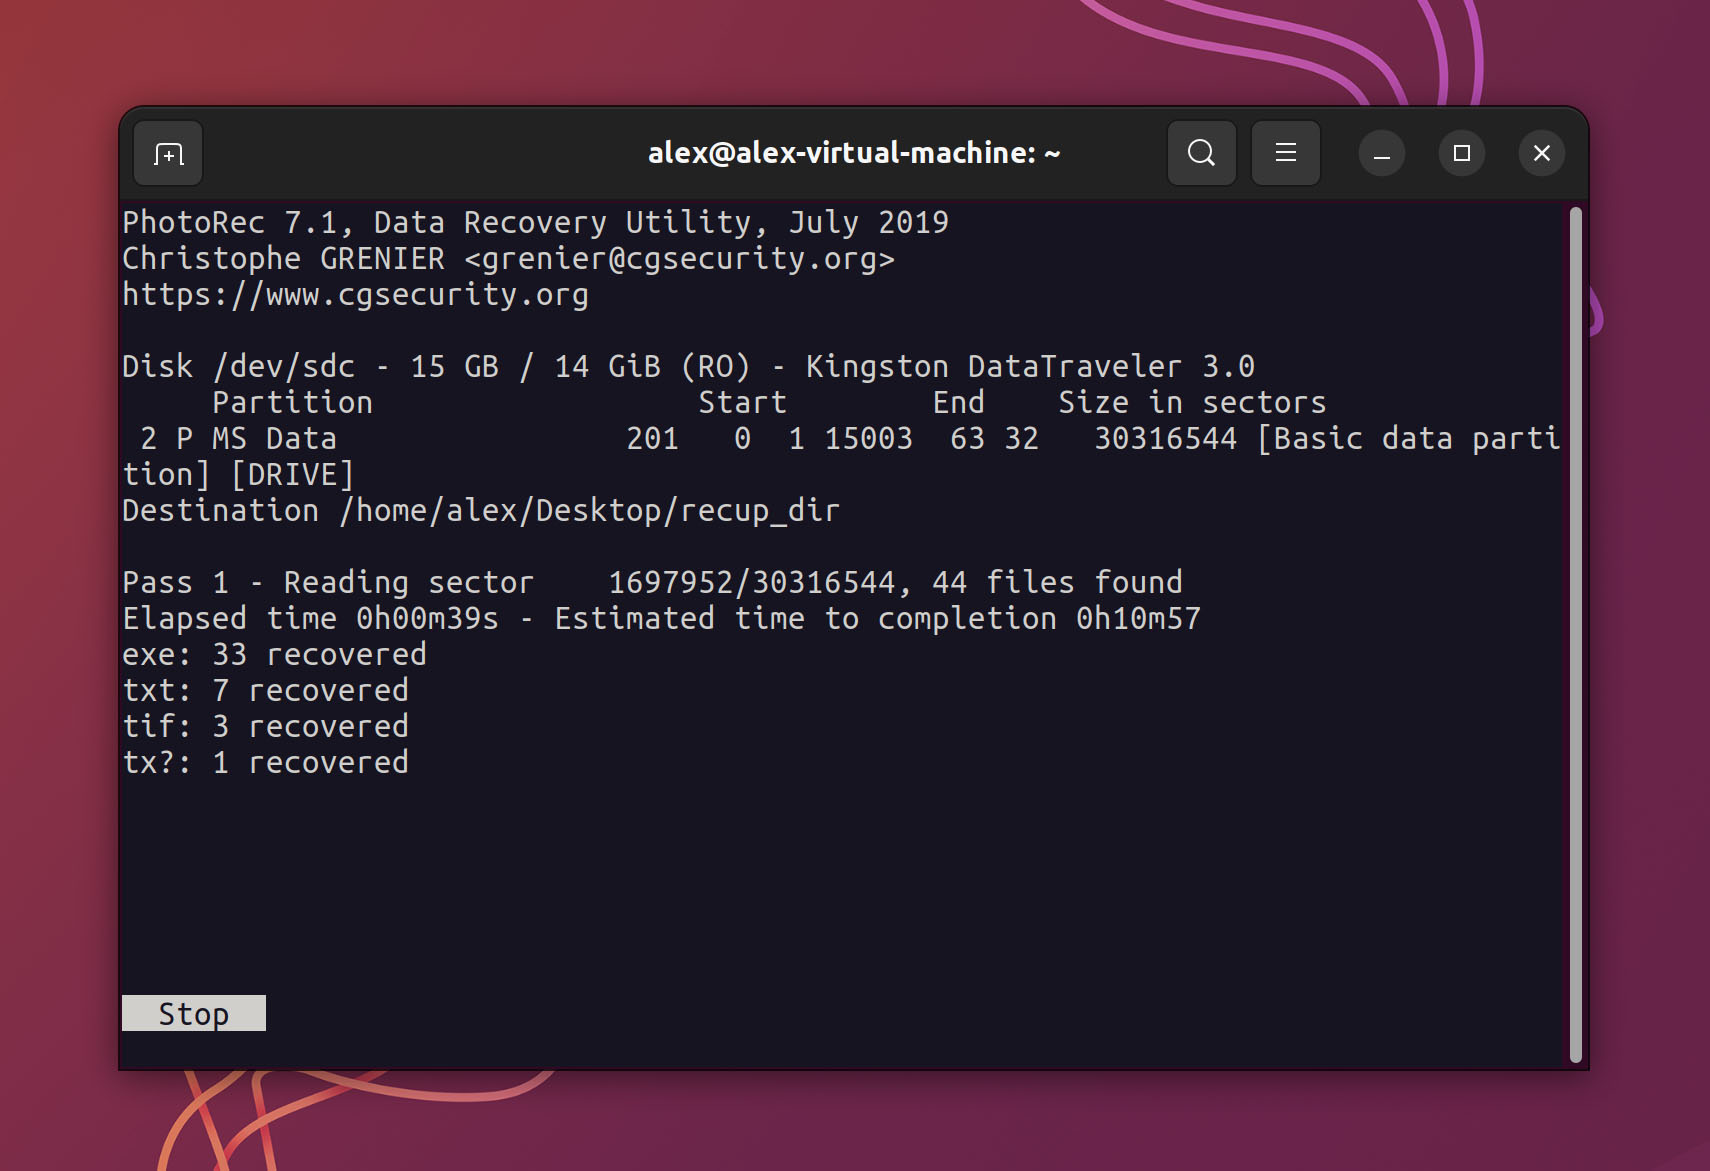
- Enter C to start scanning. PhotoRec will automatically recover and save every file that is found, updating the statistics accordingly. Once the recovery is complete, you can check out the recovered files in the destination folder and discard the unnecessary data.
Other Tools You Can Consider for FAT32 File Recovery
In case Disk Drill’s just not for you, there are several solid data recovery program alternatives you can try out, each with its own set of advantages and disadvantages. Here are a few worth considering:
Minitool Data Recovery

Minitool Data Recovery is a relatively straightforward option that provides you with the usual bells and whistles expected of an app in its niche.
However, it does also include the ability to restore entire partitions, which is great. The free trial lets you recover up to 1GB of data, but some of its cooler features are reserved for the paid version. While the app does suffer from a slightly outdated interface design and a finicky preview function, Minitool Data Recovery is a competent program that’s worth a look.
TestDisk
If you’re not keen on spending any money on your data recovery solution, then TestDisk might be right up your alley. This open-source and completely free app offers a wide range of supported file systems and file types, but its main drawback is its command-line interface (CLI), which often deters less technically skilled users. For those who don’t mind learning how to navigate a CLI-based program and are looking for something light on the wallet, TestDisk has a lot to offer.
EaseUS
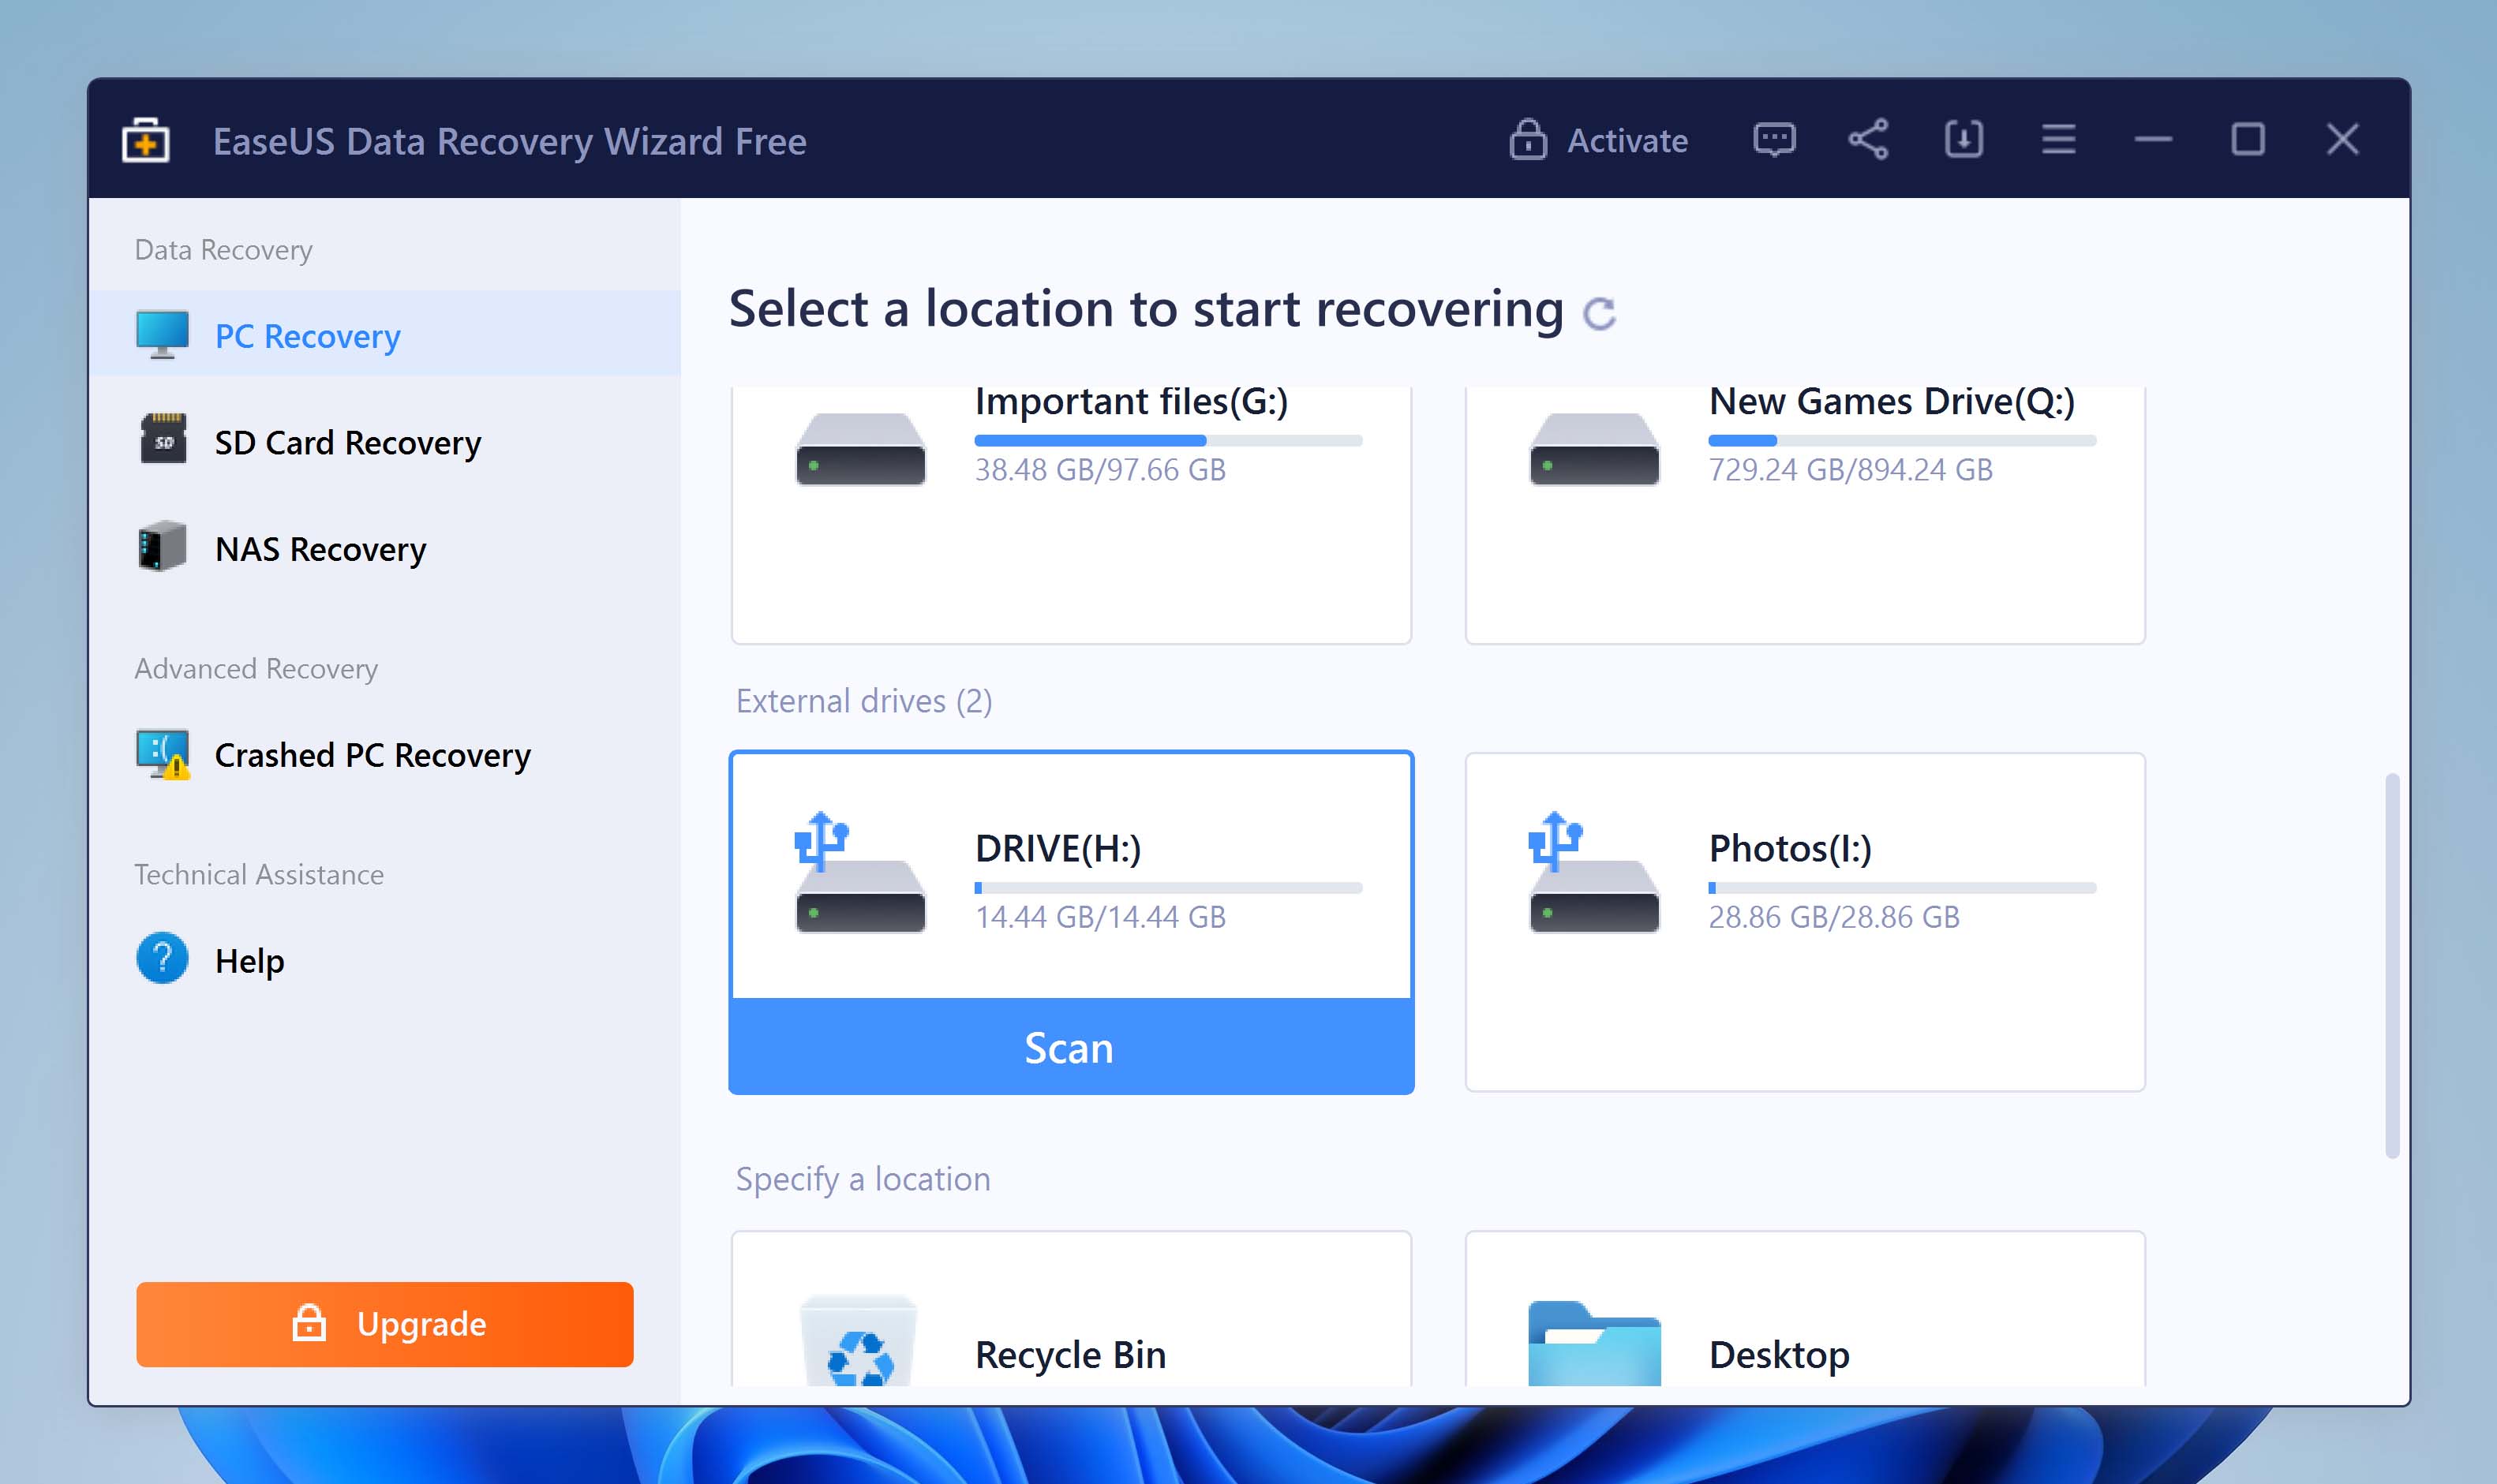
EaseUS is a long-standing data recovery program that’s been around for almost two decades. Similar to Disk Drill, it’s designed with both computer veterans and novices in mind and boasts reliable results and a polished interface. EaseUS does have a trial version with a 2GB recovery limit, but its paid plans can be quite pricey, especially in the short term.
Conclusion
The FAT32 file format was once one of the most common formatting systems. And while its popularity has waned in recent years, there are still quite a large number of storage devices that still utilize the file system – particularly removable ones like SD cards and flash drives.
Thankfully, it is not that difficult to recover data from a FAT32 drive. Most leading data recovery applications support legacy file formats just fine, and you can use them to restore your deleted files.
Whether you are on Windows, Mac, or even Linux, there is a good data recovery tool for your platform. Simply follow the instructions outlined above, and you will have your important files recovered in no time.
FAQ
Is FAT32 still in use?
For the most part, no. FAT32 has been phased out from all operating systems. Windows uses NTFS, Mac its own proprietary systems, while Linux relies on ext. Even portable storage media like SD cards have switched to exFAT.
That being said, old computers sometimes still use FAT32. You can even format a drive with this file format on modern computers if you so want.
How do I recover files from FAT32?
The best way to recover lost or deleted files from a FAT32 storage device is through a top-notch data recovery program. But given the age of FAT32 and how much less it’s being used nowadays, many recovery solutions have opted not to support the file system. So the important thing here is to not only find an app with high recovery rates but one that’s compatible with FAT32 as well.
How do I recover my FAT partition?
There are many ways to recover a partition. In many cases, it might be easier to use a data recovery tool to restore the important data and then create a new partition. You can recover data from a formatted partition as well using the same method.
What is the best FAT32 Recovery tool?
There are many great data recovery tools available for free. For Linux, PhotoRec is your best bet. It can recover as much data as you want from a FAT32 drive or partition and save it in another location.
On platforms like Windows or Macintosh, Disk Drill is a great option. It can scan any connected device and display all files that can be recovered. From there, you can select which files you actually want to keep, saving time and storage space.
How do I fix a FAT32 memory card?
If the memory card is corrupted, you need to fix or reformat it. Use the chkdsk utility to scan the drive for errors and automatically fix them. If that doesn’t do the trick, use a data recovery tool to restore the important files and then format the SD card to make it usable.
This article was written by Levin Roy, a Contributing Writer at Handy Recovery Advisor. It was recently updated by Princess Lescan. It was also verified for technical accuracy by Andrey Vasilyev, our editorial advisor.
Curious about our content creation process? Take a look at our Editor Guidelines.