
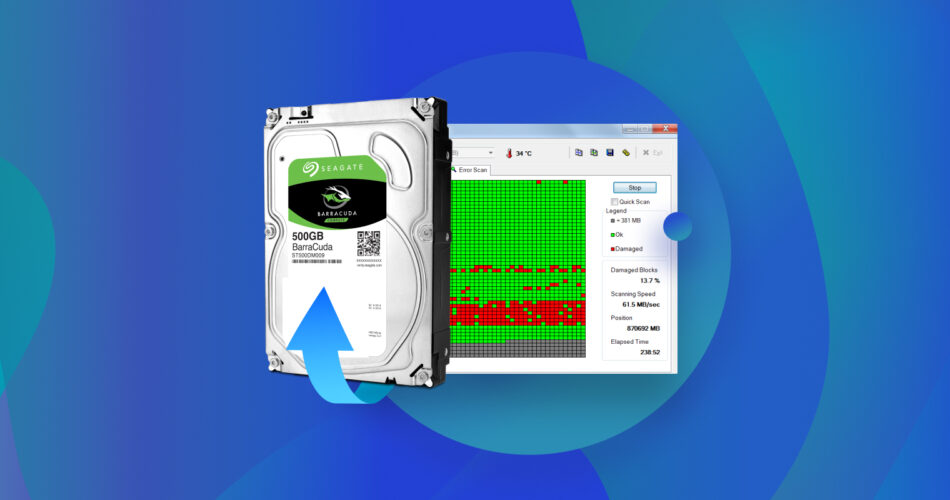
If you’re seeing bad sectors on your hard drive and worried about your data, or you’ve already lost access to your files and are looking for a way to recover them, you’re in the right place. Bad sectors are a warning sign that your hard drive is failing, and the longer you wait, the higher the risk of permanent data loss. Recovery is often still possible, and we’ll walk you through how to do it. Why trust us? We’ve rescued data from more failing drives than we can count. If there’s a way to get your files back, we know it.
We’ll show you how to recover data from a hard drive with bad sectors, as well as a few fixes you can use to get the damaged drive back to working order.
Is It Possible to Recover Data From a Hard Drive With Bad Sectors?
Yes, there are cases where it is possible to recover data from an HDD with bad sectors. But, due to the nature of bad sectors, there’s never a guarantee. Bad sectors are a sign of corruption. There are two types:
- Logical bad sectors occur when your operating system repeatedly fails to read data from the sector.
- Physical bad sectors are typically worse and appear as a result of physical damage.
When a sector turns bad, your hard drive will attempt to transfer the data to a spare sector to prevent data corruption. However, if the data wasn’t transferred, the data remaining in the bad sector will become lost. Just as you can recover data from a dead hard drive, there are times when it is possible to recover data from a hard drive that contains bad sectors using a data recovery app.
To do so, your drive must at least be visible in Disk Management and show the correct capacity. It is also important to check the drive’s S.M.A.R.T. monitoring data to understand its overall health and see whether the condition is stable or rapidly degrading. Some tools, such as Disk Drill, include built-in SMART monitoring, which we will cover later.
Keep in mind that it isn’t possible to recover data directly from bad sectors themselves, as they are no longer readable. Recovery depends on whether your important files were stored in healthy areas of the drive. The chances of success are always case-dependent and vary based on the extent of physical damage.
As the drive is in a vulnerable state, any action could be detrimental to your data. Therefore, we strongly recommend making a backup before you implement any fixes.
How to Recover Data From Hard Drive With Bad Sectors
For recovering data from a hard drive with bad sectors, we recommend Disk Drill Data Recovery. It is a data recovery tool that allows you to create a byte-to-byte backup of the drive and scan the copy instead of the original disk. This approach helps protect unstable media, including a drive with bad sectors, and allows data recovery from healthy areas without putting additional stress on the failing hardware.
It has a long track record of successful recoveries from an array of supported file systems, including NTFS, FAT32, EXT3/EXT4, HFS, and APFS. More importantly, it includes a byte-to-byte backup feature we can use to take an image of the failing hard drive, which we can then use for recovery. Below, we’ll demonstrate both how to create a backup and how to recover data from it.
How to Create a Byte-to-byte Backup
A hard drive with bad sectors is in an unstable state. Therefore, any action you take on the drive itself, including data recovery, could pose a serious risk and contribute to partial or complete data loss. To prevent this, making A byte-to-byte copy of the hard drive will allow you to recover your data from the image file without interfering with the hard drive.
But first, before you start any process on the disk, check Disk Drill’s built-in S.M.A.R.T. monitoring feature. It allows you to track your drive’s health and detect early warning signs of failure.
How to enable S.M.A.R.T. monitoring in Disk Drill:
- Open Disk Drill and select your drive from the list.
- Go to the S.M.A.R.T. Monitoring section on the left.
- Enable monitoring to view real-time health indicators and warnings.
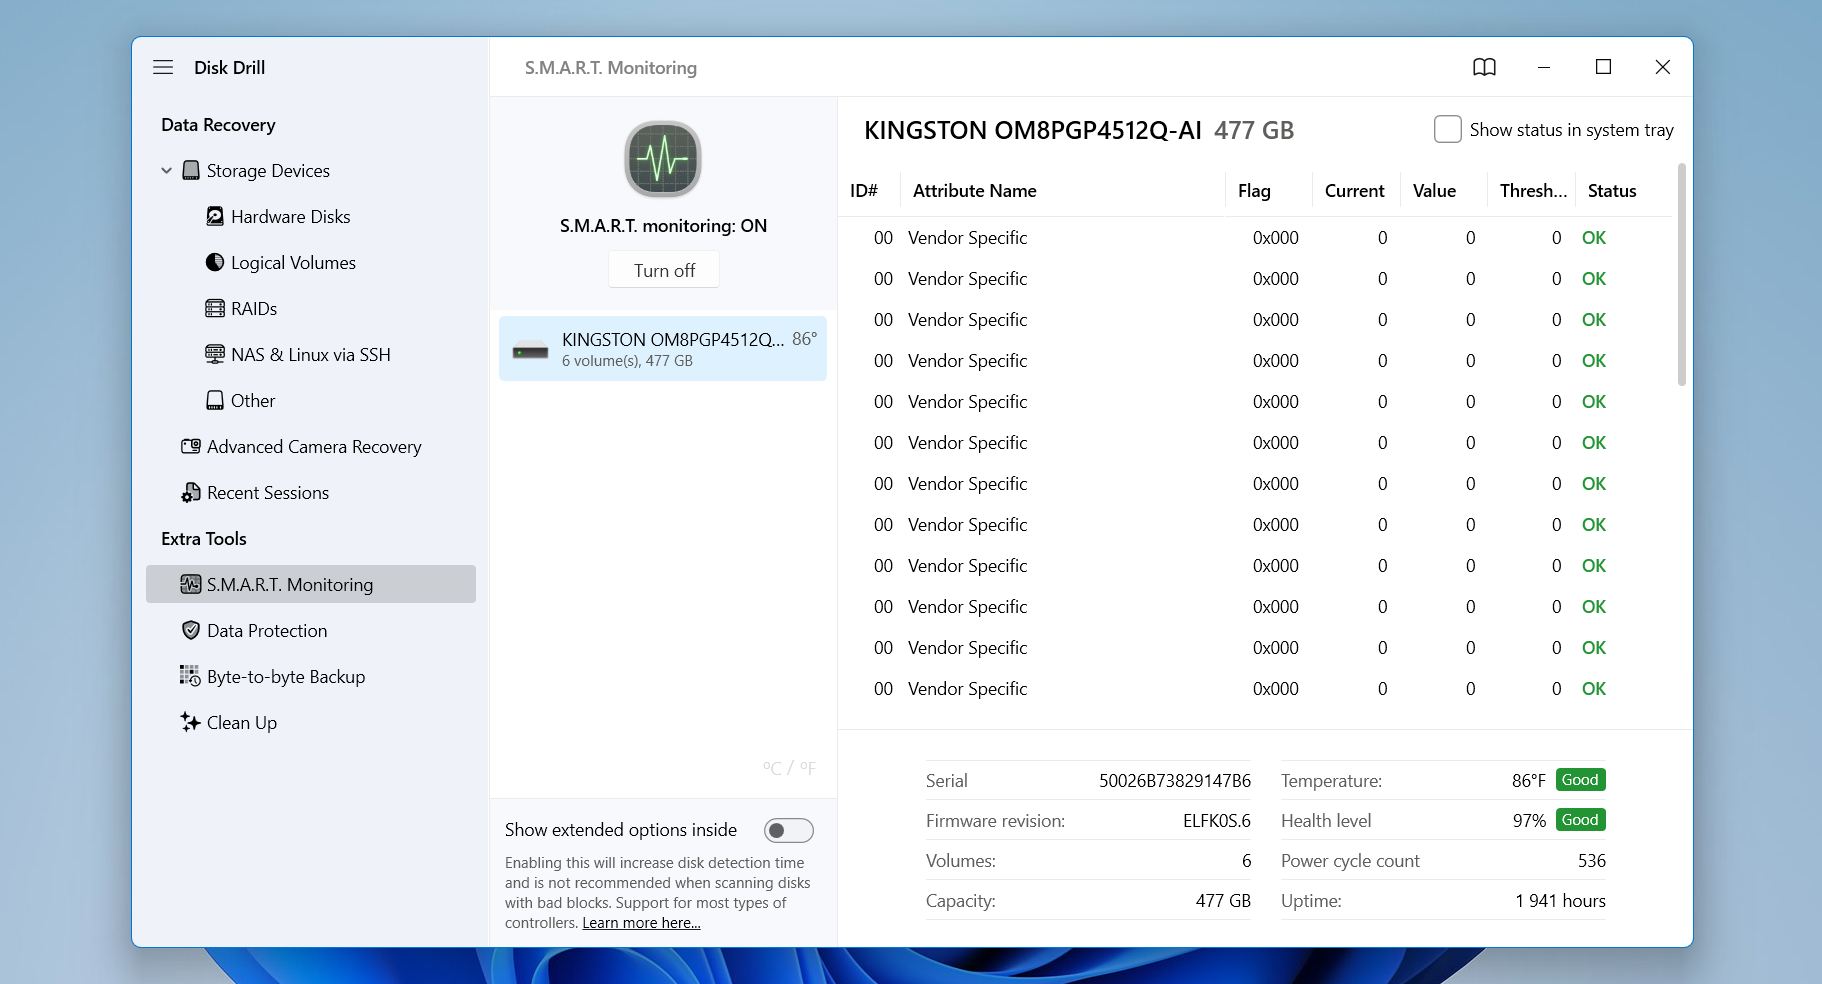
This quick check can help you decide whether the drive is still stable enough for software recovery or if it is safer to consult professionals before the condition worsens. Pay special attention to these attributes:
- 05, Reallocated Sectors Count (growing value indicates surface damage)
- C5 (197), Current Pending Sector Count (sectors waiting for remap due to read issues)
- C6 (198), Uncorrectable Sector Count (sectors that cannot be read or corrected)
- C7 (199), UDMA CRC Error Count (often related to cable or connection problems)
- BB (187), Reported Uncorrectable Errors (serious read failures reported by the drive)
- BC (188), Command Timeout (communication timeouts between drive and controller)
Now, let’s create a byte-to-byte backup with Disk Drill:
- Download and install Disk Drill to a separate healthy drive.
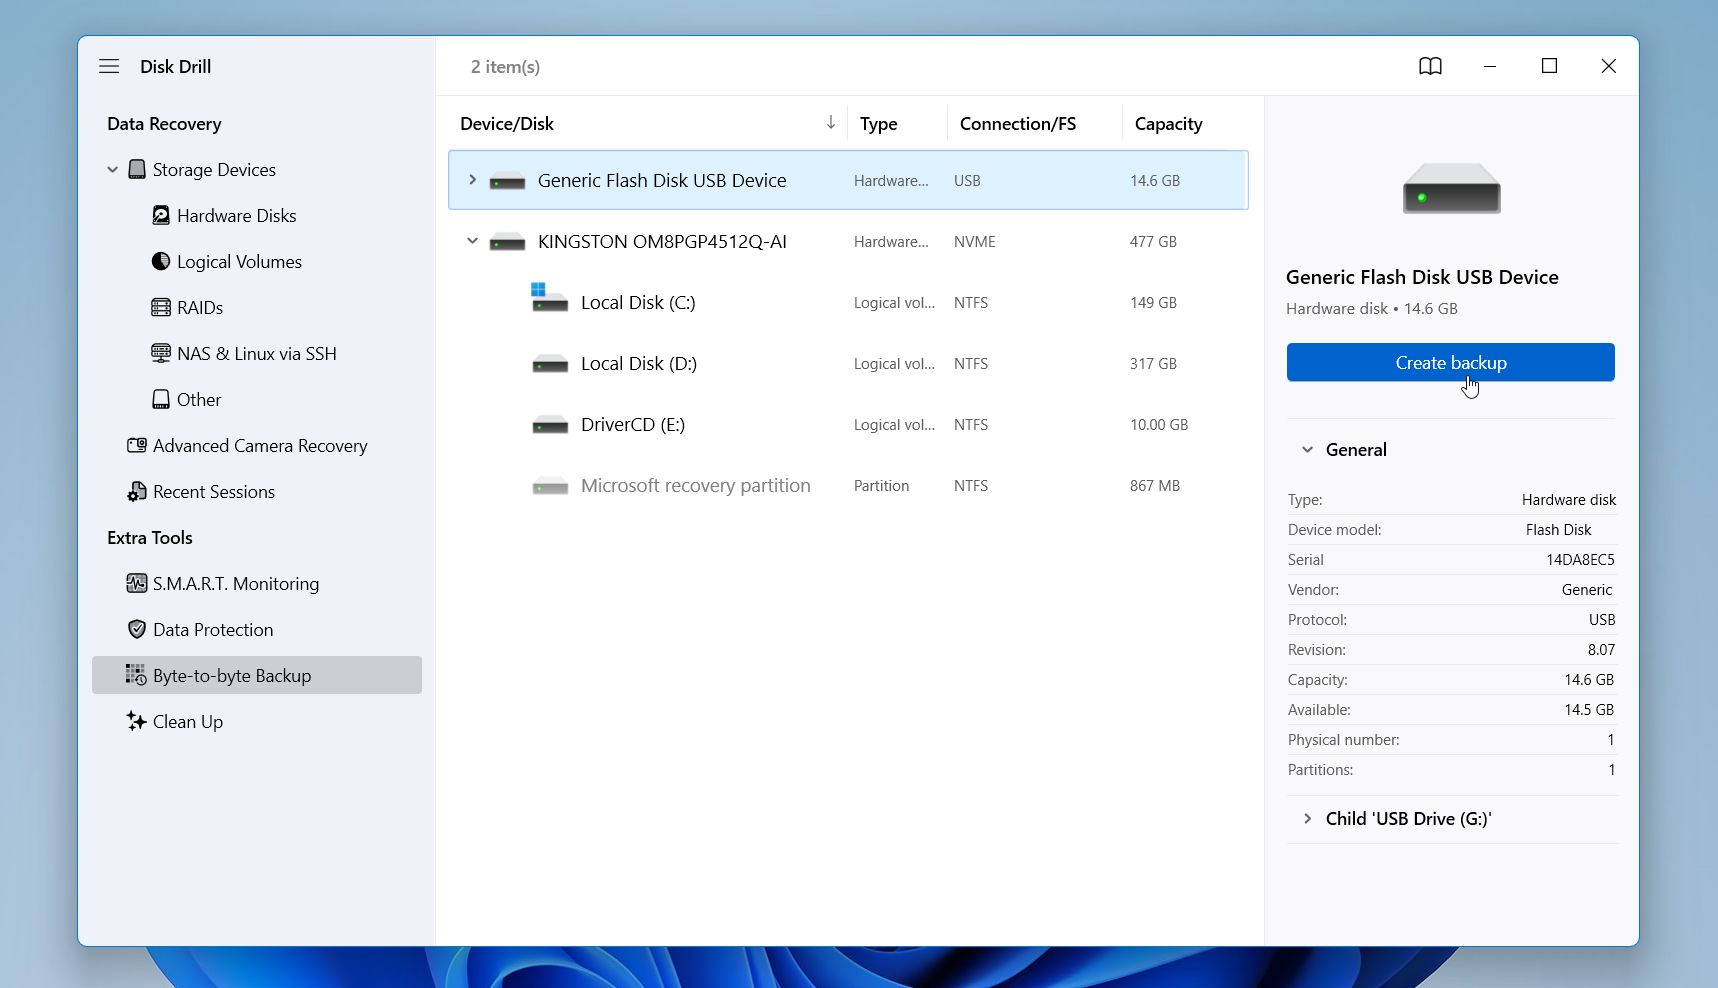
- Click Byte-to-byte Backup.
- Select the hard drive with bad sectors and click Create backup.
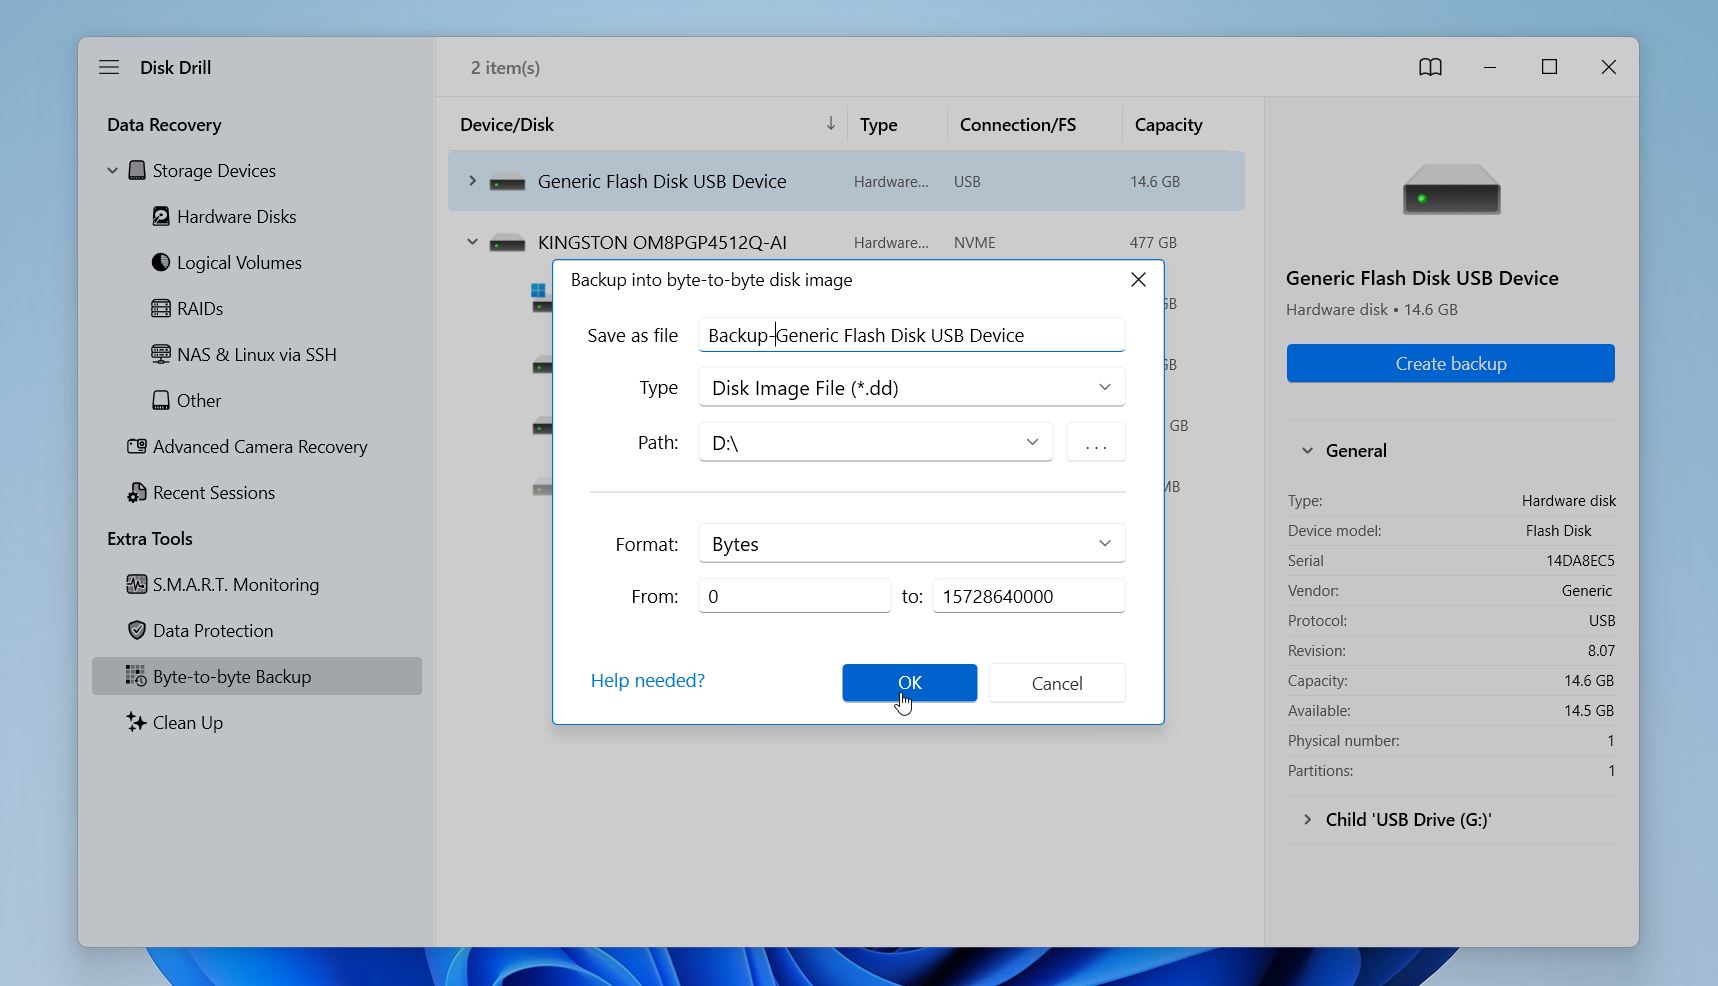
- Give the backup a name and choose a storage location. Make sure the target disk has enough free space and is larger than or at least equal to the full capacity of the problem drive. Then click OK.
- This may take considerable time depending on drive size and condition. Do not interrupt the process, wait until it’s completed.
Disk Drill uses a smart multi-pass approach when creating a byte-to-byte backup. It first skips problematic sectors to complete a fast initial copy, then performs additional read attempts on damaged areas without putting unnecessary stress on the drive. If the drive disconnects during the process, Disk Drill automatically resumes the backup once the device reconnects. This auto-resume capability allows you to leave the computer running without constant supervision
When bad sectors are detected, Disk Drill automatically reduces the read block size (from 64 KB down to 512 bytes) and performs 5-8 controlled retries to extract as much readable data as possible. It also uses parallel read/write operations to improve speed and reduce wear.
For advanced users, Disk Drill allows manual adjustment of backup parameters, including block size and retry settings. Detailed guidance is available in the official documentation.
How to Recover Data From the Byte-to-byte Backup
Now that we have a byte-to-byte backup of the hard drive with bad sectors, we can safely perform data recovery on the image. We will attach the disk image we just created and scan it for all recoverable data.
Here’s how you restore data from a hard drive with bad sectors using an image with Disk Drill:
- Return to Storage devices (main menu) and click Attach disk image to assign the newly created backup of the hard drive with bad sectors.
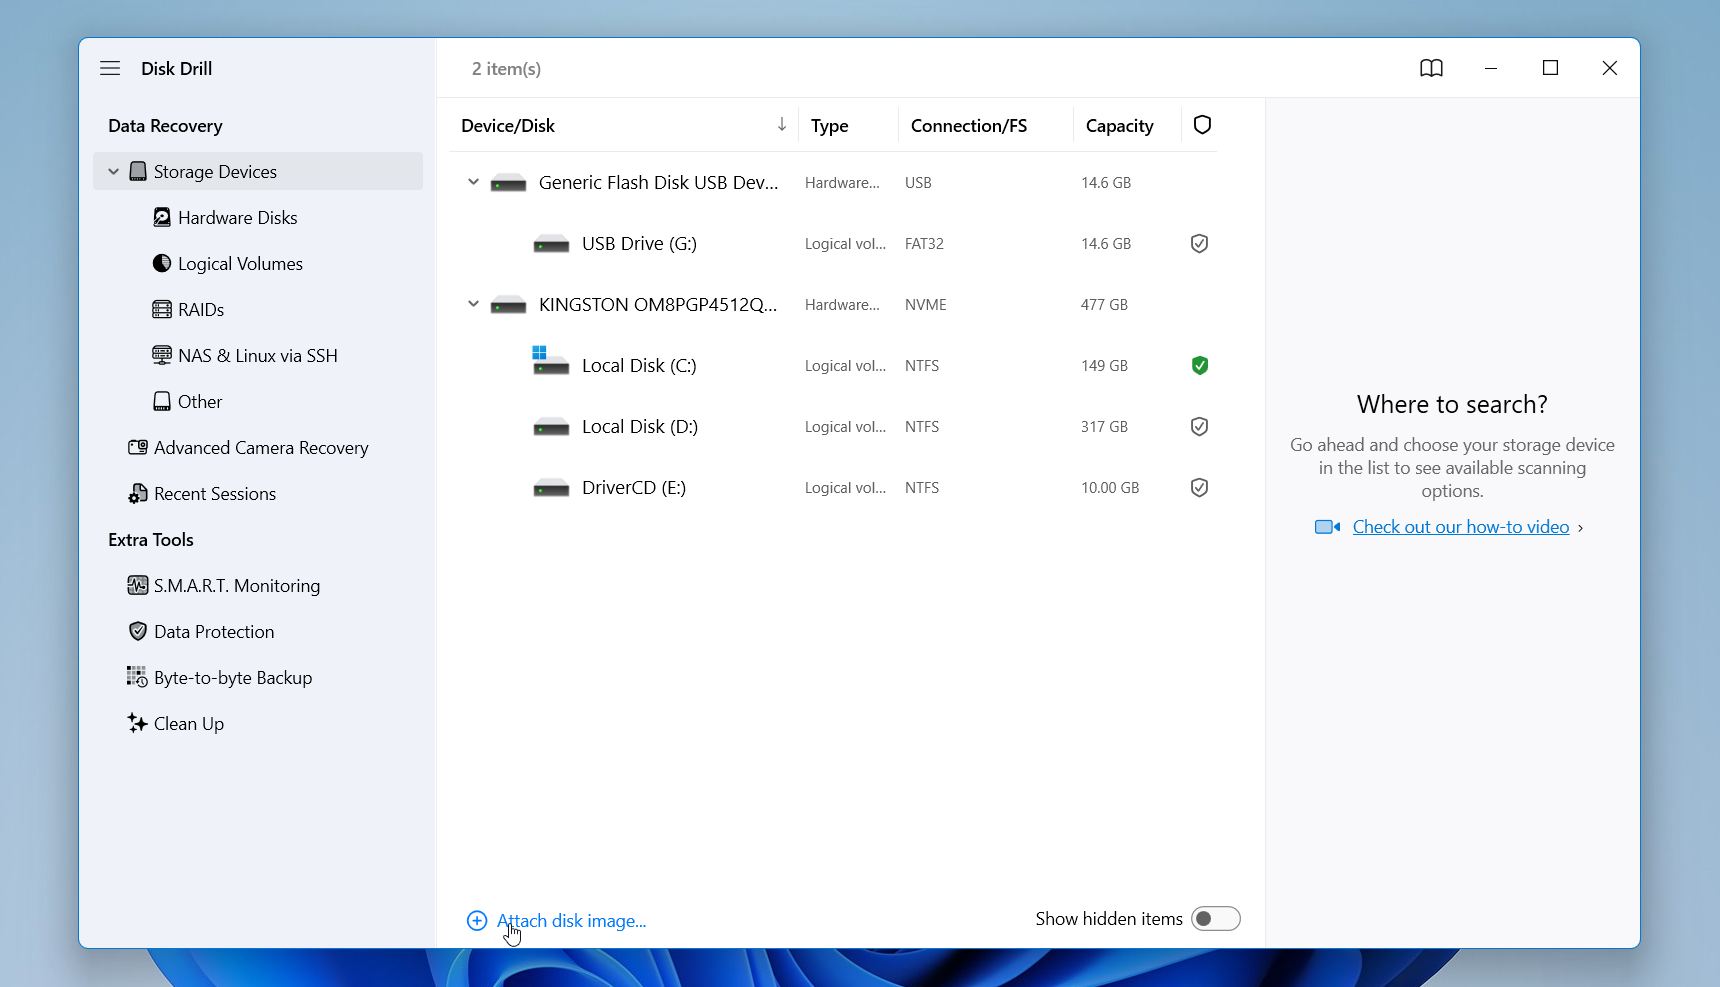
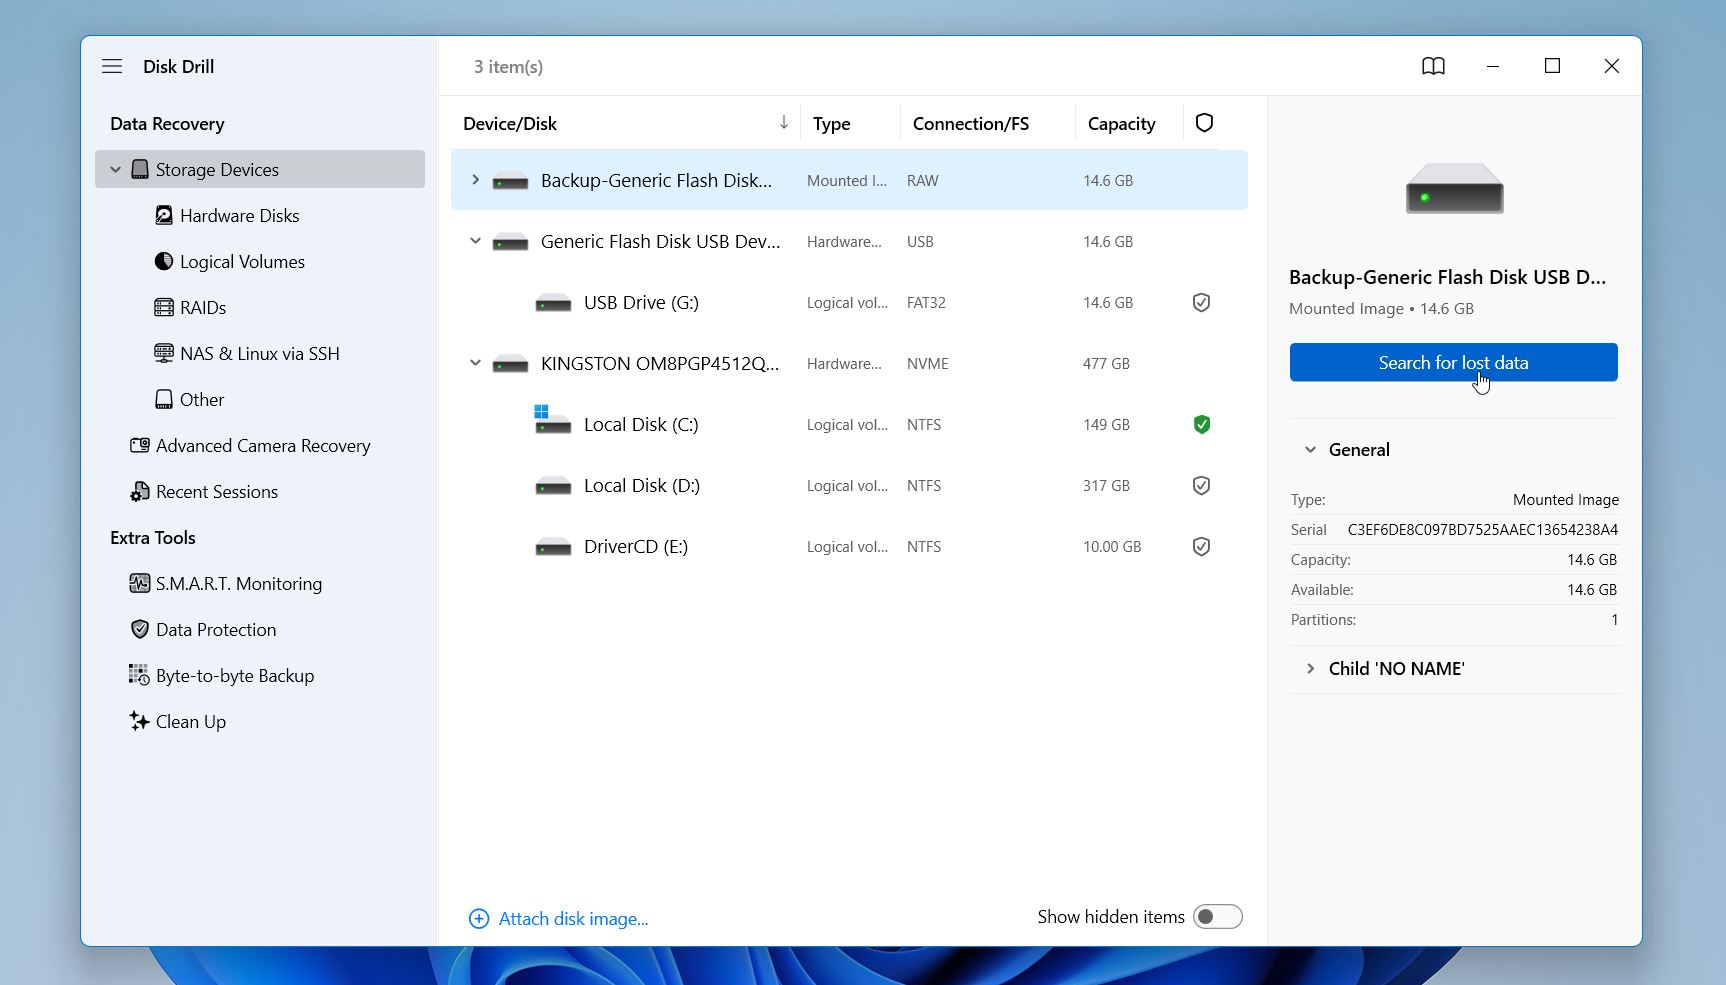
- Select the image and click Search for lost data.
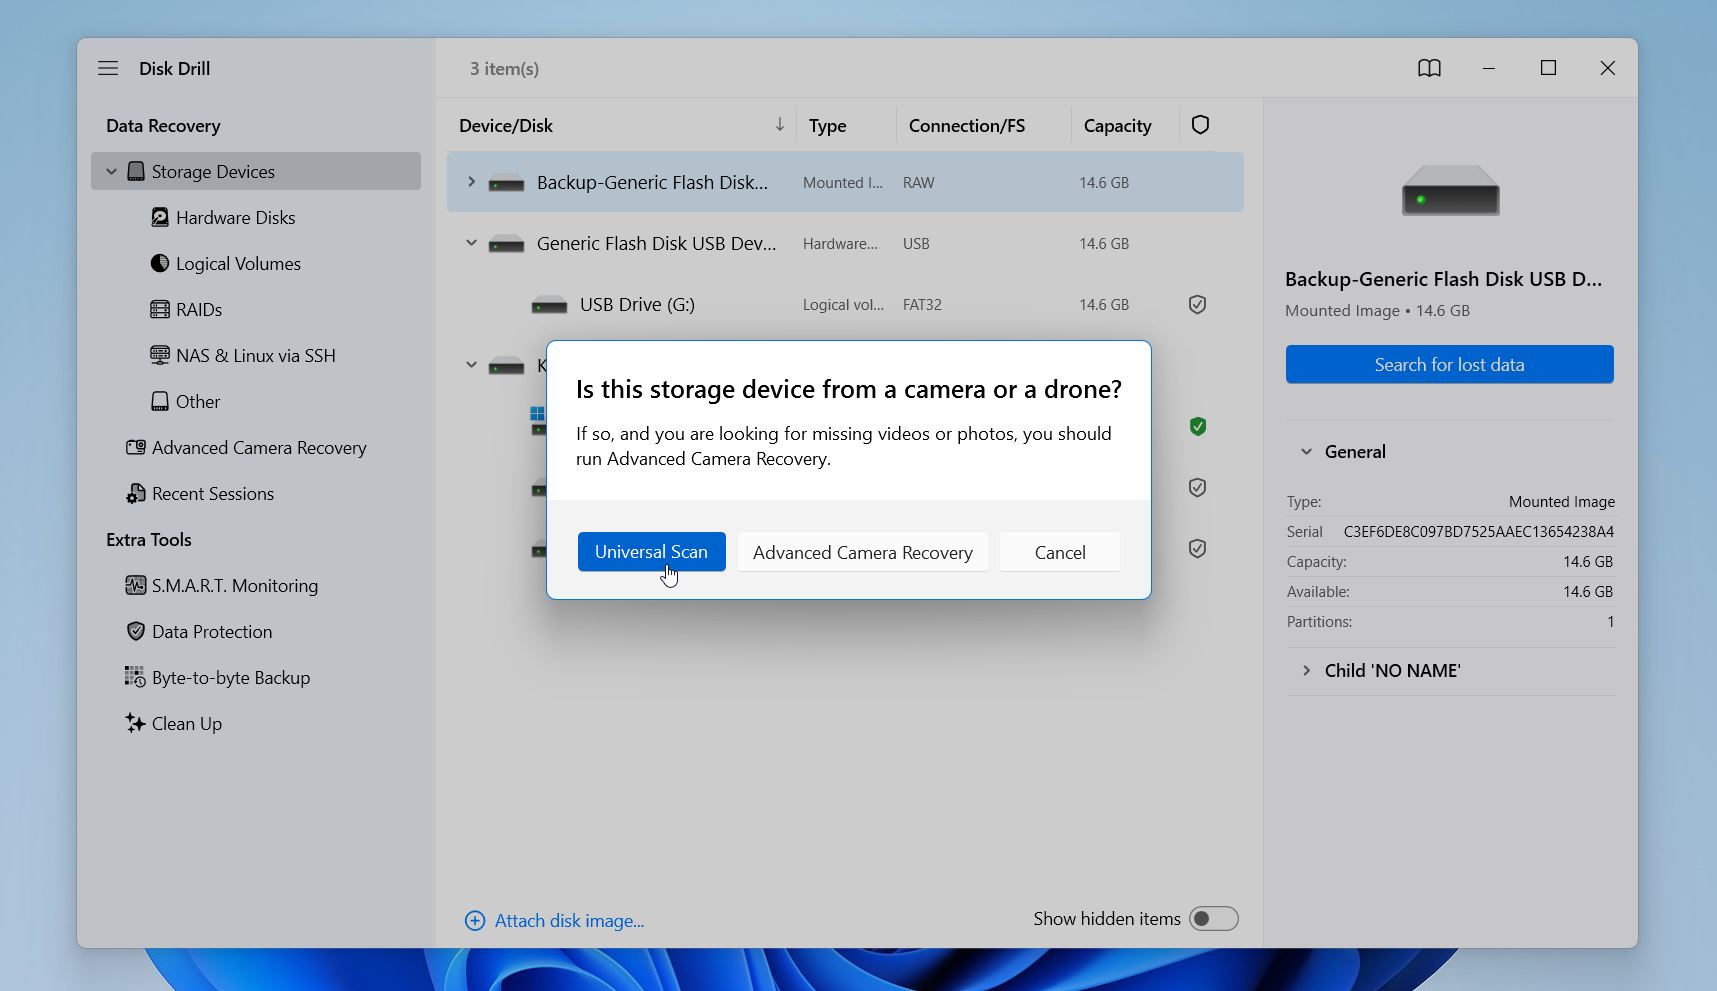
- Select a scan mode if prompted. For a hard drive it’s recommended to use the Universal Scan. Advanced Camera Recovery is better suited for video recovery from camera storage media.
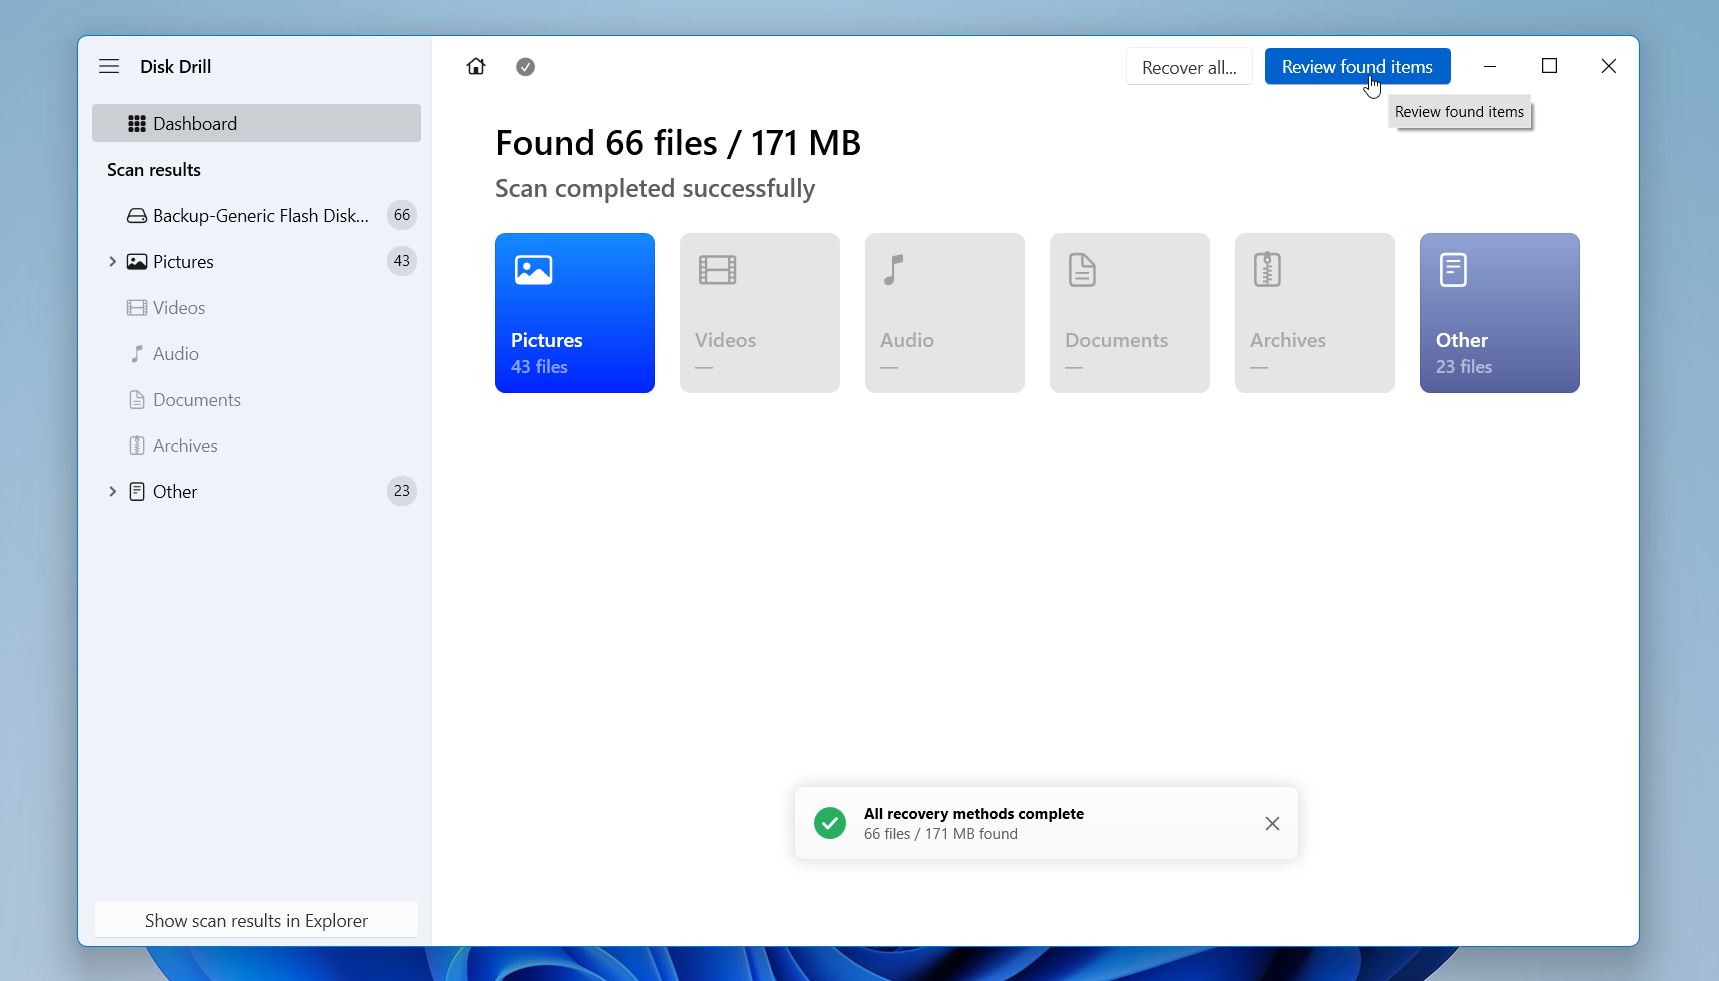
- Click Review found items if you look for a specific file. Alternatively, just click Recover all to recover as much as possible.
- Use the filter buttons to organize the results by type, size, date modified, or recovery chances. Use a preview to confirm that it is a file you need. If the file displays correctly in the preview, it means the data is 100% intact, and the file can be recovered.
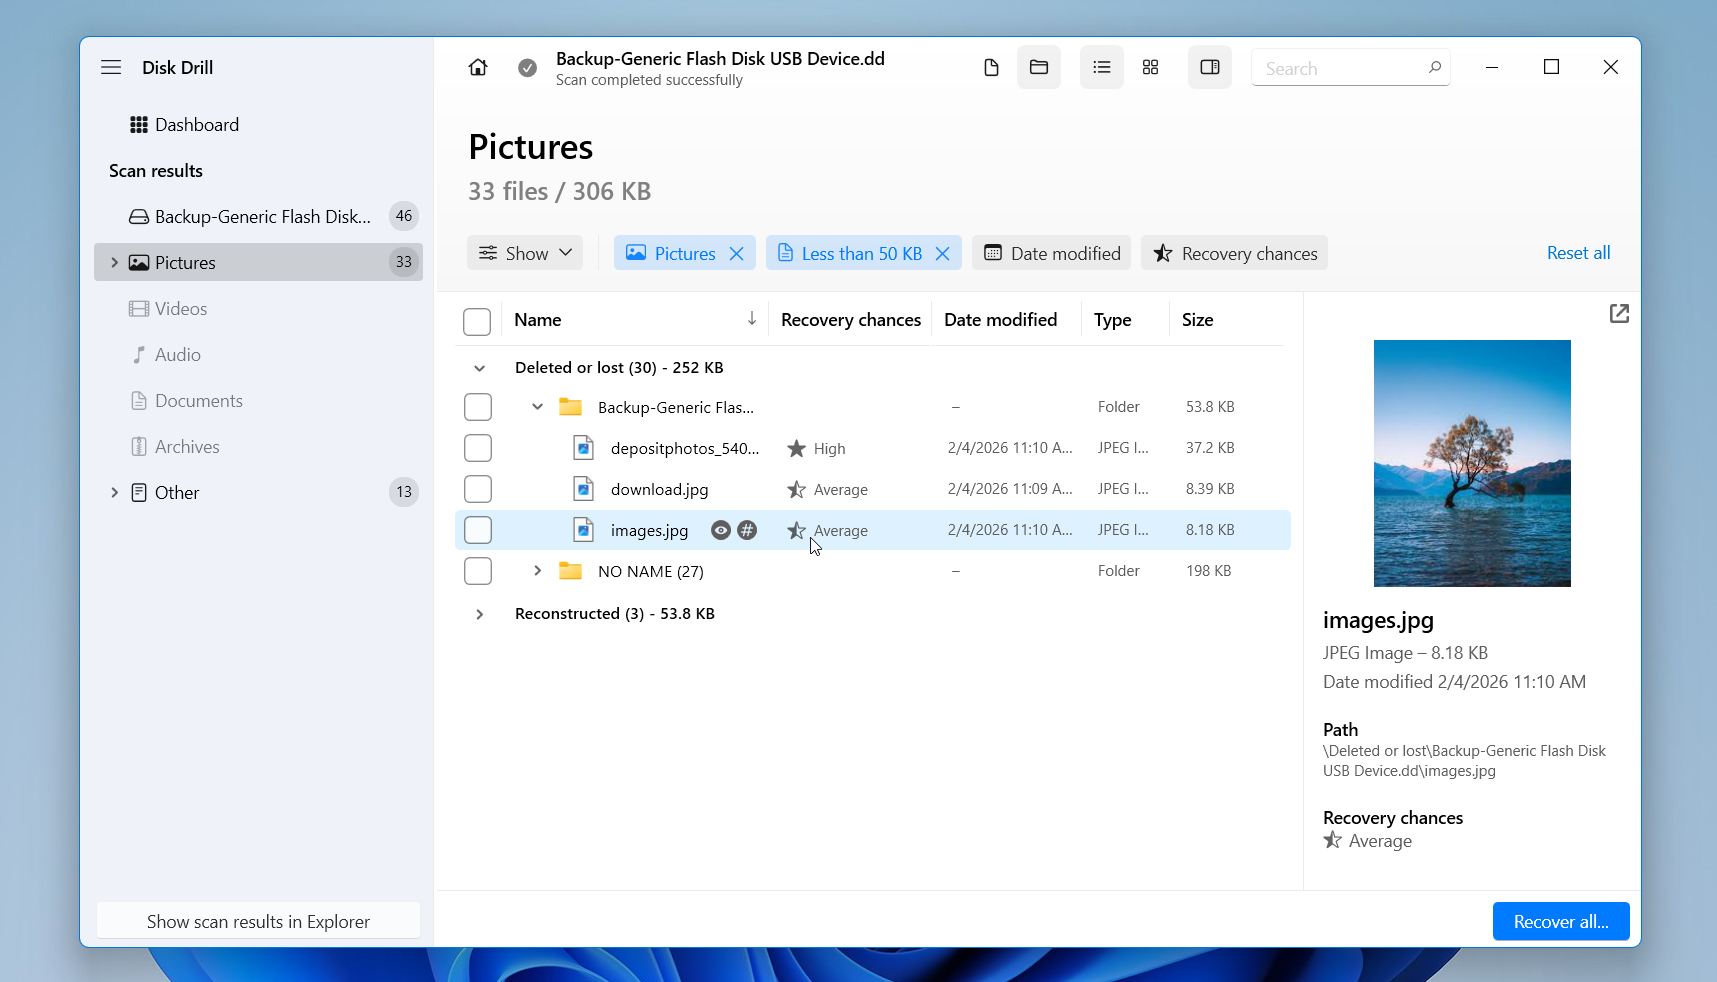
- Mark which files you want to recover from the bad sector hard drive image. When ready, click Recover.
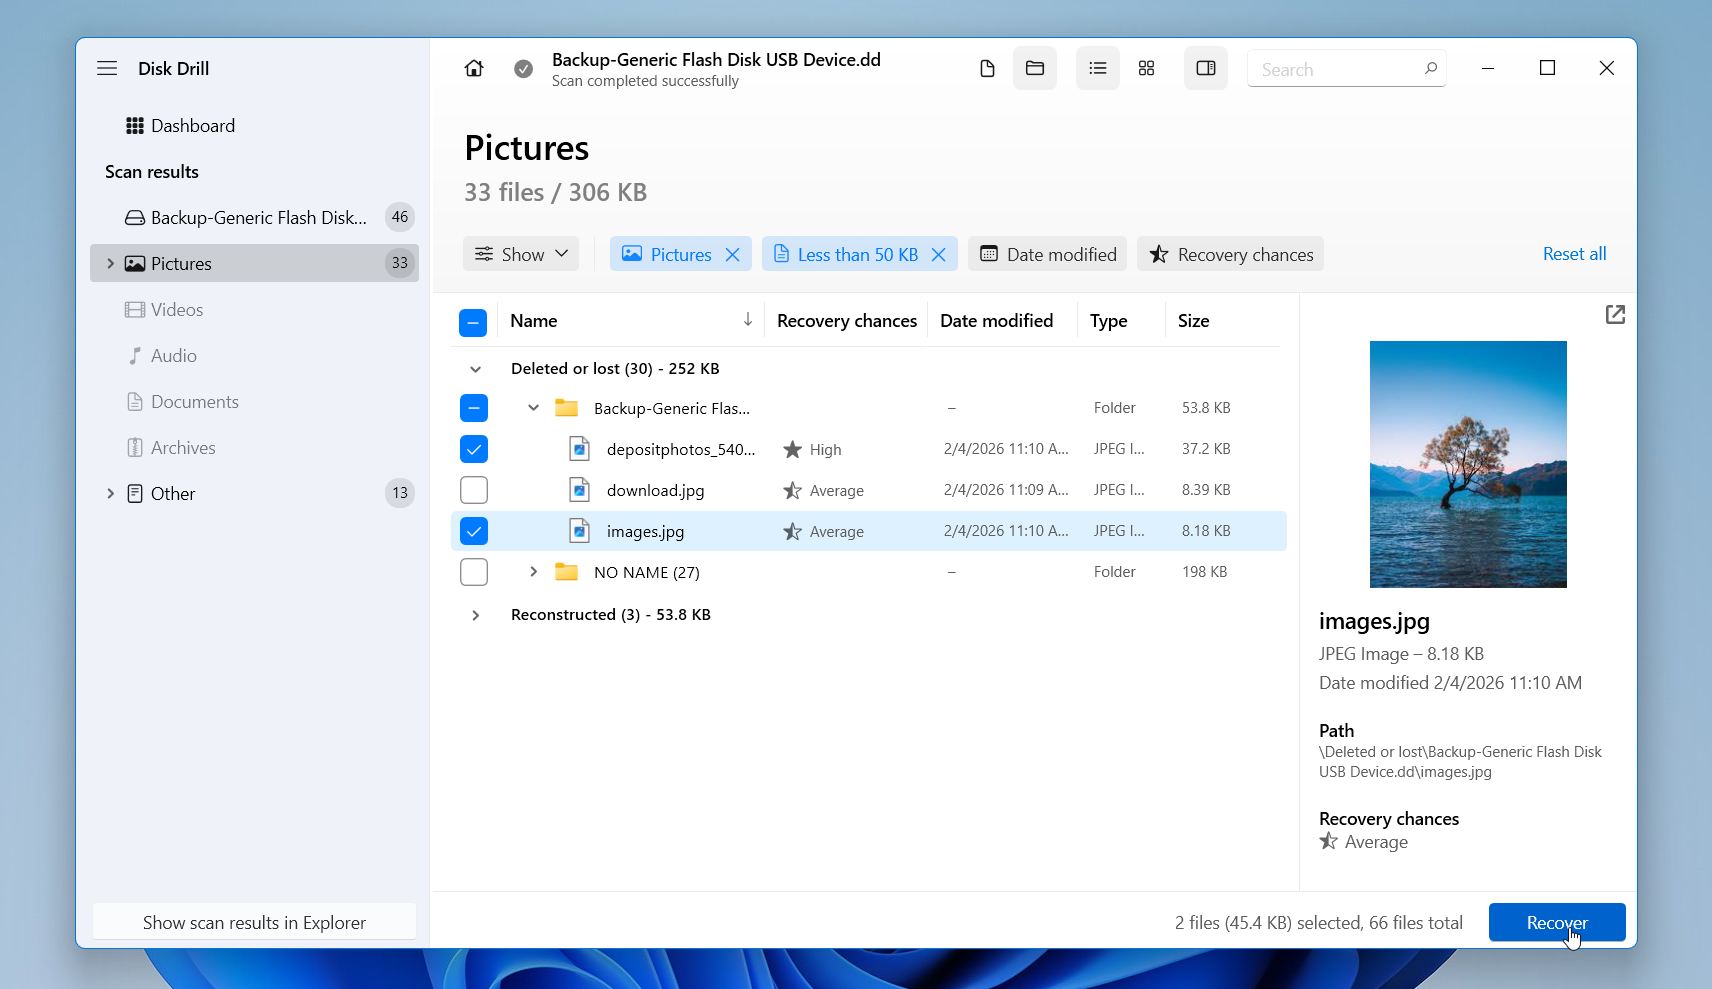
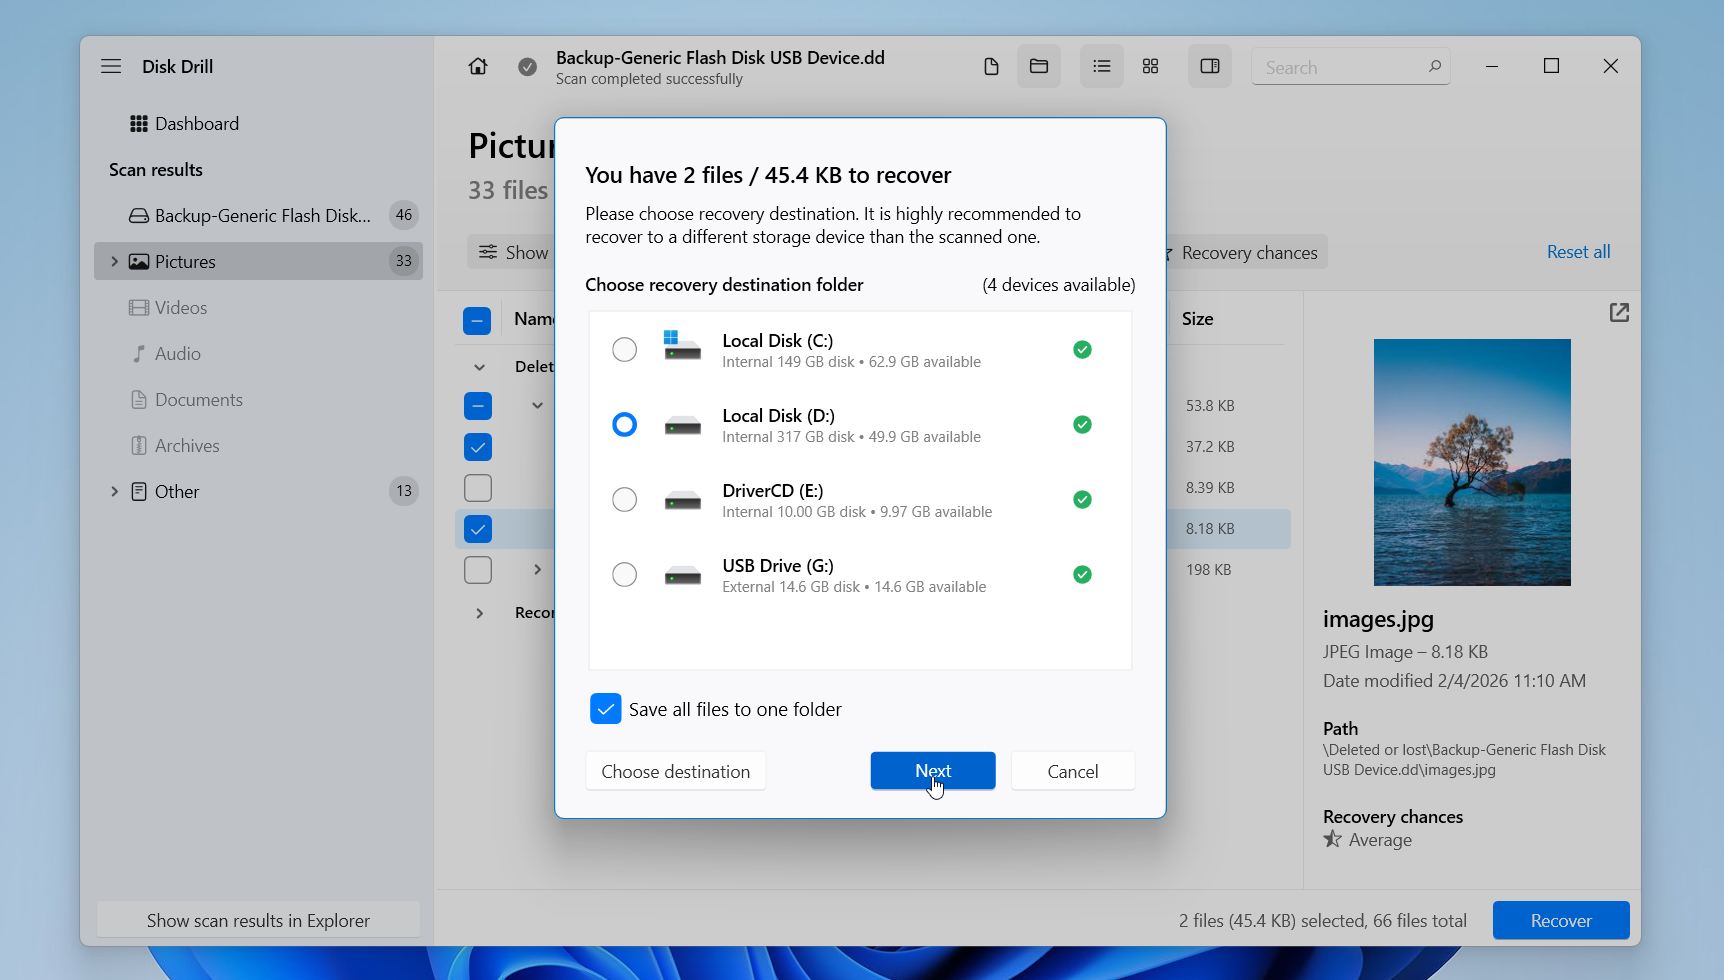
- Choose an appropriate recovery location on a healthy storage device and click Next.
In especially severe cases, when the hard drive is physically damaged or not detected at all and DIY recovery is no longer realistic, you can consider a professional data recovery service. This option is usually much more expensive than using software yourself, but in situations with critical business data or irreplaceable files, it may be the only viable path. Our team has prepared a list of the best data recovery services in case you decide to go that route.
How to Fix Bad Sectors on Hard Drive
After you perform data recovery from a hard drive with bad sectors, there are a handful of fixes you can use to repair it. The below solutions were demonstrated on Windows 11, but they also work for Windows 10.
Any repairs made to fix bad sectors can lead to data loss, so it’s important that you at least back up the drive first.
Method 1:Fix Bad Sectors Using CMD (CHKDSK)
CheckDisk is a hard drive-repair command. When used with the /r parameter, it can locate bad sectors and map them as unusable:
- Right-click Start and click Terminal (Admin).
- Type chkdsk *: /r. Replace * with your drive letter. Press Enter.
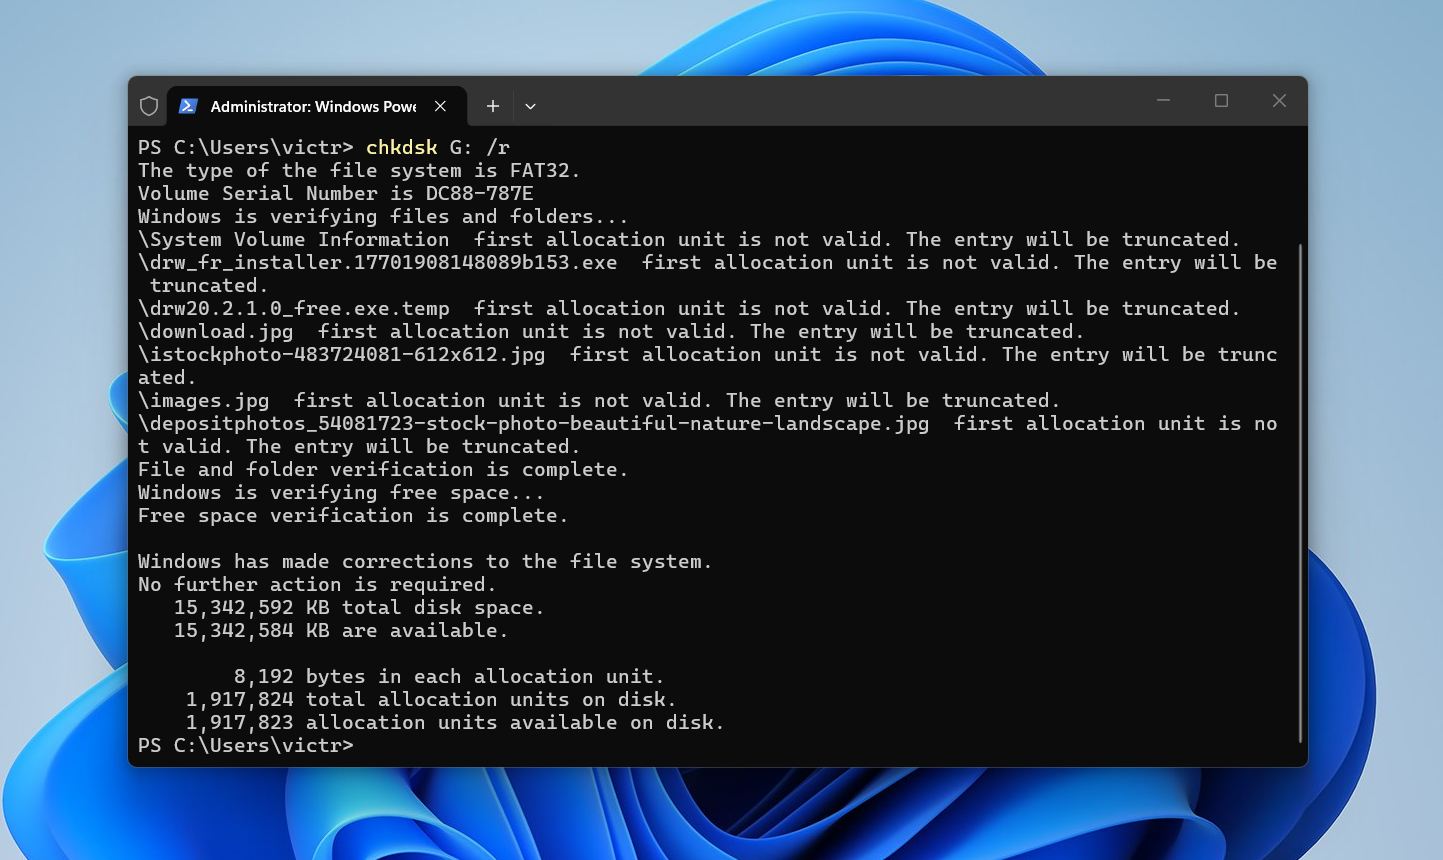
Remember, CHKDSK can’t repair physical damage; it only detects and isolates it. If the scan reports many bad sectors, it’s a strong sign the drive may be failing, and we recommend backing up your data right away. For additional community advice and real-world experiences, see the discussion on using CHKDSK safely.
Method 2:Perform Full Format
The main difference between quick and full format lies in thoroughness, a full format does a complete scan of your hard drive and marks bad sectors so they cannot be written to on a file system level. Be warned that this will wipe all traces of data.
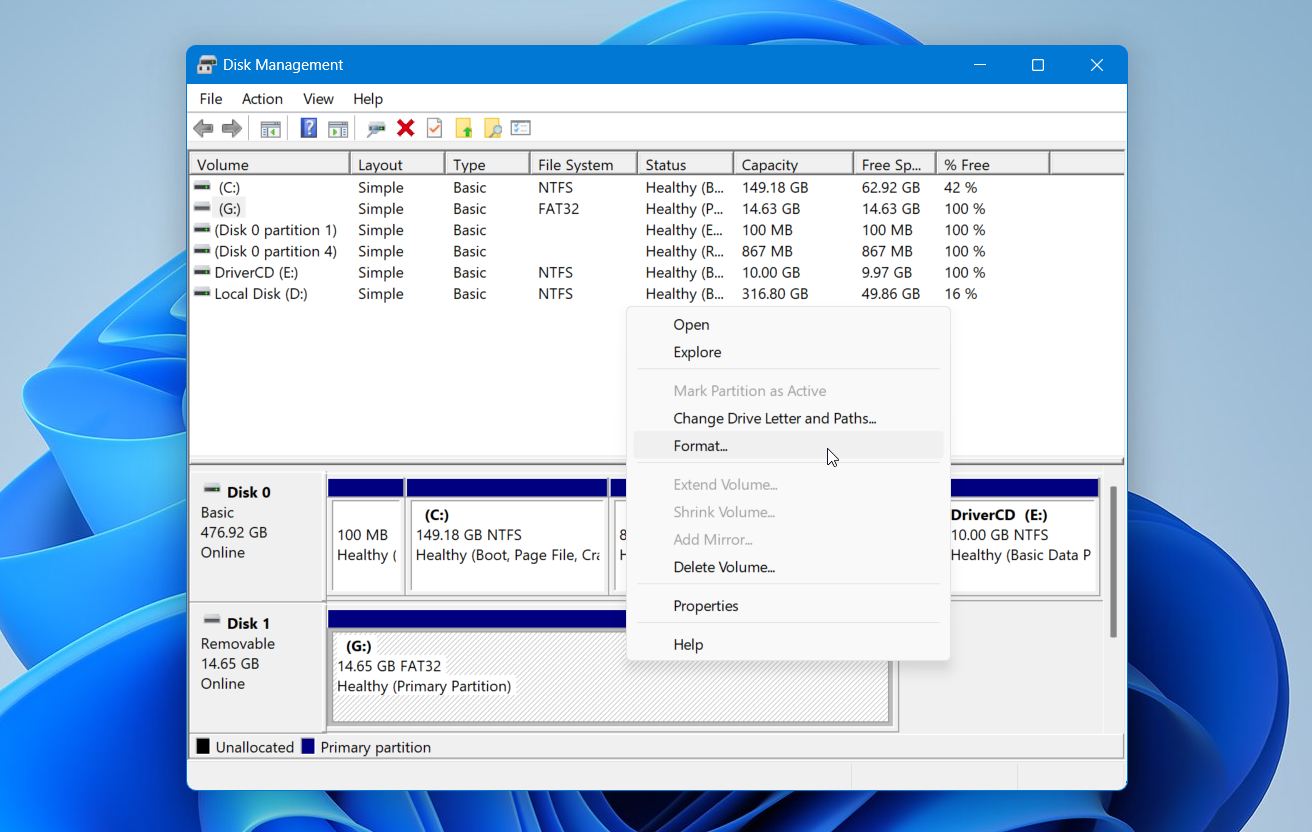
- Right-click Start and click Disk Management.
- Right-click the volume of the hard drive with bad sectors and click Format…
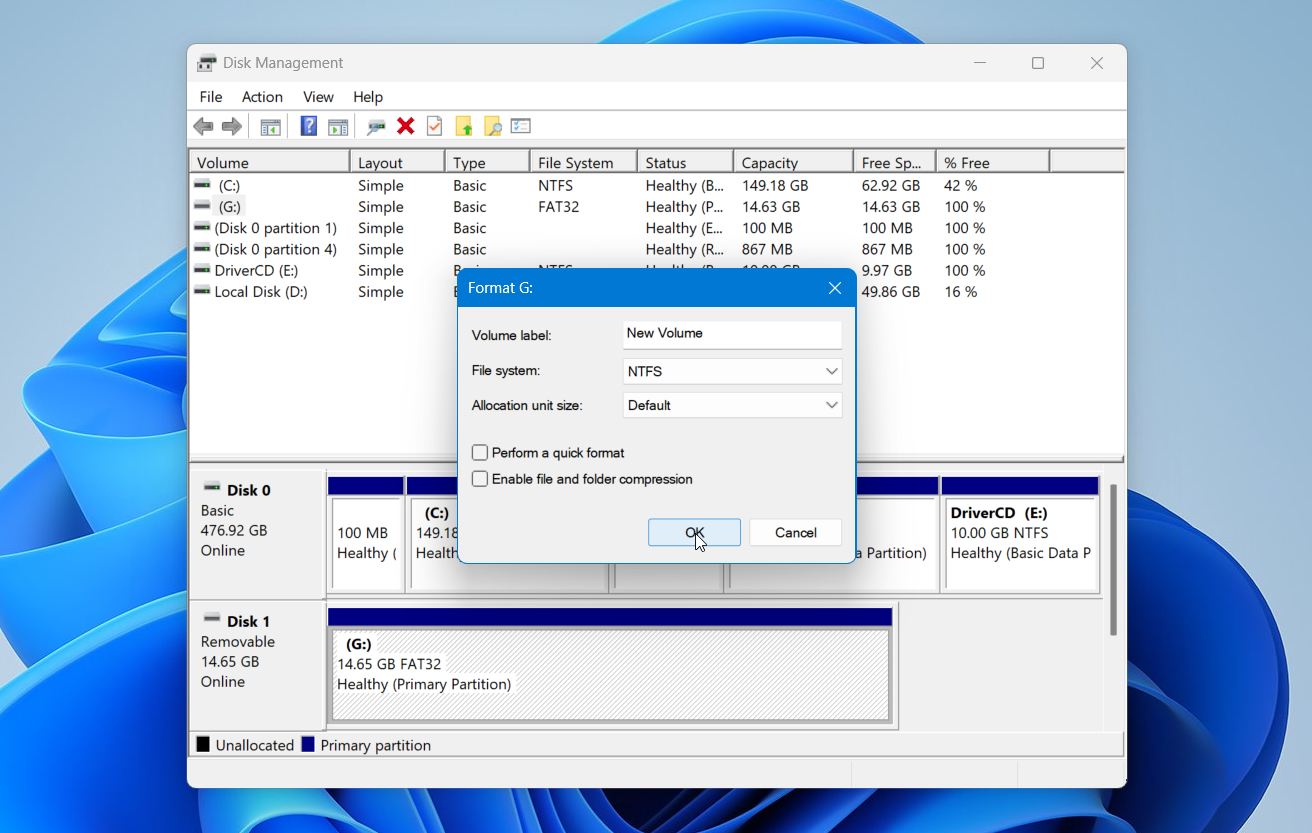
- Make sure Perform a quick format is not ticked and click OK.
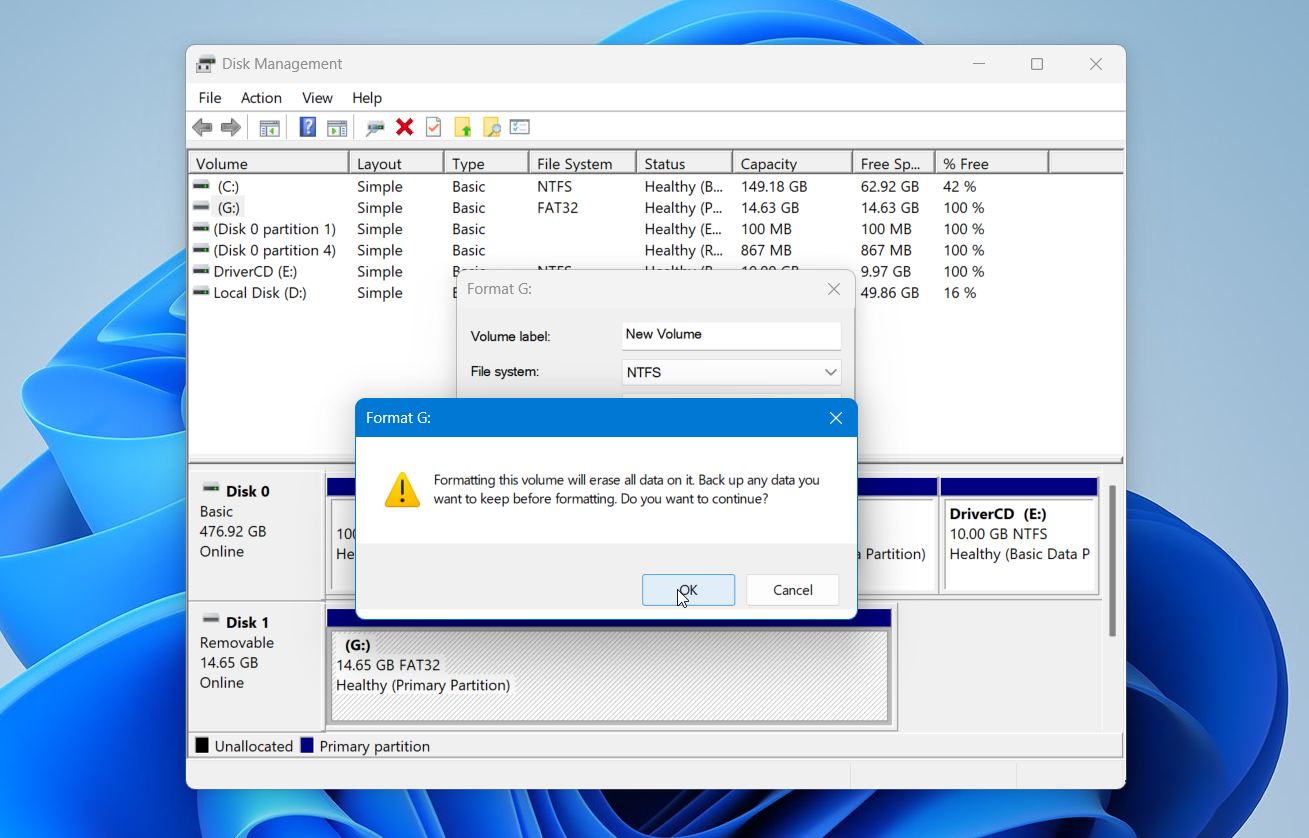
- Click OK again to confirm.
You can also format a drive using third-party utilities, not only built-in system tools. For example, HDD Low Level Format Tool by HDDGuru is often used as an alternative when standard formatting fails or when deeper reinitialization is required.<
Method 3:Remap Bad Sectors Using Victoria SSD/HDD
Victoria for Windows is a free tool you can use to diagnose and repair problems with your hard drive. You can use it to locate and remap bad sectors, which replaces the bad sector with a working one from the spare sector pool:
- Download Victoria for Windows.
- Select the hard drive with bad sectors, then click Test & Repair.
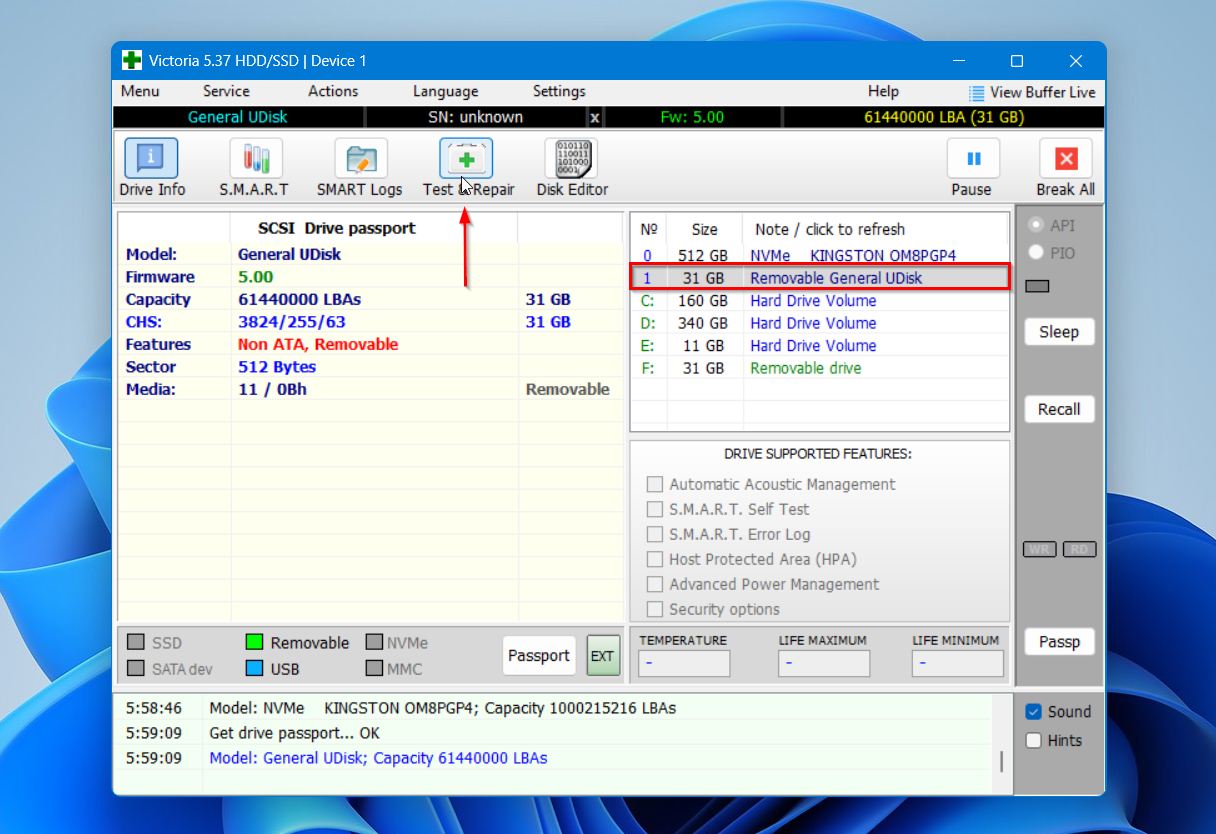
- Select Remap, then click Scan.
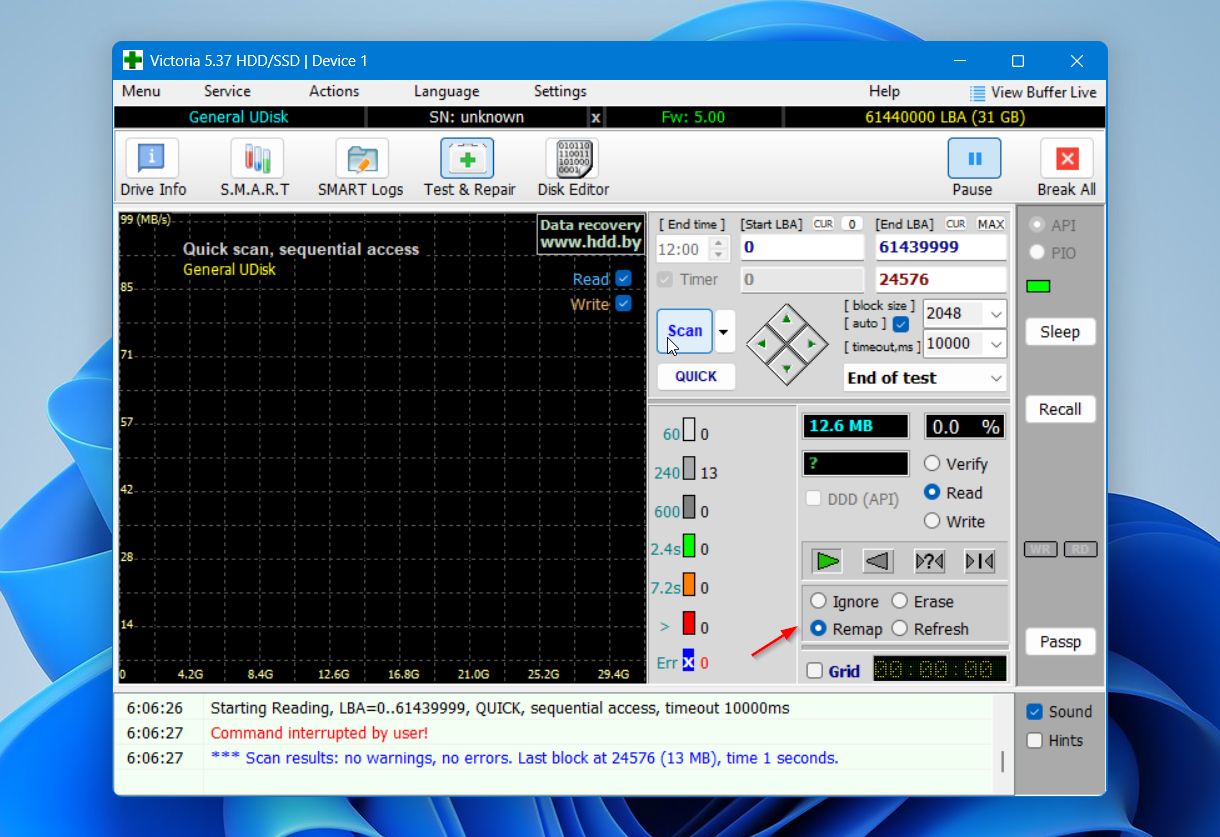
Victoria is frequently recommended and discussed in data recovery communities, including our own forum. However, keep in mind that remapping does not “heal” the drive. It only marks problematic sectors as unusable and replaces them with spare ones. If bad sectors continue to appear, the drive is deteriorating. In that case, create a full byte-to-byte backup immediately and plan for drive replacement.
Tips to Prevent Bad Sectors
While bad sectors can occur naturally as a hard drive ages, there are ways to prevent unnecessary bad sectors from appearing by actively taking care of your hard drive (and computer in general). This could extend its lifespan.
Method |
Description |
🧹 Clean your computer regularly |
Dust build-up will inevitably block airflow when left unchecked. Without sufficient airflow, your hard drive can overheat, leading to a myriad of problems and reducing overall performance. |
🩺 Monitor S.M.A.R.T. data |
Disk Drill includes a free active disk monitoring tool that passively monitors your hard drive’s S.M.A.R.T. data. It alerts you to anything of concern as it notices it so you don’t need to keep manually checking your hard drive health. |
🔌 Shut down safely |
Always power down your computer using the provided Shut down option in the Start menu. Forcing your computer to shut down by holding the power button can corrupt your hard drive. For extra safety, consider investing in an Uninterrupted Power Supply (UPS) to combat sudden power outages. |
👍 Buy from trusted brands |
If a deal seems too good to be true, it probably is. Buying hard drives from random brands that don’t have a reputation can end up costing you later on, as cheap hard drives often contain cheap, unreliable hardware. |
And, most importantly, back up your data. This way, even if you lose some data due to the sudden appearance of bad sectors, you can easily restore the copy without spending time trying to recover it. File History is a great starting point as it’s free and super easy to set up.
Conclusion
The appearance of bad sectors is usually a sign that your hard drive has sustained some form of damage. Although it’s not possible to recover files from bad sectors specifically (as they become unreadable), you can recover data from a hard drive that has bad sectors. It is also possible to recover data from a hard drive that won’t boot due to bad sectors.
As soon as you can, make a byte-to-byte copy of your drive. Then, scan it and recover your data using a data recovery tool like Disk Drill. From there, you’re free to repair the damage with CheckDisk or Victoria for Windows, or perform a full format.
FAQ
Can you repair bad sectors on a hard drive by formatting it?
A full format can detect bad sectors and mark them as unusable so the file system avoids writing data to those areas. It does not repair the physical damage itself. The process works at the file system level, which means the affected blocks are simply excluded from future use. A quick format does not check for bad sectors at all. Keep in mind that a full format completely erases all data on the drive, and recovery becomes impossible afterward.
Can CHKDSK fix bad sectors?
CheckDisk is a Windows disk-checking command that scans a drive for file system errors and problematic sectors. It can detect bad sectors and mark them as unusable so the operating system avoids writing data to those areas. It does not repair physical damage on the drive.
It’s a powerful command that can be used as a solution for many problems, such as when you need to fix a corrupted hard drive. Once the process is complete, data will no longer be written to sectors that were identified as faulty.
How can I recover my hard drive from bad sectors?
Performing hard drive recovery on a hard drive with bad sectors is possible. Before you do anything, make sure a backup has been made of the hard drive first. Then, you can use CheckDisk to try to fix any bad sectors on the hard drive. Should that fail, you can instead perform a full format. Note, however, that this will completely wipe all data that is present on the drive
How do you fix bad sectors on an external hard drive?
Before you try to fix any bad sectors, you should start with external hard drive data recovery. Then, you can fix bad sectors on an external hard drive using CheckDisk, or by performing a full format (this will completely erase all data).
How do you retrieve files from a hard drive with bad sectors?
You can recover data from a drive with bad sectors using reliable data recovery software. The key is to minimize stress on the failing disk and avoid writing anything to it.
Here is the general process:
- Install a data recovery tool on a separate, healthy drive.
- Create an image (backup) of your drive.
- Select the affected hard drive or newly created backup and run a full scan.
- Review the scan results and preview the files you want to restore.
- Recover the selected data to a different physical disk, never back to the damaged drive.
This article was written by Jordan Jamieson-Mane, a Staff Writer at Handy Recovery Advisor. It was also verified for technical accuracy by Andrey Vasilyev, our editorial advisor.
Curious about our content creation process? Take a look at our Editor Guidelines.