Bad sectors, also referred to as bad blocks, are an unfortunate problem that affects hard disk drives and solid-state drives alike. When they appear, there’s a chance that some of your data will become inaccessible, sometimes even permanently lost.
However, not all bad sectors are irreparable, and the type of bad sector you encounter will influence the recoverability of your data. In this article, we’re going to explain what causes bad blocks, how to fix bad sectors (as well as which ones can be fixed), and some proven methods for protecting your data against the sudden appearance of bad sectors.
While bad sectors can appear on forms of flash storage like solid-state drives and USB flash drives, they’re much more prominent on hard disk drives, as the mechanical parts are more susceptible to physical damage and degradation over time.
The Most Common Causes of Bad Blocks on HDDs
Bad sectors appear naturally the longer a hard drive has been in operation. In fact, it’s common for hard drives to ship with bad sectors directly from the factory. The only difference is that these bad sectors are already mapped out and added to the list of defective sectors maintained by your drive’s firmware, commonly known as the P-List (Primary Defect List) Table.
Bad sectors that come shipped with your drive (as in those on the P-List) will not affect your drive’s performance. However, sectors that become corrupted as the drive is in use will impact drive performance as more appear. Bad sectors that appear during normal operation are added to the G-List (Growth Defect List) Table.
Here are some common issues that can cause an increase in bad sectors:
- Physical damage – With HDDs, your data is stored on magnetic platters. If these platters become misaligned or damaged due to the drive being dropped, it can lead to some sectors becoming unreadable.
- Wear and tear – The physical components of your hard drive can wear down over time, such as the read/write head and spindle motor. As the physical condition of your drive worsens, bad sectors will begin to appear.
- Disk malfunction – A malfunctioning disk can exhibit signs of erratic behavior. For example, incorrect head operations can lead to bad blocks appearing on the disk.
- Excessive heat – Your hardware can only operate within a certain temperature range. If your computer isn’t being cooled sufficiently, it can lead your hardware to overheat and cause massive stress on the drive, which causes bad sectors.
- Electromagnetic interference – Electromagnetic interference (EMI) can interfere with the read/write head of the drive. In doing so, the head will be unable to position itself correctly over the spinning platters, leading to issues writing the data and leading to corrupted sectors.
Next, to determine whether or not it’s possible to fix bad sectors on an HDD, let’s quickly talk about what types of bad blocks can be repaired.
Can Bad Blocks Be Repaired?
Bad sectors come in two types: soft and hard (also referred to as soft blocks and hard blocks). The soft block variety is software-related, caused by logical issues that prevent certain sectors from working as intended. It’s possible to repair soft blocks through sector reallocation or error correction. In addition to being fixable, it’s also possible to recover data from an HDD with soft bad sectors.
Hard blocks are more troublesome, as they are irreparable. A hard block is caused by physical damage to the sector, following issues like head crashes or external shocks. When you encounter a hard block, nothing can be done besides marking it to be excluded from use. The drive will continue to function, though the presence of hard blocks will reduce its overall capacity over time.
How to Repair Bad Sectors on a Hard Drive
We have listed a few proven methods you can use to fix bad sectors on a hard drive. Bear in mind, however, that all of the methods we’ve described are likely to lead to partial or complete data loss on the disk. Therefore, it is absolutely essential that you make a copy of the disk if you need to preserve the data it contains. In the next section, we’ll guide you through how to recover it.
Additionally, once your disk is repaired, you should not use it again for storing important data, including your operating system. Once a drive has exhibited a sudden increase of bad sectors, it should be considered unstable as more problems are likely to follow.
Method 1. Use Victoria
Victoria for Windows is one of the best hard drive repair software tools you can use to fix bad blocks on a hard drive. It’s a diagnostic utility that can do a surface scan of your hard drive to locate bad sectors and then give you a few options on how you want to address them.
Follow these steps to remap bad sectors using Victoria for Windows:
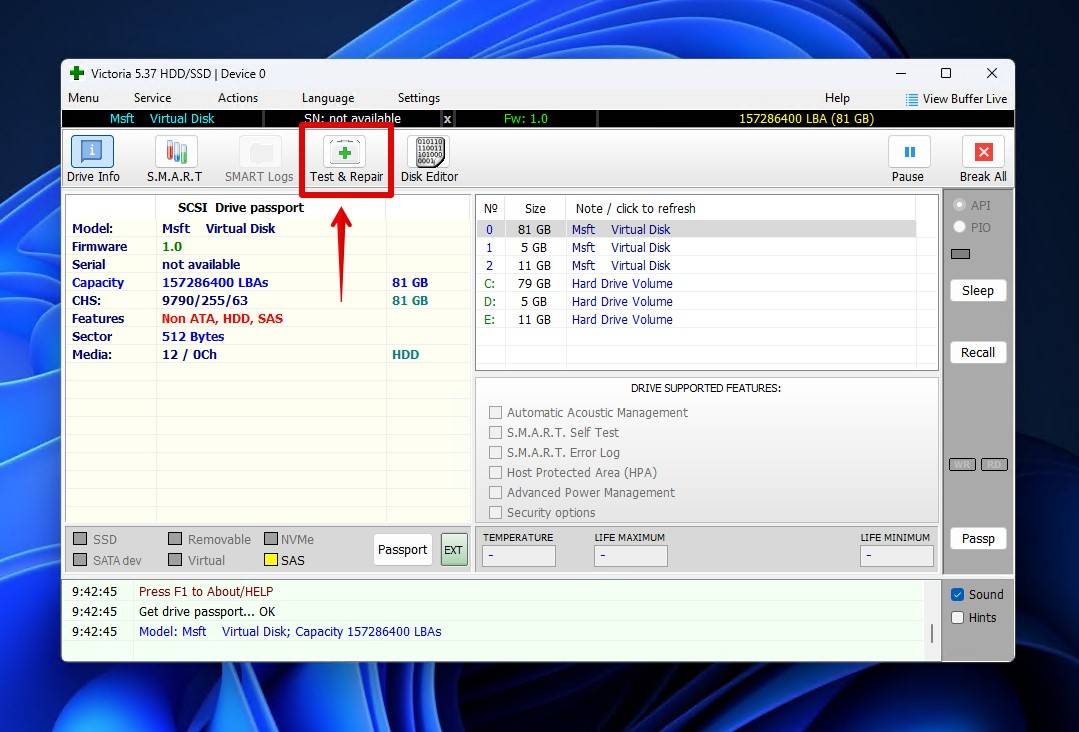
- Download and open Victoria.
- Click Test & Repair.
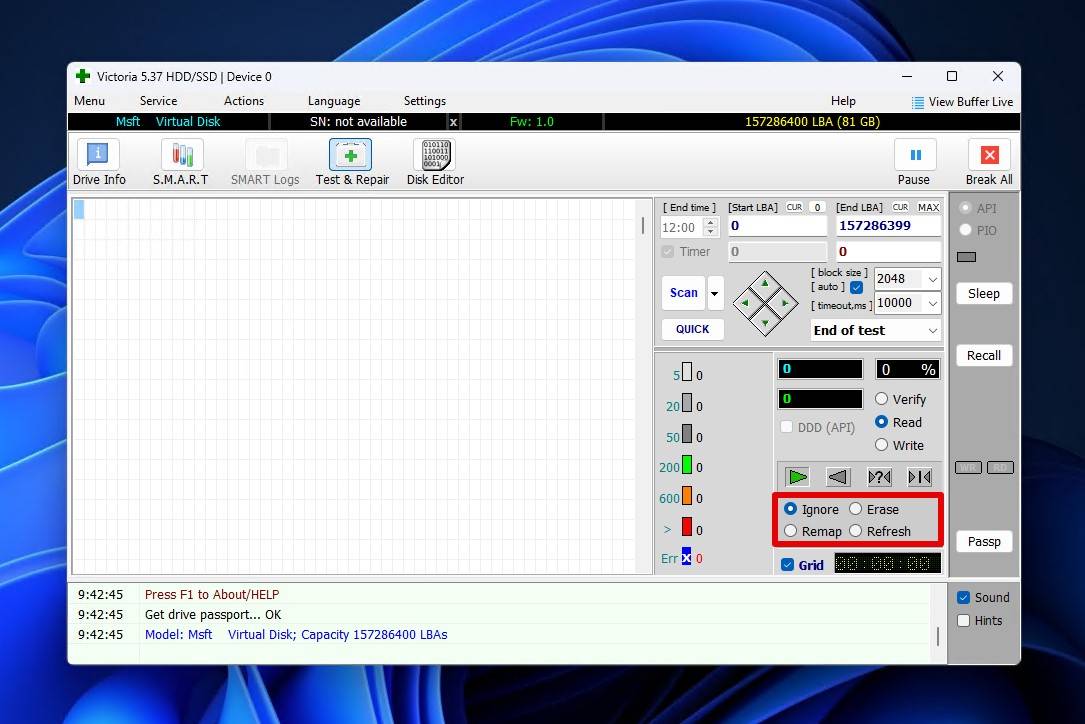
- Choose how you would like to scan the drive. Erase is the best choice if your main priority is to repair as many bad sectors as possible, while Remap is ideal if you want to prioritize data recovery.
👀
Ignore will find bad sectors and map them without taking any further action. Erase will attempt to overwrite all bad sectors it finds with zeros (which also renders your lost data unrecoverable). Remap will try to reassign bad sectors to spare sectors (along with the data). Refresh will try to re-read and re-write the data back to the sector.
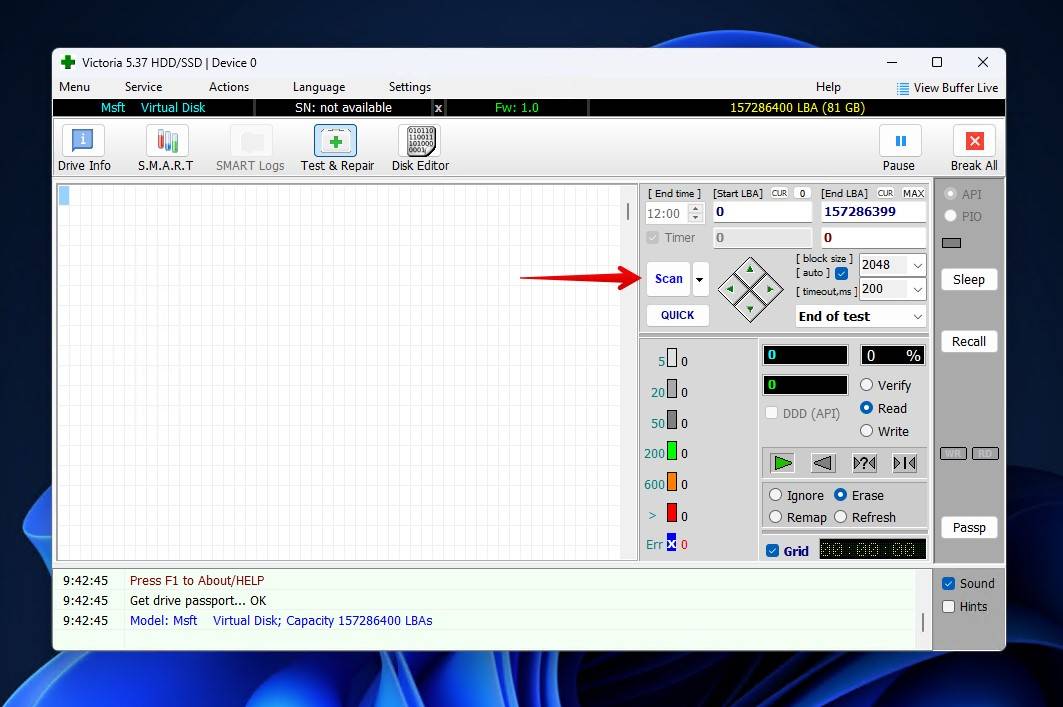
- Click Scan.
Method 2. Run CHKDSK With the /r Parameter
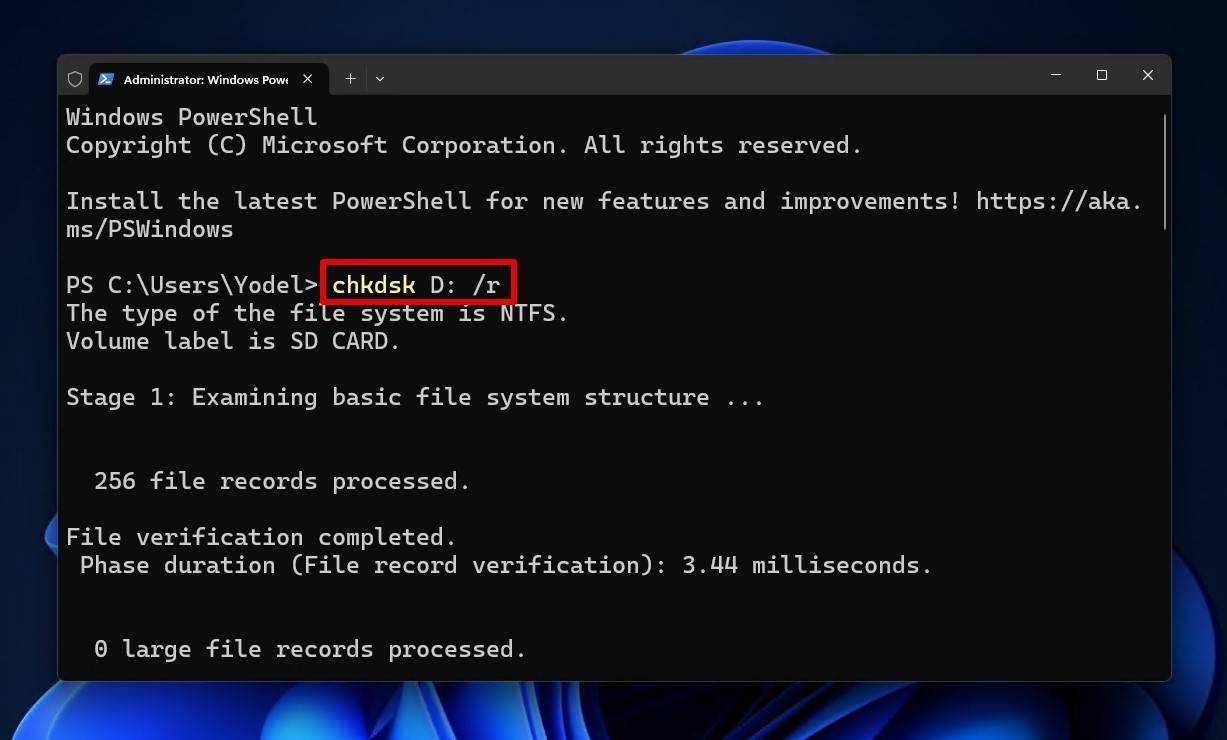
CHKDSK is a file system repair tool that can also detect and fix an HDD’s bad sectors. The CHKDSK command will scan your disk’s surface and, upon discovering a bad sector, attempt to rewrite the data to a spare sector on the disk. If it fails to do this, it will deem it a hard bad sector and update the file system’s records accordingly.
Follow these instructions to repair logical bad sectors using CHKDSK:
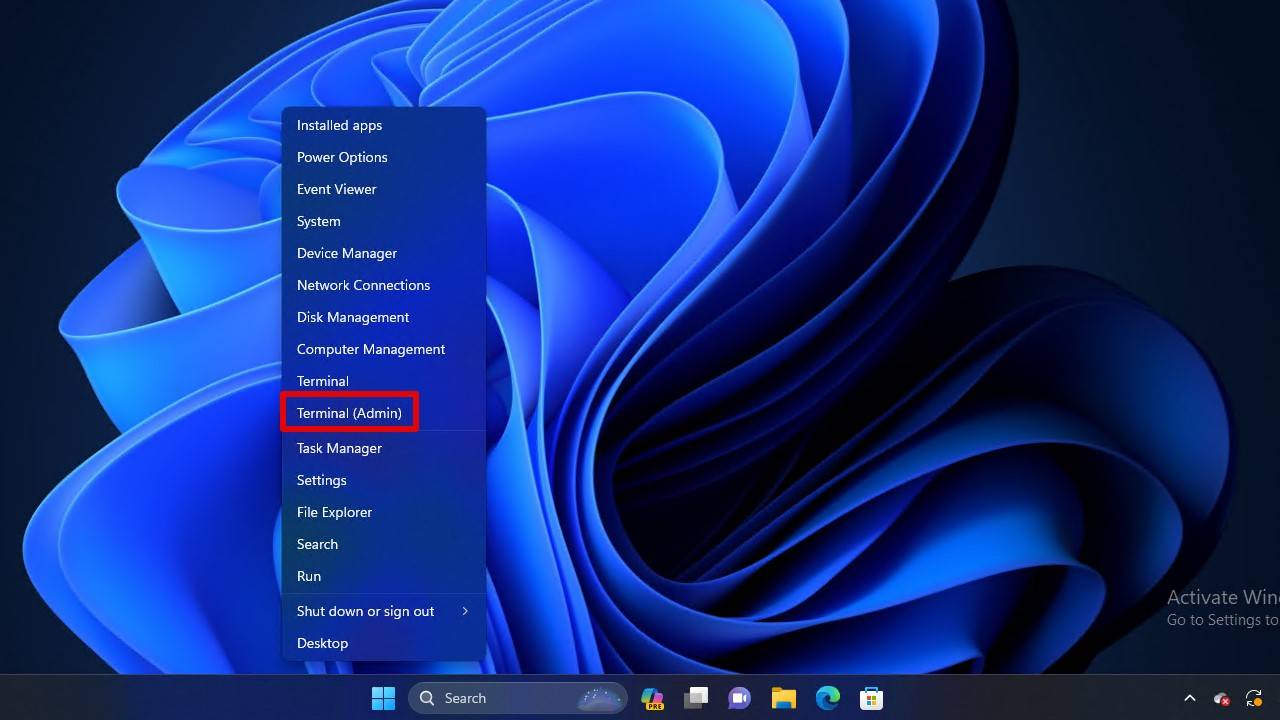
- Right-click Start and click Terminal (Admin).
- Type chkdsk *: /r. Replace the * symbol with the drive letter assigned to the affected disk. Press Enter.
Method 3. Perform a Full Format
The most effective way of repairing logically bad sectors and mapping out physical ones is through a full format. Granted, this step is also the most destructive to your data, as every sector will be overwritten with zeros, making data recovery almost impossible.
If your system drive is affected, you will need to remove it from your computer and connect it to another one as an external device.
Follow these instructions to repair bad sectors on a hard drive with a full format:
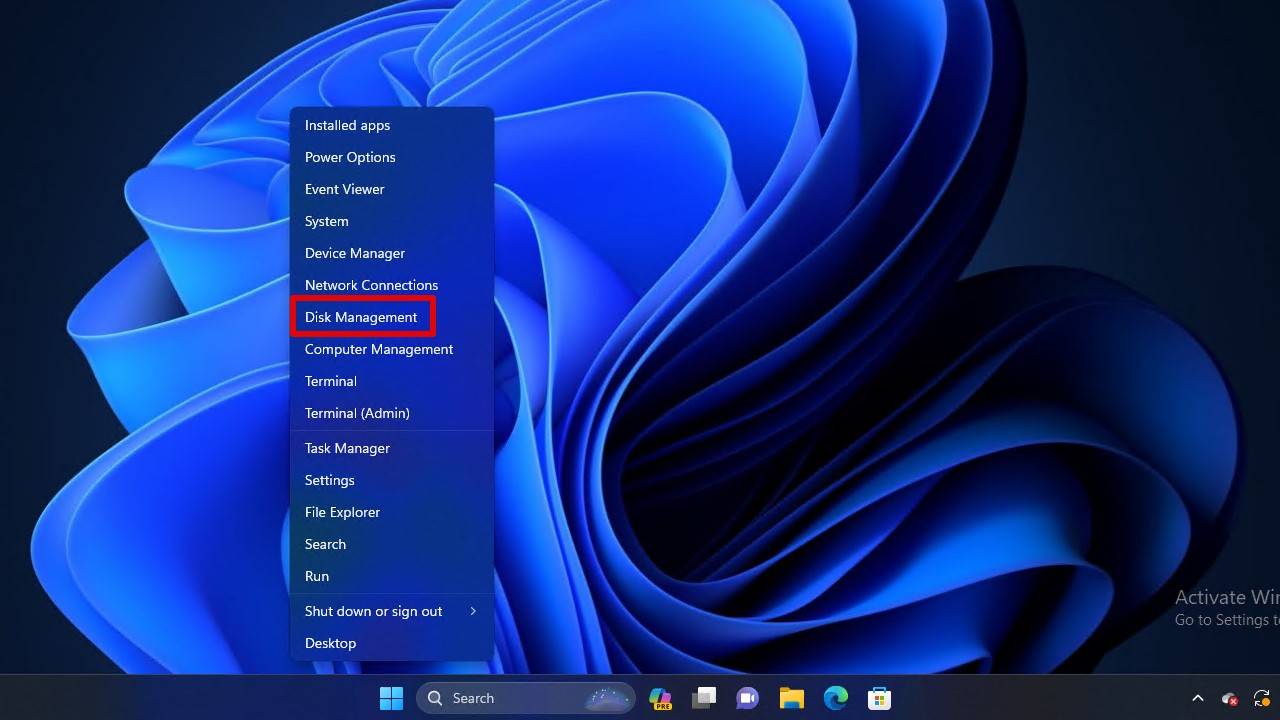
- Right-click Start and click Disk Management.
- Right-click the volume and click Format.
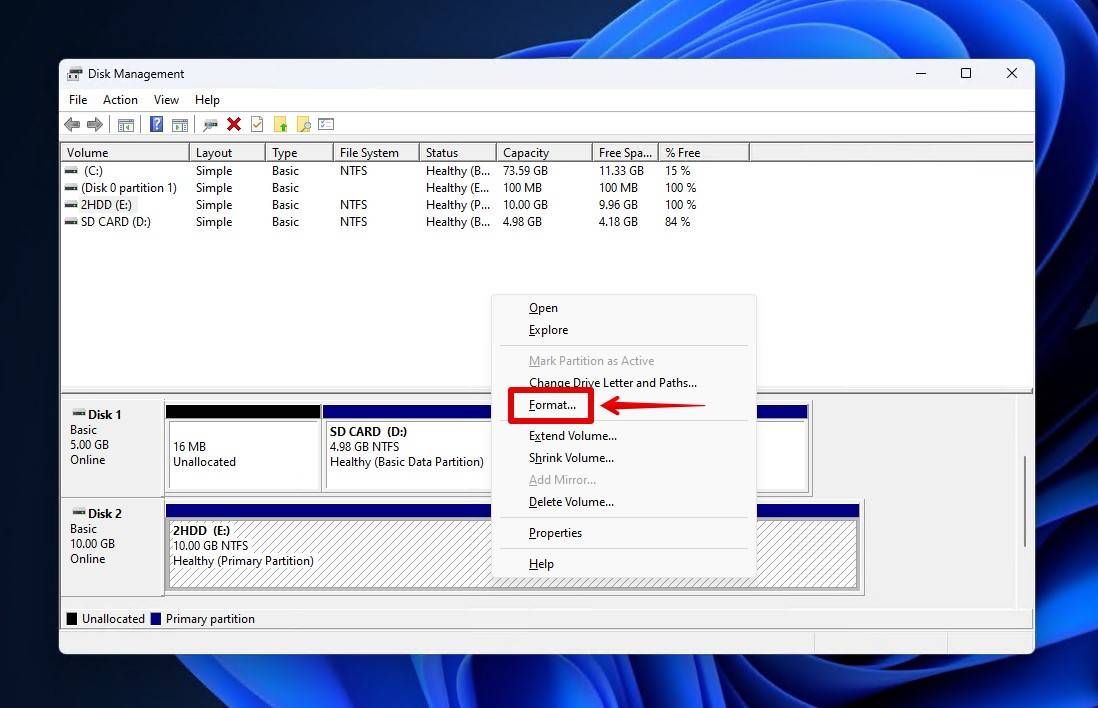
- Select a file system and untick Perform a quick format. Click OK.
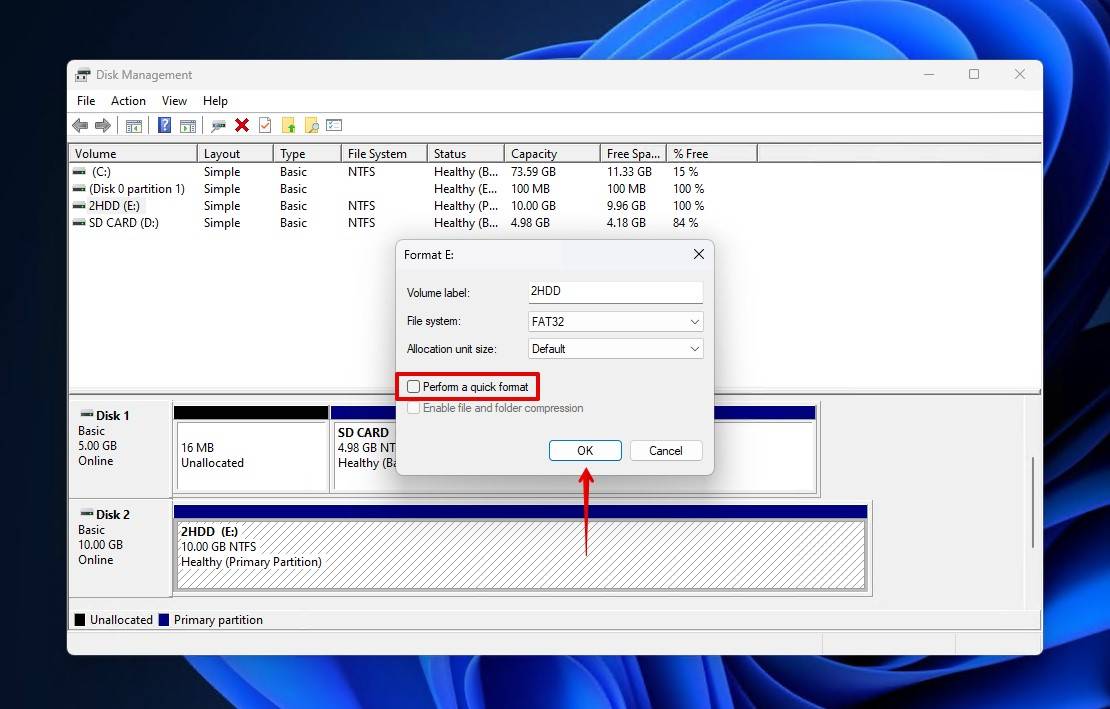
- Click OK again for confirmation.
How to Protect Data on a Disk with Bad Blocks
You can preserve the current state of your disk by creating a byte-to-byte backup of it. This backup will include your entire disk structure as it is now. This is an essential step if you want a chance at restoring the data on the disk, as the aforementioned methods for fixing the bad sectors will result in data loss.
Option A. Disk Drill (Best for Data Recovery)
Our first recommendation is Disk Drill, a professional data recovery tool. Despite it being a data recovery tool first and foremost, it includes a useful byte-to-byte drive backup feature with which you can make a full copy of your drive in DMG or ISO format. Once you have the disk image, you can then scan it to recover your data, whereby avoiding the need to continue using the drive itself to transfer your data across.
This is useful in instances where bad sectors are being caused by some form of logical corruption. Disk Drill still has a chance at recovering the data that’s currently inaccessible. And, by scanning the disk image instead, you’re not putting additional stress on the drive itself, which could otherwise lead to further data loss.
Bear in mind that, in order to recover data from the image, you will need a Disk Drill PRO license.
Follow these steps to create a byte-to-byte image using Disk Drill:
- Download and install Disk Drill to a separate drive.
- Click Byte-to-byte Backup.
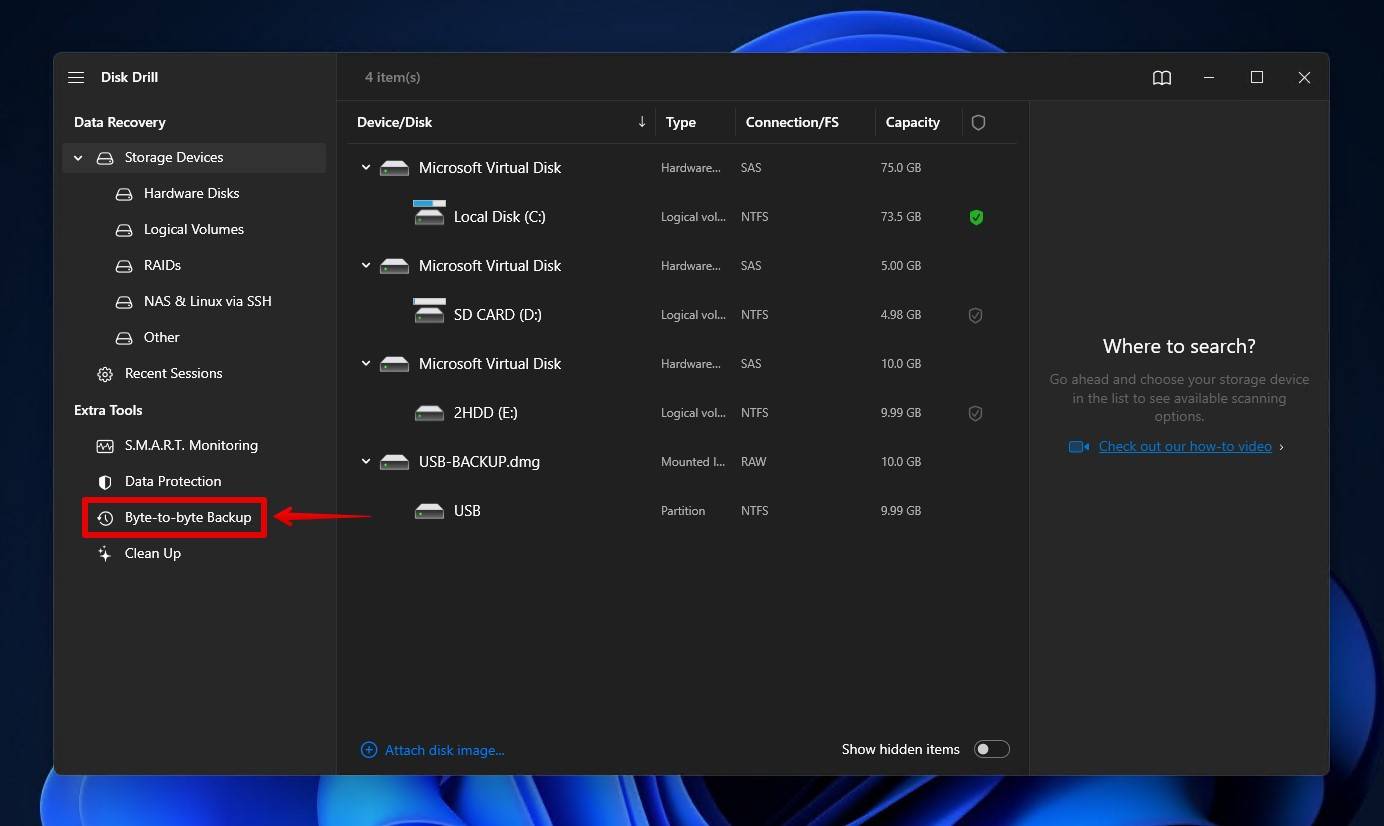
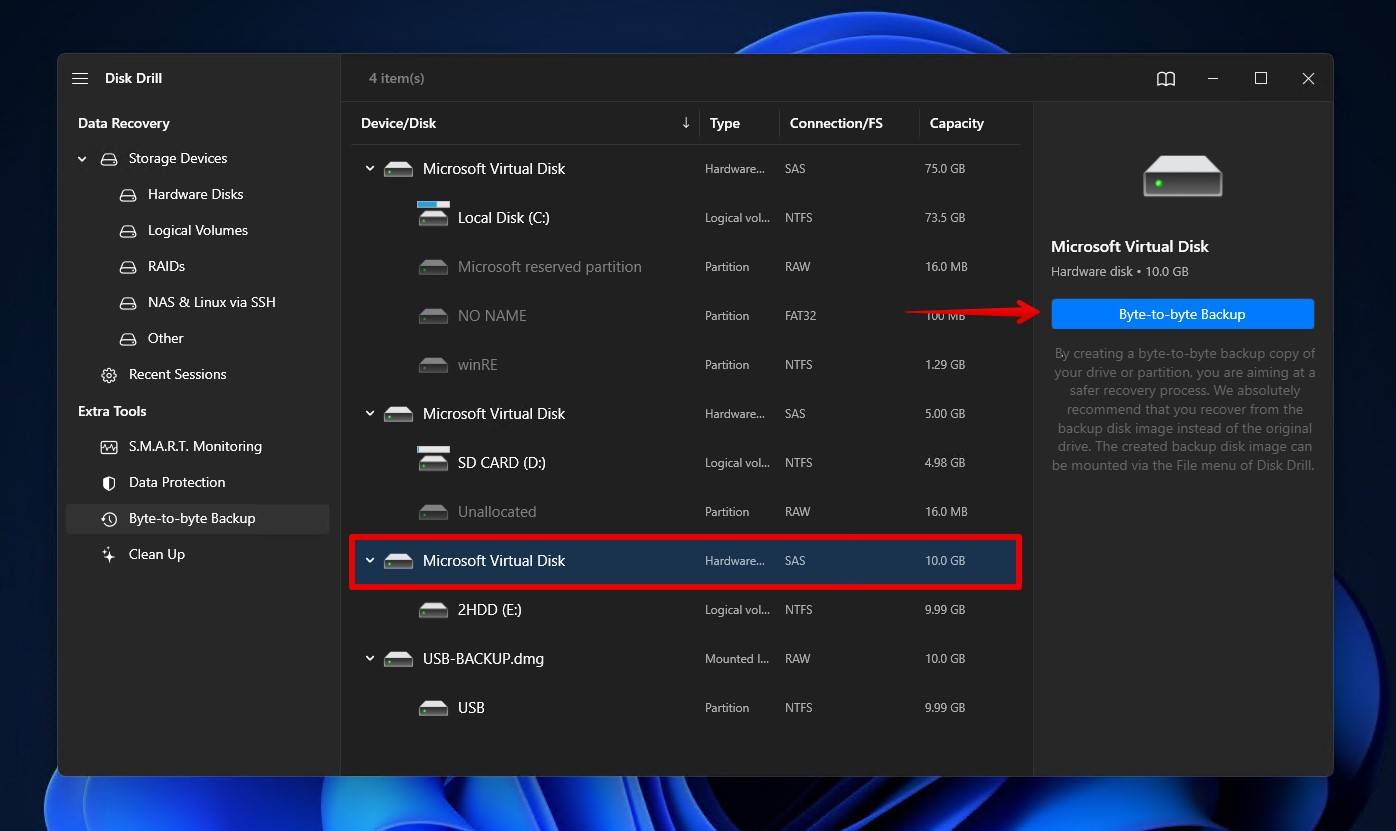
- Select the hard drive that contains back sectors, then click Byte-to-byte Backup.
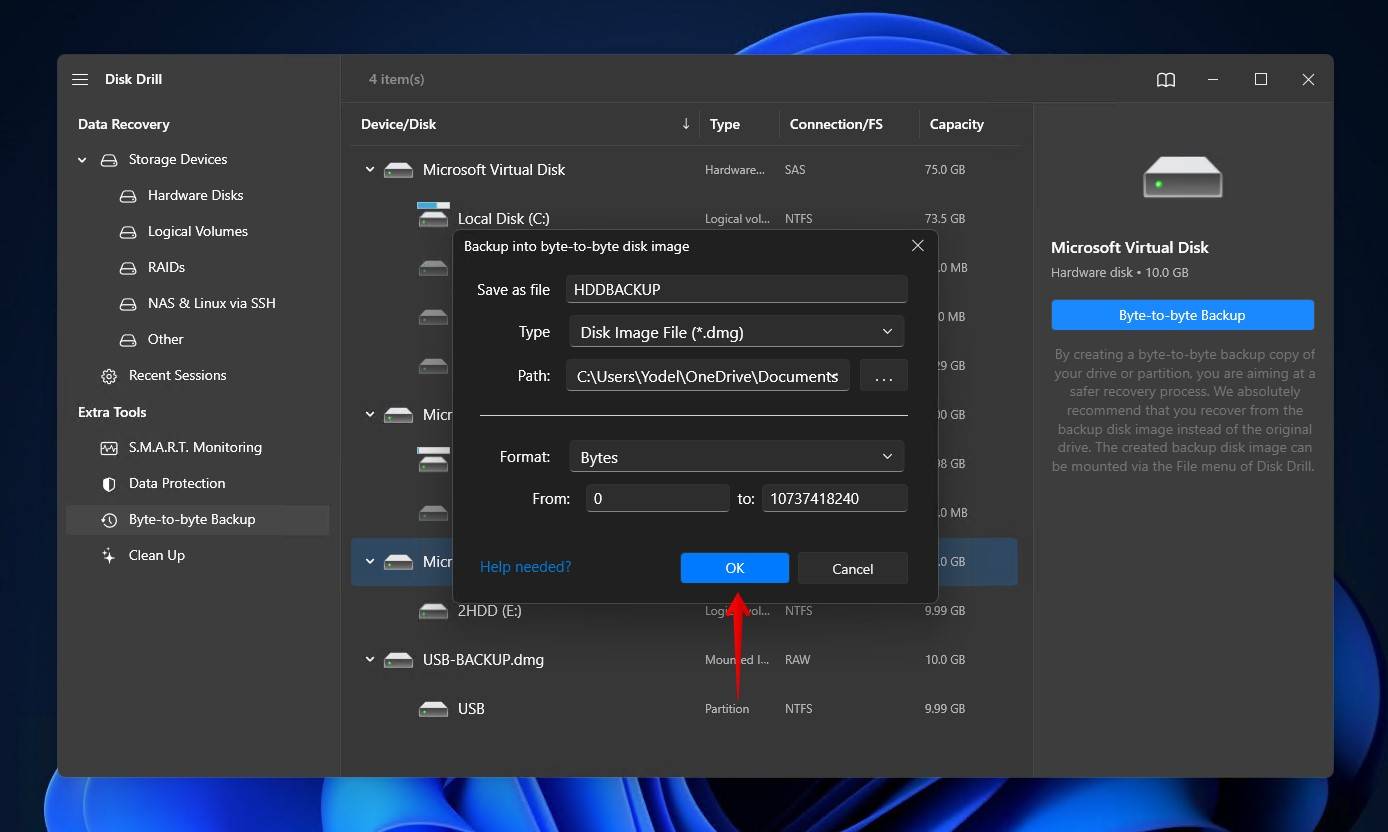
- Give the backup a name and select where you want to store it (ideally on a separate physical disk). It’s at this stage where you can also choose the file format you’d like to use (DMG or ISO) as well as specify what parts of the disk you’d like to back up (leave the default settings if you want to back up everything). Click OK.
Once the disk image is created, you can safely recover all the data from it and move it across to another storage device. We’ll show you how to do this as well.
This is how you recover data from the byte-to-byte image:
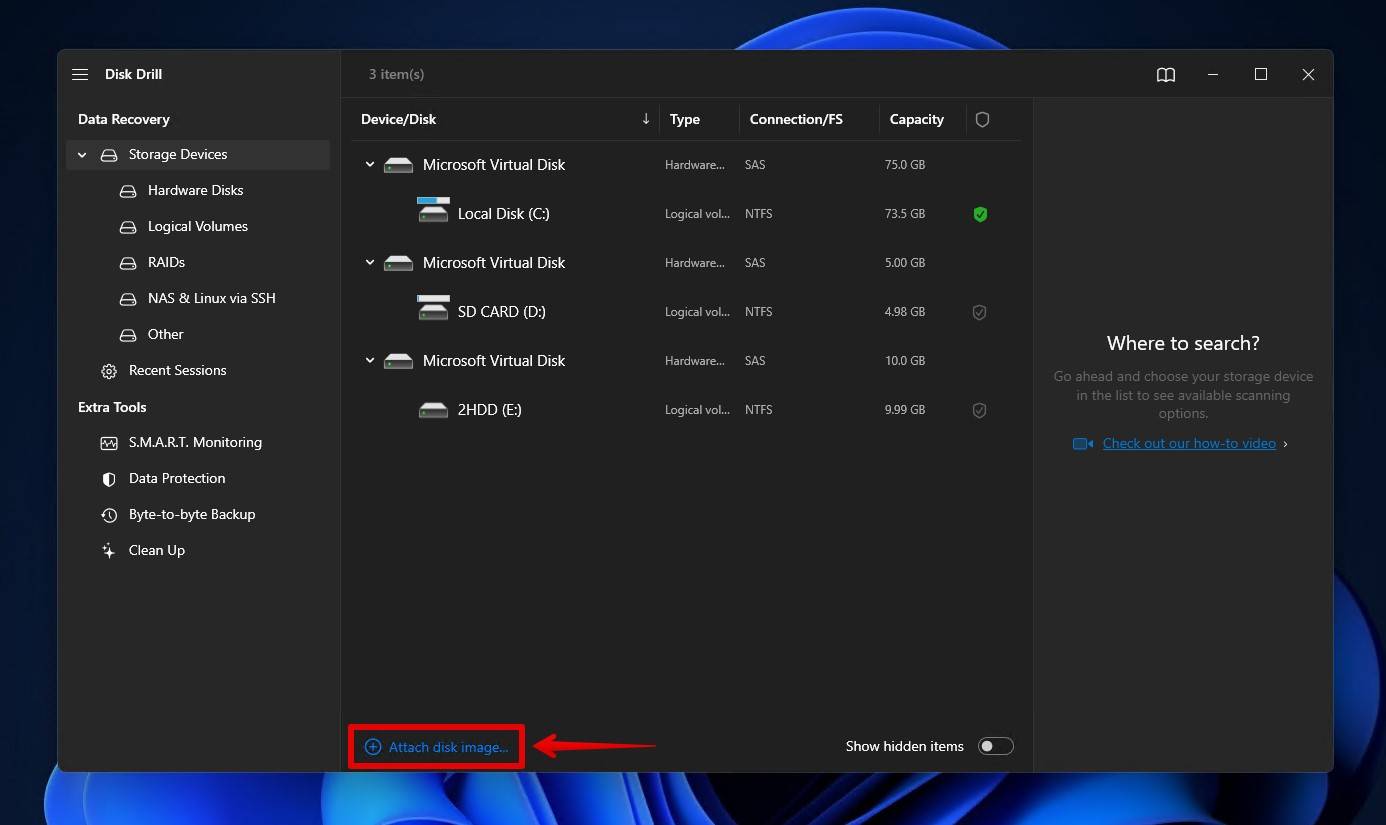
- Return to the Storage Devices section, then click Attach disk image. Locate and select the byte-to-byte backup we created in the previous section.
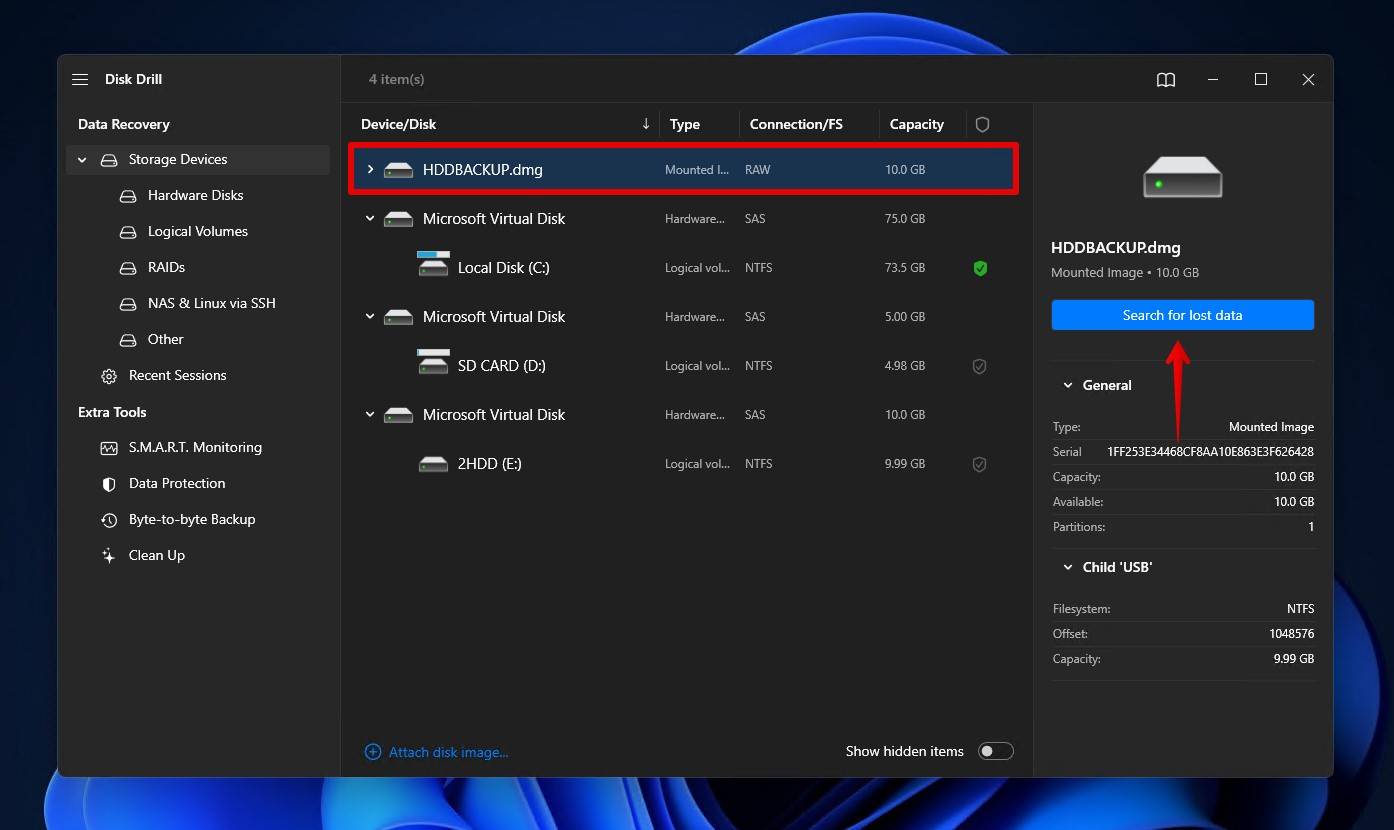
- Select the disk image from the list of devices, then click Search for lost data.
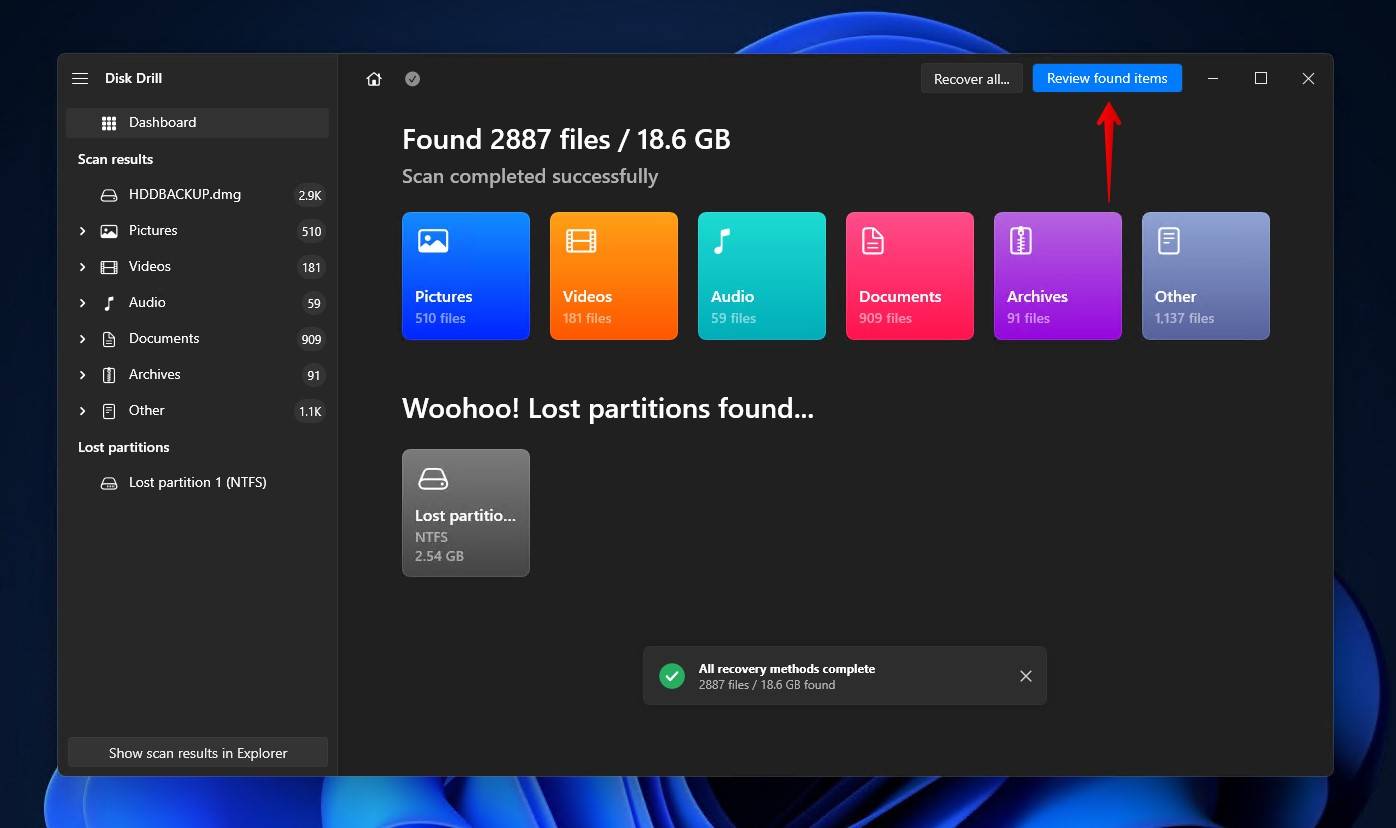
- Click Review found items. If you want to recover everything all at once instead, click Recover all.
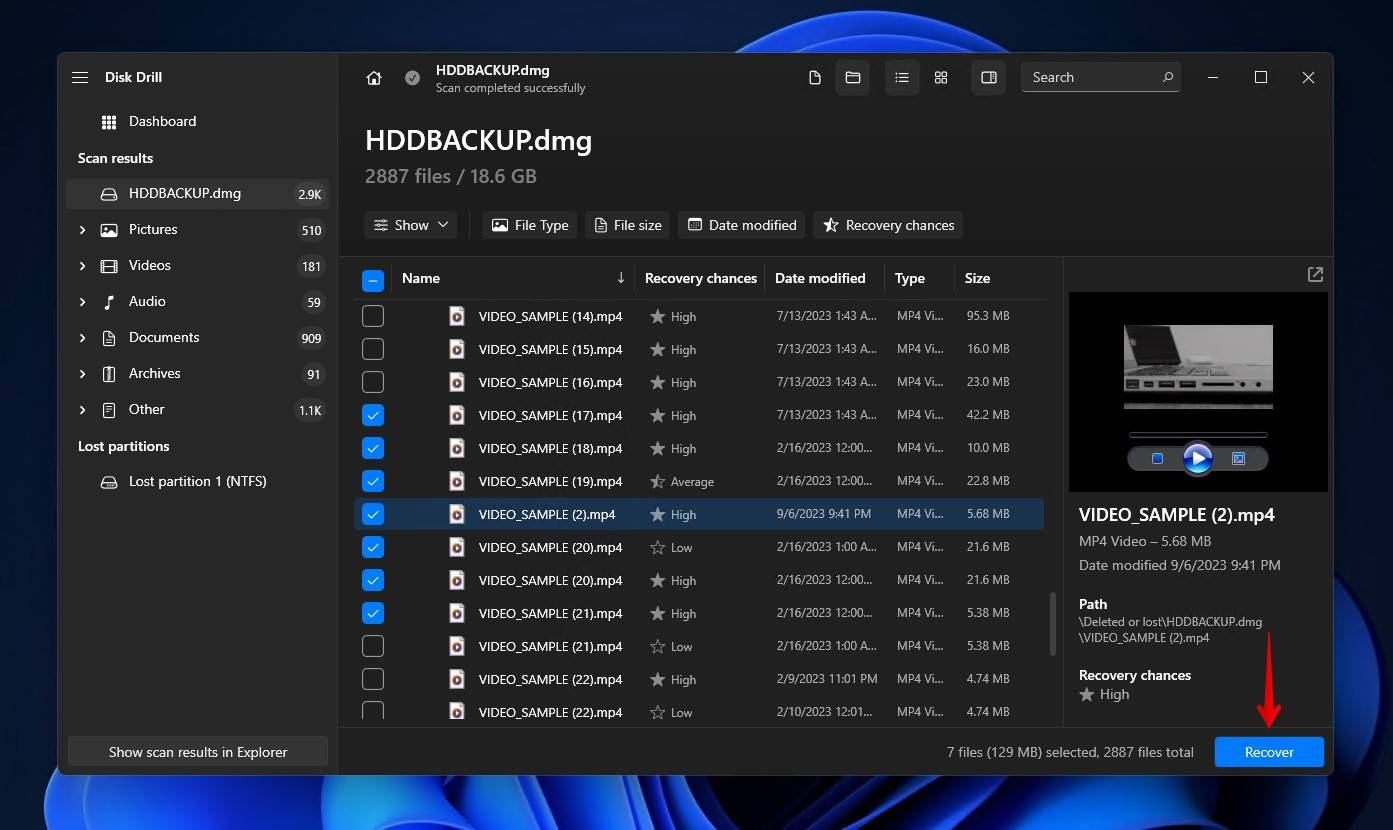
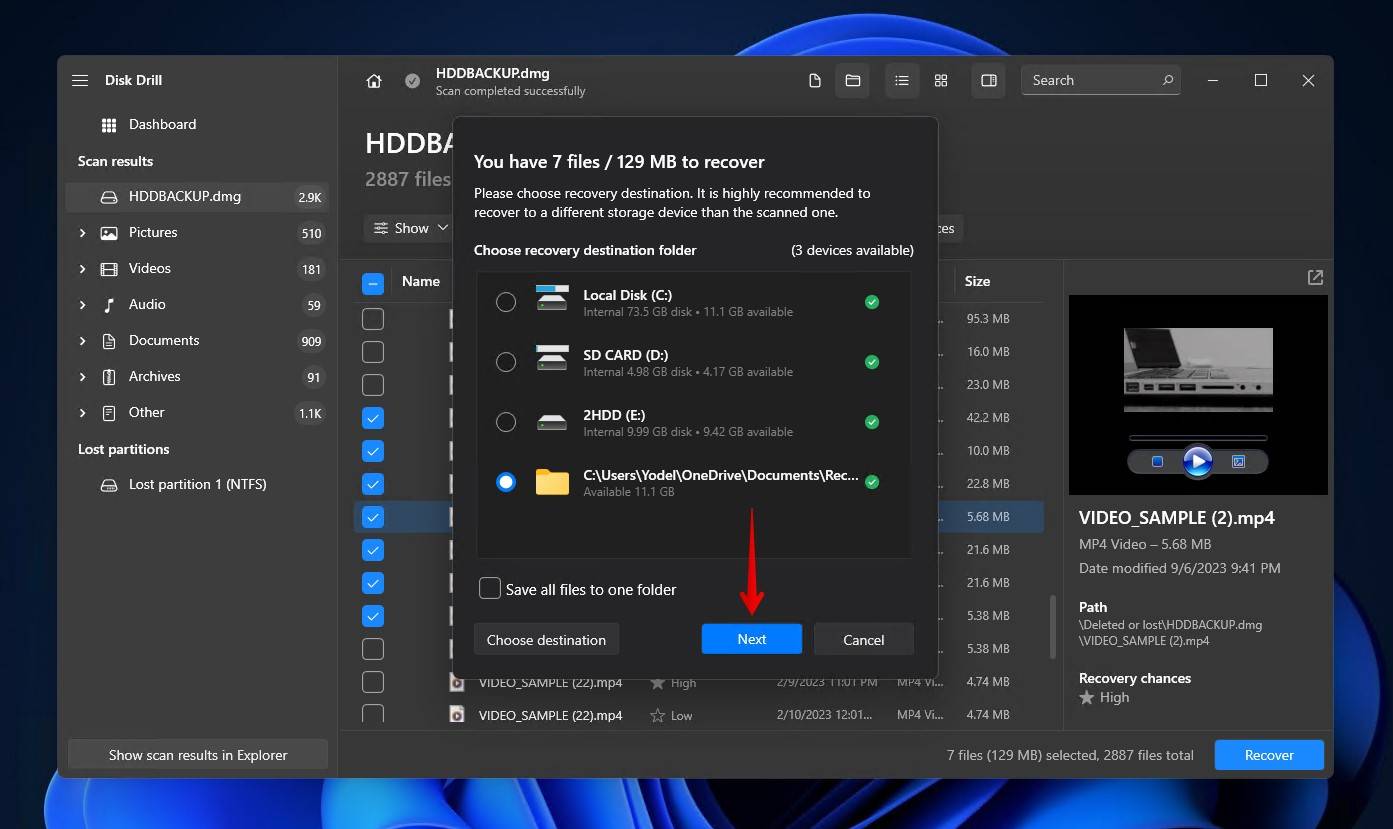
- Select the files you want to recover. Existing files will be in the Existing dropdown section, while data that may have been deleted by the damage that caused the bad sectors will be in the Deleted or lost and Reconstructed dropdown sections. When you’re ready, click Recover.
- Choose where you’d like to store the recovered files. This should be on a separate physical disk so as not to corrupt the existing data. Click Next.
While Disk Drill is safe to use and offers many useful features, you may want an alternative to consider as well. R-Studio is another excellent option, as it includes comprehensive settings for image creation and a number of useful recovery features, as well as UFS Explorer, a cross-platform tool designed for data recovery.
Option B. Macrium Reflect (Best for Basic Scenarios)
If you simply want to make a full backup of your drive before it gets more bad sectors, Macrium Reflect is a great option. Unlike Disk Drill, it doesn’t allow you to recover data from sectors that suffer from logical damage, but it is very easy to use and gives you many options for defining the backup.
As a dedicated backup utility, Macrium Reflect offers two options: disk cloning or disk imaging. If you already have another blank drive to store the data, you can use the disk cloning option to move everything across. Otherwise, you can create a disk image in the MRIMG format.
While Macrium Reflect Free is no longer available on the official site, you can download it from the mirror site MajorGeeks.
We’ll show you how to create a disk image using Macrium Reflect Free:
- Download Macrium Reflect Free.
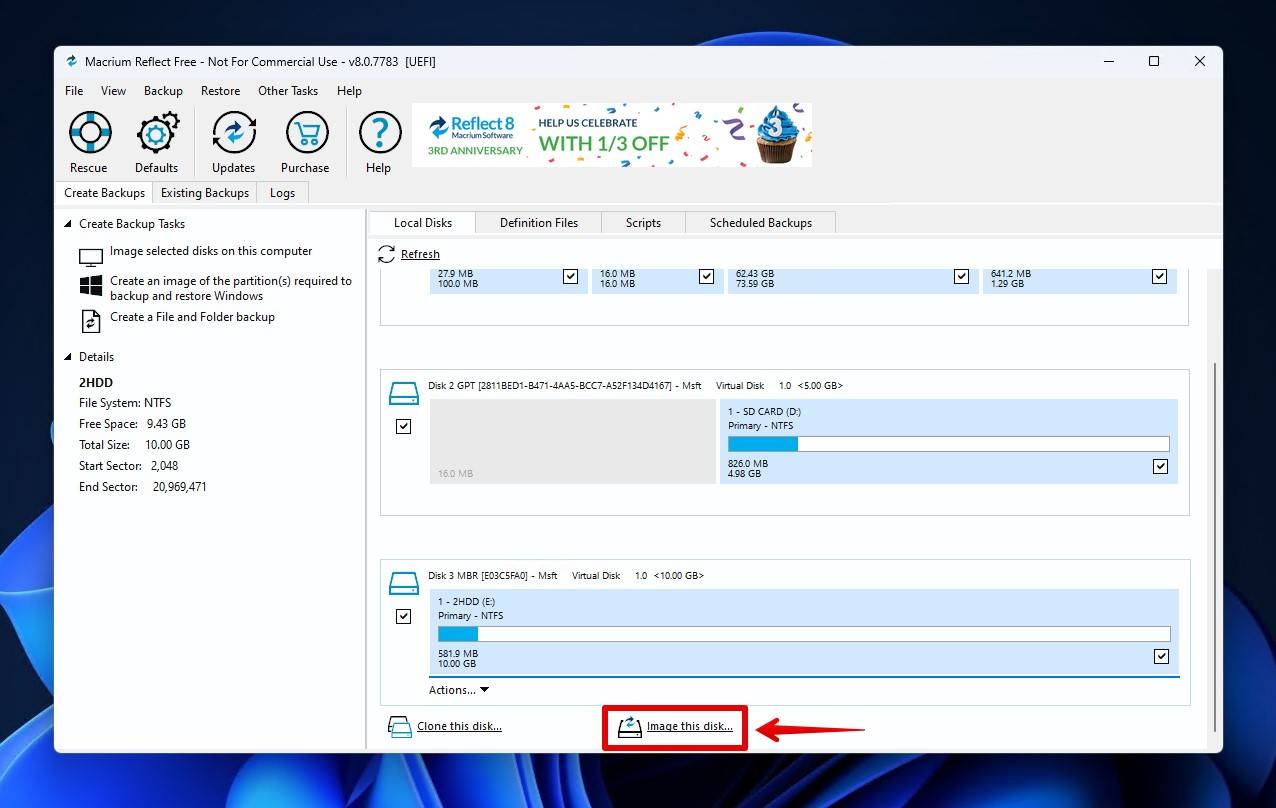
- Click on the disk that contains bad sectors, then click Image this disk.
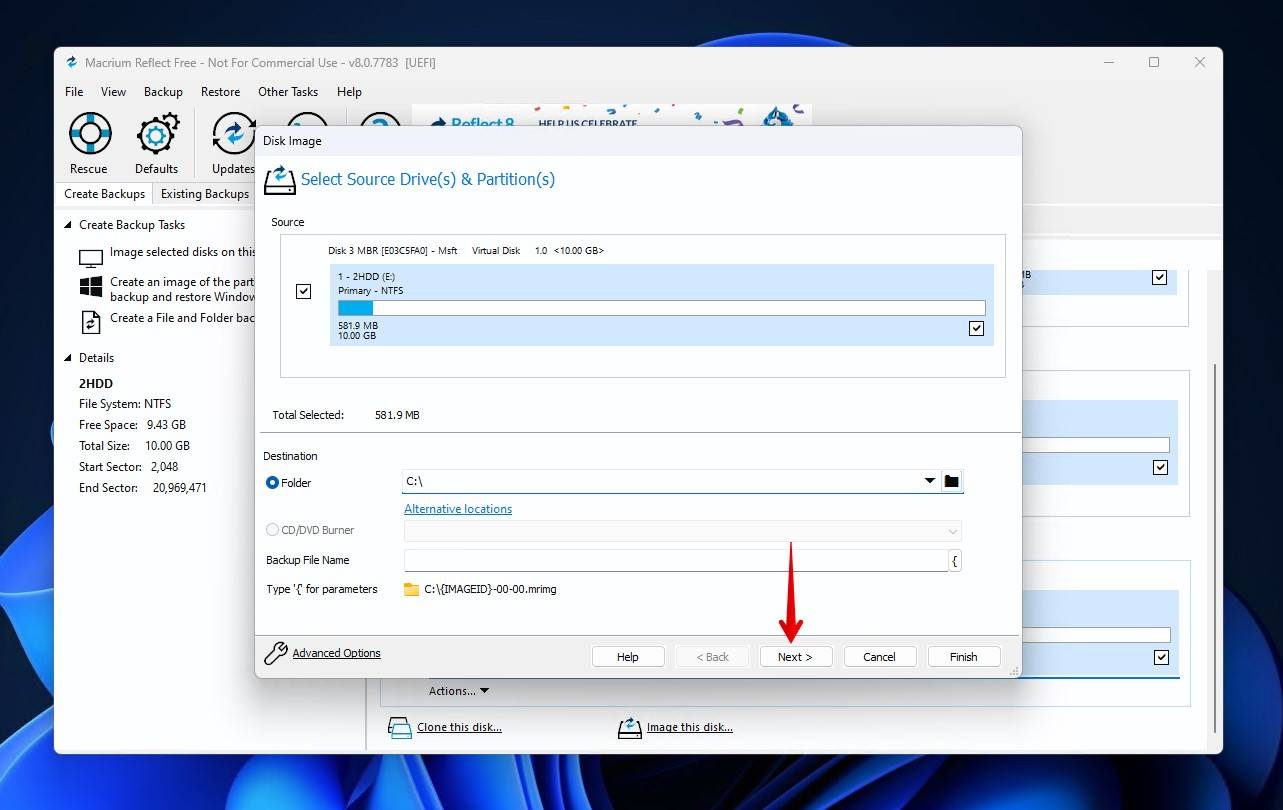
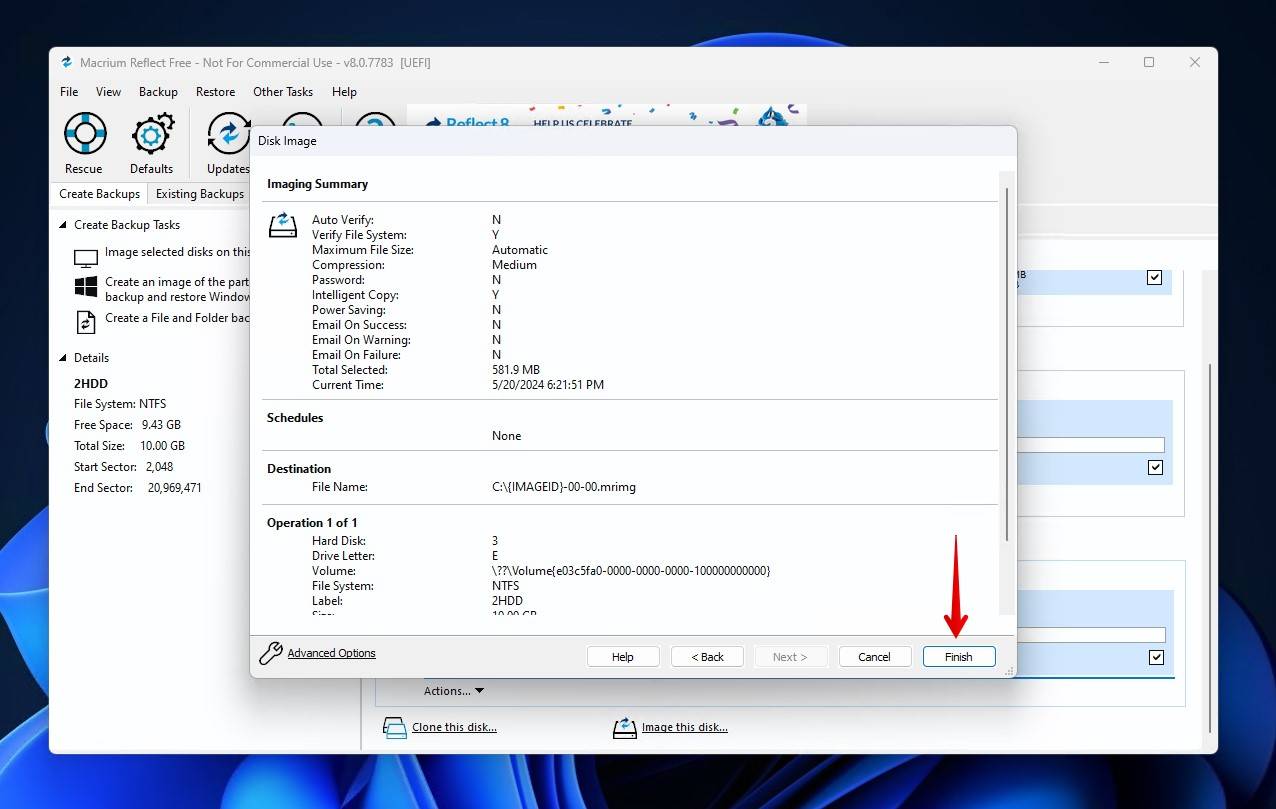
- Specify where you want to store the image. You can also explore the Advanced Options, which lets you set the compression level, password protection, and integrity verification. Click Next.
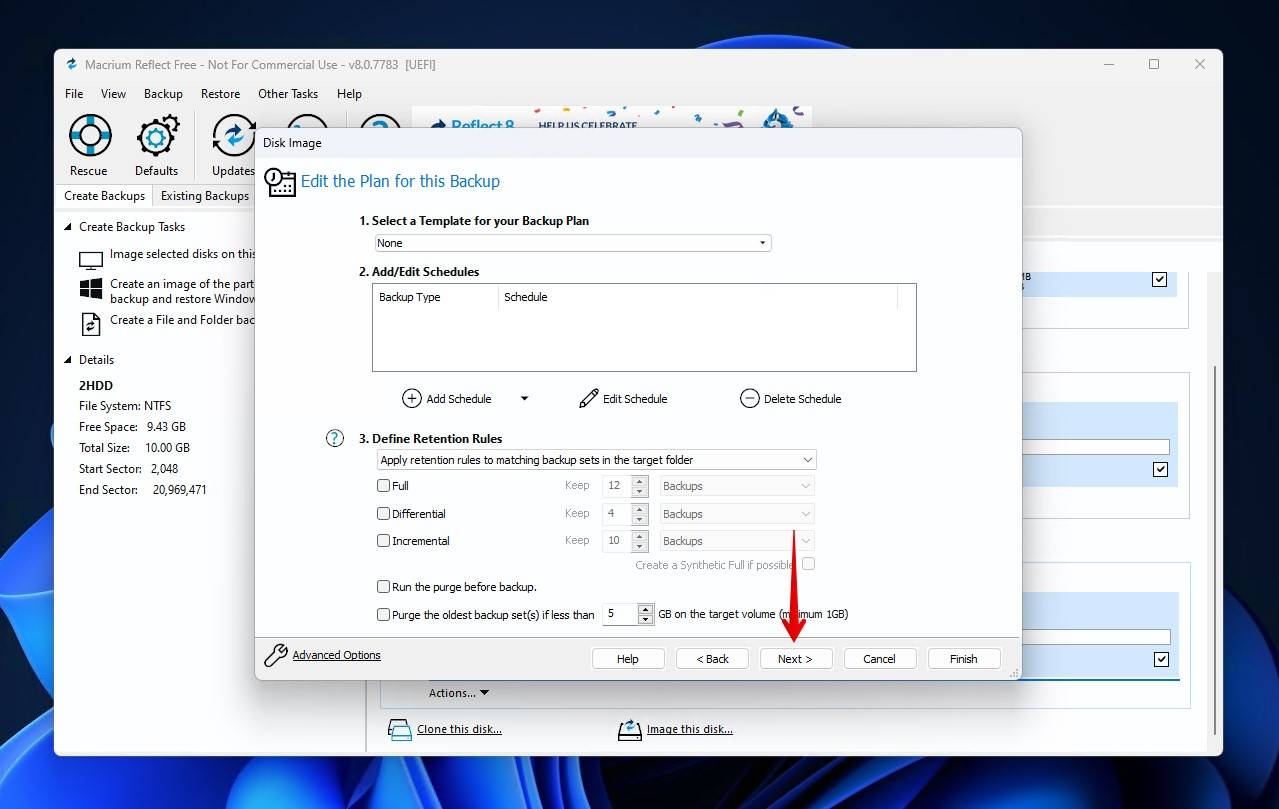
- Define the plan for this backup. If it’s a one-off backup, you can simply untick all options. Click Next.
- Click Finish.
If you want a completely free and open-source backup solution instead, Clonezilla is a very popular choice. It’s a partition and disk imaging/cloning application that offers a lot of useful features for backing up hard disks that contain bad sectors.
One More Useful Option Worth Mentioning for HDDs with Bad Blocks
A good way to keep on top of bad sectors that appear is regularly defragmenting your disk. Over time, the data you store will gradually be split across available sectors on your drive. When data is in this fragmented state, it takes your hard drive longer to piece together the entire file, as it has to jump between different parts of the disk.
Defragmenting a drive will rearrange data into contiguous blocks, speeding up the time it takes to open files and keeping it organized. Doing so has a number of advantages. In addition to better file management and faster read times, it also improves overall system performance and extends the lifespan of your hard drive, as it minimizes the movement of the read/write head.
You should not defragment a solid-state drive, as it doesn’t suffer from the same latency in accessing fragmented data that hard disk drives do. Additionally, the process of moving files around to be in contiguous blocks uses write cycles, which an SSD has a limited number of.
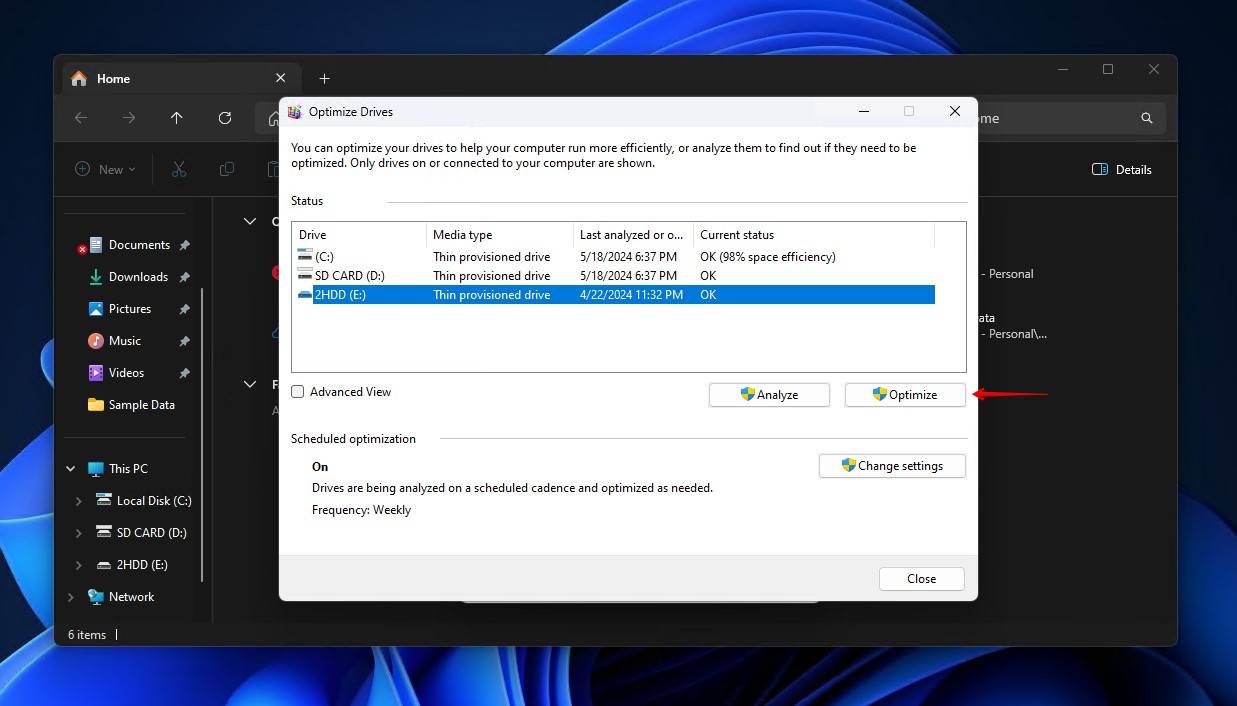
Here’s a brief guide on how to defragment your drive in Windows 11:
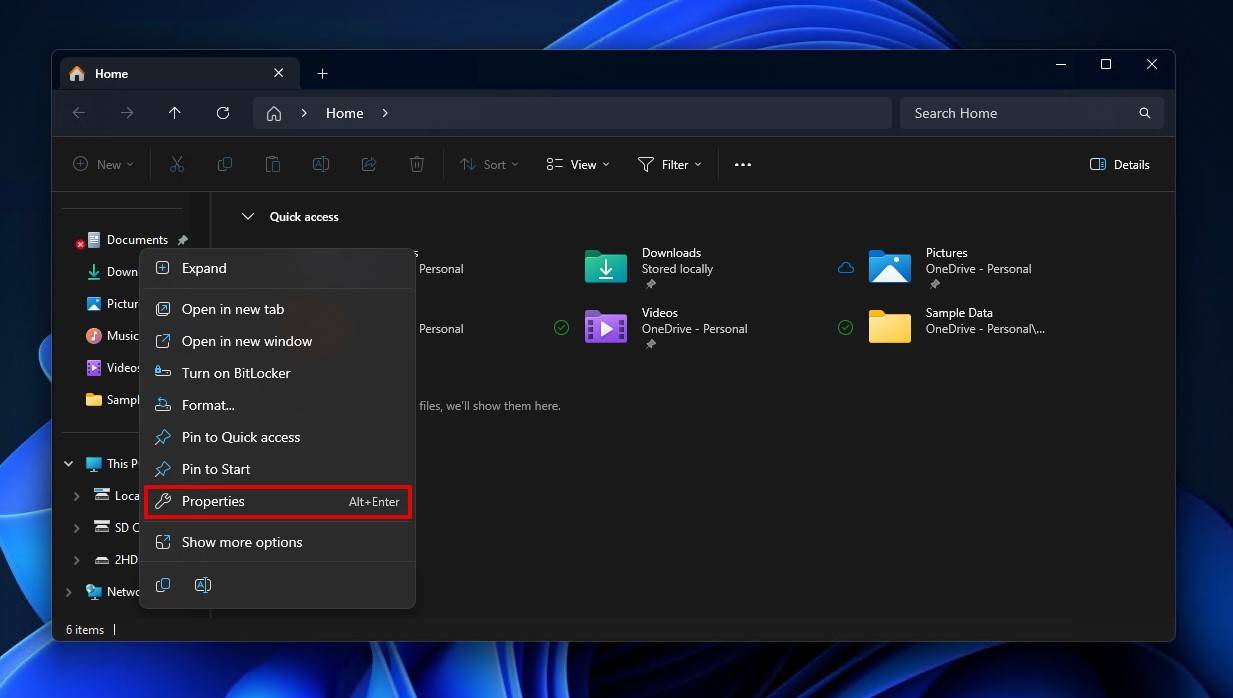
- Open File Explorer. Right-click your drive, then click Properties.
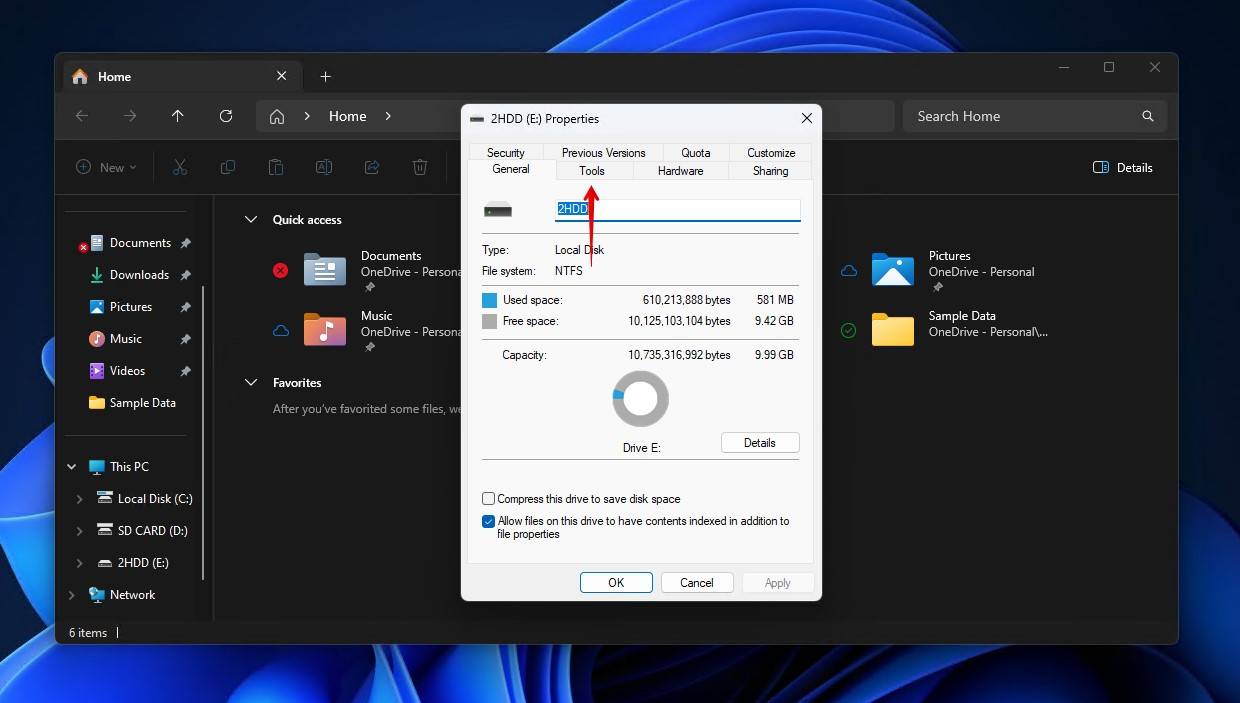
- Click Tools.
- Click Optimize.
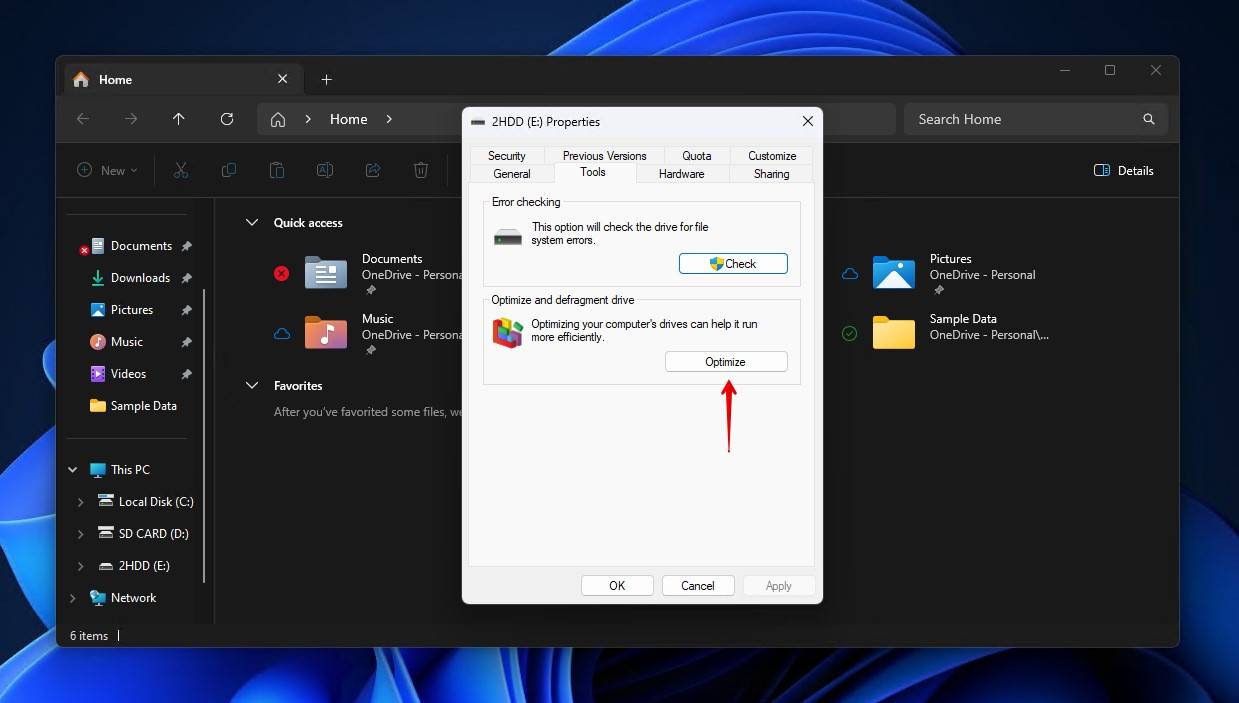
- Select the disk and click Optimize.
Fixing HDD Bad Sectors: Dishonorable Mentions
In your search for answers on how to repair bad sectors on a hard drive, you’ll come across a wide variety of solutions. Unfortunately, there are some solutions floating around out there that don’t actually help with repairing the problem. We’re going to include some of them here and explain why they may not be suitable for this exact situation.
- Bootrec – Bootrec is a Windows tool designed to troubleshoot and repair boot-related issues. We often see it recommended as a viable method for fixing bad sectors, particularly with the use of the /fixboot and /rebuildbcd command parameters. Despite its usefulness in other scenarios, it is not designed to scan for bad sectors and only specializes in issues relating to the bootability of your drive.
- Boot into Safe Mode – Safe Mode prevents third-party software and drivers from starting when you load into Windows. This is intended to help you diagnose what software is causing an issue. This will not help in fixing bad sectors, as it does not include any functionality to locate and address them.
- Reinstall Windows – A fresh install of Windows can fix many issues, but bad sectors are not one of them. At no point in the Windows installation process does it perform a surface scan to identify bad sectors. Instead, Windows will simply be installed in working sectors, leaving the bad sectors unaddressed.
It’s easy to misunderstand the efficacy of a solution found online, especially if you’re not familiar with how it works. Understanding why it won’t work helps to avoid “fixes” that might actually cause more harm than good.
Conclusion
Bad sectors come in two forms: logical and physical. Logical ones are software-related and have a chance of being fixed, while physical ones are permanent. When you encounter a sudden rise in bad sectors, backing up the drive first is your top priority. After backing it up, you can recover what data you can with a data recovery tool and attempt to repair the drive. Be warned, however, that once a drive starts to rapidly collect bad sectors it should be considered unstable and should not be used to store important data.
Stay on top of bad sectors by regularly checking your hard drive health. Old hard drives are more likely to have a higher number of bad sectors. In cases where you’re dealing with an older drive, be sure to check out our guide on how to perform old hard drive recovery.
This article was written by Jordan Jamieson-Mane, a Staff Writer at Handy Recovery Advisor. It was also verified for technical accuracy by Andrey Vasilyev, our editorial advisor.
Curious about our content creation process? Take a look at our Editor Guidelines.