Have you lost data on your Samsung Solid-State Drive (SSD)? This is a common problem many face as SSDs, with their rapid, flash-based memory, are replacing traditional Hard Disks (HDDs). Samsung, a leader in the tech industry, is at the forefront of this transition, with its SSDs being a popular choice for data storage.
The solution? Our guide on Samsung SSD data recovery. We provide easy-to-follow techniques that are both effective and reliable. By following our guide, you can quickly recover your lost data from Samsung SSDs, ensuring that your valuable information is not permanently lost. Trust our expertise to guide you through a seamless recovery process.
We’ve covered a little theory behind SSD data recovery, but if you want to skip straight to the recovery techniques, click here.
Can I Recover Data from a Samsung SSD by Myself?
Yes, you can recover data from a Samsung SSD, but there’s a catch. If you’re sure that your data has been permanently deleted (by emptying the Bin or using Shift + Delete) or you formatted the device/partition in question, third-party data recovery tools are your go-to solution. These tools are designed to scan and retrieve deleted files from your Samsung SSD. Now, here’s the kicker:
- Internal SSDs come with a feature called TRIM. This essential system-level feature is a standard on all SSDs. By clearing the flash memory cell, TRIM allows your operating system to get rid of unnecessary data blocks. This not only keeps your SSD tidy but also boosts its data-writing performance and extends its overall lifespan. The downside? When TRIM is active, data recovery chances hit rock bottom because it causes immediate overwriting of deleted data, especially when your PC is idle. So, recovering data from an internal Samsung SSD? It’s possible, but only if TRIM was turned off when your data got lost. Want to know how to disable TRIM to prevent this from happening again? Here’s a decent guide. And here’s more technical information about the fsutil behavior command.
- Portable SSDs offer some advantages for data recovery compared to traditional ones. That’s because TRIM support for external SSDs is often limited. Since Samsung includes several portable SSDs in its lineup it is important to note that enabling TRIM functionality on portable SSDs hinges on several factors. These factors include the specific SSD’s TRIM capabilities, the operating system you’re using (older Windows versions typically lack TRIM support), the connection method (USB Attached SCSI Protocol, or UASP, is required, not the traditional USB Mass Storage protocol), and even the file system used (only NTFS or ReFS are supported). Given the extensive list of requirements, it’s likely that your portable Samsung SSD hasn’t been impacted by TRIM.
But why wait and wonder? You can easily verify if TRIM has been working on your SSD. Here’s a straightforward guide on how to check.
How to Check If Your Samsung SSD Data Is Actually Deleted
Chances are your deleted data is safely tucked in the recycle bin. This is the first place you need to search for your deleted files.
- If you have a weird obsession with constantly hitting SHIFT + Delete, you should check out our tutorial on recovering permanently deleted Recycle Bin data.
- Believe it or not, your SSD has an in-built recycle bin that collects deleted files. We’ve covered an entire article on how to unhide the recycle bin on your external hard drive.
- Alternatively, we recommend you check for hidden drive partitions on your Samsung SSD. If you accidentally deleted an entire partition, you can still recover it. Try conducting a drive partition search In Windows File Explorer. You might find a copy of your deleted data.
How to Recover Permanently Deleted Data with a Recovery Tool
Now, taking a shot with data recovery tools is a viable option. Several tools are out there, and our research team did their homework by compiling a list of the best data recovery apps.
Our top choice? Disk Drill. This tool isn’t just highly efficient; it’s also incredibly easy to use, offering a recovery solution in just minutes.
Disk Drill has got you covered for all major SSD brands – think Samsung, Crucial, WD, and the like. It’s not just about brand compatibility, though; Disk Drill is versatile in handling data recovery from various file systems including FAT32, exFAT, EXT3/EXT4, and NTFS. It can also perform a Deep Scan if your device or partition was reformatted. And even if it can’t recover data from file system records (where the file type doesn’t matter), Disk Drill has an effective signature scanner that can identify and rescue around 400 different file types. This latter feature is crucial especially if your Samsung SSD is corrupted and the file system doesn’t appear. Last but not least, Disk Drill allows you to scan your device to see what data can be recovered without any cost. Plus, you can recover up to 500 MB of data for free.
Without any further ado, here’s how you can perform Samsung SSD data recovery using Disk Drill:
- Download, install and launch Disk Drill.
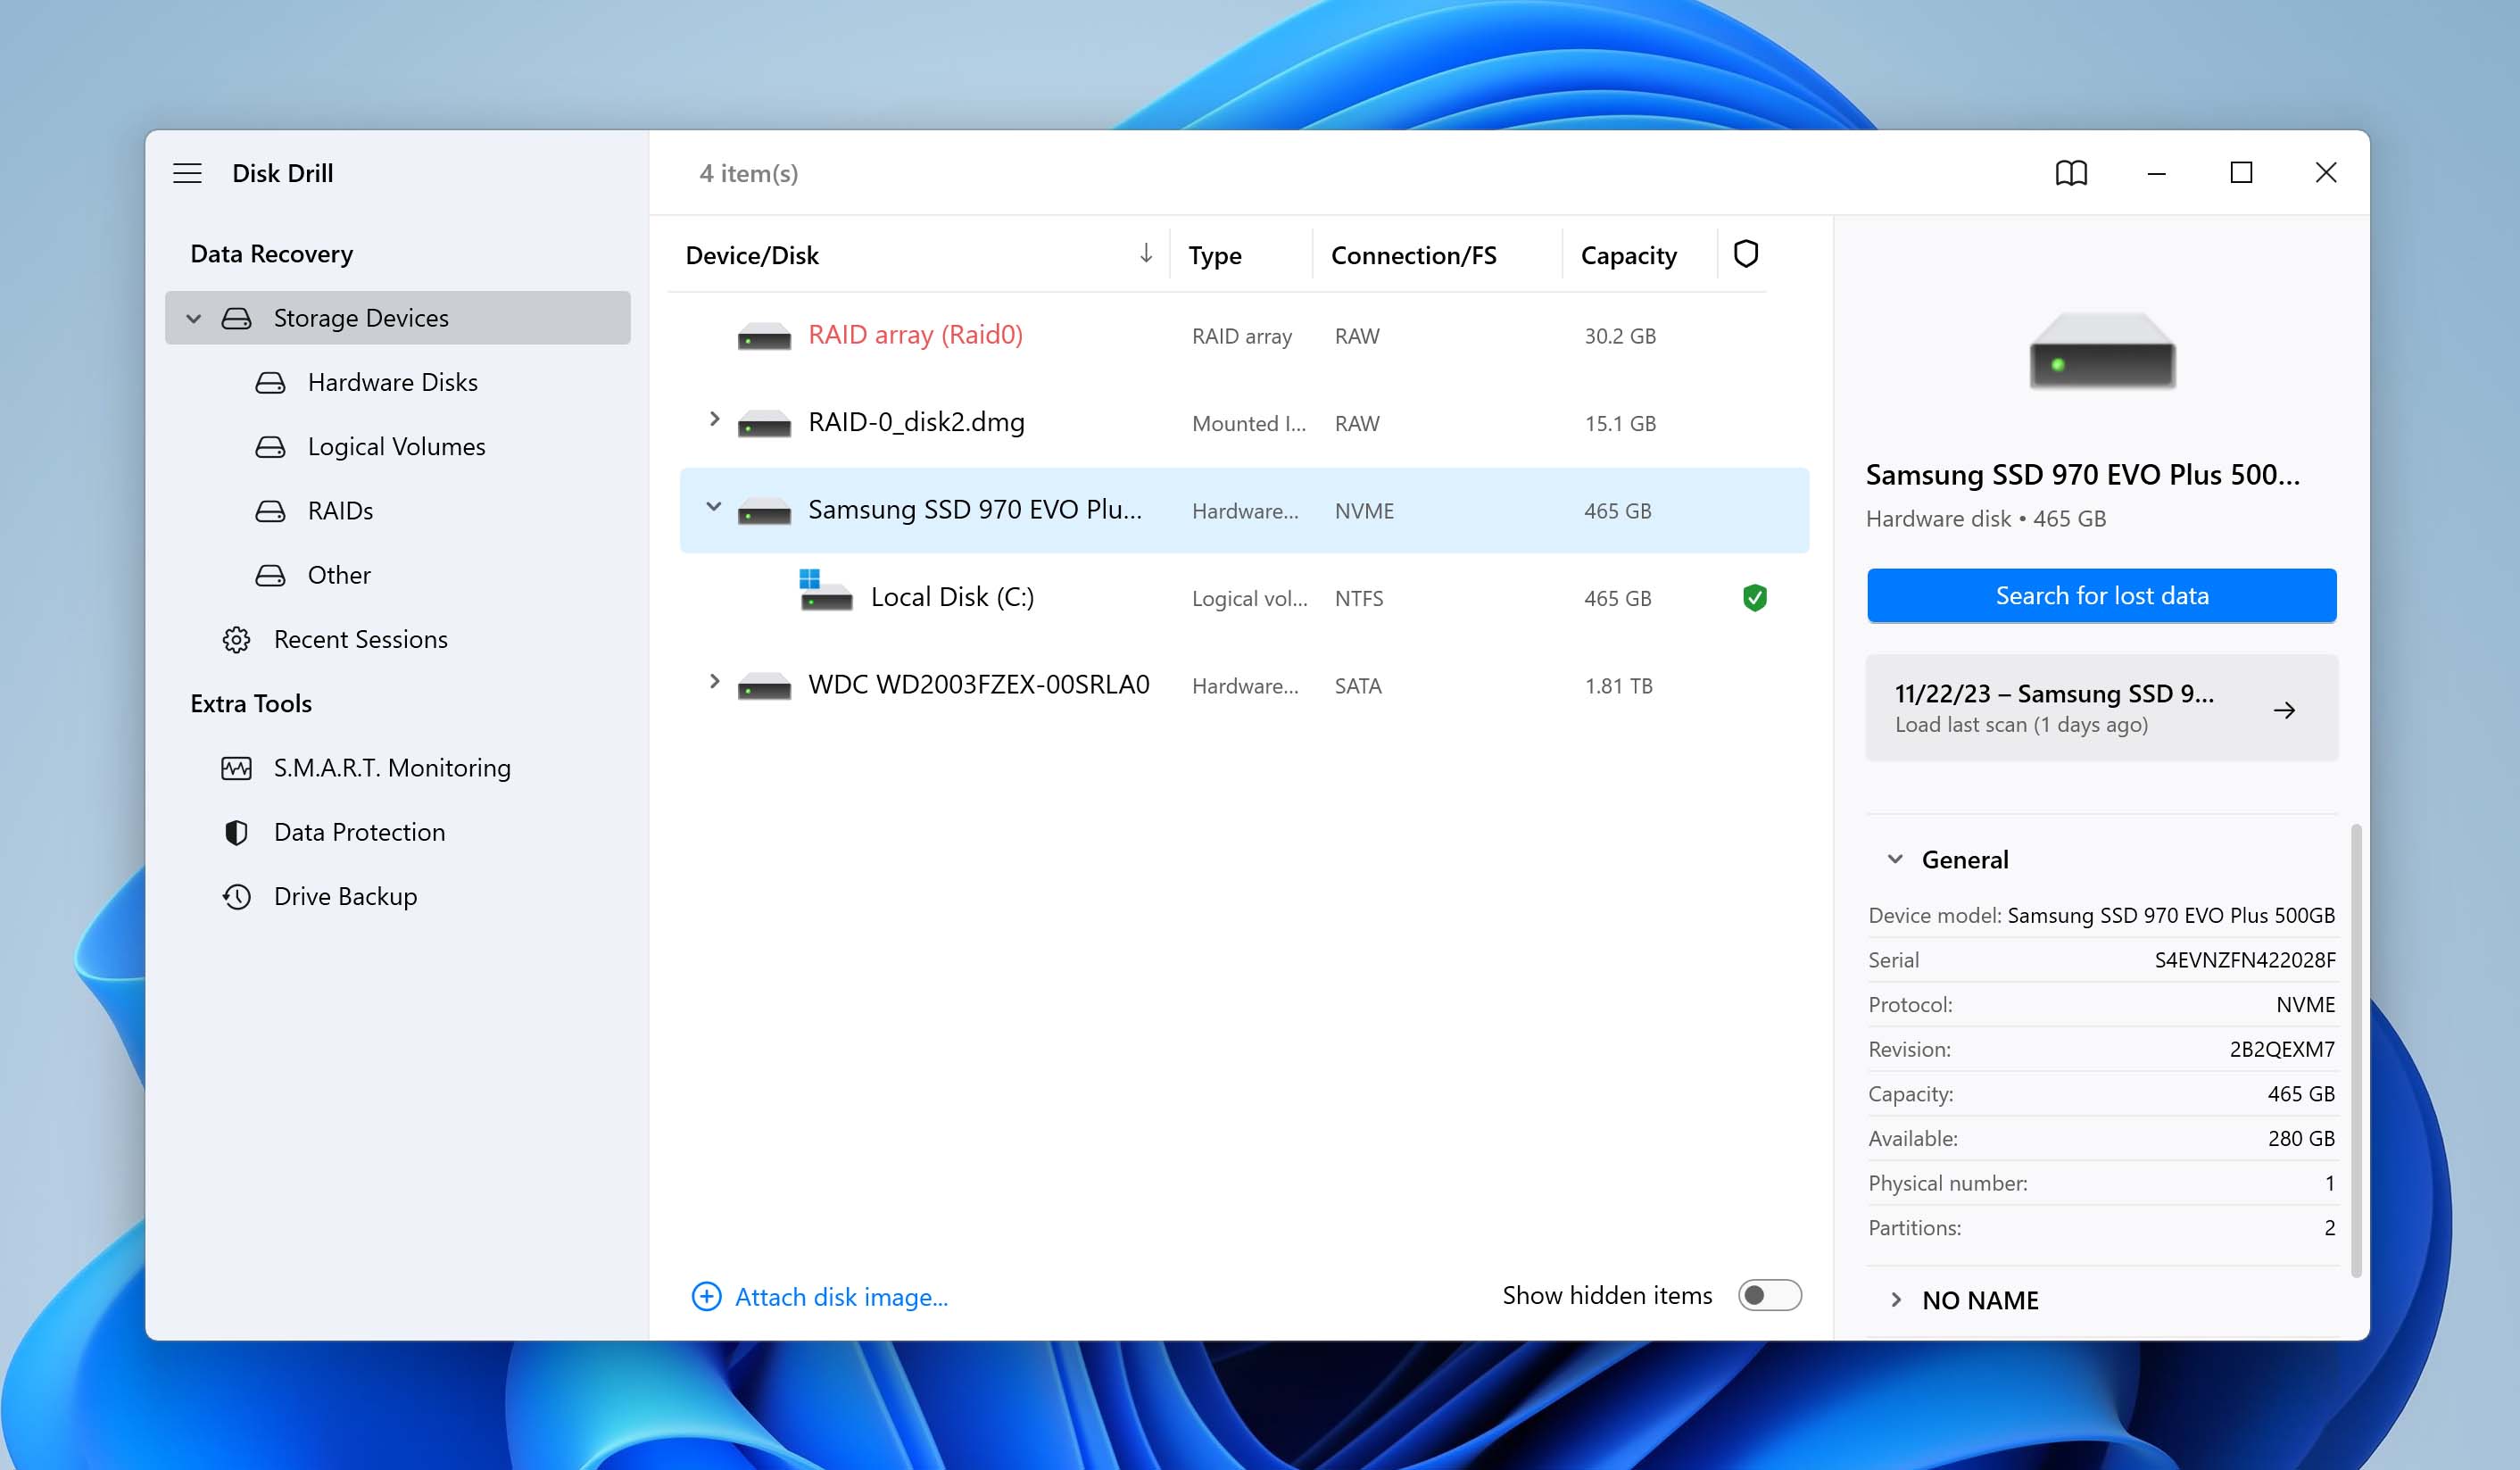
- Select your Samsung SSD from the list of drives, and click on Search for Lost Data.
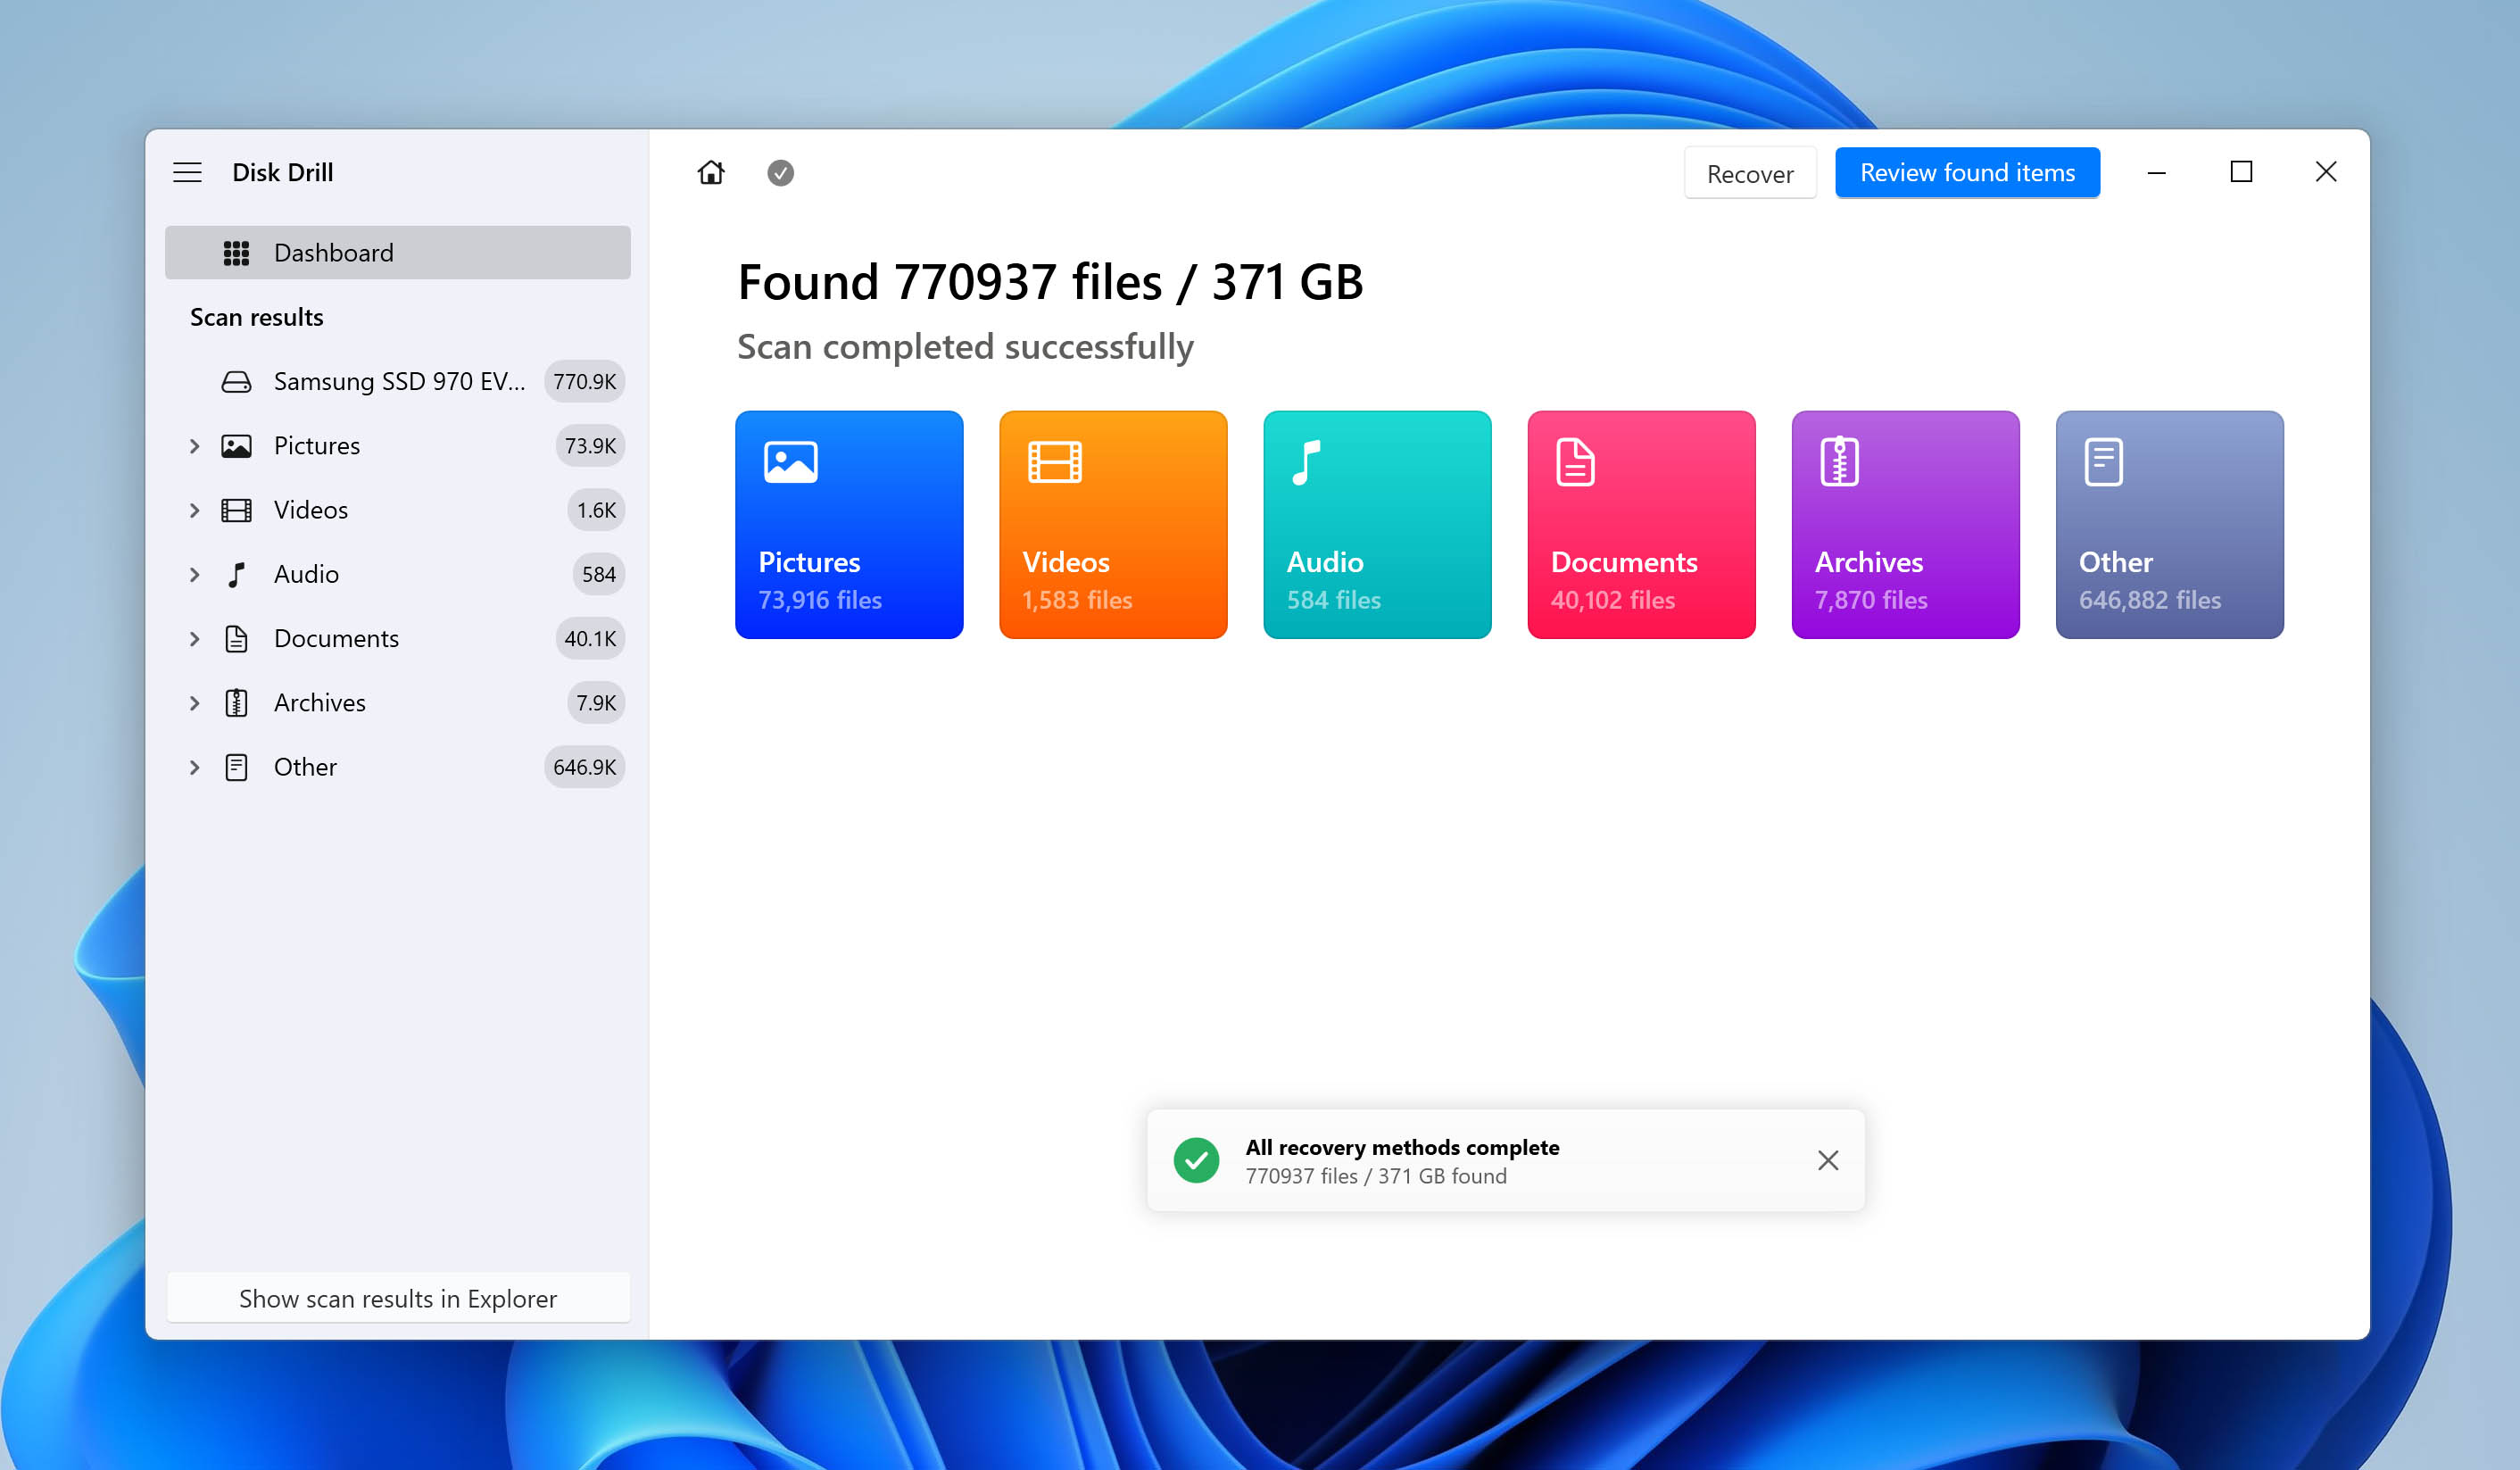
- Once the scan completes, click on Review Found Items.
- Pick the required files and click Recover. In this tutorial, I’m attempting to recover some lost photos.
- 🔍The filters option is a blessing as you can swiftly sort through the scan results for a particular file type. To filter, type in your desired file type in the top right search bar. For example, “.mp3” or “.pdf”.
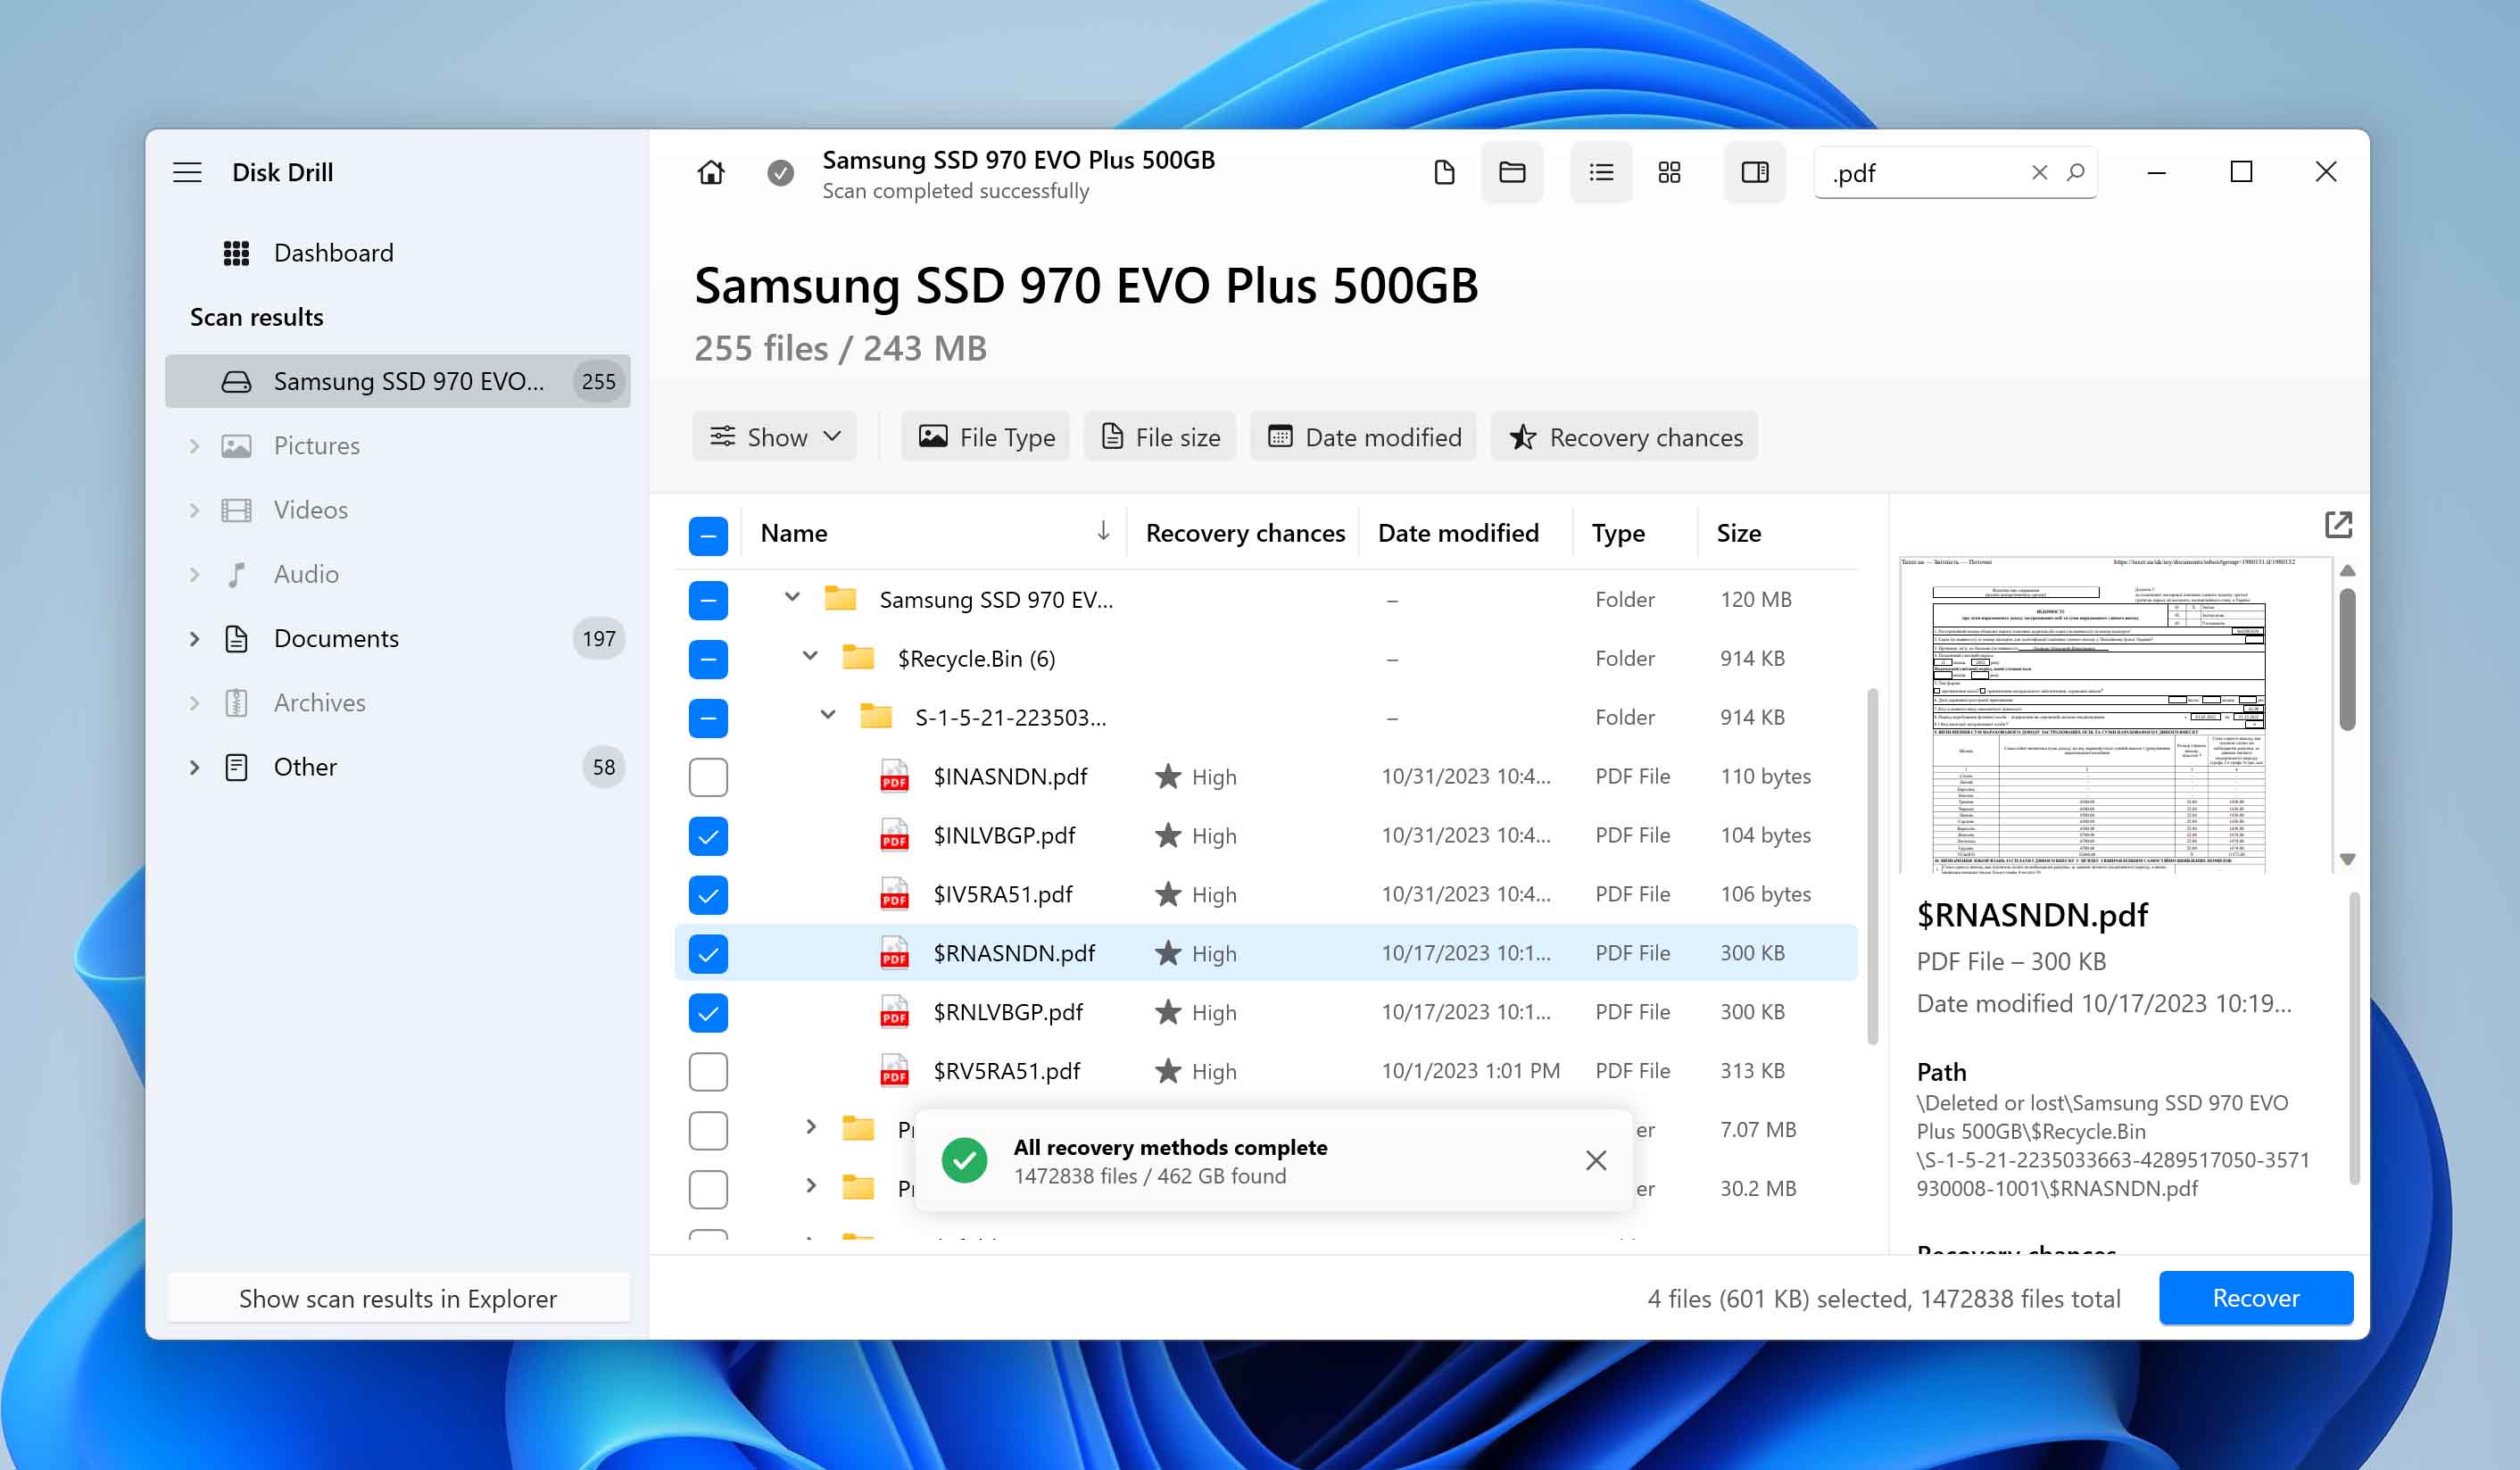
- 📂The Preview option is another helpful feature as you can view essential details like the file size or the last modified date. While hovering over files, click on the eye icon to open the preview pane.
- 🔍The filters option is a blessing as you can swiftly sort through the scan results for a particular file type. To filter, type in your desired file type in the top right search bar. For example, “.mp3” or “.pdf”.
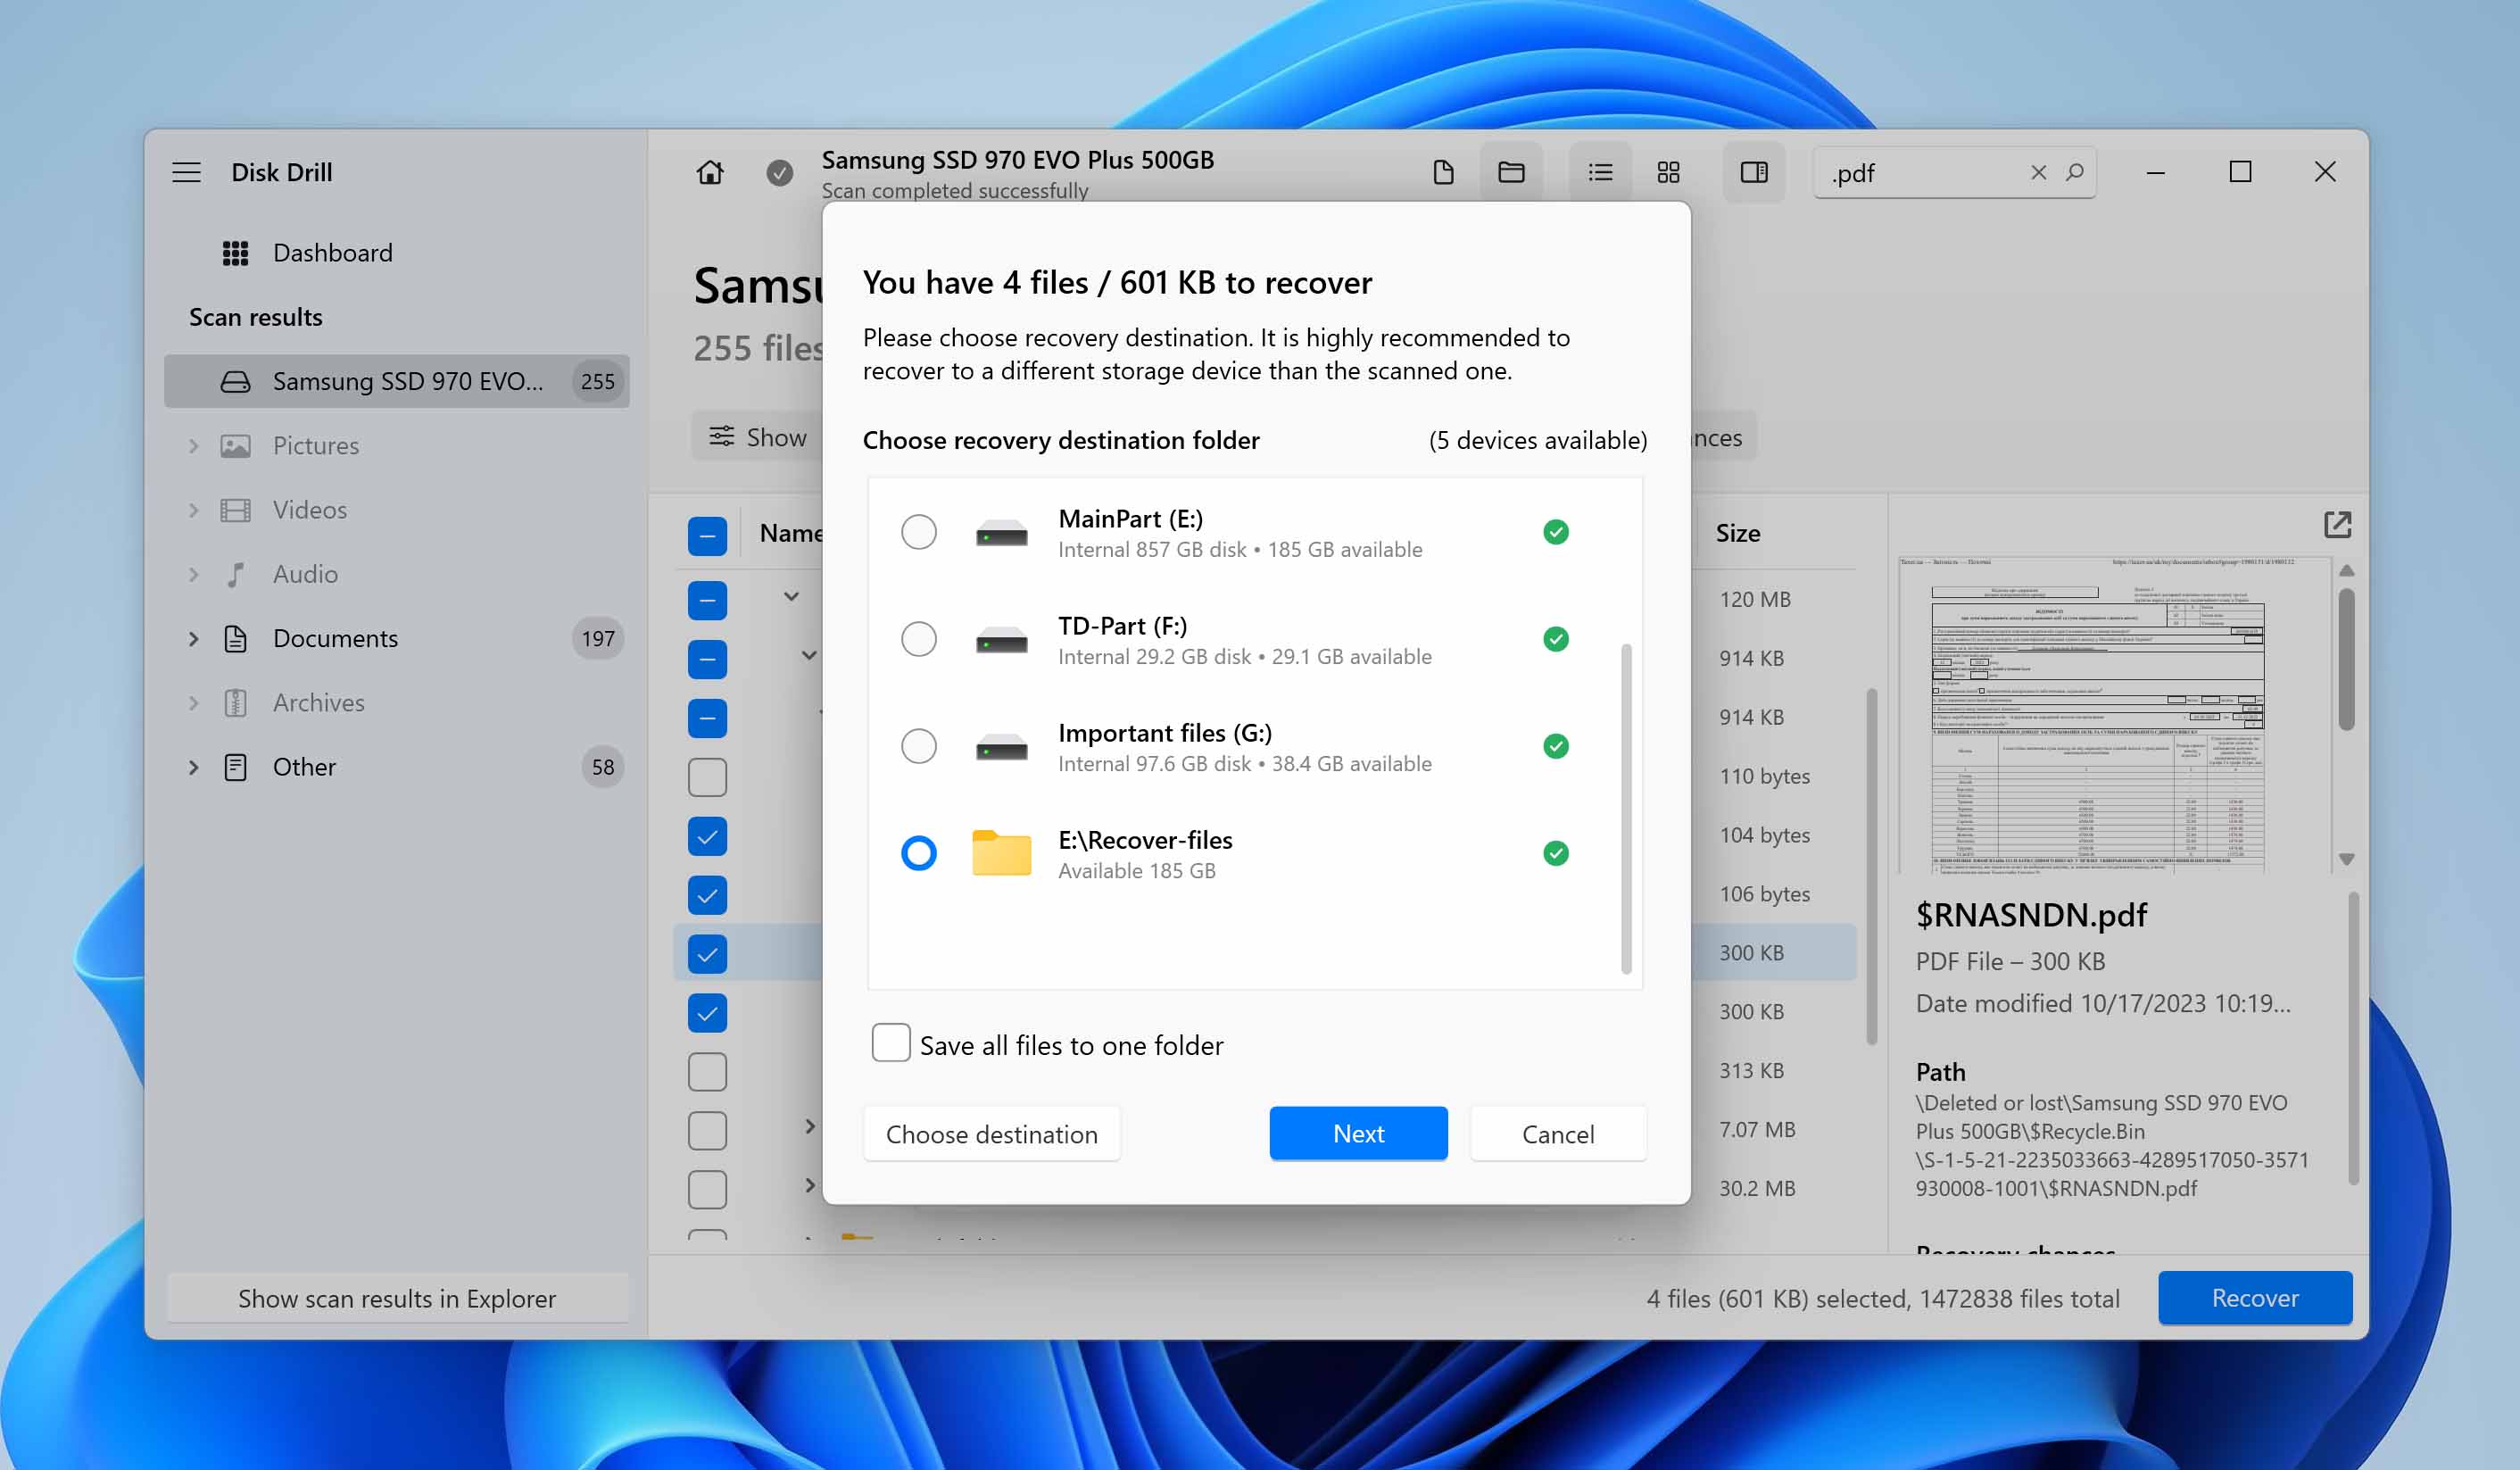
- Specify the recovery location and click Next. We recommend selecting a destination that’s not the affected SSD to prevent file overwriting.
Disk Drill offers a variety of features, including byte-to-byte backups, partition data recovery, and NVMe data recovery, among others. For a detailed understanding of how Disk Drill can be beneficial to you, consider reading our comprehensive review. If you have concerns regarding safety, our article titled ‘Is Disk Drill Safe?‘ offers valuable insights on that matter. In addition to Disk Drill, our list of top SSD data recovery software includes a few other noteworthy options and Disk Drill alternatives worth exploring.
Two Primary Causes of Data Loss in Samsung SSDs
Broadly, there are two main problems leading to SSD data loss:
- Accidental Deletion: Accidental deletion or formatting arises from human error – and it’s pretty frequent. However, as long as the TRIM feature is disabled, data recovery from your Samsung SSD is very much possible. If you are dealing with an accidental format, check out our step-by-step guide on data recovery from a formatted SSD.
- Samsung SSD Corruption or Physical Damage: There are several reasons behind an SSD malfunctioning or data loss:
- 💾 Like any other electronic device, Samsung SSDs have a limited lifespan. Over time, the flash memory cells in an SSD can wear out, making it more likely for the drive to fail.
- 🔥 SSDs can overheat if they are not properly ventilated. This can damage the flash memory cells and shorten the lifespan of the drive.
- ⚡ Sudden power outages or fluctuations can damage the SSD controller or corrupt data on the drive.
- 🐞 Bugs in the SSD’s firmware can cause a variety of problems, including data corruption, performance degradation, and even complete failure.
- ❌ The Samsung SSD could be incompatible with your OS, thus triggering the “Unsupported File System” error.
- 🚫 The file system on your Samsung SSD can become corrupted or disappear, rendering your device unreadable (RAW).
- ☢️ Physical damage to the SSD, such as dropping the drive or spilling liquid on it, can damage the flash memory cells or the controller board, and lead to complete failure.
- ⏏️ Improperly removing the SSD from your computer can cause various types of issues, including connectivity problems.
- 🦠 Malware infections or virus attacks can also impact your Samsung SSD, potentially corrupting its file system or causing files to go missing on your device.
The good news is that recovering data from a Samsung SSD is still achievable in many cases. For logical issues like file system corruption, DIY techniques can often be successful. As long as your SSD is recognized in Windows Disk Management, you can use data recovery software to scan it, as shown in our guide above. Even if your system’s SSD becomes corrupt, you can perform this process on another PC by connecting your SSD as an additional or external drive. Just ignore any “format your device” errors.
For SSDs formatted in file systems not supported by Windows, there are still options: (1) Access the drive using specialized software. (2) Recover data using most data recovery software through signature scanning. (3) Use a data recovery software tool that supports recovery from specific file systems, like R-Studio for Mac-specific formats
However, a word of caution: if your Samsung SSD shows signs of obvious physical damage, stop using it immediately and consult a professional data recovery service.
FAQ
How to recover deleted files from Samsung SSD?
Need to get your data back from an SSD? Here’s a quick step-by-step guide using a Samsung SSD data repair tool:
- Download, install, and launch your chosen Samsung SSD data repair tool.
- Scan your Samsung SSD by selecting it in the software.
- Choose files for recovery, or opt to recover all files in bulk.
- Set a destination for the recovered data and finalize the recovery process.
How do I connect my Samsung SSD drive?
The Samsung SSD drive, be it Samsung 850 EVO, Samsung 840 PRO, or Samsung T5, comes with two connecting cables:
- USB 3.1 USB-C to A cable
- USB 3.1 USB-C to C cable
Simply connect one cable end to your PC and the other to your SSD drive.
How much does Samsung SSD data recovery cost?
Typically, the cost of data recovery depends on factors like the amount of damage inflicted on the SSD. DIY software solutions typically range from $50 to $100 per license. For professional data recovery services, expect to pay between $300 and $1,000 for Samsung SSD recovery.
What is the best Samsung SSD recovery tool?
Disk Drill is the frontrunner as the most viable and easy-to-use SSD recovery solution:
Some other noteworthy Samsung drive recovery software include:
- DMDE
- EaseUS Data Recovery Wizard
- DiskGenius
- R-Studio
There is also a tool called “Samsung Magician,” but it is strictly a utility for managing, optimizing, and monitoring the health of your Samsung SSD and does not offer data recovery functionalities.
Do Samsung SSDs come with cables?
It depends on the Samsung SSD you are buying. Some of them come with connecting cables though most don’t.
Conclusion
Dealing with data loss on any device is a hassle – especially if it’s your Samsung SSD. Accidental deletion and SSD corruption/damage are the main culprits behind data loss. We have demonstrated data recovery from a Samsung SSD using a third party recovery tool.
Please note that we also have a separate article on how to recover data from a Mac SSD.
This article was written by Joshua Solomon, a Contributing Writer at Handy Recovery Advisor. It was also verified for technical accuracy by Andrey Vasilyev, our editorial advisor.
Curious about our content creation process? Take a look at our Editor Guidelines.