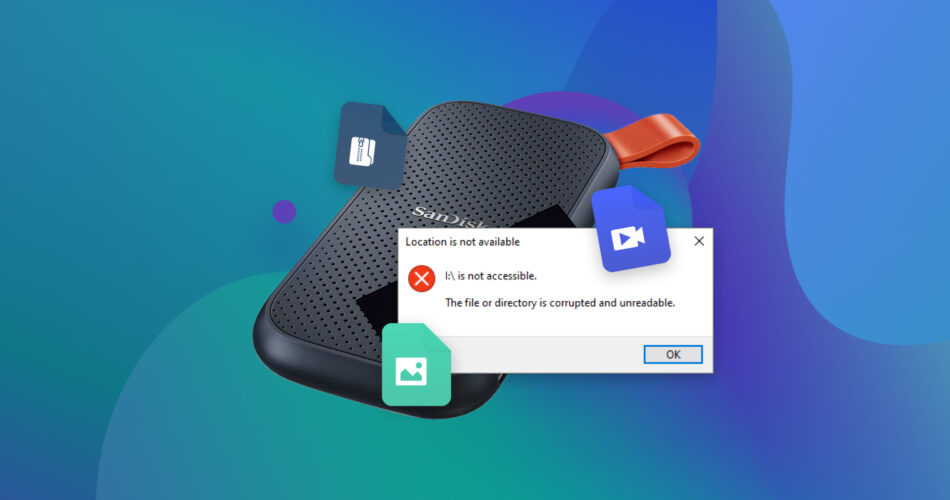
Corrupted SSD Recovery: How to Recover Data From a Corrupted Solid-State Drive SSDs (Solid-State Drives) are increasingly bypassing traditional hard drives because of better durability, faster reading/writing speed, and power efficiency. However, SSDs aren’t immune to corruption and data loss.
If your SSD has become corrupted or damaged, don’t fret. This article covers five methods to help you perform corrupted SSD recovery and retrieve data.
Symptoms of SSD Corruption
Since SSDs are flash devices and operated via integrated circuits, they are vulnerable to malfunctions caused by power surges and fluctuations. Just like traditional hard drives, even SSDs show warning signs of corruption.
If you can identify these signs, your first step should be to back up all your data to prevent significant data loss. Here’s a list of some common symptoms of corruption on your SSD:
Symptoms | Description |
🦥 Major performance slowdowns | If your SSD has become corrupted, chances are that it will become excessively slow. Corruption or damage can have a negative impact on SSD performance. |
📂 Files are getting corrupted or disappearing | You may start noticing that the files on your SSD have suddenly disappeared, and you're unable to find them in their usual location, or that some data has become corrupted. |
❌ System crash or BSOD | Another sign of an impending SSD failure is unexpected crashes or freezes. If your computer starts crashing more frequently or the Blue/Black Screen of Death error appears, it could be a sign that the drive is failing. |
📚 SSD is stuck in read-only mode | If the SSD has become corrupted, it may enter into a locked read-only mode. This happens if it exceeds its lifetime write cycles. In such a case, you won't be able to modify existing information or even save new information on the SSD. |
🦠 File system corruption | When the file system of the SSD becomes corrupted or RAW, you’re unable to access it and receive an error message. |
💻 SSD is not recognized by the PC | Sometimes, the SSD disk structure becomes corrupted and unreadable. In such cases, the SSD is undetected by the Windows operating system. The SSD may not show up on This PC, File Explorer, and Disk Management, despite being correctly connected to the computer. |
📜 SSD asks to be formatted | If you keep seeing the 'You Need to Format the Disk in Drive Before You Can Use It' error pop-up on your screen, it's likely to be a symptom of SSD corruption. |
❎ You get various error messages | If error messages like: "Your machine won't boot," "No bootable device," or "No bootable medium" keep appearing on the screen of your PC, it may be time to back up your data and repair your SSD. |
How to Recover Data From a Corrupted SSD
It’s critical to recover data from your SSD before attempting a repair. Repairing a corrupted SSD can lead to formatting or data loss – mainly because of the TRIM feature.
Most SSDs come with the TRIM command enabled by default. TRIM keeps data organized and “informs” the SSD which data blocks are redundant in order to manage storage space efficiently. While this can improve SSD performance, TRIM makes data recovery impossible because the deleted data gets overwritten almost immediately. Thus, you have to ensure that the TRIM command is disabled on your SSD before you attempt to recover data. However, the catch here is to disable the TRIM command almost immediately after you delete data because it only takes a few minutes for TRIM to overwrite your deleted files.
You can check the TRIM status of your SSD by entering the following command in the Command Prompt ‘cmd’ window:
fsutil behavior query DisableDeleteNotify
- If the “NTFS DisableDeleteNotify = 1 (Enabled)” message appears, TRIM is disabled.
- But if the “NTFS DisableDeleteNotify = 0″ message appears, then TRIM is enabled on your SSD.
If you discover that the TRIM feature is disabled, you can try to scan the SSD using one of the top ten options from our compilation of the best data recovery apps.
After thorough research, our team has picked Disk Drill as the best SSD data recovery tool.
Disk Drill is a reliable tool that performs corrupted SSD recovery efficiently. It has an easy-to-use interface that is great for first-time users and an advanced algorithm that helps you retrieve data in a matter of clicks. Moreover, the tool supports all major file systems like FAT32, NTFS, exFAT, etc. Furthermore, even when you can’t navigate to the SSD on File Explorer, Disk Drill can access your files and safely recover them (if your disk is available on Disk Management and doesn’t display a No Media label).
Follow these steps to recover data from a corrupted SSD via Disk Drill:
- Download, install and launch Disk Drill.
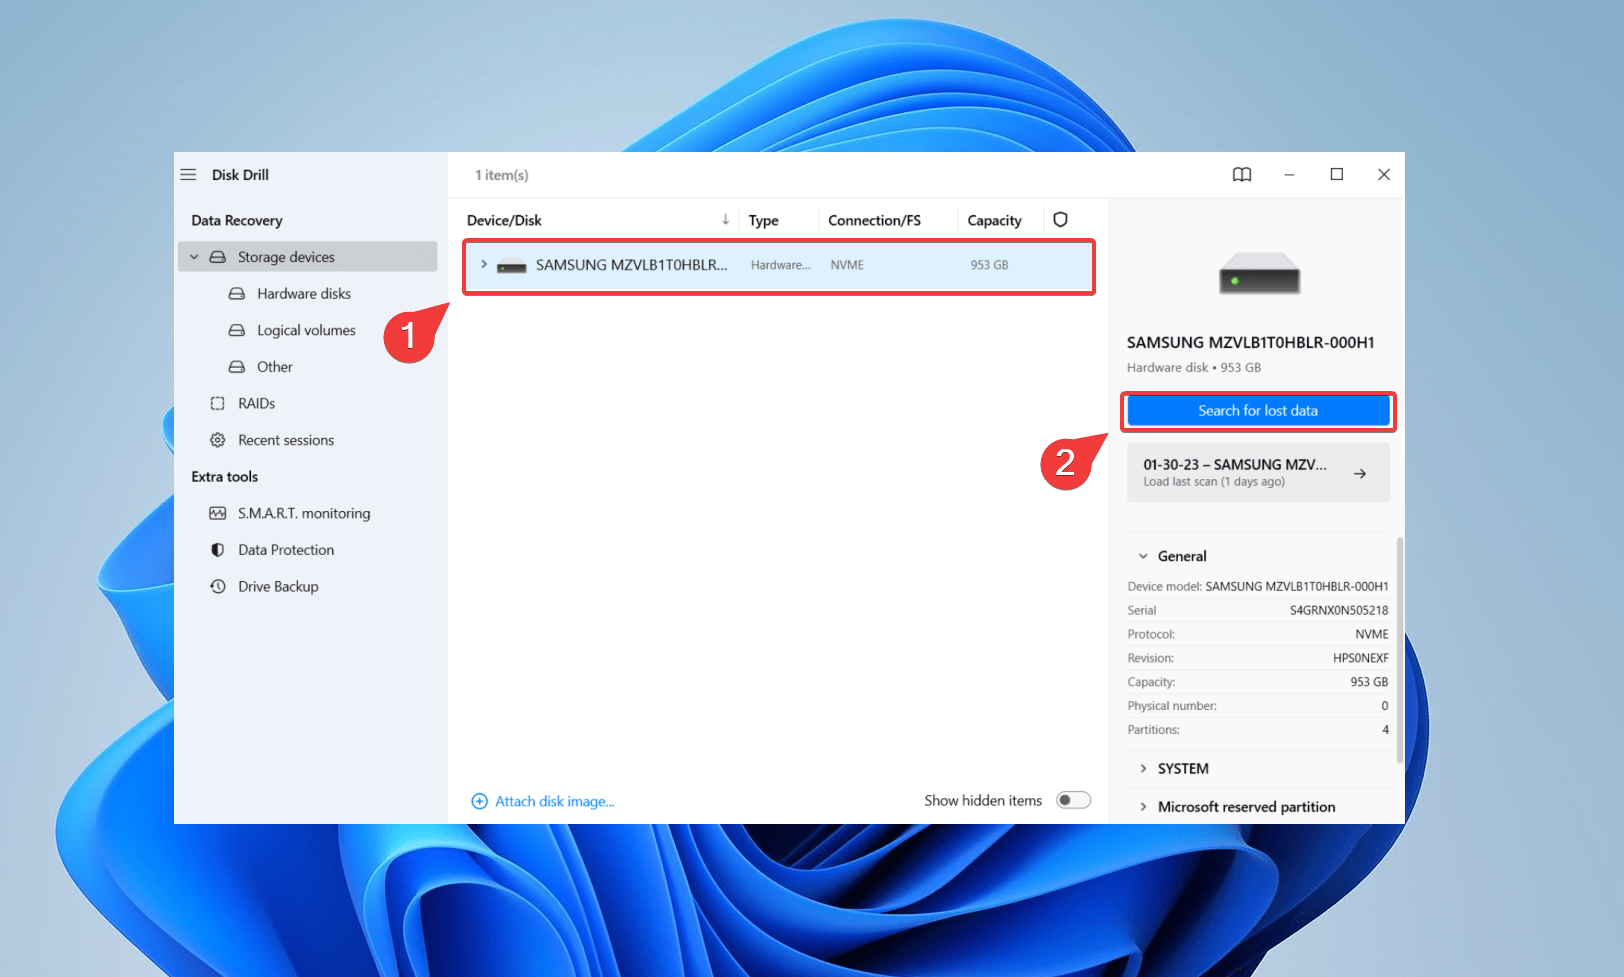
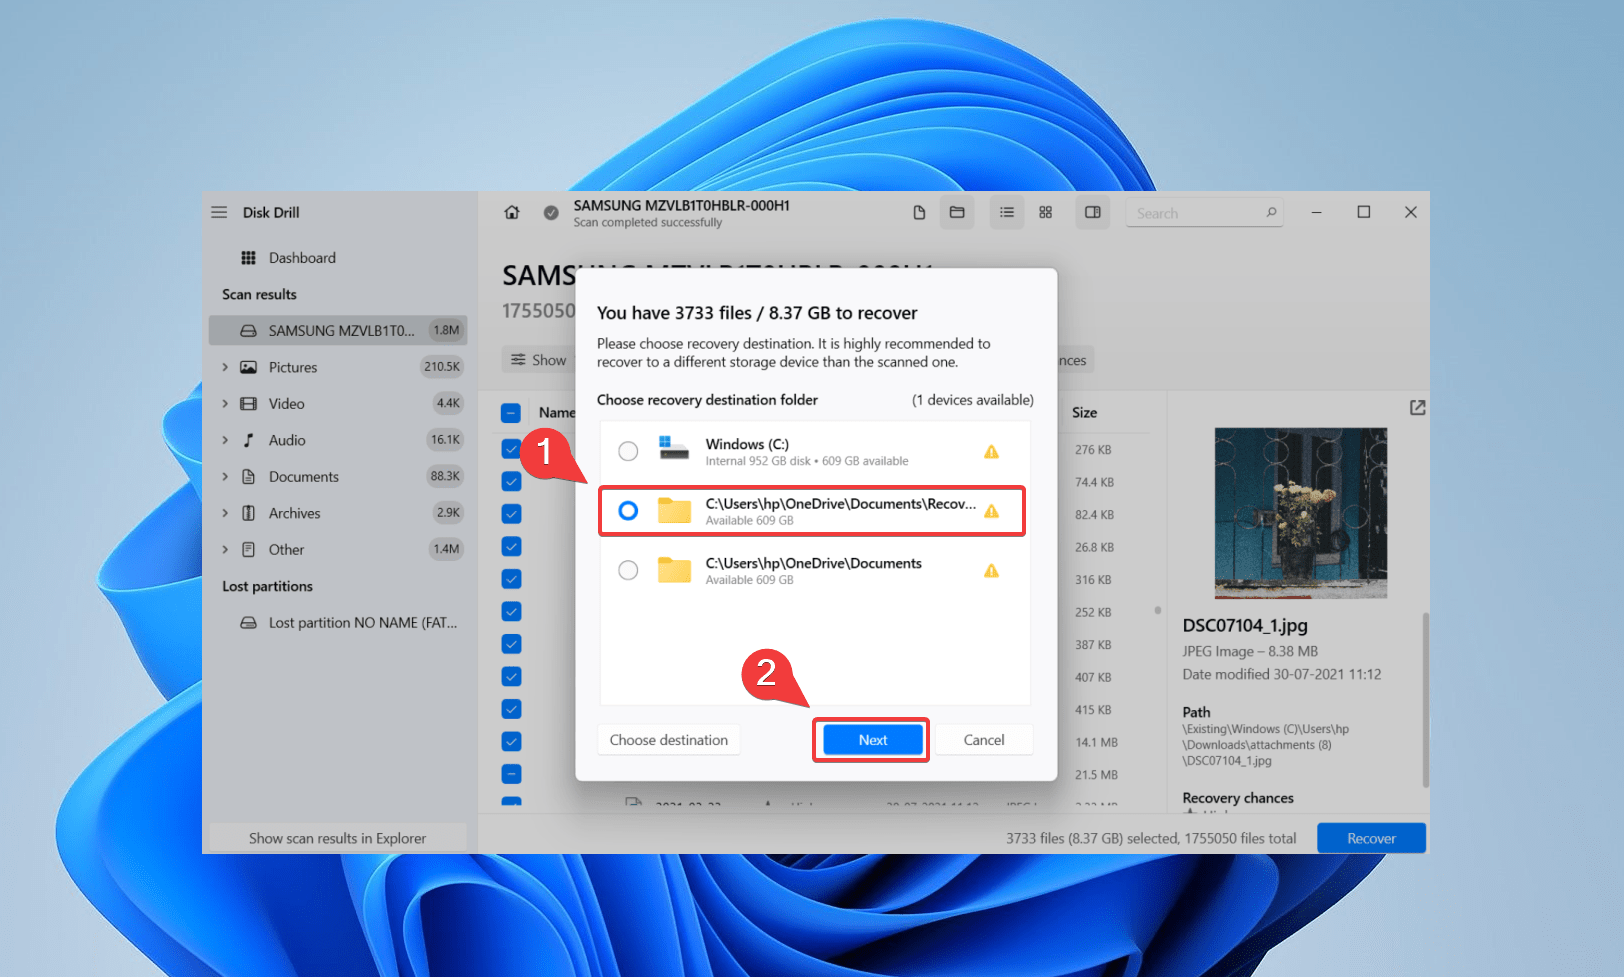
- Select the corrupted SSD from the listed devices. To begin the corrupted SSD recovery process, click the Search for lost data button.
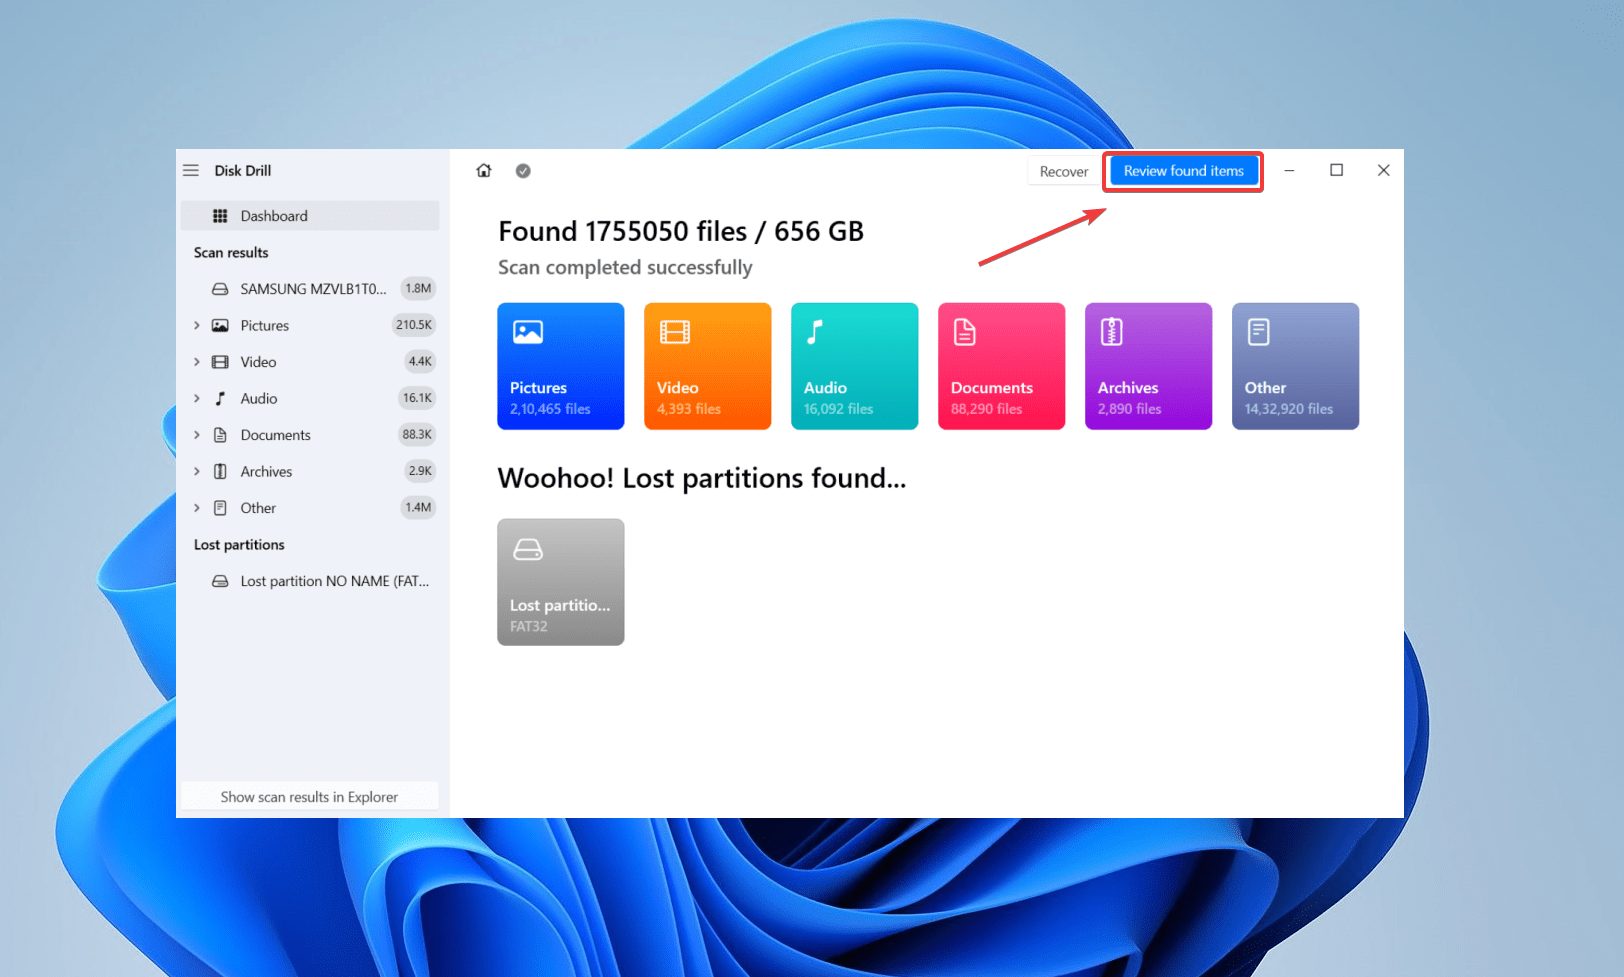
- Disk Drill’s algorithm will scan the corrupted SSD for recoverable, deleted, and existing data. It also allocates your files into categories – Pictures, Video, Audio, Documents, Archives, and other files. Once the scan is complete, click Review found items.
- Preview and select the files you want to recover. Click the eye button to preview files and use this feature to check details like the file path, last modified date, etc., and decide which files you wish to recover.
Additionally, if the preview doesn’t work for a particular file type, you can still consider the recovery chances attribute.
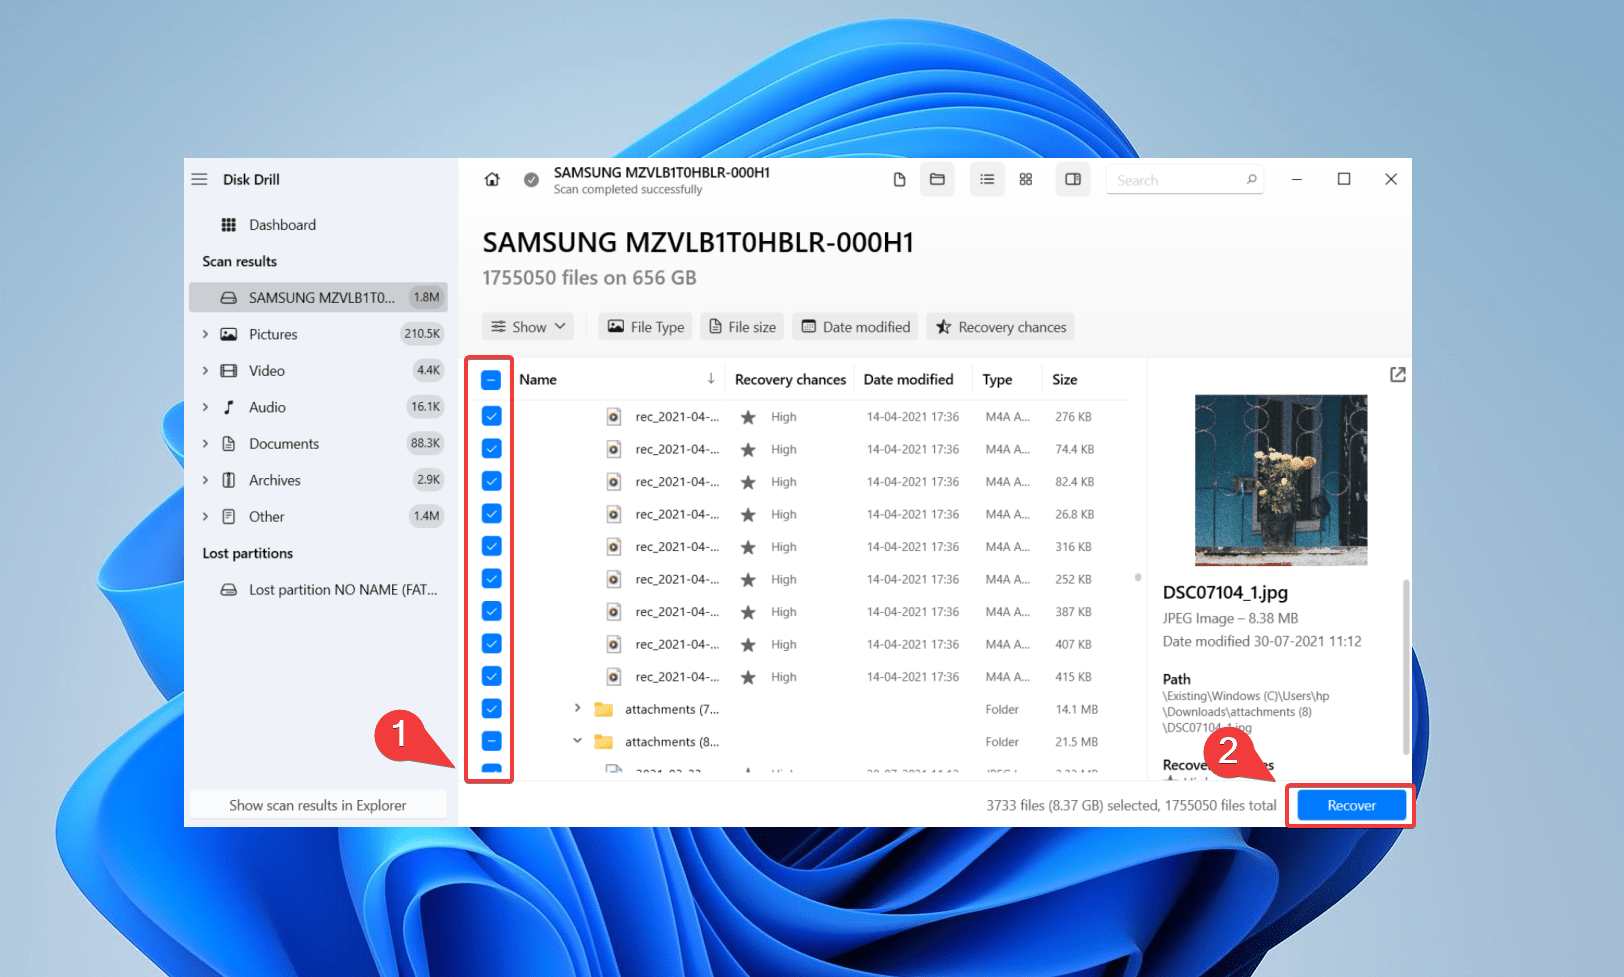
- You can filter through the results for specific files or choose to recover all found files from the corrupted SSD. Tick the checkboxes next to each file to select them for recovery.
- Finally, click the Recover button. Disk Drill will ask you to specify the destination where you want to store your recovered files, so ensure that you choose a device other than the corrupted SSD—Press Next to finish corrupted SSD recovery.
Disk Drill offers additional notable features like byte-to-byte backups and M.2 NVME Data Recovery. To learn more about utilizing all of its advanced features, go through our detailed Disk Drill review.
If you’re unable to recover your lost files using data recovery software like Disk Drill, it’s best to approach a trusted data recovery service to help you out. Most recovery service centers have trained professionals who can make your life easy and assist you with retrieving data from your corrupted or damaged SSD. To make it easy for you, we’ve put together a list of the best data recovery services.
How to Fix the Corrupted or Unreadable SSD Error
After you’ve successfully recovered data from a corrupted SSD, you can now attempt to repair it. Several methods are available to help you fix the corrupted SSD or hard drive, depending on what has caused the damage:
Method 1: Connect Your SSD to Another Port or PC
If your SSD shows symptoms of corruption or becomes unreadable, we recommend you start by turning off your computer and disconnecting the data cable. Once the computer turns back on, connect the SSD to another port. You can also try connecting the SSD to another PC.
Method 2: Update SSD Firmware & Drivers
If the SSD’s firmware has become corrupted, it could lead to read/write errors. You can attempt to repair the corrupted SSD by updating SSD firmware and drivers.
Follow these steps to update your SSD firmware:
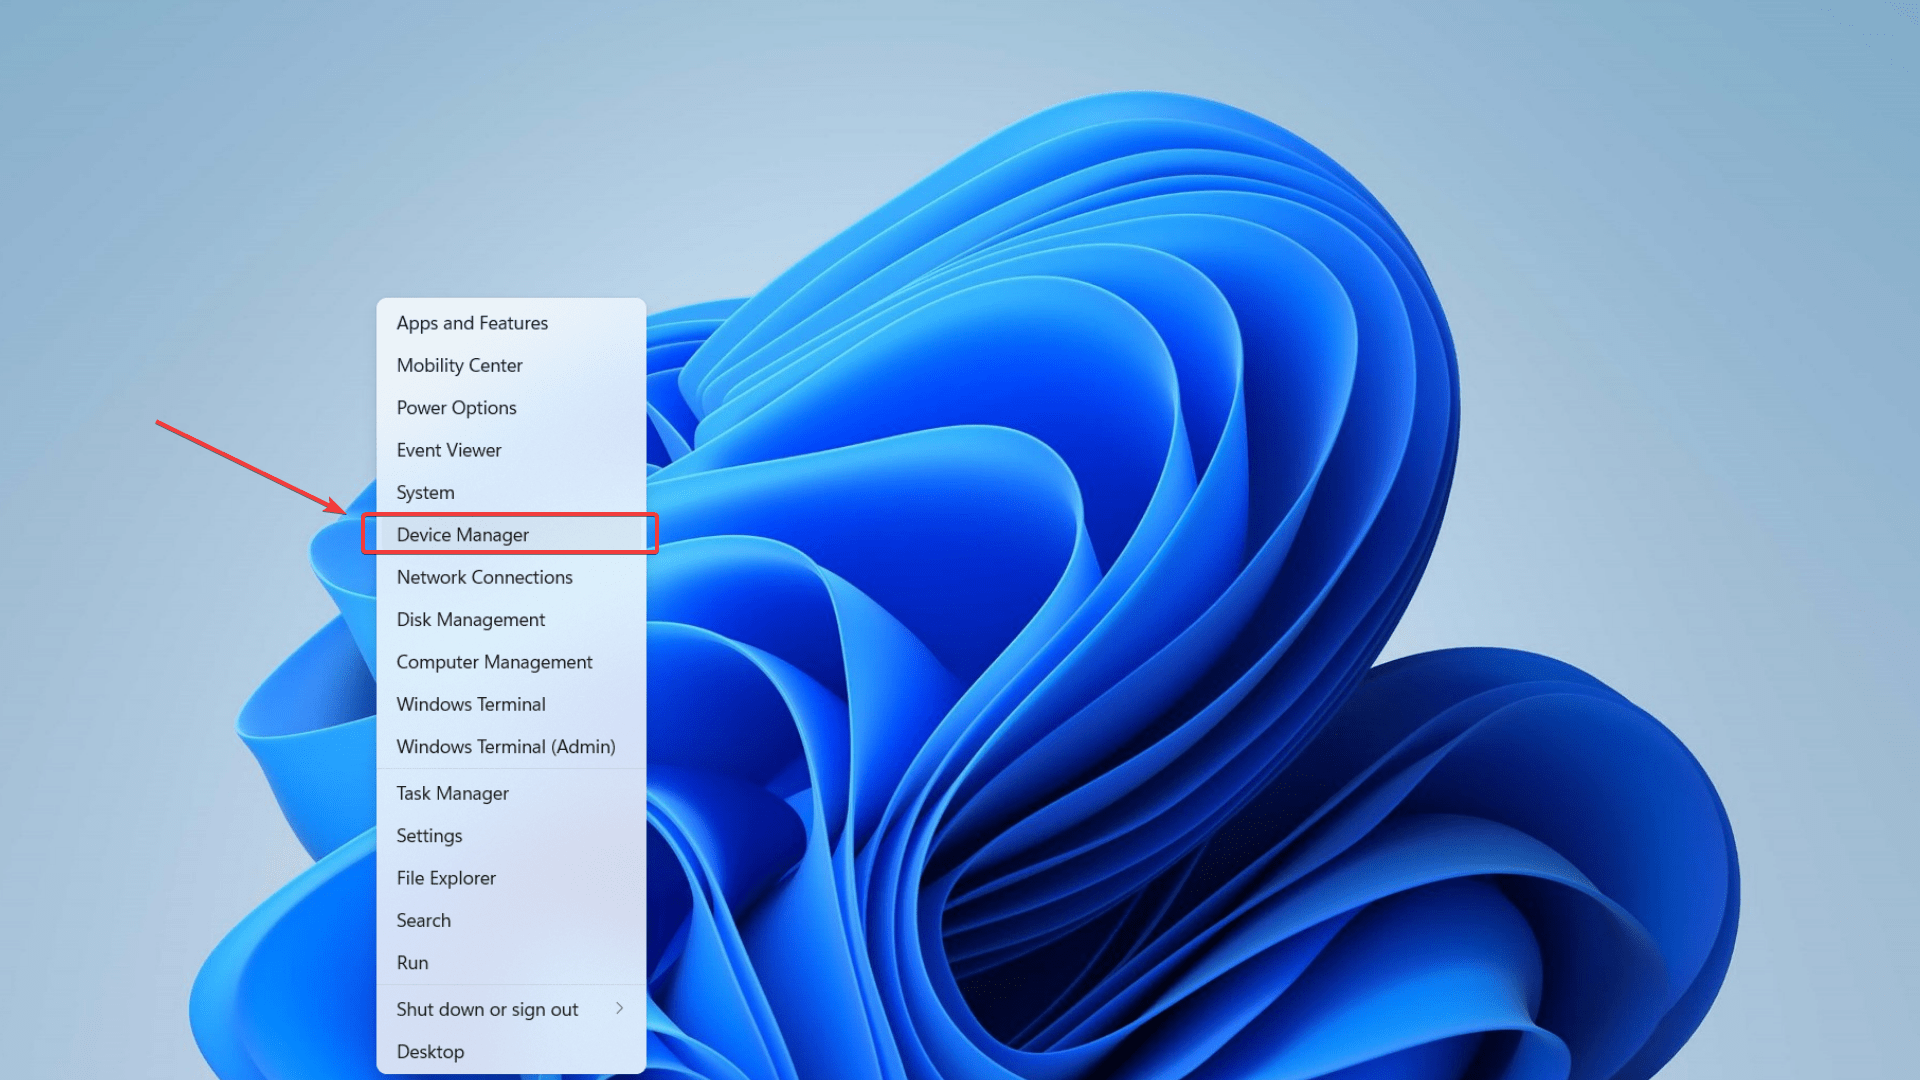
- Press Win + X, then select Device Manager.
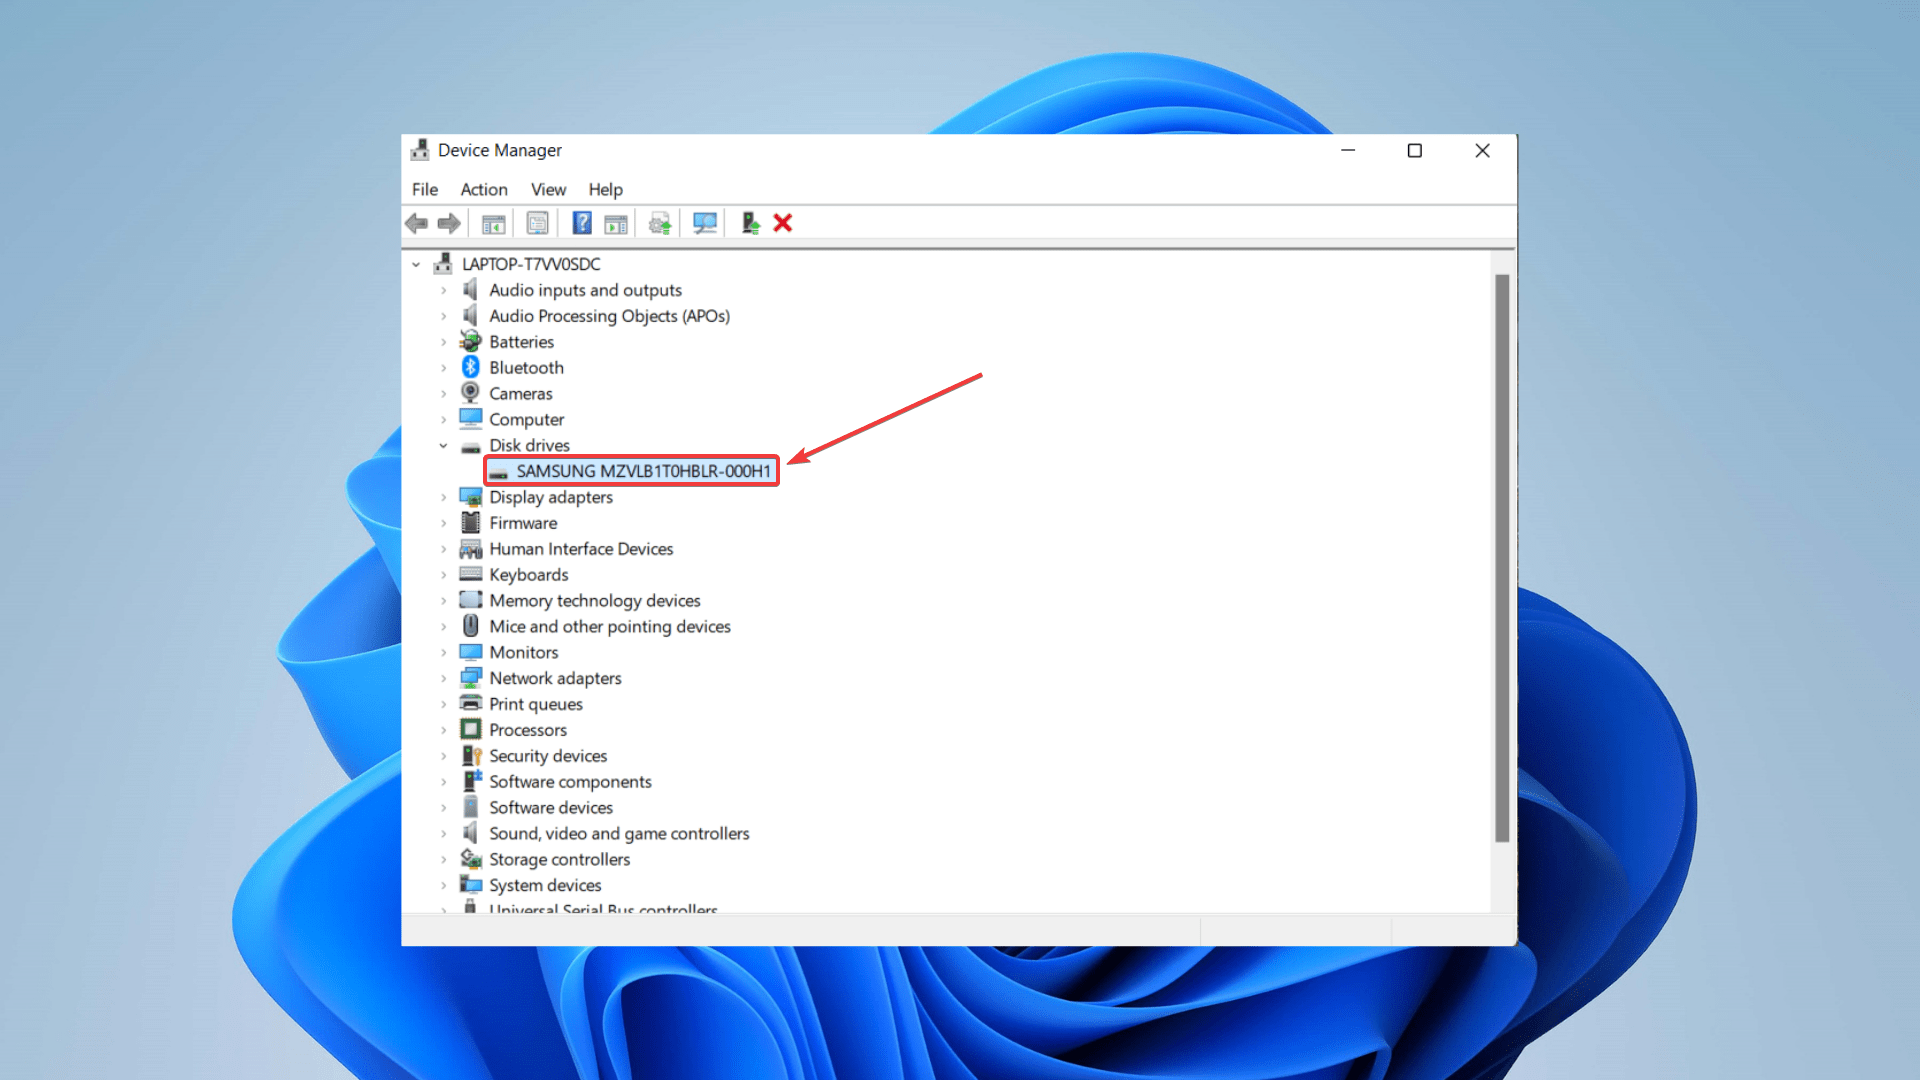
- Expand the Disk drives section.
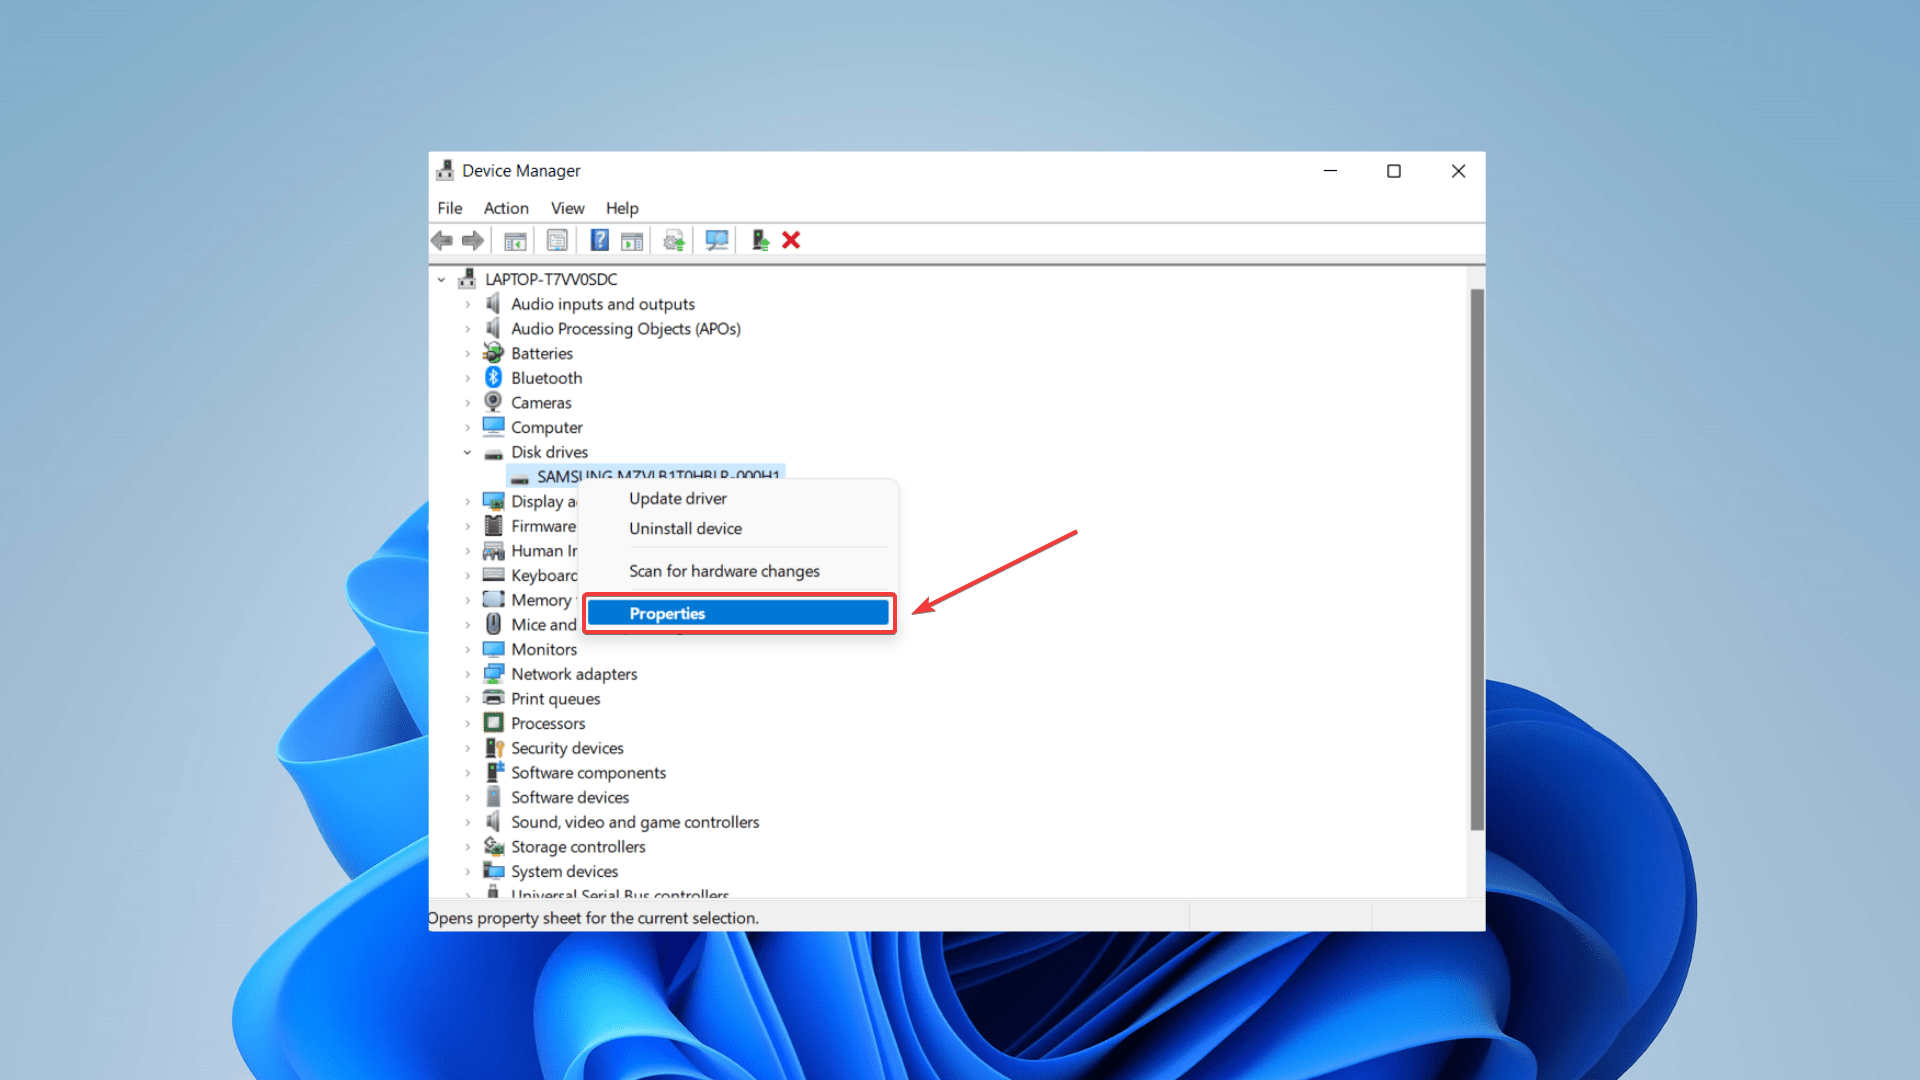
- Right-click your SSD and select Properties.
- Go to the Details tab and select Hardware Ids from the drop-down menu.
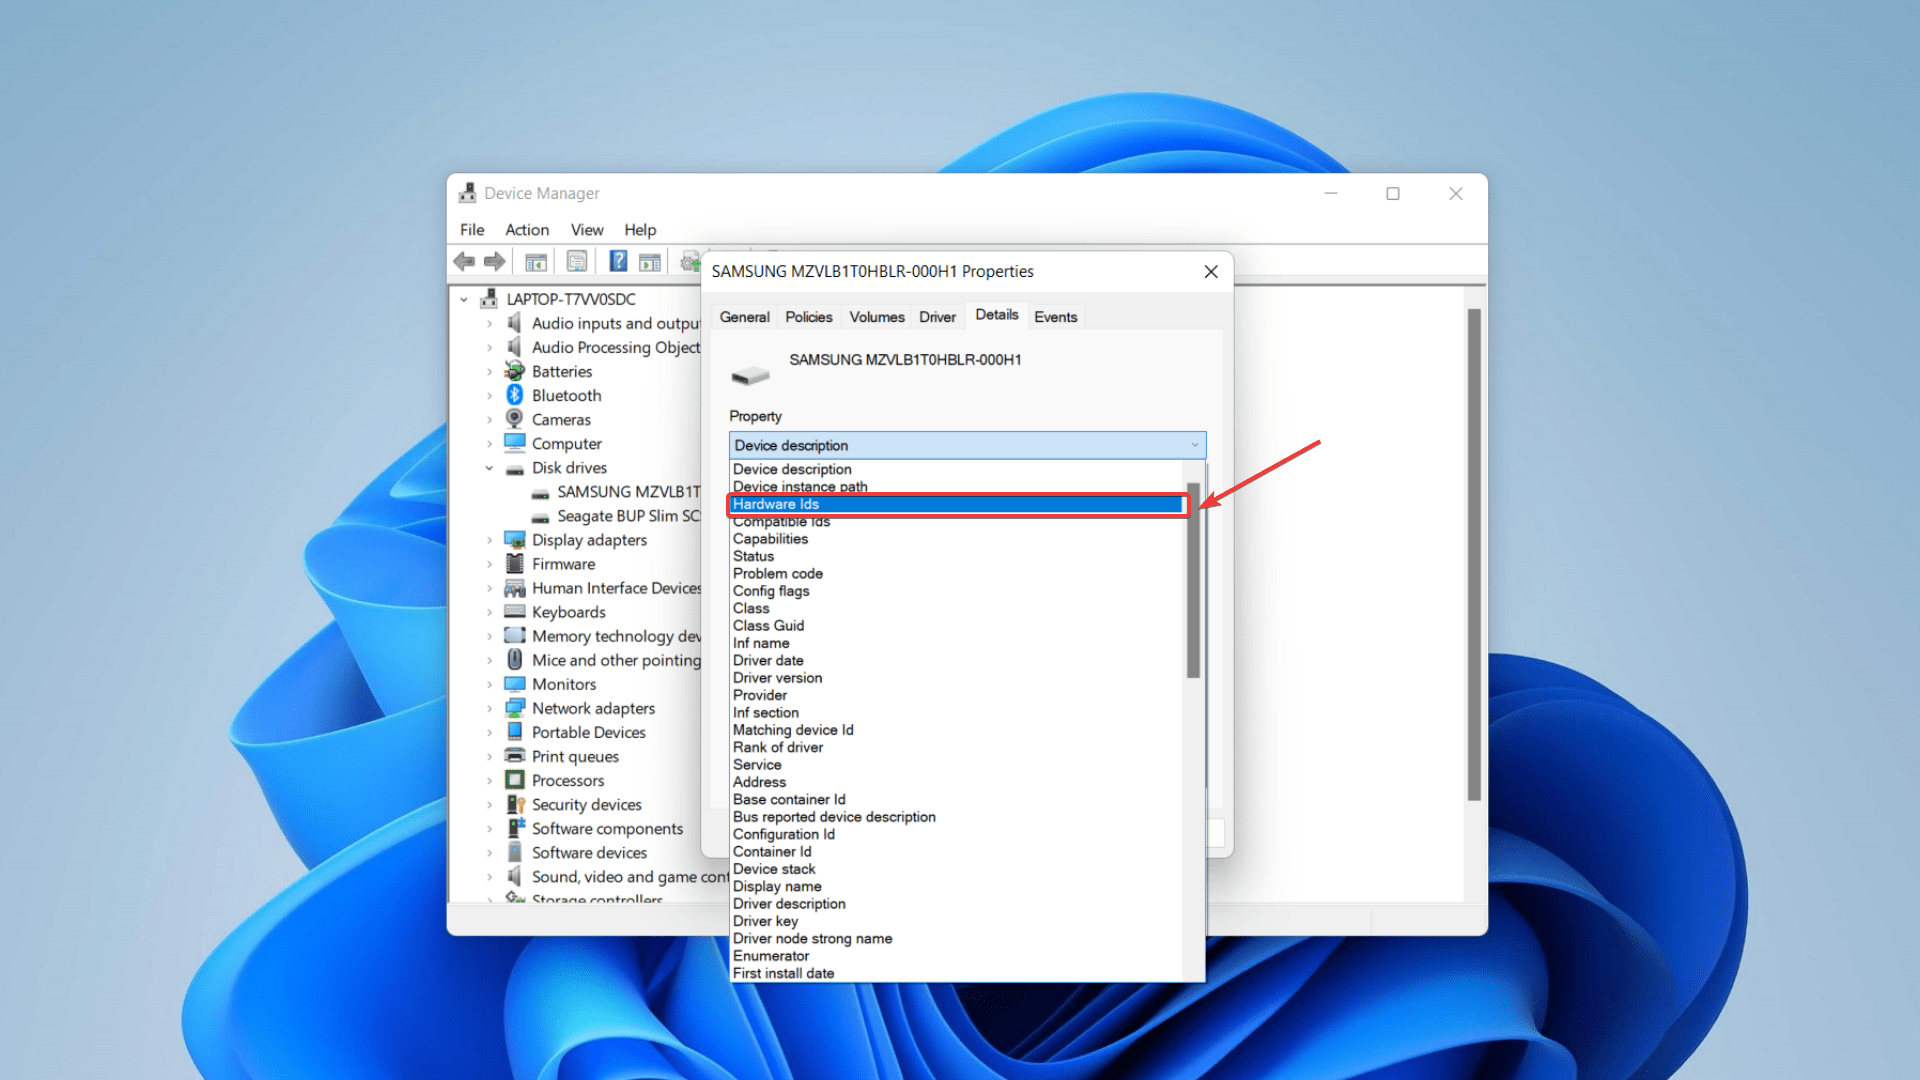
- The firmware revision will be listed at the end of the SSD part number on the top line.
Like firmware, outdated SSD drivers could also cause the SSD to fail or become corrupt. Follow these steps to update your SSD drivers:
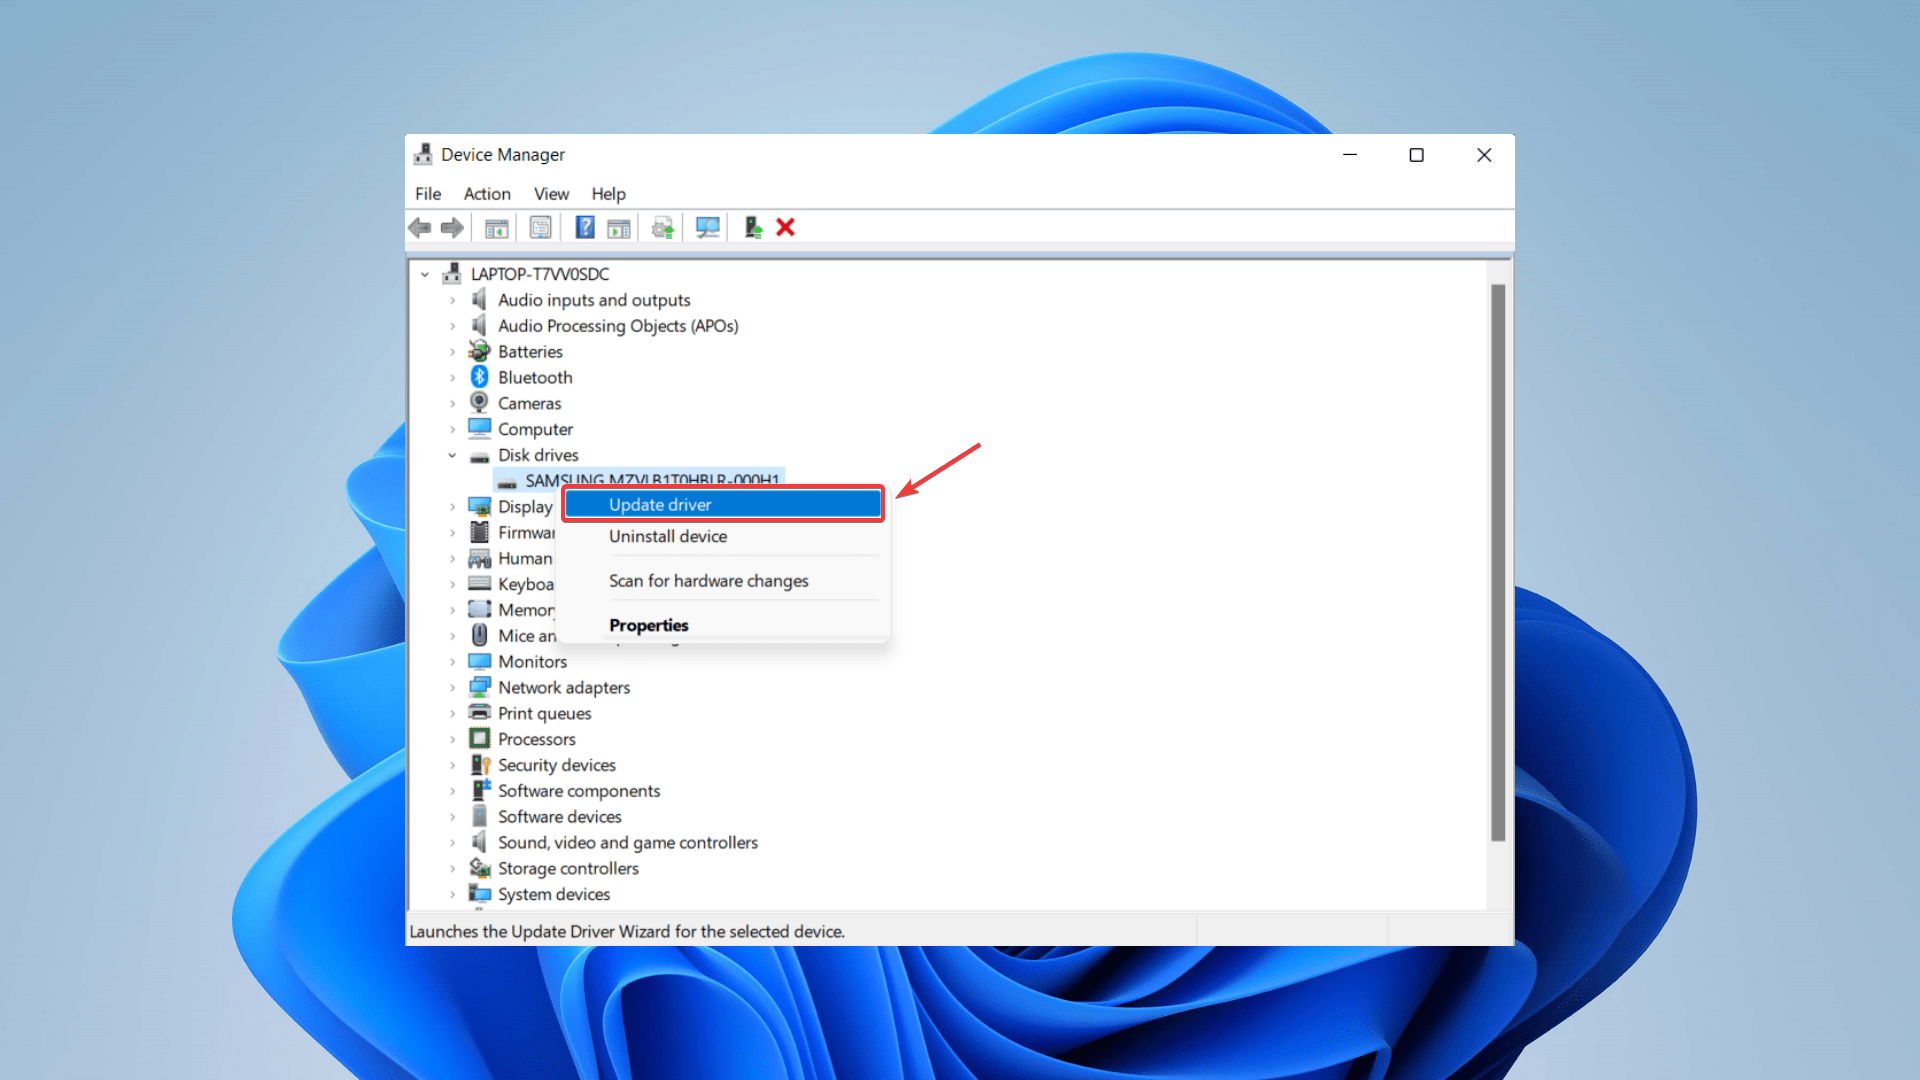
- Press Win + X, then select Device Manager.
- Now, expand the Disk drives section.
- Right-click your SSD device and choose the Update driver option.
- Click Search automatically for drivers.
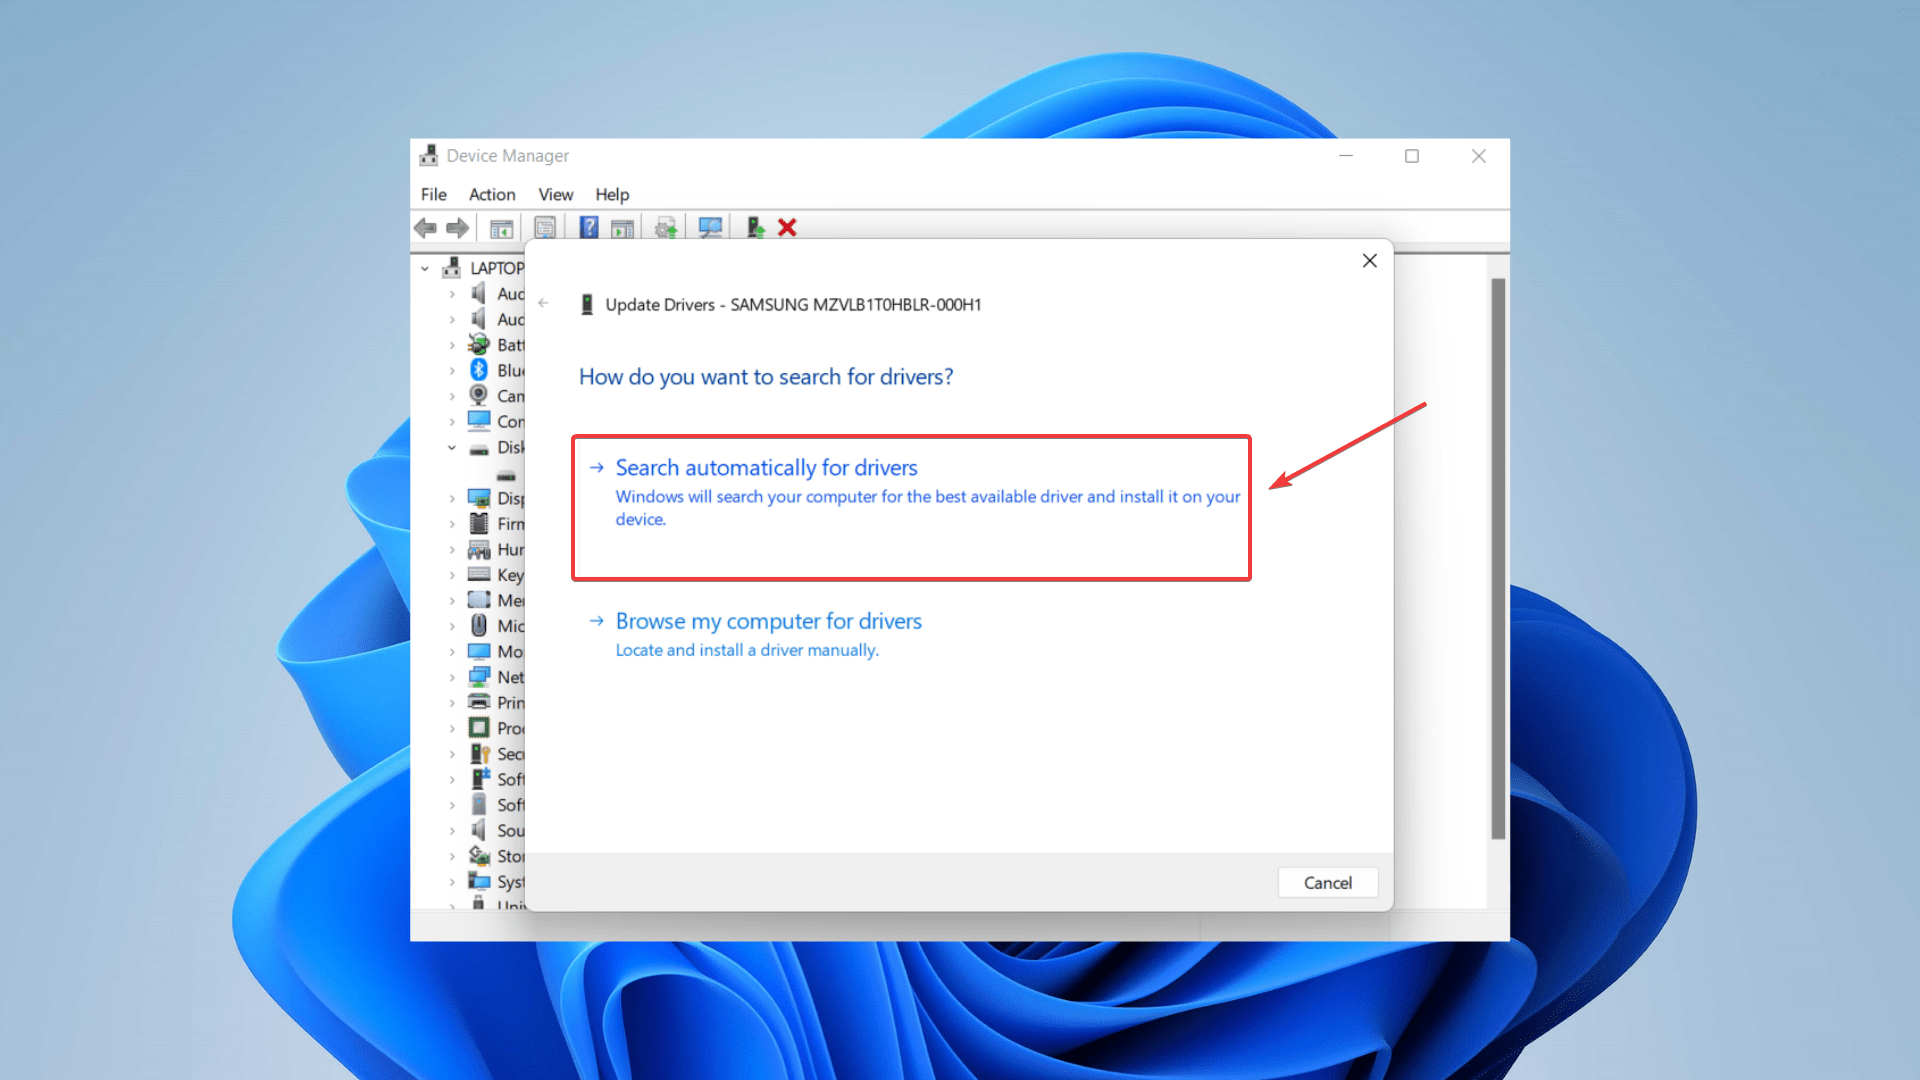
- Finally, reboot your PC to complete updating the drivers.
Method 3: Repair Bad Sectors on the Corrupted SSD Using CMD (CHKDSK)
You can make the corrupted SSD functional by repairing its bad sectors. If there are logically bad sectors on your SSD, you can repair them using the CHKDSK command. CHKDSK is a Windows built-in utility used to fix any logical errors. However, this method can result in complete data loss, so you must perform corrupted SSD data recovery in advance.
Follow these steps to remove the bad sector from the damaged SSD using CMD (CHKDSK):
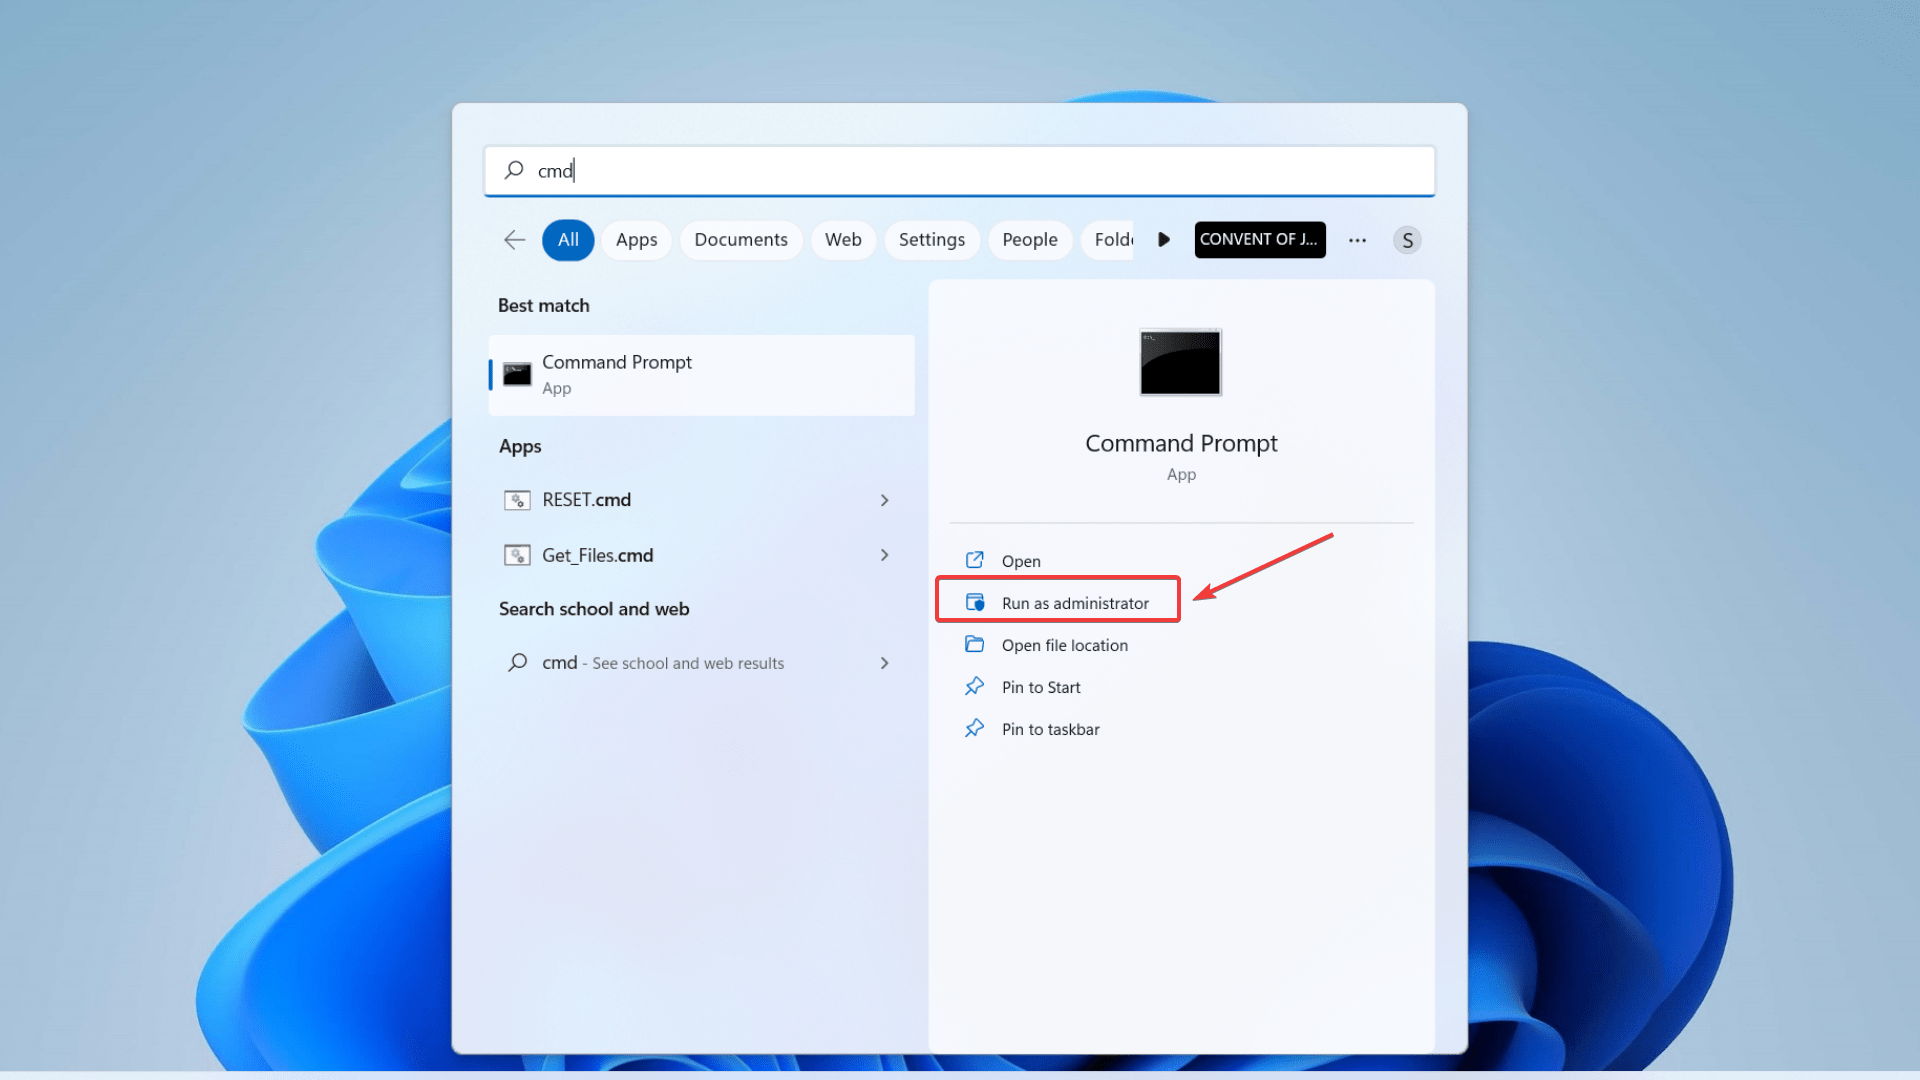
- Press the Windows key and type “cmd”.
- When the Command Prompt option appears, choose “Run as administrator.”
- In the Command Prompt window, enter the following command and hit Enter.
chkdsk E: /f /r /x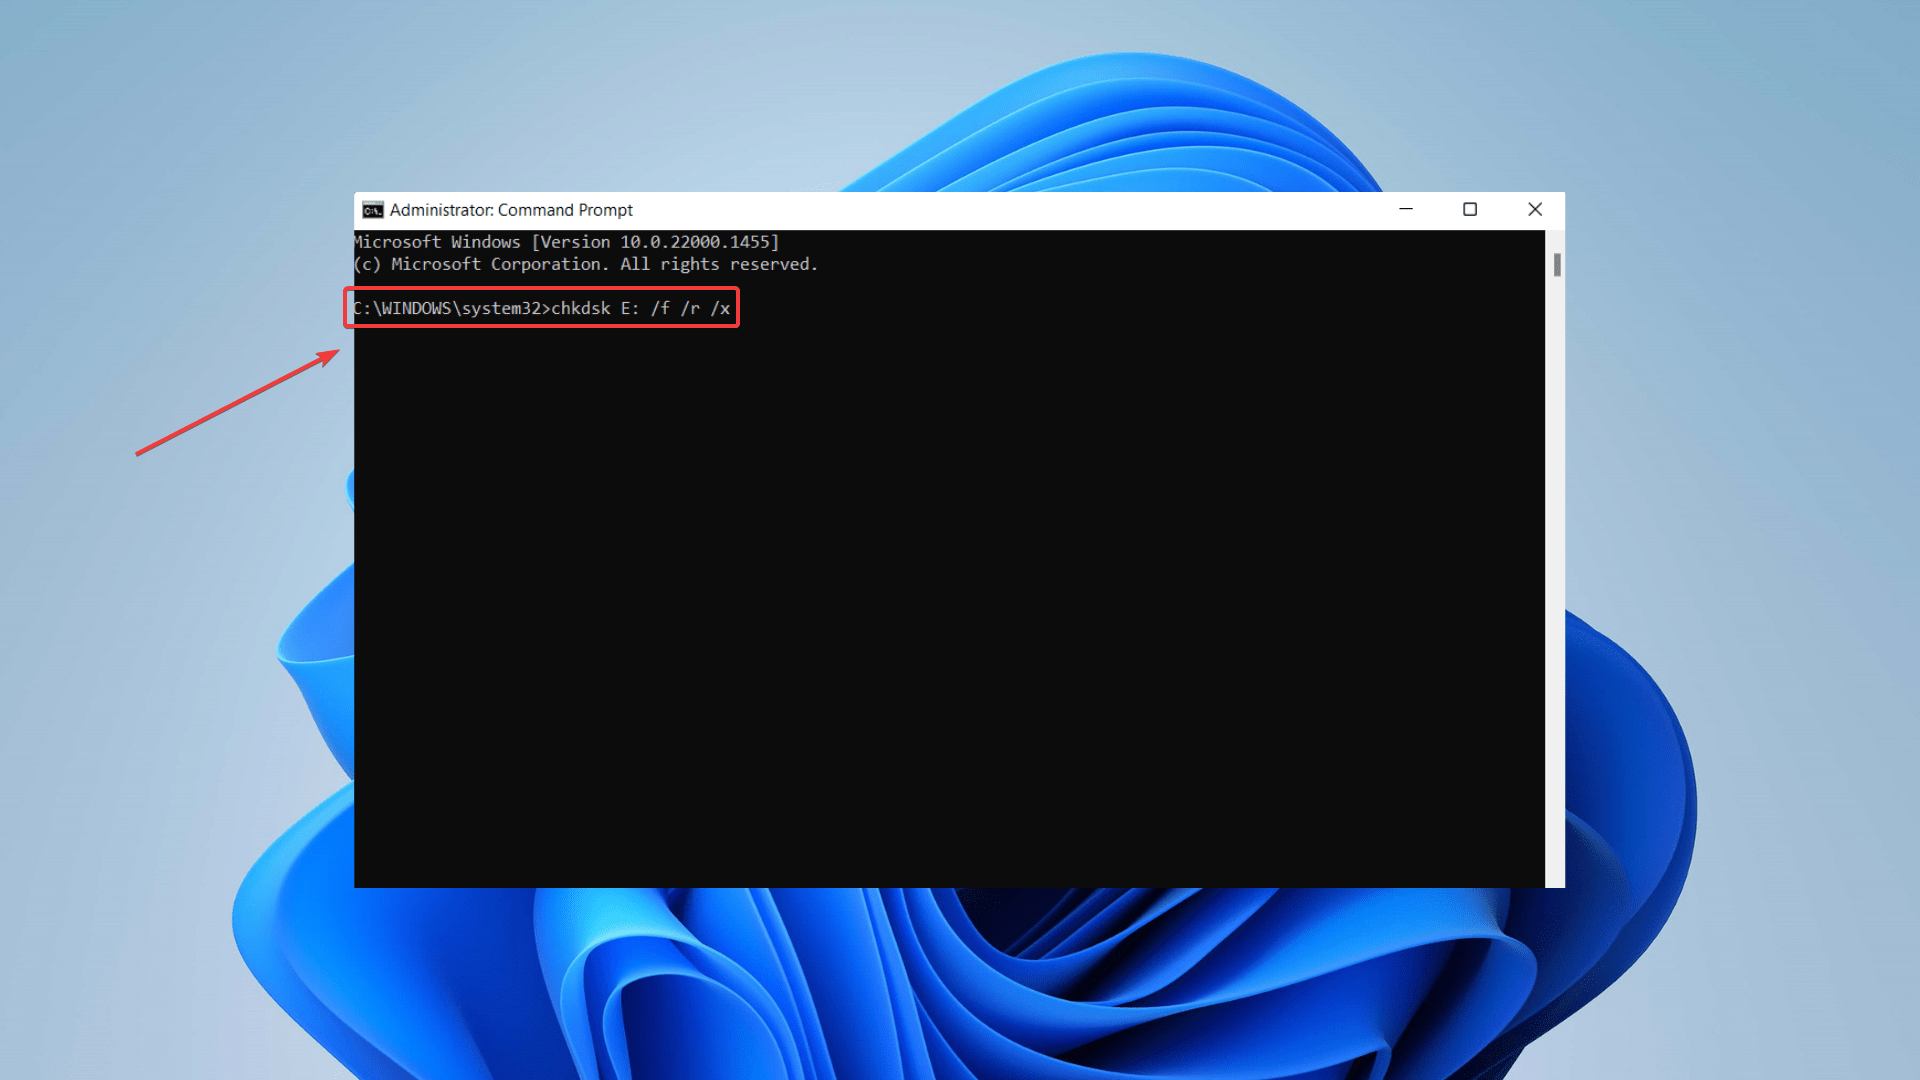 Note – Here, “E” is the drive letter of your SSD from which you want to repair bad sectors. The “/f” tells CHKDSK to fix any errors it finds; “/r” tells it to locate the bad sectors on the drive and recover readable information; “/x” forces the drive to dismount before the process starts.
Method 4: Perform Full Format of the Corrupted SSD
If none of the other methods work, you can attempt to repair your SSD by performing a full format. A full format finds and excludes the use of bad sectors. As a result, a full format gives your SSD a fresh start.
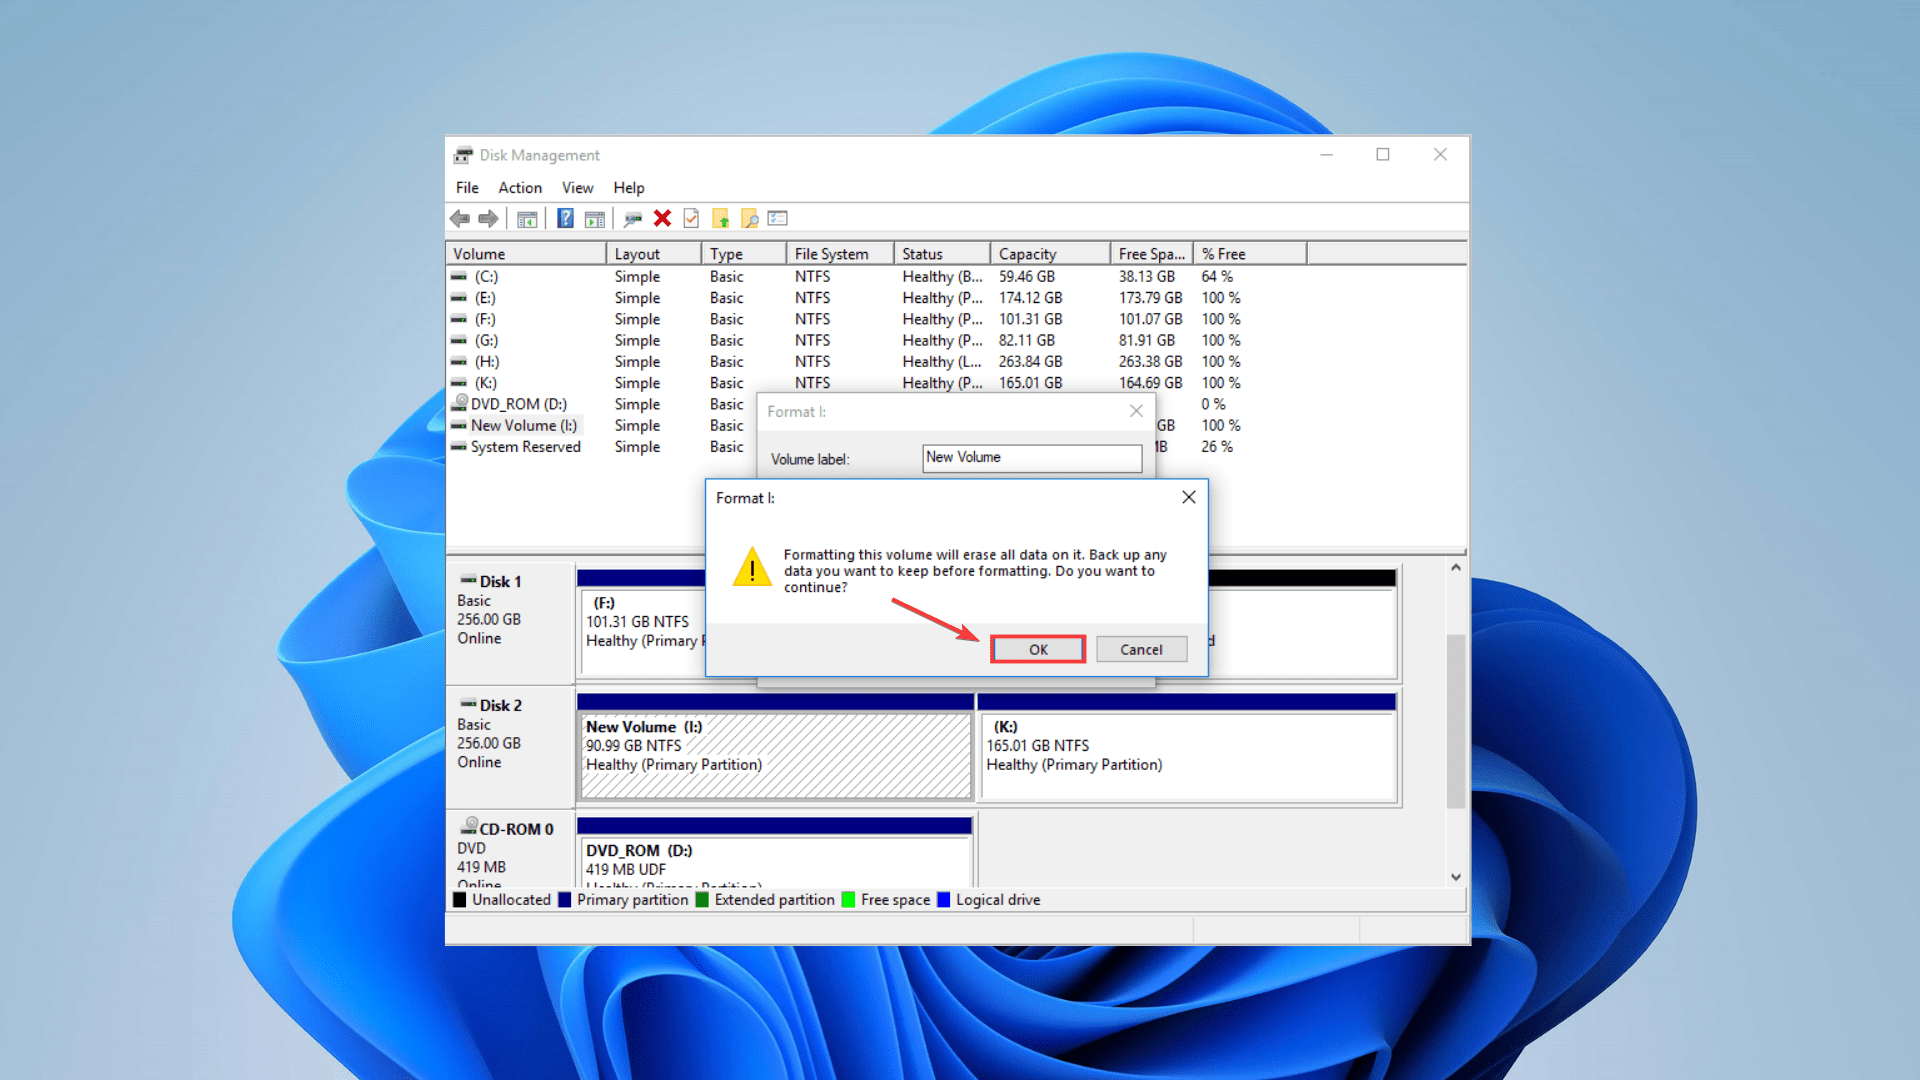
However, you must ensure that all your data is backed up before formatting your SSD since this process will wipe out all your existing data and make it impossible to recover data from the formatted SSD.
Follow these steps to perform a full format of the corrupted SSD:
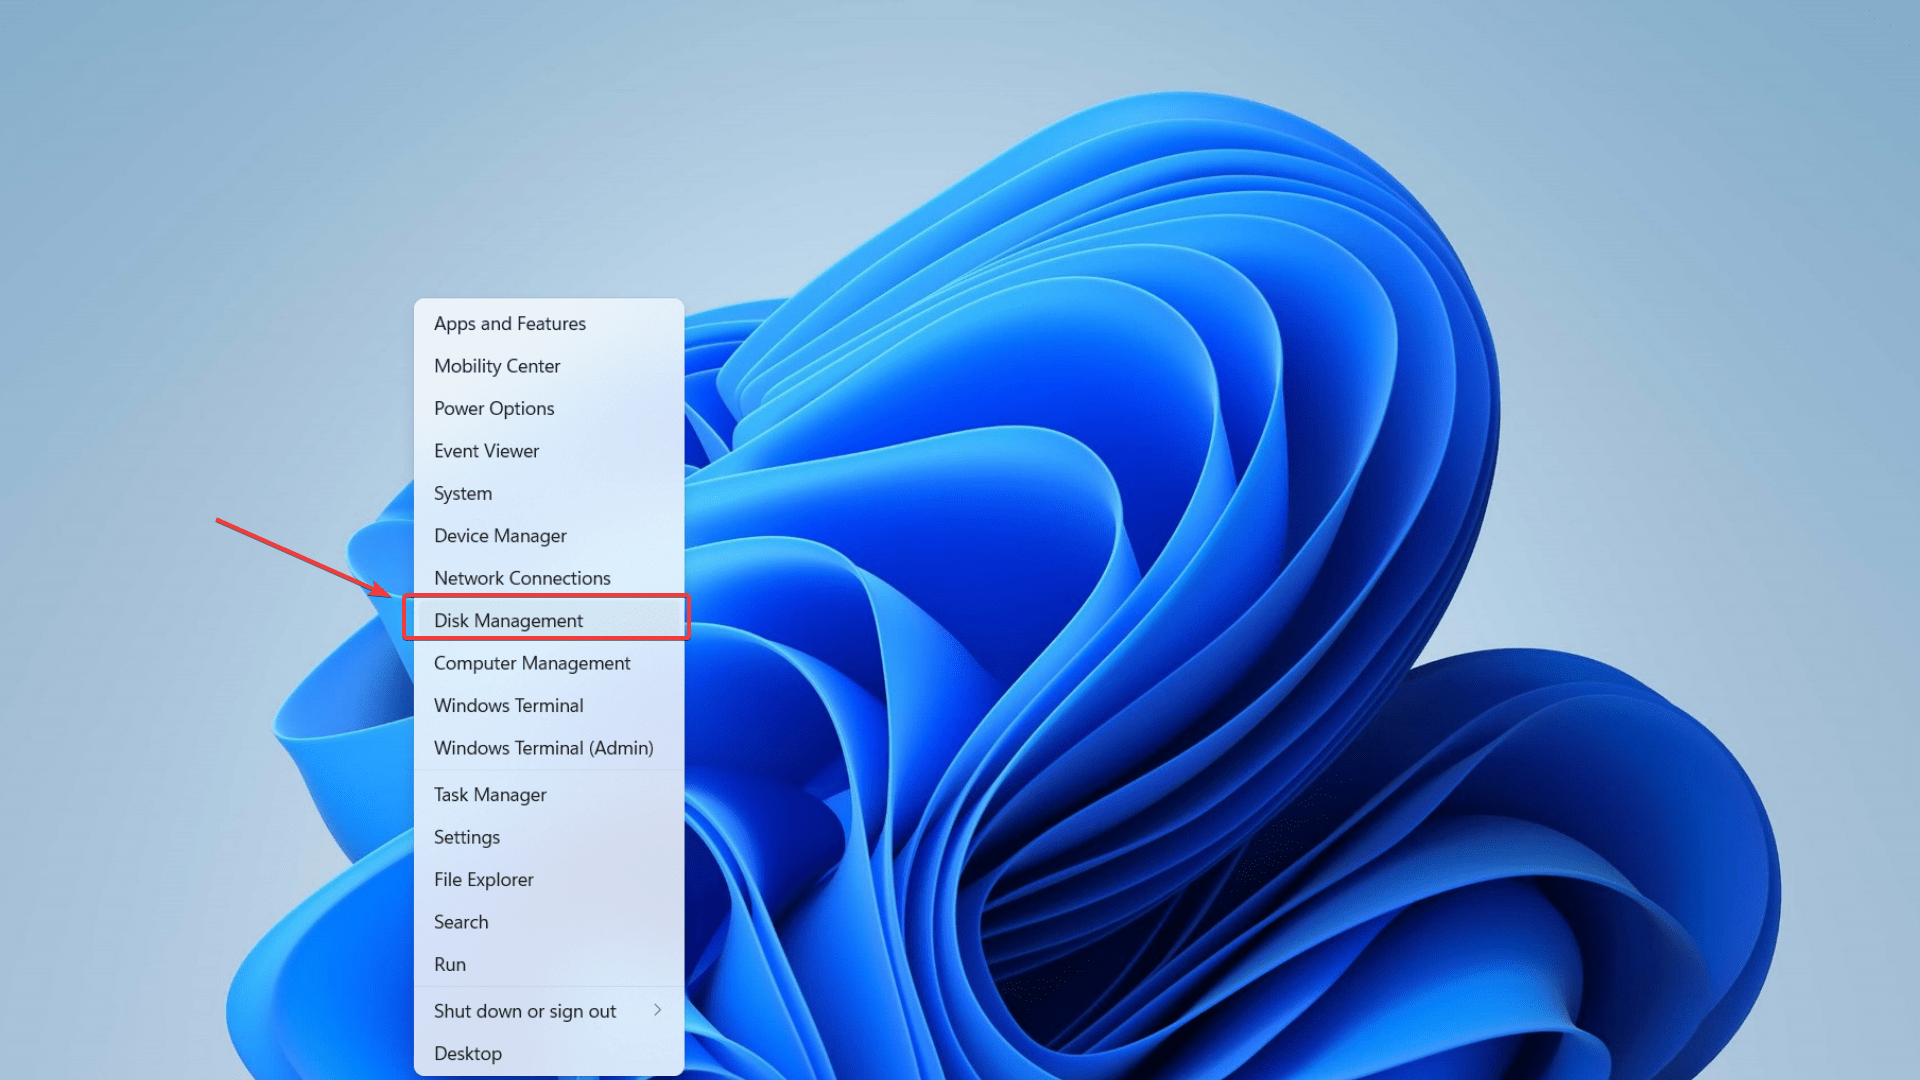
- Press Win + X and select Disk Management.
- Select the SSD partition you wish to format.
- Right-click the SSD partition and choose Format.
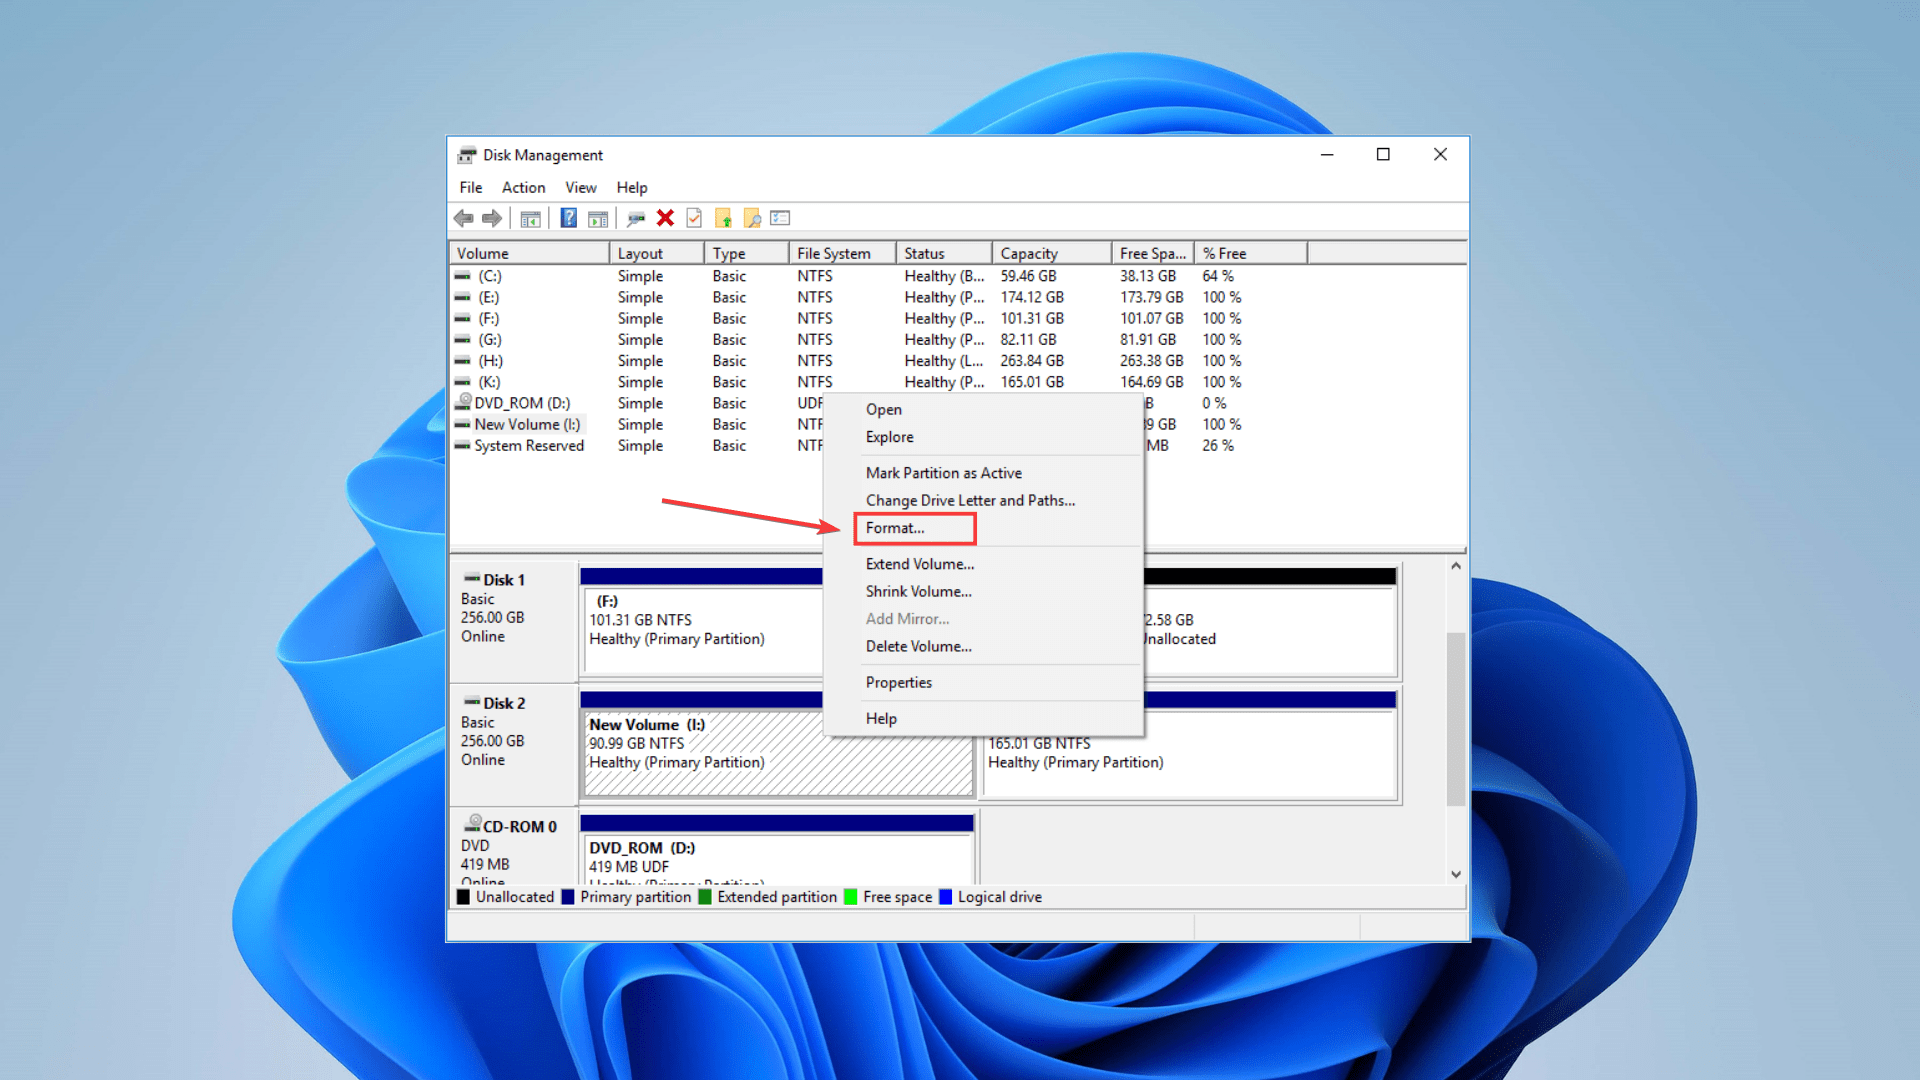
- Uncheck the Perform a quick format option. Doing this would mean that you are performing a standard or full format.

- Now, click OK to format the SSD.
Method 5: Repair the Corrupted SSD Partition Using TestDisk
The final method to repair corrupted SSD is by using TestDisk. It is an open-source tool designed to help recover lost partitions or make non-booting disks bootable.
Follow these steps to repair the corrupted SSD partition with TestDisk on Windows:
- Download the TestDisk recovery software. Once you’ve downloaded the folder, extract it.
- Open the folder and navigate to the testdisk_win application. Now, launch it. Select the Create option in the terminal home screen and hit Enter.
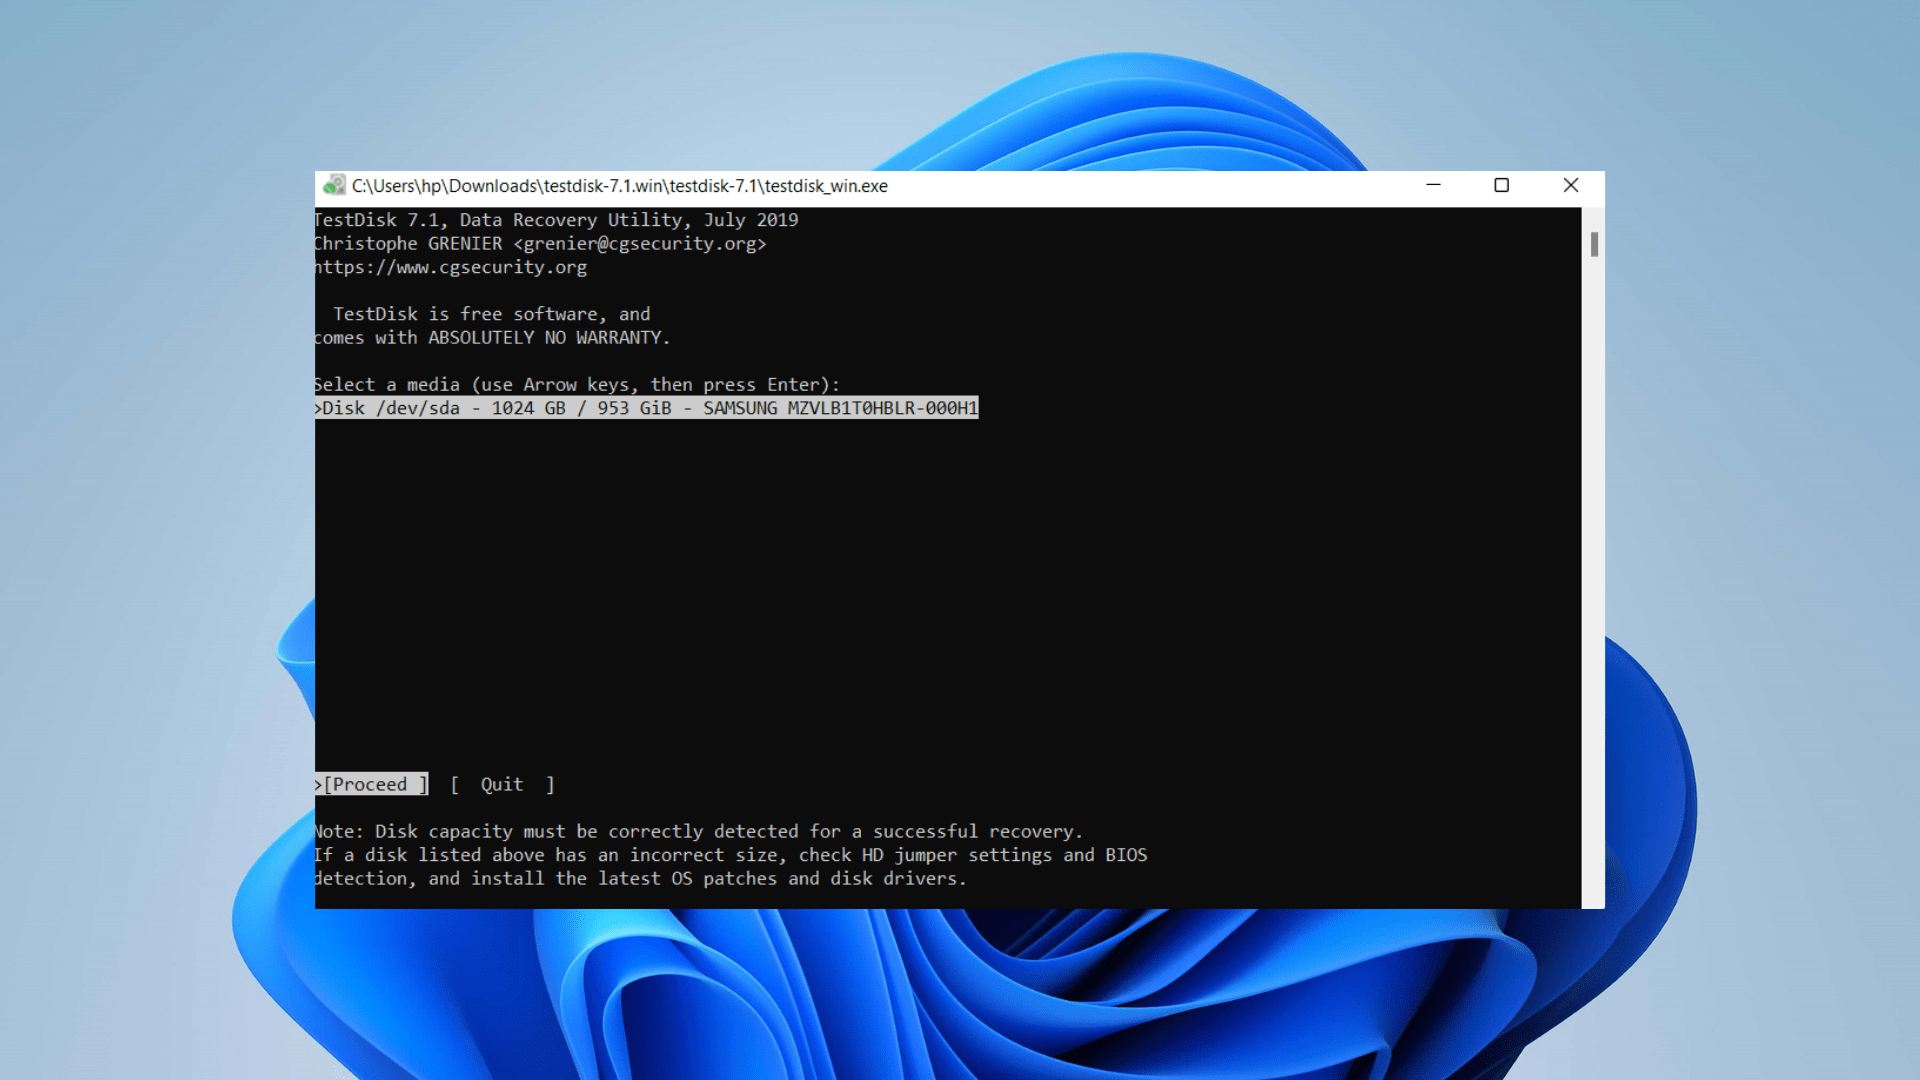
- Select the corrupted SSD from the list of devices and Proceed.
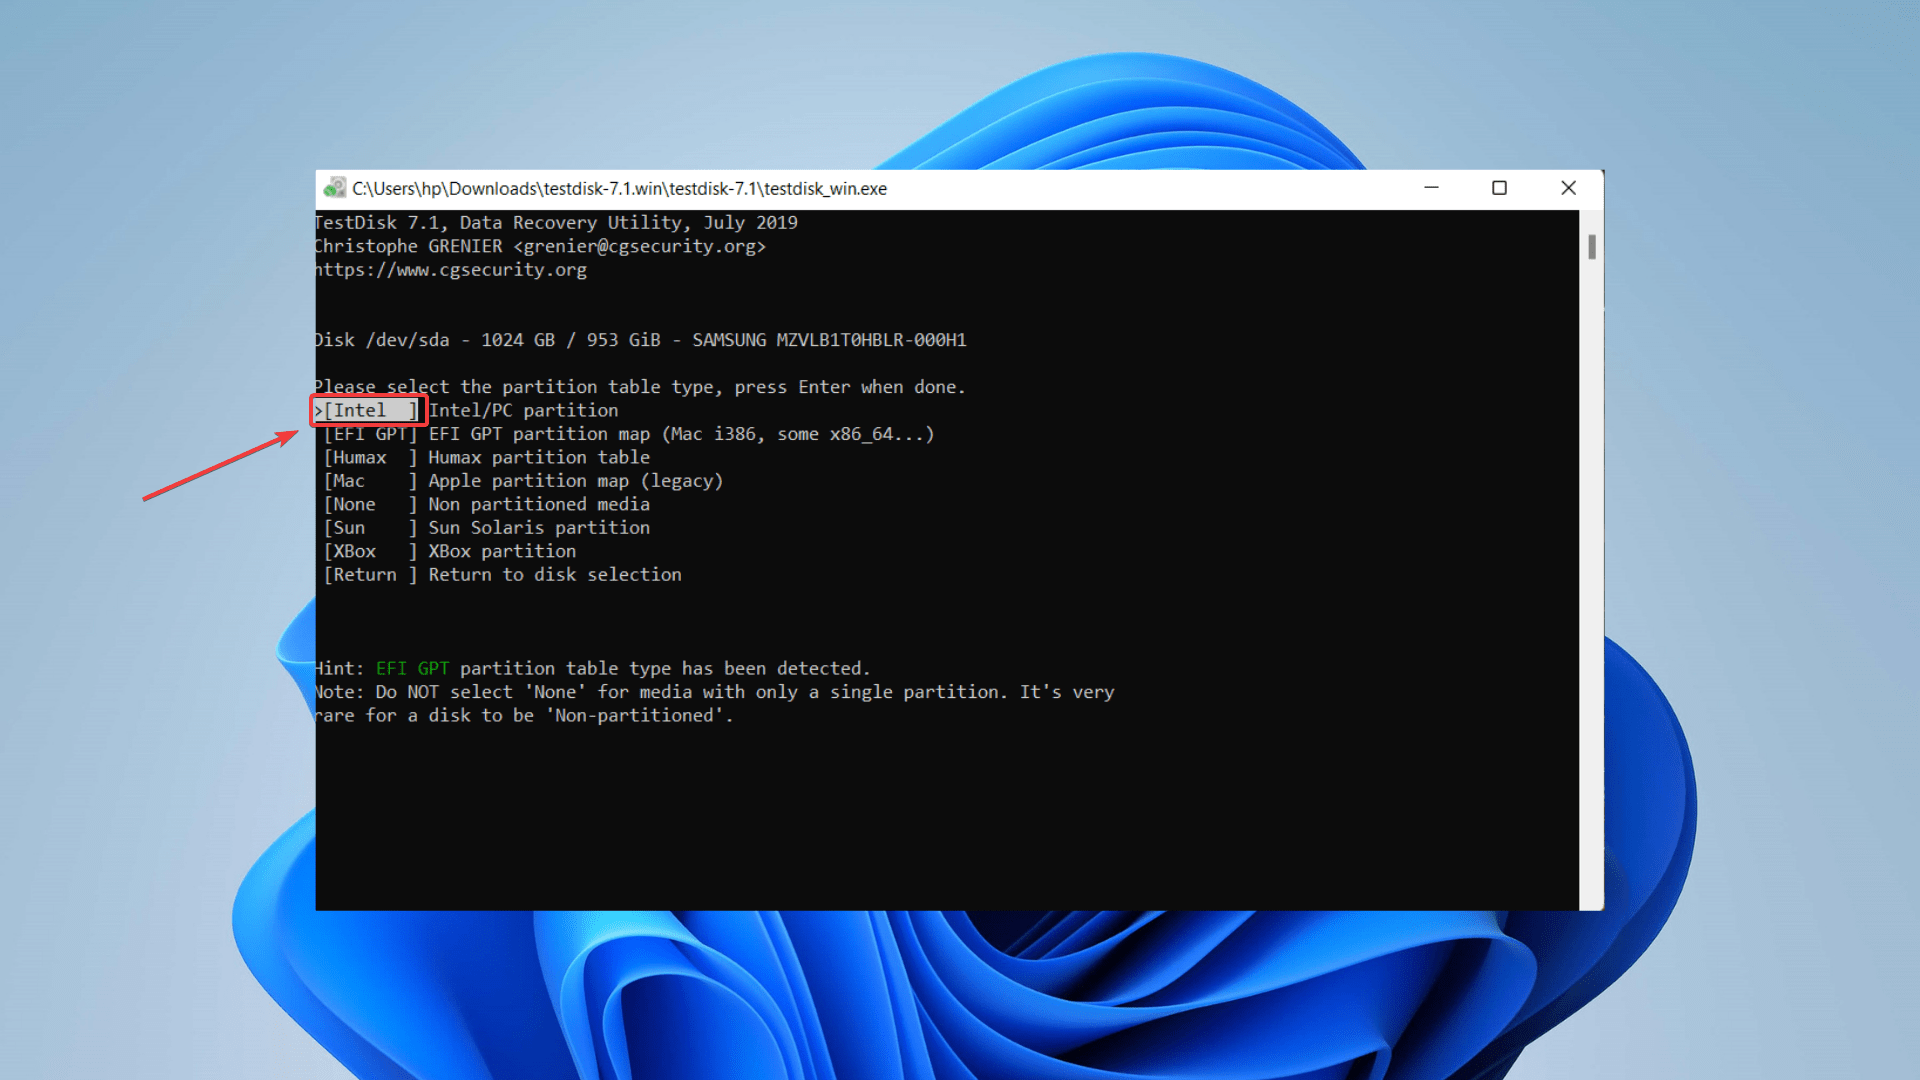
- Select Intel from the partition table on the next screen, as it signifies a Windows PC. Now, press Enter again.
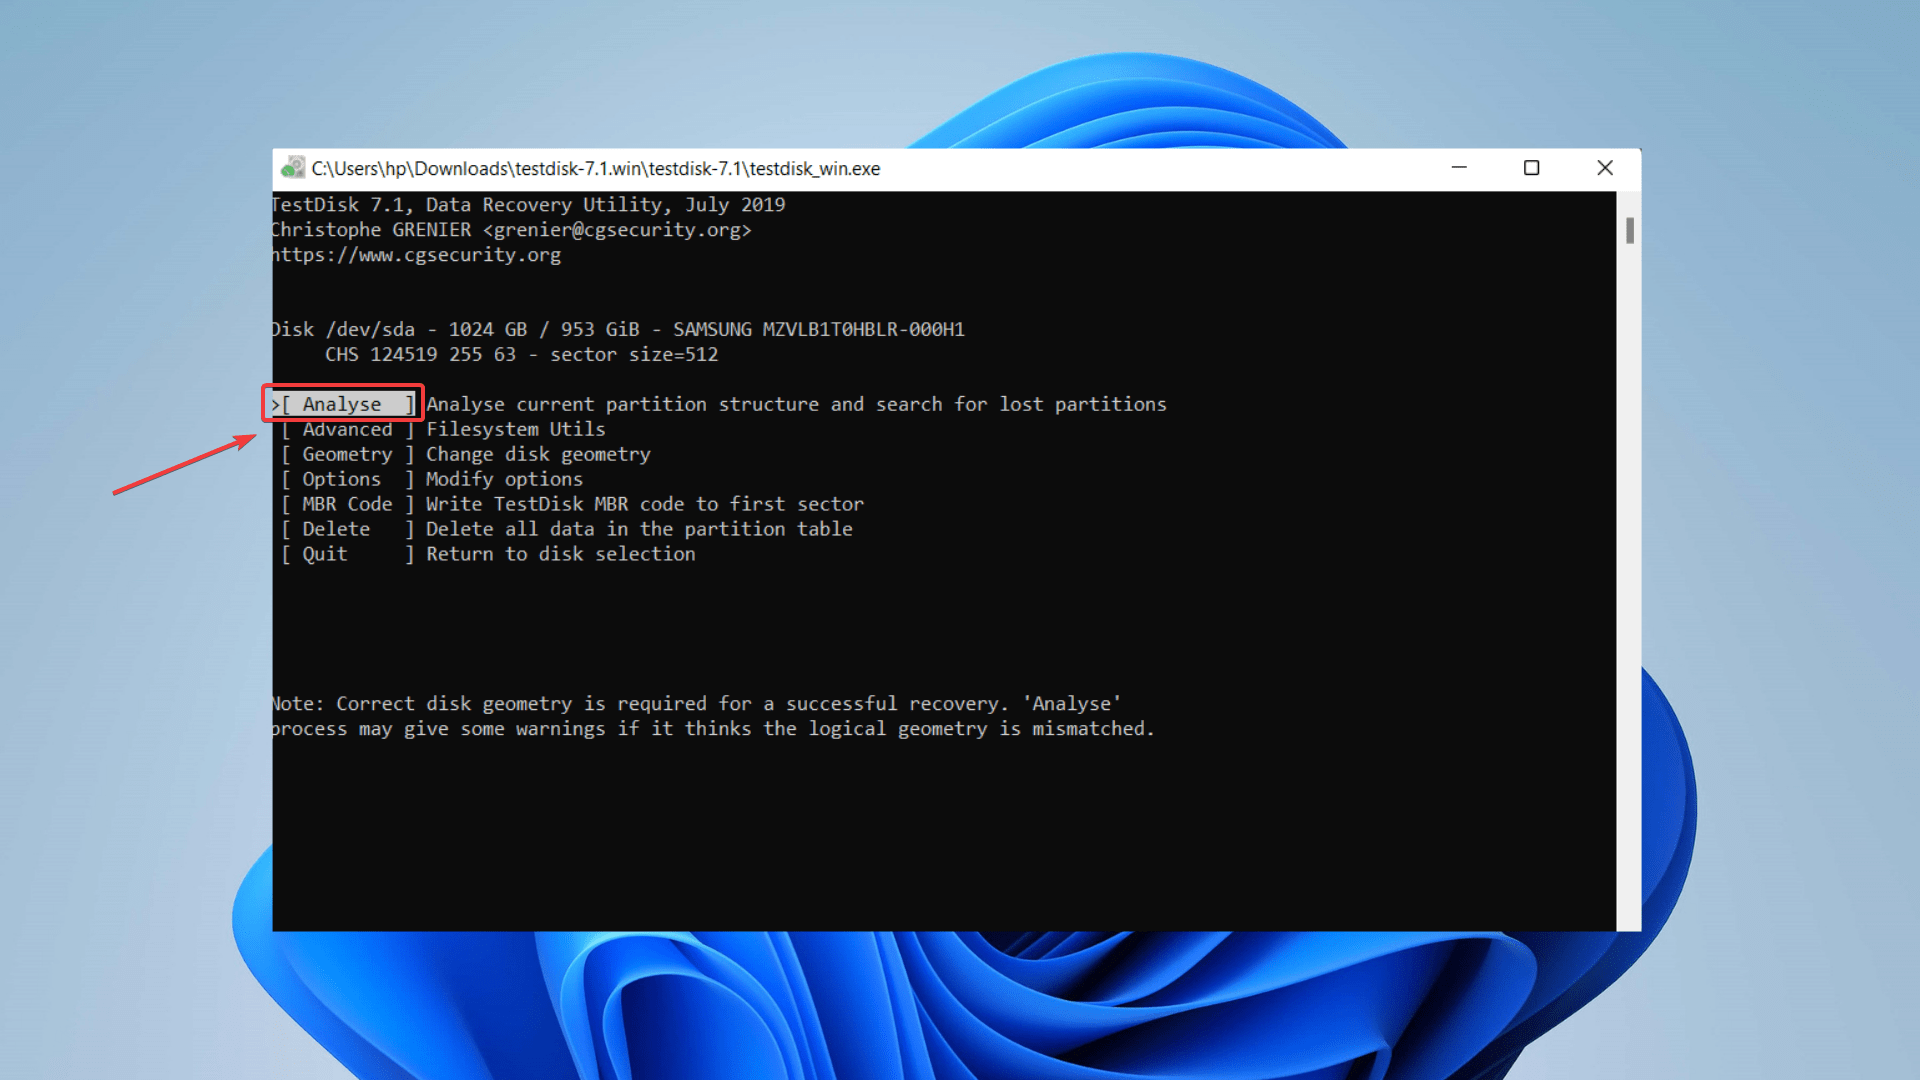
- TestDisk will now give you various options. You can select the Analyse option to initiate a Quick Search.
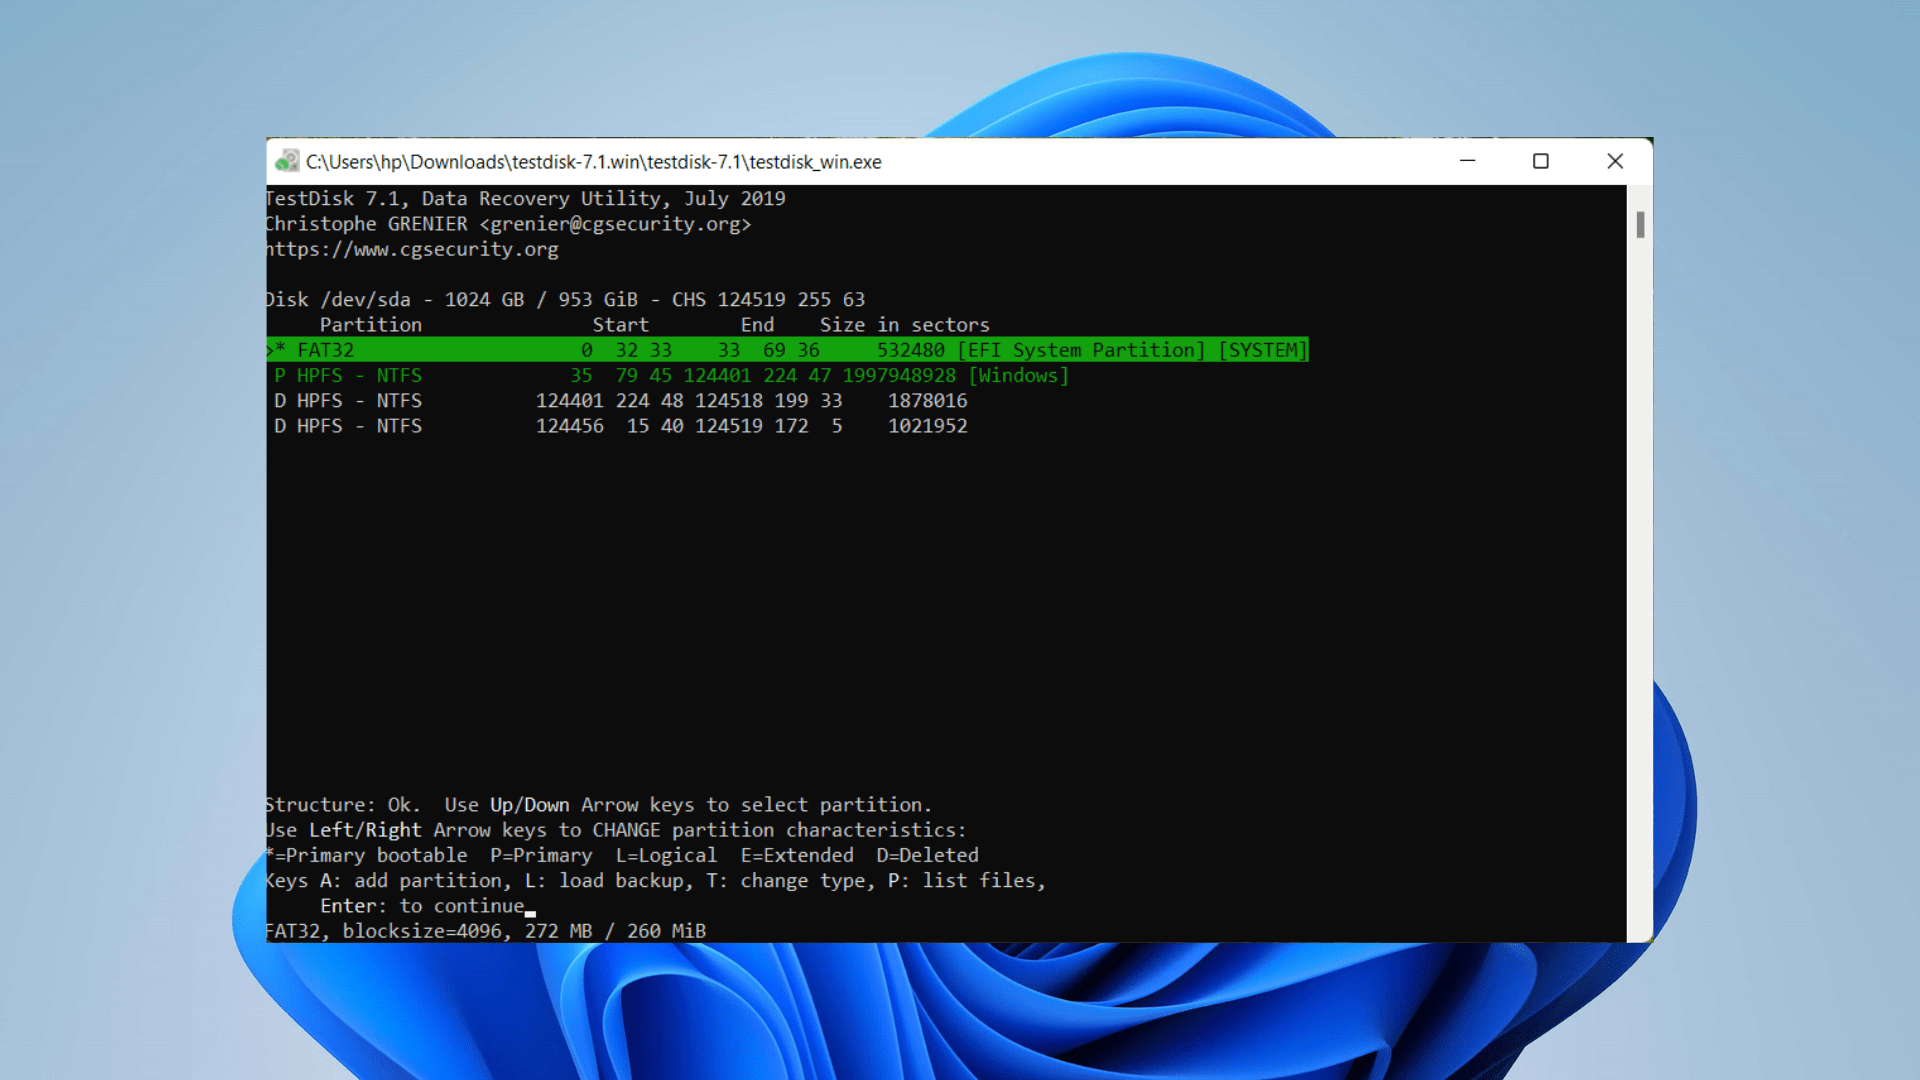
- When the detected partition appears on the screen, press Enter to continue.
- Now navigate to the next screen and select the Deeper Search option to scan the SSD partition.

- After the scan is complete, select the partition you wish to recover and follow the prompts. Press P to list all the files and C to copy the selected files. Once the selection is made, TestDisk will copy the files to your preferred folder, and the “Copy Done!” message will appear on your screen.
For an in-depth breakdown of TestDisk, its performance, and its features, go through our team’s full TestDisk review.
FAQ
Can you fix a corrupted SSD?
Yes, you can fix a corrupted SSD by following any one of these methods:
Can you recover data from an SSD that is not detected in BIOS?
If BIOS doesn’t detect your SSD, chances are you are dealing with SSD physical damage like damaged connectors or an improper installation. As a result, we recommend consulting a data recovery center to salvage your lost data.
Is it possible to recover data from a dead SSD?
In the case of a dead SSD, it’s best to contact a reliable data recovery service center to revive your disk and successfully retrieve data.
Can you recover data from a dead M.2 SSD?
M.2 SSD data recovery is possible in most cases, provided the drive is detected by the BIOS. However, if this doesn’t work, users can contact a data recovery service.
Conclusion
SSDs are efficient, high-performance storage devices with complex disk structures. However, they can still be vulnerable to corruption after power outages or other reasons. While corrupted SSD recovery is possible, it can become tricky due to TRIM. To prevent losing your data permanently, always create backups.
But still, if you find yourself with a corrupted or damaged SSD, use the methods we’ve listed to repair it and recover your lost data via trusted data recovery software or approach professional data recovery services.
This article was written by Joshua Solomon, a Contributing Writer at Handy Recovery Advisor. It was also verified for technical accuracy by Andrey Vasilyev, our editorial advisor.
Curious about our content creation process? Take a look at our Editor Guidelines.