Did files suddenly disappear from your Samsung card or phone, or did you simply delete them and now you need a way to get them back?
The term Samsung SD card recovery usually refers to two cases: recovery from a Samsung-branded memory card (used in a camera, phone, or other device) and recovery from any memory card that was used in a Samsung phone. In practice, these scenarios have more in common than differences, so we will treat them as a single case and walk you through the recovery process step by step. Where needed, we will point out the differences that may affect recovery.
Can I Recover Deleted Files from a Samsung SD Card?
The short answer is yes if you act fast. When files get deleted from a storage device, they remain in the file system until they are overwritten by new data. But you must immediately stop using the affected SD card, as any new data may overwrite the deleted files. The best and easiest way to do this is by using SD card recovery software. However, the process varies depending on how you want to handle it. We’ll go over all the available methods (along with detailed step-by-step guides) below.
You can also check real user experiences and recommendations about SD card recovery tools.
Most Common Samsung SD Card Recovery Scenarios
From our experience, Samsung SD card recovery usually has three scenarios:
- Scan the SD card on a computer. This is the most reliable recovery option. The SD card is removed from the Samsung phone (or any other device, if you’re simply using a Samsung-branded card) and connected to a computer using a USB or built-in card reader. Once connected this way, the system detects the card as external storage and provides full access to its file system, without Android or any other device restrictions. In this setup, data recovery software can scan the SD card directly, with no root/UMS access required. Deleted files, formatted cards, RAW file systems, and missing folders remain recoverable in most cases.
- Scan through the phone using a PC. This applies when the SD card remains inside the Samsung phone, but you connect the device to a computer and run recovery software from there. In this case, access still depends on Android restrictions. Without root, some recovery tools won’t even detect your phone, and those that do can only see limited data. They may find recently deleted photos or cached files, but full recovery remains restricted. With root already enabled, the software can access storage at a deeper level and scan more data.
- Scan directly on the phone. This approach relies on recovery apps installed on the Android device itself. These apps operate within strict permission limits imposed by the system. Without root, they can only access surface-level data, which typically includes thumbnails, cached files, or very recent deletions. With root access, the scope of scanning expands, but performance, stability, and overall recovery quality remain less consistent compared to computer-based methods.
The brand of the SD card or the phone does not change the recovery logic. The same tools and methods apply across models. The deciding factor is simple: scanning the SD card directly on a computer offers the highest success rate, while Android-level recovery stays limited due to system restrictions.
How to Recover Files from Samsung SD Card Using Computer
Now it’s time to talk about actual recovery. We’ll use two tools as examples: one as a best overall, universal solution, and another suited for simpler scenarios.
Method 1: Use Disk Drill to Restore Files from Samsung SD Card
We usually start with Disk Drill when we need to recover files from any memory card, including Samsung SD cards. It handles common scenarios well, including accidental deletion, formatted cards, RAW file systems, and cards that suddenly stop opening. It also works well with photos and large video files, which is great for SD cards used in phones, cameras, and drones.
Here is how to recover photos from a Samsung SD card using Disk Drill:
- Remove the SD card from your Samsung phone or any other device and connect it to your computer via a card reader.
- Download Disk Drill and install it on your computer.
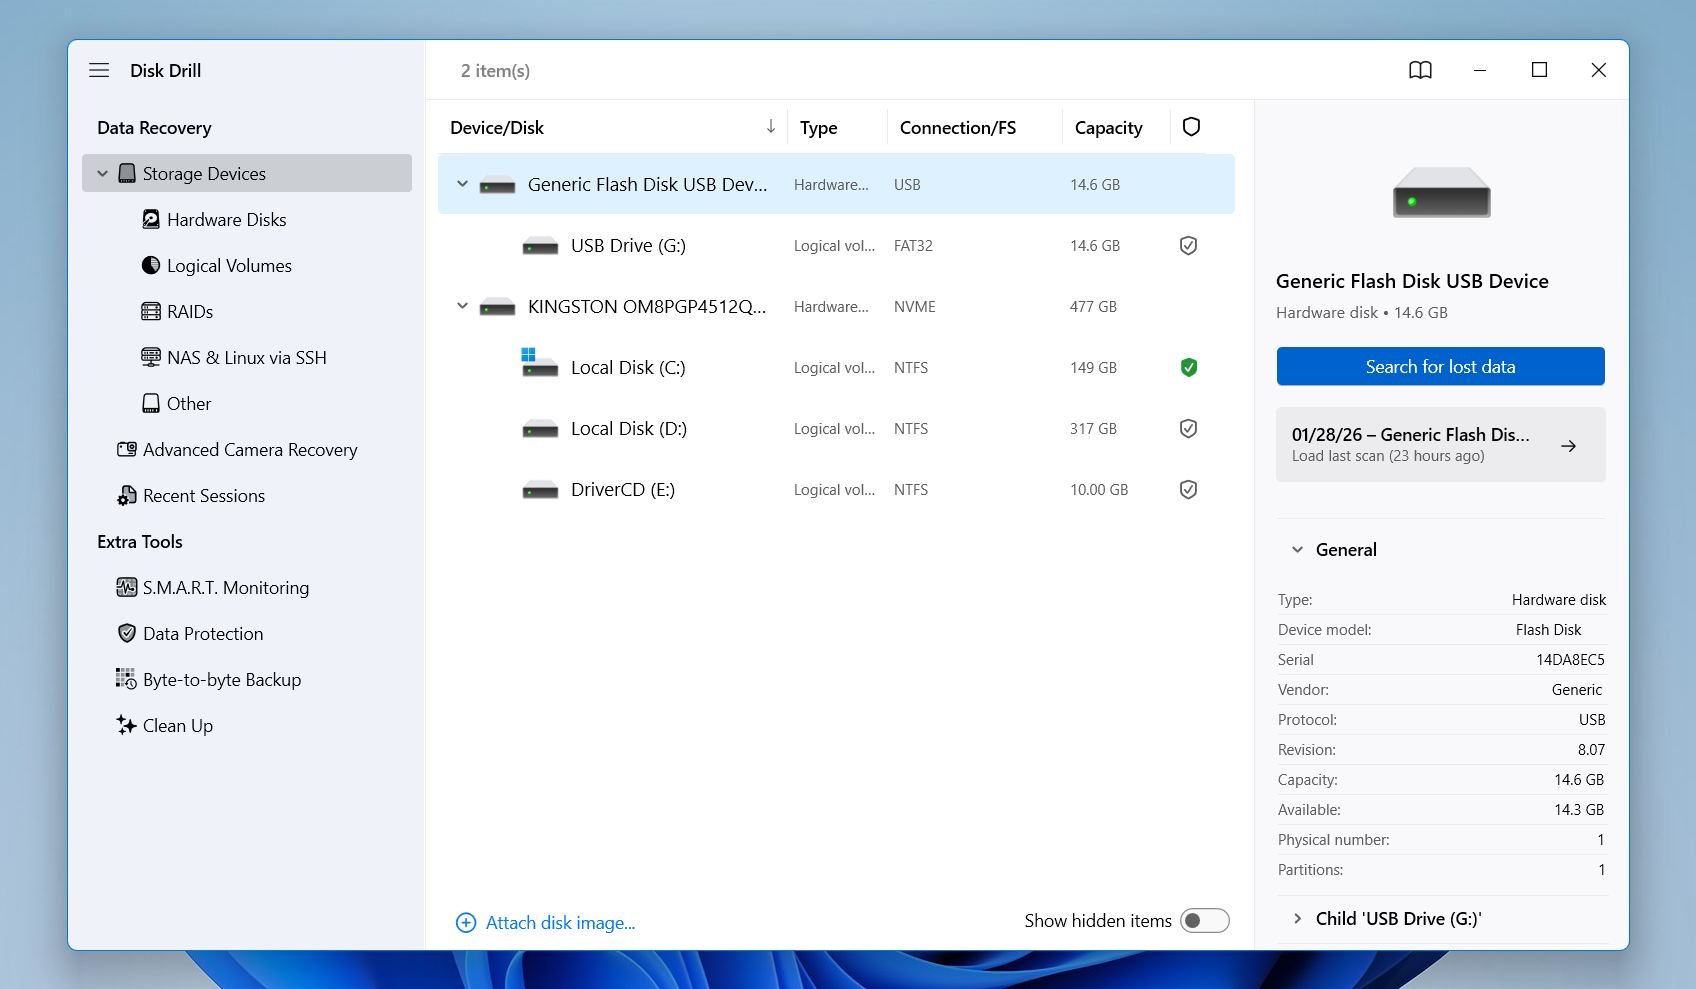
- Launch Disk Drill and select your SD card. Double-check capacity and label to avoid scanning the wrong disk.
- Click Search for lost data.
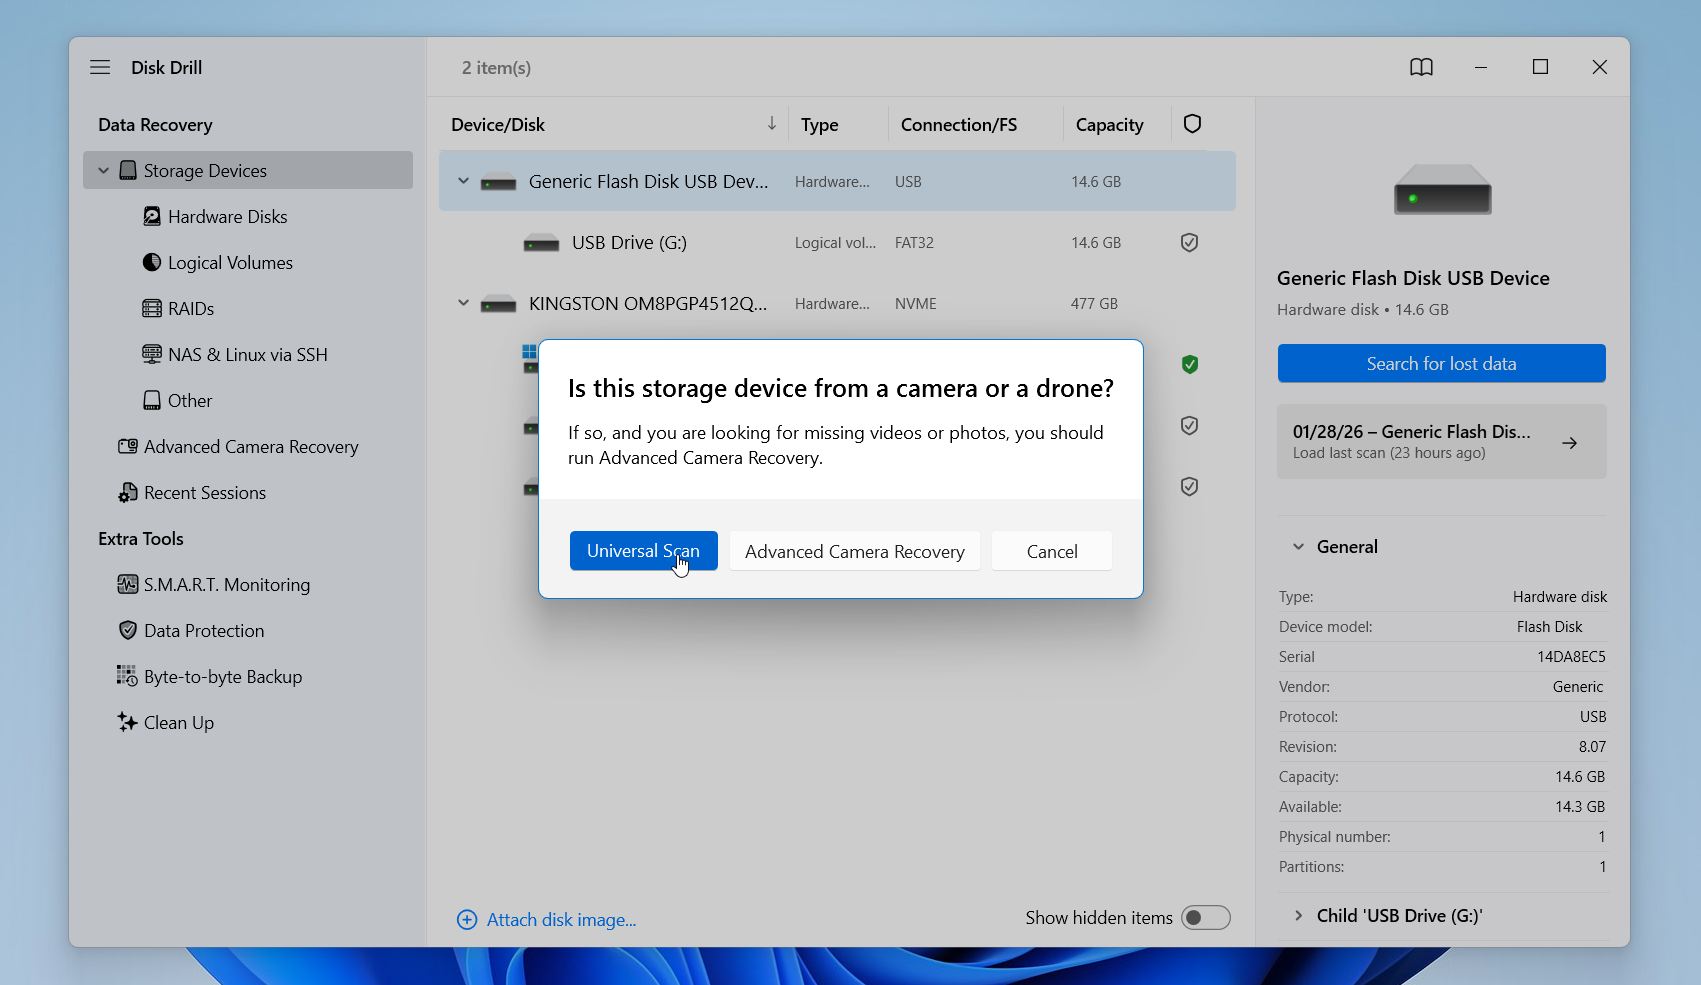
- Select the recovery mode. We recommend the Universal scan first, but if you’re dealing with lost recordings from a camera, pick Advanced Camera Recovery.
- Disk Drill will run its scan and organize results into categories (Pictures, Video, Audio, Documents, Archives, and more). You can search for your file by typing its name or file type (.jpg, .docx etc.) Or you can use filters to narrow the results as we show on the screenshot below.
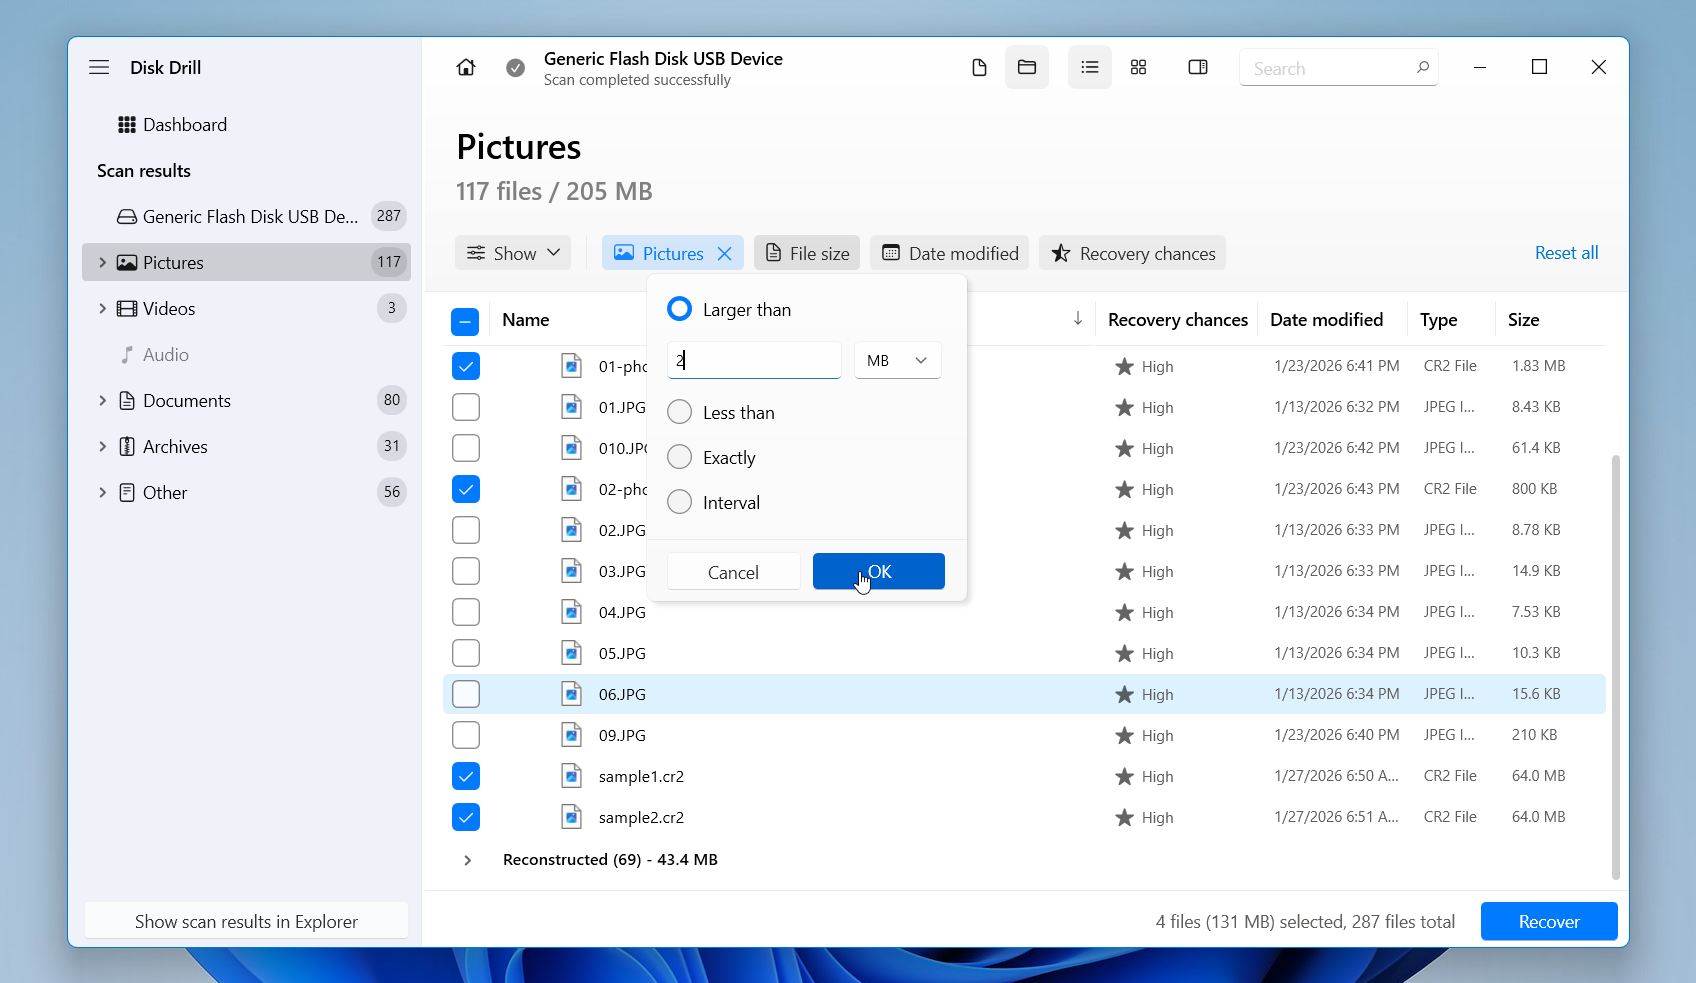
- Use preview and filters to locate the right files. Click the eye icon to confirm that files open correctly. When a file previews without errors, it means it can be fully recovered.
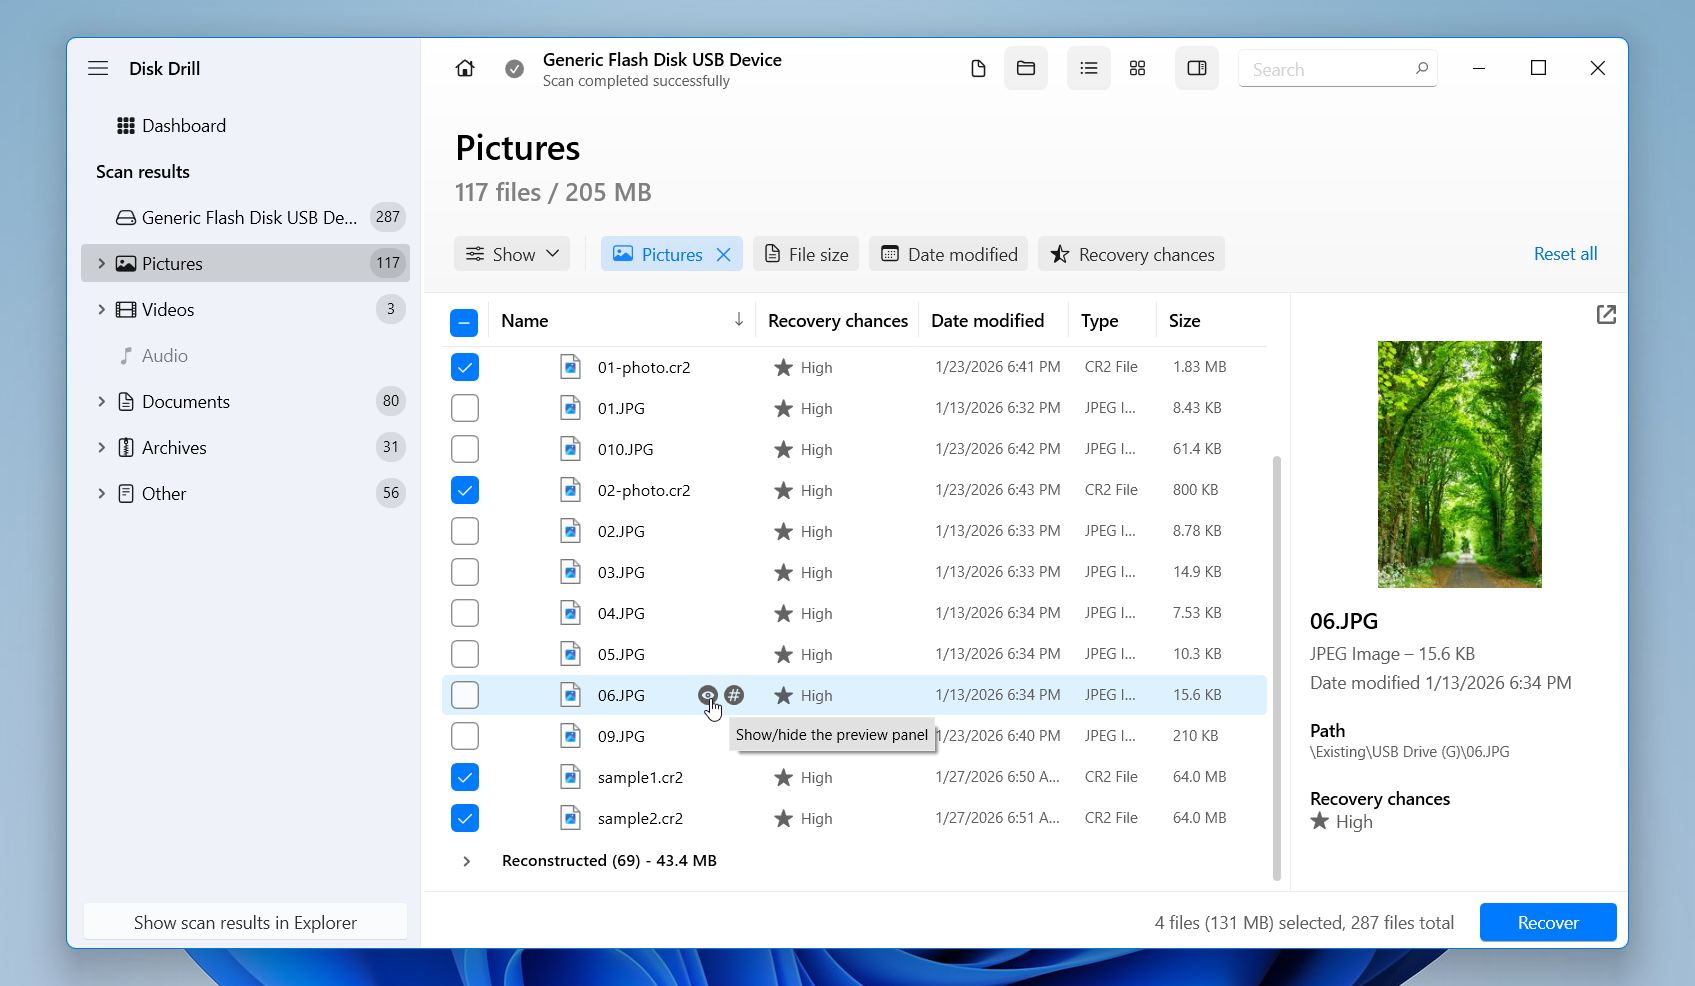
- Check the boxes next to the files/folders you want to restore. Click Recover.
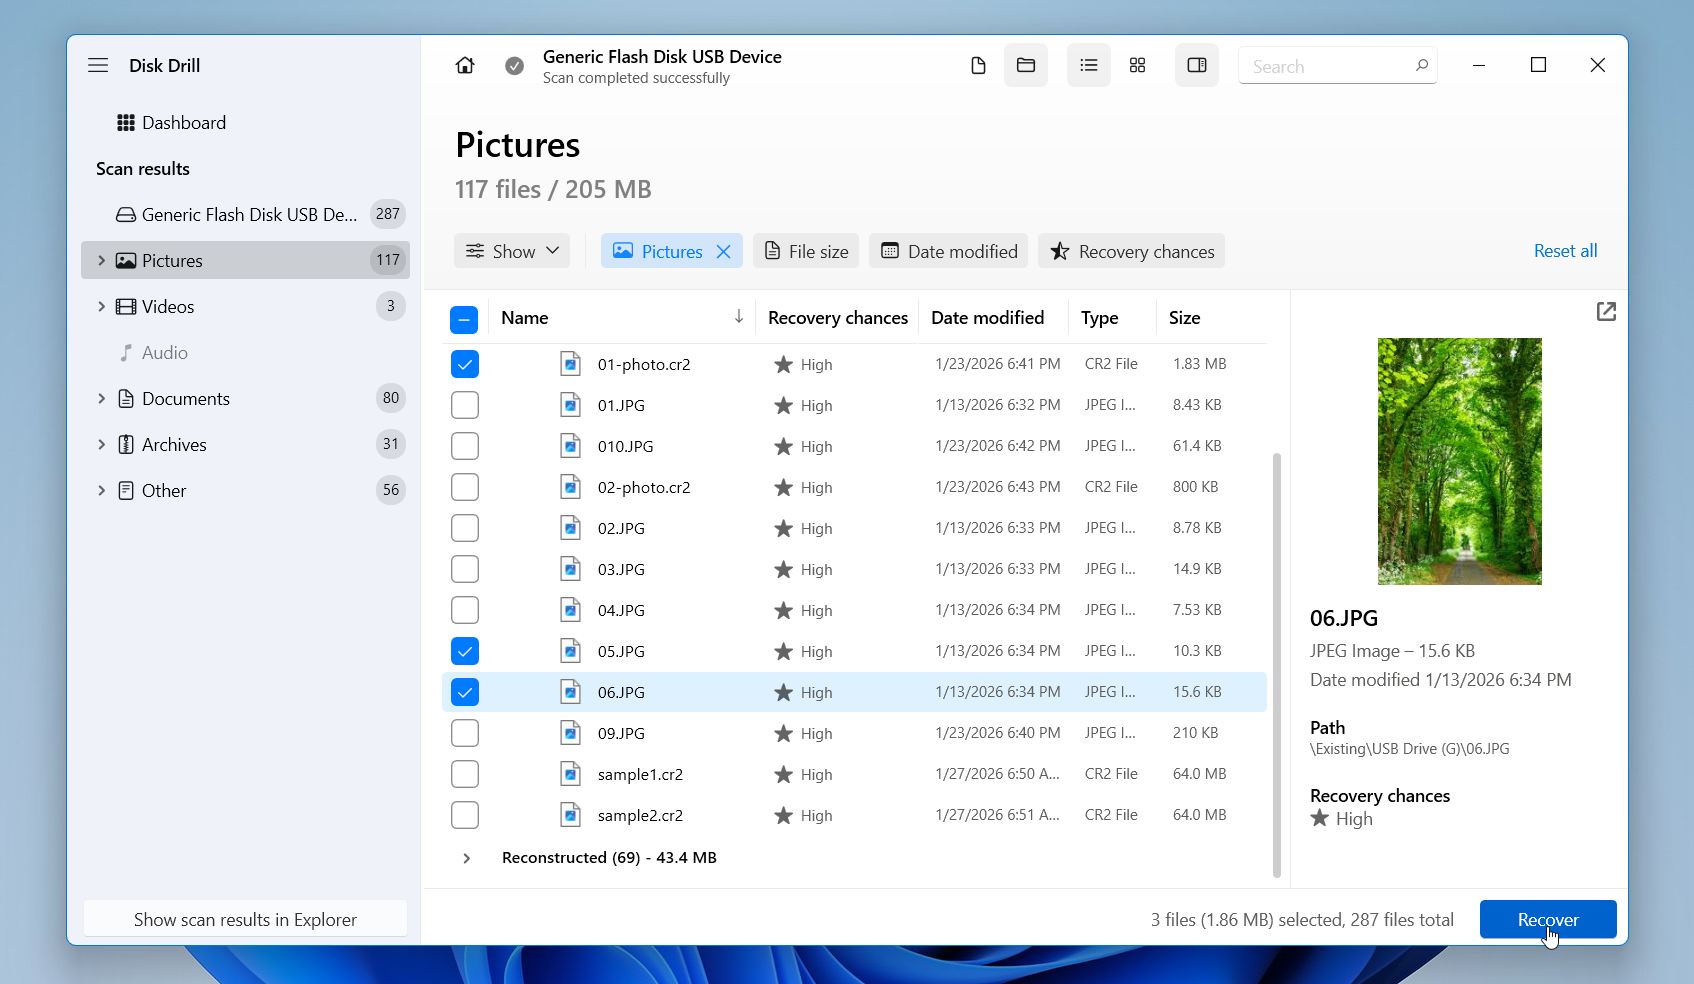
- Choose a safe recovery destination and click Next.
If the card behaves unstably, create a byte-to-byte image first and scan the image instead of the physical card. This method reduces stress on the card and prevents further damage during repeated scans.
We recommend a byte-to-byte image when the card shows read errors, random disconnects, or inconsistent scan results.
Here is how to do it:
- Open Disk Drill and click Byte-to-byte backup.

- Select your SD card from the list and click Create Backup.
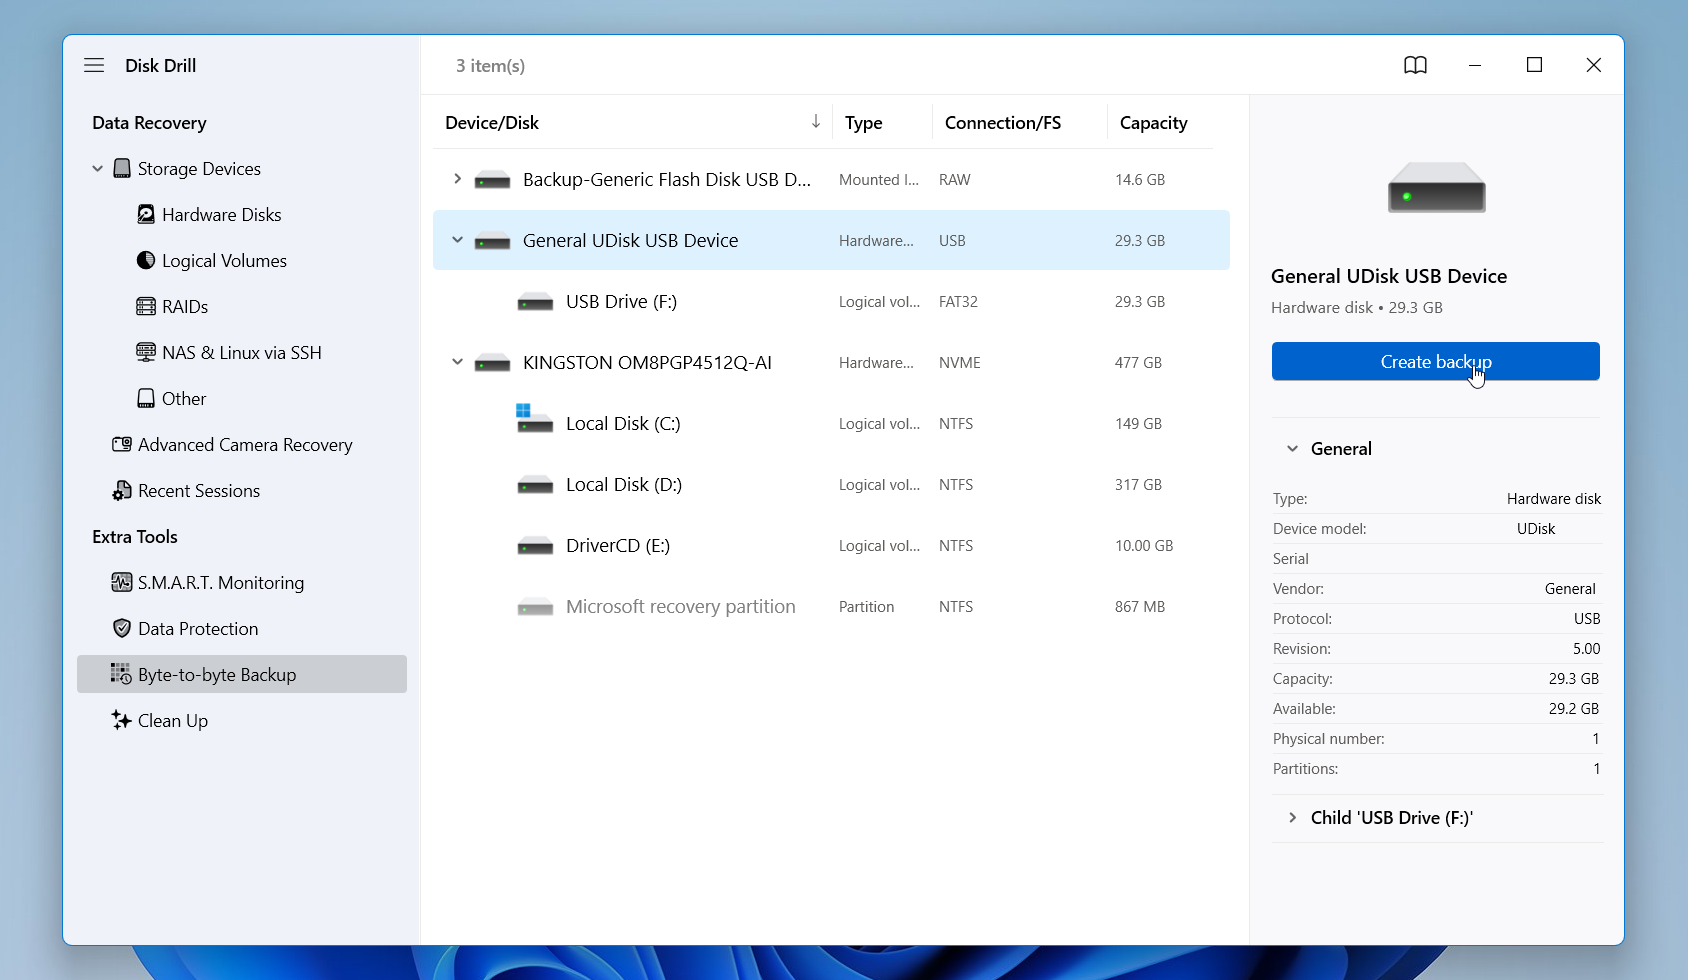
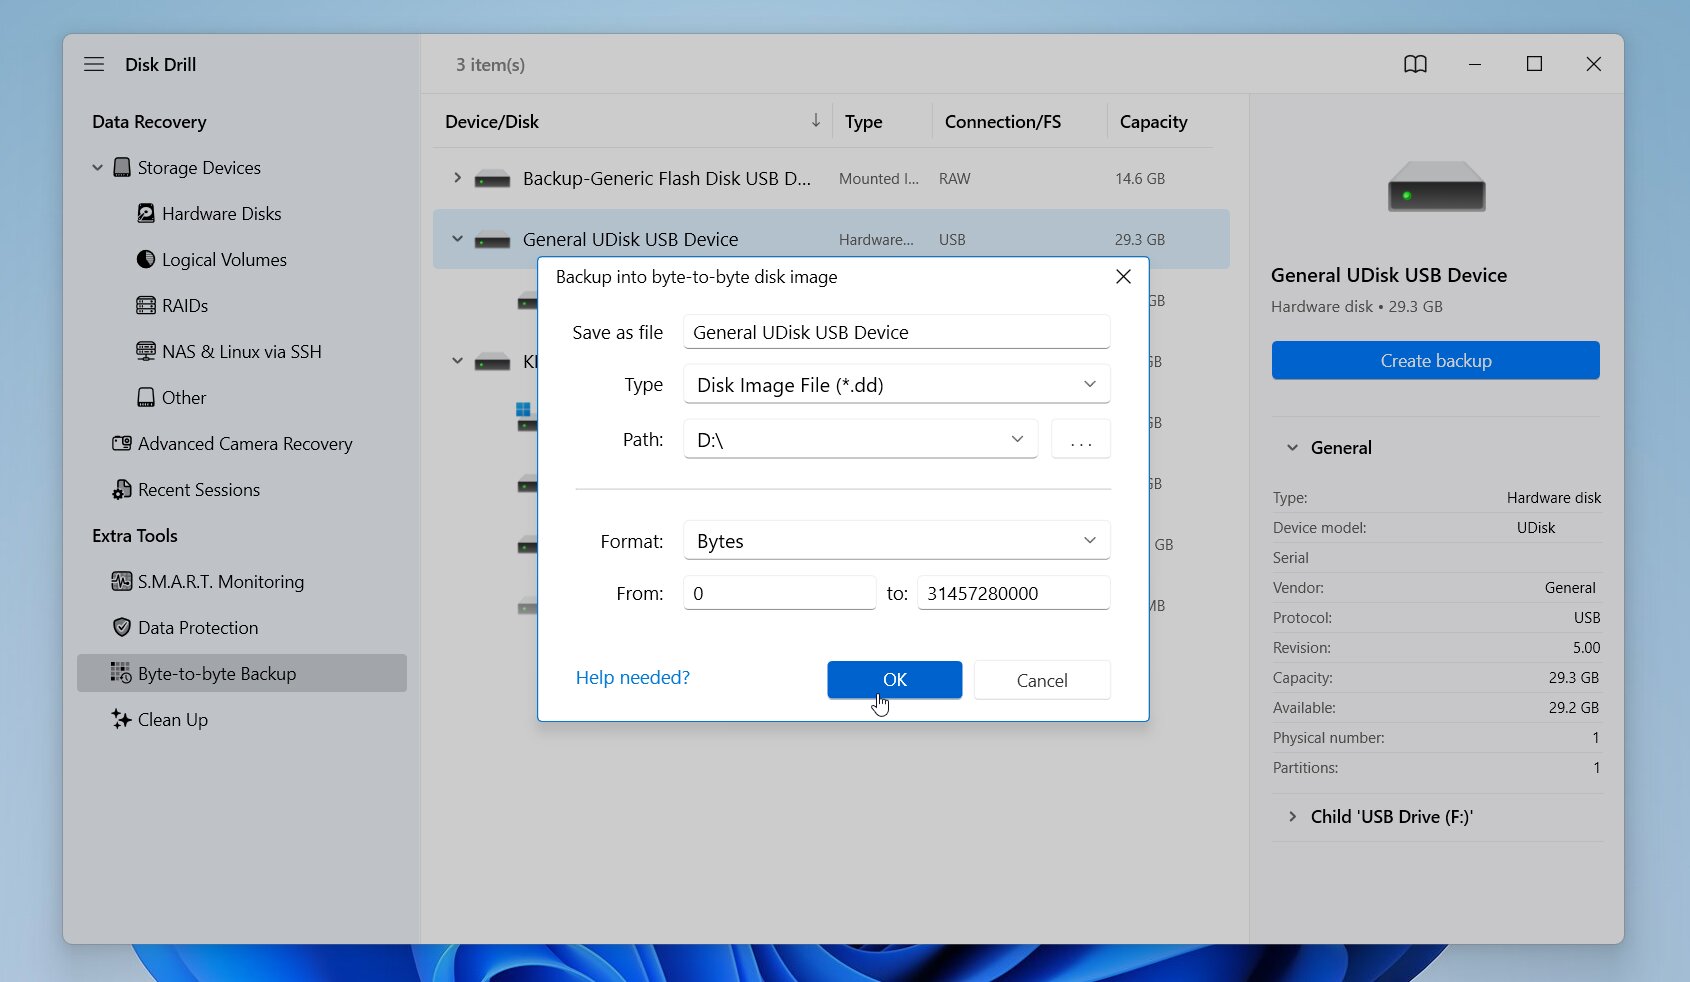
- Choose a safe location on a healthy drive and confirm image creation.
- Wait until Disk Drill finishes creating the image file.
- Return to the main window. Select Attach disk image.

- Select the created disk image instead of the physical SD card.
- Next, follow the steps we outlined earlier.
Disk Drill is available for both Windows and macOS, with a single license that covers both platforms. It also offers a free version on Windows that lets you recover up to 100 MB of data, which is enough to test real recovery results before upgrading. We cover its recovery performance, supported file systems, free limits, licensing, and real-world test results in detail in our full Disk Drill review.
Method 2: Recover Files from SD Card Free using Recuva
Recuva is a free recovery tool for Windows that we recommend for simple cases, such as recently deleted files from a healthy SD card with no heavy corruption. It does not match the recovery depth of advanced tools, but it can still help when the loss scenario is straightforward, and you want a quick free attempt. It looks outdated and scan results aren’t consistent, but it can help if the deletion happened recently.
We also have a dedicated Recuva review where we look at how it performs in real SD card recovery scenarios, its Deep Scan limitations, supported file systems, free vs paid features, and when it makes sense compared to more advanced tools. We suggest reading that review to decide whether Recuva fits your specific recovery case.
Here is how to use Recuva to recover files from a Samsung SD card:
- Remove the SD card from your Samsung phone or any other device and connect the card to a Windows PC using a card reader.
- Download and install Recuva on your computer’s internal drive.
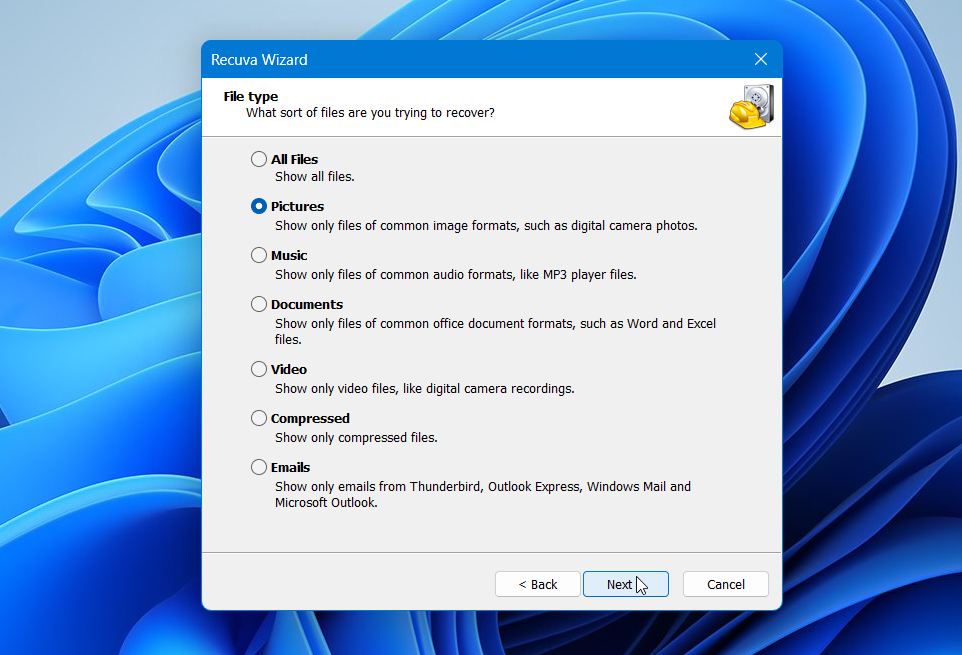
- Launch Recuva and start the wizard. Choose the file type you want to recover or select All Files. Click Next.
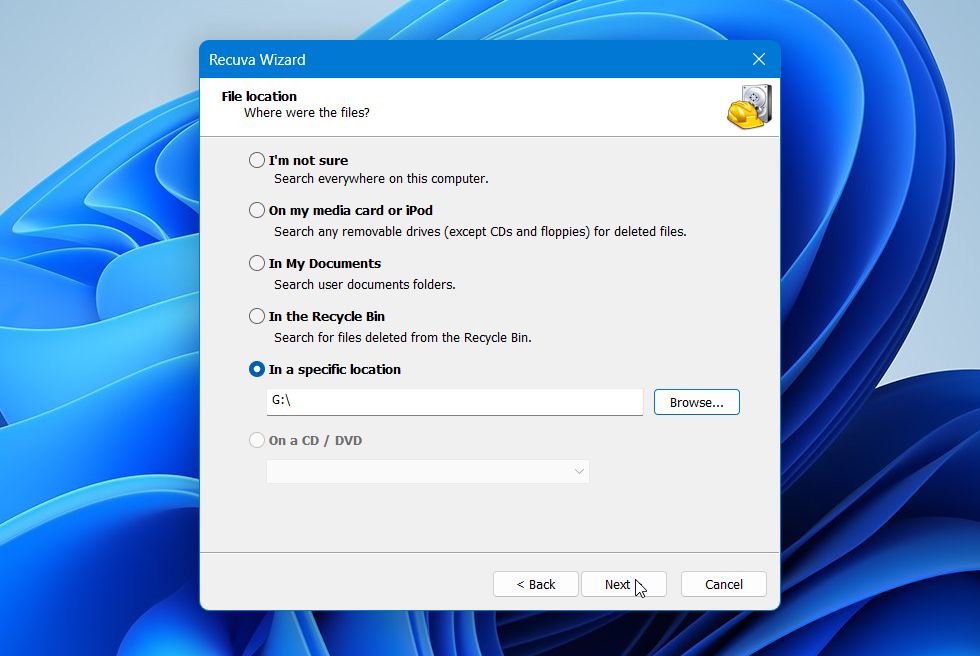
- Select the SD card location. Choose In a specific location and select the SD card drive letter. Click Next.
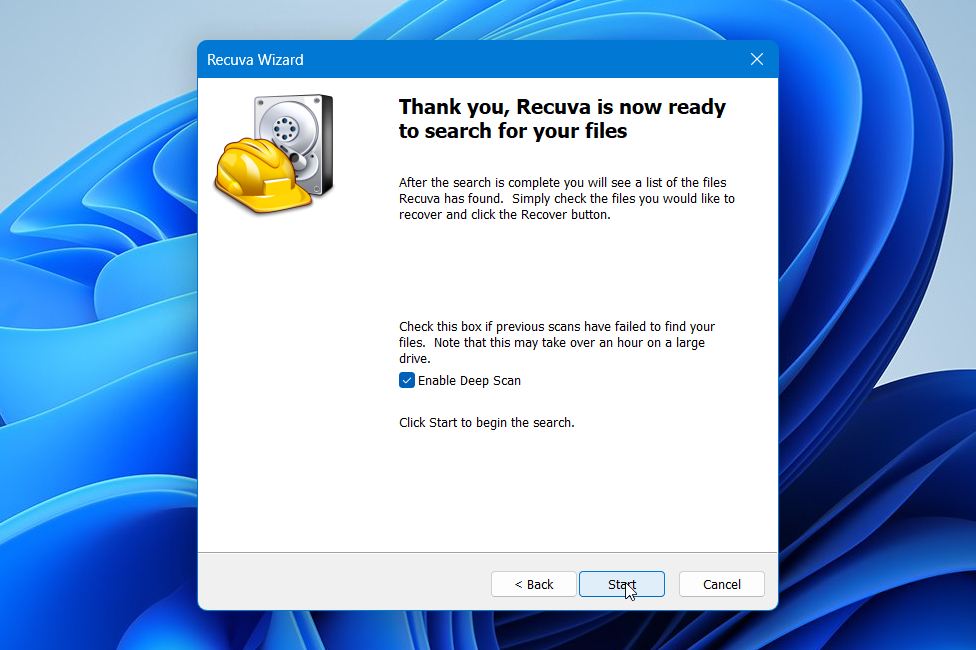
- Check Enable Deep Scan for better results after deletion or formatting and start the scan.
- Preview photos when available to confirm integrity. Check the boxes next to the needed files and click Recover.
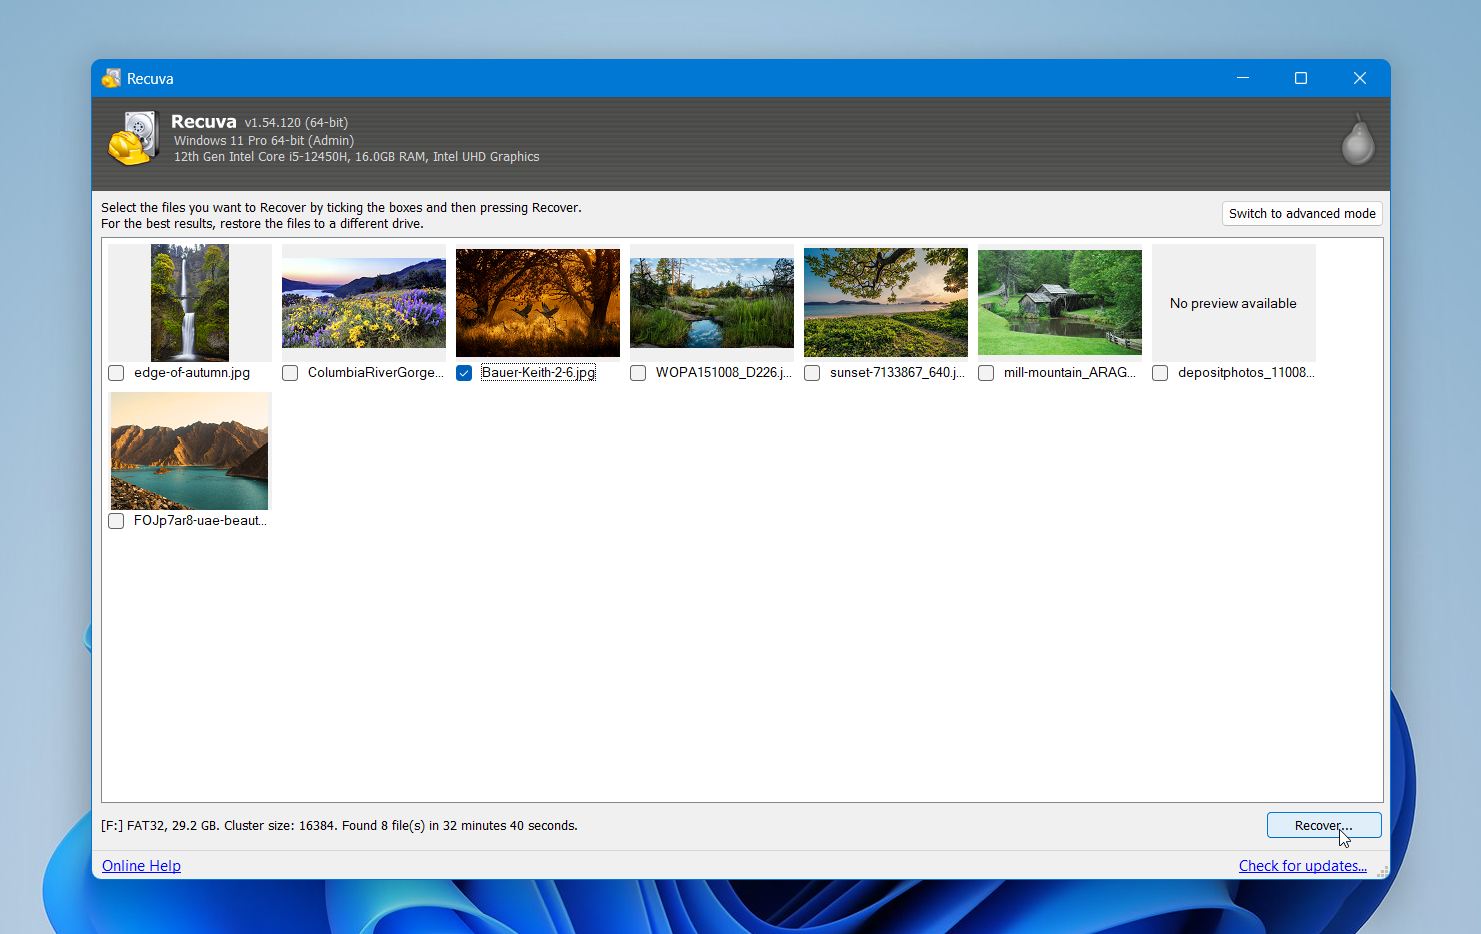
- Save recovered files to your computer or another external drive, not to the SD card.
From our experience, Disk Drill fits most Samsung SD card cases, especially after formatting, corruption, or when large media files matter. Recuva works as an option for simple deletions on healthy cards. If you’re still uncertain what tool to choose, we have in-depth Recuva vs. Disk Drill comparison.
How to Recover Data From SD Card in a Samsung Phone
When an SD card stays inside a Samsung (Android) phone, recovery options become limited. Still, there are two possible approaches worth mentioning.
Method 1: Use Android App
You can restore data from your SD card by using an SD card recovery app for Android. These apps are directly installed on your phone, which means you won’t need to use a computer or a card reader. The biggest benefit of this method is that you don’t have to detach your SD card from your mobile device.
However, some apps require you to have root access*, and most of them have less functionality (limited data recovery allowance, can only recover certain files, etc). If you still want to give it a try, we recommend DiskDigger. We’ve tested it ourselves and were able to successfully recover a small amount of data directly on our Android device.
*Rooting is not recommended if your phone was not rooted before data loss. While it does not affect data on an SD card (as long as it was not used as system storage), it will erase data from the device’s internal memory with no recovery option. In most cases, it is safer and simpler to follow the previous method and connect the card through a card reader instead.
Here’s a nice guide to help you out:
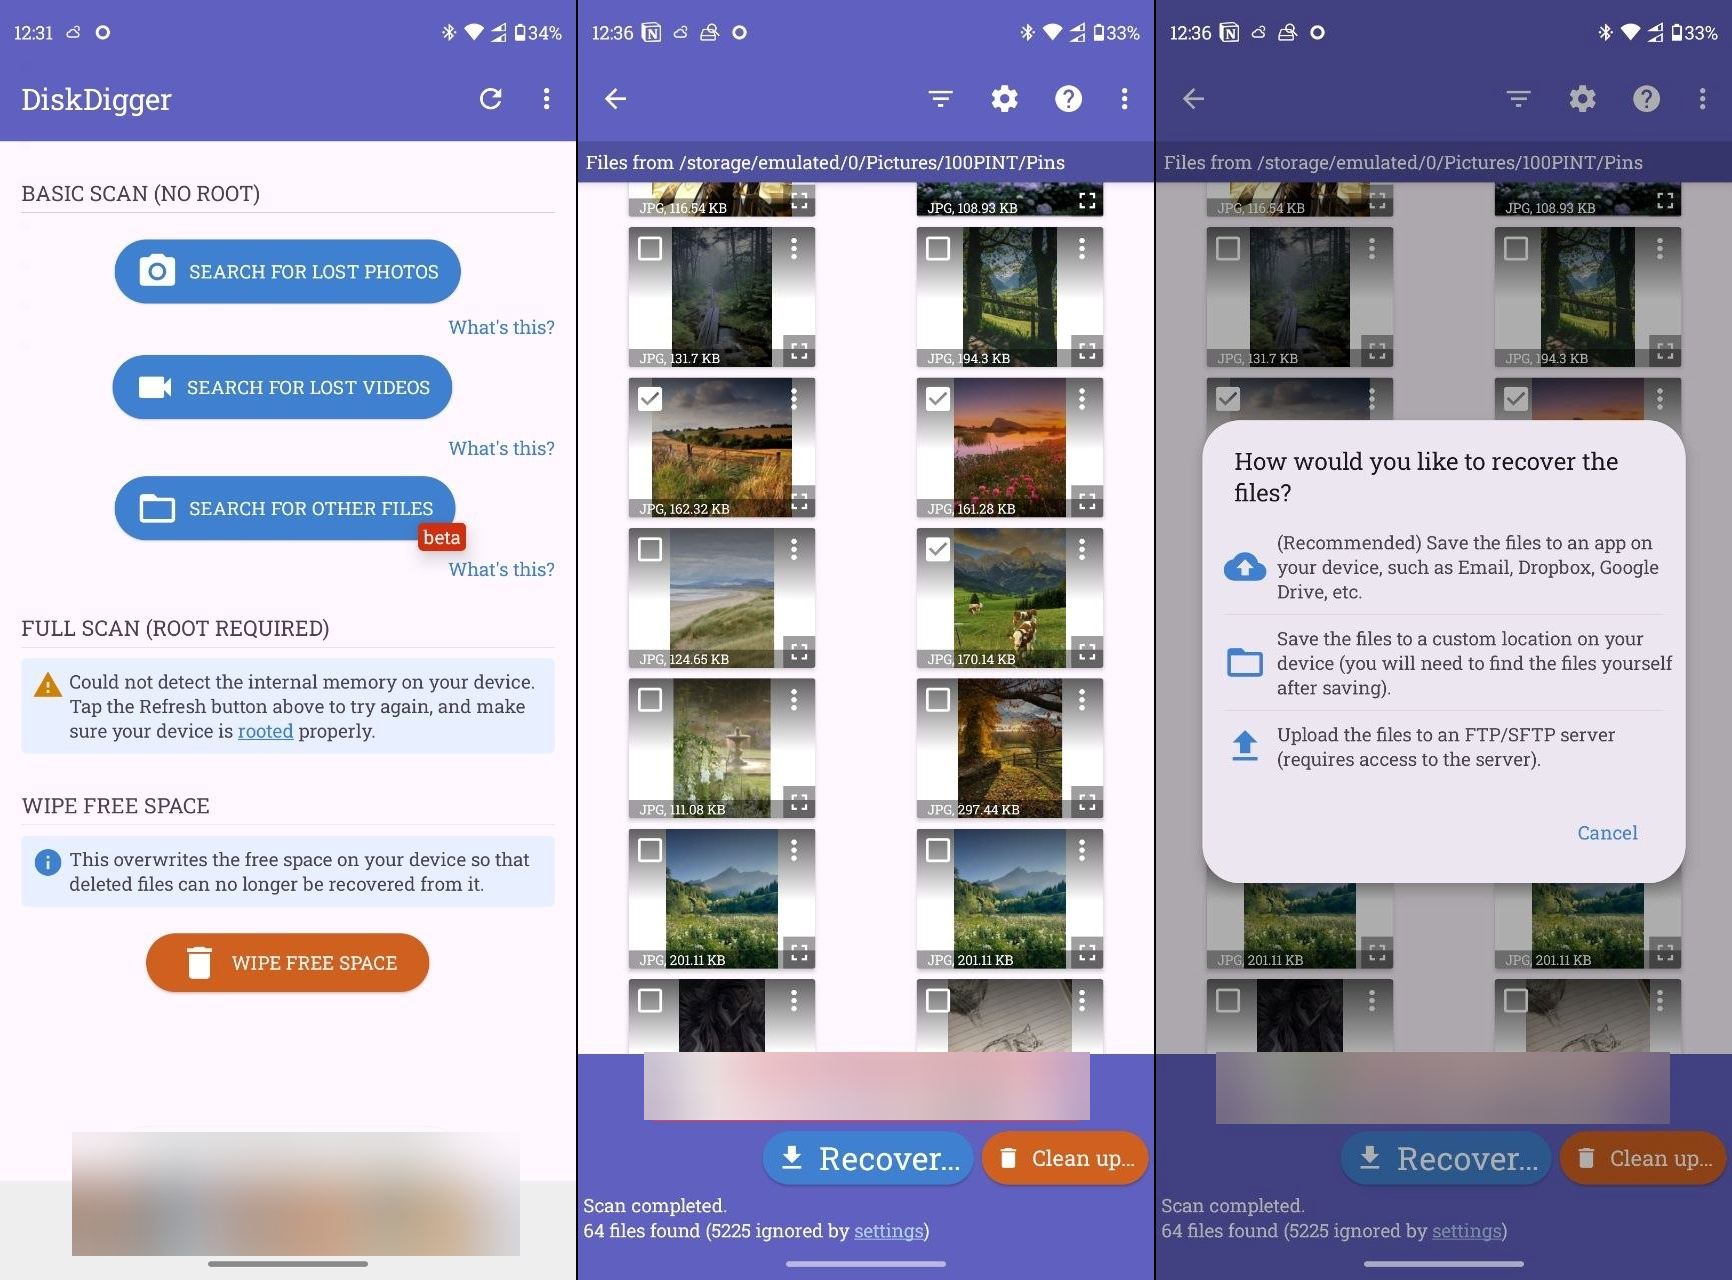
- Open Google Play Store and install DiskDigger.
- Open the app. You can choose Basic Scan if you only need to restore photos that were deleted recently or Full Scan for a more in-depth recovery. Note that Full Scan needs root access.
- DiskDigger will then ask for permission to access your file system. Tap “Allow.”
- Allow DiskDigger to complete its scan. You’ll be able to see all the files DiskDigger found as it populates the list.
- Tap on the boxes on the top-right corner of the files you want to recover. Tap “Recover” on the bottom-left corner of the screen.
- On the dialogue box that appears, choose how you want DiskDigger to save the recovered files. Option 1 uploads files to cloud services, such as Dropbox and Google Drive. Option 2 lets you save files locally (on your device). Option 3 uploads your files to an FTP server. We suggest Option 1 as it’s the easiest and most straightforward method.
Method 2: Recover Files from the Phone Using a Computer
On a phone, access to deleted files is limited. A computer gives you more control and better recovery results. For this method, we’ll use two tools: FoneLab Android Data Recovery for Windows, which works directly with Android devices, and Disk Drill for Mac.
It is always better to remove the SD card, connect it to your computer using a card reader, and then scan it with data recovery software. Direct access to the storage gives the tool the best possible chance of recovering your files. No card reader? The methods below have you covered.
For both tools to access the SD card through the phone, the Android device must have root access. Without root, the memory card won’t be available for low-level scanning.
Android Data Recovery on Windows
FoneLab Android Data Recovery is a tool for direct phone recovery on Windows. It connects to your device, scans selected data types, and presents results in a simple interface. It works best for common file types such as photos, videos, messages, and documents.
Here is how to scan and recover files using FoneLab:
- Download FoneLab Android Data Recovery from the official website and install it on your computer. Launch the program once the installation is complete.
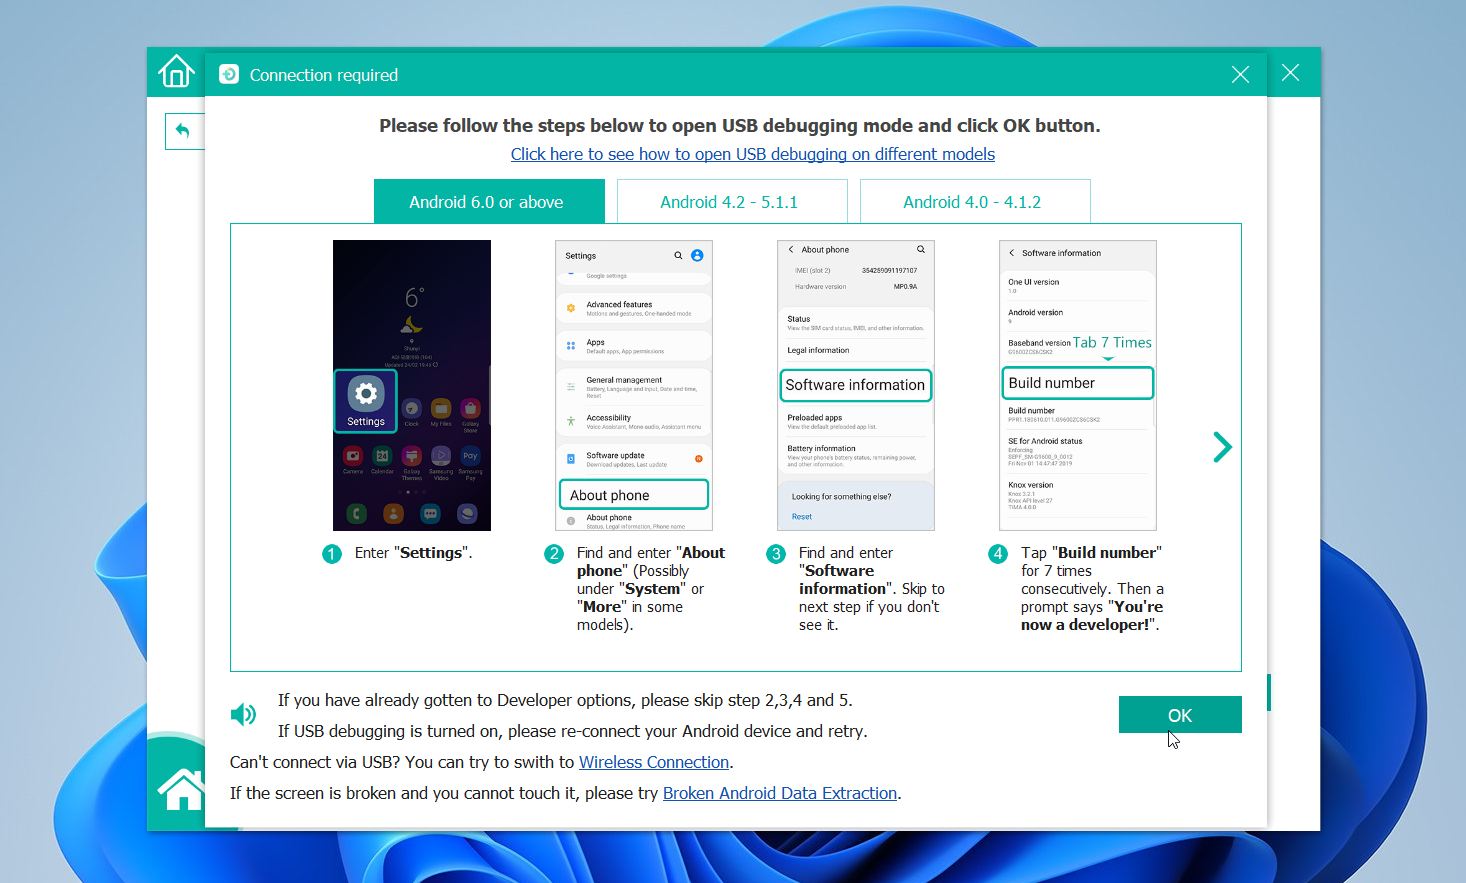
- Next, connect your phone to the computer using a USB cable. The tool will prompt you to enable USB debugging. Follow the on-screen instructions: go to Settings → About phone → Software information, then tap Build number several times to unlock Developer options. After that, enable USB debugging and confirm the connection on your device.
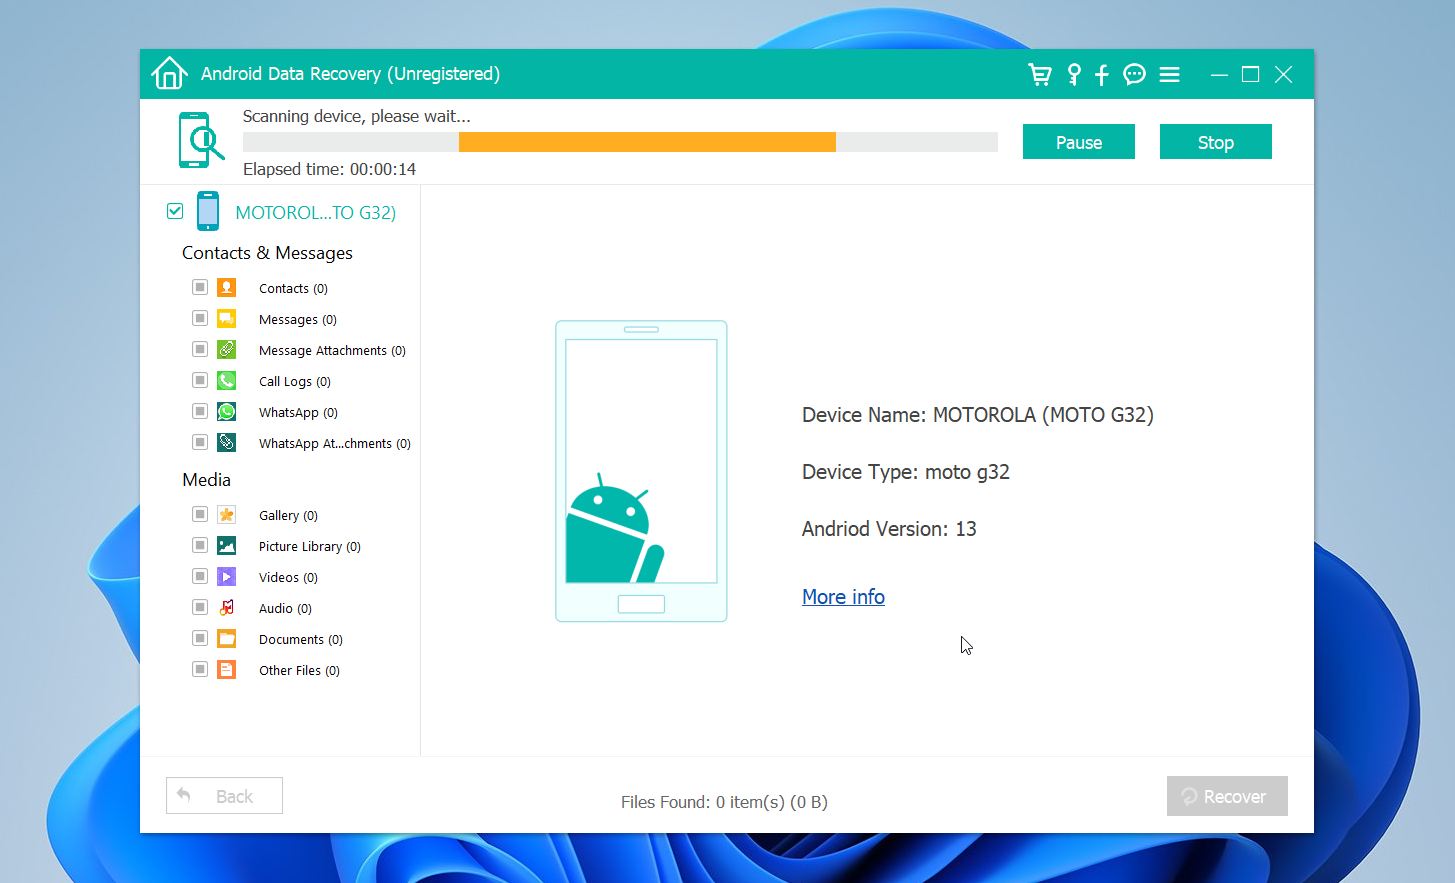
- Once the phone is detected, you’ll see a screen where you can choose what types of data to scan. Select the categories you need, such as Gallery, Picture Library, Videos, or Documents, then click Next.

- The software will start scanning your device. This may take a few minutes depending on storage size and the selected file types. During the scan, it will organize files into categories so you can browse them more easily.
- After the scan completes, review the results. You can filter files and preview images before recovery. This step is important, because if a file previews correctly, it usually means it can be restored without issues. Select the files you want and click Recover.
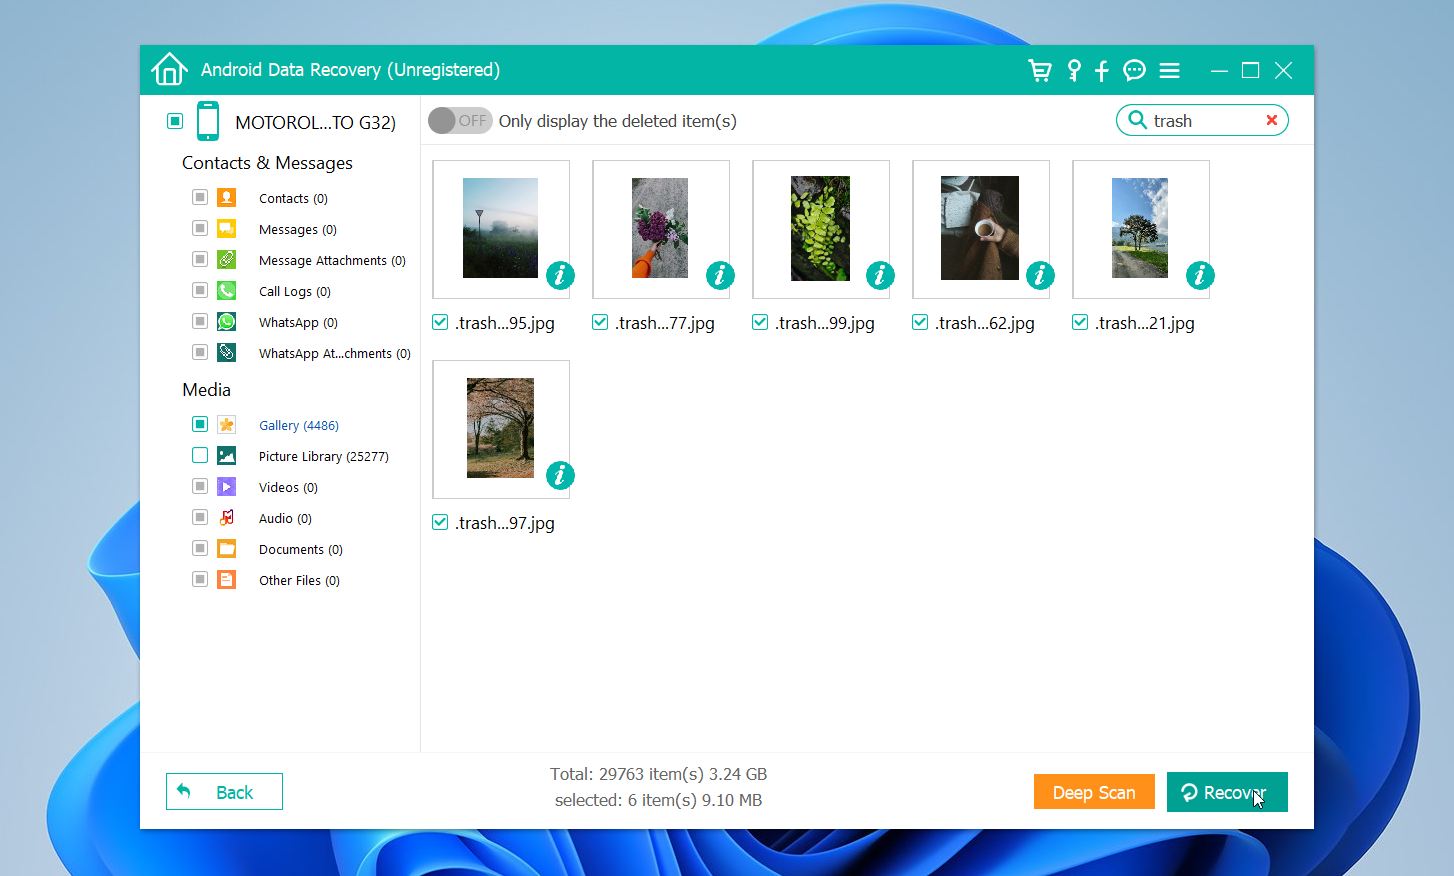
- Choose a location on your computer to save them. Avoid restoring files back to the same device to prevent overwriting.
FoneLab runs a Quick Scan automatically. If it doesn’t find the files you need, you can try the Deep Scan, but this option is only available for rooted phones.
Recover Files from a Phone on Mac
Disk Drill is a more advanced recovery tool available on macOS. It supports deeper scans and a wide range of file systems and formats. When root access is available, it can access both internal storage and SD cards at a low level, which improves recovery results.
Here’s how to recover files from an Android device using Disk Drill on macOS:
- Connect your Android phone to your Mac via USB.
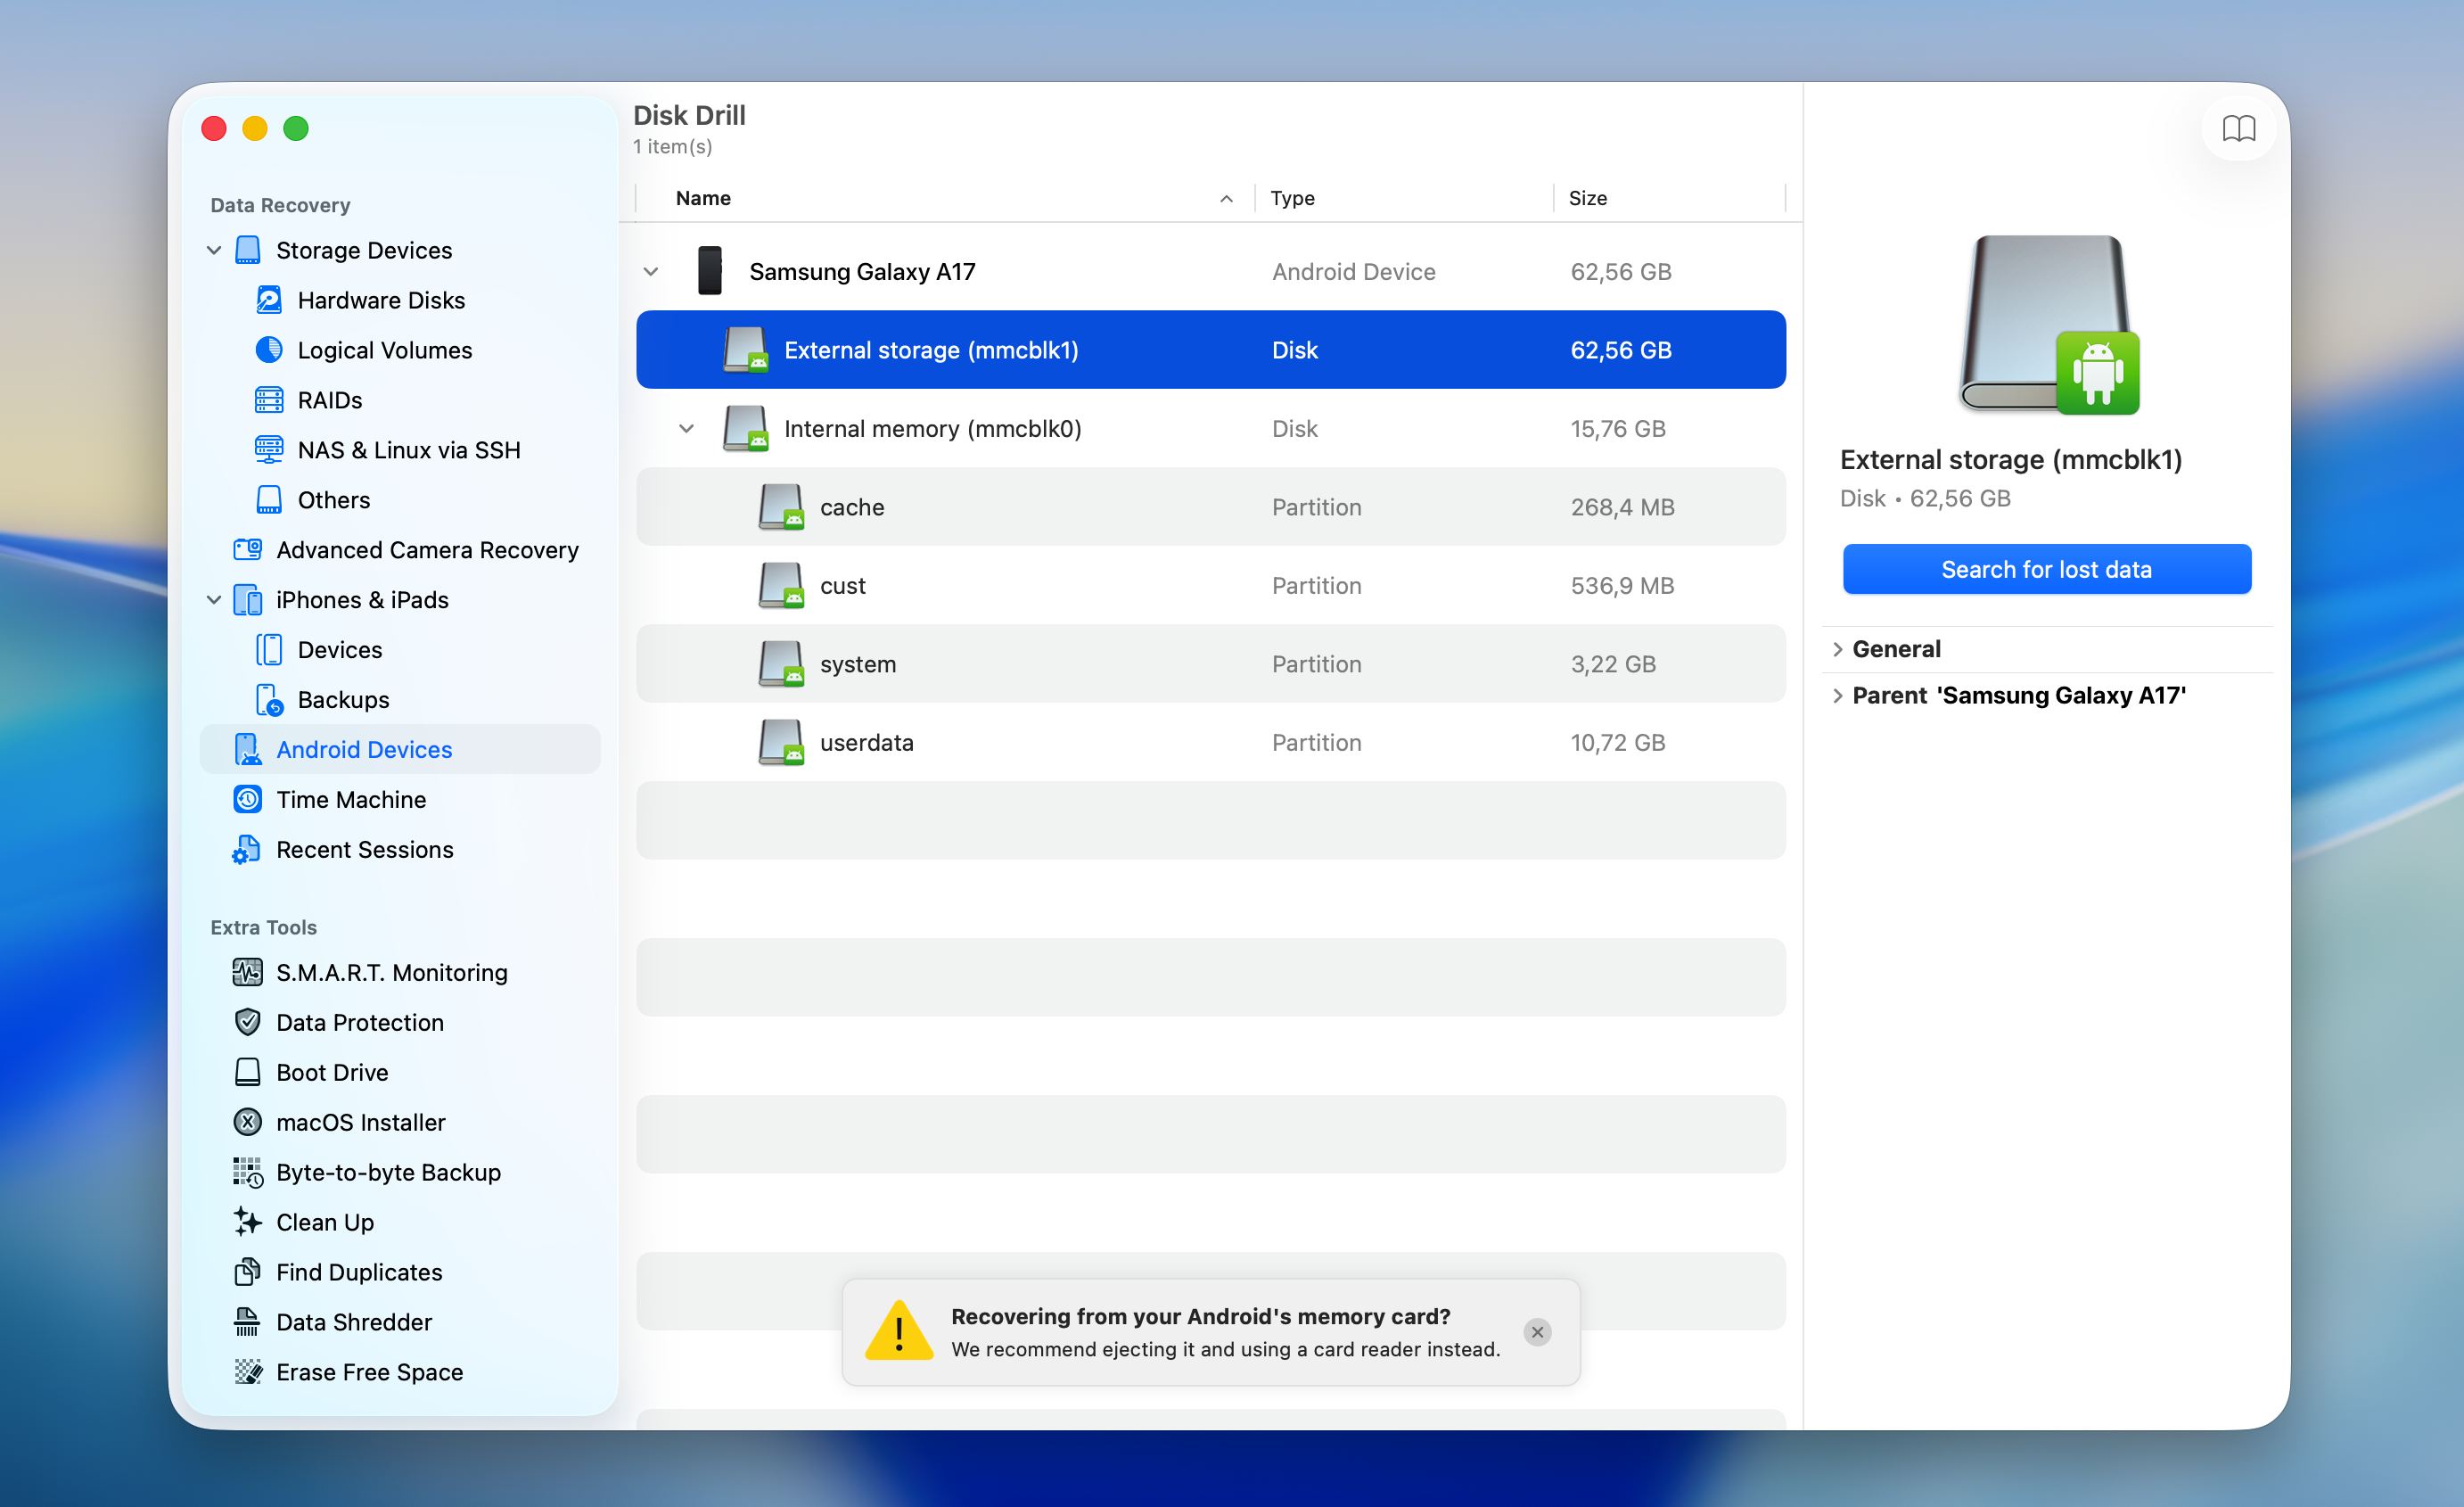
- Open Disk Drill and select Android Devices in the sidebar. You will see the detected device (for example in our case, Samsung Galaxy A17) with: Internal memory (mmcblk0) and external storage (mmcblk1), this is the SD card. Select it and click Search for lost data.
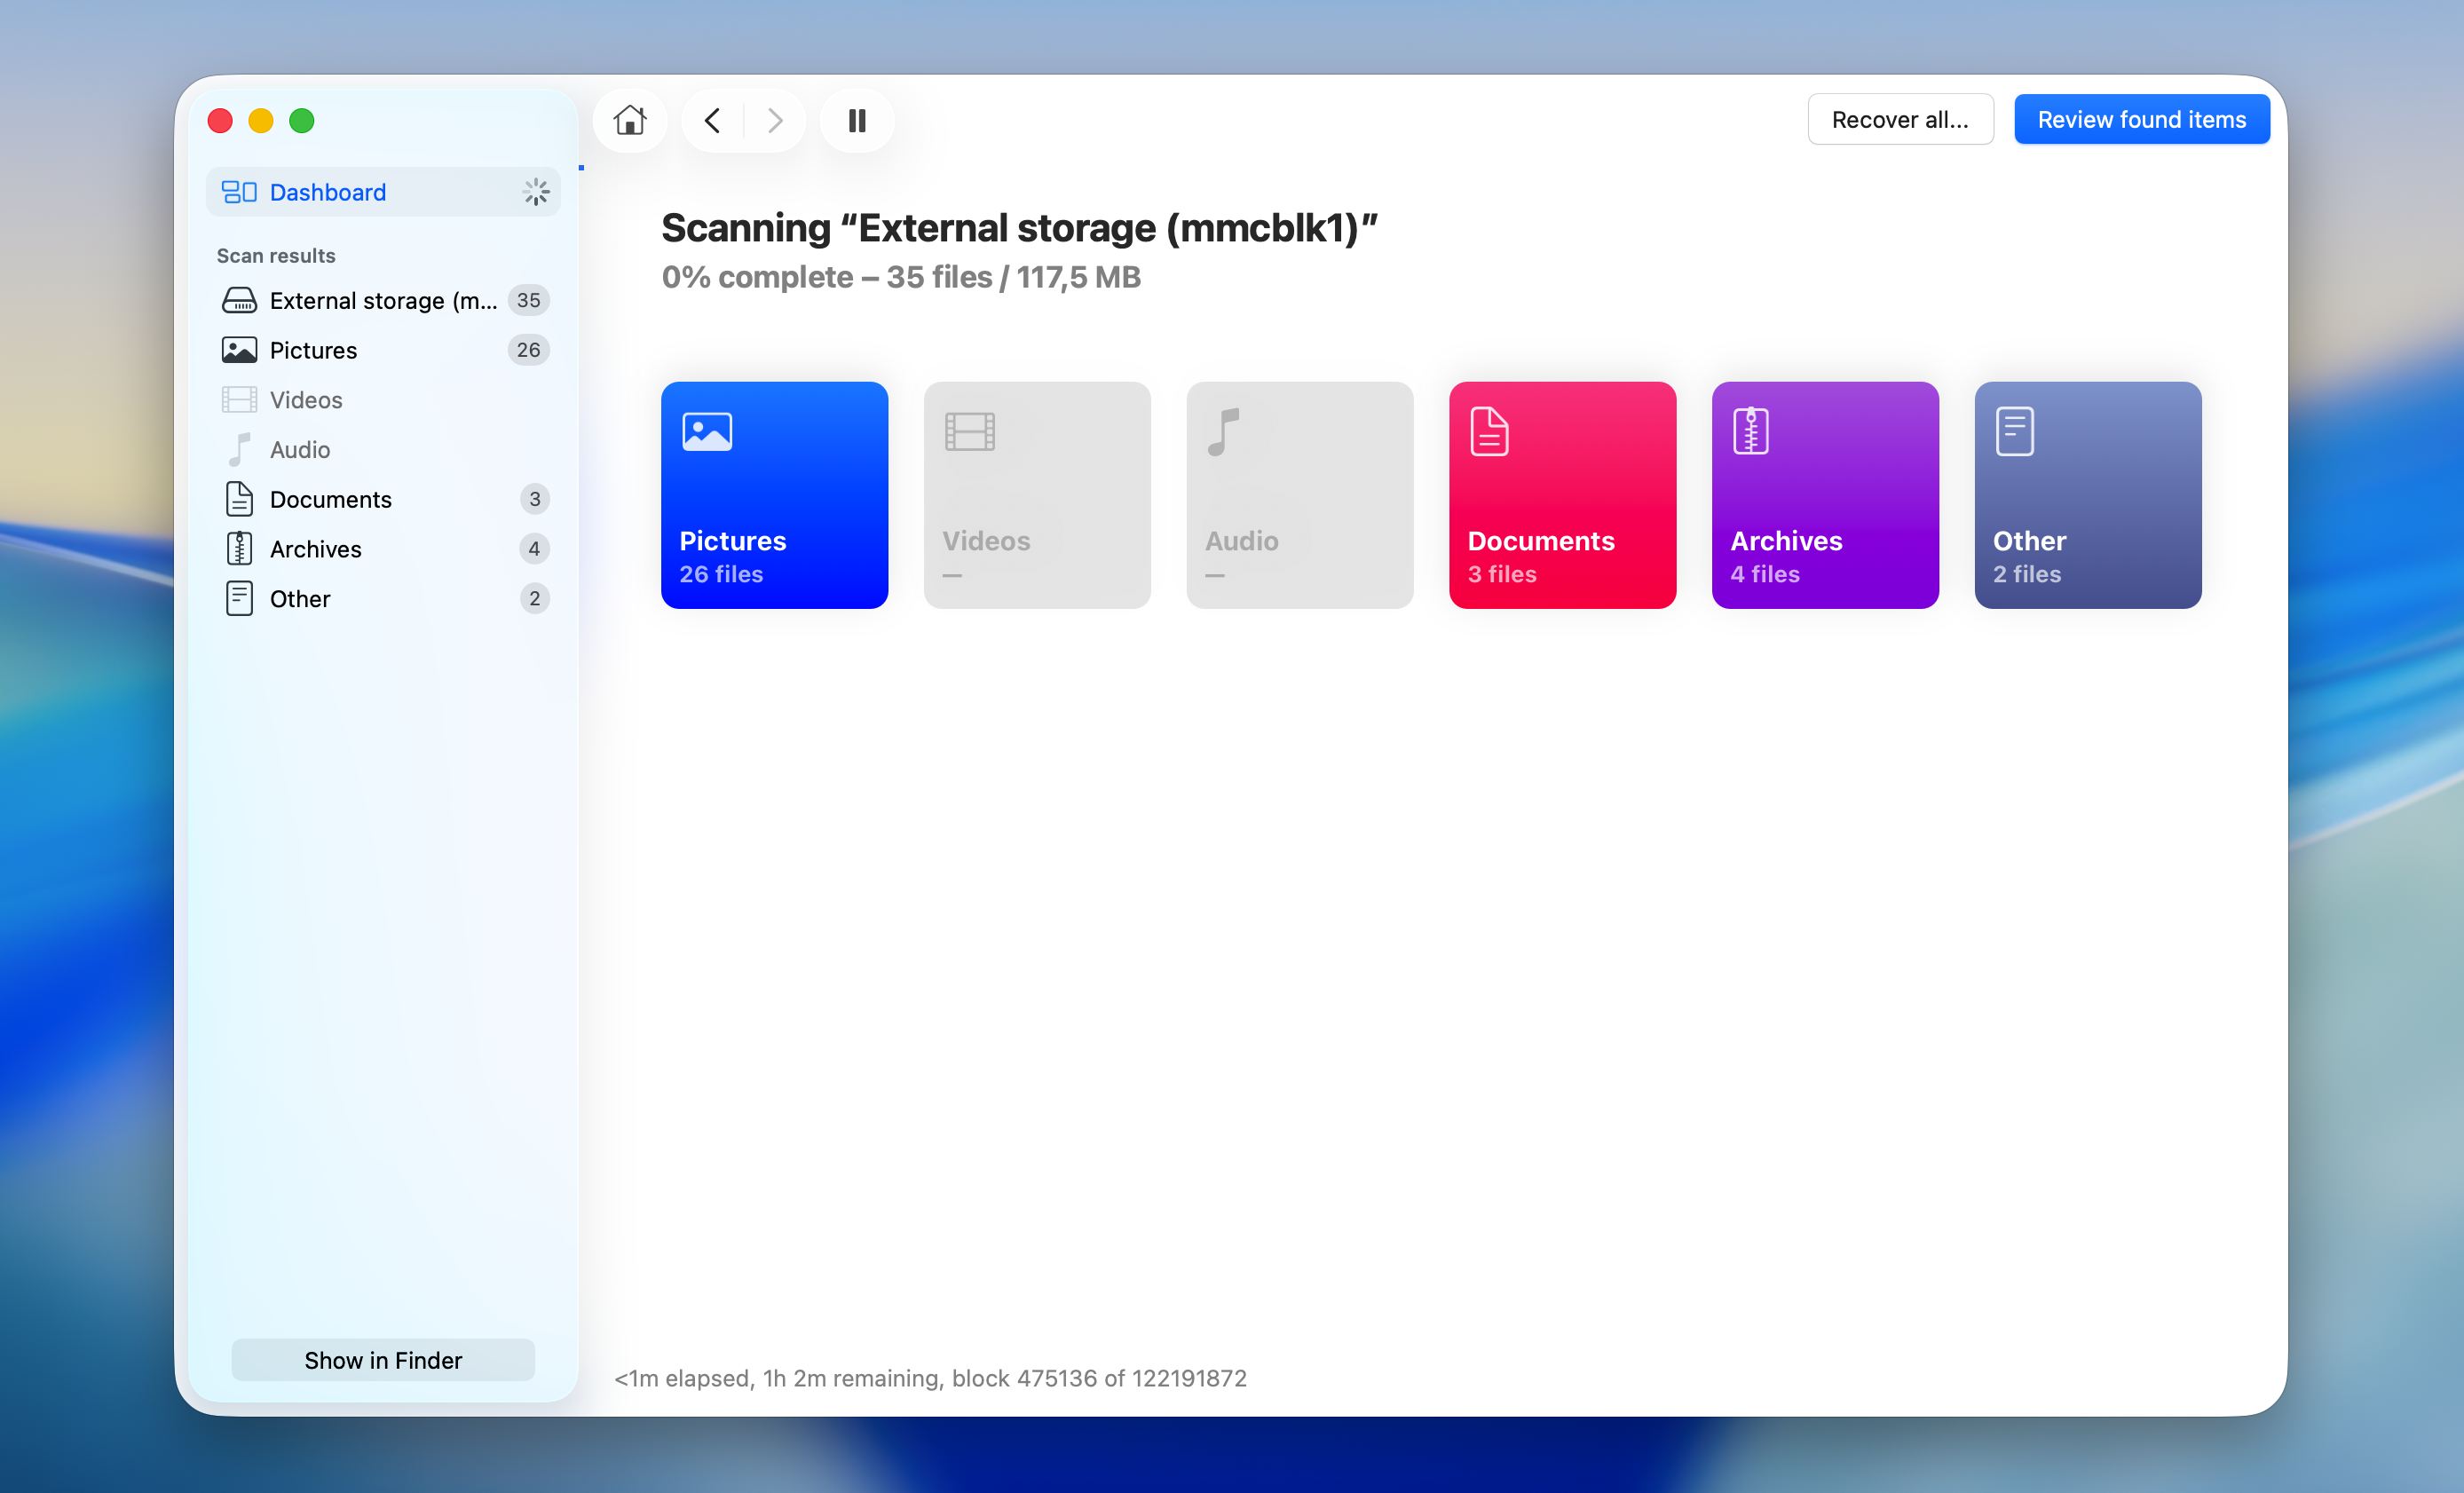
- Wait while Disk Drill scans the SD card. During the scan, the results will appear in organized categories such as Pictures, Videos, Audio, Documents, Archives, and Other. This structure helps you quickly navigate to the type of files you want to recover without waiting for the scan to fully complete. Click Review found items to examine recoverable files.
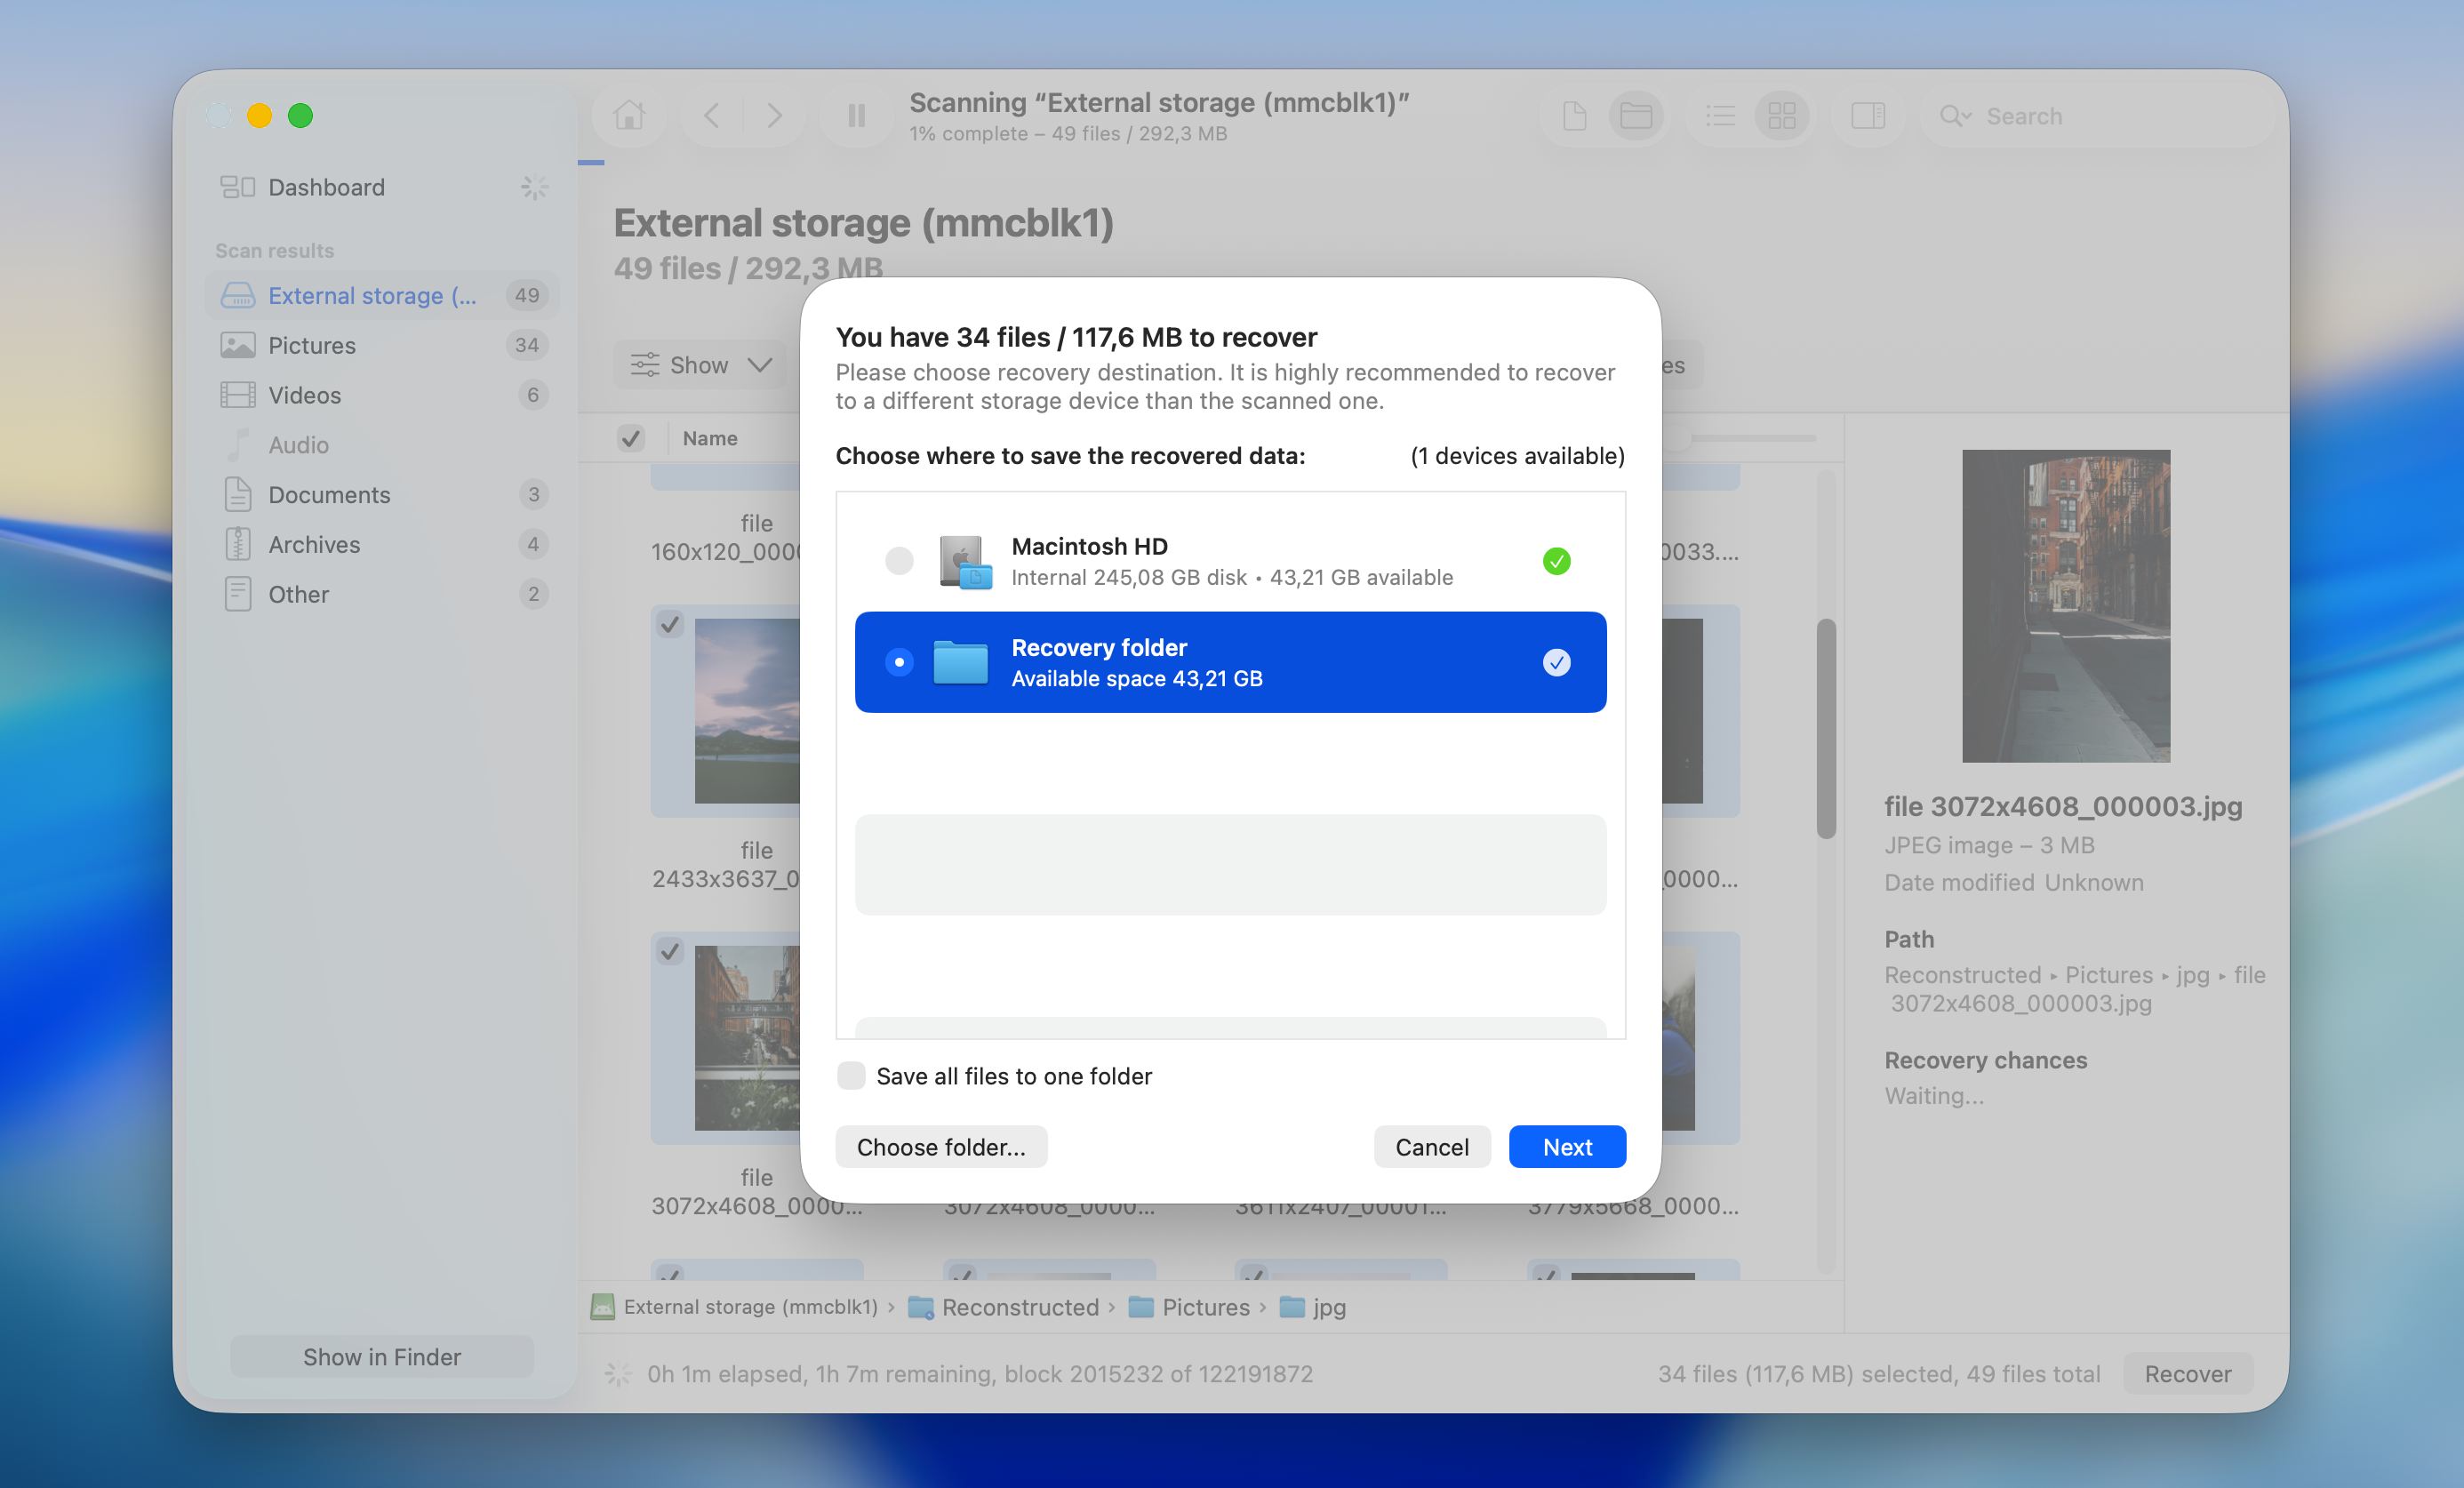
- You can preview images, check file sizes, view paths, and see recovery chances in the right panel. Select the files you want to restore and click Recover.

- Disk Drill will ask where to save the recovered data. Select a folder on your Mac (for example, a recovery folder on Macintosh HD). Click Next to complete the recovery process.
This method works well when the phone already has root access and removing the SD card is inconvenient. If you want the most straightforward and stable access, a dedicated SD card reader is still the simpler option.
What About Samsung Internal Storage Recovery?
When it comes to Samsung internal storage, recovery remains much more limited than with an SD card. Modern Android phones block direct access to the areas where deleted files usually remain. Older devices relied on USB Mass Storage, which allowed computers to treat phones like regular drives. Newer Samsung models use MTP instead, so recovery software cannot properly access or scan the internal file system without root access.
There is a big downside: root access after data loss wipes the device’s internal memory and makes existing files unrecoverable. It is required to scan internal storage, but the process itself removes the very data you want to recover. For this reason, root access only makes sense when it was already enabled before the data loss occurred.
Without root, recovery options stay limited. We usually suggest checking Trash or “Recently Deleted” folders, or restoring files from Samsung Cloud or Google backups. Some mobile recovery apps claim they can scan internal storage without root, but in practice their results remain shallow and unreliable.
FAQ
How do I recover data from my Samsung SD card?
The best way to recover data from your Samsung SD card is to detach it first from your device, connect it to a PC using a card reader, then scan it with a data recovery tool:
- Download and install data recovery software of your choice.
- Connect your Samsung SD card to your computer.
- Launch the tool and scan the SD card.
- Analyze the scan results, preview files if possible, to confirm their integrity.
- Select the files you want to recover and save to the suitable recovery destination.
How do I fix a corrupted SD card in my Samsung?
On a phone, there are basically no reliable ways to fix a corrupted SD card. On a PC, however, there are plenty of repair methods. Remember, before any fixes, you need to recover your data. Connect your SD card to your computer via a card reader, and use a data recovery tool to restore files.
Once you’ve done that, try the following methods:
- Use the CHKDSK command to scan for and attempt repair on disk errors
- Try another USB port or chance your adapter/card reader
- Try using the card on another device or PC
- Assign a new drive letter using Disk Management
- Reinstall card drivers
- Use Windows Repair Tool
- Format the SD card
- Use Diskpart “recover” command
- If all else fails, send it to a professional data recovery center.
Check this article for step-by-step guides for each method.
How do I recover data from my SD card on my Samsung phone?
Data recovery on a phone is a little complicated. If you lost important files from your SD card, we advise you to remove it from your phone and connect it to your PC or laptop via card reader. Data recovery tools available for computers are just better in every way and you have a higher chance of getting your files back. While Android recovery apps do exist and some can even scan internal storage, they usually require root access, which adds risk and often leads to inconsistent results.
Why is Samsung not reading my SD card?
Samsung phones may stop reading an SD card for several reasons. We usually see this happening when the file system is corrupted, which can happen after improper ejection or a system crash, while the SD card was in use. Another possible explanation is compatibility issues. Older or low-quality cards may not work reliably with newer Samsung devices, especially if the card uses an unsupported format. Sometimes worn contacts, micro-cracks, or heat damage can also prevent proper detection.
This article was written by Alejandro Santos, a Staff Writer at Handy Recovery Advisor. It was recently updated by Victoria Rybtsova. It was also verified for technical accuracy by Andrey Vasilyev, our editorial advisor.
Curious about our content creation process? Take a look at our Editor Guidelines.