A wrong move, a device malfunction, or maybe a misbehaving app, and your precious files on your Android device have gone bye-bye. Still, even if your data’s gone, don’t worry: you’ll probably have recovered all your deleted files on your Android device by the end of this article.
Unfortunately, we can’t offer a single, simple “press button to get back files” solution. The path to get back your deleted files from your Android device depends largely on where and how they were stored.
So, let’s see all the ways you can get your files back from your Android device.
Can You Get Deleted Files Back On Android?
Thankfully, there are many ways you can get your files back from your Android device:
- 👁️ In most cases, your files are still accessible but hidden.
- ☁️ If not, it’s still easy to retrieve them if you had stored them in a cloud-enabled service, like Google Drive or Dropbox.
- ⌛ Even in the worst-case scenario, where they’re really deleted, you can get them back using specialized data recovery software, but only if you act as soon as possible.
Like on Windows and Linux PCs, when files are “deleted” on Android devices, they’re not wiped from storage. Instead, the operating system marks the space they occupy as available for use.
Yet, despite some apps’ claims to the contrary, they might not be able to help you recover your files if a) TRIM has “mangled” them and b) you don’t have root access.
Modern NVMe and SSD drives are faster and less prone to failure than older magnetic storage solutions, like HDDs, thanks to using a controller and memory chips instead of mechanical moving parts.
However, the controller can only “zap” the chips with electricity a finite number of times to write data. After that, the chips may start failing. TRIM attempts to minimize such damage and increase performance.
It achieves this by a) shuffling data around to ensure it’s spread evenly among all chips and b) removing all “obsolete” data – including the deleted files you might want to get back. But that’s not the only hurdle.
Android follows the same multi-user security approach as Linux. That means that even the owner of a device doesn’t have complete access rights to its entire storage. This approach helps protect the system’s files and user data (if more than one shares the same device). And yet, it also means it might be impossible to recover lost files if the OS deems you shouldn’t have access to them. The only way to have complete administrative-level unrestricted access to the OS and all data is through what’s known as a “root” account.
However, that leads to more potential issues with data recovery. If there isn’t unrestricted root access, enabling it can be convoluted – “how much” depends on the device. The process often includes:
- 📝 Installing apps or scripts.
- 🪟 Modifying system files.
- ✏️ Writing new data.
- ⚡ Going through one or more reboots.
All those actions can also render the deleted data unrecoverable by writing over it or “triggering” TRIM.
Still, if those files were stored in a cloud-enabled service’s folder, like Google Drive or Dropbox, you can always redownload them from their cloud-synced versions, even if TRIM eliminates their local instances.
Keep in mind that eventually, your files will be removed. Thus, you have to act as soon as you realize they’re gone.
📱 How Can Your Files Disappear On Android?
Unfortunately, the most common cause for data loss is user error – the user accidentally deleting their files. Everybody thinks they’ll never have to deal with such a problem. However, it’s easy to select the wrong tiny thumbnails and merrily proceed to the deletion of photos you’d rather prefer you hadn’t eradicated. And, yes, we are talking from experience!
It’s also relatively easy, although rare, for the file system to become corrupted. An unexpected device shut down while a file writing process is in progress may lead to such a problem.
The same can also happen on older, overused devices with failing storage. However, in such cases, after managing to pull your data out, it’s best to start planning a device replacement. Even if you manage to save your data, those memory chips aren’t user-serviceable.
Those aren’t the only sources of data loss, but they are by far the most common.
💾 Recovering Deleted Files On Android From Internal And External Storage?
On most Android devices, there are usually two pools of storage you can access: internal and external.
- Internal storage is made up of memory chips inside the device. Both the OS and any extra files (for apps or created by the user) reside there.
- External storage usually refers to solutions that extend the device’s available internal storage, like micro SD cards and USB flash drives.
Modern versions of Android allow unrestricted access to the external storage since there would be no point in restrictions anyway. You can always, for example, connect a micro SD card to your PC to access everything on it. However, modern Android puts up barriers and doesn’t allow unrestricted access to its internal storage for security reasons. That’s why you might see suggestions that your device should be “rooted” for optimal file recovery on Android.
📲 Recovering Lost Data From Rooted VS Non-Rooted Android
Precisely because of the restrictions we mentioned above, you may see suggestions that your device should be “rooted” for optimal file recovery on Android.
The term stems from Linux, where “root” is the default administrator’s account. A root account has full, unrestricted access to everything on the device.
However, just like on Linux, it’s suggested you use a different account when using your device since it’s easy to break something when logged in as root. That’s why this account is disabled by default on Android.
Thus, “rooting” is usually a process through which the user gains back those administrative rights – and, with them, the ability to do whatever they wish to their device.
🔒 Encryption Headache
Encryption might be excellent for security, but it’s also a significant roadblock when you need to recover data from a device. When encrypted on Android, the contents of a micro/mini SD card can only be accessed on that Android device.
Encryption shouldn’t be a problem if you’re trying to recover your data directly on your Android device. However, it makes using your PC to recover your data impossible. You’ll first have to insert your SD card back to the device where it was encrypted, decrypt it, and then try to recover your data from it.
Almost all modern Android devices support encryption. However, many come with their own interfaces on top of vanilla Android, each “moving things around”.
Still, Android also allows you to perform a search in its Settings menu. So, you can locate the option to decrypt your SD card on all Android devices by simply searching for it:
- Visit your Android device’s Settings menu.
- Tap on the Search field and type “encrypt”.
- Select any entry that references your SD card or “external storage”.
- Check the options there and choose the one that will decrypt your SD card.
The Best Ways To Undelete Files On Android
In most cases, even if they’re nowhere to be found, you can probably still get your files back from your Android device. However, their recovery depends on many factors:
- Where were they stored?
- Were you using any cloud-enabled services?
- Did you keep backups?
- Is your phone rooted?
The method you’ll have to use to undelete files on Android depends on the answers to those questions. Still, although the solutions change, as you’ll see, they’re all pretty straightforward.
Method 1: Recover From Backup
Most modern smartphone and tablet manufacturers equip their offerings with various tools and utilities, including backup solutions. Still, the process of backing up and restoring data from them differs between manufacturers and devices and can often be quite convoluted.
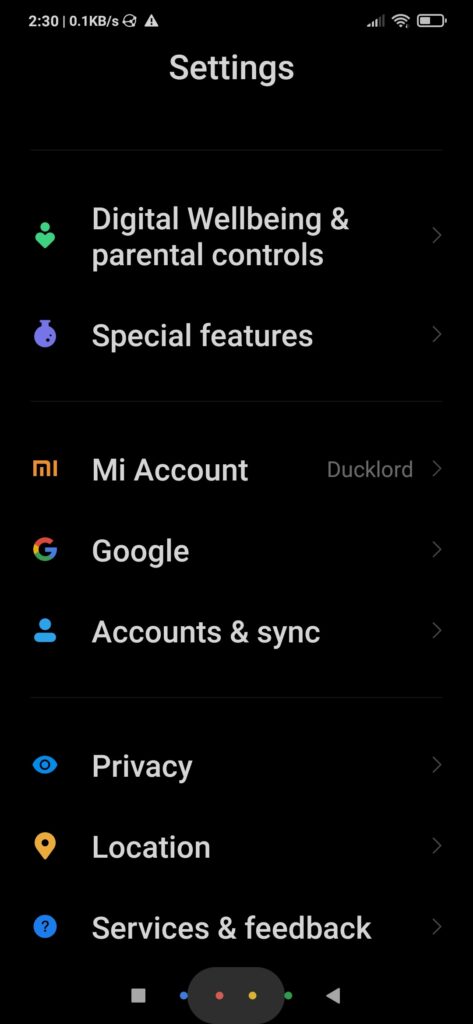
For example, on this author’s Xiaomi smartphone, all backup functionality is semi-hidden under your Mi account settings. If you have a similar device, you can set it up, initiate a backup manually, or restore files from that spot.
- Visit your Xiaomi device’s settings by dragging down on the screen to access the top menu and selecting the “cog” icon at the top right.
- Scroll down to find the Mi Account entry and select it.
- Choose the Xiaomi Cloud option.
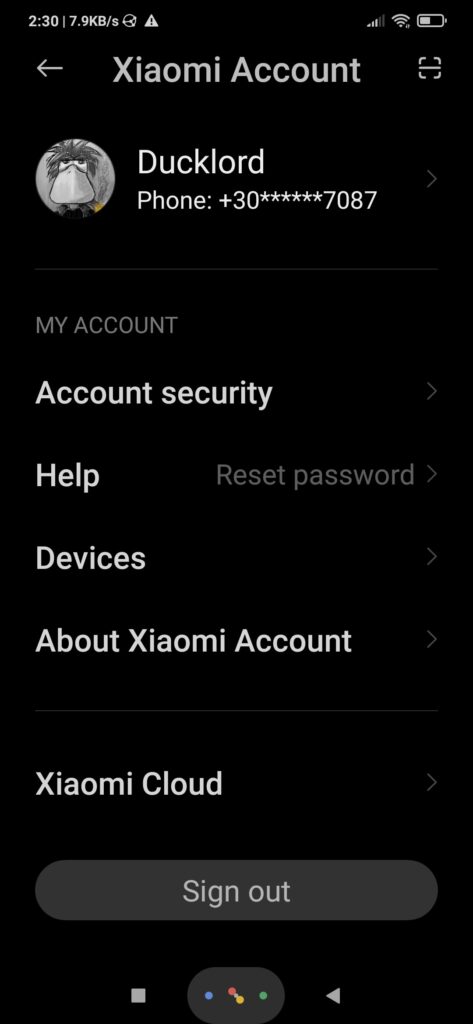
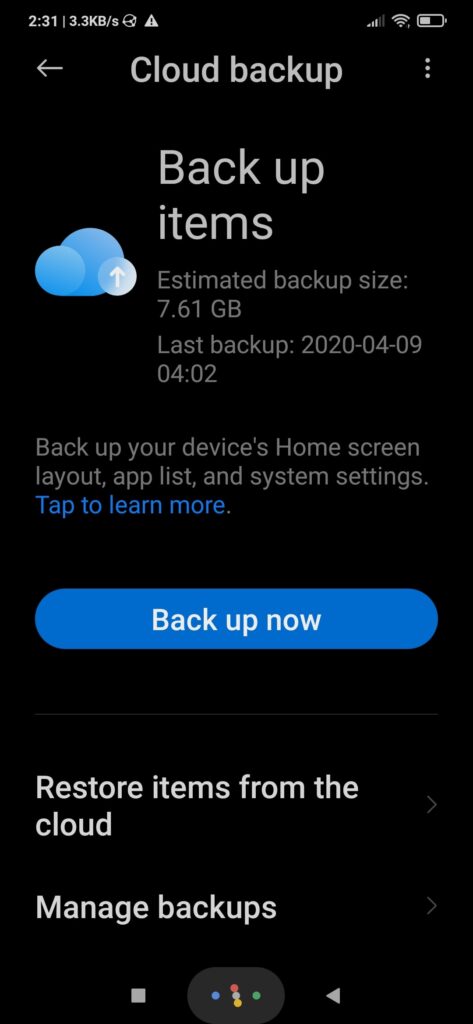
Your Xiaomi device should be syncing data like SMS messages, contacts, notes, calendars, etc. However, if you scroll down the list of (potentially) synced data, you’ll find another entry about Backups. If you’ve followed through with your Xiaomi device’s initial setup, it should be set to “On”. That’s from where you can take and restore backups of other files that aren’t included in the list above, so, touch that entry to visit the Backups sub-menu.
From there, you can enable Automatic backups (if they aren’t already enabled), tweak the Backup schedule (on our device, it was set to 7 days by default), and initiate a backup manually by touching the Back up now button.
To recover backed-up files..:
- Scroll farther down and tap on Restore items from the cloud.
- Tap on one of the available backups, and then on Select backup to do just that.
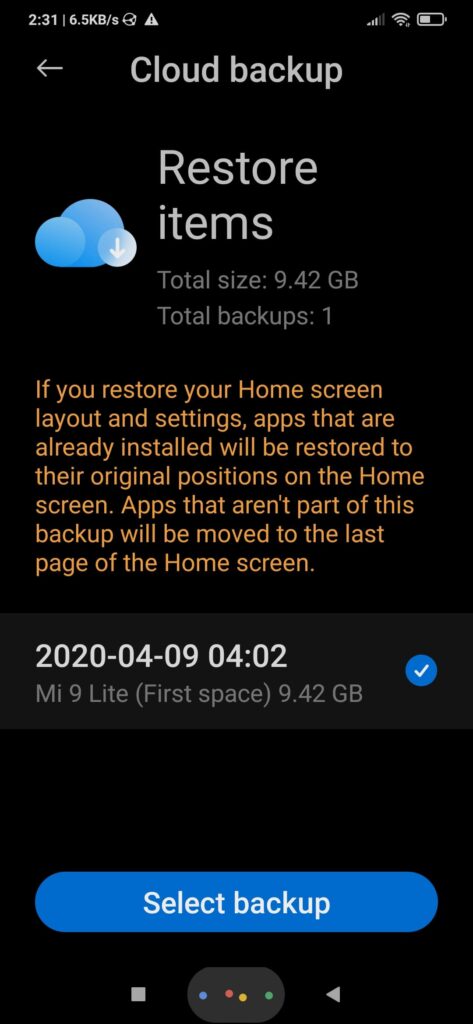
- Check the items from the backup that you want to get back (Settings, Home screen layout & apps, etc.). Tap on Restore.

The process should be relatively similar on other manufacturers’ devices since most offer their own takes on cloud services, which usually include data syncing and backups.
For example, have you got a smartphone by Samsung, and were using its Samsung Cloud in-built backup solution? Then, it’s easy to restore your data from there as follows:
- Pay a visit to your device’s Settings.
- Choose “Accounts and back up”.
- Tap on Backup and restore.
- Select Restore data.
- Choose what you would like to restore, and then tap on Restore.
Soon after, you will have your data back. If not, it’s worth checking our more extensive guide on how to recover deleted photos from any Samsung phone.
Method 2: Get Back Your Deleted Photos
Undeleting your photos on Android devices is relatively easy, at the least, if you are using the default Photos app from Google for managing them. That’s because when you delete image files from inside Photos, they are not removed from the device. Instead, they’re moved to a trashcan. Eventually, they’re also removed from there, so you have to get them back before that happens.
Thankfully, just like you can recover your deleted photos on Windows 10, that’s also possible on your Android-based smartphone:
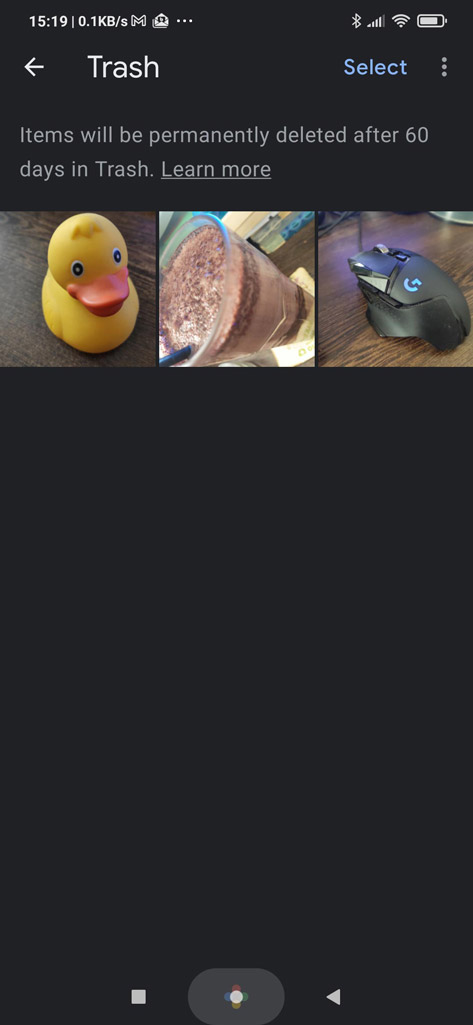
- Launch Google’s official Photos app.
- Move to its 4th tab, Library. Choose Trash on the top right.
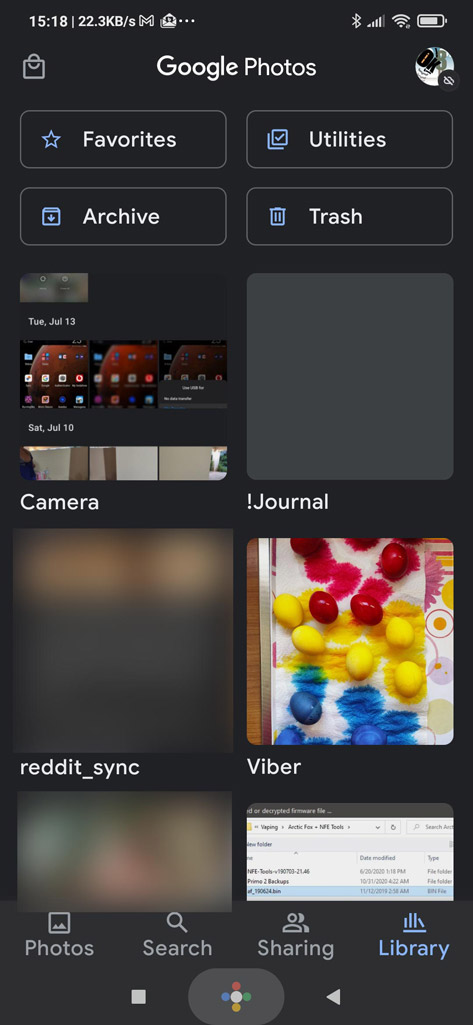
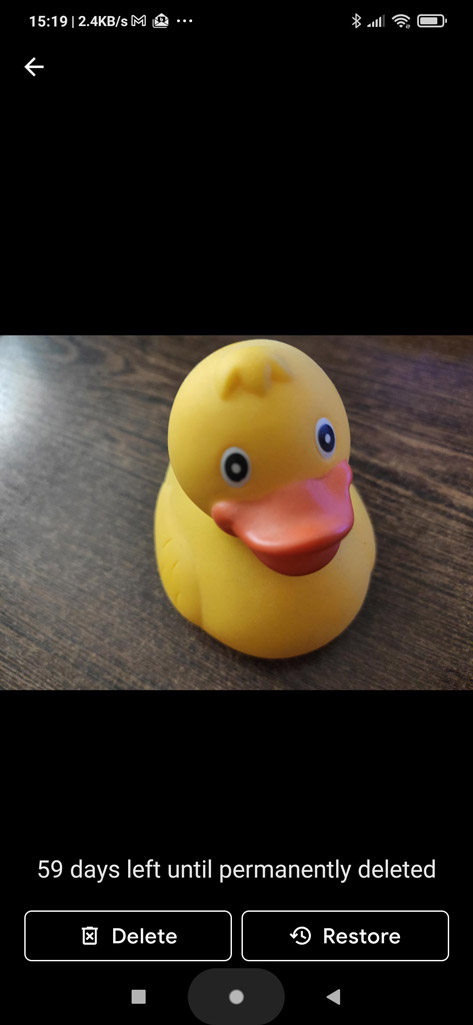
- Inside, you will find all image files deleted within (by default) the last 60 days.
- Tap and hold on the first one that you would like to recover to initiate a selection, and then tap on the rest of the images you would like to get back.
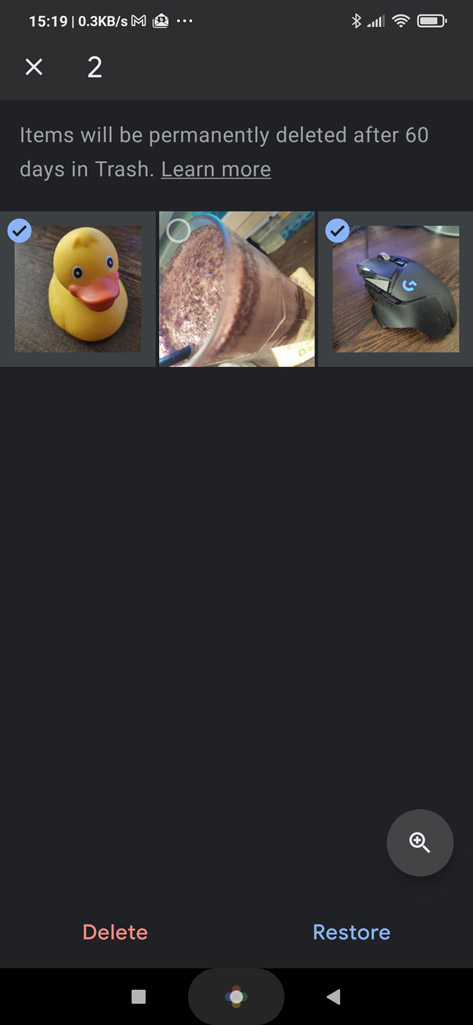
- Tap on Restore to get your images back.
Also read How to Recover Deleted Photos From Any Device for more ways to get back your photos.
Method 3: Undelete Your Lost Google Drive Files
If you are using Google Drive, you can get your files back just like you can from Google Photos. However, you must be even swifter because Google Drive’s default period for deletion is 30 days, half that of Google Photos.
- Run the official Google Drive app on your device.
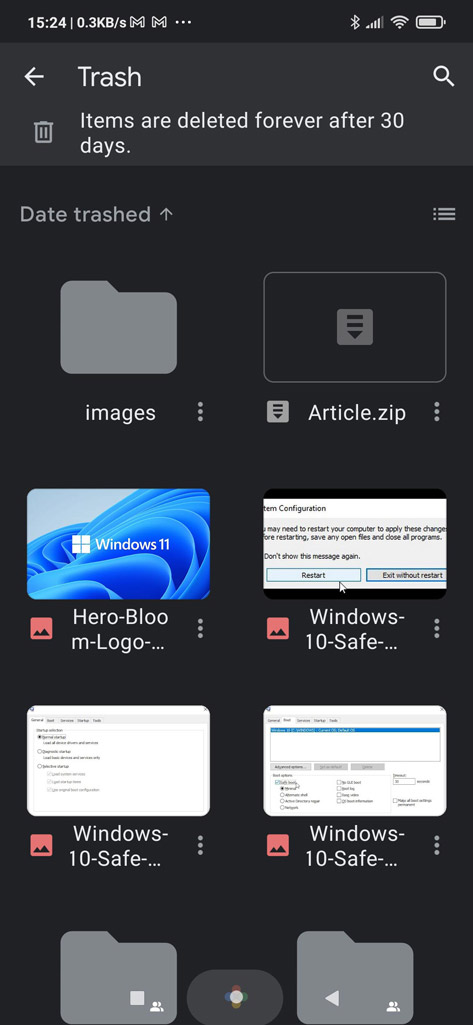
- Unlike Google Photos, the trashcan on the Google Drive app isn’t accessible from one of the tabs, so there’s no point searching for it there.
- Instead, slide from the left to access the app’s menu, and from there, choose the third option, Trash.
- Inside Google Drive’s trash folder, you will find all files deleted within the last 30 days.
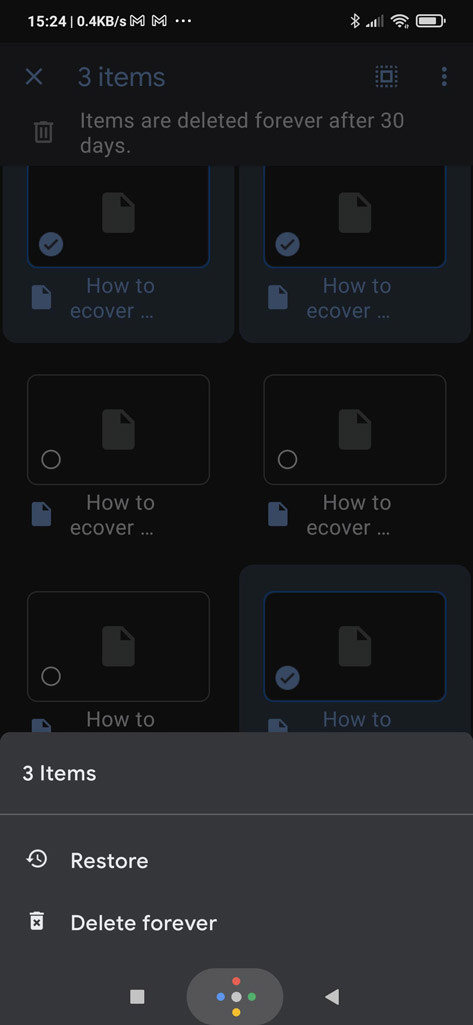
- Tap and hold on the 1st file you want to recover to initiate a selection process. Then, tap on the subsequent ones that you also want to get back.

- Tap on the icon with the three dots on the top right. Then, choose Restore from the panel that slides from the bottom of the screen to undelete your files.
Still, sometimes this approach might not work. In such cases you might want to check out our extended guide on how to recover deleted files from your Google Drive.
Method 4: Restore Your Files In Dropbox
Getting your files back from Dropbox can be equally easy, even if it might not seem so initially.
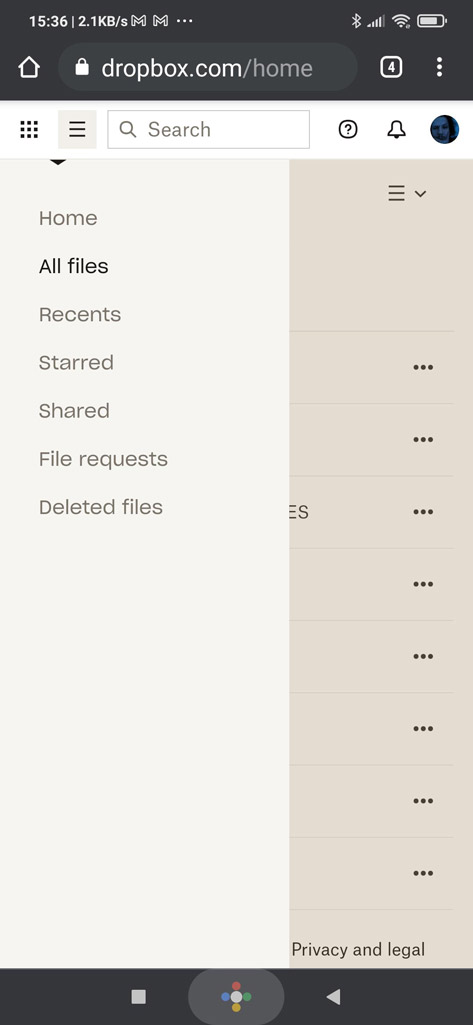
- If you look inside the Dropbox app for your lost files, you probably won’t find them.
- instead, launch your favorite browser and pay a visit to Dropbox’s site. Sign in with the same credentials you use for the app.
- Tap on the “hamburger menu” on the top left to access a menu that will appear on a slide on the left side of the screen. From there, choose the last entry, “Deleted files”.
- Check all deleted files, and tap on the ones you want to get back.
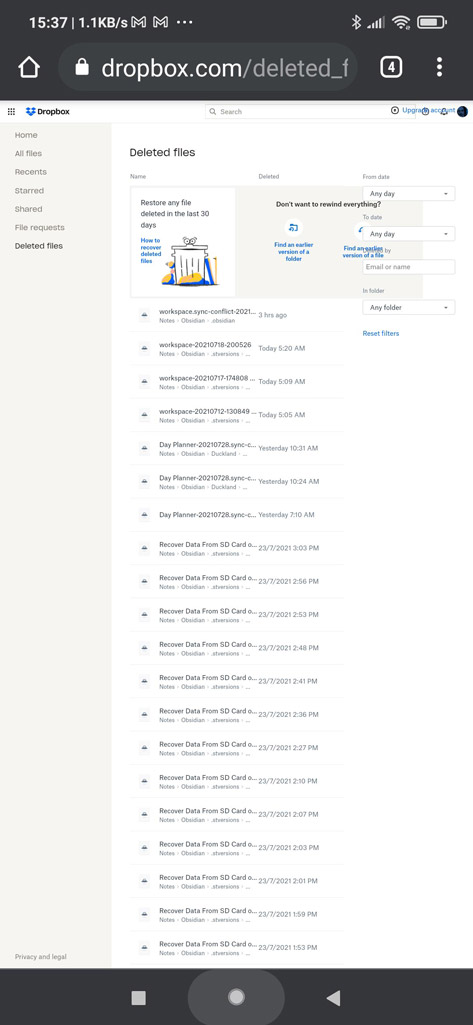
- You can either tap on each file and then select “Restore all files”, or you can tap and hold on a file to enable Dropbox’s multi-file selection mode. In the second case, a new “Restore” button will appear on the top right. After selecting your files, tap on that button to undelete them.

It’s worth noting that this is only one of the many approaches you could use to recover deleted files from dropbox.
Method 5: Recover WhatsApp Data
If you are using WhatsApp, you might not see an option to get any lost data back. However, recovering your WhatsApp data can be unbelievably easy!
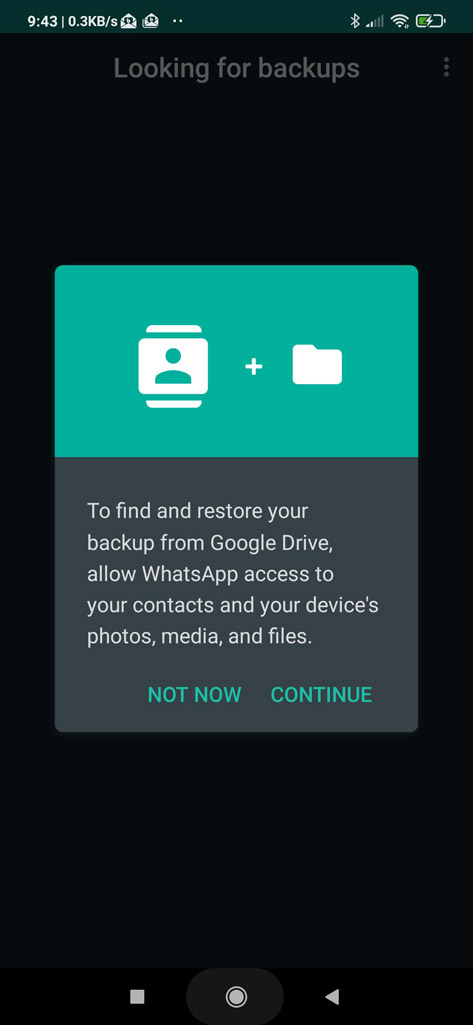
- Getting your data back in WhatsApp can be as easy as uninstalling and then reinstalling the app again. WhatsApp will prompt you to grant it the right to look for backups in your device’s files. Tap on “continue”.
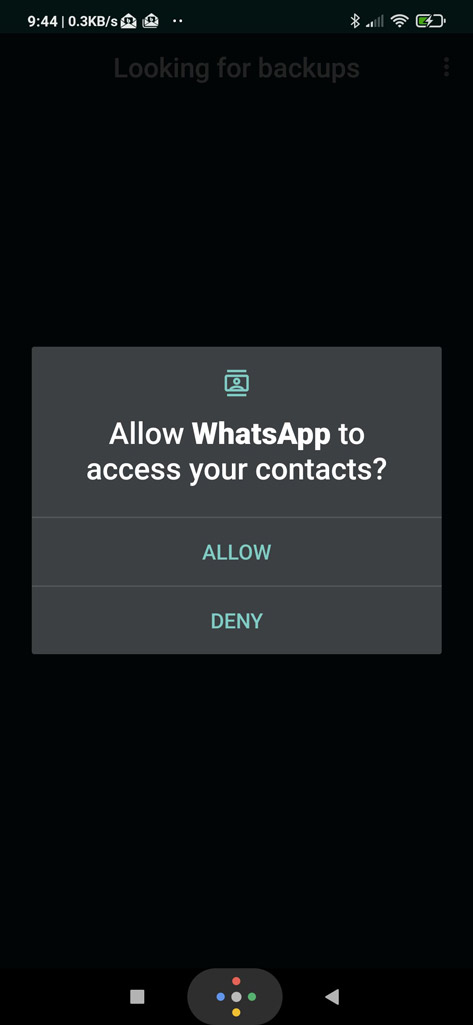
- Tap “Allow” on all prompts to give WhatsApp access to your files.
- If WhatsApp locates a backup, it will offer you the option to restore it. Tap on the “Restore” button to do so.

- After a while, WhatsApp will inform you about the outcome of the recovery. Tap on “Next” to return to Whatsapp’s main interface with, hopefully, most of your data back.
Method 6: Recover Your Lost Android Files With a Mac and Disk Drill
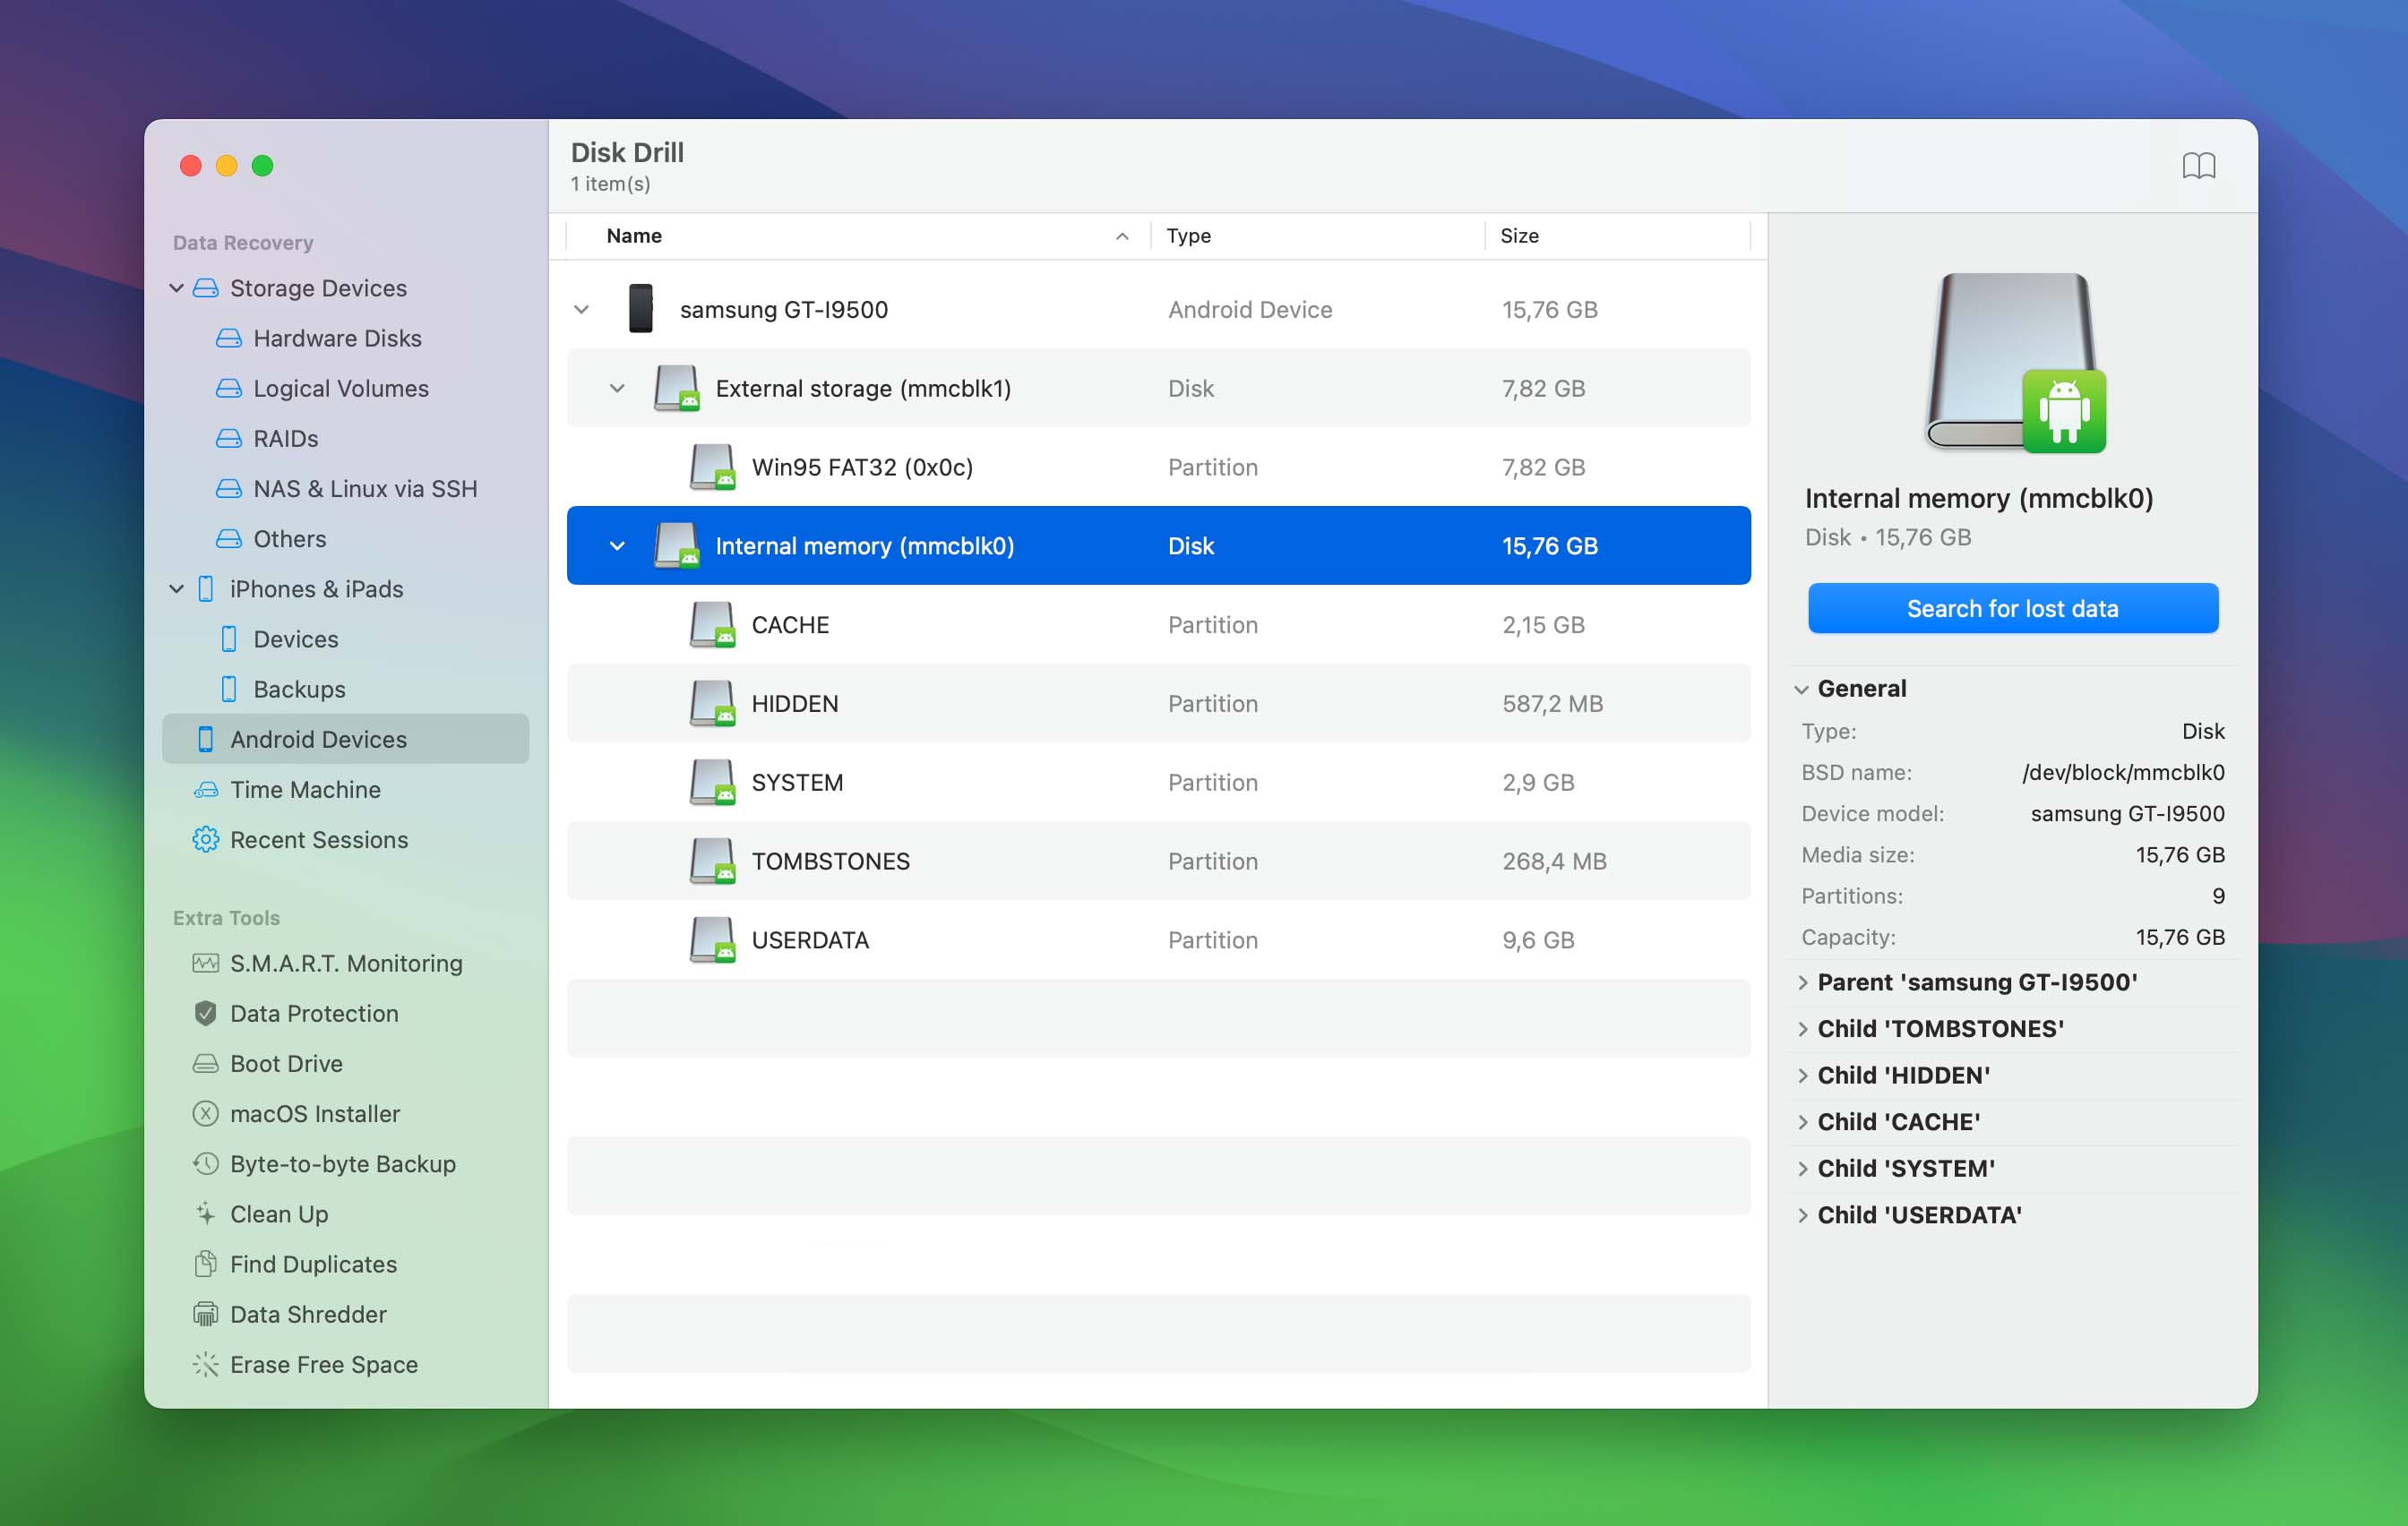
In many ways, Windows and Mac computers are worlds apart. Still, one of the common points between them is that Disk Drill is one of the best solutions for recovering data on both.
We chose Disk Drill for this article primarily because it can scan both the internal memory of Android devices and SD cards. It can scan an SD card whether it’s used as an extension of Android’s internal memory or as a separate external storage device.
For best results, in the second scenario, it’s best if you remove the SD card from your Android device, plug it directly on a computer using a card reader, and scan it from there.
But that’s not all. Disk Drill supports almost all storage devices, from internal and external Mac hard drives to USB flash drives, iPods, Kindles, and Android smartphones and tablets. It can work with actual storage devices, individually or in RAID setups, or with disk images stored in files, which it can access as virtual hard drives. But it can also work with Time Machine backups, detecting and parsing their disks, scanning the existing snapshots, and enabling the restoration of their contents.
The app supports an impressive number of over 400 file formats and comes with categories and filters that can help you locate precisely the ones you want to get back. It enables you to preview many types of files to ensure they’re the ones you seek and can also estimate their chances of a successful recovery.
To recover deleted files from your Android smartphone or tablet on a Mac:
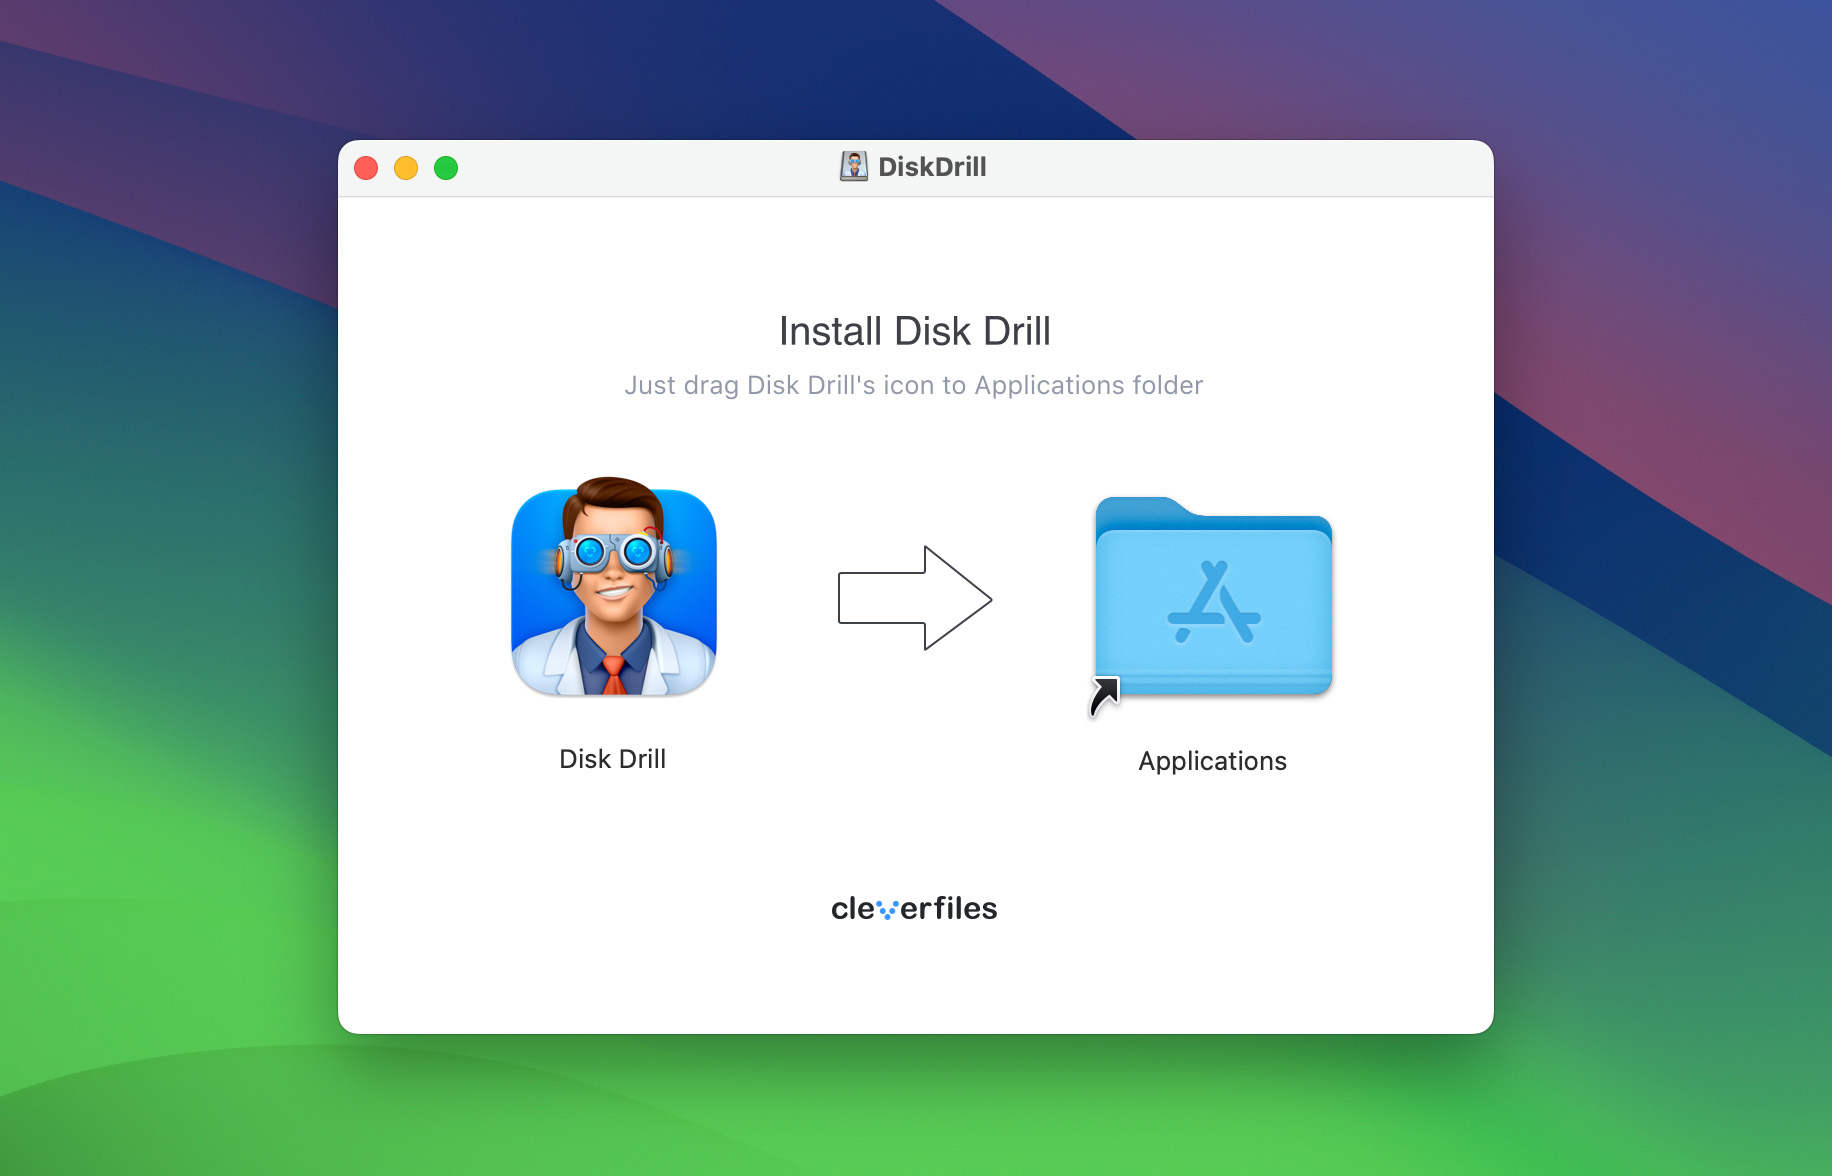
- Install Disk Drill on your Mac by downloading it from its official site and then dragging its installation file to the Applications folder.
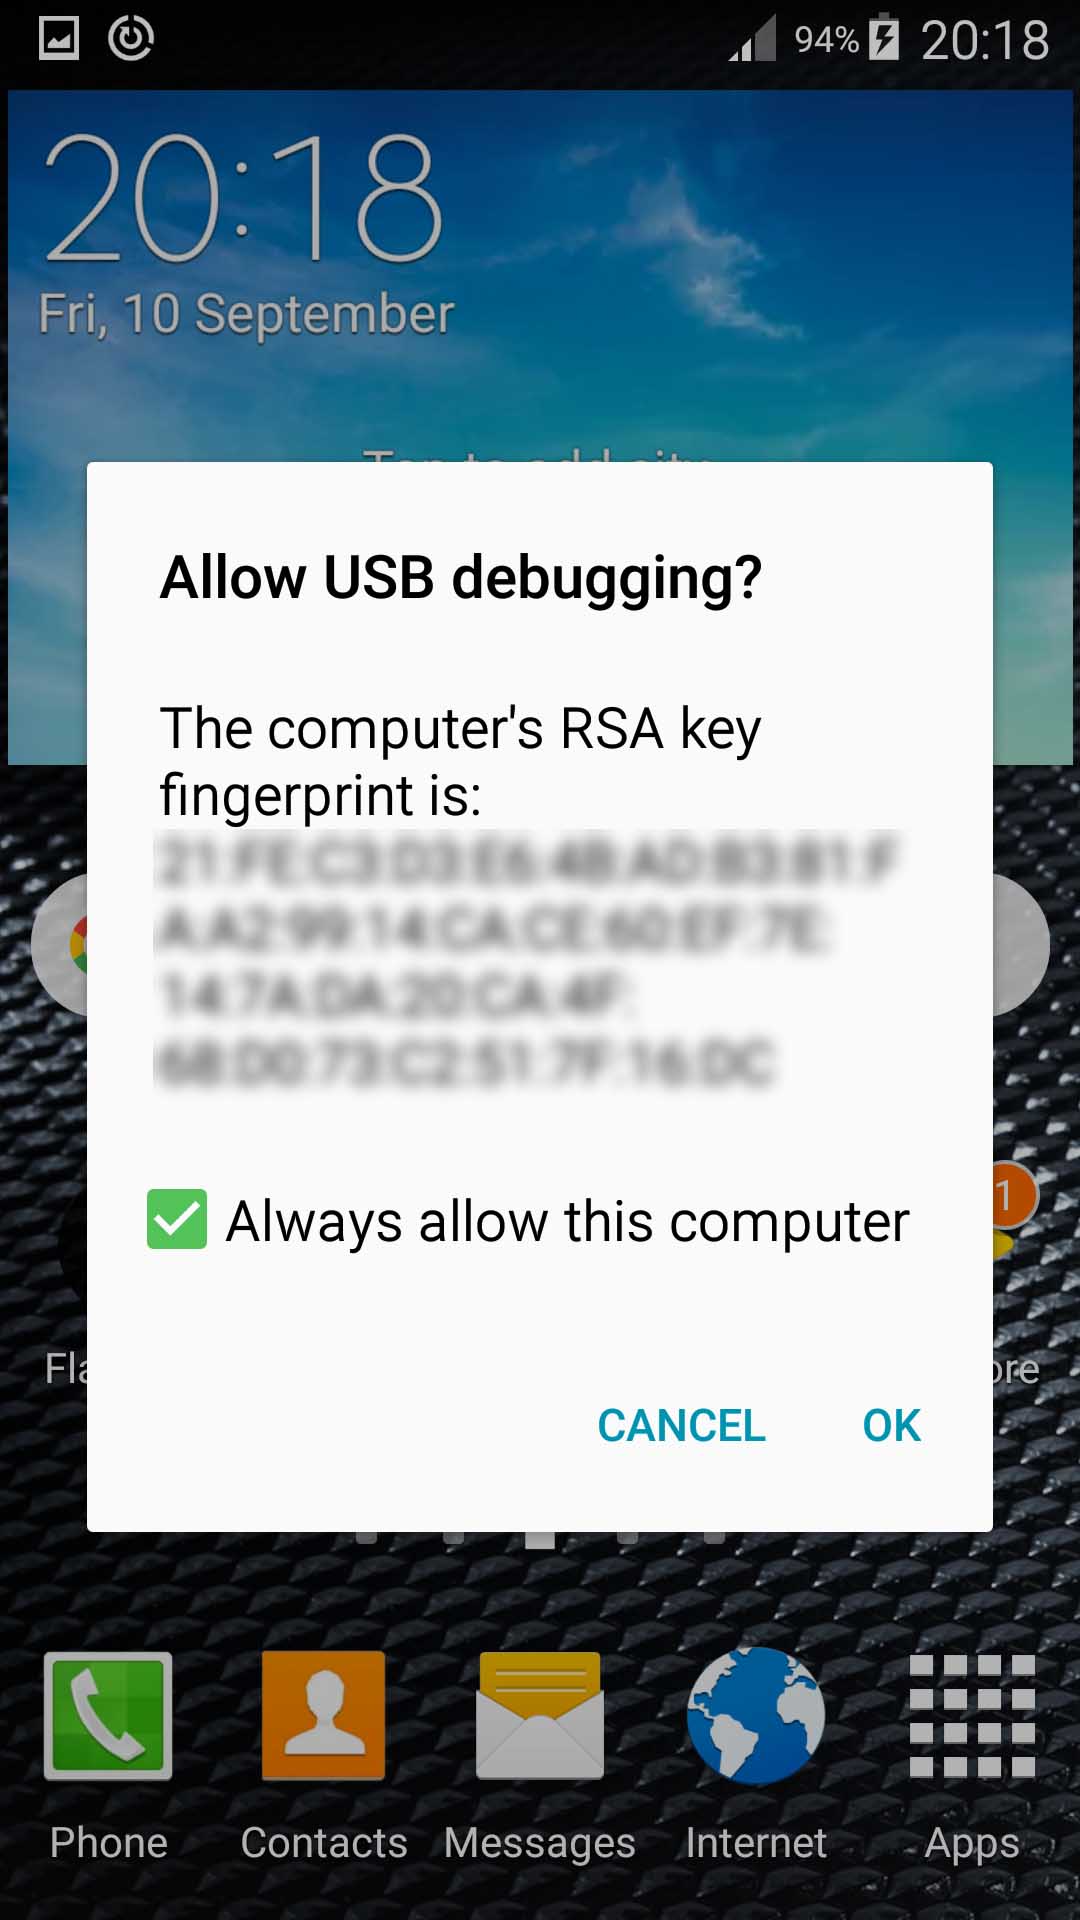
- Connect your Android device to your Mac with a USB cable, and answer positively when asked if you want to “Allow USB debugging”.
- Disk drill needs unrestricted access to recover as many of your deleted files as possible from your Android device. However, “unrestricted access” demands a rooted Android device. If you don’t know if your device is or isn’t rooted, or want to learn more about the process, make sure to read this guide on the topic.
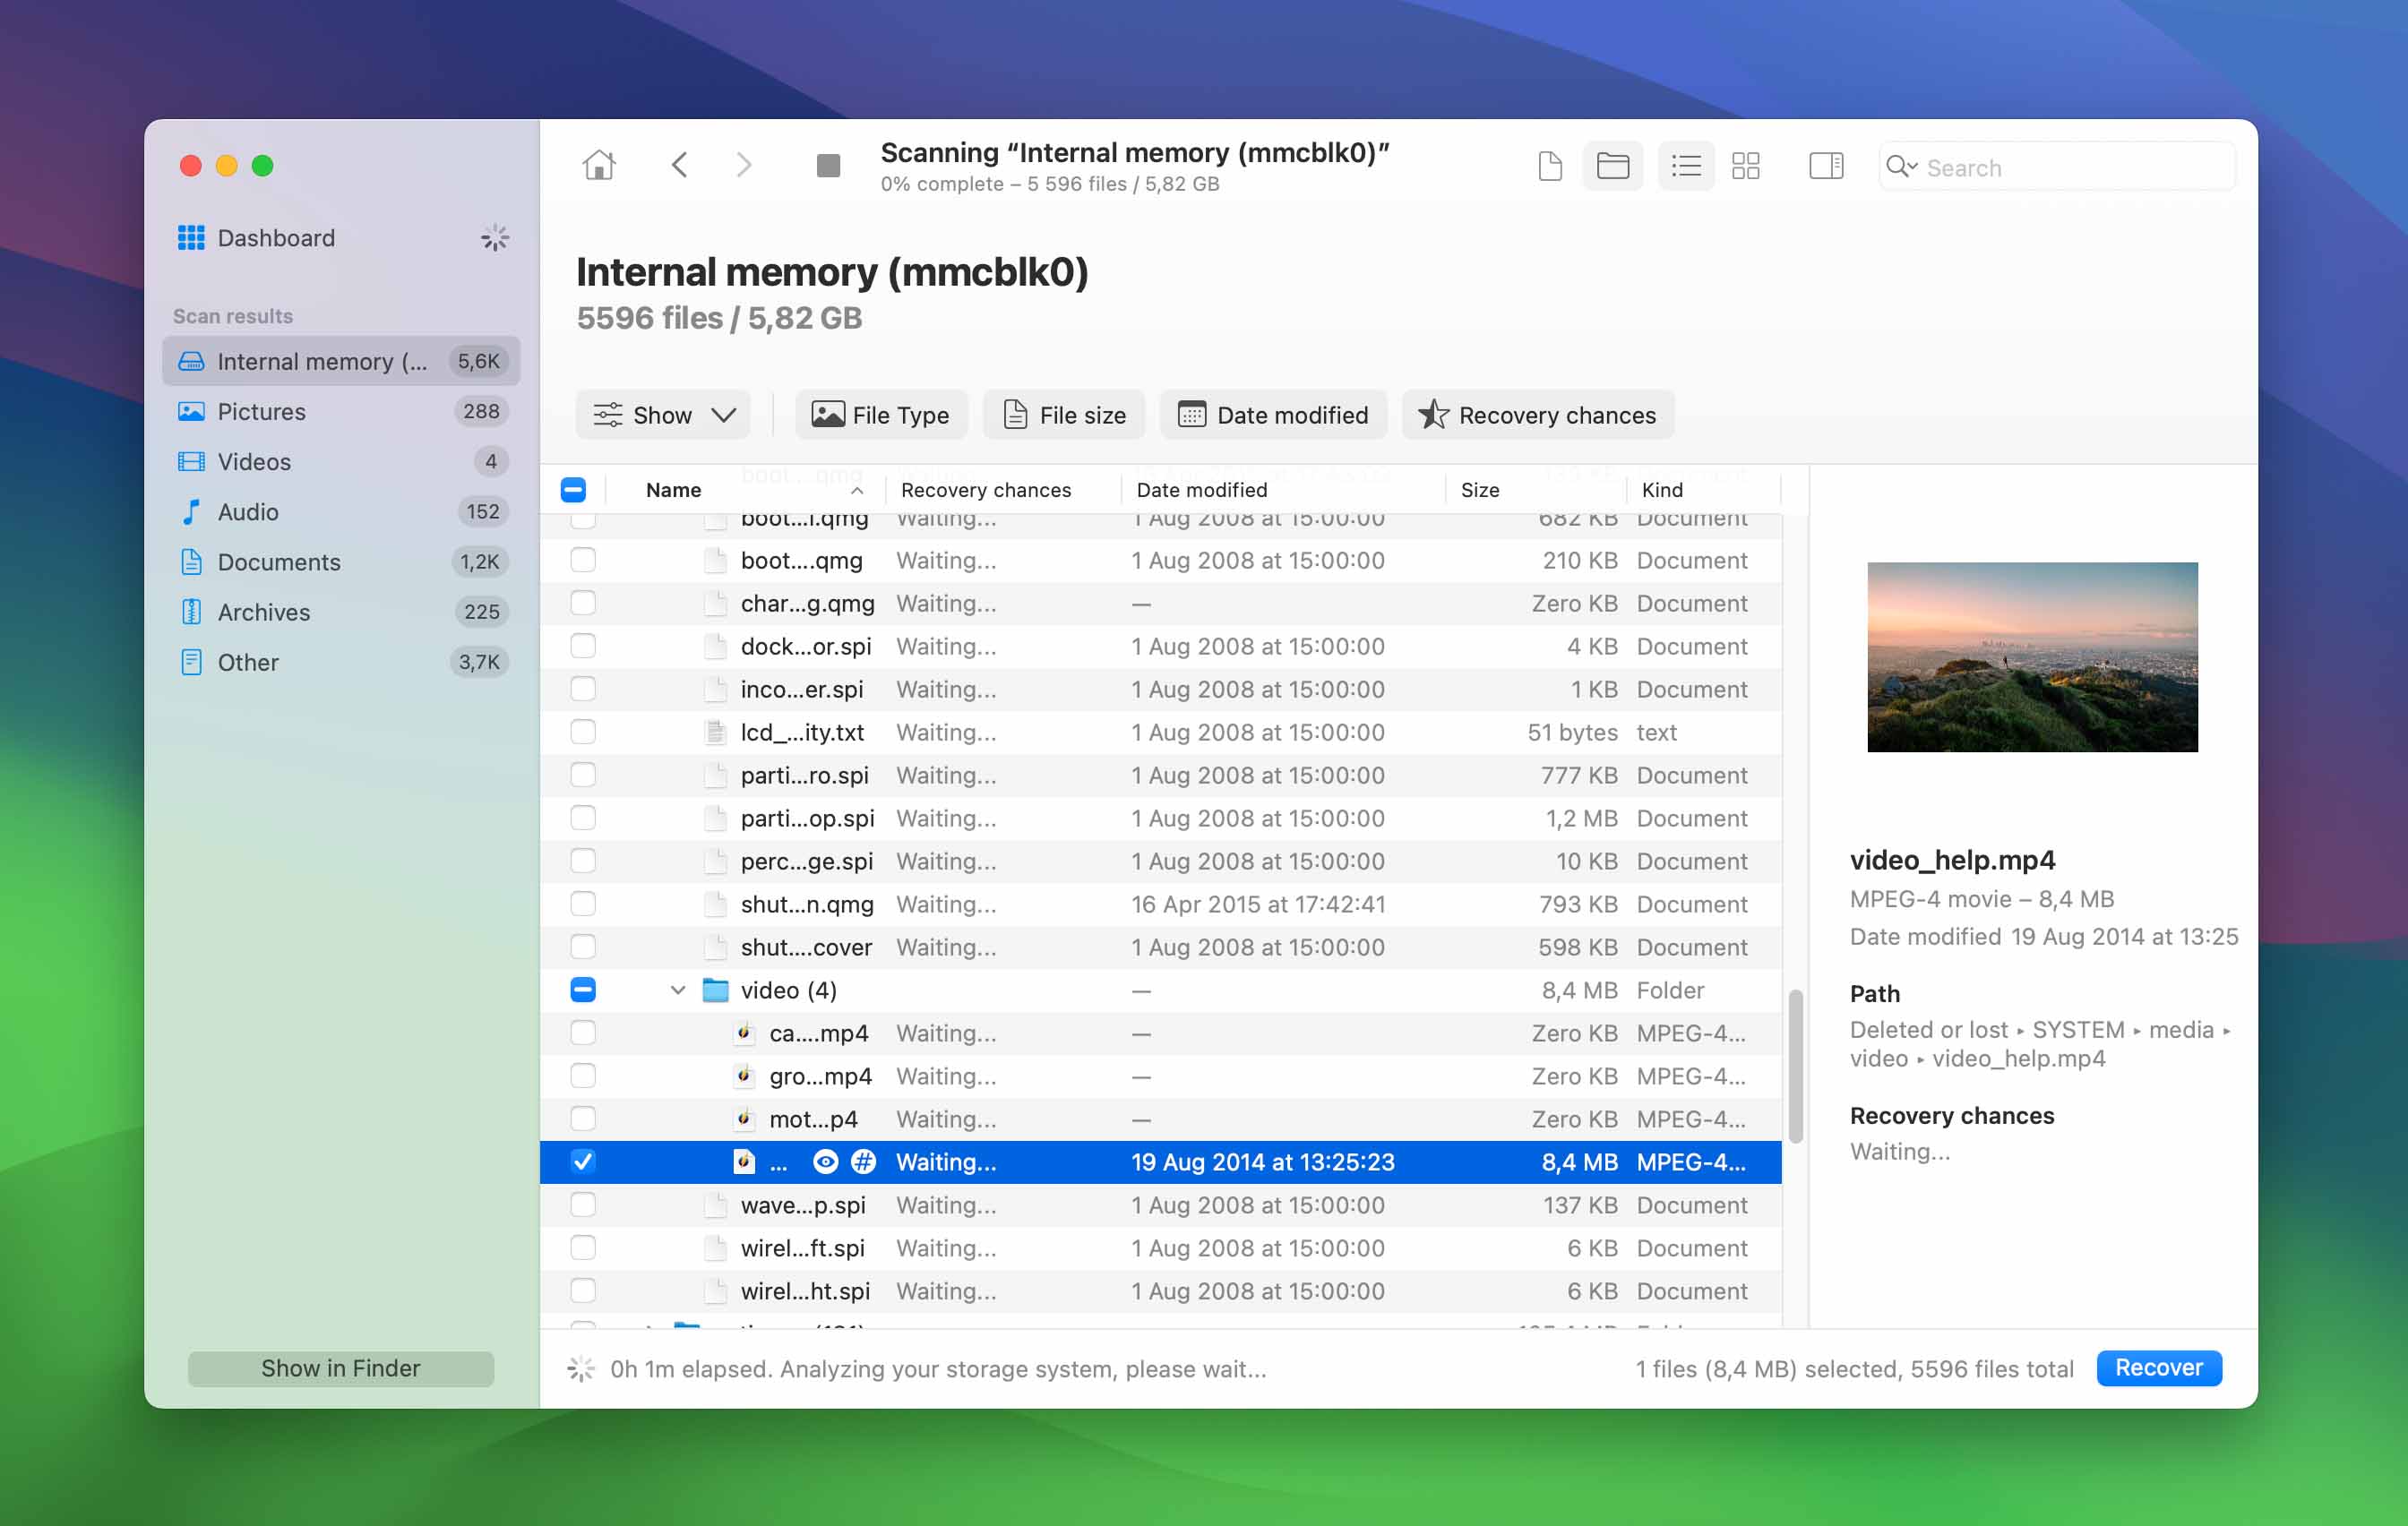
- Run Disk Drill and find your android device on its list. Click on the “Search for lost data” button on its right to begin the recovery process.
- After a while, Disk Drill will present you the files it located. If you can’t make heads or tails of them purely based on their filenames, make sure to use Disk Drill’s preview function by clicking on the little “eye” icon next to their filename.
- Place a checkmark on the left of the files you want to get back. Then, click on the Recover button on the top right of Disk Drill’s window.
Interested in Disk Drill? Then read our full review.
Method 7: Get Back Your Disappeared Android Files on a PC With PhoneRescue
If you’re on a PC with Windows, it’s worth trying a solution like iMobie’s quite popular PhoneRescue. Although the OS is different, this solution more or less works the same way as Disk Drill on a Mac.
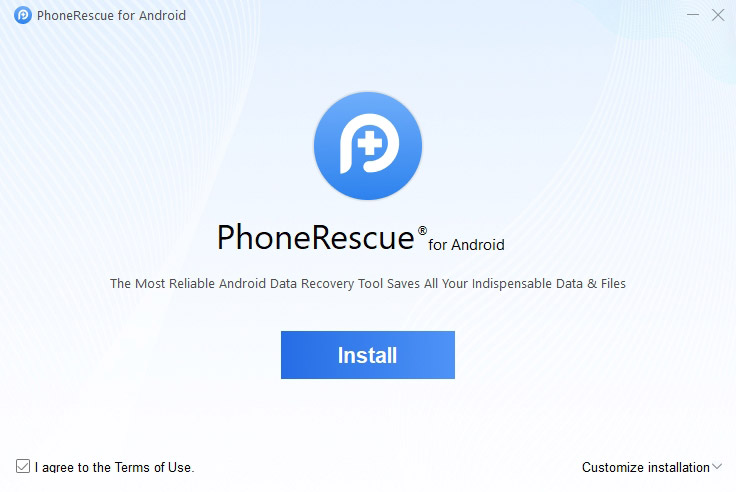
- Download iMobie’s PhoneRescue from its official site, then run the downloaded executable to install the app on your PC.
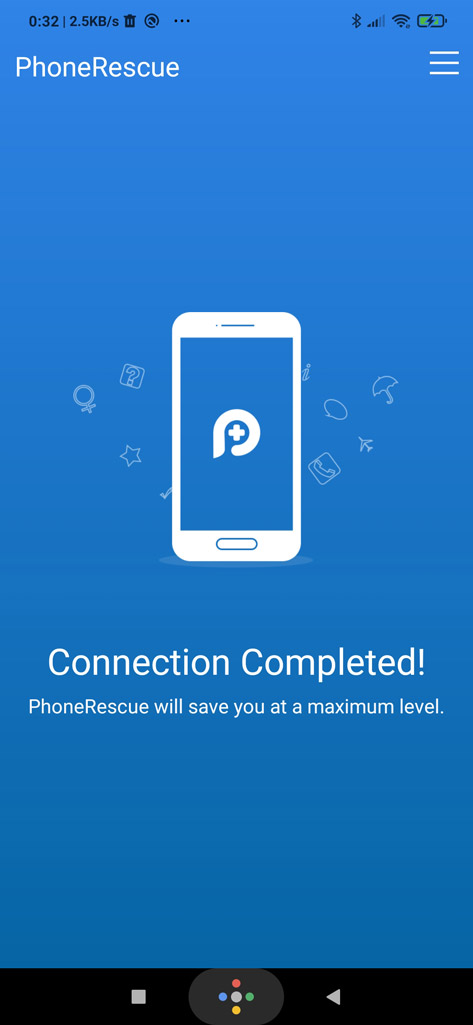
- Connect your phone to your computer with a USB cable. Then, follow the on-screen instructions (both on your PC and your smartphone) to install a secondary application on your smartphone. With both the PC and smartphone “nodes” up and running, iMobie’s PhoneRescue will connect to your phone.
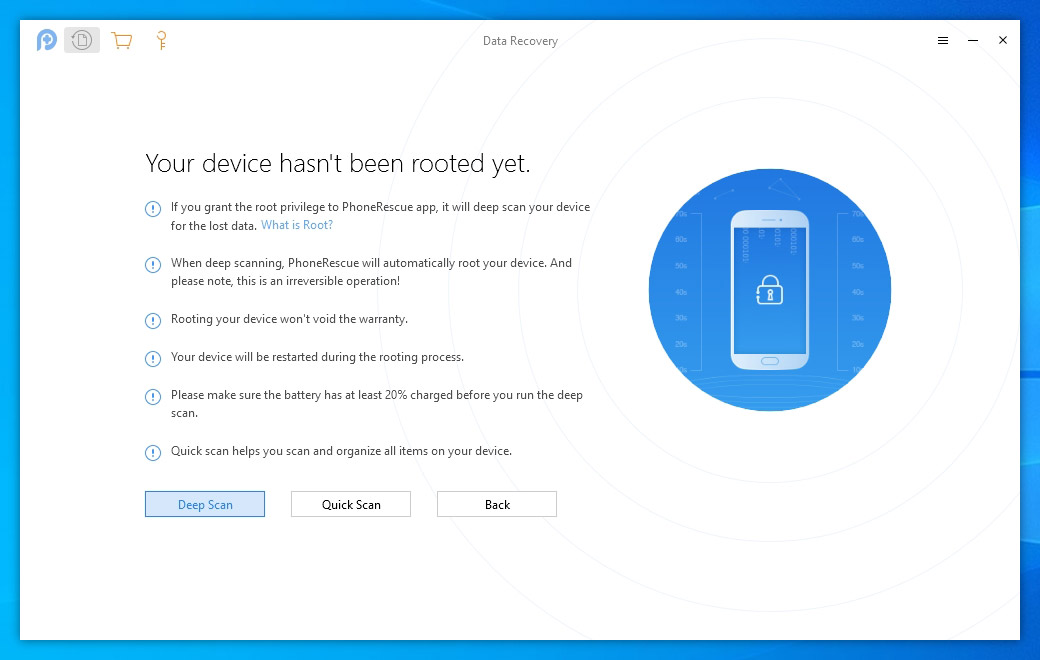
- If you want to perform a Deep Scan for optimal results, PhoneRescue will offer suggestions on how to root your phone. Those who’d prefer to keep their phone unrooted can use the app’s Quick Scan function.
- PhoneRescue will begin analyzing your smartphone and present its findings in realtime.
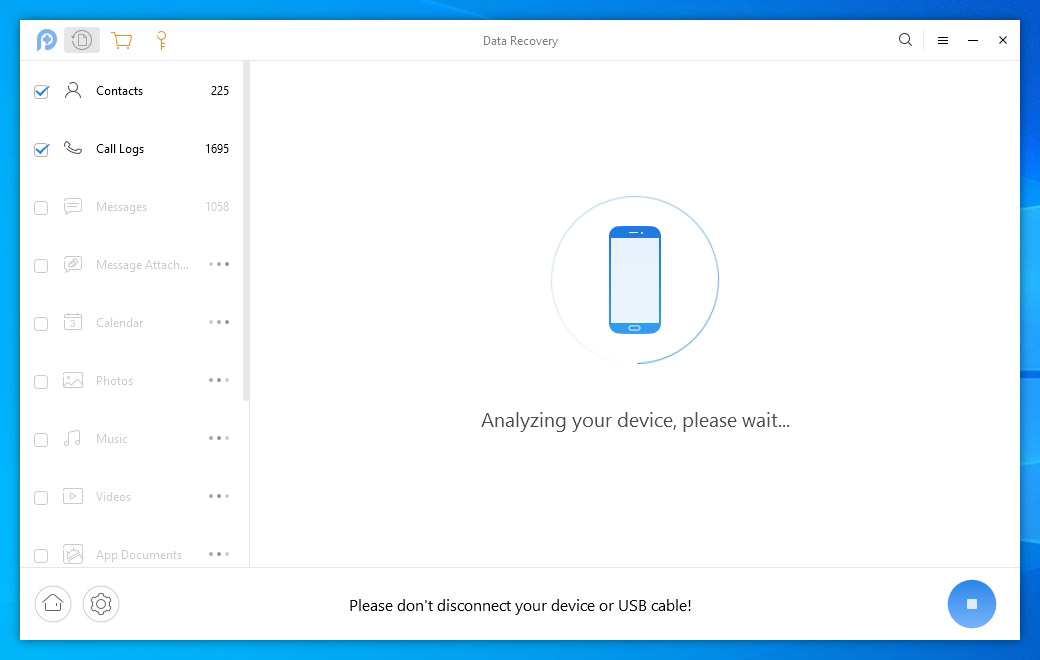
- When iMobie’s PhoneRescue completes its scan, go through the different types of data from the menu on the left, and choose the entries you’d like to recover by placing a checkmark on their left. Finally, click on the icon on the bottom right of the app to start the recovery process.
PhoneRescue’s trial version only allows you to preview the data you can get back. You have to purchase the app for actual data recovery.
Method 8: Undelete Your Data From an SD Card With Disk Drill for Windows
We have already seen how one of the best data recovery solutions on Macs, Disk Drill, can recover data from an SD card. Since by purchasing a license for the app you can use it on both macOS and Windows, we’ve decided to use Disk Drill on Microsoft’s OS, too.
Of course, it helped that Disk Drill also stands out as the best overall among the alternatives available on Windows. Almost all of the pros of Disk Drill’s macOS version also apply to the one for Windows: the ability to work with most major file systems and device types, “knowledge” of hundreds of file formats, RAID, encrypted volume, and image support, and much more. All “behind” the same streamlined and user-friendly user interface.
Note: This method is suitable when the SD card was used as “standalone” external storage, and not as an extension of Android’s internal memory.
To recover your deleted files from your Android device using Disk Drill on Windows:
- Download Disk Drill from its official site, and install it.

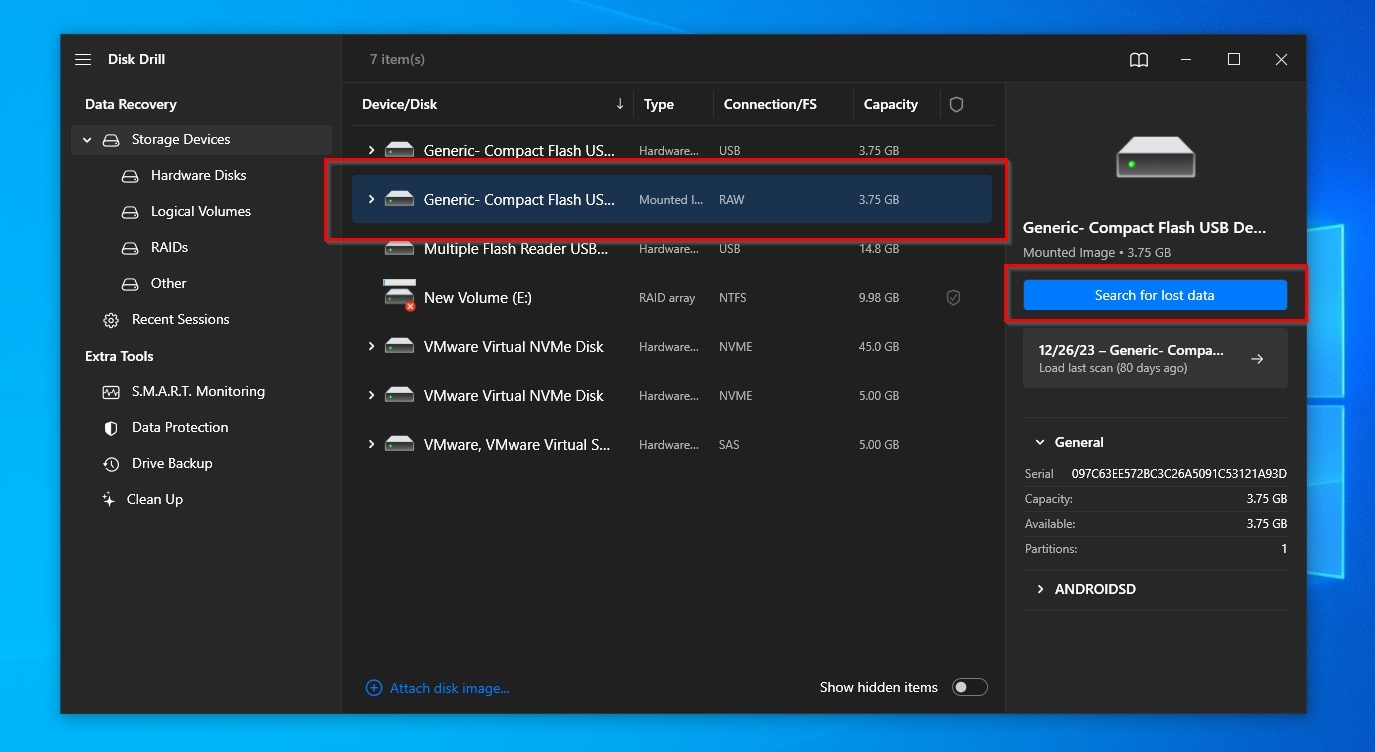
- Select your SD card from Disk Drill’s Device/Disk list. Then, click Search for lost data.
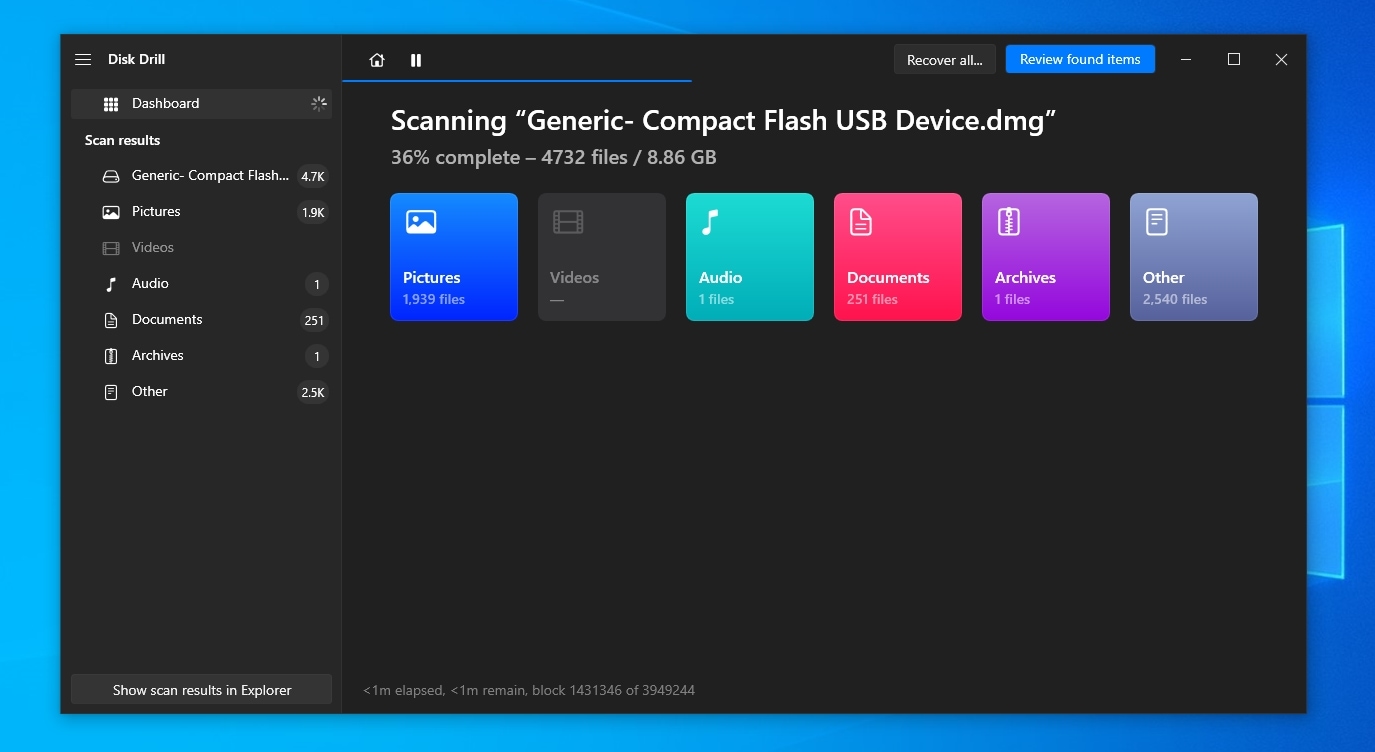
- Let Disk Drill’s scan run its course to ensure it will find as many files as possible. When it’s done, and you see a pop-up stating “All recovery methods complete”, close it, and click Review found items on the top right of the window.
- Use the Categories on the left and the Filters above the file list to focus on specific files based on various factors, like their type, latest modification date, etc.
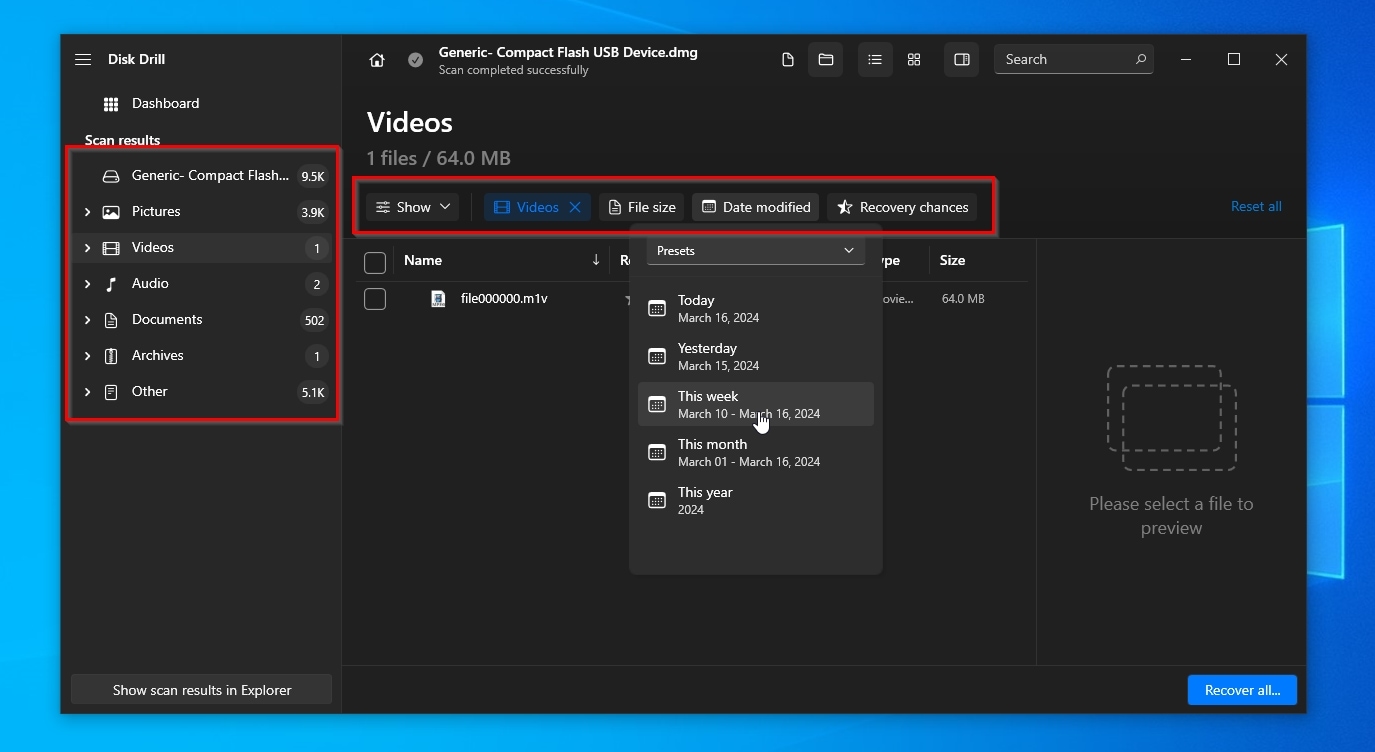
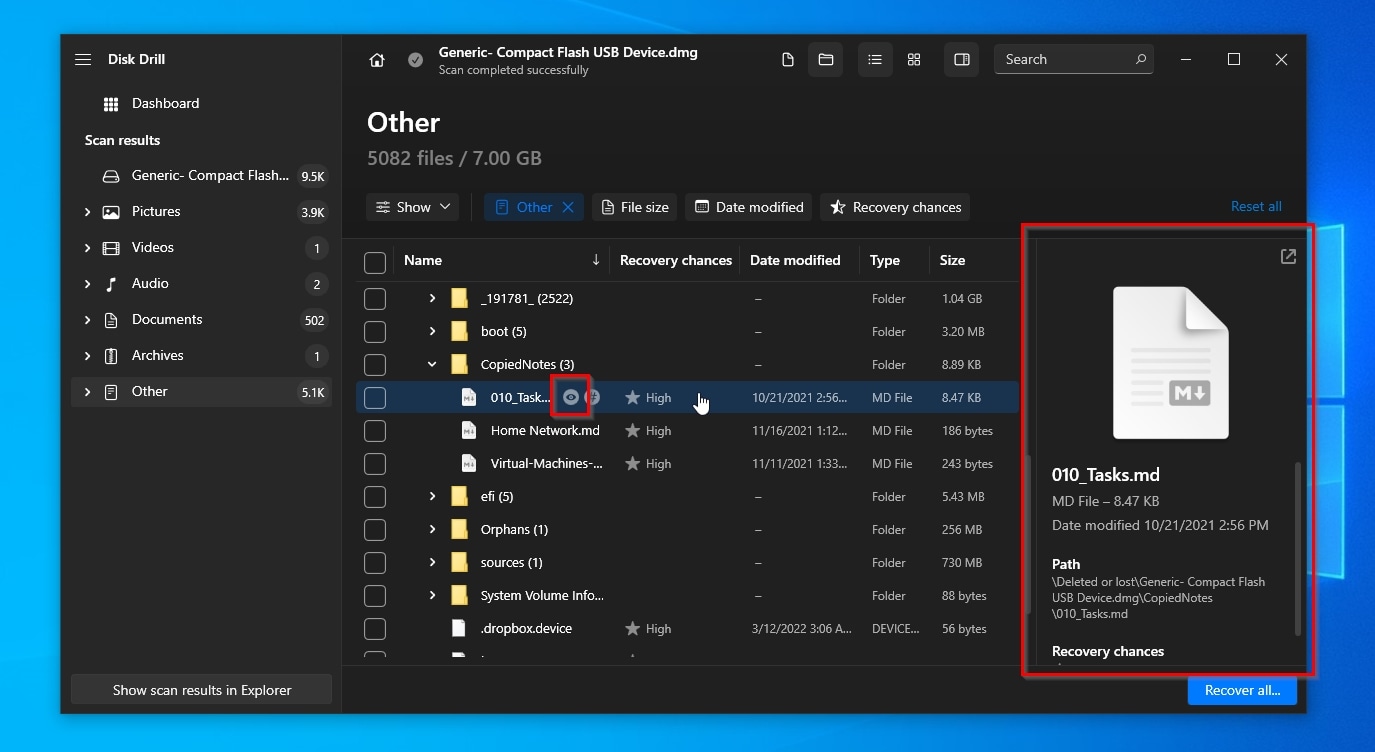
- To ensure the files you locate are the ones you want to recover, use Disk Drill’s Preview feature: let your mouse cursor hover over a file’s entry and click the little eye icon that appears. Depending on the file’s type, you should see a preview of its contents or information about it on Disk Drill’s preview panel on the right of the window.
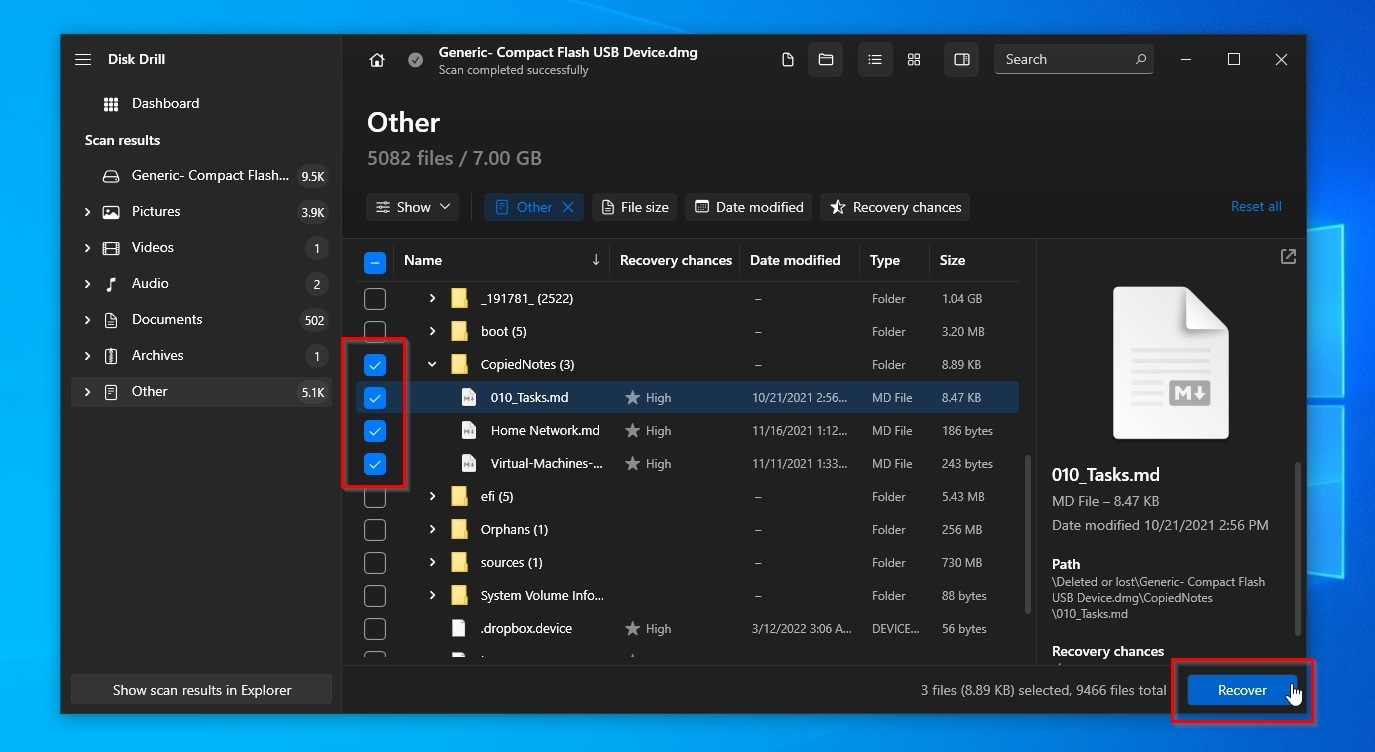
- Place a checkmark on the left of the files you want to get back to mark them for recovery. When you’ve located and marked all of them, click on Recover.
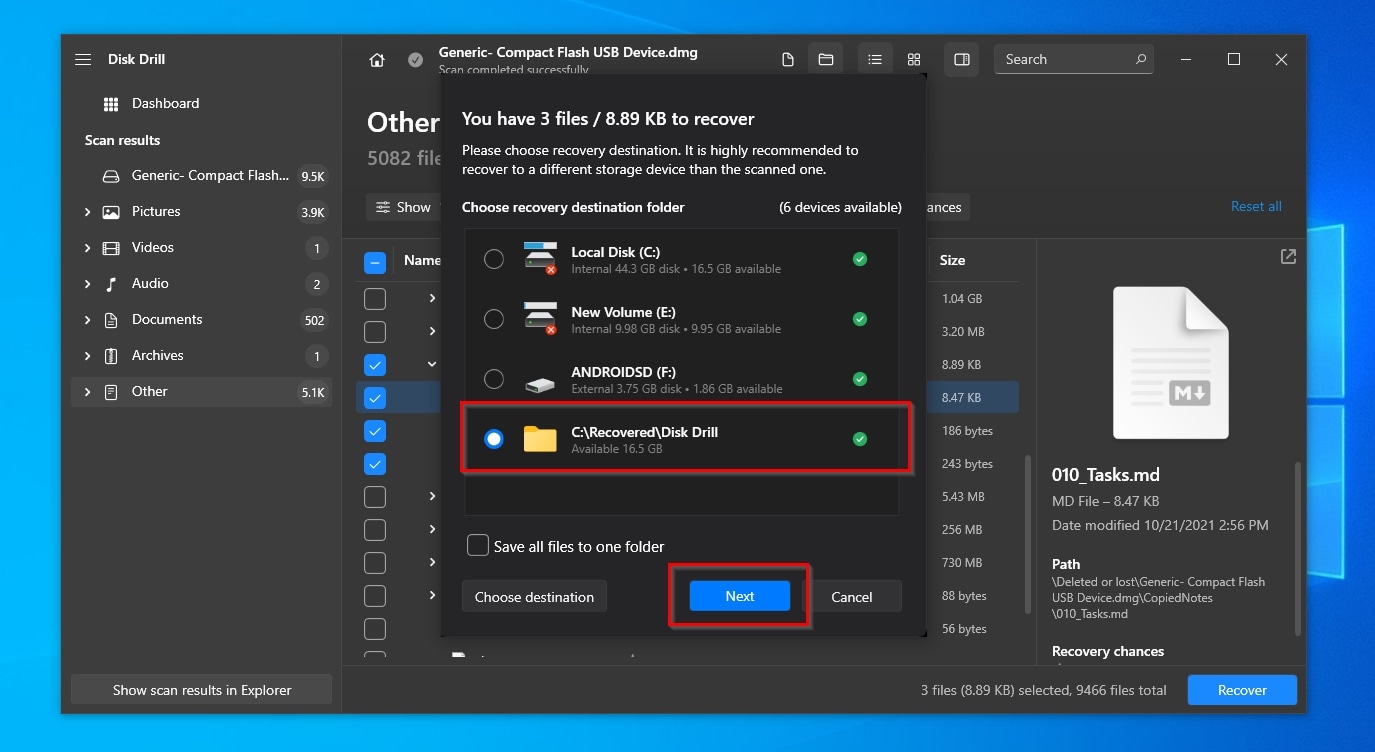
- Choose where you want Disk Drill to store the recovered files. If the one you want isn’t among the suggested destination folders, click Choose destination and select the path you want from the requester that will appear. Remember to choose a different destination than the SD card from which you want to recover your files to avoid overwriting useful data. With a destination folder selected, click Next to proceed to the actual recovery process.
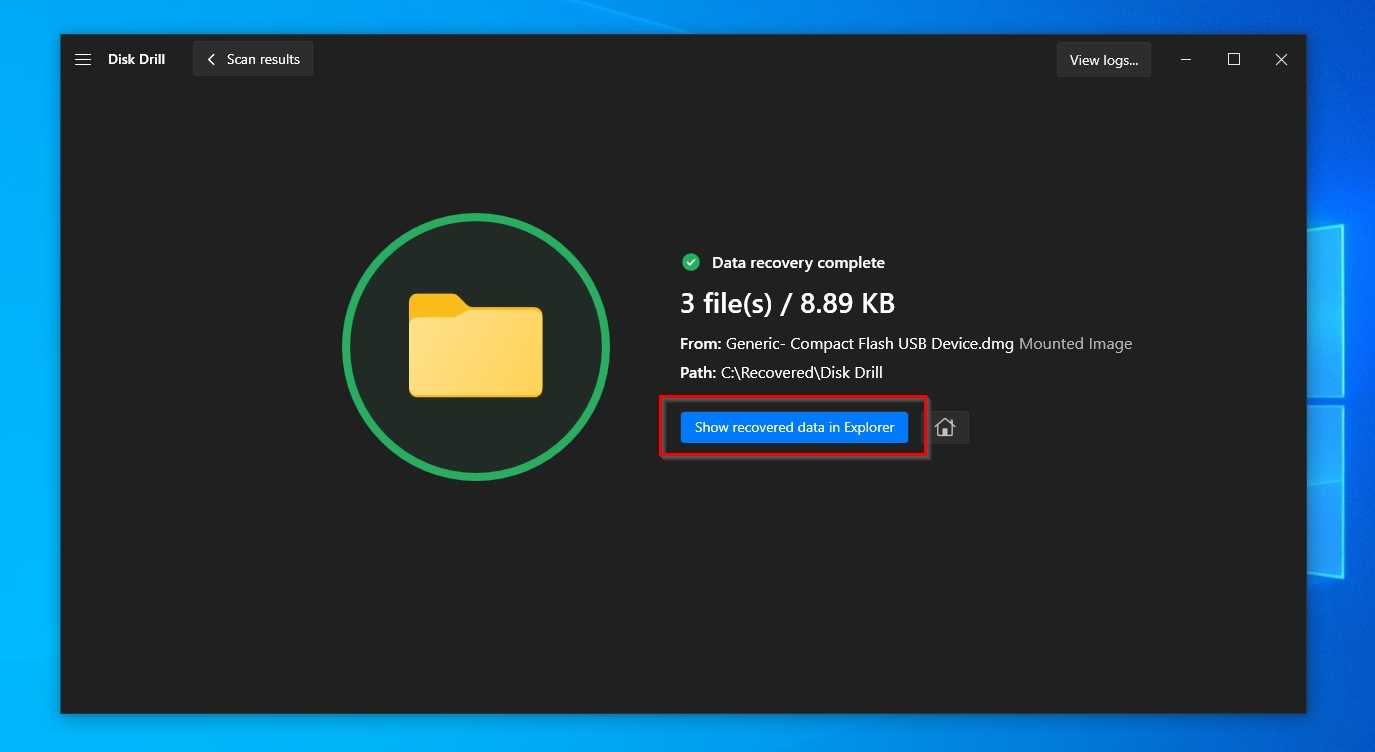
- Disk Drill’s blazing-fast recovery engine will quickly retrieve your files from your SD card. They’ll be in the folder you selected in the previous step, which Disk Drill will open in your Operating System’s default file manager if you click Show recovered data in Explorer.
Still, despite Disk Drill being our top choice, it’s not the only recovery solution you can turn to. Check out our best Android data recovery software roundup for more suggestions.
Method 9: Save Your Files Directly On Android With Disk Digger
Even if you don’t have access to a Mac or PC, it’s still possible to recover your deleted files directly on your Android device. Flow chart, you can use an app like Disk Digger.
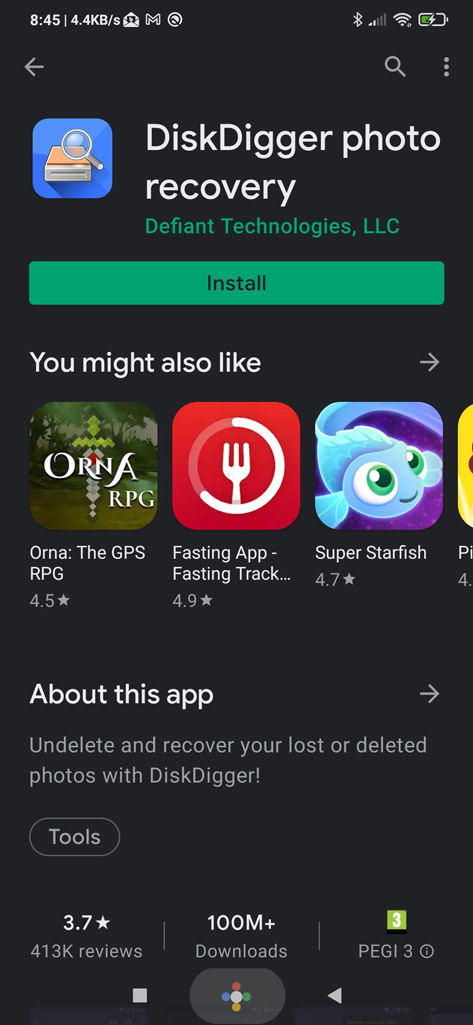
- Search for “DiskDigger” on Google Play, and install the app on your Android device.
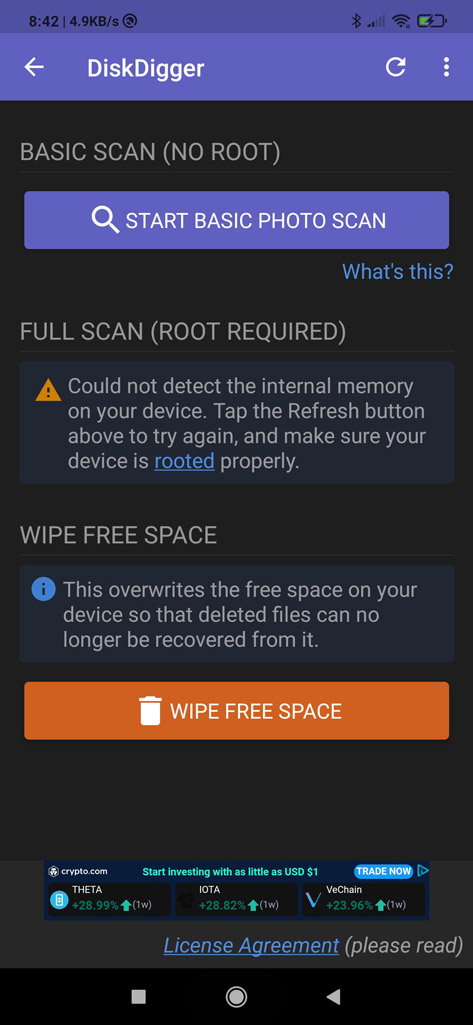
- Run the app and choose “START BASIC PHOTO SCAN” if your device isn’t rooted. However, you’ll get better results if your device is rooted and you go for a “FULL SCAN”.
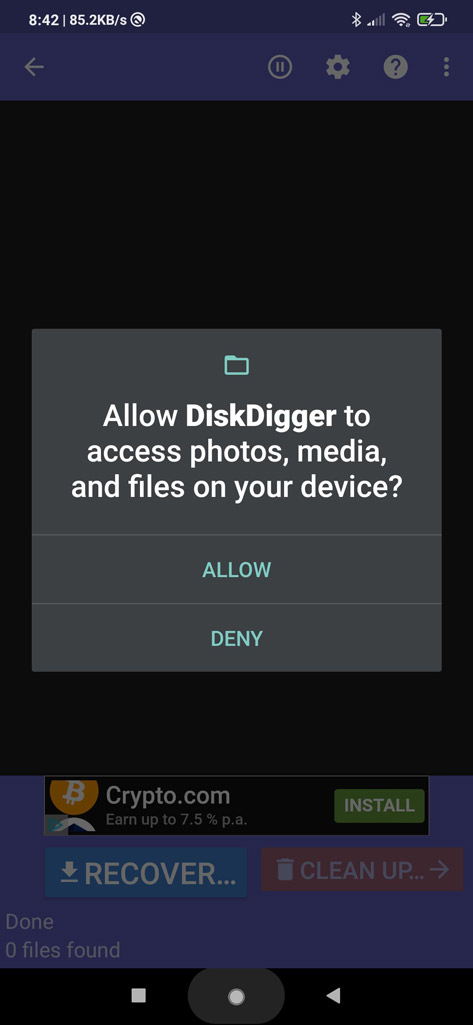
- When asked, allow DiskDigger to access your files.
- After a while, DiskDigger will start presenting the files it located. The more time you allow the scan to run, the more files it will find.

- Tap on the files you want to get back to place a checkmark on them.
- Tap on the “Recover” button on the bottom left of the app. Then, choose how you want to get back your recovered files.

- One of the most popular and straightforward approaches is choosing the first option that forwards your recovered files to any installed app – like Dropbox or an email client. Then, for example, email your recovered files to yourself.
If you have an ancient device with a version of Android older than 4.0, it might not work with modern recovery apps. However, that’s expected, since unfortunately, almost no other current app would work on it.
You should also check out our review of the PC version of Disk Digger + our ranking of the best apps to recover data from SD card(s) on Android.
Method 10: Have The Experts Save Your Data From Your Android Device
If you believe trying to get back your files on your own is too much fuss, or your attempts to do so were fruitless, you can always turn to the experts. Services like CleverFiles’ Data Recovery Center can recover lost data from Android – or any other type of device.
Of course, services like these come with a price and some waiting time. However, they also have more chances of getting your precious data back. Two of the reasons we prefer CleverFiles’ Data Recovery Center are their cost-effective free evaluation and no data – no charge policies.
You can also check out our extended review of the best data recovery services to find more alternatives, and learn what they offer over typical data recovery apps.
FAQ
I deleted some files on my Android smartphone - can I undo and recover them?
It depends on where you had them stored. Some apps – like Dropbox – offer either an undo delete function or a trash can where you can find your deleted files.
My Android device is rooted - will that affect any chances of recovery negatively?
Quite the opposite, recovering files from a rooted Android device is better because you have unrestricted access to your device’s storage.
Can my computer assist in recovering more data from my Android device?
There’s no guarantee “you’ll get more data back” by using a computer. However, computers are more powerful than mobile devices, and their software is more advanced, so it’s possible.
Is it possible to recover deleted files on Android if I don't have access to a computer?
Yes, there are specialized apps for that, like Disk Digger. However, such apps can’t reach their full potential on “vanilla Android”. Your device must be rooted for that.
Where do deleted files go on Android?
There’s no single answer to this question since it depends on how each manufacturer customizes Android for their devices, how each user tweaks their device, and which additional software they’ve installed and are actively using. On “vanilla” Android installations with default apps and settings, and depending on the OS’s version, deleted files may be temporarily moved to a Trash folder, which acts like the Recycle Bin on Windows PCs. This folder can be accessed by the Files app that accompanies the newer versions of Alphabet’s Android OS.
If the files were stored in a cloud service’s folder, like Google Drive, and the related settings weren’t configured to sync all data locally, those files might only exist online. In such scenarios, no hint of them would be left on the device after deleting them, leaving nothing behind a data recovery app could find. However, you’d be able to find them moved to the cloud service’s equivalent of a Recycle Bin.
How long are deleted files stored on Android?
Typically, deleted files remain in a Trash folder on “vanilla” or only lightly customized versions of Android for a predefined period (usually up to 30 days) or until the user manually removes them. After the files are marked as removed from there, too, their data fragments remain on the device’s storage until the next TRIM process launches, erasing them and shuffling data around.
Other file-juggling services and apps, from Dropbox to Mega, usually keep deleted files in their own version of such a folder for a similar amount of time. TRIM or any other local process doesn’t affect anything stored on cloud servers.
So, You Can Get Your Data Back on Android!
Getting your files back on an Android device is, admittedly, less straightforward than on a computer. That’s mainly because the recovery’s outcome is also affected by where you kept or how you used to access your files. Each app can be a separate microcosm with its own rules. Thankfully, most apps offer functions that allow you to recover any data you lost from them.
Even in worst-case scenarios, where your data is nowhere to be found, you can turn to third-party solutions like Disk Drill and DiskDigger. And even if you don’t manage to get your files back, no matter what you try, you always have the experts as a final solution.
This article was written by Odysseas Kourafalos, a Editor-in-Chief at Handy Recovery Advisor. It was also verified for technical accuracy by Andrey Vasilyev, our editorial advisor.
Curious about our content creation process? Take a look at our Editor Guidelines.