This article describes the top 5 solutions that you can use to recover deleted Google Drive files, covering everything from the Trash folder to data recovery software to backups and more. For each solution, we provide clear instructions that you can follow with ease even if you’ve never experienced data loss before.
Being able to link your calendar, task, and note-taking apps to a shared cloud storage solution, all your data in one place, is convenient and tidy. However, accessing those files from multiple points in different ways also increases the possibility of data loss.
Soon after trying a new note-taking app on your smartphone and fumbling with its controls, you might find yourself trying to recover deleted files from Google Drive. One wrong move and your precious files will appear permanently deleted from Google Drive’s servers.
The magic word here is “appear,” for as we’ll see, in most cases, it’s possible to recover deleted Google Drive files with the methods we’ll see here.
Quick navigation
Problem |
Solution |
I deleted a file or folder from Google Drive. |
|
I deleted a Google Drive file or folder from my HDD. |
|
I have permanently deleted a Google Drive file or folder. |
|
I want to restore my lost files from a backup. |
|
I want to restore previous versions of my files. |
|
I want the quickest and easiest way to recover my files. |
|
I need to recover a co-worker’s files. |
|
I want to recover files older than 30 days. |
Can You Recover Deleted Files From Google Drive?
Google Drive is a cloud storage service, which means that your files reside on its remote servers, right? How could you possibly recover deleted files from Google Drive’s servers when you don’t have physical access to them? Well, it turns out you can.
Although you don’t have access to Google’s hardware, those files aren’t stored purely online: they’re also cached locally on your computer. This means you can use classic approaches to restore those lost Google Drive files, just like you’d “undelete” any other local file.
Alternatively, you can turn to Google’s own tools and services to locate and restore your deleted Google Drive files.
The 5 Best Ways to Recover Deleted Google Drive Files
There are multiple ways to recover deleted files from Google Drive. The following five are tried, tested, and proven to work. They’re what we’re using when we find ourselves in a similar position. However, they also vary in complexity and the time they demand. Still, if one doesn’t work for you, it’s worth trying a more complicated approach.
Method #1: Easy Google Drive File Recovery From Trash
The easiest method to save your files from deletion is before they are actually deleted. Google Drive offers its own version of a Trash folder, within which your not-actually-deleted files remain for up to 30 days. To save your files from the clutches of eternal doom within 30 days from their deletion:
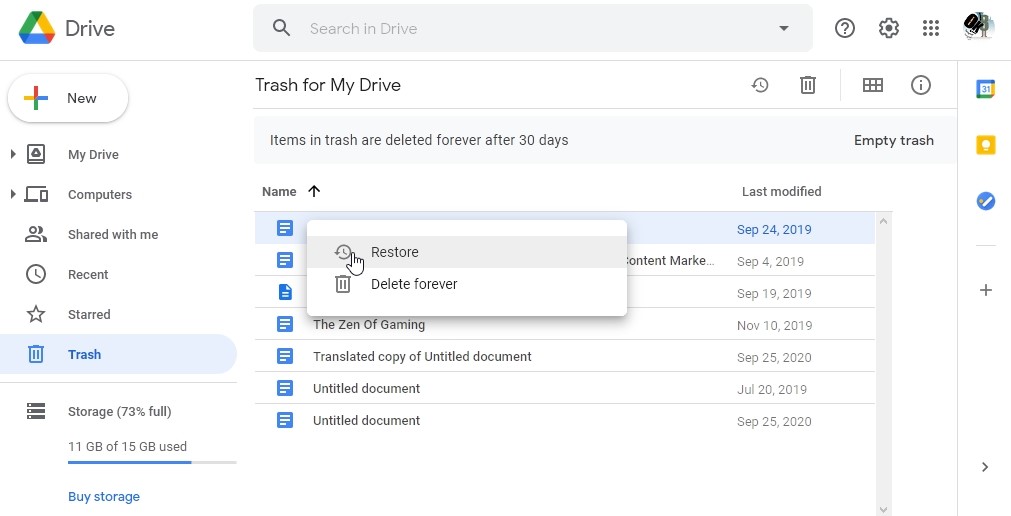
- Pay a visit to the online version of Google Drive through your browser and log in with your credentials.
- Choose Trash from the list of places on the left.
- You’ll see a list of “deleted” files that are still available, among which hopefully you should also find the one you want to restore.
- Right-click on it and choose “Restore” from the menu that pops up.
It’s also worth noting that you may be able to skip this step if you’ve just soft-deleted the file you want to restore. Your Google Drive might live in the cloud, but the files and folders you’re using could be synced locally, depending on your settings. Thus, the file you just deleted might have moved to your desktop’s Trashcan/Recycle Bin.
The method to restore it from there is precisely the same as through Google Drive’s Trash folder, minus the need to visit its site.
- Open your local Trashcan/Recycle Bin folder on your desktop.
- Right-click on the file you want back.
- Choose restore/recover.
Ideally, your file will pop up back at its original location.
Method #2: Resurrect Lost Google Drive Files With Data Recovery Software
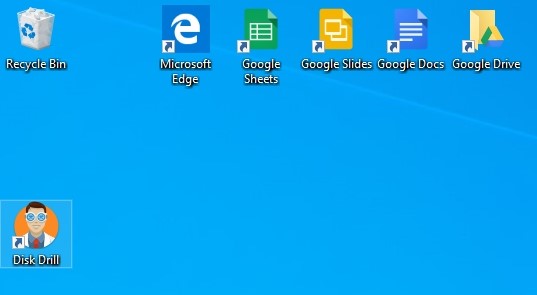
Your Google Drive files were probably cached locally if you accessed them from “normal” desktop software and not web apps in your browser. Thus, just like any local file, they’ll be recoverable using specialized software for such tasks. “Software” like Disk Drill, which combines powerful recovery algorithms with exceptional ease of use.
Although we’re using Disk Drill on Windows for this guide, it’s also available on Mac OS, but also iPhone, iPad, and Android. The process for recovering deleted Google Drive files on your Mac with it is almost identical.
To restore your lost Google Drive files with Disk Drill:
- Download the application from its official site and install it.
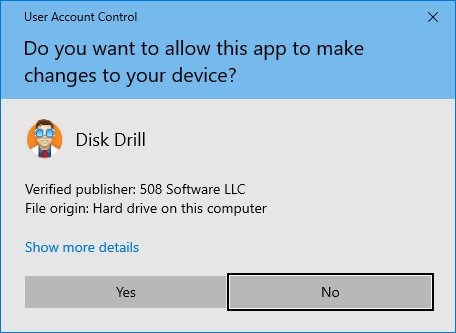
- Disk Drill needs unrestricted access to your hard disk drive to find and recover your lost files, so you’ll have to grant it permission when asked.
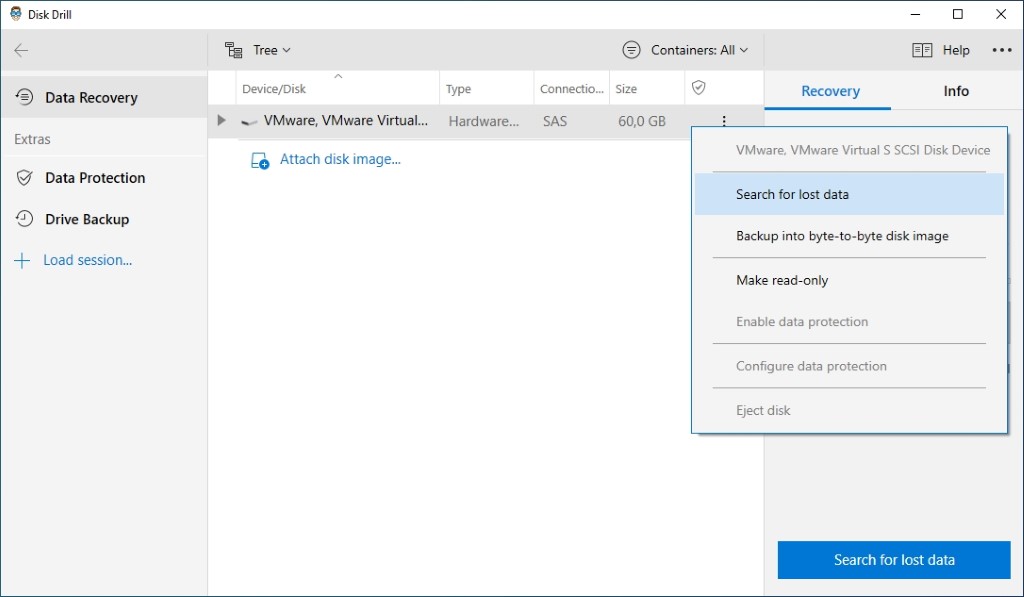
- After you accept an End User License Agreement, you’ll see Disk Drill’s interface. The middle section will display a list of your storage devices. Locate the disk where your local Google Drive folder or your Trashcan/Recycle Bin (or both) reside. Left-click on its entry and then click on the “Search for lost data” button, which appears at the bottom right. Alternatively, you can right-click on the disk and choose the same action, “Search for lost data,” from the menu that pops-up.
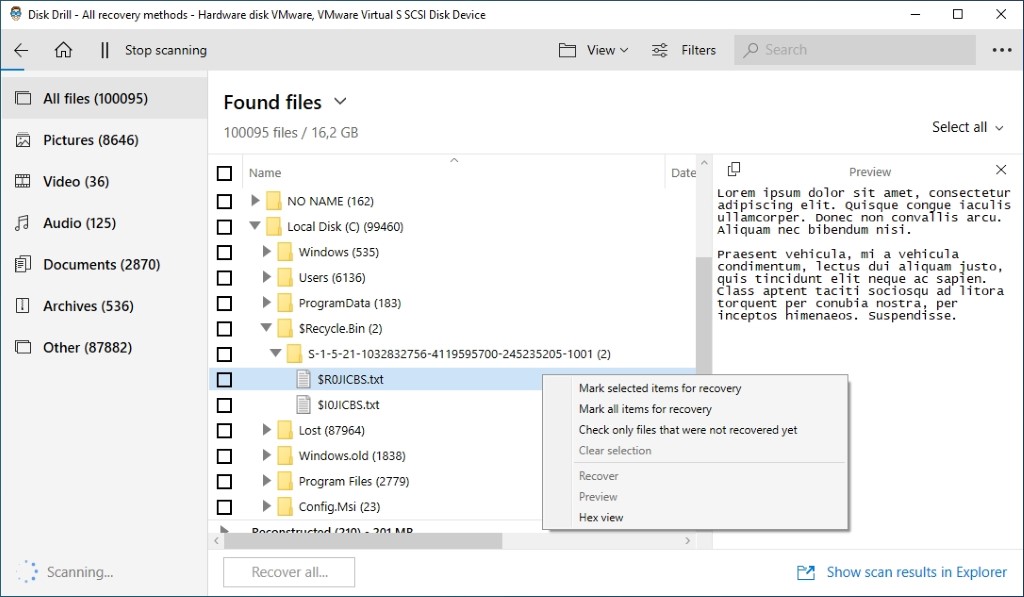
- The app will start scanning your hard disk drive for lost files. However, you don’t have to wait for the process to complete to check them out. With a click on “Review found items” on the top right of the window, you can check out the files the program located while it’s still scanning for more.
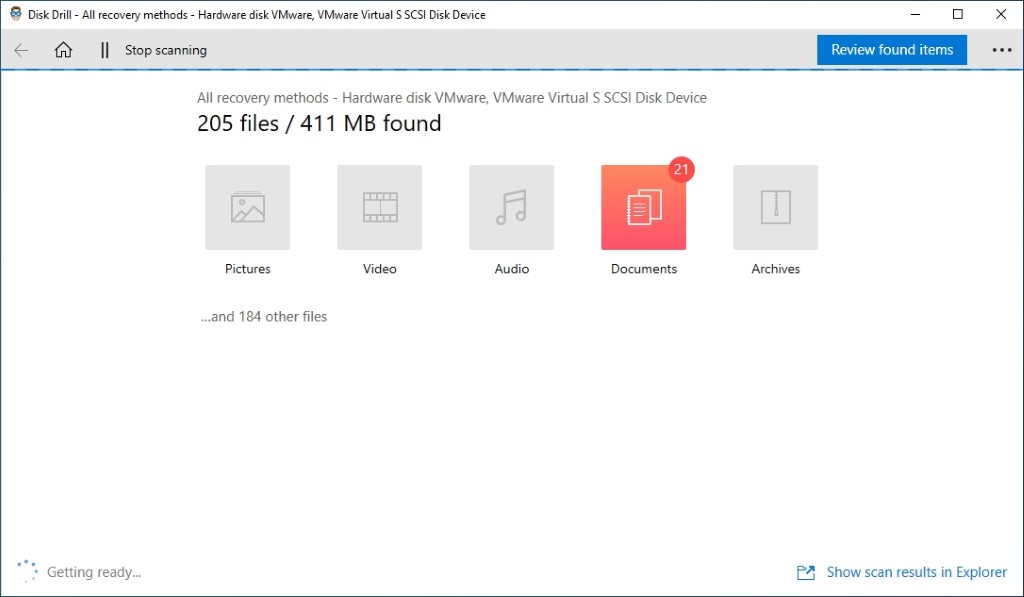
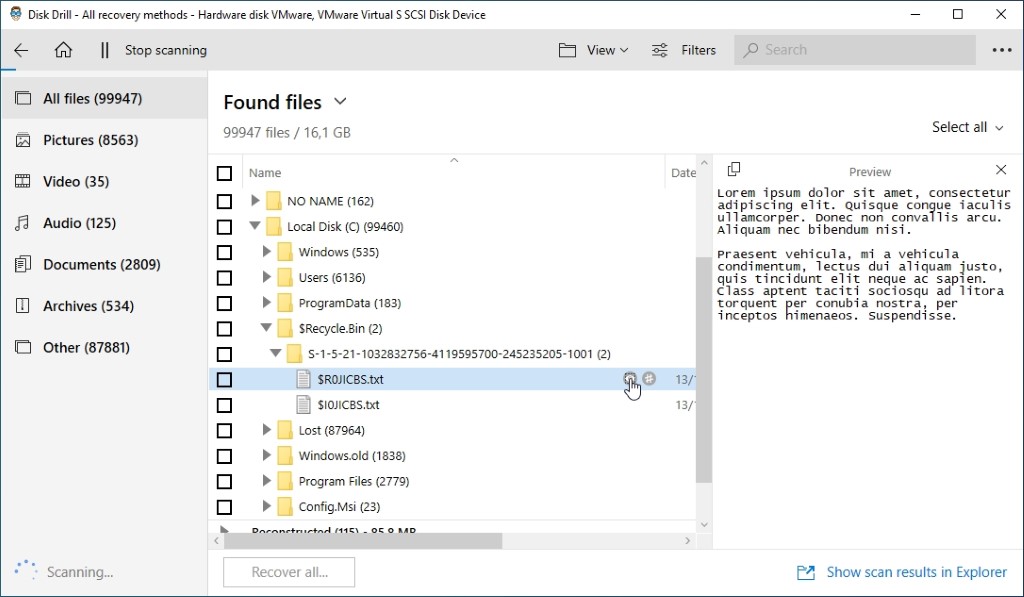
- If you locate the file you need among Disk Drill’s results, there’s no point in keeping the scanning process running. Click on “Stop scanning” to end it. Then, notice how two icons appear when you hover over the file you sought.
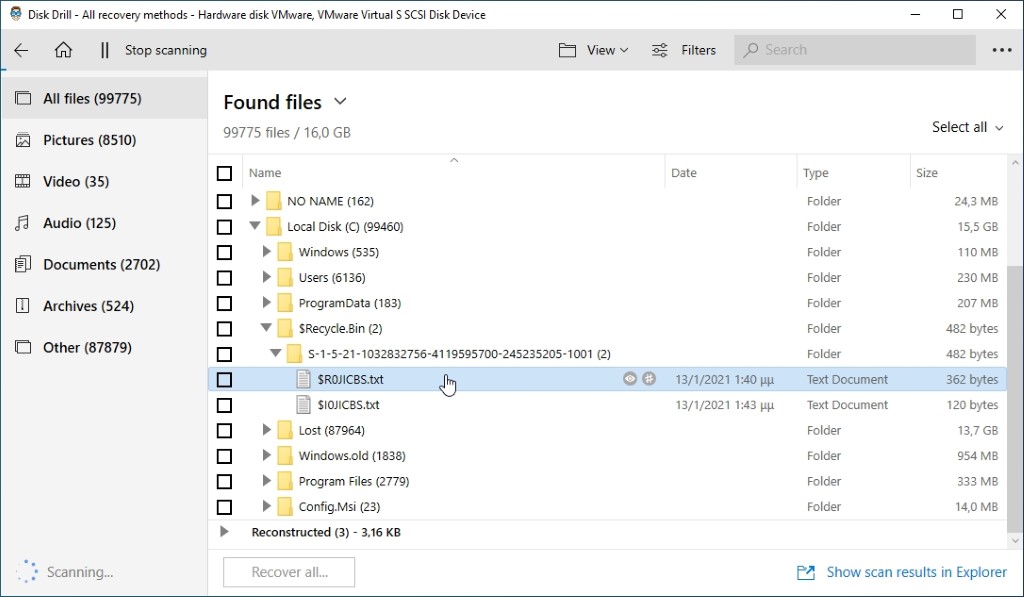
- By clicking on the “eye” icon, you can preview the file – at least, if Disk Drill supports its type. You won’t be able to check obscure formats, but Disk Drill supports the most popular image and document formats.
- To recover the file, right-click on it and choose “Mark selected items for recovery” from the menu that pops up, or “tick” the checkbox on the left of its entry.
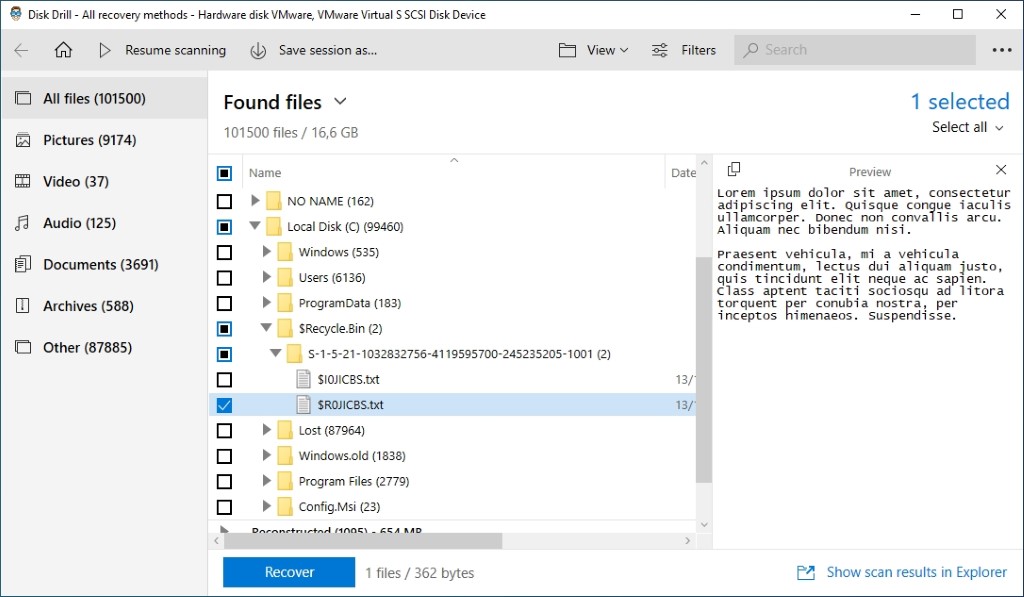
- After selecting one or more files for recovery, a new blue “Recover” button will show up at the bottom of Disk Drill’s window. Click on it to move to the next step of the process.
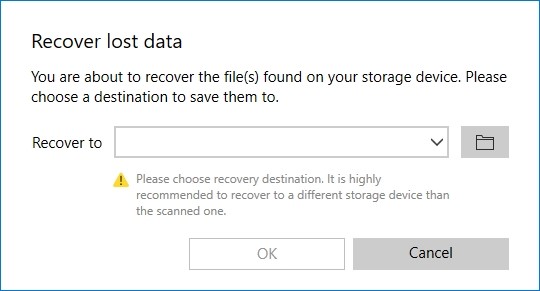
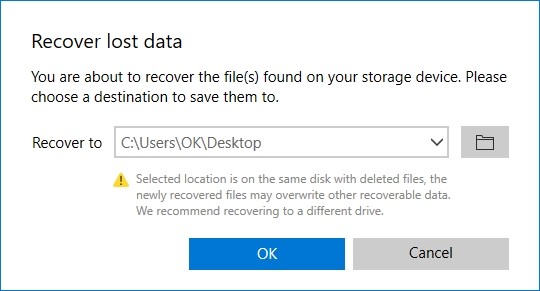
- Click on the button with the folder icon on the right of the requester that will pop-up to choose where you want to recover your files. It’s best if you select a different storage device than the one from where you’re restoring data.
- Click on the blue “OK” button that will appear after choosing your storage target to begin the actual recovery process. A short while later, Disk Drill will inform you about completing the process and offer to take you directly to your recovered files. To do that, click on the blue “Show recovered data in Explorer” button.
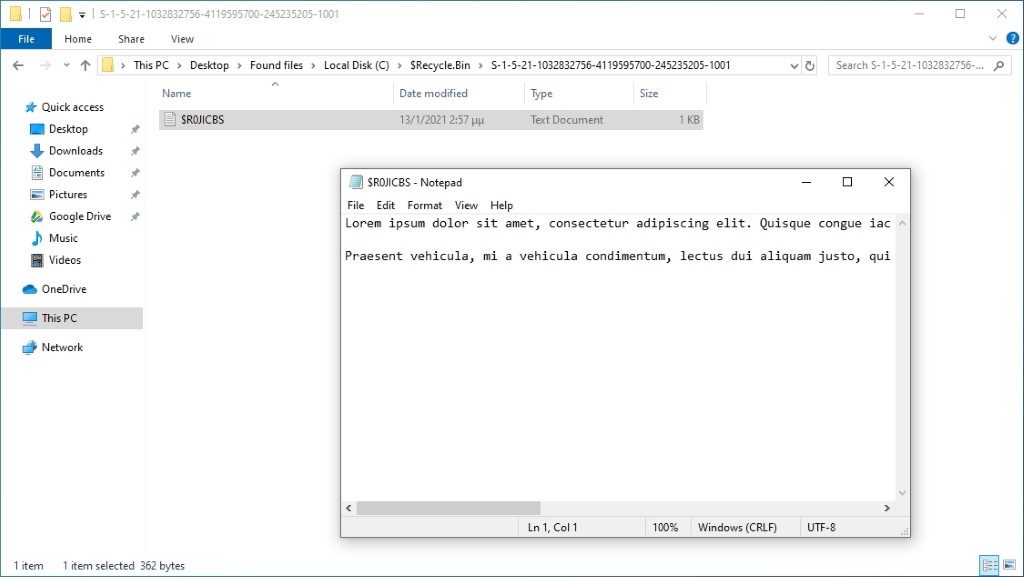
- Although it might not have managed to save their names, you’ll find your restored files and their precious content within the “Found Files” sub-folder. Disk Drill will have placed them in a recreation of the original directory structure, so you may have to look within subfolders to locate the actual files.
This method is admittedly more complicated than merely choosing to restore a file from your operating system’s Trashcan/Recycle Bin. However, it’s also more powerful and can recover deleted Google Drive files that were gone from the Trashcan/Recycle Bin – and more.
Method #3: Restore Your Lost Google Drive Files From Google Takeout Backups
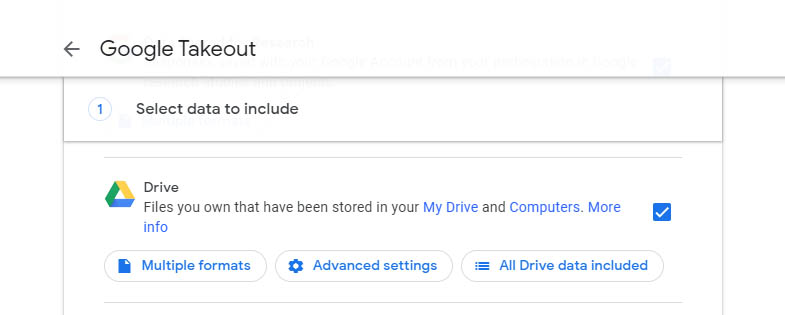
Being prepared is the best way to deal with a catastrophe, and in the case of data loss, “being prepared” translates to “having a backup.” Google offers an official way to take backups of your Google Drive that you might be using: Google Takeout.
Have you downloaded to your PC a relatively recent Google Takeout backup of your Google Drive? Then, maybe you’ll be able to restore your files from there. As proof that it’s worth taking precautions, this is also the second quickest method to recover lost files next to undeleting them from Trash.
- Find the Google Takeout file on your local storage.
- The file will be a typical ZIP archive. Newer versions of all major OSes either come with preinstalled tools for dealing with such files or have support for ZIP “baked-in.” Thus, you can probably right-click on your file and choose the “extract” option that appears. If you don’t see such an option, you can use a third-party tool to deal with the format, with 7-Zip being one of the most popular.
- Your file will hopefully be among the extracted ones. To restore it to its original position, you’ll have to re-upload it to your Google Drive from your browser. Alternatively, you can copy it to your local Google Drive folder with your favorite file manager, then let your files sync.
Of course, if you haven’t downloaded a Google Takeout backup ZIP, this method won’t work, and you’ll have to try the alternatives.
If you’ve already used Google Takeout before, remember to do it again – and again, as frequently as you can. Every new zip you download is an updated package of your Google Drive’s contents. With multiple backups, you can move back and forth in your Google Drive’s history and recover various versions of files or ones you deleted long ago.
Method #4: Bring Any Deleted Google Drive Files Back With Google Console
If you are using a Google Workspace account with Google Drive, your G-Suite’s administrator can recover your deleted files. They can even restore lost files from user accounts that were deleted in the meantime. It’s also possible to recover files from Shared Drive, where multiple users can access the same storage. The G-Suite Admin Console helps with those actions.
All deleted files are recoverable with this method for up to 25 days after removal from Thrash. This gives you a convenient time bonus to save them. However, this approach doesn’t work for personal accounts.
Approach #1
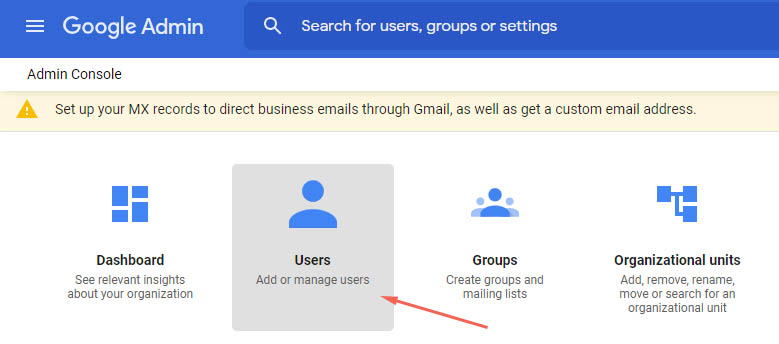
To recover deleted files from a user’s Google Drive through the G-Suite Admin Console:
- Go to your Admin Console dashboard.
- Choose the Users entry.
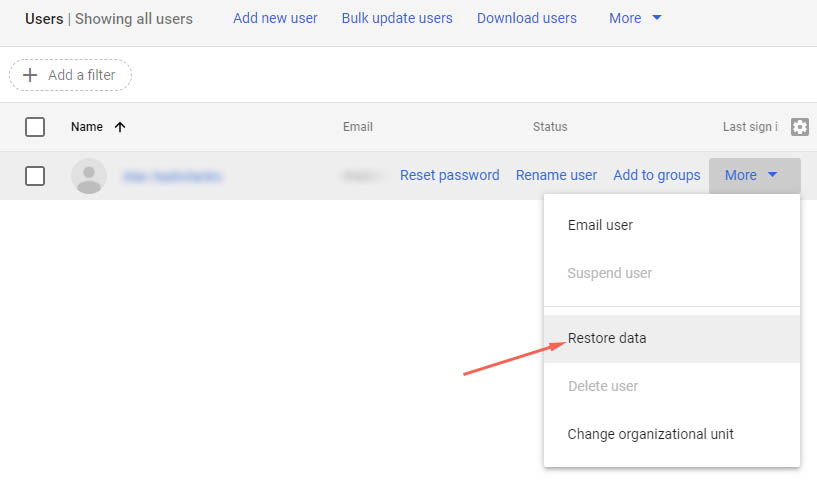
- Notice how an icon with three dots appears on the right of the user’s name you’re pointing at.
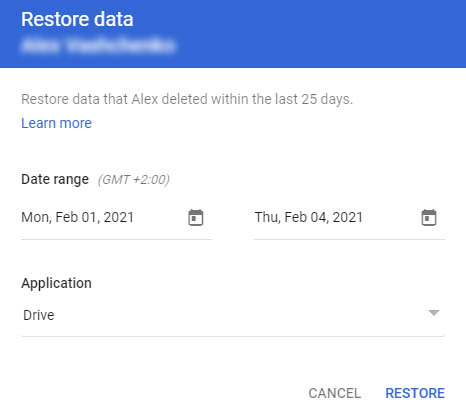
- Click on that icon and choose “Restore Data” from the menu that pops up.
- Define the date range covering the data you want to recover. Also, change the “Application” to “Drive”. Unfortunately, you don’t have more granular control over what will be restored.
Approach #2
Alternatively, if the files you wish to recover resided in a Shared Drive, you’ll have to:
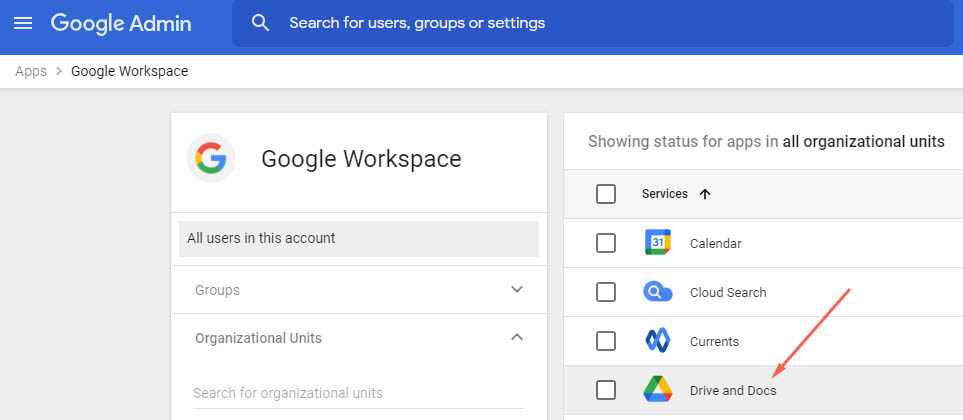
- Pay a visit to your Admin Console dashboard.
- Move to Apps, then Google Workspace, then Drive and Docs.
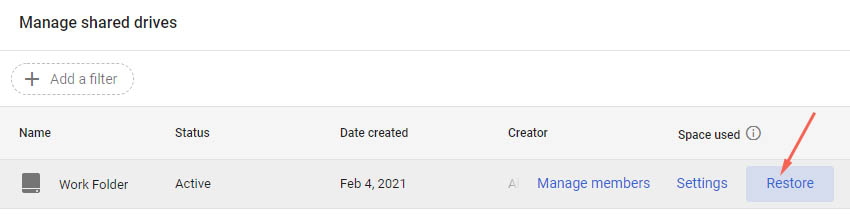
- Choose “Manage shared drives”.
- Locate the folder you want to restore and click on the restore button on the far right.
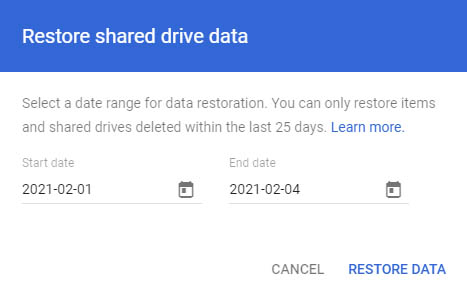
- Set the date range that includes the most updated version of the file but before its deletion. Then, click on RESTORE DATA.
Approach #3
Did the lost files belong to a deleted user account instead? To restore them, you’ll first have to recover/re-enable the account itself. The process goes like this:
- Visit your Admin Console dashboard.
- Click on “Users”.
- Choose “+ add filter” and select “Recently deleted”.
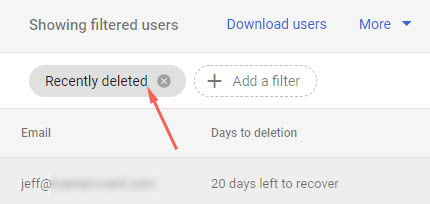
- When you see the deleted account whose files you wish to recover, hover over it and click on “Recover”.
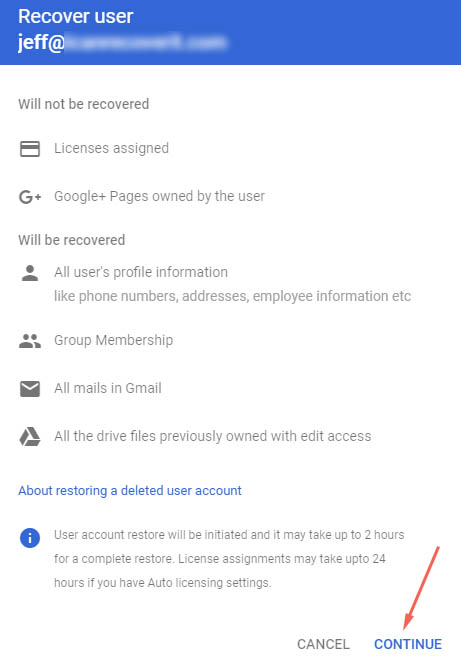
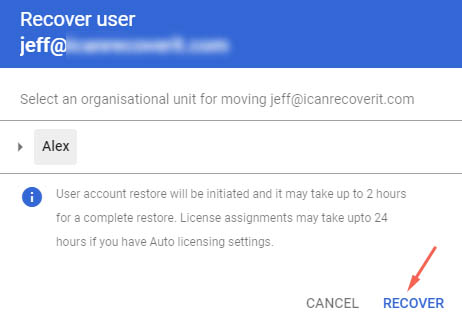
- Click on “Continue,” choose where the user belongs, and click “Recover”.
- With the user’s account restored, return to your Admin Console dashboard’s initial page.
- Move to Apps and click on “Google Workspace”.
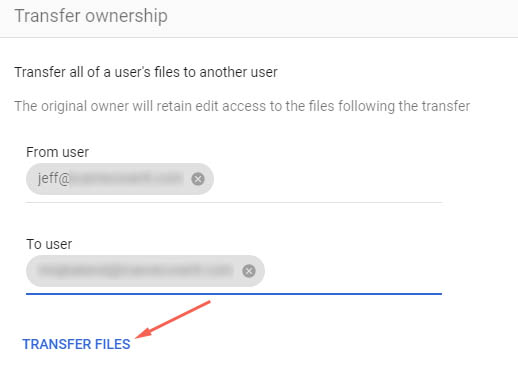
- Choose “Drive and Docs” and select “Transfer ownership”.
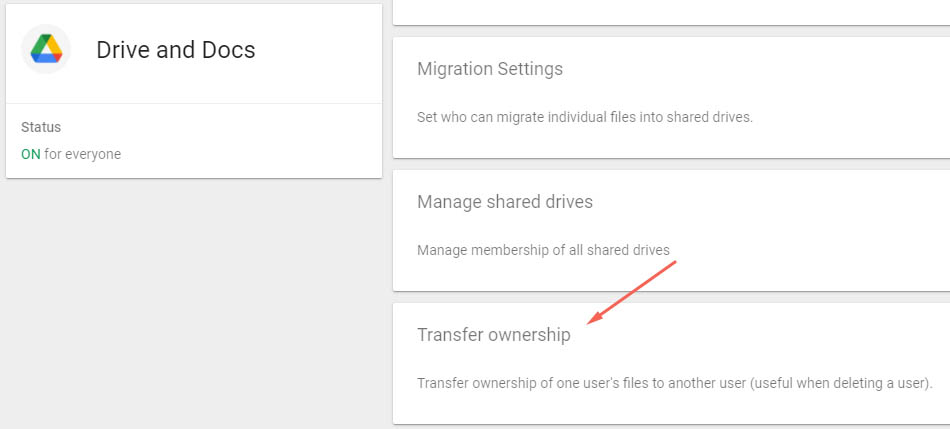
- Enter the restored user account’s name in the “From” field and your user account’s name in the “To” field to transfer ownership of their files from their account to yours.
- Click on “Transfer files” to move the files to your Google Drive user account.
Even if you don’t manage to recover your files in one of the above ways, though, there’s one last hope. At least, if you were using Google Drive together with Google Apps Vault.
Method #5: Pull Your Files From Your Google Drive’s Archives With Google Vault
Google Vault isn’t a backup but rather an archival solution, available for G-Suite users. The difference is that with Google Vault, you don’t have direct access to your files. Nor can you quickly restore them, like if they were temporarily moved to a Trash/Recycle Bin folder. Instead, you have to locate and “export” them since Google Vault works as an archive of all your Google Data.
To recover files deleted from a Google Drive account with Google Vault:
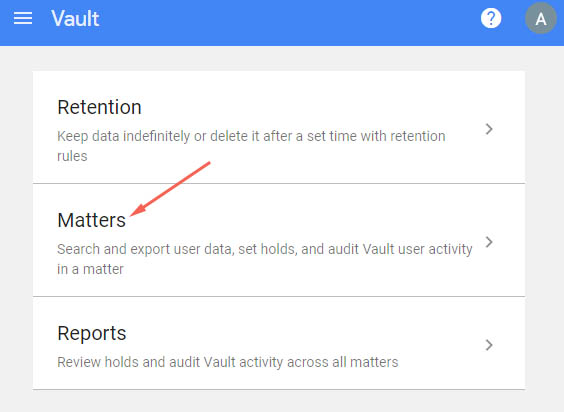
- Begin by visiting its page and logging in with your admin account.
- Choose the “Matters” section.
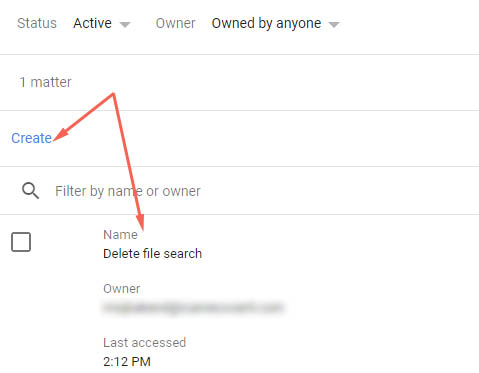
- Create or select the Matter that includes the data you want to recover.
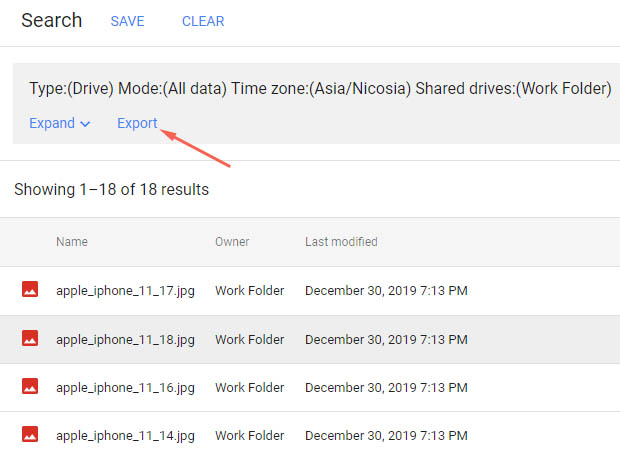
- Click on “Search” from the list on the left, choose “Drive,” and enter the email address of the account whose files you want to recover.
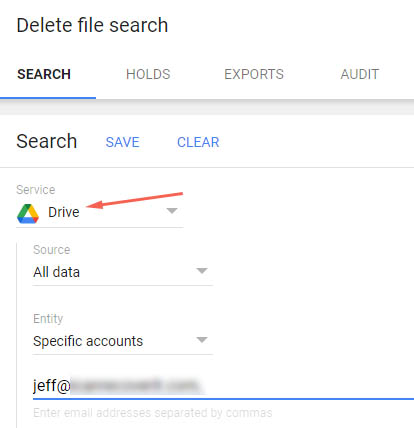
- Use the provided fields to narrow down your filters to assist in locating the desired files.
- When you find them, click on “Export”. You can now download your formerly lost files in a zip archive.
Unfortunately, this method relies on the archival powers of Google Vault. You can’t take advantage of it if you hadn’t configured Google Vault before to monitor your files.
FAQ
How Long Does Google Drive Keep Deleted Files?
Deleted files remain in Google Drive’s Trash folder for 30 days since deletion – unless you manually remove them from there in the meantime. That applies to G-Suite accounts, too. However, a G-Suite admin can still recover those files up to 25 days after they disappeared from the Trash folder.
Is It Possible to Recover the Previous Version of a Google Drive File?
There are multiple ways to recover previous versions of a Google Drive file. However, they’re all more complicated than what alternative cloud storage solutions offer. Unlike, say, Dropbox, with Google Drive, you can’t choose a file and instantly check its past versions. Instead, you can restore them from a backup, either from a third-party solution or Google Takeout. Alternatively, you can follow the steps we see through Google Console’s dashboard or the Google Vault to restore your data from a specific time range.
If I Permanently Deleted a File in My Google Drive, Can Google Retrieve the Lost File for Me if I Tell Them the File Name?
The answer is, unfortunately, it depends. There are no guarantees your file will remain intact at Google’s servers, but https://support.google.com/drive/answer/1716222. Keep in mind that the file should not only have been in your own Google Drive when deleted, but it should also belong to you, or you should have full access to it.
Conclusion
An absent-minded move might feel like the beginning of impending doom when That Important File You Really Needed disappears. Thankfully, as we saw, recovering files from Google Drive is easy and can also be relatively painless. At least, as long as you realize you’ve lost your files within a 30 (+25 for G-Suite users) day timeframe.
Still, instead of trying to undo an error, it’s better to use a file’s almost-lost as a nudge to, finally, start keeping backups of your precious data.
This article was written by Odysseas Kourafalos, a Editor-in-Chief at Handy Recovery Advisor. It was also verified for technical accuracy by Andrey Vasilyev, our editorial advisor.
Curious about our content creation process? Take a look at our Editor Guidelines.