
Accidentally deleted an important personal or work email and can’t find it? Or maybe you know where the deleted email should be, but it’s no longer there? This happens all the time, but it doesn’t mean it’s gone for good. There’s a way to get it back (actually several ways) and we’ll demonstrate how to recover deleted emails on Mac step by step. Read on and you’ll find everything you need to get your email back without starting over.
Mac Email Recovery Breakdown
This article is a guide to help you restore your Apple Mail and retrieve deleted iCloud emails, and even recover a deleted mailbox on your Mac. However, even if you’re using other email clients – such as Outlook or Gmail – the basic premise is the same. All email providers have a trash folder that stores deleted emails for a certain amount of time, depending on the current user settings (the default for Apple Mail or iCloud Mail is 30 days).
Once those 30 days have passed, you’ll have to rely on backups to get them back. Don’t have any backups? We have a section for that too. We’ll show you how to use specialized data recovery tools in case your mail files have been permanently deleted from your drive. Use the short table below to quickly jump to the section that best suits your current situation:
- I’m using Apple Mail.
- I’m using iCloud Mail.
- I have Time Machine activated. Remind me how to use it.
- I’m using Apple Mail and I found no backups.
How to Retrieve Deleted Emails on Mac
Depending on how you set up your email client and your Mac, you might be able to restore your deleted emails with a few steps. We’ve listed them below along with detailed instructions and screenshots, so try them one by one.
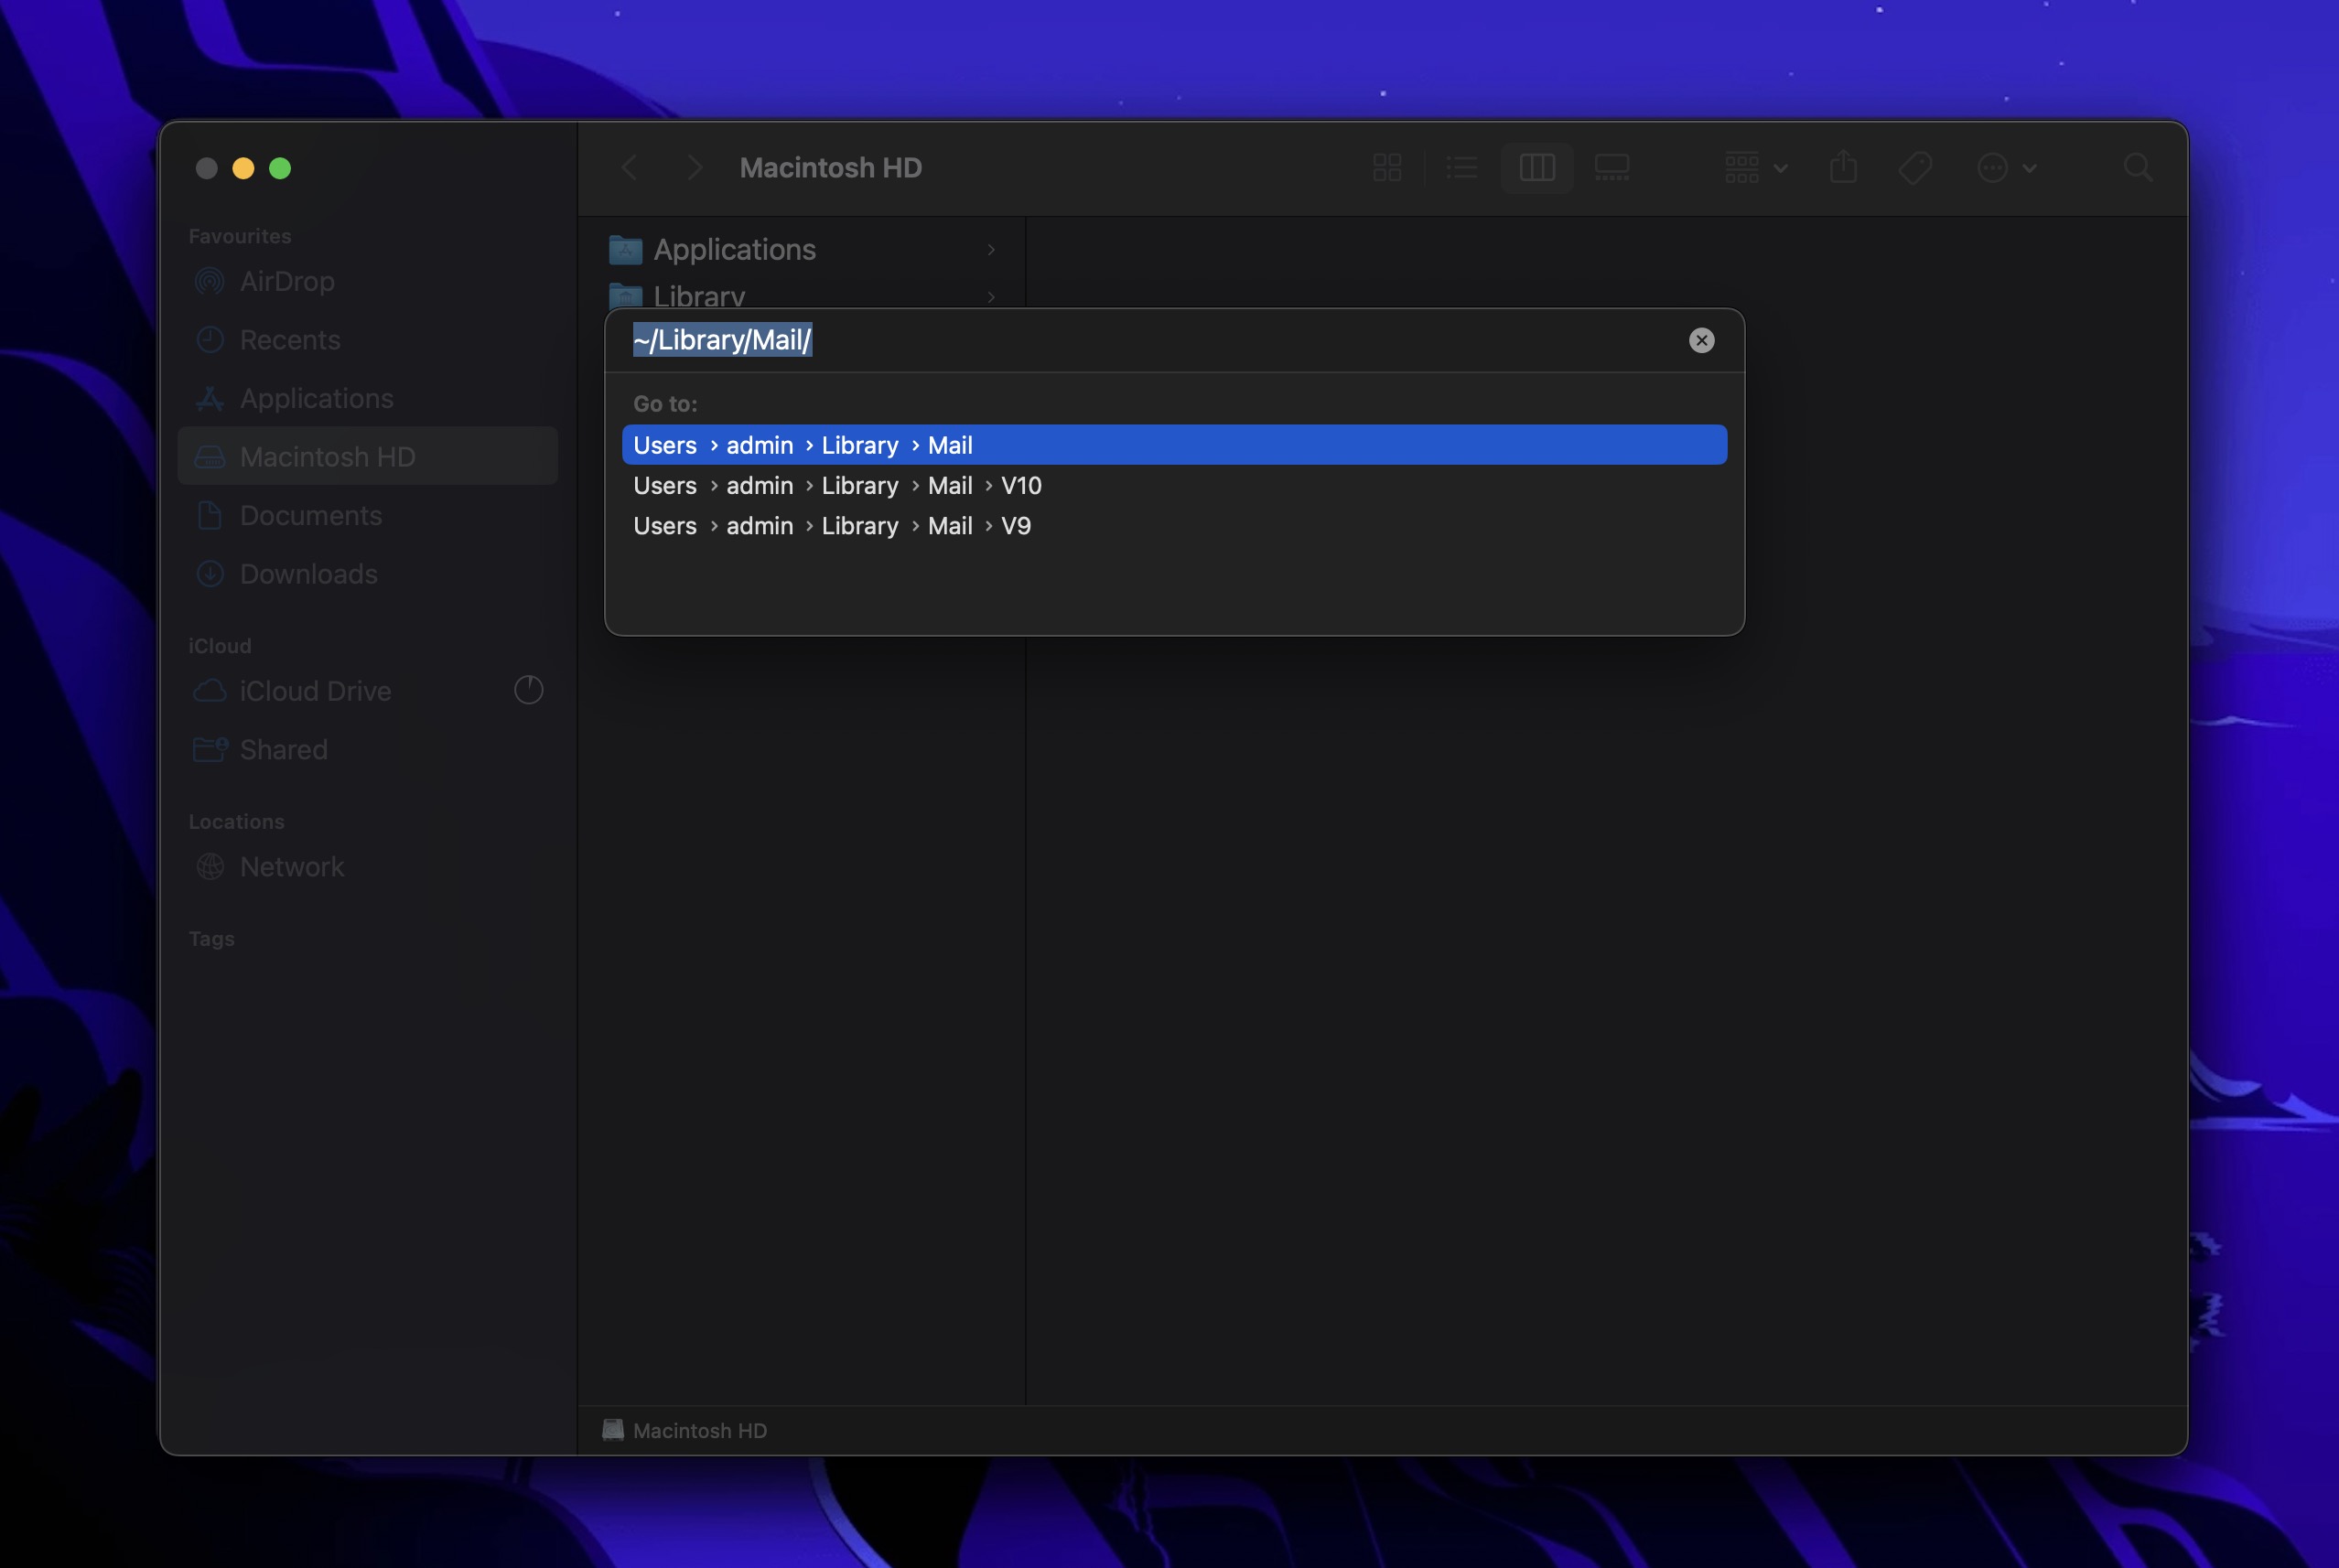
Where are emails stored on your Mac? Email apps on Mac, like Apple Mail, store your emails locally in hidden system folders. These folders contain all your mailboxes, organized by account. To access it, open Finder, click Go in the menu bar, select Go to Folder, and type ~/Library/Mail.
You should see your Apple Mail emails as .emlx files. Each file stores email content and its full source code, so it might be hard to figure out what exactly you’re reading.
Check Your Trash Folder
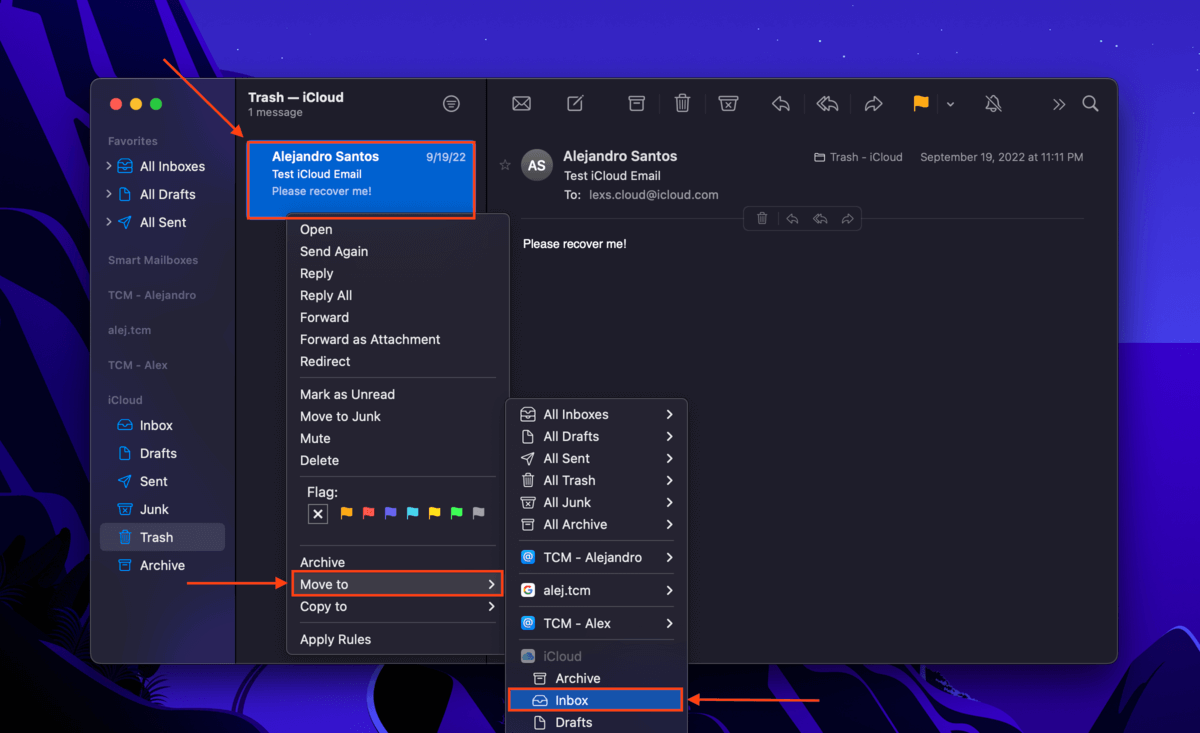
As we mentioned earlier, all email clients provide a trash folder that stores deleted emails for a certain amount of time. For Apple Mail/iCloud Mail, it will be gone after 30 days by default. For example, to recover a deleted email on Apple Mail, click the Trash folder location on your email client’s left sidebar.
Once you’re in the Trash folder, right-click the email you want to restore and click Move to > Inbox.
Pro Tip: When using Apple Mail or iCloud Mail, you can change the amount of time a deleted email stays in your Trash folder before it’s gone forever. While your email client is open, head to the menu bar and click Mail > Settings or Preferences. Navigate to the Accounts tab and select the mailbox you want to modify. Under Trash Mailbox, click the dropdown menu for the Erase deleted messages setting and choose a suitable option for you.
Check Your Emails via iCloud
If you manage your email through iCloud instead of a local client like Apple Mail, the steps differ a bit. iCloud Mail uses a web-based interface, and what Apple Mail calls “Trash,” iCloud labels as “Bin.” Aside from the name, the concept is similar: iCloud keeps deleted emails for 30 days before removing them permanently. If the message you need is still within that timeframe, you can bring it back with just a few clicks:
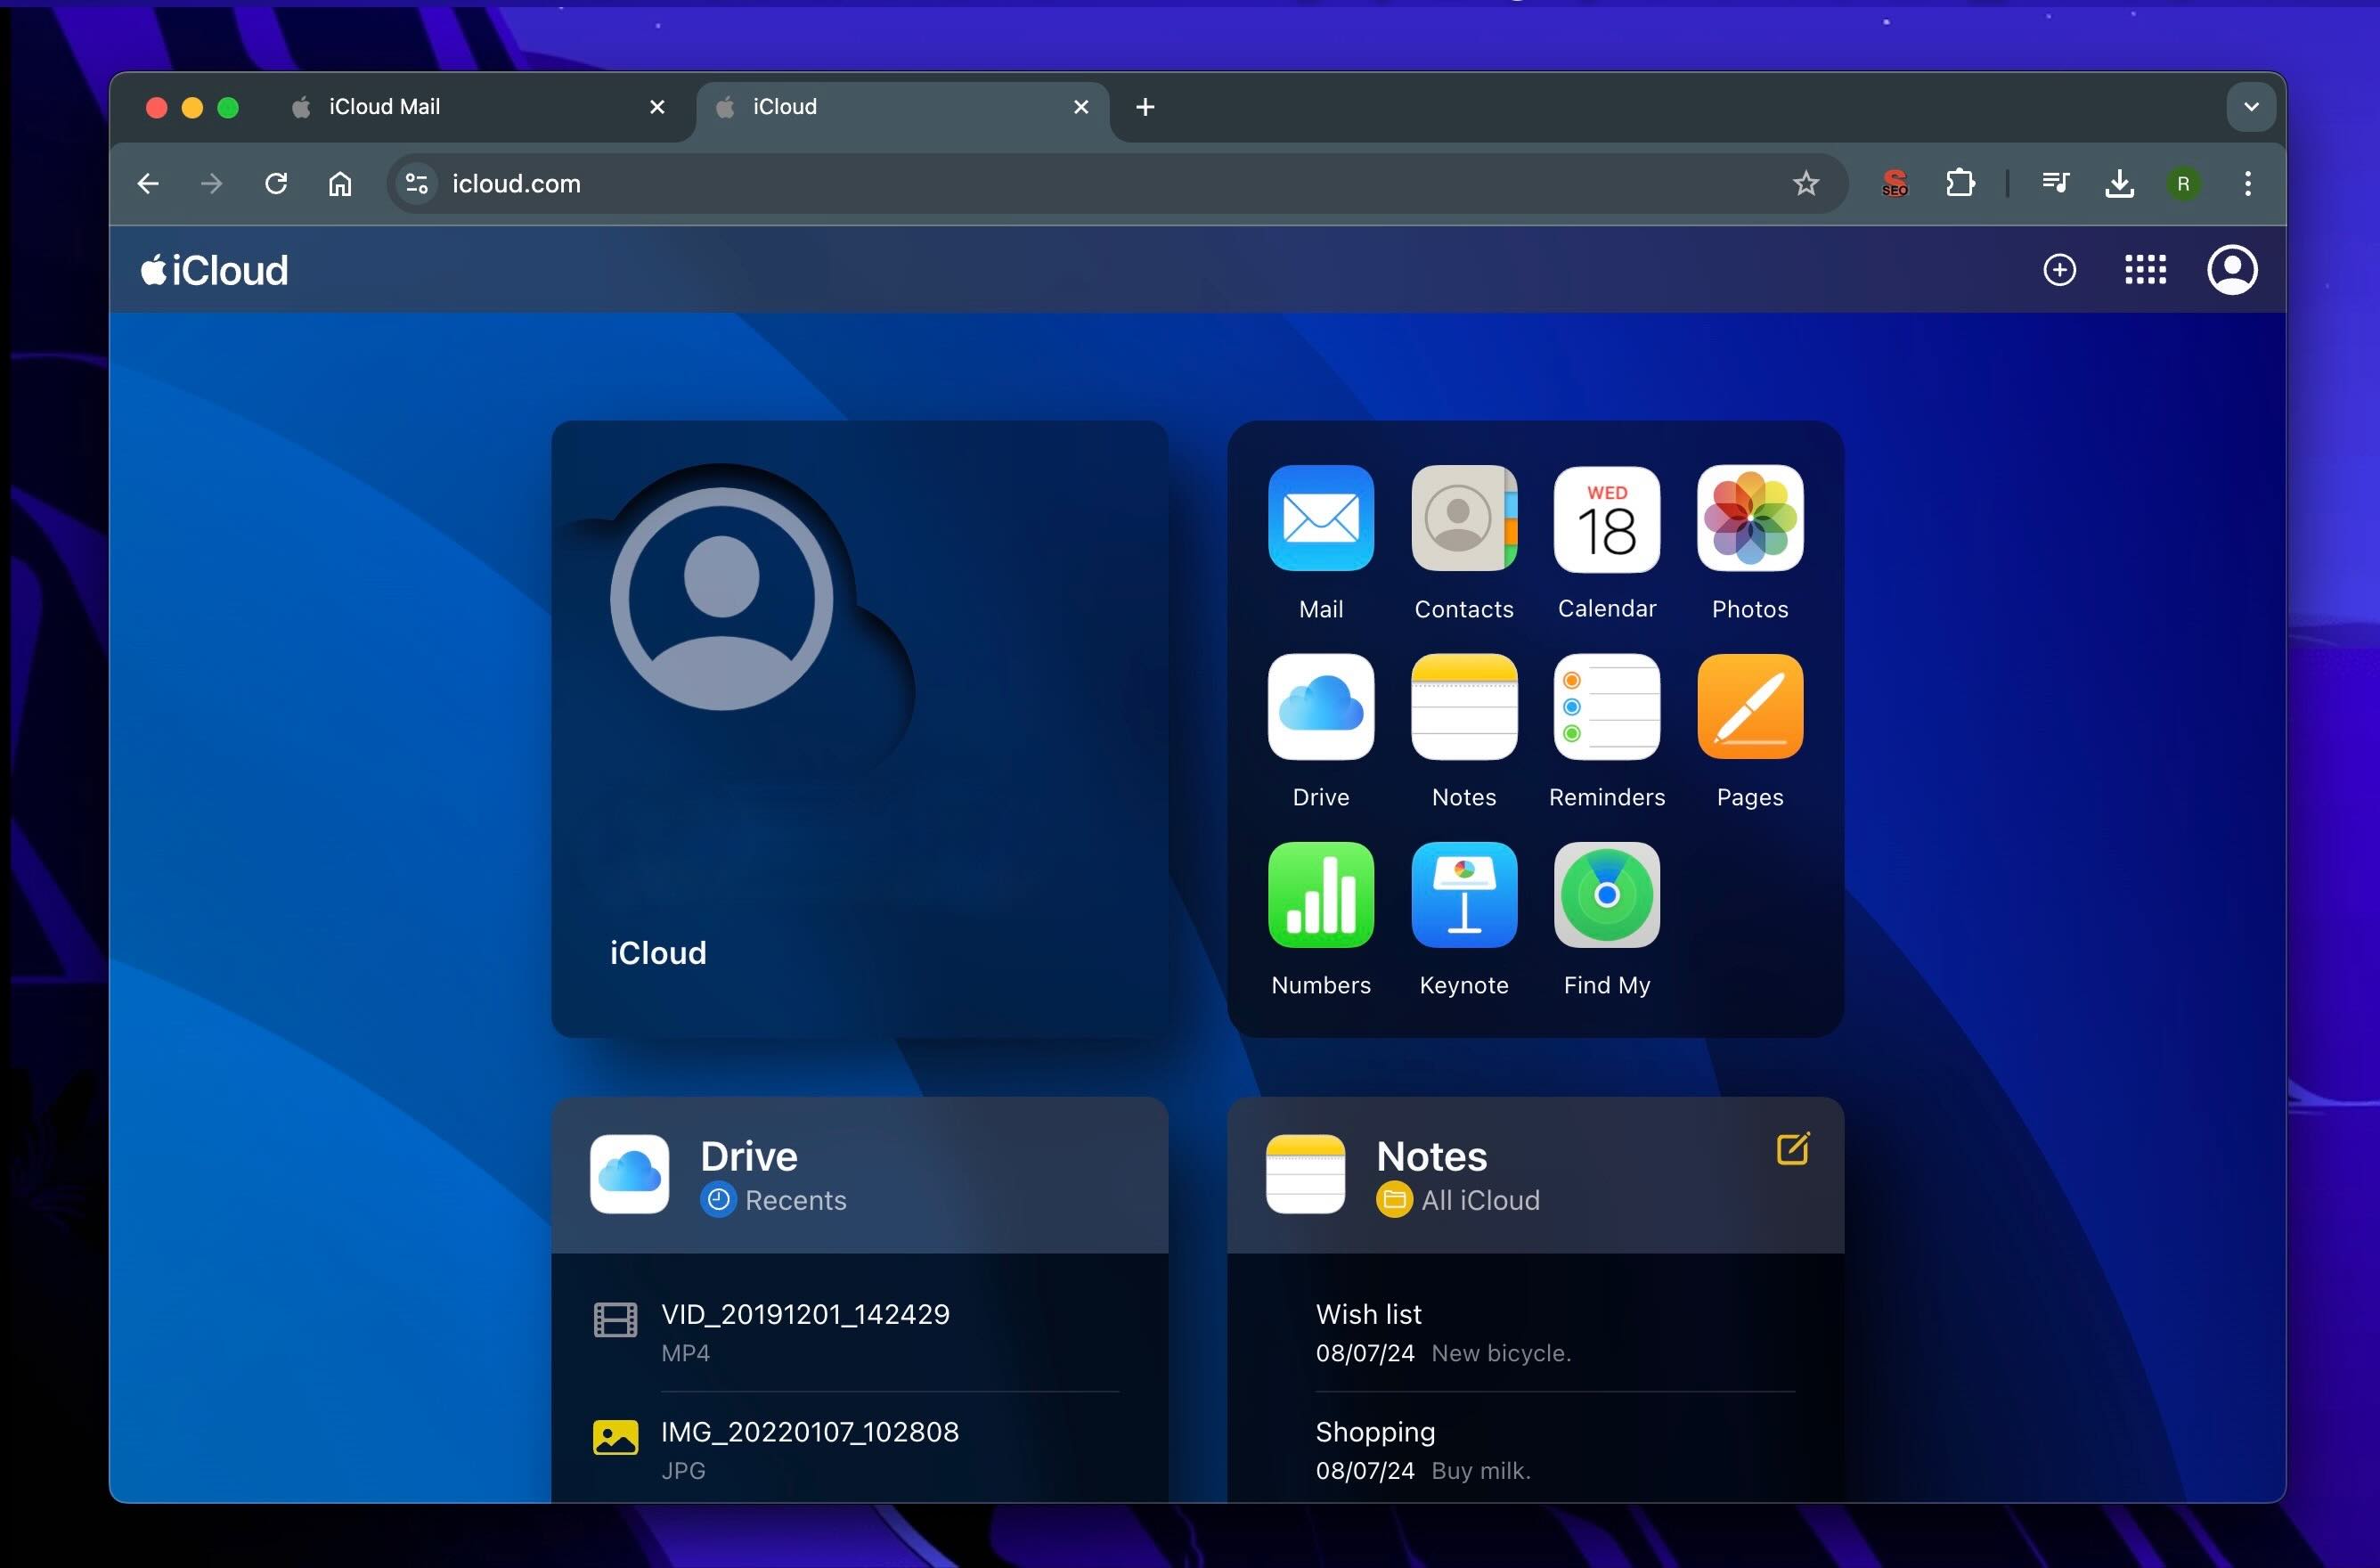
- Open a browser, head to icloud.com, and sign in with your Apple ID.
- Select the Mail icon to open your inbox and other folders.
- Look at the sidebar and select “Bin.” Your recently deleted emails should appear here.

- Right-click the email you want to restore, then select Move Message… from the menu.
- Choose where to send it (for example, back to your Inbox).
Any emails you restore in iCloud’s web interface will reappear on all connected devices, including your Mac, iPhone, and iPad.
How to Recover Permanently Deleted Emails on Mac
So far, we’ve tackled straightforward methods. But what if your emails are gone from every folder, and they’ve been erased from your drive entirely? You have two main routes: restore from a backup or use data recovery software.
Our records show that most users don’t set up backups beforehand, so data recovery tools often become the go-to option. Let’s start there.
Option A: Use Data Recovery Software
When you delete a file, it doesn’t just vanish on the spot. Your Mac simply marks that file’s space as free for new data. Until something new comes along and overwrites that space, the original file is often still there, hidden from view. Data recovery tools tap into this reality, scanning your drive for signs of “deleted” files—emails included—even if you’ve emptied the Trash.
When you deal with lost or deleted data, it’s best to avoid using the drive (where your mail client was installed or where your email data was stored) as much as possible. Any activity—saving files, installing software, or even regular use—can overwrite the deleted data. Once overwritten, the data becomes unrecoverable, even with advanced recovery tools. This means you shouldn’t download or install recovery software on the same drive or partition where you deleted your emails.
However, if you only have one system disk and no external media, go ahead and install the recovery software on it—it’s better than not attempting recovery at all.
These days, you’ll find plenty of data recovery options on the market, and we’ve tested a lot of them. In our opinion, one of the best tools comes from CleverFiles, the team behind Disk Drill. It stands out for its intuitive design, powerful scanning modes, and reliable performance.
Disk Drill can recover all kinds of files, from documents and spreadsheets to photos, videos, and archives. It also supports a wide range of email-related formats:
- EML: Electronic Mail Format
- EMLX: Apple Mail Message
- MBOX: Native archive format of various email clients
- MSG: Outlook Mail Message
- OLK14MSGSOURCE: Outlook Email Message Data File (Outlook for Mac)
- OLK15MESSAGE: Outlook for Mac message containers
- EFA: Encrypt 2005 E-mail File
If you want to know more about the app before installing it on your Mac, read this full Disk Drill for Mac review.
Here’s how you can recover permanently deleted emails on your Macbook/Mac using Disk Drill:
- Download Disk Drill. Open the downloaded file and follow the on-screen instructions to install it. Provide any required permissions when prompted, such as full disk access.
- Once installed, find Disk Drill in your Applications folder and open it.
- You’ll see a list of your Mac’s disks and partitions. Pick the drive where your emails were stored. If you’re looking for Apple Mail emails, this will typically be your Mac’s internal drive.
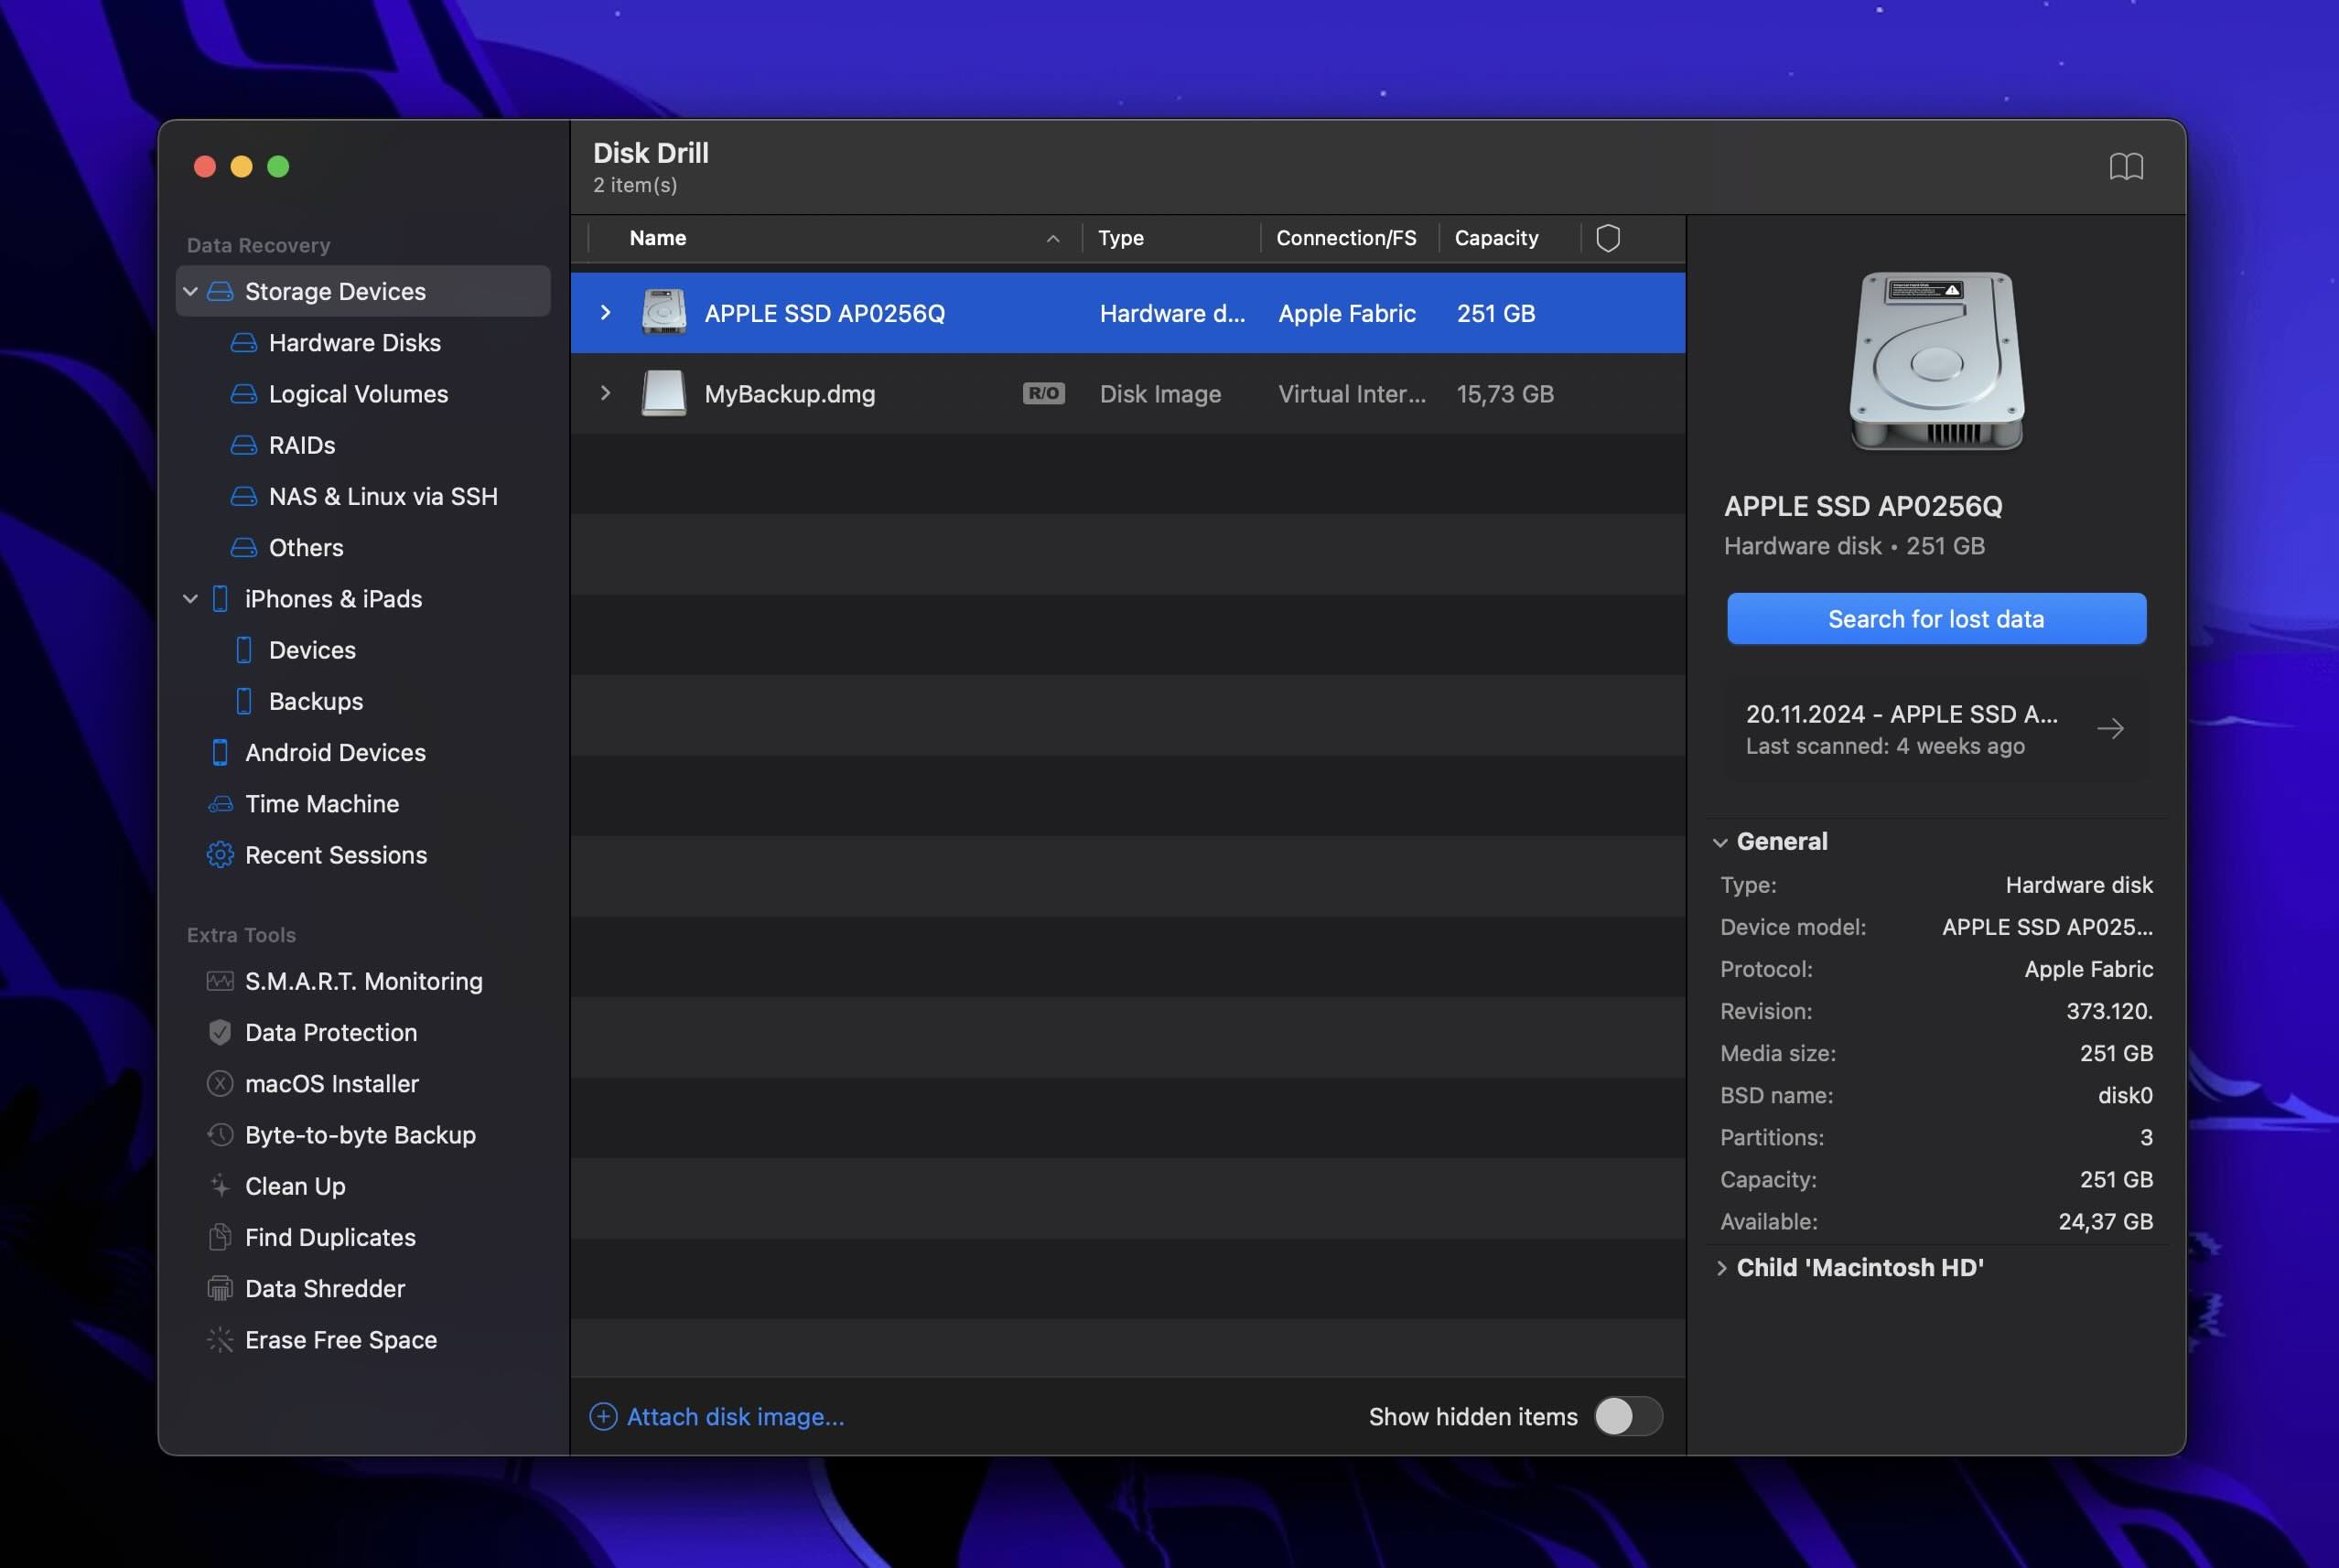
- Then click Search for lost data to begin the scan.
- You can click Review found items right after the scan ends or even before it does. If you don’t want to wait until the entire process finishes, you can check the results as they appear. Disk Drill updates the list in real time, and the number of recoverable files grows as the scan goes on.
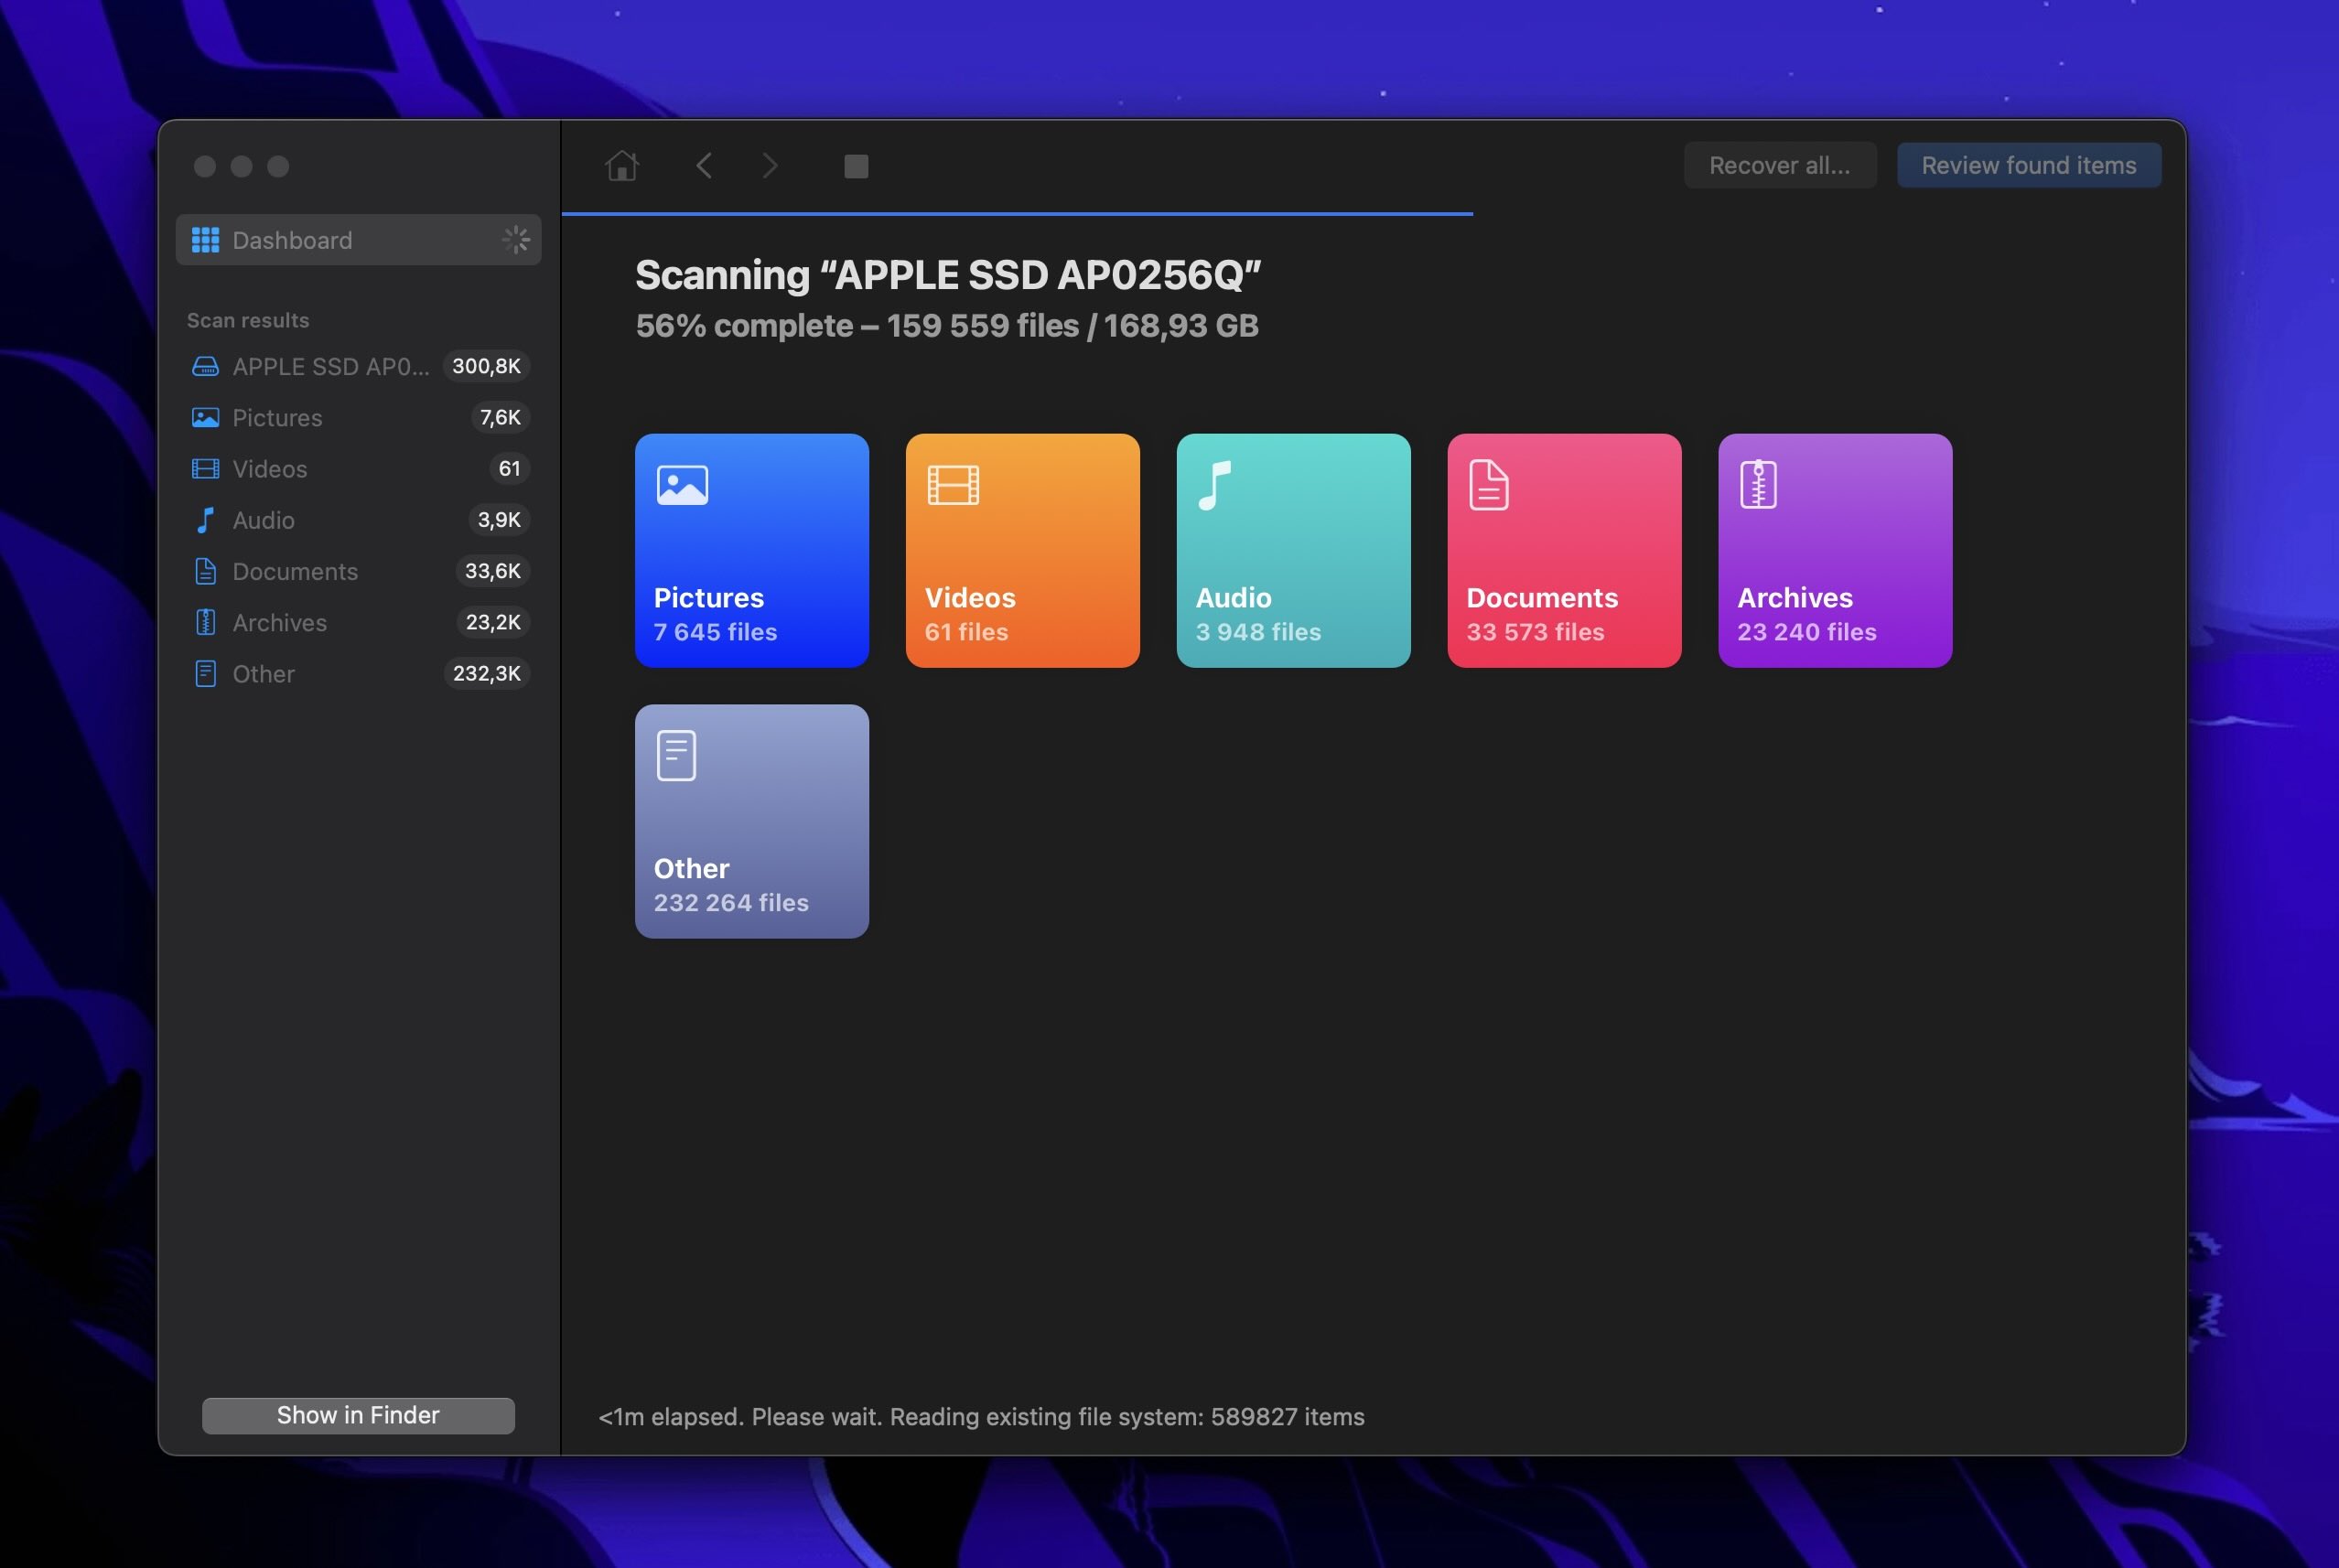
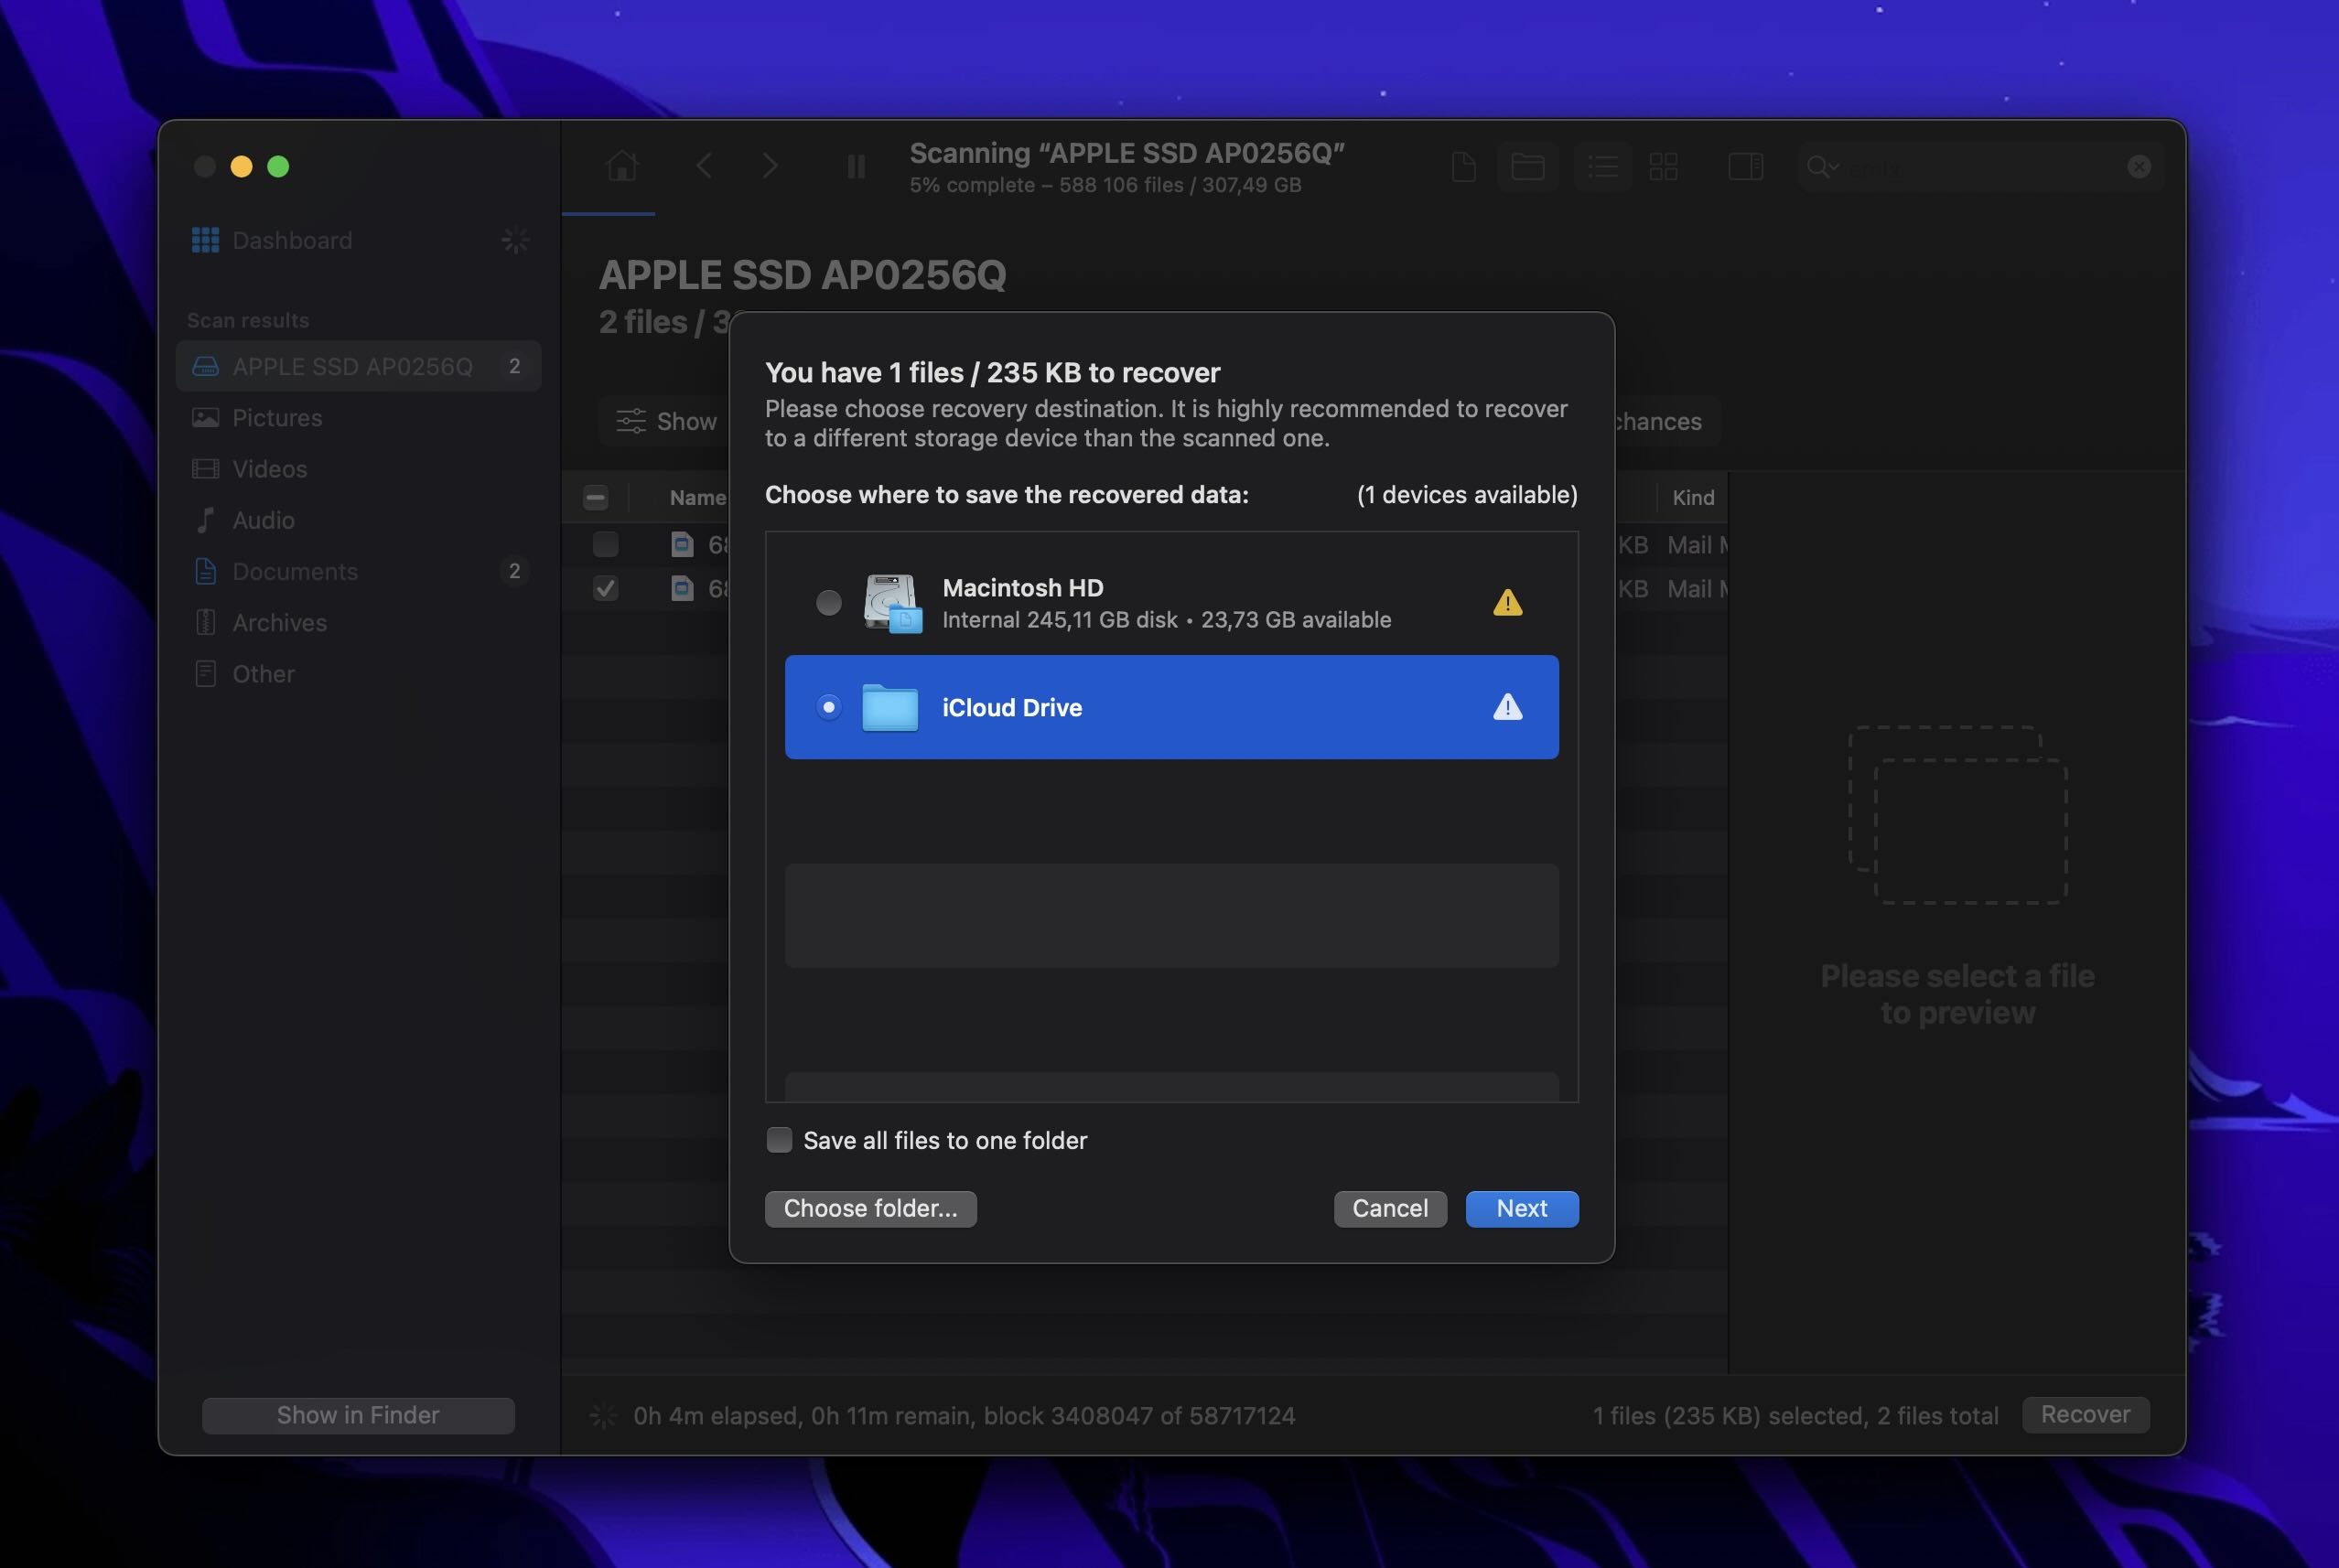
- To quickly find deleted emails on your Mac, type MBOX or EMLX in the search bar in the upper-right corner of the window. Your MBOX data usually comes in folder – fortunately, Disk Drill can recover deleted folders as a whole. Once you locate your MBOX folder or EMLX files, tick the boxes in the left-most column and click Recover.

- In the popup that appears, select a location to store your data. Always save a recovered file to a separate drive – never to the same drive you’re recovering. This helps you avoid overwriting data. Once you’ve chosen a destination folder, click Next.
Disk Drill’s Basic version for Mac lets you scan and preview unlimited files, so you can see what’s recoverable. To save any recovered files, you’ll need to upgrade to the PRO version.
Disk Drill is a highly capable tool, and if there’s anything left to recover, it’s likely to find it. However, if you feel that Disk Drill isn’t the right fit for you, check out our list of Disk Drill alternatives.
By the way, if you have an SSD, recovery becomes much trickier and is often impossible. This is because SSDs use a feature called TRIM, which automatically clears deleted data to optimize performance. You can learn more about this in our guide on SSD data recovery.
Option B: Use Time Machine Backup
For users of macOS Mojave (10.14) and below:
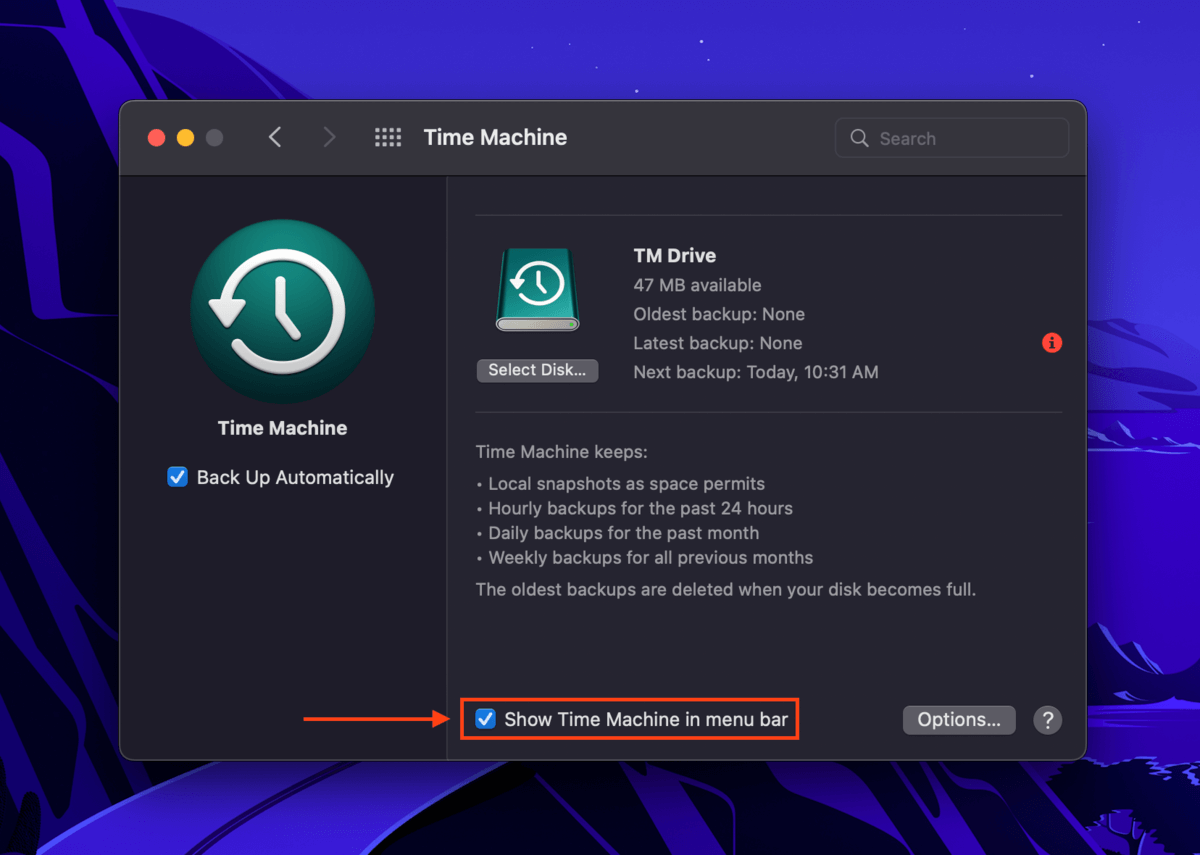
You can restore deleted emails from a Time Machine backup the same way you restore files using Time Machine in Finder. To do this, you must first make sure to enable the Show Time Machine in menu bar setting in the System Preferences > Time Machine window.
Once this setting is enabled, open your Mail app. Then, on the Apple menu bar, click the Time Machine button > Enter Time Machine. Use the arrows on the right of the screen to browse through earlier versions of your Apple mail files. Once you find the content you need, select it and click the Restore button.
Time Machine is the best way to recover deleted files on a Mac without software. But for this method to work, you need to have set up Time Machine beforehand and created backups of your emails before you lost them. This method is not applicable for macOS Catalina (10.15) and above.
For users of macOS Catalina (10.15) and above:
While users running more recent macOS versions can’t launch Time Machine directly over the Mail app, it is possible to restore a backup of the system folders that store MBOX (mailbox folders) or EMLX (individual emails) data.
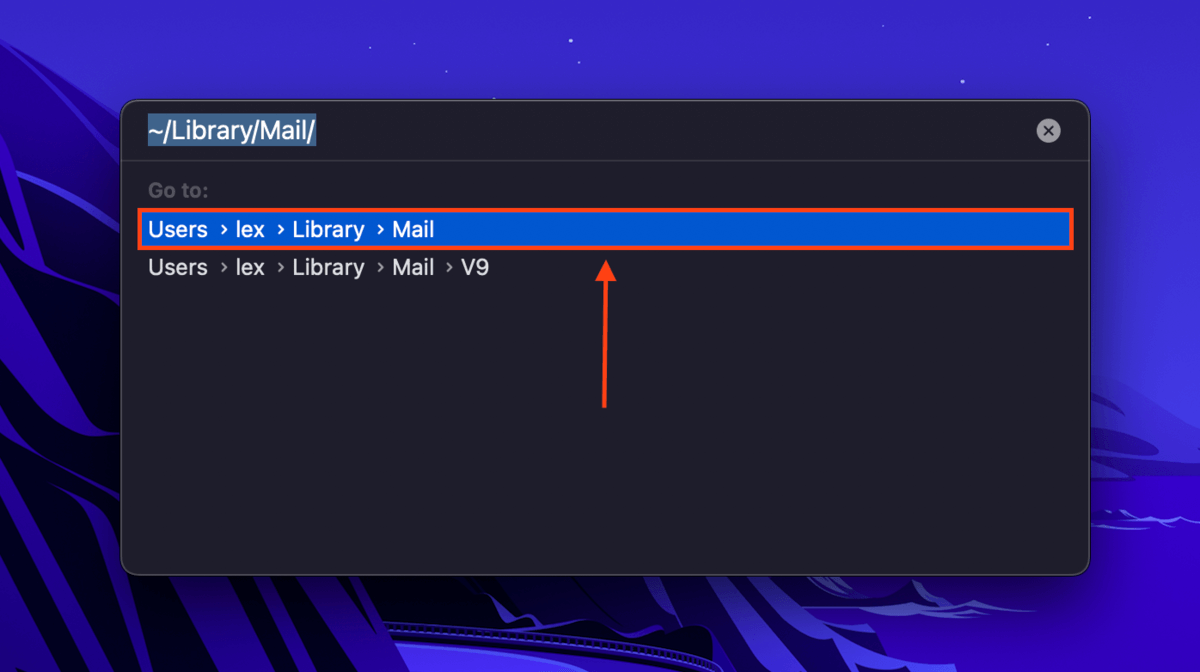
To do so, make sure that the Time Machine button is enabled (System Settings/Preferences > Time Machine) and navigate to the ~/Library/Mail/ folder folder as we talked about before, using the Finder > Go > Go to Folder… tool.
Once in the Mail folder, click the Time Machine button > Enter Time Machine or Browse Time Machine Backups and use the arrows on the right to navigate to a backup that was created before you deleted your mail. Then, select the MBOX folder or EMLX files you want to recover and click Restore.
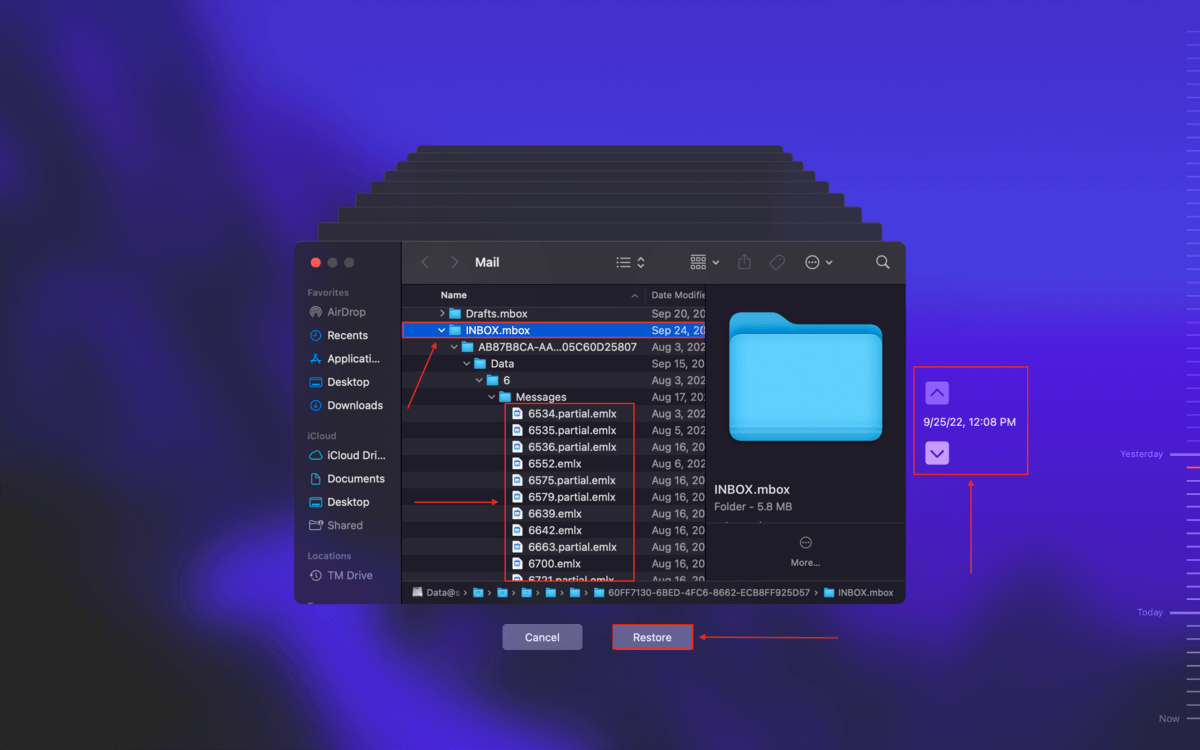
By the way, you can restore your files to a different location if you want to play it safe and avoid overwriting anything important. This keeps your current files intact and gives you a chance to sort through the recovered data. In Time Machine, navigate to the file or folder you need, then Control-click (or two-finger tap, or right-click—whatever suits you) and select “Restore to…” from the contextual menu.
I’ve Recovered My Email Files – What’s Next?
So, you’ve got your email file back, but now what? You need to see them just like you normally do in your Mail app. Thankfully, it’s very easy to make that happen—all you need to do is import them into the Apple Mail app. Here’s how:
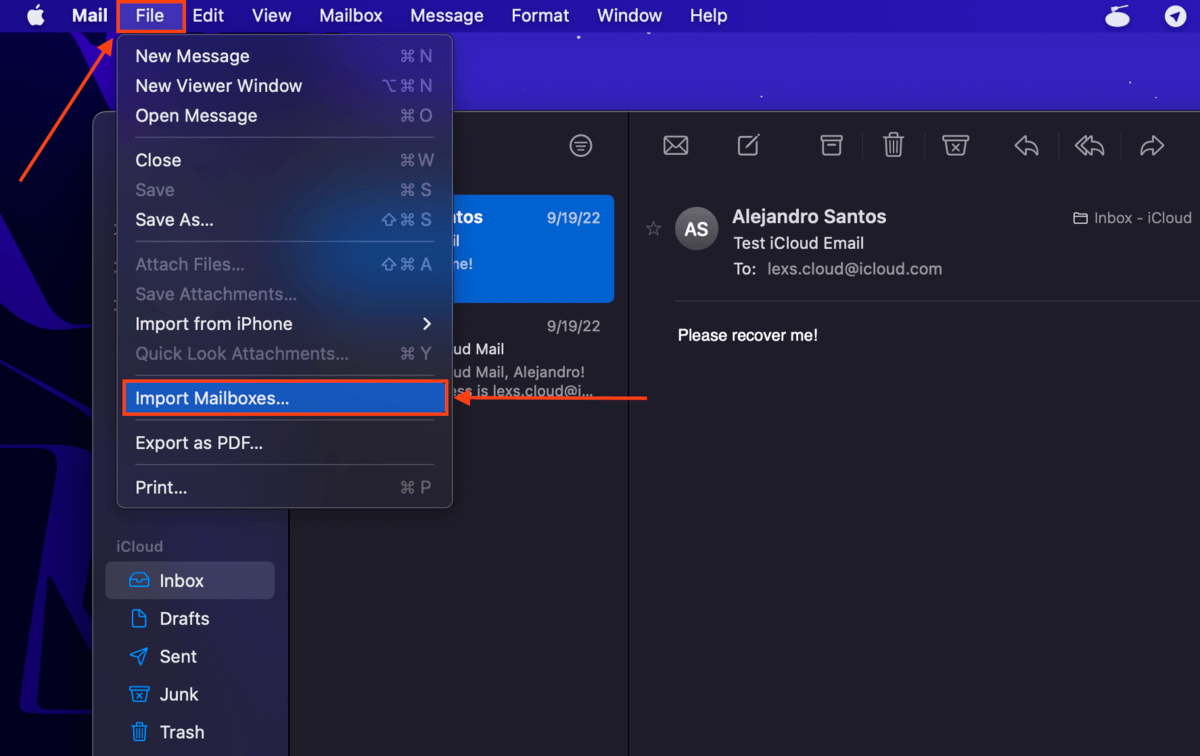
- Open Apple Mail.
- On the menu bar, click File > Import Mailboxes…
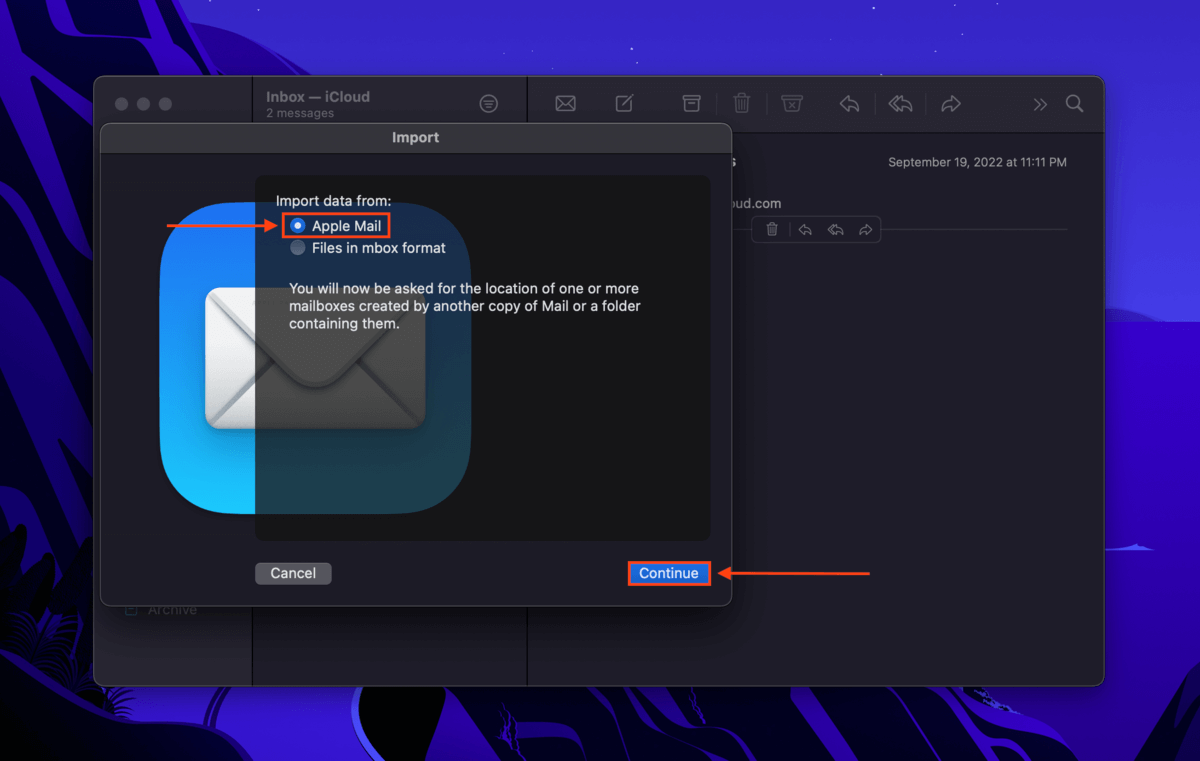
- Click Apple Mail and click Continue.
- Use the browser to locate and select your MBOX folder or EMLX file and click Choose.
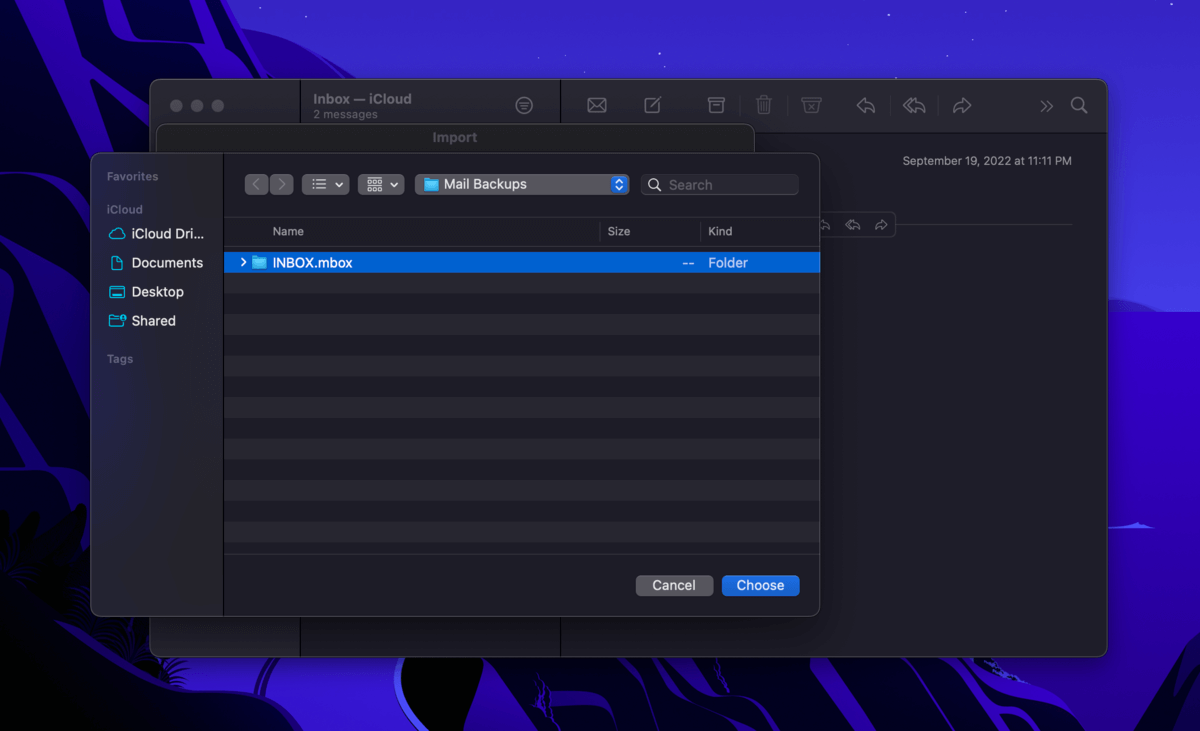
- Once you’re returned to the main Apple Mail window, you should find your imported data in an email folder called Import in the left sidebar. You can then move any of your mail to any mailbox you want.
FAQ
Can I recover permanently deleted emails on Mac if I don’t have any backups?
Yes, you can recover permanently deleted emails on a Mac, even without backups, but it depends on a few factors. When emails are deleted, their data often remains on the drive until it’s overwritten by new files. Data recovery tools, such as Disk Drill, R-Studio, or UFS Explorer can scan your Mac’s drive for remnants of deleted email files like MBOX or EMLX and attempt to recover them.
To increase the chances of recovery, avoid using the drive where the emails were stored. And remember, the longer you wait, the higher the chances that the deleted data will be overwritten.
What data recovery software for Mac works best with emails?
Some of the best data recovery software for Mac that supports common email file formats like MBOX, EMLX, and MSG includes Disk Drill, R-Studio, and UFS Explorer. These tools are known for their reliable capabilities and broad file support, including email files.
Can I recover permanently deleted emails from iCloud?
No, you can’t. Once you delete an email, that information gets synced to the cloud and to the rest of your devices. However, iCloud Mail stores deleted mail in its own Trash folder for 30 days by default.
How do I recover deleted emails on my iPhone?
To recover deleted emails on your iPhone, follow these steps:
- Open the Mail app, go to your email account, and select the Trash folder. Most email providers store deleted emails here for a certain period (typically 30 days).
- Tap on the deleted email to open it, then tap the Move icon (a folder with an arrow) and choose Inbox or another folder to restore it.
- Or if you’ve just deleted the email and have the Shake to Undo feature enabled, shake your iPhone right away. This will undo the deletion.
How to recover deleted emails from Gmail on Mac?
To recover deleted emails from Gmail on Mac, access your Gmail through a web browser. Then select the Trash folder from the left sidebar. Right-click the email you want to restore > Move > Inbox.
This article was written by Alejandro Santos, a Staff Writer at Handy Recovery Advisor. It was recently updated by Roman Demian. It was also verified for technical accuracy by Andrey Vasilyev, our editorial advisor.
Curious about our content creation process? Take a look at our Editor Guidelines.