
Losing some important information from your Mac is never a pleasant experience. If you suddenly realize that you are missing a folder or some files, your first reaction may be to panic. Fortunately, there are multiple methods with which you can recover deleted files from your Mac or MacBook.
These methods don’t involve specialized software or sending the disk to a data recovery center. Some of them make use of native features of macOS while others make use of previously created backups of your data. Hopefully, one of these methods can restore your valuable information.
Reminder: The methods we describe below encompass all of the currently available ways to recover deleted data on a Mac without software. In some cases, these techniques may not be sufficient to resolve your data loss situation. You may need to use data recovery software to restore your files and folders. You can choose a reliable and reasonably priced product like Disk Drill or consult our rankings of the best data recovery software solutions for Mac.
Methods to Recover Deleted Files on a Mac Without Software
Here are five methods you can use to try and recover lost or deleted files on your Mac without using data recovery software.
1. Trash Bin
The Trash Bin folder, which is usually simply called the Trash, is the first place to look for deleted files on a Mac machine. The Trash is a special folder that the operating system uses to temporarily stored deleted items. Use the following procedure to recover a deleted file or folder from the Trash Bin.
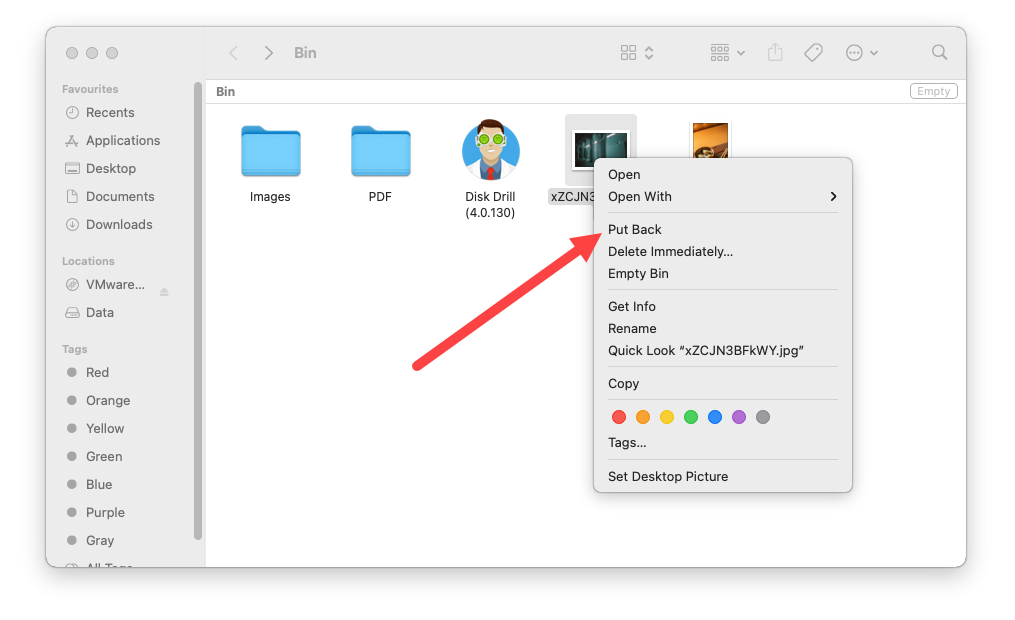
- Click on the Trash Bin icon to open the Trash folder.
- Search for the files you would like to recover.
- Right-click on the chosen items and select the Put Back option to restore files from the Trash back to their original location.
Emptied trash by mistake? Don’t worry, you still have options to recover accidentally emptied Trash on Mac.
2. Undo Option
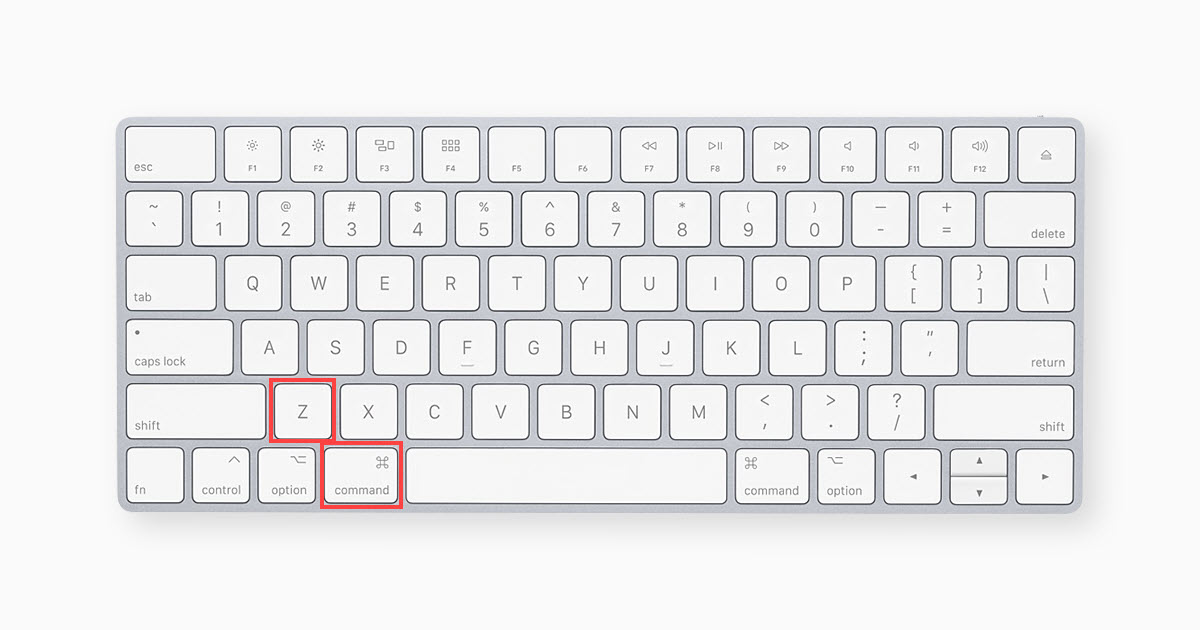
A very simple method of recovering a recently deleted file is with the macOS Command-Z keystroke combination. If you realize you have mistakenly just deleted a file, simply press the Command-Z to undo your last action. This method needs to be executed quickly, as each subsequent action you take on your Mac reduces the possibility that the file can be recovered. It’s worth a try but refrain from getting frustrated if it fails to restore the deleted file.
An important point to remember is that this method will not reverse the act of emptying the Trash Bin. Once the Trash has been emptied, your recovery options will be limited to recovering from a backup or using a third-party software solution.
3. Terminal
This solution is essentially another way to access files that are resident in the Trash Bin. If you have emptied the Trash, move on to the recovery methods that take advantage of your backups to restore your data. When you use the Put Back option from within the Trash Bin, you are performing the following procedure in a more streamlined and user-friendly way.
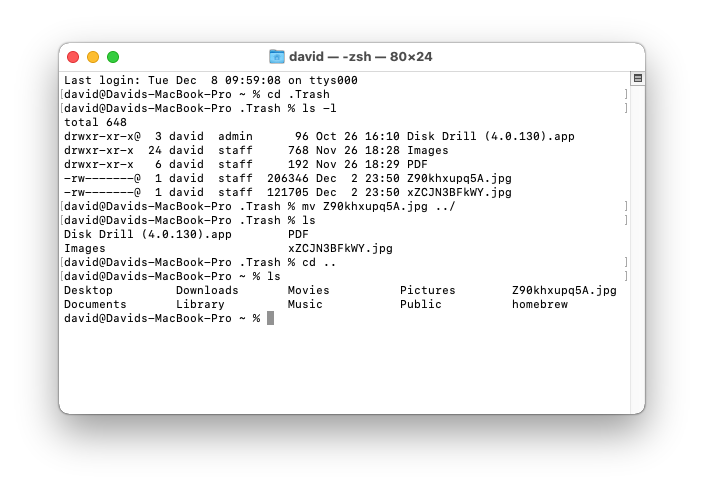
- Open the Terminal application on your Mac.
- Enter the command cd .Trash and hit Return to go to the Trash folder.
- Type this command with the name of the file you want to recover using this format mv xxx.xxx ../ where xxx.xxx is the full filename and extension.
- Hit Return.
- Type Quit to close Terminal.
- Open a Finder window or navigate to your home folder and verify the file has been successfully moved.
You can also read our comprehensive guide on recovering deleted files using Mac Terminal.
A word on backups: You need to take the practice of backing up your data seriously. There may be times when a backup is the only way to recover your lost data. We will look at recovering from two Apple-based backup solutions, Time Machine and iCloud, but there are other third-party and cloud backup services available. Make sure you use one if you value your data.
4. Time Machine
Time Machine is the backup and recovery tool that Apple ships with macOS. It requires you to use an external storage device to store your data backups. If you haven’t yet set up Time Machine, check out this Apple support page and start backing up your Mac today!
Once it’s set up you can manually backup your machine on-demand or schedule backups to occur regularly. The following procedure should be followed to restore data from a Time Machine backup.
- Open a Finder window in the Folder where the lost data was stored. For example, if you deleted a file from your Pictures folder, open Finder in the Pictures folder.
- Open Time Machine by clicking the clock icon on your menu bar, from Launchpad, or by choosing it in System Preferences.
- Use the arrows and timeline to browse the local snapshots and backups.
- Select one or more items you want to restore and click Restore.
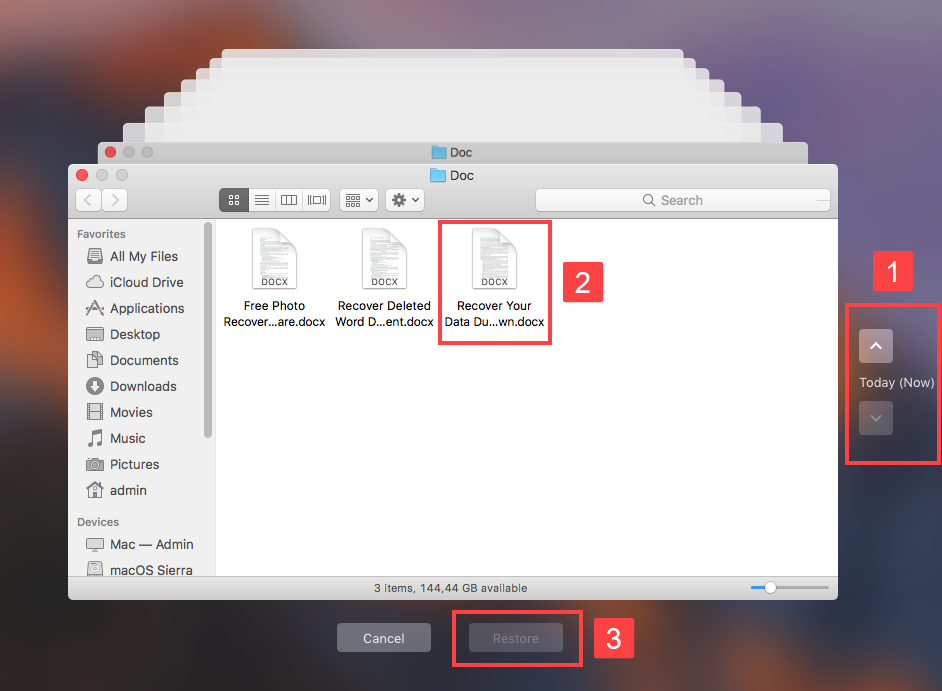
Restored items will be recovered to their original location.
5. iCloud Drive
iCloud is Apple’s cloud storage solution and your Mac has a direct connection to it with your iCloud Drive. If you need to set up your iCloud Drive, check out this Apple help page. You can configure the drive to automatically store items from specified folders, like Documents and Desktop.
Files stored on the iCloud Drive are backed up to the cloud. This allows you to easily recover them to any device that has an Internet connection. Items in your iCloud Drive can be recovered from iCloud if they are deleted.
Restore a file deleted from iCloud
Files deleted directly from your iCloud Drive can be recovered for up to 30 days after the deletion with the following procedure.
- Go to iCloud.com and login with your Apple ID.
- Open iCloud Drive and click Recently Deleted in the bottom-right corner of the window.
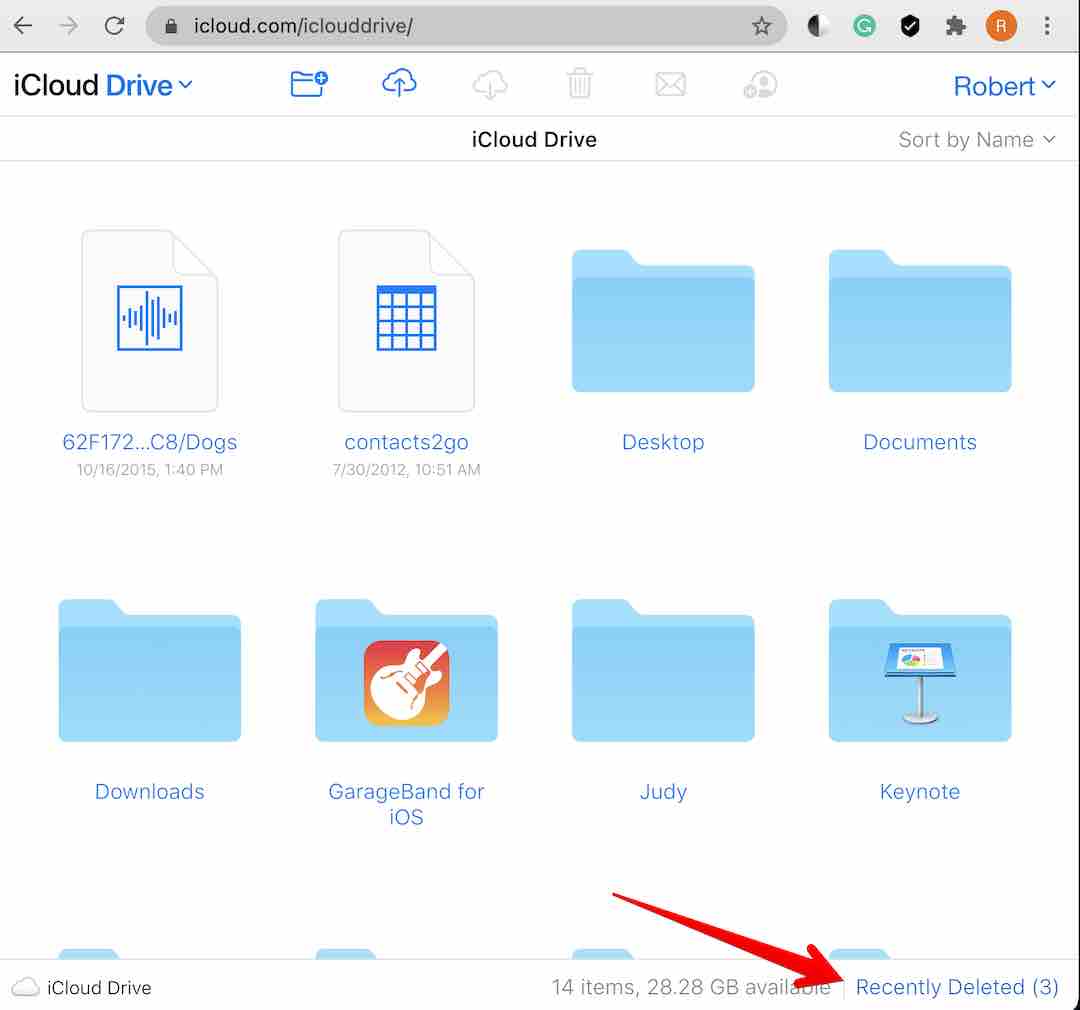
- Click Recover All or select the items you wish to restore and then click Recover.
Restoring data deleted from other applications
Follow these steps to recover files deleted from within an app on your Mac.
- Go to iCloud.com and login with your Apple ID.
- Under your Profile’s drop-down menu, select Settings and then Advanced.
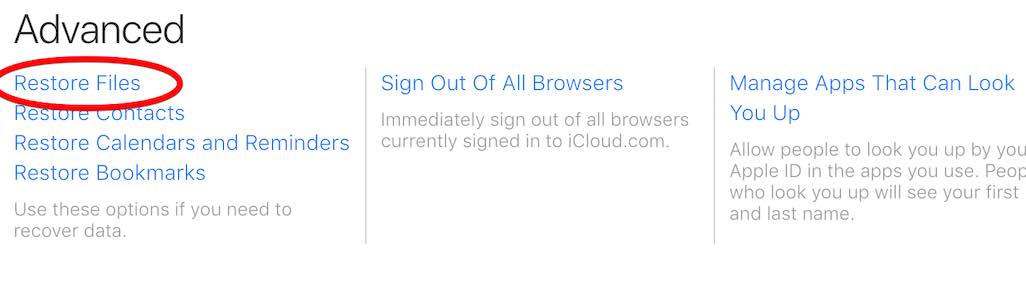
- Click Restore Files.
- Select individual files or Select All.

- Click Restore to recover the files to their original locations.
A limitation of this recovery method is that you have to be using iCloud and you can only recover files for 30 days after they have been deleted.
FAQ
Why it is even possible to recover recently or permanently deleted files on Mac?
The reason you can recover deleted files from your Mac is that when macOS deletes an item, it does not physically remove it from storage. It marks the space occupied by the item as being available for future use. Until the data is overwritten it can be recovered.
What can I do to increase the success rate of deleted file recovery on Mac?
The most important thing you can do to increase the success rate of deleted file recovery on Mac is to stop using the storage device that contained the lost item until you have completed its recovery. Using the device risks overwriting the data before it can be recovered.
Are there any app-specific recovery features on a Mac?
Yes, there are recovery features built into many of the apps that run on your Mac. In some cases, such as with iTunes, you can restore past purchases and songs easily from the cloud. The Mail app keeps deleted items in a Trash folder for a designated number of days. Other apps like Contacts, Photos, and Notes keep deleted items in a Recently Deleted folder where they can easily be retrieved.
Conclusion
As you can see, there are multiple ways to recover from accidentally deleting a file on your Mac. We can’t overemphasize the importance of backing up your data. It may seem like a waste of time, but when you lose an important file, it can be a life-saver.
With any luck, you will be able to recover your lost file or folder using one of the methods described above. If these methods fail, you should consider trying data recovery software that can recover data that has not been overwritten by repairing the logical links deleted by macOS. Good luck!
This article was written by Robert Agar, a Staff Writer at Handy Recovery Advisor. It was also verified for technical accuracy by David Morelo, our editorial advisor.
Curious about our content creation process? Take a look at our Editor Guidelines.