
If you are a Mac user, you are probably familiar with many of its useful tools. One of them is Notes, an app designed for quickly jotting down your ideas. Whether you need to save useful links, important memos, or to-do lists, Notes is here to get the job done.
And it all works great until you realize that some of the notes are missing. Maybe they disappeared after you’ve installed an update or you’ve accidentally deleted them. That doesn’t matter. What you need are efficient ways to restore them and get on with your work. Today, we will show you 5 ways that can make that happen.
Where Does Mac Store My Notes?
For extra security, Mac gives you 2 ways in which you can save your work. Ideally, you should rely on them both.
- 💻 Hard Drive. One of them is to store your notes locally. By default, they are saved in ~/Library/Group Containers/group.com.apple.notes/.
- ☁️ Cloud Storage. Your notes will also be stored online if you’ve synced them with iCloud, Apple’s official cloud service.
What Happened to My Deleted Notes?
Once notes are deleted, they will be stored in the Recently Deleted folder for 30 to 40 days. In case more time has passed, you will have to use recovery software to restore them.
If you’ve previously saved notes and haven’t overwritten them, partial, if not full, recovery is possible. But, it’s important that you act quickly.
Note: to maximize your chances of recovery, stop using Mac immediately, and disconnect it from the internet.
5 Best Ways to Recover Notes on a Mac
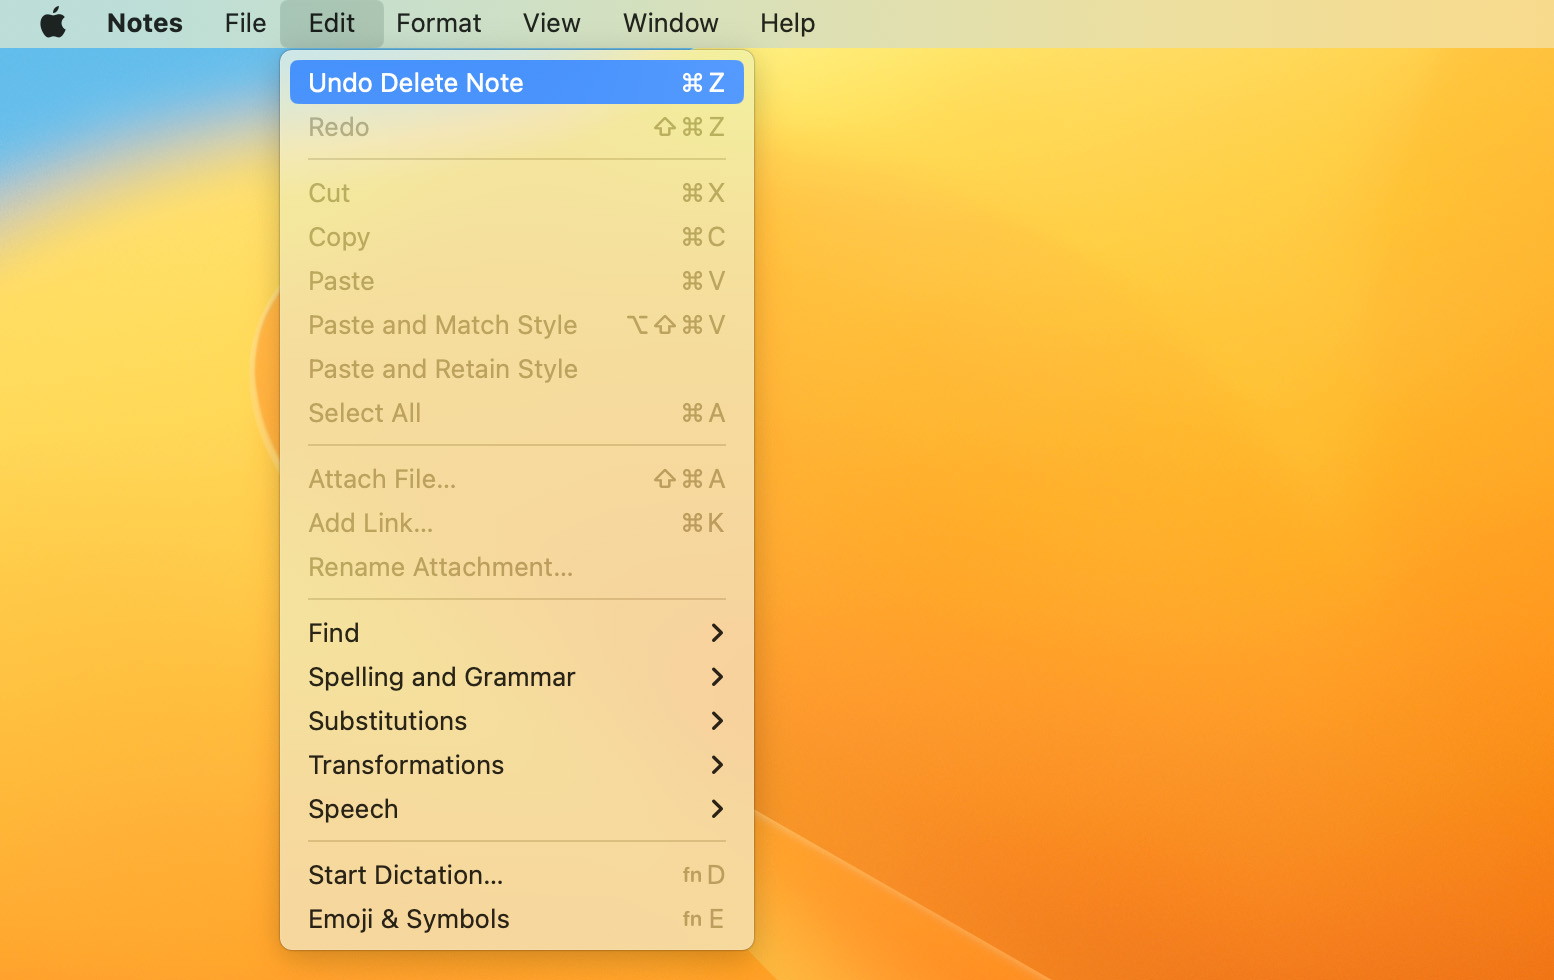
Method 1: Restore Lost Notes from the Recently Deleted Folder
In case your notes disappeared in the last month, they may still be in the app. Removed Notes don’t go to the Trash Bin, but are kept in the Recently Deleted folder before permanent deletion. To see recently deleted notes, here is how to access them.
- Go to the Notes App.
- Choose the Recently Deleted option from the sidebar on the left. In it, select the note that you wish to recover.
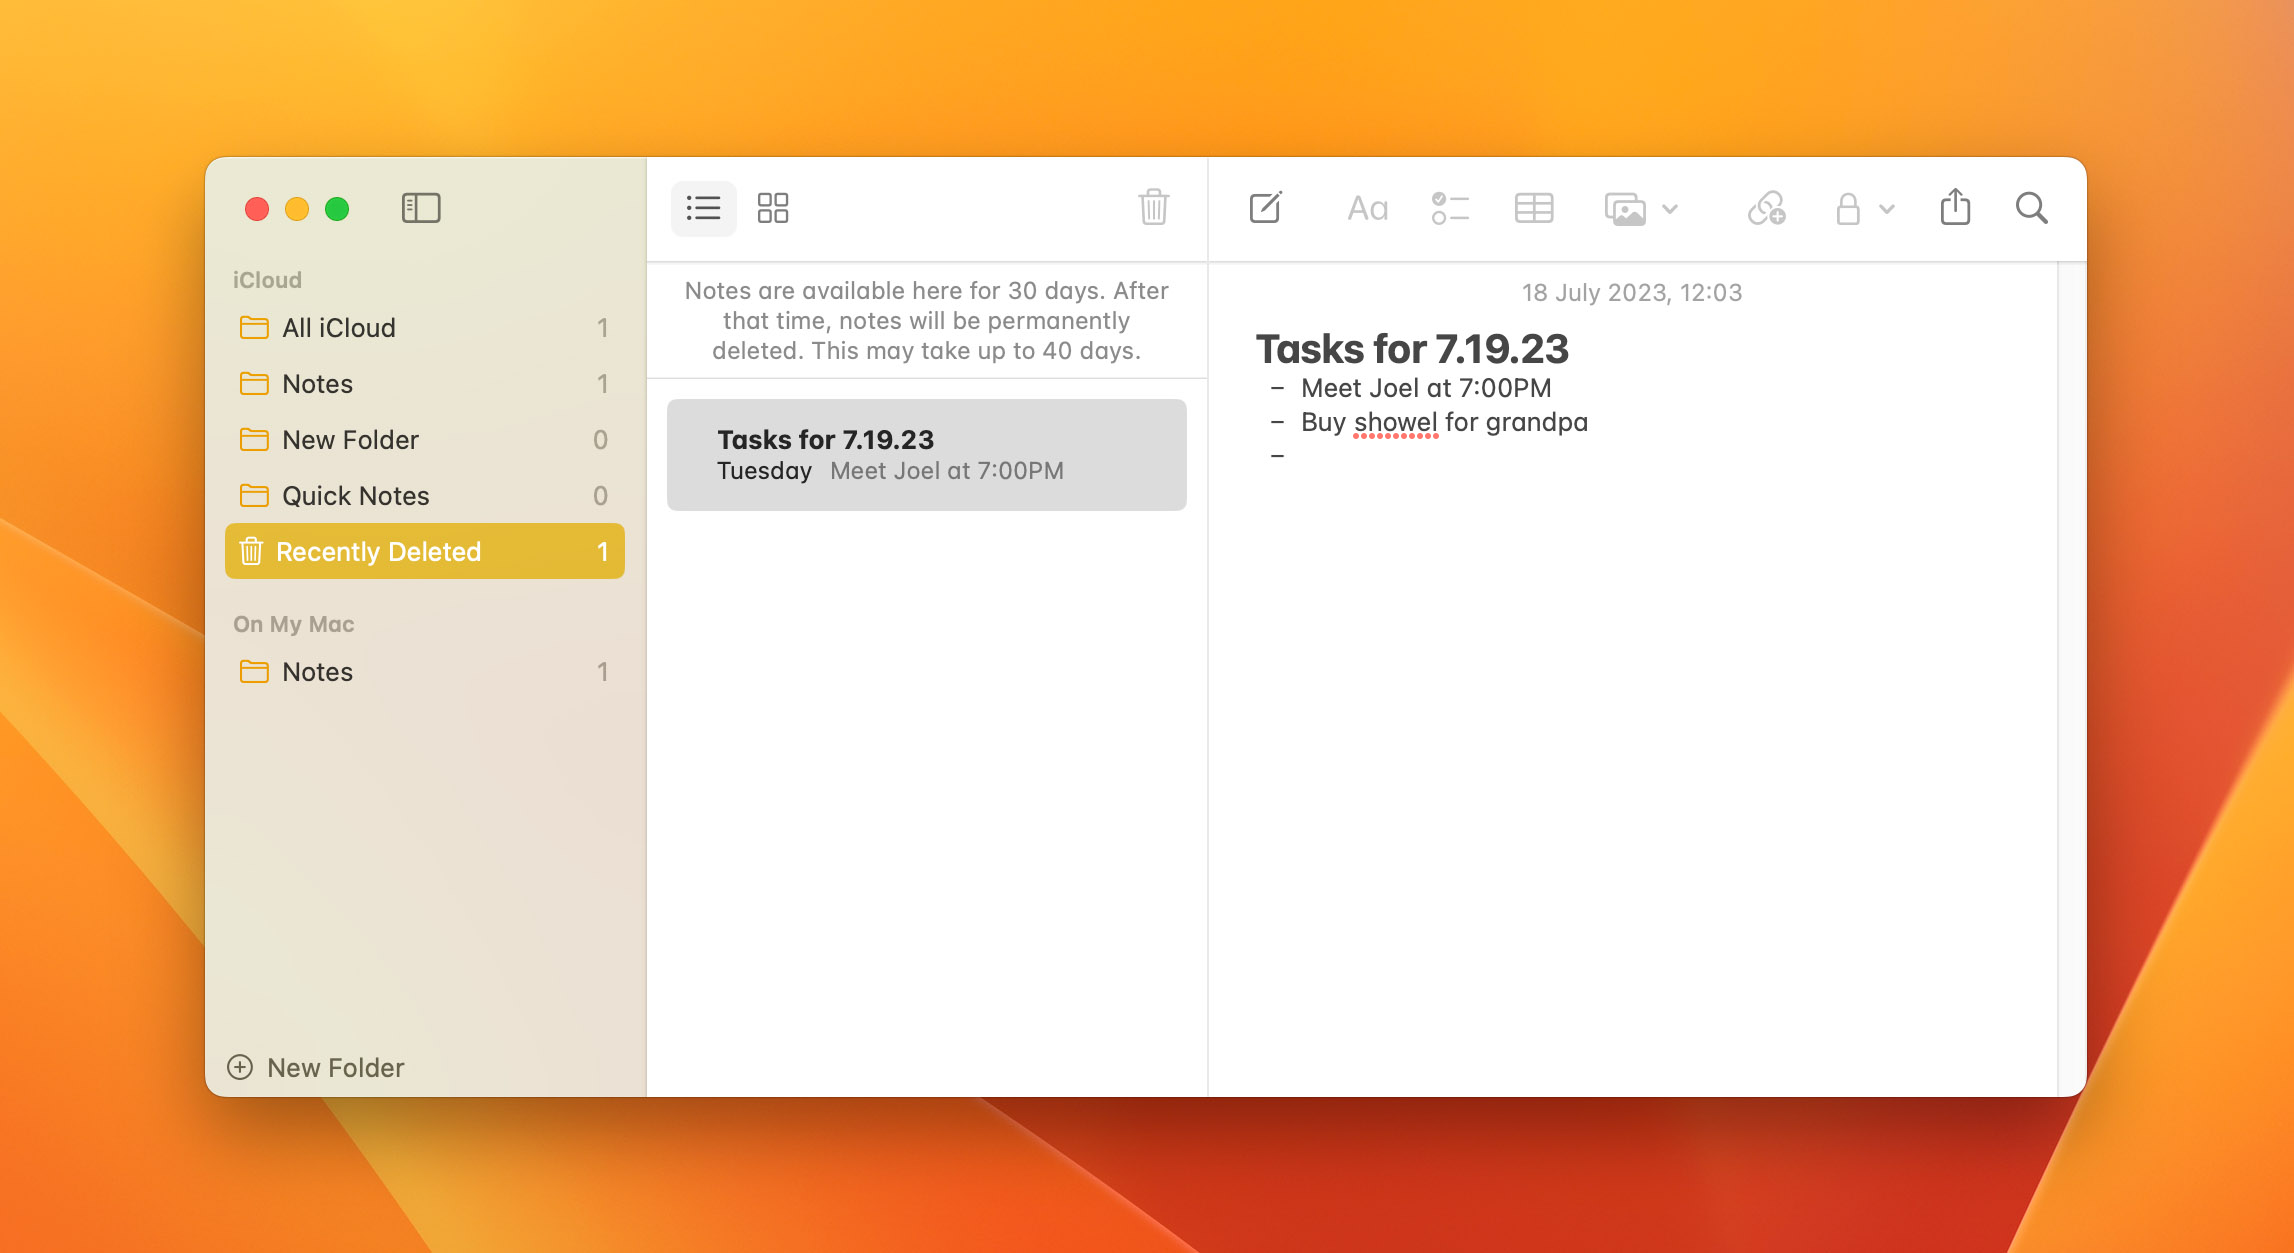
- Click on the top menu bar and go Edit > Undo Trash Note. You can also right-click on a note and pick a folder in which you want to restore it.
Method 2: Find Deleted Notes With iCloud
Cloud storage is very popular these days and rightfully so. By storing your data online, you are guaranteed to have access to them even in case of hard-drive failure and other unforeseen circumstances. In case you’ve synced your files with iCloud, it’s very straightforward to recover notes on Mac.
Guide to Recovering Files With iCloud
- First, it’s important to turn off iCloud syncing, so that the files on the cloud don’t get deleted as well. Go to System Preferences, open iCloud on the bottom, and uncheck the Notes box.

- Visit iCloud and log in with your Apple ID.
- Open Notes inside iCloud’s interface.
- Locate the deleted notes that you wish to restore and click recover to transfer them back to your Mac.
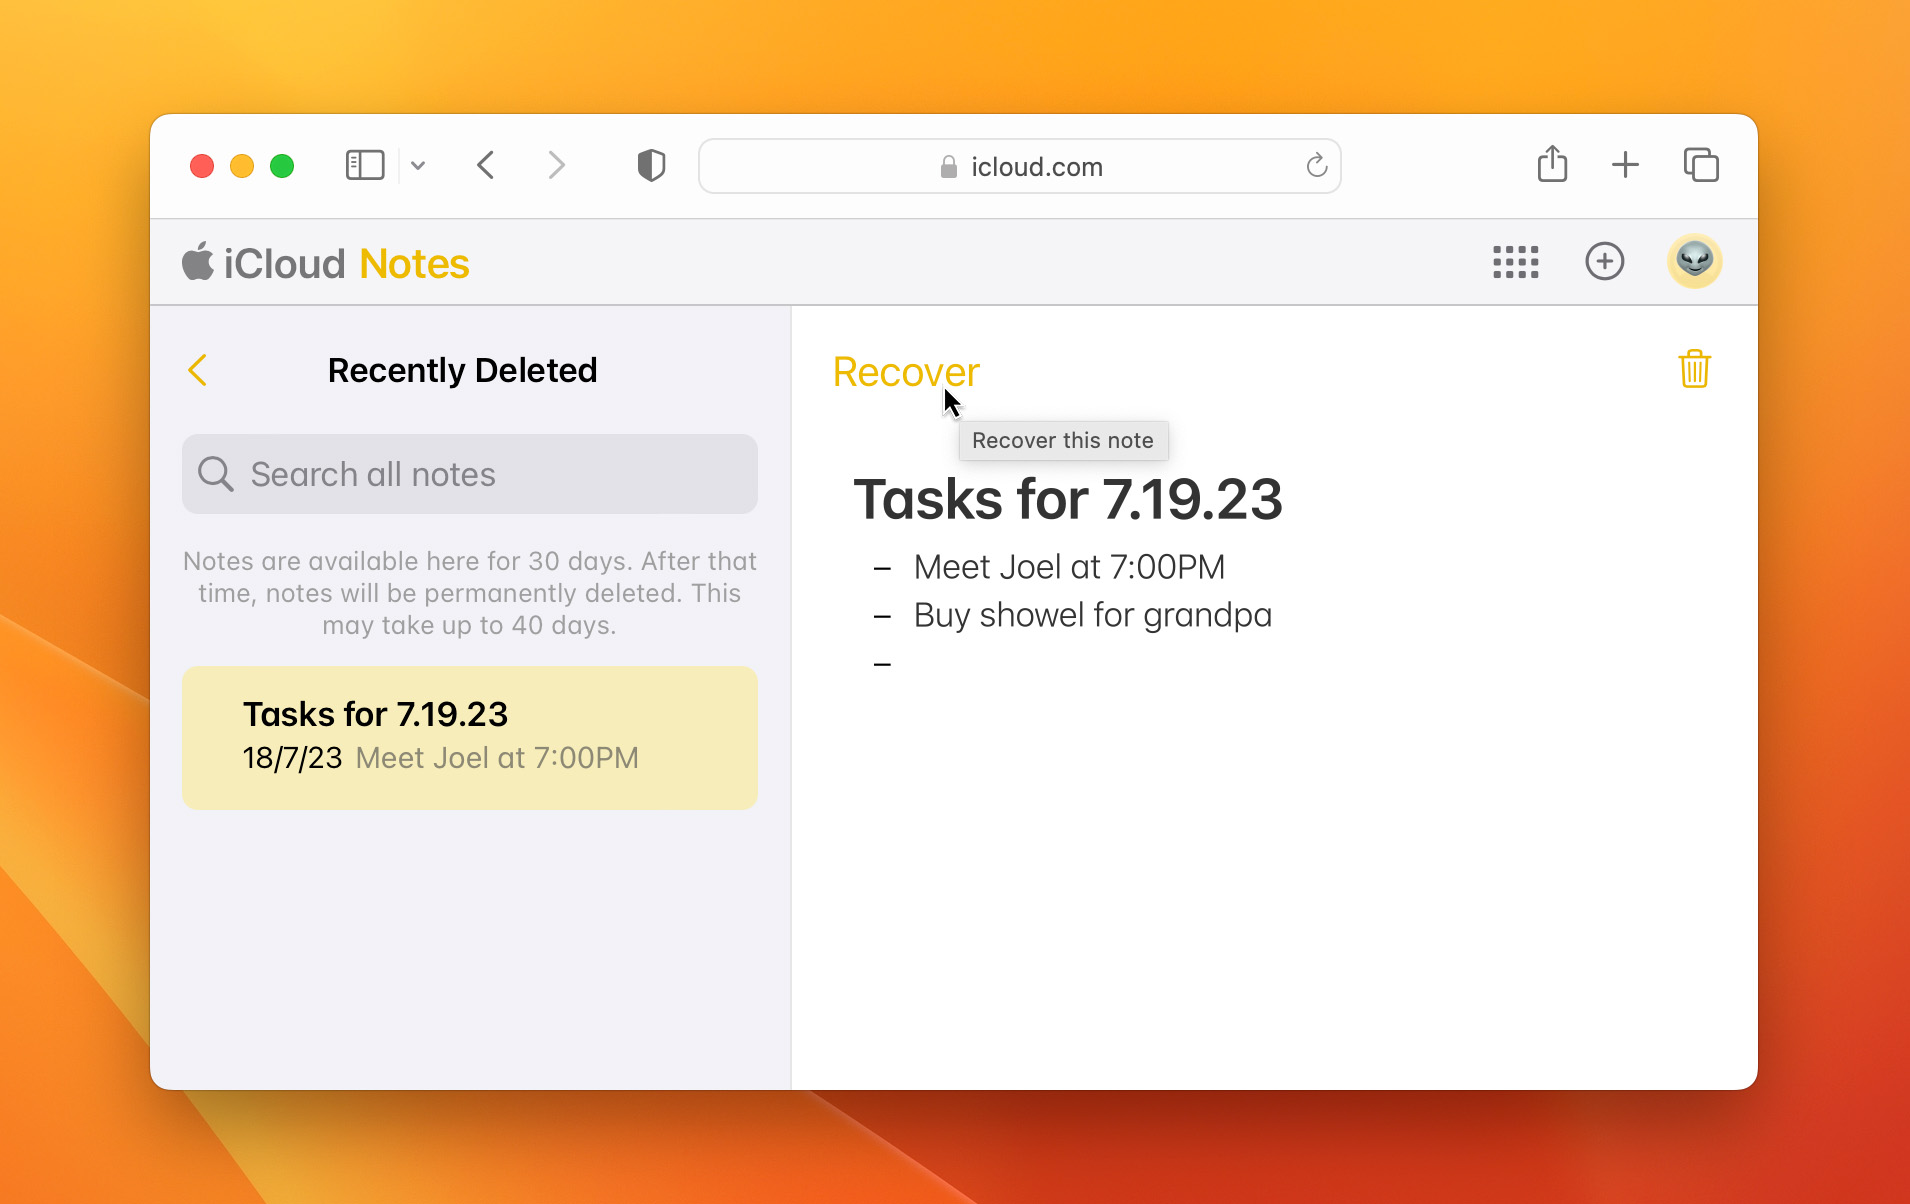
Note: don’t forget to turn iCloud syncing back on, so that your notes continue being protected.
Method 3: Recover Notes With Time Machine
Apple has always handled user files with great care, giving us a lot of options to protect them. One of them is Time Machine, a built-in feature that lets you back up every important file, such as music, documents, and memos, on your Mac. If Time Machine is enabled on your device, you can use it to bring back your lost notes.
Time Machine is a fast and easy-to-use method that’s very effective. However, it will overwrite your latest notes, so it’s necessary to protect them first.
How to Create Backup Before Starting Time Machine
There are 2 ways, and both are very easy to do.
- Open Notes > File > Export as PDF to convert your notes, and then move them to another storage location. Importing them back is also intuitive and can be done in seconds.
- Alternatively, you can copy the whole Notes database, which can be found here:
- ~/Library/Containers/com.apple.notes/Data/Library/Notes
- Additional notes files are stored here: ~/Library/Group Containers/group.com.apple.notes folder.
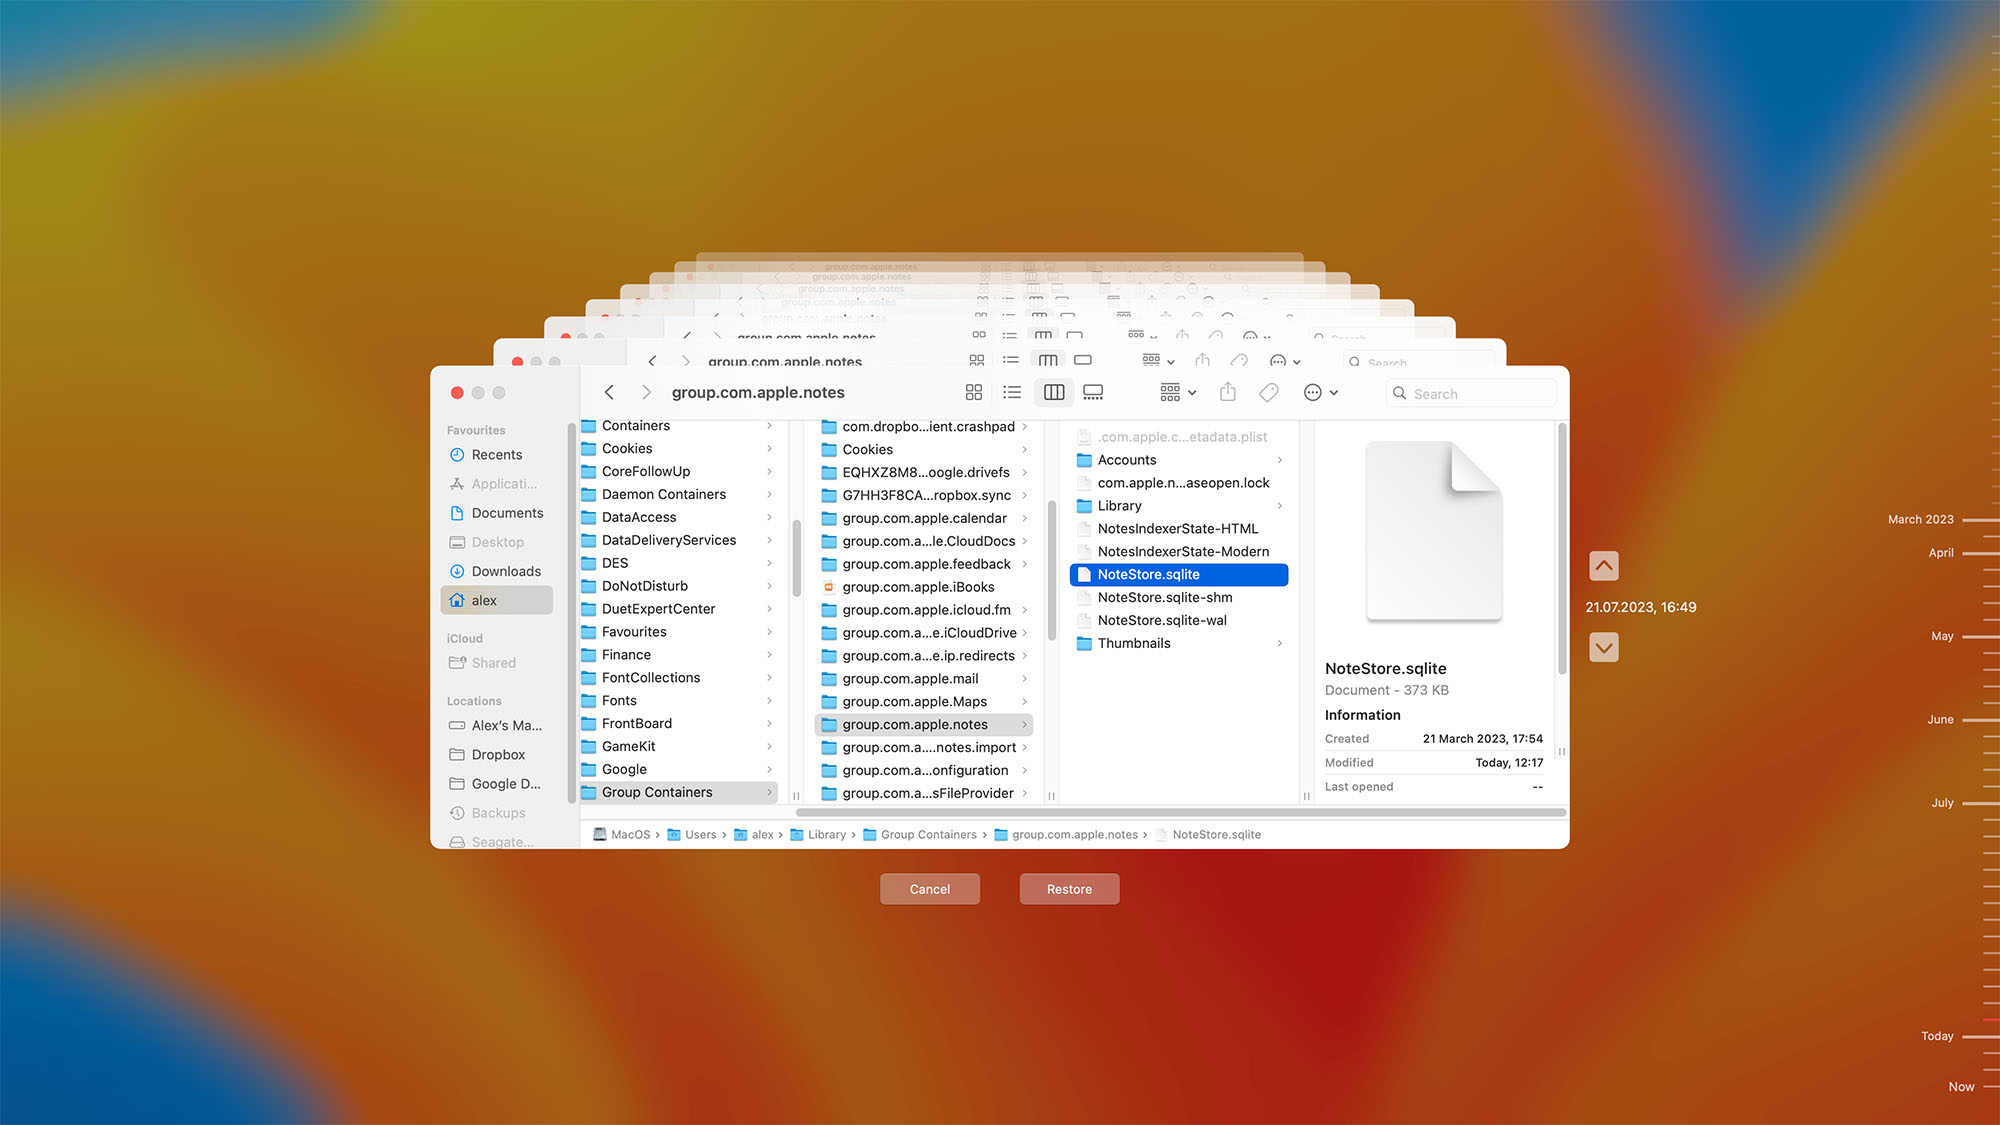
How to Use a Time Machine
After you’ve created a copy of your Notes database, it’s time for a 4-step recovery:
- Connect your backup drive to your Mac if it isn’t connected already.
- Close Notes and turn off iCloud syncing to prevent them from interfering.
- Open Finder and pick Go > Go to Folder from the menu bar.
- Enter the following path and confirm: ~/Library/Group Containers
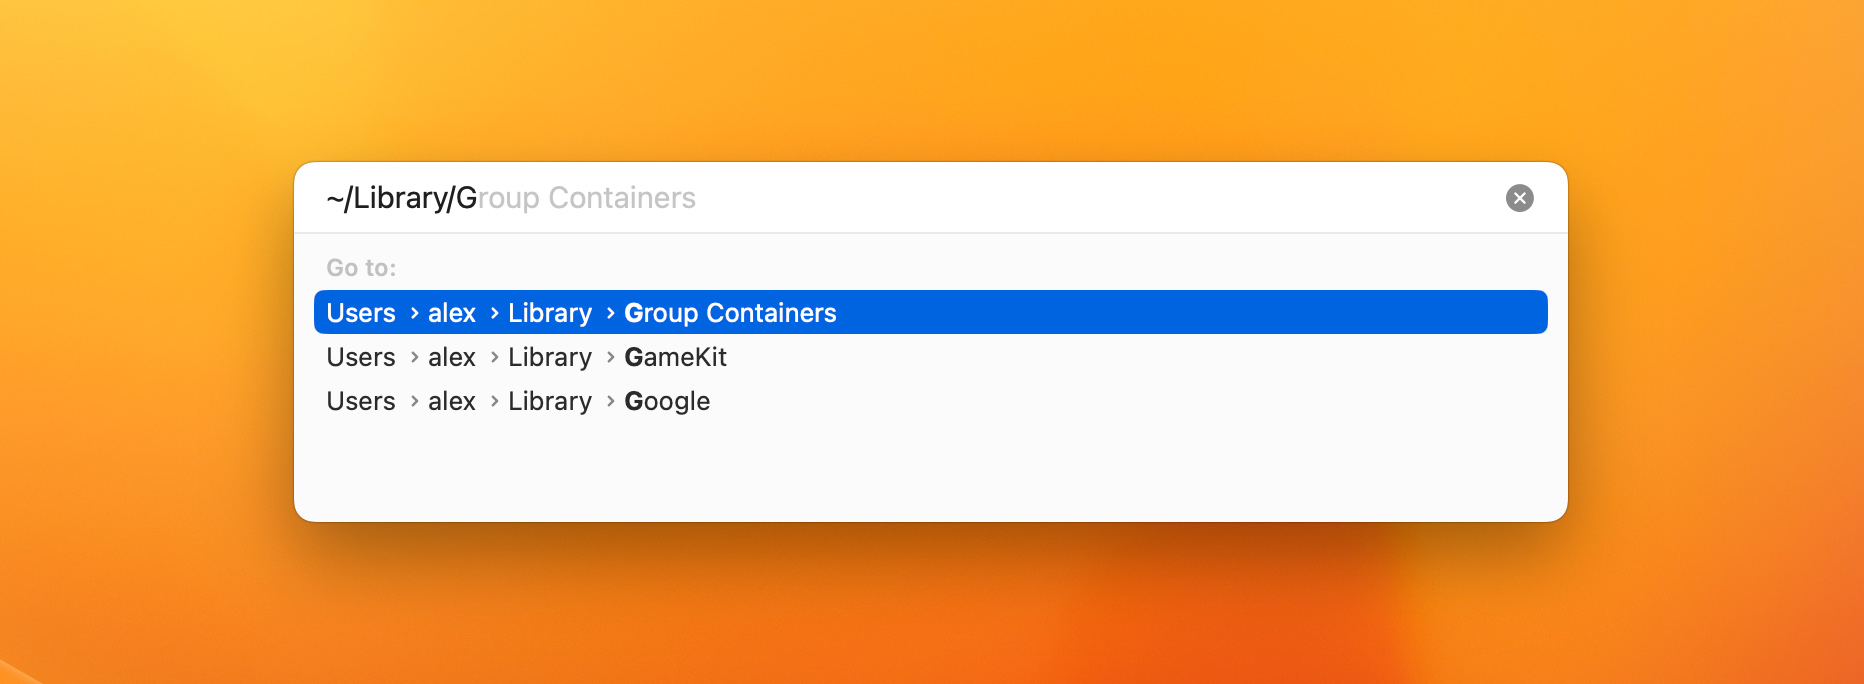
- Select the following folder: group.com.apple.notes
- On the right side of your menu bar click on the clock icon and select Browse Time Machine Backups.

- Choose an older version of the “group.com.apple.notes” folder (one that contains the notes you want to recover) using the arrows or the timeline and click Restore.
Note: Time Machine works only if you’ve created a backup before. Even then, if it’s too old, your notes will still be missing. In this case, you should consider using specialized data recovery software.
Method 4: Access Deleted Notes Through .storedata
The .storedata files are designed to temporarily store important information. You can easily browse to it and try to locate your missing notes from there.
- Open Finder and paste the following address ~/Library/Containers/com.apple.notes/Data/Library/Notes. This will open a folder with .storedata files.
- Copy all of the files to the folder of your choice.
- To open them, you will have to change the extensions from .storedata to .html and open them in any browser.
- Your notes should be displayed in text format. Copy and store them in a safe location.
Method 5: Use Data Recovery Software
If none of the above methods work, it’s time to use data recovery software for Mac. However, there’s a sea of these apps on Mac, some of which deliver mediocre results, at best. Others can even infect your computer with malware.
To come up with the best recommendation, we have tested a dozen of recovery apps and paid attention to the following metrics:
- 📈 Popularity: Apps get popular for a reason, and a top data recovery software will have a proven track record. Look what the users are saying about it on credible sites like MacUpdate and don’t simply trust the marketing.
- 😕 Ease of Use: The software also has to be intuitive so that even a casual user can recover deleted notes on Mac with ease. Look for apps with a minimalistic interface, but don’t confuse this with limited features.
- 🧰 Features: With more tools at your disposal, there’s a greater chance of successfully restoring your notes. A powerful recovery software will come with many features that will help you and also prevent future data loss.
- 💲 Price: Depending on the amount and value of the notes you’ve lost it may not be the best option to buy the most expensive software. On the other hand, completely free apps will probably not yield the best results. That’s why we narrowed our search for software that has the best ratio of price and features.
In the end, we’ve found that Disk Drill was the most successful with recovering lost files on Mac. So much so, that it became a go-to solution for our editorial team in case of accidental deletion. Disk Drill has a reasonable price, is very straightforward to use, and is very stable across various operating systems. Aside from recovery, there are other useful tools such as disk health, cleanup, and data backup that are also free.
Recover Notes on Mac Via Disk Drill
Disk Drill is a versatile data recovery software application that can recover hundreds of different file formats, including .notes which is the original file type, and notes exported as PDFs. Let’s take a closer look at how it works.
Step 1: Install Disk Drill
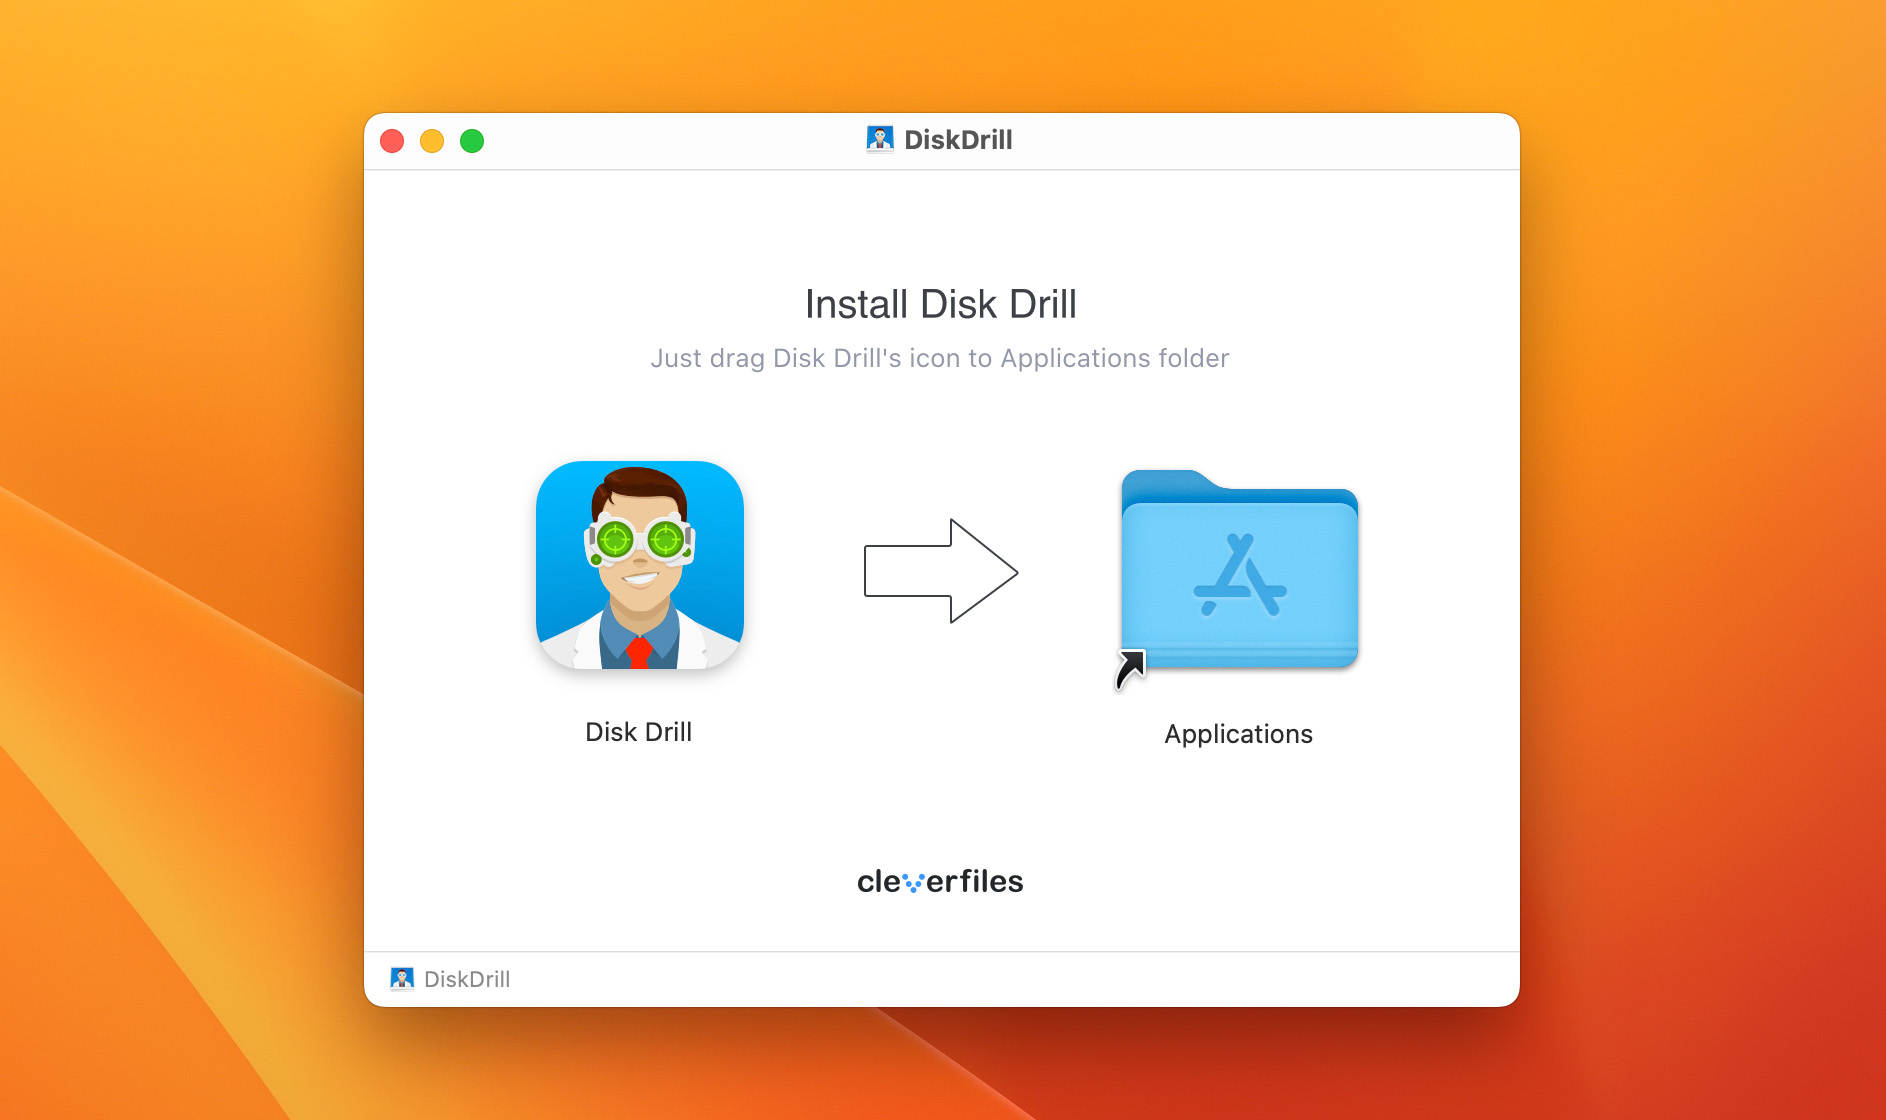
First, you need to download Disk Drill and install it on your Mac. Make sure that you don’t install it on the drive where your lost Mac notes were stored to avoid overwriting them with Disk Drill data, which would make their recovery impossible.
Step 2: Launch the Program
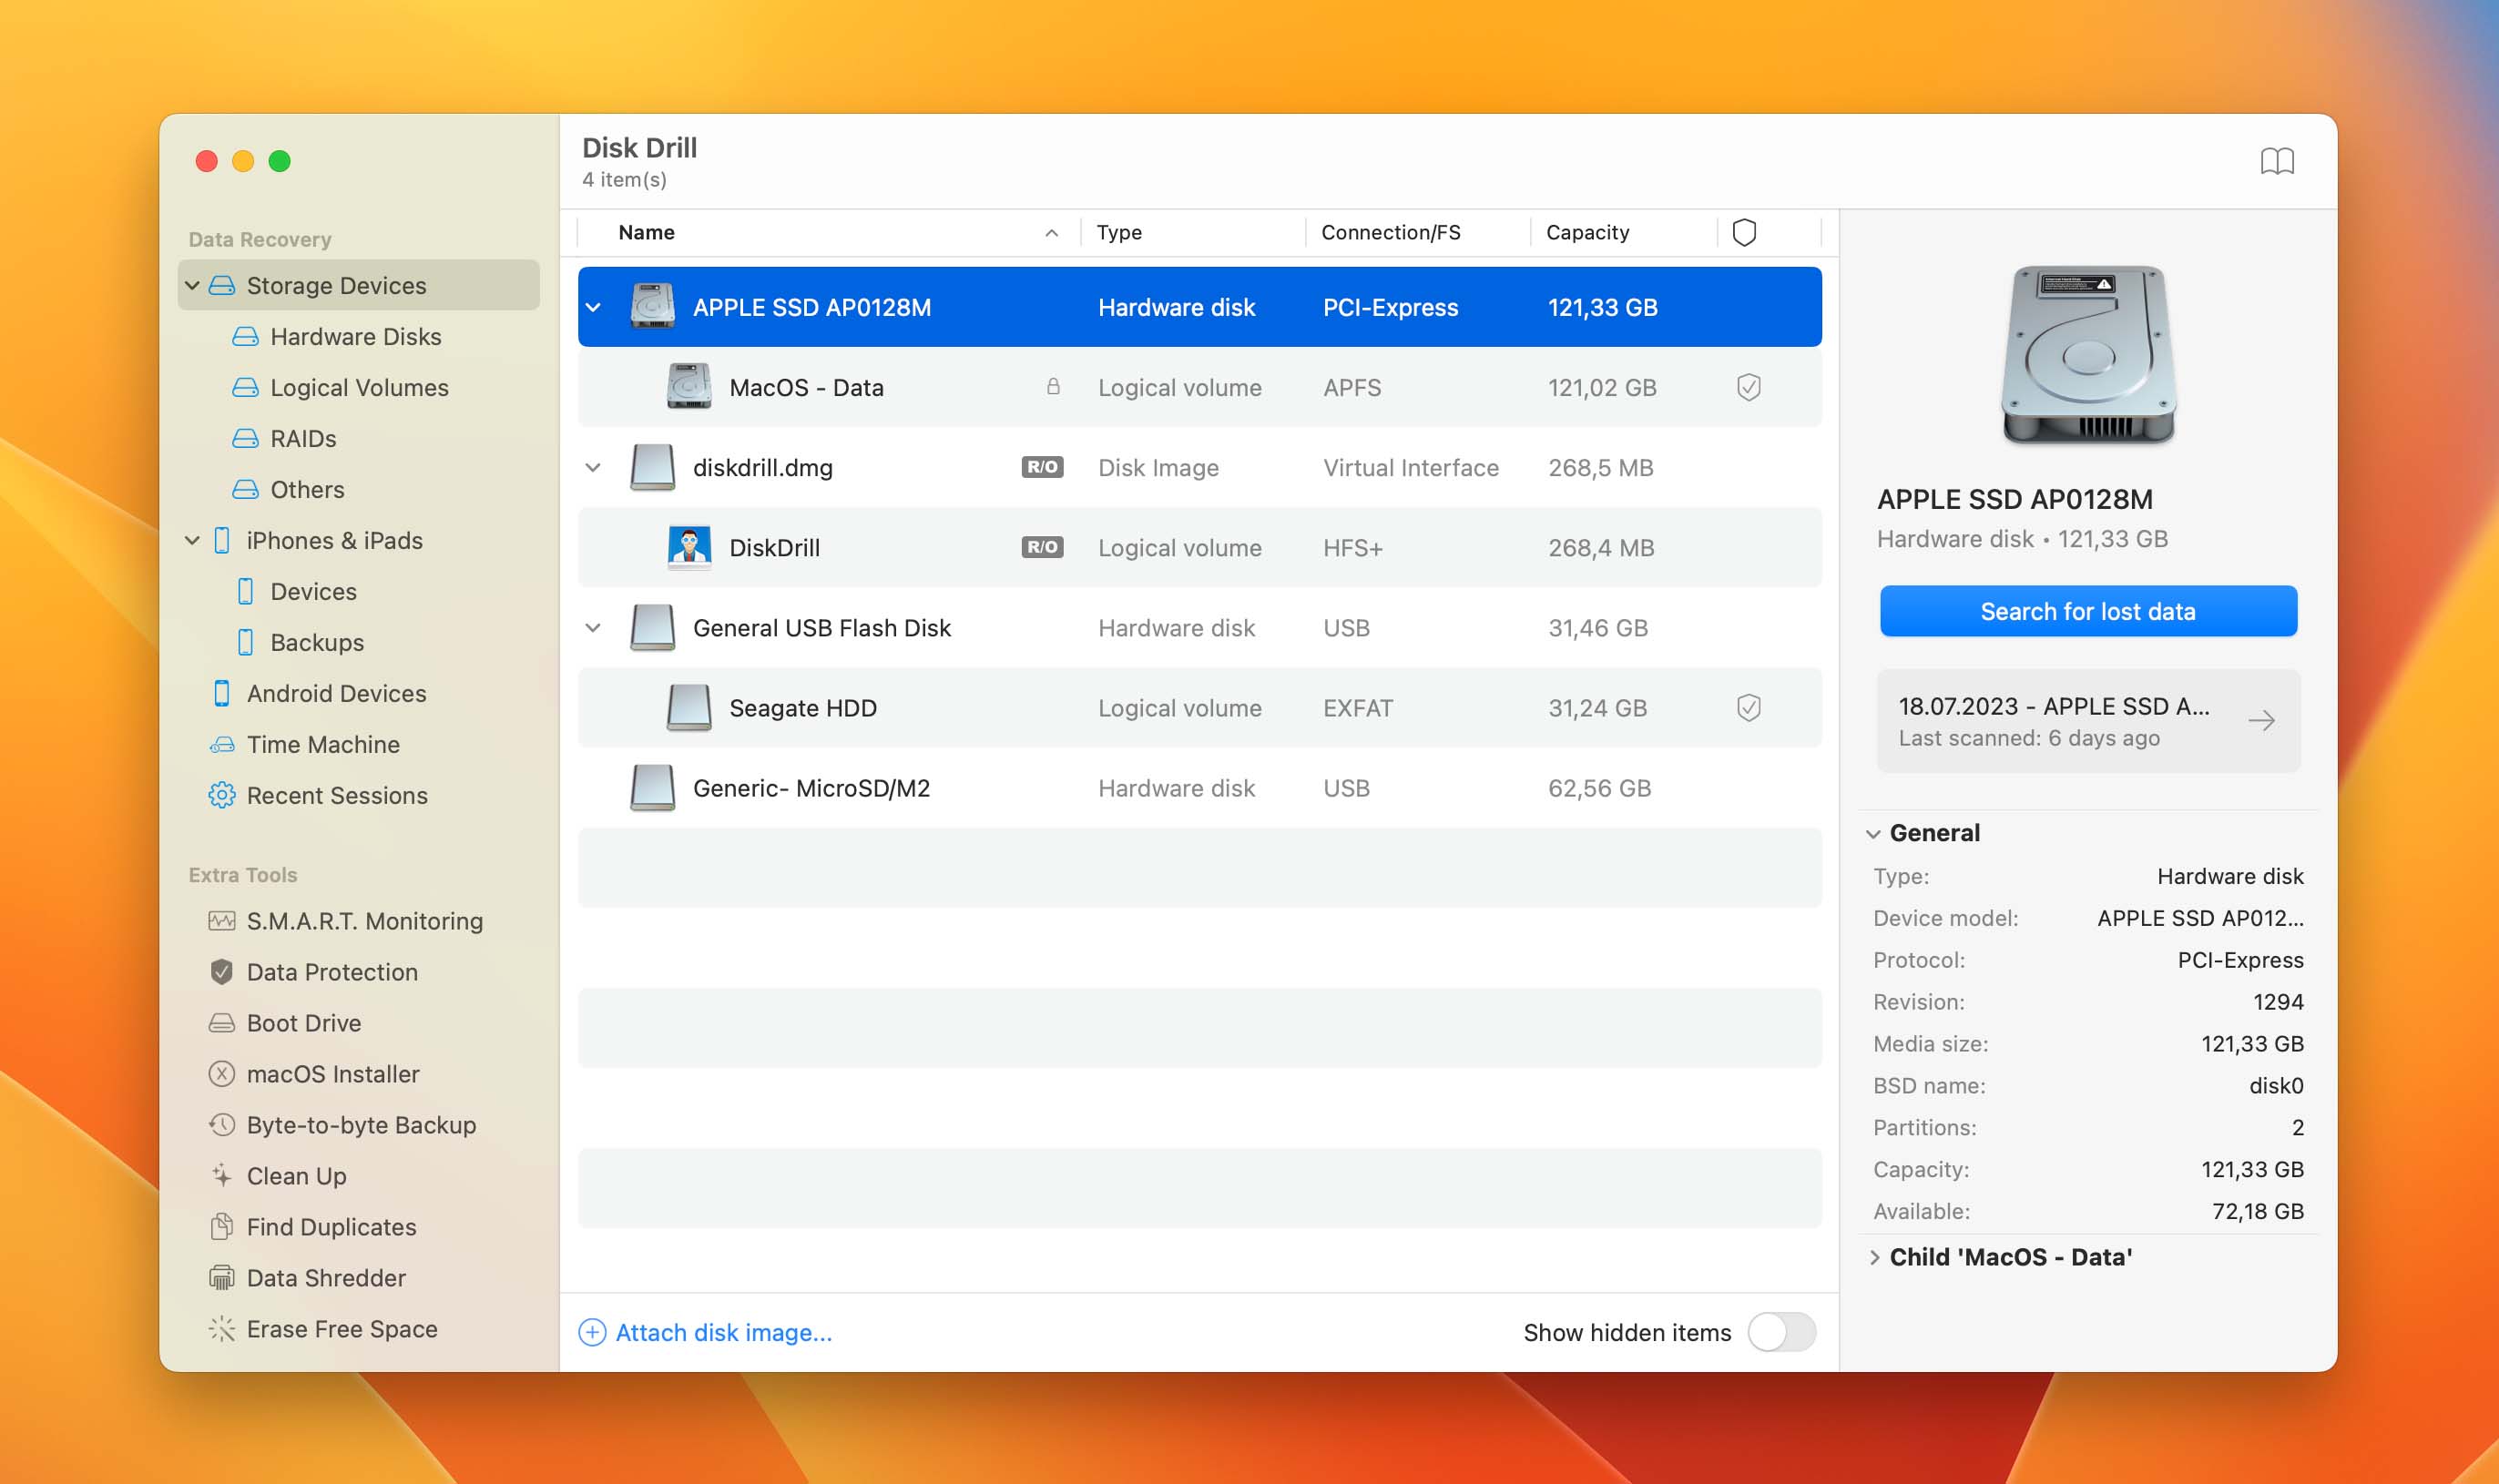
Next, open Finder, navigate to the Application folder, and launch Disk Drill. The software will present you with Logical volumes and Hardware disks. Choose the place where your lost notes were located and click on Search for lost data button located at the middle right part of your screen to start the recovery process.
Step 3: Browse Through the Preview List
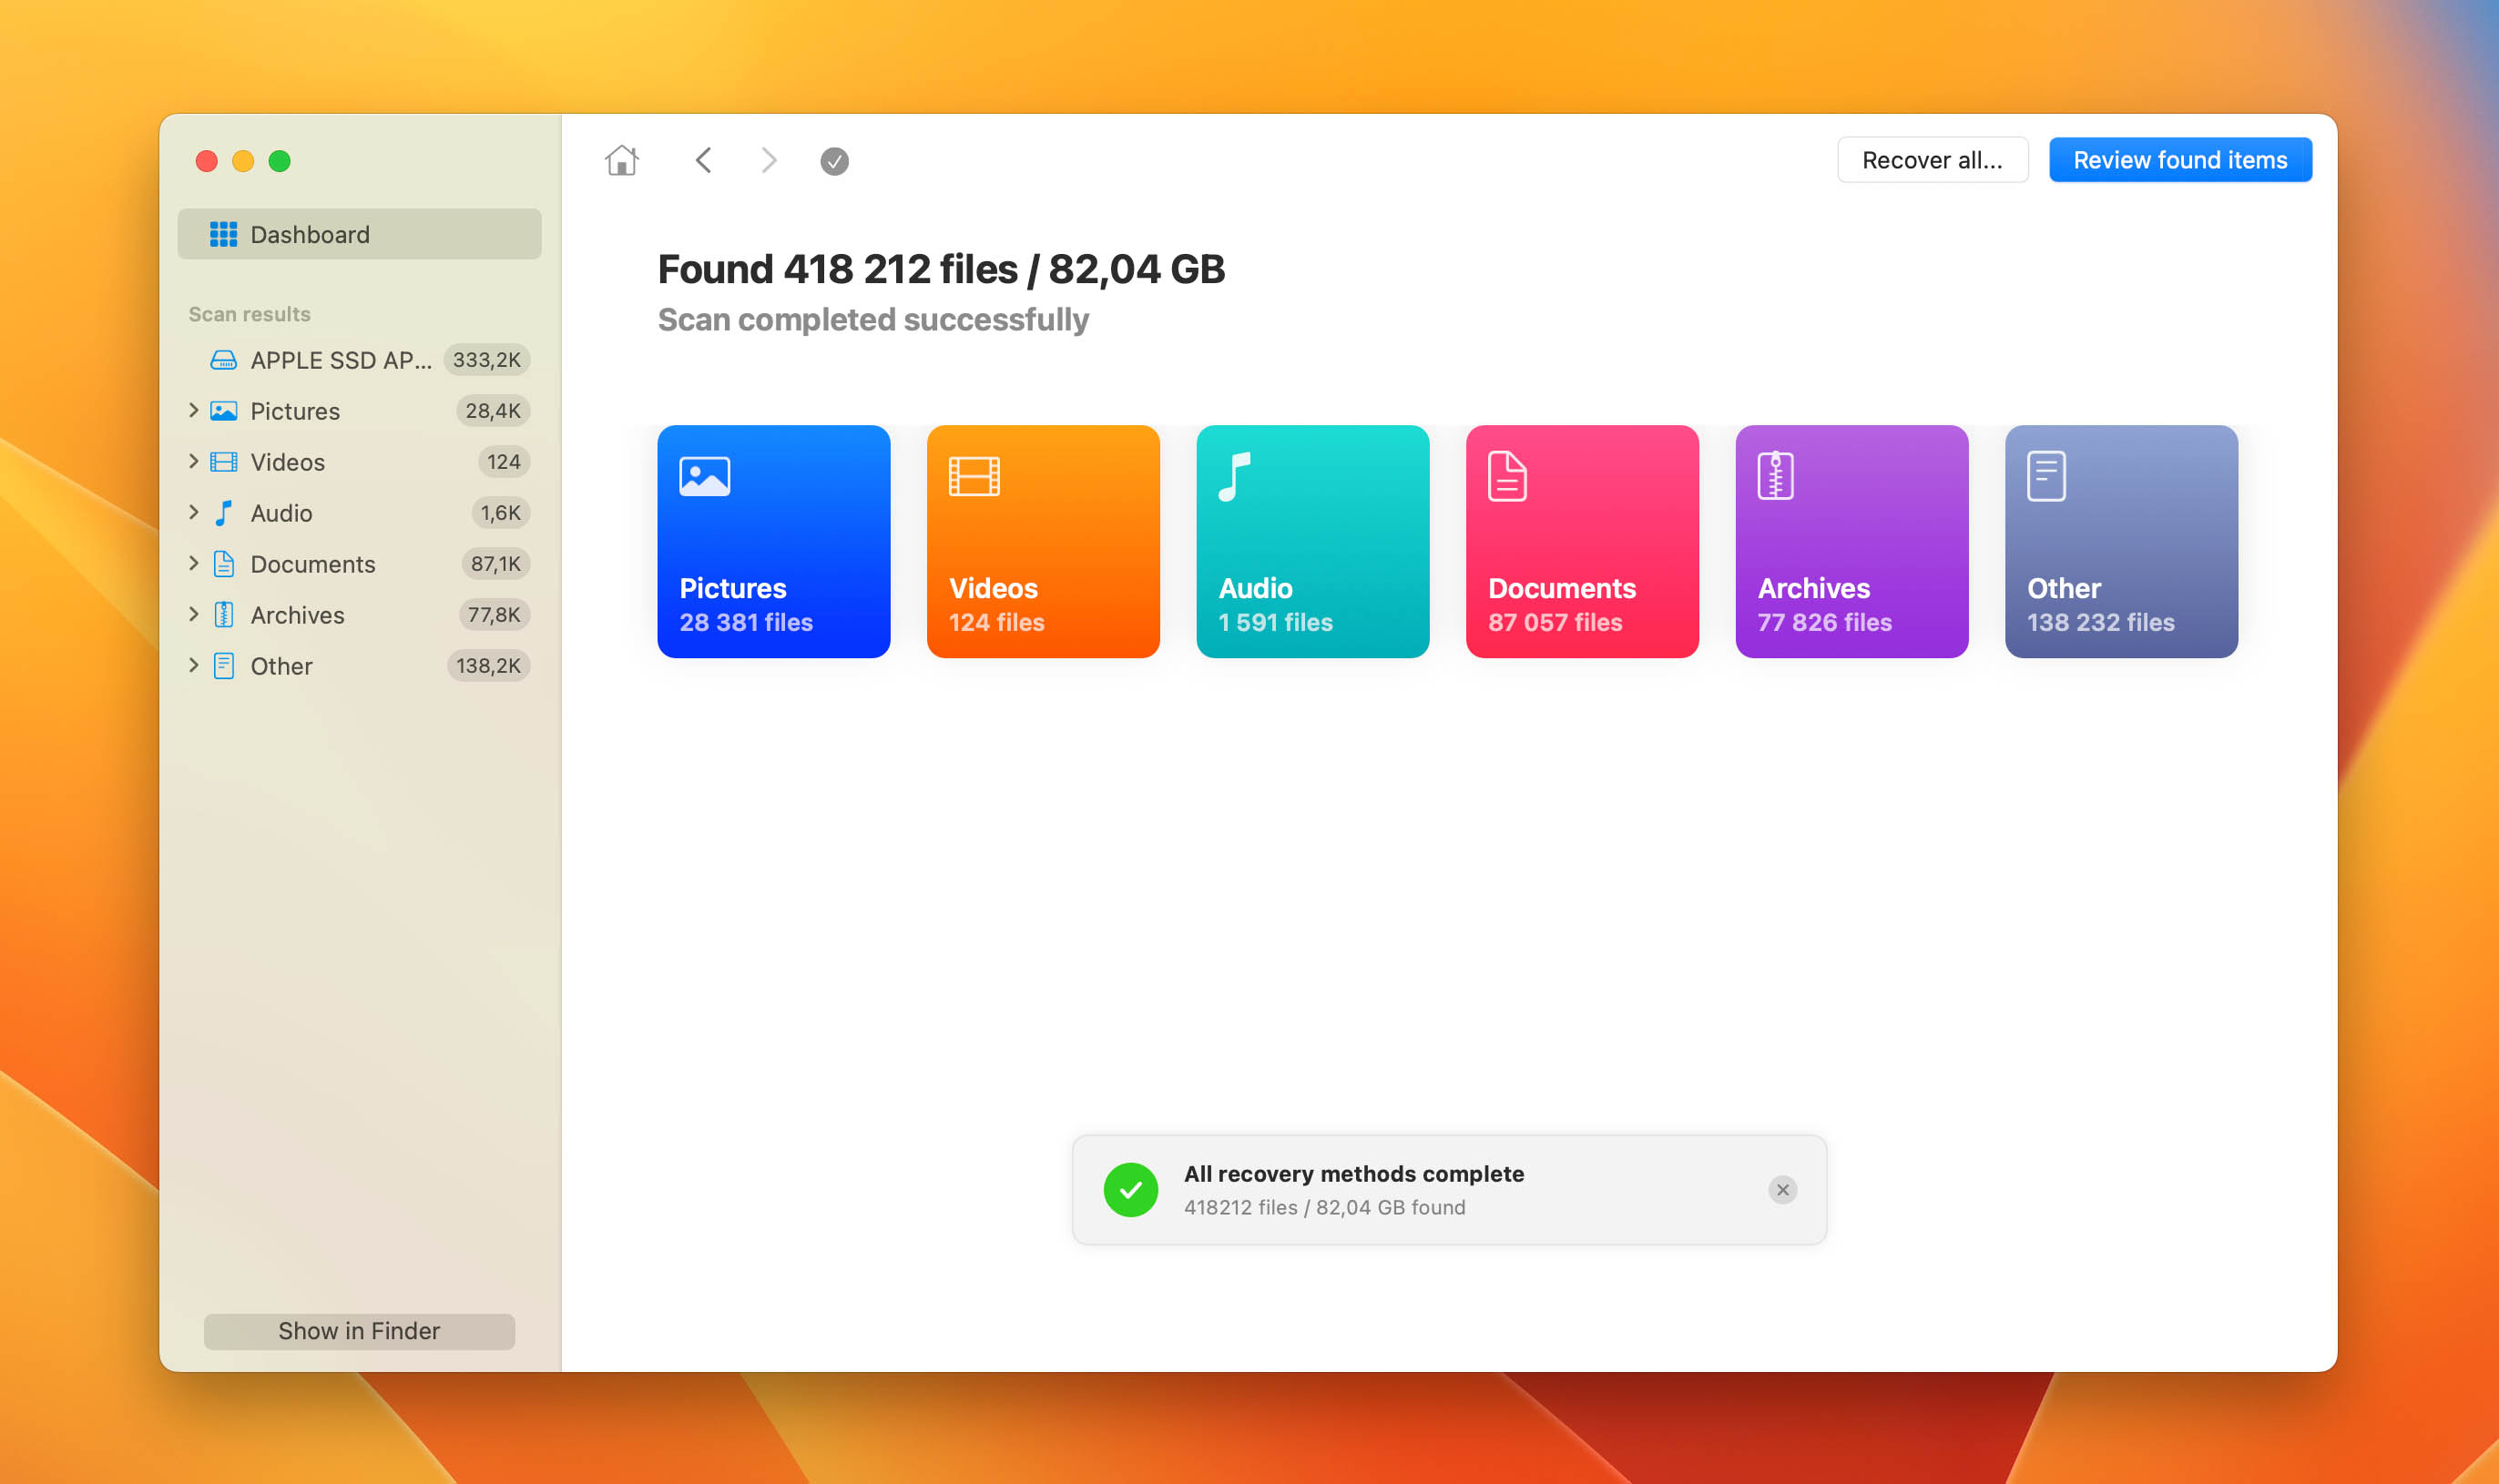
Wait for Disk Drill to finish scanning. This may take some time, depending on the speed and size of your storage device. You also have the option to preview the found items while the scan is ongoing. Just click the Review Found Items tab found on the upper right corner of your screen.
Step 4: Filter The Results
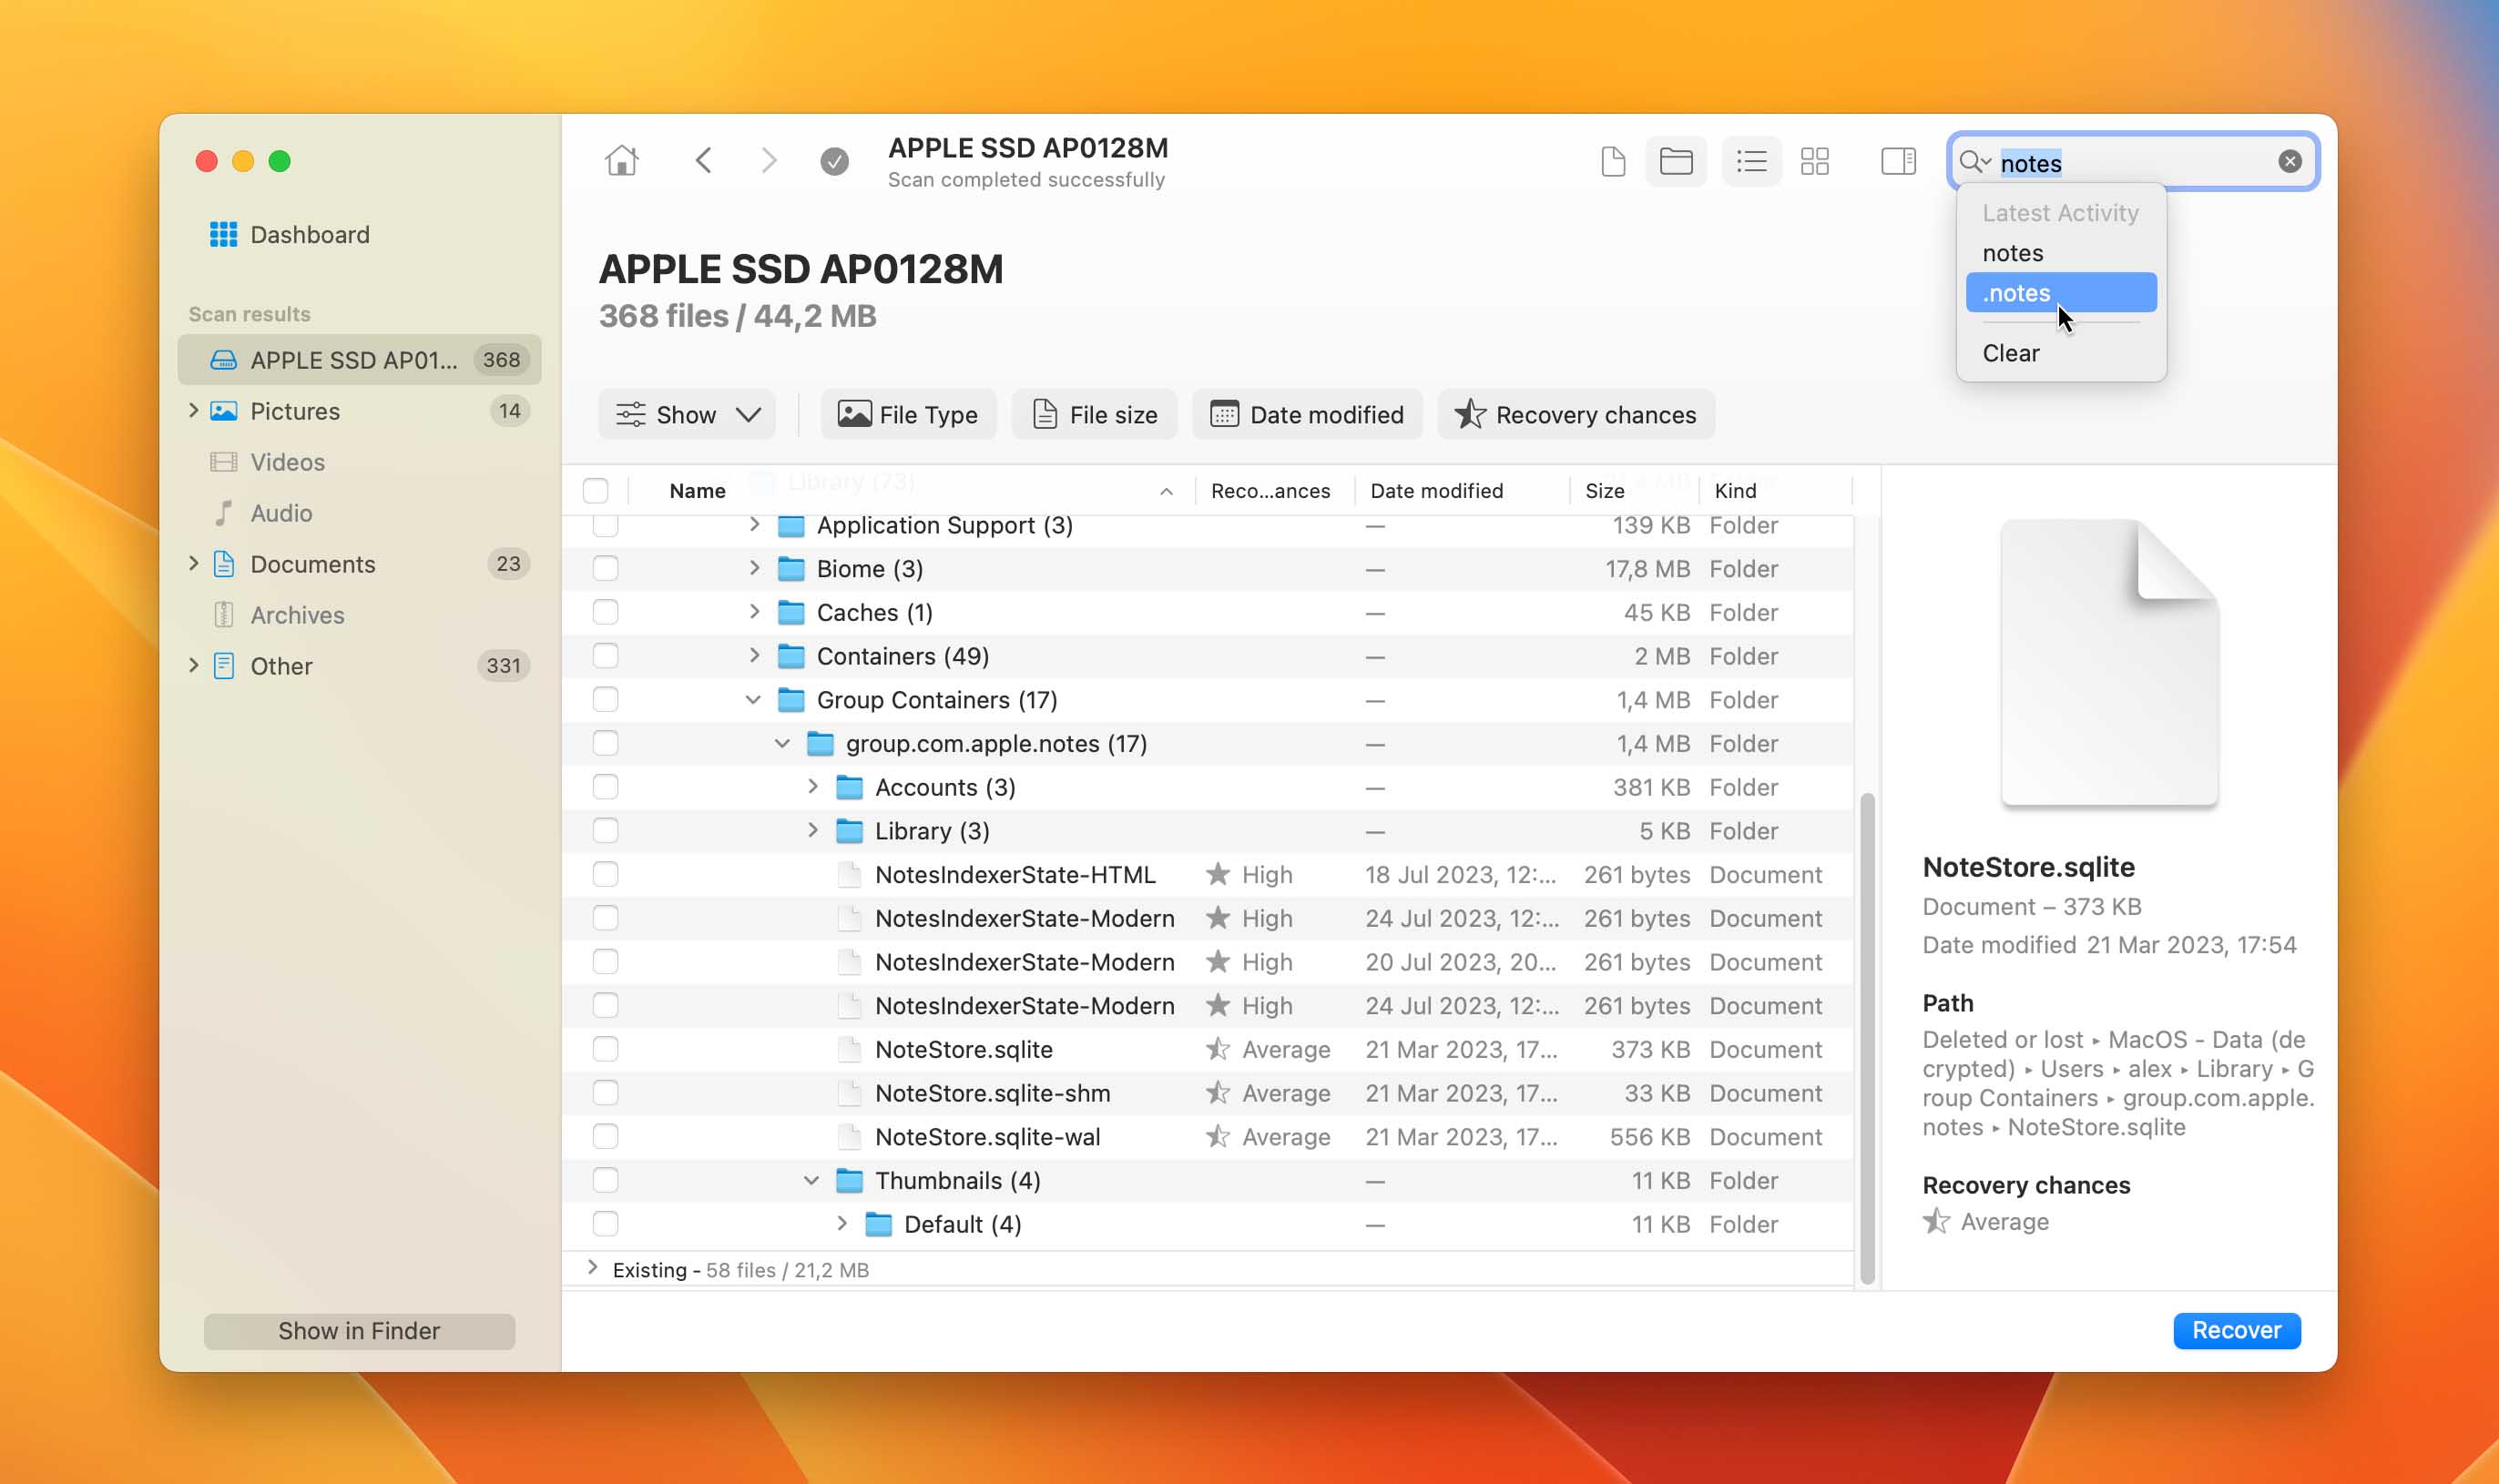
Once the scan is finished, go through the list of recoverable files. You can use the scan results filters on the left on part of your screen. These filters will allow you to narrow down the displayed files based on file type, file size, date modified, and more. By making use of these filters, it will be easier for you to reduce the number of files recovered by Disk Drill to the ones that you are looking for. Since you are looking for deleted notes, type .notes on the search bar, as this is the normally the file format for notes on Mac.
Step 5: Restore Your Data
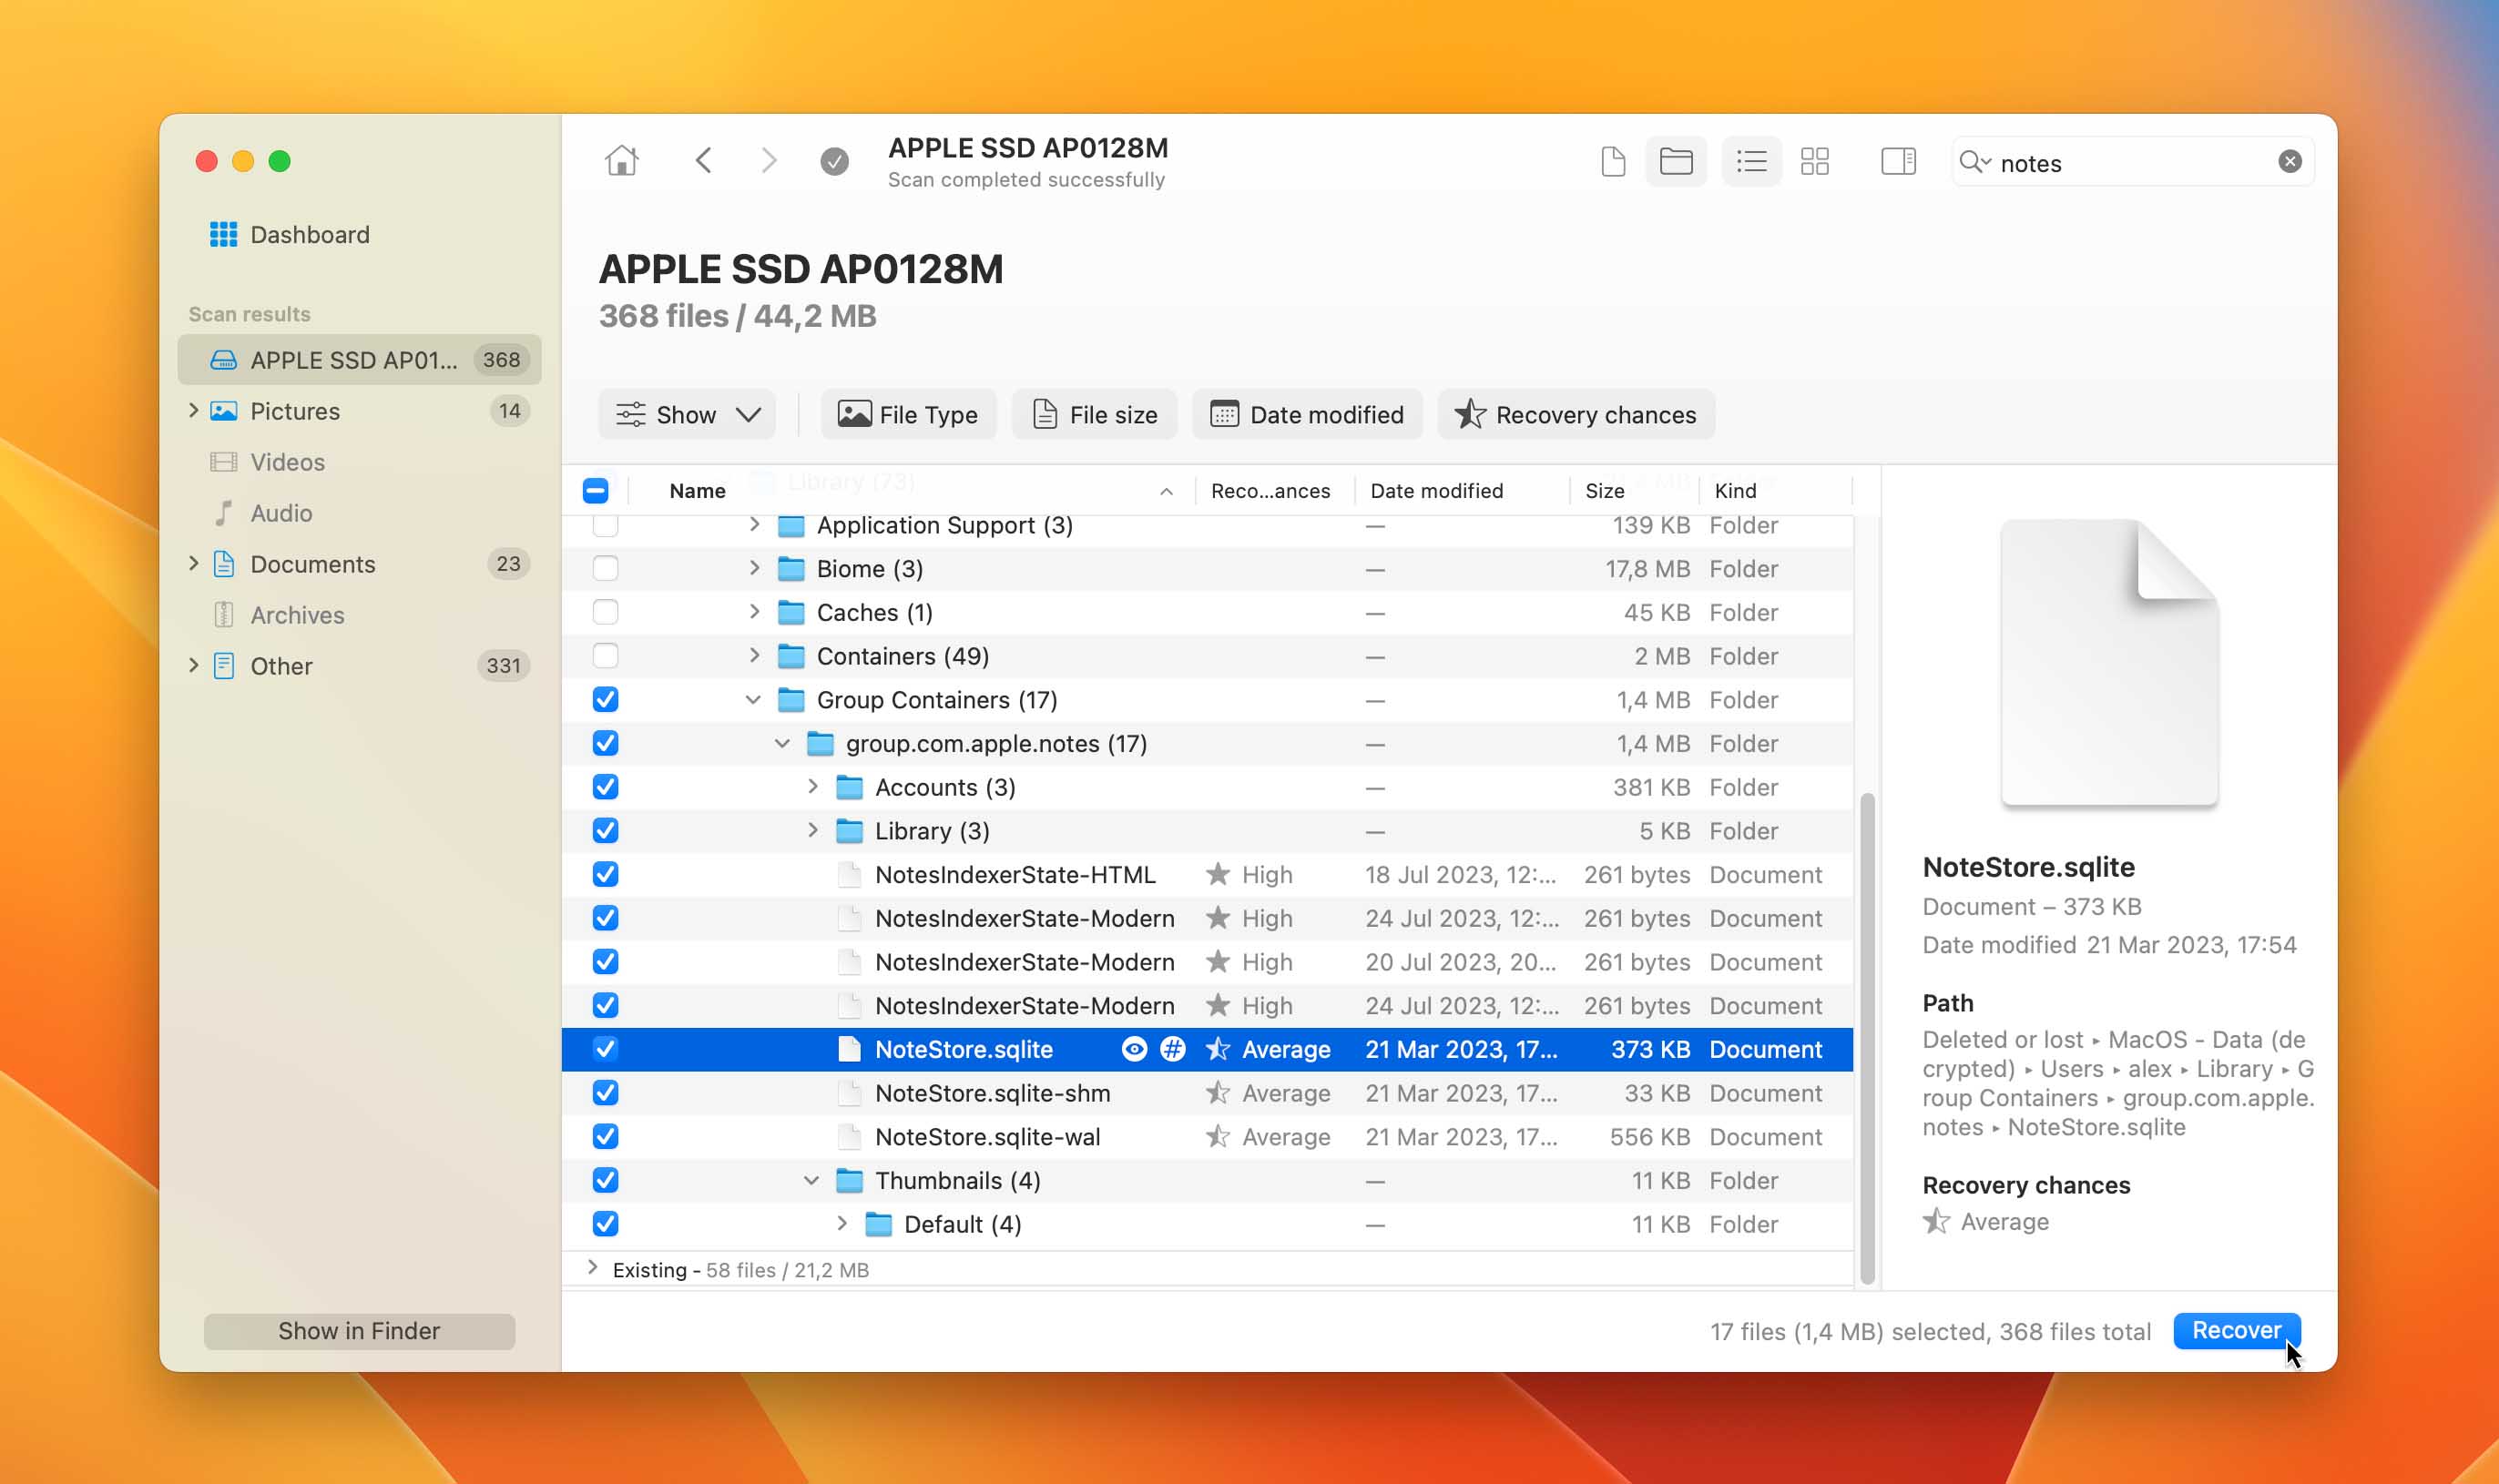
Once you found your recovered items, tick the boxes next to the notes that you wish to recover and click the Recover button. You will be asked to choose a recovery folder. Make sure to select a folder that’s located on a different storage device than the one you’ve scanned.
Tip: The default location for Notes is ~/Library/Containers/com.apple.Notes/Data/Library/Notes/ and recovered Notes files can be placed there after the recovery.
By the way, we’ve conducted a comprehensive review of Disk Drill, in addition to a detailed safety analysis concerning its impact on your devices and data. If you’re keen on gaining insights about the macOS version of Disk Drill, We’d recommend this exceptionally well-done article. Its authors have indeed done a noteworthy job.
How Did Notes Disappear From My Mac?
There are many reasons why users can’t find their notes on Mac. Usually, we are talking about one of these 5 scenarios.
- 😲 Accidental Deletion: We don’t want to point any fingers, but user error is at the top of the list. If you are dealing with dozens of notes, it’s easy to confuse them and notice that only in retrospect.
- 👾 Malware Infestation: Sometimes, note disappearance can be a symptom of the underlying problem. Contrary to popular opinion, Mac is not immune to ransomware and viruses that will delete or lock your valuable notes. If you’ve noticed a sudden drop in performance, it’s time to do a virus scan.
- ⚠️ Faulty Hard Drive: By default, the Notes app stores files on your Mac’s main hard drive. It is common to lose files if your HDD is damaged or corrupted.
- ⚙️ Failed macOS Update: When you are installing a new version of OS it’s important that this process isn’t interrupted. In case of a power loss or accidental restart, there’s a solid chance that something goes wrong and your notes disappear.
- 📛 Software Crash: Sometimes, a new version of OS is still not fully optimized with Notes. This can lead to frequent crashes which in turn may result in data loss.
FAQ
How to recover accidentally deleted notes on Mac?
If you accidentally deleted your notes on Mac, you may recover it by checking the Recently Deleted folder on your Notes app. If you don’t have the Recently Deleted folder, you may also check your Trash. If you still can’t find your deleted notes, you may download a recovery software such as Disk Drill to help you recover your deleted notes on Mac.
Why I can't find recently deleted notes on Mac?
These are the usual reasons why you can’t find recently deleted notes on your Mac:
- You have deleted them permanently.
- You have disabled the Recently Deleted folder on your Notes app.
- Notes have been deleted from another device. This is possible especially when you are using multiple devices with the same iCloud account and Notes app.
How to restore notes from backup?
You can retrieve your deleted notes using a backup from Time Machine. Here’s how to do it:
- Connect your Time Machine backup drive to your Mac.
- Go to the folder containing the deleted notes in the Notes app once it is open.
- Enter Time Machine by clicking on the Time Machine icon in the menu bar.
- In the Time Machine interface, you can browse through various backups.
- To access a backup that holds the deleted notes, use the timeline on the right side of the screen.
- Select the notes you want to recover by clicking “Restore” after you’ve located the desired backup.
Final Thoughts
As you can see, there are many paths you can take to restore your notes. Even better, they are easy to try and you can go through them quickly. Time is everything, so start now to have the best chance of recovering them. There may be no need to take your Mac to the expensive restoration services. This way, you’ve learned something valuable and saved your money.
This article was written by Marko Medakovic, a Author at Handy Recovery Advisor. It was recently updated by Mako Young. It was also verified for technical accuracy by Andrey Vasilyev, our editorial advisor.
Curious about our content creation process? Take a look at our Editor Guidelines.