
TL;DR: Mac hard drive recovery is crucial when a drive malfunctions, either due to physical damage, logical issues, or even simple data loss from accidental deletion. For logically damaged drives or unintended data removal, tools like Disk Drill offer recovery solutions. Users can also restore data from Time Machine backups or utilize the Mac’s built-in Disk Utility for repairs. If dealing with a physically damaged drive, self-recovery is difficult, and professional data recovery services are advised.
It’s never fun when it happens, but every now and then, it just does — your hard drive malfunctions, and you seemingly lose your files. It can happen to both internal and external drives, and if it does, you might be facing a difficult choice: Either give up and consider your files lost, or pursue sometimes complicated recovery methods.
Thankfully, however, Mac hard drive data recovery has gotten a whole lot more simple over the years, and with a bit of forward-thinking, you’ll never have to worry about losing your files again. Also thankfully, there are ways to recover files from a Mac hard drive.
Certainly, your hard drive could face several issues. It might be physically damaged, making file recovery difficult. Or there could be logic issues, leading to lost files without physical damage. Alternatively, you might just accidentally delete data. Either way, it complicates Mac or MacBook hard drive recovery. We’ll explore the primary scenarios below.
Recovering Data From a Logically Damaged Mac Hard Drive
If your hard drive’s logic has been damaged, which is to say that it’s physically fine but is somehow still malfunctioning, there are a few ways to recover your data and files. Some of those ways are easier than others, but they should still allow you to recover files that might be important to you.
Please be aware that all methods below can also be used whether you’ve inadvertently or deliberately deleted data from your Mac hard drive and wish to retrieve it.
Method 1: Using a Data Recovery Tool for Mac Hard Drive Data Recovery
We recommend you start your data recovery journey by downloading a capable data recovery tool. While even the best data recovery tool won’t repair your disk, it can detect files that have become lost due to logical damage, allowing you to recover them to a safe destination. There are several tools available, and one of the most popular is Disk Drill.
Disk Drill is the tool we swear by because it’s relatively easy to use and allows you to perform a deep scan of your hard drive to find any missing files. With Disk Drill, you can filter through all the files that it finds, save them wherever you want to, and if you want, perform a bulk scan that saves all the files that it can possibly find. It’s a great tool to have if your hard drive is acting up.
Here’s a quick rundown on how to use Disk Drill:
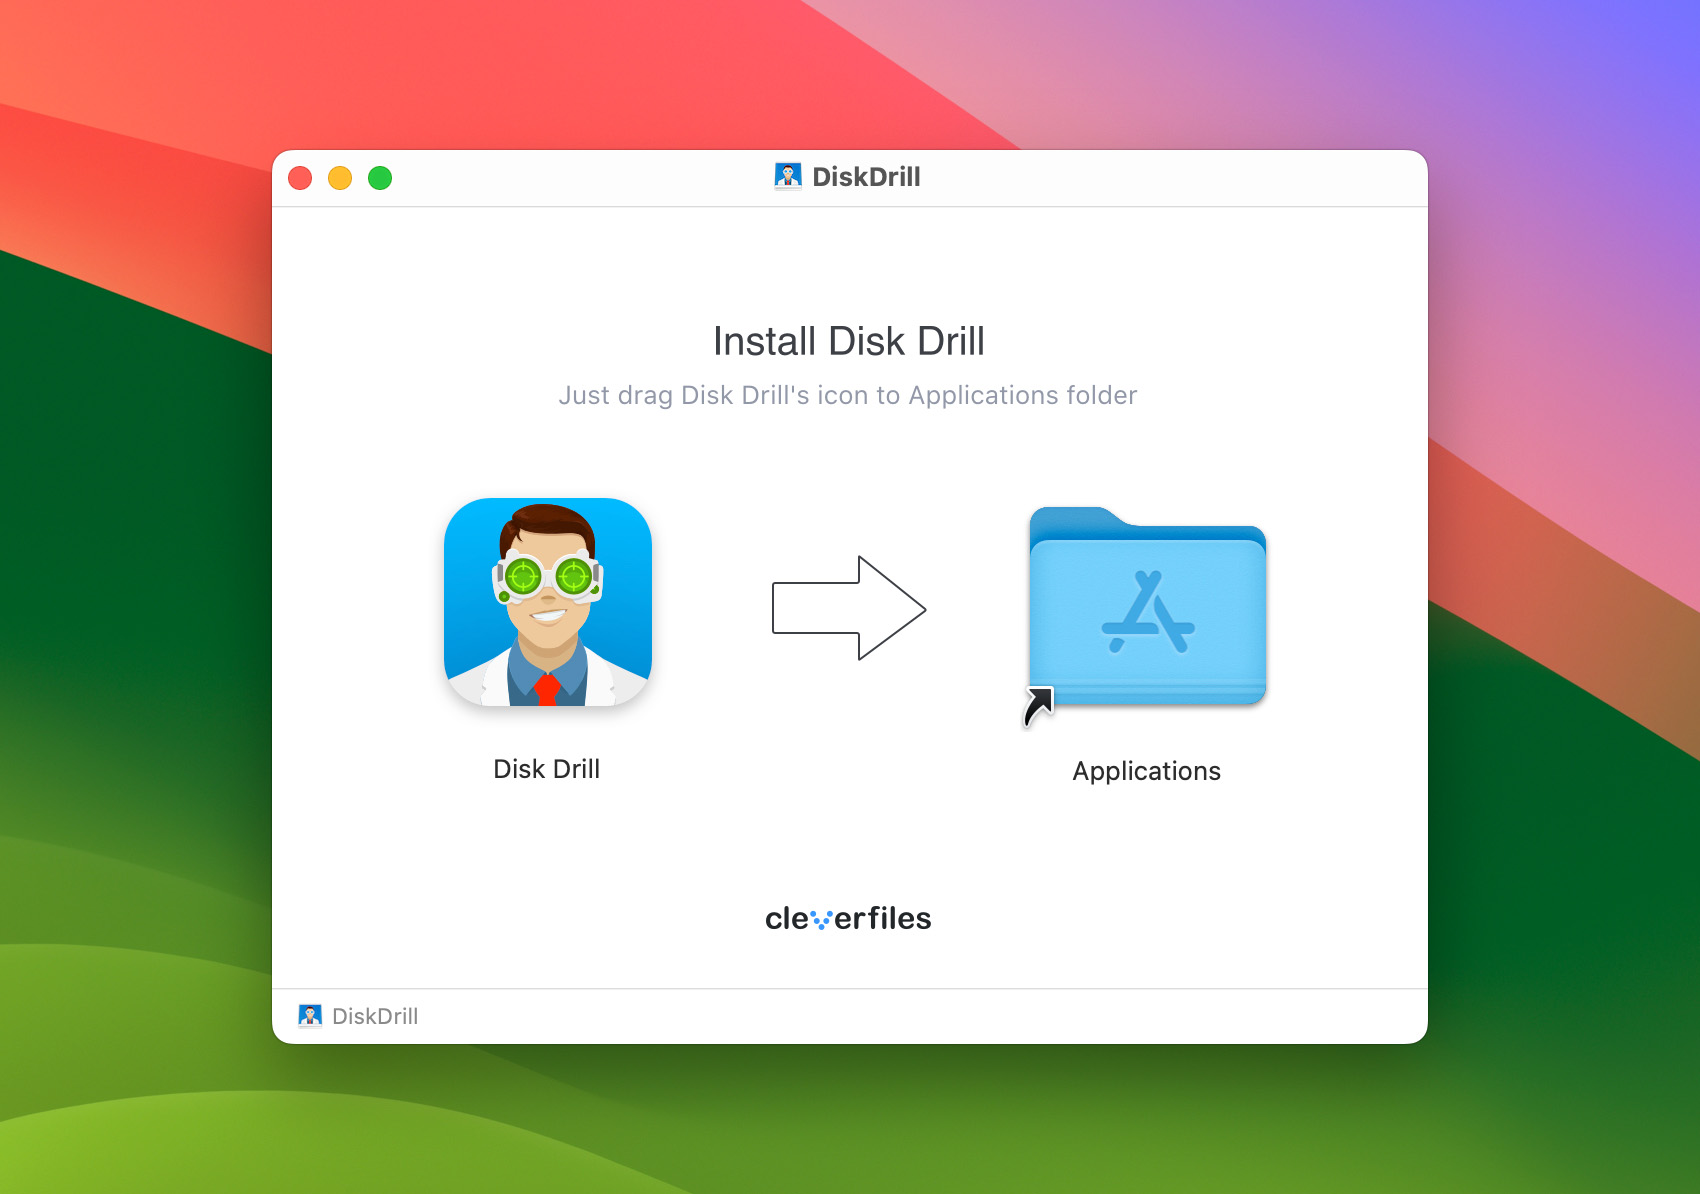
- Download and install Disk Drill, and connect your hard drive to your computer if it’s external.
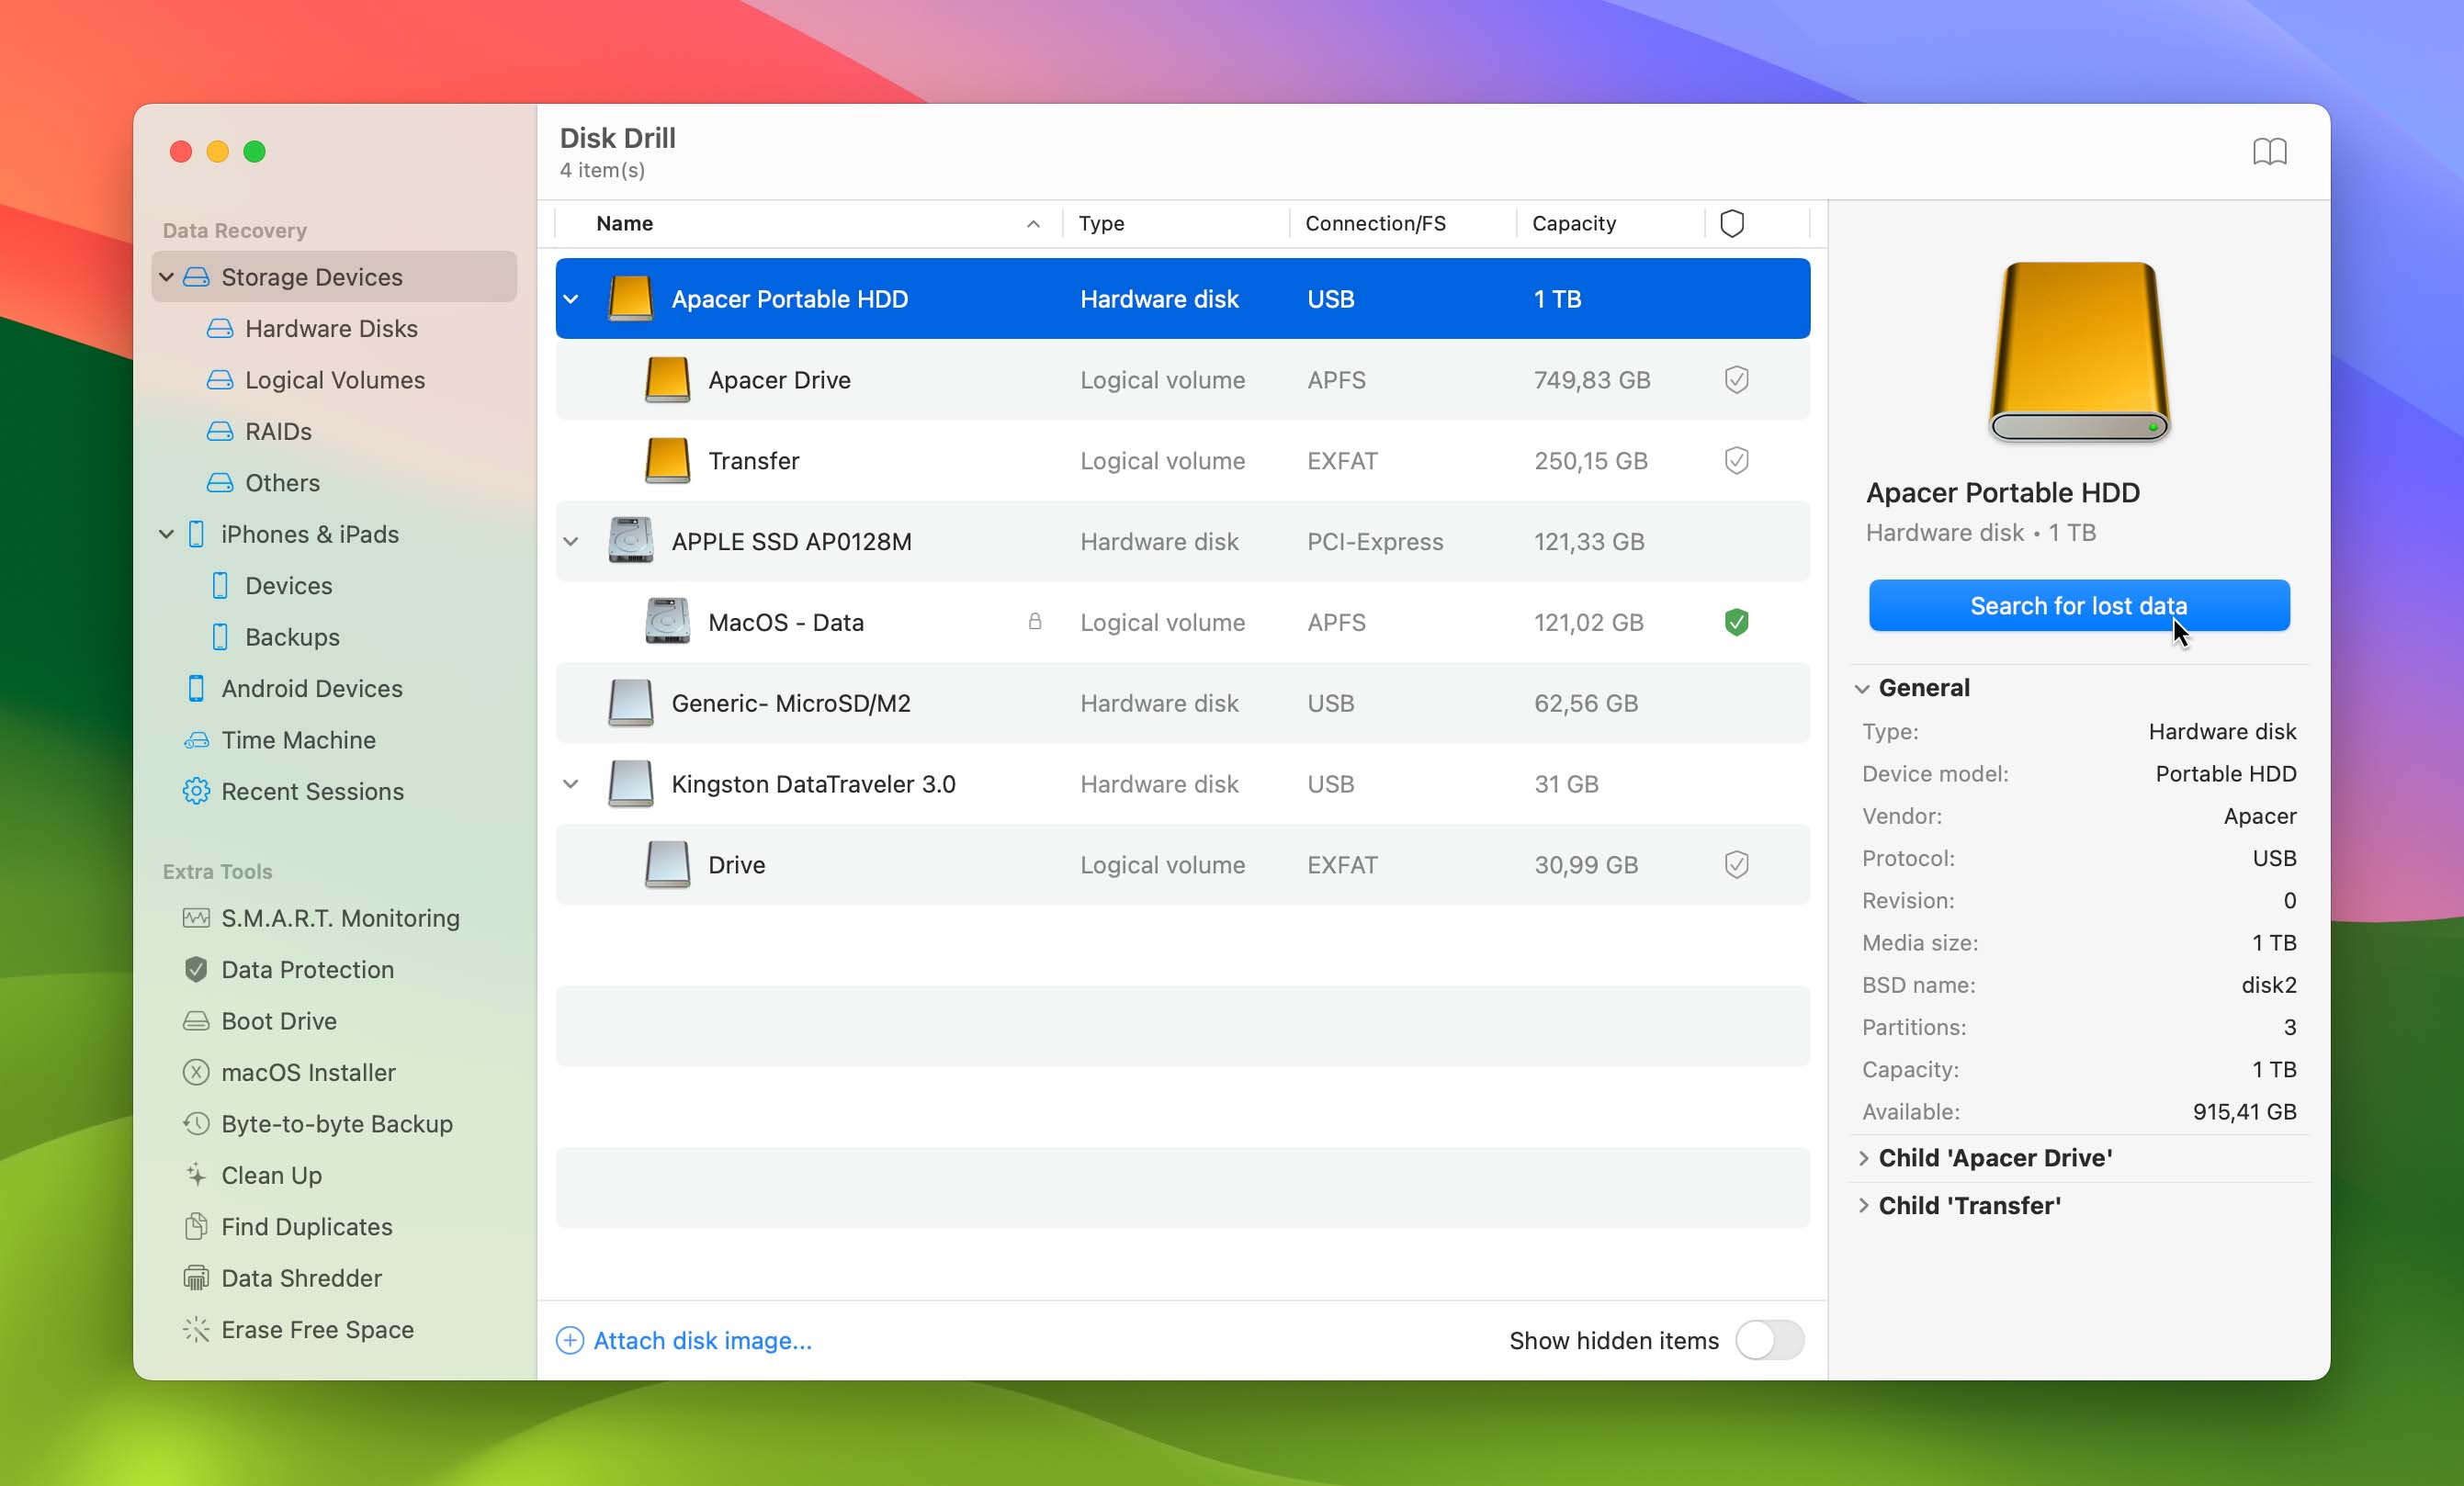
- Open Disk Drill and find the hard drive on the list of drives. Select it, and press the “Search for lost data button” on the right side of the display.
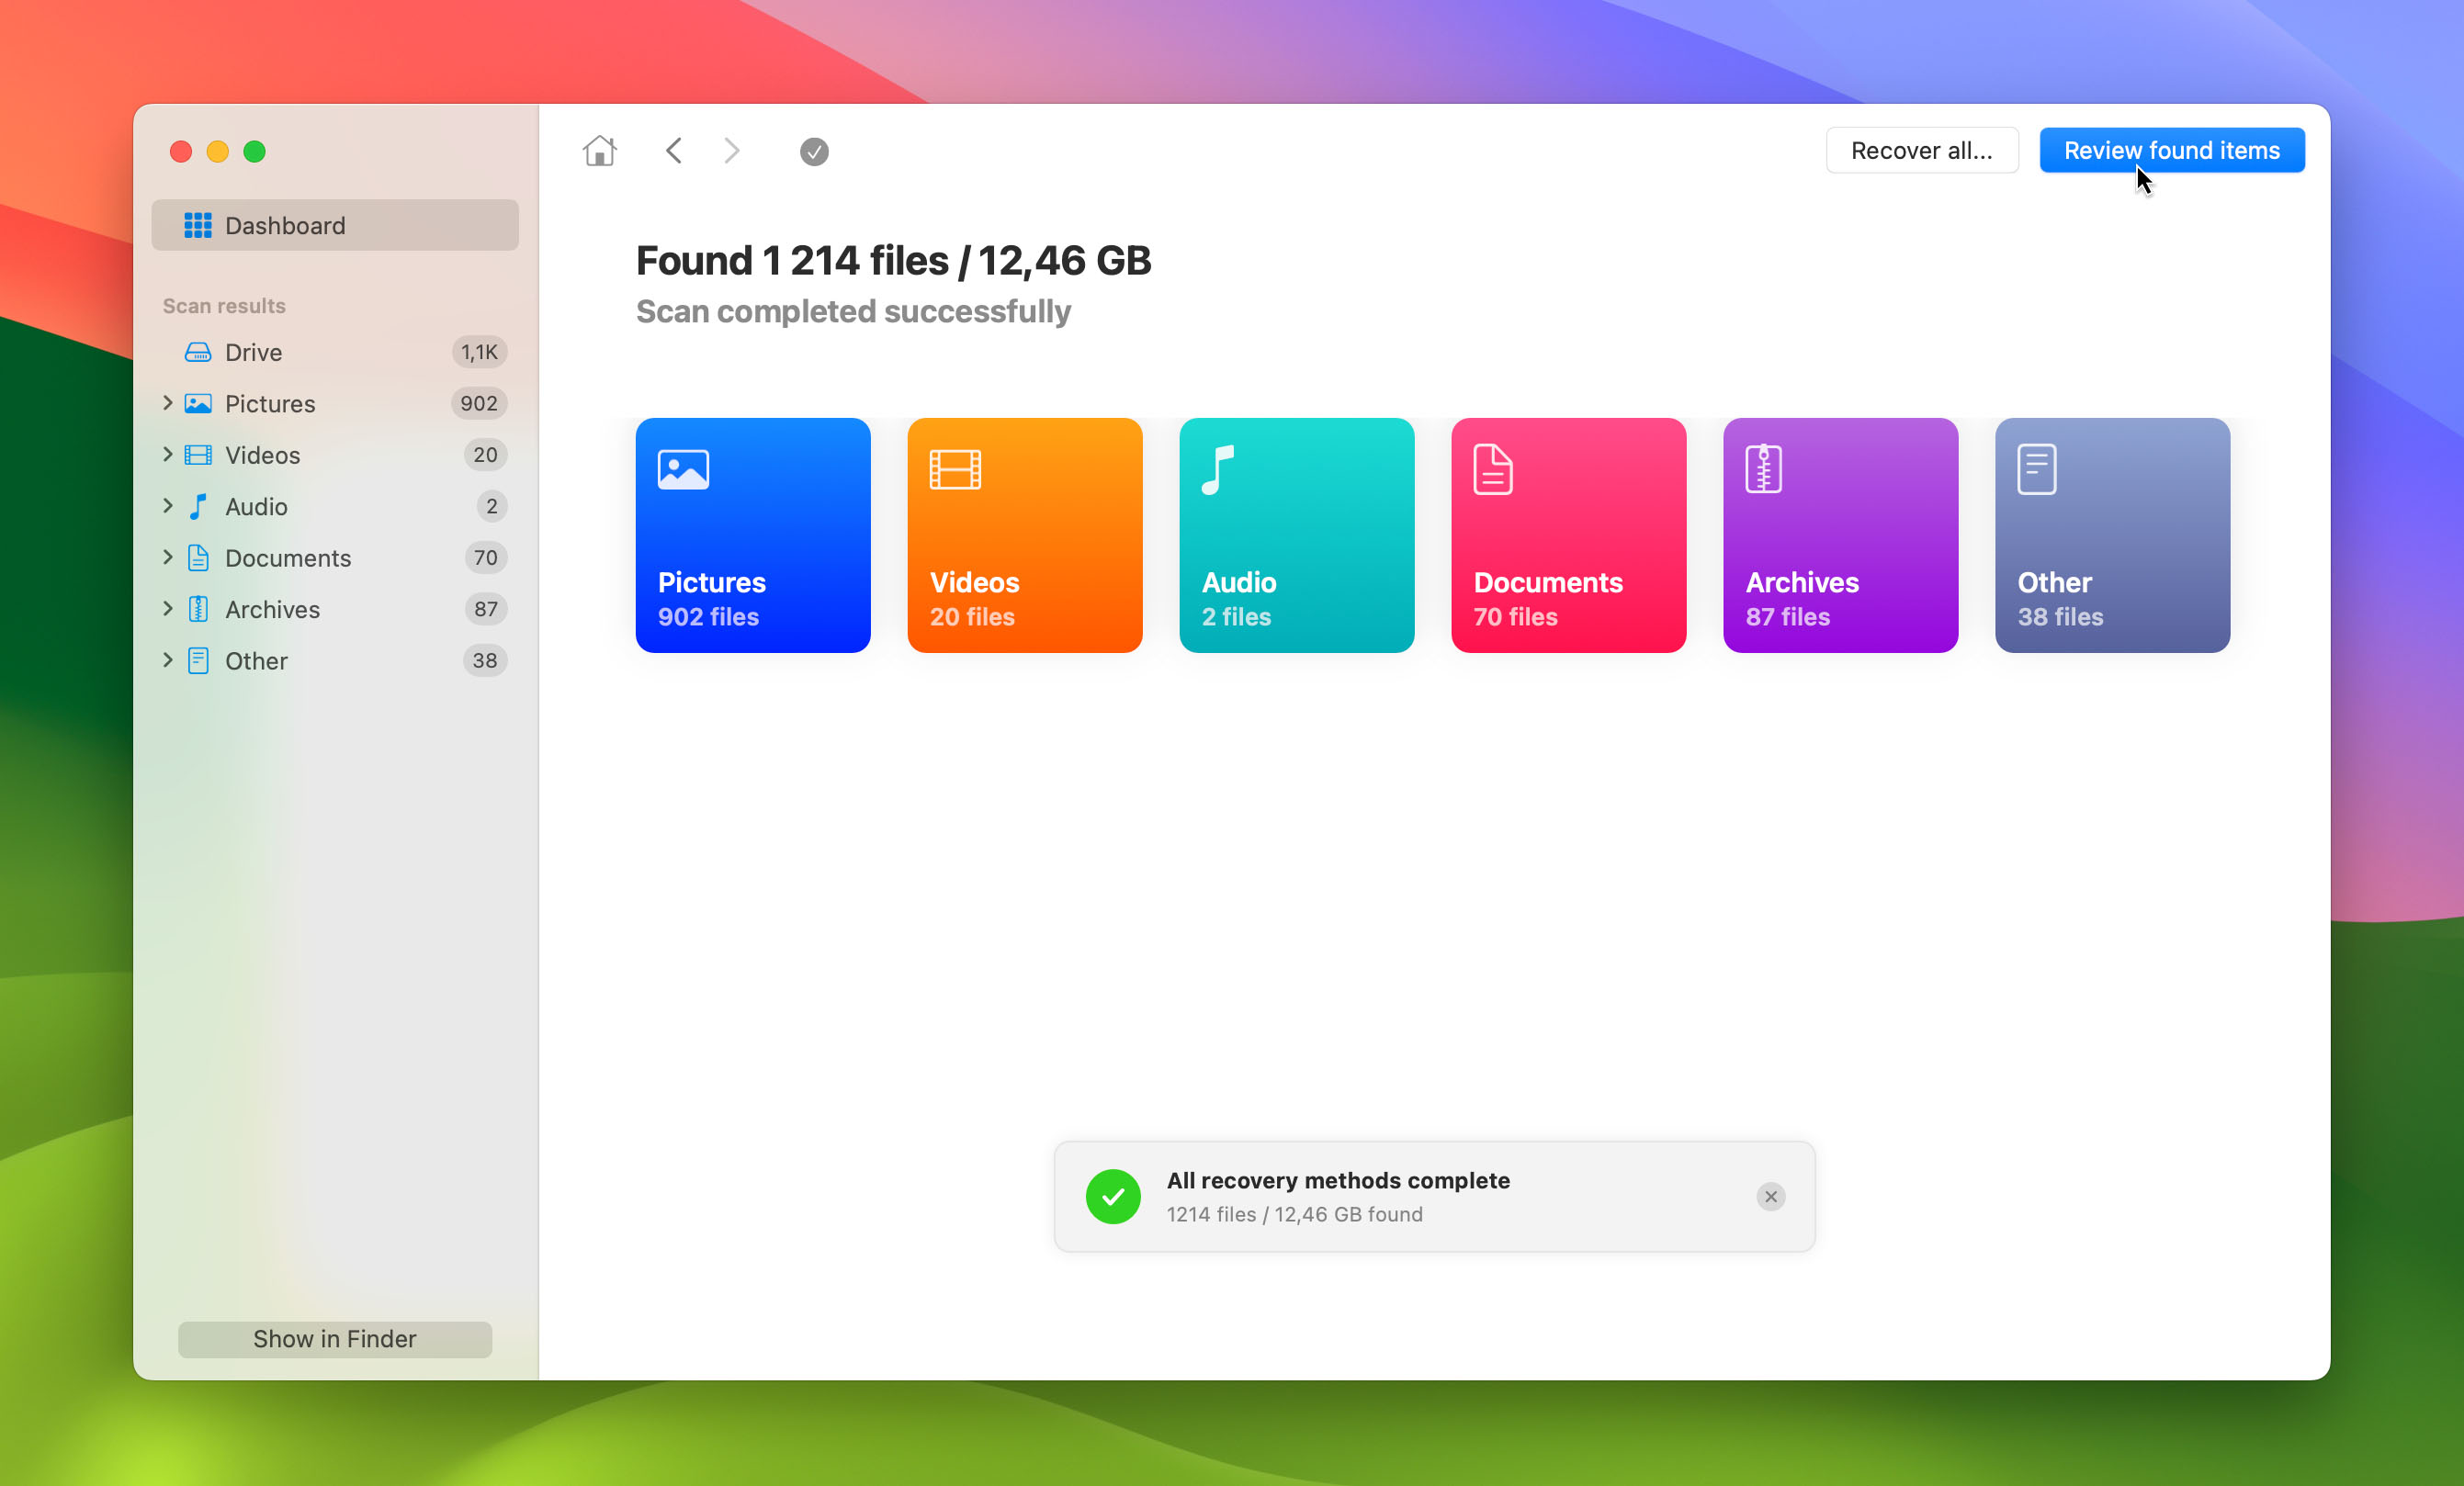
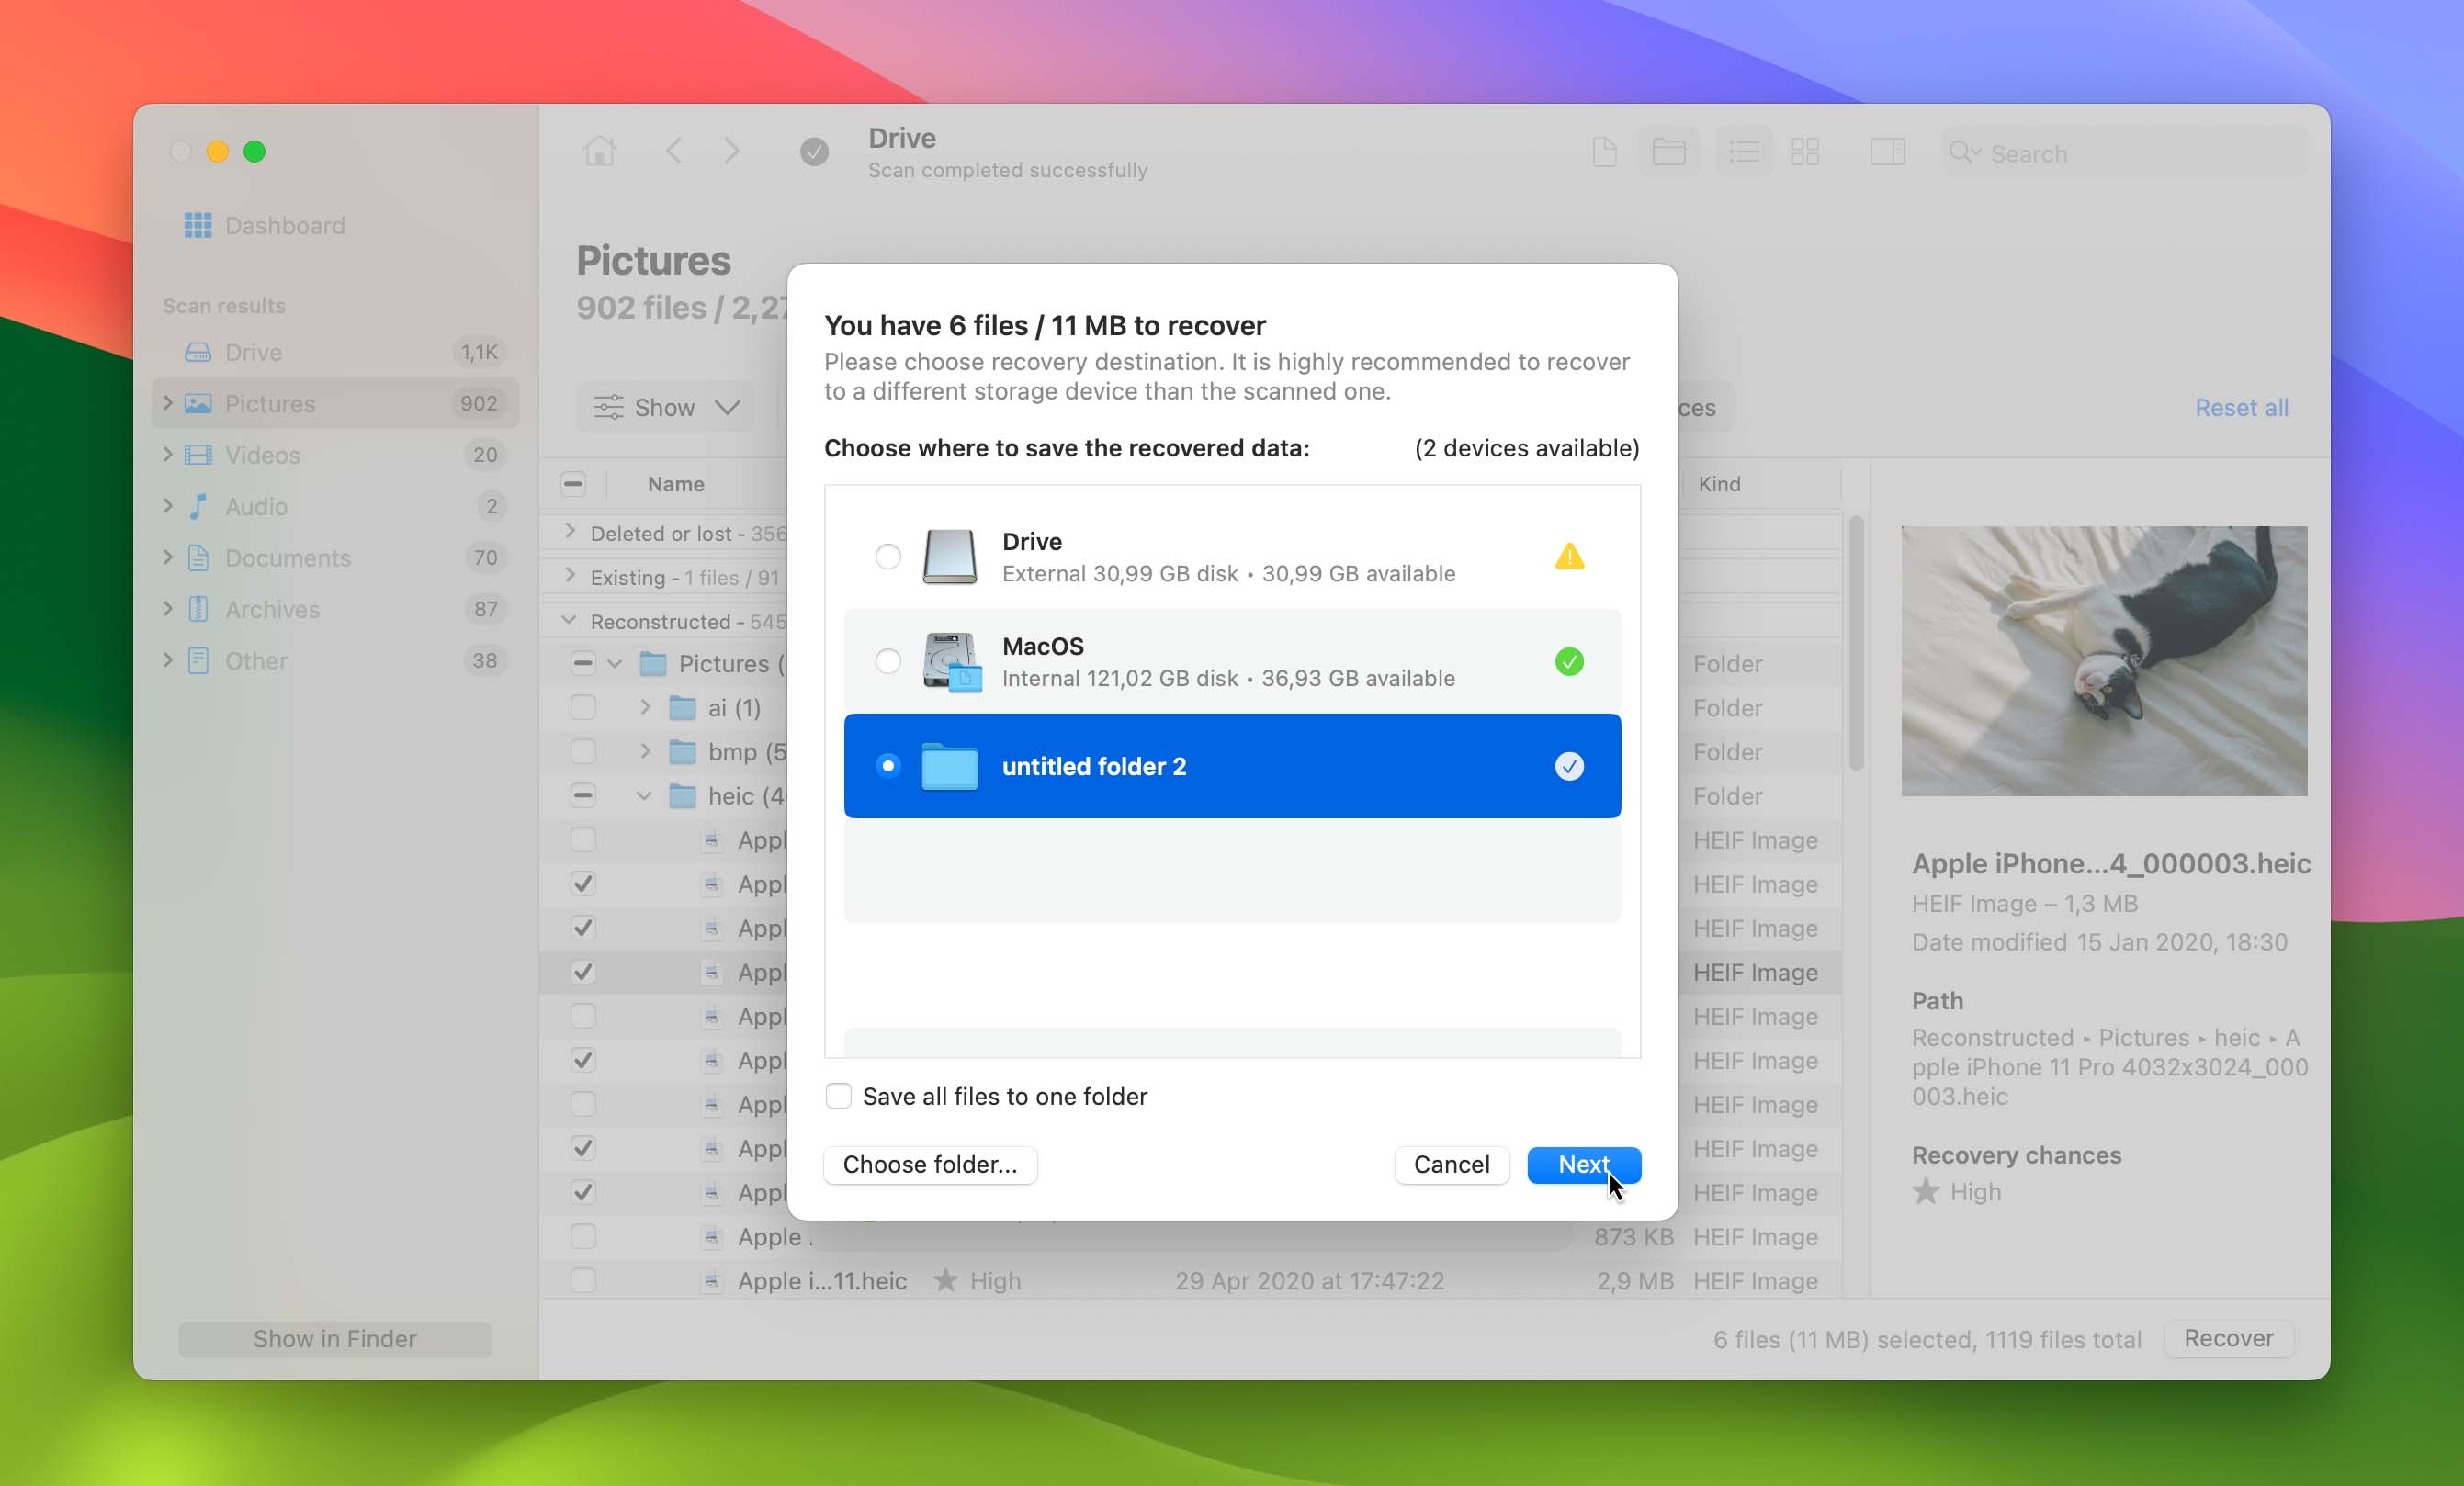
- Wait for Disk Drill to scan your drive for files. Once it has finished, select ‘Recover all…’ if you want to recover all the found files at once, or ‘Review found items’ if you want to choose what you want to recover.
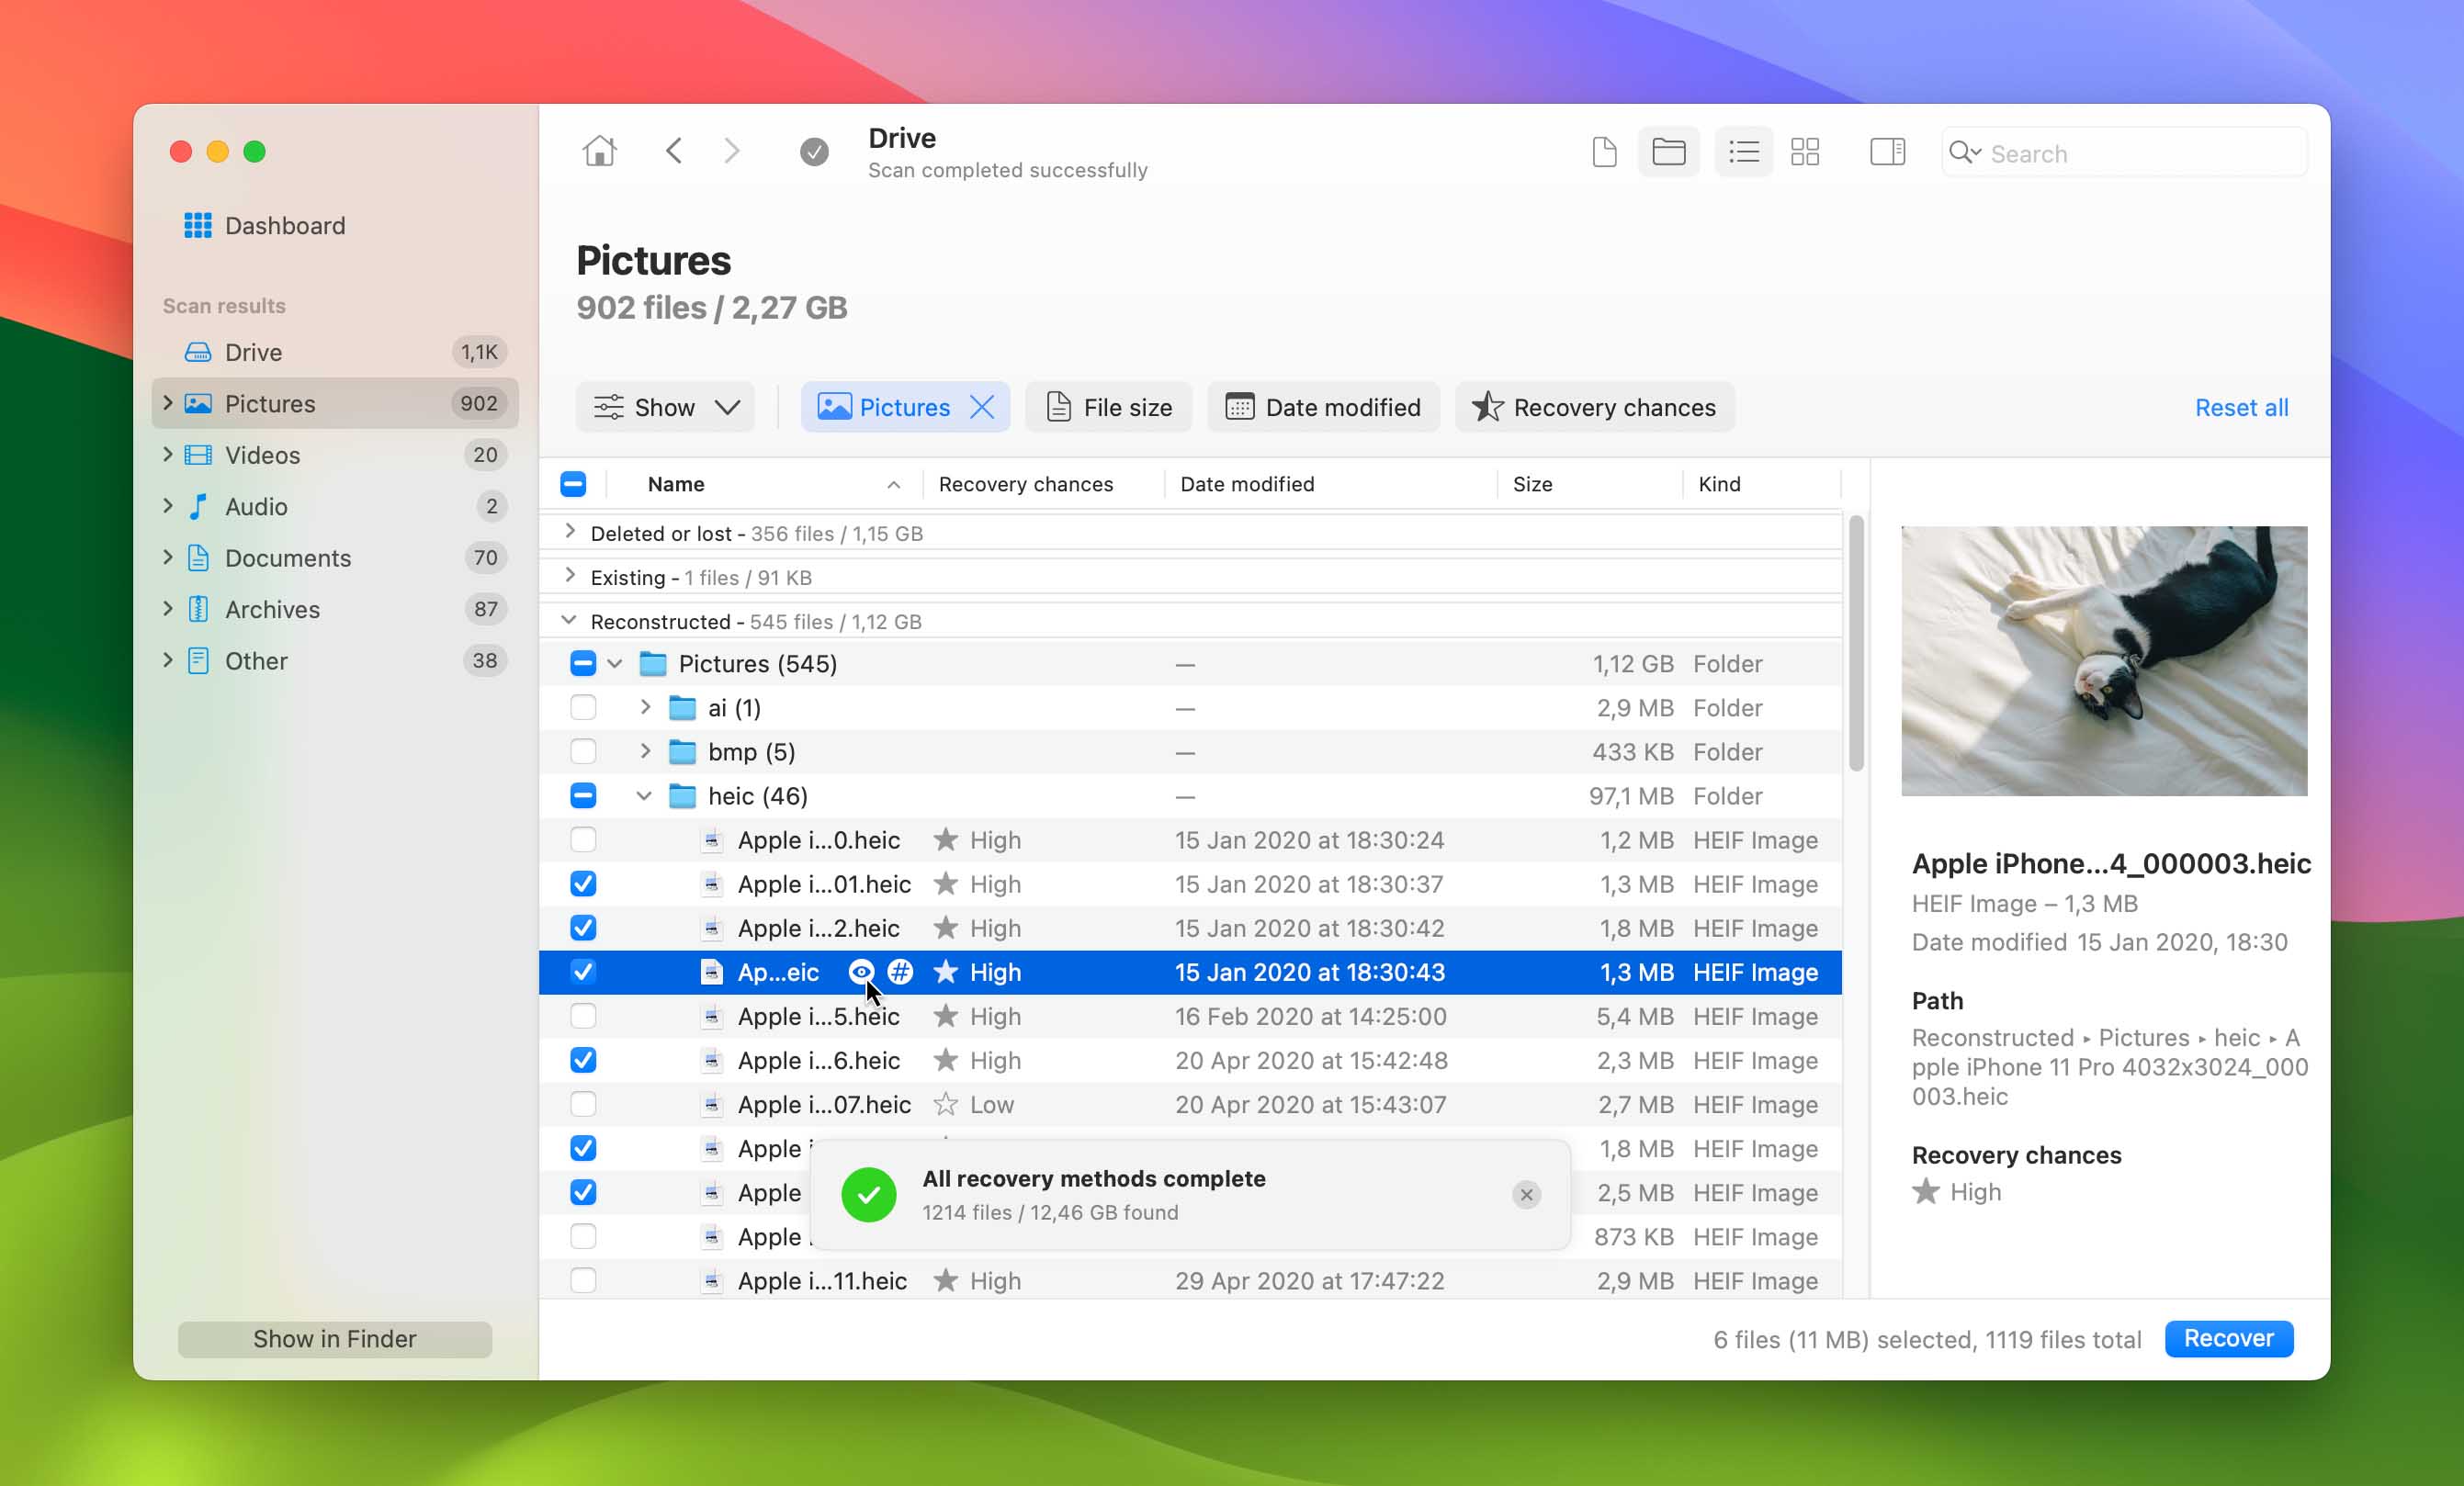
- Select the files you want to recover if you chose ‘Review found items’ in the previous step. Disk Drill organizes files into three main categories: Deleted or lost (recovered deleted data), Existing (data currently present on the disk), Reconstructed (data recovered using file signatures). You can navigate between these categories using advanced filters. Also use the preview feature (represented by an eye icon) to view files before making your final selections.
- Click “Recover” and choose your save location. Please do not select the same location from which you are trying to recover to avoid overwriting. Once it has finished, you’ll be able to navigate to the folder to look through the files that were recovered.
Curious about Disk Drill? We’ve conducted an extensive review of this tool. Additionally, we’ve delved into a separate analysis focused on its safety aspects. Keep in mind, our insights are based on the Windows version. For a comprehensive review of the macOS version of Disk Drill, we highly recommend the article from these experts.
Method 2: Recover Data From a Mac Hard Drive Using Time Machine
No luck with Disk Drill? Don’t worry! Then it’s time to go through your Time Machine backups in search of the missing files.
If you’ve been using the Mac’s built-in Time Machine technology, then it should be creating copies of files as you create them. This can apply to both internal and external hard drives, however, the drive with the Time Machine backup on it will need to be fully functional.
If you’re restoring files that were previously stored on an external hard drive, before attempting to restore files from your malfunctioning or corrupt hard drive, it’s worth buying a new one to store those files. Alternatively, if you have enough space on your internal drive, you can simply save the files there instead. Then, follow the steps below.
- Open Time Machine, and navigate to the file or folder you want to restore by using the slider on the right side to “go back in time” to before the drive failure.
- Right-click the files or folders you want to restore, and tap the “Restore [file] to…” button.
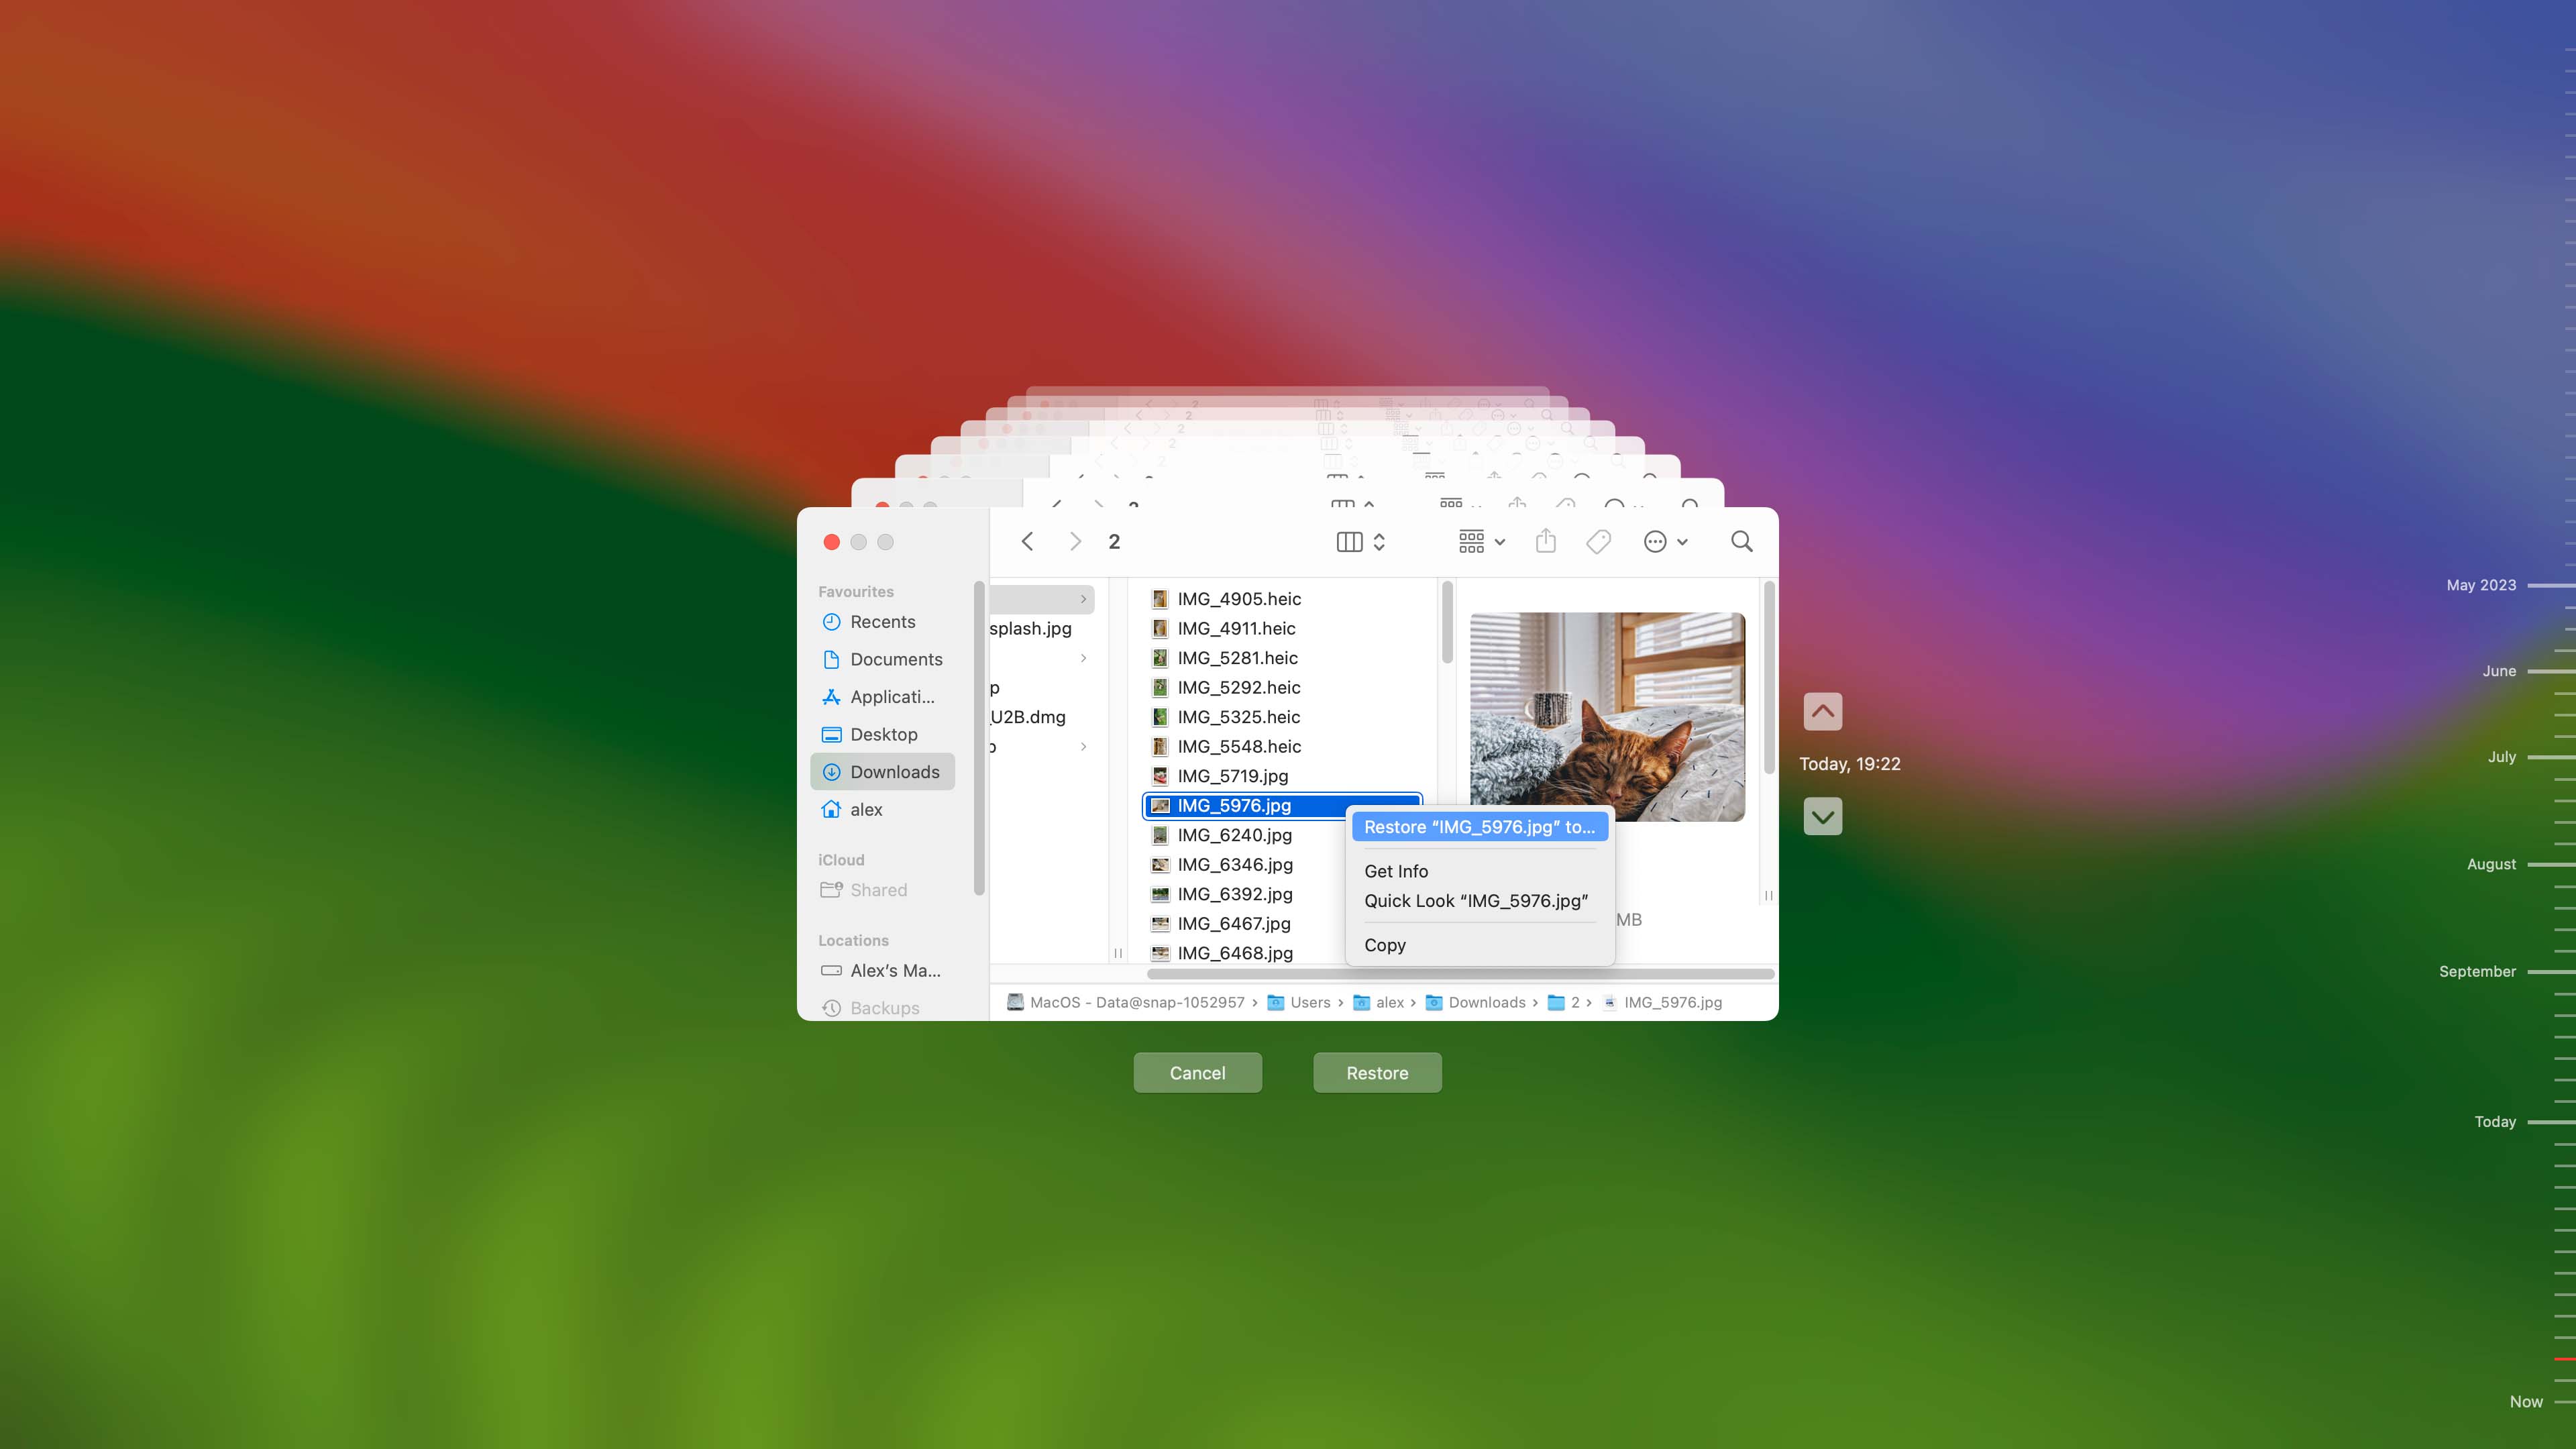
- Save your files or folders to a new location that isn’t on the failed drive.
Things are a little more complicated if the hard drive that failed was your Mac’s internal drive. In this case, if you’ve been using Time Machine, you have a backup on an external drive. To restore those files, you may need a new Mac computer. With the new computer, during the setup process, you’ll be able to restore your computer from the Time Machine backup.
Method 3: Recover Your Mac Hard Drive Using Disk Utility
If you don’t have a Time Machine backup or the drive that is broken is your Time Machine backup, you may need to take a different route, and that may involve using a disk repair tool. Apple has a disk repair tool built right into the Mac, called Disk Utility, and it’s worth trying to use Disk Utility before paying for a data recovery tool.
Follow the steps below to use Disk Utility to try and repair a drive:
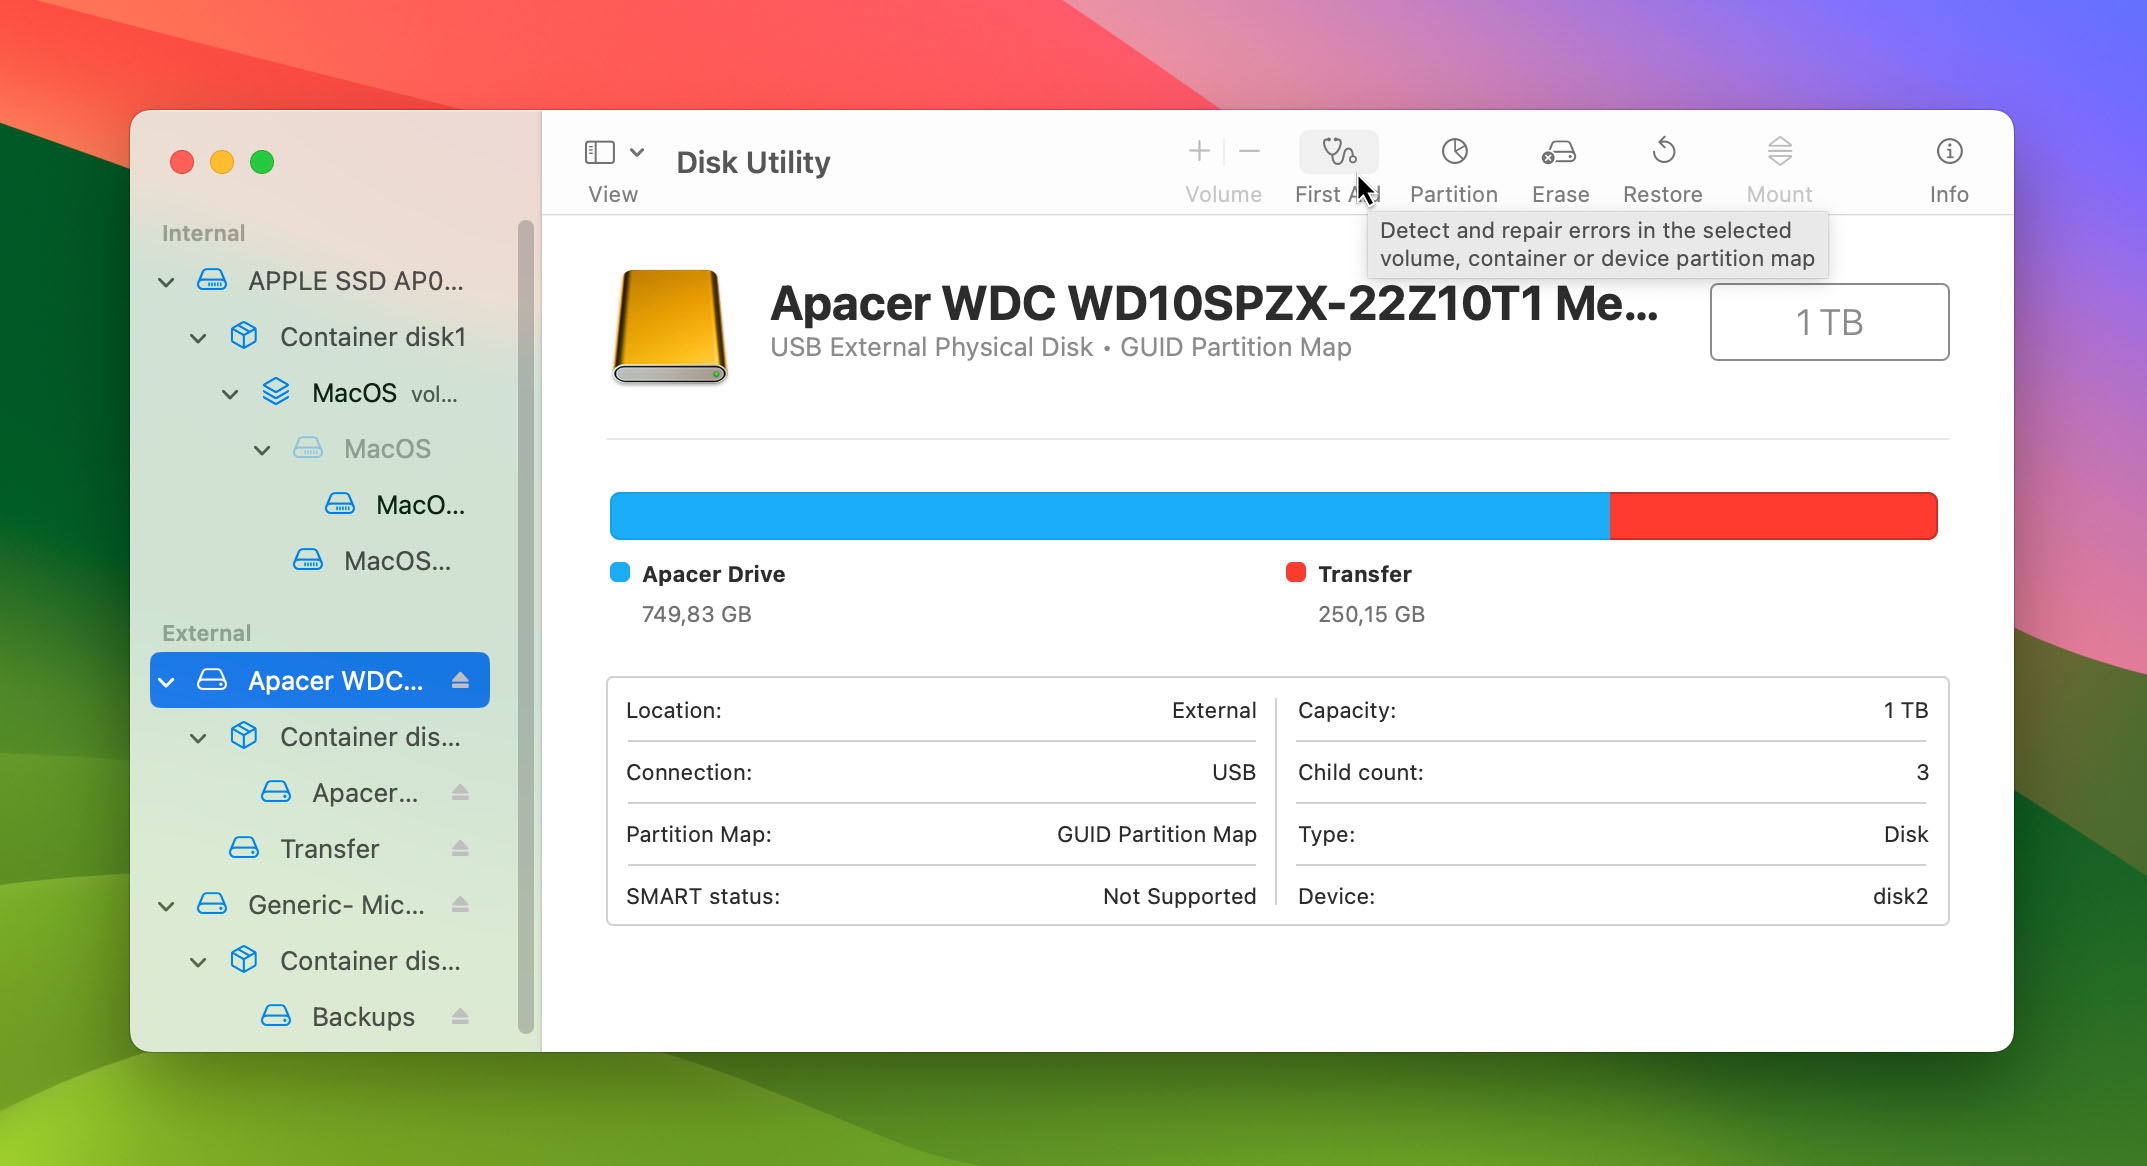
- Open the Disk Utility application on your iMac, MacBook, or other Mac computer.
- On the left-hand sidebar, there should be a list of drives. Find the drive that isn’t working. It’s very important you select the correct drive, so double-check. If you’re currently using your Mac, avoid selecting the “Macintosh HD” option; the steps below don’t apply to it.
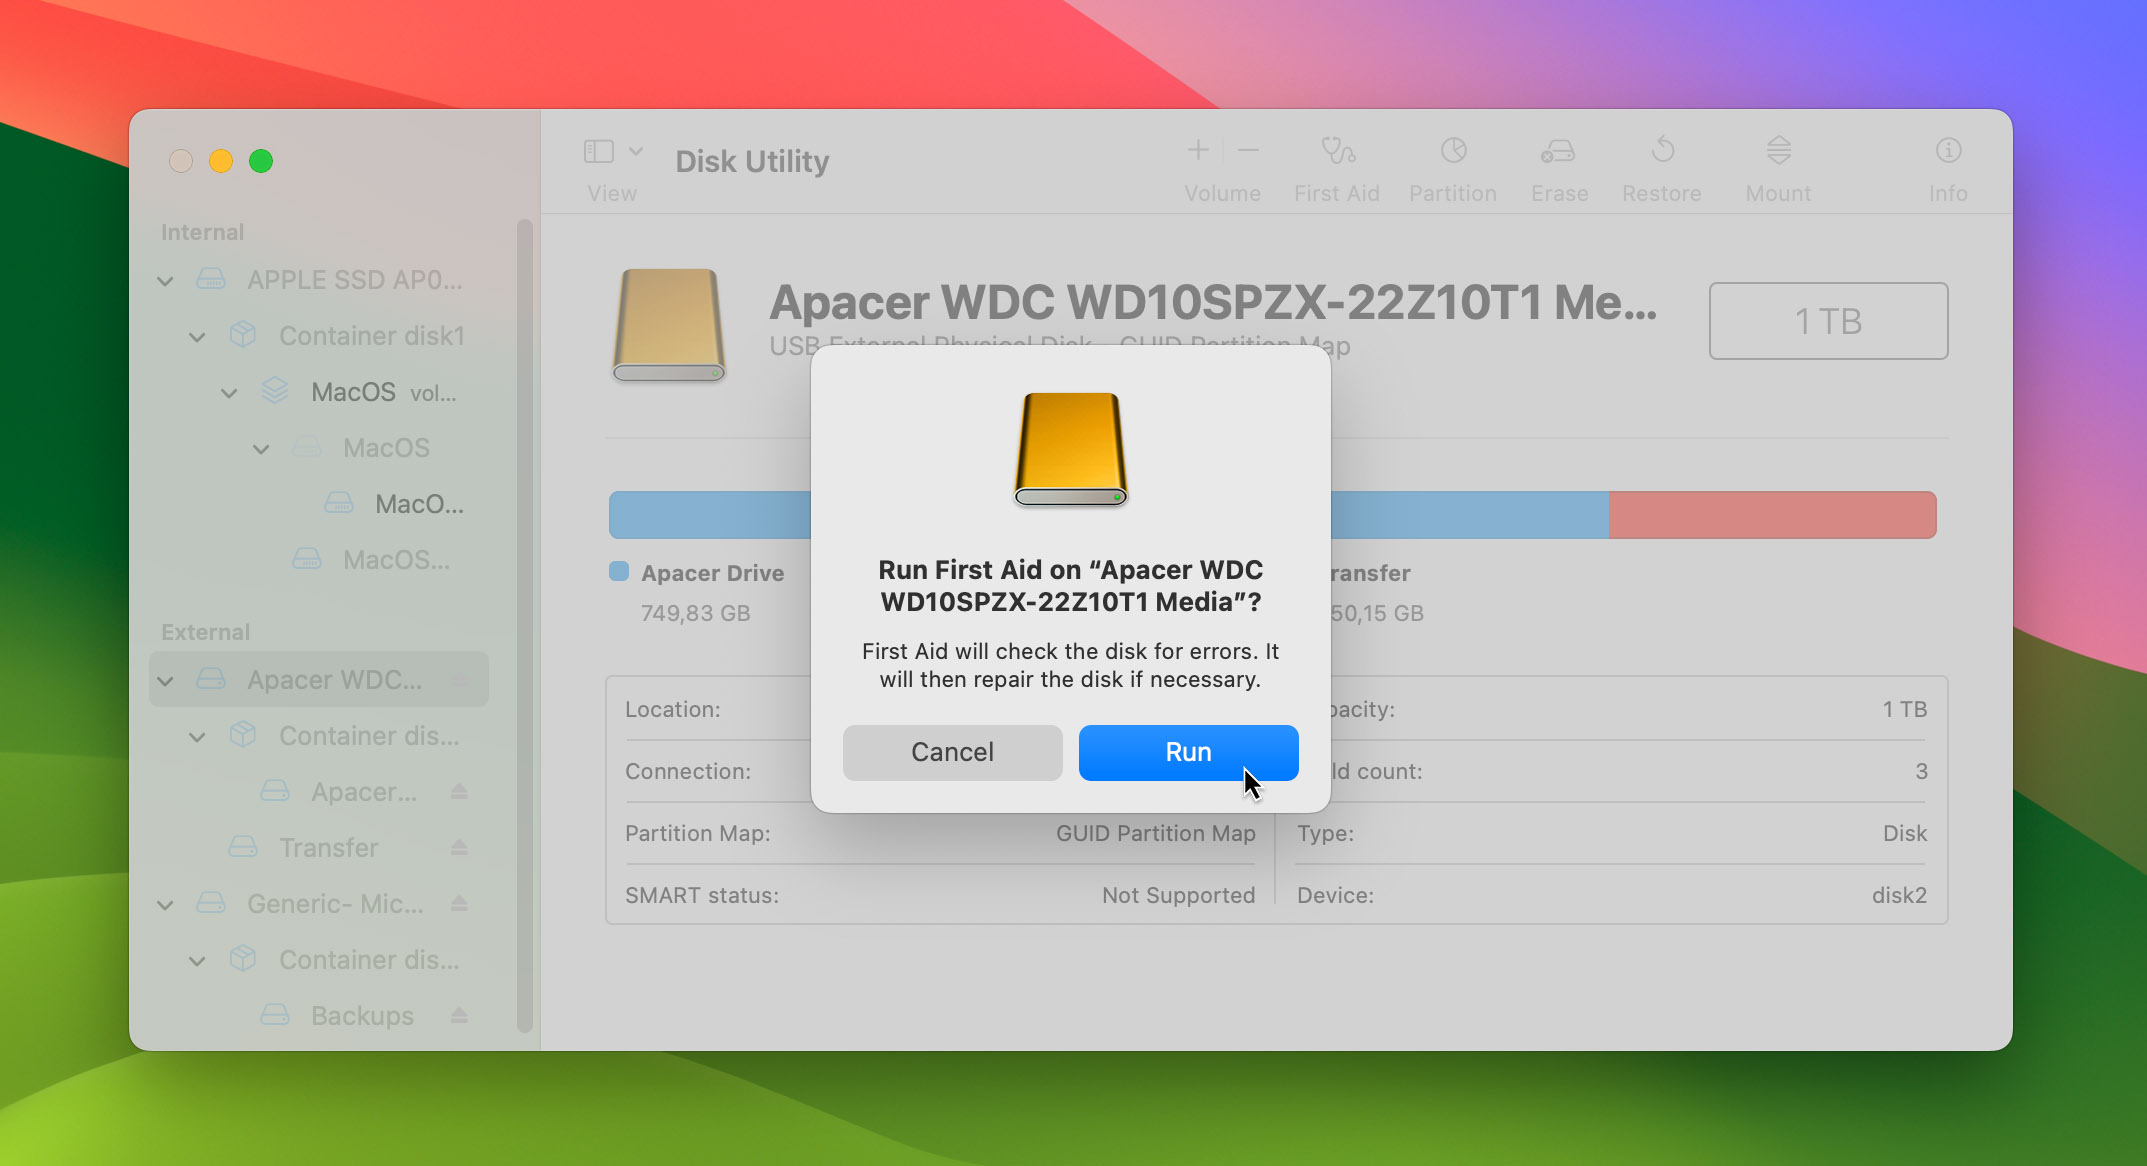
- Open the drop-down menu on the drive, and select the last volume associated with it. Then, tap the “First Aid” button on the top of the window.
- Disk Utility will attempt to fix the drive. Once it has finished, move to the next volume up, and so on, until you have performed First Aid on all volumes and the drive as a whole.
Hopefully, the program will have repaired the hard drive and it will be fully usable again, with your files intact. If not, move on to the next step.
How to Prevent Future File Loss
If you want to make sure that you don’t have to worry about losing files in the future, it’s worth setting up Time Machine on your Mac.
To set up Time Machine, you’ll need to have an external hard drive. When you plug that drive into your Mac, you should get a prompt asking if you want to use the drive for Time Machine. Tap “Yes” and follow the on-screen instructions, which will include choosing any folders and locations you want excluded from the backup. Whenever you have that drive plugged in, Time Machine should update its backup — so it will always be up to date, and you can always count on it when you need it.
The dynamics of data recovery can differ significantly between SSDs (Solid State Drives) and traditional HDDs (Hard Disk Drives). Dive into our comprehensive article on Mac SSD Data Recovery where we delve deep into these differences and the intricacies of SSD recovery on Mac.
Recovering Data From a Physically Damaged Mac Hard Drive
If your hard drive is physically damaged, you’re unfortunately much less likely to be able to restore your lost files. In fact, if your hard drive is physically damaged, probably the best thing to do is either come to terms with having lost your files or get in touch with a professional data recovery service like Salvagedata that deals with damaged drives. They may tell you that your drive is too damaged to recover files from, and in that case, you’re out of luck.
If you are set on recovering the data by yourself, there are a few things that you can try. For starters, you could buy a hard drive enclosure, and install the hard drive in that enclosure. Sometimes, hard drive enclosures fail, and the actual drive is perfectly fine — and in that case, you may be able to recover your files, and use the drive as normal, with just a new enclosure. If that doesn’t work, you’ll need to get a professional involved, with the understanding that you may have lost your files forever.
Below are answers to a few questions you may have on Mac hard drive recovery.
FAQ
Can I recover files from a corrupt Mac hard drive?
If your hard drive has been corrupted, you may still be able to recover files from it. Follow the instructions above to recover files from a “logically damaged hard drive.”
Can I recover data from a dead Mac hard drive?
It’s a lot less likely that you’ll be able to recover files from a physically damaged hard drive, but there is still a possibility. It’s worth trying to put the drive in a new enclosure. If that doesn’t work, contact a professional.
Does Time Machine recover files from an emptied trash?
Time Machine does not back up files from the Trash. If you need to recover such a file, you should try and find where the file was before you placed it in the trash.
This article was written by Christian de Looper, a Contributing Writer at Handy Recovery Advisor. It was also verified for technical accuracy by Andrey Vasilyev, our editorial advisor.
Curious about our content creation process? Take a look at our Editor Guidelines.