Clean installing macOS on your Mac gives it a fresh start. It wipes the disk—removing the operating system (OS), your applications, personal files, and settings—and reinstalls macOS on your Mac. You’d want to clean install macOS if you’re upgrading, your Mac is slowing down, feels cluttered, or your device is facing unresolvable system errors.
In the sections below, we describe how you can clean install macOS 14 Sonoma, using easy-to-follow step-by-step instructions. Let’s get to it:
What Is Clean Install: Clean vs. Upgrade Install
When Apple releases a new macOS version, you can either perform an upgrade install, or a clean install. An upgrade install keeps your files and settings intact, by installing the new OS over the previous one. On the other hand, a clean install removes the previous OS and installs the new OS, also removing your personal apps, files, and settings in the process.
Like other macOS versions, macOS 14 Sonoma, too, allows you to perform an upgrade install, or a clean install.
- Performing a clean install entails wiping your Mac clean and then reinstalling its operating system. By doing so, all of your documents, photos, apps, and other data located on your Mac prior to this will be gone, and your Mac will be restored to factory settings. After that, the new OS will get installed on a clean and reformatted drive, allowing you to enjoy your “utterly new Mac.”
Since doing a clean install involves deleting all of the data from your Mac, it is essential to make a fresh backup before moving further.
- Upgrade install means that you’ll be installing the new OS over your old one. Many people choose this option since it is much easier than a clean install. However, sometimes an upgrade install may cause glitches and make your Mac run slow. This is why it may be better to go the harder way but thus avoid such issues.
macOS Clean Install Types
When it comes to performing a clean install of macOS, you have two options: doing it on a non-startup drive or on your Mac’s startup drive:
- Non-startup drive: Performing a clean install on a non-startup drive is a bit easier compared to the other type since it doesn’t require you to create a macOS bootable USB drive. However, for this method, you’ll need an additional external drive (aside from your Mac’s startup drive). This method allows you to keep your older macOS version and, at the same time, try out the new one.
- Startup drive: If your Mac is having startup issues, running slow, or is behaving strangely, doing a clean install directly on your Mac’s startup drive can solve those issues. Also, this type of clean macOS install involves completely erasing your Mac and restoring it to factory settings. Therefore, it gives you the chance of a second fresh start with your device.
The first method is generally used with beta macOS versions since it allows you to try out the operating system without making any changes to the main startup drive.
What You Will Need and Is Your Computer Suitable
To install macOS Sonoma on your Mac, you need to make sure that your device is compatible with this operating system version. Luckily, Apple made it clear which Mac models can run the new macOS.
Here’s a list of devices that support macOS 14 Sonoma:
- MacBook Pro (2018 onwards).
- MacBook Air (2018 onwards).
- iMac (2019 onwards).
- iMac Pro (2017).
- Mac mini (2018, M1 2020, 2023).
- Mac Studio (2022, 2023)
- Mac Pro (2019, 2023).
If you’re not sure which Mac model you have, it’s easy to find that out. Just open the Apple menu in the top-left corner of your screen and click About this Mac. Under the Overview tab, you’ll see your Mac’s type and year.
Now that you’ve figured out whether your Mac is compatible with the new operating system or not, it’s time to go through the things that you’ll need to make a clean install:
- 💻 Your Mac — it’s pretty obvious, but still.
- 📁 macOS Sonoma installation file — just download the operating system without installing it right away.
- 💽 USB flash drive — you’ll need it to load the macOS Sonoma install file and then use it to reinstall the operating system on your Mac (it should be at least 16GB).
- 💾 External drive — you’ll need it for your backup (make sure that it has enough space for all your files).
- 🌐 Internet connection — it is necessary for downloading the macOS installation file.
Steps to Clean Install macOS 14 Sonoma
Now that you’ve figured out whether your Mac is compatible with the new operating system, you’re ready to move forward. Here are step-by-step instructions on how to do a clean install of macOS.
Step #1: Back Up Your Mac
Time Machine is macOS’ in-built backup and restore application. When enabled, Time Machine first creates a full backup of your Mac, or the selected folders, and then keeps hourly backups of the past 24 hours, daily backups for the past month, and weekly backups for backups older than a month.
Time Machine creates incremental backups—only files that have changed or have been added are backed up to the initial full backup. This promotes efficiency, and saves time as well as storage space.
To use Time Machine, you’ll need an external storage drive that isn’t used for anything else.
Here’s how to use Time Machine to back up your Mac:
- Connect the external storage drive you’ll use as the Time Machine drive to your Mac. Ensure that it’s erased and formatted to the APFS, or MacOS Extended (Journaled) file system—you can do this using Disk Utility.
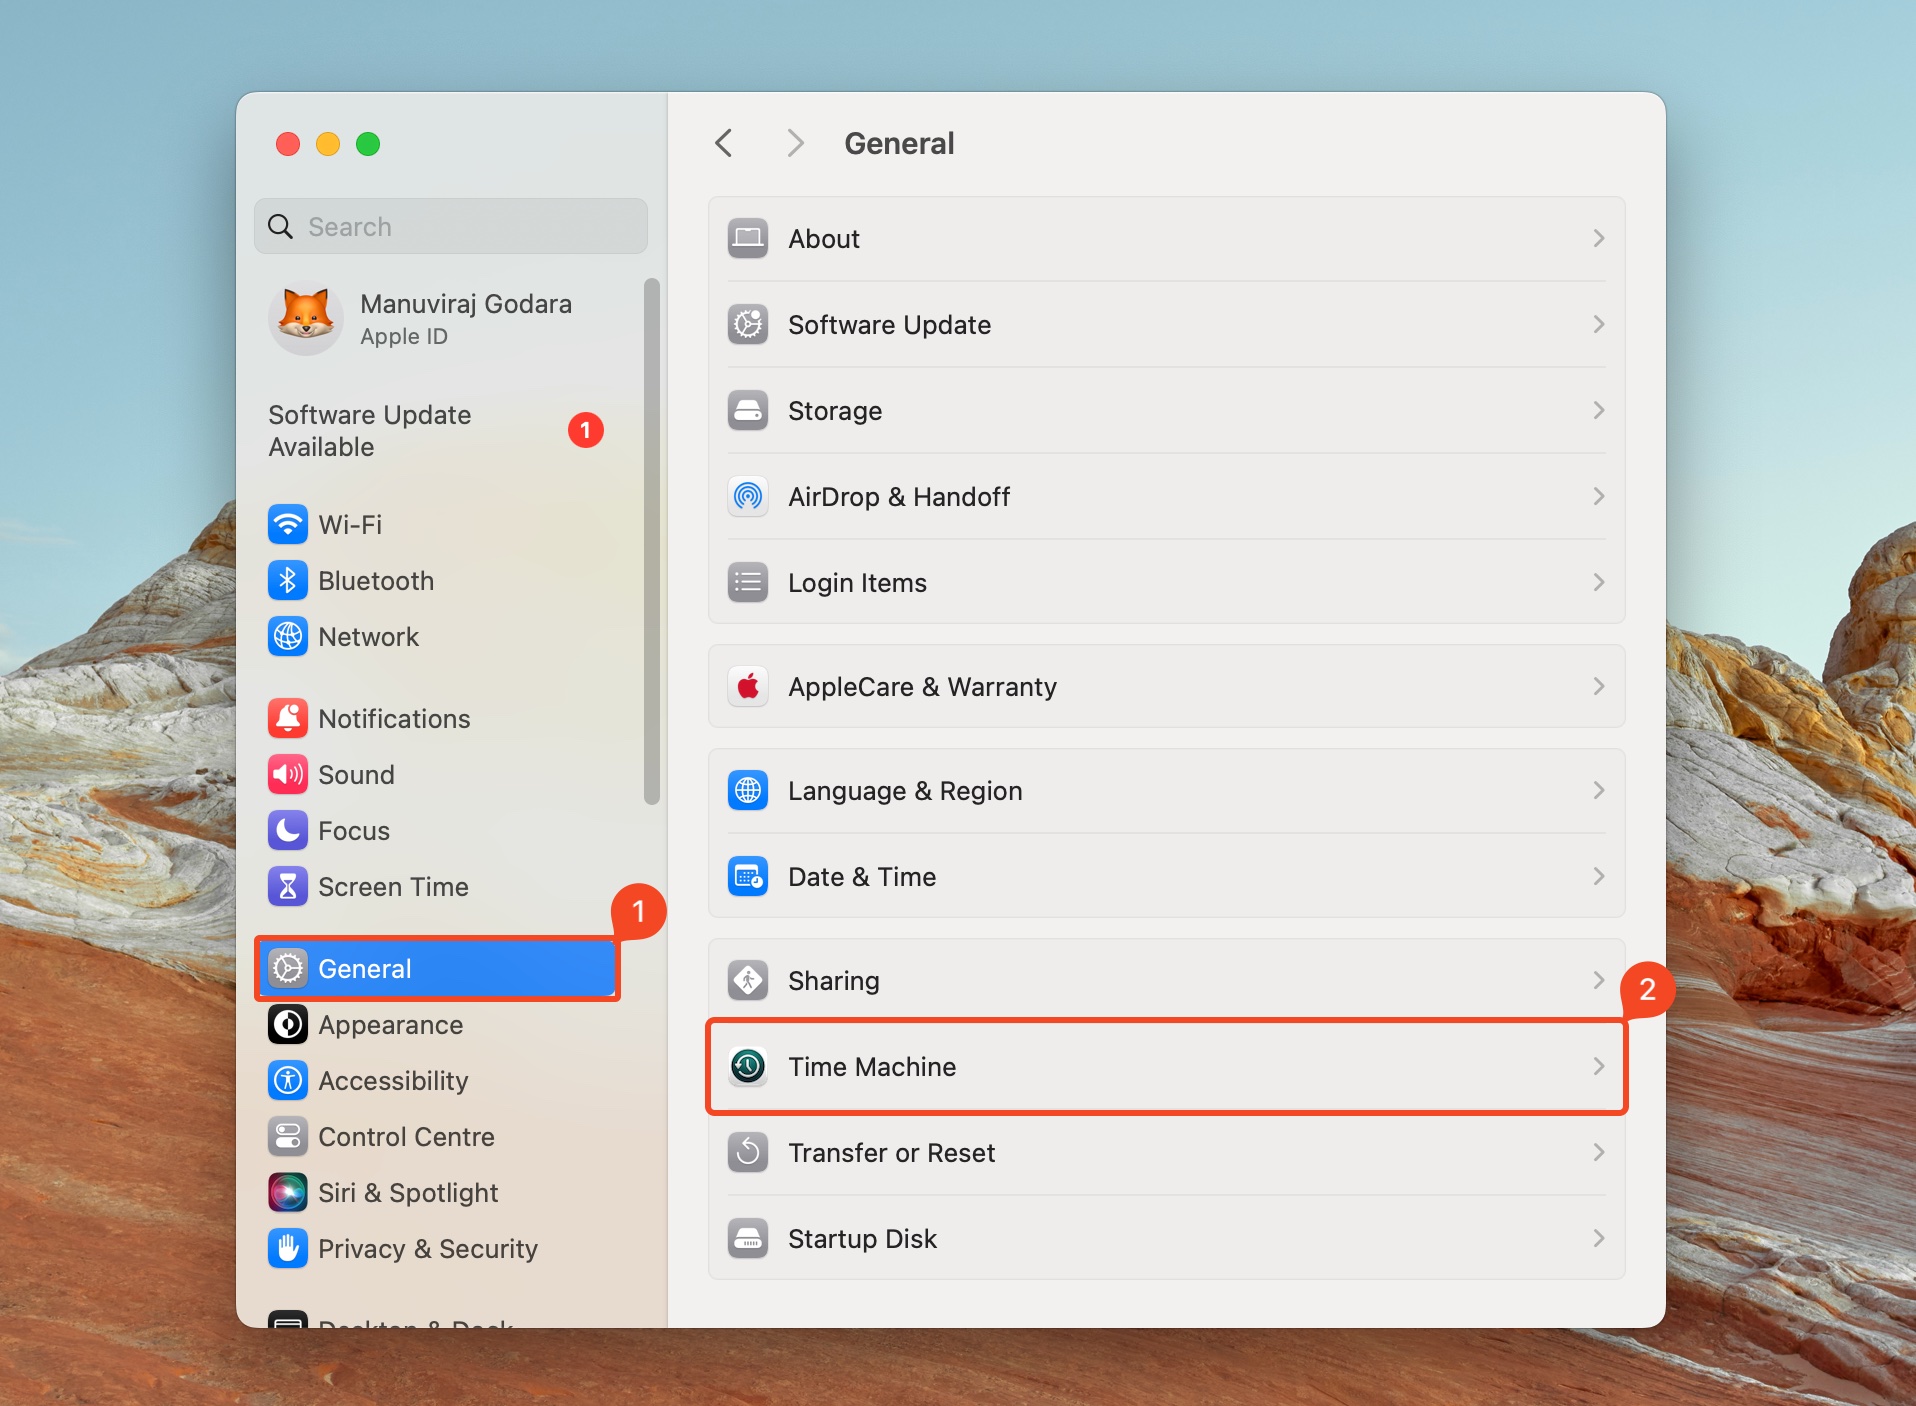
- Click on the Apple menu on the top-left corner of your screen, and choose System Settings (or System Preferences, depending on your macOS version).
- Click on General in the sidebar, then click on Time Machine.
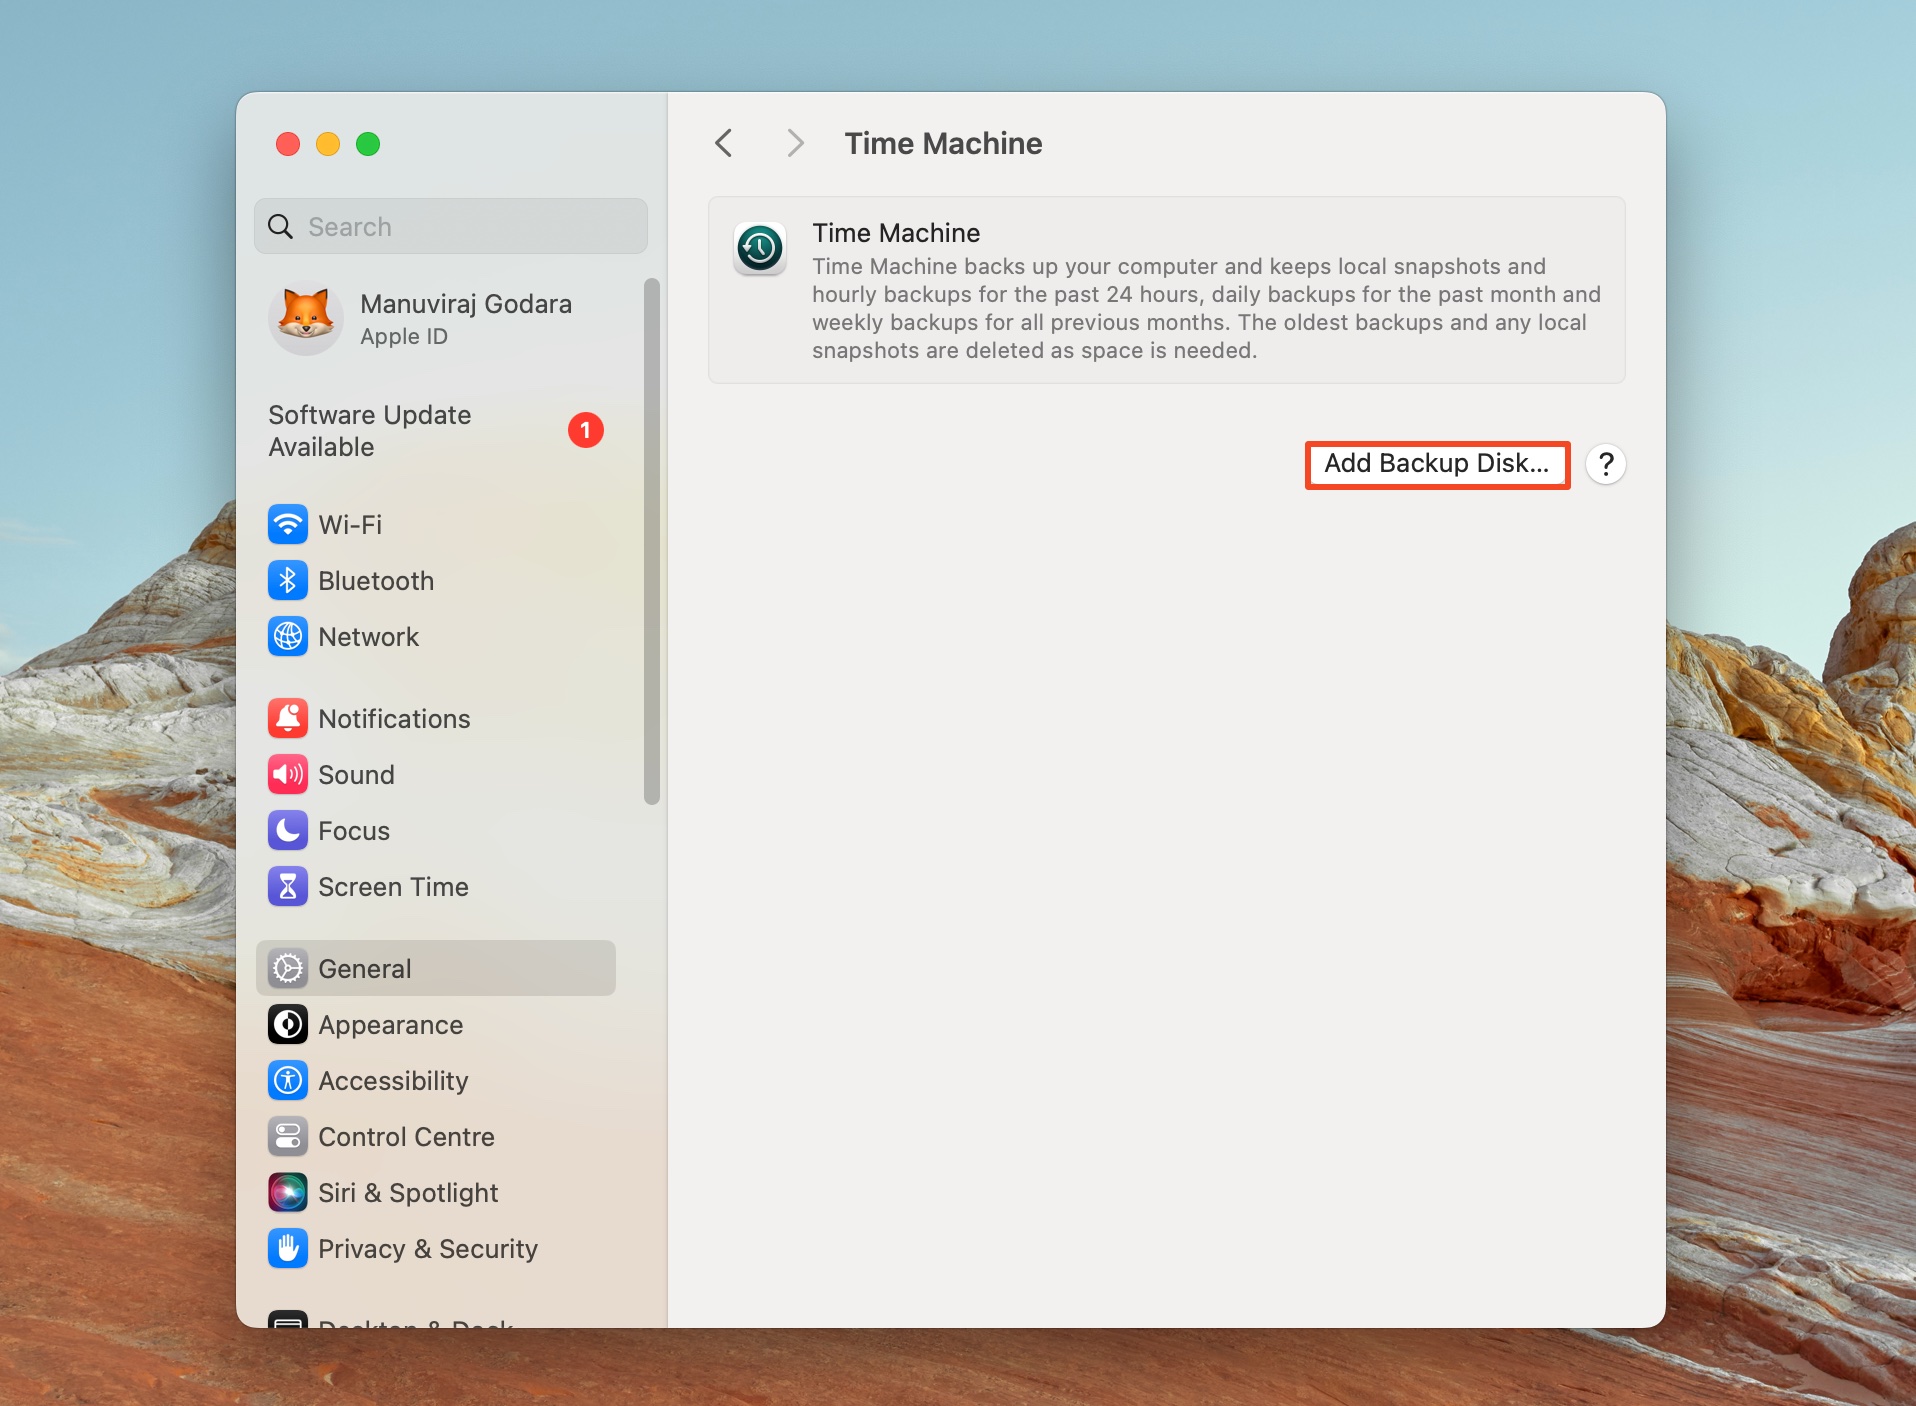
- Click on Add Backup Disk, or click the + button.
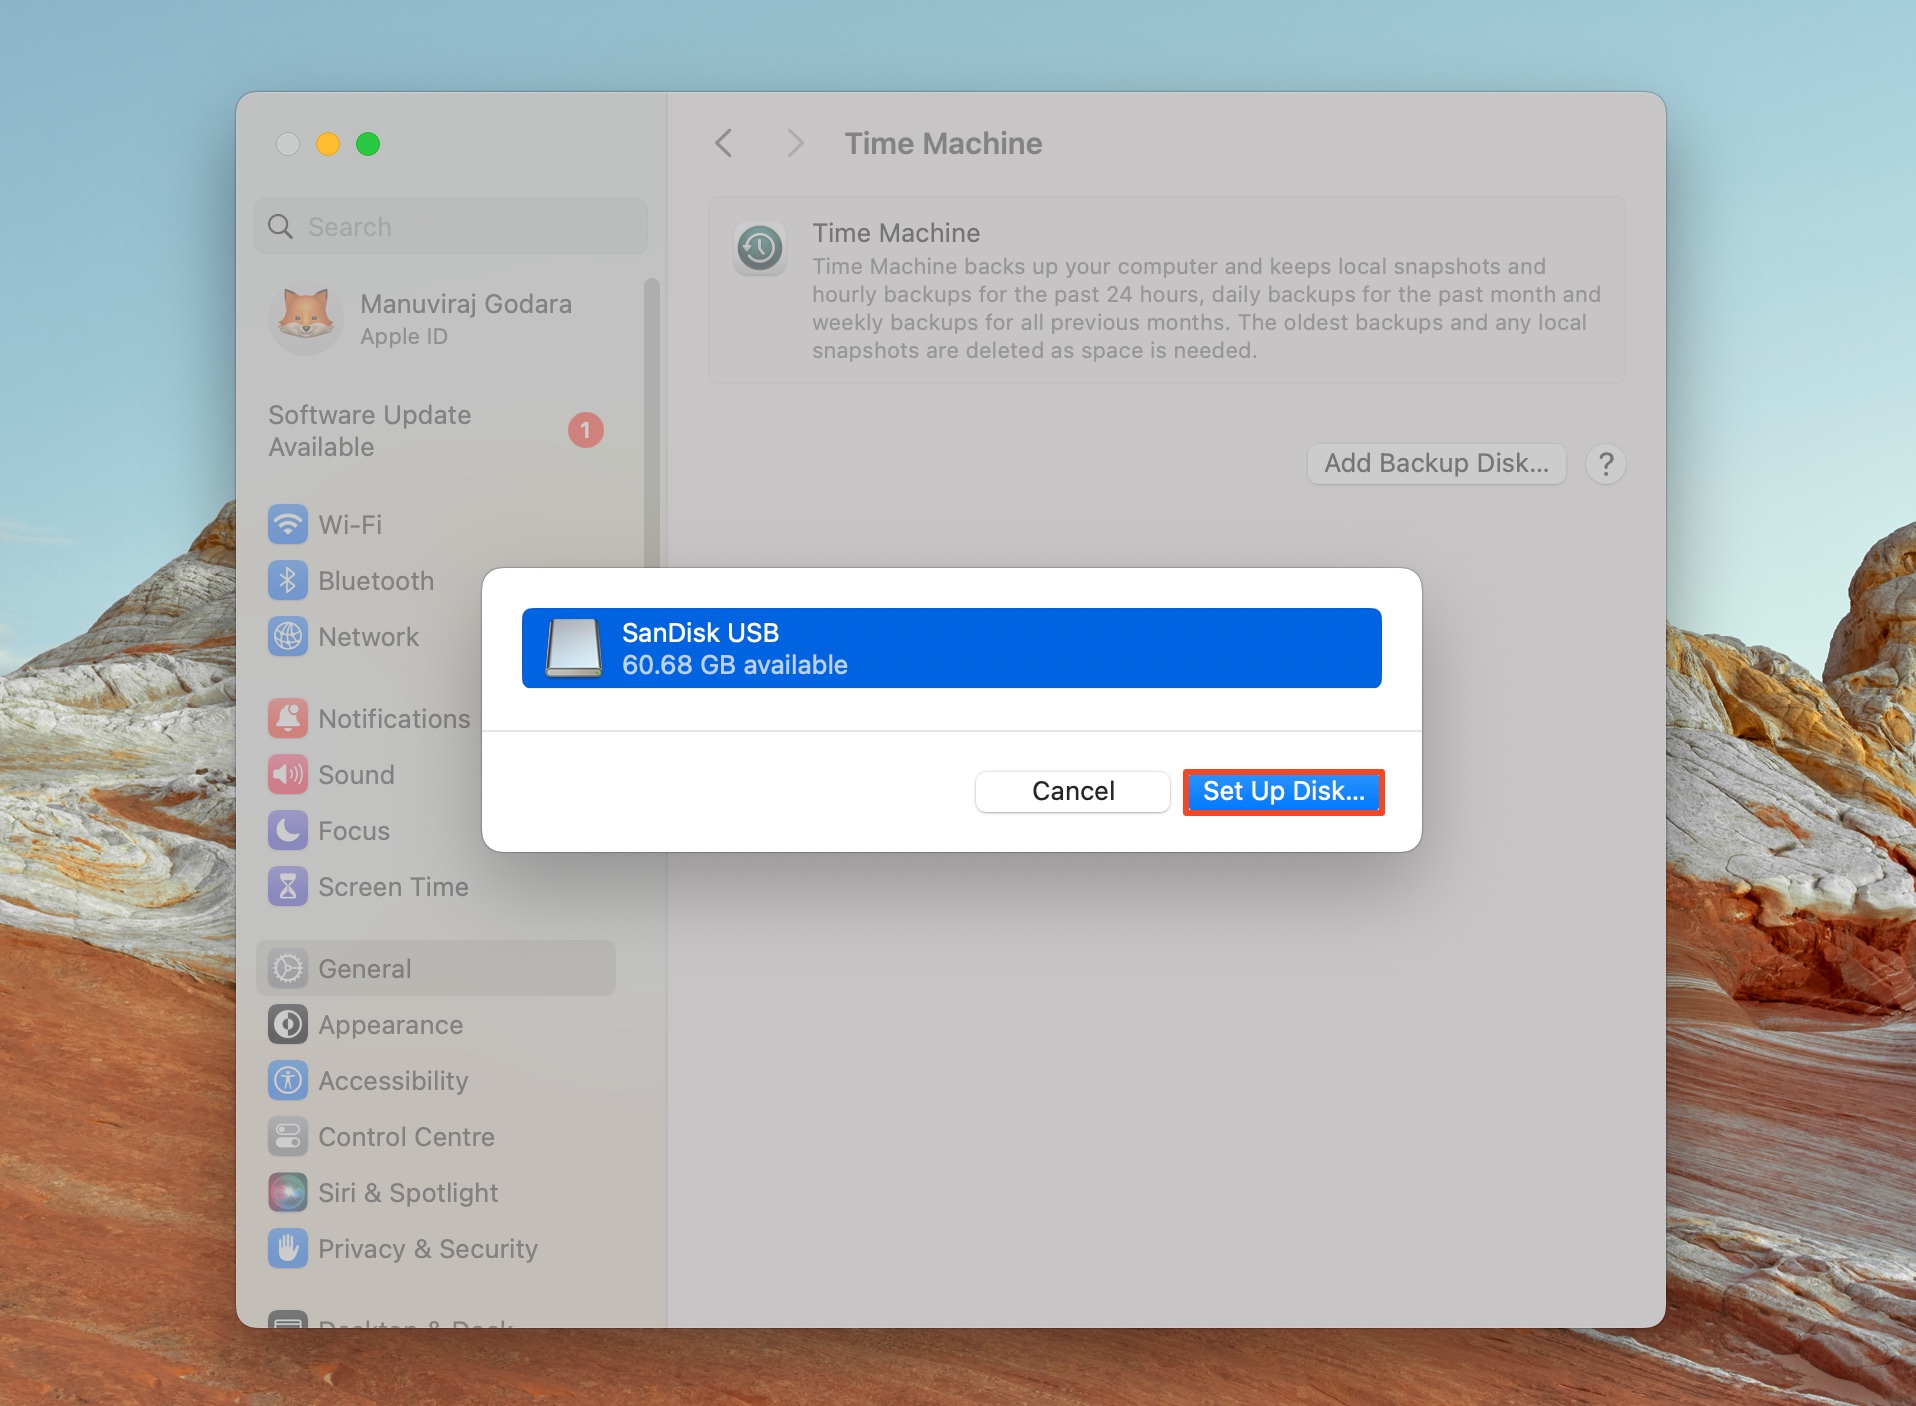
- Select the external storage device, and click Set Up Disk. The drive will be set up as a Time Machine drive. If the drive wasn’t formatted properly, macOS may prompt you to format it during this step.
- Choose whether you’d like to encrypt the backup, and create a password and password hint. You can also set disk usage limit by selecting the Custom option and adjusting the slider. Click on Done after making the required changes.
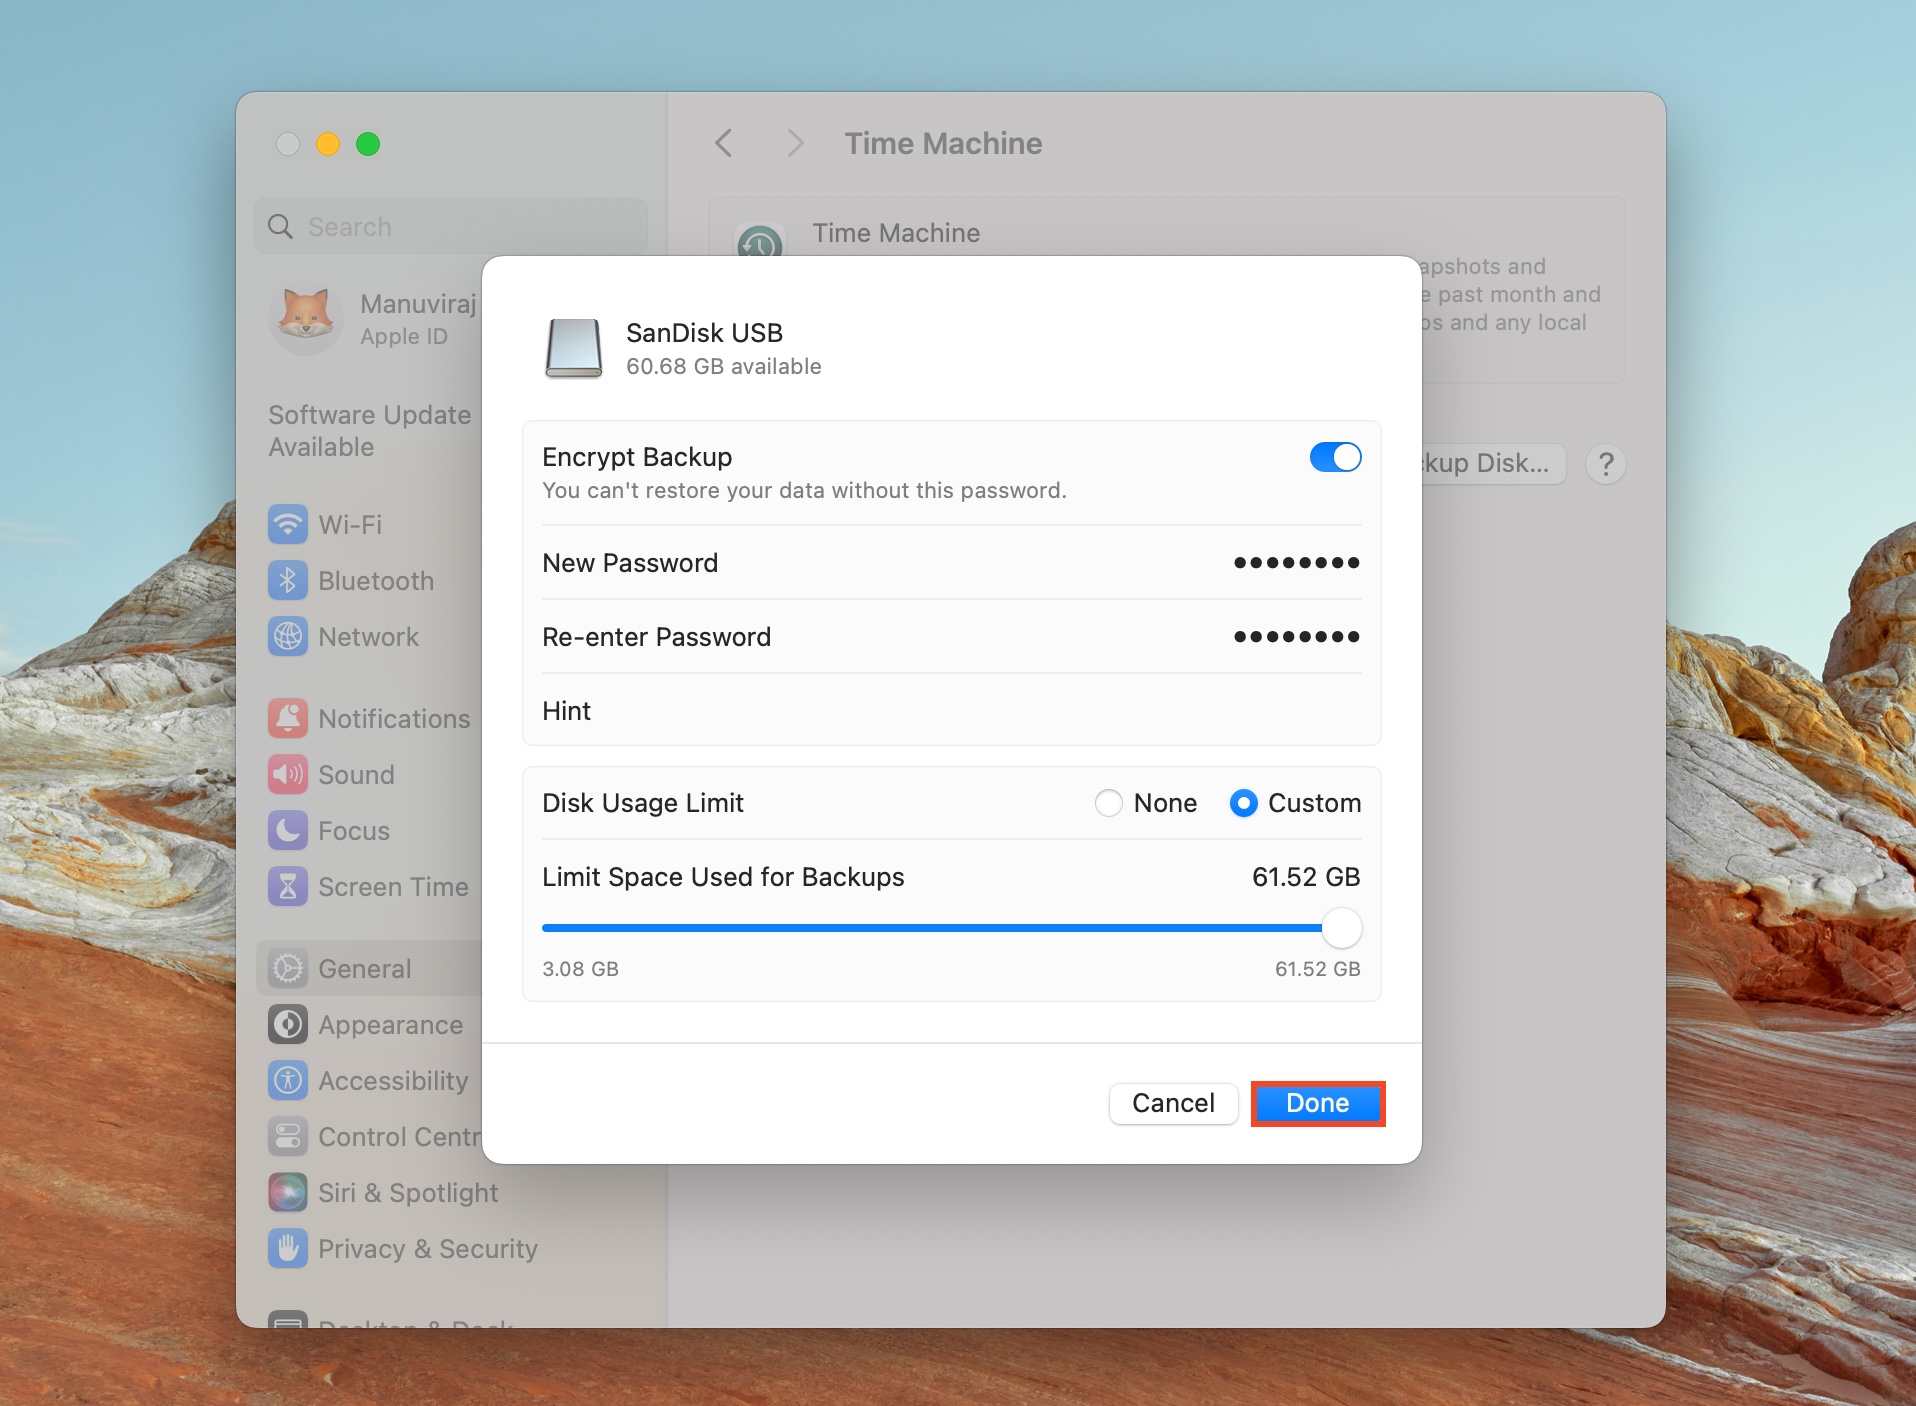
- Click on Erase in the next prompt.

- Click the Time Machine menu icon in the top-right corner of the menu bar, and click Back Up Now.
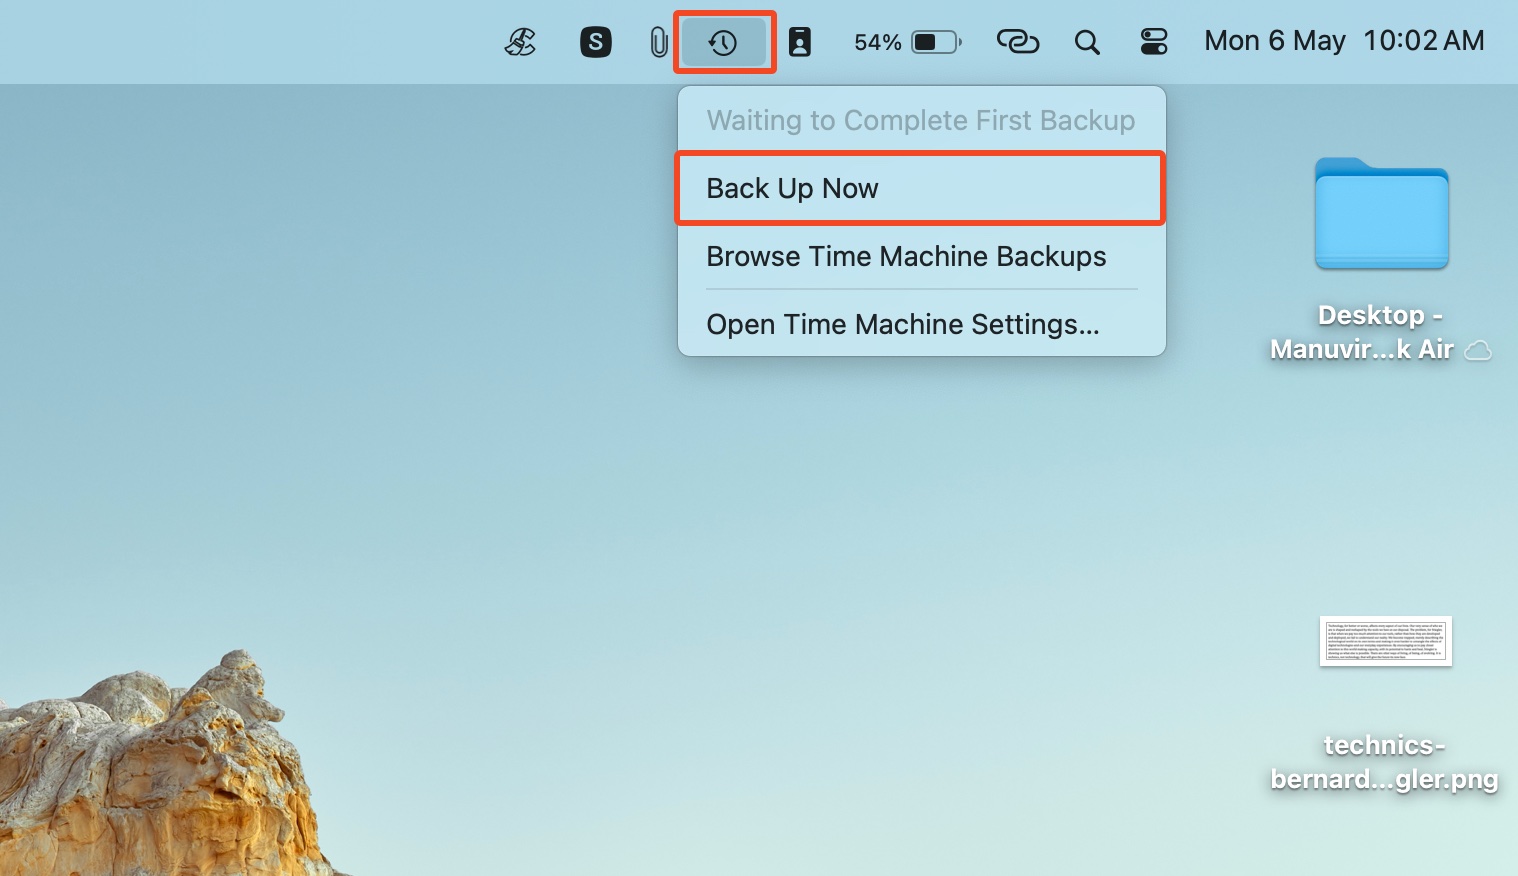
- Wait until macOS backs up all your files, then proceed with clean installing macOS 14 Sonoma.
Step #2: Get macOS Sonoma
As of writing this article, macOS Sonoma is the latest version of macOS. We recommend downloading and installing it. However, we’ve linked older versions of macOS in a separate block later on in this section.
Here’s how to download macOS Sonoma:
- On your Mac, click this link to open the macOS Sonoma download page in the App Store.
- Click on Get.
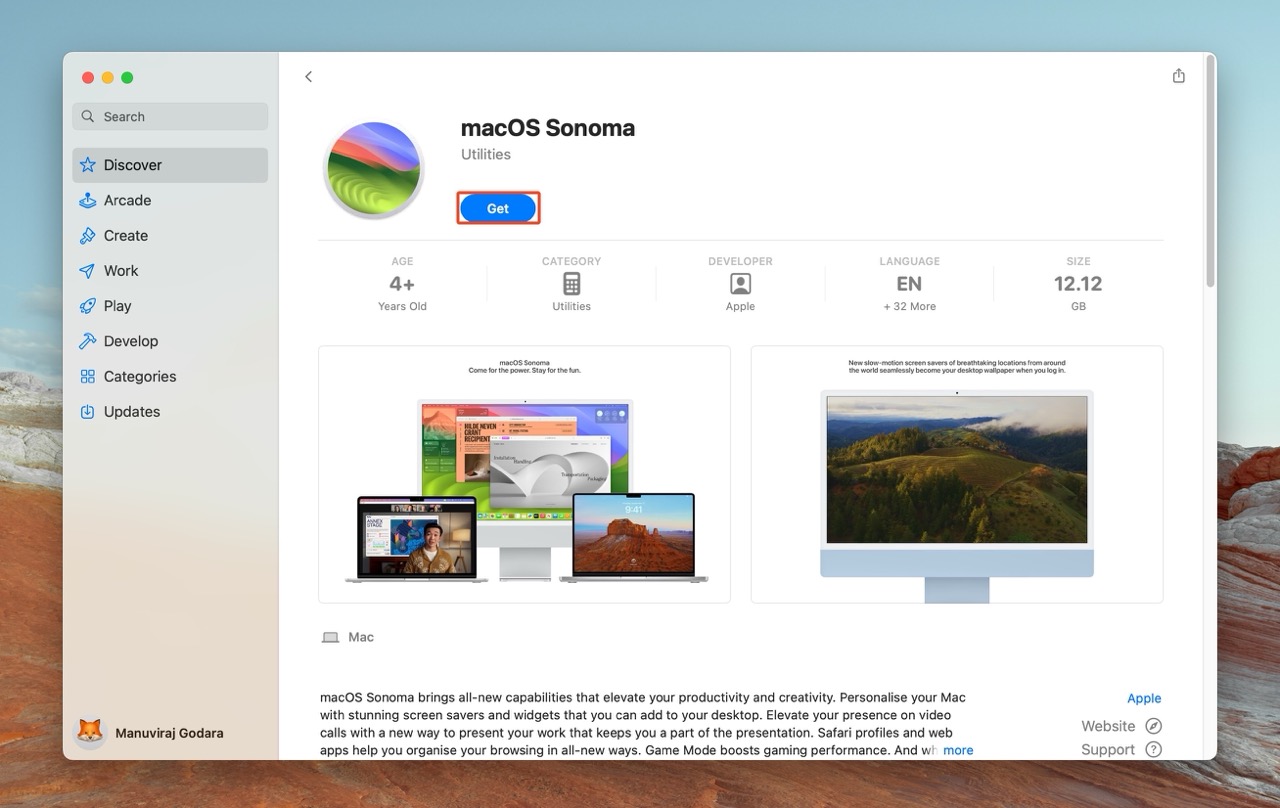
- Click on Download in the confirmation prompt to begin downloading macOS Sonoma.
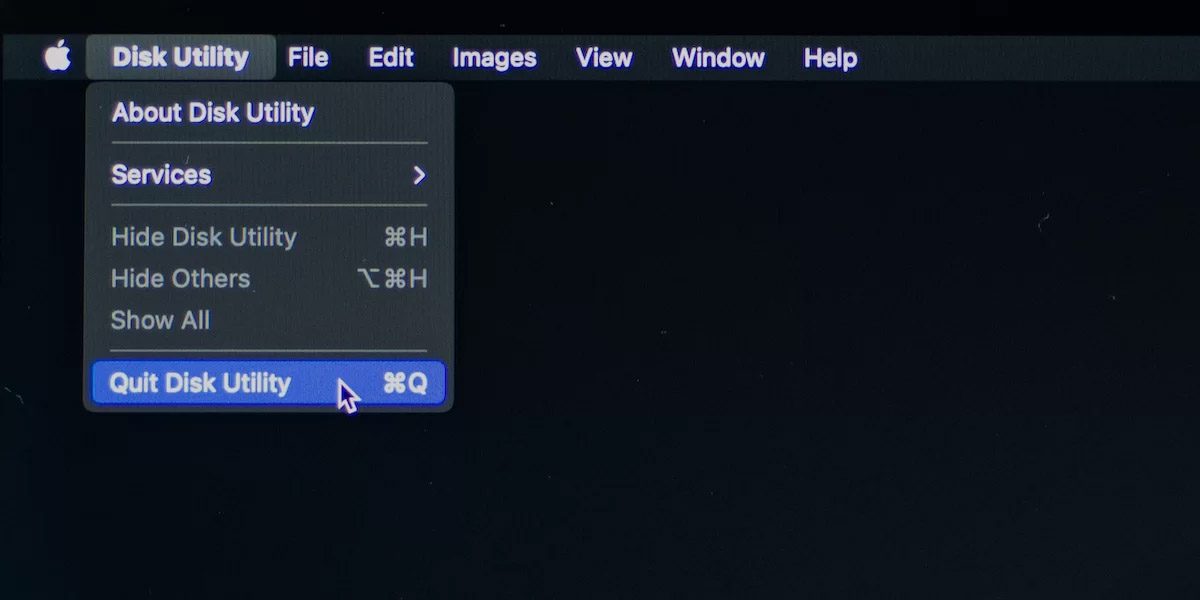
Once the download completes a separate window will open, prompting you to install macOS Sonoma right away. DO NOT install macOS Sonoma using this window. Close it and quit the program—right-click on it in the dock, and choose Quit.
You’ll be able to find the macOS Sonoma installation file in your Applications folder.
How to Get an Install File for an Older Version of macOS
If you want to clean install your Mac but use an older version of macOS, you can definitely do so. All of these macOS versions can also be downloaded via App Store. Just click the needed macOS version, and follow the same instructions as in the case of macOS Sonoma.
Click on the needed macOS version to download the installation file:
Step #3: Create a Bootable Drive
The next step that you should take is to prepare a bootable macOS drive. Here you have two options: use a third-party app or Terminal.
It is completely up to you to choose which method to use. However, it should be mentioned that using the right third-party app for this job makes creating the bootable drive much easier and quicker, and therefore can save you a lot of nerves.
To create a bootable drive, you’ll need the previously downloaded macOS installer and an external drive of some kind (or a USB flash drive). Keep in mind that you need to format your external drive before loading the macOS installation file onto it.
Make sure that your external drive doesn’t contain any valuable files since after you format it, everything will get erased.
Follow these steps to format your external drive (or USB flash drive):
- Press Command + Space to open Spotlight Search. Search for “disk utility” and open it.
- Select your external storage drive from the sidebar, and then click on Erase.
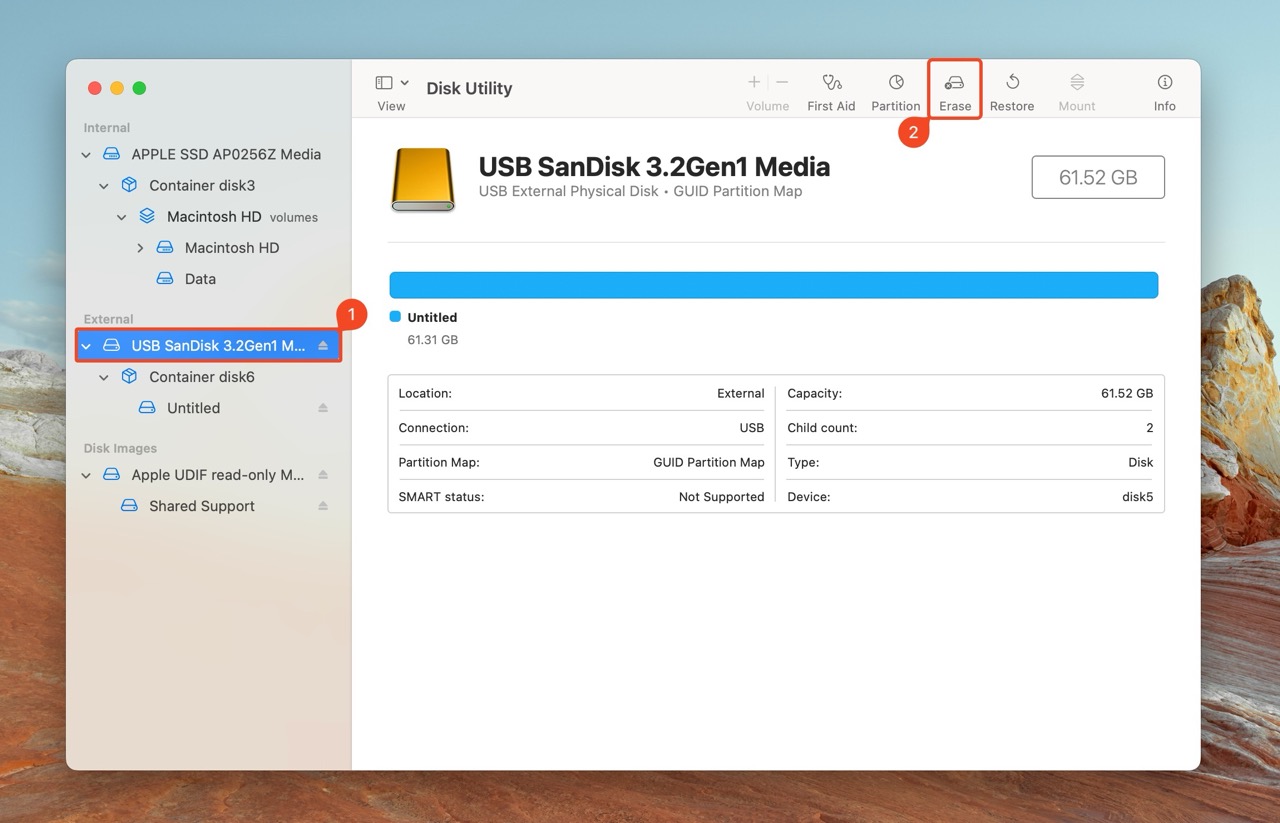
- Type in your preferred name for the external drive in the Erase prompt. Choose Mac OS Extended (Journaled) from the Format drop-down menu. Leave the Scheme drop-down menu as it is, and click Erase.
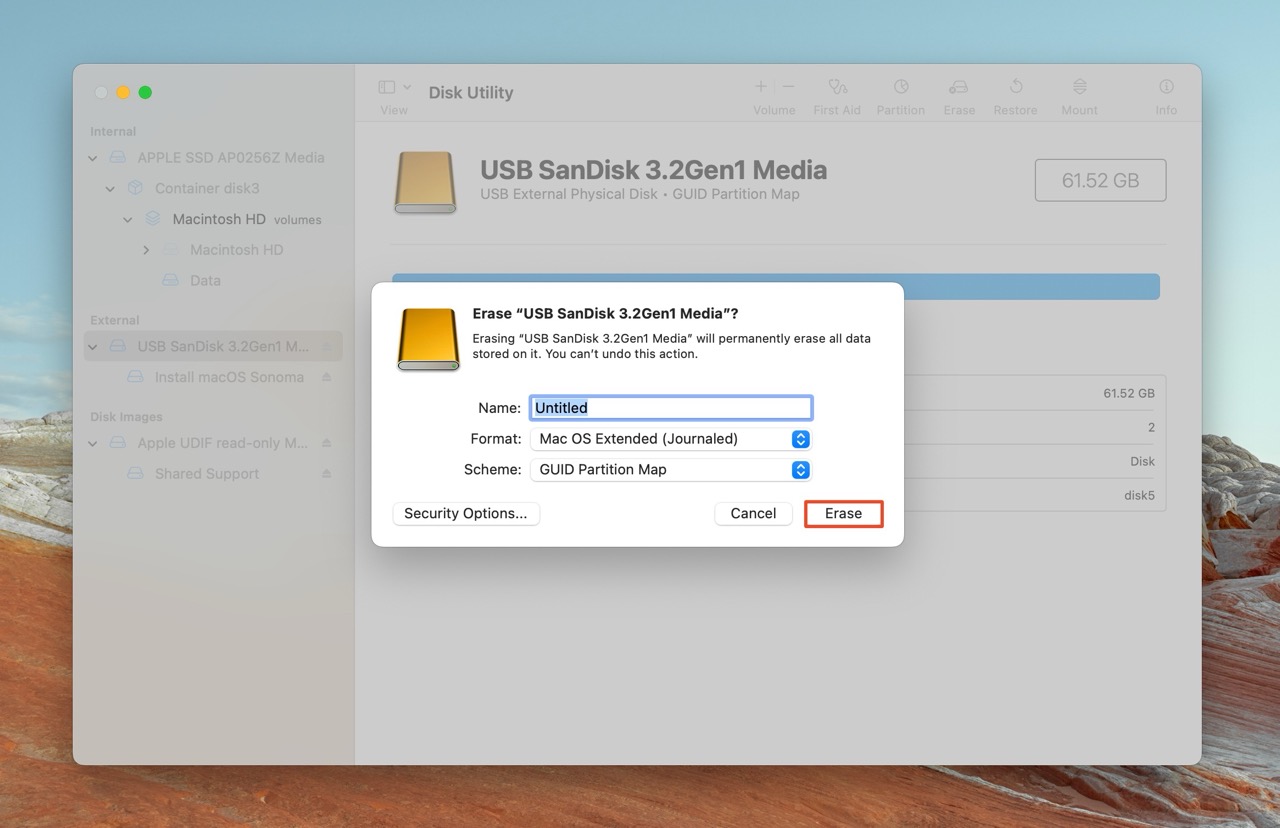
- MacOS will format the external drive.
Now that you’ve prepared your external drive, you’re all set to move on to the next step—creating the macOS bootable drive.
Option A: Disk Drill’s macOS Installer
One of the best third-party apps for this job is Disk Drill. All that you’ll need to do to create a bootable macOS drive is make a few clicks and wait a few minutes while the app does all the work for you.
So, here’s how to create a bootable drive via Disk Drill:
- Download Disk Drill and install it.
- Launch Disk Drill, and click on macOS Installer under Extra tools in the sidebar.
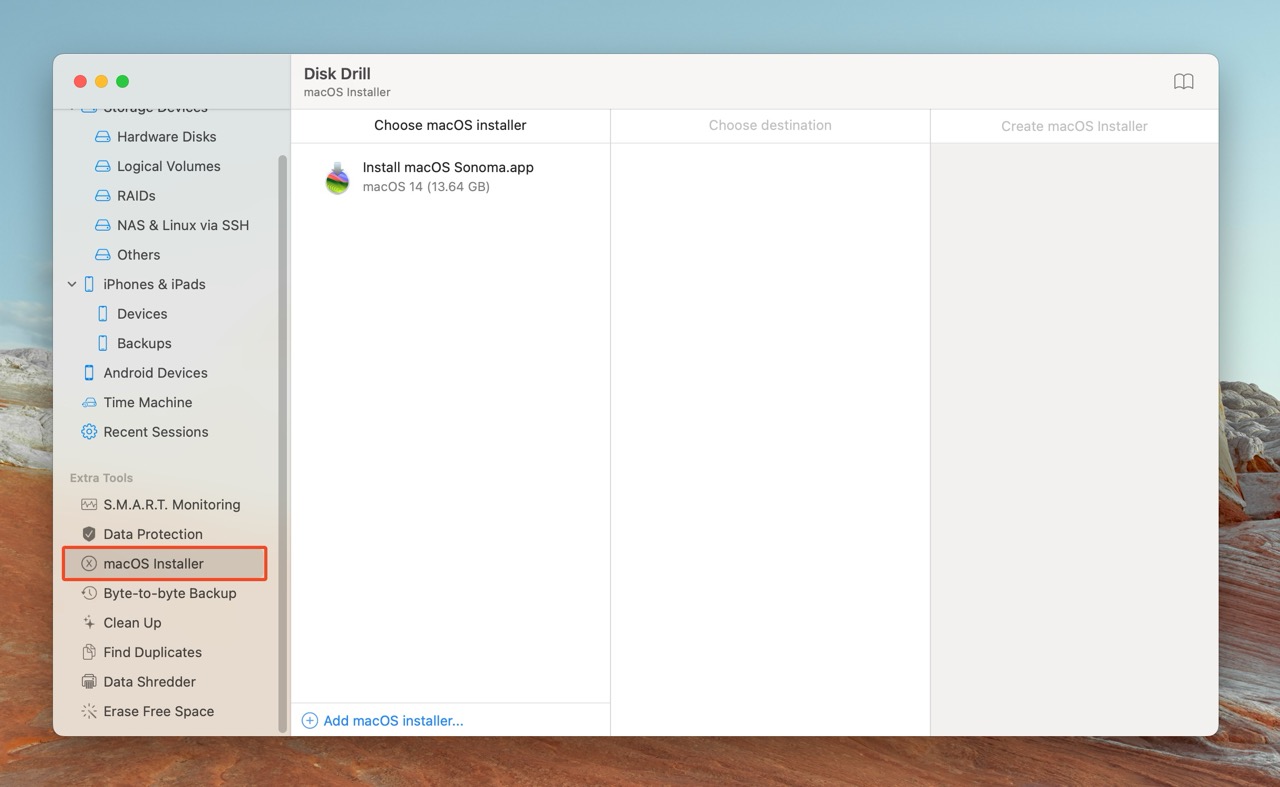
- Disk Drill will auto-detect the macOS installer on your disk, If it doesn’t, click on Add macOS installer, choose Locate installer on disk, select the Install macOS Sonoma file from the Finder window that pops up, and click Open. It’ll be added to the Choose macOS installer column.
- Select Install macOS Sonoma in the Choose macOS installer column.
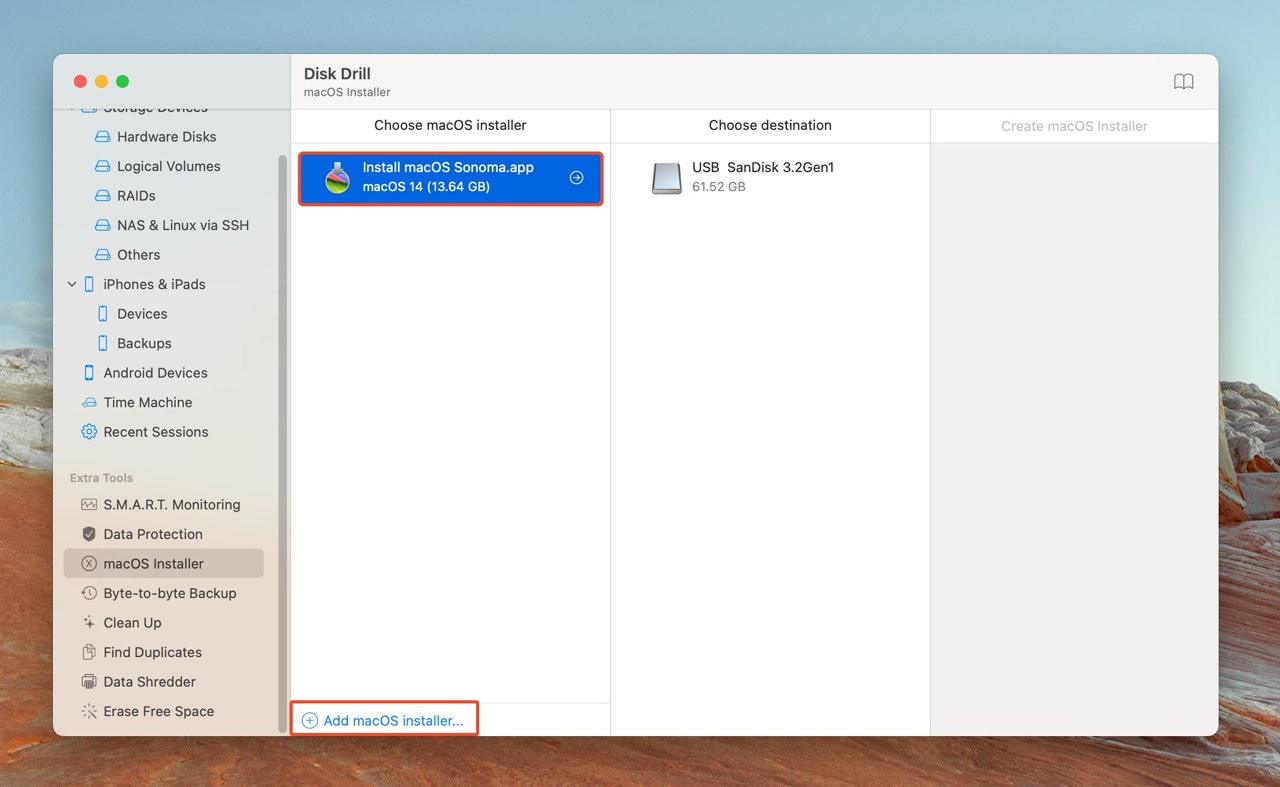
- Select your external drive from the Choose destination column.
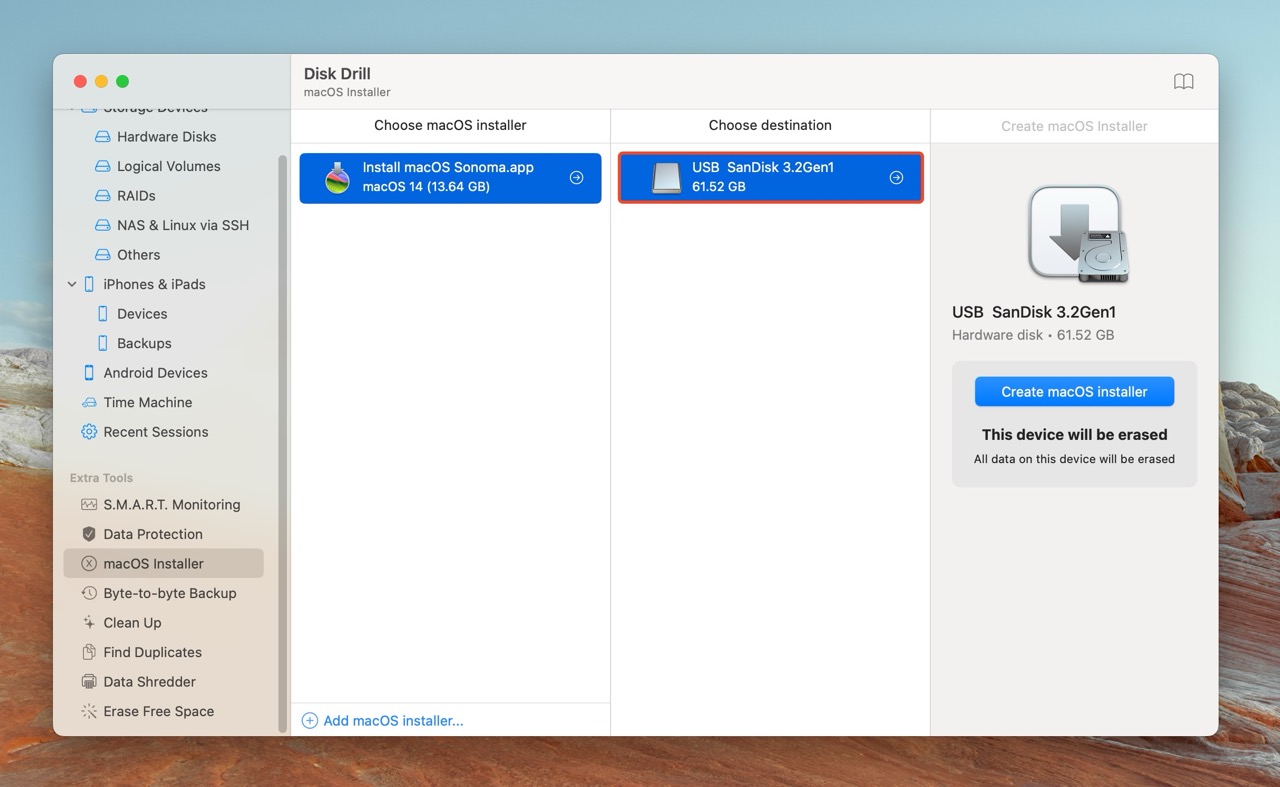
- Click on Create macOS Installer.

- Click Yes in the confirmation prompt.
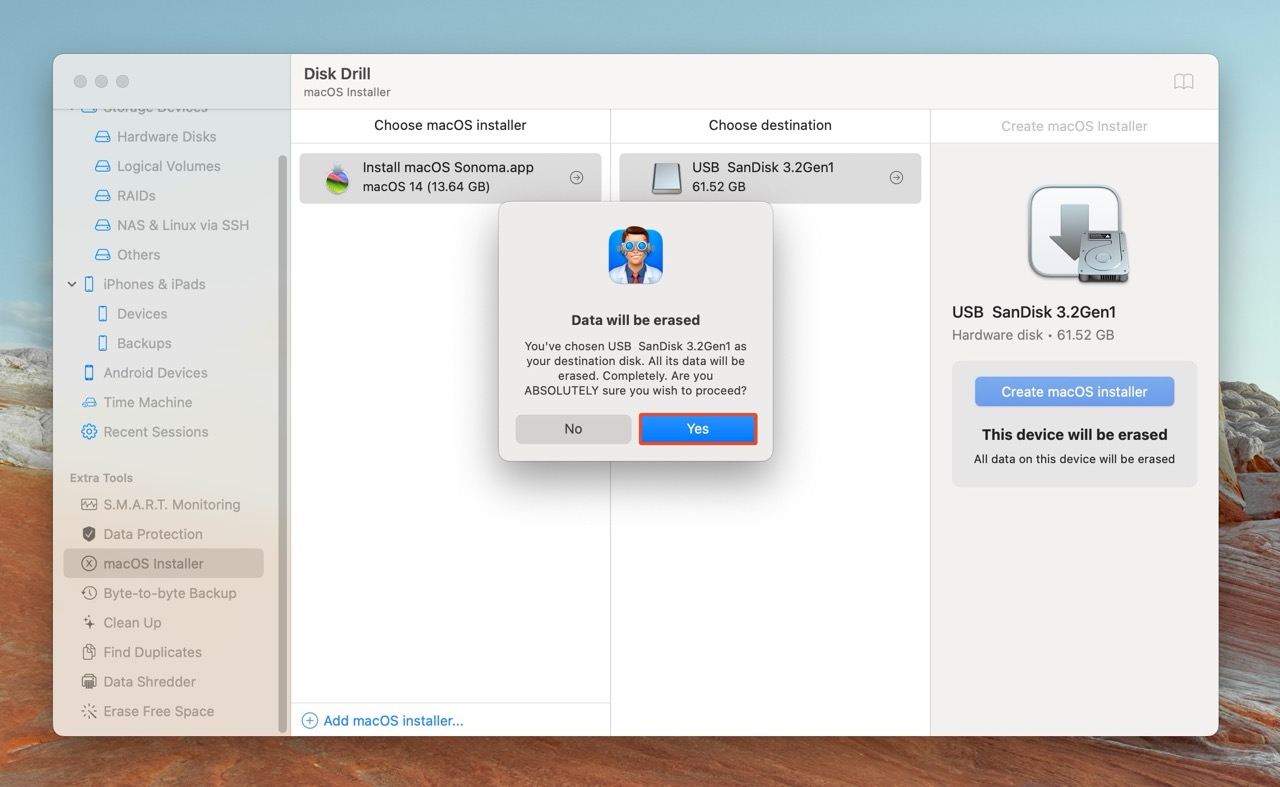
- Disk Drill will create a bootable macOS installation drive.
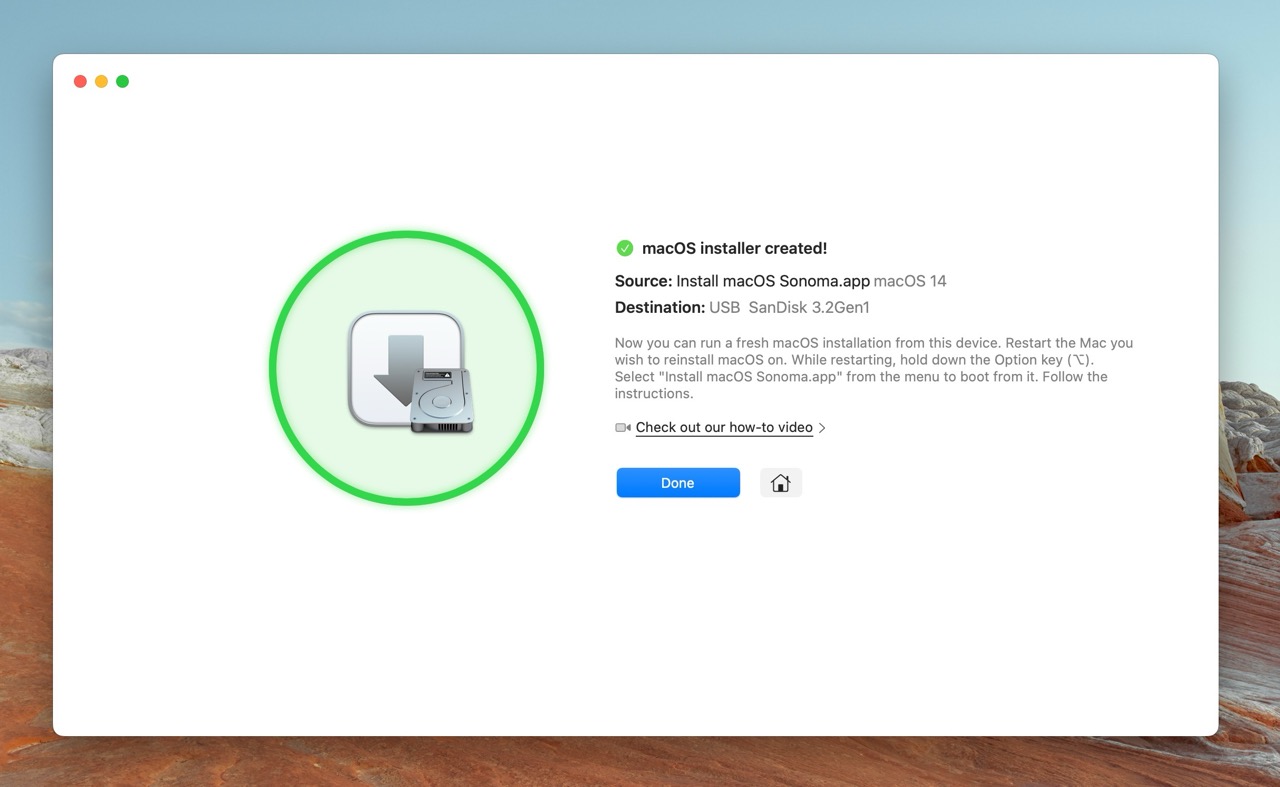
That’s it! Once the app is finished, you’ll see a popup saying, “macOS installer created!“. Click Done, eject the drive, and you are ready to move on to the next step.
Option B: Using Terminal
If you don’t want to download a third-party app, you can create a macOS bootable installer manually via Terminal. But if compare this method with the previous one, this one is a bit more complicated since it entails using createinstallmedia commands.
Here’s how to create a bootable USB drive using Terminal:
- Open Spotlight Search (Command + Space), and search for “terminal.” Click on the Terminal app from the search results to open it.
- Type sudo /Applications/Install\ macOS\ Sonoma.app/Contents/Resources/createinstallmedia –volume /Volumes/MyVolume in Terminal and press Enter. Replace MyVolume with the name of the external storage drive you want to use as a bootable installer. You can find the name of your USB drive under Locations in Finder. In my case, it’s called Bootable macOS Installer. Refer to the screenshot for the correct syntax—observe how we treat the spaces in the volume name.
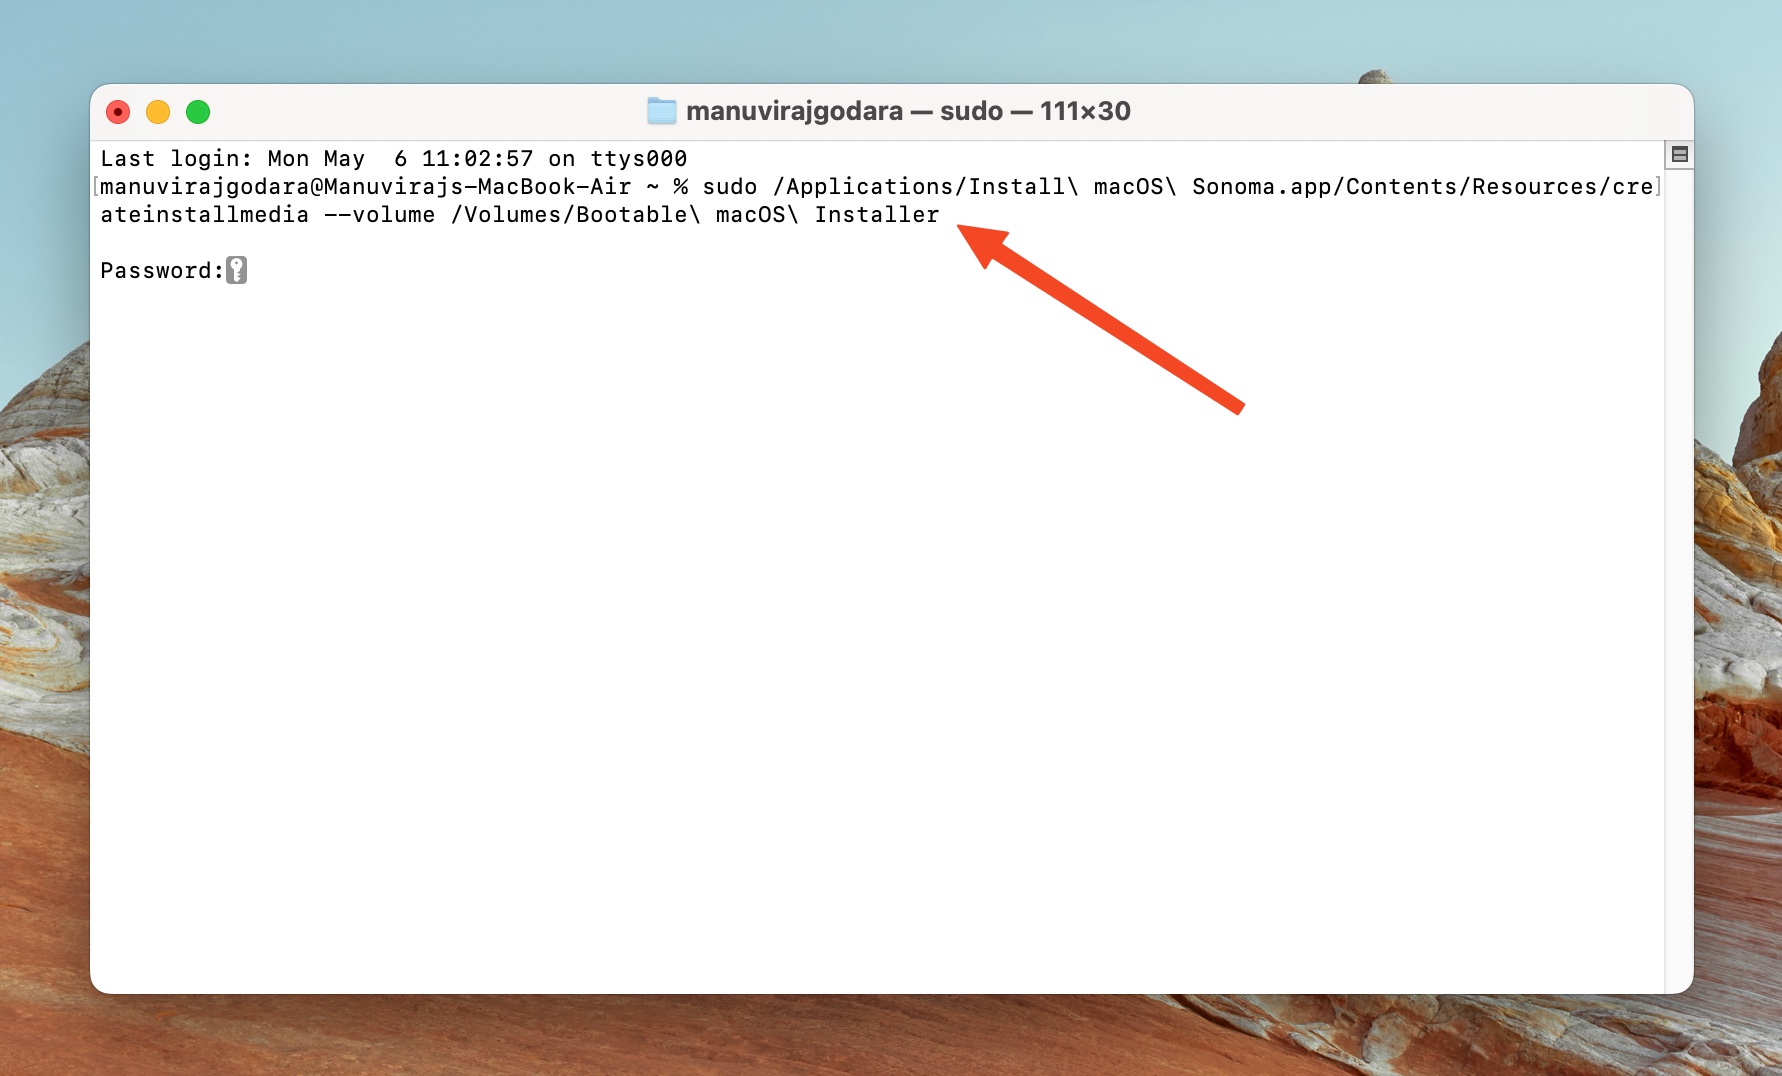
- Type in your password when prompted and press Enter. You won’t see any characters as you type.
- Type Y, and press Enter to allow Terminal to Erase the drive.
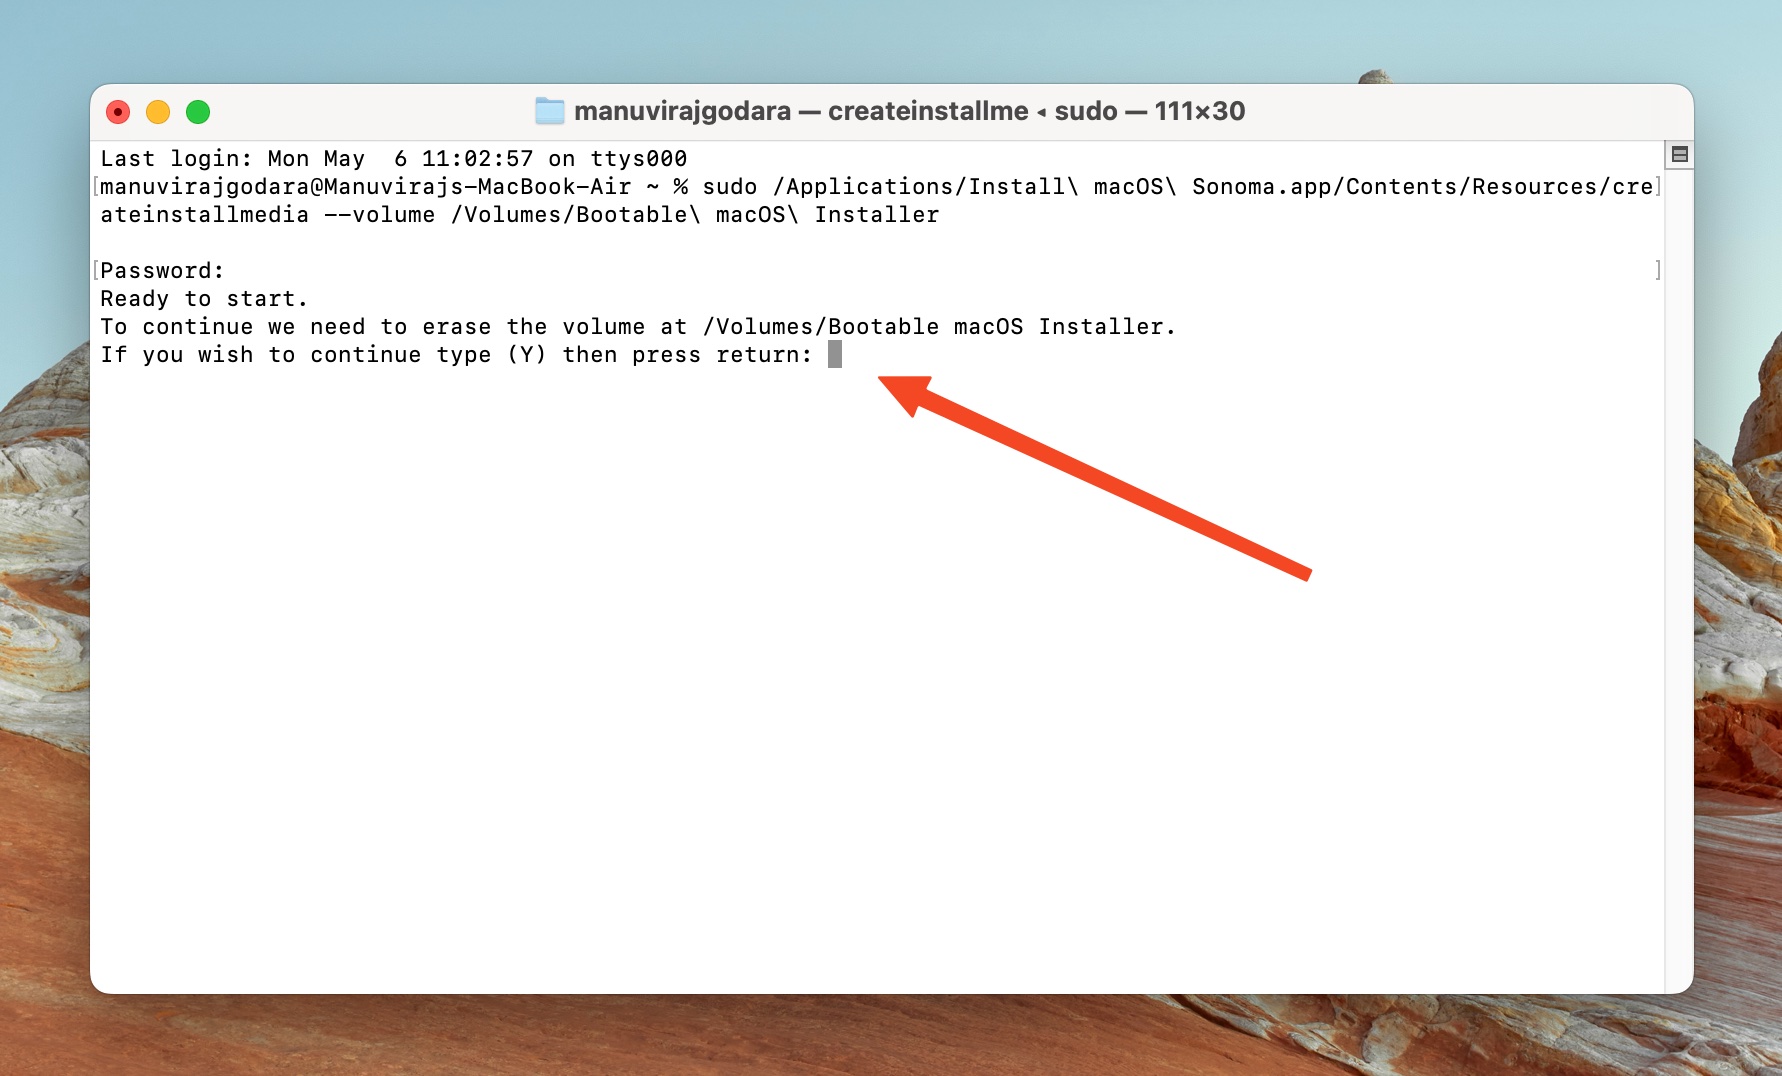
- Click OK to allow Terminal to access the drive, if prompted.
- Terminal will create the installation media.
Step #4: Wipe Your Mac
To be able to clean install macOS, it is essential to wipe your Mac, or in other words, reset it to factory settings.
But before you do this, make sure that you’ve made a backup of your Mac (we covered this in step 1 of this article). It is also important to emphasize the fact that after you wipe your Mac clean, it’s impossible to go back. That’s why you need a backup version of your Mac so that you’ll be able to access any of your files even after the reset.
Now that you’re ready, let’s wipe your Mac clean.
Intel-Based Macs
To erase Intel-based Macs with the Apple T2 security chip, follow these steps:
- Click on the Apple menu and choose System Settings.
- Click on General in the sidebar.
- Click on Transfer or Reset in the right pane.
- Click on Erase All Content and Settings.
- Type in your password and press Enter.
- Review what items will be deleted and click on Continue.
- Type in your iCloud password to sign out of your Apple ID, and click Continue.
- Click on Erase All Content and Settings in the prompt to wipe your Mac.
To erase Intel-based Macs without the Apple T2 security chip, follow these steps:
- Click on the Apple menu and choose Restart. Immediately hold the Command + R keys after you do this.
- Select Disk Utility, and then click Continue, in the Recovery app.
- Select your Mac’s primary storage disk (Macintosh HD, by default) in the sidebar, and click on Erase in the Disk Utility toolbar.
- Type in a name for the disk, and choose APFS in the Format pop-up menu. Click on Erase Volume Group.
- MacOS will erase the disk, after which you can quit Disk Utility and proceed to install macOS Sonoma.
Macs With an M1, M2, or M3 Chip
If you’re trying to wipe clean an M1-based Mac, follow these steps:
- Boot your Mac into Recovery Mode. Turn off your Mac, then turn it back on by pressing and holding the power button until you see the Startup Options window, then click Options and Continue.
- Click Disk Utility on the Utilities window.
- Choose the name of your startup disk in the sidebar (it’s usually listed as Macintosh HD).
- Click Erase.
- Choose the format for your startup disk (APFS) and type in a name for it.
- Click Erase Volume Group.
- Once the process is finished, quit Disk Utility.
Step #5: Reinstall macOS
There is one more thing that you should do before reinstalling macOS, which is changing your Mac’s security settings. If you don’t do this, your Mac won’t let you boot from your external drive.
So, first, boot your Mac into Recovery Mode. For M1-based Macs, press and hold the power button until the Startup Options screen appears. With all other Macs, press the power button to turn on your Mac and hold down Command + R until you see the Apple logo.
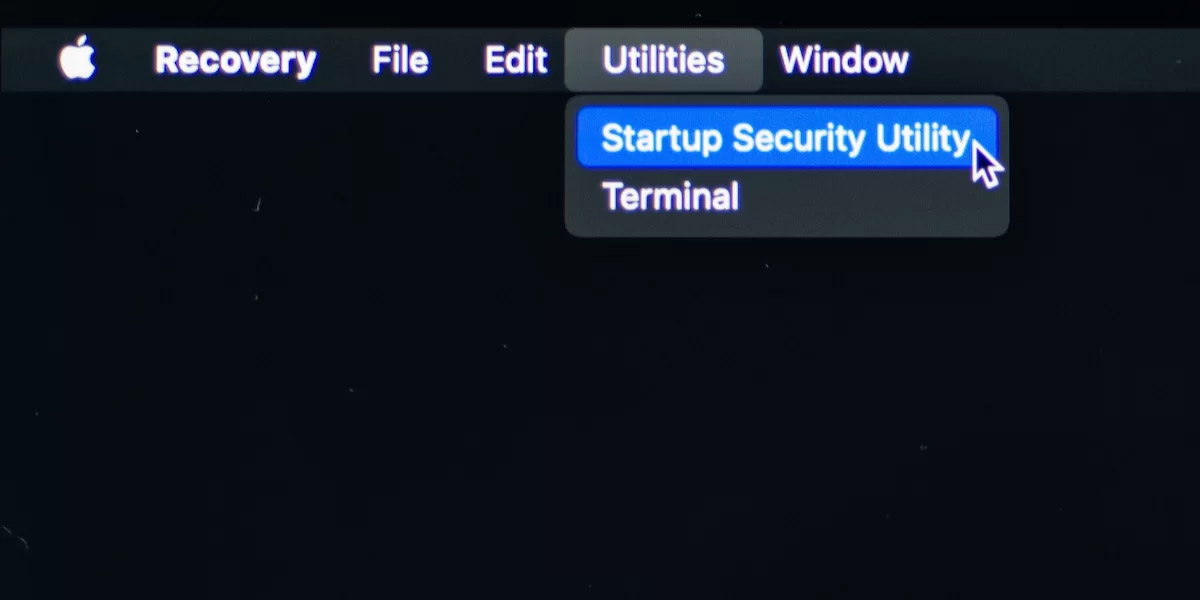
Then, depending on the type of your Mac, do the following:
- For M1, M2, M3-based Macs — click Options > Continue. Then from the top menu bar, head to Utilities > Startup Security Utility. Choose your system drive and click Security Policy. From all of the options, click Reduced Security and then OK to confirm.
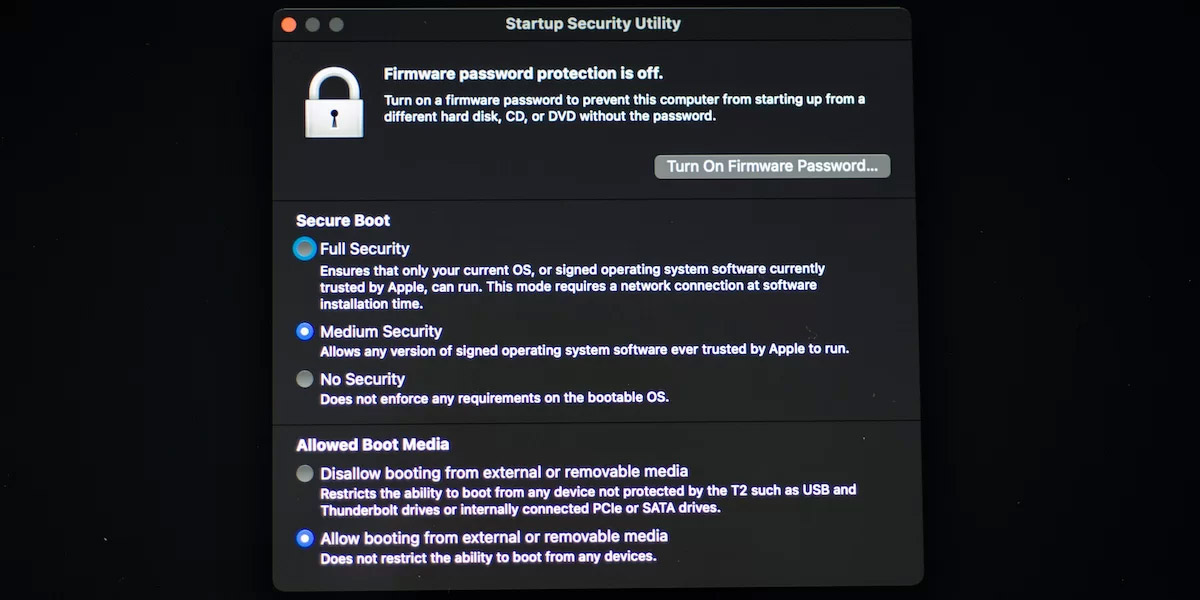
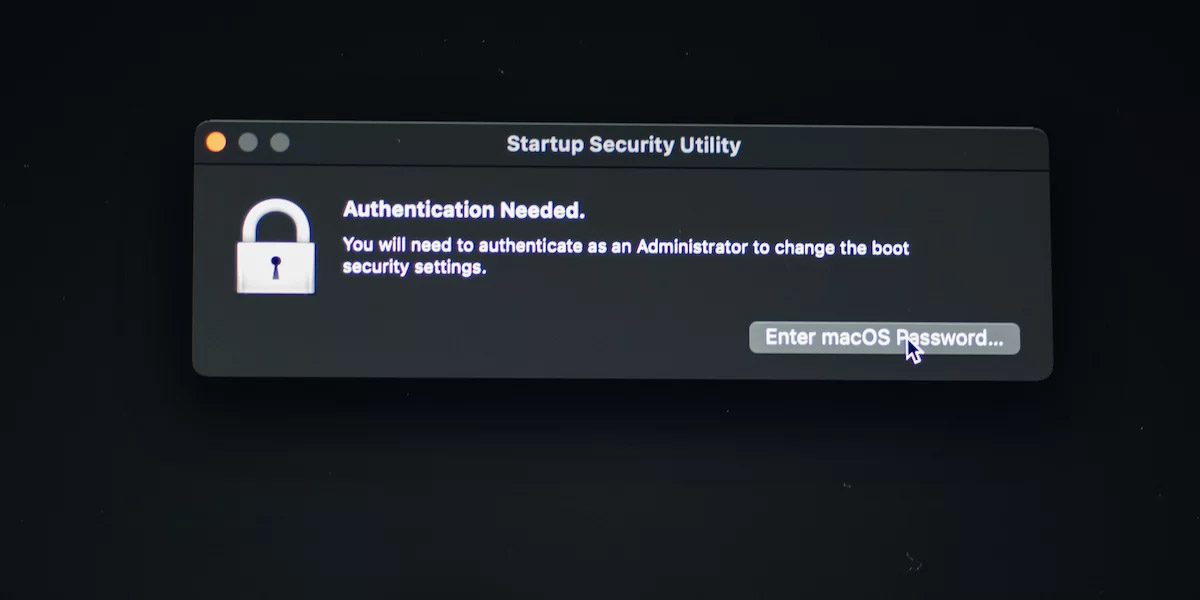
- For Macs with T2-powered chips — click Utilities > Startup Security Utility. Then click Enter macOS password and type it in. From the available options, click Medium Security and Allow booting from external or removable media.
- For Macs without a security chip — click User Account and type in your password when prompted. Then click Utilities > Startup Security Utility. Click Turn Off Firmware Password.
Now you are finally ready to move on to the final step of the clean install macOS process. Here’s what you should do to clean install macOS Sonoma on your Mac:
- Turn off your Mac.
- Plug in the USB flash drive containing the macOS installation file into your Mac.
- Press the power button to turn your Mac back on, and while it’s booting up, press and hold the Option/Alt key (for Intel-based Macs), or hold the power button until you see options (for M1, M2, M3-based Macs).
- A Startup Manager screen should appear. Click Install macOS Sonoma (or click the drive containing the name of whatever macOS version you’re installing). Click Continue to confirm.
- After this, macOS Recovery window should open. Click Install macOS and then Continue to start the installation process. Follow the on-screen instructions to set up your Mac.
That’s it! Enjoy your squeaky clean and upgraded Mac.
FAQ
What happens if you reinstall macOS?
By reinstalling macOS on your device, you’ll be replacing your old (default) operating system files with “new” versions. All of your files, photos, documents will be left without any change.
Does reinstalling macOS delete everything?
Reinstalling macOS via Recovery Mode does not erase data and keeps your files and settings intact. But if some of your data is corrupted, it may influence the whole reinstallation process.
Is it possible to clean install macOS without USB?
Yes, but the overall process will be quite different. If you want to clean install macOS Sonoma, then you can first upgrade your Mac, and after that, simply head to System Preferences and click Erase All Content and Settings from the top menu bar.
Conclusion
Now that macOS Sonoma is out, there’s nothing stopping you from using the new operating system for performing a clean install of your Mac. It is an excellent way to both keep your Mac up-to-date and declutter it from unnecessary apps and files. And by doing a backup of the data stored on your device before that, you’ll be able to access all of your files from your Mac whenever you want (even after the clean install).
This article was written by Romana Levko, a Staff Writer at Handy Recovery Advisor. It was recently updated by Manuviraj Godara. It was also verified for technical accuracy by Andrey Vasilyev, our editorial advisor.
Curious about our content creation process? Take a look at our Editor Guidelines.