If you can’t see files on an external hard drive on Mac, it might be a sign of a minor problem… or that something is going terribly wrong. In this situation, your files may be in danger of becoming permanently lost.
Here’s what to do: (1) immediately stop using your external hard drive, (2) act fast, and (3) read this article. We’ll show you how to recover files that disappeared from an external hard drive on Mac. And once your data is safe, we’ll teach you how to fix it.
How to Recover Files Disappeared From External Hard Drive on Mac
If your files disappeared from your hard drive, attempting to repair it may cause permanent data loss… So recovering your external hard drive is our first priority. Below, we demonstrate 2 reliable ways to do this: (a) using a data recovery tool and (b) restoring a Time Machine backup.
Time Machine only backs up internal drives by default, so if you want to recover data from an external flash drive, it should have been added during the initial setup.
Option A: Using Data Recovery Tool
Even if you don’t have any backups, you can recover disappearing files from an external hard drive using data recovery software. It’s a powerful tool that can extract data directly from your drive’s file system, even if it doesn’t show up in Finder.
Before proceeding, check if your drive shows up in Disk Utility with the correct size (see the “Capacity” in Disk Utility). If so, it’s safe to proceed. If not, we strongly recommend that you send your drive to a professional data recovery service. Otherwise, you risk permanent data loss.
To demonstrate this process, we’ll be using a tool called Disk Drill. It works for all Mac file systems (HFS+, APFS) and it recognizes over 300 file types, making it perfect for restoring an external hard drive with a variety of data types.
To recover lost files from an external hard drive on Mac:
- Download and install Disk Drill.
- Connect your external hard drive to your Mac and launch Disk Drill (Finder > Applications).

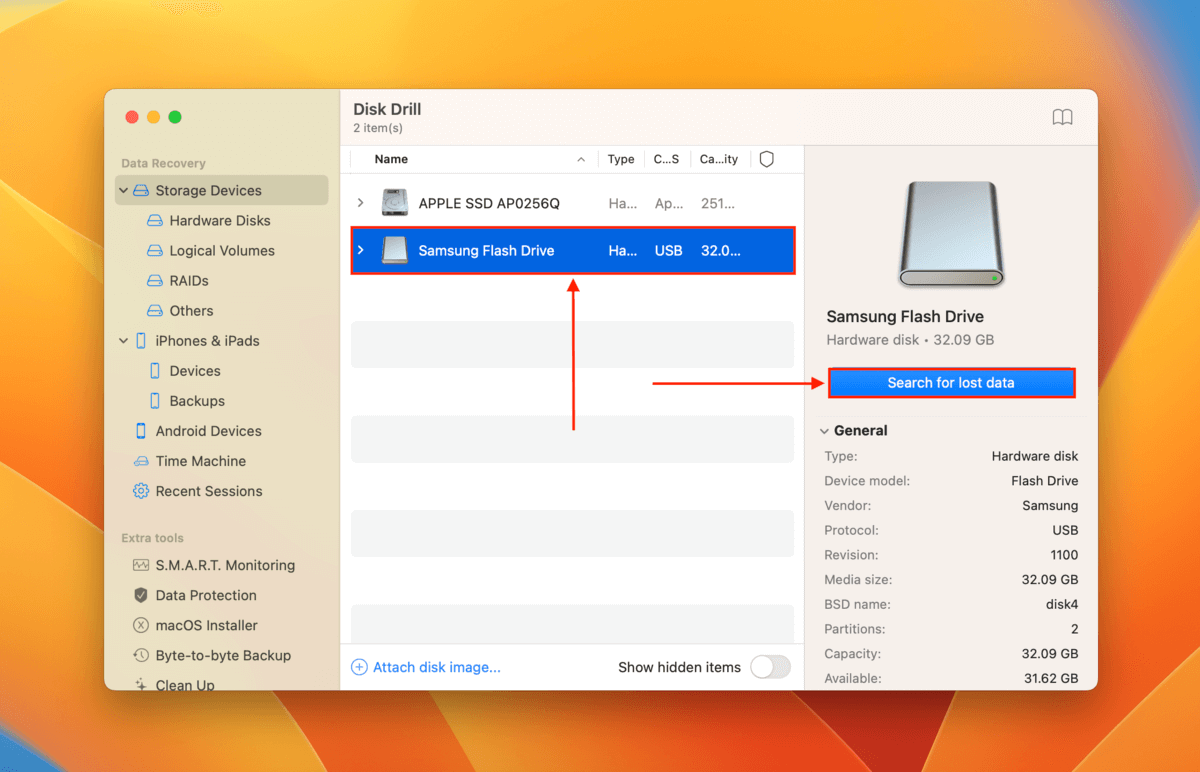
- Select your external hard drive and click Search for lost data.
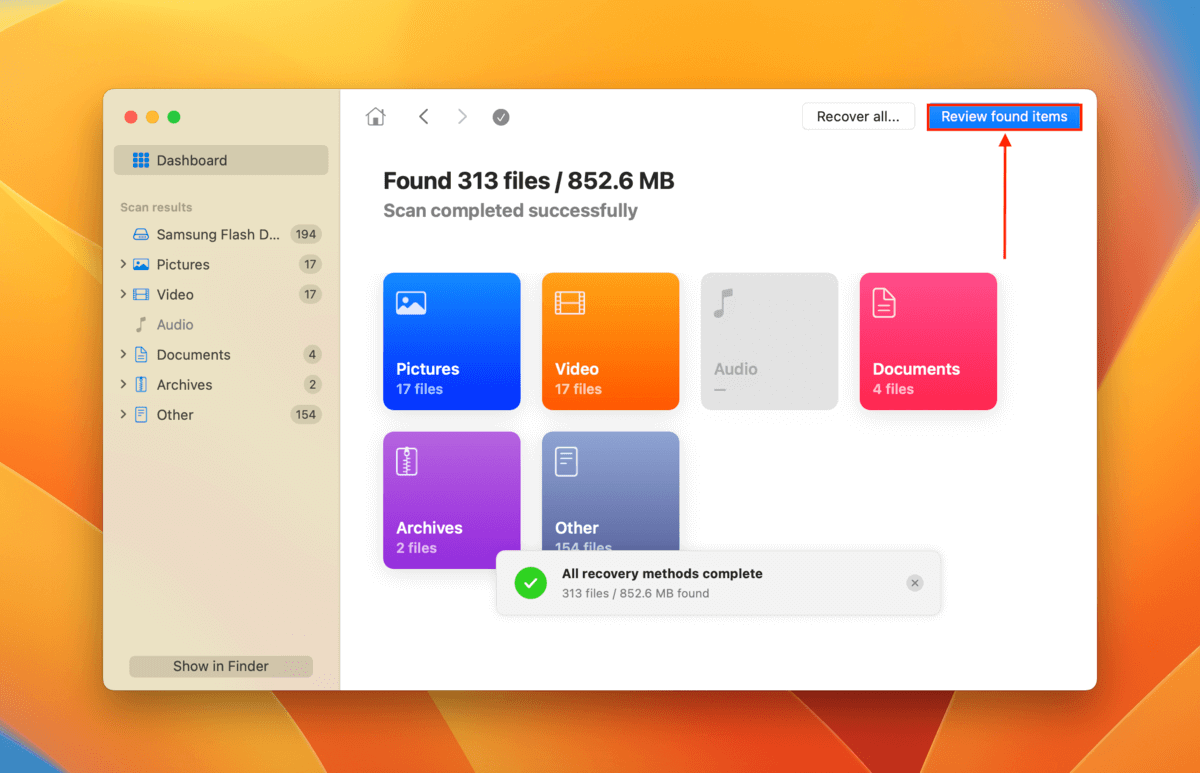
- Once Disk Drill is done scanning your drive, click Review found items.
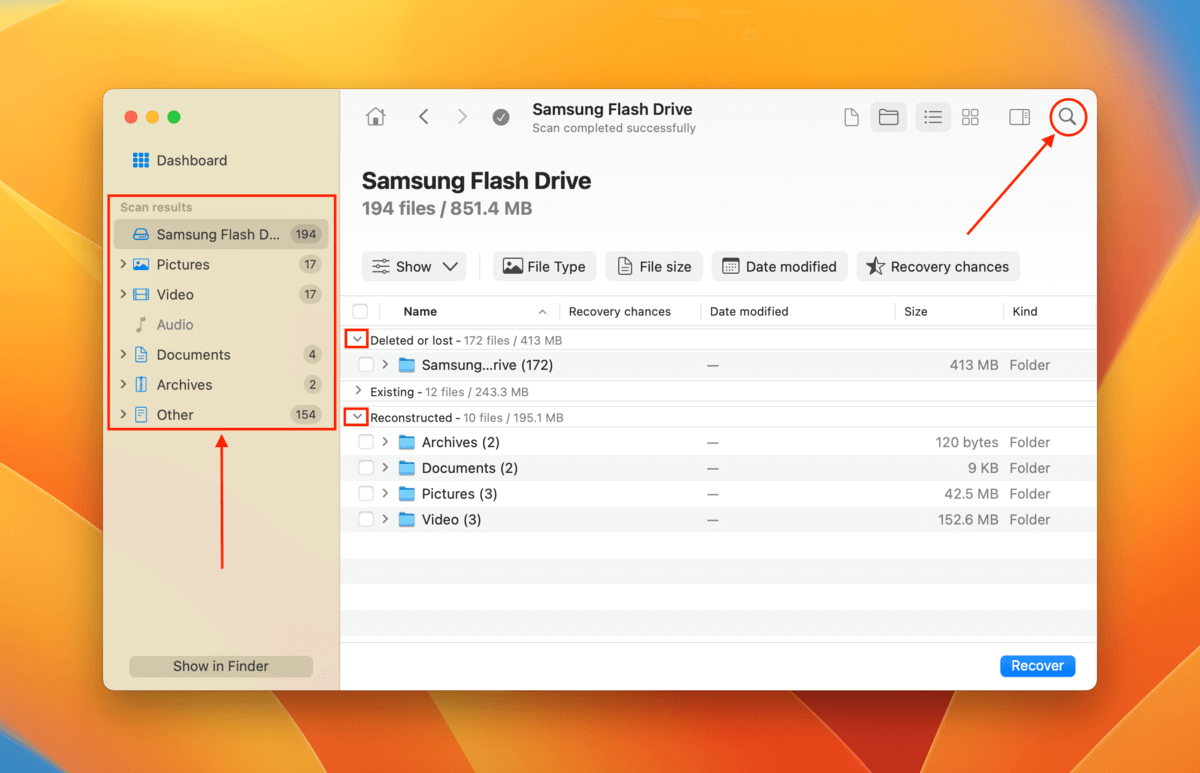
- Expand the Deleted or lost tab to browse files that were accidentally deleted or formatted. Expand the Reconstructed tab for files that were lost due to corruption. The Existing tab may also be worth a check because your files may still be present on your drive – just hidden or inaccessible. You can use the search tool or the filters in the sidebar if you’re looking for specific files.
- Once you’ve found a file you want to restore, you can preview it by hovering your mouse beside it and clicking the eye button that appears. Then, use the boxes in the leftmost corner to select your files and click Recover.
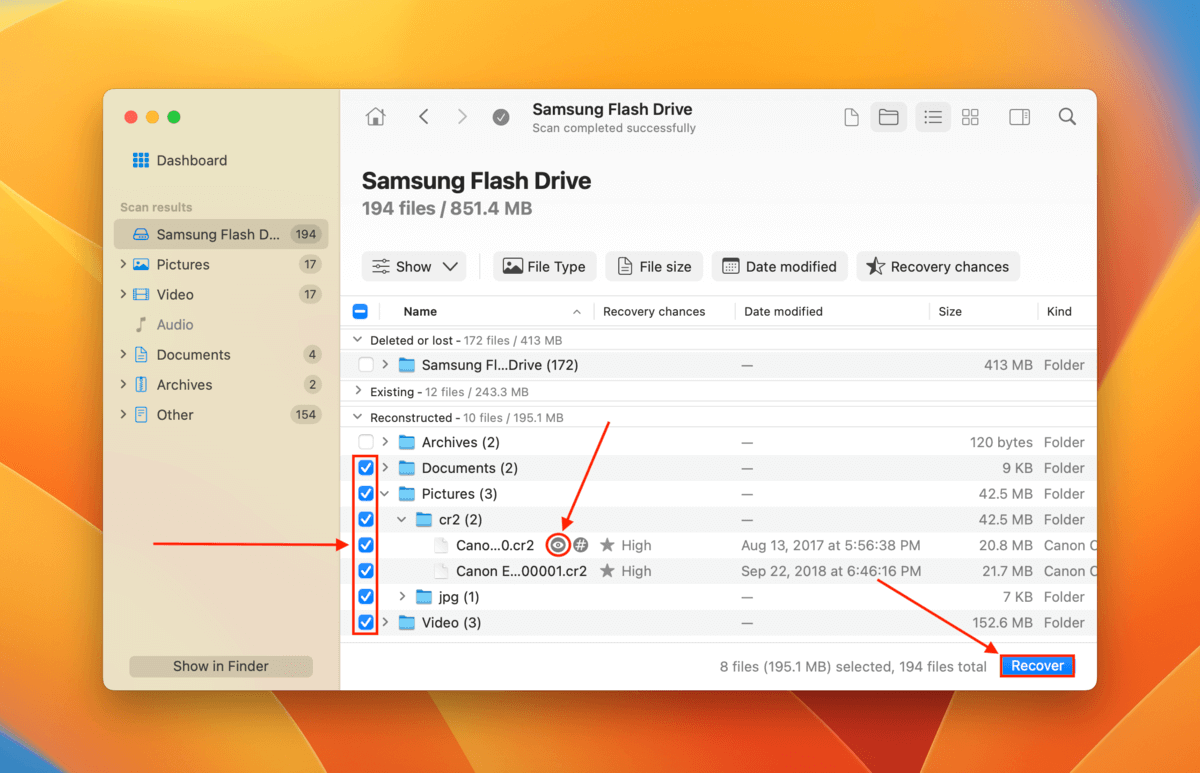
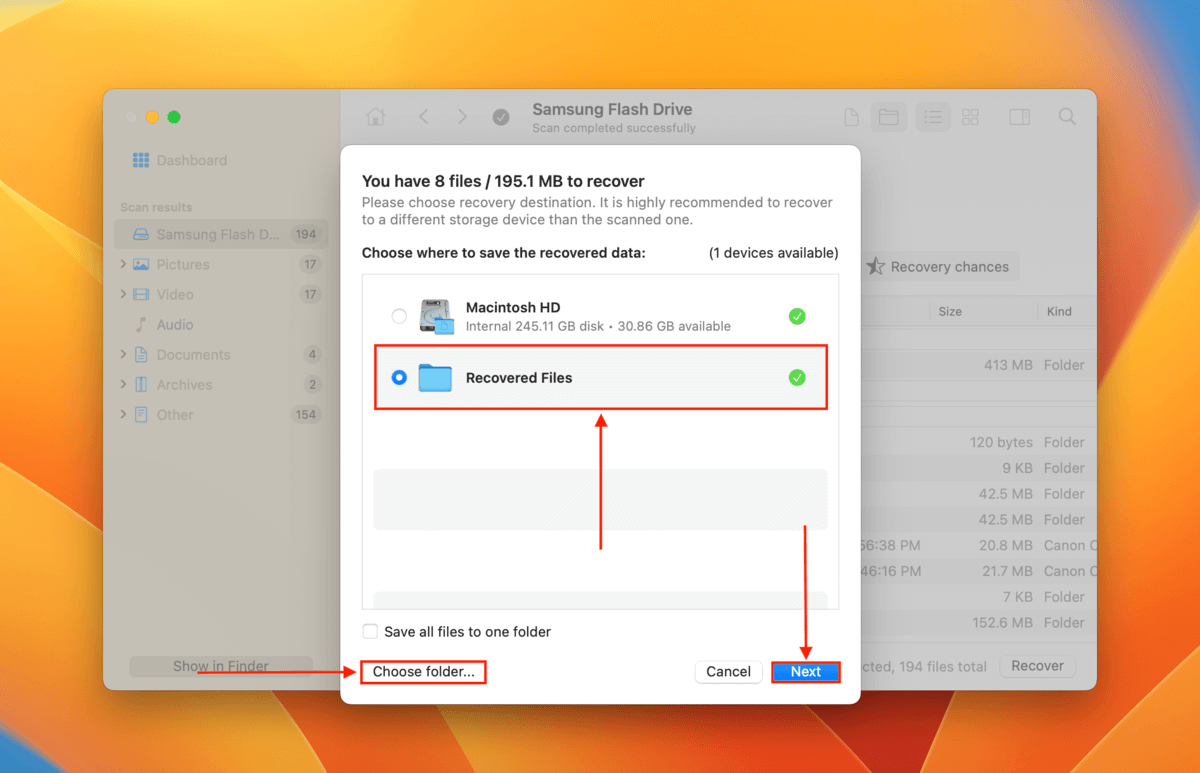
- Select a location on your computer where you want Disk Drill to save your recovered files. You can click Choose folder to select a specific folder – just don’t save it to your drive. Then, click Next.
Disk Drill Basic doesn’t allow you to recover deleted files on a Mac for free. But you can scan your drive and preview your files for free, which is a great way to figure out if your data is still recoverable. If you want to learn more about Disk Drill and its features, check out our in-depth Disk Drill review.
Option B: Recover Missing Files Using Time Machine Backup
If you enabled Time Machine backups for your external drive before your files disappeared, you may already have copies of your data. This tool creates incremental backups of files and folders – so you can restore a Time Machine backup that contains the previous versions of the files and folders of your drive.
Remember that you need to manually include external drives in your backups. So this will only work if you included your drive when you initialized the backup.
To restore missing files on your external drive from a Time Machine backup:
- Connect your external hard drive to your Mac and navigate to its root folder in Finder.
- Connect your Time Machine drive to your Mac if you have it (even if you don’t, you may have Time Machine backups of your data saved locally).
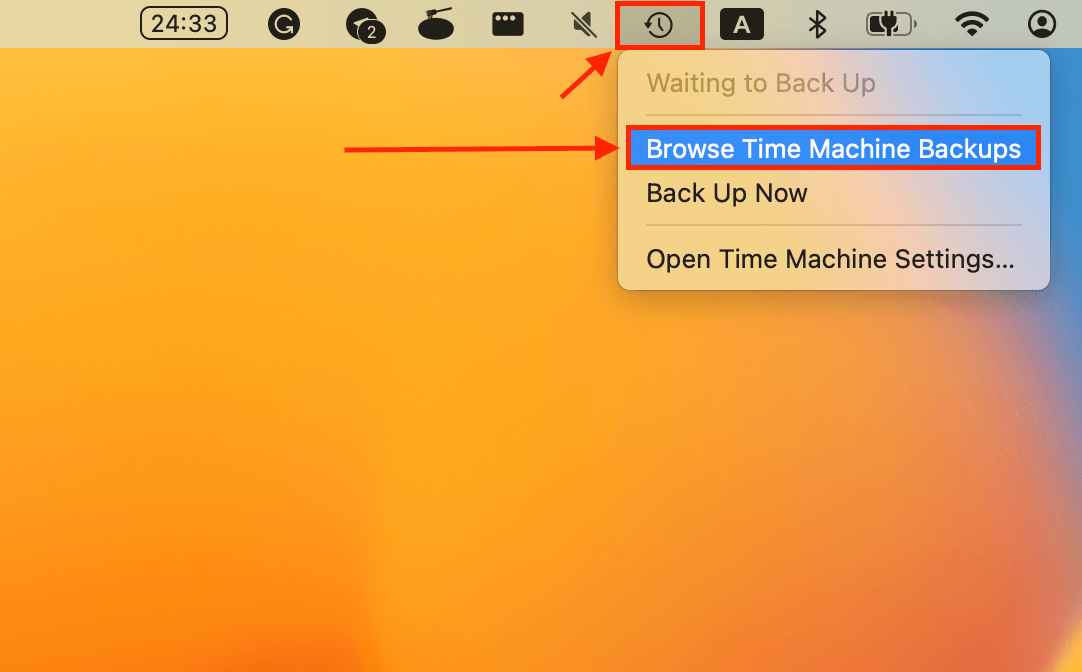
- On the Apple menu bar, click the Time Machine button > Browse Time Machine Backups.
- Use the arrows on the right to browse through previous versions of your drive/drive folders. Once you find a backup with all your files intact, select the data you want to recover (you can drag your mouse pointer or Command + Click to select multiple files) and click Restore.

If successful, your files should reappear in their original location on your external hard drive.
How to Fix External Hard Drive that Keeps Losing Files on a Mac
Once you’ve secured the files that suddenly disappeared from your Mac, you can now attempt to repair your drive. As you’ll see in the methods below, most cases can be resolved with DIY solutions. But the key to a successful fix is properly diagnosing your drive.
In the following sections, we’ll show you how to identify what went wrong with your drive and how to fix it.
Method 1: Check if Mac Recognizes Your External Hard Drives
First, check the external hard drive in Disk Utility to confirm that Mac recognizes it. If your drive uses a supported file system (HFS+, APFS, ExFAT, FAT32) and the size displayed is correct, you can fix it with the methods in this article.
If your drive is properly recognized by macOS, proceed with Methods 2-4. You may also attempt to scan your drive with data recovery software in this scenario, but we always recommend doing that before repair.
If Mac doesn’t properly recognize your external hard drive, one (or more) of your mechanical components is likely malfunctioning. It may also be a sign of severe corruption. However, you may still be able to resolve the issue yourself – here are some resources to help you:
| Symptoms | Solutions |
|---|---|
Your external hard drive won’t show up in Finder or Disk Utility. |
What to Do if Your External Hard Drive Is Not Showing Up or Being Recognized on Mac |
Your external hard drive isn’t mounting properly (its storage bar in Disk Utility says “Not Mounted” or the drive is greyed out). |
|
Your Mac can’t read the files on your external hard drive or it prompts you with an error. |
You can also check your drive’s manufacturer website for diagnostic tools, which are usually free. Here’s an example from Seagate (Windows and Linux only).
If you are completely unable to establish a connection between your external hard drive and your MacBook, your drive may be physically damaged. If you still have important data on your drive, stop using it immediately and send it to a reputable data recovery service.
They have experts, special tools, and facilities to safely recover data from physically damaged drives. If you attempt to fix or recover it yourself, you may cause permanent data loss.
Method 2: Unhide Hidden Files and Folders
It’s entirely possible that your files disappeared from the flash drive on Mac because they are set to be hidden. You can show hidden files and folders on your Mac using a simple Finder shortcut.
To unhide your files in Finder, navigate to your external hard drive’s root folder and hit the Shift + Command + > keys.
Method 3: Fix External Hard Drive Errors with First Aid Tool
First Aid is a useful Disk Utility tool that can fix file system errors, partitioning issues, and problematic sectors on your external hard drive. These are all common culprits of disappearing files and fixing them should get rid of this behavior.
To fix your external hard drive using First Aid:
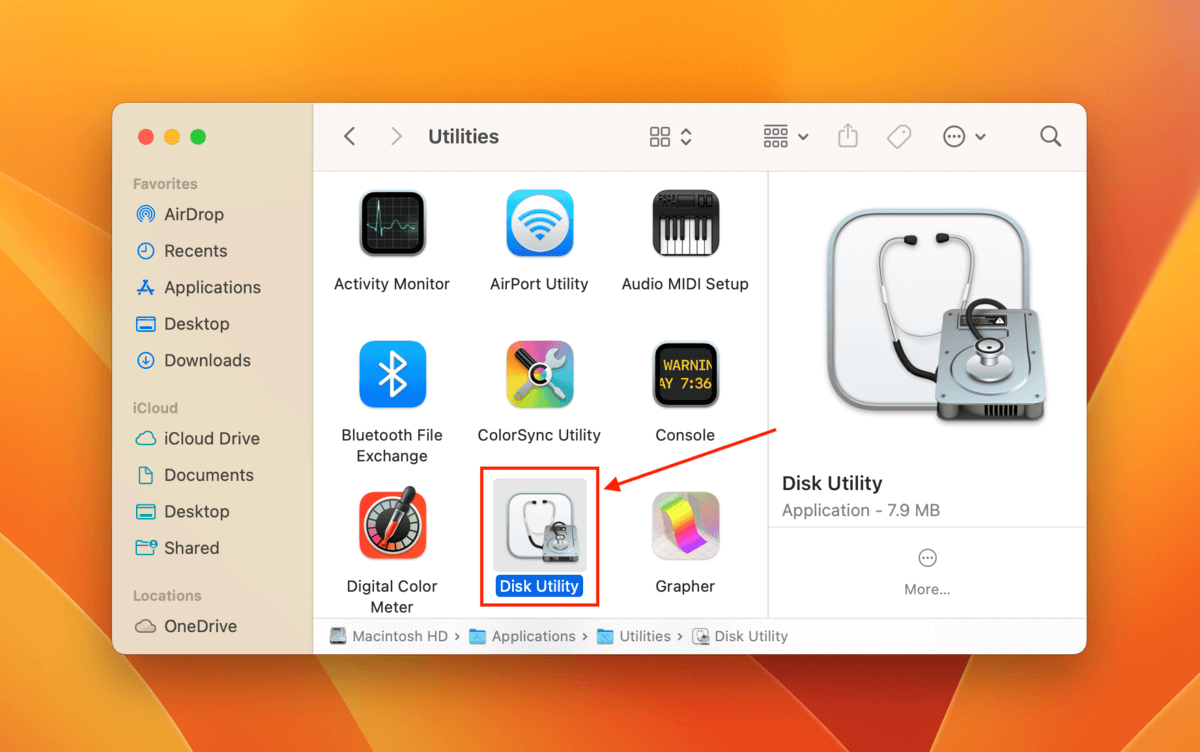
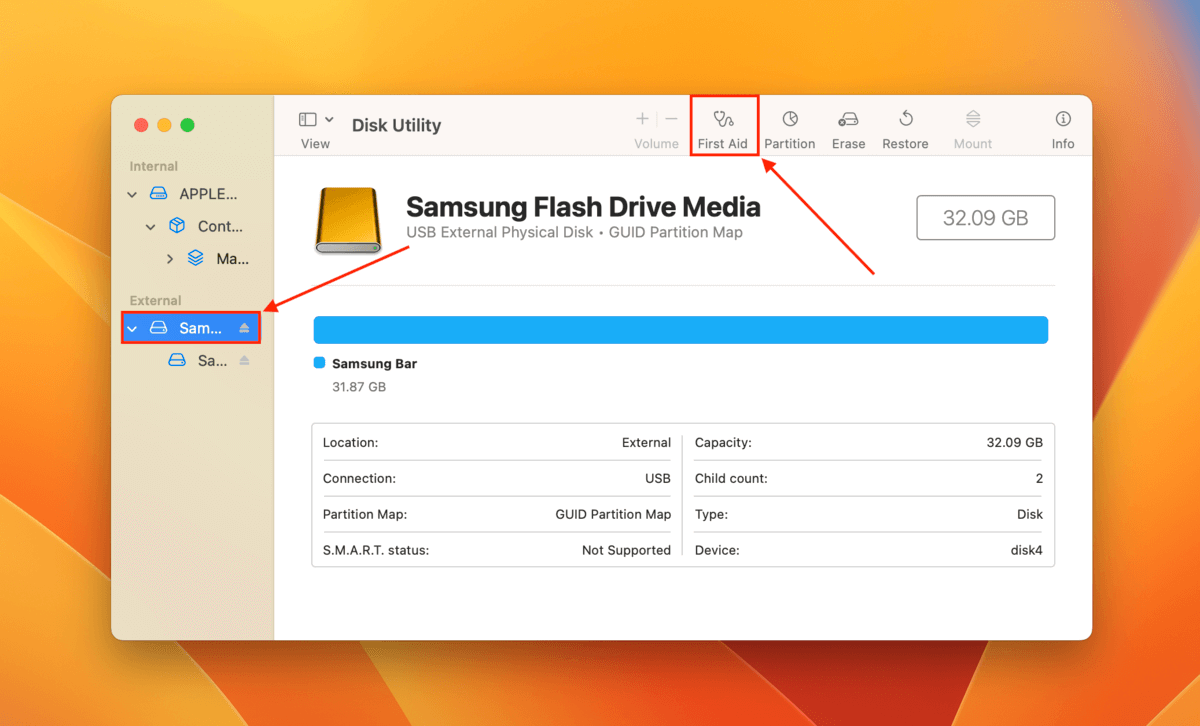
- Make sure your external hard drive is securely connected to your Mac, then launch Disk Utility (Finder > Applications > Utilities).
- Select your drive from the left sidebar and click First Aid.
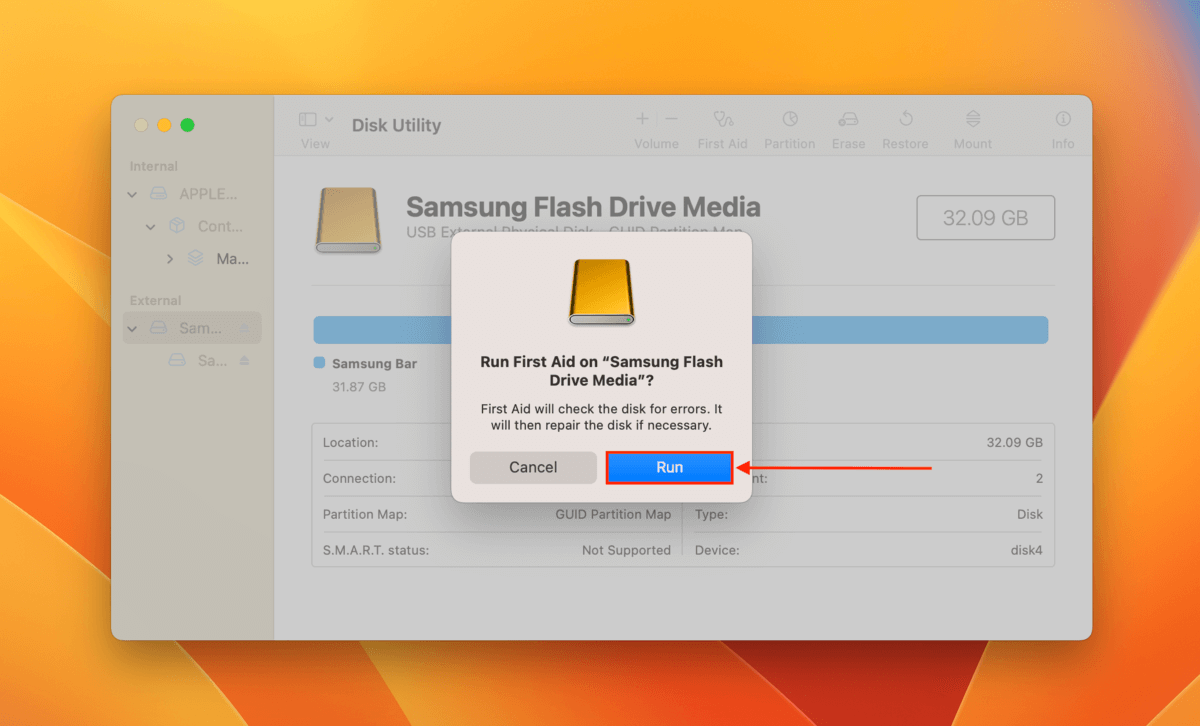
- Click Run in the dialogue box to confirm the action.
Method 4: Fix Corrupted Partition Using TestDisk
When you have a corrupted partition on your external hard drive, data loss occurs because the information about where your data is and how it’s organized gets messed up. So your files aren’t actually “deleted” – your computer just can’t find them.
TestDisk is a free and open-source partition recovery tool. Using TestDisk, you can reconstruct corrupted partitions with the information it finds on the drive. It can also repair file system errors caused by corruption, which may even be enough to recover the data from your external hard drive.
There are cases of severe corruption that affect your data directly, which is why we recommend recovering your files before attempting to fix your drive.
- Download and install the TestDisk app.
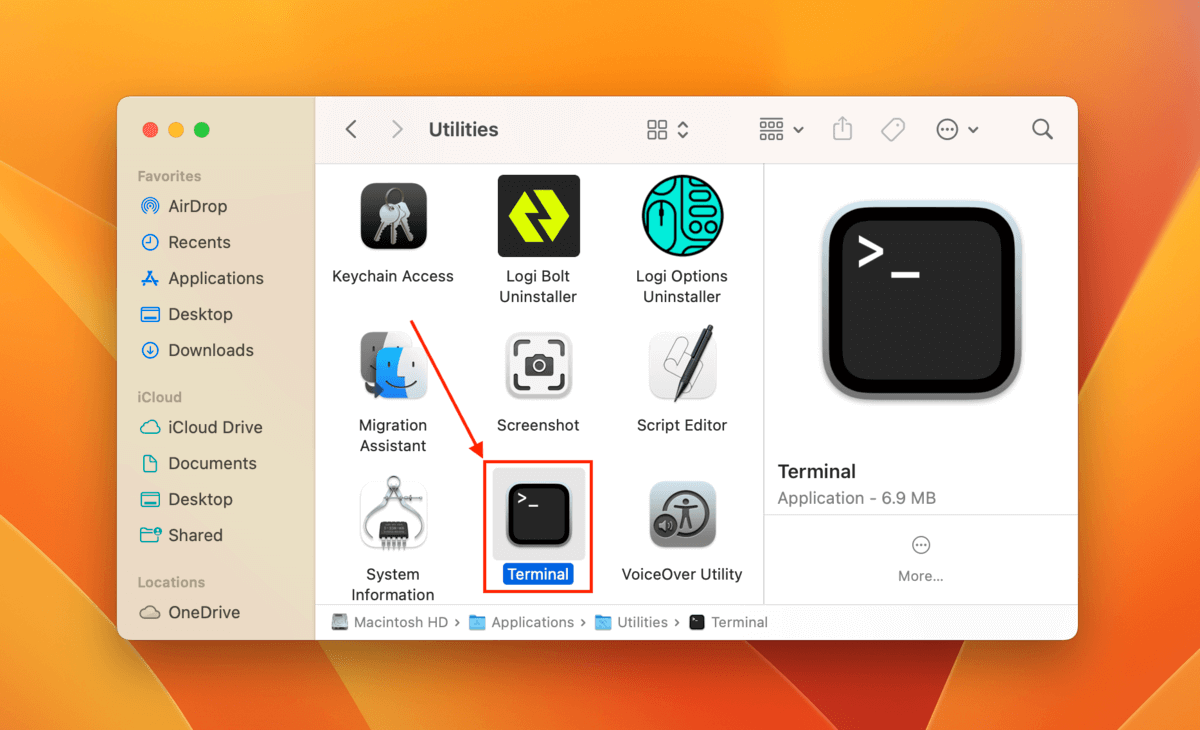
- Connect your external hard drive to your Mac and open the Terminal app (Finder > Applications > Utilities).
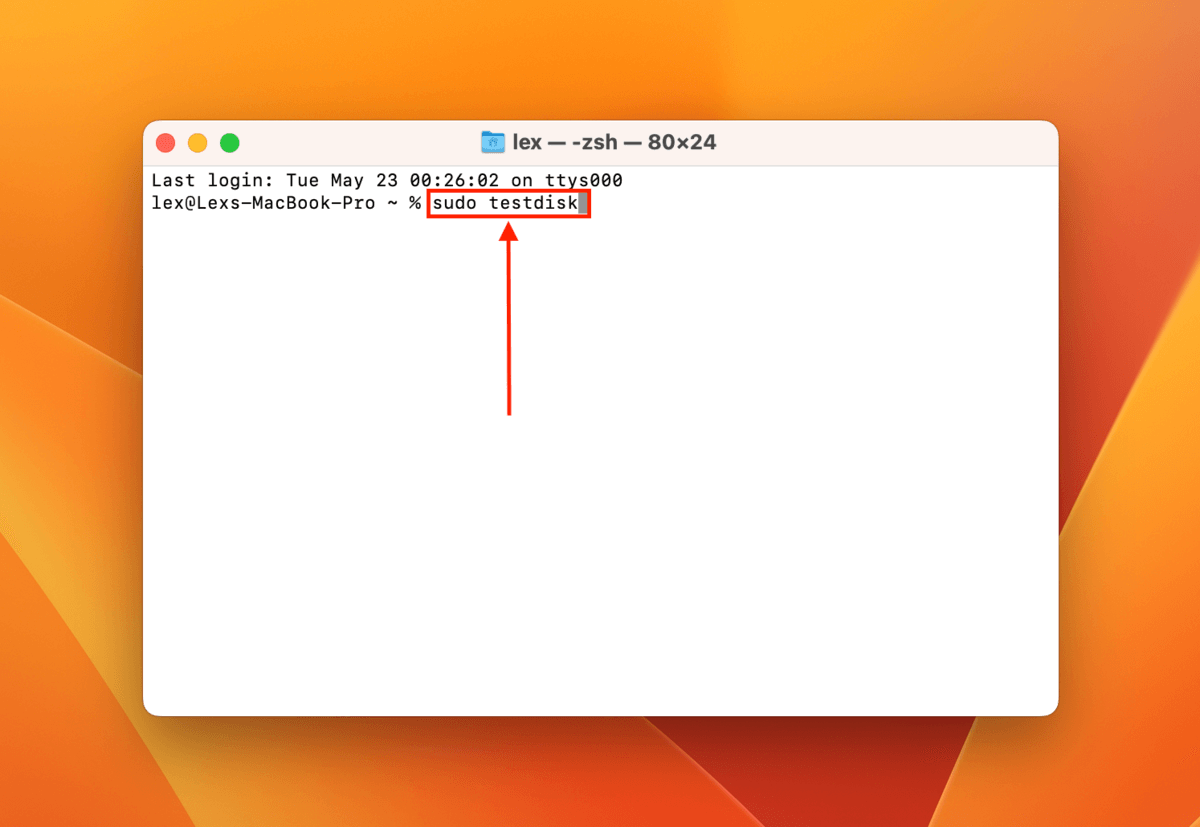
- In Terminal, type the following command and press the Return key:
sudo testdisk
You may be prompted to enter your password before the app launches.
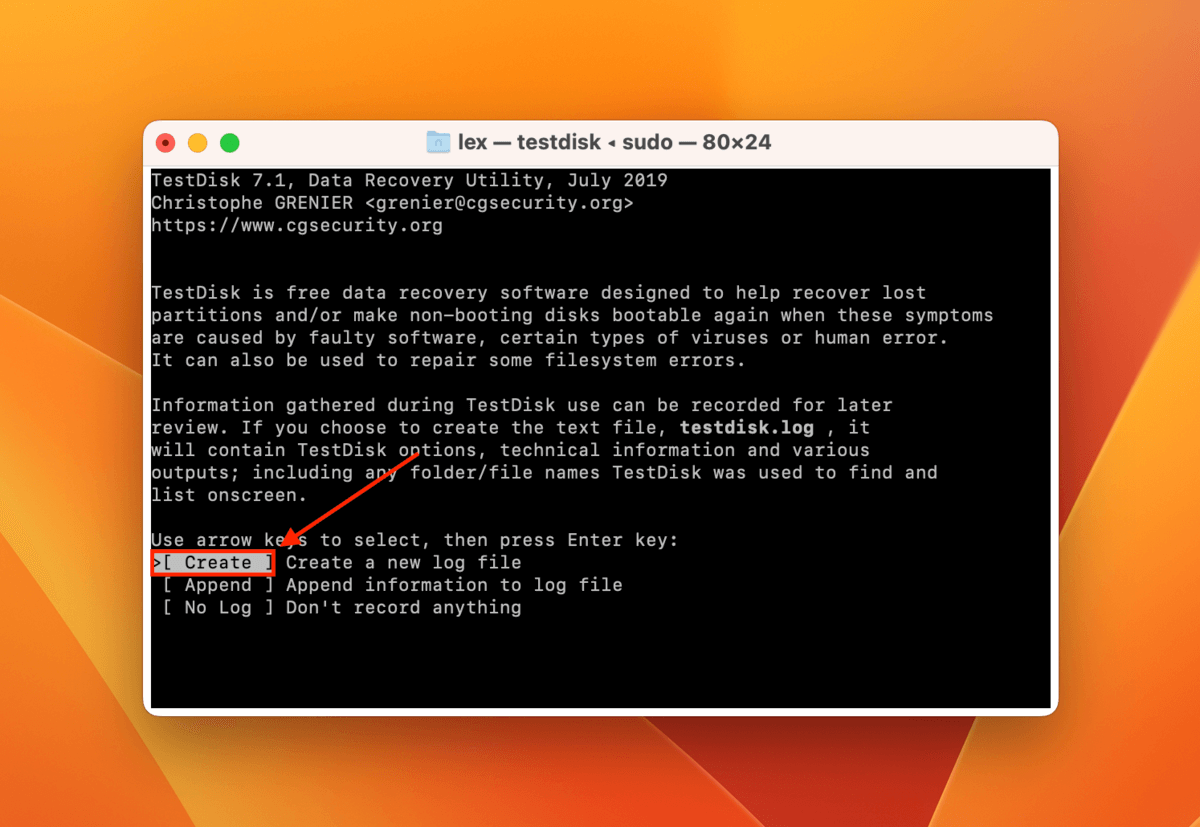
- Once you’re in the TestDisk environment, use your arrow keys to select Create and hit Return.
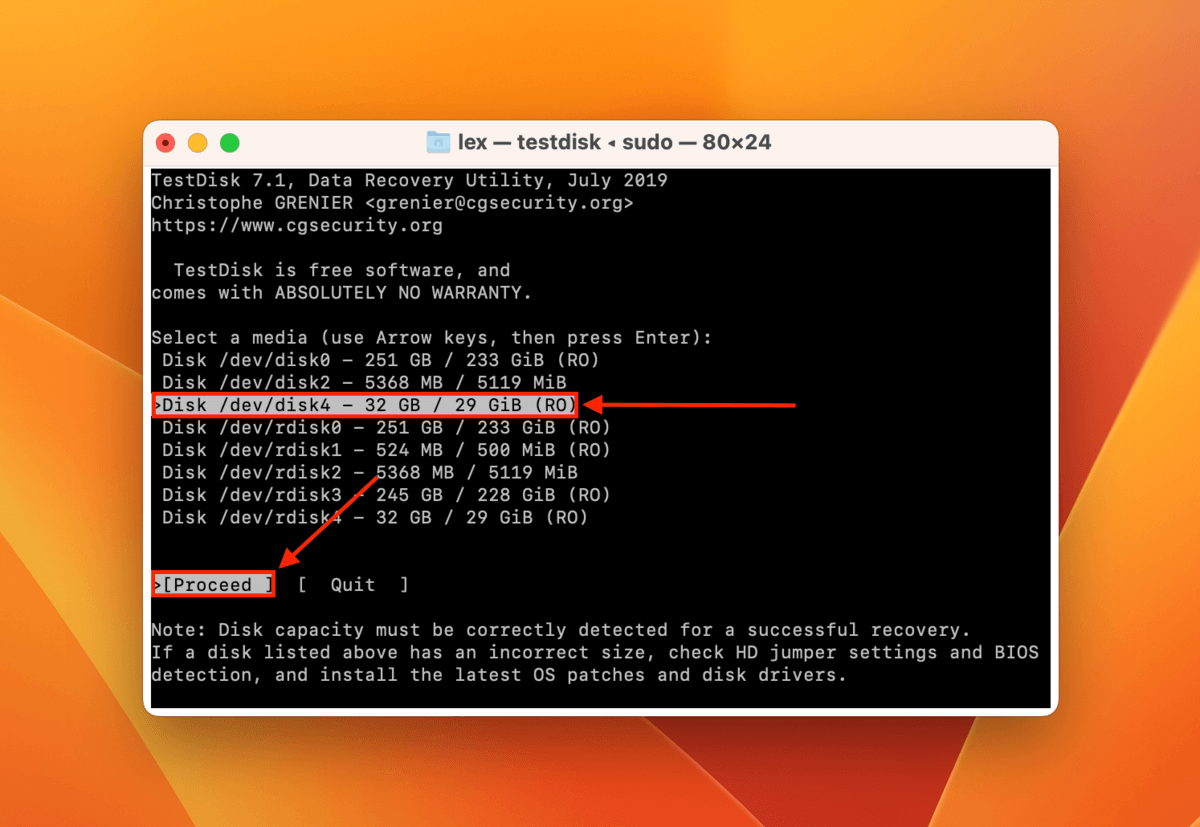
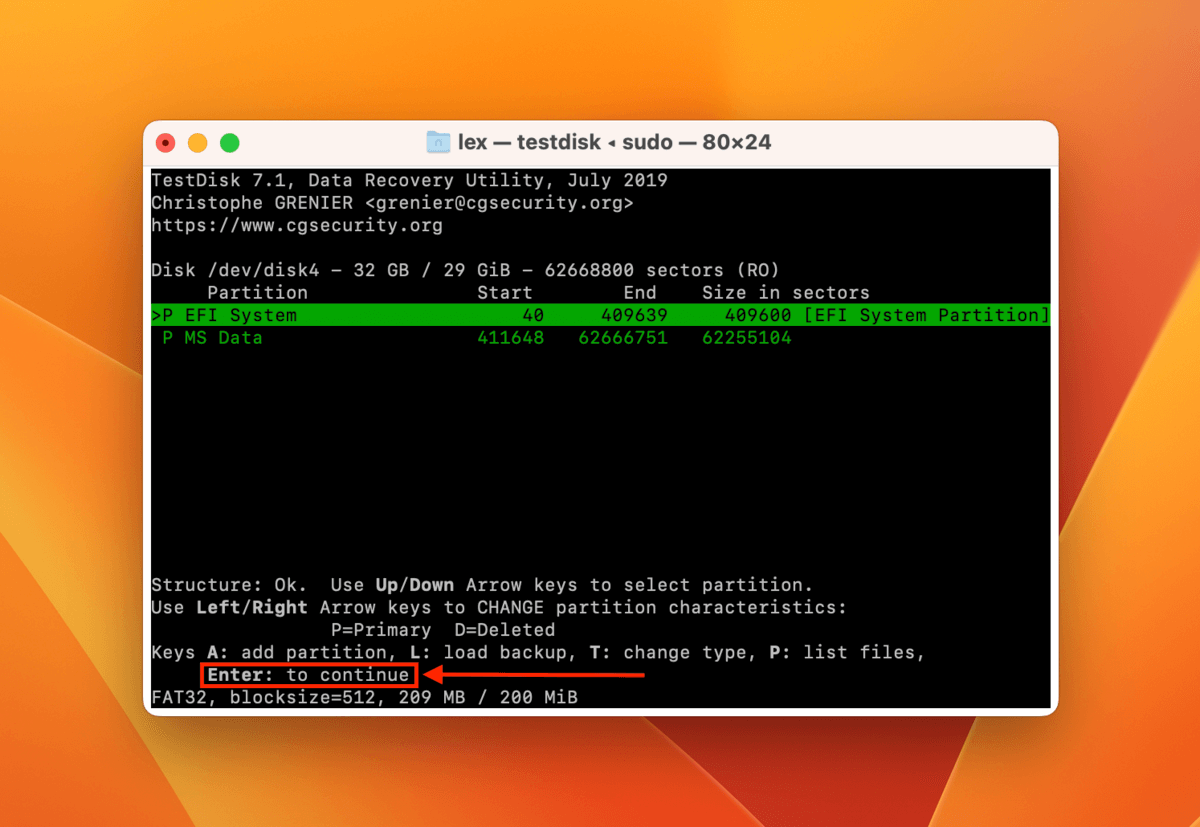
- Use your arrow keys to select your external hard drive. Then, select Proceed and hit Return.
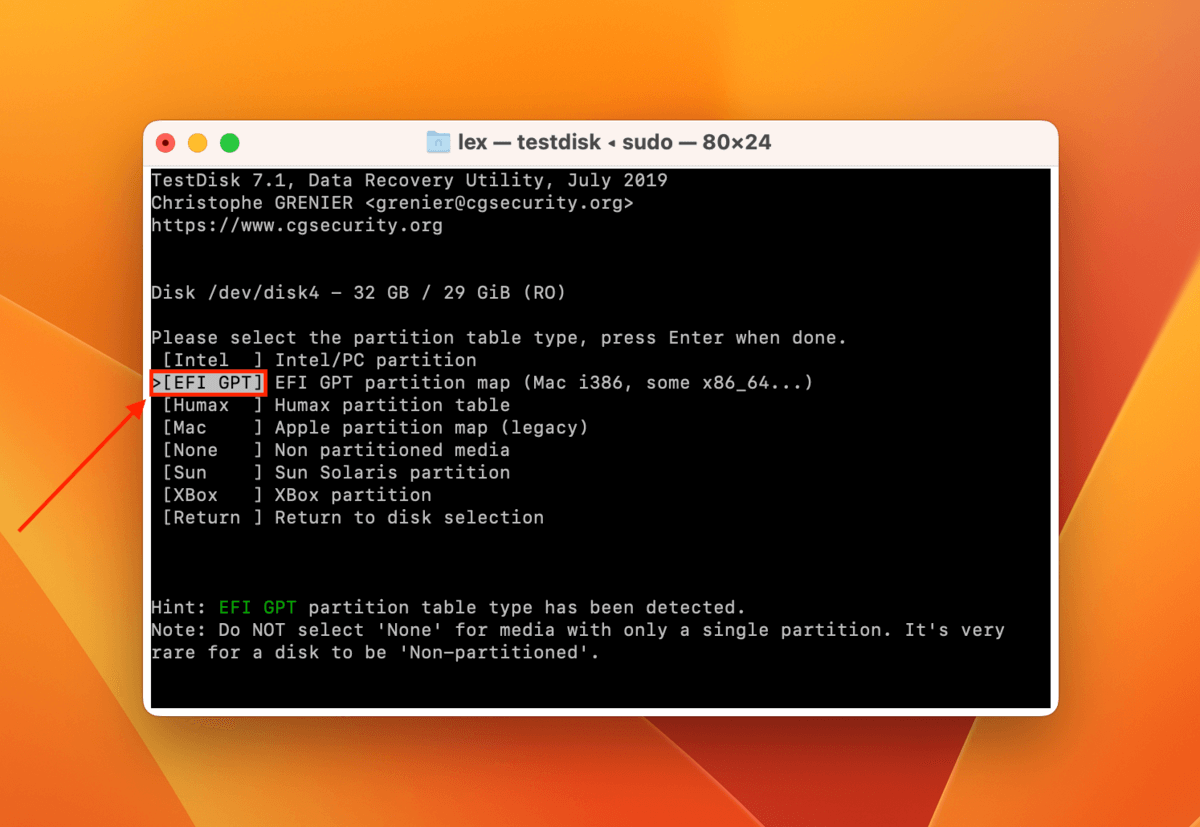
- Select your drive’s partition table type. TestDisk will usually detect it for you, so you can just leave the default option and hit Return.
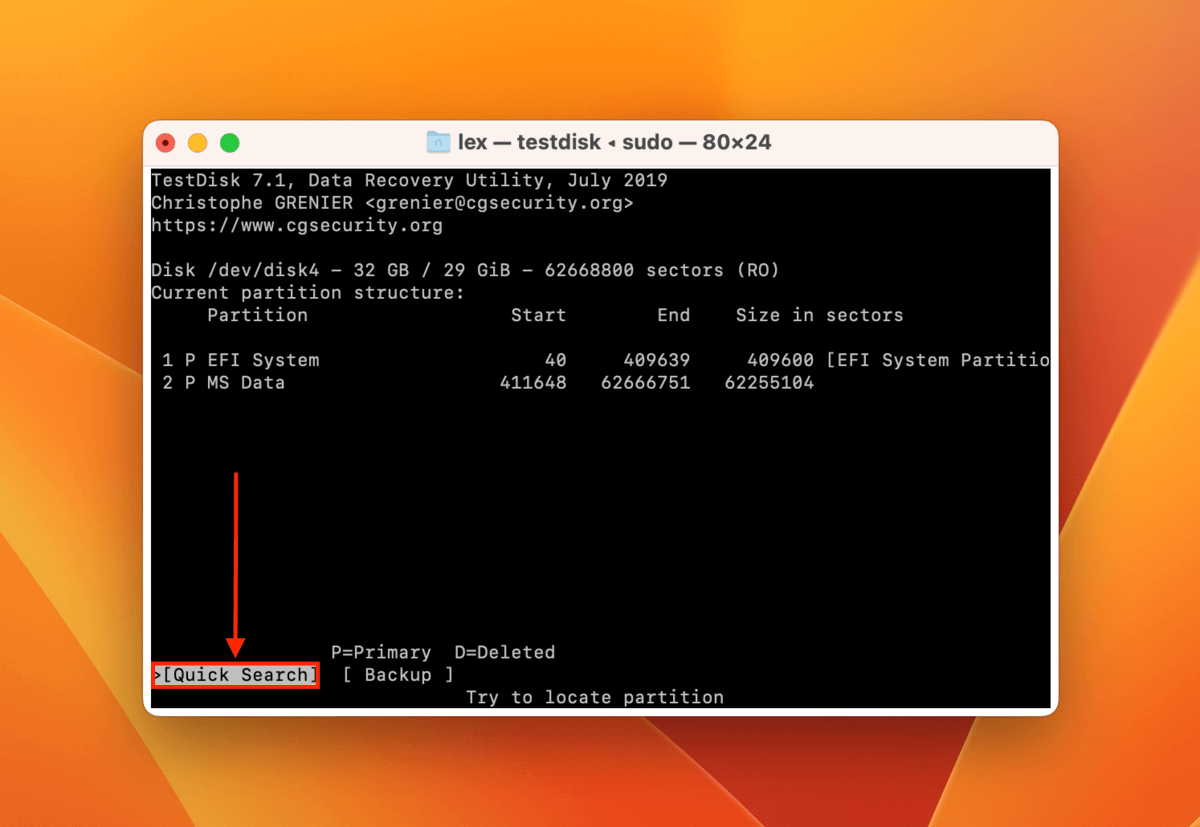
- Select Analyse and hit Return.

- Select Quick Search and hit Return to begin scanning your drive.
- TestDisk will displays the partitions it found. Here, you can change the partition’s parameters before writing it to your drive. Hit Return again.
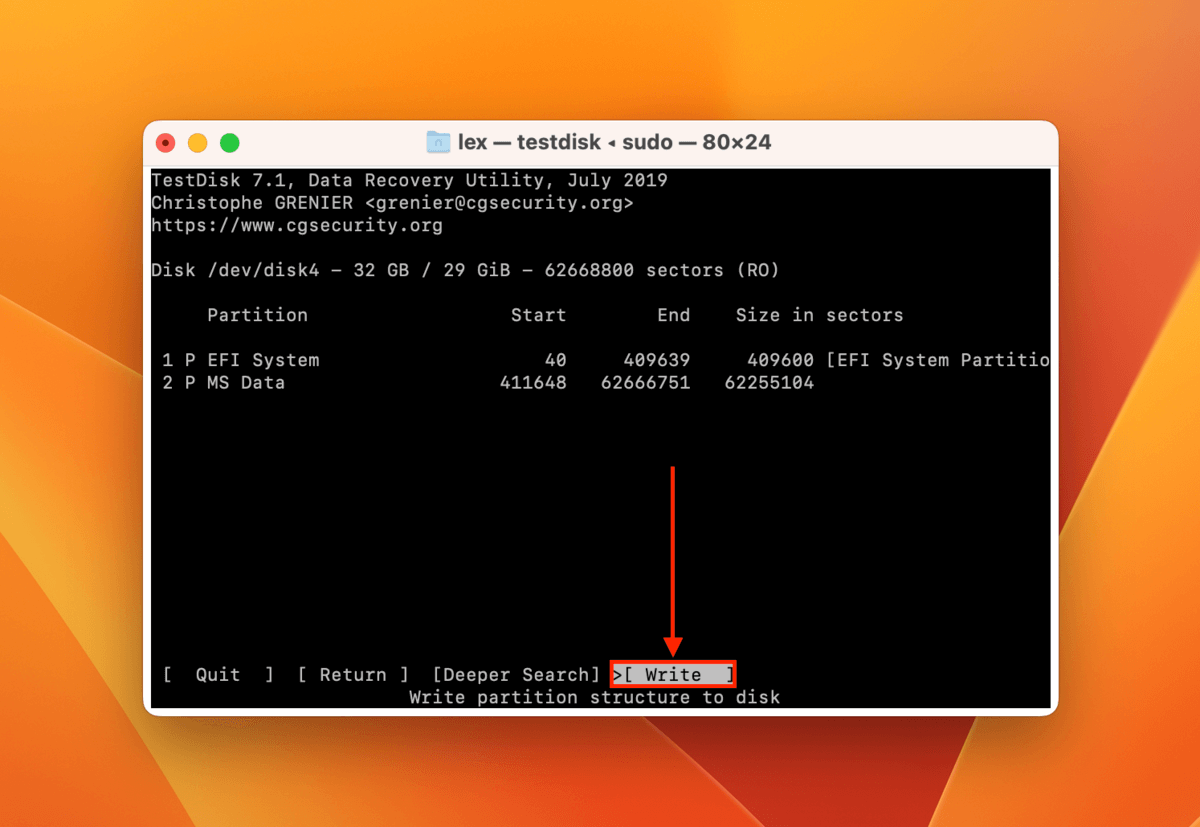
- Select Write and hit Return to recover the partition. If the partition wasn’t found, select Deeper Search for TestDisk to scan your drive with a more advanced algorithm – make sure to Write the new partition if found.
If you want to learn more about TestDisk and its features, read our full TestDisk review.
FAQ
How to show hidden files on an external hard drive on Mac?
To show hidden files on an external hard drive on Mac, navigate to its root folder in Finder and hit the Command + Shift + > keys.
Why is WD Passport not showing files on Mac?
There are multiple possible reasons why your WD Passport is not showing files on Mac:
- Your external hard drive is corrupted.
- There is a mechanical issue with your cables or ports.
- Your external hard drive is using an unsupported file system, such as NTFS.
- Your external hard drive is not getting mounted on your Mac.
- The files on your external hard drive are set to Hidden.
- Your drive is physically damaged.
If the issues persist, you may also start to notice that your WD Passport stops showing up on your Mac. We highly suggest you use data recovery software to restore your data now if you haven’t already because it will likely get permanently deleted soon or during the repair process.
Why Can't I see files on my external hard drive on Mac?
If you can’t see files on your external hard drive on Mac, one of these issues may be why:
- Settings – It’s possible that there’s nothing wrong with your external hard drive and your files are just set to hidden. To unhide them, hit Command + Shift + > in the root folder of your drive in Finder.
- Mechanical Issues – The cables you use to connect your drive to your Mac may be worn. Your Mac’s ports may be damaged themselves. Try using other cables or connecting your drive to another MacBook or desktop Mac.
- Logical Damage – Accidental deletion or formatting, an incompatible file system, and corruption are all possible causes of data loss. Make sure to properly diagnose your drive before fixing it.
- Physical Damage – Data loss (among other unexpected side effects) is common in cases of physical damage. Don’t try to recover your drive yourself – instead, send it to a professional data recovery service.
Conclusion
Disappearing files is a common issue for external hard drives because so many random issues can cause it. Fortunately, you can restore your data and fix your drive by yourself in most cases. But to avoid permanent data loss in the future, we strongly recommend that you consistently back up your data using Time Machine.
This article was written by Alejandro Santos, a Staff Writer at Handy Recovery Advisor. It was also verified for technical accuracy by Andrey Vasilyev, our editorial advisor.
Curious about our content creation process? Take a look at our Editor Guidelines.