If you want to convert FAT32 to NTFS, you’ve come to the right place. Usually, a file system conversion requires a disk format – which puts your precious data at risk. This article will discuss how you can convert FAT32 to NTFS without losing data. Additionally, the article also throws light on some essential background information on FAT32 to NTFS conversion. Click here to skip straight to the FAT32 to NTFS conversion tutorial.
When Should You Consider Converting from FAT32 to NTFS File System
You might consider converting from FAT32 to an NTFS file system to overcome specific challenges. These include file size limitations, compatibility, performance issues, etc. Here’s a deep dive into these challenges:
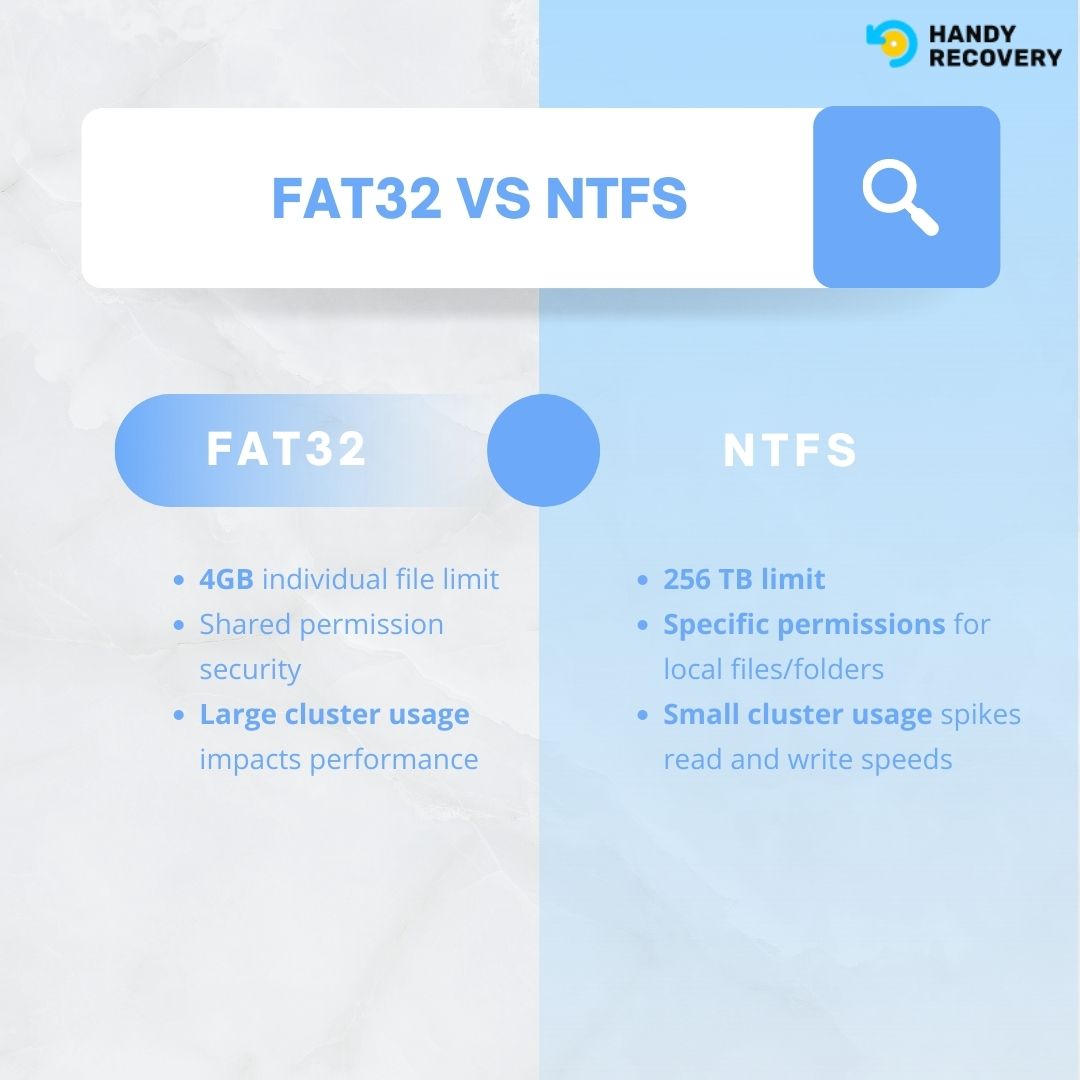
- 📁 File size limitations – The FAT32 file system cannot support a single file of more than 4GB. So, if you try to transfer a file larger than 4GB to a FAT32 formatted drive, you will encounter the “the file is too large for the destination file system” error message. The grass is greener on the other side, with NTFS promising a maximum file size of up to 256 TB.
- 🔰 Compatibility – Newer software applications and operating systems are often configured to support NTFS. A few applications require the NTFS system for certain features to become functional.
- 🔒 Security – The FAT32 system offers only shared permissions. However, NTFS enables you to define specific permissions for local folders/files.
- ⚡ Performance – The FAT32 file system utilizes larger clusters than NTFS. Compared to FAT32, the NTFS file system has higher disk utilization and can manage disk space more effectively. Lastly, NTFS’ read and write speeds are faster than that of FAT32.
Is It Time to Convert from FAT32 to NTFS? Key Scenarios to Look Out For
While several options are available to convert data storage from FAT32 to NTFS, a certain level of risk is always involved. You might get an error or corrupt the integrity of the file system. For this reason, we strongly recommend backing up your data. If such an option is unavailable, we’ve compiled a list of methods that allow you to convert from FAT32 to NTFS without losing or transferring data.
Scenario | Solutions |
I need to сonvert FAT32 to NTFS and keep files on the hard drive. | |
I want to convert FAT32 to NTFS and erase all data. | |
I need to recover data from a converted FAT32 to NTFS hard drive. |
Not sure what to do next? Follow the steps mentioned below in the same exact order.
How to Convert FAT32 to NTFS Without Losing Data
Let’s explore the nitty-gritty of converting a FAT32 file system to NTFS without any data loss:
Step 1: Secure Your Hard Drive’s Data by Creating a Byte-to-Byte Backup Copy
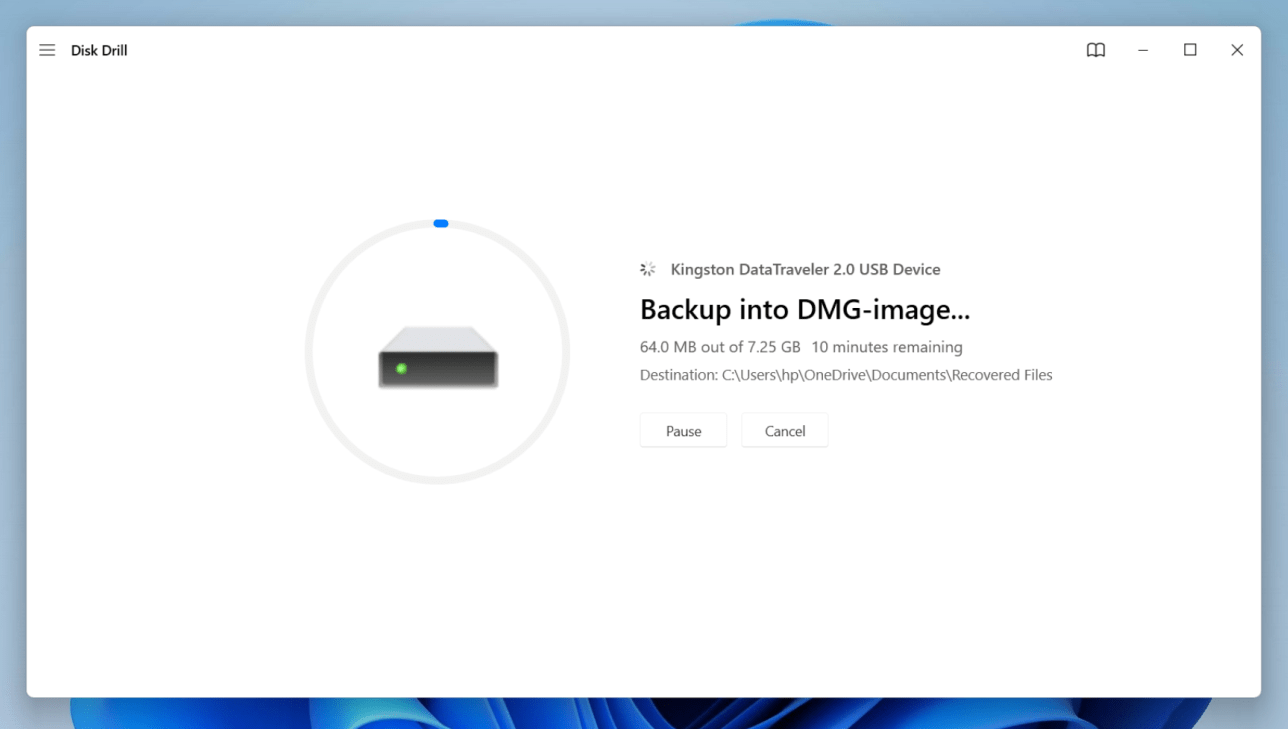
Things can easily go wrong while attempting a FAT32 to NTFS file system conversion. Consequently, To ensure you successfully change FAT32 to NTFS without losing data, we suggest creating a byte-to-byte level backup with Disk Drill. This feature allows you to create a disk image of your storage device: a hard drive, USB flash drive, or SD card – down to the exact byte level. You can then scan the created disk image to search for lost data.
If you end up losing data, creating a byte-to-byte backup copy will prevent any data loss. This means that you can format the hard drive without losing data.
Here’s how you can create a byte-level backup with Disk Drill and proactively secure your data before attempting a file system conversion:
- Download, Install, and Launch Disk Drill on your PC.
- Select the target storage device from the list of devices. Now, click Drive Backup from the Extra tools panel on the left.
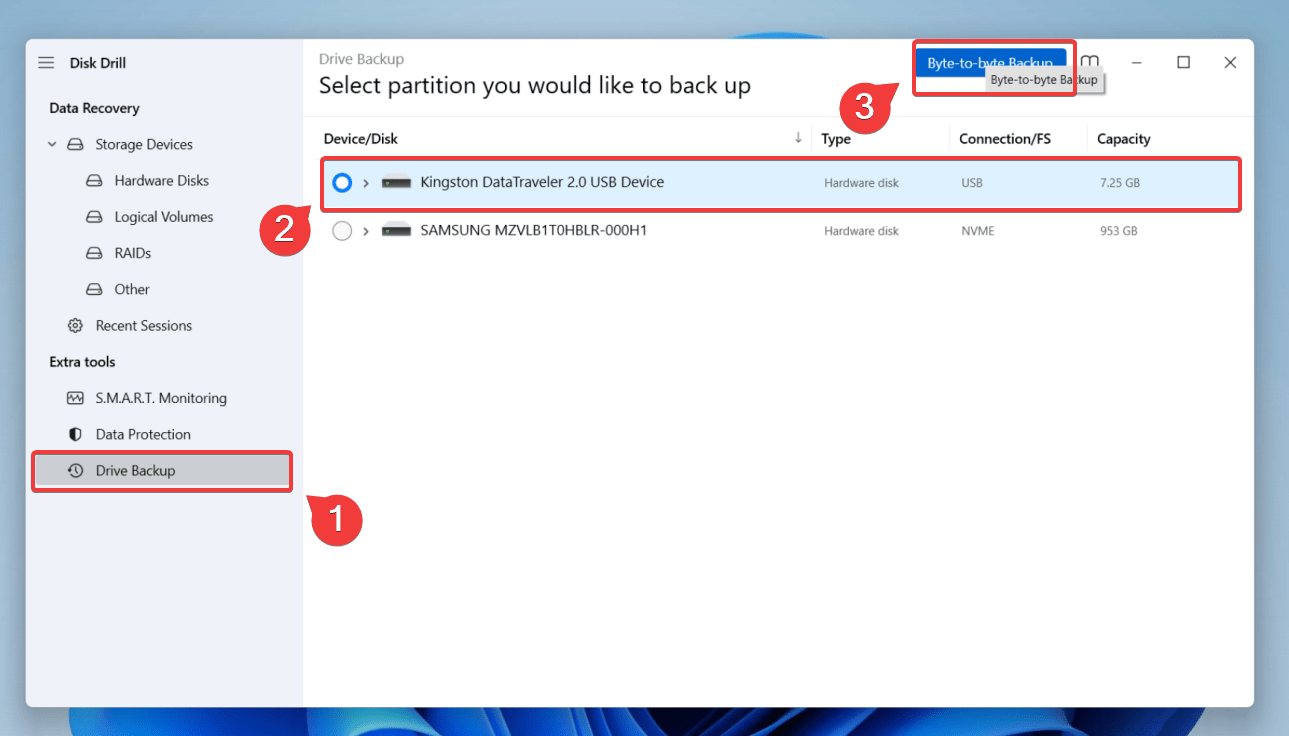
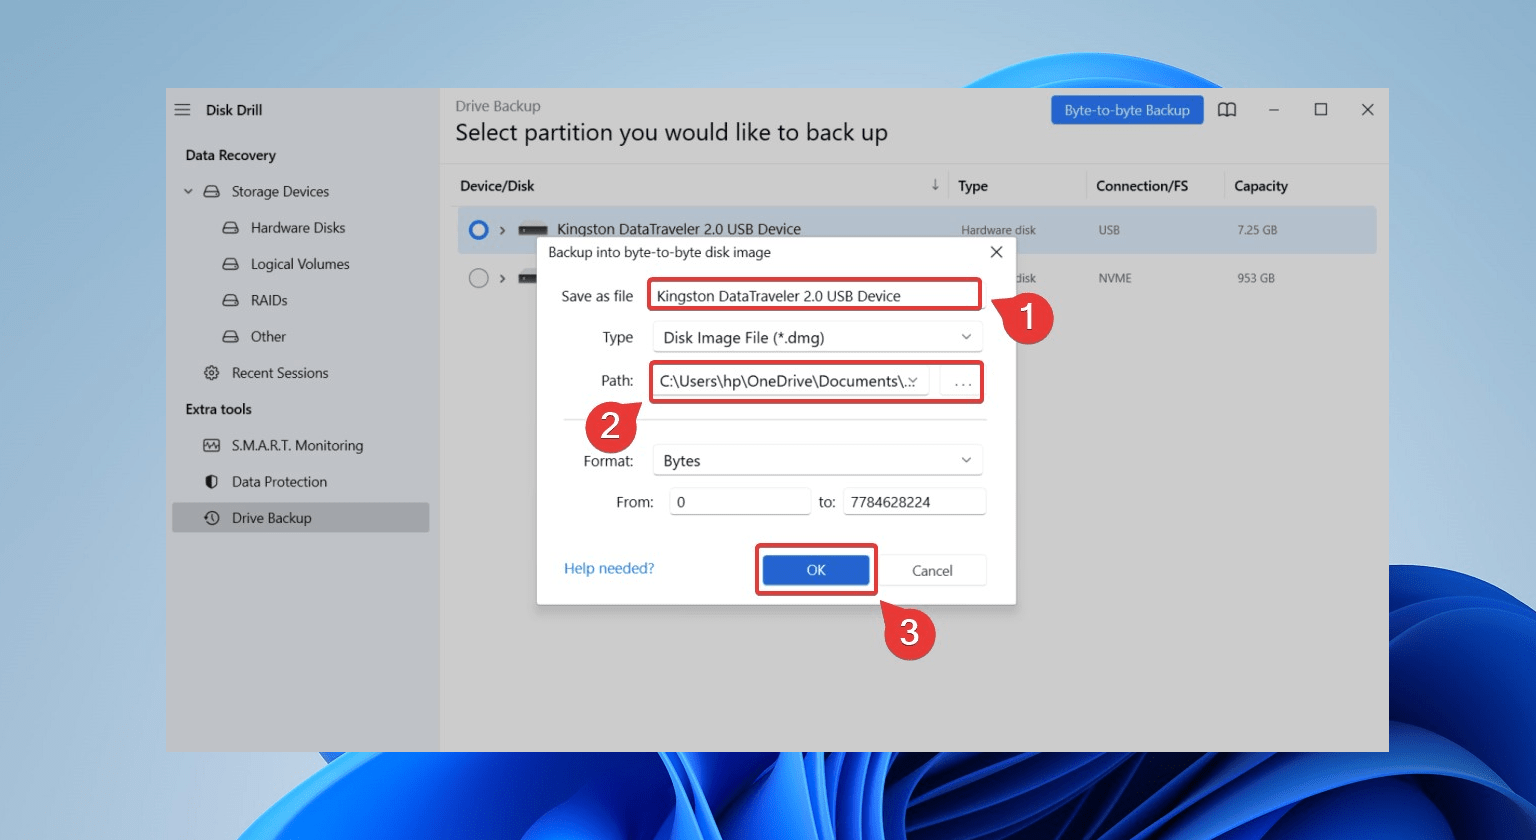
- Click on your storage device, then specify the name and location to save the DMG (disk image) file.
- Once the backup process begins, wait for Disk Drill to create the byte-to-byte backup of your drive.
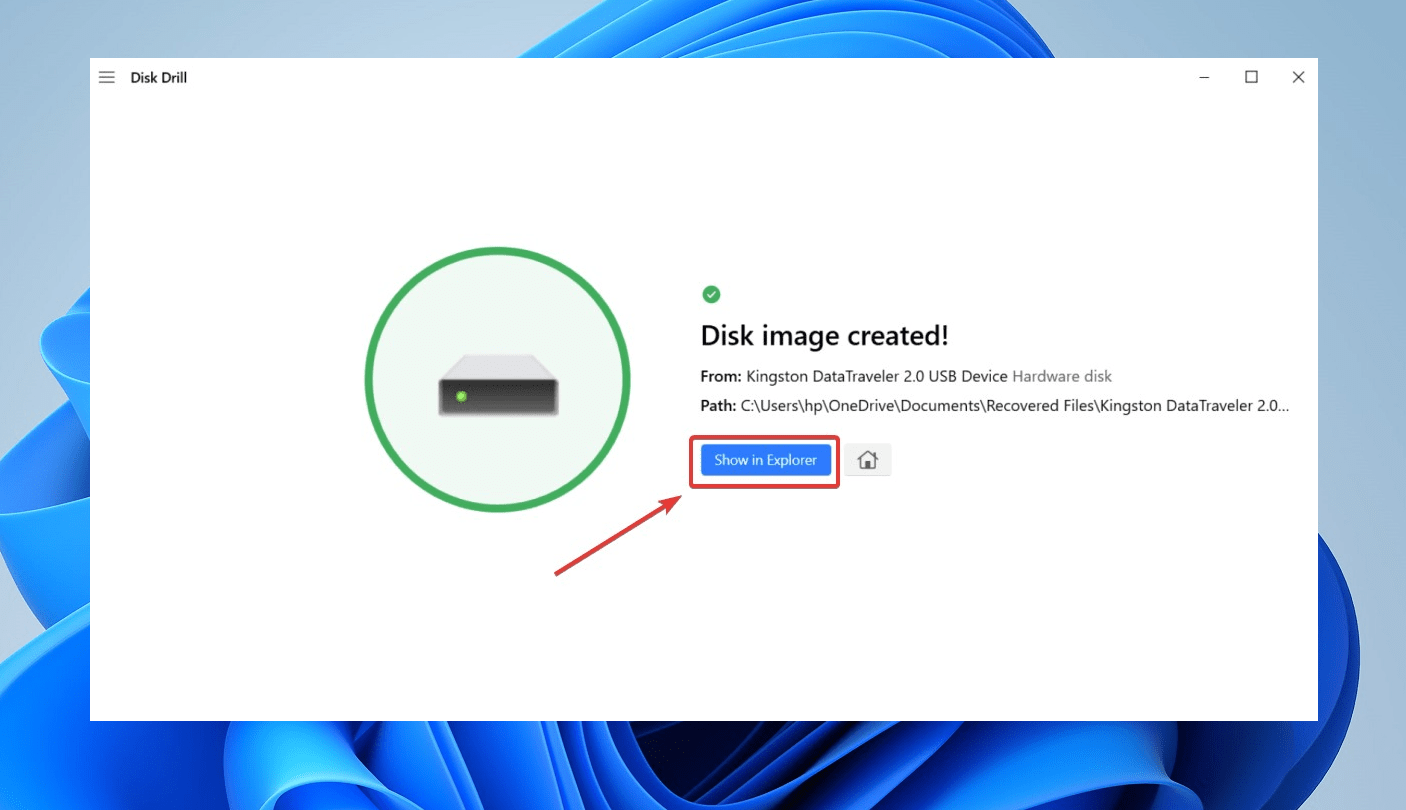
- After creating the disk image, click on Show in Explorer to locate the disk image. Now, return to the Disk Drill home screen.
With that, your hard disk data is now safe. You can go ahead and begin the formatting process to convert the hard drive from FAT32 to NTFS. If you need to extract data from your hard drive disk image, follow these steps:
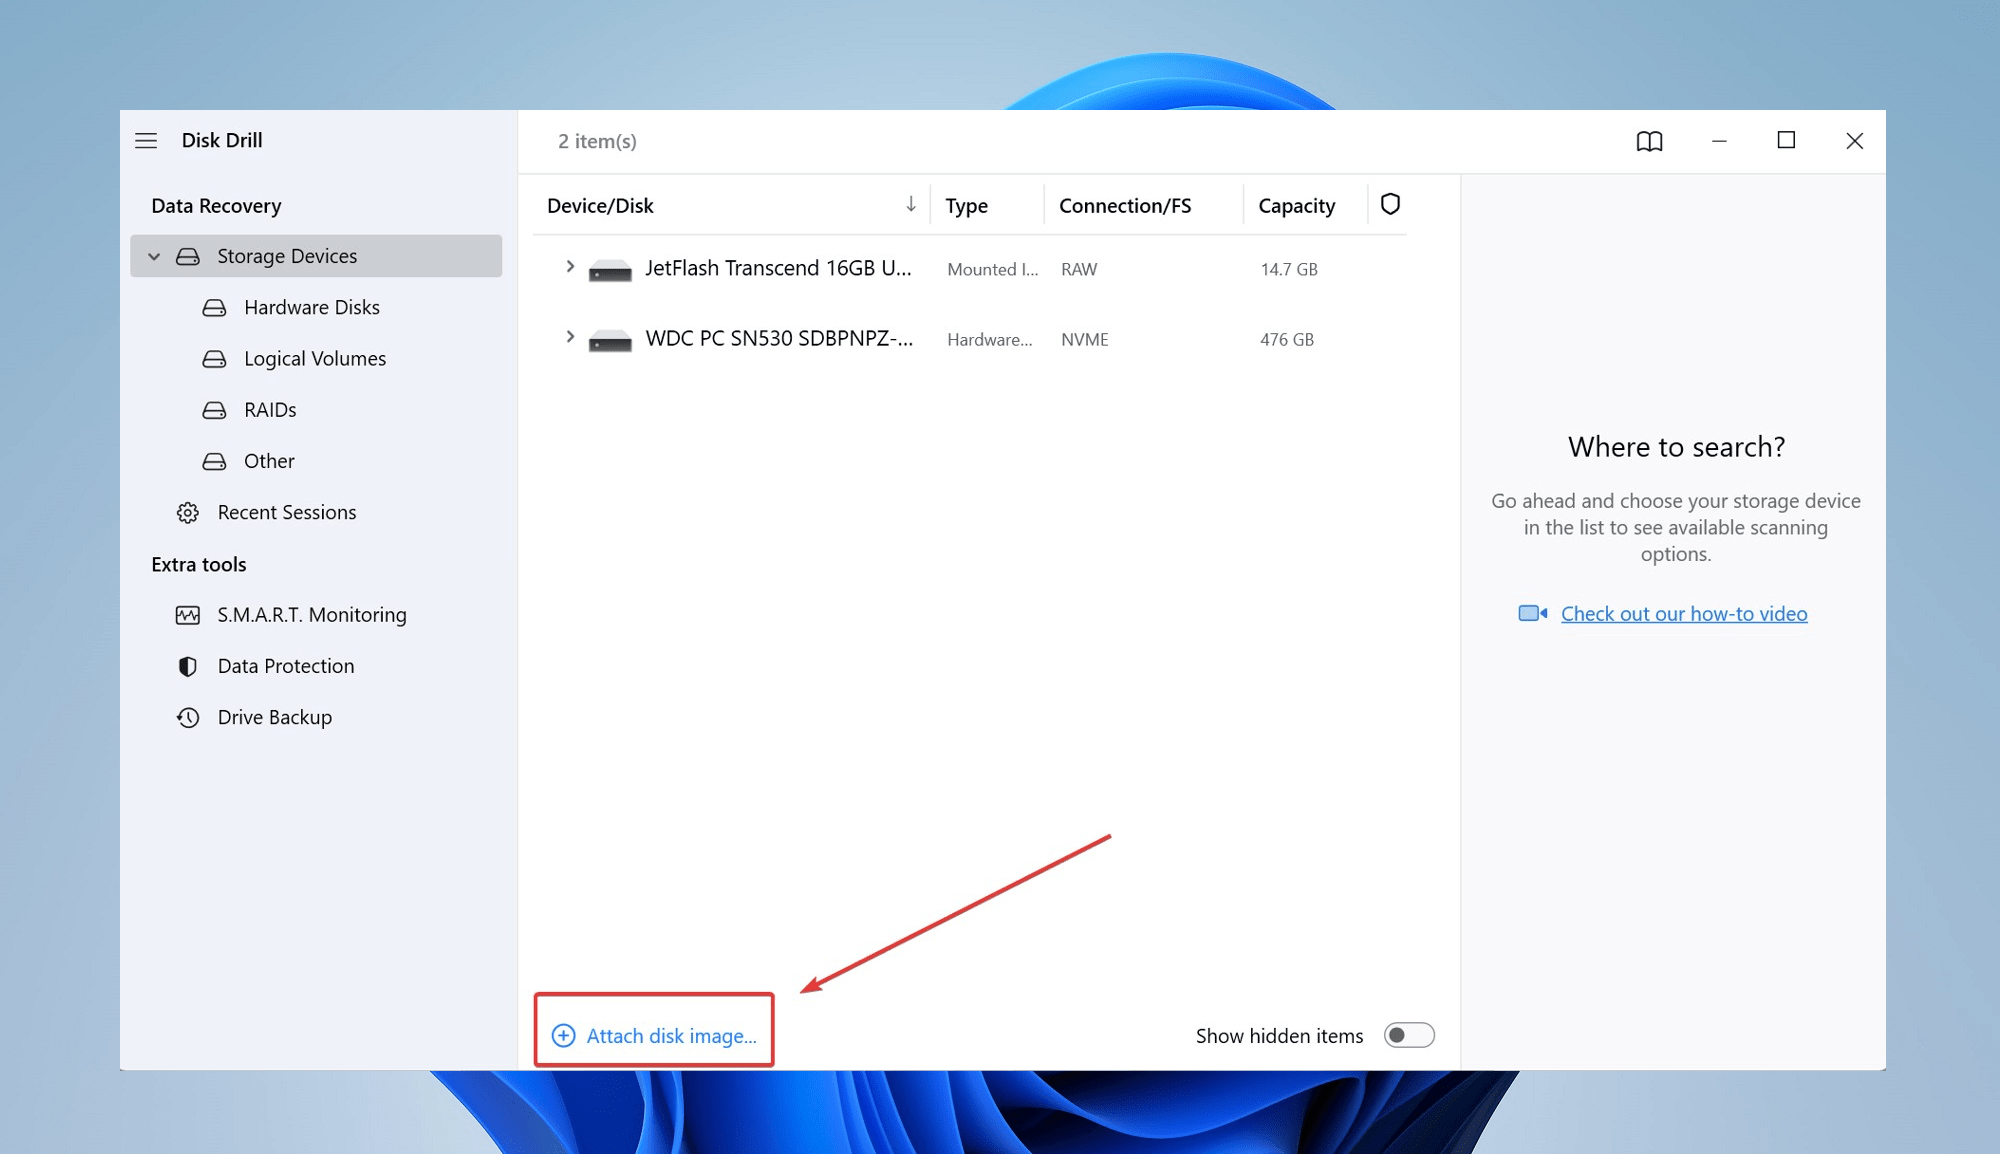
- To scan the created disk image for accessing existing data, click Attach disk image at the bottom.
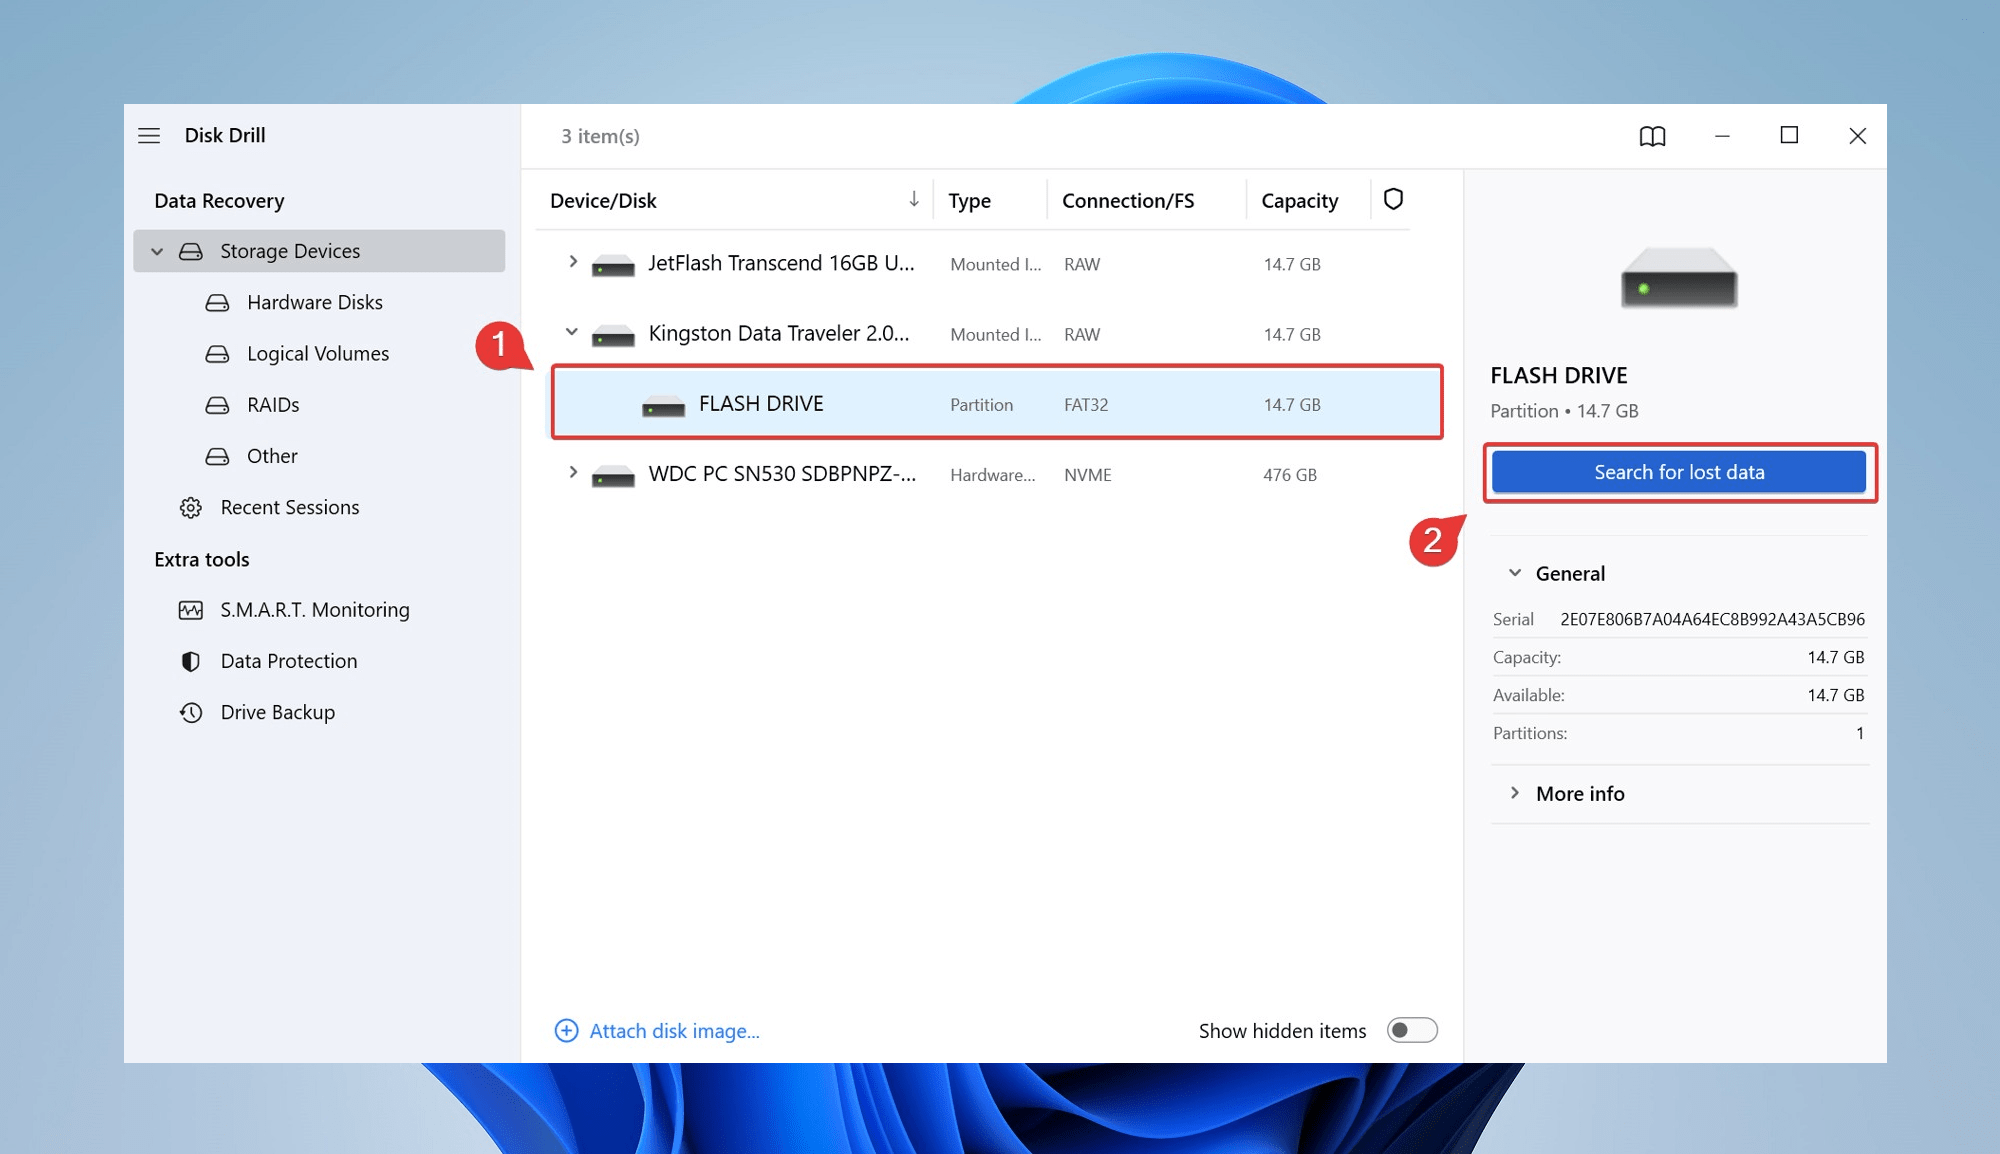
- Now, select the DMG file and click Search For Lost Data.
- Depending on the drive size, the algorithm will take some time to detect recoverable files. Once this scan is complete, click Review found items.
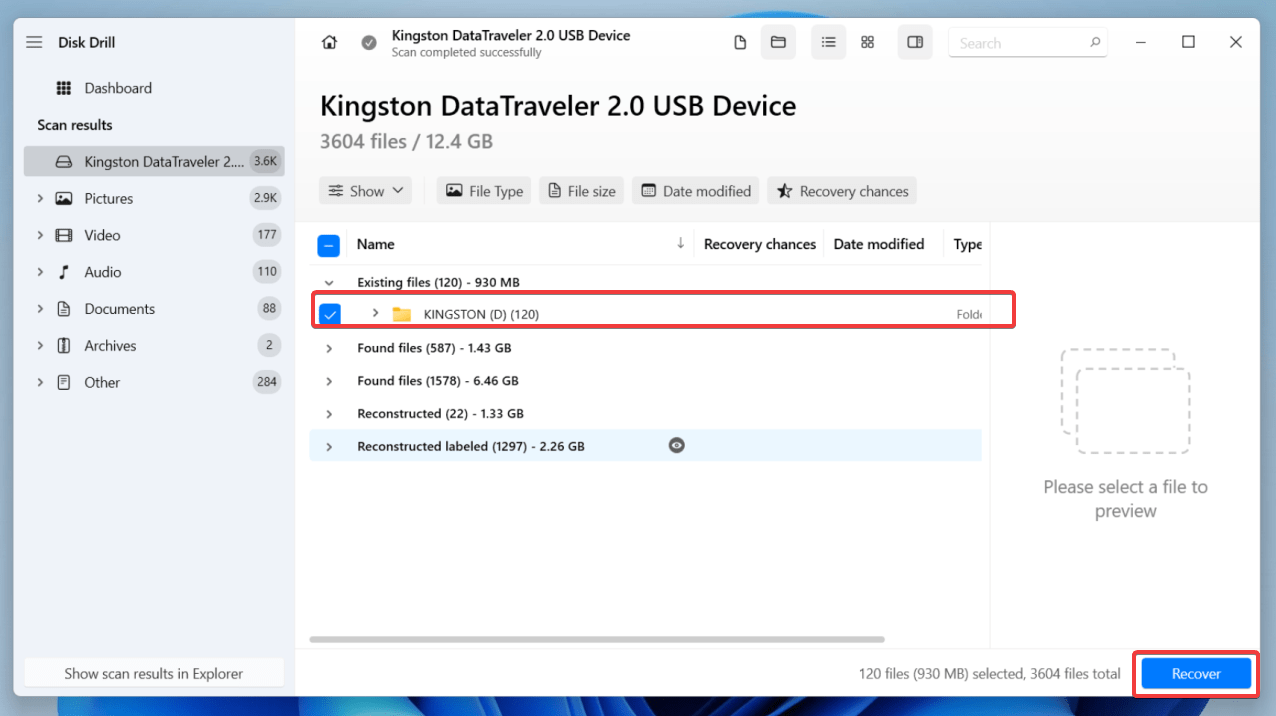
- Click on the Existing tab to explore files residing in your storage device.
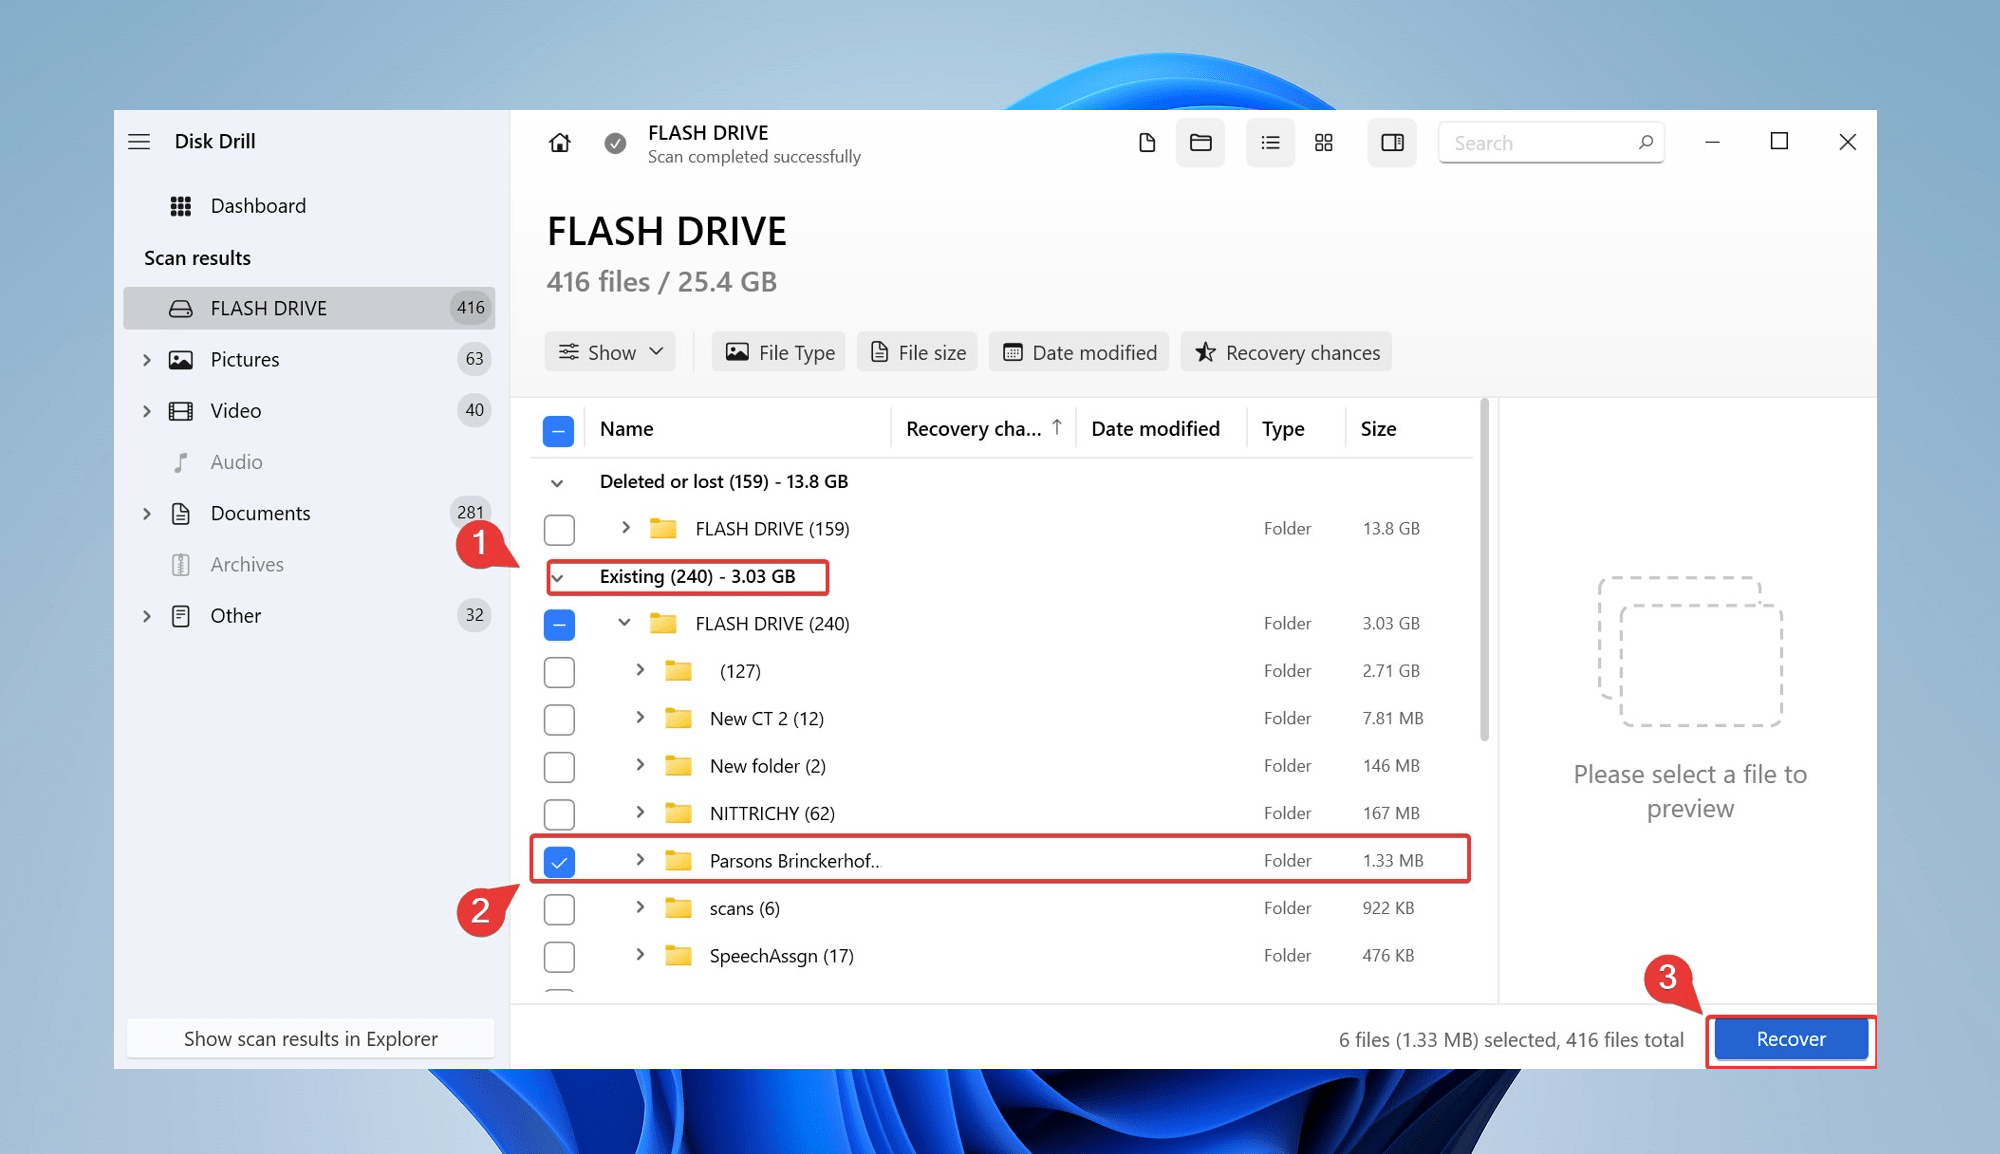
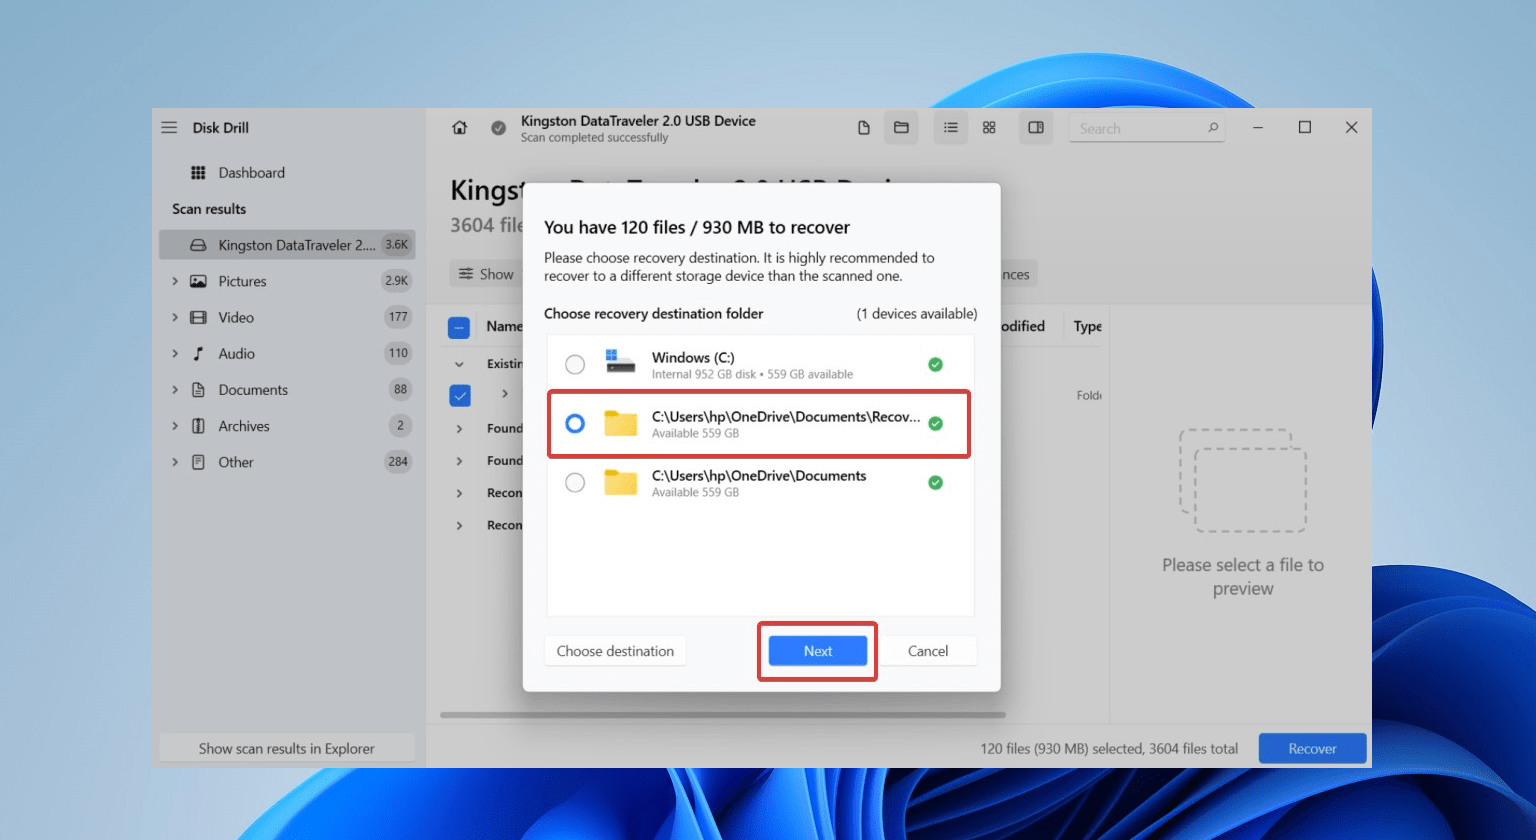
- Once you’ve selected the files you want to recover, click the Recover button. Now, choose a storage location for the recovered data, and click Next.
Step 2: Convert FAT32 to NTFS Without Data Loss
After successfully backing up your drive, you can attempt to convert FAT32 to NTFS without losing data:
Method 1: Convert FAT32 to NTFS Without Losing Data Using CMD
Perhaps the easiest and fastest way to convert a drive’s file system is to format the drive. But this means that you lose all your data. By using Command Prompt, you can change FAT32 to NTFS without formatting or losing any data. Here’s how:
- First, open File Explorer and locate the drive of the file system you want to convert. Check and remember the drive letter, which we’ll use in the following steps.
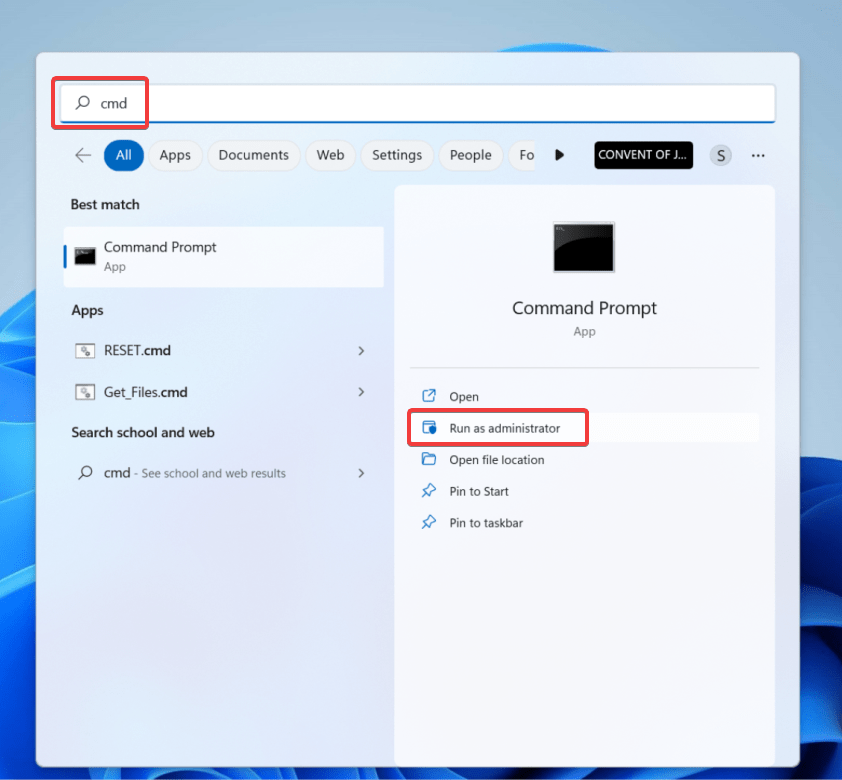
- Now, open the search bar and type in cmd. Now, select the Run as administrator option.
- Once the Command Prompt window opens, run the following command and hit Enter:
convert Drive Letter:/fs:ntfs(Ensure that the drive letter is the same as the target drive.)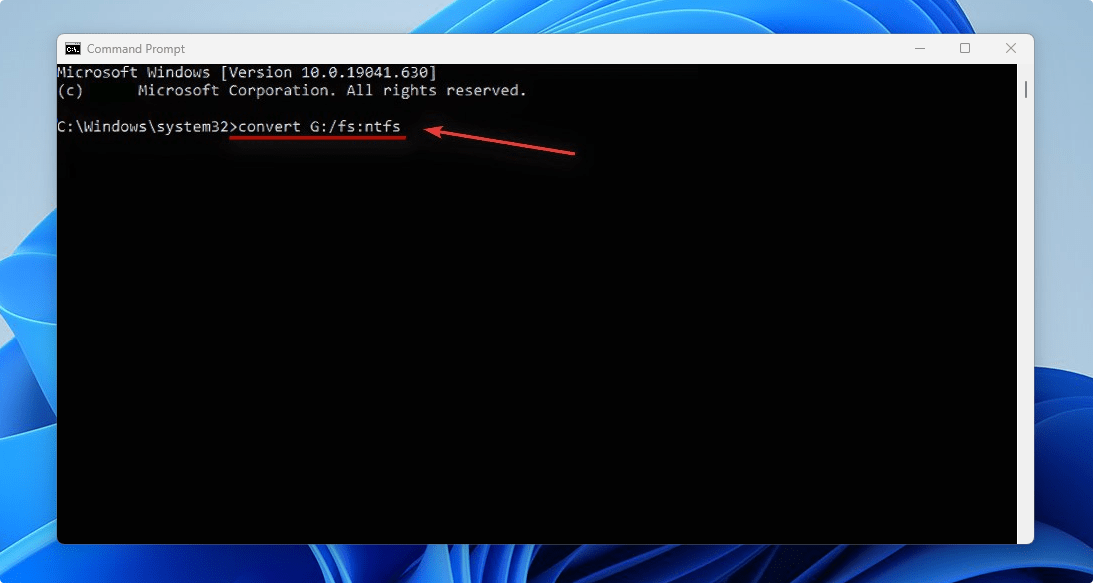
- Follow the prompt to enter the current volume label for the drive. Press Enter to execute the command, and the drive will be formatted and changed to NTFS.

Method 2: Convert FAT32 to NTFS Without Formatting the Entire Drive
Another method to convert FAT32 to NTFS is by shrinking a partition of your hard drive. Once this is done, you can convert the unallocated space into NTFS, move the data there and then reformat the remaining disk space to NTFS. While it can seem like a lengthy process, it can help convert FAT32 to NTFS without formatting the entire drive.
To achieve this, you can use third-party software like the AOMEI Partition Assistant, a free disk partition software for Windows. It comes with powerful features that allow you to control your hard disk and partitions.
Here’s how you can follow this method:
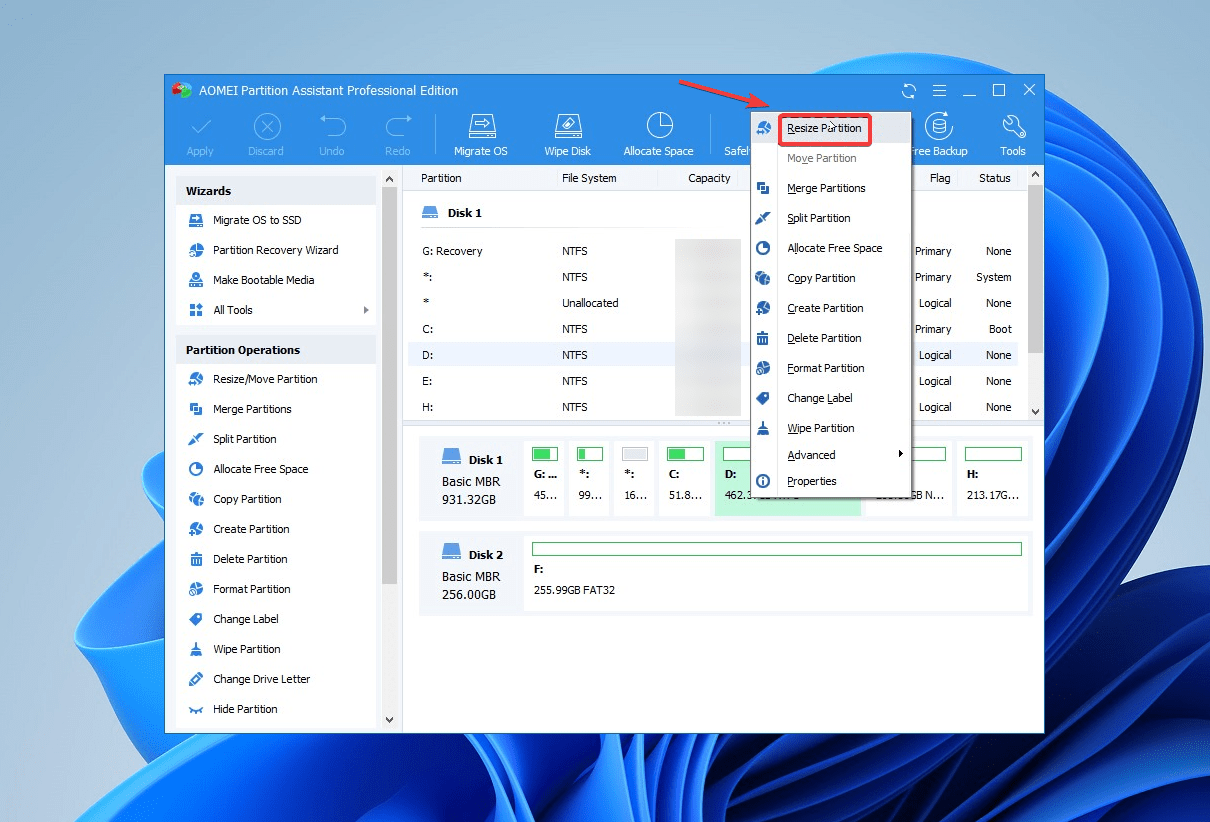
- Install and launch the AOMEI Partition Assistant. In the main window, find and right-click the partition you want to shrink and select “Resize Partition”.
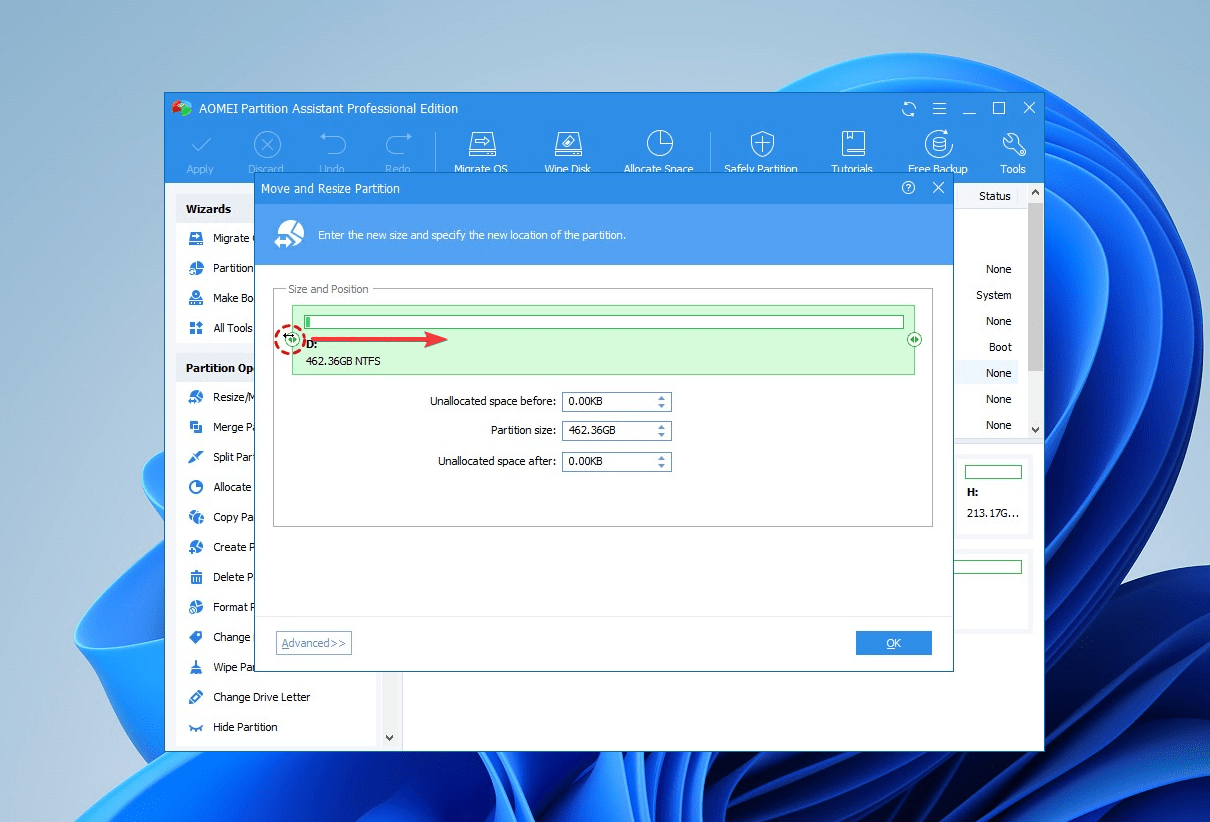
- In the pop-up windows, position the mouse pointer on the left handle and drag the slider bar rightwards to shrink the partition.
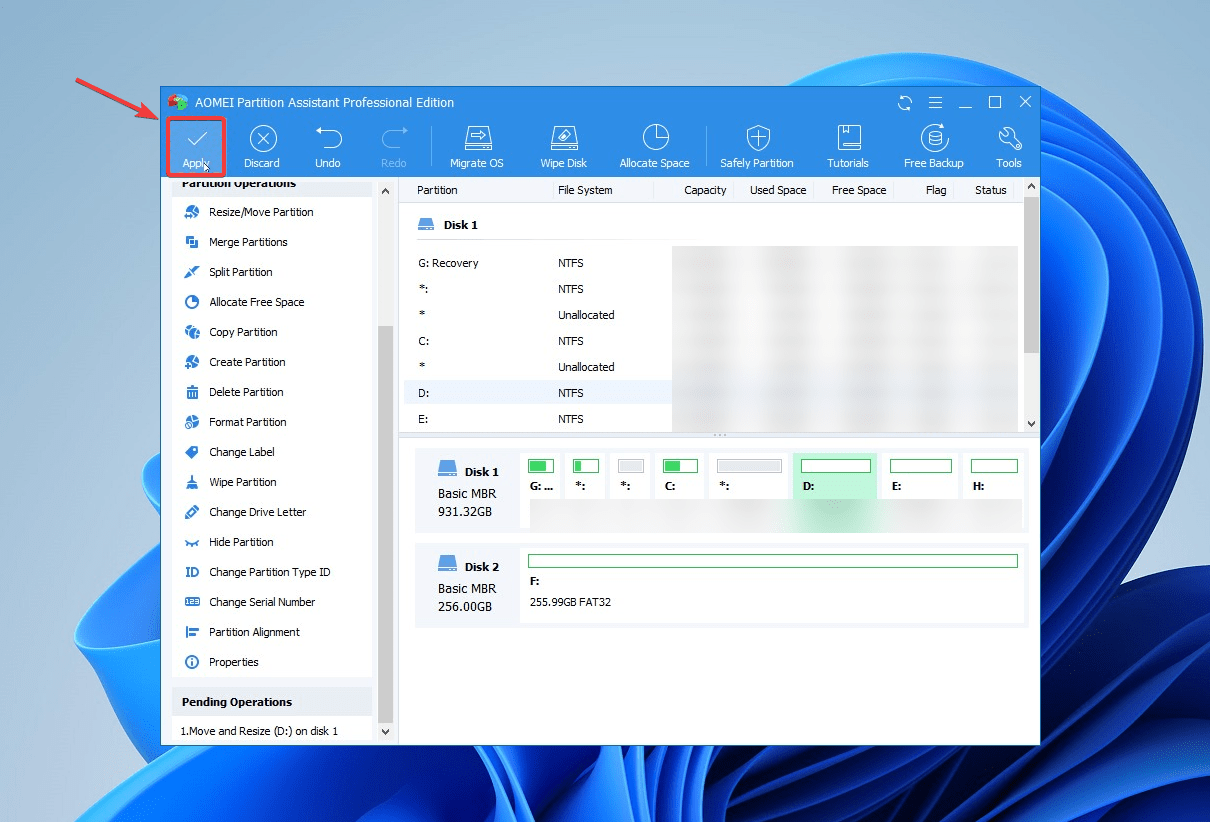
- Click “OK” to return to the main window. You can now preview the unallocated space beside the partition. Ensure that you click “Apply” on the toolbar to complete the process.
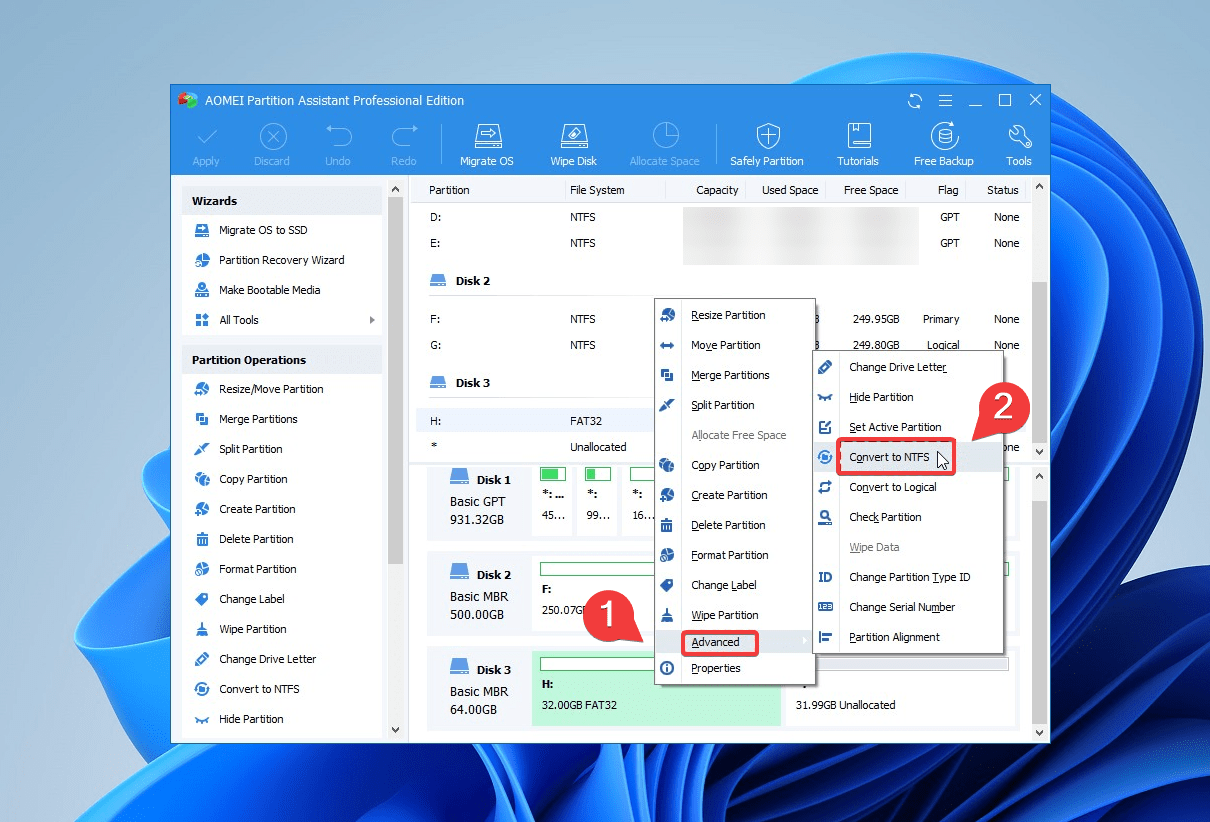
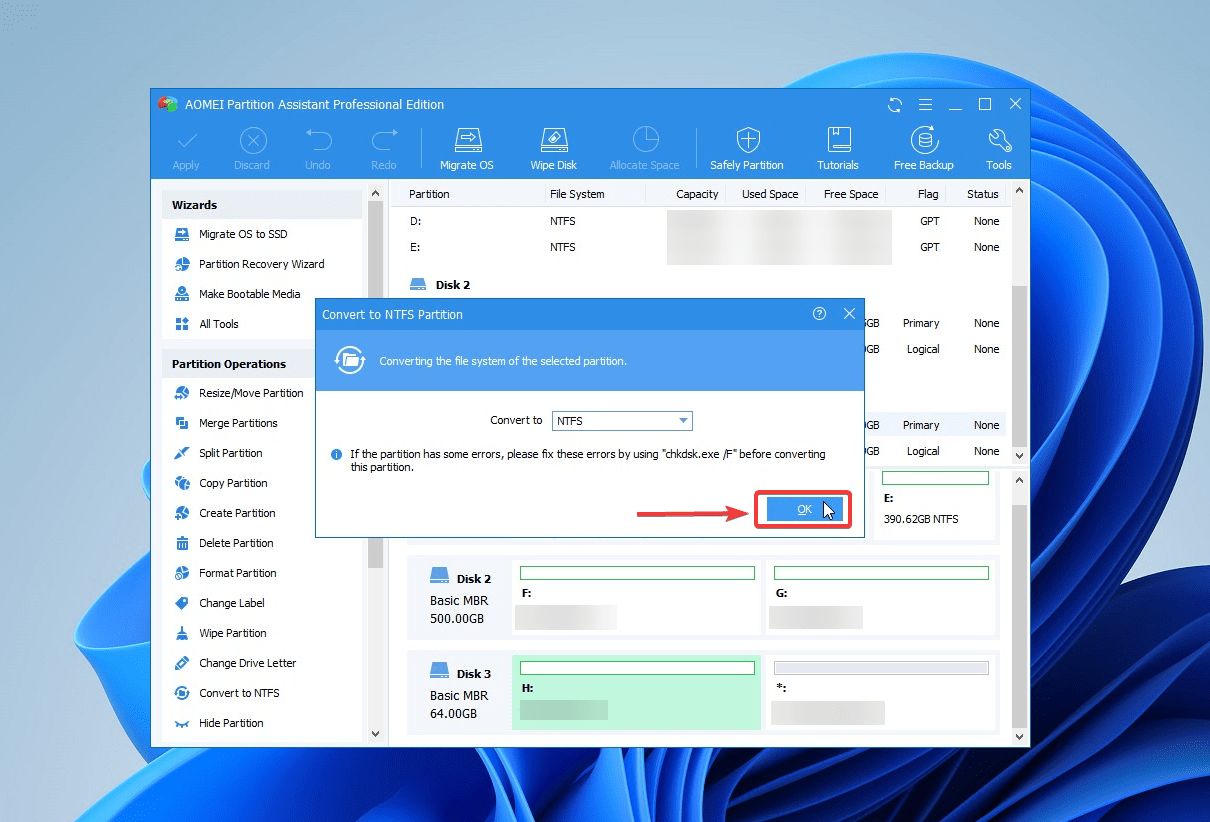
- After resizing the partition, select the unallocated space on the partition. Now, right click the Partition > Advanced > Convert to NTFS.
- In the pop-up window, click “OK” to continue. Once again, click “Apply” to execute this operation.
- Once done, you can move all your data to the newly-converted NTFS partition and follow the same steps to reformat the remaining disk space to NTFS.
Method 3: Format Your Data Storage In File Explorer
If the above methods don’t work, you can format the storage device in File Explorer. Formatting will shred your data and result in a complete data loss. As a result, it’s critical to perform a complete disk backup before attempting a format. Follow these steps to format data with File Explorer:
- Go to the Windows File Explorer.
- Find and right-click the target drive, then choose Format.
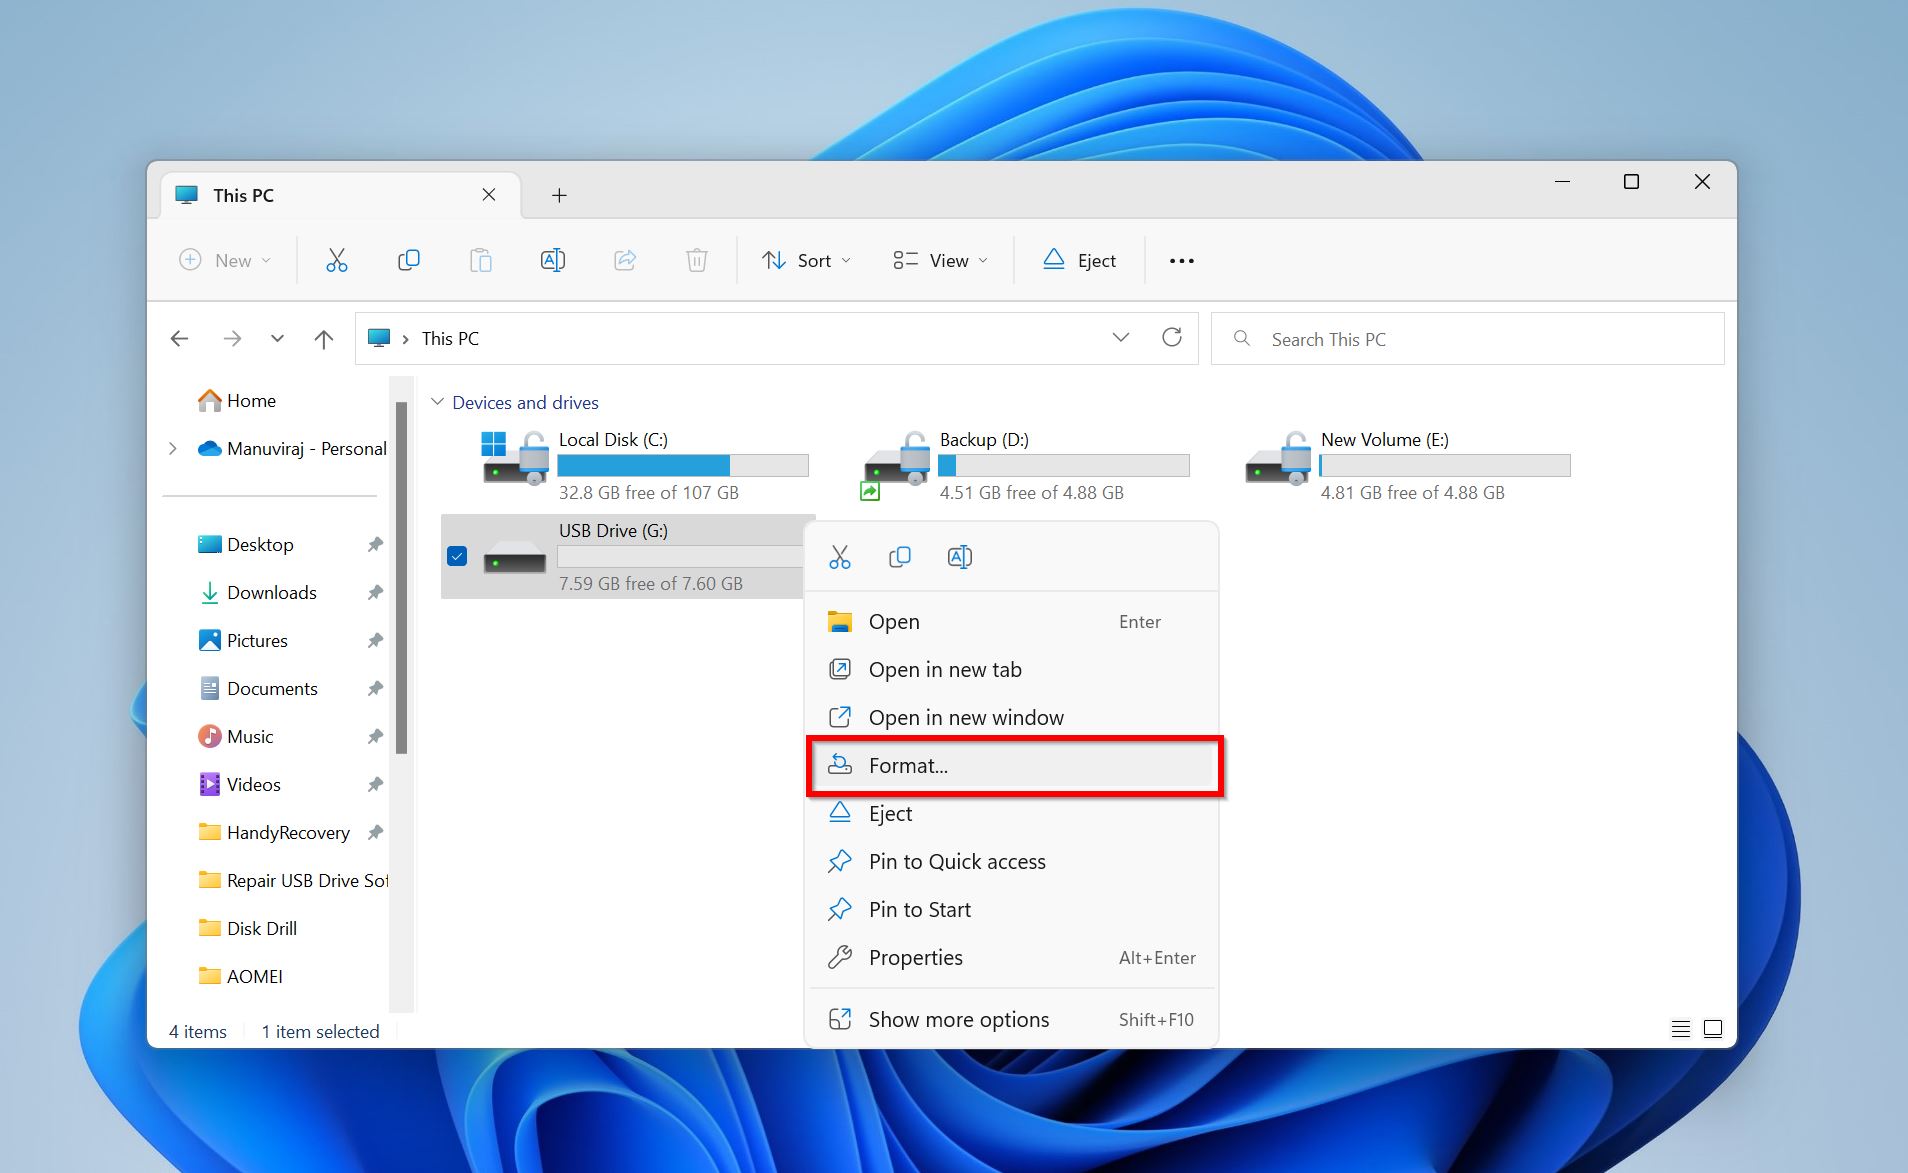
- Select the Quick Format option and change the file system to NTFS.
- Finally, click Start to initiate the formatting.
Step 3: Recover Data You May Have Lost During Formatting
Let’s suppose you went ahead and attempted a file system conversion without taking backups. If you ended up formatting the disk, don’t worry – we got you covered. Professional data recovery software is the most efficient way to retrieve data lost during formatting. Disk Drill is one of the best data recovery apps available on the market. With an intuitive interface and a robust algorithm, Disk Drill recovers data from all major file formats and Windows file systems like FAT32, NTFS, etc.
Follow these steps to recover data lost during formatting via Disk Drill:
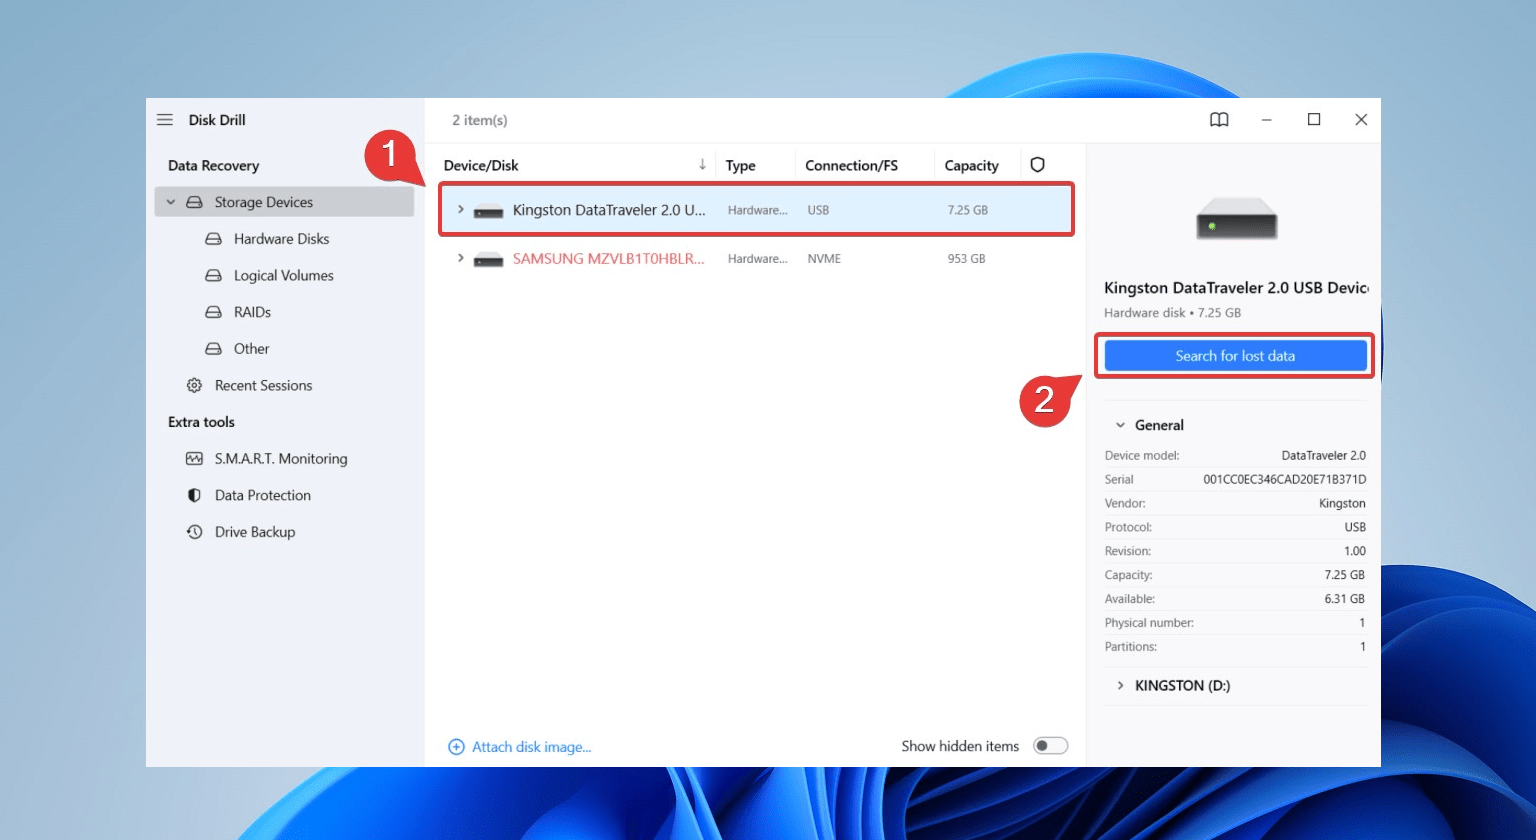
- Download, Install, and launch Disk Drill.
- Connect the converted drive to your computer.
- Select the converted drive from the list of drives, and click Search for lost data.
- While converting a drive from FAT32 to NTFS, data loss is a significant concern. Disk Drill thoroughly scans your converted drive to hunt for recoverable data during this step. Once the scan terminates, click Review found items.
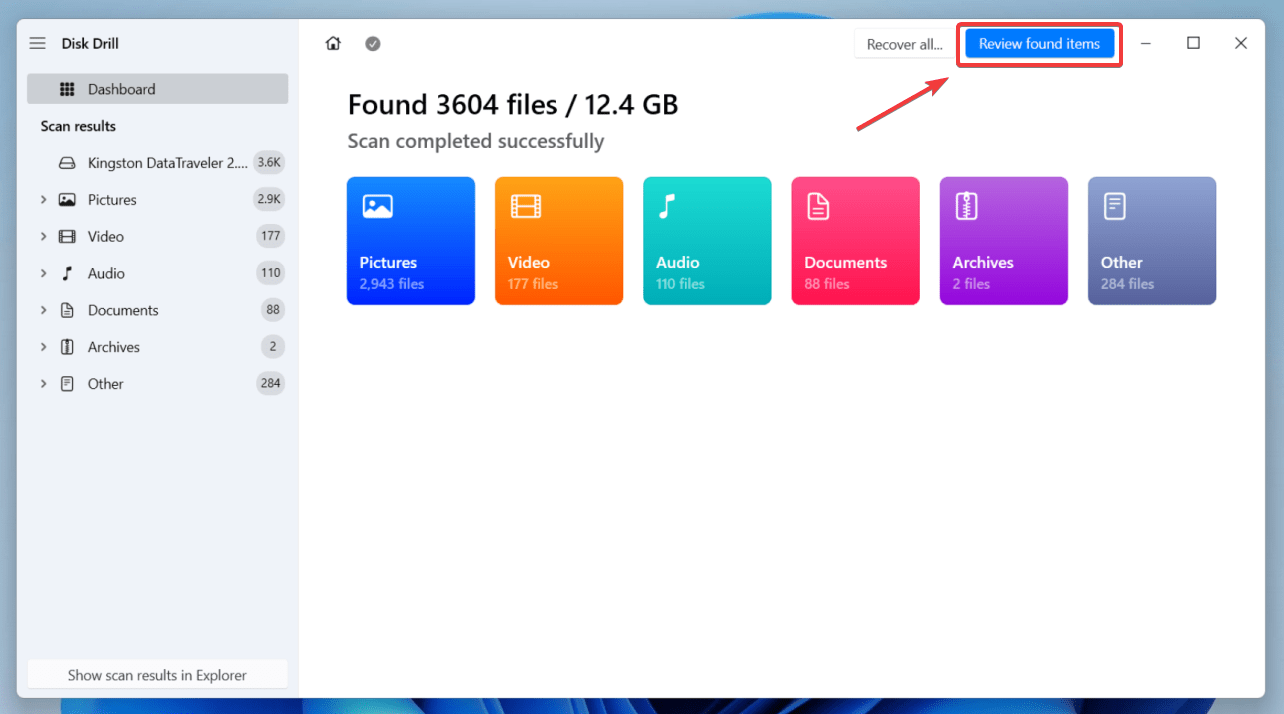
- Preview the files you want to recover. You can filter through the results for specific files: Key in a particular file format in the top right corner and click enter to refine your search results.
- Select the files you wish to retrieve and click Recover.
- Now, select a storage location for the restored data and ensure you don’t choose the same converted drive as the target destination to avoid overwriting—Press Next to complete data recovery.
To learn more about Disk Drill and its extensive feature set, such as SMART disk health monitoring, recovery vault, and byte-to-byte backups, check our detailed Disk Drill review. Additionally, we encourage you to delve into our comprehensive Disk Drill safety analysis for a thorough evaluation.
FAQ
Can FAT32 be converted to NTFS?
Yes, FAT32 can be converted to NTFS using one of the following methods:
- Convert FAT32 to NTFS using the CMD prompt
- Convert FAT32 to NTFS using Disk Management
- Format to NTFS using Windows File Explorer
How can I change FAT32 to NTFS in Windows without losing data?
Always back up your data to prevent unnecessary data loss during the conversion process. You can change FAT32 to NTFS in Windows without losing data using the following methods:
- Convert FAT32 to NTFS using the CMD prompt
- Convert FAT32 to NTFS using Disk Management
How to convert FAT32 to NTFS without losing data on Mac?
Follow these steps to reformat your FAT32 drive to NTFS on Mac using a third party tool called Paragon NTFS. However, this process results in data loss.
- Perform a backup of your hard drive data.
- Download, install and launch Paragon NTFS.
- On the Paragon NTFS tool, select the FAT32 volume.
- Click Erase to reformat the FAT32 volume to NTFS.
- Wait for the process to terminate.
How to convert FAT32 to NTFS without losing data using the command prompt?
Follow these steps to convert FAT32 to NTFS without losing data using the command prompt:
- Open the search bar and type in cmd. Now, select Run as administrator.
- Once the Command Prompt window opens, enter this command:
convert F:/fs:ntfs(F is the drive letter of the target drive.) - Follow the prompt to enter the current volume label for the drive. Press Enter.
Conclusion
Converting a drive from FAT32 to NTFS usually entails the daunting risk of data loss. This article features methods for changing FAT32 to NTFS without any data loss. You can use methods like CMD or disk management where there’s no data loss or format the FAT32 drive to NTFS. Either way, it’s best always to have backups of your drive to stay insured against unprecedented data loss.
This article was written by Joshua Solomon, a Contributing Writer at Handy Recovery Advisor. It was also verified for technical accuracy by Andrey Vasilyev, our editorial advisor.
Curious about our content creation process? Take a look at our Editor Guidelines.