Microsoft Storage Spaces is an often-overlooked performance-enhancing and data-protecting feature similar to RAID, and it’s present in Windows 10 and Windows 11. Because not many users know about the feature and take advantage of it, there are not many helpful resources out there that explain how to recover data from Microsoft Storage Spaces when something goes wrong.
That’s where this article comes in, taking you step by step through the process of Storage Spaces recovery.
Important: The sooner you initiate the Storage Spaces recovery after noticing data loss, the better your chances of retrieving your files.
What Causes Microsoft Storage Spaces Corruption and Data Loss
Storage Spaces can be a robust way to protect your data from loss, but it all depends on how the technology is configured. That’s because three different types of Storage Spaces exist, and one of them doesn’t offer any data loss protection at all:
- Simple Spaces: Boosts performance, offers no protection from drive failure, ideal for temporary data, and requires a minimum of two drives.
- Mirror Spaces: Enhances performance, safeguards files through multiple copies, tolerates one or two drive failures depending on configuration, optimal for general-purpose files, and necessitates at least two or five drives for two-way or three-way mirror spaces, respectively.
- Parity Spaces: Designed for storage efficiency, shields files by keeping multiple copies, perfect for archival data and streaming media, and requires a minimum of three drives for single drive failure protection and seven for double drive failure protection.
What often happens is that Windows users create a Storage Spaces pool in the Simple Spaces configuration without realizing that it offers no extra data loss protection compared with traditional, singular hard drives. They are then left in a precarious position when one of the following typical culprits occurs, as they find themselves without the redundancy or the extra copies of data that they had presumed existed:
Reasons |
Description |
Solution |
😧 Accidental Deletion |
Sometimes, we accidentally delete files or entire folders. Whether it’s an unfortunate click or an oversight during file organization, the result is always the same but it, fortunately, doesn’t have to be permanent if you have the right recovery tools at your disposal. |
Use data recovery software to undelete accidentally deleted files. |
🚫 Hard drive issues |
This happens when one or more of your drives experiences a critical issue that prevents it from working correctly. These issues can be of general nature and caused by, for example, bad drivers, or they can be related directly to Storage Spaces (see the list below). |
It’s best to perform diagnostics on the hard drive or run Event Viewer to determine the cause of the malfunction. |
📛 File system corruption |
File system corruption occurs when the structure of a drive, whose purpose is to help the operating system locate and access stored data, gets damaged. This might be caused by bad sectors, a sudden shutdown, virus attack, or software bugs. |
File system corruption is often possible to repair with a simple CMD tool (chkdsk). You can also use data recovery software to retrieve lost files. |
⚡ Power outages or system crashes |
Sudden power outages or system crashes can cause problems with the integrity of your Storage Spaces pool. When your computer doesn’t get to shut down properly, it can leave data in an inconsistent state, making it unreadable when you reboot. |
You can attempt to repair the Storage Spaces pool using chkdsk and use data recovery software to recover lost files. |
⚠️ Hardware failure |
Hard drives can fail and instantly cause all data stored on them to disappear. Unfortunately, there’s not much that can be done at home about catastrophic hard drive failure besides double-checking the status of the drive. |
Check that all drives are correctly recognized by the system and, if they’re not, reconnect them to your Storage Spaces pool. |
How to Recover Files from Microsoft Storage Spaces
When it comes to Storage Spaces recovery, one of the most reliable and user-friendly tools you can use is Disk Drill.
This popular data recovery tool supports all available types of Microsoft Storage Spaces, including simple, two-way mirror, three-way mirror, and parity spaces. It also backs various RAID types, providing a comprehensive solution to restore files from Microsoft Storage Spaces.
Moreover, Disk Drill can recover data from a variety of Windows file systems, including FAT16, FAT32, exFAT, NTFS, NTFS5, and even disks that have no functional file system because they’ve been logically damaged (read our Disk Drill review for an in-depth look at the software’s impressive capabilities).
If you have any safety concerns about using Disk Drill, rest assured that it’s a trusted and safe tool. You can read more about its approach to data recovery and whether Disk Drill contains any viruses or other malware in our in-depth safety analysis.
Here are the steps to recover data from Microsoft Storage Spaces using Disk Drill:
- Download and install Disk Drill. Visit the official Disk Drill website, download the Windows installer, and follow the installation wizard to install it.

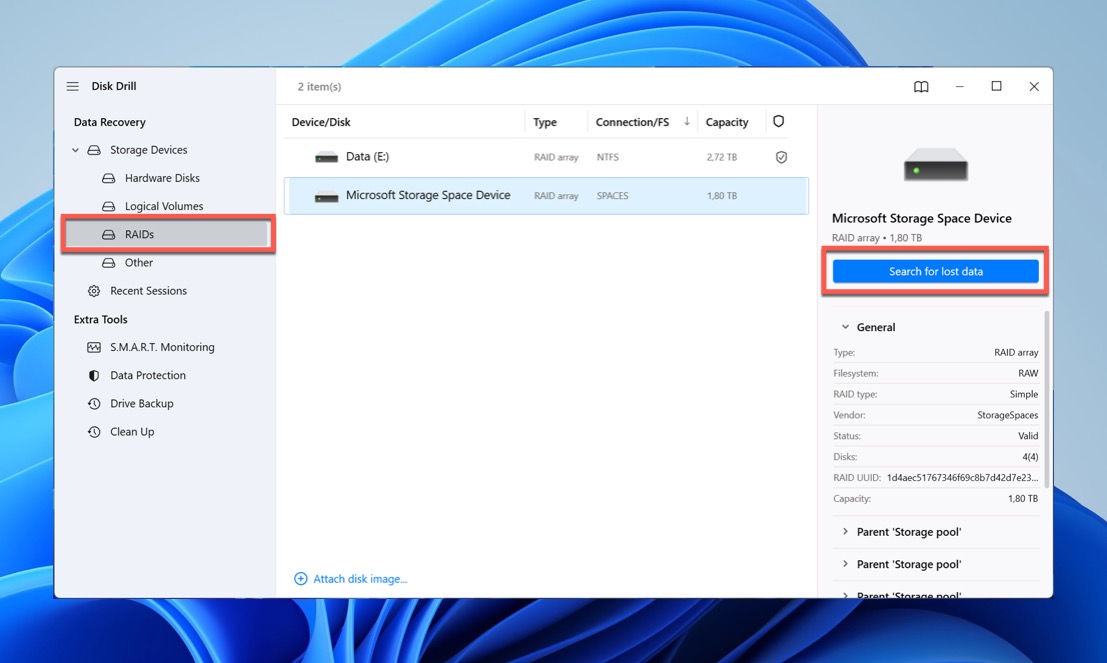
- Launch Disk Drill and scan your Storage Spaces pool. First, navigate to the RAIDs tab found under Storage Devices. Here, it’s essential that you select the entire Storage Spaces pool, not just a single drive. This is crucial due to the way data copies are distributed across the entire pool. Once selected, you can start scanning by clicking the “Search for lost data” button.
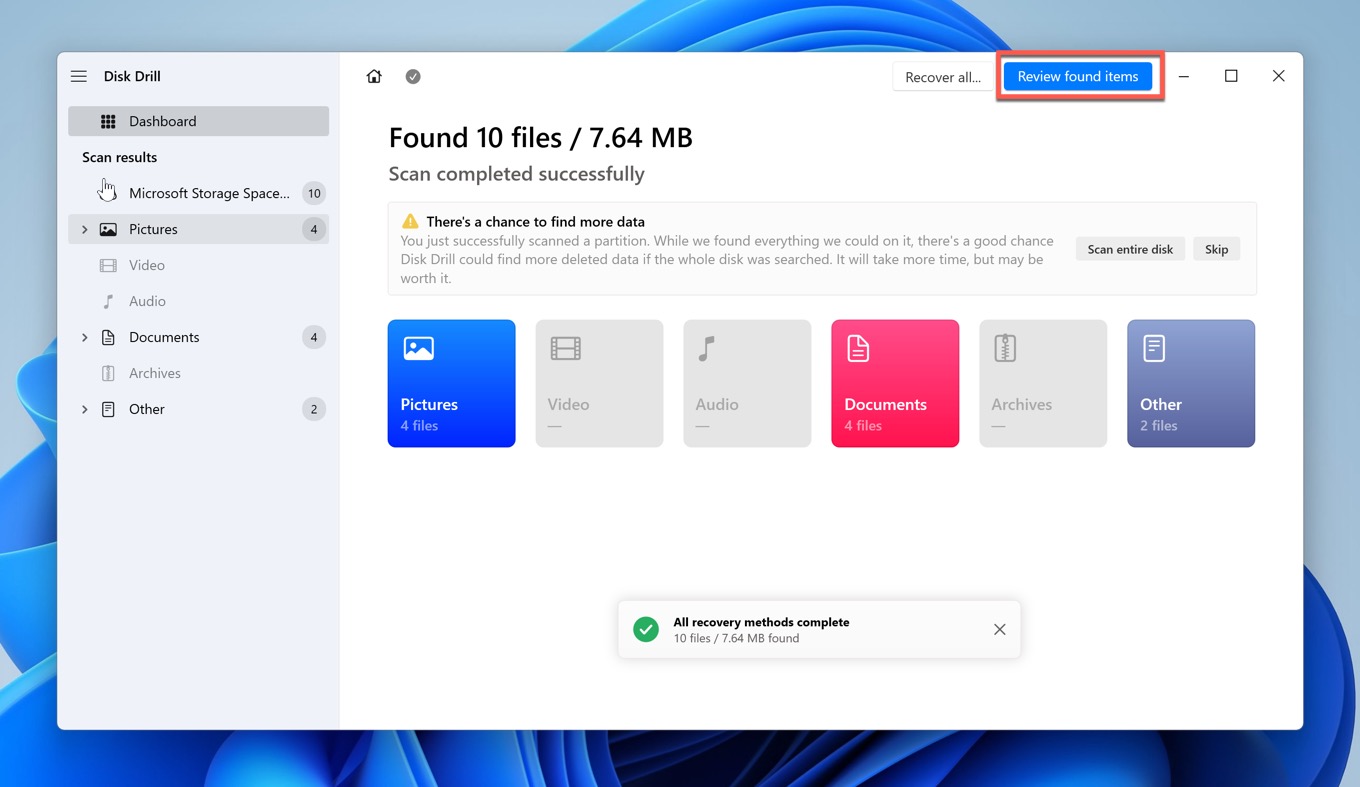
- Review found items. It can take a long time to scan a Storage Spaces pool, so we recommend you click the “Review found items” button right away to see scan results in real time.
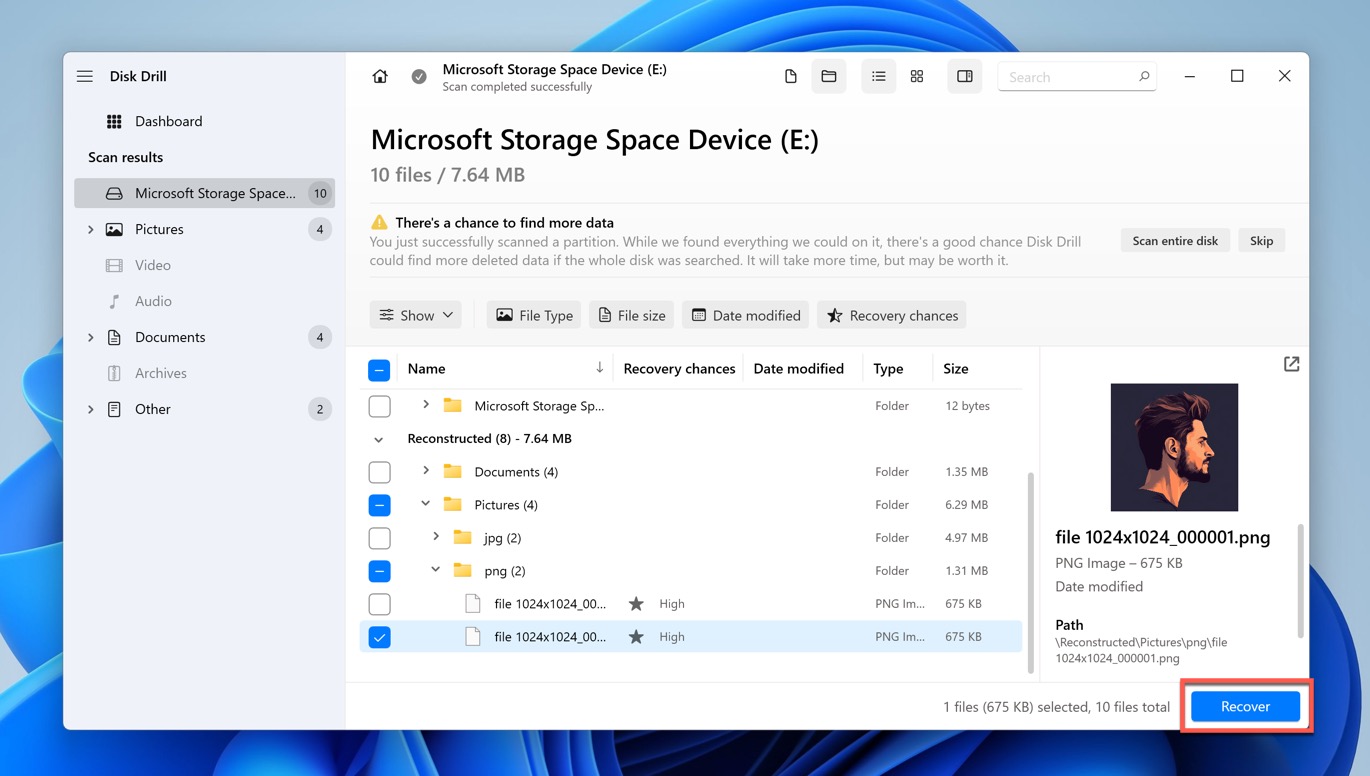
- Select missing files. Assuming you don’t want to recover every single file, you should take advantage of Disk Drill’s filters, search bar, and preview feature to find & select what you’re looking for.
- Recover data from Microsoft Storage Spaces. Finally, with your missing files selected, you can click the “Recover” button and choose a save location that’s different from the source drive to prevent any accidental data overwriting.
Note: Disk Drill is also one of the best RAID data recovery solutions on the market, so don’t hesitate to utilize it even if you’re dealing with complex RAID configurations in addition to Storage Spaces.
Troubleshooting Microsoft Storage Spaces Issues
There are many Microsoft Storage Spaces errors that can sour your user experience.
Before we introduce the methods for addressing them, let’s take a look at the following overview to provide a starting point for understanding what we’re dealing with:
- Drive or storage space issues: This error might occur when you’ve disconnected and reconnected the drive(s) from the storage pool.
- Inaccessible; reconnect drives or check the Physical drives section: A fairly common Storage Spaces error that usually happens when there are changes in the pool configuration.
- Reduced resiliency: Triggered when one or more drives belonging to the redundant spaces (mirror or parity) have failed.
- No capacity; add N drives: Typically encountered when available disk space has been exhausted.
- Disconnected; reconnect drive: This error message indicates a connection problem with a drive.
- Stale; enable pool: Indicates that there might be a problem with the storage pool.
- Unrecognized configuration; reset drive: This error suggests that the Storage Spaces metadata may be damaged.
- No Redundancy Operational Status: This can happen when a Storage Spaces drive has failed.
The good news is that these and other similar issues can often be fixed using the below-described methods.
Method 1: Ensure that All Drives are Correctly Recognized by the System
One of the first steps in troubleshooting Storage Spaces issues is to verify that your system properly recognizes all the drives that contribute to the Storage Spaces pool.
If Windows 10 or Windows 11 doesn’t recognize any of your drives, you won’t be able to access the data stored within your Storage Spaces configuration.
Here are the steps to ensure all drives are correctly recognized by your system:
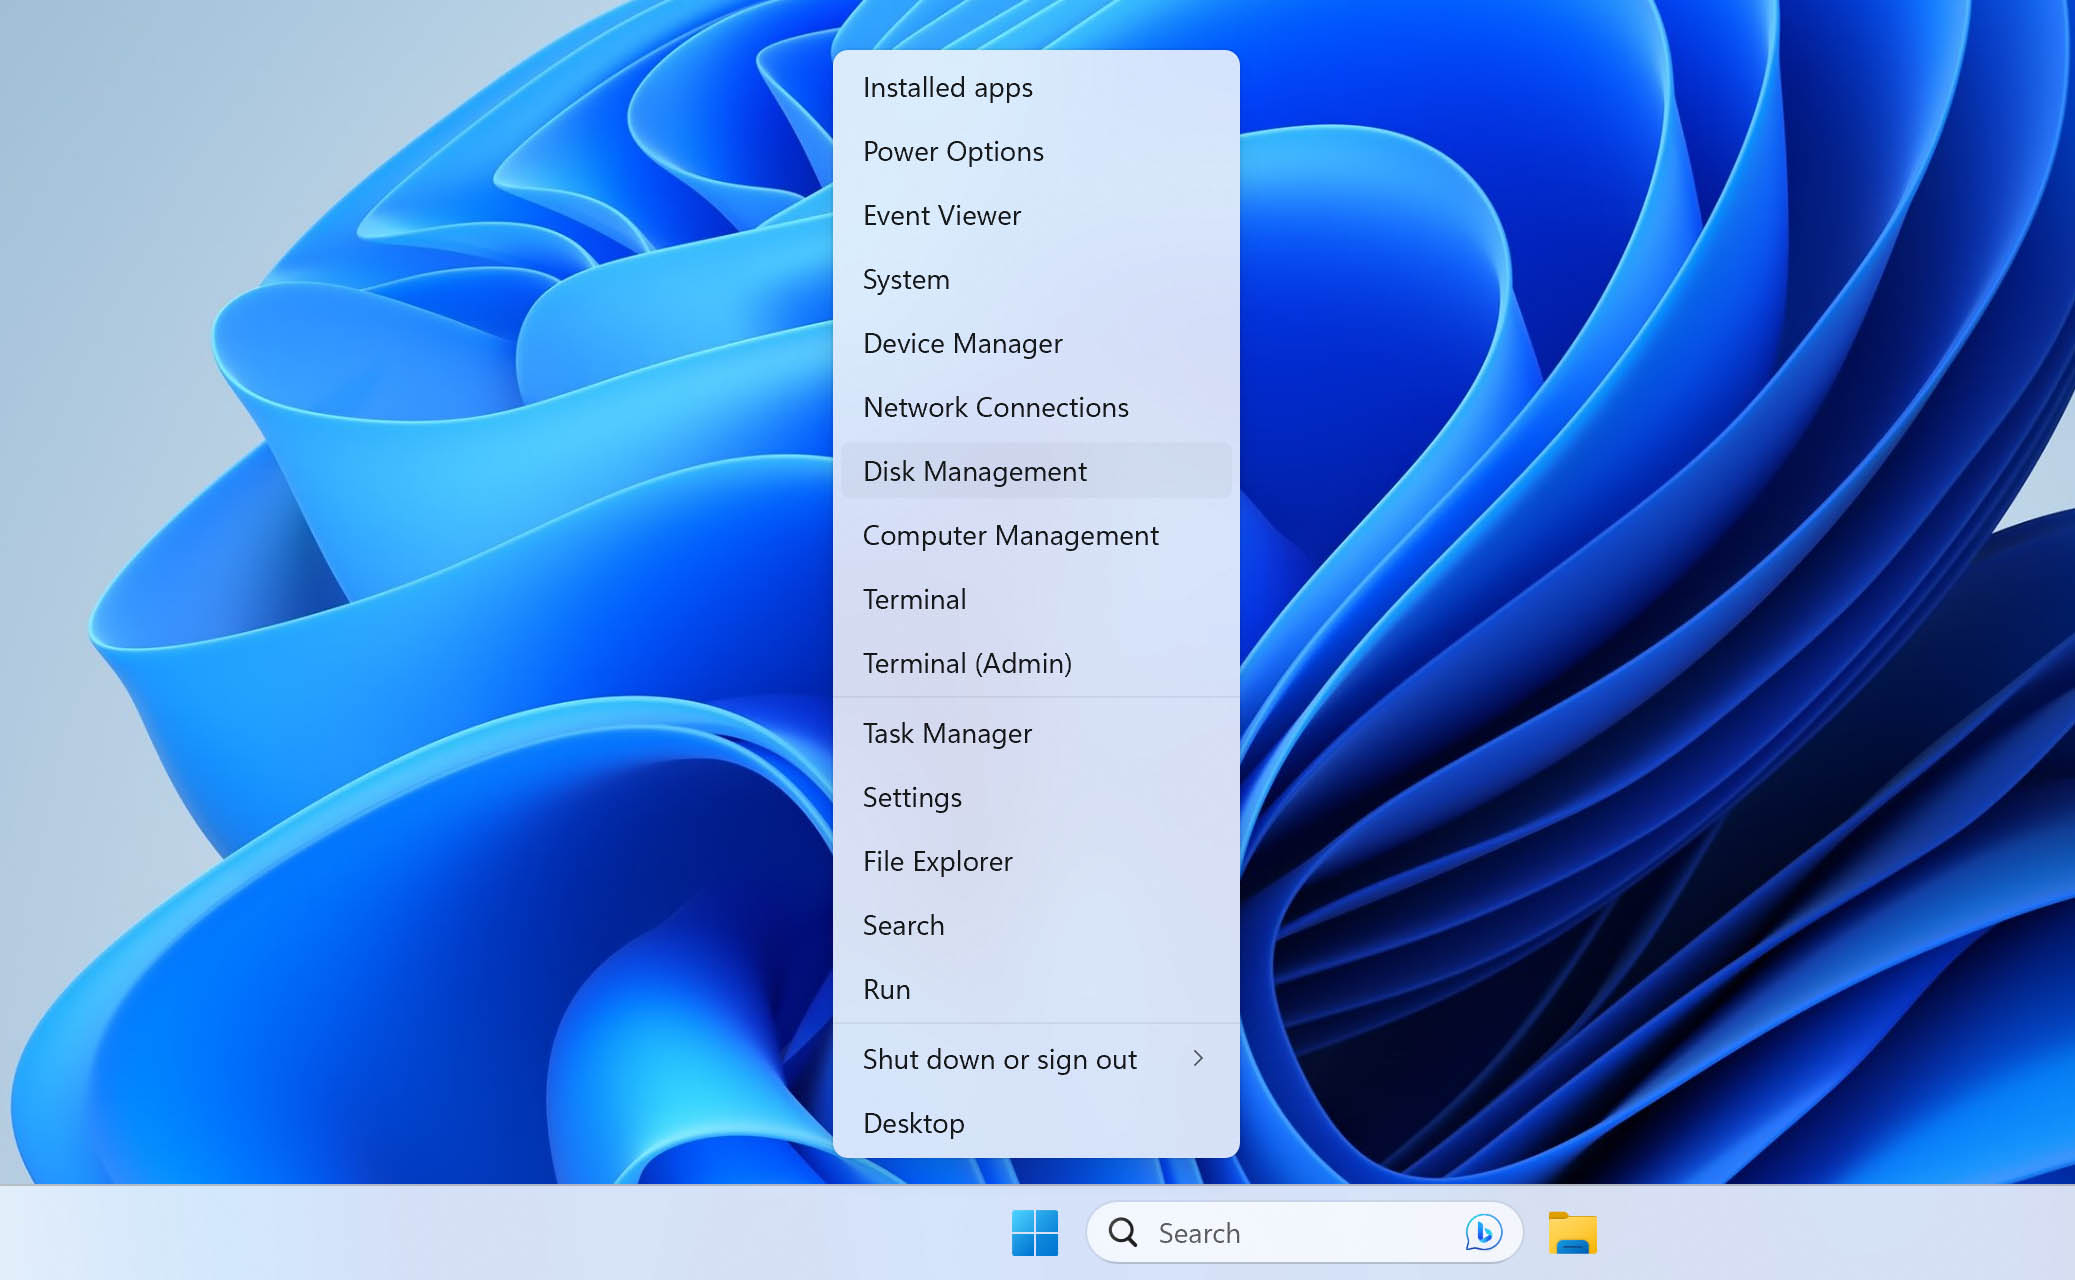
- Press Win + X on your keyboard.
- Select Disk Management from the menu.
- Look for your Storage Spaces drives.
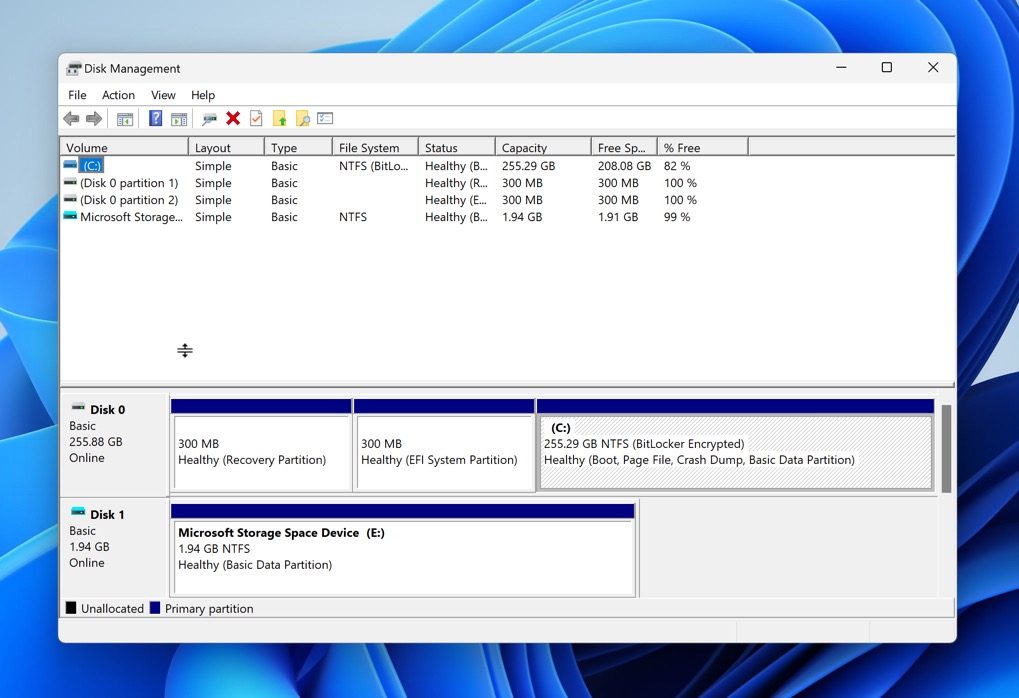
Your Storage Spaces drives should be listed in the Disk Management tool and not appear as “Not Initialized,” which is a clear sign that something is wrong with it.
Tip: We have an entire article dedicated to the issue of how to recover data from uninitialized disks, so feel free to read it if you would like to know everything there is to know about the topic.
Method 2: Reconnect All Drives Used in Storage Spaces
If one or more of your Storage Spaces drives isn’t recognized, then the simplest solution you can try is to reconnect all drives. Why all? Because it can be difficult to determine where the problem really is, so it’s easiest to perform what can be called a “mechanical restart” to rule out problems with loose cables and so on.
Here’s how to reconnect all drives to repair Storage Spaces:
- Shut down your computer.
- Physically disconnect all Storage Spaces drives from the computer.

- Reconnect all Storage Spaces drives to the computer.
- Power on your computer.
- Check the status of your drives by following the instructions provided in Method 1.
Tip: If you’re still experiencing issues after following these steps, it might be beneficial to try using different cables for the connections. Over time, cables can become faulty due to wear and tear or accidental damage, and this can cause the drives to be unrecognized.
Method 3: Use the Event Viewer to Pinpoint the Issue
When you’ve tried reconnecting drives, changing cables, and yet your Storage Spaces issues persist, it’s time to dig deeper into what could be causing these problems.
Windows has a built-in tool for just this kind of detective work: Event Viewer. It’s a powerful utility that can provide crucial insights into errors related to drives and storage failure. Because Event Viewer logs hundreds, if not thousands, of events every day, it can be difficult to find what you’re looking for, but we’re here to help you with that.
Follow these steps to pinpoint the cause of your Storage Spaces issues using Event Viewer:
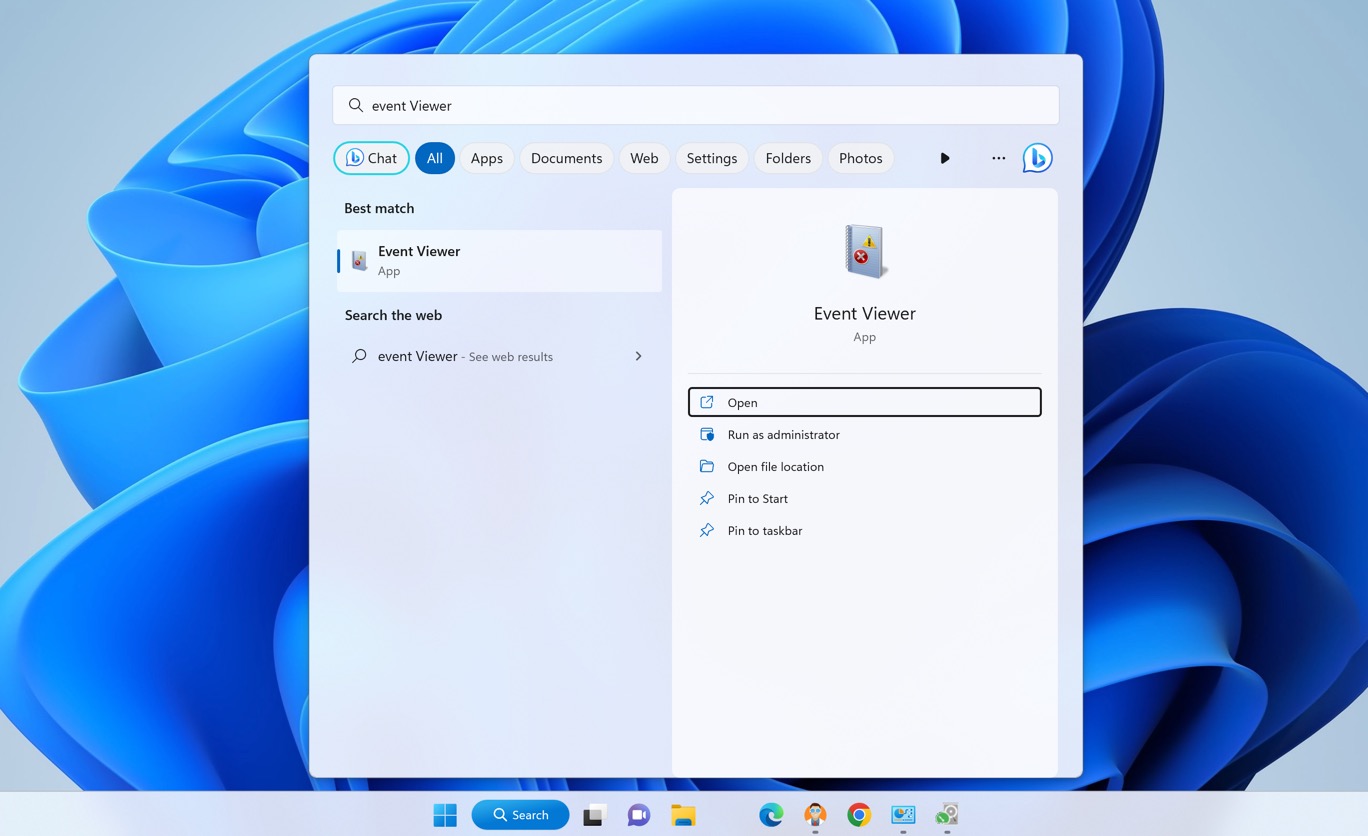
- Open the Start menu and type “Event Viewer.” Select the relevant search result.
- Navigate to Applications and Services Logs > Microsoft > Windows.
- Go through the “StorageSpaces-XYZ” folders. The “StorageSpaces-Driver” folder is especially important because it contains driver-related events.
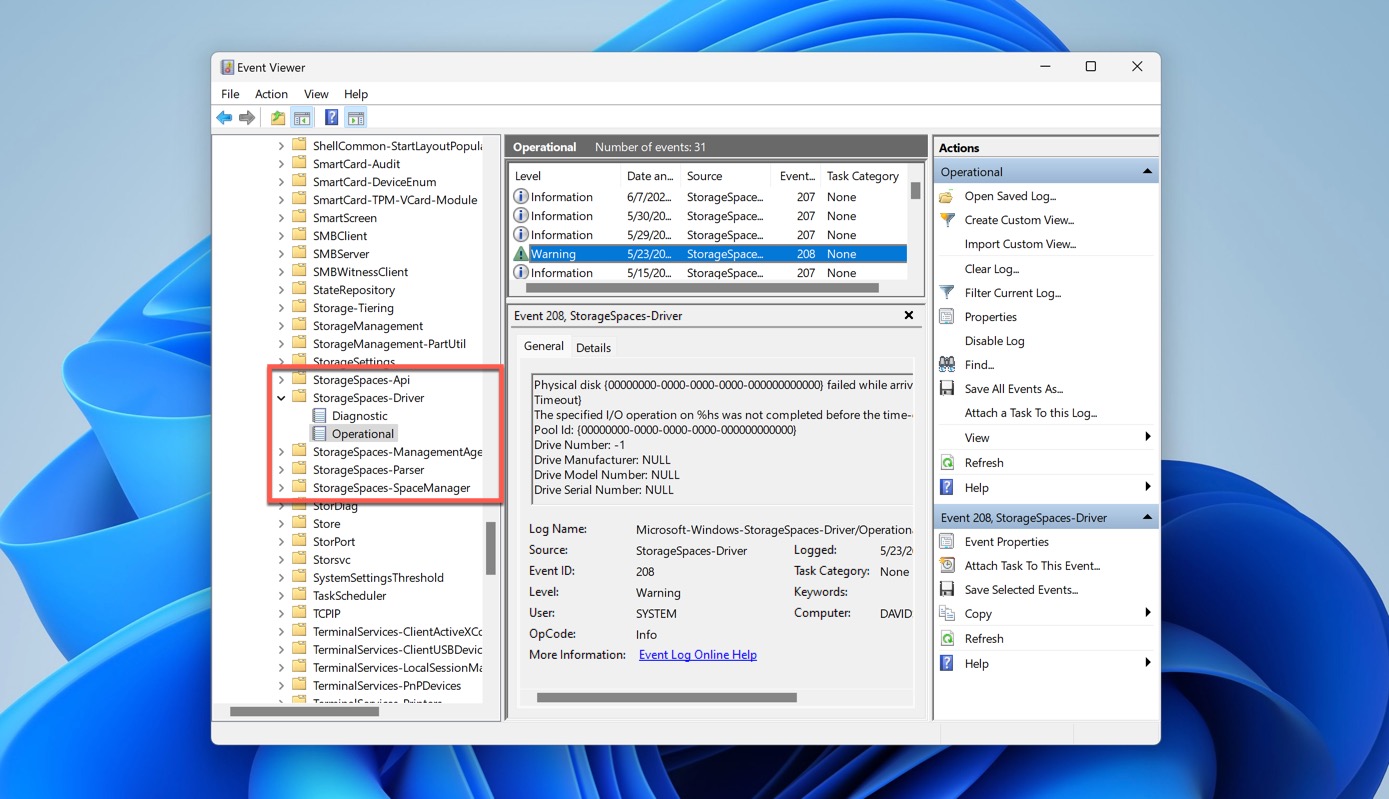
- Analyze the recorded events and pay attention to warnings and errors.
- Consult this article or Google for information on how to address any issues you find.
Method 4: Perform Diagnostics on the Hard Drives
Modern hard drives support Self-Monitoring, Analysis, and Reporting Technology (S.M.A.R.T.), a feature that allows you to check hard drive health in real time.
If you’ve been dealing with hard drive reliability issues, experiencing various slowdowns and even data transfer errors, then we highly recommend you use a free software tool that supports S.M.A.R.T. monitoring to see a comprehensive overview of your hard drive’s status.
The Storage Spaces recovery tool we recommended earlier, Disk Drill, comes with free S.M.A.R.T. monitoring capabilities, so it makes sense to use it.
Here’s how to check S.M.A.R.T. data using Disk Drill:
- Download and install Disk Drill.
- Launch the application and choose the S.M.A.R.T. Monitoring tool from the left pane.
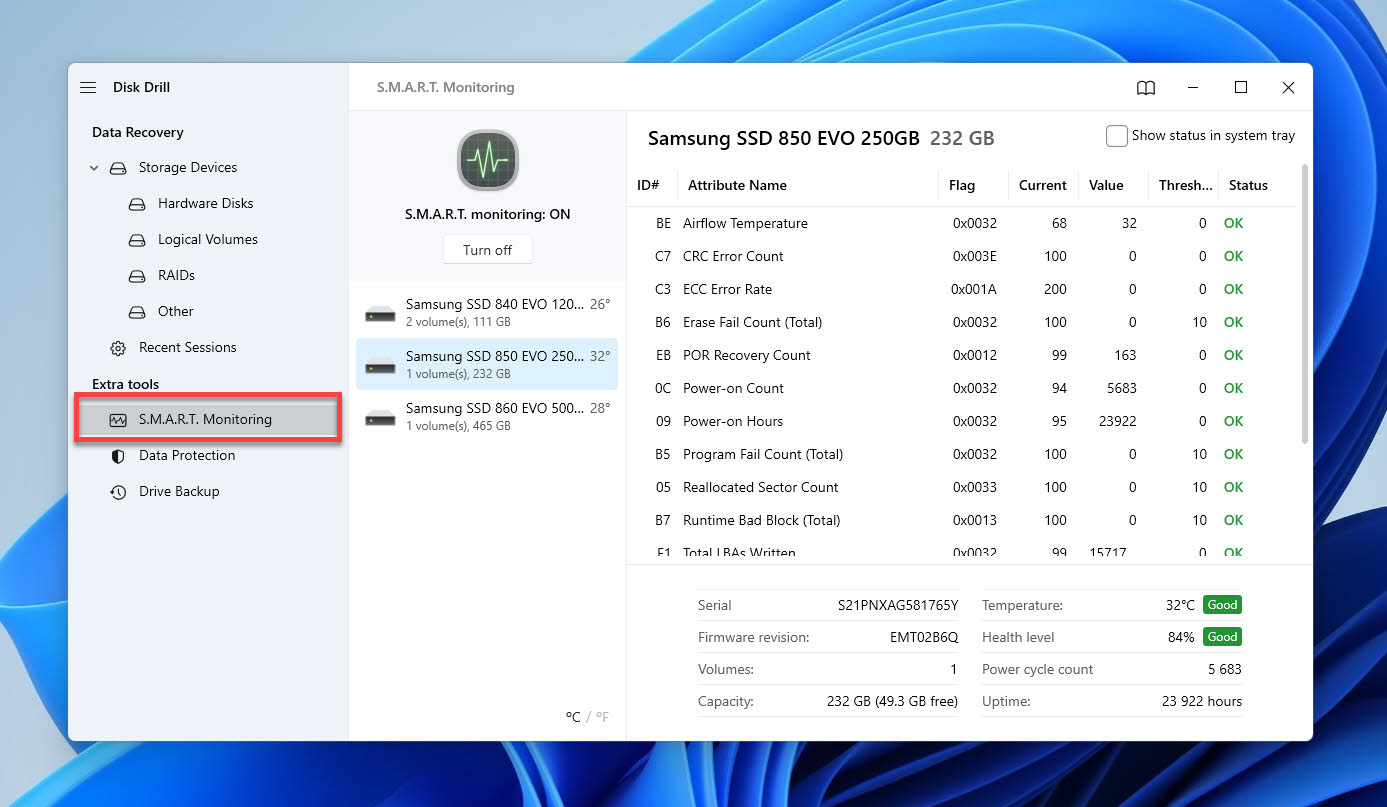
- Enable the feature for each of your Storage Spaces drives.
- Check S.M.A.R.T. value and look for anything alarming.
- Decide if the hard drive is healthy and replace it if it doesn’t.
Method 5: Repair Disk Errors With CMD (chkdsk)
Many disk errors Storage Spaces users may encounter can be resolved with the help of built-in Windows tools. One such built-in tool is the Command Prompt utility, which enables you to run a utility called chkdsk.
With chkdsk, short for check disk, you can scan your Storage Spaces drives for errors and attempts to fix them with a single command.
Here’s how to repair Storage Spaces using chkdsk:
- Open the Start menu and type “terminal.”
- Launch the Terminal app as an administrator.
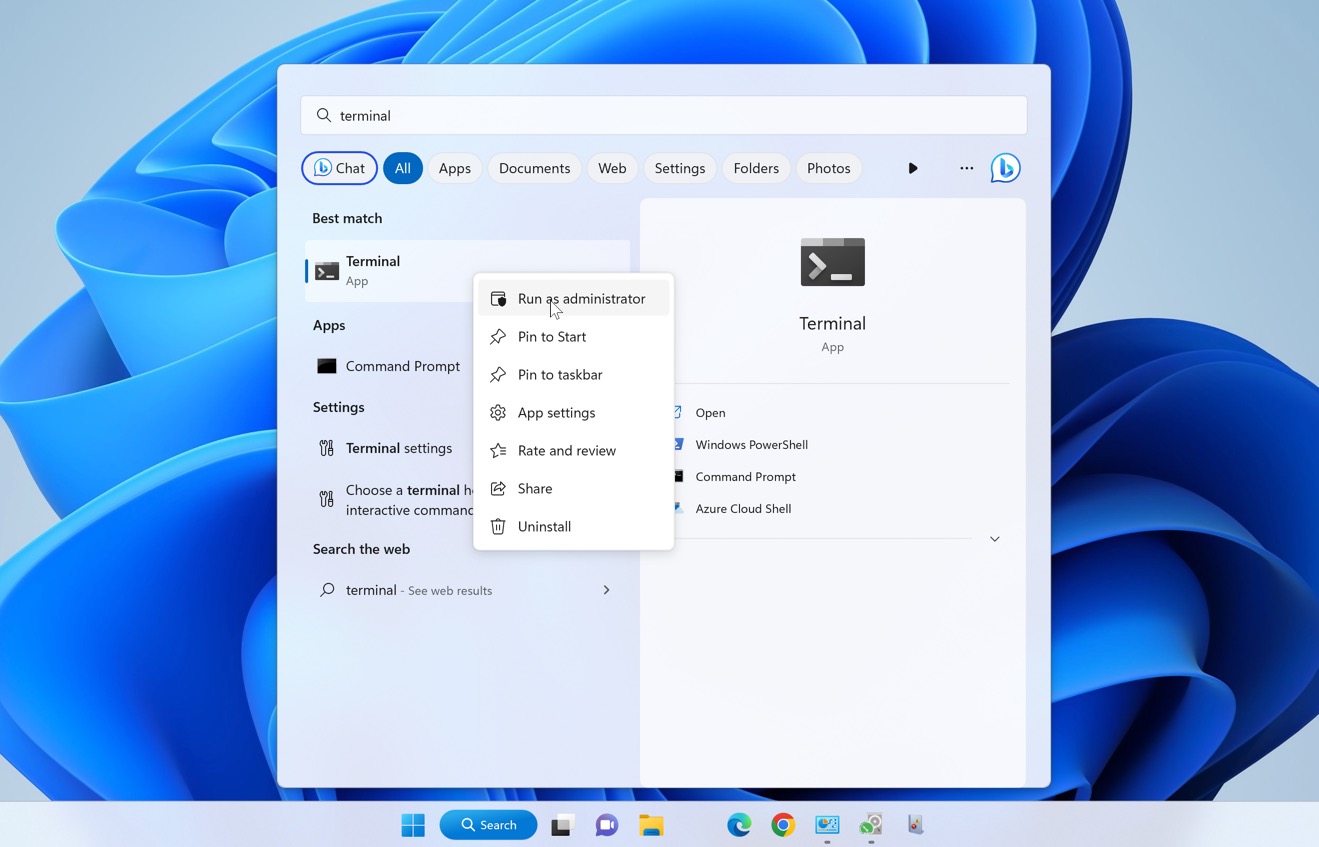
- Enter the following command and press Enter: chkdsk X: /f /r (replace “X with the drive letter assigned to one of your Storage Spaces drives”)
- Wait for chkdsk to complete its scan.
- Review the results of the scan.
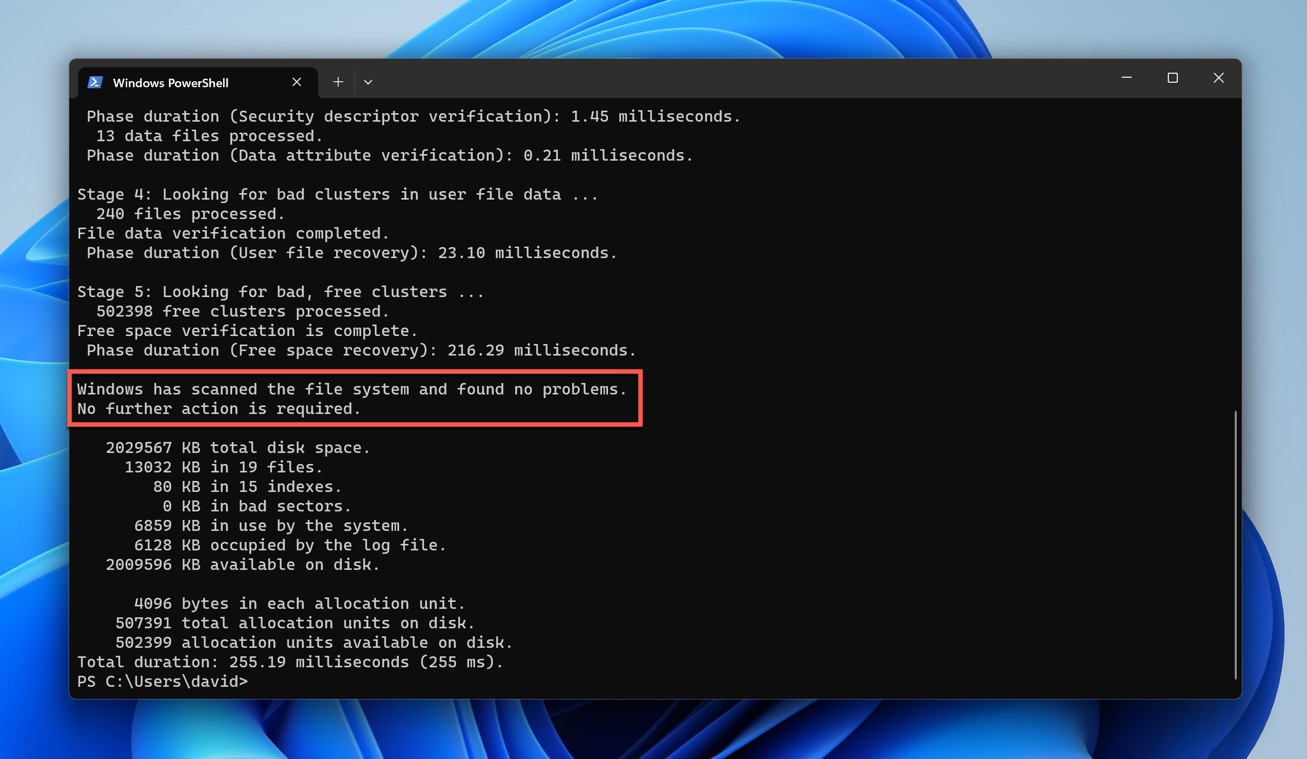
It’s also important to remember that while chkdsk can help fix a corrupted hard drive that belongs to your Storage Spaces pool, it won’t be able to recover lost data. That’s why it’s a good idea to first use Windows 11/Windows 10 Storage Spaces recovery software like Disk Drill.
FAQ
How do I recover data from a Storage Spaces pool?
To recover data from a Storage Spaces pool, you need to:
- Download and install Disk Drill, a reliable storage spaces recovery tool.
- Launch Disk Drill and make sure your drives are connected.
- Go to the RAIDs tab and scan your Storage Spaces pool.
- Select files for recovery.
- Click the “Recover” button and choose a destination.
How to repair Microsoft Storage Spaces?
You can often repair a Microsoft Storage Spaces pool using chkdsk, a command-line disk repair utility that’s included with the Windows operating system.
Can I recover Microsoft Storage Spaces using UFS Explorer?
Yes, you can recover Microsoft Storage Spaces using UFS Explorer, but you need to use the RAID version of the software.
Conclusion
Microsoft Storage Spaces is a useful feature in Windows 10 and Windows 11, and, if configured appropriately, it can be a lifesaver when facing a storage failure or drive failure. But, like any technology, it isn’t foolproof, and you can certainly encounter various hiccups or even experience data loss along the way. Hopefully, this article has equipped you with the right knowledge and tools to be ready to tackle any problems head-on and recover Storage Spaces.
This article was written by David Morelo, a Staff Writer at Handy Recovery Advisor. It was also verified for technical accuracy by Andrey Vasilyev, our editorial advisor.
Curious about our content creation process? Take a look at our Editor Guidelines.