We all use our Macs to store important videos—whether for personal moments, work projects, or entertainment. If you accidentally deleted a video or can’t locate it, you’ve come to the right place. Over the years, this article has helped several hundred people recover deleted videos on their Macs, and we keep it updated to make sure it stays relevant and helpful in the future. Now, we’ll show you the methods that work best, so you can restore your videos too.
We’ve tried to present this guide in a logical order, we’ll start with the simplest and most common solutions and work up to more advanced things. If you’ve already tried some of the earlier steps, feel free to skip ahead to the next ones.
Try to Find Deleted Videos on Your Mac
When videos disappear from your Mac, the first place to check is the Trash—but you probably already know that. Just as a quick reminder, you can open the Trash from your Dock. If you spot your deleted videos there, simply right-click and select Put Back to restore them to their original location. Since you’ve likely already checked, let’s move on to another possible spot: the Photos Library.
Look in the Recently Deleted folder in Photos:
- Open the Photos app from your Dock or Applications folder.
- Scroll down the sidebar and select Recently Deleted.
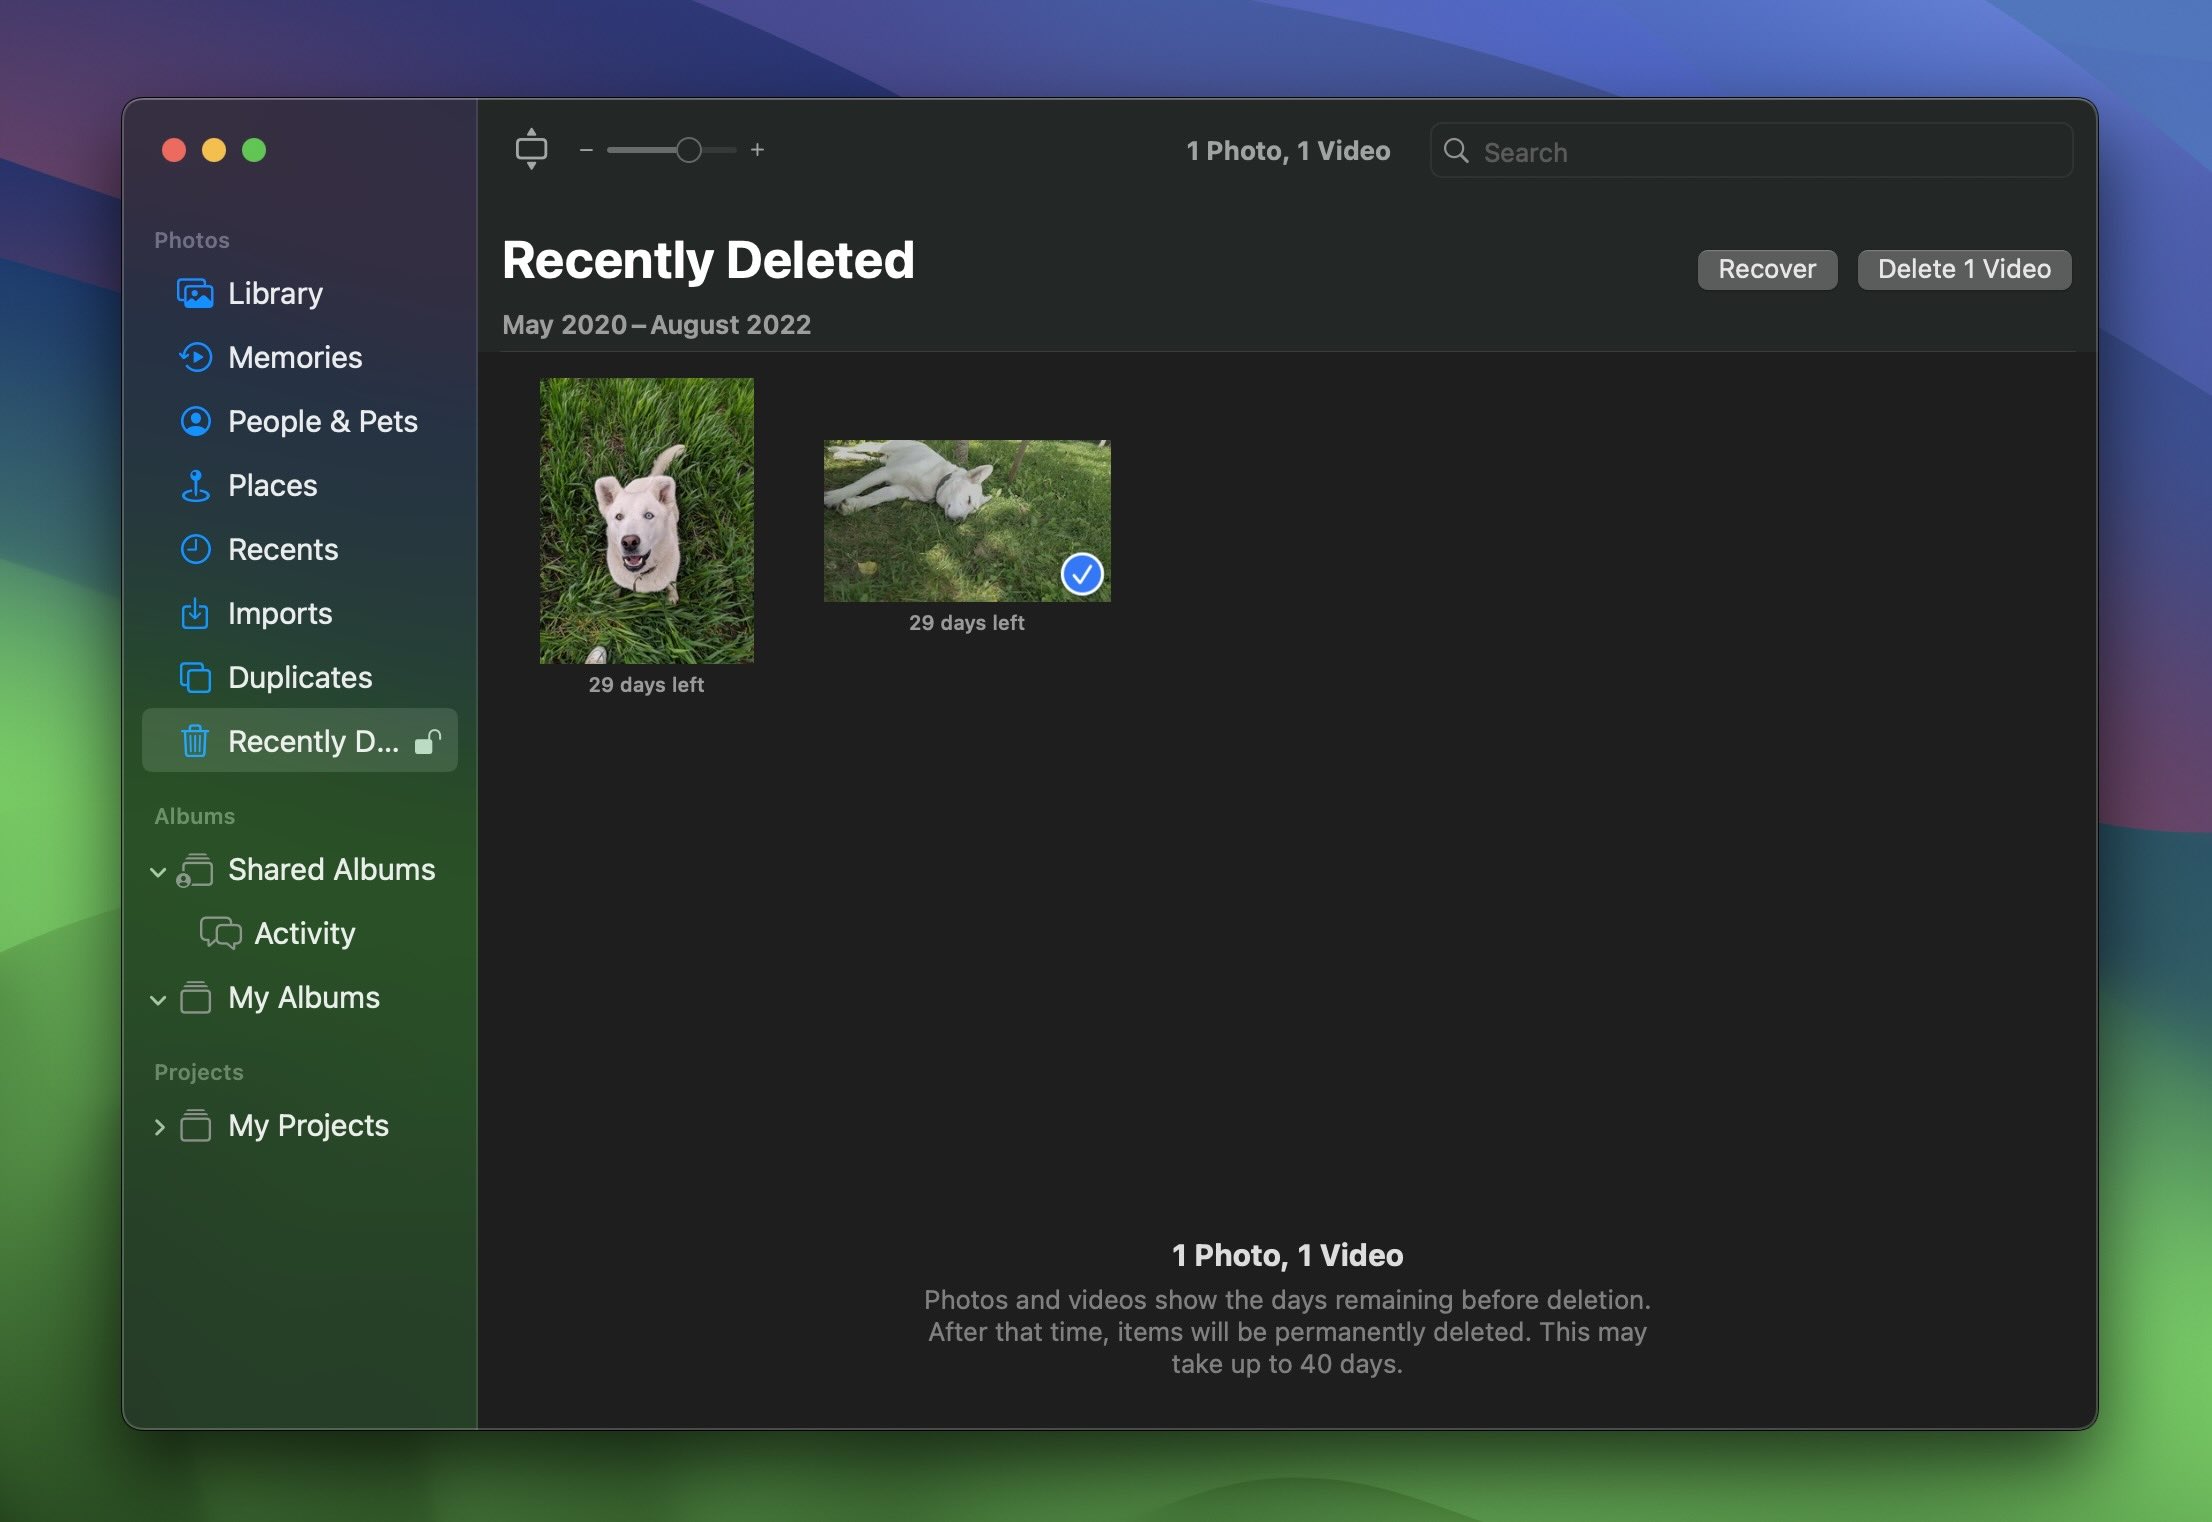
- Look for your missing video. The folder shows a countdown of days remaining before permanent deletion, which can be up to 40 days. However, in reality, they are stored for 30 days.
- If you find the video, select it and click Recover at the top-right corner. This moves the file back to your main Library.
If you don’t see your videos in the Library, it doesn’t always mean they’re deleted. They might still be on your Mac but saved in an unexpected location. You can try Finder to search your entire Mac for video files:
- Open Finder from the Dock.

- Press Command + F to bring up the search bar.
- Set the search to This Mac so it scans your entire system.
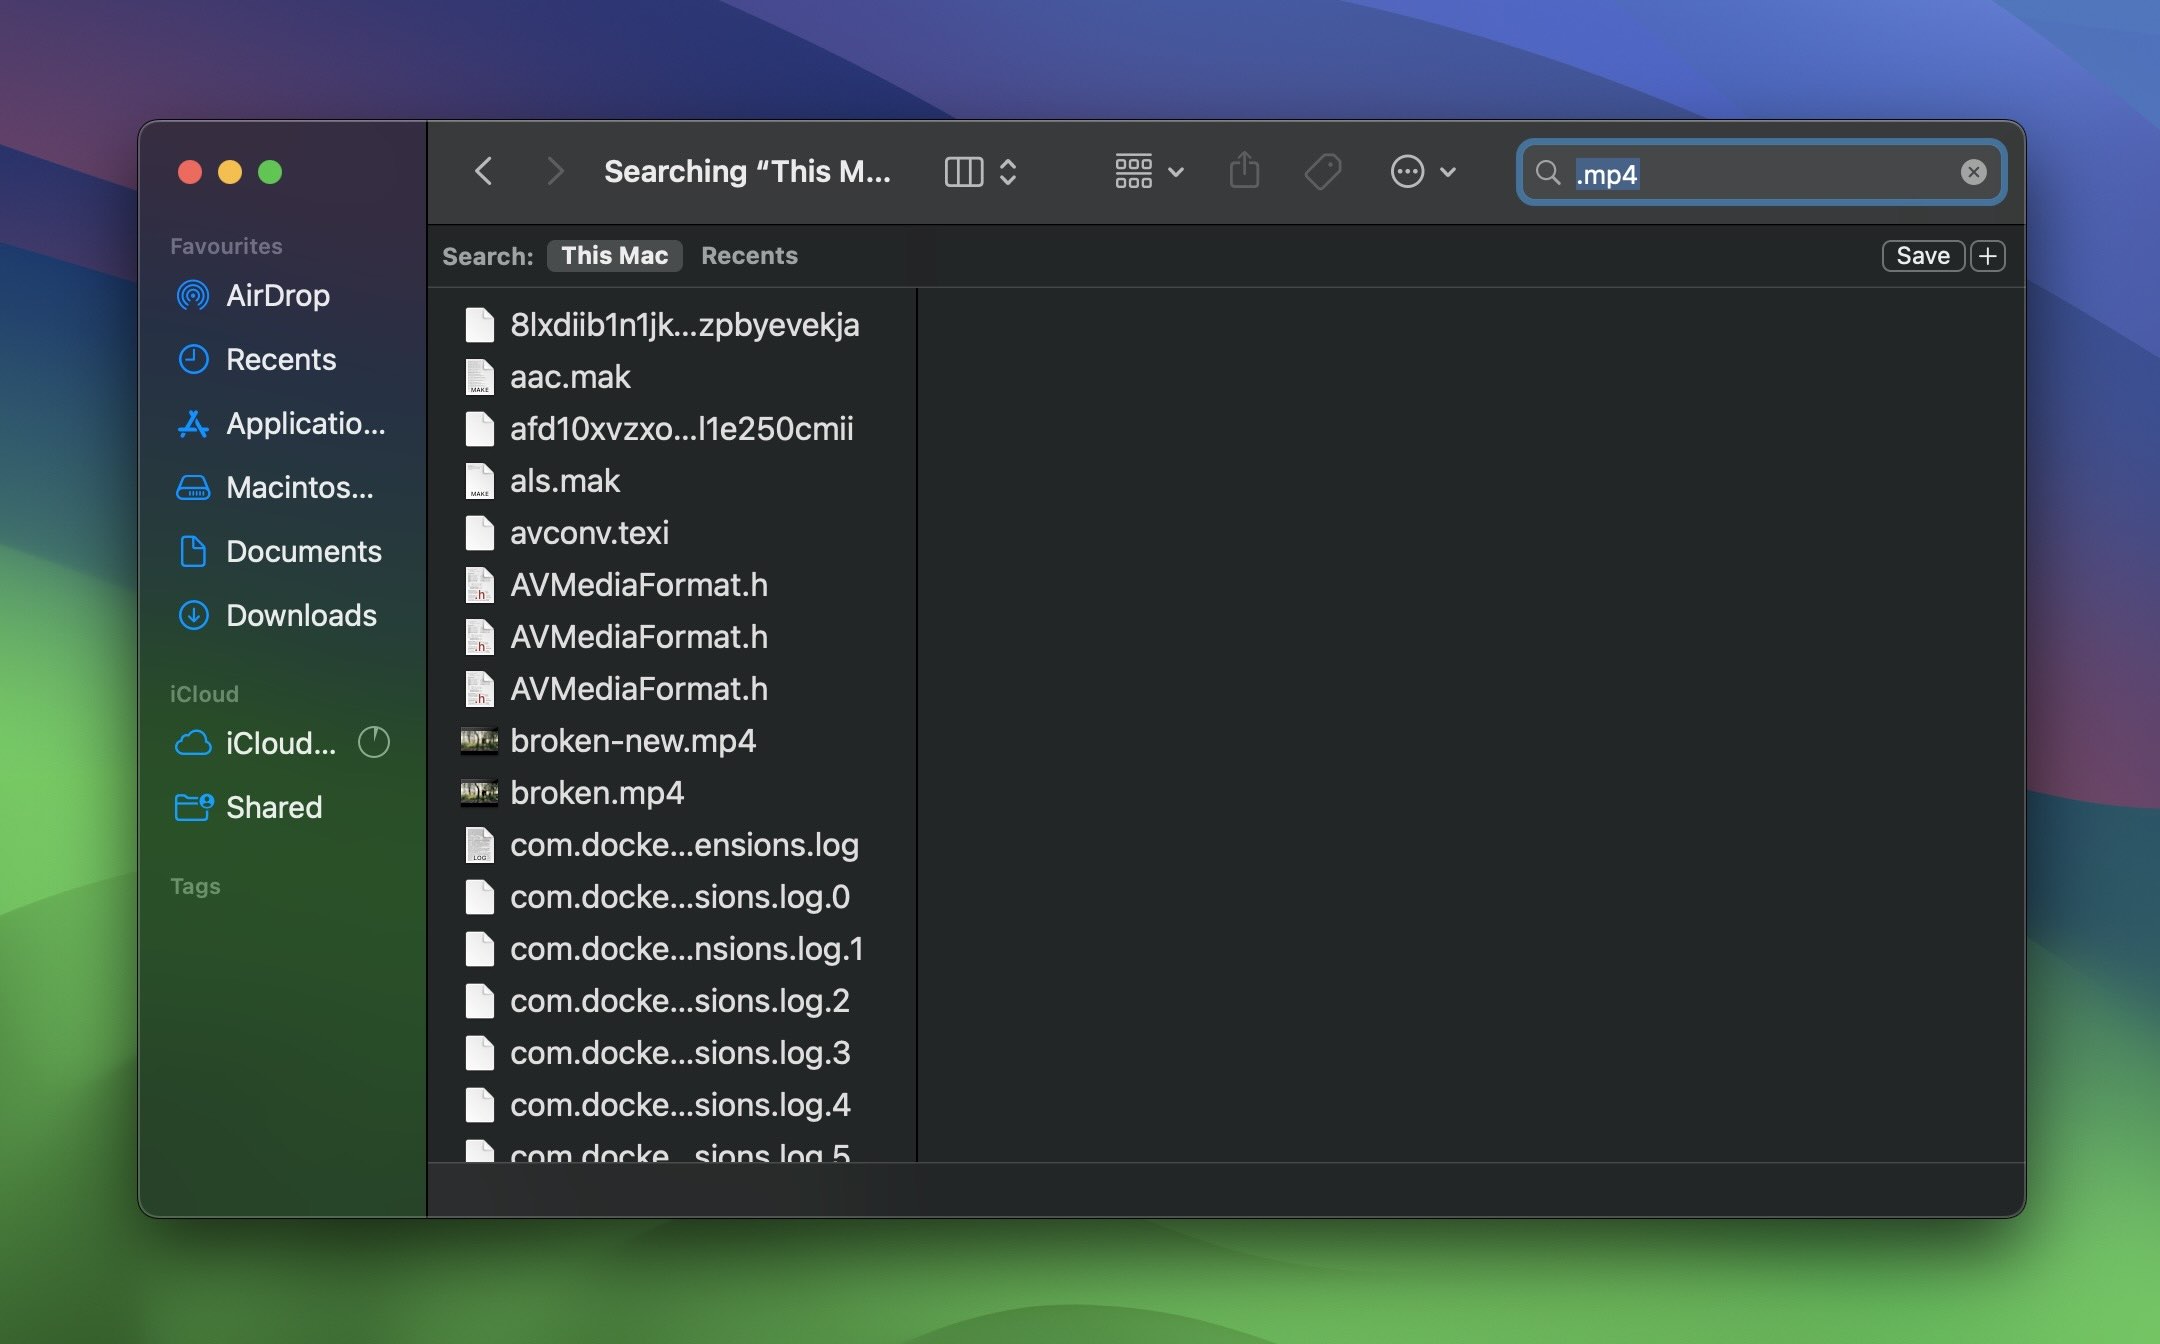
- Type the video’s name, file type (like MP4 or MOV), or just “video” in the search bar.
- Look through the results. If you find your video, right-click on it and choose Show in Enclosing Folder to see where it’s saved.
Got Nothing? Check Your Backups and Snapshots
If you couldn’t find your video in the Trash, Photos Library, or Finder, that’s okay. The next stop is backups. macOS offers built-in options like Time Machine and iCloud, and if you use third-party services like Google Drive or Dropbox, they can help too. But here’s the catch—they only work if they were set up before you lost your videos.
If you’re sure you don’t have backups running on your Mac, feel free to skip this section and jump to Still Nothing? Recover Permanently Deleted Videos Using Mac Data Recovery Software.
If there’s a chance backups were active, here’s what to do next.
Option A: Time Machine
Time Machine is Apple’s built-in backup tool and one of the easiest ways to recover deleted videos on a Mac—if it’s been set up beforehand. Time Machine creates regular backups of your system, and that includes all your files, so you can go “back in time” to recover what was deleted.
Here are the steps you need to follow to recover deleted videos on Mac using Time Machine:
- Connect your Time Machine backup drive to your Mac. If you don’t have the drive with you, don’t worry—Time Machine keeps local snapshots on your Mac. These are one-day snapshots, so if your videos were deleted recently, they might still be in one of these snapshots.
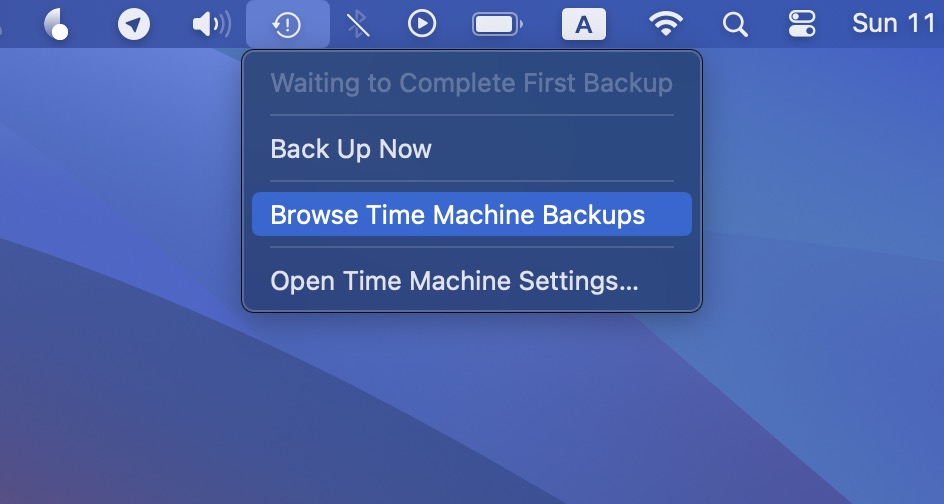
- Click the Time Machine icon in the menu bar. Select Browse Time Machine Backups to start looking through your saved versions.
- On the right side of the screen, you’ll see a timeline with different dates. Pick a date before the video was deleted. This lets you see your files as they were on that day.
- Navigate to the folder where your video was stored. If you remember the file name or type (like MP4 or MOV), use the search bar to narrow down your options.

- You can press the spacebar to open Quick Look to preview it.
- Select the video and click Restore. Time Machine will return the file to its original location on your Mac.
You can restore videos to a different location in Time Machine. Just hold the Option key and select Restore To… This lets you pick a specific folder for the restored file.
Option B: Cloud Backups
Another backup option is cloud storage services like iCloud, Google Drive, Google Photos, and Dropbox. These platforms can be lifesavers if you’ve been syncing your videos, as they often keep deleted files for a limited time in a Trash or Recently Deleted folder.
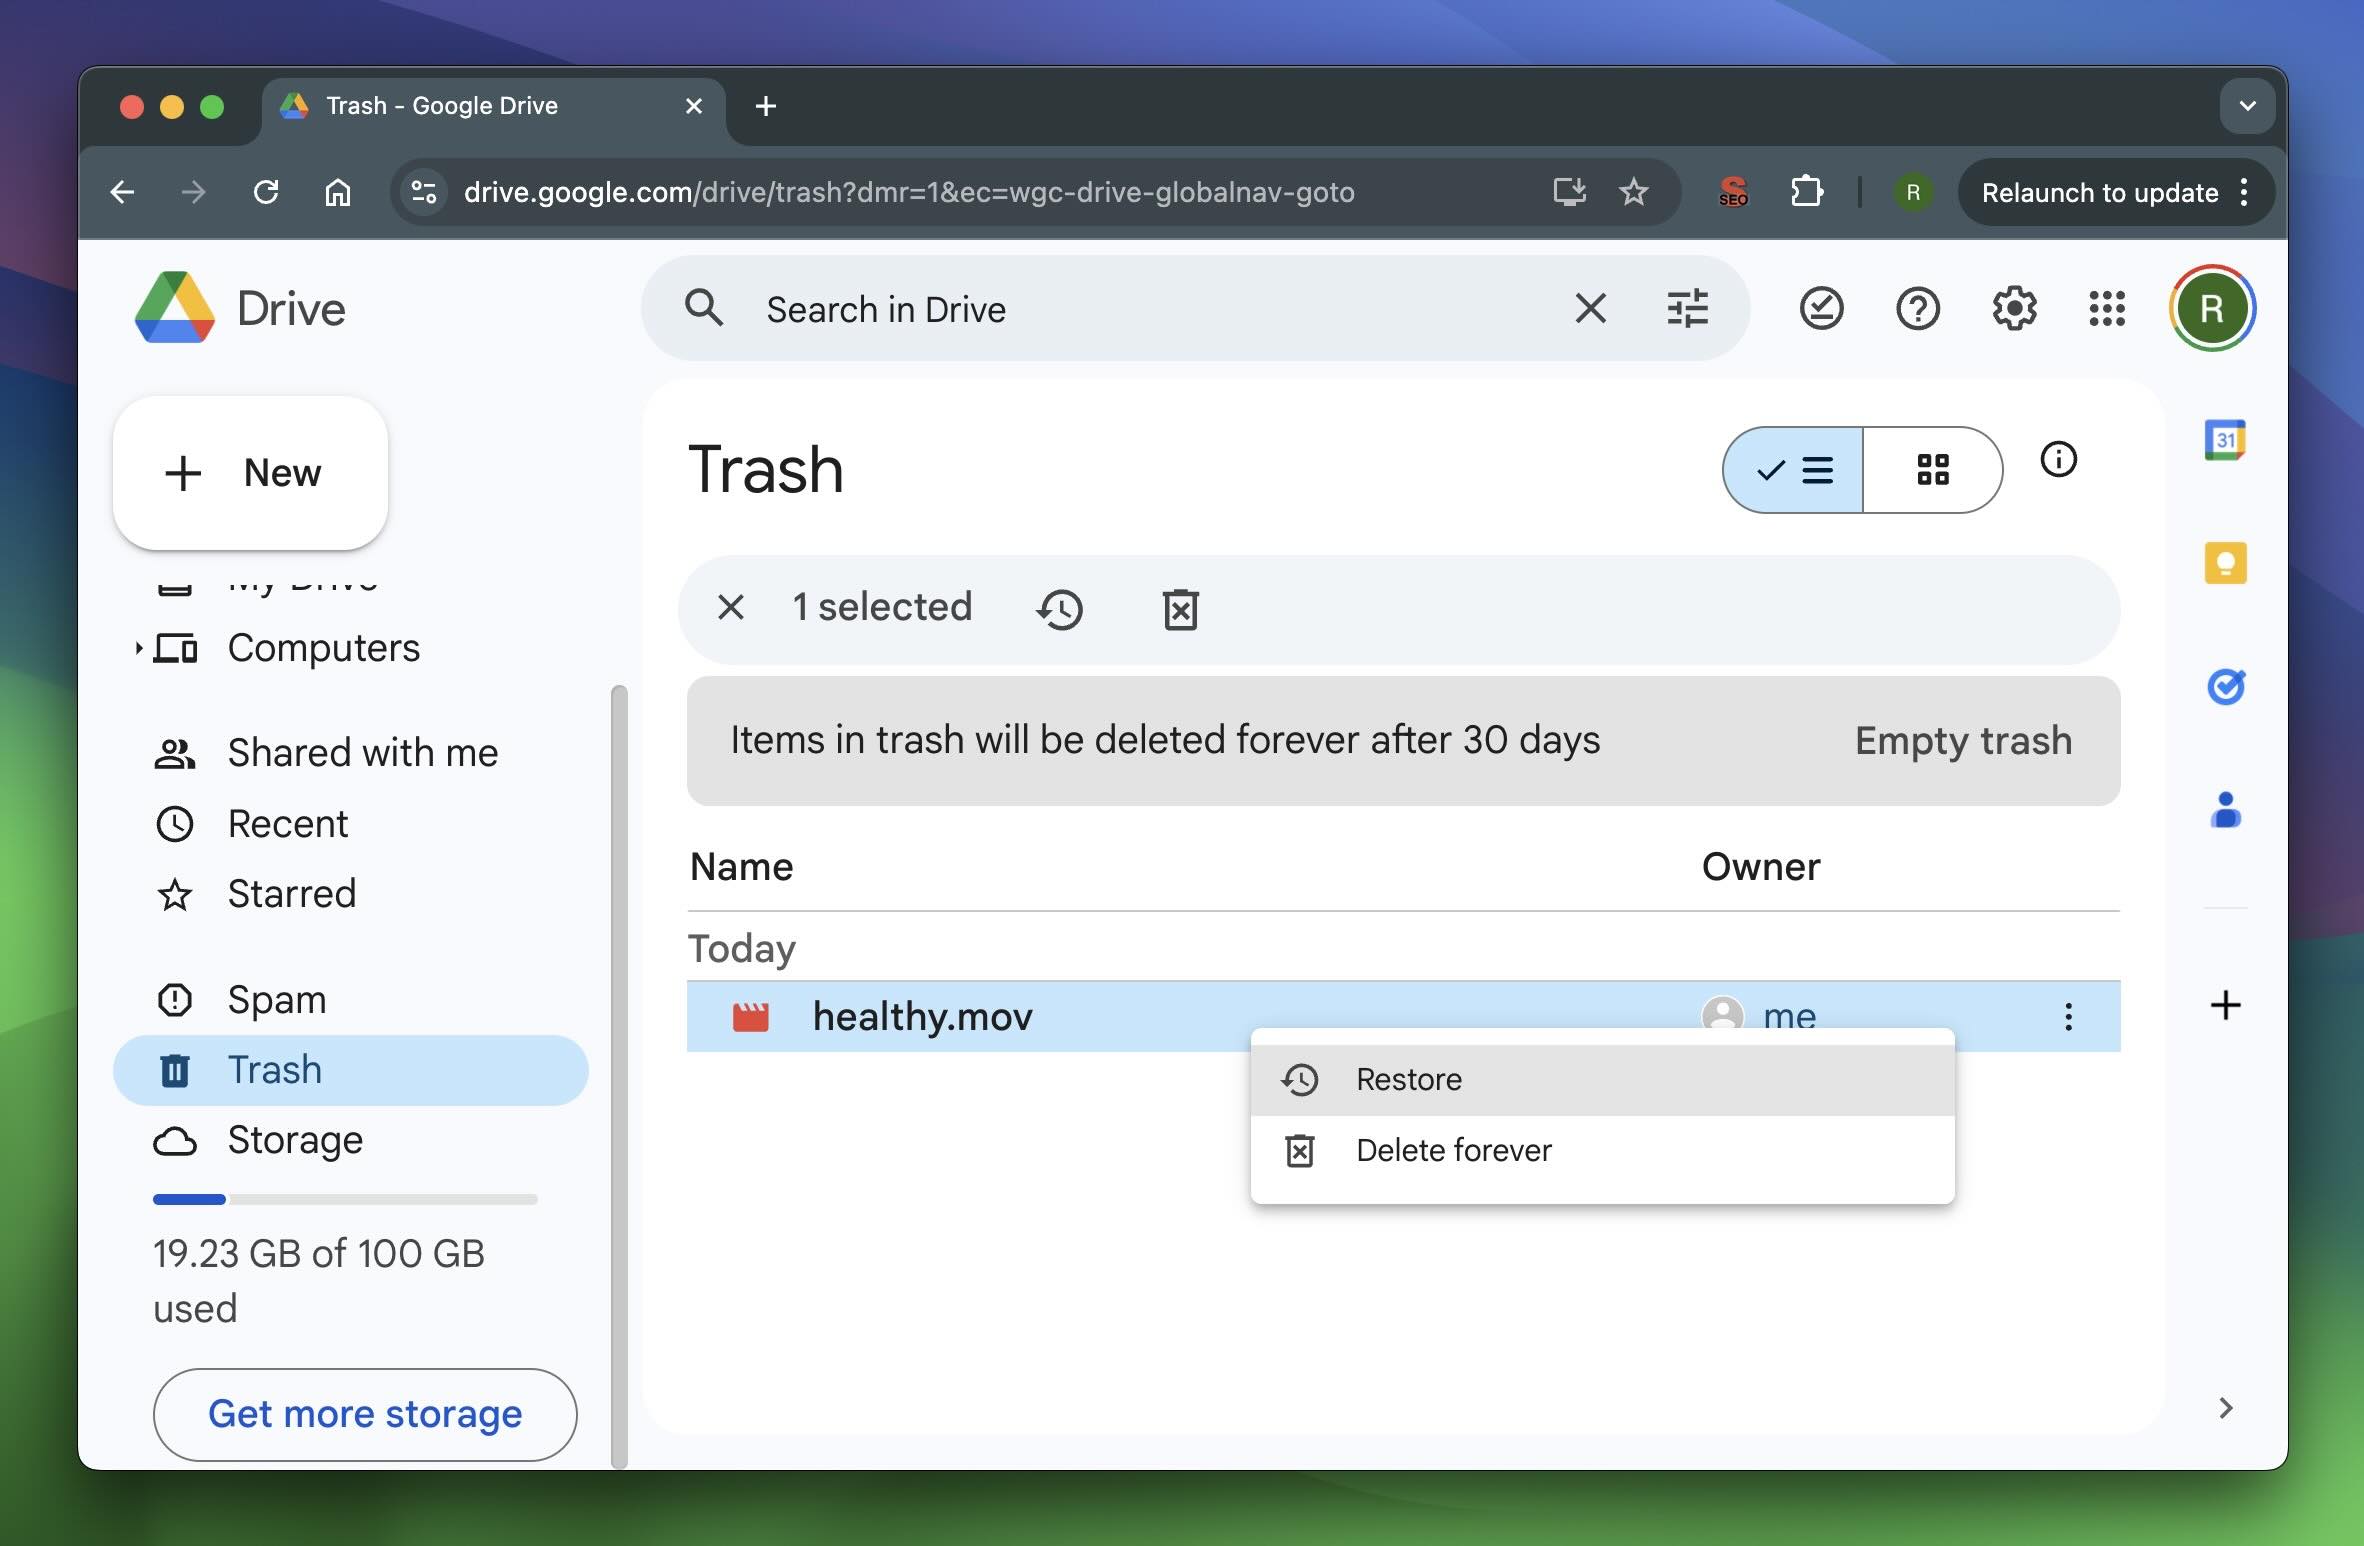
Important to know. Different cloud services handle file deletion in distinct ways. For instance, iCloud synchronization links your Mac’s Trash and iCloud’s Recently Deleted folder, so deleting a file from your Mac’s Trash also removes it from iCloud. On the other hand, Google Drive desynchronizes files when they are deleted; this means the file may no longer appear in your Mac’s Trash but will still be available in Google Drive’s Trash. As a result, the Google Drive cloud service might be more useful in cases like this than iCloud.
Here’s how to recover deleted videos from cloud backups:
- Open the cloud storage app on your Mac or log in through a browser. Make sure you’re using the same account that’s linked to your Mac.
- Use the search bar to look for your video by name, file type (like MP4 or MOV), or date. If you’re unsure, browse through the folders where you normally save or sync your videos.
- Most cloud services keep deleted files for some time:
- iCloud: Go to iCloud.com and check the Recently Deleted folder in Photos or iCloud Drive.
- Google Drive/Photos: Open the Trash folder in the left-hand menu.
- Dropbox: Check the Deleted Files section under Files.
- If you find the video, select it and click Restore (or the equivalent option). The file will go back to its original cloud location, where you can download it to your Mac.
- Right-click the file in the cloud folder and select Download or a similar option.
Most cloud services work in similar ways. The features might have different names, but the overall process—search, check the deleted files folder, restore, and download—remains the same. However, there are some differences in how long each service keeps deleted files. Here’s a quick overview:
Service |
Deleted Files Retention Period |
iCloud |
Files stay in the Recently Deleted folder for 30 days. |
Google Photos |
Backed-up photos/videos stay in Trash for 60 days, unbacked files stay for 30 days. |
Google Drive |
Deleted files remain in Trash for 30 days. |
Dropbox |
30 days for free accounts, and 180 days for Professional and team plans. |
Still Nothing? Recover Permanently Deleted Videos Using Mac Data Recovery Software
As a Mac user, you can choose from multiple data recovery software applications to recover permanently deleted videos. For the purposes of this article, we will focus on one commercial solution (Disk Drill) and one free solution (PhotoRec). Each of the two applications can reliably recover permanently deleted video files, but they provide a vastly different user experience and features.
You should be aware that if your deleted files were on an SSD drive, the chances of recovery drop dramatically due to the TRIM function, which automatically clears deleted data to optimize space.
Option A: Disk Drill
![]()
Disk Drill has always been one of our favorite data recovery solutions for Mac because it has a high recovery rate and the interface is very easy for beginners to use.
Aside from its data recovery capabilities, Disk Drill is packed with features that protect your disks and help you manage your data.
Here are just some of the reasons why we recommend Disk Drill:
- Perfectly supports macOS file systems. And also supports exFAT and FAT32 if the videos were lost from an external medium, and even NTFS if your “disk” is not formatted with macOS’s native file system.
- Disk Drill can restore video files with their original names and folder structure, as long as the file system isn’t damaged.
- If Disk Drill fails to recover data from the file system itself (when it’s badly damaged or lost), it can recover data from file signatures, it recognizes many types of files, including popular video formats like MOV, MP4, AVI, and even more specialized formats like ARI, M2TS, R3D (and many more).
- In Disk Drill, you can preview the video before recovery, so you can be sure it’s the right file.
The free version of Disk Drill can preview an unlimited number of files, giving you a chance to see which can be recovered and which can’t before you purchase a license. A single Disk Drill Pro license costs just $89, and you can use it for as long as you want.
Now that we’ve described the features and capabilities of Disk Drill, let’s move on to how to recover permanently deleted videos from Mac using the app:
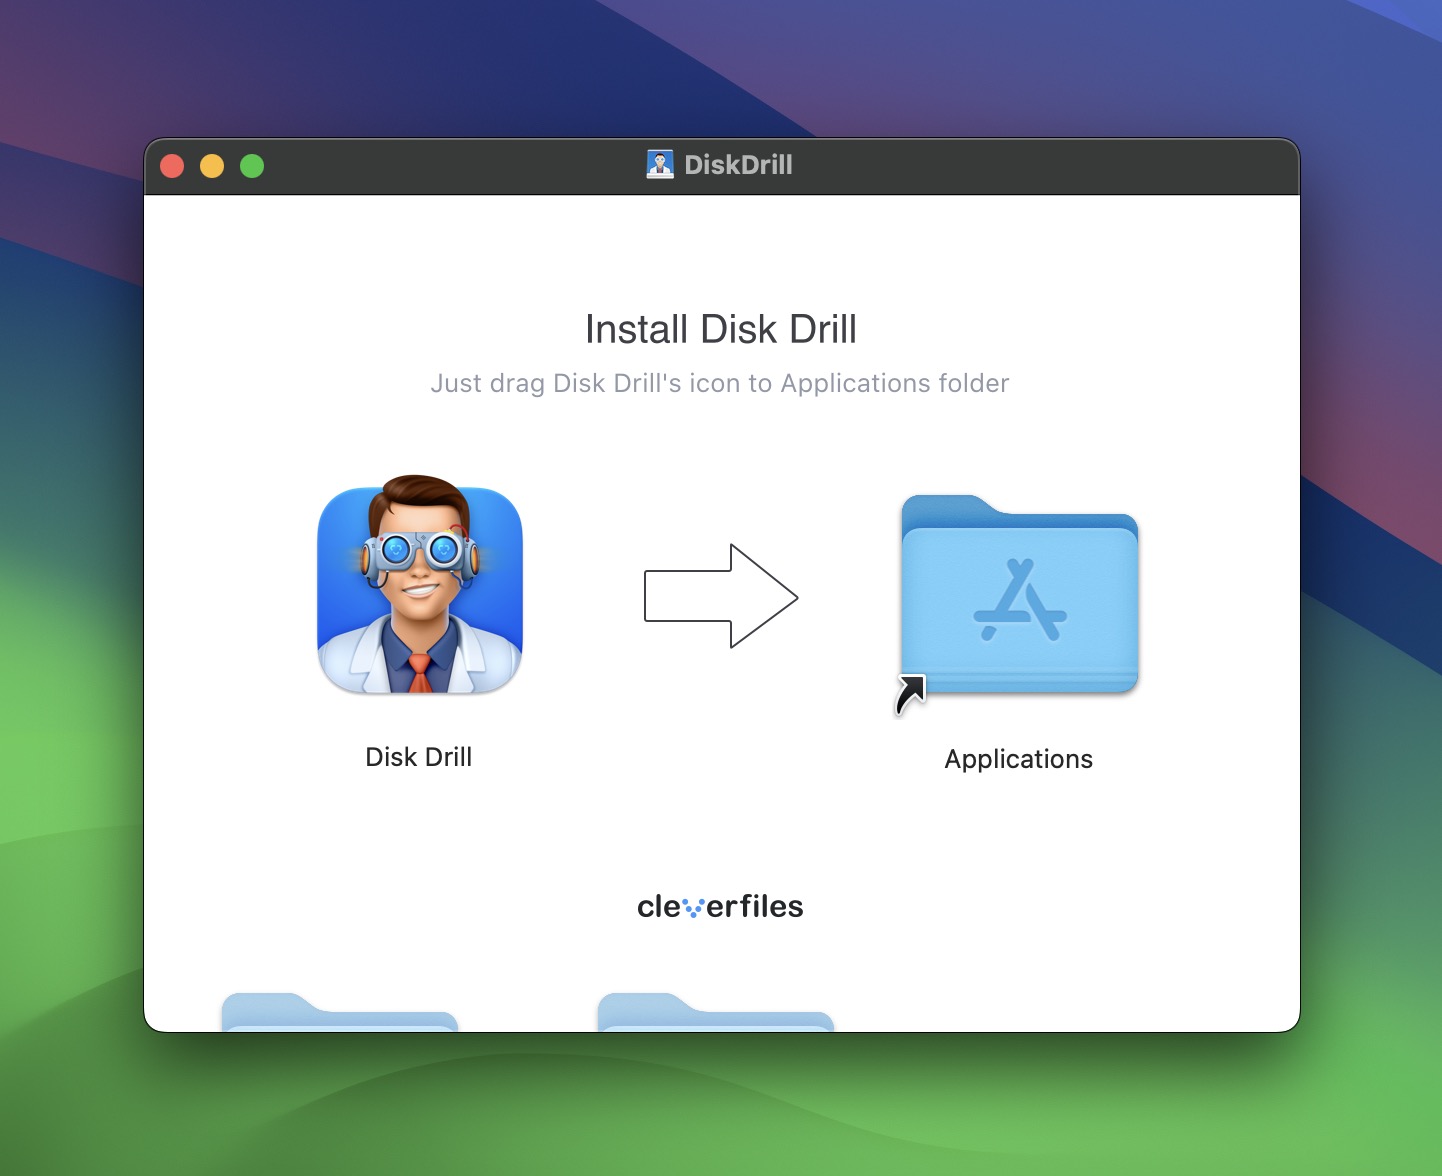
- Download the Disk Drill app from its official website.
- Open the downloaded file and then drag the Disk Drill icon to the Applications folder to complete the installation.
- Launch the the Disk Drill app on your Mac.
- Grant the app access when prompted. Just enter your administrator password to continue. You might also need to adjust your security settings; if that happens, follow the on-screen instructions. It’s safe to do this—Disk Drill is completely secure, we’ve tested it ourselves.
- Select the drive you want to check for lost videos. If you want to scan an external hard drive, make sure to plug it into your computer before launching the app so Disk Drill can detect it.
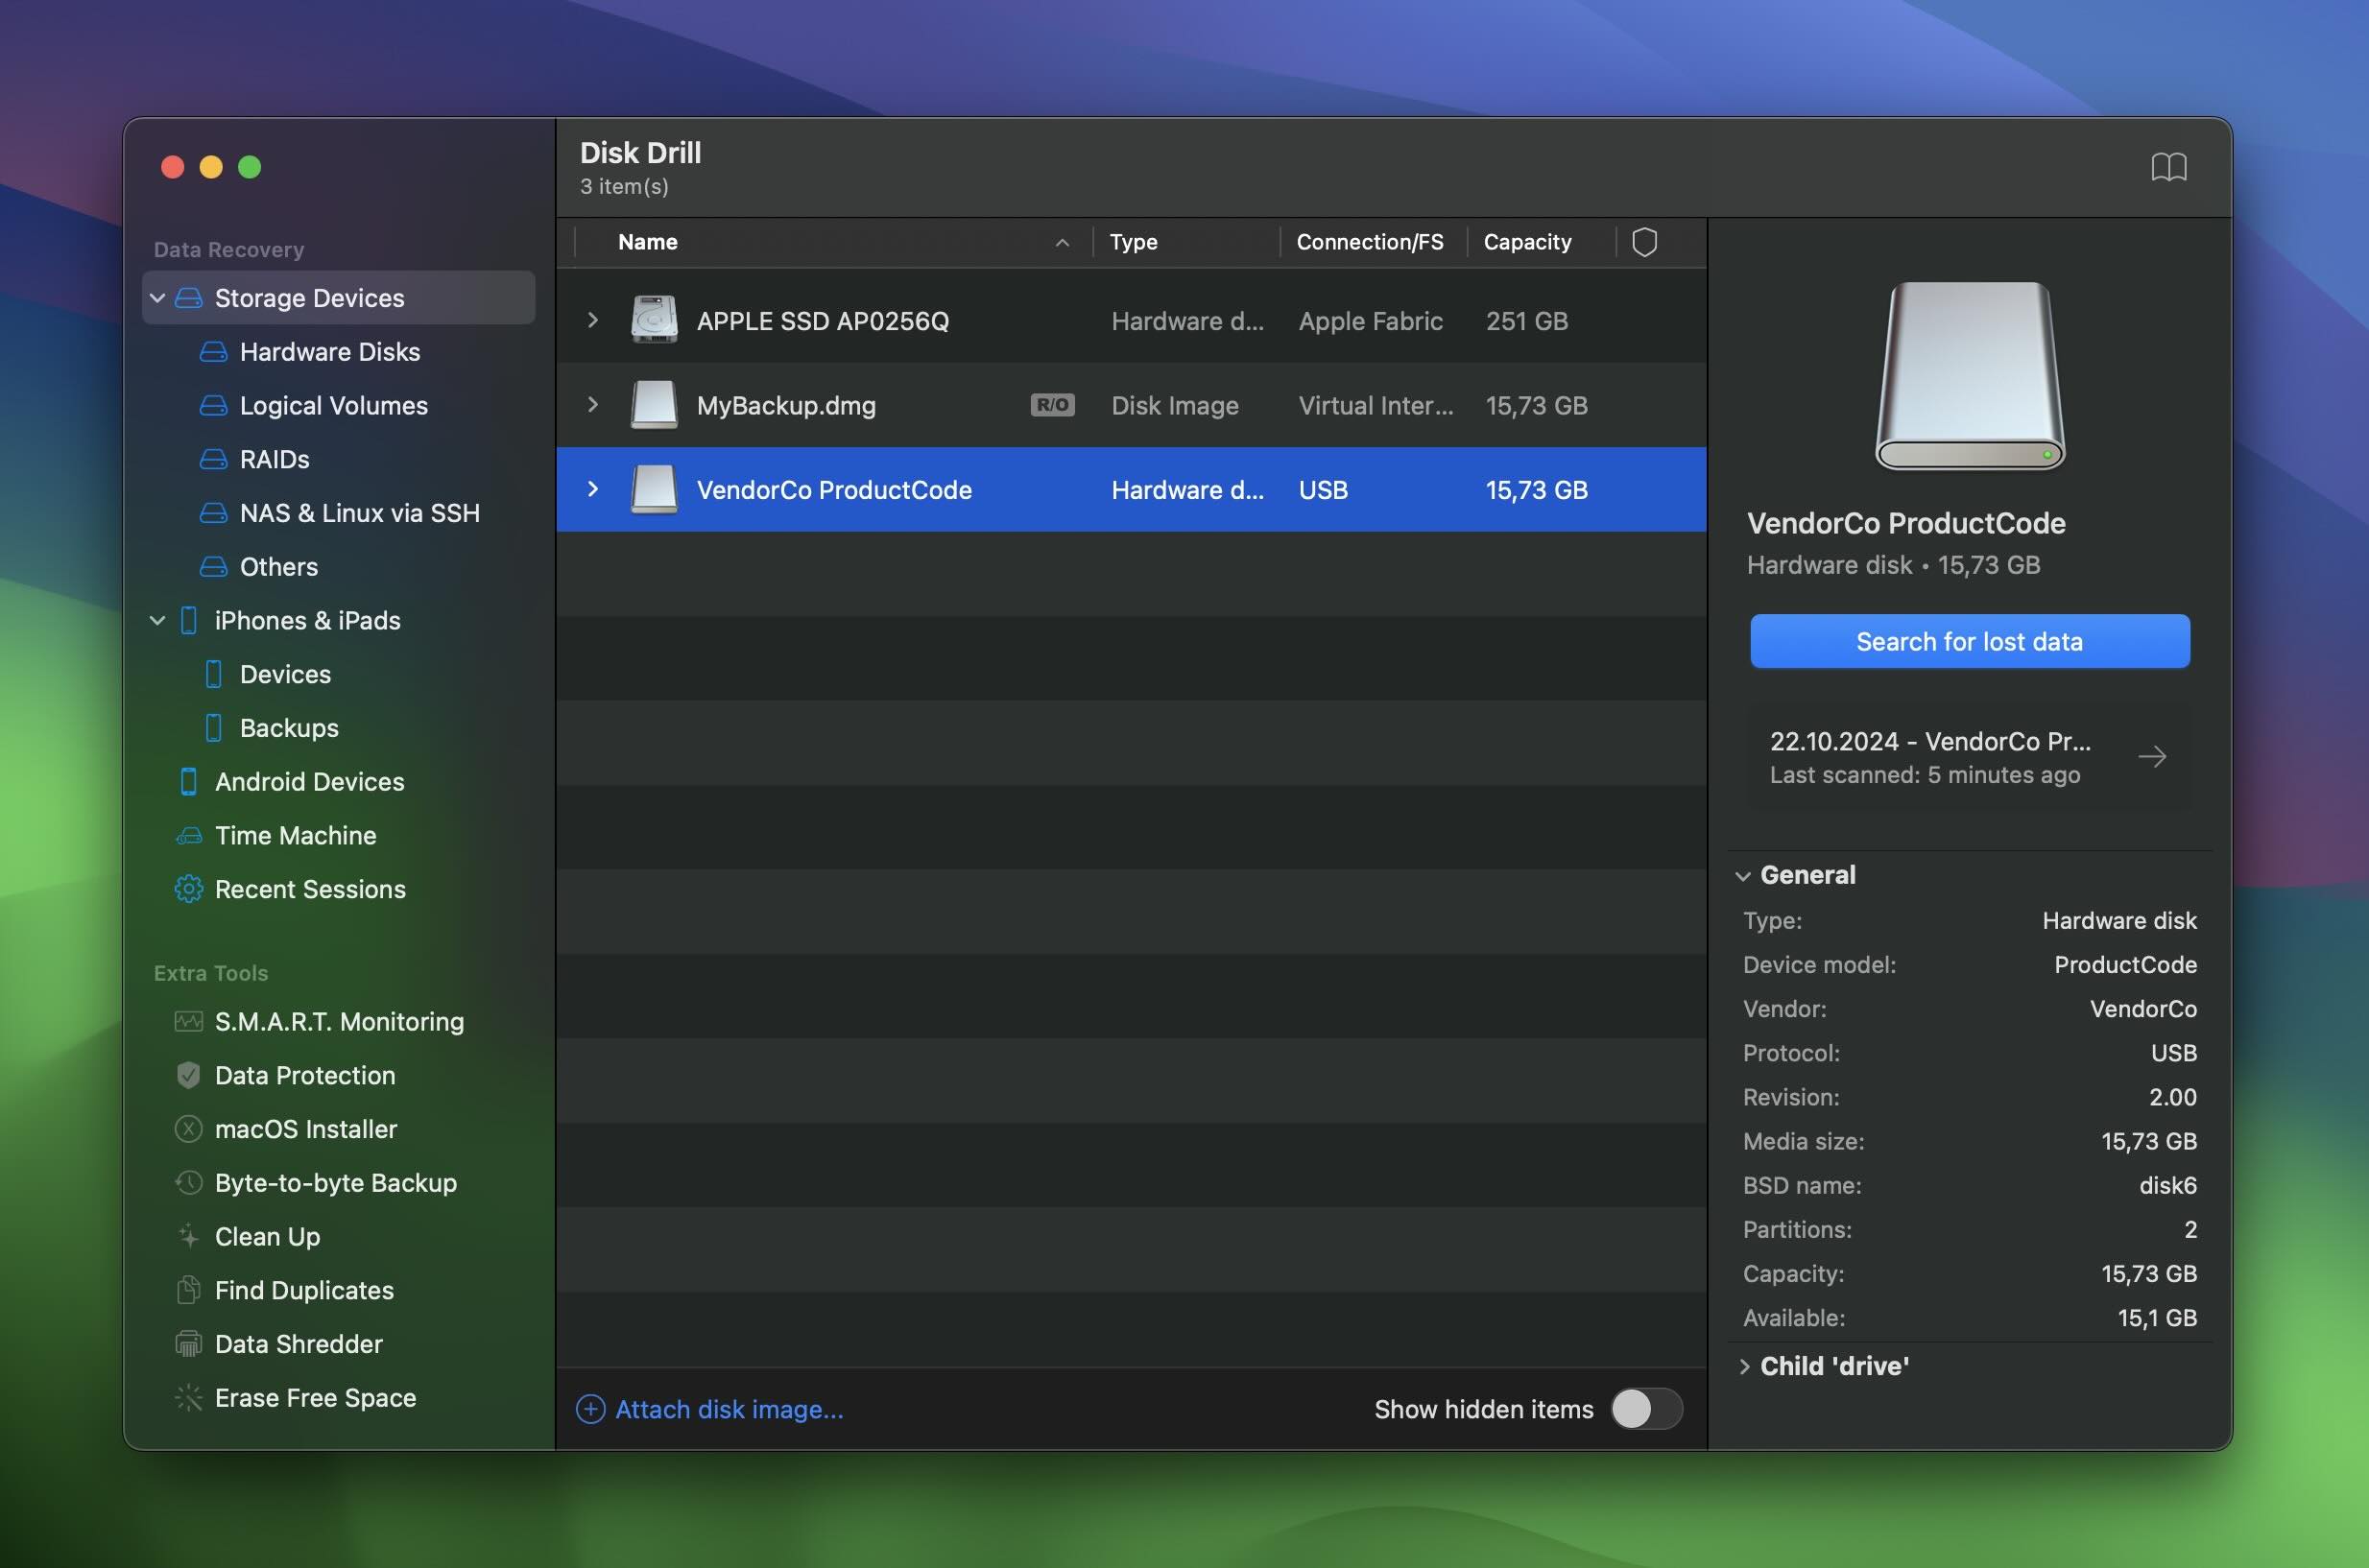
- Click Search for lost data to start a scan. As we mentioned before, Disk Drill will run through several scan modes. It starts with a quick scan to find recently deleted files, then moves to a deep scan for files that were deleted a while ago or are on damaged/formatted drive, which analyzes every sector to reconstruct data. If needed, it also performs a partition search to locate files from lost or corrupted partitions.
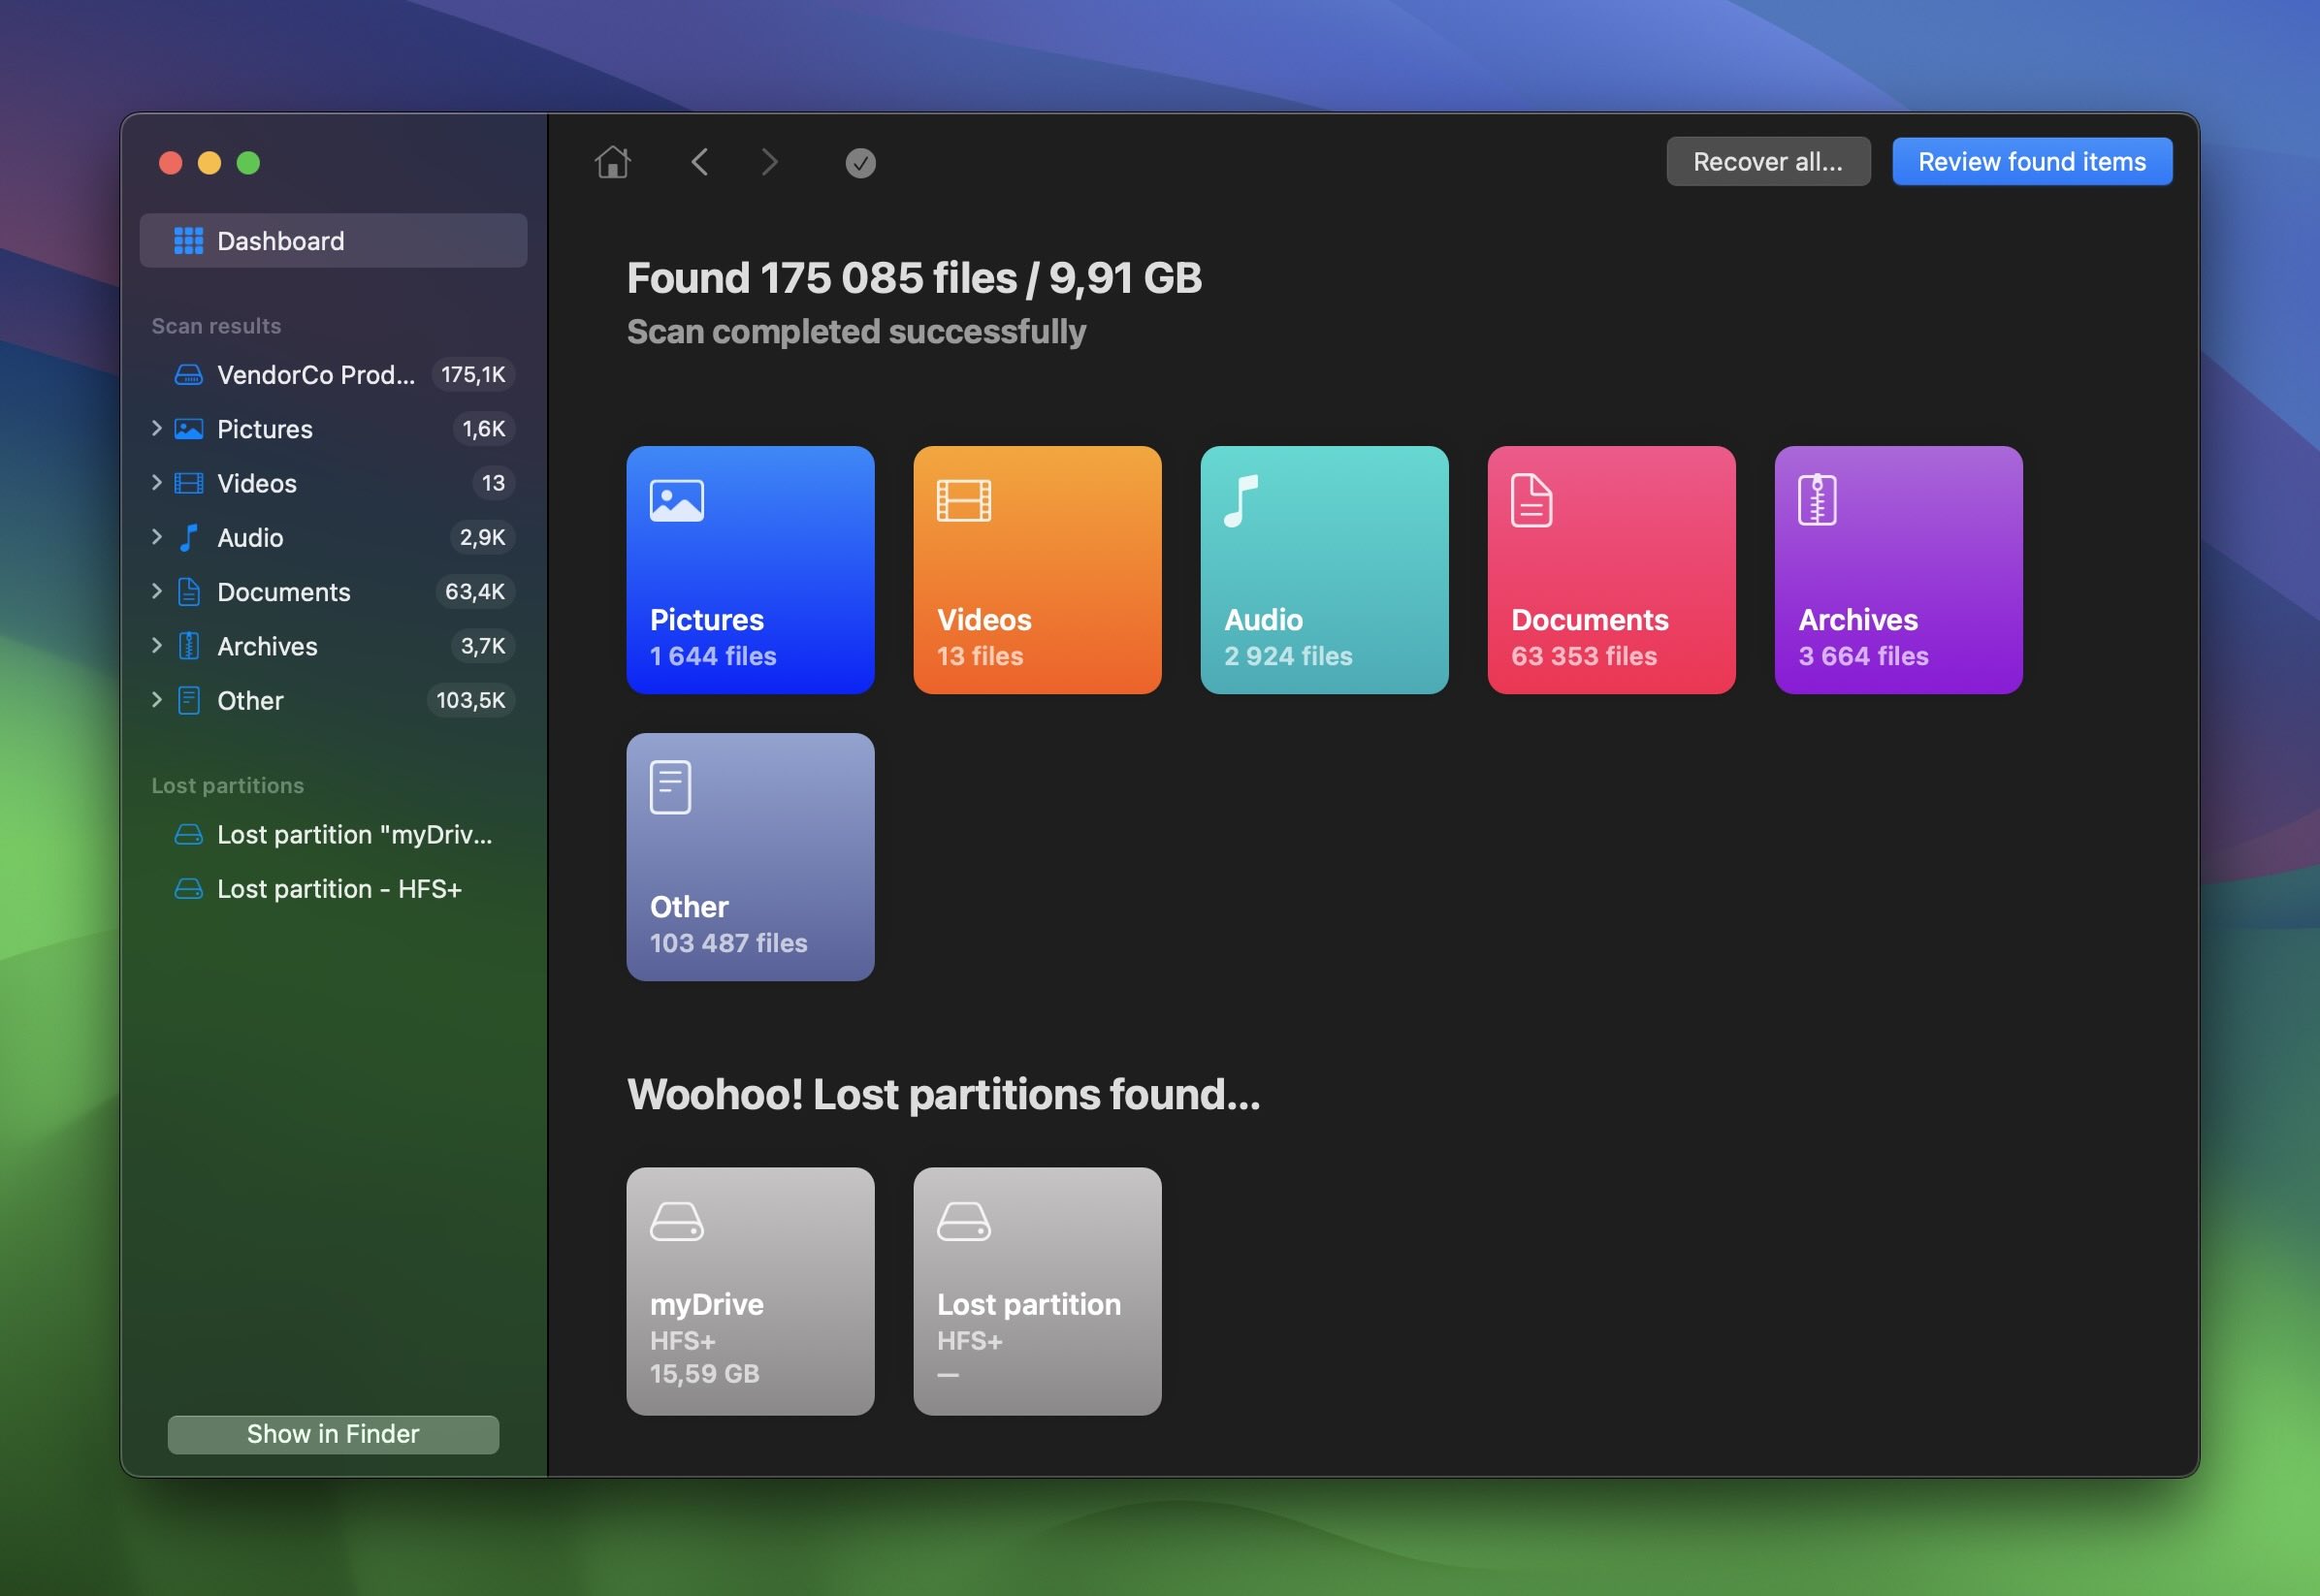
- Once the scan is complete, you can choose between Recover All to restore everything Disk Drill found or Review Found Items to select specific files. If you’re eager to check results before the scan finishes, you can click Review Found Items while the scan is still running to preview and recover files as they appear.
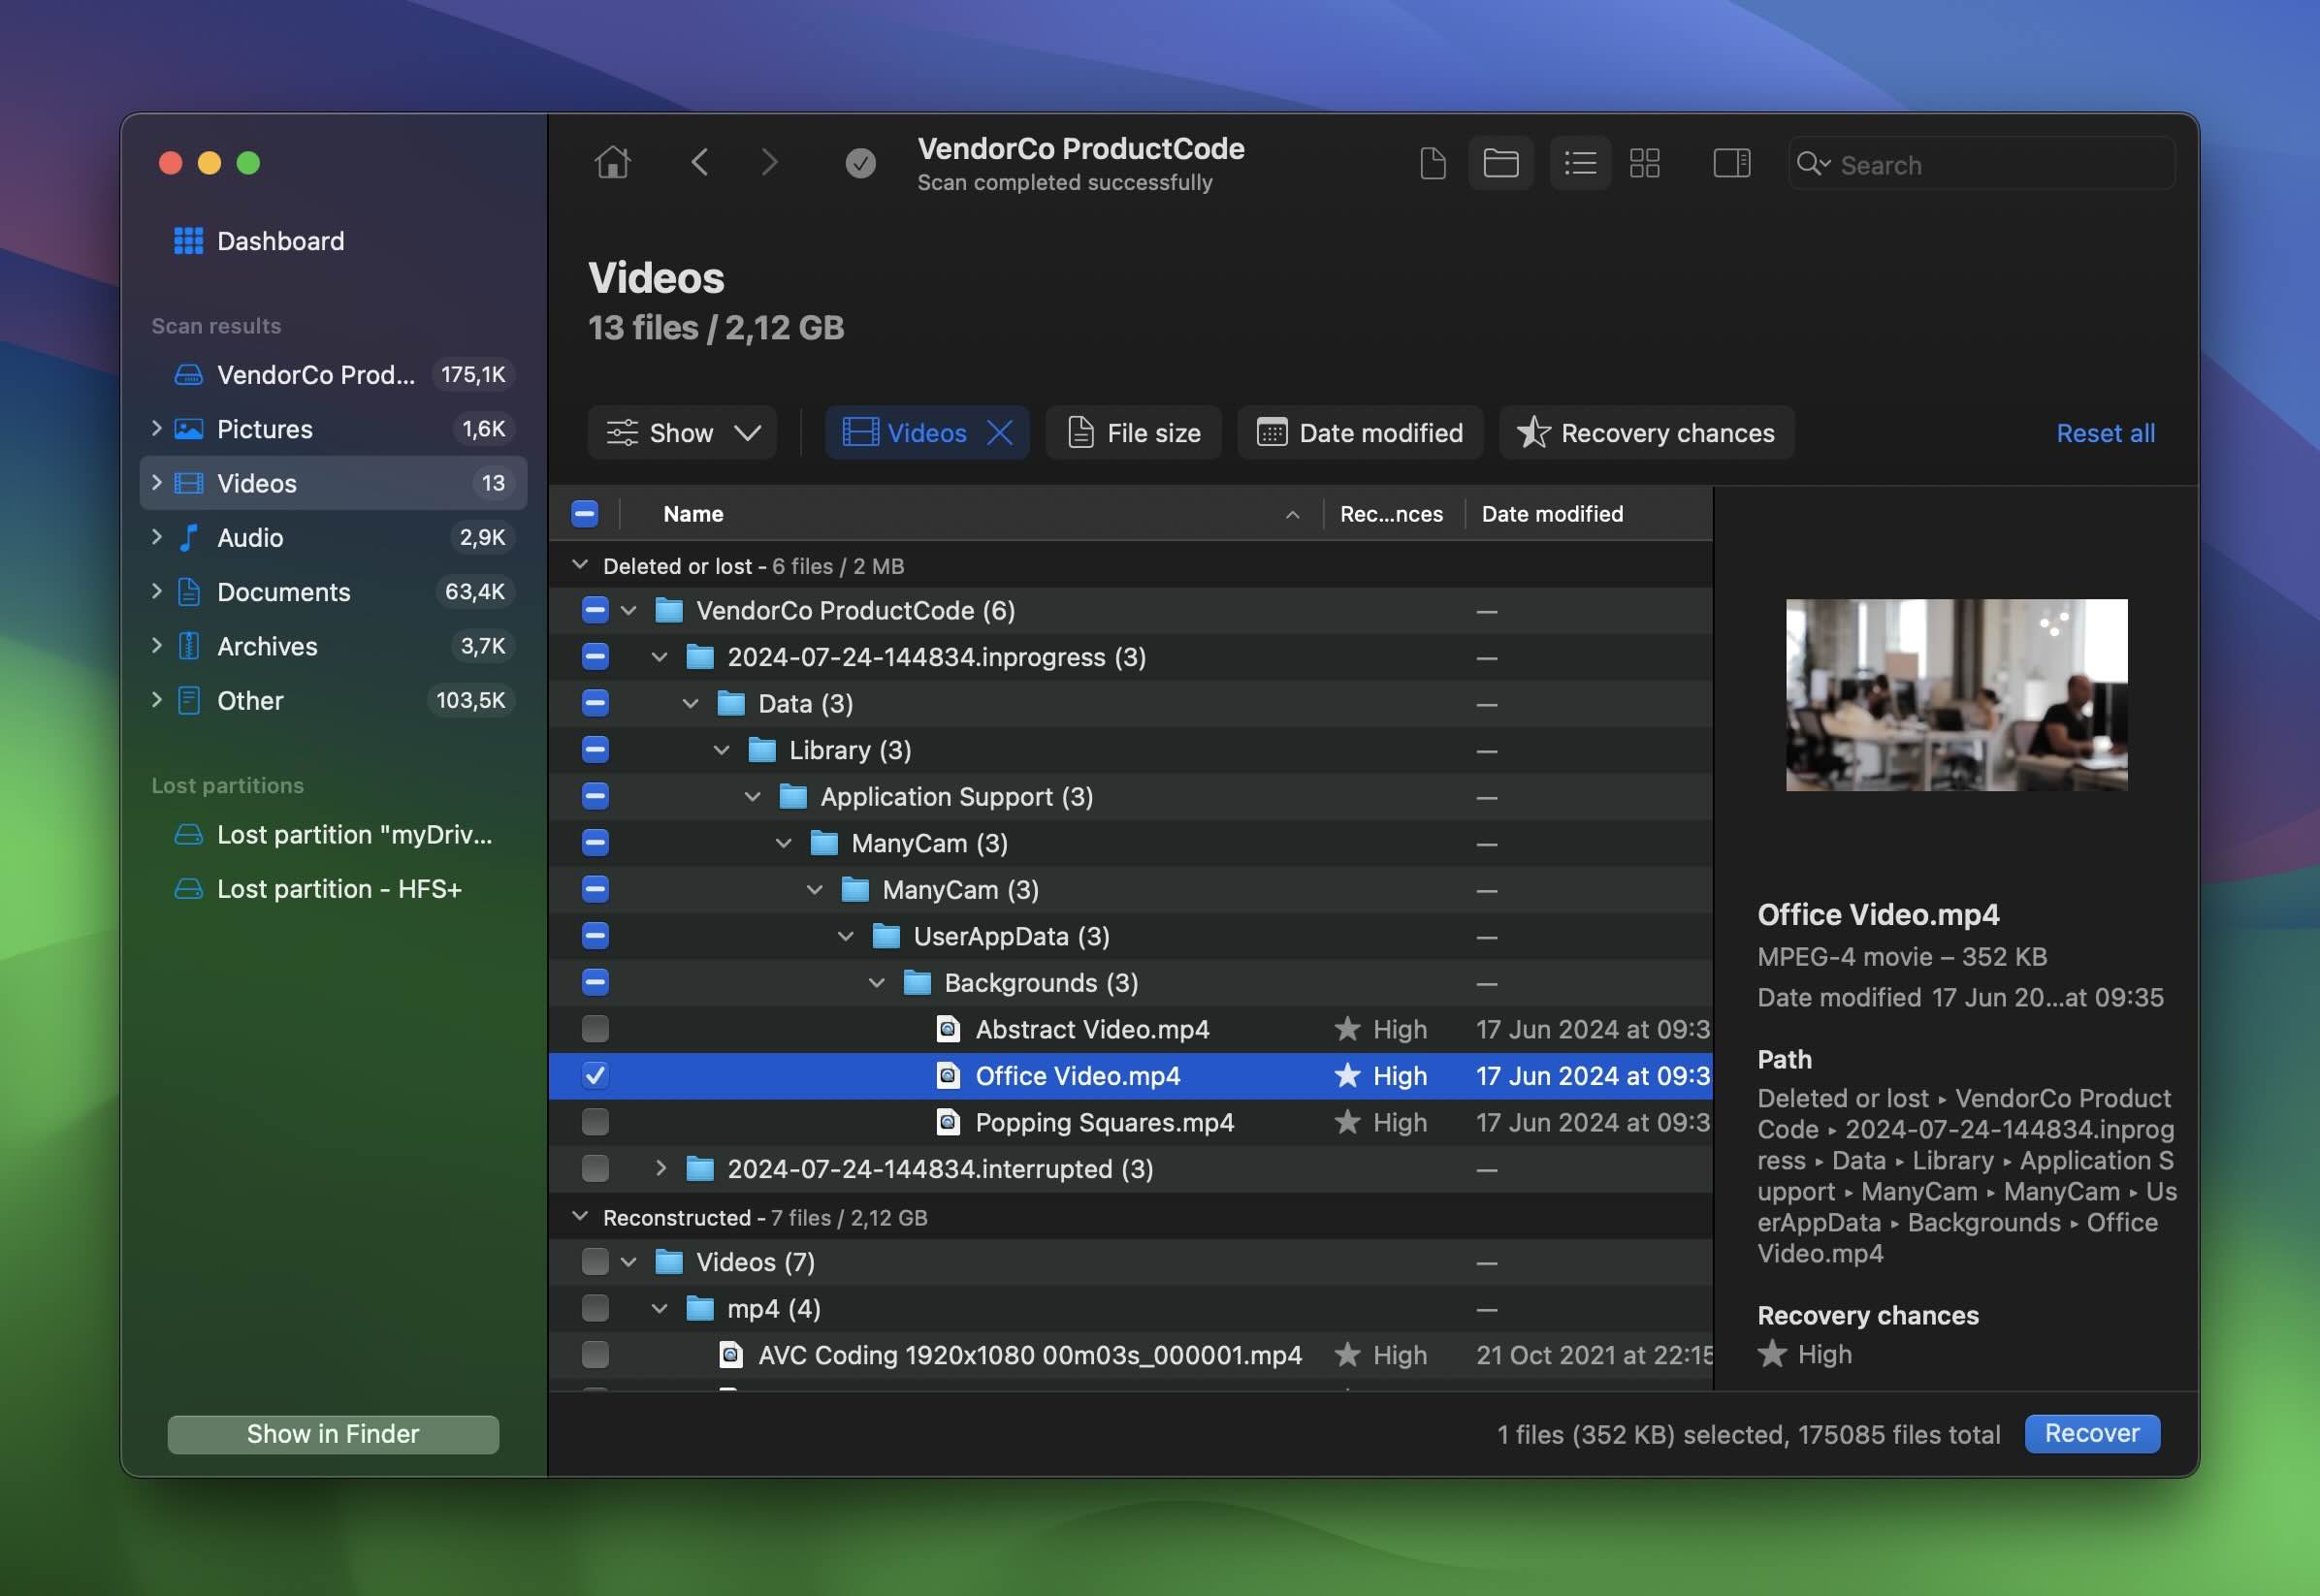
- Since we’re after video files, you can select the Videos category, and Disk Drill will display all the videos it found. As you hover over the file names, you’ll notice an 👁️🗨️ eye icon next to each one. Click it to preview the video and confirm it’s the file you’re looking for.
- Once you’ve found and selected the deleted video file, click Recover.
- Choose the folder destination where you want to place the recovered file.
Disk Drill’s free version also offers many additional useful abilities, such as:
- It has S.M.A.R.T. monitoring capabilities, which allow you to check the hard drive health of your macOS device and detect hardware issues that can potentially lead to data loss.
- It can create full byte-to-byte backups of your storage devices and protect file metadata to increase data recovery chances.
- It has multiple scan modes: quick scan, deep scan, and scan for lost partitions.
- It has additional features such as disk clean up, data shredder, and data protection.
Option B: PhotoRec

If you’re an advocate of open-source software or would like to recover your lost video files without spending any money, then PhotoRec is for you.
Even though this data recovery software is named PhotoRec, it can recover more than just photos, and it can perform everything from SD card recovery to hard drive recovery. The only catch is you need to be comfortable with Terminal because the application doesn’t have a graphical user interface.
Here are some of the things we like about PhotoRec:
- 💸 It’s completely free. No need to pay to fully enjoy its features.
- 🔄 It can recover an unlimited number of files.
- 🗂️ It can recover over 400 file types including video formats like AVI, MOV, MKV, MP4, 3GP, 3G2, WMV, ASF, FLV, SWF, MPG, RM.
The command-line interface in PhotoRec may feel tricky at first, but with a bit of practice, you’ll get the hang of it. Unfortunately, that’s not the only downside. Unlike Disk Drill, which offers multiple scan modes, PhotoRec relies solely on a signature scan mode. This approach searches for specific file signatures to recover files but ignores file names and original folder structures. Combined with the lack of a preview feature, you’ll likely spend a lot of time manually sifting through its findings. That’s why we rarely rely on PhotoRec in real-world situations.
Here’s how to recover lost video files using PhotoRec on Mac:
- Install PhotoRec using Homebrew (PhotoRec is included in the TestDisk package): brew install testdisk
- Launch Terminal, type photorec, and press Return.

- Use your arrow keys to select the drive you want to scan and retrieve the lost video files.
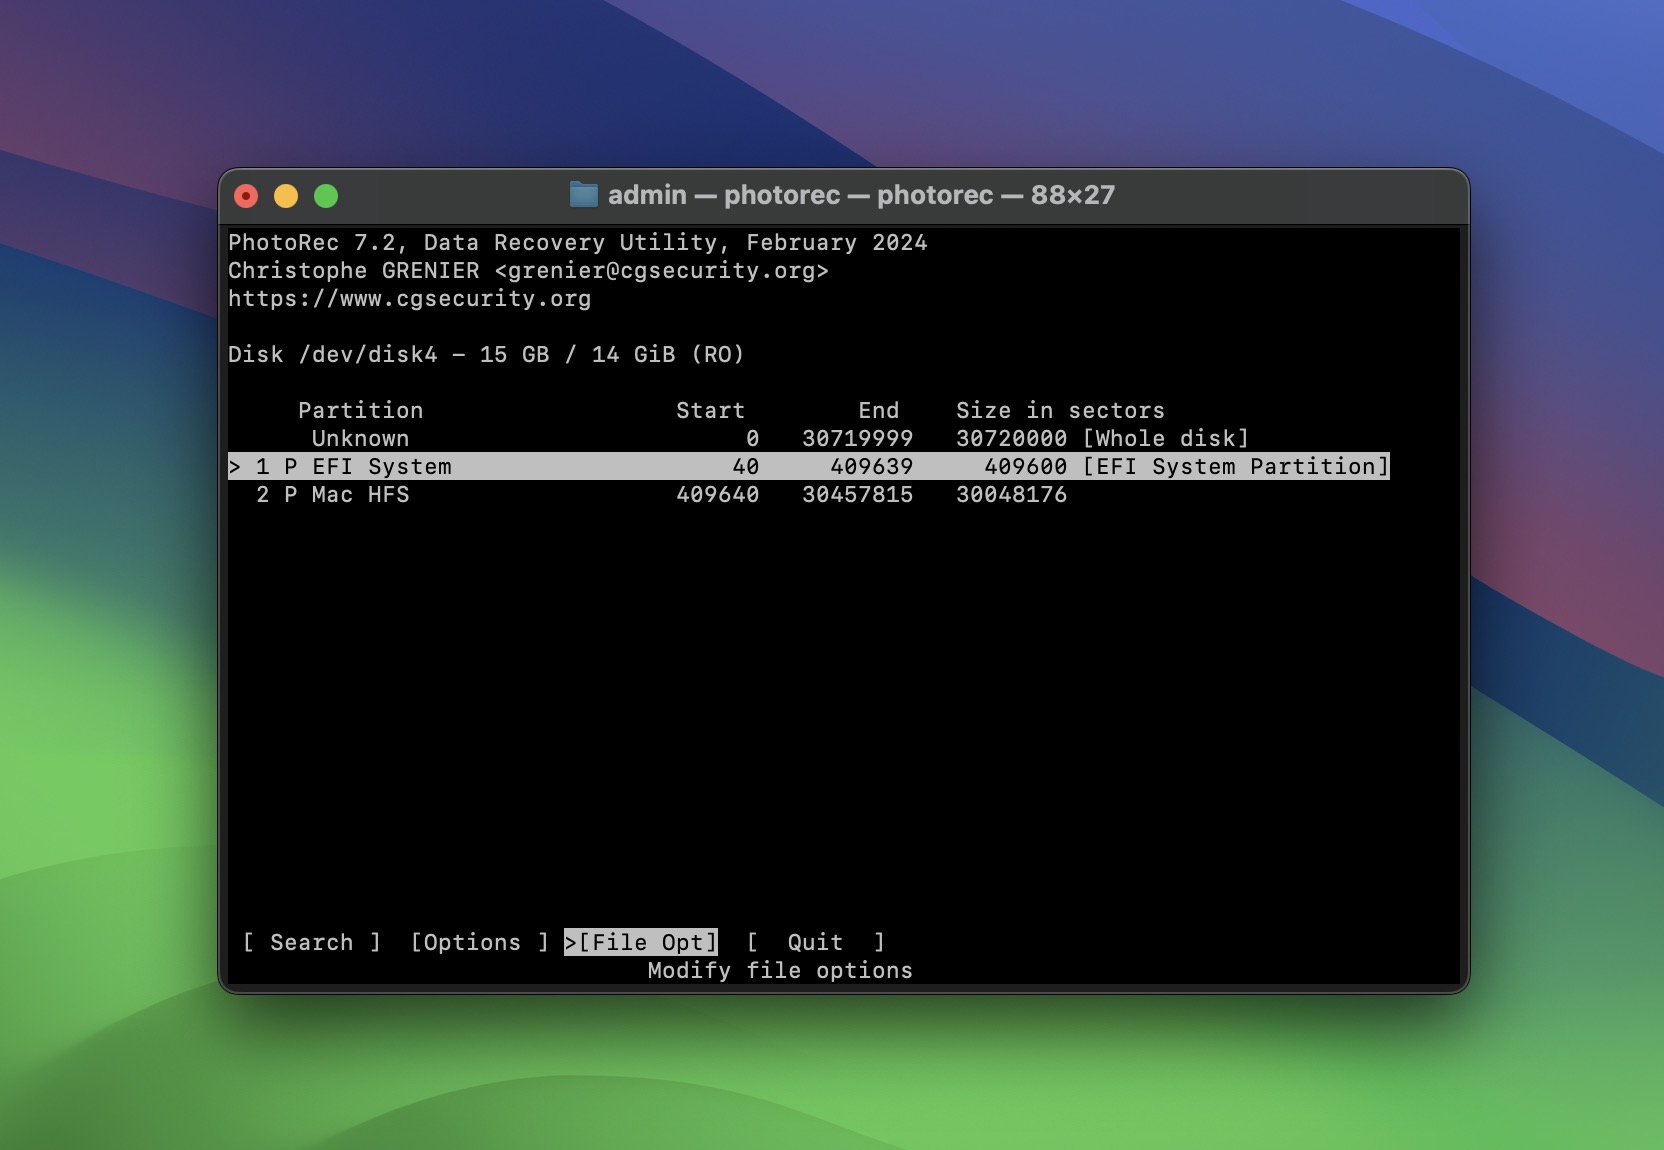
- Locate the Proceed option by pressing the arrow keys to continue. You will be taken to a new screen where you will see your selected drive.
- View the lost files by selecting the option File Opt.
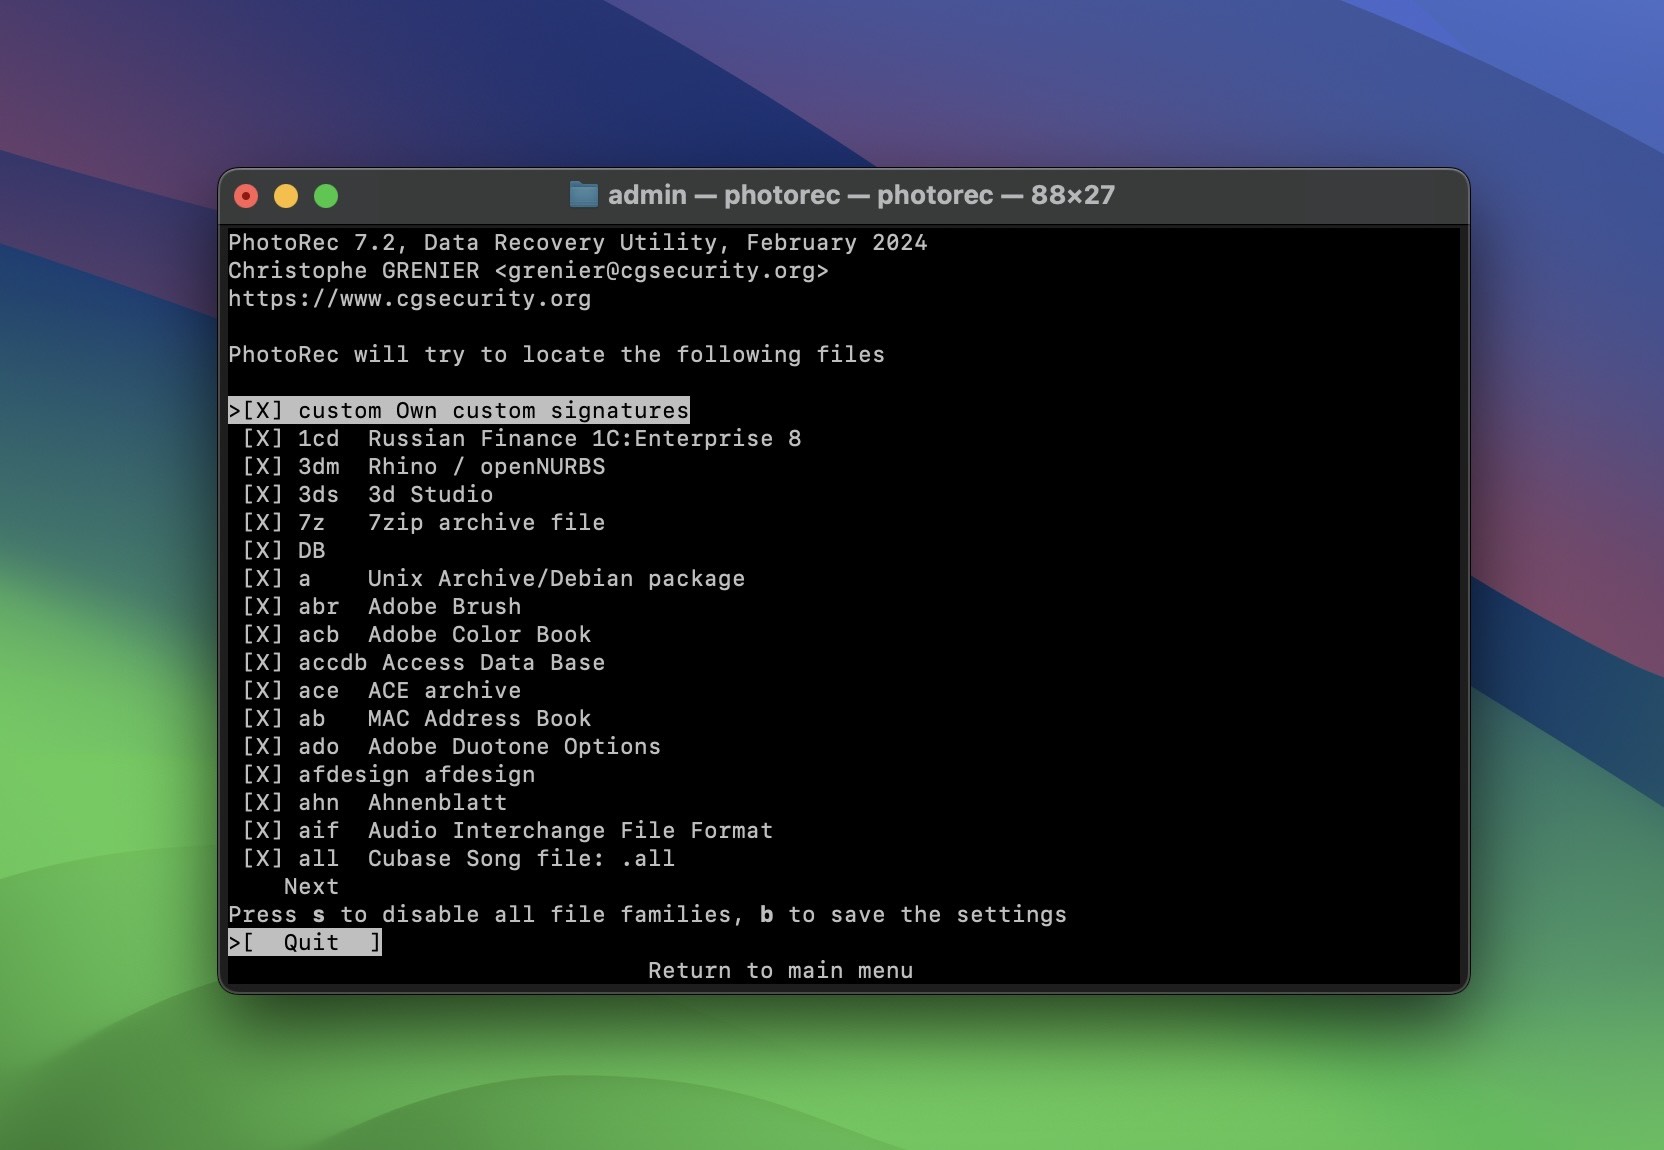
- Recover all your files by pressing S on your keyboard. Keep in mind that if you choose to retrieve all, the recovery process will take time.
- Recover specific files by scrolling down until you see the file name, and hitting spacebar to select the file. Press B to save the settings, then press Enter twice to go back to the previous menu.
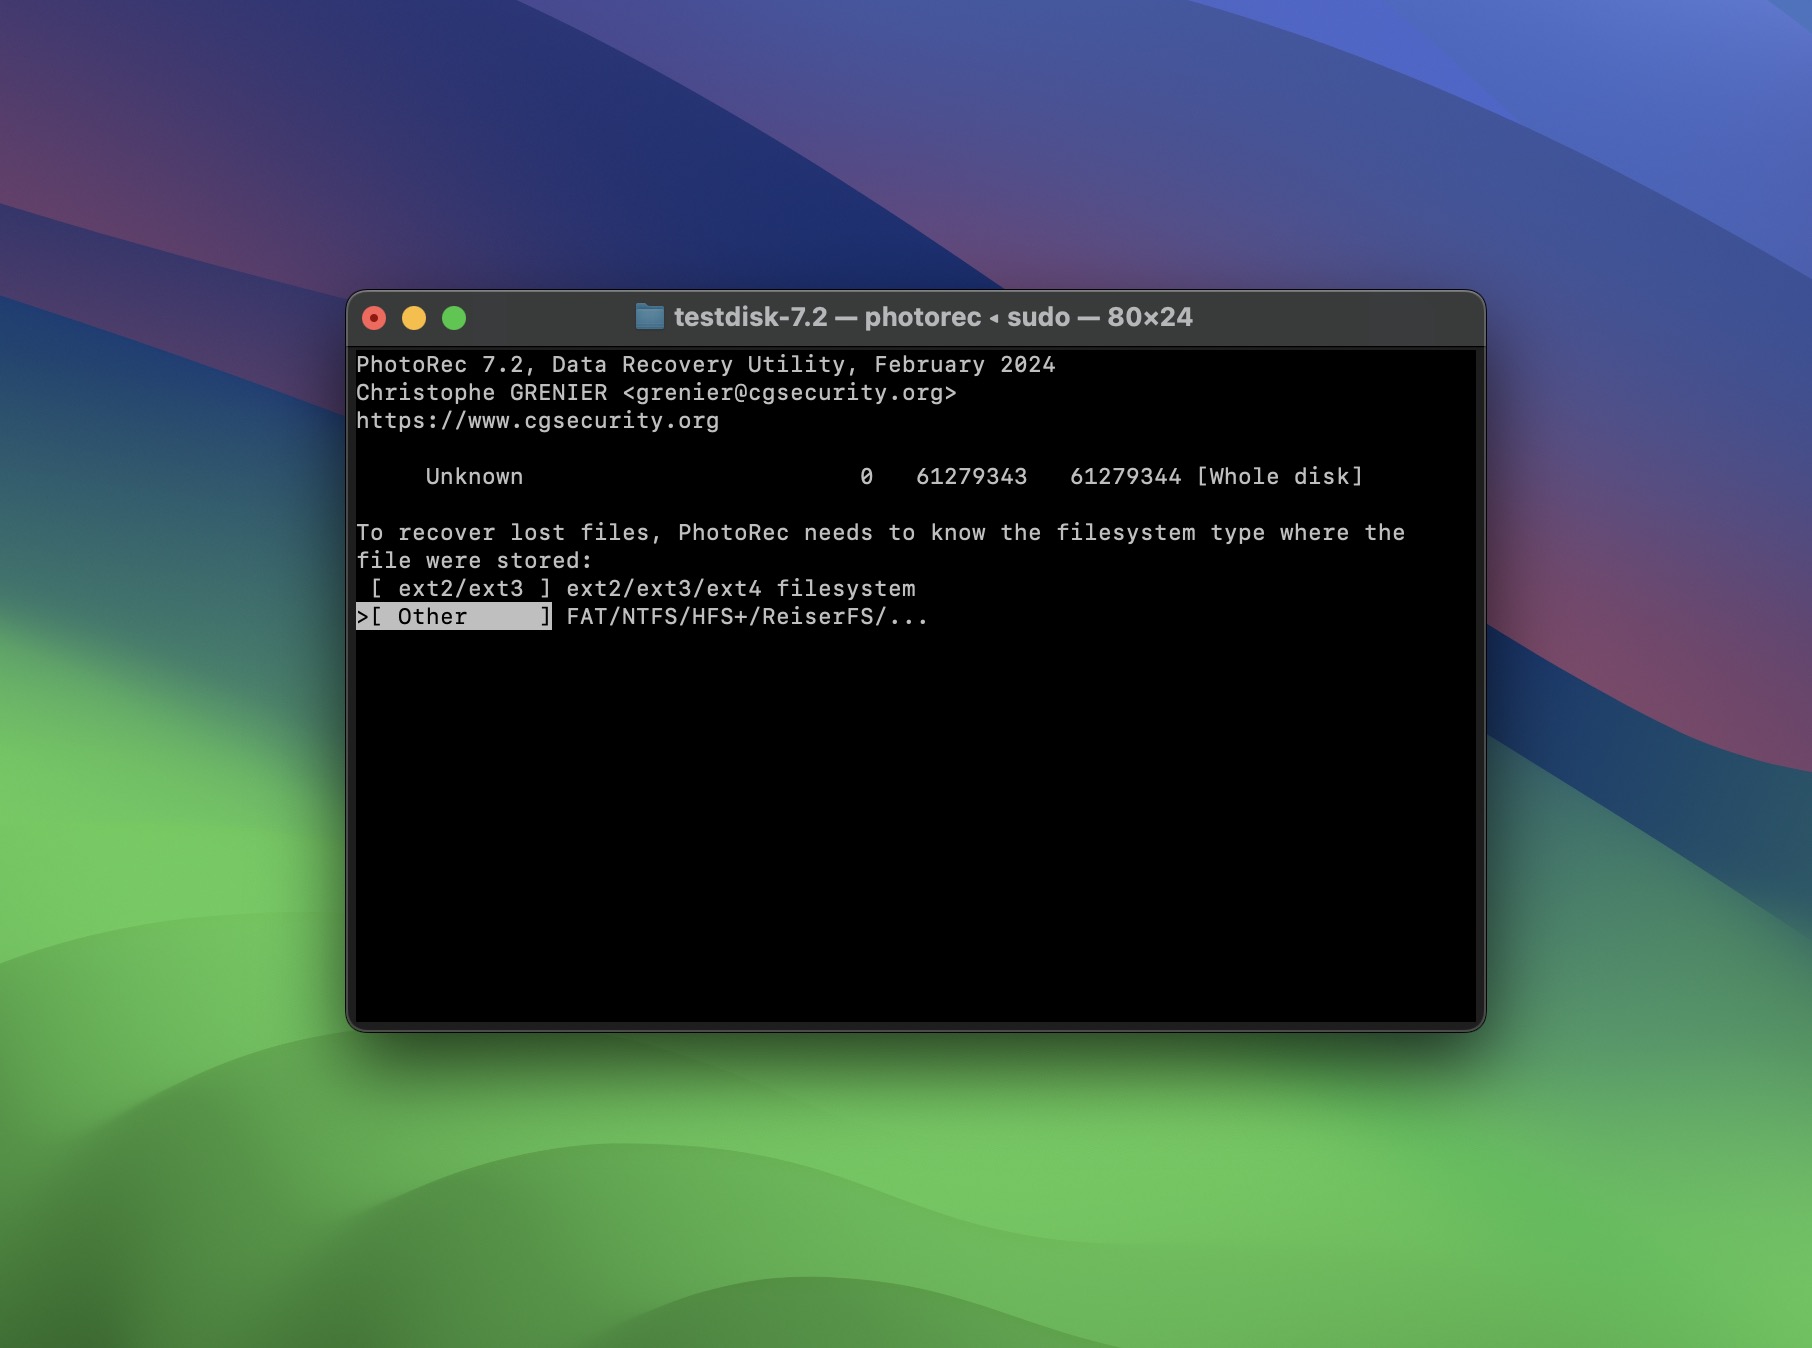
- Press the Arrow Up key to select the No Partition option which scans the whole disk. Then go to the Search option by pressing the Left key and Enter. Choose Other if you are not using an ext file system.
- Choose your destination folder from the list that will appear on your screen. Confirm your selection by pressing the C key.
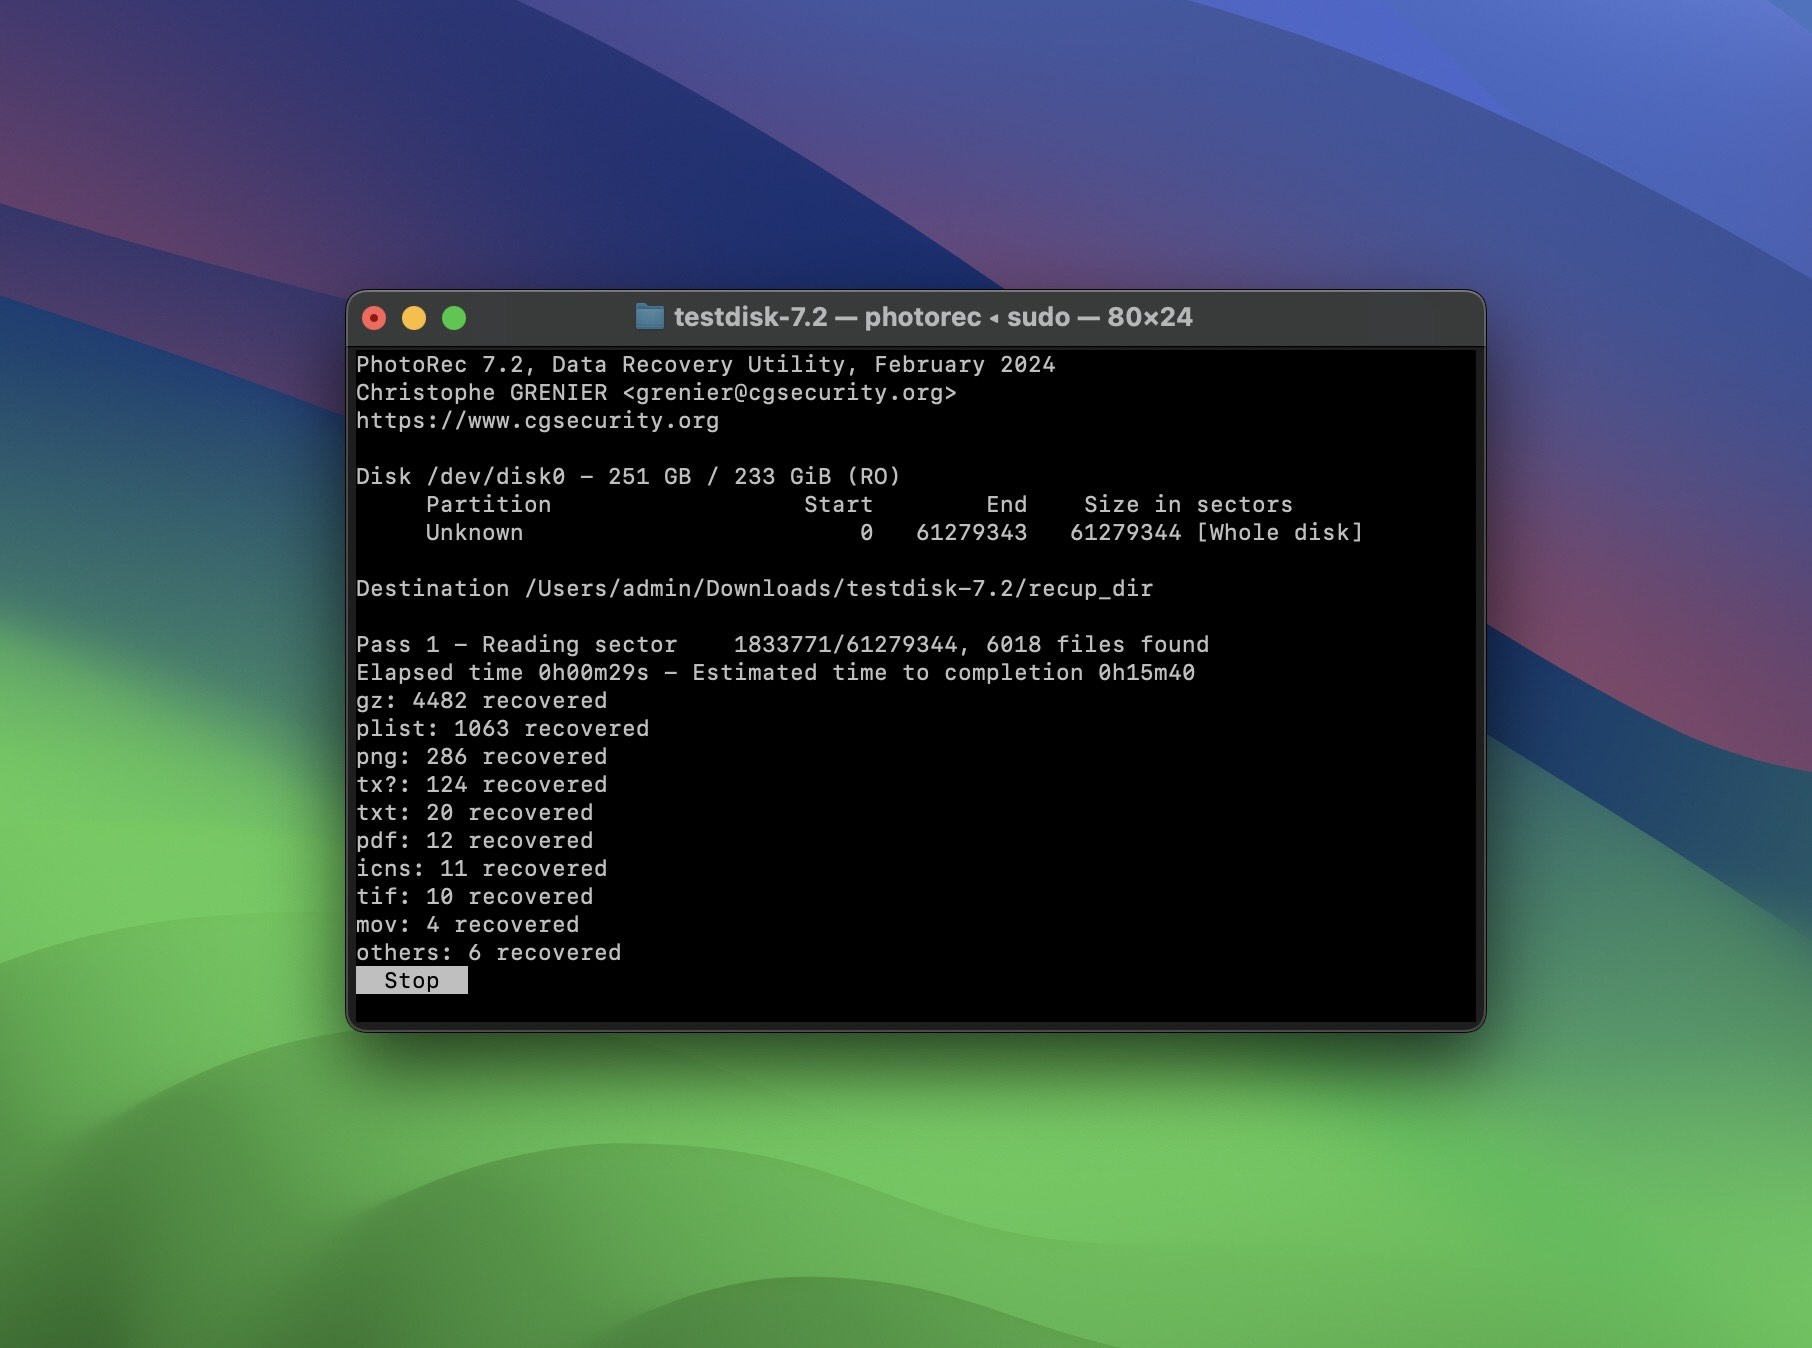
- Wait for the recovery process to finish. This will take a while depending on how heavy the file is. “Recovery Completed” will appear on the screen to confirm that the process is completed.
- Exit the program.
PhotoRec also comes bundled with TestDisk, which is another useful tool for partition recovery. For more information about PhotoRec, you can check out our full review here.
Recovered Deleted Video But It Seems Corrupted or Won’t Play? Try Fixing It
Sometimes, recovery is a success, but when you try to play the video, it doesn’t work or seems corrupted. This can happen if parts of the file were overwritten and the video is incomplete, which makes video players struggle with playback. Luckily, there are a few ways to try and repair the file. Here are two methods we often use.
Option A: Clever Online Video Repair
One option we found to often be successful with corrupted videos is the online service Clever Online Video Repair. Developed by CleverFiles—the same team behind Disk Drill—this tool stands out among similar video repair options due to its generous features. It supports a wide range of video formats (MP4, MOV, 3GP, 3G2, M4V, FLV, and GIFV), and can repair video files as large as 5 GB, which is impressive compared to its competitors, who usually offer no more than 500 MB.
To use Clever Online Video Repair, all you need is an internet connection and a web browser. Here’s a quick guide to get you started:
- Go to the Clever Online Video Repair website.
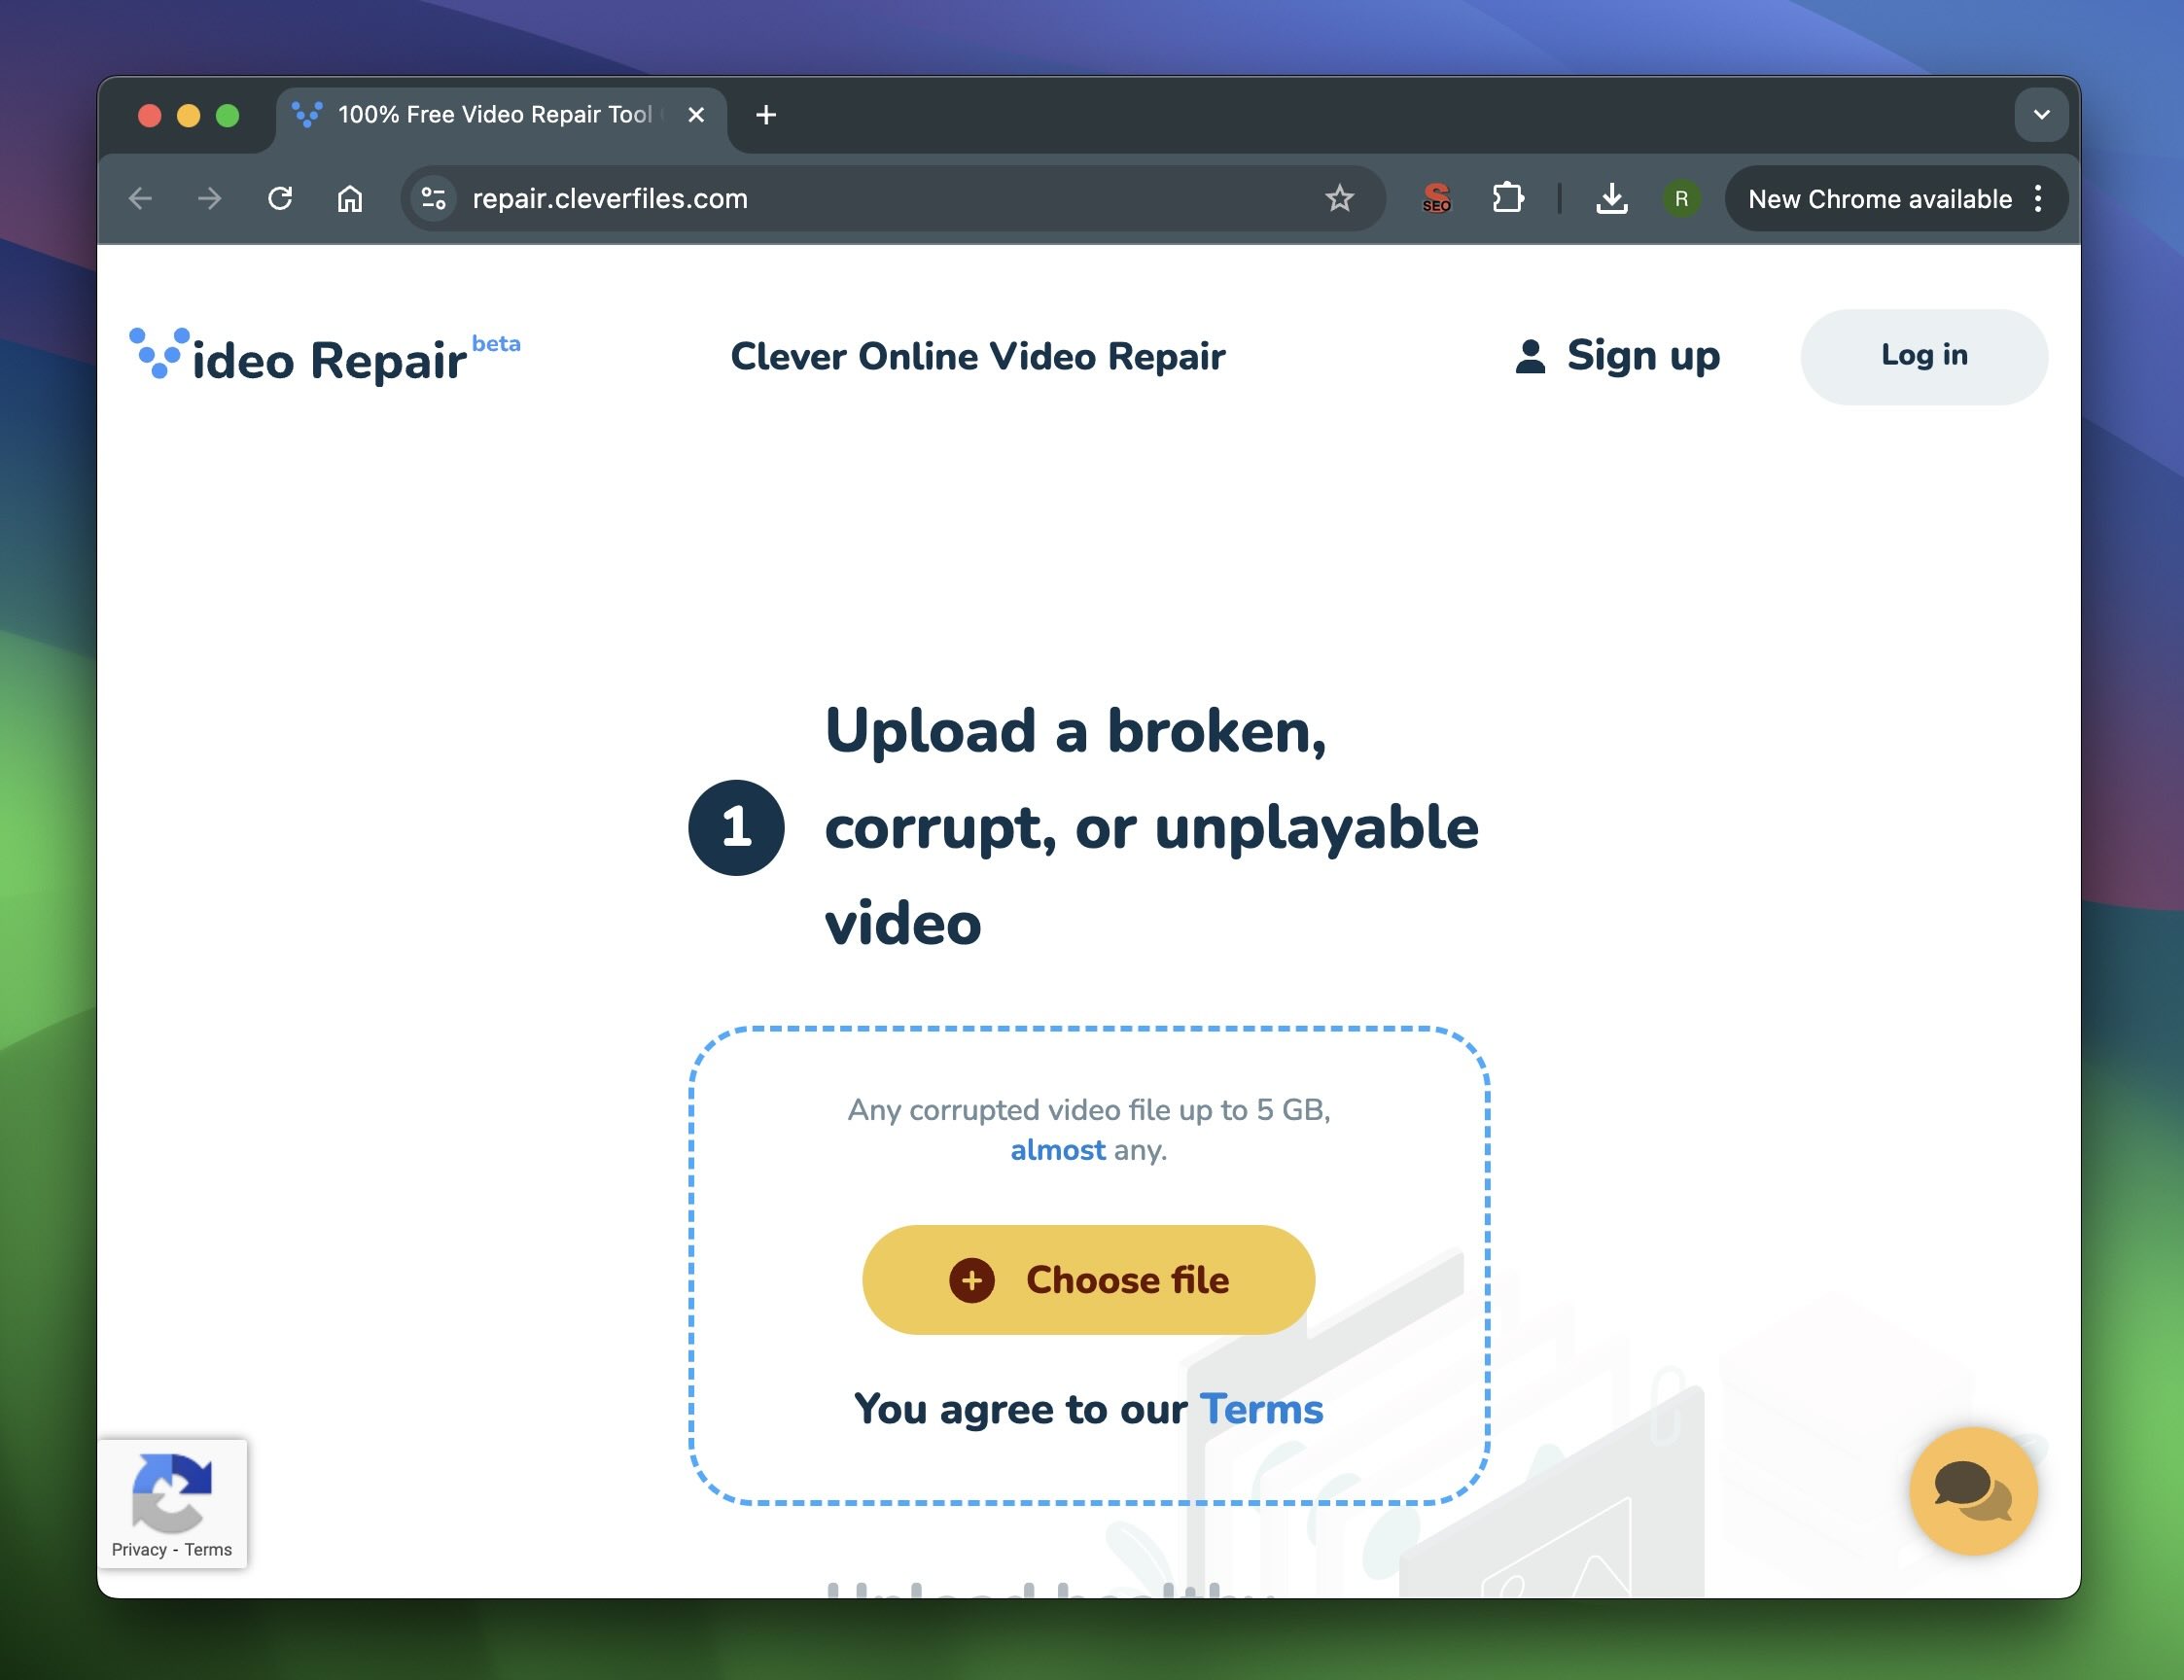
- Click the Upload File button and select the corrupted video file from your computer.
- Upload a healthy video file recorded in the same format and with the same settings (resolution, frame rate, etc.) as the corrupted video, you can upload it alongside the corrupted file. This allows the service to extract the necessary information from the healthy video to restore the damaged file.
- Now create an account or sign in.
- Once the files are uploaded, the tool will automatically detect the problem and begin the repair process. The repair time will vary depending on the file size and the severity of the corruption.
- After the repair is complete, you’ll be prompted to download the fixed video. You can then check it to confirm that the issue has been resolved.
Clever Online Video Repair doesn’t require any special software or complicated steps—just upload, repair, and download. From our experience, the repair process is usually pretty quick, and it often takes longer to upload the file than to actually fix it. Of course, the time will depend on your ISP upload speeds and the size of the video, but overall, it’s a fast and easy way to repair corrupted videos.
Option B: VLC Media Player
Another fix you can try is VLC Media Player. You’ve probably heard of it—it’s one of the most popular free media players out there, and it comes with a handy feature that can attempt to fix damaged or incomplete video files. While this feature is designed for AVI files, you can still use it with other video formats. Simply change the file extension to .avi, and VLC will try to repair the video when you open it. It doesn’t always work, but it’s definitely worth a shot.
Here’s how to use VLC to try and fix your video:
- If you don’t already have it, download VLC Media Player from the official website and install it on your Mac.
- Find your corrupted video file and change its file extension to .avi. For example, if your file is video.mp4, rename it to video.avi.
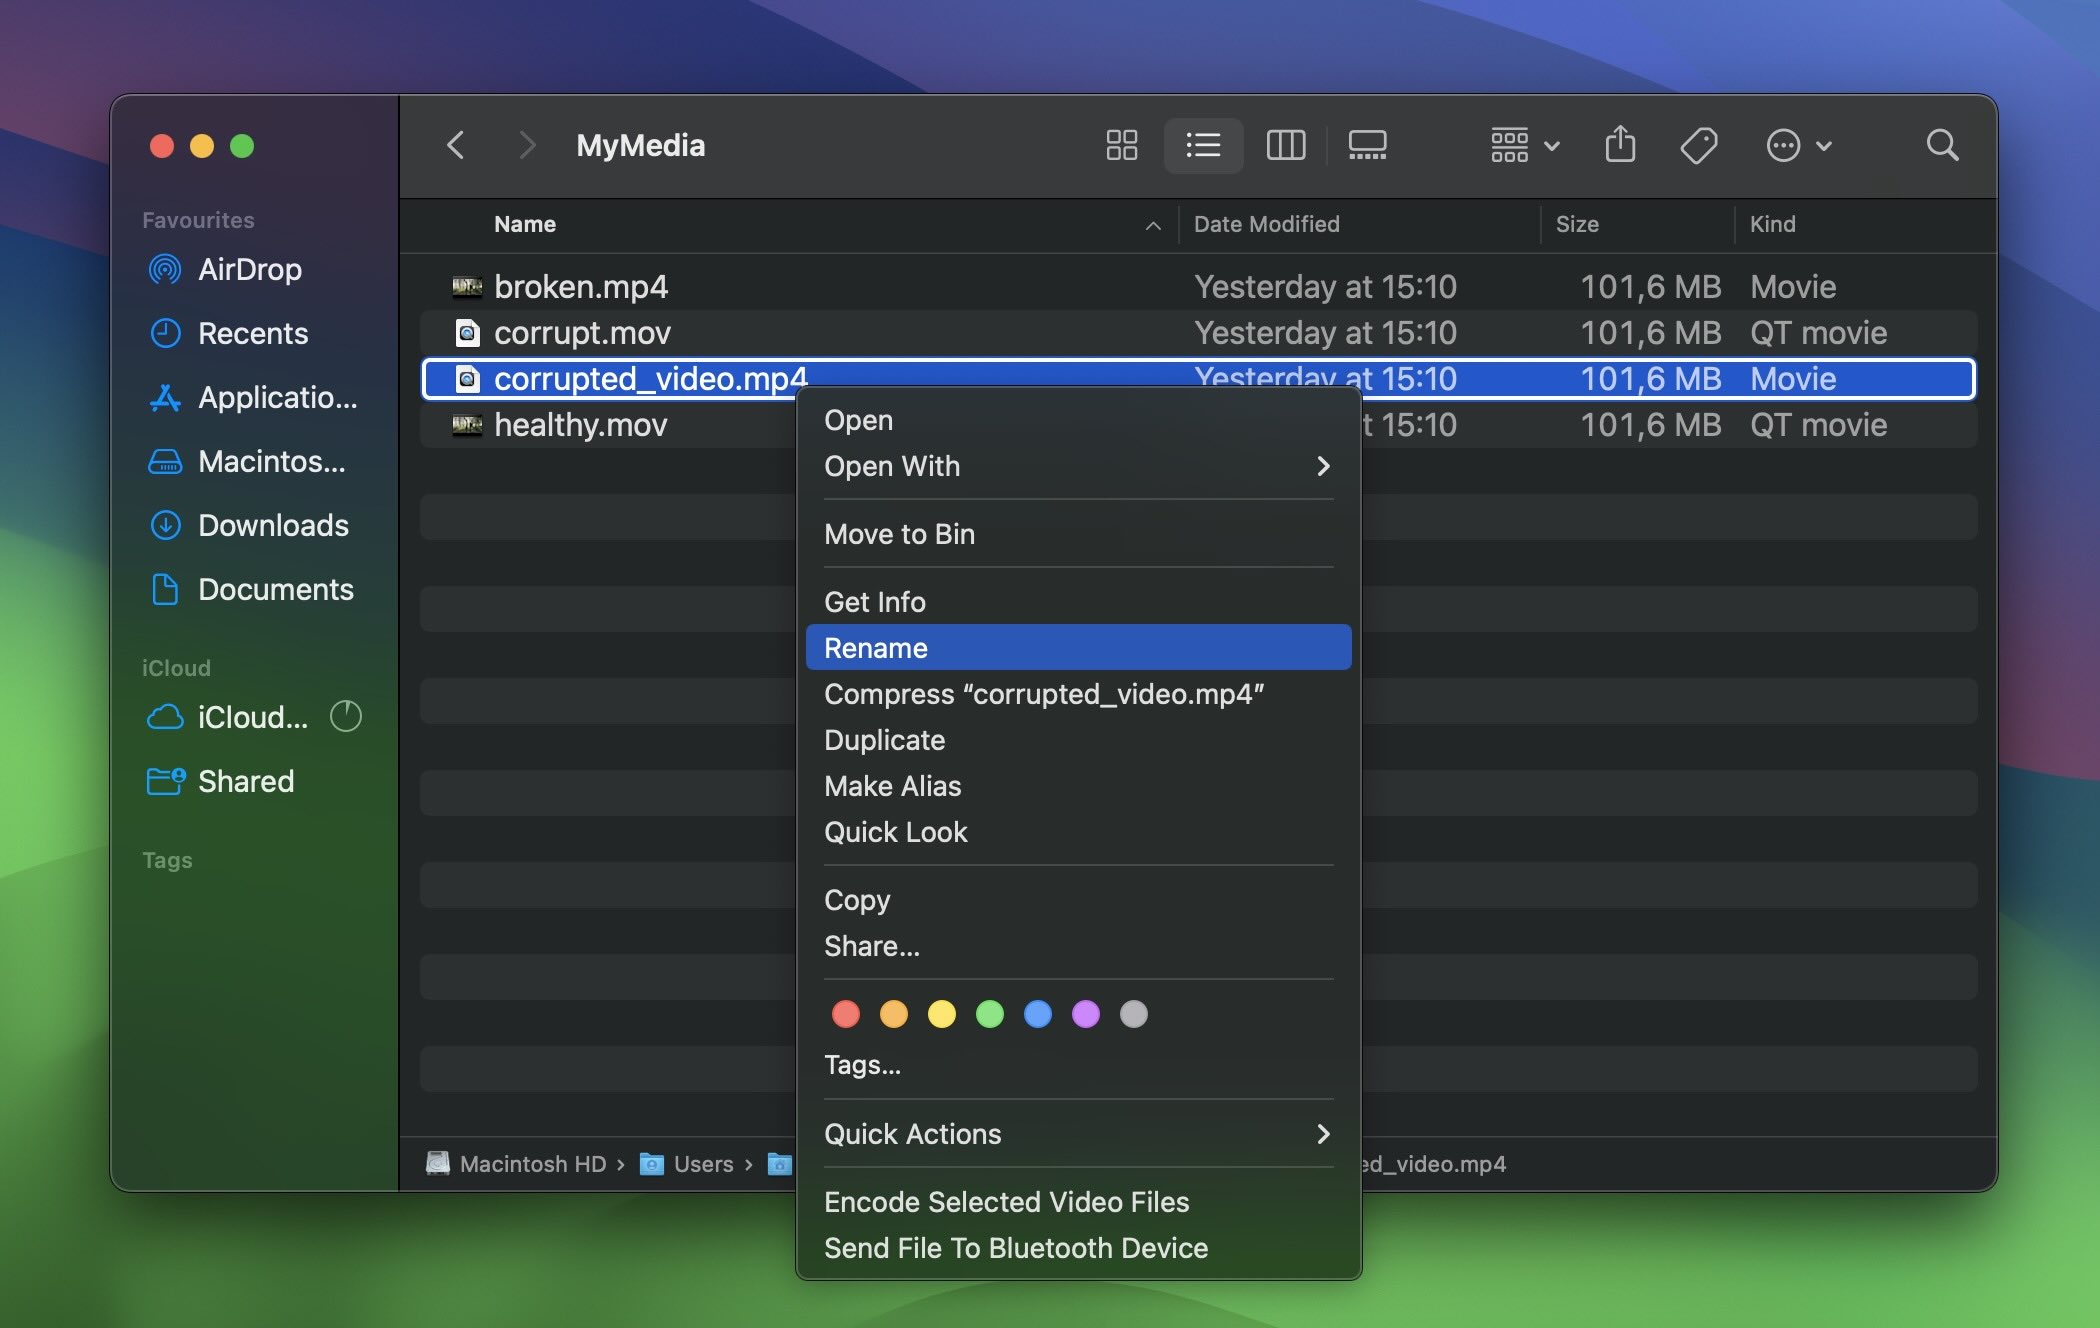
- Launch VLC and open the renamed file. If the video has minor corruption, VLC might automatically attempt to repair it.
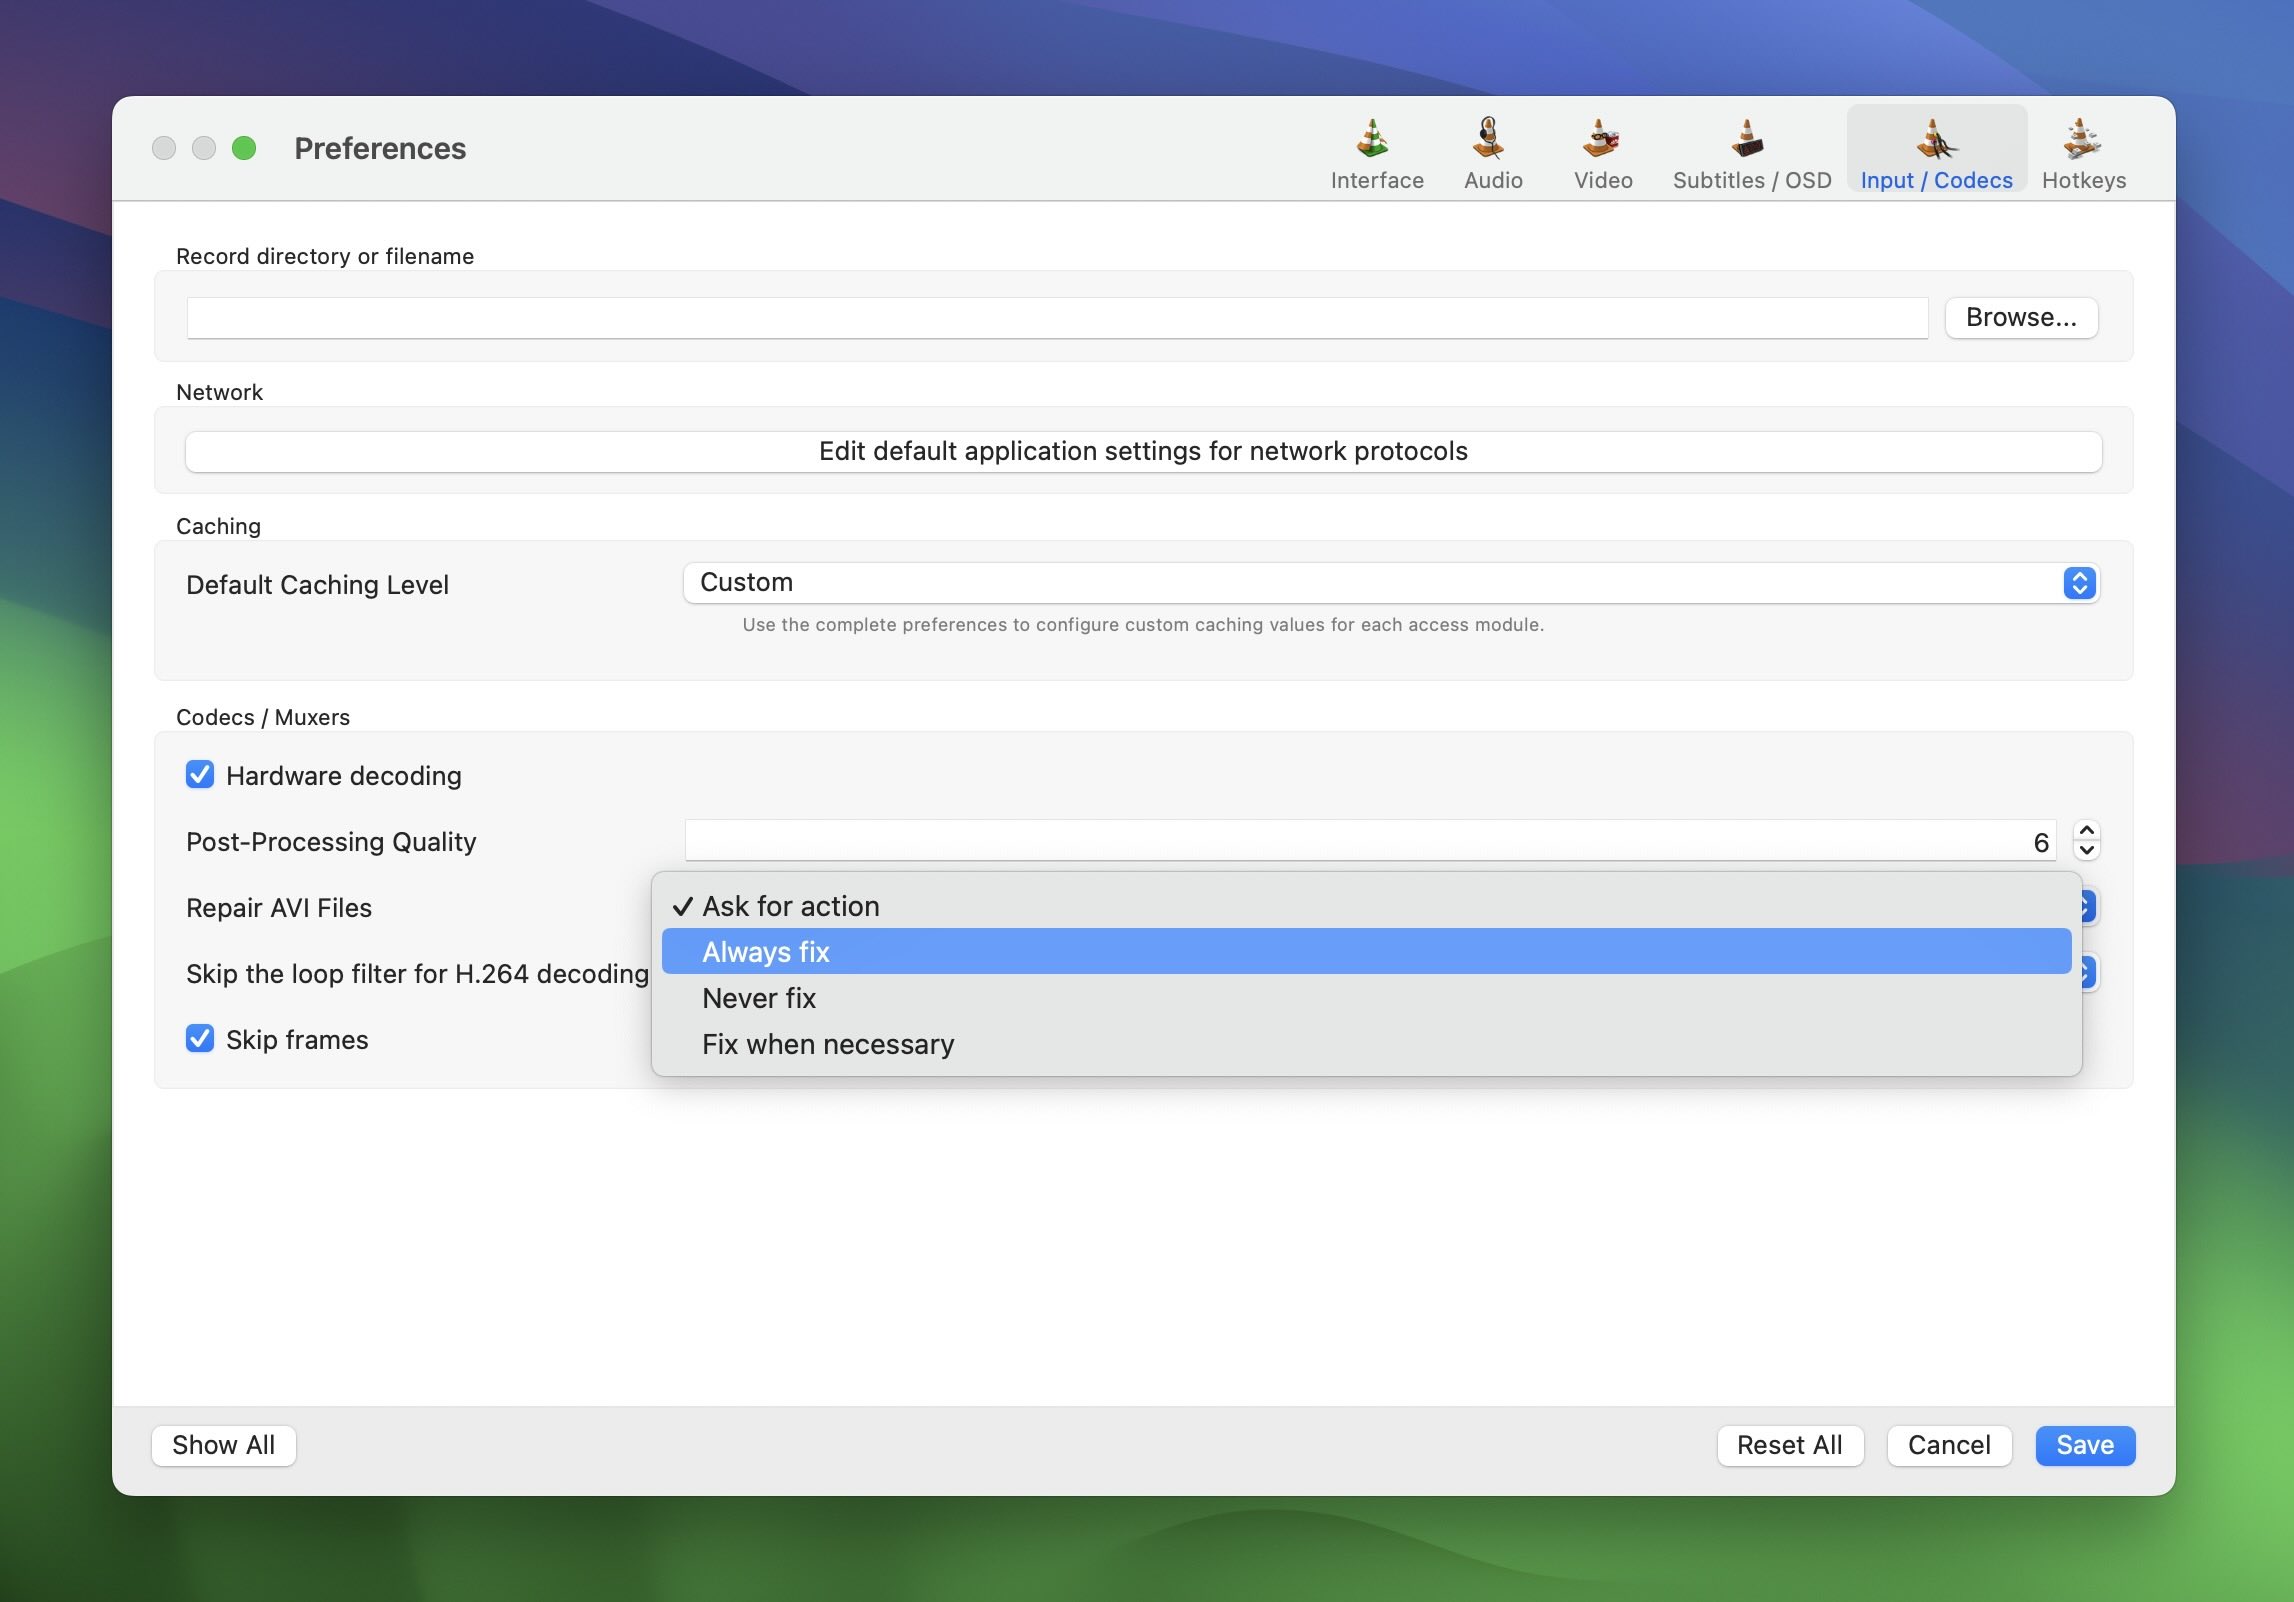
- If the video still won’t play, go to Tools > Preferences in the VLC menu. In the Input/Codecs tab, find the Damaged or Incomplete AVI File setting and select Always Fix. Save the changes and try to reopen the video.
Don’t Want to Go DIY? You MacBook Is Dead? Contact Data Recovery Service
We have seen many successfully recovered videos with the methods we covered above (including us). However, if you don’t want to do it yourself, or if your MacBook is completely unresponsive and you can’t even boot it up to get those videos off of it, consider professional help. Data recovery services specialize in retrieving data from damaged, corrupted, or dead devices, and they have the tools and expertise to handle situations that DIY methods can’t fix.
Most services won’t charge you unless they manage to get your video files back, so you have nothing to lose.
If you need help, we have a guide to help you determine the best data recovery service for you.
FAQ
Is it possible to recover deleted video files on a Mac?
In general, deleted videos can be recovered as long as they haven’t been overwritten. Overwriting can happen almost instantly after deletion, but it can also take hours, days, and even weeks—it all depends on the size and type of your storage device, its usage, and your luck.
As a Mac user, you have several ways to restore deleted videos that still remain in the system even after being deleted:
- 💿 Backups. Up-to-date backups can save you from even the most catastrophic cases of data loss. If you have Time Machine enabled on your Mac or have recently created a manual backup of your video files, then recovering the missing ones shouldn’t be a problem.
- 🗑 Trash. When you delete a file on macOS, the file is moved to the Trash folder. It then stays there for some time.
- 👨💻 Data recovery software. Files that are no longer in Trash physically remain on the storage device until they are overwritten. Data recovery software can help retrieve them, but your success depends on whether or not the data has been overwritten. Be advised that if you’ve actively used your drive after deletion, your chances of recovery are slimmer, as every operation on your Mac could overwrite parts of the drive where your deleted data is still stored. Additionally, if your deleted files were on an SSD drive, the chances of recovery drop significantly due to the TRIM function.
Can you recover permanently deleted files on Mac for free?
Yes, you can recover permanently deleted files on Mac for free. Some data recovery software applications like PhotoRec are free. With PhotoRec, you can recover an unlimited number of files. Others like Disk Drill offer a free trial.
Can I recover deleted videos on a MacBook without software?
Yes, you can recover deleted videos on a MacBook without using software, but only if they’re still in places like the Trash or backed up. Here are the main ways to recover deleted videos without software:
- 🗑 When you delete a video on macOS, it goes to the Trash and stays there for a while before being permanently deleted. If the video is still in the Trash, you can easily restore it.
- 💻 If you use Time Machine on your MacBook, you can restore deleted videos from a backup. Just enter Time Machine, go to the date before the video was deleted, and restore it.
- ☁️ If you use iCloud, Google Drive, Dropbox, or any other cloud service, your deleted video might still be in the cloud’s Trash or Recently Deleted folder. Log into your cloud account and restore the video if it’s still available.
If the video isn’t in the Trash and you don’t have a backup, you’ll likely need to use data recovery software or seek professional help to recover it.
How to recover deleted videos from an SD card on Mac?
There are many ways to recover deleted videos from an SD card on Mac. You can use data recovery software, Mac’s Time Machine, or even manually locate your deleted videos in the Trash Bin.
How to recover permanently deleted .mp4 videos on Mac?
To recover permanently deleted .mp4 videos, the best way is by using data recovery software like Disk Drill and PhotoRec.
This article was written by Mako Young, a Contributing Writer at Handy Recovery Advisor. It was recently updated by Roman Demian. It was also verified for technical accuracy by Andrey Vasilyev, our editorial advisor.
Curious about our content creation process? Take a look at our Editor Guidelines.