Like every component in your computer, hard drives can occasionally fail. What sets them apart from every other component, however, are the consequences when that happens. A hard drive itself is replaceable, but the data it holds often isn’t. And without an adequate backup system for your data, you put a lot at risk.
If you think something might be wrong with your drive or just want to check your Mac hard drive health, we’ve got five solid tools to help you out. We’ve split them into three categories: Basic, for simple built-in macOS checks; Beginner, for easy-to-use third-party apps; and Advanced, for more detailed diagnostics. Whatever your skill level, you’ll find an option that works for you.
5 Clues It’s Time to Check Disk Health on Your Mac
Your hard drive is the backbone of your Mac—it holds everything from your OS to your files. When it starts having problems, it’s only a matter of time before things go downhill. As you’ve probably guessed, there are some telltale signs that your disk might need a health check. Let’s break it down:
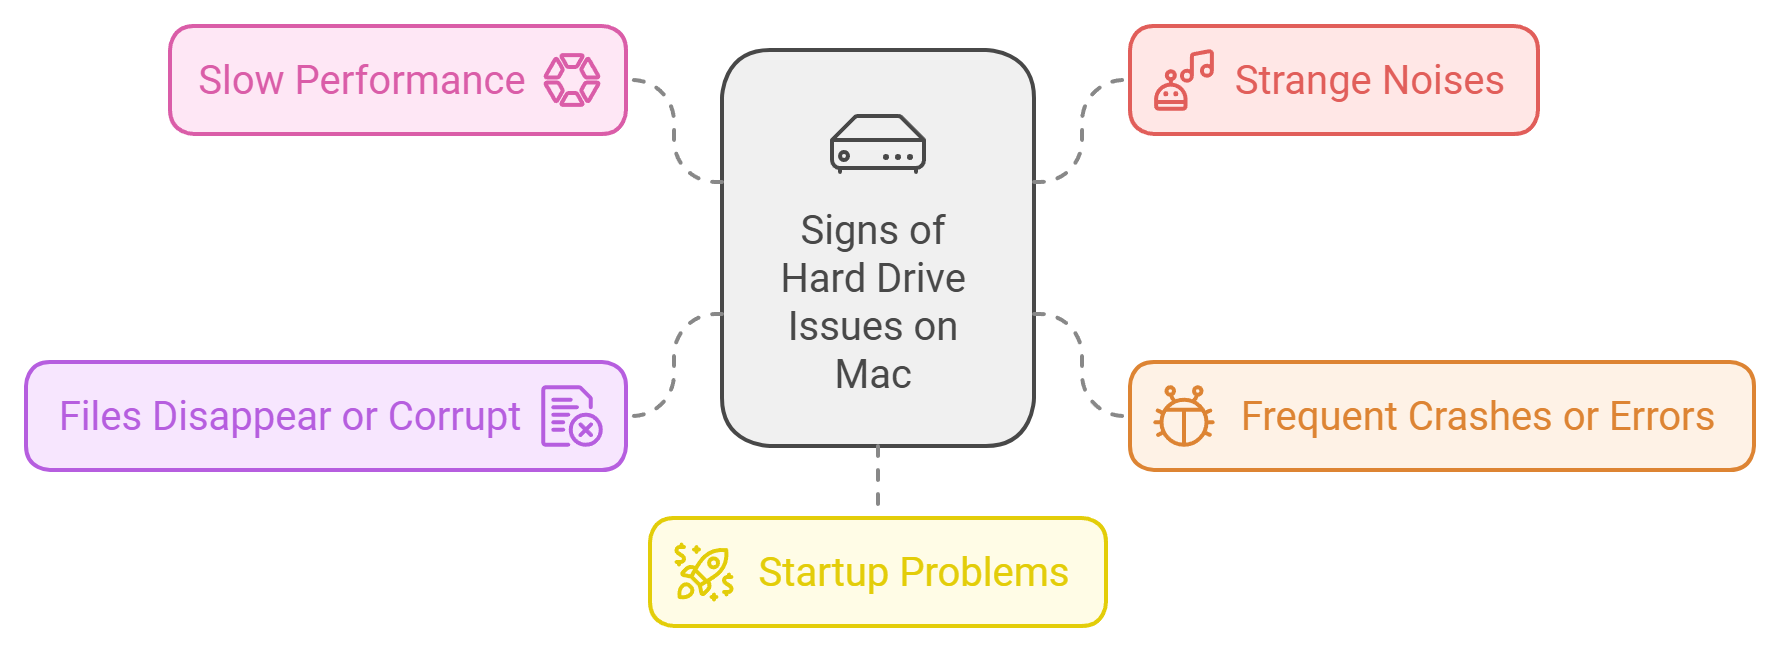
- The first and most common problem is slow performance. If your apps take forever to load, or your Mac freezes for no reason, it’s often a sign your hard drive is struggling.
- Next on the list, strange noises. If you hear clicking, grinding, or buzzing sounds coming from your Mac, it’s not normal—especially for an HDD. These noises usually point to physical damage or wear.
- Frequent crashes or errors? That’s another red flag. If you’re staring at the spinning beach ball or dealing with random restarts, your drive might be to blame.
- Ever had files disappear or show up corrupted? That’s a big one. Missing or damaged files often signal that your drive isn’t reading or writing data correctly.
- Finally, let’s talk about startup problems. If your Mac struggles to boot, it could mean the drive is on its last legs.
Even if you don’t notice any of these signs, it’s still a smart move to put your Mac HDD through a test every now and then. You don’t need to wait until you hear strange noises to check Mac hard drive health.
Think of it this way: just like you don’t wait for your car’s engine to fail before getting an oil change, you shouldn’t wait for your hard drive to fail before a health check.
Now, let’s take a look at how you can run a Mac disk health check.
Basic: Check the Hard Drive Health of a Mac with Disk Utility
You can scan a Mac disk with your Mac’s own built-in tool for that – Disk Utility. It’s a bit limited in functionality compared to some tools on the open market, but it still gets the job done, and is completely free.
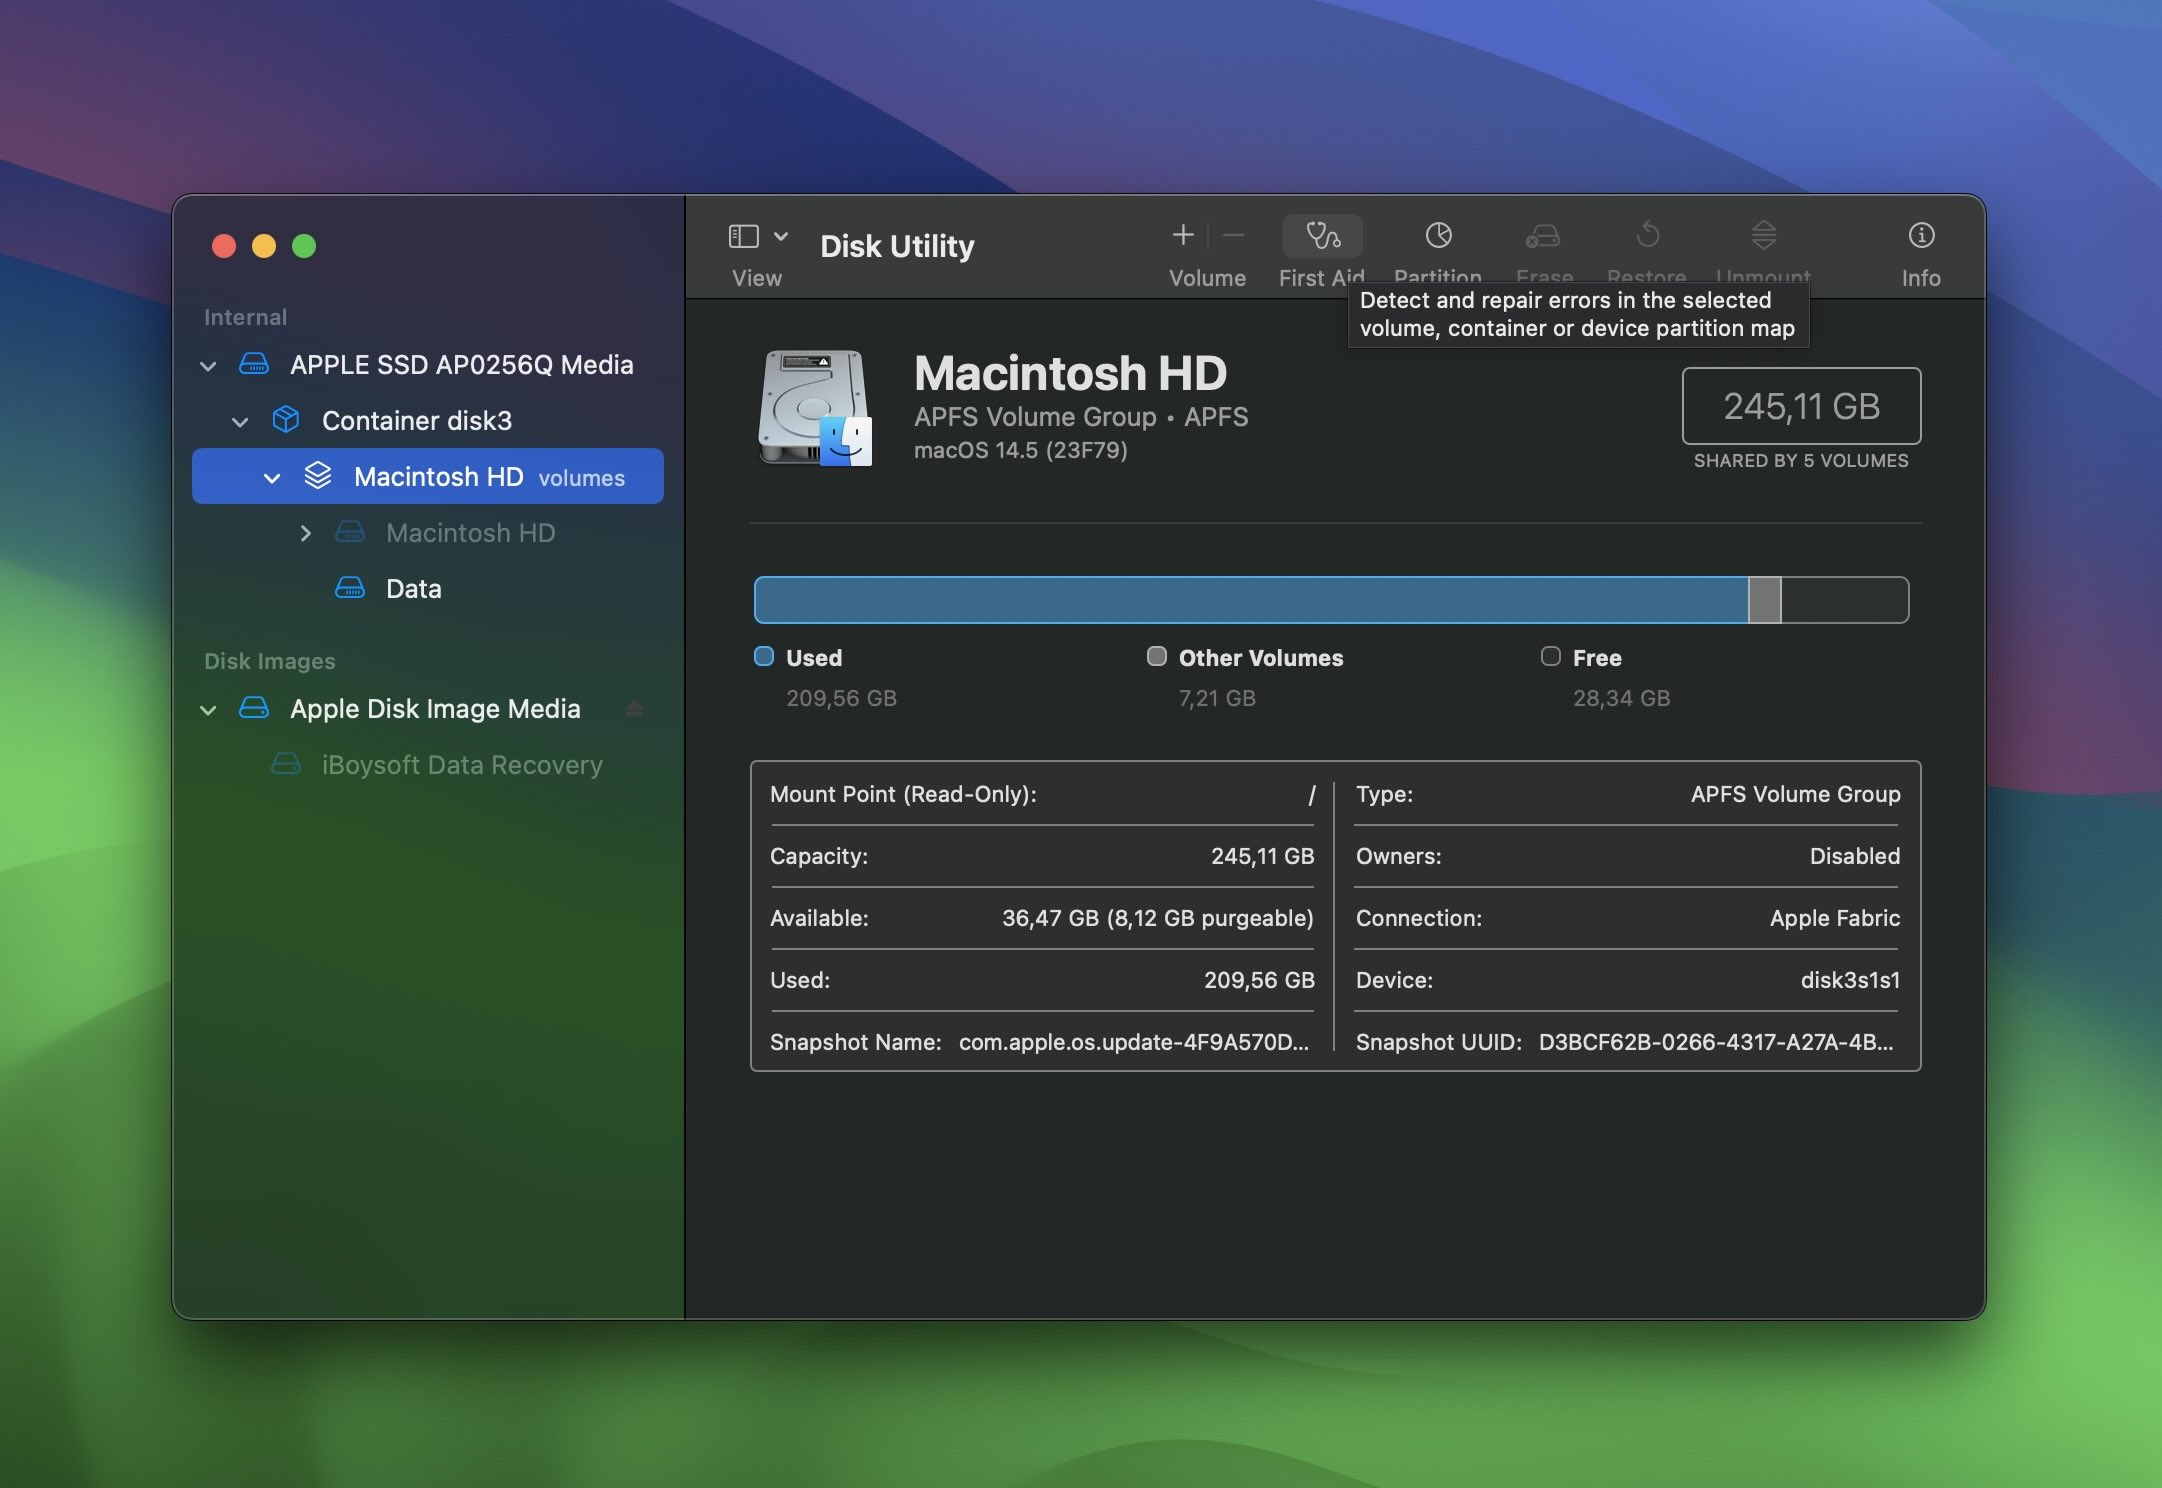
To check your Mac’s disk with Disk Utility, follow these steps:
- Start Disk Utility from Applications -> Utilities.
- Find your disk in the list on the left side (if you have multiple disks), and click on it.
- Click on Info in the top right.
- Look at the presented information.
Disk Utility will check the hard drive on your Mac for errors. All results will be listed in the text field in the middle of the window – pay special attention to any red messages. Those indicate errors. Not every error will be critical, and some can be safely ignored, but you should still read over the list in detail.
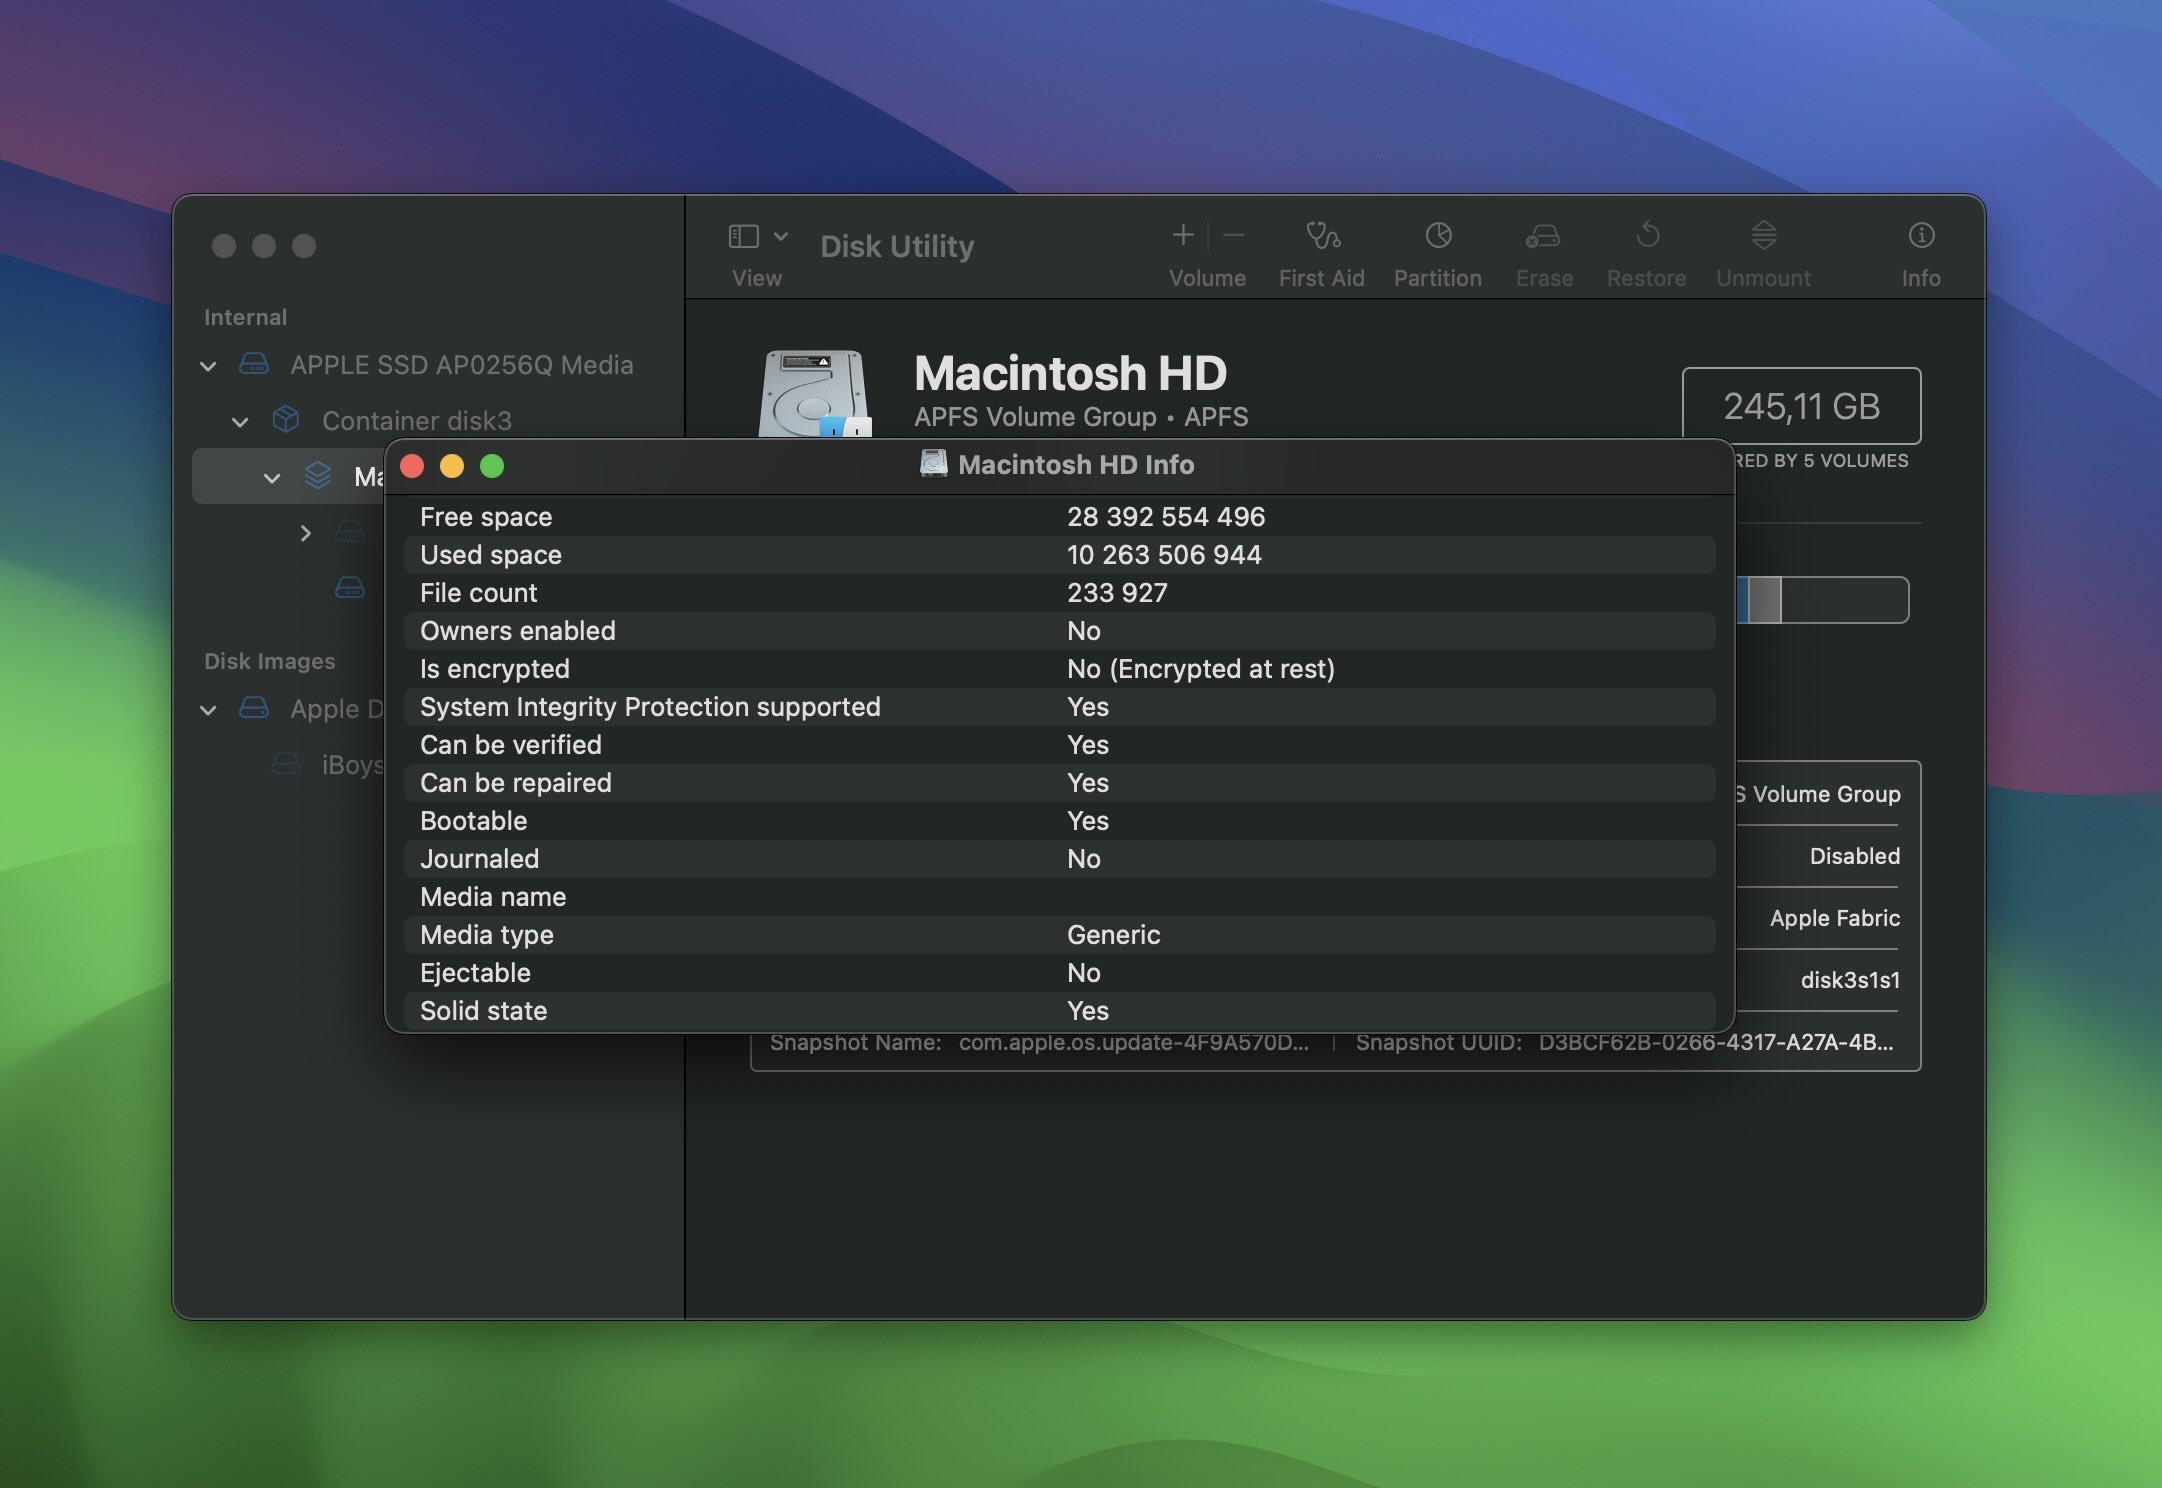
Here’s what you can learn about your drive’s health from Disk Utility:
- At the bottom, you’ll see the SMART status field. It may say Not Supported, which means this drive doesn’t support SMART monitoring. If SMART is available and says Verified, your drive is in good shape.
- The Available Space and Free Space sections show how much room is left. Keep some free space for smooth performance; if you running low, it’s time to clear some files.
- Fields like Can be repaired and Can be verified confirm that Disk Utility can run checks/repairs on this drive if needed.
From this snapshot, our drive doesn’t show any obvious issues, but since SMART monitoring isn’t supported, we’ll need to use third-party tools for deeper checks.
When we talk about Disk Utility, we can’t skip First Aid. It’s designed to handle logical errors, such as file system inconsistencies or directory issues, and it’s often effective at resolving these problems. To use it, in Disk Utility, select your drive, and click the First Aid button at the top. While it won’t fix physical issues, it’s a reliable first step for software-level errors.
What we liked: Disk Utility is intuitive and easy to use, and available on every Mac by default. This makes it a good option in a pinch.
What we didn’t like: Doesn’t offer as many features for scanning and repairing your disk compared to professional apps on the market, especially if you encounter more serious problems.
Beginner: Test Your Mac’s Hard Drive with Third-Party Tools
Now let’s talk about something more sophisticated: third-party tools for a Mac disk health check. These apps go further than Disk Utility, with more detailed diagnostics and real-time monitoring. Tools like Disk Drill and DriveDx make it easy to keep tabs on your drive’s condition. They’re user-friendly but packed with the features you need for a deeper look at your storage.
Option A: Disk Drill
Disk Drill is a data recovery utility that comes with a variety of extra features, including the ability to monitor your drives and check the hard drive health on a Mac. The application can also provide you with information about the current S.M.A.R.T status of your drive.
Here’s how to use Disk Drill to test your hard drive:
- Install and run Disk Drill for Mac.
- Go to S.M.A.R.T Monitoring.
- Select your drive, and Click Turn On if it’s not already enabled.
- You’ll see the drive’s S.M.A.R.T information presented on the right side.
Disk Drill can also help you recover files you’ve lost to accidental deletion. Try running a scan with it to see what comes up – just go to Storage devices on the left. Normally, no files should end up deleted due to disk failure, but it is possible in an extremely small number of cases. If parts of the disk that contain information about which sectors are occupied by files and which are free get corrupted, this could lead to files being incorrectly marked as deleted.
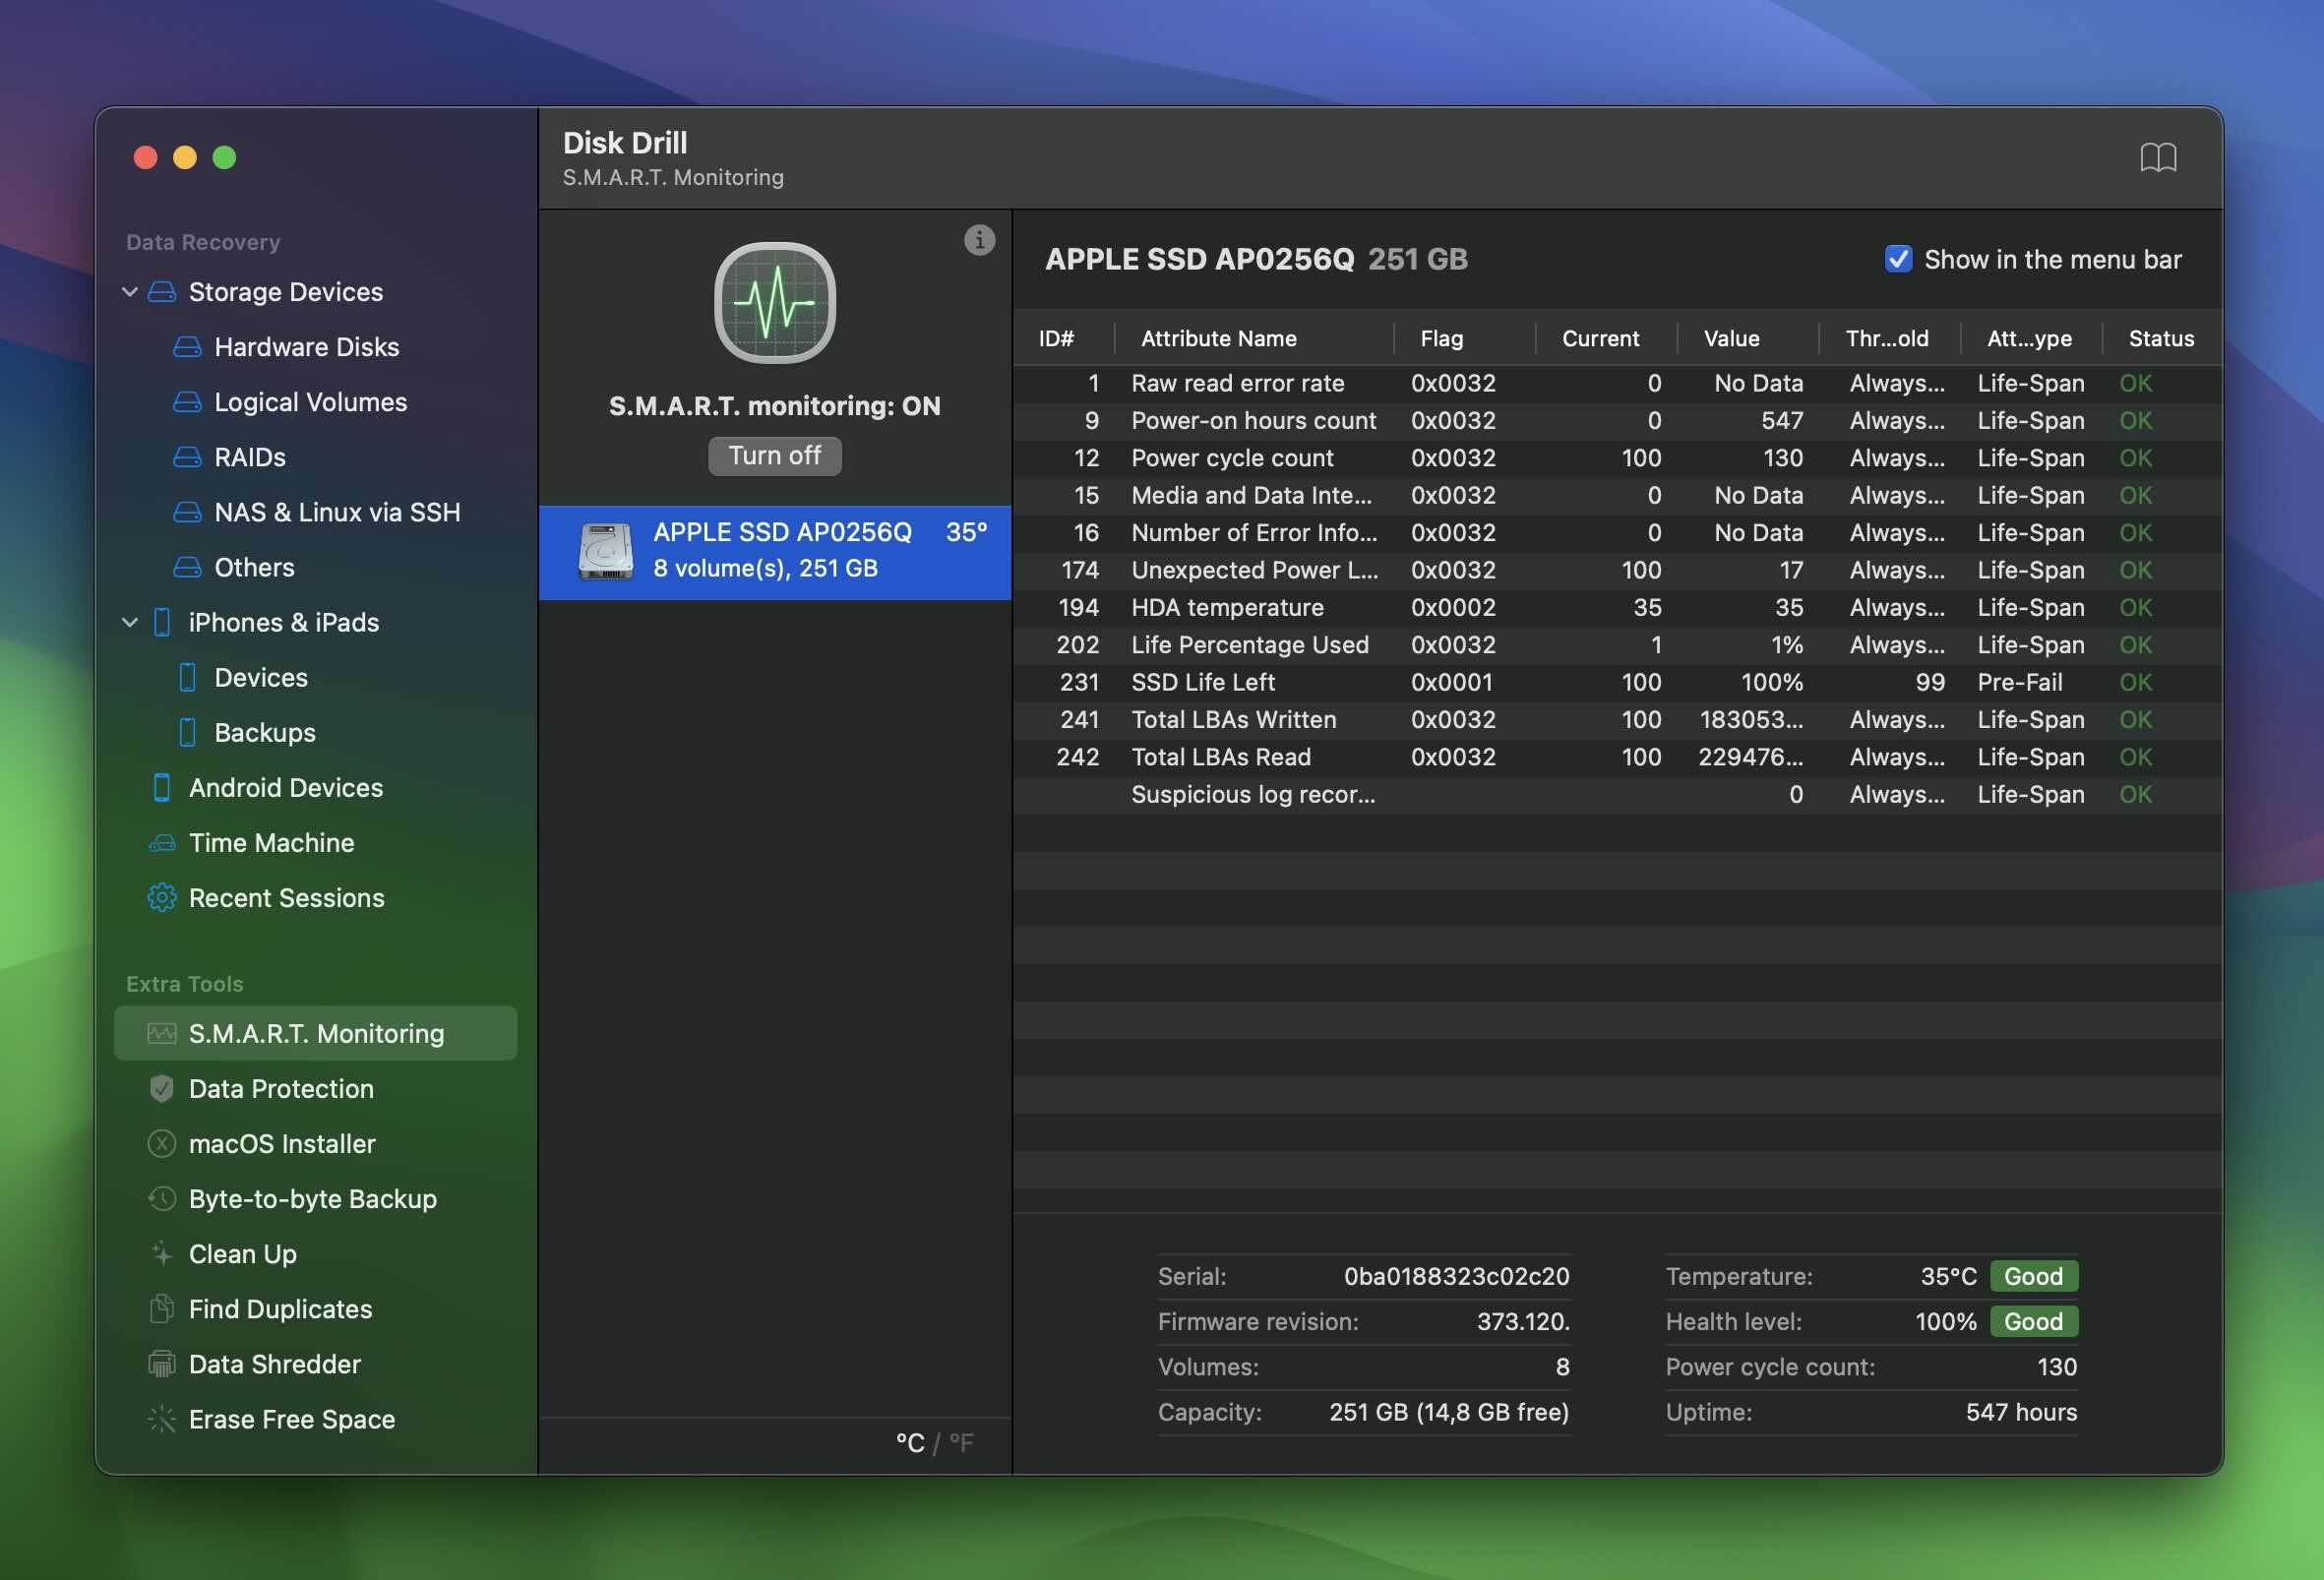
As you can see in the snapshot, the drive is listed as “Good” with a 100% health level, it’s in excellent shape. Disk Drill’s SMART Monitoring lays out important details like Power-On Hours (728), Power Cycle Count (141), and Life Left (100%); the temperature reads 40°C, also marked as “Good,” and key indicators like Raw Read Error Rate and Unexpected Power Loss show “OK” statuses, signaling no issues.
You don’t have to be an expert to understand every parameter listed. Frankly, you don’t even have to do anything—Disk Drill will automatically check your Mac hard drive health in the background. If it detects any problems, it will notify you right away, so you won’t need to run manual checks anymore. As long as you have SMART Monitoring activated, the tool will keep an eye on your drive.
What we liked: Detailed analysis and direct support for S.M.A.R.T for Macs that still have it. Advanced recovery features that give you the best chance to retrieve deleted files.
What we didn’t like: Can seem a bit overwhelming for new users until they get accustomed to the interface – but well worth the effort to adjust.
Option B: DriveDx
DriveDx does one job, but it does it better than many tools on the market. The application is designed to help you monitor the health of your drives, and features a simple but powerful interface that provides you with immediate access to a wide range of statistics about your drives.
To check your drive health with DriveDx, follow these steps:
- Install DriveDx and launch it.
- On the left side, you’ll see a list of your current drives. Click the one you’re interested in.
- The right side of the window will be populated with information about your drive.
- Scroll through the list, paying attention to the Status column. Look for any indicators that are below 100%, or marked in a color other than green.
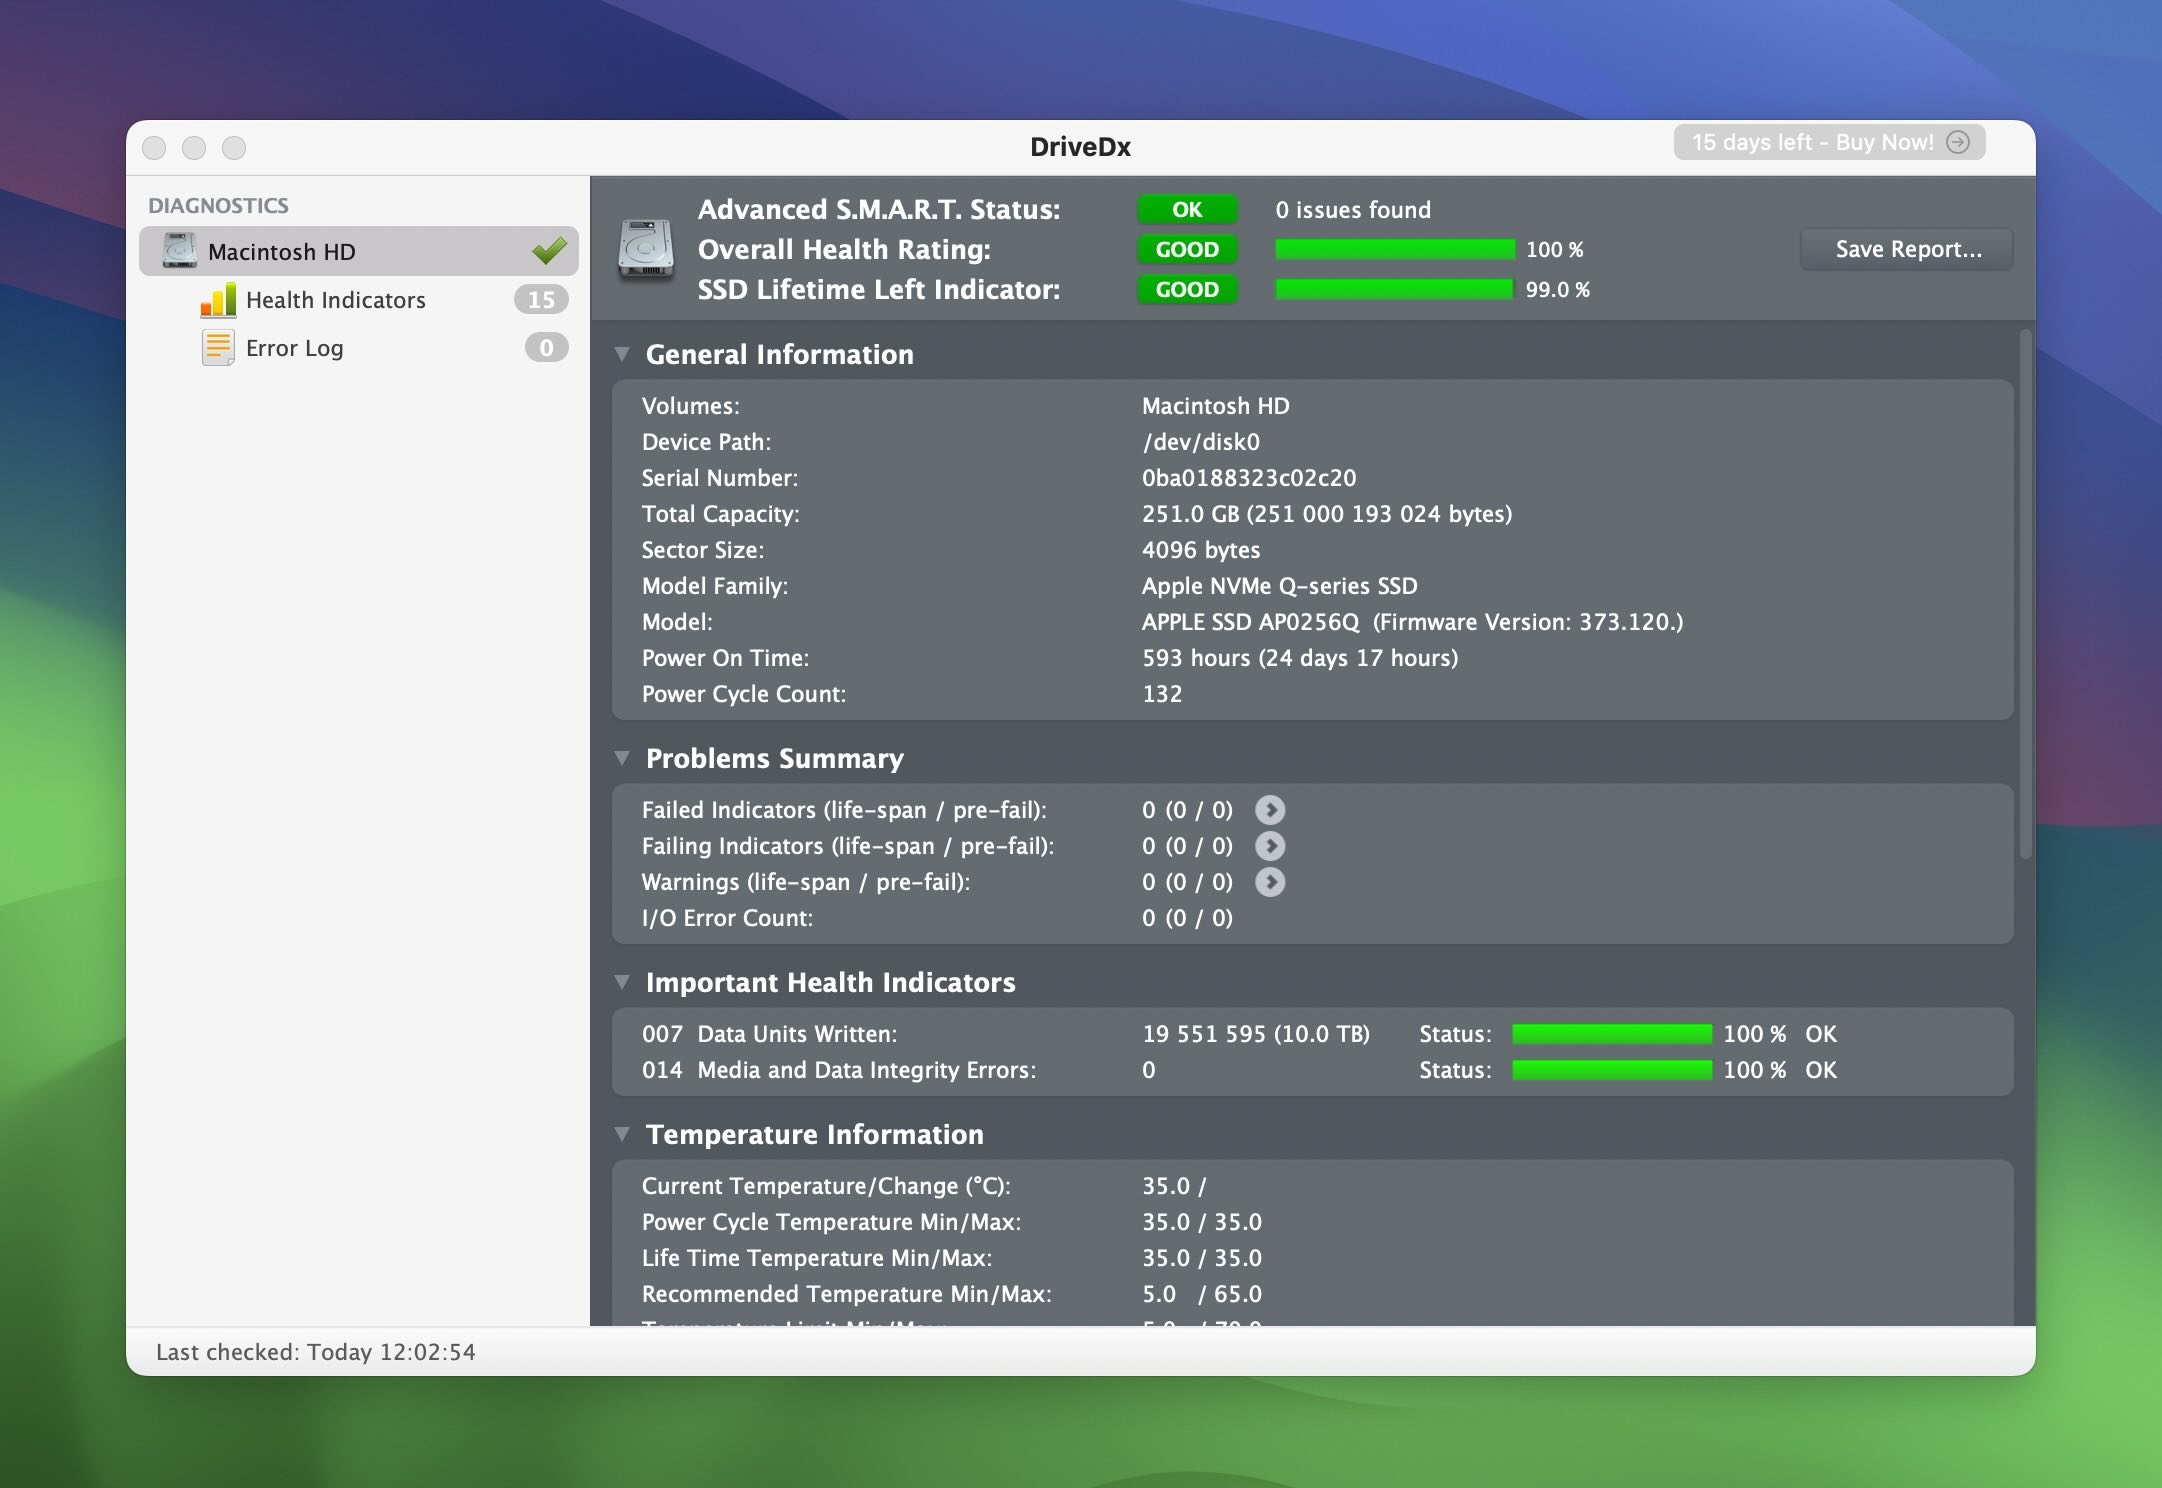
From the screenshot, you can see that the drive is in great shape. The Advanced S.M.A.R.T. Status is marked as “OK,” and both the Overall Health Rating and SSD Lifetime Left Indicator show “Good” at 100% and 99%, respectively. The Problems Summary shows no issues, and all key health indicators, like data integrity and temperature, are marked “OK.”
It’s no surprise that Disk Drill gave the same results. Both tools confirm the drive is healthy and performing as expected.
What we liked: Fast and simple to use, perfect for users of any skill level.
What we didn’t like: Quite limited in functionality compared to other products.
Advanced: Check Mac Hard Drive Using Advanced Diagnostic Tools
If you look for something slightly more advanced, these tools can help you check your drive in even more detail, and provide you with more control over the process. Keep in mind that some of these require advanced skills, so don’t attempt them unless you know what you’re doing.
Option A: GSmartControl
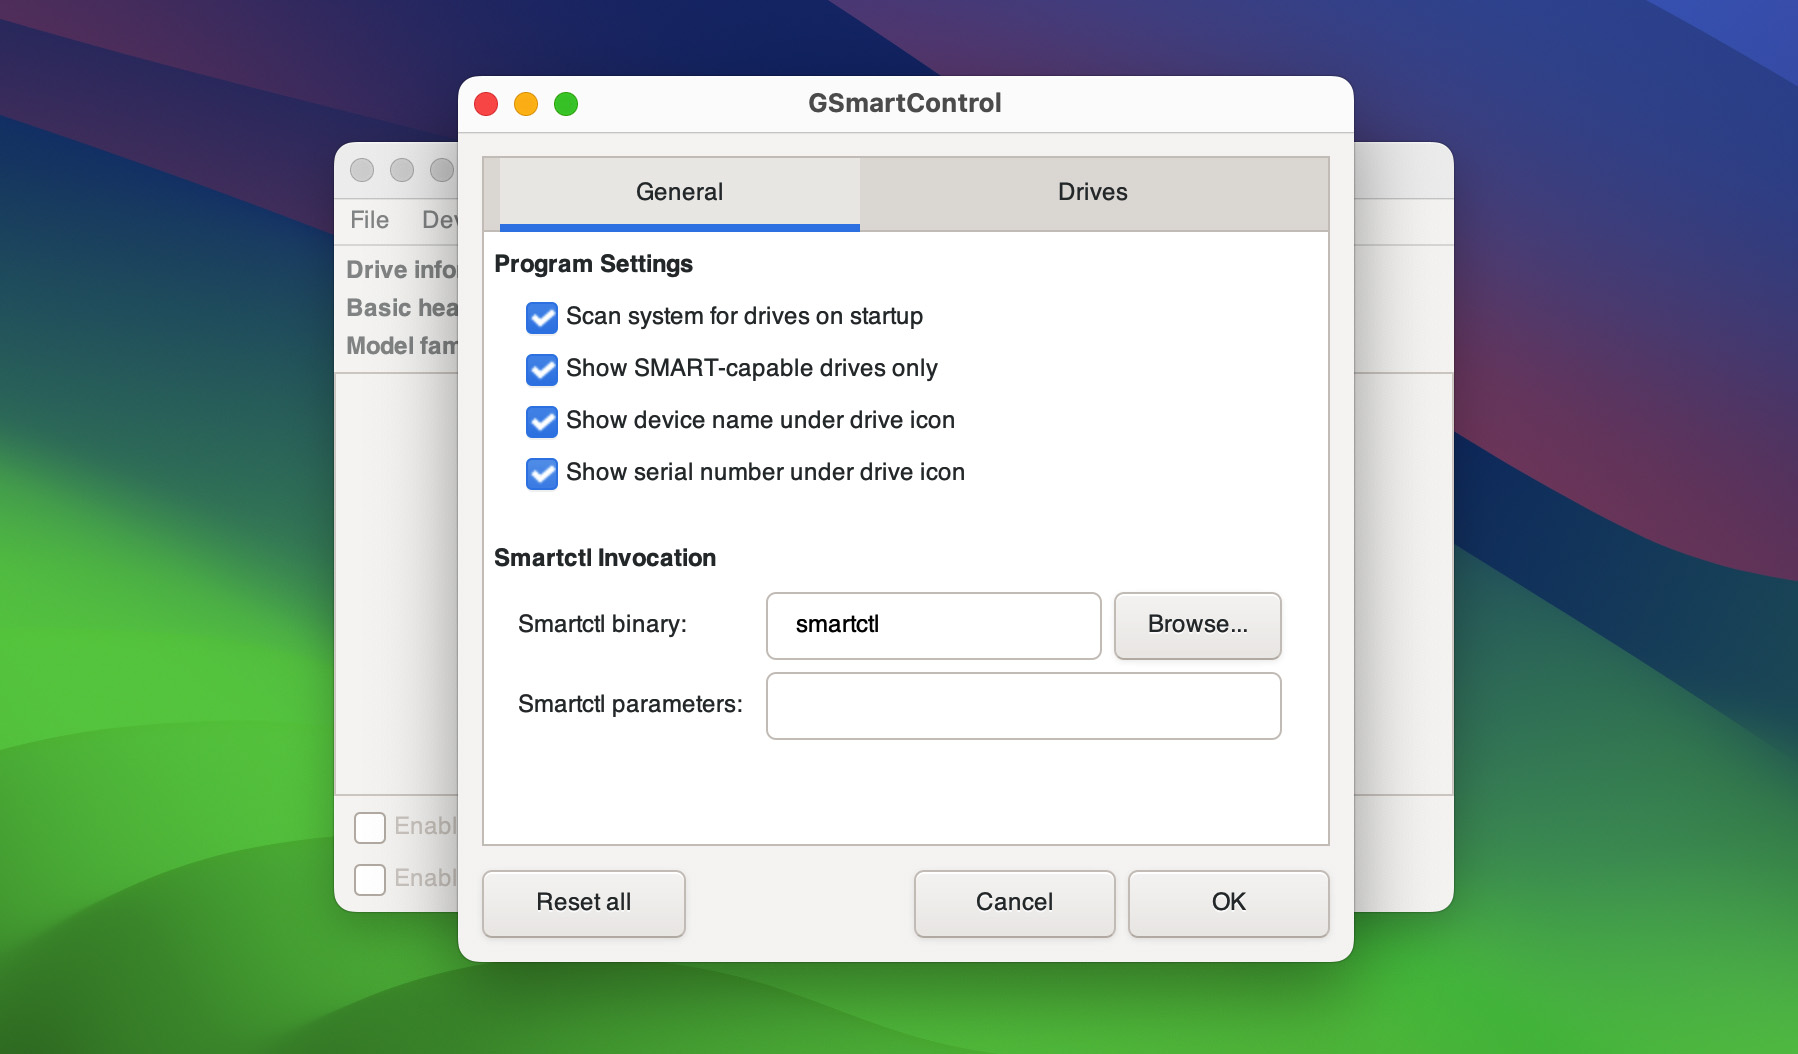
GSmartControl is built on a popular package, smartctl, which is part of smartmontools. It provides a graphical interface to the console application, so you can more easily take advantage of its features without having to type long commands in your terminal and stare at the results. It’s one of the easier ways to check a Mac hard drive for bad sectors.
- Install GSmartControl and launch it.
- You will be presented with a list of your drives. Right-click the one you want to verify, and click View details.
- On the next screen, you’ll see several tabs that will show you various details about your drive. The most interesting ones right now are Attributes and Error log.
- Under Attributes, you will see a full list of all technical attributes of your drive. Pay attention to Reallocated Sector Count, Offline Uncorrectable, and any row that has pre-failure in its Type column. Any rows highlighted in red/pink should also be checked. You can hover your mouse over different rows to see an explanation of their contents.
- If you want to perform more extensive tests, go back to the main screen, right-click your drive, and select Perform Tests. Keep in mind that those can take several hours.
What we liked: Lots of technical information presented with practically no filters – everything you might need to know is there.
What we didn’t like: Can be very chaotic and confusing for inexperienced users, and even for some experienced ones who don’t know what information they’re looking for specifically.
Option B: smartmontools
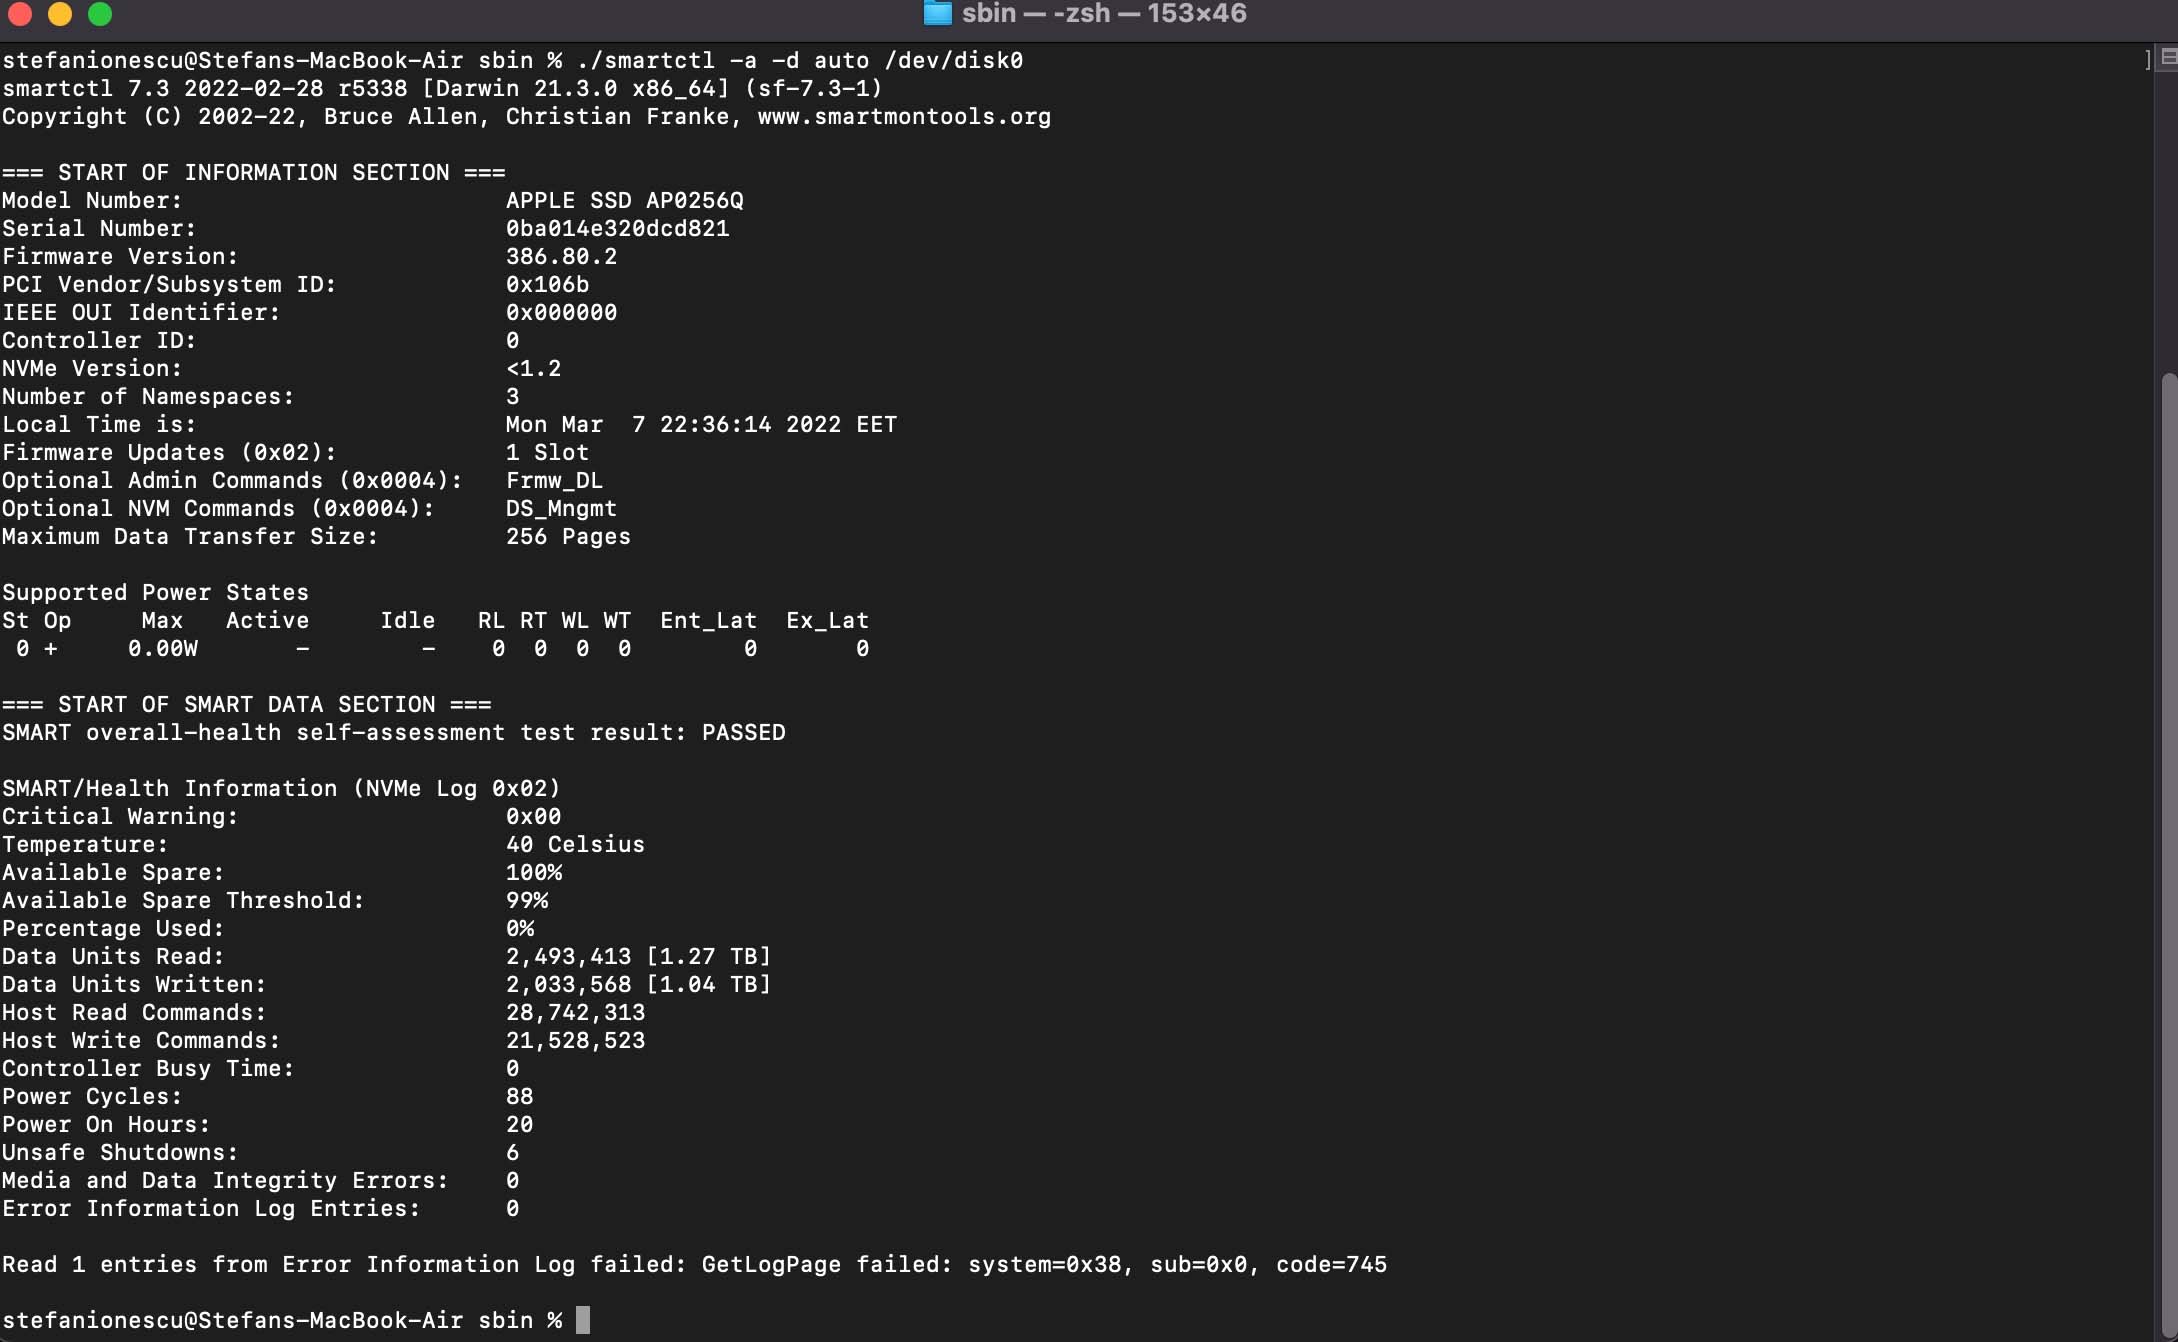
Unlike all other options on this list, smartmontools works from the command line. This means you’ll have to get your hands dirty in the terminal to use it, which may not be ideal for every user. But if you prefer the terminal for whatever reason, or you’re currently limited to it due to an emergency situation, this can be a great option.
Assuming your drive is in /dev/disk0, here is how to use smartmontools to check its health:
- Type sudo smartctl -a -d auto /dev/disk0.
- This will provide you with the device’s current S.M.A.R.T parameters.
- Type sudo smartctl -d auto -t short /dev/disk0. This will start a “short” test of your drive, which means that it will run some basic checks but won’t dig into too much detail.
- Several other test modes are available – short, long, conveyance, and select. Long tests, as their name implies, take longer to complete, but check your drive in more detail. Conveyance tests specifically check for errors related to physical damage, typically associated with transportation. And with select, you can choose a specific range of addresses to be checked.
What we liked: Provides a lot of control over the testing of your drive’s health, and plenty of technical details.
What we didn’t like: Not suitable for inexperienced users at all.
What Should I Do If a Drive Health Scan Indicates Problems?
As you can see from our screenshots, we don’t have any problems with our drive—everything shows “Good” and “OK.” But what if that’s not the case for you? If your scan results don’t look as reassuring, the first thing you should think about is your files. Find an external drive or use a cloud backup service like iCloud to transfer your data somewhere safe. But what if the drive’s condition is too bad for a simple copy-and-paste? We’ll show you what can be done.
Create Byte-to-byte Backup and Recover Data
We’ve already mentioned that Disk Drill is primarily a data recovery tool, and this is where it truly shines. It’s especially effective for problematic Mac drives, thanks to its Byte-to-Byte Backup feature. This tool creates an exact copy of your drive, it captures everything—including corrupted or unreadable sections—so no data gets overlooked.
Here’s why this feature matters: when a drive is unstable, trying to move files the usual way can make things worse. A byte-to-byte backup preserves the drive’s current state, and lets you work with a safe copy instead of the damaged original. This approach is perfect for drives with physical problems, bad sectors, or corrupted file systems.
Disk Drill can also recover data from drives that don’t appear in Finder but still show up in Disk Utility, which often happens when the drive has issues or errors.
To create a byte-to-byte backup with Disk Drill:
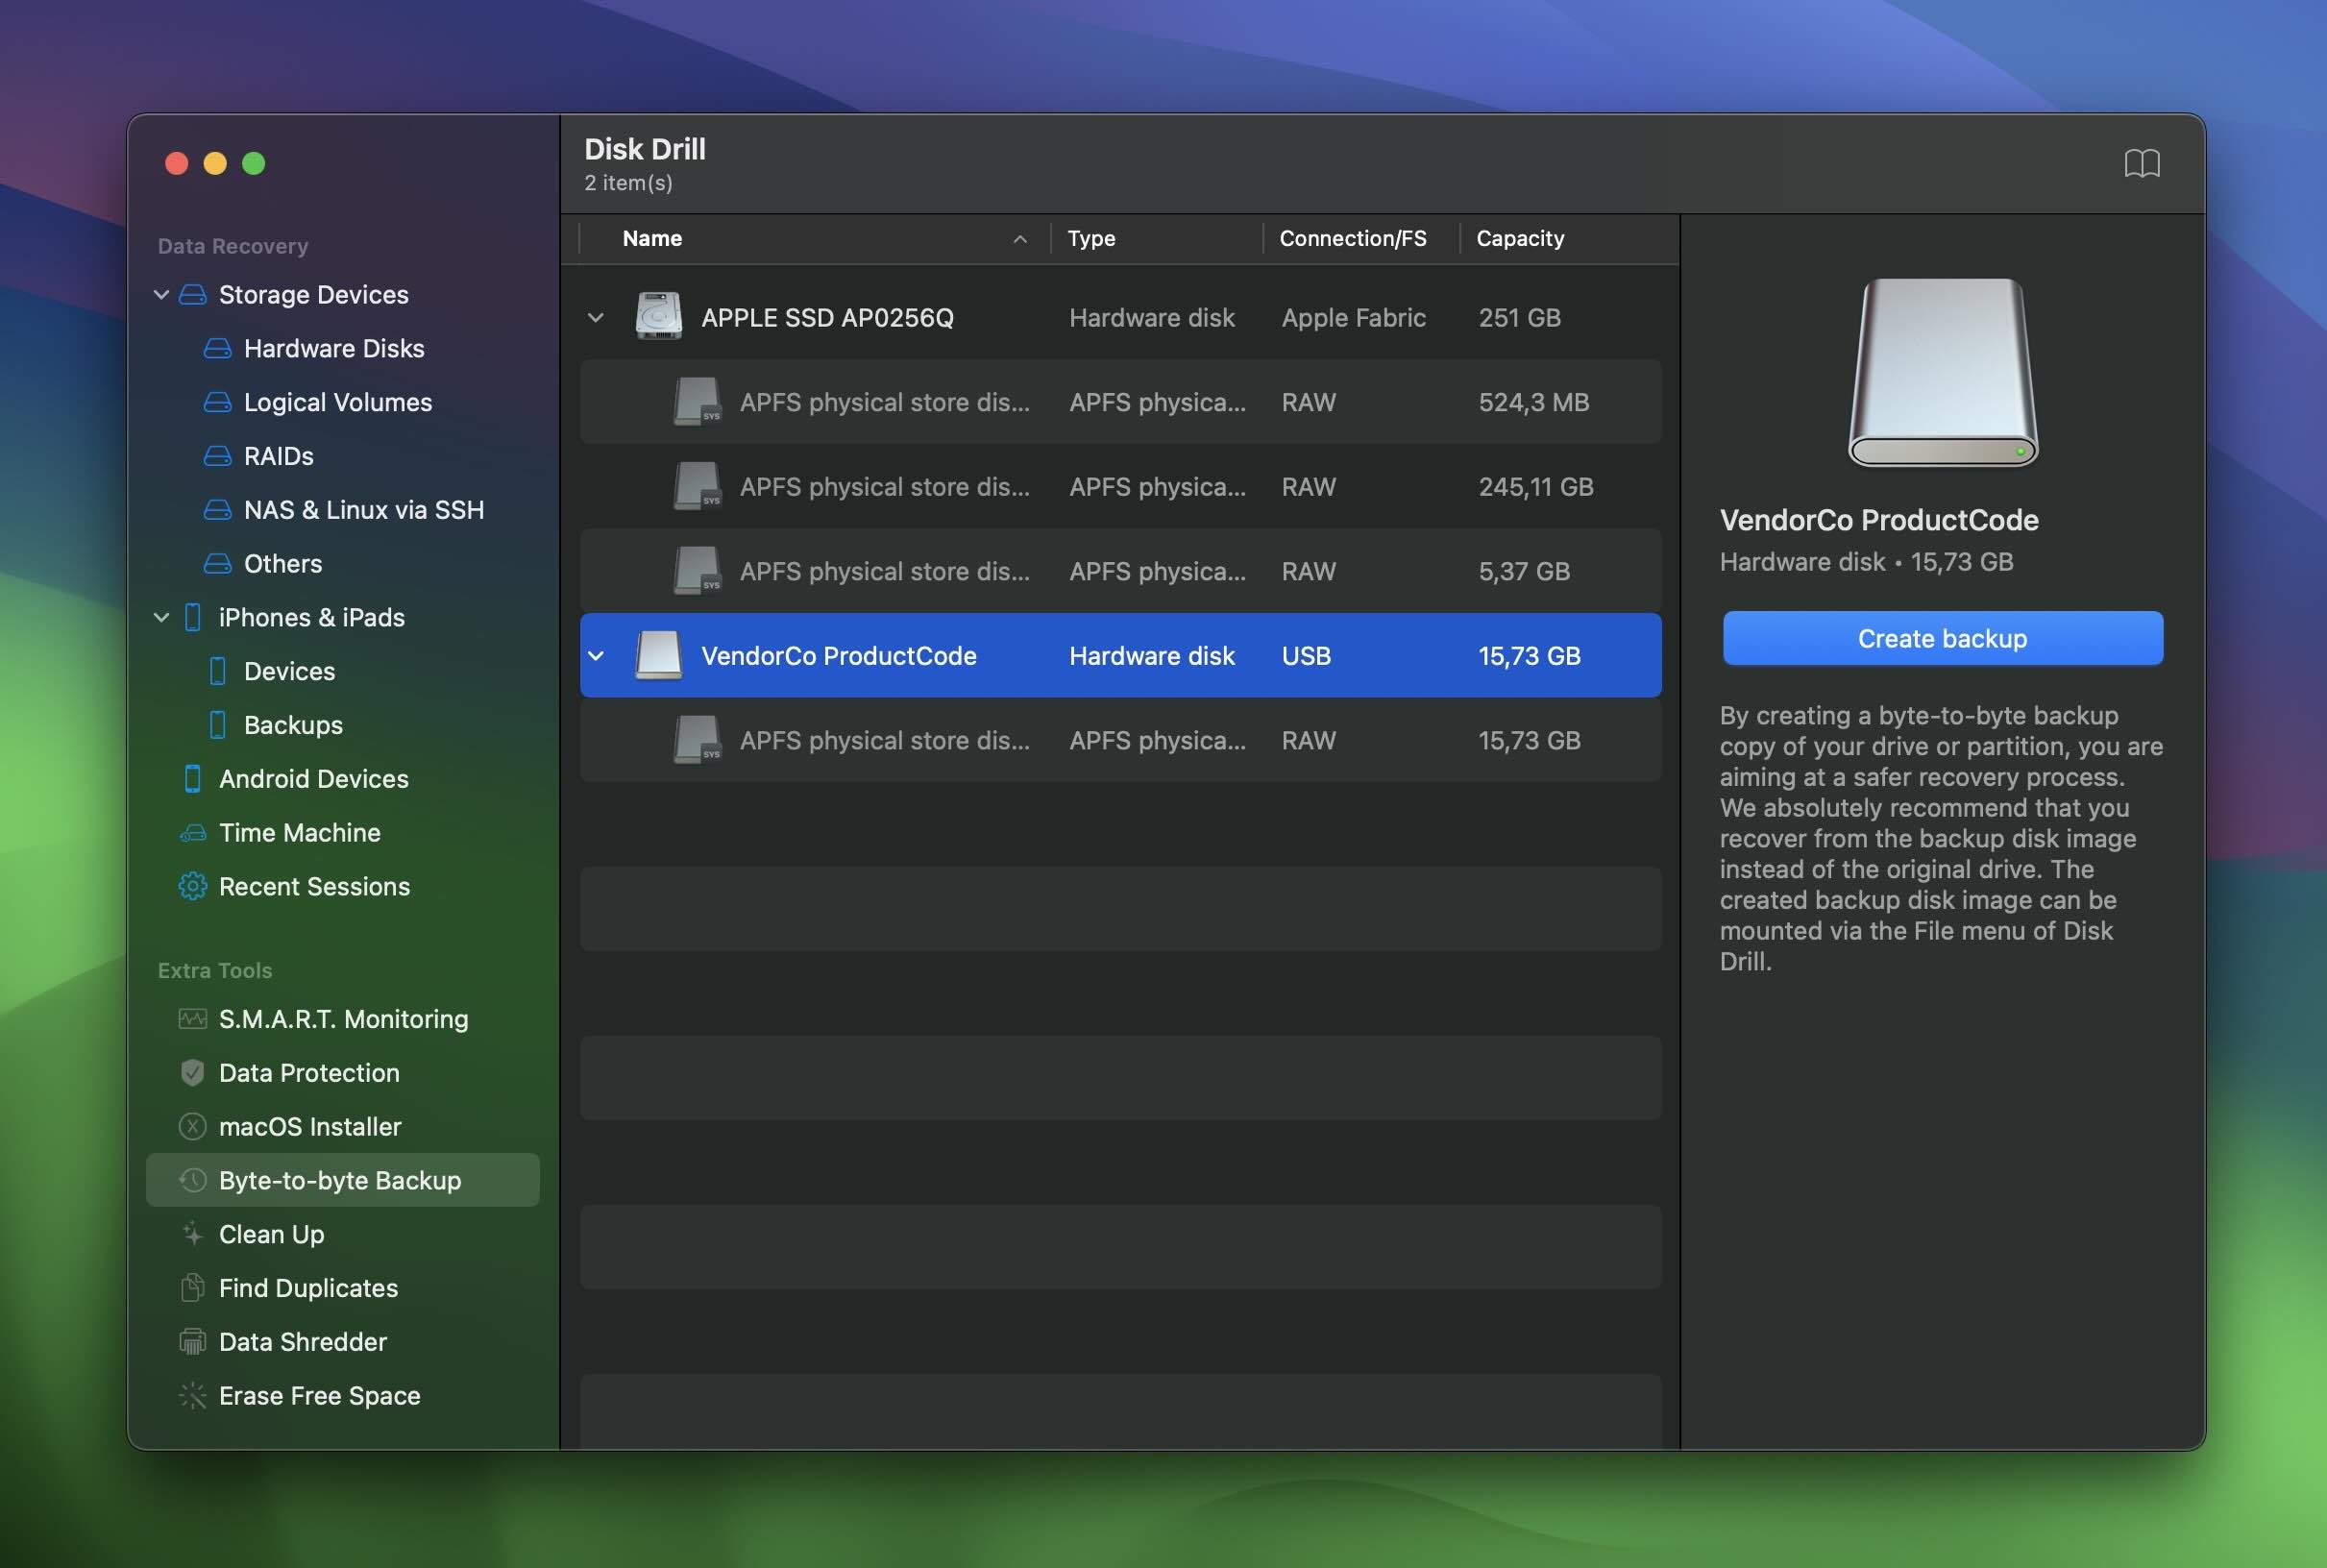
- Go to the Extra Tools section and choose Byte-to-Byte Backup.
- Select your Mac drive from the list.
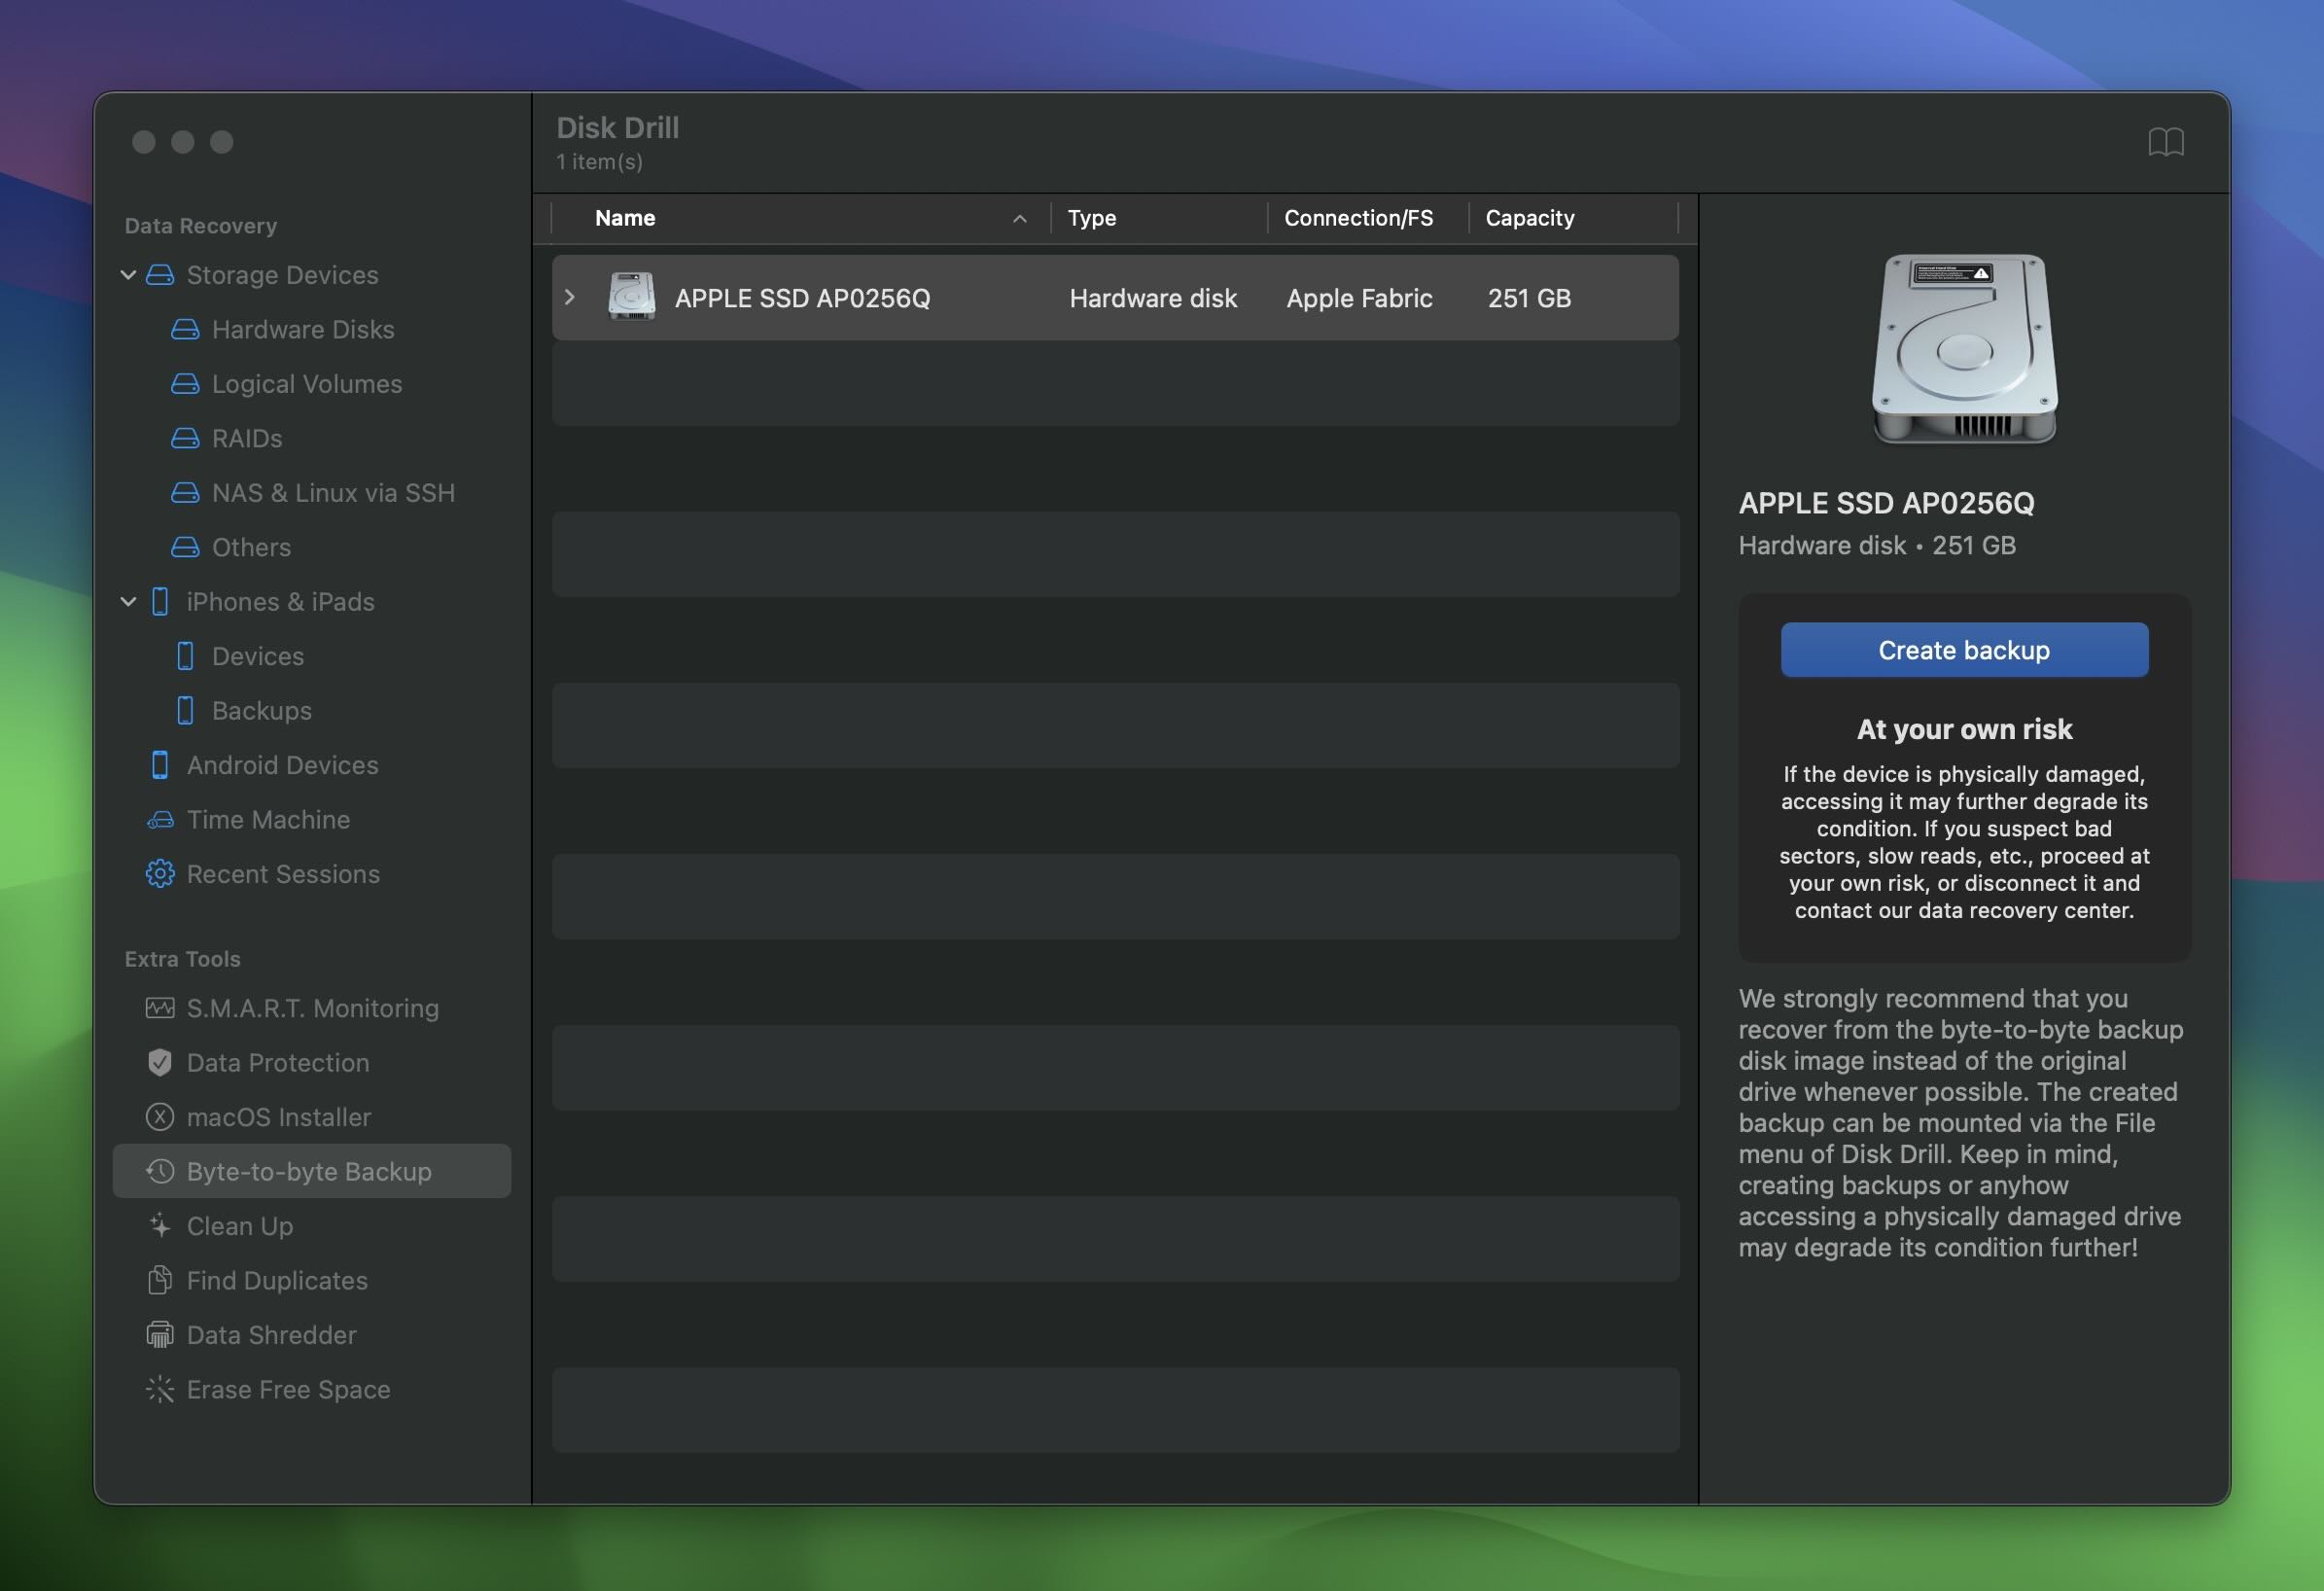
- Pick a destination for the backup—an external drive with plenty of free space works best.
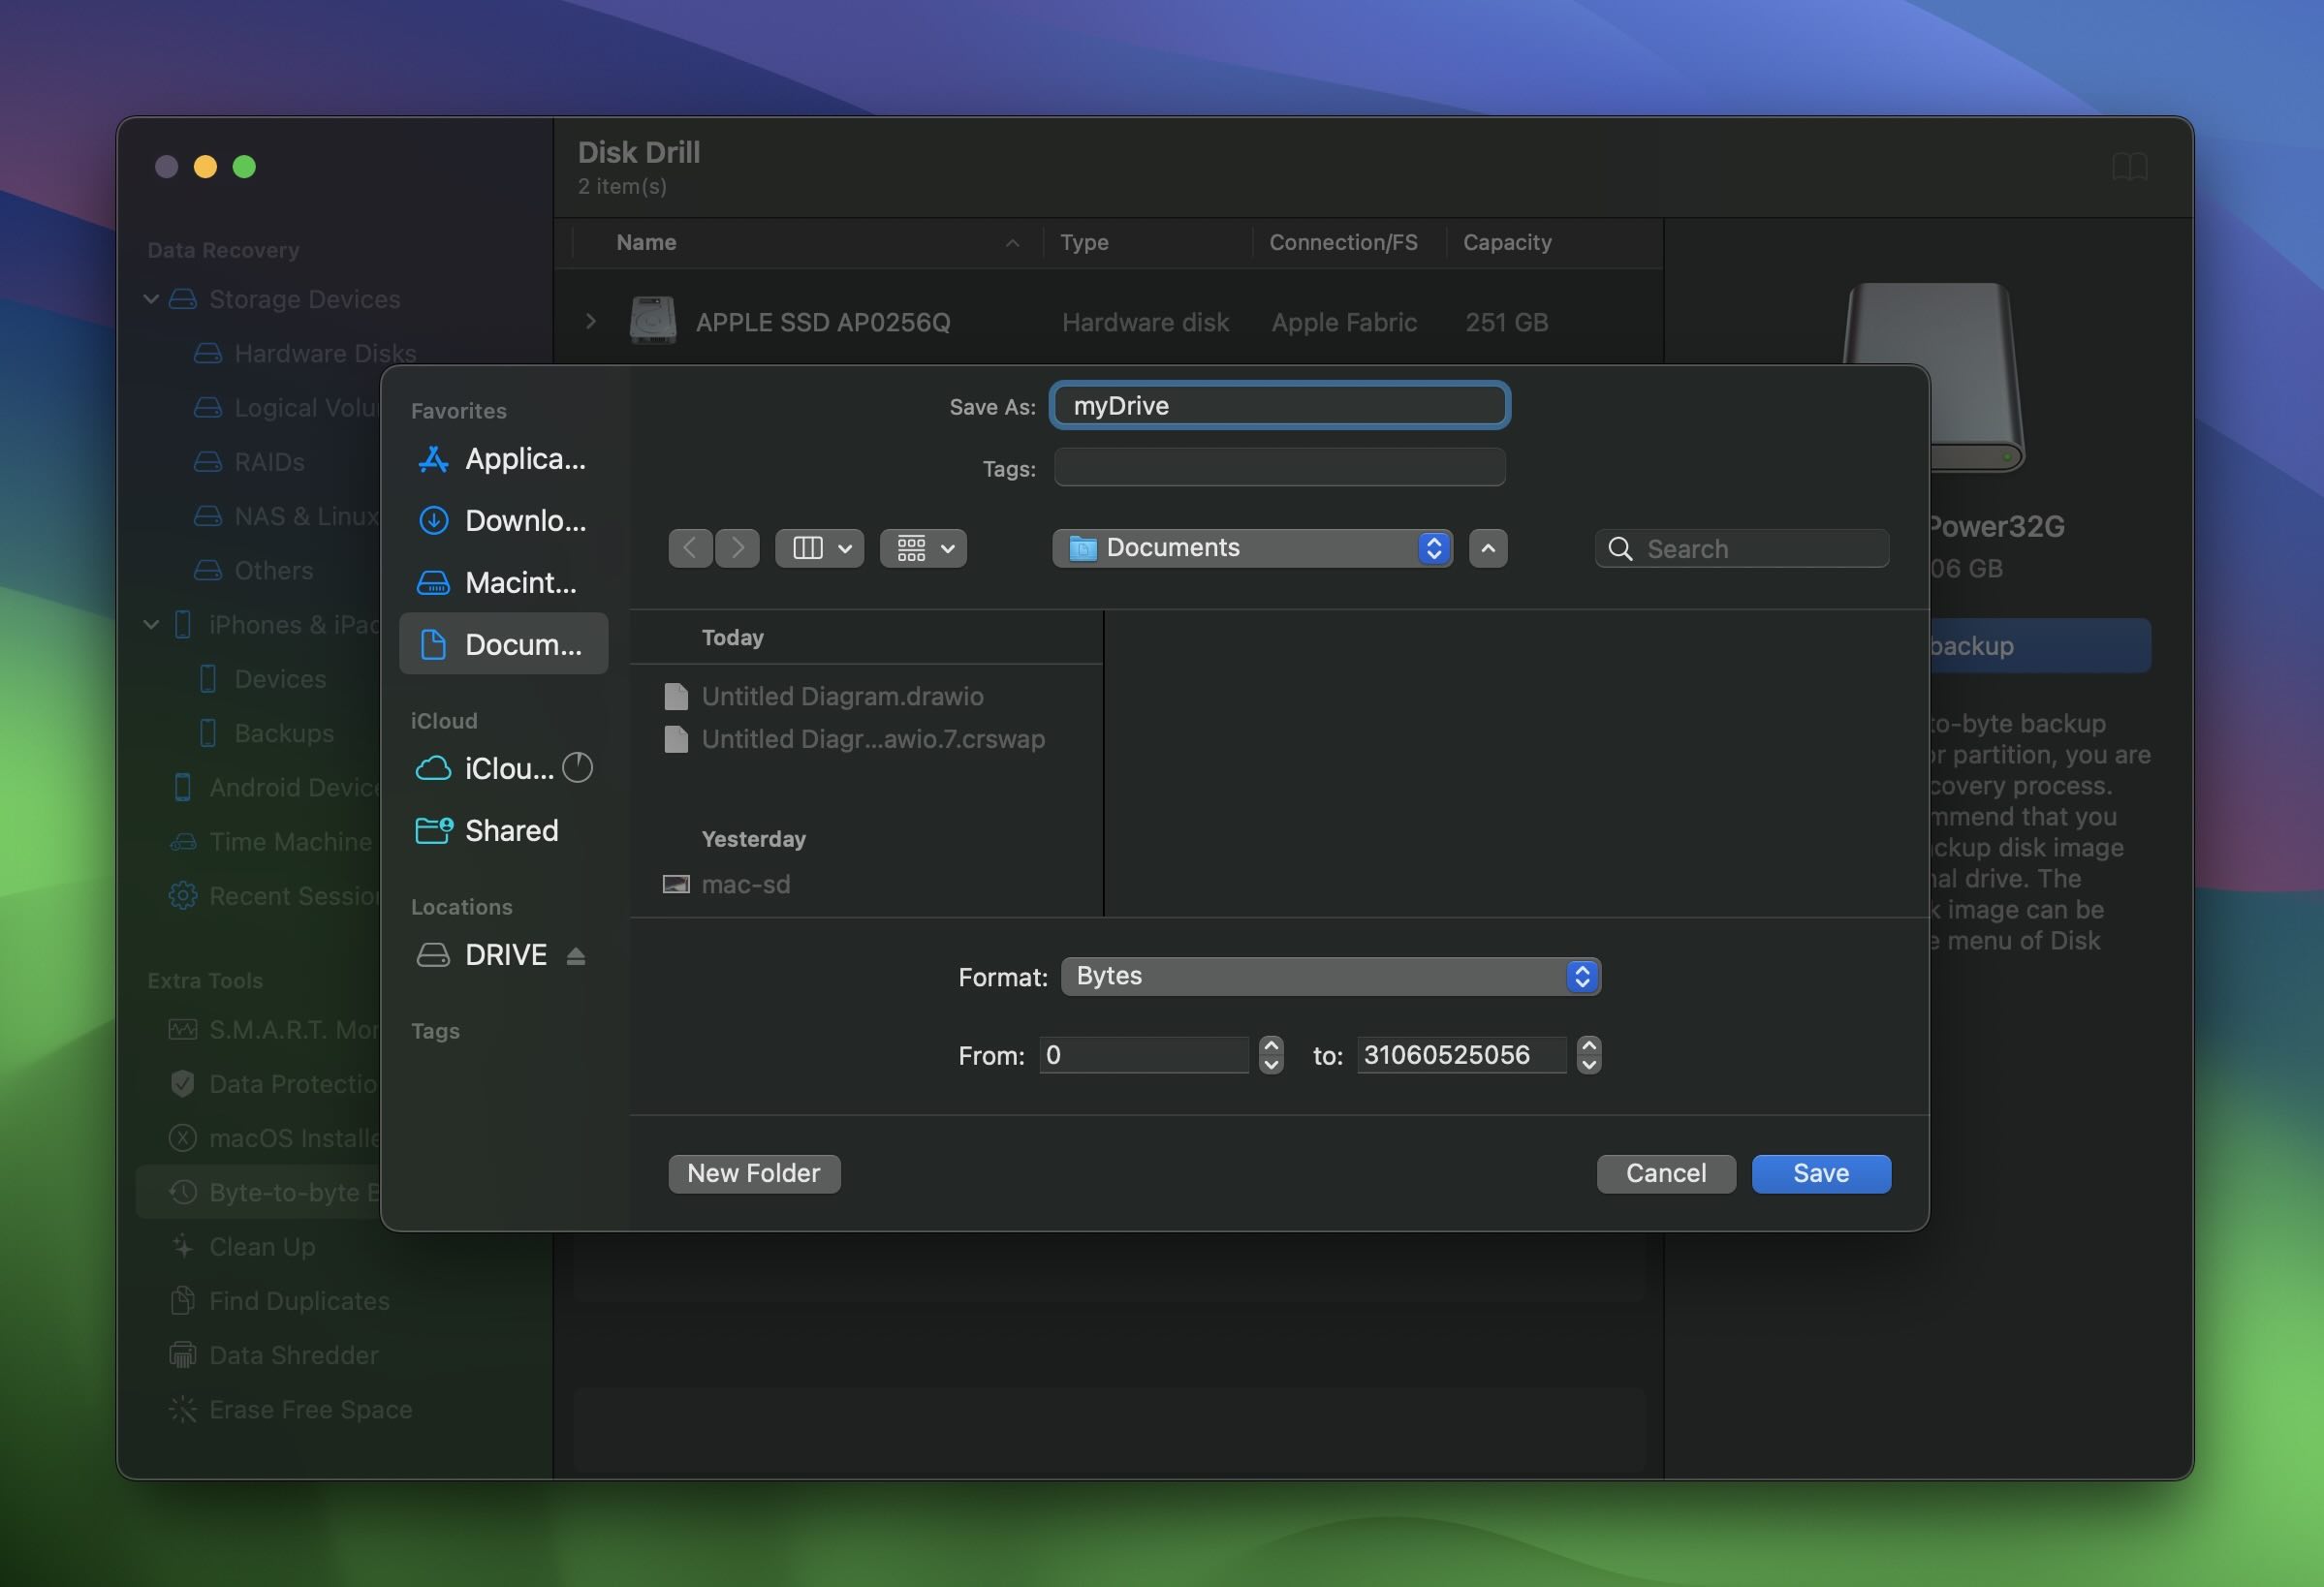
- Start the process and let Disk Drill handle the rest. It will capture every recoverable bit of data from your drive.
Once the backup is ready, you can use Disk Drill’s recovery tools to scan the backup file instead of the original drive. The great thing about this is that you can run the scan on any computer with Disk Drill installed, not just the one where the backup was created. However, keep in mind that while features like Byte-to-Byte Backup and SMART Monitoring are completely free, data recovery requires the PRO version of Disk Drill. It’s a paid feature, but it’s worth it when your data is on the line.
Here’s how to recover your files from this backup:
- Click on Attach Disk Image from the main menu. Find the backup file you created and load it into Disk Drill.

- Select the backup image and click Search for Lost Data. Disk Drill will scan the image for any recoverable files.
- You can click on categories like Pictures, Videos, or Audio to quickly find specific types of files. If you want to see everything Disk Drill found, just click Review Found Items to browse through all recoverable files.
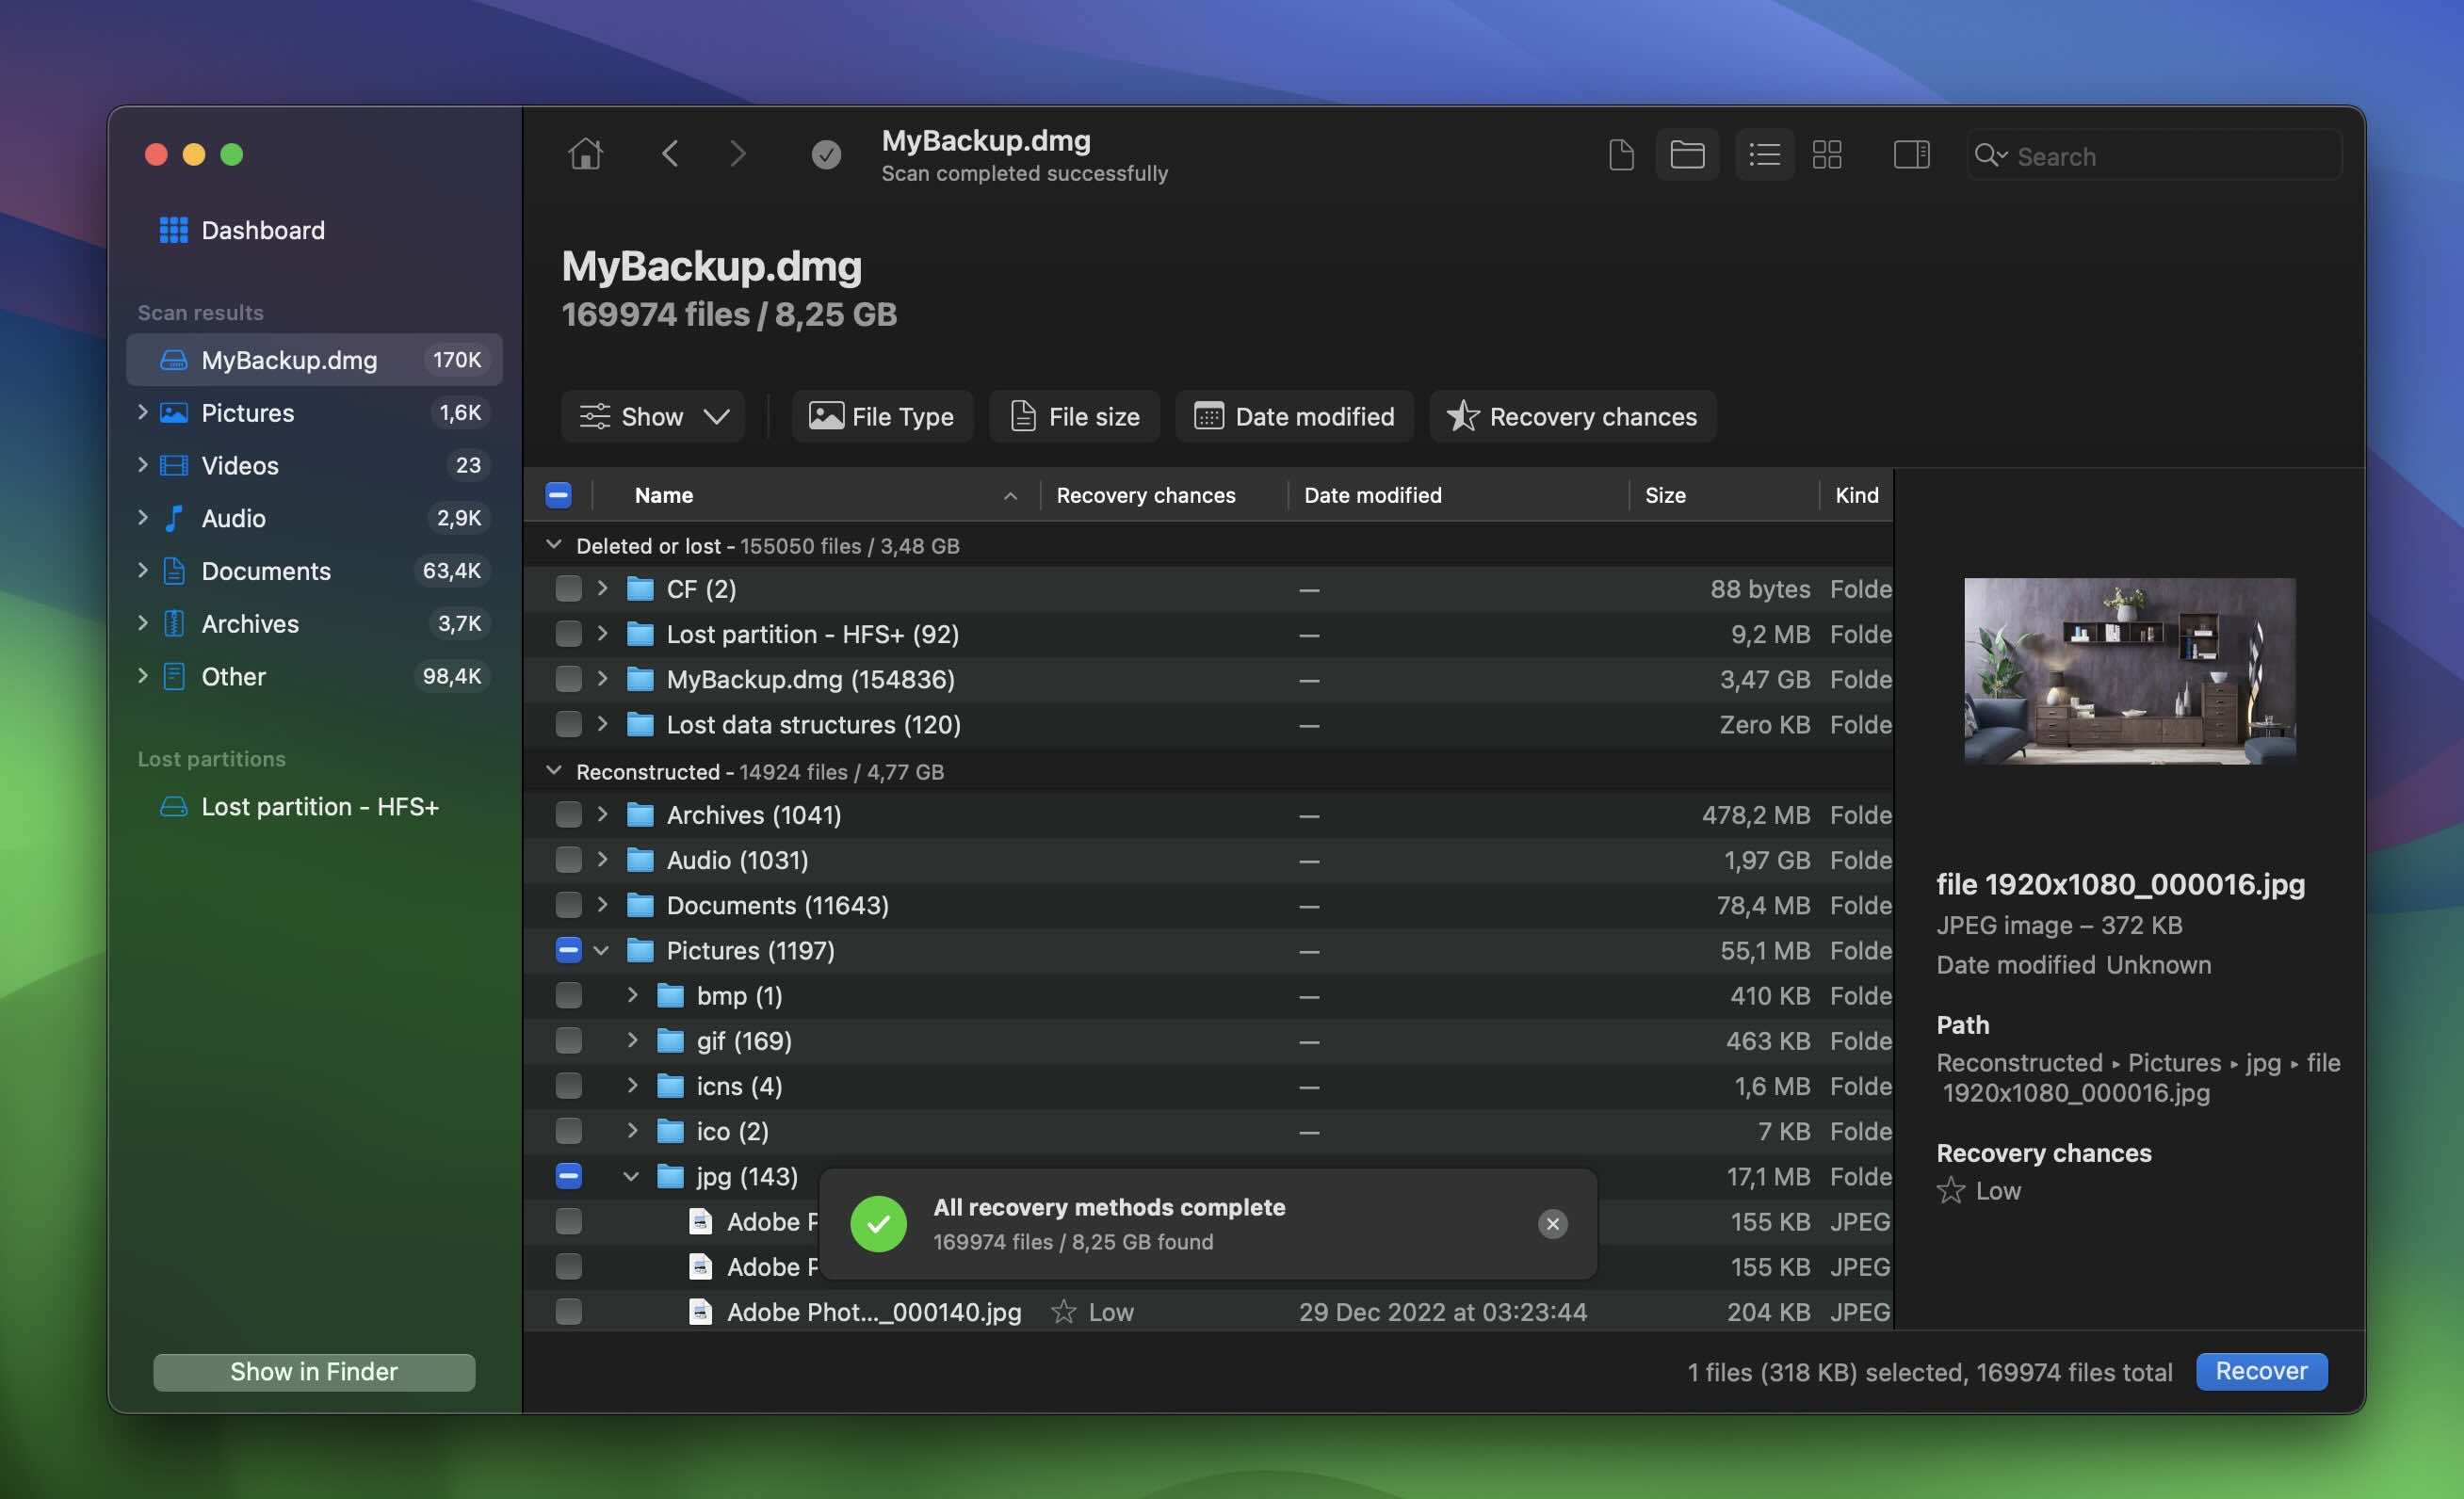
- As you click on a file, you’ll see a preview. If it’s something you need, just check the box next to the file. You can also select entire folders if you want to recover a large batch of files at once.
- Click Recover, then choose a safe location to save your files.
Use Data Recovery Services
If, for some reason, you couldn’t or wouldn’t recover the files yourself—or if the data on your drive is extremely valuable and you don’t want to take any risks with DIY methods—professional hard drive recovery services are always an option. These services specialize in retrieving data from even the most damaged or inaccessible drives.
Professional recovery experts use specialized equipment and techniques to safely extract data, whether the drive has physical damage, severe corruption, or mechanical failure. While it’s not a cheap option, it’s the safest route when your data is irreplaceable, and you want the best possible recovery outcome.
Here’s what you should know:
- Professional services use specialized equipment, like cleanrooms, to safely work on physically damaged drives. They handle everything from water damage to head crashes and corrupted firmware.
- Most top recovery services have a policy where you only pay if they successfully recover your data. It’s a solid guarantee you don’t pay for nothing.
- Many companies, like SalvageData or DriveSavers, offer free evaluations. They’ll assess your drive and give you a quote before you commit.
- If you’re in a rush, some services offer expedited recovery, sometimes within 24 hours. It’s a pricier option, but worth it in urgent situations.
FAQ
I have an SSD. Do I still need to do this?
Even though SSDs are more resilient to data loss by design, they are by no means immune to failure. Checking the health of your SSD is just as important as it is for a regular hard drive, especially if you frequently use your computer for stressful tasks, such as heavy media applications or design tools that read from the drive in large volumes.
Can I use the same tools to check the health of the external hard drive on a Mac?
Yes, you can use the same tools to check the health of an external hard drive on a Mac. Built-in tools like Disk Utility work perfectly for external drives. Just connect the drive, open Disk Utility, and select it from the list to check its basic health status.
Third-party apps like Disk Drill, DriveDx, and smartmontools are also great for external drives.
How do I minimize the risk of hard drive failure?
If you have a regular hard drive (and not an SSD), it’s important to understand that it’s very vulnerable to sudden physical motions, especially when the plates are spinning (i.e. when the disk is in use). Modern hard drives are built to resist some stress and abuse, but you should still be more gentle with them compared to most other hardware components.
Avoid moving your computer when it’s on, and if you’re packing it up for transportation, make sure it’s adequately covered to minimize any sudden movement during transit. Hard drives can heat up too, so give your computer some “breathing time” every now and then when you’re actively using it.
How do I check my hard drive for bad sectors on a Mac?
A Mac hard drive diagnostic tool can help you identify bad sectors on your drive and rate the overall health of your drive.
To check your hard drive for bad sectors on a Mac, you can use Disk Utility:
- Open Disk Utility from Applications > Utilities.
- Select your hard drive from the sidebar.
- Click First Aid and run it. While First Aid doesn’t explicitly highlight bad sectors, it can identify and repair file system errors caused by them.
Or you can use third-party apps like DriveDx, Disk Drill, or smartmontools. These tools read your drive’s SMART data, which includes metrics like bad sectors, reallocated sectors, and overall health.
How long do Mac hard drives last?
According to most user reports, drives tend to last between five to eight years, but your mileage can vary significantly depending on your actual use case.
Is it possible to check a Mac hard drive for bad sectors using Terminal?
Yes, using smartmontools – follow our corresponding guide above for more details.
This article was written by Stefan Ionescu, a Contributing Writer at Handy Recovery Advisor. It was recently updated by Roman Demian. It was also verified for technical accuracy by Andrey Vasilyev, our editorial advisor.
Curious about our content creation process? Take a look at our Editor Guidelines.