
In this article, we are going to show you how to recover deleted Pages documents on your Mac or MacBook. As Apple’s main word processing solution, many individuals use the program to create documents, some of which are very important. Everything is great until a user fails to save a file or one gets accidentally deleted.
Choosing the Most Suitable Method to Recover Pages Document on a Mac
Based on our Google Ads research, more than 58% of users encounter unexpected loss or accidental deletion of their Pages files. With that in mind, we prioritized the methods that help users recover deleted Pages documents. However, we also covered methods that can get back previous versions of unsaved Pages files.
![]()
Fortunately, multiple methods enable you to recover lost Pages documents on your Mac. With any luck, one of these techniques will enable you to get your documents back safely. Read on and find out which one will work for your situation.
Problem |
Solution |
I have recently deleted the Pages document in question. |
Check the Mac Trash bin for a quick and easy recovery. (Jump to solution!) |
I can’t find my Pages document. |
Try using Finder to locate your Pages files. (Jump to solution!) |
I have accidentally permanently deleted an important Pages document. |
Data recovery software can recover these files. (Jump to solution!) |
My Pages app froze and did not save my Pages document. |
Use the autosave or Revert To feature to get the most recent version of the file. (Jump to solution!) |
A virus wiped out all of my Pages documents. Help! |
Data recovery software or a backup should be able to recover your files. (Jump to data recovery software section | Jump to backup recovery section) |
My Mac crashed and I did not save my Pages document. |
Use the autosave or Revert To feature to get the most recent version of the file. (Jump to solution!) |
My Pages document disappeared. |
Try using Finder to locate your Pages file. (Jump to solution!) |
I want to restore an earlier version of a Pages document on my Mac. |
You can use a backup or the Revert To feature of Pages. (Jump to backup recovery section | Jump to Revert To section) |
My Pages documents on my iCloud Drive have disappeared. |
Use the iCloud recovery procedure to get them back. (Jump to solution!) |
How to Recover Deleted or Lost Pages Document on Mac
To write this guide, we recreated different data loss scenarios by deleting Pages documents with different conditions. We successfully tested 4 methods to recover them; each method is best suited for different conditions, such as whether you have a backup or a previous save (or no failsafe at all). We also arranged them in order of ease if you want to opt for the simpler tasks to begin with.
Method 1: Recover a Lost Pages Document on Mac From the Trash
Requirements |
Suited for |
Ease of Implementation |
Files not manually emptied from Trash, or auto-deleted after 30 days |
Recently deleted Pages documents |
Easy |
Your Mac has a built-in feature that can help recover recently deleted files and folders. The Mac Trash bin is a special folder that temporarily stores items deleted from your computer. Use the following simple procedure to see if your deleted Pages file can be recovered from the Trash.
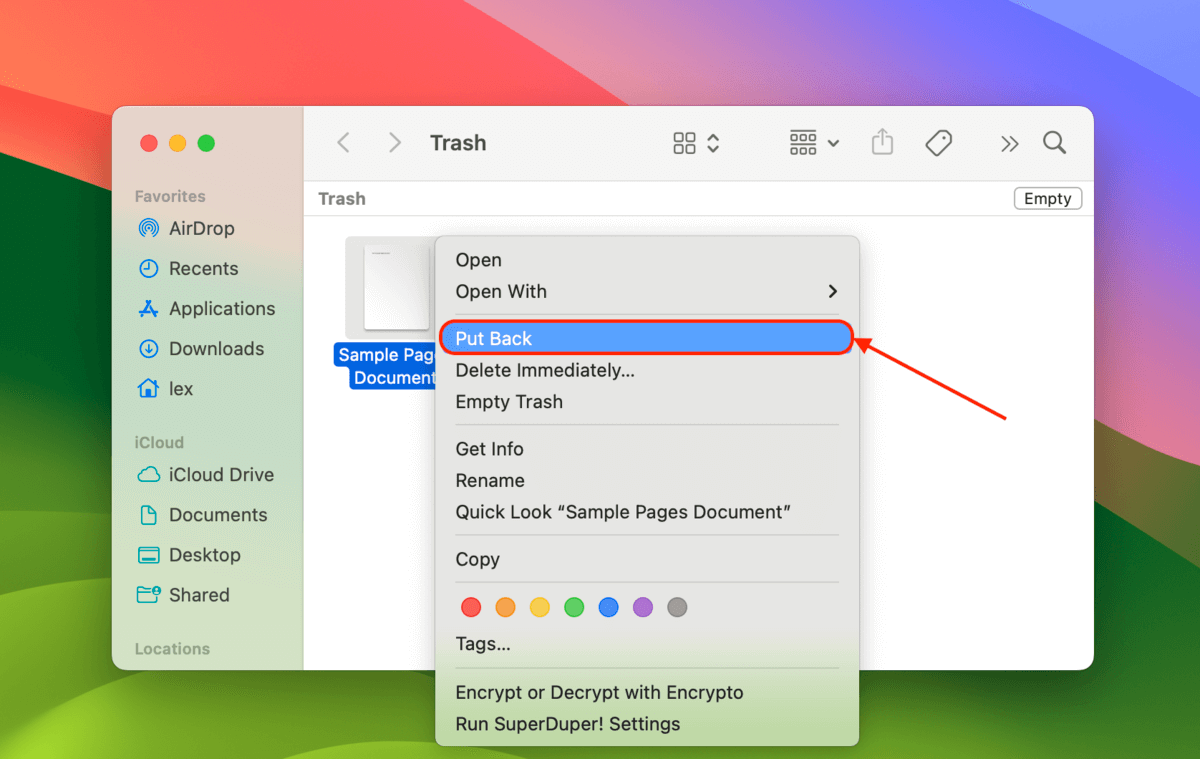
- Open the Trash by clicking on the Trash can icon.
- Scroll through the folder to locate the file you want to recover.
- Right-click on the file and select Put Back to restore the item to its original location.
Files are retained in the Trash bin until you manually empty it or until files are automatically deleted. You can use Finder’s Preferences to set the Trash to delete items after 30 days. More information on how to use the Trash bin efficiently can be found on this Apple support page.
Method 2: Recover Deleted Pages Documents Using Data Recovery Software
Requirements |
Suited for |
Ease of Implementation |
Data recovery software, avoid overwriting files on storage device |
Deleted Pages documents not in Trash or backup |
Moderate to Difficult (depends on software) |
Data recovery software can help get back deleted Pages documents that have not been backed up and are no longer available in the Trash. Before we describe this recovery method, let’s look at how it works and why it needs to be carried out promptly after discovering you have lost a file.
IMPORTANT: Data recovery software needs to be used quickly after the data loss occurs to avoid overwriting or corrupting the desired files. When the Mac operating system deletes an item, it is not immediately physically removed from the storage device. The logical links that make the file accessible are deleted and the space the item occupied is marked as available for reuse by the system.
Each time you use the storage device that contained the deleted Pages document, you risk overwriting it with new data. For this reason, you need to stop using the device until the recovery process is complete. This includes not using the device for the download or installation of the data recovery tool.
Choosing a data recovery solution
![]() There are many data recovery solutions to choose from. We direct you to our review of the best options available for Mac. It provides a variety of products that can help you recover lost Pages documents.
There are many data recovery solutions to choose from. We direct you to our review of the best options available for Mac. It provides a variety of products that can help you recover lost Pages documents.
We are going to use Disk Drill in our example of recovering deleted Pages files with software. We like it for several reasons including its nice interface, recovery capabilities, and additional data protection tools.
Our favorite feature (which we’ll be showcasing in this guide) is the preview tool, which displays a working preview of almost any common file, including Pages documents. Using the preview tool, you can check each page of your document to ensure the content is intact. Being able to preview a file is also a reliable indication that it can be recovered.
You are invited to read our full review of Disk Drill for more information on this excellent recovery solution.
How to recover deleted Pages documents with Disk Drill
Follow these steps to use Disk Drill to restore deleted Pages files that can’t be restored with a backup or the Trash.
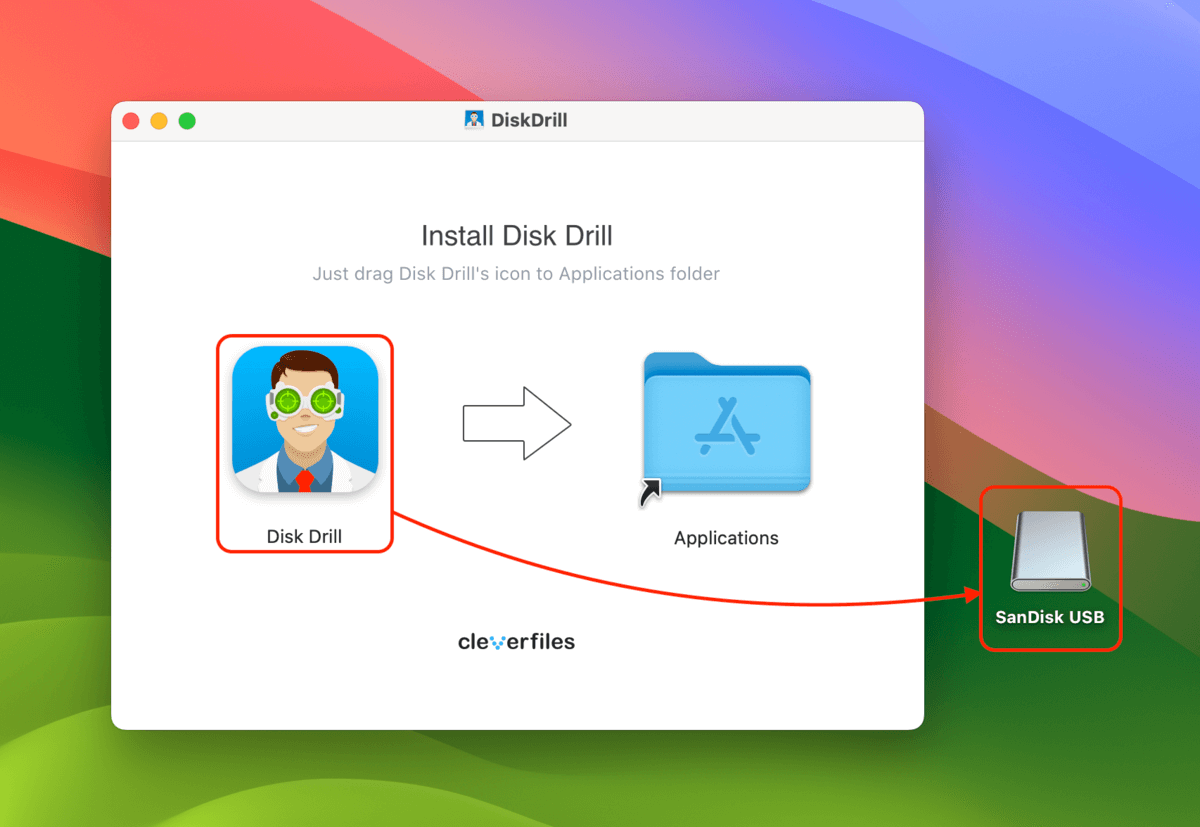
- Download Disk Drill from the Cleverfiles website and install it. If your documents are saved on your Mac drive, download Disk Drill on an external storage device and install it there. You can do so by running the installer (from the storage device) until you’re prompted to drag the Disk Drill icon to the Applications folder. Instead, drag it to the icon of your external drive on your Desktop.
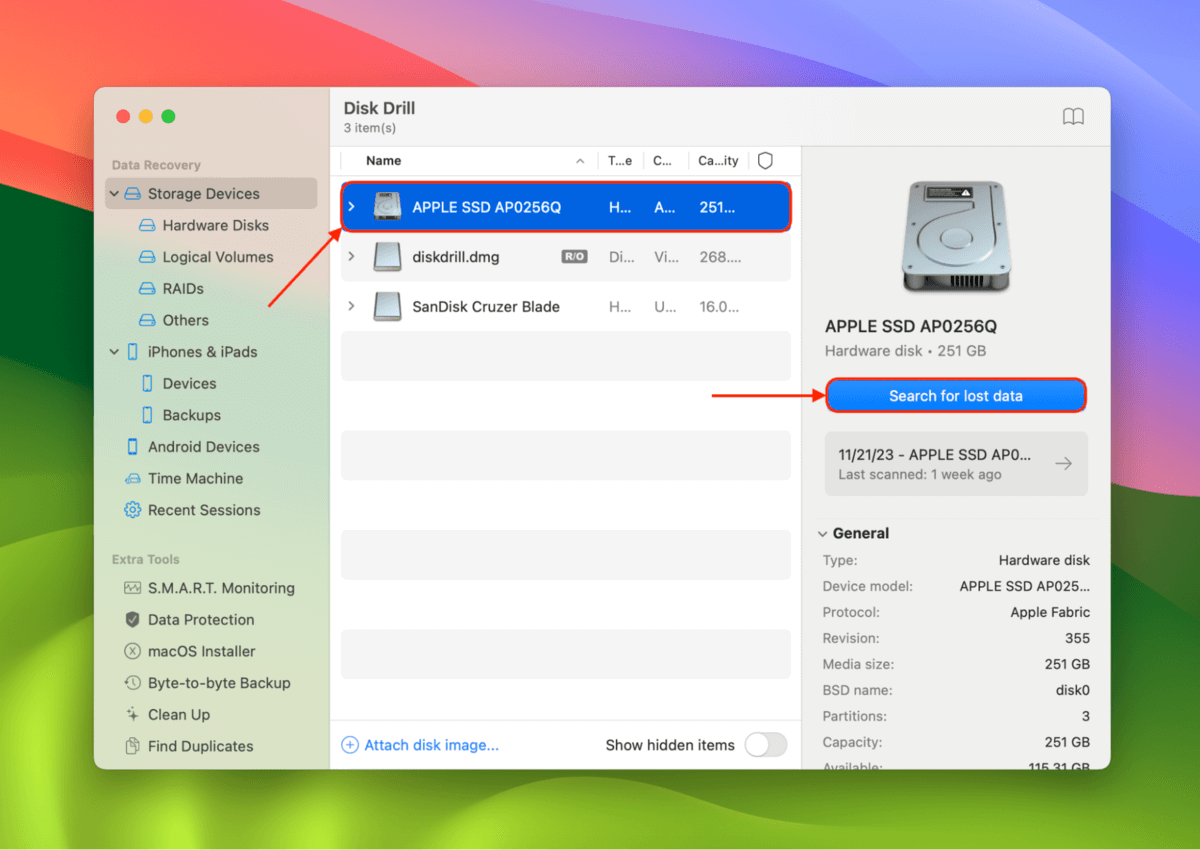
- Launch Disk Drill and select the drive where the lost Pages files were stored (if they were stored on your Mac, choose “Apple SSD.” Then, click Search for lost data.
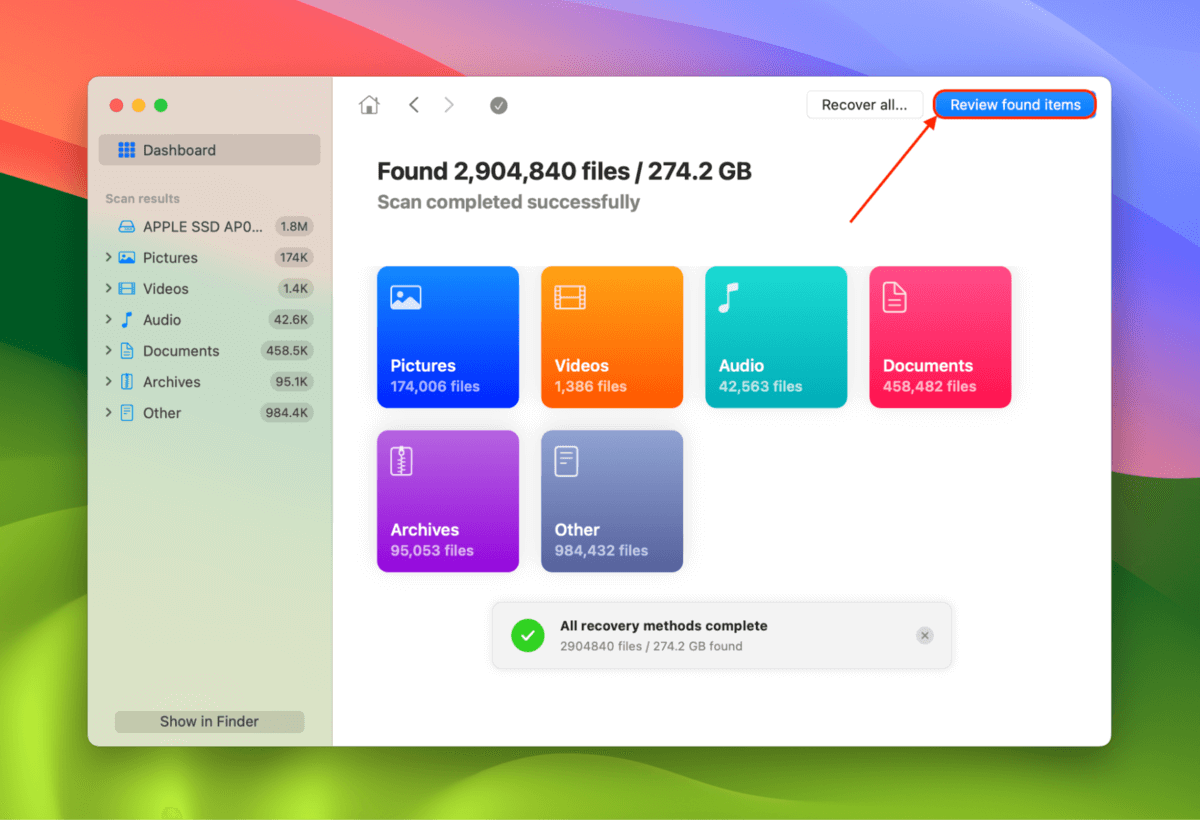
- Once Disk Drill is done scanning your drive, click Review found items.
- Click Documents in the left sidebar to filter the scan results. You can also type “pages.” in the search tool so Disk Drill only shows found files with the .pages extension. Then, expand the Deleted or lost and Reconstructed sections, which show the files Disk Drill found using different recovery techniques. It’s best to browse both of them to be more thorough.
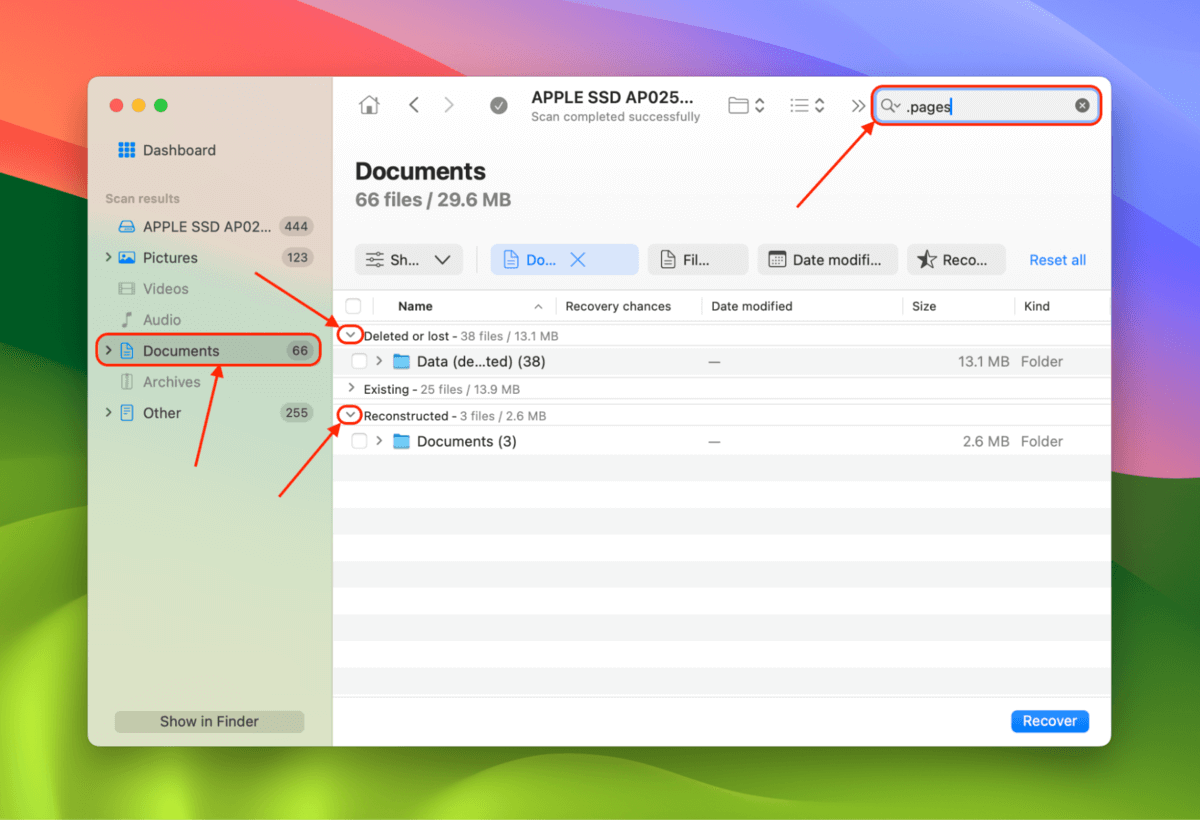
- Make sure to preview your documents by hovering your point pointer beside a file and clicking the eye button that appears. Then, mark the Pages files you want to restore and click Recover.
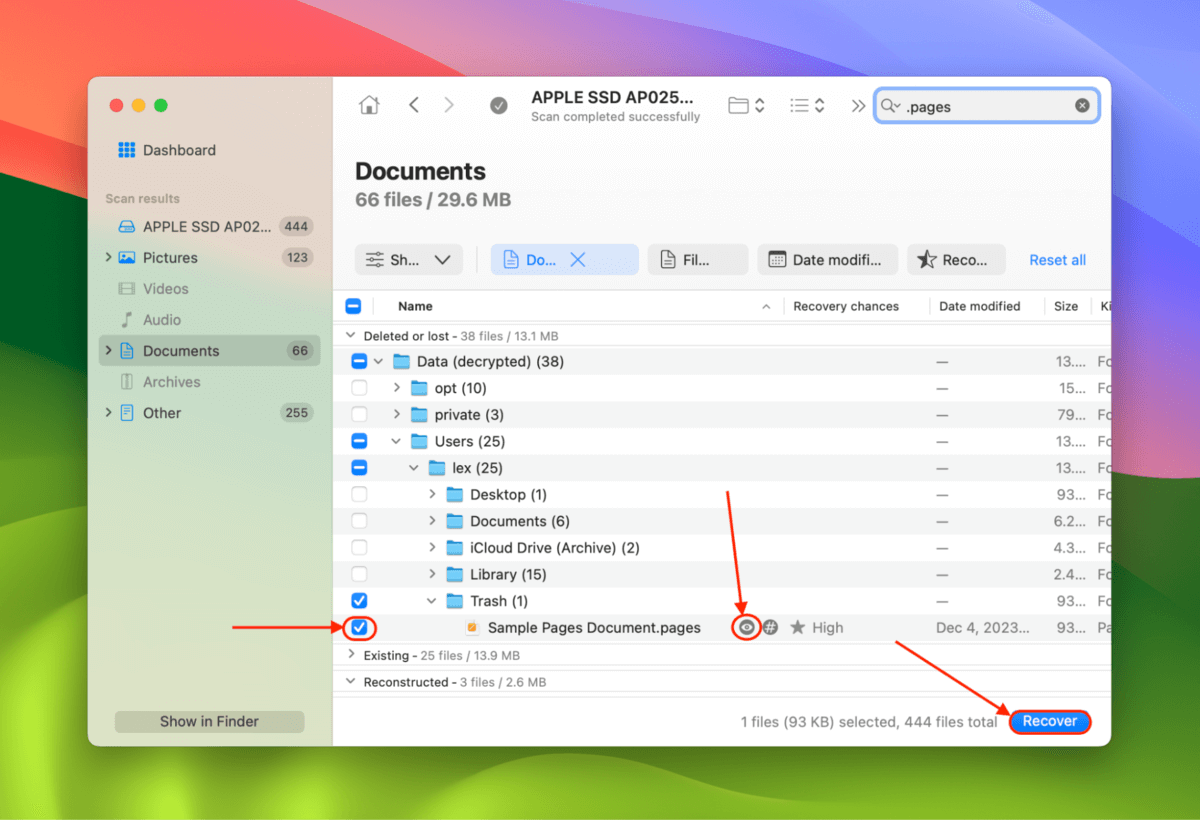
- Choose where you want Disk Drill to save your recovered documents. Then, select a location on a drive other than the one you’re recovering (e.g. if you’re restoring the Pages files from your Mac drive, choose the storage device you connected in step 1). Then, click Next to start the recovery process.
Basic version of the Disk Drill for Mac doesn’t offer free data recovery. However, you can scan, backup, and preview your data for free, which is great for knowing whether or not your data is recoverable.
Method 3: Using Time Machine to Recover a Deleted Pages Document
Requirements |
Suited for |
Ease of Implementation |
Preconfigured Time Machine backups, backup device connected |
Deleted, unsaved, overwritten Pages documents |
Moderate (requires prior setup) |
Time Machine is a built-in backup tool on macOS. Once you set it up, it continues to work in the background, updating your backup files whenever there are changes. This provides users access to previous versions or “snapshots” of their files and folders.
We found Time Machine to be useful not only for recovering deleted or lost Pages documents. You can also restore earlier snapshots of your documents (e.g. you want to revert unwanted changes).
For the best results, make sure you have your Time Machine drive on hand. But even if you don’t, Time Machine has a useful feature where it still creates local backups in the absence of the Time Machine drive. It stores copies of your files on your Mac for 24 hours after any changes are made.
We’ll cover both scenarios in the guides below.
Restore Your Pages Document from Your Time Machine Drive
To restore your Pages document from a Time Machine backup drive:
- Connect your Time Machine backup to your Mac. Then, open Finder and navigate to the folder where your lost Pages documents were stored.
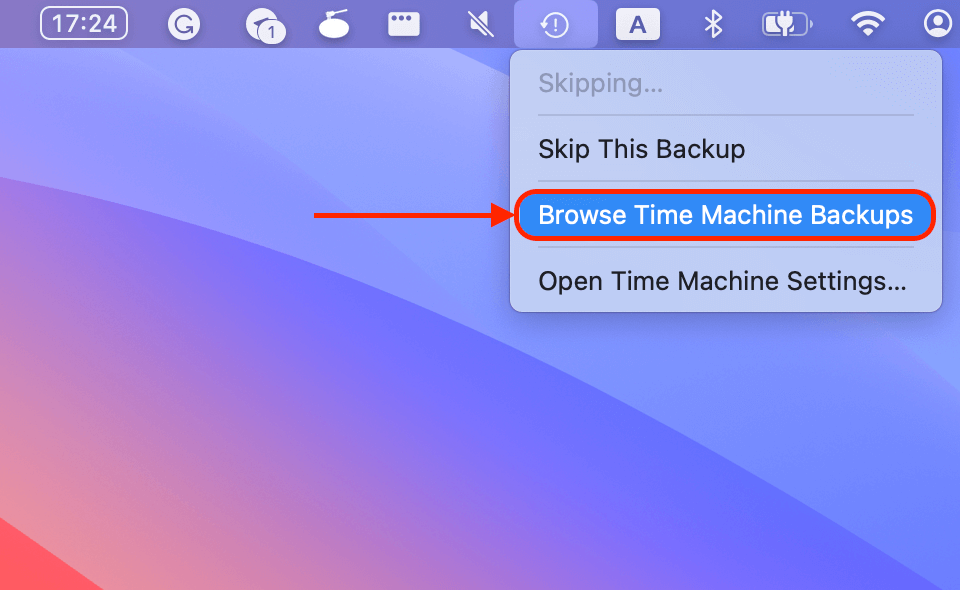
- On the Apple menu bar, click the Time Machine button > Browse Time Machine backups.
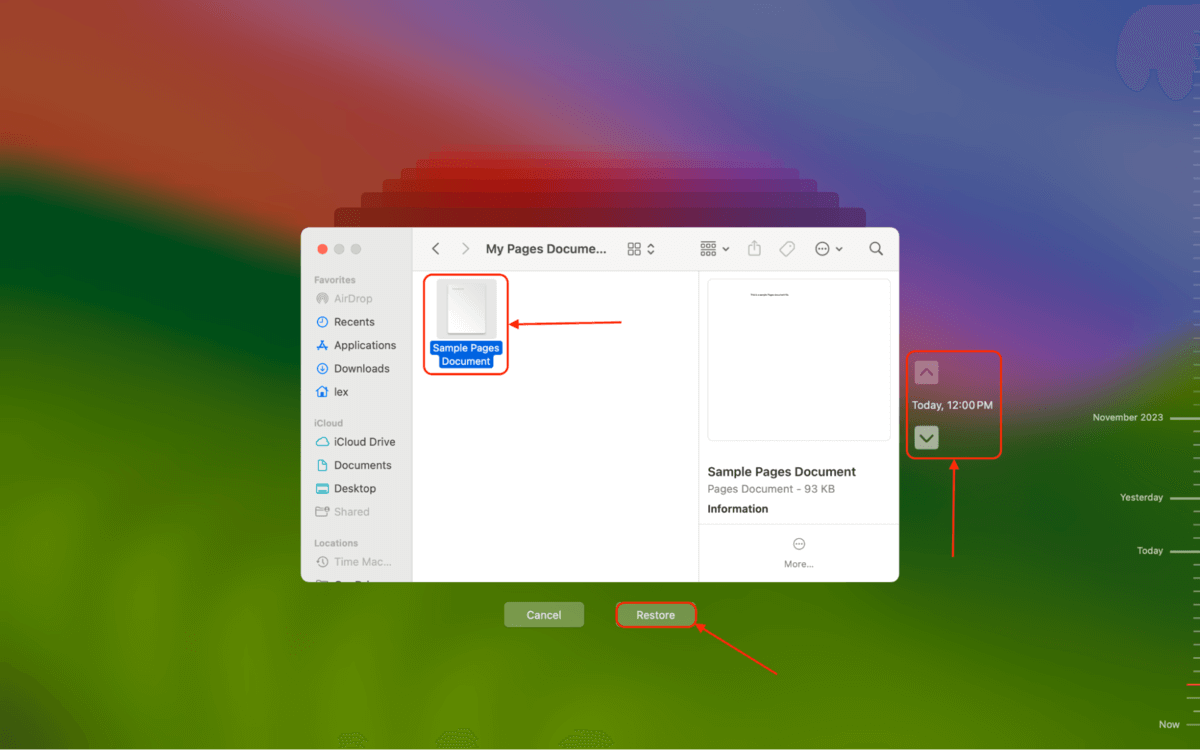
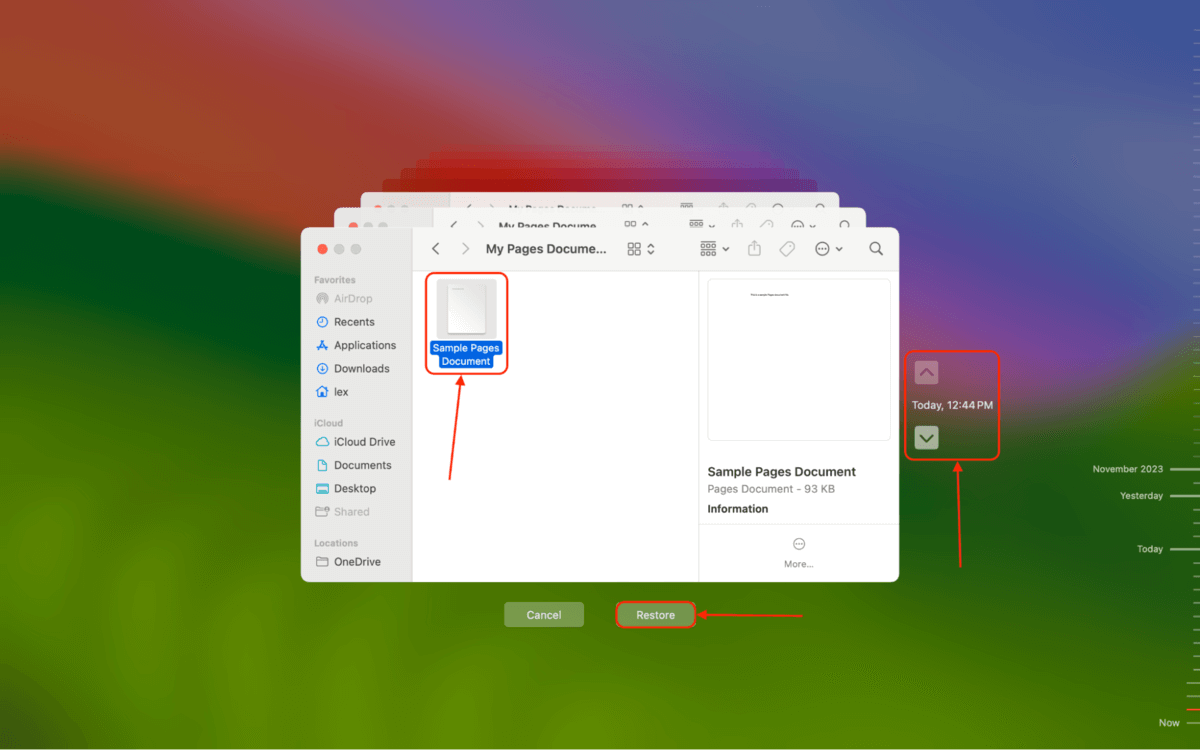
- Use the arrows on the right to browse through previous versions of the folder until you find the snapshots of your Pages file. Select them (click + drag for multiple files) and click Restore.
Restore Your Pages Document from Local Time Machine Backups
To restore your local snapshots of your Pages document directly from your Mac:
- Open Finder and navigate to the folder where your Pages documents were stored before deletion.
- Click the Time Machine button > Browse Time Machine backups.
- Notice that my Time Machine drive is no longer listed in the Finder sidebar because I disconnected it. You can still the arrows on the right to browse through the folder’s version history until you find the local snapshots of your Pages file. Select them (click + drag for multiple files) and click Restore.
If you are not currently backing up your Mac with Time Machine, we strongly suggest you start right away. This Apple support page describes how to use Time Machine to back up your data. If you would like more detailed information regarding the power of restoring with Time Machine backups, check out our in-depth article on the subject.
Method 4: Use the Revert To Option to Recover a Lost Pages Document
Requirements |
Suited for |
Ease of Implementation |
Document saved at least once in Pages, multiple versions available |
Overwritten Pages documents |
Easy (requires prior setup) |
When you save a file in Pages, the program saves it as a new version. Over time, you will accrue many versions of a file as it is modified and saved. This fact can be extremely helpful if you make extensive changes to a document and then decide you need to get back to an earlier version.
Use the following steps to go back to an earlier version of a Pages document.
- Open the current version of the document in Pages.
- Click on the File Menu and choose the Revert To option.
- Choose to recover the Last Saved or Last Opened file.
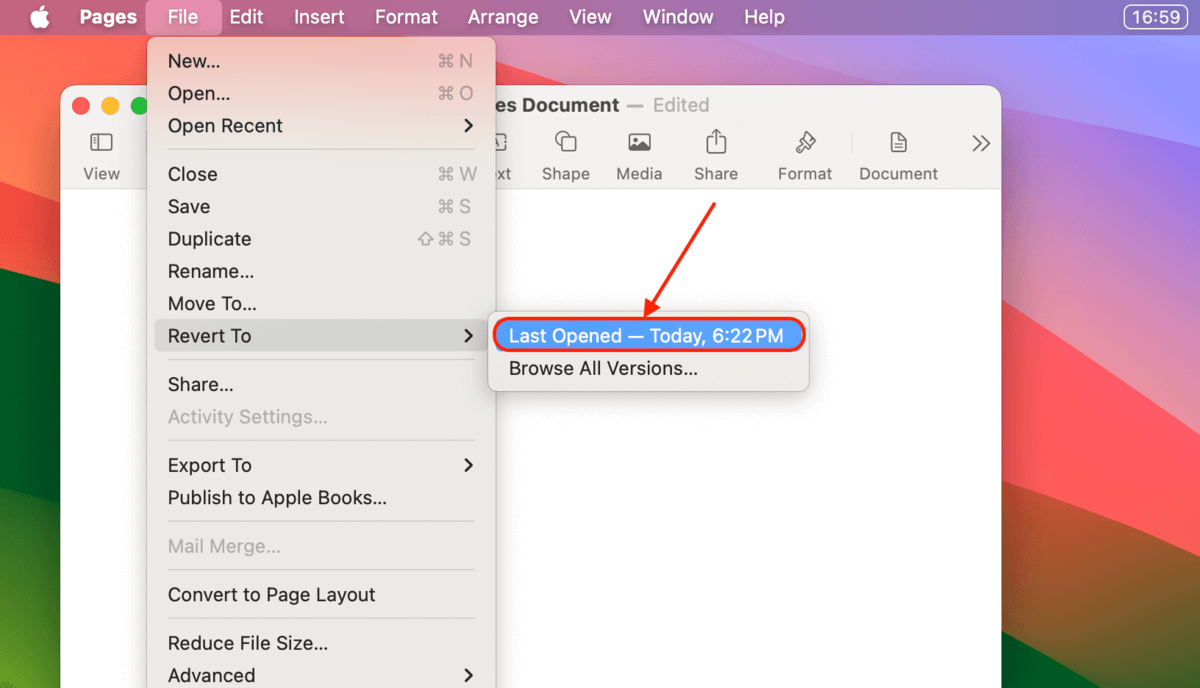
- You can also Browse All Versions. You will be presented with a screen that allows you to scroll through the various versions of the file.
- Select the version you want and click the Restore button.
The Pages Revert To option is a great way to recover from some overly enthusiastic editing and get back to a simpler version of your document. It’s another example of the built-in features that make using a Mac so productive and enjoyable.
How to Recover Unsaved Pages Document on Mac
This section is dedicated to the various methods for recovering unsaved Pages documents on a Mac. It’s for users whose Pages app malfunctioned or simply closed before the document could be saved.
We simulated these conditions multiple times (making small changes to cover all scenarios) and came up with 4 methods to restore unsaved Pages documents.
Similar to the last big section of this article, we indicate each method’s requirements, suitability, and ease of implementation to help you select the best one for your situation.
Method 1: Locate Disappeared Pages Document Recovery with Finder
Suited for |
Requirements |
Ease of Implementation |
Unsaved Pages documents |
Files still present on the drive, knowledge of file creation date/time |
Moderate |
You may be able to locate an unsaved Pages document using the Mac Finder application. Try using the following procedure to use Finder to search for your lost document.
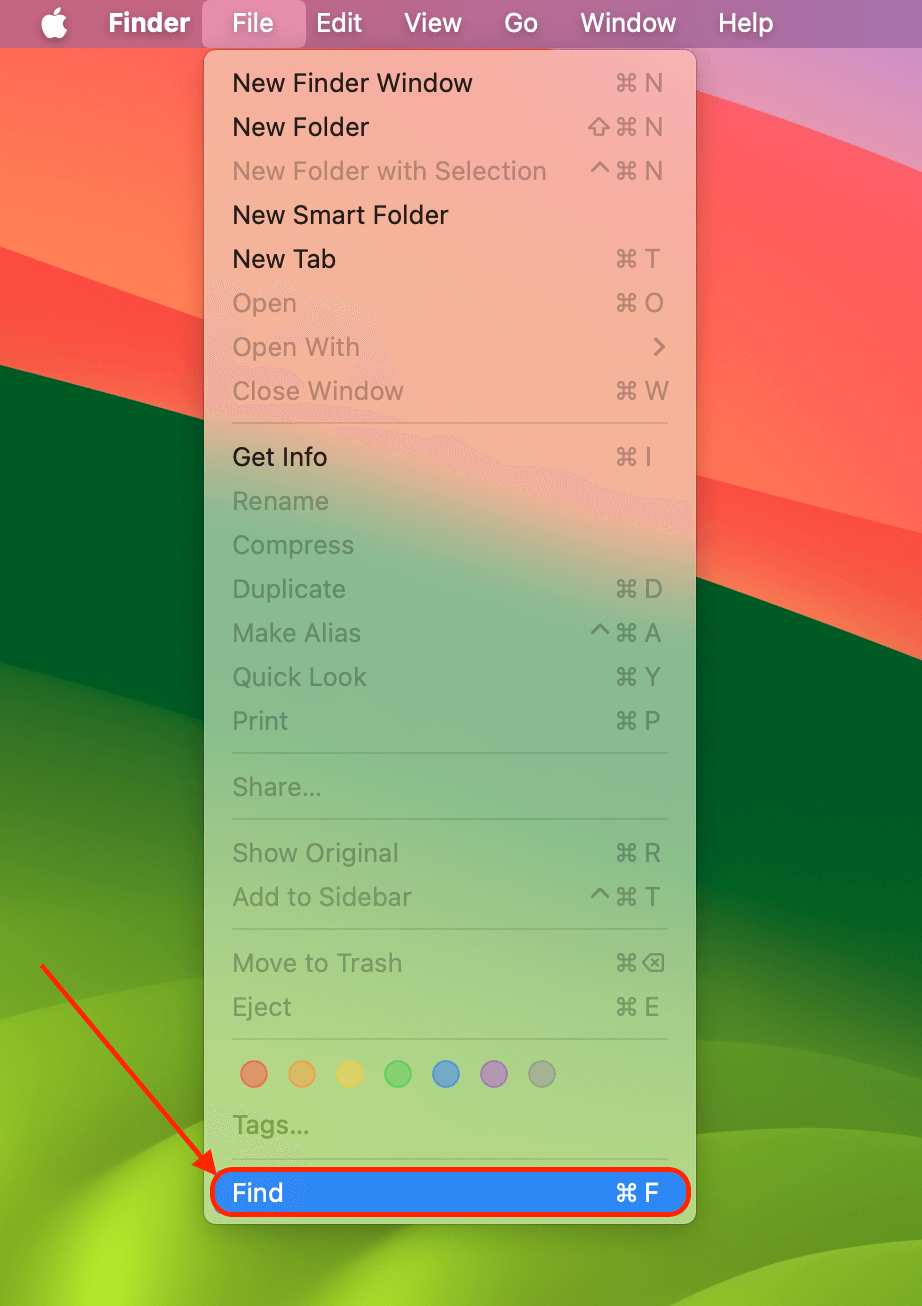
- Open Finder and navigate to the File Menu tab at the top of the window.
- Open the File Menu and select the Find option.
- Click on This Mac in the search bar.
- Select Kind is Document.
- Use the + button to add more parameters, like Last opened date. Additionally, type .pages in the search field.
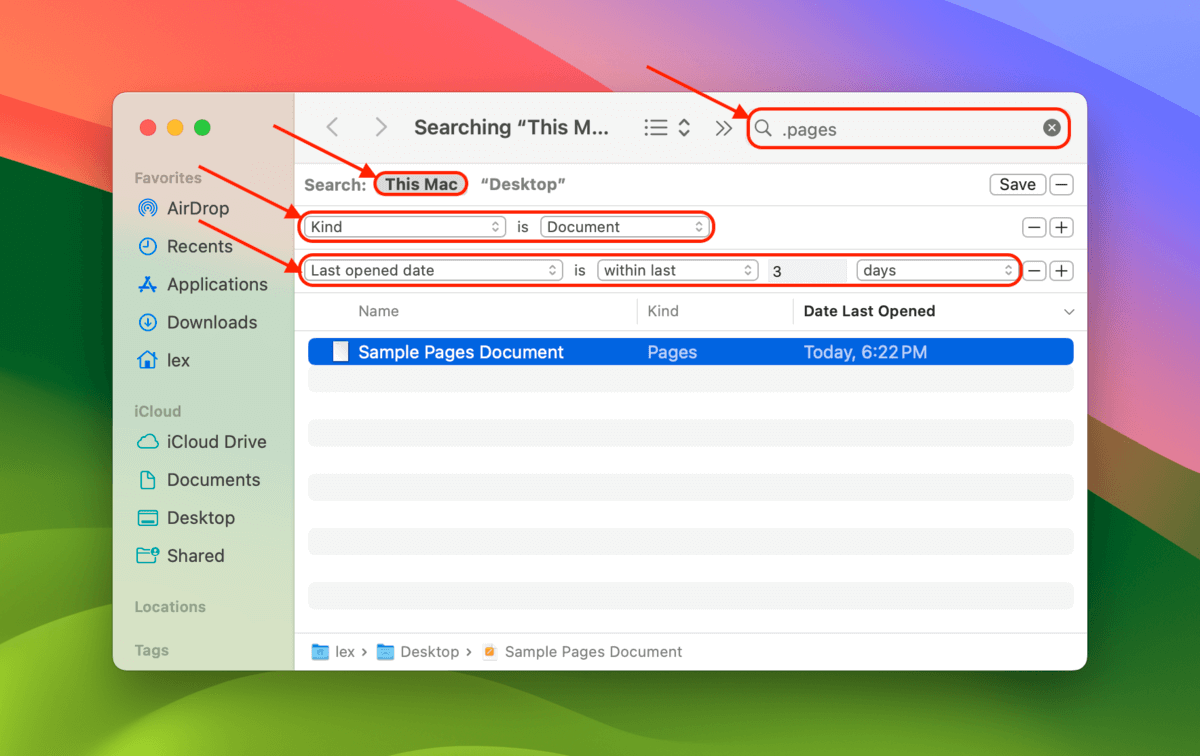
- Scroll through the list and search for potential Pages documents. Use the date and time to narrow your search.
- If you locate an item that may be your lost Pages document, drag and drop it on the Pages icon. The items will open if they are indeed Pages files. You can also try dropping the files on the TextEdit icon if they don’t open in Pages.
This method may be able to help you locate and recover an unsaved Pages document. There will be many files listed, so it’s best to have a good idea of the date and time the file was created when conducting your search.
Method 2: Recover an Unsaved Pages Document with Auto Recovery
Suited for |
Requirements |
Ease of Implementation |
Unsaved Pages documents |
Autosave feature turned on in Pages, document saved at least once |
Easy |
You can take advantage of auto recovery if your Mac’s Autosave feature is turned on. When the feature is active, files are automatically saved when you close an application. You are not prompted to save the file unless you have turned off this operating system feature. A nice explanation of how to turn off autosave if you wish is available on this page.
With Autosave turned on, you can’t accidentally forget to save your Pages doc when you close the app. Autosave also periodically saves the file and is responsible for creating new versions whenever you manually save a file. Accessing an unsaved file should be as simple as opening the file in Pages, which should present you with the more recently updated document.
You can also use the Revert To feature of Pages as described in an earlier section of this article. This feature allows you to access all of the previously saved versions of your document and recover whichever one you want.

Method 3: Search the Temp Folder for Unsaved Pages Documents
Requirements |
Suited for |
Ease of Implementation |
Access to Mac’s Temp folder, data not overwritten post-crash |
Unsaved Pages documents after crash or unexpected termination |
Moderate |
If your computer crashes or Pages terminates unexpectedly, you might be able to rescue data from your Mac’s Temp folder. Here’s an overview of how to view the contents of the Temp folder.
- Open the Terminal application.
- Type the following command: echo $TMPDIR. The output of the command is the pathname to the TEMP folder.
- Use this command to view its contents: open $TMPDIR.
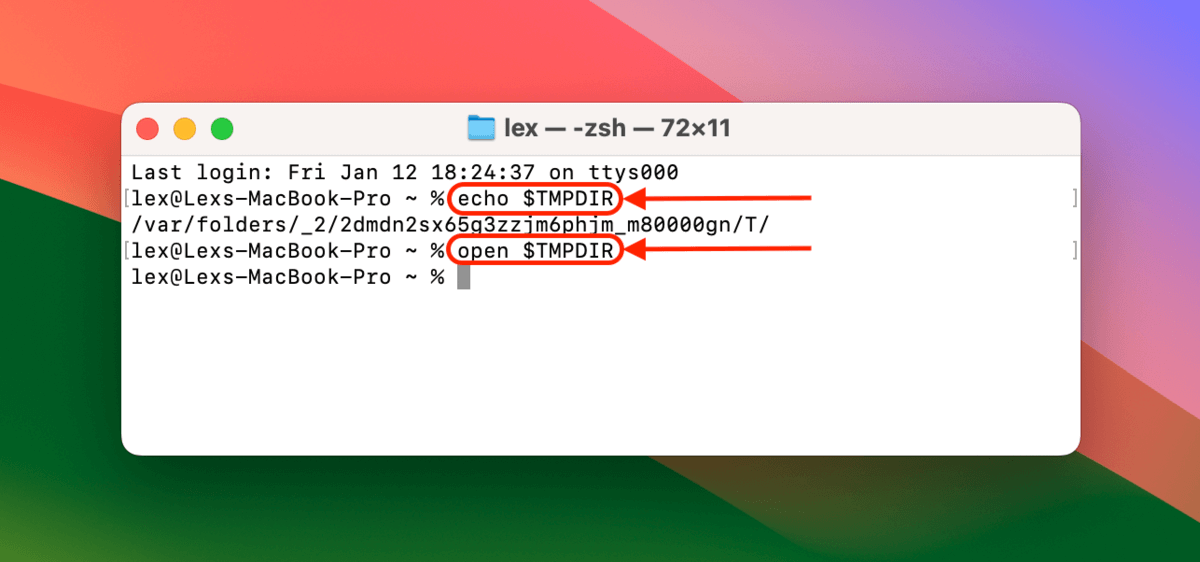
- A Finder window will be displayed allowing you to view the files in TMPDIR.
- Search through the files and see if your Pages file is there. If so, attempt to open it in Pages.
A detailed description of the temporary folders on your Mac and their various uses can be found on this page.
Method 4: Recover Deleted Pages Documents from iCloud
Requirements |
Suited for |
Ease of Implementation |
Documents saved/synced to iCloud Drive, recover within 30 days of deletion |
Deleted Pages documents from iCloud Drive |
Easy |
Files stored on your iCloud Drive are backed up to the cloud. You can save your Pages docs to your iCloud Drive, and then recover them from iCloud if they are deleted. Consult this Apple help page if you need some assistance in setting up your iCloud Drive.
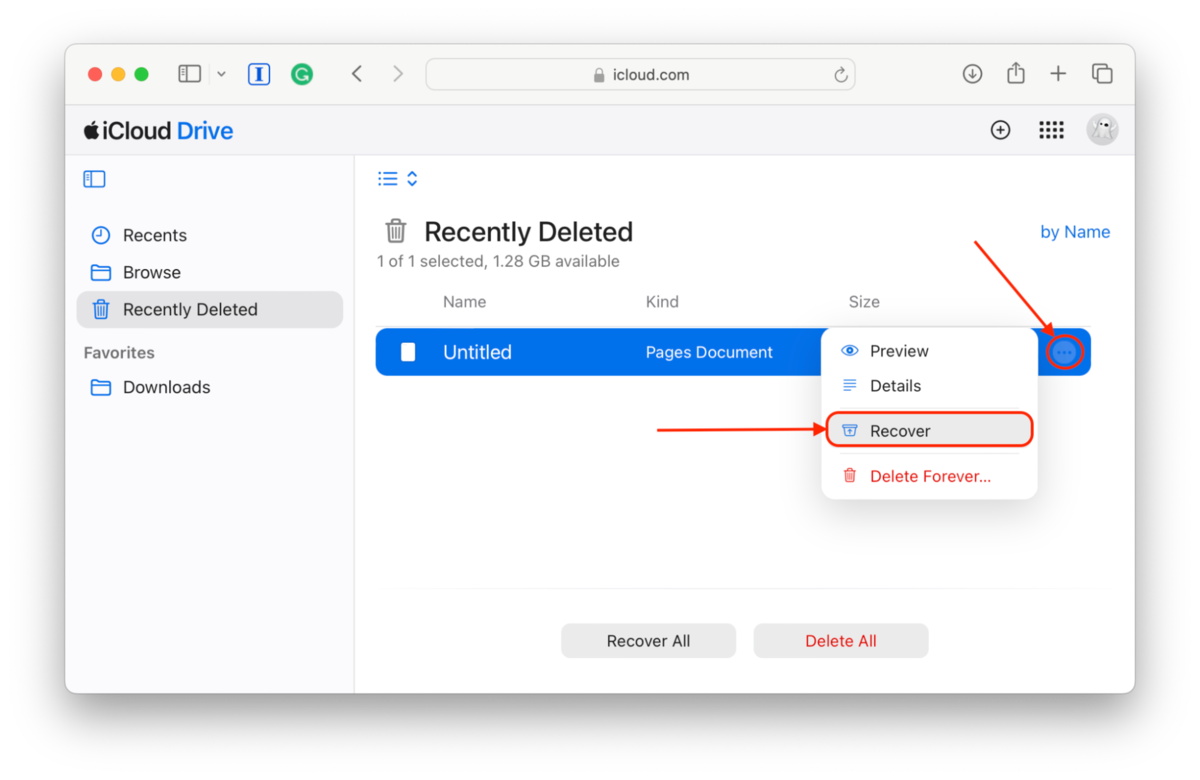
Follow these steps to recover deleted Pages files on your Mac.
- Log into iCloud.com and click iCloud Drive.
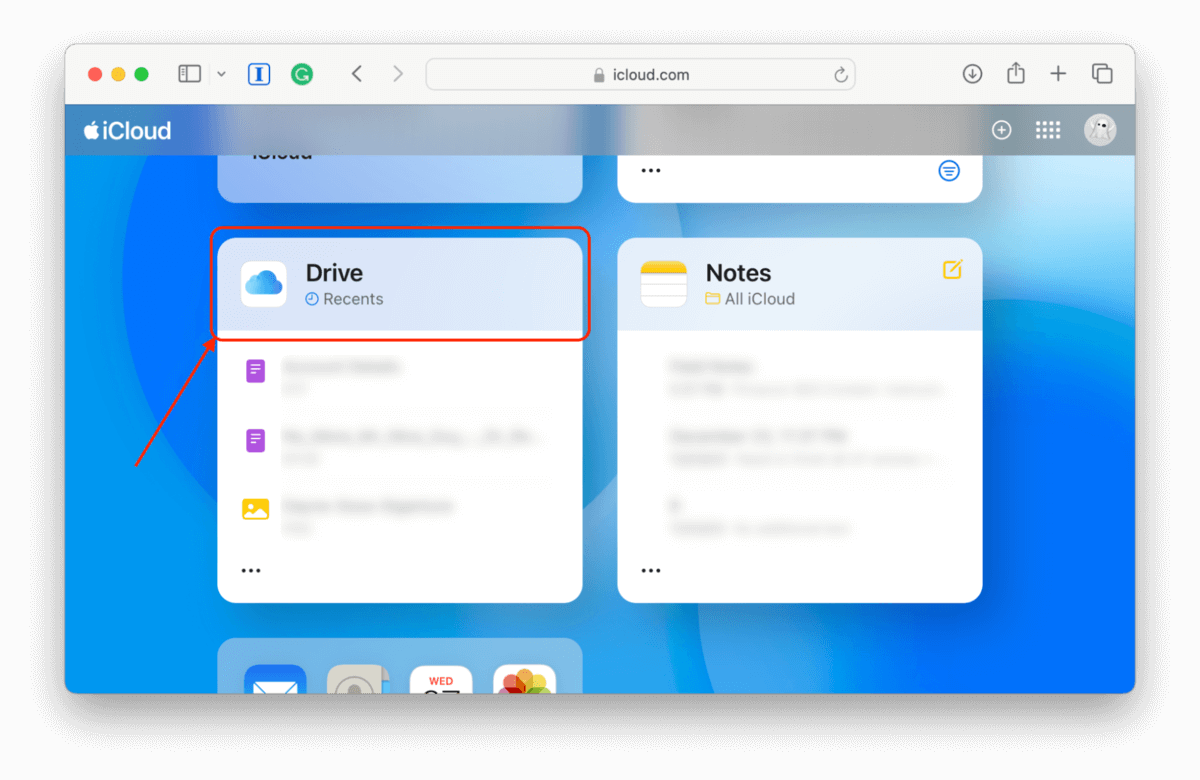
- Select the Recently Deleted folder in the last sidebar. If your Pages file is there, click the 3 dots beside it and click Recover. If it’s not, continue to step 3.
- Return to your iCloud homepage. Then, scroll to the bottom and click Data Recovery.
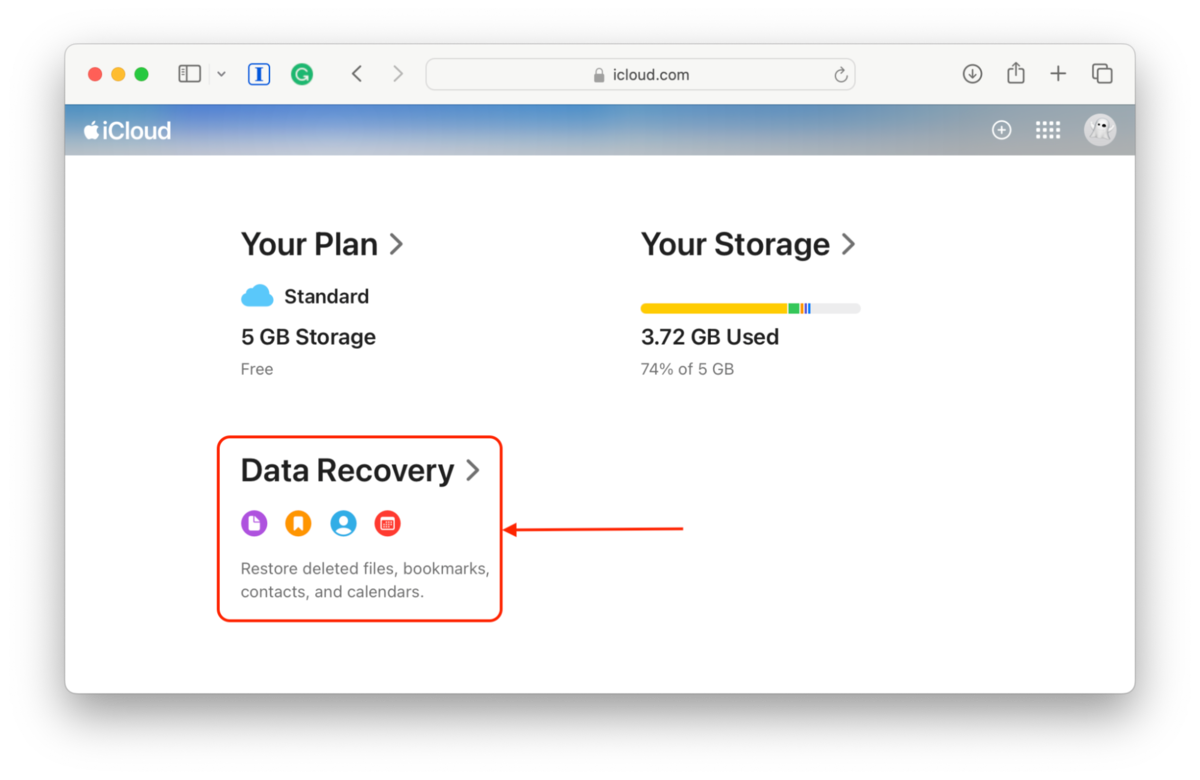
- Click Restore Files.
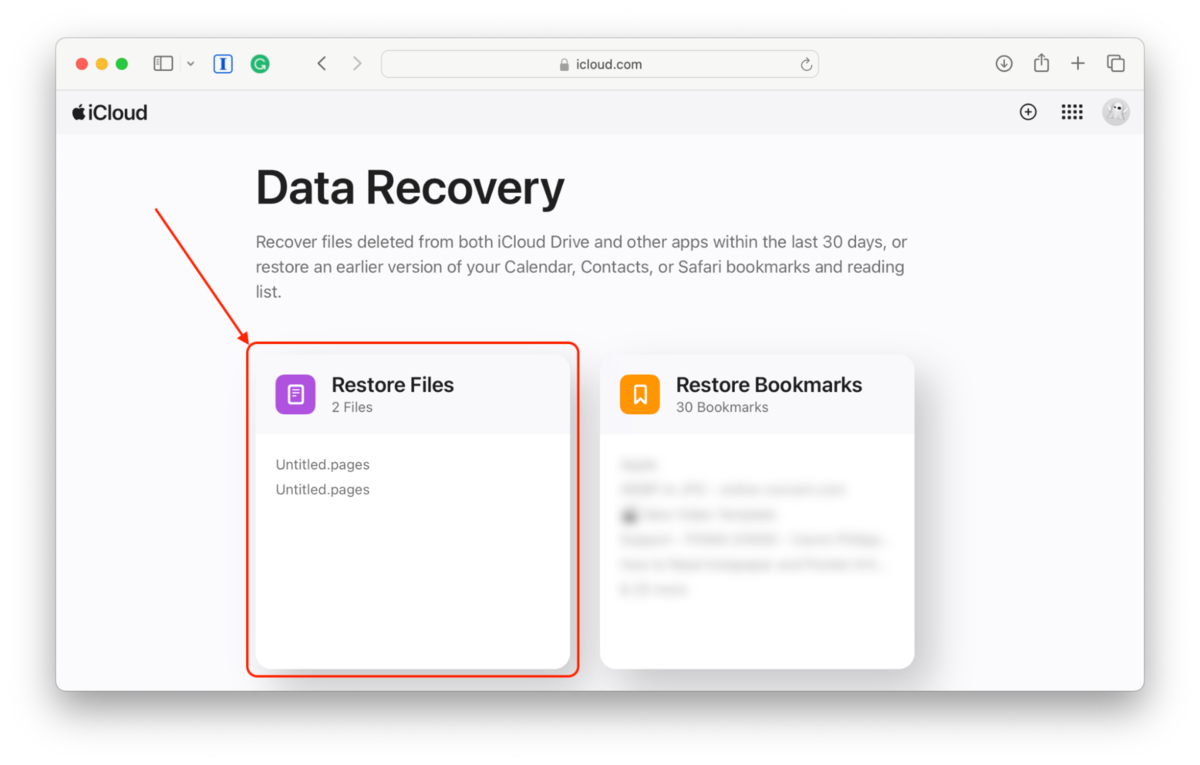
- Mark the boxes beside the Pages you want to recover and click Restore.
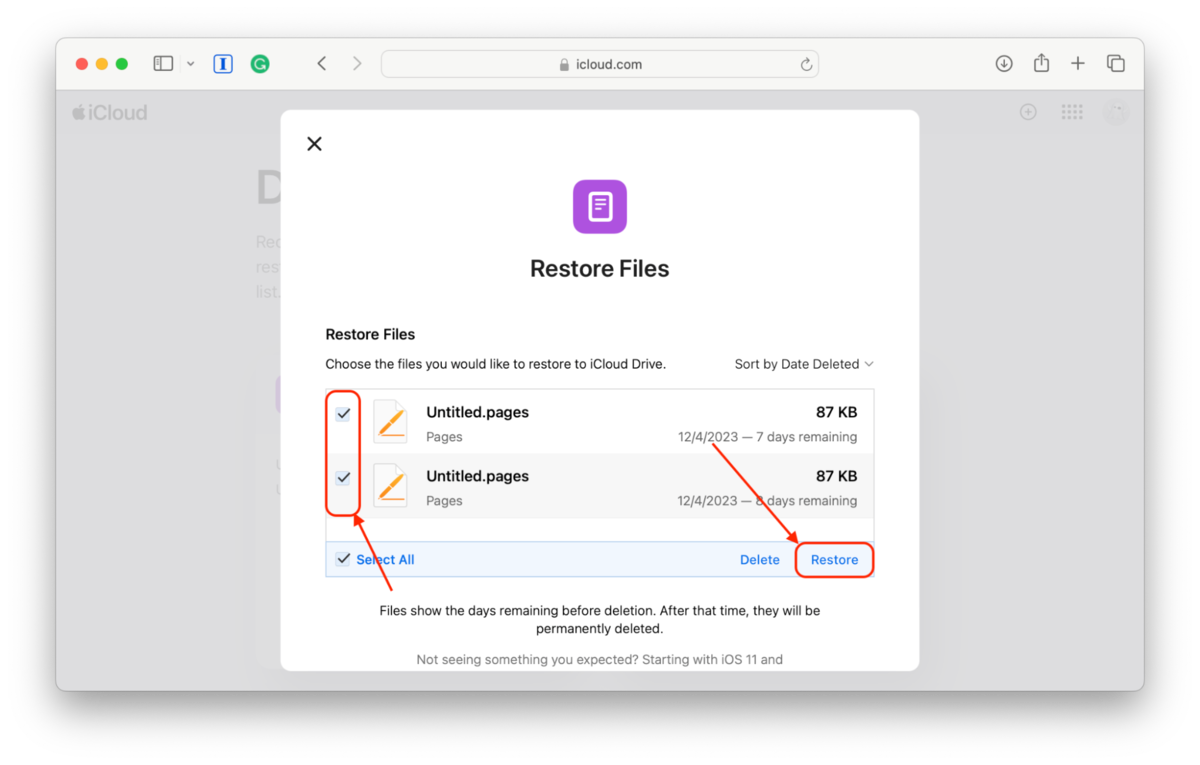
Files are available to be restored through iCloud for 30 days after they have been deleted.
FAQ
Does Pages on Mac autosave?
Yes, Pages on Mac does autosave, but two conditions must be met for this feature to protect your documents.
- You need to have saved a new Pages document manually for autosave to kick in. Once you have saved the file once, new versions will be created every time you see it and autosave will save the file once an hour.
- You also need to have autosave activated in your Mac’s settings. Here’s what you need to do.
- Open Settings > General.
- Ensure the checkbox is unchecked for Ask to keep changes when closing documents.
Checking this box turns off autosave and will prompt you to save documents when you close them.
How do I recover unsaved Pages on Mac?
Unsaved Pages files can be recovered using the auto recovery or by searching the Mac Temp folder. Previous sections of this article describe these methods in detail. Please refer to them for step-by-step instructions.
How to recover unsaved Pages document on iPad
Use the following procedure to recover an unsaved Pages document to a previous version on your iPad.
- Open Pages and tap Documents in the top-left corner to view your documents.
- Tap Select at the top of the screen and then tap the document you want to recover to a previous version
- Tap Versions at the top of the screen.
- Tap a previous version to select it.
- Tap Preview to preview the file. It can be searched and objects can be copied. You cannot edit the file.
- At this point you can:
- Save a copy of the version shown in the preview.
- Replace the current version with the preview version.
- Close the preview and return to the current version.
- Tap Done.
How do I recover a deleted Pages document on iPhone?
Use the following procedure to recover a deleted Pages document on iPhone.
- Open Pages and tap Documents in the top-left corner.
- Tap the Locations tab in the top-left corner.
- In Locations, tap Recently Deleted.
- Perform one of the following actions:
- Recover one or more items by tapping Select and then tapping the documents you want to recover. Tap Recover to perform the recovery.
- Get information about a recently deleted item by touching and holding the name of the document or folder. Lift your finger and make your selection from the popup menu that is displayed.
How to recover a replaced Pages document
You may or may not be able to recover a replaced Pages document based on how it was replaced. If you create a new file with the same name as a previously saved file and then save the new file, it will overwrite the original file and make it impossible to recover it.
If you have simply replaced a previous version of a file with updated information, you can use the Revert To feature to go back to a previously saved version of the file. The procedure to recover a Pages file using this method is described fully in a previous section of this article.
Conclusion
As long as you have not overwritten the deleted Pages document, it can be recovered from the Trash or with data recovery software. Backups will be necessary if the file was overwritten. In the case of unsaved Pages files, we have described multiple methods of recovering the most recently saved version of the file.
We hope this information helps you recover your lost Pages files. We strongly suggest you start backing up your files to provide another recovery option when things go wrong. Most data recovery apps like Disk Drill offer a free trial that will scan your disk and report on the recoverable data. It’s certainly worth a try.
This article was written by Robert Agar, a Staff Writer at Handy Recovery Advisor. It was recently updated by Alejandro Santos. It was also verified for technical accuracy by Andrey Vasilyev, our editorial advisor.
Curious about our content creation process? Take a look at our Editor Guidelines.