
Facing the challenge of misplaced or deleted digital files? You’re not alone. As we delve deeper into the digital age, the problem of managing and retrieving missing or deleted downloads looms large. Fortunately, we have concise, proven methods to help. Dive into this guide to rediscover your important files, backed by tried-and-tested solutions countless users trust.
The moment you notice files missing, restrict using your computer to a minimum. The more you use the computer, the higher the risk of your files getting overwritten, and thus, lost forever.
Imprortant: Based on our findings, the most common reason for lost files in the download folder is straightforward: unintentional deletion, quickly followed by an emptied Recycle Bin. Does this sound familiar? If so, you’ll want to pay special attention to method number 6. However, don’t stop there. We recommend getting acquainted with all the recovery techniques we’ve provided. Below, you’ll find a comprehensive list of scenarios, each linked to the pertinent sections of our article.
Problem |
Solution |
I recently deleted a file from my downloads folder |
|
I can’t find a file I downloaded recently |
|
I accidentally permanently deleted an important download |
|
My browser crashed during a download, and now I can’t see the file |
|
I accidentally deleted the downloads folder |
|
I need to resume a canceled download in Chrome |
Where Does Windows Store Downloads?
By default, Windows stores your downloaded files in the Downloads folder. Furthermore, you can customize this download location to a folder of your choice.
To navigate to the default download folder, navigate to:
C:\Users\your_name\Downloads
You can move downloads to other folders, but you can also change the default location for downloads through your browser.
8 Tried-and-Tested Solutions to Recover Lost Downloads
As you keep reading this article, we will guide you through recovering your lost or broken files. Try out all of the suggestions we have before you give up on your downloads forever. We have tested each solution extensively and will take you through a step-by-step process to get your downloaded files back.
Method 1: Locate the Downloads Folder and Find Your Deleted Downloads
Regardless of the browser you use, downloaded files are saved inside the “Downloads” folder by default. However, it might be possible that you selected a different folder to save your downloads to. If this happens, you might not find the file because you are looking in the wrong place.
Here’s what you can do:
- Open the sidebar in your browser, and navigate to “Settings” or “Options”.
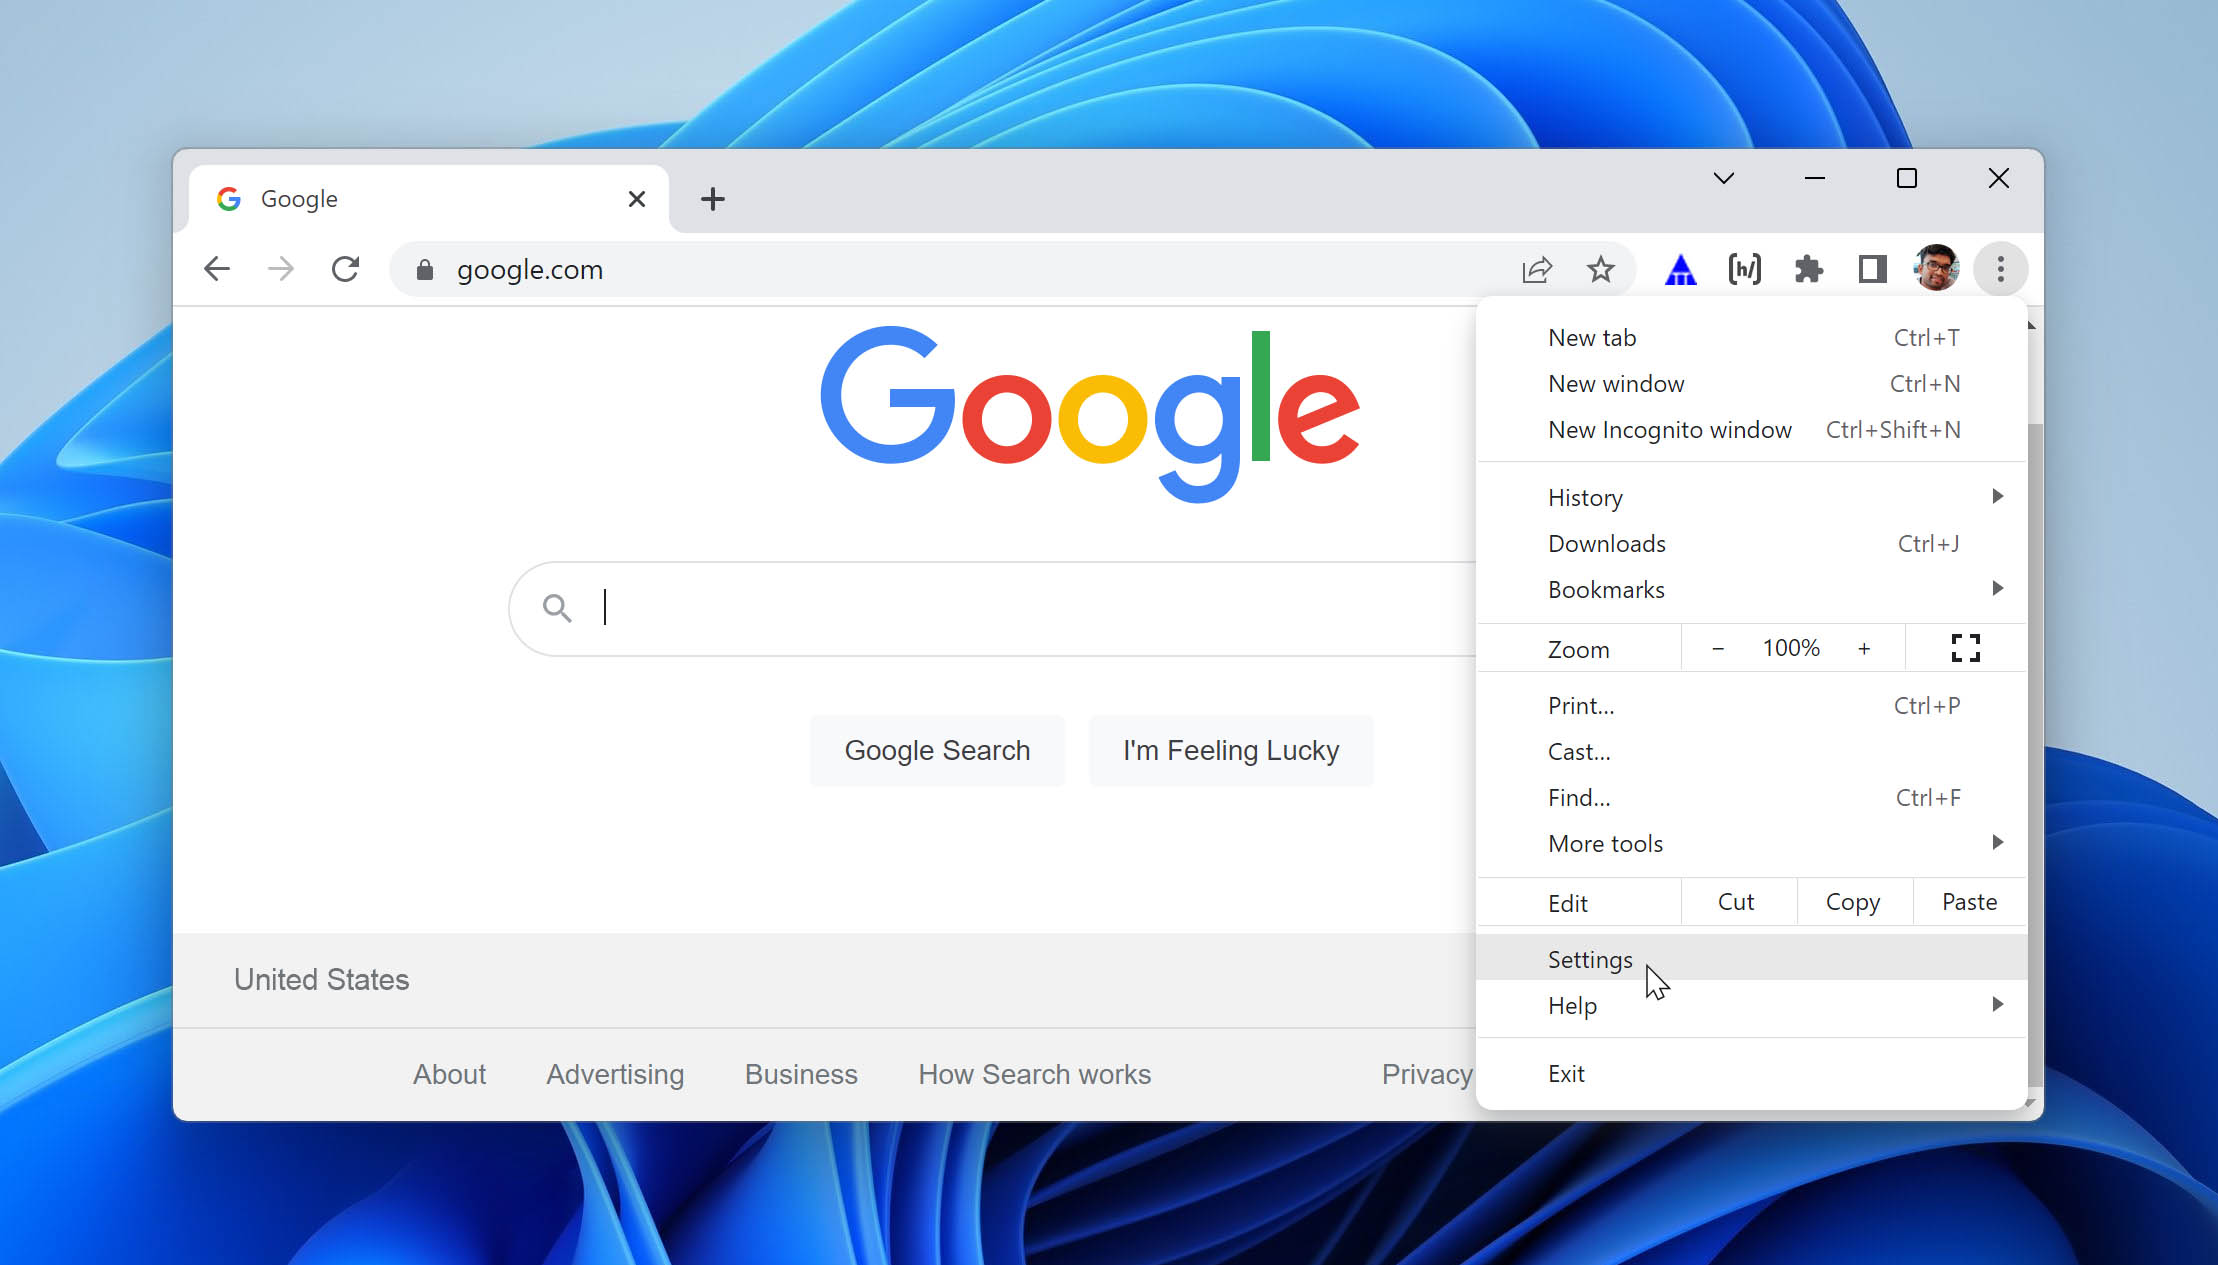
- In the “General Settings” menu, find “Downloads” or “Download Options”.
- Verify the path for the folder where you store downloaded files.
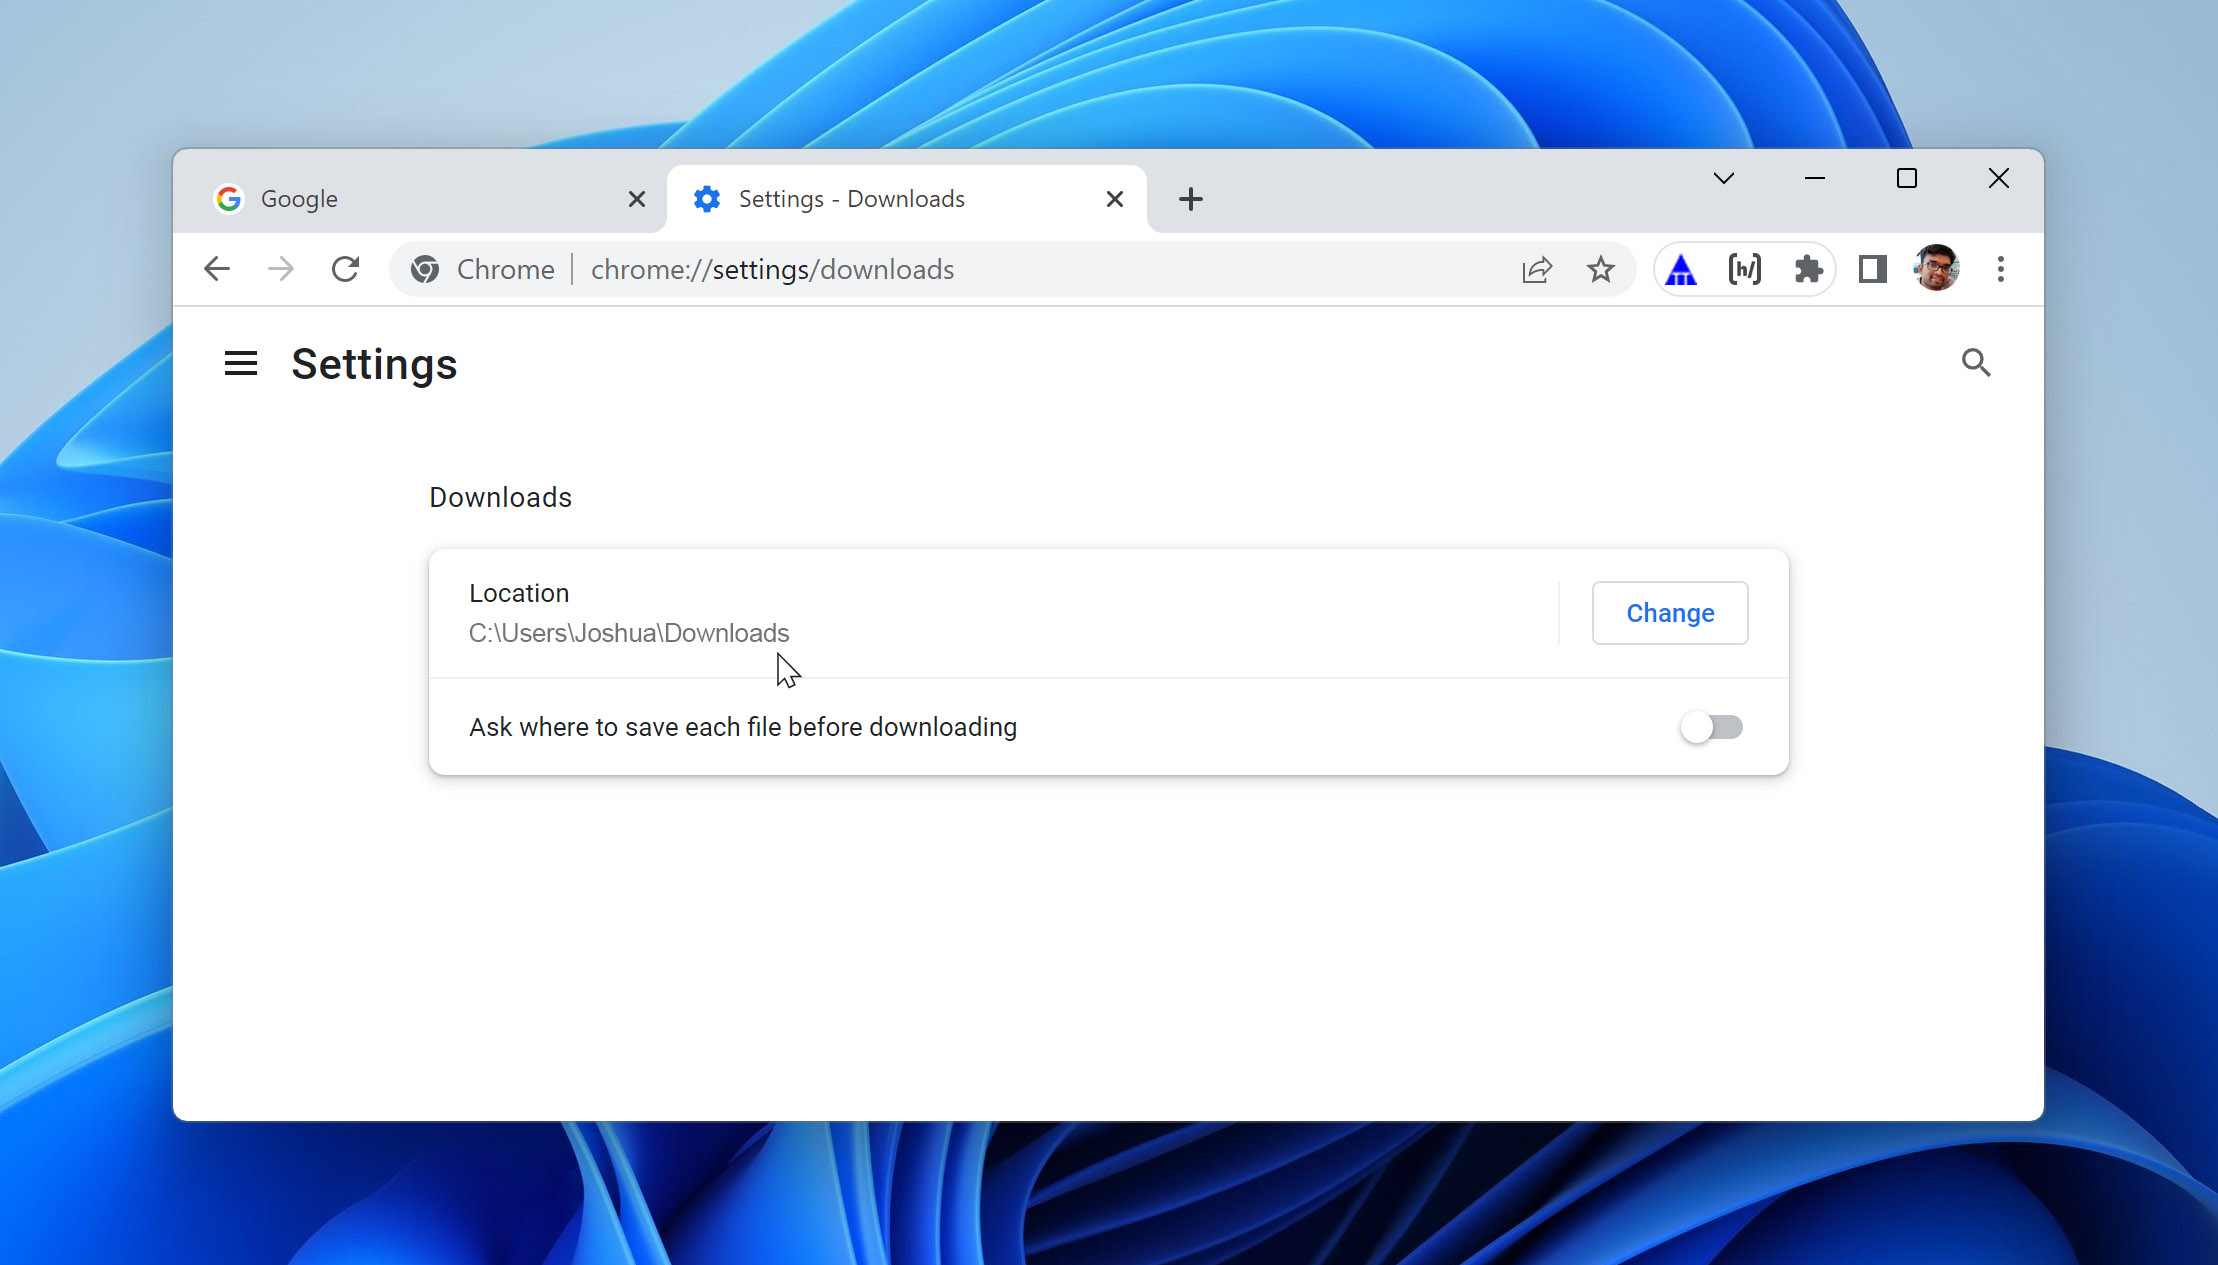
- Try opening this folder and looking for your files.
This solution will work if your files are being saved to a different location by default. However, if it doesn’t restore downloads, try the next method.
Method 2: Check the Recycle Bin for Deleted Downloads
Should you happen to delete your desired file by accident, it has quite likely been sent to the Recycle Bin. In this case, you can recover downloads very easily, unless you permanently deleted the file or emptied the recycle bin.
Make it a habit not to permanently delete a file directly. If you delete the file simply, it is moved to the recycle bin. This is an extra step that allows you to quickly recover files if you made an accident.
- Open the Recycle Bin, either from the Desktop or from File Explorer.
- Look for your desired file in the window that shows up. If the window is extremely cluttered, you can also use tools from the search bar to zero in on your file.
- Once you find your file, right-click on it and select “Restore”.
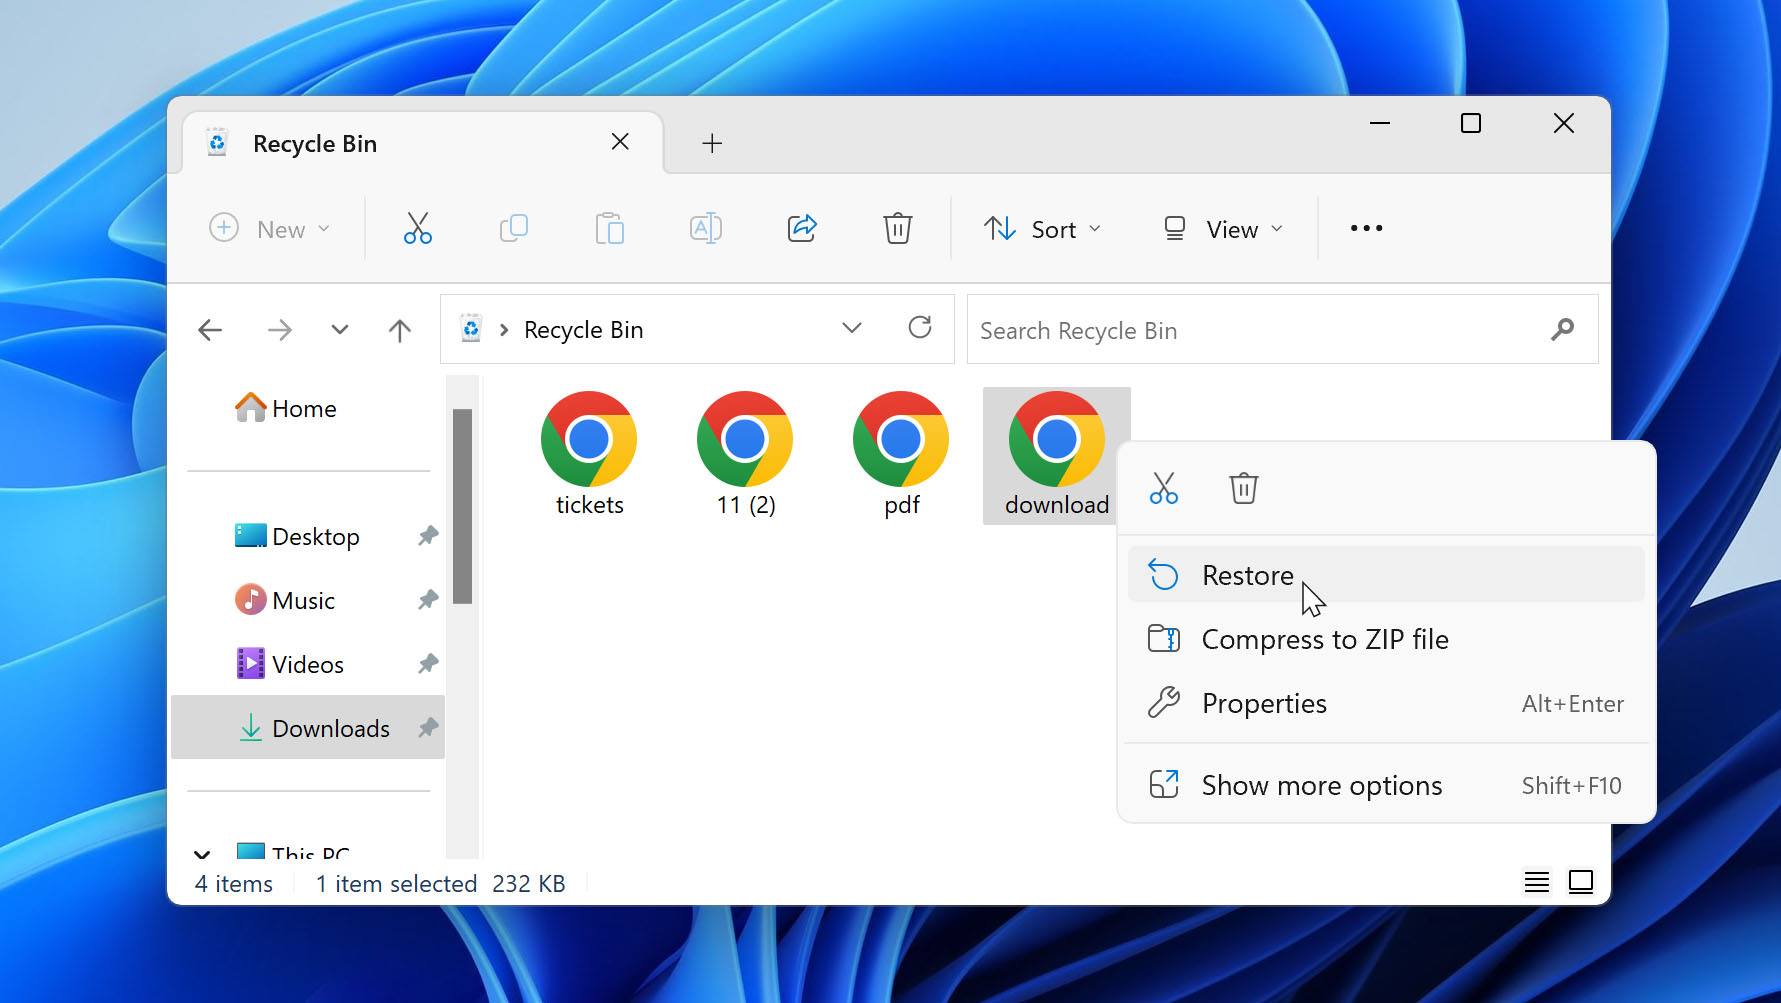
This will put your file back where it was before being deleted.
Check the Original Location of the file before you restore it. This will help you quickly navigate to it once restored.
Method 3: Re-download the Deleted Download Files
Web browsers are amazing little things. If you download a file once, it is quite likely that your browser has the path saved so that you can re-download the file later. Even if you permanently deleted the file, you can recover it this way.
We will guide you through re-downloading files on Chrome and Mozilla Firefox, two of the most common browsers out there.
- Open your browser of choice. Remember that if you use multiple browsers, only the browser you used to download the file will “remember” its path.
- Open Settings through the sidebar (three dots in Chrome and three horizontal bars in Firefox).
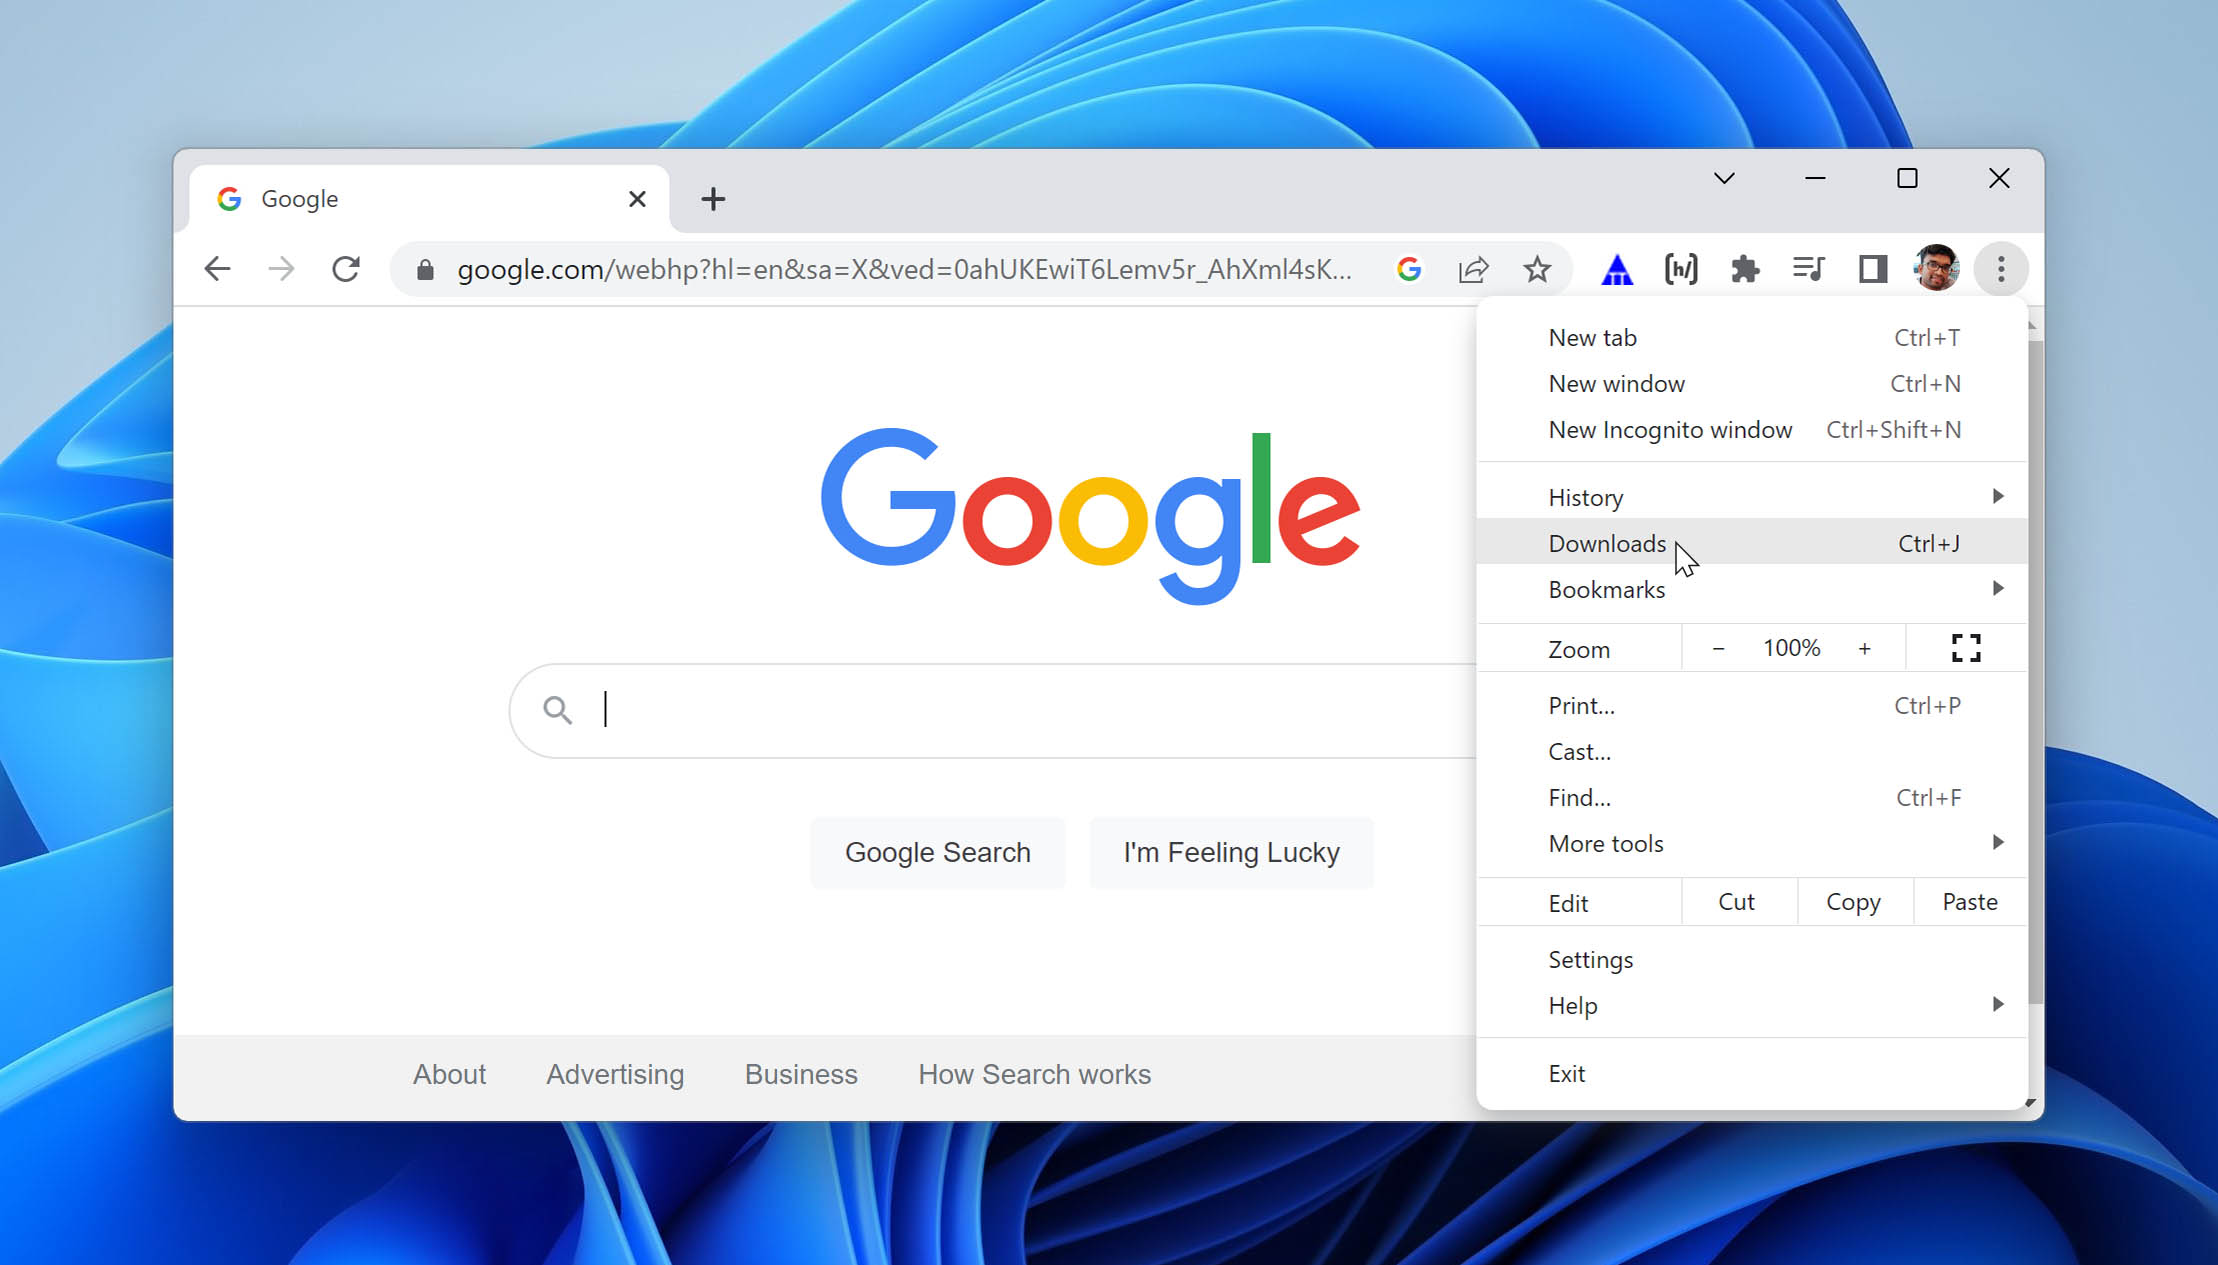
- Navigate to the “Downloads” option. Alternatively, you may press Ctrl + J in either Chrome or Firefox to directly jump to Downloads.
- Look for the file you lost.
- If you can see a “Show in folder” option under the file, it is still located on your computer. You can click on this button to navigate to the folder it is in and that should solve your problem.
- If the downloaded file says “Deleted”, then you might have lost it. But look right under the filename, for there is a URL. If you copy this path and paste it into your browser, you can quickly retrieve the deleted download!
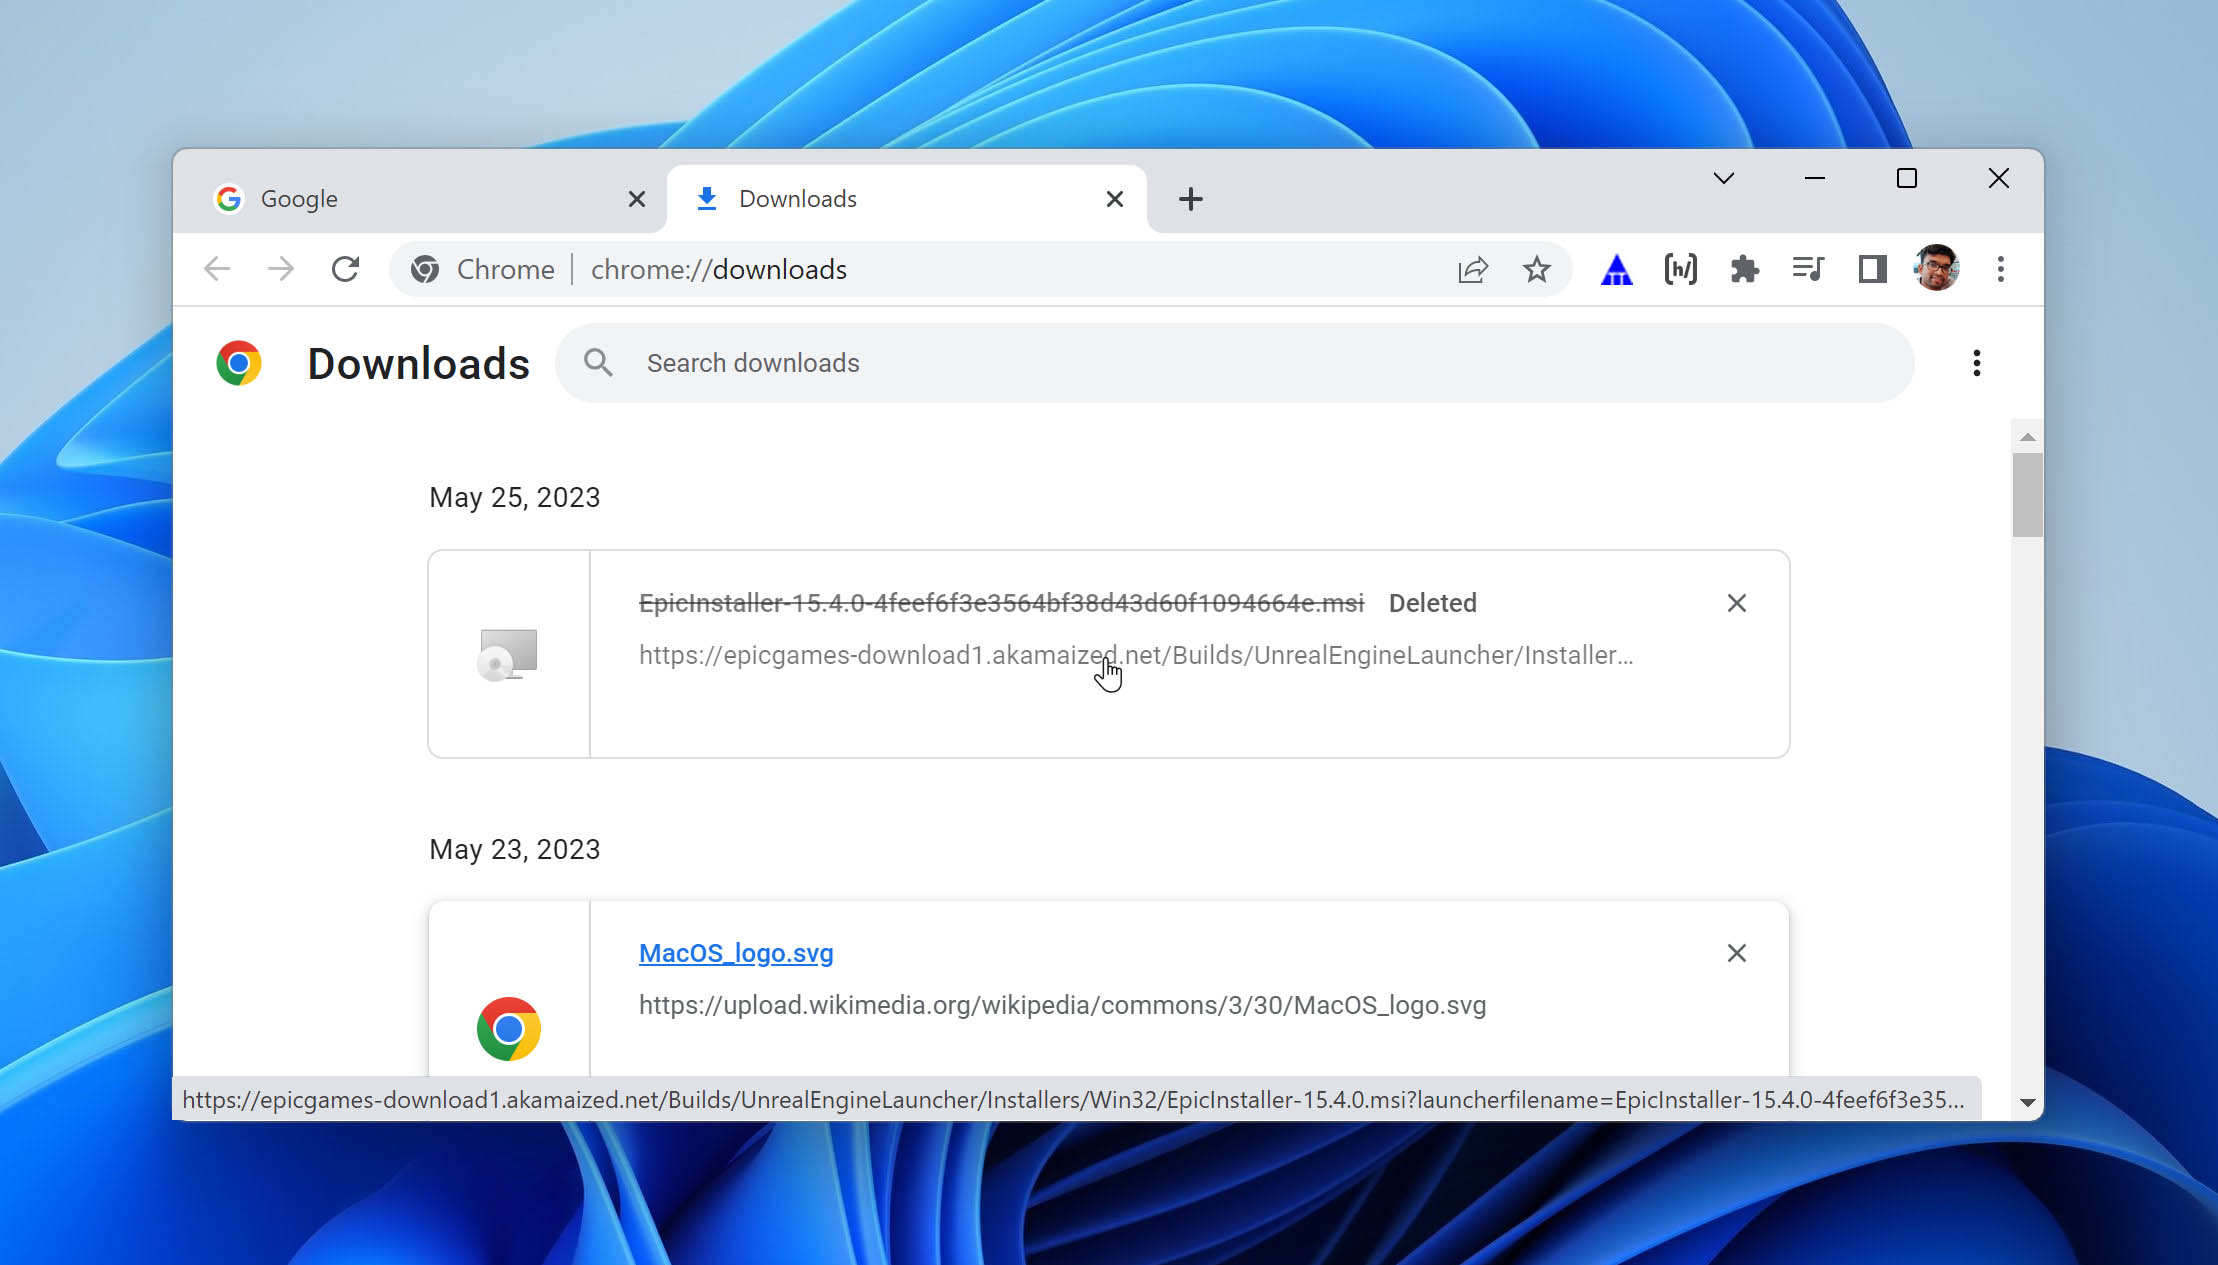
This method is extremely handy if you are downloading files from a public source that allows redownloads. However, confidential information is often sent through expiring links that do not let you download the file again. In such a case, you might have to try some of the other alternatives we have.
Method 4: Search for Deleted Downloads in Temporary Files
Windows creates a folder that stores temporary files on your computer. While this folder holds many kinds of files, it also stores and indexes downloads. This makes it possible for you to search for them for a short while after they have been deleted.
Here’s how you can find such a file on Windows:
- Press the Start button.
- Start typing the name of the file you are trying to retrieve.
- Press Enter.
If you have the temporary files feature working, then a window should open. This window will have a list of files matching your search. You can right-click the file and open it or drag and drop it to your desired location.
Alternatively, navigate to the following folder: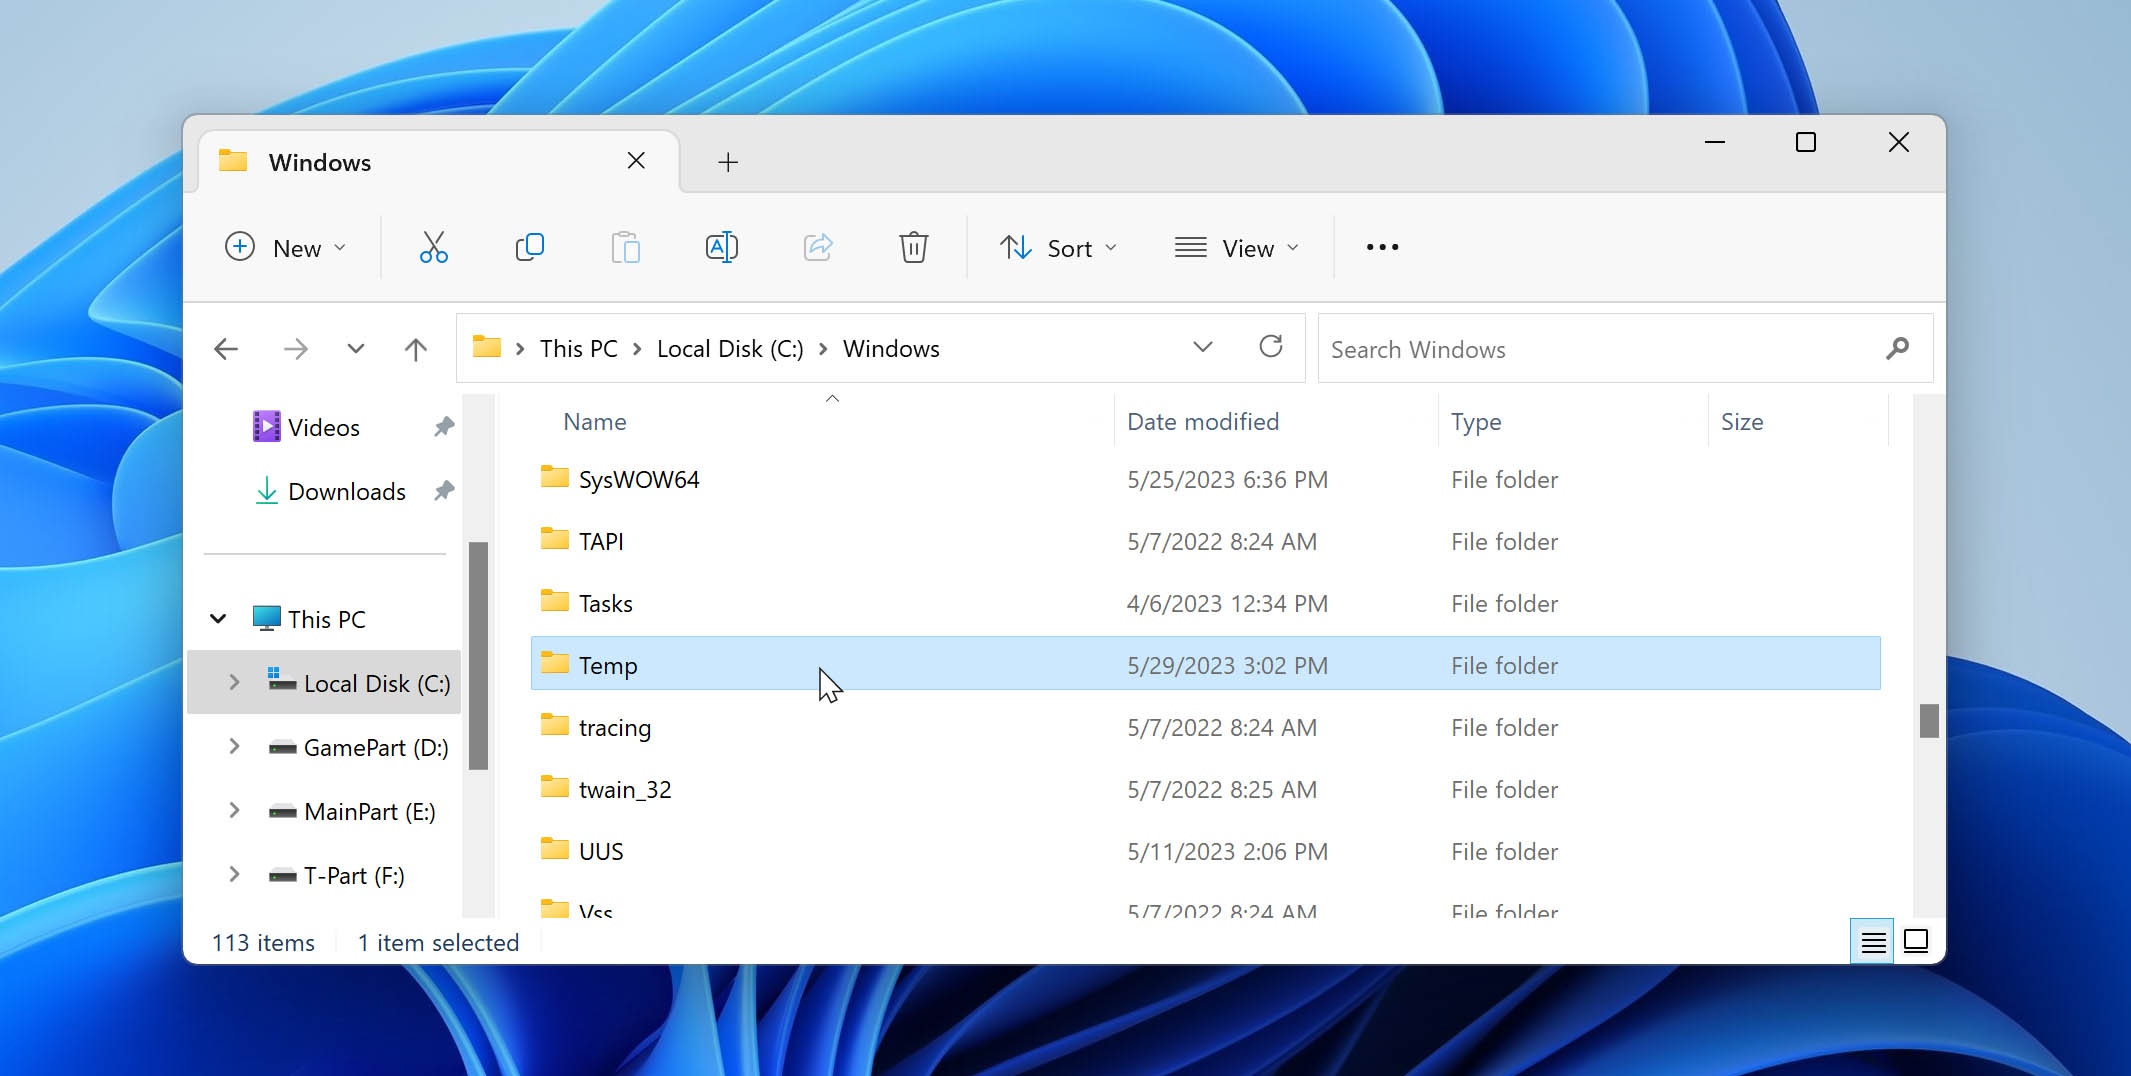
Method 5: Resume Interrupted Downloads
Sometimes, you might not be able to find your downloads because they did not finish downloading completely. This can happen if you accidentally shut the browser, your connection broke down, or your computer shut down completely. Relax, as this is very easy to fix.
- Open your browser, and navigate to Downloads. (See Method 3 for more details).
- Navigate to the file that did not complete downloading.
- Click on the Retry button under the file description.
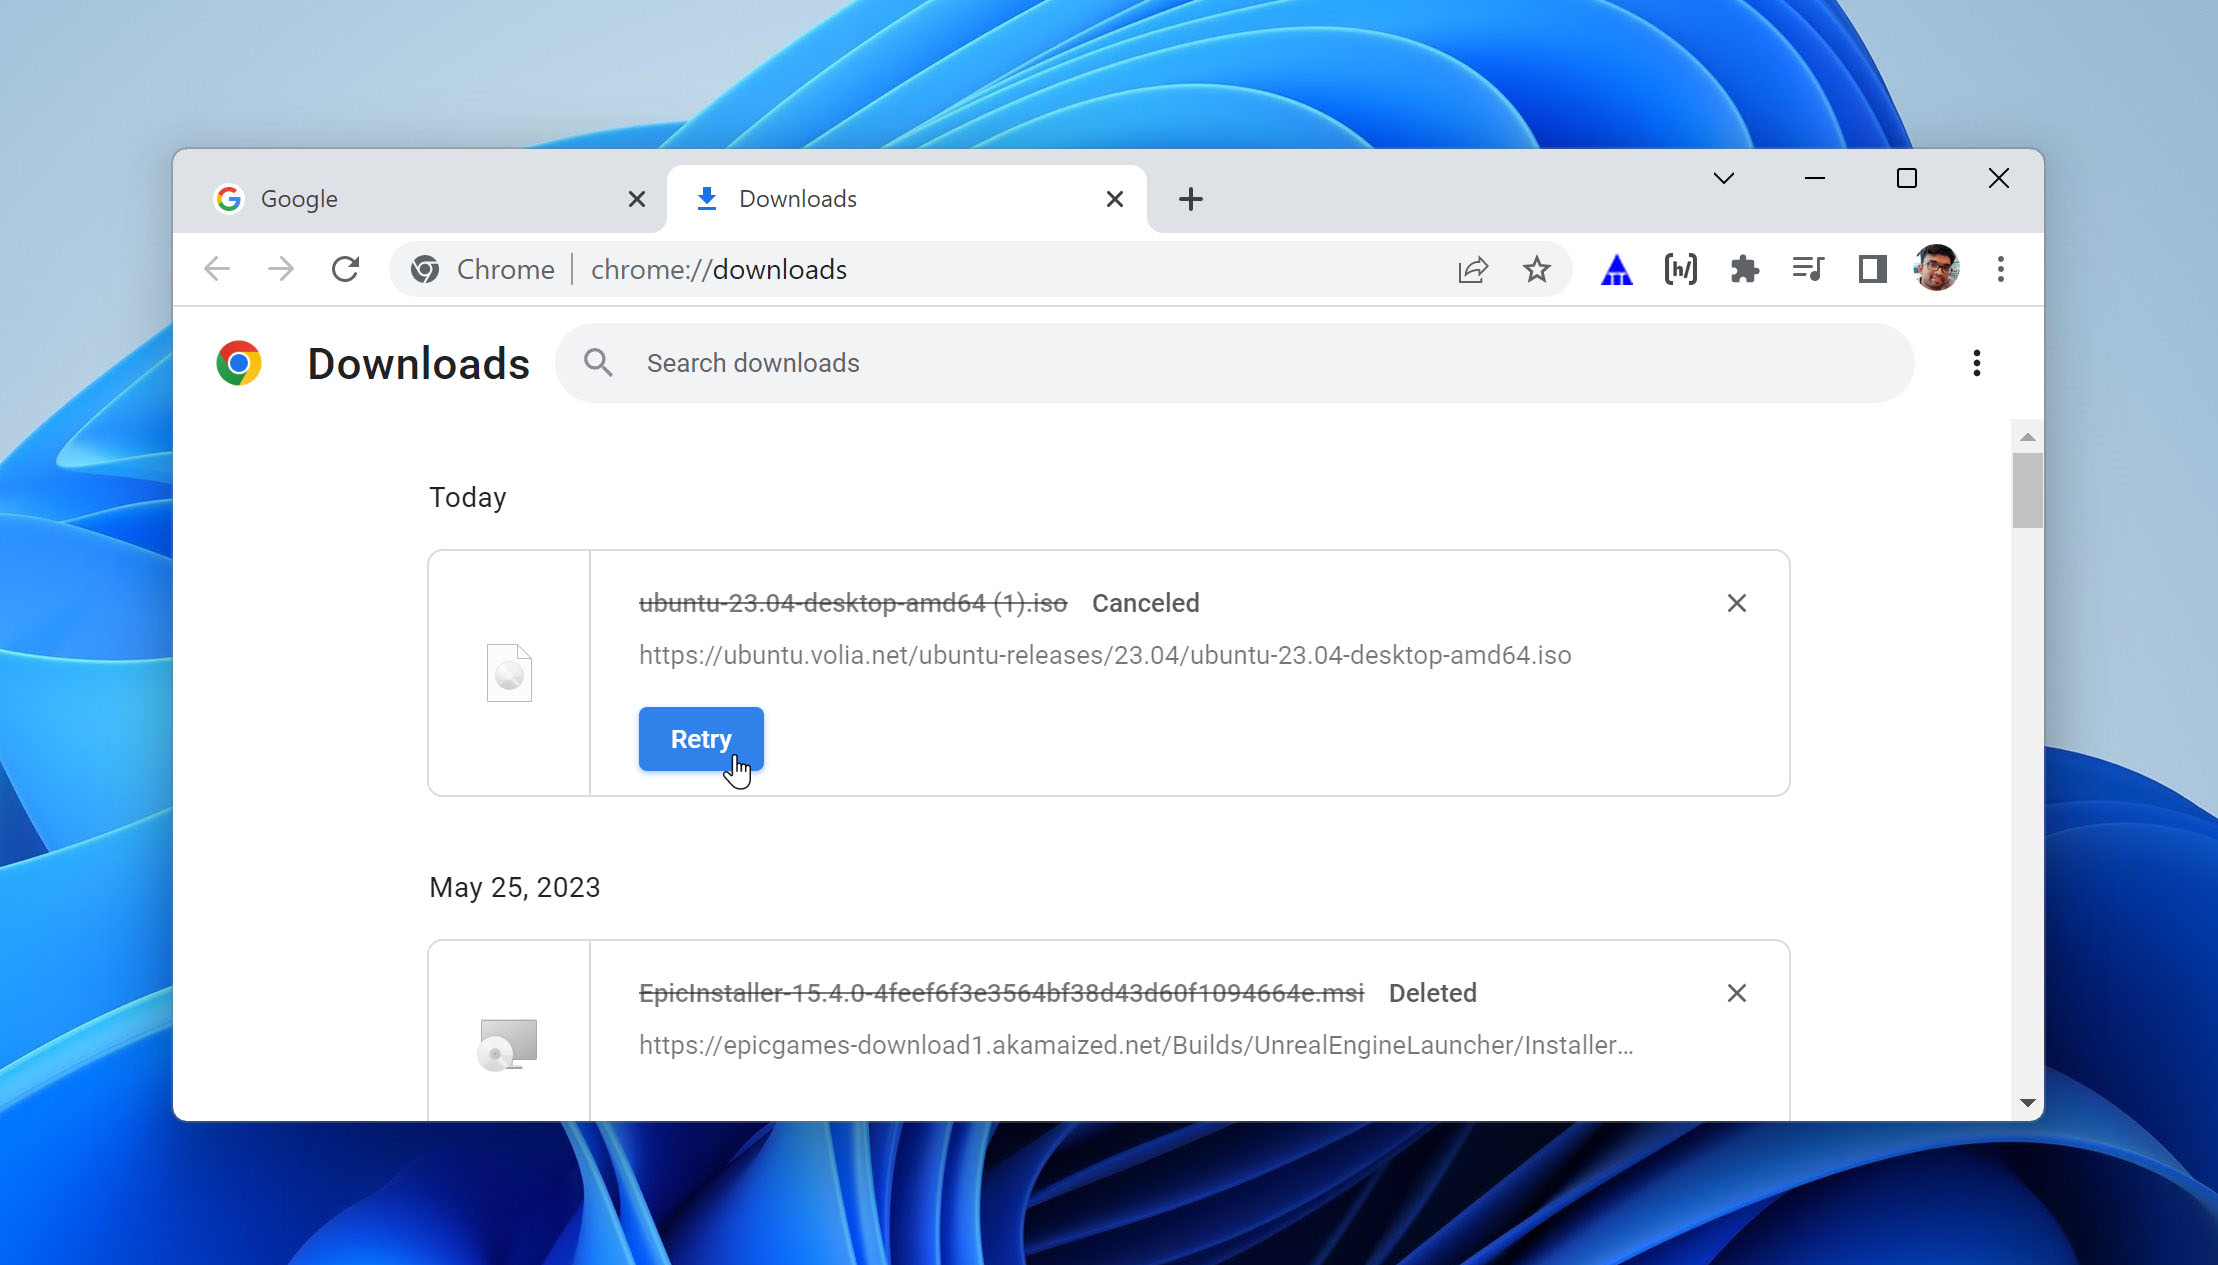
- Wait until the download is complete.
Your download should now appear in the Downloads folder of your computer. You can open this file or move it to a more suitable location.
If none of the above methods worked for you, don’t worry. It might be time to try something more powerful.
Method 6: Use Data Recovery Software to Retrieve Deleted Files and Folders
If you’ve exhausted all of the alternatives we suggested, do not panic. Sometimes, retrieving downloads using these methods can be challenging. However, with Data Recovery Tools, you can swiftly recover and restore your deleted files. Especially if you’ve permanently deleted your files, you can’t retrieve them without data recovery software.
Numerous creators of data recovery tools exist, making it challenging to choose among them. We are always searching for newer, more potent tools and have, therefore, tested many of them.
The one tool that consistently outperformed the rest was Disk Drill. It was straightforward to start using and proved exceptionally efficient in recovering our files. Here’s how you can recover your files with Disk Drill.
- Download and Install the Windows version of Disk Drill. Disk Drill has a free version for Windows that you can download from here. Install it and give it the administrator’s credentials so that it can run properly.
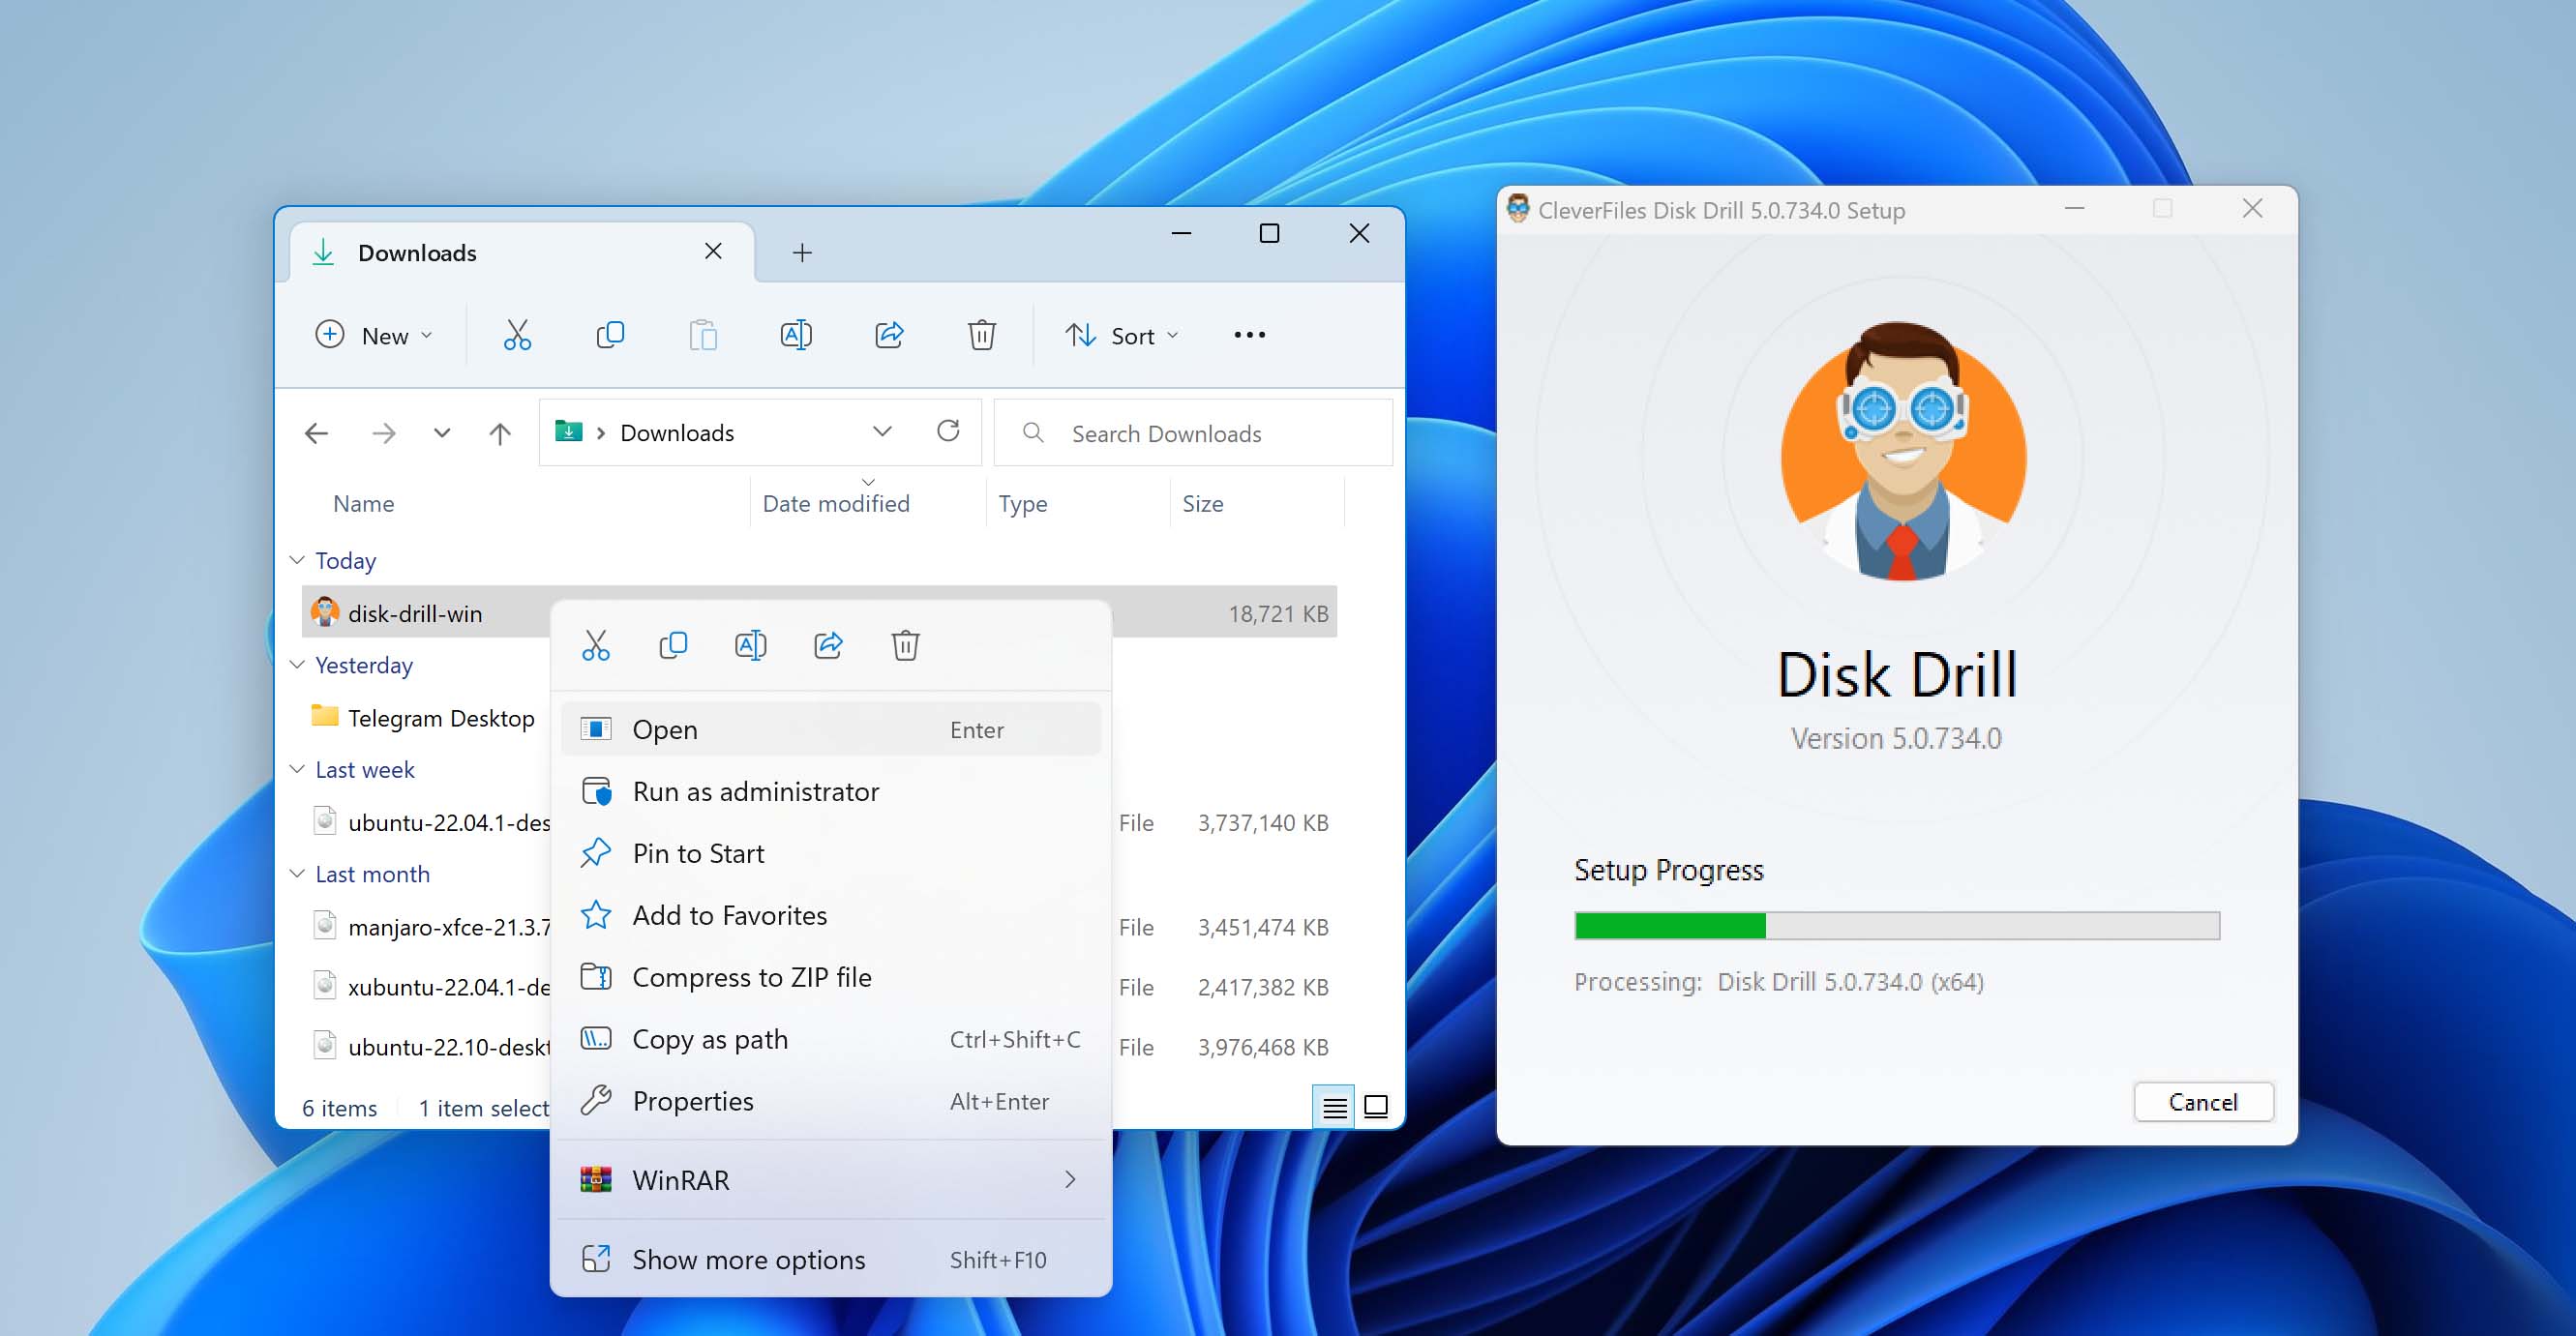
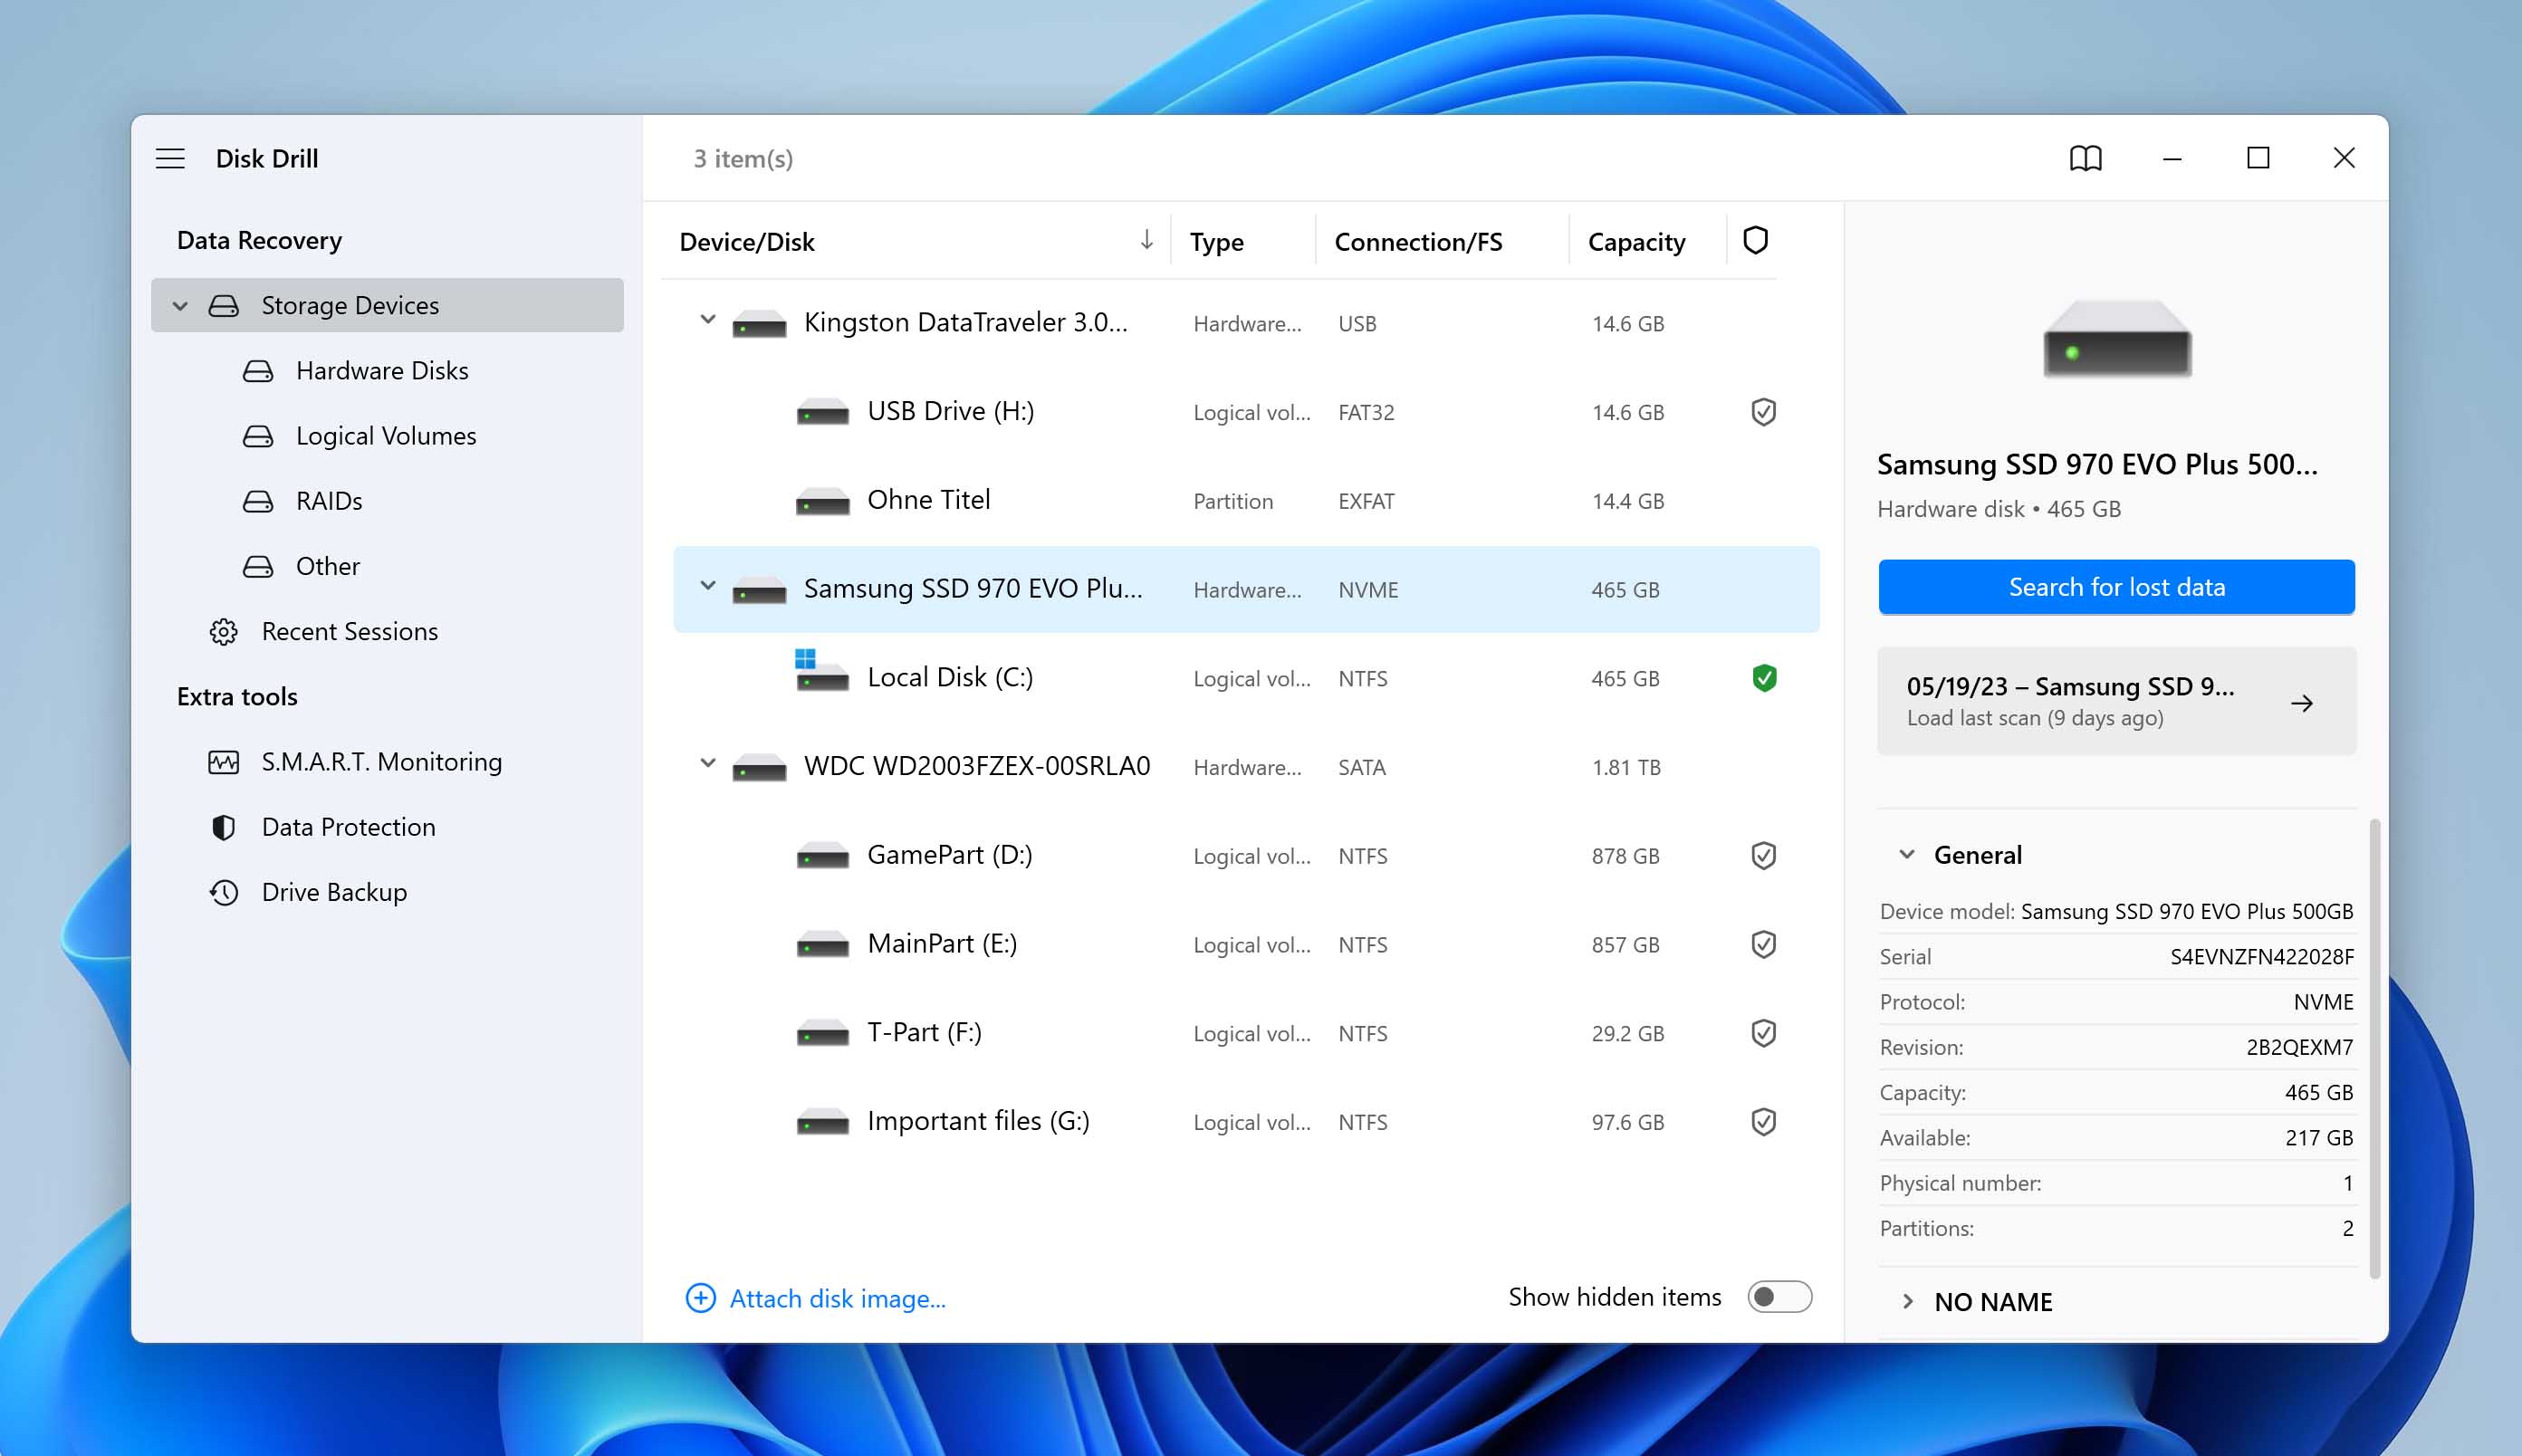
- Select the disk that has your downloads. In Disk Drill’s interface, you will see a selection of disks. Locate the right disk and select it.
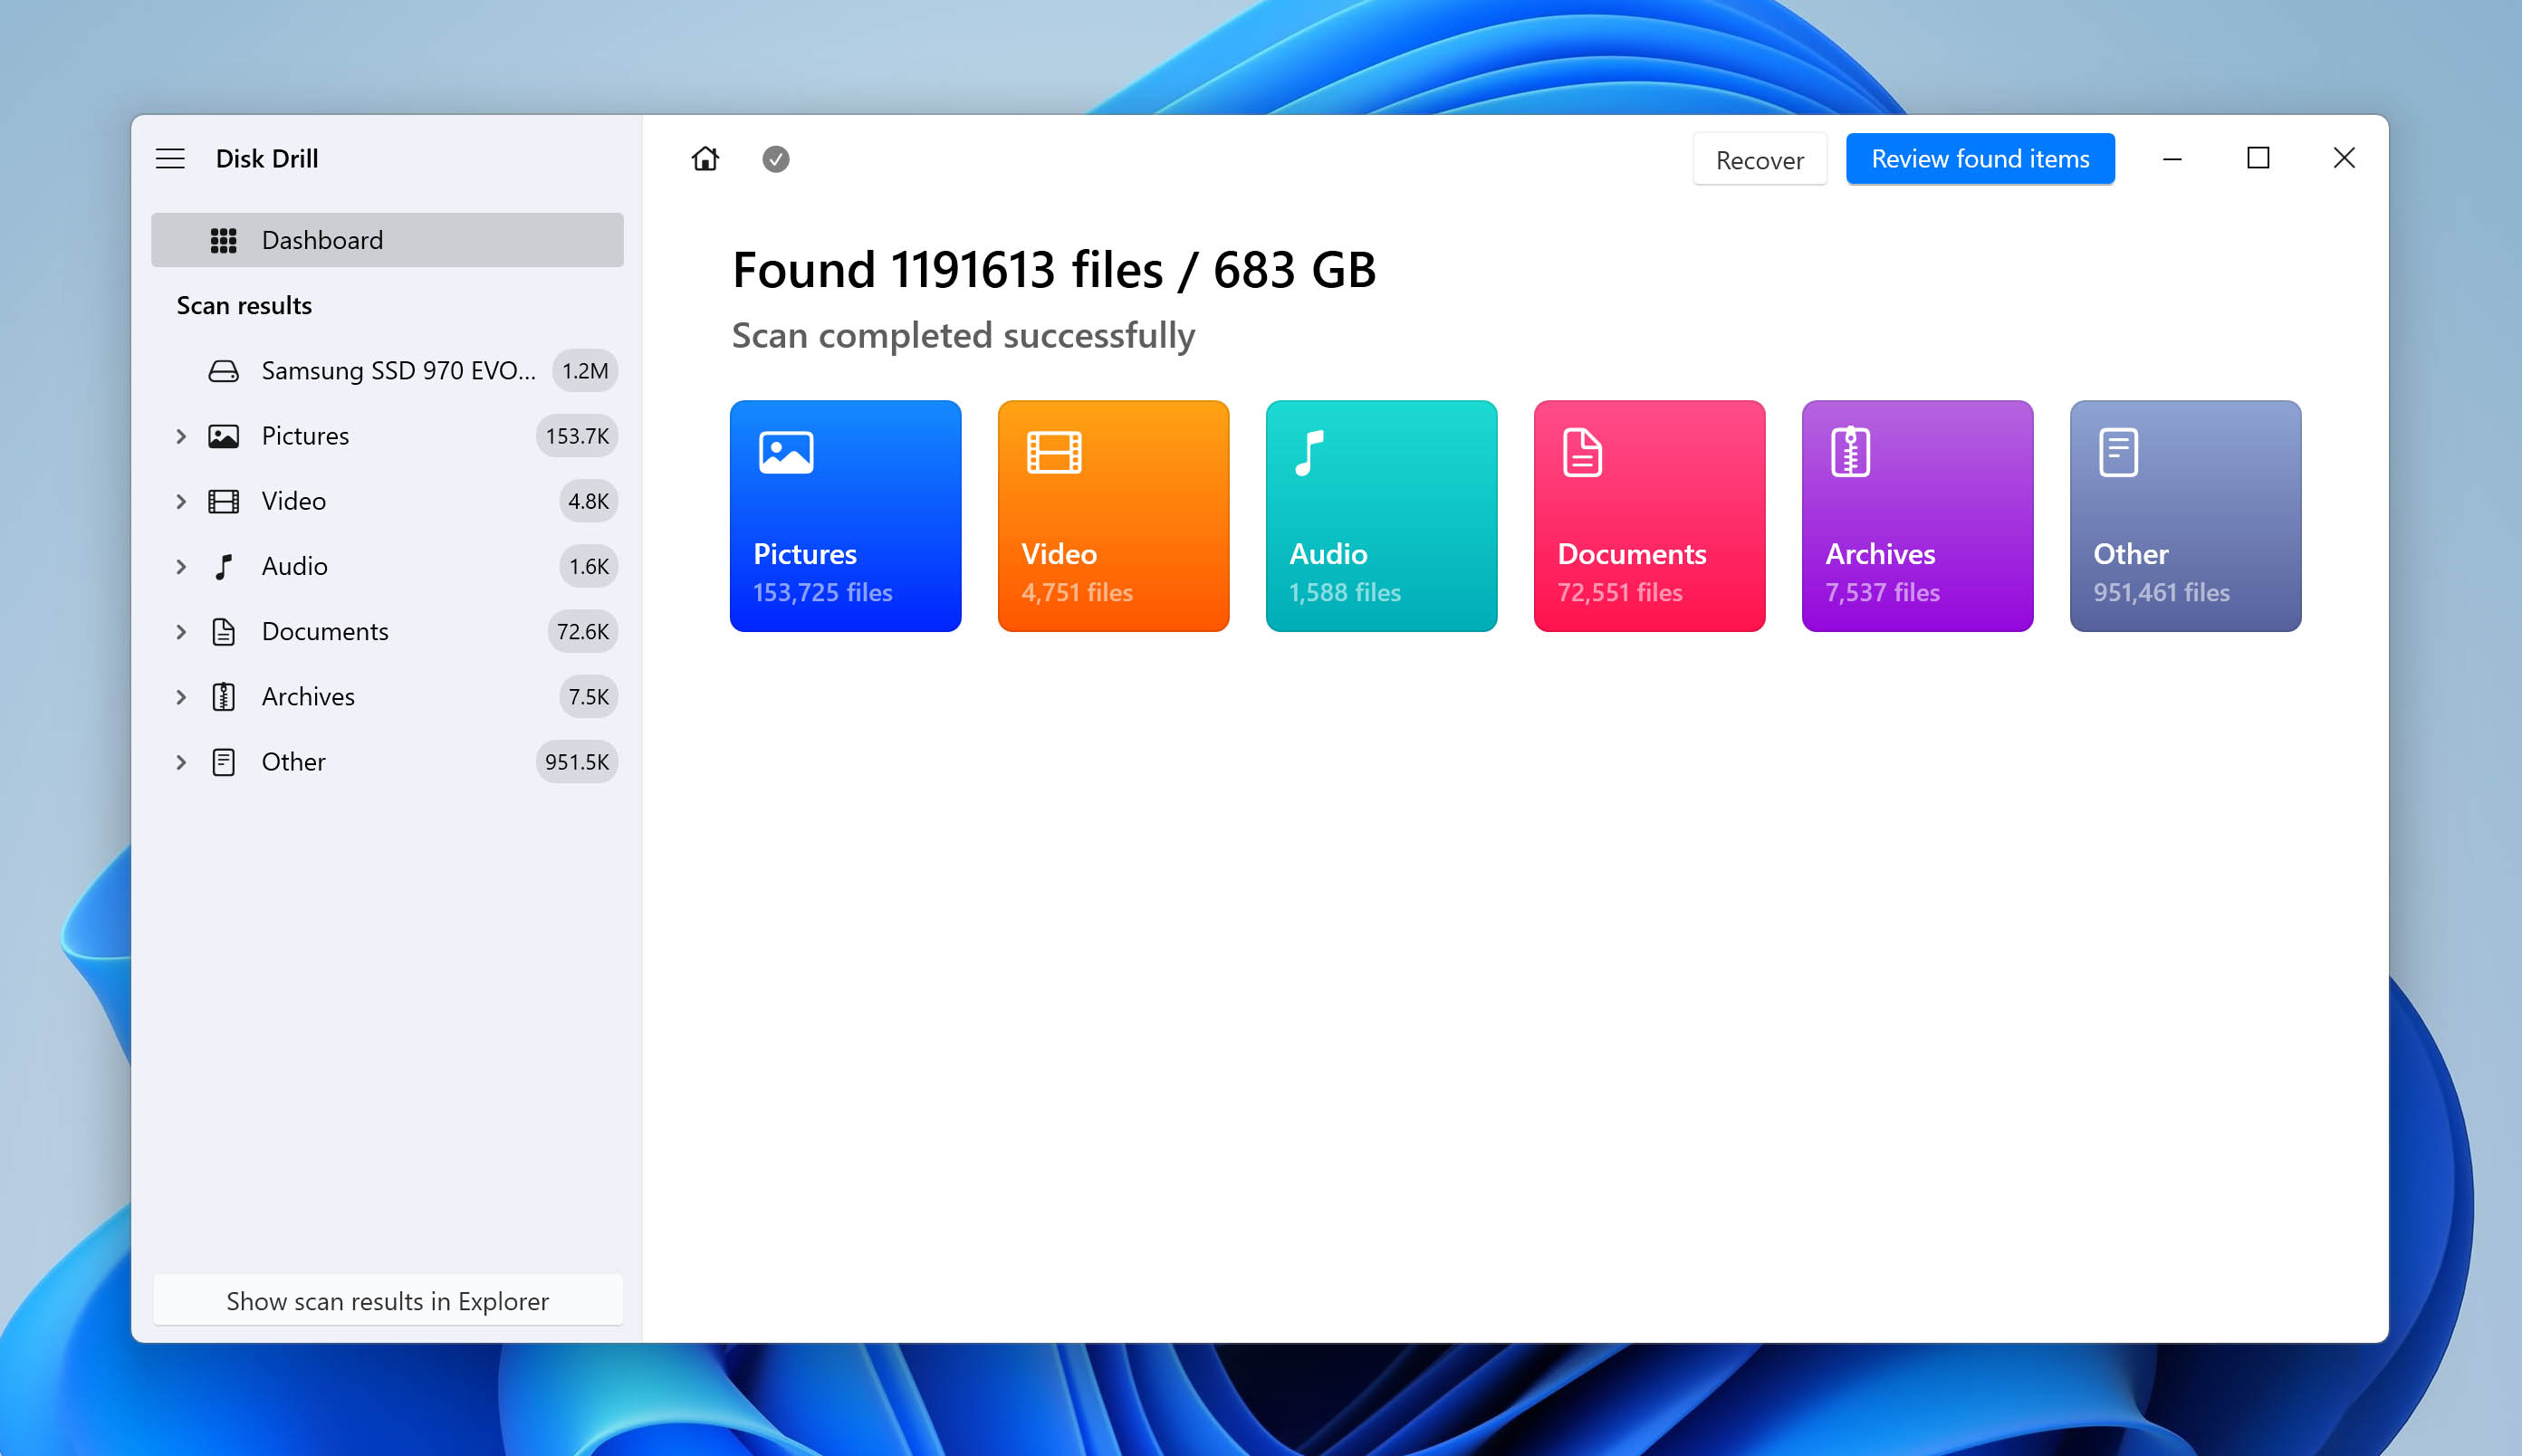
- Scan for lost downloads. Start scanning for lost files using the “Search for lost data” button. This will initiate the algorithms that help recover deleted files.
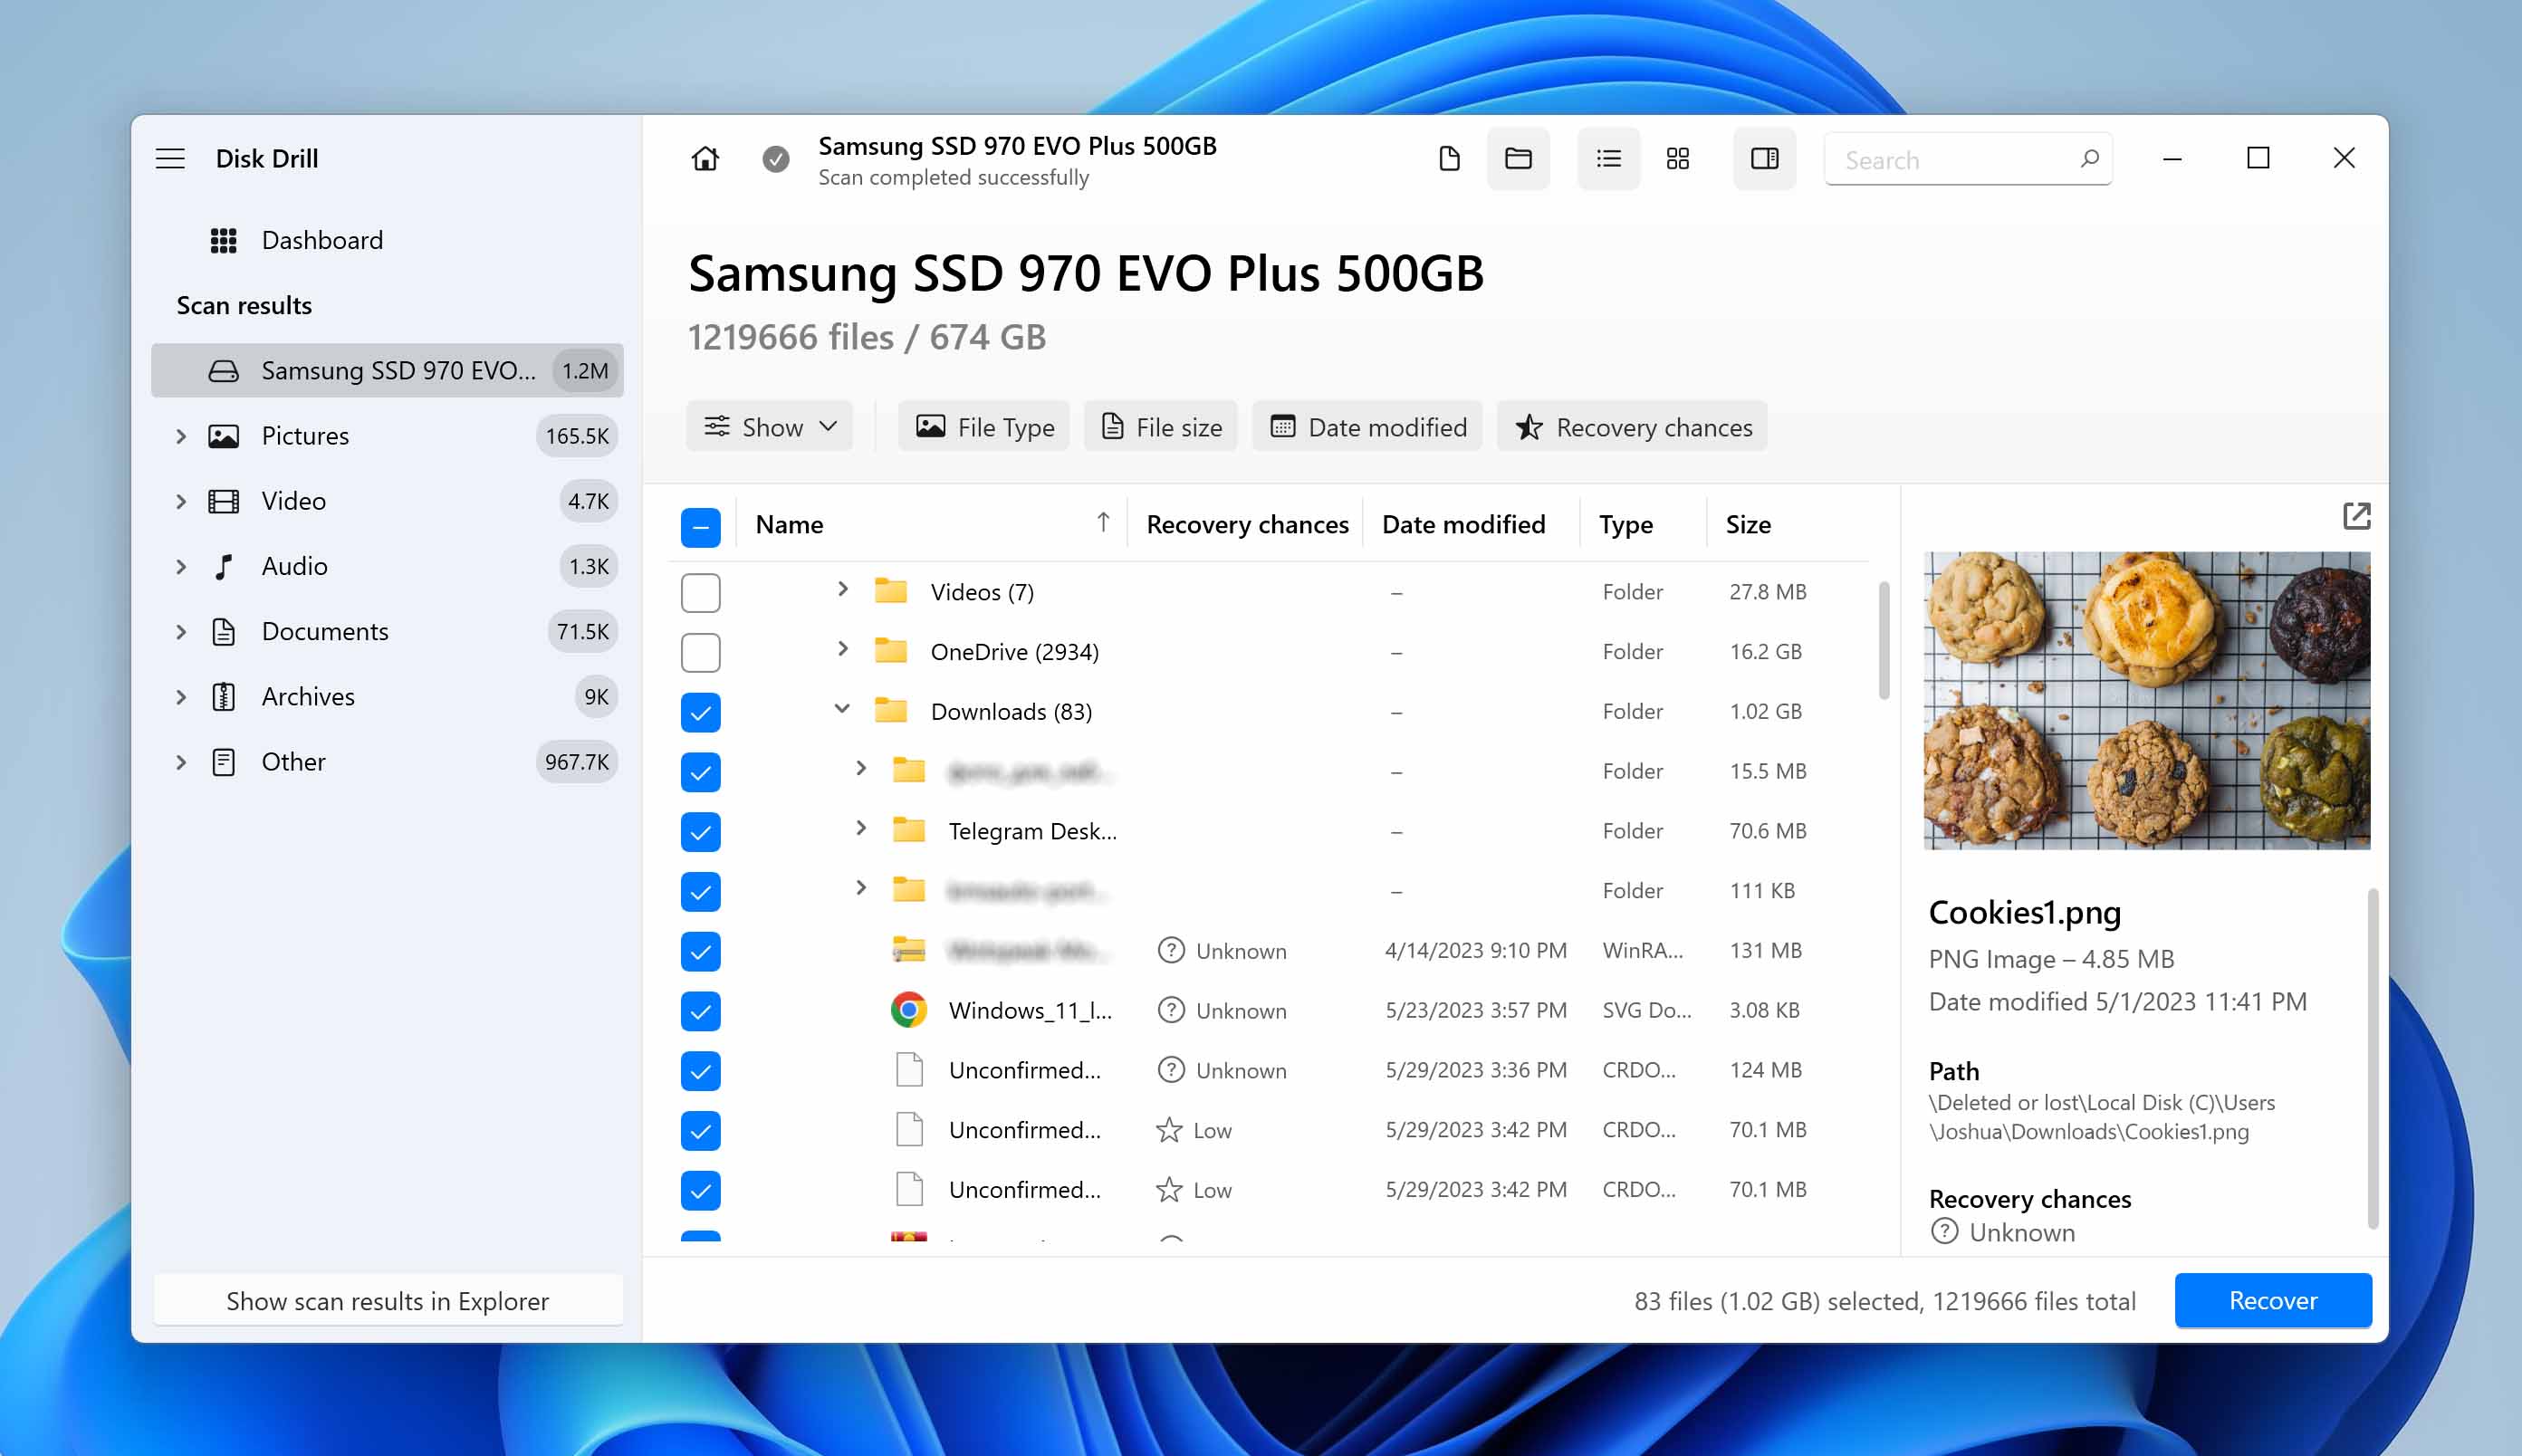
- Select the files to recover. Once Disk Drill finishes scanning your folder, it will generate a list of files it has found. Select the ones you wish to recover.✅
Use Disk Drill’s inbuilt search tools to narrow down to the file you are looking for. Use the file extension filters, or type in filenames into the search bar to quickly jump to the desired file.
- Select a destination to place recovered files in. You need to set a location where your recovered downloads can be saved to. We strongly suggest that you select a different folder than the one which contained the file. This will prevent the computer from overwriting your files; Click on “OK”.
Want to learn more about Disk Drill? We’ve written a comprehensive review on the tool. Additionally, we’ve assessed its safety in a separate analysis.
Method 7: Restore Deleted Downloads Using File History
File History is a great Windows feature that backs up your data at regular intervals. While you cannot use this method if you haven’t set it up, you should go right ahead and initialize File History now.
To start File History:
- Open Control Panel.
- Navigate to System and Security, and then File History.
- Select Turn On.

- Pick a drive to store it to.
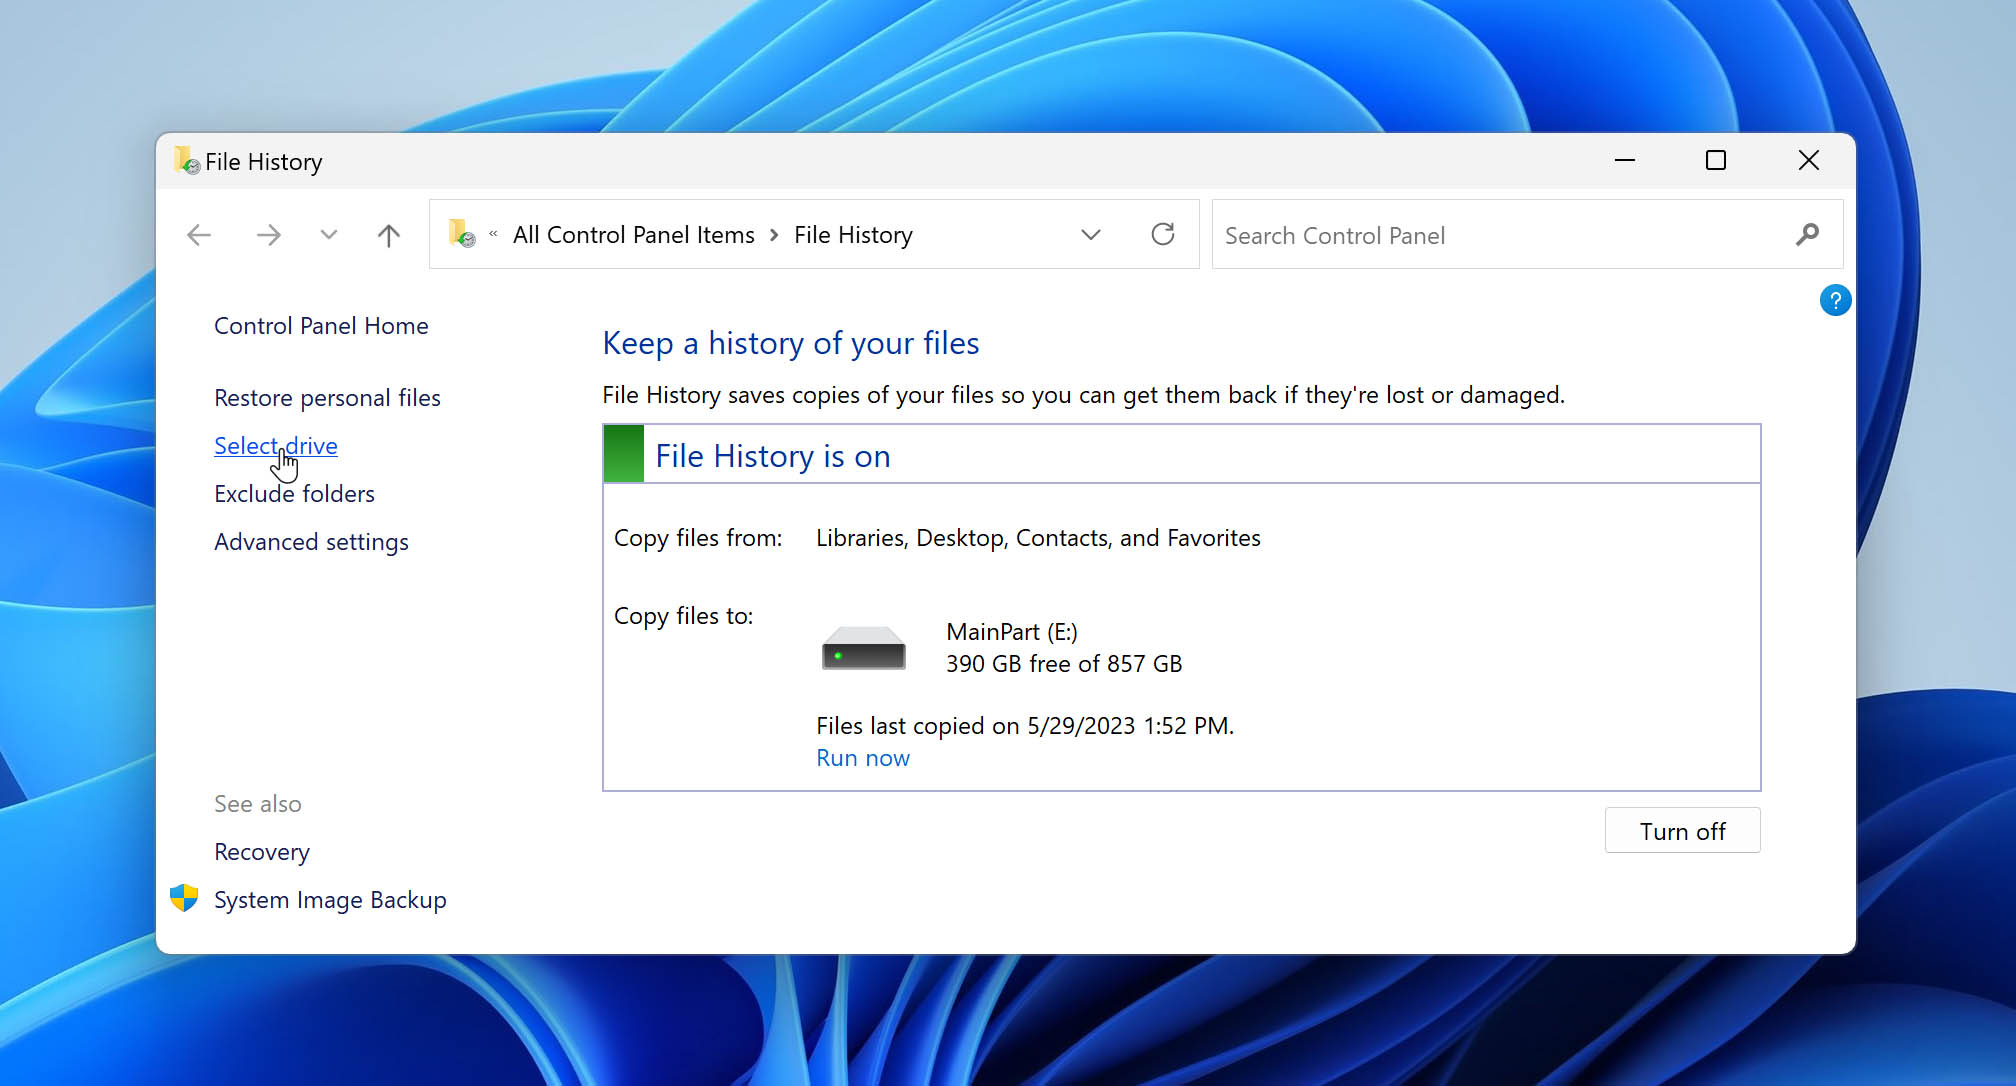
- Select which folders to back up. Remember that File History only backs up libraries, so store personal files in there!
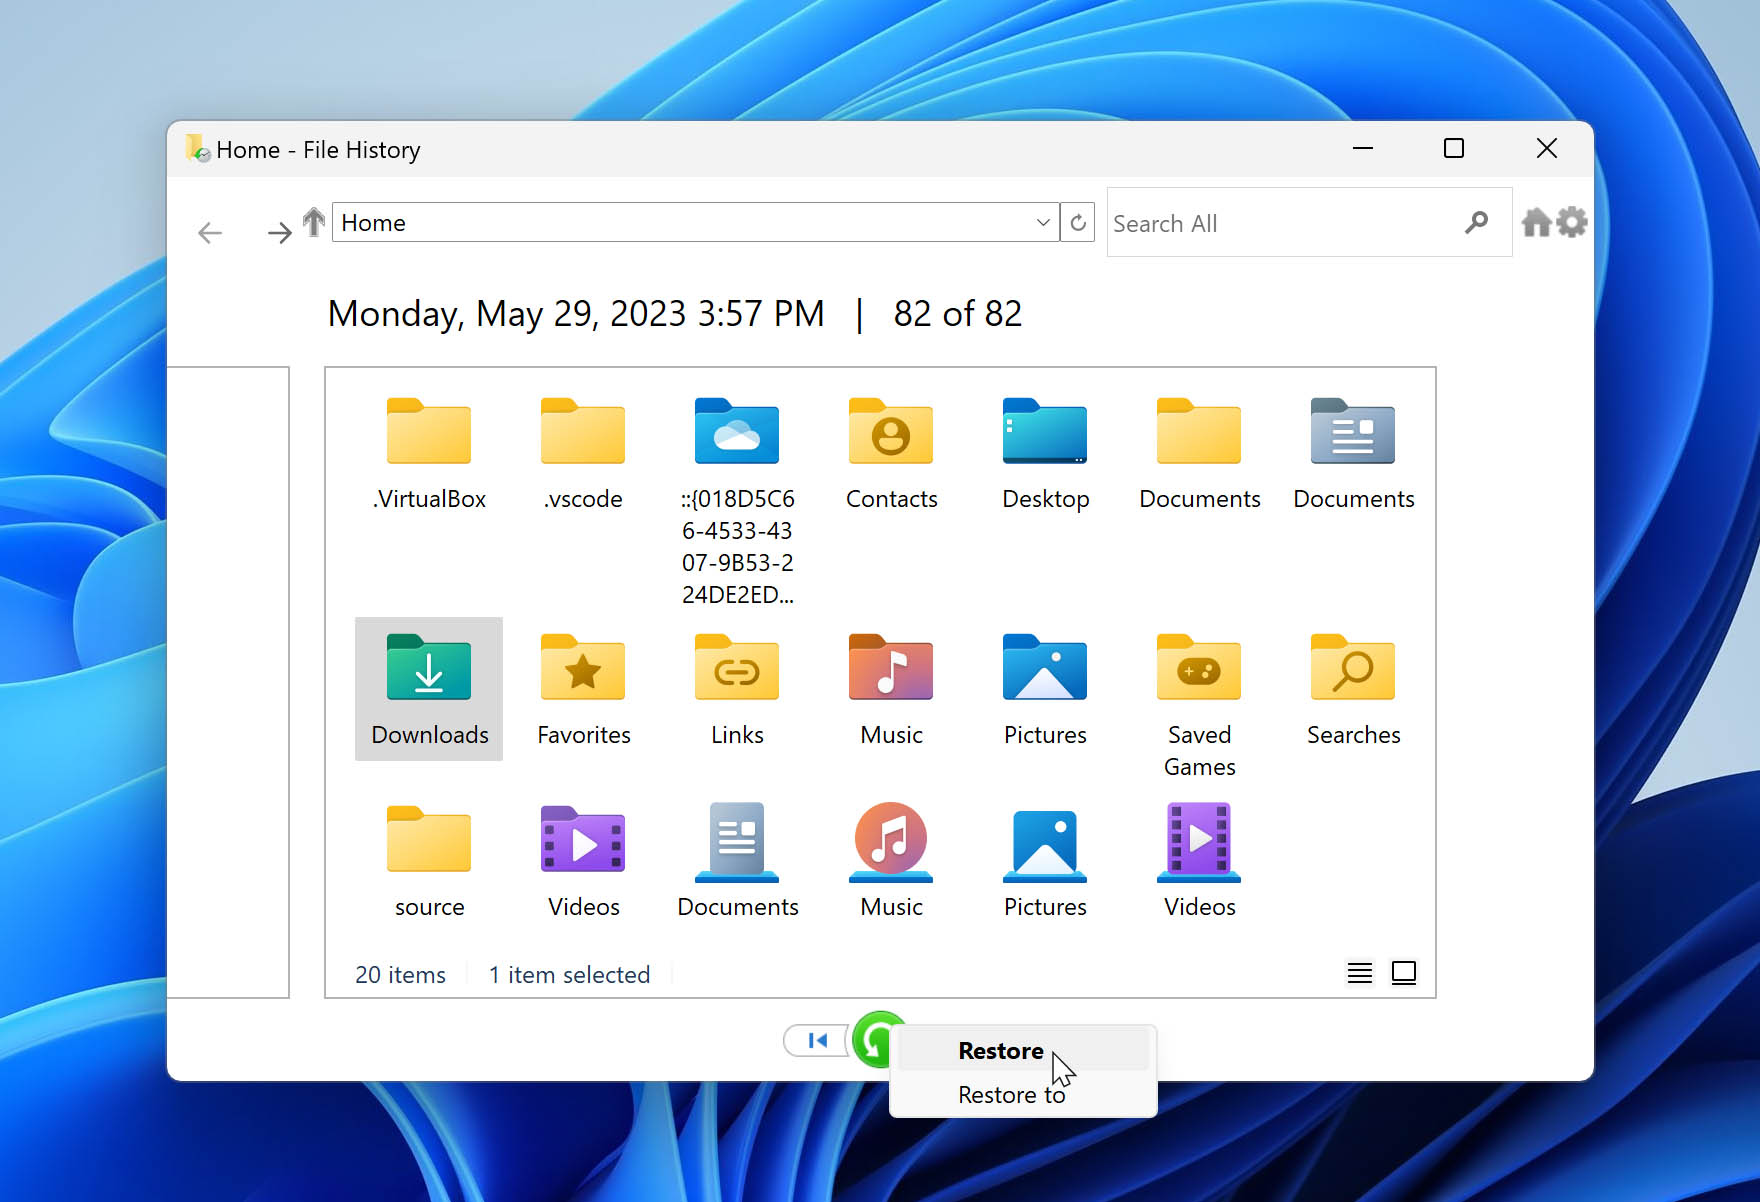
If you have already set up File History, you can quickly revert to older versions of your files. You can use it to restore your deleted downloads. Here’s how:
- Open File History.
- Click on Restore Personal Files.

- Browse through the files and folders.
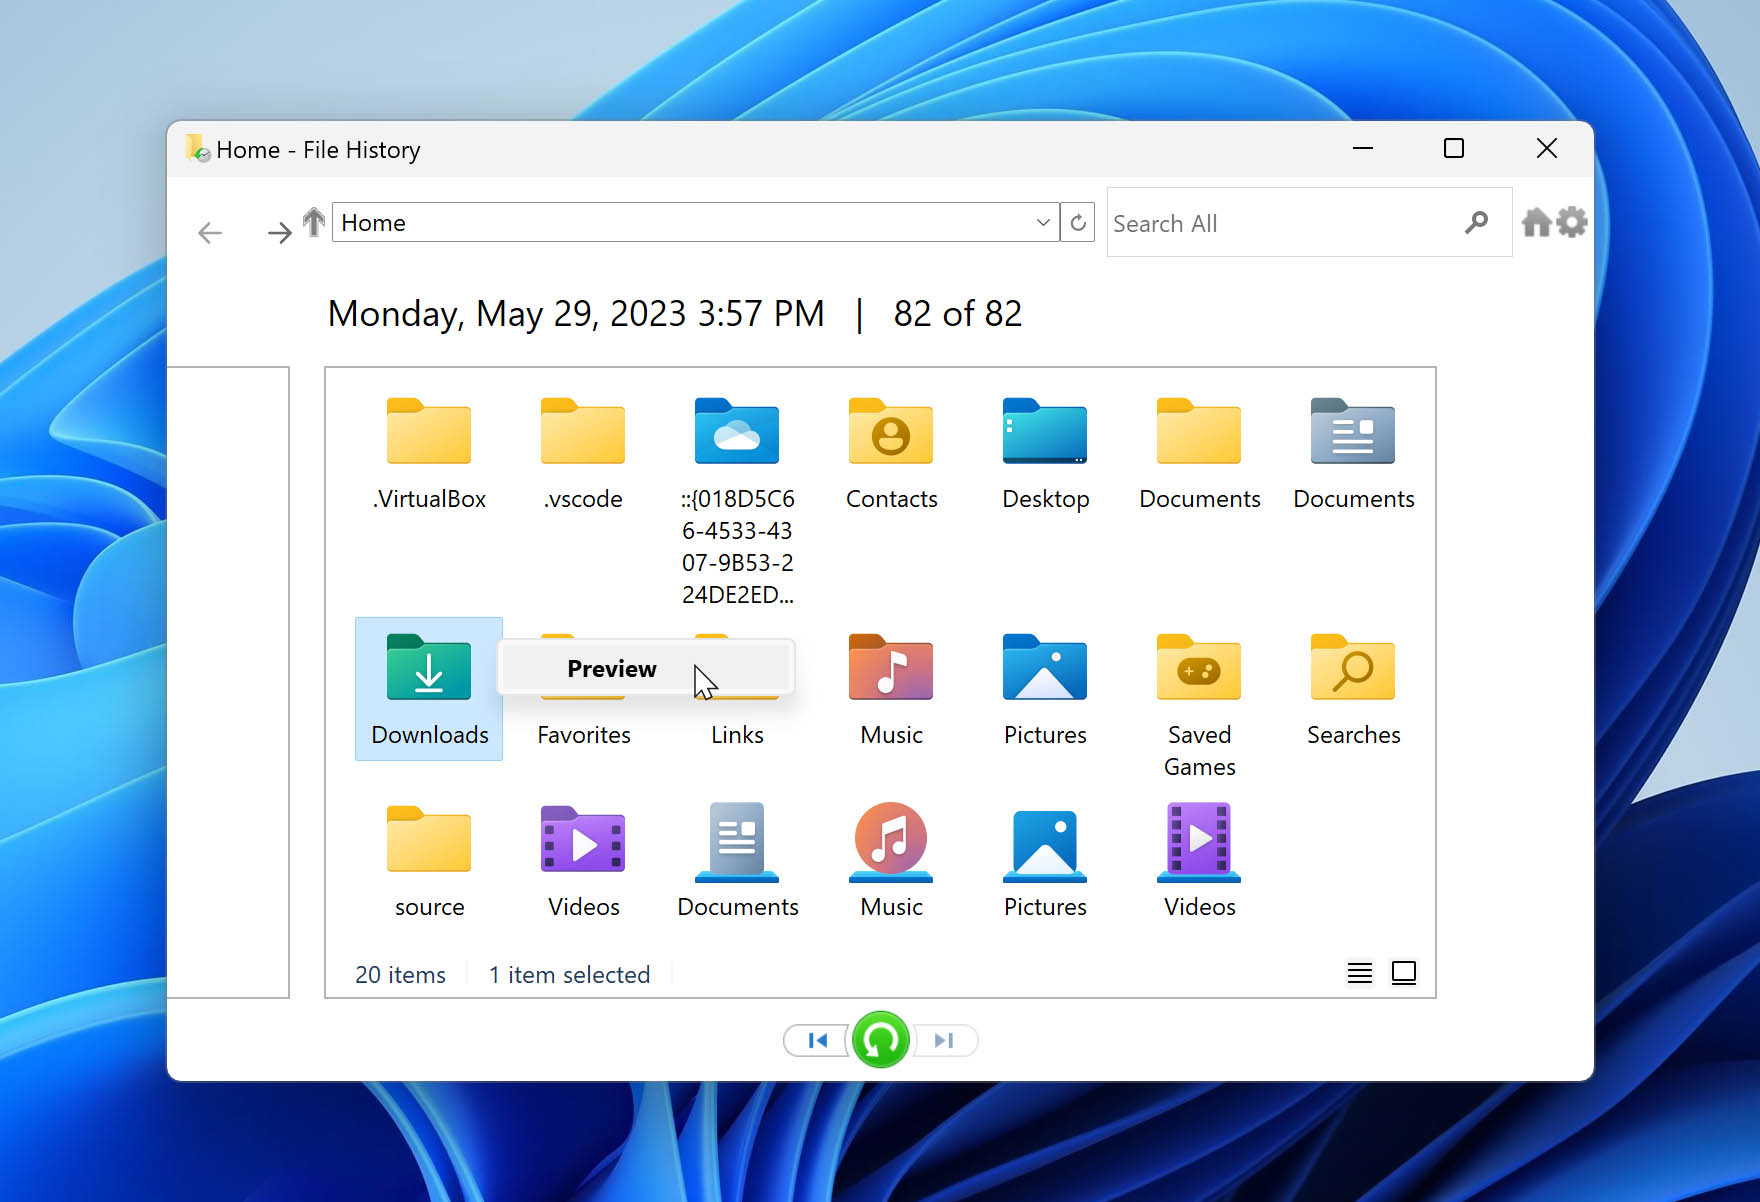
- Restore your selected files.
Method 8: Recover Downloads Sent to Windows Quarantine
The internet is often a shady place, with a lot of malicious files and software doing the rounds. Windows has an inbuilt defense system that scans files and sends suspicious items to a “quarantine”.
While this is a great feature, it is not entirely foolproof. Sometimes, you might have internal files from your business or personal storage that are incorrectly configured. Windows Defender might think of it as a threat and quarantine such a file.
If you are absolutely sure that your files are not harmful, you can recover them from the quarantine.
Here’s how to restore downloads if they have been quarantined:
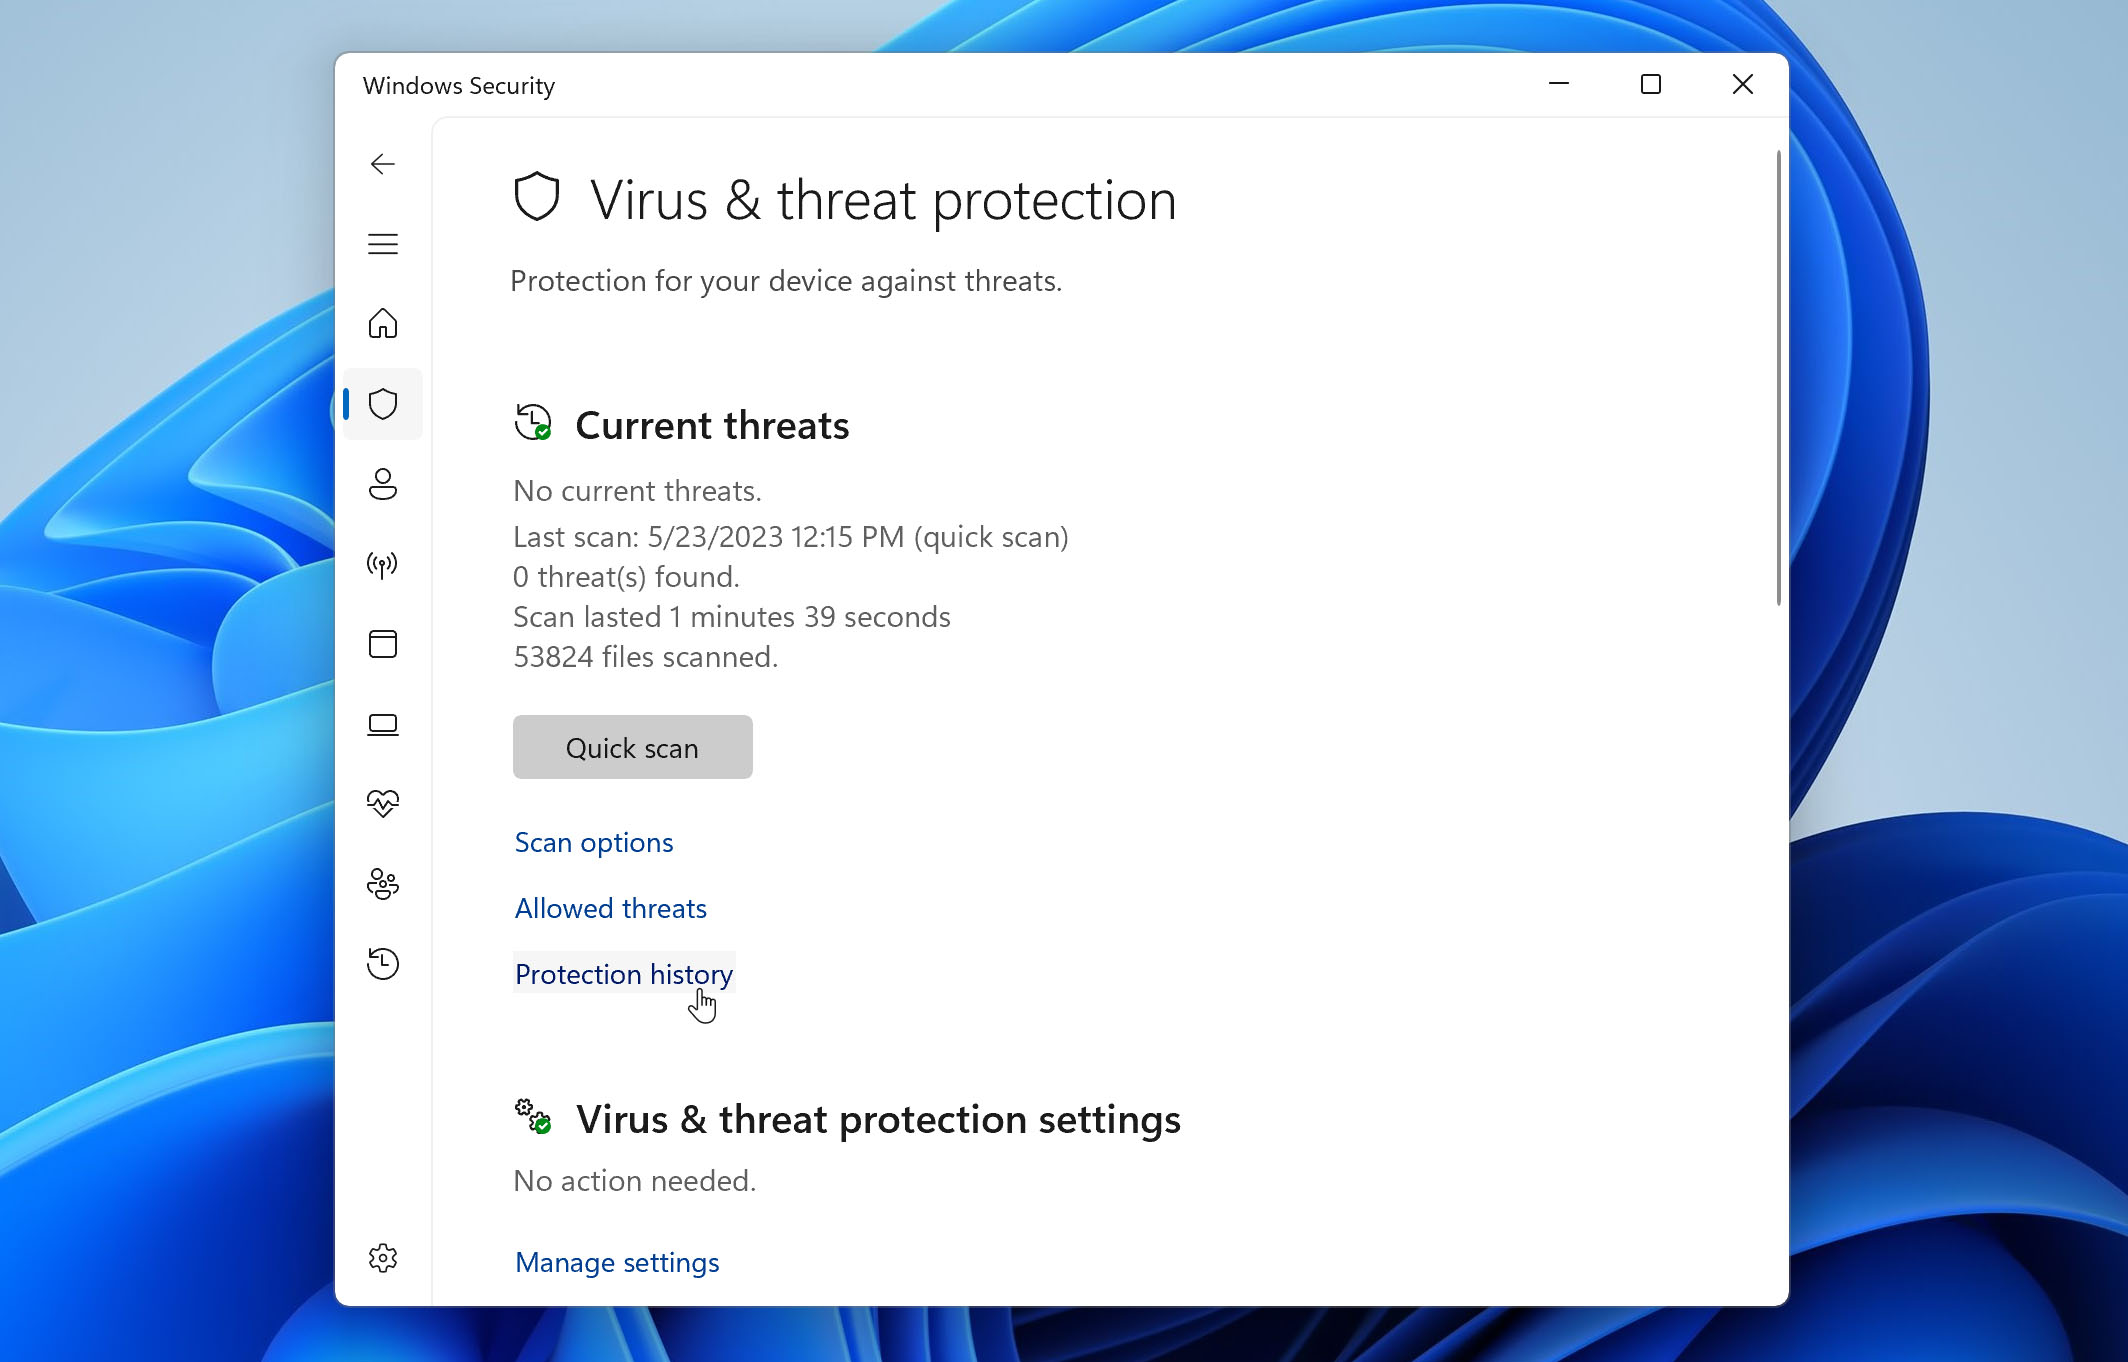
- Open Windows Security.
- Select Virus & threat protection and then click Protection history.
- In the list of all recent items, filter on Quarantined Items.
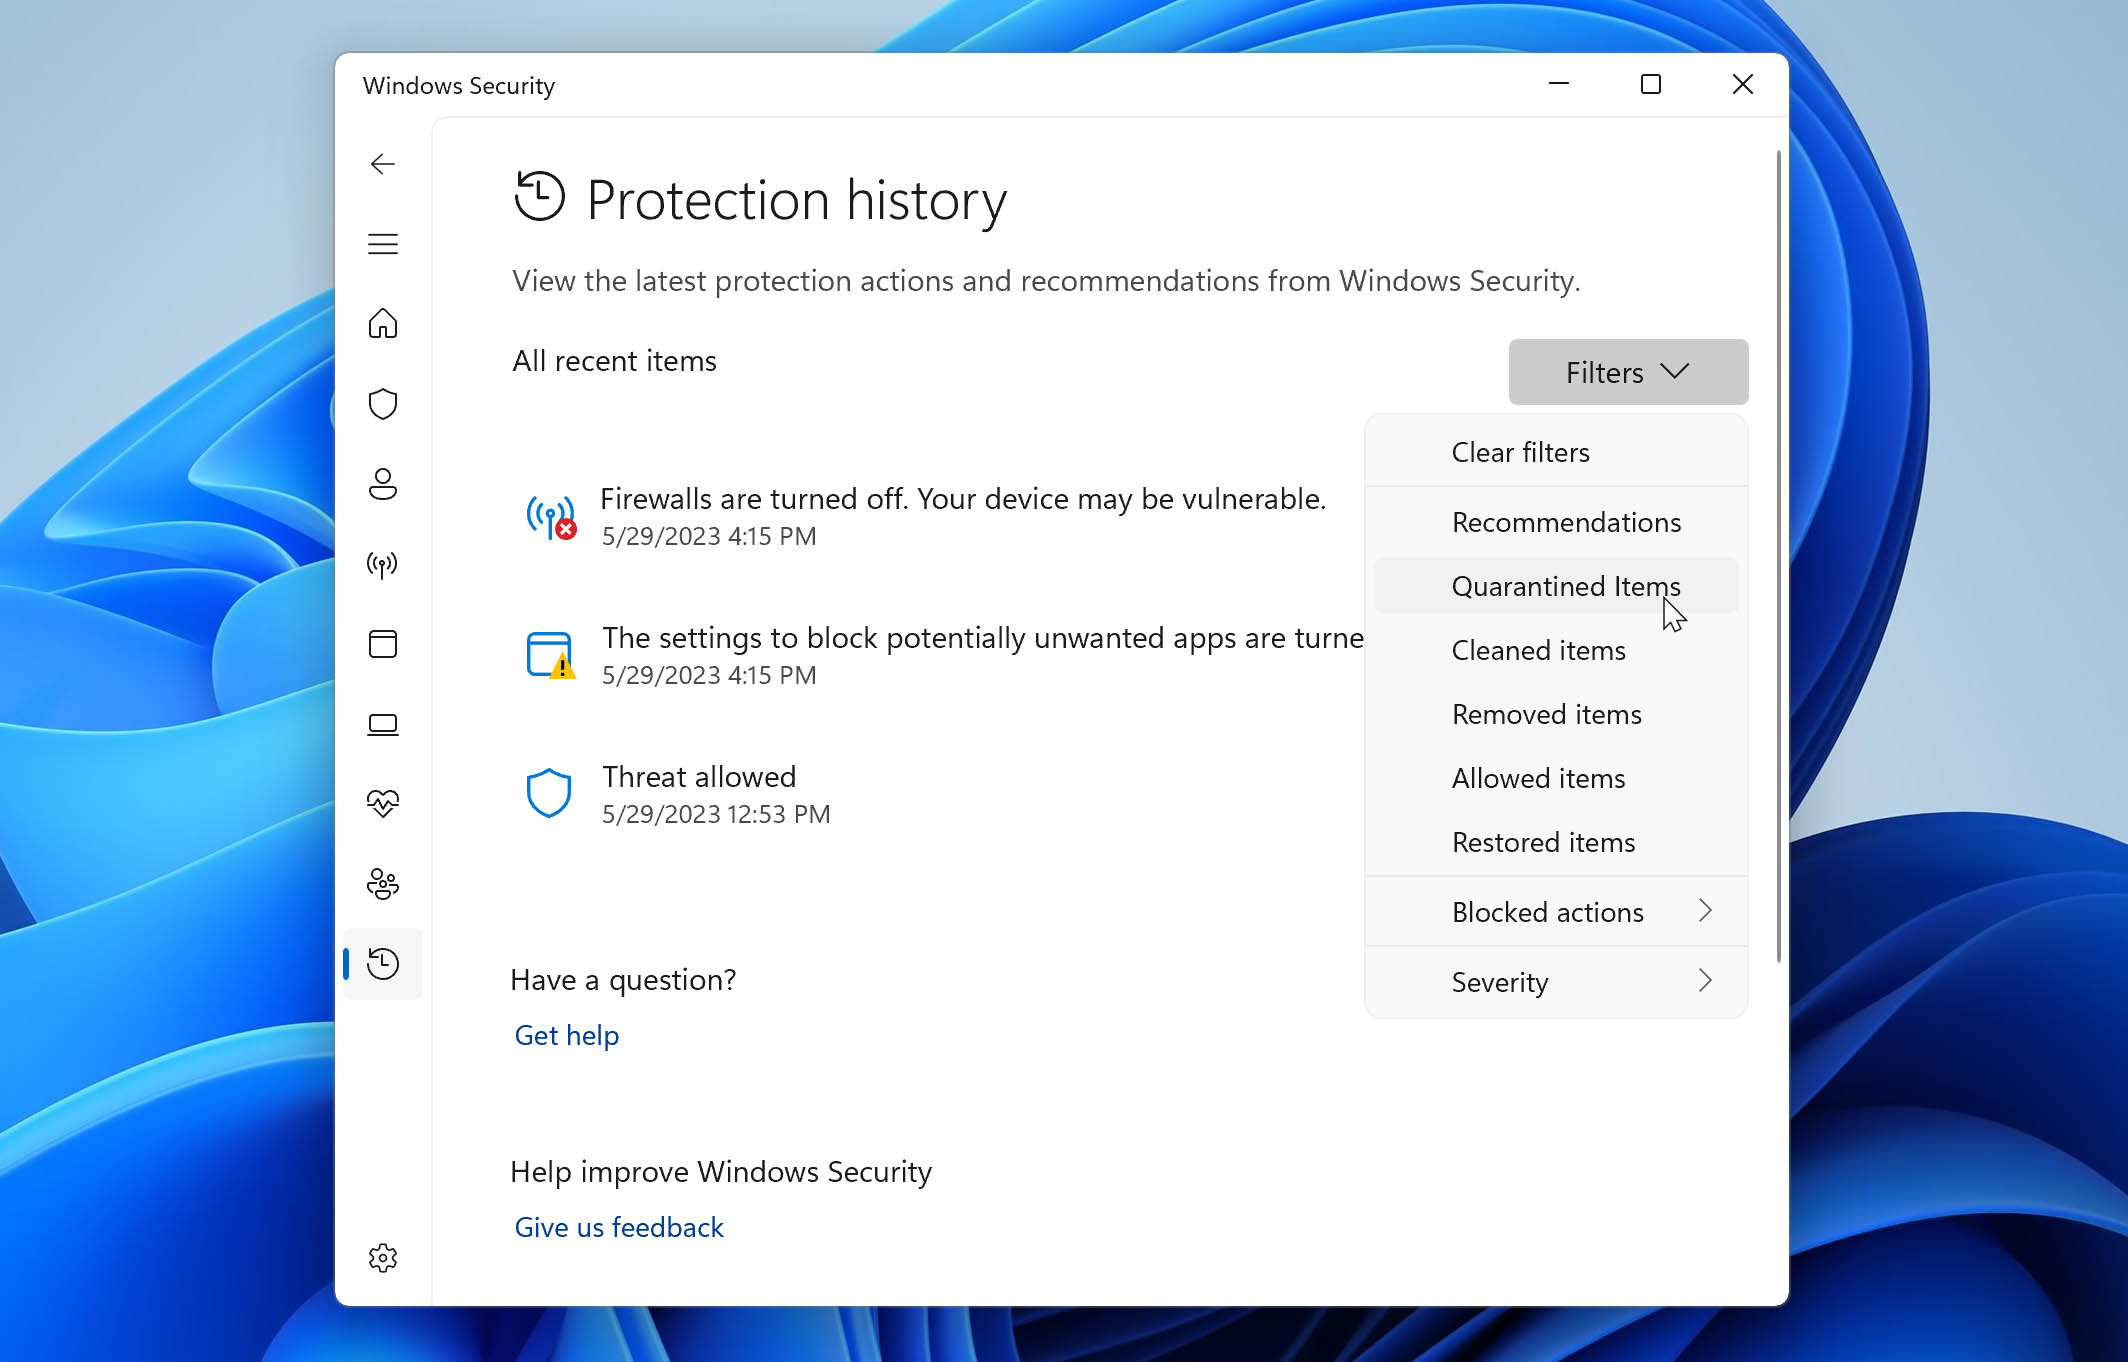
- Select an item you want to keep and take an action, such as restore.
Those are our top guaranteed solutions for recovering deleted downloads. We always begin by trying out the first five methods, as they are simple and fast. However, when we run into actual trouble, such as permanently deleting files or not being able to re-download attachments, we fall back upon Disk Drill. It has been easy to use, extremely intuitive, and the pricing is very attractive to us.
FAQ
How do I recover deleted downloads from Chrome?
If you have deleted your downloads, first check the Recycle Bin: If you see the files there, follow Method 1 from this article. Otherwise, you can try re-downloading the file from the Downloads menu in Chrome. Should you have permanently deleted the file with no chance of redownloading it, definitely try using a data recovery tool.
What happens if I delete my Downloads folder?
If you delete your Downloads folder, you will lose the files and folders inside it. However, there is a chance that it has simply been moved to the Recycle Bin. Try to find your files in there, and if you do, you can safely restore them. Permanently deleted files are more difficult to recover, and you will have to rely on data recovery software.
Can I safely clear my Downloads folder?
Sometimes the Downloads folder gets overwhelmingly populated with files. This might make you want to reorganize all of it or delete it completely. Make sure you check if there is any file or folder important to you, and create a backup before you delete the folder. Once you are certain that there is no file you wish to keep handy, you can safely delete the Downloads folder without problems. If you happen to accidentally lose the folder, try our methods to recover your data.
How can I recover deleted downloads on Mac?
If you just deleted a file from your Mac, recover it from your trash bin. The trash bin stores your deleted files for up to a month, and you will be able to restore them fast. Also, check if you have a backup that might contain your files, and try to recover your downloads from this backup. If all else fails, you might have to use a recovery tool. Our article on recovering files from Macs might be very handy for you.
How can I recover deleted downloads from Android?
If you have permanently deleted files from your Android, you will have to connect it to a PC to debug it. Connect your phone to the PC using a USB cable, and use a data recovery tool to scan the storage on your Android phone. This will help you retrieve your deleted downloads in no time.
How can I recover deleted downloads from Chromebook?
Unfortunately, Chromebook does not have an equivalent for Windows’ Recycle Bin and Mac’s Trash Bin. Therefore, any deleted files are deleted permanently with no way of retrieving them. If you are using a Chromebook, remember to never leave files in the Downloads folder and always maintain a backup of all of your information.
Key Takeaways
Accidental file deletion is not an apocalyptic moment, although it sure may seem to be so. Especially on Windows, there are many ways of recovering your deleted downloads, such as restoring them, redownloading them, and looking for them in the right folders.
When these methods fail, you can count on excellent data recovery applications which reliably recover your data in no time.
This article was written by Joshua Solomon, a Contributing Writer at Handy Recovery Advisor. It was also verified for technical accuracy by Andrey Vasilyev, our editorial advisor.
Curious about our content creation process? Take a look at our Editor Guidelines.