Windows Defender Antivirus sometimes acts a little too trigger-happy, as you’ve probably found out on your own. Chances are you saw an ominous warning from Windows Defender and clicked to confirm the deletion, only to realize later that you actually needed that file. Right? It’s a common problem, and our team has helped many people recover their files after Windows Defender decided they were threats. Stick with us, and we’ll show you exactly what can be done to recover files deleted by Windows Defender and how to keep it from happening again.
Windows Defender Antivirus uses advanced algorithms and definitions to identify potential threats. While it’s quite effective at catching malware, it sometimes flags safe files as dangerous. This happens due to several reasons: outdated virus definitions, overly aggressive settings, or certain files behaving in ways that resemble malware (like scripts or installers). Even legitimate software can trigger alerts if it uses techniques commonly exploited by actual threats. In short, Windows Defender errs on the side of caution to keep your system secure, but this can lead to false positives that put your files at risk.
That said, remember two important points:
- Windows Defender usually flags files as suspicious for a reason; there are often components within the file’s code or behavior that can trigger antivirus warnings.
- Even if you think it may be a false positive, you should still take every warning from Windows Defender seriously and respond appropriately—better safe than sorry.
How to Restore Files Removed by Windows Defender
To get back files deleted by Windows Defender, we need to use data recovery software. These apps are specifically designed to retrieve deleted or lost data and are commonly used in all kinds of situations—deletions from the Recycle Bin, SD card formatting, or even file loss due to antivirus actions. In our case, they can be just as effective.
While various recovery tools are available on the market, we’ll follow the data recovery process using Disk Drill and Recuva in this article. They are amongst the most popular recovery tools in the industry, are easy to use (especially Disk Drill), and both offer free versions, so you can download and start using them without much hassle.
Software solutions are great if you need to recover a file you know was permanently deleted by Windows Defender. However, there’s a chance your file might be in quarantine and not actually deleted. We’ll cover how to locate and restore quarantined files in detail in the next section.
Option A: Disk Drill
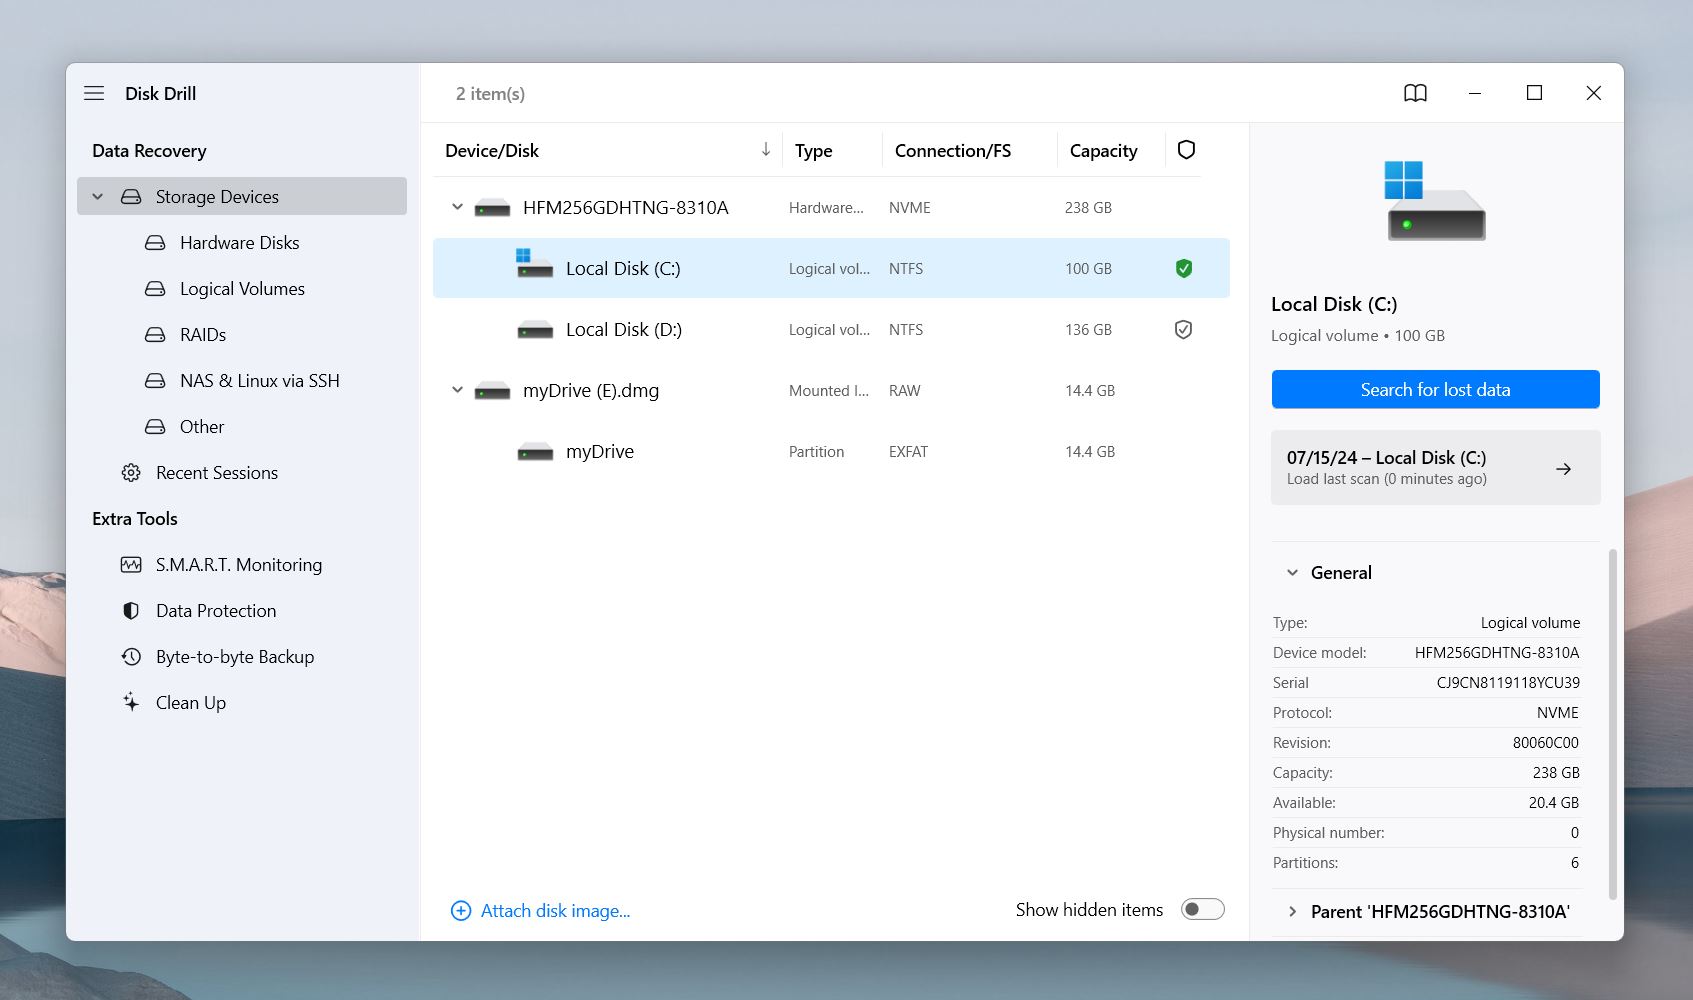
Disk Drill, released in 2010 by CleverFiles, is one of the leading data recovery solutions for home users. The software supports both Windows and macOS and comes packed with advanced features like data protection, byte-level backups, etc.
![]()
You can only recover deleted data if it hasn’t been overwritten. To increase your chances, avoid using the drive where Windows Defender deleted your files. If it’s a USB drive, don’t copy or move anything to it. The same goes for internal drives—the less you use it, the better. When you install a data recovery app, if you have more than one drive or partition, install it on the one where the deleted files were not stored.
Follow these steps to recover deleted files from Windows Security:
- Download and Install Disk Drill from their official website.
- Now, launch Disk Drill. Select the drive you wish to scan—be sure to choose the one where your deleted files were stored before Windows Defender removed them (this could be your internal drive, USB flash drive, or any other storage). Then click on Search for Lost Data to initiate the search. Note that you can pause, save, or resume it whenever you wish. Disk Drill allows users to save search results and even mount them as a disk.
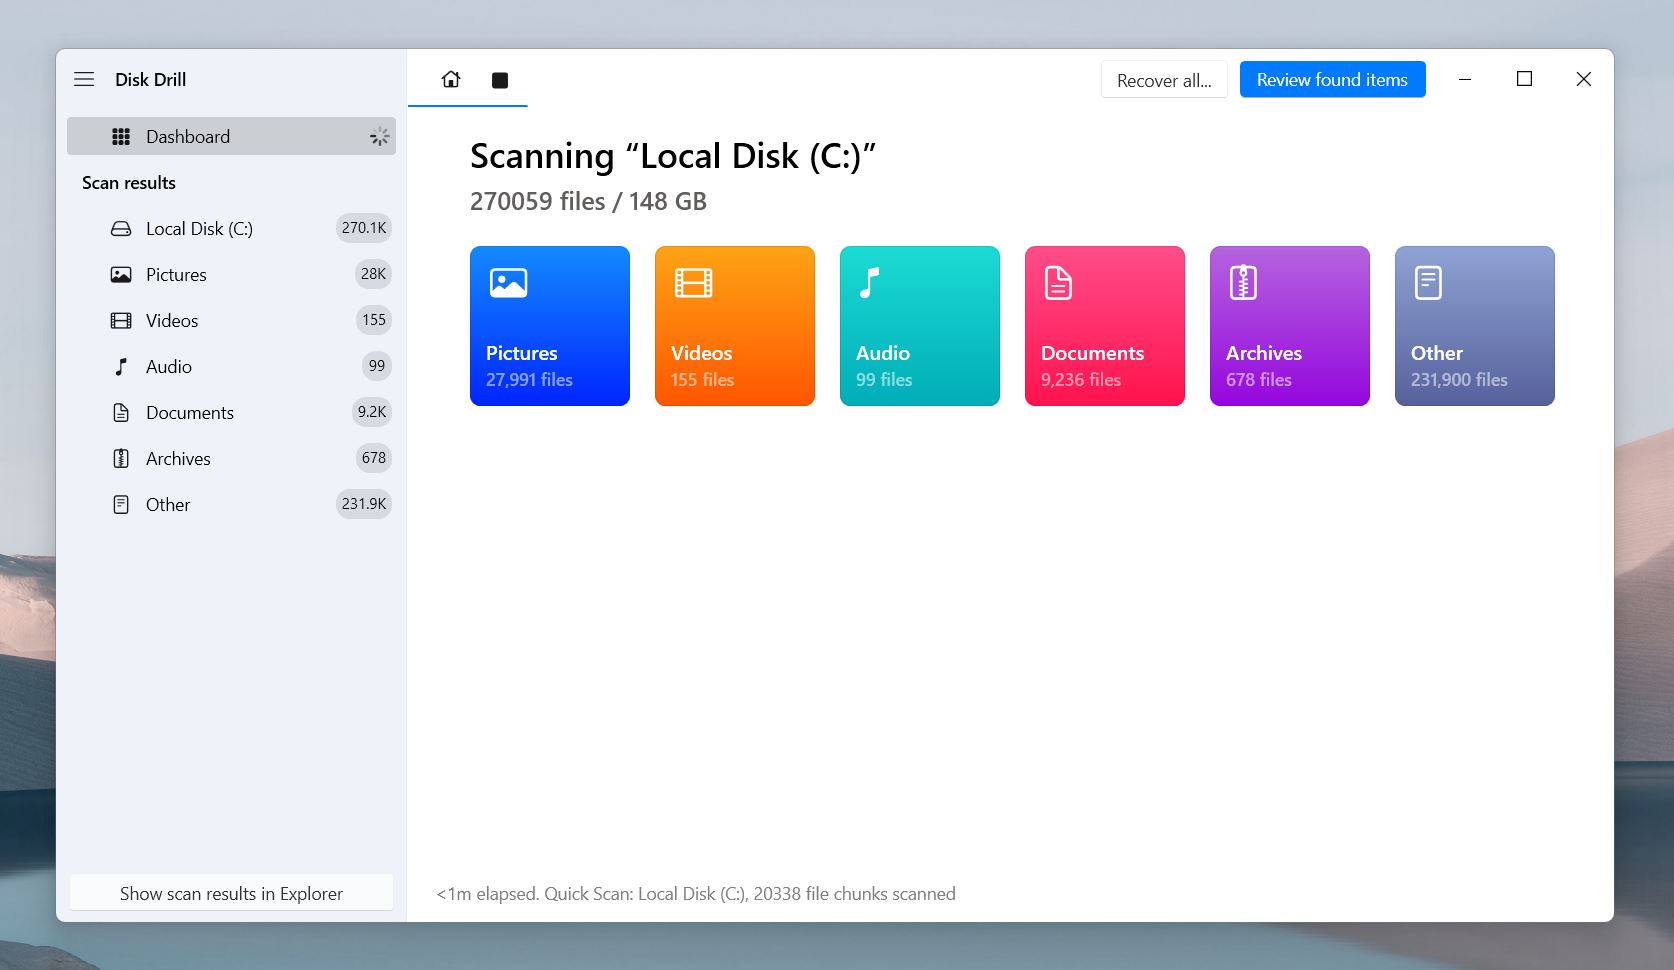
- When the scan starts, you’ll see categories like Pictures, Videos, Audio, and Documents displayed as icons. You can wait for the scan to finish or click on a category to check what’s already been found. If you’d rather not filter by category, just click Review found items at the top to see everything.
- If you remember the file name, you can type it into the search bar to find it faster. It’s a simple way to get right to the file you need.
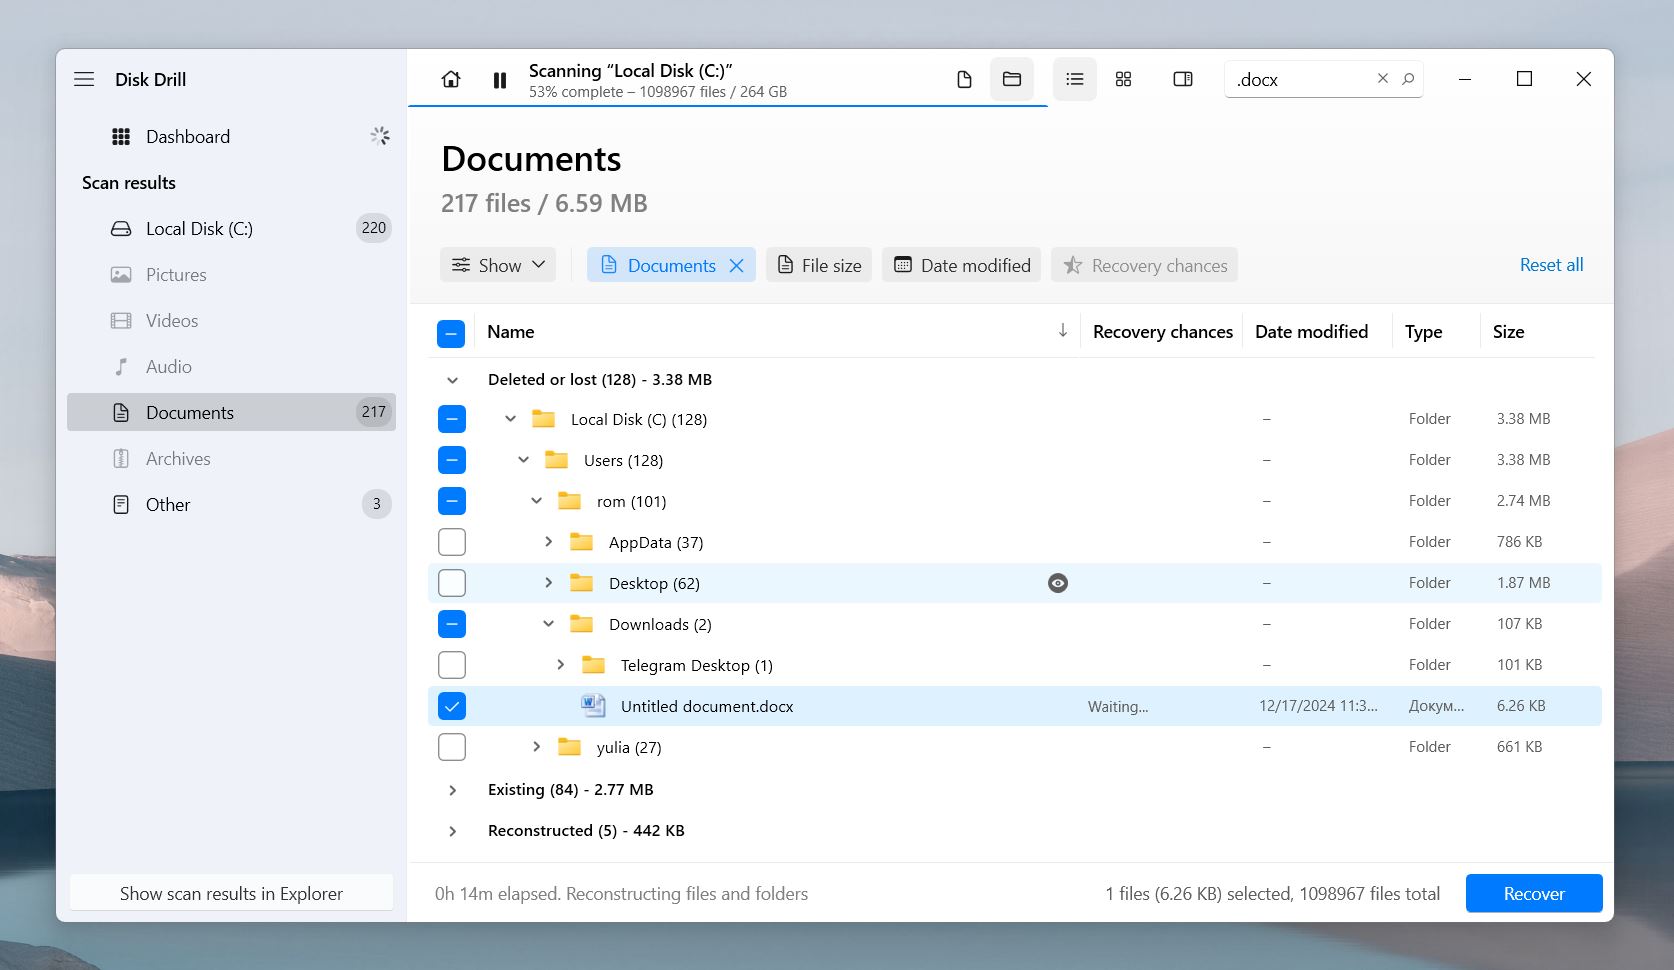
- As you click on each file, a small preview window appears on the right side of the screen. If you want a full preview, click the eye icon next to the file name. Disk Drill can preview any file as long as your Windows system has an appropriate viewer app installed. 👀
In the Recovery Chances column, you’ll see ratings like High, Average, or Low for each file. These ratings show the file’s condition and the likelihood of successful recovery. However, if you can preview the file, you can be sure it’s 100% recoverable.
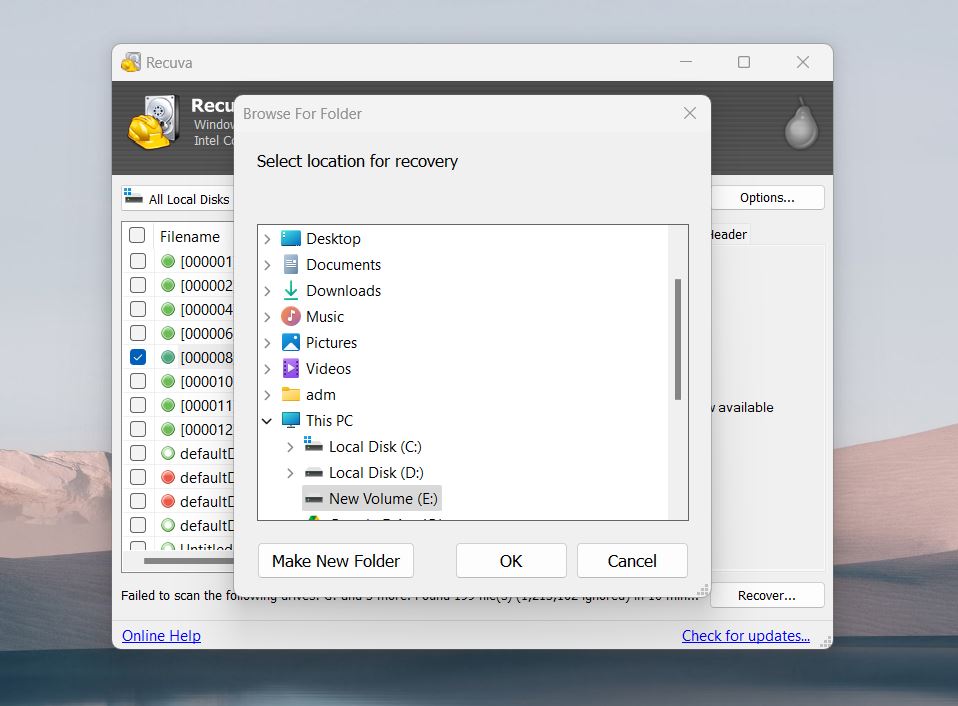
- Now, select your desired files and click Recover.
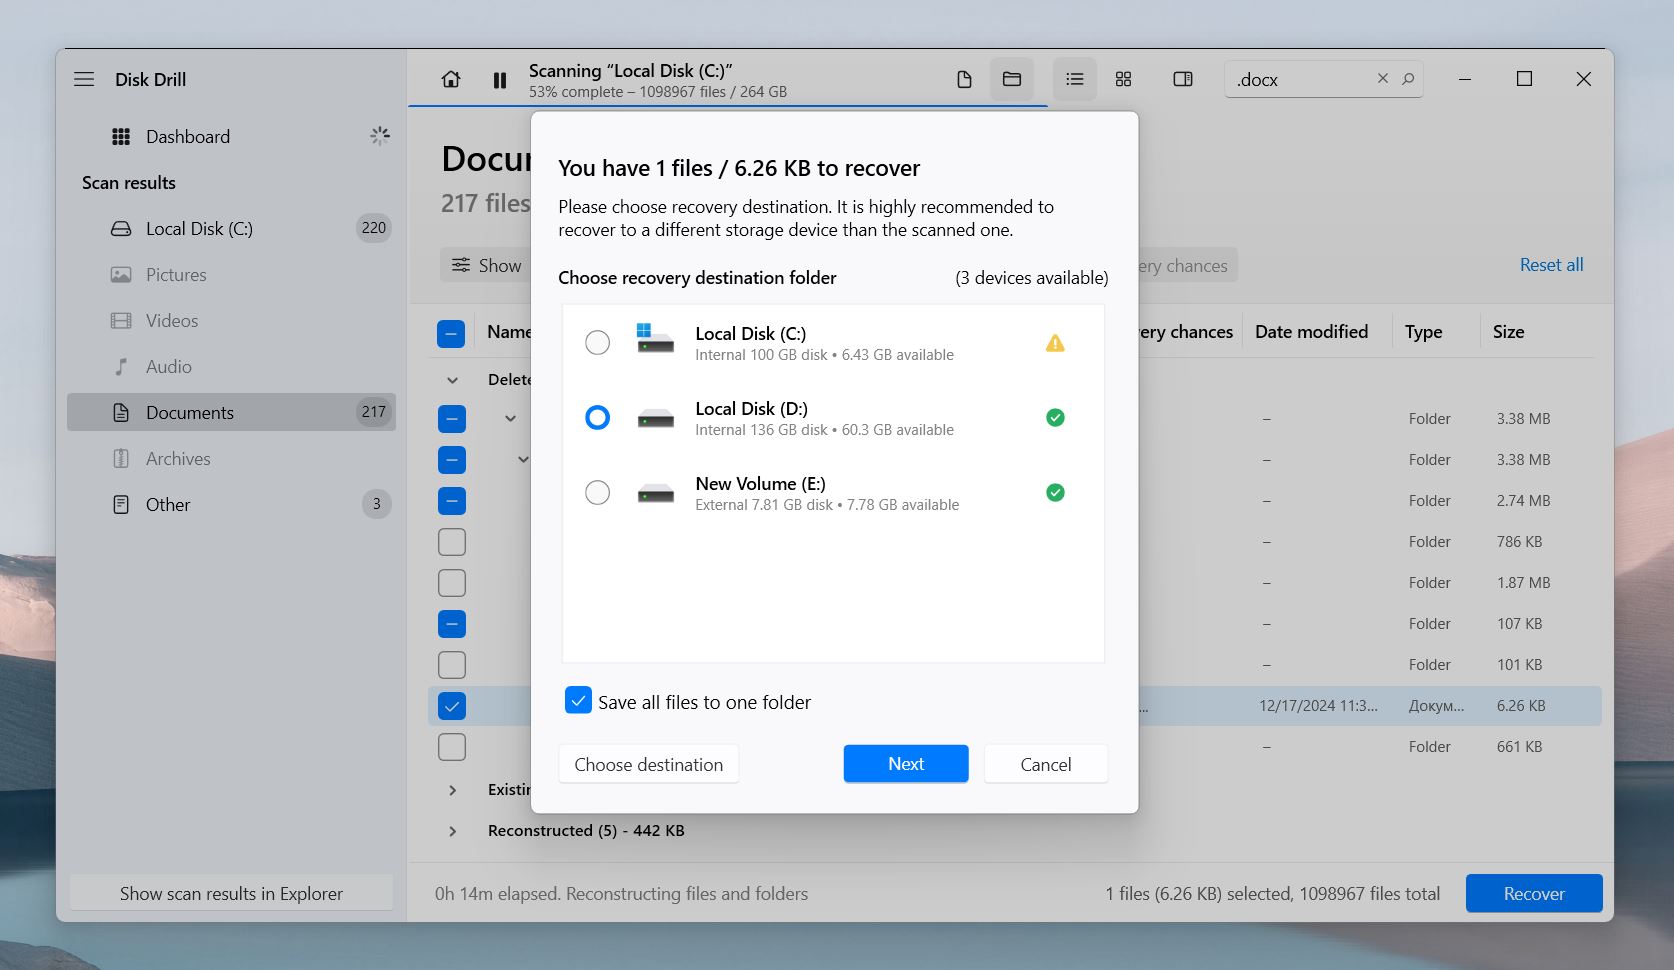
- Choose the recovery location and make sure that you’ve selected a different device or drive to restore the files deleted by Windows Defender.
Disk Drill allows you to recover up to 500MB for free (you’ll need to upgrade to PRO for unlimited recovery), but you can scan and preview as many times as you like to see if the files can be recovered at all.
Disk Drill supports many common (and even uncommon) file formats. It can recover audio, videos, images, documents, and archives in a variety of situations and storage configurations. Whether Windows Defender removed your files from an internal drive, external drive, memory card, or USB drive, Disk Drill can locate them as long as they still exist. However, recovery chances can vary depending on the device. For example, SSDs are notorious for their TRIM command, which often makes recovery completely impossible.
If you want to learn more about Disk Drill’s capabilities and additional features, check out our full Disk Drill review. It covers everything you might want to know.
Option B: Recuva
Recuva, created by Piriform—the developer behind CCleaner—is a tried-and-tested data recovery solution that allows you to recover different data types like music, pictures, videos, and other important files.
![]()
What sets Recuva apart is its lightweight design and free version, which offers unlimited data recovery. However, it’s not without its issues. The interface feels dated and less user-friendly compared to modern tools. It also cannot scan an entire disk—only individual partitions. Additionally, it often fails to recover files with their original names and folder structures, even in cases where other tools, like Disk Drill, successfully manage it. Keep this in mind and be prepared for such possibilities.
You can follow these steps to get back files deleted by Windows Defender using Recuva:
- Download and Install Recuva, then launch the software on your computer. Remember, if possible, Install it on a drive or partition that does not contain the files you’re trying to recover.
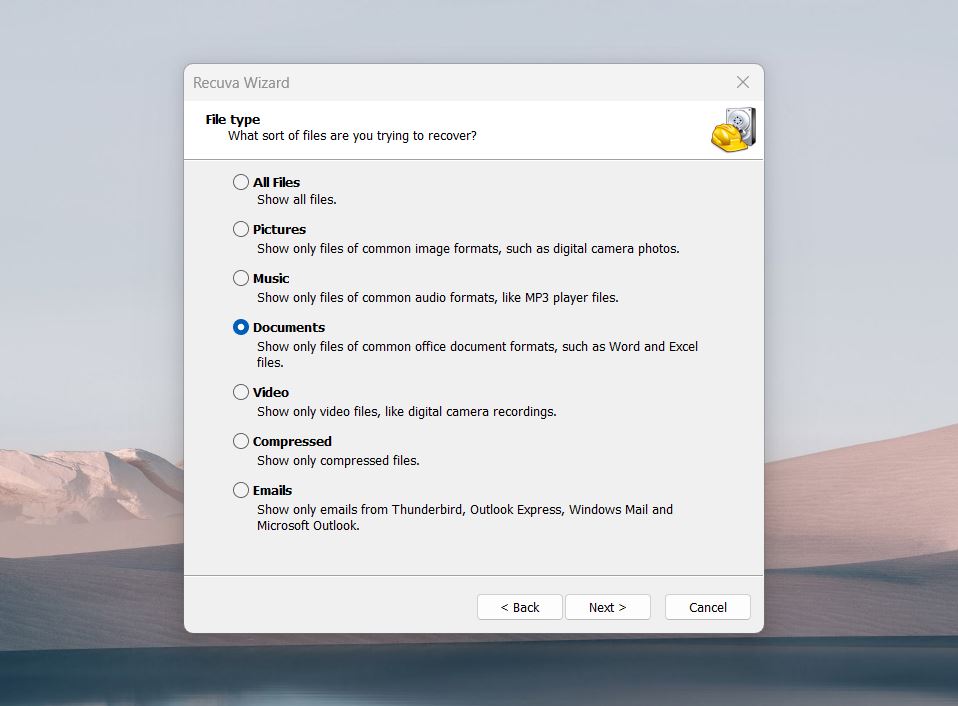
- Now, choose the general category of the files you wish to recover. You can either select the All Files for a broader search spectrum or the specific type of file you want the software to retrieve like Pictures, Documents, or Video. Then, click Next.
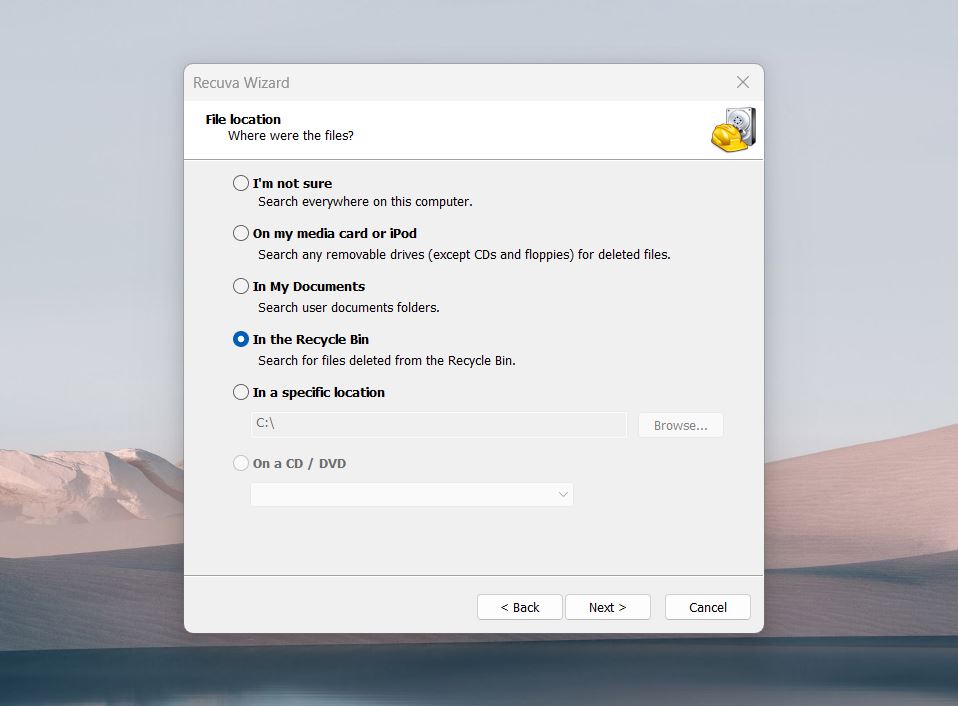
- In the next window, select the location from which you want to get back the files deleted by Windows Defender. Now, click Next again.
- Recuva is now ready to scan your device for lost or deleted files. Tick the box beside Enable Deep Scan to retrieve deeply buried files. You can also hit the witch to Advanced Mode button to filter through the results and find the exact files you’re looking for.

- You can preview the files by clicking on them in the left window. Tick the checkboxes to select these files, then click Recover.
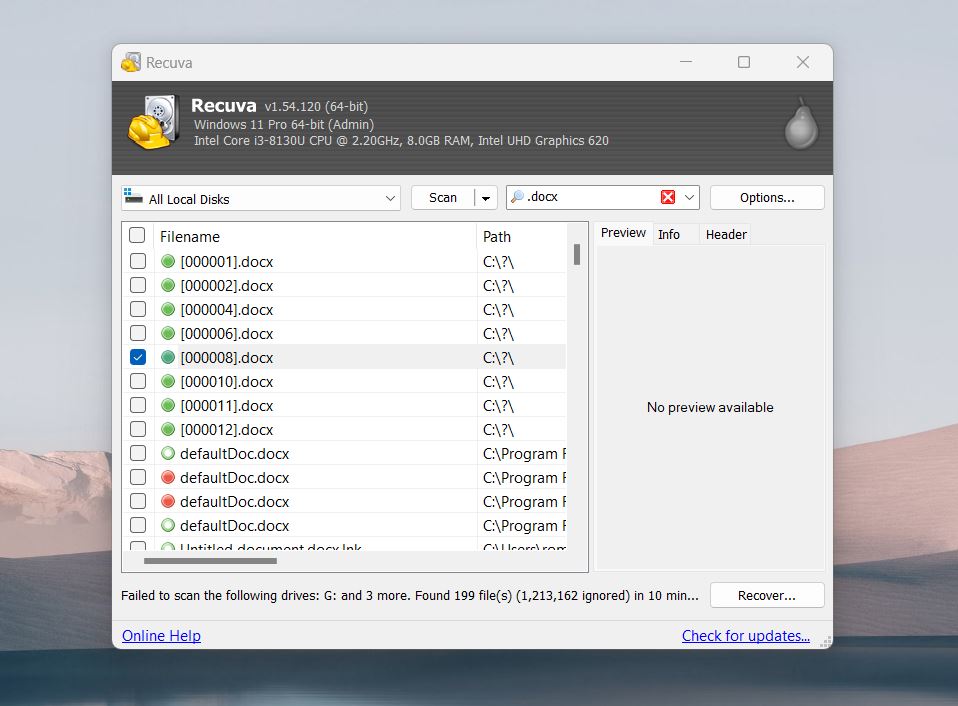 👀
👀Recuva uses a color-coded system for a health assessment (green, yellow, and red) to indicate how likely the file is recoverable.
- Now, select a location where you want to save the recovered files. Then, click OK.
Recuva works well for basic data loss situations and common file types. But, if you’ve tried Recuva and didn’t find your files, it’s a good idea to try a more advanced tool like Disk Drill. It often recovers files in cases where Recuva struggles, especially in more complex data loss scenarios. In our direct comparison, Disk Drill clearly outperformed Recuva with higher recovery rates and better features.
How to Find Files Deleted by Windows Defender
As we mentioned, sometimes files aren’t necessarily deleted. Windows Defender Antivirus can place them in a special holding space called quarantine. This means the files are still on your system, just isolated for safety. We’ll show you two ways to restore files removed by Windows Defender using built-in tools.
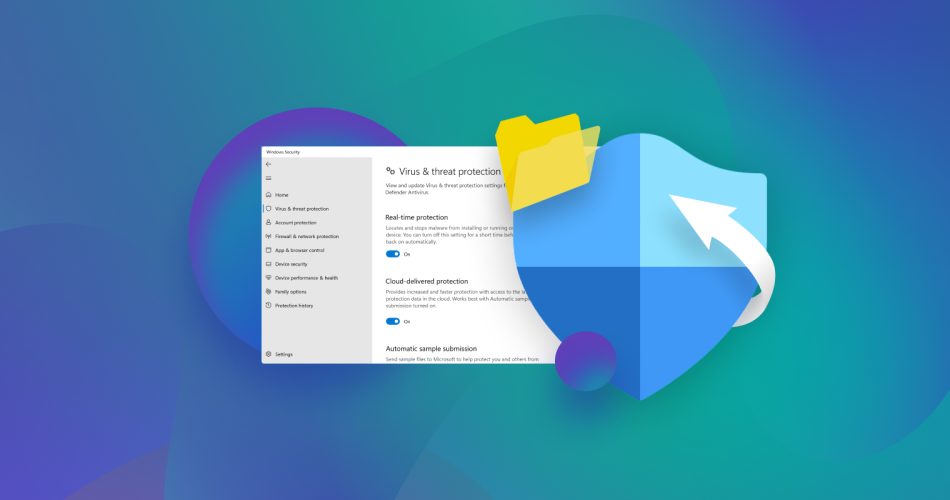
Option A: Restore Quarantined Files Using Windows Security
Windows Security offers a simple way to locate and restore files quarantined by Windows Defender. The process is nearly identical for both Windows 10 and Windows 11.
Beware! – Windows Defender doesn’t always flag or delete files by mistake. In most cases, the files it removes could pose a real threat to your device. Make sure you’re absolutely certain a quarantined file is safe before you restore it.
Here’s how you can restore quarantined files using Windows Security on Windows 10/11:
- Go to Search > Settings > Windows Security.
- Select Virus & threat protection and then click Protection history.

- In the list of All recent items, filter on Quarantined Items.
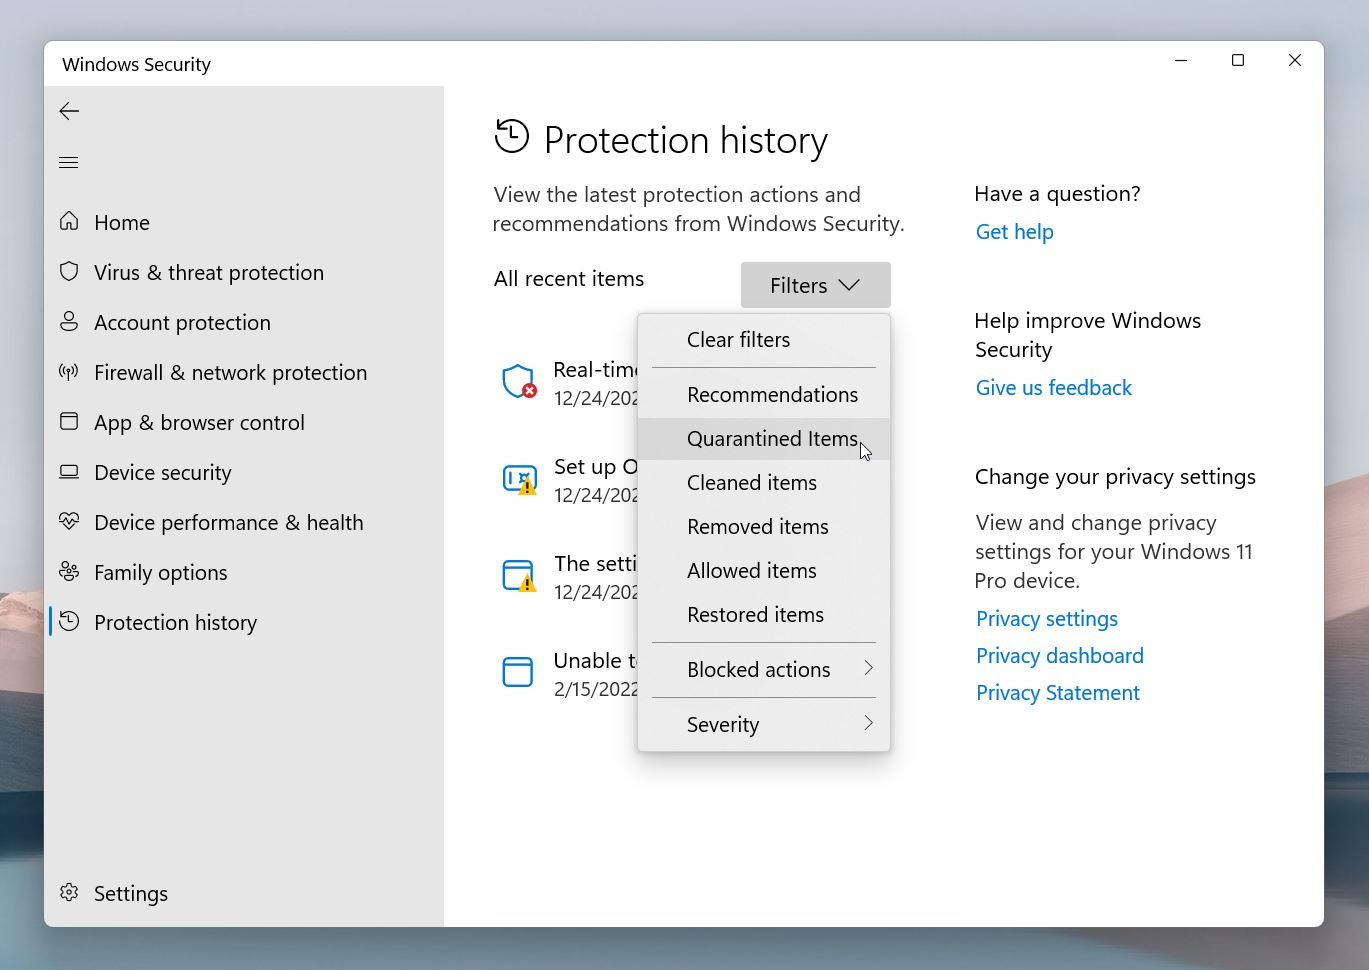
- Select the item you wish to keep and take action, such as restoring it.
If the list of the detected items is empty, Windows Defender has likely already deleted the quarantined files. In this case, your best option is to use data recovery software to restore the files removed by Windows Defender.
Option B: Restore Quarantined Items With CMD
If you prefer a more hands-on approach or, for some reason, can’t restore files through Windows Security, using Command Prompt (CMD) provides an alternative method to recover quarantined items.
Here’s how you can restore quarantined files with CMD on Windows 10/11:
- Type
cmdin the search box. - Right-click on Command Prompt from the list of results and select Run as Administrator.
- In the CMD window, type the following command to navigate to the Windows Defender folder:
cd C:\Program Files\Windows Defender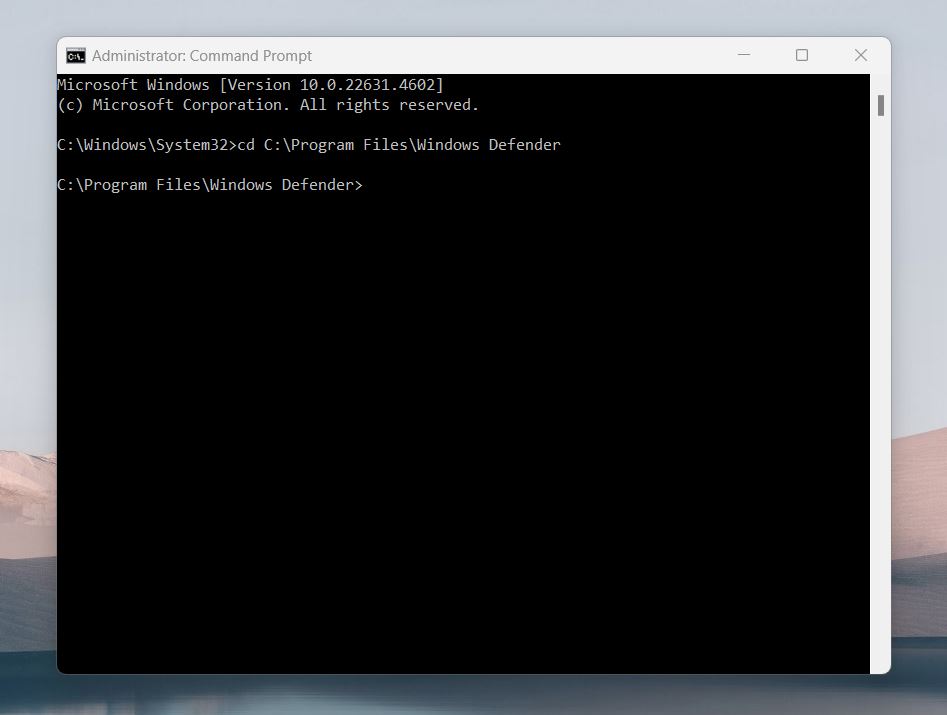
- Type in the following command and hit Enter again to list all the quarantined items in your system.
MpCmdRun.exe -restore -listall
- Now, type in the following command and press Enter to restore a quarantined item to its earlier destination successfully.
MpCmdRun.exe -Restore -Name ITEM-NAMENote: Remember to replace the “ITEM-NAME” with the name of the quarantined item you want to restore.
Don’t Want to Go Through It Again? Stop Windows Defender from Deleting Your Files
So, you got your file back from Windows Defender’s jaws, but what’s stopping it from doing the same thing again? We’ll show you how to modify Windows Defender’s settings so you won’t have to deal with this issue again.
If you’re absolutely sure your file is safe and has been flagged by mistake, you can report it as a false positive to Microsoft. This helps improve Windows Defender’s detection algorithms and prevents similar issues in the future. You can submit the file for review through the Microsoft Security Intelligence Submission portal or directly within Windows Security (use the “Report a problem” option in the Protection History section).
Method 1: Add Exclusions
You can add “exclusions” under Windows Security to prevent specific, folders, or file types from being deleted by Windows Defender. These exclusions will stop your files from being deleted automatically if they’re perceived as threats.
Here’s how you can add Exclusions under Windows Security on Windows 10/11:
- Go to Search > Settings > Windows Security > Virus & threat protection.
- Now, go to Virus & threat protection settings and click Manage Settings.
- Scroll down to Exclusions and click Add or remove exclusions.
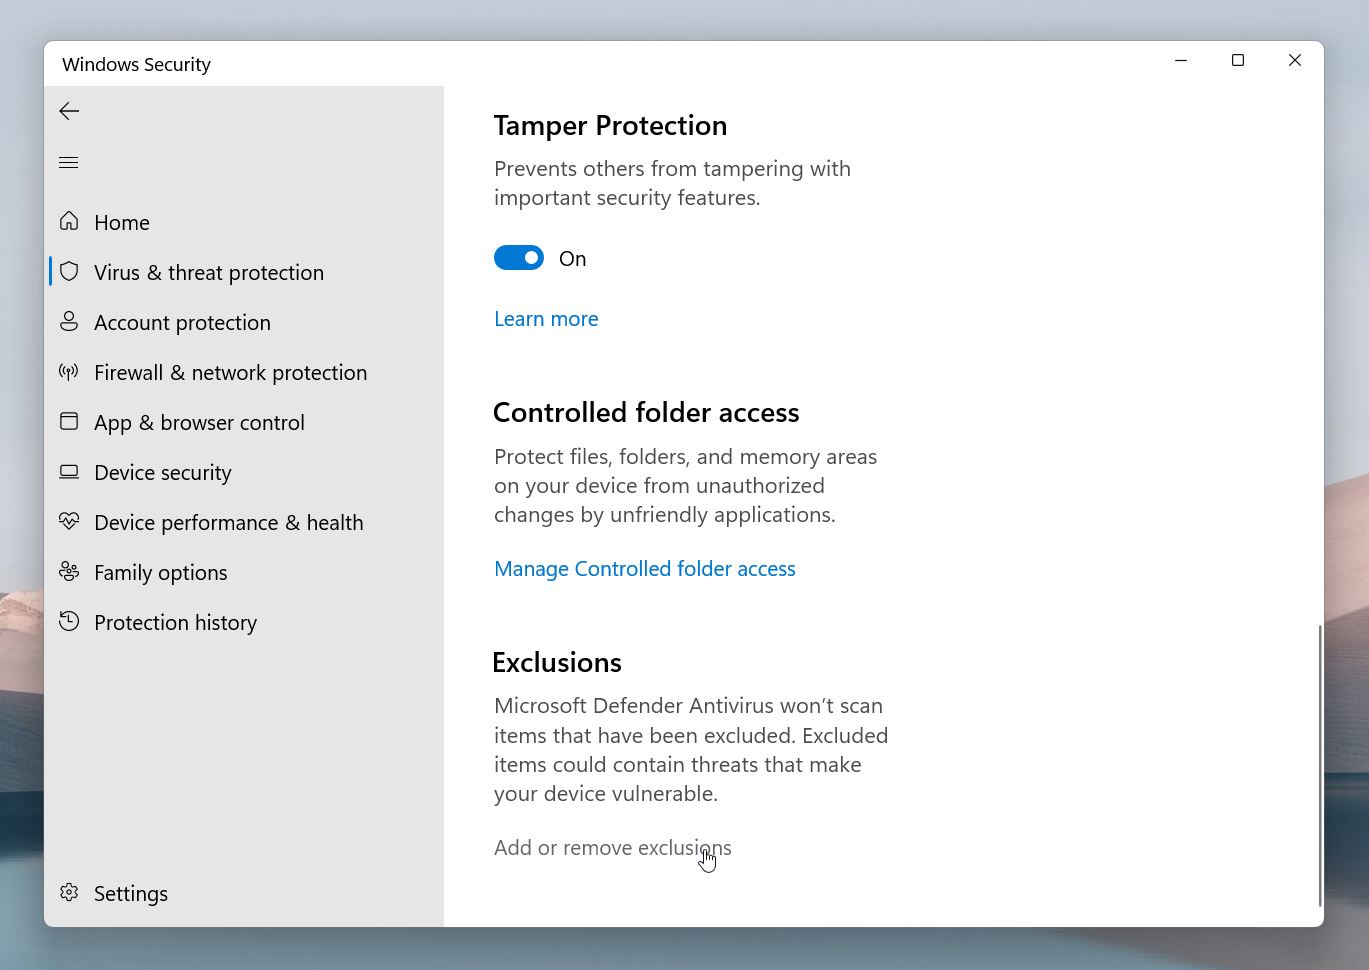
- Click + Add an Exclusion and select File, Folder, File Type, or Process to specify the exact files or file types you don’t want Windows Defender to delete.
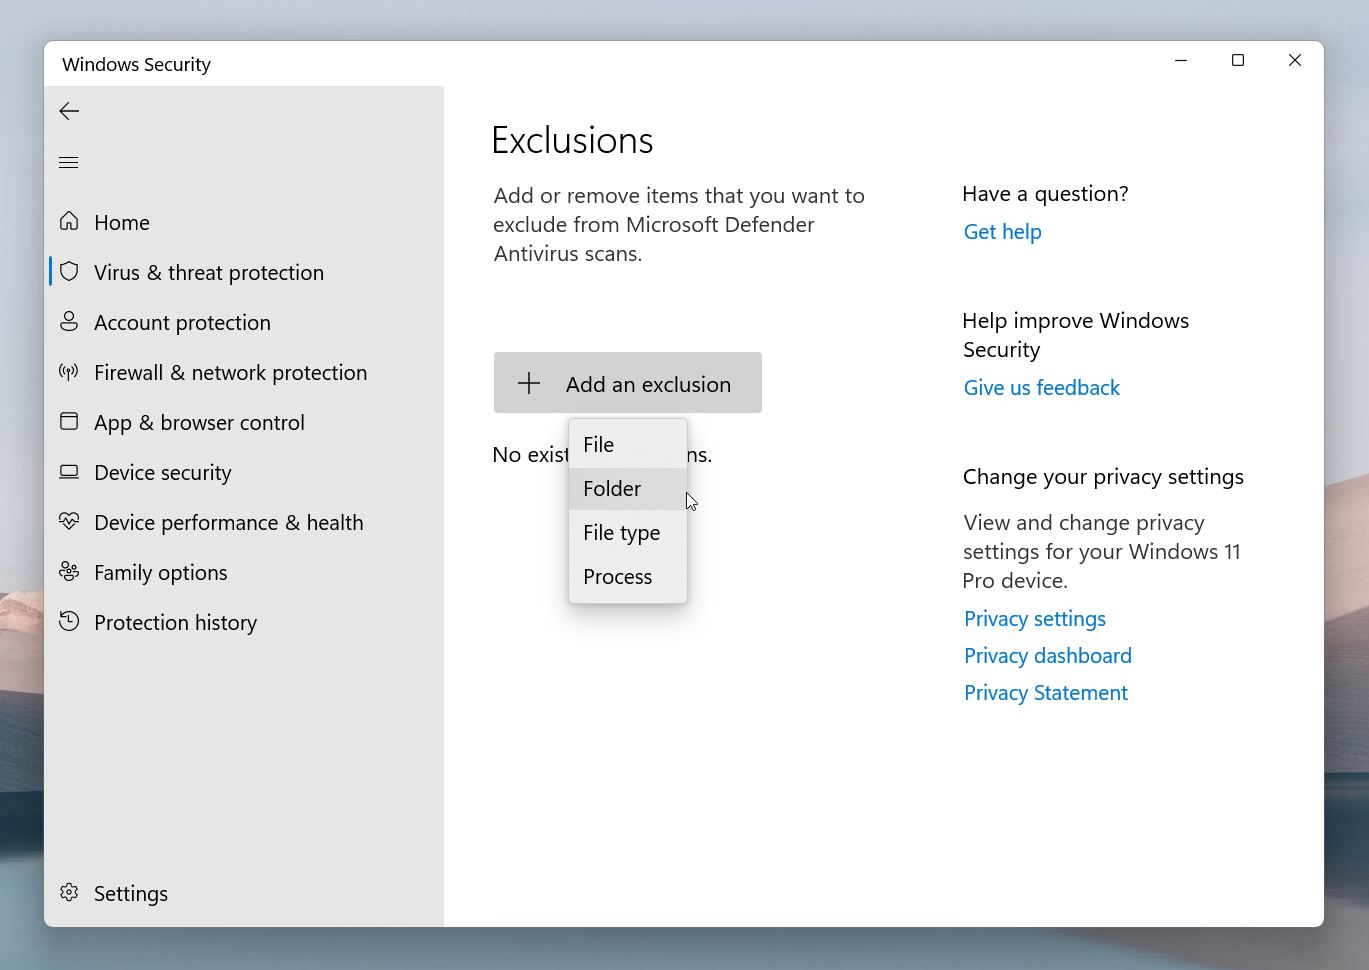
- Once you save the changes, all the files you’ve set as ‘Exclusions’ won’t be removed or deleted again.
Method 2: Disable Windows Defender Temporarily
Another way to stop Windows Defender from mistakenly quarantining a file is by temporarily disabling the Windows Defender. This can be useful when you need to run specific files that Windows Defender might perceive as a threat to your computer. Keep in mind, though, that this is only a temporary solution, as Windows Defender will turn itself back on automatically after a short period.
Caution! – There is also a way to disable Windows Defender permanently, but we strongly recommend that you do not follow that path as it can make your system vulnerable to malware and virus attacks.
Here’s how to do it:
- Go to Search > Settings > Windows Security > Virus & threat protection.
- Now, go to Virus & threat protection settings and click Manage Settings.
- Find Real-time protection and turn off the toggle switch under it.
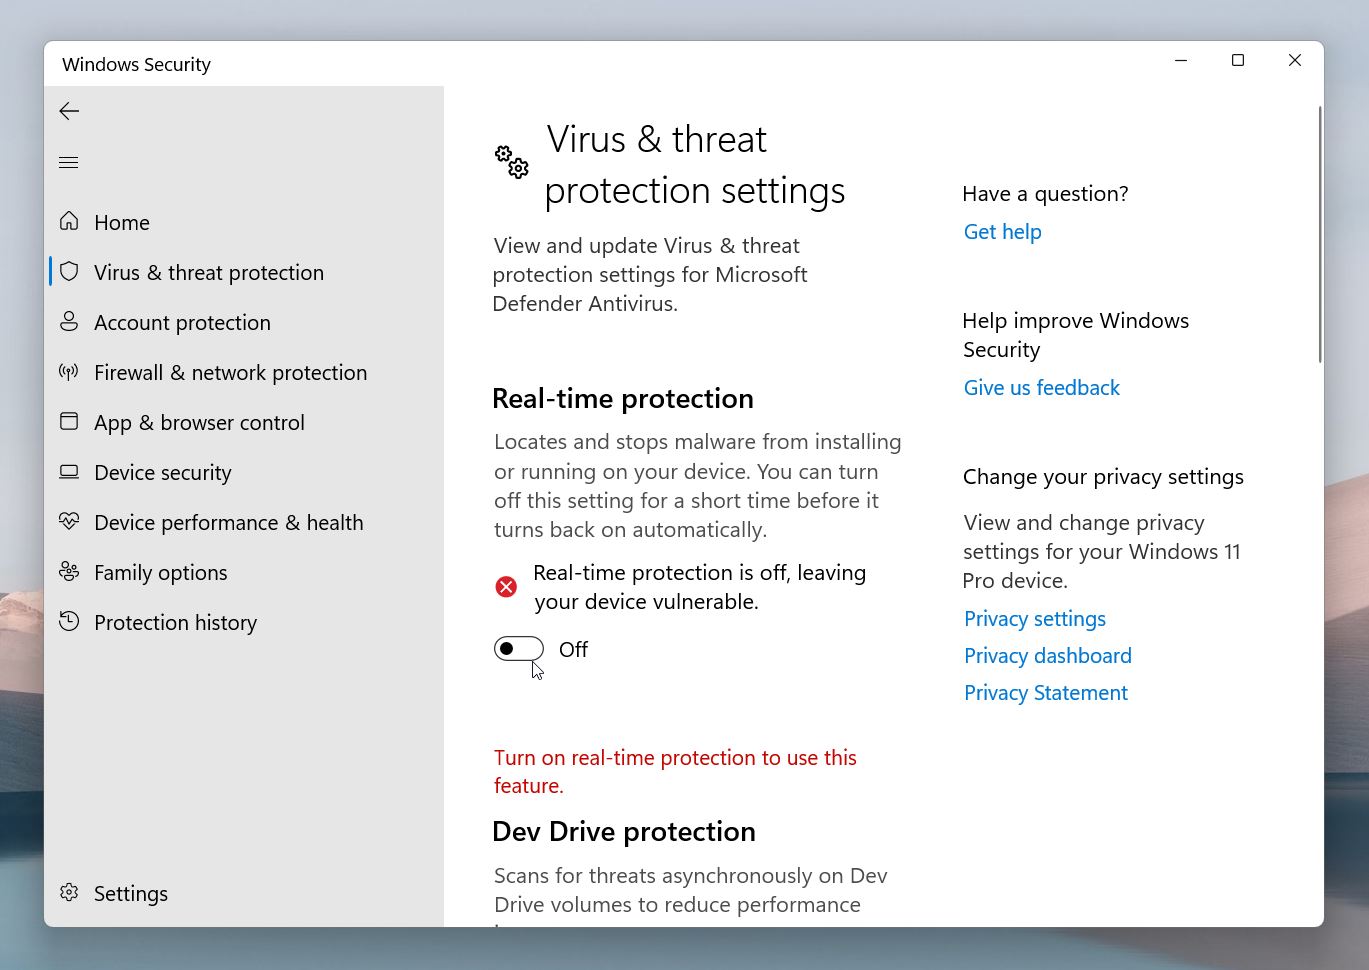
After you’re done, make sure to turn Windows Defender Antivirus back on. You don’t want to leave your computer unprotected, as it could be vulnerable to threats.
FAQ
Can Windows Defender recover deleted files?
No, Windows Defender cannot recover files it has deleted. Once a file is removed by Windows Defender, it is permanently deleted. In this case, you’ll need to use third-party data recovery software, like Disk Drill or Recuva, to try and retrieve it.
However, if a file was only quarantined (and has not been purged), you can restore it from within Windows Security under Protection History.
How to get back files deleted by Windows Defender?
To get back files deleted by Windows Defender, follow these steps:
- Open Windows Security, go to Protection History, and look for the file under quarantined items. If it’s there, you can restore it directly.
- If the file isn’t in quarantine and has been permanently deleted, use recovery tools like Disk Drill or Recuva to scan your drive and retrieve the file. For the best chance of recovery, stop using the drive where the file was stored to avoid overwriting the deleted data.
What is the difference between Windows Defender and Windows Security?
Windows Defender refers specifically to the antivirus program designed to protect your system from malware and other threats. It is a core feature of Windows Security.
Windows Security, on the other hand, is a broader application that acts as a centralized dashboard for various security features on your device. It includes tools like Windows Defender Antivirus, firewall settings, device security, and protection history.
Where is the Windows Defender quarantine location?
The Windows Defender quarantine location is typically found at:
C:\ProgramData\Microsoft\Windows Defender\Quarantine
This is a hidden system folder, so you’ll need to enable the option to view hidden files and folders in File Explorer to access it. Quarantined files are stored here temporarily until they are either restored or permanently deleted.
However, we recommend you interact with these quarantined files only through antivirus software to protect your system against threats:
- Go to Search > Settings > Windows Security.
- Select Virus & threat protection and then click Protection history.
- In the list of All recent items, filter on Quarantined Items.
However, we recommend you to interact with these quarantined files only through antivirus software to protect your system against threats.
Why can't I restore quarantined files from Windows Defender?
There are a few reasons you might not be able to restore quarantined files:
- You may not have the necessary administrator permissions to restore files. Make sure you’re signed in as an administrator.
- Windows Defender may delete quarantined files after a certain period if you don’t restore them in time.
- The quarantined file or its metadata might be damaged, which can make restoration impossible.
- Some group policies or system settings may block the option to restore quarantined files.
How to remove quarantined threats in Windows Defender?
To permanently remove quarantined threats in Windows Defender, follow these steps:
- Go to Search > Settings > Windows Security.
- Select Virus & threat protection and then click Protection history.
- In the list of All recent items, filter on Quarantined Items.
- Select your files then click remove.
This article was written by Joshua Solomon, a Contributing Writer at Handy Recovery Advisor. It was recently updated by Roman Demian. It was also verified for technical accuracy by Andrey Vasilyev, our editorial advisor.
Curious about our content creation process? Take a look at our Editor Guidelines.