
Have you tried to recover deleted files, only to find them showing up with generic names like “file0001.jpg” or “recovered_1.doc”? A lot of people run into this problem, and that’s exactly why our team put together this guide.
We’ll break down the factors that impact whether you can recover files with their original names and what you can do to improve your chances. Keep reading, and you’ll learn all the basics (and more) of data recovery with original file names.
We understand there’s a 99.99% chance you’ve already done this, but we have to mention it just in case! Don’t forget to check the Recycle Bin on Windows. Files you delete usually stay there with their original names and locations, and you can restore them with a quick right-click. If you used the Shift + Delete shortcut, though, they won’t show up there, and you’ll need to use data recovery software instead.
How to Recover Deleted Files with Original File Name
If your situation meets the above criteria, then you have a very high chance of restoring your deleted files with their original names and folder structure intact.
In the sections that follow, we’ll look at three ways to recover deleted files. But before we start, here are a couple more tips to increase your chances of a successful recovery:
- 📁 Don’t write new files to the drive or partition affected by data loss. Ideally, download the data recovery program on an external drive and connect it to your PC when performing data recovery. Even the normal functioning of Windows can write new data to your storage drive.
- 🛠️ If data was lost due to physical damage, you’re better off contacting professional data recovery services, as you can unknowingly damage the drive even further.
Method 1: Recover Files with Original Names using Data Recovery Tool
As we mentioned, you’ll need a data recovery app that can use existing file system records to restore deleted files with their original names. While most tools can do this, not all deliver consistent results (the quality of their recovery algorithms can be very different). Some tools can’t recover file names at all since they rely solely on signature scan mode, which isn’t designed to do that.
We recommend using tools like Disk Drill or Recuva, two popular options for Windows users. For this demonstration, we’ll use Disk Drill. It is much easier to use thanks to its interface, extensive filtering options, and file preview features. It also performs much better in recovering original file names. In our experience, Recuva often fails to recover file names even when it should.
Let’s walk through how you can use Disk Drill to recover deleted files by name:
- Download and install Disk Drill. Install the software on a drive/partition other than the one you’re recovering data from (if possible) to avoid overwriting lost files.
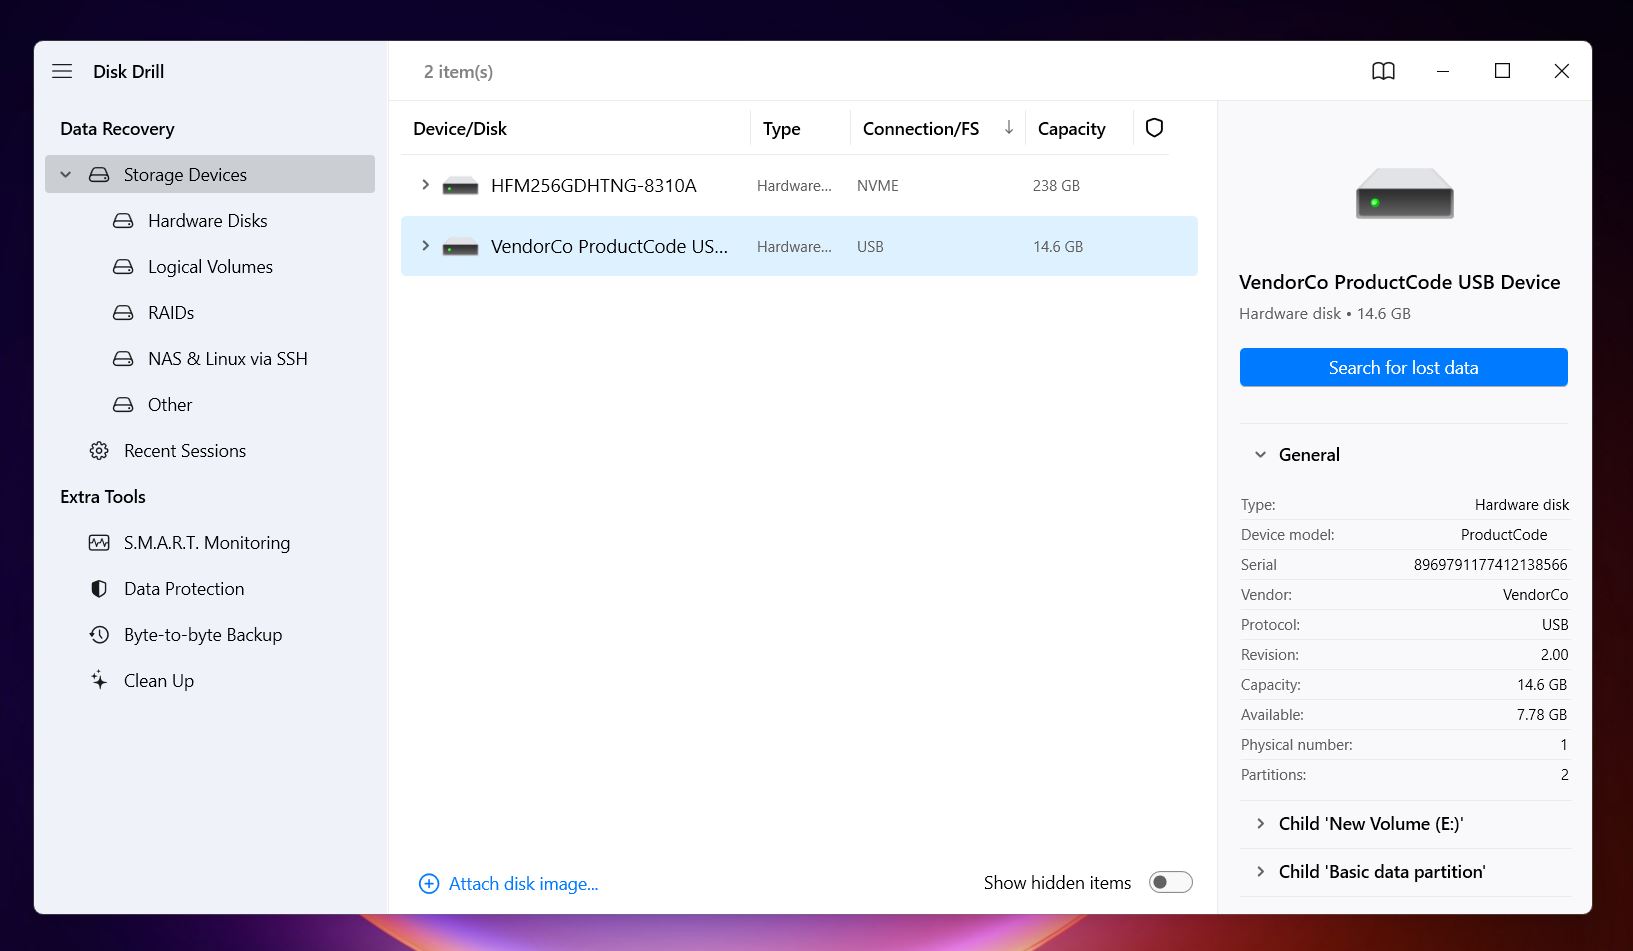
- Open Disk Drill and locate the drive or partition where the deleted files were stored. You should see all storage devices connected to your computer, including internal drives, external drives, USB drives, memory cards, and more.
- Once you’ve selected the drive or partition, click Search for Lost Data to start the process.
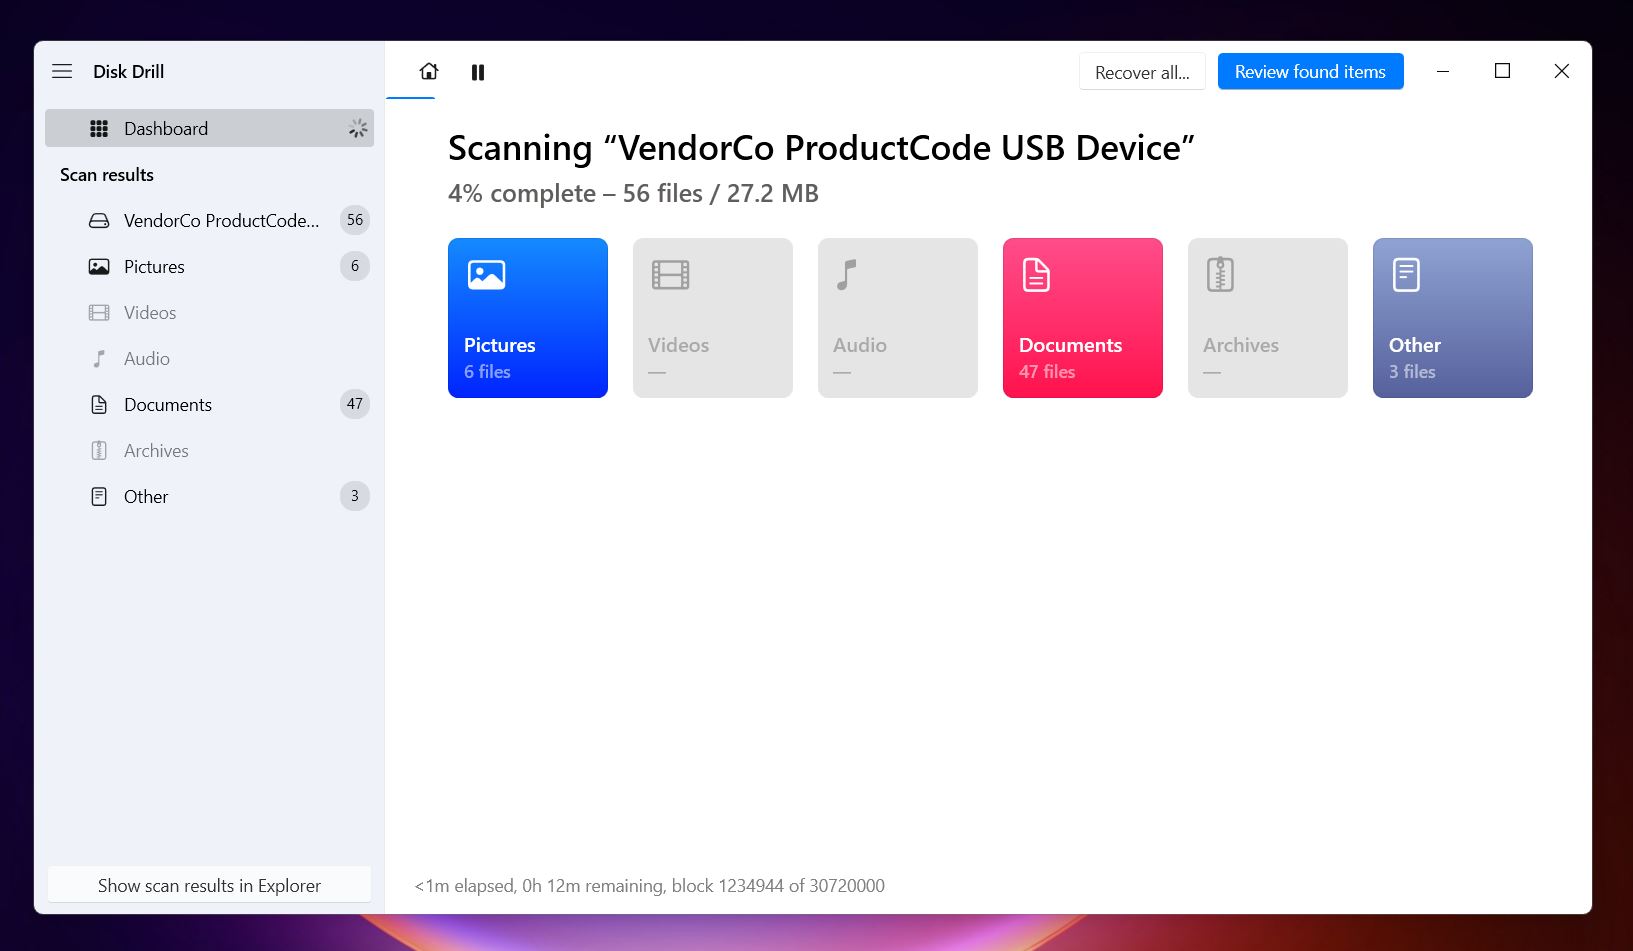
- As Disk Drill scans, you’ll see categories like Pictures, Video, Audio, Documents, and more. Click on any of these categories to see a list of files filtered by the type you selected. Alternatively, you can click the Review found items button at the top to see all the files Disk Drill has found.
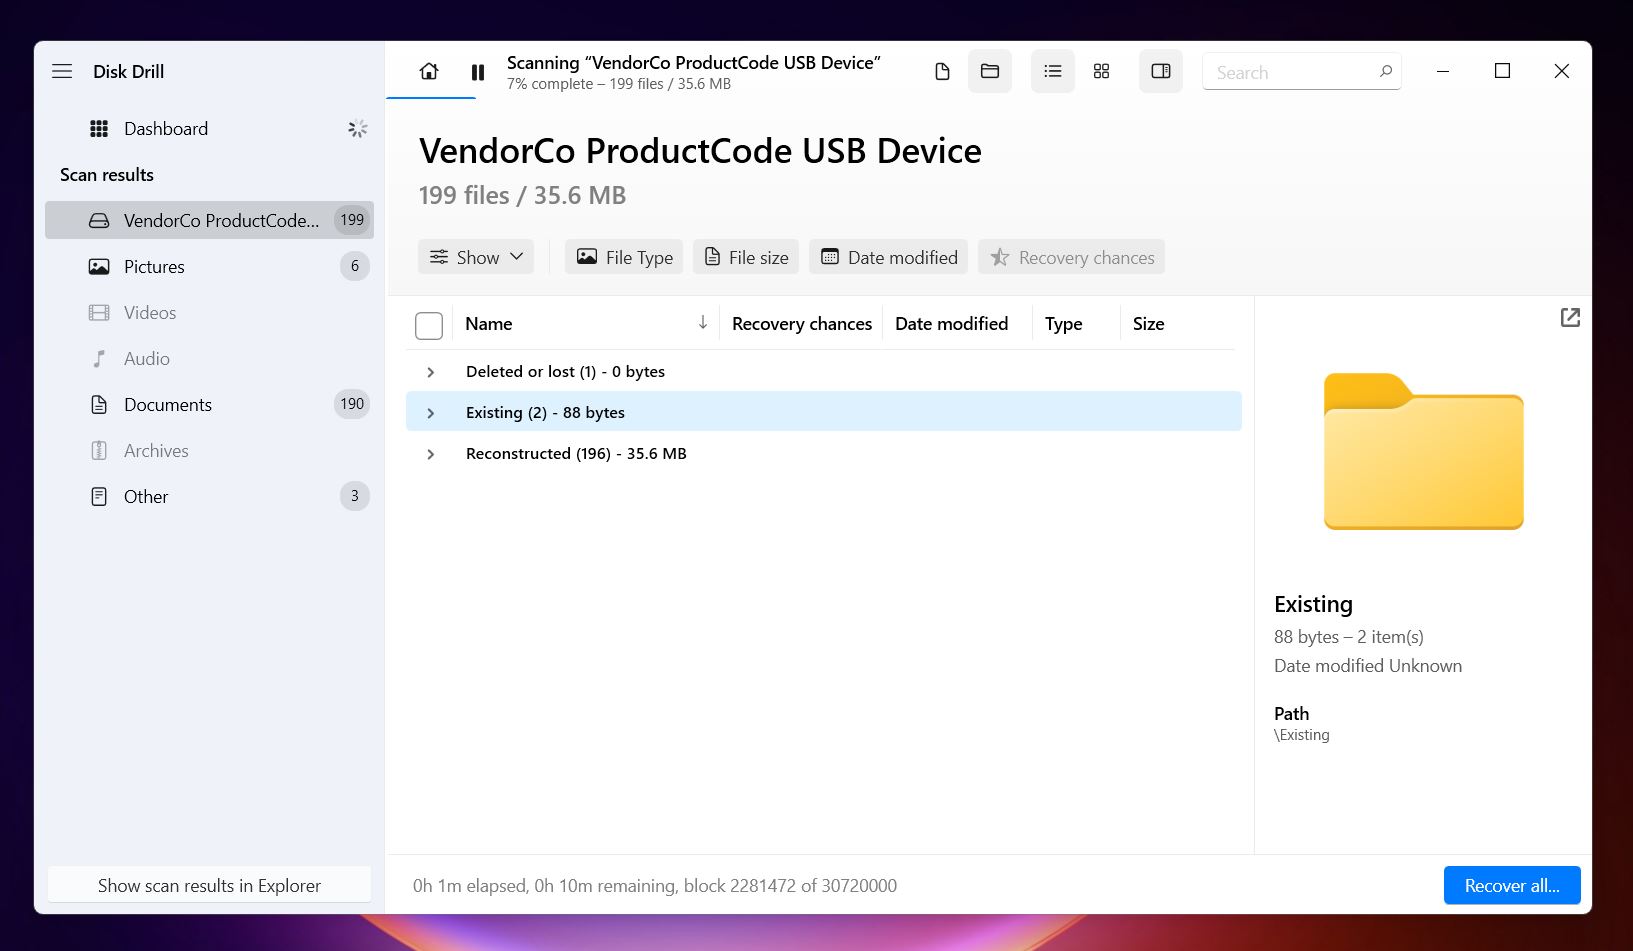
- As you check the results, you’ll also notice subcategories like Deleted or Lost, Reconstructed, and Existing:
- Deleted or Lost: This category includes files that were deleted but still have recoverable file system records, so it should be possible to restore them with their original names and folder structures.
- Reconstructed: These files are recovered using Disk Drill’s signature scan. While this method restores file content, it doesn’t include metadata, so files may have generic names.
- Existing: This category displays files that are still present on the drive and haven’t been deleted. These might show up during the scan if they match the search criteria or filters.
- You can also use the search bar at the top to filter files even further. This allows you to search by full or partial file names, or even just by file extensions like .jpg or .mp3.
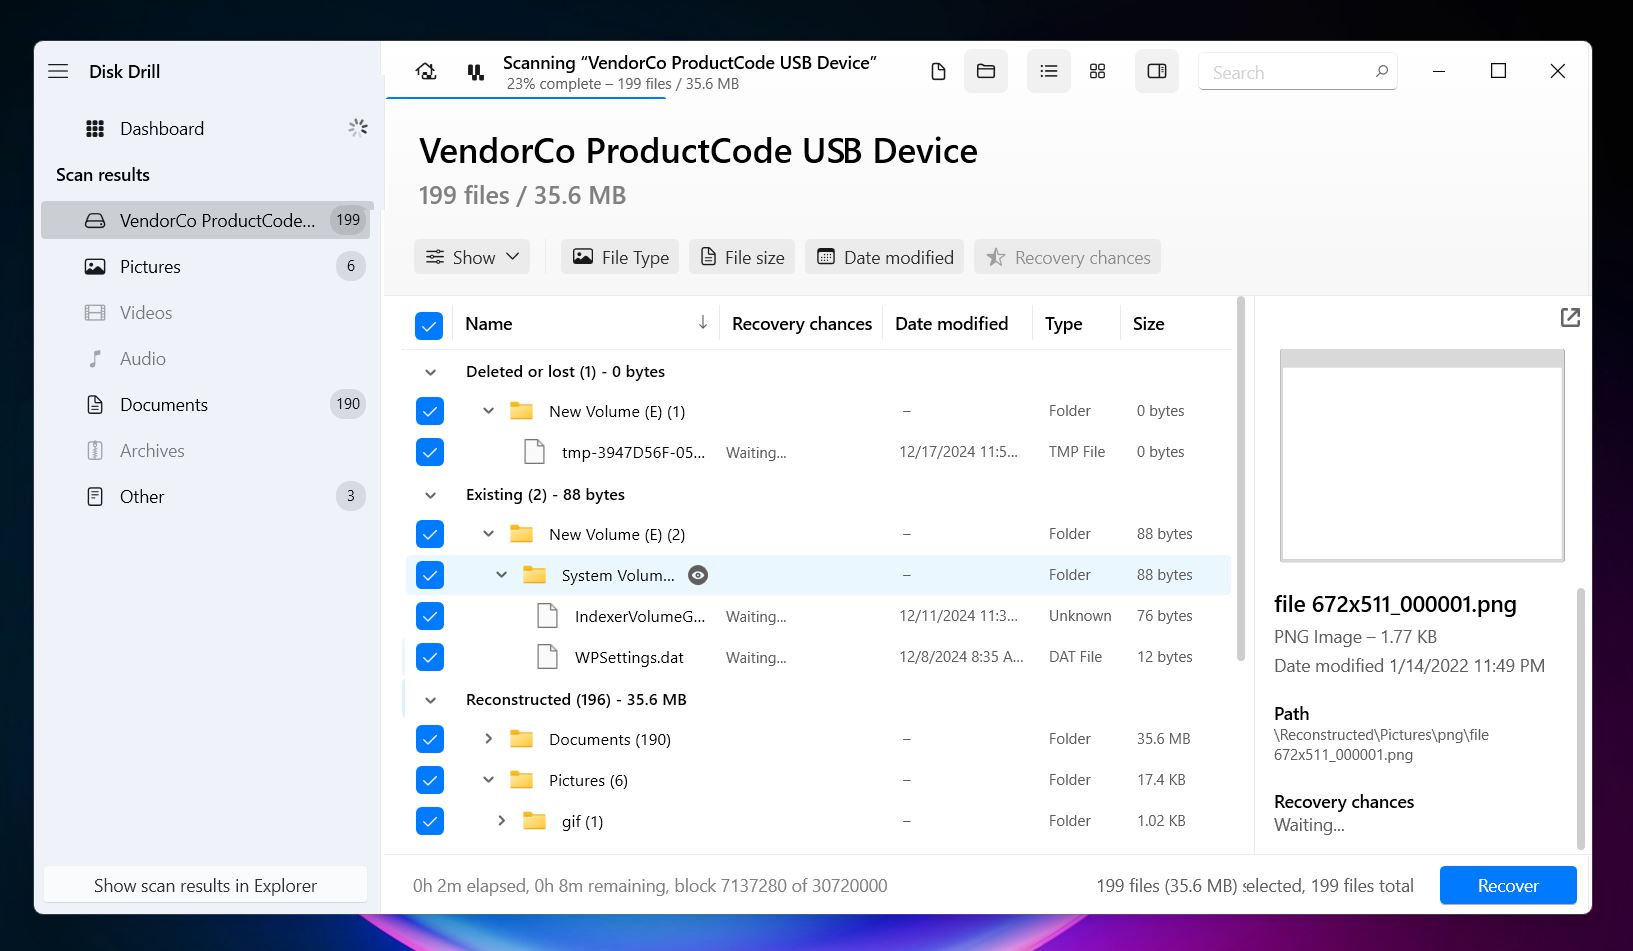
- To make sure you’re recovering the right files, click the eye icon next to any file to see a full preview to confirm the content before moving forward.
- Once you’ve verified the files you want, check the boxes next to them and hit the Recover button.
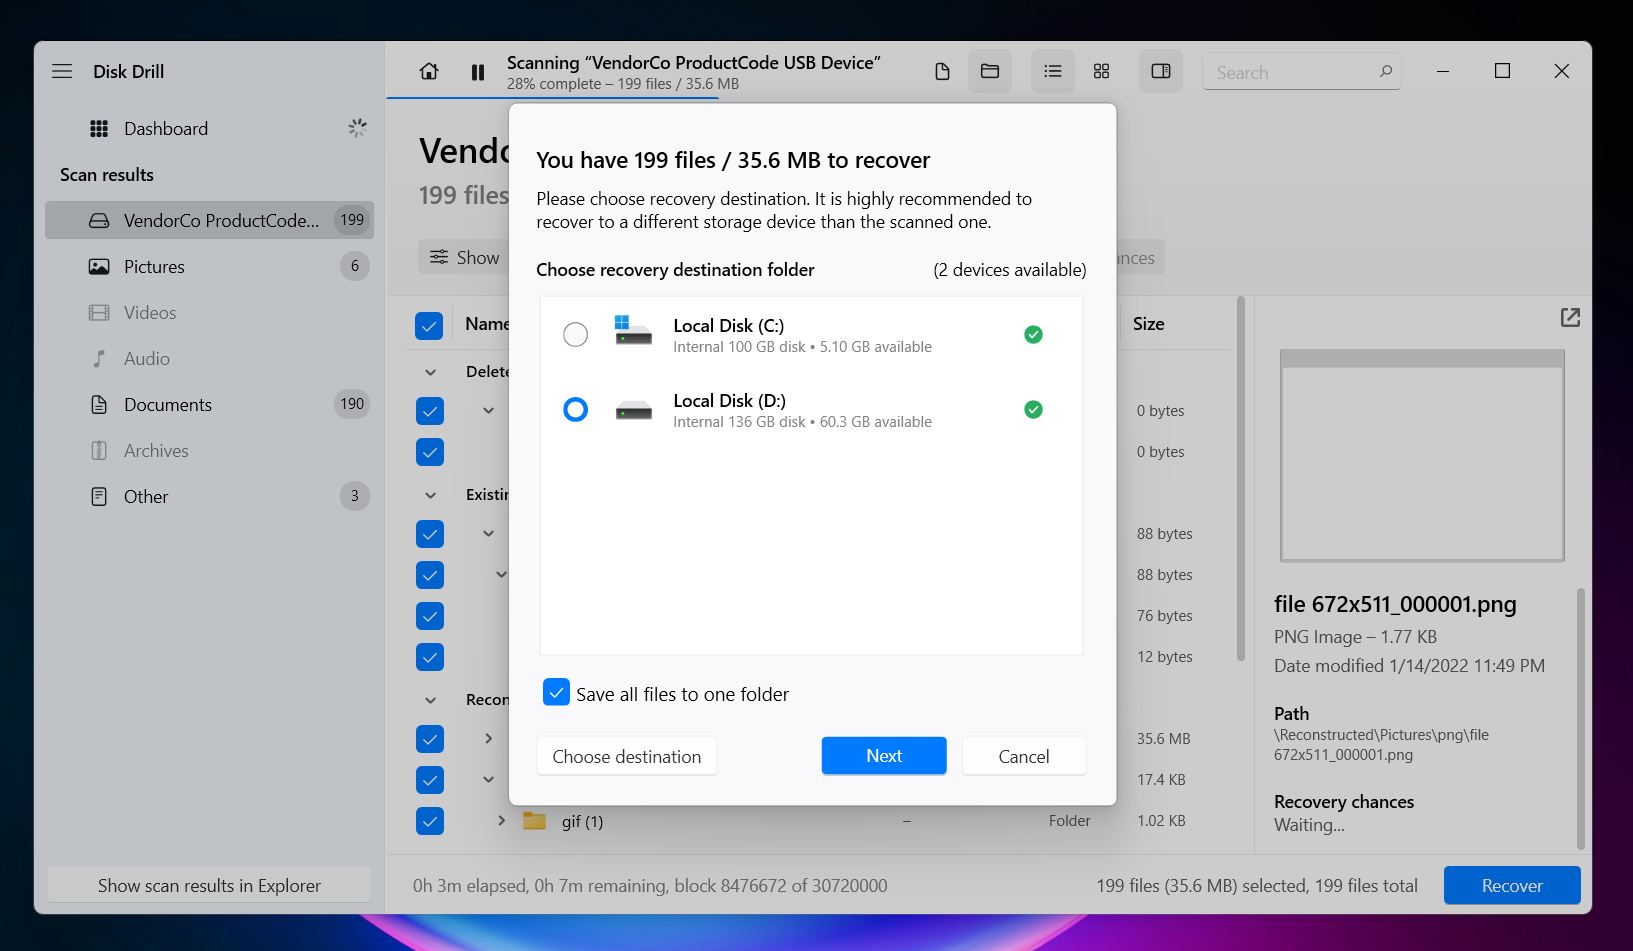
- In the next window, choose a recovery destination for the files. Again, make sure to select a different drive or partition if possible.
Disk Drill’s free Basic version lets you scan and preview files as many times as you want, but recovery is capped at 500MB. This allows you to test if files can be recovered with their original names and even recover some files. For unlimited recovery, you’ll need to upgrade to the PRO version.
Disk Drill is a solid tool for data recovery with original file names. It shows consistent results in all kinds of data loss scenarios. However, as we mentioned earlier, if the file system is badly damaged and no table records have survived, Disk Drill might use its Signature Scanner to find your lost data.
This mode works by identifying unique patterns or “signatures” in the raw data, completely independent of the file system. While it might recover files this way, the recovered files will have generic names like “file0001.jpg” or “recovered_1.doc.” You’ll need to rely on the Preview feature to identify them. Thankfully, Disk Drill can preview almost any file that your OS can open, either natively or with a third-party tool.
If you want to try other apps to compare results, here’s a list of capable alternatives to Disk Drill.
Method 2: Retrieve Deleted Files & Folders from Backup
As we mentioned before, if you have backups, it can be a much easier task. Windows 10 and 11 have an in-built backup feature called Windows File History that can help restore your files with the correct file names and folder structure intact. However, the feature should have been enabled before the data loss occurred.
To recover files with Windows File History, the feature needs to have been turned on and running before the files were deleted. It is not enabled by default.
Here is a guide on how to recover your data and restore original file names, using Windows File History:
- Connect the storage drive that you assigned to Windows File History.
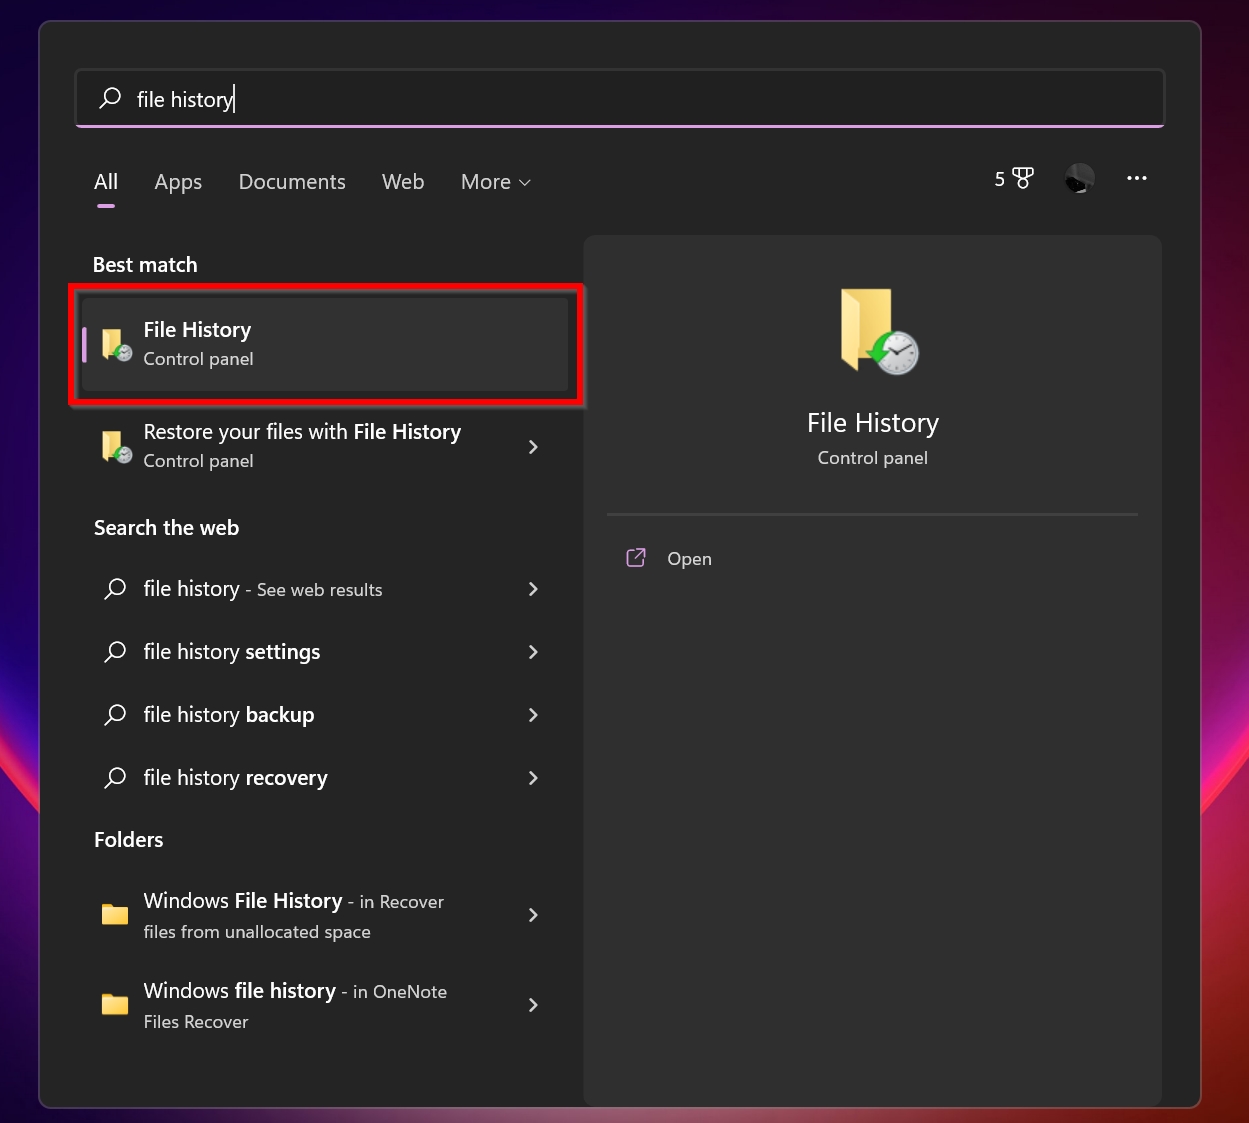
- Now, type “file history” in Windows Search (Windows Key + S). Click on the File History Control Panel setting from the search results.
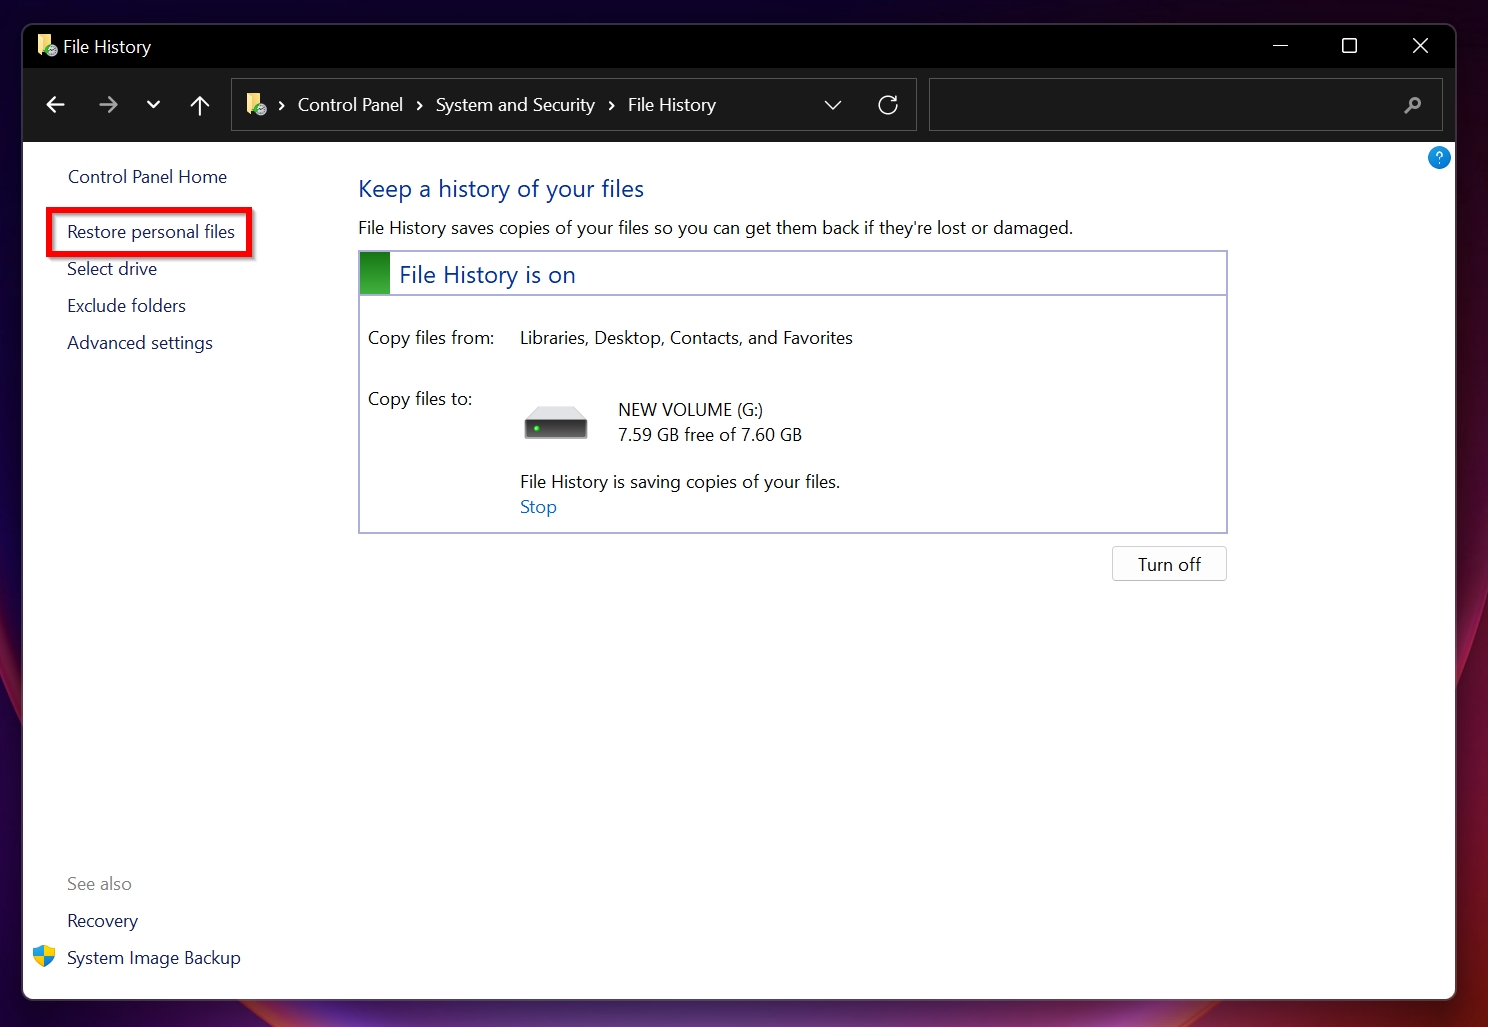
- Here, click on the Restore personal files option.
- Cycle through the backups using the navigation buttons at the bottom. Confirm the files you want to recover by checking the file names, select them and click the green Restore button.
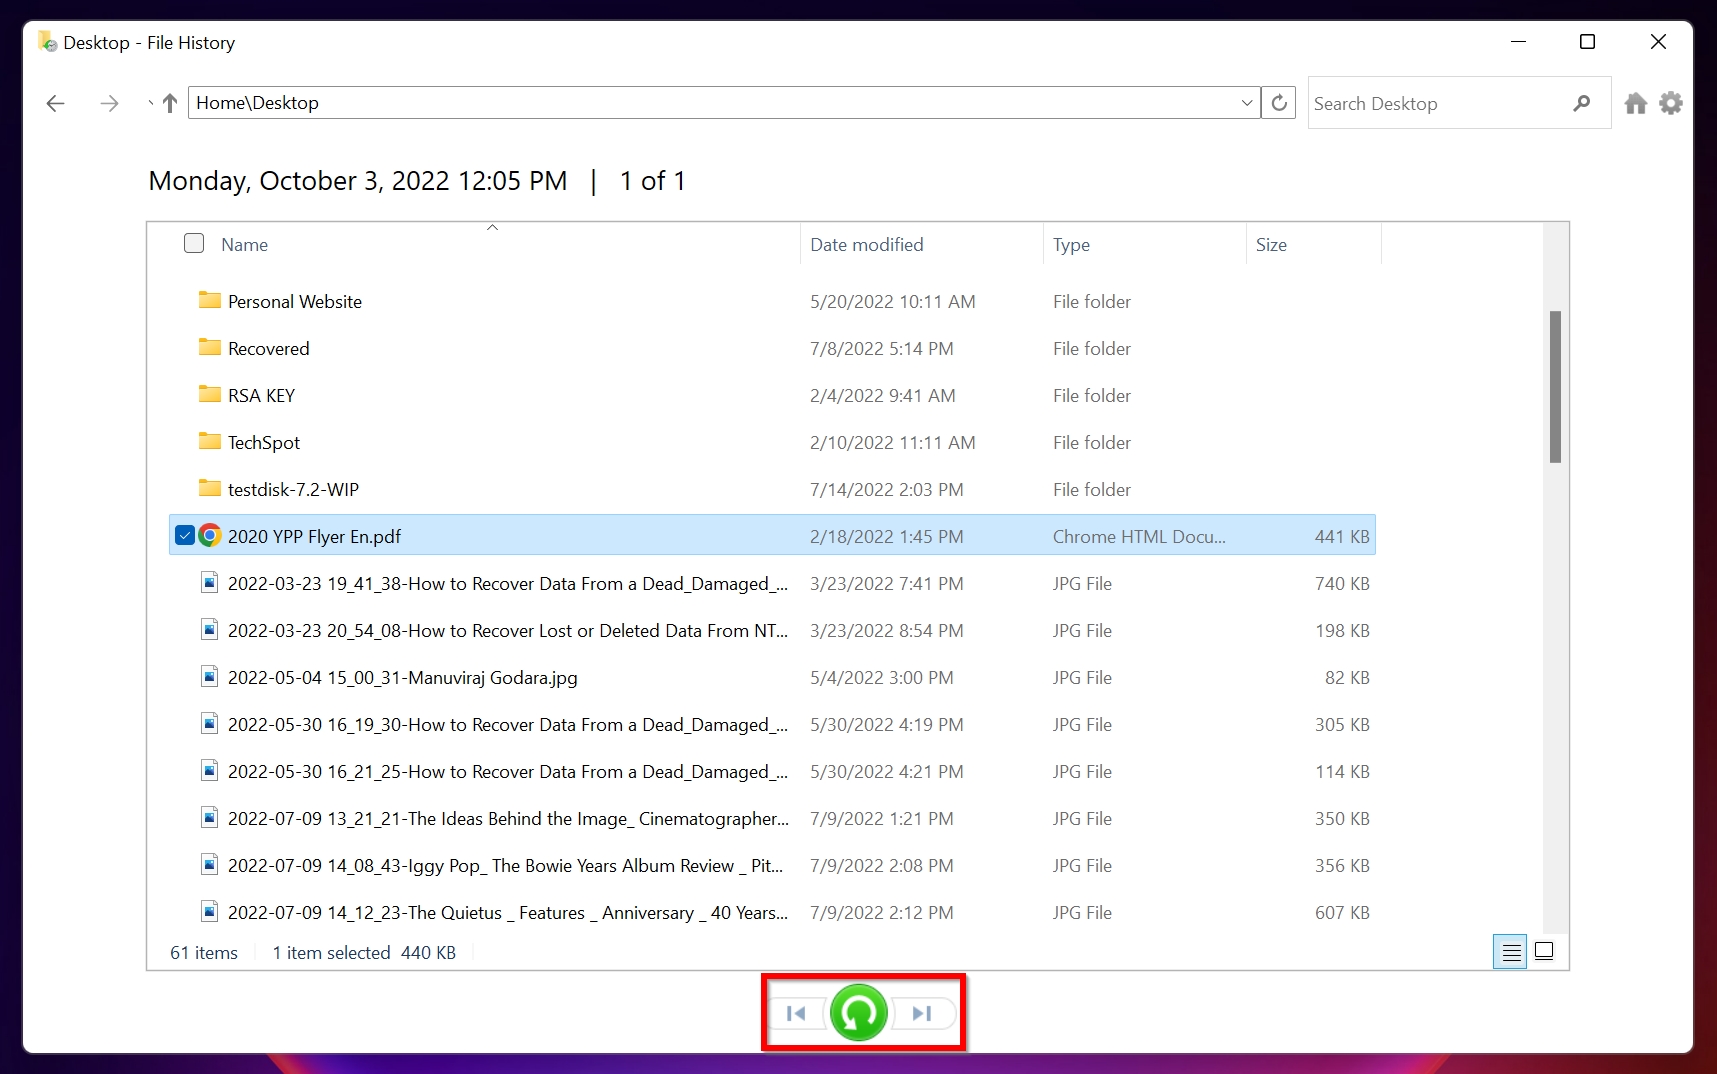
- File History will restore the selected files to the original directory.
And don’t forget about cloud backups like OneDrive, Google Drive, or Dropbox—especially OneDrive, since it’s built into Windows 10 and 11. By default, it’s not active, but you might have turned it on at some point before the deletion and forgotten about it. It’s worth checking. OneDrive usually backs up files in locations like Desktop, Documents, Music, Pictures, and Videos.
Method 3: Restore Original Folder Structure from Deleted/Damaged Partition
If data loss occurred because of a damaged or corrupt partition on your storage drive, TestDisk is an open-source data recovery tool that can restore the partition to its original state for free. While the program is excellent at doing its job, it doesn’t have a GUI, like Disk Drill.
TestDisk is a recovery tool built for specific scenarios—like when an entire partition is lost or deleted. In cases like this, it’s a great recovery option that can often restore all files with their original names and folder structures. However, it’s not really designed to recover individual files you accidentally deleted, so don’t think of it as a solution for that.
For individual files, TestDisk includes a companion tool called PhotoRec, which comes bundled in the same archive. But since PhotoRec only relies on signature scanning and can’t recover original names or folder structures, it’s completely useless for the purpose of this article. That’s why we won’t focus on it here.
Instructions on how to restore original file names and recover your data using TestDisk:
- Download TestDisk and extract the ZIP file.
- Run the testdisk_win.exe file from the extracted folder.
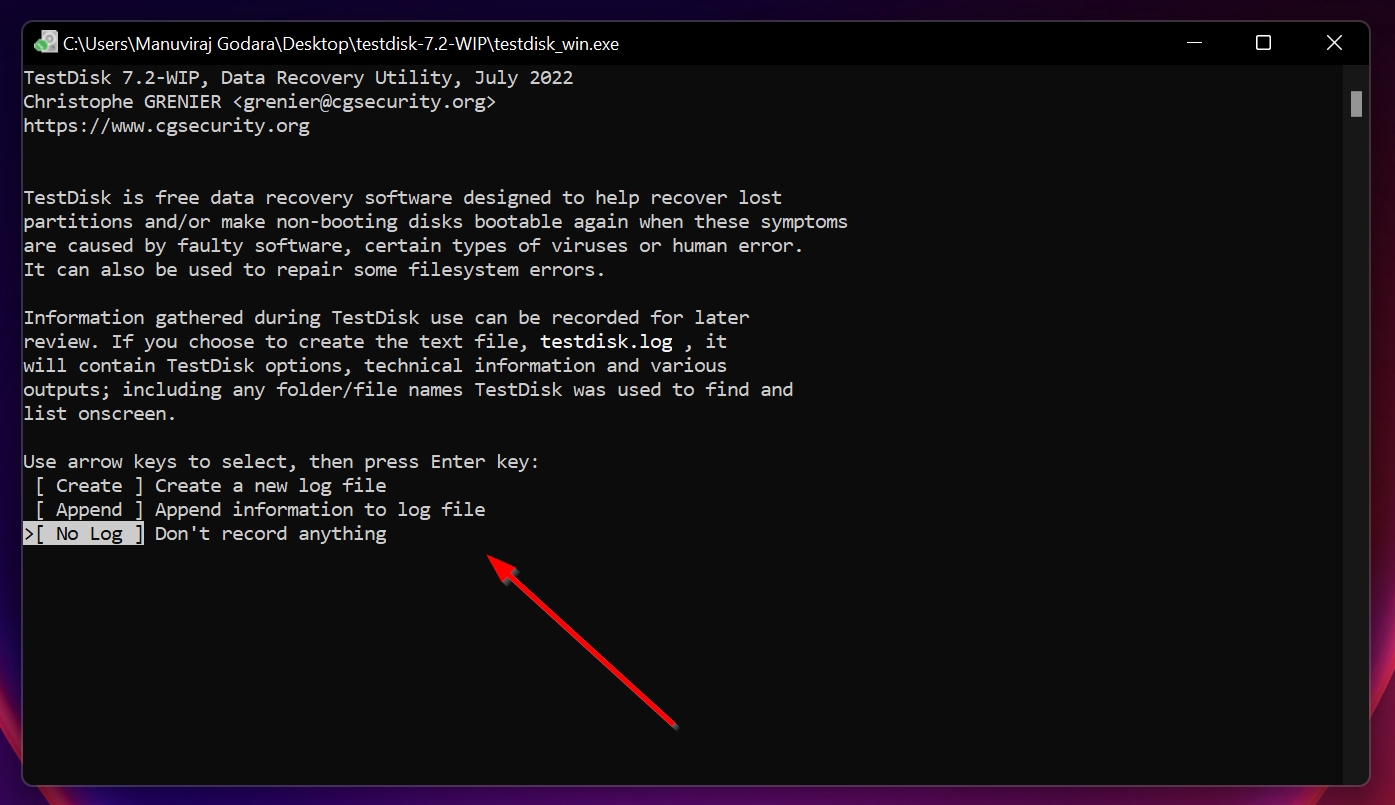
- Select whether you want to create a log file or not. Use the arrow keys to navigate and press Enter to select.
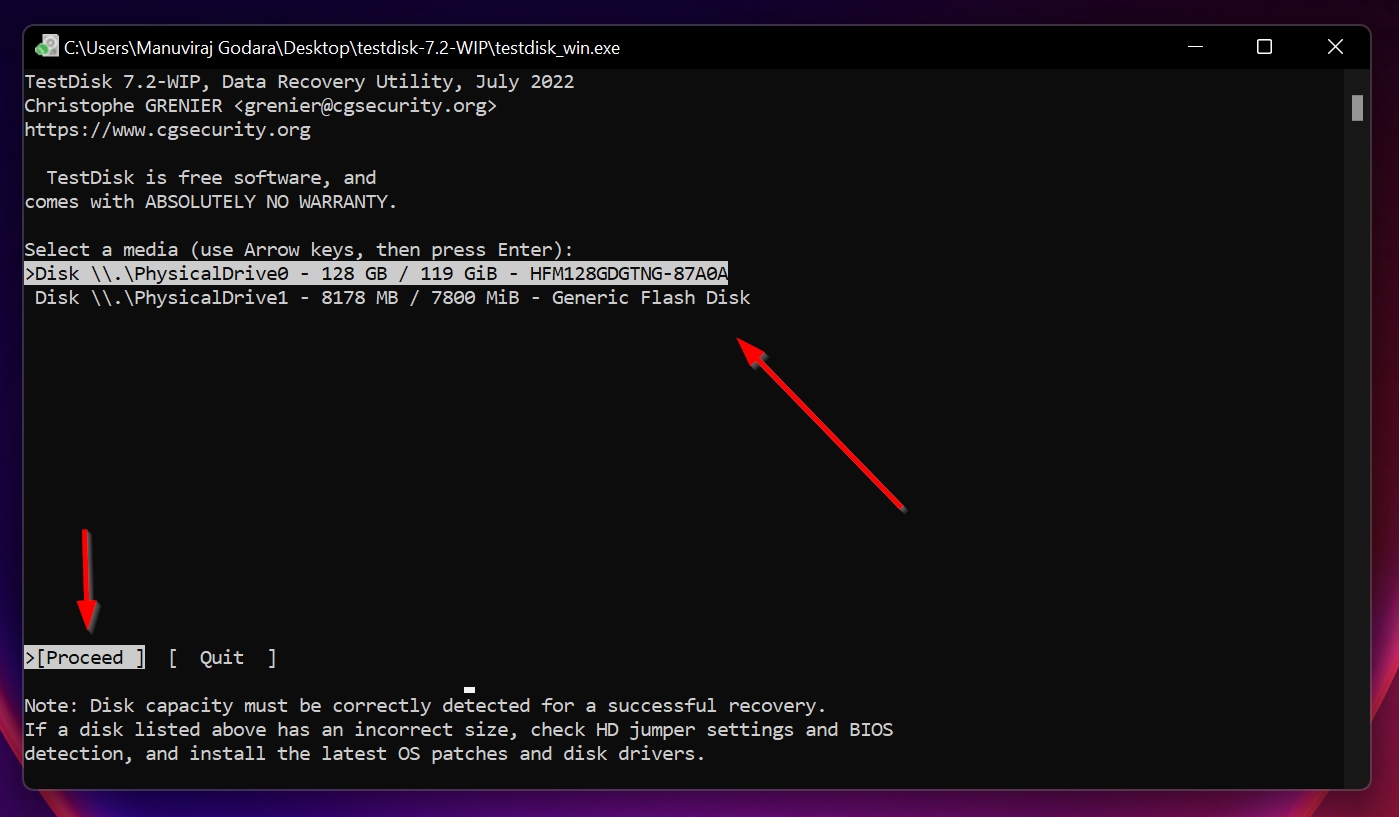
- Now, choose the storage drive by using the Up and Down arrow keys. Once highlighted, select Proceed and press Enter.
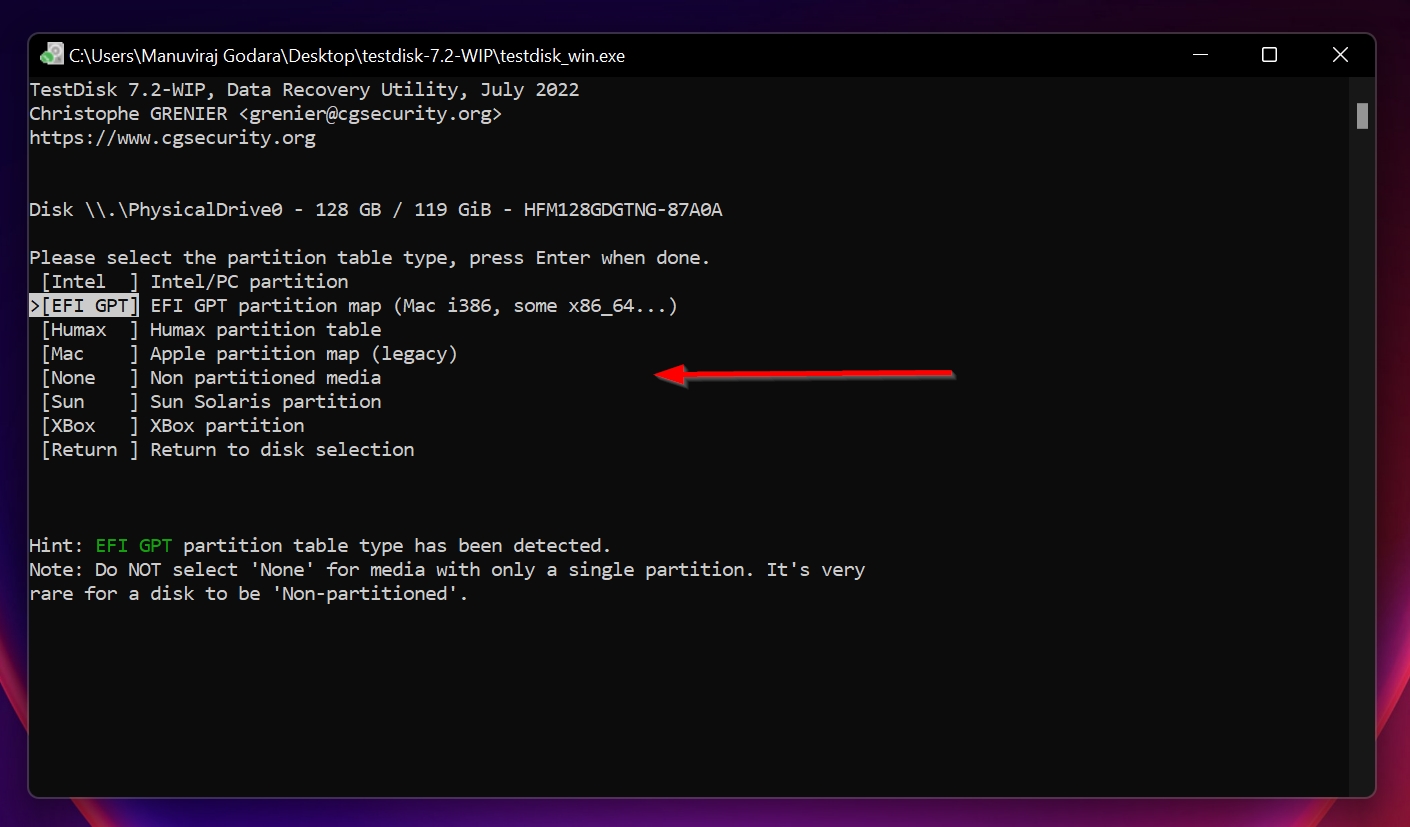
- TestDisk will present you with a partition table selection screen. It’s best to leave the default option highlighted (TestDisk automatically detects this) and press Enter.
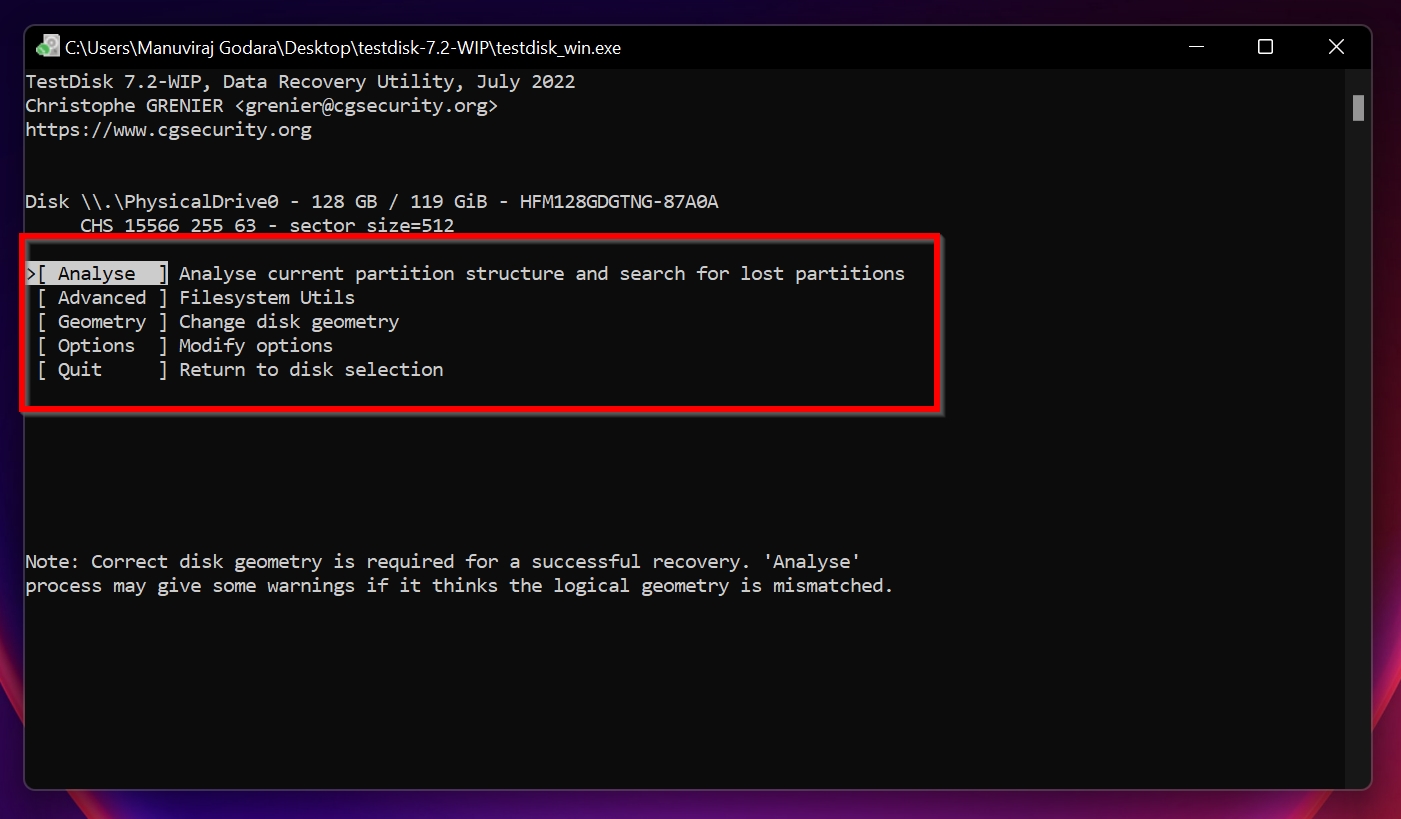
- Highlight the Analyse option and press Enter.
- After this, select the Quick Search option and press Enter.
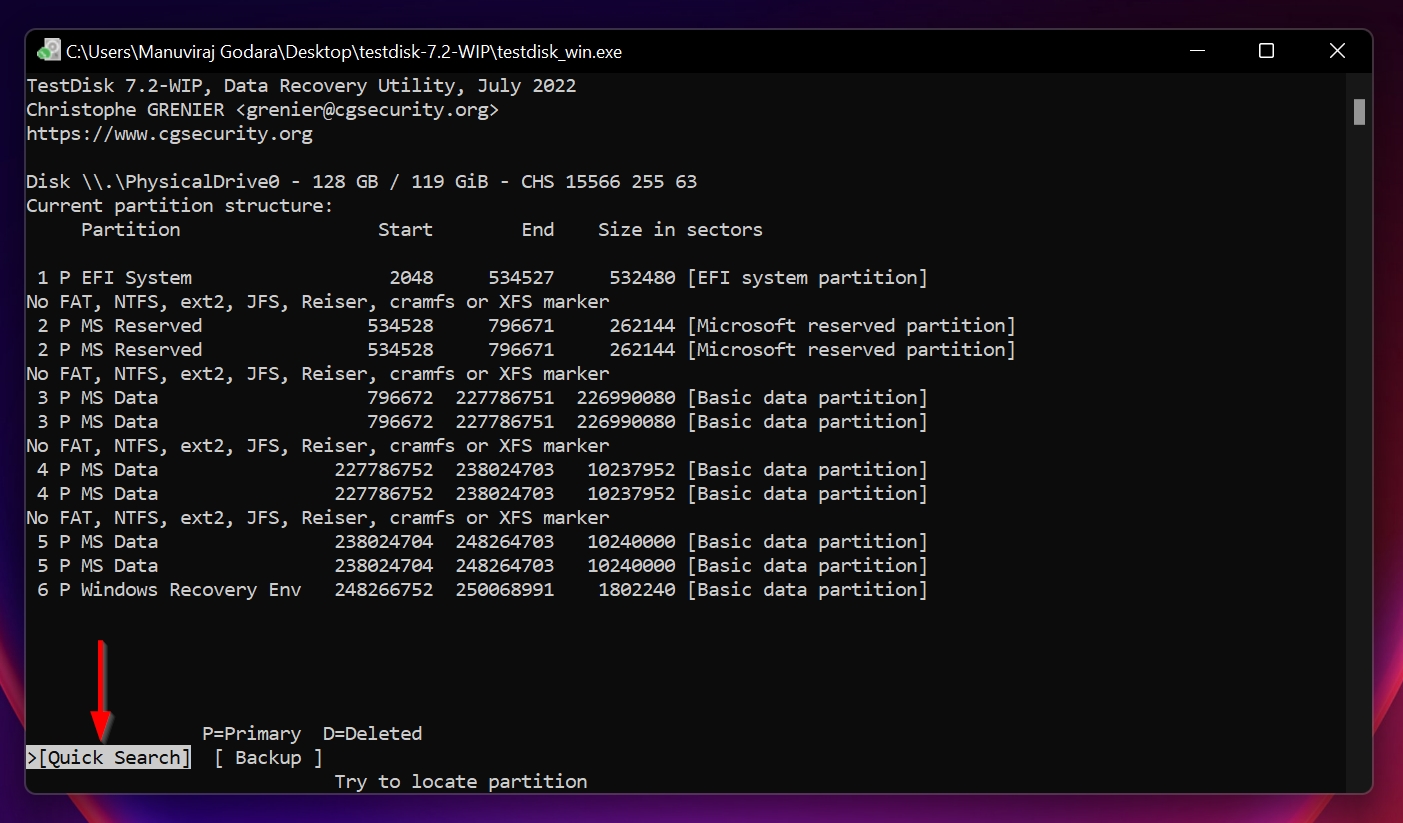
- On the next screen, press P to view recoverable files. After confirming your files are there, press Q to go back.
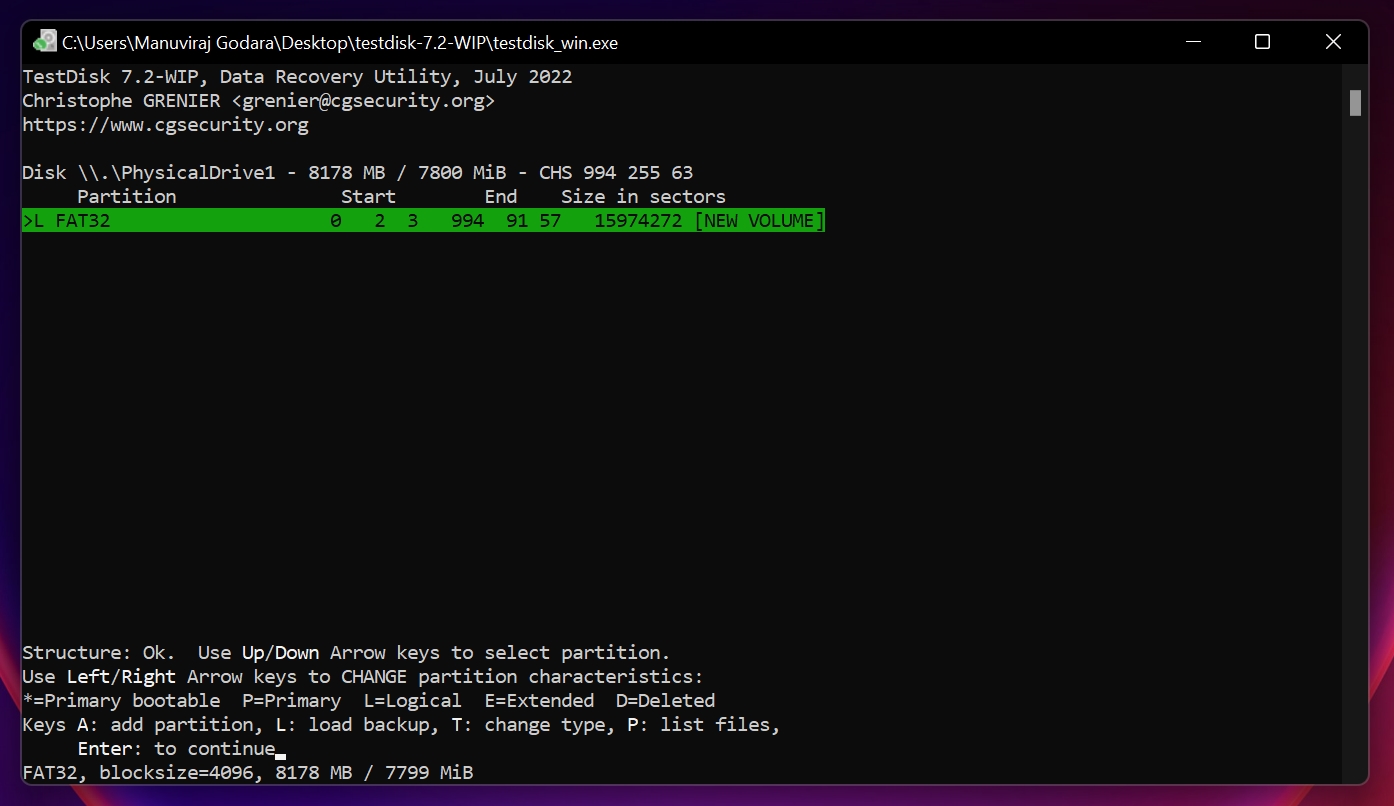
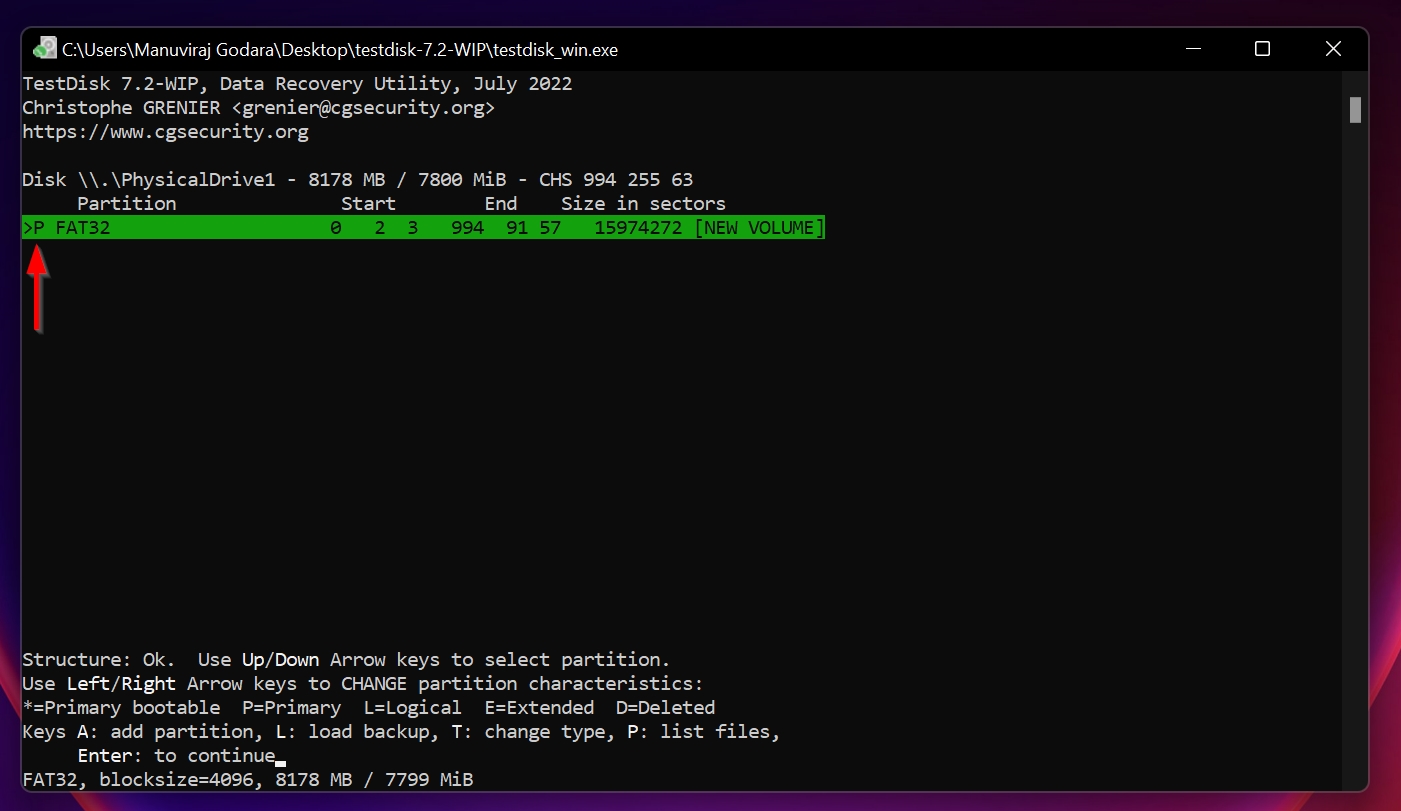
- Use the left and right arrow keys to cycle through the disk letters and make sure there is a P at the beginning and press Enter. See the image below for reference.
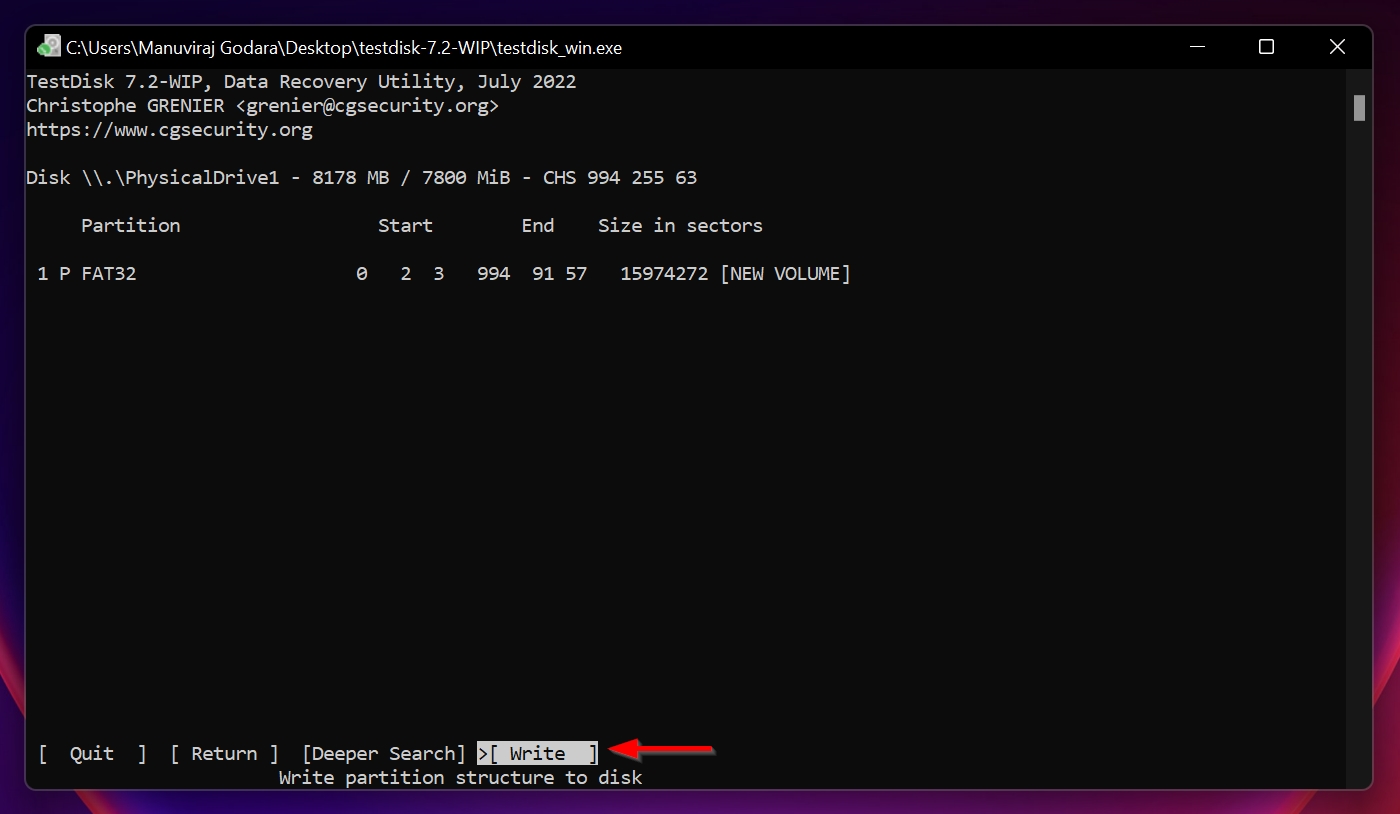
- Select the Write option and press Enter. Press Y on the confirmation prompt.
- TestDisk will restore your damaged or deleted partition.
TestDisk is a capable recovery tool, but it’s not the most user-friendly option due to its command-line nature. If you need an app with better interface or more versatile recovery capabilities, check these TestDisk alternatives.
Final Words
Data recovery is not a game with a 100% success rate. As we covered at the beginning, many factors influence the results, including how the data was lost and the state of the file system. Be prepared for the possibility that, in some cases, only parts of the file name might remain in the file system. Recovery tools may only retrieve files with partial or truncated names if the relevant metadata has been partially overwritten.
It’s also important to remember that not all file systems behave the same way when it comes to file name recovery. For example, NTFS, commonly used on Windows, stores richer metadata compared to FAT32 or exFAT, which can increase the likelihood of file recovery with the original name.
If you have additional questions or need further assistance, you can visit online communities like DataRecoveryHelp on Reddit or start a discussion in our own community. It’s a great place to share your experiences, ask for advice, and get tips from other users or our team.
FAQ
Is it possible to recover files with their original names after emptying the Recycle Bin?
Yes, it’s possible to recover files with their original names after emptying the Recycle Bin. If you have backups, check those first. If not, you’ll need a data recovery app that can restore files with their original names and folder structure. Disk Drill is a solid example of such software and works well in these situations.
How do I recover deleted files with original file names?
You can recover deleted files with original file names using data recovery software. Here is how:
- Download and install a reliable data recovery app.
- Open the app and select the storage drive where the files were deleted. Start the scan.
- Review the scan results to locate files with their original names. Use filters or a search bar to narrow down results based on file names.
- Select the files you want to recover and choose a destination folder on a different drive to avoid overwriting data.
Can I recover files with correct names and folder structure?
Yes, you can recover files with the correct names and folder structure intact. The best way to do so is to use good data recovery programs, such as Disk Drill and TestDisk. However, if Windows File History was enabled at the time of data loss, you can use the feature to get back your files as well.
Additionally, don’t forget to first check the Recycle Bin for the deleted files.
How to recover deleted files with original names on Mac?
On macOS, you can use the Time Machine feature to check for and restore the files. If you can’t locate the files there, it’s recommended you use a data recovery program to perform data recovery with original file names.
Which data recovery app should I use if I want to keep the original file names?
You’ll need a data recovery app that can rely on records in the file system to restore files with their original names and folder structures. Look for an app that can scan the file system for intact metadata rather than relying solely on raw signature scans, as those don’t preserve original names.
For example, some tools, like Disk Drill, offer different scan modes—one that restores files based on file system records and another that uses signature scans. On the other hand, apps like PhotoRec only rely on signature scans, so they can’t recover files with their original names and folder structures.
Why do some recovered files show generic names like “file0001.jpg” or “recovered_1.doc”?
Recovered files show generic names like ‘file0001.jpg’ or ‘recovered_1.doc’ when the file system records containing the original names and folder structures are missing or overwritten. In these cases, recovery tools rely on signature scans, which detect files based on their data patterns rather than metadata.
Since signature scans don’t access file system records, they can’t retrieve original names or locations. Instead, they assign generic names to the recovered files.
Why don't my recovered files have their original names?
If you’re trying to recover a deleted file by name and find that it shows up with generic titles, there are two possibilities for why this happens:
- You might have chosen a recovery tool that relies solely on file signatures. These tools can recover files based on their content, but they can’t read or restore original names from the file system records, which is why the files show up with generic names.
- The file system may be too damaged or even absent. In this case, no file system records exist to link the files to their original names. Without these records, the recovery tool has no way to retrieve the original metadata.
Can PhotoRec recover data with original file names?
No, PhotoRec cannot recover data with original file names. PhotoRec relies solely on signature-based scanning, which detects files based on their content rather than file system records. As a result, it may recover the file itself, but it won’t be able to restore original file names or folder structures.
This article was written by Manuviraj Godara, a Staff Writer at Handy Recovery Advisor. It was recently updated by Roman Demian. It was also verified for technical accuracy by Andrey Vasilyev, our editorial advisor.
Curious about our content creation process? Take a look at our Editor Guidelines.