Need to recover data from a WD My Passport? Stop searching. Our team sees this question pop up constantly, even in our own community threads. Since we’ve dealt with more drive recovery cases than we can count (WD My Passport included), we figured it was time to put together a straight-to-the-point guide. Just what actually works. Give this a couple minutes and you’ll know exactly what to do next.
This text focuses on DIY WD My Passport data recovery, since that’s what most people come here looking for. Based on what we’ve seen in real cases (and what actually works), these are the tools and steps that give you a solid shot at getting your files back on your own. That said, we’ll also touch on what Western Digital officially offers – tools and their recommended data recovery services – so you have the full picture.
Don’t need the background? Jump to the recovery guide right now.
What Is WD My Passport?
WD My Passport is a line of portable hard drives by Western Digital. The brand is known for the high reliability of its products and its great customer support, which makes them a prime choice among users who do frequent backups, and those who need a lot of portability in their daily work with data.
However, no matter how good a hard drive may be, it’s never guaranteed to be completely safe against corruption and data loss.
At its May 13, 2025, release, Backblaze’s “Backblaze Drive Stats Report” shared fresh reliability data across major hard drive brands, including WD (WDC). Based on that dataset, here’s how WD stacked up in terms of drive durability and failure rates:
Brand
Average Annualized Failure Rate (AFR)
Western Digital (WDC)
0.41%
Seagate
4.46%
Toshiba
2.55%
HGST (Hitachi)
1.66%
When you break the data down by manufacturer, Western Digital (WDC) sits in the low-failure group. From 2023 through 2025, WDC models stayed in a narrow range of roughly 0.4%–0.7% quarterly AFR, which is below the ranges for Seagate and HGST in the same period.
Backblaze also calls out WDC models as “top performers” and highlights that because their failure rates are already so low, even minor shifts are noticeable in the dataset.
While WD generally offers solid reliability, they’re not flawless. In June 2021, a serious vulnerability affected older WD My Book Live and Live Duo devices. A remote command exploited unpatched security flaws (CVE-2018-18472 and CVE-2021-35941), wiping user data via factory reset. WD advised users to disconnect these legacy devices from the internet immediately, as firmware support ended in 2015. It’s a sharp reminder that even trusted brands aren’t immune to risk.
Is It Possible to Retrieve Files from WD My Passport?
If we had to give a simple yes or no, we’d say yes, you can recover files from a WD My Passport in many situations. However, your success rate will depend mostly on the circumstances of the data loss. In some cases, it should be a relatively simple and straightforward process. In other situations, you may be completely out of luck.
- 😧 Accidental deletion. If the files were simply deleted, then you probably have a good chance of getting them back. The main concern here is how much the disk has been used since the deletion occurred, especially for writing new files. If any new files got saved to the drive afterward, they may have occupied parts of the drive that used to belong to your original data. In this case, your files will be either partially or fully corrupted. However, if you disconnected the drive immediately after the accidental deletion happened, you will probably be able to get all your files back.
- 👾 Drive is corrupted. A drive can get corrupted for a number of reasons. When this happens, it will either become unreadable (more on that below), or you may lose parts of the data stored on it to corruption. The main issue with a corrupted drive is that it can be difficult to know when this has occurred. You may have bad sectors on your drive that don’t prevent you from using it normally – until you hit one of them when saving a new file to the drive. Or, you may encounter file system errors (which often result in error messages asking you to format your hard drive; don’t do that yet!), or you might even experience the vanishing of the file system. In these situations, recovering files will depend on how much physical or logical damage is involved.
- 🚫 Drive is unrecognized/unreadable. A drive that is unreadable in Windows can either be very simple to fix or a huge headache. Sometimes it’s just a matter of running CHKDSK (sometimes also called Check Disk or Scandisk) and correcting some minor mistakes. This can frequently happen when you disconnect drives without properly ejecting them in Windows, for example. These errors are not fatal but can be annoying to deal with when they occur. On the other hand, sometimes a drive being unreadable or not showing up in Windows could be due to a more serious problem which may even be unsolvable in the end (such as “No Media” error in Disk Management).
- 🧹 Drive is formatted. The point of formatting a drive is to erase it completely. And yet, that’s not actually guaranteed to happen. There are two types of formatting – quick and full – and depending on the one that was chosen for your drive, it’s possible that the “erased” data is still all there, just marked as inaccessible. That’s the case with a quick format, but if the drive has gone through a full format, then the data is actually gone. The reason full formats take longer is that the program goes through every single bit on the drive and clears it, rather than just marking the space occupied by files as unused.
- 💾 RAW drive. If your drive gets converted to a RAW format, this can be a huge headache to deal with if you don’t have the right tools. The problem is, in this state, it’s sometimes impossible to tell where one file ends and another begins. There are some programs capable of performing a Deep Scan on your file system turned RAW, attempting to recover data based on records that survived OR, alternatively, identify files by specific patterns (signatures) and recover types of files that the software claims to ‘support’. You’re not guaranteed a full recovery, especially for certain formats. However, it is often possible to recover a significant portion of your data after a drive or partition has been converted to a RAW format.
Also, if we’re talking about deleted files, the type of drive inside your WD My Passport matters a lot. Traditional HDD models (like the My Passport Ultra or older My Passport Essentials) usually keep deleted data intact until it’s overwritten, which makes recovery more likely. But newer SSD-based models (like WD My Passport SSD) use TRIM, and that can erase deleted data in the background almost instantly, often leaving no chance of recovery. That said, don’t lose hope too fast. If your external SSD was connected via a USB Type-A or even some Type-C hubs, it might not have received the TRIM command at all. In those cases, deleted files may still be sitting there.
How to Recover Data from a WD My Passport External Hard Drive
Let’s take a closer look at a few software options that our editorial team thinks are worth checking out.
Tool |
Best For |
Our Recommendation |
Deleted files, formatted drives, RAW partitions, or any WD My Passport data loss issue |
A strong all‑rounder – we recommend using this one in almost any situation, especially if your WD My Passport is acting oddly. |
|
Basic recovery of recently deleted files |
This is a basic tool that may be useful if you simply deleted a couple of files and your WD My Passport shows up in File Explorer. |
|
Advanced partition issues, volumes missing, RAW drives |
Use when partitions disappeared and you’re comfortable with a technical tool. This is not for deleted‑file recovery. |
Method 1: Disk Drill
Disk Drill Data Recovery is a great option. We can recommend this one for pretty much any WD My Passport recovery scenario – it’s one of the best tools we’ve tested across real-world cases.
Here’s how to recover data from WD My Passport using Disk Drill:
- Download Disk Drill and install it on your system drive. The program has a free version available.
- Connect the WD hard drive to your computer and launch Disk Drill.
- (Optional) Scroll down to Extra Tools and select Byte-to-byte Backup.
 We recommend using this if your WD My Passport is acting up (maybe it takes forever to load). This creates a complete sector‑by‑sector copy of your drive that you’ll scan later instead of the original. That way, the recovery process doesn’t put extra stress on a drive.👀
However, if you’re just trying to recover deleted files and the drive appears to be working normally, you can skip this step and jump straight to step 8.
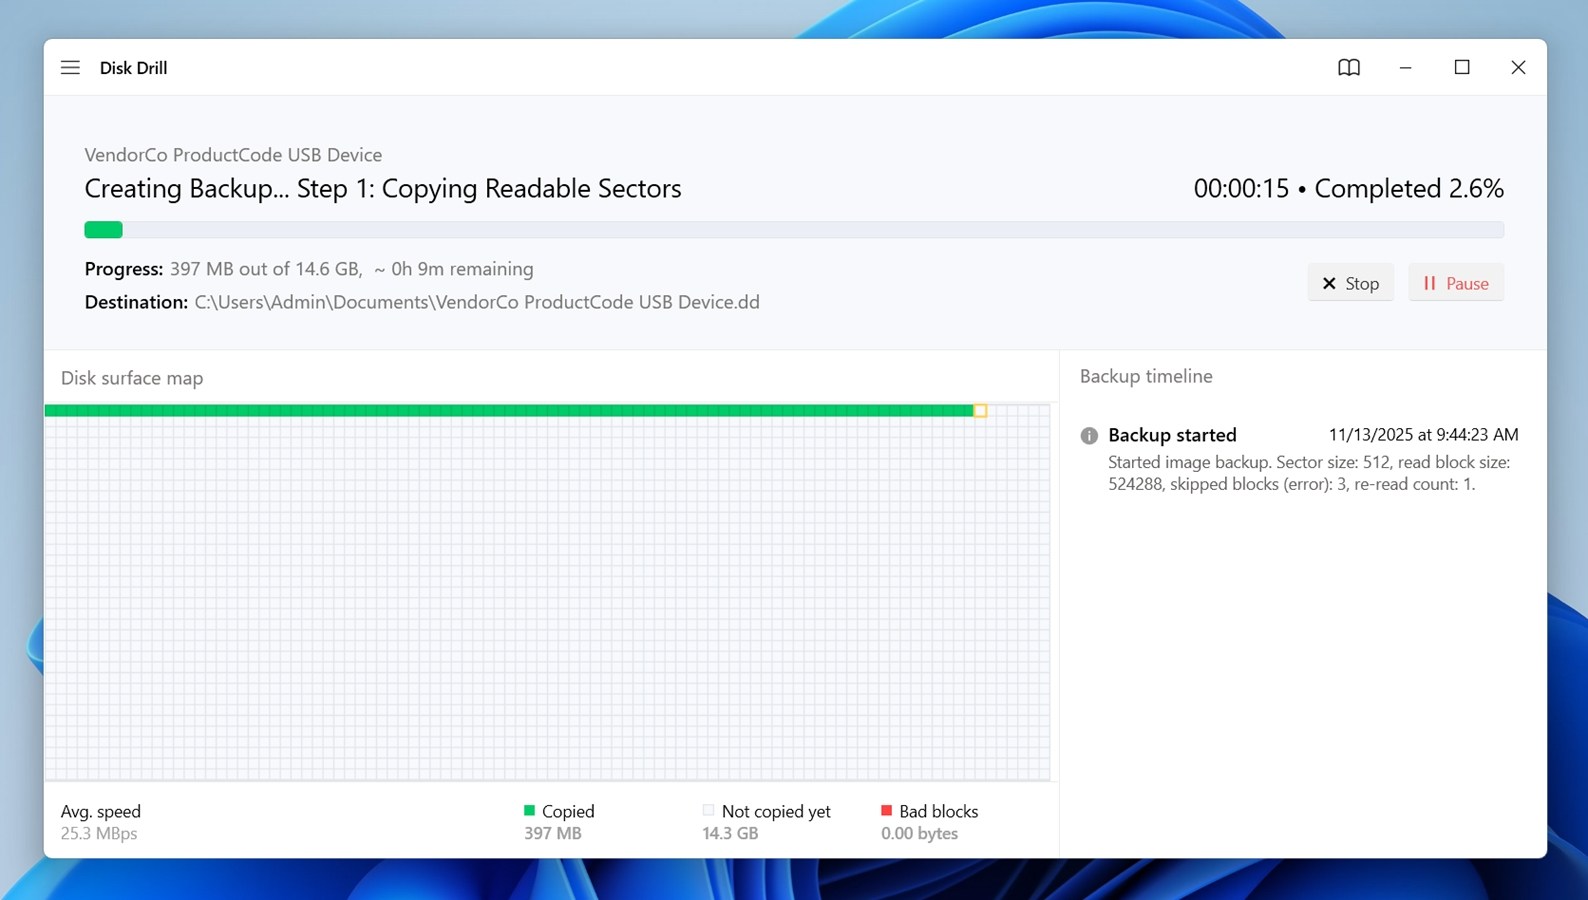
- Choose your WD My Passport from the list, then click Create backup.
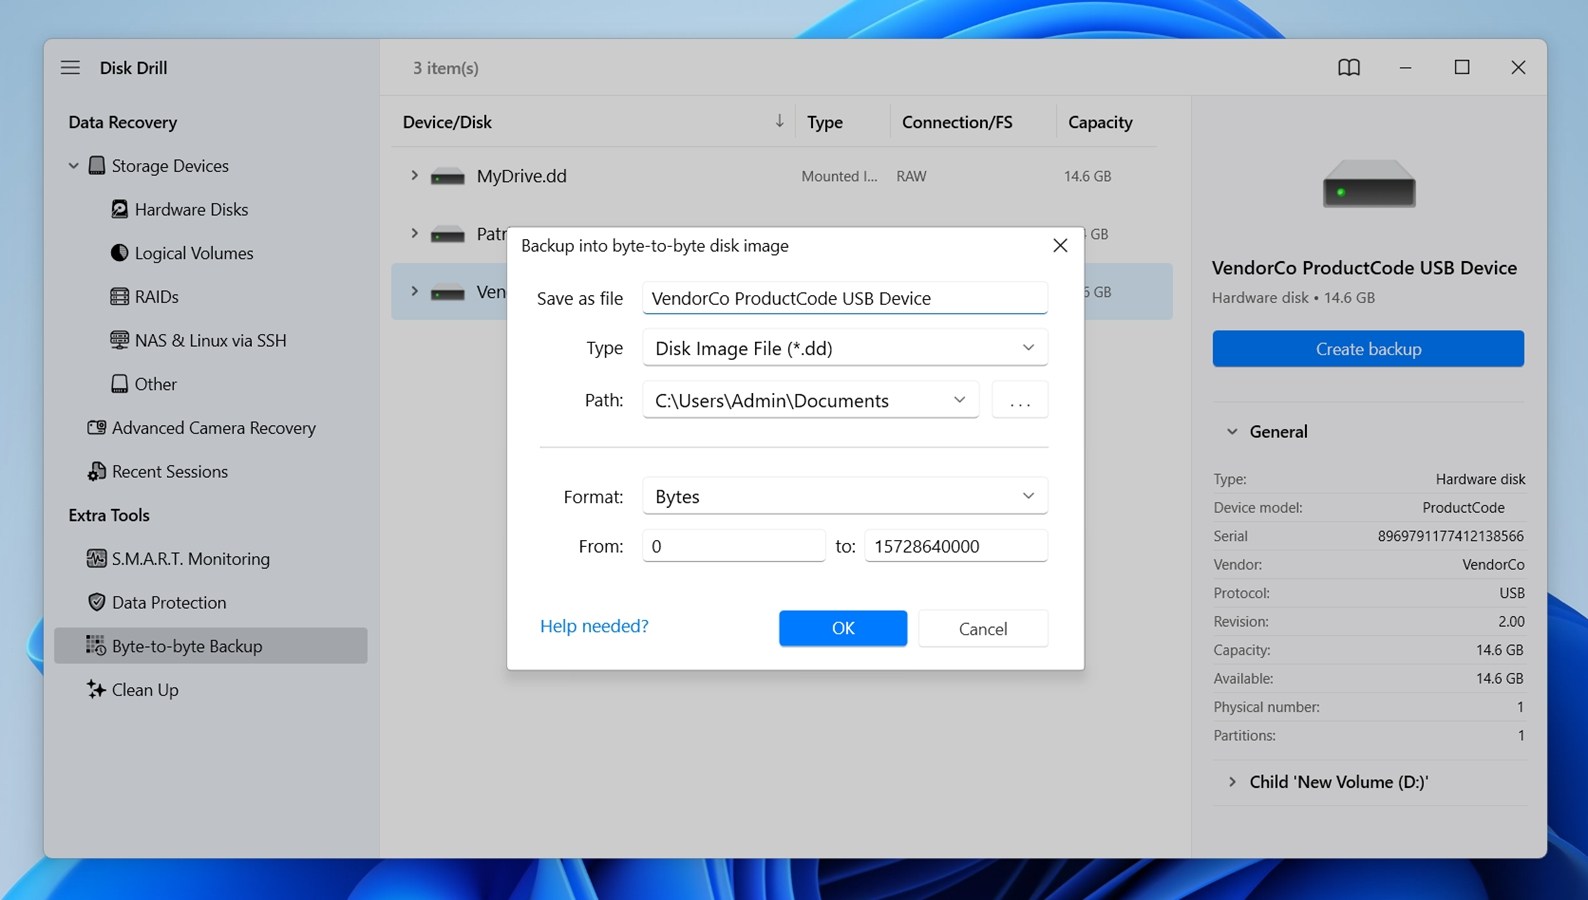
- Select a save location with enough free space and click OK to start the backup.
- Once done, return to the main screen and click Attach disk image.
- Locate the image file you just saved and open it.
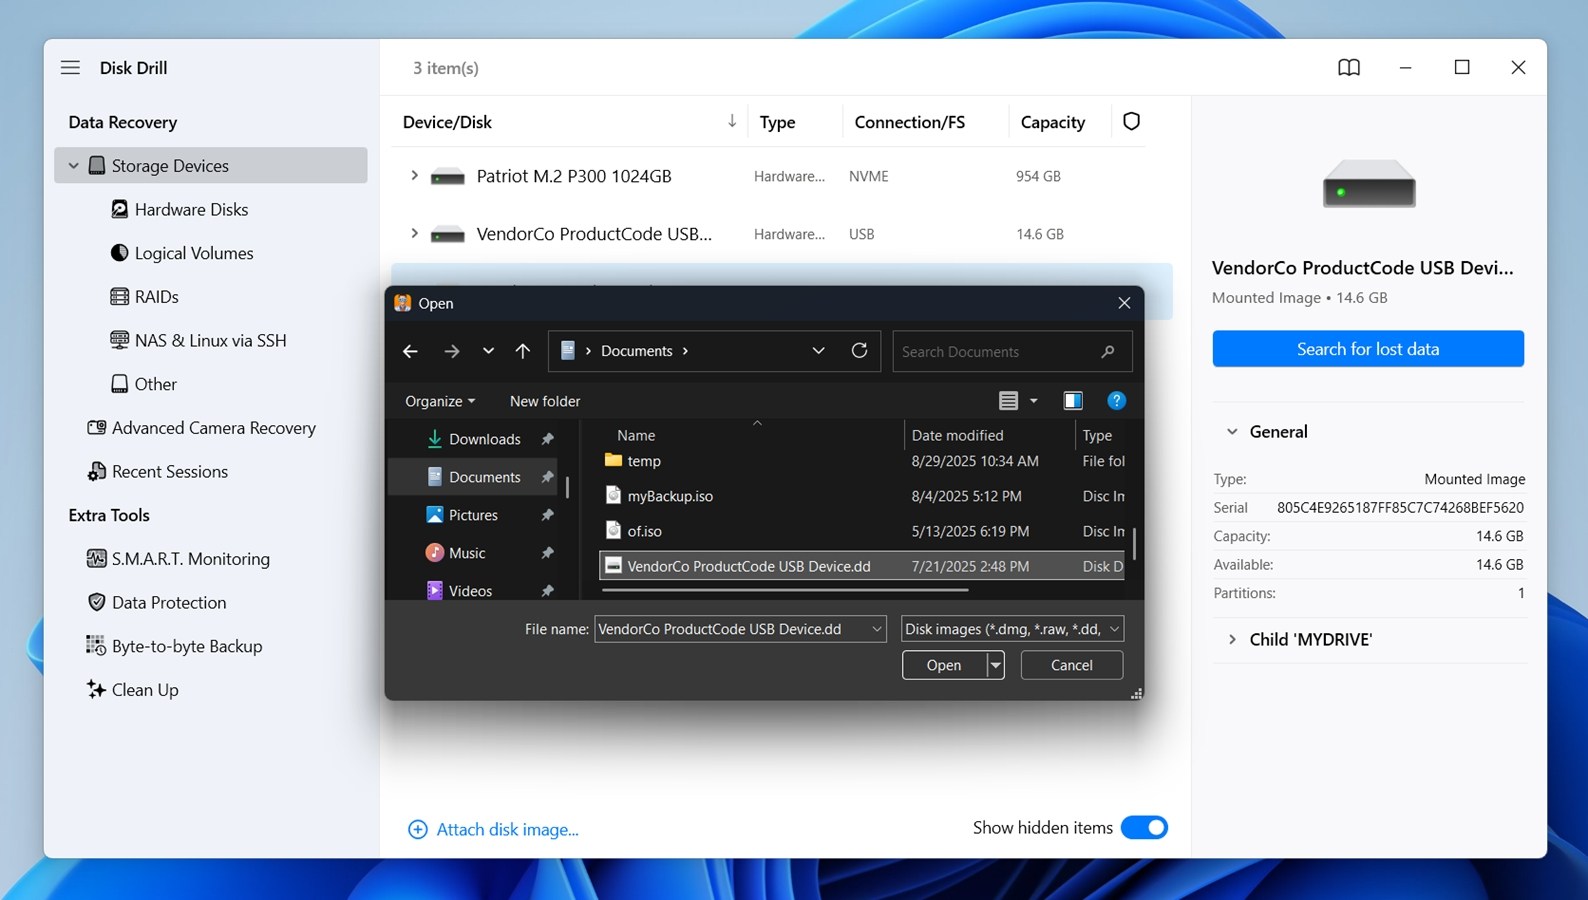
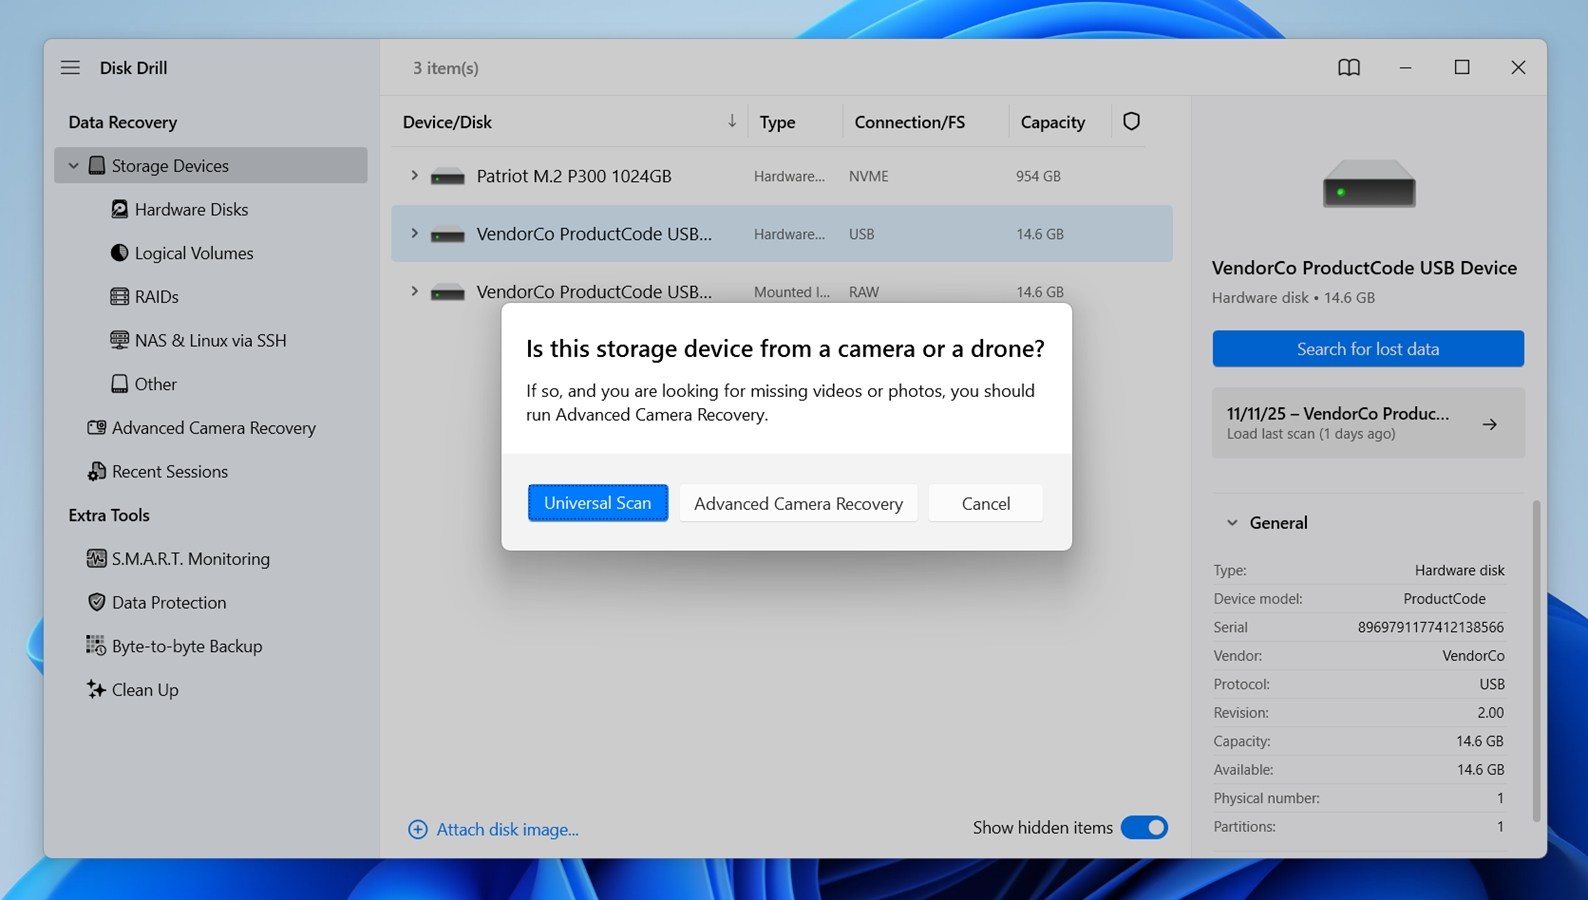
- Select the mounted image (or your actual WD My Passport drive if you skipped the backup steps) from the list.
- Click Search for lost data. If you’re asked to pick a scan type, go with Universal Scan.
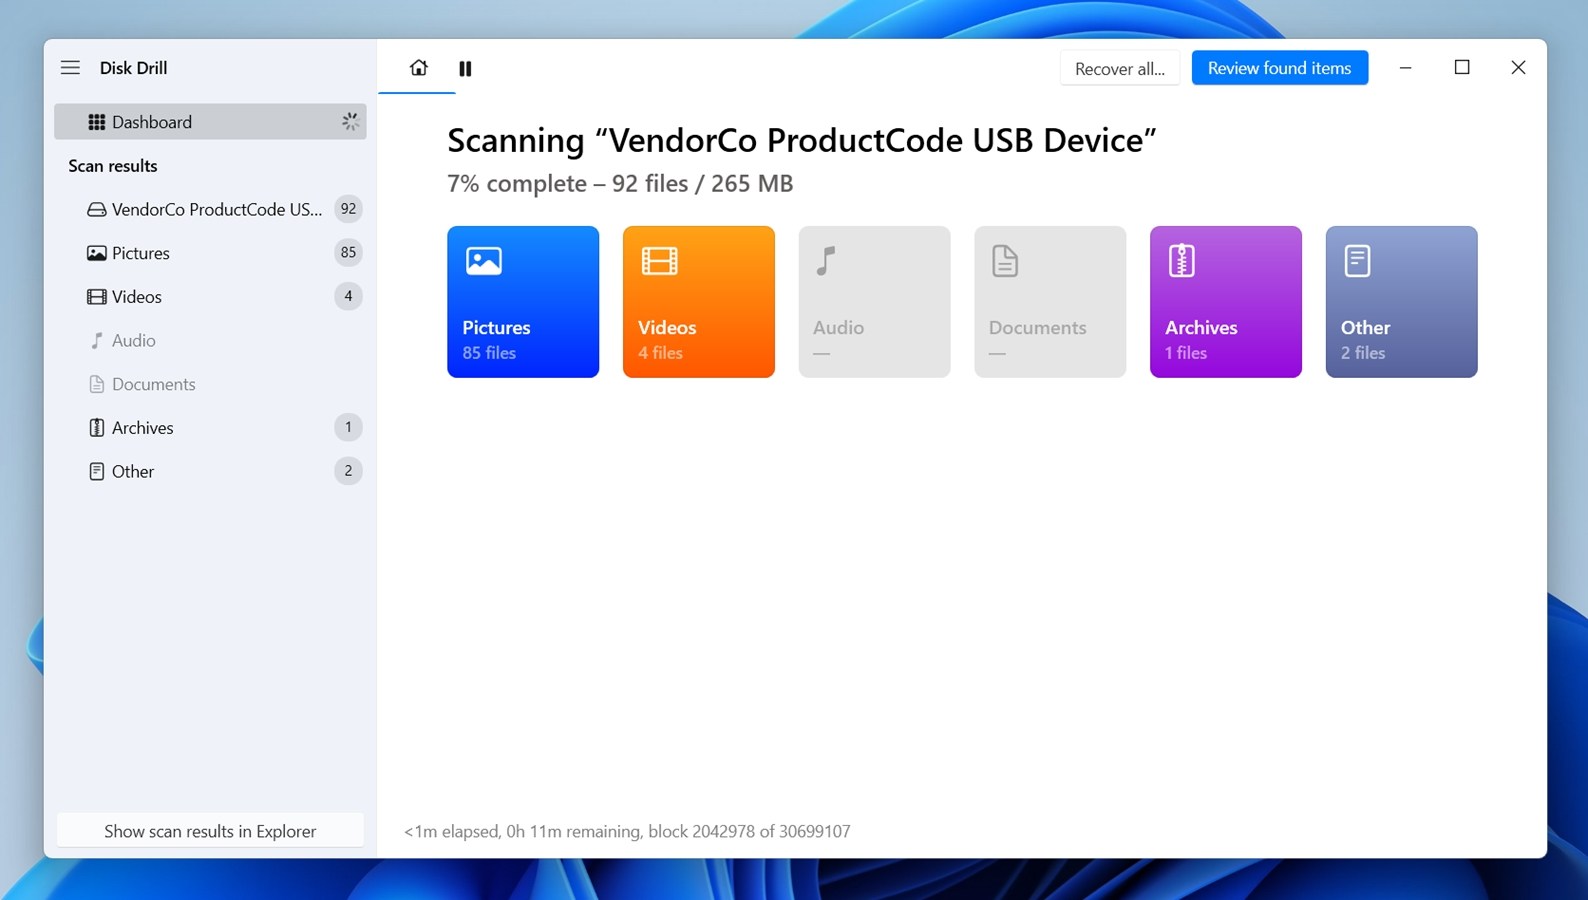
- Wait for the scan to complete or click Review found items anytime to see results.
- Use the filter tabs inside Disk Drill’s results window to quickly check different categories of files.
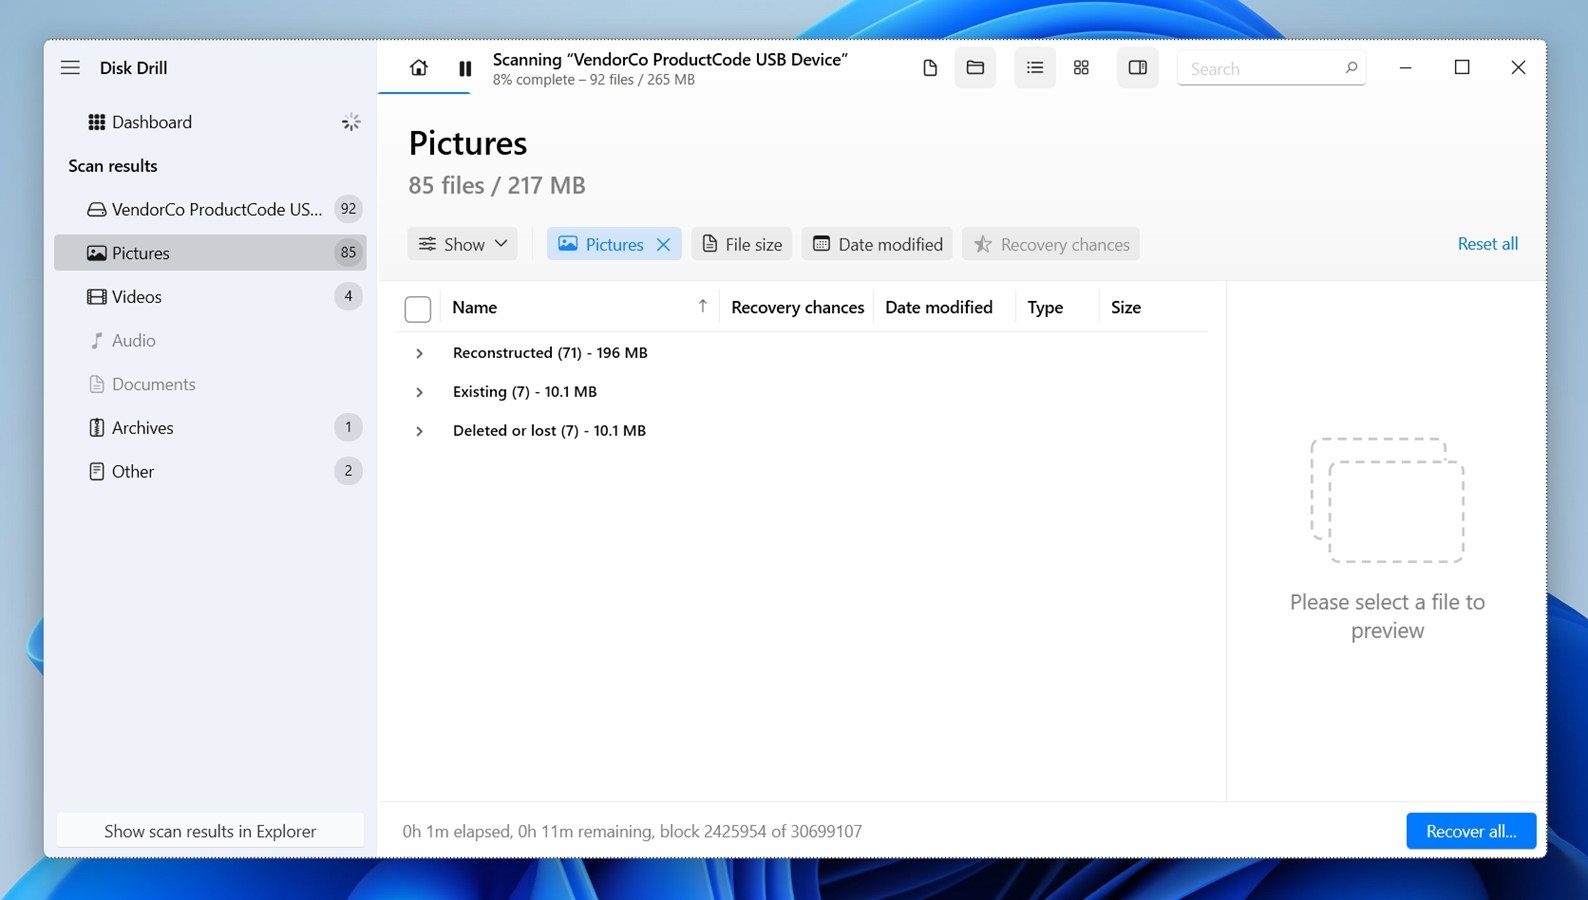 The Existing tab shows what’s currently accessible on the disk – great if your files are just “hidden” or the file system is damaged. The Deleted or lost tab displays files that were removed but still recoverable (assuming they haven’t been overwritten). The Reconstructed section pulls in anything Disk Drill was able to identify by file signature, even if the original names and folder structures are missing. This is especially helpful for photos, videos, and documents that may have been wiped out during a format.
 - Click any file to preview it and confirm it’s intact.
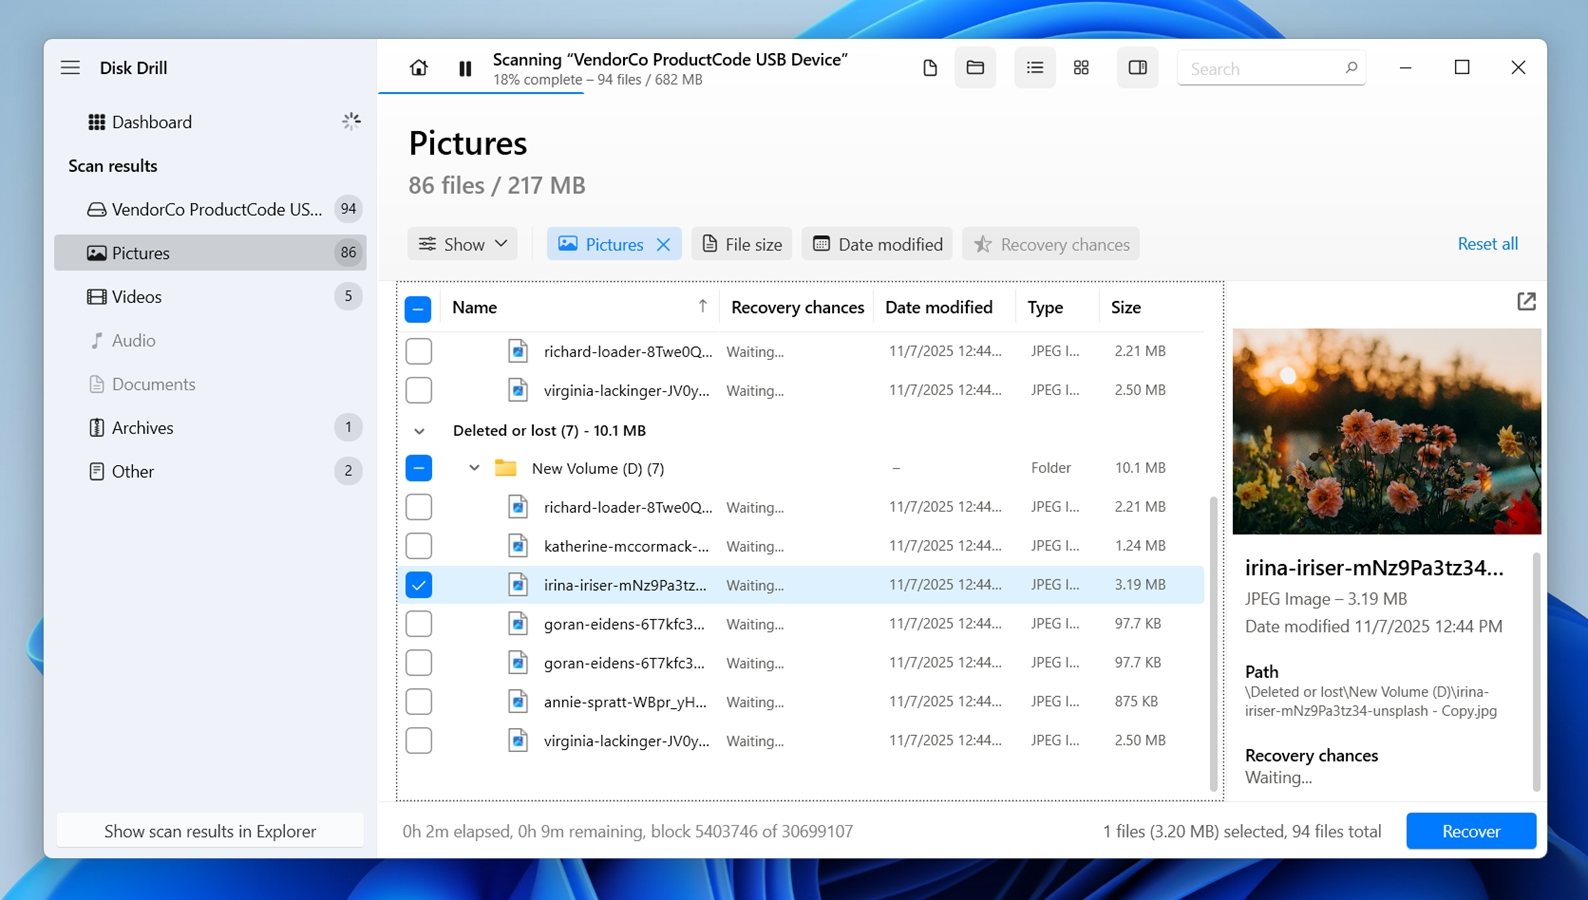 While Disk Drill includes a “Recovery chances” column, the preview is the best way to know for sure. If you can open the preview, that’s your green light. A working preview means the file’s data is still there and can be recovered without any problems.
 - Select the files or folders you want to recover.
- Click Recover.
- Choose a different destination drive (not the WD My Passport) for saving recovered files.
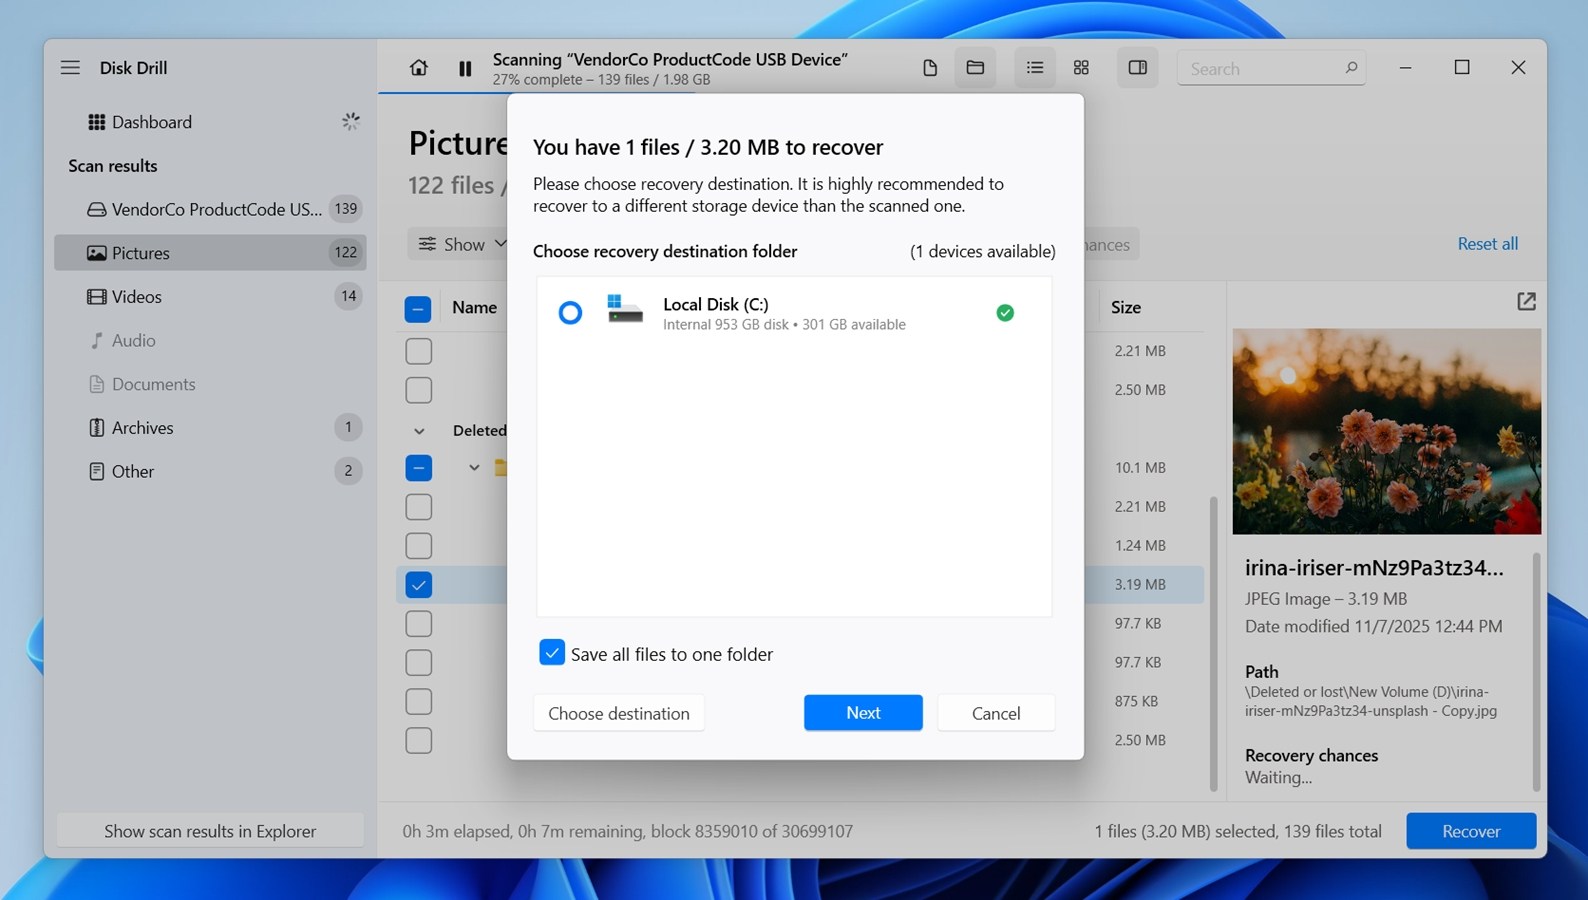
- Click Next and wait for the recovery to complete. If you’re using the free version of Disk Drill, you’ll be able to recover up to 100 MB of data without a license on Windows. That might not sound like much, but it’s often enough to bring back a few important work files, documents, or a small project folder. And for testing, it’s a great way to confirm that recovery is even possible before paying. Not many tools with this level of capability offer a free recovery tier at all.
Why Disk Drill stands out for WD My Passport recovery:
- Handles NTFS, exFAT, FAT32, and even APFS (if the drive was formatted for macOS).
- Deleted files, formatted partitions, RAW drives, missing volumes – Disk Drill can scan and recover from all of them using Universal Scan.
- Includes a Byte-to-Byte Backup feature. This is key if your WD My Passport disconnects, slows down, or shows read errors.
- If you can unlock your My Passport with WD Security or WD Unlocker, Disk Drill can read and recover data like any other drive.
- Built-in preview lets you check recovery chances before committing. You’ll see which files are intact.
- Intuitive Interface (no extra setup).
- Filter results by file type (images, docs, videos), modification date, size, and even recovery chance.
- Even if your WD drive was fully reformatted or shows up as unallocated/RAW, Disk Drill can carve out recoverable files based on file signatures.
- Cross-platform (recover on Windows, then continue the session on a Mac (or vice versa).
By the way, you might’ve noticed a tool called S.M.A.R.T. Monitoring under Extra Tools in Disk Drill. 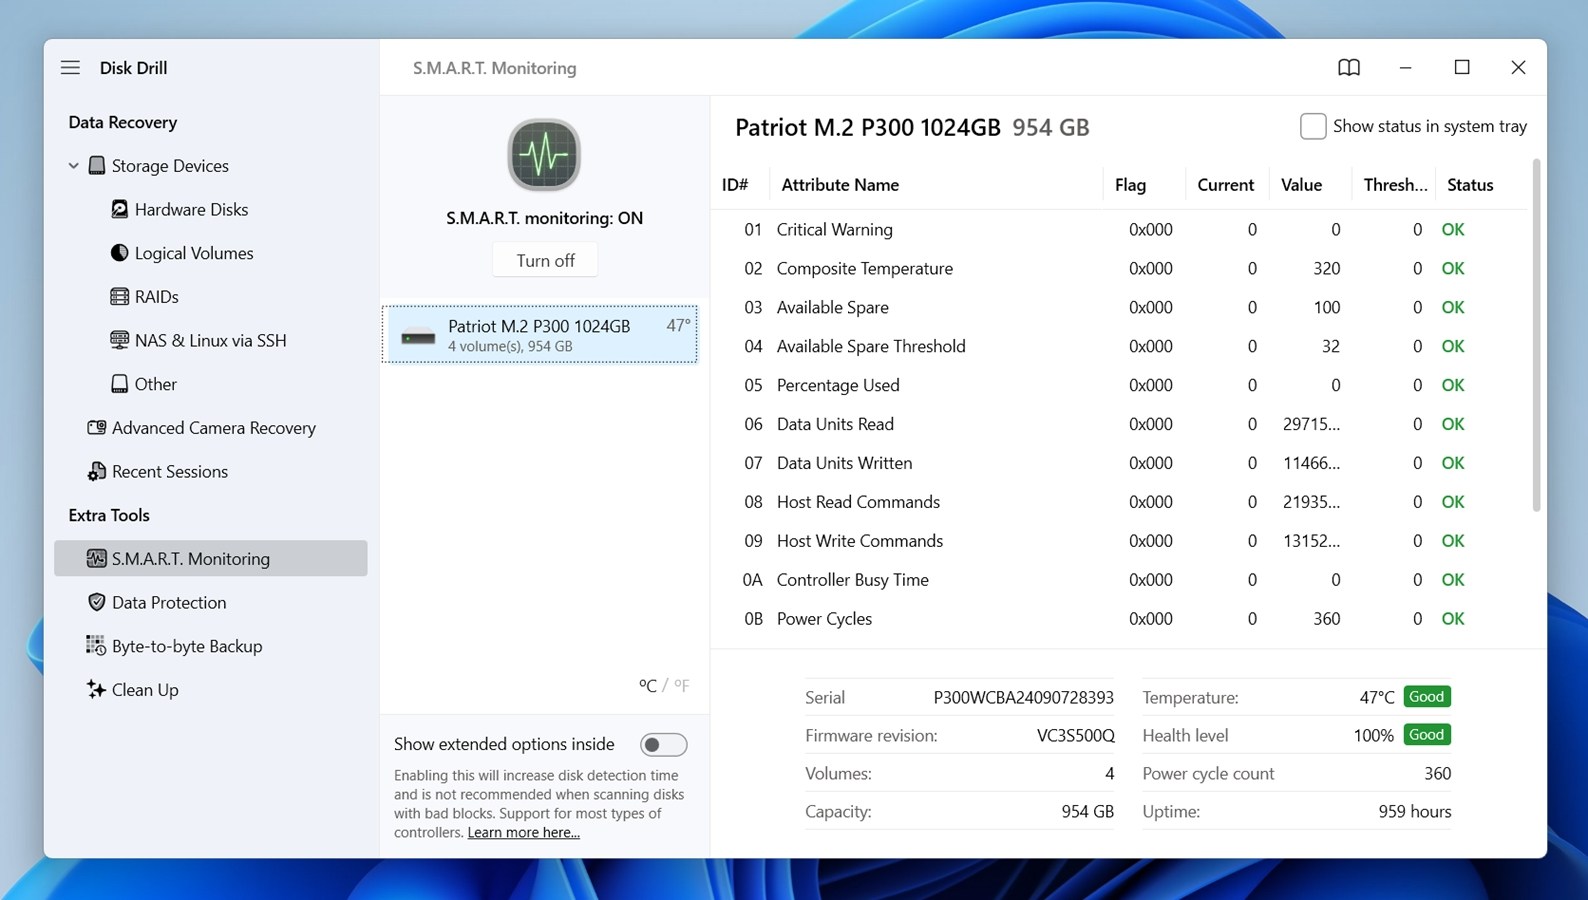 We recommend using it too – it’s a simple way to check your drive’s health. Just open it and toggle “Turn On”. It’ll show you vital stats like temperature, error rates, and overall status. If anything looks off (like a red warning or failing attribute), it’s a strong sign that you should back up and recover your data before the drive gets worse (and maybe even consider retiring the drive altogether).
Method 2: Recuva
While Recuva is more of a basic undelete tool (reflected in its simplistic and dated UI), it’s still a decent option for simple data loss situations.
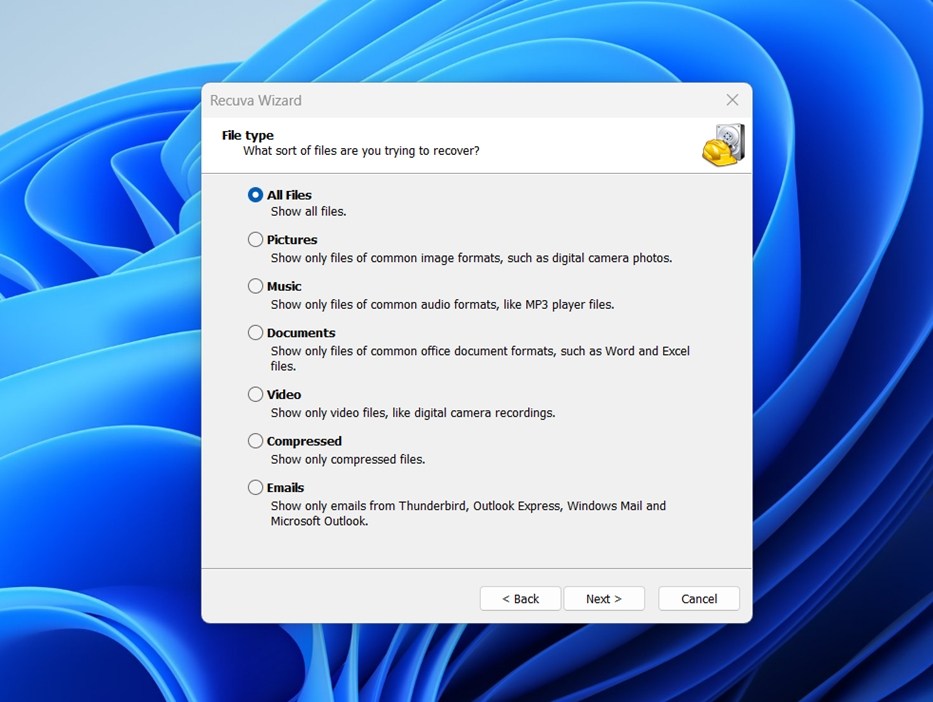
Here’s how to recover deleted files from a WD My Passport drive using Recuva:
- Download Recuva.
- Connect the hard drive to your computer and launch Recuva.
- Choose the types of files you want to recover (or all types).
- Choose the WD My Passport drive that you want to recover.
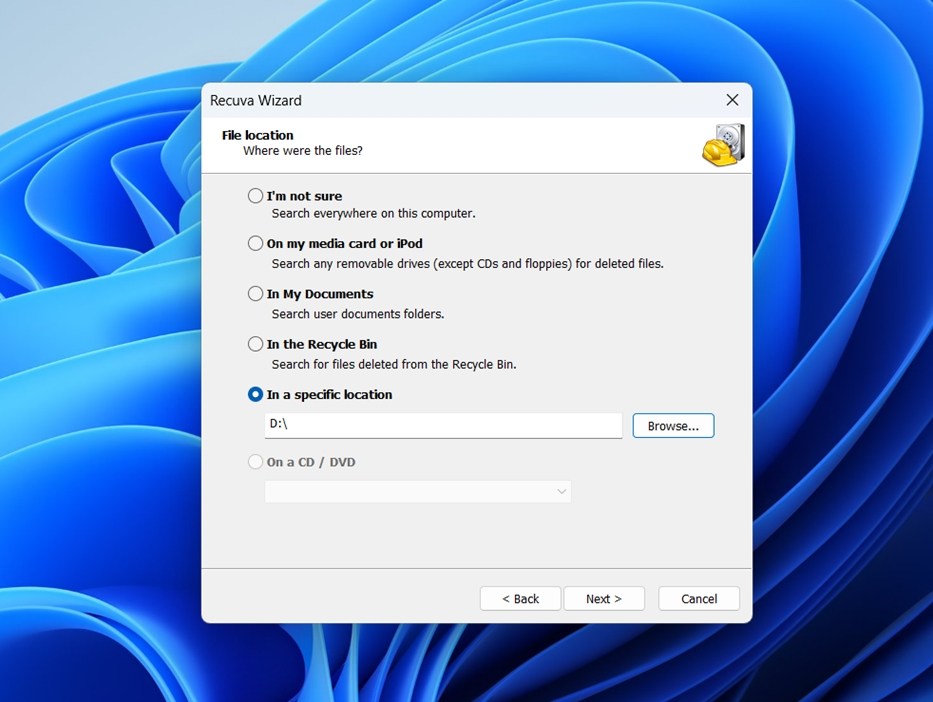
- Click Start.⚠️
Optional: if you’ve already done this but didn’t find anything, check the “Enable Deep Scan” box before starting the process.

- Go through the list of discovered files, and pick the ones you want to recover by ticking their checkboxes.

- Click “Recover”.
- Choose a location to save the recovered files to.
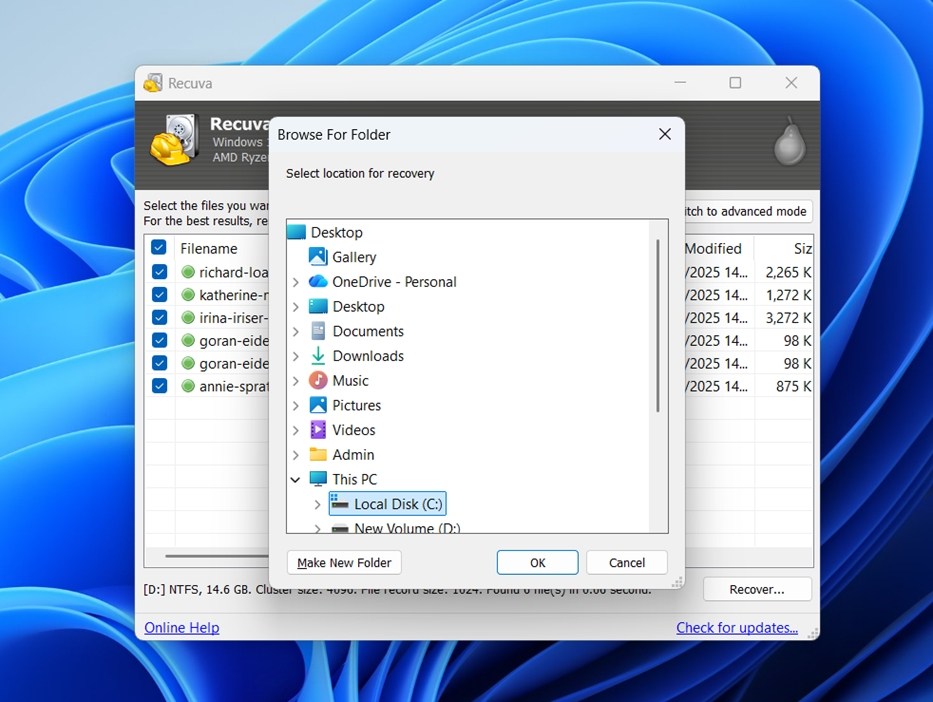 Never recover to the same drive, because this will overwrite files and will likely corrupt the process!
Why Recuva stands out for WD My Passport recovery:
- Recuva is tiny, installs fast, and works out of the box.
- No limits in the free version.
- It performs well if you’ve recently deleted files and your WD My Passport still mounts correctly in Windows.
- Works on FAT32, exFAT, and NTFS drives – most WD My Passport drives are pre-formatted with these.
- The step-by-step recovery wizard walks you through selecting file types and locations, which is helpful for non-technical users.
- Color‑coded “recovery chance” indicator.
While Recuva doesn’t include extra tools like S.M.A.R.T. monitoring, byte-to-byte backups, or disk health checks that can help prevent or troubleshoot recovery issues, it does offer one useful bonus: secure file deletion. If you’re retiring a WD My Passport, Recuva can securely erase files to prevent them from being recovered by others (useful if you’re selling or disposing of the drive).
Method 3: TestDisk
Unlike the first two methods, TestDisk isn’t a “click-and-scan” recovery app. It’s a command-line tool built for deep disk repair and recovery, not file undeletion. We’ve seen situations where a Western Digital My Passport drive was brought back to life with TestDisk
If your drive suddenly stopped showing up properly, or you’re getting a “drive not initialized” or “RAW” error, TestDisk can often rebuild the partition table and bring your data back without even needing to do file-by-file recovery.
However, this tool isn’t for everyone. It’s fully text-based and assumes you know your way around disk structures. If you’re unsure or don’t want to risk making things worse, we strongly recommend sticking with Method 1.
Here’s how to recover a WD My Passport hard drive using TestDisk:
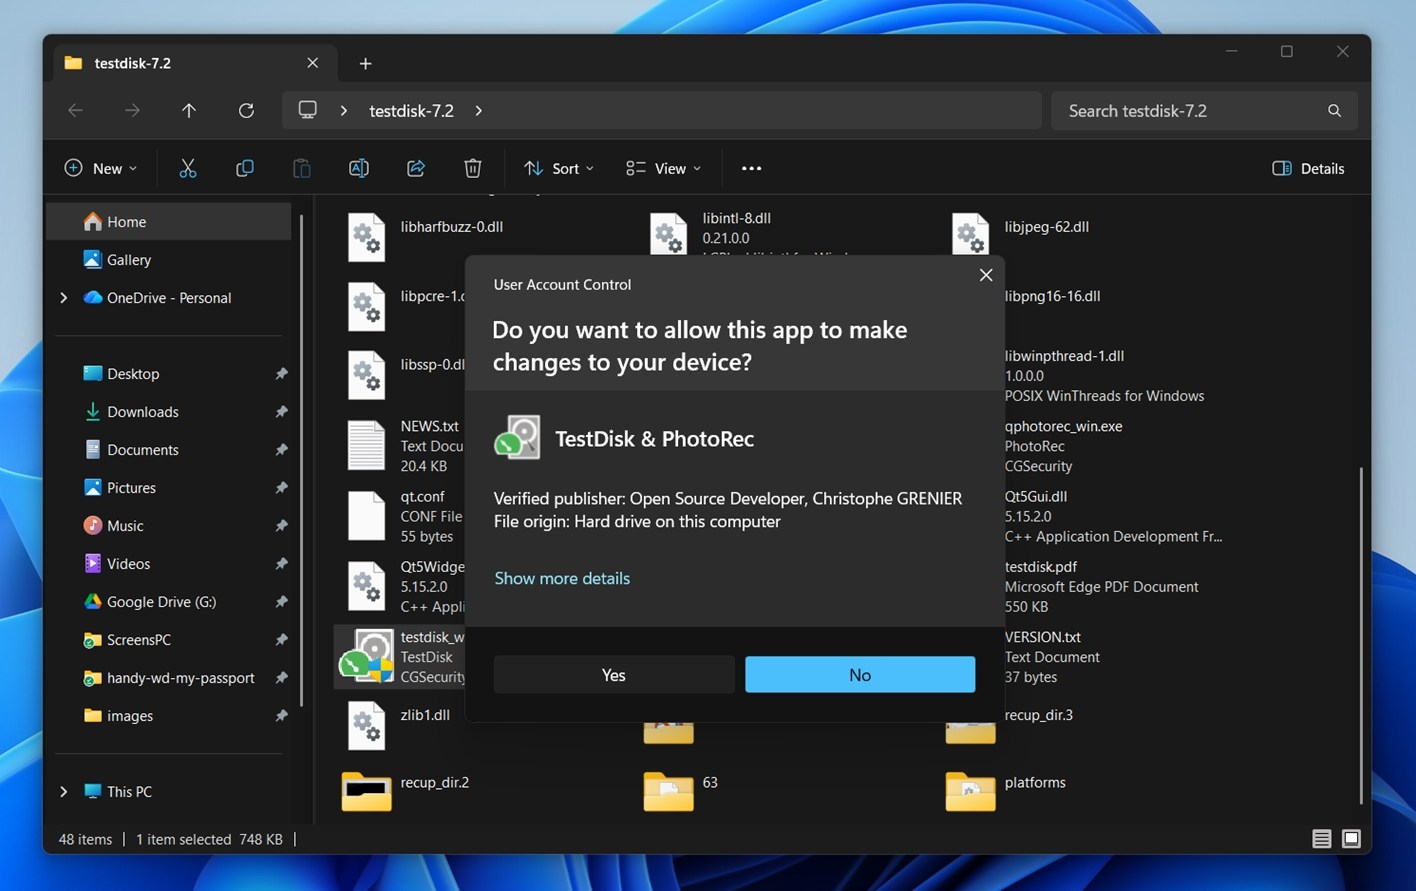
- Download TestDisk from cgsecurity.org. We recommend version 7.2 – it’s the latest stable build and has been tested thoroughly across Windows, macOS, and Linux.
- Extract the downloaded archive to a known location.
- Launch testdisk_win.exe.
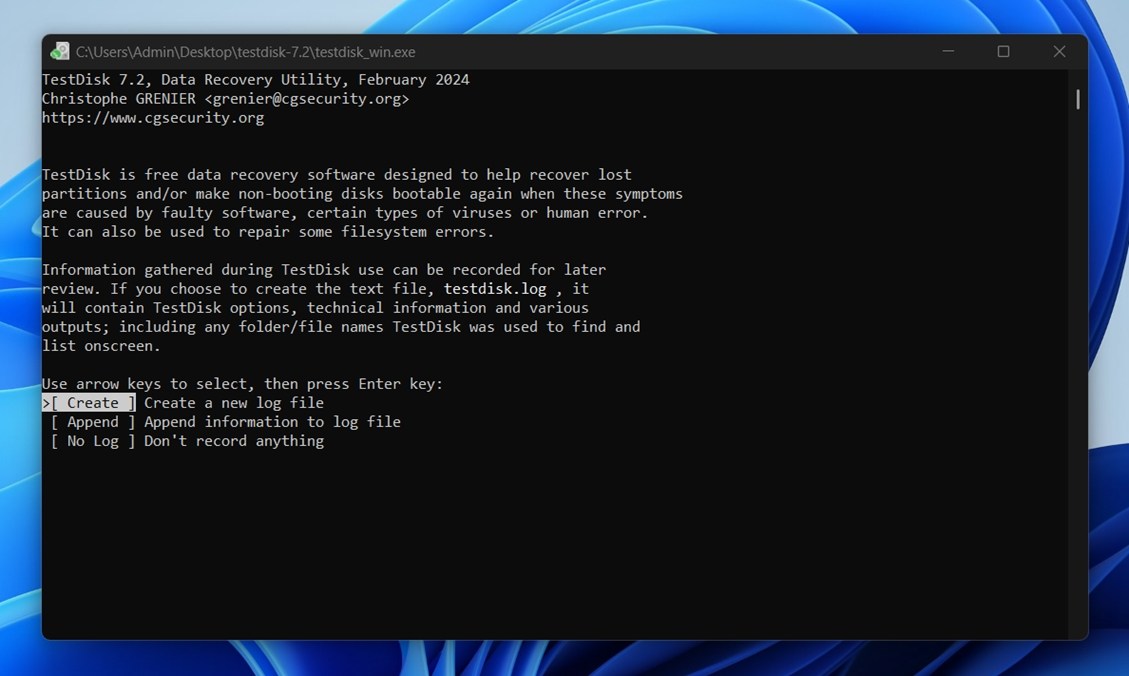
- At the prompt, select “Create” to generate a new log file.
- Choose your WD My Passport from the list of storage devices (make sure you identify it correctly by size or label).
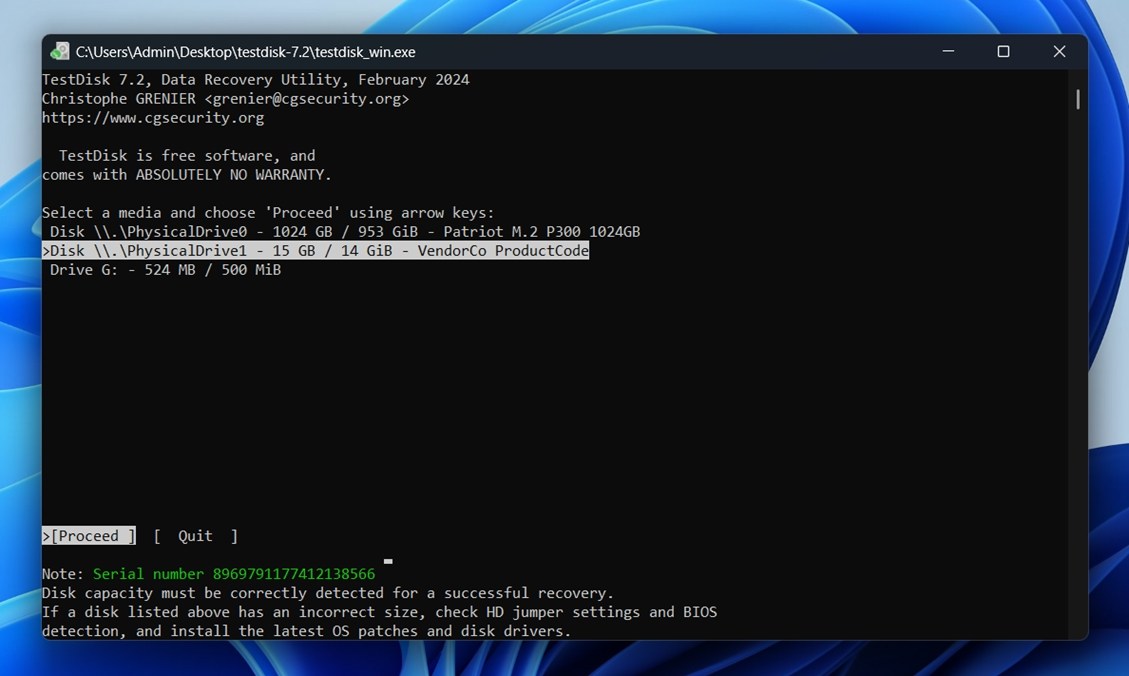
- TestDisk will ask for the partition table type. For most external WD drives, “Intel” (for MBR) or “EFI GPT” (for newer models with large capacity) is correct. It usually auto-selects the right one.

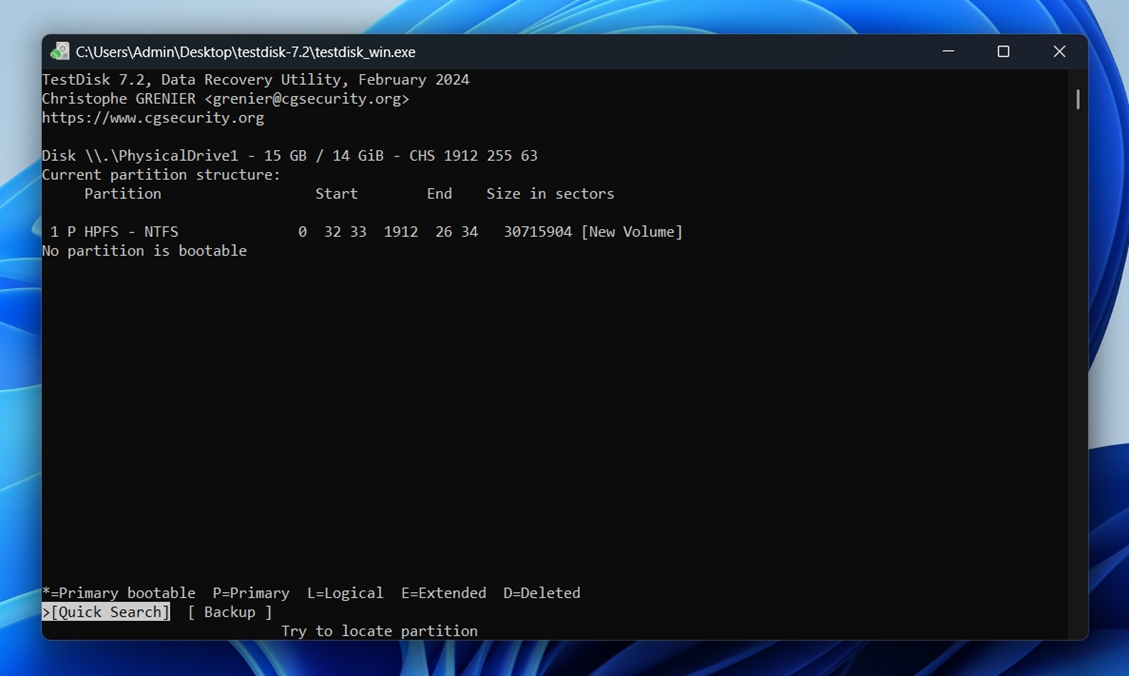
- Select “Analyse” to let TestDisk scan for existing and lost partitions.

- If your partition shows up, press Enter. If not, choose “Quick Search” to run a faster scan for lost partitions.
- When partitions are found, highlight each and press P to preview the file list.
- If your missing files are visible, you’re in luck – go back, reselect the partition, and choose “Write” to restore it. Confirm the write operation when prompted.
- Exit TestDisk and reboot your computer to finalize changes. Your WD My Passport should now show up as usual in File Explorer or Finder.
Why TestDisk stands out for WD My Passport recovery:
- Completely free and open-source.
- Excellent at fixing partition tables and recovering lost partitions when the drive turns RAW or unallocated.
- Can rebuild boot sectors and restore NTFS/FAT/ext2/3/4 structures.
- Works cross-platform: supports Windows, macOS, Linux, even DOS.
- Lightweight and portable.
- Often included in bootable Live CDs.
By the way, in the same folder where you find TestDisk, you’ll also see a tool called PhotoRec (or its optional GUI version qPhotoRec). This is TestDisk’s companion utility, designed specifically for file carving. We decided not to include it in the main part of this guide because it comes with some important limitations: due to its signature-scan-mode-only nature, it has no folder structure recovery, no original file names, and the UI (especially in the standard version) can be too much for non-technical users.
That said, if the file system on your WD My Passport is completely gone, PhotoRec might still help you recover usable data. If you want to learn more about how it works and when to use it, we’ve got a full review you can check out.
What WD Officially Offers for Data Recovery
We’ve already covered what you can try when recovering data yourself, and in most situations, that’s more than enough. But sometimes WD My Passport drives are in worse shape. If the drive doesn’t show up in Disk Management at all, and you’ve ruled out connection issues, you’re likely facing hardware failure. In that case, DIY tools won’t help.
This is where WD’s official data recovery options come into play. Western Digital doesn’t offer in-house recovery, but it does partner with several labs. These include:
- Ontrack
- DriveSavers
- Secure Data Recovery
- Gillware
You can find their official listings on WD’s website. These services have the experience and tools to handle physical damage, firmware issues, and encryption related issues – situations that go far beyond what consumer-grade tools can fix.
Importantly, using one of WD’s approved partners won’t void your drive’s warranty, as long as you request and retain a written record of the recovery attempt. This documentation is a standard part of the process and helps protect your warranty claim (and the recovery firm’s credibility).
WD also offers an add-on data recovery insurance plan for newly purchased drives. This service is available at the time of purchase and covers one in-lab recovery attempt, should the need arise. It can be a good option for users storing mission-critical files without a secondary backup system.
The downside is cost. Professional recovery, especially for drives with mechanical failure, typically runs between $800 and $2,500 for a 1TB drive, based on estimates from users on WD forums. WD support staff will often recommend these services outright if they determine the problem is hardware-based.
If you want a closer look at professional data recovery labs – what services they offer, their pricing models, guarantees and so on, we’ve got a full breakdown that covers all that and more. It includes some of the top names Western Digital recommends.
Final Notes
Before wrapping up, there are a few gotchas we’ve seen trip people up when trying to recover data from a Western Digital external drive, especially My Passport models.
Don’t Remove the Drive From Its Enclosure
Many WD external drives (especially the My Passport line) encrypt your data by default using a chip built into the USB-to-SATA controller board inside the enclosure. This means the data on the disk is not readable if you take the drive out and connect it directly via SATA or a generic USB adapter.
Forum users across WD Community and others have confirmed that doing so results in a RAW or empty volume, because without the original encryption controller, the data looks like gibberish.
In some cases, people were able to recover their data only by re-soldering a broken USB connector and using the original board again. Obviously, that approach only applies to users with experience in electronics repair or data recovery hardware. Re-soldering a broken USB port or sourcing a matching controller board isn’t exactly beginner-friendly. If you’re not already familiar with the process (or if the drive contains critical data), it’s safer to stop and hand it off to a lab. One wrong move can permanently destroy your chance of recovery.
Password-Protected Drives Require the Password (No Way Around It)
If you set a password using WD Security, the drive will appear locked every time it’s plugged in until you enter that password with the WD Discovery utility. Only then will it show up with a usable drive letter and allow any recovery software to scan it.
If you forgot the password:
- There are no tools (legit or otherwise) that can bypass or decrypt WD’s AES-256 hardware encryption.
- Even professional labs won’t be able to help unless the password is known.
So sadly, there’s no way around it. If the password is lost, the data is gone.
Be cautious of shady apps claiming to unlock WD drives – they’ll likely just wipe the drive or do nothing at all.
FAQ
How to recover data from an unrecognized WD My Passport Drive?
It depends on what you mean by “unrecognized.”
If the drive shows up in Disk Management with the correct size, even if it appears as RAW, unallocated, or doesn’t have a drive letter – that’s good news. That means the system can still detect the physical drive, and most proper data recovery software (like the one in Method 1) can still scan it and find your data.
Just make sure the size looks right and it’s not listed as “0 bytes.” From there, launch a recovery tool, run a scan, and you may be able to recover everything without much hassle.
However, if the drive doesn’t show up at all (not in Disk Management, not in Device Manager, nowhere) then you’re likely dealing with a hardware-level issue (like a failed USB bridge or dead controller). In those cases, DIY recovery is no longer an option, and you’ll need professional help. We explain that in the “What WD Officially Offers for Data Recovery” section.
How to repair a WD My Passport external hard drive?
There are a few HDD repair tools (both built-in and third-party) that can help fix non-physical issues like file system corruption or bad sectors. These tools won’t help with hardware failure, but they’re worth trying before considering professional recovery.
Here are some you can use:
- CHKDSK (Windows built-in). Run chkdsk /f /r from Command Prompt. It can fix logical file system errors and mark bad sectors. Be cautious: while it works for minor issues, it may cause data loss.
- HDD Regenerator. Scans and attempts to repair bad sectors by magnetic reversal. Works well for aging drives with sector errors.
- Victoria HDD/SS. A diagnostic tool that provides a SMART report, surface scan, and sector repair. Great for checking drive health in detail and spotting early signs of failure.
- SpinRite. A long-standing drive repair utility designed to recover and refresh sectors. Best used on older spinning drives. It operates outside the OS and boots from a USB or CD.
Just remember: it’s always recommended to attempt external drive data recovery first before running any repair tools. Once a repair tool makes changes (especially sector remapping) you could overwrite recoverable data.
What is the best WD Passport data recovery software?
If we were choosing one tool for nearly every situation, we’d go with Disk Drill. It supports the full range of data loss scenarios – from deleted files to RAW drives, and works great with both HDD and SSD versions of the WD My Passport line.
That said, that is the best Western Digital recovery tool depends on your specific case:
- If you only accidentally deleted some files and your My Passport appears normally in Windows, a simpler free option like Recuva might be enough.
- If the partition table is damaged or the drive shows up as “unallocated/RAW,” you might use something like TestDisk for advanced recovery.
How to restore WD My Passport to factory settings?
There’s not really any “factory reset” option for hard drives in general unless you’re using a special model like a My Passport Wireless. To restore a drive to a clean state, all you have to do is run a full format on it.
Make sure to choose the “full” option in the format application, because otherwise the data on the drive will not actually get erased – it will simply be marked as deleted, allowing applications to overwrite it later. If you have any sensitive data on the drive, keep in mind that it can be recovered after a quick format by someone using a recovery tool.
How do I perform WD My Passport Ultra data recovery if the drive is password-locked?
If your WD My Passport Ultra is protected with a password via WD Security or WD Discovery, the drive uses AES-256 hardware encryption. That means your data is locked at the hardware level, and you can’t access anything until it’s unlocked – even with recovery software.
If you know the password:
- Connect the drive and launch the WD Discovery app.
- Enter your password to mount the drive.
- Once the drive shows up, use your preferred recovery software, like Disk Drill or Recuva, to scan and recover data.
If you forgot the password, WD clearly states that without the password, there’s no way to recover your files.
This article was written by Stefan Ionescu, a Contributing Writer at Handy Recovery Advisor. It was recently updated by Roman Demian. It was also verified for technical accuracy by Andrey Vasilyev, our editorial advisor.
Curious about our content creation process? Take a look at our Editor Guidelines.