When your drive or partition turns RAW, you lose access to your files in File Explorer like you normally would. But the thing is, those files are still there. Our team has dealt with RAW partitions on all kinds of devices—HDDs, SD cards, USB sticks, you name it. We’ll show you how to recover data from your RAW partition quickly and safely. It’s not as complicated as it might seem, and you’ll see that for yourself as we go through each step.
If your disk or partition is RAW, this means that:
- ⛔ The drive’s file system is missing or damaged
- ⚠️ The RAW drive or partition has yet to be formatted with a file system
- 🖥️ The file system of the drive or partition is not recognized by Windows
We will demonstrate two approaches to RAW disk recovery. We’ll start with the simplest method because, in our experience, most people just want to quickly retrieve their files from a RAW partition. The second approach is a more complex RAW file system recovery process, with multiple steps and advanced repair tools. Let’s start!
How to Recover Data from RAW Partition
The quickest way to recover your data from RAW partition is with data recovery software.
These tools can handle all sorts of situations—corrupted storage devices, formatted drives or partitions, and most importantly for us, RAW partitions or disks.
One of our favorite recovery tools is Disk Drill. It combines powerful capabilities with an intuitive interface that makes the process super simple even for beginners.
Here are a couple of reasons why we recommend Disk Drill:
- Disk Drill offers both Quick and Deep Scan modes. The Deep Scan mode is especially important in our case because it excels at recovering data when the file system has vanished. In most cases, the actual file system records remain intact, even though the partition appears RAW. While some records may be damaged due to various reasons, Disk Drill’s Deep Scan mode can recover them. It can also preserve file names and folder structures in many scenarios.
- If the damage to the file system records is too severe, Disk Drill can fall back on its Signature Scan mode. This feature doesn’t rely on the file system at all. Instead, it scans the disk for data based on unique patterns or “signatures” associated with file types (it supports over 400 file types).
- It can show you the contents of files before you recover them. Disk Drill’s preview feature works seamlessly with almost anything your OS can open, whether that’s through native tools or third-party apps.
- It also comes with a free version that lets you scan a RAW partition, preview the files it finds, and even recover up to 500 MB of data. It’s a great way to see how well it works for your situation without spending any money upfront.
Interested in Disk Drill? Read more information about the tool in our full review.
But now let’s move on to a step-by-step guide on how to recover files from a RAW drive or a partition. Here’s how to do it:
- Head over to the Disk Drill website and download the latest version.
- After disk-drill-win.exe has finished downloading, double-click the file in the Downloads folder to launch the installation.
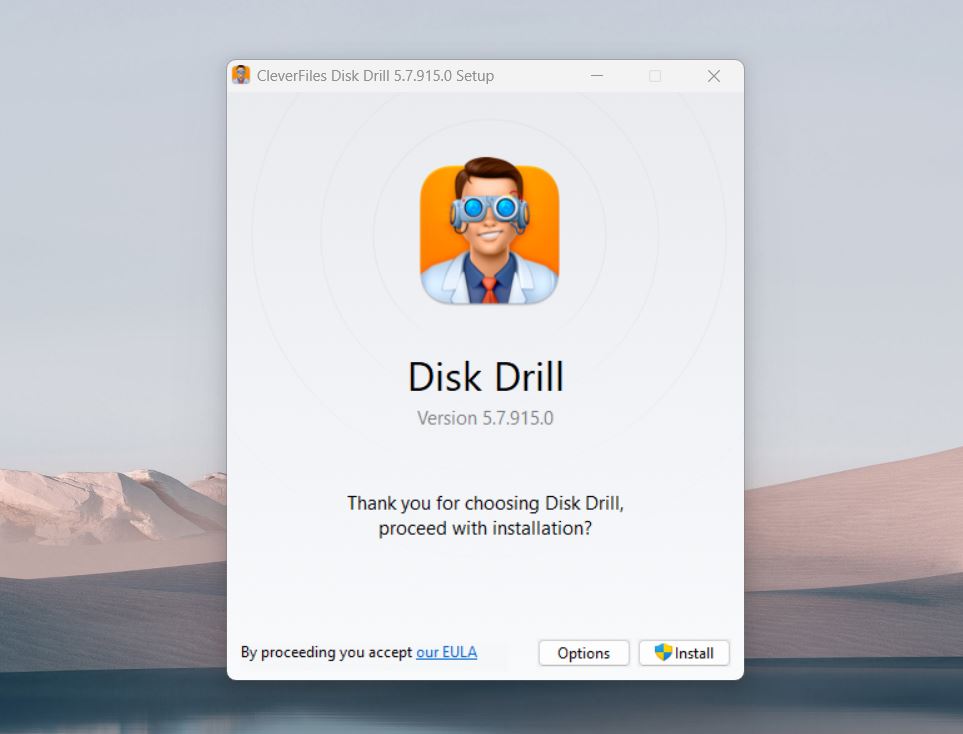
- When presented with the Disk Drill Setup window, click Install.
- After the Disk Drill setup completes, launch Disk Drill.
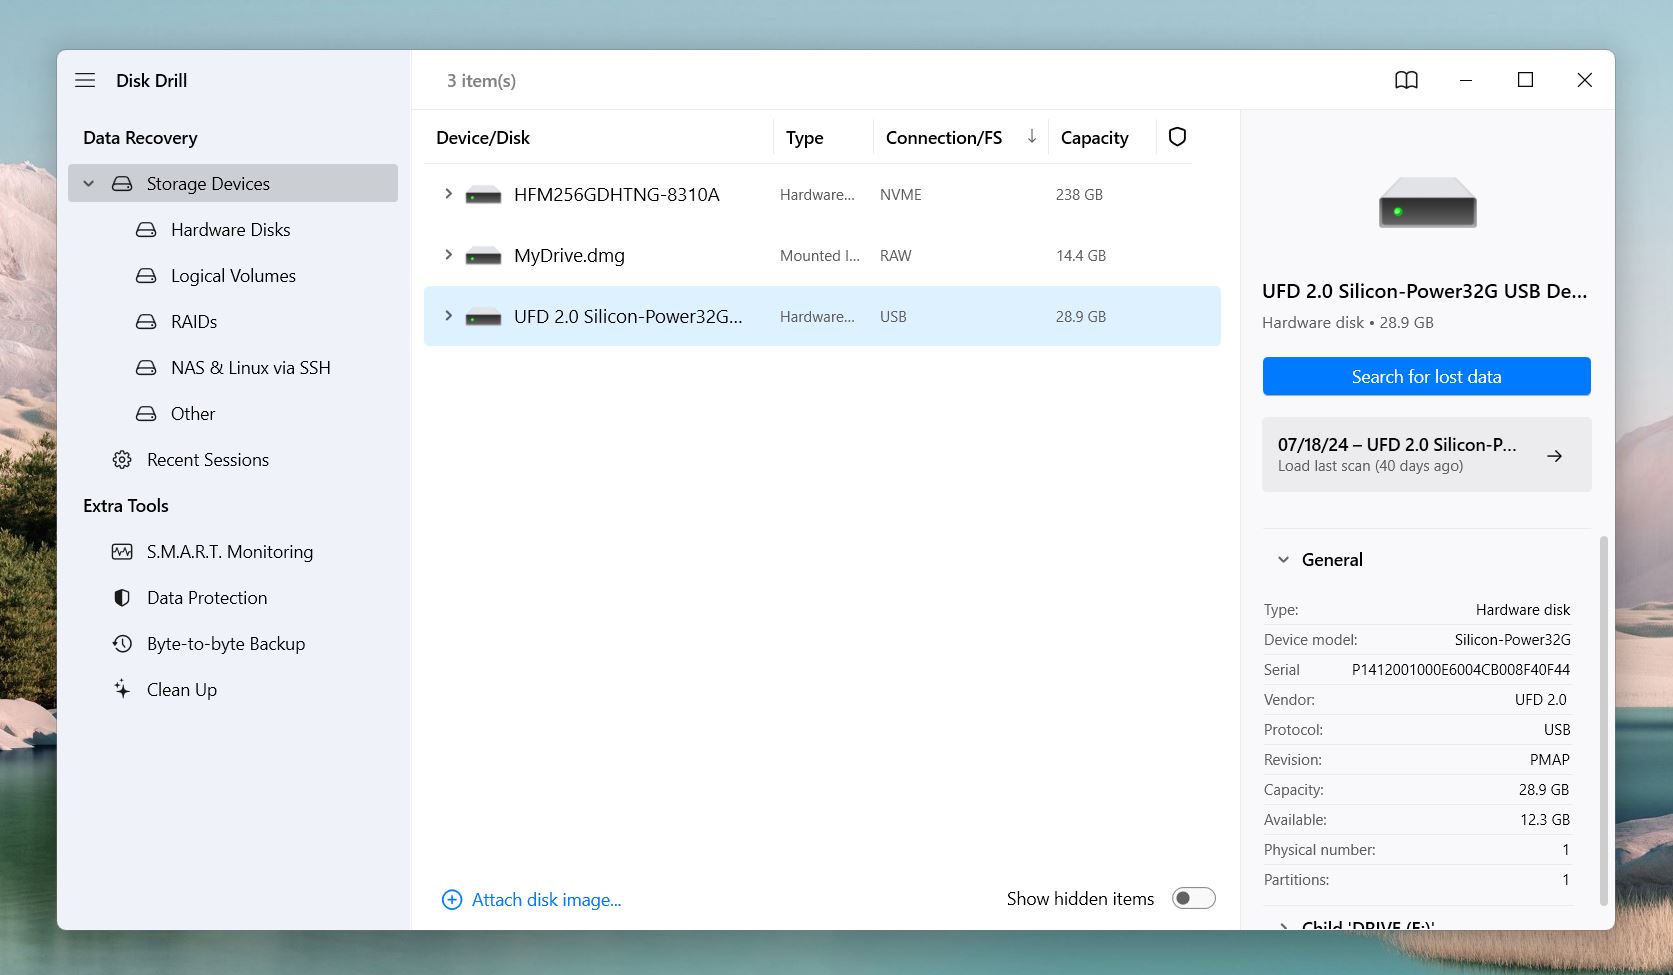
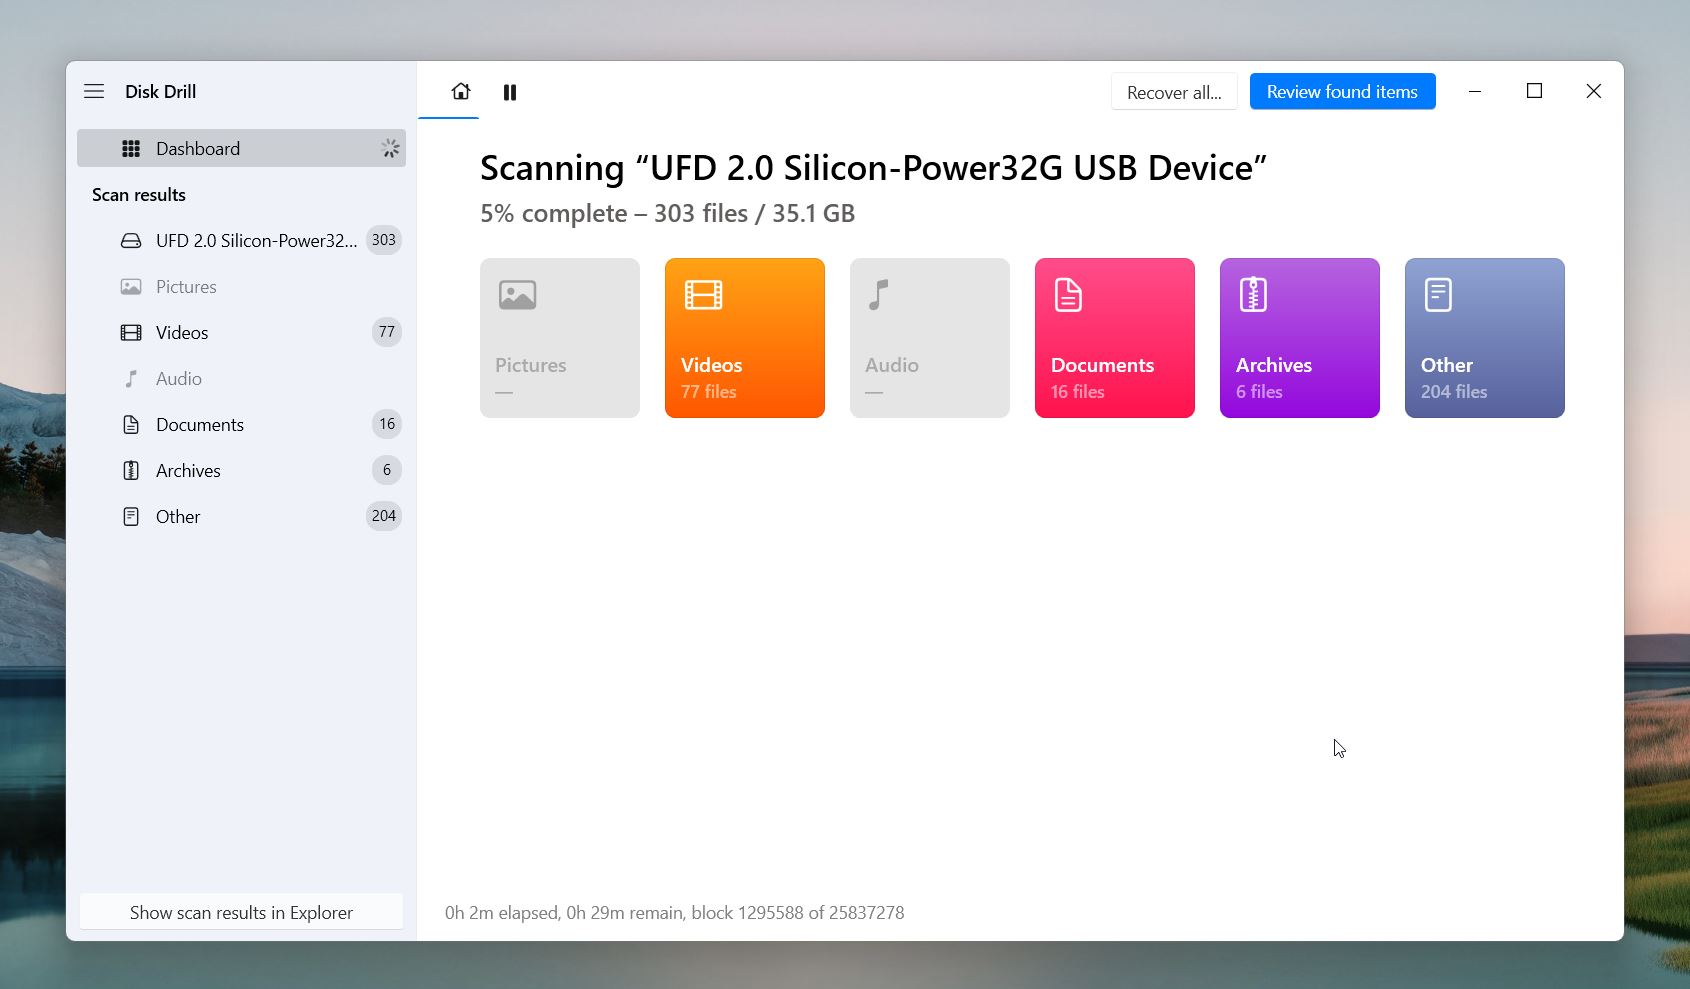
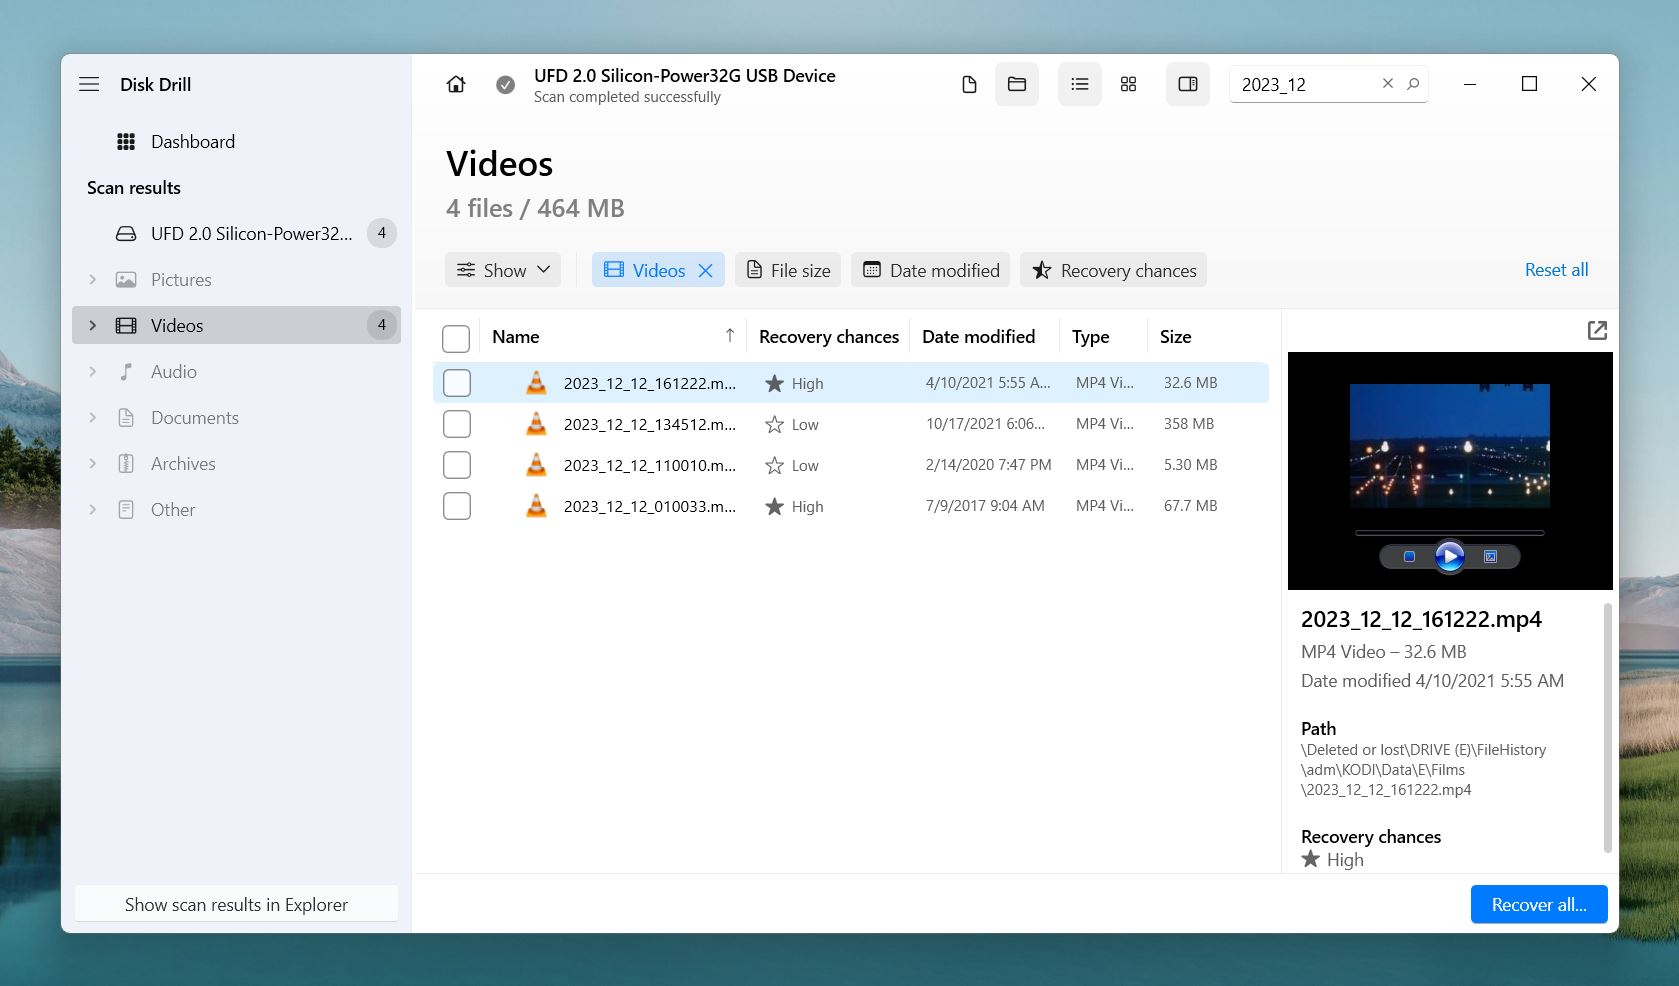
- Select the RAW disk or partition. Click the Search for Lost Data button to begin.
- Choose either the Recover all… button or Preview Found Items.
- If you choose Preview Found Items, you’ll see an Explorer-like list that allows you to select individual files or folders to recover. Once you’ve selected the files and folders you wish to recover. Click the Recover button.
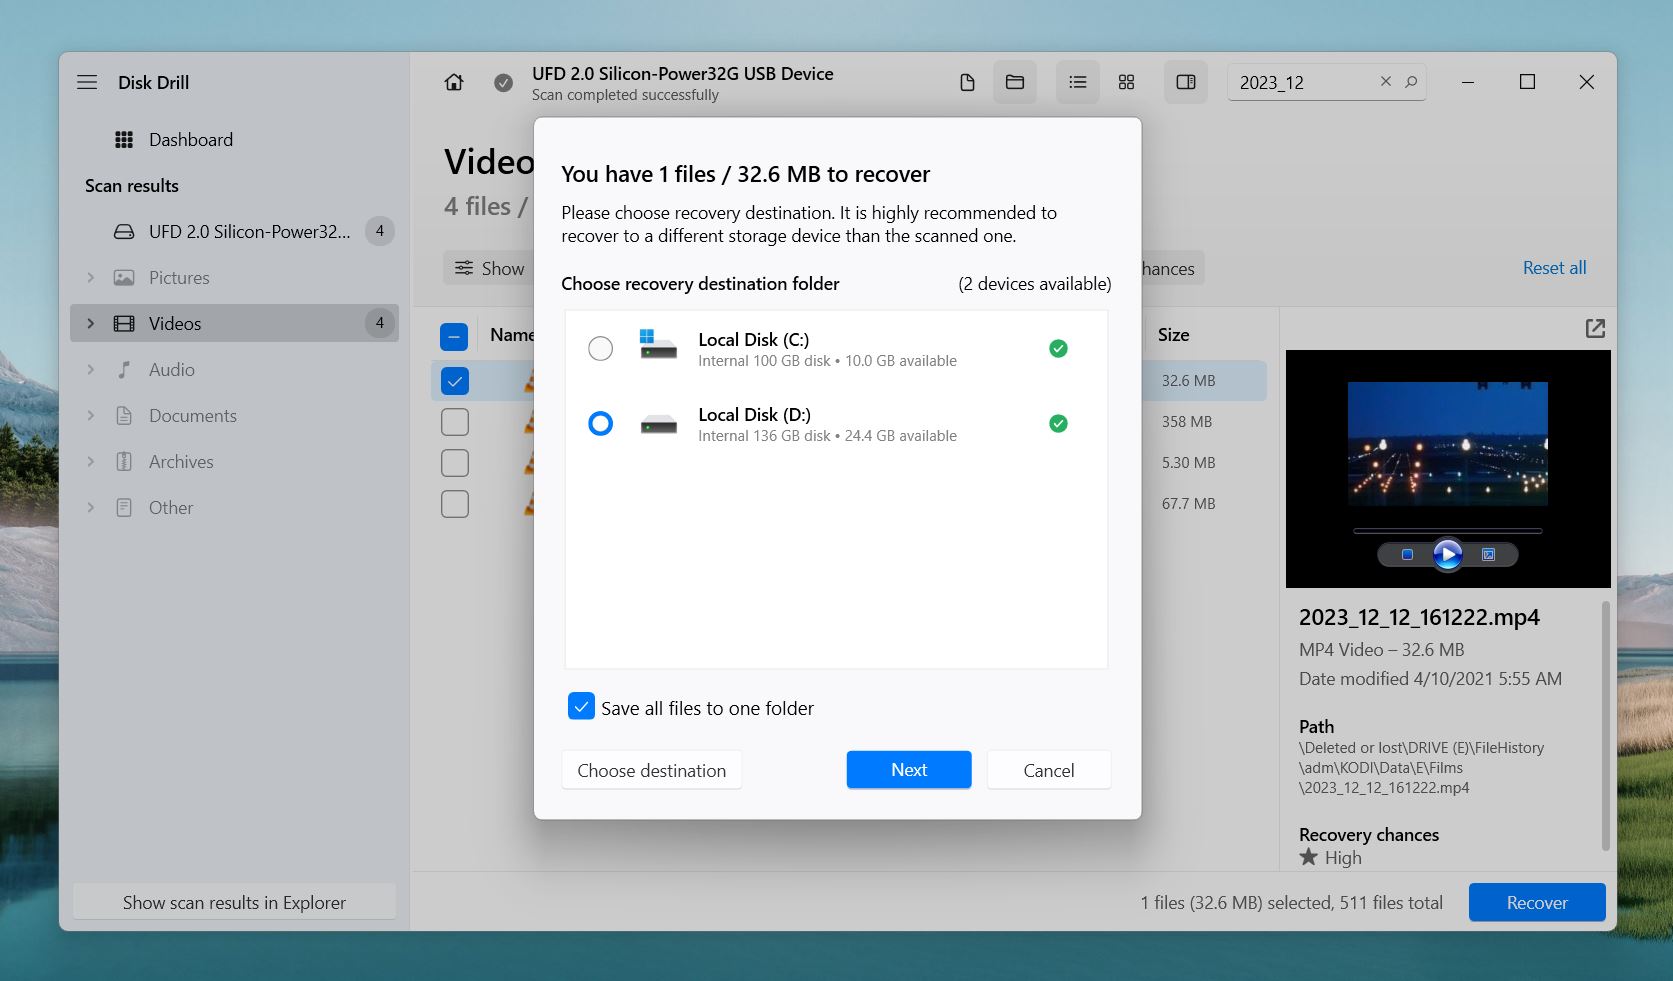
- Choose a safe destination folder. We usually recommend picking a different drive to save the recovered files to avoid overwriting. However, you won’t be able to write any data to the RAW drive anyway. Click Next.
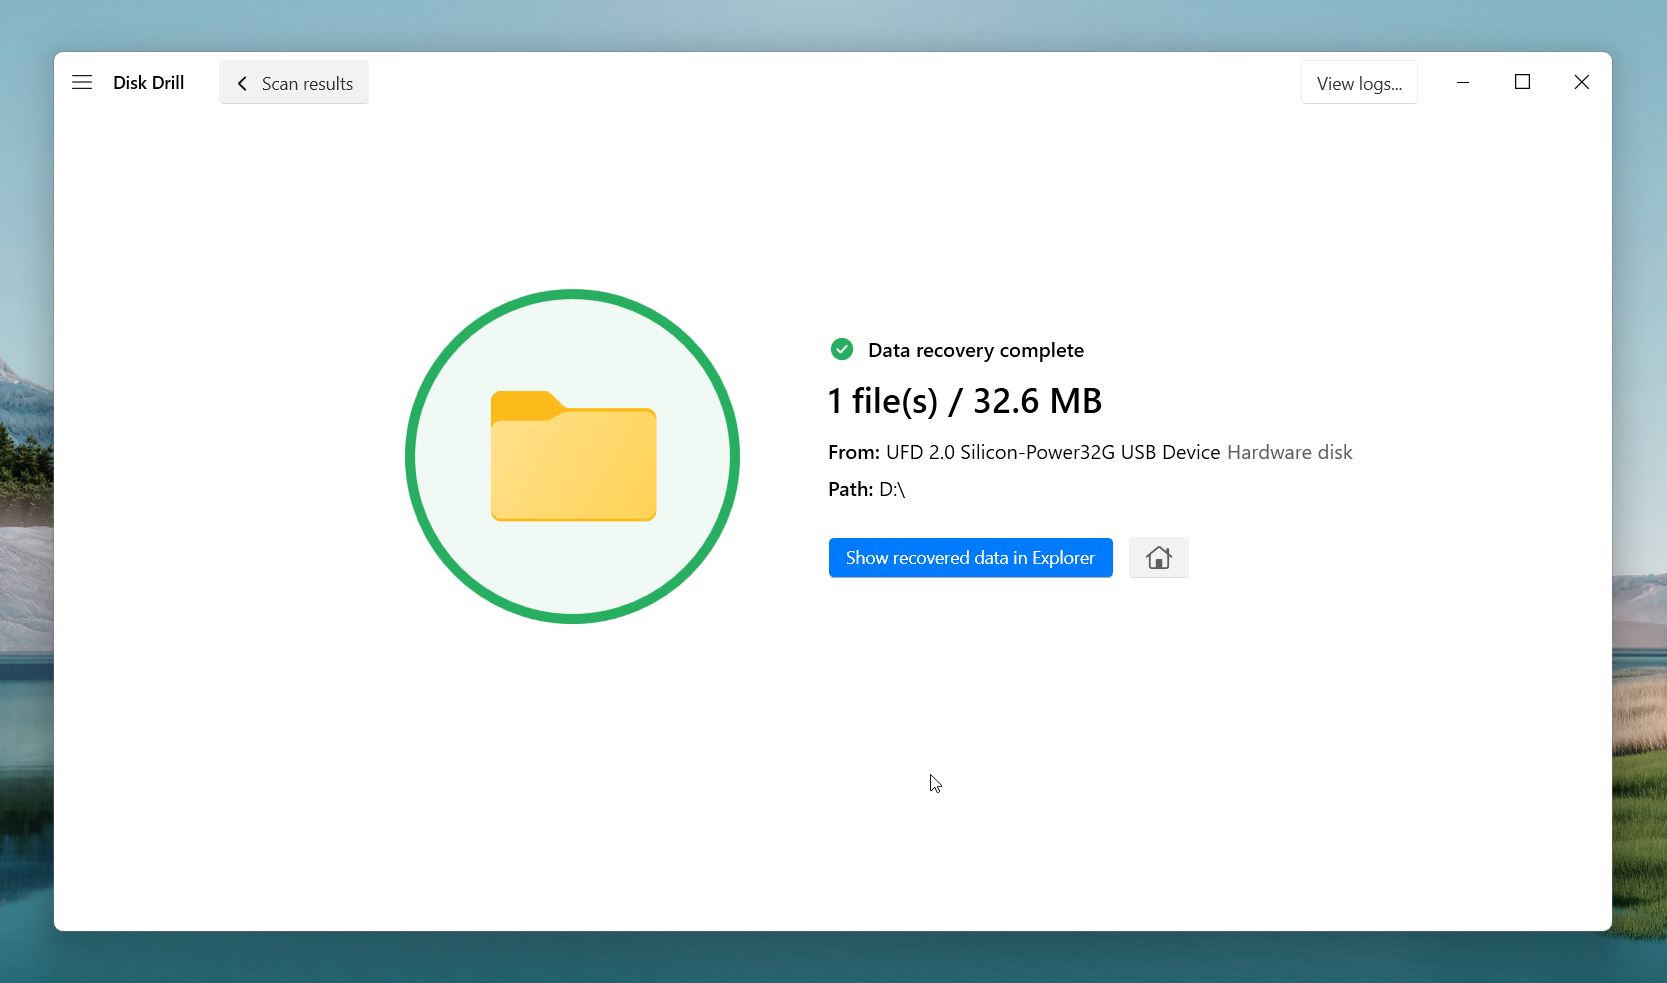
- Wait while Disk Drill recovers your files. When RAW data recovery is completed, click the Show recovered data in Explorer button to view the recovered files.
And that’s it! As you can see, nothing complicated. Now your files are safe, and you’re free to do whatever you want with the RAW partition. You can format it and assign a proper file system so it works as intended. The most important part is that your files are secure on another drive, ready for you to use.
Alternative Approach to RAW Partition Recovery
There’s also another way to recover data from a RAW partition: we can try to fix the partition itself. The process follows a straightforward algorithm.
Step 1: Create a Raw Partition Backup
First, we need to create a backup of your RAW drive or partition. There’s no way to know in advance if repair tools will work perfectly or if the situation might worsen during the process. So backup will guarantee your data is preserved no matter what happens.
Option A: Disk Drill
To create a backup of your RAW partition, you can use the same tool we mentioned earlier—Disk Drill. It has a powerful Byte-for-byte backup feature designed to create an exact copy of your drive or partition.
A byte-to-byte backup creats an exact, sector-by-sector copy of a storage device, regardless of its file system or current state (like a RAW partition). Unlike traditional backups that only save accessible files, a byte-to-byte backup captures every single piece of data on the drive.
Here’s how to create a Byte-to-Byte backup of a RAW partition Using Disk Drill:
- Open Disk Drill and look for the Extra Tools section on the main menu. Choose the Byte-to-byte Backup option to start creating an exact copy of the RAW partition.
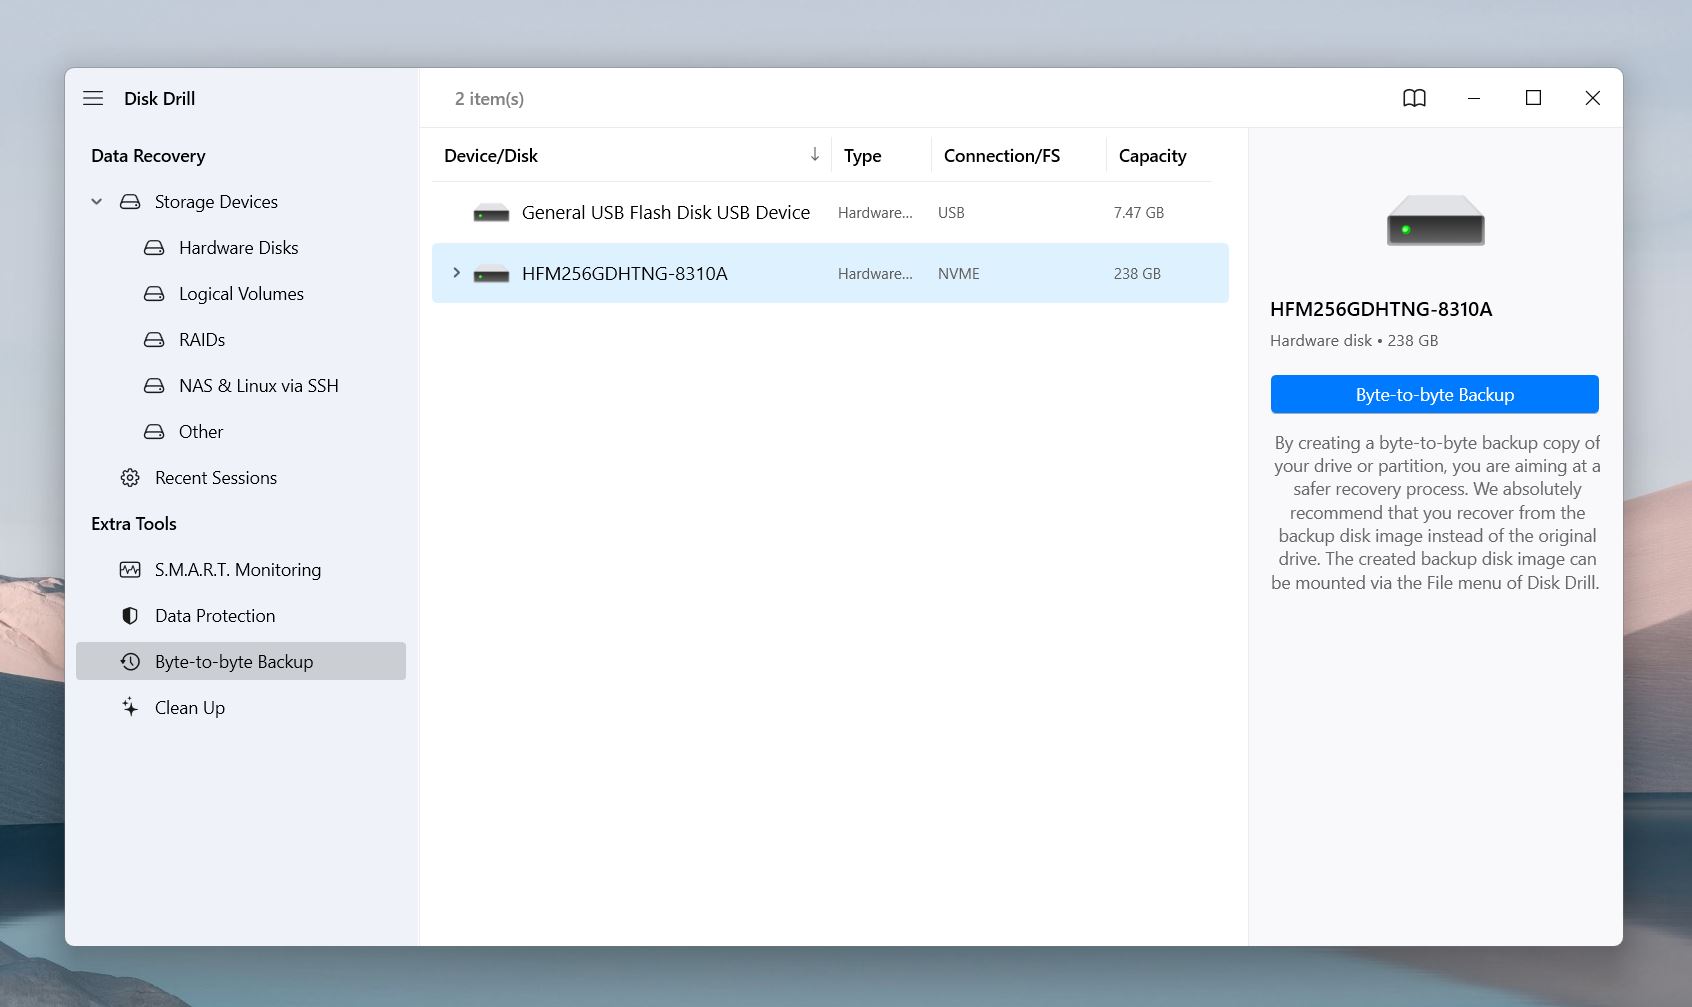
- In the list of drives, find your RAW partition or disk. It may not show a recognizable file system but will appear as available storage. Select it as the source for the backup and click on Byte-to-byte Backup button on the right.
- Pick a safe location on a different drive to save the backup file.
- Click OK to initiate the process. Disk Drill will copy every sector of the RAW partition into a disk image file, typically in .iso or .dmg format. The time required depends on the size and condition of the drive.
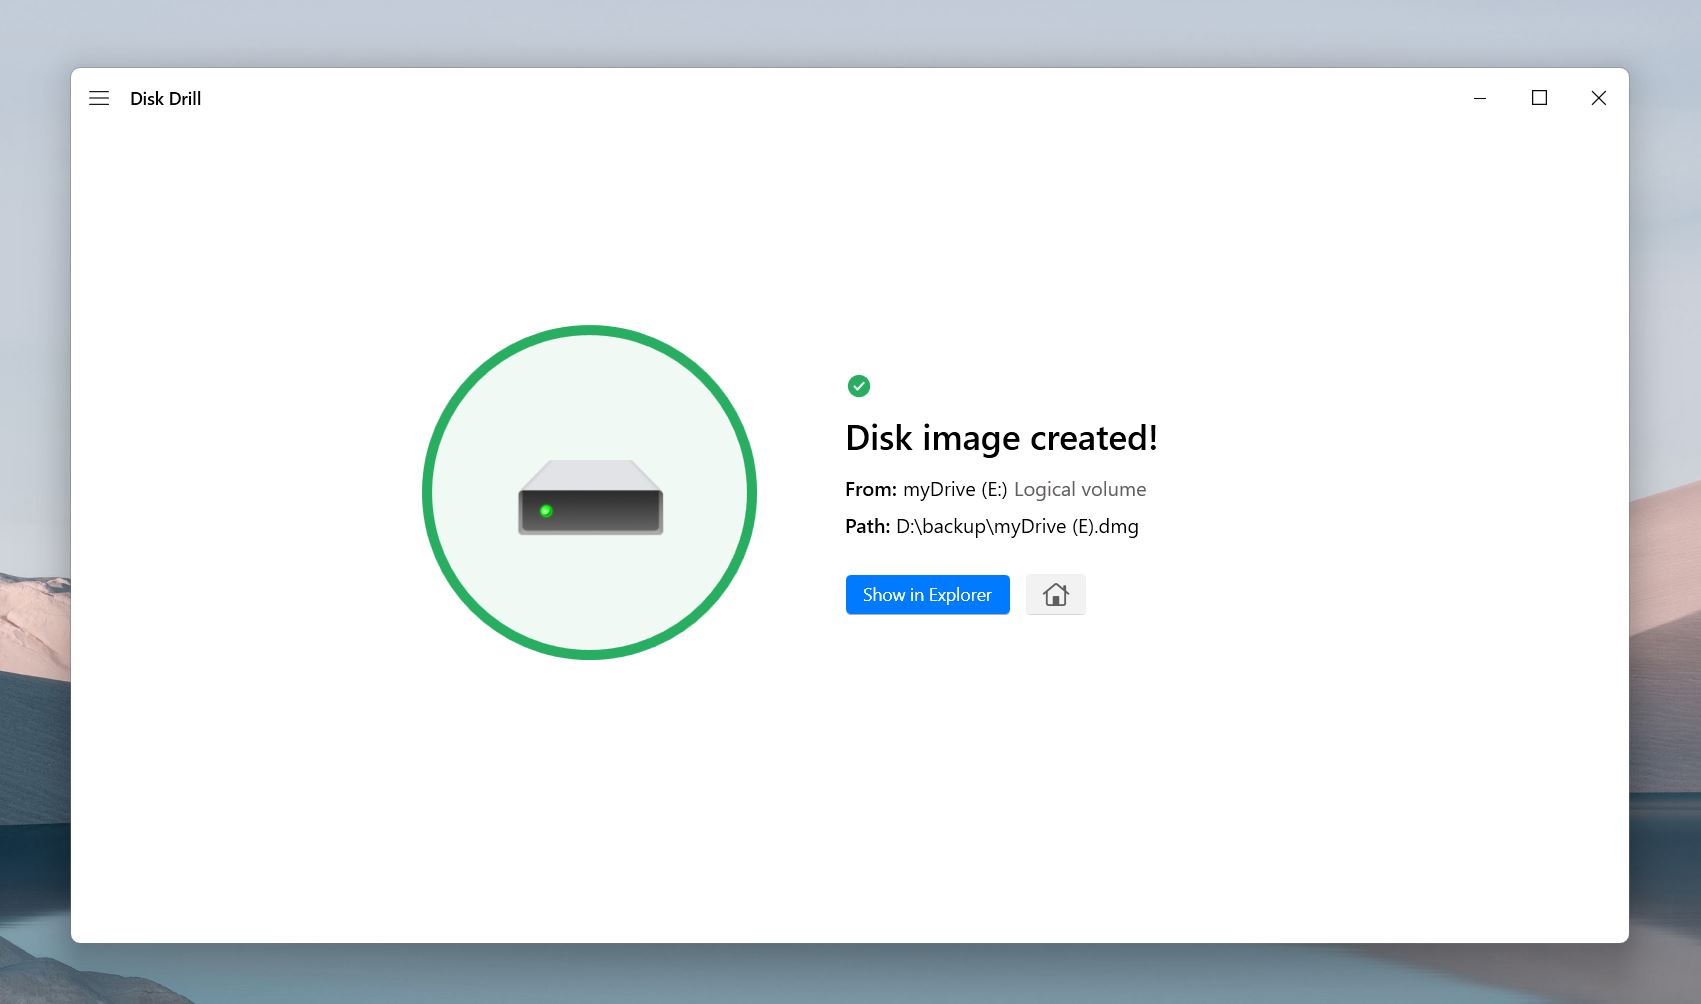
- Once completed, check the destination folder for the backup file. You now have a byte-to-byte copy of your RAW partition, which you can use with recovery tools or to retrieve your data later.
Keep in mind, while you can create a byte-to-byte backup using the free Basic version of Disk Drill, data recovery from this backup (or any other source) is limited to 500 MB in the free version.
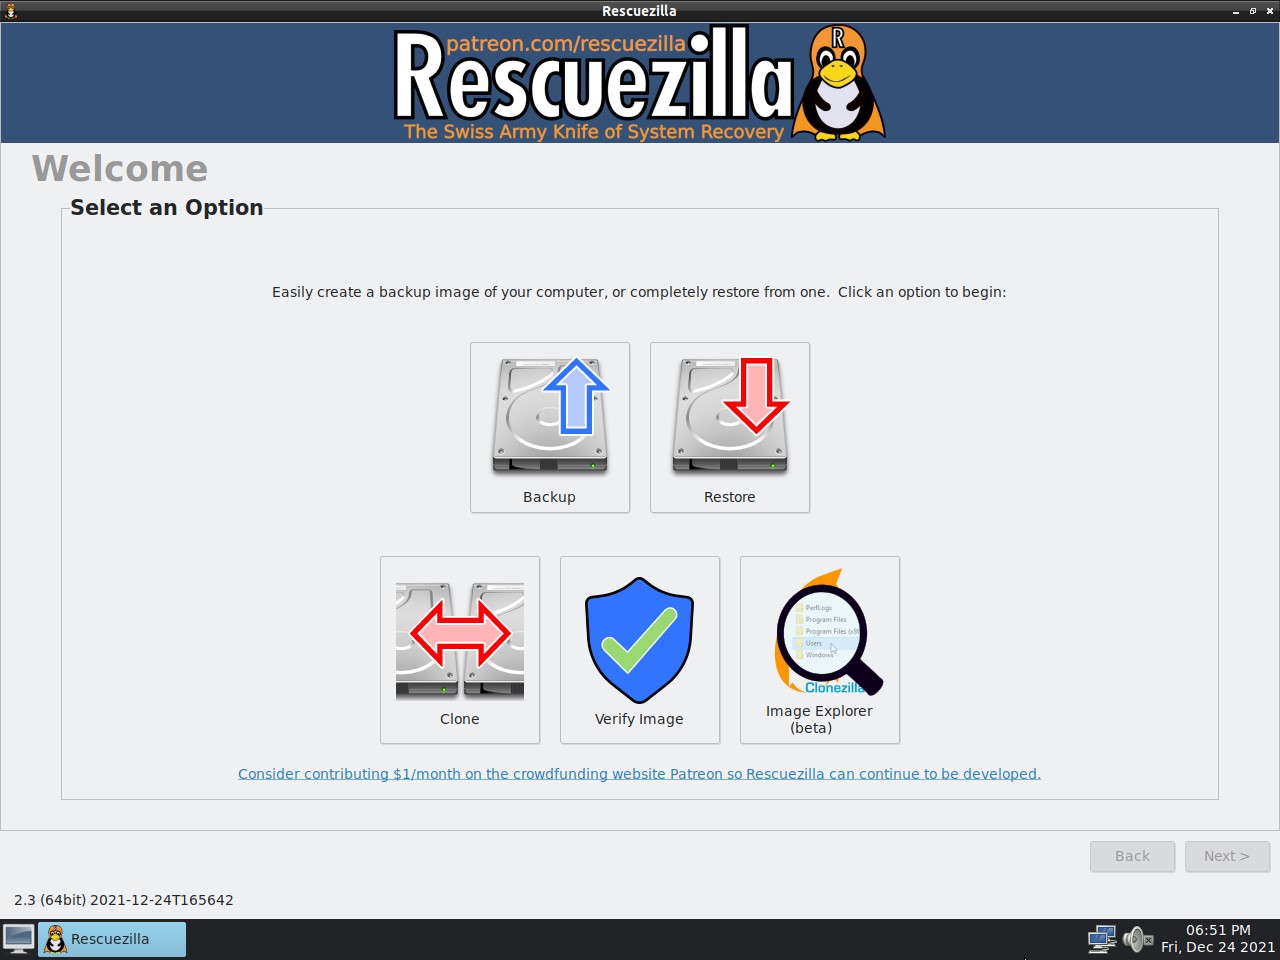
Option B: Rescuezilla
Another option that allows you to create a full image of a RAW drive or partition is Rescuezilla. This free, open-source tool is a user-friendly alternative to Clonezilla, which is a powerful but command-line-based disk imaging and cloning software.
Rescuezilla adds a graphical user interface (GUI) over Clonezilla, which makes its capabilities accessible to more people— not everyone wants to work in the command line these days.
This tool can create an exact sector-by-sector image of your drive, including the damaged areas, for recovery later.
Rescuezilla works in its own environment, completely bypassing your computer’s OS. While it’s a bit more technical than Disk Drill, it’s a lifesaver when your system has problems. It doesn’t require installation. You boot it directly from a USB drive, and it loads a full operating system (based on Ubuntu) with a simple, point-and-click interface.
Here’s how to create a RAW drive or partition backup with Rescuezilla:
- Download the Rescuezilla ISO file from the Rescuezilla website and save it to your computer.
- Use a tool like Rufus to write the Rescuezilla ISO to a USB drive and make it bootable.
- Plug the bootable USB into your computer, restart, and open the boot menu (usually by pressing F12 or Esc during startup). Select the USB drive as the boot source.
- When Rescuezilla launches, choose the Backup option from the menu.
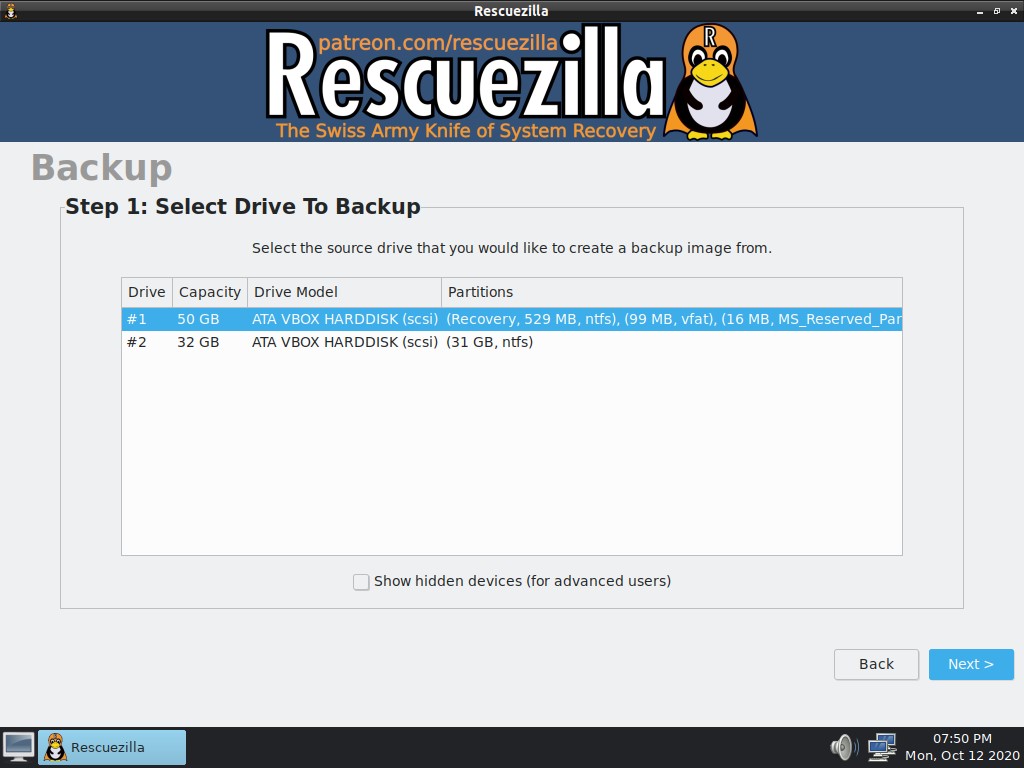
- Select the RAW drive or partition as the source for your backup. Rescuezilla will include all data on the drive, even inaccessible or corrupted areas.
- Pick a destination to save the backup image.

- Confirm the settings and start the backup process. Rescuezilla will create a full image of the RAW drive, which may take some time.
- After the backup is complete, check the saved image file on the destination drive to confirm it’s ready for recovery or repair.
With the backup ready, you can safely move on to recovery or repair steps without risking your files.
Step 2: Run CHKDSK
CHKDSK is a built-in Windows utility that scans your drive for errors and attempts to fix issues like file system corruption or bad sectors. It can be useful with RAW partitions in specific cases, such as when an NTFS partition becomes RAW due to boot sector corruption. If the backup boot sector is intact, CHKDSK can restore the partition and make it accessible again.
However, if your partition was not originally NTFS—say, FAT32 or exFAT—CHKDSK won’t be able to help you with your RAW partition. In such cases, you can confidently skip this step and move directly to TestDisk.
If your RAW partition was NTFS, follow these steps to run CHKDSK:
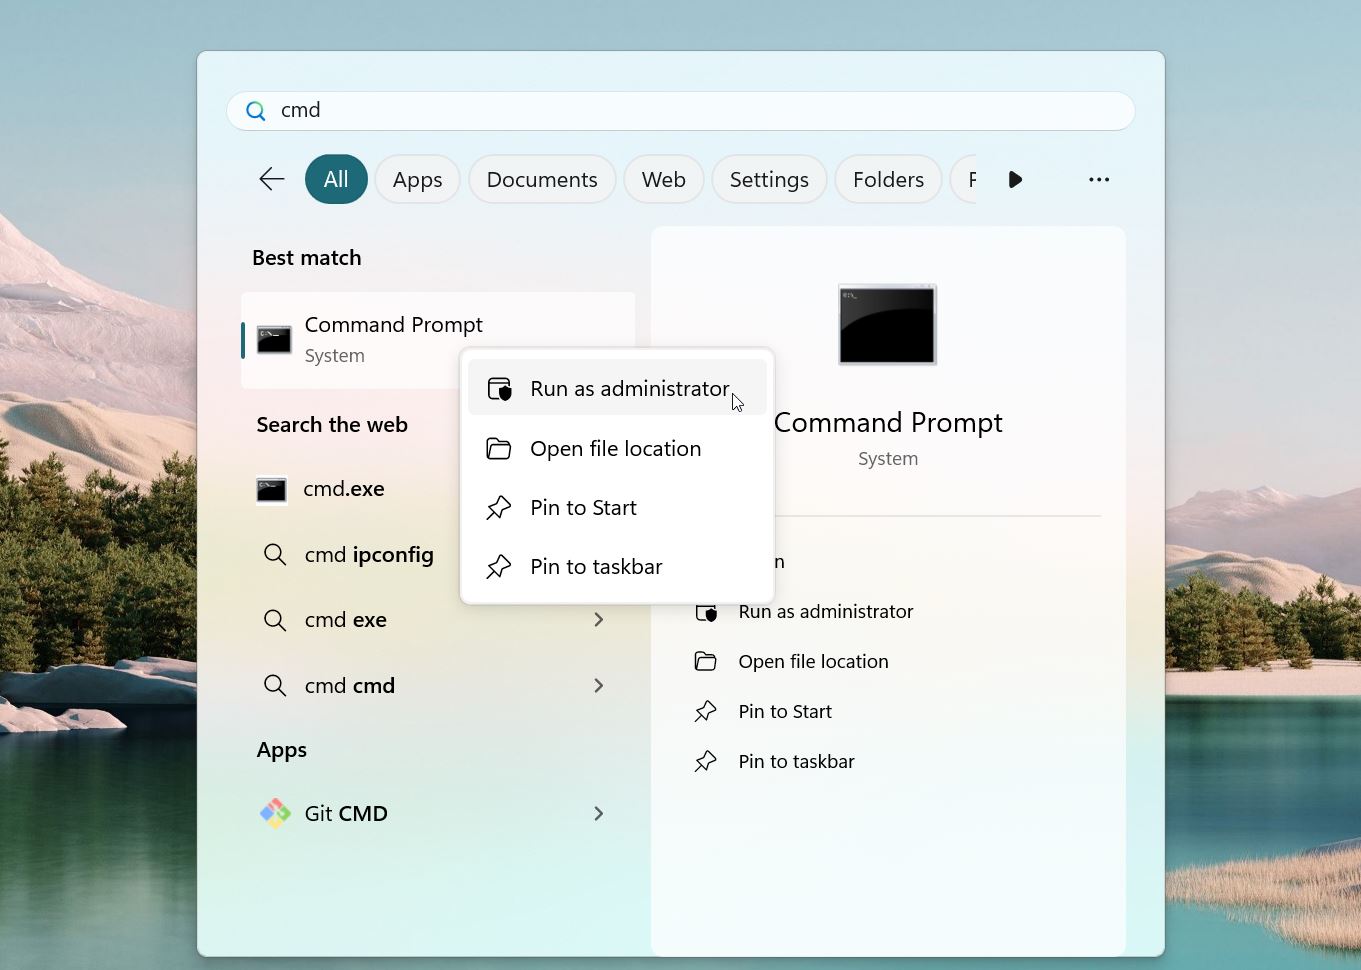
- Press Win + S, type cmd, and right-click on Command Prompt.
- Select Run as Administrator from the context menu.
- In the Command Prompt, type the following and press Enter:
chkdsk [Drive Letter]: /r
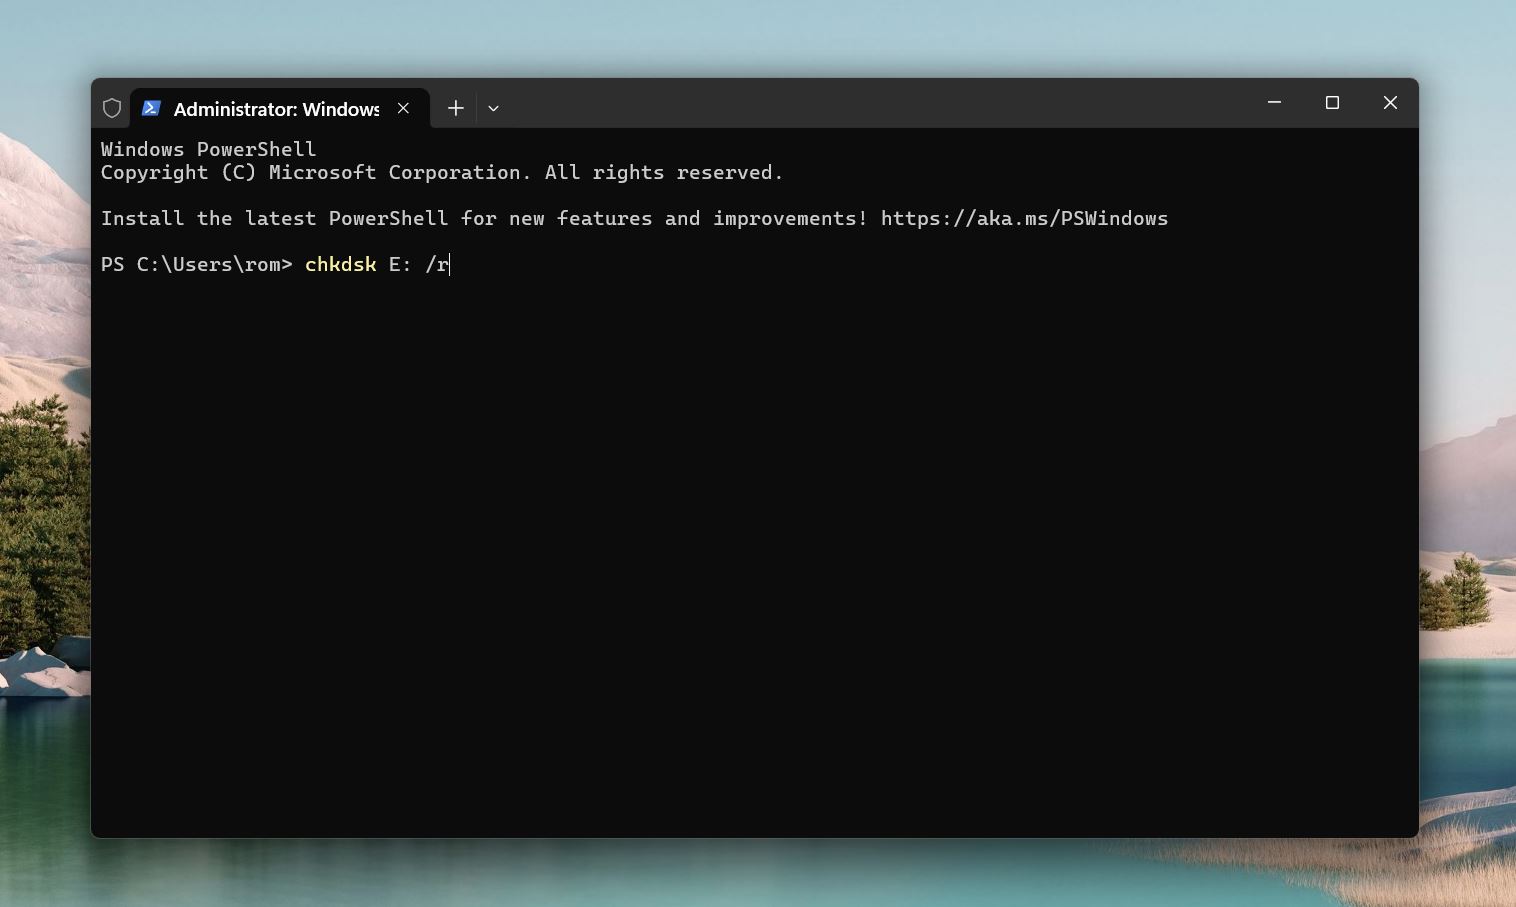 Replace [Drive Letter] with the drive letter of your RAW partition (e.g., chkdsk E: /r).
 - CHKDSK will analyze the RAW partition and attempt to repair any corruption. If it detects an intact backup boot sector, it will use it to restore the NTFS partition.
- Once the process completes, CHKDSK will display a report. If it successfully repaired the partition, check if you can now access your files through File Explorer.
As we mentioned earlier, some methods can lead to data loss, and CHKDSK is no exception. We want to emphasize this once more—creating a backup beforehand is always a smart move.
Step 3: Use Testdisk for RAW File System Recovery
If CHKDSK didn’t work or your RAW partition wasn’t originally NTFS, it’s time to turn to TestDisk. This free, open-source tool can rebuild file systems (FAT, NTFS, and ext2/ext3), recover lost/deleted partitions, and repair corrupted boot sectors (on FAT and NTFS volumes).
Like CHKDSK, TestDisk runs in a command-line interface, but don’t let that intimidate you—it’s not that hard to use.
Here’s how you can perform RAW file system recovery using TestDisk:
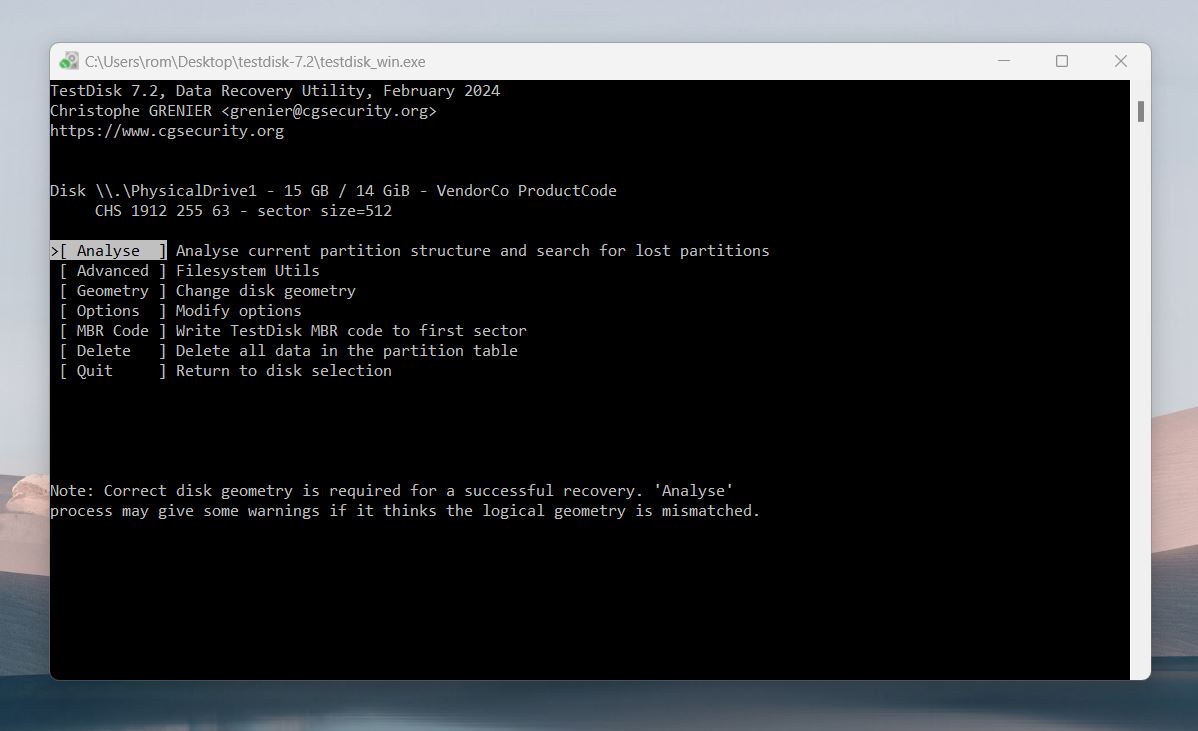
- Head to the official TestDisk website. The latest version is 7.3, we recommend to download the stable 7.2 release for reliability.
- Extract the downloaded file to a folder on your system. No installation is required.
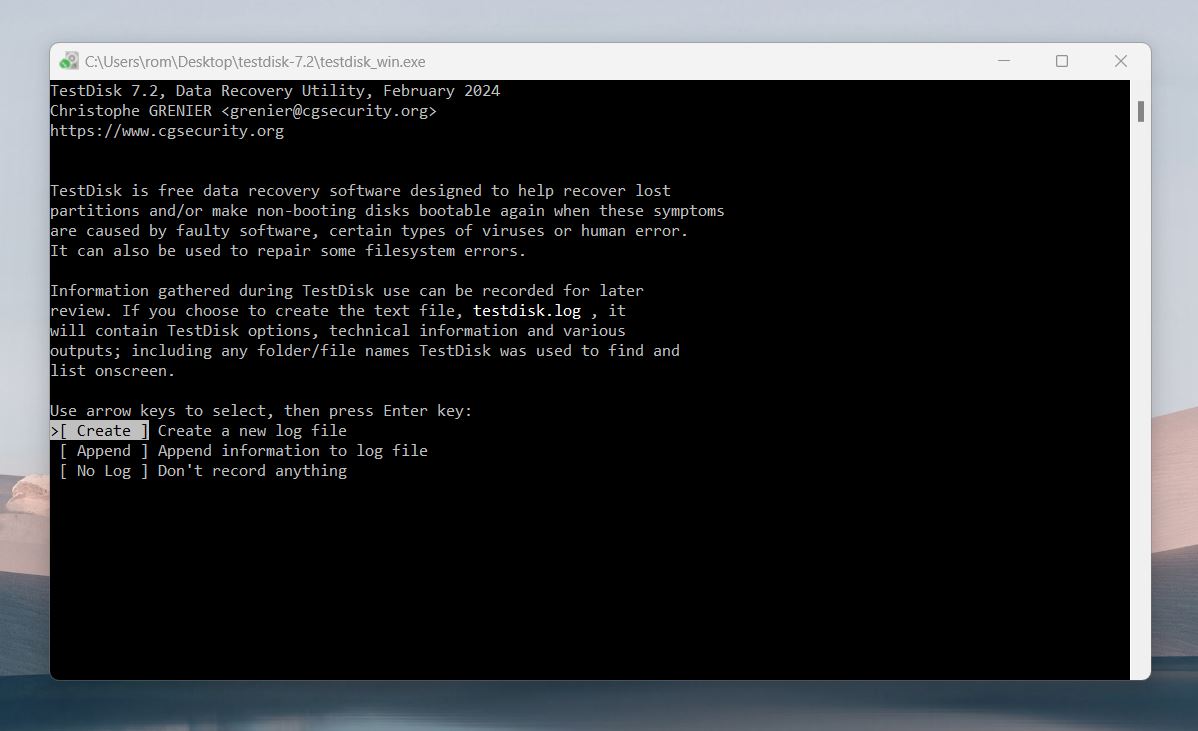
- Open the folder containing the TestDisk files, right-click on testdisk_win.exe, and select “Run as administrator.” When the program starts, choose [Create] to make a log file that records its actions and findings or [No Log] if you don’t need it.
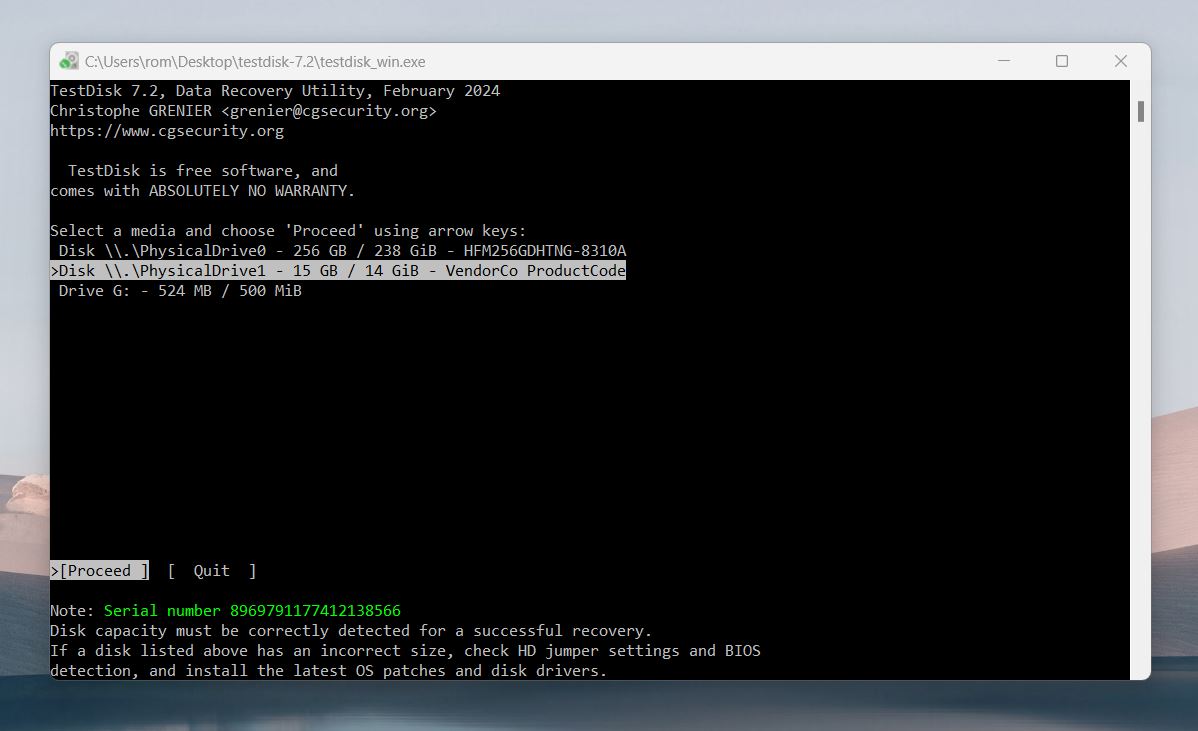
- Use the arrow keys to select the drive that contains your RAW partition, then press Enter.
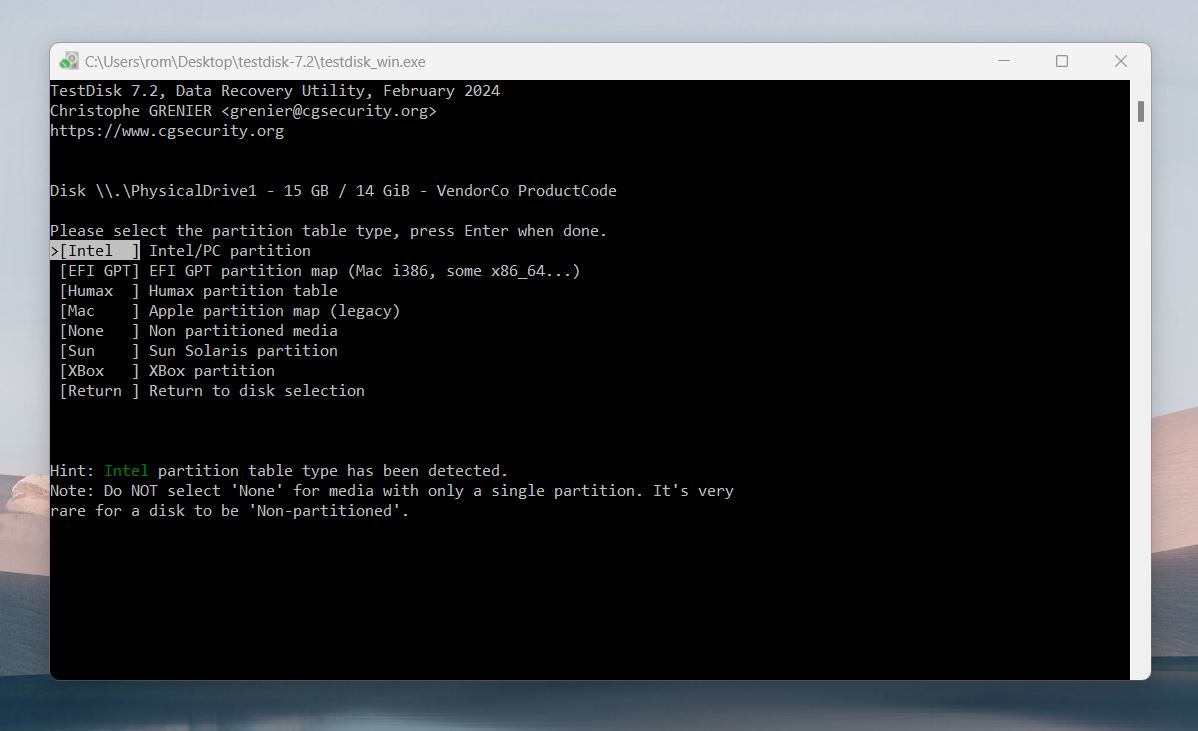
- TestDisk will usually auto-detect the correct partition table type. If it doesn’t, select the appropriate option (usually Intel for most drives or EFI GPT for newer systems). Press Enter to proceed.
- Choose [Analyse] and press Enter to let TestDisk scan the selected drive for lost or deleted partitions. If initial results are incomplete, you can use [Quick Search] or [Deeper Search] for a more thorough examination.
- Once TestDisk identifies the RAW partition, it will offer options to rebuild the boot sector, recover the partition, or repair the file system.
- Choose the appropriate option based on the detected issue and follow the on-screen prompts.
- TestDisk will ask if you want to write the changes to the disk. Confirm this step to finalize the repair.
- Select [Quit] to exit TestDisk and check if your partition is accessible in File Explorer. Your files should now be restored and ready to use.
If your drive or partition is back to normal and you can access it like before (and your files are still there), congrats—you’re all set! Your data is safe, and you’re done here. If not, keep reading—we’ve got more steps to help you out.
TestDisk is a capable tool, and we’ve successfully used it many times to fix issues like this. However, if TestDisk doesn’t do the trick in your case, you still have options. That backup you created in Step 1 is your safety net. You can use it to recover your files, even if the RAW partition itself can’t be repaired. There are also alternatives to TestDisk, which may help in some cases. After recovering your data, you can format the drive to make it usable again.
Sometimes, the damage to the partition is too severe for repair tools to fix. In those cases, a fresh start with a clean format is the best move. Let’s head to the next step and see how to recover your data from the backup.
Step 4: Recover Data from Raw Partition Backup
If previous methods didn’t work, it’s time to retrieve data from the image we created in Step 1, we need a tool that can scan image files for data. You can use the previously mentioned Disk Drill, or similar tools like UFS Explorer or DiskGenius, which also handle disk images. For the sake of this article, we’ll stick with Disk Drill.
To scan the backup image, you’ll need to mount it first. Here’s how to do it.
- Open Disk Drill, and you’ll see a list of all detected storage devices. At the bottom of the list, you’ll find an option labeled Attach Disk Image… Click on it and select the image file you created in Step 1 (typically in .iso or .dmg format).
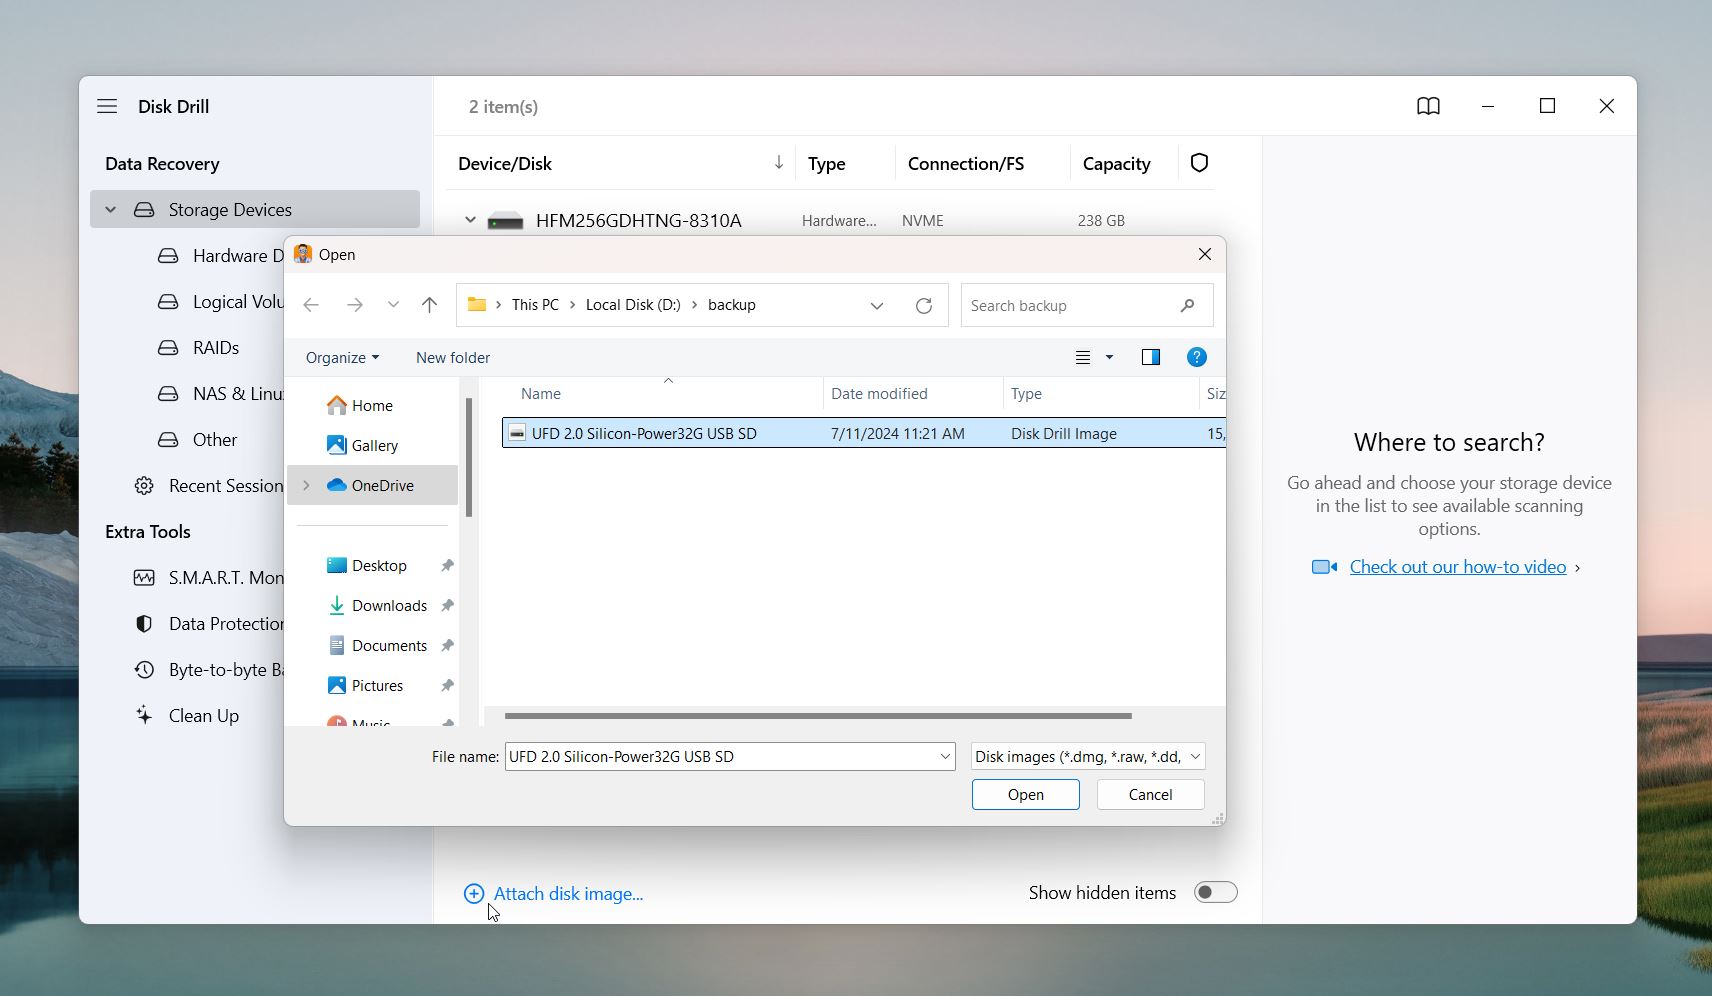
- Once you’ve selected the file, Disk Drill will mount it, and it will appear as a separate device on the list, just like a physical drive. Select the mounted image and click the Scan for Lost Data button on the right.
- From this point, the next steps are identical to those we covered earlier in the article when scanning a RAW partition directly.
Use Disk Drill to scan, preview recoverable files, and restore the ones you need to a safe location. Once your files are safe, you can move to the final step: formatting the RAW drive/partition to make it usable again. Let’s wrap this up!
Step 5: Reformat RAW Drive/Partition
And, the final step—reformatting your RAW drive or partition. Now that your data is safely recovered, you can reformat the drive to assign it a proper file system and make it whole again. This process will erase everything on the drive, but since your files are secure elsewhere, it’s safe to proceed.
It’s possible to format a drive without losing data, but you’ll still need to back up your files first.
Here’s how to reformat your RAW drive or partition:
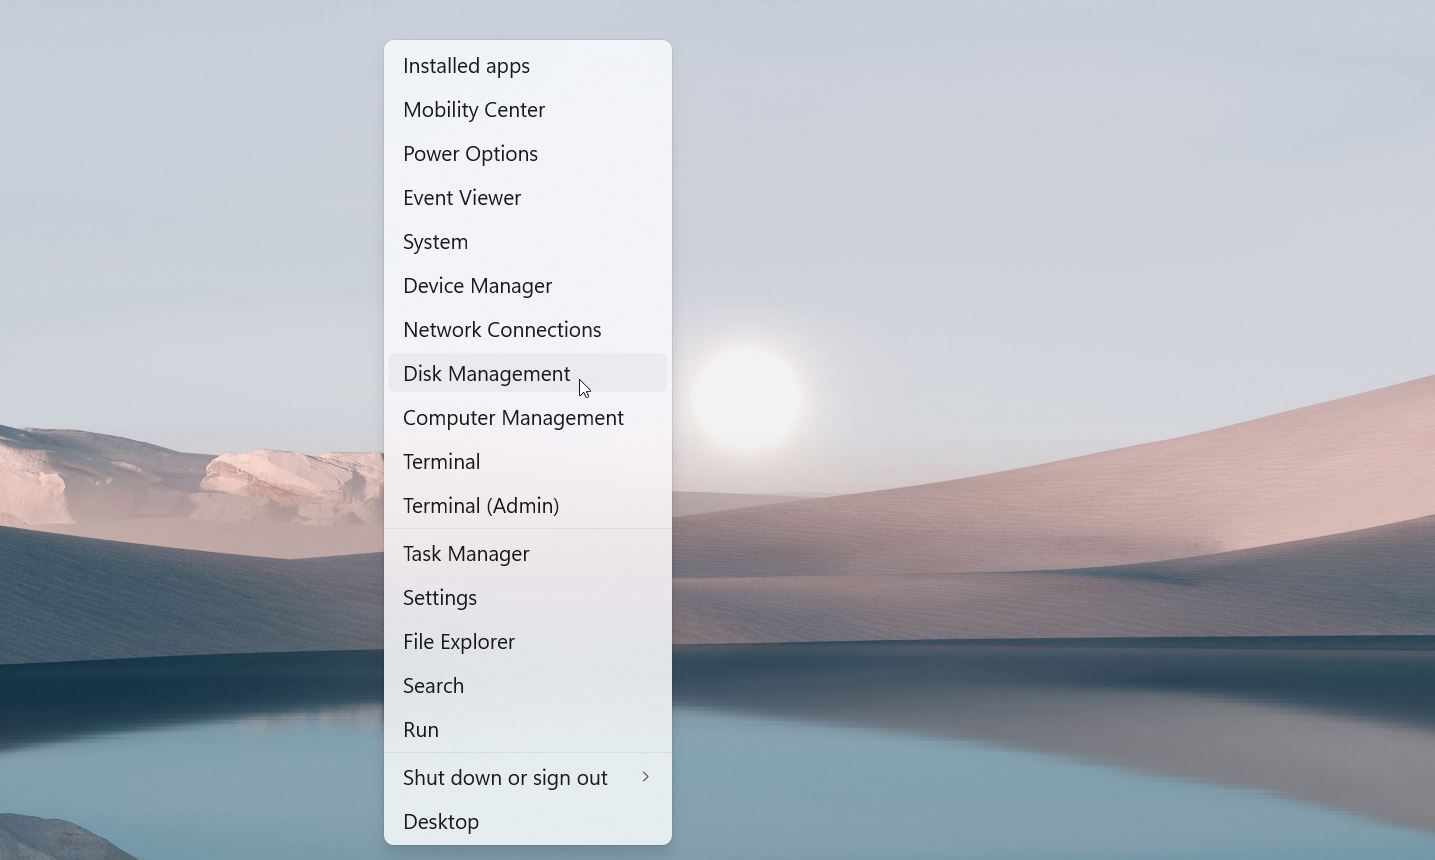
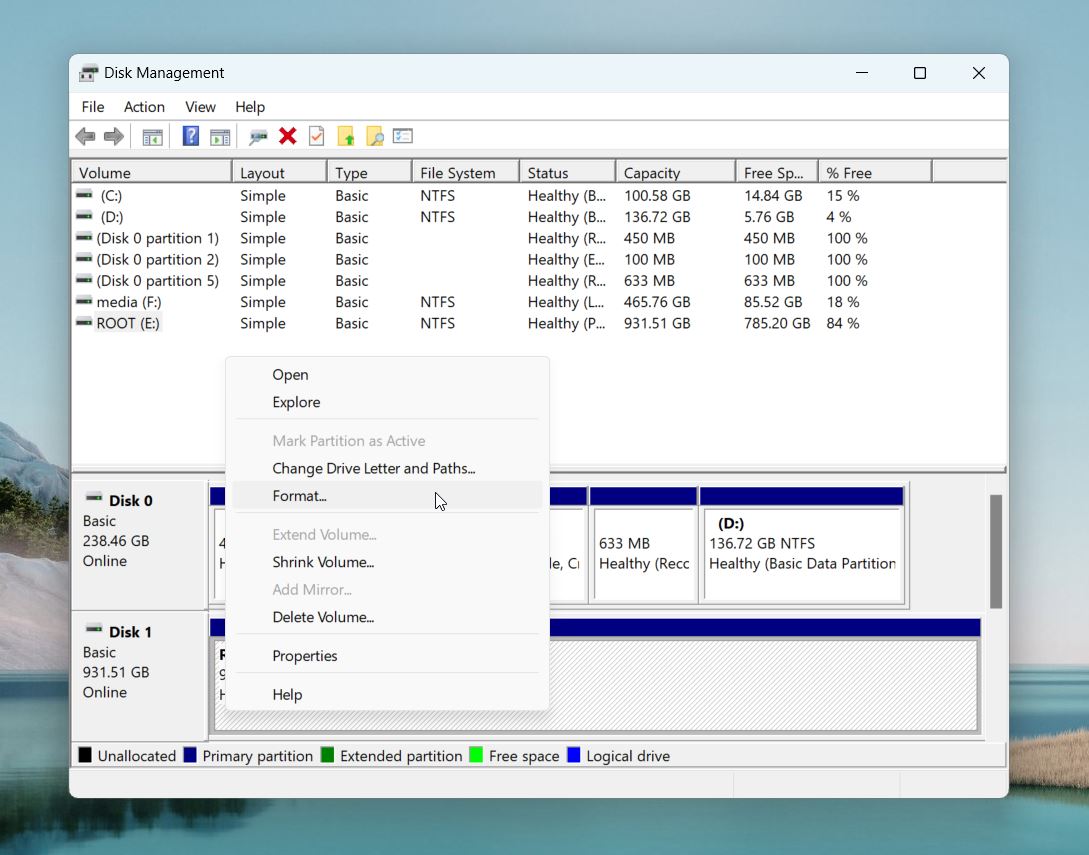
- Press Win + X and click Disk Management.
- Find your RAW drive or partition in the list.
- Right-click it and select Format from the context menu.
- In the options window, select a file system: NTFS for Windows-only use, exFAT for compatibility with Windows, macOS, Linux, or FAT32 for older devices.

- Optionally, give your partition a name (volume label) to make it easier to identify later.
- By default, the system uses quick format, which is usually pre-checked in the options. If you uncheck it, the process switches to full format.
👀
The difference? Quick format removes the file system table, which makes the drive look empty but the actual data is still on the disk. It’s much faster but doesn’t check for bad sectors. Full format scans the drive for bad sectors and overwrites the data, so nothing from the previous content survives. It’s more thorough but takes longer. For most situations, quick format works fine unless you suspect issues with the drive or need to erase data completely.
- Hit OK, and Windows will format the drive.
That’s it! Your data is now safe, and the RAW partition or drive is no longer RAW. If you want, you can copy and paste your recovered files back to where they were originally stored.
By the way, if Windows prompted you to format the drive and you did so before reading this guide—it might still be possible to recover your files from formatted storage. This is true if you used quick format, as we mentioned earlier. Since quick formatting doesn’t overwrite the data, recovery apps can still scan the drive and retrieve the files.
FAQ
How to recover data from a RAW drive?
Here’s a super-quick guide on recovering data from a RAW drive:
- Download and install the RAW data recovery software of your choice.
- Connect the RAW drive to your PC/Laptop.
- Launch the app and scan your RAW disk.
- Select the files you want to restore and click the Recover button.
- Choose a safe location to restore the recovered files.
Can you recover data from a RAW partition?
Yes, you can recover data from a RAW partition! A RAW partition means the file system is damaged or missing, so your computer can’t access the data normally. The good news is the files are usually still there.
To get them back, you’ll need recovery tools like Disk Drill, UFS Explorer, or TestDisk.
Is there a way to recover data from a RAW partition for free?
Yes, you can recover data from a RAW partition for free using certain tools. Many RAW data recovery programs offer free versions with limited capabilities that can still get the job done, especially for smaller recoveries. Here are a few options:
- Disk Drill (free Version) allows you to scan a RAW partition and preview recoverable files for free. It also lets you recover up to 500 MB of data at no cost.
- TestDisk (completely Free) is a powerful open-source tool that can recover data and even repair RAW partitions without any fees. It works well for users comfortable with command-line tools.
- PhotoRec (free companion to TestDisk) can extract individual files from RAW partitions.
What is the best RAW partition recovery software?
The best RAW partition recovery software depends on your specific needs, but here are a few standout options:
- Disk Drill: User-friendly, powerful, and supports RAW recovery. Free version allows up to 500 MB of recovery. Great for beginners.
- TestDisk: Completely free. Best for advanced users who are comfortable with command-line tools.
- EaseUS Data Recovery Wizard: Easy to use. Good for all levels of experience.
- R-Studio: Advanced recovery for professionals.
- DiskGenius: Combines partition management with RAW recovery. Ideal for users who want both RAW data recovery and drive repair tools in one.
This article was written by Travis Rose, a Author at Handy Recovery Advisor. It was recently updated by Roman Demian. It was also verified for technical accuracy by Andrey Vasilyev, our editorial advisor.
Curious about our content creation process? Take a look at our Editor Guidelines.