If you accidentally deleted some files from your LaCie drive, formatted it, or ran into problems accessing it, you’ve landed on the right page. Our guide covers everything you need to know for successful LaCie data recovery.
We’ll walk through all the methods available and share some lesser-known tips about LaCie recovery software. Each step here is based on our hands-on experience with these drives, so you’ll know what actually works. Let’s jump right in.
Must-Know Basics for LaCie Hard Drive Data Recovery
There are a few major things you should keep in mind to help increase your chances of a successful LaCie hard drive data recovery. If your data matters to you, read this section before going any further. Think of it as your personal checklist of do’s and don’ts.
- 🛑 Stop using your device. If you’ve deleted something from it, formatted it, or found that your files have disappeared from your external hard drive, the first thing you should do is stop using it. We want to prevent even the tiniest background process from overwriting any files. And if your drive is corrupted, using it more will only make the problem worse.
- 🙅♂️ Do not format/reformat the drive. A hard drive corruption can sometimes result in your drive prompting an error and asking you to format it when you connect it. Formatting/reformatting a drive instantly wipes any existing data on the disk. And since you need to connect your drive to your computer to format it, you risk overwriting the formatted data and losing it completely.
- 🛠️ Avoid running repair tools before recovery, even if they seem harmless. Tools like CHKDSK or third-party repair apps might fix filesystem issues but they can also cause new ones (or wipe out recoverable file fragments). If your files are important, recovery should come first. You’ll have time to fix the drive after your data is safe.
- 🗃️ Create a byte-to-byte backup. Finally, we want to create an “image-based backup” of your drive. As opposed to a “file-based backup” where a user or program copies files to another location, an “image-based backup” creates an exact clone of the entire drive. We’ll use this clone as the target of data recovery so we can preserve your drive as much as possible.
You can use any image backup software you want, but we suggest using Disk Drill. Its Byte-to-byte backup feature is completely free, and we’ll be using this app for data recovery as well. This is a good method to recover an external hard drive without formatting. We’ll show you exactly how to do this in the next section. Read on.
No matter what exactly caused the issue with your LaCie drive – as long as your computer can still detect it, there’s a solid chance you can retrieve data from it.
If you’re not sure whether the drive is being detected (maybe it doesn’t show up in File Explorer like it normally would), you can double-check using Disk Management:
- Right-click the Start button and select Disk Management.
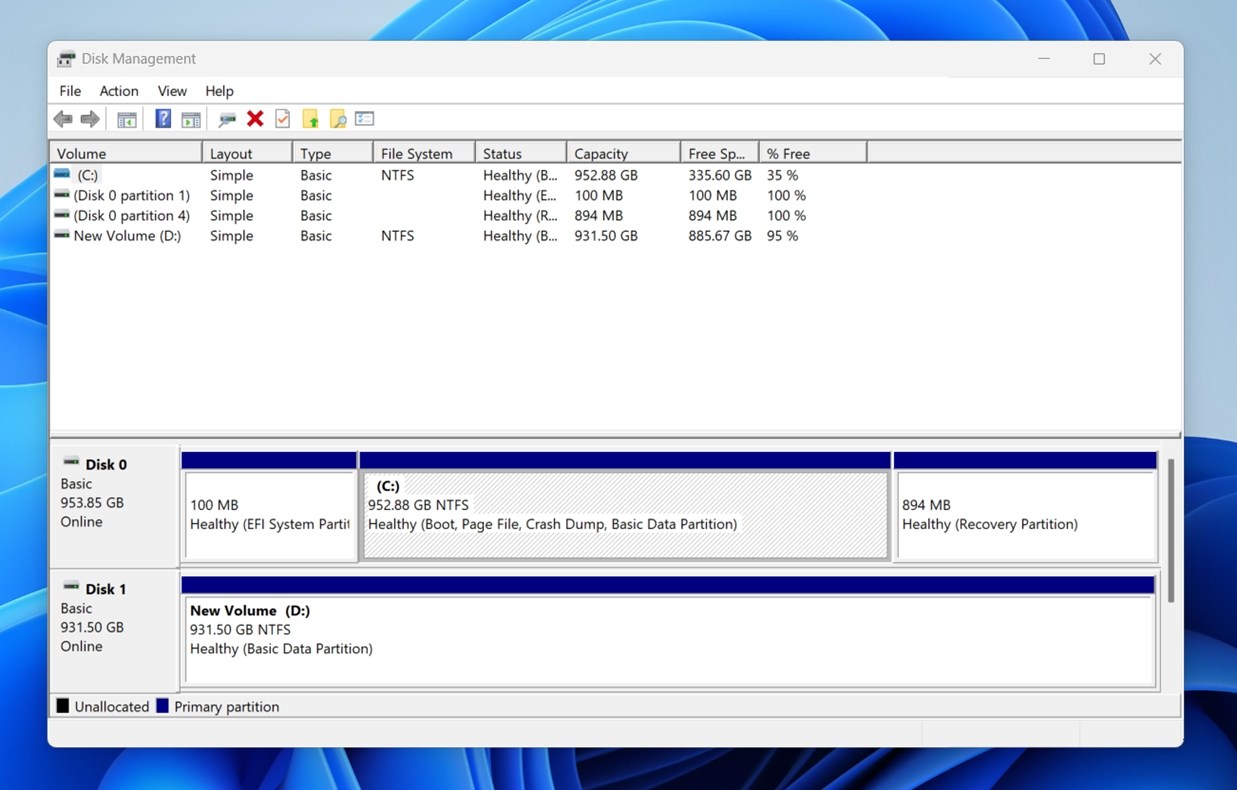
- Scroll through the list of drives – if you see your LaCie drive listed there (even if it shows up as RAW, Unallocated, or missing a letter), that’s a good sign. You can proceed with the recovery steps.
If the drive doesn’t show up in Disk Management at all, that could point to more serious issues or a connection problem – we’ll walk through those situations later in the guide too.
How to Recover Data From a LaCie External Hard Drive
Now let’s get to the practical part. Below, we’ll walk you through a clear, step-by-step process to recover data from your hard drive using LaCie data recovery software.
We’ll demonstrate two options:
- Disk Drill – A freeware powerhouse we already mentioned above. It’s packed with features and smart enough to handle pretty much anything. If you want a smooth experience and a higher recovery rate, this is the way to go.
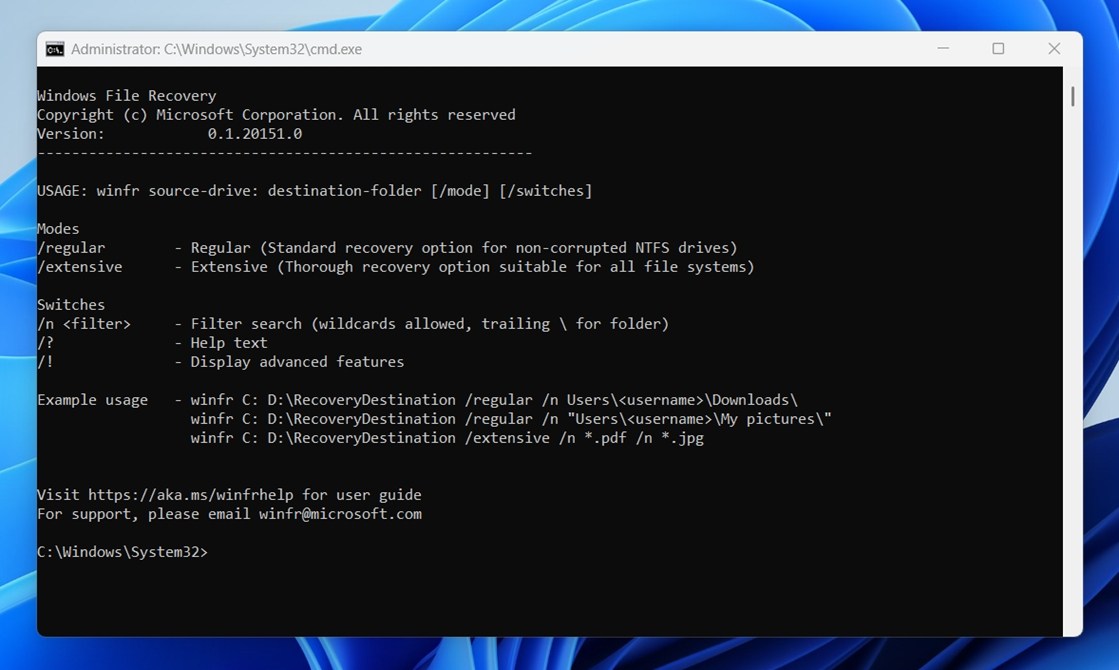
- Windows File Recovery – A command-line tool from Microsoft. It’s not fancy, but it’s 100% free and available straight from the Microsoft Store.
Option A: Disk Drill for Windows
We’ve used Disk Drill loads before here at Handy Recovery Advisor to demonstrate data recovery for different types of devices, and there are good reasons for that, believe us. It’s come in handy more than once during LaCie drive recovery cases we’ve worked on.
![]()
If you feel unsure about installing recovery software, that’s completely valid and a smart habit to have. But Disk Drill is safe. We’ve reviewed and tested it thoroughly ourselves, including checking for anything sketchy in how it behaves or installs – like our team does with all the software we recommend.
Here’s how you can use Disk Drill for LaCie data recovery:
- Download Disk Drill from CleverFiles’ official website. Just click the button, and the latest version (Disk Drill 6) should download automatically. It works with both Windows 10 and Windows 11.
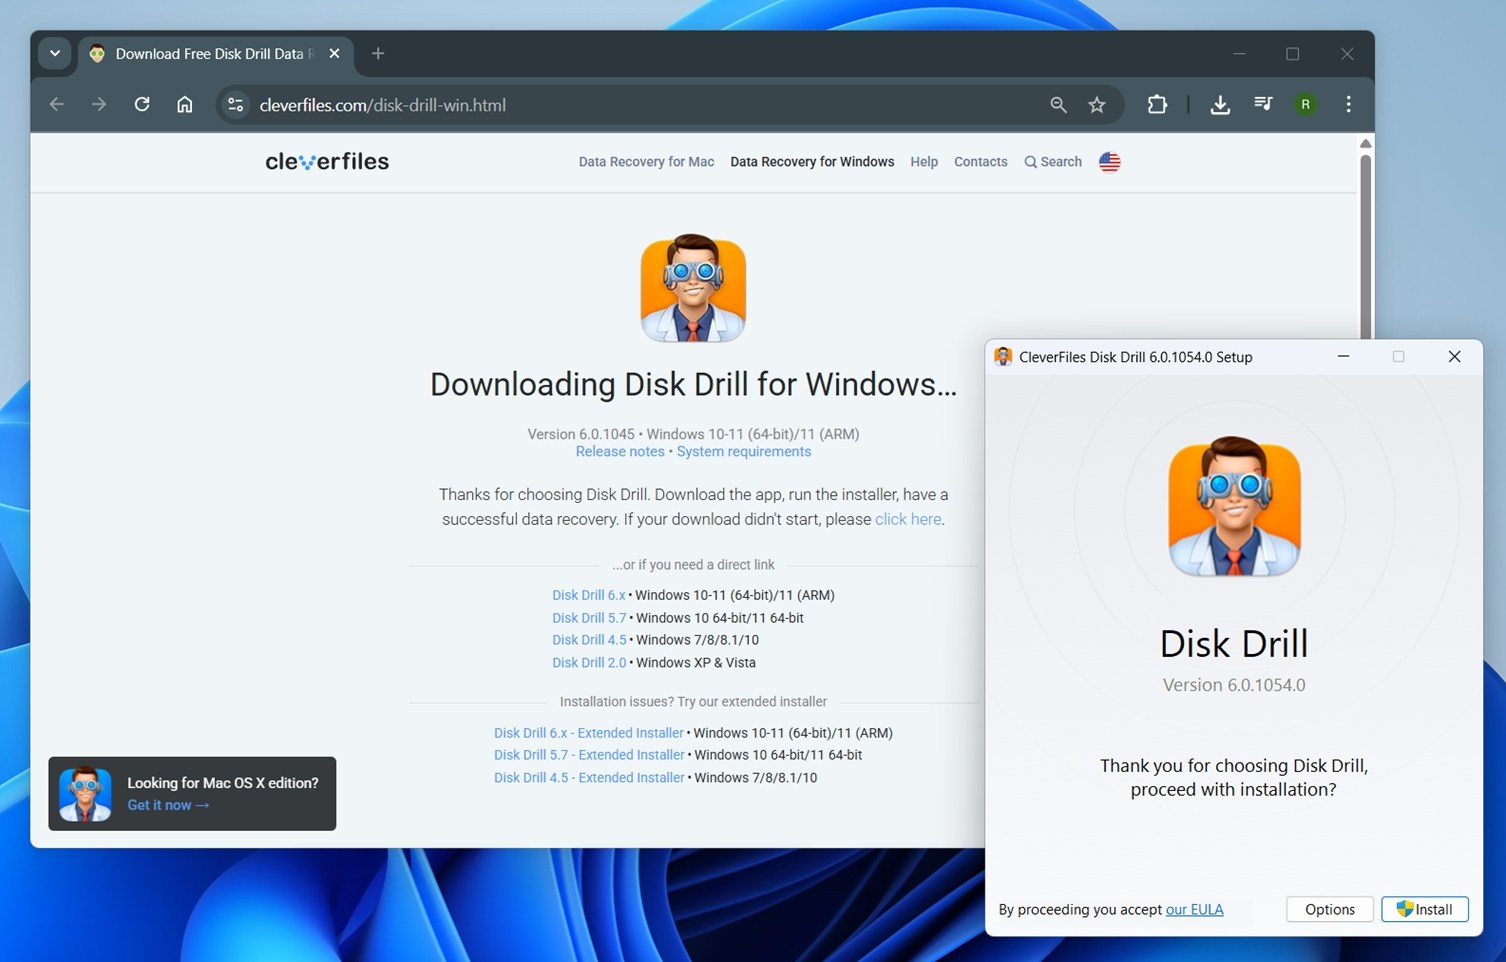
- After that, launch the installer and follow the usual setup process. Choose the default options (unless you have a reason to change them).
- Plug your LaCie external hard drive directly into your computer. If possible, avoid using USB hubs or extension cables, as they can sometimes cause power or detection issues.
- Open Disk Drill from your desktop or Start menu. Once it loads, you’ll see a list of all available drives connected. Look through the list and find your LaCie drive.
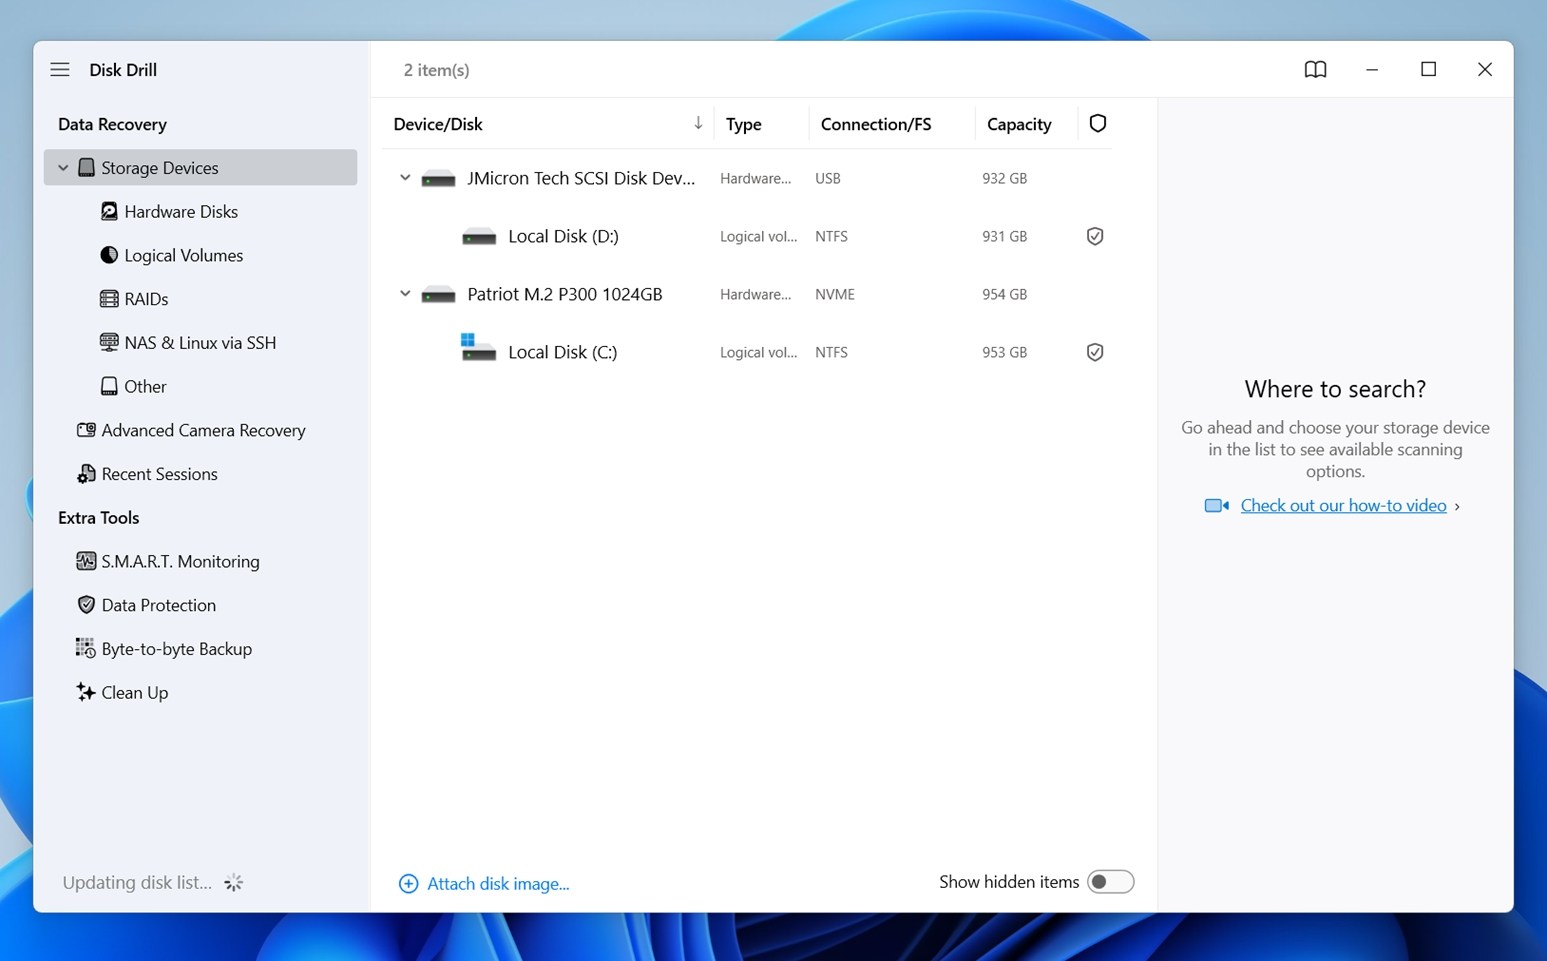 If you’re not sure which drive is which, check the Capacity and Connection shown next to each name. For example, your internal system drive will likely say “SATA” or “NVMe,” while your LaCie might show up as “USB” and have the matching storage size.
 - (Optional step) Create a Byte-to-Byte backup. If you simply deleted a few files and want them back, and your drive seems to be working fine, you can skip this and jump to step 8.
However, if your LaCie drive does act up, it might be smart to back it up first and work from the image. Go to the left sidebar and select Byte-to-byte Backup.
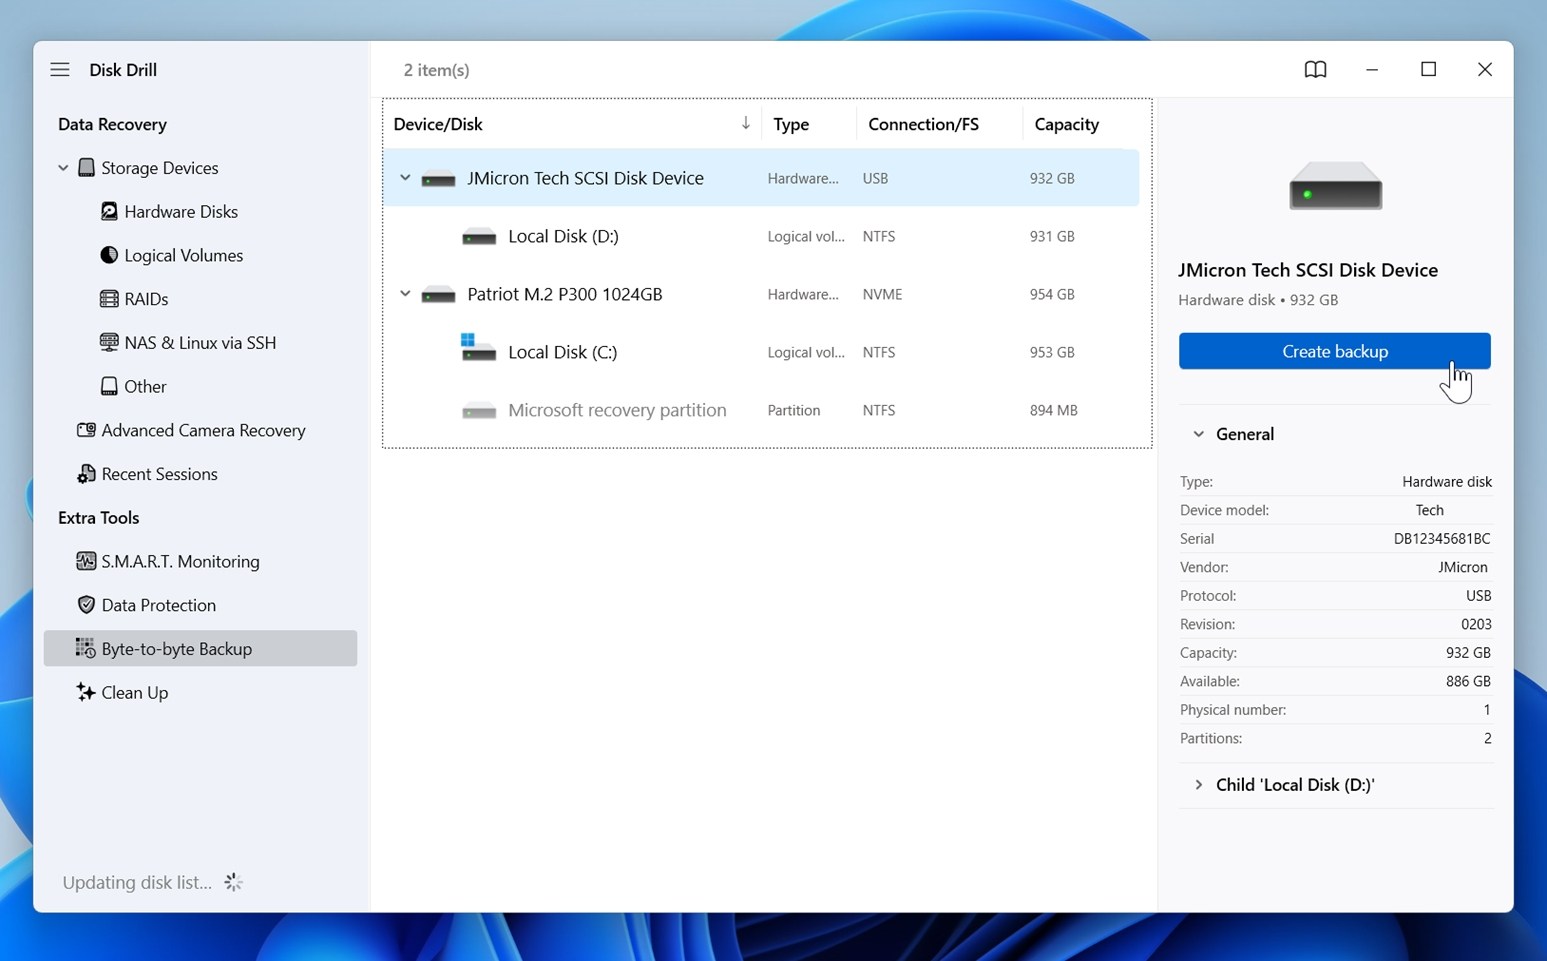
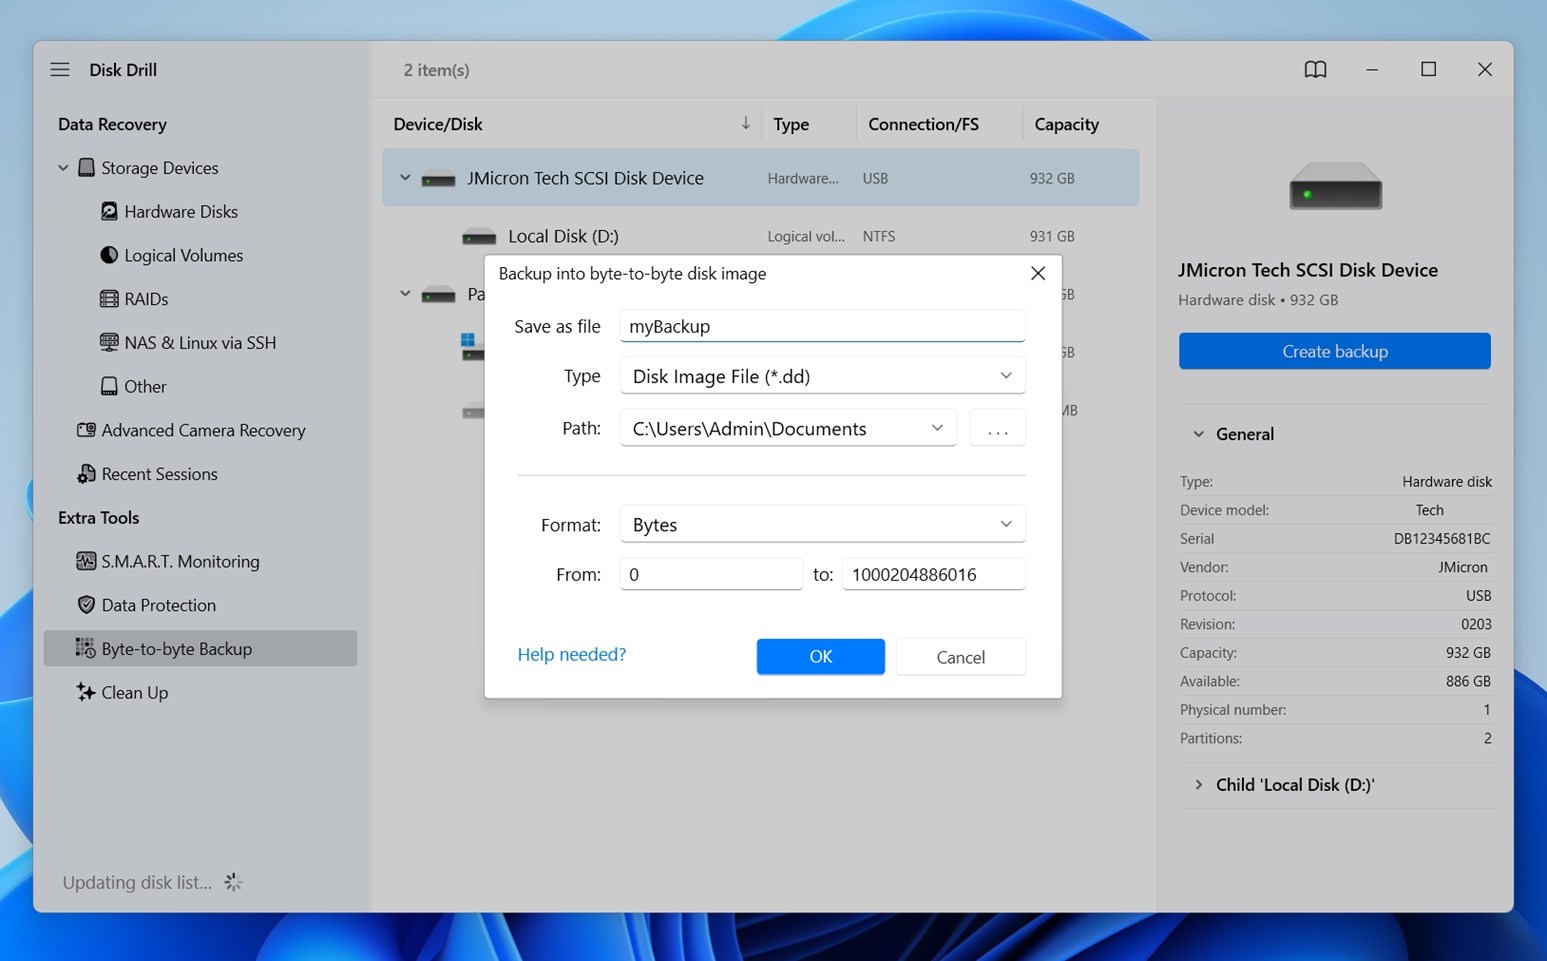
- Choose your LaCie drive, then click Create backup in the top right corner. Follow the prompts to save the image file to another drive – make sure you have enough free space (a bit more than the full size of your LaCie drive).
- After you create a disk image, you need to mount it. Scroll to the bottom of the main screen and click Attach disk image. Find the file you just created and open it – Disk Drill will add it to the list of drives right next to your real one.
- Select your drive/image and click Search for lost data to begin the scan.
- Disk Drill may ask you which scan mode to use.
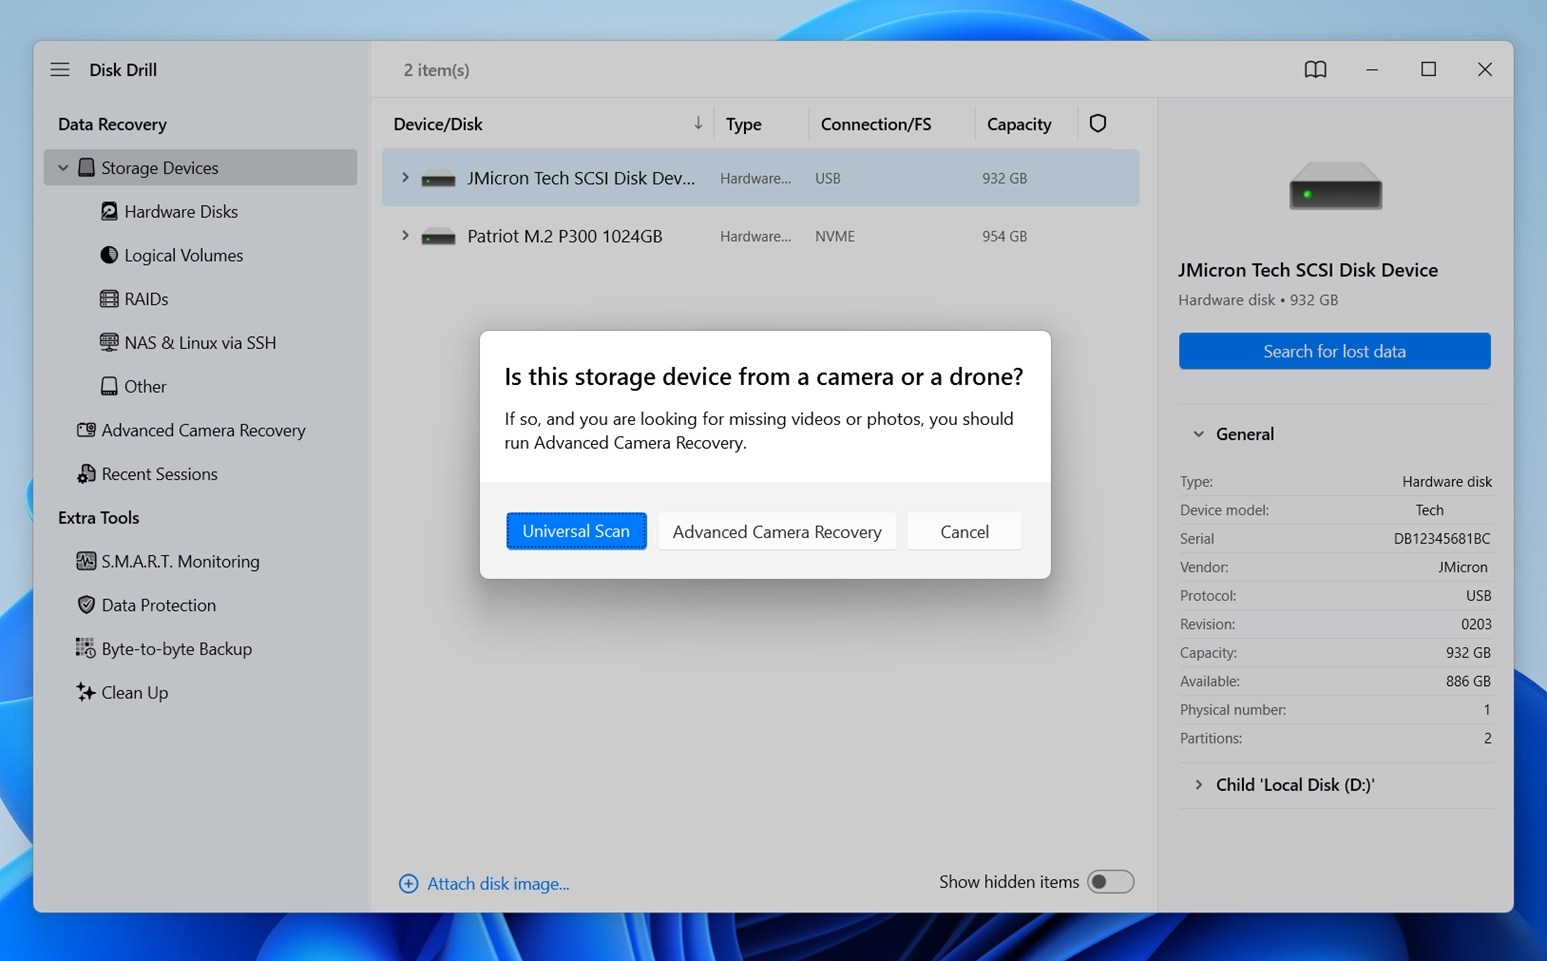 Choose Universal Scan – it’s the standard all-purpose mode that works well in most LaCie hard drive data recovery cases.
 - You’ll see progress in real time, and here’s the helpful part – you don’t need to wait for the scan to fully finish.
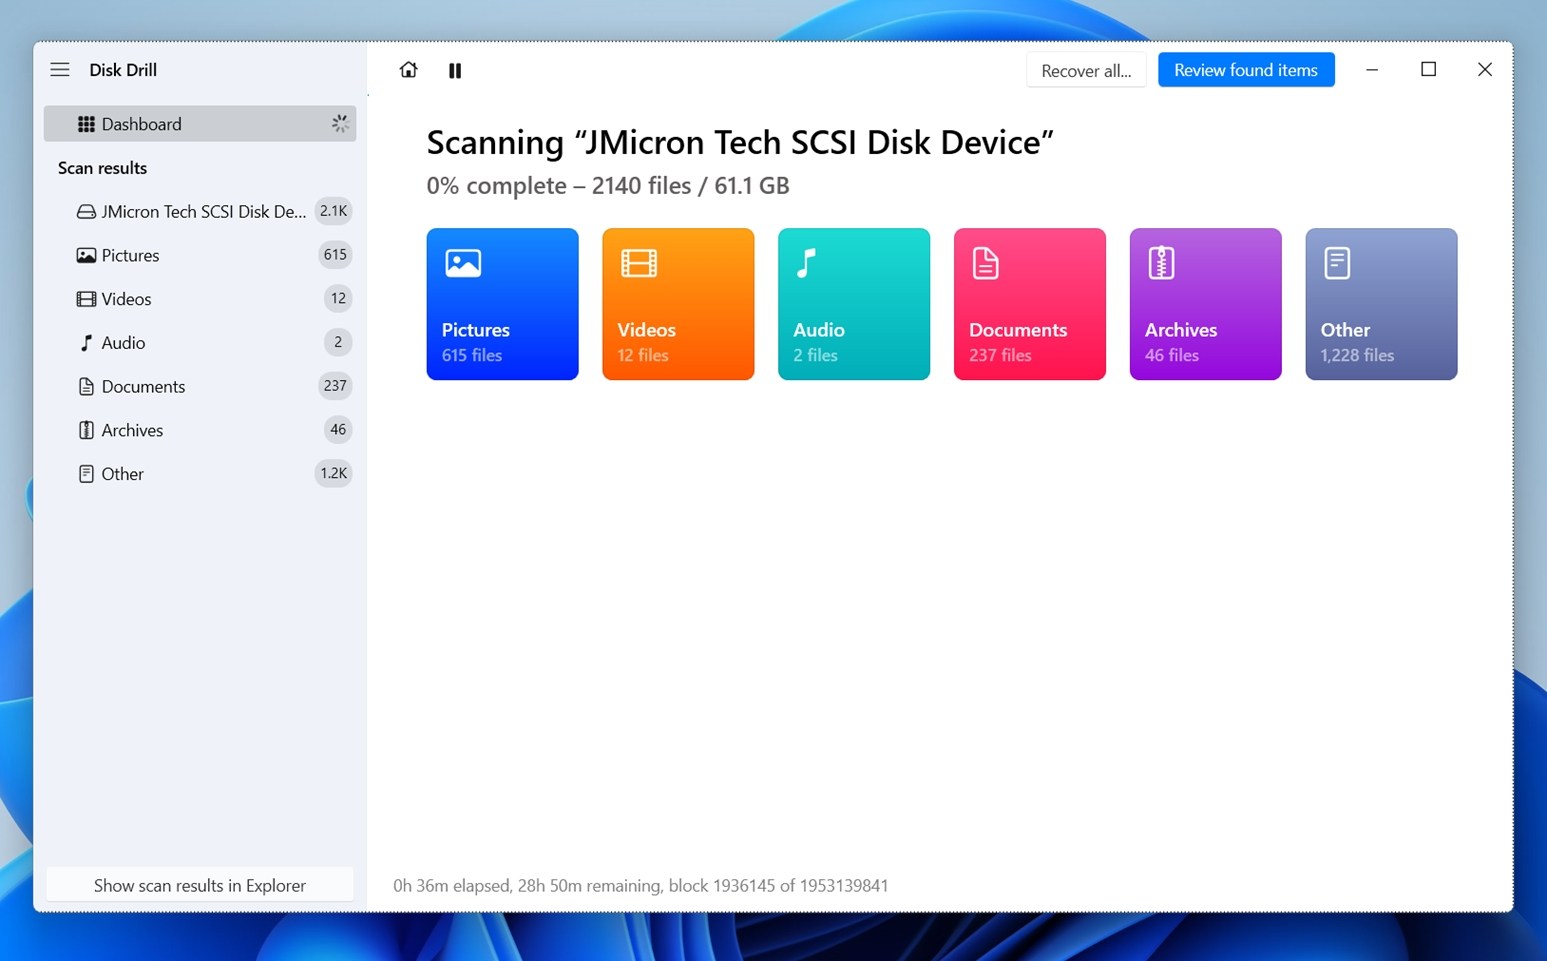 Disk Drill lets you browse and preview results as they come in. They neatly sorted into categories like Pictures, Video, Audio, Documents, Archives, and Other Files. 🗨️
If you’re after everything on the drive and don’t need to preview or cherry-pick specific files, you can just let the scan finish and then click Recover all... (Just choose a safe recovery location on a different drive.) Once selected, Disk Drill will save everything it found to that folder.
- You can click around to explore manually, or use the search bar at the top like you would in File Explorer. It supports names, partial names, or even file extensions.
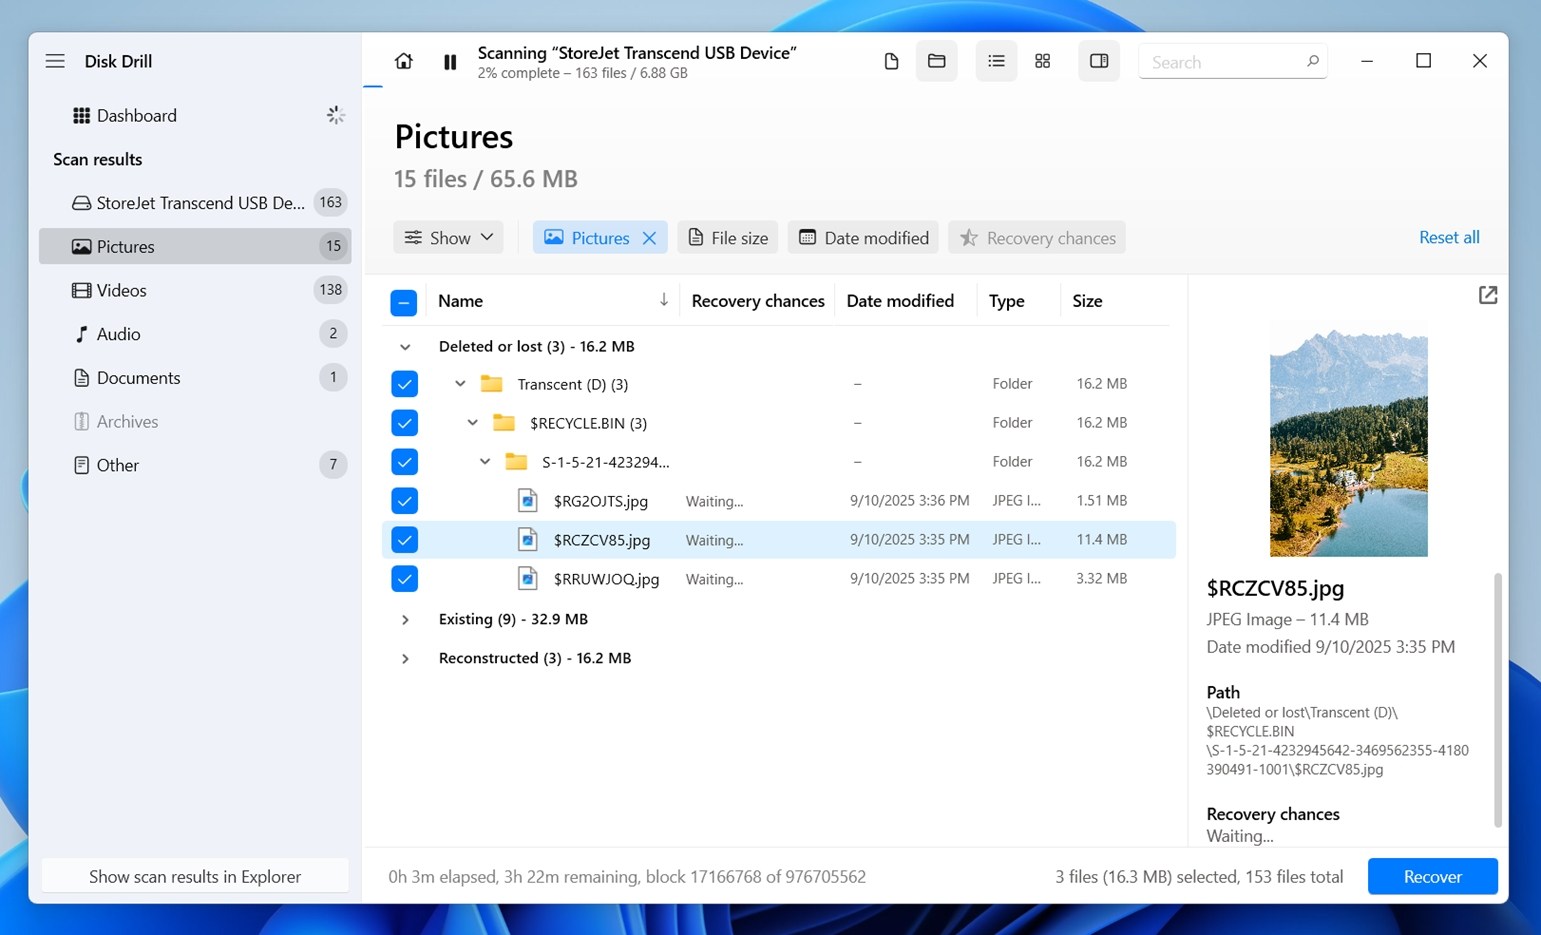
- But of course, the easiest way to check if that’s the file you want to recover is to preview it. As you click on any file, you’ll see a preview panel on the right. Disk Drill can preview pretty much anything your OS can open (either natively or with a viewer you have installed). Previews are also the best way to confirm the file is intact. If you see a full preview, it means the file is 100% recoverable.
- Once you’ve checked the files or folders you want, go ahead and click the Recover button.
- Disk Drill will ask you where to save the recovered data.
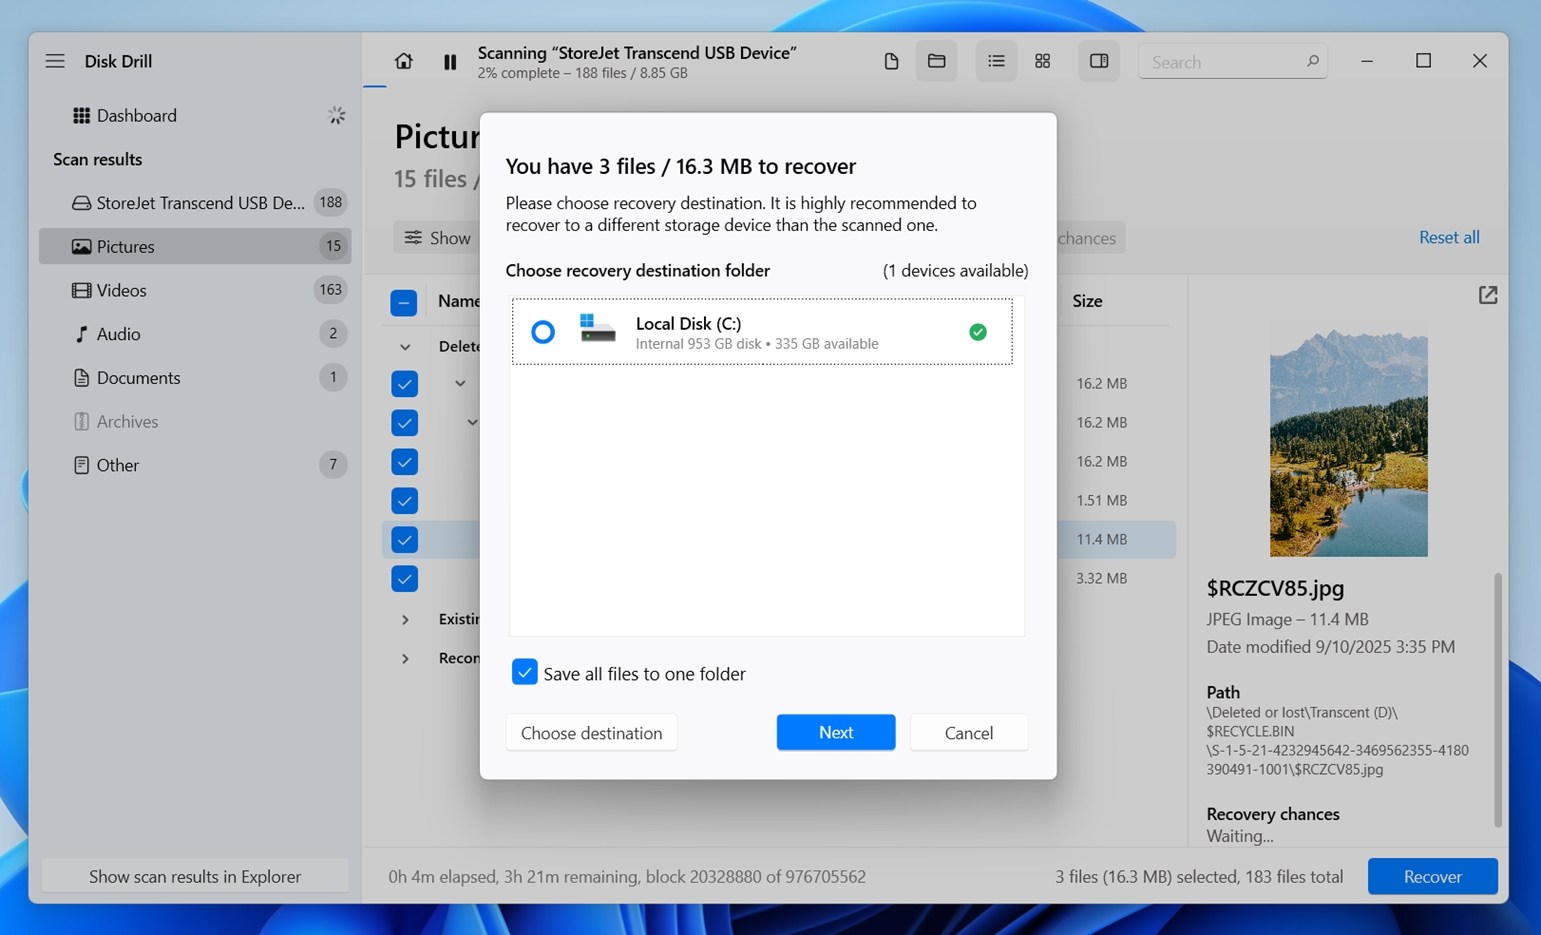 Important detail here: don’t select your LaCie drive as the destination. If you do, Disk Drill will warn you anyway, but the reason matters – saving files to the same drive you’re recovering from can overwrite the very data you’re trying to get back. Pick a different internal/external drive or a USB stick with enough space.
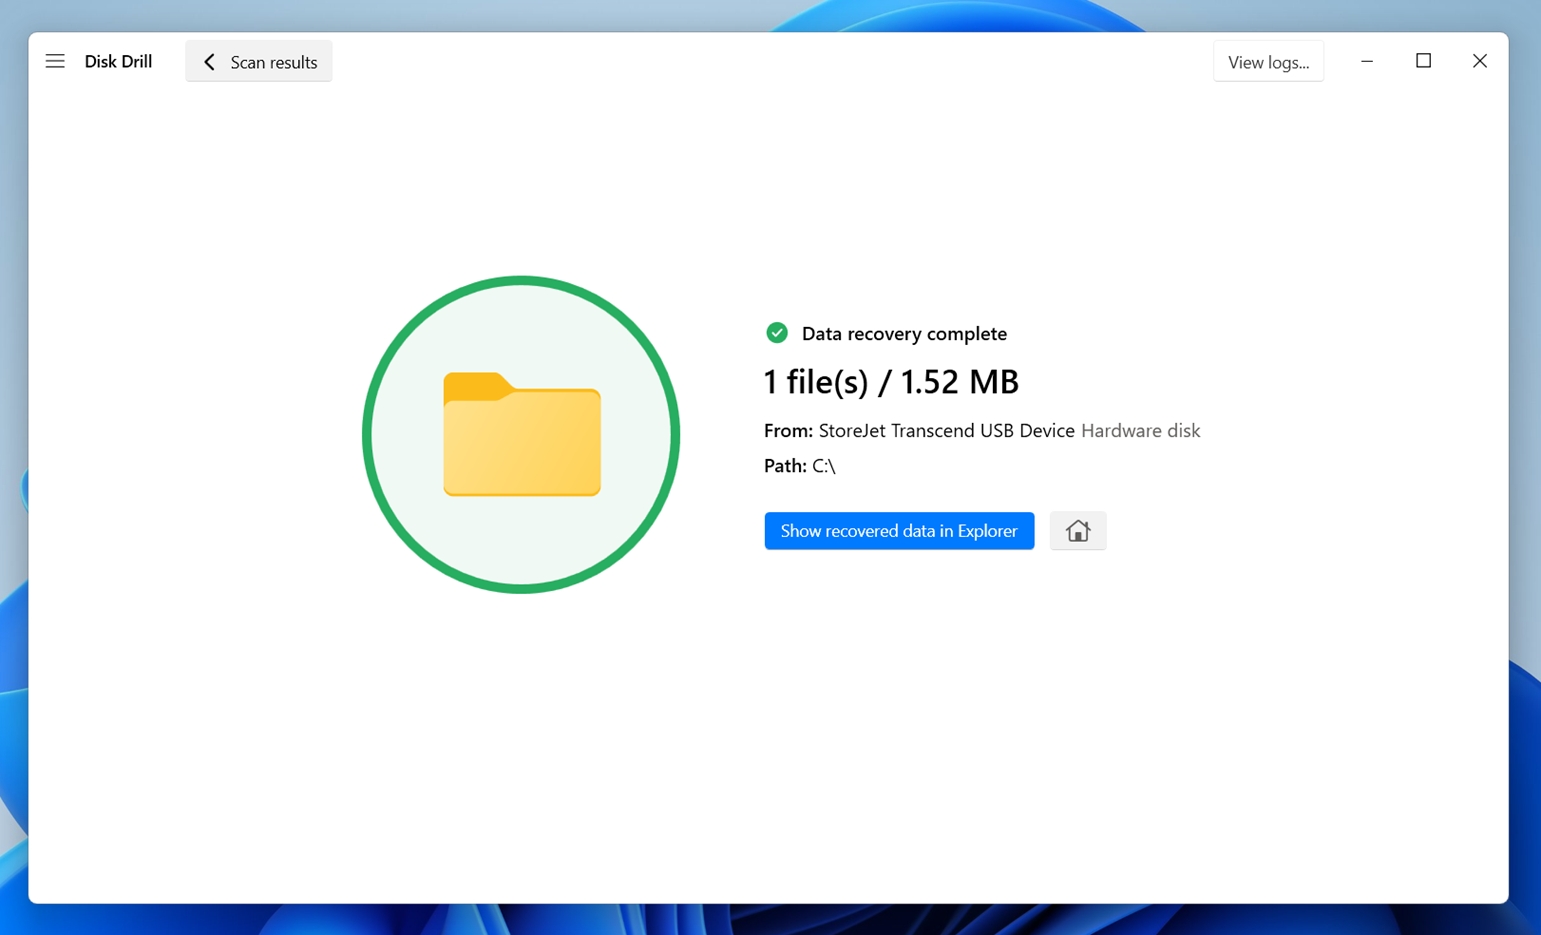
 - Once recovery finishes, Disk Drill will give you the option to Show recovered data in Explorer. Click it, and it’ll pop open the folder so you can check your files right away.
Disk Drill also comes with S.M.A.R.T. monitoring, which lets you check the health status of your LaCie drive. You’ll find it under the Extra Tools tab in the sidebar. If you see warnings (like high reallocated sector count, overheating, or pending sector issues), that’s usually a cue to create a byte-to-byte backup.
All these extra features are unlocked in the free version of Disk Drill. On Windows, you’ll be able to recover up to 100 MB without upgrading to PRO. That might actually be enough for minor data loss incidents, like deleted documents or a small batch of photos. And for a tool of this caliber, with high file recovery chances and tons of quality-of-life features, it’s a pretty generous free tier.
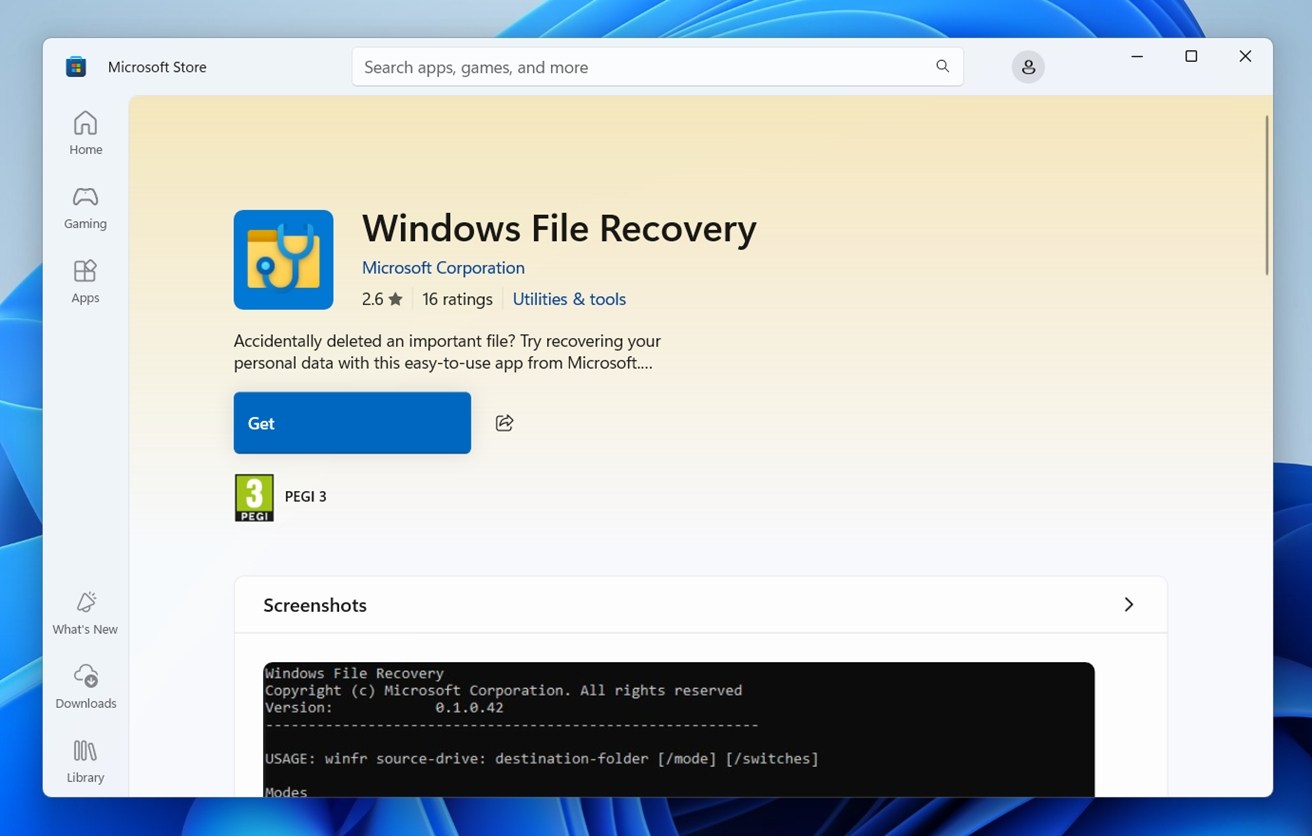
Option B: Windows File Recovery Tool
The Windows File Recovery Tool is 100% free software from the Microsoft Store. If you have Windows 10/11, you can use it to recover data from drives formatted with Windows file systems like NTFS, FAT, or exFAT (in our tests, it worked best with NTFS). But unlike Disk Drill, it doesn’t have a GUI (graphical user interface) so you’ll have to use the command line to recover data from your LaCie external hard drive.
![]()
As we mentioned in our full Windows File Recovery review, it’s a fairly basic tool that can work for the simplest data loss cases. We’re using it here because it’s Microsoft’s own utility and available for free from the Microsoft Store; but keep in mind, there are many other recovery tools out there, including some free LaCie recovery software options. If you’re curious or want to compare tools, check out our full data recovery software ranking.
By the way, you may have come across a GUI version of Windows File Recovery online called WinFRGUI, or even found a couple of versions floating around. If you wonder what it is and how legit it really is, we investigated the whole situation here.
Here’s how you can use Windows File Recovery:
- Download the Windows File Recovery Tool from the Microsoft Store and open it.
- Type the following command and hit enter:
winfr E: C:\RecoveredFiles /extensive
Replace “E:” with your LaCie drive’s assigned letter and replace “C:\RecoveredFiles” with the location on your computer where you want the tool to save the recovered files. Press Y when prompted to continue.
- Wait for Windows File Recovery Tool to complete its scan, then hit Y when prompted to view the recovered files. They’ll be organized by file type into folders that will be located in the destination you specified.
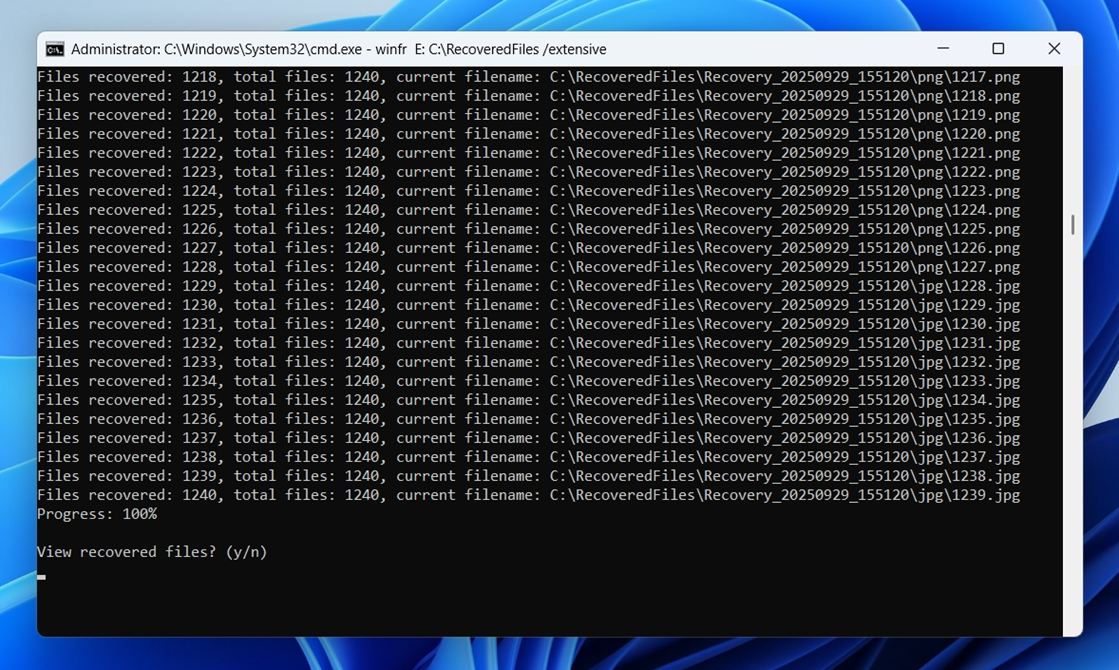
What is “/extensive” here? The /extensive mode in Windows File Recovery is the tool’s more thorough scanning options. Microsoft suggests using it when the drive has been formatted or corrupted, but we recommend using it in any case. That gives you everything the tool can muster.
Unlike the quicker /regular mode (recommended for recently deleted files on NTFS drives), /extensive performs a deep scan to locate fragmented or older deleted files.
In short: Windows File Recovery is fine for simple cases, like a few recently deleted files of common types. But if your drive was formatted or shows signs of problems, this tool likely won’t cut it. You’ll need something more advanced for that.
What Factors Affect Data Recovery from a LaCie Hard Drive?
LaCie external hard drive data recovery is usually a fairly simple process, but like with any recovery case, success is never guaranteed. Too many factors come into play to make promises. That said, you might be glad to hear this: most people who try DIY LaCie data recovery software report good results.
In fact, based on our survey, about 79% of users who followed the steps and used trusted recovery tools were able to recover their data successfully. So as you can see, your chances are solid.
Here are the key factors that make a difference:
- Have you continued using the drive since the file was deleted? Drive activity matters a lot. Writing new files or modifying existing ones can overwrite deleted data. For example, saving a 5 MB file could wipe out a previously deleted archive of the same size. The less you’ve used the drive, the better your chances.
- What type of storage device are you dealing with? Traditional HDDs are more forgiving. When files are deleted, the data stays on the disk until it’s overwritten. That gives recovery software something to work with. SSDs are trickier. Most run a feature called TRIM, which wipes deleted data quickly to maintain performance. That makes recovery difficult (often impossible), especially on internal SSDs, where TRIM is almost always active. However, if you’re using an external SSD, TRIM might not run at all. External drives connected via USB Type-A or Type-C hubs (which includes most LaCie portable SSDs) often don’t pass TRIM commands properly. That means the deleted files might still be recoverable.
- What caused the data loss in the first place? Simple deletions (or even a quick format) usually give you a good chance of recovery. The data is still on the drive – it’s just hidden from the file system and marked as free space. The opposite scenario is a full format, which wipes file system structures and overwrites sectors with zeros. That leaves you with much lower odds of recovering anything usable (basically zero chance in practice).
- What actions did you take right after losing data? If you tried repairs, formatted the drive again, or scanned it multiple times with different tools, that can reduce your chances. Recovery is most effective when done early and carefully (ideally before anything else touches the disk).
How to Fix a Malfunctional/Unreadable LaCie Drive
Now, as promised, let’s get to the fixes. These might be useful if you’re dealing with something more serious than just a few deleted files – like when your LaCie hard drive won’t boot or refuses to show up at all on your computer.
Method 1: Check ports and connectors
Unplug your LaCie drive and try a different USB port – preferably one on the back of your PC if you’re using a desktop. Avoid USB hubs, especially passive ones. If you’re using a Type-C cable, try switching to a Type-A port (or vice versa) if the drive supports both.
Next, swap out the cable if you have a spare. Damaged or loose cables are more common than you’d think, especially with older or heavily-used external drives.
Also check if the drive powers on – look for activity lights or listen for the usual spin-up sound (if it’s an HDD). If nothing happens at all, try connecting it to another computer to rule out system-side issues.
Method 2: Run CHKDSK
If your LaCie drive gets detected just fine but throws errors when you try to open it, there’s one built-in Windows utility that might actually help: CHKDSK.
This tool scans the drive for file system problems and tries to repair them. It’s not a full recovery tool, but in some cases, it can bring a damaged LaCie drive back into working condition.
Here’s how to use it:
- Open Command Prompt as Administrator (Right-click Start > choose Command Prompt (Admin) or Windows Terminal (Admin))
- Type the following command “chkdsk E: /f /r /x”
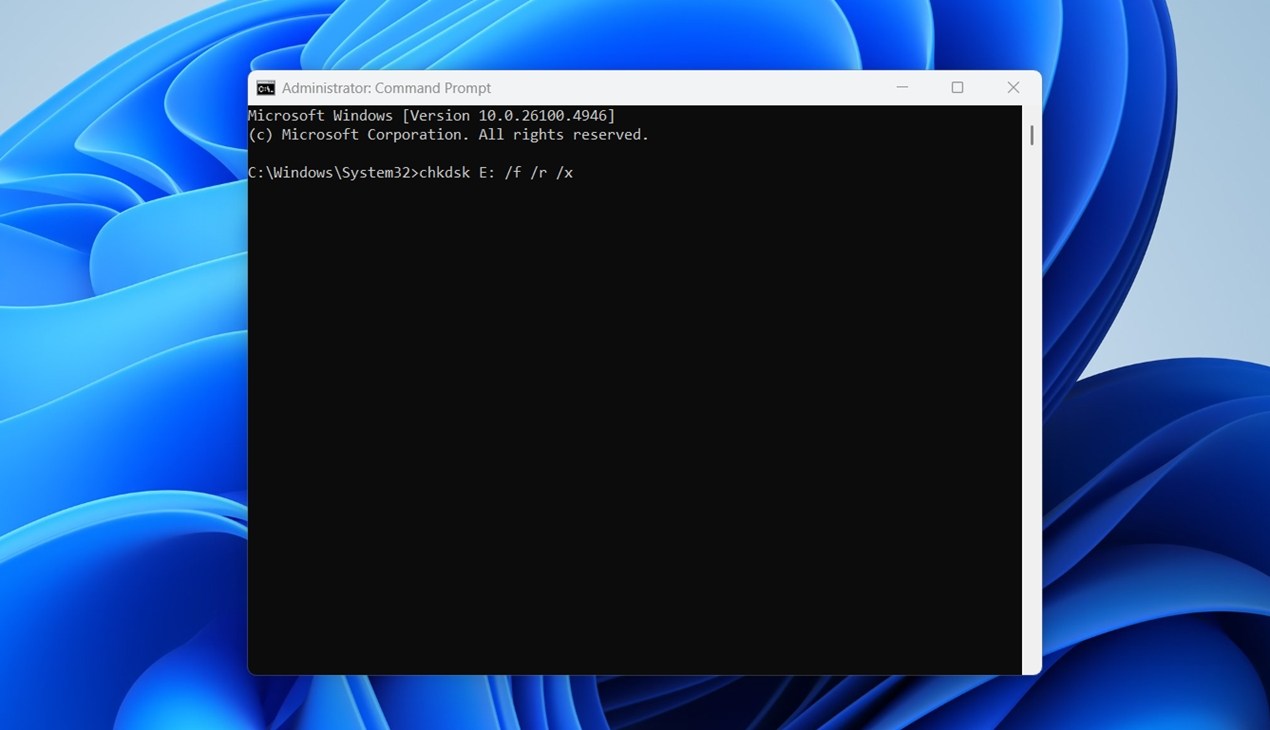
Replace E: with the correct letter assigned to your LaCie drive.
- /f tells CHKDSK to fix errors
- /r locates bad sectors and recovers readable data
- /x forces the drive to dismount first if it’s in use
Now, important warning: don’t run CHKDSK if you haven’t recovered your files yet. In some situations, especially on formatted or unstable drives, CHKDSK can cause permanent data loss.
Use this only if the data isn’t valuable, or if you’ve already finished your LaCie hard drive recovery and just want the drive usable again.
Method 3: Assign/Change its drive letter
Your computer should automatically assign a drive letter to your LaCie drive so both devices can properly communicate. A bug or lack of resources can interrupt this process, but we can do it manually.
Here’s how:
- Right-click the Start button and select Disk Management.
- Look through the list of volumes and find your LaCie drive (You’ll usually recognize it by its size or label. If it’s missing a drive letter, it’ll show as a healthy volume without a letter assigned.)
- Right-click the drive and choose Change Drive Letter and Paths…
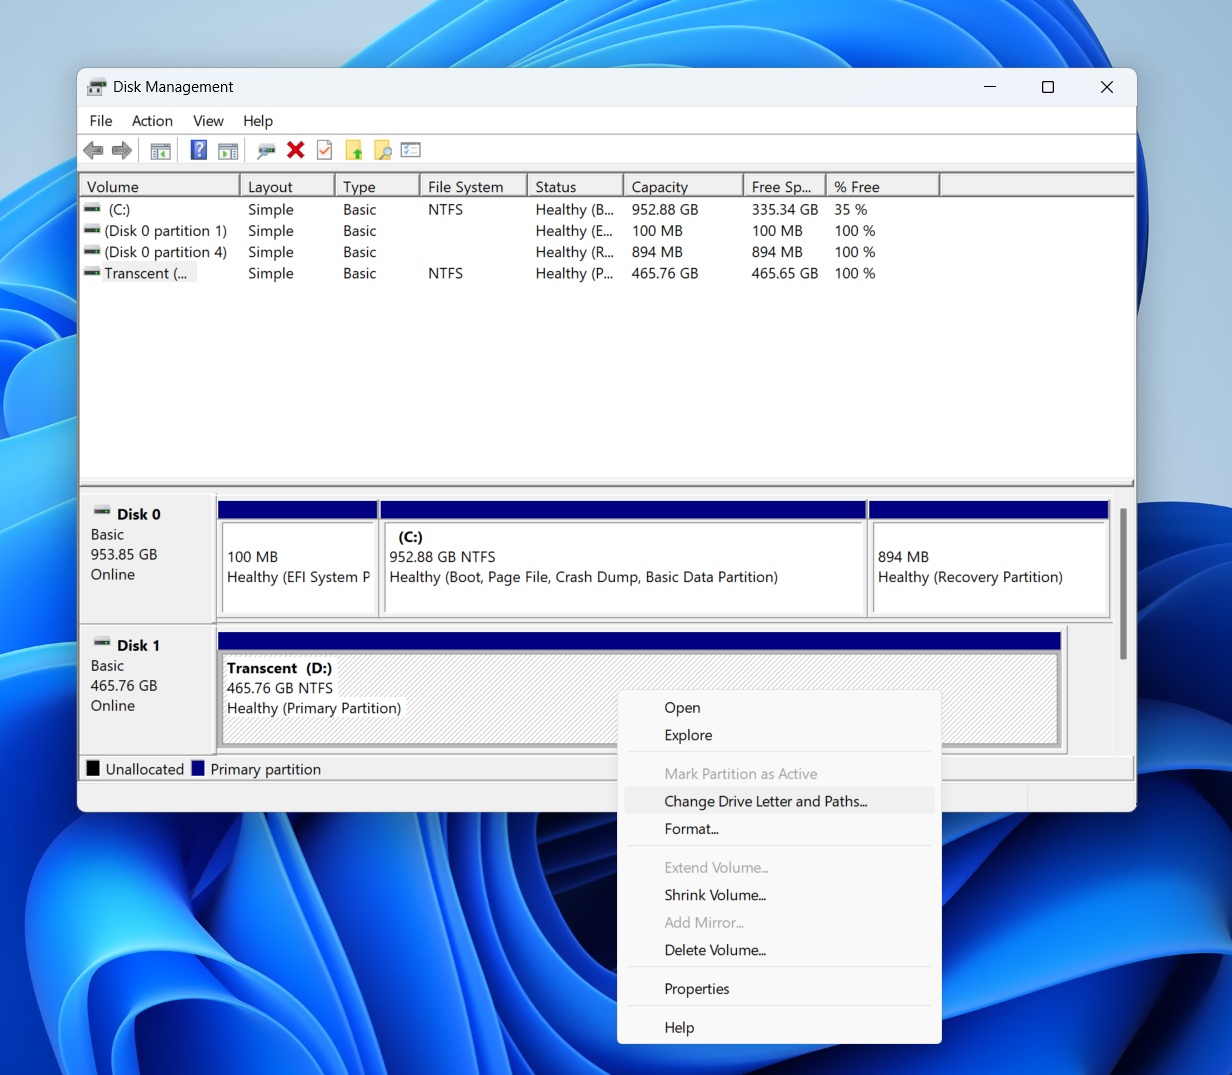
- Click Add if it doesn’t have a letter, or Change to assign a new one.
- Pick any available letter and click OK.
After that, your LaCie drive should appear in File Explorer like normal.
If it still doesn’t show up or gives access errors, the issue might be deeper (like partition damage or corruption). But if this solves it, you’re back in business.
Method 4: Use Victoria SSD/HDD
Victoria is a powerful diagnostic tool that scans for bad sectors and attempts to remap them. It’s been around since 2006 and has a strong reputation for handling physical drive problems.
Use it when your LaCie hard drive shows signs of bad sectors – things like painfully slow performance, frequent read/write errors, or freezing when trying to copy files. These are often early warnings of physical damage.
Here’s how to use VictoriaHDD to check and repair your LaCie drive:
- Download the latest version of Victoria.
- Extract the files to a folder. It runs as a standalone app.
Right-click the program file and select Run as Administrator (this gives it the access needed to scan the drive properly).
- From the list of connected drives, select your LaCie hard drive.
- Go to the Tests&Repair tab and click Scan to begin a full surface analysis.
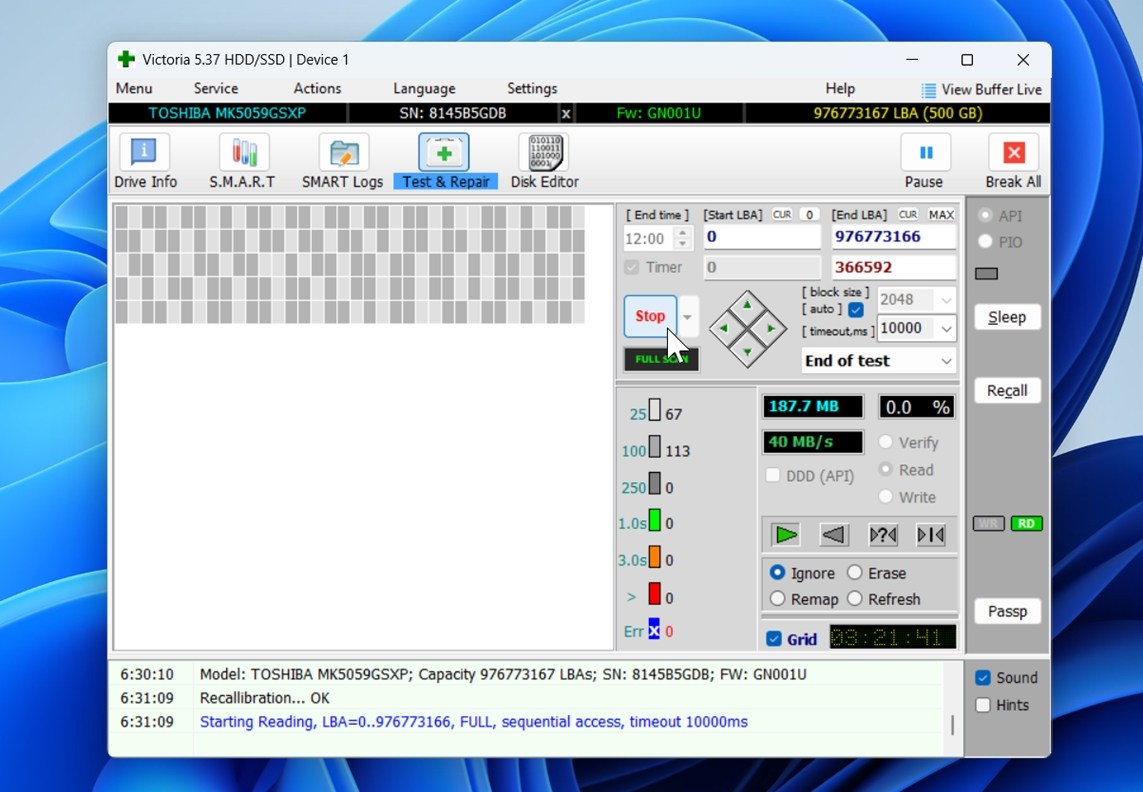
- As the scan runs, Victoria will display a live map of sector health: good (green), slow (yellow), and bad (red).
- If bad sectors are found, enable the Remap option. This tells the drive to reallocate those sectors so the operating system won’t touch them again.
Keep in mind, this is more about stabilizing the drive – not recovering lost data. If Victoria shows serious damage, and you haven’t recovered your files yet, now’s the time to stop and switch to a professional LaCie hard drive recovery tool.
You can find Victoria, and plenty of other useful utilities, in our list of the best hard disk repair software. If your LaCie drive needs fixing, it’s a solid resource worth checking out.
Method 5: Use TestDisk to Fix Partition Issues
TestDisk is free, open-source software that can be incredibly useful if you accidentally deleted a partition (or if it somehow got corrupted or disappeared altogether). It’s a tool we’ve used countless times and reviewed extensively. It’s not the easiest thing to use, but in the right scenarios, it might be the best tool for the job.
TestDisk doesn’t focus on individual file recovery like some other apps. Instead, it’s designed to restore lost partitions and rebuild damaged partition tables. If your LaCie hard drive shows up as RAW, unallocated, or refuses to open even though it appears in Disk Management, this tool is worth a shot.
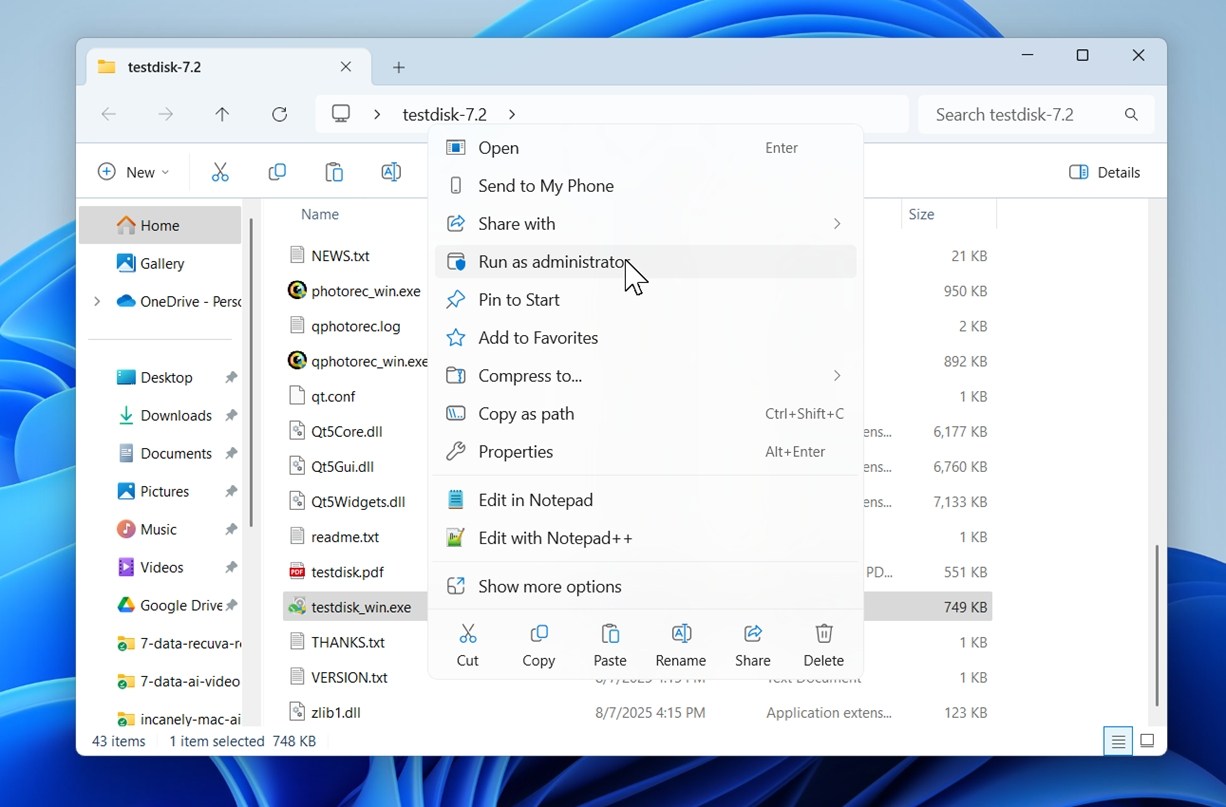
Here’s how to use it:
- Download TestDisk from cgsecurity.org and extract the files (no installation required here).
- Run testdisk_win.exe as Administrator.
- At the prompt, choose Create to generate a log file (or skip it – it won’t affect recovery).
- Select your LaCie drive from the list of connected disks.
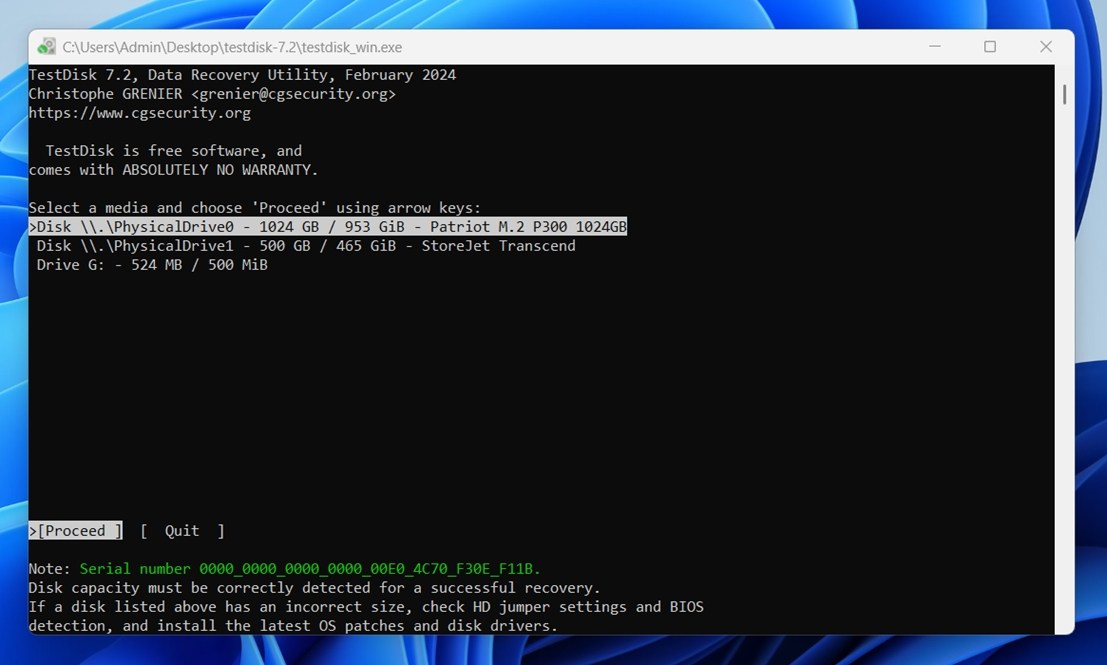
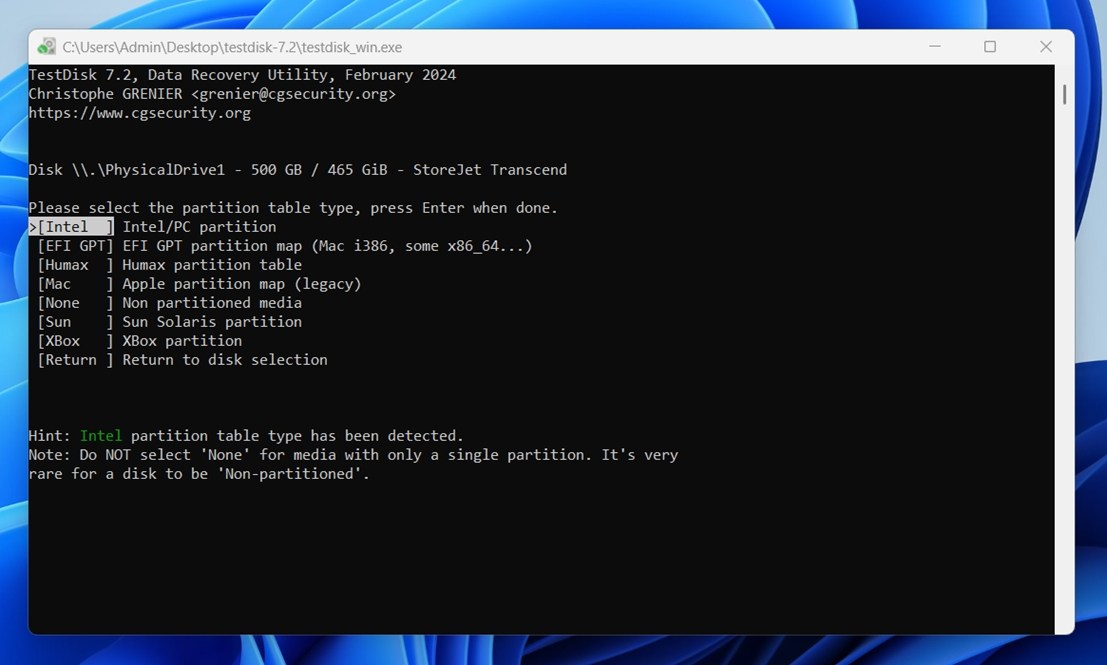
- Choose the correct partition table type – usually Intel for most Windows setups.
- Select Analyse, then run a Quick Search.
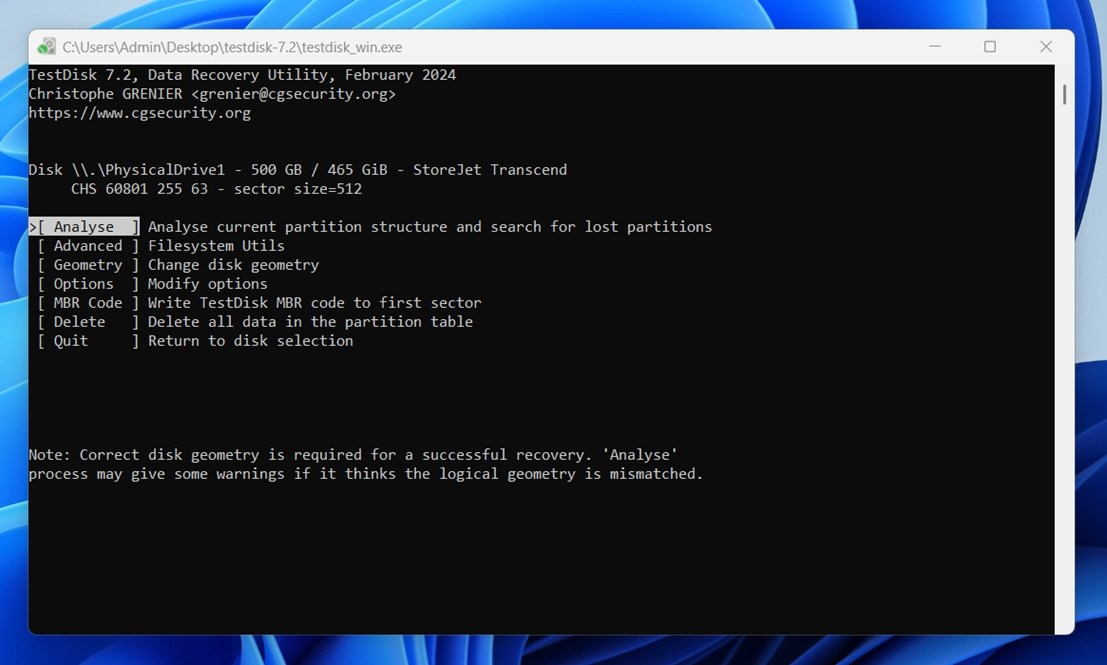
- If TestDisk finds your lost partition, review the info and press Enter.
- If not, go ahead with Deeper Search to scan further back.
- When the correct partition appears, press Enter, then choose Write to restore it.
After the process completes, reboot your computer and check if your LaCie drive shows up normally again in File Explorer.
Method 6: Format the LaCie drive
And of course, the simplest method of all is formatting. If you’ve already retrieved your data, nothing stops you from simply wiping the drive and starting fresh.
This is often the quickest way to deal with file system errors, unreadable volumes, or strange behavior- as long as there’s no data left you still need to recover. Once you format the drive, recovery becomes a lot harder or even impossible in some cases.
Here’s how to do it safely:
- Open Disk Management (right-click Start > Disk Management).
- Find your LaCie drive in the list.
- Right-click it and choose Format.
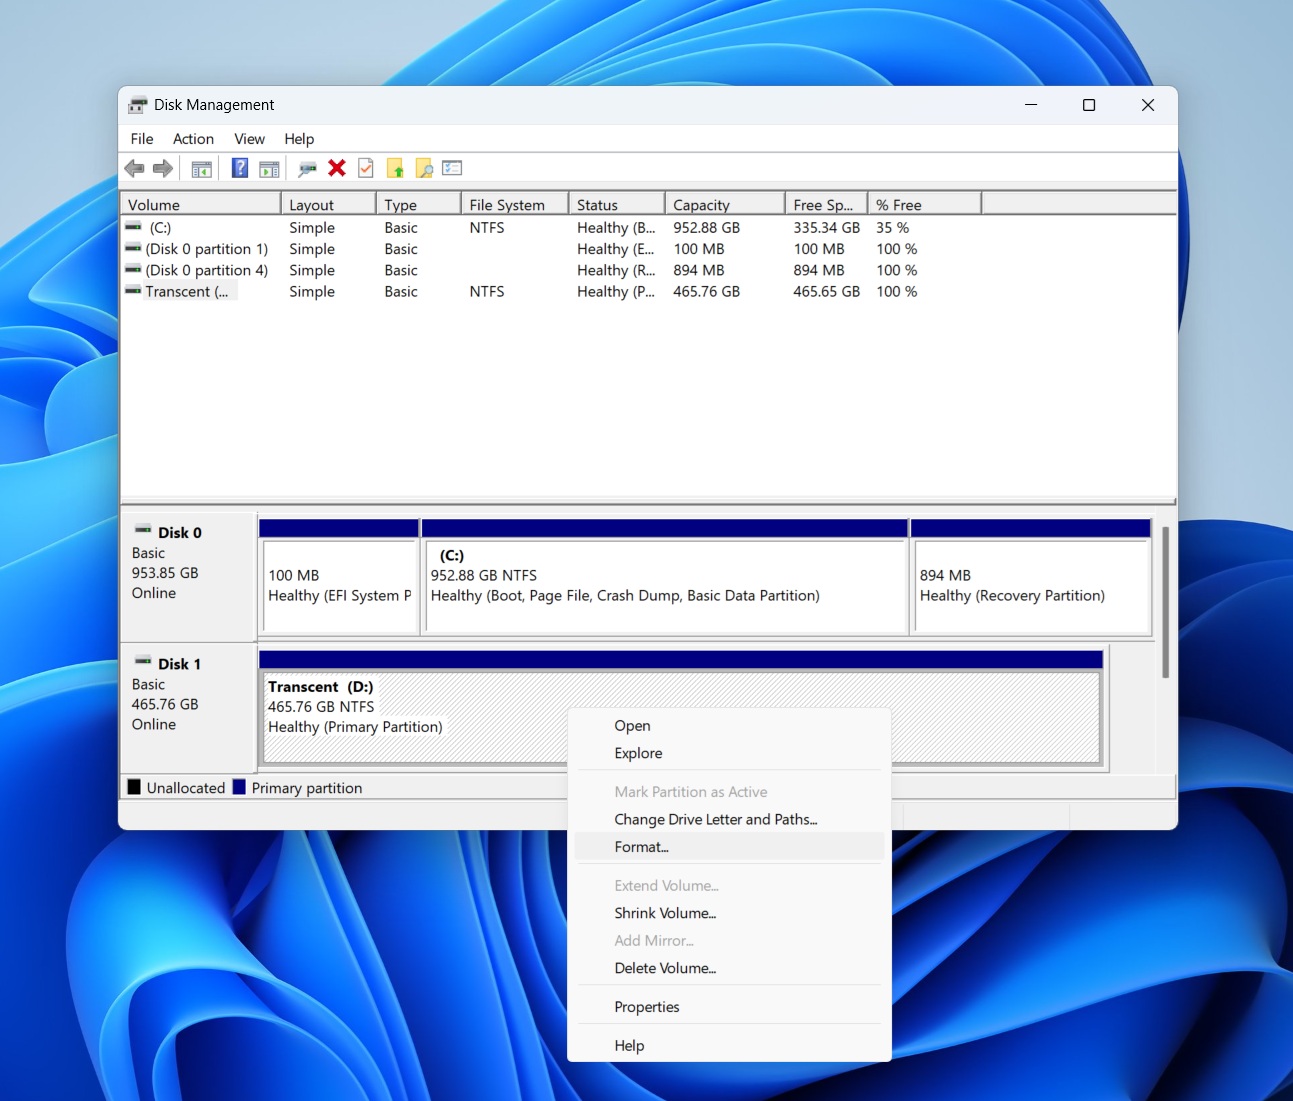
- Choose a file system: NTFS for Windows-only use, exFAT for cross-platform compatibility (Windows + macOS).
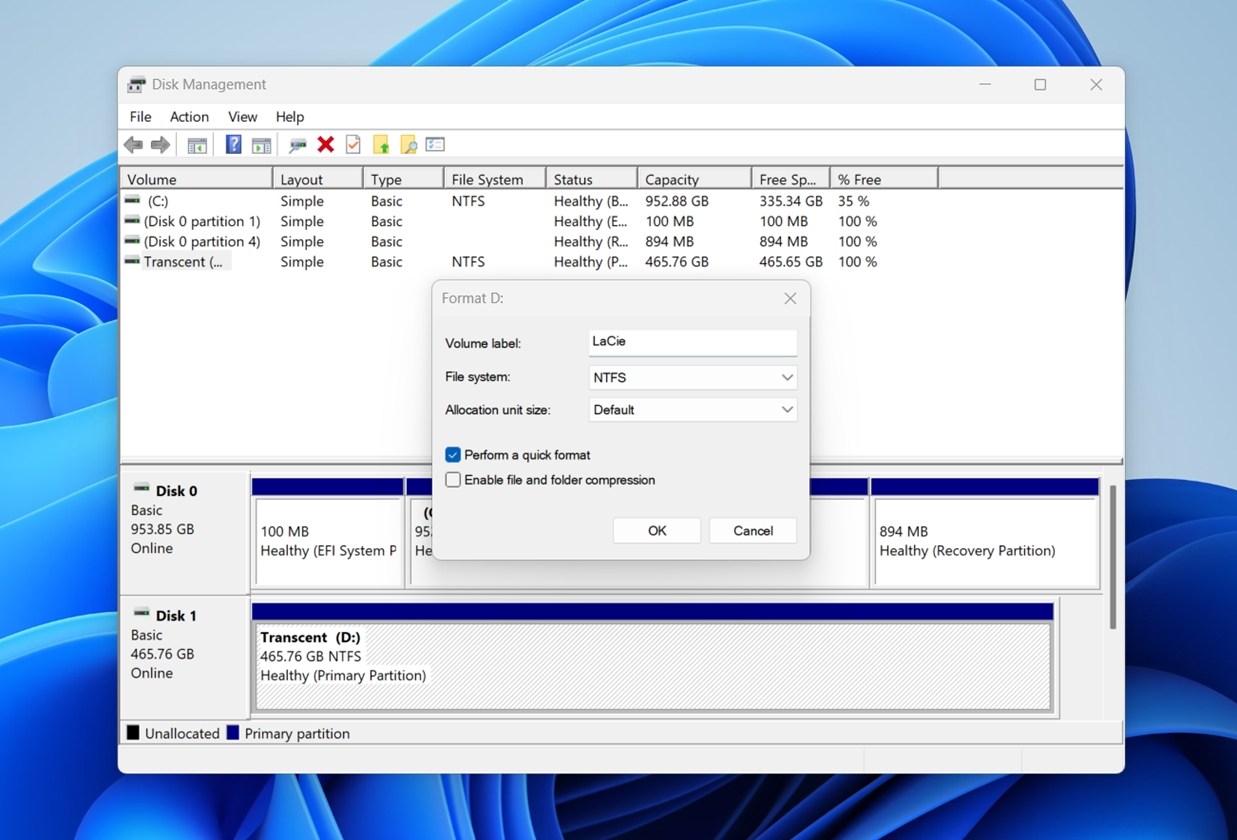
- Leave Allocation Unit Size at Default, give it a simple name if you want, and click OK.
Windows will warn you that all data will be lost. That’s expected. After formatting, the drive should behave like a new disk.
When It Makes Sense to Contact LaCie’s Official Recovery Service
Of course, there are some cases where DIY LaCie hard drive recovery is not possible – or not worth the risk. If it’s something serious like physical damage or high-value business data, it makes more sense to stop and bring in professionals.
LaCie is part of Seagate, and their official recovery option is through Rescue Data Recovery Services.
Initiating a recovery request is simple: Contact Seagate customer support and explain what happened with your LaCie drive. Once your claim is approved, they’ll send you a prepaid shipping label so you can safely send the damaged drive to their lab.
- On average, the process takes about 30 business days from the time your drive reaches the lab. Keep in mind that timeline can shift depending on how bad the damage is, local customs, parts availability, and other logistical factors.
- If recovery is successful, they’ll ship your data back to you on a new encrypted storage device for added security.
- If recovery isn’t possible, they’ll send your original damaged drive back to you.
LaCie’s Rescue plan is often included with eligible drives at the time of purchase – but even if it’s not, Seagate still accepts out-of-warranty cases (fees may apply depending on the situation).
Of course, nothing forces you to go with Seagate’s recovery service. There are plenty of other professional data recovery labs out there – some may even be closer to where you live or easier to work with, depending on your region.
If you’re exploring alternatives, we’ve put together a solid guide on the best professional data recovery services, including what to expect, how pricing works, and how each lab handles the process.
Just a fair warning: none of this is cheap. Professional recovery is pricey, especially if the damage is severe or requires physical repairs. You could be looking at hundreds of dollars, sometimes more.
That’s why DIY recovery is still the smarter option in most cases.
Quick Recap
If we had to condense this entire guide into a TL;DR for those who scrolled straight to the bottom – here it is:
- Accidentally deleted files or formatted your LaCie drive? You still have a good shot at recovery (especially if you haven’t used the drive since).
- LaCie hard drive recovery software is your best first step. It’s safe, effective, and can handle most DIY scenarios. Try Disk Drill. You can even make a byte-to-byte backup if your drive is acting up.
- Drive not showing up? If you already recovered your data, you can safely use tools like Disk Management, TestDisk, or Victoria to fix common issues.
- Still nothing? You’re probably dealing with hardware trouble. In that case, professional data recovery labs (like Seagate’s Rescue service) might be your only option. But if your data has been simply overwritten, even the service won’t be able to recover it.
- Just know it won’t be cheap. Labs are expensive, so go DIY first unless your drive is completely dead or making weird noises.
Whether you’re here for one missing folder or a full-blown recovery mission, we hope this guide helped you figure out what to do next.
If you still have questions, check the FAQ section below – your answer might already be there. If not, feel free to ask our community directly here. We’re always around and happy to help.
FAQ
How to recover data from a LaCie external hard drive?
To recover data from a LaCie external hard drive, follow these steps:
- Stop using the drive. Avoid copying new files to it.
- Download data recovery software.
- Launch the recovery tool and select your LaCie external drive.
- Let the software perform a full scan to locate deleted/lost files.
- Review the results. Use the preview feature (if possible) to confirm the files you want to recover.
- Recover to a different drive. Never save recovered files back to the same LaCie drive to avoid overwriting data.
- Safely eject the drive.
Does DIY LaCie data recovery void my warranty?
No, using data recovery software does not void your LaCie warranty. As long as you’re not physically opening the drive or modifying its hardware, your warranty remains intact. Running scans, backups, or using recovery tools are all safe steps.
However, if you send the drive to a third-party repair shop or open the enclosure yourself, that can void the warranty. If your drive is still under warranty and you’re unsure, it’s always a good idea to check with LaCie or Seagate support before doing anything beyond software-based recovery.
Is there any LaCie recovery service?
LaCie users have access to professional in-lab recovery through Seagate’s Rescue Data Recovery Services. If your LaCie drive includes Rescue coverage, you’ll get one in-lab recovery attempt included, along with a prepaid shipping label to send the drive to Seagate’s secure facility. If recovery succeeds, your data returns on an encrypted storage device. If it doesn’t, the drive is sent back to you.
But this isn’t the only route. Many reputable third-party labs offer specialized LaCie recovery services too.
Is there any free Lacie recovery software?
There are some free tools that can help you recover data from a LaCie external hard drive, even if none are branded specifically for LaCie. Here’s a quick overview:
- PhotoRec (open‑source). A file-carving tool that scans for known file types across various storage devices. It runs via command line, though a basic GUI version is available on Windows. While it’s highly capable, keep in mind it comes with some key limitations: no original file names or folder structure, no preview support, lacks many quality-of-life features found in paid tools.
- TestDisk (open-source). PhotoRec’s companion tool focused on recovering lost or damaged partitions. It’s completely free and open-source, but like PhotoRec, it runs through a command-line interface with no official GUI.
- Recuva (free). Simple, user-friendly, can be effective for basic recovery tasks.
How safe is LaCie data recovery software? Can I make things worse?
LaCie data recovery software is generally safe to use – as long as you follow best practices. Most tools are designed to operate in read-only mode, so they won’t write anything to your LaCie drive during the scan. That means your lost data stays untouched while the software analyzes the disk.
Plus, many options, like Disk Drill, which we covered in this guide, offer extra safety features like byte-to-byte backups. These let you create a full disk image of your LaCie drive before running recovery. That way, you’re working with a copy instead of the original, which minimizes any risk of further data loss.
Just remember: avoid recovering files back to the same drive, and stop using it the moment you realize files are missing. That’s how you keep things safe.
Is there any software to repair LaCie hard drive?
Yes, there are hard disk repair software for Windows that may be able to fix your LaCie hard drive. But only consider them after you’ve safely recovered your data with data recovery apps,
Here are a few types to look into:
- Disk repair utilities (like Victoria) – these tools check the physical surfaces of your drive, identify slow or failing sectors, and either remap or mark them as unusable. That helps improve performance and reliability.
- Filesystem repair tools (like CHKDSK on Windows) – these can fix logical filesystem issues, like when the drive loads but won’t open. Use with caution, though; if your data hasn’t been backed up or recovered yet, you risk losing it permanently.
- Partition repair tools (like TestDisk) – and these are for when your disk appears as RAW, lost, or unallocated. TestDisk can rebuild or recover partitions, bringing your drive back into a usable state – again, best used after data recovery or with a disk image.
Is it possible to restore a LaCie external hard drive on a Mac?
In most cases, yes! It is possible to restore a LaCie external hard drive on a Mac. For an in-depth guide on how to do it, read our in-depth guide on how to recover data from an external hard drive on a Mac.
This article was written by Alejandro Santos, a Staff Writer at Handy Recovery Advisor. It was recently updated by Roman Demian. It was also verified for technical accuracy by Andrey Vasilyev, our editorial advisor.
Curious about our content creation process? Take a look at our Editor Guidelines.