
If you connected your SD card, just like always, but it won’t open and shows up as RAW, you’re probably dealing with file system corruption. But is it really a lost cause? Or can you still recover your files and fix the RAW SD card? Now, in some cases, a card might show up as RAW simply because it’s brand new. But if you’re here, our guess is that’s not your situation. Your SD card was likely working fine before something went wrong.
We’ve dealt with all kinds of SD card problems, including plenty of RAW card cases, and today we want to walk you through exactly what to do if it happens to you.
Pro-tip: RAW data just means the file system is missing or unreadable, not that your files are gone. They’re still there, just uncategorized. So don’t touch your SD card until you read this guide. And definitely do not format it, even if Windows prompts you to. We’ll explain why, and show you the right way to recover your data, just below.
Key Takeaways
- RAW usually means Windows can’t read the file system (exFAT/FAT32/NTFS) since it is corrupted or completely gone, but your files may still be there.
- Don’t format first. It can lower recovery odds and make results messier. Recover files first, then fix the card.
- Your safest “default” move: use a recovery tool (like Disk Drill) that can scan without a working file system (signature-based recovery), then save files to a different drive.
- On RAW cards, recovery tools rebuild files by signatures, so names and folder structure often won’t survive. Expect messy filenames.
- A tool like TestDisk might fix it by repairing the partition structure, but it’s hit-or-miss and more technical.
- After you recover data, formatting is the real “fix.” That’s how you rebuild a clean file system and get the card back to normal use.
- Some “RAW” problems aren’t the card. A bad/cheap card reader, flaky adapter, or USB port can cause RAW-like behavior.
- If the card shows a weird capacity (like 32 MB instead of 64 GB) or flips read-only due to hardware failure, software often won’t solve it.
Can You Recover Files from a RAW SD Card?
Yes, in most cases, you can. A RAW SD card usually means there’s no recognized file system present. This often happens because the file system, like FAT32, exFAT, or NTFS, has been corrupted, removed, or damaged. The OS relies on that file system to know where your files are and how to read them. Without it, the card appears blank and inaccessible, even though your data is still physically there.
This is where RAW SD card recovery software can help. It’s designed to scan this kind of unreadable card and recover whatever data it finds, photos, videos, audio files, documents, even when the file system is completely broken.
Of course, if you’re not trying to save anything from the card, you can skip ahead to the next section: How to Fix a RAW SD Card.
By the way, if you already formatted your SD card to fix the RAW issue and now want your data back, Method 1 below will still work for that case too. But if you want a more in-depth walkthrough tailored specifically to formatted cards, check out our full guide: How to Recover Data from a Formatted SD Card.
How to Recover Data from a RAW SD Card
There are a few different ways to deal with a RAW SD card, and we’ll split this section into two methods that can retrieve data from a RAW SD card. Both involve using recovery software that works with RAW storage, whether it’s an SD card or something else. We’ll explain how each one works, when to use it, and what kind of results to expect.
Let’s start with the simpler method first.
Method 1: Use Disk Drill to Recover Data from a RAW SD Card
This is the most universal method. It uses a recovery tool that can handle almost any data loss scenario. Even if your RAW SD card was formatted or throws the usual “You need to format the disk before you can use it” error, this kind of software can bypass it entirely. It doesn’t rely on a working file system to access your data and can often recover files even after formatting.
It’s low effort, beginner-friendly, and works even if you’ve never done data recovery before. Just follow the steps and let the tool do the heavy lifting.
While there’s no shortage of tools that can scan a RAW SD card, we’ll use one of our go-to options, Disk Drill, for this walkthrough. The reason is simple: most recovery apps rely on the file system to locate and recover data. But when your SD card turns RAW, the file system is either missing or unreadable. So what then?
That’s where more advanced tools like Disk Drill shine. Instead of depending solely on file system records, it can detect and recover files based on their unique binary patterns (known as file signatures). Disk Drill supports close to 400 file formats in its latest version (Disk Drill 6), from photos and videos to documents and archives.
On top of that, Disk Drill is incredibly easy to use, even for first-timers.
Here’s how to recover data from a RAW SD card using Disk Drill:
- Download the free version of Disk Drill from the official site and run the installer.
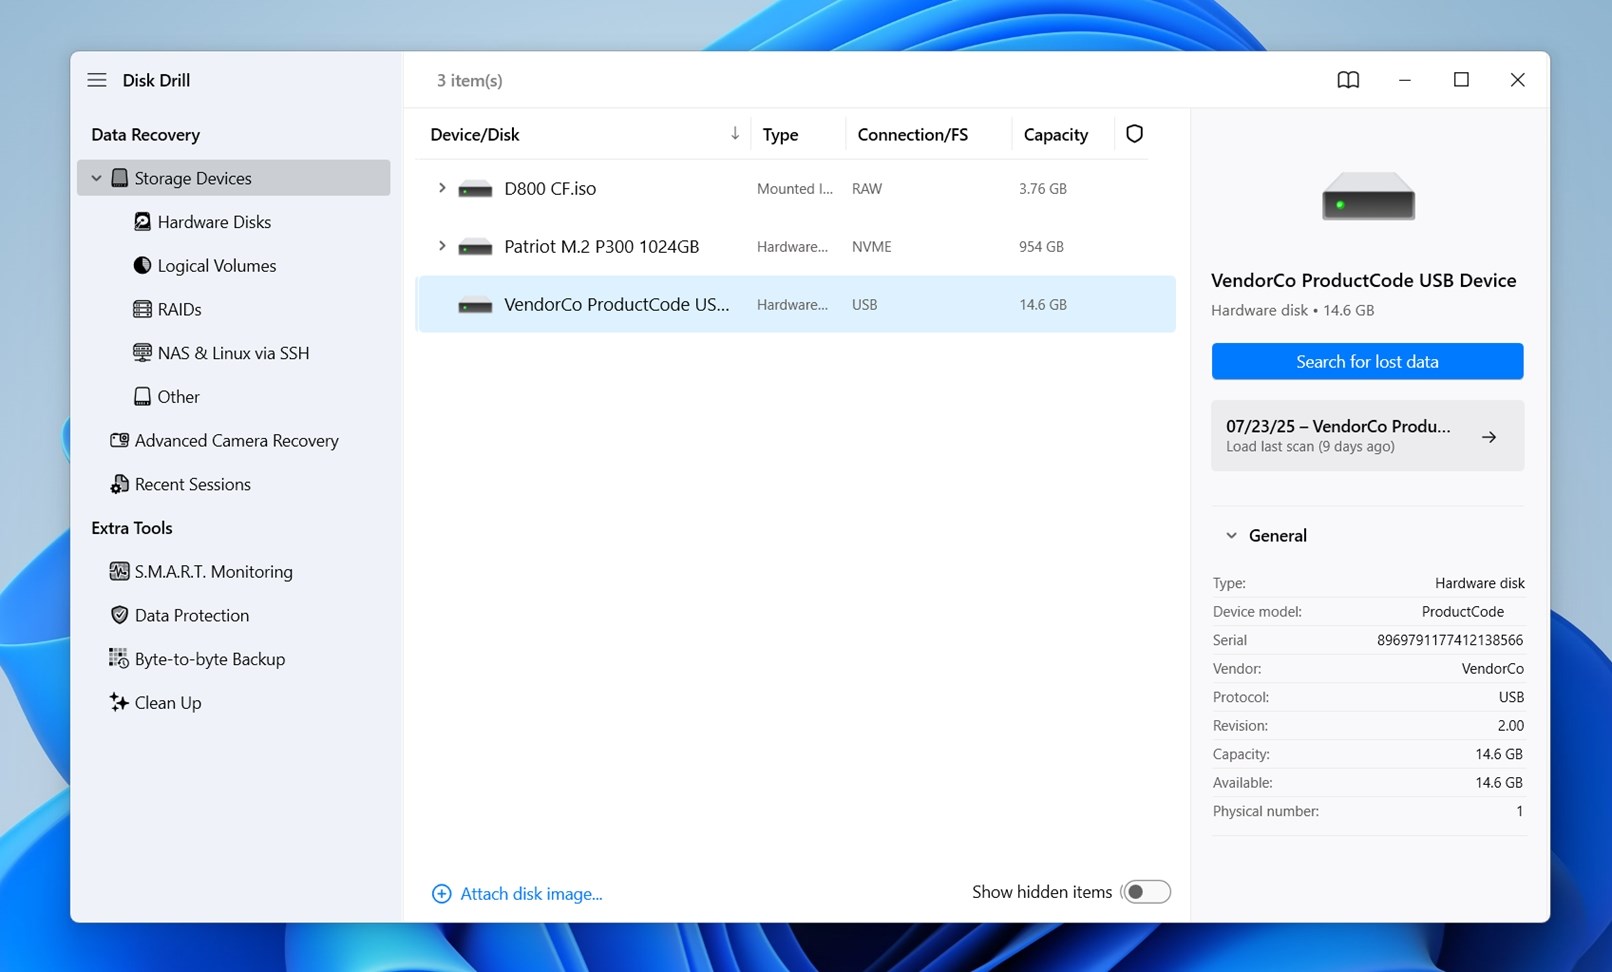
- Connect the RAW SD card to the computer with a card reader and open Disk Drill. The app will list all storage devices, including your RAW SD card. Select the drive corresponding to it and select Search for lost data.
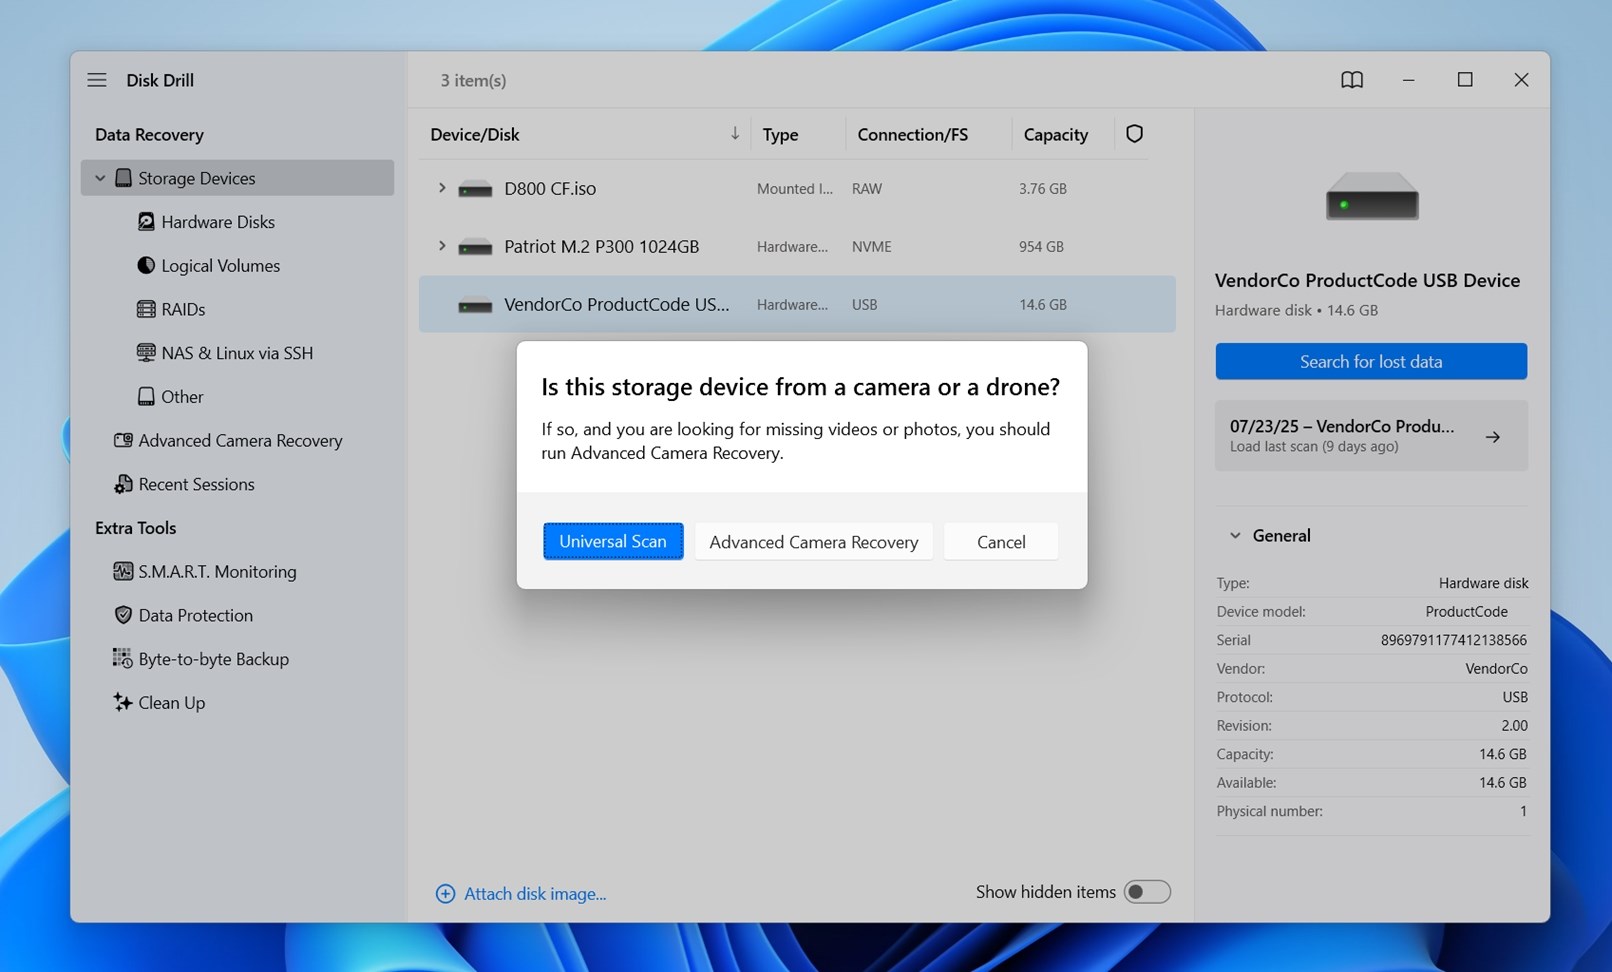
- At this point, Disk Drill will ask you to choose a scan type. Select Universal Scan. This option combines all available scan methods: Quick, Deep, and, most importantly for RAW SD cards, Signature Scan.
- All the files detected with this method can be seen by using the Review found items option. If you don’t want to sift through the results, you can click the Recover all… button to recover everything found on the SD card. Keep in mind that this can quickly exhaust your data recovery limit if you are using the free plan.
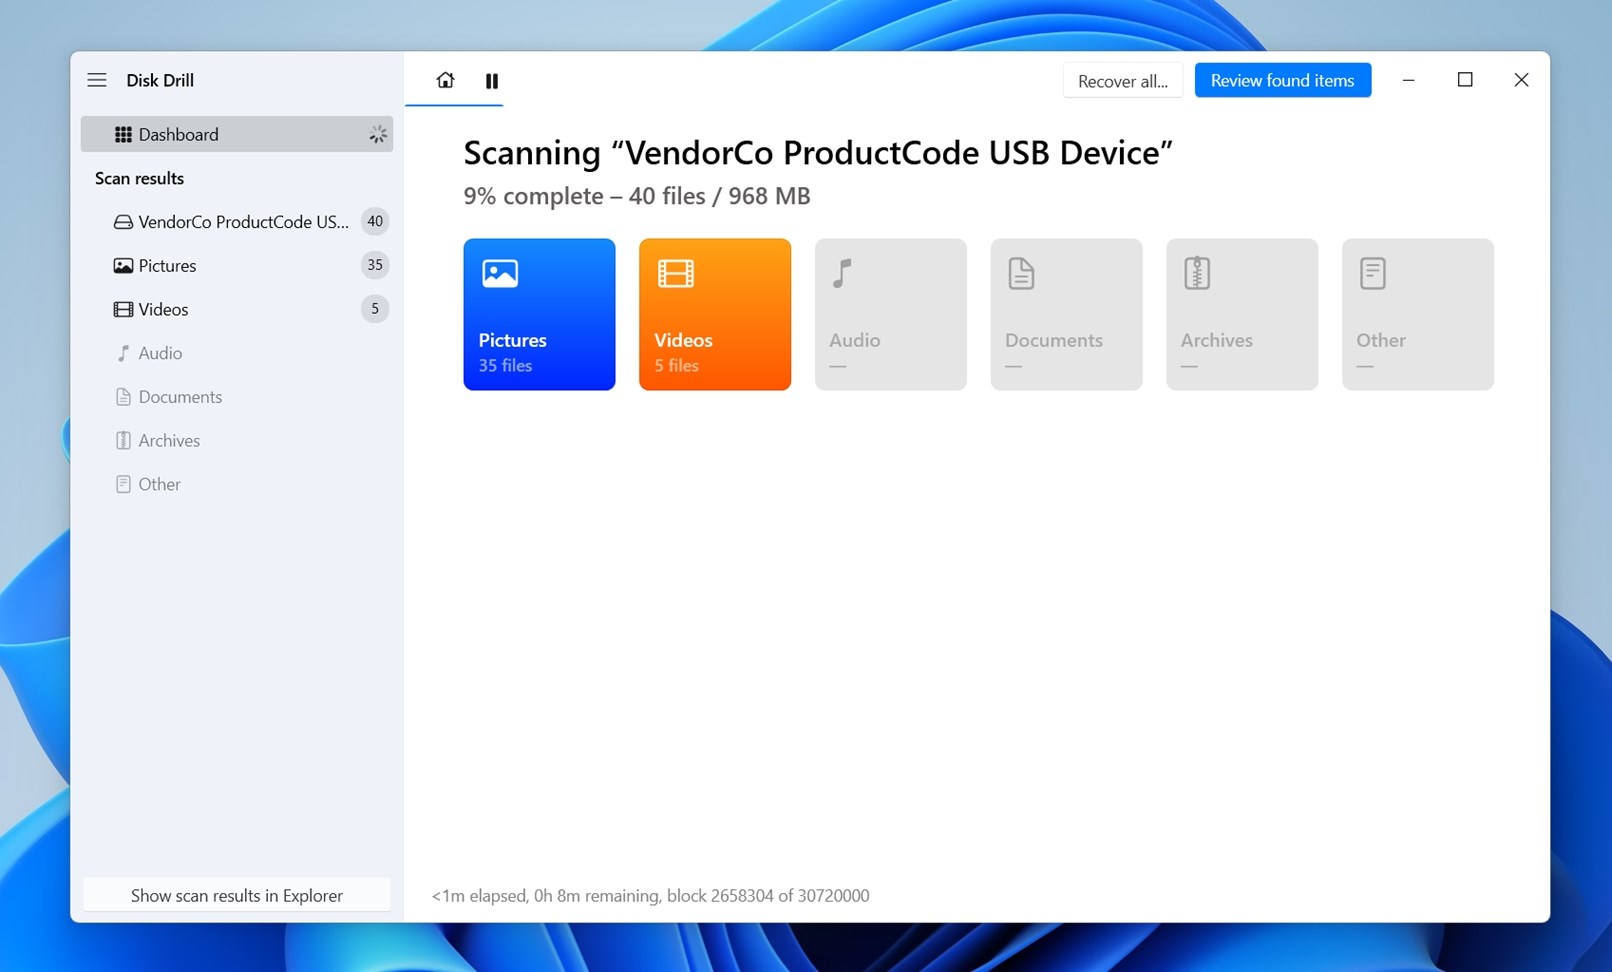
- Depending on the types of files recovered, you can see three folders here: Existing, Reconstructed, and the Deleted or lost directory.
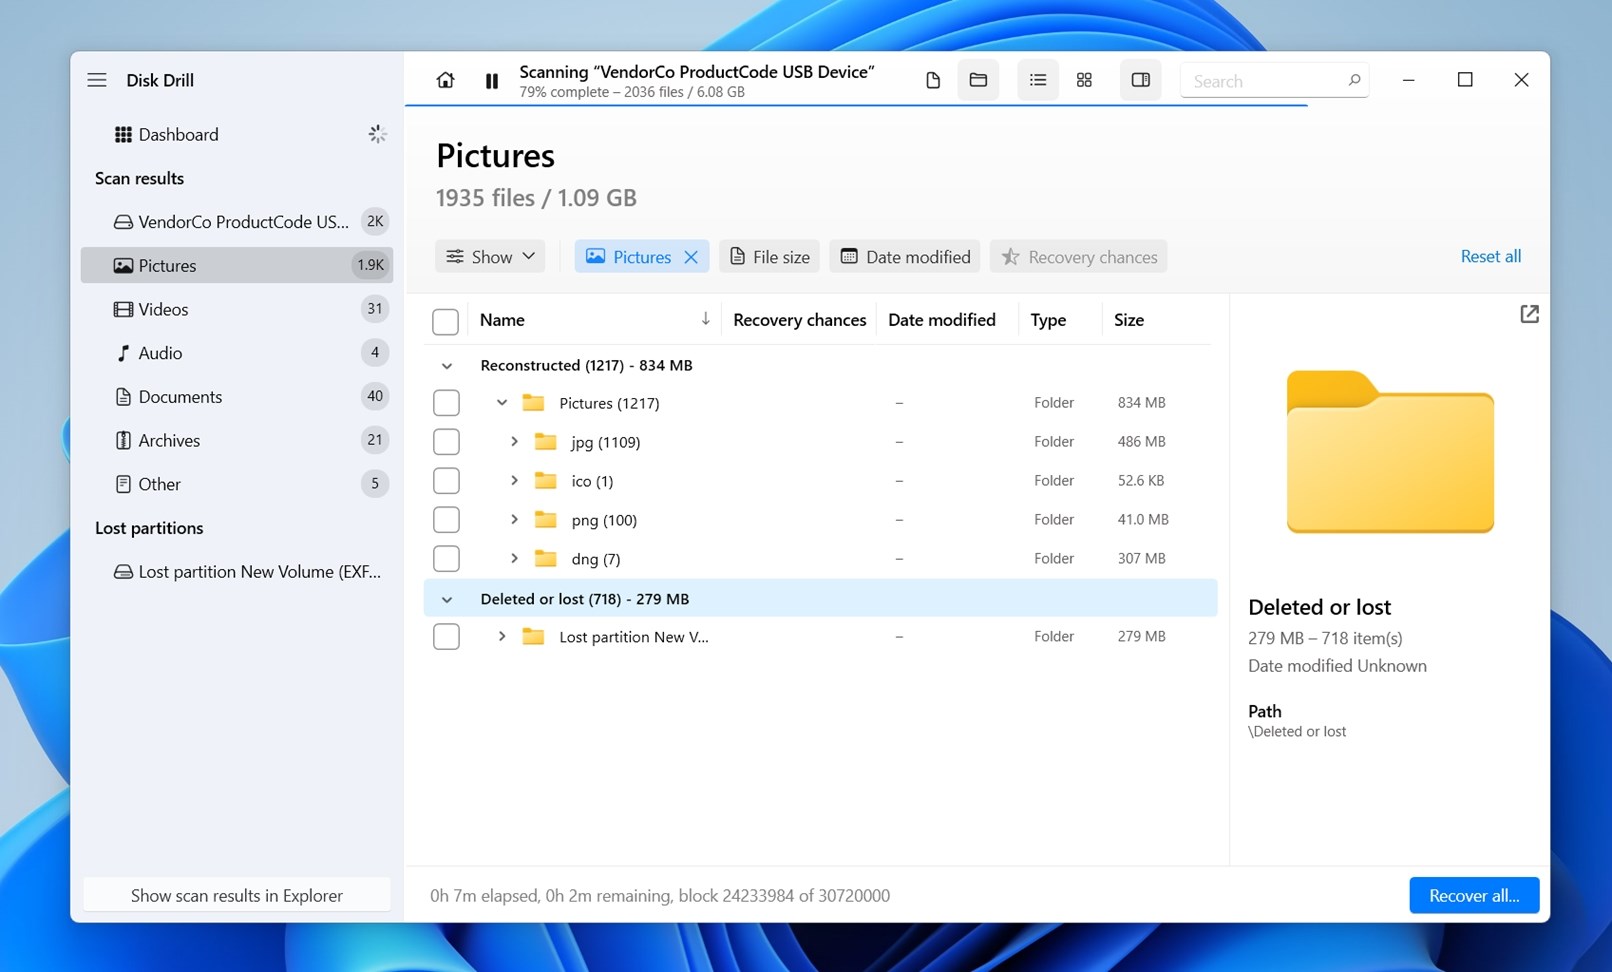
- For a RAW SD card, most of the recovered files will be found in the Reconstructed folder, since they have to be rebuilt by their file signatures. Depending on what was deleted before it went RAW, you might find some files in other directories as well.
- On the left-hand panel, you’ll see a list of file types. If you want to view only the images that were found, just select Pictures. You can also expand that category to narrow it down even further, like JPG, PNG, or RAW photo formats.
- You can also use the search bar in the top-right corner to type in a file extension (like .mp4) or even part of a filename, if you remember it. On top of that, Disk Drill offers plenty of filtering options: you can sort files by type, date, size, and even recovery chances.
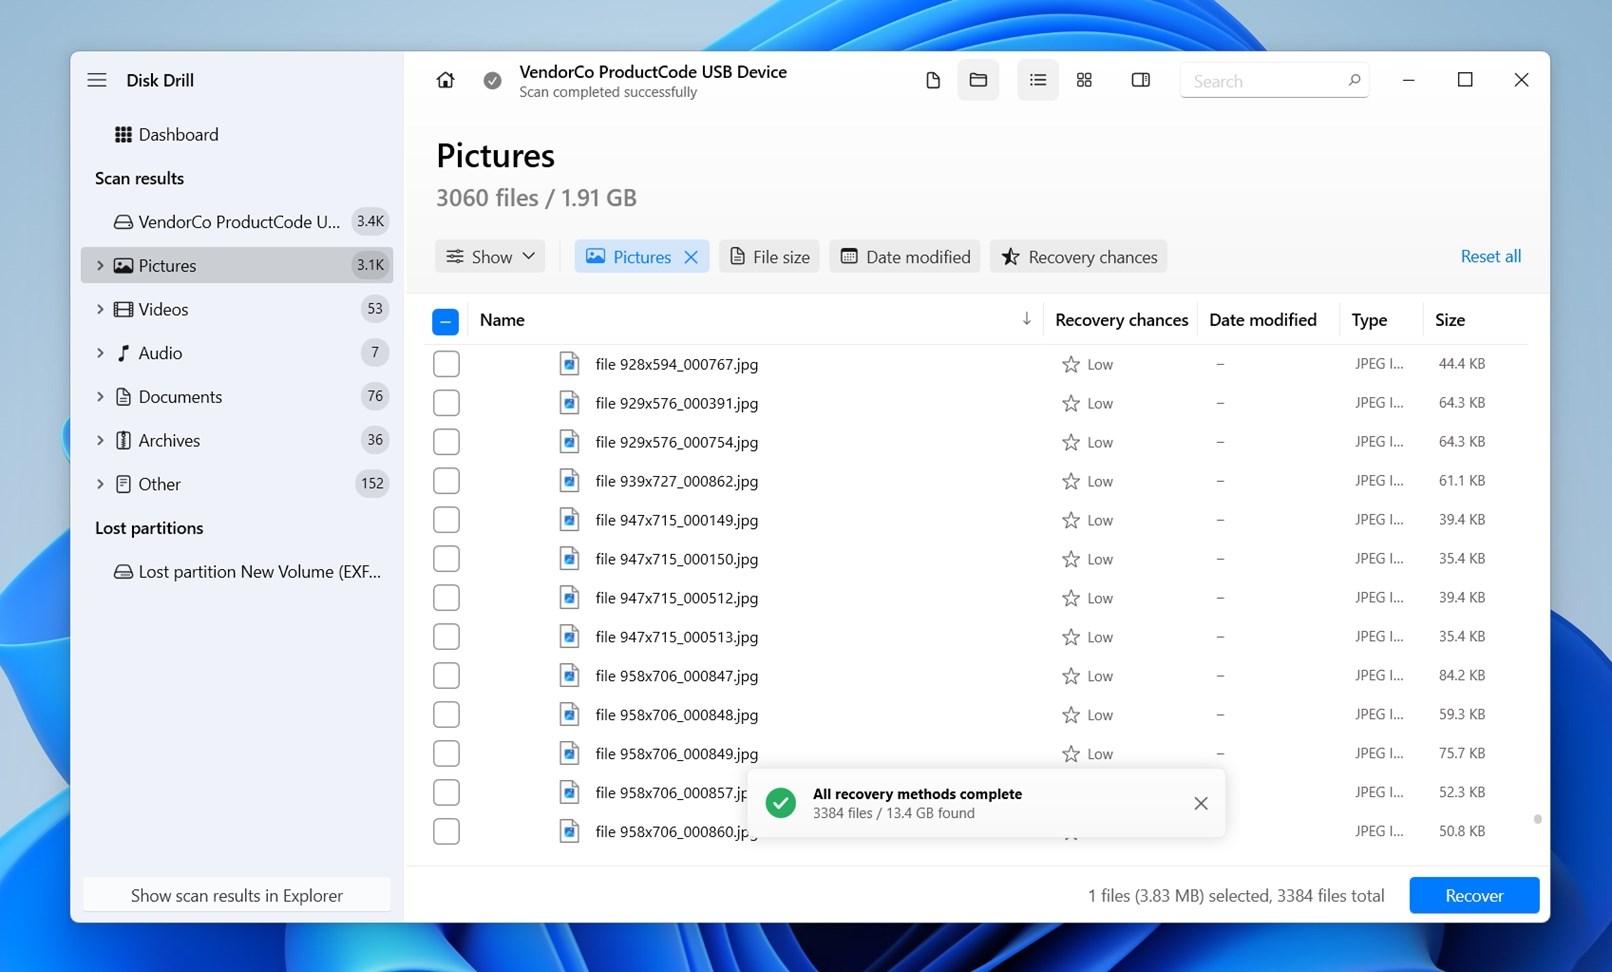 That last one is especially useful. It gives you a quick estimate of how likely each file is to be intact and fully usable after recovery. Look for files marked as a “High” – those are your best candidates for a successful restore.
 - On the left pane, you should see a preview of the selected file. If nothing shows up right away, try clicking the eye icon next to the filename.
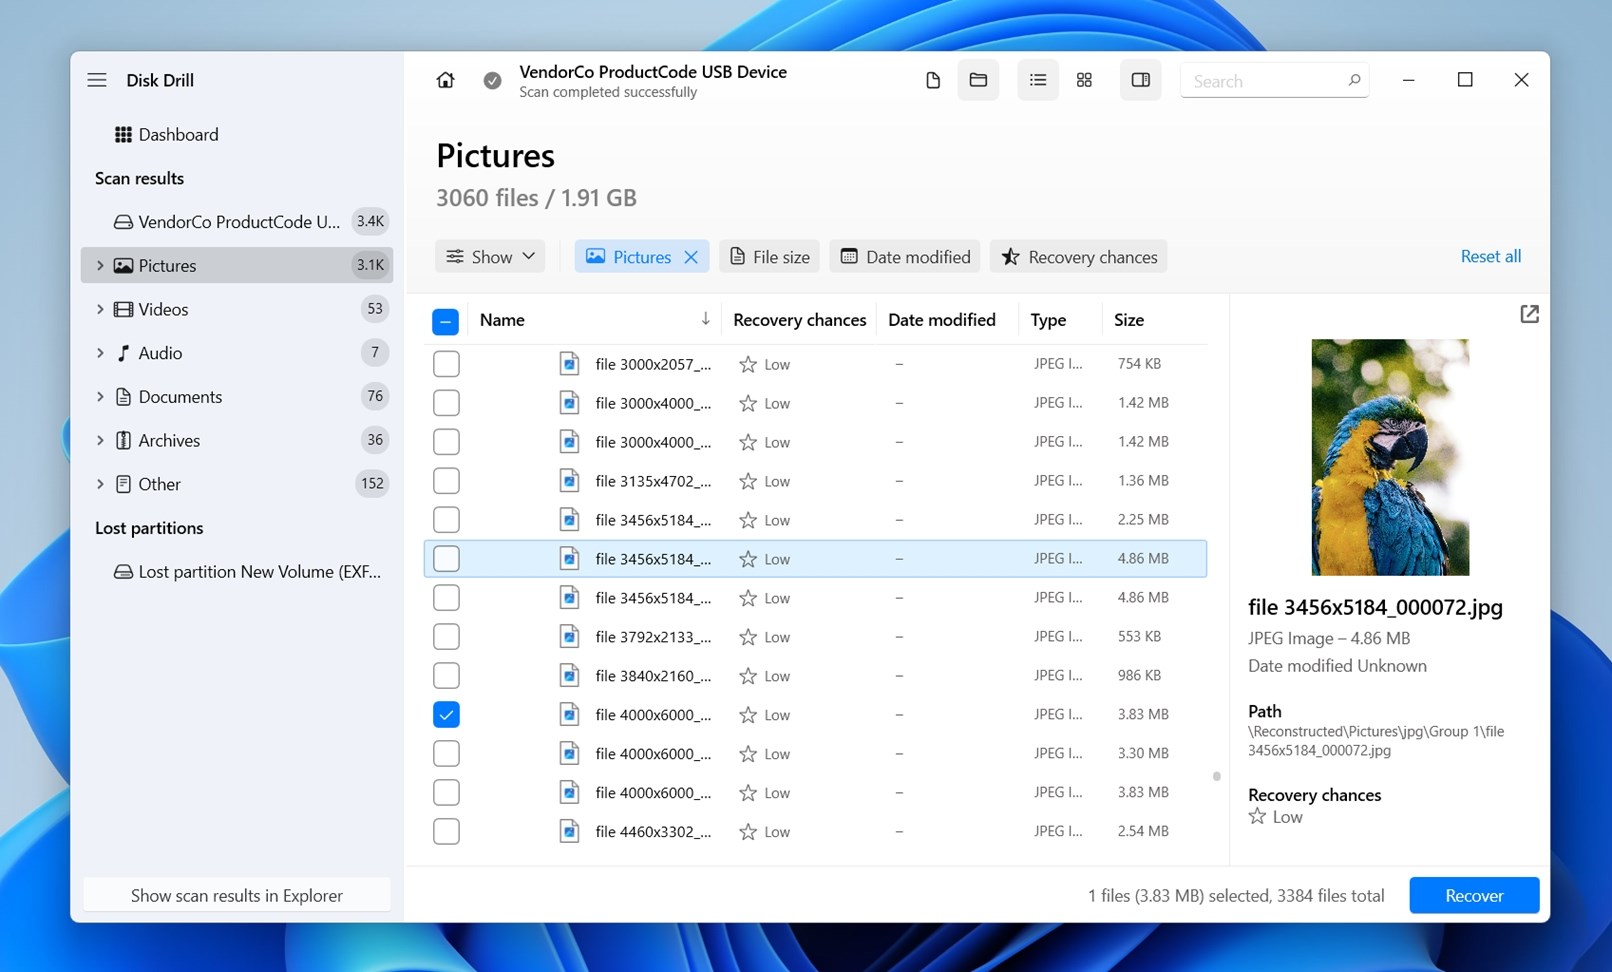 Disk Drill can preview all kinds of files, photos, videos, audio, and more, as long as your OS can open them natively or you have a viewer installed. If your computer can open it, Disk Drill can too.
 - As you find the files you want to recover, just check the boxes next to them, then click the Recover button at the bottom right of the window.
 You can select individual files or entire folders.
 - Before saving the files, Disk Drill will ask you to specify a destination folder. Pick any location on your PC and click on Next. The selected files will now be saved to the folder you picked, ready to be opened normally.
To know more about why we picked Disk Drill for this demonstration, take a look at our detailed review, where we cover all its advanced features: like byte-to-byte backups, S.M.A.R.T. disk health monitoring, and the new Advanced Camera Recovery module introduced in the latest update.
It’s also one of the safest SD data recovery tools we’ve tested. We even ran a separate security check just to confirm that, which you can read about in our Disk Drill safety analysis article.
Method 2: Use TestDisk to Fix the File System
This method can be useful in certain cases where a RAW SD card is the result of partition table damage. This tool is designed to repair partition structures and, if successful, can restore access to your existing data without actually recovering it file by file.
That said, it’s important to understand that TestDisk doesn’t recover data in the traditional sense – it attempts to make the RAW SD card readable again by fixing structural issues. It’s also a command-line tool, so it requires careful navigation and some technical comfort. Use it with caution, and only if you’re confident in what each step does.
TestDisk is an open-source data recovery tool built specifically for partition and file system repair. In some cases, it can restore access to a corrupted partition, including all of its data.
But here’s an important warning: TestDisk works at the structure level. That means it interacts directly with partition tables and file system metadata. If you select the wrong device or make a wrong move, you could accidentally cause more damage or overwrite data that’s still recoverable. So if that sounds too risky (or if you’re not comfortable with command-line environment) it’s safer to stick with Method 1.
The interface can be a bit daunting, but it is an effective tool, as we note in our complete review of TestDisk.
Here’s how to use TestDisk:
- To repair your RAW SD card, first download TestDisk. No installation is required – you just have to extract the downloaded zip file. You’ll notice there’s a 7.3 (Work In Progress) version available, but we recommend sticking with version 7.2. It’s stable, well-tested, and it’s the one we’ve used successfully in many recovery cases.
- Connect your SD card to the PC.
- Run the executable file (.exe) to open TestDisk in a black terminal window. Don’t panic, you just have to select options for the most part, not enter any command. In the first option, for example, just hit Enter.
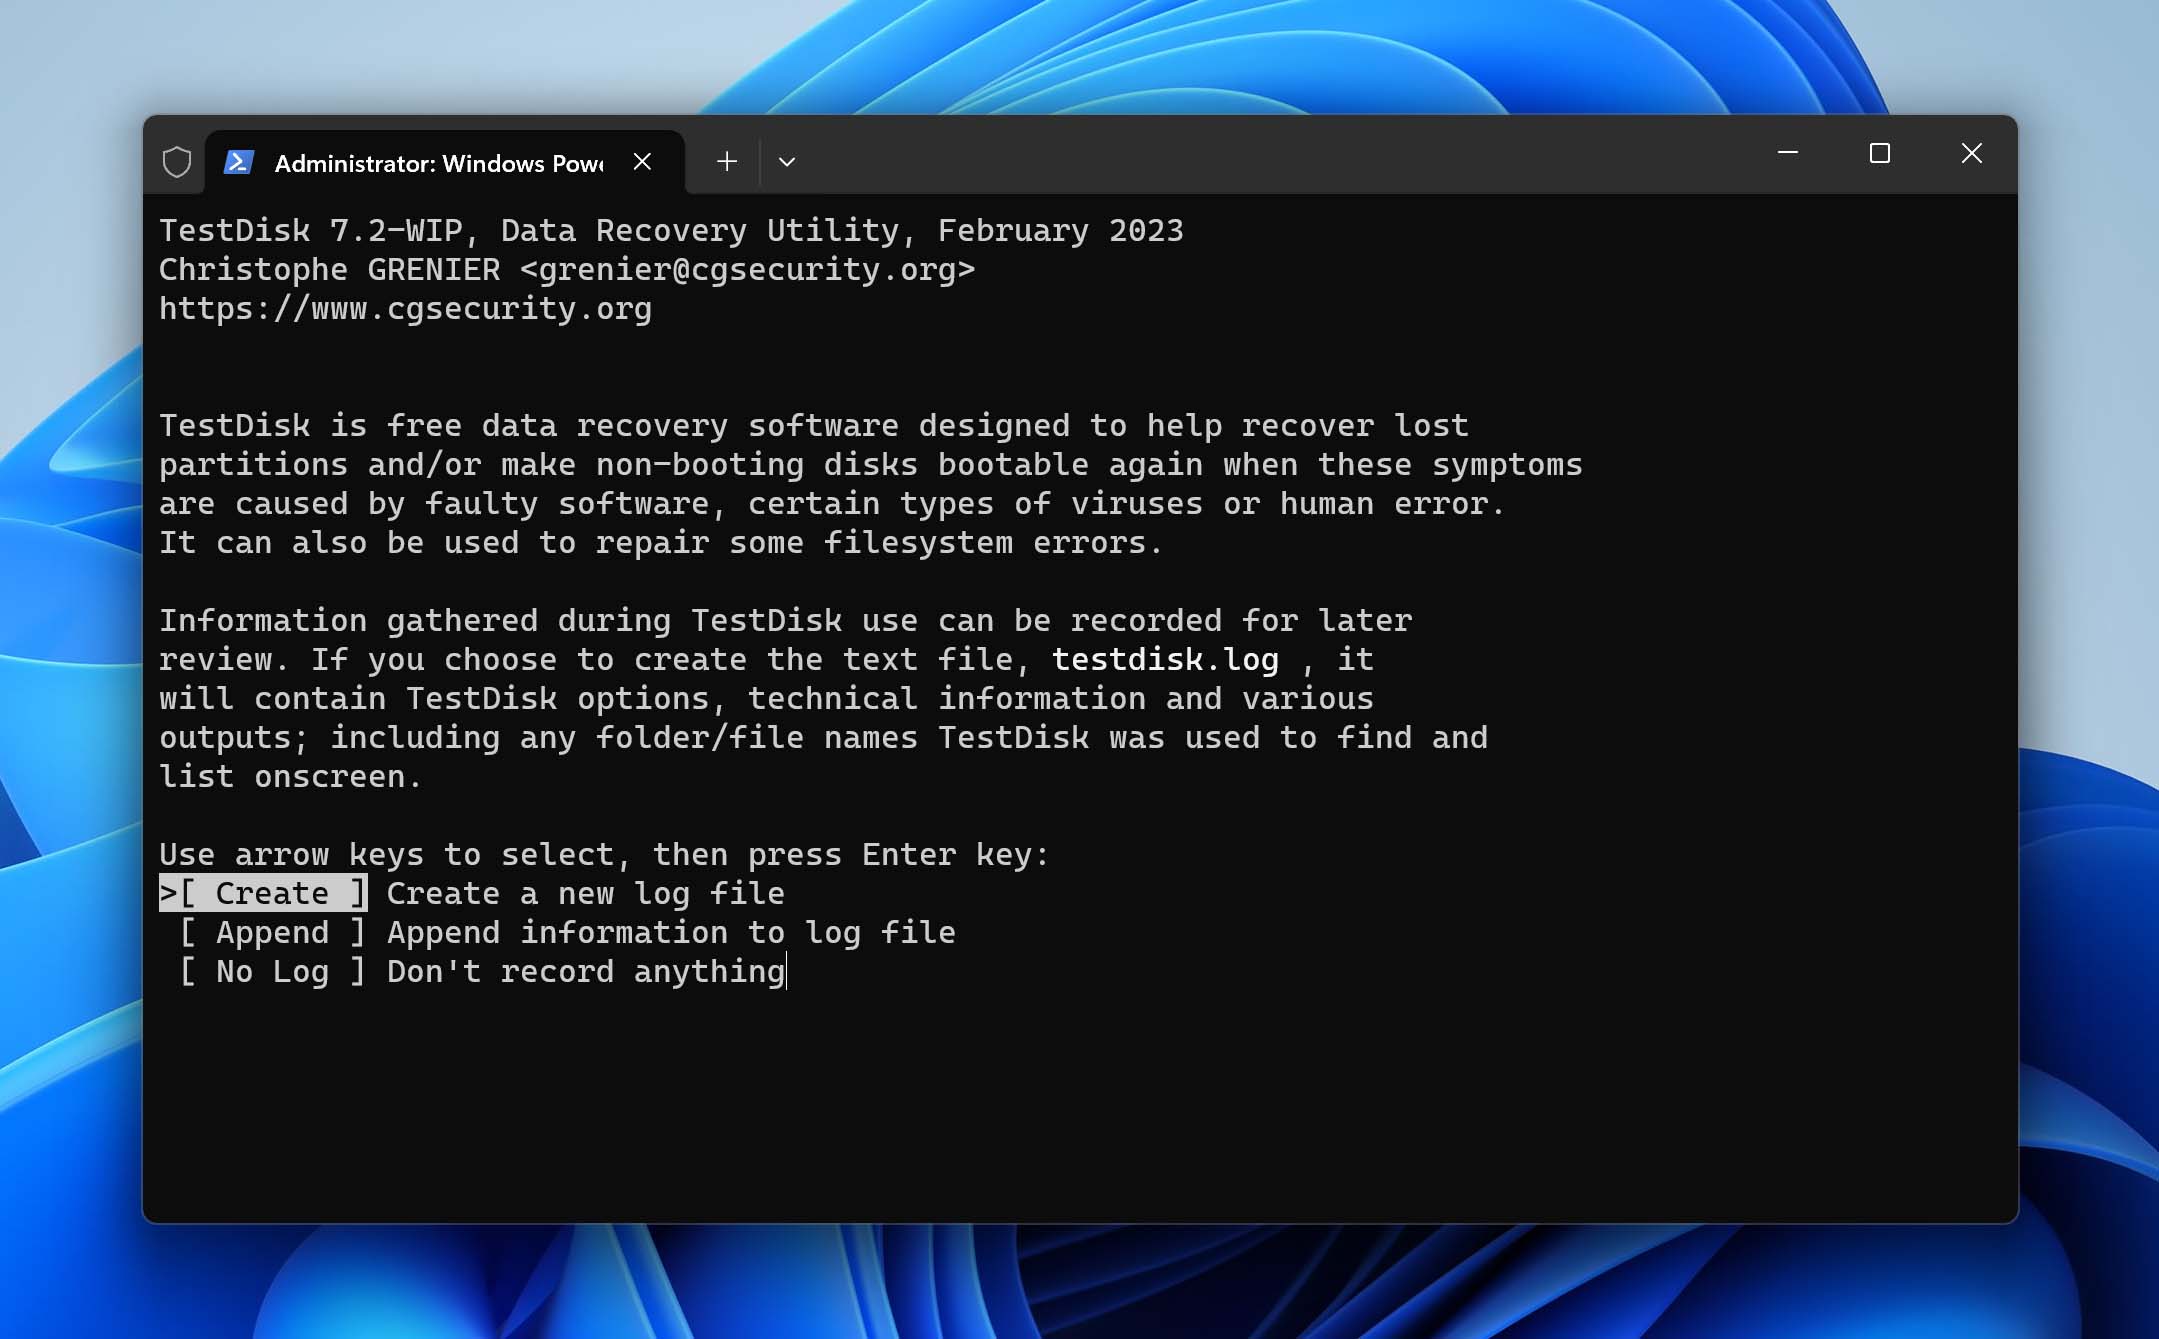
- The next window lists all the drives connected to your PC, even the RAW SD card. Navigate to it using the arrow keys and hit Enter.
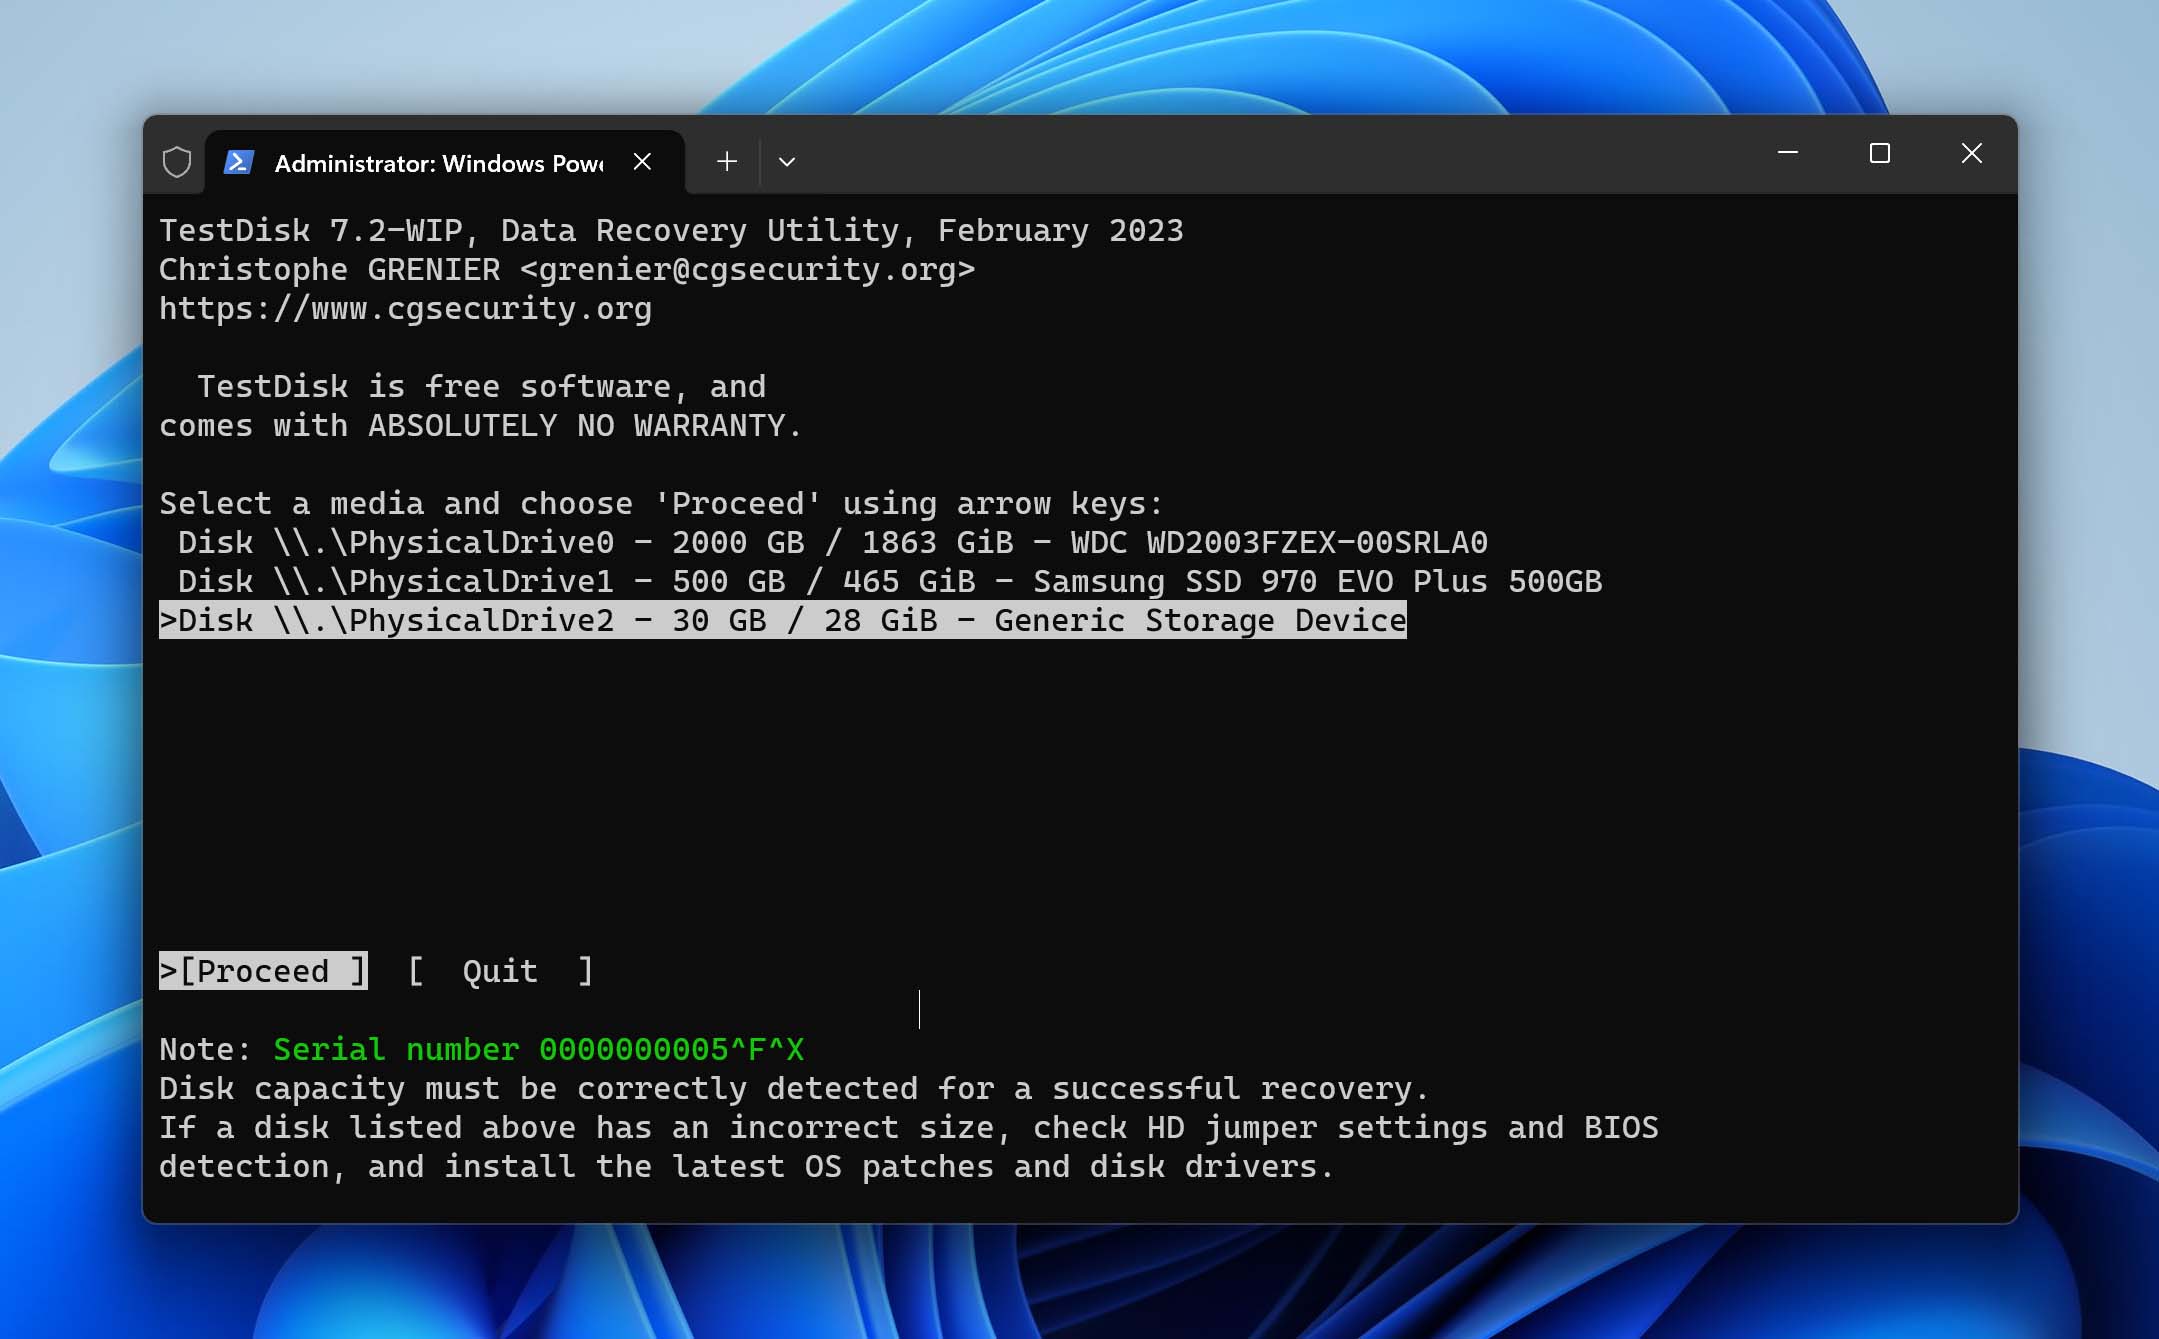
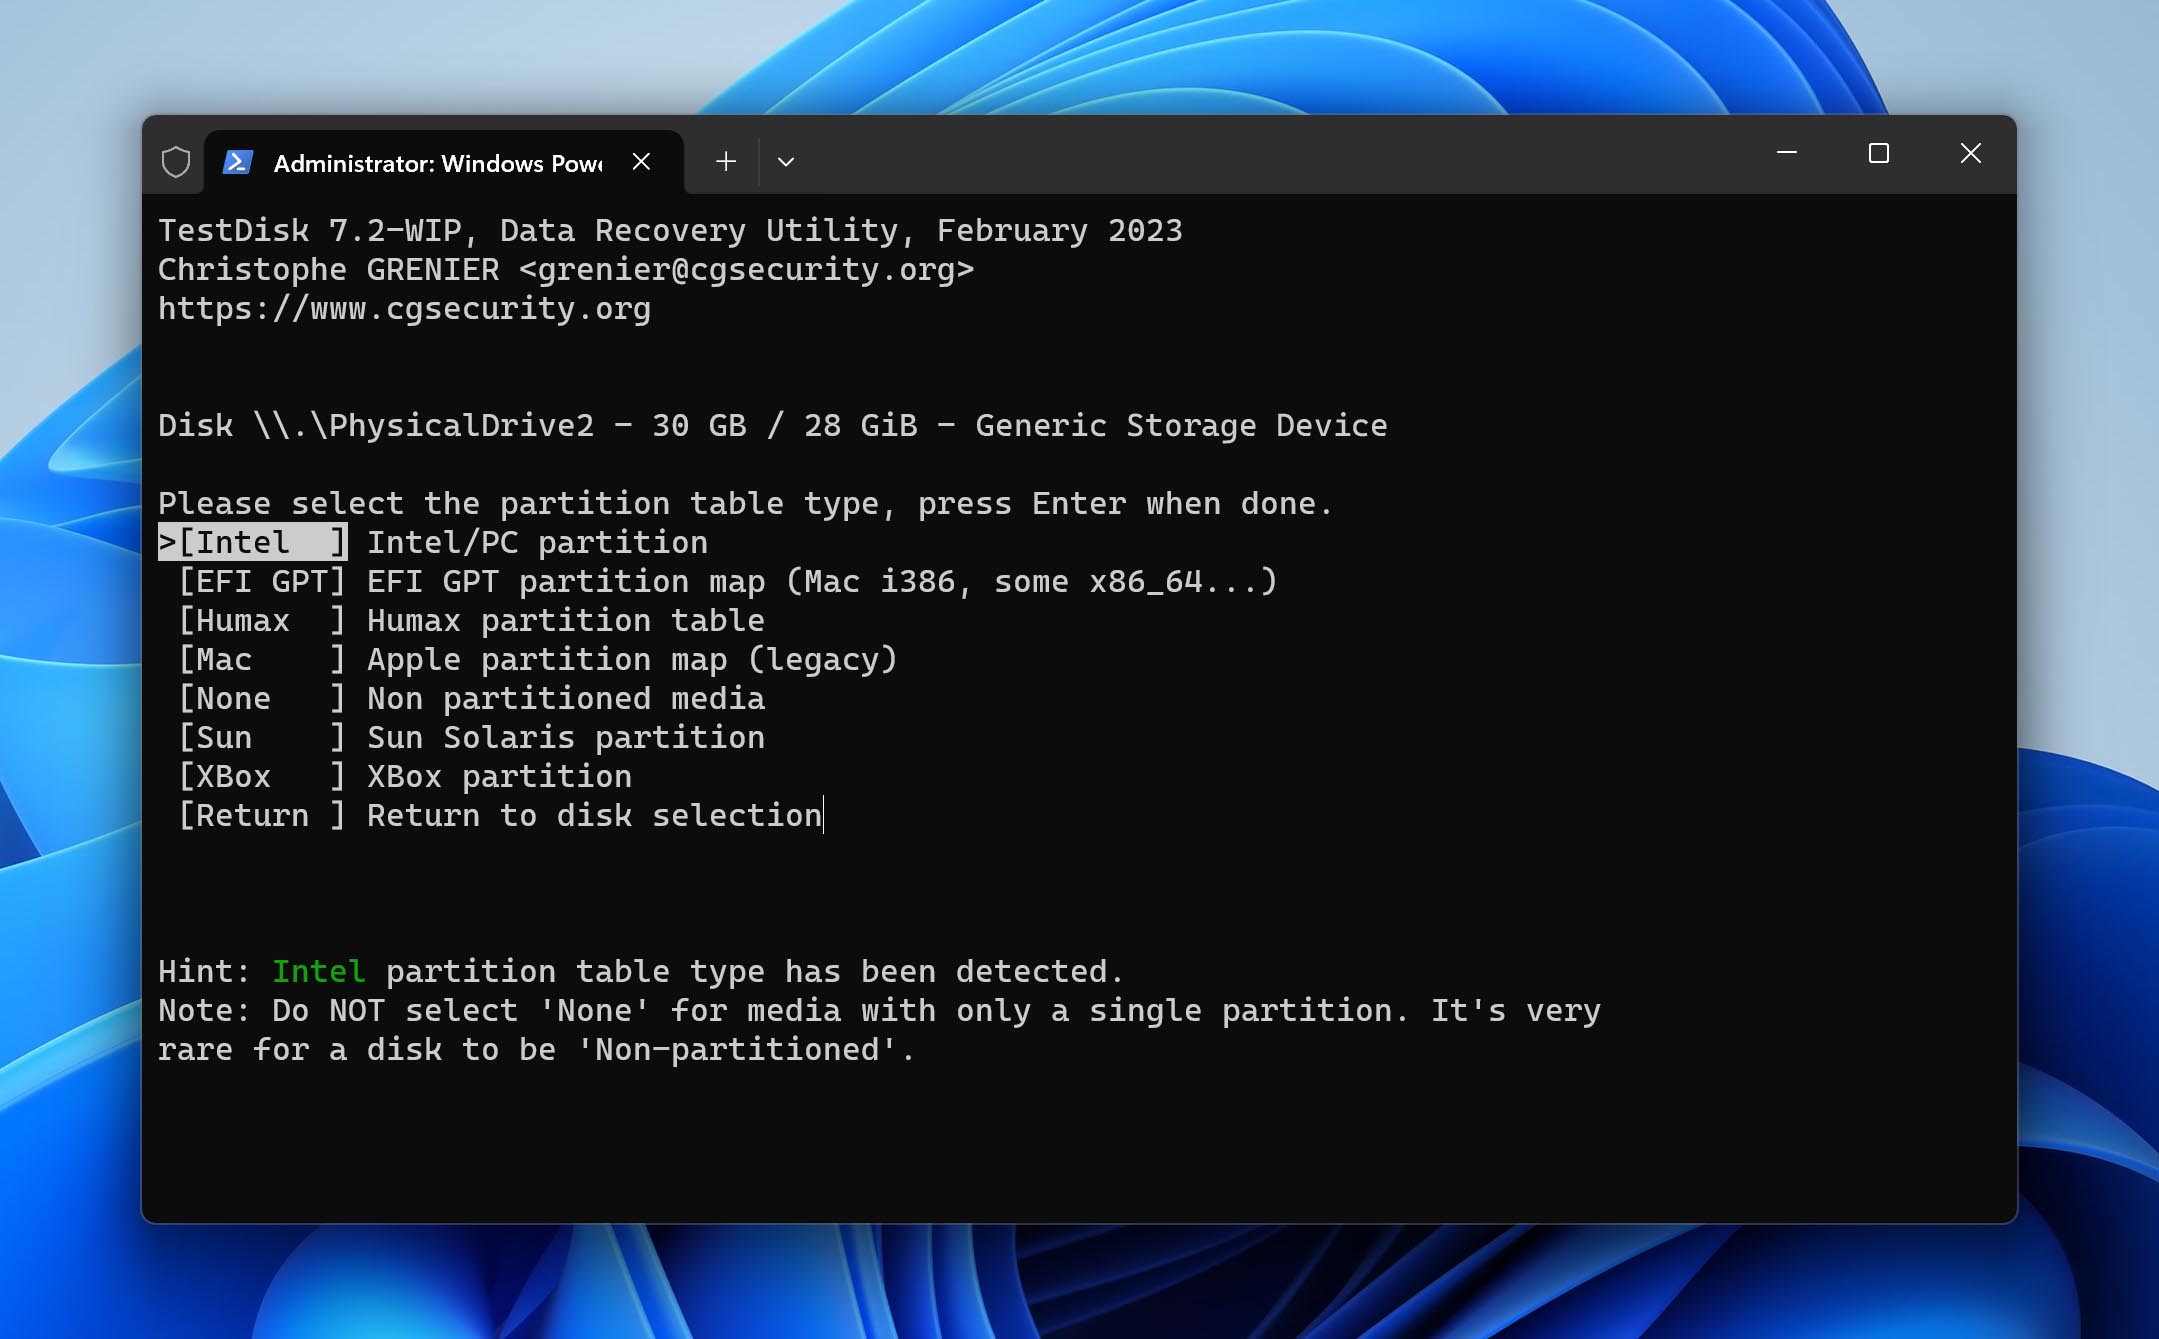
- This is where you select the type of partition that TestDisk should search for. Select the partition type that matches your SD card (you can take a cue from the systems mentioned) and hit the Enter key again.
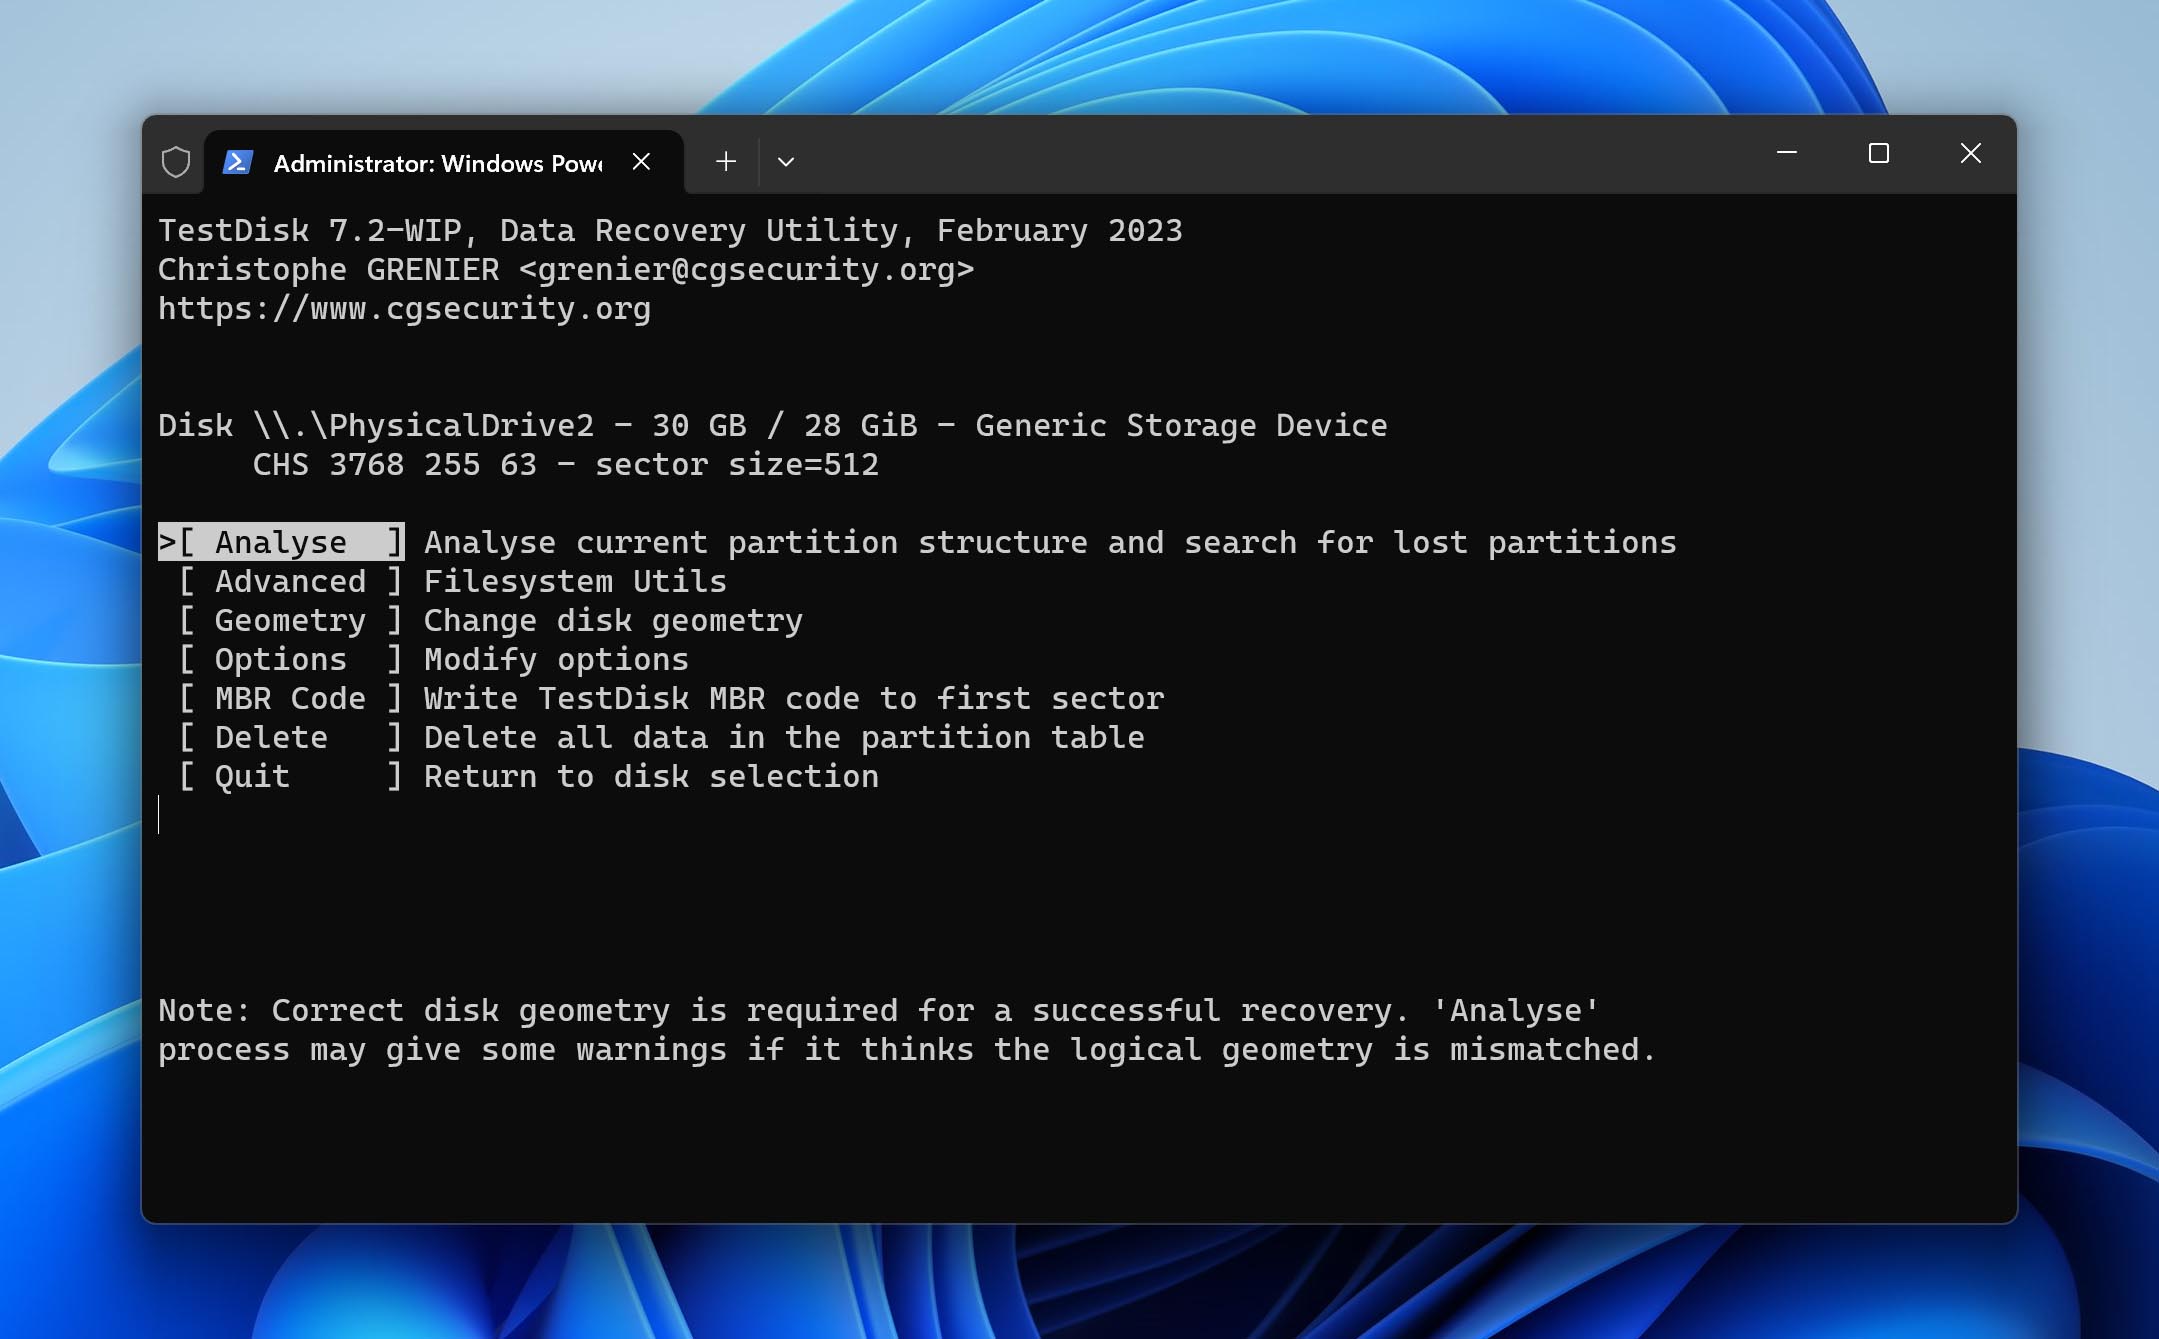
- The first option, Analyze, is what we need to scan the RAW SD card and try to repair its file table. As it is already selected, hit Enter again.
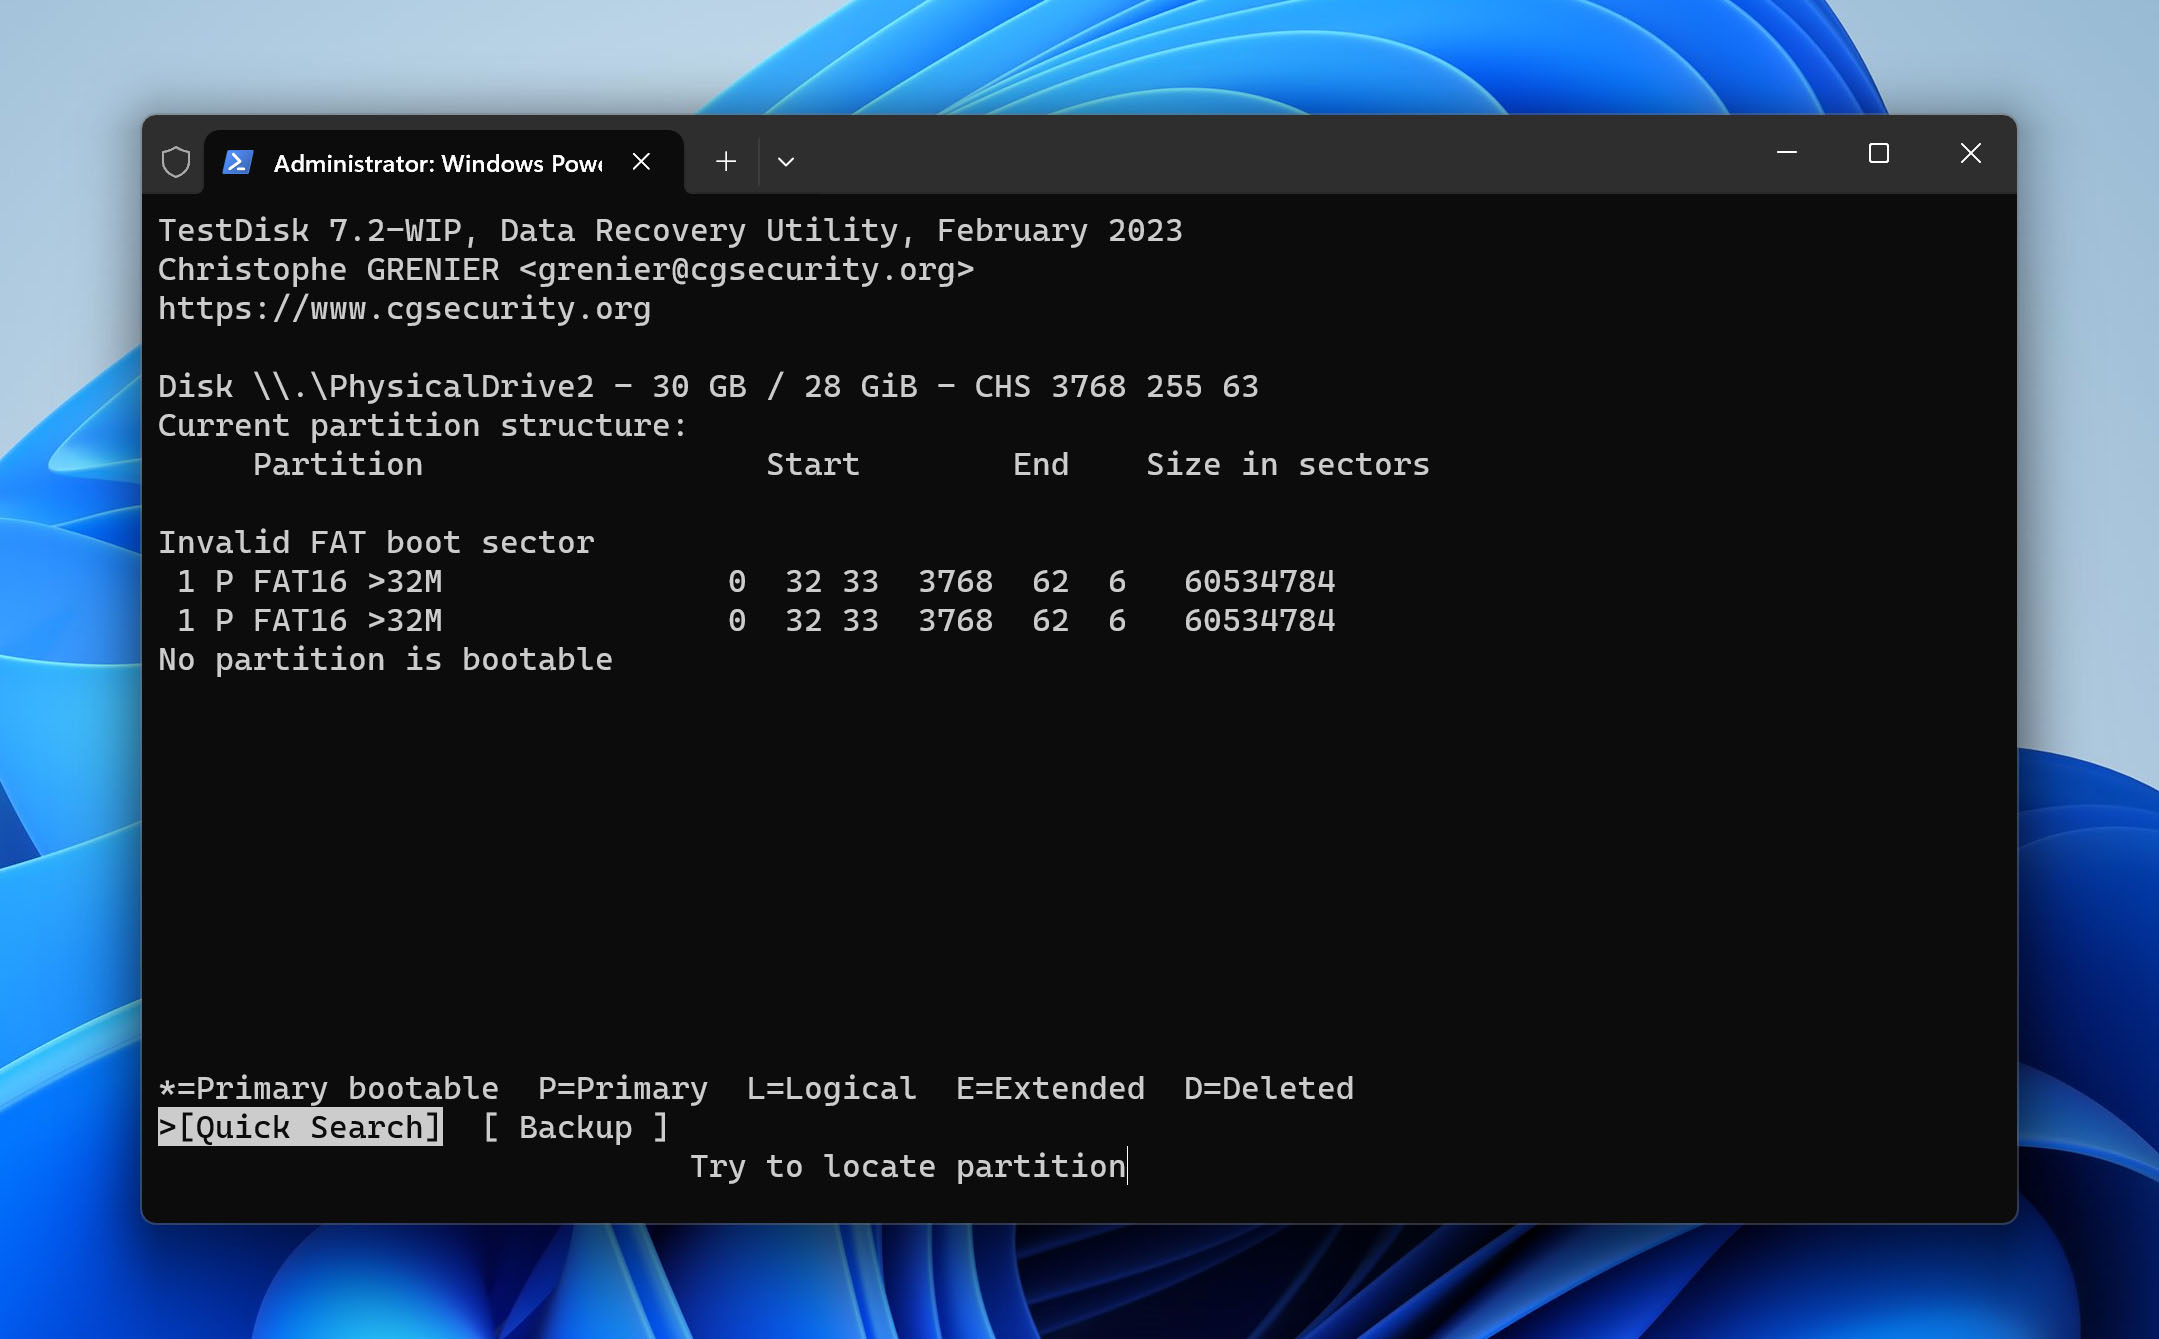
- This window is supposed to list out all the partitions of the drive, but for the RAW SD card, no bootable partition will be found. Press the Enter key to trigger a Quick Search.
- If TestDisk succeeds in recovering a partition from the RAW SD card, it will be displayed in the next step. Select the partition and hit Enter to continue.
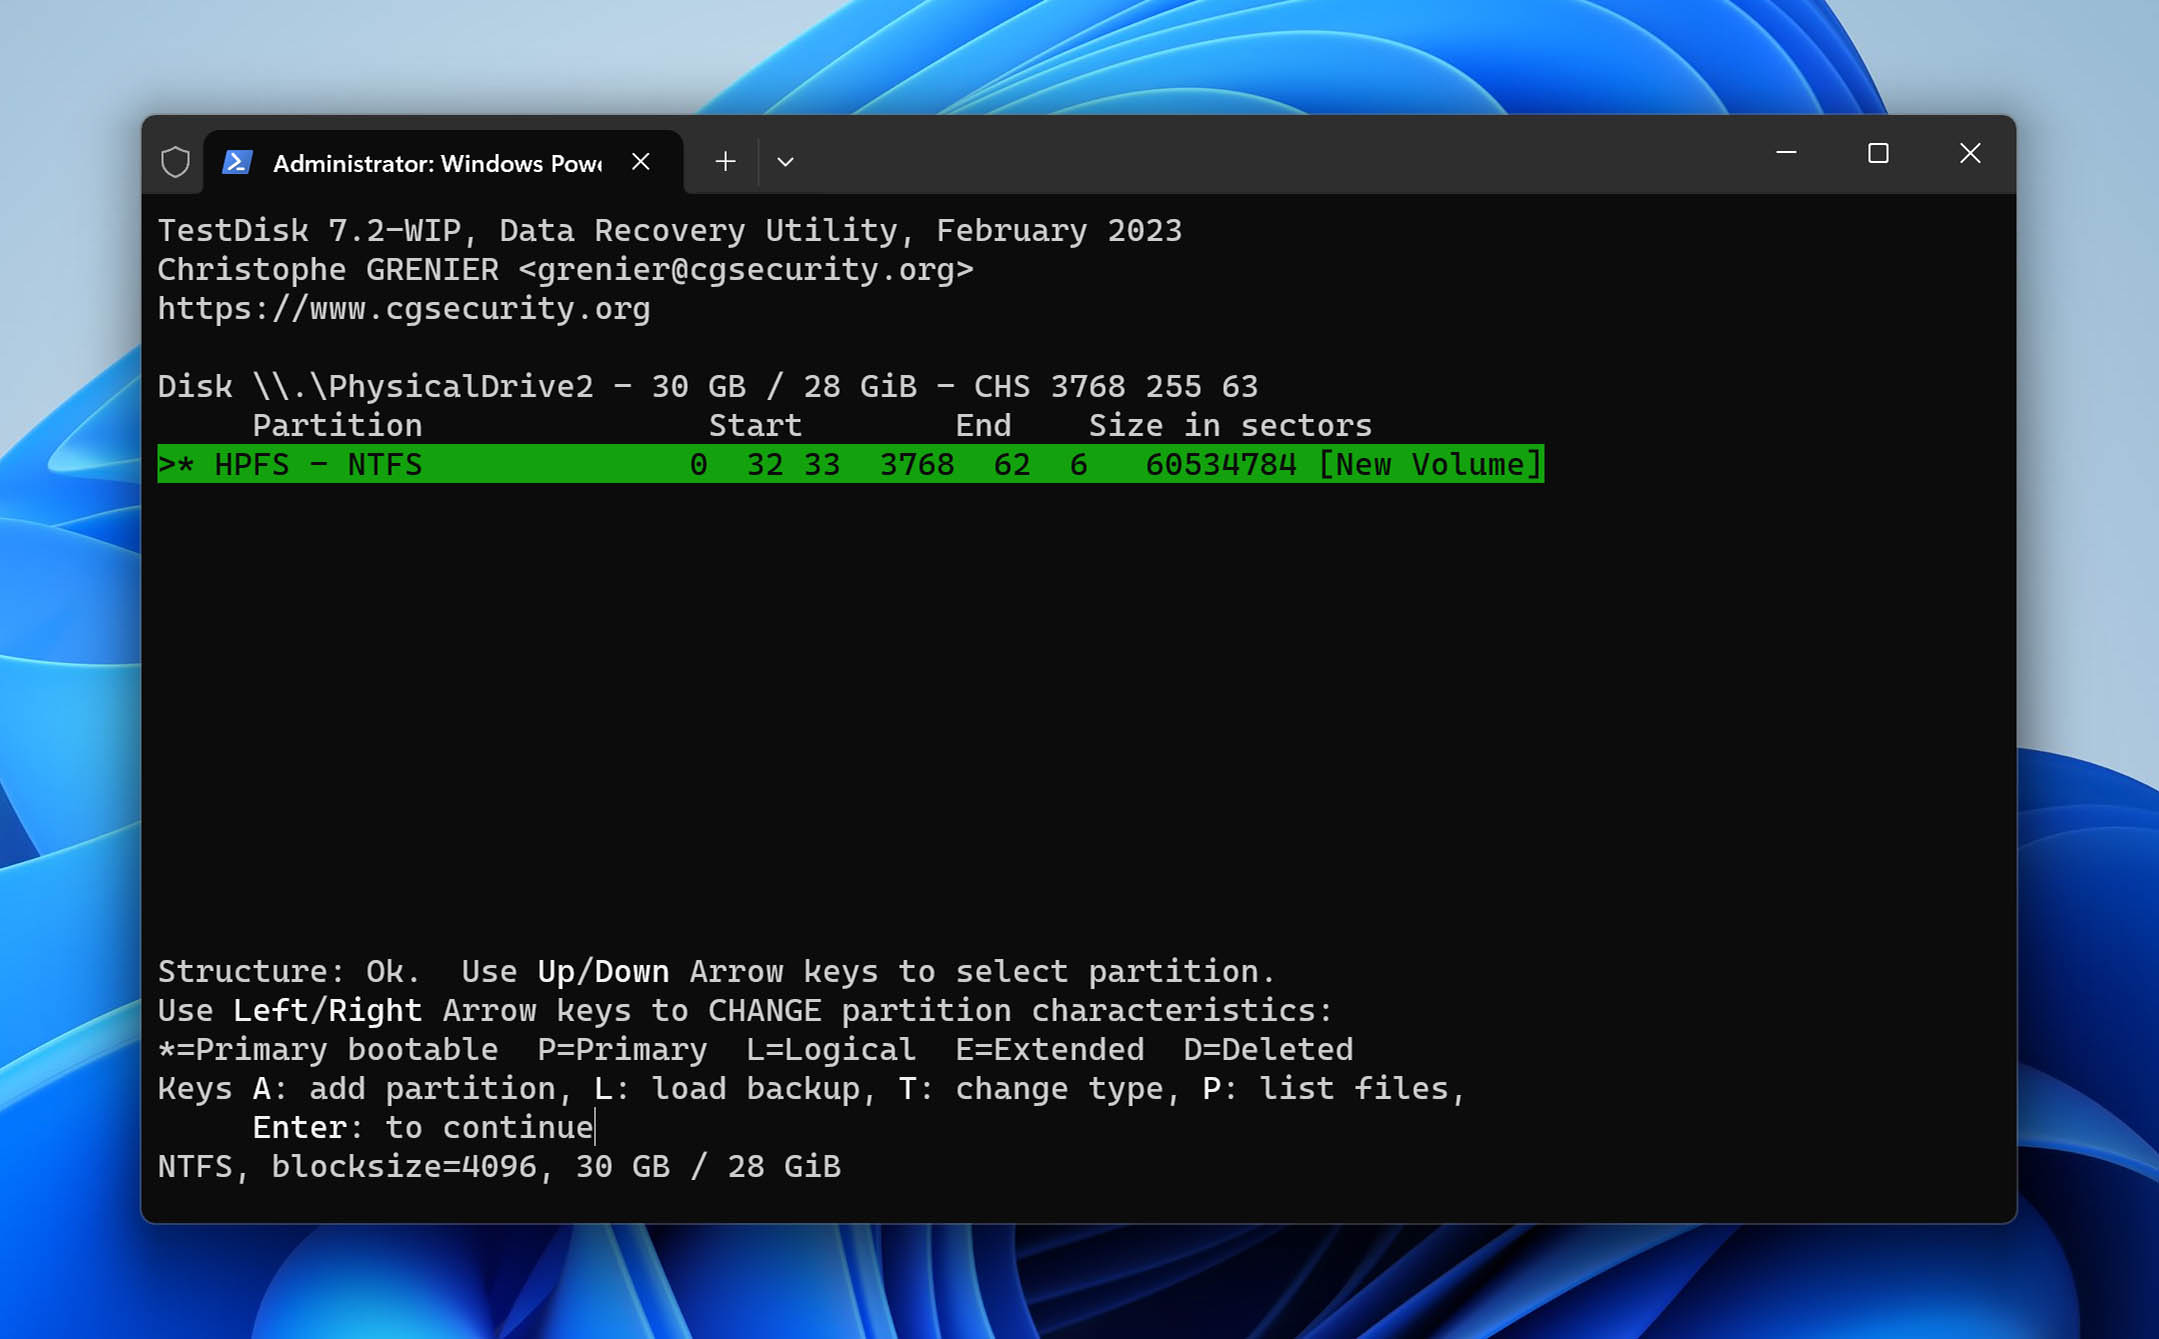
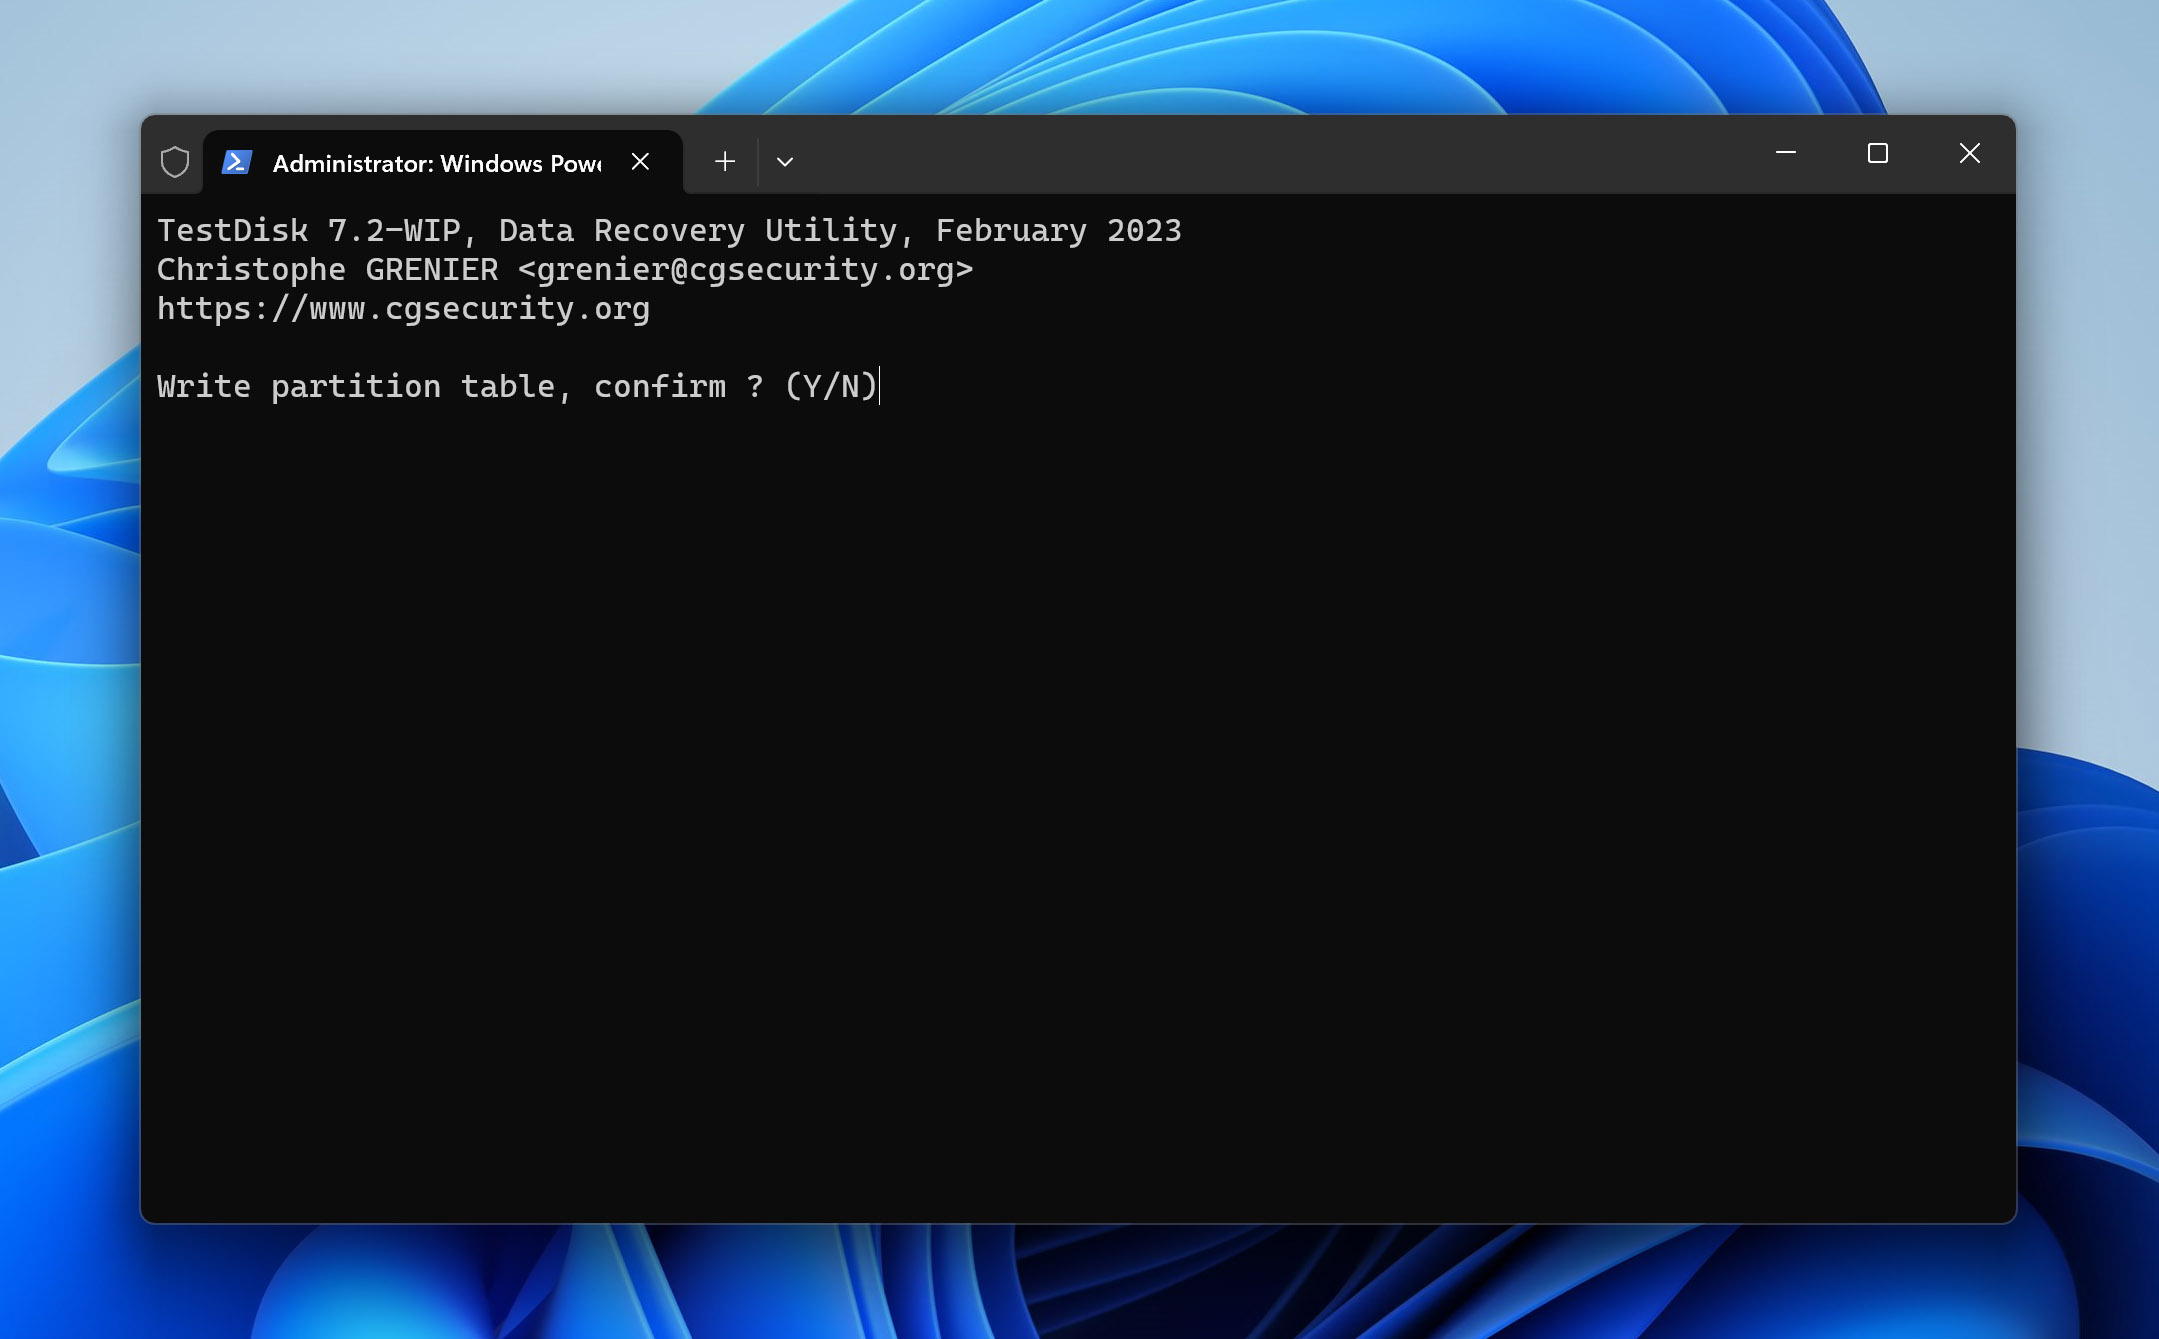
- Now you can save this recovered partition. Navigate to the Write option with the arrow keys and hit enter. In case a partition wasn’t found, you can use the Deeper Search option to have TestDisk look more thoroughly.
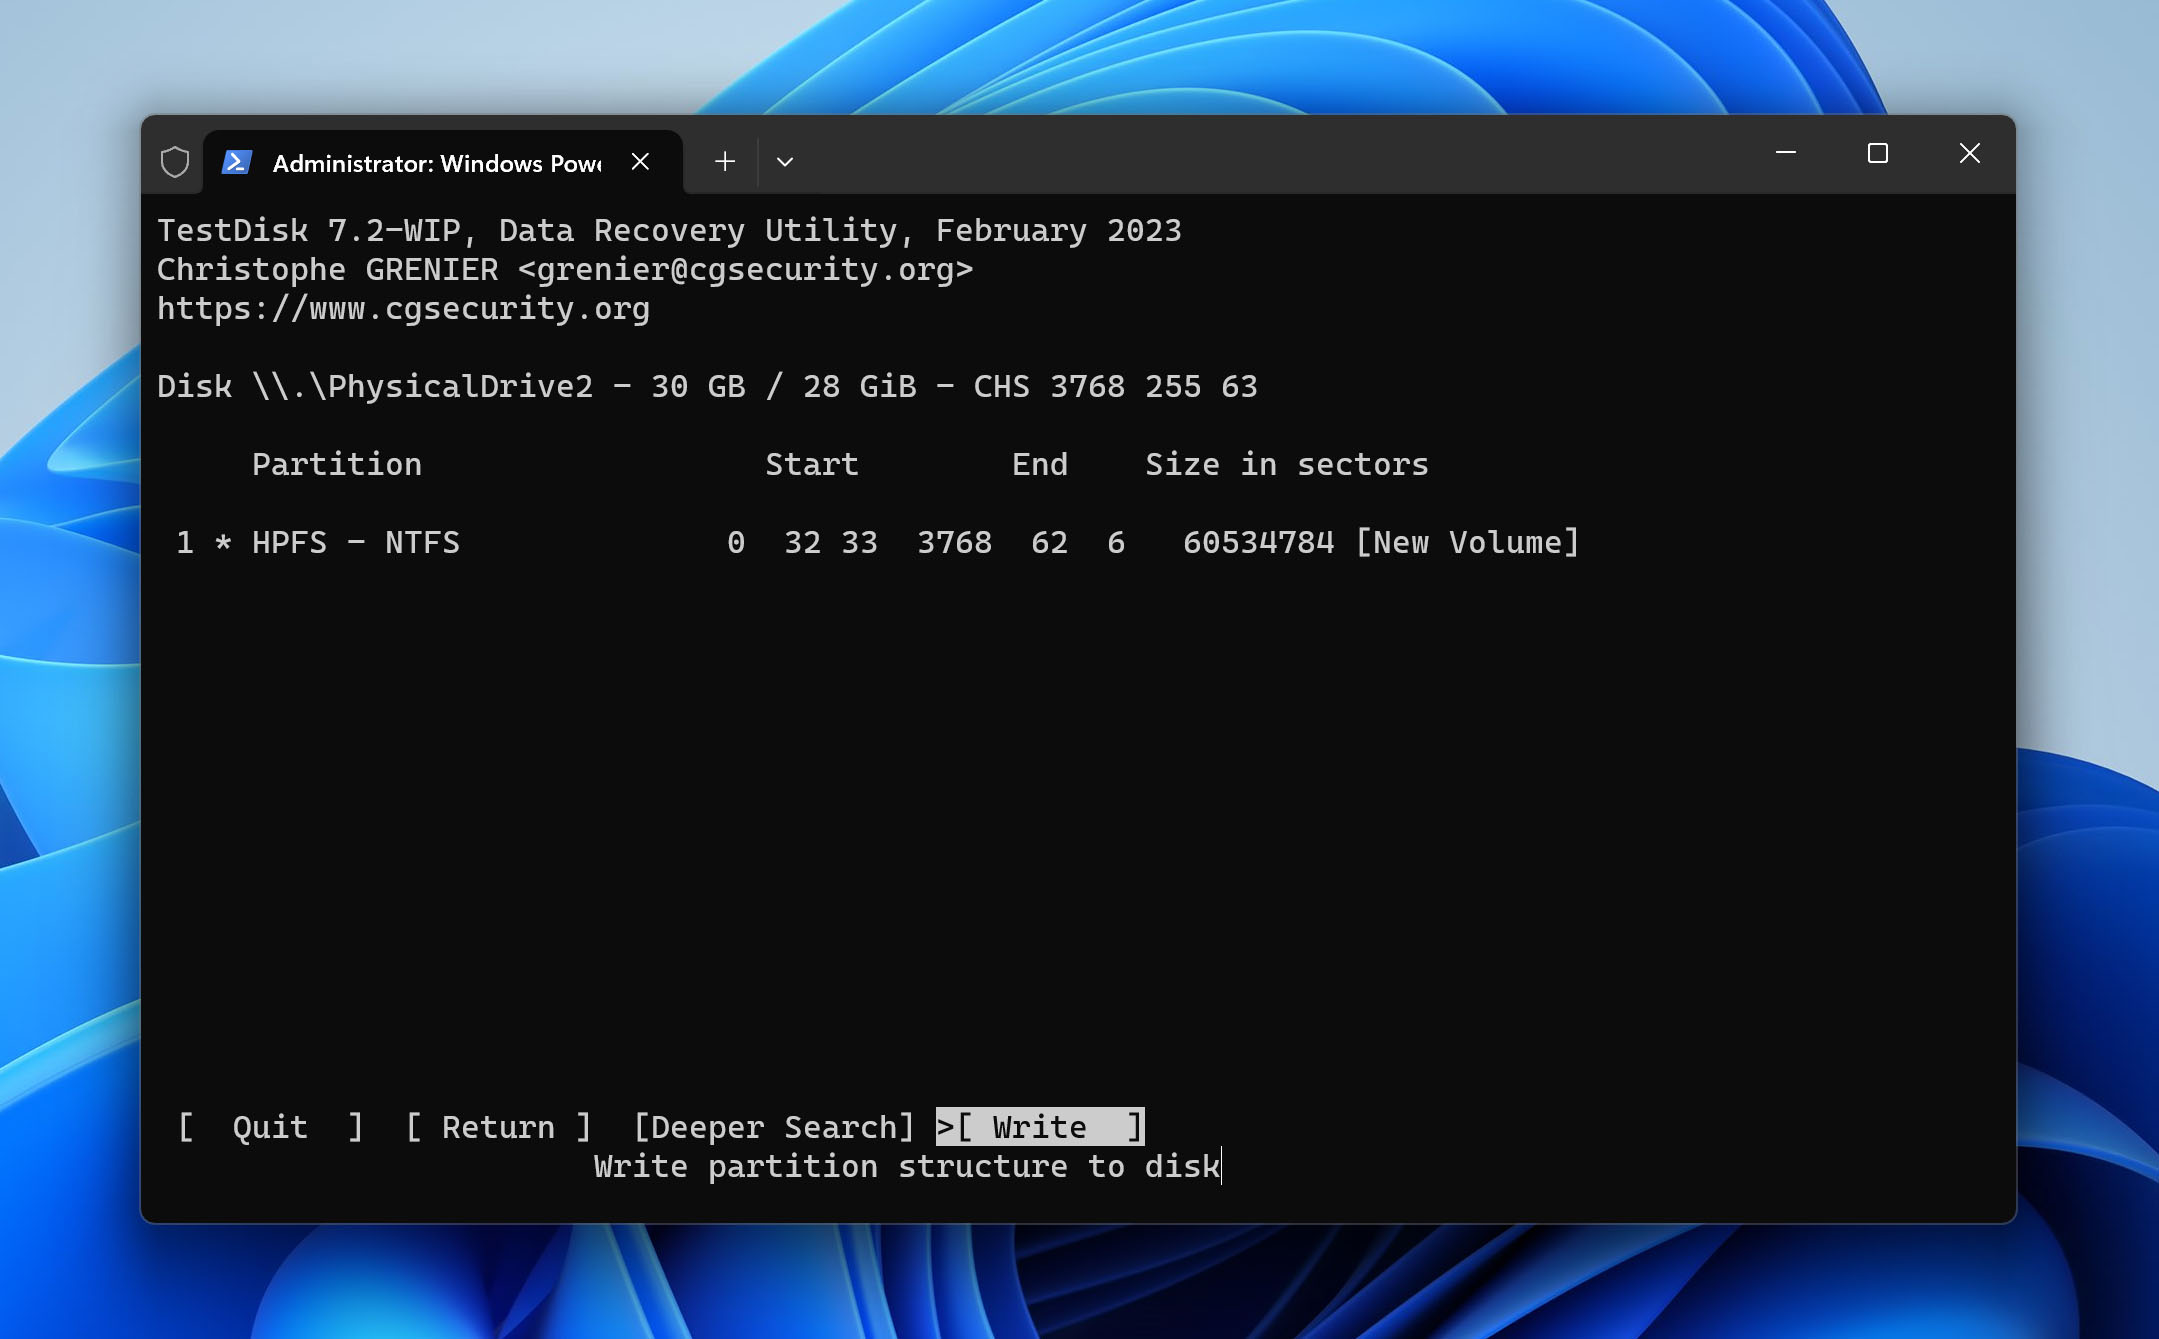
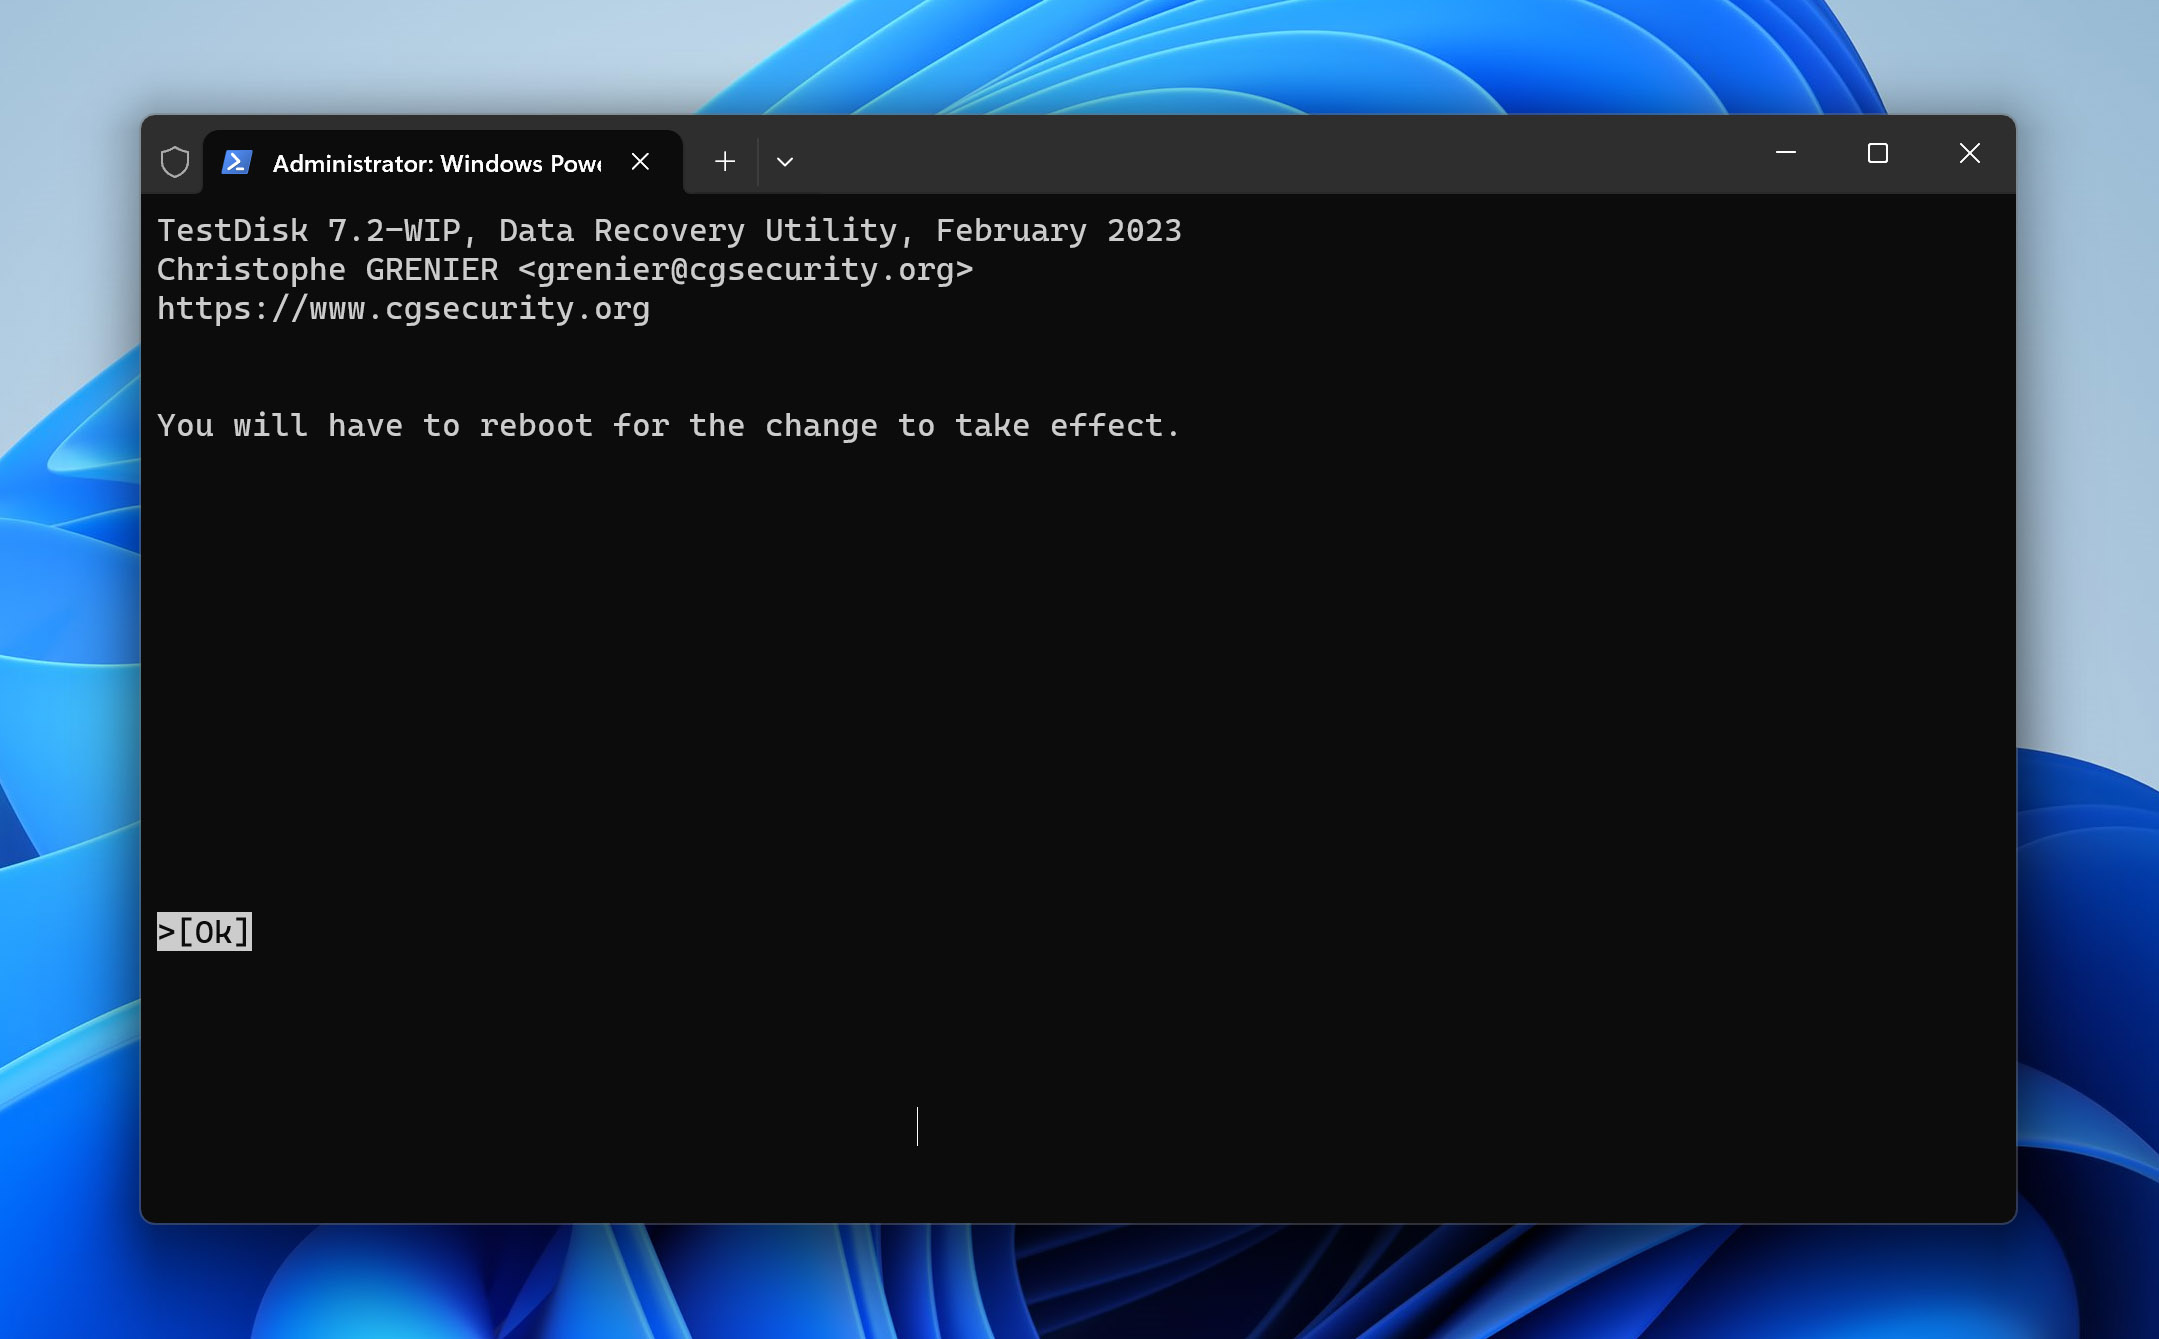
- Confirm the operation by tapping “y” on your keyboard.
- The recovered drive will be saved to disk. Restart your PC to be able to access all of that data again. To fix the RAW SD card itself, you will need to format it.
If TestDisk doesn’t look like the right fit for you, too technical, too risky, we’ve got you covered. Check out our article on the best alternatives to TestDisk for more user-friendly options.
Also, you might have noticed two programs called PhotoRec and qPhotoRec sitting next to TestDisk in the folder you extracted. They’re companion tools, both act as free RAW SD card recovery software, able to scan damaged or inaccessible cards at a deep level and recover individual files based on their signatures
PhotoRec uses a command-line interface, while qPhotoRec is just a basic GUI wrapper for it. Functionally, they’re the same under the hood; qPhotoRec just gives you buttons to click instead of typing through the terminal. Both work well for scanning RAW or severely corrupted drives, but they don’t recover original filenames or folder structure, since they rely purely on file signatures. That seriously limits their usefulness in more typical data loss scenarios, but when it comes to RAW SD cards, that drawback doesn’t matter as much, because any tool capable of handling RAW media will be forced to use signature mode anyway.
How to Fix a RAW SD Card
Now, if you don’t care about the data on the card (or you’ve already recovered everything using Method 1) and just want to turn your RAW SD card back into a normal, usable one, you’ll need to fix the file system.
The best and most reliable way to do that is to reformat the card. That wipes the corrupted file system and creates a new one from scratch.
We’ll walk you through that process in a few different ways, so no matter what’s working (or not working) on your end, you’ll have options. We’ll also show one extra method that can sometimes fix a RAW SD card in specific situations without formatting, but it’s not guaranteed.
Method 1: Run CHKDSK
This method can only fix a RAW SD card in a very specific situation – when the card was originally formatted with NTFS and the issue is limited to a damaged boot sector. In these cases, CHKDSK can sometimes restore access by using the backup boot sector to repair the file system.
That said, most SD cards are formatted as FAT32 or exFAT, not NTFS. So unless you’re sure the card was using NTFS, this method won’t work (you’ll see the “CHKDSK is not available for RAW drives” error message), and running CHKDSK on a non-NTFS RAW card may even cause more problems. Use with caution, and only if you know what file system was in use.
CHKDSK is the go-to solution for most data corruption-related problems on the computer. But be sure to use it only if your data is already backed up or fully recovered. This tool has been known to cause data loss, especially when used on drives with serious corruption.
We’ve even heard from readers who ran CHKDSK on a drive and ended up stuck for hours on Stage 4 of 5. So again – use caution.
Here’s how to run it:
- Insert your RAW SD card into your computer using a card reader.
- Open Command Prompt as Administrator. Press Windows + S, type cmd, right-click on Command Prompt, and choose Run as administrator.

- Type the following command (replace E: with your actual SD card letter): chkdsk E: /f /r /x
- Press Enter and let the scan run. This can take a while, especially for large or badly corrupted cards. Don’t interrupt the process.
- Check File Explorer to see if the SD card is accessible again.
If the scan fails with a message like “CHKDSK is not available for RAW drives” or if it gets stuck for hours, it probably won’t work in your case, it’s best to move on to the next method.
Method 2: Format a RAW SD Card
If all you want is to fix the SD card itself and make it available for storage again, you just need to format it. Do keep in mind though that this will lose you all of your previous data, so only go down this route when everything of value has already been extracted from the card.
When you are ready, here are two ways of formatting your RAW SD card.
Option A: From File Explorer
This is the easiest RAW SD card fix. If your card shows up in File Explorer, all you need to do is this:
- Open File Explorer and locate the SD card. It may not have a name, but it should still appear under This PC.
- Right-click the drive and choose Format…

- In the Format window, set the File system to FAT32 or exFAT.
- Make sure Quick Format is checked.
- You can give the card a name (optional).
- Click Start to begin. The process usually takes just a few seconds.
The window that appears lets you choose the file system as well as some additional options. Make sure that you are using FAT32/exFAT. You’ll also see the Quick Format checkbox. If you leave it checked, the format will be fast and won’t overwrite all sectors. But since your data is already off the RAW SD card, you might want to uncheck it to run a full format. This takes longer but helps fully wipe the card and mark any bad sectors, which can be useful if the card was acting unstable.
Option B: From Command Prompt (CMD)
Formatting a drive can be done from the command prompt too. Doing so gives no additional advantages, so File Explorer should be the preferred option. The only reason to use the CMD is if the file explorer is not working for some reason, or if you just prefer command-line tools.
- To begin, run Command Prompt as an administrator.
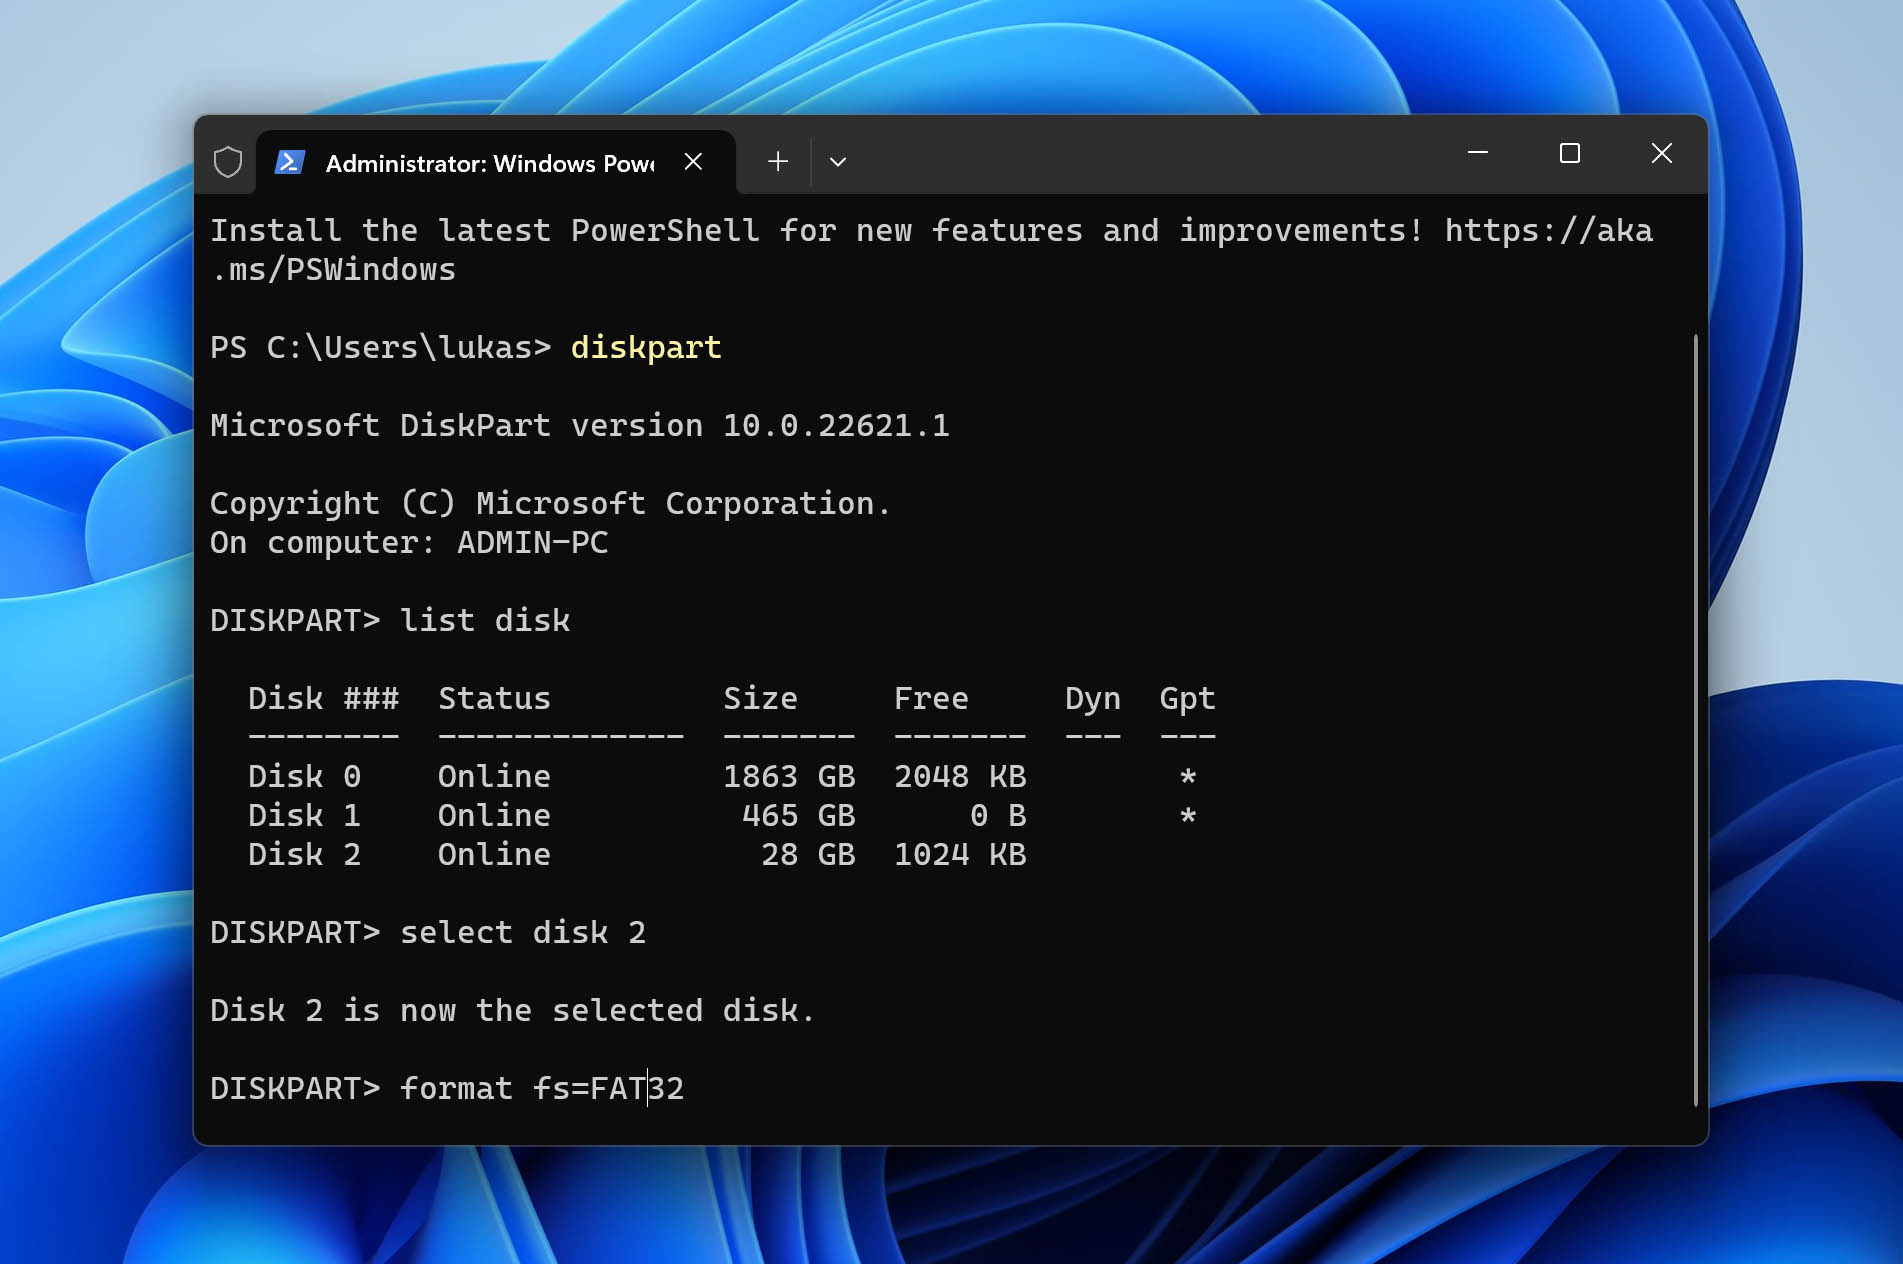
- We will be using the in-built Diskpart utility for this. First, enter Diskpart to start up the tool.
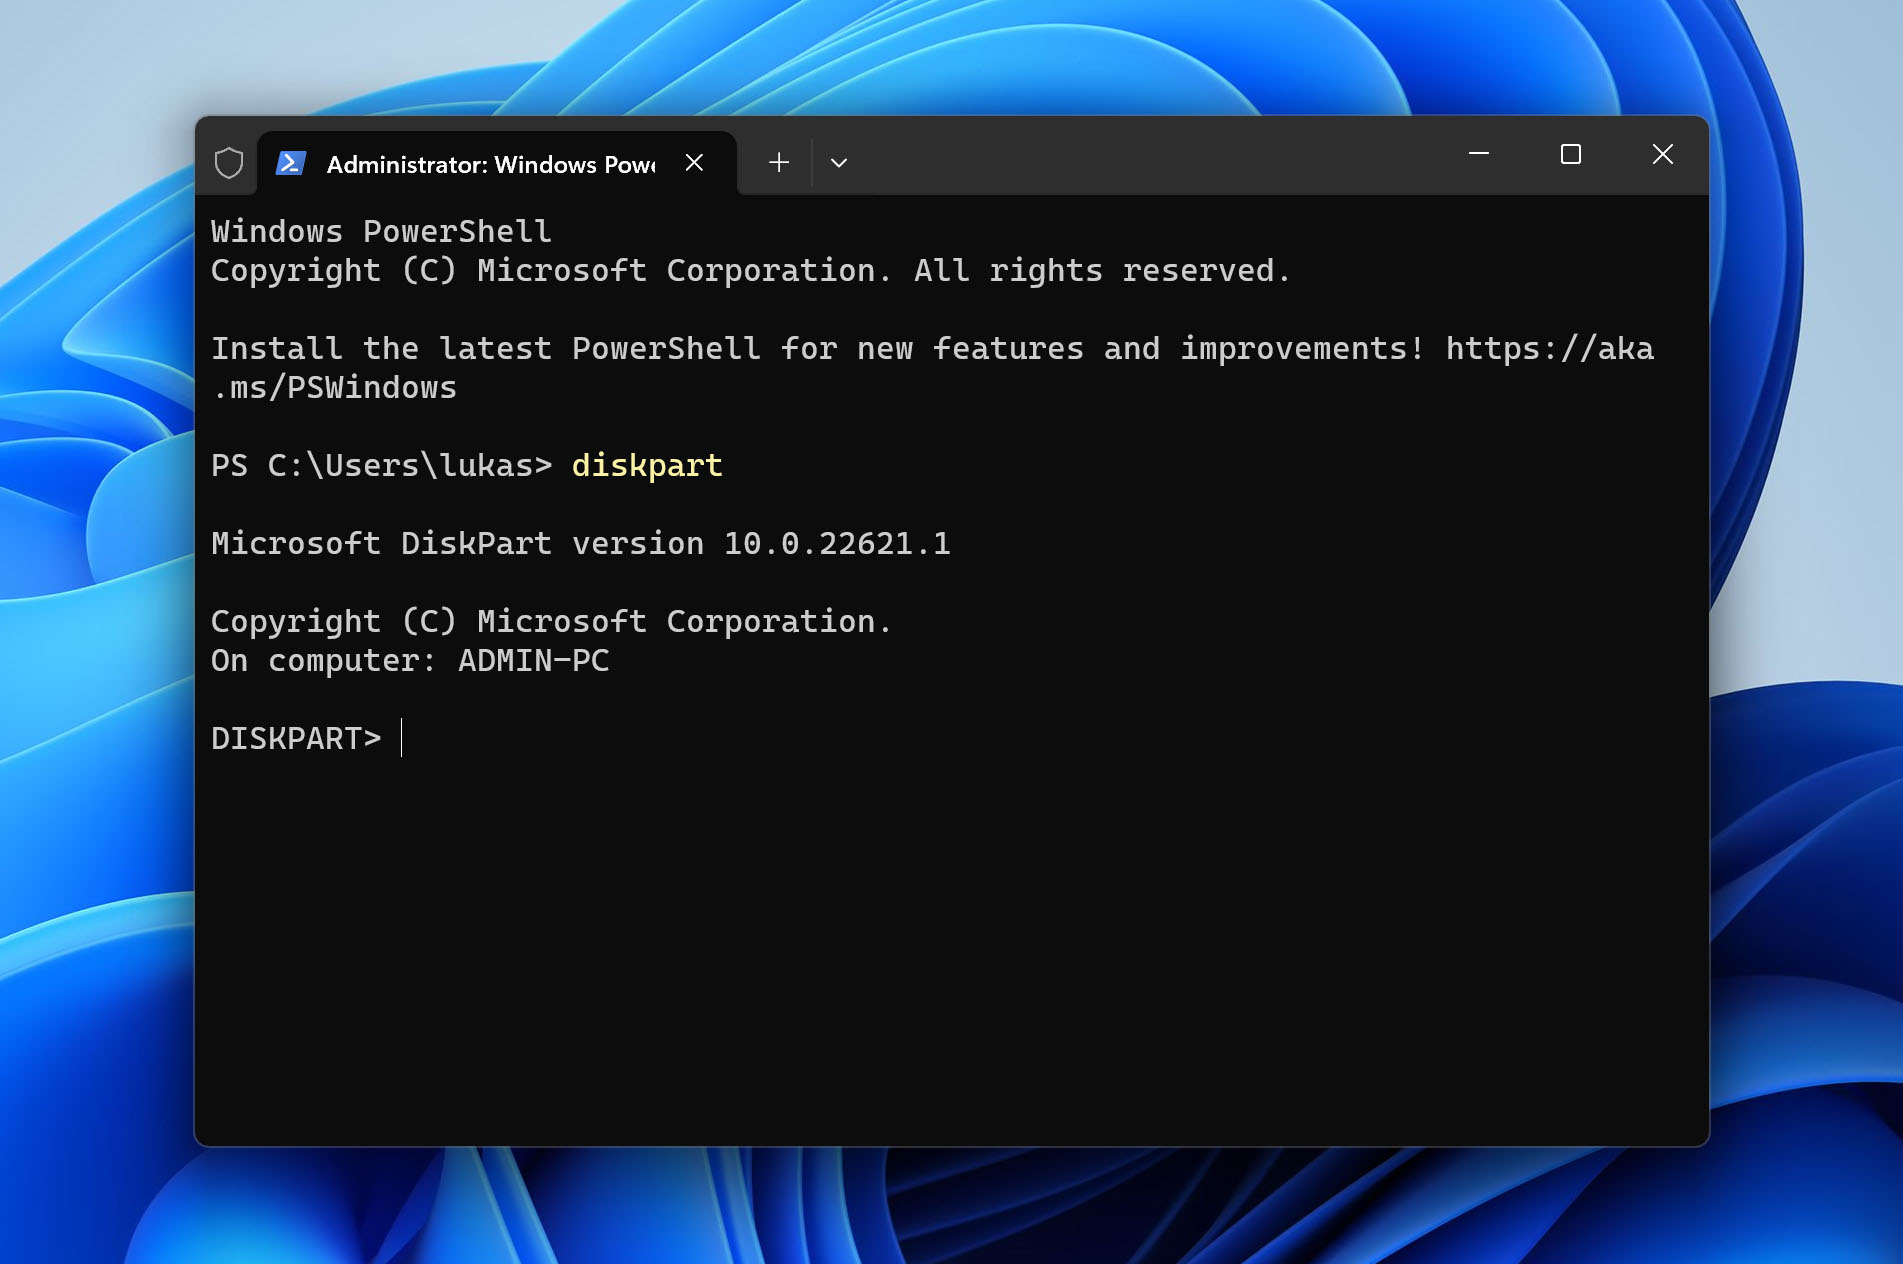
- Now use the list disk command to get all the drives connected with your computer listed with their numeric ids.
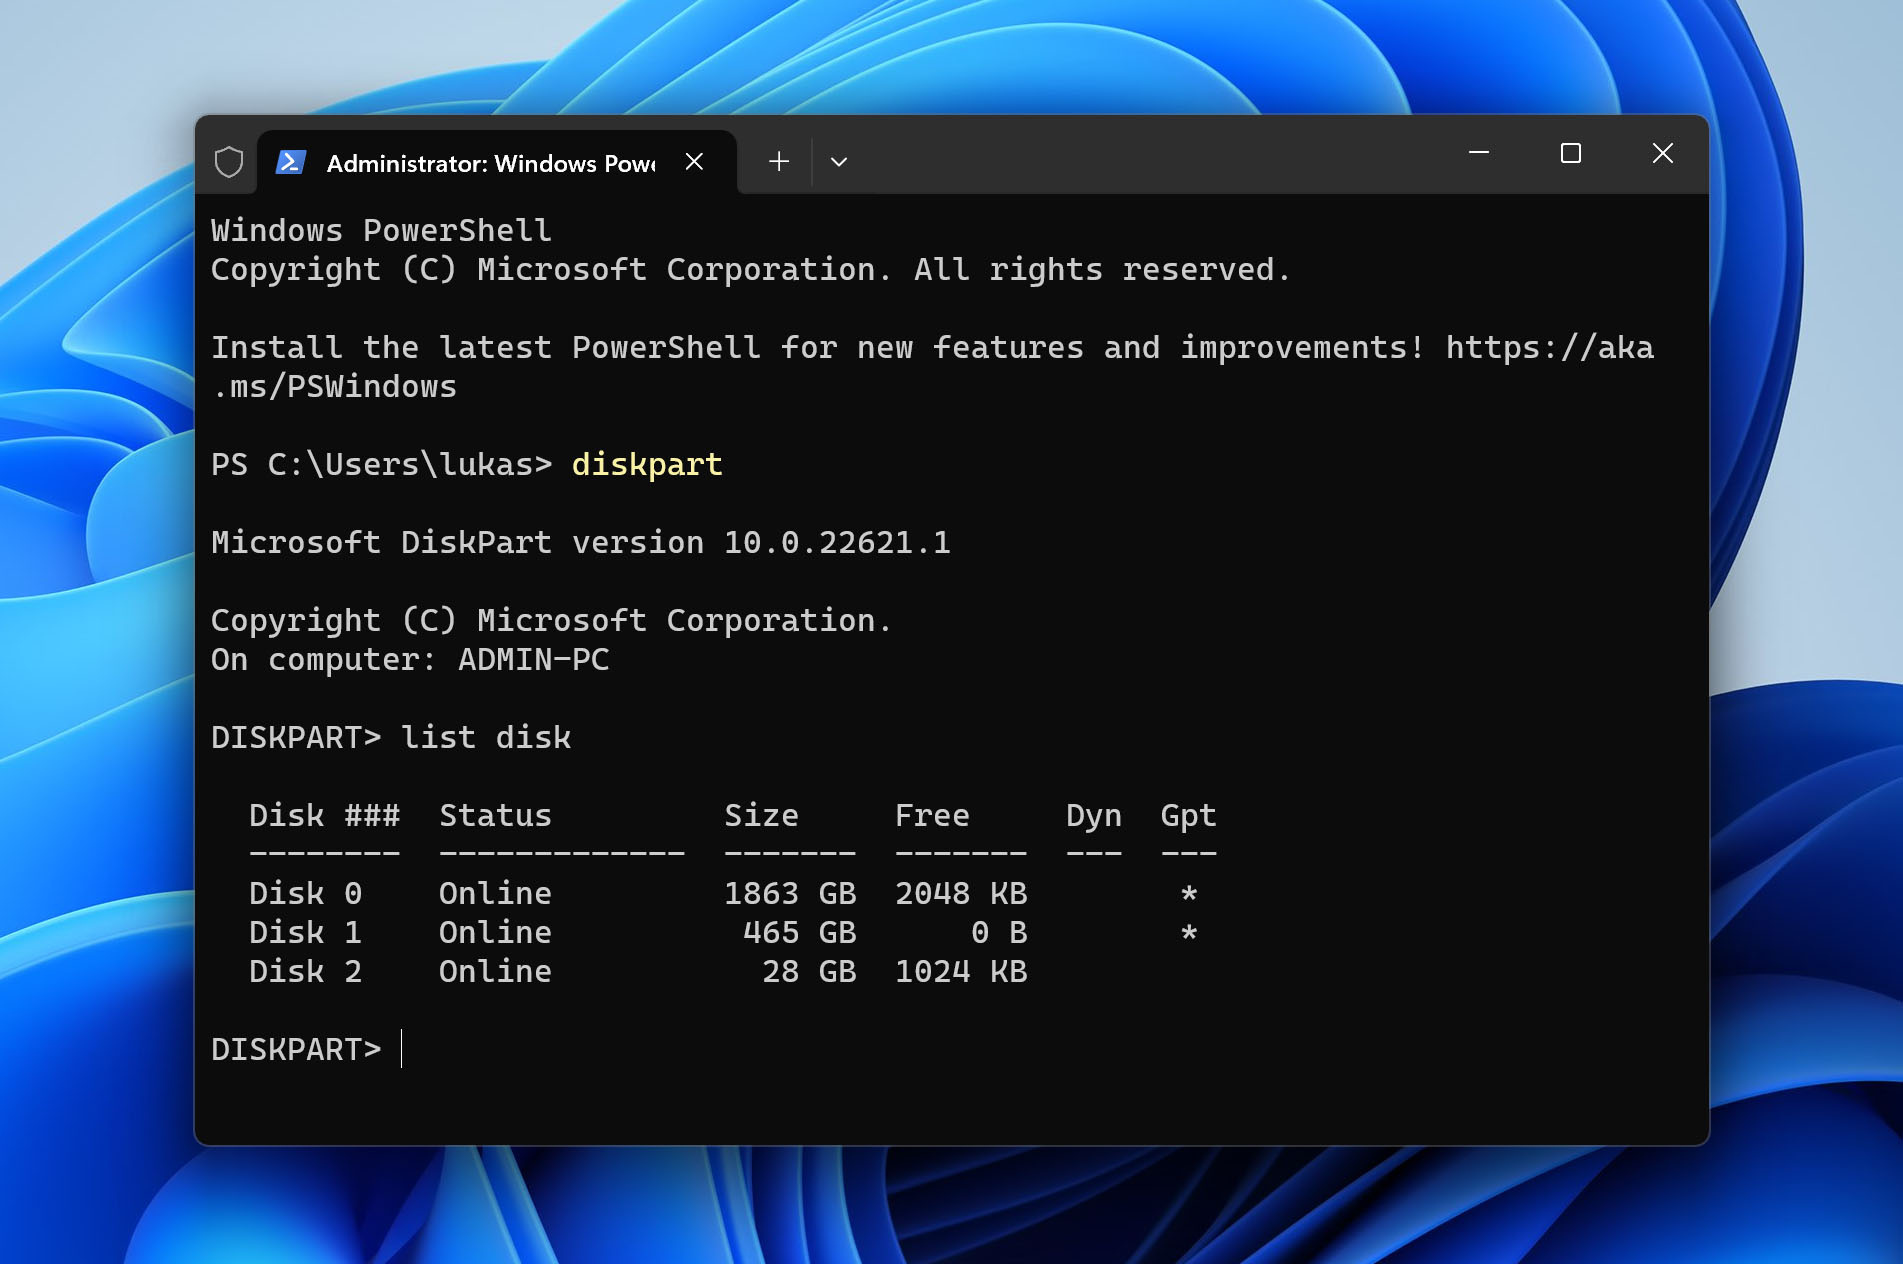
- Determine which of these disks is the RAW SD card through the storage sizes alongside each entry, and take note of that number. The command select disk x (where x is the id) will choose that disk for further processing.
- All that remains is to format the disk using the format command. Specify FAT32 as the file system by typing: format fs=FAT32 and you are done.
Be careful when using DiskPart. It’s a command-line tool, and it doesn’t ask for confirmation before running most actions. Double-triple-check that you’ve selected the correct drive before running any command. The last thing you want is to accidentally format the wrong disk and wipe important data by mistake. Take your time here.
Why Does an SD Card Become RAW?
Like any other storage media, SD cards are formatted with a file system too. And when the file allocation table at the heart of this system gets affected, the files on the card can no longer be accessed by the operating system.
But how can the file system be tampered with? Here are some of the common reasons:
- 👴 In any SD card, physical deterioration and aging of the device can destroy the file system. All storage media can support a limited number of write operations, and as this limit approaches, the card starts behaving oddly. Often, the file system itself gets affected, rendering the card unusable unless formatted again.
- 🔌 This problem can also arise from an abrupt power failure. When the card suddenly loses power in the midst of reading or writing any data, the process to update the file allocation table is still ongoing. Broken off in the middle, it can render the table corrupted, and the card RAW.
- 🧲 SD cards, like all other long-term storage media, use magnetization to record data. Now, this magnetization is durable enough to last even when power has been removed from the card. But when left that way for months and years, and exposed to other magnetic fields, its internal magnetic polarities can get scrambled. This can lead to the SD card losing its file system and registering as RAW data.
- 🦠 Malware is another common source of data corruption. While it is rare for a computer virus to attack the file system itself, it can happen. And when it does, your SD card will become RAW and inaccessible to the computer.
When RAW SD Card Recovery Isn’t So Simple
In most cases, a RAW SD card is straightforward – scan the card with the right tool, pull your files, then format it. But every now and then, we run into edge cases that throw a wrench into the process. Whether it’s misleading hardware behavior or software that doesn’t play well with RAW media, here are some of the more unusual roadblocks you might encounter:
Misreported Capacity and “Chip-Off” Scenarios
Sometimes, the card doesn’t just go RAW – it also misreports its capacity. You plug in a 64 GB microSD, and it suddenly shows up as 32 MB. That’s not a formatting glitch – it usually points to internal controller damage. In these situations, standard recovery tools won’t help.
If the memory chips themselves are still intact, recovery may require a highly technical process called a chip-off recovery. This involves physically removing the flash chip from the card and reading it using specialized equipment in a lab environment. Not cheap, but it’s the only shot if the controller is gone.
Some Tools Just Can’t Handle RAW Media
Not all recovery tools are built to scan RAW drives properly, especially when it comes to SD cards. We’ve seen users try popular utilities like Recuva or Windows File Recovery, only to find that the software won’t even recognize the card because there’s no file system to read.
These tools rely heavily on the file table (like FAT32 or exFAT) to navigate the storage. When that table’s gone or unreadable (as is the case with RAW cards), they’re basically blind. In contrast, tools like Disk Drill, PhotoRec, or R-Studio can operate independently of the file system and dig directly into the raw binary data.
Card Readers Can Be the Culprit
Sometimes the SD card isn’t actually the problem – it’s the reader. There are cases where a microSD card showed up as RAW or unreadable on one computer, but worked fine when plugged into another system with a different reader or adapter.
Cheap or older readers might miscommunicate with the card, especially high-capacity SDXC or UHS-I/UHS-II cards. You might get errors like “You need to format the disk” or “Windows can’t read this file system,” when in reality, the file system is fine.
Read-Only Mode Gets in the Way
Some RAW SD cards flip into read-only mode as a kind of self-preservation mechanism when they detect internal damage or too many write errors. In this state, recovery software might still be able to scan and extract files, but any attempt to repair or reformat the card will fail with errors like “The disk is write-protected.”
This can trip people up because it feels like a permissions issue or system error, but it’s usually a hardware-level lock. There are a few workarounds. You can try using low-level tools like SD Card Formatter (from the SD Association), HDD Low Level Format Tool, or DISKPART in Windows to force a format and clear the read-only status.
FAQ
Why did my SD card turn RAW?
The primary cause of an SD card becoming RAW is a corrupted file allocation table. Now this corruption could stem from several issues, such as malware, improper shutdown, sudden ejection, or even aging of the device.
How do I format a RAW SD card?
You can format a RAW SD card by following these steps:
- Connect the SD card to your computer with a card reader.
- Open File Explorer and Right-click on the RAW SD card.
- Select Format in the drop-down menu.
- Hit the Start button to format your RAW SD card.
Why my RAW SD card won't format?
Formatting is one of the few things you can do even when your SD card is RAW. In case you cannot find the command – or are unable to use it, you need to make sure your PC can access the card properly.
- Re-insert your SD card into the card reader and check if it is firmly plugged in.
- Try switching USB slots in case one is malfunctioning.
- You may also want to try a low-level format tool like HDD Low Level Format Tool – a more advanced option that can sometimes access “stuck” cards.
If nothing works, you might be dealing with a physically damaged SD card.
How do I recover files from a RAW SD card?
You can recover files from a RAW SD card with the following steps:
- Connect your RAW SD card to a PC using a card reader.
- Download a data recovery software tool and install it on your PC.
- Launch the software and perform a scan on your RAW SD card.
- Preview the recoverable files after the scan is complete (if your software supports this feature).
- Select the files you wish to recover and save them to your hard drive.
Is it possible to perform RAW SD card recovery for free?
Yes, it is possible to recover data from a RAW SD card without spending any money. You need to download the free version of a powerful data recovery tool like Disk Drill and scan the SD card with it.
Or, you can go with 100% free open-source tools like TestDisk or PhotoRec. These are powerful and work even when the SD card shows up as RAW.
Just keep in mind: not all free tools support RAW media. For example, Recuva is free and has no recovery limits, but it can’t scan RAW drives, so it won’t help in this situation.
Is it possible to repair a RAW SD card without formatting?
In most cases, formatting is what actually fixes a RAW SD card. When the file system is too damaged for the OS to recognize, creating a new one (i.e., formatting) is usually the only way to make the card usable again.
That said, there is a rare exception. If your SD card was originally formatted as NTFS and the damage is limited to the boot sector, the CHKDSK tool might be able to repair it using the backup boot sector, without needing to format the card.
But this only works in a very narrow scenario, and most SD cards are formatted as FAT32 or exFAT, where CHKDSK typically won’t help.
Can recovery software handle micro SD RAW fix the same way as SD cards?
Data recovery software handles micro SD cards and full-size SD cards the same way. That’s because what matters is the file system and storage format – not the physical size of the card.
Whether it’s a micro SD or standard SD, if the card is RAW (due to file system corruption), recovery tools like can scan the card and recover files just as they would with any other removable drive.
Is there a difference between recovering RAW files from an SD card and recovering data from a RAW SD card?
Yes, and it’s a common point of confusion. Some people mix up the two because of how similar the phrases sound.
A RAW SD card is when the card’s file system (like FAT32 or exFAT) becomes damaged or unreadable. In this case, you’re trying to recover any data from a card that can’t be accessed normally.
Meanwhile, RAW files refer to uncompressed image formats used by professional cameras, like CR2 (Canon), NEF (Nikon), ARW (Sony), RW2 (Panasonic), and others. These are high-quality photo files. In that case, the SD card itself is working fine – you’re just trying to get back deleted or lost RAW media files.
If that’s your situation, many data recovery tools can handle it:
- Disk Drill (Free version) – Recovers up to 500MB for free on Windows and includes support for RAW photo formats with preview, so you can see the image before recovering it.
- DMDE Free Edition – Also supports RAW format recovery with a 4,000-file-per-session limit.
- PhotoRec – Completely free and supports a wide range of RAW image formats.
As long as your SD card is still readable at the hardware level (even if it’s showing up as RAW), these tools can often scan it and pull your RAW photos out.
Final Words
We hope this guide helped you fix your RAW SD card, and maybe even made it feel like nothing ever happened. But if things didn’t go smoothly, or you’re facing a weird issue we didn’t cover in the FAQ, it’s still not a dead end.
Head over to the Handy Recovery Advisor Community. Use the search bar to look up your exact problem; there’s a good chance someone else already posted about it (and got help). If not, start a new thread. Just describe your situation in detail: what led up to it, what tools you’ve tried, and what your SD card is showing now. If you can, grab a screenshot and attach it. That makes it way easier for others to jump in and help.
We’ve fixed a lot of “hopeless” cases in the community. Yours could be next.
This article was written by Levin Roy, a Contributing Writer at Handy Recovery Advisor. It was recently updated by Roman Demian. It was also verified for technical accuracy by Andrey Vasilyev, our editorial advisor.
Curious about our content creation process? Take a look at our Editor Guidelines.