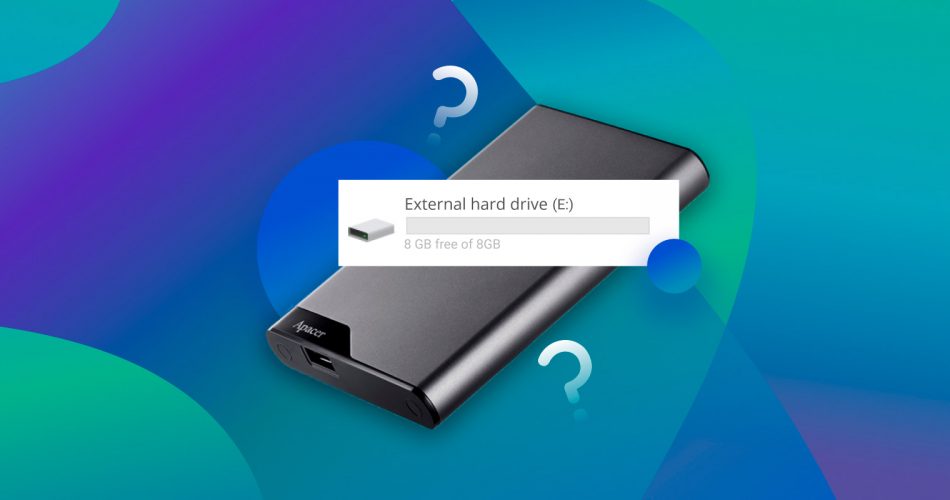
Files disappeared from your external hard drive? You’re not the first one dealing with this. We’ve received tons of questions about this exact issue, from people wondering if there’s still a way to get it back.
The truth is that in most cases, it’s completely fixable. Whether certain folders are missing or just a couple of files, we’ve helped a lot of people recover from this, and today, we’ll help you too.
Below, we cover the not-so-mystery of the missing files and provide step-by-step guides for 4 of the most effective methods to recover them. Click here if you want to skip the introduction and jump straight to the data recovery part.
Why Files Could Disappear From an External Hard Drive
The first thing we want to cover is: this kind of issue usually isn’t random. If files disappeared from your external hard drive, there’s almost always a specific cause – damage or corruption (or in some cases, user error). We listed the most common reasons below:
Accidental Deletion |
Quite obvious, but accidental deletion is one of the most common reasons for data loss. It’s fine, we won’t judge you. Good news – deleted files are often still fully intact in the file system. |
Hidden Files |
Files become hidden for 2 reasons: (1) They are system files that keep Windows stable or, (2) you accidentally changed their properties. Solutions below. |
Modified Registry Key |
Viruses often target it so they can stay safely hidden in the file system. Below, we’ll show you how to check and fix this directly in the Registry. |
Mirror image in memory is damaged |
Mirror images stored incremental backups for everything from user files to system folders. Data loss is inevitable if it gets damaged or corrupted. |
Accidental Formatting |
The process of formatting wipes data from a drive. But if it was a quick format (which is usually the default), it doesn’t actually erase the files themselves. It just removes the file system’s index that tells your computer where everything is stored. That means you can still recover data from a formatted hard drive. |
Wear and Physical Damage |
Hard drives are particularly prone to wear and damage due to their spinning disk. In this case, it’s better to send it to a professional data recovery center to avoid making things worse. |
Problems with File System Integrity |
A damaged or corrupted file system may cause files to disappear from a hard drive or simply go hidden. You usually fix corrupted drives by formatting them (which wipes your data). However, by using data recovery software, you can recover data from your external hard drive without formatting. |
Quick check before we go further. Sometimes, what looks like a serious problem is just a minor Windows glitch.

Try this: properly eject the external hard drive, unplug it physically, wait a few seconds, then plug it back in and let Windows detect it again. It might be a long shot, but we’ve actually seen cases where missing files or entire folders reappeared after a simple reconnect. Worth a try.
Can You Recover Files that Disappeared From an External Hard Drive?
External hard drives have their own “behaviors” when handling file storage. This dictates how data recovery will go. Common scenarios are:
Scenario 1: Files Permanently Deleted From an External Drive
While external drives don’t send permanently deleted files to the Recycle Bin, they still exist deep within the file system. However, they’re already marked to be overwritten so saving new data to the drive may truly delete them forever.
We recommend stopping using the drive as soon as possible to avoid overwriting! Every new file you add risks replacing the very data you want to get back.
Did you know that external hard drives have their own Recycle Bin? No? Find out more here.
Scenario 2: Files Missing From an External Hard Drive but Still Taking Up Space
There are two reasons for a mismatch of available space on an external hard drive. Either you accidentally set those files to “Hidden” or they have been permanently deleted but still temporarily reside in your drive’s file system (like we talked about in the last section).
So your files may be deleted according to the Windows interface, but space is still occupied on the drive. In either case, you can absolutely recover your missing data using the methods below.
4 Methods to Recover Missing Files From an External Hard Drive
We have no way to know exactly why a file or folder disappeared from your external hard drive, but based on what we’ve seen in countless recovery cases, some fixes tend to work more often than others. So instead of listing everything at random, we’ve arranged the fixes in the order that usually gets the best results first.
Here are 4 different external hard drive data recovery methods that explain in simple words what problem it solves, along with step-by-step guides so you don’t get lost along the way.
Method 1: Scan It with a Data Recovery Tool
If files disappeared from your external hard drive, the safest move you can make is to stop using it and scan it with data recovery software.
This works because deleted files (whether you removed them by accident, formatted the drive, or they vanished due to file system issues) are still sitting on the disk. They’re just invisible to Windows. Recovery tools scan the drive at a deeper level and pull out those “invisible” files as long as they haven’t been overwritten yet.
This is the method that’s proven to be the most universal in our experience, which is why we always start with it.
For this article, we’ll be using Disk Drill. We’ve used it many times to recover large amounts of data, and it’s super easy to use – even for beginners. Plus, it comes with all kinds of quality-of-life features that make the whole process smoother.
If you want to learn more about this software, we wrote a full Disk Drill review on our blog. And one of our colleagues even took the time to specifically test Disk Drill for safety, just to be thorough.
Here’s what you should do to recover missing files from an external hard drive:
- Connect your external hard drive (this also works for USB flash drives) to your computer.
- Download and install Disk Drill.
- Once the .exe file is downloaded, double-click it and follow the setup instructions. You can leave most settings at default unless you have a specific install location in mind. Just make sure you don’t install it onto the same external drive you’re trying to recover from. We’ve already explained why that’s a bad idea: it can overwrite the very files you’re hoping to get back.
- Launch Disk Drill.
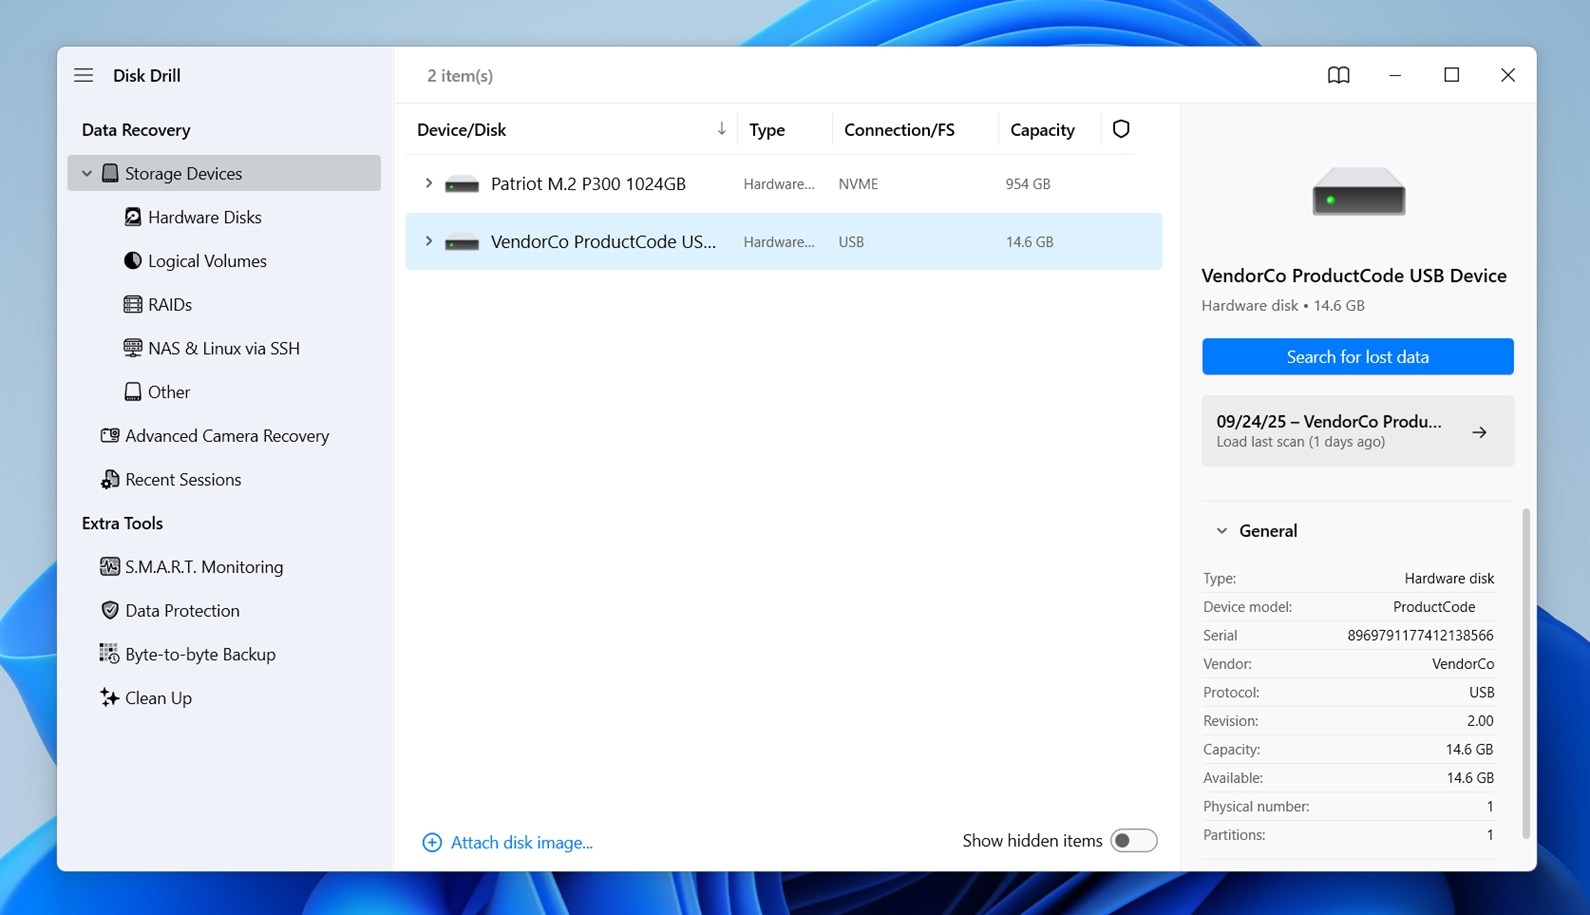 On the main screen, you’ll see a list of all connected drives and partitions. Look for your external hard drive with missing data – it should show up with its name and size. Select the entire drive, not just a single partition.
 - Click the Search for lost data button next to your external drive.
- Disk Drill will then ask you to choose a scan mode.
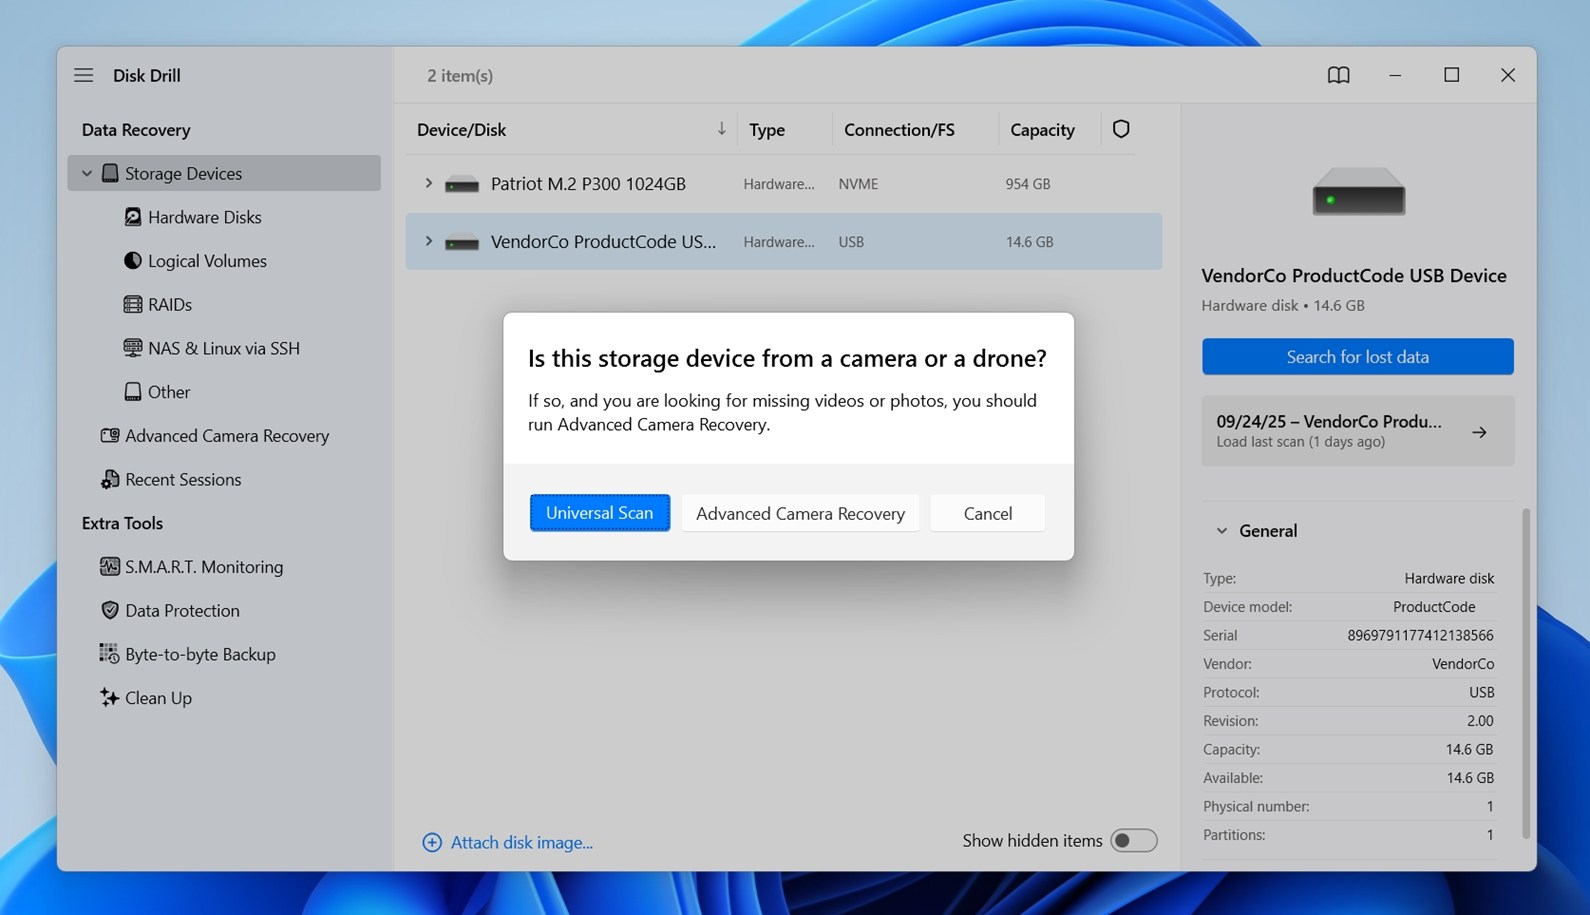 Select Universal Scan. It will begin scanning the drive for missing files. Depending on the drive size, connection speed (USB 2.0/USB 3.0), and condition, the scan may take anywhere from a few minutes to several hours.
 - You don’t have to wait for the scan to finish to start browsing results. You can click Review found items at any time.

- Disk Drill also automatically groups found files into categories: Pictures, Video, Audio, Documents, Archives, Other Files. You can click on any of these to dig through specific file types.
- Once you’re inside the Review Found Items window, you’ll notice Disk Drill breaks the results into three main categories: Deleted or Lost, Existing, and Reconstructed.
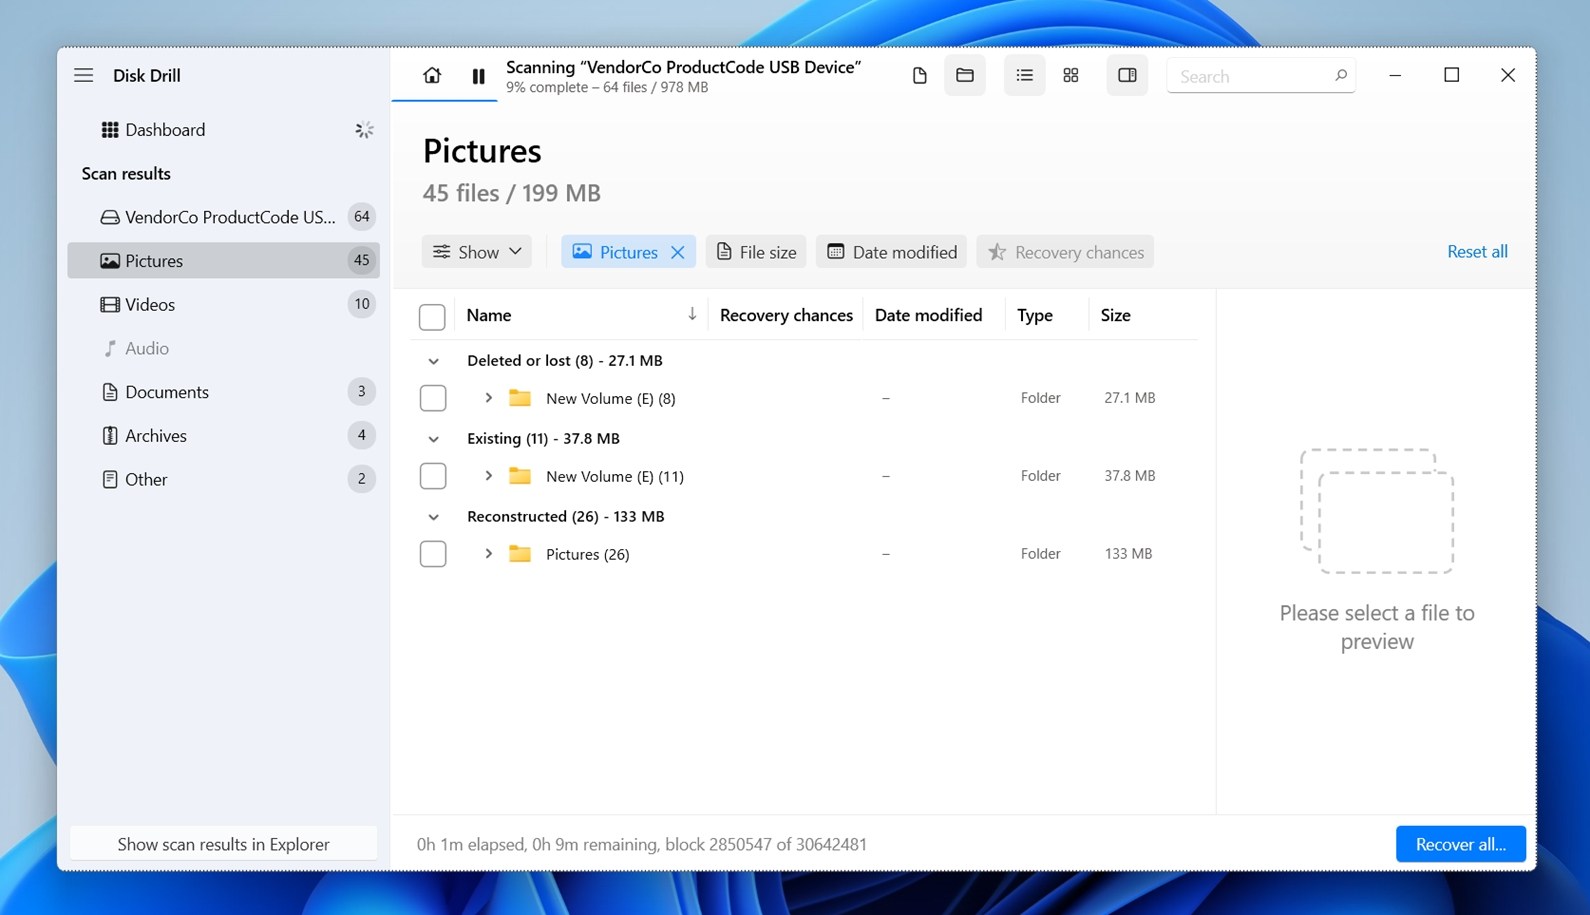
- If your files disappeared from the external hard drive, they’ll most likely be under Deleted or Lost, or sometimes in Reconstructed.
- You don’t need to scroll. At the top of the screen, there’s a search bar that works just like File Explorer – so if you know the file name, part of it, or even just the extension like pdf or jpg, use it. It’ll make things a lot quicker.
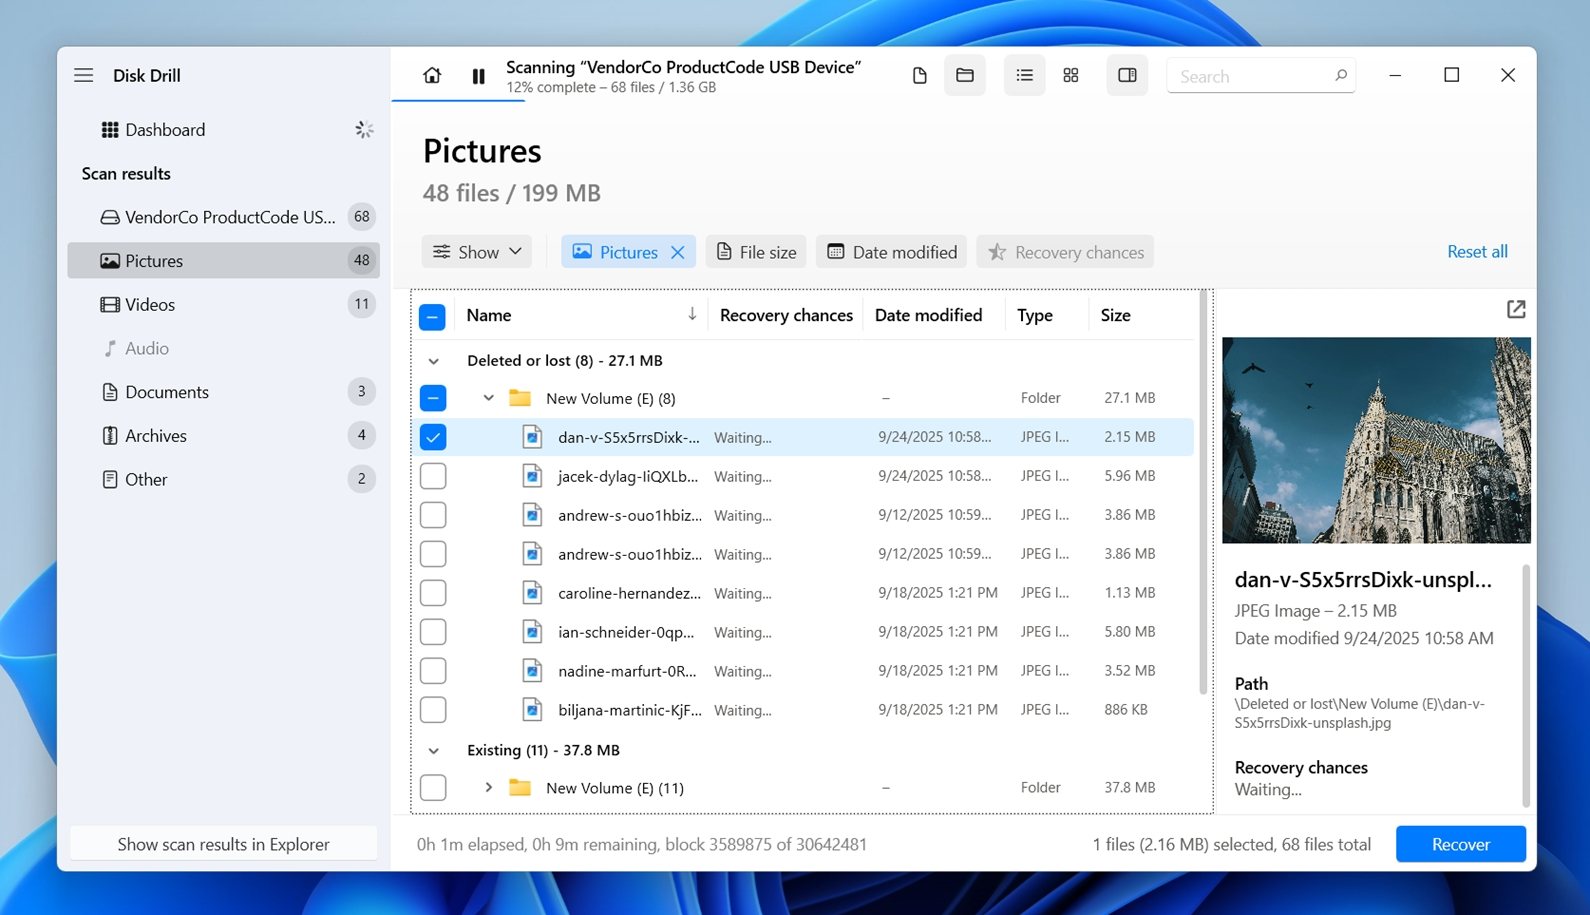
- As you click on files, a small preview shows up on the right. Disk Drill can preview almost any file type (either because your system already supports it, or through apps already installed on your PC). And here’s the thing: if you can preview a file, that means it’s fully recoverable. Think of it like this: if you can see the contents, Disk Drill can save it.
- Once you’ve marked the files you want to recover, all you need to do is click the Recover button at the bottom.
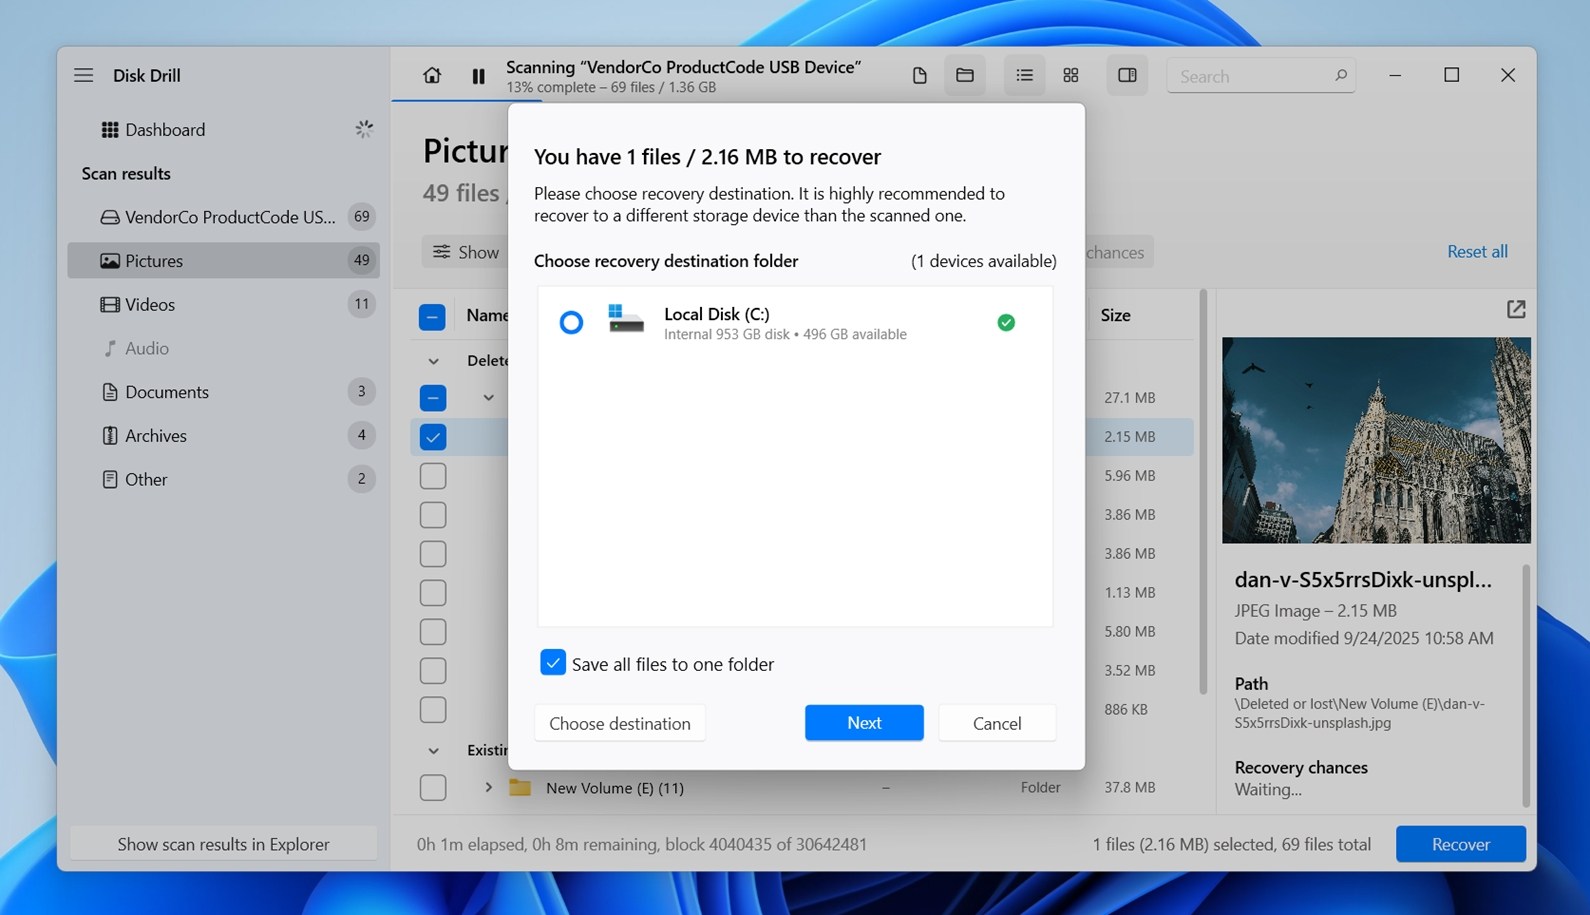 On Windows, Disk Drill’s free version lets you recover up to 100 MB without a license. That might not sound like a lot, but for a tool at this level, it’s actually pretty generous. You can easily recover a bunch of important documents, PDFs, Excel files, or even test whether your missing files are still there.
 - Disk Drill will ask you where to save the files. Choose a safe location. And yes, once again, don’t save them back to the same external drive you’re recovering from. Same reason as before: you risk overwriting the very data you’re trying to get back. Pick another internal drive or a different external one if you have it. Once recovery finishes, you’ll get an option to open the folder and check your files right away.
While Disk Drill is often our go-to data recovery tool, it’s not the only one worth considering. We’ve put together a detailed ranking of the best data recovery tools where you can compare other powerful alternatives like R-Studio, PhotoRec, Data Rescue, and more.
We go pretty deep in that guide – we break down pros, cons, features, pricing, file system support, and even real-world recovery test results. If you’re still deciding what tool to use, or just want to see how they stack up, it’s worth a look.
Method 2: Try to Unhide Files on Your External Drive
The next way to recover missing data is to check if your files on the external hard drive disappeared simply because they were hidden.
Windows sometimes hides files by default ( system files), but it’s also possible that you, someone else, or even malware changed the visibility settings. In some cases, entire folders may look like they’ve gone, even though they’re still there.
Here are two ways to unhide them:
With Windows Explorer
You can unhide files (even system files) by changing a setting via Windows Explorer. Here’s how to do it:
- Open File Explorer and go to your external drive.
- At the top, click the View tab.
- Hover over Show, then click Hidden items in the dropdown menu.

That’s it, any files or folders marked as hidden will now become visible. You’ll notice they appear slightly transparent, which is how Windows marks them as “hidden but shown.”
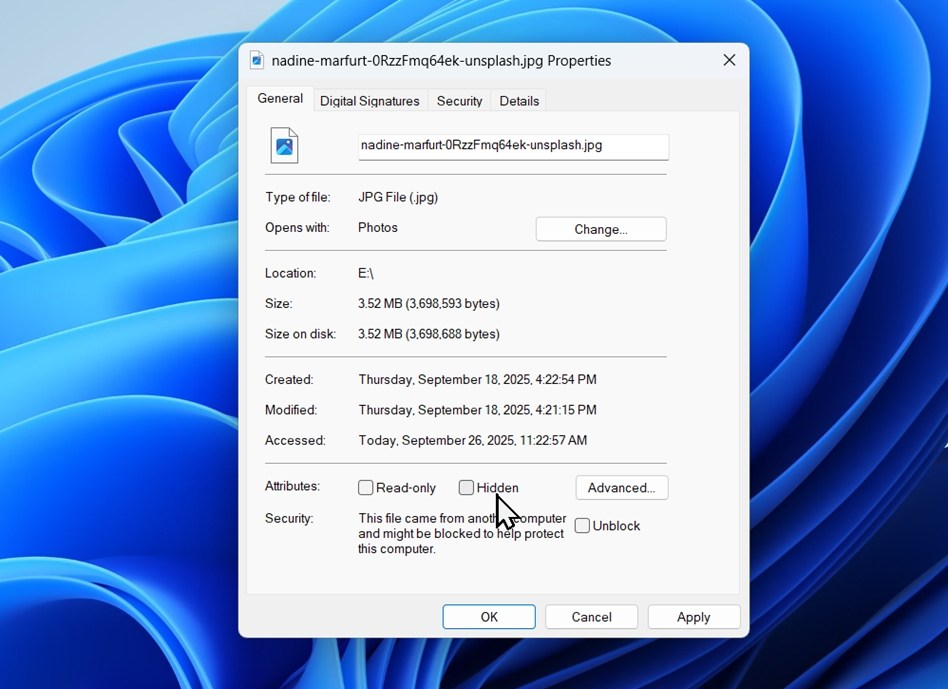
If you want to make them fully visible (so they look like regular files again), just right-click the file or folder, choose Properties, and uncheck the Hidden box under the Attributes section, and that file will stay visible even if you turn off the “Hidden items” option later.
With Windows Command Prompt (attrib)
There’s also an alternative way: use the attrib command. It allows users to modify attributes on files and directories. We’re going to use it to clear the “Hidden” attribute.
Be careful with this command. While it’s safe when used exactly as shown, we’ve seen it trip people up. In most cases, the File Explorer method above is enough to reveal hidden files, so try that first.
It’s super easy – just a single line of code. Open Command Prompt, type the following command, and press enter:
attrib -h -r -s /s /d D:\**.**
Change the drive letter (in this case “D”) to whatever letter is assigned to the drive you want to scan.
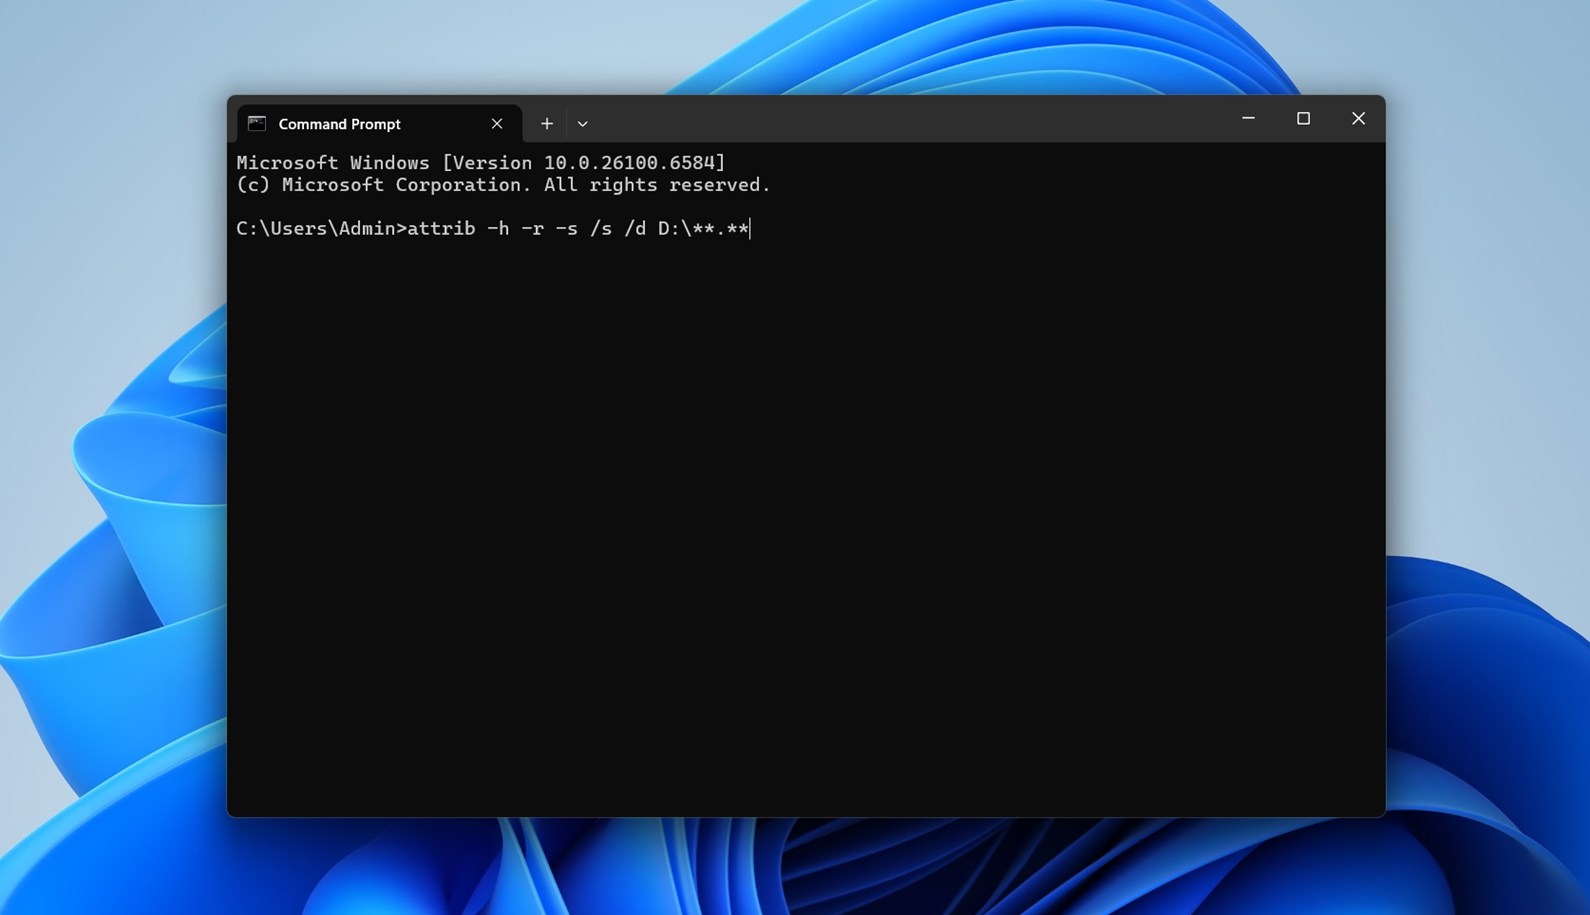
What this does: This command strips away any hidden (-h), read-only (-r), or system file (-s) attributes from all files and folders, including subfolders (/s) and directories themselves (/d). It doesn’t delete anything, just tells Windows to stop hiding it.
After running it, go back to File Explorer and check your external hard drive. If files disappeared from the external hard drive, they might now be visible again.
Method 3: Change the Registry Value to Access Hidden Folders
If you’re unable to unhide your files using the above method, a virus may have disabled your ability to change folder settings by attacking the registry. This is a common tactic viruses use to evade detection. Here’s how to change it manually in the registry:
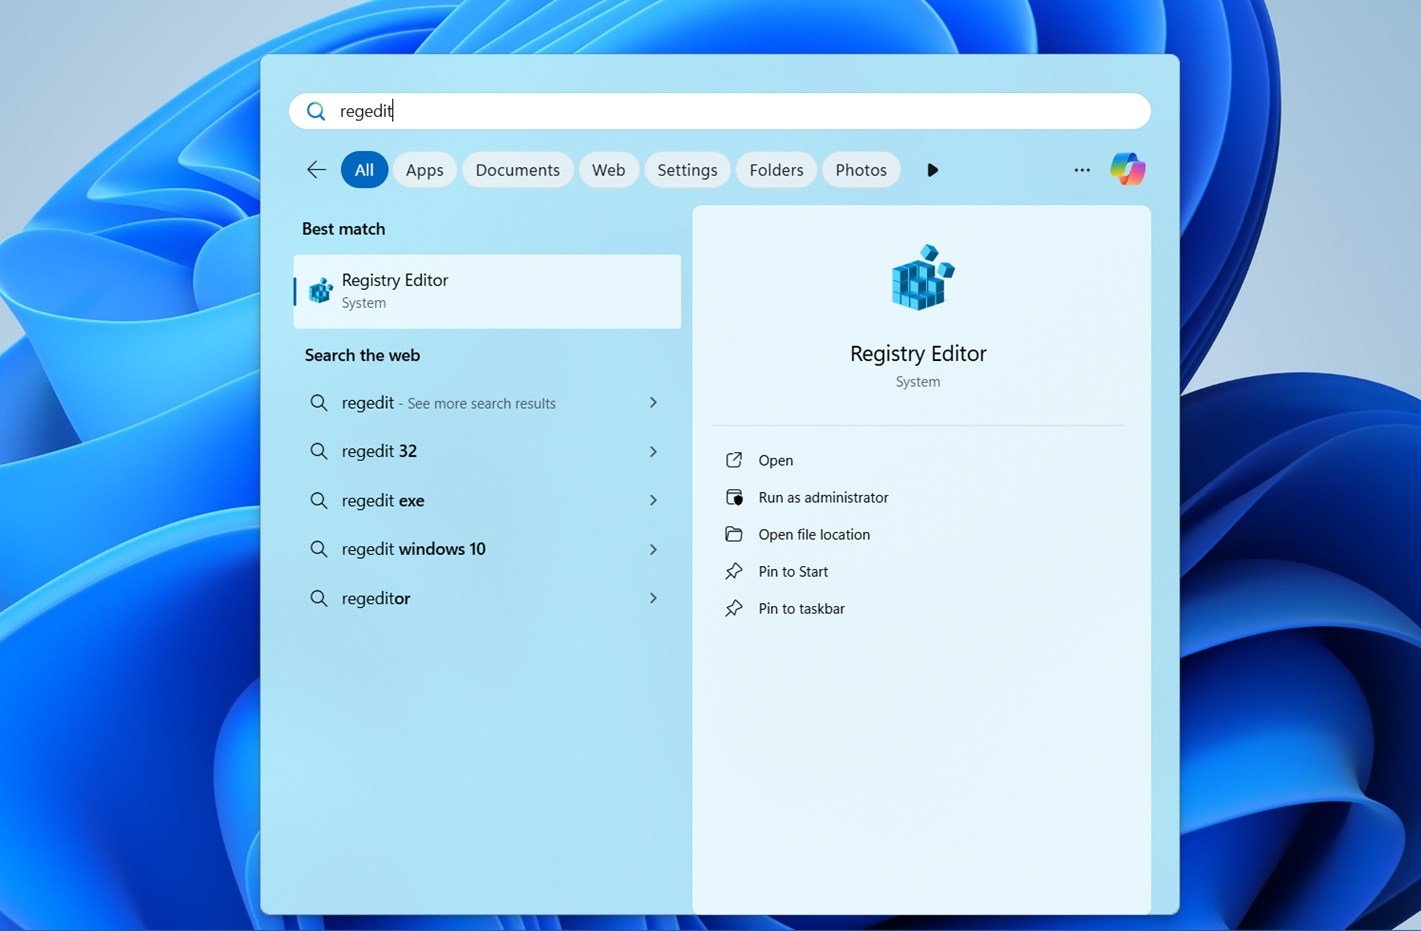
- Open the Registry Editor by launching the Run command (Windows + R) and typing “regedit”. Hit “OK”.
- On the left sidebar, navigate to (you can copy-paste it to the address bar): “HKEY_CURRENT_USER\Software\Microsoft\Windows\CurrentVersion\Explorer\Advanced”.
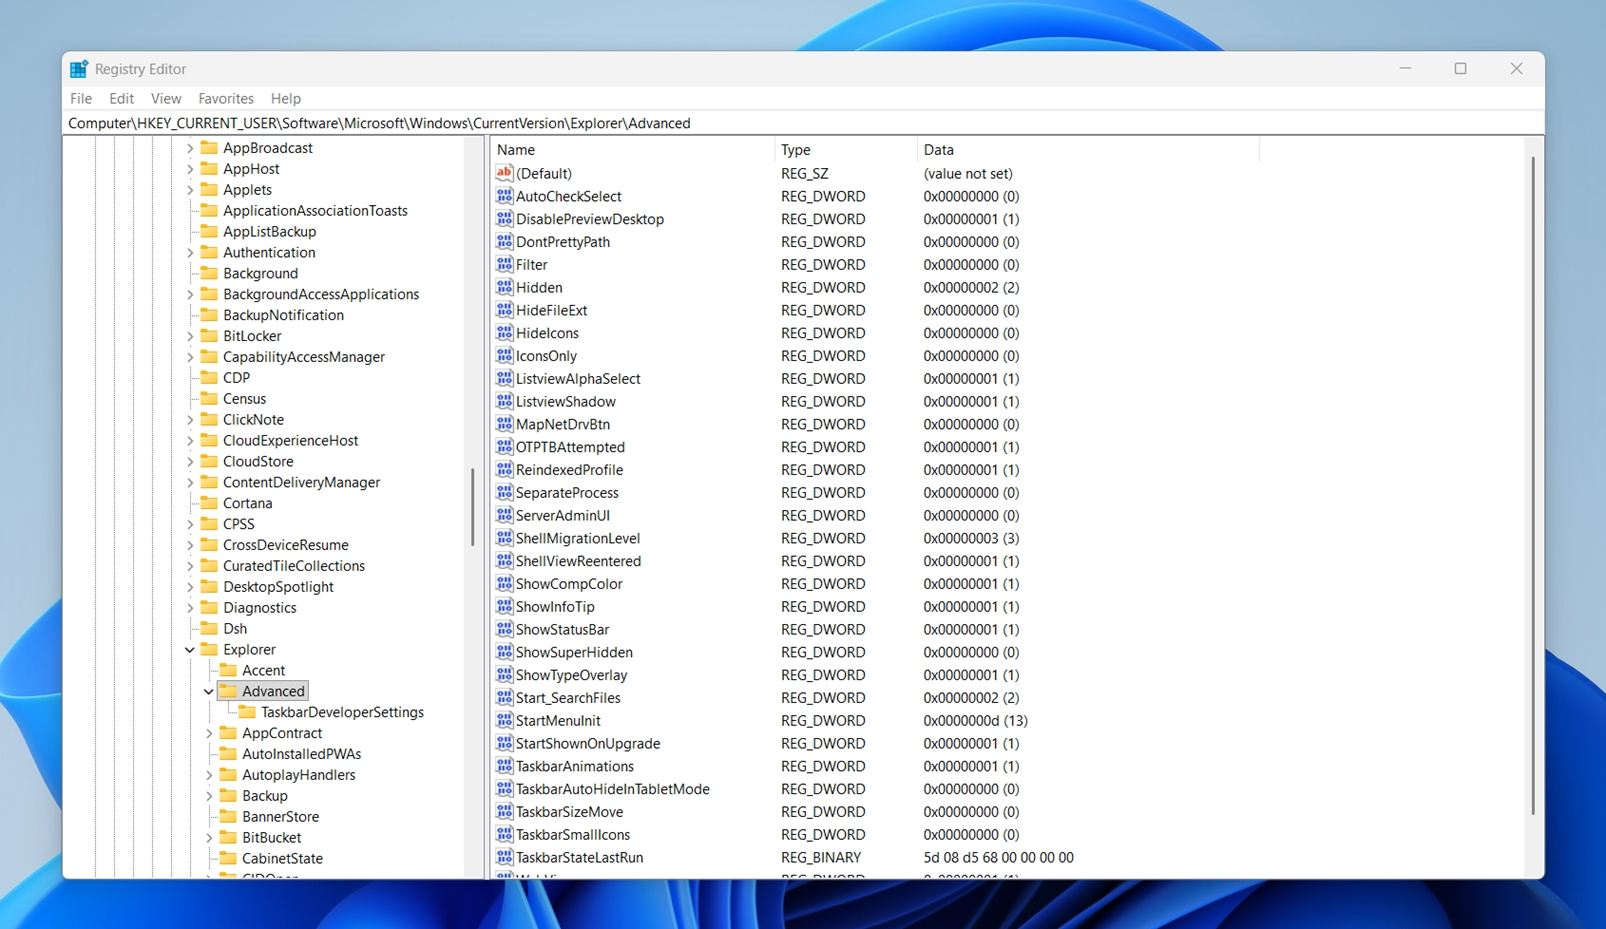
- In the right pane, set (or create if it’s not there) this DWORD (32-bit) value: “Hidden = 1”.
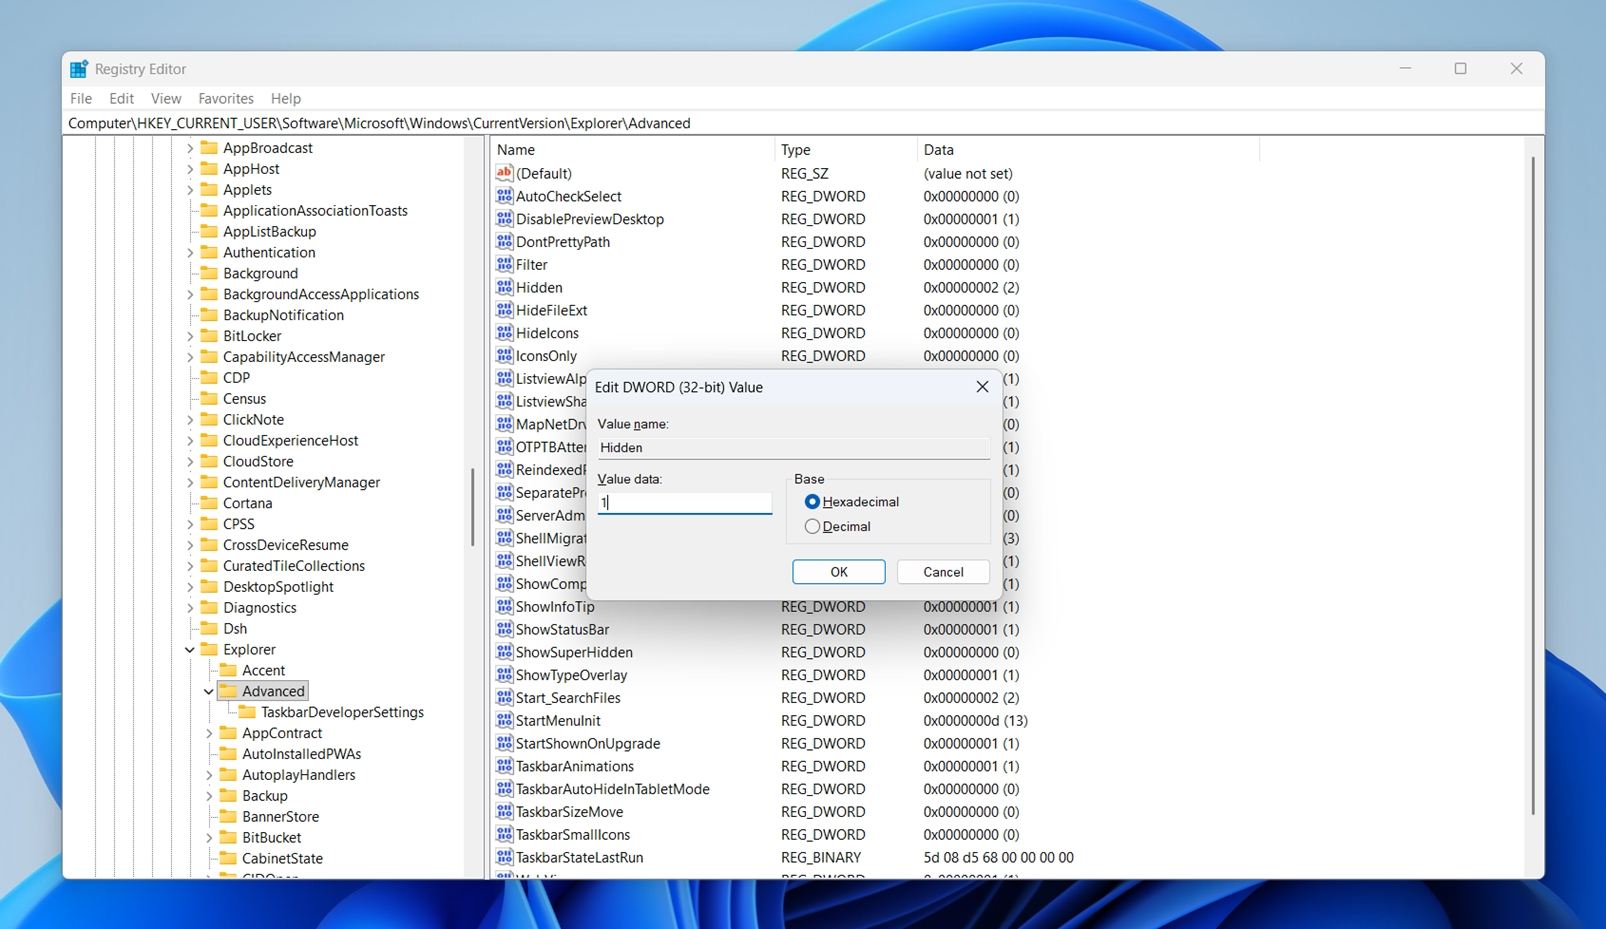
- To create it, you can right-click empty space > New > DWORD (32-bit) Value > name it exactly “Hidden”, double-click, set Value data to “1”.
- Then, press Ctrl + Shift + Esc to open Task Manager and scroll down to Windows Explorer.
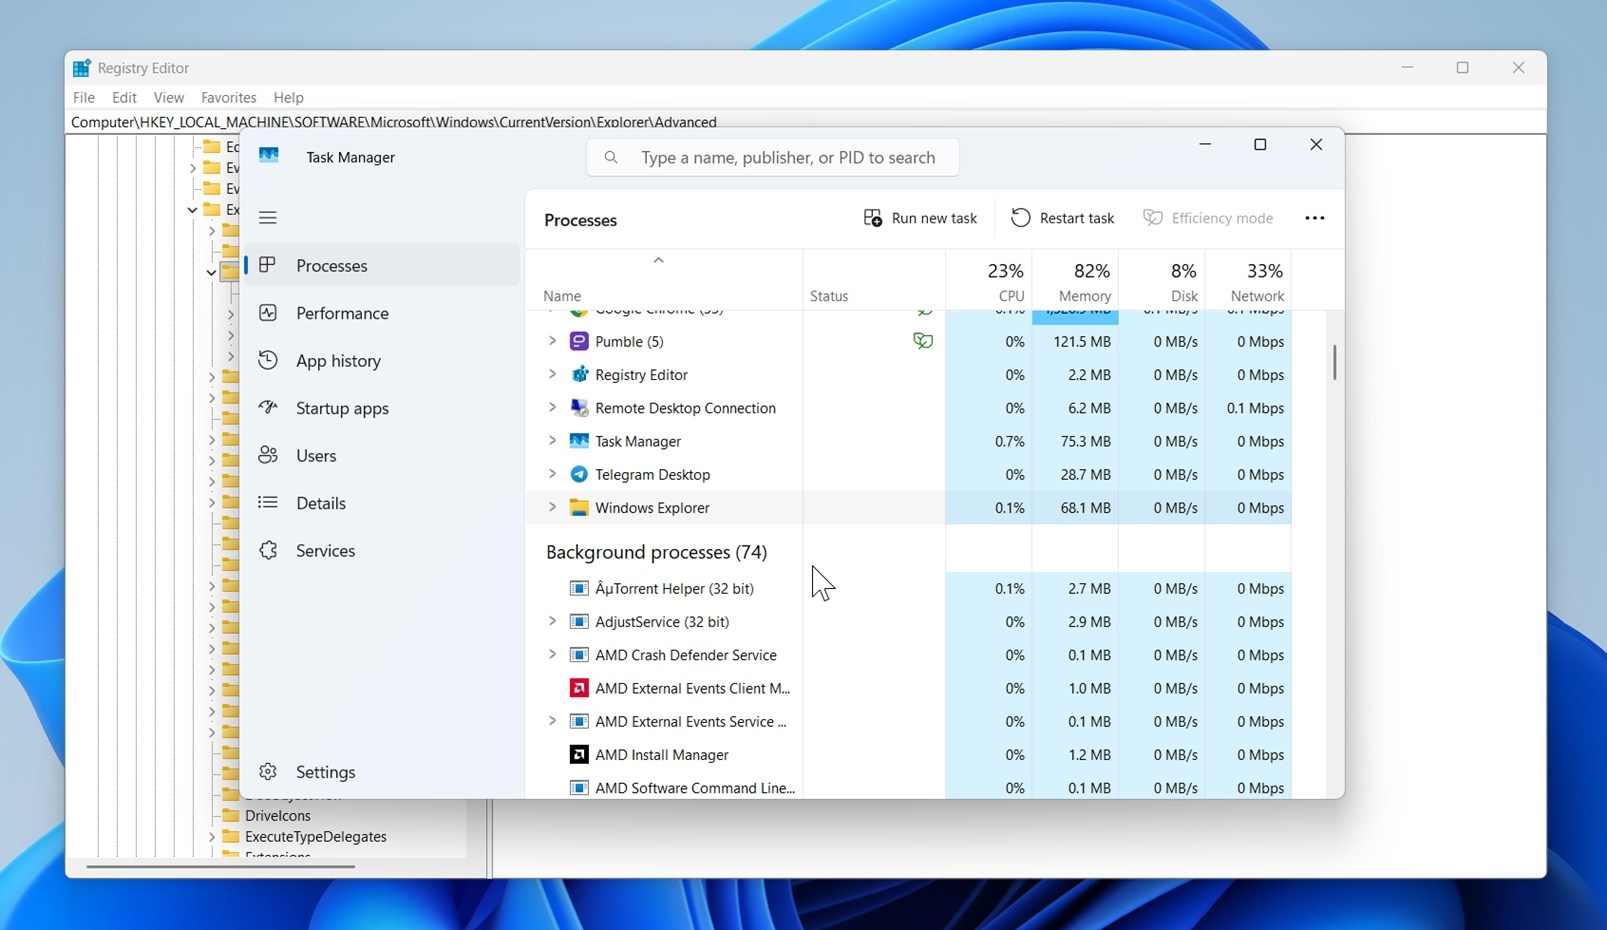
- Right-click it and select Restart.
Now go back to your external drive in File Explorer. If hidden files were the issue, they should now be visible.
Method 4: Check the Integrity of the Drive’s File System
Next on our list of methods is a file system check.
Viruses or drive corruption can damage the integrity of the file system. This may cause files missing from a hard drive, or in some cases, even your external hard drive won’t show up on File Explorer. Fortunately, Windows provides native tools that can check your file system integrity and repair errors along the way.
We’ve deliberately placed this method lower in this guide because we’ve seen cases where file-system repairs can lead to data loss. If your data is really important and you skipped Method 1, we strongly suggest going back to it.
CHKDSK
CHKDSK is a powerful command prompt utility that can detect, report, and even repair errors, bad sectors, and more. In some cases, it can even fix a corrupted hard drive. Here’s how to use it:
- Run Command Prompt as Administrator.
- Type the following command and hit enter:
chkdsk X:
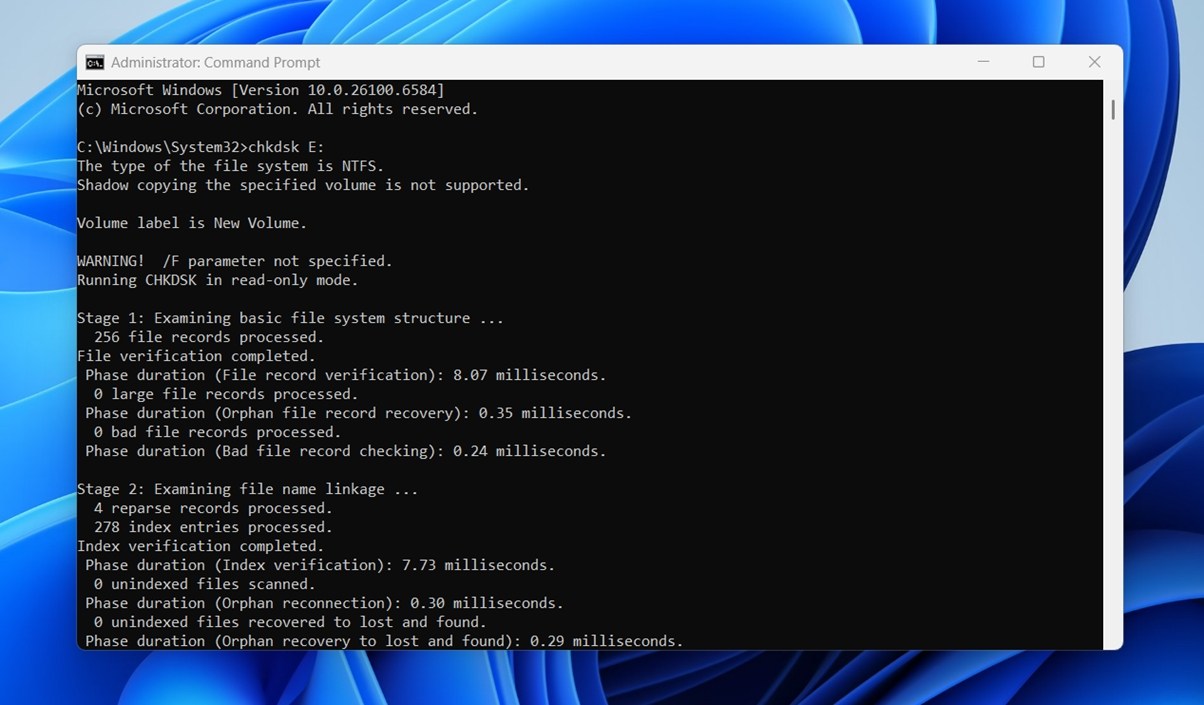 Replace X: with the letter of your external hard drive.
CHKDSK can take a long time to finish, especially if the drive has damaged or unstable sectors. That’s totally normal, so give it time.
That said, we’ve seen cases discussed in our own community where CHKDSK got stuck on stage 4 (verifying file data). If that happens, it might be a sign of deeper issues with the drive, like unreadable sectors or failing heads.
Error-Checking Tool
If you’re not a fan of command-line stuff, there’s a friendlier version built into File Explorer: The Error-Checking Tool. It also detects and attempts to repair errors on the disk. Unlike the last method, you don’t need Command Prompt to use it.
That said, it’s basically just CHKDSK running under the hood with preset options.
Here’s how to use it:
- On Windows file explorer, look for your drive on the left sidebar and right-click > Properties.
- Open the Tools tab, and click the “Check” button under the “Error-checking” section.
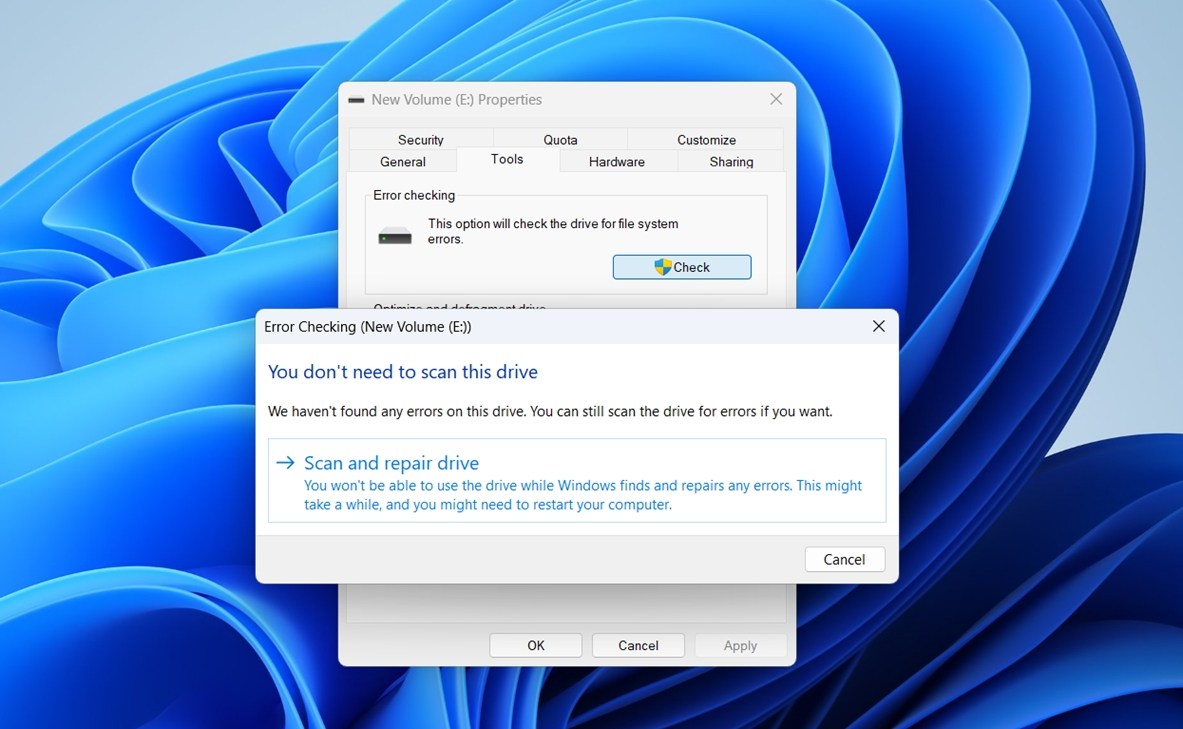
- Then click “Scan and repair drive”.
Before You Go
We hope one of the methods above helped you get your files back. But there’s one last thing we highly recommend doing before calling it done – a full virus or malware scan.
Not every case of files disappearing from an external hard drive is caused by something malicious… but it does happen. And if your files vanished for no obvious reason, it’s definitely worth checking.
Plus, let’s be honest, there’s no situation where a virus scan is a bad idea. Whether it finds something or not, it rules out one more possible cause.

What to do:
- Keep your external drive connected during the scan.
- Open your antivirus software, whether it’s Windows Defender, Avast, Malwarebytes, or anything else you trust.
- Choose a full scan, so it checks everything on your system and anything connected to it. That way, malware has nowhere to hide.
- Let it run and check for threats.
By the way, there are also cases where your antivirus is the reason a file disappeared. Pretty much any antivirus can sometimes mistake a safe file for a threat and quarantine or delete it. But as you probably guessed, you can still recover files deleted by Avast, Windows Defender, or any other antivirus, as long as the data hasn’t been overwritten yet.
FAQ
How to find lost files on an external hard drive?
If files went missing from your external hard drive, start with the search bar in File Explorer.
- Open the drive, then type a part of the file name, or even just the file extension like .jpg, .pdf, or .docx. This helps narrow things down fast.
- If you’re not sure about the name, try general terms like “report” or “invoice”. You can also sort the results by size or date modified.
- Next, turn on hidden file visibility. In the View tab, check “Hidden items”. If you still see nothing, go to Folder Options and uncheck “Hide protected operating system files”. That might reveal system-managed folders or files that were accidentally hidden. Look for slightly transparent files (that’s Windows showing you something is hidden but still there).
- If none of that helps, your files might be deleted or hidden behind file system issues. In that case, use a data recovery tool. Scan the drive and see what can be recovered. Just don’t install the recovery software or save recovered files to the same drive (could overwrite what you’re trying to get back).
Is it possible to recover a folder that disappeared from an external drive?
It’s absolutely possible. Everything that applies to missing files also applies to missing folders. Like individual files, folders can also be hidden, so if you turn on “Show hidden items” in File Explorer, that missing folder might appear again (usually with a transparent look).
If that doesn’t work, data recovery software can help. If the drive’s file system is still in decent shape and the deleted data hasn’t been overwritten, there’s a good chance you’ll be able to recover entire folder structures (including their original names and internal layout).
Why are files missing from my external hard drive but still taking up space?
This usually means the files are still physically on the drive but marked as hidden, deleted, or stuck behind a corrupted file system. Windows shows the space as used because the data is still there (even if you can’t see it in File Explorer).
Here’s what to do:
- First, Open File Explorer, go to the drive, and turn on Show hidden items (View tab > check “Hidden items”). If you see any files or folders appear slightly transparent, that means they’re hidden.
- Enable viewing of protected operating system files, and check if you see folders like $RECYCLE.BIN or System Volume Information. These can hold deleted or system-managed data.
- If the drive still looks empty, use a tool like Disk Drill, Recuva, or PhotoRec to scan the drive and recover hidden or deleted files.
What if I managed to recover files that disappeared from my hard drive, but after a while they’re gone again?
If the recovered files vanished again, it usually means the underlying issue wasn’t fixed. Here are a few possible reasons why this can happen:
- Malware is still active. Some viruses or malicious scripts hide or delete files repeatedly. If you didn’t run a full system and external drive scan after recovery, this might be the cause. You didn’t unhide them permanently. If the files were hidden, they may re-hide themselves after a reboot or reconnect. To prevent this, after recovery, right-click each file or folder, Properties > uncheck Hidden, then Apply.
- Or it’s a drive issue. If your hard drive is failing or has file system damage, it may “lose” recovered data again after you disconnect or reboot. Check the drive’s health using S.M.A.R.T. tools.
This article was written by Alejandro Santos, a Staff Writer at Handy Recovery Advisor. It was recently updated by Roman Demian. It was also verified for technical accuracy by Andrey Vasilyev, our editorial advisor.
Curious about our content creation process? Take a look at our Editor Guidelines.